

Page 1
D7 Star Ride on Mini
Operator manual
Please read this operator manual carefully before use
Page 2

2
contents
1.0 summary . . . . . . . . . . . . . . . . . . . . . . . . . . . . . . . . . . . . . . . . . . . . . . . . . . . . . . .. . . . 3
2.0 summary of security matters . . . . . . . . . . . . . . . . . . . . . . . . . . . . . . . . . . . . . . . . . . . . .3
3.0 technical parameter . . . . . . . . . . . . . . . . . . . . . . . . . . . . . . . . . . . . . . . . . . . . . . . . . . 4
4.0 machine loading and unloading . . . . . . . . . . . . . . . . . . . . . . . . . . . . . . . . . . .. . . . . . . . 5
5.0 disassembly of machine . . . . . . . . . . . . . . . . . . . . . . . . . . . . . . . . . . . . . . . . . . . . . . . 5
6.0 instructions . . . . . . . . . . . . . . . . . . . . . . . . . . . . . . . . . . . . . . . . . . . . . . . . . . .. . . . . . . . 5
6-1 view . . . . . . . . . . . . . . . . . . . . . . . . . . . . . . . . . . . . . . . . . . . . . . . . . . . . . . . .. . . . .. . 5
6-2 view . . . . . . . . . . . . . . . . . . . . . . . . . . . . . . . . . . . . . . . . . . . . . . . . . . . . . . . . .. .. . . . 6
6-3 view . . . . . . . . . . . . . . . . . . . . . . . . . . . . . . . . . . . . . . . . . . . . . . . . . . . . . . . . . . . . . . 6
6-4 view . . . . . . . . . . . . . . . . . . . . . . . . . . . . . . . . . . . . . . . . . . . . . . . . . . . . . . . . . . .. . . 6
6-5 view . . . . . . . . . . . . . . . . . . . . . . . . . . . . . . . . . . . . . . . . . . . . . . . . . . .. . . . . .. . . . . . 7
6-6 view . . . . . . . . . . . . . . . . . . . . . . . . . . . . . . . . . . . . . . . . . . . . . . .. . . . . . . . . . .. . . . . 7
6-7 view . . . . . . . . . . . . . . . . . . . . . . . . . . . . . . . . . . . . . . . . . . . . . . . . . . . . . . . . . . . . . . 8
6-8 view . . . . . . . . . . . . . . . . . . . . . . . . . . . . . . . . . . . . . . . . . . . . . . . . . . . . . . . . . . . . . . 8
7.0 maintenance . . . . . . . . . . . . . . . . . . . . . . . . . . . . . . . . . . . . . . . . . . . . . . . . .. . . . . . . . 9
8.0 common faults and processing methods . . . . . . . . . . . . . . . . . . . . . . . . . . . . . . . . . . . 10
D7 explosion drawing . . . . . . . . . . . . . . . . . . . . . . . . . . . . . . . . . . . .. . . . . . . . . . . . . . . . 12
D7 explosion drawing . . . . . . . . . . . . . . . . . . . . . . . . . . . . . . . . . . . . . . . . . . . . . . . . . . . . . 13
D7 explosion drawing . . . . . . . . . . . . . . . . . . . . . . . . . . . . . . . . . . . . . . . . . . . . . . . ... . . . . 14
D7 explosion drawing . . . . . . . . . . . . . . . . . . . . . . . . . . . . . . . . . . . . . . . . . . . . . . . . . . . . . 15
D7 explosion drawing . . . . . . . . . . . . . . . . . . . . . . . . . . . . . . . . . . . . . . . . . . . . . . . . . . . . . 16
D7 explosion drawing . . . . . . . . . . . . . . . . . . . . . . . . . . . . . . . . . . . . . . . . . . . . . . . . . . . . . 17
Page 3

3
summary
attention:Please read this manual carefully before operating D7 floor
scrubber.
introduction
D7 is a compact mini automatic ride on floor scrubber, suitable for using in medium
environment, for cleaning stains on various hard floor, it can remove the stains and not
absorbed by the floor cleaning solution recovery, it is a simple and high-efficient cleaning tool.
usage
Widely used in a large area of the airport, commercial complex, sports stadiums, municipal,
inter-city train, factory production workshop, purifying workshop, food processing, electrical
and top five-star hotel of semi open square, underground parking, building channel site, regular
circulation of the rapid mechanical floor cleaning, cleaning operations more efficient.
The device is not suitable for use in the rain or placed under the gun. It is strictly prohibited to
use the equipment in the flammable and explosive environment to collect dangerous dust or
flammable liquid. In addition, the equipment is not suitable for the use of transport.
Summary of security matters
attention: operator must read this manual carefully
before starting any work, be sure to be familiar with all the design, control methods and
functions of this machine.
first use of the machine, the operator should be placed in the open area to understand its
various function.
Page 4

4
before starting any operation, check the machine and its parts in general and in the state of
operation.
if the machine doesn't work properly, you can't use.
the operator must be applied to the appropriate application areas when they operate the
machine.
operation attention to obstacles in the workplace, such as stairs, shelves, and pay attention to
the people around, especially in children.
using a suitable cleaning agent, washing machine cleaning agent is used only in accordance
with the use of detergent manufacturers, the use of cleaning agents according to the appropriate
dose and limit requirements.
only by those who have received appropriate training using appropriate tools for maintenance
and repair of the washing machine.
The cleaning or maintenance of the washing machine to turn off power or remove the battery.
To prohibit the use of high-pressure water or steam cleaning equipment for the washing
machine.
The prohibition of electrical components of water.
Note: the use of this cleaning machine to clean up flammable liquids, solvents, fuel, active
metal water vapor or flammable dust.
Item
parameter
Rated voltage
DC24V
Wording width
510mm
Page 5

5
Suction width
830mm
Work efficiency
3000㎡/h
brush
510mm
Brush speed
175rpm
Brush motor
550W
Brush pressure
20kg
Suction motor
500W
vacuum degree
160mbar
Walking motor
500W
Speed
0-6km/h
Maximum gradability
10°(without water)
Turning radius
900mm
Solution tank
70L
Recovery tank
75L
Noise grade
68dB
Battery group
2
×DC12V 100AH 3H
Battery weight
70kg
weight(without battery)
112kg
Page 6
6
4.0 Machine loading and unloading
Special packing fit for forklift loading and
unloading. Can not stack. The net weight is
190kg(without packing).
Packing dimension:
Length: 1400mm
Width: 750mm
Height: 1360mm
5.0 machine disassembly
Take the bag-packed machine in a wide area to
remove the outer packing.
remove the wedge of the fixed wheel. Check if
the brush base and squeegee mounting
brackets are raised.
release the motor brake handle after lifting.
slope down the machine from the wooden
pallet.
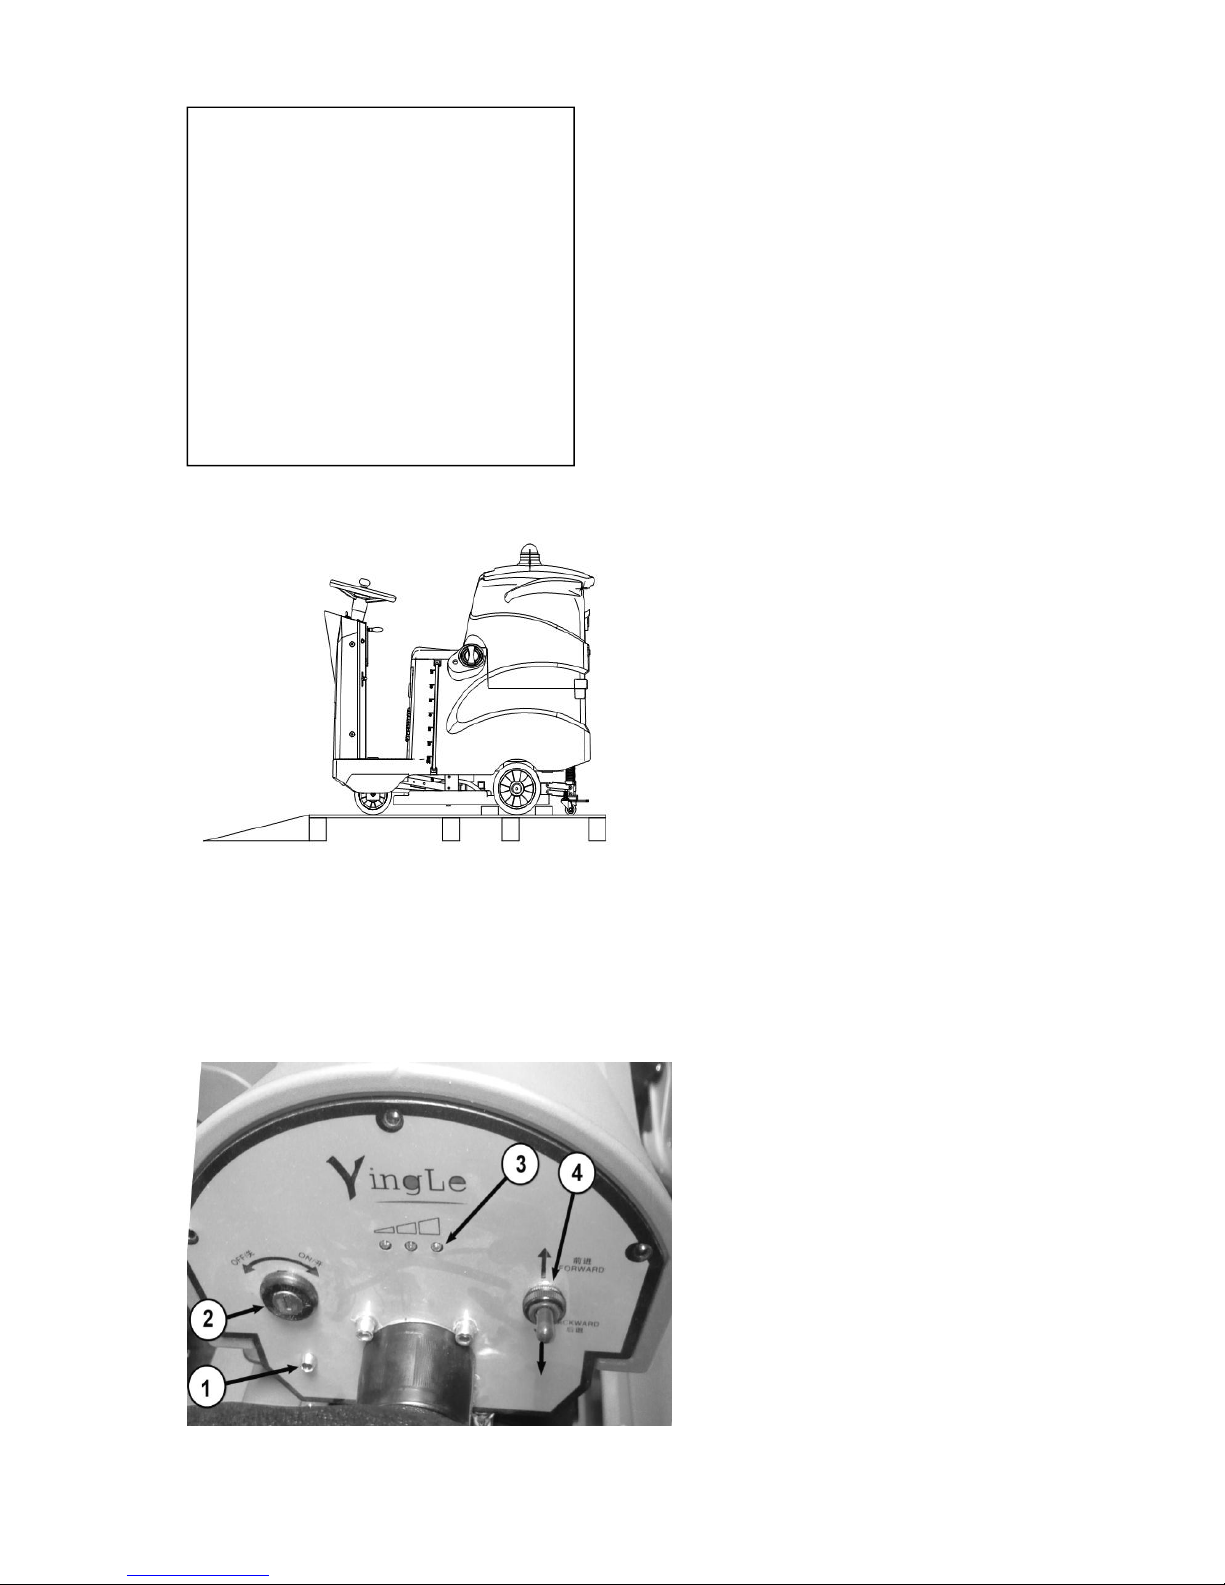
direction for use
①
power indicator light
②
power key switch
③
quantity of electricity : three lights
are all on when full power, if only
left light flashed, please
immediately turn off the machine
and charge the battery
④
the front and rear walking
converter
Page 7

7
⑤
release lever handle (upward pull water
volume increase)
⑥
loudspeaker button
⑦
squeegee lifting handle(when the power lock
open, put down this handle, the suction motor
will work automatically, at this moment the
machine can not backward, the handle must
be raised if backward )
⑧
brush lifting handle(power lock open, put
down this handle and step⑨accelerator
pedal,brush will work)
⑨
accelerator pedal(from shallow to deep, the
machine will from slow to fast)
○
10
steering wheel
○
11
water tank button(water tank could be
tip-back when press the bottom)
○
12
solution tank thread cap(after unscrew,
clean water can put in)
○
13
total power emergency switch
○
14 drive axle electronic brake conversion
handle.
Dial up to stop the use of electronic brake
machine can not use the electric power to
walk, you can use human resources.
Dial down to enable electronic brake, foot
pedal can walk, release the pedal will
Page 8

8
automatically stop the brake, using human
power to push.
Page 9

9
○
15 drain out pipe
○
16 water tank cover support frame
○
17 float bowl
○
18 charger power plug
○
19 charger
To start charging, the machine will
automatically cut off the operation,
until the end of charge
Page 10

10
Brush installation diagram:
1.put ⑧ handle up。
2.the brush on the ground, from the side to push
it into the brush under the lid, Visual Basic is the
brush cover round center.
3.put ⑧ handle down, the brush cover down
automatically on the brush plate
4.stepping on⑨ the pedal to intermittent light
two or three, the brush will be automatically
installed.
Squeegee installation diagram
1.put squeegee in the correct location of
tank back, then pull out the suction pipe
joint out of the cylinder into the middle
of the water column(A)
2.put the bottom of stud insert (B)
3.The plum nut (C) according to the
direction indicated by appropriate
tightening will be installed by hand.
Page 11

11
1.daily maintenance
1)take down pad holder/brush, and clean specific cleaning agent.
2)drain out the water both in solution tank and recovery tank, and clean by clean water.Check
if there are debris left, if yes, please remove immediately.
3)raise the squeegee assembly off the floor and wipe the rubber with a wet towel
4) remove the vacuum suction filter device rinse with water
5) wipe the machine clean with a specific cleaner
6)charge the battery
7)check the squeegee rubber if damage, if yes,change the other side.
2.monthly maintenance
(1)check the top of battery is clean to prevent corrosion.
(2)check the battery cable is loose or corrosion.
(3)check the water tank cover seal, if damaged please replace.
(4)lubricate all lubrication parts and shafts with special lubricants.
(5)check if machine fasteners are loose.
(6)check if the water tank is leaking.
3. motor maintenance
(1)please contact floor scrubber manufacturer directly.
(2)every 250 hours of use, should check the motor brushes. If the wear is serious, please
contact the manufacturer to replace.
4.battery maintenance
(1)please follow the manufacturers operating manual.
(2)the top electrode and the battery corrosion, soda is ok, can not put the solution into the
battery.
(3)brush for the battery and the battery line part with soda water
(4)regularly check whether the battery cable wear and contact loose, if necessary, please
replace.
5. machine storage
(1)stored in the room, stored in a dry place.
(2)upright storage.
(3)lift brush set off the floor.
(4)lift squeegee assembly off floor.
(5)if the storage place is extremely cold, need to keep the machine completely dry before the
storage machine, in order to avoid low temperature damage.
(6)drain solution and recovery tank.
Page 12

12
8.0 common faults and solutions
fault
reason
solution
Machine not working
Not open power switch
Open power switch
Battery low power
Charging
Battery damage
Replace battery
Battery connection line loosen
tighten connection line
Fuse damage
Replace fuse
Power key switch damage
Contact supplier
Brush motor not working
Brush not contact with floor
Put down brush
Low battery
Charging
Brush lifting protection switch
damaged
Contact supplier
Brush motor damaged or its line
damaged
Contact supplier
Brush motor carbon brush wear
Contact supplier
Electromagnetic switch damage
Contact supplier
Machine not running
Controller overload protection start
Turn off the power switch
and wait for 2 minutes
Controller damaged
Contact supplier
Drive motor or its line damaged
Contact supplier
Brush motor carbon brush wear
Contact supplier
Suction pump can not run
Suction pump overload fuse burn
off
Replace fuse
Water pump or line damage
Contact supplier
The suction pump wear serious
Contact supplier
Solution flow is little or
no
The ball valve is too small or
closed.
Adjust flow switch
Flow switch is too small or closed
Adjust flow switch
Solution hose or filter blockage
Rinse pipe or filter strainer
with clean water
Drain solenoid valve blocking
Open water solenoid valve
cleaning
Poor water absorption
performance
recovery tank full
Drain recovery tank
The pipe plug is loose.
Tighten the pipe plug.
Floating ball filter blocking
Rinse floating ball filter
Squeegee assembly blocking
Rinse squeegee assembly
Rubber abrasion
Change the other side of
replace
Rubber position is not correct
Adjust the rubber
The suction pipe is not connected
Reliable connection suction
Page 13

13
reliably with the squeegee
assembly
pipe
Suction pipe blockage
Clear blockage
Water absorption pipe damage
Replace
the lid of the recovery tank is not
covered.
Cover up
recovery tank cover sealing strip
Replace sealing
Suction pump damage
Contact supplier
Short running time
Battery low
Charging
Battery damaged
Replace battery
Battery need maintenance
Check battery maintenance
Charger damaged
Repair or replace charger
Attention: special tips
When a higher step or obstacle is encountered on the ground to block the wheel and when the
upper slope is over, 还要踩死脚踏板硬闯的时候,because the motor torque is not enough to
pass, in order to protect motor, the controller will start overload protection, failure of pedal
walking function. relieve overload protection method is: turn off the power switch and wait 2
minutes, then restart. If the machine cannot pass the obstacle, please use the handle in the
figure 14 indicating dial up. Think of a way to use human resources.
Page 14

14
Page 15

15
Page 16

16
Page 17

17
Page 18

18
Page 19

19
Page 20

www.starmakina.com.tr
Star Temizlik Makinaları ve Ekipmanları San. Tic. Ltd. Şti.
Ferhatpaşa Mah. 34 Sok. No. 30A
34888 Ataşehir İstanbul TÜRKİYE
Tel. +90 216 471 23 47 Dah./Ext.121
Faks. +90 216 471 22 02
star@starmakina.com.tr
www.staff.com.tr
 Loading...