

Page 1
Blue Nebula Patch Editor/Librarian, Version 4.00B Page 1
Patch Editor/Librarian
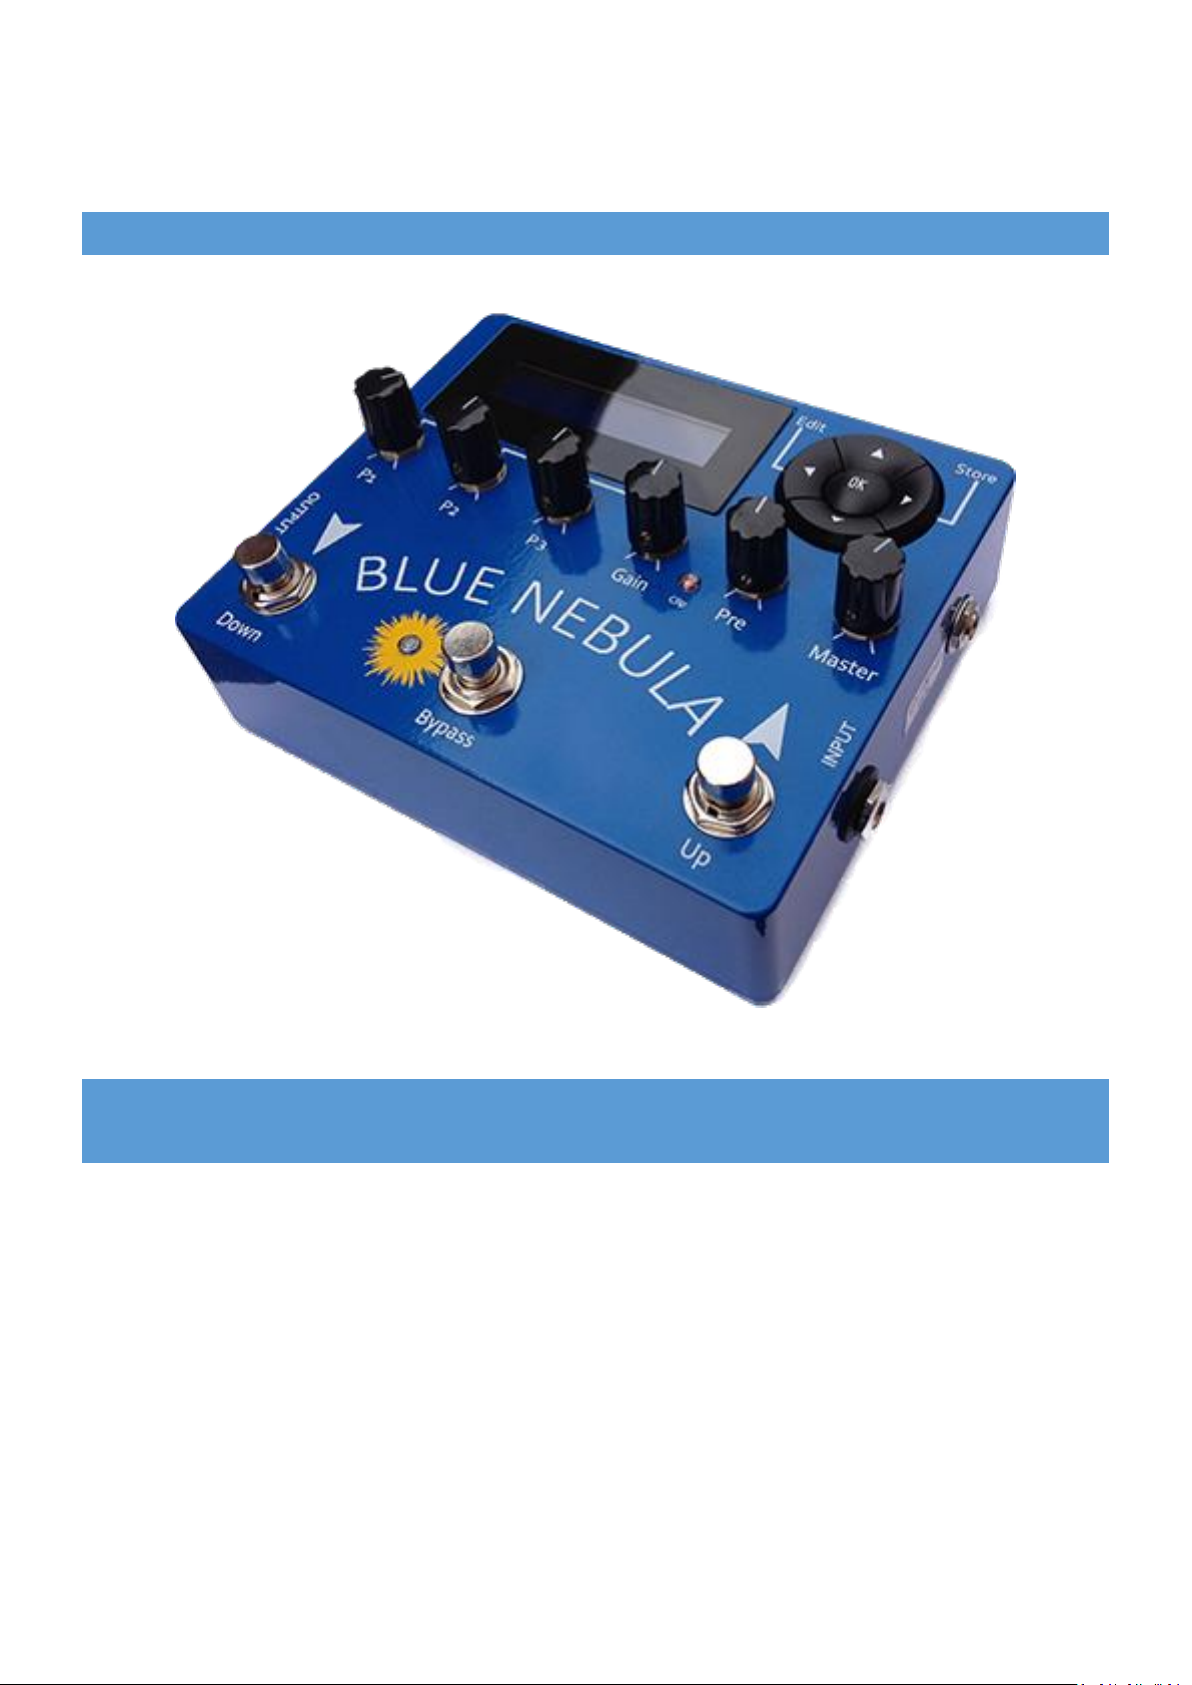
FOR THE BLUE NEBULA TAPE ECHO AND GUITAR EFFECTS PEDAL
SOFTWARE & USER GUIDE BY PHILIP HAWTHORNE B SC (HONS)
MARCH 2016/2017
Page 2
Blue Nebula Patch Editor/Librarian, Version 4.00B Page 2
PATCH EDITOR/LIBRARIAN FOR THE BLUE NEBULA TAPE ECHO & G-FX
Please note an up to date version of Java 8 must be installed on your computer in order to run Librarian. The 64-bit Librarian
requires 64-bit Java to run. If you only see a grey box with no controls or buttons when you run the 64-bit Librarian then it
means you only have 32-bit Java installed – the 32-bit Librarian will work, or if you prefer, you can install a 64-bit version of
Java.
The Blue Nebula Patch Editor/Librarian is a software program that allows transfer of User patches between the Blue Nebula
Tape Echo & G-FX pedal and a host computer running Windows or Mac OS X. Patches can be sent from the computer to the
Blue Nebula and vice versa. The Librarian also allows patches to be saved to and loaded from the computer’s hard drive.
As the name suggests, the software also allows Patches to be edited, by selecting the required echo or effect model and
adjusting the effect parameters such as Dry/Wet Mix, Heads/Program and Feedback values.
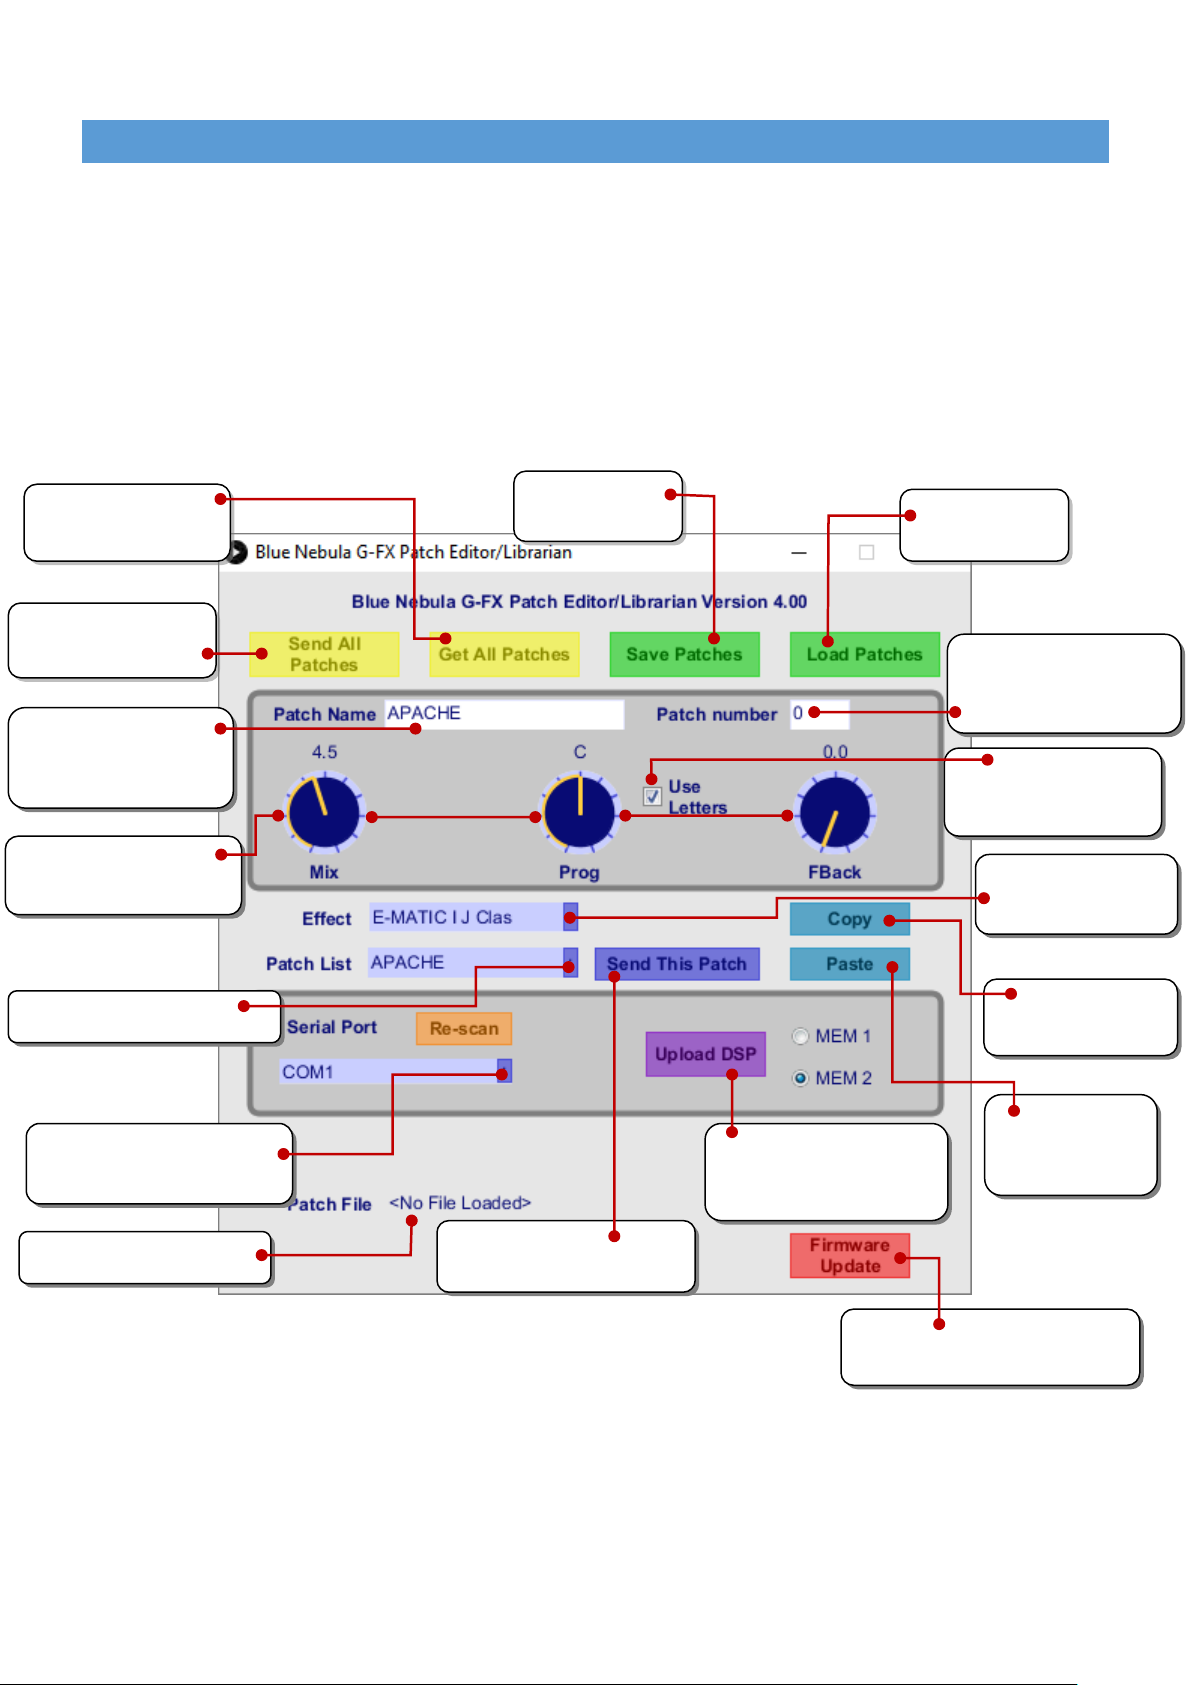
Figure 1: The Editor/Librarian Window
• Make sure your Blue Nebula is loaded with firmware Version 3.00 or later.
• Connect Blue Nebula to your computer via a suitable USB lead.
• Run the Librarian application e.g. on Windows double-click BN Librarian.exe.
Current patch file loaded (if any).
Click here to choose a patch to edit.
Click here to select the
effect for this patch.
Click here to select the Serial port
to which Blue Nebula is connected.
Adjust the effect parameters
with these three virtual knobs.
Current patch number –
change and press Enter to
move this patch.
Current patch name – edit it
here if you want to change
it.
Click to send the patches
to the Blue Nebula.
Click to get the patches
from the Blue Nebula.
Click to load a patch
file from disk.
Click to save a patch
file to disk.
Tick to display head
settings as A, B, C, E, F.
Click here to send just the current
patch to the Blue Nebula.
Click here to Copy this
patch to the clipboard.
Click here to Paste
the copied patch
from the clipboard.
Click here to load and send
new effects to the Blue
Nebula’s FX memory.
Click here to update the Blue Nebula’s
Firmware
Page 3
Blue Nebula Patch Editor/Librarian, Version 4.00B Page 3
• Choose the Serial Port to which your Blue Nebula is connected from the Librarian’s drop down Serial Port list.
• If the Blue Nebula wasn’t connected when you ran Librarian, click the orange Re-scan button to refresh the Serial Ports list.
• You can retrieve the patches from the Blue Nebula by clicking on the Librarian’s Get All Patches button – see Basic
Operations.
BASIC OPERATIONS
To retrieve patches from the Blue Nebula: Click the Get All Patches button in the Librarian window. The LCD on the Blue
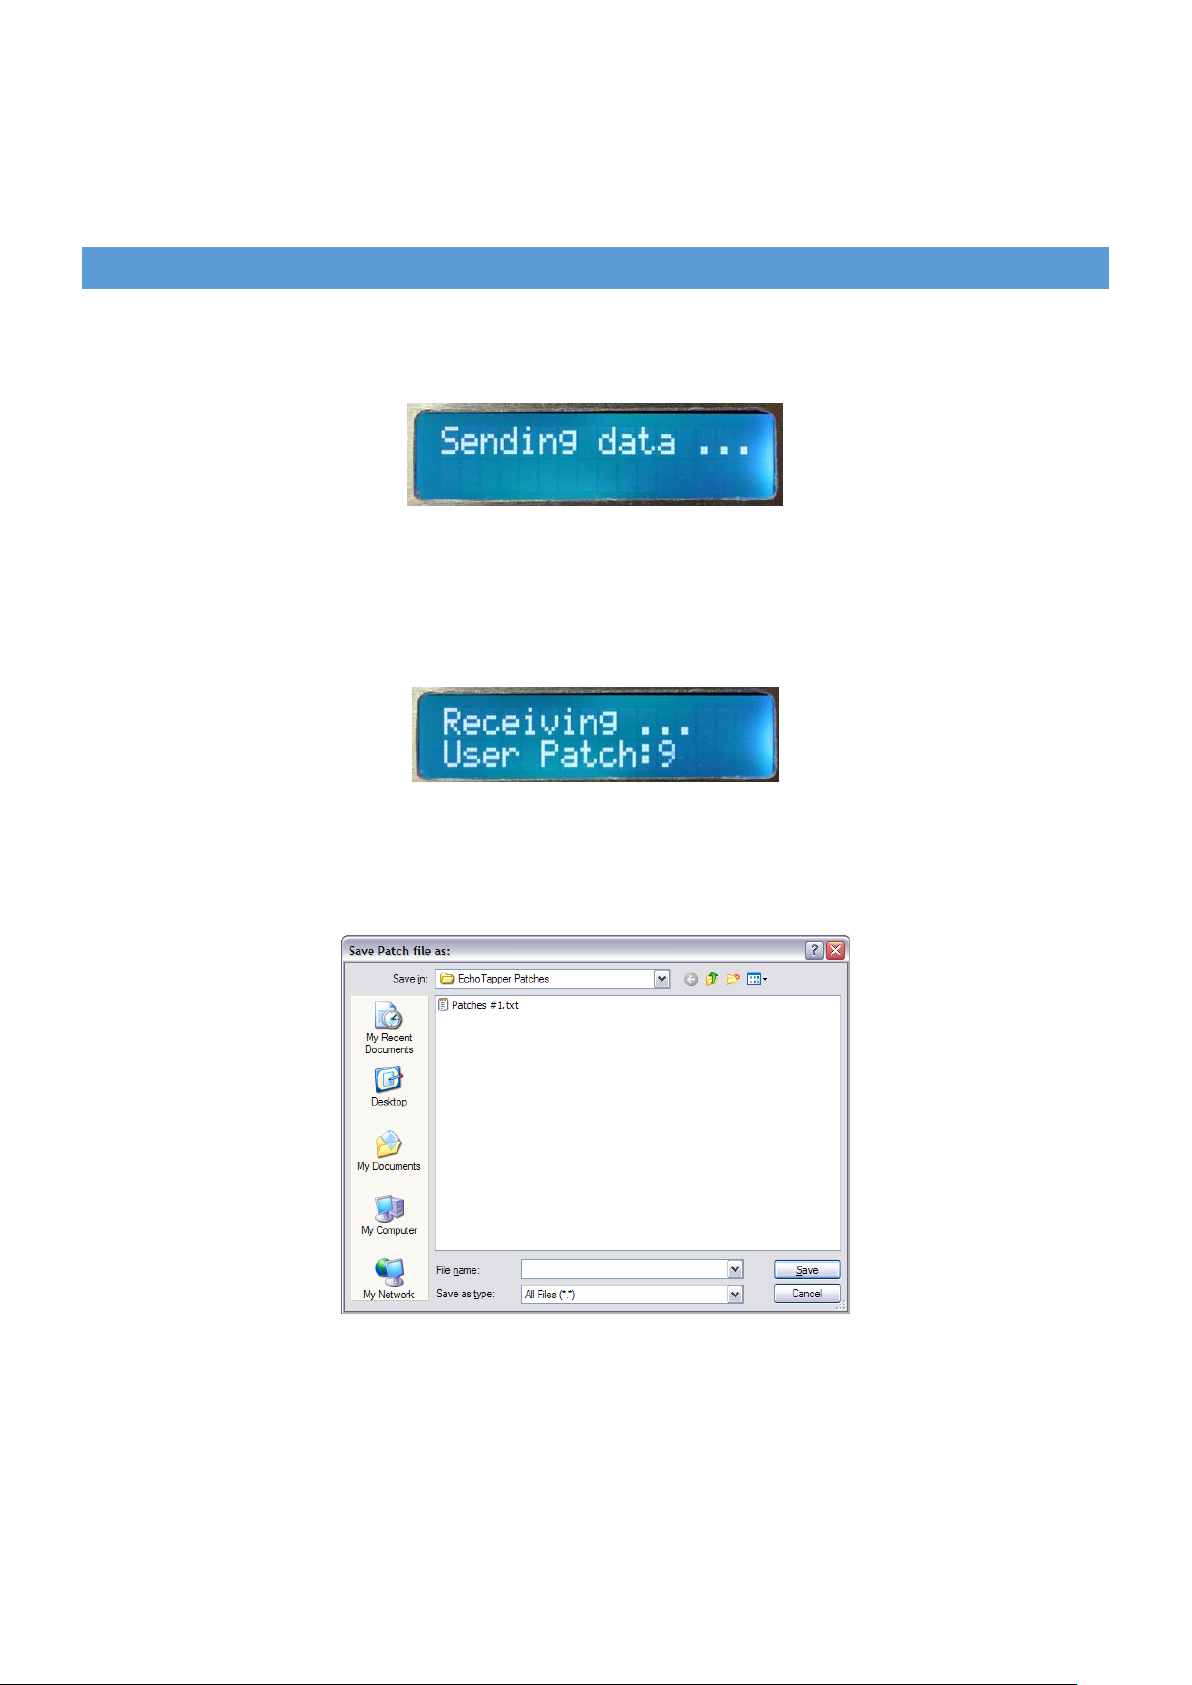
Nebula will briefly display “Waiting for connection …” then “Sending data …” and after a few seconds the transfer of
patches to your computer will be completed and the Blue Nebula will resume its normal operation.
Figure 2: The Blue Nebula sending patches to the Librarian
To send patches from the computer to the Blue Nebula: Click the Librarian’s Send All Patches button. The Blue Nebula LCD
will display “Receiving …” and the number of each patch as it is received. After a few seconds the transfer of patches to your
Blue Nebula will be completed and it will resume its normal operation.
Figure 3: The Blue Nebula receiving patches from the Librarian
To save patches from the Librarian to your hard drive: Click the Save Patches button and a Save Patch file as: dialog box
will open allowing you to name your file. To complete the save operation, click the Save button.
Figure 4: Saving a patch file.
Page 4
Blue Nebula Patch Editor/Librarian, Version 4.00B Page 4
To load patches from your hard drive to the Librarian: Click the Load Patches button and browse to the file you want in the
Open a Patch file: dialog box, and then click the Open button.
Figure 5: Opening a patch file
USING THE EDITOR
In addition to its ‘librarian’ functions (saving and loading patches and transferring them to and from the Blue Nebula) the
software also has an ‘editor’ role which allows individual patches to be edited.
To choose a patch for editing, select it from the Patch List drop down. The name of the selected patch will appear in the
Patch Name box where it may be edited if required.
You can change the effect used by the displayed patch by selecting it in the Effect drop down and choosing from one of the
16 effects available in the two effects memories in your Blue Nebula. (If you haven’t uploaded any extra effects to the Blue
Nebula’s second effects memory these will display as ‘Empty Slot’ in the Effects drop down list.)
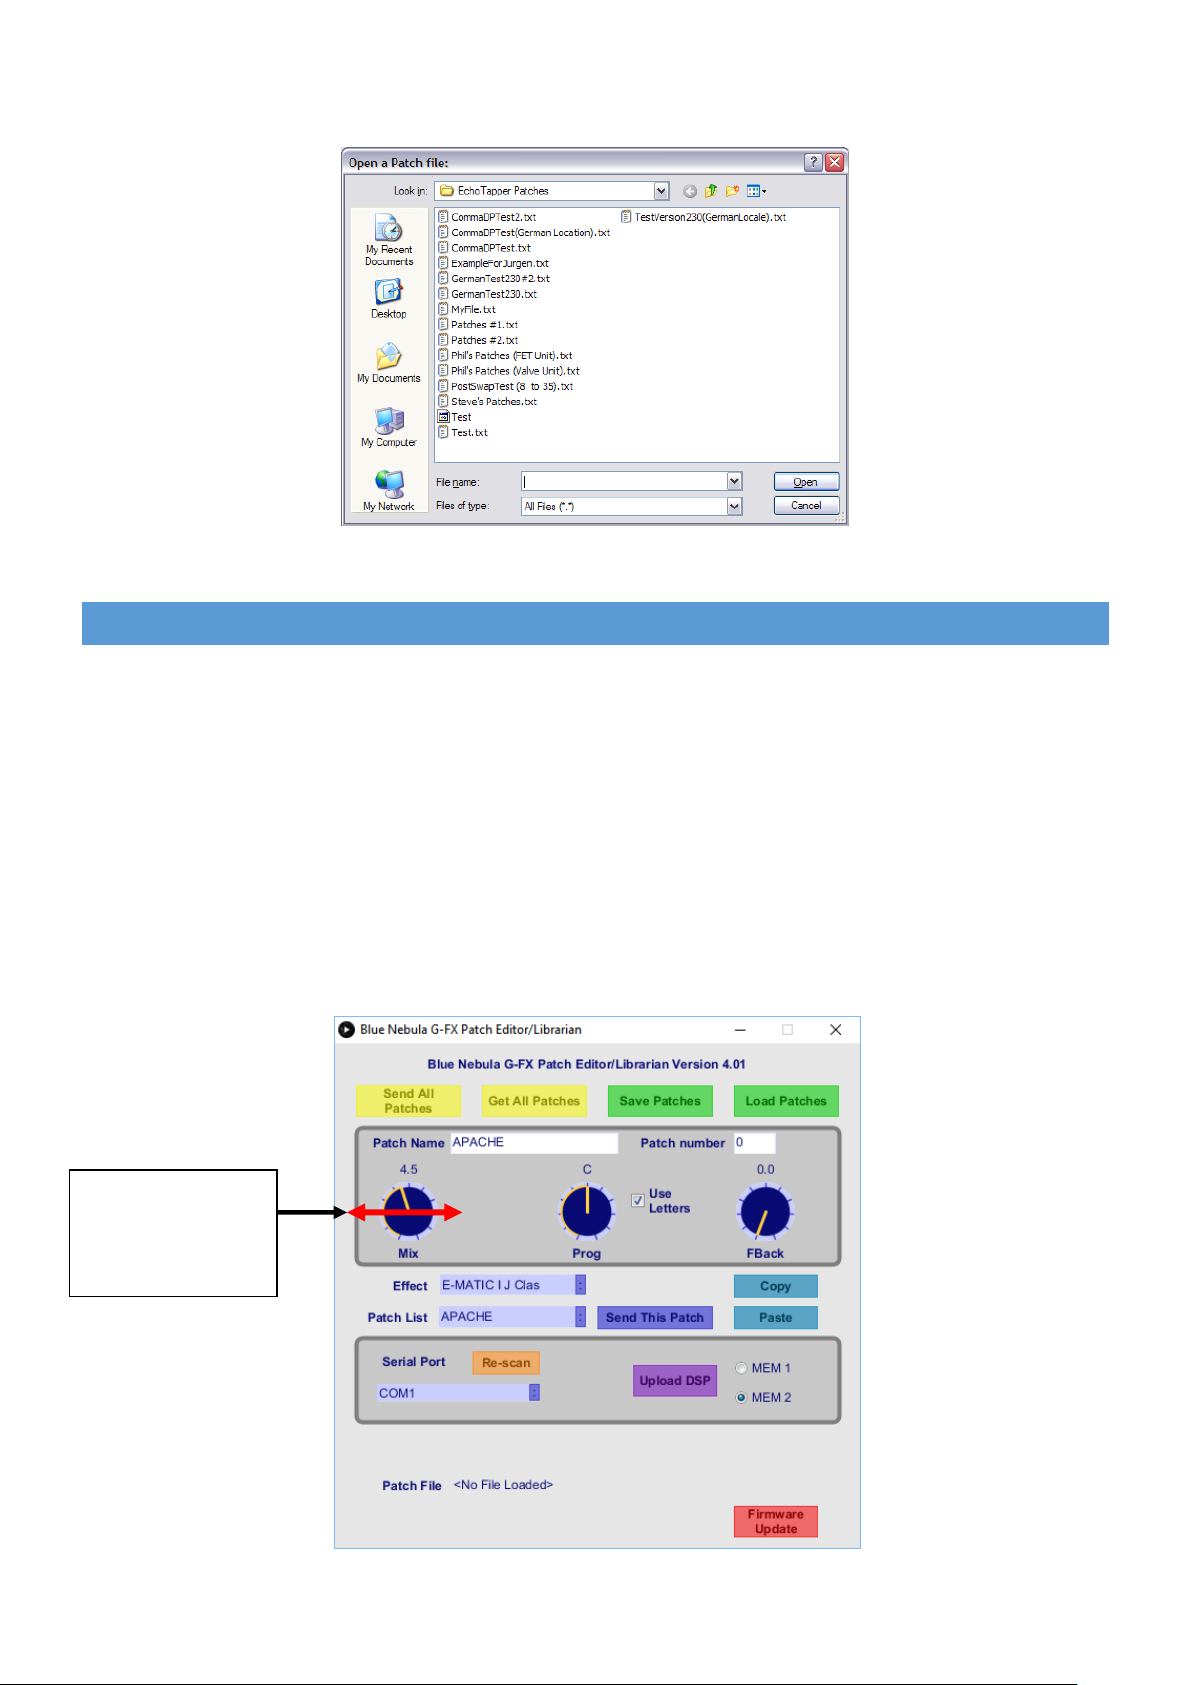
Each effect has three parameters that you can adjust. You can adjust the value of the three effect parameters by clicking
and dragging from side to side on any of the three knobs Mix, Prog and FBack. Note, the labelling of the knobs will change
depending on which effect is currently selected – see Appendix 1.
To adjust a value,
click over a knob and
drag from side to side
Page 5

Blue Nebula Patch Editor/Librarian, Version 4.00B Page 5
The Use Letters checkbox, if ticked, instructs the Librarian to display the Head Select setting as a letter, A, B, C, E or F, as in
the Meazzi Echomatic I and Vox Long Tom echo machines which used a switch to select different magnetic playback head
combinations, rather than a numeric value. This option is ignored for echo models and other effects that do not feature a
‘heads’ switch.
To send the edited patch to the Blue Nebula so you can hear how it sounds click the Send This Patch button. The patch will
be transferred to the corresponding patch location in the Blue Nebula, overwriting any patch that was stored there. The
Blue Nebula will also switch to the transferred patch number, if it wasn’t already set to that patch, so you can try it out.
CHANG ING THE ORDER OF YOUR PATCHES
You may wish to re-arrange your patches into a different order, perhaps to suit a set-list for a particular gig. This can be
done by first selecting a patch that you would like to move, typing the new patch number in the Patch Number field, and
then pressing Enter. This will swap the source and destination patches in the patch list. An example will make this clearer.
Assuming the default patches are loaded, let’s say you wish to move “MAN OF MYSTERY” (patch 3) to become patch
number 7, which is currently “THE STRANGER”.
1. Choose MAN OF MYSTERY from the Patch List
2. Click in the Patch Number field and change the Patch Number from 3 to 7
3. Press the Enter key on your keyboard
Hey Presto! The current patch (number 3) is now “THE STRANGER” and, if you click on the Patch List, you will find “MAN OF
MYSTERY” is now patch 7. This procedure can be repeated as often as necessary until your patches are in the order that you
want.
If you enter an invalid patch number, you will see the following message box:
The permitted range of patch numbers is 0 (zero) to 127.
DON’T FORGET TO SAVE YOUR EDITED PATCH L IST BEFORE EXITING THE LIBR ARIAN.
Page 6

Blue Nebula Patch Editor/Librarian, Version 4.00B Page 6
MOVING A PATCH – IN PICTURES!
STE P 1:
STE P 2:
STE P 3:
Select the patch you
want to move.
Change the patch number
to the one where you want
to move it.
Hit Enter and the
patches will be
swapped over.
Page 7

Blue Nebula Patch Editor/Librarian, Version 4.00B Page 7
USING COPY AND PASTE
The Blue Nebula can store 128 possible user patches and many tunes use quite similar effects and settings; in fact many
tunes will use identical effects and settings. To avoid having to switch backwards and forwards between patches for each
tune, you may find that you prefer to have a separate patch for each tune so you can simply step through the patches as
each tune comes up in the set list. Using the ability to name each patch (with a name of up to 16 characters), you can match
the patch name to the song name meaning you always know you’ve selected the correct patch for the next tune!
The Copy and Paste buttons make it easy to do all this. You simply select a patch you want to copy, click the Copy button to
place the patch on the clipboard, then go to the destination patch and click the Paste button. Change the patch name and
make any tweaks to the parameter knobs if required and repeat as necessary.
DON’T FORGET TO SAVE YOUR EDITED PATCH L IST BEFORE EXITING THE LIBR ARIAN.
UPLOADING NEW DSP CODE
IMPORTANT: YOUR BLUE NEBULA MUST BE POWER ED VIA THE 12V DC J ACK DURING THIS PROC EDURE.
The Blue Nebula has two DSP memories, MEM 1 and MEM 2, which each hold the DSP (Digital Signal Processing) code for 8
effects. MEM 1 holds the 8 ‘core’ echo effects (numbered 0-7) which are emulations of classic tape or disc echo machines
such as the Meazzi Echomatic I and the Vox Long Tom. These are not normally changed by the user but if there are
improvements or minor changes made to the DSP code, these can be updated by loading the new code to MEM1.
The second memory, MEM 2, is available for the user to upload the DSP code for another 8 effects (numbered 8-15) of their
choice from suitable sets of effects that may be made available. This code will be supplied in an Intel hex format file (.hex)
for uploading to the Blue Nebula by clicking the Upload DSP button in the Librarian and selecting the .hex file from the file
browser.
Tip: The Blue Nebula pedals supplied by Stanley FX come with MEM 2 pre-loaded with a selection of other echo and effects
models. See Appendix 3 for a list of these.
In addition to the DSP code in the .hex file, there must also be a ‘labels’ file with the same name as the .hex file but with a
.lbl extension. This should contain the names for each of the 8 new effects followed by the P1, P2 and P3 knob labels for
each effect and a set of ‘flags’ that are used to denote if the P2 knob setting should be displayed on the Blue Nebula LCD as
a ‘heads switch setting’ of A, B, C, E or F, or as a normal numeric value in the 0-100 range.
Each ‘labels’ file consists of 24 lines which can be thought of as being in three sections of 8 lines each (there must be no
blank lines in the file):
LINES 1-8: EFFECT NAMES (MAXIMUM 16 CHARACTERS)
LINES 9-16: THREE KNOB LABELS FOR P1, P2 AND P3, WITH ONE SPACE BETWEEN EACH LABEL
LINES 17-24: P2 ‘HEADS’ FLAGS, ONE FLAG PER LINE, EITHER 1 OR 0 VALUE.
An example .lbl file is shown in Table 1.
Page 8

Blue Nebula Patch Editor/Librarian, Version 4.00B Page 8
TA BL E 1: EXAMPLE 'L ABE LS' FILE FO R N EW EFFECT S
LINE NUMBER
DON’T TYPE T HIS!
FILE CONTENTS
SECTION
DON’T TYPE T HIS!
EFFECT NAMES
Maximum 16 Characters
KNOB LABELS
NB Exactly One space
between each label!
Maximum 16 characters total
P2 ‘HEADS’ FLAGS
Use 1 or 0 only
The first 8 lines give the names of the 8 effects that will be uploaded to the Blue Nebula. In this example the first effect
(which will become the 9th in the Blue Nebula’s effects list) is called
The second section (lines 9-16) gives the knob labels to be used for each effect. In this example the knobs for
(defined on line 9) will be displayed as Depth’ on the Blue Nebula LCD.
IMPORTANT: THERE MUS T BE EXACTLY ONE SPACE B ETWEEN EACH KNOB LABEL.
The third section of the file (lines 17-24) should contain either a 1 or a 0 on each line. If you want the P2 knob value to be
shown as a ‘heads switch letter’ as on the original Meazzi and similar vintage echo machines put a 1 on that line and if you
want the P2 value to be shown as a numeric value in the normal way from 0-100, then put a 0 on that line.
has a 0 on its line (line 17) so P2 will display as a numeric value. The effect (shown in red
Page 9

Blue Nebula Patch Editor/Librarian, Version 4.00B Page 9
on line 7) has its knobs labelled ‘Mix (line15) and P2 will display as A, B, C, E or F because there is a 1 on
the corresponding line 23.
Note the maximum length of each of the effect names and each line of knob labels is restricted to 16 characters as that is
the maximum number of characters that can be displayed on each line of the Blue Nebula’s LCD.
Assuming the new effects code is contained in a file called “NewFX.hex” then the labels file must be called “NewFX.lbl” and
it must reside in the same folder as the .hex file.
To upload “NewFX.hex” to your Blue Nebula, first make sure that the MEM 2 radio button is selected - this is the default,
only change to MEM 1 if you are updating the core echo effects programs - then click the Upload DSP button, browse to the
folder containing “NewFX.hex”, click on it and click the Open button in the file browser dialog box:
Figure 6: Selecting a new DSP .hex file
If the .hex file doesn’t contain valid Intel Hex data the Librarian will display an error dialog similar to this:
Figure 7: Invalid .hex file error dialog box
If the .lbl file is missing you will get an error dialog similar to this:
Figure 8: Error Dialog if the Labels (.lbl) file is missing
If the two files are found and contain the correct information, the DSP code and the new labels will be sent to the Blue
Nebula which will show the message shown in Figure 9 while the code is uploading:
Page 10

Blue Nebula Patch Editor/Librarian, Version 4.00B Page 10
Figure 9: Blue Nebula is loading new DSP Code
The upload takes around 15-16 seconds. To make the new code take effect you need to restart the Blue Nebula –
disconnect the USB cable and unplug the DC power cable from the Blue Nebula, wait a few seconds then reconnect the
power cable. Your new effects will now be ready to try out and can be used in any User Patch, just like the original built-in
effects which can of course still be used as well.
Note that the Librarian’s effects list and knob labels will also be updated and will be remembered the next time it starts up
so that it remains in sync with your uploaded Blue Nebula effects.
UPDATING THE BLUE NEBULA FIRMWARE
The firmware is the internal software that controls your Blue Nebula pedal and from time to time we may release updates
to improve it or fix minor bugs. Librarian Version 4.00 and later has a built-in Firmware Updater that avoids the need to use
third-party software to update your Blue Nebula.
When a firmware update is released the first step is to download it to your computer from our website and make a note of
where you saved it (by default it is usually saved in the Downloads folder). Now connect your Blue Nebula to the computer
via the USB cable and choose the Serial Port that it is connected to. Click the red Firmware Update button at the bottom of
the Librarian window and a file browser will open to allow you to locate the file you downloaded previously:
Select the correct file (it will have a .hex extension) and click Open. Depending on the speed of your computer the update
takes about 15-30 seconds after which the Blue Nebula will restart. As it displays the Welcome screen, you can check that it
now shows the version number of the updated firmware to confirm the update has been successful.
Please note that the firmware update ‘disconnects’ the Blue Nebula from the computer so if you wish to continue using the
Librarian after an update you need to click the Re-scan button and reselect the Serial Port to re-establish contact with the
Blue Nebula.
Page 11

Blue Nebula Patch Editor/Librarian, Version 4.00B Page 11
APPENDIX 1
TA BL E 2: THE KNO B L ABELLING IN TH E DI FF E RENT EFFE CTS MODELS
EFFECT #
EFFECT NAME
ECHO MODEL N AM E
P11
P2
P3
0
E-MATIC I J Clas
Echomatic I Model ‘J’ Classic
Mix
Prog
FBack
1
E-MATIC I F Clas
Echomatic I Model ‘F’ Classic
Mix
Prog
FBack
2
E-MATIC I F SPEC
Echomatic I Model ‘F’ Special
Mix
Prog
FBack
3
E-MATIC II Bank
Echomatic Model-II Bank
Mix
Prog
FBack
4
Vox Long Tom
Vox Long Tom Classic
Mix
Prog
FBack
5
E-MATIC II Class
Echomatic II Classic
H123
H4
FBack
6
Roland R301 Vari
Roland Model 301 Mode 5
Mix
Vari
FBack
7
TREM W/REVERB
Reverb and/or Tremolo
Revb
Speed
Depth
8
Empty Slot
User defined2
User defined3
User defined
User defined
9
Empty Slot
User defined
User defined
User defined
User defined
10
Empty Slot
User defined
User defined
User defined
User defined
11
Empty Slot
User defined
User defined
User defined
User defined
12
Empty Slot
User defined
User defined
User defined
User defined
13
Empty Slot
User defined
User defined
User defined
User defined
14
Empty Slot
User defined
User defined
User defined
User defined
15
Empty Slot
User defined
User defined
User defined
User defined
1
P1 is the left knob, P2 is the middle knob and P3 is the right knob on the Blue Nebula pedal.
2
The effect models 8-15 depend on sets of effects uploaded to the Blue Nebula’s extra effect memory (MEM 2) and can be
named by editing the ‘labels’ file. This is simply a text file with the ‘lbl extension as explained earlier.
3
The labels used for the knobs are also defined in the same ‘labels’ file. The default labels for the Empty Slot are ‘----‘
Page 12

Blue Nebula Patch Editor/Librarian, Version 4.00B Page 12
APPENDIX 2
PATCH FILE FORMAT
This information is provided for those who just have to know about such things but if you want to experiment, please be
sure to use the Librarian to save the patches from your Blue Nebula to disk beforehand in case you mess things up and need
to recover the precious patches you have worked so hard to create. You have been warned!
The patch file is an ASCII text file with the first line giving the number of patches it contains (usually 128) followed by one
line of comma separated text per patch with the following format:
patch name, location, coded, effect model, P1 value, P2 value, P3 value
Notes:
1. The patch name must be exactly 16 characters long, padded with spaces if necessary.
2. location is the patch number. It determines where this patch will be stored in the Blue Nebula’s user patch
memory (and in the Librarian’s patch list). This means patches do not necessarily have to be stored in the file in
patch number order, though they usually are! (Allowed values: 0-127).
You could use this information to create your own file (in a text editor) containing just a single patch, or as many as
required, so you can send it to a friend and they can load it without overwriting all their own patches. This short file
contains two patches that will be stored as patch numbers 33 and 22 when loaded into the Librarian, overwriting
existing patches 22 and 33 but leaving all other patches intact:
2
GENERAL ECHO ,33,false,5,2,2,1
MY LITTLE EKO ,22,true,1,5,4,3
3. coded is a boolean value that is retained for compatibility with earlier versions of the software. It can be set to true
or false. The value is read by the Blue Nebula but ignored. (Allowed values: true or false).
4. The effect model is the value from the EFFECT # column in Table 1 corresponding to the echo model selected for
this patch. (Allowed values: 0-15).
5. The knob values
4
are stored in the file as floating point numbers, (Allowed values: 0.0 - 10.0).
4
When the Send All Patches button is clicked, the values sent to the Blue Nebula are converted to integers in the range 0-
255. These correspond to the values of 0-100 you see when editing a patch on the Blue Nebula hardware itself.
Page 13

Blue Nebula Patch Editor/Librarian, Version 4.00B Page 13
APPENDIX 3
TA BL E 3: ECHO AN D E F FE CTS MO D E LS S UPP LI E D IN MEM 2 IN THE STANLE Y FX BL UE NEBULA PE DAL S
EFFECT #
EFFECT NAME
ECHO MODEL OR EFFEC T
P1
P2
P3
8
Binson-B2-1-5
Binson B2 Switch Positions 1-55
Mix
Heads
FBack
9
Binson-B2-6-10
Binson B2 Switch Positions 6-106
Mix
Heads
FBack
10
Binson-B2-11-15
Binson B2 Switch Positions 11-157
Mix
Heads
FBack
11
Warm Delay
A warm ‘modern’ delay with up to 1
second maximum delay time
Mix
Delay
Repeat
12
Rev / Phaser
Reverb + Phaser Effect
Rev
Rate
Sweep
13
Rev / Flanger
Reverb + Flanger Effect
Rev
Rate
Sweep
14
Deep Chorus
Chorus Effect with variable level and
two different modulation rates
Level
Rate1
Rate2
15
Guitar Abbey Rev
Based on a famous reverb sound
Level
Decay
Damp
5
In this model the LCD shows the switch positions 1-5 as A, B, C, E and F respectively.
6
In this model the LCD shows the switch positions 6-10 as A, B, C, E and F respectively.
7
The real Binson B2 had a 12-way switch used to select different combinations of its three playback heads so only 12
combinations were possible. The echo model Binson-B2-11-15 adds the three combinations not available with a 12-way
switch. Switch positions 11 and 12 are shown on the LCD as A and B respectively. The ‘extra’ positions 13-15 are shown as C
E and F respectively.
 Loading...