


If you have questions or comments, contact us.
Pour toute question ou tout commentaire, nous contacter.
Si tiene dudas o comentarios, contáctenos.
1-800-4-DeWALT
Instruction Manual
Guide D’utilisation
Manual de instrucciones
DCR025
Heavy-Duty Bluetooth® Work Site Radio/Charger
Radio/Chargeur industrielle de chantier BluetoothMD
Radio/cargador Bluetooth® de alto rendimiento para el sitio
detrabajo
final page size: 8.5 x 5.5 in

ENGLISH
English (original instructions) 1
Français (traduction de la notice d’instructions originale) 11
Español (traducido de las instrucciones originales) 22
ENGLISH
DeWALT
DeWALT
Definitions: Safety Alert Symbols and Words
This instruction manual uses the following safety alert symbols and words to alert you to hazardous situations and your risk
of personal injury or property damage.
DANGER: Indicates an imminently hazardous situation which, if not avoided, will result in death or seriousinjury.
WARNING: Indicates a potentially hazardous situation which, if not avoided, could result in death or seriousinjury.
CAUTION: Indicates a potentially hazardous situation which, if not avoided, may result in minor or moderateinjury.
(Used without word) Indicates a safety related message.
NOTICE: Indicates a practice not related to personal injury which, if not avoided, may result in propertydamage.
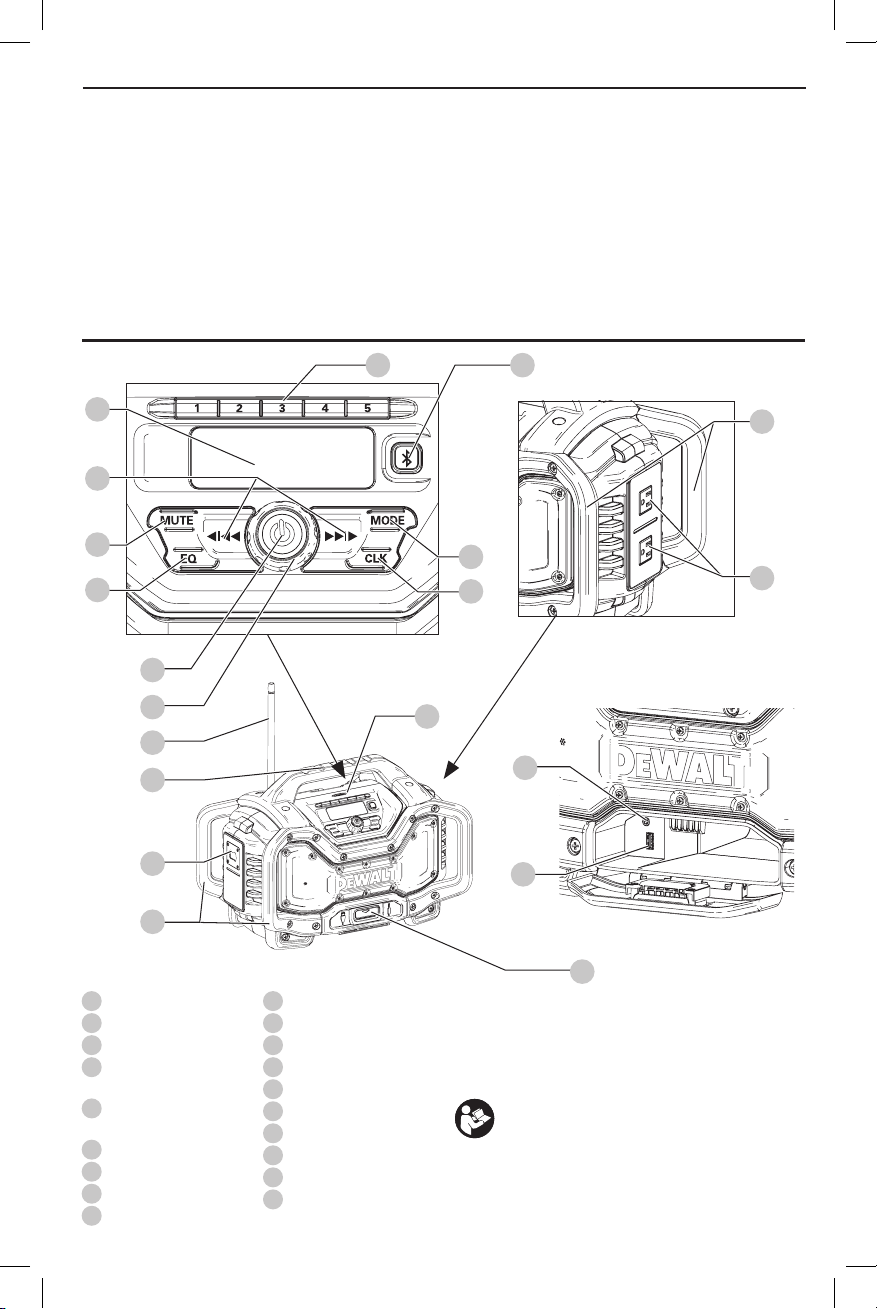
Fig. A
11
5
9
10
8
1
2
3
18
15
19
12
13
19
6
7
16
17
14
1
ON/OFF button
2
Volume knob
3
Antenna
4
Device storage
compartment
5
Seek/tuner/arrow
buttons
6
Mode button
7
Clock button
8
Radio preset buttons
9
Mute button
10
EQ button
11
LCD display
12
Charging indicator light
13
Bluetooth button
14
AC outlet
15
Bottle opener
16
AUX audio port
17
USB charging port
18
Carry handle
19
Roll cage
4
WARNING! Read all safety warnings and all
instructions. Failure to follow the warnings and
instructions may result in electric shock, fire and/or
seriousinjury.
WARNING: To reduce the risk of injury, read the
instructionmanual.
If you have any questions or comments about this or
any
1-800-4-
tool, call us toll free at:
(1-800-433-9258).
1
ENGLISH
DeWALT
DeWALT
DeWALT
DCR025 Heavy-Duty Bluetooth® Work Site
Radio/Charger
The DCR025 Heavy-Duty Bluetooth® Work Site
RadioCharger is an AM/FM radio. The DCR025 can be
powered by 120V AC power source as well as all
12 V Max*, 20V Max*, and FLEXVOLTTM Li-Ion battery packs.
Batteries sold separately.
SAVE ALL WARNINGS AND
INSTRUCTIONS FOR FUTURE
REFERENCE
Important Safety Instructions
WARNING: Read all safety warnings and all
instructions. Failure to follow the warnings and
instructions may result in electric shock, fire and/or
serious injury.
1 . Read these instructions.
2 . Keep these instructions.
3 . Heed all warnings.
4 . Follow all instructions.
5 . Do not use this apparatus near water.
6 . Clean only with a dry cloth.
7 . Do not block any ventilation openings. Install in
accordance with the manufacturer’s instructions.
8 . Do not install near any heat sources such as
radiators, heat registers, stoves or other apparatus
(including amplifiers) that produce heat.
9 . Do not defeat the safety purpose of the polarized or
grounding-type plug. A polarized plug has two blades
with one wider than the other. A grounding type plug
has two blades and a third grounding prong. The wide
blade or the third prong are provided for your safety. If
the provided plug does not fit into your outlet, consult an
electrician for replacement of the obsolete outlet.
10 . Protect the power cord from being walked on
or pinched particularly at plugs, convenience
receptacles, and the point where they exit from
theapparatus.
11 . Only use attachments/accessories specified by
themanufacturer.
12 . Unplug this apparatus during lightning storms or
when unused for long periods of time.
13 . Refer all servicing to qualified service personnel.
Servicing is required when the apparatus has been
damaged in any way, such as power-supply cord or plug
is damaged, liquid has been spilled or objects have fallen
into the apparatus, the apparatus has been exposed
to rain or moisture, does not operate normally, or has
beendropped.
14 . Apparatus shall not be exposed to dripping or
splashing and no objects filled with liquids, such as
vases, shall be placed on the apparatus
WARNING: To reduce the risk of fire or electric shock,
do not expose this apparatus to rain or moisture. Use
only in dry locations.
WARNING: To prevent electric shock, match wide
blade of plug to wide slot of outlet.
The label on your tool may include the following symbols. The
symbols and their definitions are asfollows:
V ......................... volts
Hz ....................... hertz
min ..................... minutes
or DC ......direct current
...................... Class I Construction
(grounded)
…/min .............. per minute
BPM .................... beats per minute
IPM ..................... impacts per minute
RPM .................... revolutions per
minute
sfpm ................... surface feet per
minute
SPM .................... strokes per minute
A ......................... amperes
W ........................ watts
or AC ........... alternating current
or AC/DC .... alternating or
direct current
...................... Class II
Construction
(double insulated)
no ....................... no load speed
n ......................... rated speed
...................... earthing terminal
..................... safety alert symbol
..................... visible radiation
..................... wear respiratory
protection
..................... wear eye
protection
..................... wear hearing
protection
..................... read all
documentation
BATTERIES AND CHARGERS
The battery pack is not fully charged out of the carton.
Before using the battery pack and charger, read the
safety instructions below and then follow charging
proceduresoutlined. When ordering replacement battery
packs, be sure to include the catalog number andvoltage.
Your radio is a
instructions before using your charger. Consult the chart
at the end of this manual for compatibility of chargers and
batterypacks.
charger. Be sure to read all safety
READ ALL INSTRUCTIONS
Important Safety Instructions for All
Battery Packs
WARNING: Read all safety warnings and all
instructions for the battery pack, charger and
power tool. Failure to follow the warnings and
instructions may result in electric shock, fire and/
or serious injury.
• Do not charge or use the battery pack in explosive
atmospheres, such as in the presence of flammable
liquids, gases or dust. Inserting or removing the battery
pack from the charger may ignite the dust orfumes.
• NEVER force the battery pack into the charger. DO
NOT modify the battery pack in any way to fit into
a non-compatible charger as battery pack may
rupture causing serious personal injury. Consult
the chart at the end of this manual for compatibility of
batteries andchargers.
• Charge the battery packs only in designated
• DO NOT splash or immerse in water or otherliquids.
chargers.
2
• Do not store or use the tool and battery pack in
DeWALT
DeWALT
locations where the temperature may reach or
exceed 104°F (40°C) (such as outside sheds or metal
buildings in summer). For best life store battery packs in
a cool, drylocation.
NOTE: Do not store the battery packs in a tool with
the trigger switch locked on. Never tape the trigger
switch in the ONposition.
• Do not incinerate the battery pack even if it is
severely damaged or is completely worn out. The
battery pack can explode in a fire. Toxic fumes and
materials are created when lithium ion battery packs
areburned.
• If battery contents come into contact with the skin,
immediately wash area with mild soap and water. If
battery liquid gets into the eye, rinse water over the open
eye for 15 minutes or until irritation ceases. If medical
attention is needed, the battery electrolyte is composed of
a mixture of liquid organic carbonates and lithiumsalts.
• Contents of opened battery cells may cause
respiratory irritation. Provide fresh air. If symptoms
persist, seek medicalattention.
WARNING: Burn hazard. Battery liquid may be
flammable if exposed to spark orflame.
WARNING: Fire hazard. Never attempt to open the
battery pack for any reason. If the battery pack case
is cracked or damaged, do not insert into the charger.
Do not crush, drop or damage the battery pack. Do
not use a battery pack or charger that has received a
sharp blow, been dropped, run over or damaged in
any way (e.g., pierced with a nail, hit with a hammer,
stepped on). Damaged battery packs should be
returned to the service center forrecycling.
Transportation
WARNING: Fire hazard. Do not store or carry the
battery pack so that metal objects can contact
exposed battery terminals. For example, do
not place the battery pack in aprons, pockets, tool
boxes, product kit boxes, drawers, etc., with loose
nails, screws, keys, etc. Transporting batteries
can possibly cause fires if the battery terminals
inadvertently come in contact with conductive
materials such as keys, coins, hand tools and the
like. The US Department of Transportation Hazardous
Material Regulations (HMR) actually prohibit
transporting batteries in commerce or on airplanes in
carry-on baggage UNLESS they are properly protected
from short circuits. So when transporting individual
battery packs, make sure that the battery terminals
are protected and well insulated from materials that
could contact them and cause a short circuit.
ENGLISH
Shipping the
The DeWALT FLEXVOLT™ battery has two modes: Use
andShipping.
Use Mode: When the FLEXVOLT™ battery stands alone or is
in a DeWALT 20V Max* product, it will operate as a 20V Max*
battery. When the FLEXVOLT™ battery is in a 60V Max* or a
120V Max* (two 60V Max* batteries) product, it will operate
as a 60V Max* battery.
Shipping Mode: When
the cap is attached to
the FLEXVOLT™ battery,
the battery is in Shipping
Mode. Strings of cells are
electrically disconnected within the pack resulting in three
batteries with a lower watt hour (Wh) rating as compared to
one battery with a higher Watt hour rating. This increased
quantity of three batteries with the lower watt hour rating
can exempt the pack from certain shipping regulations that
are imposed upon the higher Watt hour batteries.
The battery label indicates two Watt Hour Ratings (see
example). Depending on how the battery is shipped, the
appropriate Whr rating must be used to determine the
applicable shipping requirements. If utilizing the shipping
cap, the pack will be considered 3 batteries at the Whr
indicated for “Shipping”. If shipping without the cap or in
a tool, the pack will be considered one battery at the Watt
hour rating indicated next to “Use”.
Example of Use and Shipping Label Marking
For example, shipping Wh rating might indicate 3 x 40 Wh,
meaning 3 batteries of 40 Watt hours each. The Use Wh
rating might indicate 120 Watt hour (1 battery implied).
FLEXVOLT™ Battery
USE: 120 Wh Shipping: 3 x 40 Wh
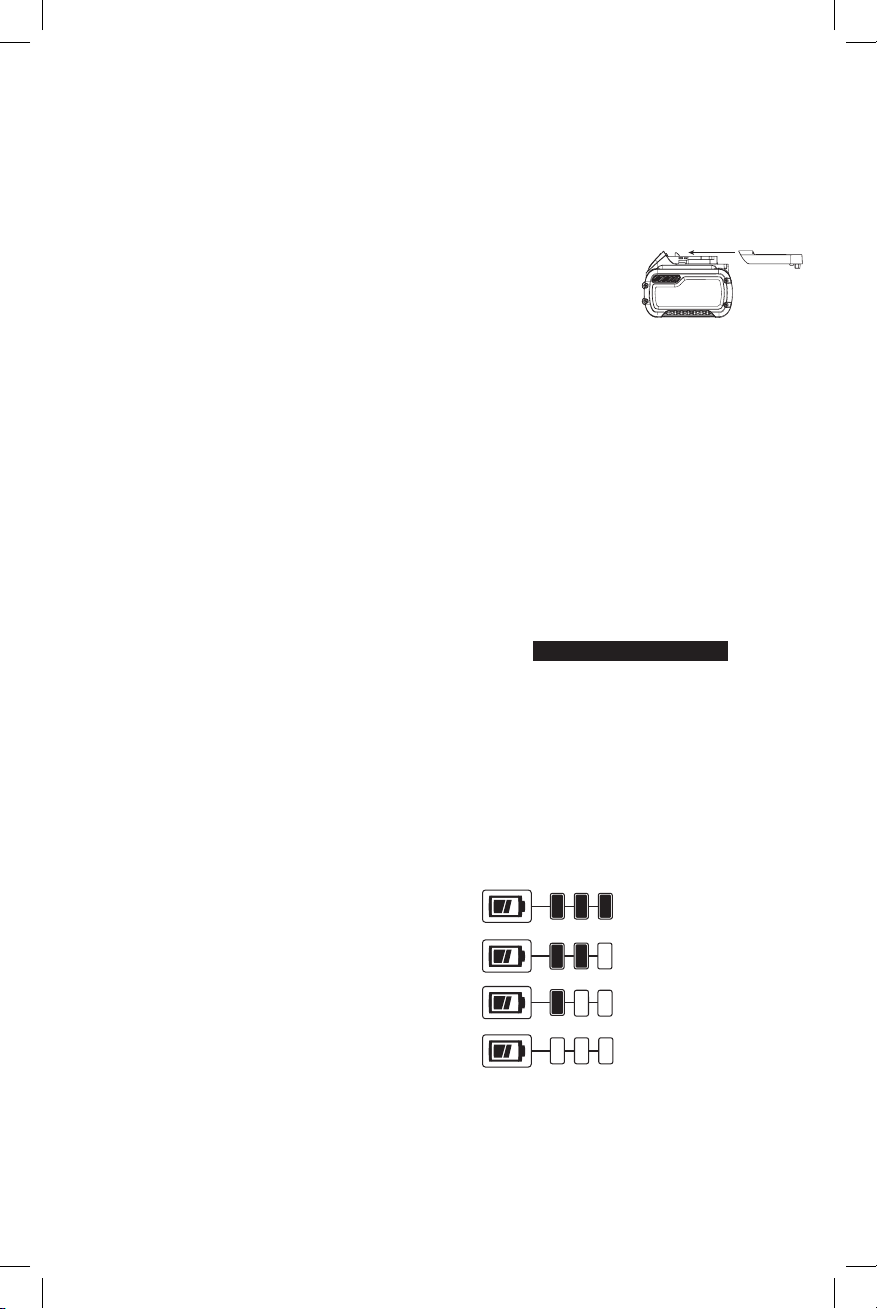
Fuel Gauge Battery Packs (Fig. B)
Some
consists of three green LED lights that indicate the level of
charge remaining in the batterypack.
The fuel gauge is an indication of approximate levels of
charge remaining in the battery pack according to the
followingindicators:
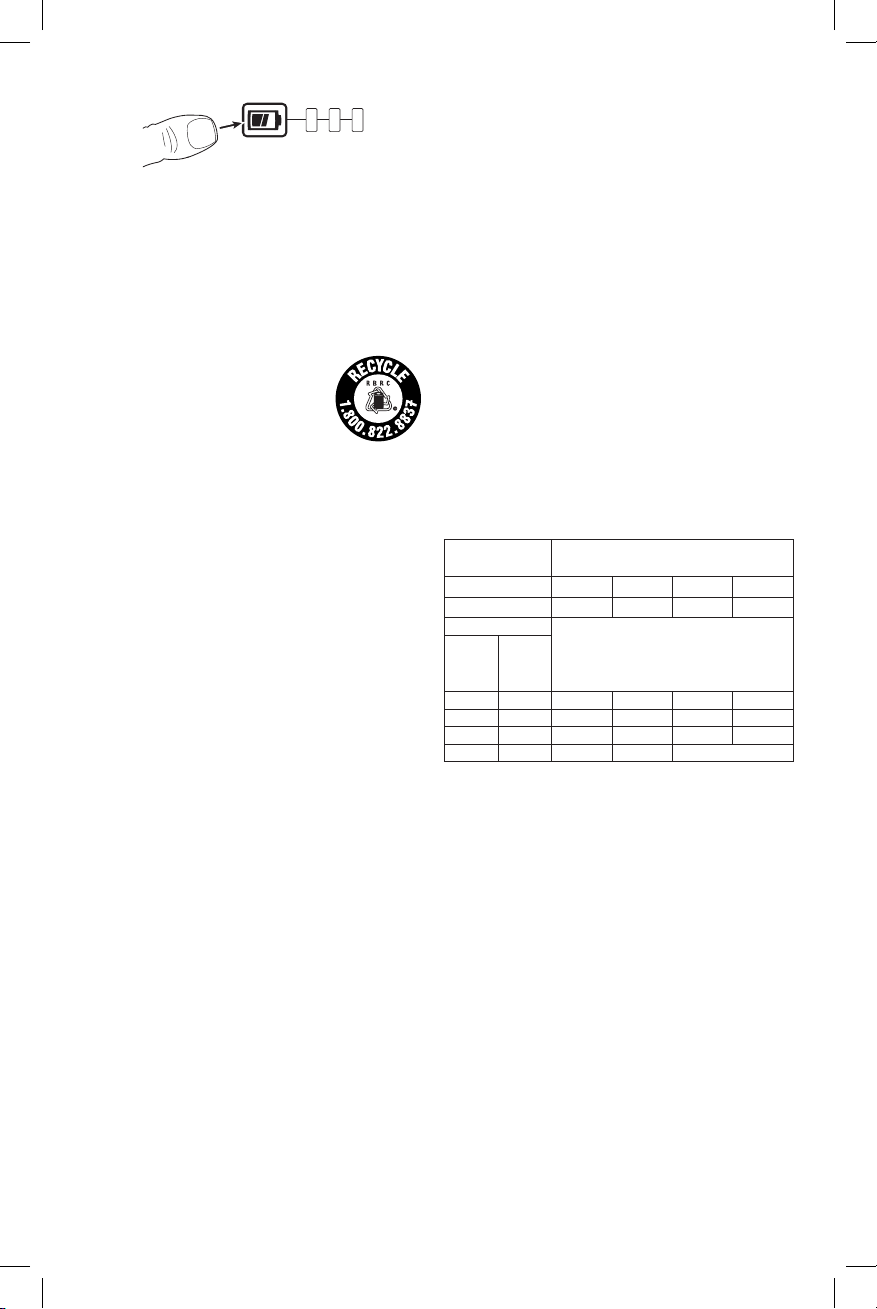
To actuate the fuel gauge, press and hold the fuel gauge
button. A combination of the three green LED lights will
illuminate designating the level of charge left. When the
level of charge in the battery is below the usable limit, the
fuel gauge will not illuminate and the battery will need to
berecharged.
battery packs include a fuel gauge which
75–100% charged
51–74% charged
< 50% charged
Pack needs to be charged
3
ENGLISH
DeWALT
DeWALT
DeWALT
DeWALT
DeWALT
Fig. B
NOTE: The fuel gauge is only an indication of the charge left
on the battery pack. It does not indicate tool functionality
and is subject to variation based on product components,
temperature and end-userapplication.
For more information regarding fuel gauge battery packs,
please contact call 1-800-4visit our website www.dewalt.com.
(1-800-433-9258) or
The RBRC® Seal
The RBRC® (Rechargeable Battery
Recycling Corporation) Seal on the nickel
cadmium, nickel metal hydride or lithiumionbatteries (or battery packs) indicates
that the costs to recycle these batteries
(or battery packs) at the end of their useful life have already
been paid by
spent nickel cadmium, nickel metal hydride or lithium-ion
batteries in the trash or municipal solid waste stream and
the Call2Recycle® program provides an environmentally
consciousalternative.
Call 2 Recycle, Inc., in cooperation with
battery users, has established the program in the United
States and Canada to facilitate the collection of spent nickel
cadmium, nickel metal hydride or lithium-ion batteries. Help
protect our environment and conserve natural resources by
returning the spent nickel cadmium, nickel metal hydride
or lithium-ion batteries to an authorized
center or to your local retailer for recycling. You may also
contact your local recycling center for information on
where to drop off the spent battery. RBRC® is a registered
trademark of Call 2 Recycle,Inc.
RBRC™ is a registered trademark of the Rechargeable Battery
RecyclingCorporation.
. In some areas, it is illegal to place
and other
service
Important Safety Instructions for All
Battery Chargers
WARNING: Read all safety warnings and all
instructions for the battery pack, charger and
power tool. Failure to follow the warnings and
instructions may result in electric shock, fire and/
or serious injury.
• DO NOT attempt to charge the battery pack with
any chargers other than the ones in this manual.
The charger and battery pack are specifically designed to
worktogether.
• These chargers are not intended for any uses other
than charging
Any other uses may result in risk of fire, electric shock
orelectrocution.
• Do not expose the charger to rain orsnow.
• Pull by the plug rather than the cord when
disconnecting the charger. This will reduce the risk of
damage to the electric plug andcord.
4
rechargeable batteries.
• Make sure that the cord is located so that it will not
be stepped on, tripped over or otherwise subjected
to damage orstress.
• Do not use an extension cord unless it is absolutely
necessary. Use of improper extension cord could result in
risk of fire, electric shock orelectrocution.
• When operating a charger outdoors, always provide
a dry location and use an extension cord suitable
for outdoor use. Use of a cord suitable for outdoor use
reduces the risk of electricshock.
• An extension cord must have adequate wire size
(AWG or American Wire Gauge) for safety. The smaller
the gauge number of the wire, the greater the capacity
of the cable, that is, 16 gauge has more capacity than 18
gauge. An undersized cord will cause a drop in line voltage
resulting in loss of power and overheating. When using
more than one extension to make up the total length,
be sure each individual extension contains at least the
minimum wire size. The following table shows the correct
size to use depending on cord length and nameplate
ampere rating. If in doubt, use the next heavier gauge. The
lower the gauge number, the heavier thecord.
Minimum Gauge for Cord Sets
Volts
120 V 25 (7.6) 50 (15.2) 100 (30.5) 150 (45.7)
240 V 50 (15.2) 100 (30.5) 200 (61.0) 300 (91.4)
Ampere Rating
More
Not
Than
More
Than
0 6 18 16 16 14
6 10 18 16 14 12
10 12 16 16 14 12
12 16 14 12 Not Recommended
• Do not place any object on top of the charger or
place the charger on a soft surface that might block
the ventilation slots and result in excessive internal
heat. Place the charger in a position away from any heat
source. The charger is ventilated through slots in the top
and the bottom of thehousing.
• Do not operate the charger with a damaged cord
orplug.
• Do not operate the charger if it has received a sharp
blow, been dropped or otherwise damaged in any
way. Take it to an authorized servicecenter.
• Do not disassemble the charger; take it to an
authorized service center when service or repair
is required. Incorrect reassembly may result in a risk of
electric shock, electrocution orfire.
• Disconnect the charger from the outlet before
attempting any cleaning. This will reduce the risk of
electric shock. Removing the battery pack will not reduce
thisrisk.
• NEVER attempt to connect 2 chargerstogether.
• The charger is designed to operate on standard
120V household electrical power. Do not attempt to
Total Length of Cord in Feet
(meters)
American Wire Gauge

use it on any other voltage. This does not apply to the
DeWALT
vehicularcharger.
WARNING: Shock hazard. Do not allow any liquid to
get inside the charger. Electric shock mayresult.
WARNING: Burn hazard. Do not submerge the
battery pack in any liquid or allow any liquid to
enter the battery pack. Never attempt to open the
battery pack for any reason. If the plastic housing of
the battery pack breaks or cracks, return to a service
center for recycling.
CAUTION: Burn hazard. To reduce the risk of injury,
charge only
Other types of batteries may overheat and burst
resulting in personal injury and propertydamage.
NOTICE: Under certain conditions, with the charger
plugged into the power supply, the charger can
be shorted by foreign material. Foreign materials
of a conductive nature, such as, but not limited to,
grinding dust, metal chips, steel wool, aluminum
foil or any buildup of metallic particles should be
kept away from the charger cavities. Always unplug
the charger from the power supply when there is no
battery pack in the cavity. Unplug the charger before
attempting toclean.
rechargeable battery packs.
Charging a Battery (Fig. C)
When the radio is plugged in it will charge the installed
battery. Unplugged, the radio will run up to 8 hours on a
fully charged battery using a premium 20 V Max* Li-Ion
battery. Using batteries of lower voltage and amp hours will
yield less run time.
1. Plug the charger into an appropriate outlet before
inserting battery pack.
Fig. C
21
20
2. Insert the battery pack
the battery pack is fully seated in the charger. The red
(charging) light will blink continuously indicating that
the charging process has started.
3. The completion of charge will be indicated by the red
light remaining ON continuously. The battery pack is
fully charged and may be used at this time or left in the
charger. To remove the battery pack from the charger,
push the battery release button
20
into the charger, making sure
21
on the battery pack.
ENGLISH
NOTE: To ensure maximum performance and life of lithium-
ion battery packs, charge the battery pack fully before first
use.
Charger Operation
Refer to the indicators below for the charge status of the
battery pack.
DCB101, DCR015, DCR025
Charging
Fully Charged
Hot/Cold Pack Delay
Problem Pack or Charger*
*DCB101, DCR015 only.
DCB107, DCB112, DCB113, DCB115, DCB118, DCB132
Charging
Fully Charged
Hot/Cold Pack Delay*
* DCB107, DCB112, DCB113, DCB115, DCB118, DCB132:
The red light will continue to blink, but a yellow indicator
light will be illuminated during this operation. Once the
battery pack has reached an appropriate temperature, the
yellow light will turn off and the charger will resume the
charging procedure.
The compatible charger(s) will not charge a faulty battery
pack. The charger will indicate faulty battery pack by
refusing to light or by displaying a problem pack or charger
blink pattern.
NOTE: This could also mean a problem with a charger.
If the charger indicates a problem, take the charger and
battery pack to be tested at an authorized service center.
Hot/Cold Pack Delay
When the charger detects a battery pack that is too hot
or too cold, it automatically starts a Hot/Cold Pack Delay,
suspending charging until the battery pack has reached an
appropriate temperature. The charger then automatically
switches to the pack charging mode. This feature ensures
maximum battery pack life.
A cold battery pack will charge at a slower rate than a warm
battery pack. The battery pack will charge at that slower rate
throughout the entire charging cycle and will not return to
maximum charge rate even if the battery pack warms.
The DCB118 charger is equipped with an internal fan
designed to cool the battery pack. The fan will turn on
automatically when the battery pack needs to be cooled.
Never operate the charger if the fan does not operate
properly or if ventilation slots are blocked. Do not permit
foreign objects to enter the interior of the charger.
Electronic Protection System
Li-Ion tools are designed with an Electronic Protection
System that will protect the battery pack against
overloading, overheating or deep discharge.
5

ENGLISH
The tool will automatically turn off if the Electronic
Protection System engages. If this occurs, place the lithiumion battery pack on the charger until it is fully charged.
Charger Cleaning Instructions
WARNING: Shock hazard. Disconnect the charger
from the AC outlet before cleaning. Dirt and grease
may be removed from the exterior of the charger using
a cloth or soft non-metallic brush. Do not use water or
any cleaning solutions.
Important Charging Notes
1. Longest life and best performance can be obtained if
the battery pack is charged when the air temperature is
between 65°F and 75°F (18° – 24°C). DO NOT charge
the battery pack in an air temperature below +40°F
(+4.5°C), or above +104°F (+40°C). This is important
and will prevent serious damage to the battery pack.
2. The charger and battery pack may become warm to the
touch while charging. This is a normal condition, and
does not indicate a problem. To facilitate the cooling of
the battery pack after use, avoid placing the charger or
battery pack in a warm environment such as in a metal
shed or an uninsulated trailer.
3. If the battery pack does not charge properly:
a. Check operation of receptacle by plugging in a lamp
or other appliance;
b. Check to see if receptacle is connected to a light
switch which turns power off when you turn out the
lights;
c. Move the charger and battery pack to a location
where the surrounding air temperature is
approximately 65°F – 75°F (18° – 24°C);
d. If charging problems persist, take the tool, battery
pack and charger to your local service center.
4. The battery pack should be recharged when it fails to
produce sufficient power on jobs which were easily
done previously. DO NOT CONTINUE to use under these
conditions. Follow the charging procedure. You may
also charge a partially used pack whenever you desire
with no adverse effect on the battery pack.
5. Foreign materials of a conductive nature such as, but
not limited to, grinding dust, metal chips, steel wool,
aluminum foil, or any buildup of metallic particles
should be kept away from charger cavities. Always
unplug the charger from the power supply when there
is no battery pack in the cavity. Unplug the charger
before attempting to clean.
6. Do not freeze or immerse the charger in water or any
other liquid.
Storage Recommendations
1. The best storage place is one that is cool and dry, away
from direct sunlight and excess heat or cold.
2. For long storage, it is recommended to store a fully
charged battery pack in a cool dry place out of the
charger for optimal results.
6
NOTE: Battery packs should not be stored completely
depleted of charge. The battery pack will need to be
recharged before use.
SAVE THESE INSTRUCTIONS FOR
FUTURE USE
1. This device complies with Part 15 of the FCC Rules
and Industry Canada License-exempt RSS standard(s).
Operation is subject to the following two conditions:
a. This device may not cause harmful interference, and
b. This device must accept any interference received,
including interference that may cause undesired
operation.
2. Changes or modifications not expressly approved by the
party responsible for compliance could void the user’s
authority to operate the equipment.
3. This equipment has been tested and found to comply
with the limits for a Class B digital device, pursuant
to Part 15 of the FCC Rules. These limits are designed
to provide reasonable protection against harmful
interference in a residential installation. This equipment
generates, uses, and can radiate radio frequency energy
and, if not installed and used in accordance with the
instructions, may cause harmful interference to radio
communications. However, there is no guarantee that
interference will not occur in a particular installation.
If this equipment does cause harmful interference to
radio or television reception, which can be determined
by turning the equipment off and on, the user is
encouraged to try to correct the interference by one of
the following measures:
- Reorient or relocate the receiving antenna.
- Increase the separation between the equipment
and receiver.
- Connect the equipment into an outlet on a
circuit different from that to which the receiver is
connected.
- Consult the dealer or an experienced radio/TV
technician for help.
4. CAN ICES-3 (B)/NMB-3(B)
5. Under Industry Canada regulations, this radio transmiIer
may only operate using an antenna of a type and
maximum (or lesser) gain approved for the transmiIer by
Industry Canada. To reduce potential radio interference
to other users, the antenna type and its gain should
be so chosen that the equivalent isotropically radiated
power (e.i.r.p) is not more than that necessary for
successful communication.
6. To comply with FCC and Industry Canada RF radiation
exposure limits for general population, the antenna
used for this device must not be co-located or operating
in conjunction with any other antenna or transmiter.
COMPONENTS (FIG. A)
WARNING: Never modify the power tool or any part
of it. Damage or personal injury couldresult.
Refer to Figure A at the beginning of this manual for a
complete list ofcomponents.

Intended Use
DeWALT
DeWALT
This
broadcast radio reception or to play/stream audio via a
wireless Bluetooth® connection or wired connection to a
mobile phone or other audio device and charge
batteries.
DO NOT use under wet conditions or in presence of
flammable liquids orgases.
DO NOT let children come into contact with the tool.
Supervision is required when inexperienced operators use
thistool.
Bluetooth® radio/charger is designed for
ASSEMBLY AND ADJUSTMENTS
WARNING: To reduce the risk of serious personal
injury, turn unit off and remove the battery pack
before making any adjustments or removing/
installing attachments or accessories. An
accidental start-up can causeinjury.
To Install Coin Cell Battery (Fig. D)
WARNING: Danger of explosion if battery is
incorrectly replaced. When replacing battery, replace
it with the same or equivalent type CR2032. Observe
correct polarity (+ and –) when replacing batteries.
Do not store or carry batteries so that metal objects
can contact exposed battery terminals.
1. On the battery door on the back of the unit, turn the
22
screw
remain captive in the door.
2. Press down on the battery door latch and pull to open.
3. Install the coin cell battery
inside the coin cell battery area.
4. Replace the battery door, insert the screw and tighten.
NOTE: To reset the LCD display, clock, and pre-sets remove
the coin cell battery and re-install. Follow this procedure if
the screen seems to lock in place.
counterclockwise to remove. Screw will
Fig. D
22
23
23
according to the diagram
DANGER: DO NOT INGEST BATTERY; CHEMICAL
BURN HAZARD. This product contains a coin/
button cell battery. If the coin/button cell battery is
swallowed, it can cause severe internal burns in just
2hours and can lead to death.
Keep new and used batteries away from children. If
the battery compartment does not close securely stop
using the product and keep it away from children
If you think batteries might have been swallowed or
placed inside any part of the body, seek immediate
medical attention.
OPERATION
WARNING: To reduce the risk of serious personal
injury, turn unit off and remove the battery pack
before making any adjustments or removing/
installing attachments or accessories. An
accidental start-up can causeinjury.
Your Bluetooth® radio/charger is equipped with memory
capacity in order to store the time and your selected
memory channels. When the radio is in the OFF position,
this memory capacity is powered by one coin cell battery
that is included with the radio/charger.
Power/Volume Adjustment
1. To turn the radio on and off, press the ON/OFF
2. Turn the dial
1
button
.
2
decrease the volume, turn counterclockwise.
Note the volume can also be muted by pressing the
mute button
clockwise to increase the volume. To
9
.
Mode Function
To choose one of the mode functions(FM1, FM2, AM, AUX
or Bluetooth) push the mode button
function is found.
NOTE: Pressing the Bluetooth button
radio into Bluetooth mode.
6
until the desired
13
Tune or Seek Function
There are two tuning methods and one seek method for
finding the desired frequency.
To tune:
Press and release the right or left arrow button
until the desired frequency is found.
To seek:
Press and hold the right or left arrow button
seconds. The tuner frequency will change to the first radio
station with acceptable clarity and stop at that station.
NOTE: When the radio/charger is paired to a Bluetooth®
device the right and left arrow buttons
skip or go to previous tracks on the audio device.
5
To Program the Clock
1. Power on the radio.
2. Press the clock button. The date and time will be
displayed, and the year will begin to blink.
3. Use the clock button to pick the parameter of time
desired and use the right and left arrows to adjust.
NOTE: If you do not press a button within 5 seconds,
the clock programming feature will automatically return
to the previous setting.
To Program the Memory Buttons
Ten FM and five AM radio stations may be independently
set. After programming the buttons, pressing 1, 2, 3, 4 or 5
will instantly change the frequency to the preset station.
1. Turn power on.
2. Set the radio to desired station (see Tune or Seek
Function).
ENGLISH
also puts the
5
. Repeat
5
for 2
can be used to
7

ENGLISH
3. Press and hold one of the desired memory preset
4. Repeat steps 2 and 3 to set the other preset buttons.
8
buttons
right side of the LCD. The preset button is now set.
until the button number appears on the
To Adjust the EQ
Sound quality can be adjusted by changing the equalization
of the bass or treble of the radio.
1. Press the EQ button
2. Press the right arrow
setting or the left arrow
3. Once desired adjustment is achieved, leave all buttons
released for more than 3 seconds. The procedure
will exit and the equalization adjustment will
remainactivated.
10
to select bass or treble.
5
button to increase the selected
5
button to decrease it.
Playing Audio Through an External
Device (Fig. A, E)
Audio can be played through the radio/charger via a
wireless Bluetooth® connection to a compatible Bluetooth®
device or by connecting audio device or mobile phone
using a 1/8' (3.5 mm) audio cable to the audio port
located inside the device storage compartment
Fig. E
16
17
Pairing Radio/charger with a Bluetooth® Audio Device
1. Place the radio/charger and the Bluetooth® audio source
within 3.3' (1m) of each other.
2. Turn radio/charger on by pressing the power button
3. Press the Bluetooth® button
button to put the unit into Bluetooth® (BT) mode. This
will cause the Bluetooth button to blink slowly. During
this time, the radio is trying to find a previously paired
device. If found the Bluetooth button will stay lit without
any blinking.
4. If another device is to be paired, press the Bluetooth
button and it should begin a fast blink pattern. While
the radio is displaying the fast blink, it is in paring mode.
5. Confirm pairing on your device. (Please consult
your device's instruction manual for specific pairing
instructions.)
NOTE: If pairing is not confimed within 2 minutes, the
LED will stop flashing and the radio/charger will return
to half second interval blink pattern.
6. Once pairing is successful the Bluetooth® indicator/
13
button
emit a short tone. The radio/charger will now play music
from your device.
will turn solid and the radio/charger will
13
or use the mode
16
4
.
1
Bluetooth Status Indicator
LED indicator Status/Mode
Steady blinking (half
second interval)
Rapid Blinking radio/charger is in pairing
Solid light radio/charger is connected
No light radio/charger has timed out
Connecting a Previously Paired Bluetooth® Audio
Device
If a Bluetooth® device has been previously paired to the
radio/charger it should automatically reconnect when
radio/charger is powered on. After 4 seconds the radio/
charger will go into connecting mode. This is indicated by
the Bluetooth® indicator/button
the previously paired Bluetooth® device is recognized and
connected, the LED will go solid. If connection does not
occur and you are unable to stream music please follow the
instructions for Pairing Radio/charger with a Bluetooth®
Audio Device.
radio/charger is unpaired or in
connecting mode.
mode and discoverable by
your device.
with a device.
and/or is off.
13
blinking steady. Once
Timeout Functionality (Fig. A)
To conserve battery life the radio/charger is designed to
power off automatically after an hour of inactivity. This
inactivity could be due to the device being unpaired for
an hour or in the case of the Bluetooth® connection being
broken for the same period of time. If the radio/charger
powers off due to inactivity of any kind refer to Connecting
a Previously Paired Bluetooth® Audio Device.
NOTE: Optimum Bluetooth® streaming range is roughly
30 ft (9m) (line of sight) to the radio/charger but distances
up to 100 feet (30m) are possible. Physical obstacles, other
wireless devices or electromagnetic devices may affect the
connection quality.
.
If Bluetooth® connection is lost due to exceeding time of
separation, exceeding the optimum distance, obstacles or
otherwise, reconnecting your device with the radio/charger
may be necessary.
Charging a Cell Phone or Audio Device
Via USB (Fig. E)
Your audio device or mobile phone can be charged (up
to 2.1 AMPS) using the USB power port
charger. This charging is possible when unit is on, running
off of AC plug power or the battery pack.
17
on the radio/
AC Outlets (Fig. F)
The radio/charger is equipped with 2 AC outlets
(10amp maximum) for powering additional tools
orappliances.
14
8

Fig. F
DeWALT
DeWALT
DeWALT
DeWALT
DeWALT
DeWALT
DeWALT
DeWALT
DeWALT
DeWALT
DeWALT
14
Important Radio Notes
1. Reception will vary depending on location and strength
of radio signal.
2. Running the radio while connected to certain
generators may cause background noise.
3. AM reception will most likely be clearer when powered
by a battery pack.
MAINTENANCE
WARNING: To reduce the risk of serious personal
injury, turn unit off and remove the battery pack
before making any adjustments or removing/
installing attachments or accessories. An
accidental start-up can causeinjury.
Cleaning
WARNING: Blow dirt and dust out of all air vents with
clean, dry air at least once a week. To minimize the risk
of eye injury, always wear ANSI Z87.1 approved eye
protection when performingthis.
WARNING: Never use solvents or other harsh
chemicals for cleaning the non-metallic parts of
the tool. These chemicals may weaken the plastic
materials used in these parts. Never let any liquid get
inside the tool; never immerse any part of the tool into
aliquid.
Accessories
WARNING: Since accessories, other than those
offered by
product, use of such accessories with this tool could be
hazardous. To reduce the risk of injury, only
recommended accessories should be used with
thisproduct.
Recommended accessories for use with your tool
are available at extra cost from your local dealer or
authorized service center. If you need assistance in
locating any accessory, please contact
Tool Co., 701East Joppa Road, Towson, MD 21286, call
1-800-4www.dewalt.com.
, have not been tested with this
(1-800-433-9258) or visit our website:
Industrial
Repairs
The radio/charger and battery pack are notserviceable.
WARNING: To assure product SAFETY and
RELIABILITY, repairs, maintenance and adjustment
(including brush inspection and replacement) should
be performed by a
or a
identical replacementparts.
authorized service center. Always use
factory service center
Register Online
Thank you for your purchase. Register your product nowfor:
• WARRANTY SERVICE: Registering your product will
help you obtain more efficient warranty service in case
there is a problem with yourproduct.
• CONFIRMATION OF OWNERSHIP: In case of
an insurance loss, such as fire, flood or theft, your
registration of ownership will serve as your proof
ofpurchase.
• FOR YOUR SAFETY: Registering your product will
allow us to contact you in the unlikely event a safety
notification is required under the Federal Consumer
SafetyAct.
Register online at www.dewalt.com/register.
Three Year Limited Warranty
will repair, without charge, any defects due to
faulty materials or workmanship for three years from the
date of purchase. This warranty does not cover part failure
due to normal wear or tool abuse. For further detail of
warranty coverage and warranty repair information, visit
www.dewalt.com or call 1-800-4This warranty does not apply to accessories or damage
caused where repairs have been made or attempted by
others. This warranty gives you specific legal rights and
you may have other rights which vary in certain states
orprovinces.
In addition to the warranty,
byour:
1 YEAR FREE SERVICE
will maintain the tool and replace worn parts
caused by normal use, for free, any time during the first year
afterpurchase.
2 YEARS FREE SERVICE ON DEWALT BATTERY PACKS
DC9071, DC9091, DC9096, DC9182, DC9280, DC9360, DCB120,
DCB127, DCB201, DCB203, DCB203BT, DCB207, DCB361
3 YEARS FREE SERVICE ON DEWALT BATTERY PACKS
DCB200, DCB204, DCB204BT, DCB205, DCB606
NOTE: Battery warranty voided if the battery pack is
tampered with in any way.
for any injury caused by tampering and may prosecute
warranty fraud to the fullest extent permitted bylaw.
(1-800-433-9258).
tools are covered
is not responsible
ENGLISH
9

ENGLISH
DeWALT
DeWALT
90 DAY MONEY BACK GUARANTEE
If you are not completely satisfied with the performance of
your
can return it within 90 days from the date of purchase with
a receipt for a full refund – no questionsasked.
LATIN AMERICA: This warranty does not apply to products
sold in Latin America. For products sold in Latin America,
see country specific warranty information contained in
the packaging, call the local company or see website for
warrantyinformation.
FREE WARNING LABEL REPLACEMENT: If your warning
labels become illegible or are missing, call 1-800-4(1-800-433-9258) for a freereplacement.
Power Tool, Laser, or Nailer for any reason, you
10

Définitions : symboles et termes d'alarmes sécurité
DeWALT
DeWALT
Ces guides d'utilisation utilisent les symboles et termes d'alarmes sécurité suivants pour vous prévenir de situations
dangereuses et de risques de dommages corporels ou matériels.
DANGER: indique une situation dangereuse imminente qui, si elle n’est pas évitée, entraînera la mort ou des
blessuresgraves.
AVERTISSEMENT: indique une situation potentiellement dangereuse qui, si elle n’est pas évitée, pourrait entraîner la
mort ou des blessuresgraves.
ATTENTION: indique une situation potentiellement dangereuse qui, si elle n’est pas évitée, pourrait entraîner des
blessures légères oumodérées.
(Si utilisé sans aucun terme) Indique un message propre à la sécurité.
AVIS : indique une pratique ne posant aucun risque de dommages corporels mais qui par contre, si rien n’est fait
pour l’éviter, pourrait poser des risques de dommages matériels.
Fig. A
8
13
FRANÇAIS
11
5
9
10
1
2
3
18
15
19
1
Bouton MARCHE/ARRÊT
2
Bouton du volume
3
Antenne
4
Compartiment à
accessoire
5
Boutons recherche/
syntoniseur/flèche
6
Sélecteur de mode
7
Touche de réglage
horaire
8
Touches de préréglage
radio
9
Touche Mute (sourdine)
10
Touche EQ (Égalisation)
11
Affichage LCD
12
Voyant de charge
13
Touche Bluetooth
14
Prises CA
15
Ouvre-bouteille
16
Prise audio aux.
17
Port de charge USB
18
Poignée de transport
19
Boîtier
6
7
12
16
17
4
AVERTISSEMENT! lire tous les avertissements de
sécurité et toutes les directives. Le non-respect
des avertissements et des directives pourrait se
solder par un choc électrique, un incendie et/ou une
blessuregrave.
AVERTISSEMENT : afin de réduire le risque de
blessures, lire le mode d’emploi del’outil.
Pour toute question ou remarque au sujet de cet outil
ou de tout autre outil
sans frais : 1-800-4-
, composez le numéro
(1-800-433-9258).
19
14
11

FRANÇAIS
DeWALT
DeWALT
Radio/Chargeur industrielle de chantier
BluetoothMD DCR025
Le modèle de Radio/Chargeur industrielle de chantier
BluetoothMD DCR025 est une radio AM/FM. La DCR025 peut
être alimentée par courant CA de 120v, ainsi que par tous
les blocs-piles
par les blocs-piles Li-Ion FLEXVOLTMC. Ces blocs-piles sont
vendus séparément.
de 12v max*et 20v max* ainsi que
CONSERVER TOUTES CES DIRECTIVES
ET CONSIGNES POUR FUTURE
RÉFÉRENCE
Consignes de sécurité importantes
AVERTISSEMENT: lire toutes les directives et toutes
les consignes de sécurité. Tout manquement aux
directives et consignes pose des risques de décharge
électrique, d’incendie et/ou de blessure grave.
1 . Lire ces directives.
2 . Conserver ces directives.
3 . Respecter tous les avertissements.
4 . Suivre toutes les directives.
5 . Ne pas utiliser cet appareil à proximité d’eau.
6 . N’utiliser qu’un chiffon sec pour le nettoyage.
7 . Ne bloquer aucun orifice d’aération. Installer
conformément aux directives du fabricant.
8 . Ne pas installer à proximité de sources de chaleur,
tels radiateurs, registres de chaleur, cuisinières ou
tout autre appareil (y compris les amplificateurs).
9 . Ne pas annihiler le but sécuritaire de la fiche
polarisée ou mise à la terre. Une fiche polarisée possède
deux lames dont l’une est plus large que l’autre. Une fiche
mise à la terre possède deux lames et une troisième broche
mise à la terre. La large lame ou la troisième broche ont
été installée pour assurer votre sécurité. Si la fiche fournie
de rentre pas dans la prise utilisée, consulter un électricien
pour faire changer cette prise désuète.
10 . Protéger le cordon d’alimentation contre tout
piétinement ou constriction particulièrement au
niveau des fiches, des prises, et au point de sortie
desappareils.
11 . Utiliser exclusivement des accessoires recommandés
par le fabricant.
12 . Débrancher l’appareil pendant les orages,
ou lorsqu’il restera inutilisé pendant une
périodeprolongée.
13 . Confier l’entretien de l’appareil aux soins d’un
personnel qualifié. Faire systématiquement entretenir
l’appareil en cas de dommages quelconques, tels que:
le cordon électrique, ou une fiche, a été endommagé, un
liquide ou un objet a pénétré dans l’appareil, l’appareil a
été exposé à la pluie ou à l’humidité, il ne fonctionne pas
normalement ou il a fait une chute.
14 . Protéger l’appareil de tout liquide, ou éclaboussure,
et ne disposer aucun objet rempli d’un liquide, (un
vase par exemple) sur l’appareil.
AVERTISSEMENT: pour réduire tout risque d’incendie
ou de chocs électriques, protéger cet appareil contre
la pluie ou l’humidité. Ne l’utiliser que dans des
endroitssecs.
AVERTISSEMENT: pour prévenir tout choc électrique,
aligner la large lame de la fiche avec la large fente de
la prise.
L’étiquette apposée sur votre outil peut inclure les symboles
suivants. Les symboles et leur définition sont indiqués ci-après:
V ......................... volts
Hz ....................... hertz
min ..................... minutes
or DC ...... courant continu
...................... fabrication classe I
(mis à la terre)
…/min .............. par minute
BPM .................... battements par
minute
IPM ..................... impacts par minute
RPM .................... revolutions per
minute
sfpm ................... pieds linéaires par
minute (plpm)
SPM (FPM) ......... fréquence par
minute
A ......................... ampères
W ........................ watts
or AC ........... courant alternatif
or AC/DC .... courant alternatif
ou continu
...................... fabrication classe II
(double isolation)
no ....................... vitesse à vide
n ......................... vitesse nominale
...................... borne de terre
...................... symbole
d’avertissement
..................... radiation visible
..................... protection
respiratoire
..................... protection oculaire
..................... protection auditive
..................... lire toute la
documentation
BLOCS-PILES ET CHARGEURS
Le bloc-piles n’est pas totalement chargé d’usine. Avant
d’utiliser le bloc-piles et le chargeur, lire les consignes de
sécurité ci-après puis suivre la procédure de chargement
indiquée. Pour commander un bloc-piles de rechange,
s’assurer d’en inclure le numéro de catalogue et la tension.
Votre radio est un chargeur
toutes les consignes de sécurité avant toute utilisation
du chargeur. Consulter le tableau en fin de manuel pour
connaître les compatibilités entre chargeurs et blocs-piles.
. S’assurer de bien lire
Consignes importantes de sécurité
les blocs-piles
AVERTISSEMENT : Lire toutes les instructions et
toutes les consignes de sécurité propres au bloc-
piles, au chargeur et à l’outil électrique. Tout
manquement aux avertissements et instructions
pose des risques de décharges électriques,
d’incendie et/ou de blessures graves.
• Ne pas recharger ou utiliser un bloc-piles en milieu
déflagrant, en présence, par exemple, de poussières,
gaz ou liquides inflammables. Le fait d’insérer ou
retirer un bloc-piles de son chargeur pourrait causer
l’inflammation de poussières ou d’émanations.
• NE JAMAIS forcer l’insertion d’un bloc-piles dans un
chargeur. NE modifier un bloc-piles d’AUCUNE façon
pour le faire rentrer dans un chargeur incompatible,
car il pourrait se briser et causer des dommages
12

corporels graves. Consulter le tableau en dernière page
DeWALT
DeWALT
DeWALT
de ce manuel pour connaître les compatibilités entre
chargeurs et blocs-piles.
• Recharger les blocs-piles exclusivement dans des
chargeurs
• NE PAS éclabousser le bloc-piles ou l’immerger dans l’eau
ou dans tout autreliquide.
• Ne pas entreposer ou utiliser l’appareil et le bloc-
piles en présence de températures ambiantes
pouvant excéder 40°C (104°F) (comme dans des
hangars ou des bâtiments métalliques l’été). Pour
préserver leur durée de vie, entreposer les blocs-piles dans
un endroit frais etsec.
REMARQUE: ne pas mettre un bloc-piles dans un
outil dont la gâchette est verrouillée en position de
marche. Ne jamais bloquer l’interrupteur en position
deMARCHE.
• Ne pas incinérer le bloc-piles même s’il est
sévèrement endommagé ou complètement usagé,
car il pourrait exploser et causer un incendie.
Pendant l’incinération des blocs-piles au lithium-ion, des
vapeurs et matières toxiques sontdégagées.
• En cas de contact du liquide de la pile avec la peau,
rincer immédiatement au savon doux et à l’eau. En
cas de contact oculaire, rincer l’œil ouvert à l’eau claire
une quinzaine de minutes ou jusqu’à ce que l’irritation
cesse. Si des soins médicaux s’avéraient nécessaires, noter
que l’électrolyte de la pile est composé d’un mélange de
carbonates organiques liquides et de sels delithium.
• Le contenu des cellules d’une pile ouverte peut
causer une irritation respiratoire. En cas d’inhalation,
exposer l’individu à l’air libre. Si les symptômes persistent,
consulter unmédecin.
AVERTISSEMENT: risques de brûlure. Le liquide de la
pile peut s’enflammer s’il est exposé à des étincelles ou
à uneflamme.
AVERTISSEMENT: risques d’incendie. Ne jamais
tenter d’ouvrir le bloc-piles pour quelque raison
que ce soit. Si le boîtier du bloc-piles est fissuré ou
endommagé, ne pas l’insérer dans un chargeur. Ne
pas écraser, laisser tomber, ou endommager les blocspiles. Ne pas utiliser un bloc-piles ou un chargeur
qui a reçu un choc violent, ou si l’appareil est tombé,
a été écrasé ou endommagé de quelque façon que
ce soit (p. ex. percé par un clou, frappé d’un coup
de marteau, piétiné). Les blocs-piles endommagés
doivent être renvoyés à un centre de réparation pour
y êtrerecyclés.
.
Transport
AVERTISSEMENT: risques d’incendie. Au moment
de ranger ou transporter le bloc-piles, veiller à
protéger ses bornes à découvert de tout objet
métallique. Par exemple, éviter de placer le bloc-
piles dans un tablier, une poche, une boîte à outils
ou un tiroir, etc. contenant des objets tels que clous,
vis, clés, etc. Le fait de transporter des blocs-piles
comporte des risques d’incendie, car les bornes
des piles pourraient entrer, par inadvertance,
FRANÇAIS
en contact avec des objets conducteurs, tels
que: clés, pièces de monnaie, outils ou autres.
La réglementation sur les produits dangereux
(Hazardous Material Regulations) du département
américain des transports interdit, en fait, le transport
des blocs-piles dans les commerces ou dans les avions
dans les bagages de cabine, À MOINS qu’ils ne soient
correctement protégés de tout court-circuit. Aussi
lors du transport individuel de blocs-piles, s’assurer
que leurs bornes sont bien protégées et isolées de
tout matériau pouvant entrer en contact avec elles et
provoquer un court-circuit.
Expédition du bloc-piles
Le bloc-piles DeWALT FLEXVOLTMC possède deux modes:
Utilisation et Expédition.
Mode Utilisation: lorsque le bloc-piles FLEXVOLTMC est par
lui-même ou dans un produit DeWALT 20v max*, il
fonctionnera comme un bloc-piles de 20v max*. Lorsque le
bloc-piles FLEXVOLTMC est dans un produit de 60v max* ou
120v max* (deux blocs-piles de 60v max*), il fonctionnera
comme un bloc-piles de 60v max*..
Mode Expédition: lorsque
le capuchon est inséré sur
le bloc-piles FLEXVOLTMC,
le bloc-piles est en mode
Expédition. Les modules
de cellules sont électriquement déconnectés du bloc le
faisant correspondre à trois blocs-piles d’un wattheure (Wh)
inférieur comparé à un bloc-piles de wattheure élevé. Ce
passage à trois blocs-piles à un wattheure inférieur peut
permettre au bloc-piles d’être exempté de suivre certaines
directives d’expédition imposées sur les blocs-piles de
wattheure supérieur.
L’étiquette du bloc-piles donne deux estimations de
wattheures (se reporter à l’exemple). Selon comment le
bloc-piles est expédié, l’estimation appropriée de wattheure
doit être utilisée pour déterminer les modalités d’expédition
lui correspondant. Si le capuchon d’expédition est utilisé,
le bloc-piles sera considéré comme 3 blocs-piles au
wattheure indiqué pour «Expédition». S’il est expédié sans
le capuchon ou dans un outil, le bloc-piles sera considéré
comme un seul bloc-piles au wattheure indiqué à côté de
«Utilisation».
Exemple d’étiquetage d’utilisation et d’expédition
Par exemple, le Wh de expédition pourra indiquer 3 x 40
Wh, ce qui correspond à 3 blocs-piles de 40 wattheures
chacun. L'utilisation du wattheure pourra indiquer 120
wattheures (sous-entendu 1 bloc-piles).
USE: 120 Wh Shipping: 3 x 40 Wh
FLEXVOLT
MC
Témoin de Charge du Bloc-Piles (Fig. B)
Certains blocs-piles
charge qui consiste en trois voyants Del verts indiquant le
niveau de charge du bloc-piles.
Le témoin de charge indique approximativement le niveau
de charge restant dans le bloc-piles en fonction des voyants
suivants:
possèdent un témoin de
13

FRANÇAIS
DeWALT
DeWALT
DeWALT
DeWALT
DeWALT
Chargé de 75 à 100%
Chargé de 51 à 74%
Chargé de < 50%
Le bloc-piles doit être rechargé
Pour activer le témoin de charge, maintenez appuyé le
bouton du témoin de charge . Une combinaison des trois
voyants Del verts s’allumera indiquant le niveau de charge.
Lorsque le niveau de charge du bloc-pile atteint la limite
minimale d’utilisation, le témoin de charge reste éteint et le
bloc-piles doit êtrerechargé.
Fig. B
REMARQUE: le témoin de charge ne fait qu’indiquer
le niveau de charge du bloc-piles. Il ne donne aucune
indication quant au fonctionnement de l’outil. Son propre
fonctionnement pourra aussi varier en fonction des
composants produit, de la température et de l’application
d’utilisation.
Pour plus d’informations quant au témoin de charge du
bloc-piles, veuillez appeler le 1-800-4-
9258) ou vous rendre sur notre site www.dewalt.com.
(1-800-433-
Le sceau SRPRC®
Le sceau SRPRC® (Société de recyclage des
piles rechargeables du Canada) apposé
sur une pile au nickel-cadmium, à hydrure
métallique de nickel ou au lithium-ion
(ou un bloc-piles) indique que les coûts
de recyclage de ces derniers en fin d’utilisation ont déjà été
réglés par
ou aux ordures municipales des piles au nickel-cadmium, à
l’hydrure métallique de nickel ou au lithium-ion, est illégale;
le programme de l’Appel à Recycler® constitue donc une
solution pratique etécologique.
Appel à Recycler Canada, Inc., en collaboration avec
et d’autres utilisateurs de piles, a mis sur pied de
programme aux États-Unis et au Canada pour faciliter la
collecte des piles au nickel-cadmium, à l’hydrure métallique
de nickel ou au lithium-ion usagées. Aidez-nous à protéger
l’environnement et à conserver nos ressources naturelles
en renvoyant les piles au nickel-cadmium, à l’hydrure
métallique de nickel ou au lithium-ion usagées à un centre
de réparation autorisé
qu’elles y soient recyclées. On peut en outre se renseigner
auprès d’un centre de recyclage local pour connaître
d’autres sites lesacceptant.
SRPRC® est une marque déposée de l’Appel à Recycler
Canada,Inc.
. Dans certaines régions, la mise au rebut
ou chez votre détaillant afin
Directives de sécurité importantes
propres à tous les chargeurs de piles
AVERTISSEMENT : Lire toutes les instructions et
toutes les consignes de sécurité propres au bloc-
piles, au chargeur et à l’outil électrique. Tout
manquement aux avertissements et instructions
pose des risques de décharges électriques,
d’incendie et/ou de blessures graves.
• NE PAS tenter de charger de bloc-piles avec des
chargeurs autres que ceux décrits dans ce manuel.
Le chargeur et son bloc-piles ont été conçus tout
spécialement pour fonctionnerensemble.
• Ces chargeurs n’ont pas été conçus pour une
utilisation autre que recharger les blocs-piles
rechargeables
comporte des risques d’incendie, de chocs électriques ou
d’électrocution.
• Protéger le chargeur de la pluie ou de laneige.
• Tirer sur la fiche plutôt que sur le cordon pour
débrancher le chargeur. Cela permet de réduire
les risques d’endommager la fiche ou le cordon
d’alimentation.
• S’assurer que le cordon est protégé de manière à
ce que personne ne marche ni ne trébuche dessus,
ou à ce qu’il ne soit ni endommagé ni soumis à
aucunetension.
• N’utiliser une rallonge qu’en cas de nécessité
absolue. L’utilisation d’une rallonge inadéquate
comporte des risques d’incendie, de chocs électriques ou
d’électrocution.
• Pour utiliser un chargeur à l’extérieur, le placer dans
un endroit sec et utiliser une rallonge conçue pour
l’extérieur. L’utilisation d’une rallonge conçue pour
l’extérieur réduit les risques de chocsélectriques.
• Pour la sécurité de l’utilisateur, utiliser une rallonge
de calibre adéquat (AWG, American Wire Gauge
[calibrage américain normalisé des fils électriques]).
Plus le calibre est petit, et plus sa capacité est grande. Un
calibre16, par exemple, a une capacité supérieure à un
calibre18. L’usage d’une rallonge de calibre insuffisant
causera une chute de tension qui entraînera perte de
puissance et surchauffe. Si plus d’une rallonge est utilisée
pour obtenir une certaine longueur, s’assurer que chaque
rallonge présente au moins le calibre de fil minimum. Le
tableau ci-dessous illustre les calibres à utiliser selon la
longueur de rallonge et l’intensité nominale indiquée sur
la plaque signalétique. En cas de doute, utiliser le calibre
suivant. Plus le calibre est petit, plus la rallonge peut
supporter decourant.
. Toute autre utilisation
14

Calibre minimum pour les cordons d'alimentation
DeWALT
Volts
120 V 7,6 ( 25 ) 15,2 ( 50 )
240 V 15,2 ( 50 )
Ampères
Plus que Pas plus
• Ne poser aucun objet sur le chargeur. Ne pas mettre
le chargeur sur une surface molle qui pourrait en
bloquer la ventilation et provoquer une surchauffe
interne. Éloigner le chargeur de toute source de chaleur.
Le chargeur dispose d’orifices d’aération sur le dessus et le
dessous duboîtier.
• Ne pas le faire fonctionner avec un cordon
d’alimentation ou une ficheendommagée.
• Ne pas utiliser le chargeur s’il a reçu un coup,
fait une chute ou a été endommagé de quelque
façon que ce soit. Le ramener dans un centre de
réparationagréé.
• Ne pas démonter le chargeur. Pour tout service
ou réparation, le rapporter dans un centre de
réparation agréé. Le fait de le réassembler de façon
incorrecte comporte des risques de chocs électriques,
d’électrocution et d’incendie.
• Débrancher le chargeur du secteur avant tout
entretien. Cela réduira tout risque de chocs
électriques. Le fait de retirer le bloc-piles ne réduira pas
cesrisques.
• NE JAMAIS tenter de connecter 2 chargeursensemble.
• Le chargeur a été conçu pour être alimenté en
courant électrique domestique standard de 120
volts. Ne pas tenter de l’utiliser avec toute autre
tension. Cela ne s’applique pas aux chargeurs de
postesmobiles.
que
0 6 18 16 16 14
6 10 18 16 14 12
10 12 16 16 14 12
12 16 14 12 Non recommandé
AVERTISSEMENT: risques de chocs électriques. Ne
laisser aucun liquide pénétrer dans le chargeur, des
chocs électriques pourraient en résulter.
AVERTISSEMENT: risques de brûlure. Ne submerger
le bloc-piles dans aucun liquide et le protéger de toute
infiltration de liquide. Ne jamais tenter d’ouvrir le
bloc-piles pour quelque raison que ce soit. Si le boîtier
plastique du bloc-piles est brisé ou fissuré, le retourner
dans un centre de réparation pour y être recyclé.
ATTENTION: risques de brûlure. Pour réduire tout
risque de dommages corporels, ne recharger que des
blocs-piles rechargeables
de piles pourrait exploser et causer des dommages
corporels etmatériels.
AVIS: sous certaines conditions, lorsque le chargeur
est connecté au bloc d’alimentation, des matériaux
étrangers pourraient court-circuiter le chargeur. Les
corps étrangers conducteurs tels que (mais pas limité
Longueur totale du cordon
d'alimentation en mètre (pieds)
( 100 )
30,5
AWG
. Tout autre type
30,5
( 100 )
61,0
( 200 )
45,7
( 150 )
91,4
( 300 )
FRANÇAIS
à) poussières de rectification, débris métalliques, laine
d’acier, feuilles d’aluminium, ou toute accumulation
de particules métalliques doivent être maintenus
à distance des orifices du chargeur. Débrancher
systématiquement le chargeur lorsque le bloc-piles
n’y est pas inséré. Débrancher systématiquement le
chargeur avant toutentretien.
Chargement du bloc-piles (Fig. C)
Lorsque la radio est branchée, elle rechargera le bloc-piles
installé. Débranchée, la radio fonctionnera jusqu’à 8 heures
sur un bloc-piles pleinement chargé, si un bloc-piles
Li-Ion de 20 volts max* est utilisé. Le fait d’utiliser des
piles de tension et ampères inférieurs diminuera le temps
defonctionnement.
1. Branchez le chargeur dans la prise appropriée avant d’y
insérer le bloc-piles.
Fig. C
21
20
2. Insérer le bloc-piles
assurant qu’il y est correctement calé. Le voyant rouge
(charge) clignotera de façon continue indiquant que le
cycle de chargement a commencé.
3. En fin de charge, le voyant rouge restera ALLUMÉ de
façon continue. Le bloc-piles est alors complètement
rechargé et peut être utilisé ou laissé dans le chargeur.
Pour retirer le bloc-piles du chargeur, appuyez sur le
bouton de libération du bloc-piles
REMARQUE: pour assurer des performances optimales et
une durée de vie maximale des blocs-piles au lithium-ion,
recharger pleinement le bloc-piles avant toute utilisation
initiale.
Utilisation du chargeur
Reportez-vous aux indications du tableau ci-dessous pour
consulter le statut de charge du bloc-piles.
DCB101, DCR015, DCR025
Bloc-piles en Cours de Chargement
Bloc-piles Chargé
Suspension de Charge Contre
le Chaud/Froid
Bloc-Pile ou Chargeur Défectueux*
*DCB101, DCR015 seulement.
20
dans le chargeur, en vous
21
sur le bloc-piles.
15

FRANÇAIS
DCB107, DCB112, DCB113, DCB115, DCB118, DCB132
Bloc-piles en Cours
de Chargement
Bloc-piles Chargé
Suspension de Charge Contre
le Chaud/Froid*
* DCB107, DCB112, DCB113, DCB115, DCB118, DCB132:
le voyant rouge ne cessera de clignoter, mais un voyant
jaune restera allumé pendant cette opération. Lorsque
le bloc-piles aura repris une température appropriée,
le voyant jaune s’éteindra et le chargeur reprendra sa
procédure de charge.
Le chargeur ne pourront recharger des blocs-piles
défectueux. Le chargeur indiquera qu’un bloc-piles est
défectueux en refusant de s’allumer ou en affichant blocpiles ou chargeur défectueux.
REMARQUE: cela pourra aussi indiquer un problème avec
le chargeur.
Si le problème provient du chargeur, faites vérifier le
chargeur et le bloc-piles chez un centre de réparation agréé.
Fonction de suspension de charge contre le chaud/
froid
Lorsque le chargeur détecte un bloc-piles trop chaud
ou trop froid, il démarre automatiquement la fonction
de suspension de charge contre le chaud, suspendant
le chargement jusqu’à ce que le bloc-piles ait repris une
température appropriée. Le chargeur ensuite se remettra
automatiquement en mode de chargement. Cette
caractéristique assure aux blocs-piles une durée de vie
maximale.
Un bloc-piles froid se rechargera moins vite qu’un bloc-piles
chaud. Le bloc-piles se rechargera à ce rythme plus lent tout
au cours du cycle de charge et ne retournera pas à sa vitesse
maximale de charge même s’il venait à se réchauffer.
Le chargeur DCB118 est équipé d’un ventilateur interne
destiné à refroidir le bloc-piles. Le ventilateur se mettra
automatiquement en marche chaque fois que le bloc-piles
aura besoin de se refroidir.
N’utilisez jamais le chargeur si le ventilateur ne fonctionne
pas correctement ou si ses fentes d’aération sont bloquées.
Protégez systématiquement l’intérieur du chargeur de tout
objet étranger.
Système de protection électronique
Les appareils au Li-Ion sont équipés d’un système
électronique de protection pour protéger les blocs-piles de
toute surcharge, surchauffe ou fuite importante.
L’appareil s’arrêtera automatiquement dès que le système
électronique de protection sera activé. Si c’était le cas,
placez le bloc-piles au lithium-ion sur son chargeur jusqu’à
ce qu’il soit complètement rechargé.
Instructions d’entretien du chargeur
AVERTISSEMENT: risques de chocs électriques.
Débrancher le chargeur de la prise de courant
alternatif avant tout entretien. Éliminer toute saleté
16
ou graisse de la surface externe du chargeur à l’aide
d’un chiffon ou d’une brosse non métallique douce.
N’utiliser ni eau ni aucun nettoyant liquide.
Remarques importantes concernant le
chargement
1. Pour augmenter la durée de vie du bloc-piles
et optimiser son rendement, le recharger à une
température ambiante de 18° à 24°C (65°F à 75°F). NE
PAS recharger le bloc-piles à une température inférieure
à +4,5°C (+40°F) ou supérieure à +40°C (+104°F).
C’est important pour prévenir tout dommage sérieux
au bloc-piles.
2. Le chargeur et son bloc-piles peuvent devenir chauds
au toucher pendant la charge. C’est normal et ne
représente en aucun cas une défaillance du produit.
Pour faciliter le refroidissement du bloc-piles après
utilisation, éviter de laisser le chargeur ou le bloc-piles
dans un local où la température ambiante est élevée
comme dans un hangar métallique ou une remorque
non isolée.
3. Si le bloc-piles ne se recharge pas correctement:
a. Vérifier le bon fonctionnement de la prise en
y branchant une lampe ou tout autre appareil
électrique.
b. Vérifier que la prise n’est pas contrôlée par un
interrupteur qui coupe le courant lorsqu’on éteint les
lumières.
c. Déplacer le chargeur et le bloc-piles dans un local où
la température ambiante se trouve entre environ 18°
et 24°C (65°F et 75°F).
d. Si le problème persiste, amener l’outil, le bloc-piles et
son chargeur dans un centre de réparation local.
4. Recharger le bloc-piles lorsqu’il ne produit plus assez
de puissance pour effectuer un travail qu’il faisait
facilement auparavant. NE PAS CONTINUER à l’utiliser
dans ces conditions. Suivre la procédure de charge. Si
nécessaire, il est aussi possible de recharger
un bloc-piles partiellement déchargé sans effet nuisible
sur le bloc-piles.
5. Les corps étrangers conducteurs tels que (mais
pas limité à) poussières de rectification, débris
métalliques, laine d’acier, feuilles d’aluminium,
ou toute accumulation de particules métalliques
doivent être maintenus à distance des orifices du
chargeur. Débrancher systématiquement le chargeur
lorsque le bloc-piles n’y est pas inséré. Débrancher
systématiquement le chargeur avant tout entretien.
6. Ne pas congeler ou immerger le chargeur dans l’eau ou
tout autre liquide.
Recommandations de stockage
1. Le lieu idéal de rangement est un lieu frais et sec, à l’abri
de toute lumière solaire directe et de toute température
excessive.
2. Pour un stockage prolongé, il est recommandé
d’entreposer le bloc-piles pleinement chargé dans un

DeWALT
DeWALT
lieu frais et sec, hors du chargeur pour optimiser les
résultats.
REMARQUE: les blocs-piles ne devraient pas être
entreposés complètement déchargés. Il sera nécessaire de
recharger le bloc-piles avant réutilisation.
CONSERVER CES CONSIGNES POUR
UTILISATION ULTÉRIEURE
1. Cet appareil est conforme au paragraphe 15 du
règlement du FCC et à la (aux) norme(s) RSS exempté(s)
de licence d’Industrie Canada. Son utilisation est sujette
aux deux conditions suivantes:
a. Ce dispositif ne doit pas causer d’interférences
nuisibles; et
b. Ce dispositif doit accepter toute interférence reçue,
y compris toute interférence pouvant causer un
fonctionnement indésirable.
2. Tout changement, ou toute modification, apporté à
l’appareil qui ne serait pas expressément homologué
par le tiers responsable de sa conformité pourra annuler
les droits de l’utilisateur à employer cet équipement.
3. Cet équipement a été testé et jugé conforme aux
limites propres aux appareils numériques de Classe
B, conformément au Paragraphe 15 du règlement du
FCC. Ces limites sont destinées à offrir une protection
raisonnable contre les interférences nuisibles d’une
installation résidentielle. Cet équipement produit,
utilise et peut émaner des ondes radiofréquences
qui, s’il n’est pas installé et utilisé conformément aux
directives, pourront causer des interférences nuisibles
aux communications radio. Cependant, en fonction des
installations réalisées, l’absence d’interférences n’est
pas garantie. Si cet équipement cause des interférences
nuisibles à la réception radio ou télévision (ce qui peut
être déterminé par la mise sous/hors tension de cet
équipement) l’utilisateur est encouragé à tenter de
corriger ces interférences en prenant l’une des mesures
suivantes:
- Réorienter l’antenne de réception ou en changer
l’emplacement.
- Augmenter la distance entre l’équipement et le
récepteur.
- Brancher l’équipement à une prise située sur un
circuit différent de celui sur lequel le récepteur est
connecté.
- Contacter un revendeur ou consulter un technicien
radio/télé qualifié.
4. CAN ICES-3 (B)/NMB-3(B)
5. Conformément aux réglementions d’Industrie Canada,
cet émetteur radio ne peut fonctionner qu’avec une
antenne dont le type et le gain maximal (ou d’une
valeur moindre) sont homologués par Industrie Canada
pour cet émetteur. Pour réduire toute interférence
radio potentielle pouvant affecter les autres utilisateurs,
le type d’antenne et ses gains devraient être choisis
de façon à ce que la puissance isotrope rayonnée
équivalente ne soit pas supérieure aux limites
permettant la communication.
6. Pour être conforme aux limites d’irradiations RF du FCC
et d’Industrie Canada quant aux limites d’irradiation
pour la population en général, l’antenne utilisée
avec cet appareil ne doit pas être placée ou utilisée
conjointement avec tout autre émetteur ou toute autre
antenne.
DESCRIPTION (FIG. A)
AVERTISSEMENT: ne jamais modifier l’outil
électrique ni aucun de ses composants, car il y a
risques de dommages corporels oumatériels.
Reportez-vous en figureA au début de ce manuel pour
obtenir la liste complète descomposants.
Usage prévu
Cette radio/chargeur BluetoothMD
pour transmettre toute réception radio ou jouer/transmettre
en continu au travers d’une connexion sans fil BluetoothMD
ou d’une connexion filaire avec un téléphone mobile ou
tout autre appareil audio, et pour recharger des blocs-piles
.
NE PAS les utiliser en milieu ambiant humide ou en
présence de liquides ou de gazinflammables.
NE PAS le laisser à la portée des enfants. Une supervision
est nécessaire auprès de tout utilisateur nonexpérimenté.
a été conçue
ASSEMBLAGE ET AJUSTEMENTS
AVERTISSEMENT: pour réduire le risque de
blessures graves, éteindre l’outil et retirer le bloc-
piles avant d’effectuer tout réglage et d’enlever
ou d’installer tout accessoire. Un démarrage
accidentel peut provoquer desblessures.
Pour installer une pile bouton (Fig. D)
AVERTISSEMENT: si la pile installée est incorrecte,
il y aURA danger d’explosion. Pour changer de
pile, la remplacer par une pile similaire CR2032
ou équivalente. Pour remplacer la pile, respecter
la polarité (+ et –). Au moment d’entreposer ou
transporter les piles, s’assurer qu’aucun objet
métallique n’entre en contact avec leurs bornes
àdécouvert.
1. Sur le clapet de fermeture à l’arrière de l’appareil,
tournez la vis
restera attachée au clapet.
Fig. D
2. Appuyez sur le verrou du volet de fermeture puis tirez
pour ouvrir.
3. Installez la pile bouton
l’intérieur de son réceptacle.
4. Réinstallez le volet de fermeture puis réinsérez la vis et
revissez-la.
NOTE : Pour réinitialiser l’affichage LCD, l’horloge et les
préréglages, retirez et réinstallez l’élément de pile plate.
Suivez ce processus si l’écran semble bloqué.
22
vers la gauche pour la retirer. La vis
22
23
en suivant le diagramme à
FRANÇAIS
23
17

FRANÇAIS
DANGER : NE PAS INGÉRER LA PILE; DANGER DE
BRÛLURE CHIMIQUE. Ce produit contient une pile
plate qui, si en cas d’ingestion, peut causer de graves
brûlures internes en seulement 2 heures et entraîner
la mort.
Conservez les piles neuves et usagées hors de portée
des enfants. Si le compartiment de la pile ne ferme
pas complètement, cessez d’utiliser le produit et
conservez-le hors de portée des enfants.
Si vous pensez que des piles ont pu être avalées ou
placées à l’intérieur d’une partie quelconque du corps,
consultez immédiatement un médecin.
UTILISATION
AVERTISSEMENT: pour réduire le risque de
blessures graves, éteindre l’outil et retirer le bloc-
piles avant d’effectuer tout réglage et d’enlever
ou d’installer tout accessoire. Un démarrage
accidentel peut provoquer desblessures.
Votre radio/chargeur BluetoothMD est équipée d’une
capacité mémoire pour sauvegarder l’heure et vos stations
préférées. Lorsque la radio est à l’ARRÊT, sa mémoire est
alimentée par une pile bouton qui est incluse avec la radio/
chargeur.
Réglage de la puissance/du volume
1. Pour allumer ou éteindre la radio, appuyez sur
l’interrupteur MARCHE/ARRÊT
2. Tournez le bouton
volume. Pour baisser le volume, tournez vers la gauche.
Le volume peut également être désactivé en appuyant
sur la touche Mute
2
9
Mode de fonctionnement
Pour choisir l’un des modes de fonctionnement (FM1, FM2,
AM, AUX ou Bluetooth), appuyez sur le sélecteur de mode
6
jusqu’à ce que vous trouviez le mode désiré.
REMARQUE: appuyer sur la touche Bluetooth
également la radio en mode Bluetooth.
Recherche ou réglage de station
Il y a deux méthodes de réglage et une méthode de
recherche pour trouver la fréquence désirée.
Syntonisation:
Appuyez puis relâchez le bouton flèche gauche ou droite
Répétez jusqu’à ce que vous trouviez la fréquence désirée.
Recherche:
Maintenez appuyé 2 secondes le bouton flèche gauche
5
ou droite
première station radio claire et s’y arrêtera.
REMARQUE: lorsque la radio/chargeur est appariée à un
appareil BluetoothMD, le bouton flèche droite ou gauche
peut être utilisé pour passer une chanson ou retourner à la
précédente sur l’appareil radio.
. La fréquence du syntoniseur passera sur la
Programmation de l’horloge
1. Allumez la radio
2. Appuyez sur la touche de réglage horaire. La date et
l’heure s’afficheront et l’année se mettra à clignoter.
1
.
vers la droite pour augmenter le
.
13
met
3. Utilisez la touche de réglage horaire pour paramétrer
l’heure désirée et utilisez la flèche droite ou gauche pour
les ajustements.
NOTE : Si vous n’appuyez pas sur un bouton dans le
délai de 5 secondes, le dispositif de programmation
de l’horloge retournera automatiquement au réglage
précédent.
Pour programmer les boutons de la
mémoire
Il est possible de régler indépendamment dix stations FM
et cinq stations AM. Après avoir programmé les boutons,
appuyez sur 1, 2, 3, 4 ou 5 pour aller instantanément à la
station préréglée.
1. Mettez l’appareil en marche.
2. Réglez la radio à la station désirée (voir Fonction de
syntonisation ou de recherche).
3. Maintenez appuyée la touche de mémoire préréglée
4. Refaites les étapes 2 et 3 pour régler d’autres boutons.
8
désirée
jusqu’à ce que le numéro de la touche
apparaisse sur le côté droit de l’écran LCD. Gardez le
doigt sur le bouton jusqu’à ce que le clignotement
cesse. Le bouton de préréglage est maintenant réglé.
Pour ajuster l’égalisation
Il est possible d’ajuster la qualité du son en changeant
l’égalisation des graves ou des aigus de la radio.
1. Appuyez sur le bouton EQ
ouaigu.
2. Appuyez sur le bouton de la flèche droite pour
augmenter le réglage sélectionné ou sur le bouton
de la flèche gauche
3. Quand l’ajustement désiré est effectué, ne touchez pas
aux boutons pendant plus de 3 secondes. Le processus
se terminera et l’ajustement de l’égalisation demeurera.
10
pour sélectionner grave
5
pour le réduire.
Lecture audio d’un dispositif externe
(Fig. A, E)
L’audio peut être écoutée avec la radio/chargeur au travers
de la connexion sans fil BluetoothMD avec un appareil
BluetoothMD compatible ou en la connectant à un appareil
audio ou à un téléphone mobile à l’aide d’un câble audio
de 3,5mm (1/8po) à l’aide de la prise audio
5
.
l’intérieur du compartiment à accessoire
Fig. E
16
5
17
4
.
16
située à
5
18
 Loading...