


Manual de instrucciones
DCR010
12V/20V Max* Worksite Bluetooth® Speaker
12 V/20V max* (FR)
12 V/20 V Máx* (SP)
Instruction Manual
Guide D’utilisation
final page size: 8.5 x 5.5 in
If you have questions or comments, contact us.
Pour toute question ou tout commentaire, nous contacter.
Si tiene dudas o comentarios, contáctenos.
1-800-4-DeWALT

ENGLISH
English (original instructions) 1
Français (traduction de la notice d’instructions originale) ?
Español (traducido de las instrucciones originales) ?
ENGLISH
DeWALT
DeWALT
Definitions: Safety Alert Symbols and Words
This instruction manual uses the following safety alert symbols and words to alert you to hazardous situations and your risk
of personal injury or property damage.
DANGER: Indicates an imminently hazardous situation which, if not avoided, will result in death or seriousinjury.
WARNING: Indicates a potentially hazardous situation which, if not avoided, could result in death or seriousinjury.
CAUTION: Indicates a potentially hazardous situation which, if not avoided, may result in minor or moderateinjury.
(Used without word) Indicates a safety related message.
NOTICE: Indicates a practice not related to personal injury which, if not avoided, may result in propertydamage.
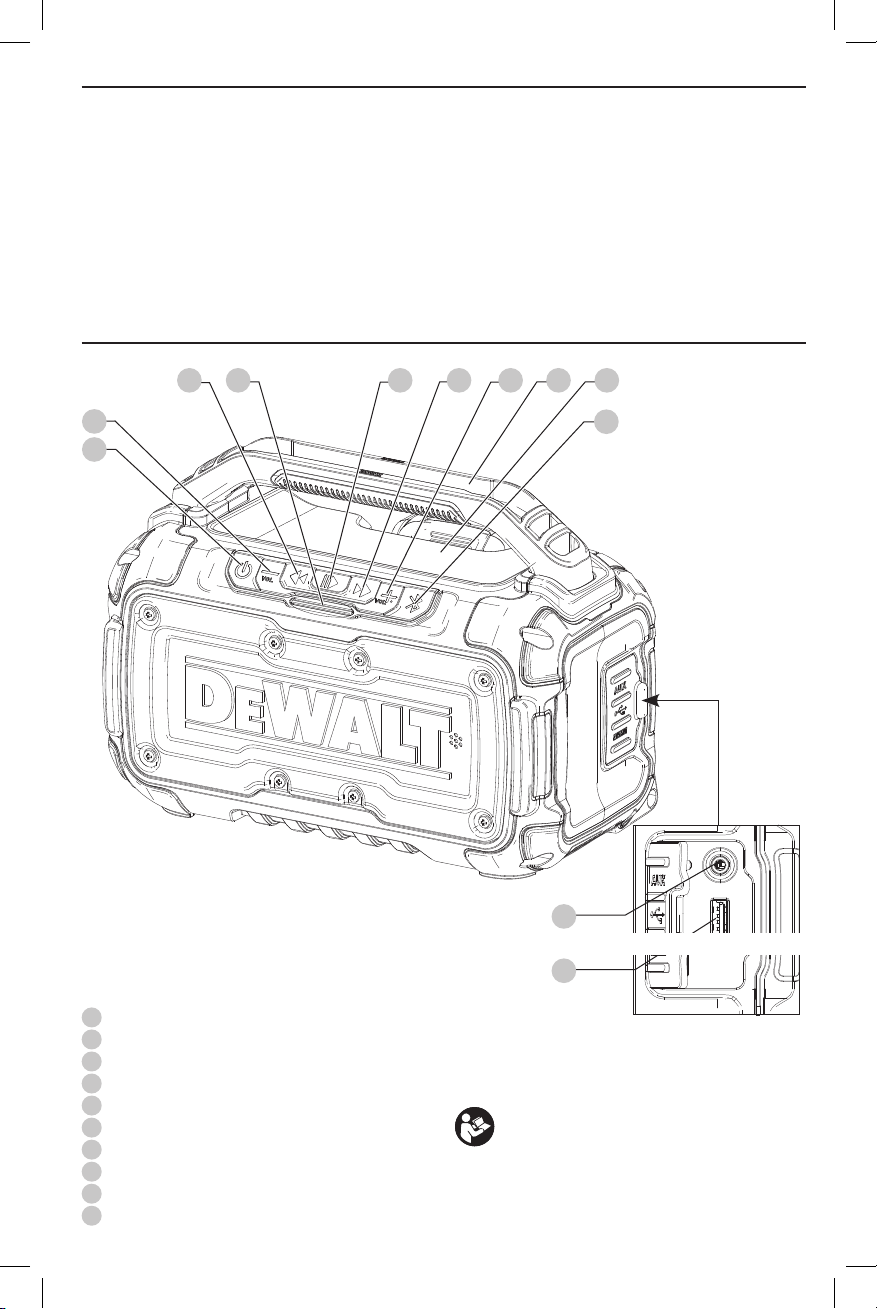
Fig. A
2
1
3 4
235 9
10
6
7
Illustration to be updated
8
1
Power button
2
Volume buttons +/-
3
Track change buttons
4
Bluetooth®** status indicator
5
Play/Pause button
6
Bluetooth® button
7
Auxiliary port
8
USB port
9
Handle and mobile phone cradle
10
Cell phone tray
WARNING: Read all safety warnings and all
instructions. Failure to follow the warnings and
instructions may result in electric shock, fire and/or
seriousinjury.
WARNING: To reduce the risk of injury, read the
instructionmanual.
If you have any questions or comments about this or
any
1-800-4-
tool, call us toll free at:
(1-800-433-9258).
1

ENGLISH
IMPORTANT SAFETY INSTRUCTIONS
WARNING:
a ) Read these instructions.
b ) Keep these instructions.
c ) Heed all warnings.
d ) Follow all instructions.
e ) Do not use this apparatus near water.
f ) Clean only with a dry cloth.
g ) Do not block any ventilation openings. Use in
accordance with the manufacturer’s instructions.
h ) Do not use near any heat sources such as radiators,
heat registers, stoves or other apparatus (including
amplifiers) that produce heat.
i ) Do not defeat the safety purpose of the polarized or
grounding-type plug. A polarized plug has two blades
with one wider than the other. A grounding type plug
has two blades and a third grounding prong. The wide
blade or the third prong are provided for your safety. If
the provided plug does not fit into your outlet, consult
an electrician for replacement of the obsolete outlet.
j ) Protect the power cord from being walked on
or pinched particularly at plugs, convenience
receptacles, and the point where they exit from
theapparatus.
k ) Only use attachments/accessories specified by
themanufacturer.
l ) Unplug this apparatus during lightning storms or
when unused for long periods of time.
m ) Refer all servicing to qualified service personnel.
Servicing is required when the apparatus has been
damaged in any way, such as power-supply cord or
plug is damaged, liquid has been spilled or objects
have fallen into the apparatus, the apparatus has
been exposed to rain or moisture, does not operate
normally, or has been dropped.
n ) Apparatus shall not be exposed to dripping or
splashing and no objects filled with liquids, such as
vases, shall be placed on the apparatus.
o ) Do not use under wet conditions or in presence of
flammable liquids or gases.
p ) Do not keep ears close to this appliance.
Safety Instructions for Speakers
• To reduce the risk of fire or electric shock, do not expose
this apparatus to rain or moisture.
• Do not abuse cord. Never carry the speaker by its cord.
Never pull the cord to disconnect from the socket. Keep the
cord away from heat, oil and sharp edges.
• Remove the battery pack. Switch off before leaving
it unattended. Remove the battery pack when not in
use, before changing accessories or attachments and
beforeservicing.
• This appliance is not intended for use by persons (including
children) with reduced physical, sensory or mental
capabilities, or lack of experience and knowledge, unless
they have been given supervision or instruction concerning
2
use of the appliance by a person responsible for their
safety.
• Children should be supervised to ensure that they do not
play with the appliance.
• No exposed flame sources, such as lighted candles, should
be placed on the speaker.
• To reduce the risk of hearing damage, do not place ears
too close to the speaker.
• Mains plug is used as the disconnect device; the
disconnect device (plug) shall remain readily operable.
• An extension cord must have adequate wire size
(AWG or American Wire Gauge) for safety. The smaller
the gauge number of the wire, the greater the capacity
of the cable, that is, 16 gauge has more capacity than 18
gauge. An undersized cord will cause a drop in line voltage
resulting in loss of power and overheating. When using
more than one extension to make up the total length,
be sure each individual extension contains at least the
minimum wire size. The following table shows the correct
size to use depending on cord length and nameplate
ampere rating. If in doubt, use the next heavier gauge. The
lower the gauge number, the heavier thecord.
Minimum Gauge for Cord Sets
Volts
120 V 25 (7.6) 50 (15.2) 100 (30.5) 150 (45.7)
240 V 50 (15.2) 100 (30.5) 200 (61.0) 300 (91.4)
Ampere Rating
More
Not
Than
More
Than
0 6 18 16 16 14
6 10 18 16 14 12
10 12 16 16 14 12
12 16 14 12 Not Recommended
The label on this unit may include the following symbols. The
symbols and their definitions are asfollows:
V ......................... volts
Hz ....................... hertz
min ..................... minutes
or DC ......direct current
...................... Class I Construction
…/min .............. per minute
BPM .................... beats per minute
IPM ..................... impacts per minute
RPM .................... revolutions per
sfpm ................... surface feet per
SPM .................... strokes per minute
A ......................... amperes
W ........................ watts
or AC ........... alternating current
or AC/DC .... alternating or
Total Length of Cord in Feet
American Wire Gauge
no ....................... no load speed
n ......................... rated speed
(grounded)
minute
minute
direct current
(meters)
...................... Class II
Construction
(double insulated)
...................... earthing terminal
..................... safety alert symbol
..................... visible radiation
..................... wear respiratory
protection
..................... wear eye
protection
..................... wear hearing
protection
..................... read all
documentation

BATTERIES AND CHARGERS
DeWALT
DeWALT
DeWALT
The battery pack is not fully charged out of the carton.
Before using the battery pack and charger, read the
safety instructions below and then follow charging
proceduresoutlined. When ordering replacement battery
packs, be sure to include the catalog number andvoltage.
This unit uses a
instructions before using your charger. Consult the chart
at the end of this manual for compatibility of chargers and
batterypacks.
charger. Be sure to read all safety
READ ALL INSTRUCTIONS
Important Safety Instructions for All
Battery Packs
WARNING: Read all safety warnings and all
instructions for the battery pack, charger and
this unit. Failure to follow the warnings and
instructions may result in electric shock, fire and/
or serious injury.
• Do not charge or use the battery pack in explosive
atmospheres, such as in the presence of flammable
liquids, gases or dust. Inserting or removing the battery
pack from the charger may ignite the dust orfumes.
• NEVER force the battery pack into the charger. DO
NOT modify the battery pack in any way to fit into
a non-compatible charger as battery pack may
rupture causing serious personal injury. Consult
the chart at the end of this manual for compatibility of
batteries andchargers.
• Charge the battery packs only in designated
• DO NOT splash or immerse in water or otherliquids.
• Do not store or use the unit and battery pack in
• Do not incinerate the battery pack even if it is
• If battery contents come into contact with the skin,
• Contents of opened battery cells may cause
chargers.
locations where the temperature may reach or
exceed 104°F (40°C) (such as outside sheds or metal
buildings in summer). For best life store battery packs in
a cool, drylocation.
severely damaged or is completely worn out. The
battery pack can explode in a fire. Toxic fumes and
materials are created when lithium ion battery packs
areburned.
immedicately wash area with mild soap and water.
If battery liquid gets into the eye, rinse water over the open
eye for 15 minutes or until irritation ceases. If medical
attention is needed, the battery electrolyte is composed of
a mixture of liquid organic carbonates and lithiumsalts.
respiratory irritation. Provide fresh air. If symptoms
persist, seek medicalattention.
WARNING: Burn hazard. Battery liquid may be
flammable if exposed to spark orflame.
WARNING: Fire hazard. Never attempt to open the
battery pack for any reason. If the battery pack case
is cracked or damaged, do not insert into the charger.
Do not crush, drop or damage the battery pack. Do
ENGLISH
not use a battery pack or charger that has received a
sharp blow, been dropped, run over or damaged in
any way (e.g., pierced with a nail, hit with a hammer,
stepped on). Damaged battery packs should be
returned to the service center forrecycling.
Transportation
WARNING: Fire hazard. Do not store or carry the
battery pack so that metal objects can contact
exposed battery terminals. For example, do
not place the battery pack in aprons, pockets, tool
boxes, product kit boxes, drawers, etc., with loose
nails, screws, keys, etc. Transporting batteries
can possibly cause fires if the battery terminals
inadvertently come in contact with conductive
materials such as keys, coins, hand tools and the
like. The US Department of Transportation Hazardous
Material Regulations (HMR) actually prohibit
transporting batteries in commerce or on airplanes in
carry-on baggage UNLESS they are properly protected
from short circuits. So when transporting individual
battery packs, make sure that the battery terminals
are protected and well insulated from materials that
could contact them and cause a short circuit.
NOTE: Lithium-ion batteries should not be put in
checked baggage.
Shipping the
The DeWALT FLEXVOLT™ battery has two modes: Use and
Shipping.
Use Mode: When the FLEXVOLT™ battery stands alone or is
in a DeWALT 20V Max* product, it will operate as a 20V Max*
battery. When the FLEXVOLT™ battery is in a 60V Max* or a
120V Max* (two 60V Max* batteries) product, it will operate
as a 60V Max* battery.
Shipping Mode: When
the cap is attached to the
FLEXVOLT™ battery, the
battery is in Shipping Mode.
Strings of cells are electrically
disconnected within the pack resulting in three batteries
with a lower Watt hour (Wh) rating as compared to one
battery with a higher Watt hour rating. This increased
quantity of three batteries with the lower Watt hour rating
can exempt the pack from certain shipping regulations that
are imposed upon the higher Watt hour batteries.
The battery label indicates two Watt hour ratings (see
example). Depending on how the battery is shipped, the
appropriate Watt hour rating must be used to determine
the applicable shipping requirements. If utilizing the
shipping cap, the pack will be considered 3 batteries at
the Watt hour rating indicated for “Shipping”. If shipping
without the cap or in a tool, the pack will be considered one
battery at the Watt hour rating indicated next to “Use”.
Example of Use and Shipping Label Marking
For example, Shipping Wh rating might indicate 3 x 40 Wh,
meaning 3 batteries of 40 Watt hours each. The Use Wh
rating might indicate 120 Wh (1 battery implied).
FLEXVOLT™ Battery
USE: 120 Wh Shipping: 3 x 40 Wh
3

ENGLISH
DeWALT
DeWALT
DeWALT
DeWALT
DeWALT
DeWALT
Fuel Gauge Battery Packs (Fig. B)
Some
consists of three green LED lights that indicate the level of
charge remaining in the batterypack.
The fuel gauge is an indication of approximate levels of
charge remaining in the battery pack according to the
followingindicators:
To actuate the fuel gauge, press and hold the fuel gauge
button. A combination of the three green LED lights will
illuminate designating the level of charge left. When the
level of charge in the battery is below the usable limit, the
fuel gauge will not illuminate and the battery will need to
berecharged.
NOTE: The fuel gauge is only an indication of the charge left
on the battery pack. It does not indicate tool functionality
and is subject to variation based on product components,
temperature and end-userapplication.
For more information regarding fuel gauge battery packs,
please call 1-800-4website www.dewalt.com.
battery packs include a fuel gauge which
75–100% charged
51–74% charged
< 50% charged
Pack needs to be charged
Fig. B
(1-800-433-9258) or visit our
The RBRC® Seal
The RBRC® (Rechargeable Battery
Recycling Corporation) Seal on the nickel
cadmium, nickel metal hydride or lithiumion batteries (or battery packs) indicates
that the costs to recycle these batteries
(or battery packs) at the end of their useful life have already
been paid by
spent nickel cadmium, nickel metal hydride or lithium-ion
batteries in the trash or municipal solid waste stream and
the Call2Recycle® program provides an environmentally
consciousalternative.
Call 2 Recycle, Inc., in cooperation with
battery users, has established the program in the United
States and Canada to facilitate the collection of spent nickel
cadmium, nickel metal hydride or lithium-ion batteries. Help
protect our environment and conserve natural resources by
returning the spent nickel cadmium, nickel metal hydride
or lithium-ion batteries to an authorized
center or to your local retailer for recycling. You may also
contact your local recycling center for information on
where to drop off the spent battery. RBRC® is a registered
trademark of Call 2 Recycle,Inc.
. In some areas, it is illegal to place
and other
service
Important Safety Instructions for All
Battery Chargers
WARNING: Read all safety warnings and all
instructions for the battery pack, charger and
this unit. Failure to follow the warnings and
instructions may result in electric shock, fire and/
or serious injury.
• DO NOT attempt to charge the battery pack with
any chargers other than the ones in this manual.
The charger and battery pack are specifically designed to
worktogether.
• These chargers are not intended for any uses other
than charging
Any other uses may result in risk of fire, electric shock
orelectrocution.
• Do not expose the charger to rain orsnow.
• Pull by the plug rather than the cord when
disconnecting the charger. This will reduce the risk of
damage to the electric plug andcord.
• Make sure that the cord is located so that it will not
be stepped on, tripped over or otherwise subjected
to damage orstress.
• Do not use an extension cord unless it is absolutely
necessary. Use of improper extension cord could result in
risk of fire, electric shock orelectrocution.
• When operating a charger outdoors, always provide
a dry location and use an extension cord suitable
for outdoor use. Use of a cord suitable for outdoor use
reduces the risk of electricshock.
• An extension cord must have adequate wire size
(AWG or American Wire Gauge) for safety. The smaller
the gauge number of the wire, the greater the capacity
of the cable, that is, 16 gauge has more capacity than 18
gauge. An undersized cord will cause a drop in line voltage
resulting in loss of power and overheating. When using
more than one extension to make up the total length,
be sure each individual extension contains at least the
minimum wire size. The following table shows the correct
size to use depending on cord length and nameplate
ampere rating. If in doubt, use the next heavier gauge. The
lower the gauge number, the heavier thecord.
Minimum Gauge for Cord Sets
Volts
120 V 25 (7.6) 50 (15.2) 100 (30.5) 150 (45.7)
240 V 50 (15.2) 100 (30.5) 200 (61.0) 300 (91.4)
Ampere Rating
More
Not
Than
More
Than
0 6 18 16 16 14
6 10 18 16 14 12
10 12 16 16 14 12
12 16 14 12 Not Recommended
• Do not place any object on top of the charger or
place the charger on a soft surface that might block
the ventilation slots and result in excessive internal
rechargeable batteries.
Total Length of Cord in Feet
(meters)
American Wire Gauge
4

heat. Place the charger in a position away from any heat
DeWALT
source. The charger is ventilated through slots in the top
and the bottom of thehousing.
• Do not operate the charger with a damaged cord
orplug.
• Do not operate the charger if it has received a sharp
blow, been dropped or otherwise damaged in any
way. Take it to an authorized servicecenter.
• Do not disassemble the charger; take it to an
authorized service center when service or repair
is required. Incorrect reassembly may result in a risk of
electric shock, electrocution orfire.
• Disconnect the charger from the outlet before
attempting any cleaning. This will reduce the risk of
electric shock. Removing the battery pack will not reduce
thisrisk.
• NEVER attempt to connect 2 chargerstogether.
• The charger is designed to operate on standard
120V household electrical power. Do not attempt to
use it on any other voltage. This does not apply to the
vehicularcharger.
WARNING: Shock hazard. Do not allow any liquid to
get inside the charger. Electric shock mayresult.
WARNING: Burn hazard. Do not submerge the
battery pack in any liquid or allow any liquid to
enter the battery pack. Never attempt to open the
battery pack for any reason. If the plastic housing of
the battery pack breaks or cracks, return to a service
center for recycling.
CAUTION: Burn hazard. To reduce the risk of injury,
charge only
Other types of batteries may overheat and burst
resulting in personal injury and propertydamage.
NOTICE: Under certain conditions, with the charger
plugged into the power supply, the charger can
be shorted by foreign material. Foreign materials
of a conductive nature, such as, but not limited to,
grinding dust, metal chips, steel wool, aluminum
foil or any buildup of metallic particles should be
kept away from the charger cavities. Always unplug
the charger from the power supply when there is no
battery pack in the cavity. Unplug the charger before
attempting toclean.
rechargeable battery packs.
Charging a Battery (Fig. C)
1. Plug the charger into an appropriate outlet before
inserting battery pack.
Fig. C
13
12
ENGLISH
2. Insert the battery pack
the battery pack is fully seated in the charger. The red
(charging) light will blink continuously indicating that
the charging process has started.
3. The completion of charge will be indicated by the red
light remaining ON continuously. The battery pack is
fully charged and may be used at this time or left in the
charger. To remove the battery pack from the charger,
push the battery release button
and then slide the battery pack out of the charger.
NOTE: To ensure maximum performance and life of lithiumion battery packs, charge the battery pack fully before first
use.
12
(
)
into the charger, making sure
13
(
)
on the battery pack
Charger Operation
Refer to the indicators below for the charge status of the
battery pack.
DCB107, DCB112, DCB113, DCB115, DCB118, DCB132
Charging
Fully Charged
Hot/Cold Pack Delay*
* DCB107, DCB112, DCB113, DCB115, DCB118, DCB132:
The red light will continue to blink, but a yellow indicator
light will be illuminated during this operation. Once the
battery pack has reached an appropriate temperature, the
yellow light will turn off and the charger will resume the
charging procedure.
The compatible charger(s) will not charge a faulty battery
pack. The charger will indicate faulty battery pack by
refusing to light.
NOTE: This could also mean a problem with a charger.
If the charger indicates a problem, take the charger and
battery pack to be tested at an authorized service center.
Hot/Cold Pack Delay
When the charger detects a battery pack that is too hot
or too cold, it automatically starts a Hot/Cold Pack Delay,
suspending charging until the battery pack has reached an
appropriate temperature. The charger then automatically
switches to the pack charging mode. This feature ensures
maximum battery pack life.
A cold battery pack will charge at a slower rate than a warm
battery pack. The battery pack will charge at that slower rate
throughout the entire charging cycle and will not return to
maximum charge rate even if the battery pack warms.
The DCB118 charger is equipped with an internal fan
designed to cool the battery pack. The fan will turn on
automatically when the battery pack needs to be cooled.
Never operate the charger if the fan does not operate
properly or if ventilation slots are blocked. Do not permit
foreign objects to enter the interior of the charger.
Electronic Protection System
Li-Ion tools are designed with an Electronic Protection
System that will protect the battery pack against
overloading, overheating or deep discharge.
5

ENGLISH
DeWALT
The tool will automatically turn off if the Electronic
Protection System engages. If this occurs, place the lithiumion battery pack on the charger until it is fully charged.
Wall Mounting
DCB107, DCB112, DCB113, DCB115, DCB118, DCB132
These chargers are designed to be wall mountable or to
sit upright on a table or work surface. If wall mounting,
locate the charger within reach of an electrical outlet,
and away from a corner or other obstructions which may
impede air flow. Use the back of the charger as a template
for the location of the mounting screws on the wall. Mount
the charger securely using drywall screws (purchased
separately) at least 1" (25.4 mm) long, with a screw head
diameter of 0.28–0.35" (7–9mm), screwed into wood to an
optimal depth leaving approximately 7/32" (5.5 mm) of the
screw exposed. Align the slots on the back of the charger
with the exposed screws and fully engage them in the slots.
Charger Cleaning Instructions
WARNING: Shock hazard. Disconnect the charger
from the AC outlet before cleaning. Dirt and grease
may be removed from the exterior of the charger using
a cloth or soft non-metallic brush. Do not use water or
any cleaning solutions.
Important Charging Notes
1. Longest life and best performance can be obtained if
the battery pack is charged when the air temperature is
between 65°F and 75°F (18° – 24°C). DO NOT charge
the battery pack below +40°F (+4.5°C), or above
+104°F (+40°C). This is important and will prevent
serious damage to the battery pack.
2. The charger and battery pack may become warm to the
touch while charging. This is a normal condition, and
does not indicate a problem. To facilitate the cooling of
the battery pack after use, avoid placing the charger or
battery pack in a warm environment such as in a metal
shed or an uninsulated trailer.
3. If the battery pack does not charge properly:
a. Check operation of receptacle by plugging in a lamp
or other appliance;
b. Check to see if receptacle is connected to a light
switch which turns power off when you turn out the
lights;
c. Move the charger and battery pack to a location
where the surrounding air temperature is
approximately 65°F – 75°F (18° – 24°C);
d. If charging problems persist, take the tool, battery
pack and charger to your local service center.
4. The battery pack should be recharged when it fails to
produce sufficient power on jobs which were easily
done previously. DO NOT CONTINUE to use under these
conditions. Follow the charging procedure. You may
also charge a partially used pack whenever you desire
with no adverse effect on the battery pack.
5. Foreign materials of a conductive nature such as, but
not limited to, grinding dust, metal chips, steel wool,
aluminum foil, or any buildup of metallic particles
should be kept away from charger cavities. Always
6
unplug the charger from the power supply when there
is no battery pack in the cavity. Unplug the charger
before attempting to clean.
6. Do not freeze or immerse the charger in water or any
other liquid.
Storage Recommendations
1. The best storage place is one that is cool and dry, away
from direct sunlight and excess heat or cold.
2. For long storage, it is recommended to store a fully
charged battery pack in a cool dry place out of the
charger for optimal results.
NOTE: Battery packs should not be stored completely
depleted of charge. The battery pack will need to be
recharged before use.
SAVE THESE INSTRUCTIONS FOR
FUTURE USE
COMPONENTS (FIG. A)
WARNING: Never modify the unit or any part of it.
Damage or personal injury couldresult.
Refer to Figure A at the beginning of this manual for a
complete list ofcomponents.
Intended Use
This
audio via a wired connection or a wireless Bluetooth®
connection to a mobile phone or other audio device.
DO NOT use under wet conditions or in presence of
flammable liquids orgases.
DO NOT let children come into contact with the unit.
Supervision is required when inexperienced operators use
thisunit.
USB Port (Fig. A)
The USB port
such as mobile phones, tablets, or portable music players.
When the speaker is powered by the AC cable, the USB port
will charge a device without requiring the user to press the
power button
When the speaker is powered by batteries, the USB power
output port will charge a device when the user presses the
power button
NOTE: The audio device must connect to the speaker via
Bluetooth® or the auxiliary port to use the speaker function.
The USB port is only a power port for charging the audio
device.
Handle/Mobile Phone Cradle (Fig. D)
The speaker should be transported using the handle
handle has a cradle which can be used to hold the mobile
phone while in use.
Bluetooth® speaker is designed to play/stream
8
(
)
delivers up to 2.1 amps to power devices
1
(
)
.
1
(
)
to turn the speaker on.
WARNING: A mobile phone cannot be secured in
the cradle and can fall if the speaker is moved or
transported. Be sure to remove mobile phone from the
cradle before moving or transporting the speaker.
9
(
)
. The

Fig. D
9
Mobile Phone Tray (Fig. A)
The speaker has a mobile phone tray
to hold the mobile phone while in use.
WARNING: A mobile phone cannot be secured
in the tray and can fall if the speaker is moved or
transported. Be sure to remove mobile phone from the
tray before transporting the speaker.
10
(
)
which can be used
Mounting the Speaker (Fig. E)
The speaker is designed to be mountable or to sit upright
on a table or work surface. If mounting, use the mounting
15
slots
(
)
found on the bottom of the speaker as a template
for the location of the screws on the wood or wall. Mount
the speaker securely using drywall screws (purchased
separately) at least 25.4mm long with a screw head
diameter of 5–7mm, screwed into wood to an optimal
depth leaving approximately 5.5mm of the screw exposed.
Align the slots on the back of the speaker with the exposed
screws and fully engage them in the slots. The speaker can
be mounted horizontally or vertically in either direction.
Fig. E
15
ENGLISH
To power the speaker using the AC power cord, plug the
cord into the speaker's AC power input
back of the speaker, then plug the 120V AC cord end into
the wall outlet or an appropriate-sized extension cord that
is plugged into a wall outlet. Always fully extend the cord
before eachuse.
NOTE: The battery pack must be removed before the AC
power cord can be plugged into the AC power input.
Fig. F
11
(
)
found on the
11
Inserting and Removing the Battery Pack
from the Bluetooth® Speaker (Fig. G)
NOTE: Make sure your battery pack
To Install the Battery Pack into the
Speaker
1. Align the battery pack
speaker's battery port
2. Slide it in until the battery pack is firmly seated and
ensure that you hear the lock snap intoplace. Be sure
that it does not disengage.
To Remove the Battery Pack from
the Speaker
1. Press the battery release button
battery pack out of the battery port.
2. Insert battery pack into the charger as described in the
charger section of thismanual.
Fig. G
12
(
)
is fullycharged.
12
(
)
with the rails inside the
14
.
13
(
)
and firmly pull the
13
OPERATION
WARNING: To reduce the risk of serious personal
injury, turn unit off and disconnect battery pack
before cleaning, making any adjustments or
removing/installing attachments or accessories.
The speaker can operate off of DC power (a battery pack) or
with the AC power cord supplied.
Powering with the AC Power Cord (Fig. F)
WARNING: Use only the AC power cord
recommended for this product. Use of any other
external power supply could damage the speaker or
powersupply.
12
14
7

ENGLISH
Button Functions (Fig. A)
Power Button
Press the power button
oroff.
1
(
)
to turn the speaker either on
Play/Pause Button
When audio device connected via Bluetooth®: Press the
play/pause button
audio device. Press the play/pause button again to pause
play.
When audio device connected via auxiliary port: Press
the play/pause button
5
(
)
to begin playing a selection from the
5
(
)
to mute the speaker.
Volume Adjustment Buttons
The volume buttons
volume on the speaker.
NOTE: The play/pause and volume adjustment buttons will
function whether it is paired via Bluetooth® or connected via
the auxiliary port.
2
(
)
can be used to increase or decrease
Track Change Buttons
The right and left track change buttons
skip or go to previous tracks on the audiodevice.
NOTE: The track change buttons will function only when
paired via Bluetooth®.
3
(
)
can be used to
Playing Audio
Audio can be played through the speaker via a wireless
Bluetooth® connection to a compatible Bluetooth® audio
device or by connecting an audio device via the auxiliary
port.
Pairing Speaker with a Bluetooth®
Audio Device (Fig. A)
1. Place the speaker and the Bluetooth® audio device
within 3 feet (1m) of eachother.
4
(
)
to blink
1
(
)
.
2. Turn on the speaker by pressing the power button
3. Be sure the Bluetooth® audio device has Bluetooth®
turned on. (Please consult your device's instruction
manual for specific pairing instructions.)
4. Press the Bluetooth® button
will cause the Bluetooth® status indicator
slowly. During this time, the speaker is trying to find a
previously paired device. If found, the Bluetooth® status
indicator will stay lit without anyblinking.
5. If another device is to be paired, the Bluetooth®
status indicator will blink rapidly. While the speaker is
displaying the fast blink, it is in pairingmode with a
newdevice.
6. Confirm pairing on your device.
NOTE: If pairing is not confirmed within 5 minutes, the
status indicator will stop flashing and will return to a half
second interval blinkpattern.
7. Once pairing is successful, the Bluetooth® status
indicator will turn solid. The speaker will now play audio
from yourdevice.
NOTE: Audio output power: 2x10W.
6
(
)
on the speaker. This
Bluetooth® Status Indicator
Blink Patterns Status/Mode
Steady blinking (half
second interval)
Rapid Blinking Speaker is in pairing mode and
Solid light Speaker is connected with adevice.
No light Speaker has timed out and/or isoff.
Connecting a Previously Paired Bluetooth®
AudioDevice
If a Bluetooth® device has been previously paired to the
speaker, it should automatically reconnect when the
speaker is powered on. After 4 seconds, the speaker will go
into connecting mode. This is indicated by the Bluetooth®
status indicator
paired Bluetooth® device is recognized and connected, the
Bluetooth® status indicator will stop blinking and turn solid.
If connection does not occur and you are unable to stream
audio, please follow the instructions for Pairing Speaker
with a Bluetooth® AudioDevice.
NOTE: The Bluetooth® audio device must have Bluetooth®
turned on to automatically pair.
Timeout Functionality (Fig. A)
To conserve battery life, the speaker is designed to power
off automatically after a half hour of inactivity. This inactivity
could be due to the device being unpaired for a half hour
or in the case of the Bluetooth® connection being broken
for the same period of time. If the speaker powers off due
to inactivity of any kind, refer to Connecting a Previously
Paired Bluetooth® AudioDevice.
NOTE: Optimum Bluetooth® streaming range is roughly
30 feet (9m) (line of sight) to the speaker, but distances up
to 100 feet (30m) are possible. Physical obstacles, other
wireless devices or electromagnetic devices may affect the
connectionquality.
If Bluetooth® connection is lost due to exceeding time of
separation, exceeding the optimum distance, obstacles or
otherwise, reconnecting your device with the speaker may
benecessary.
Incoming Call
If your phone receives a call while it is connected to the
speaker, it will pause the Bluetooth® connection.
Speaker is unpaired or in
connectingmode.
discoverable by yourdevice.
4
(
)
blinking steadily. Once the previously
Auxiliary Port (Fig. A)
To use the auxiliary port
included) to connect an audio device, such as a CD player,
mobile phone, or portable music player. The sound from the
audio device plays through the speaker.
7
(
)
, use a 3.5 mm stereo cable (not
MAINTENANCE
WARNING: To reduce the risk of serious personal
injury, turn unit off and disconnect battery pack
before cleaning, making any adjustments or
removing/installing attachments or accessories.
8

Cleaning
WARNING: Blow dirt and dust out of all air vents with
clean, dry air at least once a week. To minimize the risk
of eye injury, always wear ANSI Z87.1 approved eye
protection when performingthis.
WARNING: Never use solvents or other harsh
chemicals for cleaning the non-metallic parts of
the unit. These chemicals may weaken the plastic
materials used in these parts. Use a dry cloth. Never let
any liquid get inside the unit; never immerse any part
of the unit into aliquid.
Accessories
WARNING: Since accessories, other than those
offered by DeWALT, have not been tested with this
product, use of such accessories with this product
could be hazardous. To reduce the risk of injury, only
D
WALT recommended accessories should be used
e
with thisproduct.
Recommended accessories for use with your unit
could be available at extra cost from your local dealer
or authorized service center. If you need assistance in
locating any accessory, please contact D
Tool Co., 701East Joppa Road, Towson, MD 21286, call
1-800-4-DeWALT (1-800-433-9258) or visit our website:
www.dewalt.com.
WALT Industrial
e
Repairs
The charger and battery pack are notserviceable.
WARNING: To assure product SAFETY and
RELIABILITY, repairs, maintenance and adjustment
(including brush inspection and replacement, when
applicable) should be performed by a DeWALT factory
service center or a D
Always use identical replacementparts.
e
WALT authorized service center.
Register Online
Thank you for your purchase. Register your product nowfor:
• WARRANTY SERVICE: Registering your product will
help you obtain more efficient warranty service in case
there is a problem with yourproduct.
• CONFIRMATION OF OWNERSHIP: In case of
an insurance loss, such as fire, flood or theft, your
registration of ownership will serve as your proof
ofpurchase.
• FOR YOUR SAFETY: Registering your product will
allow us to contact you in the unlikely event a safety
notification is required under the Federal Consumer
SafetyAct.
Register online at www.dewalt.com/register.
Three Year Limited Warranty
DeWALT will repair, without charge, any defects due to
faulty materials or workmanship for three years from
the date of purchase. This warranty does not cover part
failure due to normal wear or tool abuse. For further detail
of warranty coverage and warranty repair information,
visit www.dewalt.com or call 1-800-4-D
WALT (1-800-
e
ENGLISH
433-9258). This warranty does not apply to accessories
or damage caused where repairs have been made
or attempted by others. THIS LIMITED WARRANTY IS
GIVEN IN LIEU OF ALL OTHERS, INCLUDING THE IMPLIED
WARRANTY OF MERCHANTABILITY AND FITNESS FOR A
PARTICULAR PURPOSE, AND EXCLUDES ALL INCIDENTAL
OR CONSEQUENTIAL DAMAGES. Some states do not allow
limitations on how long an implied warranty lasts or the
exclusion or limitation of incidental or consequential
damages, so these limitations may not apply to you. This
warranty gives you specific legal rights and you may have
other rights which vary in certain states orprovinces.
WALT tools are covered
In addition to the warranty, D
byour:
1 YEAR FREE SERVICE
WALT will maintain the tool and replace worn parts
D
e
caused by normal use, for free, any time during the first year
afterpurchase.
2 YEARS FREE SERVICE ON DEWALT BATTERY PACKS
DC9071, DC9091, DC9096, DC9182, DC9280, DC9360, DCB120,
DCB127, DCB201, DCB203BT, DCB207, DCB361
3 YEARS FREE SERVICE ON DEWALT BATTERY PACKS
DCB200, DCB204, DCB204BT, DCB203, DCB205, DCB205BT,
NOTE: Battery warranty voided if the battery pack is
tampered with in any way. D
for any injury caused by tampering and may prosecute
warranty fraud to the fullest extent permitted bylaw.
If you are not completely satisfied with the performance of
your D
can return it within 90 days from the date of purchase with
a receipt for a full refund – no questionsasked.
LATIN AMERICA: This warranty does not apply to products
sold in Latin America. For products sold in Latin America,
see country specific warranty information contained in
the packaging, call the local company or see website for
warrantyinformation.
FREE WARNING LABEL REPLACEMENT: If your warning
labels become illegible or are missing, call 1-800-4-DeWALT
(1-800-433-9258) for a freereplacement.
**The Bluetooth® word mark and logos are registered
trademarks owned by the Bluetooth®, SIG, Inc. and any use of
such marks by D
DCB206, DCB230, DCB606, DCB609
90 DAY MONEY BACK GUARANTEE
WALT Power Tool, Laser, or Nailer for any reason, you
e
eWALT is under license.
e
e
WALT is not responsible
ESPECIFICACIONES
DCR010 20 V Máx*/120V
9

Wireless Certifications and Safety
Information
• This device is either CAN ICES-3(B)/NMB-3(B)or CAN ICES5(B)/NMB-5(B)compliant.
• This device complies with Part 15 of the FCC Rules and Industry
Canada License-exempt RSS standard(s). Operation is subject
to the following two conditions: 1) This device may not cause
harmful interference, and 2) This device must accept any
interference received, including interference that may cause
undesiredoperation.
This equipment has been tested and found to comply with the
limits for a Class B digital device, pursuant to Part 15 of the FCC
Rules. These limits are designed to provide reasonable protection
against harmful interference in a residential installation. This
equipment generates, uses and can radiate radio frequency
energy and, if not installed and used in accordance with
the instructions, may cause harmful interference to radio
communications. However, there is no guarantee that
interference will not occur in a particular installation. If
this equipment does cause harmful interference to radio or
television reception, which can be determined by turning the
equipment off and on, the user is encouraged to try to correct
the interference by one or more of the followingmeasures:
1)Reorient or relocate the receivingantenna, 2) Increase the
separation between the equipment andreceiver, 3) Connect
the equipment into an outlet on a circuit different from that to
which the receiver isconnected or 4) Consult the dealer or an
experienced radio/TV technician forhelp.
• Changes or modifications to this equipment not expressly
approved by the manufacturer could void the user’s
authority to operate the device.
• Under Industry Canada regulations, this radio transmitter
may only operate using an antenna of a type and maximum
(or lesser) gain approved for the transmitter by Industry
Canada. To reduce potential radio interference to other users,
the antenna type and its gain should be so chosen that the
equivalent isotropically radiated power (e.i.r.p.) is not more
than that necessary for successfulcommunication.
• To comply with FCC and Industry Canada RF exposure
limits for general population/uncontrolled exposure, the
antenna(s) used for this transmitter must be installed
to provide a separation distance of at least 20 cm from
all persons and must not be co-located or operated in
conjunction with any other antenna or transmitter.
For Bluetooth® Products
• When traveling on airlines, be sure to comply with the airline
restrictions on usage of personal electronic devices and
Bluetooth®.
• The out of range alert feature has been designed to act as an
aid to warn against products getting misplaced or stolen. It
is not a securitysystem.
• The connectivity range is up to 100 feet (30.5 meters)
depending on environment andlocation.
• The shortwave radio frequency signals of a Bluetooth® device
may impair the operation of other electronic and medical
devices (such as pacemakers or hearing aids).
NOTE: The Bluetooth® word mark and logos are registered
trademarks owned by the Bluetooth®, SIG, Inc. and any use of
such marks is under license. Other trademarks and trade names
are those of their respectiveowners.
This product complies with these standards when operated with
a 6 foot (1.8 meters) or shorter extensioncord.
Homologation du matériel sans fil et
informations sécurité
• Cet appareil est conforme à la norme CAN ICES-3(B)/NMB3(B) ou CAN ICES-5(B)/NMB-5(B).
• Cet appareil est conforme au paragraphe 15 du règlement
du FCC et à la (aux) norme(s) RSS exempté(s) de licence
d’Industrie Canada. Son utilisation est sujette aux deux
conditions suivantes : 1) Ce dispositif ne doit pas causer
d’interférences nuisibles; et 2) Ce dispositif doit accepter toute
interférence reçue, y compris toute interférence pouvant
causer un fonctionnementindésirable.
Cet équipement a été testé et jugé conforme aux limites propres
aux appareils numériques de Classe B, conformément au
Paragraphe 15 du règlement du FCC. Ces limites sont destinées à
offrir une protection raisonnable contre les interférences nuisibles
d’une installation résidentielle. Cet équipement produit, utilise et
peut émaner des ondes radiofréquences qui, s’il n’est pas installé
et utilisé conformément aux directives, pourront causer des
interférences nuisibles aux communications radio. Cependant, en
fonction des installations réalisées, l’absence d’interférences n’est
pas garantie. Si cet équipement cause des interférences nuisibles
à la réception radio ou télévision (ce qui peut être déterminé par
la mise sous/hors tension de cet équipement) l’utilisateur est
encouragé à tenter de corriger ces interférences en prenant l’une
ou plusieurs des mesures suivantes: 1)Réorienter l’antenne de
réception ou en changer l’emplacement, 2)Augmenter la distance
entre l’équipement et le récepteur, 3)Brancher l’équipement à une
prise située sur un circuit différent de celui sur lequel le récepteur
est connecté, ou 4) Contacter un revendeur ou consulter un
technicien radio/téléqualifié.
• Tout changement ou toute modification à l’appareil qui ne
serait pas expressément approuvé par le fabricant pourra
annuler les droits de l’utilisateur à employer cet équipement.
FINAL PAGE SIZE: 8.5" x 5.5" (half letter)
(MAR18) Part No. N591662 Copyright © 2018

• Conformément aux réglementions d’Industrie Canada, cet
émetteur radio ne peut fonctionner qu’avec une antenne
dont le type et le gain maximal (ou d’une valeur moindre)
sont homologués par Industrie Canada pour cet émetteur.
Pour réduire toute interférence radio potentielle pouvant
affecter les autres utilisateurs, le type d’antenne et ses gains
devraient être choisis de façon à ce que la puissance isotrope
rayonnée équivalente ne soit pas supérieure aux limites
permettant lacommunication.
• Afin de se conformer aux limites d’exposition aux RF de FCC
et Industrie Canada pour la population générale/l’exposition
non contrôlée, une ou plusieurs antennes utilisées pour cet
émetteur doivent être installées afin d’offrir une distance
de séparation d’au moins 20 cm de toutes les personnes et
doivent ne pas être situées au même endroit ou utilisées
conjointement à tout autre antenne ou émetteur.
Pour les produits Bluetooth
MD
• Avant de voyager en avion, s’assurer de suivre les restrictions
des compagnies aériennes quant à l’utilisation d’appareils
électroniques et BluetoothMDpersonnels.
• La fonctionnalité d’alarme hors plage a été conçue pour
servir à aider à alerter en cas de perte ou vol de produits. Ce
n’est pas un système de sécurité.
• La plage de connectivité peut aller jusqu’à 30.5 meters (100
pieds) en fonction de l’environnement et des lieux.
• Les signaux de radiofréquences ondes courtes d’un
appareil BluetoothMD pourront affecter les opérations
d’autres appareils électroniques ou médicaux (comme les
stimulateurs cardiaques ou les appareils acoustiques).
REMARQUE: le terme et les logos Bluetooth
MD
sont des marques
déposées appartenant à BluetoothMD, SIG, Inc. et toute utilisation
de ces marques est autorisée par licence. Toute autre marque de
commerce et appellation commerciale reste la propriété de leurs
propriétairesrespectifs.
Ce produit est conforme à ces standards lorsqu’il est utilisé avec
un cordon de 1m 80 (6pi) oumoins.
Certificaciones inalámbricas e
información de seguridad
Este dispositivo cumple con CAN ICES-3(B)/NMB-3(B)o con CAN
ICES-5(B)/NMB-5(B).
• Este dispositivo cumple con la Sección 15 de las normas de
la Comisión Federal de Comunicaciones (FCC) y las normas
RSS de exención de licencia del Ministerio de Industria de
Canadá. Su funcionamiento está sujeto a las dos siguientes
condiciones: 1) Este dispositivo no puede causar interferencia
dañina, y 2) Este dispositivo debe aceptar cualquier
interferencia que reciba, incluyendo aquella interferencia
que podría producir un funcionamiento no deseado.
Este equipo ha sido probado y se ha demostrado que cumple
con los límites establecidos para dispositivos digitales de ClaseB,
de conformidad con la Sección 15 de las Normas de la FCC.
Estos límites están diseñados para ofrecer un nivel razonable
de protección contra la interferencia dañina en instalaciones
residenciales. Este equipo genera, utiliza y puede emitir energía
de radiofrecuencia y, si no se instala y utiliza de acuerdo
con las instrucciones proporcionadas, puede producir una
interferencia dañina a la comunicación radial. Sin embargo, no
existen garantías de que no ocurra interferencia alguna en una
instalación en particular. Si este equipo produce interferencia
dañina a la recepción radial o de televisión, lo que puede
determinarse al apagar y volver a encender el equipo, se pide al
usuario que corrija la interferencia implementando una o más
de las siguientesmedidas: 1) Cambie la orientación o el lugar
donde esté ubicada la antena receptora, 2) Aumente el espacio
que separa al equipo del receptor, 3) Conecte el equipo a una
toma de corriente que esté en un circuito diferente al circuito al
que esté conectado el receptor, o 4) Consulte con el distribuidor
o con un técnico de radio y televisión con experiencia que pueda
ayudarle.
• Los cambios o modificaciones que no estén aprobados
expresamente por el fabricante podrían anular la
autorización del usuario para utilizar el dispositivo.
• Según el reglamento del Ministerio de Industria de Canadá,
este transmisor de radio puede funcionar solamente con
una antena del tipo y de la máxima (o menor) ganancia
aprobados para el transmisor por el Ministerio de
Industria de Canadá. Para reducir la posible interferencia
radioeléctrica a otros usuarios, el tipo de antena y su
ganancia deberían elegirse de manera que la potencia
isotrópica radiada equivalente (p.i.r.e.) no sea mayor que la
necesaria para una comunicaciónsatisfactoria.
• Para cumplir con los límites de exposición a radiofrecuencia
de FCC e Industry Canada para la población general/
exposición no controlada, la(s) antena(s) utilizada(s) para
este transmisor debe(n) instalarse para proporcionar una
distancia de separación de por lo menos 20 cm de todas las
personas y no debe ubicarse ni utilizarse junto con cualquier
otra antena o transmisor.
Para productos con Bluetooth®
• Al viajar en avión, asegúrese de cumplir con las restricciones
de las líneas aéreas acerca del uso de dispositivos
electrónicos personales y Bluetooth®.
• La función de alerta de fuera de alcance ha sido diseñada
para servir de ayuda para evitar la pérdida o robo de
productos. No es un sistema de seguridad.
• El rango de conectividad es de hasta 30.5 m (100 pies)
dependiendo del entorno y la ubicación.
• Las señales de radiofrecuencia de onda corta de un
dispositivo Bluetooth® pueden afectar el funcionamiento de
otros dispositivos médicos y electrónicos (como marcapasos
o audífonos).
NOTA: La marca denominativa y los logotipos de Bluetooth® son
marcas registradas propiedad de Bluetooth®, SIG, Inc. y todo uso
de dichas marcas se hace bajo licencia. Otras marca y nombres
comerciales son de sus respectivospropietarios.
Este producto cumple con estas normas cuando se pone en
funcionamiento con un alargador de 1.82 m (6 pies) o máscorto.
 Loading...