

Stanley WET / DRY VACUUM Owner's Manual
Manufactured in China
T oll-free helpline for replacement parts:1-888-899-0146
© 2011 Alton Industry Ltd. Group - All Right s Reserved
For replacement bags: Manutel
2087 av. Chartier Dorveal, QC H9P 1H3 Canada
1 800 561 1773
Stanley@ manutel.com
WWW. Manutel.com
WET / DR Y VACUUM
IMPORT ANT: READ OPERA T OR’S MANUAL BEFORE USING!
Owner’ s Manual
PN#8600008361
Version: C

EXTENSION CORDS
When using the appliance at a distance where an extension cord becomes necessary, a -conductor rounding cord
of adequate size must be used for safety, and to prevent loss of power and overheating. Use the table below to
determine A.W.G. wire size required. To determine ampere rating of your vacuum, refer to nameplate located on
rear of motor cover.
Before using appliance, inspect power cord for loose or exposed wires and damaged insulation. Make any needed
repairs or replacements before using your appliance. Use only three-wire outdoor extension cords which have
three-prong grounding-type plugs and three-pole receptacles which accept the extension cord's plug. When
vacuuming liquids, be sure the extension cord connection does not come in contact with the liquid.
NOTE: STATIC SHOCKS ARE COMMON IN DRY AREAS OR WHEN THE RELATIVE HUMIDITY OF THE AlR IS
LOW. THIS IS ONLYTEMPORARY AND DOES NOT AFFECTTHE USE OF THE APPLIANCE.TO REDUCE THE
FREQUENCY OF STATIC SHOCKS IN YOUR HOME, THE BEST REMEDY IS TO ADD MOISTURE TO THE AlR
WITH ACONSOLE OR INSTALLED HUMIDIFIER.
Volts Total length of cord in feet
120V 25 50 100 150
Ampere Rating
More - Not
More
Than
AWG
0-6
6-10
10-12
12-16
18
18
16
14
16
16
16
12
16
14
14
14
12
12
Not recommended

TABLE OF CONTENTS
1. IMPORTANT SAFTY INSTRUCTIONS----------------------------------------------------------------------------------2
2. GROUNDING INSTRUCTIONS------------------------------------------------------------------------------2
3. INTRODUCTION ---------------------------------------------------------------------------------------------------------------3
4. UNPACKING AND CHECKING CARTON CONTENTS---------------------------------------------------------------3
5. UNPACKING AND SET UP SUMMARY-----------------------------------------------------------------------------------4
6. CASTER/ACCESSORY HOLDER ASSEMBLY------------------------------------------------------------------------4
7. FILTERS ASSEMBLY---------------------------------------------------------------------------------------------------------4
8. POWER HEAD ASSEMBLY-------------------------------------------------------------------------------------------------5
9. OPERATION ---------------------------------------------------------------------------------------------------------------5-6
10. ACCESSORIES--------------------------------------------------------------------------------------------------------------6-7
11. MAINTENANCE ---------------------------------------------------------------------------------------------------------------7
12. STORAGE----------------------------------------------------------------------------------------------------------------------8
13. TROUBLE SHOOTING-------------------------------------------------------------------------------------------------------8
14. EXPLODED VIEW—MAIN UNIT-------------------------------------------------------------------------------------------9
15. PARTS LIST—MAIN UNIT-------------------------------------------------------------------------------------------------10
16. WARRANTY------------------------------------------------------------------------------------------------------------11
IMPORTANT SAFETY INSTRUCTIONS & GROUNDING INSTRUCTIONS
When using an electrical appliance, basic precautions should
be always followed, including the following: READ ALL
INSTRUCTIONS BEFORE USING THIS APPLIANCE.
ATTENTION!
Read all safety rules carefully before attempting to
operate. Retain for future reference.
DANGER!
Never operate this unit when flammable materials or vapors
are present because electrical devices produce arcs or
sparks that can cause a fire or explosion.
NEVER OPERATE UNATTENDED!
WARNING!
To reduce the risk of fire, electric shock, or injury:
1. Do not leave appliance when plugged in. Unplug from outlet
when not in use and before servicing. Connect to a properly
grounded outlet only. See Grounding Instruction.
2. Do not expose to rain—store indoors.
3. Always disconnect the plug from the wall outlet before
removing the tank cover
4. Do not allow to be used as a toy. Close attention is necessary
when used by or near children.
5. Do not use with damaged cord or plug. If appliance is not
working as it should, has been dropped, damaged, left
outdoors or dropped into water, contact ALTON Corporation
for assistance.
6. Do Not: pull or carry by cord, use cord as a handle, close a
door on cord or pull cord around sharp edges or corners. Do
not run appliance over cord. Keep cord away from heated
surfaces.
7. Do not unplug by pulling on cord. To unplug, grasp the plug;
not the cord.
8. Do not handle plug or appliance with wet hands.
9. Do not put any object into openings. Do not use with any
openings blocked; keep free of dust, lint, hair and anything
that may reduce air flow.
10. Keep hair, loose clothing, fingers and all parts of body away
from openings and moving parts.
11. Do not pick up anything that is burning or smoking, such as
cigarettes, matches or hot ashes.
12. Do not use without dust bag and/or filters in place.
13. Turn off all controls before unplugging.
14. Use extra care when cleaning on stairs.
15. Do not use to pick up flammable or combustible liquids such
as gasoline or use in areas where they may be present.
16. Do not use your cleaner as a sprayer of flammable liquids
such as oil base paint, lacquers, etc.
17. Do not vacuum toxic, carcinogenic, combustible or
other hazardous materials such as asbestos, arsenic, barium,
beryllium, lead, pesticides or other health endangering
materials.
18. Do not pick up soot, cement, plaster or drywall dust without
filter and dust bag in place. These are very fine particles that
may affect the performance of the motor or be exhausted
back into the air. Additional dust bags are available.
19. Do not leave the cord lying on the floor once you have
finished the cleaning job. It can become a tripping hazard.
20. Use special care when emptying heavily loaded tanks.
21. To avoid spontaneous combustion, empty tank after each
use.
22. The operation of a utility vac can result in foreign objects
being blown into eyes, which can result in eye damage.
Always wear safety goggles when operating vacuum.
23. STAY ALERT. Watch what you are doing and use common
sense. Do not use vacuum cleaner when you are tired,
distracted or under the influence of drugs, alcohol or
medication causing diminished control.
NOTE: Use only as described in this manual. Use only
manufacturer's recommended attachments.
SAVE THESE INSTRUCTIONS
GROUNDING INSTRUCTIONS
This appliance must be grounded. If it should malfunction or
breakdown, grounding provides a path of least resistance for
electric current to reduce the risk of electric shock. This appliance
is equipped with a cord having an equipment-grounding conductor
and grounding plug. The plug must be inserted into an appropriate
outlet that is properly installed and grounded in accordance with
all local codes and ordinances.
WARNING!
IMPROPER CONNECTION OF THE EQUIPMENT GROUNDING
CONDUCTOR CAN RESULT IN A RISK OF ELECTRIC SHOCK.
CHECK WITH A QUALIFIED ELECTRICIAN OR SERVICE
PERSON IF YOU ARE IN DOUBT AS TO WHETHER THE
OUTLET IS PROPERLY GROUNDED. DO NOT MODIFY THE
PLUG PROVIDED WITH THE APPLIANCE. IF IT WILL NOT FIT
THE OUTLET, HAVE A PROPER OUTLET INSTALLED BY A
QUALIFIED ELECTRICIAN.
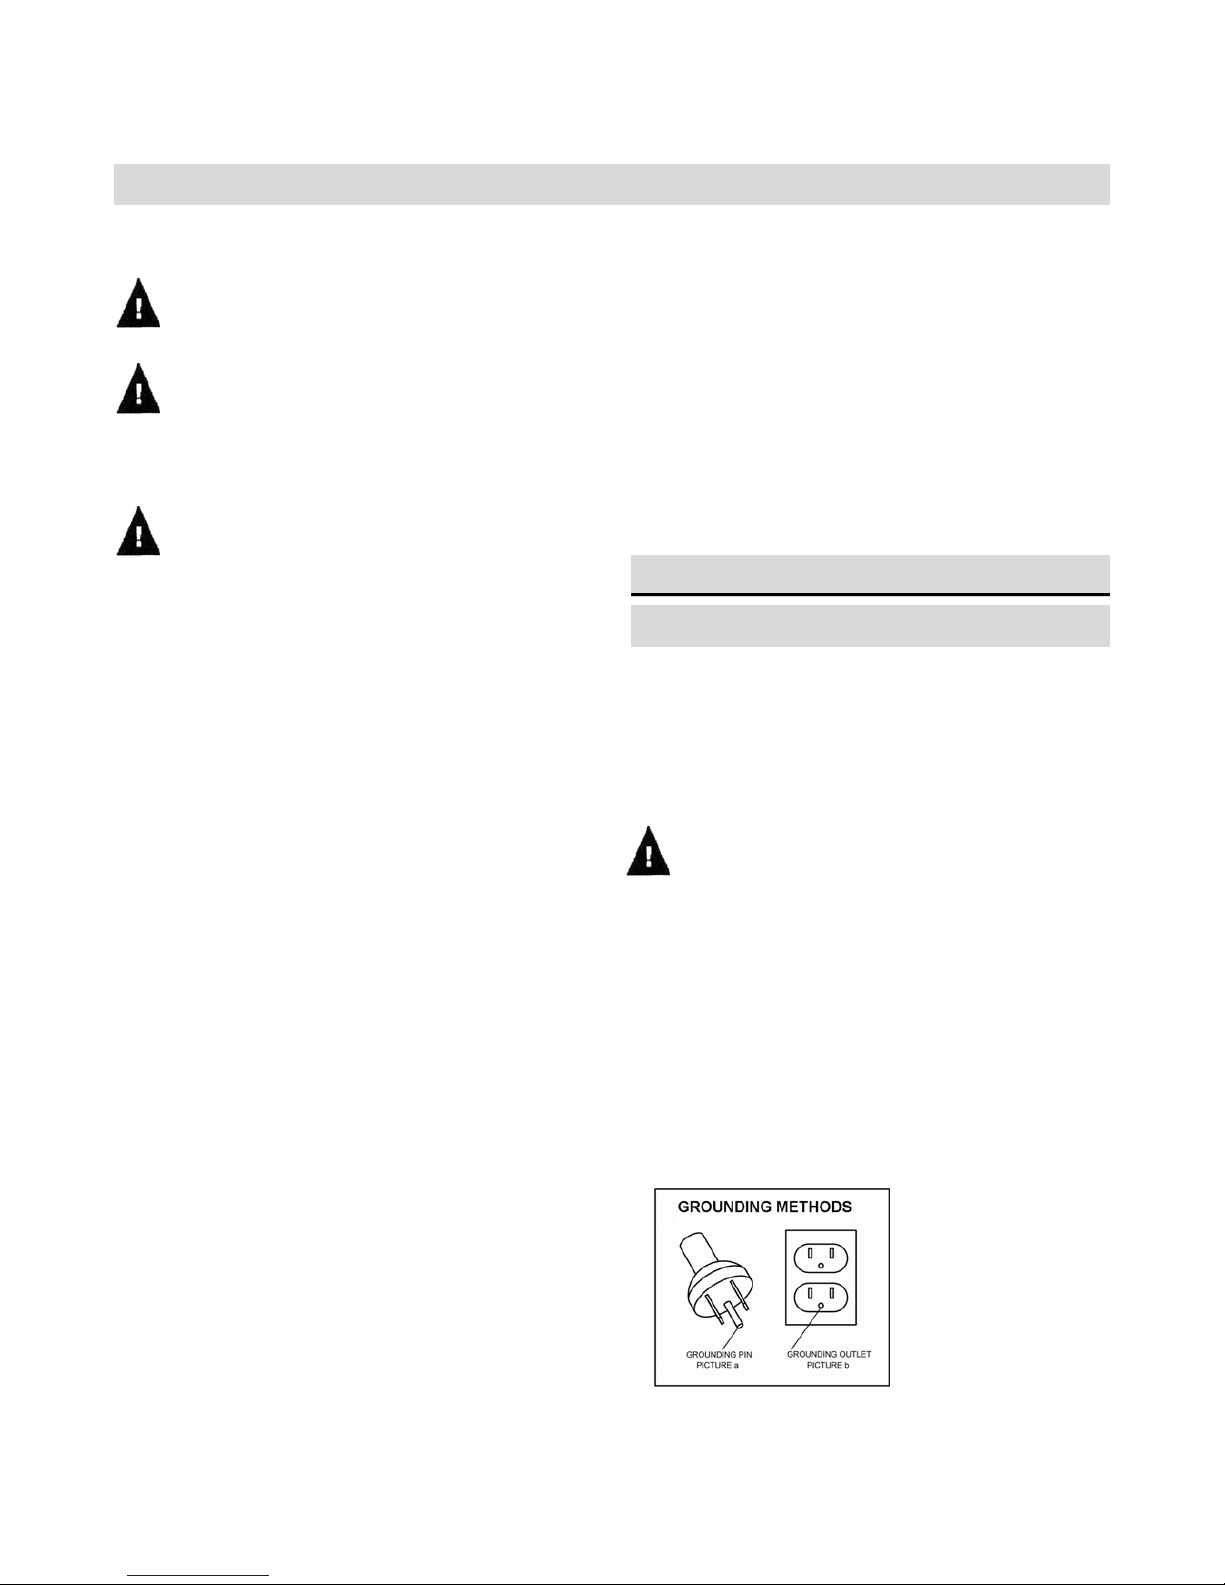
24. This appliance is for use on a nominal 120-volt circuit. The
grounded plug that looks like the plug illustrated in picture(a).
The grounded outlet that looks like the plug illustrated in picture
(b). The customer only needs to plug the grounded plug into the
grounded outlet which could accomplish the grounding.
25. No adaptor should be used with this appliance.
-2-
INTRODUCTION
This Wet/Dry Vacuum is intended to household and workshop use. It ma y be used for v acuuming wet or dr y media and ma y be
used as a blower.
Read this operator’s manual to familiarize yourself with the product features and to understand the specific usage of your new
vacuum.
UNPACKING AND CHECKING CARTON CONTENTS
ATTENTION!
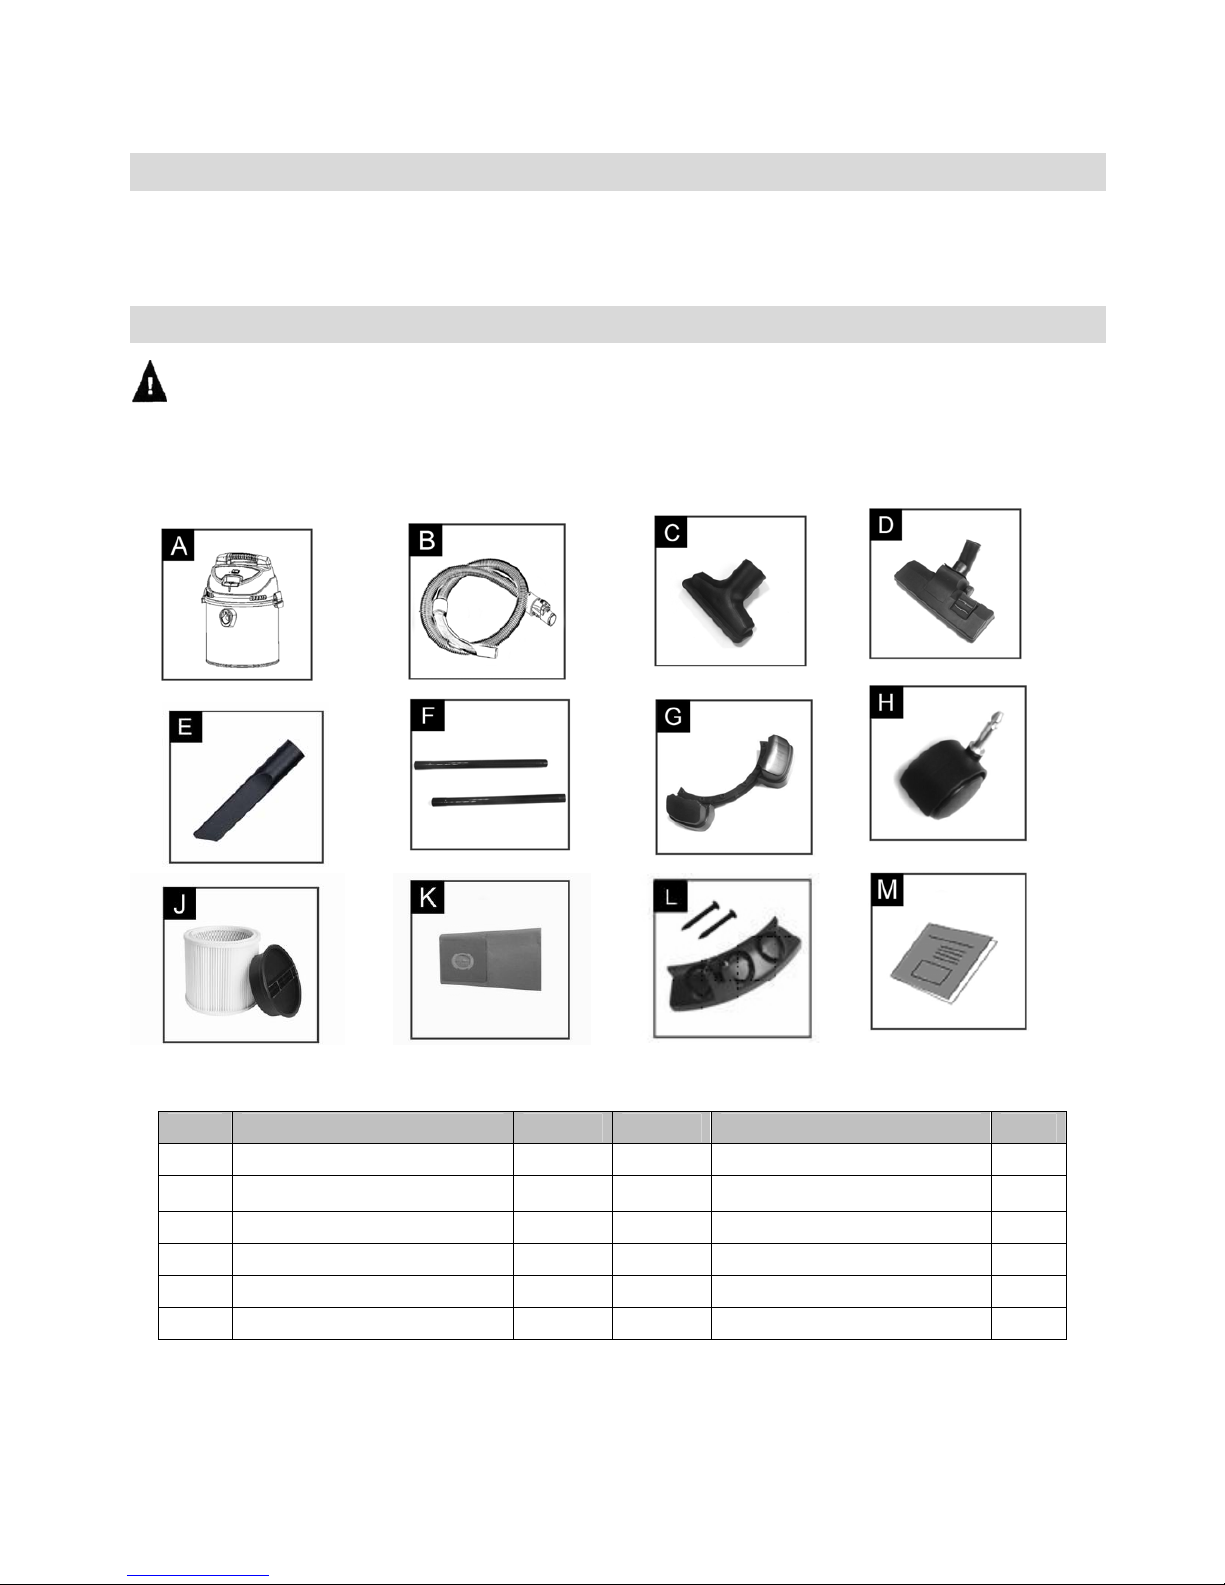
Remove contents of carton. Check each item against the Carton Contents list. Call 1-888-899-0146 or email us at
info@altonindustries.com if any parts are damaged or missing.
Not standard with all models
ITEM DESCRIPTION QTY ITEM DESCRIPTION QTY
A Vacuum Assembly 1 G Caster dolly 2
B Flexible hose 1 H Caster 4
C Utility brush 1 J Cartridge Filter 1
D Floor brush 1 K Disposable filter bag 1
E Crevice nozzle 1 L Accessories holder 1
F Extension wand 2 M User manual 1
-3-
UNPACKING & SET-UP SUMMARY
1. Pull lid latches in an outward motion, remove power head and some accessories that may have been shipped in the tank.
2. Attach casters following the instructions in this manual.
3. Before replacing power head, refer to Filters Assembly and Power Head Assembly and Operation in this manual to ensure
you have the proper filt ers installe d for your clea ning operati on.
4. Replace power head, and apply pressure with thumb to each latch until it snaps tightly in place. Make sure all lid latches are
clamped securely.
5. Insert the flexible hose end into inlet of tank.
6. Attach the extension wands to the accessory end of the hose. Twist slightly to tighten the connection.
7. Attach one of the cleaning accessories (depending on your cleaning requirements) on the extension wands.
Twist slightly to tighten the connection.
8. Plug the cord into the wall outlet. Your cleaner is ready for use
CASTER / ACCESSORY HOLDER ASSEMBLY
Not standard with all models
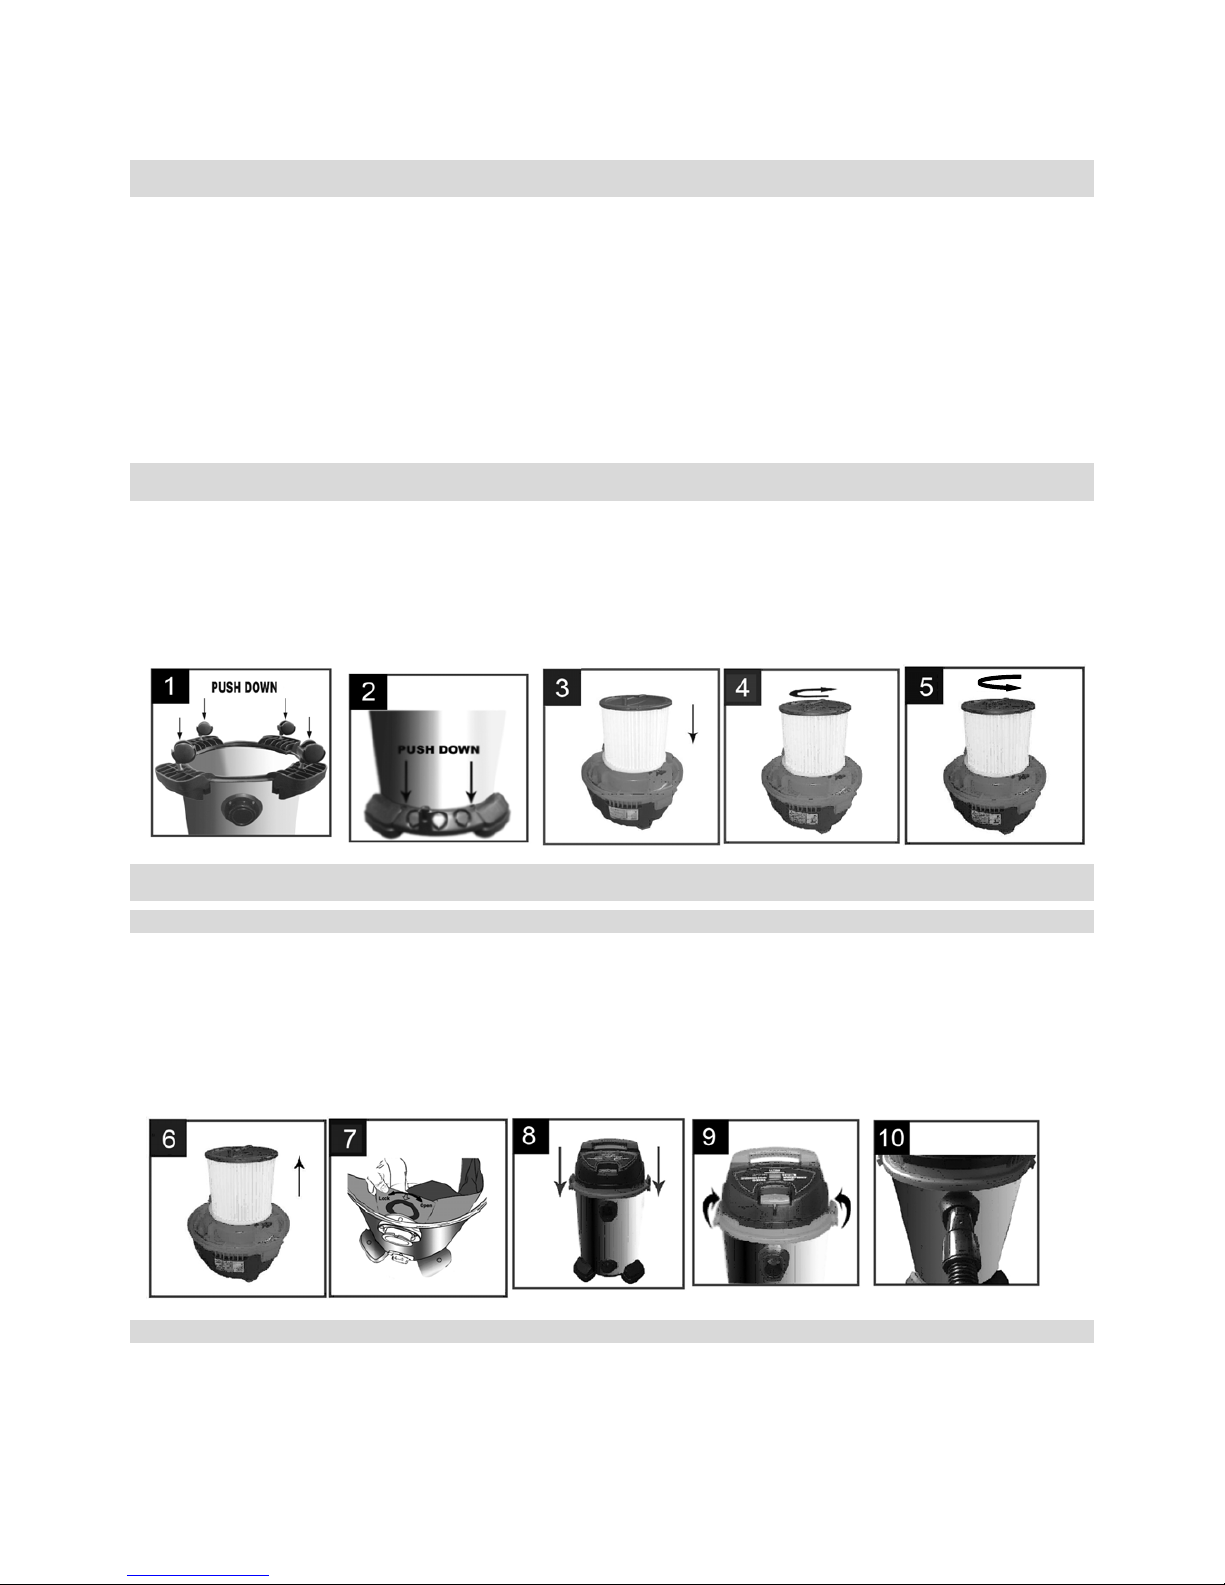
1. Invert dust tank, Insert caster (part H) into foot by placing stem of caster into the holes provided. Apply pressure and
twisting motion until casters snap into place. (Picture 1)Caster will swivel easily when positioning is correct. Rotate
dust tank assembly upright.
2. Place accessories holder (part L), with curved surface against tank, on rear caster dolly.(Picture 2)
3. Using a long screwdriver, install screws (part L) into matching holes on both side of accessory holder. Tighten screws
until just snug. Do not over tighten as this may tend to deform the dollies.
FIL TERS ASSEM BLY
CARTRIDGE FILTER ASSEMBLY
1. With the power head in an upside down position, slide the filter (part J) down over the lid cage. Push until the filter
seals against the cover.(Picture 3)
2. Hold the power head with one hand, turn the handle on the filter retainer clockwise to tighten, locking the filter into
place.(Picture 4)
IMPORTANT: Do not over tighten as this may deform or crack the filter cage or filter.
3. To remove the filter for cleaning, again hold the tank cover and turn the filter retainer counter-clock-wise to loosen and
remove it.(Picture 5)
4. Slide the cartridge filter off the lid cage. (Picture 6)
DISPOSABLE FILTER BAG ASSEMBLY
5. Slide collar of disposable filter bag (part K) attached into deflector guide and turn it in counter clockwise to lock the bag in place.
6. To remove the disposable filter bag, turn the bag in clockwise and slide out of the deflector guide. (Picture 7)
-4-
POWER HEAD ASSEMBLY
1. Install the power head assembly onto the tank assembly as shown. (Picture 8)
2. Rotate both latches up and pres s unt il you he ar them snap over the flanges on the tank. (Picture 9)
ACCESSORIES ASSEMBL Y
1. Insert the flexible hose (part B) end into inlet of tank. The hose should be snapped into place.(Picture 10)
2. To remove the hose from vacuum, press the release button in the hose assembly and pull the hose out of the
vacuum inlet.
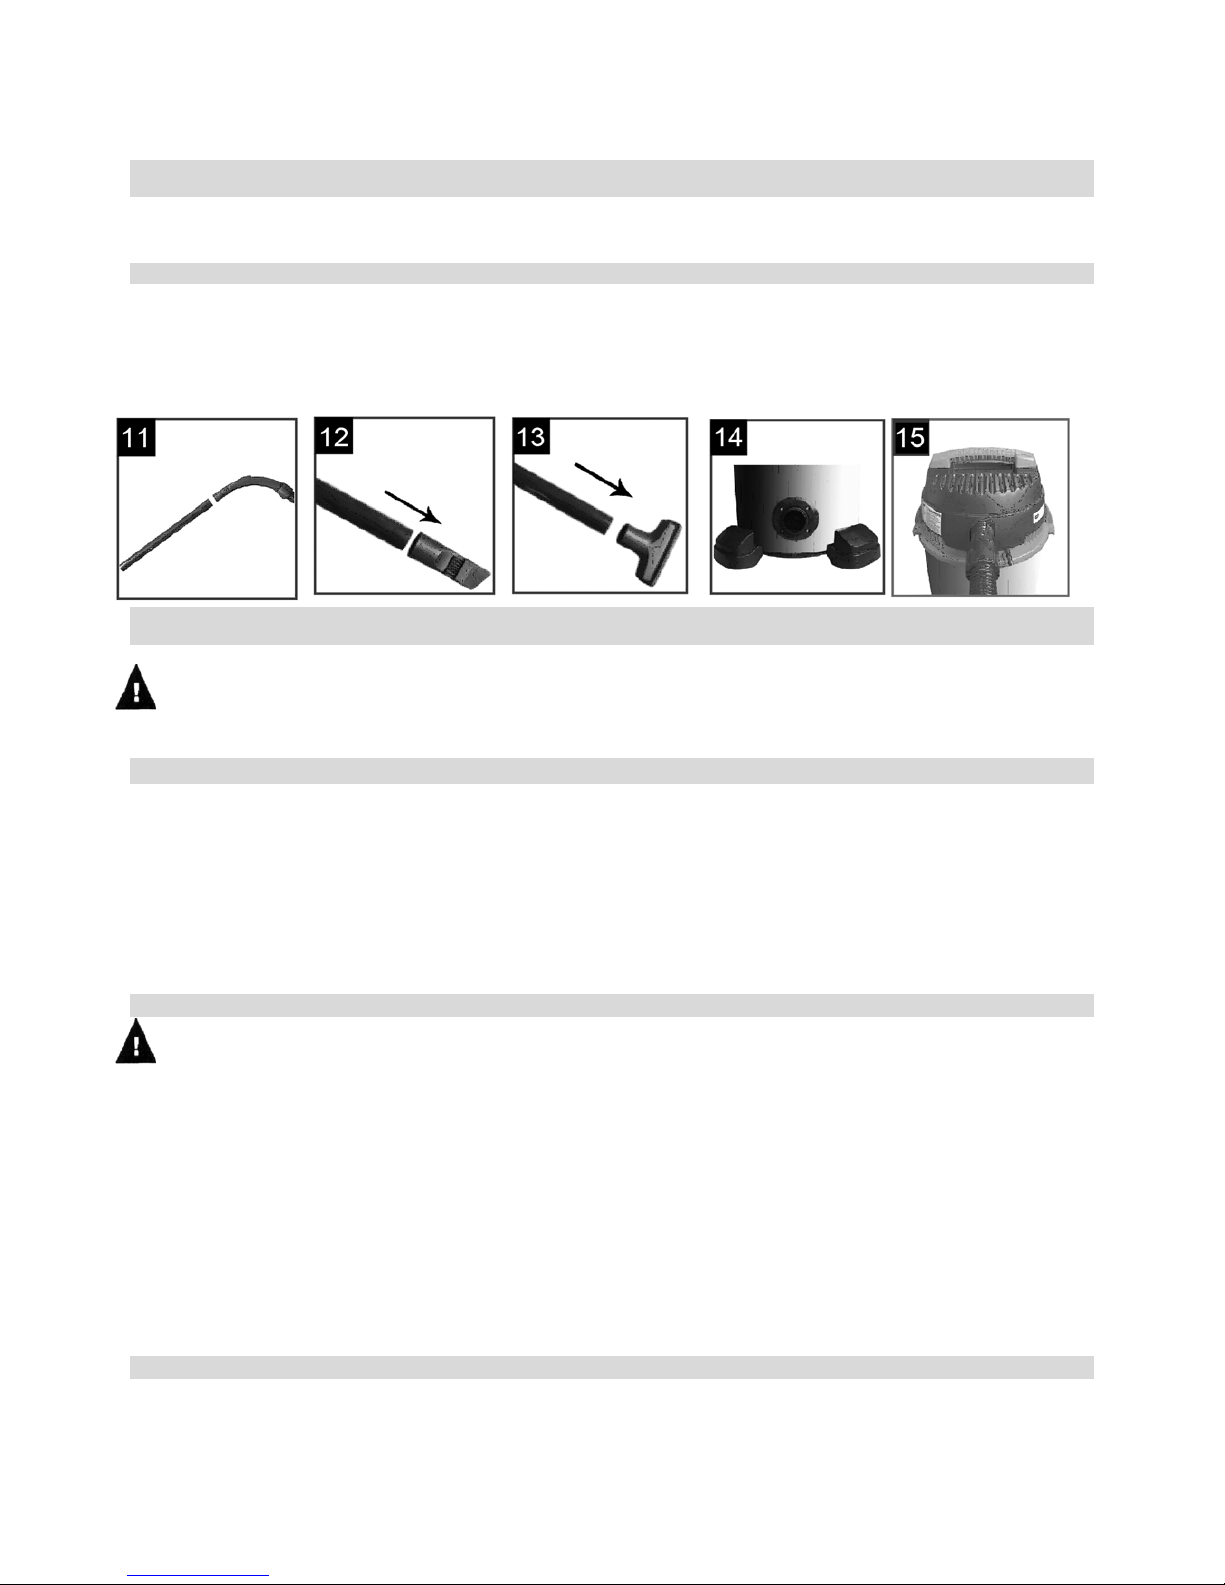
3. Attach the extension wands (part F) to the accessories end of the wands. (Picture 11)
4. Attach one of the cleaning accessories (depending on your cleaning requirements) on the extension wands.
(Picture 12 & 13)
OPERATION
ATTENTION!
THE FILTER MUST ALWAYS BE IN CORRECT POSITION TO REDUCE THE RISK OF LEAKS AND POSSIBLE
DAMAG TO VACUUM.
VACUUMING LIQUIDS
1. When picking up small amounts of liquid the cartridge filter (part J) may be left in place.
2. When picking up large amounts of liquid we recommend that the cartridge filter (part J) be removed. If the filter is
not removed, it will become saturated and misting may appear in the exhaust.
3. When the liquid in the tank reaches a predetermined lever, the float mechanism will rise automatically to cut off
air-flow. When this happens the motor will develop a higher than normal pitch noise and the suction is drastically
reduced. Please turn off the vacuum, unplug the power cord, and empty the tank. (NOTE: On the condition the tank is
filled with liquids, the red indicator in the power head cover can also light)
4. After using the vacuum to pick up liquids, the cartridge filter (part J) must be dried to reduce the risk of possible
mildew and damage to the filter.
VACUUMING DRY MATERIALS
WARNING!
ALWAYS DISCONNECT THE PLUG FROM THE WALL OUTLET BEFORE REMOVING THE POWER
HEAD.
1. To pick up wall dust and dry material, the disposable filter bag (part K) can be used for filtration.
2. To pick up wall dust and dry material, the cartridge filter (part J) can be used for filtration.
3. But disposable filter bag (part K) plus filter (part J) can be used for better filtration. When using your vacuum to
pick up very fine dust, it will be necessary for you to empty the tank and clean the filter at more frequent intervals
to maintain peak vacuum performance.
NOTE: If you use your vacuum to pick up dust when the filter is wet, the filter will clog quickly and be very difficult to
clean.
4. If your filter (part J) is wet but you need to use filter to pick up dry material, you can quickly dry the filter by running
the vacuum without hose attached for about 10 minutes. The clean air rushing through the vacuum will help dry the
filter
FILTER PERFORMANCE INDICATOR
1. When the indicator is dark that indicate your filter is clean and ready to use.
2. When the indicator is light that shows your filter is dirty and needs to be cleaned or replaced or the vacuum clog, it
need to be clean.
-5-

EMPTY LIQUID WASTE FROM THE TANK
WARNING!
TO REDUCE THE RISK OF INJURY FROM ACCIDENTAL STARTING, UNPLUG POWER CORD BEFORE
EMPTYING THE TANK.
1. The vacuum can be emptied of liquid waste by removing the tank drain cap. To empty, turn unit off and remove plug
from the wall receptacle. Remove the drain cap and deposit the liquid waste contents in a suitable drain. After the
tank is empty, return the drain cap to its original position. (Picture 14)
2. Another option is to remove the power head assembly. Lay power head assembly aside on a clean area.
3. Dump the tank contents into the proper waste disposal container.
WARNING!
TO REDUCE THE RISK OF BACK INJURY OR FALLS, DO NOT LIFT A VACUUM HEAVY WITH LIQUID
OR DEBRIS. SCOOP OR DRAIN ENOUGH CONTENTS OUT TO MAKE THE VACUUM LIGHT ENOUTH TO
LIFT COMFORTABLY.
BLOWER FUNCTION
WARNING!
ALWAYS WEAR SAFETY EYEWEAR COMPLYING WITH ANSI Z87.1 (OR IN CANADA, CSA Z94.3) BEFORE
USING AS BLOWER.
WARNING!
TO REDUCE THE RISK OF INJURY TO BYSTANDERS, KEEP THEM CLEAR OF BLOWING DEBRIS.
ATTENTION!
WEAR A DUST MASK IF BLOWING CREATS DUST WHICH MIGHT BE INHALED.
ATTENTION!
TO REDUCE THE RISK OF HEARING DAMAGE WEAR EAR PROTECTORS WHEN USING THE
VAC/BLOWER FOR EXTENDED HOURS OR WHEN USING IN A NOISY AREA.
1. This vacuum features a blowing port. It can blow sawdust and other debris. Follow the steps below to use your vac
as a blower.
2. Locate blowing port of yo ur va c(Picture 15).
3. Insert the locking end of the hose (part B) into the blowing port of the vac. The hose should snap into place.
4. To remove the hose from vac, press the release button in the hose assembly and pull the hose out of the vac inlet.
5. (Optional) Attach extension wand to opposite end hose, then place the car nozzle on the wand.
6. Turn vac on and y ou are ready to use yo ur vac as a blower.
ACCESSORIES
WARNING!
MAKE SURE ALL ASSEMBLY IS ACCORDING TO THIS MANUAL.
ATTENTION!
THE VACUUM IS EQUIPPED WITH THREE NOZZLES FOR DIFFERENT APPLICATIONS. EACH INDIVIDUAL
NOZZLE CAN EITHER BE FITTED ONTO THE EXTENSION WAND OR DIRECTLY ONTO HANDLE OF
FLEXIBLE HOSE.
-6-
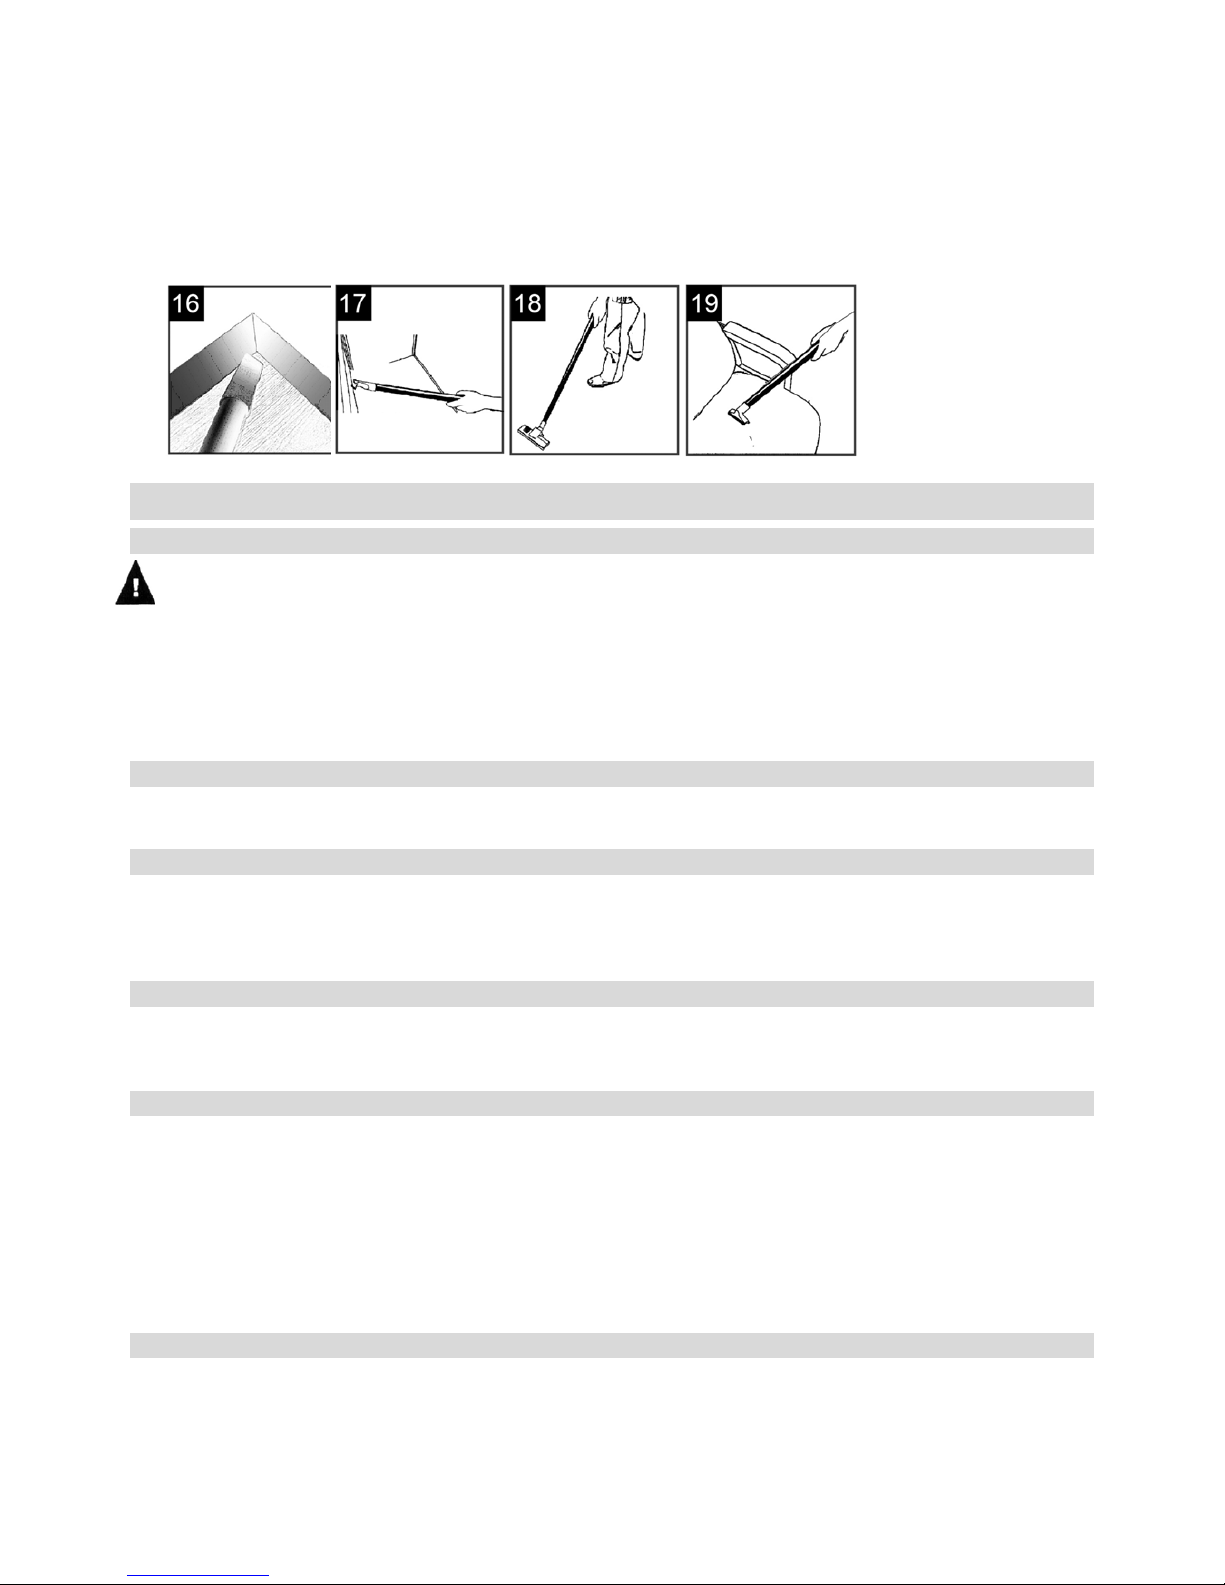
1. Crevice tool (part E) -It is suitable for sucking an d cleanin g the co rners and niches w here can’t b e reac hed by other
accessories. Besides, it can be used as blowing tool. (Picture 16 & 17)
2. Bristled floor brush (part D) - It is suitable for cleaning wide are as . Us e o n bare f loo rs an d carp ets. (Picture 18)
3. Wide angle tool (part C) - It is suitable for cleaning the dust on the carpe t, sofa and mattresses.(Picture 19)
MAINTENANCE
FILTER
WARNING!
TO REDUCE THE RISK OF INJURY FROM ACCIDENTAL STARTING, UNPLUG POWER CORD BEFORE
CHANGING OR CLEANING FILTER.
NOTE: The cartridge filter (part J) is made of high quality paper designed to stop very small particles of dust.
The filter can be used for dry pick up or small amounts of liquid. Handle the filter carefully when removing to clean or
installing it. Creases in the filter pleats may occur from installation but will not affect the performance of the filter.
NOTE: The disposable filter (part K) can only be used for dry pick up. Please do not use for wet pick up.
FILTER CLEANING
IMPORTANT: After cleaning, check the filter for tears or small holes. Do not use a filter with holes or tears in it. Even a
small hole can cause a lot of dust to come out of your vacuum. Replace it immediately.
FILTER REMOVAL
To remove the filter for cleaning or replacement, unscrew the filter
cover from the filter cage and lift off filter.
IMPORTANT: To avoid damage to the motor and injury, always reinstall the filter (part J or K) before using the vacuum
for dry or wet pick-up.
CLEANING A WET FILTER
1. After filter (part J) is removed, run water through the filter f rom a h os e or sp igot. T ake ca re t hat w ater pressure from
the hose is not strong enough to damage the filter.
2. Refer to ‘’filters assembly’’ section of this manual. Allow the filter to dry before reinstalling and storing the vacuum.
CLEANING A DRY FILTER
1. For the best cleaning results due to accumulated dust, clean the filter in an open area. CLEANING SHOULD be
done outdoors and not in the living quarters.
2. Refer to ‘’filters assembly’’ section of this manual to remove the filter (part J) and disposable filter bag (part K).
3. After the disposable filter bag (par t K) removal from vacuum, let the dry debris fall down to the garbage can from the
dust bag.
4. After the filter (part J) removal from vacuum, remove the dry debris by gently tapping filter against the inside wall of
your dust tank. The debris will loos en and fall.
5. For thorough cleaning of dry fi lter wit h fine dust (n o debris), run w ater through it as desc ribed under “C leanin g A Wet
Filter.
CLEANING AND DISINFECTING THE WET/DRY VACUUM
To keep your Wet/Dry Vacuum looking its best, clean the outside with a cloth dampened with warm water and mild soap.
To clean the tank:
1. Dump the debris out.
2. Wash drum thoroughly with warm water and mild soap.
-7-
3. Wipe out with dry cloth.
Before prolonged storage or as needed (i.e.: waste water pick up) the tank should be disinfected.
To disinfect the tank:
1. Pour 1 gallon of water and 1 teaspoon chlorine bleach into the tank.
2. Let solution stand for 20 minutes, carefully swishing every few minutes, make sure to wet all inside surfaces of the
tank.
3. Empty drum after 20 minutes. Rinse with water until bleach smell is gone. Allow tank to dry completely before sealing
the power head on the tank.
STORAGE
Before storing your vacuum, the dust tank should be emptied and cleaned. The cord should be wrapped around the unit.
Accessories should be kept in the same area as the vacuum so they can be readily available. The vacuum should be
stored indoors.
WARNING!
TO ASSURE PRODUCT SAFETY AND RELIABILITY, REPAIRS AND ADJUSTMENTS SHOULD BE PERFORMED
BY AUTHORIZED SERVICE CENTER, ALWAYS USING ALTON REPLACEMENT PARTS.
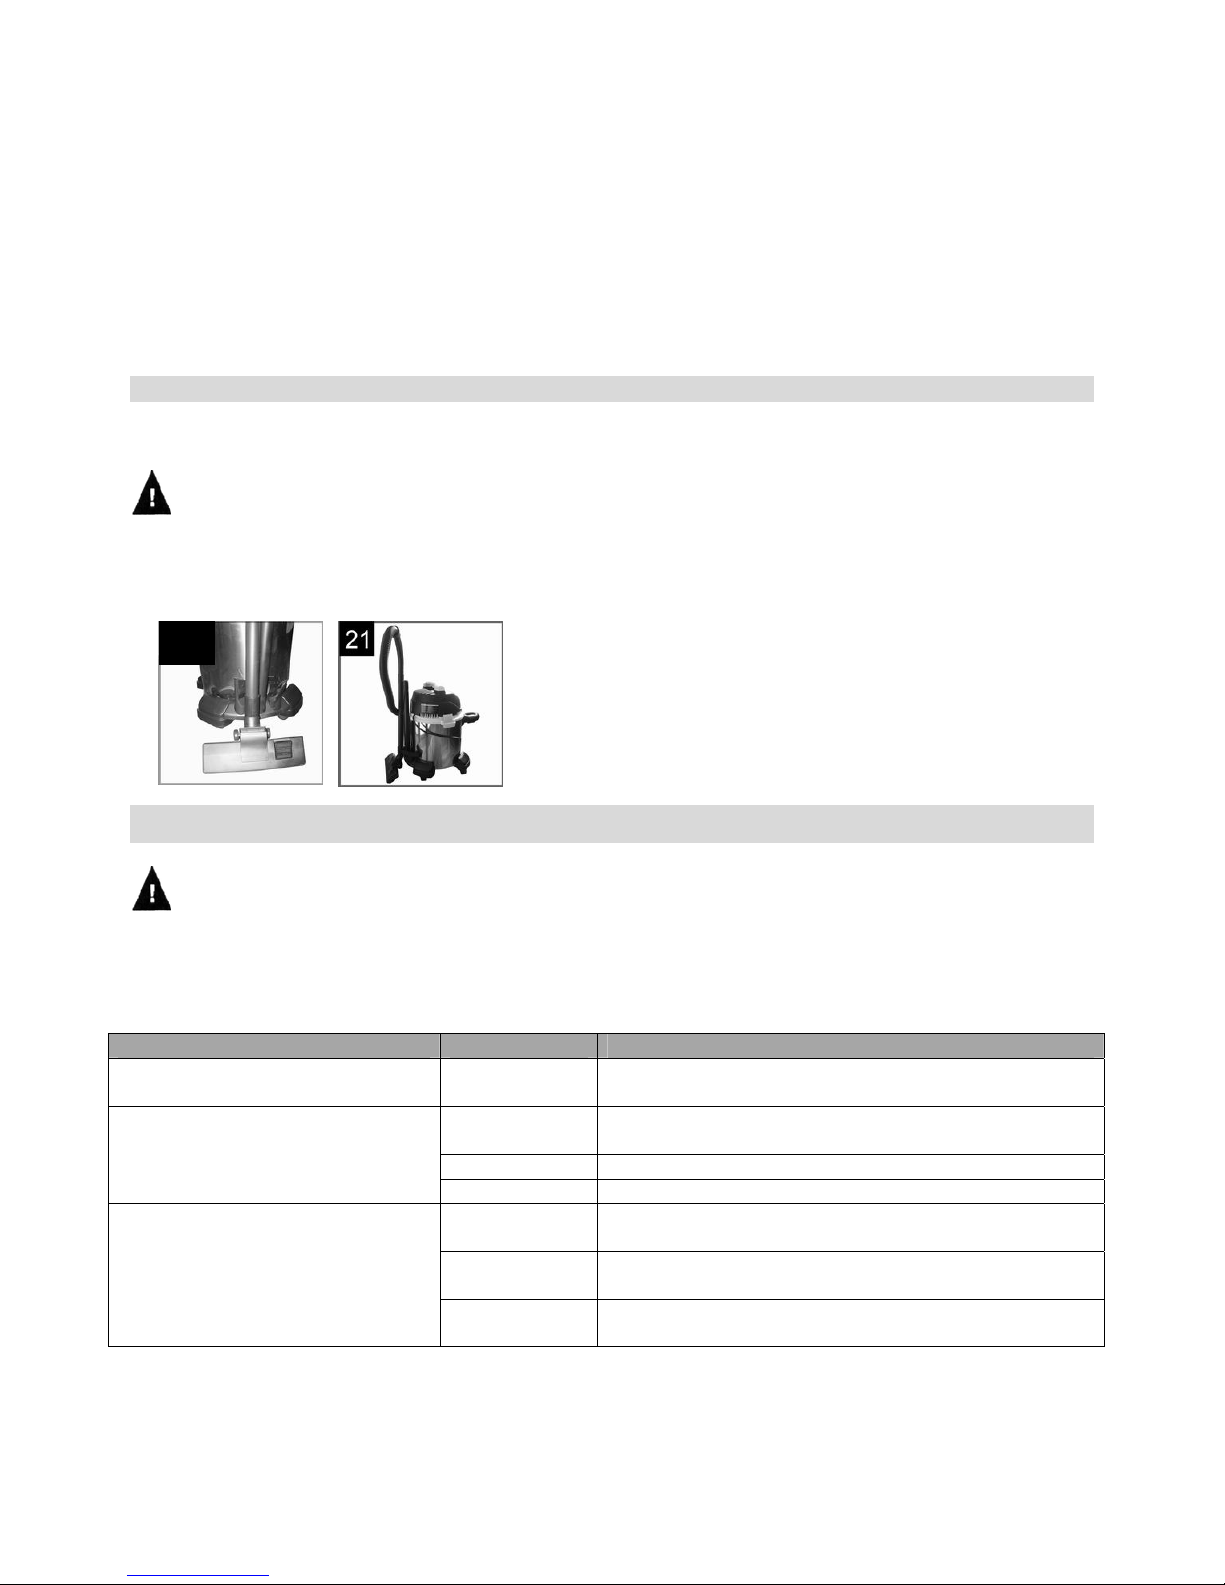
1. The cord can be wrapped around the cord wraps provided on the tank cover.
2. The other accessories can be stored on the accessories holder. (Picture 20 & 21)
TROUBLE SHOOTING
WARNING
TO REDUCE THE RISK OF INJURY FROM MOVING PARTS AND/OR ELECTRICAL SHOCK, TURN POWER
SWITCH OFF AND DISCONNECT GROUNDED PLUG FROM ELECTRICAL OUTLET BEFORE PERFORMING
TROUBLESHOOTING CHECKS.
Minor problems often can be fixed without calling Alton Customer Service.
PROBLEM CAUSE SOLUTION
Vacuum will not run No electricity
Make sure electrical outlet has voltage. (A qualified
electrician may need to be contacted)
Loss of suction wet pick-up
Full tank
Drain and clean tank (follow instructions on page 6)
Clogged hose Remove hose and clean debris
Clogged filter Clean or replace filter (follow instructions on page 7)
Loss of suction dry pick-up
Full tank
Drain and clean tank (follow instructions on page 6)
Clogged hose
Remove hose and clean debris
Clogged filter
Clean or replace filter (follow instructions on page 7)
20
-8-
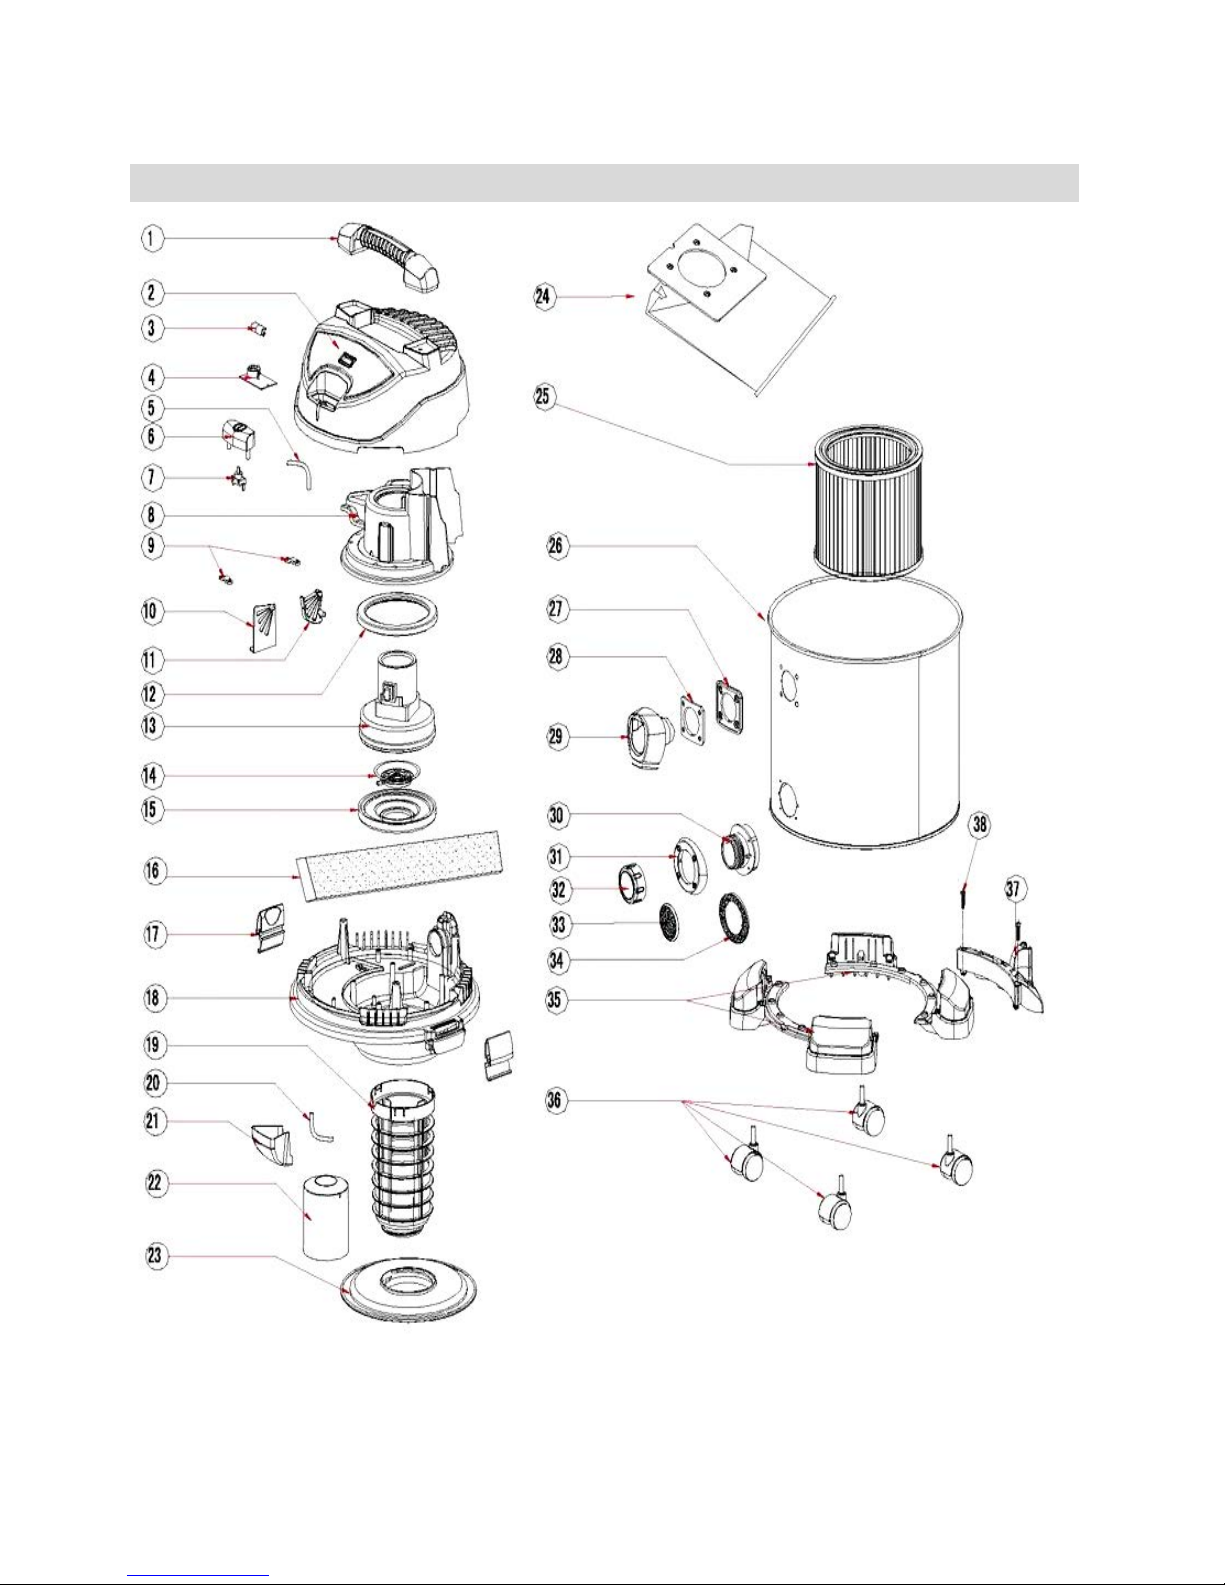
EXPLODED VIEW-MAIN UNIT
-9-

PARTS LIST—MAIN UNIT
ITEM DESCRIPTION QTY ITEM DESCRIPTION QTY
1
Handle 1 21
Air pipe cover
1
2
Top cover assembly 1 22 Float 1
3
Indicator cover
1 23
Cartridge filter cover
1
4
Power circuit board 1 25 Cartridge Filter 1
5
Air pipe 1 1 26 Drum 1
6
OFF/ON switch button
1 27
Inner fixation board
1
7
On/Off switch 1 28 Outer fixation board 1
8
Thermal baffle 1 29 Inlet tube holder 1
9
Holder plate for switch
1 30
Drain Inner fixation board
1
10
Air by-pass board 1 31 Drain Outer fixation board 1
11
Air by-pass valve 1 32 Drain cap 1
12
Motor support ring
1 33
Drain cap seal
1
13
Motor 1 34 Drain Inner seal ring 1
14
Inlet grill
1
Below parts not standard with all models
15
Motor seal ring
1 24
Disposable Filter dust bag
1
16
Noise absorb sponge 1 35 Caster dolly 2
17
Lid latch 2 36 Caster 4
18
Motor base
1 37
Accessories holder
1
19
Float Holder 1 38 Screw 2
20
Air pipe2 1
-10-

Alton Industry Ltd. Group
1 year Limited Warranty
This warranty covers any defects in materials or workmanship of the enclosed
product. Alton Industry Ltd. Group will repair or replace any defective materials due to
craftsmanship of the product. This warranty does not cover any problem caused by
misuse, abuse, accidents or acts of God, such as floods or hurricanes. Consequential
and incidental damages are not covered under this warranty. Coverage terminates if
you sell or otherwise transfer the ownership. If you feel you have a defective product,
please submit a copy of your receipt to the address below and call 1-888-899-0146
for instructions prior returning this item to the store or sending back to:
Alton Industry Ltd. Group
1031 North Raddant Rd
Batavia, Illinois 60510
We will inspect the product and contact you wi thin 72 hours to gi ve you the results of
our inspection. We reserve the right to repair or replace the product at our discre tion.
However , we may replace the product with one of similar but not exact features.
Parts and Service Information available call Alton Industry at 1-888-899-0146
This warranty gives you specific legal rights, and you may have also other
rights which vary from state to state.
-11-
 Loading...