

Page 1

Stanley TLM165I
1
EN
Table of Contents
Instrument Set-up- - - - - - - - - - - - - - - - - - - - - - -2
Introduction- - - - - - - - - - - - - - - - - - - - - - - - - - - - - - -2
Overview - - - - - - - - - - - - - - - - - - - - - - - - - - - - - - - -2
Display - - - - - - - - - - - - - - - - - - - - - - - - - - - - - - - - - -3
Insert batteries - - - - - - - - - - - - - - - - - - - - - - - - - - - -3
Operations - - - - - - - - - - - - - - - - - - - - - - - - - - - - - -4
Switching ON/OFF - - - - - - - - - - - - - - - - - - - - - - - - -4
Clear - - - - - - - - - - - - - - - - - - - - - - - - - - - - - - - - - - -4
Message Codes - - - - - - - - - - - - - - - - - - - - - - - - - - -4
Adjusting measuring reference - - - - - - - - - - - - - - - - -4
Distance unit setting - - - - - - - - - - - - - - - - - - - - - - - -5
Multifunctional endpiece- - - - - - - - - - - - - - - - - - - - - -5
Measuring Functions - - - - - - - - - - - - - - - - - - -6
Measuring single distance - - - - - - - - - - - - - - - - - - - - 6
Permament measuring- - - - - - - - - - - - - - - - - - - - - - -6
Add / Subtract - - - - - - - - - - - - - - - - - - - - - - - - - - - - -6
Area- - - - - - - - - - - - - - - - - - - - - - - - - - - - - - - - - - - -7
Volume- - - - - - - - - - - - - - - - - - - - - - - - - - - - - - - - - -7
Pythagoras (2-point) - - - - - - - - - - - - - - - - - - - - - - - -8
Pythagoras (3-point) - - - - - - - - - - - - - - - - - - - - - - - -8
Memory (5 last results) - - - - - - - - - - - - - - - - - - - - - -9
Technical Data - - - - - - - - - - - - - - - - - - - - - - - - - 10
Message Codes - - - - - - - - - - - - - - - - - - - - - - - - 11
Care- - - - - - - - - - - - - - - - - - - - - - - - - - - - - - - - - - - - 11
Warranty - - - - - - - - - - - - - - - - - - - - - - - - - - - - - - - 11
Safety Instructions - - - - - - - - - - - - - - - - - - - - - 11
Areas of responsibility - - - - - - - - - - - - - - - - - - - - - - 11
Permitted use - - - - - - - - - - - - - - - - - - - - - - - - - - - -12
Prohibited use - - - - - - - - - - - - - - - - - - - - - - - - - - - -12
Hazards in use - - - - - - - - - - - - - - - - - - - - - - - - - - -12
Limits of use - - - - - - - - - - - - - - - - - - - - - - - - - - - - -12
Disposal - - - - - - - - - - - - - - - - - - - - - - - - - - - - - - - -12
Electromagnetic Compatibility (EMC) - - - - - - - - - - - -12
FCC statement (applicable in U.S.) - - - - - - - - - - - - -13
Laser classification- - - - - - - - - - - - - - - - - - - - - - - - -13
Labelling - - - - - - - - - - - - - - - - - - - - - - - - - - - - - - - -13
Page 2
Stanley TLM165I
2
EN
Instrument Set-up
Introduction
The safety instructions and the user manual should be
read through carefully before the product is used for the
first time.
The person responsible for the product must ensure that
all users understand these directions and adhere to them.
The symbols used have the following meanings:
WARNING
Indicates a potentially hazardous situation or an unintended use
which, if not avoided, will result in death or serious injury.
CAUTION
Indicates a potentially hazardous situation or an unintended use
which, if not avoided, may result in minor injury and/or appreciable material, financial and environmental damage.
Important paragraphs which must be adhered to in practice
as they enable the product to be used in a technically
correct and efficient manner.
i
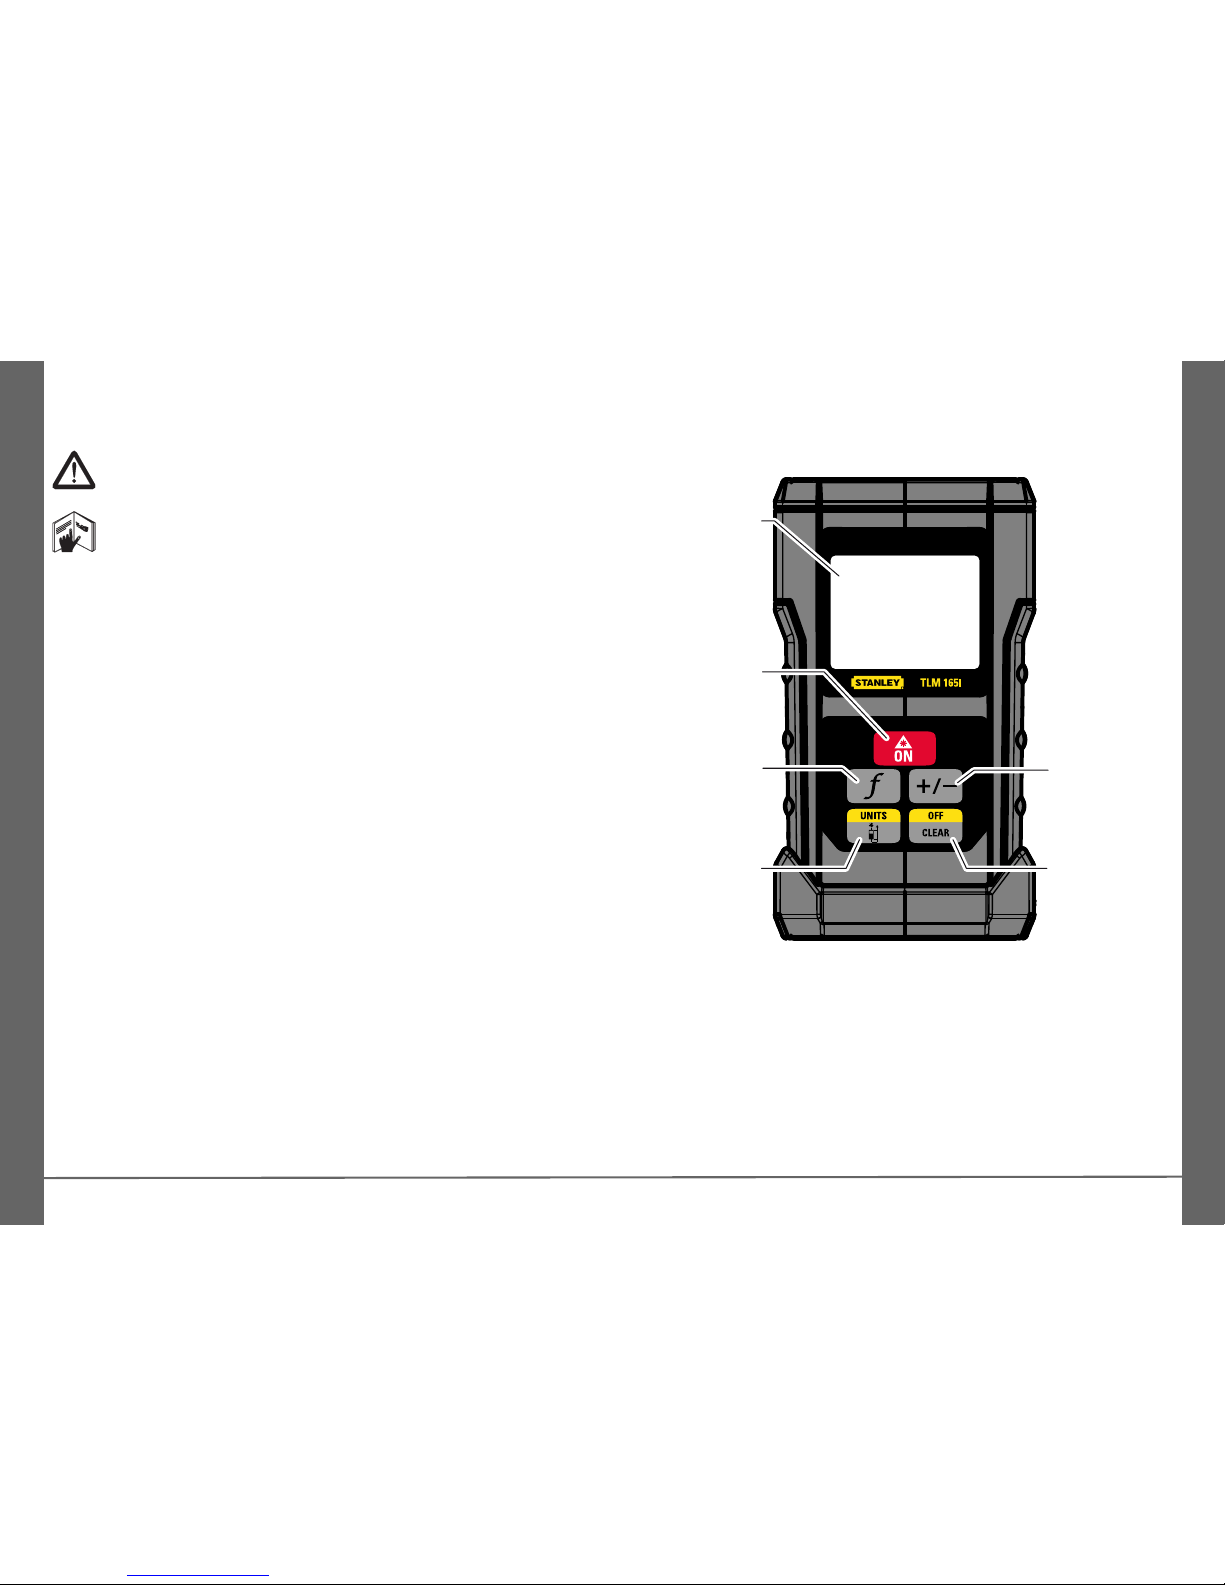
Overview
Display
On / Measure /
Tracking
Area /
Volume /
Pythagoras/
Memory
Measuring
reference /
Unit
Add /
Subtract
Clear / Off
Page 3
Stanley TLM165I
Instrument Set-up
3
EN
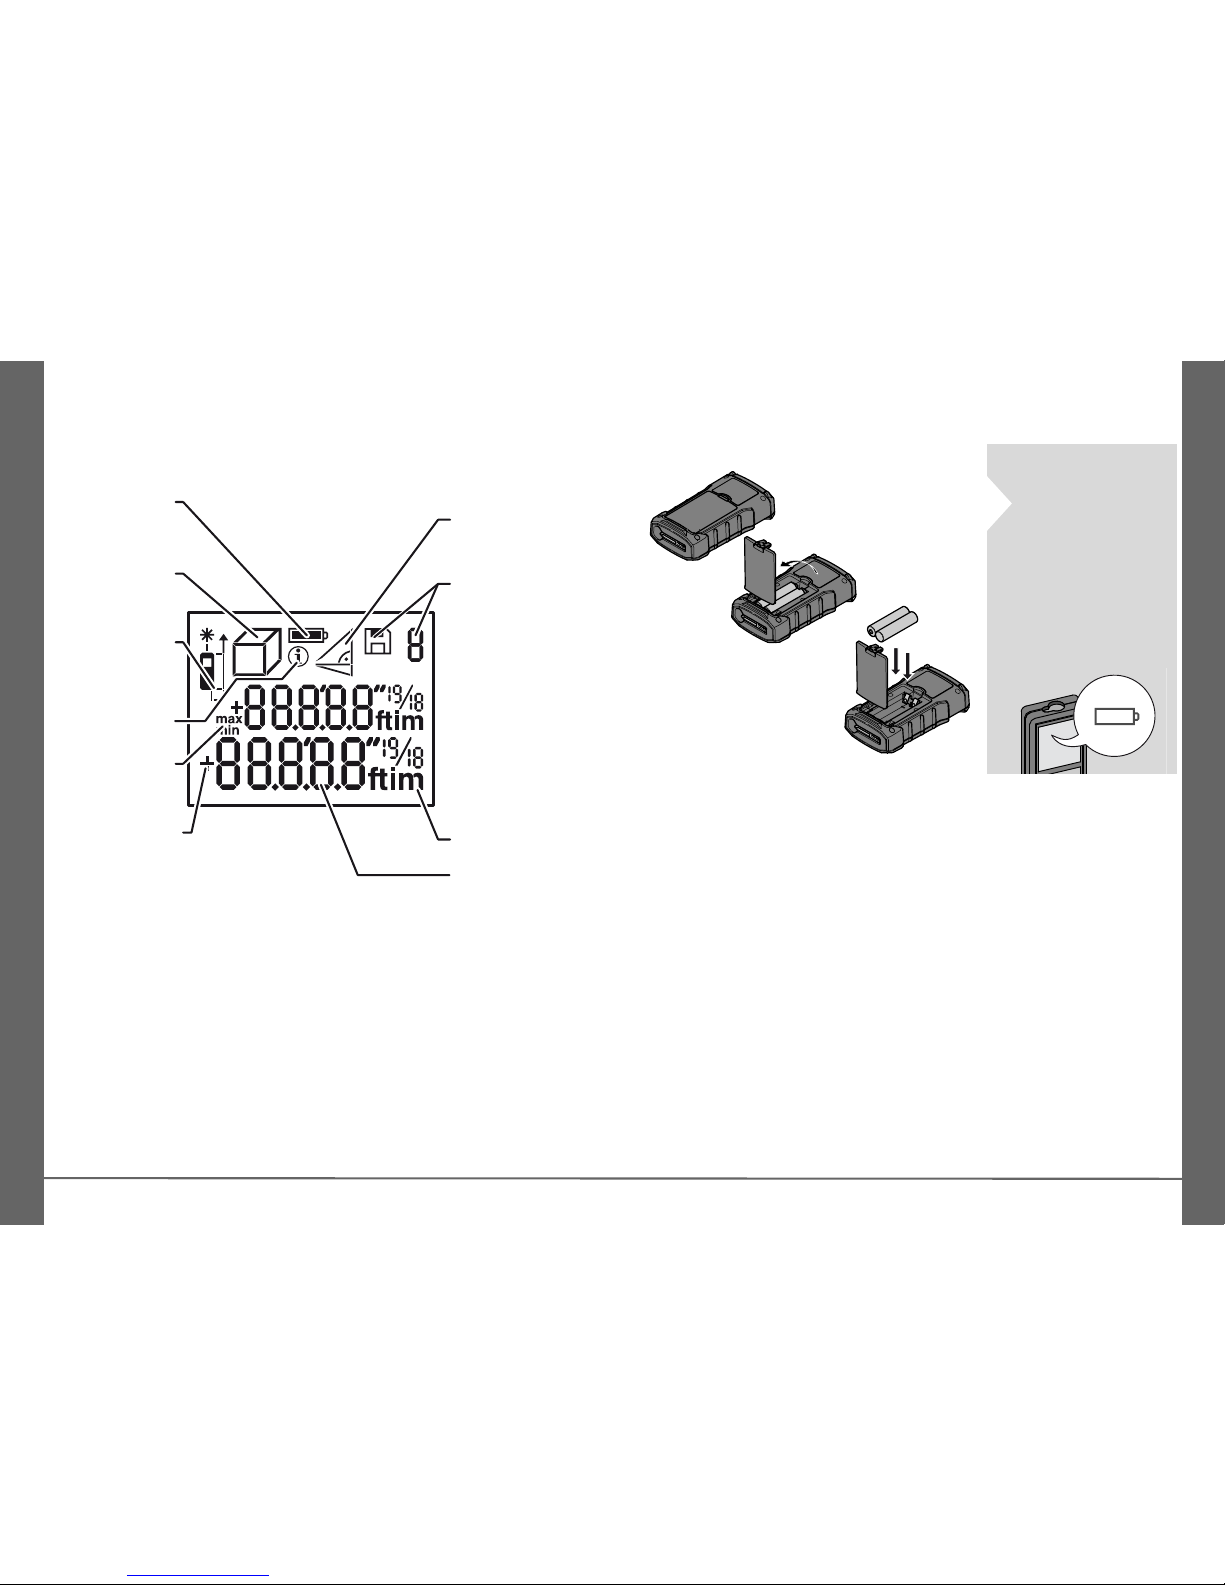
Display
Battery
Units
Area /
Volume
Min/Max
Measuring
Measuring
reference
Info
Addition /
Subtraction
Pythagoras
Memory
Main line
Insert batteries
i
To ensure a reliable use, do not
use zinc-carbon
batteries.
Change batteries
when battery
symbol is flashing.
Page 4
Stanley TLM165I
4
EN
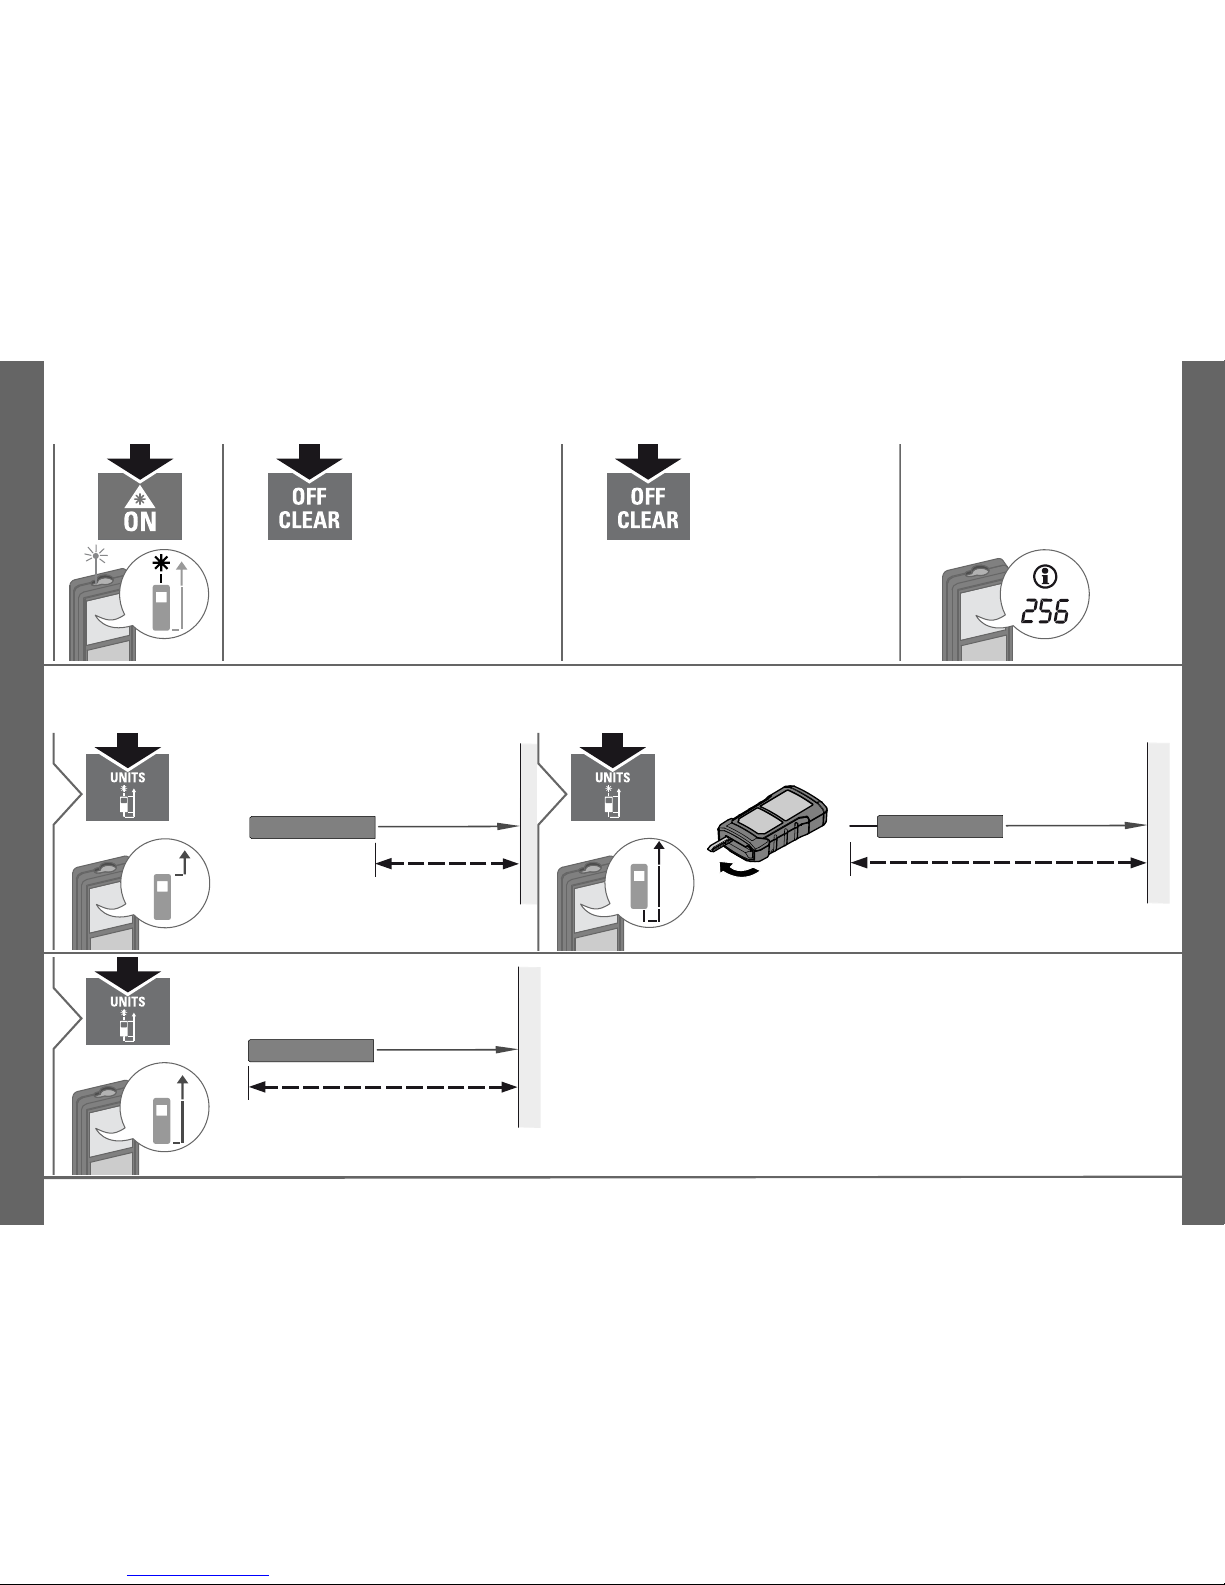
Operations
Switching ON/OFF Clear Message Codes
2 sec
Device is
turned OFF.
1x
Undo last action.
If the info icon appears with a
number, observe the instructions in section "Message
Codes".
Example:
Adjusting measuring reference
Distance is measured from the
front of the device.
1
Distance is measured from the pin
of the endpiece.
2
Distance is measured from the rear
of the device (standard setting).
3
Page 5

Stanley TLM165I
Operations
5
EN
Distance unit setting
0.000m
0'00" 1/16
0 in 1/16
Switch between the
following units:
2 sec
Multifunctional endpiece
Page 6

Stanley TLM165I
6
EN
Measuring Functions
Measuring single distance
1
Aim active laser at target.
2
8.532 m
3
i
Target surfaces: Measuring
errors can occur when measuring to colourless liquids,
glass, styrofoam or semi-permeable surfaces or when
aiming at high gloss surfaces. Against dark surfaces the
measuring time increases.
Permament measuring
1
2 sec
8.532 m
Aim active laser at target.
2
The last value measured is displayed.
Stops permanent measuring.
3
Add / Subtract
7.332 m
1
The next measurement is added
to the previous
one.
2
1x1x
2x
The next measurement is subtracted from the
previous one.
5.5I5 m
I2.847 m
3
i
The result is shown in the
main line and the measured
value above. This process
can be repeated as required.
The same process can be
used for adding or subtracting
areas or volumes.
Page 7

Stanley TLM165I
Measuring Functions
7
EN
Area
11x2
Aim laser at first
target point.
3
4
Aim laser at second target point.
24.352 m
2
5
i
The result is shown in the
main line and the measured
value above.
Volume
12x2
Aim laser at first
target point.
3
4
Aim laser at second target point.
5
6
Aim laser at third
target point.
78.694 m
3
7
i
The result is
shown in the
main line and
the measured
value above.
Page 8

Stanley TLM165I
Measuring Functions
8
EN
Pythagoras (2-point)
13x2
Aim laser at upper point.
3
4
Aim laser rectangular at lower
point.
8.294 m
5
i
The result is shown
in the main line and
the measured distance above.
Pressing the measuring key for 2 sec
in the function activates automatically
Minimum or Maximum measurement.
Pythagoras (3-point)
14x2
Aim laser at upper point.
3
4
Aim laser at rectangular point.
5
6
Aim laser at lower point.
8.294 m
7
i
The result is shown in the main
line and the measured distance
above.
Pressing the measuring key for
2 sec in the function activates
automatically Minimum or Maximum measurement.
Page 9

Stanley TLM165I
Measuring Functions
9
EN
Memory (5 last results)
8.294 m
5
5 last results are
displayed.
1
5x
8.294 m
5
Navigates trough
5 last results.
2
Page 10

Stanley TLM165I
10
EN
Technical Data
* applies for 100 % target reflectivity (white painted
wall), low background illumination, 25 ºC
** applies for 10 to 500 % target reflectivity, high background illumination, -10 ºC to 50 ºC
*** Tolerances apply from 0.05 m to 10 m with a confidence level of 95%. The maximum tolerance may
deteriorate to 0.15 mm/m between 10 m to 30 m and
to 0.2 mm/m for distances above 30 m
**** applies for 100 % target reflectivity, background
illumination of approximately 30'000 lux
Distance measurement
Typical Measuring Tolerance* ± 1.5 mm / 0.06 in ***
Maximum Measuring Tolerance**
± 3.0 mm / 0.12 in ***
Range at Target Plate 60 m / 197 ft
Typical Range* 50 m / 164 ft
Range at unfavourable condition ****
40 m / 132 ft
Smallest unit displayed 1 mm / 1/16 in
Ø laser point
at distances
6 / 30 mm
(10 / 50 m)
General
Laser class 2
Laser type 635 nm, < 1 mW
Protection class IP54 (dust- and splash
water protected)
Autom. laser switch off after 90 s
Autom. power switch-off after 180 s
Battery durability (2 x AAA) up to 3000 measure-
ments
Dimension (H x D x W) 104 x 58.8 x 29.6 mm
4.25 x 2.31 x 1.17 in
Weight (with batteries) 100 g / 3.53 oz
Temperature range:
- Storage
- Operation
-25 to 70 °C
-13 to 158 °F
-10 to 50 °C
14 to 122 °F
Functions
Distance measuring yes
Min/Max measuring yes
Permanent measuring yes
Addition/Subtraction yes
Area yes
Volume yes
Pythagoras 2-point, 3-point
Memory 5 results
Page 11

Stanley TLM165I
11
EN
Message Codes
If the message Error does not disappear
after switching on the device repeatedly,
contact the dealer.
If the message InFo appears with a
number, press the Clear button and
observe the following instructions:
Care
• Clean the device with a damp, soft cloth.
• Never immerse the device in water.
• Never use aggressive cleaning agents
or solvents.
Warranty
The Stanley TLM has a two-year warranty.
For further information on this, contact
your dealer.
Subject to change (drawings, descriptions
and technical data).
Safety Instructions
The person responsible for the instrument
must ensure that all users understand
these directions and adhere to them.
Areas of responsibility
Responsibilities of the manufacturer
of the original equipment:
Stanley Tools
701 E. Joppa Road
Towson, Maryland 21286
www.STANLEYLASERS.com
www.STANLEYTOOLS.com
www.STANLEYTOOLS.eu
The company above is responsible for
supplying the product, including the User
Manual in a completely safe condition.
The company above is not responsible for
third party accessories.
Responsibilities of the person in
charge of the instrument:
• To understand the safety instructions on
the product and the instructions in the
User Manual.
• To be familiar with local safety regulations relating to accident prevention.
• Always prevent access to the product by
unauthorised personnel.
No. Cause Correction
204 Calculation error Perform measurement
again.
252 Temperature too
high
Let device cool down.
253 Temperature too
low
Warm device up.
255 Received signal too
weak, measuring
time too long
Change target surface
(e.g. white paper).
256 Received signal too
high
Change target surface
(e.g. white paper).
257 Too much back-
ground light
Shadow target area.
258 Measurement
outside of measuring range
Correct range.
260 Laser beam inter-
rupted
Repeat measurement.
Page 12

Stanley TLM165I
Safety Instructions
12
EN
Permitted use
• Measuring distances
• Tilt measurement
Prohibited use
• Using the product without instruction
• Using outside the stated limits
• Deactivation of safety systems and
removal of explanatory and hazard
labels
• Opening of the equipment by using tools
(screwdrivers, etc.)
• Carrying out modification or conversion
of the product
• Use of accessories from other manufacturers without express approval
• Deliberate dazzling of third parties; also
in the dark
• Inadequate safeguards at the surveying
site (e.g. when measuring on roads,
construction sites, etc.)
• Deliberate or irresponsible behaviour on
scaffolding, when using ladders, when
measuring near machines which are
running or near parts of machines or
installations which are unprotected
• Aiming directly in the sun
Hazards in use
WARNING
Watch out for erroneous measurements if
the instrument is defective or if it has been
dropped or has been misused or modified.
Carry out periodic test measurements.
Particularly after the instrument has been
subject to abnormal use, and before,
during and after important measurements.
CAUTION
Never attempt to repair the product yourself. In case of damage, contact a local
dealer.
WARNING
Changes or modifications not expressly
approved could void the user’s authority to
operate the equipment.
Limits of use
Refer to section "Technical data".
The device is designed for use in
areas permanently habitable by
humans. Do not use the product in explosion hazardous areas or in aggressive
environments.
Disposal
CAUTION
Flat batteries must not be disposed of with
household waste. Care for the environment and take them to the collection points
provided in accordance with national or
local regulations.
The product must not be disposed with
household waste.
Dispose of the product appropriately in accordance with the
national regulations in force in your
country.
Adhere to the national and country specific
regulations.
Product specific treatment and waste
management can be downloaded from our
homepage.
Electromagnetic Compatibility
(EMC)
WARNING
The device conforms to the most stringent
requirements of the relevant standards
and regulations.
Yet, the possibility of causing interference
in other devices cannot be totally
excluded.
i
Page 13

Stanley TLM165I
Safety Instructions
13
EN
FCC statement (applicable in U.S.)
This equipment has been tested and found
to comply with the limits for a Class B
digital device, pursuant to part 15 of the
FCC Rules. These limits are designed to
provide reasonable protection against
harmful interference in a residential installation.This equipment generates, uses and
can radiate radio frequency energy and, if
not installed and used in accordance with
the instructions, may cause harmful interference to radio communications.
However, there is no guarantee that interference will not occur in a particular installation. If this equipment does cause
harmful interference to radio or television
reception, which can be determined by
turning the equipment off and on, the user
is encouraged to try to correct the interference by one or more of the following
measures:
• Reorient or relocate the receiving
antenna.
• Increase the separation between the
equipment and receiver.
• Connect the equipment into an outlet on
a circuit different from that to which the
receiver is connected.
• Consult the dealer or an experienced
radio/TV technician for help.
Laser classification
The device produces visible laser beams,
which are emitted from the instrument:
It is a Class 2 laser product in accordance
with:
• IEC60825-1 : 2007 „Radiation safety of
laser products“
Laser Class 2 products:
Do not stare into the laser beam or direct it
towards other people unnecessarily. Eye
protection is normally afforded by aversion
responses including the blink reflex.
WARNING
Looking directly into the beam with optical
aids (e.g. binoculars, telescopes) can be
hazardous.
CAUTION
Looking into the laser beam may be
hazardous to the eyes.
Labelling
Attach the laser sticker (a) of your country
language.
Laser Radiation
Do not stare into the beam
Laser class 2
acc. IEC 60825-1:2007
Maximum radiant power: <1mW
Emitted wavelength: 620-690nm
Beam divergence: 0.16 x 0.6 mrad
Impulse duration: 0.2 x 10
-9
s - 0.8 x 10⁻⁹s
a
 Loading...