

Supreme DF
User's Manual
&
Installation and Servicing Instructions
PLEASE READ THESE INSTRUCTIONS BEFORE USING THIS APPLIANCE
06/10 EINS 514896
REMEMBER, when replacing a part on this appliance, use only spare parts that you can be assured conform to the safety
and performance specification that we require. Do not use reconditioned or copy parts that have not been clearly
authorised by Waterford Stanley.

Be safe
Warning
Accessible parts will become hot in use. To avoid burns and scalds children should be kept away.
You need clean fresh air - so does your cooker. Burner flames produce exhaust gases, heat and moisture. Make sure
that the kitchen is well ventilated: keep natural ventilation holes open or install a powered cooker hood that vents
outside. If you have several burners on or use the cooker for a long time, open a window or turn on an extractor fan.
For more detail see the Installation Instructions.
We recommend you read the 'General Safety Instructions' section if you have not used a gas cooker before.
We describe some basic guidelines on how to use a gas cooker safely.
Gas and Electricity
Make sure that the gas supply is turned on and that the cooker is wired in and switched on. The cooker needs electricity .
Peculiar smells
When you first use your cooker it may give off a slight odour and a little smoke. This is normal and harmless (from oven
lagging and starch binder on the element insulation) and will cease after a short period of use.
2

3
Contents
Users Guide
Setting up the Cooker for Use Page 4
Hotplate Burners Page 5
The Slow Cooking Oven Page 6
Ideas for the Slow Cooking Oven Page 7
The Grill (Top Right) Page 12
The Fan Ovens Page 13
Oven Cooking Guide Page 14
Fan Oven Cooking Chart Page 16
The Automatic Cooking Control Page 17
Cleaning the Cooker Page 20
Troubleshooting Page 24
General Safety Instructions Page 26
Installation Guide
Installation Page 28
Servicing Page 35
Circuit Diagram Page 39
Technical Data Page 40
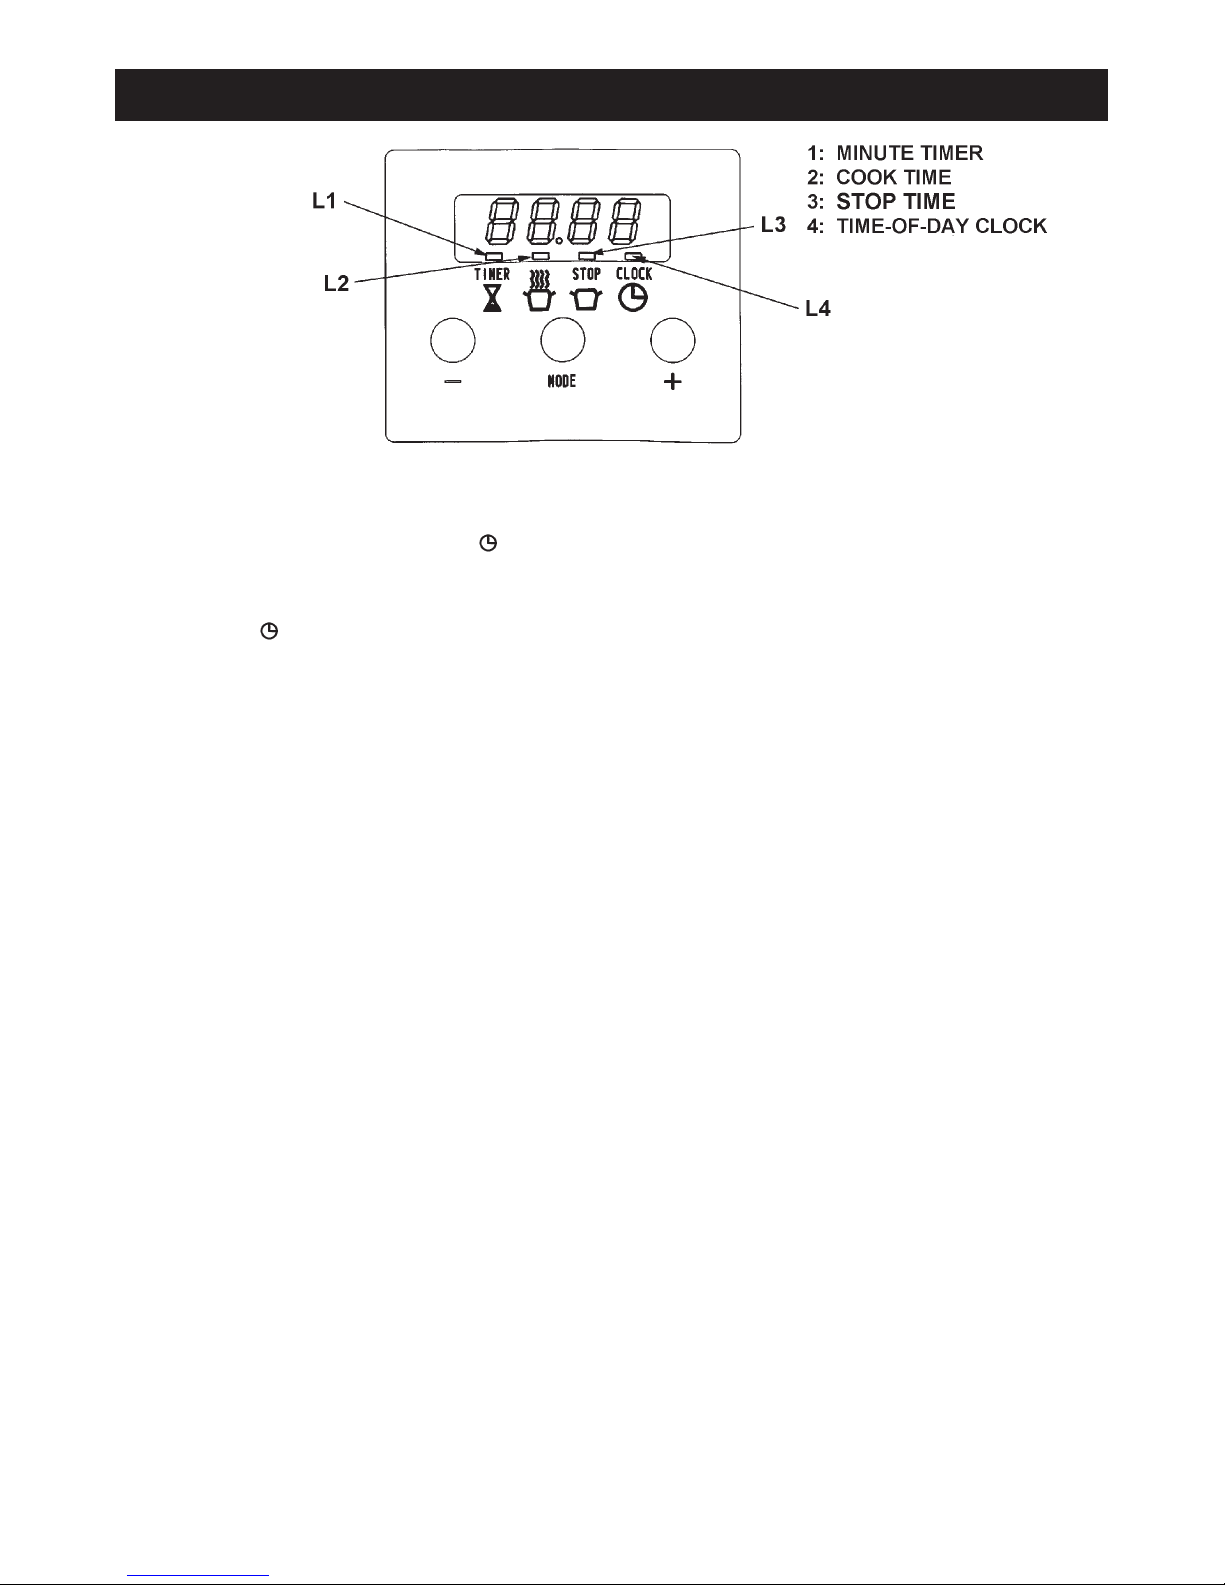
Before the fan oven can be used, it will be necessary to set the ‘time-of-day-clock’.
This is a 24-hour clock, and when the power supply is initially switched on, or after an interruption in supply, the clock will
show 12.00 and the L 4 will flash above the sign.
SETTING THE TIME OF DAY
1. Whilst the L 4 is flashing, press the plus + and/or minus buttons until the display shows the correct time of
day.
2. After 5 seconds, the L4 will stop flashing.
The setting can be altered at any time by using the MODE button until the L 4 flashes and pressing the plus + and minus
- buttons.
The cooker is now ready for use.
Setting up the cooker for use
4
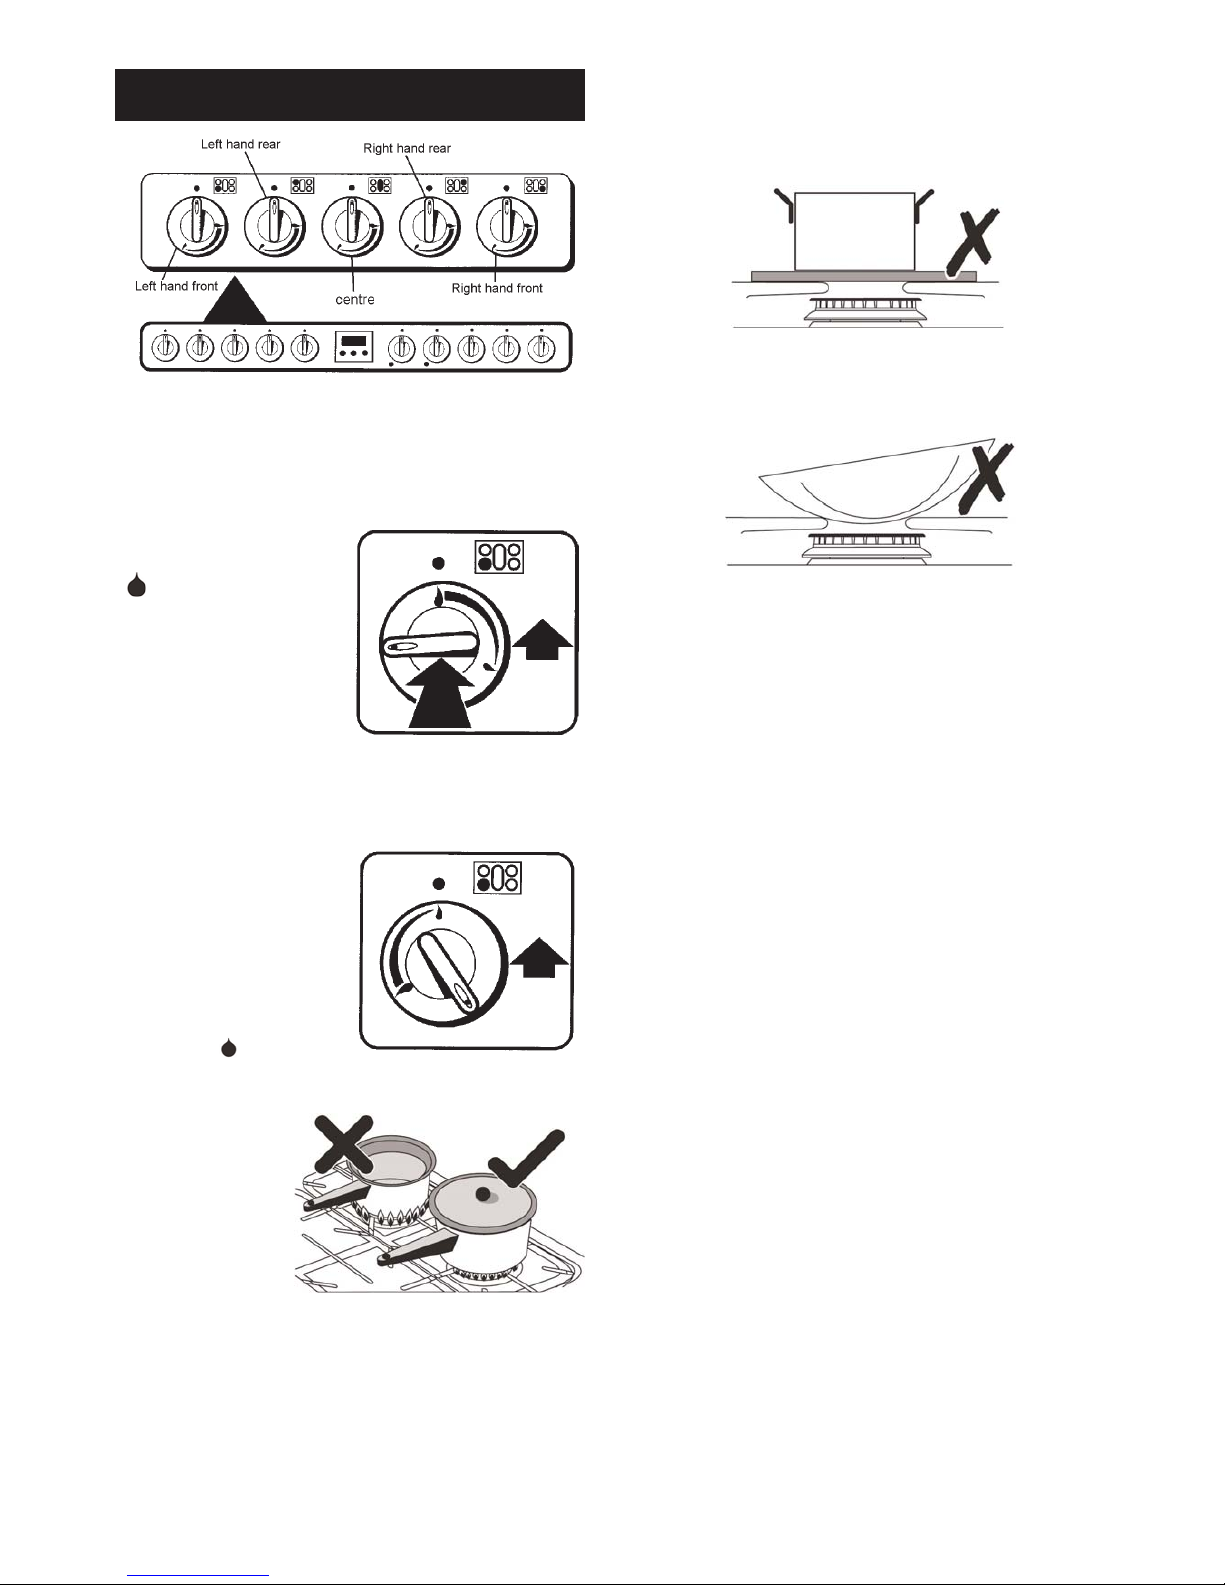
The drawing above each knob indicates which burner that
knob controls. There is a spark ignition system that works
when the knob is pressed in. Each burner also has a
special safety device that stops the flow of gas if the flame
goes out.
Push in and turn a knob to
the large flame symbol
( ).
Keep holding the knob
pressed in to let the gas
through to the burner for a
few seconds. The igniter will
spark and light the gas
automatically.
If, when you let go of the control knob, the burner goes
out, the safety device has not held in. Turn the control to
the off position and wait one minute, then try again this
time holding in the control
knob for slightly longer.
Adjust the flame height to
suit by turning the knob.
On this cooker the low
position is beyond high, not
between high and off. The
small flame ( ) marks the
‘low position’.
Turn the knob
towards it after the
contents of a pan
have boiled.
Place all pans
centrally over the
burners. The flames
must be on the base
of the pan. Do not allow the flames to go up the sides of
the pan.
Using a lid will help the contents boil more quickly.
Always position pan handles away from the front of the
cooker, out of reach of small children.
Pan and kettles with concave bases or down turned base
rims should not be used.
Simmering aids, such as asbestos or mesh mats, are NOT
recommended. They will reduce burner performance and
could damage the pan supports.
Avoid using unstable and misshapen pans that may tilt
easily and pans with a very small base diameter e.g. milk
pans, single egg poachers.
Do not use oversized pans that overhang the edges of the
pan supports.
Minimum pan sizes
The minimum pan diameter recommended is 120mm
(about 4
3
/4
”).
When the hotplate control knob is pressed in, sparks will
be made at every burner, this is normal.
If, after lighting the hotplate burner flame goes out, turn it
off and leave it for one minute before relighting it.
IMPORTANT: The cast iron pan supports on the
appliance are of a professional design and much
heavier than most if not all gas hob cookers.
Therefore care must be taken when removing or refitting them from or to the hob. It is important that they
are lifted from the appliance. Do not drag them across
adjacent enamelled components as this could
damage the enamel.
Y ou can remove the burner head for cleaning. See the
‘Cleaning your cooker’ section of these instructions
for removal and fitting of the pan supports and burner
parts.
You should wipe the top surface of the cooker around the
hotplate burners as soon as possible after spills occur. Try
to wipe them off while the hotplate is still warm.
5
Hotplate Burners

Deep Fat Frying
z
Use a deep pan large enough to completely cover the
appropriate heating area.
z
Never fill the pan more than one-third full of fat or oil.
z
Never leave fat or oil unattended during the heating or
cooking period.
z
Never use a lid on the pan.
z
IMPORTANT: Oil is a fire risk; do not leave pans
containing oil unattended.
z
In the event of fire cover with a lid and turn OFF the
appliance.
Do not attempt to extinguish the fire using water.
Smother the flames on the hob rather than attempting to
remove the pan to the outside.
Burns and injuries are caused almost invariably by picking
up the burning pan to carry outside.
z
Do not try to fry too much food at a time, especially
frozen food. This only lowers the temperature of the oil
or fat too much, resulting in greasy food.
z
Always dry food thoroughly before frying and lower it
slowly into the hot oil or fat. Frozen foods in particular,
will cause frothing or spitting, if added to quickly.
z
Keep the outside of the pan, clean and free from
streaks of oil or fat.
NOTE: Use of aluminium pans may cause metallic
marking of the pan supports. This does not affect the
durability of the enamel and may be cleaned off with a
metal cleaner such as ‘Brasso’ or an enamel rubber.
Fish Kettle Burner
The central hotplate burner can be used to cook whole
salmon, trout, etc. in a fish kettle.
Suggested Method for cooking whole Salmon
Place the gutted and cleaned fish, with or without head
and tail in to the kettle with sufficient water to almost cover
the fish. Season with salt and pepper and add a few
pieces of carrot, onion and parsley to give flavour. Bring to
the boil, covered and simmer for 8 - 10 mins per 450g (1
lb).
When cooked, leave to cool in the liquid before draining,
and removing the skin. Decorate as desired.
6
This oven is for long, slow cooking over 6-8 hours,
keeping food warm and warming plates for short periods.
Extra care must be taken when warming bone china use the lowest setting.
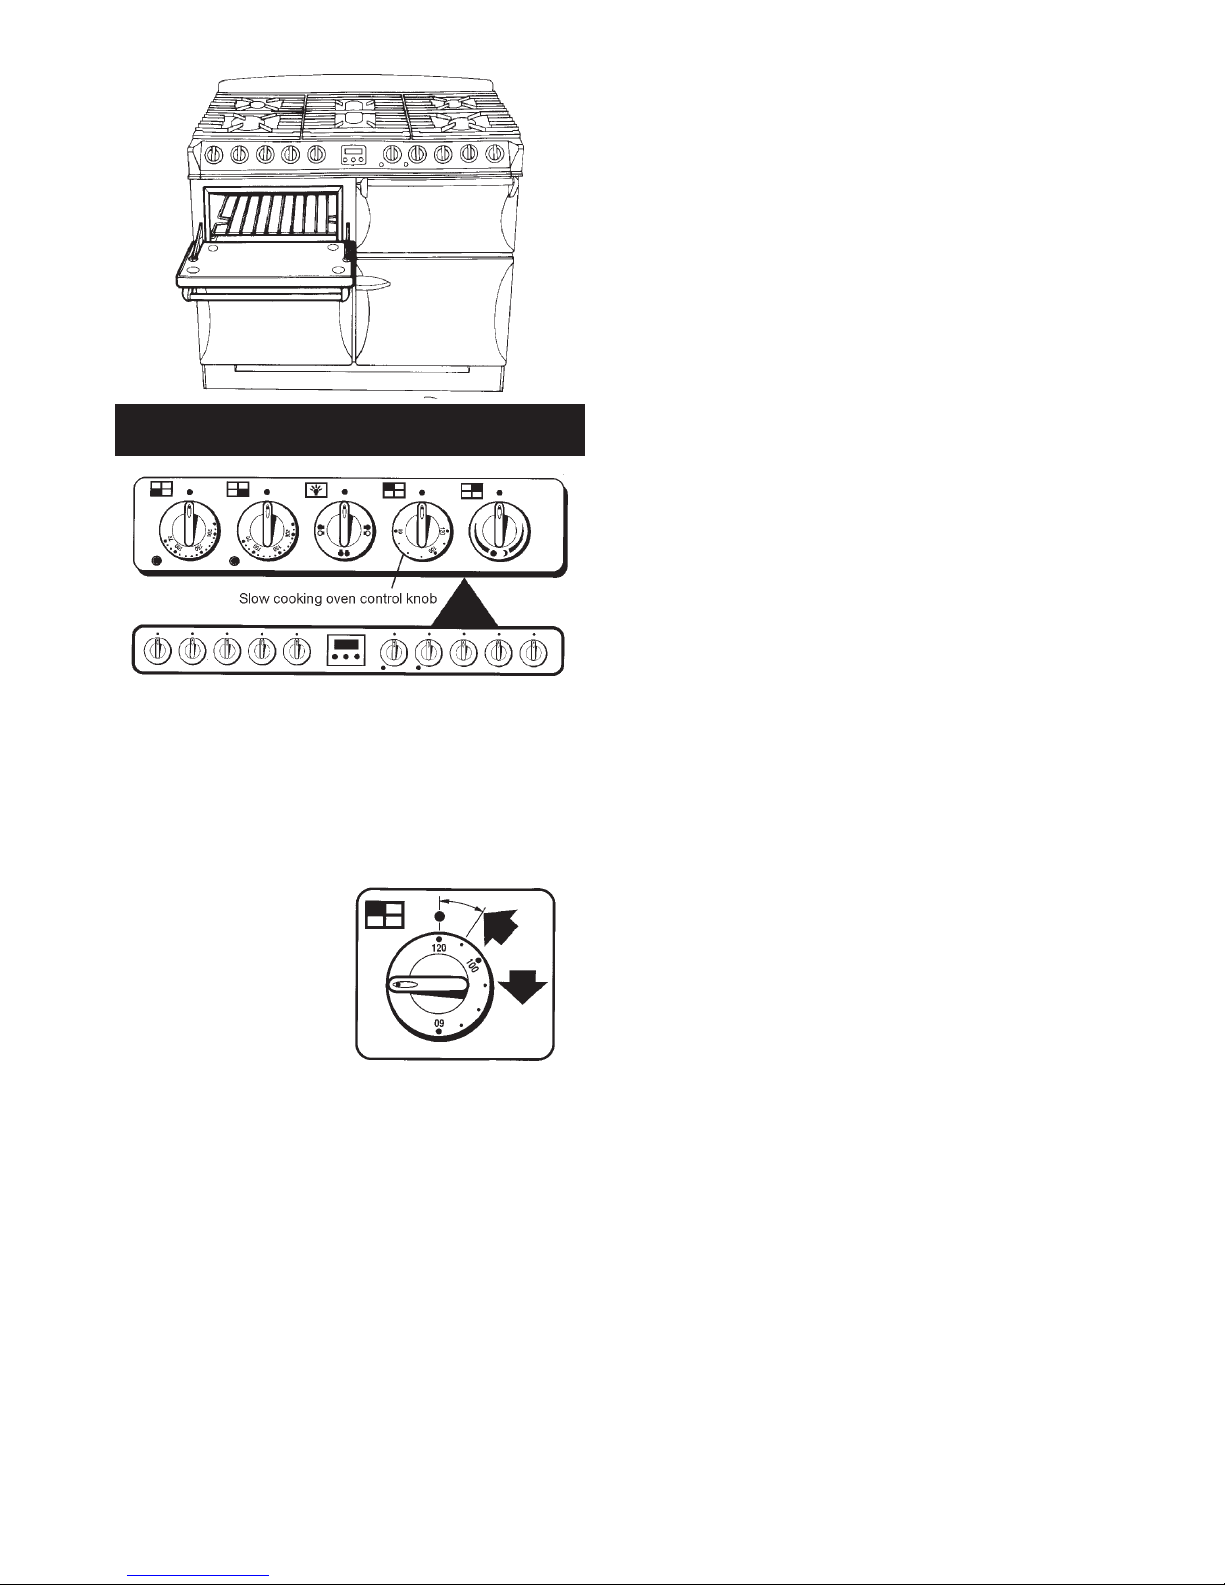
Using the Slow Cooking Setting
The slow cooking setting
is in the area marked
between 110° - 120°C
on the oven control knob.
The Slow Cooking oven has side panels that are coated
with a special enamel that partly cleans itself. For more on
cleaning the ovens see the ‘Cleaning your cooker’ section
of these instructions.
Points to bear in mind when preparing food.
Do not place dishes directly on to the oven base. Always
place onto shelf supplied.
The shelf is designed to lock in place, but is removable for
cleaning. See the ‘Cleaning your cooker’ section of these
instructions.
Push dishes well back in the oven to ensure that they are
positioned over the element beneath the base plate.
Make sure all dishes will fit into the oven before preparing
the food.
All dishes cooked by the slow cooking method should be
cooked for a minimum of 6 hours. They will ‘hold’ at this
setting for a further 1-2 hours but marked deterioration in
appearance will be noticed in some cases.
Joints of meat and poultry should be cooked at 180°C for
30 minutes before transferring to the slow cooking oven.
Meat over 2.7 kg (6lbs) and poultry over 2kg (4lbs 8ozs)
are unsuitable for the slow cooking method.
Always stand covered joints on a rack over a meat tin, to
allow good air circulation.
Make sure that pork and poultry reach an internal
temperature of at least 90°C.
Slow cooking is unsuitable for stuffed meat and poultry.
Always brings soups, casseroles and liquids to the boil
before putting in the oven. When casseroles are used,
cover the food first with foil and then the lid to prevent loss
of moisture.
Always thaw frozen foods completely before cooking.
Root vegetables will cook better if cut into small pieces.
Adjust seasonings and thickenings at the end of the
cooking time.
Egg and fish dishes need only 1-5 hours cooking and
should be included in day cooking sessions, where they
can be observed from time to time.
Dried red kidney beans must be boiled for a minimum of
ten minutes, after soaking, and before inclusion in any
dish.
Storage and Re-Heating of Food
If food is to be frozen or not served immediately, cool it in
a clean container as quickly as possible.
Thaw frozen food completely in the refrigerator before reheating.
Re-heat food thoroughly and quickly either on the hotplate
or in a hot oven 200°C (180°C fan oven), and then serve
immediately.
The Slow Cooking Oven
7

Many favourite recipes can be adapted for this type of cooking:
Slow Cooking Oven Recipes - Meal 1
6 - 8 hours cooking time
Ragout of Beef in Ale
Baked Potatoes
Rice Pudding
Ingredients Method
* If cooking for 8 hours or more use 40g (1 1/2
oz) rice only
Ideas for the Slow Cooking Oven
Ragout of Beef in Ale
Baked Potatoes
Rice Pudding
30ml (2tbsps) oil
675g (1
1
/
2 lbs) chuck steak, cubed
1 clove of garlic, crushed
2 carrots, sliced
100g (4oz) mushrooms, quartered
2 medium onions, sliced
40g (1
1
/2 ozs) plain flour
5ml (1 tsp) coarse-grained mustard
10ml (1 dsp) Demerara sugar
30ml (2tbsps) tomato purée
450ml (
3
/4 pt) brown ale
salt and freshly ground pepper
4 medium sized potatoes
*40-50g (1
1
/2 - 2 ozs) pudding rice
25g (1oz) sugar
550ml (1 pt) milk
nutmeg
knob of butter
25g (1oz) sultanas (optional)
1. Sauté the meat in a casserole in hot oil until brown.
Remove.
2. Sauté the garlic, onions, carrots and mushrooms until
brown.
3. Stir in flour and mix well.
4. Add mustard, sugar and tomato purée.
5. Stir in the ale and seasoning. Return meat.
6. Bring to the boil and cover. Transfer to the oven.
1. Wash and prick well all over.
2. Wrap in one layer of foil.
3. Place directly on the shelf in between the casserole
and rice pudding.
1. Wash the rice in cold water and place in an 850ml (1
1
/2 pt) pie dish.
2. Add the sugar, milk and sultanas if using.
3. Sprinkle with nutmeg and add a good knob of butter.
8

Slow Cooking Oven Recipes - Meal 2
6 - 8 hours cooking time
Roast Fillet of Lamb
Dauphinoise Potatoes
Bread and Butter Pudding
Ingredients Method
Roast fillet of Lamb
Dauphinoise Potatoes
Bread and Butter Pudding
900g - 1.25 kg (2 - 2
1
/
2lbs) lamb
450g (1 lb) potatoes, thinly sliced
1-2 cloves of garlic, crushed
125ml (
1
/4 pt) double cream
salt and freshly ground black pepper
6-8 medium slices of wholemeal bread
Approx 50g (2ozs) butter, melted
Grated rind of one orange (optional)
25g (1oz) desiccated coconut
50 - 100g (2 - 4oz) luxury/tropical mixed fruit
50g (2oz) soft brown sugar
450ml (
3
/
4 pt) milk
2 eggs
1. Season and wrap the lamb in foil.
2. Stand meat on a rack over a small roasting tin.
1. Grease a shallow oval or rectangular dish.
2. Arrange layers of potatoes, seasoning and garlic in the
dish, ending with potatoes.
3. Pour over the cream and cover well with foil.
1. Grease a shallow oval or rectangular dish.
2. Cut the crusts off the bread and divide into
rectangles/triangles.
3. Dip enough pieces of bread in the butter on one side to
cover the base of the dish, butter side up.
4. Sprinkle with half of the fruit, coconut, sugar and
orange rind.
5. Cover with a second layer of bread dipped in the butter
and then the remaining rind, fruit, coconut and sugar.
6. Whisk the eggs and milk together and pour over the
bread, Stand for
1
/2 hour before baking. Leave
uncovered in the oven.
9

Slow Cooking Oven Recipes - Meal 3
6 - 8 hours cooking time
Gammon and Apricot Pie
Braised Red Cabbage
St. Clements Pudding
Ingredients Method
Gammon and Apricot Pie
St Clements Pudding
Braised Red Cabbage
2 gammon rashers approx 15mm (
1
/
2”) thick
100g (4oz) no-soak dried apricots
25g (1oz) sultanas
3 large potatoes, thinly sliced
300ml (
1
/2 pt) chicken stock
50g (2oz) butter, melted
2 rounds of thick sliced wholemeal bread
a little milk
50g (2oz) butter or margarine
50g (2oz) soft brown sugar
grated rind and juice of 1 lemon
grated rind and juice of 1 orange
3 eggs, separated
caster sugar for sprinkling
350g (3/4 lb) red cabbage
25g (1oz) butter
1 medium onion, sliced
1 medium cooking apple, sliced
30ml (2 tbsps) cider vinegar
45ml (3 tbsps) honey
salt and pepper
1. Remove the rind from the gammon. Nick the edges
and lay them in a shallow dish.
2. Sprinkle with apricots, sultanas and pepper.
3. Overlap the sliced potatoes on top of the gammon.
Pour over stock.
4. Brush with melted butter, place in the oven
1. Grease a shallow ovenproof dish and line the base
with fingers of bread.
2. Pour over sufficient milk to be absorbed by the bread.
3. Cream the fat and sugar.
4. Add the yolks, grated rind and juice of orange and
lemon. Beat.
5. Whisk the egg whites stiffly and fold most of them into
the creamed mixture.
6. Spread the mixture over the bread.
7. Finish with a layer of the remaining egg white, thickly
dredged with sugar. Leave uncovered. Place in the
oven.
1. Slice the red cabbage finely.
2. Melt the butter in an oval casserole dish and sauté the
onion and apple until starting to soften.
3. Add the cabbage and cook for a further 2 minutes.
4. Mix in the vinegar, honey and seasoning.
5. Cover with buttered greaseproof paper and a tightly
fitting lid, covered in foil. Place in the oven.
10

Slow Cooking Oven Recipes - Meal 4
6 - 8 hours cooking time
Chilli Con Carne
Oven Rice
Frangipane and Apple Pudding
Ingredients Method
Chilli Con Carne
Frangipane and Apple Pudding
Oven Rice
450g (1 lb) minced beef
1 x 400g (14 oz) tin tomatoes
1 x 400g (14oz) tin kidney beans
1 packed Chilli con carne spice mix
100ml (4 fl oz) water
450g (1 lb) cooking apples, grated
50g (2 oz) vanilla fudge, chopped
50g (2 oz) softened butter
50g (2 oz) soft brown sugar
50g (2 oz) ground almonds
12g (
1
/2
oz) plain flour
1 egg
almond essence
225g (8oz) long grain rice
350ml (12 fl ozs) water
seasoning
1. Brown the minced beef in an oval casserole dish.
2. Stir in the spice mix.
3. Add beans drained, tomatoes and water.
4. Mix well together. Bring to boil, cover well and place in
oven.
1. Grease a shallow oven dish.
2. Mix the apples and fudge together and place into the
dish.
3. Cream the rest of the ingredients and add a few drops
of almond essence.
4. Carefully spread over the apple. Leave uncovered and
place in oven.
1. Wash rice and place in an oval casserole dish.
2. Pour on water, seasoning and bring to the boil.
3. Cover well and place in oven.
11
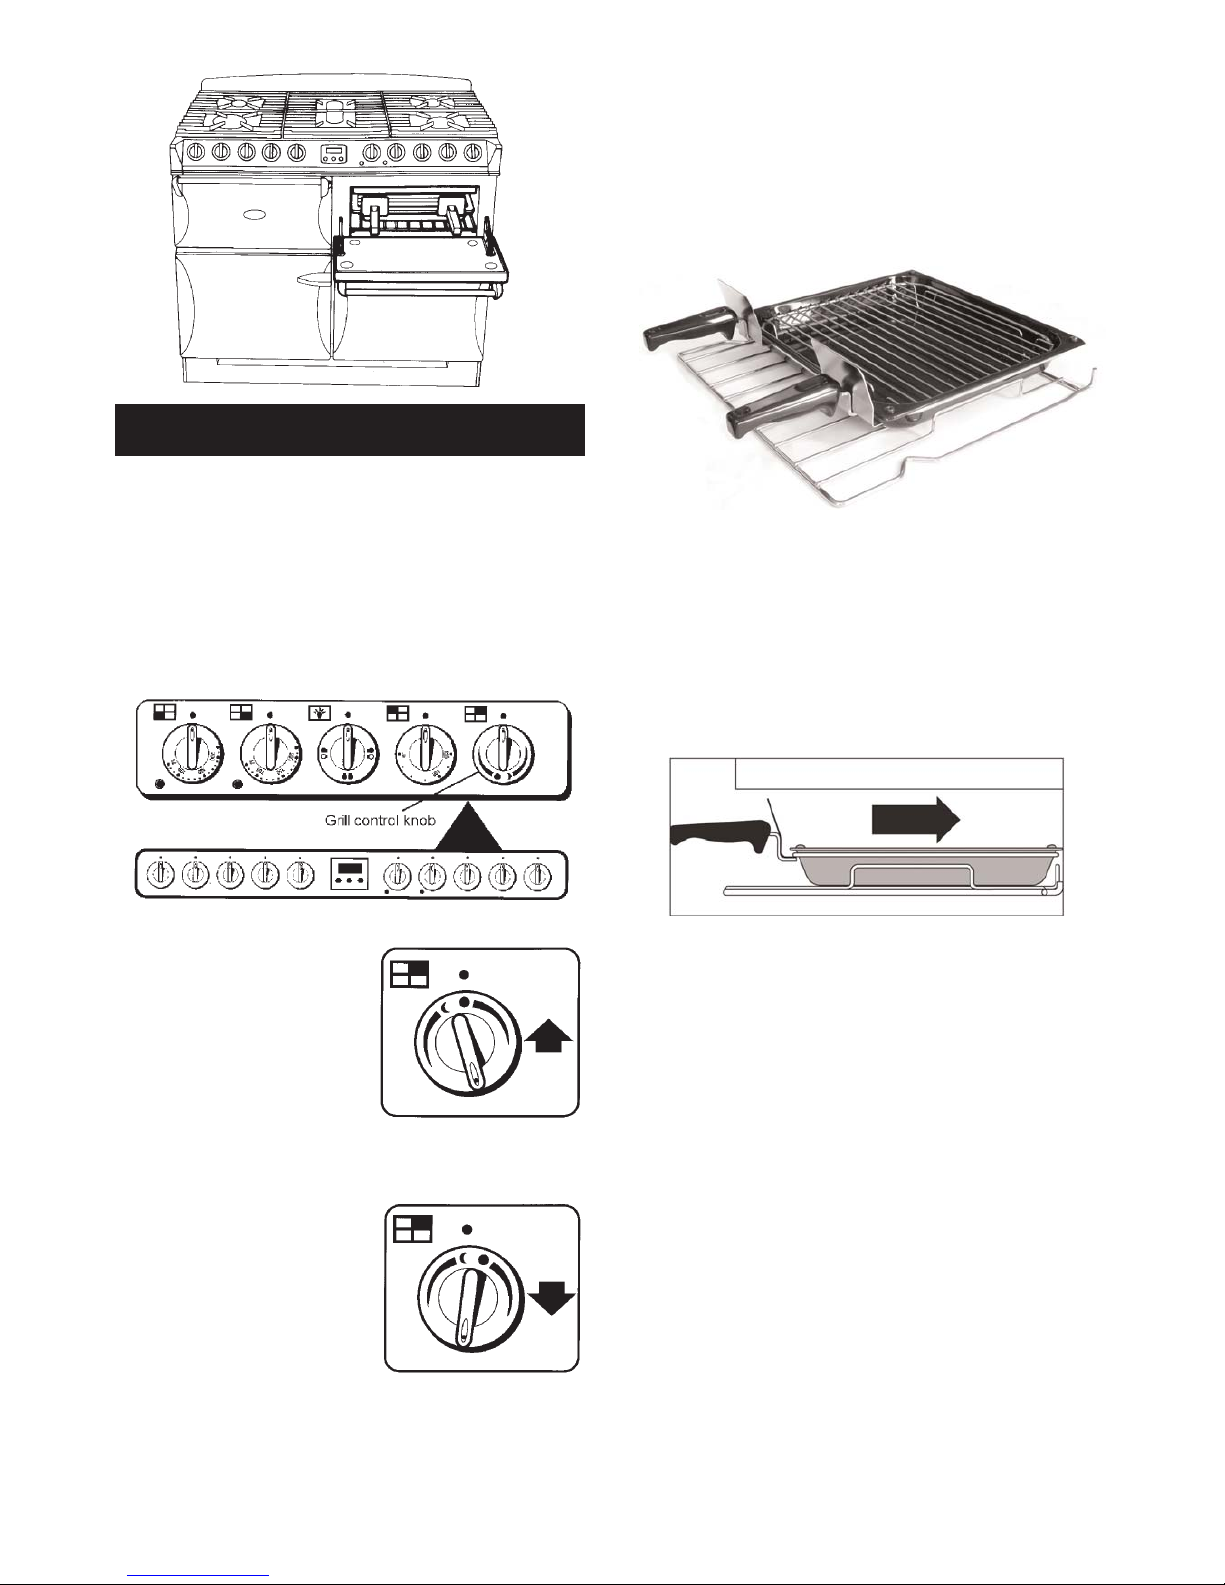
CAUTION: Accessible parts may be hot when the grill
is in use. Young children should be kept away.
If you find a crack in the glass surface of the grill
immediately disconnect the appliance from the electricity
supply. Do not reconnect the appliance until it is repaired.
THE GRILL COMPARTMENT DOOR MUST BE KEPT
OPEN WHEN THE GRILL IS ON.
The very high speed instant grill
is divided into two areas to save
energy and to suit individual
grilling requirements.
Turn the grill control clockwise
and the whole of the grilling
area can be used for large
amounts of food.
For small amounts of food e.g.
2 slices of toast, one or two
chops etc. turn the control anticlockwise. Only the middle
area of the grill heats up.
Most food is cooked at a high setting but for thicker pieces
of meat/poultry and for food such as well done steak the
heat can be reduced by turning the control down to a
lower setting.
For best results pre-heat at a high setting for
approximately 2 minutes.
The grill pan fits on the shelf supplied (shown out of the
grill chamber for clarity).
The shelf is designed to lock in place, but is removable for
cleaning. See the ‘Cleaning the cooker’ section of these
instructions.
Make sure the grill pan is pushed right to the back of the
grill chamber.
Food should be cooked on the grid or in the base of the
grill pan. You can brown the top of dishes, cooked in the
oven, under the grill by placing the dish onto the base of
the grill pan, which can easily slide along the floor of the
grill cavity.
The grill chamber has side panels that are coated with a
special enamel that partly cleans itself. For more on
cleaning the cooker see the ‘Cleaning the cooker’ section
of these instructions.
12
The Grill (Top Right)
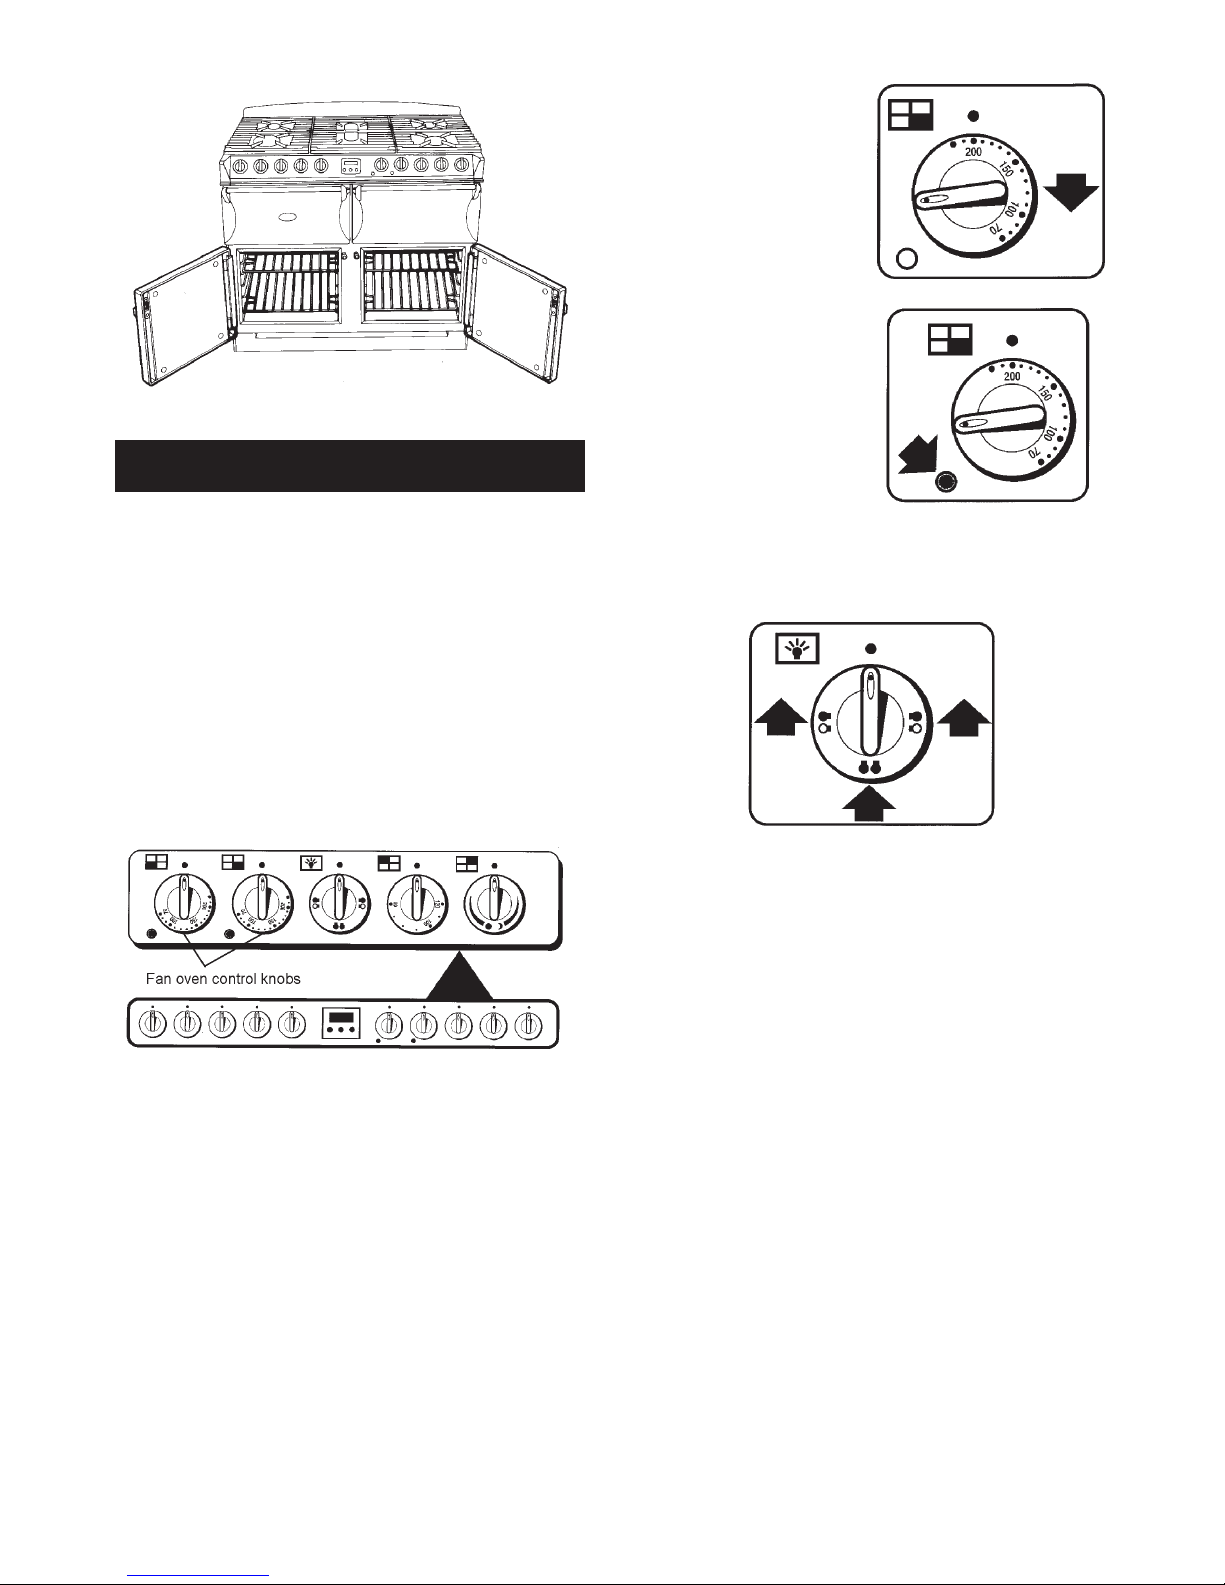
During use the appliance becomes hot. Care should
taken to avoid touching the heating elements inside
the ovens.
The clock must be set to the time of day before the left
hand oven will work. See ‘Setting up the cooker for
use’ section of these instructions for how to set the
clock.
Both the lower ovens are fan ovens. The fans circulate hot
air continuously, which means faster more even cooking.
It is only necessary to pre-heat the ovens for food such as
scones, puff pastry, Yorkshire Pudding, bread etc.
To operate either oven
Before using for the first time, heat the ovens to 200°C for
30 minutes to dispel manufacturing odours.
NOTE: The recommended
cooking temperatures for
fan ovens are generally
lower than non-fanned
ovens. (See Page 16).
Turn the oven temperature
knob to the temperature you
need.
The oven indicator light will
glow until the oven has
reached the temperature
you selected.
It will then cycle on and off
during cooking.
The Oven Lights
Turn the oven light knob to the left for the left hand oven
light and to the right for the right hand oven light. To turn
on both lights turn the knob to the bottom position.
13
The Fan Ovens

14
Cooking Hints
When using the fan ovens, reduce conventional oven
settings by 10ºC - 20ºC and cooking time by up to 10
minutes for every hour.
Fan oven cooking is particularly suitable for baking on
several shelves at one time.
The wire shelves should always be pushed firmly to the
back of the oven.
Baking trays, meat tins etc. should be placed level
centrally on the oven shelves. Keep all trays and
containers away from the sides of the oven, as
ovenbrowning of the food may occur.
For even browning, the maximum recommended size of
baking tray is 300mm x 240mm (12” x 9
1
/2”).
When the oven is on, do not leave the door open for
longer than necessary, otherwise the knobs may get very
hot.
Always leave a ‘fingers width’ between dishes on the
same shelf, and between dishes and the sides of the
oven, this allows the heat to circulate freely around them.
The base of a pastry dish can be browned by pre-heating
the baking tray for 15 minutes before placing the dish in
the centre of the tray.
Where dishes may boil and spill over during cooking,
place them on a baking tray.
Please remember that all cookers vary - temperatures in
the new Aga Masterchef ovens may differ to those other
cookers. Settings and cooking times can be changed to
suit individual tastes. It is important to check that food is
piping hot before serving.
The cooking chart is a general guide but times and
temperatures may vary according to individual recipes.
The meat sections should be used as a general guide but
may vary according to the size, shape of joint on or off the
bone.
Thaw frozen joints before cooking them.
The times are for open roasting, If covered allow extra
time.
The turkey/chicken is cooked when the juices run clear
when pierced with a skewer. If the juices are still pink
continue to cook checking every 15 minutes.
Do not place the shelf or food on the base of the ovens.
Steam
When cooking foods with high water content (e.g. oven
chips) there may be some steam visible at the grille at the
rear of the hotplate.
Condensation may form on the cooker. This is quite
normal and nothing to worry about. The condensation
forms when heat and moisture are present. Whenever
possible try to make sure that food which contains a lot of
moisture for example casseroles are covered. If you do
notice any condensation, wipe it up straight away. Do not
leave food in the oven to cool after it has been switched
off.
Cooking high moisture content foods can create a ‘steam
burst’, when the oven door is opened. When opening the
oven stand well back and allow any steam to disperse.
General
The fan ovens are fitted with side, roof and back panels
that are coated with a special enamel that partly cleans
itself. The oven liners (see Cleaning the cooker) work
better when fat splashes are avoided. Cover meat when
cooking.
To reduce fat splashing when you add vegetables to hot
fat around a roast, dry them thoroughly and brush lightly
with cooking oil.
For more on cleaning the ovens see the ‘Cleaning the
cooker’ section of these instructions.
Do not allow young children to stand on the drop
down oven doors.
Oven Cooking Guide
 Loading...