

Page 1
STSJ0600
English(Original) Page 4
French Page 10
Portuguese Page 18
Russian Page 26
Ukrainian Page 35
Page 2
ENGLISH
(Original instructions)
FIG. A
FIG. B
1
3
2
4
9
5
6
8
7
FIG. C
10
12
11
FIG. D FIG. E
10
4
2
13
6
14
Page 3
(Original instructions)
ENGLISH
FIG. F
FIG. G
15
FIG. H FIG. I
7
5
9
3
Page 4
ENGLISH
(Original instructions)
Technical Data
SPECIFICATIONS STSJ0600
Power 600W
Voltage 220-240V
Frequency 50/60Hz
Speed 800 - 3000 /min
Pendulum action 4 Stages
Bevel cut 0-45º
Modes 3
Cutting capacity
Steel 5mm
Aluminio 15mm
Wood 85mm
Stroke length 20mm
Cord 2m
DO NOT RETURN THIS PRODUCT TO THE STORE,
first contact your local STANLEY Office
or nearest authorized service center.
General Safety Rules
Warning! Read and understand all instructions.
Failure to follow all instructions listed below, may
personal injury.
result in electric shock, fire and/or serious
Save These Instructions
Safety instructions
General power tool safety warnings
Warning! Read all safety warnings and all
instructions listed below may result in electric shock, fire
and/or serious injury.
Save all warnings and instructions for future reference.
The term "power tool" in all of the warnings listed below
refers to your mains operated (corded) power tool or battery
operated (cordless) power tool.
1. Work area safety
a. Keep work area clean and well lit. Cluttered or dark
instructions. Failure to follow the warnings and
areas invite accidents.
4
b. Do not operate power tools in explosive
atmospheres, such as in the presence of flammable
liquids, gases or dust. Power tools create sparks which
may ignite the dust or fumes.
c. Keep children and bystanders away while operating
a power tool. Distractions can cause you to lose control.
2. Electrical safety
a. Power tool plugs must match the outlet. Never
modify the plug in any way. Do not use any adapter
plugs with earthed (grounded) power tools.
Unmodified plugs and matching outlets will reduce risk of
electric shock.
b. Avoid body contact with earthed or grounded
surfaces such as pipes, radiators, ranges and
refrigerators. There is an increased risk of electric
shock if your body is earthed or grounded.
c. Do not expose power tools to rain or wet conditions.
Water entering a power tool will increase the risk of
electric shock.
d. Do not abuse the cord. Never use the cord for
carrying, pulling or unplugging the power tool. Keep
cord away from heat, oil, sharp edges or moving
parts. Damaged or entangled cords increase the risk of
electric shock.
e. When operating a power tool outdoors, use an
extension cord suitable for outdoor use. Use of a cord
suitable for outdoor use reduces the risk of electric
shock.
f. If operating a power tool in a damp location is
unavoidable, use a residual current device (RCD)
protected supply. Use of an RCD reduces the risk of
electric shock. Note: The term “Residual Curent Device
(RCD)” can be replaced by “Ground Fault Circuit
Interrupter (GFCI)” or by “Earth Leakage Circuit Breaker
(ELCB)”.
3. Personal safety
a. Stay alert, watch what you are doing and use
common sense when operating a power tool. Do not
use a power tool while you are tired or under the
influence of drugs, alcohol or medication. A moment
of inattention while operating power tools may result in
serious personal injury.
b. Use personal protective equipment. Always wear eye
protection. Protective equipment such as dust mask,
non-skid safety shoes, hard hat, or hearing protection
used for appropriate conditions will reduce personal
injuries.
Page 5
(Original instructions)
ENGLISH
c. Prevent unintentional starting. Ensure the switch is
in the off-position before connecting to power
source and/or battery pack, picking up or carrying
the tool. Carrying power tools with your finger on the
switch or energising power tools that have the switch on
invites accidents.
d. Remove any adjusting key or wrench before turning
the power tool on. A wrench or a key left attached to a
rotating part of the power tool may result in personal
injury.
e. Do not overreach. Keep proper footing and balance
at all times. This enables better control of the power
tool in unexpected situations.
f. Dress properly. Do not wear loose clothing or
jewellery. Keep your hair, clothing and gloves away
from moving parts. Loose clothes, jewellery or long
hair can be caught in moving parts.
g. If devices are provided for the connection of dust
extraction and collection facilities, ensure these are
connected and properly used. Use of dust collection
can reduce dust-related hazards.
4. Power tool use and care
a. Do not force the power tool. Use the correct power
tool for your application. The correct power tool will do
the job better and safer at the rate for which it was
designed.
f. Keep cutting tools sharp and clean. Properly
maintained cutting tools with sharp cutting edges are less
likely to bind and are easier to control.
5. Service
a. Have your power tool serviced by a qualified repair
person using only identical replacement parts. This
will ensure that the safety of the power tool is
maintained.
6. Labels on tool
The label on your tool may include the following symbols:
Read
Instructions
Manual
Use Eye
Protection
Use Ear
Protection
V ........ Volts
A ........ Amperes
Hz ....... Hertz
W ........ Watts
min ..... minutes
..... Alternating
Current
..... Direct
Current
n
....... No-Load
0
Speed
...... Class II
Construction
.... Earthing
Terminal
.... Safety Alert
Symbol
.../min.. Revolutions
or Reciprocation per
minute
Position of date barcode
The Date Code, which also includes the year of
manufacture, is printed into the housing.
Example:
2014 XX JN
Year of manufacturing
b. Do not use the power tool if the switch does not turn
it on and off. Any power tool that cannot be controlled
with the switch is dangerous and must be repaired.
c. Disconnect the plug from the power source and/or
the battery pack from the power tool before making
any adjustments, changing accessories, or storing
power tools. Such preventive safety measures reduce
the risk of starting the power tool accidentally.
d. Store idle power tools out of the reach of children
and do not allow persons unfamiliar with the power
tool or these instructions to operate the power tool.
Power tools are dangerous in the hands of untrained
users.
e. Maintain power tools. Check for misalignment or
binding of moving parts, breakage of parts and any
other condition that may affect the power tools
operation. If damaged, have the power tool repaired
before use. Many accidents are caused by poorly
maintained power tools.
7. Electrical safety
Your tool is double insulated; therefore no earth
wire is required. Always check that the main voltage
corresponds to the voltage on the rating plate.
Warning! If the power cord is damaged, it must
be replaced by the manufacturer, authorized
STANLEY Service Center or an equally qualified
person in order to avoid damage or injury. If the power cord
is replaced by an equally qualified person, but not authorized
by STANLEY, the warranty will not be valid.
Additional Jigsaws Safety Warning
Warning! Additional safety warnings for jigsaws.
• Hold the tool by the insulated gripping surfaces
when performing an operation where the cutting tool
may contact hidden wiring or its own cord. Contact
with a “live” wire will make exposed metal parts of the
tool “live” and shock the operator.
5
Page 6
ENGLISH
(Original instructions)
• Use clamps or another practical way to secure and
support the workpiece to a stable platform. Holding
the work by hand or against your body leaves it unstable
and may lead to loss of control.
• Keep hands away from cutting area. Never reach
underneath the work piece any reason. Do not insert
fingers or thumb into the vicinity of the reciprocating
blade and blade clamp. Do not stabilize the saw by
gripping the shoe.
• Keep blades sharp. Dull or damaged blades may cause
the saw to swerve or stall under pressure. Always use
the appropriate type of saw blade for the workpiece
material and type of cut.
• When cutting pipe or conduit, make sure that they
are free from water, electrical wiring, etc.
• Do not touch the workpiece or the blade immediately
after operating the tool. They can become very hot.
• Be aware of hidden hazards, before cutting into
walls, floors or ceiling, check for the location of
wiring and pipes.
• The blade will continue to move after releasing the
switch. Always switch the tool off and wait for the saw
blade to come to a complete standstill before putting the
tool down.
Warning! Contact with, or inhalation of dusts arising
from cutting applications may endanger the health
of the operator and possible bystanders. Wear a
dust mask specifically designed for protection against dust
and fumes and ensure that persons within or entering the
work area are also protected.
• This tool is not intended for use by persons (including
children) with reduced physical, sensory or mental
capabilities, or lack of experience and knowledge, unless
they have been given supervision or instruction
concerning use of the appliance by a person responsible
for their safety. Children should be supervised to ensure
that they do not play with the appliance.
• The intended use is described in this instruction manual.
The use of any accessory or attachment or perfor mance
of any operation with this tool other than those
recommended in this instruction manual may present a
risk of personal injury and/or damage to property.
Residual risks
Additional residual risks may arise when using the tool which
may not be included in the enclosed safety warnings. These
risks can arise from misuse, prolonged use etc.
Even with the application of the relevant safety regulations
and the implementation of safety devices, certain residual
risks can not be avoided. These include:
• Injuries caused by touching any rotating/moving parts.
• Injuries caused when changing any parts, blades or
accessories.
• Injuries caused by prolonged use of a tool. When using
any tool for prolonged periods ensure you take regular
breaks.
• Impairment of hearing.
• Health hazards caused by breathing dust developed
when using your tool (example:- working with wood,
especially oak, beech and MDF.)
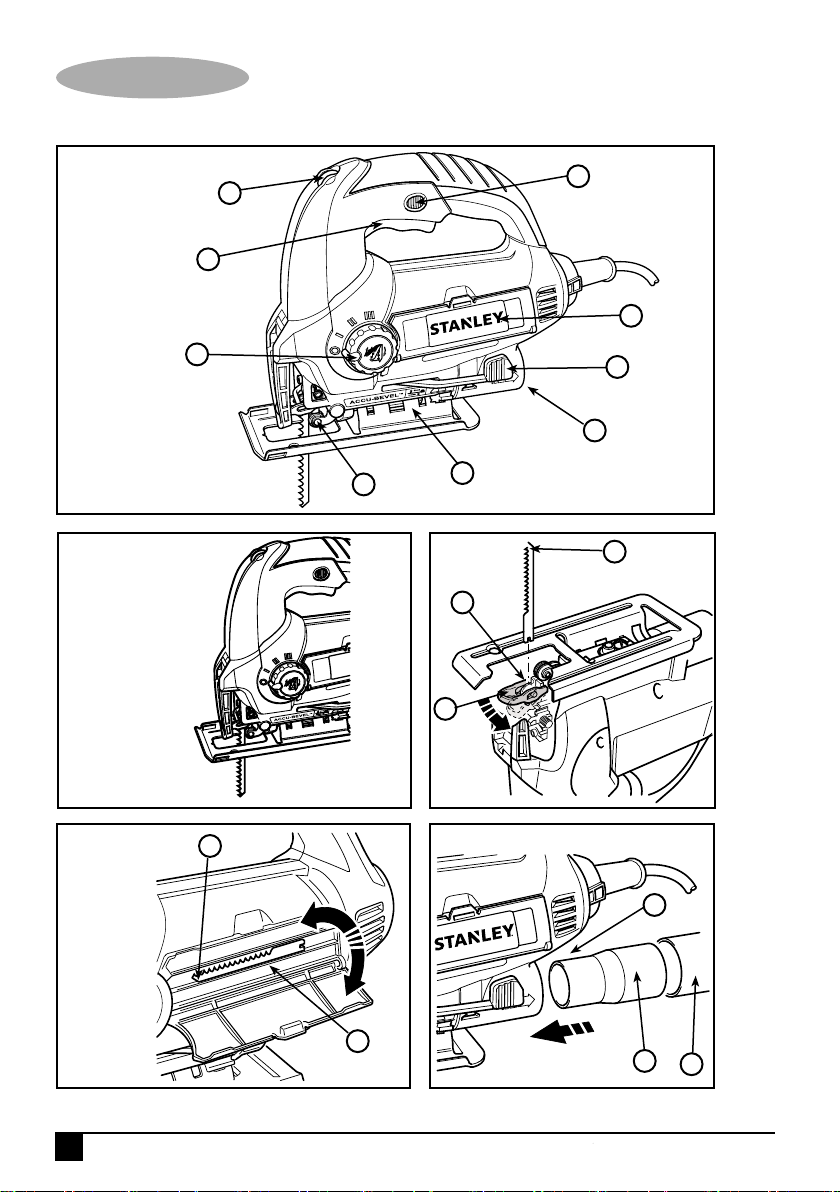
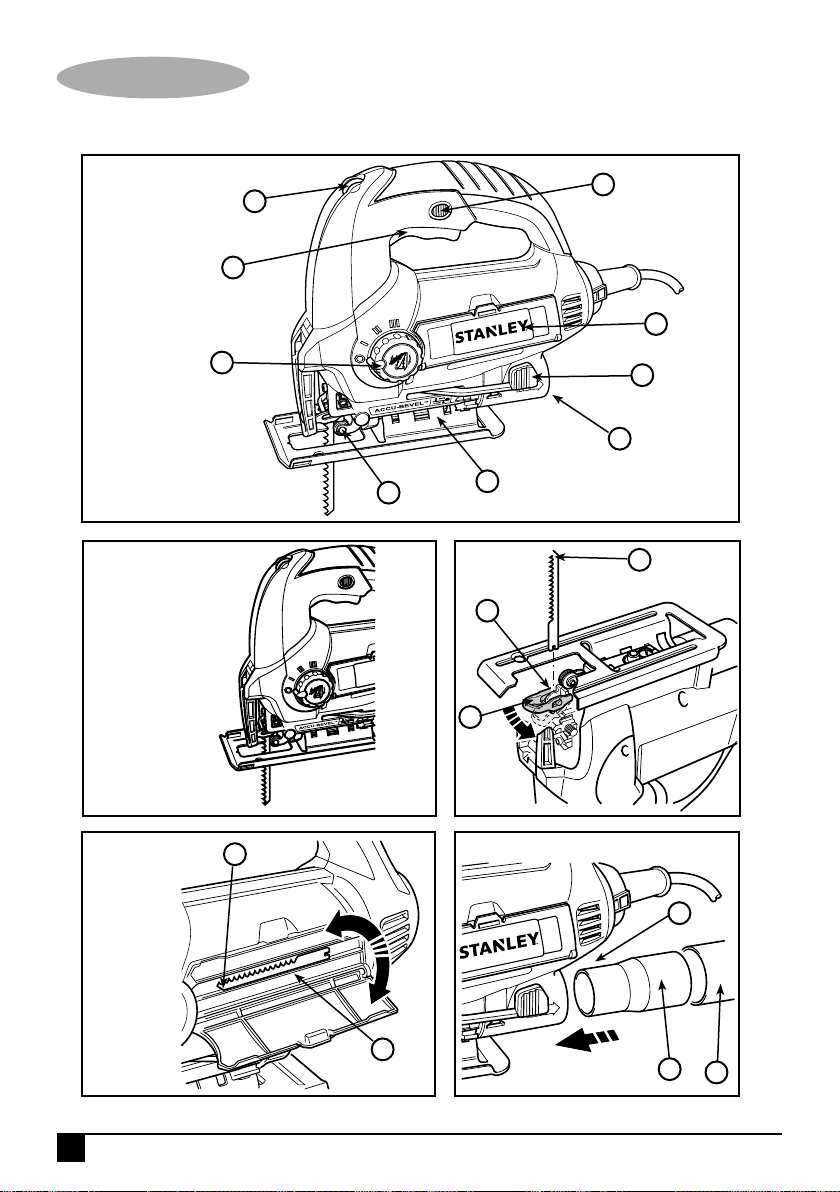
Features (Fig. A)
1. Variable speed control knob
2. On/off switch
3. Lock-on button
4. Blade storage compartment cover
5. Shoe plate locking lever
6. Dust extraction outlet
7. Shoe plate
8. Saw blade support roller
9. Pendulum stroke selector
Additional features (Fig. A)
Additional features may be applicable depending upon the
product purchased. The additional features applicable to the
catalogue number purchased are shown in Fig. A.
Assembly
Warning! Before attempting any of the following
operations, make sure that the tool is switched off
and unplugged and that the saw blade has
stopped. Used saw blades may be hot.
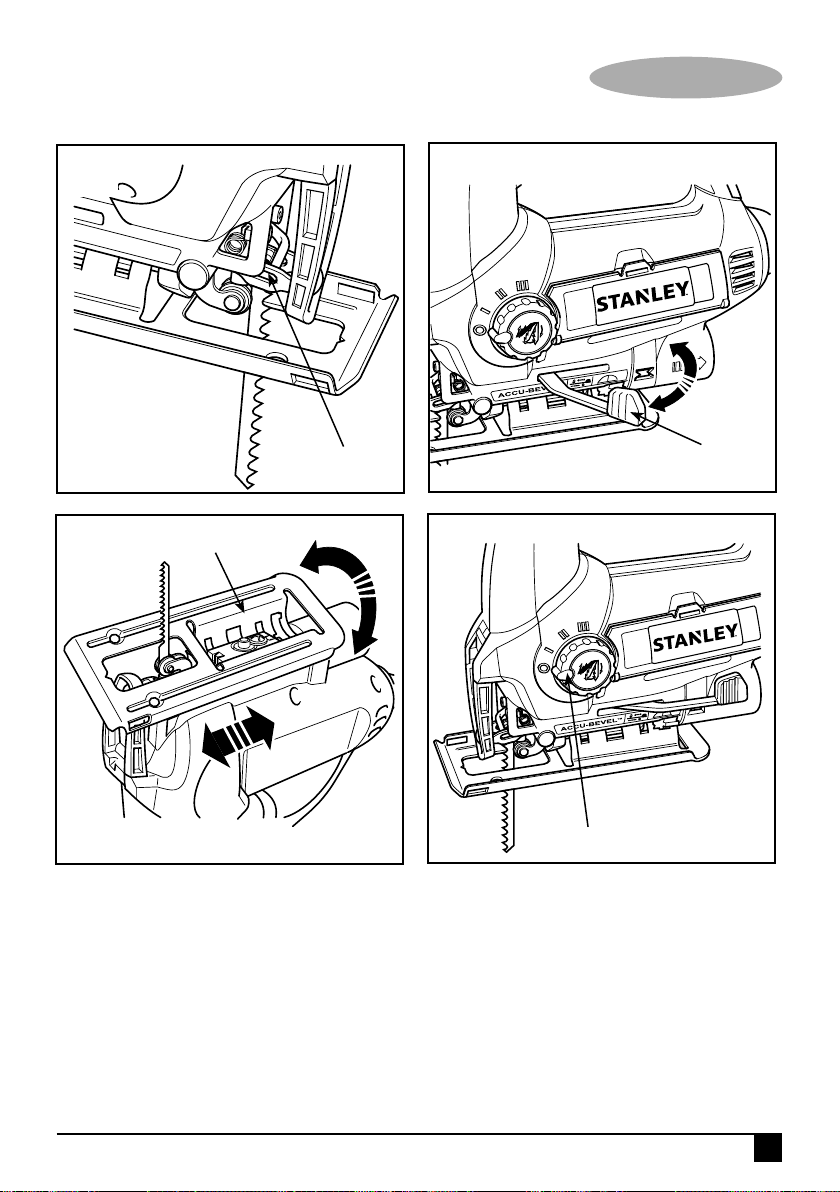
Fitting and removing the saw blade (Fig. C and D)
Warning! Before attempting any of the following
operations, make sure that the tool is switched off
and unplugged and that the saw blade has
stopped. Used saw blades may be hot.
6
Page 7
(Original instructions)
ENGLISH
Fitting the saw blade (Fig. C)
• Hold the saw blade (10) as shown, with the teeth facing
forward.
• Push and hold the blade clamp (11) down.
• Insert the shank of the saw blade into the blade holder
(12) as far as it will go.
• Release the blade clamp (11).
Saw blade storage (Fig. D)
Saw blades (10) can be stored in the storage compartment
(4) located on the side of the tool.
• Open the cover of the saw blade storage compartment
(4) by holding the tab on the top of the cover and pulling
it outward.
• The blades are retained in the compartment by a
magnetic strip. To remove a blade, press down on one
end of the blade to raise the other end, and remove.
• Close the cover of the saw blade storage compartment
(4) and make sure that it is latched closed.
Warning! Close the storage compartment door
securely before operating the saw.
Connecting a vacuum cleaner to the tool (Fig. E)
An adaptor (13) is required to connect a vacuum cleaner or
dust extractor to the tool.
• Push the adaptor (13) into the dust extraction outlet (6).
• Connect vacuum cleaner hose (14) to the adaptor (13).
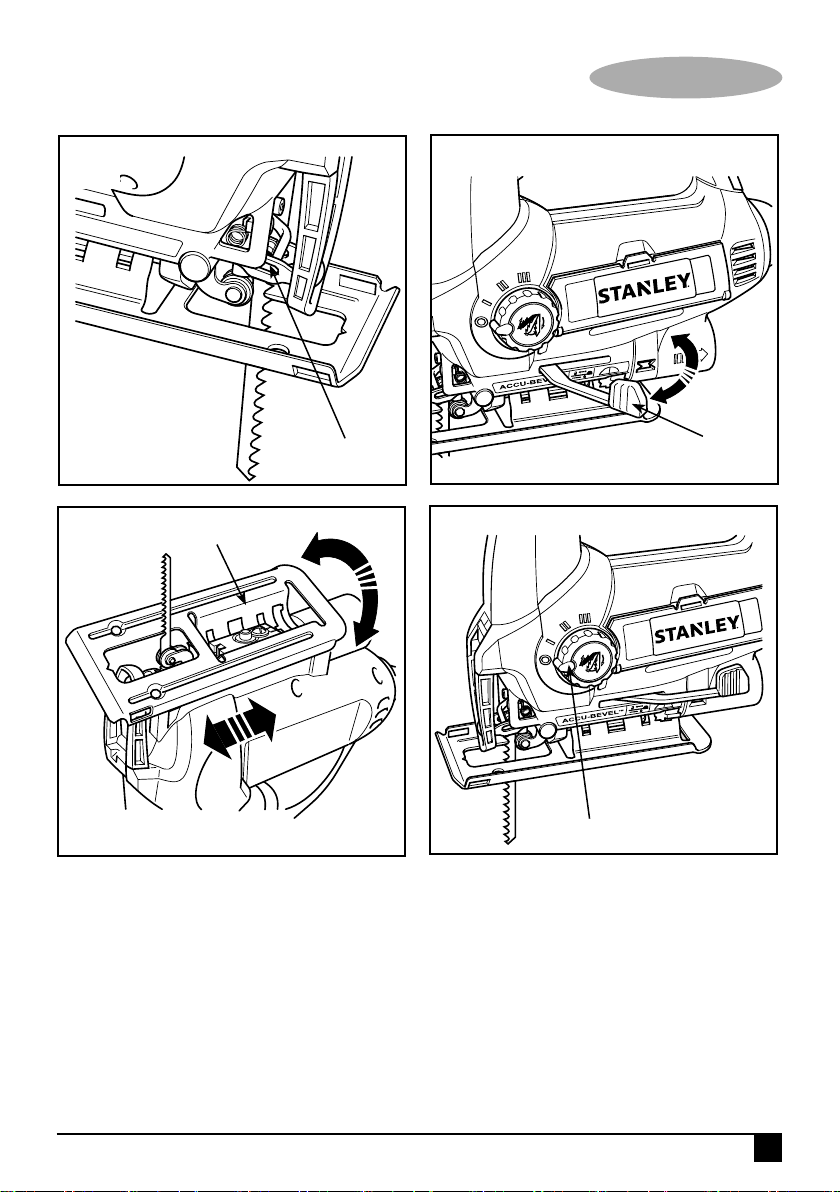
Cut line blower (Fig. F)
• To aid visibility when cutting, your jigsaw is equipped
with a cut line blower (15) which will keep the work area
clear of dust as you saw.
Use
Adjusting the shoe plate for bevel cuts (Fig. G and H)
Warning! Never use the tool when the shoe plate
is loose or removed.
The shoe plate (7) can be set to a left or right bevel angle of
up to 45°.
• Pull the shoe plate locking lever (5) outwards to unlock
the shoe plate (7) from the 0 deg position.
• Pull the shoe plate (7) forward and set the required bevel
15°, 30° and 45° indicated in the bevel angle window.
• Push the shoe plate locking lever (5) back towards the
saw to lock the shoe plate (7).
To reset the shoe plate (7) for straight cuts:
• Pull the shoe plate locking lever (5) outwards to unlock
the shoe plate (7).
• Set the shoe plate (7) to an angle of 0º and push the
shoe plate backwards.
• Push the shoe plate locking lever (5) back towards the
saw to lock the shoe plate (7).
Setting the pendulum stroke (Fig. I)
• Set the pendulum stroke selector (9) to the required
position.
• Position 0: metal and aluminium and sheet metal.
• Position I: for laminates, hard wood, work tops.
• Position II: for plywood and PVC/Plastics.
• Position III: for soft wood and fast cutting.
Variable speed control
• Set the variable speed control knob (1) to the required
speed range.
• Use a high speed for wood, medium speed for
aluminium and PVC and low speed for metals other than
aluminium.
Switching on and off
• To switch the tool on, press the on/off switch (2).
• To switch the tool off, release the on/off switch (2).
• For continuos operation, press the lock-on button (3) and
release the on/off switch (2).
• To switch the tool off when in continuous operation,
press the on/off switch (2) and release it.
Sawing
Hold the tool firmly with both hands while cutting. The shoe
plate (7) should be held firmly against the material being cut.
This will help prevent the saw from jumping, reduce vibration
and minimise blade breakage.
7
Page 8
ENGLISH
(Original instructions)
• Let the blade run freely for a few seconds before starting
the cut.
• Apply only a gentle pressure to the tool while performing
the cut.
Hints For Optimum Use
Sawing laminates
When cutting laminates, splintering may occur which can
damage the presentation surface. The most common saw
blades cut on the upward stroke, therefore if the shoe plate
is sitting on the presentation surface either use a saw blade
that cuts on the downward stroke or:
• Use a fine-tooth saw blade. Saw from the back surface
of the workpiece.
• To minimise splintering, clamp a piece of scrap wood or
hardboard to both sides of the workpieces and saw
through this sandwich.
Sawing metal
Be aware that sawing metal takes much more time than
sawing wood.
• Use a saw blade suitable for sawing metal.
• When cutting thin sheet metal, clamp a piece of scrap
wood to the back surface of the workpiece and cut
through this sandwich.
• Spread a film of oil along the intended line of cut.
Maintenance
Your tool has been designed to operate over a long period
of time with a minimum of maintenance. Continuous
satisfactory operation depends upon proper tool care and
regular cleaning.
Warning! Before performing any maintenance, switch off
and unplug the tool.
• Regularly clean the ventilation slots in your tool using a
soft brush or dry cloth.
• Regularly clean the motor housing using a damp cloth.
Do not use any abrasive or solvent-based cleaner.
Accessories
The performance of your tool depends on the accessory
used. STANLEY accessories are engineered to high quality
standards and designed to enhance the performance of your
tool. By using these accessories you will get the very best
from your tool.
Service Information
STANLEY offers a full network of company-owned and
authorized service locations. All STANLEY Service Centers
are staffed with trained personnel to provide customers with
efficient and reliable power tool service. For more
information about our authorized service centers and if you
need technical advice, repair, or genuine factory
replacement parts, contact the STANLEY location nearest
you.
Protecting the environment
Separate collection. This product must not be
disposed of with normal household waste.
Should you find one day that your Stanley product needs
replacement, or if it is of no further use to you, do not
dispose of it with household waste. Make this product
available for separate collection.
Separate collection of used products and packaging
allows materials to be recycled and used again.
Re-use of recycled materials helps prevent
environmental pollution and reduces the demand for raw
materials.
Local regulations may provide for separate collection of
electrical products from the household, at municipal waste
sites or by the retailer when you purchase a new product.
Stanley provides a facility for the collection and recycling of
Stanley products once they have reached the end of their
working life. To take advantage of this service please return
your product to any authorised repair agent who will collect
them on our behalf.
You can check the location of your nearest authorised repair
agent by contacting your local Stanley office at the address
indicated in this manual. Alternatively, a list of authorised
Stanley repair agents and full details of our after-sales
service and contacts are available on the Internet at:
www.2helpU.com
8
Page 9

Two years full warranty
If your Stanley product becomes defective due to faulty
materials or workmanship within 24 months from the date of
purchase, Stanley Europe guarantees to replace all defective
parts free of charge or – at our discretion – replace the unit
free of charge provided that:
• The product has not been misused and has been used in
accordance with the instruction manual.
• The product has been subject to fair wear and tear;
• Repairs have not been attempted by unauthorised
persons;
• Proof of purchase is produced.
• The Stanley product is returned complete with all original
components
If you wish to make a claim, contact your seller or check the
location of your nearest authorised Stanley repair agent in
the Stanley catalogue or contact your local Stanley office at
the address indicated in this manual. A list of authorised
Stanley repair agents and full details of our after sales
service is available on the internet at:www.stanleytools.com
(Original instructions)
ENGLISH
9
Page 10
FRANÇAIS
(Instructions initiales)
FIG. A
FIG. B
1
3
2
4
9
5
6
8
7
FIG. C
10
12
11
FIG. D FIG. E
10
4
10
13
6
14
Page 11
(Instructions initiales)
FRANÇAIS
FIG. F
FIG. G
15
FIG. H FIG. I
7
5
9
11
Page 12
FRANÇAIS
(Instructions initiales)
Fiche technique
SPÉCIFICATIONS STSJ0600
Puissance 600W
Tension 220-240V
Fréquence 50/60Hz
Vitesse 800 - 3000 /min
Action pendulaire 4 Stades
Coupe angulaire 0-45º
Modes 3
Capacité de coupe
Acier 5mm
Aluminium 15mm
Bois 85mm
Longueur de course 20mm
Cordon 2m
NE RETOURNEZ PAS CET APPAREIL AU MAGASIN,
contactez d’abord le bureau local Stanley ou le centre de
service agréé le plus proche.
Règles générales de sécurité
Attention! Lire et assimiler toutes les
instructions. Le non-respect de toutes les
instructions mentionnées ci-dessous peut
entraîner un choc électrique, un incendie et/ou des
blessures graves.
CONSERVER CES INSTRUCTIONS
Consignes de sécurité
Consignes générales de sécurité concernant les outils
électroportatifs
Attention! Lire avec attention tous les
avertissements et toutes les instructions. Le
non-respect des avertissements et des instructions
indiquées ci-dessous peut entraîner un choc électrique, un
incendie et/ou des blessures graves
Conservez ces consignes et ces instructions pour
référence ultérieure.
La notion "d’outil électroportatif" mentionnée par la suite se
rapporte à des outils électriques raccordés au secteur (avec
câble) ou fonctionnant avec piles (sans fil).
1. Sécurité de la zone de travail
a. Maintenir la zone de travail propre et bien éclairée.
Un lieu de travail en désordre ou mal éclairé augmente
le risque d’accidents.
b. Ne pas utiliser d’outils électroportatifs dans un
environnement présentant des risques d’explosion
ni en présence de liquides, gaz ou poussières
inflammables. Les outils électroportatifs génèrent des
étincelles risquant d’enflammer les poussières ou les
vapeurs.
c. Pendant l’utilisation d’un outil électroportatif, les
enfants et autres personnes présentes doivent rester
éloignés. En cas d’inattention, vous risquez de perdre le
contrôle de l’outil.
2. Sécurité électrique
a. La fiche de l’outil électrique doit être compatible
avec la prise d’alimentation, Ne modifiez la fiche en
aucun cas. N’utilisez pas d’adaptateurs avec des
outils ayant une prise de terre. Le respect de ces
consignes réduit le risque de choc électrique.
b. Eviter le contact physique avec des surfaces mises à
la terre telles que tuyaux, radiateurs, fours et
réfrigérateurs. Le risque de choc électrique augmente si
votre corps est relié à la terre.
c. Ne pas exposer les outils électroportatifs à la pluie
ou à l’humidité. La pénétration d’eau dans un outil
électroportatif augmente le risque de choc électrique.
d. Ne pas maltraiter le câble d’alimentation. Ne jamais
utiliser le câble pour porter l’outil, et ne le tirez pas
pour débrancher l’outil. Maintenir le câble éloigné
des sources de chaleur, de la graisse, des bords
coupants et des pièces en rotation. Un câble
endommagé ou emmêlé augmente le risque de choc
électrique.
e. Lorsque vous utilisez l’outil électroportatif à
l’extérieur, utilisez une rallonge homologuée pour
une utilisation à l’extérieur. L’utilisation d’une rallonge
électrique homologuée pour les travaux à l’extérieur
réduit le risque de choc électrique.
f. Si l’outil doit être utilisé dans un endroit humide,
utilisez un dispositif différentiel à courant résiduel
(DDR). L’utilisation d’un tel dispositif réduit le risque de
choc électrique. Remarque: Le terme “dispositif
différentiel à courant résiduel (DDR)” peut être remplacé
par “disjoncteur de fuite à la terre (DDFT)” ou par
“interrupteur différentiel de sécurité (ELCB)”.
3. Sécurité personnelle
a. Restez vigilant, surveillez ce que vous faites et faites
preuve de bon sens quand vous utilisez un outil.
N’utilisez pas un outil électroportatif lorsque vous
êtes fatigué ou après avoir consommé de l’alcool ou
pris des médicaments. Un moment d’inattention en
utilisant l’outil peut entraîner de graves blessures.
b. Portez un équipement de protection. Portez toujours
des lunettes de protection. Selon le travail à
effectuer, le port d’un équipement de protection tel que
masque anti-poussières, chaussures de sécurité
antidérapantes, casque ou protection auditive, réduit le
risque de blessures.
12
Page 13
(Instructions initiales)
FRANÇAIS
c. Evitez tout démarrage imprévu. L’interrupteur de
l’outil doit être en position d’arrêt (off) avant
d’effectuer le branchement à l’alimentation et/ou au
bloc batterie, de ramasser l’outil ou de le porter.
Porter ou brancher un outil électrique dont l’interrupteur
est en position Marche (on) est une invite à l’accident.
d. Retirez les outils ou les clés de réglage avant de
mettre l’outil en marche. Une clé ou un outil se
trouvant sur une partie en rotation peut causer des
blessures.
e. Adoptez une position confortable. Adoptez une
position stable et gardez votre équilibre en
permanence. Vous contrôlerez mieux l’outil dans des
situations inattendues.
f. Portez des vêtements appropriés. Ne portez pas de
vêtements amples ou de bijoux. N’approchez pas les
cheveux, vêtements ou gants des pièces en
mouvement. Les vêtements amples, les bijoux ou les
cheveux longs peuvent s’accrocher dans les pièces en
mouvement.
g. En cas d’utilisation d’appareils servant à aspirer ou
à recueillir les poussières, assurez-vous qu’ils sont
correctement raccordés et utilisés. L’utilisation de tels
dispositifs réduit les dangers dus aux poussières.
4. Utilisation des outils électroportatifs et précautions
a. Respectez la capacité de l’outil. Utilisez l’outil
approprié pour le travail à effectuer. Avec un outil
approprié, vous travaillerez mieux et en toute sécurité.
b. N’utilisez pas un outil électroportatif dont
l’interrupteur marche/arrêt est défectueux. Un outil
électroportatif qui ne répond pas à la commande
marche/arrêt est dangereux et doit être réparé.
c. Retirez la fiche de la prise de courant et/ou
débranchez le bloc-batterie avant d’effectuer des
réglages, de changer les accessoires ou de ranger
l’outil. Cette mesure de précaution empêche de mettre
l’outil en marche accidentellement.
d. Rangez les outils électroportatifs hors de la portée
des enfants et les personnes ne connaissant pas
l’outil ne doivent en aucun cas l’utiliser. Les outils
électroportatifs sont dangereux lorsqu’ils sont utilisés par
des personnes non initiées.
e. Entretenez les outils électroportatifs. Vérifiez que
les parties en mouvement fonctionnent
correctement et qu’elles ne sont pas coincées.
Vérifiez qu’il n’y a pas de pièces cassées ou
endommagées susceptibles de nuire au bon
fonctionnement de l’outil. S’il est endommagé, faites
réparer l’outil avant de l’utiliser. De nombreux
accidents sont la conséquence d’outils mal entretenus.
f. Les outils de coupe doivent toujours être aiguisés et
propres. Des outils soigneusement entretenus avec des
bords tranchants bien aiguisés se coincent moins
souvent et peuvent être guidés plus facilement.
5. Réparations
a. Faites réparer votre outil électroportatif uniquement par
du personnel qualifié et seulement avec des pièces de
rechange appropriées. Cela garantira le maintien de la
sécurité de votre outil.
6. Etiquettes apposées sur l’outil
L’étiquette apposée sur votre outil peut contenir les
symboles suivants:
Lire le manuel
d’instructions
Utiliser une
protection
oculaire
Utiliser des
protections
auditives
V ........ Volts
A ........
Ampères
W ........
min .....
.....
.....
n
.......
0
Hertz
Watts
minutes
Courtant
alternatif
Courant
continu
Vitesse à
vide
......
Construction
de classe II
....
Borne de
Symbole d’alerte
de sécurité
Rotations
par minute
terre
....
.../min..
Hz .......
Position of date barcode
Le code de la date, comprenant aussi l’année de fabrication,
est imprimé sur le boîtier de l’outil.
Exemple:
2014 XX JN
Année de fabrication
7. Sécurité électrique
Cet outil est doublement isolé; par conséquent,
aucun câble de mise à la terre n’est nécessaire.
Vérifiez si l’alimentation mentionnée sur la plaque
signalétique de l’appareil correspond bien à la tension
présente sur le lieu.
Attention! Si le câble d’alimentation est
endommagé, il doit être remplacé par le fabricant,
par un centre de réparation Stanley agréé ou par
un électricien qualifié, de façon à éviter les dommages
matériels et corporels. En cas de remplacement du câble
d’alimentation par un électricien qualifié mais non agréé par
Stanley, la garantie ne sera pas valable.
Mises en garde supplémentaires pour les
scies sauteuses
Attention ! Mises en garde supplémentaires pour
les scies sauteuses.
• Tenez l’outil électrique par les surfaces de prise
isolées quand l’accessoire de coupe risque d’entrer
en contact avec un fil électrique caché ou son propre
cordon. Si l’accessoire de coupe entre en contact avec
un fil sous tension il peut « électrifier » les parties
métalliques exposées et donner une décharge électrique
à l’utilisateur.
13
Page 14
FRANÇAIS
(Instructions initiales)
• Utilisez des pinces ou tout autre moyen pratique
pour sécuriser et soutenir la pièce sur une
plateforme stable. Si vous tenez la pièce à la main ou
contre votre corps elle n’est pas stable et cela peut
causer une perte de contrôle.
• Gardez les mains loin de la zone de coupe. Ne
passez jamais la main en dessous de la pièce que
vous sciez, pour quelque raison que ce soit. Ne
mettez pas vos doigts près de la lame à va-et-vient ni
près du serre-lame. Ne stabilisez pas la scie en la tenant
par la plaque de base.
• Gardez les lames bien aiguisées. Des lames usées
ou endommagées peuvent faire dévier ou caler la
scie à cause de la pression. Utilisez toujours le type
approprié de lame de scie adapté au matériau et au type
de coupe.
• Quand vous sciez un tuyau ou un conduit, vérifiez
qu’il ne contient pas d’eau, de câble électrique etc.
• Ne touchez pas la pièce ni la lame immédiatement
après avoir utilisé l’outil. Elles peuvent être très
chaudes.
• Tenez compte des dangers cachés, avant de percer
un mur, un sol ou un plafond, vérifiez l’emplacement
des câbles électriques et des tuyaux.
• La lame continuera de bouger après que vous ayez
relâché la gâchette. Mettez toujours l’outil hors tension
et attendez que la lame de scie ait complètement arrêté
de bouger avant de poser l’outil.
Attention ! Le contact avec, ou l’inhalation de
poussières soulevées par le sciage peut mettre en
danger la santé de l’utilisateur et des autres
personnes présentes. Portez un masque antipoussières
spécifiquement conçu pour la protection contre la poussière
et les fumées et veillez à ce que les personnes qui se
trouvent dans la zone de travail soient elles aussi protégées.
• Cet outil n’est pas fait pour être utilisé par des
personnes (y compris les enfants) avec des capacités
physiques, sensorielles ou mentales réduites, ou un
manque d’expérience et de connaissances, sauf si elles
bénéficient, par l’intermédiaire d’une personne
responsable de leur sécurité, d’une supervision ou
d’instructions concernant l’utilisation de l’appareil. Les
enfants doivent être surveillés pour s’assurer qu’ils ne
jouent pas avec l’appareil.
• L’usage pour lequel cet outil est conçu est décrit dans
les instructions de ce manuel. Si vous faites des travaux,
utilisez un accessoire ou un attachement autres que
ceux recommandés dans ce manuel pour cet outil, vous
risquez de vous blesser et/ou causer des dommages
matériels.
Risques résiduels
Des risques résiduels supplémentaires qui ne sont peut-être
pas mentionnés dans les consignes de sécurité ci-incluses
peuvent exister quand vous vous servez de l’outil. Ces
risques peuvent être dus à un mauvais usage, une utilisation
trop prolongée etc.
Même en appliquant les règles de sécurité et en mettant en
place les dispositifs de sécurité, certain risques résiduels ne
peuvent pas être complètement éliminés. Ils comprennent :
• Se blesser en touchant les parties tournantes/mobiles.
• Se blesser en changeant les pièces, les lames ou les
accessoires.
• Se blesser en travaillant avec un outil trop longtemps.
Quand vous vous servez d’un outil pendant de longues
périodes pensez à faire des pauses régulières.
• Perte de l’acuité auditive.
• Problèmes de santé dus à l’inhalation de la poussière
produite par votre outil (exemple : travail sur du bois,
plus particulièrement le chêne, le hêtre et les panneaux
MDF).
Caractéristiques (Fig. A)
1. Bouton du variateur de vitesse
2. Bouton Marche/Arrêt
3. Bouton de verrouillage
4. Couvercle du compartiment à lames
5. Levier de verrouillage de la plaque de base
6. Sortie du capteur de poussière
7. Plaque de base
8. Rouleau d’appui de la lame de scie
9. Sélecteur de mouvement pendulaire
Caractéristiques supplémentaires (Fig. A)
Des caractéristiques supplémentaires peuvent être
applicables suivant le produit acheté. Voir à la Fig. A les
caractéristiques supplémentaires correspondant au numéro
de catalogue de l’outil que vous avez acheté.
Montage
Attention ! Avant de tenter une des opérations
suivantes, vérifiez que l’outil est hors tension et
débranché et que la lame de scie s’est arrêtée. Les
lames de scie qui viennent d’être utilisées peuvent être très
chaudes.
Installer et enlever la lame de scie (Fig. C et D)
Attention ! Avant de tenter une des opérations
suivantes, vérifiez que l’outil est hors tension et
débranché et que la lame de scie s’est arrêtée. Les
lames de scie qui viennent d’être utilisées peuvent être très
chaudes.
14
Page 15

(Instructions initiales)
FRANÇAIS
Installer la lame de scie (Fig. C)
• Tenez la lame de scie (10) comme illustré, avec les
dents vers l’avant.
• Poussez et retenez le dispositif de serrage (11) de la
lame.
• Insérez la tige de la lame de scie dans le porte-lame
(12) le plus loin possible.
• Relâchez le dispositif de serrage (11) de la lame.
Rangement de la lame de scie (Fig. D)
Les lames de scie (10) peuvent être rangées dans le
compartiment à lames (4) situé sur le côté de l’outil.
• Ouvrez le couvercle du compartiment à lames (4) de
scie en tirant la patte sur le dessus du couvercle vers
l’extérieur.
• Les lames sont maintenues dans le compartiment par
une bande aimantée. Pour enlever une lame, appuyez
sur un bout de la lame pour soulever l’autre extrémité et
l’enlever.
• Fermez le couvercle du compartiment à lames (4) et
vérifiez qu’il est correctement fermé.
Attention ! Fermez bien le couvercle du
compartiment à lames avant de vous servir de la
scie.
Brancher un aspirateur sur l’outil (Fig. E)
Il vous faut un adaptateur (13) pour connecter un aspirateur
ou un capteur de poussière sur l’outil.
• Poussez l’adaptateur (13) dans la sortie du capteur de
poussière (6).
• Branchez le tuyau de l’aspirateur (14) sur l’adaptateur
(13).
Souffleur de trait de coupe (Fig. F)
• Pour aider la visibilité quand vous sciez, votre scie
sauteuse est équipée d’un souffleur de trait de coupe
(15) qui dégage la poussière sur la zone de travail
pendant que vous sciez.
Utilisation
Réglage de la plaque de base pour les coupes
angulaires (Fig. G et H)
Attention ! N’utilisez jamais l’outil quand la plaque
de base est desserrée ou enlevée.
La plaque de base (7) peut être réglée jusqu’à 45°pour une
coupe angulaire droite ou gauche.
• Tirez le levier de verrouillage (5) de la plaque de base
vers l’extérieur pour débloquer la plaque de base (7) de
la position à 0°.
• Tirez la plaque de base (7) vers l’avant et réglez
l’inclinaison requise à 15°, 30° ou 45°, indiqués dans
l’angle de la fenêtre d’inclinaison.
• Repoussez le levier de verrouillage (5) de la plaque de
base vers la scie pour verrouiller la plaque de base (7).
Pour rerégler la plaque de base (7) sur coupe droite :
• Tirez le levier de verrouillage (5) de la plaque de base
vers l’extérieur pour débloquer la plaque de base (7).
• Réglez la plaque de base (7) à 0º et poussez la plaque
de base vers l’arrière.
• Repoussez le levier de verrouillage (5) de la plaque de
base vers la scie pour verrouiller la plaque de base (7).
Réglage du mouvement pendulaire (Fig. I)
• Réglez le sélecteur de mouvement pendulaire (9) sur la
position requise.
• Position 0 : métal et aluminium et tôle.
• Position I : panneaux mélaminés, bois dur, plans de
travail.
• Position II : contreplaqué et PVC / plastiques.
• Position III : for soft wood and fast cutting.
Commande du variateur de vitesse
• Réglez le bouton du variateur de vitesse (1) sur la plage
de vitesse requise.
• Utilisez une vitesse rapide pour le bois, une vitesse
moyenne pour l’aluminium et le PVC et une vitesse faible
pour les métaux autres que l’aluminium.
Marche / Arrêt
• Pour mettre l’outil sous tension, appuyez sur le bouton
marche/arrêt (2).
• Pour mettre l’outil hors tension, relâchez le bouton
marche/arrêt (2).
• Pour un fonctionnement continu, appuyez sur le bouton
de verrouillage (3) et relâchez le bouton marche/arrêt (2).
• Pour mettre l’outil hors tension quand il est en
fonctionnement continu, appuyez sur le bouton
marche/arrêt (2) et relâchez-le.
Sciage
Tenez l’outil fermement avec les deux mains quand vous
sciez. La plaque de base (7) doit être tenue fermement
contre le matériau que vous coupez. Cela aide à éviter que
la scie soit éjectée, que la lame casse et ça réduit les
vibrations.
15
Page 16

FRANÇAIS
(Instructions initiales)
• Laissez la lame tourner à vide pendant quelques
secondes avant de commencer à scier.
• N’exercez qu’une légère pression sur l’outil pendant que
vous sciez.
Astuces pour une utilisation optimale
Sciage de panneaux mélaminés
Quand vous sciez des panneaux mélaminés, des éclats
peuvent abîmer la surface de présentation. Les lames de
scie sauteuse les plus courantes coupent pendant le
mouvement vers le haut, et donc si la plaque de base
repose sur la surface de présentation, soit utilisez une lame
de scie qui coupe pendant le mouvement vers le bas, ou
bien :
• Utilisez une lame de scie à denture fine. Sciez en
partant de la surface arrière de la pièce.
• Pour minimiser les éclats, fixez un morceau de bois ou
de carton dur des deux côtés de la pièce et coupez à
travers ce sandwich.
Sciage du métal
Rappelez-vous que scier du métal prend beaucoup plus de
temps que scier du bois.
• Nettoyez régulièrement le boîtier du moteur avec un
chiffon humide. N’utilisez pas de produit nettoyant abrasif
ou à base de solvant.
Accessoires
La performance de votre outil dépend de l’accessoire utilisé.
Les accessoires STANLEY sont fabriqués en respectant un
standard de qualité élevé et conçus pour améliorer la
performance de votre outil. En utilisant ces accessoires vous
obtiendrez le maximum de votre outil.
Informations de service
STANLEY possède un réseau complet de points de services
dans ses propres établissements et chez des représentants
agréés. Tous les Centres de Service STANLEY disposent
d’un personnel qualifié pour offrir clients un service efficace
et fiable de leurs outils électriques. Pour plus de
renseignements sur nos centres de service agréés et si vous
avez besoin de conseils techniques, de réparations ou de
pièces de rechange d’origine, contactez le représentant
STANLEY le plus proche.
• Utilisez une lame de scie adéquate pour scier le métal.
• Quand vous sciez une tôle fine, fixez une chute de bois
sur la surface arrière de la pièce et coupez à travers ce
sandwich.
• Étalez un film d’huile le long du trait de coupe.
Entretien
Votre outil a été conçu pour fonctionner longtemps avec un
minimum d’entretien. Un fonctionnement continuellement
satisfaisant de l’outil dépend de son utilisation appropriée et
d’un nettoyage régulier.
Attention ! Avant de faire l’entretien de votre outil, mettez-le
hors tension et débranchez la prise électrique.
• Nettoyez régulièrement les fentes de ventilation de votre
outil avec une brosse douce ou un chiffon sec.
16
Page 17

(Instructions initiales)
FRANÇAIS
Protection de l’environnement
Collecte sélective. Ne pas jeter cet appareil avec les
ordures ménagères.
Si vous devez remplacer un appareil Stanley ou si vous ne
l’utilisez plus, ne le jetez pas avec les ordures ménagères,
mais dans les conteneurs de collecte sélective.
La collecte sélective des produits et des emballages
usagés permet de recycler et de réutiliser leurs
matériaux. La réutilisation de matériaux recyclés
aide à protéger l’environnement contre la pollution et à
réduire la demande en matières premières.
Les réglementations locales peuvent proposer la collecte
sélective des appareils électriques ménagers, dans des
déchetteries municipales ou par le revendeur lorsque vous
achetez un nouvel appareil. Stanley dispose d’installations
pour la collecte et le recyclage des produits Stanley en fin de
vie. Pour profiter de ce service, veuillez rapporter votre
appareil auprès d’un centre de réparation agréé qui se
chargera de le collecter en notre nom.
Pour connaître l’adresse d’un centre de réparation agréé
près de chez vous, contactez votre distributeur Stanley à
l’adresse indiquée dans ce manuel, ou consultez la liste des
centres de réparation agréés Stanley et tout renseignement
complémentaire sur notre service après-vente sur le site
internet à l’adresse: www.2helpU.com.
Garantie deux
Si votre appareil STANLEY s’avère défectueux en raison
d’un vice de matériau ou de fabrication dans les 24 mois à
compter de sa date d’achat, STANLEY Europe garantit le
remplacement gratuit de toute pièce défectueuse ou – à
notre entière discrétion – le remplacement gratuit de
l’appareil, à condition que:
• L’appareil n’ait pas été utilisé avec négligence et qu’il ait
été utilisé en suivant les instructions contenues dans ce
manuel.
• L’appareil ait été soumis à une usure normale;
• Aucune réparation n’ait été effectuée par du personnel
non autorisé;
• Une preuve d’achat soit fournie.
• L’appareil STANLEY soit retourné complet, avec
l’ensemble de ses composants originaux.
Pour avoir recours à la garantie, contactez votre revendeur
ou consultez l’emplacement du centre de réparation agréé
Stanley le plus proche dans le catalogue, ou contactez le
service clientèle Stanley à l’adresse indiquée dans ce
manuel. Une liste des centres de réparation agréés Stanley
et tout détail complémentaire concernant notre service
après-vente sont à votre disposition sur notre site internet
:www.stanleytools.com
17
Page 18

PORTUGUESE
(Instruções Originais)
FIG. A
FIG. B
1
3
2
4
9
5
6
8
7
FIG. C
10
12
11
FIG. D FIG. E
10
4
18
13
6
14
Page 19

(Instruções Originais)
PORTUGUESE
FIG. F
FIG. G
15
FIG. H FIG. I
7
5
9
19
Page 20

PORTUGUESE
(Instruções Originais)
Dados técnicos
ESPECIFICAÇÕES STSJ0600
Potência 600 W
Tensão 220-240 V
Frequência 50/60 Hz
Velocidade 800 - 3000 /min
Ação tipo pêndulo 4 Fases
Corte chanfro 0-45º
Modes 3
Capacidade de corte
Aço 5 mm
Alumínio 15 mm
Madeira 85 mm
Comprimento do curso 20 mm
Corda 2 m
NÃO DEVOLVER ESTE PRODUTO À LOJA,
Contacte primeiro com o seu escritório STANLEY ou centro
de serviços autorizado mais próximo.
Regras de Segurança Geral
Aviso! Ler e compreender todas as instruções.
A falha em seguir todas as instruções listadas
em baixo podem resultar em choque, incêndio
e/ou grave lesão pessoal.
GUARDAR ESTAS INSTRUÇÕES
Instruções de Segurança
Aviso de segurança geral de ferramenta elétrica
Aviso! Ler e compreender todas as
instruções. A falha em seguir todas as
instruções listadas em baixo podem resultar em
choque, incêndio e/ou grave lesão pessoal.
Guarde todos estes avisos para futura consulta.
O termo “ferramenta elétrica” em todos os avisos em baixo
listados refere-se aos meios operados (por cabo) da
ferramenta elétrica ou ferramenta elétrica alimentada a
bateria (sem fios).
1. Segurança de área de trabalho
a. Manter a área de trabalho limpa e bem iluminada.
Áreas desordenadas ou escuras são propícias a
acidentes.
b. Não operar as ferramentas elétricas em atmosferas
explosivas, tais como na presença de materiais,
gases ou poeiras. Ferramentas elétricas podem causar
faíscas que acendam a poeira ou fumos.
c. Manter as crianças e transeuntes longe quando
operar uma ferramenta elétrica. Distrações podem-no
fazer perder o controlo.
2. Segurança elétrica
a. As fichas das ferramentas elétricas devem ser iguais
às das tomadas. Nunca modifique de qualquer forma
a ficha. Não usar quaisquer fichas com ferramentas
elétricas com ligação à terra (terra). Fichas não
modificadas e tomadas condizentes reduziram o risco de
choque elétrico.
b. Evite o contacto físico com superfícies ligadas à
terra tais como tubos, radiadores, conteúdos e
frigoríficos. Existe um risco maior de choque elétrico se
o seu corpo estiver ligado à terra ou chão.
c. Não exponha as ferramentas elétricas a condições
chuvosas ou húmidas. Água que entre numa
ferramenta elétrica aumentará o risco de choque elétrico.
d. Não abuse do fio. Nunca use o fio para carregar,
puxar ou desligar a ferramenta elétrica. Mantenha o
fio longe do calor, óleo, pontas afiadas ou partes
móveis. Fios danificados ou entrelaçados aumentam o
risco de choque elétrico.
e. Quando operar uma ferramenta elétrica no exterior,
use um fio de extensão adequado para uso exterior.
O uso de um fio apropriado para uso exterior reduz o
risco de choque elétrico.
f. Se o uso de uma ferramenta elétrica num local
húmido não for inevitável, use uma fonte protegida
de dispositivo de corrente residual (DCR). O uso de
DCR reduz o risco de choque elétrico. Aviso: O termo
“Dispositivo de Corrente Residual (DCR)” pode ser
substituído por Disjuntor (D)” ou por “Disjuntor
Diferencial (DD)”.
3. Segurança pessoal
a. Esteja atento, tenha atenção ao que está a fazer e
use o senso comum quando operar uma ferramenta
elétrica. Não use ferramentas elétricas quando
estiver cansado ou sob influência de drogas, álcool
ou medicação. Uma desatenção enquanto opera uma
ferramenta elétrica pode causar graves danos pessoais.
b. Use equipamento de proteção pessoal. Use sempre
proteção ocular. Equipamento protetor tal como
mascara de poeiras, calçado anti derrapagem, capacete,
ou proteção auditiva usada para as condições
apropriadas de poeiras, calçado anti derrapagem,
capacete, ou proteção auditiva usada para as condições
apropriadas reduzirá o risco de lesões pessoais.
20
Page 21

(Instruções Originais)
PORTUGUESE
c. Previna arranque indesejado. Assegure-se que o
interruptor está na posição “off” antes de ligar à
fonte de energia e/ou pilhas, ao pegar ou carregar a
ferramenta. Carregar ferramentas elétricas com o seu
dedo no interruptor ou alimentar ferramentas elétricas
que têm o interruptor ligado propiciam os acidentes.
d. Remova qualquer chave de ajuste ou chave antes
de ligar a ferramenta elétrica. Uma chave deixada
presa à peça em rotação pode resultar em lesões
pessoais.
e. Não se exceda. Mantenha sempre a posição de pés
adequada e equilíbrio. Isto permite um melhor controlo
da ferramenta elétrica em situações inesperadas.
f. Vista-se apropriadamente. Não use roupas largas ou
joias. Mantenha o seu cabelo, vestuário e luvas
longe das partes em movimento. Vestuário largo, joias
ou cabelo comprido podem ficar presos nas peças em
movimento.
g. Se são fornecidos dispositivos para a coleção ou
extração de poeiras e instalações de coleção,
assegure-se que estes estão ligados e são usados
apropriadamente. Uso da recolha de poeira pode reduzir
o risco de perigos relacionados com a poeira.
4. Uso e cuidado da ferramenta elétrica
a. Não forçar a ferramenta elétrica. Use a ferramenta
elétrica correta para a sua tarefa. A ferramenta elétrica
correta fará o trabalho melhor de forma mais segura à
medida para a qual foi desenhada.
b. Não use a ferramenta elétrica se o interruptor não a
ligar ou desligar. Qualquer ferramenta elétrica que não
possa ser controlada com o interruptor é perigosa e
deve ser reparada.
c. Desligue a fiche da fonte de energia e/ou pilha da
ferramenta elétrica antes de fazer qualquer ajuste
mudar acessórios ou guardar as ferramentas
elétricas. Tais medidas preventivas reduzem o risco de
ligar a ferramenta elétrica acidentalmente.
d. Guarde ferramentas elétrica inativas fora do alcance
das crianças e não permita a pessoas não
familiarizadas com as ferramentas elétricas a operar
a ferramenta elétrica. Ferramentas elétricas são
perigosas nas mãos de utilizadores não preparados.
e. Reveja as ferramentas elétricas. Verifique se há
desalinhamento ou ligação das peças móveis, se as
peças quebraram e quaisquer outras condições que
possam afetar a operação das ferramentas elétricas.
Muitos acidentes são causados por ferramentas
elétricas mal revistas.
f. Mantenha as ferramentas de corte afiadas e limpas.
Ferramentas de corte devidamente revistas com
superfícies de corte afiadas têm menos probabilidades
de ligar e mais fáceis de controlar.
5. Manutenção
a. Mantenha a sua ferramenta elétrica revista por uma
pessoa especializada de reparações usando só
peças de substituição idênticas. Isto assegurará que a
segurança da ferramenta elétrica está mantida.
6. Etiquetas na ferramenta
A etiqueta na sua ferramenta pode incluir os
seguintes símbolos:
Ler Manual
de Instruções
Usar proteção
ocular
Usar proteção
auditiva
V ........ Volts
A ........ Amperes
Hz ....... Hertz
W ........ Watts
min ..... minutos
.....
Corrente
Alternada
.....
Corrente
Direta
n
.......
Velocidade
0
em vazio
Classe II
......
Construção
Símbolo de
....
Aviso de
Terminal de
....
Ligação à
Terra
.../min..
Rotações ou
Reciprocações
por minuto
Posição do código de barras de dados
O código de Dados, que também inclui o ano de fabrico,
é impresso na carcaça.
Exemplo:
2014 XX JN
Ano de Fabrico
7. Segurança elétrica
A sua ferramenta é duplamente isolada; por isso
não necessita de fio de terra. Verifique sempre que
a voltagem principal corresponde à placa sinalética.
Aviso! Se o fio de alimentação está danificado,
deverá ser trocado pelo fabricante, Centro de
Serviços autorizado da STANLEY ou uma pessoa
igualmente qualificada de forma a evitar danos ou lesões.
Se o fio de alimentação for trocado por uma pessoa
igualmente qualificada, mas não autorizada pela STANLEY,
a garantia não será válida.
Aviso de segurança das serras de vaivém
adicional
Aviso! Instruções de segurança adicionais para
serras de vaivém.
• Mantenha a ferramenta elétrica em superfícies
aderentes isoladas quando executar uma operação
em que a ferramenta de corte pode entrar em
contacto com fios escondidos ou com o seu próprio
cabo. O contacto com um fio «sob tensão» pode expor
peças de metal da ferramenta «à tensão» e provocar um
choque elétrico no operador.
21
Page 22

PORTUGUESE
(Instruções Originais)
• Utilize grampos ou outra maneira prática de segurar
e apoiar a peça de trabalho numa plataforma estável.
Segurar o trabalho na mão ou contra o seu corpo
torna-o instável e pode provocar perda de controlo.
• Mantenha as mãos afastadas da área de corte.
Nunca se exponha por baixo da peça de trabalho por
qualquer razão. Não insira os dedos ou o polegar na
proximidade da lâmina alternativa ou no grampo da
lâmina. Não estabilize a serra agarrando a sapata.
• Mantenha as lâminas afiadas. Lâminas cegas ou
danificadas podem provocar que a serra se desvie ou
pare sob pressão. Utilize sempre o tipo apropriado da
lâmina de serra para o material da peça de trabalho e
tipo de corte.
• Quando cortar tubo ou eletroduto certifique-se de
que estão sem água, fios elétricos, etc.
• Não toque na peça de trabalho ou na lâmina logo
após utilizar a ferramenta. Elas ficam muito quentes.
• Esteja consciente dos perigos escondidos e antes
de furar as paredes, chãos ou tetos, verifique a
localização de fios e tubos.
• A lâmina continuará a mover-se depois de soltar o
interruptor. Desligue sempre a ferramenta e aguarde
que a lâmina da serra permaneça completamente
parada antes de pousar a ferramenta.
Aviso! O contacto com ou a inalação de poeiras
que surgem das aplicações de corte podem pôr em
perigo a saúde do operador ou de possíveis
espectadores. Use uma máscara de pó concebida
especificamente para proteção contra o pó e fumos e
garantir que as pessoas dentro ou que entrem na área de
trabalho também ficam protegidas.
• Esta ferramenta não se destina a ser utilizada por
pessoas (incluindo crianças) com deficiência física ou
mental ou falta de experiência e conhecimento, salvo se
receberam supervisão ou instruções relativas à
utilização do aparelho por parte da pessoa responsável
pela sua segurança. As crianças deverão ser vigiadas
de modo a garantir que não brincam com o aparelho.
• A utilização prevista está descrita neste manual de
instruções. A utilização de qualquer acessório ou anexo
ou a realização de qualquer operação com esta
ferramenta que não as recomendadas neste manual de
instruções podem representar um risco de lesões
pessoais e/ou danos na propriedade.
Riscos residuais
Os riscos residuais podem surgir quando utiliza a
ferramenta que pode não estar incluída nos avisos de
segurança anexos. Estes riscos podem surgir da má
utilização, utilização prolongada, etc.
Mesmo com a aplicação das regras de segurança
relevantes e a implementação de dispositivos de segurança,
não podem ser evitados certos riscos residuais. Estes
incluem:
• Lesões causadas por tocar em peças rotativas/móveis.
• Lesões causadas quando substitui quaisquer peças,
lâminas ou acessórios.
• Lesões causadas por utilização prolongada de uma
ferramenta. Quando utiliza uma ferramenta por períodos
prolongados, certifique-se de que faz intervalos
regulares.
• Perda de audição.
• Os perigos de saúde causados por respirar pó
desenvolvido quando utiliza a sua ferramenta (por
exemplo: trabalhar com madeira, especialmente
carvalho, faia e MDF.)
Características (Fig. A)
1. Botão de controlo da velocidade variável
2. Interruptor On/Off (Ligar/Desligar)
3. Interruptor de bloqueio
4. Cobertura do compartimento de armazenamento de
lâmina
5. Alavanca de bloqueio da placa da sapata
6. Saída de extração de pó
7. Placa da sapata
8. Rolo de apoio da lâmina da serra
9. Seletor do curso do pêndulo
Características adicionais (Fig. A)
Características adicionais podem ser aplicáveis
dependendo do produto adquirido. As características
adicionais aplicáveis ao número de catálogo adquirido
são mostradas na Fig. A.
Montagem
Aviso! Antes de tentar qualquer uma das
operações seguintes, certifique-se de que a
ferramenta está desligada, inclusive da tomada, e
que a lâmina de serra parou. As lâminas de serra
utilizadas podem estar quentes.
Ajustar em remover a lâmina de serra (Fig. C e D)
Aviso! Antes de tentar qualquer uma das
operações seguintes, certifique-se de que a
ferramenta está desligada, inclusive da tomada, e
que a lâmina de serra parou. As lâminas de serra utilizadas
podem estar quentes.
22
Page 23

(Instruções Originais)
PORTUGUESE
Ajustar a lâmina da serra (Fig. C)
• Mantenha a lâmina de serra (10) como mostrado, com
os dentes voltados para a frente.
• Empurre e segure o grampo da lâmina (11) para baixo.
• Insira o cabo da lâmina da serra no suporte da lâmina
(12) tanto quanto for possível.
• Solte o grampo da lâmina (11).
Armazenamento da lâmina da serra (Fig. D)
As lâminas de serra (10) podem ser armazenadas no
compartimento de armazenamento (4) localizadas na parte
lateral da ferramenta.
• Abra a tampa do compartimento de armazenamento da
lâmina da serra (4) segurando a tira na parte superior da
tampa e puxando-o para fora.
• As lâminas são retidas no compartimento por uma
banda magnética. Para remover uma lâmina, pressionar
sobre uma extremidade da lâmina para levantar a outra
extremidade e remover.
• Feche a tampa do compartimento de armazenamento
da lâmina da serra (4) e certifique-se que se está
fechada e travada.
Aviso! Feche a porta do compartimento de
armazenamento de forma segura antes de
trabalhar a serra.
Ligar um aspirador à ferramenta (Fig. E)
Um adaptador (13) é necessário para ligar um aspirador ou
extrator de pó à ferramenta.
• Pressione o adaptador (13) para a saída de extração de
pó (6).
• Ligue o tubo do aspirador (14) ao adaptador (13).
Ventilador da linha de corte (Fig. F)
• Para ajudar a visibilidade quando corta, a sua serra
vaivém está equipada com o ventilador da linha de corte
(15) que manterá a área de trabalho limpa de pó como a
sua serra.
Utilização
Ajustar a placa de sapata para cortes de chanfro (Fig. G
e H)
Aviso! Nunca utilize a ferramenta quando a placa
da sapata está desapertada ou foi removida.
A placa da sapata (7) pode ser configurada num ângulo de
chanfro esquerdo ou direito até 45°.
• Puxe a alavanca de bloqueio da placa de sapata (5)
para o exterior para desbloquear a placa da sapata (7) a
partir da posição de 0°.
• Puxe a placa de sapata (7) para a frente e defina o
chanfro necessário 15°, 30° e 45° indicado na janela do
ângulo do chanfro.
• Pressione a alavanca de bloqueio da placa de sapata (5)
para trás da serra para bloquear a placa da sapata (7).
Para repor a placa de sapata (7) para cortes retos:
• Puxe a alavanca de bloqueio placa de sapata (5) para o
exterior para desbloquear a placa da sapata (7).
• Configure a placa da sapata (7) num ângulo de 0º e
puxe a placa da sapata para trás.
• Pressione a alavanca de bloqueio da placa de sapata (5)
para trás da serra para bloquear a placa da sapata (7).
Configuração do curso de pêndulo (Fig. I)
• Configure o seletor do curso do pêndulo (9) para a
posição desejada.
• Posição 0: metal e alumínio e folha de metal.
• Posição I: para laminados, madeira dura, topos de
trabalho.
• Posição II: para a madeira compensada e
PVC/Plásticos.
• Posição III: para madeira macia e corte rápido.
Controlo da velocidade variável
• Configurar o botão de controlo da velocidade variável (1)
para a gama da velocidade desejada.
• Utilize uma velocidade alta para a madeira, velocidade
média para alumínio e PVC e velocidade baixa para
metais e outras que não sejam alumínio.
Ligar e desligar
• Para ligar a ferramenta, pressione o interruptor on/off (2)
(ligar/desligar).
• Para desligar a ferramenta, solte o interruptor on/off (2)
(ligar/desligar).
• Para o funcionamento contínuo, pressione o botão de
bloqueio (3) e solte o interruptor on/off (3) (ligar/desligar).
• Para desligar a ferramenta quando em funcionamento
contínuo, pressione o interruptor on/off (ligar/desligar) e
solte-o.
Serrar
Manter a ferramenta com firmeza com as duas mãos
enquanto corta. A placa da sapata (7) deve ser mantida com
firmeza contra o material a ser cortado. Isto ajudará a
prevenir que a serra salte, reduz a vibração e minimiza a
quebra da lâmina.
23
Page 24

PORTUGUESE
(Instruções Originais)
• Deixe que a lâmina funcione livremente durante alguns
segundos antes de iniciar o corte.
• Aplique apenas uma ligeira pressão na ferramenta
enquanto executa o corte.
Sugestões para uma utilização ótima
Serrar laminados
Quando corta laminados pode ocorrer o lascamento o que
pode danificar a superfície de apresentação. As lâminas de
serra mais comuns cortam no curso ascendente, portanto,
se a placa da sapata está colocada na superfície da
apresentação, quer utilize uma lâmina de serra que corta
com o golpe descendente ou:
• Utilize uma lâmina de serra de dente fino. Serre da
superfície de trás da peça de trabalho.
• Para minimizar a lascagem, prenda um pedaço de
madeira ou madeira compensada em ambos os lados
das peças de trabalho e serre através desta sanduíche.
Serrar metal
Esteja consciente de que serrar metal leva muito mais
tempo do que serrar madeira.
• Utilize a lâmina de serra adequada para serrar metal.
• Limpe regularmente o corpo do motor com um pano
húmido. Não utilize nenhum agente de limpeza abrasivo
ou à base de solvente.
Acessórios
O desempenho da sua ferramenta depende do acessório
utilizado. Os acessórios STANLEY foram fabricados para
elevados padrões de qualidade e foram concebidos para
melhorar o desempenho da sua ferramenta. Ao utilizar estes
acessórios obterá o melhor da sua ferramenta.
Serviços de informação
A STANLEY proporciona uma rede completa de filiais e
locais de serviço autorizados da empresa. Todos os Centros
de Serviço STANLEY são equipados com pessoal treinado
para oferecer aos clientes um serviço de ferramentas
elétricas eficiente e confiável. Para obter mais informações
sobre os nossos centros de serviços autorizados e se
precisar de aconselhamento técnico, reparação ou peças de
reposição genuínas de fábrica, entre em contacto com o
local STANLEY mais próximo de si.
• Quando corta folha fina de metal, aperte uma peça de
madeira na superfície de trás da peça de trabalho e
corte através desta sanduíche.
• Espalhe uma película de óleo ao longo da linha de corte
pretendida.
Manutenção
A sua ferramenta foi concebida para funcionar durante um
longo período de tempo com um mínimo de manutenção.
Um funcionamento satisfatório permanente depende de um
cuidado adequado da ferramenta e de uma limpeza regular.
Aviso! Antes de realizar qualquer manutenção, desligue a
ferramenta, inclusive da tomada.
• Limpe regularmente as ranhuras de ventilação da sua
ferramenta utilizando uma escova macia ou um pano
seco.
24
Page 25

(Instruções Originais)
PORTUGUESE
Protegendo o ambiente
Recolha separada. Este produto não deve ser
descartado com o resto do lixo caseiro normal.
Se encontrar que um dia o seu produto Stanley precisa de
substituição, ou se já não tem mais uso para si, não o
descarte com o resto de lixo caseiro normal. Disponibilize
este produto para recolha separada.
Recolha separada dos produtos usados e
embalagens permite que os materiais sejam
reciclados e usados de novo. Reutilizar materiais
reciclados ajuda a prevenir poluição ambiental e reduz a
necessidade de matéria-prima.
Leis locais podem fornecer recolha separada de produtos
elétricos das casas, em sítios de resíduos municipais ou no
vendedor quando você compra um novo produto. Stanley
oferece uma instalação para a recolha e reciclagem de
produtos Stanley uma vez que estes atingiram o fim da sua
vida útil. Para desfrutar deste serviço por favor devolva o
seu produto a qualquer agente autorizado de reparações
que os recolherá em nosso nome.
Você pode verificar a localização do seu agente de
reparações autorizado mais próximo contactando o seu
escritório local Stanley no endereço indicado neste manual.
Alternativamente, uma lista de agentes de reparações
autorizados pela Stanley e detalhes completes dos nossos
serviços pós-venda e contactos estão disponíveis na
Internet em: www.2helpU.com
dois ano de garantia total
Se o seu produto STANLEY ficar defeituoso devido a
materiais ou mão-de-obra defeituosos em 24 meses a
contra da data da compra, STANLEY Europe garante a
substituição de todas as peças defeituosas sem custos – por
nossa conta – substitui a unidade sem custos dado que:
• O produto não foi mal usado e foi usado de acordo com
o manual de instruções.
• O produto foi sujeito a uso e desgaste justo;
• Não foram tentadas reparações feitas por pessoas não
autorizadas;
• É fornecida um comprovativo de compra.
• O produto STANLEY é devolvido com todos os seus
componentes originais.
Se quiser apresentar uma reclamação, contacte o seu
vendedor ou verifique a localização do agente de
reparações Stanley autorizado no catálogo ou contacte com
o seu escritório local nos endereços indicados neste
manual. Uma lista de agentes autorizados de reparação
Stanley e detalhes completes dos nossos serviços
pós-venda estão disponíveis na internet em:
www.stanleytools.com
25
Page 26

РУССКИЙ
(Оригинальные инструкции)
FIG. A
FIG. B
1
3
2
4
9
5
6
8
7
FIG. C
10
12
11
FIG. D FIG. E
10
4
26
13
6
14
Page 27

(Оригинальные инструкции)
РУССКИЙ
FIG. F
FIG. G
15
FIG. H FIG. I
7
5
9
27
Page 28

РУССКИЙ
(Оригинальные инструкции)
Технические данные
СПЕЦИФИКАЦИИ STSJ0600
Мощность 600W
Напряжение 220-240V
Частота 50/60Hz
Скорость 800-3000/мин
Маятниковый ход 4 стадии
Косой срез 0-45°
Режимы 3
Режущая способность
Сталь 5 мм
Алюминий 15 мм
Дерево 85 мм
Длина хода 20 мм
Шнур 2 м
НЕ ВОЗВРАЩАЙТЕ ЭТО ИЗДЕЛИЕ В МАГАЗИН,
сначала обратитесь в ваш местный офис STANLEY или
в ближайший авторизованный сервисный центр.
Общие правила техники безопасности
Внимание! Прочитайте и поймите все
инструкции. Несоблюдение любых
к поражению электрическим током, пожару и/или
серьезной травме.
инструкций, указанных ниже, может привести
СОХРАНИТЕ ЭТИ ИНСТРУКЦИИ
Правила техники безопасности
Общие предупреждения по технике безопасности
электроинструментов
Внимание! Ознакомьтесь со всеми
правилами безопасности и инструкциями.
указанных ниже, может привести к поражению
электрическим током, пожару и/или серьезной травме.
Сохраните все предупреждения и инструкции для
будущего использования.
Термин "электроинструмент" во всех предупреждениях,
указанных ниже, относится к вашему сетевому (с
кабелем) электроинструменту или аккумуляторному
электроинструменту (без кабеля питания).
1. Безопасность рабочего места
а. Содержите рабочее место в чистоте и хорошо
b. Не работайте с электроинструментом в месте
Несоблюдение предупреждений и инструкций,
освещенным. Беспорядок на рабочем месте или
отсутствие освещения рабочего места может
привести к аварии.
хранения взрывоопасных материалов, например,
в присутствии огнеопасных жидкостей, газов или
пыли. Электрические инструменты создают искры,
которые могут воспламенить пыль или пары.
с. Дети и посторонние лица должны находиться как
можно дальше во время работы с
электроинструментом. Вы можете отвлечься и
потерять контроль.
2. Электробезопасность
а. Вилка электроинструмента должна
соответствовать розетке. Никогда не
модифицируйте вилку каким-либо образом. Не
используйте никакие вилки-переходники с
заземленными (замкнутыми на землю)
электроинструментами. Вилки и розетки, которые
не подвергались никаким изменениям снижают риск
поражения электрическим током.
b. Избегайте контакта тела с заземленными
поверхностями, такими как трубы, радиаторы,
плиты и холодильники. Существует повышенный
риск поражения электрическим током, если ваше
тело заземлено.
с. Избегайте любого воздействия дождя или влаги
на электроинструменты. Вода, попавшая в
электроинструмент, увеличивает риск поражения
электрическим током.
d. Аккуратно обращайтесь со шнуром питания.
Никогда не используйте шнур питания для
переноски, перемещения или извлечения вилки
из розетки. Держите шнур вдали от источников
тепла, масла, острых краев или движущихся частей.
Поврежденные или запутанные шнуры увеличивают
риск поражения электрическим током.
е. При работе с электроинструментом на улице,
используйте удлинитель, подходящий для
наружного использования. Использование кабеля,
пригодного для использования на открытом воздухе,
снижает риск поражения электрическим током.
f. При необходимости работы с
электроинструментом во влажной среде,
используйте устройство защитного отключения
(УЗО). Использование УЗО снижает риск поражения
электрическим током. Примечание: Термин
“устройство защитного отключения (УЗО)” может
быть заменен на "аварийный прерыватель
заземления" или "автоматический выключатель тока
утечки".
3. Личная безопасность
a. Будьте внимательны, смотрите, что вы делаете,
используйте здравый смысл при работе с
электроинструментом. Не используйте
электроинструмент, если вы устали или находитесь
под влиянием наркотиков, алкоголя или лекарств.
Малейшая неосторожность при работе с
электроинструментом может привести к серьезным
травмам.
28
Page 29

(Оригинальные инструкции)
РУССКИЙ
b. Используйте средства индивидуальной защиты.
Всегда надевайте защитные очки. Другое
защитное оборудование, включая респиратор,
ботинки на нескользящей подошве, защитный
шлем или средства защиты органов слуха,
используемые в надлежащих условиях, уменьшат
риск получения травмы.
с. Для предотвращения случайного запуска,
убедитесь, что переключатель находится в
выключенном положении перед подключением к
источнику питания и/или аккумуляторной
батарее, поднятия или переноски инструмента.
Не переносите электроинструмент с пальцем на
выключателе и не включайте питание на инструмент
с включенным выключателем, что может привести к
несчастному случаю.
d. Перед включением электроинструмента
снимайте регулировочный или гаечный ключ.
Гаечный или регулировочный ключ, оставленный на
вращающейся части электроинструмента, может
привести к травме.
е. Не тянитесь. Сохраняйте правильную стойку и
баланс все время. Это позволяет лучше
контролировать инструмент в неожиданных
ситуациях.
f. Одевайтесь правильно. Не надевайте свободную
одежду или украшения. Держите волосы, одежду
и перчатки вдали от движущихся частей.
Свободная одежда, украшения или длинные
волосы могут попасть в движущиеся части.
g. Если имеются устройства для подключения
пылесборника или вытяжки, убедитесь в том,
что они подсоединены и используются
правильно. Использование пылесборника снижает
вероятность возникновения рисков, связанных с
пылью.
4. Использование и уход за электроинструментом
a. Не перегружайте электроинструмент.
Используйте подходящий электрический
инструмент для соответствующего применения.
Правильно подобранный электроинструмент
позволит выполнить работу лучше и безопаснее при
скорости, для которой он был разработан.
b. Не используйте электроинструмент, если
переключатель не может его включить и
выключить. Любой электроинструмент, который
нельзя контролировать с помощью переключателя,
опасен и должен быть отремонтирован.
c. Отключите кабель питания от источника питания
и/или аккумуляторный блок от электрического
инструмента перед выполнением любых
регулировок, замены принадлежностей или при
хранении электроинструмента. Такие
профилактические меры безопасности уменьшают
риск непреднамеренного запуска электрического
инструмента.
d. Храните неиспользуемые электроинструменты в
недоступном для детей месте и не позволяйте
лицам, не знакомым с электроинструментом или
данными инструкциями, работать с
электроинструментом. Электроинструменты опасны
в руках неопытных пользователей.
е. Поддержание электроинструмента. Проверяйте
разрегулированность или cоединение
подвижных частей, поломки частей и любые
другие условия, которые могут повлиять на
работу электроинструмента. При наличии
повреждения, отремонтируйте
электроинструмент перед использованием.
Многие несчастные случаи являются следствием
плохого ухода за электроинструментом.
f. Держите режущий инструмент острым и чистым.
Хорошо ухоженный режущий инструмент с острыми
режущими кромками легче контролировать.
5. Обслуживание
а. Обеспечьте, чтобы обслуживание и ремонт
вашего электроинструмента проводился в
авторизованном сервисном центре по ремонту с
использованием только оригинальных запасных
частей. Это станет гарантией безопасности
электроинструмента.
6. Этикетки на инструменте
Этикетка на вашем инструменте может включать
следующие символы:
Читайте
инструкции по
эксплуатации
Используйте
средства
защиты глаз
Используйте
средства
защиты
органов слуха
В ........ Вольт
A ........ Ампер
Гц ....... Герц
Вт ........ Ватт
мин...... минуты
Перемен-
.....
ный ток
Постоян-
.....
ный ток
Скорость
n
.......
0
без нагрузки
Конструкция
......
класса II
Терминал
....
заземления
Символ
предупреж-
....
дения об
опасности
обороты или
...мин..
возвратнопоступательное движение
в минуту
Положение даты штрих-кода
Дата кода, который также включает год изготовления,
печатается на корпусе.
Пример:
2014 XX JN
Год изготовления
7. Электрическая безопасность
Ваш инструмент имеет двойную изоляцию,
именно в этой связи заземляющий провод не
требуется. Всегда проверяйте, что напряжение
сети соответствует напряжению, указанному на
заводской табличке.
Внимание! Если шнур питания поврежден, он
должен быть заменен производителем в
авторизованном сервисном центре STANLEY
или квалифицированным специалистом для того, чтобы
избежать повреждения или травмы. Если шнур питания
заменен квалифицированным специалистом, не
уполномоченным STANLEY, гарантия не будет
действовать.
29
Page 30

РУССКИЙ
(Оригинальные инструкции)
Дополнительные меры безопасности для
машинной ножовки
Предостережение! Дополнительные меры
безопасности для машинной ножовки.
• Держите инструмент за изолированные ручки
при выполнении работы, когда режущий
инструмент может контактировать со скрытой
проводкой или своим собственным шнуром.
Контакт с "работающим" проводом сделает открытые
металлические части инструмента проводящими, и
оператора может ударить электрическим током.
• Используйте зажимы или еще один практический
способ для обеспечения и поддержания
работающего изделия на устойчивой платформе.
Проведение работы по руке или против вашего тела,
лишает устойчивости и может привести к потере
контроля.
• Держите руки подальше от зоны резания. Никогда
не прикасайтесь к низу заготовки по любой причине.
Не вставляйте пальцы или большой палец в
непосредственной близости от диска, совершающего
возвратно-поступательные движения. Не
стабилизируйте пилу посредством удержания
башмака.
• Следите, чтобы полотно ножовки было острым.
Тупые или поврежденные полотна могут заставить
пилу отклониться или затормозиться под давлением.
Всегда используйте соответствующий тип пилы для
материала заготовки и характера реза.
• При резке трубы или трубопровода, убедитесь,
что в них нет воды, электрической проводки и
т.д.
• Не прикасайтесь к обрабатываемой детали или
лезвию сразу после работы с инструментом. Они
могут быть очень горячими.
• Будьте в курсе скрытых опасностей, прежде чем
резать в стенах, полах или потолках проверьте их на
наличие электропроводки и трубопроводов.
• Полотно будет продолжать двигаться после
отпускания выключателя. Всегда выключайте
инструмент и подождите, пока полотно ножовки не
остановится полностью, прежде чем положить
электроинструмент.
Предостережение! Контакт с/или вдыхание
пыли, возникающие при резке, могут
представлять опасность для здоровья оператора
и окружающих лиц. Надевайте респиратор, специально
разработанный для защиты от пыли и паров, и следите,
чтобы лица, находящиеся в рабочей зоне, также были
защищены.
• Этот инструмент не предназначен для
использования лицами (включая детей) с
ограниченными физическими, сенсорными или
умственными способностями или с недостатком
опыта или знаний, если они не находятся под
контролем или не получили инструкции относительно
использования устройства от лица, ответственного
за их безопасность. Дети должны быть под
присмотром, чтобы они не играли с инструментом.
• Назначение инструмента описывается в данном
руководстве. Использование любых аксессуаров или
выполнение любой работы с помощью этого
инструмента, не рекомендованных в данном
руководстве, может представлять опасность
получения травм и/или повреждения имущества.
Остаточные риски
Дополнительные остаточные риски могут возникнуть при
использовании инструмента, которые не включены в
описанные здесь правила техники безопасности. Эти
риски могут возникнуть при неправильном или
продолжительном использовании изделия и т.п.
Несмотря на соблюдение соответствующих правил
техники безопасности и использование
предохранительных устройств, некоторых остаточных
рисков невозможно избежать. Они включают в себя:
• Травмы в результате касания
вращающихся/движущихся частей.
• Риск получения травмы во время смены деталей
инструмента, ножей или насадок
• Травмы, вызванные продолжительным
использованием инструмента. При использовании
инструмента в течение продолжительного периода
времени делайте регулярные перерывы в работе.
• Плохой слух.
• Ущерб здоровью в результате вдыхания пыли при
использовании инструмента (пример: работа с
деревом, в особенности, древесиной дуба, бука и
древесноволокнистой плитой средней плотности).
Характеристики (рис. А)
1. Регулятор переменной скорости
2. Переключатель включения/выключения
3. Кнопка блокировки
4. Крышка отсека для хранения диска
5. Блокирующий рычаг платформы башмака
6. Выходное отверстие для отсоса пыли
7. Платформа башмака
8. Поддерживающий ролик пильного диска
9. Селектор хода маятника
Дополнительные характеристики (рис. А)
Дополнительные характеристики могут быть применимы
в зависимости от приобретенного продукта.
Дополнительные характеристики, приобретенные
согласно определенного номера каталога, показаны на
рис. А.
30
Page 31

(Оригинальные инструкции)
РУССКИЙ
Сборка
Предостережение! Перед тем, как начать
любую из следующих операций, убедитесь, что
инструмент выключен и отключен от сети, и что
полотно ножовки остановлено. Полотно сразу после
работы может быть горячим.
Установка и снятие полотна (рис. C и D)
Внимание! Перед тем, как осуществить любую
из следующих операций, необходимо убедиться,
что инструмент выключен и отключен от сети, и
что полотно ножовки остановлено. Полотно после
использования может быть горячим.
Установка полотна ножовки (рис. C)
• Держите полотно ножовки (10), как показано,
зубцами вперед.
• Нажмите и удерживайте зажим полотна (11) вниз.
• Вставьте хвостовик полотна в держатель (12),
насколько это возможно.
• Отпустите зажим полотна (11).
Хранение полотна ножовки (рис. D)
Полотно ножовки (10) может храниться в специальном
отсеке для хранения (4), расположенном на боковой
стороне инструмента.
• Откройте крышку отсека для хранения полотна (4),
удерживая выступ на верхней части крышки,
потяните ее наружу.
• Полотна ножовки удерживаются в отсеке при
помощи магнитной полосы. Чтобы вытащить
полотно, нажмите на один конец полотна, чтобы
поднять другой и вытащите.
• Закройте крышку отсека для хранения полотен (4) и
убедитесь, что она плотно закрыта.
Предостережение! Плотно закройте крышку
отсека для хранения полотен перед началом
работы с пилой.
Подключение пылесоса к инструменту (рис. Е)
Для подключения к инструменту пылесоса или вытяжки
пыли, необходим адаптер (13).
• Вставьте адаптер (13) в выходное отверстие для
вытяжки пыли (6).
• Подключите шланг пылесоса (14) к адаптеру (13).
Воздуходувка для линии разреза (рис. F)
Для облегчения видимости при резке, ваша машинная
ножовка оснащена воздуходувкой для линии разреза
(15), при помощи которой рабочая зона будет
очищаться от пыли во время распиливания.
Использование
Регулировка подошвы башмака для косых срезов
(рис. G и H)
Предостережение! Никогда не используйте
инструмент, если подошва башмака не
закреплена или отсутствует.
• Подошва башмака (7) может быть установлена на
левой или правой стороне под наклонным углом до
45°.
• Потяните фиксирующий рычаг подошвы (5) наружу,
чтобы разблокировать подошву (7) с позиции 0
градусов.
• Потяните подошву (7) вперед и установите
необходимый наклон 15°, 30° и 45°, указанный в окне
наклона угла.
• Нажмите рычаг блокировки подошвы (5) обратно к
пиле, чтобы зафиксировать подошву башмака (7).
Для переустановки подошвы башмака (7) для прямой
резки:
• Потяните фиксирующий рычаг подошвы (5) наружу,
чтобы разблокировать подошву башмака (7).
• Установите подошву башмака (7) под углом 0
градусов и нажмите/протяните подошву башмака
назад.
• Нажмите рычаг блокировки подошвы (5) обратно к
пиле, чтобы зафиксировать подошву (7).
Установка хода маятника (рис. I)
• Установите переключатель хода маятника (9) в
нужное положение.
• Положение 0: металл, алюминий и листовой металл.
• Положение I: для ламината, твердой древесины,
рабочих поверхностей.
• Положение II: для фанеры и ПВХ/пластика
• Положение III: для мягкой древесины и быстрой
резки.
Регулирование скорости
• Установите ручку регулирования скорости (1) в
требуемое положение скорости.
• Используйте высокую скорость для дерева, среднюю
скорость для алюминия и ПВХ и низкую для других
металлов, отличных от алюминия.
Включение и выключение
• Чтобы включить инструмент, нажмите на
переключатель вкл./выкл. (2).
• Чтобы выключить инструмент, отпустите кнопку
переключатель вкл./выкл. (2).
• Для непрерывной работы нажмите фиксатор
клавиши (3) и отпустите переключатель вкл./ выкл.
(2).
• Чтобы выключить инструмент, находящийся в
непрерывном режиме работы, нажмите
переключатель вкл./ выкл. (2) и отпустите его.
31
Page 32

РУССКИЙ
(Оригинальные инструкции)
Распиловка.
Держите инструмент обеими руками во время резки.
Подошва башмака (7) должна прочно удерживаться
против разрезаемого материала. Это поможет
предотвратить пилу от скачков, уменьшить вибрацию и
минимизировать возможность поломки полотна.
• Дайте полотну свободно поработать в течение
нескольких секунд, прежде чем начать резку.
• Применяйте только легкое надавливание на
инструмент при выполнении разреза.
Советы для оптимального использования
Распиловка ламината
При разрезании ламината, могут случиться сколы,
которые могут повредить внешний вид поверхности.
Наиболее распространенными разрезами полотна
является разрез вверх, поэтому, если подошва башмака
находится на внешней поверхности ламината, вам
необходимо использовать пилу с ходом вниз или:
• Используйте пилу с мелкими зубьями. Распиливайте
с задней части заготовки.
• Чтобы свести к минимуму раздробление, зажмите
кусок лома древесины или ДВП с обеих сторон
заготовок и распиливайте через так называемый
сандвич.
Распиловка металла
Помните, что распиловка металла занимает гораздо
больше времени, чем пиление древесины.
• Используйте полотно ножовки подходящее для
распиловки металла.
• При резке тонкого листового металла, прижмите
кусочек древесины к задней поверхности заготовки и
распиливайте через этот сандвич.
длительного периода времени при минимальном
техническом обслуживании. Для обеспечения
удовлетворительной работы, инструмент должен
правильно храниться и подвергаться регулярной чистке.
Предостережение! Перед выполнением любых работ
по обслуживанию выключите и отсоедините инструмент.
• Регулярно очищайте вентиляционные прорези
инструмента мягкой щеткой или сухой тканью.
• Регулярно очищайте корпус двигателя влажной
тканью. Не используйте абразивные вещества или
чистящие растворы на основе растворителя.
• Регулярно открывайте патрон и извлекайте его,
чтобы удалить пыль внутри.
Аксессуары
Производительность вашего инструмента зависит от
используемых аксессуаров. Аксессуары STANLEY
разработаны согласно высоким стандартам качества, и
они способны увеличить производительность вашего
электроинструмента. Используя эти принадлежности, вы
сможете наиболее эффективно использовать ваш
инструмент.
Информационная служба
STANLEY предлагает полную сеть авторизированных
сервисных центров, принадлежащих компании. Все
сервисные центры STANLEY укомплектованы
персоналом, прошедшим обучение, чтобы предоставить
клиентам эффективный и надежный сервис по
обслуживанию электроинструментов. Для получения
дополнительной информации о авторизированных
сервисных центрах, или если вам нужен технический
совет, ремонт или оригинальные запасные части, вам
необходимо обратиться в ближайший сервисный центр
STANLEY.
• Нанесите масляную пленку вдоль предполагаемой
линии реза.
Обслуживание
Ваш инструмент был разработан для работы в течение
32
Page 33

(Оригинальные инструкции)
РУССКИЙ
Защита окружающей среды
Раздельный сбор и утилизация. Этот продукт не
следует утилизировать вместе с бытовым
мусором.
Если вы поймете, что ваш продукт Stanley нуждается в
замене, или если он не имеет никакого дальнейшего
применения для вас, не выбрасывайте его вместе с
бытовыми отходами. Предоставьте этот продукт для
раздельного сбора/утилизации.
Раздельный сбор продуктов и упаковок
позволяет осуществить их переработку и
использовать их повторно. Повторное
использование переработанных материалов помогает
защищать окружающую среду от загрязнения и снижает
расход сырьевых материалов.
Местное законодательство может обеспечить сбор
старых электроинструментов отдельно от бытового
мусора на муниципальных свалках отходов или в
торговом предприятии при покупке нового изделия.
Stanley обеспечивает возможность для сбора и
утилизации продуктов Stanley, как только они достигли
конца своего срока службы. Для того чтобы
воспользоваться этой услугой, вы можете сдать ваше
изделие в любой авторизованный сервисный центр,
который собирает их по нашему поручению.
Вы можете узнать место нахождения вашего
ближайшего авторизованного сервисного центра,
обратившись в местное отделение Stanley по адресу,
указанному в данном руководстве. Кроме того, список
авторизованных ремонтных агентов Stanley и полную
информацию о нашем послепродажном обслуживании и
контактах вы можете найти в Интернете:
www.2helpU.com10
Два год полной гарантии
Если ваш продукт STANLEY выходит из строя из-за
дефектных материалов или изготовления в течение 24
месяцев с даты покупки, STANLEY Europe гарантирует
замену всех неисправных деталей бесплатно или - по
своему усмотрению - замену продукта бесплатно при
условии, что:
• Продукт использовался правильно, его эксплуатация
проводилась строго в соответствии с инструкцией по
эксплуатации.
• Продукт подвергался естественному износу;
• Ремонт не проводился посторонними лицами;
• Представлены документы, подтверждающие покупку.
• Продукт STANLEY возвращается в полном комплекте
со всеми оригинальными компонентами
Если вы хотите сделать заявку, свяжитесь с продавцом
или узнайте место нахождения вашего ближайшего
авторизованного сервисного агента Stanley в каталоге
Stanley или обратитесь в местное представительство
Stanley по адресу, указанному в данном руководстве.
Список авторизованных сервисных агентов Stanley и
полную информацию о нашем послепродажном
обслуживании можно найти в Интернете по адресу:
www.stanleytools.com
33
Page 34

РУССКИЙ
(Оригинальные инструкции)
Гарантийные условия
Уважаемый покупатель!
1. Поздравляем Вас с покупкой высококачественного
изделия STANLEY и выражаем признательность за Ваш
выбор.
2. При покупке изделия требуйте проверки его комплектности
и исправности в Вашем присутствии, инструкцию по
эксплуатации и заполненный гарантийный талон на
русском языке.
В гарантийном талоне должны быть внесены: модель,
дата продажи, серийный номер, дата производства
инструмента; название, печать и подпись торговой
организации. При отсутствии у Вас правильно заполненного гарантийного талона, а также несоответствия
указанных в нем данных мы будем вынуждены откло- нить
Ваши претензии по качеству данного изделия.
3. Во избежание недоразумений убедительно просим Вас
перед началом работы с изделием внимательно
ознакомиться с инструкцией по его эксплуатации.
Правовой основой настоящих гарантийных условий
является действующее Законодательство. Гарантийный
срок на данное изделие составляет 24 месяца и
исчисляется со дня продажи. В случае устранения
недостатков изделия, гарантийный срок продлевается на
период его нахождения в ремонте. Срок службы изделия
составляет 5 лет со дня продажи.
4. В случае возникновения каких-либо проблем в про- цессе
эксплуатации изделия рекомендуем Вам обра- щаться
только в уполномоченные сервисные центры STANLEY,
адреса и телефоны которых Вы сможете найти в
гарантийном талоне, на сайте www.2helpU.com или узнать
в магазине. Наши сервисные станции - это не только
квалифицированный ремонт, но и широкий ассортимент
запчастей и принадлежностей.
5. Производитель рекомендует проводить периодическую
проверку и техническое обслуживание изделия в
уполномоченных сервисных центрах.
Изготовитель
Блэк энд Деккер Холдингс ГмбХ
Германия, 65510, Идштайн,
ул. Блэк энд Деккер, 40
6. Наши гарантийные обязательства распространяются
только на неисправности, выявленные в течение гарантийного срока и вызванные дефектами производства и \
или материалов.
7. Гарантийные условия не распространяются на
неисправности изделия, возникшие в результате:
7.1. Несоблюдения пользователем предписаний инструкции по
эксплуатации изделия, применения изделия не по
назначению, неправильном хранении, использования
принадлежностей, расходных материалов и запчастей, не
предусмотренных производителем.
7.2. Механического повреждения (сколы, трещины и разрушения) внутренних и внешних деталей изделия,
основных и вспомогательных рукояток, сетевого электрического кабеля, вызванного внешним ударным или
любым иным воздействием
7.3 Попадания в вентиляционные отверстия и проникновение внутрь изделия посторонних предметов,
материалов или веществ, не являющихся отходами,
сопровождающими применение изделия по назначению,
такими как: стружка, опилки, песок, и пр.
7.4. Воздействий на изделие неблагоприятных атмосферных и
иных внешних факторов, таких как дождь, снег,
повышенная влажность, нагрев, агрессивные среды,
несоответствие параметров питающей электросети,
указанных на инструменте.
7.5. Стихийного бедствия. Повреждение или утрата изделия,
связанное с непредвиденными бедствиями, стихийными
явлениями, в том числе вследствие действия
непреодолимой силы (пожар, молния, потоп и другие
природные явления), а так же вследствие перепадов напряжения в электросети и другими причинами, которые
находятся вне контроля производителя.
8. Гарантийные условия не распространяются:
8.1. На инструменты, подвергавшиеся вскрытию, ремонту или
модификации вне уполномоченного сервисного центра.
8.2. На детали и узлы, имеющие следы естественного износа,
такие как:
приводные ремни и колеса, угольные щетки, смазка,
подшипники, зубчатое зацепление редукторов, резиновые уплотнения, сальники, направляющие ролики,
муфты, выключатели, бойки, толкатели, стволы, и т.п.
8.3. На сменные части: патроны, цанги, зажимные гайки и
фланцы, фильтры, аккумуляторные батареи, ножи,
шлифовальные подошвы, цепи, звездочки, пильные шины,
защитные кожухи, пилки, абразивы, пильные и
абразивные диски, фрезы, сверла, буры и т.п.
8.4. На неисправности, возникшие в результате перегрузки
инструмента (как механической, так и электрической),
повлекшей выход из строя одновременно двух и более
деталей и узлов, таких как: ротора и статора, обеих
обмоток статора, ведомой и ведущей шестерни редуктора или других узлов и деталей. К безусловным
признакам перегрузки изделия относятся, помимо прочих:
появление цветов побежалости, деформация или
оплавление деталей и узлов изделия, потемнение или
обугливание изоляции проводов электродвигателя под
воздействием высокой температуры.
34
Page 35

(Оригінальні інструкції)
УКРАЇНСЬКА
FIG. A
FIG. B
1
3
2
4
9
5
6
8
7
FIG. C
10
12
11
FIG. D FIG. E
10
4
13
6
14
35
Page 36

УКРАЇНСЬКА
(Оригінальні інструкції)
FIG. F
FIG. G
15
FIG. H FIG. I
7
5
36
9
Page 37

(Оригінальні інструкції)
УКРАЇНСЬКА
Технічні дані
СПЕЦІФІКАЦІЇ STSJ0600
Потужність 600W
Напруга 220-240V
Частота 50/60Hz
Швидкість 800-3000/хвил
Mаятниковий хід 4 стадії
Косий зріз 0-45°
Режими 3
Ріжуча здатність
Сталь 5 мм
Алюміній 15 мм
Дерево 85 мм
Довжина ходу 20 мм
Шнур 2 м
НЕ ПОВЕРТАЙТЕ ЦЕЙ ВИРІБ В МАГАЗИН,
спочатку зверніться у місцевий офіс STANLEY або в
найближчий авторизований сервісний центр.
Загальні правила техніки безпеки
Увага! Прочитайте і зрозумійте всі інструкції.
Недотримання будь-яких інструкцій,
ураження електричним струмом, пожежі та/або
серйозної травми.
зазначених нижче, може призвести до
ЗБЕРЕЖІТЬ ЦІ ІНСТРУКЦІЇ
Правила техніки безпеки
Загальні попередження з техніки безпеки
електроінструментів
Увага! Ознайомтеся з усіма правилами
безпеки та інструкціями. Недотримання
може призвести до ураження електричним струмом,
пожежі та/або серйозної травми.
Збережіть всі попередження та інструкції для
майбутнього використання.
Термін "електроінструмент" у всіх попередженнях,
зазначених нижче, відноситься до мережевого (з
кабелем) електроінструменту або акумуляторної батареї
(без кабелю живлення).
1. Безпека робочого місця
а. Утримуєте робоче місце в чистоті і добре
попереджень та інструкцій, зазначених нижче,
освітленим. Безлад на робочому місці або
відсутність освітлення робочого місця може
призвести до аварії.
b. Не працюйте з електроінструментом в місці
зберігання вибухонебезпечних матеріалів,
наприклад, у присутності легкозаймистих рідин,
газів або пилу. Електричні інструменти створюють
іскри, що можуть запалити пил або пари.
с. Діти і сторонні особи повинні знаходитися
якнайдалі під час роботи з електроприладами. Ви
можете відволіктися і втратити контроль.
2. Електробезпека
а. Вилка електроінструмента повинна відповідати
розетці. Ніколи не змінюйте вилку будь-яким
чином. Не використовуйте ніякі
вилки-перехідники з заземленими (замкнутими на
землю) електроінструментами. Вилки і розетки, які
не піддавалися ніяким змінам знижують ризик
ураження електричним струмом.
b. Уникайте контакту тіла з заземленими
поверхнями, такими як труби, радіатори, плити та
холодильники. Існує підвищений ризик ураження
електричним струмом, якщо ваше тіло заземлене.
с. Уникайте будь-якого впливу дощу або вологи на
електроінструменти. Вода, що потрапила в
електроінструмент, збільшує ризик ураження
електричним струмом.
d. Обережно поводьтеся зі шнуром живлення.
Ніколи не використовуйте шнур живлення для
перенесення, переміщення або вилучення вилки з
розетки. Тримайте шнур подалі від джерел тепла,
масла, гострих країв або рухомих частин.
Пошкоджені або заплутані шнури збільшують ризик
ураження електричним струмом.
е. При роботі з електроінструментом на вулиці,
використовуйте подовжувач, відповідний для
зовнішнього використання. Використання кабелю,
придатного для використання на відкритому повітрі,
знижує ризик ураження електричним струмом.
f. При необхідності роботи з електроінструментом у
вологому середовищі, використовуйте пристрій
захисного відключення (ПЗВ). Використання ПЗВ
знижує ризик ураження електричним струмом.
Примітка: Термін "пристрій захисного відключення
(ПЗВ)" може бути замінений на "аварійний переривач
заземлення" або "автоматичний вимикач струму
витоку".
3. Особиста безпека
a. Будьте уважні, дивіться, що ви робите,
використовуйте здоровий глузд при роботі з
електроприладами. Не використовуйте
електроінструмент, якщо ви втомилися або
перебуваєте під впливом наркотиків, алкоголю або
ліків. Найменша необережність при роботі з
електроінструментом може призвести до серйозних
травм.
b. Використовуйте засоби індивідуального захисту.
Завжди надягайте захисні окуляри. Інше захисне
обладнання, включаючи респіратор, черевики на
нековзній підошві, захисний шолом або засоби
37
Page 38

УКРАЇНСЬКА
(Оригінальні інструкції)
захисту органів слуху, використовувані в належних
умовах, зменшать ризик отримання травми.
с. Для запобігання випадкового запуску,
переконайтеся, що перемикач знаходиться у
вимкненому положенні перед підключенням до
джерела живлення та/або акумуляторної батареї,
підняття або перенесення інструменту. Не
переносьте електроінструмент з пальцем на
вимикачі і не включайте електроживлення на
інструмент з увімкненим вимикачем, що може
призвести до нещасного випадку.
d. Перед включенням електроінструменту знімайте
регулювальний або гайковий ключ. Гайковий або
регулювальний ключ, залишений на обертовій
частині електроінструменту, може призвести до
травми.
е. Не тягніться. Зберігайте правильну стійку і
баланс весь час. Це дозволяє краще контролювати
інструмент в несподіваних ситуаціях.
f. Одягайтеся правильно. Не надягайте вільний
одяг або прикраси. Тримайте волосся, одяг і
рукавички далеко від рухомих частин. Вільний
одяг, прикраси або довге волосся можуть потрапити
в рухомі частини.
g. Якщо є пристрої для підключення пилозбірника
або витяжки, переконайтеся в тому, що вони
під'єднані і використовуються правильно.
Використання пилозбірника знижує ймовірність
виникнення ризиків, пов'язаних з пилом.
4. Використання та догляд за електроінструментом
a. Не перевантажуйте електроінструмент.
Використовуйте відповідний електричний
інструмент для відповідного застосування.
Правильно підібраний електроінструмент дозволить
виконати роботу краще і безпечніше при швидкості,
для якої він був розроблений.
b. Не використовуйте електроінструмент, якщо
перемикач не може його включити і вимкнути.
Будь-який електроінструмент, який не можна
контролювати за допомогою перемикача, є
небезпечний і повинен бути відремонтований.
c. Від'єднайте кабель живлення від джерела
живлення та/або акумулятора від електричного
інструменту перед виконанням будь-яких
регулювань, заміни приладдя або при зберіганні
електроінструменту. Такі профілактичні заходи
безпеки зменшують ризик ненавмисного запуску
електричного інструменту.
d. Зберігайте електроприлади в недоступному для
дітей місці і не дозволяйте особам, які не знайомі
з електричним інструментом або даними
інструкціями, працювати з електроприладами.
Електроінструменти небезпечні в руках
недосвідчених користувачів.
е. Підтримання електроінструменту. Перевіряйте
разрегульованість або з'єднання рухомих частин,
поломки частин і будь-які інші умови, які можуть
вплинути на роботу електроінструменту. При
наявності пошкодження, відремонтуйте
електроінструмент перед використанням. Багато
нещасних випадків є наслідком поганого догляду за
електроінструментом.
f. Тримайте ріжучий інструмент гострим і чистим.
Добре доглянутий ріжучий інструмент з гострими
ріжучими крайками легше контролювати.
5. Обслуговування
а. Забезпечте, щоб обслуговування і ремонт вашого
електроінструменту проводився в
авторизованому сервісному центрі по ремонту з
використанням тільки оригінальних запасних
частин. Це стане гарантією безпеки
електроінструменту.
6. Етикетки на інструменті
Етикетки на вашому інструменті можуть включати
такі символи:
Читайте
інструкції з
експлуатації
Використовуйте
засоби захисту
очей
Використовуйте
засоби захисту
органів слуху
В ........ Вольт
A ........ Ампер
Гц ....... Герц
Вт ........
мин .....
n
0
Ватт
хвилини
Змінний
.....
струм
Постійний
.....
струм
Швидкість
.......
без навантаження
......
Конструкція
класу II
Термінал
....
заземлення
Символ
....
попередження про
небезпеку
хв..
обороти або
зворотно
поступальний рух в
хвилину
Положення дати штрих-коду
Дата коду, який також включає рік виготовлення,
друкується на корпусі.
Приклад:
2014 XX JN
Рік виготовлення
7. Електрична безпека
Ваш інструмент має подвійну ізоляцію, саме в
цьому зв'язку заземлюючий провід не потрібен.
Завжди перевіряйте, що напруга мережі
відповідає напрузі, вказаній на табличці.
Увага! Якщо шнур живлення пошкоджений, він
повинен бути замінений виробником в
авторизованому сервісному центрі STANLEY
або кваліфікованим фахівцем для того, щоб уникнути
пошкодження або травми. Якщо шнур живлення
замінений кваліфікованим фахівцем, не уповноваженим
STANLEY, гарантія не діятиме.
Додаткові заходи безпеки для машинної ножівки
Застереження! Додаткові заходи безпеки для
машинної ножівки.
Тримайте інструмент за ізольовані ручки при виконанні
роботи, коли ріжучий інструмент може контактувати з
прихованою проводкою або своїм власним шнуром.
Контакт з "працюючим" проводом зробить відкриті
металеві частини інструменту провідніком, і оператора
може вдарити електричним струмом.
38
Page 39

(Оригінальні інструкції)
УКРАЇНСЬКА
• Використовуйте затискачі або ще один практичний
спосіб для забезпечення і підтримки виробу на стійкій
платформі. Проведення роботи по руці або проти
вашого тіла, позбавляє стійкості і може призвести до
втрати контролю.
• Тримайте руки подалі від зони різання. Ніколи не
торкайтеся до низу заготовки з будь-якої причини. Не
вставляйте пальці або великий палець в
безпосередній близькості від диска, який робить
зворотно-поступальні рухи. Не стабілізуйте пилу за
допомогою утримання башмака.
• При різанні труби або трубопроводу, переконайтеся,
що в них немає води, електричної проводки і т.д.
• Не доторкайтеся до оброблюваної деталі або
полотна відразу після роботи з інструментом. Вони
можуть бути дуже гарячими.
• Будьте в курсі прихованих небезпек, перш ніж різати
в стінах, підлозі або стелях перевірте їх на наявність
електропроводки і трубопроводів.
• Полотно буде продовжувати рухатися після
відпускання вимикача. Завжди вимикайте інструмент і
почекайте, поки полотно ножівки не зупиниться
повністю, перш ніж покласти електроінструмент.
Застереження! Контакт с/або вдихання пилу, що
виникають при різанні можуть становити
небезпеку для здоров'я оператора і оточуючих
осіб. Одягайте респіратор, спеціально розроблений для
захисту від пилу і парів, і стежте, щоб особи, які
перебувають в робочій зоні, також були захищені.
• Цей інструмент не призначений для використання
особами (включаючи дітей) з обмеженими фізичними,
сенсорними або розумовими здібностями або з
браком досвіду чи знань, якщо вони не знаходяться
під контролем або не отримали інструкції щодо
використання пристрою від особи, відповідальної за
їх безпеку. Діти повинні бути під наглядом, щоб вони
не гралися з інструментом.
• Призначення інструменту описується в цьому
посібнику. Використання будь-яких аксесуарів або
виконання будь-якої роботи за допомогою цього
інструменту, не рекомендованих у цьому посібнику,
може становити небезпеку отримання травм та/або
пошкодження майна.
Залишкові ризики
Додаткові залишкові ризики можуть виникнути при
використанні інструменту, який не може бути включений
в описані тут правила техніки безпеки. Ці ризики можуть
виникнути при неправильному або тривалому
використанні виробу і т.д. Незважаючи на дотримання
відповідних правил техніки безпеки та використання
запобіжних пристроїв, деяких залишкових ризиків
неможливо уникнути. Вони включають в себе:
• Травми в результаті торкання обертових/рухомих
частин.
• Ризик отримання травми під час зміни деталей
інструменту, ножів або насадок.
• Травми, викликані тривалим використанням
інструменту. При використанні інструменту протягом
тривалого часу робіть регулярні перерви в роботі.
• Поганий слух
• Збиток здоров'ю внаслідок вдихання пилу при
використанні інструменту (приклад: робота з
деревом, особливо, з деревиною дуба, бука і
деревоволокнистими плитами середньої щільності)
Характеристики (мал. А)
1. Регулятор змінної швидкості
2. Перемикач включення/виключення
3. Кнопка блокування
4. Кришка відсіку для зберігання диска
5. Блокуючий важіль платформи башмака
6. Вихідний отвір для відсмоктування пилу
7. Платформа башмака
8. Підтримуючий ролик пилкового диска
9. Селектор ходу маятника
Додаткові характеристики (мал. А)
Додаткові характеристики можуть бути застосовні в
залежності від придбаного продукту. Додаткові
характеристики, придбані згідно до певного номера
каталогу, показані на мал. А.
Збірка
Застереження! Перед тим, як почати будь-яку з
наступних операцій, переконайтеся, що
інструмент вимкнений і відключений від мережі,
і що полотно ножівки зупинено. Полотно відразу після
роботи може бути гарячим.
Установка і зняття полотна (мал. C і D)
Увага! Перед тим, як здійснити будь-яку з
наступних операцій, необхідно переконатися,
що інструмент вимкнений і відключений від
мережі і що полотно ножівки зупинено. Полотно після
використання може бути гарячим.
39
Page 40

УКРАЇНСЬКА
(Оригінальні інструкції)
Установка полотна ножівки (мал. C)
• Тримайте полотно ножівки (10), як показано, зубцями
вперед.
• Натисніть і утримуйте зажим полотна (11) вниз.
• Вставте хвостовик полотна в тримач (12), наскільки
це можливо.
• Відпустіть затискач полотна (11).
Зберігання полотна ножівки (мал. D)
Полотно ножівки (10) може зберігатися в спеціальному
відсіку для зберігання (4), розташованому на бічній
стороні інструменту.
• Відкрийте кришку для зберігання полотна (4),
утримуючи виступ на верхній частині кришки,
потягніть її назовні.
• Полотна ножівки утримуються у відсіку за допомогою
магнітної смуги. Щоб витягнути полотно, натисніть на
один кінець полотна, щоб підняти інший і витягніть.
• Закрийте кришку відсіку для зберігання полотен (4) і
переконайтеся, що вона щільно закрита.
Застереження! Щільно закрийте кришку відсіку
для зберігання полотен перед початком роботи з
пилою.
Connecting a vacuum cleaner to the tool (Fig. E)
Підключення пилососа до інструменту (мал. Е)
Для підключення до інструменту пилососа або витяжки
пилу, необхідний адаптер (13).
• Вставте адаптер (13) у вихідний отвір для витяжки
пилу (6).
• Підключіть шланг пилососа (14) до адаптера (13).
Повітродувка для лінії розрізу (мал. F)
Для полегшення видимості при різанні, ваша машинна
ножівка оснащена повітродувкою для лінії розрізу (15),
за допомогою якої робоча зона буде очищатися від пилу
під час розпилювання.
Використання
Регулювання підошви башмака для косих зрізів
(мал. G і H)
Застереження! Ніколи не використовуйте
інструмент, якщо підошва башмака не
закріплена або відсутня.
Підошва башмака (7) може бути встановлена на лівій
або правій стороні під похилим кутом до 45°.
• Потягніть фіксуючий важіль підошви (5) назовні, щоб
40
розблокувати підошву (7) з позиції 0 градусів.
• Потягніть підошву (7) вперед і встановіть необхідний
нахил 15°, 30° і 45°, зазначений у вікні нахилу кута.
• Натисніть важіль блокування підошви (5) назад до
пилки, щоб зафіксувати підошву черевика (7).
Для перевстановлення підошви башмака (7) для прямого
різання:
• Потягніть фіксуючий важіль підошви (5) назовні, щоб
розблокувати підошву башмака (7).
• Встановіть підошву башмака (7) під кутом 0 градусів і
натисніть/простягніть підошву башмака назад.
• Натисніть важіль блокування підошви (5) назад до
пилки, щоб зафіксувати підошву (7).
Установка ходу маятника (мал. I)
• Встановіть перемикач ходу маятника (9) в потрібне
положення.
• Положення 0: метал и алюміній и листовий метал.
• Положення I: для ламінату, твердої деревини,
робочих поверхонь.
• Положення II: для фанери и ПВХ/пластику
• Положення III: для м'якої деревини та швидкого
різання.
Регулювання швидкості
• Встановіть ручку регулювання швидкості (1) в
необхідне положення швидкості.
• Використовуйте високу швидкість для дерева,
середню швидкість для алюмінію і ПВХ і низьку для
інших металів, відмінних від алюмінію.
Вмикання і вимикання
• Щоб включити інструмент, натисніть на перемикач
вкл./викл. (2).
• Щоб вимкнути інструмент, відпустіть кнопку
перемикача вкл./викл. (2).
• Для безперервної роботи натисніть фіксатор клавіші
(3) і відпустіть перемикач вкл./викл. (2).
• Щоб вимкнути інструмент, що знаходиться в
безперервному режимі роботи, натисніть перемикач
вкл./викл. (2) і відпустіть його.
Розпилювання
Тримайте інструмент обома руками під час різання.
Підошва башмака (7) повинна міцно утримуватися проти
матеріалу, який розрізається. Це допоможе запобігти
ножовці від стрибків, зменшити вібрацію і мінімізувати
можливість поломки полотна.
Page 41

• Дайте полотну вільно попрацювати протягом
декількох секунд, перш ніж почати різання.
• Застосовуйте лише легке натиснення на інструмент
при виконанні розрізу.
Поради для оптимального використання
Розпилювання ламінату
При розрізуванні ламінату, можуть трапитися відколи, які
можуть зашкодити зовнішньому вигляду поверхні.
Найбільш поширеними розрізами пилкового полотна є
розріз вгору, тому, якщо підошва башмака знаходиться
на зовнішній поверхні ламінату, вам необхідно
використовувати пилку з ходом вниз або:
• Використовуйте пилку з дрібними зубами.
Розпилюйте з задньої поверхні заготовки.
• Щоб звести до мінімуму роздроблення затисніть
шматок брухту деревини або ДВП з обох боків
заготовок і розпилюйте через так званий сандвіч.
Розпилювання металу
Пам'ятайте, що розпилювання металу займає набагато
більше часу, ніж деревини.
• Використовуйте полотно підходяще для
розпилювання металу.
• При різанні тонкого листового металу, притисніть
шматочок деревини до задньої поверхні заготовки і
розпилюйте через цей сандвіч.
(Оригінальні інструкції)
• Регулярно очищайте корпус двигуна вологою
тканиною. Не використовуйте абразивні речовини або
чистящи розчини на основі розчинника. Важливо! Для
забезпечення безпеки і надійності обладнання,
ремонт, технічне обслуговування і регулювання (крім
тих, які перераховані в цьому посібнику) повинні
виконуватися кваліфікованим персоналом в
авторизованих сервісних центрах з використанням
оригінальних запасних частин.
УКРАЇНСЬКА
Аксесуари
Продуктивність вашого електроінструменту залежить від
використовуваних аксесуарів. Аксесуари STANLEY
розроблено відповідно високим стандартам якості, і
вони здатні збільшити продуктивність вашого
електроінструменту. Використовуючи ці
приналежності, ви зможете найбільш ефективно
використовувати ваш інструмент.
Інформаційна служба
STANLEY пропонує повну мережу авторизованих
сервісних центрів, що належать компанії. Всі сервісні
центри STANLEY укомплектовані персоналом, який
пройшов навчання, щоб надати клієнтам ефективний і
надійний сервіс з обслуговування електроінструментів.
Для отримання додаткової інформації про авторизовані
сервісни центри або якщо вам потрібна технічна рада,
ремонт або оригінальні запасні частини, вам необхідно
звернутися в найближчий сервісний центр STANLEY.
• Нанесіть масляну плівку уздовж передбачуваної лінії
різу.
Обслуговування
Ваш інструмент був розроблений для роботи протягом
тривалого періоду часу при мінімальному технічному
обслуговуванні. Для забезпечення задовільної роботи,
інструмент повинен правильно зберігатися і піддаватися
регулярному чищенню.
Застереження! Перед виконанням будь-яких робіт з
обслуговування вимкніть і відключіть інструмент.
• Регулярно очищайте вентиляційні прорізи
інструменту м'якою щіткою або сухою тканиною.
41
Page 42

УКРАЇНСЬКА
(Оригінальні інструкції)
Захист навколишнього середовища
Роздільний збір і утилізація. Цей продукт не слід
утилізувати разом з побутовим сміттям.
Якщо ви зрозумієте, що ваш продукт Stanley
потребує заміни, або якщо він не має ніякого подальшого
застосування для вас, не викидайте його разом з
побутовими відходами. Надайте цей продукт для
роздільного збору/утилізації.
Роздільний збір продуктів і упаковок дозволяє
здійснити їх переробку і використати їх повторно.
Повторне використання перероблених
матеріалів допомагає захищати довкілля від
забруднення і знижує витрату сировинних матеріалів.
Місцеве законодавство може забезпечити збір старих
електроінструментів окремо від побутового сміття на
муніципальних звалищах відходів або в торговому
підприємстві при купівлі нового виробу. Stanley
забезпечує можливість для збору і утилізації продуктів
Stanley, як тільки вони досягли кінця свого терміну
служби. Для того, щоб скористатися цією послугою, ви
можете здати ваш виріб у будь-який авторизований
сервісний центр, який збирає їх за нашим дорученням.
Ви можете упізнати місце знаходження вашого
найближчого авторизованого сервісного центру,
звернувшись в місцеве відділення Stanley за адресою,
вказаною в цьому керівництві. Крім того, список
авторизованих ремонтних агентів Stanley і повну
інформацію про наше післяпродажне обслуговування і
контакти ви можете знайти в Інтернеті:
www.2helpu.com10
Два рік повної гарантії
Якщо ваш продукт STANLEY виходить з ладу із-за
дефектних матеріалів або виготовлення впродовж 24
місяців з дати купівлі, STANLEY Europe гарантує заміну
усіх несправних деталей безкоштовно або - на власний
розсуд - заміну продукту безкоштовно за умови, що:
• Продукт використовувався правильно, його
експлуатація проводилася строго відповідно до
інструкції з експлуатації.
• Продукт піддавався звичайному зносу;
• Ремонт не проводився сторонніми особами;
• Представлені документи, що підтверджують купівлю.
• Продукт STANLEY повертається в повному комплекті
з усіма оригінальними компонентами
Якщо ви хочете зробити заявку, зв'яжіться з продавцем
або з’ясуйте місце знаходження вашого найближчого
авторизованого сервісного агента Stanley в каталозі
Stanley або зверніться в місцеве представництво Stanley
за адресою, вказаною в цьому посібнику. Список
авторизованих сервісних агентів Stanley і повну
інформацію про наше післяпродажне обслуговування
можна знайти в Інтернеті за адресою:
www.stanleytools.com
90618195 01/2015
42
Page 43

Гарантійні умови
Шановний покупець!
1. Вітаємо Вас з покупкою високоякісного виробу
STANLEY і висловлюємо вдячність за Ваш вибір.
2. При покупці виробу вимагайте перевірки його
комплектності і справності у Вашій присутності,
інструкцію з експлуатації та заповнений гарантійний
талон українською мовою
В гарантійному талоні повинні бути внесені: модель,
дата продажу, серійний номер, дата виробництва
інструменту; назва, печатка і підпис торгової
організації. За відсутності у Вас правильно
заповненого гарантійного талону, а також при
невідповідності зазначених у ньому даних ми
будемо змушені відхилити Ваші претензії щодо
якості даного виробу.
3. Щоб уникнути непорозумінь, переконливо просимо
Вас перед початком роботи з виробом уважно
ознайомитися з інструкцією з його експлуатації.
Правовою основою справжніх гарантійних умов є
чинне Законодавство. Гарантійний термін на даний
виріб складає 24 місяці і обчислюється з дня
продажу. У разі усунення недоліків виробу,
гарантійний строк продовжується на період його
перебування в ремонті. Термін служби виробу
становить 5 років з дня продажу.
4. У разі виникнення будь-яких проблем у процесі
експлуатації виробу рекомендуємо Вам звертатися
тільки в уповноважені сервісні центри STANLEY,
адреси та телефони яких Ви зможете знайти в
гарантійному талоні, на сайті www.2helpU.com або
дізнатися в магазині. Наші сервісні станції - це не
тільки кваліфікований ремонт, але і широкий
асортимент запчастин і аксесуарів.
5. Виробник рекомендує проводити періодичну
перевірку і технічне обслуговування виробу в
уповноважених сервісних центрах.
6. Наші гарантійні зобов'язання поширюються тільки
на несправності, виявлені протягом гарантійного
терміну і викликані дефектами виробництва та \ або
матеріалів.
7. Гарантійні умови не поширюються на несправності
виробу, що виникли в результаті:
7.1 Недотримання користувачем приписів інструкції з
експлуатації виробу, застосування виробу не за
призначенням, неправильного зберігання,
використання приладдя, витратних матеріалів і
запчастин, що не передбачені виробником.
7.2 Механічного пошкодження (відколи, тріщини і
руйнування) внутрішніх і зовнішніх деталей виробу,
основних і допоміжних рукояток, мережевого
кабелю, що викликані зовнішнім ударним або
будь-яким іншим впливом
(Оригінальні інструкції)
7.3 Потрапляння у вентиляційні отвори та проникнення
всередину виробу сторонніх предметів, матеріалів
або речовин, що не є відходами, які супроводжують
застосування виробу за призначенням, такими як:
стружка, тирса, пісок, та ін.
7.4 Впливу на виріб несприятливих атмосферних і
інших зовнішніх факторів, таких як дощ, сніг,
підвищена вологість, нагрівання, агресивні
середовища, невідповідність параметрів
електромережі, що зазначені на інструменті.
7.5 Стихійного лиха. Пошкодження або втрати виробу,
що пов'язані з непередбаченими лихами,
стихійними явищами, у тому числі внаслідок дії
непереборної сили (пожежа, блискавка, потоп і інші
природні явища), а також внаслідок перепадів
напруги в електромережі та іншими причинами, які
знаходяться поза контролем виробника.
8. Гарантійні умови не поширюються:
8.1. На інструменти, що піддавались розкриттю, ремонту
або модифікації поза уповноваженим сервісним
центром.
8.2. На деталі, вузли та матеріали, що мають сліди
природного зносу, такі як: приводні ремені і колеса,
вугільні щітки, мастило, підшипники, зубчасті
зчеплення редукторів, гумові ущільнення, сальники,
направляючі ролики, муфти, вимикачі, бойки,
штовхачі, стволи тощо.
8.3. На змінні частини: патрони, цанги, затискні гайки і
фланці, фільтри, акумуляторні батареї, ножі,
шліфувальні підошви, ланцюги, зірочки, пильні
шини, захисні кожухи, пилки, абразиви, пильні і
абразивні диски, фрези, свердла, бури тощо
8.4. На несправності, що виникли в результаті
перевантаження інструменту (як механічного, так і
електричного), що спричинили вихід з ладу
одночасно двох і більше деталей і вузлів, таких як:
ротора і статора, обох обмоток статора, веденої і
ведучої шестерень редуктора або інших вузлів і
деталей. До безумовних ознак перевантаження
виробу відносяться, крім інших: поява кольорів
мінливості, деформація або оплавлення деталей і
вузлів виробу, потемніння або обвуглювання
ізоляції проводів електродвигуна під впливом
високої температури.
УКРАЇНСЬКА
Виробник:
"Stanley Black & Decker Deutschland
GmbH" Black-&-Decker Str.40, D-65510
Idstein, Німеччина
43
Page 44

Names & Addresses for STANLEY Service Concessionaries - MIDDLE EAST & AFRICA
ALGERIA: Sarl Outillage Corporation, 08 Rue Med Boudiaf - Cheraga - Algiers, Algeria. Tel: (213-21) 375130, Fax: (213-21) 369667. ANGOLA: Angoferraria,
Lda., Rua Robert Shields, No. 61, Luanda, Angola, Tel: 00244-222-395837 / 222-395034, Fax: 00244-222-394790. AZERBAIJAN: Royalton Holdings Ltd. 41
Khagani St. Apt. 47 AZ 1001, Baku. Tel: (994-12) 4935544, Fax: (994-12) 5980378. BAHRAIN: Kavalani & Sons W.L.L., P.O. Box 71, Sitra, Manama, Tel: (973)
17732888, Fax: (973) 17737379. Alfouz Services Co. WLL., P.O. Box 26562, Tubli, Manama. Tel: (973) 17783562, Fax: (973) 17783479. EGYPT: El Farab
S.A.E., 15-Nabil El Wakkad Street, Dokki, Giza, Egypt, Tel: 00202-37603946 / 002-010-2582544, Fax: 00202-33352796. ETHIOPIA: Seif Tewfik Sherif, Arada
Sub-City, Kebele 01/02, Global Insurance Building, 2nd Floor, Room 43, P.O. Box 2525, Addis Ababa, Ethiopia. Tel: (251-11) 1563968/ 1563969, Fax: (251-11)
1558009. IRAQ: Financial Links, Kazzaz Building Arasat Al-Hindia Block No: 629 Street: 31Building No: 1 Baghdad – Iraq. Tel: 00964 (0)780 195 2223/ 00964
(0)781 3763044. Al Sard Co. for General Trading Ltd. Jbara Bldg. 3Flr, Al Rasheed St. Bagdad. Tel: (964) 18184102. Sakhar Group, Arrassat al-hindya Al
Masbah, Bagdad. (964) 7400144446. JORDAN: Palestine Bldg. Matl. (Bashiti Hardware), 93 King Abdullah 2nd Street, Opp. ELBA House, P.O. Box 3005,
Amman 11953, Tel: (962-6) 5349098, Fax: (962-6) 5330731. KENYA: Dextron Tools Ltd., P.O. Box 20121-00200, Shariff House, Kimathi Street, Nairobi. Tel:
(254-20) 6905000/ 2358021, Fax: (254-20) 6905111/ 6905112. KUWAIT: Al Omar Technical Co., P.O. Box 4062, 13041 Safat, Kuwait. Tel: (965) 24848595/
24840039, Fax: (965) 24845652. Fawaz Al Zayani Establishment, P.O. Box 42426, Shop No. 18, Al Humaizi Commercial Complex, Khalifa Al Jassim,
Shuwaikh, Kuwait. Tel: (965) 24828710, Fax: (965) 24828716. Fawaz Al Zayani Establishment, P.O. Box 42426, Shop No.18, Al Humaizi Commercial
Complex, Khalifa Al Jassim, Shuwaikh, Kuwait, Tel: (965) 24828710, Fax: (965) 24828716. Fawaz Al Zayani Establishment, Fahaheel Industrial Area, Main St.,
Sanaya, Kuwait, Tel: (965) 23925830, Fax: (965) 24828716. LEBANON: Est. Shaya & Azar S.A.R.L., Boulvard Jdeideh - Mar Takla - Bouchrieh .P.O. Box
90545 Jdeideh.Beirut - Lebanon, Tel: 00961 1 872305 / 306 , Fax: 00961 1 872303. LIBYA: North Africa Trading ( El Ghoul Brothers), AlHilal Service Center
Tawergha St. Misurata, Tel: 00218-091-3221408. (Benghazi) Sniydel st., Amr Ibn EL-Aas Rd. Tel: (+218) 92 5771120. (Tripoli) Al Barniq Service Center,
Mokhazin elsukar st., ElFallah. Tel: (+218) 21 4808019. (Misrata) Al Hilal Service Center, Tawergha st. Tel: (+218) 51 2626743. MAURITIUS: Robert Le Marie
Limited, Old Moka Road, Bell Village, P.O. Box 161, Port Louis, Tel: 00230-212 1865/ 212 2847, Fax: 00230-2080843. MOROCCO: Ets Louis Guillaud & Cie,
149, Quartier Industriel, Moulay Rachid, Casablanca, Postal Code 20450, Morocco, Tel: 00212-522729233, Fax: 00212-522729096. NIGERIA: Meridian
Power Tools Ltd., Gr.Floor, #1 Alhaji Masha Rd, Next toTeslim Balogun Stadium, Near National Stadium Surulere, Lagos, Nigeria, Tel: 00234-1-7740431 /
7740410, Fax: 00234-1-7913798. OMAN: Al Jizzi Company LLC, P.O. Box 1704,PC 112 Ruwi, Oman, Tel: (968) 24832618/ 24835153, Fax: (968)
24831334/24836460. Al Hassan Technical & Construction Supplies Co. LLC, P.O. Box 1948, P.C. 112, Ruwi, Tel: (968) 24810575 / 24837054, Fax: (968)
24810287/ 24833080. Oman Hardware Co. LLC, P.O. Box 635, Ruwi Postal Code 112, Te: (968) 24815131, Fax: (968) 24816491. Khimji Ramdas, P.O. Box
19, Post Code 100, Ghala, Muscat, Oman. Tel: (968) 24595906/ 907, Fax: (968) 24852752. Oman Marketing & Service Co. (Omasco), P.O. Box 2734, Behind
Honda Showroom, Wattayah, Oman. Tel: (968) 24560232/ 24560255, Fax: (968) 24560993. Oman Marketing & Service Co. (Omasco), Al Ohi, Sohar, Oman.
Tel: (968) 26846379, Fax: (968) 26846379. Oman Marketing & Service Co. (Omasco), Sanaya, Salalah, Oman. Tel: (968) 23212290, Fax: (968) 23210936.
PAKISTAN: ZIT Co - Nasir & Bros., 2nd Floor, Qadri Center, Chowk Dalgran Railway Road, Lahore, Pakistan, Tel: 0092 42 37670839, Fax: 0092 42
37652989. Ammar Service & Spares, 60-Bank Arcade, Serai Road, Karachi, Pakistan. Tel: (92-21) 32426905, Fax: (92-21) 32427214. QATAR: Teyseer
Industrial Supplies & Services Co. WLL, 55, Al Wakalat St. (Between St. 18 & 19) Salwa Industrial Area, P.O. Box 40523 Doha,Qatar, Te: (974) 44581536, Fax:
(974) 44682024. Shaheen Electrical Works & Trading Co. WLL, Gate 34, St. 44 Industrial Area P.O. Box 9756, Doha, Tel: (974) 44600230 /44600525, Fax:
(974) 44601338. Al Muftah Service Centre, Al Wakrah Road, P.O. Box 875, Doha,Qatar, Tel: (974) 44650880/ 44650110/ 44446868, Fax: (974) 44441415 /
44662599. SAUDI ARABIA: (Al Bahr) Mohamed Ahmed Bin Afif Est., P.O. Box 530, Yanbu, Al Bahr. Tel: (966-4) 3222626/ 3228867, Fax: (966-4) 3222210.
(Al Khobar) Fawaz Ebrahim Al Zayani Trading Est., P.O. Box 76026, Al Khobar # 31952, Tel: (966-3) 8140914, Fax: (966-3) 8140824. MSS (Al-Mojil Supply &
Services) P.O. Box 450, Jubail 31951, Opp. Gulf Bridge Library & Riyadh House. Tel: (966-3) 3612850/ 3624487/ 3621729, Fax: (966-3) 3623589/ 3620783.
(Dammam) MSS (Al-Mojil Supply & Services), P.O. Box 450, Jubail 31951.Opp-Gulf Bridge Library & Riyadh House, Tel: (966-3) 3612850 / 3624487 /
3621729, Fax: (966-3) 3623589 / 3620783. Al Bawardi Tools & Hardware, P.O. Box 112, Dammam, Tel: (966-3) 8330780 Ext.24 / 8348585 Ext. 24 /
+966-3-8335555, Fax: (966-3) 8336303. (Al Hassa) Mutawa Trading & Gen. Services, Maliki road Hafuf city, Al Hassa, KSA. Tel: (966) 502846275 (Jeddah) Al
Bawardi Tools & Hardware, P.O. Box 16905, Jeddah 21474, Tel: (966-2) 6444547 / 6439035 / 6456095, Fax: (966-2) 6439024. EAC (Al Yousef Contg. & Trdg.
Est.), P.O. Box 30377, Jeddah -21477, Tel: (966-2) 6519912, Fax: (966-2) 6511153. (Madina) Garziz Trading for Bldg Mat & Decoration, P.O. Box 3364,
Madina, Tel: (966-4) 826 14 90 / 8227636, Fax: (966-4) 8265741. (Riyadh) Industrial Material Organization (IMO), P.O. Box 623, Rail Street ,Riyadh, Tel:
(966-1) 4028010 Ext 26 / 8001245757, Fax: (966-1) 4037970. Sultan Garment Factory (RSC), P.O. Box 29912, Riyadh 11467, KSA, Tel: (966-1) 4055148 /
4042889, Fax: (966-1) 4055148. Al Bawardi Tools & Hardware, P.O. Box 68, Riyadh 11411, Tel: (966-1) 4484999, Fax: (966-1) 4487877. (Yanbu) Fawaz
Ebrahim Al Zayani, Opposite to Al Fouzan, Jeddah highway or King Abdul Aziz road, Yanbu. Tel: (966-4) 3960980, Fax: (966-4) 3961980. Mohamed Ahmed
Bin Afif Est., P.O. Box 530, Yanbu, Al Bahr, Tel: (966-4) 3222626/ 3228867, Fax: (966-4) 3222210. SOUTH AFRICA: Stanley Black & Decker - RSA, 199
Winze Drive Stormill Ext 9 Roodepoort, Tel: (2711) 472 0454, Fax: (2711) 472 0482. Trevco Power Tool Service 14 Steenbok Street, Koedoespoort, 0186,
Pretoria, South Africa. Tel: (27-86) 1873826, Fax: (27-86) 5001771. TANZANIA: General Motors investment Ltd., P.O. Box 16541, 14 Nyerere Road,
Vingunguti, Dar-es-Salaam. Tel: (255 22) 2862661/ 2865022, Fax: (255 22) 2862667. TUNISIA: Societe Tunisienne De Maintenance (STM), Rue de la
Physique. Nouvelle Zone Industrielle Ben Arous., 2013 Ben Arous, Tunisia. Tel: (+216) 79 389687, Fax: (+216) 71 385154. UAE: (Abu Dhabi) Light House
Electrical, P.O. Box 120, Abu Dhabi, Tel: (971-2) 6726131, Fax: (971-2) 6720667. Galaxy Equipment Trading, Madinath Zayed (Baada Zaid), Abu Dhabi P.C.
58910, Tel: (971-2) 8844279, Fax: (971-2) 8844297 (Ajman) Al Sukoon Gen. Trdg. Co. LLC, P.O. Box 2975, Ajman. Tel: (971-6) 7435725/ 7438317, Fax:
(971-6) 7437350. Al Sukoon Gen. Trdg. Co. LLC, P.O. Box 2975, Ajman, Tel: (971-6) 7435725 / 7438317, Fax: (971-6) 7437350 (Al Ain) Zillion Equipment and
Spare Parts Trading LLC, P.O. Box 19740, Opp. Bin Sadal/ Trimix Redymix Sanaiya, Al Ain. Tel: (971-3) 7216690, Fax: (971-3) 7216103. (Dubai) Black &
Decker (Overseas) GmbH, P.O. Box 5420, Dubai, Tel: (971-4) 8127400/ 8127406, Fax: (971-4)2822765. Ideal Star Workshop Eqpt.Trading LLC, P.O. Box
37116, Al Quoz, Dubai, Tel: (971-4) 3474160, Fax: (971-4) 3474157, Fine Tools, P.O.Box 30139 , Al Quoz, Dubai, Tel: (971-4) 3385240, Fax: (971-4) 3385239,
Alebrah Engineering Service, P.O. Box 78954, Al Qusais , Dubai, Tel: (971-4) 2850044, Fax: (971-4) 2844802. (Musaffah) Light House Electrical, P.O. Box
120, Abu Dhabi, Tel: (971-2) 5548315, Fax: (971-2) 5540461. (Sharjah) Mc Coy Middle East LLC, P.O. Box 25793, Sharjah, Tel: (971-6) 5395931, Fax:
(971-6) 5395932. Burj Al Madeena, Industrial Area No.1, Opp. Pakistani Masjid, P.O. Box 37635, Sharjah. Tel: (971-6) 5337747, Fax: (971-6) 5337719. Burj Al
Madeena, , Industrial Area No 1,opp Pakistani Masjid P.O. Box 37635, Sharjah, Tel: (971-6) 5337747, Fax: (971-6) 5337719 (Ras Al Khaimah) Mc Coy Middle
East LLC, P.O. Box 10584, Ras Al Khaimah, Tel: (971-7) 2277095, Fax: (971-7) 2277096. UGANDA: The Building Center (U) Ltd., 52 Station Road, Kitgum
House, P.O. Box 7436, Kampala, Uganda. Tel: (256-41) 4234567/ 4259754, Fax: (256-41) 4236413. YEMEN: (Aden) Middle East Trad. Co. Ltd. (METCO),
Mualla Dakka, Aden, Yemen. Tel: (967-2) 222670, Fax: (967-2) 222670. (Sana'a) Middle East Trad. Co. Ltd. (METCO), Hayel St., Sana'a, Yemen. Tel: (967-1)
204201, Fax: (967-1) 204204. (Taiz) Middle East Trading Co. (METCO), P.O. Box 12363, 5th Flr, Hayel Saeed Anam Bldg, Al-Mugamma St. Taiz, Yemen. Tel:
(967-4) 213455, Fax: (967-4) 219869.
 Loading...