

Page 1
STHT77502-1 & STHT77592-1
Self-Leveling Cross-line Laser
Please read these instructions before operating the product.
www.2helpU.com
DOC100270398
GB
NL
GR
I
FIN
HU
BG
LV
D
DK
CZ
ES
NO
SK
RO
LT
F
SE
RU
PT
PL
SI
EE
TR
HR
Page 2

A
4
x1
x2
1
2
< 4º
_
3
2
Figures
Page 3
3
C
B
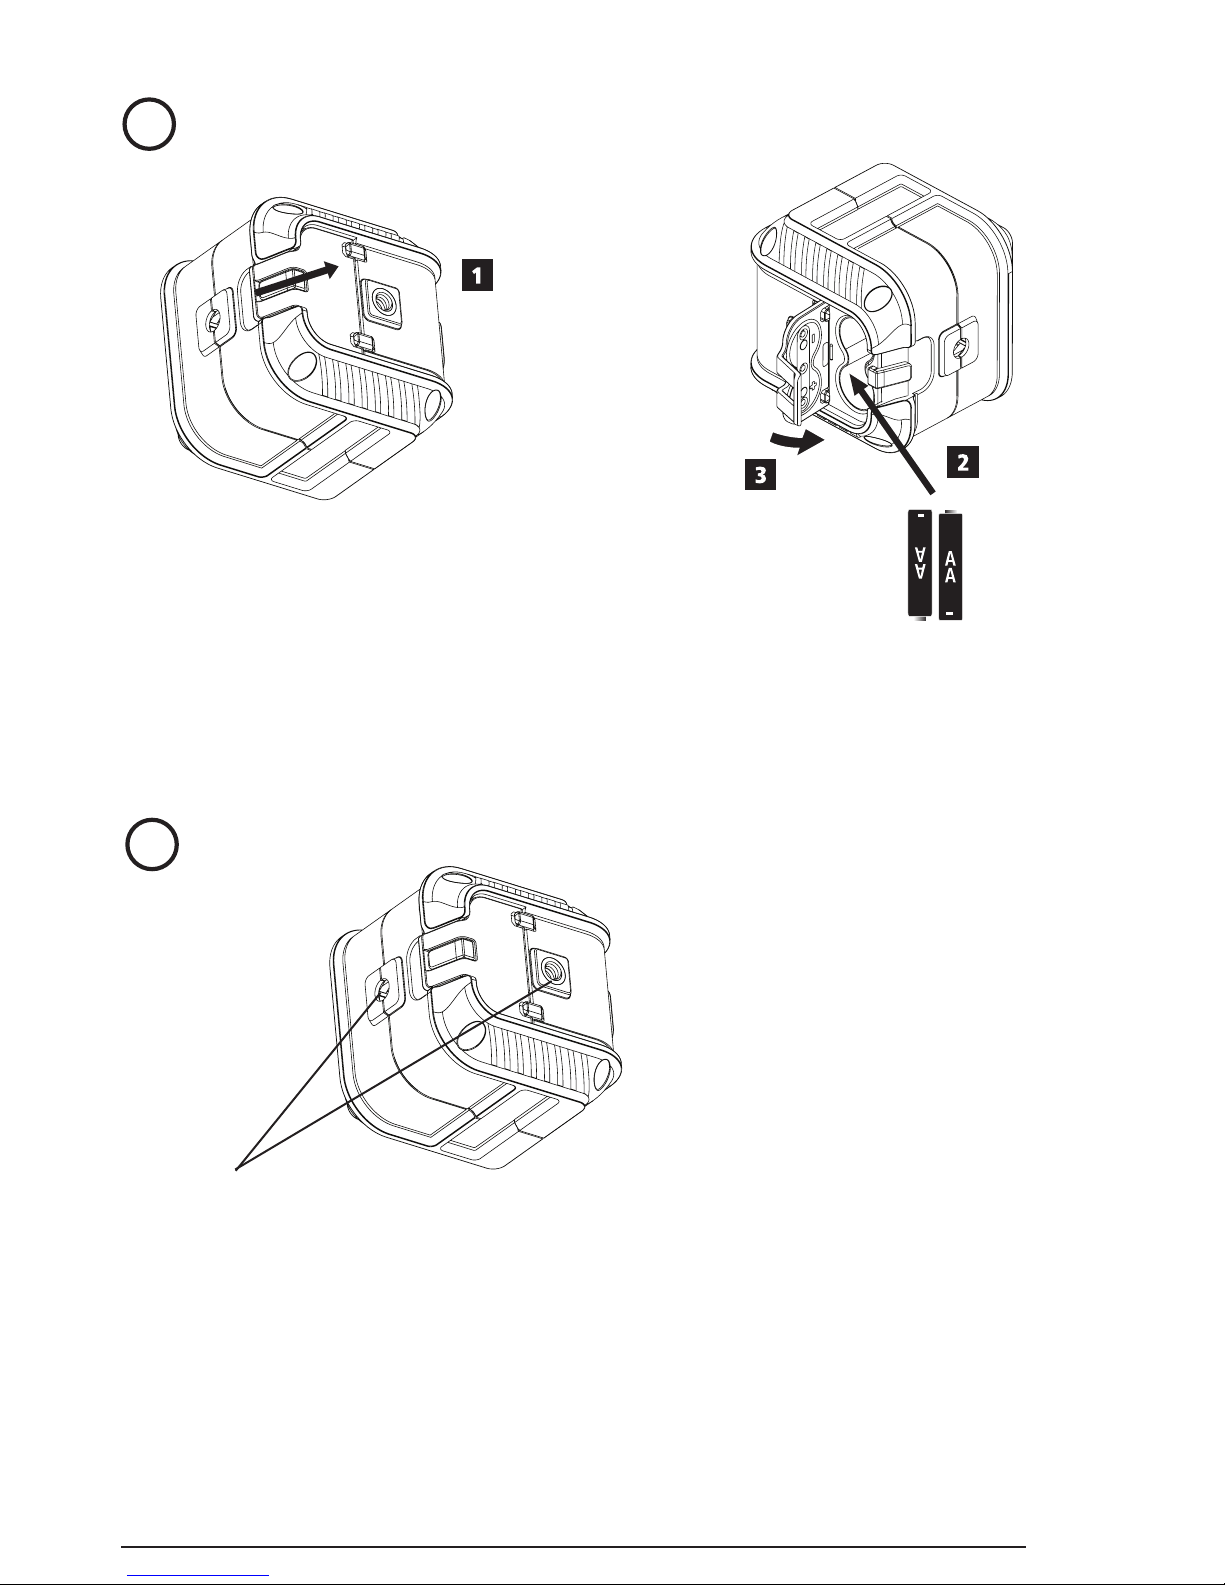
1/4-20
Page 4
4
Figures
D
1
2
3
4
D
1
D
1
2
P
1
D
1
P
1
P
2
2
P
2
D
2
P
3
P
1
P
1
P
3
D
2
P
2
P
4
P
1
P
3
P
4
P
2
D
3
D
4
Page 5
5
1
2
3
E
D
1
D
1
P
1
P
1
P
1
P
1
P
2
P
3
P
2
P
3
D
2
D
1
2
2
Page 6
6
Figures
1
2
F
b
c
a
> 3.28 . (1.0m)
_
> 3.28 . (1.0m)
_
e
> 6.56 . (2.0m)
_
D
e
b
c
f
a
Page 7

1
2
3
G
P2
3 ft (0.91 m)
4 ft (1.22 m)
1.22 m
D
P1
P1
P1
P2
7
Page 8
1/4-20
360º
1
7
5
2
4
3
6
8
H
8
Figures
Page 9
9
GB
Contents
• Laser Information
• User Safety
• Battery Safety
• Installing AA Batteries
• Turning the Laser On
• Checking Laser Accuracy
• Using the Laser
• Maintenance
• Troubleshooting
• Service and Repairs
• Specications
Laser Information
The STHT77502-1 and STHT77592-1 lasers are Class
2 laser products. The lasers are self-leveling laser
tools that can be used for horizontal (level) and vertical
(plumb) alignment projects.
User Safety
Safety Guidelines
The denitions below describe the level of severity for
each signal word. Please read the manual and pay
attention to these symbols.
DANGER: Indicates an imminently
hazardous situation which, if not avoided,
will result in death or serious injury.
WARNING: Indicates a potentially
hazardous situation which, if not avoided,
could result in death or serious injury.
CAUTION: Indicates a potentially hazardous
situation which, if not avoided, may result in
minor or moderate injury.
NOTICE: Indicates a practice not related to
personal injury which, if not avoided, may result in
property damage.
If you have any questions or comments about this
or any STANLEY
®
tool, go to
http://www.STANLEY.com.
WARNING:
Read and understand all instructions.
Failure to follow the warnings and
instructions in this manual may result in
serious personal injury.
SAVE THESE INSTRUCTIONS
WARNING:
Laser Radiation Exposure. Do not
disassemble or modify the laser level.
There are no user serviceable parts
inside. Serious eye injury could result.
WARNING:
Hazardous Radiation. Use of controls or
adjustments, or performance of procedures,
other than those specied herein may result
in hazardous radiation exposure.
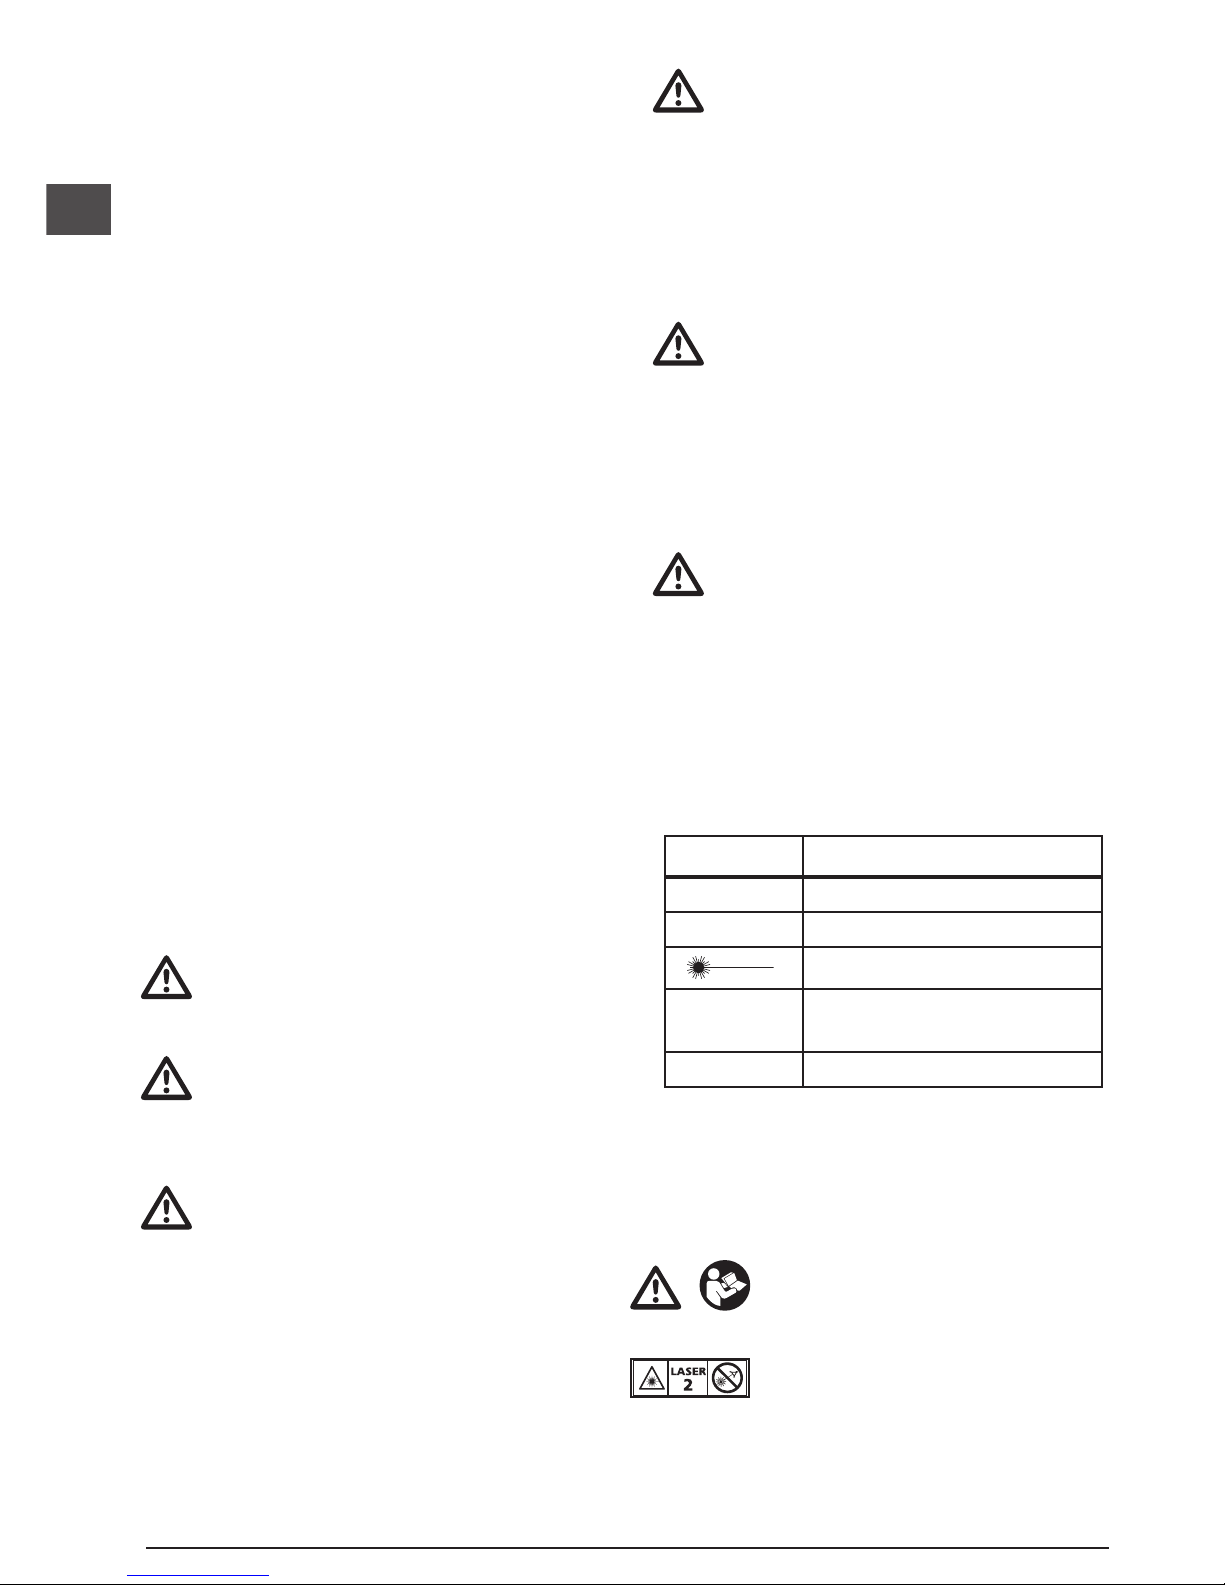
The label on your laser may include the following
symbols.
Symbol Meaning
V Volts
mW Milliwatts
Laser Warning
nm Wavelength in nanometers
2 Class 2 Laser
Warning Labels
For your convenience and safety, the following
labels are on your laser.
WARNING: To reduce the risk of
injury, user must read instruction
manual.
WARNING: LASER RADIATION. DO
NOT STARE INTO BEAM. Class 2
Laser Product.
SER.____________
TYPE 1
3V DC
LASER
2
≤1.5mW @630-680nm
IEC 60825-1: 2014
MADE IN CHINA
www.stanleylasers.com
www.stanleytools.com
STHT77502-1
Page 10
10
GB
SER.____________
TYPE 1
3V DC
LASER
2
MADE IN CHINA
www.stanleylasers.com
www.stanleytools.com
≤1.5mW @510-530nm
IEC 60825-1: 2014
STHT77592-1
• Do not operate the laser in explosive
atmospheres, such as in the presence of
ammable liquids, gases, or dust. This tool may
create sparks which may ignite the dust or fumes.
• Store an idle laser out of reach of children and
other untrained persons. Lasers are dangerous in
the hands of untrained users.
• Tool service MUST be performed by qualied
repair personnel. Service or maintenance
performed by unqualied personnel may result in
injury. To locate your nearest Stanley service center
go to http://www.2helpU.com.
• Do not use optical tools such as a telescope or
transit to view the laser beam. Serious eye injury
could result.
• Do not place the laser in a position which may
cause anyone to intentionally or unintentionally
stare into the laser beam. Serious eye injury
could result.
• Do not position the laser near a reective
surface which may reect the laser beam toward
anyone’s eyes. Serious eye injury could result.
• Turn the laser off when it is not in use. Leaving
the laser on increases the risk of staring into the
laser beam.
• Do not modify the laser in any way. Modifying
the tool may result in hazardous laser radiation
exposure.
• Do not operate the laser around children or
allow children to operate the laser. Serious eye
injury may result.
• Do not remove or deface warning labels. If labels
are removed, the user or others may inadvertently
expose themselves to radiation.
• Position the laser securely on a level surface. If
the laser falls, damage to the laser or serious injury
could result.
Personal Safety
• Stay alert, watch what you are doing, and use
common sense when operating the laser. Do not
use the laser when you are tired or under the
inuence of drugs, alcohol, or medication. A moment
of inattention while operating the laser may result in
serious personal injury.
• Use personal protective equipment. Always wear
eye protection. Depending on the work conditions,
wearing protective equipment such as a dust
mask, non-skid safety shoes, hard hat, and hearing
protection will reduce personal injury.
Tool Use and Care
• Do not use the laser if the Power/Transport Lock
switch does not turn the laser on or off. Any tool that
cannot be controlled with the switch is dangerous
and must be repaired.
Follow instructions in the Maintenance section of this
manual. Use of unauthorized parts or failure to follow
Maintenance instructions may create a risk of electric
shock or injury.
Battery Safety
WARNING:
Batteries can explode, or leak, and can
cause injury or re. To reduce this risk:
• Carefully follow all instructions and warnings on the
battery label and package.
• Always insert batteries correctly with regard to
polarity (+ and –), as marked on the battery and
the equipment.
• Do not short battery terminals.
• Do not charge disposable batteries.
• Do not mix old and new batteries. Replace all
batteries at the same time with new batteries of the
same brand and type.
• Remove dead batteries immediately and dispose of
per local codes.
• Do not dispose of batteries in re.
• Keep batteries out of reach of children.
• Remove batteries when the device is not in use.
Page 11
11
GB
Installing AA Batteries
Load new AA batteries in the STHT77502-1 or
STHT77592-1 laser.
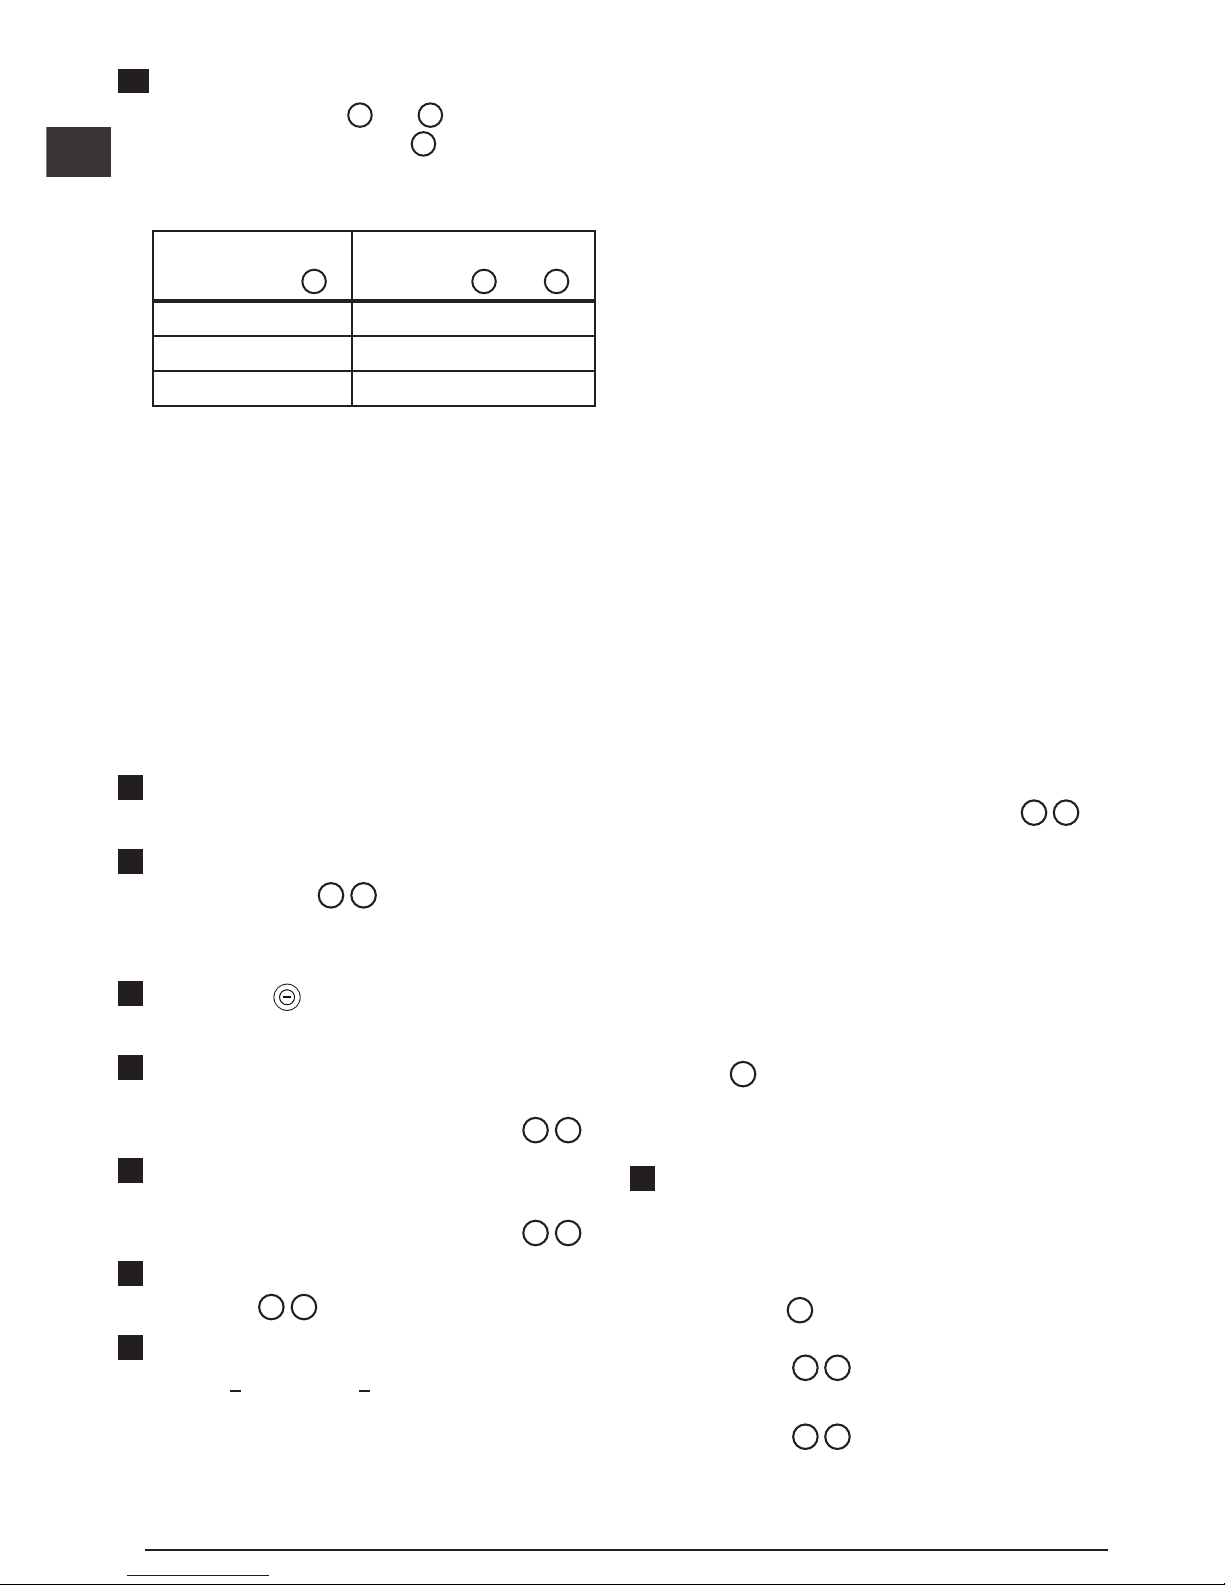
1.
Turn the laser upside down.
2.
On the bottom of the laser, lift up the latch to
open the battery compartment cover
(Figure B 1).
3.
Insert two new, high-quality, name brand AA
batteries, making sure to position the - and +
ends of each battery as noted inside the battery
compartment (Figure B 2).
4.
Push the battery compartment cover closed until
it snaps in place (Figure B 3).
When the laser is not in use, keep the Power/
Transport Lock switch in the center (OFF) position
(Figure
A 2
) to save battery power.
Turning the Laser On
1.
Place the laser on a smooth, flat, level surface,
with the laser facing straight ahead toward the
opposing wall (0º position).
2.
Turn the laser ON to display the front cross
beams. Either:
• Move the Power/Transport Lock switch to the
left to keep the pendulum locked and display
the cross beams in manual mode
(Figure
A 1
).
• Move the Power/Transport Lock switch to the
right to unlock the pendulum and display the
cross beams in self-leveling mode
(Figure
A 3
).
3.
Press (Figure A 4) once to display
a horizontal laser line, a second time to display
a vertical line, and a third time to display
a horizontal line and a vertical line.
4.
Check the laser beams.
• If the laser is tilted so much that it cannot selflevel (> 4°), or the laser is not level in manual
mode, the laser beams will flash.
• If the laser beams ash, the laser is not level
(or plumb) and should NOT BE USED for
determining or marking level or plumb. Try
repositioning the laser on a level surface.
5.
If ANY of the following statements are TRUE,
continue with the instructions for Checking Laser
Accuracy BEFORE USING THE LASER for
a project.
• This is the first time you are using the laser
(in case the laser was exposed to extreme
temperatures).
• The laser has not been checked for accuracy
in a while.
• The laser may have been dropped.
Checking Laser Accuracy
The laser tools are sealed and calibrated at the factory.
It is recommended that you perform an accuracy
check prior to using the laser for the rst time (in
case the laser was exposed to extreme temperatures)
and then regularly to ensure the accuracy of your
work. When performing any of the accuracy checks
listed in this manual, follow these guidelines:
• Use the largest area/distance possible, closest
to the operating distance. The greater the area/
distance, the easier to measure the accuracy of
the laser.
• Place the laser on a smooth, at, stable surface
that is level in both directions.
• Mark the center of the laser beam.
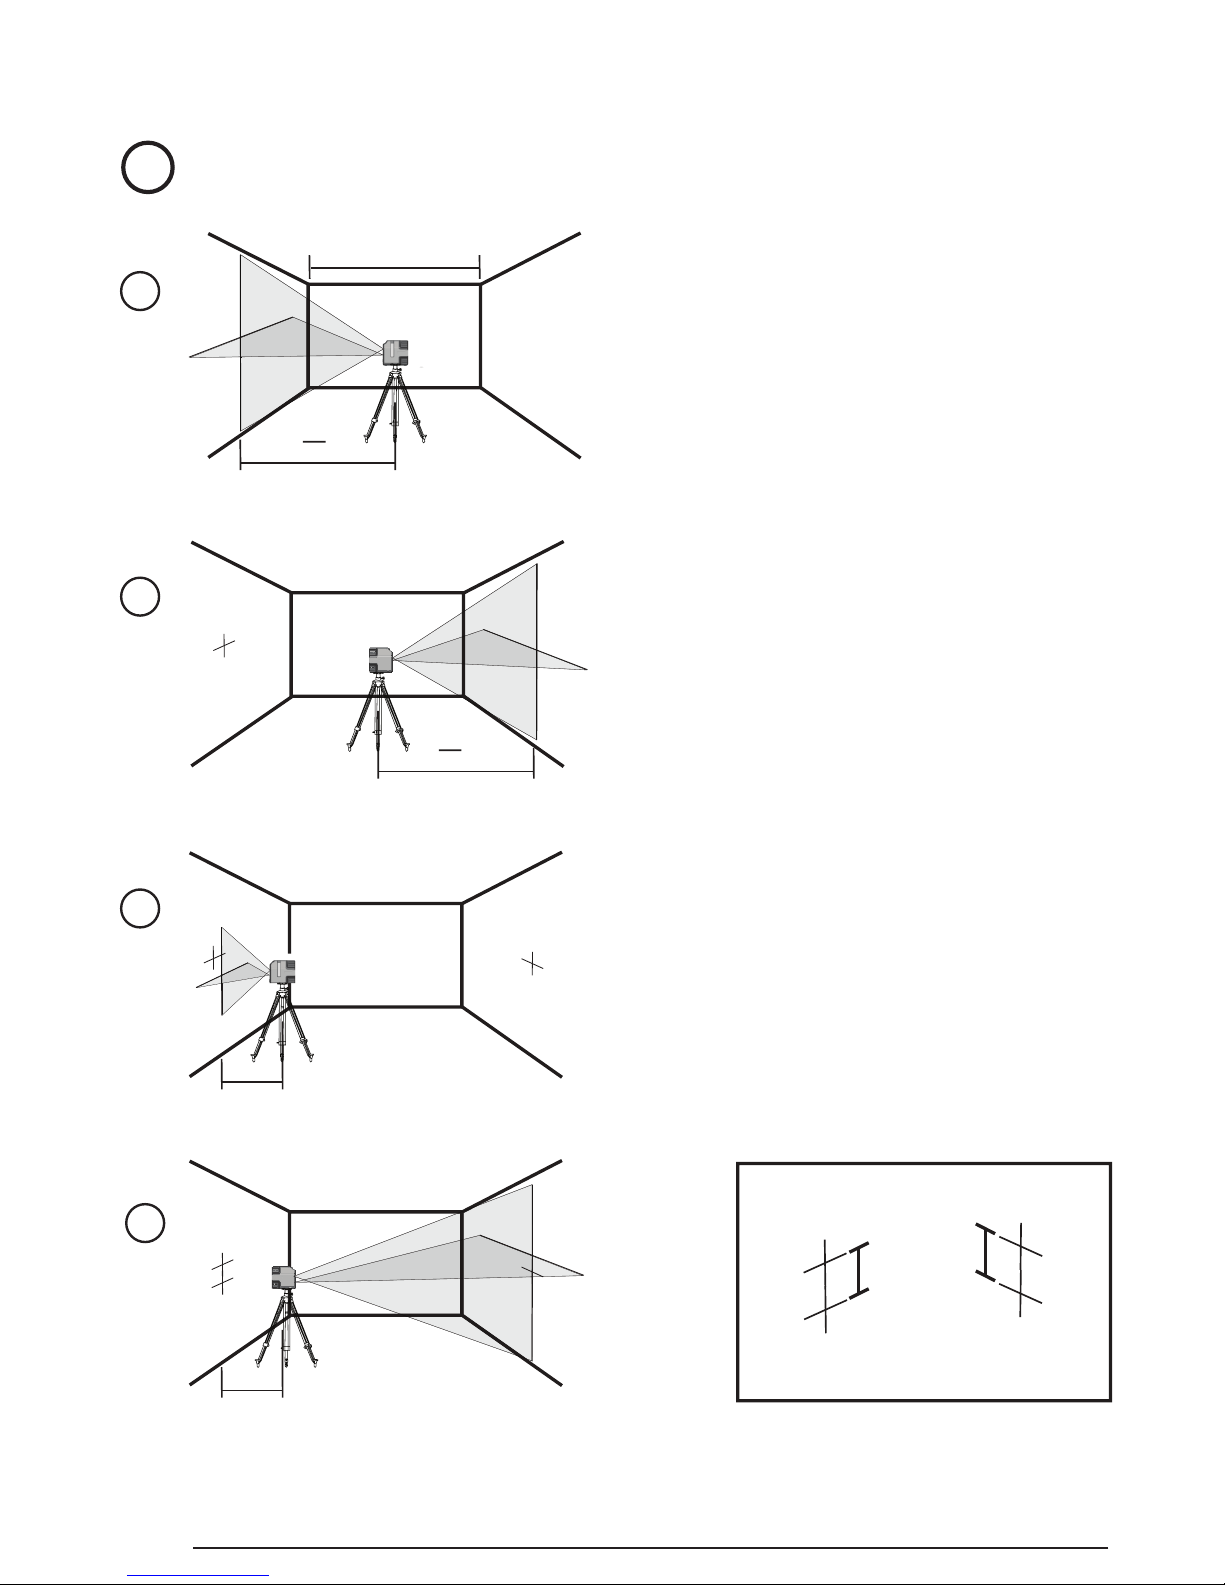
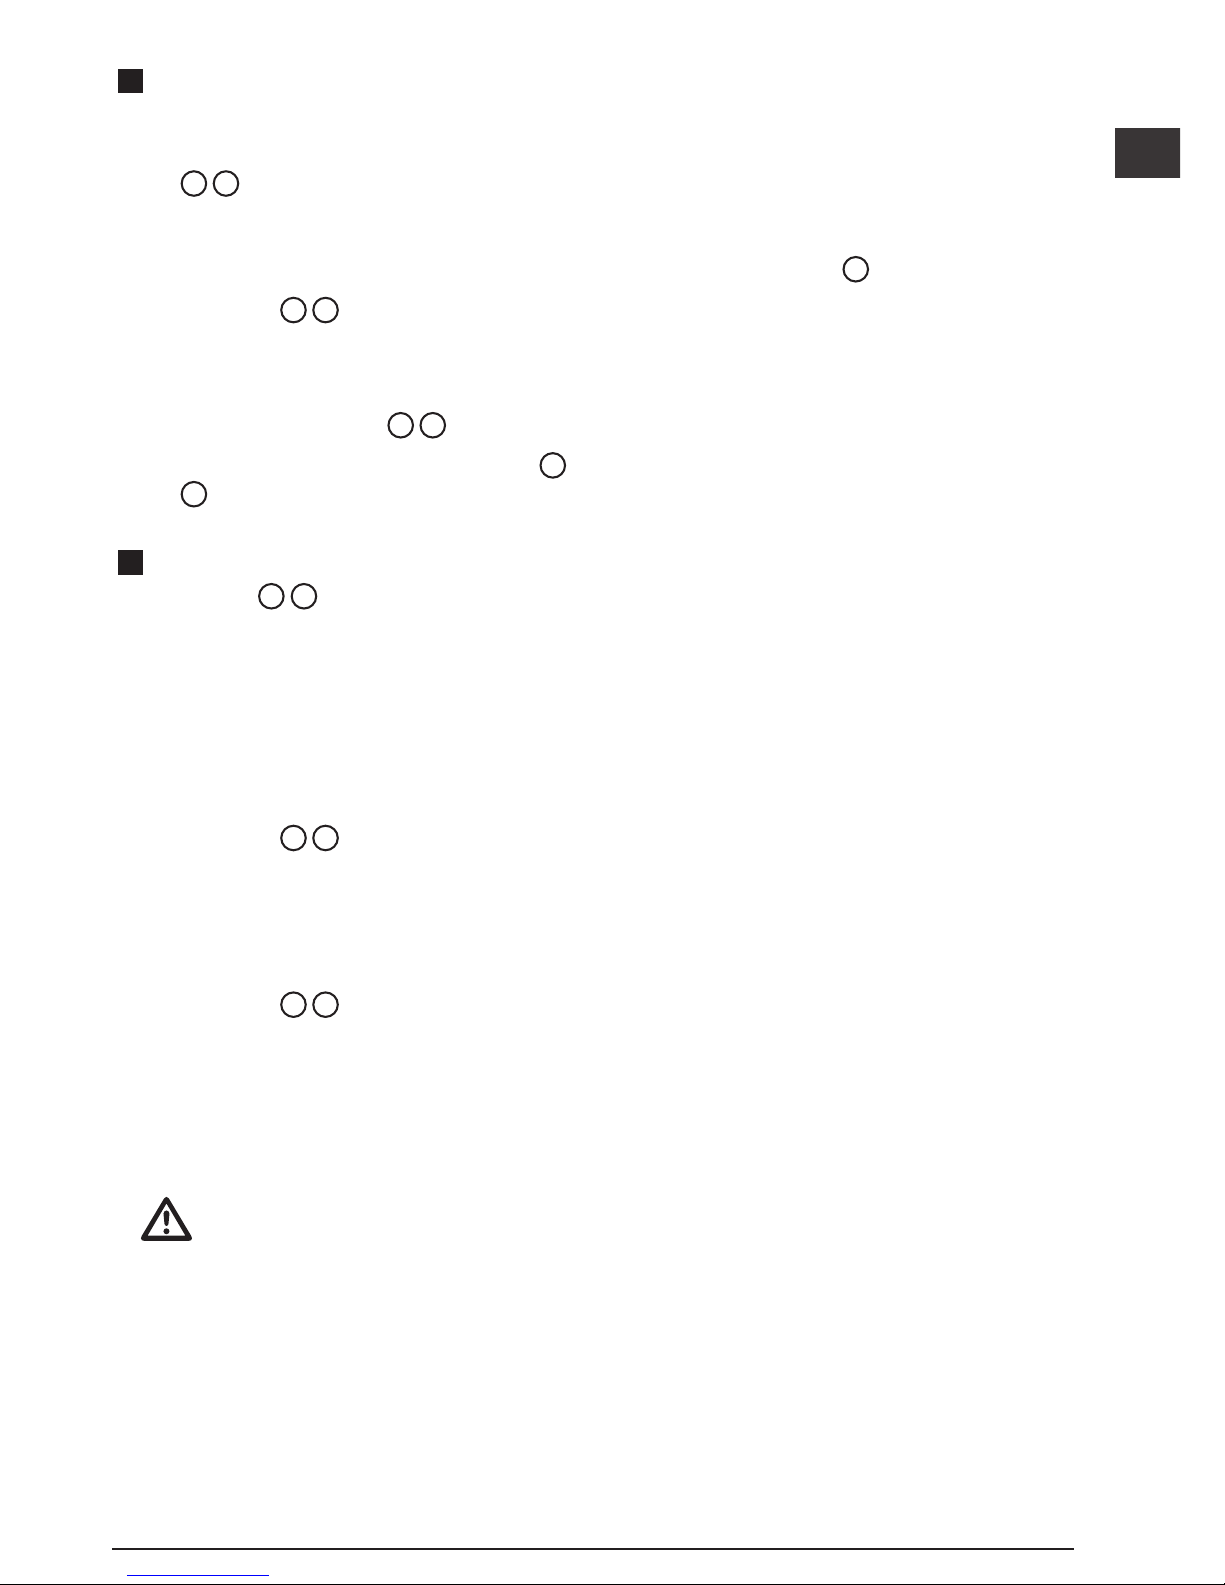
Level Beam Accuracy
Checking the horizontal scan calibration of the laser
requires two walls 30′ (9m) apart. It is important
to conduct a calibration check using a distance no
shorter than the distance of the applications for which
the tool will be used.
1.
Place the laser on a tripod facing straight ahead
toward a wall (Figure D 1).
2.
Move the Power/Transport Lock switch to the
right (Figure A 3) to turn the laser ON in
self-leveling mode and display the horizontal and
vertical beams.
Page 12
12
GB
3.
Mark P1 where the horizontal and vertical beams
cross on the wall.
4.
Turn the laser 180º.
5.
Mark P2 where the horizontal and vertical beams
cross on the wall (Figure
D 2
).
6.
Turn the laser 180º and move it near the rst wall
(Figure D 3).
7.
Near P1, mark P3 where the horizontal and
vertical beams cross on the wall.
8.
Turn the laser 180º (Figure D 4).
9.
Near P2, mark P4 where the horizontal and
vertical beams cross on the wall.
10.
Measure the vertical distance between P1 and
P3.
11.
Measure the vertical distance between P2 and
P4.
12.
If your measurement is greater than the Allowable
Distance Between P1 & P3 or P2 & P4 for the
corresponding Distance Between Walls in the
following table, the laser must be serviced at an
authorized service center.
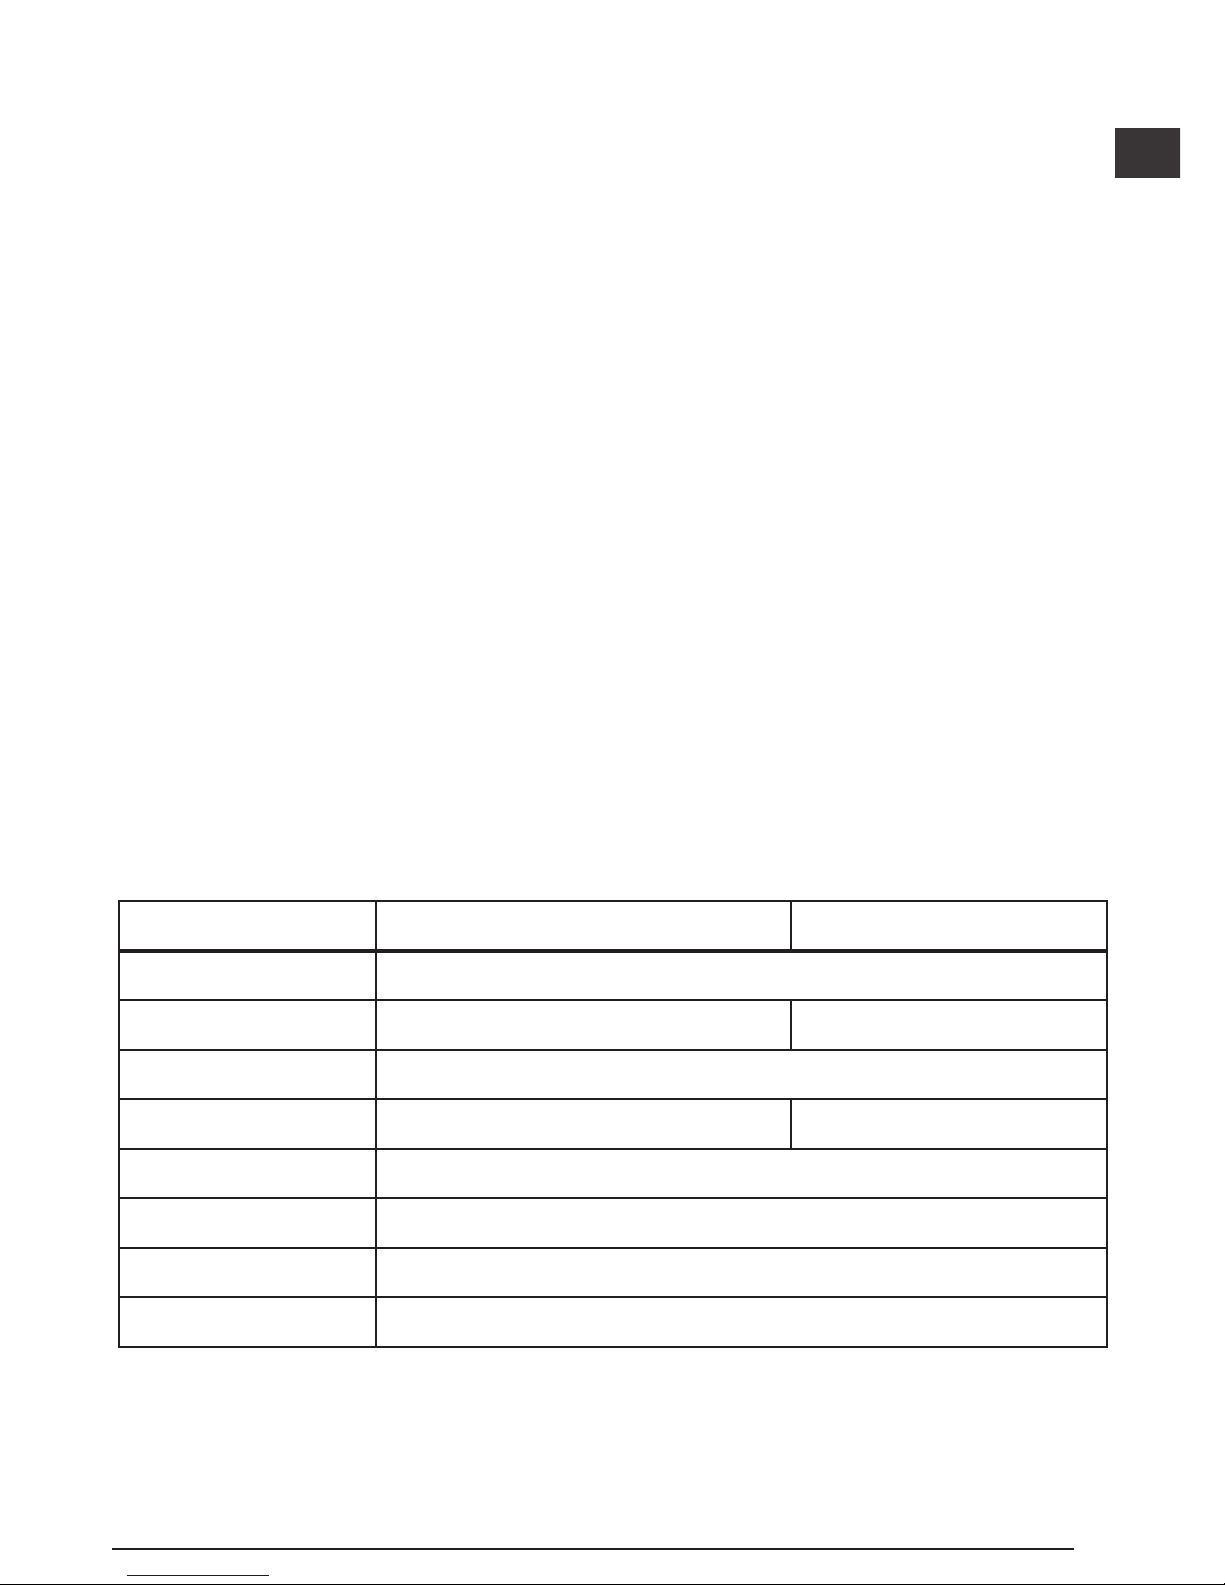
Distance
Between Walls
Allowable Distance
Between P1 & P3 or
P2 & P4
30′ (9m) 1/8” (3mm)
40′ (12m) 5/32” (4mm)
50′ (15m) 7/32” (5mm)
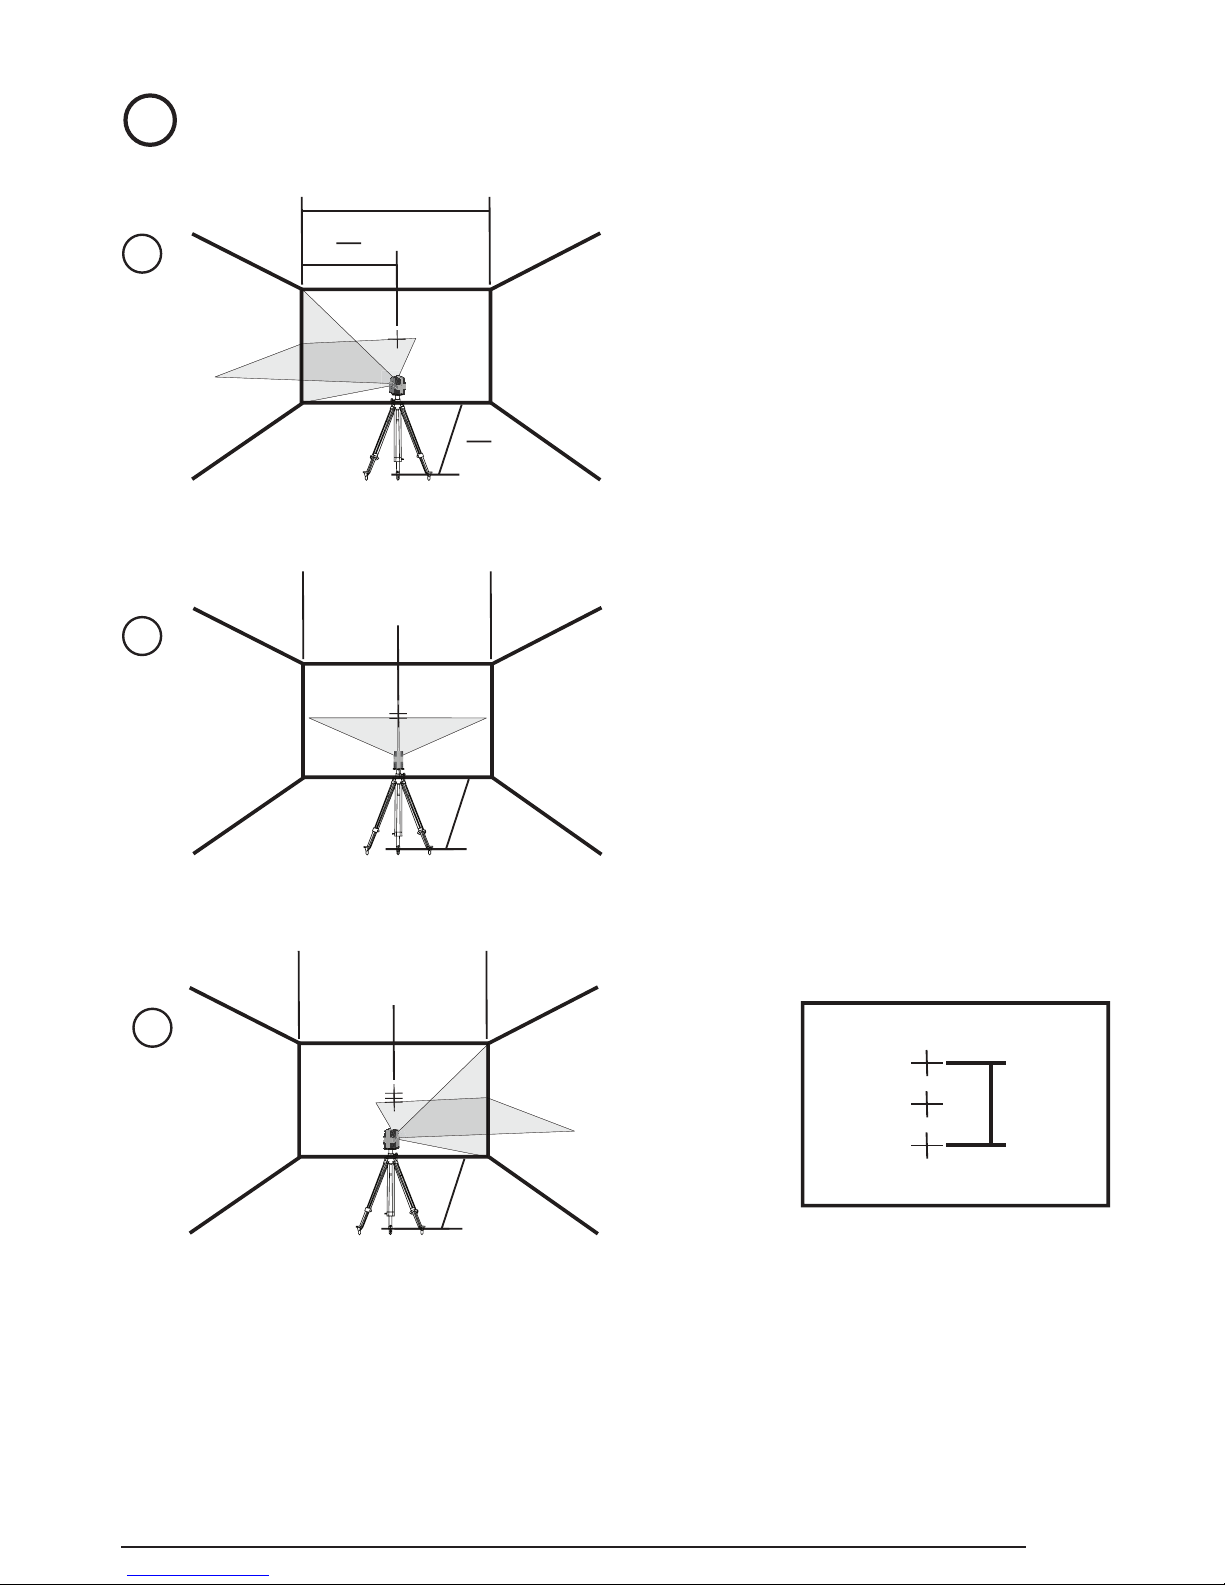
Horizontal Beam Accuracy
Checking the horizontal pitch calibration of the
laser requires a single wall at least 30′ (9m) long.
It is important to conduct a calibration check using
a distance no shorter than the distance of the
applications for which the tool will be used.
1.
Place the laser on a tripod facing the corner of
a room (Figure E 1).
2.
Move the Power/Transport Lock switch to the
right (Figure A 3) to turn the laser ON in
self-leveling mode and display the horizontal and
vertical beams.
3.
Aim the vertical beam at a corner of the room.
4.
Where the horizontal beam crosses the center of
the adjacent wall, mark P1.
5.
Turn the laser so the vertical beam crosses P1
(Figure
E 2
).
6.
Where the horizontal beam crosses the vertical
beam, mark P2.
7.
Turn the laser so the vertical beam is aimed at
the second corner (Figure E 3).
8.
Where the horizontal beam is vertically in line
with P1 and P2, mark P3.
9.
Measure the vertical distance between the
highest and lowest points (between P1, P2, and/
or P3).
10.
If your measurement is greater than the Allowable
Distance Between Highest & Lowest Points for
the corresponding Distance Between Walls in the
following table, the laser must be serviced at an
authorized service center.
Distance Between
Walls
Allowable Distance
Between Highest &
Lowest Points
30′ (9m) 1/4” (6mm)
40′ (12m) 5/16” (8mm)
50′ (15m) 13/32” (10mm)
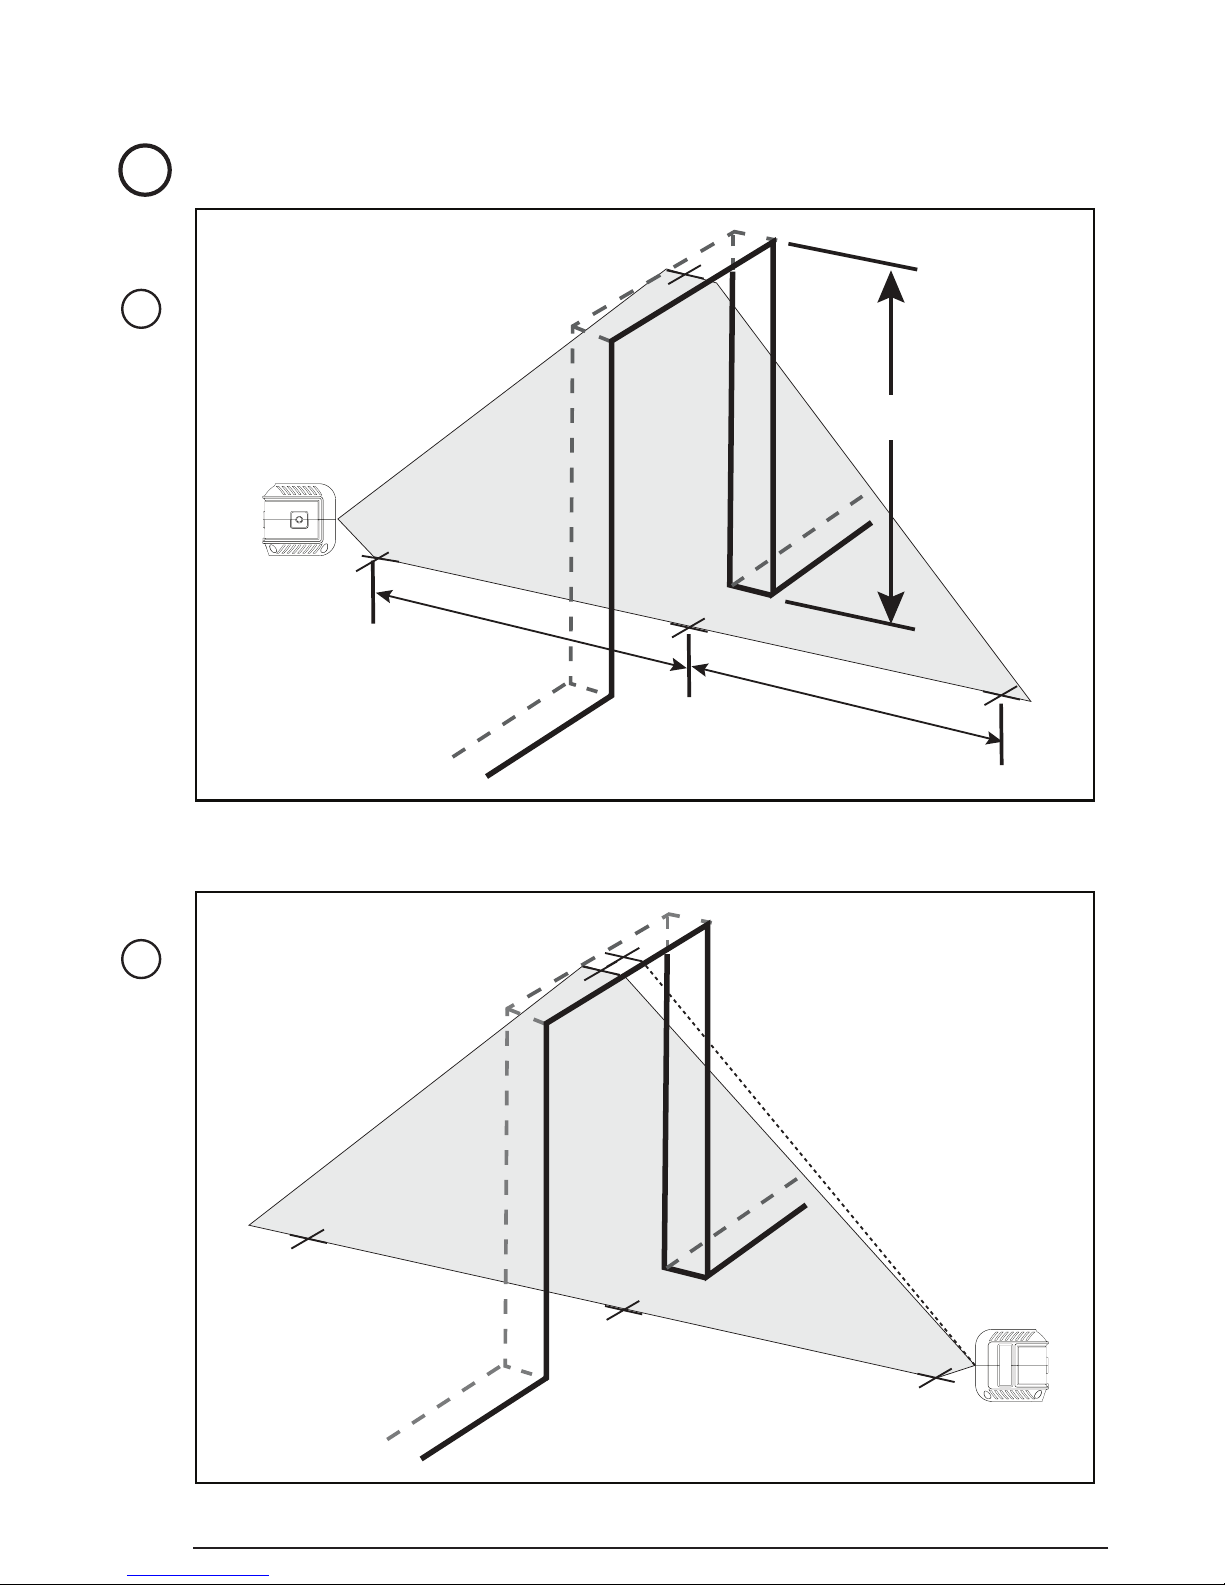
Vertical Beam Accuracy
Checking the vertical (plumb) calibration of the
laser can be most accurately done when there is
a substantial amount of vertical height available,
ideally 30′ (9m), with one person on the oor
positioning the laser and another person near a ceiling
to mark the position of the beam. It is important to
conduct a calibration check using a distance no
shorter than the distance of the applications for which
the tool will be used.
1.
Place the laser at least 3.28 ft (1.0m) from a door
jamb (Figure
F 1
).
2.
Move the Power/Transport Lock switch to the
right (Figure A 3) to turn the laser ON in
self-leveling mode and display the horizontal and
vertical beams.
Page 13
13
GB
3.
Aim the vertical laser beam toward the door jamb.
4.
Along the bottom of the laser beam, mark three
locations a, b, and c; where b is midway
between a and c.
5.
Where the top of the laser beam appears at the
top of the door jamb, mark
e
.
6.
Move the laser to the opposite side of the door
jamb (Figure F 2).
7.
Align the bottom of the laser beam with a, b,
and c.
8.
Where the top of the laser beam appears at the
top of the door jamb, mark f.
9.
Measure the distance between e and f.
10.
If your measurement is greater than the
Allowable Distance Between e and f for the
corresponding Ceiling Height D in the following
table, the laser must be serviced at an authorized
service center.
Ceiling Height
D
Allowable Distance
Between e and
f
6.56′ (2.0m) 1/16" (1.5mm)
8.20′ (2.5m) 3/32” (2.0mm)
9.84′ (3.0m) 1/8” (2.5mm)
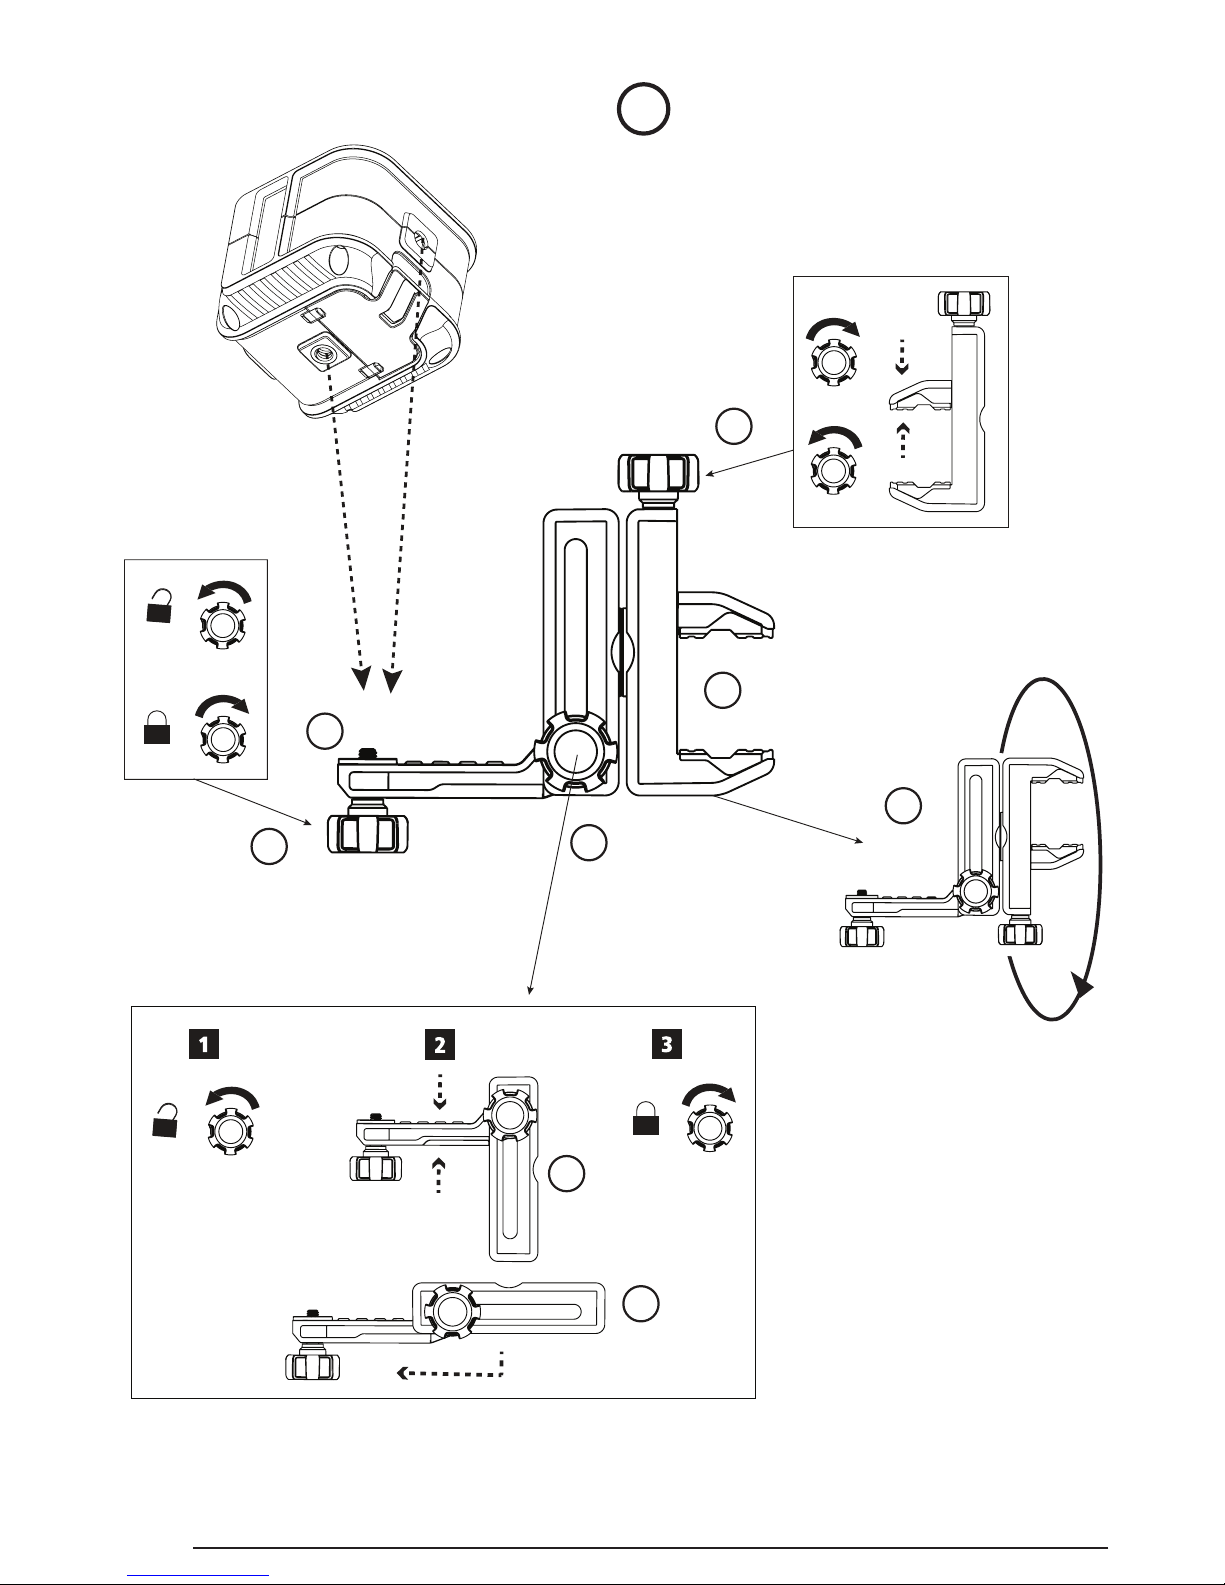
Side Vertical Beam Accuracy
Checking the vertical (plumb) calibration of the side
laser can be most accurately done when there is at
least 16ft. (1.5m) of oor space and another person
to assist. It is important to conduct a calibration check
using a distance no shorter than the distance of the
applications for which the tool will be used.
1.
Place the laser on a level oor that is at least
16ft. (1.5m) long.
2.
Move the Power/Transport Lock switch to the
right (Figure A 3) to turn the laser ON in
self-leveling mode and display the horizontal and
vertical beams.
3.
Press once to display the side vertical beam.
4.
Measure exactly 3 ft. (0.91m) from the center of
the laser unit along the front vertical beam, and
mark P1 (Figure G 1).
5.
Measure exactly 4 ft. (1.22m) out from the center
of the laser unit along the side vertical beam, and
mark P2 (Figure G 2).
6.
Measure the distance between P1 and P2
(Figure G 3).
7.
If the distance between P1 and P2 is not 5ft
+ 1/32” (1.522m + 0.75mm), please bring the
laser unit to your nearest STANLEY service
center for calibration.
Using the Laser
Operating Tips
• Always mark the center of the beam created by
the laser.
• Extreme temperature changes may cause
movement of internal parts that can affect accuracy.
Check your accuracy often while working.
• If the laser is ever dropped, check to make sure it
is still calibrated.
• As long as the laser is properly calibrated, the
laser is self-leveling. Each laser is calibrated at
the factory to nd level as long as it is positioned
on a at surface within average ± 4° of level. No
manual adjustments are required.
• Use the laser on a smooth, at, level, surface.
Turning the Laser Off
Slide the Power/Transport Lock switch to the OFF
position (Figure A 2) when the laser is not in use. If
the switch is not placed in the OFF position, the laser
will not turn off.
Page 14
14
GB
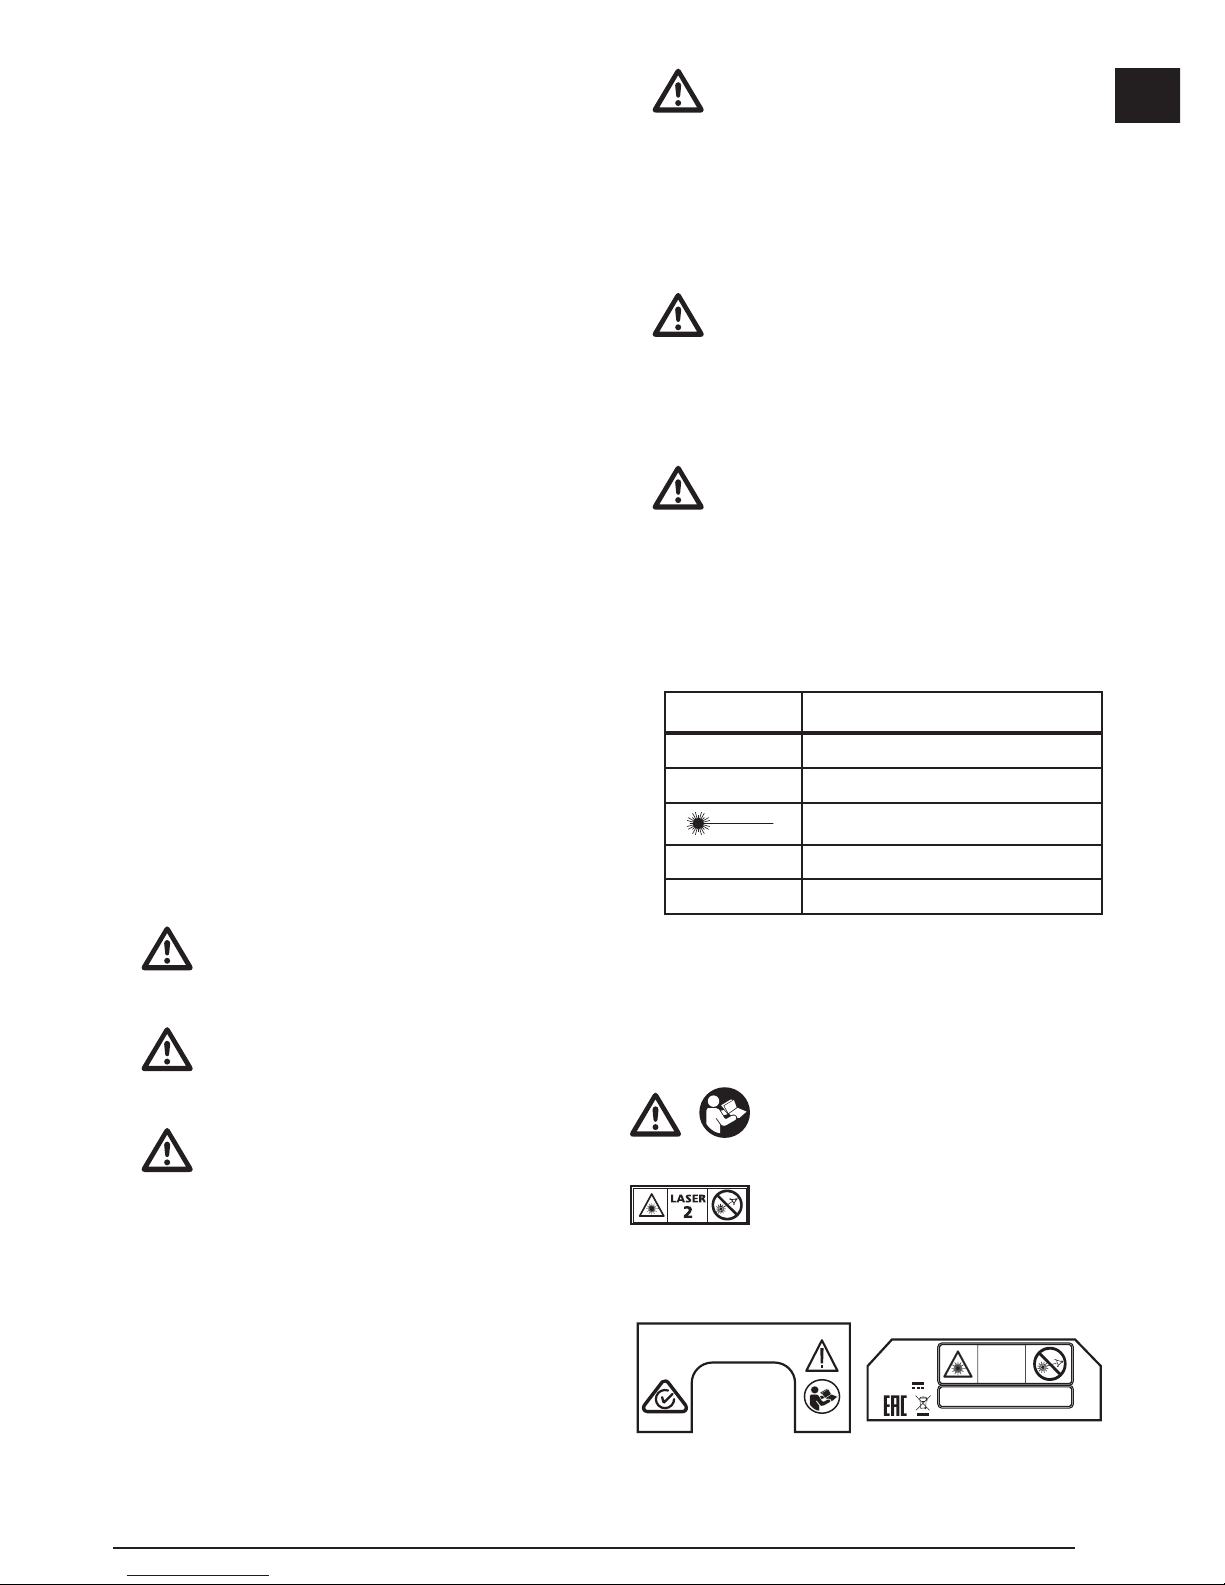
Using the Laser with the Bracket
A bracket (Figure H) is included with the laser so
you can easily attach the laser to a stud, ceiling grid,
or pole.
1.
Securely attach the laser to the bracket.
• Using the 1/4-20 thread on the bottom, side,
or back of the laser (Figure
C
), position the
laser on the 1/4-20 thread on the bracket arm
(Figure H 1).
• Turn the laser knob (Figure
H 2
) clockwise
to lock the laser on the 1/4-20 thread on the
bracket arm.
2.
If needed, change the height or position of the
laser on the bracket.
• Turn the adjustment knob (Figure
H 3
)
counter-clockwise to loosen the bracket arm.
• Slide the bracket arm up or down to the desired
height (Figure
H 4
). To change the bracket
from 90° to 180°, slide the bracket arm to the
top of the bracket and then flip the arm to the
right (Figure H 5).
• Turn the adjustment knob (Figure
H 3
)
clockwise to lock the bracket arm in place.
3.
Use the bracket’s clamp (Figure H 6) to hold
the laser in place on a stud, ceiling grid, or pole.
• If necessary, rotate the clamp so it is positioned
at the correct angle for attaching to the object.
While holding the bracket arm with one hand,
use your other hand to turn the clamp
(Figure
H 7
).
• Position the bracket’s clamp around the stud,
ceiling grid, or pole.
• Turn the clamp knob (Figure
H 8
) clockwise
until the clamp is tight around the object and
the bracket is held in place.
Using the Laser with Other
Accessories
WARNING:
Since accessories other than those offered
by STANLEY have not been tested with this
laser, use of such accessories with this laser
could be hazardous.
Only use STANLEY® accessories that are
recommended for use with this model. Accessories
that may be suitable for one laser may create a risk of
injury when used with another laser.
The laser is equipped with a 1/4-20 female thread on
the bottom, side, and back (Figure C)
to accommodate current or future STANLEY®
accessories.
Other recommended accessories for use with this
laser are available at extra cost from your local dealer
or authorized service center. If you need assistance
locating any accessory, please contact your nearest
STANLEY service center or visit our website:
http://www.STANLEY.com.
Maintenance
• When the laser is not in use, clean the exterior parts
with a damp cloth, wipe the laser with a soft dry
cloth to make sure it is dry, and then store the laser
in the kit box provided.
• Although the laser exterior is solvent resistant,
NEVER use solvents to clean the laser.
• Do not store the laser at temperatures below -5 ˚F
(-20 ˚C) or above 140 ˚F (60 ˚C).
• To maintain the accuracy of your work, check the
laser often to make sure it is properly calibrated.
• Calibration checks and other maintenance repairs
may be performed by STANLEY service centers.
Page 15

15
GB
Troubleshooting
The Laser Does Not Turn On
• Check the AA batteries to make sure:
• Each battery is installed correctly, according
to (+) and (–) listed inside the battery
compartment.
• The battery contacts are clean and free of rust
or corrosion.
• The batteries are new, high-quality, name
brand batteries to reduce the chance of battery
leakage.
• Make sure the AA batteries are in proper working
condition. If in doubt, try installing new batteries.
• When using rechargeable batteries, make sure the
batteries are fully charged.
• Be sure to keep the laser dry.
• If the laser unit is heated above 120 ˚F (50 ˚C), the
unit will not turn ON. If the laser has been stored
in extremely hot temperatures, allow it to cool. The
laser level will not be damaged by using the Power/
Transport Lock switch before cooling to its proper
operating temperature.
The Laser Beams Flash
When in self-leveling mode, the lasers are designed
to self-level up to an average of 4° in all directions. If
the laser is tilted so much that the internal mechanism
cannot level itself (or the laser is not level when in
manual mode), the laser beams will ash indicating
that the tilt range has been exceeded.
THE FLASHING BEAMS CREATED BY THE LASER
ARE NOT LEVEL OR PLUMB AND SHOULD NOT BE
USED FOR DETERMINING OR MARKING LEVEL
OR PLUMB. Try repositioning the laser on a more
level surface.
Laser Beams Will Not Stop Moving
The laser is a precision instrument. Therefore, if it is
not positioned on a stable (and motionless) surface,
the laser will continue to try to nd level. If the beam
will not stop moving, try placing the laser on a more
stable surface. Also, try to make sure that the surface
is relatively at and level, so that the laser is stable.
Service and Repairs
Note: Disassembling the laser level will void all
warranties on the product.
To assure product SAFETY and RELIABILITY, repairs,
maintenance and adjustment should be performed by
authorized service centers. Service or maintenance
performed by unqualied personnel may result in a risk
of injury. To locate your nearest STANLEY
service
center, go to http://www.STANLEY.com.
Two Year Warranty
Stanley warrants its electronic measuring
tools against deciencies in materials and / or
workmanship for two years from date of purchase.
Decient products will be repaired or replaced,
at Stanley’s option, if sent together with proof of
purchase to:
Stanley UK Sales Limited
Gowerton Road
Brackmills, Northampton NN4 7BW
This Warranty does not cover deciencies caused
by accidental damage, wear and tear, use other than
in accordance with the manufacturer’s instructions
or repair or alteration of this product not authorised
by Stanley.
Repair or replacement under this Warranty does not
affect the expiry date of the Warranty.
To the extent permitted by law, Stanley shall
not be liable under this Warranty for indirect or
consequential loss resulting from deciencies in
this product.
This Warranty may not be varied without the
authorisation of Stanley.
This Warranty does not affect the statutory rights of
consumer purchasers of this product.
This Warranty shall be governed by and construed in
accordance with the laws of the country sold where
in and Stanley and the purchaser each irrevocably
agrees to submit to the exclusive jurisdiction of
the courts of that country over any claim or matter
arising under or in connection with this Warranty.
Calibration and care are not covered by warranty.
Page 16

16
GB
NOTE:
The customer is responsible for the correct use and care of the instrument. Moreover, the customer is
completely responsible for periodically checking the accuracy of the laser unit, and therefore for the
calibration of the instrument.
Specications
STHT77502-1 STHT77592-1
Light Source Laser diodes
Laser Wavelength 630 – 680 nm visible 510 – 530 nm visible
Laser Power ≤1.5 mW CLASS 2 LASER PRODUCT
Working Range 12m (36′) 16m (53′)
Accuracy ±5 mm @ 10m (3/16” @ 33′)
Power Source 2 AA (1.5V) size batteries (3V DC)
Operating Temperature -10°C to 40°C (14°F to 104°F)
Storage Temperature -20°C to 60°C (-5°F to 140°F)
Page 17
17
D
Inhalt
• Informationen zum Laser
• Benutzersicherheit
• Sicherer Umgang mit Akkus
• Einlegen von AA-Batterien
• Einschalten des Lasers
• Prüfen der Lasergenauigkeit
• Verwendung des Lasers
• Wartung
• Fehlerbehebung
• Service und Reparaturen
• Spezikationen
Informationen zum Laser
Die Laser STHT77502-1 und STHT77592-1
sind Laserprodukte der Klasse 2. Die Laser sind
selbstnivellierende Laserwerkzeuge, die für Projekte
genutzt werden können, bei denen eine horizontale
(waagerechte) und vertikale (senkrechte) Ausrichtung
nötig ist.
Benutzersicherheit
Sicherheitsrichtlinien
Im Folgenden wird die Relevanz der einzelnen
Warnhinweise erklärt. Bitte lesen Sie die
Betriebsanleitung und achten Sie auf diese Symbole.
GEFAHR: Weist auf eine unmittelbar
drohende gefährliche Situation hin, die,
sofern nicht vermieden, zu tödlichen oder
schweren Verletzungen führt.
WARNUNG: Weist auf eine möglicherweise
gefährliche Situation hin, die, sofern nicht
vermieden, zu tödlichen oder schweren
Verletzungen führen kann.
VORSICHT: Weist auf eine möglicherweise
gefährliche Situation hin, die, sofern nicht
vermieden, zu leichten oder mittelschweren
Verletzungen führen kann.
HINWEIS: Weist auf ein Verhalten hin, das nichts
mit Verletzungen zu tun hat, aber, wenn es nicht
vermieden wird, zu Sachschäden führen kann.
Bei Fragen oder Anmerkungen zu diesem oder
anderen STANLEY
®
-Werkzeugen besuchen Sie
bitte http://www.STANLEY.com.
WARNUNG:
Lesen und verstehen Sie alle
Anweisungen. Das Nichtbeachten von
Warnhinweisen und Anweisungen in dieser
Anleitung kann schweren Verletzungen
führen.
BEWAHREN SIE DIESE ANWEISUNGEN AUF
WARNUNG:
Belastung durch Laserstrahlung.
Zerlegen oder modizieren Sie den
Laser-Nivelliergerät nicht. Im Inneren
benden sich keine zu wartenden Teile.
Es können schwere Augenverletzungen
auftreten.
WARNUNG:
Gefährliche Strahlung. Die Verwendung
von Steuerelementen oder Anpassungen
sowie die Durchführung von Verfahren, die
nicht den hierin beschriebenen entsprechen,
kann zu gefährlicher Strahlenbelastung
führen.
Das Etikett auf Ihrem Laser kann die folgenden
Symbole enthalten.
Symbol Bedeutung
V Volt
mW Milliwatt
Laser-Warnung
nm Wellenlänge in Nanometer
2 Laser der Klasse 2
Warnetiketten
Für mehr Komfort und Sicherheit sind auf Ihrem
Laser folgende Etiketten angebracht.
WARNUNG: Zur Reduzierung der
Verletzungsgefahr muss jeder
Benutzer die Betriebsanleitung lesen.
Page 18
D
18
WARNUNG: LASERSTRAHLUNG.
BLICKEN SIE NICHT IN DEN
STRAHL. Laserprodukt der Klasse 2.
SER.____________
TYPE 1
3V DC
LASER
2
≤1.5mW @630-680nm
IEC 60825-1: 2014
MADE IN CHINA
www.stanleylasers.com
www.stanleytools.com
STHT77502-1
SER.____________
TYPE 1
3V DC
LASER
2
MADE IN CHINA
www.stanleylasers.com
www.stanleytools.com
≤1.5mW @510-530nm
IEC 60825-1: 2014
STHT77592-1
• Betreiben Sie den Laser nicht in
explosionsgefährdeter Umgebung, in der
sich brennbare Flüssigkeiten, Gase oder
Staub benden. Dieses Werkzeug kann Funken
erzeugen, die den Staub oder die Dämpfe
entzünden können.
• Bewahren Sie einen nicht verwendeten Laser
außerhalb der Reichweite von Kindern und
anderen nicht im Umgang damit geschulten
Personen auf. Laser sind in den Händen nicht
geschulter Personen gefährlich.
• Die Werkzeugwartung MUSS durch qualiziertes
Reparaturpersonal durchgeführt werden. Service
oder Wartung durch nicht qualiziertes Personal
kann zu Verletzungen führen. Ihr nächstgelegenes
Stanley Service Center nden Sie auf
http://www.2helpU.com.
• Verwenden Sie keine optischen Werkzeuge wie
Teleskope oder Tachymeter, um den Laserstrahl
zu sehen. Es können schwere Augenverletzungen
auftreten.
• Bringen Sie den Laser nicht in eine Stellung, in
der jemand absichtlich oder unbeabsichtigt in
den Laserstrahl blicken kann. Es können schwere
Augenverletzungen auftreten.
• Stellen Sie den Laser nicht in der Nähe
einer reektierenden Oberäche auf, die
den Laserstrahl in Richtung der Augen von
Personen ablenken kann. Es können schwere
Augenverletzungen auftreten.
• Schalten Sie den Laser aus, wenn er nicht
verwendet wird. Wenn der Laser eingeschaltet
bleibt, erhöht sich das Risiko, dass jemand in den
Laserstrahl blickt.
• Nehmen Sie keinerlei Änderungen am Laser
vor. Veränderungen am Werkzeug können zu
gefährlicher Laserstrahlung führen.
• Betreiben Sie den Laser nicht in der Nähe von
Kindern und lassen Sie ihn nicht von Kindern
bedienen. Es können schwere Augenverletzungen
auftreten.
• Entfernen oder beschädigen Sie keine
Warnetiketten. Wenn Etiketten entfernt werden,
können der Benutzer oder andere Personen
unbeabsichtigt Strahlung ausgesetzt werden.
• Stellen Sie den Laser auf einer ebenen Fläche
auf. Wenn der Laser umfällt, kann es zu Schäden
daran oder zu schweren Verletzungen kommen.
Sicherheit von Personen
• Seien Sie aufmerksam, achten Sie darauf, was
Sie tun, und gehen Sie sachgerecht mit dem Laser
um. Benutzen Sie den Laser nicht, wenn Sie müde
sind oder unter dem Einuss von Drogen, Alkohol
oder Medikamenten stehen. Ein Moment der
Unachtsamkeit beim Betrieb eines Lasers kann zu
schweren Verletzungen führen.
• Tragen Sie persönliche Schutzausrüstung. Tragen
Sie Augenschutz. Je nach Arbeitsbedingungen
empehlt sich das Tragen von Schutzausrüstung,
zum Beispiel Staubmaske, rutschfeste
Sicherheitsschuhe, Schutzhelm und Gehörschutz,
um Verletzungen zu vermeiden.
Verwendung und Pege des
Werkzeugs
• Benutzen Sie keinen Laser, dessen Einschalt-/
Transportsperre defekt ist. Ein Werkzeug, das sich
nicht mehr ein- oder ausschalten lässt, ist gefährlich
und muss repariert werden.
Befolgen Sie die Anweisungen im Abschnitt
Wartung dieses Handbuchs. Die Verwendung nicht
genehmigter Teile oder die Nichtbeachtung der
Wartungsanweisungen können zur Gefahr von
Stromschlägen oder Verletzungen führen.
Page 19
19
D
Sicherer Umgang mit
Batterien
WARNUNG:
Batterien können explodieren oder
auslaufen und dadurch Verletzungen
oder Feuer verursachen. Zum Reduzieren
dieses Risikos:
• Befolgen Sie sorgfältig die Anleitungen und
Warnhinweise auf dem Etikett des Batterien und
der Verpackung.
• Legen Sie Batterien immer korrekt ein
(+ und –), wie auf der Batterie und dem Gerät
angegeben.
• Schließen Sie Batterieklemmen nicht kurz.
• Nicht versuchen, Einwegbatterien aufzuladen.
• Verwenden Sie nicht gleichzeitig alte und neue
Batterien. Ersetzen Sie alle Batterien gleichzeitig
durch neue Batterien der gleichen Marke und des
gleichen Typs.
• Entfernen Sie leere Batterien sofort und entsorgen
Sie sie gemäß den örtlichen Vorschriften.
• Entsorgen Sie Batterien nicht im Feuer.
• Halten Sie Batterien aus der Reichweite von
Kindern fern.
• Nehmen Sie die Batterien heraus, wenn das Gerät
nicht benutzt wird.
Einlegen von AABatterien
Setzen Sie neue AA-Batterien in den Laser
STHT77502-1 oder STHT77592-1 ein.
1.
Drehen Sie den Laser auf den Kopf.
2.
Heben Sie unten am Laser die Lasche an, um die
Batteriefachabdeckung zu öffnen
(Abbildung B 1).
3.
Legen Sie zwei neue, hochwertige
AA-Markenbatterien ein und stellen Sie dabei
sicher, dass die mit - und + gekennzeichneten
Enden jeder Batterie richtig herum im Batteriefach
liegen (Abbildung B 2).
4.
Schieben Sie die Batteriefachabdeckung
geschlossen, bis sie einrastet (Abbildung B 3).
Wenn der Laser nicht in Gebrauch ist, lassen Sie die
Einschalt-/Transportsperre in der mittleren Position
'OFF' (AUS) (Abbildung
A 2
), um die Batterie zu
schonen.
Einschalten des Lasers
1.
Platzieren Sie den Laser auf einer glatten,
flachen, ebenen Fläche, wobei der Laser gerade
nach vorn in Richtung gegenüberliegende Wand
zeigt (0º-Position).
2.
Schalten Sie den Laser EIN, um die vorderen
Querstrahlen sichtbar zu machen. Entweder:
• Stellen Sie die Einschalt-/Transportsperre nach
links, damit das Pendel gesperrt bleibt und die
Kreuzlinien im manuellen Modus angezeigt
werden (Abbildung
A 1
).
• Stellen Sie die Einschalt-/Transportsperre nach
rechts, um das Pendel zu entsperren und die
Kreuzlinien im Selbstnivellierungsmodus
angezeigt werden (Abbildung
A 3
).
3.
Drücken Sie (Abbildung A 4) einmal,
um eine horizontale Laserlinie anzuzeigen, ein
zweites Mal, um eine vertikale Linie anzuzeigen,
und ein drittes Mal, um eine horizontale Linie und
eine vertikale Linie anzuzeigen.
4.
Überprüfen Sie die Laserstrahlen.
• Wenn der Laser jedoch so stark geneigt ist,
dass er sich nicht selbst nivellieren kann (> 4°),
oder wenn der Laser im manuellen Modus nicht
waagerecht ist, blinkt der Laserstrahl.
• Wenn die Laserstrahlen blinken, ist der Laser
nicht horizontal (oder vertikal) ausgerichtet und
sollte NICHT zur Bestimmung oder Markierung
von horizontalen oder vertikalen Ebenen
verwendet werden. Versuchen Sie, den Laser
auf einer ebenen Fläche neu zu positionieren.
Page 20

D
20
5.
Wenn ALLE der folgenden Bedingungen
ERFÜLLT sind, fahren Sie mit den Anweisungen
unter Prüfen der Lasergenauigkeit fort, BEVOR
SIE DEN LASER für ein Projekt VERWENDEN.
• Es ist das erste Mal, dass Sie den Laser
verwenden (oder wenn der Laser extremen
Temperaturen ausgesetzt war).
• Der Laser wurde längere Zeit nicht auf seine
Genauigkeit überprüft.
• Der Laser ist heruntergefallen.
Prüfen der
Lasergenauigkeit
Die Laserwerkzeuge wurden werkseitig versiegelt
und kalibriert. Es wird empfohlen, vor der ersten
Verwendung des Lasers (und falls der Laser extremen
Temperaturen ausgesetzt war) und danach regelmäßig
eine Genauigkeitsprüfung durchzuführen, um die
Genauigkeit Ihrer Arbeit zu gewährleisten. Beachten
Sie bei den Genauigkeitsprüfungen gemäß diesem
Handbuch die folgenden Richtlinien:
• Nutzen Sie die größtmögliche Fläche/Entfernung,
die dem Arbeitsabstand am nächsten liegt. Je
größer die Fläche/Entfernung, desto leichter ist es,
die Genauigkeit des Lasers zu messen.
• Stellen Sie den Laser auf eine Fläche, die in beide
Richtungen glatt, stabil und eben ist.
• Markieren Sie die Mitte des Laserstrahls.
Genauigkeit des
Nivellierungsstrahls
Die Prüfung der horizontalen Scankalibrierung
des Lasers erfordert zwei Wände, die 9m
(30′) auseinander liegen. Es ist wichtig, eine
Kalibrierkontrolle durchzuführen mit einer Entfernung,
die mindestens der Entfernung der Anwendungen
entspricht, für die das Tool verwendet werden wird.
1.
Platzieren Sie den Laser auf einem Stativ, das
gerade nach vorn in Richtung einer Wand zeigt
(Abbildung D 1).
2.
Stellen Sie die Einschalt-/Transportsperre nach
rechts (Abbildung A 3), um den Laser im
Selbstnivellierungsmodus einzuschalten und die
horizontalen und vertikalen Strahlen anzuzeigen.
3.
Markieren Sie P1 dort, wo der horizontale und
der vertikale Strahl sich auf der Wand kreuzen.
4.
Drehen Sie den Laser um 180º.
5.
Markieren Sie P2 dort, wo der horizontale und
der vertikale Strahl sich auf der Wand kreuzen
(Abbildung D 2).
6.
Drehen Sie den Laser um 180º und bringen Sie
ihn in die Nähe der ersten Wand
(Abbildung D 3).
7.
Markieren Sie in der Nähe von P1 den Punkt P3
dort, wo der horizontale und der vertikale Strahl
sich auf der Wand kreuzen.
8.
Drehen Sie den Laser um 180º
(Abbildung D 4).
9.
Markieren Sie in der Nähe von P2 den Punkt P4
dort, wo der horizontale und der vertikale Strahl
sich auf der Wand kreuzen.
10.
Messen Sie die vertikale Entfernung zwischen P1
und P3.
11.
Messen Sie die vertikale Entfernung zwischen P2
und P4.
12.
Wenn Ihr Messwert größer als die Zulässige
Entfernung zwischen P1 & P3 oder P2 & P4
für die entsprechende Entfernung zwischen
den Wänden gemäß der folgenden Tabelle
ist, muss der Laser von einer autorisierten
Kundendienststelle gewartet werden.
Entfernung
zwischen den
Wänden
Zulässige Entfernung
Zwischen P1 & P3 oder
P2 & P4
30′ (9m) 1/8” (3mm)
40′ (12m) 5/32” (4mm)
50′ (15m) 7/32” (5mm)
Page 21
21
D
Genauigkeit des horizontalen Strahls
Die Prüfung der horizontalen Steigungskalibrierung
erfordert eine einzelne Wand mit einer Länge
von mindestens 9m (30′). Es ist wichtig, eine
Kalibrierkontrolle durchzuführen mit einer Entfernung,
die mindestens der Entfernung der Anwendungen
entspricht, für die das Tool verwendet werden wird.
1.
Platzieren Sie den Laser auf einem Stativ,
das der Ecke eines Raums gegenüber steht
(Abbildung E 1).
2.
Stellen Sie die Einschalt-/Transportsperre nach
rechts (Abbildung A 3), um den Laser im
Selbstnivellierungsmodus einzuschalten und die
horizontalen und vertikalen Strahlen anzuzeigen.
3.
Richten Sie den vertikalen Strahl auf eine Ecke
des Raums.
4.
Wo der horizontale Strahl die Mitte der
angrenzenden Wand kreuzt, markieren Sie P1.
5.
Drehen Sie den Laser so, dass der vertikale
Strahl P1 kreuzt (Abbildung E 2).
6.
Wo der horizontale Strahl den vertikalen Strahl
kreuzt, markieren Sie P2.
7.
Drehen Sie den Laser so, dass der vertikale
Strahl auf die zweite Ecke gerichtet ist
(Abbildung E 3).
8.
Wo der horizontale Strahl senkrecht zu P1 und
P2 steht, markieren Sie P3.
9.
Messen Sie den vertikalen Abstand zwischen den
höchsten und niedrigsten Punkten (zwischen P1,
P2 und/oder P3).
10.
Wenn Ihr Messwert größer als die Zulässige
Entfernung zwischen den höchsten und
niedrigsten Punkten für die entsprechende
Entfernung zwischen den Wänden gemäß der
folgenden Tabelle ist, muss der Laser von einer
autorisierten Kundendienststelle gewartet werden.
Entfernung
zwischen den
Wänden
Zulässige Entfernung
zwischen den
höchsten und
niedrigsten Punkten
30′ (9m) 1/4” (6mm)
40′ (12m) 5/16” (8mm)
50′ (15m) 13/32” (10mm)
Genauigkeit des vertikalen Strahls
Das Überprüfen der vertikalen (lotrechten) Kalibrierung
des Lasers erfolgt am besten, wenn eine große
vertikale Höhe zur Verfügung steht, idealerweise
9m (30′), wobei eine Person sich auf dem Boden
bendet und den Laser positioniert und eine andere
Person sich in der Nähe einer Decke bendet, um die
Position des Strahls zu markieren. Es ist wichtig, eine
Kalibrierkontrolle durchzuführen mit einer Entfernung,
die mindestens der Entfernung der Anwendungen
entspricht, für die das Tool verwendet werden wird.
1.
Stellen Sie den Laser mindestens 1,0m (3,28ft)
von einem Türpfosten entfernt auf
(Abbildung F 1).
2.
Stellen Sie die Einschalt-/Transportsperre nach
rechts (Abbildung A 3), um den Laser im
Selbstnivellierungsmodus einzuschalten und die
horizontalen und vertikalen Strahlen anzuzeigen.
3.
Richten Sie den vertikalen Laserstrahl auf den
Türpfosten.
4.
Markieren Sie entlang der Unterseite des
Laserstrahls die drei Stellen a, b und c, wo
b
auf halber Strecke zwischen a und c liegt.
5.
Wo die Spitze des Laserstrahls an der Spitze des
Türpfostens erscheint, markieren Sie e.
6.
Verschieben Sie den Laser zum
gegenüberliegenden Ende des Türpfostens
(Abbildung F 2).
7.
Richten Sie das untere Ende des Laserstrahls an
a, b
und c aus.
8.
Wo die Spitze des Laserstrahls an der Spitze des
Türpfostens erscheint, markieren Sie f.
9.
Messen Sie die Entfernung von e und f.
Page 22
D
22
10.
Wenn Ihr Messwert größer ist als die zulässige
Entfernung zwischen e und f für die
entsprechende Deckenhöhe D gemäß der
folgenden Tabelle, muss der Laser von einer
autorisierten Kundendienststelle gewartet werden.
Deckenhöhe
D
Zulässige Entfernung
zwischen e und
f
6,56′ (2,0m) 1/16" (1,5 mm)
8,20′ (2,5m) 3/32” (2,0mm)
9,84′ (3,0m) 1/8” (2,5mm)
Genauigkeit des seitlichen vertikalen
Strahls
Die Überprüfung der vertikalen (lotrechten)
Kalibrierung des seitlichen Laserstrahls erfolgt
am genauesten, wenn mindestens 1,5m (16ft)
Bodenäche und eine weitere Person zur
Unterstützung vorhanden sind. Es ist wichtig, eine
Kalibrierkontrolle durchzuführen mit einer Entfernung,
die mindestens der Entfernung der Anwendungen
entspricht, für die das Tool verwendet werden wird.
1.
Stellen Sie den Laser auf eine ebene Fläche, die
mindestens 1,5m (16ft) lang ist.
2.
Stellen Sie die Einschalt-/Transportsperre nach
rechts (Abbildung
A 3
), um den Laser im
Selbstnivellierungsmodus einzuschalten und die
horizontalen und vertikalen Strahlen anzuzeigen.
3.
Drücken Sie einmal, um den seitlichen
vertikalen Strahl anzuzeigen.
4.
Messen Sie genau 0,91m (3ft) von der Mitte der
Lasereinheit entlang des vorderen vertikalen
Strahls und markieren Sie P1 (Abbildung G 1).
5.
Messen Sie genau 1,22m (4ft) von der Mitte der
Lasereinheit entlang des seitlichen vertikalen
Strahls und markieren Sie P2 (Abbildung G 2).
6.
Messen Sie die Entfernung zwischen P1 und P2
(Abbildung G 3).
7.
Wenn die Entfernung zwischen P1 und P2 nicht
1,522m + 0,75mm (5ft + 1/32”) beträgt, bringen
Sie die Lasereinheit zur Kalibrierung zu Ihrem
nächstgelegenen STANLEY Service Center.
Verwendung des Lasers
Hinweise zum Betrieb
• Markieren Sie immer die Mitte des vom Laser
erzeugten Strahls.
• Extreme Temperaturänderungen können eine
Bewegung der inneren Teile verursachen, was die
Genauigkeit beeinträchtigen kann. Überprüfen Sie
während der Arbeit häug die Genauigkeit.
• Wenn der Laser herunterfällt, überprüfen Sie, ob er
noch richtig kalibriert ist.
• Solange der Laser korrekt kalibriert ist, ist der Laser
selbst nivellierend. Jeder Laser ist werksseitig so
kalibriert, dass er die Waagerechte ndet, solange
er auf einer geraden Fläche mit durchschnittlich
±4 ° Abweichung zur Waagerechten steht. Es sind
keine manuellen Einstellungen erforderlich.
• Verwenden Sie den Laser auf einer glatten, ebenen
Fläche.
Ausschalten des Lasers
Schieben Sie die Einschalt-/Transportsperre nach
rechts in die Position OFF (AUS) (Abbildung A 2),
wenn der Laser nicht verwendet wird. Wenn sich der
Schalter nicht in der Position OFF (AUS) bendet,
schaltet sich der Laser nicht aus.
Verwenden des Lasers mit der
Halterung
Zum Lieferumfang des Lasers gehört eine Halterung
(Abbildung H), damit Sie diesen einfach an einem
Balken, einer Deckenkonstruktion oder einem Mast
befestigen können.
1.
Befestigen Sie den Laser sicher an der
Halterung.
• Verwenden Sie das 1/4-20-Gewinde an der
Unterseite, Seite oder Rückseite des Lasers
(Abbildung
C
) und positionieren Sie den
Laser am 1/4-20-Gewinde des Halterungsarms
(Abbildung
H 1
).
• Drehen Sie den Laserknopf
(Abbildung
H 2
) im Uhrzeigersinn, um den
Laser am 1/4-20-Gewinde des Halterungsarms
zu verriegeln.
Page 23
23
D
2.
Ändern Sie bei Bedarf die Höhe oder Position
des Lasers auf der Halterung.
• Drehen Sie den Einstellknopf (Abbildung
H 3
) gegen den Uhrzeigersinn, um den
Halterungsarm zu lösen.
• Schieben Sie den Halterungsarm nach
oben oder unten auf die gewünschte Höhe
(Abbildung
H 4
). Um den Winkel der
Halterung von 90° auf 180° zu ändern,
schieben Sie den Halterungsarm zum oberen
Ende der Halterung und klappen den Arm dann
nach rechts (Abbildung H 5).
• Drehen Sie den Einstellknopf (Abbildung
H
3
) im Uhrzeigersinn, um den Halterungsarm
an seiner Position zu verriegeln.
3.
Verwenden Sie die Klammer der Halterung
(Abbildung H 6), um den Laser an einem
Balken, einer Deckenkonstruktion oder einem
Mast an seiner Position zu halten.
• Wenn nötig, drehen Sie die Klammer so,
dass sie im richtigen Winkel steht, um am
jeweiligen Objekt befestigt zu werden. Halten
Sie den Halterungsarm mit einer Hand fest und
drehen Sie die Klammer mit der anderen Hand
(Abbildung
H 7
).
• Bringen Sie die Klammer der Halterung um
einen Balken, eine Deckenkonstruktion oder
einen Mast herum an.
• Drehen Sie den Knopf der Klammer
(Abbildung
H 8
) im Uhrzeigersinn, bis die
Klammer fest am jeweiligen Objekt sitzt und die
Halterung an ihrer Position gehalten wird.
Verwenden des Lasers mit anderem
Zubehör
WARNUNG:
Da Zubehör, das nicht von STANLEY
angeboten wird, nicht mit diesem Laser
geprüft worden ist, kann die Verwendung
von solchem Zubehör an diesem Laser
gefährlich sein.
Verwenden Sie nur STANLEY
®
-Zubehörteile, die für
dieses Modell empfohlen werden. Zubehör, das für
einen Laser geeignet ist, kann bei Verwendung an
einem anderen Laser zu Risiken führen.
Der Laser ist an der Unterseite, der Seite und
der Rückseite mit einem 1/4-20-Innengewinde
ausgestattet (Abbildung C), um aktuelles oder
zukünftiges STANLEY®-Zubehör aufnehmen zu
können.
Anderes empfohlenes Zubehör für diesen Laser
können Sie bei Ihrem Händler oder einem autorisierten
Service Center erwerben. Wenn Sie Hilfe bei der
Zubehörsuche benötigen, wenden Sie sich bitte an
Ihr nächstgelegenes STANLEY Service Center oder
besuchen Sie unsere Website:
http://www.STANLEY.com.
Wartung
• Wenn der Laser nicht in Gebrauch ist, reinigen
Sie die Außenteile mit einem feuchten Tuch
und wischen Sie den Laser mit einem weichen,
trockenen Tuch ab, damit er trocken ist, und
bewahren Sie den Laser in der zugehörigen Box
auf.
• Obwohl das Äußere des Lasers
lösungsmittelbeständig ist, verwenden Sie zu seiner
Reinigung NIEMALS Lösungsmittel.
• Lagern Sie den Laser nicht bei Temperaturen unter
-20 ˚C oder über 60 ˚C.
• Um die Genauigkeit Ihrer Arbeit zu gewährleisten,
überprüfen Sie den Laser regelmäßig auf korrekte
Kalibrierung.
• Kalibrierungsprüfungen und andere
Wartungsarbeiten können von STANLEY Service
Centern durchgeführt werden.
Page 24

D
24
Fehlerbehebung
Der Laser lässt sich nicht einschalten
• Prüfen Sie die AA-Batterien, um Folgendes
sicherzustellen:
• Jede Batterie wurde korrekt gemäß der
Kennzeichnung (+) und (–) im Batteriefach
eingesetzt.
• Die Batteriekontakte sind sauber und frei von
Rost oder Korrosion.
• Die Batterien sind neue, hochwertige,
Markenbatterien, welche die Wahrscheinlichkeit
des Auslaufens zu verringern.
• Stellen Sie sicher, dass AA-Batterien in
einwandfreiem Zustand sind. Im Zweifelsfall
versuchen Sie, neue Batterien einzusetzen.
• Stellen Sie bei der Verwendung von
wiederauadbaren Batterien sicher, dass die
Batterien vollständig aufgeladen sind.
• Achten Sie darauf, den Laser trocken zu halten.
• Wenn die Lasereinheit über 50 ˚C warm wird,
schaltet sich das Gerät nicht ein. Wenn der Laser
bei extrem heißen Temperaturen gelagert wurde,
lassen Sie ihn abkühlen. Das Laser-Nivelliergerät
wird nicht beschädigt, wenn Sie die Einschalt-/
Transportsperre betätigen, bevor das Gerät auf die
richtige Betriebstemperatur abgekühlt ist.
Die Laserstrahlen blinken
Im Selbstnivellierungsmodus sind die Laser für
eine Selbstnivellierung bis zu einer durchschnittlichen
Abweichung von 4° in alle Richtungen ausgelegt.
Wenn der Laser so weit geneigt wird, dass sich der
interne Mechanismus nicht selbst ausgleichen kann
(oder wenn der Laser im manuellen Modus nicht
waagerecht ist), blinken die Laserstrahlen, was
bedeutet, dass der Neigungsbereich überschritten
wurde.
WENN DIE VOM LASER ERZEUGTEN STRAHLEN
BLINKEN, IST DER LASER NICHT HORIZONTAL
ODER VERTIKAL AUSGERICHTET UND SOLLTE
NICHT ZUR BESTIMMUNG ODER MARKIERUNG
VON HORIZONTALEN ODER VERTIKALEN EBENEN
VERWENDET WERDEN. Versuchen Sie, den Laser
auf einer noch ebeneren Fläche neu zu positionieren.
Die Laserstrahlen hören nicht auf,
sich zu bewegen
Der Laser ist ein Präzisionsinstrument. Daher wird
der Laser, wenn er nicht auf einer stabilen (und
bewegungslosen) Fläche steht, weiterhin versuchen,
sich selbst zu nivellieren. Wenn die Bewegung des
Strahls nicht aufhört, versuchen Sie, den Laser auf
eine stabilere Fläche zu stellen. Versuchen Sie auch
sicherzustellen, dass die Fläche möglichst ach und
eben ist, damit der Laser stabil steht.
Service und Reparaturen
Anmerkung: Wenn der Laser zerlegt wird, werden
alle Garantien des Produkts ungültig.
Zur Gewährleistung der SICHERHEIT und
ZUVERLÄSSIGKEIT des Produkts sollten
Reparatur-, Wartungs- und Einstellungsarbeiten
nur von autorisierten Kundendienststellen
durchgeführt werden. Service oder Wartung durch
nicht qualiziertes Personal kann das Risiko von
Verletzungen erhöhen. Ihr nächstgelegenes STANLEY
Service Center nden Sie auf
http://www.STANLEY.com.
Zwei Jahre Garantie
Stanley gibt für seine elektronischen Messgeräte eine
Garantie von zwei Jahren ab Kaufdatum für Materialund/oder Verarbeitungsmängel.
Mangelhafte Produkte werden nach Ermessen von
Stanley repariert oder ersetzt, wenn sie zusammen
mit dem Kaufbeleg an folgende Adresse geschickt
werden:
Stanley UK Sales Limited
Gowerton Road
Brackmills, Northampton NN4 7BW
Diese Garantie deckt keine Mängel ab, die durch
zufällige Beschädigungen oder Verschleiß oder durch
eine Verwendung verursacht wurden, die nicht mit den
Anweisungen des Herstellers in Übereinstimmung
steht, oder wenn eine Reparatur oder Veränderung
des Produkts vorgenommen wurde, die nicht von
Stanley genehmigt wurde.
Reparatur oder Austausch im Rahmen dieser Garantie
beeinträchtigen nicht das Ablaufdatum der Garantie.
Page 25
25
D
Soweit gesetzlich zulässig, haftet Stanley im Rahmen
dieser Garantie nicht für indirekte oder Folgeschäden,
die aus Mängeln an diesem Produkt resultieren.
Diese Garantie darf ohne Genehmigung von Stanley
nicht variiert werden.
Diese Gewährleistung berührt nicht die gesetzlichen
Rechte der Endverbraucher dieses Produkts.
Diese Garantie unterliegt den Gesetzen des Landes,
in dem das Produkt verkauft wird, und Stanley und
der Käufer erklären sich jeweils unwiderruich damit
einverstanden, sich in Bezug auf jede Forderung
oder andere Angelegenheit, die sich aus oder im
Zusammenhang mit dieser Garantie ergibt, der
ausschließlichen Zuständigkeit der Gerichte dieses
Landes zu unterwerfen.
Kalibrierung und Wartung werden nicht durch die
Garantie abgedeckt.
HINWEIS:
Der Kunde ist für die korrekte Verwendung und Pege
des Instruments verantwortlich. Darüber hinaus ist der
Kunde vollständig für die regelmäßige Überprüfung
der Genauigkeit der Lasereinheit und somit für die
Kalibrierung des Instruments verantwortlich.
Technische Daten
STHT77502-1 STHT77592-1
Lichtquelle Laserdioden
Laser-Wellenlänge 630 – 680 nm sichtbar 510 – 530 nm sichtbar
Laserleistung ≤1,5 mW LASERPRODUKT DER KLASSE 2
Funktionsbereich 12m (36’) 16m (53’)
Genauigkeit ±5 mm bei 10m (±3/16“ bei 33′)
Stromquelle 2 Batterien der Größe AA (1,5V) (3V DC)
Betriebstemperatur -10°C bis 40°C (14°F bis 104°F)
Lagertemperatur -20°C bis 60°C (-5°F bis 140°F)
Page 26
F
26
Table des matières
• Informations sur le laser
• Sécurité de l'utilisateur
• Sécurité concernant les piles
• Installer les piles AA
• Allumer le laser
•Vérier la précision du laser
•Utiliser le laser
• Maintenance
• Dépannage
• Entretien et réparations
• Caractéristiques
Informations sur le laser
Les lasers STHT77502-1 et STHT77592-1 sont des
produits laser de classe 2. Les lasers sont des outils
laser à mise à niveau automatique qui peuvent être
utilisés pour les projets d'alignement horizontal
(de niveau) et vertical (à l'aplomb).
Sécurité de l'utilisateur
Directives liées à la sécurité
Les dénitions ci-dessous décrivent le niveau de
gravité de chaque mention d'avertissement. Veuillez
lire le manuel et faire attention à ces symboles.
DANGER : Indique une situation de danger
imminent qui engendre, si elle n'est pas
évitée, la mort ou de graves blessures.
AVERTISSEMENT : Indique une situation
de danger potentiel qui pourrait engendrer,
si elle n'est pas évitée, la mort ou de graves
blessures.
ATTENTION : Indique une situation de
danger potentiel qui peut engendrer, si elle
n'est pas évitée, des blessures bénignes ou
modérées.
REMARQUE : Indique une pratique ne posant
aucun risque de blessures mais qui, si elle n'est pas
évitée, peut entraîner des dommages matériels.
Si vous avez des questions ou des commentaires
concernant cet outil ou tout autre outil STANLEY
®
,
consultez le site http://www.STANLEY.com.
AVERTISSEMENT :
Vous devez lire et assimiler toutes
les instructions. Le non-respect des
avertissements et des instructions listés
dans ce manuel peut entraîner de graves
blessures.
CONSERVEZ CES INSTRUCTIONS
AVERTISSEMENT :
Exposition au rayonnement laser. Ne
désassemblez pas et ne modiez pas
le niveau laser. Il n'y a aucune pièce
réparable par l'utilisateur à l'intérieur.
De graves lésions oculaires pourraient
en résulter.
AVERTISSEMENT :
Rayonnement dangereux. L'utilisation
de commandes ou de réglages ou
l'exécution de procédures autres que celles
mentionnées dans ce document peuvent
engendrer une exposition dangereuse au
rayonnement laser.
L'étiquette gurant sur votre laser peut contenir les
symboles suivants.
Symbole Signication
V Volts
mW Milliwatts
Avertissement laser
nm Longueur d'onde en
nanomètres
2 Laser de classe 2
Étiquettes d'avertissement
Pour des raisons de commodité et de sécurité, les
étiquettes suivantes gurent sur votre laser.
AVERTISSEMENT : An de réduire le
risque de blessures, l'utilisateur doit
lire le manuel d'utilisation.
AVERTISSEMENT : RAYONNEMENT
LASER. NE REGARDEZ PAS
DIRECTEMENT LE FAISCEAU
LASER. Produit laser de classe 2.
Page 27
27
F
SER.____________
TYPE 1
3V DC
LASER
2
≤1.5mW @630-680nm
IEC 60825-1: 2014
MADE IN CHINA
www.stanleylasers.com
www.stanleytools.com
STHT77502-1
SER.____________
TYPE 1
3V DC
LASER
2
MADE IN CHINA
www.stanleylasers.com
www.stanleytools.com
≤1.5mW @510-530nm
IEC 60825-1: 2014
STHT77592-1
• Ne faites pas fonctionner le laser dans un
environnement présentant des risques
d'explosion, notamment en présence de
liquides, gaz ou poussières inammables.
Cet outil peut créer des étincelles qui peuvent
enammer les poussières et les fumées.
• Rangez le laser non utilisé hors de portée des
enfants et des autres personnes non qualiées.
Les lasers peuvent être dangereux entre des mains
inexpérimentées.
• Les réparations sur l'outil DOIVENT être
réalisées par un réparateur qualié. Toute
opération de réparation ou de maintenance réalisée
par une personne non qualiée peut engendrer
des blessures. Pour connaître l'emplacement de
votre centre d'assistance Stanley le plus proche,
consultez le site http://www.2helpU.com.
• N'utilisez pas d'instruments optiques, comme
un télescope ou une lunette pour regarder
le faisceau laser. De graves lésions oculaires
pourraient en résulter.
• Ne placez pas le laser dans une position
permettant que quiconque puisse regarder
volontairement ou non vers le faisceau laser. De
graves lésions oculaires pourraient en résulter.
• Ne placez pas le laser près d'une surface
rééchissante qui pourrait faire reéter le
faisceau laser dans les yeux de quiconque. De
graves lésions oculaires pourraient en résulter.
• Éteignez le laser si vous ne l'utilisez pas. Laisser
le laser allumé augmente le risque que quelqu'un
regarde le faisceau.
• Ne modiez le laser d'aucune manière. La
modication de l'outil pourrait provoquer une
exposition dangereuse au rayonnement du laser.
• Ne faites pas fonctionner le laser près d'enfants
et ne laissez pas les enfants utiliser le laser. De
graves lésions oculaires pourraient en résulter.
• Ne retirez et n'abîmez pas les étiquettes
d'avertissement. Si les étiquettes étaient retirées,
l'utilisateur ou d'autres personnes pourraient
s'exposer au rayonnement par inadvertance.
• Placez le laser de façon sûre, sur une surface
de niveau. La chute du laser peut occasionner
l'endommagement de ce dernier ainsi que de
graves blessures.
Sécurité des personnes
• Restez vigilant, surveillez ce que vous faites et
faites preuve de bon sens lorsque vous utilisez le
laser. N'utilisez pas le laser si vous êtes fatigué
ou sous l’inuence de drogue, d’alcool ou de
médicaments. Tout moment d’inattention pendant
l’utilisation du laser peut engendrer de graves
blessures.
• Portez des équipements de protection individuelle.
Portez toujours une protection oculaire. En fonction
des conditions de travail, le port d'équipements
de protection individuelle, comme un masque
à poussières, des chaussures de sécurité
antidérapantes, un casque et des protections
auditives peuvent réduire les blessures.
Utilisation et entretien de l'outil
• N'utilisez pas le laser si l'interrupteur
Alimentation/Verrouillage Transport ne permet
plus d'allumer et d'éteindre le laser. Tout outil qui ne
peut plus être commandé par son interrupteur est
dangereux et doit être réparé.
Respectez les instructions de la section Maintenance
de ce manuel. L'utilisation de pièces non autorisées ou
le non-respect des instructions liées à la Maintenance
peuvent occasionner un risque de choc électrique ou
de blessures.
Page 28
F
28
Sécurité concernant les
piles
AVERTISSEMENT :
Les piles peuvent exploser ou fuir et
provoquer des blessures ou un incendie.
An de réduire ce risque :
• Respectez soigneusement toutes les consignes et
tous les avertissements des étiquettes apposées
sur les piles et leur emballage.
• Insérez toujours les piles correctement en
respectant la polarité (+ et -), comme indiqué sur la
pile et sur l'équipement.
• Ne court-circuitez aucune des bornes des piles.
• Ne rechargez pas des piles endommagées.
• Ne mélangez pas des piles neuves avec des piles
usagées. Remplacez toutes les piles par des piles
neuves de même marque et de même type, en
même temps.
• Retirez immédiatement les piles vides et jetez-les
conformément à la réglementation locale en
vigueur.
• Ne jetez pas les piles au feu.
• Gardez les piles hors de portée des enfants.
• Retirez les piles lorsque l'appareil n'est pas utilisé.
Installer les piles AA
Installez des piles AA neuves dans le laser
STHT77502-1 ou STHT77592-1.
1.
Retournez le laser.
2.
Au bas du laser, soulevez la languette pour ouvrir
le cache du compartiment à piles (Figure B 1).
3.
Insérez deux piles AA neuves, de bonne qualité
et de marque, en vous assurant de positionner
les extrémités - et + de chaque pile comme
indiqué à l'intérieur du compartiment à piles
(Figure
B 2
).
4.
Poussez le cache du compartiment à piles
jusqu'à ce qu'il s'enclenche en place pour le
fermer (Figure B 3).
Lorsque le laser n'est pas utilisé, gardez l'interrupteur
Alimentation/Verrouillage Transport en position
centrale (Arrêt) (Figure
R 2
) pour économiser
les piles.
Allumer le laser
1.
Positionnez le laser sur une surface régulière,
plane et de niveau, le laser faisant directement
face au mur opposé (position 0º).
2.
Allumez le laser pour afcher les faisceaux
croisés avant. Vous pouvez soit :
• Déplacer l'interrupteur Alimentation/Verrouillage
Transport vers la gauche pour verrouiller
l'effet pendulaire et afcher les faisceaux
transversaux en mode manuel (Figure
R 1
).
• Déplacer l'interrupteur Alimentation/Verrouillage
Transport vers la droite pour déverrouiller
l'effet pendulaire et afcher les faisceaux
transversaux en mode Niveau automatique
(Figure
R 3
).
3.
Appuyez une fois sur (Figure R 4) pour
diffuser une ligne laser horizontale, une seconde
fois pour diffuser une ligne verticale et une
troisième fois pour diffuser une ligne horizontale
et une ligne verticale.
4.
Vériez les faisceaux laser.
• Si le laser est trop penché et qu'il ne peut pas
se mettre de niveau (> 4°) ou si le laser n'est
pas de niveau en mode Manuel, les faisceaux
laser clignotent.
• Si les faisceaux laser clignotent, cela indique
que le laser n'est pas de niveau (ou d'aplomb)
et qu'il NE DOIT PAS ÊTRE UTILISÉ pour
déterminer ou marquer un niveau ou un
aplomb. Essayez alors de placer le laser sur
une surface de niveau.
Page 29
29
F
5.
Si UNE des constatations suivantes est VRAIE,
poursuivez avec les instructions relatives à la
Vérication de la précision du laser AVANT
D'UTILISER LE LASER pour un quelconque
projet.
• C'est la première fois que vous utilisez
le laser (si le laser a été exposé à des
températures extrêmes).
• La précision du laser n'a pas été vérifiée
depuis longtemps.
• Il se peut que le laser ait chuté.
Vérier la précision du
laser
Les outils laser sont scellés et calibrés en usine. Nous
vous recommandons de procéder à la vérication de
la précision avant d'utiliser le laser pour la première
fois (si le laser a été exposé à des températures
extrêmes) et ensuite régulièrement an de garantir la
précision de votre travail. Lorsque vous procédez
à une quelconque vérication de précision listée
dans ce manuel, respectez ces directives :
• Utilisez une zone/distance la plus grande possible
et la plus proche possible de la distance
d'utilisation. Plus la zone/distance est grande, plus
il est simple de mesurer la précision du laser.
• Placez le laser sur une surface régulière, plane,
stable, de niveau dans les deux sens.
• Marquez le centre du faisceau laser.
Précision du faisceau de
niveau
La vérication du calibrage du balayage horizontal
du laser nécessite d'avoir deux murs à disposition,
éloignés de 30′ (9m). Il est important de procéder à la
vérication du calibrage en utilisant une distance au
moins égale à la distance de l'opération pour laquelle
l'outil sera utilisé.
1.
Placez le laser sur un trépied face à un mur
(Figure D 1).
2.
Déplacez l'interrupteur Alimentation/Verrouillage
Transport vers la droite (Figure R 3) pour
allumer le laser en mode Niveau Auto et afficher
les faisceaux horizontal et vertical.
3.
Marquez P1 là où le faisceau horizontal et le
faisceau vertical se croisent sur le mur.
4.
Tournez le laser de 180º.
5.
Marquez P2 là où le faisceau horizontal et le
faisceau vertical se croisent sur le mur
(Figure D 2).
6.
Tournez le laser de 180º et déplacez-le près du
premier mur (Figure
D 3
).
7.
Près de P1, marquez P3 là où le faisceau
horizontal et le faisceau vertical se croisent sur le
mur.
8.
Tournez le laser de 180º (Figure D 4).
9.
Près de P2, marquez P4 là où le faisceau
horizontal et le faisceau vertical se croisent sur le
mur.
10.
Mesurez la distance verticale entre P1 et P3 .
11.
Mesurez la distance verticale entre P2 et P4 .
12.
Si votre mesure est plus grande que la Distance
admissible entre P1 et P3 ou P2 et P4 pour la
distance entre les murs correspondante dans le
tableau suivant, cela indique que le laser doit être
révisé dans un centre d'assistance agréé.
Distance entre
les murs
Distance admissible
Entre P1 et P3 ou P2
et P4
9m (30′) 3mm (1/8”)
12m (40′) 4mm (5/32”)
15m (50′) 5mm (7/32”)
Page 30
F
30
Précision du faisceau horizontal
La vérication du calibrage du tangage horizontal du
laser nécessite d'avoir un seul mur à disposition, d'au
moins 30′ (9m) de long. Il est important de procéder
à la vérication du calibrage en utilisant une distance
au moins égale à la distance de l'opération pour
laquelle l'outil sera utilisé.
1.
Placez le laser sur un trépied face au coin d'une
pièce (Figure
E 1
).
2.
Déplacez l'interrupteur Alimentation/Verrouillage
Transport vers la droite (Figure R 3) pour
allumer le laser en mode Niveau Auto et afficher
les faisceaux horizontal et vertical.
3.
Dirigez le faisceau vertical sur un coin de la
pièce.
4.
Marquez P1 là où le faisceau horizontal croise le
centre du mur adjacent.
5.
Tournez le laser de façon que le faisceau vertical
croise P1 (Figure E 2).
6.
Marquez P2 là où le faisceau horizontal croise le
faisceau vertical.
7.
Tournez le laser de façon que le faisceau vertical
soit dirigé vers le second coin (Figure E 3).
8.
Marquez P3 là où le faisceau horizontal est aligné
à la verticale de P1 et P2.
9.
Mesurez la distance verticale entre le point le
plus haut et le point le plus bas (entre P1, P2, et/
ou P3).
10.
Si votre mesure est plus grande que la Distance
admissible entre le point le plus haut et le point
le plus bas pour la distance entre les murs
correspondante dans le tableau suivant, cela
indique que le laser doit être révisé dans un
centre d'assistance agréé.
Distance entre
les murs
Distance admissible
entre le point le plus
haut et le ploint le
plus bas
9m (30′) 6mm (1/4”)
12m (40′) 8mm (5/16”)
15m (50′) 10mm (13/32”)
Précision du faisceau vertical
La vérication du calibrage vertical (aplomb) du
laser est réalisée de façon plus précise si la hauteur
verticale disponible est conséquente, idéalement 30′
(9m) et si une personne au sol positionne le laser et
qu'une autre personne près du plafond marque la
position du faisceau. Il est important de procéder à la
vérication du calibrage en utilisant une distance au
moins égale à la distance de l'opération pour laquelle
l'outil sera utilisé.
1.
Placez le laser à au moins 3,28 ft (1,0m) du
montant d'une porte (Figure F 1).
2.
Déplacez l'interrupteur Alimentation/Verrouillage
Transport vers la droite (Figure R 3) pour
allumer le laser en mode Niveau Auto et afficher
les faisceaux horizontal et vertical.
3.
Dirigez le faisceau laser vertical vers le montant
de la porte.
4.
Le long du bas du faisceau laser, marquez trois
emplacements a, b et c, là où b se trouve
au centre entre a et c.
5.
Là où le haut du faisceau laser apparaît en haut
du montant de la porte, marquez e.
6.
Déplacez le laser du côté opposé du montant de
la porte (Figure F 2).
7.
Alignez le bas du faisceau laser sur a,
b
et c.
8.
Là où le haut du faisceau laser apparaît en haut
du montant de la porte, marquez
f
.
Page 31

31
F
9.
Mesurez la distance entre e et f.
10.
Si votre mesure est plus grande que la Distance
admissible entre eet fpour la Hauteur de
plafond correspondante D dans le tableau
suivant, cela indique que le laser doit être révisé
dans un centre d'assistance agréé.
Hauteur de
plafond
D
Distance admissible
entre e et
f
2.0m (6.56′) 1.5mm (1/16”)
2.5m (8.20') 2mm (3/32”)
3.0m (9.84′) 2.5mm (1/8”)
Précision du faisceau vertical latéral
La vérication du calibrage vertical (à plomb) du laser
latéral est réalisée de façon plus précise avec une
surface au sol d'au moins 16ft. (1,5m) et l'aide d'une
autre personne. Il est important de procéder à la
vérication du calibrage en utilisant une distance au
moins égale à la distance de l'opération pour laquelle
l'outil sera utilisé.
1.
Placez le laser sur un sol de niveau à d'au moins
16ft. (1,5m) de long.
2.
Déplacez l'interrupteur Alimentation/Verrouillage
Transport vers la droite (Figure R 3) pour
allumer le laser en mode Niveau Auto et afficher
les faisceaux horizontal et vertical.
3.
Appuyez une fois sur pour afficher le
faisceau vertical latéral.
4.
Mesurez exactement 3 ft. (0,91m) du centre du
module laser le long du faisceau vertical avant et
marquez P1 (Figure G 1).
5.
Mesurez exactement 4 ft. (1,22m) du centre du
module laser le long du faisceau vertical latéral et
marquez P2 (Figure G 2).
6.
Mesurez la distance entre P1 et P2
(Figure
G 3
).
7.
Si la distance entre P1 et P2 n'est pas de 5ft
+ 1/32” (1,522m + 0,75mm), apportez le module
laser dans votre centre d'assistance STANLEY le
plus proche pour le faire calibrer.
Utiliser le laser
Astuces d'utilisation
• Marquez toujours le centre du faisceau créé par
le laser.
• Les variations extrêmes de températures peuvent
faire bouger les pièces à l'intérieur du laser et
affecter la précision. Vériez souvent la précision au
cours de votre travail.
• Si le laser chute, vériez qu'il est toujours calibré.
• Tant que le laser est correctement calibré, il garde
sa capacité de détection du niveau automatique.
Chaque laser est calibré en usine pour trouver le
niveau dès qu'il est placé sur une surface plane
dont le niveau moyen est de ± 4°. Aucun réglage
manuel n'est nécessaire.
• Utilisez le laser sur une surface régulière, plane
et de niveau.
Éteindre le laser
Glissez l'interrupteur Alimentation/Verrouillage
Transport en position Arrêt (Figure R 2) lorsque le
laser n'est pas utilisé. Tant que l'interrupteur n'est pas
placé sur la position Arrêt, le laser ne s'éteint pas.
Utiliser le laser avec la console
Une console (Figure H) est livrée avec le laser
pour vous permettre de facilement xer le laser sur
l'ossature d'un mur ou d'un plafond ou un mât.
1.
Fixez fermement le laser sur la console.
• Placez le filetage femelle 1/4-20 au bas, sur
le côté ou à l'arrière du laser (Figure
C
), sur
le filetage mâle 1/4-20 sur le bras la console
(Figure H 1).
• Tournez le bouton sur le laser (Figure
H 2
)
dans le sens des aiguilles d'une montre pour
verrouiller le laser sur le filetage 1/4-20 du bras
de la console.
Page 32

F
32
2.
Au besoin, modifiez la hauteur ou la position du
laser sur la console.
• Tournez le bouton de réglage (Figure
H 3
)
dans le sens inverse des aiguilles d'une montre
pour desserrer le bras de la console.
• Faites glisser le bras de la console vers le haut
ou le bas jusqu'à la hauteur voulue (Figure
H
4
). Pour changer l'angle de la console de
90° à 180°, faites glisser le bras de la console
jusqu'en haut de la console puis pivotez le bras
de la console vers la droite (Figure H 5).
• Tournez le bouton de réglage (Figure
H 3
)
dans le sens des aiguilles d'une montre pour
resserrer le bras de la console.
3.
Utilisez la fixation de la console (Figure H 6)
pour maintenir le laser en place sur une ossature
de mur ou de plafond ou un mât.
• Au besoin, tournez la fixation pour qu'elle soit
au bon angle par rapport à l'objet auquel la
console doit être fixée. Tout en maintenant le
bras de la console d'une main, utilisez l'autre
main pour tourner la fixation (Figure
H 7
).
• Placez la fixation de la console autour de
l'ossature du mur ou du plafond ou du mât.
• Tournez le bouton de la fixation
(Figure
H 8
) dans le sens des aiguilles
d'une montre jusqu'à ce que la fixation soit bien
serrée autour de l'objet et que la console soit
bien maintenue en place.
Utiliser le laser avec d'autres
accessoires
AVERTISSEMENT :
Les accessoires, autres que ceux proposés
par STANLEY n'ont pas été testés avec ce
laser, leur utilisation avec ce laser peut donc
être dangereuse.
N'utilisez que des accessoires STANLEY
®
,
recommandés pour ce modèle. Les accessoires
adaptés pour un laser particulier peuvent occasionner
des risques de blessures s'ils sont utilisés avec un
autre laser.
Le laser est équipé d'un letage femelle 1/4-20 au
bas, sur le côté et à l'arrière (Figure
C
) qui facilite
l'utilisation des accessoires STANLEY® présents et
futurs.
D'autres accessoires recommandés pour ce laser
sont disponibles en option chez votre revendeur ou
dans votre centre d'assistance agréé. Si vous avez
besoin d'aide pour trouver un accessoire quel qu'il soit,
contactez votre centre d'assistance STANLEY le plus
proche ou consultez le site Internet :
http://www.STANLEY.com.
Maintenance
• Lorsque le laser n'est pas utilisé, nettoyez les
parties extérieures à l'aide d'un chiffon humide,
essuyez le laser avec un chiffon doux et sec pour
le sécher complètement et rangez-le dans le boîtier
dans lequel il a été fourni.
• Même si l'extérieur du laser résiste aux solvants,
n'utilisez JAMAIS aucun solvant pour le nettoyer.
• Ne stockez pas le laser à des températures
inférieures à -5°F (-20°C) ou supérieures à 140°F
(60°C).
• Pour conserver la précision de votre travail, vériez
régulièrement le calibrage correct du laser.
• Les vérications du calibrage et les autres
opérations de maintenance et de réparation
peuvent être effectuées dans les centres
d'assistance STANLEY.
Dépannage
Le laser ne s'allume pas
• Contrôlez les piles AA an de vous assurer que :
• Chaque pile est installée correctement, en
respectant les (+) et les (–) gurant dans le
compartiment à piles.
• Les contacteurs des piles sont propres et
exempts de rouille et de corrosion.
• Les piles sont neuves, de bonne qualité et de
marque afin de réduire le risque de fuite.
Page 33

33
F
• Assurez-vous que les piles AA sont en bon état
de fonctionnement. En cas de doute, installez des
piles neuves.
• Si vous utilisez des piles rechargeables, assurez-
vous qu'elles sont pleinement rechargées.
• Assurez-vous de garder le laser au sec.
• Si le module laser chauffe à plus de 120°F
(50°C), il ne s'allume pas. Si le laser a été rangé
à des températures extrêmement chaudes,
laissez-le refroidir. Le niveau du laser ne sera
pas endommagé si l'interrupteur Alimentation/
Verrouillage Transport est utilisé avant que le laser
ne refroidisse à sa température de fonctionnement.
Les faisceaux laser clignotent
En mode Niveau Auto, les lasers sont conçus pour se
mettre automatiquement de niveau à une inclinaison
moyenne de 4° dans toutes les directions. Si le laser
est trop penché pour que le mécanisme interne puisse
se mettre de niveau automatiquement (ou si le laser
n'est pas de niveau lorsqu'il est en mode Manuel), les
faisceaux laser clignotent pour indiquer que la plage
d'inclinaison a été dépassée.
LES FAISCEAUX LASER CRÉÉS PAR LE LASER
NE SONT PAS DE NIVEAU OU D'APLOMB ET
LE LASER NE DOIT PAS ÊTRE UTILISÉ POUR
DÉTERMINER OU MARQUER UN NIVEAU OU UN
APLOMB. Essayez de placer le laser sur une surface
plus droite.
Les faisceaux laser ne cessent pas
de bouger
Le laser est un instrument de précision. C'est la raison
pour laquelle il cherche continuellement le niveau s'il
n'est pas placé sur une surface stable et immobile. Si
le faisceau ne s'arrête pas de bouger, tentez de placer
le laser sur une surface plus stable. Assurez-vous
aussi que la surface est relativement plate et de
niveau pour que le laser soit stable.
Entretien et réparations
Remarque : Le désassemblage du niveau laser
annule toutes les garanties du produit.
An d'assurer la SÛRETÉ et la FIABILITÉ du produit,
les réparations, la maintenance et les réglages
doivent être réalisés dans des centres d'assistance
agréés. Toute opération de réparation ou de
maintenance réalisée par une personne non qualiée
peut engendrer des blessures. Pour connaître
l'emplacement de votre centre d'assistance STANLEY
le plus proche, consultez le site
http://www.STANLEY.com.
Garantie de deux ans
Stanley garantit ses instruments de mesure
électroniques contre tout défaut de pièces et/ou de
main d'œuvre pour une durée de deux ans, à partir de
la date d'achat.
Les produits défectueux sont réparés ou remplacés,
à la discrétion de Stanley, s'ils sont retournés avec
leur preuve d'achat à :
Stanley UK Sales Limited
Gowerton Road
Brackmills, Northampton NN4 7BW
Cette garantie ne couvre pas les pannes provoquées
par des dommages accidentels, l'usure normale, une
utilisation non conforme aux instructions du fabricant
ou une réparation ou altération du produit, non
autorisées par Stanley.
La réparation ou le remplacement dans le cadre de
cette garantie ne modie pas la date d'expiration de
la garantie.
Dans les limites autorisées par la loi, Stanley ne
saurait être tenu responsable, dans le cadre de cette
garantie, pour les pertes indirectes ou consécutives
liées à la panne de ce produit.
Cette garantie ne peut pas être modiée sans
l'autorisation de Stanley.
Cette garantie ne va pas à l'encontre des droits légaux
des acheteurs consommateurs de ce produit.
Page 34

F
34
Cette garantie est régie et interprétée conformément
aux lois du pays de vente et Stanley et l'acheteur
acceptent de façon irrévocable de porter devant la
juridiction exclusive des tribunaux de ce pays, toute
réclamation ou question découlant de ou en relation
avec cette garantie.
Le calibrage et l'entretien ne sont pas couverts par
la garantie.
REMARQUE :
Le client est responsable de l'utilisation correcte et
du soin apporté à l'appareil. De plus, le client est
entièrement responsable des contrôles périodiques
liés à la précision de l'appareil laser et donc du
calibrage de l'instrument.
Page 35

35
F
Caractéristiques
STHT77502-1 STHT77592-1
Source lumineuse Diodes laser
Longueur de l'onde laser 630 – 680 nm visible 510 – 530 nm visible
Puissance laser ≤1.5 mW PRODUIT LASER DE CLASSE 2
Plage de fonctionnement 12m (36′) 16m (53′)
Précision ±5 mm à 10m (3/16” à 33′)
Source d'alimentation 2 piles AA (1,5V) (CC 3V)
Température de fonctionnement -10°C à 40°C (14°F à 104°F)
Température de stockage -20°C à 60°C (-5°F à 140°F)
Page 36

I
36
Contenuti
• Informazioni sulla livella laser
• Sicurezza dell’utilizzatore
• Sicurezza delle batterie
• Installazione delle batterie AA
• Accensione della livella laser
• Verica della precisione della livella laser
• Uso della livella laser
• Manutenzione
• Risoluzione dei problemi
• Assistenza e riparazioni
• Speciche
Informazioni sulla livella
laser
Le livelle laser STHT77502-1 e STHT77592-1
sono prodotti laser di Classe 2. Questi strumenti
laser autolivellanti possono essere usati per lavori
di allineamento orizzontale (livella) e verticale (lo
a piombo).
Sicurezza dell’utilizzatore
Istruzioni di sicurezza
Le denizioni riportate di seguito descrivono il livello di
allerta rappresentato da ogni parola di segnalazione.
Leggere attentamente il manuale, prestando
attenzione a questi simboli.
PERICOLO: indica una situazione di
pericolo imminente che, se non evitata,
provoca lesioni personali gravi o addirittura
mortali.
AVVERTENZA: indica una situazione
potenzialmente pericolosa che, se non
evitata, potrebbe provocare lesioni personali
gravi o addirittura mortali.
ATTENZIONE: indica una situazione
potenzialmente pericolosa che, se non
evitata, potrebbe provocare lesioni personali
di gravità lieve o media.
AVVISO: indica una situazione non in grado di
causare lesioni personali, ma che, se non evitata,
potrebbe provocare danni materiali.
Per qualsiasi domanda o commento in merito
a questo o ad altri prodotti STANLEY
®
visitare il
sito web http://www.STANLEY.com.
AVVERTENZA:
leggere e comprendere tutte le istruzioni.
La mancata osservanza delle avvertenze
e istruzioni contenute nel presente manuale
potrebbe causare infortuni gravi.
CONSERVARE LE PRESENTI ISTRUZIONI
AVVERTENZA:
esposizione a radiazioni laser. Non
smontare né modicare la livella laser.
Al suo interno non sono presenti parti
riparabili dall’utilizzatore. Potrebbero
vericarsi lesioni gravi agli occhi.
AVVERTENZA:
radiazioni pericolose. L’uso di controlli
o regolazioni o l’esecuzione di procedure
diversi da quelli specicati in questo
manuale potrebbe provocare l’esposizione
a radiazioni pericolose.
L’etichetta applicata sulla livella laser potrebbe
contenere i simboli riportati di seguito.
Simbolo Signicato
V Volt
mW milliwatt
Avvertenza laser
nm Lunghezza d’onda in
nanometri
2 Prodotto laser di Classe 2
Etichette di avvertenza
Per scopi di comodità e sicurezza, sulla livella
laser sono presenti le etichette riportate di seguito.
AVVERTENZA: per ridurre il rischio di
infortuni, l'utilizzatore deve leggere il
manuale d'istruzione.
AVVERTENZA: RADIAZIONI LASER.
NON FISSARE DIRETTAMENTE IL
RAGGIO LASER. Prodotto laser di
Classe 2.
Page 37

37
I
SER.____________
TYPE 1
3V DC
LASER
2
≤1.5mW @630-680nm
IEC 60825-1: 2014
MADE IN CHINA
www.stanleylasers.com
www.stanleytools.com
STHT77502-1
SER.____________
TYPE 1
3V DC
LASER
2
MADE IN CHINA
www.stanleylasers.com
www.stanleytools.com
≤1.5mW @510-530nm
IEC 60825-1: 2014
STHT77592-1
• Evitare di impiegare questa livella laser in
ambienti esposti al rischio di esplosione, ad
esempio in presenza di liquidi, gas o polveri
inammabili. Questo elettroutensile genera scintille
che possono incendiare le polveri o i fumi.
• Quando non viene usata, riporre la livella laser
fuori dalla portata dei bambini o di persone non
addestrate. I dispositivi laser risultano pericolosi se
usati da persone inesperte.
• Gli interventi di assistenza o manutenzione
sulla livella laser DEVONO essere condotti da
personale qualicato. In caso contrario potrebbero
vericarsi lesioni a persone. Per trovare il centro
di assistenza Stanley più vicino visitare il sito web
http://www.2helpU.com.
• Non utilizzare strumenti ottici, come un
telescopio o uno strumento di osservazione
astronomico, per guardare il raggio laser.
Potrebbero vericarsi lesioni gravi agli occhi.
• Non collocare la livella laser in una posizione
in cui qualcuno potrebbe intenzionalmente
o accidentalmente ssare direttamente il raggio
laser. Potrebbero vericarsi lesioni gravi agli occhi.
• Non collocare la livella laser in prossimità di
una supercie riettente che potrebbe dirigere il
raggio laser riesso verso gli occhi di qualcuno.
Potrebbero vericarsi lesioni gravi agli occhi.
• Spegnere la livella laser quando non è in uso.
Se la si lascia accesa il rischio che qualcuno ssi il
raggio laser aumenta.
• Non modicare in alcun modo la livella laser.
L’apporto di modiche alla livella laser potrebbe
comportare l’esposizione a radiazioni laser
pericolose.
• Non utilizzare la livella laser vicino a dei bambini
e non lasciare che i bambini la usino. Potrebbero
vericarsi lesioni gravi agli occhi.
• Non staccare né rovinare le etichette di
avvertenza. Rimuovendo le etichette, l’utilizzatore
o altre persone potrebbero inavvertitamente esporsi
alle radiazioni.
• Appoggiare la livella laser in modo sicuro su
una supercie piana. Se la livella laser dovesse
cadere, potrebbe danneggiarsi e provocare gravi
lesioni a persone.
Sicurezza personale
• Essere vigili, considerare le proprie azioni
e utilizzare il proprio buon senso durante l’uso
della livella laser. Non utilizzare la livella laser
quando si è stanchi o sotto l’effetto di droghe, alcool
o medicinali. Un attimo di disattenzione durante
l’uso della livella laser potrebbe causare gravi danni
alle persone.
• Usare dispositivi di protezione individuale.
Indossare sempre occhiali di protezione. In base
alle condizioni operative, l’impiego di dispositivi
di protezione individuale, quali mascherina
antipolvere, calzature di sicurezza, elmetto
e protezioni per l’udito, riduce il rischio di lesioni
alle persone.
Utilizzo e cura dello strumento
• Non utilizzare la livella laser se l’interruttore
Accensione/Blocco per trasporto non funziona.
Qualsiasi dispositivo con interruttore non
funzionante è pericoloso e deve essere riparato.
Seguire le istruzioni riportate nel capitolo
Manutenzione del presente manuale. L’uso
di componenti non autorizzati o la mancata
osservanza delle istruzioni riportate nel capitolo
Manutenzione potrebbe comportare il rischio di scosse
elettriche o lesioni a persone.
Page 38

I
38
Sicurezza delle batterie
AVVERTENZA:
le batterie possono esplodere o perdere
liquido con il rischio di causare lesioni
a persone o incendi. Per ridurre questo
rischio:
• seguire sempre attentamente tutte le istruzioni e le
avvertenze riportate sull'etichetta e sulla confezione
delle batterie;
• inserire sempre le batterie in modo corretto per
quanto riguarda la polarità
(+ e –), seguendo i simboli indicati sulla batteria
e sul dispositivo;
• non cortocircuitare i terminali della batteria;
• non ricaricare le batterie monouso;
• non mischiare batterie usate con batterie nuove;
sostituirle tutte nello stesso momento con batterie
nuove della stessa marca e dello stesso tipo;
• estrarre immediatamente le batterie esaurite dalla
livella laser e smaltirle nella modalità prevista dalle
norme locali vigenti;
• non smaltire le batterie nel fuoco;
• tenere le batterie lontano dalla portata dei bambini;
• rimuovere le batterie quando il dispositivo non è
in uso.
Installazione delle
batterie AA
Inserire batterie AA nuove nella livella laser
STHT77502-1 o STHT77592-1.
1.
Capovolgere la livella laser.
2.
Sollevare il fermo nella parte inferiore della livella
laser per aprire il coperchio del vano batterie
(Figura B 1).
3.
Inserire due batterie AA nuove di marca,
assicurandosi di posizionare i poli - e + di
ciascuna batteria come indicato all'interno del
vano batterie (Figura
B 2
).
4.
Chiudere il coperchio del vano batterie e premerlo
fino a farlo scattare in posizione (Figura B 3).
Quando la livella laser non è in uso, mantenere
l’interruttore di Accensione/Blocco per trasporto
nella posizione centrale (spento) (Figura
A 2
) per
risparmiare la carica delle batterie.
Accensione della livella
laser
1.
Collocare la livella laser su una superficie liscia,
piana e stabile, con il laser rivolto direttamente
verso la parete opposta (posizione a 0º).
2.
Accendere la livella laser per proiettare i raggi
a croce anteriormente. A questo punto è possibile
procedere in due modi:
• spostare l’interruttore di Accensione/Blocco
per trasporto verso sinistra per mantenere
bloccato il pendolo e proiettare i raggi laser
a croce in modalità manuale (Figura
A 1
);
• spostare l’interruttore di Accensione/Blocco per
trasporto verso destra per sbloccare il pendolo
e proiettare i raggi a croce nella modalità di
autolivellamento (Figura
A 3
).
3.
Premere il pulsante (Figura A 4) una
volta per proiettare una linea laser orizzontale,
una seconda volta per proiettare una linea laser
verticale e una terza volta per proiettare una linea
laser orizzontale e una verticale.
4.
Controllare i raggi laser.
• Se la livella laser viene inclinata
eccessivamente per consentire
l'autolivellamento (più di 4°) oppure se non
è esattamente orizzontale nella modalità
manuale, il raggio laser lampeggia.
• Se i raggi laser lampeggiano, la livella laser non
è esattamente orizzontale (o perpendicolare)
e NON DEVE ESSERE USATA per stabilire
o segnare il livello (orizzontalità) o il piombo
(perpendicolarità). Provare a riposizionare la
livella laser su una superficie piana.
Page 39

39
I
5.
Se QUALCUNA delle seguenti dichiarazioni è
VERA, procedere seguendo le istruzioni per la
Verica dell'accuratezza della livella laser PRIMA
DI UTILIZZARE LA LIVELLA LASER per un
progetto.
• È la prima volta che si sta usando la livella
laser (nel caso in cui il dispositivo sia stato
esposto a temperature estreme).
• La livella laser non è stata controllata da
tempo per verificarne l’accuratezza.
• La livella laser potrebbe essere caduta.
Verica dell’accuratezza
della livella laser
I dispositivi laser sono sigillati e calibrati in fabbrica.
Prima di utilizzare la livella laser la prima volta
si raccomanda di eseguire una verica della
sua accuratezza (nel caso in cui il dispositivo sia
stato esposto a temperature estreme) e in seguito
controllarla regolarmente per assicurare l'accuratezza
del proprio lavoro. Quando si esegue una delle
veriche dell'accuratezza elencate in questo
manuale, seguire queste linee guida.
• Utilizzare la più ampia area/massima distanza
possibile, che più si avvicina alla distanza
operativa. Maggiore è l'area/la distanza, più
semplice è misurare l'accuratezza della livella laser.
• Posizionare la livella laser su una supercie liscia,
piana e stabile, che sia orizzontale in entrambe
le direzioni.
• Segnare il centro del raggio laser.
Accuratezza del raggio
laser
Per vericare la calibrazione della scansione
orizzontale della livella laser occorrono due pareti
a distanza di 9 m (30'). È importante eseguire la
verica della calibrazione utilizzando una distanza
non inferiore a quella delle applicazioni per le quali lo
strumento dovrà essere usato.
1.
Posizionare la livella laser su un treppiedi, rivolta
direttamente verso una parete (Figura
D 1
).
2.
Spostare l’interruttore di Accensione/Blocco
per trasporto verso destra (Figura A
3
) per accendere la livella laser.nella modalità
di autolivellamento e proiettare i raggi laser
orizzontale e verticale.
3.
Segnare sulla parete il punto P1 di intersezione
tra il raggio laser orizzontale e quello verticale.
4.
Ruotare la livella laser di 180º.
5.
Segnare sulla parete il punto P2 di intersezione
tra il raggio laser orizzontale e quello verticale
(Figura D 2).
6.
Ruotare la livella laser di 180º e spostarla
accanto alla prima parete (Figura D 3).
7.
Segnare sulla parete, accanto al punto P1,
il punto P3 di intersezione tra il raggio laser
orizzontale e quello verticale.
8.
Ruotare la livella laser di 180º (Figura D 4).
9.
Segnare sulla parete, accanto al punto P2,
il punto P4 di intersezione tra il raggio laser
orizzontale e quello verticale.
10.
Misurare la distanza verticale tra i punti P1 e P3.
11.
Misurare la distanza verticale tra i punti P2 e P4.
Page 40

I
40
12.
Se la misura ottenuta supera la Distanza
ammissibile tra i punti P1 e P3 o P2 e P4 per la
Distanza tra le pareti corrispondente nella tabella
riportata di seguito, la livella laser deve essere
sottoposta a manutenzione presso un centro di
assistenza autorizzato.
Distanza tra le
pareti
Distanza ammissibile
tra i punti P1 e P3
o P2 e P4
9 m (30′) 3 mm (1/8”)
12 m (40′) 4 mm (5/32”)
15 m (50′) 5 mm (7/32”)
Accuratezza del raggio laser
orizzontale
Per vericare la calibrazione del passo orizzontale
della livella laser occorre una sola parete, lunga
almeno 9 m (30'). È importante eseguire la verica
della calibrazione utilizzando una distanza non
inferiore a quella delle applicazioni per le quali lo
strumento dovrà essere usato.
1.
Posizionare la livella laser su un treppiedi, rivolta
verso un angolo della stanza (Figura E 1).
2.
Spostare l’interruttore di Accensione/Blocco per
trasporto verso destra (Figura A 3)
per accendere la livella laser.nella modalità
di autolivellamento e proiettare i raggi laser
orizzontale e verticale.
3.
Dirigere il raggio laser verticale verso un angolo
della stanza.
4.
Segnare il punto P1 in cui il raggio laser
orizzontale attraversa il centro della parete
adiacente.
5.
Ruotare la livella laser in modo che il raggio laser
verticale intersechi il punto P1 (Figura E 2).
6.
Segnare il punto P2 di intersezione tra il raggio
laser orizzontale e quello verticale.
7.
Ruotare la livella laser in modo che il raggio laser
verticale sia puntato verso il secondo angolo
(Figura E 3).
8.
Segnare il punto P3 in cui il raggio laser
orizzontale è allineato verticalmente con i punti
P1 e P2.
9.
Misurare la distanza verticale tra il punto più alto
e quello più basso (tra P1, P2, e/o P3).
10.
Se la misura ottenuta supera la Distanza
ammissibile tra il punto più alto e quello più basso
per la Distanza tra le pareti corrispondente nella
tabella riportata di seguito, la livella deve essere
sottoposta a manutenzione presso un centro di
assistenza autorizzato.
Distanza tra le
pareti
Distanza ammissibile
tra il punto più alto
e quello più basso
9 m (30′) 6 mm (1/4”)
12 m (40′) 8 mm (5/16”)
15 m (50′) 10 mm (13/32”)
Accuratezza del raggio laser verticale
La verica della calibrazione della perpendicolarità
(piombo) della livella laser può essere eseguita nel
modo più preciso possibile se è disponibile un’altezza
verticale sostanziale, idealmente di 9 m (30′), con una
persona a livello del pavimento che posiziona la livella
laser e l’altra persona all’altezza del softto che segna
il punto creato dal raggio laser sul softto stesso.
È importante eseguire la verica della calibrazione
utilizzando una distanza non inferiore a quella delle
applicazioni per le quali lo strumento dovrà essere
usato.
1.
Posizionare la livella laser ad almeno 1 m
(3,28 ft) dallo stipite di una porta (Figura F 1).
2.
Spostare l’interruttore di Accensione/Blocco per
trasporto verso destra (Figura A 3)
per accendere la livella laser.nella modalità
di autolivellamento e proiettare i raggi laser
orizzontale e verticale.
3.
Dirigere il raggio laser verticale verso lo stipite
della porta.
4.
Lungo la parte inferiore del raggio laser segnare
tre punti a, b e c, dove b è il punto
intermedio tra a e c.
Page 41

41
I
5.
Dove la parte superiore del raggio laser compare
nella parte superiore dello stipite della porta
segnare il punto e.
6.
Spostare la livella laser all'estremità opposta dello
stipite della porta (Figura F 2).
7.
Allineare la parte inferiore del raggio laser con
i punti
a, b
e c.
8.
Dove la parte superiore del raggio laser compare
nella parte superiore dello stipite della porta
segnare il punto f.
9.
Misurare la distanza tra e e f.
10.
Se la misura ottenuta supera la Distanza
ammissibile tra
e
e f per l’Altezza del
softto corrispondente
D
nella tabella riportata
di seguito, la livella deve essere sottoposta
a manutenzione presso un centro di assistenza
autorizzato.
Altezza del
softto
D
Distanza ammissibile
tra e e
f
2,0 m (6,56′) 1,5 mm (1/16”)
2,5 m (8,20′) 3/32” (2,0mm)
3,0 m (9,84′) 2,5 mm (1/8”)
Accuratezza del raggio laser laterale
La verica della calibrazione della perpendicolarità
(piombo) del raggio laser laterale può essere eseguita
nel modo più accurato possibile se è disponibile
uno spazio sul pavimento di almeno 1,5 m (16 ft),
e se è presente una seconda persona che offra il
proprio aiuto. È importante eseguire la verica della
calibrazione utilizzando una distanza non inferiore
a quella delle applicazioni per le quali lo strumento
dovrà essere usato.
1.
Posizionare la livella laser su un pavimentazione
piana lunga almeno 1,5 m (16 ft).
2.
Spostare l’interruttore di Accensione/Blocco per
trasporto verso destra (Figura A 3)
per accendere la livella laser.nella modalità
di autolivellamento e proiettare i raggi laser
orizzontale e verticale.
3.
Premere il pulsante una volta per proiettare il
raggio laser verticale laterale.
4.
Misurare esattamente 0,91 m (3 ft) dal centro
dell’unità laser lungo il raggio laser verticale
anteriore e segnare il punto P1 (Figura G 1).
5.
Misurare esattamente 1,22 m (4 ft) dal centro
dell’unità laser lungo il raggio laser verticale
laterale e segnare il punto P2 (Figura G 2).
6.
Misurare la distanza tra i punti P1 e P2
(Figura G 3).
7.
Se la distanza tra i punti P1 e P2 non è di
1,522 m + 0,75 mm (5 ft + 1/32”), portare la livella
laser nel centro di assistenza STANLEY più vicino
per la calibrazione.
Uso della livella laser
Suggerimenti per l'uso
• Segnare sempre il centro del raggio laser proiettato
dalla livella.
• Sbalzi di temperatura estremi possono provocare
lo spostamento di componenti interni della livella
laser che potrebbero inuire sulla sua accuratezza.
Vericare spesso l’accuratezza della livella laser
mentre si lavora.
• Se la livella laser viene fatta cadere
accidentalmente, assicurarsi che sia ancora
calibrata.
• Finché la livella laser è adeguatamente calibrata,
l’autolivellamento funziona correttamente. Ogni
livella laser viene calibrata in fabbrica per trovare
l’orizzontalità quando viene posizionata su una
supercie piana nella media ± 4° di orizzontalità.
Non sono necessarie regolazioni manuali.
• Posizionare la livella laser su una supercie liscia
e piana.
Spegnimento della livella laser
Quando la livella laser non è in uso spostare
l’interruttore di Accensione/Blocco per trasporto
nella posizione centrale (spento) (Figura A 2).
Se l’interruttore non si trova nella posizione centrale
(spento), la livella laser non si spegnerà.
Page 42

I
42
Uso della livella laser con la staffa
In dotazione con la livella laser viene fornita una staffa
(Figure H) che consente di ssarla a un montante, un
controsoftto o a un’asta.
1.
Fissare saldamente la livella laser alla staffa.
• Utilizzando la filettatura di 1/4-20 nella parte
inferiore, laterale o posteriore della livella laser
(Figura
C
), posizionare la livella sul filetto di
1/4-20 del braccio della staffa (Figura H 1).
• Ruotare la manopola sulla livella laser
(Figura
H 2
) in senso orario per bloccare
il dispositivo sul filetto di 1/4-20 del braccio
della staffa.
2.
Se necessario, modificare l’altezza o la posizione
della livella laser sulla staffa.
• Ruotare la manopola di regolazione sulla livella
laser (Figura
H 3
) in senso antiorario per
allentare il braccio della staffa.
• Fare scorrere il braccio della staffa verso l’alto
o verso il basso fino all’altezza desiderata
(Figura
H 4
). Per cambiare l’orientamento
della staffa da 90° a 180°, fare scorrere il
braccio della staffa sino al punto più alto,
dopodiché ribaltarlo verso destra
(Figura H 5).
• Ruotare la manopola di regolazione sulla
livella laser (Figura
H 3
) in senso orario per
bloccare il braccio della staffa.
3.
Utilizzare il morsetto della staffa (Figura H 6)
per mantenere la livella laser ferma in posizione
su un montante, un controsoffitto o un’asta.
• Se necessario, ruotare il morsetto in modo che
sia posizionato nell’angolazione corretta per
fissarlo all’oggetto. Tenendo fermo il braccio
della staffa con una mano, con l’altra mano
ruotare il morsetto (Figura
H 7
).
• Posizionare il braccio della staffa intorno al
montante, al controsoffitto o all’asta.
• Ruotare la manopola del morsetto
(Figura
H 8
) in senso orario finché il
morsetto è serrato intorno all’oggetto e la staffa
è ferma in posizione.
Utilizzo della livella laser con altri
accessori
AVVERTENZA:
dato che accessori diversi da quelli proposti
da STANLEY non sono stati testati con
questa livella laser, l’utilizzo di tali accessori
con questo prodotto potrebbe comportare
dei rischi.
Utilizzare esclusivamente accessori STANLEY®
raccomandati per l’uso con questo modello. Gli
accessori indicati per un dispositivo laser potrebbero
diventare pericolosi, se utilizzati su un altro.
La livella laser è dotata di una lettatura femmina
di 1/4-20 nella parte inferiore, laterale e posteriore
(Figure C) per accogliere accessori STANLEY®
attuali o futuri.
Altri accessori raccomandati per l’uso con questa
livella laser sono acquistabili a fronte del pagamento
di un supplemento presso il proprio rivenditore di zona
o un centro di assistenza autorizzato. Se si ha bisogno
di assistenza per trovare degli accessori, contattare il
centro di assistenza STANLEY oppure visitare il sito
web: http://www.STANLEY.com.
Manutenzione
• Quando il dispositivo non viene usato, pulire le parti
esterne con un panno umido, stronare la livella
con un panno morbido asciutto per assicurarsi di
asciugarla bene e riporla nella scatola del kit fornita.
• Anche se le parti esterne della livella laser sono
resistenti ai solventi, NON UTILIZZARE MAI
solventi per pulire la livella.
• Non conservare la livella laser a temperature
inferiori a -20 ˚C (-5 ˚F) o superiori a 60 ˚C (140 ˚F).
• Per mantenere la precisione del proprio lavoro,
controllare spesso la livella, per assicurarsi che sia
correttamente calibrata.
• Le veriche di calibrazione e gli interventi di
manutenzione e riparazione possono essere
eseguiti presso i centri assistenza STANLEY.
Page 43

43
I
Risoluzione dei problemi
La livella laser non si accende
• Controllare le batterie AA per assicurarsi che:
• ciascuna batteria sia installata correttamente,
rispettando le polarità (+) e (–) indicate sul
vano batterie;
• i contatti delle batterie siano puliti e liberi da
ruggine o corrosione;
• le batterie siano nuove, di marca e di alta
qualità, per ridurre il rischio che si verifichino
perdite di liquido dalle batterie.
• Assicurarsi che le batterie AA funzionino
correttamente. Nel dubbio, provare a installare
nuove batterie.
• Quando si utilizzano batterie ricaricabili, assicurarsi
che siano completamente cariche.
• Assicurarsi di mantenere la livella laser asciutta.
• Se l’unità laser viene scaldata oltre i 50 ˚C (120 ˚F),
non si accende. Se la livella è stata riposta in un
luogo con una temperatura molto alta, lasciarla
raffreddare. La livella laser non si danneggia se
prima di averla fatta raffreddare per raggiungere
la sua temperatura operativa ottimale, viene usato
l’interruttore Accensione/Blocco per trasporto.
I raggi laser lampeggiano
Quando si trovano nella modalità di
autolivellamento, queste livelle laser sono progettate
per autolivellarsi in media di 4° in tutte le direzioni.
Se la livella laser viene inclinata eccessivamente,
il meccanismo interno non riesce ad autolivellarsi
(oppure se non è esattamente orizzontale quando
si trova in modalità manuale), i raggi laser
lampeggiano, per indicare che è stato superato il
range d’inclinazione.
I RAGGI LASER PROIETTATI DALLA
LIVELLA LAMPEGGIANO PERCHÉ NON
SONO ESATTAMENTE ORIZZONTALI
O PERPENDICOLARI E LA LIVELLA NON DEVE
ESSERE USATA PER STABILIRE O SEGNARE
IL LIVELLO (ORIZZONTALITÀ) O IL PIOMBO
(PERPENDICOLARITÀ). Provare a riposizionare la
livella laser su una supercie più piana.
I raggi laser non smettono di
spostarsi
La livella laser è uno strumento di precisione, perciò,
se non viene posizionata su una supercie stabile
(e ferma), continua a cercare di trovare il punto di
orizzontalità. Se il raggio laser non smette di spostarsi,
provare a spostare la livella su una supercie più
stabile. Inoltre assicurarsi che la supercie di appoggio
sia relativamente piana, afnché la livella sia stabile.
Assistenza e riparazioni
Nota: l’eventuale smontaggio della livella laser
comporterà l'inefcacia di tutte le garanzie applicabili
al prodotto.
Per assicurare la SICUREZZA e l’AFFIDABILITÀ della
livella laser gli interventi di manutenzione, riparazione
regolazione dovranno essere eseguiti presso i centri
di assistenza autorizzati. Gli interventi di assistenza
o manutenzione svolti da persone non qualicate
possono dare luogo al rischio di lesioni personali. Per
trovare il centro di assistenza STANLEY
più vicino
visitare il sito web http://www.STANLEY.com.
Garanzia di due anni
Stanley garantisce i propri strumenti di misurazione
elettronici da difetti nei materiali e/o di fabbricazione
per due anni dalla data di acquisto.
I prodotti difettosi saranno riparati o sostituiti,
a discrezione di Stanley, se inviati insieme alla prova
di acquisto a:
Stanley UK Sales Limited
Gowerton Road
Brackmills, Northampton NN4 7BW
La presente garanzia non copre i difetti causati da
danni accidentali, usura, impiego non in conformità
con le istruzioni del produttore o riparazioni
o alterazioni di questo prodotto non autorizzate da
Stanley.
La riparazione o la sostituzione in garanzia non
pregiudica la data di scadenza della Garanzia.
Nella misura consentita dalla legge, Stanley non è
responsabile ai sensi della presente Garanzia per
danni indiretti o consequenziali derivanti da difetti di
questo prodotto.
Page 44

I
44
La presente Garanzia non può essere modicata
senza l'autorizzazione di Stanley.
La presente Garanzia non pregiudica i diritti legali
degli acquirenti di questo prodotto.
La presente Garanzia è disciplinata e interpretata in
conformità con le leggi del paese di vendita e Stanley
e l'acquirente si impegnano ciascuno irrevocabilmente
a sottoporsi alla giurisdizione esclusiva dei tribunali di
tale paese in merito a qualsiasi pretesa o questione
derivante da o in relazione alla presente Garanzia.
Calibrazione e cura non sono coperte dalla garanzia.
NOTA:
Il cliente è responsabile per l'uso corretto e la cura
dello strumento. Inoltre, l’utilizzatore è completamente
responsabile del controllo periodico dell’accuratezza
dell’unità laser e, di conseguenza, della calibrazione
dello strumento.
Page 45

45
I
Speciche tecniche
STHT77502-1 STHT77592-1
Sorgente luminosa. Diodi laser
Lunghezza d'onda laser 630 – 680 nm visibile 510 – 530 nm visibile
Potenza laser ≤1,5 mW (PRODOTTO LASER DI CLASSE 2)
Range operativo 12 m (36') 16 m (53')
Precisione ±5 mm a 10 m (3/16” a 33′)
Fonte di alimentazione 2 batterie AA da 1,5 V (3 V c.c.)
Temperatura di esercizio Da -10°C a 40°C (da 14°F a 104°F)
Temperatura di stoccaggio da -20°C a 60°C (da -5°F a 140°F)
Page 46

ES
46
Contenido
• Información sobre el láser
• Seguridad del usuario
• Seguridad de la batería
• Instalar las baterías AA
• Encender el láser
• Comprobar la precisión del láser
• Uso del láser
• Mantenimiento
• Solución de problemas
• Mantenimiento y reparaciones
• Especicaciones
Información sobre el
láser
Los láseres STHT77502-1 y STHT77592-1 son
productos láser de clase 2. Los láseres son
herramientas láser autonivelantes que pueden
utilizarse para proyectos de alineación horizontal
(nivel) y vertical (plomada).
Seguridad del usuario
Pautas de seguridad
Las deniciones que guran a continuación describen
el grado de intensidad correspondiente a cada término
de alarma. Lea el manual y preste atención a estos
símbolos.
PELIGRO: Indica una situación de peligro
inminente que, de no evitarse, ocasionará la
muerte o una lesión grave.
ADVERTENCIA: Indica una situación
potencialmente peligrosa que, de no
evitarse, podría ocasionar la muerte o una
lesión grave.
ATENCIÓN: Indica una situación
potencialmente peligrosa que, de no
evitarse, puede ocasionar una lesión de
poca o moderada gravedad.
AVISO: Indica una práctica no relacionada con
lesiones personales que, de no evitarse, puede
ocasionar daños materiales.
Si tiene cualquier pregunta o comentario sobre
esta o cualquier otra herramienta de STANLEY
®
,
vaya a http://www.STANLEY.com.
ADVERTENCIA:
Lea y entienda todas las instrucciones.
El incumplimiento de las advertencias
e instrucciones indicadas en este manual
puede causar lesiones graves.
GUARDE LAS PRESENTES INSTRUCCIONES
ADVERTENCIA:
Exposición a la radiación láser. No
desmonte ni modique el nivel láser.
Este aparato no contiene piezas que
puedan ser reparadas por el usuario.
Pueden producirse lesiones oculares
graves.
ADVERTENCIA:
Radiación peligrosa. El uso de controles,
ajustes o ejecución de procedimientos
distintos a los indicados en el presente
manual puede causar una exposición
peligrosa a la radiación.
La etiqueta en su láser podrá incluir los siguientes
símbolos.
Símbolo Signicado
V Voltios
mW Milivatios
Advertencia sobre el láser
nm Longitud de onda en
nanómetros
2 Láser de Clase 2
Etiquetas de advertencia
Para su comodidad y seguridad, en el láser se
encuentran las siguientes etiquetas.
ADVERTENCIA: Para reducir el
riesgo de lesiones, el usuario debe
leer el manual de instrucciones.
ADVERTENCIA: RADIACIÓN
LÁSER. NO FIJE LA VISTA EN EL
RAYO. Producto láser de clase 2.
Page 47

47
ES
SER.____________
TYPE 1
3V DC
LASER
2
≤1.5mW @630-680nm
IEC 60825-1: 2014
MADE IN CHINA
www.stanleylasers.com
www.stanleytools.com
STHT77502-1
SER.____________
TYPE 1
3V DC
LASER
2
MADE IN CHINA
www.stanleylasers.com
www.stanleytools.com
≤1.5mW @510-530nm
IEC 60825-1: 2014
STHT77592-1
• No utilice el láser en atmósferas explosivas,
como ambientes donde haya polvo, gases
o líquidos inamables. Esta herramienta puede
originar chispas que pueden inamar el polvo
o los gases.
• Cuando no use el láser, guárdelo fuera del
alcance de los niños y de otras personas
no capacitadas para usarlo. Los láseres son
peligrosos si son utilizados por usuarios no
capacitados para su uso.
• Las reparaciones de la herramienta DEBEN
ser realizadas exclusivamente por personal
cualicado. Las operaciones de reparación
o mantenimiento realizadas por personal no
cualicado pueden causar lesiones. Para localizar
su centro de servicios Stanley más próximo, vaya
a http://www.2helpU.com.
• No utilice herramientas ópticas tales como
telescopios o teodolitos para ver el rayo láser.
Pueden producirse lesiones oculares graves.
• No coloque el láser en una posición que pueda
hacer que alguien mire jamente el rayo láser
de forma intencional o no intencional. Pueden
producirse lesiones oculares graves.
• No coloque el láser cerca de una supercie
reectante que reeje el rayo láser hacia los
ojos de alguna persona. Pueden producirse
lesiones oculares graves.
• Apague el láser cuando no lo utilice. Si deja
encendido el láser, aumenta el riesgo de que
alguien mire directamente al rayo láser.
• No modique el láser de ningún modo. Si realiza
cambios en la herramienta, podrá dar lugar a una
exposición peligrosa a la radiación láser.
• No utilice el láser cerca de los niños ni deje
que estos lo utilicen. Pueden producirse daños
oculares graves.
• No retire ni deshaga las etiquetas de
advertencia. Si retira las etiquetas, el
usuario u otras personas pueden exponerse
involuntariamente a la radiación.
• Coloque el láser en modo rme sobre una
supercie plana. Sil el láser se cae, pueden
producirse daños al láser o lesiones graves.
Seguridad personal
• Manténgase alerta, esté atento a lo que hace
y use el sentido común cuando utilice el láser. No
use el láser si está cansado o bajo los efectos de
drogas, medicamentos o alcohol. Un momento
de desatención cuando se usa el láser puede
ocasionar lesiones personales graves.
• Utilice equipo de seguridad personal. Utilice
siempre protección ocular. Dependiendo de
las condiciones de trabajo, el uso de equipos
de protección tales como mascarilla antipolvo,
calzado de seguridad antideslizante, casco de
seguridad y protección auditiva reduce las lesiones
personales.
Uso y cuidado de la herramienta
• No utilice el láser si este no puede encenderse
y apagarse utilizando el interruptor de
alimentación/bloqueo de transporte. Toda
herramienta que no pueda controlarse con el
interruptor es peligrosa y debe ser reparada.
Siga las instrucciones de la sección Mantenimiento
de este manual. El uso de piezas no autorizadas
o el incumplimiento de las instrucciones de
Mantenimiento pueden causar riesgo de descarga
eléctrica o lesiones.
Page 48

ES
48
Seguridad de la batería
ADVERTENCIA:
Las baterías pueden explotar o tener
pérdidas y causar lesiones o incendios.
Para reducir este riesgo:
• Siga con cuidado todas las instrucciones y las
advertencias colocadas en la etiqueta y el paquete
de baterías.
• Introduzca siempre correctamente las baterías
respetando la polaridad (+ y –), señalada en la
batería y en el equipo.
• No cortocircuite los terminales de la batería.
• No cargue las baterías desechables.
• No mezcle las baterías nuevas y viejas. Cambie
todas las baterías a la vez con baterías nuevas del
mismo tipo y marca.
• Saque inmediatamente las baterías consumidas
y deséchelas según las normas locales.
• No deseche las baterías en el fuego.
• Mantenga las baterías fuera del alcance de los
niños.
• Extraiga las baterías cuando no use el dispositivo.
Instalar baterías AA
Cargar las baterías AA nuevas en el láser
STHT77502-1 o STHT77592-1.
1.
De vuelta el láser hacia abajo.
2.
En la parte inferior del láser, levante la pestaña
para abrir la tapa del compartimento de la batería
(Figura B 1).
3.
Introduzca cuatro baterías AA nuevas, de una
marca de elevada calidad, asegurándose de
colocar los terminales - y + de cada batería tal
y como se indica el interior del compartimento de
las baterías (Figura
B 2
).
4.
Cierre la tapa del compartimento de las pilas
apretándolo hasta que encaje en su posición
(Figura B 3).
Cuando el láser no está en uso, mantenga el
interruptor de alimentación/bloqueo de transporte en
la posición central (OFF - apagado) (Figura
R 2
)
para ahorrar batería.
Encender el láser
1.
Coloque el láser sobre una superficie lisa, plana
y nivelada, con el láser mirando hacia delante,
hacia la pared opuesta (posición a 0º).
2.
Encienda el láser para mostrar los haces
frontales cruzados. O:
• Desplace el interruptor de alimentación/
bloqueo de transporte a la izquierda para
mantener el péndulo bloqueado y mostrar los
haces cruzados en modo manual
(Figura
1 R
).
• Desplace el interruptor de alimentación/
bloqueo de transporte a la derecha para
desbloquear el péndulo bloqueado y mostrar
los haces cruzados en modo autonivelante
(Figura
R 3
).
3.
Pulse (Figura R 4) una vez para mostrar
una línea láser horizontal, una segunda vez para
mostrar una línea vertical y una tercera vez para
mostrar una línea horizontal y una línea vertical.
4.
Compruebe los rayos del láser.
• Si el láser está tan inclinado que no puede
autonivelarse (> 4°), o si el láser no está
nivelado en modo manual, parpadearán los
rayos del láser.
• Si los rayos del láser parpadean, el láser
no está nivelado (o a plomo) y NO DEBE
UTILIZARSE para determinar o marcar el nivel
o la plomada. Intente reposicionar el láser en
una superficie nivelada.
Page 49

49
ES
5.
Si CUALQUIERA de las siguientes armaciones
es VERDADERA, siga las instrucciones para
Controlar la precisión del láser ANTES DE USAR
EL LÁSER para un proyecto.
• Esta es la primera vez que usa el láser
(en caso de que el láser haya sido expuesto
a temperaturas extremas).
• No se ha comprobado la precisión del láser
durante un periodo.
• Puede que el láser se haya caído.
Comprobar la precisión del
láser
Las herramientas láser vienen selladas y calibradas
de fábrica. Se recomienda efectuar una comprobación
de la precisión antes de usar el láser por primera
vez (en caso de que el láser se haya expuesto
a temperaturas extremas) y sucesivamente en
modo regular para garantizar la precisión del
trabajo. Cuando realice las comprobaciones de
la precisión indicadas en este manual, siga las
siguientes directrices:
• Use el área/distancia más grande y cercana
posible a la distancia de funcionamiento. Cuanto
más grande sea el área/distancia, más fácil es
medir la precisión del láser.
• Coloque el láser sobre una supercie lisa, plana
y rme, que esté nivelada en ambas direcciones.
• Marque el centro del rayo láser.
Precisión del haz de
nivelación
Para comprobar la calibración del escaneo horizontal
del láser se requieren dos paredes a 30′ (9 m) de
distancia. Es importante realizar una prueba de
calibración utilizando una distancia que no sea más
corta de la distancia de las aplicaciones para las
cuales se utilizará la herramienta.
1.
Coloque el láser sobre un trípode mirando hacia
adelante recto hacia la pared (Figura D 1).
2.
Desplace el interruptor de alimentación/bloqueo
de transporte a la derecha (Figura R 3) para
encender el láser en modo de autonivelante
y mostrar el haz horizontal y vertical del láser.
3.
Marque P1 donde los haces horizontal y vertical
se cruzan en la pared.
4.
Gire el láser a 180º.
5.
Marque P2 donde los haces horizontal y vertical
se cruzan en la pared (Figura
D 2
).
6.
Gire el láser a 180º y acérquelo a la primera
pared (Figura D 3).
7.
Cerca de P1, marque P3 donde los haces
horizontal y vertical se cruzan en la pared.
8.
Gire el láser a 180º (Figura D 4).
9.
Cerca de P2, marque P4 donde los haces
horizontal y vertical se cruzan en la pared.
10.
Mida la distancia vertical entre P1 y P3.
11.
Mida la distancia vertical entre P2 y P4.
12.
Si su medición es superior a la Distancia
admisible entre P1 y P3 o P2 y P4 para la
correspondiente Distancia entre paredes en la
siguiente tabla, el láser debe ser reparado por un
centro de servicios autorizado.
Distancia entre
paredes
Distancia admisible
Entre P1 y P3 o P2 y P4
30′ (9 m) 1/8” (3 mm)
40′ (12 m) 5/32” (4 mm)
50′ (15 m) 7/32” (5 mm)
Precisión del haz horizontal
Para comprobar la calibración de la inclinación
horizontal del láser, necesitará una sola pared de una
longitud mínima de 30′ (9 m). Es importante realizar
una prueba de calibración utilizando una distancia que
no sea más corta de la distancia de las aplicaciones
para las cuales se utilizará la herramienta.
1.
Coloque el láser sobre un trípode mirando hacia
una habitación (Figura E 1).
Page 50

ES
50
2.
Desplace el interruptor de alimentación/bloqueo
de transporte a la derecha (Figura R 3) para
encender el láser en modo de autonivelante
y mostrar el haz horizontal y vertical del láser.
3.
Apunte el haz vertical hacia una esquina de la
habitación.
4.
Donde el haz horizontal se cruce con el centro de
la pared adyacente, marque P1.
5.
Gire el láser de modo que el haz vertical se cruce
con P1 (Figura E 2).
6.
Donde el haz horizontal se cruza con el haz
vertical, marque P2.
7.
Gire el láser hasta que el haz vertical apunte
hacia la segunda esquina (Figura
E 3
).
8.
Donde el haz horizontal queda en línea vertical
con P1 y P2, marque P3.
9.
Mida la distancia vertical entre los puntos más
alto y más bajo (entre P1, P2 y/o P3).
10.
Si su medición es superior a la Distancia
admisible entre los puntos más alto y más bajo
para la correspondiente Distancia entre paredes
en la siguiente tabla, el láser debe ser reparado
por un centro de servicios autorizado.
Distancia entre
paredes
Distancia admisible
entre puntos más alto
y más bajo
30′ (9 m) 1/4” (6 mm)
40′ (12 m) 5/16” (8 mm)
50′ (15 m) 13/32” (10 mm)
Precisión del haz vertical
La comprobación de la calibración vertical (plomada)
del láser puede realizarse con mayor precisión cuando
hay a disposición una altura vertical considerable,
idealmente de 30′ (9 m), con una persona en el suelo
colocando el láser y otra persona cerca del techo para
marcar la posición del haz. Es importante realizar una
prueba de calibración utilizando una distancia que no
sea más corta de la distancia de las aplicaciones para
las cuales se utilizará la herramienta.
1.
Coloque el láser a por lo menos 3.28 ft (1.0 m)
del marco de una puerta (Figura F 1).
2.
Desplace el interruptor de alimentación/bloqueo
de transporte a la derecha (Figura R 3) para
encender el láser en modo de autonivelante
y mostrar el haz horizontal y vertical del láser.
3.
Apunte el haz vertical del láser hacia el marco de
la puerta.
4.
A lo largo del fondo del haz láser, marque tres
ubicaciones a, b y c; donde b está a mitad
de camino entre
a
y c.
5.
Donde la parte superior del haz del láser aparece
en la parte superior del marco de la puerta,
marque e.
6.
Mueva el láser hacia el lado opuesto al marco de
la puerta (Figura F 2).
7.
Alinee el fondo del haz del láser con
a, b
y c.
8.
Donde la parte superior del haz del láser aparece
en la parte superior del marco de la puerta,
marque f.
9.
Mida la distancia entre e y f.
10.
Si la medida es superior a la distancia admisible
entre e y f para la correspondiente altura del
techo D indicada en la siguiente tabla, el láser
debe ser reparado por un centro de servicios
autorizado.
Altura del techo
D
Distancia admisible
Entre e y
f
6,56′ (2,0 m) 1/16" (1.5 mm)
8,20′ (2,5 m) 3/32”(2.0 mm)
9,84′ (3,0 m) 1/8” (2.5 mm)
Precisión del haz lateral vertical
La comprobación de la calibración lateral vertical
(a plomo) del láser puede hacerse en modo preciso
cuando haya por lo menos 16 ft (1.5 m) de espacio
en el suelo y otra persona que ayude. Es importante
realizar una prueba de calibración utilizando una
distancia que no sea más corta de la distancia
de las aplicaciones para las cuales se utilizará la
herramienta.
1.
Coloque el láser en un suelo nivelado de por lo
menos 16 ft (1.5 m) de largo.
Page 51

51
ES
2.
Desplace el interruptor de alimentación/bloqueo
de transporte a la derecha (Figura R 3) para
encender el láser en modo de autonivelante
y mostrar el haz horizontal y vertical del láser.
3.
Pulse una vez para mostrar el haz vertical
lateral.
4.
Mida 3 ft (0.91 m) exactamente desde el centro
la unidad láser a lo largo del haz vertical frontal
y marque P1 (Figura G 1).
5.
Mida 4 ft (1.22 m) exactamente desde el centro
la unidad láser a lo largo del haz vertical lateral
y marque P2 (Figura G 2).
6.
Mida la distancia vertical entre los puntos P1
y P2 (Figura G 3).
7.
Si la distancia entre P1 y P2 no es de 5 ft + 1/32”
(1.522 m + 0.75 mm), lleve la unidad láser a su
centro de servicios STANLEY más próximo para
que lo calibren.
Uso del láser
Consejos operativos
• Marque siempre el centro del rayo creado por
el láser.
• Los cambios bruscos de temperatura pueden hacer
mover las piezas internas y afectar a la precisión.
Compruebe a menudo la precisión cuando utilice
el láser.
• En caso de caída del láser, compruebe si aún está
calibrado.
• Si el láser está correctamente calibrado, se nivelará
automáticamente. Cada láser está calibrado en la
fábrica para encontrar el nivel, si se coloca en una
supercie plana con un nivel medio de ± 4°. No es
necesario realizar ajustes manuales.
• Use el láser sobre una supercie lisa, plana
y estable.
Apagar el láser
Deslice el interruptor de alimentación/bloqueo de
transporte hacia la posición de apagado
(Figura
R 2
) cuando no utilice el láser. Si el
interruptor no está colocado en la posición de
apagado, el láser no se apaga.
Usar el láser con el soporte
Se suministra un soporte (Figura H) junto con el
láser, para que pueda colocarlo fácilmente en un
gancho, entramado de techo o palo.
1.
Fije bien el láser al soporte.
• Usando la rosca de 1/4-20 de la parte inferior
o trasera del láser (Figura
C
), coloque el láser
en la rosca de 1/4-20 del brazo del soporte
(Figura H 1).
• Gire el botón del láser (Figura
H 2
) en
sentido horario para bloquear el láser en la
rosca de 1/4-20 del brazo del soporte.
2.
Si es necesario, cambie la altura o la posición del
láser en el soporte.
• Gire el botón de ajuste (Figura
H 3
) en
sentido antihorario para aflojar el brazo del
soporte.
• Deslice el brazo del soporte hacia arriba
o abajo a la altura deseada (Figura
H 4
).
Para cambiar el soporte de 90° a 180°, deslice
el brazo del soporte hacia la parte superior del
soporte y gire el brazo a la derecha
(Figura H 5).
• Gire el botón de ajuste (Figura
H 3
) en
sentido horario para bloquear el brazo del
soporte en su posición.
3.
Use la mordaza del brazo (Figura H 6) para
sujetar el láser en su posición en un gancho,
entramado de techo o palo.
• Si es necesario, gire la mordaza para que
quede posicionada en el ángulo correcto para
colocar el objeto. Mientras sostiene el brazo de
soporte con una mano, use la otra para girar la
mordaza (Figura
H 7
).
• Coloque la mordaza del soporte alrededor del
gancho, entramado de techo o palo.
Page 52

ES
52
• Gire el botón de la mordaza (Figura H 8) en
sentido horario hasta que la mordaza apriete el
objeto y el soporte quede en su lugar.
Usar el láser con otros accesorios
ADVERTENCIA:
Dado que los accesorios que no sean los
suministrados por STANLEY no han sido
sometidos a pruebas con este láser, el uso
de tales accesorios con el láser puede ser
peligroso.
Use solo LOS ACCESORIOS DE STANLEY®
recomendados para usar con este modelo. Los
accesorios aptos para un láser pueden causar riesgo
de daños personales al utilizarse con otro láser.
El láser está dotado de una rosca hembra de 1/4-20
en la parte inferior, lateral y trasera (Figura C)
para colocar los accesorios actuales o futuros de
STANLEY®.
En su distribuidor local o centro de servicios
autorizado, puede adquirir otros accesorios
recomendados para utilizar con el láser. Si necesita
asistencia para colocar cualquier accesorio, póngase
en contacto con su centro de servicios de STANLEY
más próximo o visite nuestro sitio web:
http://www.STANLEY.com.
Mantenimiento
• Cuando no se usa el láser, limpie las partes
exteriores con un paño húmedo, limpie el láser con
un paño seco suave para que no se humedezca
y guárdelo en el estuche suministrado.
• No obstante la parte exterior del láser sea resistente
a los disolventes, NUNCA use disolventes para
limpiar el láser.
• No guarde el láser a temperaturas inferiores a -5 ˚F
(-20 ˚C) o superiores a 140 ˚F (60 ˚C).
• Para mantener la precisión de su trabajo,
compruebe a menudo que su láser esté bien
calibrado.
• Las comprobaciones de calibración y otras
reparaciones de mantenimiento pueden ser
realizadas por los centros de reparación de
STANLEY.
Solución de problemas
El láser no se enciende
• Compruebe las pilas AA para asegurarse de que:
• Las baterías estén correctamente instaladas,
respetando las indicaciones (+) y (–) del interior
del alojamiento de la batería.
• Los contactos de la batería estén limpios y no
tengan polvo ni óxido.
• Las baterías sean nuevas, de alta calidad y de
marca, para reducir el riesgo de pérdidas.
• Compruebe que las pilas AA se encuentran en buen
estado. Si tiene alguna duda, intente colocando
pilas nuevas.
• Cuando use baterías recargables, compruebe que
las baterías estén totalmente cargadas.
• Asegúrese de conservar el láser seco.
• Si la unidad láser se calienta por encima de los
120 °F (50 ºC), la unidad no se encenderá. Si
el láser ha sido almacenado a temperaturas
demasiado calientes, deje que se enfríe. El nivel
láser no se dañará si usa el botón de alimentación/
bloqueo de transporte antes de que se enfríe hasta
su temperatura de funcionamiento adecuada.
Los rayos del láser parpadean
Cuando están en modo autonivelante, los láseres
han sido diseñados para autonivelarse hasta un
promedio de 4° en todas las direcciones. Si el láser
se inclina demasiado y el mecanismo interno no
puede autonivelarse (o el láser no está nivelado
cuando está en modo manual), los haces del láser
parpadearán para indicar que se ha superado el rango
de inclinación.
Page 53

53
ES
LOS HACES PARPADEANTES CREADOS POR
EL LÁSER NO ESTÁN NIVELADOS O A PLOMO
Y NO DEBEN UTILIZARSE PARA DETERMINAR
O MARCAR EL NIVEL O LA PLOMADA. Intente
reposicionar el láser en una supercie más nivelada.
Los haces del láser no dejan de
moverse
El láser es un instrumento de precisión. Por lo tanto,
si no se coloca sobre una supercie estable (y ja),
el láser seguirá intentando encontrar su nivel. Si el
haz no deja de moverse, intente colocar el láser en
una supercie más estable. Del mismo modo, intente
comprobar que la supercie sea relativamente plana
y nivelada, para que el láser sea estable.
Mantenimiento
y reparaciones
Nota: Si desmonta el nivel láser, anulará todas las
garantías del producto.
Para garantizar la SEGURIDAD y la FIABILIDAD
del producto, las operaciones de reparación,
mantenimiento y ajuste deberán ser realizadas por los
centros de servicio autorizados. Las operaciones de
reparación o mantenimiento realizadas por personal
no cualicado pueden causar riesgo de lesiones.
Para localizar su centro de servicios STANLEY
más
próximo, vaya a http://www.STANLEY.com.
Dos años de garantía
Stanley garantiza sus herramientas electrónicas
de medición contra defectos relacionados con los
materiales y/o de fabricación durante dos años a partir
de la fecha de compra.
Los productos defectuosos serán reparados
o sustituidos, a criterio de Stanley, si son enviados,
junto con el comprobante de compra, a:
Stanley UK Sales Limited
Gowerton Road
Brackmills, Northampton NN4 7BW
Esta garantía no cubre los defectos causados por
daños accidentales, desgaste, uso no acorde con
las instrucciones del fabricante o reparaciones
o alteraciones del producto no autorizadas por
Stanley.
La reparación o la sustitución en garantía no afecta
a la fecha de expiración de la garantía.
En la medida que la ley lo permita, Stanley no será
responsable en virtud de esta garantía por pérdidas
indirectas o consecuentes que pudieran derivarse de
defectos del producto.
Esta garantía no puede ser modicada sin la
autorización de Stanley.
Esta garantía no afecta a los derechos legales de los
compradores-consumidores de este producto.
Esta garantía se regirá y será interpretada de
conformidad con las leyes del país en que fue vendido
el producto, y Stanley y el comprador acuerdan en
modo irrevocable someterse a la jurisdicción exclusiva
de los tribunales y juzgados de tal país en caso de
demanda o cuestiones que pudiesen derivarse de esta
garantía o que estén relacionadas con la misma.
El calibrado y el cuidado no están cubiertos por la
garantía.
NOTA:
El cliente será responsable del uso y cuidado
adecuado del instrumento. Además, el cliente es
completamente responsable de comprobar de manera
periódica la precisión de la unidad láser, y por tanto de
calibrar el instrumento.
Page 54

ES
54
Especicaciones
STHT77502-1 STHT77592-1
Fuente de luz Diodos del láser
Longitud de onda del láser 630 – 680 nm visible 510 – 530 nm visible
Potencia del láser PRODUCTO LÁSER DE CLASE 2 ≤ 1.5 mW
Rango de trabajo 12m (36′) 16m (53′)
Precisión ±5 mm @ 10 m (±3/16" @ 33′)
Fuente de alimentación 2 baterías tamaño AA (1.5 V) (3 V CC)
Temperatura de funcionamiento -10 °C a 40 °C (14 °F a 104 °F)
Temperatura de almacenamiento -20 °C a 60 °C (-5 °F a 140 °F)
Page 55

55
PT
Índice
• Informações sobre o laser
• Segurança do utilizador
• Segurança da bateria
• Colocar as baterias AA
• Ligar o laser
• Vericar a precisão do laser
• Utilizar o laser
• Manutenção
• Resolução de problemas
• Assistência e reparação
• Especicações
Informações sobre
o laser
Os lasers STHT77502-1 e STHT77592-1 são produtos
laser de Classe 2. Os lasers são ferramentas laser
com nivelamento automático que podem ser utilizadas
para projectos de alinhamento na horizontal (nível)
e na vertical (prumo).
Segurança do utilizador
Directrizes de segurança
As denições abaixo descrevem o nível de gravidade
de cada aviso. Leia o manual e preste atenção a estes
símbolos.
PERIGO: Indica uma situação de perigo
eminente que, se não for evitada, irá
resultar em morte ou ferimentos graves.
ATENÇÃO: Indica uma situação
potencialmente perigosa que, se não for
evitada, poderá resultar em morte ou
ferimentos graves.
CUIDADO: Indica uma situação
potencialmente perigosa que, se não for
evitada, poderá resultar em ferimentos
ligeiros ou moderados.
AVISO: Indica uma prática não relacionada com
ferimentos que, se não for evitada, poderá resultar
em danos materiais.
Se tiver alguma dúvida ou comentário sobre esta
ou qualquer ferramenta da STANLEY
®
, vá para
http://www.STANLEY.com.
ATENÇÃO:
Leia e compreenda todas as instruções.
O não seguimento dos avisos e das
instruções indicados neste manual poderá
resultar em ferimentos graves.
GUARDE ESTAS INSTRUÇÕES
ATENÇÃO:
Exposição a radiação laser. Não
desmonte nem modique o nível do
laser. O aparelho não tem peças no
interior que possam ser reparadas
pelo utilizador. Podem ocorrer lesões
oculares graves.
ATENÇÃO:
Radiação perigosa. A utilização de
controlos ou ajustes, ou o desempenho
de procedimentos que não sejam os
especicados neste documento podem
resultar em exposição radioactiva perigosa.
A etiqueta no laser pode incluir os seguintes símbolos.
Símbolo Signicado
V Volts
mW Miliwatts
Aviso sobre o laser
nm Comprimento de onda em
nanómetros
2 Laser de classe 2
Etiquetas de aviso
Para sua comodidade e segurança, as seguintes
etiquetas estão axadas no laser.
ATENÇÃO: Para reduzir o risco de
ferimentos, o utilizador deve ler
o manual de instruções.
ATENÇÃO: RADIAÇÃO DO LASER.
NÃO OLHE FIXAMENTE PARA
O FEIXE. Produto laser de classe 2.
Page 56

PT
56
SER.____________
TYPE 1
3V DC
LASER
2
≤1.5mW @630-680nm
IEC 60825-1: 2014
MADE IN CHINA
www.stanleylasers.com
www.stanleytools.com
STHT77502-1
SER.____________
TYPE 1
3V DC
LASER
2
MADE IN CHINA
www.stanleylasers.com
www.stanleytools.com
≤1.5mW @510-530nm
IEC 60825-1: 2014
STHT77592-1
• Não utilize o laser em ambientes explosivos,
como, por exemplo, na presença de líquidos,
gases ou poeiras inamáveis. Esta ferramenta
pode criar faíscas que poderão inamar estas
poeiras ou vapores.
• Guarde o laser fora do alcance das crianças
e de pessoas que não possuam as qualicações
necessárias para as manusear. Os lasers são
perigosos nas mãos de pessoas que não possuam
as qualicações necessárias para as manusear.
• A reparação das ferramentas DEVE ser levada
a cabo apenas por pessoal qualicado.
A assistência ou manutenção realizada por pessoal
que não possua as qualicações necessárias pode
dar origem a ferimentos. Para localizar o seu centro
de assistência da Stanley mais próximo, vá para
http://www.2helpU.com.
• Não utilize ferramentas ópticas tais como um
telescópio ou trânsito para ver o raio laser.
Podem ocorrer lesões oculares graves.
• Não coloque o laser numa posição que
possa fazer com que alguém xe, de maneira
intencional ou não, o raio laser. Podem ocorrer
lesões oculares graves.
• Não posicione o laser perto de uma superfície
com reexo que possa reectir o raio laser
na direcção dos olhos de uma pessoa. Podem
ocorrer lesões oculares graves.
• Desligue o laser quando não estiver a ser
utilizado. Se deixar o laser ligado, há um maior
risco de xação do raio laser.
• Não modique o produto seja como for.
A modicação da ferramenta pode resultar em
exposição a radiação laser perigosa.
• Não utilize o laser perto de crianças nem
permita que crianças utilizem o laser. Podem
ocorrer lesões oculares graves.
• Não retire nem estrague as etiquetas de aviso.
Se retirar as etiquetas, o utilizador ou outras
pessoas podem car expostos, inadvertidamente,
a radiação.
• Coloque o laser de maneira segura sobre uma
superfície nivelada. Se o laser cair, podem ocorrer
danos no laser ou ferimentos graves.
Segurança pessoal
• Mantenha-se atento, preste atenção ao que está
a fazer e faça uso de bom senso quando utilizar
o laser. Não utilize o laser se estiver cansado ou
sob o efeito de drogas, álcool ou medicamentos.
Um momento de distracção durante a utilização do
laser poderá resultar em ferimentos graves.
• Use equipamento de protecção pessoal. Use
sempre protecção ocular. Dependendo das
condições de trabalho, o uso de equipamento
de protecção, como uma máscara anti-poeiras,
calçado anti-derrapante e protecção auricular reduz
a probabilidade de ferimentos.
Utilização e cuidados a ter com
a ferramenta
• Não utilize o laser se o interruptor Alimentação/
bloqueio de transporte não ligar ou desligar
o laser. Qualquer ferramenta que não possa ser
controlada através do interruptor de alimentação é
perigosa e tem de ser reparada.
Siga as instruções indicadas na secção Manutenção
deste manual. A utilização de peças não autorizadas
ou o não cumprimento das instruções de Manutenção
podem dar origem a um choque eléctrico ou
ferimentos.
Page 57

57
PT
Segurança das pilhas
ATENÇÃO:
As baterias podem explodir ou ocorrer
uma fuga de electrólito e causar
ferimentos ou um incêndio. Para reduzir
este risco:
• Siga com atenção todas as instruções e avisos
indicados no rótulo e embalagem das pilhas.
• Insira sempre as baterias correctamente no que
respeita à polaridade (+ e –), conforme assinalado
na bateria e no equipamento.
• Não provoque um curto-circuito nos terminais das
baterias.
• Não carregue baterias descartáveis.
• Não misture baterias antigas com novas. Substitua
todas as baterias ao mesmo tempo por novas da
mesma marca e tipo.
• Retire as baterias gastas de imediato e elimine-as
de acordo com a legislação local.
• Não deite as baterias numa fogueira.
• Mantenha as baterias fora do alcance das crianças.
• Retire as baterias quando não utilizar o dispositivo.
Colocar as baterias AA
Coloque novas baterias AA no laser STHT77502-1 ou
STHT77592-1.
1.
Coloque o laser ao contrário.
2.
Na parte inferior do laser, levante a patilha para
abrir a tampa do compartimento da bateria
(Figura B 1).
3.
Insira duas novas baterias AA de elevada
qualidade, certificando-se de que posiciona as
polaridades - e + de cada bateria, como indicado
no interior do compartimento da bateria
(Figura
B 2
).
4.
Empurre a tampa do compartimento da bateria
até encaixar (Figura B 3).
Quando não utilizar o laser, mantenha o interruptor de
Alimentação/bloqueio de transporte na posição central
(desligado) (Figura
A 2
) para poupar a carga da
bateria.
Ligar o laser
1.
Monte o laser numa superfície lisa, plana
e nivelada, com o laser virado para a frente na
direcção da parede oposta (posição de 0º).
2.
Ligue o laser para apresentar os feixes cruzados
dianteiros. Pode optar por:
• Mova o interruptor de Alimentação/bloqueio
de transporte para a esquerda para manter
o pêndulo bloqueado e apresentar os feixes
cruzados no modo manual (Figura
A 1
).
• Mova o interruptor de Alimentação/bloqueio
de transporte para a direita para desbloquear
o pêndulo e apresentar os feixes cruzados no
modo de nivelamento automático
(Figura
A 3
).
3.
Prima (Figura A 4) uma vez para
apresentar uma linha laser horizontal, duas vezes
para apresentar uma linha vertical e três vezes
para apresentar uma linha horizontal e uma linha
vertical.
4.
Verique os feixes laser.
• Se o laser estiver inclinado ao ponto de não
conseguir efectuar o nivelamento automático
(> 4°) ou se o laser não estiver nivelado
no modo manual, os feixes laser começam
a piscar.
• Se os feixes laser começarem a piscar, o laser
não está nivelado (ou a prumo) e NÃO DEVE
SER UTILIZADO para determinar ou assinalar
o nível ou o prumo. Tente posicionar o laser
numa superfície nivelada.
5.
Se alguma das seguintes armações for
VERDADEIRA, avance para as instruções
indicadas em Vericar a precisão do laser ANTES
DE UTILIZAR O LASER para um projecto.
• Esta é a primeira vez que utiliza o laser (no
caso do laser ter sido exposto a temperaturas
extremas).
• O laser não é verificado em termos de
precisão há algum tempo.
• O laser pode ter sofrido uma queda.
Page 58

PT
58
Vericar a precisão do
laser
As ferramentas laser estão seladas e foram calibradas
na fábrica. É recomendável efectuar uma vericação
de precisão antes de utilizar o laser pela primeira
vez (no caso do laser ter sido exposto a temperaturas
extremas) e depois com regularidade para garantir
a precisão do seu trabalho. Quando efectuar uma
das vericações de precisão listadas neste
manual, siga as seguintes directrizes:
• Utilize a maior área/distância possível, o mais
próximo possível da distância operacional.
Quanto maior for a área/distância, mais fácil é
medir a precisão do laser.
• Coloque o laser sobre uma superfície macia,
plana e estável e que esteja nivelada em ambas
as direcções.
• Marque o centro do feixe laser.
Precisão do feixe de
nivelamento
A vericação da calibração de varrimento horizontal
do laser requer uma distância de 30” (9 m) entre as
duas paredes. É importante efectuar uma vericação
de calibração, cuja distância não deve ser inferior
à distância das aplicações para a qual a ferramenta
será utilizada.
1.
Coloque o laser num tripé virado para a frente
para uma parede (Figura D 1).
2.
Desloque o interruptor Alimentação/bloqueio de
transporte para a direita (Figura A 3) para
ligar o laser no modo de nivelamento automático
e apresentar os feixes horizontais e verticais.
3.
Assinale P1 no ponto onde os feixes horizontais
e os verticais se cruzam na parede.
4.
Rode o laser 180º.
5.
Assinale P2 no ponto onde os feixes horizontais
e os verticais se cruzam na parede
(Figura D 2).
6.
Rode o laser 180º e aproxime-o da primeira
parede (Figura D 3).
7.
Perto de P1, assinale P3 no local onde os feixes
horizontais e verticais se cruzam na parede.
8.
Rode o laser 180º (Figura D 4).
9.
Perto de P2, assinale P4 no local onde os feixes
horizontais e verticais se cruzam na parede.
10.
Meça a distância vertical entre P1 e P3.
11.
Meça a distância vertical entre P2 e P4.
12.
Se a medição for superior à Distância permissível
entre P1 e P3 ou P2 e P4 para a Distância
entre paredes correspondente na seguinte
tabela, o laser deve ser reparado num centro de
assistência autorizado.
Distância entre
as paredes
Distância permissível
Entre P1 e P3 ou P2
e P4
30” (9 m) 1/8” (3 mm)
12 m 5/32” (4 mm)
15 m 7/32” (5 mm)
Precisão do feixe horizontal
A vericação da calibração de afastamento horizontal
do laser requer uma parede com, pelo menos 30′
(9 m) de comprimento. É importante efectuar uma
vericação de calibração, cuja distância não deve
ser inferior à distância das aplicações para a qual
a ferramenta será utilizada.
1.
Coloque o laser num tripé virado para o canto de
uma sala (Figura E 1).
2.
Desloque o interruptor Alimentação/bloqueio de
transporte para a direita (Figura A 3) para
ligar o laser no modo de nivelamento automático
e apresentar os feixes horizontais e verticais.
3.
Aponte o feixe vertical para um canto da sala.
4.
Assinale P1 no ponto onde o feixe horizontal se
cruza no centro da parede adjacente.
5.
Rode o laser para que o feixe vertical se cruze
com o P1 (Figura E 2).
Page 59

59
PT
6.
Assinale P2 no ponto onde o feixe horizontal se
cruza com o feixe vertical.
7.
Rode o laser para que o feixe vertical que
apontado para o segundo canto (Figura E 3).
8.
Assinale P3 no ponto onde o feixe horizontal ca
alinhado na vertical com P1 e P2.
9.
Meça a distância vertical entre os pontos mais
altos e mais baixos (entre P1, P2 e/ou P3).
10.
Se a medição for superior à Distância permissível
entre os pontos mais altos e mais baixos para
a Distância entre paredes correspondentes na
seguinte tabela, o laser deve ser reparado num
centro de assistência autorizado.
Distância entre
as paredes
Distância permissível
entre os pontos mais
altos e os pontos
mais baixos
30” (9 m) 1/4” (6 mm)
12 m 5/16” (8 mm)
15 m 13/32” (10 mm)
Precisão do feixe vertical
A vericação da calibração vertical (a prumo) do laser
pode ser efectuada com maior precisão se a distância
na vertical disponível for suciente, idealmente de
30′ (9 m), de modo a que uma pessoa possa instalar
o laser sentada no chão e outra pessoa perto do
tecto possa marcar a posição do feixe. É importante
efectuar uma vericação de calibração, cuja distância
não deve ser inferior à distância das aplicações para
a qual a ferramenta será utilizada.
1.
Coloque o laser a uma distância de pelo menos
3,28 pés (1,0 m) da ombreira de uma porta
(Figura F 1).
2.
Desloque o interruptor Alimentação/bloqueio de
transporte para a direita (Figura A 3) para
ligar o laser no modo de nivelamento automático
e apresentar os feixes horizontais e verticais.
3.
Aponte o feixe laser vertical na direcção da
ombreira da porta.
4.
Ao longo da parte inferior do feixe laser, assinale
três locais
a, b
, e c em que b está a meia
distância
a
e c.
5.
No ponto onde a parte superior do feixe laser
aparece na parte superior da ombreira da porta,
assinale e.
6.
Desloque o laser para o lado oposto da ombreira
da porta (Figura F 2).
7.
Alinhe a parte inferior do feixe laser com a, b,
e
c
.
8.
No ponto onde a parte superior do feixe laser
aparece na parte superior da ombreira da porta,
assinale f.
9.
Meça a distância entre e e f.
10.
Se a medição for superior à Distância permissível
entre
e
e f para a Altura até ao tecto
correspondente
D
na seguinte tabela, o laser
deve ser reparado num centro de assistência
autorizado.
Altura do tecto
D
Distância permissível
Entre e e
f
6,56” (2,0 m) 1/16" (1,5mm)
8,20” (2,5 m) 2,0 mm
9,84” (3,0 m) 1/8” (2,5 mm)
Precisão do feixe vertical lateral
A vericação da calibração (do prumo) vertical do
laser lateral pode ser efectuada com maior precisão
se a distância equivaler, a pelo menos, 16 pés. (1,5 m)
de área útil e outra pessoa para ajudar. É importante
efectuar uma vericação de calibração, cuja distância
não deve ser inferior à distância das aplicações para
a qual a ferramenta será utilizada.
1.
Coloque o laser num piso nivelado a uma
distância de pelo menos de 16 pés. (1,5 m)
comprimento.
2.
Desloque o interruptor Alimentação/bloqueio de
transporte para a direita (Figura A 3) para
ligar o laser no modo de nivelamento automático
e apresentar os feixes horizontais e verticais.
3.
Prima uma vez para apresentar o feixe
vertical lateral.
4.
Meça exactamente 3 pés (0,91 m) a partir do
centro da unidade laser ao longo do feixe vertical
dianteiro, e assinale P1 (Figura G 1).
Page 60

PT
60
5.
Meça exactamente 4 pés (1,22 m) a partir do
centro da unidade laser ao longo do feixe vertical
lateral, e assinale P2 (Figura G 2).
6.
Meça a distância entre P1 e P2 (Figura G 3).
7.
Se a distância entre P1 e P2 não for igual a 5
pés + 1/32” (1,522 m + 0,75 mm), leve a unidade
laser para o centro de assistência STANLEY mais
próximo para calibrá-lo.
Utilizar o laser
Sugestões relacionadas com
o funcionamento
• Assinale sempre o centro do feixe criado pelo laser.
• As variações extremas de temperatura provocam
o deslocamento das peças internas, o que pode
afectar a precisão. Verique a precisão com
regularidade enquanto trabalha.
• Se deixar cair o laser, certique-se de que ainda
está calibrado.
• Desde que o laser esteja devidamente calibrado, é
possível nivelá-lo automaticamente. Cada laser está
calibrado de fábrica para encontrar o nivelamento
adequado desde que esteja posicionado numa
superfície plana, com uma média de ± 4°. Não é
necessário ajuste manual.
• Utilize o laser sobre uma superfície macia, plana
e nivelada.
Desligar o laser
Deslize o interruptor de alimentação/para o transporte
para a posição Desligado/bloqueado (Figura A
2
) quando o laser não estiver a ser utilizado. Se
o interruptor não estiver na posição Desligado, o laser
não se desliga.
Utilizar o laser com o suporte
Um suporte (Figura H) é fornecido com o laser
para que possa xar o laser facilmente num perno,
evaporador de tecto ou numa haste.
1.
Fixe o laser com firmeza no suporte.
• Utilizando a rosca de 1/4-20 na parte inferior,
lateral ou traseira do laser (Figura
C
),
posicione o laser na rosca de 1/4-20 no braço
do suporte (Figura H 1).
• Rode o botão do laser (Figura
H 2
) para
a direita para bloquear o laser na rosca de
1/4-20 no braço do suporte.
2.
Se necessário, altere a altura ou a posição do
laser no suporte.
• Rode o botão de ajuste (Figura
H 3
) para
a esquerda para afrouxar o braço do suporte.
• Deslize o braço do suporte para cima ou para
baixo para a altura pretendida (Figura
H 4
).
Para alterar o ângulo do suporte de 90° para
180°, deslize o braço do suporte para a parte
superior do suporte e depois rode o braço para
a direita (Figura H 5).
• Rode o botão de ajuste (Figura
H 3
) para
a direita para fixar o braço do suporte.
3.
Utilize o grampo do suporte (Figura H 6) para
fixar o laser num perno, evaporador de tecto ou
numa haste.
• Se necessário, rode o grampo para que fique
posicionado no ângulo correcto para fixação ao
objecto. Enquanto segura o braço do suporte
com uma mão, utilize a outra mão para rodar
o grampo (Figura
H 7
).
• Posicione o grampo do suporte à volta do
perno, evaporador de tecto ou haste.
• Rode o botão do grampo (Figura
H 8
) para
a direita até o grampo ficar apertado à volta do
objecto e o suporte ficar fixado.
Page 61

61
PT
Utilizar o laser com outros acessórios
ATENÇÃO:
Uma vez que apenas foram testados com
este laser os acessórios disponibilizados
pela STANLEY, a utilização de outros
acessórios com este laser pode ser
perigosa.
Utilize apenas os acessórios da STANLEY®
recomendados para utilização com este modelo. Os
acessórios que podem ser adequados para um laser
podem representar risco de ferimentos se forem
utilizados noutro laser.
O laser está equipado com uma rosca fêmea de 1/4-
20 na parte inferior, lateral e traseira (Figura C) para
xar os acessórios actuais ou futuros da STANLEY®.
Estão disponíveis outros acessórios recomendados
para uso com o laser estão disponíveis, mediante um
custo adicional, no seu fornecedor local ou centro
de assistência autorizado. Se necessitar de ajuda
para localizar um acessório, contacte o centro de
assistência da STANLEY mais próximo ou visite
o nosso Website: http://www.STANLEY.com.
Manutenção
• Quando o laser não estiver a ser utilizado, limpe
a parte exterior com um pano húmido, passe um
pano seco e macio no laser para certicar-se de
que está seco e depois armazene o laser na caixa
do kit fornecido.
• Embora o exterior do laser seja resistente
a solventes, NUNCA utilize solventes para limpar
o laser.
• Não armazene o laser a uma temperatura inferior
a -5 F (-20 C) ou superior a 140 F (60 C).
• Para manter a ecácia do seu trabalho, verique
regularmente o laser para certicar-se de que está
bem calibrado.
• As vericações de calibração e outras reparações
de manutenção podem ser efectuadas pelos
centros de assistência da STANLEY.
Resolução de problemas
Não é possível ligar o laser
• Verique as baterias AA para garantir que:
• Cada bateria deve ser inserida correctamente,
de acordo com as polaridades (+) e (–)
indicadas no interior do respectivo
compartimento.
• Os contactos das pilhas estão limpos e não
apresentam sinais de ferrugem ou corrosão.
• As baterias são novas, de elevada qualidade
e de marca para reduzir a probabilidade de fuga
do electrólito.
• Certique-se de que as baterias AA funcionam
correctamente. Em caso de dúvida, coloque
baterias novas.
• Se utilizar baterias recarregáveis, certique-se de
que estão totalmente carregadas.
• Certique-se de que mantém o laser seco.
• Se a unidade do laser aquecer a uma temperatura
superior a 120 °F (50 °C), não é possível
ligar a unidade. Se tiver armazenado o laser
num local com temperaturas muito elevadas,
deixe-o arrefecer. O nível do laser não ca
danicado se premir o interruptor de alimentação/
bloqueio para o transporte antes de arrefecer
à temperatura de funcionamento adequada.
Os raios laser cam intermitentes
No modo de nivelamento automático, os lasers são
concebidos para um nivelamento automático para
um ângulo médio de 4° em todas as direcções. Se
o laser estiver inclinado ao ponto de não ser possível
nivelar o mecanismo interno (ou se o laser não estiver
nivelado quando estiver no modo manual), os feixes
laser começam a piscar, o que signica que o intervalo
de inclinação foi excedido.
OS RAIOS INTERMITENTES CRIADOS PELO
LASER NÃO ESTÃO NEM A NÍVEL NEM
A PRUMO E NÃO DEVEM SER UTILIZADOS
PARA DETERMINAR OU MARCAR O NÍVEL OU
O PRUMO. Tente posicionar o laser numa superfície
mais nivelada.
Page 62

PT
62
Os feixes laser não param de se
mover
O laser é um instrumento de precisão. Por
conseguinte, se não estiver posicionado numa
superfície estável (e sem movimento), o laser continua
a tentar encontrar uma posição nivelada. Se o feixe
não parar de se mover, tente colocar o laser numa
superfície mais estável. Além disso, certique-se de
que a superfície está relativamente plana e nivelada,
para que o laser que estável.
Assistência e reparação
Nota: A desmontagem do nível do laser irá anular
todas as garantias do produto.
Para garantir a SEGURANÇA e a FIABILIDADE do
produto, os trabalhos de reparação, manutenção
e ajuste devem ser realizados por centros
de assistência autorizados. A assistência ou
manutenção realizadas por pessoal que não
possua as qualicações necessárias pode dar
origem a ferimentos. Para localizar o seu centro de
assistência da STANLEY
mais próximo, vá para
http://www.STANLEY.com.
Garantia de dois anos
A Stanley garante que as respectivas ferramentas de
medição contra defeitos de material e/ou de fabrico
durante dois anos a partir da data de compra.
Os produtos com defeito vão ser reparados ou
substituídos, à discrição da Stanley, se forem enviados
em conjunto com o comprovativo de compra para:
Stanley UK Sales Limited
Gowerton Road
Brackmills, Northampton NN4 7BW
Esta garantia não abrange defeitos causados por
danos acidentais, desgaste, utilização que não
esteja de acordo com as instruções do fabricante
ou reparações ou alterações deste produto não
autorizadas pela Stanley.
A reparação ou substituição cobertas por esta garantia
não afectam a data de validade da garantia.
Na medida do autorizado por qualquer legislação
nacional aplicável, a Stanley não será responsável
ao abrigo desta garantia por perdas indirectas ou
consequenciais que resultem de defeitos neste
produto.
Esta garantia não pode ser alterada sem
a autorização da Stanley.
Esta garantia não afecta os direitos estatutários dos
compradores consumidores deste produto.
Esta garantia deve ser regida e interpretada em
conformidade com a legislação do país onde
o produto é vendido e a Stanley e o comprador
aceitam irrevogavelmente submeter-se à jurisdição
exclusiva dos tribunais do respectivo país no que
respeita a qualquer reclamação ou questão resultante
decorrente ou relacionada com esta garantia.
A calibração e os cuidado não são abrangidos pela
garantia.
NOTA:
O cliente é responsável pela utilização e cuidados
correctos do instrumento. Além disso, o cliente é
totalmente responsável pela vericação periódica da
unidade laser e, por conseguinte, pela calibração do
instrumento.
Page 63

63
PT
Especicações
STHT77502-1 STHT77592-1
Fonte de luz Díodos laser
Comprimento de onda do laser Visível a 630 – 680 nm Visível a 510 – 530 nm
Potência do laser PRODUTO LASER DE CLASSE 2 ≤ 1,5 mW
Gama de funcionamento 12 m (36") 16 m (53")
Rigor ±5 mm a 10 m (3/16” a 33′)
Fonte de alimentação eléctrica 2 baterias AA (1,5 V) (3 V CC)
Temperatura de funcionamento -10 °C a 40 °C (14 °F a 104 °F)
Temperatura de armazenamento -20 °C a 60 °C (-5 °F a 140 °F)
Page 64

NL
64
Inhoud
• Laser-informatie
• Veiligheid van de gebruiker
• Veiligheid van de batterijen
• Batterijen van het type AA plaatsen
• De laser inschakelen
• Nauwkeurigheid van de laser controleren
• De laser gebruiken
• Onderhoud
• Oplossen van problemen
• Service en reparaties
• Specicaties
Laser-informatie
De lasers STHT77502-1 en STHT77592-1 zijn
laserproducten van Klasse 2. De lasers zijn zelfnivellerend lasergereedschap dat kan worden gebruikt
voor horizontale (waterpas) en verticale (loodlijn)
uitlijningsprojecten.
Veiligheid van de
gebruiker
Veiligheidsrichtlijnen
Onderstaande denities beschrijven de ernst van de
gevolgen die met de verschillende signaalwoorden
worden aangeduid. Lees de handleiding en let goed
op deze symbolen.
GEVAAR: Duidt een dreigende gevaarlijke
situatie aan, die, als deze niet wordt
vermeden, een ongeluk met dodelijke aoop
of ernstig letsel tot gevolg zal hebben.
WAARSCHUWING: Duidt een mogelijk
gevaarlijke situatie aan, die, als deze niet
wordt vermeden, een ongeluk met dodelijke
aoop of ernstig letsel tot gevolg kan
hebben.
VOORZICHTIG: Duidt een mogelijk
gevaarlijke situatie aan, die, als deze niet
wordt vermeden aan, licht of middelzwaar
letsel tot gevolg kan hebben.
KENNISGEVING: Duidt een situatie in de praktijk
aan die niet leidt tot persoonlijk letsel, maar, als
deze niet wordt vermeden, materiële schade tot
gevolg kan hebben.
Als u vragen of opmerkingen hierover hebt of over
anderSTANLEY
®
-gereedschap, ga dan naar
http://www.STANLEY.com.
WAARSCHUWING:
Lees alle instructies en zorg ervoor dat
u ze begrijpt. Wanneer u geen gevolg geeft
aan de waarschuwingen en instructies in
deze handleiding, kan dat leiden tot ernstig
persoonlijk letsel.
BEWAAR DEZE INSTRUCTIES
WAARSCHUWING:
Blootstelling aan laserstralen. Haal
de laser-waterpas niet uit elkaar en
breng er geen wijzigingen in aan. Het
gereedschap bevat geen onderdelen
waaraan de gebruiker onderhoud kan
uitvoeren. Dit kan ernstig oogletsel
veroorzaken.
WAARSCHUWING:
Gevaarlijke straling. Gebruik van
bedieningsfuncties of de uitvoering van
aanpassingen of procedures die niet in deze
handleiding worden beschreven, kunnen tot
gevaarlijke blootstelling aan straling leiden.
Het label op uw laser kan de volgende symbolen
vermelden.
Symbool Betekenis
V Volt
mW Milliwatt
Laser-waarschuwing
nm Golengte in nanometers
2 Klasse 2 Laser
Page 65

65
NL
Waarschuwingslabels
Voor uw gemak en veiligheid worden de volgende
labels op de laser vermeldt.
WAARSCHUWING: De gebruiker
moet de instructiehandleiding lezen
zodat het risico van letsel wordt
beperkt.
WAARSCHUWING: LASER-
STRALING. KIJK NIET IN DE
STRAAL. Klasse 2 Laser-product.
SER.____________
TYPE 1
3V DC
LASER
2
≤1.5mW @630-680nm
IEC 60825-1: 2014
MADE IN CHINA
www.stanleylasers.com
www.stanleytools.com
STHT77502-1
SER.____________
TYPE 1
3V DC
LASER
2
MADE IN CHINA
www.stanleylasers.com
www.stanleytools.com
≤1.5mW @510-530nm
IEC 60825-1: 2014
STHT77592-1
• Werk niet met de laser in explosieve
omgevingen, zoals in de aanwezigheid van
brandbare vloeistoffen en gassen of brandbaar
stof. Dit gereedschap kan vonken genereren die
het stof of de dampen kunnen doen ontbranden.
• Berg laser-gereedschap dat u niet gebruikt op
buiten bereik van kinderen en andere personen
die er niet mee kunnen werken. Lasers zijn
gevaarlijk in de handen van onervaren gebruikers.
• Onderhoud aan het gereedschap MOET
worden uitgevoerd door gekwaliceerde
reparatiemonteurs. Wanneer service of onderhoud
wordt uitgevoerd door niet-gekwaliceerd personeel
kan dat letsel tot gevolg hebben. Zoek het Stanleyservicecentrum bij u in de buurt, ga naar
http://www.2helpU.com.
• Kijk niet met behulp van optisch gereedschap,
zoals een telescoop naar de laserstraal. Dit kan
ernstig oogletsel veroorzaken.
• Plaats de laser niet ergens waar iemand al dan
niet opzettelijk in de laserstraal kan kijken. Dit
kan ernstig oogletsel veroorzaken.
• Plaats de laserstraal niet bij een reecterend
oppervlak dat de laserstraal kan weerkaatsen en
in de richting van iemands ogen kan sturen. Dit
kan ernstig oogletsel veroorzaken.
• Schakel het laserapparaat uit wanneer u het
niet gebruikt. Wanneer het laserapparaat aan
blijft staan, vergroot dat het risico dat iemand in de
laserstraal kijkt.
• Breng op geen enkele wijze wijzigingen in
de laser aan. Wanneer u wijzigingen in het
gereedschap aanbrengt, kan dat leiden tot
gevaarlijke blootstelling aan laserstraling.
• Werk niet met het laserapparaat in de buurt van
kinderen en laat niet kinderen het laserapparaat
bedienen. Ernstige verwondingen aan de ogen
kunnen hiervan het gevolg zijn.
• Verwijder geen waarschuwingslabels en maak
ze niet onleesbaar. Als labels worden verwijderd,
kan de gebruiker of kunnen anderen zichzelf
onbedoeld blootstellen aan straling.
• Plaats het laserapparaat stevig op een waterpas
oppervlak. Als het laserapparaat valt, kan dat
beschadiging van het apparaat of ernstig letsel tot
gevolg hebben.
Persoonlijke veiligheid
• Blijf alert, kijk wat u doet en gebruik uw gezond
verstand wanneer u met dit laserapparaat werkt.
Gebruik de laser niet wanneer u moe bent of
onder invloed van verdovende middelen, alcohol
of medicatie. Een ogenblik van onoplettendheid
tijdens het werken met laserproducten kan leiden tot
ernstig persoonlijk letsel.
• Gebruik een uitrusting voor persoonlijke
bescherming. Draag altijd oogbescherming.
Afhankelijk van de werkomstandigheden zal
het dragen van een uitrusting voor persoonlijke
bescherming, zoals een stofmasker,
antislip veiligheidsschoenen, een helm en
gehoorbescherming de kans op persoonlijk letsel
verkleinen.
Page 66

NL
66
Gebruik en verzorging van het
gereedschap
• Gebruik de laser niet als de schakelaar Power/
Transport Lock niet goed werkt. Gereedschap dat
niet kan worden bediend met de aan/uit-schakelaar
is gevaarlijk en moet worden gerepareerd.
Volg de instructies in het gedeelte Onderhoud van
deze handleiding. Het gebruik van niet-goedgekeurde
onderdelen of het niet opvolgen van de instructies in
Onderhoud kan het risico van een elektrische schok
of van letsel doen ontstaan.
Veiligheid van de
batterijen
WAARSCHUWING:
Batterijen kunnen exploderen of lekken
en kunnen letsel of brand veroorzaken.
Beperk het risico door:
• Nauwgezet gevolg te geven aan alle instructies en
waarschuwingen op het label van de batterij en de
verpakking.
• Batterijen altijd op juiste wijze in te zetten en
daarbij op de polariteit te letten (+ en –), volg de
markeringen op de batterij en de apparatuur.
• Niet de polen van de batterij kort te sluiten.
• Niet niet-oplaadbare batterijen op te laden.
• Niet oude en nieuwe batterijen door elkaar te
gebruiken. Alle batterijen tegelijkertijd te vervangen
door nieuwe batterijen van hetzelfde merk en type.
• Lege batterijen onmiddellijk uit te nemen en volgens
lokaal geldende voorschriften weg te doen.
• Niet batterijen in het vuur te gooien.
• Batterijen buiten bereik van kinderen te houden.
• Batterijen uit te nemen wanneer het toestel niet in
gebruik is.
Batterijen van het type
AA plaatsen
Plaats nieuwe AA-batterijen in de laser STHT77502-1
of STHT77592-1.
1.
Draai de laser ondersteboven.
2.
Open aan de onderzijde van de laser de grendel
van de afdekking van het batterijvak
(Afbeelding B 1).
3.
Plaats twee nieuwe AA-batterijen van een goed
merk, en let er daarbij op dat u de zijde + en -
van de batterijen plaatst zoals wordt aangeduid
aan de binnenzijde van het batterijvak
(Afbeelding B 2).
4.
Duw de afdekking van het batterijvak dicht tot
deze op z’n plaats klikt (Afbeelding B 3).
Schuif wanneer de laser niet in gebruik is,
de schakelaar Power/Transport Lock naar de
middenpositie (OFF) (Afbeelding
A 2
) zodat de
batterijen worden gespaard.
De laser inschakelen
1.
Plaats de laser op een glad, vlak en recht
oppervlak, met de laser gericht op de
tegenoverstaande muur (0º positie).
2.
Schakel de laser in (ON) zodat de horizontale en
verticale laserstralen verschijnen. Of:
• Verplaats de schakelaar Power/Transport Lock
naar links zodat de slinger vergrendeld blijft en
de kruislingse lijnen worden weergegeven in de
handmatige stand (Afbeelding
A 1
).
• Verplaats de schakelaar Power/Transport Lock
naar rechts zodat de slinger ontgrendeld wordt
en de kruislingse lijnen in de zelf-nivellerende
stand (Afbeelding
A 3
).
3.
Druk op (Afbeelding A 4) zodat een
horizontale laserlijn verschijnt, druk een tweede
maal voor een verticale lijn en een derde maal
voor een horizontale lijn en een verticale lijn.
Page 67

67
NL
4.
Controleer de laserstralen.
• Als de laser zo schuin (> 4°) wordt gezet dat
het apparaat zichzelf niet waterpas kan zetten,
of de laser niet waterpas is in de handmatige
stand, zullen de laserstralen knipperen.
• Als de laserstralen knipperen, is de laser
niet waterpas (of loodrecht) en mag NIET
WORDEN GEBRUIKT voor het bepalen of
markeren van een lijn waterpas of loodrecht.
Zet de laser opnieuw goed neer op een
oppervlak dat waterpas is.
5.
Als EEN van de volgende verklaringen
WAAR is, ga dan verder met de instructies
voorNauwkeurigheid van de laser controleren
EN GEBRUIK DAARNA PAS DE LASER voor
een project.
• Dit is de eerste maal dat u de laser gebruikt
(in het geval dat de laser blootgesteld is
geweest aan extreme temperaturen).
• De laser is al enige tijd niet op
nauwkeurigheid gecontroleerd.
• De laser is misschien gevallen.
Nauwkeurigheid van de
laser controleren
Het lasergereedschap wordt in de fabriek verzegeld en
gekalibreerd. U wordt geadviseerd de nauwkeurigheid
te controleren voordat u de laser voor de eerste
keer gebruikt (in het geval dat de laser blootgesteld
is geweest aan extreme temperaturen) en daarna
regelmatig de nauwkeurigheid van uw werk te
controleren. Volg deze richtlijnen, wanneer
u een van de nauwkeurigheidscontroles in deze
handleiding uitvoert:
• Gebruik een zo groot mogelijke ruimte/afstanddie
gelijk of bijna gelijk is aan de werkafstand. Hoe
groter de ruimte/afstand, des te gemakkelijker is het
de nauwkeurigheid van de laser te meten.
• Plaats de laser op eenglad, vlak, stabiel
oppervlak dat in beide richtingen waterpas is.
• Markeer het middelpunt van de laserstraal.
Nauwkeurigheid
waterpaslijn
Wilt u de horizontale scankalibratie van de laser
controleren, dan hebt u twee muren nodig op 9 m (30′)
afstand van elkaar. Het is erg belangrijk dat u een
kalibratietest uitvoert over een afstand die niet kleiner
is dan de afstand waarvoor u de laser wilt gebruiken.
1.
Plaats de laser op een statief en stel het apparaat
recht tegenover een muur op (Afbeelding
D 1
).
2.
Verplaats de schakelaar Power/Transport Lock
naar rechts (Afbeelding A 3) en schakel zo
de laser in (ON) in de zelf-nivellerende stand, nu
verschijnen de horizontale en verticale stralen.
3.
Markeer P1 waar de horizontale en verticale
lijnen elkaar kruisen op de muur.
4.
Draai de laser 180º.
5.
Markeer P2 waar de horizontale en verticale
lijnen elkaar kruisen op de muur
(Afbeelding D 2).
6.
Draai de laser 180º en verplaats het apparaat tot
dichtbij de eerste muur (Afbeelding D 3).
7.
Markeer bij P1 P3 bij de plaats waar de
horizontale en verticale lijnen elkaar kruisen op
de muur.
8.
Draai de laser 180º (Afbeelding D 4).
9.
Markeer bij P2 P4 bij de plaats waar de
horizontale en verticale lijnen elkaar kruisen op
de muur.
10.
Meet de verticale afstand tussen P1 en P3.
11.
Meet de verticale afstand tussen P2 en P4.
Page 68

NL
68
12.
Als groter is dan de Toe te stane afstand tussen
P1 en P3 of P2 en P4 voor de bijbehorende
Afstand Tussen wanden in de volgende tabel,
moet de laser worden nagezien in een ofcieel
servicecentrum.
Afstand tussen
wanden
Toe te stane afstand
Tussen P1 en P3 of
P2 en P4
9 m′ (30') 3 mm
12 m 4 mm
15 m′ (50') 5 mm
Nauwkeurigheid horizontale lijn
Als u de kalibratie van de horizontale helling van de
laser wilt controleren hebt u één muur nodig van ten
minste 9m (30′) lang. Het is erg belangrijk dat u een
kalibratietest uitvoert over een afstand die niet kleiner
is dan de afstand waarvoor u de laser wilt gebruiken.
1.
Plaats de laser op een statief en stel het
apparaat op tegenover de hoek van een vertrek
(Afbeelding E 1).
2.
Verplaats de schakelaar Power/Transport Lock
naar rechts (Afbeelding A 3) en schakel zo
de laser in (ON) in de zelf-nivellerende stand
en zodat de horizontale en verticale stralen
verschijnen.
3.
Richt de verticale straal op een hoek van de
ruimte.
4.
Markeer P1 op de plaats waar de horizontale
lijn het midden van de ernaast liggende muur
doorkruist.
5.
Draai de laser zo dat de verticale lijn P1 kruist
(Afbeelding E 2).
6.
Markeer P2 waar de horizontale lijn de verticale
lijn kruist.
7.
Draai de laser zo dat de verticale lijn op de
tweede hoek is gericht (Afbeelding E 3).
8.
Markeer P3 waar de horizontale lijn verticaal
uitkomt op P1 en P2.
9.
Meet de verticale afstand tussen de hoogste en
de laagste punten (tussen P1, P2 en/of P3).
10.
Als uw meting groter is dan de Toe te stane
afstand tussen de Hoogste en de Laagste punten
voor de bijbehorende Afstand tussen wanden
in de volgende tabel, moet de laser worden
nagezien in een ofcieel servicecentrum.
Afstand tussen
wanden
Toe te stane afstand
tussen Hoogste &
Laagste Punten
9 m′ (30') 6 mm
12 m 8 mm
15 m 10 mm
Nauwkeurigheid verticale lijn
De controle van de verticale kalibratie (loodlijn) kan
het nauwkeurigst worden uitgevoerd wanneer er een
aanzienlijke verticale hoogte beschikbaar is, in het
ideale geval 9 m (30′), met één persoon op de vloer
die de laser plaatst en een ander persoon die in de
buurt van het plafond de punt markeert die door de
laser op het plafond wordt geprojecteerd. Het is erg
belangrijk dat u een kalibratietest uitvoert over een
afstand die niet kleiner is dan de afstand waarvoor
u de laser wilt gebruiken.
1.
Plaats de laser op een afstand van ten minste
1,0 m van een deurpost (Afbeelding F 1).
2.
Verplaats de schakelaar Power/Transport Lock
naar rechts (Afbeelding A 3) en schakel zo
de laser in (ON) in de zelf-nivellerende stand
en zodat de horizontale en verticale stralen
verschijnen.
3.
Richt de verticale laserstraal naar de deurpost.
4.
Markeer langs de onderzijde van de laserstraal
drie locaties a, ben c; waar b halverwege
is tussen a en c.
5.
Waar de bovenzijde van de laserstraal aan de
bovenzijde van de deurpost verschijnt,
markeert u e.
6.
Verplaats de laser naar de tegenovergestelde
zijde van de deurpost (Afbeelding F 2).
7.
Breng de onderzijde van de laserstraal op één lijn
met a, b en c.
Page 69

69
NL
8.
Waar de bovenzijde van de laserstraal aan de
bovenzijde van de deurpost verschijnt,
markeert u f.
9.
Meet de afstand tussen e en f.
10.
Als uw meting groter is dan de Toe te stane
afstand tussen
e
en f voor de bijbehorende
Plafondhoogte
D
in de volgende tabel, moet
de laser worden nagezien in een ofcieel
servicecentrum.
Plafondhoogte
D
Toe te stane afstand
Tussen e en
f
2,0 m′ (6,56') 1,5 mm
2,5 m′ (8,20') 2,0 mm
3,0 m′ (9,84') 2,5 mm
Nauwkeurigheid verticale zijlijn
U kunt de kalibratie van de verticale lijn (loodlijn) van
de zijlaser het nauwkeurigst controleren wanneer er
tenminste 1,5 m afstand over de vloer is en er iemand
is die u kan assisteren. Het is erg belangrijk dat u een
kalibratietest uitvoert over een afstand die niet kleiner
is dan de afstand waarvoor u de laser wilt gebruiken.
1.
Plaats de laser op een vloer die waterpas is en
ten minste 1,5 m lang is.
2.
Verplaats de schakelaar Power/Transport Lock
naar rechts (Afbeelding A 3) en schakel zo
de laser in (ON) in de zelf-nivellerende stand
en zodat de horizontale en verticale stralen
verschijnen.
3.
Druk op zodat de verticale zijlijn verschijnt.
4.
Meet precies 0,91 m af van het midden van de
laser-unit langs de voorste verticale straal, en
markeer P1 (Afbeelding G 1).
5.
Meet precies 1,22 m af van het midden van de
laser-unit langs de verticale zijlijn, en markeer P2
(Afbeelding G 2).
6.
Meet de afstand tussen punten P1 en P2
(Afbeelding G 3).
7.
Als de afstand tussen P1 en P2 niet 1,522 m
+ 0,75 mm is, breng dan de laser-unit naar het
STANLEY -servicecentrum bij u in de buurt en
laat het apparaat daar kalibreren.
De laser gebruiken
Bedieningstips
• Markeer altijd het middelpunt van de straal die door
de laser wordt geprojecteerd.
• Extreme temperatuurwisselingen kunnen leiden tot
beweging van interne onderdelen en dat kan de
nauwkeurigheid nadelig beïnvloeden. Controleer de
nauwkeurigheid vaak tijdens uw werkzaamheden.
• Als de laser is gevallen, controleer dan vooral altijd
de kalibratie.
• Zolang de laser goed is gekalibreerd, stelt de laser
zichzelf waterpas. Iedere laser wordt in de fabriek
zo gekalibreerd dat waterpas wordt gevonden
zolang het apparaat maar op een vlak oppervlak
wordt geplaatst dat niet meer dan gemiddeld ± 4°
van het waterpaspunt is verwijderd. Handmatige
aanpassingen zijn niet nodig.
• Gebruik de laser op een glad, vlak en recht
oppervlak.
De laser uitschakelen
Schuif de schakelaar Power/Transport Lock naar de
stand OFF (Afbeelding A 2) wanneer de laser niet
in gebruik is. Staat de schakelaar niet in de stand OFF,
dan wordt het laser-apparaat niet uitgeschakeld.
De laser gebruiken met de beugel
Er wordt een beugel (Afbeelding H) bij de laser
geleverd zodat u het apparaat gemakkelijk op
een steun, raster in het plafond of een paal kunt
bevestigen.
1.
Zet de laser stevig vast op de beugel.
• Plaats de laser met behulp van de 1/4-20
schroefdraad aan de onderzijde, zijde
achterzijde van het apparaat (Afbeelding
C
),
op de 1/4-20 schroefdraad op de arm van de
beugel (Afbeelding H 1).
• Draai met de laserknop (Afbeelding
H 2
)
de laser naar rechts vast op de 1/4-20
schroefdraad op de arm van de beugel.
Page 70

NL
70
2.
U kunt, zo nodig, de hoogte of de positie van de
laser op de beugel veranderen.
• Draai de stelknop (Afbeelding
H 3
) naar
links als u de arm van de beugel wilt losmaken.
• Schuif de arm van de beugel omhoog of
omlaag naar de gewenste hoogte
(Afbeelding
H 4
). U kunt de hoek van de
beugel wijzigen van 90° naar 180°, door de
arm van de beugel naar de bovenzijde van de
beugel te schuiven en vervolgens de arm naar
rechts te klappen (Afbeelding H 5).
• Draai de stelknop (Afbeelding
H 3
) naar
rechts als u de arm van de beugel op z'n plaats
wilt vergrendelen.
3.
Houd met behulp van de klem van de beugel
(Afbeelding H 6) de laser op z'n plaats op een
balk, een raster in het plafond of een paal.
• U kunt, zo nodig, de klem draaien zodat deze
in de juiste hoek staat voor het bevestigen
van een object. Draai, terwijl u de arm van de
beugel met één hand vasthoudt, de klem met
uw andere hand (Afbeelding
H 7
).
• Plaats de klem van de beugel rond de balk, op
het raster in het plafond of aan de paal.
• Draai de knop van de klem (Afbeelding
H 8
)
naar rechts tot de klem stevig rond het object
zit en de beugel op z'n plaats wordt gehouden.
De laser gebruiken met andere
accessoires
WAARSCHUWING:
Accessoires die niet worden aangeboden
door STANLEY zijn niet met deze laser
getest, en daarom kan het gebruik van
dergelijke accessoires met deze laser
gevaarlijk zijn.
Gebruik alleen STANLEY®-accessoires die
voor gebruik met dit model worden aanbevolen.
Accessoires die misschien geschikt zijn voor de
ene laser, kunnen gevaarlijk zijn wanneer ze op een
andere laser worden gebruikt.
De laser is voorzien van een 1/4-20 interne
schroefdraad aan de onderzijde, zijde en achterzijde
(Afbeelding
C
) voor toepassing van op dit moment
verkrijgbare of toekomstige STANLEY®-accessoires.
Andere accessoires die worden aanbevolen
voor gebruik met deze laser zijn tegen meerprijs
verkrijgbaar bij uw leverancier ter plaatse of bij een
ofcieel servicecentrum. Heeft u hulp nodig bij het
vinden van een accessoire, neem dan contact op met
het STANLEY-servicecentrum bij u in de buurt of ga
naar onze website: http://www.STANLEY.com.
Onderhoud
• Wanneer u de laser niet meer gebruikt, maak dan
de externe onderdelen ervan schoon met een
vochtige doek, veeg vervolgens het apparaat droog
met een droge doek en berg het vervolgens op in
de meegeleverde gereedschapsdoos.
• De externe onderdelen van de laser zijn wel
bestand tegen oplosmiddelen, maar u mag de laser
NOOIT met dergelijke middelen schoonmaken.
• Berg het laserapparaat niet op bij temperaturen
lager dan -20˚C (-5 ˚F) of hoger dan 60 ˚C (140 ˚F).
• Zorg ervoor dat u nauwkeurig werk kunt blijven
leveren, controleer regelmatig de kalibratie van
de laser.
• Controles van de kalibratie en andere
onderhoudswerkzaamheden kunnen door
STANLEY-servicecentra.
Oplossen van problemen
De laser kan niet worden
ingeschakeld
• Controleer de AA-batterijen zodat u zeker weet dat:
• Elke batterijgoed is geplaatst, volgens de (+) en
(–) die aan de binnenzijde van het batterijvak
wordt vermeld.
• De contacten van de batterijen schoon zijn en
vrij van roest of corrosie.
• De batterijen nieuw zijn en van een goed merk,
zodat de kans van lekkage van de batterijen
wordt beperkt.
Page 71

71
NL
• Controleer dat de AA-batterijen in goede werkende
staat zijn. Als u hierover twijfelt, probeer dan of het
apparaat beter werkt met nieuwe batterijen.
• Wanneer u oplaadbare batterijen gebruikt,
controleer dan dat deze geheel zijn opgeladen.
• Let er vooral op dat de laser droog blijft.
• Als het laser-apparaat warmer wordt dan 50 ˚C,
kan het niet worden ingeschakeld. Als het
laser-apparaat is opgeborgen bij extreem hoge
temperaturen, laat het dan afkoelen. De laser-
waterpas zal niet beschadigd raken wanneer u de
schakelaar Power/Transport Lock bedient voordat
u het apparaat tot de juiste laatste temperatuur
laat afkoelen.
De laserstraal knippert
De lasers zijn zo ontworpen dat ze in de zelfnivellerende standzichzelf waterpas afstellen tot
op gemiddeld4° in alle richtingen. Als de laser zo
ver wordt gekanteld dat het interne mechanisme
zichzelf niet waterpas kan afstellen (of de laser is
niet waterpas in de handmatige stand), zullen de
laserstralen knipperen ten teken dat het kantelbereik
is overschreden.
ALS DE LASERSTRALEN KNIPPEREN, IS DE
LASER NIET WATERPAS OF LOODRECHT EN MAG
NIET WORDEN GEBRUIKT VOOR HET BEPALEN
OF MARKEREN VAN EEN LIJN WATERPAS OF
LOODRECHT. Zet de laser opnieuw goed neer op een
oppervlak dat beter waterpas is.
Laserstralen blijven in beweging
De laser is precisie-instrument. Daarom zal de
laser, als het apparaat niet op een stabiel (en
stilstaand) oppervlak is geplaatst, blijven proberen het
waterpaspunt te vinden. Blijft de straal in beweging,
plaats de laser dan op een stabieler oppervlak.
Controleer ook dat het oppervlak betrekkelijk vlak en
recht is, zodat de laser stabiel staat.
Service en reparaties
Opmerking: Wanneer de laser wordt gedemonteerd,
komen alle garanties op het product te vervallen.
De VEILIGHEID en BETROUWBAARHEID van
het product kunnen alleen worden gegarandeerd
wanneer reparaties, onderhoudswerkzaamheden
en afstellingen worden uitgevoerd door ofciële
servicecentra. Wanneer service of onderhoud wordt
uitgevoerd door niet-gekwaliceerd personeel kan
een risico van letsel ontstaan. Zoek het STANLEY
-servicecentrum bij u in de buurt, ga naar
http://www.STANLEY.com.
Garantie van twee jaar
Stanley geeft op elektronisch meetgereedschap
een garantie tegen gebreken in materialen en/of de
uitvoering, gedurende twee jaar na de aankoopdatum.
Niet goed werkende producten zullen worden
gerepareerd of vervangen, al naargelang Stanley
besluit, als zij samen met het aankoopbewijs worden
opgestuurd naar:
Stanley UK Sales Limited
Gowerton Road
Brackmills, Northampton NN4 7BW
Deze garantie dekt geen gebreken die worden
veroorzaakt door ongelukken, slijtage, gebruik dat
niet in overeenstemming is met de instructies van de
fabrikant of reparatie of wijziging van dit product die
niet door Stanley is geautoriseerd.
Reparatie of vervanging krachtens deze Garantie is
niet van invloed op de aoopdatum van de Garantie.
In de mate waarin dat wordt toegestaan bij wet zal
Stanley onder deze Garantie niet aansprakelijk zijn
voor indirecte schade of gevolgschade die het gevolg
is van gebreken in dit product.
Van deze Garantie mag niet worden afgeweken
zonder autorisatie van Stanley.
Deze Garantie heeft geen gevolgen voor de wettelijke
rechten van consumenten/kopers van dit product.
Page 72

NL
72
Voor deze Garantie gelden de wetten van het land
waarin de aankoop is gedaan en deze Garantie
is opgesteld in overeenkomst met deze wetten en
Stanley en de koper gaan beide onherroepelijk
akkoord met de exclusieve jurisdictie van de
rechtbanken van dat land, ten aanzien van een
aanspraak of aangelegenheid die ontstaat krachtens
of in verband met deze Garantie.
Kalibratie en de juiste behandeling vallen niet onder
de garantie.
OPMERKING:
De klant is verantwoordelijk voor het juiste gebruik en
de juiste behandeling van het instrument. Bovendien is
de klant volledig verantwoordelijk voor het van tijd tot
tijd controleren van de nauwkeurigheid van de laser-
unit, en daarom voor de kalibratie van het instrument.
Page 73

73
NL
Specicaties
STHT77502-1 STHT77592-1
Lichtbron Laser-diodes
Laser-golengte 630 – 680 nm zichtbaar 510 – 530 nm zichtbaar
Laser-vermogen ≤1,5 mW KLASSE 2 LASERPRODUCT
Werkbereik 12m (36′) 16m (53′)
Nauwkeurigheid ± 5 mm @ 10 m (±3/16" @ 33′)
Voedingsbron 2 batterijen formaat AA (1,5V) (3V DC)
Bedrijfstemperatuur -10°C tot 40°C (14°F tot 104°F)
Opslagtemperatuur -20°C tot 60°C (-5°F tot 140°F)
Page 74

DK
74
Indhold
• Laserinformation
• Brugersikkerhed
• Batterisikkerhed• Isætning af AA-batterier
• Sådan tændes laseren
• Kontrol af laserpræcision
• Brug af laseren
• Vedligeholdelse
Fejlsøgning
• Service og reparationer
• Specikationer
Laserinformation
STHT77502-1 og STHT77592-1 lasere er
laserprodukter fra klasse 2. Laserenhederne
er selvnivellerende laserværktøj, som kan
anvendes til horisontale (vater) og vertikale (lod)
tilpasningsprojekter.
Brugersikkerhed
Retningslinjer for sikkerhed
De nedenstående denitioner beskriver
sikkerhedsniveauet for hver enkelt signalord. Læs
venligst vejledningen og vær opmærksom på disse
symboler.
FARE: Indikerer en yderst farlig situation,
som kan forårsage alvorlige kvæstelser eller
ulykker med dødelig udgang, hvis de ikke
undgås.
ADVARSEL: Indikerer en potentiel farlig
situation, som kan forårsage alvorlige
kvæstelser eller ulykker med dødelig
udgang, hvis den ikke undgås.
FORSIGTIG: Indikerer en potentiel farlig
situation, som kan forårsage mindre
alvorlige eller moderate kvæstelser, hvis
den ikke undgås.
BEMÆRK: Indikerer anvendelser, som ikke
medfører kvæstelser, men kan forårsage materielle
skader, hvis disse ikke undgås.
Hvis du har spørgsmål i forbindelse med dette
eller andre STANLEY
®
værktøjer, bedes du gå ind
på http://www.STANLEY.com.
ADVARSEL:
Læs og forstå alle instruktioner. Hvis
advarslerne og instruktionerne i denne
vejledning ikke følges, er der fare for
alvorlige personlige kvæstelser.
OPBEVAR DISSE INSTRUKTIONER
ADVARSEL:
Eksponering af laserstrålinger.
Laserværktøjet må ikke adskilles eller
modiceres. Der ndes ingen dele inden
i apparatet, som brugeren kan reparere.
Det kan medføre alvorlige øjenskader.
ADVARSEL:
Farlig stråling. Brug af andre kontroller
eller justeringer eller udførelse af andre
procedurer end dem, der beskrives her, kan
resultere i farlig stråling.
På etiketten på din laser ndes muligvis følgende
symboler.
Symbol Betydning
V Volt
mW Milliwatt
Laseradvarsel
nm Bølgelængde i nanometer
2 Laser fra klasse 2
Advarselsetiketter
For din bekvemmelighed og sikkerhed er der påsat
følgende etiket på din laser.
ADVARSEL: For at reducere risikoen
for kvæstelser, bør brugeren læse
brugervejledningen.
ADVARSEL: LASERSTRÅLING. SE
IKKE DIREKTE IND I STRÅLEN.
Laserprodukt fra klasse 2.
Page 75

75
DK
SER.____________
TYPE 1
3V DC
LASER
2
≤1.5mW @630-680nm
IEC 60825-1: 2014
MADE IN CHINA
www.stanleylasers.com
www.stanleytools.com
STHT77502-1
SER.____________
TYPE 1
3V DC
LASER
2
MADE IN CHINA
www.stanleylasers.com
www.stanleytools.com
≤1.5mW @510-530nm
IEC 60825-1: 2014
STHT77592-1
• Brug ikke laseren i områder med
eksplosionsfare som f.eks. nær letantændelige
væsker, gasser eller støv. Dette værktøj kan
danne gnister, som kan antænde støv eller dampe.
• Opbevar laseren uden for børns eller andre
uøvede personers rækkevidde, når den ikke er
i brug. Lasere er farlige i hænderne på uøvede
brugere.
• Servicering af værktøj SKAL skal udføres af
kvaliceret reparationspersonale. Servicering
eller vedligeholdelse udført at ukvaliceret
personale kan medføre kvæstelser. Besøg
http://www.2helpU.com for at nde en Stanley
servicelial i nærheden.
• BRUG IKKE optiske værktøjer som f.eks. et
teleskop eller linser til at se ind i laserstrålen.
Det kan medføre alvorlige øjenskader.
• Laseren må ikke placeres i en position, som
udgør at uvedkommende med eller uden forsæt
kigger ind i laserstrålen. Det kan medføre
alvorlige øjenskader.
• Laseren må ikke anbringes i nærheden af
en reekterende overade, som forårsager
at laserstrålen reekteres hen mod
uvedkommende personers øjne. Det kan medføre
alvorlige øjenskader.
• Sluk for laseren, når den ikke er i brug. Faren
for at se ind i laserstrålen forøges, så længe den
er tændt.
• Laseren må på ingen måde modiceres.
Modicering af værktøjet kan resultere i farlig
laserstråling.
• Laseren må ikke anvendes i nærheden af børn,
og lad ikke børn bruge laseren. Det kan medføre
alvorlige øjenskader.
• Fjern eller overdæk ikke advarselsetiketter.
Hvis etiketterne fjernes, kan brugeren eller andre
uvedkommende personer udsættes for utilsigtet
stråling.
• Placér laseren sikkert på en jævn overade. Hvis
laseren falder ned, kan det medføre beskadigelse af
laseren eller alvorlige kvæstelser.
Personlig sikkerhed
• Vær opmærksom, hold øje med hvad du gør, og
brug almindelig sund fornuft, når du anvender et
laseren. Brug ikke laseren, når du er træt eller
påvirket af stoffer, alkohol eller medicin. Et øjebliks
uopmærksomhed under betjening af laseren kan
forårsage alvorlige personskader.
• Anvend personligt beskyttelsesudstyr. Anvend altid
øjenbeskyttelse. Alt efter arbejdsforholdene skal
der bæres beskyttelsesudstyr så som støvmaske,
skridsikre sko, hård hjelm og høreværn, hvilket
reducerer faren for kvæstelser.
Brug og vedligeholdelse af værktøj
• Laseren må ikke anvendes, hvis tænd/sluk/
transportlås-kontakten ikke kan tænde eller
slukke for laseren. Ethvert værktøj, der ikke kan
kontrolleres med kontakten, er farligt og skal
repareres.
Følg instruktionerne i afsnittet Vedligeholdelse i
denne vejledning. Brug af uautoriserede dele eller hvis
instruktionerne under Vedligeholdelse ikke læses, er
der fare elektrisk stød eller kvæstelser.
Batterisikkerhed
ADVARSEL:
Batterier kan eksplodere eller lække
og forårsage kvæstelser eller brand.
Overhold følgende for at formindske
denne fare:
• Følg omhyggeligt alle instruktioner og advarsler på
batterietiketten og -emballagen.
• Batterier skal altid isættes korrekt mhp. polariteten
(+ og –), iht. markeringerne på batteriet og udstyret.
• Kortslut ikke batteripoler.
• Oplad ikke engangsbatterier.
Page 76

DK
76
• Bland ikke gamle batterier med nye. Udskift alle
batterier med nye batterier af samme mærke og
type samtidigt.
• Tag alle brugte batterier ud med det samme og
bortskaf dem iht. bestemmelserne.
• Udsæt ikke batterier for ild.
• Batterierne skal være uden for børns rækkevidde.
• Fjern batterierne, når apparatet ikke er i brug.
Isætning af AA-batterier
Isæt nye AA-batterier i STHT77502-1 eller
STHT77592-1 laseren.
1.
Vend laseren på hovedet.
2.
Løft lasken op på bunden af laseren for at åbne
batterirummets dæksel (ill. B 1).
3.
Isæt to nye mærkevare AA batterier af høj kvalitet
og sørg for at placere - og + enderne for hvert
batteri i overensstemmelse med markeringerne
inden i batterirummet (ill. B 2).
4.
Skub batterirummets dæksel lukket, indtil det går
i indgreb (ill. B 3).
Når laseren ikke er i brug, skal du holde tænd/sluk/
transportlåse-kontakten i midterpositionen (OFF)
(ill.
A 2
) for at spare batteristrøm.
Sådan tændes laseren
1.
Placer laseren på en glat, plan, nivelleret
overflade, hvor laseren peger lige fremad mod
den modsatte væg (0º position).
2.
Tænd for laseren for at vise de frontale
krydsstråler. Enten:
• Flyt tænd/sluk/transportlåse-kontakten til
venstrefor at holde pendulet låst og vise
krydsstrålerne i manuel tilstand (ill.
A 1
).
• Flyt tænd/sluk/transportlåse-kontakten til
højre for at låse op for pendulet og vise
krydsstrålerne i selvnivellerende tilstand
(ill.
A 3
).
3.
Tryk på (ill. A 4) én gang for at vise en
horisontal laserlinje, en gang til for at vise en
vertikal linje og en tredje gang for at vise en
horisontal linje og en vertikal linje.
4.
Kontrollér laserstrålerne.
• Hvis laseren vippes så meget, at den ikke
kan nivellere sig selv (> 4°), eller laseren
ikke er nivelleret i manuel tilstand, blinker
laserstrålerne.
• Hvis laserstrålerne blinker, er laseren ikke i
vater (eller i lod) og SKAL IKKE ANVENDES til
bestemmelse eller markering i vater eller lod.
Placér laseren igen på en jævn overflade.
5.
Hvis NOGLE af følgende konstateringer er
SANDE, skal der fortsættes med instruktionerne
for Kontrol af laserpræcision INDEN LASEREN
ANVENDES til et projekt.
• Dette er første gang du anvender laseren
(i tilfælde af at laseren er blevet udsat for
ekstremt høje temperaturer).
• Laseren er ikke blevet kontrolleret for
præcision i et stykke tid.
• Laseren er muligvis styret ned.
Kontrol af laserpræcision
Laserværktøjet er tætnet og kalibreret på fabrikken.
Det anbefales, at du udfører en præcisionskontrol
inden brug af laseren den første gang (i tilfælde af
at laseren blev udsat for ekstremt høje temperaturer)
og derefter regelmæssigt for at sikre præcisionen af
dit arbejde. Når der udføres præcisionskontroller,
som er nævnt i denne vejledning, skal disse
retningslinjer følges:
• Brug det/den størst mulige område/afstand, der
er tæt på den afstand, som værktøjet vil blive
anvendt på. Jo større området/afstanden er, jo
lettere bliver det at måle laserens præcision.
• Placér laseren på en glat, jævn og stabil
overade, som er i vater i begge retninger.
• Markér midten af laserstrålen.
Page 77

77
DK
Vandret
strålenøjagtighed
Kontrol af den horisontale scanningskalibrering af
laseren kræver to vægge 9 m (30′) fra hinanden.
Det er vigtigt at udføre en kalibreringskontrol med
en distance, der ikke er kortere end distancen af
anvendelserne, som værktøjet vil blive brugt til.
1.
Placer laseren på et stativ, der vender direkte
mod en væg (ill.
D 1
).
2.
Flyt tænd/sluk/transportlåse-kontakten til højre
(ill. A 3) for at tænde for laseren i
selvnivellerende tilstand og vise de horisontale og
vertikale stråler.
3.
Markér P1, hvor de horisontale og vertikale
stråler krydser på væggen.
4.
Drej laseren 180º.
5.
Markér P2, hvor de horisontale og vertikale
stråler krydser på væggen (ill. D 2).
6.
Drej laseren 180º og yt den nær den første væg
(ill. D 3).
7.
Nær P1 skal du markere P3, hvor de horisontale
og vertikale stråler krydser på væggen.
8.
Drej laseren 180º (ill. D 4).
9.
Nær P2 skal du markere P4, hvor de horisontale
og vertikale stråler krydser på væggen.
10.
Mål den vertikale distance mellem P1 og P3.
11.
Mål den vertikale distance mellem P2 og P4.
12.
Hvis din måling er større end den Tilladte
afstand mellem P1 & P3 eller P2 & P4 for den
tilsvarende Afstand mellem væggene i følgende
skema, skal laseren serviceres hos et autoriseret
servicecenter.
Afstand mellem
væggene
Tilladt afstand
Mellem P1 & P3 eller
P2 & P4
9 m (30′) 3 mm (1/8")
12 m (40′) 4 mm (5/32")
15 m (50′) 5 mm (7/32")
Horisontal strålenøjagtighed
Kontrol af den horisontale hældningskalibrering af
laseren kræver en enkelt væg på mindst 9 m (30′)
lang. Det er vigtigt at udføre en kalibreringskontrol
med en distance, der ikke er kortere end distancen af
anvendelserne, som værktøjet vil blive brugt til.
1.
Placer laseren på et stativ, der vender mod
hjørnet af et rum (ill. E 1).
2.
Flyt tænd/sluk/transportlåse-kontakten til højre
(ill. A 3) for at tænde for laseren i
selvnivellerende tilstand og vise de horisontale og
vertikale stråler.
3.
Ret den vertikale stråle mod et af rummets
hjørner.
4.
Markér P1, hvor den horisontale stråle krydser
midten af den tilstødende væg.
5.
Drej laseren, så den vertikale stråle krydser P1
(ill. E 2).
6.
Markér P2, hvor den horisontale stråle krydser
den vertikale stråle.
7.
Drej laseren, så den vertikale stråle vender mod
det andet hjørne (ill. E 3).
8.
Markér P3, hvor den horisontale stråle er vertikalt
i linje med P1 og P2.
9.
Mål den vertikale afstand mellem de højeste og
laveste punkter (mellem P1, P2 og/eller P3).
10.
Hvis din måling er større end den Tilladte afstand
mellem de højeste og laveste punkter for den
tilsvarende afstand mellem væggene i følgende
skema, skal laseren serviceres hos et autoriseret
servicecenter.
Afstand mellem
væggene
Tilladt afstand mellem
højeste og laveste
punkter
9 m (30′) 6 mm (1/4")
12 m (40′) 8 mm (5/16")
15 m (50′) 10 mm (13/32")
Page 78

DK
78
Vertikal strålenøjagtighed
Kontrollen af den vertikale (lod) kalibrering af laseren
kan gøres mest præcist, når der er tilstrækkelig vertikal
højde til rådighed, hvilket ideelt er 9 m (30′), med en
person i gulvhøjde, som positionerer laseren, og en
anden person tæt ved loftet til at markere strålens
position. Det er vigtigt at udføre en kalibreringskontrol
med en distance, der ikke er kortere end distancen af
anvendelserne, som værktøjet vil blive brugt til.
1.
Placer laseren mindst 1,0 m (3,28 fod) fra en
dørsidekarm (Figure
F 1
).
2.
Flyt tænd/sluk/transportlåse-kontakten til højre
(ill. A 3) for at tænde for laseren i
selvnivellerende tilstand og vise de horisontale og
vertikale stråler.
3.
Ret den vertikale laserstråle mod dørsidekarmen.
4.
Langs bunden af laserstrålen skal du markere tre
steder a, b og c; hvor b er midt imellem a
og
c
.
5.
Markér e, hvor toppen af laserstrålen vises
øverst på dørsidekarmen.
6.
Flyt laseren til den modsatte side af væggen
(ill. F 2).
7.
Juster bunden af laserstrålen med a, b og c.
8.
Markér f, hvor toppen af laserstrålen vises
øverst på dørsidekarmen.
9.
Mål afstanden mellem e og f.
10.
Hvis din måling er større end den Tilladte afstand
mellem
e
og f for den tilsvarende loftshøjde
mellem
D
i følgende skema, skal laseren
serviceres hos et autoriseret servicecenter.
Loftshøjde
D
Tilladt afstand
Mellem e og
f
2,0 m (6,56′) 1,5 mm (1/16")
2,5 m (8,20′) 2,0 mm (3/32”)
3,0 m (9,84′) 2,5 mm (1/8")
Sidevertikal strålenøjagtighed
Kontrollen af den vertikale (lod) kalibrering af laseren
kan gøres mest præcist, når der er et gulvareal
på mindst 1,5 m (16 fod) og en anden person til at
hjælpe. Det er vigtigt at udføre en kalibreringskontrol
med en distance, der ikke er kortere end distancen af
anvendelserne, som værktøjet vil blive brugt til.
1.
Anbring laseren på et plant gulv, der er mindst
1,5 m (16 fod) langt.
2.
Flyt tænd/sluk/transportlåse-kontakten til højre
(ill. A 3) for at tænde for laseren i
selvnivellerende tilstand og vise de horisontale og
vertikale stråler.
3.
Tryk én gang for at få vist den sidevertikale
stråle.
4.
Mål nøjagtigt 0,91 m (3 fod) fra midten af
laserenheden langs den frontale vertikale stråle,
og markér P1 (ill. G 1).
5.
Mål nøjagtigt 1,22 m (4 fod) ud fra midten af
laserenheden langs den sidevertikale stråle, og
markér P2 (ill. G 2).
6.
Mål afstanden mellem P1 og P2 (ill. G 3).
7.
Hvis afstanden mellem P1 og P2 ikke
er 1,522 m + 0,75 mm (5 fod + 1/32”, bedes du
aevere laserenheden på dit nærmeste STANLEY
servicecenter for at få den kalibreret.
Brug af laseren
Betjeningstips
• Markér altid midten af strålen, som laseren danner.
• Ekstreme temperaturændringer kan forårsage at
indvendige dele bevæger sig, hvilket har indydelse
på præcisionen. Kontrollér præcisionen ofte under
arbejdet.
• Hvis laseren falder ned på gulvet, skal du
kontrollere, at den stadig er kalibreret.
Page 79

79
DK
• Så længe laseren er kalibreret korrekt, er den
selvnivellerende. Hver laser er kalibreret på
fabrikken til at nde vater, så længe den er
positioneret på en ad overade inden for ca. ± 4°
ift. vater. Det er ikke nødvendigt med manuelle
justeringer.
• Brug laseren på en glat, plan, jævn overade.
Sådan slukkes laseren
Skub tænd/sluk/transportlås-kontakten hen på OFF-
positionen A 2), når laseren ikke er i brug. Hvis
kontakten ikke er placeret i OFF-positionen, slukkes
laseren ikke.
Brug af laseren med beslaget
Et beslag (ill. H) følger med laseren, så du nemt
kan sætte laseren fast på en stift, et loftsgitter eller
en stang.
1.
Sæt laseren godt fast på beslaget.
• Brug 1/4-20-gevindet på bunden, siden
eller bagsiden af laseren (ill.
C
), og placer
laseren på 1/4-20-gevindet på beslagarmen
(ill. H 1).
• Drej laserknappen (ill.
H 2
) med uret
for at låse laseren på 1/4-20-gevindet på
beslagarmen.
2.
Skift om nødvendigt laserens højde eller position
på beslaget.
• Drej justeringsknappen (ill.
H 3
) mod uret for
at løsne beslagarmen.
• Skub beslagarmen op eller ned til den ønskede
højde (ill.
H 4
). For at ændre beslaget fra
90° til 180° skal du skubbe beslagarmen til
toppen af beslaget og derefter vippe armen til
højre (ill. H 5).
• Drej justeringsknappen (ill.
H 3
) med uret for
at låse beslagarmen fast.
3.
Brug beslagets klampe (ill. H 6) til at holde
laseren på plads på en stift, et loftsgitter eller en
stang.
• Drej om nødvendigt klampen, så den er
placeret i den rette vinkel til at fastgøre
genstanden. Mens du holder beslagarmen med
den ene hånd, skal du bruge din anden hånd til
at dreje klampen (ill.
H 7
).
• Placer beslagets klampe omkring stiften,
loftsgitteret eller stangen.
• Drej klampeknappen (ill.
H 8
) med uret,
indtil klampen er stram omkring genstanden, og
beslaget holdes på plads.
Brug af laseren med andet tilbehør
ADVARSEL:
Siden andet tilbehør end det, der tilbydes
af STANLEY, ikke er blevet afprøvet med
denne laser, kan brug af sådant tilbehør
med denne laser være farlig.
Brug kun STANLEY® tilbehør, som er anbefalet til brug
med denne model. Tilbehør, der kan være velegnet
til en laser, kan skabe risiko for personskade, når det
bruges med en anden laser.
Laseren er udstyret med et 1/4-20-hungevind på
bunden, siden og bagsiden (ill. C) til montering af
aktuelt eller fremtidigt STANLEY®-tilbehør.
Andet anbefalet tilbehør til brug med denne laser kan
købes hos din lokale forhandler eller autoriserede
servicecenter. Hvis du har brug for hjælp med at nde
tilbehør, bedes du kontakte STANLEY servicecenteret,
eller besøge vores websted:
http://www.STANLEY.com.
Vedligeholdelse
• Når laseren ikke er i brug, skal de udvendige dele
rengøres med en fugtig klud, laseren skal tørres af
med en blød, tør klud - vær sikker på at den er tør og derefter skal den deponeres i den medleverede
kasse.
• Selvom laserens ydre er modstandsdygtig over
for opløsningsmidler, må der ALDRIG anvendes
opløsningsmidler til at rengøre laseren.
Page 80

DK
80
• Undlad at opbevare laseren ved temperaturer på
under -5˚F (-20˚C) eller over 140˚F (60˚C).
• For at bibeholde nøjagtigheden af dit arbejde, skal
laseren kontrolleres regelmæssigt for at sikre, at
den er kalibreret korrekt.
• Kalibreringskontroller og andre
vedligeholdelsesreparationer kan udføres af
STANLEYStanley-servicecentre.
Fejlsøgning
Laseren tænder ikke
• Kontrollér AA-batterierne for at sikre:
• Hver batteri er isat korrekt i overensstemmelse
med (+) og (–) mærkerne inden i batterirummet.
• Batterikontakterne er rene og uden rust eller
korrosion.
• Batterierne er nye mærkebatterier af høj kvalitet
for at reducere risikoen for at batterierne lækker.
• Kontrollér at AA batterier er i korrekt stand. Hvis du
er i tvivl, så sæt nye batterier i.
• Når du bruger genopladelige batterier, skal du sørge
for, at batterierne er helt ladet op.
• Vær sikker på at laseren er tør.
• Hvis laserenheden er opvarmet til over 50 ˚C
(120 ˚F), kan den ikke TÆNDES. Hvis laseren har
været opbevaret under ekstremt høje temperaturer,
så giv den tid til at køle af. Lasernivelleringen
beskadiges ikke ved at anvende tænd/sluk/
transportlåse-kontakten inden afkølingen til korrekt
driftstemperatur.
Laserstrålen blinker
Når de er i selvnivellerende tilstand, er laserne
konstrueret til at være selvnivellerende op til ca.
4° i alle retninger. Hvis laseren vippes så meget,
at den interne mekanisme ikke kan stille sig selv i
vater (eller laseren ikke er nivelleret, når i manuel
tilstand), vil laserstrålerne blinke, hvilket indikerer at
hældningsområdet er blevet overskredet.
LASERSTRÅLERNE BLINKER, NÅR DEN IKKE ER
I VATER ELLER I LOD, OG IKKE SKAL ANVENDES
TIL BESTEMMELSE ELLER MARKERING I VATER
ELLER LOD. Placér laseren igen på en mere jævn
overade.
Laserstråler bliver ved med at bevæge
sig
Laseren er et præcisionsinstrument. Hvis det ikke
placeres på en stabil (og ubevægelig) overade, vil
laseren derfor blive ved med at forsøge at nde vater.
Hvis strålen ikke vil holde op med at bevæge sig, så
prøv at placere laseren på en mere stabil overade.
Forsøg også at sørge for at overaden er relativt ad
og nivelleret, så laseren er mere stabil.
Service og reparationer
Bemærk: Garantien bortfalder, hvis
lasernivelleringsenheden demonteres.
For at sikre produktets SIKKERHED og
PÅLIDELIGHED, bør reparationer, vedligeholdelse
og justeringer udføres af autoriserede servicecentre.
Servicering eller vedligeholdelse udført at ukvaliceret
personale kan resultere i farer for kvæstelser. For at
nde dit nærmeste STANLEY
servicecenter bedes du
gå til http://www.STANLEY.com.
To års garanti
Stanley yder garanti på sine elektroniske
måleværktøjer mod mangler i materialer og/eller
udførelse i to år fra købsdatoen.
Mangelfulde produkter vil blive repareret eller udskiftet
efter Stanleys valg, hvis de sendes sammen med
købsbevis til:
Stanley UK Sales Limited
Gowerton Road
Brackmills, Northampton NN4 7BW
Denne garanti dækker ikke mangler, der skyldes
utilsigtet skade, slitage, brug der ikke er i
overensstemmelse med producentens anvisninger
eller reparation eller ændring af dette produkt, der ikke
er autoriseret af Stanley.
Reparation eller udskiftning i henhold til denne garanti
påvirker ikke udløbsdatoen for garantien.
Page 81

81
DK
I det omfang loven tillader det, vil Stanley ikke være
ansvarlige under denne garanti for indirekte skader
eller følgeskader som følge af fejl og mangler i dette
produkt.
Denne garanti kan ikke ændres uden tilladelse fra
Stanley.
Denne garanti påvirker ikke forbrugernes lovmæssige
rettigheder ved køb af dette produkt.
Denne garanti er underlagt og fortolkes i
overensstemmelse med lovgivningen i det land,
produktet blev solgt og Stanley og køberen accepterer
uigenkaldeligt at underkaste sig den eksklusive
kompetence fra domstolene i dette land mod
ethvert krav eller spørgsmål, der opstår under eller i
forbindelse med denne garanti.
Kalibrering og pleje er ikke dækket af garantien.
BEMÆRK:
Kunden er ansvarlig for korrekt brug og pleje
af enheden. Desuden er kunden ansvarlig for
regelmæssig kontrol af laserenhedens nøjagtighed og
også for kalibrering af enheden.
Page 82

DK
82
Specikationer
STHT77502-1 STHT77592-1
Lyskilde Laserdioder
Laserbølgelængde 630 – 680 nm synlig 510 – 530 nm synlig
Lasereffekt ≤1.5 mW LASERPRODUKT FRA KLASSE 2
Arbejdsområde 12m (36′) 16m (53′)
Nøjagtighed ±5 mm @ 10 m (3/16” @ 33′)
Forsyningskilde 2 AA (1,5 V) batterier (3V DC)
Driftstemperatur -10°C til 40°C (14°F til 104°F)
Opbevaringstemperatur -20°C til 60°C (-5°F til 140°F)
Page 83

83
SE
Innehåll
• Laserinformation
• Användarsäkerhet
• Batterisäkerhet
• Installation av AA-batterier
• Slå på lasern
• Kontrollera laserns korrekthet
• Använda lasern
• Underhåll
• Felsökning
• Service och reparationer
• Specikationer
Laserinformation
STHT77502-1 och STHT77592-1 laser är klass
2-laserprodukter. Lasern är självnivellerande
laserverktyg som kan användas för horisontell (avvägt)
och vertikalt (lodrät) inställningsprojekt.
Användarsäkerhet
Säkerhetsriktlinjer
Denitionerna nedan beskriver nivån på skärpan
hos varje signalord. Läs igenom manualen och var
uppmärksam på dessa symboler.
FARA: Indikerar en akut farlig situation som,
om den inte undviks, resulterar i dödsfall
eller allvarlig skada.
VARNING: Indikerar en potentiellt farlig
situation som, om den inte undviks, kan
resultera i dödsfall eller allvarlig skada.
FÖRSIKTIGHET: Indikerar en potentiellt
farlig situation som, om den inte undviks,
kan resultera i mindre eller moderata
skador.
NOTERA: Indikerar ex praxis om inte är relaterat
till personskador vilka, om de inte undviks, kan
resultera i egendomsskador.
Om du har några frågor eller kommentarer om
detta eller något annat STANLEY
®
-verktyg, gå till
http://www.STANLEY.com.
VARNING:
Läs igenom och förstå alla instruktioner.
Om inte varningarna och instruktionerna
i denna manual följs kan det resultera
i allvarliga personskador.
SPARA DESSA INSTRUKTIONER
VARNING:
Laserstrålningsexponering. Demonera
inte eller modiera laserpasset. Det
nns inga användarservicebara delar
på insidan. Allvarliga ögonskador kan
uppstå.
VARNING:
Farlig strålning. Användning av
kontrollerna eller inställningar eller
prestanda av andra procedurer än de
som speciceras häri kan resultera i farlig
exponering av strålning.
Etiketten på din laser kan inkludera följande symboler.
Symbol Betydelse
V Volt
mW Milliwatt
Laservarning
nm Våglängd i nanometer
2 Klass 2 laser
Varningsetiketter
För din bekvämlighet och säkerhet nns följande
etiketter på din laser.
VARNING: För att minska risken för
skador måste användaren läsa
bruksanvisningen.
VARNING: LASERSTRÅLNING.
STIRRA INTE IN I STRÅLEN. Klass 2
laserprodukt.
SER.____________
TYPE 1
3V DC
LASER
2
≤1.5mW @630-680nm
IEC 60825-1: 2014
MADE IN CHINA
www.stanleylasers.com
www.stanleytools.com
STHT77502-1
Page 84

SE
84
SER.____________
TYPE 1
3V DC
LASER
2
MADE IN CHINA
www.stanleylasers.com
www.stanleytools.com
≤1.5mW @510-530nm
IEC 60825-1: 2014
STHT77592-1
• Använd inte lasern i explosiv atmosfär, såsom
i närheten av lättantändliga vätskor, gaser eller
damm. Detta verktyg skapar gnistor som kan
antända damm eller ångor.
• Förvara lasrar som är påslagna utom räckhåll
för barn och andra outbildade personer.
Lasrar kan vara farliga i händerna på outbildade
användare.
• Verktygsservice MÅSTE utföras av kvalicerade
reparatörer. Service eller underhåll som utförs av
okvalicerade personer kan resultera skador. För
att hitta ditt närmaste Stanley servicecenter, gå till
http://www.2helpU.com.
• Använda inte optiska verktyg som ett teleskop
eller överföring för att visa laserstrålen. Allvarliga
ögonskador kan uppstå.
• Placera inte lasern i en position där den kan
göra att någon avsiktligt eller oavsiktligt stirrar
in i laserstrålen. Allvarliga ögonskador kan uppstå.
• Placera inte lasern nära reekterande ytor som
kan reektera laserstrålen mot någons ögon.
Allvarliga ögonskador kan uppstå.
• Stäng av lasern när den inte används. Lämna
lasern påslagen ökar risken för att någon stirrar in
i laserstrålen.
• Modiera inte lasern på något sätt. Modiering
av verktyget kan resultera in exponering av farlig
laserstrålning.
• Använd inte lasern runt barn eller låta barn
använda lasern. Allvarliga ögonskador kan uppstå.
• Ta inte bort eller förstör varningsetiketter.
Om etiketter tas bort kan användare oavsiktligt
exponera sig själva för strålningen.
• Placera lasern säkert på en plan yta. Om laser
faller ned kan det resultera i skador på lasern eller
allvarliga personskador.
Personlig säkerhet
• Var uppmärksam, titta på vad du gör och använd
sunt förnuft när lasern används. Använd inte lasern
när du är trött eller påverkad av droger, alkohol
eller mediciner. En ögonblicks ouppmärksamhet
när lasern används kan resultera i allvarliga
personskador.
• Använd personlig skyddsutrustning. Använd alltid
skyddsglasögon. Beroende på arbetsförhållandena,
användning av skyddsutrustning såsom dammask,
halkfria skor, hjälm och hörselskydd minskar risken
för personskador.
Verktyg användning och skötsel
• Använd inte lasern om Ström-/transportlåset inte
slår på eller stänger av lasern. Alla verktyg som
inte kan kontrolleras av strömbrytaren är farliga och
måste repareras.
Följ instruktionerna i sektionen Underhåll i denna
bruksanvisning. Användning av obehöriga delar eller
att instruktionerna under Underhåll inte följs, kan
utgöra en risk för elektriska stötar eller skador.
Batterisäkerhet
VARNING:
Batterier kan explodera eller läcka och
kan orsaka skador eller brand. För att
minska risken:
• Följ noga alla instruktioner och varningar på
batterietiketten och paketet.
• Sätt alltid i batterierna med korrekt polaritet
(+ och –), såsom markerats på batteriet och i facket.
• Kortslut inte batterikontakterna.
• Ladda inte engångsbatterier.
• Blanda inte nya och gamla batterier. Byt alla
batterier samtidigt till nya batterier av samma märke
och typ.
• Ta bort förbrukade batterier omedelbart och lämna
dem till batteriåtervinningen.
• Kasta inte batterier i elden.
• Förvara alltid batterier utom räckhåll för barn.
• Ta bort batterierna när enheten inte används.
Page 85

85
SE
Installering av AAbatterier
Sätt i nya AA -batterier i STHT77502-1 eller
STHT77592--1-lasern.
1.
Vänd lasern upp och ned.
2.
Lyft upp haken på lasern för att öppna
batterifacket i botten på lasern (bild B 1).
3.
Sätt i två nya, högkvalitativa, namnvarumärkes
AA-batterier, se till att positionen på - och +
ändarna på varje batteri motsvarar märkningen
på insidan av batterifacket (bild B 2).
4.
Skjut batterifackets lock nedåt för att stänga tills
det snäpper på plats (bild B 3).
När lasern inte används, se till att Ström-/
transportlåset är placerat i mittpositionen (AV)
(bild
S 2
) för att spara batteri.
Slå PÅ lasern
1.
Placera lasern på en slät, plan och jämn yta,
med lasern riktad rakt mot motsatta vägen
(0º position).
2.
Slå PÅ lasern för att visa de främre krysslinjerna.
Antingen:
• Flytta Ström-/transportlåset till vänster för
att hålla pendeln låst och visa krysslinjerna
i manuellt läge (bild
S 1
).
• Flytta Ström-/transportlåset till höger för att
hålla låsa upp pendeln och visa krysslinjerna
i självnivellerande läge (bild
S 3
).
3.
Tryck på (bild S 4) en gång för att visa en
horisontell laserlinje, en andra gång för att visa
en vertikal linje och en tredje gång för att visa en
horisontal linje och en vertikal linje.
4.
Kontrollera laserstrålarna.
• Om lasern lutas så mycket att den inte kan
självnivelleras (> 4°), eller om lasern inte är
plan i manuellt läge, kommer laserstrålarna
att blinka.
• Om laserstrålen blinkar, är inte lasern i nivå
(eller lodrätt) och SKALL INTE ANVÄNDAS
för avgörande eller markering av nivellering
eller lodning. Försök att placera om lasern på
en plan yta.
5.
Om NÅGON av följande uppgifter är SANN,
fortsätt med instruktionerna för Kontrollera
laserns korrekthet INNAN LASERN ANVÄNDS för
ett projekt.
• Detta är första gången du använder
lasern (om lasern exponerats för extrema
temperaturer).
• Lasern korrekthet har inte kontrollerats på
ett tag.
• Lasern kan ha tappats.
Kontrollera laserns
korrekthet
Laserverktyg är förseglade och kalibrerade från
fabriken. Det rekommenderas att du utför en
korrekthetskontroll före användning av lasern
första gången (om lasern har exponerats för
extrema temperaturer) och sedan regelbundet för att
garantera korrektheten för ditt arbete. När någon av
korrekthetskontrollerna utförs som listas i denna
manual, följ dessa riktlinjer:
• Använd största området/avstånd som är möjligt,
närmast till driftavståndet. Ju större område/
avstånd desto lättare att avgöra korrektheten hos
lasern.
• Placera lasern på en slät, plan och stabil yta som
är plan i båda riktningarna.
• Markera centrum av laserstrålen.
Page 86

SE
86
Strålens nivåkorrekthet
Kontroll av den horisontella sökningskalibreringen på
lasern kräver två väggar 30′ (9 m) isär. Det är viktigt
att utföra en kalibreringskontroll med ett avstånd som
inte understiger avståndet för vilket verktyget skall
användas.
1.
Placera lasern på en trefot som är riktad rakt mot
en vägg (bild D 1).
2.
Flytta ström-/transportlåset till höger (bild S 3)
för att sätta PÅ lasern i självnivellerande läge och
visa de horisontella och vertikala laserstrålarna.
3.
Markera P1 där de horisontala och vertikala
strålarna korsar väggen.
4.
Vänd lasern 180º.
5.
Markera P2 där de horisontala och vertikala
strålarna korsar väggen. (bild D 2).
6.
Vänd lasern 180º och ytta den nära den första
väggen (bild D 3).
7.
Nära P1, markera P3 där de horisontala och
vertikala strålarna korsar väggen.
8.
Vänd lasern 180º (bild D 4).
9.
Nära P2, markera P4 där de horisontala och
vertikala strålarna korsar väggen.
10.
Mät det vertikala avståndet mellan P1 och P3.
11.
Mät det vertikala avståndet mellan P2 och P4.
12.
Om din mätning är större än Tillåtet avstånd
mellan P1 och P3 eller P2 och P4 för
motsvarande avstånd mellan väggarna i följande
tabell måste lasern lämnas för service hos ett
auktoriserat servicecenter.
Avstånd mellan
väggarna
Tillåtet avstånd
Mellan P1 och P3 eller
P2 och P4
30′ (9 m) 1/8” (3 mm)
40′ (12 m) 5/32” (4 mm)
50′ (15 m) 7/32” (5 mm)
Strålens horisontala korrekthet
Kontroll av den horisontella sökningskalibreringen på
lasern kräver en vägg som är minst 9 m (30′) lång.
Det är viktigt att utföra en kalibreringskontroll med
ett avstånd som inte understiger avståndet för vilket
verktyget skall användas.
1.
Placera lasern på en trefot som är riktad mot
hörnet av ett rum (bild E 1).
2.
Flytta ström-/transportlåset till höger (bild S 3)
för att sätta PÅ lasern i självnivellerande läge och
visa de horisontella och vertikala laserstrålarna.
3.
Rikta den vertikala strålen mot hörnet av rummet.
4.
Markera P1 där den horisontala strålen korsar
mitten av den intilliggande väggen.
5.
Vänd lasern så den vertikala strålen korsar P1
(bild E 2).
6.
Markera P2 där den horisontala strålen korsar
den vertikala strålen.
7.
Vänd lasern så den andra vertikala strålen är
riktad mot det andra hörnet (bild E 3).
8.
Markera P3 där den horisontala strålen är
vertikalt i linje med P1 och P2.
9.
Mät det vertikala avståndet mellan de högsta och
lägsta punkterna (mellan P1, P2 och/eller P3).
10.
Om din mätning är större än tillåtet avstånd
mellan de högsta och lägsta punkterna för
motsvarande avstånd mellan väggarna i följande
tabell måste lasern lämnas för service hos ett
auktoriserat servicecenter.
Avstånd mellan
väggarna
Tillåtet avstånd mellan
de högsta och lägsta
punkterna
30′ (9 m) 1/4” (6 mm)
40′ (12 m) 5/16” (8 mm)
50′ (15 m) 13/32” (10 mm)
Page 87

87
SE
Strålens vertikala korrekthet
Kontroll av vertikala (lodrät) kalibreringen hos lasern
kan göras mycket korrekt när det många vertikala
höjder tillgängliga, idealiskt 9 m (30′),med en person
på golvet som positionerar lasern och en annan
person nära ett tak för att markera positionen av
strålen. Det är viktigt att utföra en kalibreringskontroll
med ett avstånd som inte understiger avståndet för
vilket verktyget skall användas.
1.
Placera lasern minst 3,28 ft (1,0 m) från en
dörrkarm (bild
F 1
).
2.
Flytta ström-/transportlåset till höger (bild S 3)
för att sätta PÅ lasern i självnivellerande läge och
visa de horisontella och vertikala laserstrålarna.
3.
Rikta den vertikala laserstrålen mot dörrkarmen.
4.
Längs med den undre delen av laserstrålen,
markera tre platser a, b och c; där b är
halvvägs mellan a och c.
5.
Där den övre delen av laserstrålen visas ovanpå
dörrkarmen, markera e.
6.
Flytta lasern till den motsatta sidan av dörrkarmen
(bild F 2).
7.
Rikta undre delen av laserstrålen med a, b
och c.
8.
Där den övre delen av laserstrålen visas ovanpå
dörrkarmen, markera f.
9.
Mät avståndet mellan e och f.
10.
Om din mätning är större än Tillåtet avstånd
mellan
e
och f för motsvarande takhöjd D
i följande tabell, måste lasern lämnas för service
hos ett auktoriserat servicecenter.
Takhöjd
D
Tillåtet avstånd
Mellan e och
f
6,56′ (2,0 m) 1/16" (1,5 mm)
8,20′ (2,5 m) 3/32” (2,0 mm)
9,84′ (3,0 m) 1/8” (2,5 mm)
Sidostrålens vertikala korrekthet
Kontroll av den vertikala (lodrät) kalibreringen
hos sidolasern kan göras mycket korrekt när det
nns minst 16 ft. (1,5 m) av golvutrymme och en
annan person hjälper till. Det är viktigt att utföra
en kalibreringskontroll med ett avstånd som inte
understiger avståndet för vilket verktyget skall
användas.
1.
Placera lasern på ett plant golv som är minst
16 ft. (1,5 m) långt.
2.
Flytta ström-/transportlåset till höger (bild S 3)
för att sätta PÅ lasern i självnivellerande läge och
visa de horisontella och vertikala laserstrålarna.
3.
Tryck på en gång för att visa en vertikal
sidostråle.
4.
Mät upp exakt 3 ft. (0,91 m) från mitten av
laserenheten längs den främre vertikala strålen
och markera P1 (bild G 1).
5.
Mät upp exakt 4 ft. (1,22 m) ut från mitten av
laserenheten längs den vertikala sidostrålen och
markera P2 (bild G 2).
6.
Mät avståndet mellan punkt P1 och P2
(bild G 3).
7.
Om avståndet mellan P1 och P2 inte är
5 ft + 1/32” (1,522 m + 0,75 mm), ta med
laserenheten till ditt närmaste STANLEY service
nter för kalibrering.
Använda lasern
Hanteringstips
• Markera alltid centrum av strålen som skapas av
lasern.
• Extrema temperaturförändringar kan orsaka rörelser
hos interna delar som kan påverka korrektheten.
Kontrollera korrektheten ofta under arbetet.
• Om lasern någon gång tappas, kontrollera den för
att vara säker på att den fortfarande är kalibrerad.
Page 88

SE
88
• Så länge som lasern är ordentligt kalibrerad
självnivellerar den sig. Varje laser är kalibrerad på
fabrik för att vara vågrät så länge som den placeras
på en plan yta inom ± 4° från vågrätt läge. Inga
manuella justeringar behövs.
• Placera lasern säkert på en slät och plan yta.
Stänga av lasern
Skjut Ström-/transportlåset till AV-positionen
(bild S 2) när lasern inte används. Om
strömbrytaren inte står i AV-läge kommer lasern inte
stängas av.
Använda lasern med fästet
Ett fäste (bild H) kommer med lasern så att du enkelt
kan fästa lasern på en gängad stång, ett takgaller
eller en stolpe.
1.
Sätt fast lasern på fästet på ett säkert sätt.
• Använd 1/4-20-gängan på undersidan, sidan
eller baksidan av lasern (bild
C
), placera
lasern på 1/4-20-gängan på armen på fästet
(bild H 1).
• Vrid på laserknappen (bild
H 2
) medurs för
att låsa fast lasern på 1/4-20-gängan på armen
på fästet.
2.
Ändra höjden eller positionen på lasern på fästet
om det behövs.
• Vrid på justeringsknappen (bild
H 3
) moturs
för att lossa fästets arm.
• Skjut fästets arm uppåt eller nedåt till önskad
höjd (bild
H 4
). För att ändra fästet från 90°
till 180°, skjut armen till toppen på fästet och
vrid sedan armen till höger (bild H 5).
• Vrid på justeringsknappen (bild
H 3
) medurs
för att låsa fast armen fästets arm.
3.
Använd fästets klämma (bild H 6) för att hålla
lasern på plats på en gängad stång, ett takgaller
eller en stolpe.
• Om det behövs, vrid klämman så att den är
placerad i rätt vinkel för att fästa på objektet.
Medan du håller fästet med en hand, använd
din andra hand för att vrida på klämman
(bild
H 7
).
• Placera fästets klämma runt den gängade
stången, takgallret eller stolpen.
• Vrid på klämknappen (bild
H 8
) medurs tills
klämman sitter fast runt objektet och fästet
hålls på plats.
Använda lasern med andra tillbehör
VARNING:
Eftersom andra tillbehör som inte erbjuds
av STANLEY inte har testats med denna
produkt, kan användning av sådana tillbehör
vara farliga.
Använd endast STANLEY®-tillbehör som
rekommenderas för användning med denna modell.
Tillbehör som kan vara lämpliga för en laser kan
utgöra en risk för skador när de används på annan
laser.
Lasern är utrustad med en 1/4-20 hongänga i botten,
på sidan och baksidan (bild C) för att passa med
nuvarande och framtida STANLEY®-tillbehör.
Andra rekommenderade tillbehör för användning med
denna laser nns tillgängliga till en extra kostnad
från din lokala återförsäljare eller auktoriserade
servicecenter. Om du behöver hjälp med att hitta
något tillbehör, kontakta ditt närmaste STANLEYservicecenter eller besök vår webbplats:
http://www.STANLEY.com.
Underhåll
• När lasern inte används, rengör de yttre delarna
med en fuktig trasa, torka av lasern med en
mjuk och torr trasa för att vara säker på att den
är torr och förvara sedan lasern i medföljande
utrustningslåda.
• Även om laserns yttre är motståndskraftig mot
lösningsmedel skall ALDRIG lösningsmedel
användas för att rengöra lasern.
• Förvara inte lasern vid temperaturer under -20 ˚C
(-5 ˚F) eller över 60˚C (140 ˚F).
• För att bibehålla korrektheten för ditt arbete bör
lasern kontrolleras ofta för att vara säker på att den
fortfarande är kalibrerad.
Page 89

89
SE
• Kalibreringskontroller och andra
underhållsreparationer bör utföras av STANLEY-
servicecenter.
Felsökning
Lasern slås inte på
• Kontrollera AA-batterierna för att garantera att:
• Varje batteri är installerat korrekt enligt (+) och
(–) som visas inuti batterifacket.
• Batterikontakterna är rena och fria från rost
eller korrosion.
• Batterierna är nya, av hög kvalitet,
varumärkesbatterier för att minska risken för
batteriläckage.
• Se till att AA-batterierna fungerar. Vid tveksamheter,
försök att installera nya batterier.
• Vid användning av uppladdningsbara batterier, se
till att batterierna är fulladdade.
• Se till att hålla lasern torr.
• Om laserenheten värms till över 50 ˚C (120 ˚F)
kommer enheten inte att slås PÅ. Om lasern har
förvarats i extremt heta temperaturer, låt den
svalna. Laserpasset kommer inte att skadas genom
att använda Ström-/transportlåset innan kylning till
dess korrekta drifttemperatur.
Laserstrålen blinkar
När lasern är i självnivellerande läge, är den
designad att vara självnivellerande upp till ett
medelvärde på 4° i alla riktningar. Om lasern lutas
så mycket att den interna mekanismen inte kan
självnivelleras (eller om lasern inte är i nivå i manuellt
läge), kommer laserstrålarna att blinka för att indikera
att lutningsområdet har överskridits.
LASERSTRÅLARNA SOM SKAPAS AV LASERN
ÄR INTE I NIVÅ ELLER LODRÄT OCH SKALL INTE
ANVÄNDAS FÖR ATT AVGÖRA ELLER MARKERA
AVVÄGNING ELLER I LOD. Försök att placera om
lasern på en mer plan yta.
Laserstrålen slutar inte röra sig
Lasern är ett precisionsinstrument. Därför, om den inte
placeras på en stabil (och orörlig) yta kommer lasern
att fortsätta att försöka hitta avvägning. Om strålen
inte slutar att röra på sig, försök att placera lasern på
en mer stabil yta. Försök också att se till att ytan är
relativt jämn och plan så att lasern är stabil.
Service och reparationer
Observera: Demontering av laserpasset kommer att
göra alla garantier ogiltiga för produkten.
För att garantera produktens SÄKERHET och
PÅLITLIGHET skall reparationer, underhåll och
justeringar utföras av auktoriserade servicecenter.
Service eller underhåll som utförs av okvalicerade
personer kan resultera skador. För att hitta ditt
närmaste STANLEY
-servicecenter, gå till
http://www.STANLEY.com.
Två års garanti
Stanley garanterar att sina elektroniska mätverktyg är
fria från materialfel och/eller tillverkningsfel under ett år
från inköpsdatumet.
Felaktiga produkter kommer att repareras eller bytas
ut, efter Stanleys bedömning, om de skickas in
tillsammans med inköpsbevis till:
Stanley UK Sales Limited
Gowerton Road
Brackmills, Northampton NN4 7BW
Denna garanti täcker inte felaktigheter som orsakas
av oavsiktlig skada, slitage, användning annan
är i enlighet med tillverkarens instruktioner eller
reparationer eller ändringar av produkten som inte
godkänts av Stanley.
Reparationer eller utbyte under garantin påverkar inte
garantin giltighetstid.
Enligt vad som tillåts enligt lag kommer inte Stanley
att vara ansvariga under denna garanti för indirekta
eller därav följande förluster på grund av felaktigheter
hos produkten.
Denna garanti kan inte ändras utan tillstånd av
Stanley.
Page 90

SE
90
Denna garanti påverkar inte de lagenliga rättigheter för kunder som köper denna produkt.
Denna garanti skall regleras av och har skapats i enlighet med de lagar som gäller i det land där produkten köpts
och Stanley och köparen samtycker att oåterkalleligen hänskjuta de krav eller ärenden inför det landets domstol
som uppstår under eller i anslutning till denna garanti.
Garantin gäller inte för förbruknings- eller slitagedelar.
OBSERVERA:
Kunden är ansvarig för korrekt användning och skötsel av instrumentet. Dessutom ärt kunden fullständigt
ansvarig för att regelbundet kontrollera korrektheten hos laserenheten och därför för kalibreringen av
instrumentet.
Specikationer
STHT77502-1 STHT77592-1
Ljuskälla Laserdioder
Laservåglängd 630 - 680 nm synligt 510 - 530 nm synligt
Lasereffekt ≤1,5 mW KLASS 2 LASERPRODUKT
Arbetsområde 12 m (36’) 16 m (53’)
Korrekthet ±5 mm @ 10m (±3/16” @ 33′)
Energikälla 2 AA (1,5V) storlek på batterier (3V DC)
Drifttemperatur -10 °C till 40 °C (14 °F till 104 °F)
Lagringstemperatur -20 °C till 60 °C (-5 °F till 140 °F)
Page 91

91
FIN
Sisältö
• Laseria koskevat tiedot
• Käyttöturvallisuus
• Akun turvallisuus
• AA-paristojen asentaminen
• Laserin kytkeminen päälle
• Laserin tarkkuuden tarkistaminen
• Laserin käyttö
• Huolto
• Vianmääritys
• Huolto ja korjaus
• Tekniset tiedot
Laseria koskevat tiedot
STHT77502-1 ja STHT77592-1 -laserit ovat
luokan 2 lasertuotteita. Laserit ovat itsetasaavia
laserlaitteita, joita voidaan käyttää vaaka- (taso) ja
pystysuuntaisissa (kohtisuora) kohdistuksissa.
Käyttöturvallisuus
Turvallisuusohjeet
Alla olevat määritykset kuvaavat kunkin varoitussanan
tärkeystason. Lue ohjekirja ja kiinnitä huomiota
seuraaviin merkkeihin.
VAARA: Ilmoittaa välittömästä vaarasta,
joka johtaa kuolemaan tai vakavaan
vammautumiseen, mikäli sitä ei vältetä.
VAROITUS: Ilmoittaa mahdollisesta
vaarasta, joka voi johtaa kuolemaan tai
vakavaan vammautumiseen, mikäli sitä ei
vältetä.
HUOMIO: Ilmoittaa mahdollisesta vaarasta,
joka voi johtaa lievään tai kohtalaisen
vakavaan vammautumiseen, mikäli sitä ei
vältetä.
HUOMAUTUS: Ilmoittaa toimenpiteestä, joka voi
johtaa omaisuusvahinkoon, mikäli sitä ei vältetä.
Mikäli sinulla on kysyttävää tai huomautuksia
tästä tai muusta STANLEY
®
-työkalusta, lisätietoa
on saatavilla osoitteesta http://www.STANLEY.com.
VAROITUS:
Kaikki ohjeet on luettava ja
ymmärrettävä. Mikäli tämän ohjekirjan
varoituksia ja ohjeita ei noudateta,
seurauksena voi olla vakava henkilövahinko.
SÄILYTÄ NÄMÄ OHJEET
VAROITUS:
Lasersäteelle altistuminen. Lasertasoa
ei saa purkaa tai muuttaa. Sisällä ei ole
käyttäjän huollettavissa olevia osia.
Vakavan silmävamman vaara.
VAROITUS:
Vaarallinen säteily. Muiden kuin tässä
määritettyjen säätöjen tai toimenpiteiden
suorittaminen voi johtaa vaaralliseen
säteilylle altistumiseen.
Laserissa oleva merkki voi sisältää seuraavat symbolit.
Symboli Merkitys
V Volttia
mW Milliwattia
Laserin varoitus
nm Aallonpituus nanometreinä
2 Luokan 2 laser
Varoitusmerkit
Laser sisältää seuraavat merkit käyttömukavuutta
ja turvallisuutta varten.
VAROITUS: Käyttäjän on luettava
ohjekirja henkilövahinkovaaran
välttämiseksi.
VAROITUS: LASERSÄTEILY. ÄLÄ
KATSO SÄTEESEEN. Luokan 2
lasertuote.
SER.____________
TYPE 1
3V DC
LASER
2
≤1.5mW @630-680nm
IEC 60825-1: 2014
MADE IN CHINA
www.stanleylasers.com
www.stanleytools.com
STHT77502-1
Page 92

FIN
92
SER.____________
TYPE 1
3V DC
LASER
2
MADE IN CHINA
www.stanleylasers.com
www.stanleytools.com
≤1.5mW @510-530nm
IEC 60825-1: 2014
STHT77592-1
• Laseria ei saa käyttää räjähdysalttiissa
ympäristöissä, kuten syttyvien nesteiden,
kaasun tai pölyn lähettyvillä. Tästä
sähkötyökalusta voi syntyä kipinöitä, jotka voivat
sytyttää pölyn tai höyryt.
• Säilytä käyttämätöntä laseria lasten ja
muiden kouluttamattomien henkilöiden
ulottumattomissa. Laserit ovat vaarallisia
kouluttamattomien henkilöiden käsissä.
• Työkalua SAAVAT huoltaa vain pätevät korjaajat.
Pätemättömien henkilöiden suorittama huolto voi
johtaa henkilövahinkoihin. Paikanna lähin Stanleyhuoltopalvelu osoitteessa http://www.2helpU.com.
• Älä käytä lasersäteen katselemiseen optisia
välineitä kuten teleskooppia tai välilaitteita.
Vakavan silmävamman vaara.
• Laseria ei saa asettaa asentoon, jossa henkilöt
voivat tarkoituksellisesti tai vahingossa katsoa
lasersäteeseen. Vakavan silmävamman vaara.
• Laseria ei saa asettaa heijastavien pintojen
lähelle, sillä pinnat voivat heijastaa lasersäteen
muiden silmiin. Vakavan silmävamman vaara.
• Kytke laser pois päältä, kun sitä ei käytetä. Jos
laser jätetään päälle, lasersäteeseen katsomisen
vaara on suurempi.
• Laseria ei saa muuttaa millään tavalla. Työkalun
muuttaminen voi johtaa vaaralliseen lasersäteilyyn
altistumiseen.
• Laseria ei saa käyttää lasten lähellä eikä lasten
saa antaa käyttää laseria. Vakavan silmävamman
vaara.
• Varoitusmerkkejä ei saa poistaa tai turmella. Jos
merkit poistetaan, käyttäjä tai muut henkilöt voivat
altistua vahingossa säteilylle.
• Aseta laser tukevasti tasaiselle alustalle. Jos
laser putoaa, laser voi vaurioitua tai seurauksena
voi olla vakava henkilövahinko.
Henkilöturvallisuus
• Pysy valppaana, tarkkaile toimenpiteitäsi ja käytä
laseria terveellä maalaisjärjellä. Älä käytä laseria
väsyneenä tai huumausaineiden, alkoholin tai
lääkkeiden vaikutuksen alaisena. Hetkellinenkin
epähuomio laserin käytön aikana voi johtaa vakaviin
henkilövahinkoihin.
• Käytä henkilökohtaisia suojavarusteita. Käytä
aina suojalaseja. Suojavarusteiden, kuten
hengityssuojan, turvajalkineiden, kypärän
ja kuulonsuojaimien käyttö voi vähentää
henkilövahinkovaaraa työskentelyolosuhteista
riippuen.
Työkalun käyttö ja hoito
• Laseria ei saa käyttää, jos Virran/kuljetuksen
lukituskytkin ei kytke laseria päälle ja pois päältä.
Laitteet, joita ei voida hallita kytkimellä, ovat
vaarallisia ja ne on korjattava.
Noudata tämän ohjekirjan osion Huolto ohjeita.
Hyväksymättömien osien käyttö tai Huolto-osion
ohjeiden noudattamatta jättäminen voi johtaa
sähköiskuun tai henkilövahinkoon.
Akkujen ja paristojen
turvallisuus
VAROITUS:
Paristot voivat räjähtää tai vuotaa sekä
aiheuttaa henkilövammoja tai tulipalon.
Toimi seuraavasti riskien välttämiseksi:
• Noudata kaikkia paristojen tuotemerkkiin ja
pakkaukseen merkittyjä ohjeita ja varoituksia
huolellisesti.
• Aseta akut/paristot aina oikein akun ja laitteiston
napaisuusmerkintöjä (+ ja –) noudattaen.
• Älä aiheuta oikosulkua akun napojen välillä.
• Älä lataa kertakäyttöisiä paristoja.
• Älä sekoita uusia ja vanhoja akkuja/paristoja.
Vaihda kaikki paristot samaan aikaan saman
merkkisiin ja tyyppisiin paristoihin.
• Poista tyhjät paristot heti ja hävitä ne paikallisten
määräyksien mukaan.
Page 93

93
FIN
• Älä hävitä akkuja/paristoja tulessa.
• Pidä paristot aina lasten ulottumattomissa.
• Poista akku/paristot, kun laitetta ei käytetä.
AA-paristojen
asentaminen
Asenna uudet AA-paristot STHT77502-1 tai
STHT77592-1 laseriin.
1.
Käännä laser ylösalaisin.
2.
Nosta laserin alaosassa oleva lukitus ylös
paristokotelon kannen avaamiseksi
(kuva B 1).
3.
Aseta koteloon kaksi korkealaatuista ja tunnettua
tuotemerkkiä edustavaa AA-paristoa ja varmista,
että paristojen - ja + -päät asetetaan kotelon
napaisuusmerkintöjen mukaisesti (kuva B 2).
4.
Paina paristokotelon kansi kiinni, kunnes se
napsahtaa paikoilleen (kuva B 3).
Kun laseria ei käytetä, pidä Virran/kuljetuksen
lukituskytkin keskiasennossa (OFF) (kuva
V 2
)
paristojen virran säästämiseksi.
Laserin kytkeminen
päälle
1.
Aseta laser tasaiselle alustalle niin, että laser
osoittaa suoraan eteenpäin vastakkaista seinää
kohti (0º asento).
2.
Kytke laser toimintaan (ON) etummaisten
poikkisäteiden näyttämiseksi. Joko:
• Siirrä Virran/kuljetuksen lukituskytkin
vasemmalle heilurin lukitsemiseksi paikoilleen
ja poikkisäteiden näyttämiseksi manuaalisessa
tilassa (kuva
V 1
).
• Siirrä Virran/kuljetuksen lukituskytkin
oikealle heilurin lukituksen avaamiseksi ja
poikkisäteiden näyttämiseksi itsetasaustilassa
(kuva
V 3
).
3.
Paina kerran (kuva V 4) nähdäksesi
vaakasuoran laserlinjan, toisen kerran nähdäksesi
pystysuoran linjan ja kolmannen kerran
nähdäksesi vaaka- ja pystysuoran linjan.
4.
Tarkista lasersäteet.
• Jos laser on kallistunut niin paljon, ettei se voi
itsetasoittua (> 4°), tai laser ei ole tasaisesti
manuaalisessa tilassa, lasersäteet vilkkuvat.
• Jos lasersäteet vilkkuvat, laser ei ole
vaakasuorassa (tai kohtisuorassa) EIKÄ
SITÄ SAA KÄYTTÄÄ vaaka- tai pystytason
määrittämiseen tai merkitsemiseen. Sijoita
laser uudelleen tasaiselle alustalle.
5.
Jos JOKIN seuraavista kohdista PÄTEE, jatka
kohtaanLaserin tarkkuuden tarkistaminen ENNEN
LASERIN KÄYTTÖÄ projektissa.
• Käytät laseria ensimmäistä kertaa (jos laser
on altistunut äärilämpötiloille).
• Laserin tarkkuutta ei ole tarkistettu pitkään
aikaan.
• Laser on voitu pudottaa.
Laserin tarkkuuden
tarkistaminen
Laserlaitteet on tiivistetty ja kalibroitu tehtaalla.
Tarkkuus on suositeltavaa tarkistaa ennen
laserin ensimmäistä käyttökertaa (jos laser
on altistunut äärilämpötiloille) ja sen jälkeen
säännöllisesti tarkkuuden varmistamiseksi. Noudata
seuraavia ohjeita tässä ohjekirjassa kuvattujen
tarkkuustarkastuksien aikana:
• Käytä suurinta mahdollista aluetta/etäisyyttä,
joka on lähinnä käyttöetäisyyttä. Mitä suurempi
alue/etäisyys, sitä helpompaa laserin tarkkuuden
mittaaminen on.
• Aseta laser tasaiselle ja vakaalle alustalle, joka on
tasainen molemmissa suunnissa.
• Merkitse lasersäteen keskikohta.
Page 94

FIN
94
Tasasäteen tarkkuus
Laserin vaakasuoran skannauksen kalibrointi voidaan
tarkistaa käyttäen kahta 9 m (30′) etäisyydellä
toisistaan olevaa seinää. Kalibroinnin tarkistus on
tärkeää suorittaa vähintään sillä etäisyydellä, jolla
työkalua tullaan käyttämään.
1.
Aseta laser jalustalle, joka osoittaa suoraan
seinää kohti (kuva D 1).
2.
Siirrä Virran/kuljetuksen lukituskytkin oikealle
(kuva V 3) laserin kytkemiseksi päälle (ON)
itsetasaustilassa ja vaaka- sekä pystysuorien
säteiden näyttämiseksi.
3.
Merkitse P1 kohtaan, jossa vaaka- ja pystysuorat
säteet kohtaavat seinällä.
4.
Käännä laseria 180º.
5.
Merkitse P2 kohtaan, jossa vaaka- ja pystysuorat
säteet kohtaavat seinällä (kuva D 2).
6.
Käännä laseria 180º ja siirrä se ensimmäisen
seinän lähelle (kuva D 3).
7.
Merkitse P3 kohdan P1 lähelle kohtaan, jossa
vaaka- ja pystysuorat säteet kohtaavat seinällä.
8.
Käännä laseria 180º (kuva D 4).
9.
Merkitse P4 kohdan P2 lähelle kohtaan, jossa
vaaka- ja pystysuorat säteet kohtaavat seinällä.
10.
Mittaa pisteiden P1 ja P3 välinen kohtisuora
etäisyys.
11.
Mittaa pisteiden P2 ja P4 välinen kohtisuora
etäisyys.
12.
Jos mittaustulos on sallittua P1 - P3 tai P2 - P4
välistä etäisyyttä suurempi seuraavan taulukon
vastaavien seinien välisellä etäisyydellä, laser on
vietävä valtuutettuun huoltopalveluun huoltoon.
Seinien välinen
etäisyys
Sallittu etäisyys
Välillä P1 - P3 tai P2 - P4
30′ (9 m) 1/8” (3 mm)
40′ (12 m) 5/32” (4 mm)
50′ (15 m) 7/32” (5 mm)
Vaakasuoran säteen tarkkuus
Laserin vaakasuoran tason kalibrointi voidaan
tarkistaa käyttäen yhtä vähintään 30′ (9 m) pitkää
seinää. Kalibroinnin tarkistus on tärkeää suorittaa
vähintään sillä etäisyydellä, jolla työkalua tullaan
käyttämään.
1.
Aseta laser jalustalle, joka osoittaa huoneen
nurkkaan (kuva E 1).
2.
Siirrä Virran/kuljetuksen lukituskytkin oikealle
(kuva V 3) laserin kytkemiseksi päälle (ON)
itsetasaustilassa ja vaaka- sekä pystysuorien
säteiden näyttämiseksi.
3.
Suuntaa kohtisuora säde huoneen nurkkaan.
4.
Merkitse P1 kohtaan, jossa vaakasuora säde
kohtaa lähellä olevan seinän keskikohdan.
5.
Käännä laseria niin, että pystysuora säde kohtaa
merkinnän P1 (kuva E 2).
6.
Merkitse P2 kohtaan, jossa vaakasuora säde
kohtaa pystysuoran säteen.
7.
Käännä laseria niin, että pystysuora säde
kohdistuu toiseen nurkkaan (kuva E 3).
8.
Merkitse P3 kohtaan, jossa vaakasuora säde on
kohtisuoraan samansuuntaisesti merkinnän P1 ja
P2 kanssa.
9.
Mittaa korkeimman ja matalimman pisteen
välinen pystysuora etäisyys (välillä P1, P2 ja/tai
P3).
10.
Jos mittaustulos on sallittua korkeimman ja
matalimman pisteen välistä etäisyyttä suurempi
seuraavan taulukon vastaavien seinien välisellä
etäisyydellä, laser on vietävä valtuutettuun
huoltopalveluun huoltoon.
Seinien välinen
etäisyys
Sallittu etäisyys
korkeimman ja
matalimman pisteen
välillä
30′ (9 m) 1/4” (6 mm)
40′ (12 m) 5/16” (8 mm)
50′ (15 m) 13/32” (10 mm)
Page 95

95
FIN
Pystysuoran säteen tarkkuus
Laserin kohtisuoran kalibroinnin tarkistaminen voidaan
suorittaa tarkimmin, kun käytettävissä on huomattava
mieluiten 30′ (9 m) kohtisuora tila yläpuolella ja yksi
henkilö pitää laseria lattialla ja toinen henkilö on katon
lähellä säteen osoittaman pisteen merkitsemiseksi
kattoon. Kalibroinnin tarkistus on tärkeää suorittaa
vähintään sillä etäisyydellä, jolla työkalua tullaan
käyttämään.
1.
Aseta laser vähintään 1,0 m (3.28 ft) päähän
oven karmista (kuva
F 1
).
2.
Siirrä Virran/kuljetuksen lukituskytkin oikealle
(kuva V 3) laserin kytkemiseksi päälle (ON)
itsetasaustilassa ja vaaka- sekä pystysuorien
säteiden näyttämiseksi.
3.
Suuntaa pystysuora lasersäde oven karmia kohti.
4.
Merkitse lasersäteen alaosan lisäksi kolme
kohtaa a, b ja c; jossa b on kohtien a ja
c
keskellä.
5.
Merkitse e kohtaan, jossa lasersäteen yläosa
näkyy oven karmin yläpuolella.
6.
Siirrä laser oven karmin vastakkaiselle puolelle
(kuva F 2).
7.
Kohdista lasersäteen alaosa kohtaan a, b ja
c
.
8.
Merkitse f kohtaan, jossa lasersäteen yläosa
näkyy oven karmin yläpuolella.
9.
Mittaa kohdan e ja f välinen etäisyys.
10.
Jos mittaustulos on sallittua kohtien e ja f
välistä etäisyyttä suurempi seuraavan taulukon
vastaavalla katon korkeudella D, laser on
vietävä valtuutettuun huoltopalveluun huoltoon.
Katon korkeus
D
Sallittu etäisyys
Seuraavien kohtien
välillä e ja
f
6,56′ (2,0 m) 1/16" (1,5 mm)
8,20′ (2,5 m) 3/32” (2,0 mm)
9,84′ (3,0 m) 1/8” (2,5 mm)
Pystysuoran sivusäteen tarkkuus
Sivulaserin pystysuoran (luoti) kalibroinnin tarkistus
voidaan suorittaa tarkimmin vähintään 1,5 m (16ft.)
lattia-alueella ja toisen henkilön avustuksella.
Kalibroinnin tarkistus on tärkeää suorittaa vähintään
sillä etäisyydellä, jolla työkalua tullaan käyttämään.
1.
Aseta laser tasaiselle lattialle, jonka pituus on
vähintään 1,5 m (16ft.).
2.
Siirrä Virran/kuljetuksen lukituskytkin oikealle
(kuva V 3) laserin kytkemiseksi päälle (ON)
itsetasaustilassa ja vaaka- sekä pystysuorien
säteiden näyttämiseksi.
3.
Paina painiketta kerran nähdäksesi
kohtisuoran sivusäteen.
4.
Mittaa tarkalleen 0,91 m (3 ft.) laserlaitteen
keskiosasta etummaista pystysuoraa sädettä
pitkin ja merkitse P1 (kuva G 1).
5.
Mittaa tarkalleen 1,22 m (4 ft.) laserlaitteen
keskiosasta pystysuoraa sivusädettä pitkin ja
merkitse P2 (kuva G 2).
6.
Mittaa pisteiden P1 ja P2 välinen etäisyys
(kuva G 3).
7.
Jos kohtien P1 ja P2 välinen etäisyys poikkeaa
arvosta 5ft + 1/32” (1,522 m + 0,75 mm), vie
laserlaite lähimpään STANLEY-huoltoliikkeeseen
kalibrointia varten.
Laserin käyttö
Käyttövinkkejä
• Merkitse aina lasersäteen keskikohta.
• Äärimmäiset lämpötilavaihtelut voivat liikuttaa
sisäosia, mikä voi vaikuttaa tarkkuuteen. Tarkista
tarkkuus usein käytön aikana.
• Jos laser putoaa, tarkista sen virheetön kalibrointi.
• Laser on itsetasoittuva oikein kalibroituna. Laserit
on kalibroitu tehtaalla löytämään taso, tämä
edellyttää laserin asettamista tasaiselle alustalle
keskimäärin ± 4° tasalle. Laite ei vaadi manuaalista
säätöä.
• Käytä laseria tasaisella alustalla.
Page 96

FIN
96
Laserin kytkeminen pois päältä
Liu'uta Virran/kuljetuksen lukituskytkin OFF-asentoon
(kuva V 2), kun laseria ei käytetä. Jos kytkintä ei
ole asetettu OFF-asentoon, laser ei sammu.
Laserin käyttö kannattimella
Kannatin (kuva H) toimitetaan laserin mukana, jotta
laser voitaisiin kiinnittää helposti tankoon, kattoritilään
tai pylvääseen.
1.
Kiinnitä laser hyvin kannattimeen.
• Käytä laserin alaosassa, sivulla tai takana
olevia 1/4-20 kierteitä (kuva
C
) asettaaksesi
laserin kannattimen varren 1/4-20 kierteiseen
(kuva H 1).
• Käännä laserin nuppia (kuva
H 2
)
myötäpäivään laserin lukitsemiseksi
kannattimen varren 1/4-20 kierteisiin.
2.
Vaihda tarvittaessa laserin korkeutta tai asentoa
kannattimessa.
• Käännä säätönuppia (kuva
H 3
)
vastapäivään kannattimen varren
löysäämiseksi.
• Liu’uta kannattimen vartta ylös- tai alaspäin
haluamallesi korkeudelle (kuva
H 4
). Voit
muuttaa kannattimen asentoa arvosta 90°
arvoon 180° liu’uttamalla kannattimen varren
kannattimen yläosaan ja kääntämällä vartta
sitten oikealle (kuva H 5).
• Käännä säätönuppia (kuva
H 3
)
myötäpäivään kannattimen varren
lukitsemiseksi paikoilleen.
3.
Käytä kannattimen pidikettä (kuva H 6) laserin
pitämiseksi paikoillaan tangossa, kattoritilässä tai
pylväässä.
• Kierrä tarvittaessa pidikettä niin, että se on
oikeassa kulmassa kohteen kiinnittämiseksi.
Pitele kannattimen vartta yhdellä kädellä ja
käännä toisella kädellä pidikettä (kuva
H 7
).
• Aseta kannattimen pidike tangon, kattoritilän tai
pylvään ympärille.
• Käännä kiinnitysnuppia (kuva
H 8
)
myötäpäivään, kunnes pidike on kireästi
kohteen ympärillä ja kannatin on paikoillaan.
Laserin käyttö muilla lisävarusteilla
VAROITUS:
Koska muiden kuin STANLEYlisävarusteiden sopivuutta ei ole testattu
tässä laserissa, niiden käyttö tässä laserissa
voi olla vaarallista.
Käytä ainoastaan tähän malliin suositeltuja
STANLEY®-lisävarusteita. Tiettyyn lasermalliin sopivat
lisävarusteet voivat olla vaarallisia toisessa laserissa
käytettyinä.
Laserin alaosassa, sivussa ja takana on 1/4-20
sisäkierteet (kuva C) saatavilla olevia ja tulevia
STANLEY®-lisävarusteita varten.
Muita tähän laseriin suositeltuja lisävarusteita on
saatavilla lisämaksusta paikalliselta jälleenmyyjältä
tai valtuutetusta huoltopalvelusta. Jos tarvitset apua
lisävarusteiden löytämisessä, ota yhteyttä lähimpään
STANLEY-huoltopalveluun tai vieraile verkkosivustolla:
http://www.STANLEY.com.
Huolto
• Kun laser poistetaan käytöstä, puhdista sen
ulkopinnat kostealla liinalla ja pyyhi laser kuivaksi
pehmeällä ja kuivalla liinalla. Aseta se sitten säilöön
toimitetussa pakkauksessa.
• Vaikka laserin ulkopinnat kestävät liuottimet, ÄLÄ
KOSKAAN käytä liuottimia laserin puhdistamisessa.
• Älä säilytä laseria alle -20 ˚C (-5 ˚F) tai yli 60 ˚C
(140 ˚F) lämpötilassa.
• Varmista laserin tarkkuus tarkistamalla sen
virheetön kalibrointi.
• STANLEY-huoltopalvelut voivat suorittaa
kalibrointitarkistuksia ja muita huollon aikaisia
korjauksia.
Page 97

97
FIN
Vianmääritys
Laser ei käynnisty
• Tarkista AA-paristot varmistaaksesi seuraavat:
• Kaikki paristot on asennettu oikein
paristokotelon napaisuusmerkintöjen (+) ja (–)
mukaisesti.
• Paristojen navat ovat puhtaita ja ettei niissä ole
ruostetta tai korroosiota.
• Paristot ovat uusia, korkealaatuisia ja edustavat
tunnettua tuotemerkkiä vuotovaarojen
vähentämiseksi.
• Varmista AA-paristojen hyvä kunto. Mikäli
epäselvyyksiä ilmenee, kokeile asentaa uudet
paristot.
• Jos käytät ladattavia paristoja, varmista, että ne on
ladattu täyteen.
• Varmista, että laser on kuiva.
• Jos laser on kuumentunut yli 50 ˚C (120 ˚F)
lämpötilaan, laite ei käynnisty. Jos laseria on
säilytetty erittäin korkeissa lämpötiloissa, anna sen
jäähtyä. Lasertaso ei vaurioidu käyttäessä Virran/
kuljetuksen lukituskytkintä ennen sen jäähtymistä
oikeaan käyttölämpötilaan.
Lasersäteet vilkkuvat
Kun laitteet on itsetasoitustilassa, laserit on
tarkoitettu itsetasoittuviksi keskimäärin korkeintaan
noin 4° kaikissa suunnissa. Jos laser on kallistunut
niin, että sisäinen mekanismi ei voi tasoittua
itsestään (tai laser ei ole tasaisesti manuaalisessa
tilassa), lasersäteet vilkkuvat ilmoittaen kallistusvälin
ylittymisestä.
VILKKUVAT LASERSÄTEET EIVÄT OLE
VAAKASUORASSA TAI KOHTISUORASSA EIKÄ
SITÄ SAA KÄYTTÄÄ VAAKA- TAI PYSTYTASON
MÄÄRITTÄMISEEN TAI MERKITSEMISEEN. Sijoita
laser uudelleen tasaisemmalle alustalle.
Lasersäteiden liike ei lopu
Laser on tarkkuusväline. Jos sitä ei aseteta vakaalle
(ja liikkumattomalle) pinnalle, laser pyrkii jatkuvasti
löytämään tasoa. Jos säteen liike ei lopu, kokeile
asettaa laser vakaammalle alustalle. Varmista myös,
että alusta on suhteellisen tasainen laserin vakauden
takaamiseksi.
Huolto ja korjaus
Huomaa: Jos lasertaso puretaan, tuotteen takuut
mitätöityvät.
Varmista tuotteen TURVALLISUUS ja
LUOTETTAVUUS viemällä se korjattavaksi,
huollettavaksi ja säädettäväksi valtuutettuun
huoltopalveluun. Pätemättömien henkilöiden
suorittama huolto voi johtaa henkilövahinkoihin.
Paikanna lähin STANLEY
-huoltopalvelu osoitteessa
http://www.STANLEY.com.
Kahden vuoden takuu
Stanley myöntää sen elektronisille mittauslaitteille
kahden vuoden takuun, joka kattaa materiaali- ja/tai
valmistusviat ja astuu voimaan ostopäivänä.
Vialliset laitteet korjataan tai vaihdetaan Stanleyn
harkinnan mukaan, jos ne toimitetaan seuraavaan
osoitteeseen ostotositteen ohella:
Stanley UK Sales Limited
Gowerton Road
Brackmills, Northampton NN4 7BW
Tämä takuu ei koske vikoja, jotka johtuvat vahingoista,
kulumisesta, valmistajan ohjeista poikkeavasta
käytöstä tai tuotemuutoksista tai korjauksista, joihin
Stanley ei ole antanut lupaa.
Tämän takuun piiriin kuuluva korjaus tai vaihto ei
vaikuta takuun voimassaoloaikaan.
Lain sallimissa määrin Stanley ei tämän takuun
piirissä ota vastuuta suorista tai seuraamuksellisista
menetyksistä, jotka aiheutuvat tämän tuotteen
puutoksista.
Tähän takuuseen ei saa tehdä muutoksia ilman
Stanleyn lupaa.
Tämä takuu ei vaikuta tämän tuotteen ostavan
kuluttajan lakisääteisiin oikeuksiin.
Page 98

FIN
98
Tähän takuuseen sovelletaan sen maan
lainsäädäntöä, jossa tuote myytiin. Stanley ja tuotteen
ostaja sitoutuvat peruuttamattomasti kyseisen maan
yksinomaiseen tuomiovaltaan koskien kaikkia tähän
takuuseen liittyviä vaateita tai muita tapauksia.
Takuu ei kata kalibrointia ja ylläpitoa.
HUOMIO:
Asiakas vastaa laitteen oikeaoppisesta käytöstä ja
ylläpidosta. Asiakkaan vastuulla on lisäksi tarkistaa
laserlaitteen tarkkuus säännöllisesti ja suorittaa sen
kalibrointi tarvittaessa.
Page 99

99
FIN
Tekniset tiedot
STHT77502-1 STHT77592-1
Valonlähde Laserdiodit
Laserin aallonpituus 630 – 680 nm näkyvissä 510 – 530 nm näkyvissä
Laserteho ≤ 1,5 mW LUOKAN 2 LASERTUOTE
Käyttöväli 12 m (36′) 16 m (53′)
Tarkkuus ± 5 mm etäisyydellä 10 m (3/16” etäisyydellä 33′)
Virtalähde 2 AA (1,5V) paristot (3V DC)
Käyttölämpötila -10 °C - 40 °C (14 °F - 104 °F)
Säilytyslämpötila -20 °C - 60 °C (-5 °F - 140 °F)
Page 100

NO
100
Innhold
• Laserinformasjon
• Brukersikkerhet
• Batterisikkerhet
• Installere AA-batterier
• Slå på laseren
• Sjekke lasernøyaktighet
• Bruk av laseren
• Vedlikehold
• Feilsøking
• Service og reparasjoner
• Spesikasjoner
Laserinformasjon
Laserne STHT77502-1 og STHT77592-1 er Klasse 2
laserprodukter. Laserne er selvrettende laserverktøy
som kan brukes til horisontale (vater) og vertikale
(loddlinje) innretningsjobber.
Brukersikkerhet
Sikkerhetsanvisninger
Denisjonene under beskriver alvorlighetsgraden for
hvert signalord. Les bruksanvisningen nøye og legg
spesielt merke til disse symbolene.
FARE: Varsler om en umiddelbar farlig
situasjon som, hvis den ikke unngås kan
føre til død eller alvorlig personskade.
ADVARSEL: Varsler om en mulig farlig
situasjon som, hvis den ikke unngås kan
føre til død eller alvorlig personskade.
FORSIKTIG: Varsler om en mulig farlig
situasjon som, hvis den ikke unngås kan
føre til mindre eller moderate personskader.
MERK: Varsler om en bruk som ikke relateres til
personskade, men som, hvis den ikke unngås, kan
føre til materielle skader.
Hvis du har spørsmål eller kommentarer om dette
eller et hvilket som helst STANLEY
®
-verktøy, gå til
http://www.STANLEY.com.
ADVARSEL:
Les og forstå alle instruksjonene. Hvis
du ikke følger advarslene og instruksjonene
i denne bruksanvisningen, kan dette
resultere i alvorlig personskade.
OPPBEVAR DISSE INSTRUKSJONENE
ADVARSEL:
Eksponering for laserstråling. Du
skal ikke demontere eller modisere
laservateren. Det nnes ingen deler inni
som eieren kan utføre service på. Dette
kan føre til alvorlig øyeskade.
ADVARSEL:
Farlig stråling. Bruk av kontroller eller
justeringer eller utførelse av prosedyrer som
ikke er spesisert her kan føre til at du blir
eksponert for farlig stråling.
Merkene på laseren kan inneholde de følgende
symbolene.
Symbol Betydning
V Volt
mW Milliwatt
Laseradvarsel
nm Bølgelengde i nanometer
2 Klasse 2 laser
Advarselsmerker
Følgende merker nnes på din laser for din
sikkerhet og for å gjøre det enklere for deg.
ADVARSEL: For å redusere risikoen
for skader, må brukeren lese
bruksanvisningen.
ADVARSEL: LASERSTRÅLING.
IKKE STIRR INN I STRÅLEN. Klasse
2 laserprodukt.
SER.____________
TYPE 1
3V DC
LASER
2
≤1.5mW @630-680nm
IEC 60825-1: 2014
MADE IN CHINA
www.stanleylasers.com
www.stanleytools.com
STHT77502-1
 Loading...