

Page 1
STGB3715
English Page 3
Turkish Page 11
Page 2
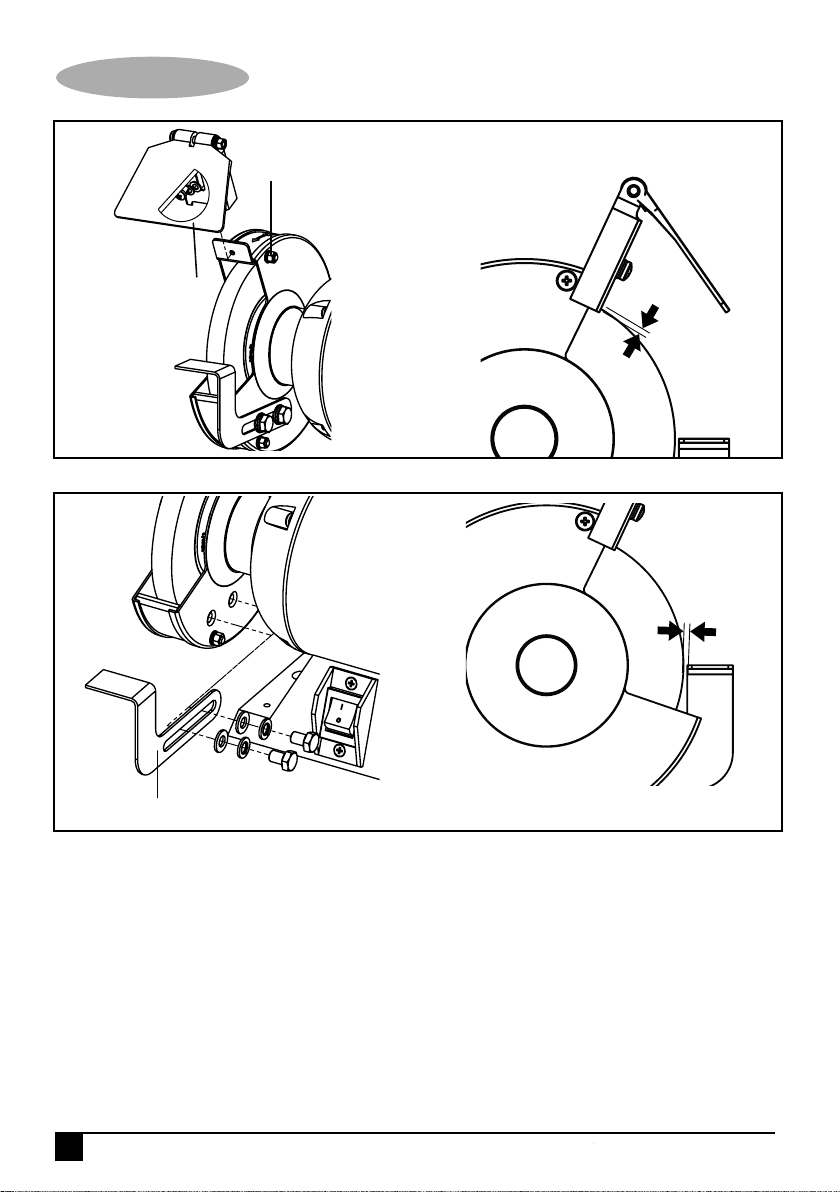
FIG. 1
FIG. 2
ENGLISH
(Original instructions)
B
A
MAX 2 mm
MAX 2 mm
C
2
Page 3
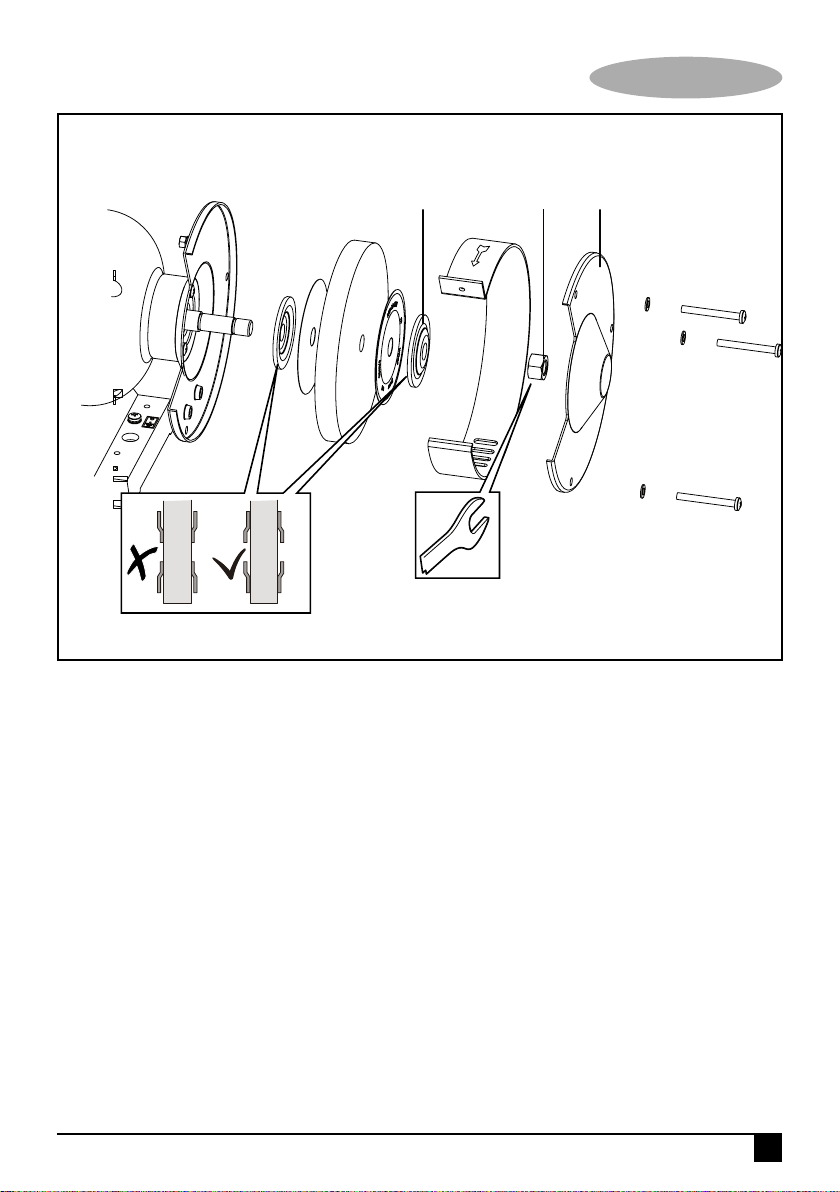
FIG. 3
(Original instructions)
D E F
ENGLISH
3
Page 4
ENGLISH
(Original instructions)
DO NOT RETURN THIS PRODUCT TO THE STORE,
first contact your local STANLEY Office
or nearest authorized service center.
Intended use
This tool is intended as a stationary machine for sharpening
of hand tools as well as for grinding and deburring metal
General Safety Rules
Warning! Read and understand all instructions.
Failure to follow all instructions listed below, may
result in electric shock, fire and/or serious
personal injury.
SAVE THESE INSTRUCTIONS
Safety instructions
General power tool safety warnings
WARNING! Read all safety warnings and all
instructions. Failure to follow the warnings and
instructions listed below may result in electric
shock, fire and/or serious injury.
Save all warnings and instructions for future reference.
The term "power tool" in all of the warnings listed below
refers to your mains operated (corded) power tool or battery
operated (cordless) power tool.
1. Work area safety
a. Keep work area clean and well lit. Cluttered or dark
areas invite accidents.
b. Do not operate power tools in explosive
atmospheres, such as in the presence of flammable
liquids, gases or dust. Power tools create sparks
which may ignite the dust or fumes.
c. Keep children and bystanders away while operating
a power tool. Distractions can cause you to lose
control.
2. Electrical safety
a. Power tool plugs must match the outlet. Never
modify the plug in any way. Do not use any adapter
plugs with earthed (grounded) power tools.
Unmodified plugs and matching outlets will reduce risk
of electric shock.
b. Avoid body contact with earthed or grounded
surfaces such as pipes, radiators, ranges and
refrigerators. There is an increased risk of electric
shock if your body is earthed or grounded.
c. Do not expose power tools to rain or wet conditions.
Water entering a power tool will increase the risk of
electric shock.
d. Do not abuse the cord. Never use the cord for
carrying, pulling or unplugging the power tool. Keep
cord away from heat, oil, sharp edges or moving
parts. Damaged or entangled cords increase the risk of
electric shock.
e. When operating a power tool outdoors, use an
extension cord suitable for outdoor use. Use of a cord
suitable for outdoor use reduces the risk of electric
shock.
f. If operating a power tool in a damp location is
unavoidable, use a residual current device (RCD)
protected supply. Use of an RCD reduces the risk of
electric shock. Note: The term “Residual Curent Device
(RCD)” can be replaced by “Ground Fault Circuit
Interrupter (GFCI)” or by “Earth Leakage Circuit Breaker
(ELCB)”.
3. Personal safety
a. Stay alert, watch what you are doing and use
common sense when operating a power tool. Do not
use a power tool while you are tired or under the
influence of drugs, alcohol or medication. A moment
of inattention while operating power tools may result in
serious personal injury.
b. Use personal protective equipment. Always wear eye
protection. Protective equipment such as dust mask,
non-skid safety shoes, hard hat, or hearing protection
used for appropriate conditions will reduce personal
injuries.
c. Prevent unintentional starting. Ensure the switch is
in the off-position before connecting to power
source and/or battery pack, picking up or carrying
the tool. Carrying power tools with your finger on the
switch or energising power tools that have the switch on
invites accidents.
d. Remove any adjusting key or wrench before turning
the power tool on. A wrench or a key left attached to a
rotating part of the power tool may result in personal
injury.
e. Do not overreach. Keep proper footing and balance
at all times. This enables better control of the power tool
in unexpected situations.
f. Dress properly. Do not wear loose clothing or
jewellery. Keep your hair, clothing and gloves away
from moving parts. Loose clothes, jewellery or long hair
can be caught in moving parts.
4
Page 5

(Original instructions)
ENGLISH
g. If devices are provided for the connection of dust
extraction and collection facilities, ensure these are
connected and properly used. Use of dust collection
can reduce dust-related hazards.
4. Power tool use and care
a. Do not force the power tool. Use the correct power
tool for your application. The correct power tool will do
the job better and safer at the rate for which it was
designed.
b. Do not use the power tool if the switch does not turn
it on and off. Any power tool that cannot be controlled
with the switch is dangerous and must be repaired.
c. Disconnect the plug from the power source and/or
the battery pack from the power tool before making
any adjustments, changing accessories, or storing
power tools. Such preventive safety measures reduce
the risk of starting the power tool accidentally.
d. Store idle power tools out of the reach of children
and do not allow persons unfamiliar with the power
tool or these instructions to operate the power tool.
Power tools are dangerous in the hands of untrained
users.
e. Maintain power tools. Check for misalignment or
binding of moving parts, breakage of parts and any
other condition that may affect the power tools
operation. If damaged, have the power tool repaired
before use. Many accidents are caused by poorly
maintained power tools.
f. Keep cutting tools sharp and clean. Properly
maintained cutting tools with sharp cutting edges are
less likely to bind and are easier to control.
g) Use the power tool, accessories and tool bits etc. in
accordance with these instructions, taking into
account the working conditions and the work to be
performed. Use of the power tool for operations
different from those intended could result in a hazardous
situation.
5. Service
a. Have your power tool serviced by a qualified repair
person using only identical replacement parts. This
will ensure that the safety of the power tool is mainta
Additional Safety Rules For Bench Grinders
• Always use proper guard with grinding wheel. A guard
protects operator from broken wheel fragments.
• Accessories must be rated for at least the speed
recommended on the tool warning label.Wheels and
other accessories running over the rated speed can fly
apart and cause injury.
• Before using, inspect recommended accessory for
cracks or flaws. If such a crack or flaw is evident, discard
the accessory. DO NOT USE A GRINDING WHEEL
THAT IS CRACKED OR FLAWED IN ANY WAY.
• When starting the tool, let it run for one minute. Never
start the tool with a person in line with the wheel. This
includes the operator.
• Do not grind on the sides of grinding wheels unless they
are specifically designed for that purpose.
• Do not overtighten wheel clamp nut. This may crack the
grinding wheel.
• Clean the cavity around the grinding wheel periodically.
Warning! Some dust created by power sanding, sawing,
grinding, drilling, and other construction activities contains
chemicals known to cause cancer, birth defects or other
reproductive harm. Some examples of these chemicals are:
• Lead from lead-based paints,
• Crystalline silica from bricks and cement and other
masonry products, and arsenic and chromium from
chemically-treated lumber. (CCA)
Your risk from these exposures varies, depending on how
often you do this type of work. To reduce your exposure to
these chemicals: Work in a well ventilated area, and work
with approved safety equipment, such as those dust masks
that are specially designed to filter out microscopic particles.
• Wear protective glasses;
• Do not use damaged or unshaped wheels;
• The adjustment of the spark arrestor shall be made
frequently, so as to compensate the wear of the wheel,
keeping the distance between the guard and the wheel
as small as possible, but in any case not greater than
2mm;
5
Page 6

ENGLISH
(Original instructions)
• The adjustment of the work rest shall be done gradually
so as to compensate the wear of the wheel, keeping the
distance between the work rest and the wheel as small
as possible, but in any case not greater than 2mm;
• Allow the tool to cool down after a continuous use of 20
minutes (S2 20min)
• Basic information on grinding wheels
1. Put grinding wheel in individual package, and keep in a
dry and well-ventilated place.
2. Various shortcomings during installation and operation
can lead to bursting of grinding wheels.
3. Ordinary grinding wheels are generally not designed to
withstand a greater lateral load.
4. Tap off cutting debris from the grinding wheel always
leads to damage of the grinding wheel.
5. Grinding wheels which may have an imbalance burst
easily.
6. An unbalance of a grinding wheel can not be completely
removed by withdrawing with a diamond dresser.
7. Incorrectly stored grinding wheels can burst immediately
after switching on, or individual small fragments fly away
like a bullet.
• Releasing jammed accessories. Release the pressure
on work piece, grinding wheels will return running.
6. Labels on tool
The label on your tool may include the following symbols:
Read
Instructions
Manual
Use Eye
Protection
Use Ear
Protection
V ........ Volts
A ........ Amperes
Hz ....... Hertz
W ........ Watts
min ..... minutes
..... Alternating
Current
..... Direct
Current
n
....... No-Load
0
Speed
...... Class II
Construction
.... Earthing
Terminal
.... Safety Alert
Symbol
.../min.. Revolutions
or Reciprocation per
minute
Position of date barcode
The Date Code, which also includes the year of
manufacture, is printed into the housing.
Example:
2014 XX JN
Year of manufacturing
Package Contents
The package contains:
1 Bench Grinder
2 Tool Rests
2 Eye Shields
2 Mounting Brackets
1 Instruction Manual
Features
This tool includes some or all of the following features.
• Lifting and transportation. Stop and disconnect machine.
Use two hands to lift up machine from two sides of
bottom of bearing housing.
• The work piece should be suitable for opening size
between wheels and plate. The machine is designed
and manufactured exclusively for grinding metals using
properly authorized grinding wheels. The grinding
machine must be used exclusively for this purpose.
6
A. Spark Guard
B. Screw
C. Tool Rest
D. Flange
E. Clamping Nut
F. Protective Cover
Page 7

(Original instructions)
ENGLISH
7. Electrical safety
Warning! If the power cord is damaged, it must
be replaced by the manufacturer, authorized
STANLEY Service Center or an equally qualified
person in order to avoid damage or injury. If the power cord
is replaced by an equally qualified person, but not
authorized by STANLEY, the warranty will not be valid.
Bench Mounting
1. The grinder should be unplugged.
2. Position grinder on workbench. Check for the availability
of power for the grinder. Mark location of holes for
drilling.
3. Drill appropriate sized holes.
4. Insert 1/4” (6mm) Hex head bolts through washers and
the holes. You may want to use washers on the
underside of the bench as well.
5. Tighten the nuts. Do not overtighten. Allow the rubber
feet to absorb the vibration when the grinder is running.
Installing eye shields and mounting of spark guard
(Fig. 1)
Turn off tool and disconnect from power supply. Adjust
the eye shields so they are between the wheels and your
eyes.
Note: Eye shields are not designed to replace safety
glasses.
• Mounting of spark guard
- loosen screw B (do not remove it)
! regularly check the distance between spark guard A
and the grinding wheel (max. 2 mm) and re-adjust, if
necessary
- replace the grinding wheel, if it is worn down to the point
where spark guard A can no longer be adjusted to the
maximum distance of 2 mm
Installing tool rests (Fig. 2)
Turn off power and disconnect from power supply. Use
the bolts, washers, spacers and lock nuts from the plastic
bag to secure the brackets and tool rests in place.
Caution: Use the washers and screws supplied.
Longer screws may interfere with the movement
of the grinding wheel.
! regularly check the distance between tool rest C and the
grinding wheel (max. 2 mm) and re-adjust, if necessary
• Mounting tool on working surface
Operation
Never use a bench grinder if it is not firmly fastened to a
work bench or rigid frame. Before turning the grinder on,
put on safety glasses. Turn on the grinder and allow it to
reach full speed ( 2950 /min) . Hold the workpiece firmly and
against the tool rest. Hold very small pieces with pliers or
other suitable clamps. Feed the work smoothly and evenly
into the grinding wheel. Move the work slowly and avoid
jamming the work against the wheel. As the wheel tends to
slow down you should occasionally release the pressure to
let the wheel return to full speed.
Grind only on the face of the grinding wheel and never on
the side. (Some wheels are designed for side grinding and
will say so on their instruction sheets).
Caution: Prolonged grinding will cause most
materials to become hot. Handle them with
pliers.
Switch
The switch is located on the front of the grinder, on the base.
To turn the tool on depress the side of the rocker switch on
the right side, marked “1”. To turn off the grinder, depress the
left side of the rocker switch, marked “ O ”.
Changing Accessories
Turn off the tool and disconnect from power supply. Use only
wheels that measure 152mm in diameter. This tool has
13mm arbors on both sides. Follow the steps below to
remove and replace an accessory.
Replacing grinding wheels (FIG.3)
! disconnect the plug
! use only grinding wheels with an allowable speed
7
Page 8

ENGLISH
(Original instructions)
matching at least the highest no-load speed of the tool
! use only original Stanley grinding wheels
- remove protective cover F by loosening (not removing)
the 3 screws B
- unscrew clamping nut E with a spanner
- remove clamping flange D and grinding wheel
- for mounting new grinding wheel handle in reversed
order
! perform a sound-test on new grinding wheels and test-run
them without load for at least 5 minutes (stay out of danger
area)
Maintenance
Your tool has been designed to operate over a long period of
time with a minimum of maintenance. Continuous
satisfactory operation depends upon proper tool care and
regular cleaning.
Warning! Before performing any maintenance, switch off
and unplug the tool.
• Regularly clean the ventilation slots in Your tool using a
soft brush or dry cloth.
• Regularly clean the motor housing using a damp cloth.
Do not use any abrasive or solvent-based cleaner.
Cleaning
Blowing dust and grit out of the wheel guards using
compressed air is a necessary regular maintenance
procedure. Dust and grit containing metal particles often
accumulate on interior surfaces and could create an
electrical shock hazard if not frequently cleaned out.
ALWAYS WEAR SAFETY GLASSES.
Caution! Never use solvents or other harsh chemicals for
cleaning the non-metallic parts of the tool. Use clean, dry rag
only.
Accessories
The performance of your tool depends on the accessory
used. STANLEY accessories are engineered to high quality
standards and designed to enhance the performance of your
tool. By using these accessories you will get the very best
from your tool.
Specifications
STGB3715
Voltage 230V
Frequency 50Hz
Power 373W
No-load speed 2950/min (rpm)
Wheel diameter 152mm (6”)
Cord 1m
Weight 8.6kg
Service Information
STANLEY offers a full network of company-owned and
authorized service locations. All STANLEY Service Centers
are staffed with trained personnel to provide customers with
efficient and reliable power tool service. For more
information about our authorized service centers and if you
need technical advice, repair, or genuine factory
replacement parts, contact the STANLEY location nearest
you.
LpA (sound pressure) dB(A) 58,0
K
(sound pressure uncertainty) dB(A) 3
pA
LWA (sound power) dB(A) 72.5
KWA (sound power uncertainty) dB(A) 3
8
Page 9

(Original instructions)
ENGLISH
Protecting the environment
Separate collection. This product must not be
disposed of with normal household waste.
Should you find one day that your Stanley product needs
replacement, or if it is of no further use to you, do not
dispose of it with household waste. Make this product
available for separate collection.
Separate collection of used products and packaging
allows materials to be recycled and used again.
Re-use of recycled materials helps prevent
environmental pollution and reduces the demand for raw
materials.
Local regulations may provide for separate collection of
electrical products from the household, at municipal waste
sites or by the retailer when you purchase a new product.
Stanley provides a facility for the collection and recycling of
Stanley products once they have reached the end of their
working life. To take advantage of this service please return
your product to any authorised repair agent who will collect
them on our behalf.
You can check the location of your nearest authorised repair
agent by contacting your local Stanley office at the address
indicated in this manual. Alternatively, a list of authorised
Stanley repair agents and full details of our after-sales
service and contacts are available on the Internet at:
www.2helpU.com
EC declaration of conformity
MACHINERY DIRECTIVE
STGB3715
STANLEY declares that these products described under
"technical data" are in compliance with:
2006/42/EC, EN 61029-1, EN 61029-2-4
These products also comply with Directive
2014/30/EU and 2011/65/EU. For more information, please
contact STANLEY at the following address or refer to the
back of the manual.
The undersigned is responsible for compilation of the
technical file and makes this declaration on behalf of
STANLEY.
R.Laverick
Engineering Manager
STANLEY , Europe, Egide Walschaertsstraat14-18,
2800 Mechelen, Belgium
01.2015
9
Page 10

ENGLISH
(Original instructions)
Two years full warranty
If your STANLEY product becomes defective due to faulty
materials or workmanship within 24 months from the date of
purchase, STANLEY Europe guarantees to replace all
defective parts free of charge or – at our discretion – replace
the unit free of charge provided that:
• The product has not been misused and has been used in
accordance with the instruction manual.
• The product has been subject to fair wear and tear;
• Repairs have not been attempted by unauthorised
persons;
• Proof of purchase is produced.
• The STANLEY product is returned complete with all
original components
If you wish to make a claim, contact your seller or check the
location of your nearest authorised STANLEY repair agent in
the STANLEY catalogue or contact your local STANLEY
office at the address indicated in this manual. A list of
authorised STANLEY repair agents and full details of our
after sales service is available on the internet
at:www.stanleytools.com
10
Page 11

FIG. 1
FIG. 2
(Orijinal talimatlar)
TÜRKÇE
B
A
MAX 2 mm
MAX 2 mm
C
11
Page 12

FIG. 3
TÜRKÇE
(Orijinal talimatlar)
D E F
12
Page 13

(Orijinal talimatlar)
TÜRKÇE
BU ÜRÜNÜ MAĞAZAYA İADE ETMEYİN;
önce en yakın STANLEY ofisine veya
yetkili servis merkezine başvurun.
Kullanım amacı
Bu alet tezgah tipi kullanılmak üzere, taşlama, metal pas
kazıma ve el aletlerinin keskinleştirilmesi için tasarlanmıştır.
Genel Güvenlik Kuralları
Uyarı! Bütün güvenlik uyarılarını ve talimatlarını
okuyun ve anlayın. Aşağıda belirtilen tüm
talimatların herhangi birisine uyulmaması elektrik
çarpması, yangın ve/veya ciddi yaralanma riskine neden
olabilir.
BU TALİMATLARI SAKLAYIN
Güvenlik talimatları
Genel elektrikli alet güvenlik uyarıları
UYARI! Bütün güvenlik uyarılarını ve talimatlarını
mutlaka okuyun. Aşağıda yer alan uyarılar ve
talimatların herhangi birisine uyulmaması elektrik çarpması,
yangın ve/veya ciddi yaralanma riskine neden olabilir.
Bütün uyarı ve güvenlik talimatlarını ileride bakmak
üzere saklayın.
Aşağıda yer alan uyarılardaki «elektrikli alet» terimi şebeke
elektriğiyle (kablolu) veya akü/pille (şarjlı) çalışan elektrikli
aletinizi ifade etmektedir.
1. Çalışma alanının güvenliği
Çalışma alanını temiz ve aydınlık tutun. Karışık veya
karanlık alanlar kazaya davetiye çıkartır.
Elektrikli aletleri, yanıcı sıvılar, gazlar ve tozların
bulunduğu yerler gibi yanıcı ortamlarda çalıştırmayın.
Elektrikli aletler, toz veya dumanları ateşleyebilecek
kıvılcımlar çıkartır.
Bir elektrikli aleti çalıştırırken çocuklardan ve etraftaki
kişilerden uzak tutun. Dikkatinizi dağıtıcı şeyler kontrolü
kaybetmenize neden olabilir.
2. Elektrik güvenliği
Elektrikli aletlerin fişleri prizlere uygun olmalıdır. Fiş
üzerinde kesinlikle hiçbir değişiklik yapmayın. Topraklı
elektrikli aletlerde hiçbir adaptör fişi kullanmayın.
Değiştirilmemiş fişler ve uygun prizler elektrik çarpması
riskini azaltacaktır.
Borular, radyatörler, ocaklar ve buzdolapları gibi
topraklanmamış yüzeylerle vücut temasından kaçının.
Vücudunuzun topraklanması halinde yüksek bir elektrik
çarpması riski vardır.
Elektrikli aletleri yağmura maruz bırakmayın veya
ıslatmayın. Elektrikli alete su girmesi elektrik çarpması
riskini arttıracaktır.
Elektrik kablosunu uygun olmayan amaçlarla
kullanmayın. Elektrikli aleti kesinlikle kablosundan
tutarak taşımayın, çekmeyin veya prizden çıkartmayın.
Kabloyu sıcaktan, yağdan, keskin kenarlardan veya hareketli
parçalardan uzak tutun. Hasarlı veya dolaşmış kablolar
elektrik çarpması riskini arttırır.
Elektrikli bir aleti açık havada çalıştırıyorsanız, açık
havada kullanıma uygun bir uzatma kablosu kullanın.
Açık havada kullanıma uygun bir kablonun kullanılması
elektrik çarpması riskini azaltır.
Eğer bir elektrikli aletin nemli bir bölgede çalıştırılması
zorunluysa, bir artık akım aygıtı (RCD) korumalı bir
kaynak kullanın. Bir RCD kullanılması elektrik şoku
riskini azaltır. Not: «Artık Akım Aygıtı (RCD)» tanımı,
«Kaçak Akım Koruma Cihazı (GFCI)» veya «Toprak Kaçağı
Devre Kesici (ELCB)» tanımları ile değiştirilebilir.
3. Kişisel güvenlik
Elektrikli bir aleti kullanırken her zaman dikkatli olun,
yaptığınız işe yoğunlaşın ve sağduyulu davranın.
Elektrikli bir aleti yorgunken veya ilaç ya da alkolün etkisi
altındayken kullanmayın. Elektrikli aletleri kullanırken bir
anlık dikkatsizlik ciddi kişisel yaralanmayla sonuçlanabilir.
Kişisel koruyucu ekipmanları mutlaka kullanın. Daima
koruyucu gözlük takın. Koşullara uygun toz maskesi,
kaymayan güvenlik ayakkabıları, baret veya kulaklık gibi
koruyucu donanımların kullanılması kişisel yaralanmaları
azaltacaktır.
İstem dışı çalıştırılmasını önleyin. Aleti güç kaynağına
ve/veya aküye bağlamadan, yerden kaldırmadan veya
taşımadan önce düğmenin kapalı konumda olduğundan
emin olun. Aleti, parmağınız düğme üzerinde bulunacak
şekilde taşımak veya açık konumdaki elektrikli aletleri
elektrik şebekesine bağlamak kazaya davetiye çıkartır.
Elektrikli aleti açmadan önce tüm ayarlama anahtarlarını
çıkartın. Elektrikli aletin hareketli bir parçasına takılı kalmış
bir anahtar kişisel yaralanmaya neden olabilir.
Ulaşmakta zorlandığınız yerlerde kullanmayın. Daima
sağlam ve dengeli basın. Bu, beklenmedik durumlarda
elektrikli aletin daha iyi kontrol edilmesine olanak tanır.
Uygun şekilde giyinin. Bol elbiseler giymeyin ve takı
takmayın. Saçınızı, elbiselerinizi ve eldivenlerinizi hareketli
parçalardan uzak tutun. Bol elbiseler ve takılar veya uzun
saç hareketli parçalara takılabilir.
13
Page 14

ENGLISH
(Original instructions)
Eğer kullandığınız üründe toz emme ve toplama
özellikleri olan ataşmanlar varsa bunların bağlı
olduğundan ve doğru şekilde kullanıldığından emin
olun. Bu toz toplama ataşmanların kullanılması tozla ilgili
tehlikeleri azaltabilir.
4. Elektrikli aletlerin kullanımı ve bakımı
Elektrikli aleti zorlamayın. Uygulamanız için doğru
elektrikli aleti kullanın. Doğru elektrikli alet, belirlendiği
kapasite ayarında kullanıldığında daha iyi ve güvenli
çalışacaktır.
Düğme açmıyor ve kapatmıyorsa elektrikli aleti
kullanmayın. Düğmeyle kontrol edilemeyen tüm elektrikli
aletler tehlikelidir ve tamir edilmesi gerekmektedir.
Herhangi bir ayarlama, aksesuar değişimi veya elektrikli
aletlerin saklanması öncesinde fişi güç kaynağından
çekin ve/veya aküyü elektrikli aletten ayırın. Bu tür
önleyici güvenlik tedbirleri aletin istem dışı olarak
çalıştırılması riskini azaltacaktır.
Elektrikli aleti, çocukların ulaşamayacağı yerlerde
saklayın ve elektrikli aleti tanımayan veya bu talimatları
bilmeyen kişilerin elektrikli aleti kullanmasına izin
vermeyin. Elektrikli aletler, eğitimsiz kullanıcıların elinde
tehlikelidir.
Elektrikli aletleri iyi durumda muhafaza edin. Hareketli
parçalardaki hizalama hatalarını ve tutuklukları,
parçalardaki kırılmalar ve elektrikli aletin çalışmasını
etkileyebilecek tüm diğer koşulları kontrol edin. Hasarlı
ise, elektrikli aleti kullanmadan önce tamir ettirin. Kazaların
çoğu, elektrikli aletlerin bakımının yeterli şekilde
yapılmamasından kaynaklanır.
Kesim aletlerini keskin ve temiz tutun. Bakımı uygun
şekilde yapılmış keskin kesim uçlu kesim aletlerinin sıkışma
ihtimali daha düşüktür ve kontrol edilmesi daha kolaydır.
Elektrikli aleti, aksesuarlarını ve aletin diğer parçalarını
kullanırken bu talimatlara mutlaka uyun ve çalışma
ortamının koşullarını ve yapılacak işin ne olduğunu göz
önünde bulundurun. Elektrikli aletin öngörülen işlemler
dışındaki işlemler için kullanılması tehlikeli durumlara neden
olabilir.
5. Servis
Elektrikli aletinizi, sadece orijinal yedek parçaların
kullanıldığı yetkili servise tamir ettirin. Bu, elektrikli aletin
güvenliğinin muhafaza edilmesini sağlayacaktır.
Taş motorları için ek güvenlik talimatları
Taşlama diski ile daima uygun koruyucu siperliği veya
kalkanı kullanın. Siperlik veya kalkan, kullanıcının kırılan disk
parçacıklarından korunmasına yardımcı olur.
Aksesuarlar, aletin uyarı etiketinde tavsiye edilen veya daha
yüksek hız seviyeli olmalıdır. Nominal hızından daha hızlı
çalışan diskler ve diğer aksesuarlar etrafa saçılabilir ve
yaralanmalara neden olabilir.
Kullanmadan önce, tavsiye edilen aksesuarda herhangi bir
çatlak ya da yarık olup olmadığını kontrol edin. Üzerinde
çatlak ya da yarık olan aksesuarı atın. ÇATLAMIŞ VEYA
HERHANGİ BİR ŞEKİLDE KUSURLU OLAN TAŞLAMA
DİSKLERİNİ KULLANMAYIN.
Aleti çalıştırırken bir dakika boyunca çalışmasına izin verin.
Disk ile aynı hizada insanlar varsa, aleti asla çalıştırmayın.
Bu koşul kullanıcı için de geçerlidir.
Özellikle bu amaç için tasarlanmış değil ise taşlama diskin
yanları ile taşlama etmeyin.
Disk sıkıştırma somununu aşırı sıkmayın. Bu, taşlama diskini
çatlatabilir.
Taşlama diski etrafındaki boşluğu düzenli olarak temizleyin.
Uyarı! Güçlü zımparalama, kesme, taşlama, delme ve diğer
inşaat faaliyetleri sırasında oluşturulan bazı tozlar, kansere,
doğum kusurlarına ve başka yeniden oluşabilen zararlara
sebep olduğu bilinen kimyasalları içerir. Bu kimyasal
maddelerin bazı örnekleri şunlardır:
Kurşun bazlı boyalardan kurşun,
tuğla, çimento ve diğer duvarcılık ürünlerinden silika
kristaline, ve kimyasal olarak işlenmiş keresteden arsenik ve
krom.
Yukarıdakilere maruz kalma riskiniz bu tip işleri ne kadar
sıklıkla yaptığınıza göre değişir. Bu kimyasallara maruz
kalma olasılığınızı azaltmak için: Aleti iyi havalandırmalı bir
yerde kullanın ve çalışırken özel mikroskobik partikülleri
filtrelemek için tasarlanmış olan toz maskesi gibi onaylı
koruyucu ekipmanları kullanın.
Koruyucu gözlük takın;
Hasar görmüş olan veya şekilsiz taşlama disklerini
kullanmayın.
Kıvılcım kalkanı ayarı sık sık yapılmalıdır; bu, disk
aşınmasını azaltacak ayrıca disk ve kalkan arasındaki
mesafeyi mümkün olduğu kadar düşük (ancak 2 mm’den
daha fazla değil) bırakır.
14
Page 15

(Original instructions)
ENGLISH
Iş parçası desteği ayarı kademeli olarak yapılmalıdır; bu,
disk aşınmasını azaltacak ayrıca disk ve iş parçası desteği
arasındaki mesafeyi mümkün olduğu kadar düşük (ancak 2
mm’den daha fazla değil) bırakır;
20 dakikalık (S2 20min) kesintisiz bir kullanımdan sonra
aletin soğumasını bekleyin)
Taşlama diskleri hakkında temel bilgiler
Taşlama diskini ayrı ambalaja koyun ve kuru ve iyi
havalandırılan bir alanda saklayın.
Montaj ve kullanım sırasında çeşitli kusurlar taşlama
disklerinin patlamasına yol açabilmektedir.
Sıradan taşlama diskleri genellikle daha büyük bir yanal
yüke dayanacak şekilde tasarlanmış değildir.
Kesim talaşını temizlemek için taşlama diskine vurmak
taşlama diskine her zaman zarar verir.
Bir dengesizliği olabilen taşlama diskleri kolayca
patlayabililer.
Taşlama diskinin balanssızlığı elmas yontma ile tamamen
giderilemez.
Yanlış bir şekilde saklanan taşlama diskleri alet açıldıktan
hemen sonra patlayabilir ya da küçük parçaları mermi gibi
tek tek uçar.
Sıkışmış aksesuarlarının çıkartılması. İş parçasına
uygulanan baskıyı azaltın ve taşlama diskleri yeniden
dönmeye başlayacaktır.
Kaldırma ve taşıma. Aleti durdurun ve yerinden sökün. Aleti,
rulman gövdesini alttan iki taraftan ve iki elinizi de kullanarak
kaldırın.
Iş parçası, diskler ve taban arasındaki boyut açılması için
uygun olmalıdır. Alet, usulüne uygun olarak üretilmiş
taşlama disklerini kullanarak metal zımparalama için özel
olarak tasarlanmış ve üretilmiştir. Taş motoru sadece bu
işler için kullanılmalıdır.
6. Alet üzerindeki etiketler
Alet üzerinde aşağıdaki semboller bulunabilir:
Kullanım
Kılavuzunu
Okuyun
Koruyucu
Gözlük kullanın
Kulaklık
Kullanın
V ........ Volt
A ........ Amper
Hz ....... Hertz
W ........ Vat
dak ..... dakika
Alternatif
.....
Akım
Direkt
.....
Akım
boş .......
Yüksüz
Hız
......
....
....
.../min..
Sınıf II
İnşaat
Topraklama
Terminal
Güvenlik
uyarısı
Sembolü
Dakikada
devir veya
gel git sayısı
Position of date barcode
The Date Code, which also includes the year of
manufacture, is printed into the housing.
Example:
2014 XX JN
Year of manufacturing
Ambalajın İçeriği
Ambalaj, aşağıdaki parçaları içermektedir:
1 Taş motoru
2 İş parçası desteği
2 Koruyucu siperlik
2 Montaj braketi
1 Kullanım kılavuzu
ÖZELLİKLER
Bu alet, aşağıdaki özelliklerin bir kısmını veya tümünü
içermektedir.
A. Kıvılcım muhafazası
B. Vida
C. İş parçası desteği
D. Flanş
E. Sıkıştırma somunu
F. Koruyucu kapak
15
Page 16

ENGLISH
(Original instructions)
7. Elektrik güvenliği
Uyarı! Elektrik kablosu hasarlı ise, bir tehlike
oluşmasını önlemek için üretici ya da yetkili
STANLEY Servis Merkezi tarafından
değiştirilmelidir. Elektrik kablosu STANLEY yetkili servisi
haricinde değiştirilirse, garanti geçerli olmayacaktır.
Tezgaha montajı
Taş motorunun fişi prizden çekilmiş olmalıdır.
Taş motorunu tezgah üzerinde yerleştirin. Taş motorun
kullanabileceği güç kaynağını kontrol edin. Delinecek delik
yerlerini işaretleyin.
Uygun çapta delikleri delin.
Pullara ve deliklere 6 mm altıgen başlı cıvataları sokun.
Ayrıca pulları tezgahın alt tarafından da kullanabilirsiniz.
Somunları sıkın. Aşırı sıkmayın. Taş motoru çalışma
sırasında lastik ayaklara titreşimi emmeye izin verin.
Koruyucu siperliklerin ve kıvılcım kalkanının takılması
(Şekil 1)
Aleti kapatın ve fişini şebekeden çekin. Koruyucu siperlikleri,
gözleriniz ve disklerin arasında olacak şekilde ayarlayın.
Not: Siperlikler koruyucu gözlük yerine kullanılması için
tasarlanmış değildir.
Kıvılcım kalkanının takılması
Vidayı B gevşetin (ama çıkartmayın).
Kıvılcım kalkanı A ve taşlama diski arasındaki mesafeyi
düzenli olarak kontrol edin (maks. 2 mm), gerekirse
ayarlama yapın.
Kıvılcım kalkanı A en fazla 2 mm'lik azami mesafe
ayarlanabilir noktasına aşınmış ise, taşlama diskini
değiştirin.
İş parçası desteklerinin takılması (Şekil 2)
Aleti kapatın ve fişini şebekeden çekin. Braketleri ve iş
parçası desteklerini yerinde sabitlemek için plastik poşette
bulunan cıvataları, pulları, destek parçalarını ve sıkıştırma
somunları kullanın.
Uyarı: Aletle birlikte verilmiş olan pulları ve
vidaları kullanın. Daha uzun vidalar taşlama
diskin dönmesine engel olabilir.
İş parçası desteği C ve taşlama diski arasındaki mesafeyi
düzenli olarak kontrol edin (maks. 2mm), gerekirse ayarlama
yapın.
İş parçasını çalışma alanında yerleştirin.
Kullanım
Sıkıca bir tezgah ya da sert çerçeveye sabitlenmiş değilse
bir taş motorunu asla kullanmayın. Taş motorunu
çalıştırmadan önce koruyucu gözlük takın. Taş motorunu
çalıştırın ve tam hıza ulaşmasını bekleyin (2950 dev./dak.).
İş parçasını destek üzerinde sıkı tutun. Çok ufak iş parçaları
pense veya diğer uygun kelepçeler ile sabitleyin. İş parçasını
yumuşak ve eşit bir şekilde taşlama diskine yaklaştırın. İş
parçasını yavaşça hareket ettirin ve taşlama diskinde
sıkışmasından kaçının. Disk yavaşlama eğilimine girmiş
olduğunda baskıyı azaltın ve diskin tam hızına ulaşmasına
izin verin.
Taşlama işleri sadece disk yüzeğinde yapın; diskin yan
taraflarını asla kullanmayın. (Bazı diskler yan taşlama için
tasarlanmıştır; bu onların kullanım talimatlarında yazılmıştır).
Uyarı: Uzun süreli taşlama çoğu malzemelerin
sıcak hale gelmesine neden olabilir. Bu
malzemeleri pense yardımı ile tutun.
Tetik
Açma/kapama tetiği taş motorunun tabanında ön tarafta
bulunmaktadır. Aleti açmak için, açma/kapama tetiğinin «I»
işaretli sağ kısmına basın. Aleti kapatmak için, açma/kapama
tetiğinin «O» işaretli sol kısmına basın.
Aksesuarları değiştirme
Aleti kapatın ve fişini şebekeden çekin. Sadece 152 mm çapı
olan diskleri kullanın. Bu aletin iki tarafında 13 mm çapında
göbekler vardır. Aksesuarı çıkartmak ve yeniden takmak için
aşağıdaki talimatlara uyun.
Taşlama disklerinin takılması (ŞEKİL 3)
Aletin fişini şebekeden çıkarın
Sadece uygun olan maksimum hız, her zaman aletin
üzerindeki etikette belirtilen yüksüz hıza eşit veya bu hızdan
daha yüksek olan diskleri kullanın
16
Page 17

(Orijinal talimatlar)
TÜRKÇE
Sadece orijinal Stanley taşlama disklerini kullanın.
3 vidayı B gevşetin (ama çıkartmayın) ve koruyucu kapağı F
çıkartın.
Anahtar kullanarak sıkıştırma somunu E sökün.
Sıkıştırma flanşı D ve taşlama diskini çıkartın.
Ters sırayla yeni taşlama diskini takın.
Yeni taşlama disk ile ses testi yapın ve tehlikeli alanın
dışında kalarak aletin en az 5 dakika süre ile yüksüz
çalışmasına izin verin)
Bakım
Aletiniz minimum bakımla uzun bir süre çalışacak şekilde
tasarlanmıştır. Kesintisiz olarak memnuniyet verici bir şekilde
çalışması gerekli özenin gösterilmesine ve düzenli temizliğe
bağlıdır.
Uyarı! Bakımdan önce aletin kapalı ve fişinin çekilmiş
olduğundan emin olun.
Aletinizdeki havalandırma deliklerini yumuşak bir fırça veya
kuru bir bezle düzenli olarak temizleyin.
Motor muhafazasını düzenli olarak nemli bir bezle silin.
Aşındırıcı veya çözücü bazlı temizleyiciler kullanmayın.
Temizleme
Basınçlı havayı kullanarak disk muhafızların toz ve kum
temizlemesi gerekli düzenli bir bakım işlemidir. Metal içeren
toz ve parçacıklar sıkça iç yüzeylerde birikir ve düzenli
olarak temizlenmezse elektrik şoku tehlikesine neden
olabilir.
HER ZAMAN KORUYUCU GÖZLÜK TAKIN.
Uyarı! Aletin metalik olmayan parçalarını temizlemek için
asla çözücü veya başka sert kimyasal kullanmayın. Sadece
temiz ve kuru bez kullanın.
Aksesuarlar
Aletinizin performansı kullanılan aksesuara bağlıdır.
STANLEY aksesuarları, yüksek kalite standartlarına göre
üretilmiş ve aletinizin performansını arttıracak şekilde
tasarlanmıştır. Bu aksesuarları kullanarak, aletinizden en iyi
verimi alacaksınız.
Teknik özellikler
STGB3715
Voltaj 230 V
Frekans 50 Hz
Güç 373 W
Yüksüz hızı 2950 dev/dak
Disk çapı 152 mm
Kablo uzunluğu 1 m
Ağırlık 8,6 kg
Servis bilgileri
STANLEY, kendisine ait ve yetkili servisler ile tam bir servis
ağı sunmaktadır. Tüm STANLEY Servis Merkezleri
müşterilere etkili ve güvenilir elektrikli el aleti hizmeti sunmak
için eğitimli personel ile donatılmıştır. Yetkili servis
merkezlerimiz hakkında daha fazla bilgi almak istiyorsanız
veya teknik danışmanlık, onarım ya da orijinal fabrika yedek
parçası ihtiyacınız varsa, size en yakın STANLEY satış
noktasına başvurun.
LpA (ses basıncı) dB(A) 58,0
KpA (ses basıncı belirsizlii) dB(A) 3
LWA (akustik güç) dB(A) 72,5
KWA (akustik gücü belirsizlii) dB(A) 3
17
Page 18

TÜRKÇE
(Orijinal talimatlar)
Çevrenin korunması
Ayrı olarak atın. Bu ürün, normal evsel atıklarla
birlikte atılmamalıdır.
STANLEY ürününüzün değiştirilmesi gerektiğini düşünmeniz
veya artık kullanılamaz durumda olması halinde onu, evsel
atıklarla birlikte atmayın. Bu ürünü, ayrı olarak toplanacak
şekilde atın.
Kullanılmış ürünlerin ve ambalajların ayrı olarak
toplanması bu maddelerin geri dönüşüme sokularak
yeniden kullanılmasına olanak tanır. Geri dönüşümlü
maddelerin tekrar kullanılması çevre kirliliğinin önlenmesine
yardımcı olur ve ham madde ihtiyacını azaltır.
Yerel yönetmelikler, elektrikli ürünlerin evlerden toplanıp
belediye atık tesislerine aktarılması veya yeni bir ürün satın
alırken perakende satıcı tarafından toplanması yönünde
hükümler içerebilir. STANLEY, hizmet ömrünün sonuna
ulaşan STANLEY ürünlerinin toplanması ve geri dönüşüme
sokulması için bir imkân sunmaktadır. Bu hizmetin
avantajlarından faydalanmak için, lütfen, ürününüzü bizim
adımıza teslim alacak herhangi bir yetkili servise iade edin.
Bu kılavuzda belirtilen listeden size en yakın STANLEY
yetkili tamir servisinin yerini öğrenebilirsiniz. Ya da, alternatif
olarak internet’ten STANLEY yetkili tamir servislerinin
listesini ve satış sonrası hizmetlerimizle ilgili tüm bilgiler ve
temas bilgilerine aşağıdaki siteden ulaşabilirsiniz.
www.2helpU.com
AT Uygunluk Beyanatı
MAKİNE DİREKTİFİ
STGB3715
STANLEY, «teknik özellikleri» bölümünde açıklanan bu
ürünlerin aşağıda belirtilen yönergelere uygun olduğunu
beyan eder: 2006/42/EC, EN 61029-1, EN 61029-2-4
Bu ürünler ayrıca 2014/30/EU ve 2011/65/EU Direktiflerine
de uygundur. Daha fazla bilgi için, lütfen aşağıdaki adresten
STANLEY ile irtibata geçin veya kılavuzun arkasına bakın.
Bu belge altında imzası bulunan yetkili, teknik dosyanın
derlenmesinden sorumludur ve bu beyanı STANLEY adına
vermiştir.
R.Laverick
Mühendislik Bölümü Müdürü
STANLEY , Europe, Egide Walschaertsstraat14-18,
2800 Mechelen, Belgium
01.2015
18
Page 19

İki yıl tam garanti
Sahip olduğunuz STANLEY ürünü satın alma tarihinden
itibaren 24 ay içinde hatalı malzeme veya işçilik nedeniyle
bozulursa, STANLEY Europe aşağıdaki şartlara uyulması
koşuluyla ücretsiz olarak tüm kusurlu parçaların
yenilenmesini veya -kendi inisiyatifine bağlı olarak- satın
alınan ürünün değiştirilmesini garanti eder:
Ürün, hatalı kullanılmamış kullanım kılavuzuna uygun
kullanılmıştır.
Ürün yıpranmamış, hırpalanmamış ve aşınmamıştır;
Yetkili olmayan kişilerce tamire çalışılmamıştır.
Satın alma belgesi (fatura) ibraz edilmiştir.
STANLEY ürünü, tüm orijinal parçaları ile birlikte iade
edilmiştir
Garanti talebinde bulunmak için, lütfen satıcıyla irtibata geçin
veya STANLEY katalogunda belirtilen size en yakın
STANLEY yetkili satıcı adresini kontrol edin veya ürünün
kılavuzunda belirtilen adresteki yerel STANLEY yetkili tamir
servisi ile temas kurun. İnternet’ten Stanley yetkili tamir
servislerinin listesine ve satış sonrası hizmetlerimizle ilgili
tüm bilgilerine aşağıdaki siteden ulaşabilirsiniz:
www.stanleytools.com
(Orijinal talimatlar)
TÜRKÇE
19
Page 20

Sanayi ve Ticaret Bakanlığı tebliğince kullanım ömrü 7 yıldır.
Türkiye Distribütörü
STANLEY BLACK&DECKER TURKEY ALET URETIM SAN. TIC. LTD.STI.
Kozyatağı Mh Değirmen Sk. Nida Kule No:18 Kat:6
34742 Kadıköy İstanbul
Tel: (0216) 665 29 00
Faks: (0216) 665 29 01
E-posta:
 Loading...