

Page 1

STDH6513C
English(Original) Page 4
Turkish Page 7
Page 2
ENGLISH
2
(Original instructions)
7
6 7
3
6
7
5
3
1
2
4
0
1
2
3
4
5
6
7
8
9
10
11
12
13
14
15
16
17
18
19
20
0
1
2
3
4
5
6
7
8
9
10
11
12
13
14
15
16
17
18
19
20
Page 3
3
ENGLISH
(Original instructions)
5
8
Page 4
4
ENGLISH
Intended use
Your STANLEY percussion drill has been designed for
drilling in wood, metal and plastics and masonry as well as
for screwdriving purposes.
Safety instructions
General power tool safety warnings
WARNING! Read all safety warnings and all
instructions. Failure to follow the warnings and
instructions listed below may result in electric
shock, fire and/or serious injury.
Save all warnings and instructions for future reference.
The term "power tool" in all of the warnings listed below
refers to your mains operated (corded) power tool or battery
operated (cordless) power tool.
1. Work area safety
a. Keep work area clean and well lit. Cluttered or dark
areas invite accidents.
b. Do not operate power tools in explosive
atmospheres, such as in the presence of flammable
liquids, gases or dust. Power tools create sparks
which may ignite the dust or fumes.
c. Keep children and bystanders away while operating
a power tool. Distractions can cause you to lose
control.
2. Electrical safety
a. Power tool plugs must match the outlet. Never
modify the plug in any way. Do not use any adapter
plugs with earthed (grounded) power tools.
Unmodified plugs and matching outlets will reduce risk
of electric shock.
b. Avoid body contact with earthed or grounded
surfaces such as pipes, radiators, ranges and
refrigerators. There is an increased risk of electric
shock if your body is earthed or grounded.
c. Do not expose power tools to rain or wet conditions.
Water entering a power tool will increase the risk of
electric shock.
d. Do not abuse the cord. Never use the cord for
carrying, pulling or unplugging the power tool. Keep
cord away from heat, oil, sharp edges or moving
parts. Damaged or entangled cords increase the risk of
electric shock.
e. When operating a power tool outdoors, use an
extension cord suitable for outdoor use. Use of a cord
suitable for outdoor use reduces the risk of electric
shock.
f. If operating a power tool in a damp location is
unavoidable, use a residual current device (RCD)
protected supply. Use of an RCD reduces the risk of
electric shock.
3. Personal safety
a. Stay alert, watch what you are doing and use
common sense when operating a power tool. Do not
use a power tool while you are tired or under the
influence of drugs, alcohol or medication. A moment
of inattention while operating power tools may result in
serious personal injury.
b. Use personal protective equipment. Always wear eye
protection. Protective equipment such as dust mask,
non-skid safety shoes, hard hat, or hearing protection
used for appropriate conditions will reduce personal
injuries.
c. Prevent unintentional starting. Ensure the switch is
in the off-position before connecting to power
source and/or battery pack, picking up or carrying
the tool. Carrying power tools with your finger on the
switch or energising power tools that have the switch on
invites accidents.
d. Remove any adjusting key or wrench before turning
the power tool on. A wrench or a key left attached to a
rotating part of the power tool may result in personal
injury.
e. Do not overreach. Keep proper footing and balance
at all times. This enables better control of the power tool
in unexpected situations.
f. Dress properly. Do not wear loose clothing or
jewellery. Keep your hair, clothing and gloves away
from moving parts. Loose clothes, jewellery or long hair
can be caught in moving parts.
(Original instructions)
Page 5

5
ENGLISH
(Original instructions)
g. If devices are provided for the connection of dust
extraction and collection facilities, ensure these are
connected and properly used. Use of dust collection
can reduce dust-related hazards.
4. Power tool use and care
a. Do not force the power tool. Use the correct power
tool for your application. The correct power tool will do
the job better and safer at the rate for which it was
designed.
b. Do not use the power tool if the switch does not turn
it on and off. Any power tool that cannot be controlled
with the switch is dangerous and must be repaired.
c. Disconnect the plug from the power source and/or
the battery pack from the power tool before making
any adjustments, changing accessories, or storing
power tools. Such preventive safety measures reduce
the risk of starting the power tool accidentally.
d. Store idle power tools out of the reach of children
and do not allow persons unfamiliar with the power
tool or these instructions to operate the power tool.
Power tools are dangerous in the hands of untrained
users.
e. Maintain power tools. Check for misalignment or
binding of moving parts, breakage of parts and any
other condition that may affect the power tools
operation. If damaged, have the power tool repaired
before use. Many accidents are caused by poorly
maintained power tools.
f. Keep cutting tools sharp and clean. Properly
maintained cutting tools with sharp cutting edges are
less likely to bind and are easier to control.
g. Use the power tool, accessories and tool bits etc. in
accordance with these instructions, taking into
account the working conditions and the work to be
performed. Use of the power tool for operations
different from those intended could result in a hazardous
situation.
5. Service
a. Have your power tool serviced by a qualified repair
person using only identical replacement parts. This
will ensure that the safety of the power tool is
maintained.
Additional power tool safety warnings
Warning! Additional safety warnings for grinding,
sanding, wire brushing, polishing or abrasive
cuttingoff operations
• Wear ear protectors. Exposure to noise can cause
hearing loss.
• Use auxiliary handles supplied with the tool. Loss of
control can cause personal injury.
• Hold power tool by insulated gripping surfaces when
performing an operation where the cutting accessory
may contact hidden wiring or its own cord.Cutting
ac-cessory contacting a "live" wire may make exposed
metal parts of the power tool "live" and could give the
operator an electric shock.
• Use clamps or another practical way to secure and
support the workpiece to a stable platform. Holding the
work by hand or against your body leaves it unstable and
may lead to loss of control.
• Before drilling into walls, floors or ceilings, check for the
location of wiring and pipes.
• Avoid touching the tip of a drill bit just after drilling, as it
may be hot.
• The intended use is described in this instruction manual.
The use of any accessory or attachment or performance
of any operation with this tool other than those
recommended in this instruction manual may present a
risk of personal injury and/or damage to property.
Vibration
The declared vibration emission values stated in the
technical data and the declaration of conformity have been
measured in accordance with a standard test method
provided by EN 60745 and may be used for comparing one
tool with another. The declared vibration emission value may
also be used in a preliminary assessment of exposure.
Warning! The vibration emission value during actual use of
the power tool can differ from the declared value depending
on the ways in which the tool is used. The vibration level
may increase above the level stated.
When assessing vibration exposure to determine safety
measures required by 2002/44/EC to protect persons
regularly using power tools in employment, an estimation of
vibration exposure should consider, the actual conditions of
use and the way the tool is used, including taking account of
all parts of the operating cycle such as the times when the
tool is switched off and when it is running idle in addition to
the trigger time.
Page 6
6
ENGLISH
Electrical safety
This tool is double insulated; therefore no earth wire is
required. Always check that the power supply corresponds to
the voltage on the rating plate.
• If the supply cord is damaged, it must be replaced by the
manufacturer or an authorised STANLEY Service Centre
in order to avoid a hazard.
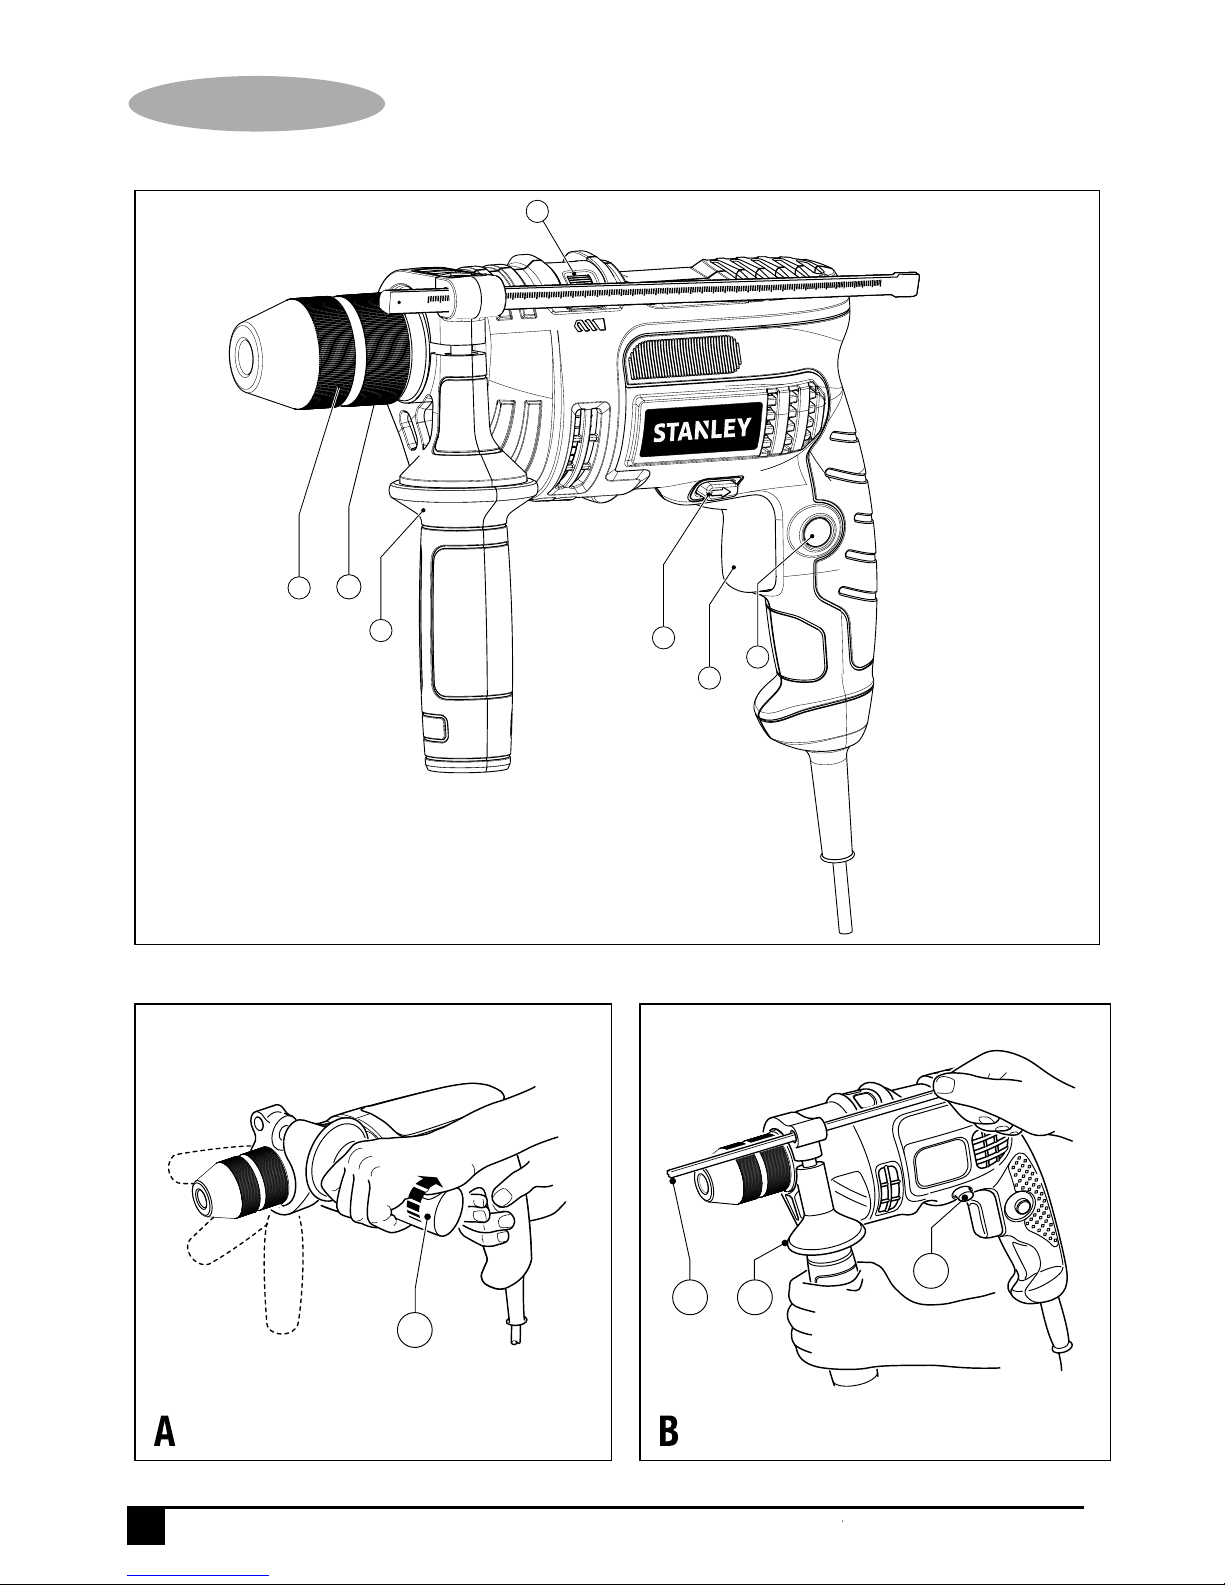
Features
This tool includes some or all of the following features.
1. Variable speed switch
2. Lock-on button
3. Forward/reverse button
4. Drilling mode selector
5. Chuck
The following accessories may not be available with your
unit
6. Depth stop
7 Side handle
Assembly
Warning! Before assembly, make sure that the tool is
switched off and unplugged
Fitting the side handle and depth stop (fig. A, B)
• Turn the grip counter clockwise until you can slide the
side handle (7) onto the front of the tool as shown
(fig. A).
• Rotate the side handle into the desired position.
• Insert the depth stop (6) into the mounding hole as
shown (Fig.B)
• Set the drilling depth as described below.
• Tighten the side handle by tuming the grip clockwise.
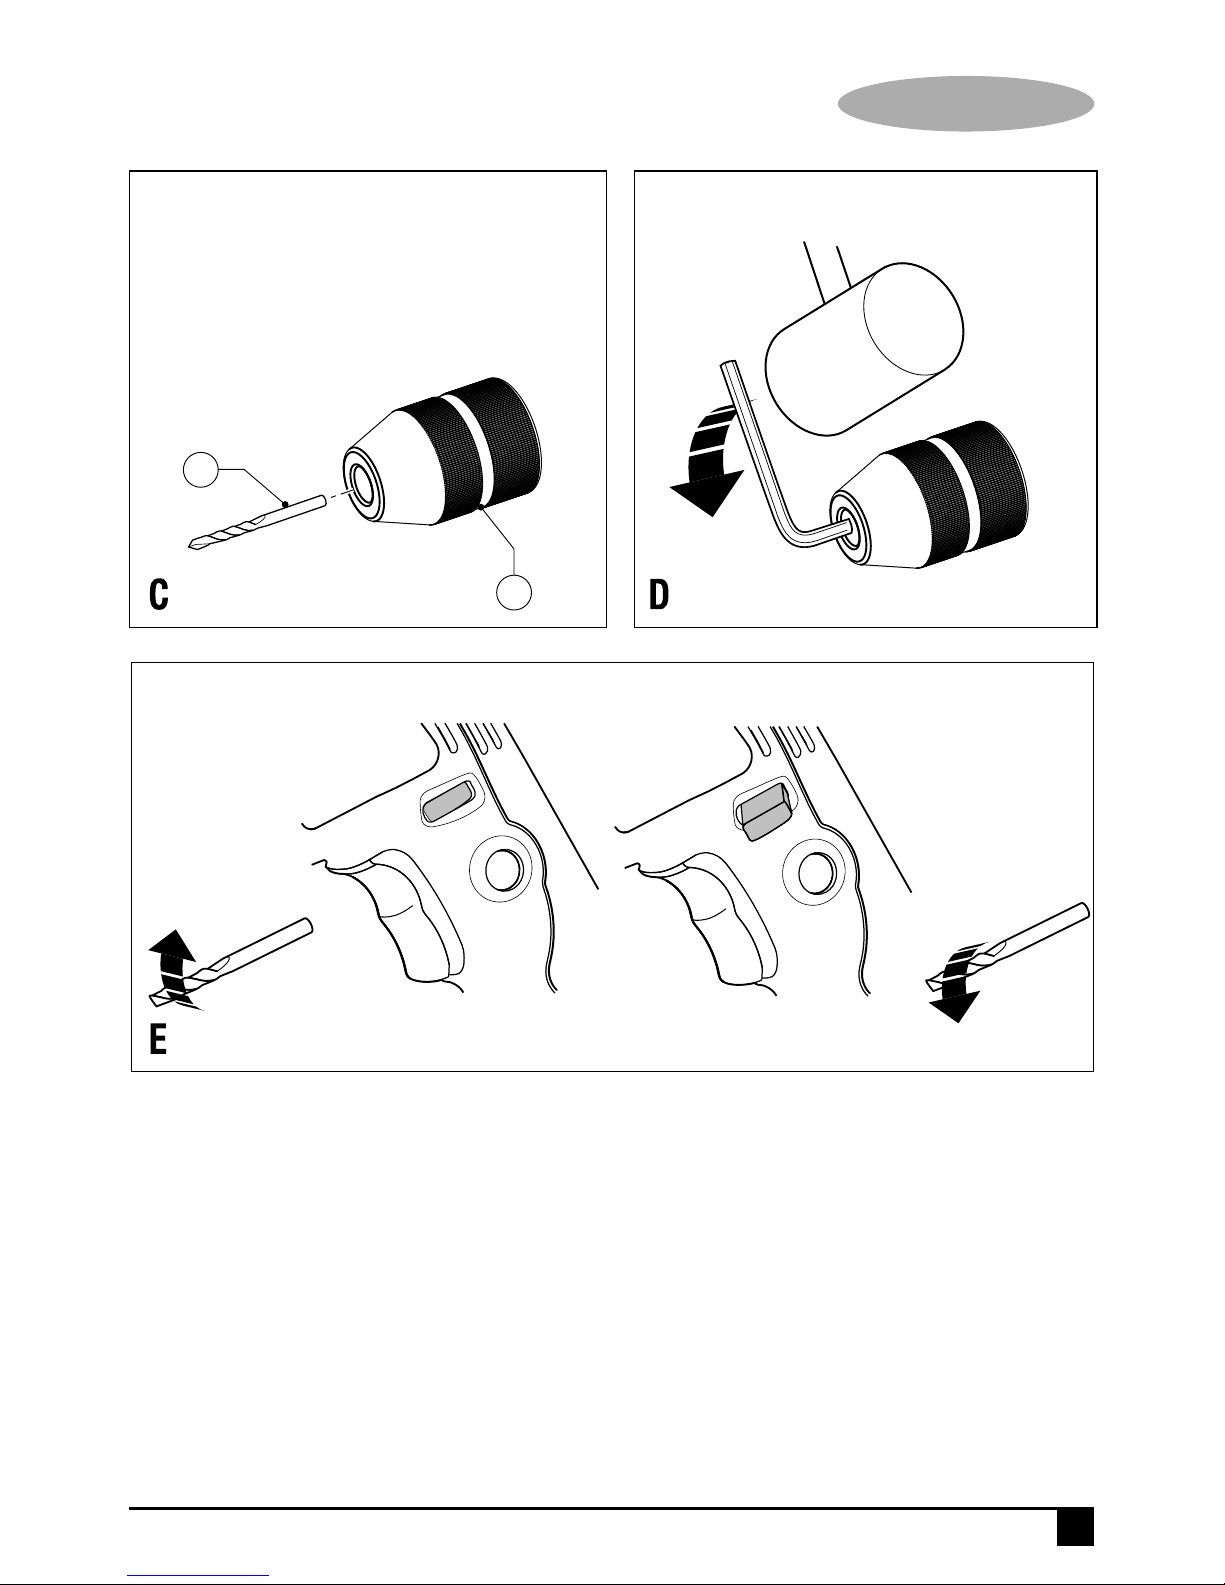
Fitting a drill bit (Fig.C)
• Open the chuck by turning the sleeve (5) counter
clockwise.
• Insert the bit shaft (8) into the chuck ( drill bit not
included)
Removing and refitting the chuck (Fig.D)
• Open the chuck as far as possible.
• Remove the chuck retaining screw, located in the chuck,
by turning it clockwise using a screwdriver.
• Tighten an Allen key. Remove the chuck by turning it
counter clockwise.
• To refit the chuck, screw it onto the spindle and secure it
with the chuck retaining screw.
Residual risks
Additional residual risks may arise when using the tool which
may not be included in the enclosed safety warnings. These
risks can arise from misuse, prolonged use etc.
Even with the application of the relevant safety regulations
and the implementation of safety devices, certain residual
risks cannot be avoided. These include:
• Injuries caused by touching any rotating/moving parts.
• Injuries caused when changing any parts, blades or
accessories.
• Injuries caused by prolonged use of a tool. When using
any tool for prolonged periods make sure you take
regular breaks.
• Impairment of hearing.
• Health hazards caused by breathing dust developed
when using your tool (example:- working with wood,
especially oak, beech and MDF).
(Original instructions)
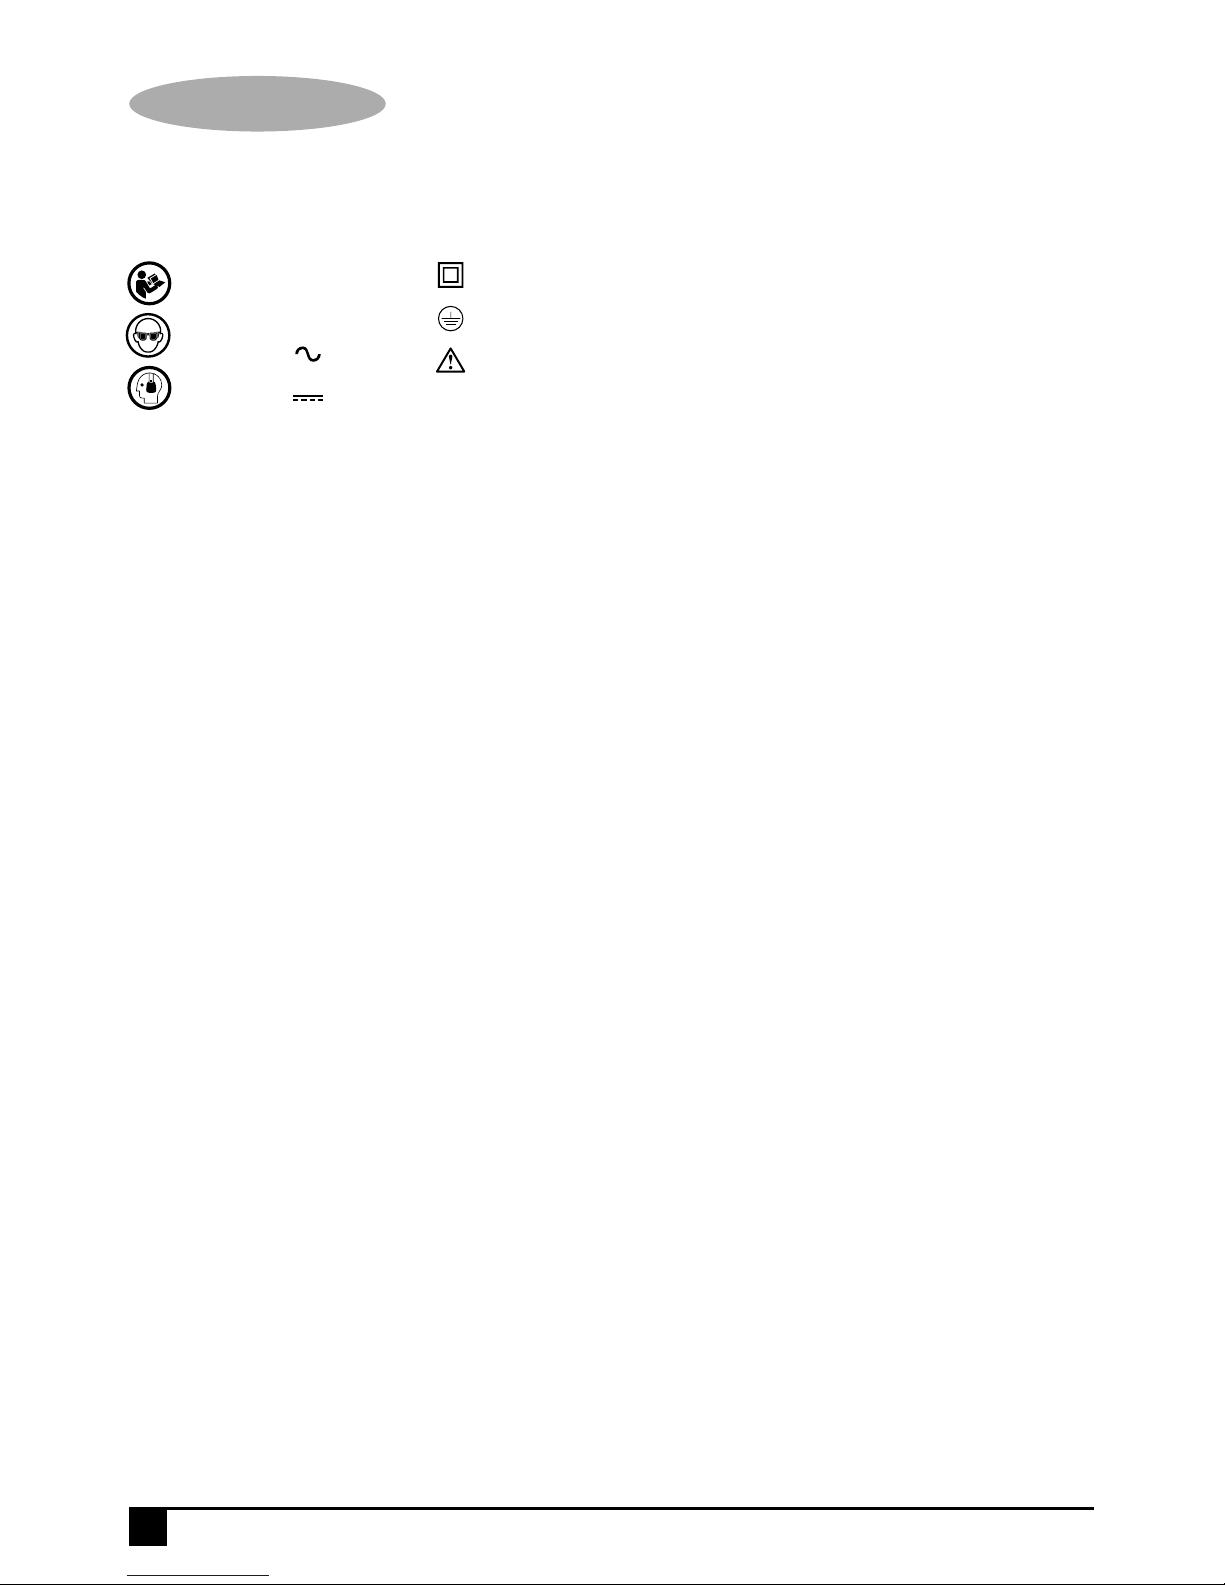
Read
Instructions
Manual
Use Eye
Protection
Use Ear
Protection
V ........ Volts
A ........ Amperes
Hz ....... Hertz
W ........ Watts
min ..... minutes
..... Alternating
Current
..... Direct
Current
n
0
....... No-Load
Speed
...... Class II
Construction
.... Earthing
Terminal
.... Safety Alert
Symbol
.../min.. Revolutions
or Reciprocation per
minute
Labels on tool
The label on your tool may include the following symbols:
Position of date barcode
The Date Code, which also includes the year of
manufacture, is printed into the housing.
Example:
2014 XX JN
Year of manufacturing
Page 7

USE
Warning! Let the tool work at its own pace. Do not
overload.
Warning! Before drilling into walls , floors or ceilings, check
for the location of wiring and pipes.
Selecting the direction of rotation (fig.E)
For drilling and for tightening screws, use forward
(clockwise) rotation. For loosening screws or removing a
jammed drill bit, use reverse (counter clockwise) rotation.
• To select forward rotation, push the forward/ reverse
button (3) to the left position.
• To select reverse rotation, push the forward /reverse
button to the right.
Warning! Never change the direction of rotation while the
motor is running.
Selecting the drilling mode
• For drilling in masonry, set the drilling mode selector (4)
to the position.
• For drilling in other materials and for screwdriving, set
the drilling mode selector to the 1 position.
Setting the drilling depth (fig.B)
• Slacken the side handle (7) by turning the grip counter
clockwise.
• Set the depth stop (6) to the desired position. The
maximum drilling depth is equal to the distance between
the tip of the drill bit and the front end of the depth stop.
• Tighten the side handle by turning the grip clockwise.
Switching on and off
• To switch the tool on, press the variable speed switch(1).
The tool speed depends on how far you press the
switch. As a general rule, use low speeds for large
diameter drill bits and high speeds for smaller diameter
drill bits.
• For continuous operation, press the lock-on button (2)
and release the variable speed switch. This option is
available only at full speed in both forward and reverse
modes.
• To switch the tool off, release the variable speed switch.
To switch the tool off when in continuous operation,
press the variable speed switch again and release it.
Maintenance
Your STANLEY power tool has been designed to
operate over a long period of time with a minimum
of maintenance. Continuous satisfactory operation
depends upon proper tool care and regular cleaning.
Important
To ensure product SAFETY and RELIABILITY, repairs,
maintenance and adjustment ( other than those listed in this
manual) should be performed by authorized service centers
or other qualified organizations, always –using identical
replacement parts inside.
Cleaning
Warning! Blow dirt and dust out the main housing with dry
air as often as dirt is seen collecting in and around the air
vents. Wear approved eye protection and approved dust
mask when performing this procedure.
Warning! Never use solvents or other harsh chemicals for
cleaning the non – metallic parts of the tool. These
chemicals may weaken the materials used in these parts.
Use a cloth dampened only with water and mild soap. Never
let any liquid get inside the tool; never immerse any part of
the tool into a liquid.
Accessories
The performance of any power tool is dependent upon the
accessory used. STANLEY accessories are engineered to
high quality standards and are designed to enhance the
performance of power tool.
STANLEY offers a large selection of accessories available at
our local dealer or authorized service center at extra cost.
Caution: The use of any other accessory not
recommended for use with this tool could be hazardous.
Service Information
STANLEY offers a full network of company-owned and
authorized service locations throughout Europe. All
STANLEY Service Centers are staffed with trained
personnel to provide customers with efficient and reliable
power tool service. Whether you need technical advice,
repair , or genuine factory replacement parts, contact the
STANLEY location nearest to you.
7
ENGLISH
(Original instructions)
Page 8

8
ENGLISH
Protecting the environment
Separate collection. This product must not be
disposed of with normal household waste.
Should you find one day that your STANLEY product needs
replacement, or if it is of no further use to you, do not
dispose of it with household waste. Make this product
available for separate collection.
Separate collection of used products and packaging
allows materials to be recycled and used again.
Re-use of recycled materials helps prevent
environmental pollution and reduces the demand for raw
materials.
Local regulations may provide for separate collection of
electrical products from the household, at municipal waste
sites or by the retailer when you purchase a new product.
STANLEY provides a facility for the collection and recycling
of STANLEY products once they have reached the end of
their working life. To take advantage of this service please
return your product to any authorised repair agent who will
collect them on our behalf.
You can check the location of your nearest authorised repair
agent by contacting your local STANLEY office at the
address indicated in this manual. Alternatively, a list of
authorised STANLEY repair agents and full details of our
after-sales service and contacts are available on the Internet
at: www.2helpU.com
(Original instructions)
Level of sound pressure according to EN 60745:
Sound pressure (L
pA
) 101 dB(A), uncertainty (K) 3 dB(A)
Sound power (LWA) 112 dB(A), uncertainty (K) 3 dB(A)
Vibration total values (triax vector sum) according to
EN 60745:
Impact drilling into concrete (a
h, ID
)= 17.97 m/s²,
uncertainty (K) = 1.5 m/s²
Drilling into Metal (a
h, D
)= 3.37 m/s²,
uncertainty (K) = 1.5 m/s²
Notes
• STANLEY’s policy is one of continuous improvement to
our products and, as such , we reserve the right to
change product specifications without prior notice.
• Standard equipment and accessories may vary by
country.
• Product specifications may differ by country.
• Complete product range may not be available in all
countries. Contact your local STANLEY dealers for range
availability.
Technical Data
Drill STDH6513C
Power W 650
Voltage V 220-240
Frequency Hz 50/60
No Load Speed /min 0-2800
Reverse Yes
Max. Drilling Capacity
Wood/Steel/Masonry mm 30/13/16
Cable Length m 2
Page 9

9
ENGLISH
Two year full warranty
If your STANLEY product becomes defective due to faulty
materials or workmanship within 24 months from the date of
purchase, STANLEY Europe guarantees to replace all
defective parts free of charge or – at our discretion – replace
the unit free of charge provided that:
• The product has not been misused and has been used in
accordance with the instruction manual.
• The product has been subject to fair wear and tear;
• Repairs have not been attempted by unauthorised
persons;
• Proof of purchase is produced.
• The STANLEY product is returned complete with all
original components
If you wish to make a claim, contact your seller or check the
location of your nearest authorised STANLEY repair agent in
the STANLEY catalogue or contact your local STANLEY
office at the address indicated in this manual. A list of
authorised STANLEY repair agents and full details of our
after sales service is available on the internet
at:www.stanleytools.com
(Original instructions)
STANLEY declares that these products described under
"technical data" are in compliance with:
2006/42/EC, EN 60745-1, EN 60745-2-1
These products also comply with Directive
2014/30/EU and 2011/65/EU. For more information, please
contact STANLEY at the following address or refer to the
back of the manual.
The undersigned is responsible for compilation of the
technical file and makes this declaration on behalf of
STANLEY.
R.Laverick
Engineering Manager
STANLEY , Europe, Egide Walschaertsstraat14-18,
2800 Mechelen, Belgium
01.2015
EC declaration of conformity
MACHINERY DIRECTIVE
STDH6513C
Page 10

10
TÜRKÇE
(Orijinal talimatlar)
Kullanım amacı
STANLEY darbeli matkabınız ahşap, metal, plastik ve duvar
delme işleri ve ayrıca vida takma/sökme uygulamaları için
tasarlanmıştır.
Güvenlik talimatları
Genel elektrikli alet güvenlik uyarıları
UYARI! Bütün güvenlik uyarılarını ve talimatlarını
mutlaka okuyun. Aşağıda yer alan uyarılar ve
talimatların herhangi birisine uyulmaması elektrik
çarpması, yangın ve/veya ciddi yaralanma riskine neden
olabilir.
Bütün uyarı ve güvenlik talimatlarını ileride bakmak
üzere saklayın.
Aşağıda yer alan uyarılardaki «elektrikli alet» terimi şebeke
elektriğiyle (kablolu) veya akü/pille (şarjlı) çalışan elektrikli
aletinizi ifade etmektedir.
1. Çalışma alanının güvenliği
Çalışma alanını temiz ve aydınlık tutun. Karışık veya
karanlık alanlar kazaya davetiye çıkartır.
Elektrikli aletleri, yanıcı sıvılar, gazlar ve tozların
bulunduğu yerler gibi yanıcı ortamlarda çalıştırmayın.
Elektrikli aletler, toz veya dumanları ateşleyebilecek
kıvılcımlar çıkartır.
Bir elektrikli aleti çalıştırırken çocuklardan ve etraftaki
kişilerden uzak tutun. Dikkatinizi dağıtıcı şeyler kontrolü
kaybetmenize neden olabilir.
2. Elektrik güvenliği
Elektrikli aletlerin fişleri prizlere uygun olmalıdır. Fiş
üzerinde kesinlikle hiçbir değişiklik yapmayın. Topraklı
elektrikli aletlerde hiçbir adaptör fişi kullanmayın.
Değiştirilmemiş fişler ve uygun prizler elektrik çarpması
riskini azaltacaktır.
Borular, radyatörler, ocaklar ve buzdolapları gibi
topraklanmamış yüzeylerle vücut temasından kaçının.
Vücudunuzun topraklanması halinde yüksek bir elektrik
çarpması riski vardır.
Elektrikli aletleri yağmura maruz bırakmayın veya
ıslatmayın. Elektrikli alete su girmesi elektrik çarpması
riskini arttıracaktır.
Elektrik kablosunu uygun olmayan amaçlarla
kullanmayın. Elektrikli aleti kesinlikle kablosundan
tutarak taşımayın, çekmeyin veya prizden çıkartmayın.
Kabloyu sıcaktan, yağdan, keskin kenarlardan veya
hareketli parçalardan uzak tutun. Hasarlı veya dolaşmış
kablolar elektrik çarpması riskini arttırır.
Elektrikli bir aleti açık havada çalıştırıyorsanız, açık
havada kullanıma uygun bir uzatma kablosu kullanın.
Açık havada kullanıma uygun bir kablonun kullanılması
elektrik çarpması riskini azaltır.
Eğer bir elektrikli aletin nemli bir bölgede çalıştırılması
zorunluysa, bir artık akım aygıtı (RCD) korumalı bir
kaynak kullanın. Bir RCD kullanılması elektrik şoku riskini
azaltır.
3. Kişisel güvenlik
Elektrikli bir aleti kullanırken her zaman dikkatli olun,
yaptığınız işe yoğunlaşın ve sağduyulu davranın.
Elektrikli bir aleti yorgunken veya ilaç ya da alkolün
etkisi altındayken kullanmayın. Elektrikli aletleri
kullanırken bir anlık dikkatsizlik ciddi kişisel yaralanmayla
sonuçlanabilir.
Kişisel koruyucu ekipmanları mutlaka kullanın. Daima
koruyucu gözlük takın. Koşullara uygun toz maskesi,
kaymayan güvenlik ayakkabıları, baret veya kulaklık gibi
koruyucu donanımların kullanılması kişisel yaralanmaları
azaltacaktır.
İstem dışı çalıştırılmasını önleyin. Aleti güç kaynağına
ve/veya aküye bağlamadan, yerden kaldırmadan veya
taşımadan önce düğmenin kapalı konumda olduğundan
emin olun. Aleti, parmağınız düğme üzerinde bulunacak
şekilde taşımak veya açık konumdaki elektrikli aletleri
elektrik şebekesine bağlamak kazaya davetiye çıkartır.
Elektrikli aleti açmadan önce tüm ayarlama anahtarlarını
çıkartın. Elektrikli aletin hareketli bir parçasına takılı kalmış
bir anahtar kişisel yaralanmaya neden olabilir.
Ulaşmakta zorlandığınız yerlerde kullanmayın. Daima
sağlam ve dengeli basın. Bu, beklenmedik durumlarda
elektrikli aletin daha iyi kontrol edilmesine olanak tanır.
Uygun şekilde giyinin. Bol elbiseler giymeyin ve takı
takmayın. Saçınızı, elbiselerinizi ve eldivenlerinizi
hareketli parçalardan uzak tutun. Bol elbiseler ve takılar
veya uzun saç hareketli parçalara takılabilir.
Page 11

11
TÜRKÇE
(Orijinal talimatlar)
Eğer kullandığınız üründe toz emme ve toplama
özellikleri olan ataşmanlar varsa bunların bağlı
olduğundan ve doğru şekilde kullanıldığından emin
olun. Bu toz toplama ataşmanların kullanılması tozla ilgili
tehlikeleri azaltabilir.
4. Elektrikli aletlerin kullanımı ve bakımı
Elektrikli aleti zorlamayın. Uygulamanız için doğru
elektrikli aleti kullanın. Doğru elektrikli alet, belirlendiği
kapasite ayarında kullanıldığında daha iyi ve güvenli
çalışacaktır.
Düğme açmıyor ve kapatmıyorsa elektrikli aleti
kullanmayın. Düğmeyle kontrol edilemeyen tüm elektrikli
aletler tehlikelidir ve tamir edilmesi gerekmektedir.
Herhangi bir ayarlama, aksesuar değişimi veya elektrikli
aletlerin saklanması öncesinde fişi güç kaynağından
çekin ve/veya aküyü elektrikli aletten ayırın. Bu tür
önleyici güvenlik tedbirleri aletin istem dışı olarak
çalıştırılması riskini azaltacaktır.
Elektrikli aleti, çocukların ulaşamayacağı yerlerde
saklayın ve elektrikli aleti tanımayan veya bu talimatları
bilmeyen kişilerin elektrikli aleti kullanmasına izin
vermeyin. Elektrikli aletler, eğitimsiz kullanıcıların elinde
tehlikelidir.
Elektrikli aletleri iyi durumda muhafaza edin. Hareketli
parçalardaki hizalama hatalarını ve tutuklukları,
parçalardaki kırılmalar ve elektrikli aletin çalışmasını
etkileyebilecek tüm diğer koşulları kontrol edin. Hasarlı
ise, elektrikli aleti kullanmadan önce tamir ettirin. Kazaların
çoğu, elektrikli aletlerin bakımının yeterli şekilde
yapılmamasından kaynaklanır.
Kesim aletlerini keskin ve temiz tutun. Bakımı uygun
şekilde yapılmış keskin kesim uçlu kesim aletlerinin sıkışma
ihtimali daha düşüktür ve kontrol edilmesi daha kolaydır.
Elektrikli aleti, aksesuarlarını ve aletin diğer parçalarını
kullanırken bu talimatlara mutlaka uyun ve çalışma
ortamının koşullarını ve yapılacak işin ne olduğunu göz
önünde bulundurun. Elektrikli aletin öngörülen işlemler
dışındaki işlemler için kullanılması tehlikeli durumlara neden
olabilir.
5. Servis
Elektrikli aletinizi, sadece orijinal yedek parçaların
kullanıldığı yetkili servise tamir ettirin. Bu, elektrikli aletin
güvenliğinin muhafaza edilmesini sağlayacaktır.
Elektrikli el aletleri için ek güvenlik talimatları
Uyarı! Taşlama, zımparalama, fırçalama, polisaj
veya aşındırıcı diskle kesme işleri için ek güvenlik
talimatları.
Kulaklık takın. Yüksek sese maruz kalmak işitme kaybına yol
açabilir.
Aletle birlikte verilmiş olan yardımcı tutma kollarını kullanın.
Kontrol kaybı kişisel yaralanmalara neden olabilir.
Kesme aksesuarının gizli kablolara veya kendi kablosuna
temas edebileceği yerlerde çalışma yaparken elektrikli aleti
yalıtımlı kavrama yüzeylerinden tutun. Kesme aksesuarının
«akım taşıyan» bir kabloya temas etmesi durumunda
elektrikli aletin metal kısımları da «akım taşır» hale gelecek
ve kullanıcının elektrik çarpılmasına neden olabilir.
Üzerinde çalıştığınız parçayı sabitlemek ve desteklemek için
kelepçeler veya başka pratik yöntemler kullanın. Parçayı elle
veya vücudunuza dayamanız dengesiz durmasına neden
olacaktır ve aletin kontrolünü kaybetmenize yol açabilir.
Duvar, zemin veya tavanda delik açmadan önce kablo ve
boruların konumunu kontrol edin.
Delme işleminin hemen ardından matkap ucuna
dokunmaktan kaçının; sıcak olabilir.
Kullanım amacı bu kullanım kılavuzunda açıklanmıştır.
Herhangi bir aksesuarın veya bağlantının ya da işlemin, bu
kılavuzda tavsiye edilen şekilden başka bir şekilde
kullanılması şahısların yaralanmalarına ve/veya mal kaybına
yol açabilir.
Titreşim
Teknik veriler ve uygunluk beyanatı içerisinde belirtilen
titreşim emisyon değerleri EN60745 tarafından belirlenen
standart bir test yöntemine uygun olarak ölçülmektedir ve
diğer bir aletle karşılaştırma yaparken kullanılabilir. Beyan
edilen titreşim emisyon değeri aynı zamanda maruz
kalmanın önceden değerlendirilmesinde de kullanılabilir.
Uyarı! Elektrikli aletin mevcut kullanımı sırasındaki titreşim
emisyon değeri, aletin kullanım yöntemine bağlı olarak,
beyan edilen değere göre farklılık sergileyebilir. Titreşim
düzeyi belirlenen seviyenin üzerinde artış gösterebilir.
İşyerinde düzenli olarak elektrikli alet kullanan çalışanları
korumak amacıyla 2002/44/EC tarafından getirilen elektrik
güvenliği önlemlerini belirlemek üzere titreşime maruz
kalmayı değerlendirirken, çalışma döngüsü içerisinde
örneğin aletin kapalı olduğu ve aktif durumda olmasının yanı
sıra boşta çalıştığı zamanlar gibi, bütün zaman dilimleri dahil
olmak üzere mevcut kullanım durumu ve aletin kullanım şekli
göz önünde bulundurularak değerlendirilmelidir.
Page 12

12
TÜRKÇE
(Orijinal talimatlar)
Elektrik güvenliği
Bu alet çift yalıtımlıdır. Bu yüzden hiçbir topraklama
kablosuna gerek yoktur. Her zaman şebeke geriliminin aletin
üretim etiketinde belirlenmiş değerlere uyup uymadığını
kontrol edin.
• Elektrik kablosu hasarlı ise, bir tehlike oluşmasını
önlemek için üretici ya da yetkili STANLEY Servis
Merkezi tarafından değiştirilmelidir.
ÖZELLİKLER
Bu alet, aşağıdaki özelliklerin bir kısmını veya tümünü
içermektedir.
1. Değişken hız ayarlı tetik
2. Kesintisiz çalıştırma düğmesi
3. İleri/geri sürgüsü
4. Delme modu seçicisi
5. Uç tutucu
Aşağıdaki aksesuarlar aletiniz ile sunulmayabilir.
6. Derinlik çubuğu
7. Yan kol
Montaj
Uyarı! Montajdan önce aletin kapalı ve fişinin çekilmiş
olduğundan emin olun
Yan kol ve derinlik çubuğunun takılması (Şekil A, B)
Tutamağı, yan kol (7) resimde gösterildiği gibi aletin ön
kısmının üzerine kaydırabilir duruma gelene kadar saatin
ters yönünde çevirin (Şekil A).
Yan kolu istediğiniz konuma çevirin.
Derinlik çubuğunu (6) resimde gösterildiği gibi montaj
deliğine takın (Şekil B).
Delme derinliğini aşağıda açıklandığı şekilde ayarlayın.
Tutamağı saat yönünde çevirerek yan kolu sıkın.
Bir matkap veya tornavida ucunun takılması (Şekil C)
Kovanı saatin tersi yönde çevirerek mandreni (5) açın.
Ucun mil kısmını (8) mandrene sokun (matkap ucu alet ile
birlikte verilmemektedir).
Mandrenin çıkarılması ve yeniden takılması (Şekil D)
Mandreni mümkün olduğunca açın.
Mandrenin içindeki tutucu vidayı çıkarmak için, bir
tornavidayla saat yönünde döndürün.
Alyan anahtarı sıkın. Mandreni saat yönünün tersine
döndürerek çıkarın.
Mandreni tekrar takmak için, onu milin üzerine vidalayın ve
mandren tutucu vidayla sabitleyin.
Diğer Tehlikeler
Aletin kullanımıyla ilgili ekte sunulan güvenlik uyarılarına
dahil olmayan ilave kalıcı riskler ortaya çıkabilir. Bu riskler,
hatalı, uzun süreli kullanım vb. dolayısıyla ortaya çıkabilir.
Emniyet tedbirlerini düzenleyen yönetmeliğin uygulanmasına
ve emniyet sağlayıcı aygıtların kullanılmasına rağmen,
başka belirli risklerden kaçınılamaz. Bunlar:
Aletin dönen ve hareket eden parçalarına dokunma sonucu
ortaya çıkan yaralanmalar.
Herhangi bir parçayı, bıçak veya aksesuarı değiştirirken
ortaya çıkan yaralanmalar.
Aletin uzun süreli kullanılması sonucu ortaya çıkan
yaralanmalar. Herhangi bir aleti uzun sürelerle
kullanacaksanız düzenli olarak çalışmanıza ara verin.
Duyma bozukluğu.
Aleti kullanırken ortaya çıkan tozun solunması sonucu
ortaya çıkan sağlık sorunları (örnek: ahşapta çalışırken,
özellikle meşe, akgürgen ve MDF).
V ........ Volt
A ........ Amper
Hz ....... Hertz
W ........ Vat
dak ..... dakika
.....
.....
boş .......
......
....
....
.../min..
6. Alet üzerindeki etiketler
Alet üzerinde aşağıdaki semboller bulunabilir:
Position of date barcode
The Date Code, which also includes the year of
manufacture, is printed into the housing.
Example:
2014 XX JN
Year of manufacturing
Kullanım
Kılavuzunu
Okuyun
Koruyucu
Gözlük kullanın
Kulaklık
Kullanın
Alternatif
Akım
Direkt
Akım
Yüksüz
Hız
Sınıf II
İnşaat
Topraklama
Terminal
Güvenlik
uyarısı
Sembolü
Dakikada
devir veya
gel git sayısı
Page 13

13
TÜRKÇE
(Orijinal talimatlar)
KULLANIMI
Uyarı! Aletin kendi hızında çalışmasına izin verin. Aşırı
yüklenmeyin.
Uyarı! Duvar, zemin veya tavanda delik açmadan önce kablo
ve boruların konumunu kontrol edin.
Dönme yönünün seçilmesi (Şekil E)
Delik açma ve vida sıkma uygulamaları için ileri (saat
yönünde) dönmeyi kullanın. Vidaları gevşetmek veya
sıkışmış bir matkap ucunu çıkartmak için geri (saatin ters
yönünde) dönmeyi kullanın.
İleri dönmeyi seçmek için ileri/geri sürgüsünü (3) sola itin.
Geri dönmeyi seçmek için ileri/geri sürgüsünü sağa itin.
Uyarı! Dönme yönünü kesinlikle motor çalışır durumdayken
değiştirmeyin.
Delme modunun seçilmesi
Duvarı delmek için, delme modu seçicisini (4) darbe
konumuna ayarlayın.
Diğer materyalleri delmek ve vida takıp sökmek için delme
modu seçicisini 1 konumuna getirin.
Delme derinliğinin ayarlanması (Şekil B)
Tutamağı saatin tersi yönde çevirerek yan kolu (7) gevşetin.
Derinlik çubuğunu (6) istediğiniz konuma ayarlayın.
Maksimum delme derinliği, matkap ucunun uç kısmı ile
derinlik çubuğunun ön ucu arasındaki mesafeye eşittir.
Tutamağı saat yönünde çevirerek yan kolu sıkın.
Açılması ve kapatılması
Aleti açmak için, değişken hız ayarlı tetiğine (1) basın. Aletin
hızı, tetiğe ne kadar bastığınıza bağlıdır. Genel kural olarak,
büyük çaplı uçlar için düşük hız, küçük çaplı uçlar içinse
yüksek hız seçin.
Sürekli çalışması için kesintisiz çalıştırma düğmesine (2)
basın ve değişken hız ayarlı tetiğini bırakın. Sürekli
çalıştırma işlevi ileri ve geri dönme yönlerinde sadece tam
hızda çalışır.
Aleti kapatmak için, değişken hız ayarlı tetiğini bırakın.
Kesintisiz çalışma konumundayken aleti kapatmak için
değişken hız düğmesine bir kez daha basın ve bırakın.
Bakım
STANLEY elektrikli aletiniz minimum bakımla uzun
bir süre çalışacak şekilde tasarlanmıştır. Kesintisiz
olarak memnuniyet verici bir şekilde çalışması gerekli özenin
gösterilmesine ve düzenli temizliğe bağlıdır.
Önemli
Alet EMNİYET GÜVENLİĞİ ve GÜVENİLİRLİK için bu
kılavuzda belirtilenler dışında tamir, bakım ve ayarlamaların
her zaman orijinal yedek parça kullanılarak, yetkili servisler
tarafından yapılması gerekmektedir.
Temizleme
Uyarı! Havalandırma deliklerinde ve etrafında toz
toplanması halinde bu tozu ve kiri kuru hava kullanarak ana
gövdeden uzaklaştırın. Bu işlemi gerçekleştirirken onaylı bir
göz koruması ve onaylı toz maskesi takın.
Uyarı! Aletin metalik olmayan parçalarını temizlemek için
asla çözücü veya başka sert kimyasal kullanmayın. Bu
kimyasallar bu parçalarda kullanılan malzemeleri
güçsüzleştirir. Yalnızca su ve yumuşak sabunla
nemlendirilmiş bir bez kullanın. Aletin içine sıvı kaçmasına
kesinlikle izin vermeyin; aletin herhangi bir parçasını bir sıvı
içine daldırmayın.
Aksesuarlar
Herhangi bir elektrikli aletin performansı kullanılan
aksesuarlara bağlıdır. STANLEY aksesuarları, yüksek kalite
standartlarına göre üretilmiş ve elektrikli aletinizin
performansını arttıracak şekilde tasarlanmıştır.
STANLEY satış noktalarından veya yetkili servisten temin
edilebilir geniş bir aksesuar çeşidi sunar.
Uyarı: Bu alet ile kullanılması önerilmeyen aksesuarların
kullanılması ciddi yaralanmaya yol açabilir.
Servis bilgileri
STANLEY Asya'da, kendisine ait ve yetkili servisler ile tam
bir servis ağı sunmaktadır. Tüm STANLEY Servis Merkezleri
müşterilere etkili ve güvenilir elektrikli el aleti hizmeti sunmak
için eğitimli personel ile donatılmıştır. Eğer teknik
danışmanlık, onarım veya orijinal fabrika yedek parçası
ihtiyacınız varsa, size en yakın STANLEY merkezine
başvurun.
Page 14

14
TÜRKÇE
Çevrenin korunması
Ayrı olarak atın. Bu ürün, normal evsel atıklarla
birlikte atılmamalıdır.
STANLEY ürününüzün değiştirilmesi gerektiğini düşünmeniz
veya artık kullanılamaz durumda olması halinde onu, evsel
atıklarla birlikte atmayın. Bu ürünü, ayrı olarak toplanacak
şekilde atın.
Kullanılmış ürünlerin ve ambalajların ayrı olarak
toplanması bu maddelerin geri dönüşüme sokularak
yeniden kullanılmasına olanak tanır. Geri dönüşümlü
maddelerin tekrar kullanılması çevre kirliliğinin önlenmesine
yardımcı olur ve ham madde ihtiyacını azaltır.
Yerel yönetmelikler, elektrikli ürünlerin evlerden toplanıp
belediye atık tesislerine aktarılması veya yeni bir ürün satın
alırken perakende satıcı tarafından toplanması yönünde
hükümler içerebilir. STANLEY, hizmet ömrünün sonuna
ulaşan STANLEY ürünlerinin toplanması ve geri dönüşüme
sokulması için bir imkân sunmaktadır. Bu hizmetin
avantajlarından faydalanmak için, lütfen, ürününüzü bizim
adımıza teslim alacak herhangi bir yetkili servise iade edin.
Bu kılavuzda belirtilen listeden size en yakın STANLEY
yetkili tamir servisinin yerini öğrenebilirsiniz. Ya da, alternatif
olarak internet’ten STANLEY yetkili tamir servislerinin
listesini ve satış sonrası hizmetlerimizle ilgili tüm bilgiler ve
temas bilgilerine aşağıdaki siteden ulaşabilirsiniz.
www.2helpU.com
(Orijinal talimatlar)
Notlar
STANLEY olarak, ürünlerimizi sürekli iyileştirme politikası
uyguladığımızdan, önceden haber vermeden ürün
özelliklerini değiştirme hakkını saklı tutarız.
Standart ekipman ve aksesuarlar ülkeye göre değişebilir.
Ürün özellikleri ülkelere göre farklı olabilir.
Komple ürün çeşidi tüm ülkelerde geçerli olmayabilir. Ürün
çeşidi durumu hakkında lütfen en yakın STANLEY yetkili
servisiyle temas kurun.
EN 60745’e göre ses basıncı düzeyi:
Ses basıncı (LpA) 101 dB(A), belirsizlik (K) 3 dB(A)
Akustik güç (LWA) 112 dB(A), belirsizlik (K) 3 dB(A)
EN 60745’e göre tespit edilen toplam titreşim değerleri
(üç yönün vektör toplamı):
Betonda darbeli delme (a
h, ID
) = 17,97 m/s²,
belirsizlik (K) = 1,5 m/s²
Metalde delme (a
h, D
) = 3,37 m/s²,
belirsizlik (K) = 1,5 m/s²
Matkap STDH6513C
Güç W 650
Voltaj V 220-240
Frekans Hz 50/60
Yüksüz hızı dev/dak 0-2800
İleri/geri dönme Var
Maks. delme kapasitesi
Ahşap/Çelik/Duvar mm 30/13/16
Kablo uzunluğu m 2
Teknik özellikleri
Page 15

15
TÜRKÇE
İki yıl tam garanti
Sahip olduğunuz STANLEY ürünü satın alma tarihinden
itibaren 24 ay içinde hatalı malzeme veya işçilik nedeniyle
bozulursa, STANLEY Europe aşağıdaki şartlara uyulması
koşuluyla ücretsiz olarak tüm kusurlu parçaların
yenilenmesini veya -kendi inisiyatifine bağlı olarak- satın
alınan ürünün değiştirilmesini garanti eder:
Ürün, hatalı kullanılmamış ve kullanım kılavuzuna uygun
kullanılmıştır.
Ürün yıpranmamış, hırpalanmamış ve aşınmamıştır;
Yetkili olmayan kişilerce tamire çalışılmamıştır.
Satın alma belgesi (fatura) ibraz edilmiştir.
STANLEY ürünü, tüm orijinal parçaları ile birlikte iade
edilmiştir
Garanti talebinde bulunmak için, lütfen satıcıyla irtibata geçin
veya STANLEY katalogunda belirtilen size en yakın
STANLEY yetkili satıcı adresini kontrol edin veya ürünün
kılavuzunda belirtilen adresteki yerel STANLEY yetkili tamir
servisi ile temas kurun. İnternet’ten Stanley yetkili tamir
servislerinin listesine ve satış sonrası hizmetlerimizle ilgili
tüm bilgilerine aşağıdaki siteden ulaşabilirsiniz:
www.stanleytools.com
(Orijinal talimatlar)
STANLEY, «teknik özellikleri» bölümünde açıklanan bu
ürünlerin aşağıda belirtilen yönergelere uygun olduğunu
beyan eder: 2006/42/EC, EN 60745-1, EN 60745-2-1
Bu ürünler ayrıca 2014/30/EU ve 2011/65/EU Direktiflerine
de uygundur. Daha fazla bilgi için, lütfen aşağıdaki adresten
STANLEY ile irtibata geçin veya kılavuzun arkasına bakın.
Bu belge altında imzası bulunan yetkili, teknik dosyanın
derlenmesinden sorumludur ve bu beyanı STANLEY adına
vermiştir.
R.Laverick
Mühendislik Bölümü Müdürü
STANLEY , Europe, Egide Walschaertsstraat14-18,
2800 Mechelen, Belgium
01.2015
AT Uygunluk Beyanatı
MAKİNE DİREKTİFİ
STDH6513C
Page 16

Page 17

Page 18

Page 19

90618169 01/2015
Page 20

 Loading...