

Page 1
20
20
19
19
18
18
17
17
16
16
15
15
14
14
13
13
12
12
11
11
10
10
9
9
8
8
7
7
6
6
5
5
4
4
3
3
2
2
1
1
0
0
STDH5510
STDH6513
English(Original) Page 4
Russian Page 9
Ukrainian Page 18
Page 2
ENGLISH
(Original instructions)
4
5
5
4
4
3
3
2
2
1
1
0
0
20
20
19
19
18
18
17
17
16
16
15
15
14
14
13
13
12
12
11
11
10
10
9
9
8
8
7
7
6
6
75
6
3
2
1
3
6 7
7
STDH5510 STDH5510
2
Page 3

10
(Original instructions)
ENGLISH
8
9
5
3
Page 4
ENGLISH
(Original instructions)
Technical Data
Drill STDH5510 STDH6513
Power W 550 650
Voltage V 220-240 220-240
Fr equency Hz 50/60 50/60
No Load Speed /min 0-2800 0-2800
Reverse Yes Yes
Max. Drilling Capacity
Wood/Steel/Masonry mm 25/10/13 30/13/16
Cable Length m 2 2
Intended use
Your STANLEY percussion drill has been
designed for drilling in wood, metal and plastics
and masonry as well as for screwdriving
purposes.
Safety instructions
General power tool safety warnings
WARNING! Read all safety warnings and all
instructions. Failure to follow the warnings and instructions
listed below may result in electric shock, fire and/or serious
injury.
Save all warnings and instructions for future reference.
The term "power tool" in all of the warnings listed below
refers to your mains operated (corded) power tool or battery
operated (cordless) power tool.
1. Work area safety
a. Keep work area clean and well lit. Cluttered or dark
areas invite accidents.
b. Do not operate power tools in explosive
atmospheres, such as in the presence of flammable
liquids, gases or dust. Power tools create sparks
which may ignite the dust or fumes.
c. Keep children and bystanders away while operating
a power tool. Distractions can cause you to lose
control.
2. Electrical safety
a. Power tool plugs must match the outlet. Never
modify the plug in any way. Do not use any adapter
plugs with earthed (grounded) power tools.
Unmodified plugs and matching outlets will reduce risk
of electric shock.
b. Avoid body contact with earthed or grounded
surfaces such as pipes, radiators, ranges and
refrigerators. There is an increased risk of electric
shock if your body is earthed or grounded.
c. Do not expose power tools to rain or wet conditions.
Water entering a power tool will increase the risk of
electric shock.
d. Do not abuse the cord. Never use the cord for
carrying, pulling or unplugging the power tool. Keep
cord away from heat, oil, sharp edges or moving
parts. Damaged or entangled cords increase the risk of
electric shock.
e. When operating a power tool outdoors, use an
extension cord suitable for outdoor use. Use of a cord
suitable for outdoor use reduces the risk of electric
shock.
f. If operating a power tool in a damp location is
unavoidable, use a residual current device (RCD)
protected supply. Use of an RCD reduces the risk of
electric shock.
3. Personal safety
a. Stay alert, watch what you are doing and use
common sense when operating a power tool. Do not
use a power tool while you are tired or under the
influence of drugs, alcohol or medication. A moment
of inattention while operating power tools may result in
serious personal injury.
b. Use personal protective equipment. Always wear eye
protection. Protective equipment such as dust mask,
non-skid safety shoes, hard hat, or hearing protection
used for appropriate conditions will reduce personal
injuries.
c. Prevent unintentional starting. Ensure the switch is
in the off-position before connecting to power
source and/or battery pack, picking up or carrying
the tool. Carrying power tools with your finger on the
switch or energising power tools that have the switch on
invites accidents.
d. Remove any adjusting key or wrench before turning
the power tool on. A wrench or a key left attached to a
rotating part of the power tool may result in personal
injury.
e. Do not overreach. Keep proper footing and balance
at all times. This enables better control of the power tool
in unexpected situations.
f. Dress properly. Do not wear loose clothing or
jewellery. Keep your hair, clothing and gloves away
from moving parts. Loose clothes, jewellery or long hair
can be caught in moving parts.
4
Page 5
(Original instructions)
ENGLISH
g. If devices are provided for the connection of dust
extraction and collection facilities, ensure these are
connected and properly used. Use of dust collection
can reduce dust-related hazards.
4. Power tool use and care
a. Do not force the power tool. Use the correct power
tool for your application. The correct power tool will do
the job better and safer at the rate for which it was
designed.
b. Do not use the power tool if the switch does not turn
it on and off. Any power tool that cannot be controlled
with the switch is dangerous and must be repaired.
c. Disconnect the plug from the power source and/or
the battery pack from the power tool before making
any adjustments, changing accessories, or storing
power tools. Such preventive safety measures reduce
the risk of starting the power tool accidentally.
d. Store idle power tools out of the reach of children
and do not allow persons unfamiliar with the power
tool or these instructions to operate the power tool.
Power tools are dangerous in the hands of untrained
users.
e. Maintain power tools. Check for misalignment or
binding of moving parts, breakage of parts and any
other condition that may affect the power tools
operation. If damaged, have the power tool repaired
before use. Many accidents are caused by poorly
maintained power tools.
f. Keep cutting tools sharp and clean. Properly
maintained cutting tools with sharp cutting edges are
less likely to bind and are easier to control.
g. Use the power tool, accessories and tool bits etc. in
accordance with these instructions, taking into
account the working conditions and the work to be
performed. Use of the power tool for operations
different from those intended could result in a hazardous
situation.
5. Service
a. Have your power tool serviced by a qualified repair
person using only identical replacement parts. This
will ensure that the safety of the power tool is
maintained.
Additional power tool safety warnings
Warning! Additional safety warnings for grinding,
sanding, wire brushing, polishing or abrasive
cuttingoff operations
• Wear ear protectors. Exposure to noise can cause
hearing loss.
• Use auxiliary handles supplied with the tool. Loss of
control can cause personal injury.
• Hold power tool by insulated gripping surfaces when
performing an operation where the cutting accessory
may contact hidden wiring or its own cord.Cutting
ac-cessory contacting a "live" wire may make exposed
metal parts of the power tool "live" and could give the
operator an electric shock.
• Use clamps or another practical way to secure and
support the workpiece to a stable platform. Holding
the work by hand or against your body leaves it unstable
and may lead to loss of control.
• Before drilling into walls, floors or ceilings, check for the
location of wiring and pipes.
• Avoid touching the tip of a drill bit just after drilling, as it
may be hot.
• This Tool is not intended for use by persons (including
children) with reduced physical, sensory or metal
capabilities, or lack of experience and knowledge, unless
they have been given supervision or instruction
concerning use of the appliance by a person responsible
for their safety. Children should be supervised to ensure
that ther do not play with the appliance.
• The intended use is described in this instruction manual.
The use of any accessory or attachment or performance
of any operation with this tool other than those
recommended in this instruction manual may present a
risk of personal injury and/or damage to property.
Labels on tool
The label on your tool may include the following symbols:
Read
Instructions
Manual
Use Eye
Protection
Use Ear
Protection
V ........ Volts
A ........ Amper es
Hz ....... Hert z
W ........ Watts
min ..... minutes
..... Alternating
Current
..... Direct
Current
n
....... No- Load
0
Speed
Position of date barcode
The Date Code, which also includes the year of
manufacture, is printed into the housing.
Example:
2014 XX JN
Year of manufacturing
...... Class II
Construction
.... Earthing
Terminal
.... Safety Alert
Symbol
.../min.. Revolutions
or Recipr ocation p er
minute
5
Page 6
ENGLISH
(Original instructions)
Electrical safety
This tool is double insulated; therefore no earth
wire is required. Always check that the power
supply corresponds to the voltage on the rating
plate.
• If the supply cord is damaged, it must be replaced by the
manufacturer or an authorised STANLEY Service Centre
in order to avoid a hazard.
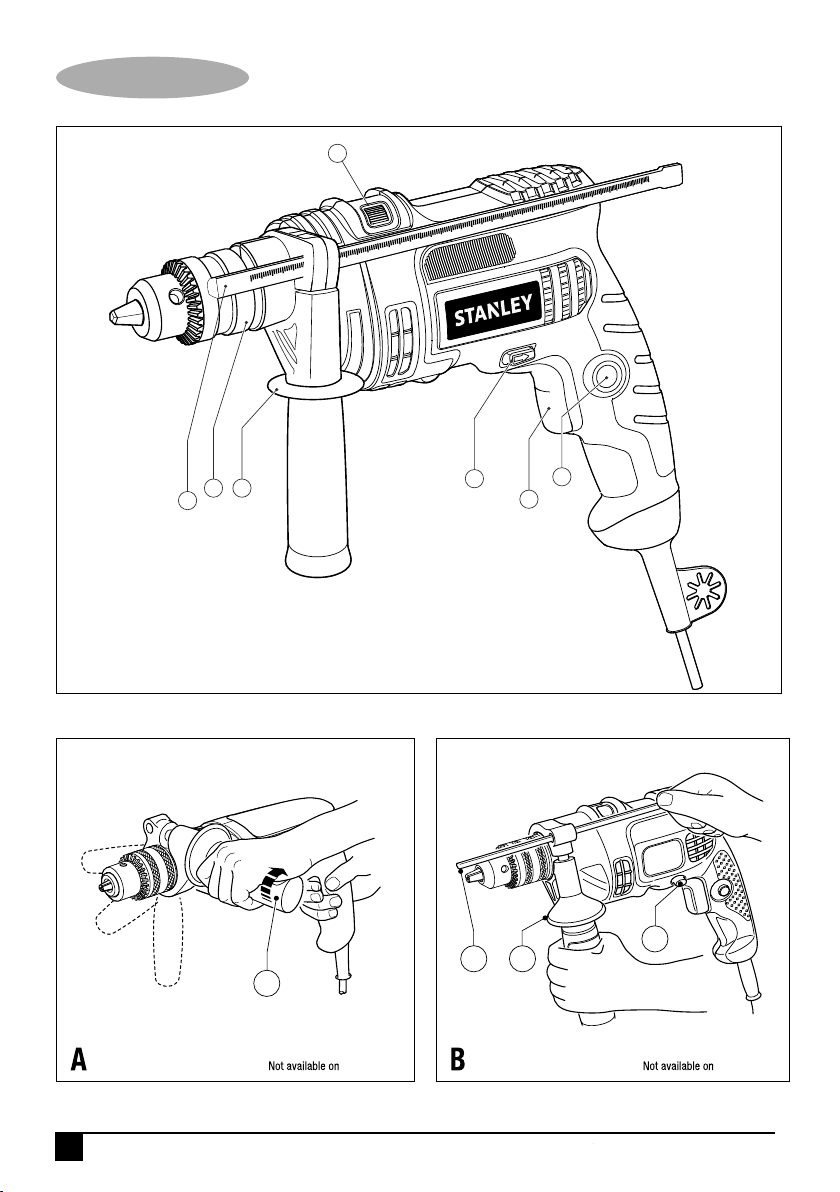
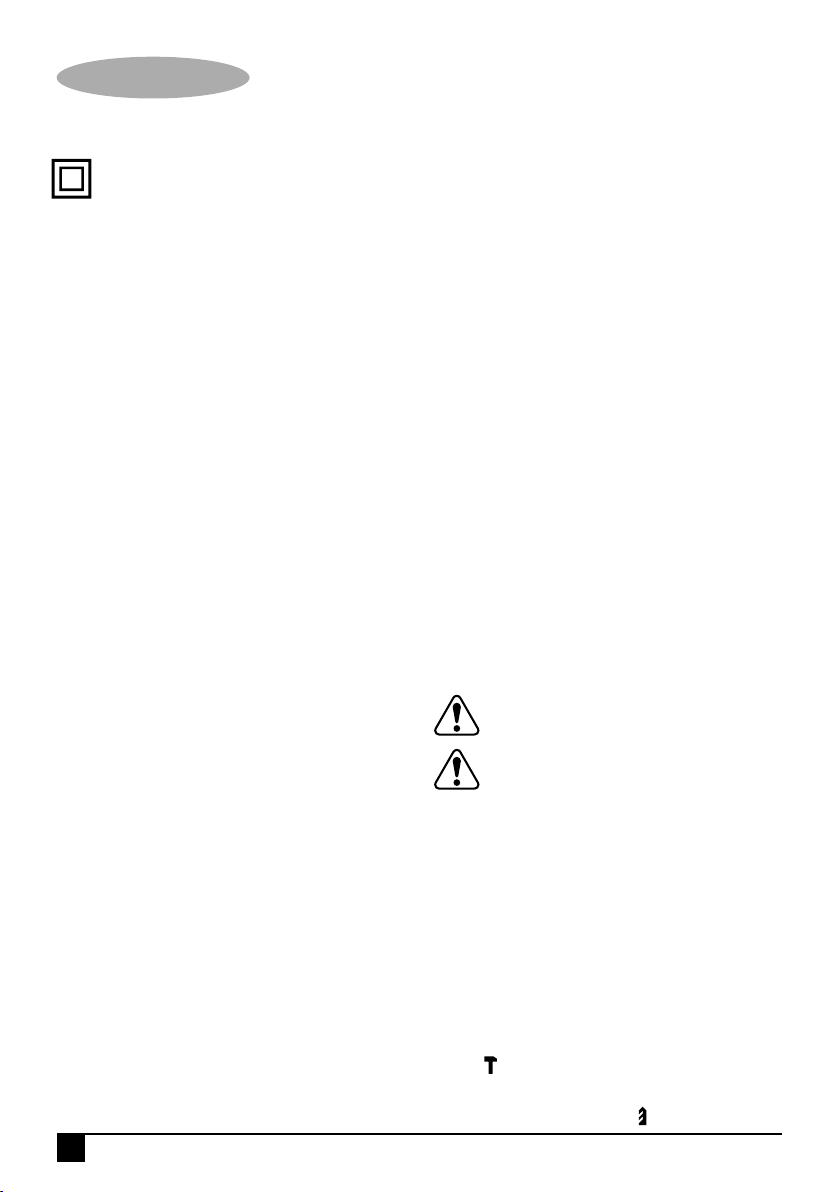
Features
This tool includes some or all of the following features.
1. Variable speed switch
2. Lock-on button
3. Forward/reverse button
4. Drilling mode selector
5. Chuck
The following accessories may not be available with your
unit
6. Depth stop
7 Side handle (STDH5510, STDH6513 only)
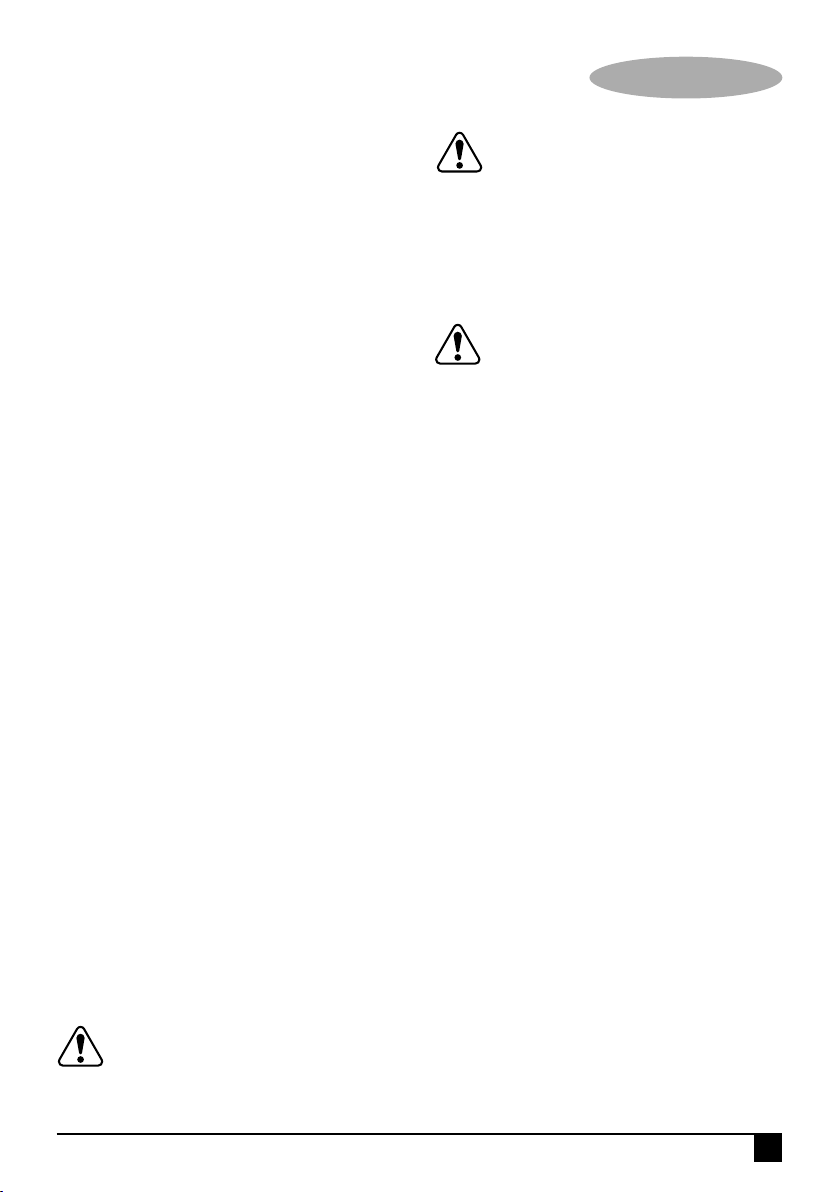
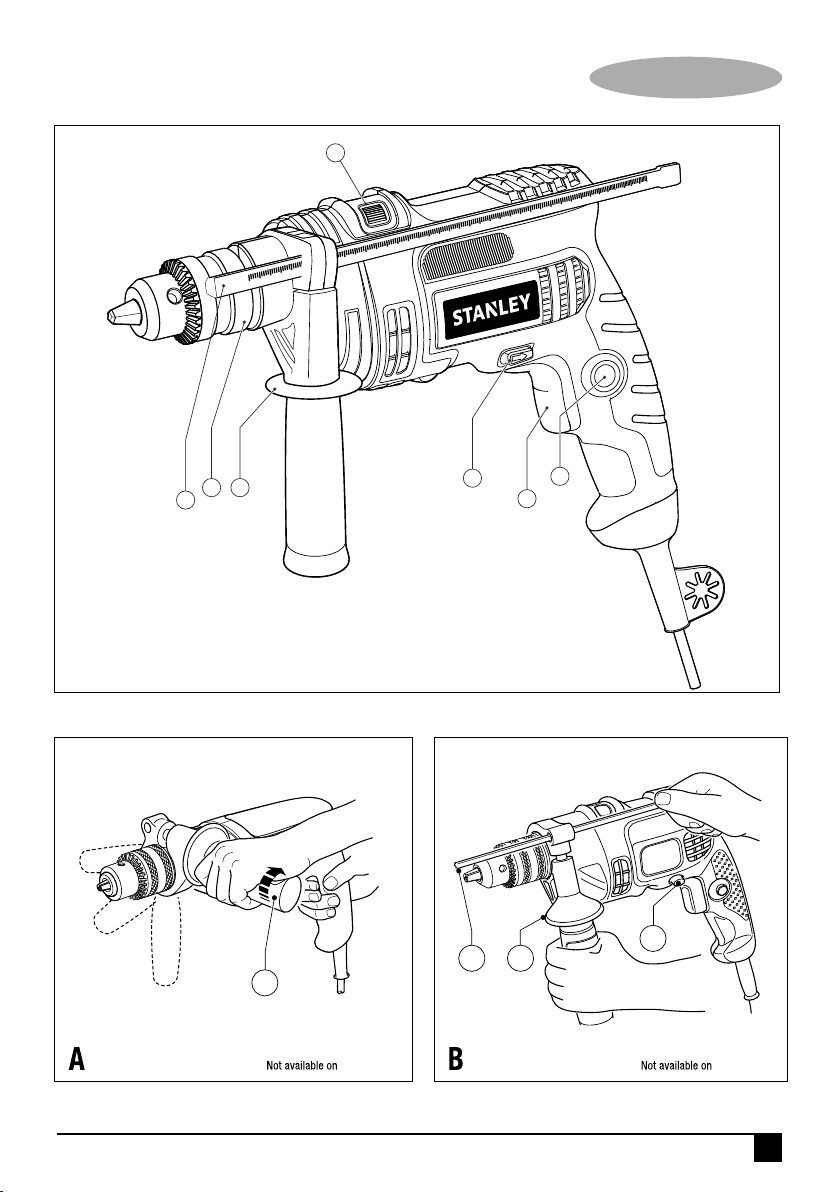
Assembly
Warning! Before assembly, make sure that the tool is
switched off and unplugged
Fitting the side handle and depth stop (fig. A, B)
• Turn the grip counter clockwise until you can slide the
side handle (7) onto the front of the tool as shown
(fig. A).
• Rotate the side handle into the desired position.
• Insert the depth stop (6) into the mounding hole as
shown (Fig.B)
• Set the drilling depth as described below.
• Tighten the side handle by tuming the grip clockwise.
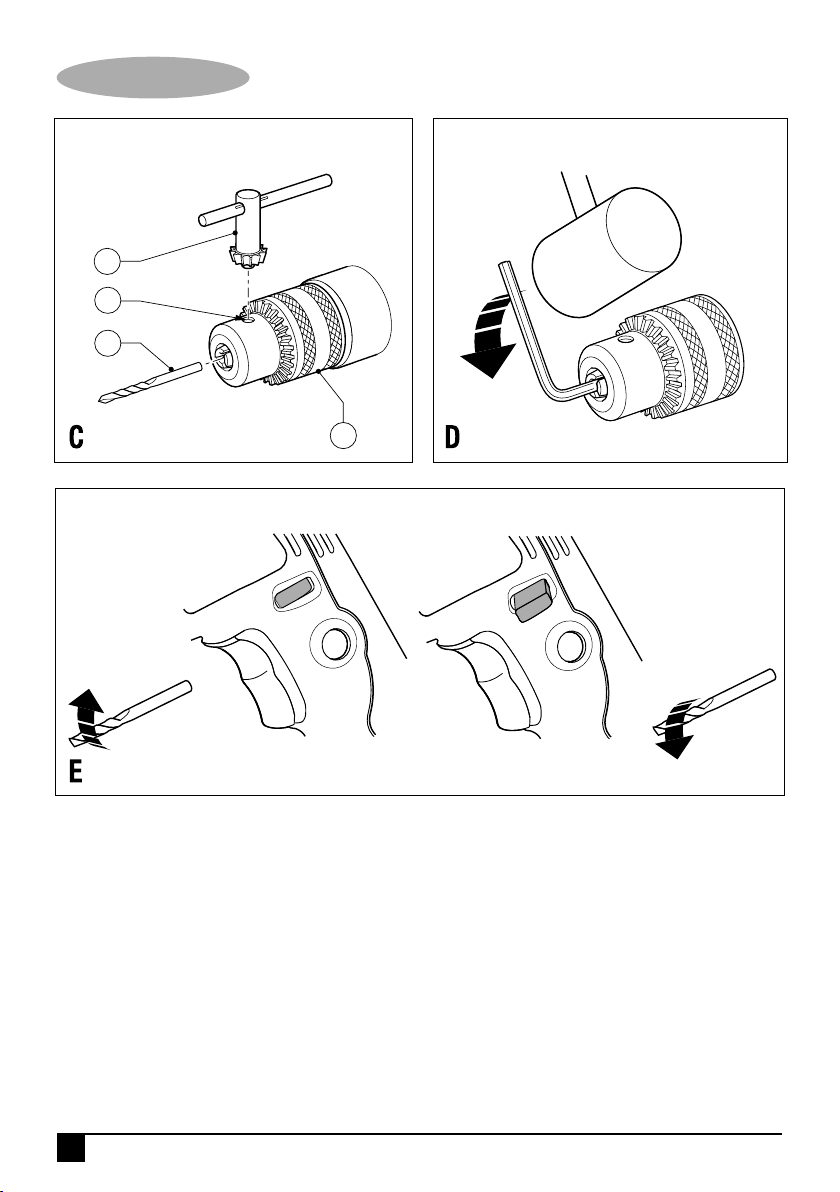
Fitting a drill bit (Fig.C)
• Open the chuck by turning the sleeve (5) counter
clockwise.
• Insert the bit shaft (9) into the chuck ( drill bit not
included)
• Insert the chuck key (10) into each hole (8) in the side of
the chuck and turn clockwise until it is tight.
Removing and refitting the chuck (Fig.D)
• Open the chuck as far as possible.
• Remove the chuck retaining screw, located in the chuck,
by turning it clockwise using a screwdriver.
• Tighten an Allen key. Remove the chuck by turning it
counter clockwise.
• To refit the chuck, screw it onto the spindle and secure it
with the chuck retaining screw.
Residual risks
Additional residual risks may arise when using the tool which
may not be included in the enclosed safety warnings. These
risks can arise from misuse, prolonged use etc.
Even with the application of the relevant safety regulations
and the implementation of safety devices, certain residual
risks cannot be avoided. These include:
• Injuries caused by touching any rotating/moving parts.
• Injuries caused when changing any parts, blades or
accessories.
• Injuries caused by prolonged use of a tool. When using
any tool for prolonged periods make sure you take
regular breaks.
• Impairment of hearing.
• Health hazards caused by breathing dust developed
when using your tool (example:- working with wood,
especially oak, beech and MDF).
USE
Warning! Let the tool work at its own pace. Do not
overload.
Warning! Before drilling into walls , floors or
ceilings, check for the location of wiring and pipes.
Selecting the direction of rotation (fig.E)
For drilling and for tightening screws, use forward
(clockwise) rotation. For loosening screws or removing a
jammed drill bit, use reverse (counter clockwise) rotation.
• To select forward rotation, push the forward/ reverse
button (3) to the left position.
• To select reverse rotation, push the forward /reverse
button to the right. Warning! Never change the direction
of rotation while the motor is running.
Selecting the drilling mode
• For drilling in masonry, set the drilling mode selector (4)
to the position.
• For drilling in other materials and for screwdriving, set
the drilling mode selector to the position.
6
Page 7
(Original instructions)
ENGLISH
Setting the drilling depth (fig.B)
• Slacken the side handle (7) by turning the grip counter
clockwise.
• Set the depth stop (6) to the desired position. The
maximum drilling depth is equal to the distance between
the tip of the drill bit and the front end of the depth stop.
• Tighten the side handle by turning the grip clockwise.
Switching on and off
• To switch the tool on, press the variable speed switch(1).
The tool speed depends on how far you press the
switch. As a general rule, use low speeds for large
diameter drill bits and high speeds for smaller diameter
drill bits.
• For continuous operation, press the lock-on button (2)
and release the variable speed switch. This option is
available only at full speed in both forward and reverse
modes.
• To switch the tool off, release the variable speed switch.
To switch the tool off when in continuous operation,
press the variable speed switch again and release it.
Maintenance
Your STANLEY power tool has been designed to operate
over a long period of time with a minimum of maintenance.
Continuous satisfactory operation depends upon proper tool
care and regular cleaning.
Important
To ensure product SAFETY and RELIABILITY, repairs,
maintenance and adjustment ( other than those listed in this
manual) should be performed by authorized service centers
or other qualified organizations, always –using identical
replacement parts inside.
Cleaning
Warning! Never use solvents or other harsh
chemicals for cleaning the non – metallic parts of
the tool. These chemicals may weaken the materials used in
these parts. Use a cloth dampened only with water and mild
soap. Never let any liquid get inside the tool; never immerse
any part of the tool into a liquid.
Accessories
The performance of any power tool is dependent
upon the accessory used. STANLEY accessories
are engineered to high quality standards and are
designed to enhance the performance of power tool.
STANLEY offers a large selection of accessories available at
our local dealer or authorized service center at extra cost.
Caution: The use of any other accessory not
recommended for use with this tool could be hazardous.
Service Information
STANLEY offers a full network of company-owned and
authorized service locations throughout Europe. All
STANLEY Service Centers are staffed with trained
personnel to provide customers with efficient and reliable
power tool service. Whether you need technical advice,
repair , or genuine factory replacement parts, contact the
STANLEY location nearest to you.
Notes
• STANLEY’s policy is one of continuous improvement to
our products and, as such , we reserve the right to
change product specifications without prior notice.
• Standard equipment and accessories may vary by
country.
• Product specifications may differ by country.
• Complete product range may not be available in all
countries. Contact your local STANLEY dealers for range
availability.
Warning! Blow dirt and dust out the main housing
with dry air as often as dirt is seen collecting in and
around the air vents. Wear approved eye protection and
approved dust mask when performing this procedure.
7
Page 8
ENGLISH
(Original instructions)
Protecting the environment
Separate collection. This product must not be
disposed of with normal household waste.
Should you find one day that your STANLEY product needs
replacement, or if it is of no further use to you, do not
dispose of it with household waste. Make this product
available for separate collection.
Separate collection of used products and packaging
allows materials to be recycled and used again.
Re-use of recycled materials helps prevent
environmental pollution and reduces the demand for raw
materials.
Local regulations may provide for separate collection of
electrical products from the household, at municipal waste
sites or by the retailer when you purchase a new product.
STANLEY provides a facility for the collection and recycling
of STANLEY products once they have reached the end of
their working life. To take advantage of this service please
return your product to any authorised repair agent who will
collect them on our behalf.
You can check the location of your nearest authorised repair
agent by contacting your local STANLEY office at the
address indicated in this manual. Alternatively, a list of
authorised STANLEY repair agents and full details of our
after-sales service and contacts are available on the Internet
at: www.2helpU.com
Two years full warranty
If your STANLEY product becomes defective due to faulty
materials or workmanship within 24 months from the date of
purchase, STANLEY Europe guarantees to replace all
defective parts free of charge or – at our discretion – replace
the unit free of charge provided that:
• The product has not been misused and has been used in
accordance with the instruction manual.
• The product has been subject to fair wear and tear;
• Repairs have not been attempted by unauthorised
persons;
• Proof of purchase is produced.
• The STANLEY product is returned complete with all
original components
If you wish to make a claim, contact your seller or check the
location of your nearest authorised STANLEY repair agent in
the STANLEY catalogue or contact your local STANLEY
office at the address indicated in this manual. A list of
authorised STANLEY repair agents and full details of our
after sales service is available on the internet
at:www.stanleytools.com
8
Page 9
(Оригинальные инструкции)
РУССКИЙ
4
20
20
19
19
18
18
17
17
16
16
15
15
14
14
13
13
12
12
11
11
10
10
9
9
8
8
7
7
6
6
5
5
4
4
3
3
2
2
1
1
0
0
75
6
3
2
1
3
6 7
7
STDH5510 STDH5510
9
Page 10
РУССКИЙ
10
8
9
(Оригинальные инструкции)
5
10
Page 11

(Оригинальные инструкции)
РУССКИЙ
Технические данные
Дрель STDH5510 STDH6513
Входная мощность W 550 650
Напряжение V 220-240 220-240
Частота Hz 50/60 50/60
Скорость без нагрузки /мин 0-2800 0-2800
Задний ход Да Да
Максимальный диаметр сверления
Дерево/сталь/каменная кладка мм 25/10/13 30/13/16
Длина кабеля м 2 2
Использование по назначению
Ваш SDS STANLEY плюс бурильный молоток
для вращательного бурения был разработан
для сверления отверстий в древесине,
металле, пластике и каменной кладке, равно как и для
легкого долбления.
Инструкции по технике безопасности
Общие предупреждения по технике
безопасности электроинструментов
Внимание! Ознакомьтесь со всеми правилами
безопасности и инструкциями. Несоблюдение
предупреждений и инструкций, указанных ниже, может
привести к поражению электрическим током, пожару
и/или серьезной травме.
Сохраните все предупреждения и инструкции для
будущего использования.
Термин "электроинструмент" во всех предупреждениях,
указанных ниже, относится к вашему сетевому (с
кабелем) электроинструменту или аккумуляторному
электроинструменту (без кабеля питания).
1. Безопасность рабочего места
а. Содержите рабочее место в чистоте и хорошо
освещенным. Беспорядок на рабочем месте или
отсутствие освещения рабочего места может
привести к аварии.
b. Не работайте с электроинструментом в месте
хранения взрывоопасных материалов,
например, в присутствии огнеопасных
жидкостей, газов или пыли. Электрические
инструменты создают искры, которые могут
воспламенить пыль или пары.
с. Дети и посторонние лица должны находиться как
можно дальше во время работы с
электроинструментом. Вы можете отвлечься и
потерять контроль.
2. Электробезопасность
а. Вилка электроинструмента должна
соответствовать розетке. Никогда не
модифицируйте вилку каким-либо образом. Не
используйте никакие вилки-переходники с
заземленными (замкнутыми на землю)
электроинструментами. Вилки и розетки, которые
не подвергались никаким изменениям снижают риск
поражения электрическим током.
b. Избегайте контакта тела с заземленными
поверхностями, такими как трубы, радиаторы,
плиты и холодильники. Существует повышенный
риск поражения электрическим током, если ваше
тело заземлено.
с. Избегайте любого воздействия дождя или влаги
на электроинструменты. Вода, попавшая в
электроинструмент, увеличивает риск поражения
электрическим током.
d. Аккуратно обращайтесь со шнуром питания.
Никогда не используйте шнур питания для
переноски, перемещения или извлечения вилки
из розетки. Держите шнур вдали от источников
тепла, масла, острых краев или движущихся частей.
Поврежденные или запутанные шнуры увеличивают
риск поражения электрическим током.
е. При работе с электроинструментом на улице,
используйте удлинитель, подходящий для
наружного использования. Использование кабеля,
пригодного для использования на открытом воздухе,
снижает риск поражения электрическим током.
f. При необходимости работы с
электроинструментом во влажной среде,
используйте устройство защитного отключения
(УЗО). Использование УЗО снижает риск поражения
электрическим током.
3. Личная безопасность
a. Будьте внимательны, смотрите, что вы делаете,
используйте здравый смысл при работе с
электроинструментом. Не используйте
электроинструмент, если вы устали или находитесь
под влиянием наркотиков, алкоголя или лекарств.
Малейшая неосторожность при работе с
электроинструментом может привести к серьезным
травмам.
b. Используйте средства индивидуальной защиты.
Всегда надевайте защитные очки. Другое
защитное оборудование, включая респиратор,
ботинки на нескользящей подошве, защитный
шлем или средства защиты органов слуха,
используемые в надлежащих условиях, уменьшат
риск получения травмы.
11
Page 12

РУССКИЙ
(Оригинальные инструкции)
с. Для предотвращения случайного запуска,
убедитесь, что переключатель находится в
выключенном положении перед подключением к
источнику питания и/или аккумуляторной
батарее, поднятия или переноски инструмента.
Не переносите электроинструмент с пальцем на
выключателе и не включайте питание на инструмент
с включенным выключателем, что может привести к
несчастному случаю.
d. Перед включением электроинструмента
снимайте регулировочный или гаечный ключ.
Гаечный или регулировочный ключ, оставленный на
вращающейся части электроинструмента, может
привести к травме.
е. Не тянитесь. Сохраняйте правильную стойку и
баланс все время. Это позволяет лучше
контролировать инструмент в неожиданных
ситуациях.
f. Одевайтесь правильно. Не надевайте свободную
одежду или украшения. Держите волосы, одежду
и перчатки вдали от движущихся частей.
Свободная одежда, украшения или длинные
волосы могут попасть в движущиеся части.
g. Если имеются устройства для подключения
пылесборника или вытяжки, убедитесь в том,
что они подсоединены и используются
правильно. Использование пылесборника снижает
вероятность возникновения рисков, связанных с
пылью.
4. Использование и уход за электроинструментом
a. Не перегружайте электроинструмент.
Используйте подходящий электрический
инструмент для соответствующего применения.
Правильно подобранный электроинструмент
позволит выполнить работу лучше и безопаснее при
скорости, для которой он был разработан.
b. Не используйте электроинструмент, если
переключатель не может его включить и
выключить. Любой электроинструмент, который
нельзя контролировать с помощью переключателя,
опасен и должен быть отремонтирован.
c. Отключите кабель питания от источника питания
и/или аккумуляторный блок от электрического
инструмента перед выполнением любых
регулировок, замены принадлежностей или при
хранении электроинструмента. Такие
профилактические меры безопасности уменьшают
риск непреднамеренного запуска электрического
инструмента.
d. Храните неиспользуемые электроинструменты в
недоступном для детей месте и не позволяйте
лицам, не знакомым с электроинструментом или
данными инструкциями, работать с
электроинструментом. Электроинструменты опасны
в руках неопытных пользователей.
е. Поддержание электроинструмента. Проверяйте
разрегулированность или cоединение
подвижных частей, поломки частей и любые
другие условия, которые могут повлиять на
работу электроинструмента. При наличии
повреждения, отремонтируйте
электроинструмент перед использованием.
Многие несчастные случаи являются следствием
плохого ухода за электроинструментом.
f. Держите режущий инструмент острым и чистым.
Хорошо ухоженный режущий инструмент с острыми
режущими кромками легче контролировать.
g. Используйте электроинструмент, аксессуары и
насадки в соответствии с данными
инструкциями, принимая внимание условия
работы и те работы, которые должны быть
выполнены. Использование электроинструмента
для операций, отличающихся от тех, для которых он
предназначен, может привести к опасной ситуации.
5. Обслуживание
а. Обеспечьте, чтобы обслуживание и ремонт
вашего электроинструмента проводился в
авторизованном сервисном центре по ремонту с
использованием только оригинальных запасных
частей. Это станет гарантией безопасности
электроинструмента.
Дополнительные меры безопасности для
электроинструментов
Предостережение! Дополнительные меры
безопасности для распилки, шлифовки,
обработки проволочной щеткой, полировки или резки
при помощи абразивного круга.
• Надевайте защитные наушники при сверлении.
Воздействие шума может привести к потере слуха.
• Держите инструмент за изолированные поверхности
во время работы, при которой режущий инструмент
может задеть скрытую проводку или собственный
кабель. При контакте режущего аксессуара с
«работающим» проводом или открытыми
металлическими частями электроинструмента
оператора может ударить электрическим током.
12
Page 13

(Оригинальные инструкции)
РУССКИЙ
• Используйте тиски или другое подходящее
приспособление для обеспечения и поддержания
обрабатываемого изделия на устойчивой
платформе. Проведение работы по направлению
руки или против вашего тела, лишает устойчивости и
может привести к потере контроля.
• Перед сверлением стен, полов и потолков,
проверьте местоположение электропроводки и труб.
• Не прикасайтесь к кончику сверла сразу после
окончания сверления, так как оно может быть
горячим.
• Этот инструмент не предназначен для
использования лицами (включая детей) с
ограниченными физическими, чувствительными или
умственными способностями или с недостатком
опыта или знаний, если они не были под контролем
и руководством лица, контролирующего
использование инструмента или лицом,
ответственным за их безопасность. Дети должны
быть под присмотром взрослых, чтобы не допустить
никаких игр с инструментом.
• Назначение инструмента описывается в данном
руководстве. Использование любых аксессуаров или
приспособлений, выполнение любых операций с
помощью этого инструмента, не рекомендованных в
данном руководстве, может представлять опасность
получения травм и/или повреждения имущества.
Этикетки на инструменте
Этикетка на вашем инструменте может включать
следующие символы:
Читайте
инструкции по
эксплуатации
Используйте
средства
защиты глаз
Используйте
средства
защиты
органов слуха
В ........ Вольт
A ........ Ампер
Положение даты штрих-кода
Дата кода, который также включает год изготовления,
печатается на корпусе.
Пример:
2014 XX JN
Год изготовления
Гц ....... Герц
Вт ........ Ватт
мин...... минуты
Пере мен-
.....
ный ток
Посто ян-
.....
ный т ок
Скоро сть
n
.......
0
без н агрузки
Конструкция
......
класса II
Терминал
....
заземления
Символ
предуп реж-
....
дения об
опасно сти
обороты или
...мин..
возвратнопоступательное движение
в минуту
Электрическая безопасность
Ваш инструмент защищен двойной изоляцией,
поэтому заземляющий провод не требуется.
Всегда проверяйте, чтобы напряжение сети
соответствовало напряжению, указанному на заводской
табличке.
• Если оригинальный шнур питания поврежден, он
должен быть заменен производителем или
уполномоченным сервисного центра STANLEY для
того, чтобы избежать опасности.
Характеристики
Этот инструмент включает в себя некоторые или все из
следующих характеристик:
1. Переключатель плавного хода
2. Кнопка блокировки
3. Переключатель вперед/назад
4. Селектор режима бурения
5. Патрон
Следующие аксессуары могут не входить в комплект с
вашим устройством
6. Ограничитель глубины
7. Боковая рукоятка (только для моделей STDH5510,
STDH6513)
Сборка
Предостережение! Перед сборкой убедитесь, что
инструмент выключен и отключен от источника питания.
Установка боковой рукоятки (рис. А, В)
• Поверните рукоятку против часовой стрелки до тех
пор, пока можно сдвинуть боковую рукоятку (7) до
упора к передней части инструмента (рис. А).
• Поверните боковую рукоятку в нужное положение.
• Вставьте ограничитель глубины сверления (6) в
отверстие, как показано на рисунке (B).
• Установите глубину сверления, как описано выше
• Затяните боковую рукоятку, повернув рукоятку по
часовой стрелке.
Установка сверла (рис.С)
• Откройте патрон, поворачивая муфту (5) против
часовой стрелки.
• Вставьте хвостовик (9) в патрон (сверло не
включено)
• Вставьте ключ зажимного патрона (10) в каждое
отверстие (8) в части патрона и поверните по
часовой стрелке до упора.
13
Page 14

РУССКИЙ
(Оригинальные инструкции)
Демонтаж и монтаж патрон (Рис. D)
• Открыть патрон, насколько это возможно.
• Снимите винт, фиксирующий патрон, расположенный
в патроне, повернув его по часовой стрелке с
помощью отвертки.
• Затяните шестигранный ключ. Снимите патрон,
повернув его против часовой стрелки.
• Для повторной установки патрона, закрепите его на
шпинделе и закрепите его с помощью стопорного
винта патрона.
Остаточные риски
Дополнительные остаточные риски могут возникнуть при
использовании инструмента, которые не включены в
описанные здесь правила техники безопасности. Эти
риски могут возникнуть при неправильном или
продолжительном использовании изделия и т.п.
Несмотря на соблюдение соответствующих правил
техники безопасности и использование
предохранительных устройств, некоторых остаточных
рисков невозможно избежать. Они включают в себя:
• Травмы в результате касания
вращающихся/движущихся частей.
• Риск получения травмы во время смены деталей
инструмента, ножей или насадок
• Травмы, вызванные продолжительным
использованием инструмента. При использовании
инструмента в течение продолжительного периода
времени делайте регулярные перерывы в работе.
• Плохой слух.
• Ущерб здоровью в результате вдыхания пыли при
использовании инструмента (пример: работа с
деревом, в особенности, древесиной дуба, бука и
древесноволокнистой плитой средней плотности).
ИСПОЛЬЗОВАНИЕ
Внимание! Дайте инструменту работать в своем
собственном темпе. Не перегружайте его.
Внимание! Перед сверлением стен, полов и
потолков, проверьте местоположение
электропроводки и труб.
Выбор направления вращения (рис. Е)
Для сверления и заворачивания винтов, используйте
вращение вперед (по часовой стрелке). Для ослабления
шурупов или извлечения застрявшего сверла,
используйте обратное вращение (против часовой
стрелки).
• Чтобы выбрать прямое вращение, нажмите ползунок
вперед/назад (3) влево.
• Чтобы выбрать обратное вращение, нажмите
ползунок вперед/назад вправо. Внимание! Никогда
не меняйте направление вращения при работающем
двигателе
Выбор режима бурения
• Для сверления в кирпичной кладке, установите
переключатель режимов сверления (4) в положение
( ).
• Для сверления в других материалах и заворачивания
шурупов, установите переключатель режимов
сверления в положение ( ).
Установка глубины сверления (Рис. B)
• Ослабьте вспомогательную рукоятку (7), повернув
рукоятку счетчика против часовой стрелки.
• Установите ограничитель глубины сверления (6) в
нужное положение. Максимальная глубина бурения
равна расстоянию между кончиком сверла и
передней частью ограничителя глубины.
• Затянуть боковую рукоятку, повернув рукоятку по
часовой стрелке.
Включение и выключение
• Чтобы включить инструмент, нажмите
переключатель плавного хода (1). Скорость
инструмента зависит от того, насколько сильно вы
нажмете переключатель. Как правило, используют
низкие скорости для сверл большого диаметра и
высокие скорости для сверл малого диаметра.
• Для непрерывной работы нажмите фиксатор
клавиши (2) и отпустите переключатель плавного
хода. Эта опция доступна только на полной скорости
в прямом и обратном режимах.
• Чтобы выключить инструмент, отпустите кнопку
включателя. Чтобы выключить инструмент, когда он
находится в непрерывном режиме работе, нажмите
переключатель плавного хода еще раз и отпустите
его.
14
Page 15

(Оригинальные инструкции)
РУССКИЙ
Обслуживание
Ваш инструмент STANLEY был разработан для работы в
течение длительного периода времени при
минимальном техническом обслуживании. Для
обеспечения удовлетворительной работы, инструмент
должен правильно храниться и подвергаться регулярной
чистке.
Важно
Для обеспечения БЕЗОПАСНОСТИ и НАДЕЖНОСТИ
оборудования, ремонт, техническое обслуживание и
регулировка (кроме тех, которые перечислены в
настоящем руководстве) должны выполняться в
авторизованных сервисных центрах или других
квалифицированных организациях, всегда используя
оригинальные запасные частей.
Чистка
Предостережение! Если вы видите пыль на или
вокруг вентиляционных портов, немедленно
удалите пыль из корпуса при помощи чистого сухого
воздуха. Для выполнения этой процедуры, пользуйтесь
соответствующими средствами защиты глаз и
респиратором.
Предостережение! Строго запрещено очищать
неметаллические детали инструмента с
помощью растворителей или других раздражающих
химических веществ. Эти химикаты могут нанести вред
материалам, из которых изготовлены данные
компоненты. Для чистки используйте ткань, смоченную в
слабом мыльном растворе. Не допускайте попадания
жидкости внутрь инструмента и никогда не опускайте
какую-либо часть инструмента в жидкость.
авторизованном сервисном центре за дополнительную
плату.
Внимание: Использование любых других аксессуаров не
рекомендуется для использования с этим инструментом
и может быть опасным.
Информационная служба
STANLEY предлагает обширную сеть авторизированных
сервисных центров, принадлежащих компании по всей
Азии. Все сервисные центры STANLEY укомплектованы
персоналом, прошедшим обучение, чтобы предоставить
клиентам эффективный и надежный сервис. Независимо
нужен ли вам технический совет, ремонт или
оригинальные запасные части, вам необходимо
обратиться в ближайший к вам сервисный центр
STANLEY.
Примечания
• Политика STANLEY является процессом
непрерывного совершенствования нашей продукции
и, таким образом, мы оставляем за собой право
изменять спецификацию продукта без
предварительного уведомления.
• Стандартное оборудование и аксессуары могут
варьировать в зависимости от страны.
• Характеристики продукции могут различаться в
зависимости от страны.
• Полный ассортимент продукции может варьировать
в зависимости от страны. Свяжитесь с вашим
местным дилером STANLEY для получения
информации о наличных моделях.
Аксессуары
Производительность электроинструмента
зависит от используемых аксессуаров.
Аксессуары STANLEY разработаны в соответствии с
высокими стандартами качества, чтобы повысить
производительность электроинструмента.
STANLEY предлагает большой выбор аксессуаров,
имеющихся в продаже у вашего местного дилера или в
15
Page 16

РУССКИЙ
(Оригинальные инструкции)
Защита окружающей среды
Раздельный сбор и утилизация. Этот продукт не
следует утилизировать вместе с бытовым
мусором.
Если вы поймете, что ваш продукт Stanley нуждается в
замене, или если он не имеет никакого дальнейшего
применения для вас, не выбрасывайте его вместе с
бытовыми отходами. Предоставьте этот продукт для
раздельного сбора/утилизации.
Раздельный сбор продуктов и упаковок
позволяет осуществить их переработку и
использовать их повторно. Повторное использование
переработанных материалов помогает защищать
окружающую среду от загрязнения и снижает расход
сырьевых материалов.
Местное законодательство может обеспечить сбор
старых электроинструментов отдельно от бытового
мусора на муниципальных свалках отходов или в
торговом предприятии при покупке нового изделия.
Stanley обеспечивает возможность для сбора и
утилизации продуктов Stanley, как только они достигли
конца своего срока службы. Для того чтобы
воспользоваться этой услугой, вы можете сдать ваше
изделие в любой авторизованный сервисный центр,
который собирает их по нашему поручению.
Вы можете узнать место нахождения вашего
ближайшего авторизованного сервисного центра,
обратившись в местное отделение Stanley по адресу,
указанному в данном руководстве. Кроме того, список
авторизованных ремонтных агентов Stanley и полную
информацию о нашем послепродажном обслуживании и
контактах вы можете найти в Интернете:
www.2helpU.com10
Полная гарантия сроком на два года
Если ваш продукт STANLEY выходит из строя из-за
дефектных материалов или изготовления в течение 24
месяцев с даты покупки, STANLEY Europe гарантирует
замену всех неисправных деталей бесплатно или - по
своему усмотрению - замену продукта бесплатно при
условии, что:
• Продукт использовался правильно, его эксплуатация
проводилась строго в соответствии с инструкцией по
эксплуатации.
• Продукт подвергался естественному износу;
• Ремонт не проводился посторонними лицами;
• Представлены документы, подтверждающие покупку.
• Продукт STANLEY возвращается в полном комплекте
со всеми оригинальными компонентами
Если вы хотите сделать заявку, свяжитесь с продавцом
или узнайте место нахождения вашего ближайшего
авторизованного сервисного агента Stanley в каталоге
Stanley или обратитесь в местное представительство
Stanley по адресу, указанному в данном руководстве.
Список авторизованных сервисных агентов Stanley и
полную информацию о нашем послепродажном
обслуживании можно найти в Интернете по адресу:
www.stanleytools.com
16
Page 17

(Оригинальные инструкции)
Гарантийные условия
Уважаемый покупатель!
1. Поздравляем Вас с покупкой высококачественного
изделия STANLEY и выражаем признательность за Ваш
выбор.
2. При покупке изделия требуйте проверки его комплектности
и исправности в Вашем присутствии, инструкцию по
эксплуатации и заполненный гарантийный талон на
русском языке.
В гарантийном талоне должны быть внесены: модель,
дата продажи, серийный номер, дата производства
инструмента; название, печать и подпись торговой
организации. При отсутствии у Вас правильно заполненного гарантийного талона, а также несоответствия
указанных в нем данных мы будем вынуждены откло- нить
Ваши претензии по качеству данного изделия.
3. Во избежание недоразумений убедительно просим Вас
перед началом работы с изделием внимательно
ознакомиться с инструкцией по его эксплуатации.
Правовой основой настоящих гарантийных условий
является действующее Законодательство. Гарантийный
срок на данное изделие составляет 24 месяца и
исчисляется со дня продажи. В случае устранения
недостатков изделия, гарантийный срок продлевается на
период его нахождения в ремонте. Срок службы изделия
составляет 5 лет со дня продажи.
4. В случае возникновения каких-либо проблем в про- цессе
эксплуатации изделия рекомендуем Вам обра- щаться
только в уполномоченные сервисные центры STANLEY,
адреса и телефоны которых Вы сможете найти в
гарантийном талоне, на сайте www.2helpU.com или узнать
в магазине. Наши сервисные станции - это не только
квалифицированный ремонт, но и широкий ассортимент
запчастей и принадлежностей.
5. Производитель рекомендует проводить периодическую
проверку и техническое обслуживание изделия в
уполномоченных сервисных центрах.
Изготовитель
Блэк энд Деккер Холдингс ГмбХ
Германия, 65510, Идштайн,
ул. Блэк энд Деккер, 40
РУССКИЙ
6. Наши гарантийные обязательства распространяются
только на неисправности, выявленные в течение гарантийного срока и вызванные дефектами производства и \
или материалов.
7. Гарантийные условия не распространяются на
неисправности изделия, возникшие в результате:
7.1. Несоблюдения пользователем предписаний инструкции по
эксплуатации изделия, применения изделия не по
назначению, неправильном хранении, использования
принадлежностей, расходных материалов и запчастей, не
предусмотренных производителем.
7.2. Механического повреждения (сколы, трещины и разрушения) внутренних и внешних деталей изделия,
основных и вспомогательных рукояток, сетевого электрического кабеля, вызванного внешним ударным или
любым иным воздействием
7.3 Попадания в вентиляционные отверстия и проникновение внутрь изделия посторонних предметов,
материалов или веществ, не являющихся отходами,
сопровождающими применение изделия по назначению,
такими как: стружка, опилки, песок, и пр.
7.4. Воздействий на изделие неблагоприятных атмосферных и
иных внешних факторов, таких как дождь, снег,
повышенная влажность, нагрев, агрессивные среды,
несоответствие параметров питающей электросети,
указанных на инструменте.
7.5. Стихийного бедствия. Повреждение или утрата изделия,
связанное с непредвиденными бедствиями, стихийными
явлениями, в том числе вследствие действия
непреодолимой силы (пожар, молния, потоп и другие
природные явления), а так же вследствие перепадов напряжения в электросети и другими причинами, которые
находятся вне контроля производителя.
8. Гарантийные условия не распространяются:
8.1. На инструменты, подвергавшиеся вскрытию, ремонту или
модификации вне уполномоченного сервисного центра.
8.2. На детали и узлы, имеющие следы естественного износа,
такие как:
приводные ремни и колеса, угольные щетки, смазка,
подшипники, зубчатое зацепление редукторов, резиновые уплотнения, сальники, направляющие ролики,
муфты, выключатели, бойки, толкатели, стволы, и т.п.
8.3. На сменные части: патроны, цанги, зажимные гайки и
фланцы, фильтры, аккумуляторные батареи, ножи,
шлифовальные подошвы, цепи, звездочки, пильные шины,
защитные кожухи, пилки, абразивы, пильные и
абразивные диски, фрезы, сверла, буры и т.п.
8.4. На неисправности, возникшие в результате перегрузки
инструмента (как механической, так и электрической),
повлекшей выход из строя одновременно двух и более
деталей и узлов, таких как: ротора и статора, обеих
обмоток статора, ведомой и ведущей шестерни редуктора или других узлов и деталей. К безусловным
признакам перегрузки изделия относятся, помимо прочих:
появление цветов побежалости, деформация или
оплавление деталей и узлов изделия, потемнение или
обугливание изоляции проводов электродвигателя под
воздействием высокой температуры.
17
Page 18

УКРАЇНСЬКА
(Оригінальні інструкції)
4
4
4
3
3
2
2
1
1
0
0
20
20
19
19
18
18
17
17
16
16
15
15
14
14
13
13
12
12
11
11
10
10
9
9
8
8
7
7
6
6
5
5
75
6
3
2
1
3
6 7
7
18
STDH5510 STDH5510
Page 19

10
(Оригінальні інструкції)
УКРАЇНСЬКА
8
9
5
19
Page 20

УКРАЇНСЬКА
(Оригінальні інструкції)
Технічні дані
Дриль STDH5510 STDH6513
Вхідна потужність W 550 650
Напруга V 220-240 220-240
Частота Hz 50/60 50/60
Швидкість без навантаження /хвил. 0-2800 0-2800
Задній хід Так Так
Максимальний діаметр свердління
Дерево/сталь/ кам'яна кладка мм 25/10/13 30/13/16
Довжина кабелю м 2 2
2. Електробезпека
а. Вилка електроінструмента повинна відповідати
b. Уникайте контакту тіла з заземленими
Використання за призначенням
Ваш SDS STANLEY плюс бурильний молоток
для обертального буріння був розроблений
для свердління отворів в деревині, металі, пластику,
кам'яній кладці і для легкого довбання.
Інструкції з техніки безпеки
Загальні попередження з техніки безпеки
електроінструментів
Увага! Ознайомтеся з усіма правилами безпеки та
інструкціями. Недотримання попереджень та інструкцій,
зазначених нижче, може призвести до ураження
електричним струмом, пожежі та/або серйозної травми.
Збережіть всі попередження та інструкції для
майбутнього використання.
Термін "електроінструмент" у всіх попередженнях,
зазначених нижче, відноситься до мережевого (з
кабелем) електроінструменту або акумуляторної батареї
(без кабелю живлення).
1. Безпека робочого місця
а. Утримуєте робоче місце в чистоті і добре
освітленим. Безлад на робочому місці або
відсутність освітлення робочого місця може
призвести до аварії.
b. Не працюйте з електроінструментом в місці
зберігання вибухонебезпечних матеріалів,
наприклад, у присутності легкозаймистих рідин,
газів або пилу. Електричні інструменти створюють
іскри, що можуть запалити пил або пари.
с. Діти і сторонні особи повинні знаходитися
якнайдалі під час роботи з електроприладами. Ви
можете відволіктися і втратити контроль.
с. Уникайте будь-якого впливу дощу або вологи на
d. Обережно поводьтеся зі шнуром живлення.
е. При роботі з електроінструментом на вулиці,
f. При необхідності роботи з електроінструментом у
3. Особиста безпека
a. Будьте уважні, дивіться, що ви робите,
b. Використовуйте засоби індивідуального захисту.
розетці. Ніколи не змінюйте вилку будь-яким
чином. Не використовуйте ніякі
вилки-перехідники з заземленими (замкнутими на
землю) електроінструментами. Вилки і розетки, які
не піддавалися ніяким змінам знижують ризик
ураження електричним струмом.
поверхнями, такими як труби, радіатори, плити та
холодильники. Існує підвищений ризик ураження
електричним струмом, якщо ваше тіло заземлене.
електроінструменти. Вода, що потрапила в
електроінструмент, збільшує ризик ураження
електричним струмом.
Ніколи не використовуйте шнур живлення для
перенесення, переміщення або вилучення вилки з
розетки. Тримайте шнур подалі від джерел тепла,
масла, гострих країв або рухомих частин.
Пошкоджені або заплутані шнури збільшують ризик
ураження електричним струмом.
використовуйте подовжувач, відповідний для
зовнішнього використання. Використання кабелю,
придатного для використання на відкритому повітрі,
знижує ризик ураження електричним струмом.
вологому середовищі, використовуйте пристрій
захисного відключення (ПЗВ). Використання ПЗВ
знижує ризик ураження електричним струмом.
використовуйте здоровий глузд при роботі з
електроприладами. Не використовуйте
електроінструмент, якщо ви втомилися або
перебуваєте під впливом наркотиків, алкоголю або
ліків. Найменша необережність при роботі з
електроінструментом може призвести до серйозних
травм.
Завжди надягайте захисні окуляри. Інше захисне
обладнання, включаючи респіратор, черевики на
нековзній підошві, захисний шолом або засоби
захисту органів слуху, використовувані в належних
умовах, зменшать ризик отримання травми.
20
Page 21

(Оригінальні інструкції)
УКРАЇНСЬКА
с. Для запобігання випадкового запуску,
переконайтеся, що перемикач знаходиться у
вимкненому положенні перед підключенням до
джерела живлення та/або акумуляторної батареї,
підняття або перенесення інструменту. Не
переносьте електроінструмент з пальцем на
вимикачі і не включайте електроживлення на
інструмент з увімкненим вимикачем, що може
призвести до нещасного випадку.
d. Перед включенням електроінструменту знімайте
регулювальний або гайковий ключ. Гайковий або
регулювальний ключ, залишений на обертовій
частині електроінструменту, може призвести до
травми.
е. Не тягніться. Зберігайте правильну стійку і
баланс весь час. Це дозволяє краще контролювати
інструмент в несподіваних ситуаціях.
f. Одягайтеся правильно. Не надягайте вільний
одяг або прикраси. Тримайте волосся, одяг і
рукавички далеко від рухомих частин. Вільний
одяг, прикраси або довге волосся можуть потрапити
в рухомі частини.
g. Якщо є пристрої для підключення пилозбірника
або витяжки, переконайтеся в тому, що вони
під'єднані і використовуються правильно.
Використання пилозбірника знижує ймовірність
виникнення ризиків, пов'язаних з пилом.
4. Використання та догляд за електроінструментом
a. Не перевантажуйте електроінструмент.
Використовуйте відповідний електричний
інструмент для відповідного застосування.
Правильно підібраний електроінструмент дозволить
виконати роботу краще і безпечніше при швидкості,
для якої він був розроблений.
b. Не використовуйте електроінструмент, якщо
перемикач не може його включити і вимкнути.
Будь-який електроінструмент, який не можна
контролювати за допомогою перемикача, є
небезпечний і повинен бути відремонтований.
c. Від'єднайте кабель живлення від джерела
живлення та/або акумулятора від електричного
інструменту перед виконанням будь-яких
регулювань, заміни приладдя або при зберіганні
електроінструменту. Такі профілактичні заходи
безпеки зменшують ризик ненавмисного запуску
електричного інструменту.
d. Зберігайте електроприлади в недоступному для
дітей місці і не дозволяйте особам, які не знайомі
з електричним інструментом або даними
інструкціями, працювати з електроприладами.
Електроінструменти небезпечні в руках
недосвідчених користувачів.
е. Підтримання електроінструменту. Перевіряйте
разрегульованість або з'єднання рухомих частин,
поломки частин і будь-які інші умови, які можуть
вплинути на роботу електроінструменту. При
наявності пошкодження, відремонтуйте
електроінструмент перед використанням. Багато
нещасних випадків є наслідком поганого догляду за
електроінструментом.
f. Тримайте ріжучий інструмент гострим і чистим.
Добре доглянутий ріжучий інструмент з гострими
ріжучими крайками легше контролювати.
g. Використовуйте електроінструмент, аксесуари та
насадки відповідно до цих вказівок, приймаючи
до уваги умови роботи і ті роботи, які повинні
бути виконані. Використання електроінструменту
для операцій, які відрізняються від тих, для яких він
призначений, може призвести до небезпечної
ситуації.
5. Обслуговування
а. Забезпечте, щоб обслуговування і ремонт вашого
електроінструменту проводився в
авторизованому сервісному центрі по ремонту з
використанням тільки оригінальних запасних
частин. Це стане гарантією безпеки
електроінструменту.
Додаткові заходи безпеки для
електроінструментів
Застереження! Додаткові заходи безпеки для
розпилювання, шліфування, обробки дротяною
щіткою, полірування або різання за допомогою
абразивного круга.
• Одягайте захисні навушники при свердлінні. Вплив
шуму може призвести до втрати слуху.
• Тримайте інструмент за ізольовані поверхні під час
роботи, при якій ріжучий інструмент може зачепити
приховану проводку або власний кабель. При контакті
ріжучого аксесуара з «працюючим» проводом або
відкритими металевими частинами
електроінструменту оператора може вдарити
електричним струмом.
21
Page 22

УКРАЇНСЬКА
(Оригінальні інструкції)
• Використовуйте лещата або інше відповідне
пристосування для забезпечення і підтримки
оброблюваного виробу на стійкій платформі.
Проведення роботи по напрямку руки або проти
вашого тіла, позбавляє стійкості і може призвести до
втрати контролю.
• Перед свердлінням стін, підлог і стель, перевірте
розташування електропроводки і труб.
• Не торкайтеся до кінчика свердла відразу після
закінчення свердління, оскільки воно може бути
гарячим.
• Цей інструмент не призначений для використання
особами (включаючи дітей) з обмеженими
фізичними, чутливими або розумовими здібностями
або з браком досвіду чи знань, якщо вони не були під
контролем і керівництвом особи, яка контролює
використання інструменту або особою,
відповідальною за їх безпеку. Діти повинні бути під
наглядом дорослих, щоб не допустити ніяких ігор з
інструментом.
• Призначення інструменту описується в цьому
посібнику. Використання будь-яких аксесуарів або
пристосувань, виконання будь-яких операцій за
допомогою цього інструменту, які не рекомендовані у
цьому посібнику, може становити небезпеку
отримання травм та/або пошкодження майна.
Етикетки на інструменті
Етикетки на вашому інструменті можуть включати
такі символи:
Читайте
інструкції з
експлуатації
Використовуйте
засоби захисту
очей
Використовуйте
засоби захисту
органів слуху
В ........ Вольт
A ........ Ампер
Гц ....... Герц
Вт ........
мин .....
n
Ватт
хвилини
Змін ний
.....
стру м
Пості йний
.....
струм
.......
Швидк ість
0
без н авантажен ня
......
....
....
хв..
Конструкція
класу II
Термінал
заземлення
Символ
попере дження п ро
небезп еку
обороти або
зворотно
поступальний рух в
хвилину
Положення дати штрих-коду
Дата коду, який також включає рік виготовлення,
друкується на корпусі.
Приклад:
2014 XX JN
Рік виготовлення
Електрична безпека
Ваш інструмент захищений подвійною
ізоляцією, тому заземлюючий провід не
потрібен. Завжди перевіряйте, щоб напруга мережі
відповідала напрузі, вказаній на табличці.
• Якщо оригінальний шнур живлення пошкоджений, він
повинен бути замінений виробником або
уповноваженим сервісного центру STANLEY для того,
щоб уникнути небезпеки.
Характеристики
Цей інструмент включає в себе деякі або всі з таких
характеристик:
1. Перемикач плавного ходу
2. Кнопка блокування
3. Перемикач вперед/назад
4. Селектор режиму буріння
5. Патрон
Наступні аксесуари можуть не входити в комплект з
вашим інструментом
6. Обмежувач глибини
7. Бічна рукоятка (тільки для моделей STDH5510,
STDH6513)
Збірка
Застереження! Перед складанням переконайтеся, що
інструмент вимкнений і відключений від джерела
живлення.
Установка бічної рукоятки (мал. А, В)
• Поверніть рукоятку проти годинникової стрілки до тих
пір, поки можна зрушити бічну рукоятку (7) до упору
до передньої частини інструменту (мал. А).
• Поверніть бічну рукоятку в потрібне положення.
• Вставте обмежувач глибини свердління (6) в отвір, як
показано на малюнку (B).
• Встановіть глибину свердління, як описано вище
• Затягніть бічну рукоятку, повернувши ії за
годинниковою стрілкою.
Установка свердла (мал.С)
• Відкрийте патрон, повертаючи муфту (5) проти
годинникової стрілки.
• Вставте хвостовик (9) в патрон (свердло не
включено)
• Вставте ключ затискного патрона (10) в кожен отвір
(8) у частині патрона і поверніть за годинниковою
стрілкою до упору.
Демонтаж і монтаж патрона (мал. D)
• Відкрити патрон, наскільки це можливо.
• Зніміть гвинт, що фіксує патрон, розташований в
патроні, повернувши його за годинниковою стрілкою
за допомогою викрутки.
• Затягніть шестигранний ключ. Зніміть патрон,
повернувши його проти годинникової стрілки.
22
Page 23

(Оригінальні інструкції)
УКРАЇНСЬКА
• Для повторної установки патрона, закріпіть його на
шпинделі і закріпіть його за допомогою стопорного
гвинта патрона.
Залишкові ризики
Додаткові залишкові ризики можуть виникнути при
використанні інструменту, які не включені в описані тут
правила техніки безпеки. Ці ризики можуть виникнути
при неправильному або тривалому використанні виробу і
т.і. Незважаючи на дотримання відповідних правил
техніки безпеки та використання запобіжних пристроїв,
деяких залишкових ризиків неможливо уникнути. Вони
включають в себе:
• Травми в результаті торкання обертових/рухомих
частин.
• Ризик отримання травми під час зміни деталей
інструменту, ножів або насадок
• Травми, викликані тривалим використанням
інструменту. При використанні інструменту протягом
тривалого періоду часу робіть регулярні перерви в
роботі.
• Поганий слух.
• Збиток здоров'ю внаслідок вдихання пилу при
використанні інструменту (приклад: робота з
деревом, особливо, деревиною дуба, бука і
деревоволокнистої плити середньої щільності).
ВИКОРИСТАННЯ
Увага! Дайте інструменту працювати у своєму
власному темпі. Не перевантажуйте його.
Увага!Перед свердлінням стін, підлог і стель,
перевірте розташування електропроводки і труб.
Вибір напрямку обертання (мал. Е)
Для свердління й загвинчування гвинтів, використовуйте
обертання вперед (за годинниковою стрілкою). Для
ослаблення шурупів або вилучення застряглого свердла,
використовуйте зворотне обертання (проти годинникової
стрілки).
• Щоб вибрати пряме обертання, натисніть повзунок
вперед/назад (3) вліво.
• Щоб вибрати зворотне обертання, натисніть повзунок
вперед/назад вправо. Увага! Ніколи не міняйте
напрямок обертання при працюючому двигуні.
Вибір режиму буріння
• Для свердління в цегляній кладці, встановіть
перемикач режимів свердління (4) в положення ( ).
• Для свердління в інших матеріалах і загвинчування,
встановіть перемикач режимів свердління в
положення ( ).
Установка глибини свердління (мал. C)
• Послабте допоміжну рукоятку (7), повернувши
рукоятку лічильника проти годинникової стрілки.
• Встановіть обмежувач глибини свердління (6) у
потрібне положення. Максимальна глибина буріння
дорівнює відстані між кінчиком свердла і передньою
частиною обмежувача глибини.
• Затягніть бічну рукоятку, повернувши рукоятку за
годинниковою стрілкою.
Вмикання і вимикання
• Щоб включити інструмент, натисніть перемикач
плавного ходу (1). Швидкість інструменту залежить
від того, наскільки сильно ви натиснете перемикач.
Як правило, використовують низькі швидкості для
свердел великого діаметру і високі швидкості для
свердел малого діаметра.
• Для безперервної роботи натисніть фіксатор клавіші
(2) і відпустіть перемикач плавного ходу. Ця опція
доступна тільки на повній швидкості в прямому і
зворотному режимах.
• Щоб вимкнути інструмент, відпустіть кнопку вмикача.
Щоб вимкнути інструмент, коли він знаходиться в
безперервному режимі роботі, натисніть перемикач
плавного ходу ще раз і відпустіть його.
Обслуговування
Ваш інструмент STANLEY був розроблений для роботи
протягом тривалого періоду часу при мінімальному
технічному обслуговуванні. Для забезпечення
задовільної роботи, інструмент повинен правильно
зберігатися і піддаватися регулярному чищенню.
Важливо
Для забезпечення безпеки і надійності обладнання,
ремонт, технічне обслуговування і регулювання (крім
тих, які перераховані в цьому посібнику) повинні
виконуватися в авторизованих сервісних центрах або
інших кваліфікованих організаціях, завжди з
використанням оригінальних запасних частин.
Чищення
Застереження! Якщо ви бачите пил на або
навколо вентиляційних портів, негайно видаліть
пил з корпусу за допомогою чистого сухого повітря. Для
виконання цієї процедури, користуйтеся відповідними
засобами захисту очей і респіратором.
23
Page 24

УКРАЇНСЬКА
(Оригінальні інструкції)
Застереження! Строго заборонено очищати
неметалеві деталі інструменту за допомогою
розчинників або інших дратівливих хімічних речовин. Ці
хімікати можуть завдати шкоди матеріалам, з яких
виготовлені дані компоненти. Для чищення
використовуйте тканину, змочену в слабкому мильному
розчині. Не допускайте попадання рідини всередину
інструменту і ніколи не опускайте будь-яку частину
інструменту в рідину.
Аксесуари
Продуктивність електроінструменту залежить від
використовуваних аксесуарів. Аксесуари
STANLEY розроблені у відповідності з високими
стандартами якості, щоб підвищити продуктивність
електроінструменту.
STANLEY пропонує великий вибір аксесуарів, наявних у
продажу у вашого місцевого дилера або в
авторизованому сервісному центрі за додаткову плату.
Увага: Використання будь-яких інших аксесуарів не
рекомендується для використання з цим інструментом і
може бути небезпечним.
Інформаційна служба
STANLEY пропонує широку мережу авторизованих
сервісних центрів, що належать компанії по всій Азії. Всі
сервісні центри STANLEY укомплектовані персоналом,
що пройшов навчання, щоб надати клієнтам ефективний
і надійний сервіс. Незалежно від того потрібна вам
технічна рада, ремонт або оригінальні запасні частини,
вам необхідно звернутися в найближчий до вас
сервісний центр STANLEY.
Примітки
• Політика STANLEY є процесом безперервного
вдосконалення нашої продукції і, таким чином, ми
залишаємо за собою право змінювати специфікацію
продукту без попереднього повідомлення.
• Стандартне обладнання та аксесуари можуть
варіювати залежно від країни.
• Характеристики продукції можуть відрізнятися
залежно від країни.
• Повний асортимент продукції може варіювати
залежно від країни. Зв'яжіться з вашим місцевим
дилером STANLEY для отримання інформації про
моделі у продажу.
Повна гарантія терміном на два роки
Роздільний збір і утилізація. Цей продукт не слід
утилізувати разом з побутовим сміттям.
Якщо ви зрозумієте, що ваш продукт Stanley потребує
заміни, або якщо він не має ніякого подальшого
застосування для вас, не викидайте його разом з
побутовими відходами. Надайте цей продукт для
роздільного збору/утилізації.
Роздільний збір продуктів і упаковок дозволяє
здійснити їх переробку і використати їх повторно.
Повторне використання перероблених
матеріалів допомагає захищати довкілля від забруднення
і знижує витрату сировинних матеріалів.
Місцеве законодавство може забезпечити збір старих
електроінструментів окремо від побутового сміття на
муніципальних звалищах відходів або в торговому
підприємстві при купівлі нового виробу. Stanley
забезпечує можливість для збору і утилізації продуктів
Stanley, як тільки вони досягли кінця свого терміну
служби. Для того, щоб скористатися цією послугою, ви
можете здати ваш виріб у будь-який авторизований
сервісний центр, який збирає їх за нашим дорученням.
Ви можете упізнати місце знаходження вашого
найближчого авторизованого сервісного центру,
звернувшись в місцеве відділення Stanley за адресою,
вказаною в цьому керівництві. Крім того, список
авторизованих ремонтних агентів Stanley і повну
інформацію про наше післяпродажне обслуговування і
контакти ви можете знайти в Інтернеті: www.2helpu.com10
24
Page 25

(Оригінальні інструкції)
Два рік повної гарантії
Якщо ваш продукт STANLEY виходить з ладу із-за
дефектних матеріалів або виготовлення впродовж 24
місяців з дати купівлі, STANLEY Europe гарантує заміну
усіх несправних деталей безкоштовно або - на власний
розсуд - заміну продукту безкоштовно за умови, що:
• Продукт використовувався правильно, його
експлуатація проводилася строго відповідно до
інструкції з експлуатації.
• Продукт піддавався звичайному зносу;
• Ремонт не проводився сторонніми особами;
• Представлені документи, що підтверджують купівлю.
• Продукт STANLEY повертається в повному комплекті
з усіма оригінальними компонентами
Якщо ви хочете зробити заявку, зв'яжіться з продавцем
або з’ясуйте місце знаходження вашого найближчого
авторизованого сервісного агента Stanley в каталозі
Stanley або зверніться в місцеве представництво Stanley
за адресою, вказаною в цьому посібнику. Список
авторизованих сервісних агентів Stanley і повну
інформацію про наше післяпродажне обслуговування
можна знайти в Інтернеті за адресою:
www.stanleytools.com
УКРАЇНСЬКА
25
Page 26

УКРАЇНСЬКА
(Оригінальні інструкції)
Гарантійні умови
Шановний покупець!
1. Вітаємо Вас з покупкою високоякісного виробу
STANLEY і висловлюємо вдячність за Ваш вибір.
2. При покупці виробу вимагайте перевірки його
комплектності і справності у Вашій присутності,
інструкцію з експлуатації та заповнений гарантійний
талон українською мовою
В гарантійному талоні повинні бути внесені: модель,
дата продажу, серійний номер, дата виробництва
інструменту; назва, печатка і підпис торгової
організації. За відсутності у Вас правильно
заповненого гарантійного талону, а також при
невідповідності зазначених у ньому даних ми
будемо змушені відхилити Ваші претензії щодо
якості даного виробу.
3. Щоб уникнути непорозумінь, переконливо просимо
Вас перед початком роботи з виробом уважно
ознайомитися з інструкцією з його експлуатації.
Правовою основою справжніх гарантійних умов є
чинне Законодавство. Гарантійний термін на даний
виріб складає 24 місяці і обчислюється з дня
продажу. У разі усунення недоліків виробу,
гарантійний строк продовжується на період його
перебування в ремонті. Термін служби виробу
становить 5 років з дня продажу.
4. У разі виникнення будь-яких проблем у процесі
експлуатації виробу рекомендуємо Вам звертатися
тільки в уповноважені сервісні центри STANLEY,
адреси та телефони яких Ви зможете знайти в
гарантійному талоні, на сайті www.2helpU.com або
дізнатися в магазині. Наші сервісні станції - це не
тільки кваліфікований ремонт, але і широкий
асортимент запчастин і аксесуарів.
5. Виробник рекомендує проводити періодичну
перевірку і технічне обслуговування виробу в
уповноважених сервісних центрах.
6. Наші гарантійні зобов'язання поширюються тільки
на несправності, виявлені протягом гарантійного
терміну і викликані дефектами виробництва та \ або
матеріалів.
7. Гарантійні умови не поширюються на несправності
виробу, що виникли в результаті:
7.1 Недотримання користувачем приписів інструкції з
експлуатації виробу, застосування виробу не за
призначенням, неправильного зберігання,
використання приладдя, витратних матеріалів і
запчастин, що не передбачені виробником.
7.2 Механічного пошкодження (відколи, тріщини і
руйнування) внутрішніх і зовнішніх деталей виробу,
основних і допоміжних рукояток, мережевого
кабелю, що викликані зовнішнім ударним або
будь-яким іншим впливом
7.3 Потрапляння у вентиляційні отвори та проникнення
всередину виробу сторонніх предметів, матеріалів
або речовин, що не є відходами, які супроводжують
застосування виробу за призначенням, такими як:
стружка, тирса, пісок, та ін.
7.4 Впливу на виріб несприятливих атмосферних і
інших зовнішніх факторів, таких як дощ, сніг,
підвищена вологість, нагрівання, агресивні
середовища, невідповідність параметрів
електромережі, що зазначені на інструменті.
7.5 Стихійного лиха. Пошкодження або втрати виробу,
що пов'язані з непередбаченими лихами,
стихійними явищами, у тому числі внаслідок дії
непереборної сили (пожежа, блискавка, потоп і інші
природні явища), а також внаслідок перепадів
напруги в електромережі та іншими причинами, які
знаходяться поза контролем виробника.
8. Гарантійні умови не поширюються:
8.1. На інструменти, що піддавались розкриттю, ремонту
або модифікації поза уповноваженим сервісним
центром.
8.2. На деталі, вузли та матеріали, що мають сліди
природного зносу, такі як: приводні ремені і колеса,
вугільні щітки, мастило, підшипники, зубчасті
зчеплення редукторів, гумові ущільнення, сальники,
направляючі ролики, муфти, вимикачі, бойки,
штовхачі, стволи тощо.
8.3. На змінні частини: патрони, цанги, затискні гайки і
фланці, фільтри, акумуляторні батареї, ножі,
шліфувальні підошви, ланцюги, зірочки, пильні
шини, захисні кожухи, пилки, абразиви, пильні і
абразивні диски, фрези, свердла, бури тощо
8.4. На несправності, що виникли в результаті
перевантаження інструменту (як механічного, так і
електричного), що спричинили вихід з ладу
одночасно двох і більше деталей і вузлів, таких як:
ротора і статора, обох обмоток статора, веденої і
ведучої шестерень редуктора або інших вузлів і
деталей. До безумовних ознак перевантаження
виробу відносяться, крім інших: поява кольорів
мінливості, деформація або оплавлення деталей і
вузлів виробу, потемніння або обвуглювання
ізоляції проводів електродвигуна під впливом
високої температури.
Виробник:
"Stanley Black & Decker Deutschland
GmbH" Black-&-Decker Str.40, D-65510
Idstein, Німеччина
26
Page 27

90618151 01/2015
Page 28

Names & Addresses for STANLEY Service Concessionaries - MIDDLE EAST & AFRICA
ALGERIA: Sarl Outillage Corporation, 08 Rue Med Boudiaf - Cheraga - Algiers, Algeria. Tel: (213-21) 375130, Fax: (213-21) 369667. ANGOLA: Angoferraria,
Lda., Rua Robert Shields, No. 61, Luanda, Angola, Tel: 00244-222-395837 / 222-395034, Fax: 00244-222-394790. AZERBAIJAN: Royalton Holdings Ltd. 41
Khagani St. Apt. 47 AZ 1001, Baku. Tel: (994-12) 4935544, Fax: (994-12) 5980378. BAHRAIN: Kavalani & Sons W.L.L., P.O. Box 71, Sitra, Manama, Tel: (973)
17732888, Fax: (973) 17737379. Alfouz Services Co. WLL., P.O. Box 26562, Tubli, Manama. Tel: (973) 17783562, Fax: (973) 17783479. EGYPT: El Farab
S.A.E., 15-Nabil El Wakkad Street, Dokki, Giza, Egypt, Tel: 00202-37603946 / 002-010-2582544, Fax: 00202-33352796. ETHIOPIA: Seif Tewfik Sherif, Arada
Sub-City, Kebele 01/02, Global Insurance Building, 2nd Floor, Room 43, P.O. Box 2525, Addis Ababa, Ethiopia. Tel: (251-11) 1563968/ 1563969, Fax: (251-11)
1558009. IRAQ: Financial Links, Kazzaz Building Arasat Al-Hindia Block No: 629 Street: 31Building No: 1 Baghdad – Iraq. Tel: 00964 (0)780 195 2223/ 00964
(0)781 3763044. Al Sard Co. for General Trading Ltd. Jbara Bldg. 3Flr, Al Rasheed St. Bagdad. Tel: (964) 18184102. Sakhar Group, Arrassat al-hindya Al
Masbah, Bagdad. (964) 7400144446. JORDAN: Palestine Bldg. Matl. (Bashiti Hardware), 93 King Abdullah 2nd Street, Opp. ELBA House, P.O. Box 3005,
Amman 11953, Tel: (962-6) 5349098, Fax: (962-6) 5330731. KENYA: Dextron Tools Ltd., P.O. Box 20121-00200, Shariff House, Kimathi Street, Nairobi. Tel:
(254-20) 6905000/ 2358021, Fax: (254-20) 6905111/ 6905112. KUWAIT: Al Omar Technical Co., P.O. Box 4062, 13041 Safat, Kuwait. Tel: (965) 24848595/
24840039, Fax: (965) 24845652. Fawaz Al Zayani Establishment, P.O. Box 42426, Shop No. 18, Al Humaizi Commercial Complex, Khalifa Al Jassim,
Shuwaikh, Kuwait. Tel: (965) 24828710, Fax: (965) 24828716. Fawaz Al Zayani Establishment, P.O. Box 42426, Shop No.18, Al Humaizi Commercial
Complex, Khalifa Al Jassim, Shuwaikh, Kuwait, Tel: (965) 24828710, Fax: (965) 24828716. Fawaz Al Zayani Establishment, Fahaheel Industrial Area, Main St.,
Sanaya, Kuwait, Tel: (965) 23925830, Fax: (965) 24828716. LEBANON: Est. Shaya & Azar S.A.R.L., Boulvard Jdeideh - Mar Takla - Bouchrieh .P.O. Box
90545 Jdeideh.Beirut - Lebanon, Tel: 00961 1 872305 / 306 , Fax: 00961 1 872303. LIBYA: North Africa Trading ( El Ghoul Brothers), AlHilal Service Center
Tawergha St. Misurata, Tel: 00218-091-3221408. (Benghazi) Sniydel st., Amr Ibn EL-Aas Rd. Tel: (+218) 92 5771120. (Tripoli) Al Barniq Service Center,
Mokhazin elsukar st., ElFallah. Tel: (+218) 21 4808019. (Misrata) Al Hilal Service Center, Tawergha st. Tel: (+218) 51 2626743. MAURITIUS: Robert Le Marie
Limited, Old Moka Road, Bell Village, P.O. Box 161, Port Louis, Tel: 00230-212 1865/ 212 2847, Fax: 00230-2080843. MOROCCO: Ets Louis Guillaud & Cie,
149, Quartier Industriel, Moulay Rachid, Casablanca, Postal Code 20450, Morocco, Tel: 00212-522729233, Fax: 00212-522729096. NIGERIA: Meridian
Power Tools Ltd., Gr.Floor, #1 Alhaji Masha Rd, Next toTeslim Balogun Stadium, Near National Stadium Surulere, Lagos, Nigeria, Tel: 00234-1-7740431 /
7740410, Fax: 00234-1-7913798. OMAN: Al Jizzi Company LLC, P.O. Box 1704,PC 112 Ruwi, Oman, Tel: (968) 24832618/ 24835153, Fax: (968)
24831334/24836460. Al Hassan Technical & Construction Supplies Co. LLC, P.O. Box 1948, P.C. 112, Ruwi, Tel: (968) 24810575 / 24837054, Fax: (968)
24810287/ 24833080. Oman Hardware Co. LLC, P.O. Box 635, Ruwi Postal Code 112, Te: (968) 24815131, Fax: (968) 24816491. Khimji Ramdas, P.O. Box
19, Post Code 100, Ghala, Muscat, Oman. Tel: (968) 24595906/ 907, Fax: (968) 24852752. Oman Marketing & Service Co. (Omasco), P.O. Box 2734, Behind
Honda Showroom, Wattayah, Oman. Tel: (968) 24560232/ 24560255, Fax: (968) 24560993. Oman Marketing & Service Co. (Omasco), Al Ohi, Sohar, Oman.
Tel: (968) 26846379, Fax: (968) 26846379. Oman Marketing & Service Co. (Omasco), Sanaya, Salalah, Oman. Tel: (968) 23212290, Fax: (968) 23210936.
PAKISTAN: ZIT Co - Nasir & Bros., 2nd Floor, Qadri Center, Chowk Dalgran Railway Road, Lahore, Pakistan, Tel: 0092 42 37670839, Fax: 0092 42
37652989. Ammar Service & Spares, 60-Bank Arcade, Serai Road, Karachi, Pakistan. Tel: (92-21) 32426905, Fax: (92-21) 32427214. QATAR: Teyseer
Industrial Supplies & Services Co. WLL, 55, Al Wakalat St. (Between St. 18 & 19) Salwa Industrial Area, P.O. Box 40523 Doha,Qatar, Te: (974) 44581536, Fax:
(974) 44682024. Shaheen Electrical Works & Trading Co. WLL, Gate 34, St. 44 Industrial Area P.O. Box 9756, Doha, Tel: (974) 44600230 /44600525, Fax:
(974) 44601338. Al Muftah Service Centre, Al Wakrah Road, P.O. Box 875, Doha,Qatar, Tel: (974) 44650880/ 44650110/ 44446868, Fax: (974) 44441415 /
44662599. SAUDI ARABIA: (Al Bahr) Mohamed Ahmed Bin Afif Est., P.O. Box 530, Yanbu, Al Bahr. Tel: (966-4) 3222626/ 3228867, Fax: (966-4) 3222210.
(Al Khobar) Fawaz Ebrahim Al Zayani Trading Est., P.O. Box 76026, Al Khobar # 31952, Tel: (966-3) 8140914, Fax: (966-3) 8140824. MSS (Al-Mojil Supply &
Services) P.O. Box 450, Jubail 31951, Opp. Gulf Bridge Library & Riyadh House. Tel: (966-3) 3612850/ 3624487/ 3621729, Fax: (966-3) 3623589/ 3620783.
(Dammam) MSS (Al-Mojil Supply & Services), P.O. Box 450, Jubail 31951.Opp-Gulf Bridge Library & Riyadh House, Tel: (966-3) 3612850 / 3624487 /
3621729, Fax: (966-3) 3623589 / 3620783. Al Bawardi Tools & Hardware, P.O. Box 112, Dammam, Tel: (966-3) 8330780 Ext.24 / 8348585 Ext. 24 /
+966-3-8335555, Fax: (966-3) 8336303. (Al Hassa) Mutawa Trading & Gen. Services, Maliki road Hafuf city, Al Hassa, KSA. Tel: (966) 502846275 (Jeddah) Al
Bawardi Tools & Hardware, P.O. Box 16905, Jeddah 21474, Tel: (966-2) 6444547 / 6439035 / 6456095, Fax: (966-2) 6439024. EAC (Al Yousef Contg. & Trdg.
Est.), P.O. Box 30377, Jeddah -21477, Tel: (966-2) 6519912, Fax: (966-2) 6511153. (Madina) Garziz Trading for Bldg Mat & Decoration, P.O. Box 3364,
Madina, Tel: (966-4) 826 14 90 / 8227636, Fax: (966-4) 8265741. (Riyadh) Industrial Material Organization (IMO), P.O. Box 623, Rail Street ,Riyadh, Tel:
(966-1) 4028010 Ext 26 / 8001245757, Fax: (966-1) 4037970. Sultan Garment Factory (RSC), P.O. Box 29912, Riyadh 11467, KSA, Tel: (966-1) 4055148 /
4042889, Fax: (966-1) 4055148. Al Bawardi Tools & Hardware, P.O. Box 68, Riyadh 11411, Tel: (966-1) 4484999, Fax: (966-1) 4487877. (Yanbu) Fawaz
Ebrahim Al Zayani, Opposite to Al Fouzan, Jeddah highway or King Abdul Aziz road, Yanbu. Tel: (966-4) 3960980, Fax: (966-4) 3961980. Mohamed Ahmed
Bin Afif Est., P.O. Box 530, Yanbu, Al Bahr, Tel: (966-4) 3222626/ 3228867, Fax: (966-4) 3222210. SOUTH AFRICA: Stanley Black & Decker - RSA, 199
Winze Drive Stormill Ext 9 Roodepoort, Tel: (2711) 472 0454, Fax: (2711) 472 0482. Trevco Power Tool Service 14 Steenbok Street, Koedoespoort, 0186,
Pretoria, South Africa. Tel: (27-86) 1873826, Fax: (27-86) 5001771. TANZANIA: General Motors investment Ltd., P.O. Box 16541, 14 Nyerere Road,
Vingunguti, Dar-es-Salaam. Tel: (255 22) 2862661/ 2865022, Fax: (255 22) 2862667. TUNISIA: Societe Tunisienne De Maintenance (STM), Rue de la
Physique. Nouvelle Zone Industrielle Ben Arous., 2013 Ben Arous, Tunisia. Tel: (+216) 79 389687, Fax: (+216) 71 385154. UAE: (Abu Dhabi) Light House
Electrical, P.O. Box 120, Abu Dhabi, Tel: (971-2) 6726131, Fax: (971-2) 6720667. Galaxy Equipment Trading, Madinath Zayed (Baada Zaid), Abu Dhabi P.C.
58910, Tel: (971-2) 8844279, Fax: (971-2) 8844297 (Ajman) Al Sukoon Gen. Trdg. Co. LLC, P.O. Box 2975, Ajman. Tel: (971-6) 7435725/ 7438317, Fax:
(971-6) 7437350. Al Sukoon Gen. Trdg. Co. LLC, P.O. Box 2975, Ajman, Tel: (971-6) 7435725 / 7438317, Fax: (971-6) 7437350 (Al Ain) Zillion Equipment and
Spare Parts Trading LLC, P.O. Box 19740, Opp. Bin Sadal/ Trimix Redymix Sanaiya, Al Ain. Tel: (971-3) 7216690, Fax: (971-3) 7216103. (Dubai) Black &
Decker (Overseas) GmbH, P.O. Box 5420, Dubai, Tel: (971-4) 8127400/ 8127406, Fax: (971-4)2822765. Ideal Star Workshop Eqpt.Trading LLC, P.O. Box
37116, Al Quoz, Dubai, Tel: (971-4) 3474160, Fax: (971-4) 3474157, Fine Tools, P.O.Box 30139 , Al Quoz, Dubai, Tel: (971-4) 3385240, Fax: (971-4) 3385239,
Alebrah Engineering Service, P.O. Box 78954, Al Qusais , Dubai, Tel: (971-4) 2850044, Fax: (971-4) 2844802. (Musaffah) Light House Electrical, P.O. Box
120, Abu Dhabi, Tel: (971-2) 5548315, Fax: (971-2) 5540461. (Sharjah) Mc Coy Middle East LLC, P.O. Box 25793, Sharjah, Tel: (971-6) 5395931, Fax:
(971-6) 5395932. Burj Al Madeena, Industrial Area No.1, Opp. Pakistani Masjid, P.O. Box 37635, Sharjah. Tel: (971-6) 5337747, Fax: (971-6) 5337719. Burj Al
Madeena, , Industrial Area No 1,opp Pakistani Masjid P.O. Box 37635, Sharjah, Tel: (971-6) 5337747, Fax: (971-6) 5337719 (Ras Al Khaimah) Mc Coy Middle
East LLC, P.O. Box 10584, Ras Al Khaimah, Tel: (971-7) 2277095, Fax: (971-7) 2277096. UGANDA: The Building Center (U) Ltd., 52 Station Road, Kitgum
House, P.O. Box 7436, Kampala, Uganda. Tel: (256-41) 4234567/ 4259754, Fax: (256-41) 4236413. YEMEN: (Aden) Middle East Trad. Co. Ltd. (METCO),
Mualla Dakka, Aden, Yemen. Tel: (967-2) 222670, Fax: (967-2) 222670. (Sana'a) Middle East Trad. Co. Ltd. (METCO), Hayel St., Sana'a, Yemen. Tel: (967-1)
204201, Fax: (967-1) 204204. (Taiz) Middle East Trading Co. (METCO), P.O. Box 12363, 5th Flr, Hayel Saeed Anam Bldg, Al-Mugamma St. Taiz, Yemen. Tel:
(967-4) 213455, Fax: (967-4) 219869.
 Loading...