

Page 1
3
STDC441L
10
Page 2
1
3
4
9
10
2
6
7
5
B
1
FIG A
FIG B
FIG D
FIG C
FIG E
8
Page 3
2
10
H1
H2
FIG F FIG G
FIG I
FIG H
Page 4
3
ENGLISH
Intended use
Your Stanley impact wrench has been designed for
screwdriving and nut setting applications.
SAFETY INSTRUCTIONS
General power tool safety warnings
Warning! Read all safety warnings and all
instructions. Failure to follow the warnings and
instructions listed below may result in electric
Save all warnings and instructions for future reference.
The term "power tool" in all of the warnings listed below refers
to your mains operated (corded) power tool or battery operated (cordless) power tool.
1. Work area safety
a. Keep work area clean and well lit. Cluttered or dark
areas invite accidents.
b. Do not operate power tools in explosive atmospheres,
or dust. Power tools create sparks which may ignite the
dust or fumes.
c. Keep children and bystanders away while operating a
power tool. Distractions can cause you to lose control.
2. Electrical safety
a. Power tool plugs must match the outlet. Never modify
the plug in any way. Do not use any adapter plugs
with earthed (grounded) power tools.
and matching outlets will reduce risk of electric shock.
b. Avoid body contact with earthed or grounded
surfaces such as pipes, radiators, ranges and
refrigerators. There is an increased risk of electric shock
if your body is earthed or grounded.
c. Do not expose power tools to rain or wet conditions.
Water entering a power tool will increase the risk of
electric shock.
d. Do not abuse the cord. Never use the cord for
carrying, pulling or unplugging the power tool. Keep
cord away from heat, oil, sharp edges or moving
parts. Damaged or entangled cords increase the risk of
electric shock.
e. When operating a power tool outdoors, use an
extension cord suitable for outdoor use. Use of a cord
suitable for outdoor use reduces the risk of electric shock.
f. If operating a power tool in a damp location is
unavoidable, use a residual current device (RCD)
protected supply. Use of an RCD reduces the risk of
electric shock.
3. Personal safety
a. Stay alert, watch what you are doing and use common
sense when operating a power tool. Do not use a
of drugs, alcohol or medication. A moment of inattention
while operating power tools may result in serious personal
injury.
b. Use personal protective equipment. Always wear eye
protection. Protective equipment such as dust mask,
non-skid safety shoes, hard hat, or hearing protection
used for appropriate conditions will reduce personal
injuries.
c. Prevent unintentional starting. Ensure the switch is in
the off-position before connecting to power source
and/or battery pack, picking up or carrying the tool.
energising power tools that have the switch on invites
accidents.
d. Remove any adjusting key or wrench before turning
the power tool on. A wrench or a key left attached to a
rotating part of the power tool may result in personal injury.
e. Do not overreach. Keep proper footing and balance at
all times. This enables better control of the power tool in
unexpected situations.
f. Dress properly. Do not wear loose clothing or
jewellery. Keep your hair, clothing and gloves away
from moving parts. Loose clothes, jewellery or long hair
can be caught in moving parts.
g. If devices are provided for the connection of dust
extraction and collection facilities, ensure these are
connected and properly used. Use of dust collection can
reduce dust-related hazards.
Technical data
STDC441L
Voltage V
DC
No-load speed /min
Max. torque
(PTI Rating)
Nm
Chuck capacity mm
Beats /min
Weight kg
18
0-2900
164
6.35
0-3100
1.5
Charger
Input Voltage
V
AC
Output Voltage V
DC
Output Current(DC) A
Approx. charge time min
220
20
2
40
Battery
90587652
9058****
Voltage
V
DC
Capacity Ah
18
1.5
Type Li-Ion
STDC441L
18V LI-ION IMPACT DRIVER
Page 5
4
ENGLISH
e. Maintain power tools. Check for misalignment or
binding of moving parts, breakage of parts and any
other condition that may affect the power tools
operation. If damaged, have the power tool repaired
before use. Many accidents are caused by poorly
maintained power tools.
f. Keep cutting tools sharp and clean. Properly
maintained cutting tools with sharp cutting edges are less
likely to bind and are easier to control.
g. Use the power tool, accessories and tool bits etc. in
accordance with these instructions, taking into
account the working conditions and the work to be
performed. Use of the power tool for operations different
from those intended could result in a hazardous situation.
5. Battery tool use and care
a.
manufacturer. A charger that is suitable for one type of
another battery pack.
b.
battery packs. Use of any other battery packs may create
c. When battery pack is not in use, keep it away from
other metal objects, like paper clips, coins, keys,
nails, screws, or other small metal objects, that can
make a connection from one terminal to another.
Shorting the battery terminals together may cause burns
d. Under abusive conditions, liquid may be ejected from
the battery; avoid contact. If contact accidentally
additionally seek medical help. Liquid ejected from the
battery may cause irritation or burns.
6. Service
a.
person using only identical replacement parts. This will
ensure that the safety of the power tool is maintained.
ADDITIONAL POWER TOOL SAFETY WARNINGS
Warning! Additional safety warnings for impact
wrenches
Wear ear protectors with impact drills. Exposure to
noise can cause hearing loss.
Use auxiliary handles supplied with the tool. Loss of
control can cause personal injury.
Hold power tool by insulated gripping surfaces when
performing an operation where the fastener may
contact hidden wiring. Fasteners contacting a "live" wire
may make exposed metal parts of the power tool "live"
and could give the operator an electric shock.
Use clamps or another practical way to secure and
support the workpiece to a stable platform. Holding the
work by hand or against your body leaves it unstable and
may lead to loss of control.
This tool is not intended for use by persons (including
children) with reduced physical, sensory or mental capabilities, or lack of experience and knowledge, unless they
have been given supervision or instruction concerning use
of the appliance by a person responsible for their safety.
Children should be supervised to ensure that they do not
play with the appliance.
The intended use is described in this instruction manual.
The use of any accessory or attachment or performance
of any operation with this tool other than those recommended in this instruction manual may present a risk of
personal injury and/or damage to property.
Warning! impact wrenches are not torque
wrenches. Do not use this tool for tightening
calibrated torque measurement device such as
a torque wrench should be used when under
tightened or over tightened fasteners can lead to
the failure of the joint.
SAFETY OF OTHERS
This appliance is not intended for use by persons (includ-
ing children) with reduced physical, sensory or mental
capabilities, or lack of experience and knowledge, unless
they have been given supervision or instruction concerning use of the appliance by a person responsible for their
safety.
Children should be supervised to ensure that they do not
play with the appliance.
4. Power tool use and care
a. Do not force the power tool. Use the correct power
tool for your application. The correct power tool will do
the job better and safer at the rate for which it was
designed.
b. Do not use the power tool if the switch does not turn it
on and off. Any power tool that cannot be controlled with
the switch is dangerous and must be repaired.
c. Disconnect the plug from the power source and/or the
battery pack from the power tool before making any
adjustments, changing accessories, or storing power
tools. Such preventive safety measures reduce the risk of
starting the power tool accidentally.
d. Store idle power tools out of the reach of children and
do not allow persons unfamiliar with the power tool or
these instructions to operate the power tool. Power
tools are dangerous in the hands of untrained users.
Page 6
5
ENGLISH
Impairment of hearing.
Health hazards caused by breathing dust developed when
using your tool (example:- working with wood, especially
oak, beech and MDF.)
LABELS ON TOOL
The following symbols are shown on the tool:
Warning! To reduce the risk of injury, the user
must read the instruction manual.
Additional safety instructions for batteries and
chargers
Batteries
Never attempt to open for any reason.
Do not expose the battery to water.
Do not store in locations where the temperature may
exceed 40 °C.
Charge only at ambient temperatures between 10 °C and
40 °C.
Charge only using the charger provided with the tool.
When disposing of batteries, follow the instructions given
in the section "Protecting the environment".
Do not attempt to charge damaged batteries.
CHARGERS
Use your Stanley charger only to charge the battery in
the tool with which it was supplied. Other batteries could
burst, causing personal injury and damage.
Never attempt to charge non-rechargeable batteries.
Have defective cords replaced immediately.
Do not expose the charger to water.
Do not open the charger.
Do not probe the charger.
The charger is intended for indoor use only.
Read the instruction manual before use.
Electrical safety
Your charger is double insulated; therefore no
earth wire is required. Always check that the
mains voltage corresponds to the voltage on the
rating plate. Never attempt to replace the charger
unit with a regular mains plug.
If the supply cord is damaged, it must be replaced by the
manufacturer or an authorised Stanley Service Centre in
order to avoid a hazard.
FEATURES
IMPORTANT SAFETY INSTRUCTIONS FOR
BATTERY CHARGERS
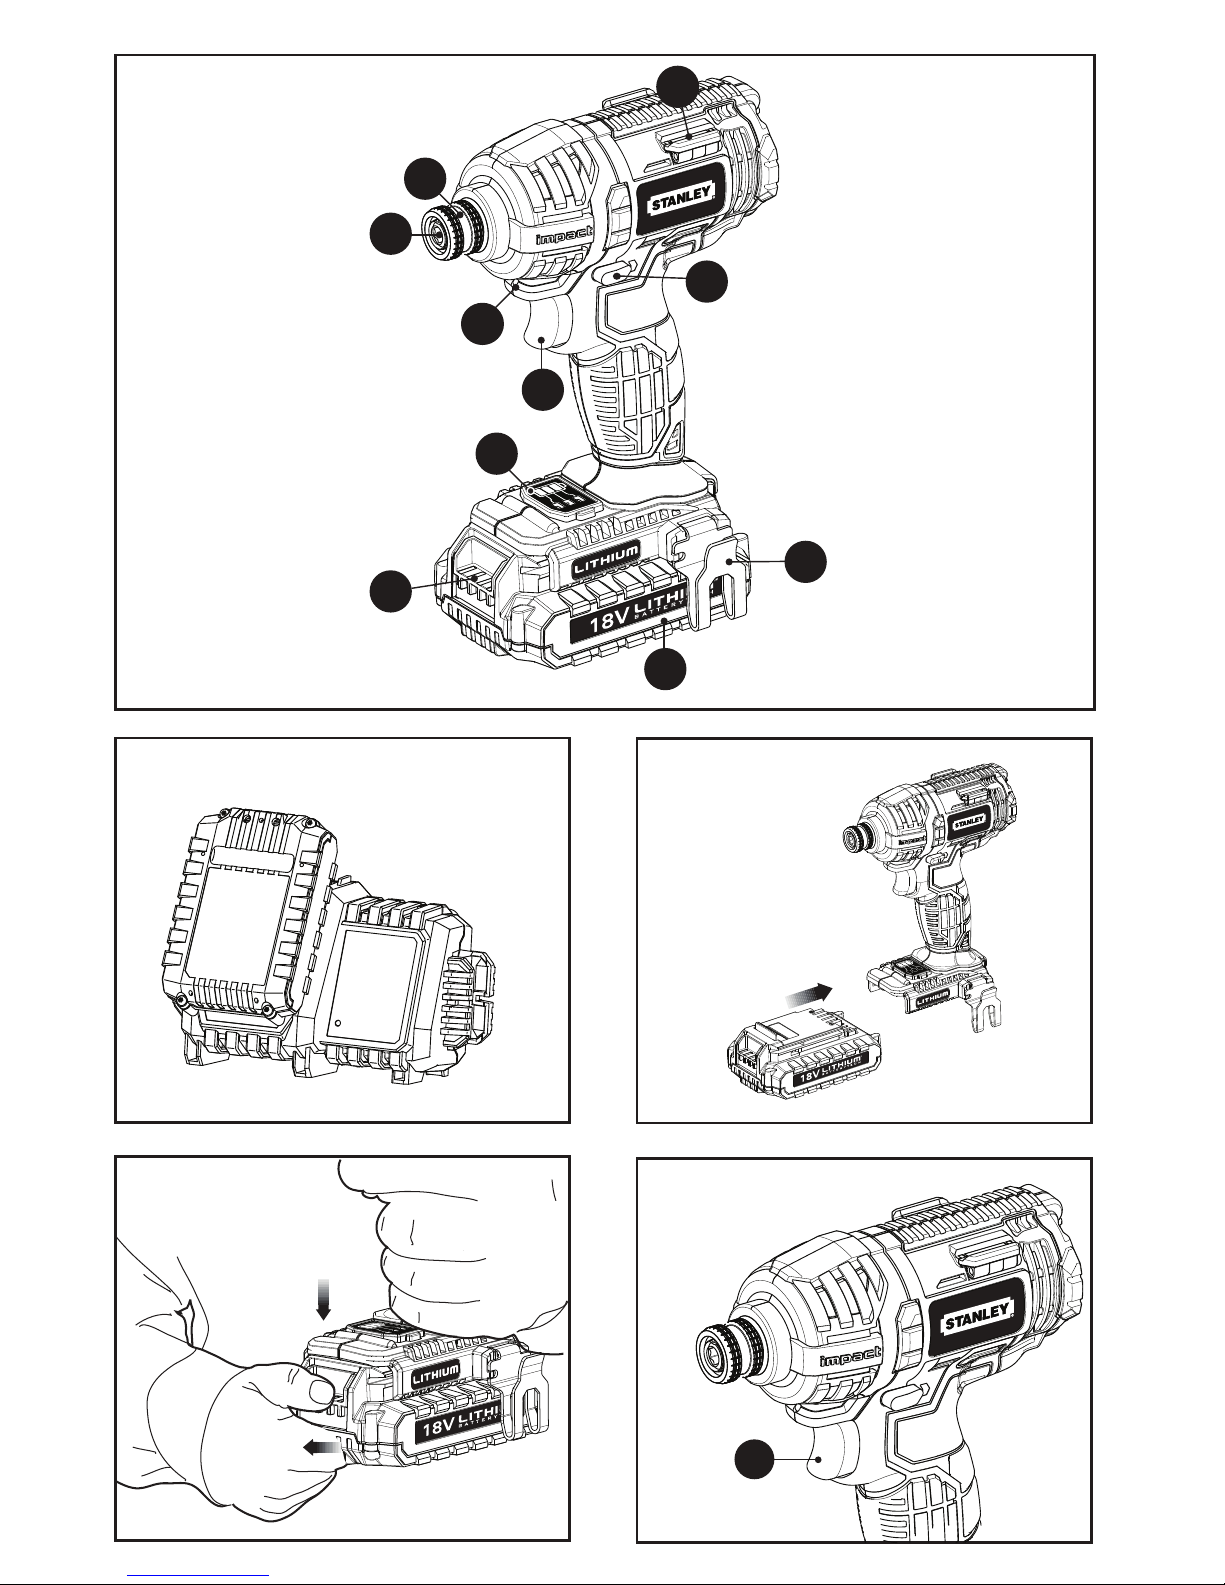
This tool includes some or all of the following features (Figure A).
1.
9. LED Work Light
10. Belt Clip
2.
Forward/Reverse Button
Trigger Switch
3.
Chuck Collar
4.
Hex Quick-Release Chuck
5.
Magnetic Bit Tip Holders (2)
6.
Battery
7.
Battery Release Button
8.
Battery Fuel Gauge
SAVE THESE INSTRUCTIONS: This manual contains
important safety instructions for battery chargers.
Before using charger, read all instructions and cautionary
markings on charger, battery pack, and product using
battery pack.
WARNING: Shock hazard. Do not allow any liquid to get
inside charger.
CAUTION: Burn hazard. To reduce the risk of injury,
charge only designated Stanley batteries. Other types of
batteries may burst causing personal injury and damage.
CAUTION: Under certain conditions, with the charger
plugged in to the power supply, the charger can be
shorted by foreign material. Foreign materials of a
conductive nature such as, but not limited to, steel wool,
aluminum foil, or any buildup of metallic particles should
be kept away from charger cavities. Always unplug the
charger from the power supply when there is no battery
pack in the cavity. Unplug charger before attempting to
clean.
DO NOT attempt to charge the battery pack with any
chargers other than the ones in this manual. The
charger and battery pack are specifically designed to work
together.
These chargers are not intended for any uses other
than charging designated Stanley rechargeable
batteries. Any other uses may result in risk of fire,
electric shock or electrocution.
Do not expose charger to rain or snow.
Pull by plug rather than cord when disconnecting
This appliance is not intended for use by persons (including
children) with reduced physical, sensory or mental capabilities,
or lack of experience and knowledge, unless they have been
given supervision or instruction concerning use of the
appliance by a person responsible for their safety.
Children should be supervised to ensure that they do not play
with the appliance.
Page 7

6
ENGLISH
5
charger. This will reduce risk of damage to electric plug
and cord.
Make sure that cord is located so that it will not be
stepped on, tripped over, or otherwise subjected to
damage or stress.
Do not use an extension cord unless it is absolutely
necessary. Use of improper extension cord could result in
risk of fire, electric shock, or electrocution.
An extension cord must have adequate wire size for
safety. The smaller the gauge number of the wire, the
greater the capacity of the cable, that is 16 gauge has
more capacity than 18 gauge. When using more than one
extension to make up the total length, be sure each
individual extension contains at least the minimum wire
size.
Do not place any object on top of charger or place the
charger on a soft surface that might block the
ventilation slots and result in excessive internal heat.
Place the charger in a position away from any heat
source. The charger is ventilated through slots in the top
and the bottom of the housing.
Do not operate charger with damaged cord or plug —
have them replaced immediately.
Do not operate charger if it has received a sharp blow,
been dropped, or otherwise damaged in any way.
Take it to an authorized service center.
Do not disassemble charger; take it to an authorized
service center when service or repair is required. Incorrect
reassembly may result in a risk of electric shock,
electrocution or fire.
Disconnect the charger from the outlet before
attempting any cleaning. This will reduce the risk of
electric shock. Removing the battery pack will not reduce
this risk.
NEVER attempt to connect 2 chargers together.
The charger is designed to operate on standard
household electrical power. Do not attempt to use it
on any other voltage.
SAVE THESE INSTRUCTIONS
Important Safety Instruction for Battery Packs
WARNING: For safe operation, read this manual and
manuals originally supplied with tool before using the
charger.
The battery pack is not fully charged out of the carton.
Before using the battery pack and charger, read the safety
instructions below. Then follow charging procedures
outlined.
Read all Instructions
Do not incinerate the battery pack even if it is
severely damaged or is completely worn out. The
battery pack can explode in a fire. Toxic fumes and
materials are created when LI-ION battery packs are
burned.
Do not charge or use battery in explosive
atmospheres, such as in the presence of flammable
liquids, gases or dust. Inserting or removing the battery
from the charger may ignite the dust or fumes.
If battery contents come into contact with the skin,
immediately wash area with mild soap and water. If
battery liquid gets into the eye, rinse water over the open
eye for 15 minutes or until irritation ceases. If medical
attention is needed, the battery electrolyte for Li-ion
batteries is composed of a mixture of liquid organic
carbonates and lithium salts.
Contents of opened battery cells may cause
respiratory irritation. Provide fresh air. If symptoms
persists, seek medical attention.
WARNING: Burn hazard. Battery liquid may be
flammable if exposed to spark or flame.
Charge the battery packs only in Stanley chargers.
DO NOT splash or immerse in water or other liquids.
This may cause premature cell failure.
Do not store or use the tool and battery pack in
locations where the temperature may reach or exceed
105°F (40C°) (such as outside sheds or metal
buildings in summer).
WARNING: Never attempt to open the battery pack for
any reason. If battery pack case is cracked or damaged,
do not insert into charger. Do not crush, drop or damage
battery pack. Do not use a battery pack or charger that
has received a sharp blow, been dropped, run over or
damaged in any way (i.e., pierced with a nail, hit with a
hammer, stepped on). Damaged battery packs should be
returned to service center for recycling.
WARNING: Fire hazard. Do not store or carry battery
so that metal objects can contact exposed battery
terminals. For example, do not place battery in aprons,
pockets, tool boxes, product kit boxes, drawers, etc., with
loose nails, screws, keys, etc. Transporting batteries
can possibly cause fires if the battery terminals
inadvertently come in contact with conductive
materials such as keys, coins, hand tools and the like.
NOTE: LI-ION batteries should not be put in checked
baggage.
STORAGE RECOMMENDATIONS
1. The best storage place is one that is cool and dry away
from direct sunlight and excess heat or cold.
2. Long storage will not harm the battery pack or charger.
CHARGING PROCEDURE
Stanley chargers are designed to charge
Stanley battery packs in 40-60 minutes depending on the pack
being charged.
1. Plug the charger into an appropriate outlet before
inserting the battery pack.
2. Insert the battery pack into the charger. (Fig. B)
3. The LED will flash indicating that the battery is
Page 8

7
ENGLISH
being charged.
4. The completion of charge is indicated by the LED
remaining on continuously. The pack is fully charged and
may be used at this time or left on the charger.
CHARGER DIAGNOSTICS
This charger is designed to detect certain problems that can
arise with the battery packs or the power source. Problems are
indicated by one LED flashing in different patterns.
BAD BATTERY
The charger can detect a weak or damaged battery.
The LED flashes in the pattern indicated on the label. If
you see this bad battery blink pattern, do not continue
to charge the battery. Return it to a service center or a
collection site for recycling.
HOT/COLD PACK DELAY
When the charger detects a battery that is excessively
hot or excessively cold, it automatically starts a
Hot/Cold Pack Delay, suspending charging until the
battery has normalized. After this happens, the
charger automatically switches to the Pack Charging
mode. This feature ensures maximum battery life. The
light flashes in the pattern indicated on the label.
LEAVING THE BATTERY IN THE CHARGER
The charger and battery pack can be left connected with the
LED glowing indefinitely. The charger will keep the battery pack
fresh and fully charged. This charger features an automatic
tune-up mode which equals or balances the individual cells in
the battery pack to allow it to function at peak capacity. Battery
packs should be tuned up weekly or whenever the battery no
longer delivers the same amount of work. To use the automatic
tune-up mode, place the battery pack in the charger and leave
it for at least 8 hours.
IMPORTANT CHARGING NOTES
1. Longest life and best performance can be obtained if the
battery pack is charged when the air temperature is
between 65°F and 75°F (18°- 24°C). DO NOT charge the
battery pack in an air temperature below +40°F (+4.5°C),
or above +105°F (+40.5°C). This is important and will
prevent serious damage to the battery pack.
2. The charger and battery pack may become warm to touch
while charging. This is a normal condition, and does not
indicate a problem. To facilitate the cooling of the battery
pack after use, avoid placing the charger or battery pack in
a warm environment such as in a metal shed, or an
uninsulated trailer.
3. If the battery pack does not charge properly:
a. Check current at receptacle by plugging in a lamp or
other appliance
b. Check to see if receptacle is connected to a light switch
which turns power off when you turn out the lights.
c. Move charger and battery pack to a location where the
surrounding air temperature is approximately 65°F - 75°F
(18°- 24°C).
d. If charging problems persist, take the tool, battery pack
and charger to your local service center.
4. The battery pack should be recharged when it fails to
produce sufficient power on jobs which were easily done
previously. DO NOT CONTINUE to use under these
conditions. Follow the charging procedure. You may also
charge a partially used pack whenever you desire with no
adverse affect on the battery pack.
5. Foreign materials of a conductive nature such as, but not
limited to, steel wool, aluminum foil, or any buildup of
metallic particles should be kept away from charger
cavities. Always unplug the charger from the power supply
when there is no battery pack in the cavity. Unplug charger
before attempting to clean.
6. Do not freeze or immerse charger in water or any other
liquid.
WARNING: Shock hazard. Do not allow any liquid to get
inside charger.Never attempt to open the battery pack for
any reason. If the plastic housing of the battery pack
breaks or cracks, return to a service center for recycling.
OPERATING INSTRUCTIONS
Installing and Removing the Battery Pack From the Tool
CAUTION: Make certain the lock-off button is engaged to
prevent switch actuation before emoving or installing
battery.
1. To install battery pack: Insert battery pack (6) into tool as
shown in Figure C.
2. To remove battery pack: Depress the battery release
button (7) as shown in Figure D and pull battery pack out
of tool.
3. Variable Speed Trigger Switch (Figure E)
To turn the tool on, squeeze the trigger switch (1). To turn
the tool off, release the trigger switch. Your tool is
equipped with a brake. The chuck will stop as soon as the
trigger switch is fully released. The variable speed switch
enables you to select the best speed for a particular
application. The more you squeeze the trigger, the faster
the tool will operate. Use lower speeds for starting holes
without a center punch, drilling in metals or plastics, or
driving screws. For maximum tool life, use variable speed
only for starting holes or fasteners.
NOTE: Continuous use in variable speed range is not
recommended. It may damage the switch and should be
avoided.
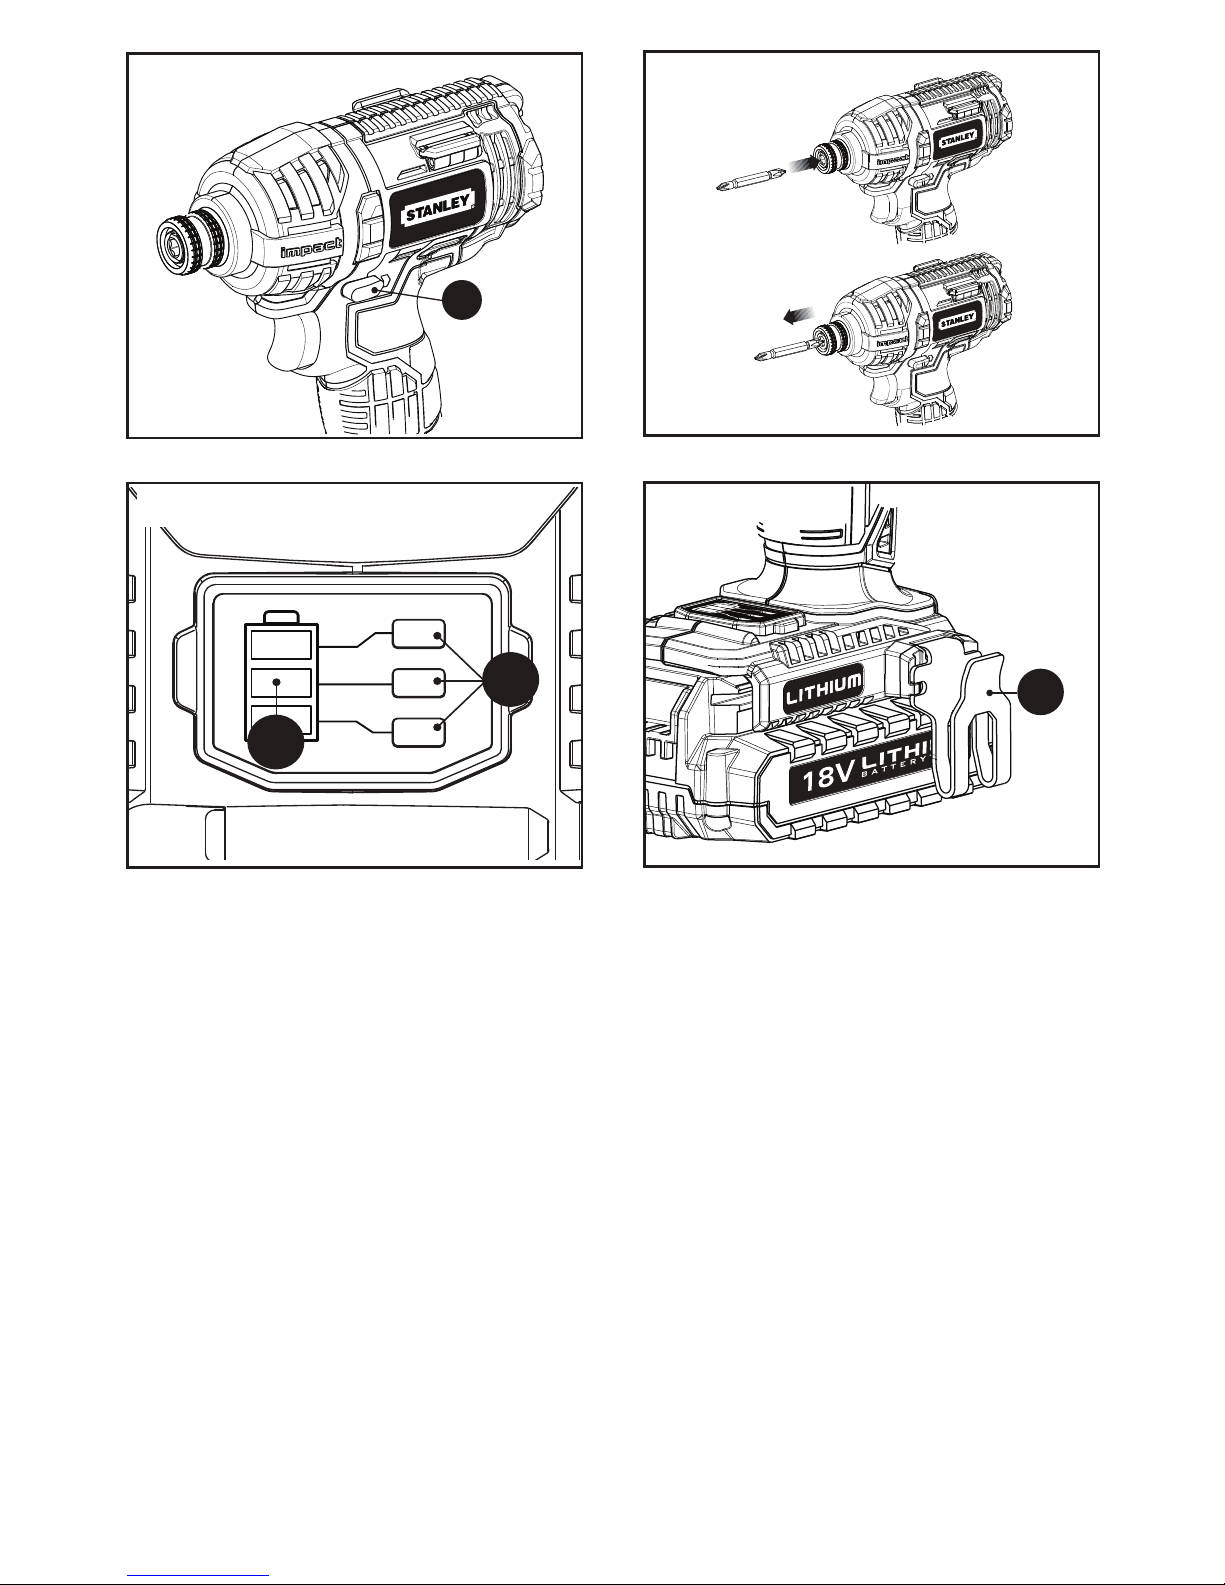
4. Forward/Reverse Control Button (Figure F)
A forward/reverse control button (2) determines the
direction of the tool and also serves as a lock off button.
To select forward rotation, release the trigger switch and
depress the forward/reverse control button on the right
side of the tool. To select reverse, depress the
forward/reverse control button on the left side of the tool.
The center position of the control button locks the tool in
the OFF position. When changing the position of the
Page 9

8
ENGLISH
control button, be sure the trigger is released.
NOTE: The first time the tool is run after changing the
direction of rotation, you may hear a click on start up. This
and the impacting noise that the tool makes is normal and
does not indicate a problem.
5. Quick Release Chuck (Figure G)
NOTE: The chuck accepts 1/4 inch (6.35 mm) hex
accessories only.
Place the switch in the locked off (center) position or
remove battery pack before changing accessories.
To install an accessory, insert the accessory into the
quick release chuck (4) until an audible click is heard to
ensure the accessory is locked in place.
To remove an accessory, pull the chuck collar (3) away
from the front of the tool, remove the accessory and
release the collar.
NOTE: The quick release chuck is spring-loaded. The
accessory will be ejected when the chuck collar is pulled
forward.
LED WORK LIGHT
When impact driver is activated by pulling the trigger switch (1),
the integrated LED work light (9) will automatically illuminate
the work area. NOTE: The work light is for lighting the
immediate work surface and is not intended to be used as a
flashlight.
BIT TIP STORAGE
Two magnetic bit storage slots (5) are built into the area on the
top of the tool.
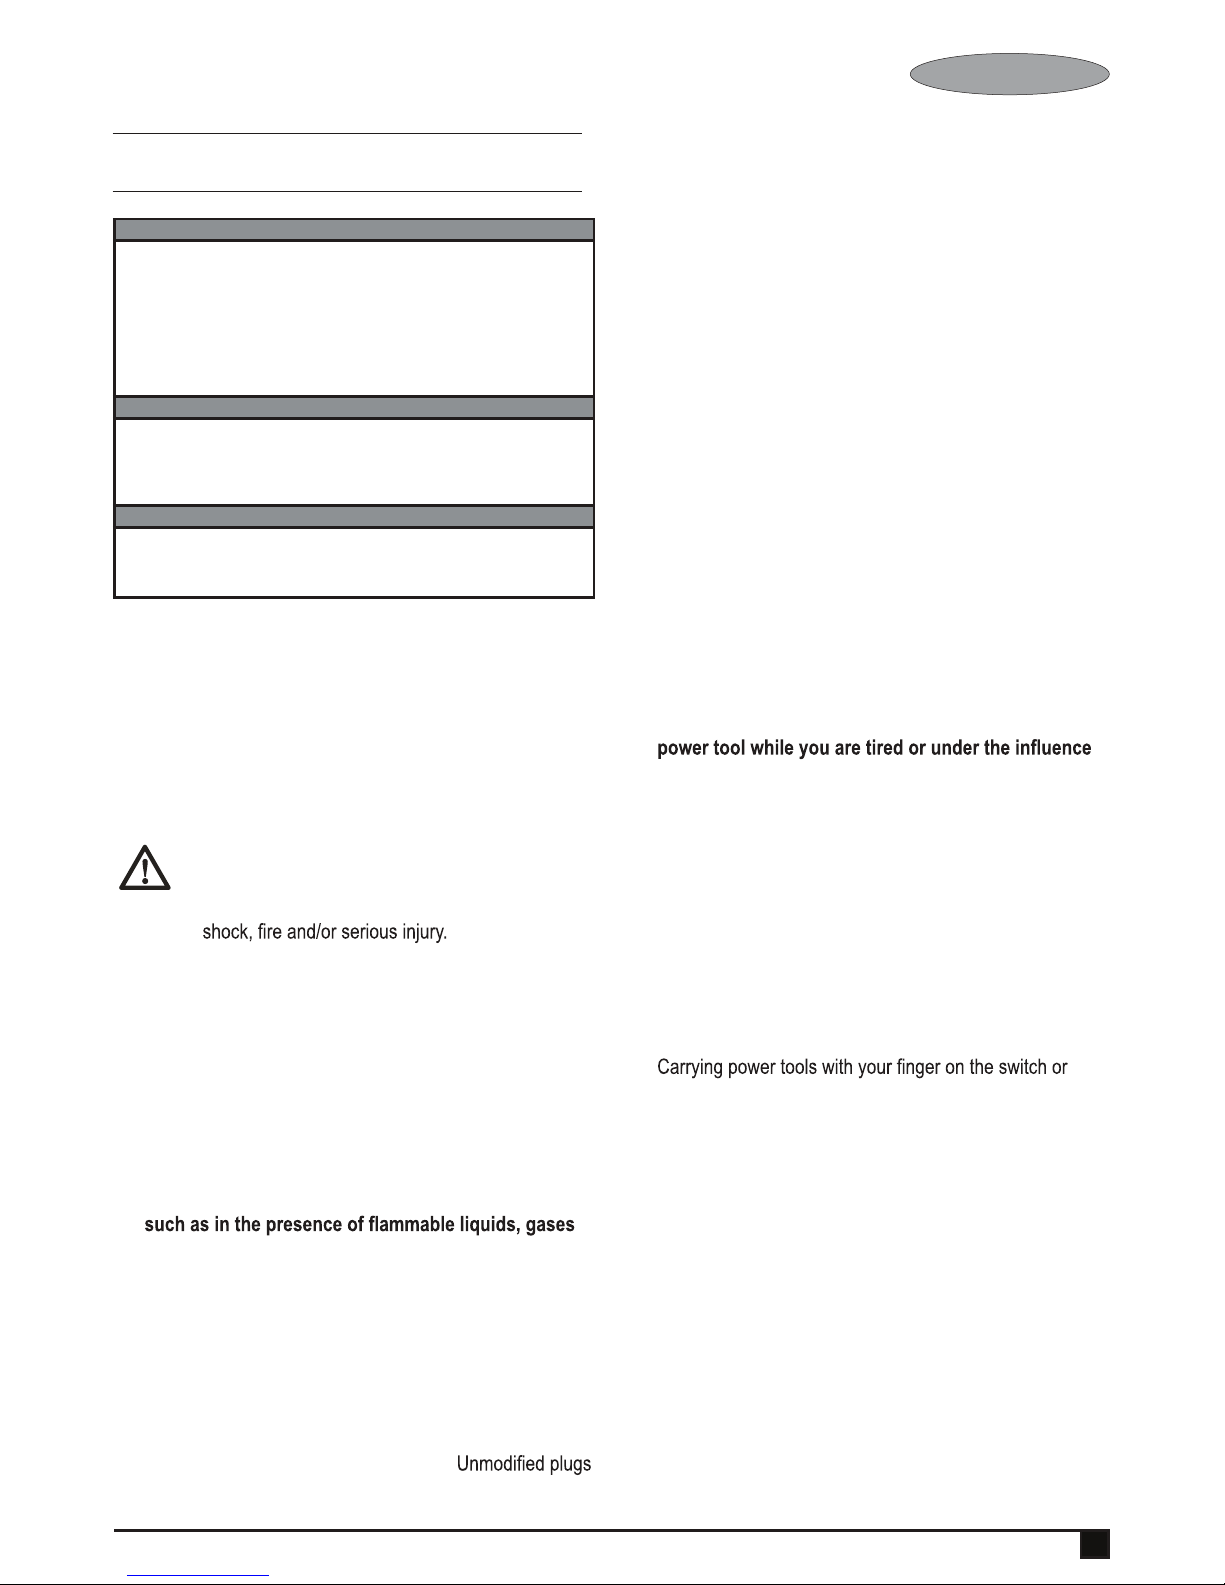
Battery Fuel Gauge - Figure H
The tool is equipped with a battery fuel gauge (8).This can be
used to display the current level of charge in the battery during
use and during charging. It does not indicate tool functionality
and is subject to variation based on product components,
temperature and end-user application.
Checking battery charge during use:
Press the battery fuel gauge button (H1).
The three LEDs (H2) will illuminate indicating the percent
of charge in the battery (Figure H).
If LED light does not lluminate, charge battery.
NOTE: This battery is designed to not operate when a charge
below 20% of its capacity is reached. After the battery
charge is depleated, the tool will not operate until after the
battery has been recharged.
BELT CLIP - FIGURE I
A belt clip (10) is provided which can be switched to either side
of the tool based on user preference for convenient access and
storage during use.
Caution: Ensure the forward/reverse control button (2) is
in the center lock position before attaching tool to belt.
MAINTENANCE
Your Stanley tool has been designed to operate over a
long period of time with a minimum of maintenance.
Continuoussatisfactory operation depends upon proper
tool care and regular cleaning.
Your charger does not require any maintenance apart
from regular cleaning.
Warning! Before performing any maintenance on the tool,
remove the battery from the tool. Unplug the charger
before cleaning it.
Regularly clean the ventilation slots in your tool and
charger using a soft brush or dry cloth.
Regularly clean the motor housing using a damp cloth. Do
not use any abrasive or solvent-based cleaner.
Regularly open the chuck and tap it to remove any dust
from the interior.
PROTECTING THE ENVIRONMENTS
Separate collection. This product must not be
disposed of with normal household waste.
Should you find one day that your Stanley product needs
replacement, or if it is of no further use to you, do not
dispose of it with household waste. Make this product
avail able for separate collection.
Separate collection of used products and
packaging allows materials to be recycled and
used again. Re-use of recycled materials helps
prevent environmental pollution and reduces the
demand for raw materials.
BATTERIES
Run the battery down completely, then remove it
from the tool.
NiCd, NiMH and Li-Ion batteries are recyclable. Take them
to any authorised repair agent or a local recycling station.
SERVICE INFORMATION
Stanley offers a full network of company-owned and
authorized service locations throughout Asia. All Stanley
Service Centers are staffed with trained personnel to
provide customers with efficient and reliable power tool
service.Whether you need technical advice, repair, or
genuine factory replacement parts, contact the Stanley
location nearest to you.
NOTES
Stanley's policy is one of continuous improvement to our
products and, as such, we reserve the right tochange
product specifications without prior notice.
Standard equipment and accessories may vary by
country.
Product specifications may differ by country.
Page 10

ENGLISH
9
Complete product range may not be available in all
countries. Contact your local Stanley dealers for range
availability.
Page 11

용도
스탠리 임팩트 렌치는 나사를 조이거나 너트 고정용으로
설계되었습니다.
안전 지침
전동 공구에 관한 일반 안전 경고
경고! 모든 안전 경고와 모든 지시사항을
읽으십시오. 아래 나열된 경고와 지시
사항을 준수하지 않으면 감전, 화재 및/또는
심각한 부상을 초래할 수 있습니다.
향후 참고할 수 있도록 모든 경고 및 지시 사항을
보관해두십시오. 아래의 모든 경고에서 사용된 "전동
공구"라는 말은 주 공급 전원에 의해 전기가 공급되는
(유선) 전동 공구 또는 충전식(무선) 전동 공구를
의미합니다.
1. 작업 안전 영역
a. 작업 영역을 청결하고 밝게 유지하십시오. 혼잡하거나
어두운 작업장에서는 사고가 발생하기 쉽습니다.
b. 가연성 액체, 가스 또는 먼지 등 폭발 가능성이
있는 환경에서 전동 공구를 사용하지 마십시오.
전동 공구에서 먼지나 가스를 발화시킬 수 있는
불꽃이 튈 수 있습니다.
c. 전공 공구를 사용하는 동안에는 어린이와 주변
사람들이 작업 영역에 가까이 들어오지 못하도록
하십시오. 주변이 산만해져 통제력을 잃을 수 있습니다.
2. 전기 안전
a. 전동 공구의 플러그는 콘센트와 형식이 일치해야
합니다. 플러그를 어떤 방식으로든 절대 개조하지
마십시오. 접지된(지면 접지) 전동 공구에 어떤
어댑터 플러그도 사용하지 마십시오. 개조되지
않은 플러그 및 형식이 일치하는 콘센트를
사용하면 감전 위험이 줄어듭니다.
기술 데이터
STDC441L
전압 V
DC
무부하회전수 /min
최대 토크
(PTI 등급)
Nm
척 크기 mm
비트 /min
무게 kg
18
0-2900
164
6.35
0-3100
1.5
충전기
입력 전압
V
AC
출력 전압 V
DC
출력 전류(DC) A
대략적 충전 시간 분
220
20
2
40
배터리
90587652
90588647
전압
V
DC
용량 Ah
18
1.5
유형 리튬 이온
STDC441L
18V 리튬이온 임팩트 드라이버
10
한국어
b. 파이프, 라디에이터, 렌지 및 냉장고 등과 같이
접지된 표면에 몸이 닿지 않도록 하십시오. 신체가
접지되어 있으면 감전 위험이 높아집니다.
c. 전동 공구를 비 또는 습한 환경에 노출하지 않도록
주의하십시오. 전동 공구에 물이 들어가면 감전
위험이 높아집니다.
d. 코드를 함부로 다루지 마십시오. 코드를 사용하여
전동 공구를 운반하거나 잡아당기거나 플러그를
뽑지 마십시오. 열, 오일, 날카로운 모서리 또는
움직이는 부품에서 멀리 떨어진 장소에 코드를
보관하십시오. 코드가 손상되거나 얽혀 있으면
감전 위험이 높아집니다.
e. 전동 공구를 실외에서 사용할 때는 실외 사용에
적합한 연장 코드를 사용하십시오. 실외 사용에
적합한 코드를 사용하면 감전 위험이 줄어듭니다.
f. 어쩔 수 없이 습한 장소에서 전동 공구를 사용해야
하는 경우에는 누전 차단기(RCD)로 보호된 전원
공급 장치를 사용하십시오. RCD(차단기)를 사용하면
감전 위험이 줄어듭니다.
3. 신체 안전 사항
a. 전동 공구로 작업할 때는 방심하지 말고 작업에
주의하면서 상식에 따르십시오. 피곤한 상태이거나
약물, 술, 치료제를 복용한 상태에서는 전동 공구를
사용하지 마십시오. 전동 공구를 사용하다 잠깐만
한 눈을 팔아도 심각한 부상을 당할 수 있습니다.
b. 신체 보호 장구를 착용하십시오. 항상 보안경을
착용하십시오. 적합한 상황에서 방진 마스크,
미끄럼 방지 안전화, 안전모 또는 청력 보호 기구
등의 보호 장비를 사용하면 신체 부상 위험이
줄어듭니다.
c. 의도하지 않은 장비 가동 방지. 전원 및/또는 배터리
팩에 연결한 상태로 공구를 선택 또는 운반할 때는
사전에 스위치가 꺼짐 위치에 있는지 반드시
확인하십시오. 스위치가 켜짐 위치에 있는
상태에서 스위치에 손가락이 닿은 상태로 전동
공구를 운반하거나 전동 공구에 전원을 공급하면
사고가 발생합니다.
d. 전동 공구를 켜기 전에 모든 조정 키 또는 렌치를
제거하십시오. 전동 공구의 회전 부품에 렌치나
키가 장착되어 있으면 부상을 당할 수 있습니다.
e. 무리하게 팔을 뻗지 마십시오. 항상 올바른
자세로 서서 균형을 유지하십시오. 그러면 예기치
않은 상황에서의 전동 공구에 대한 제어력이
향상됩니다.
f. 적절한 의복을 착용합니다. 헐렁한 옷이나 장신구를
착용하지 마십시오.머리카락, 옷 및 장갑이 움직이는
부품에 닿지 않도록 유의하십시오. 헐렁한 옷,
장신구 또는 긴 머리가 움직이는 부품에 낄 수
있습니다.
g. 먼지 배출 및 집진 시설 연결을 위한 장치가 제공된
경우, 이들 장치가 연결되어 적절히 사용되고 있는지
반드시 확인하십시오. 집진 장치를 사용하면 먼지와
관련된 위험을 줄일 수 있습니다.
Page 12

11
한국어
전동 공구에 관한 추가 안전 경고
경고! 임팩트 렌치에 대한 추가 안전
경고
4. 전동 공구 사용 및 관리
a. 전동 공구에 무리한 힘을 가하지 마십시오. 해당
용도에 맞는 올바른 전동 공구를 사용하십시오.
올바른 전동 공구를 사용해야 설계된 속도로
작업을 더욱 안전하고 정확하게 수행할 수
있습니다.
b. 스위치로 켜지고 꺼지지 않는 전동 공구는
사용하지 마십시오. 스위치로 제어되지 않는
전동 공구는 위험하므로 수리해야 합니다.
c. 전동 공구를 조정하거나 액세서리를 변경하거나
보관하기 전에 전원 및/또는 배터리 팩에서
플러그를 빼십시오. 이러한 예방적 안전 조치를
따라야 전동 공구가 갑자기 작동할 위험이
줄어듭니다.
d. 사용하지 않는 전동 공구는 어린이의 손이 닿지
않는 곳에 보관하고, 전동 공구나 본 지시 사항에
익숙하지 않은 사람이 전동 공구를 절대 사용하지
못하게 하십시오. 전동 공구는 훈련을 받지 않은
사용자가 다루면 위험합니다.
e. 전동 공구 유지 보수. 움직이는 부품의 잘못된
정렬이나 바인딩, 부품 파손 및 기타 전동 공구의
작동에 영향을 미칠 수 있는 상태가 있는지
확인하십시오. 손상된 부분이 있는 경우 사용하기
전에 전동 공구를 수리하십시오. 많은 사고는 전동
공구를 제대로 유지 보수하지 않아 발생합니다.
f. 절삭 공구를 예리하고 깨끗한 상태로
유지하십시오. 절삭 가장자리를 예리하게 잘
유지하면 절삭기를 사용할 때 바인딩이 적고
다루기가 용이합니다.
g. 작업 환경과 수행할 작업을 고려하여, 본 지시
사항에 따라 전동 공구, 액세서리 및 툴 비트 등을
사용하십시오. 본 사용 설명서의 내용과 다른
용도로 전동 공구를 사용하면 위험한 상황이
발생할 수 있습니다.
5. 배터리 공구 사용 및 관리
a. 다시 충전할 때는 제조업체에서 지정한 충전기만
사용하십시오. 한 배터리 팩 유형에 적합한
충전기를 다른 배터리 팩과 함께 사용할 경우
화재의 위험이 있습니다.
b. 전동 공구를 사용할 때는 특수 설계된 배터리 팩을
함께 사용하십시오. 다른 배터리 팩을 사용하면
부상을 입거나 화재의 위험이 있습니다.
c. 배터리 팩을 사용하지 않을 때에는 클립, 동전, 키,
못, 나사 등의 금속 물체나, 단자 간에 연결할 수
있는 작은 금속 물체가 닿지 않도록 멀리 두십시오.
배터리 단자가 단락되면 화상을 입거나 화재의
위험이 있습니다.
d. 배터리를 과다 사용하면 액체가 배터리에서 흘러
나올 수 있으므로 접촉을 피하십시오. 실수로
접촉한 경우에는 물로 씻으십시오. 액체가 눈에
들어간 경우 치료를 받으십시오. 배터리에서 나온
액체는 통증을 유발하거나 화상을 입힐 수
있습니다
6. 수리
a. 자격을 갖춘 기술자가 동일 교체 부품을
사용하여 정비 작업을 수행해야 합니다.
그래야 전동 공구의 안전이 보장됩니다.
임팩트 드릴 사용 시 귀 보호 장비를 착용하십시오.
소음에 노출되면 청력이 손상될 수 있습니다.
공구와 함께 제공되는 사이드 핸들을
사용하십시오. 제어력을 잃으면 신체 부상을 당할
수 있습니다.
잠금 장치가 숨겨진 배선에 접촉할 수 있는 작업을
수행할 때는 절연된 그립핑 표면이 닿도록 하여
전동 공구를 잡으십시오. "전류가 흐르는" 전선에
접촉된 패스너는 전동 공구의 노출된 금속
부품을 "전류가 흐르는" 상태로 만들어 작업자를
감전시킬 수 있습니다.
클램프 또는 다른 적절한 방식을 이용하여 안정된
작업대에 작업 공구들을 고정 및 지지하십시오.
작업물을 손으로 잡거나 몸으로 지탱하는 행동은
불안정하여 제어력을 잃을 수 있습니다.
이 공구는 신체, 지각 또는 정신 능력이 낮거나
경험 및 지식이 부족한 사람(어린이 포함)이
사용하도록 설계되지 않았습니다. 이러한 사람이
사용할 때는 안전 책임자의 감독 또는 제품
사용과 관련된 지시 사항이 필요합니다.
어린이가 본 제품을 가지고 놀지 못하도록 항상
주시해야 합니다.
본 사용 설명서에 제품의 용도가 설명되어
있습니다. 본 사용 설명서에서 권장하는 방식
이외의 다른 방식으로 본 공구를 조작하거나
액세서리 또는 부착물을 사용하는 경우 신체
부상의 위험이 있거나 재산상의 손해가 발생할
수 있습니다.
경고! 임팩트 렌치는 토크 렌치가
아닙니다. 이 공구를 패스너를 지정된
토크로 조이는 데 사용하지 마십시오.
패스너를 덜 조이거나 과하게 조이면 결합
실패로 이어질 수 있는 경우 토크 렌치와
같은 독립적이고 조정된 토크 측정 장치를
사용해야 합니다.
다른 사람들의 안전
이 제품은 신체, 지각 또는 정신 능력이 낮거나
경험 및 지식이 부족한 사람(어린이 포함)이
사용하도록 설계되지 않았습니다. 이러한 사람이
사용할 때는 안전 책임자의 감독 또는 제품
사용과 관련된 지시 사항이 필요합니다.
어린이가 본 제품을 가지고 놀지 못하도록 항상
주시해야 합니다.
Page 13

12
한국어
청력 손상
공구 라벨
공구에는 다음과 같은 기호가 표시되어 있습니다.
경고!
부상 위험을 줄이려면 사용자는
사용 설명서를 주의 깊게 읽어야 합니다.
배터리와 충전기 관련 추가 안전 지시 사항
배터리
어떤 이유로든 배터리 팩을 절대 열려고 하지
마십시오.
배터리에 물이 닿지 않도록 하십시오.
온도가 40 °C를 초과할 수 있는 곳에 보관하지
마십시오.
주변 온도가 10 °C - 40 °C 사이에 있을
때에만 충전하십시오.
충전할 때는 이 공구와 함께 제공된 충전기만
사용해야 합니다.
배터리를 폐기할 때는 "환경 보호" 섹션에 나와
있는 지시 사항을 따르십시오.
손상된 배터리를 충전하지 마십시오.
충전기
공구와 함께 제공된 배터리를 충전할 때는 스탠리
충전기만 사용하십시오. 다른 배터리를 사용하면
배터리가 폭발하여 신체 부상을 당하거나 손해를
입을 수 있습니다.
절대로 비충전식 배터리를 충전하려고 하지
마십시오.
손상된 코드는 즉시 교체하십시오.
충전기에 물이 닿지 않도록 하십시오.
충전기를 해체하거나 열지 마십시오.
충전기를 시험하지 마십시오.
충전기는 실내용으로만 사용합니다.
사용하기 전에 사용 설명서의 내용을
숙지하십시오.
전기 안전
전원 코드가 손상된 경우 사고가 발생하지 않도록
제조업체 또는 공인 스탠리 서비스 센터에서
교체해야 합니다.
기능
공구 사용 중에 발생하는 먼지를 호흡하여
유발되는 건강 위해성(예: 목재, 특히 오크,
너도밤나무 및 MDF가공 작업).
본 충전기는 이중으로 절연되어 있으므로
접지가 필요 없습니다. 전원 전압이 명판에
기재된 전압과 일치하는지 항상
확인하십시오. 충전기를 절대로 일반
전원 플러그로 교체하지 마십시오.
본 공구에는 다음 기능들 중 일부 또는 모두가
포함되어 있습니다(그림 A).
1. 트리거 스위치
2. 전진/후진 버튼
3. 척 칼라
4. 육각 신속 이탈 척
5. 마그네틱 비트 팁 홀더(2개)
6. 배터리
7. 배터리 탈착 버튼
8. 배터리 연료계
9. LED 작업등
10. 벨트 클립
배터리 충전기에 대한 중요한 안전 지침
이 제품은 신체, 지각 또는 정신 능력이 낮거나 경험
및 지식이 부족한 사람(어린이 포함)이 사용하도록
설계되지 않았습니다. 이러한 사람이 사용할 때는
안전 책임자의 감독 또는 제품 사용과 관련된 지시
사항이 필요합니다.
어린이가 본 제품을 가지고 놀지 못하도록 항상
주시해야 합니다.
본 지침을 잘 보관해 두십시오. 본 사용
설명서에는 배터리 충전기에 대한 중요한 안전
지침이 포함되어 있습니다.
충전기를 사용하기 전에 충전기, 배터리 팩,
그리고 배터리 팩 관련 제품에 대한 지침과 주의
표시를 숙지하십시오.
경고: 감전 위험. 충전기 내부에 액체가
들어가지 않도록 하십시오.
주의: 화상 위험. 신체 부상의 위험을 줄이려면
스탠리 배터리로만 충전하십시오. 다른 유형의
배터리는 폭발로 인한 신체 부상과 손상을
초래할 수 있습니다.
주의: 특정 조건에서, 충전기가 전원 공급기에
연결되어 있으면 충전기가 이물질에 의해
단락될 수 있습니다. 스틸 울(steel wool),
알루미늄 호일, 금속 입자 축적물 등의 전도성
이물질은 충전기 캐비티에 닿지 않게 두어야
합니다. 캐비티 안에 배터리 팩이 없을 경우
항상 배터리 전원 공급기에서 충전기의
플러그를 뽑으십시오. 충전기를 청소할 때는
플러그를 뽑아야 합니다.
본 사용 설명서에 명시된 충전기 외의 다른
충전기로 배터리 팩을 충전하지 마십시오. 본
충전기와 배터리 팩은 함께 사용하도록 특수
설계되었습니다.
이러한 충전기는 지정된 스탠리 충전용 배터리
충전 이외의 용도로는 사용할 수 없습니다. 다른
용도로 사용하면 화재, 감전 또는 감전사의
위험이 있습니다.
충전기가 비나 눈을 맞지 않도록 하십시오.
Page 14

13
한국어
5
가연성 액체, 가스 또는 먼지 등 폭발성
분위기에서 배터리를 충전하거나 사용하지
마십시오.
배터리를 삽입하거나 충전기에서
제거할 때 먼지나 가스에 불이 붙을 수 있습니다.
배터리 내용물이 피부에 닿으면 즉시 중성
세척제로 해당 부위를 씻으십시오.
배터리
액체가 눈에 들어갔을 경우, 15분 정도 또는
통증이 가실 때까지 눈을 뜨고 물로 씻어냅니다.
치료가 필요한 경우를 위해, 리튬이온 배터리의
배터리 전해질은 액체 유기 탄산염과 리튬염의
혼합물로 구성되어 있음을 알아 두십시오.
열린 배터리 셀의 내용물은 호흡기 질환을 일으킬
수 있습니다.
신선한 공기를 흡입하십시오.
증상이 계속되면 치료를 받으십시오.
경고: 화상 위험. 배터리액은 불꽃이나 화염에
노출되면 연소될 수 있습니다.
스탠리 충전기에서만 배터리 팩을 충전하십시오.
물이나 기타 액체가 튀어 묻거나 액체에 빠지지
않도록 하십시오. 이렇게 하면 배터리 셀이
조기에 고장날 수 있습니다.
온도가
40C° (105°F) 초과될 수 있는 곳(여름철
허름한 창고 또는 금속 건물 등)에 공구와
배터리 팩을 보관하거나 사용하지 마십시오.).
경고: 어떤 이유로든 배터리 팩을 절대 열려고
하지 마십시오. 배터리 팩 케이스가 깨지거나
손상되면 충전기에 넣지 마십시오. 배터리 팩을
뭉개거나 떨어뜨리거나 손상시키지 마십시오. 강한
충격을 받았거나, 떨어뜨렸거나, 차에 치였거나
기타의 원인으로 어떤 방식으로든 손상된(못이
박히거나 망치로 맞았거나 밟힘) 배터리 팩이나
충전기는 사용하지 마십시오. 손상된 배터리 팩은
재활용을 위해 서비스 센터에 반환해야 합니다.
경고: 화재 위험. 배터리를 보관하거나 휴대할
때는 노출된 배터리 단자에 금속 물체가 닿지
않도록 하십시오. 예를 들어, 못, 나사, 키 등이
있는 앞치마, 주머니, 도구상자, 제품 키트 상자,
서랍 등에 배터리를 두지 마십시오. 배터리 운반
중에 배터리 단자가 우연히 전도성 물체(예: 키,
동전, 수공구 등)에 닿게 될 경우 화재가 발생할
수 있습니다. 참고: 리튬이온 배터리는 검사된
수화물에 넣어야 합니다.
보관 권장 사항
1.
보관 장소로는 직사광선을 받지 않고 지나치게
덥거나 춥지 않은 시원하고 건조한 곳이 가장
좋습니다.
2.
장기간 보관해도 배터리 팩이나 충전기가
훼손되지 않습니다.
충전 절차
스탠리 충전기는 충전되는 팩에 따라
스탠리 배터리 팩을 40-60분 내에 충전하도록
설계되었습니다.
1.
배터리 팩을 넣기 전에 충전기를 적절한
콘센트에 꽂습니다.
충전기를 분리할 경우 코드가 아니라 플러그를
뽑으십시오. 그래야만 전기 플러그 및 코드
손상의 위험이 줄어듭니다.
코드가 밟히거나 걸리거나 기타 원인에 의해
손상되거나 압박을 받지 않도록 유의하십시오.
불가피한 경우가 아니면 연장 코드를 사용하지
마십시오. 연장 코드를 잘못 사용하면 화재,
감전 또는 감전사의 위험이 있습니다.
연장 코드는 크기가 적절해야 안전합니다.
와이어의 게이지 수치가 작을수록 케이블
용량은 더욱 커집니다. 즉, 16게이지는 18
게이지보다 용량이 더 큽니다. 길이가 짧아서
연장 코드를 두 개 이상 사용하는 경우, 각각의
연장 코드는 최소 와이어 크기 이상이어야
합니다.
충전기 위에 물건을 올려놓거나 부드러운
표면에 충전기를 두면 환기 슬롯이 막혀 내부가
과열될 수 있습니다. 충전기는 열원에 가까이
두지 마십시오. 충전기는 하우징의 상단과
하단에 있는 슬롯을 통해 환기됩니다.
코드나 플러그가 손상된 충전기를 작동시키지
마십시오. — 즉시 교체하십시오.
심한 충격을 받았거나 떨어뜨렸거나 기타의
방식으로 손상된 경우에는 충전기를 작동시키지
마십시오. 공인 서비스 센터로 가져가십시오.
충전기를 분해하지 마십시오. 서비스나 수리가
필요한 경우에는 공인 서비스 센터로
가져가십시오. 잘못 재조립하면 화재, 감전 또는
감전사의 위험이 있습니다.
청소하려면 먼저 충전기를 콘센트에서
분리하십시오. 그래야 감전 위험이 줄어듭니다.
배터리 팩을 제거하는 것만으로 이러한 위험이
줄어들지는 않습니다.
절대로 충전기 두 개를 함께 연결하지 마십시오.
충전기는 가정용 표준 전력에서 작동하도록
설계되어 있습니다. 다른 전압에서는 사용하지
마십시오.
본 지침을 잘 보관해 두십시오.
배터리 팩에 대한 중요한 안전 지침
경고: 안전한 작동을 위해, 충전기를 사용하기
전에 공구와 함께 제공된 본 설명서와 기타
설명서들을 숙지하십시오.
배터리 팩은 카톤에서 꺼낼 때 완전히 충전된
상태가 아닙니다.
배터리 팩과 충전기를 사용하기 전에 아래 안전
지침을 숙독하십시오. 그런 다음 설명된 충전
절차를 따르십시오.
모든 지시 사항을 읽으십시오.
배터리 팩이 심하게 손상되거나 완전히
낡았더라도 절대 소각하지 마십시오. 배터리
팩이 불 속에서 폭발할 수 있습니다. 리튬이온
배터리 팩은 연소되면서 독성 연기와 물질을
발생시킵니다.
Page 15

14
한국어
2.
배터리 팩을 충전기에 넣습니다. (그림 B)
3.
배터리가 충전 중임을 나타내는 LED가
깜박거립니다.
4.
충전이 완료되면 LED가 계속 켜져
있습니다. 팩이 완전히 충전되면 바로
사용하거나 충전기에 그대로 둡니다.
충전기 진단
본 충전기는 배터리 팩이나 전원에서 발생할 수 있는
특정 문제를 감지하도록 설계되었습니다. 문제가
발생하면 하나의 LED가 다른 패턴으로 깜박입니다.
불량 배터리
충전기는 성능이 약하거나 손상된 배터리를
감지합니다. LED는 라벨에 표시된 패턴으로
깜박입니다. 불량 배터리를 나타내는 깜박임
패턴이 표시되면, 배터리 충전을 중단하십시오.
불량 배터리는 재활용을 위해 서비스 센터나
전용 분리 수거소에 반환해 주십시오.
냉/온 팩 지연
충전기에서 너무 뜨겁거나 차가운 배터리가
감지되면, 냉/온 팩 지연이 자동으로
시작되어 배터리가 정상 온도가 될 때까지
충전이 중단됩니다. 이 과정이 끝나면,
충전기가 자동으로 팩 충전 모드로
전환됩니다. 이 기능은 배터리 수명을
최대한으로 보장하기 위한 것입니다.
표시등은 라벨에 표시된 패턴으로
깜박입니다.
배터리를 충전기에 두기
충전기와 배터리 팩이 연결된 상태로 둘 수 있는데,
이 경우 LED는 계속 켜진 상태로 유지됩니다.
충전기는 배터리 팩을 완전 충전 상태로
유지합니다. 이 충전기는 배터리 팩의 개별 셀이
최대 용량으로 작동할 수 있게 똑같이 균형을
맞춰주는 자동 튠업 모드를 지원합니다. 배터리
팩은 매주 또는 배터리가 이전 수준의 작업을 더
이상 수행하지 못할 때마다 튠업을 해줘야 합니다.
자동 튠업 모드를 사용하려면 배터리 팩을 충전기에
넣고 최소한 8시간 그대로 두십시오.
중요한 충전 참고사항
1. 65°
F ~ 75°F(18° ~ 24°C)의 기온에서
배터리 팩을 충전할 경우 최장 수명과 최고의
성능을 얻을 수 있습니다. +40
°
F(+4.5°C)
이하 또는 +105
°
F(+40.5°C) 이상의
기온에서는 배터리 팩을 충전하지 마십시오.
이는 매우 중요한 점으로서 배터리 팩의 심각한
손상을 예방하기 위한 것입니다.
2.
충전기와 배터리 팩은 충전중에 따뜻해집니다.
이는 정상적 현상이며 고장이 아닙니다. 사용 후
배터리 팩을 손쉽게 식히려면 충전기나 배터리
팩을 금속 창고 또는 비절연 트레일러와 같은
고온의 환경에 두지 마십시오.
3.
배터리 팩이 제대로 충전되지 않을 경우 다음과
같이 조치를 취합니다.
a.
램프나 기타 기기의 플러그를 콘센트에 꽂아서
전류가 흐르는지 확인합니다.
b.
전등의 스위치를 꺼서 해당 전등이 꺼지는지
확인해 봄으로써 그 스위치가 콘센트에 연결되어
있는지 판단합니다.
c.
충전기와 배터리 팩을 주변 기온이 약
65
°
F ~ 75°F (18° ~ 24°C)인 위치로
이동시킵니다.
d.
충전 문제가 해결되지 않으면 공구, 배터리 팩
및 충전기를 해당 지역의 서비스 센터로
가져가십시오.
4.
이전에 쉽게 수행했던 작업에 대해 충분한 힘을
발휘하지 못하는 배터리 팩은 재충전해야
합니다. 그러한 상황에서는 사용을
중단하십시오. 충전 절차를 따르십시오.
부분적으로 사용한 팩도 원할 때마다 충전할 수
있으며 이 경우 배터리 팩에는 유해한 영향이
전혀 없습니다.
5.
스틸 울(steel wool), 알루미늄 호일, 금속
입자 축적물 등의 전도성 이물질은 충전기
캐비티에 닿지 않게 두어야 합니다. 캐비티 안에
배터리 팩이 없을 경우 항상 배터리 전원
공급기에서 충전기의 플러그를 뽑으십시오.
충전기를 청소할 때는 플러그를 뽑아야 합니다.
6.
충전기를 물이나 다른 액체로 냉각시키거나
담그지 마십시오.
경고: 감전 위험. 충전기 내부에 액체가
들어가지 않도록 하십시오. 어떤 이유로든
배터리 팩을 절대 열려고 하지 마십시오. 배터리
팩의 플라스틱 하우징이 부서지거나 깨지면
재활용을 위해 서비스 센터로 반환해 주십시오.
작동 지침
공구에 배터리 팩 장착 및 제거
주의: 배터리를 장착하거나 제거할 때는 반드시
잠금 해제 버튼을 고정시켜 실수로 스위치가
작동되는 것을 방지해야 합니다.
1.
배터리 팩 설치 방법: 그림 C와 같이 배터리
팩(6)을 공구에 밀어 넣습니다.
2.
배터리 팩 제거 방법: 그림 D와 같이 배터리
탈착 버튼(7)을 누른 채 공구에서 배터리 팩을
빼십시오.
3.
가변 속도 트리거 스위치 (그림 E)
공구를 켤 때는 트리거 스위치(1)를 돌립니다.
공구를 끄려면 트리거 스위치를 놓습니다.
공구에는 브레이크가 장착되어 있습니다. 트리거
스위치가 완전히 해제되는 즉시 척은
중지됩니다. 변속 스위치를 사용하면 용도에
맞는 최상의 속도를 선택할 수 있습니다.
트리거를 더 밀어 넣을수록 공구가 더 빠르게
작동합니다. 중앙 펀치가 없는 시작 홀,
금속이나 플라스틱 드릴 작업, 나사를 조일 때는
속도를 낮추어 사용하십시오. 공구 수명을
Page 16

15
한국어
최대화하려면, 시작 홀 또는 잠금장치의
경우에만 가변 속도를 사용하십시오.
참고: 가변 속도 범위의 지속적 사용은 권장되지
않습니다. 지속적 사용은 스위치를 손상시킬 수
있으므로 피해야 합니다.
4.
전진/후진 제어 버튼(그림 F)
전진/후진 제어 버튼(2)은 공구 방향을
결정하며 잠금(lock-off) 버튼 역할도 합니다.
전진 회전을 선택하려면 트리거 스위치를 놓고
공구 오른쪽에 있는 전진/후진 제어 버튼을
눌러줍니다. 후진을 선택하려면 공구 왼쪽에서
전진/후진 제어 버튼을 눌러줍니다. 제어 버튼이
중앙에 있으면 공구가 꺼진 상태로 잠기게
됩니다. 제어 버튼의 위치를 변경할 때는 반드시
트리거를 놓아야 합니다.
참고: 회전 방향을 변경한 후 처음으로 공구를
실행하면 작동 시 '짤깍' 소리가 들립니다. 이는
공구에서 발생하는 충격음이며, 이는 정상적인
현상이며 고장이 아닙니다.
5.
신속 이탈 척(그림 G)
참고: 척은 1/4인치(6.35 mm) 육각
액세서리만 수용합니다.
스위치를 잠금 해제(중앙) 위치에 놓거나
액세서리를 충전하기 전에 배터리 팩을 제거합니다.
액세서리를 설치하려면, 액세서리가 제자리에
잠기는 찰칵 소리가 들릴 때까지 액세서리를
신속 이탈 척(4)에 끼웁니다.
액세서리를 제거하려면, 공구 전면에서 척
칼라(3)를 떼내고, 액세서리를 제거하고 칼라를
해제합니다.
참고: 신속 이탈 척은 스프링 장착식입니다. 척
칼라를 앞으로 당기면 액세서리가 나옵니다.
LED 작업등
트리거 스위치(1)를 당겨 임팩트 드라이버가
작동되면, 통합 LED 작업등(9)이 작업 영역을
자동으로 비춥니다. 참고: 작업등은 인접한
작업대를 비추기 위한 것이며 손전등으로 사용하기
위한 것이 아닙니다.
BIT TIP STORAGE
비트 팁 보관
두 개의 마그네틱 비트 보관 슬롯(5)이 공구
상단부에 내장되어 있습니다.
배터리 연료계 – 그림 H
공구에는 배터리 연료계가 장착되어 있습니다(8).
이는 사용 및 충전하는 동안 배터리의 현재 충전
레벨을 표시하기 위해 사용할 수 있습니다. 공구
기능성을 나타내는 것이 아니며 제품 구성품, 온도
및 최종 사용자의 용도에 따라 변경될 수 있습니다.
사용 중 배터리 충전 상태 확인:
배터리 연료계 버튼(H1)을 누릅니다.
세 개의 LED(H2)는 배터리의 충전 비율을
표시하면서 점등될 것입니다(그림 H).
LED 등이 점등되지 않을 경우, 배터리를
충전하십시오.
참고: 이 배터리는 용량의 20% 미만 충전시에는
작동되지 않도록 설계되었습니다. 배터리 충전이
고갈되면, 배터리가 재충전될 때까지 공구가
작동되지 않습니다.
벨트 클립 – 그림 I
벨트 클립(10)은 사용하는 동안 편리한 접근과
보관을 위해 사용자의 선호에 따라 공구 양쪽 어느
쪽으로든지 전환할 수 있습니다.
주의: 공구를 벨트에 장착하기 전에 전진/후진 제어
버튼(2)이 중앙의 잠금 위치에 있도록 하십시오.
유지 보수
스탠리 전동 공구는 최소한의 유지 보수로
장기간에 걸쳐 작업이 가능하도록 설계되어
있습니다. 만족스러운 연속 작동은 적절한 공구
관리와 정기적인 청소에 따라 그 성능이 달라질
수 있습니다.
충전기는 정기적인 청소 이외에 유지 보수가
필요하지 않습니다.
경고! 공구를 유지 보수하려면 먼저 공구에서
배터리를 분리하십시오. 충전기를 청소하기 전에
충전기의 플러그를 뽑으십시오.
부드러운 브러시와 마른 헝겊으로 공구 및
충전기의 환기 슬롯을 주기적으로 청소하십시오.
젖은 헝겊으로 모터 하우징을 주기적으로
청소하십시오. 연마재 및 유성 클리너를
사용하지 마십시오.
척을 주기적으로 열고 가볍게 두드려 내부의
먼지를 털어내십시오.
환경 보호
분리 수거. 본 제품을 일반 가정용
쓰레기로 처리하면 안됩니다.
스탠리 제품을 교체해야 하거나 더 이상 쓸모가
없어졌다고 판단될 때는 본 제품을 가정용
쓰레기와 함께 처리하지 마십시오. 이 제품은
분리 수거하십시오.
사용하던 제품과 포장을 분리 수거하면
자원을 재활용 및 재사용할 수 있습니다.
재활용 자원을 이용하면 환경 오염이
방지되고 고철 자원에 대한 수요를 줄일
수 있습니다.
배터리
배터리를 완전히 사용하고 난 후
공구에서 분리하십시오.
NiCd, NiMH 및 리튬이온 배터리는 재활용할
수 있습니다. 공인 수리점이나 지역 재활용
센터로 가져가십시오.
Page 17

16
한국어
서비스 정보
스탠리는 대한민국 전역에 영업소를 자체
운영하거나 공인 서비스 센터를 두고 있습니다.
모든 스탠리 서비스 센터에는 교육을 이수한
전문 직원이 배치되어 있어 고객에게 효과적이고
믿을 수 있는 전동 공구 서비스를 제공하고
있습니다. 기술 지원, 수리 또는 순정 교체
부품이 필요한 모든 경우에 가까운 스탠리로
연락하십시오.
참고사항
스탠리의 정책은 제품을 지속적으로 개선시키는
것이기 때문에 사전 통지 없이 제품 사양이
변경될 수 있습니다.
기본 장비 및 액세서리 구성은 국가에 따라 다를
수 있습니다.
제품 사양은 국가에 따라 다를 수 있습니다.
국가에 따라 판매하지 않는 제품도 있을 수
있습니다. 제품 판매 여부는 해당 지역에 있는
스탠리 판매점으로 문의하십시오.
Page 18

90588915 08/12
 Loading...