

Page 1
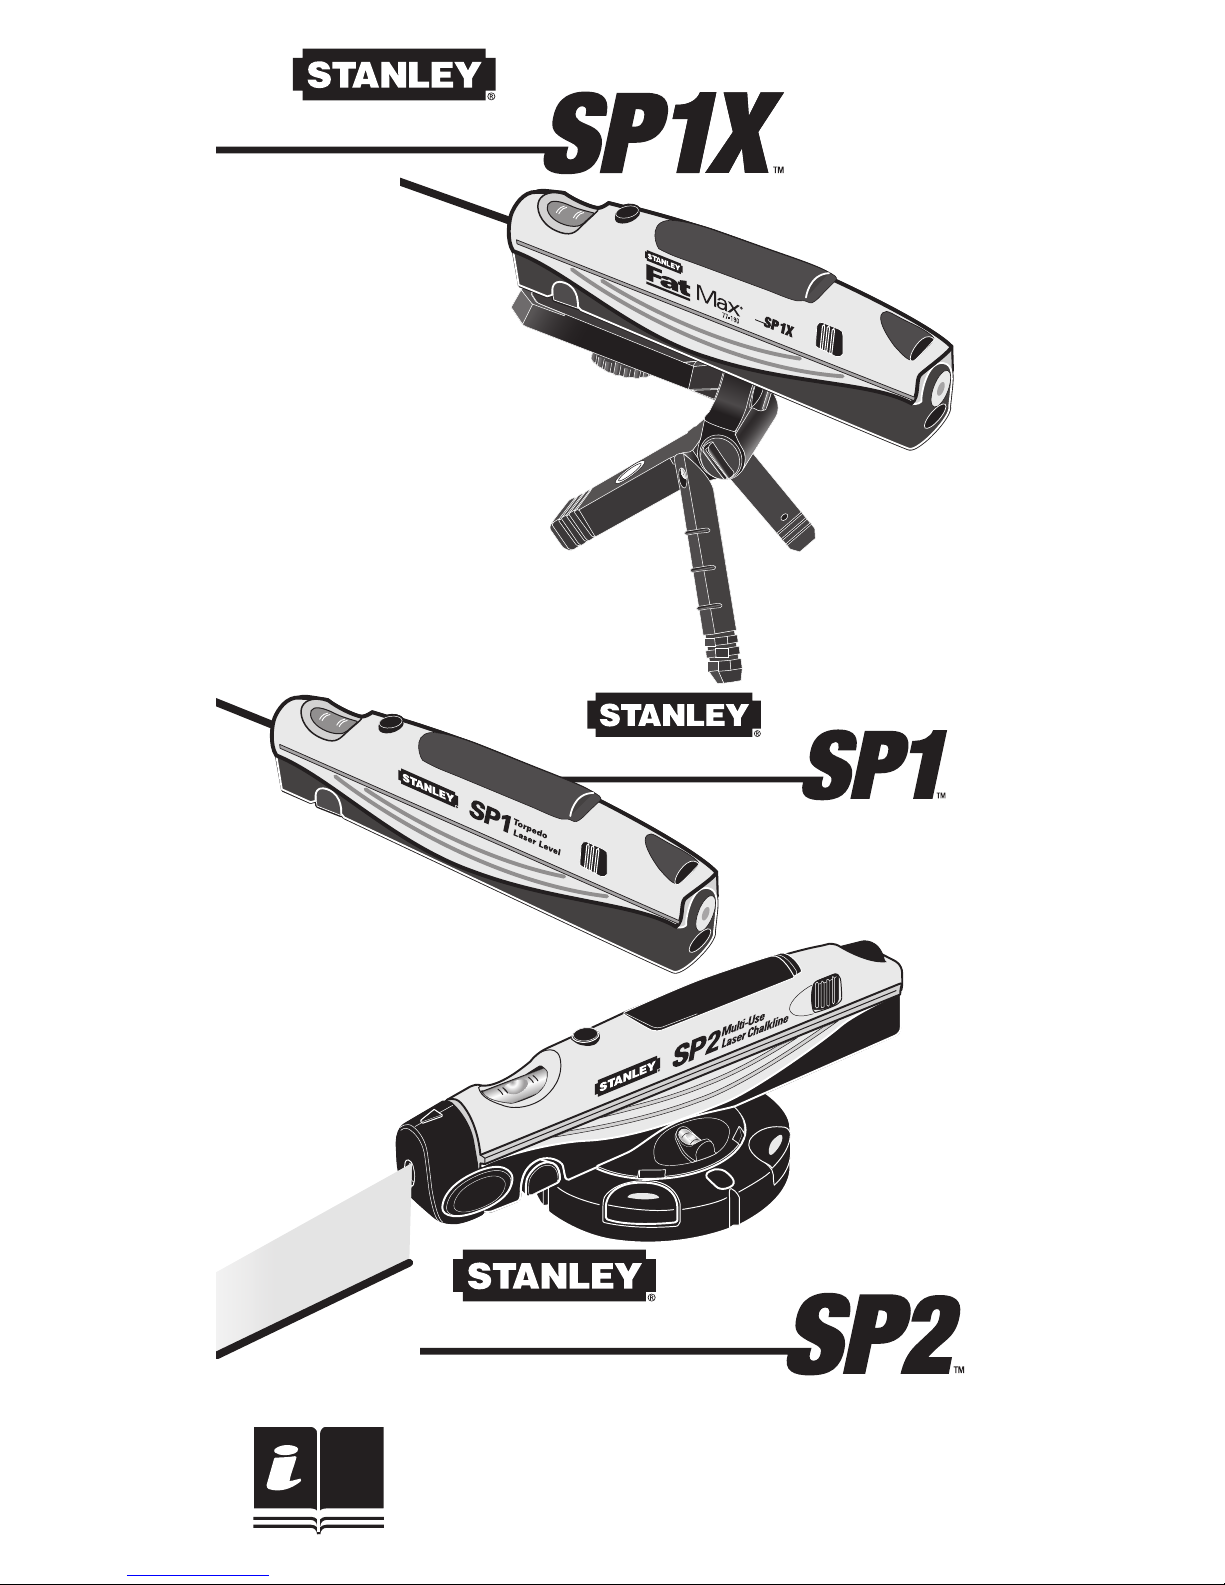
LASER TORPEDO LEVEL
MULTI-USE LASER CHALKLINE
• 77-152 •
INSTRUCTION MANUAL
MANUEL D’INSTRUCTIONS
MANUAL DE INSTRUCCIONES
LASER TORPEDO LEVEL KIT
• 77-151 •
•
• 77-190•
•
Page 2
2 • SP1 and SP2
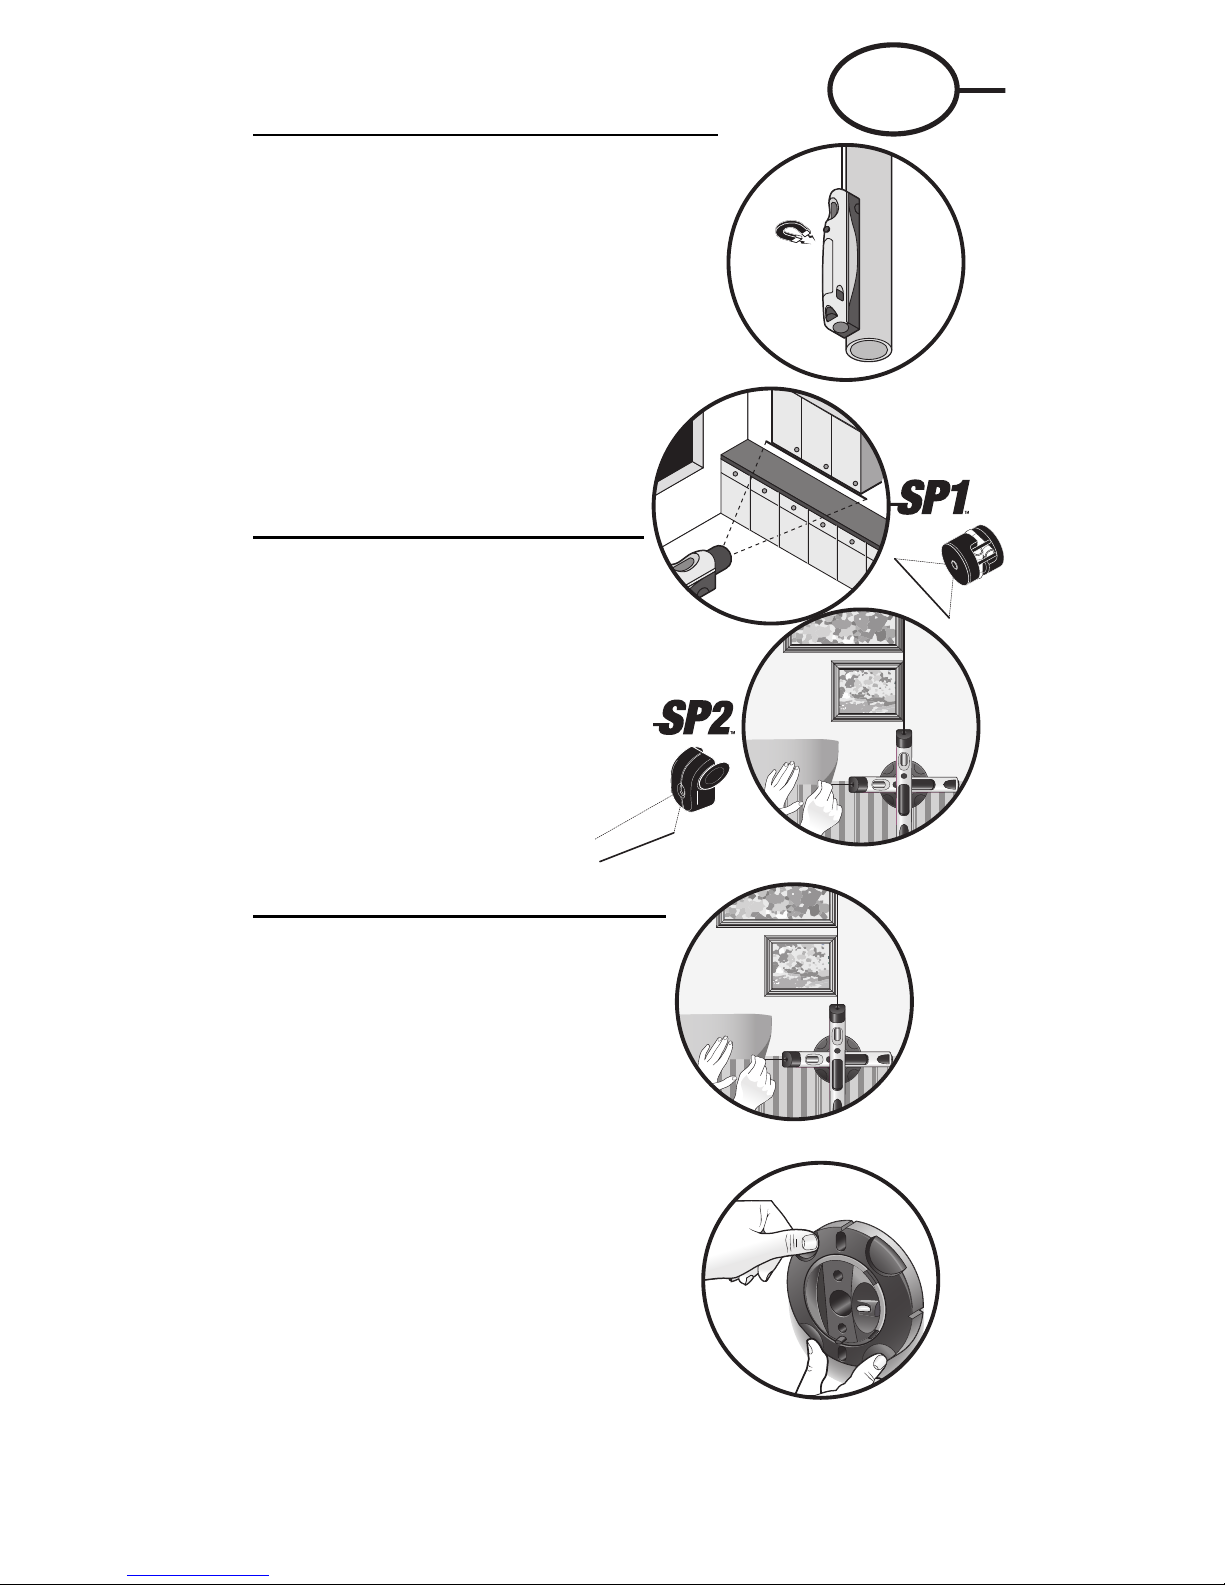
APPLICATIONS
Use as a Laser Torpedo Level:
The SP1, SP1X and SP2 Laser Level is a highly
durable, lightweight aluminum level with a red
beam laser that can be used in a variety of applications. With its level and circular plumb vials,
this state-of-the-art level projects a highly visible
red dot on almost any surface with up to
±1/4-in
@ 50-ft
(6mm accuracy at 15.3m).
Use as Laser Chalkline:
The Laser Chalkline easily attaches to the
front of the laser level. Using the line
generator, project straight lines on any
surface. Generate level and plumb chalklines using the level and plumb vials.
Use as Laser Square –
SP2 Only (on vertical surface)
Wall, Stud & Floor Mount/90º Swivel Mount
allows 90º layout capability. Place the
mount on the surface. Press the two buttons to push the retractable pins into any
soft wood or wall-board surface. Secure
the laser level to swivel mount using the
alignment pin on the mount.
Use extra caution when handling the
mount. Retractable pins are very sharp.
Push the buttons only when you place
the mount on the surface of a soft wood
or wall-board.
The laser level can be rotated 360º (with 90º references) on the wall/stud mount.
Use level vial (1g) to mark level line. Rotate 90º
so base level vial (3a) is within line. Mark laser
chalkline. You now have a 90º square from the
level line.
To use as laser square on floor, mount laser on
wall/floor mount. Align first chalkline using
arrow marker " " on swivel base. Turn swivel
base 90º using reference mark on fixed base.
You now have 90º laser square.
EN
Page 3
1a
1g
2a
3a
3d, 3e
1b
1c
1d
1f
1e
3b
3c
USING YOUR LASER LEVEL
The Laser Level offers a distinct advantage over regular carpenter’s levels in
its ability to project a highly visible level reference over both short and long
distances with great accuracy. The level can be placed in a central location
to transfer a level reference point anywhere you need it, useful when
installing wainscoting, tile, or cabinets, or leveling posts.
With its on-board circular bubble vial, the level can also be used in a vertical
position to plumb studs or transfer points from floor to ceiling.
To reference the bottom of the level, locate the center of the laser dot and
subtract 1-ft (25mm).
For best results position the tool to project the line from left to right or top to
bottom. The use of the unit from right to left and/or bottom to top will not
guarantee the same level of precision or accuracy.
MAINTENANCE
Designed to be weather resistant and construction-site tough; but as with
any precision instrument, care should be taken to avoid damage.
• Dry unit immediately if wet.
• The precision vials are protected; however, avoid hard contact with the
vials.
• Clean the front lens with a lint-free cloth or swab using a premium glass
cleaner solution.
• Clean the outside of the level with a damp cloth and dry with a soft lintfree cloth.
SP1 and SP2 • 3
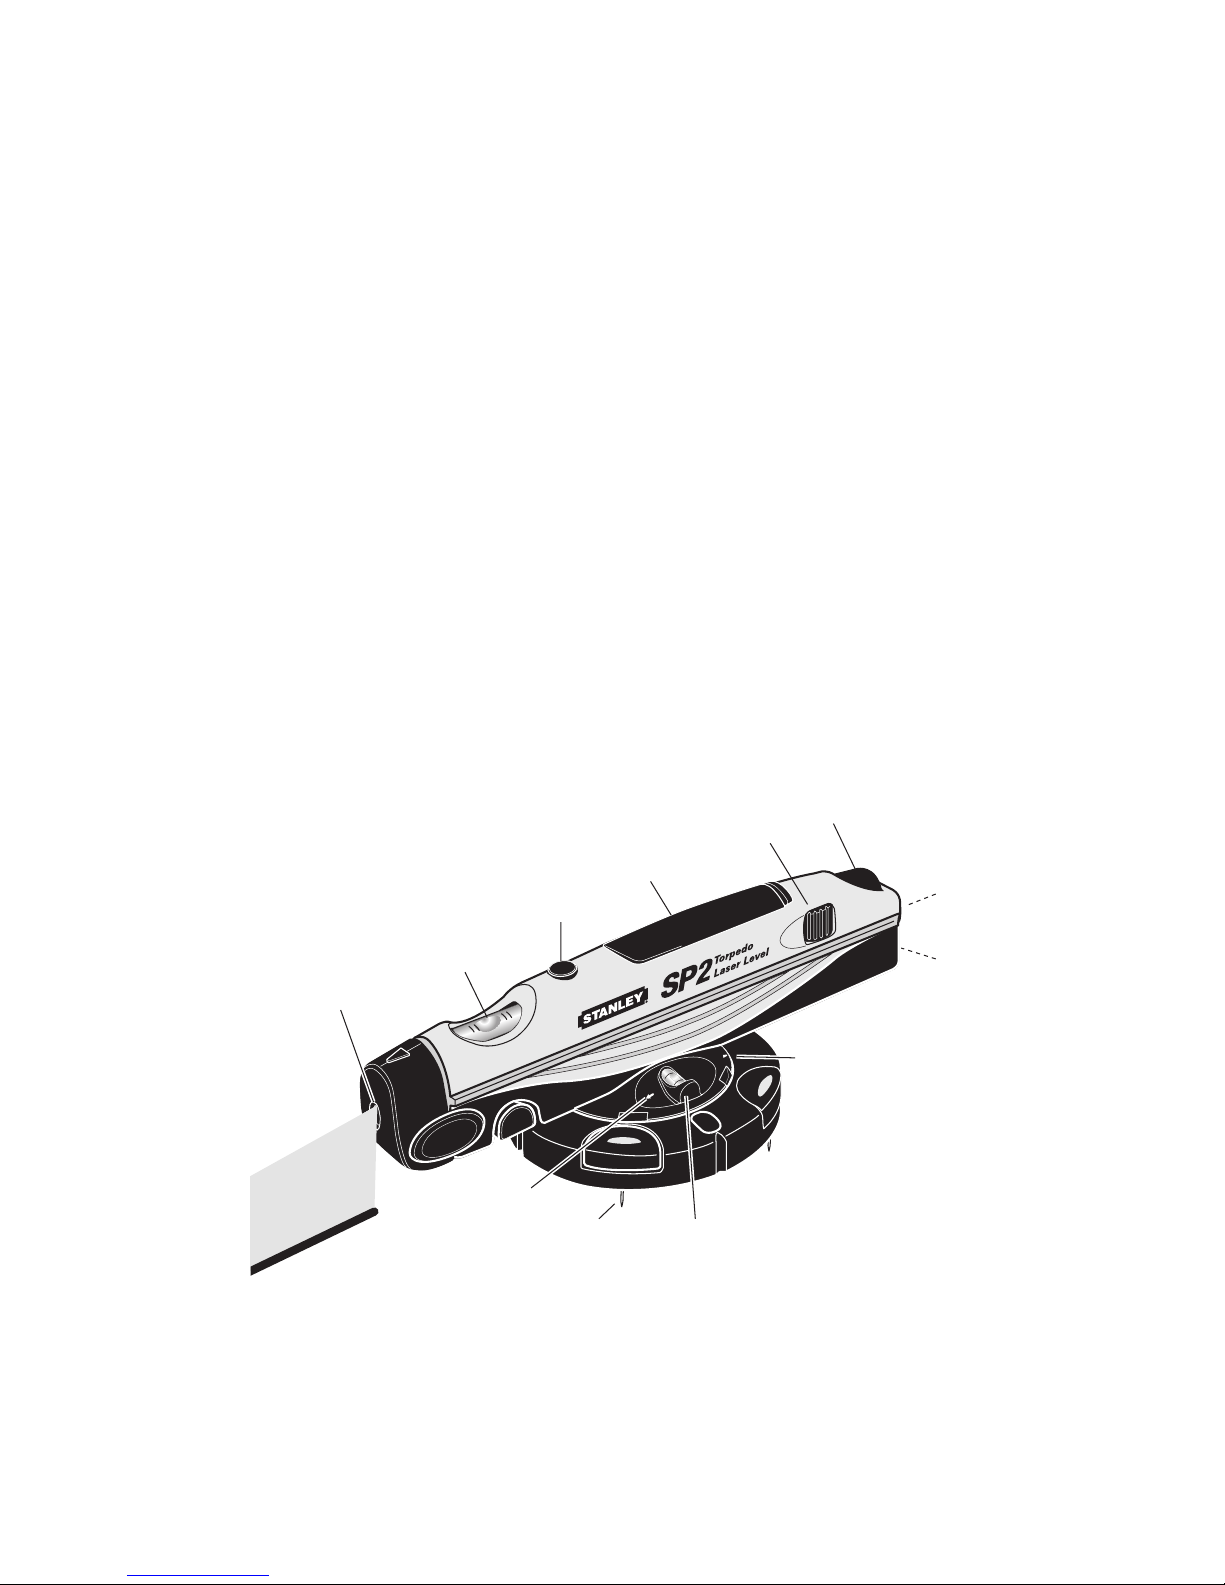
1. Laser Level– SP1, SP1X & SP2
1a. Power switch
1b. Battery cartridge
1c. Trivet height adjustment knob
1d. Trivet activator button
1e. Trivet retractor button
1f. Circular plumb vial
1g. Primary level vial
1h. Magnetic base
1i. Leveling feet (trivet)
2. Laser Chalkline
2a. Special lens for laser chalkline–SP2
The Beam Bender on the SP1 deflects a
beam to 90º from horizontal in any direction.
3. Wall/floor & stud mount– SP2
3a. Level vial (base)
3b. Vertical mount retractable pins
3c. 90º reference mark
3d. Alignment arrow
3e. Base reference marks
Page 4
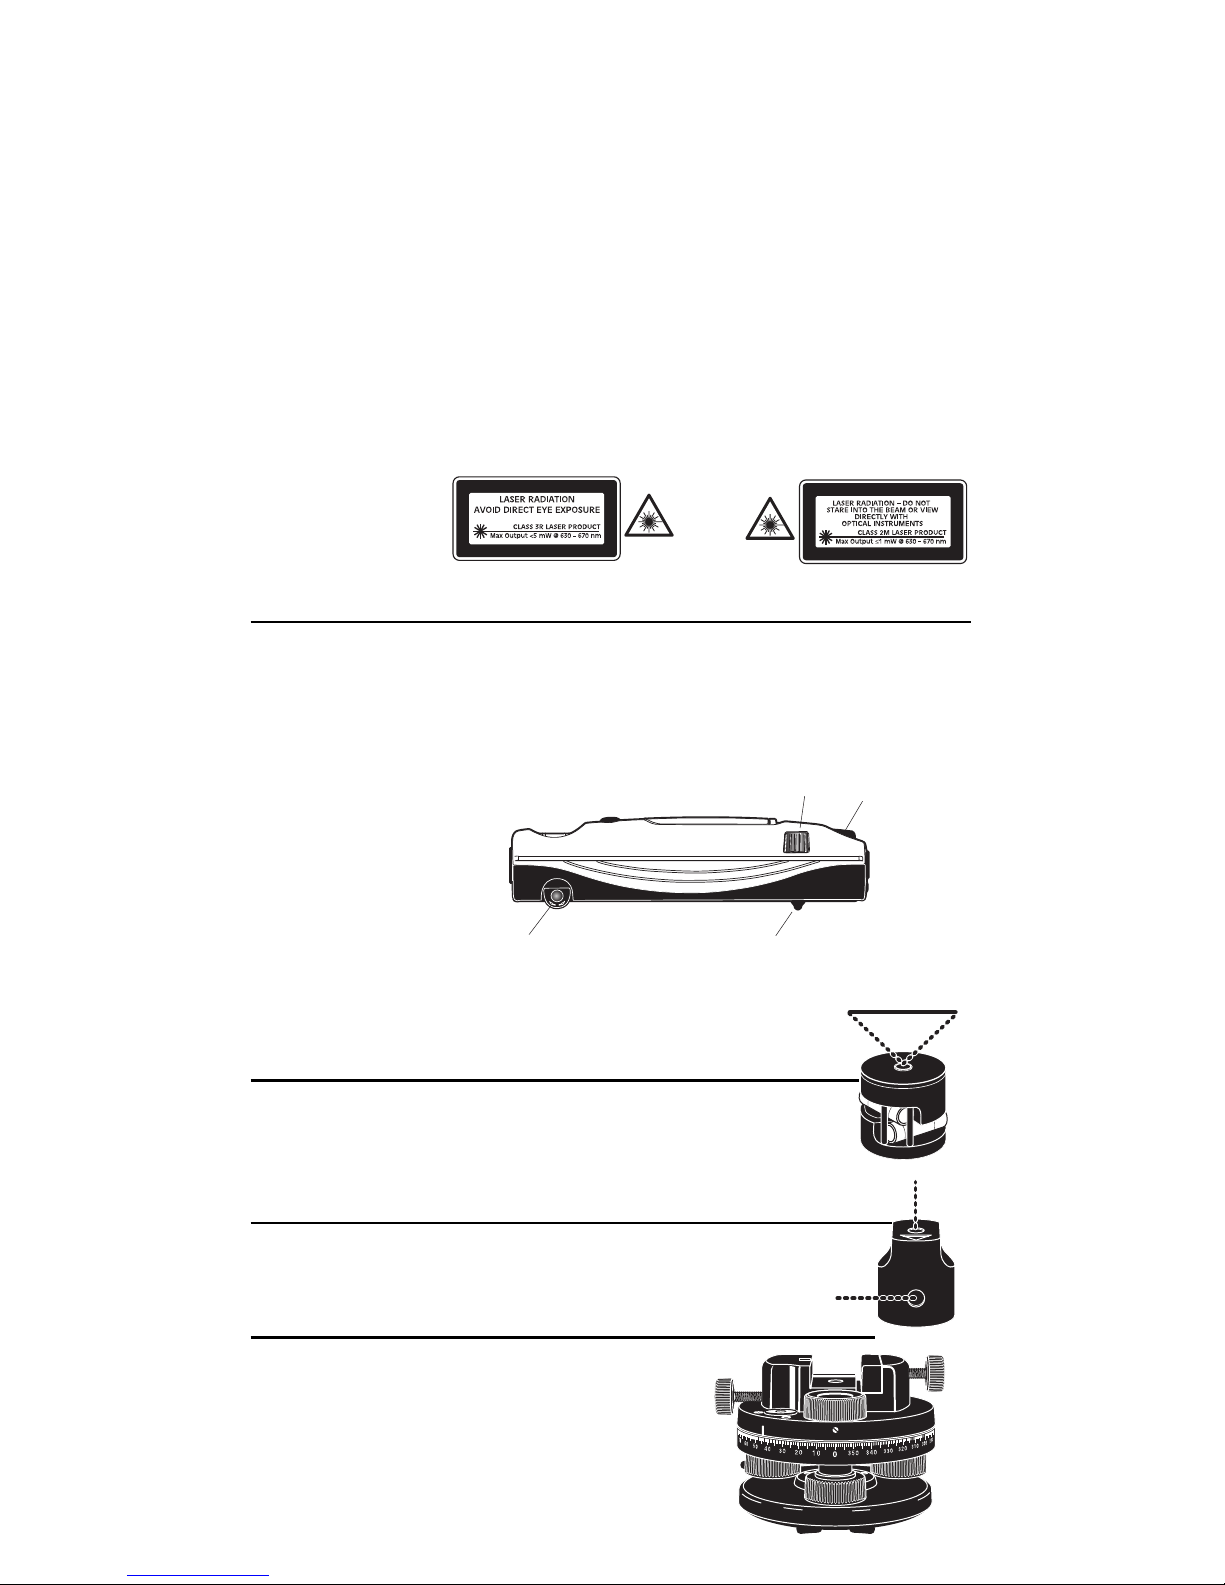
CALIBRATION
Factory set and sealed for life.
SPECIFICATIONS
Level Beam Accuracy: ±1/4-in @ 50-ft (6.3mm at 16.5m) in dot mode
Line Accuracy: ±3/8-in @ 30-ft (±9.5mm at 10m)
Working Range: Up to 50-ft (15m) indoors depending on lighting conditions
Vial Sensitivity: Level, ±20 minutes; plumb, ±30 minutes
Power: Three “AA” batteries provide 100 hours of intermittent use
Laser Diode: Class 2M/3R (>1mW), 635nm to 670nm. This product complies
with 21 CFR 1040.10 and 1040.11
Specifications subject to change without notice.
How to use the “built-in” leveling feature
Place unit on any flat, firm surface and switch on the laser. Swing out (1)
leveling feet
and push the (2) trivet activator button.
Use (3) trivet height adjustment knob to center the bubble. The laser
beam is now projecting a visible reference to the center of the laser’s aperture.
ACCESSORIES
LBS Beam Spreader– Included with SP1, SP1X
Creates a laser “chalk line” to level or plumb frames, tiles,
shelves, etc. 35 minute vial accuracy. The above items magnetically attach to the metal “donut” on the front of the level.
LBL Beam Splitter– Included with SP1X
Two beams create a 90° reference. Use to align and square corners or tiles, plumb studs, and more.
TM1 Rotary Adapter
Allows 360° rotation of level with or without tripod.
Use to transfer elevations, grade, more.
4 • SP1 and SP2
1
3
2
4
Page 5
Mini Laser Tripod– Included with SP1X
Tilts in two directions allowing the laser to set at any angle.
WARRANTY
90 day Warranty
This SP1, SP1X, SP2 is warranted to the original purchaser to be free from
defects in workmanship and material. Stanley Works will repair or replace
any defective part which may malfunction under normal and proper use
within a period of ninety (90) days from the date of purchase without charge
of parts and labor, once delivered and shipped prepaid to CST/berger, division of Stanley Works, together with proof of date and place of purchase.
CST/berger
division of Stanley Works
255 W. Fleming Street
Watseka, IL 60970
ph: (815) 435-859
This warranty is not subject to misuse, abuse, assignment or transfer. The
exclusive remedy under any and all warrants and guarantees, expressed or
implied, is limited to repair and/or replacement as provided herein, and
Stanley shall not be liable for damages from loss or delay of equipment uses,
consequential or incidental damage.
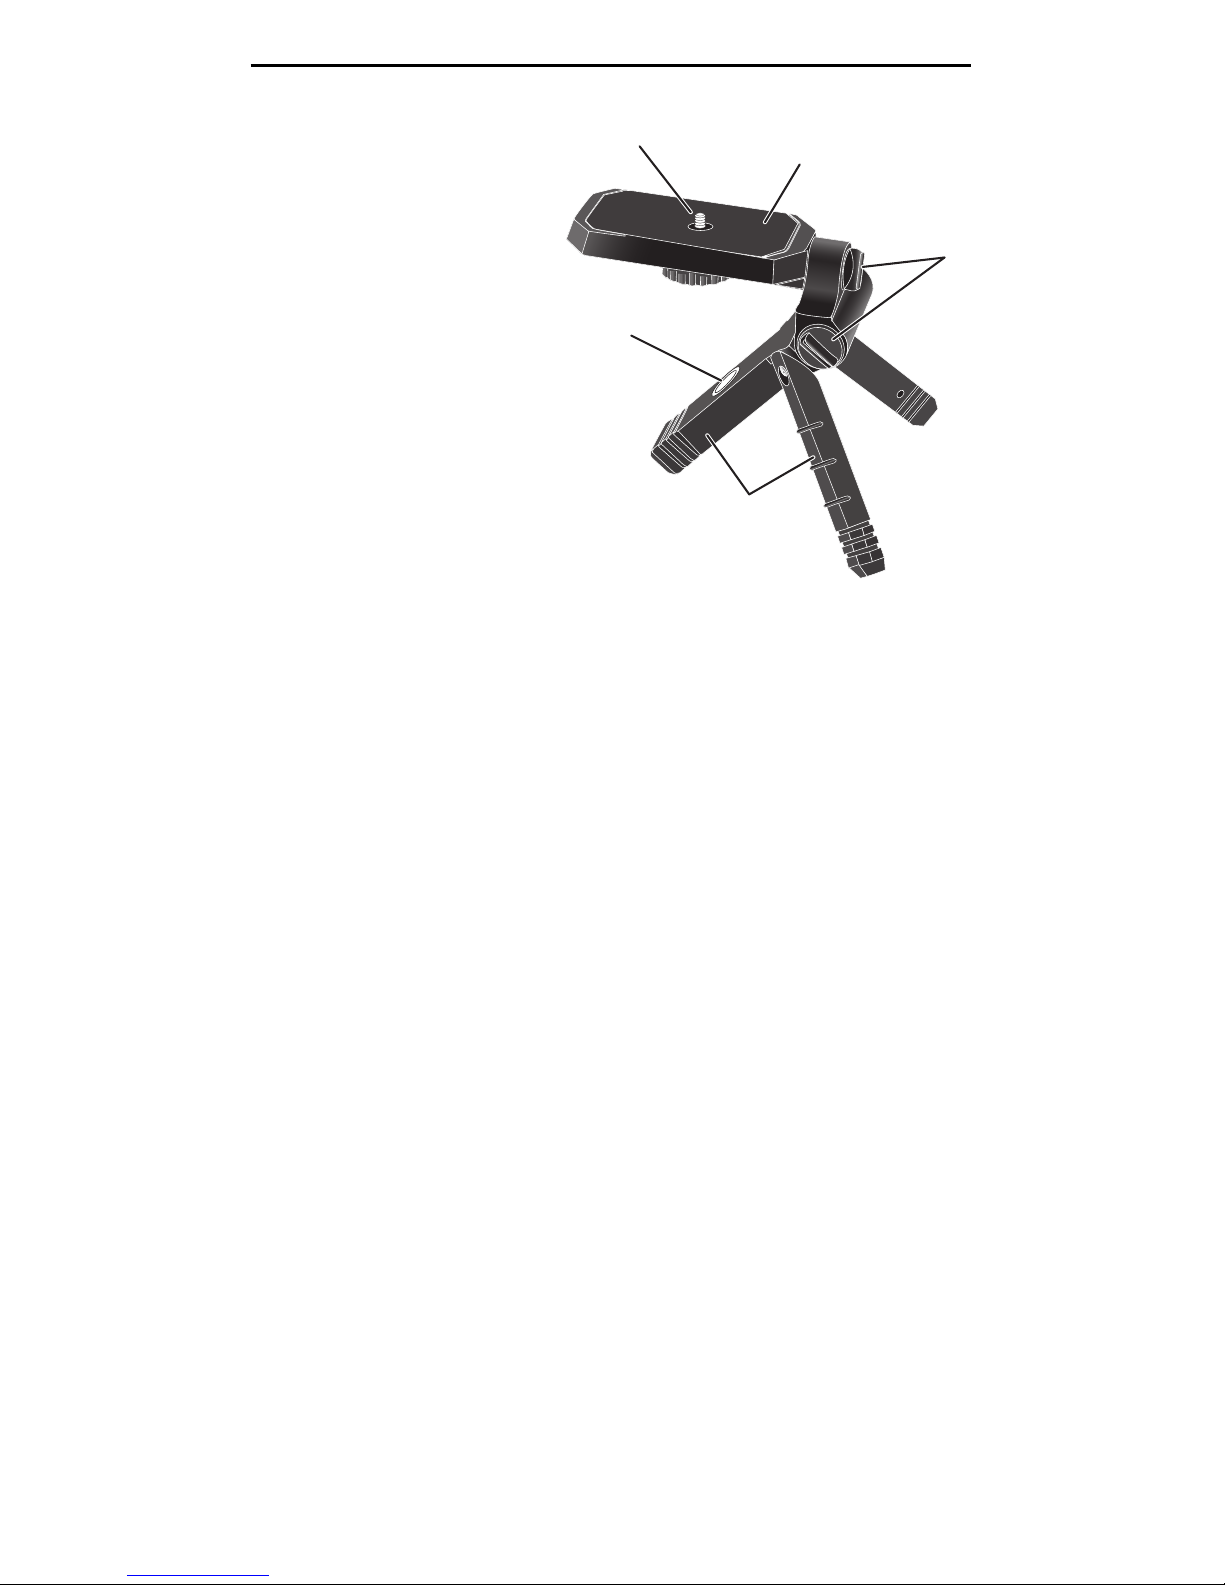
SP1 and SP2 • 5
1. 1/4x20 thread adapts to 5/8x11
2. Platform swivels in both
directions to allow laser line
positioning at any angle
3. Positioning Knobs
4. Folding tripod legs with non-skid
rubber feet
5. 5/8x11 thread mounts to surveying
tripod
1
5
2
4
3
Page 6

APPLICATIONS
Utilisation comme niveau laser :
Le niveaux laser SP1, SP1X et SP2 sont des niveaux en aluminium, robustes et légers, qui projettent un point laser rouge haute visibilité
et peuvent être utilisés pour de nombreuses applications. Ils sont équipés de
niveau tubulaire et sphérique, respectivement pour le plan horizontal et le
plan vertical ; leur précision est de 6 mm à 15 m.
Utilisation comme ligne laser :
Lorsque la tête magnétique est fixée sur la partie avant des niveaux, on produit une ligne laser qui peut être projetée sur toute surface. Grâce aux
niveaux tubulaire et sphérique, on peut tracer une ligne horizontale et une
ligne verticale en aplomb.
Utilisation comme équerre sur une surface verticale (uniquement SP2) :
La base tournante, qui peut être fixée sur une paroi ou posée à même le sol,
permet de tracer des angles à 90°. Posez la base sur la surface et appuyez
sur les deux boutons latéraux de manière à ce que les deux pointes en
dessous fixent la base en question. Montez le niveau sur la base : grâce aux
points de référence à angle droit, présents sur le bord de la base, vous pouvez tracer des lignes ou des points à l’équerre.
Le niveau laser peut tourner sur 360° (avec repères tous les 90°) sur la base
tournante.
Équerrage sur paroi
Utilisez le niveau tubulaire (1 g) comme référence pour tracer une ligne
laser. Tournez la base de manière à ce que le niveau (3a) soit aligné avec la
ligne que vous venez de tracer. Tracez de nouveau la ligne laser. Les deux
lignes sont à l’équerre entre elles.
Équerrage sur le sol.
Alignez avant tout la ligne laser, à l’aide du signe en forme de flèche se trouvant sur la base, avec l’un des repères latéraux. Tracez la ligne laser.
Tournez la base de 90° et tracez la nouvelle ligne laser.
Maniez la base très attentivement. Les deux pointes escamotables sont très
pointues. Appuyez sur les boutons latéraux après avoir posé la base sur une
surface.
UTILISATION DU NIVEAU LASER
Comparé à un niveau traditionnel à bulle, le niveau laser offre l’avantage de
projeter un point ou une ligne laser très visible à courte ou à moyenne distance avec une grande précision. Le niveau laser peut être positionné centralement de manière à projeter le rayon laser dans une direction
quelconque. Il est particulièrement utile pour le montage de plinthes, sols,
armoires ou cloisons.
Grâce à la bulle sphérique, le niveau peut être utilisé en position verticale
pour mettre d’aplomb des montants ou transférer des points du sol au
plafond.
Souvenez-vous que le centre du point laser est situé 25 mm plus haut que la
base du niveau.
6 • SP1 and SP2
F
Page 7

Pour obtenir de meilleurs résultats, il est conseillé de projeter la ligne de
gauche à droite, ou le point du haut vers le bas. L’utilisation de la ligne de
droite à gauche – ou du point du bas vers le haut – ne garantit pas la même
précision.
ENTRETIEN
Bien que résistant aux conditions atmosphériques défavorables et à l’emploi
sur le chantier, ce niveau laser doit être utilisé et manié avec attention.
• essuyez-le immédiatement s’il a été mouillé,
• évitez tout choc violent sur les bulles,
• nettoyez la lentille frontale avec un tampon d’ouate et du liquide pour
lentilles,
• nettoyez le niveau avec un chiffon humide et essuyez-le avec un tampon d’ouate.
CALIBRAGE
Effectué en usine et garanti à vie.
SP1 and SP2 • 7
1a
1g
2a
3a
3d, 3e
1b
1c
1d
1f
1e
3b
3c
1. Niveaux laser SP1, SP1X et SP2
1 a. marche
1 b. logement des piles
1 c. vis de réglage vertical
1 d. bouton d’activation du réglage vertical
1 e. bouton de désactivation du réglage
vertical
1 f. bulle circulaire
1 g. bulle tubulaire principale
1 h. base magnétique
1 i. pieds de mise à niveau
2. Ligne laser
2 a. SP2: tête magnétique générant une ligne
laser.
SP1: tête magnétique générant un point à l’équerre, orientable dans toutes les directions
3. Base de fixation SP2
3 a. bulle tubulaire
3 b. pointes escamotables pour fixation verticale
3 c. repère à 90°
3 d. flèche d’alignement
3 e. signes de référence de la base
Page 8

CARACTERISTIQUES TECHNIQUES
Précision du rayon laser:
6,3 mm à 16,5 m (point laser)
Précision de la ligne laser:
± 9,5 mm à 10 m
Portée: 15 m (à l’intérieur)
Sensibilité des bulles niveau tubulaire : ±20’ – niveau circulaire : ±30’
Alimentation: 3 piles alcalines type « AA » – 100 heures d’autonomie
Diode laser: Classe 2M/3R (> 1mW), 635-670 nm. Ce produit est conforme aux
normes 21 CFR 1040.10 et 1040.11
Les caractéristiques techniques peuvent être modifiées sans préavis
Utilisation du réglage vertical
Appuyez le niveau sur une surface plane et stable. Allumez le laser. Tournez
les pieds (1) vers le bas et activez le réglage vertical en appuyant sur le bouton (2).
Utilisez la vis de réglage vertical (3) pour centrer le niveau tubulaire. Le
rayon laser est parfaitement horizontal et peut être utilisé comme point de
référence.
ACCESSOIRES
Tête magnétique LBS (SP1, SP1X)
Elle crée une ligne laser pour mettre de niveau ou d’aplomb des
étagères, des sols, etc. Elle est équipée de deux niveaux tubulaires de référence (précision : 35’) pour le plan horizontal et
pour le plan vertical. Elle est aimantée pour se fixer sur la partie avant
du niveau.
Tête magnétique LBL (SP1X
Elle projette deux rayons à l’équerre entre eux. Idéale pour
aligner et équerrer en même temps.
Base de mise à niveau TM1
Elle permet de fixer le niveau sur un trépied muni
d’un filetage standard 5/8” x 11. Tournant sur 360°,
elle est munie de vis de mise à niveau et de bulle
circulaire de référence.
8 • SP1 and SP2
1
3
2
4
Page 9

Mini-Trépied – Compris avec le SP1X
Filets pour socle de 15,87 mm (5/8 po) X 11 (trépied de relèvement)
Filets pour socle de 6,35 mm (1/4 po)
X 20 (trépied d’appareil photo)
1. Le filetage de 6,35 mm (1/4
po) x 20 s’adapte à celui de
15,87 mm (5/8 po) x 11.
2. La plate-forme pivote des
deux côtés pour permettre le
positionnement de la ligne
laser à tout angle.
3. Boutons de positionnement
4. Pattes de trépied pliantes avec
patins de caoutchouc antidérapants
5. Le filetage de 15,87 mm (5/8 po) x 11 se
monte sur le trépied de relèvement.
GARANTIE
Le fabricant accorde une garantie de 3 mois sur ces appareils contre tout
défaut de matière ou de fabrication à condition toutefois que l’appareil ait
été utilisé correctement. Les piles et le boîtier des piles sont toujours exclus
de la garantie. La garantie commence à dater de l’achat (date figurant sur la
facture ou sur le ticket de caisse).
Pour l’assistance après-vente, s’adresser au revendeur le plus proche ou
directement au service après-vente du fabricant en votre país. Dans un cas
comme dans l’autre, si l’appareil doit être expédié, les frais de transport sont
pris en charge par le client.
Toute tentative de réparation de l’appareil de la part d’un service non agréé
annule la validité de la garantie.
L’appareil doit être accompagné du coupon de garantie annexé à la
présence notice, dûment rempli, de la facture d’achat et des indications du
défaut constaté.
En cas de recours à la garantie, la période de garantie ne s’étend ni pour
l’appareil ni pour les pièces remplacées.
Les pièces remplacées deviennent la propriété du fabricant.
IMPORTANT!
L’utilisateur est responsable de la bonne utilisation et de l’entretien de cet
appareil. Il s’engage également à contrôler le travail au fur et à mesure que
celui-ci avance et par conséquent le calibrage de l’appareil. Le calibrage et
l’entretien ne sont pas couverts par la garantie.
La sté Stanley Works se réserve d’apporter les modifications techniques
jugées utiles sans obligation de préavis.
SP1 and SP2 • 9
1
5
2
4
3
Page 10

APLICACIONES
Uso como nivel láser:
Los niveles láser SP1, SP1X y SP2 son niveles de aluminio
sólidos y livianos que proyectan un punto láser rojo de alta visibilidad y
pueden utilizarse para muchas aplicaciones. Están provistos de nivel tubular
para la superficie horizontal y nivel esférico para la superficie vertical.
Precisión: 6 mm a 15 m.
Uso como línea láser:
Fijando la cabeza magnética en la parte delantera de los niveles, se genera
una línea láser que puede proyectarse hacia cualquier superficie. Gracias al
nivel tubular y al nivel esférico, es posible trazar una línea horizontal y una
línea vertical plomada.
Uso como escuadra en una superficie vertical (sólo SP2):
La base giratoria, que puede fijarse en una pared o apoyarse sobre el piso,
permite trazar ángulos de 90°. Apoyar la base sobre la superficie y pulsar los
dos botones laterales, de modo que las dos puntas puestas debajo fijen la
base misma. Montar el nivel en la base; utilizando los puntos de referencia
de ángulo recto presentes en el borde de la base misma, podrán trazarse
líneas o puntos de escuadra.
El nivel láser puede girarse 360° (con referencias cada 90°) en la base
giratoria.
Escuadra de pared
Utilizar el nivel tubular (1 g) como referencia para trazar una línea láser.
Girar la base, de modo que el nivel (3a) se alinee con la línea trazada
anteriormente. Trazar de nuevo la línea láser. Las dos líneas láser están
escuadradas entre sí.
Escuadra de piso
Primero alinear la línea láser, utilizando la “flecha” representada en la base
por una de las referencias laterales. Trazar la línea láser. Girar la base 90° y
marcar la nueva línea láser.
Manejar la base con mucho cuidado. Las dos puntas retráctiles son muy
puntiagudas. Pulsar los botones laterales sólo tras haber apoyado la base
sobre una superficie.
USO DEL NIVEL LÁSER
El nivel láser, respecto a un nivel de burbuja tradicional, ofrece la ventaja de
proyectar con gran precisión un punto o una línea láser muy visible, tanto a
corta distancia como a mediana distancia. El nivel láser puede colocarse en
un punto central, de manera de proyectar el rayo láser hacia cualquier
dirección. Resulta particularmente útil durante el montaje de rodapiés,
pavimentos, armarios o paneles.
Gracias a la burbuja esférica, es posible utilizar el nivel en posición vertical
para plomar montantes o transferir puntos del piso al techo; hay que
considerar que el centro del punto láser se encuentra 25 mm sobre la base
del nivel.
Para obtener mayores resultados, proyectar la línea de izquierda a derecha
o el punto de arriba hacia abajo. El uso de la línea de derecha a izquierda o
del punto de abajo hacia arriba, no garantiza la misma precisión.
MANTENIMIENTO
10 • SP1 and SP2
E
Page 11

Si bien el nivel láser resiste a condiciones atmosféricas desfavorables y al
uso en la obra, debe utilizarse y manejarse con mucha atención.
• Secarlo inmediatamente, si se ha mojado
• Evitar golpes violentos en las burbujas
• Limpiar la lente delantera con un poco de algodón y líquido para lentes
• Limpiar el nivel con un paño húmedo y secarlo con algodón.
CALIBRACIÓN
Realizada en fábrica y garantizada de por vida.
ESPECIFICACIONES TÉCNICAS
Precisión del rayo láser:
6,3 mm a 16,5 m (punto láser)
Precisión de la línea láser:
± 9,5 mm a 10 m
Alcance: 15 m (en interiores)
Sensibilidad de las burbujas: nivel tubular: ±20’ – nivel circular: ±30’
Alimentación: 3 pilas alcalinas tipo “AA” – 100 horas de autonomía
Diodo láser: Clase 2M/3R (> 1mW), 635-670 nm. Este producto cumple con
las normas 21 CFR 1040.10 y 1040.11
Especificaciones sujetas a cambio sin obligación de previo aviso.
SP1 and SP2 • 11
1a
1g
2a
3a
3d, 3e
1b
1c
1d
1f
1e
3b
3c
1. Nivel láser SP1 y SP2
1 a. encendido
1 b. alojamiento pilas
1 c. tornillo de ajuste vertical
1 d. botón de activación del ajuste vertical
1 e. botón de desactivación del ajuste vertical
1 f. burbuja circular
1 g. burbuja tubular principal
1 h. base magnética
1 i. patas de nivelación
2. Línea láser
2 a. SP2: cabeza magnética que genera una línea
láser.
SP1: cabeza magnética que genera un punto
de escuadra, orientable hacia cualquier dirección
3. Base de fijación SP2
3 a. burbuja tubular
3 b. puntas retráctiles para la fijación en vertical
3 c. referencia 90°
3 d. flecha de alineación
3 e. marcas de referencia de la base
Page 12

Cómo usar el ajuste vertical
Apoyar el nivel sobre una superficie llana y estable. Encender el láser. Girar
hacia abajo las patas (1) y activar el ajuste vertical, pulsando el botón (2).
Utilizar el tornillo de ajuste vertical (3) para centrar el nivel tubular. El rayo
láser es perfectamente horizontal y puede utilizarse como punto de referencia.
ACCESORIOS OPCIONALES
Cabeza magnética LBS (SP1, SP1X)
Crea una línea láser para nivelar o plomar estanterías, pavim
entos etc. Está provista de dos niveles tubulares de referencia
(precisión 35’), uno para la superficie horizontal y el otro para la
superficie vertical. Se fija magnéticamente a la parte delantera
del nivel.
Cabeza magnética LBL (SP1X)
Proyecta dos rayos de escuadra entre sí. Ideal para alinear y
escuadrar al mismo tiempo.
Base de nivelación TM1
Permite fijar el nivel sobre un trípode con rosca
estándar 5/8” x 11. Gira a 360° y está provista de
tornillos de nivelación y burbuja circular
de referencia.
12 • SP1 and SP2
1
3
2
4
Page 13

Mini-Tripode– Incluido con el SP1X
Se inclina en dos direcciones permitiendo
que el rayo láser sea ajustado a cualquier
ánguloRosca base de 5/8” x 11 (trípode de
topografía)
Rosca base de 1/4” x 20 (trípode de cámara)
1. Rosca de 1/4” x 20 se adapta a 5/8” x 11
2. La plataforma gira en ambas direcciones para permitir la ubicación de la
línea láser en cualquier ángulo
3. Perillas de ubicación
4. Patas de trípode plegables con patas de caucho antiresbalantes
5. Las roscas de 5/8” x 11 montan en un trípode de topografía
GARANTÍA
El productor garantiza el SP1 / SP2 contra deficiencias en materiales o mano
de obra durante los 90 días posteriores a la fecha de compra.
Los productos defectuosos serán reparados o reemplazados, a elección de
Stanley Works, tras ser recibidos, a porte pagado, junto con su prueba de
compra en Stanley Works.
Esta garantía no cubre deficiencias causadas por daños accidentales, desgaste por el uso o usos diferentes de los indicados por el fabricante o
reparaciones o alteraciones de estos productos no autorizadas por Stanley
Works.
Cualquier reparación o reemplazo durante la vigencia de esta Garantía no
afecta a su fecha de vencimiento.
Dentro de lo autorizado por la legislación vigente, Stanley Works no se
obliga por esta Garantía a compensar pérdidas como resultado de deficiencias en el producto.
Para informaciones sobre la garantía, pongase en contacto con CST/berger,
una división de STANLEY WORKS, al número (815) 432-5237, o por e-mail a
sales@cstsurvey.com.
SP1 and SP2 • 13
1
5
2
Page 14

©2004 THE STANLEY WORKS:
Stanley Tools Product Group,
480 Myrtle Street, New Britain, CT 06053 U.S.A.
Tel 1-800-262-2161 Fax 860-643-3756
www.stanleyworks.com
Z94-77151N (0405)
 Loading...