

Page 1

Instruction Manual
ProSet® PB2500 blind rivet tool
ProSet® PB3400 structural rivet tool
Battery Power Tool
ProSet®
PB3400
ProSet®
PB2500
Battery Power Tool
Batteridrevet værktøj
Akkuwerkzeug
Herramienta de batería
Akkutyökalu
Outil électrique alimenté par batterie
Utensile a batteria
Accugereedschap
Batteridrevet verktøy
Elektronarzędzie akumulatorowe
Ferramenta eléctrica com bateria
Batteridrivet verktyg
GB
DA
DE
ES
FI
FR
IT
NL
NO
PL
PT
SV
Page 2
NM
K
O
K
Figure 2 Figure 3
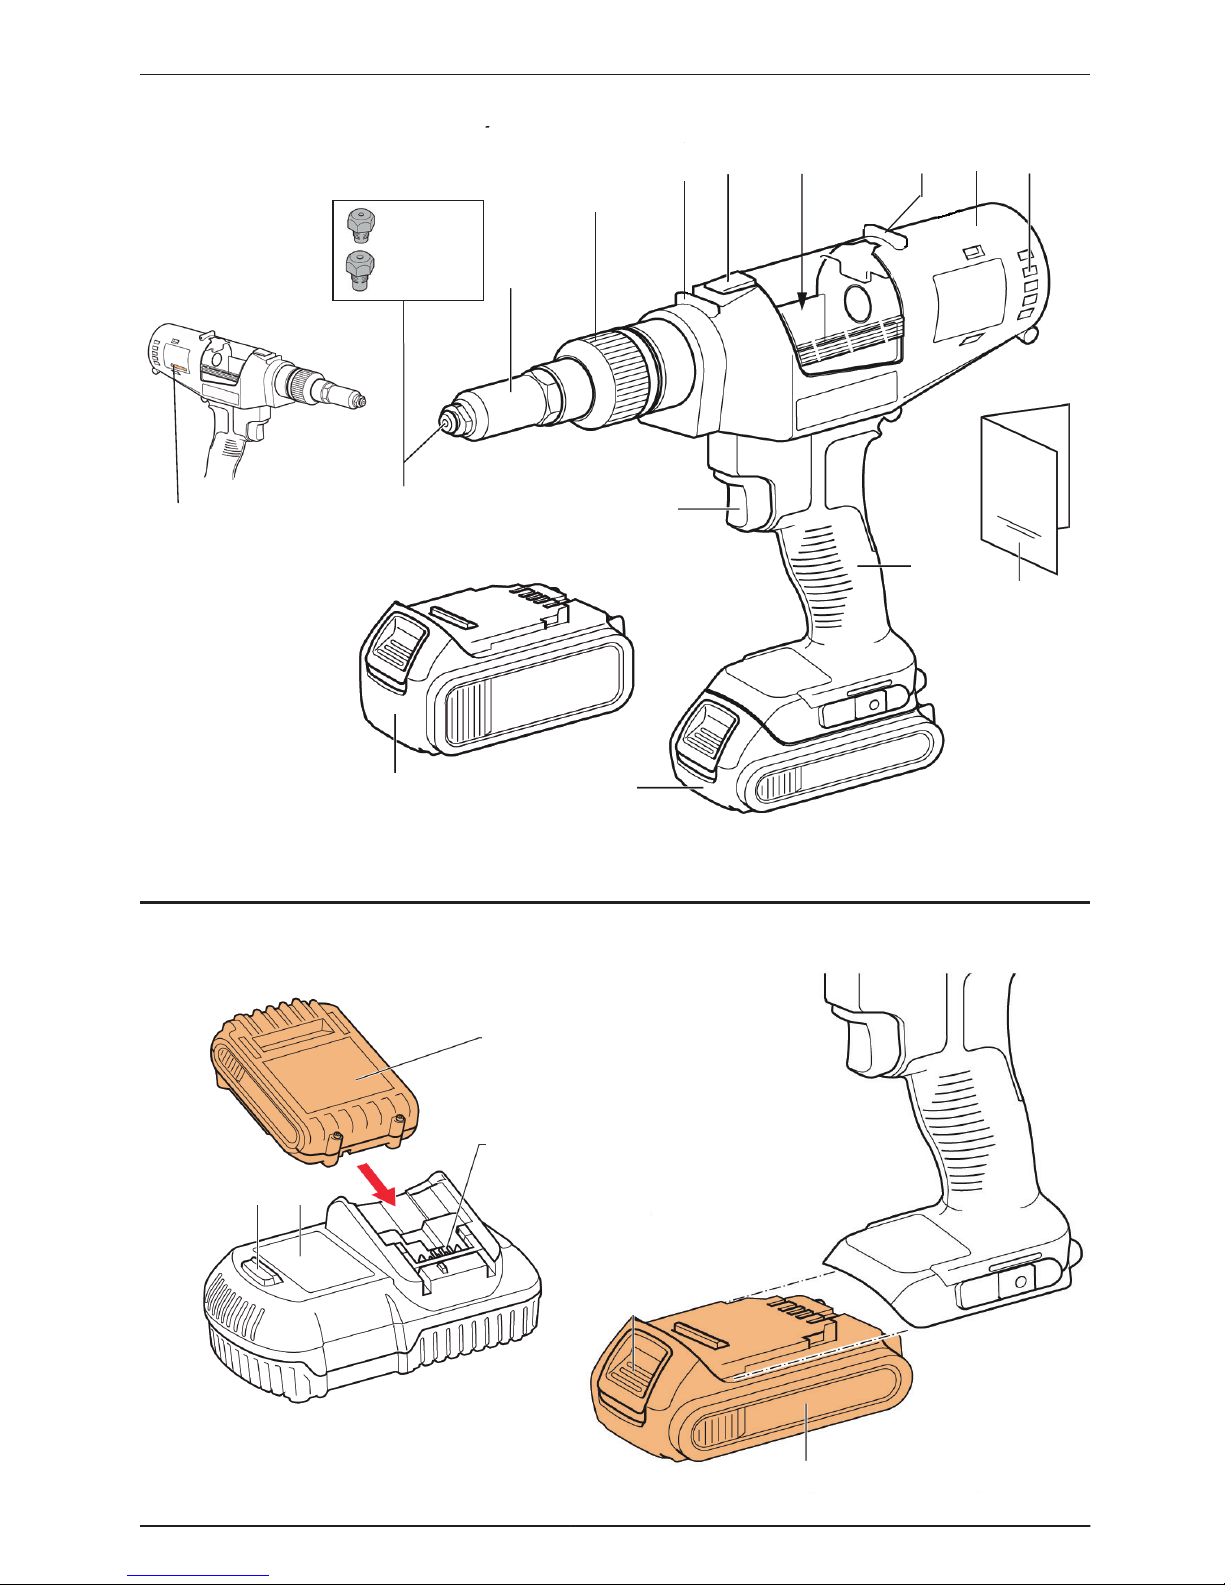
PB2500 (Ref. Section 2.4)
Figure 1
3.2 [1/8]
4,0 [5/32]
4,8 [3/16]
I
K
L
H
A
F GD
C
E
B
J
K
Model no. / Serial no.
F
Page 3

R
T2
U
V
W
B
C
D
A
J
Y
A B
E
W
A
Y
Figure 4
Figure 5
Figure 6 Figure 7
Figure 8
Figure 10
Figure 9
P
Q
R
S
T
U
P
Q
R
S
T
U
PB2500 (Ref. Section 2.4)
Figure 6a
Page 4

4
ENGLISH
©2016 Stanley Black & Decker
All rights reserved.
The information provided may not be reproduced and/or made public in any way and through any means (electronically or mechanically) without
prior explicit and written permission from STANLEY Engineered Fastening. The information provided is based on the data known at the moment of
the introduction of this product. STANLEY Engineered Fastening pursues a policy of continuous product improvement and therefore the products
may be subject to change. The information provided is applicable to the product as delivered by STANLEY Engineered Fastening. Therefore,
STANLEY Engineered Fastening cannot be held liable for any damage resulting from deviations from the original specications of the product.
The information available has been composed with the utmost care. However, STANLEY Engineered Fastening will not accept any liability with
respect to any faults in the information nor for the consequences thereof. STANLEY Engineered Fastening will not accept any liability for damage
resulting from activities carried out by third parties. The working names, trade names, registered trademarks, etc. used by STANLEY Engineered
Fastening should not be considered as being free, pursuant to the legislation with respect to the protection of trade marks.
CONTENT
Note: Drawings referring to the ProSet® PB2500 are on the Fold out of the Front Cover
Drawings referring to the ProSet® PB3400 are on the Fold out of the Back Cover
1. SAFETY DEFINITIONS ................................................................................................................................ 5
1.1 General Safety ...................................................................................................................................................................................5
1.2 Power Tool Use and Care ...............................................................................................................................................................5
1.3 Important Safety Instructions for All Battery Chargers ......................................................................................................6
1.4 Important Safety Instructions for All Battery Packs .............................................................................................................7
1.5 Specic Safety Instructions for Lithium-Ion (Li-Ion) ............................................................................................................8
1.6 Residual Risks .....................................................................................................................................................................................8
1.7 Labels and Icons ...............................................................................................................................................................................8
2. SPECIFICATION ..........................................................................................................................................9
2.1 Technical Data ...................................................................................................................................................................................9
2.2 Placing Specication ................................................................................................................................................................... 11
2.3 Package Contents ........................................................................................................................................................................11
2.4 Main Components list ................................................................................................................................................................12
2.5 Optional Accessories ................................................................................................................................................................... 12
3. TOOL USE & SET UP .................................................................................................................................13
4. OPERATING INSTRUCTIONS ...................................................................................................................13
4.1 Nose Equipment ............................................................................................................................................................................ 13
4.2 Chargers............................................................................................................................................................................................14
4.3 Battery Packs ................................................................................................................................................................................... 15
5. OPERATING PROCEDURE ........................................................................................................................15
5.1 Proper Hand Position ...................................................................................................................................................................16
5.2 Tool Operation................................................................................................................................................................................16
6. SERVICING THE TOOL .............................................................................................................................. 17
6.1 Maintenance frequency .............................................................................................................................................................. 17
6.2 Cleaning ............................................................................................................................................................................................17
6.3 Spare Parts – Tools ........................................................................................................................................................................18
6.4 Rechargeable Battery Pack ........................................................................................................................................................ 18
6.5 Protecting the Environment ......................................................................................................................................................18
7. ECDECLARATION OF CONFORMITY .....................................................................................................19
8. PROTECT YOUR INVESTMENT ................................................................................................................20
8.1 POP®Avdel® Rivet Tool Warranty ..............................................................................................................................................20
8.2 Register Your Blind Rivet Tool online .....................................................................................................................................20
Original Instruction
Page 5
5
ENGLISH
This instruction manual must be read by any person installing or operating this tool with particular
attention to the following safety rules.
1. SAFETY DEFINITIONS
The denitions below describe the level of severity for each signal word. Please read the manual and pay
attention to these symbols.
DANGER: Indicates an imminently hazardous situation which, if not avoided, will result in death or
serious injury.
CAUTION: Indicates a potentially hazardous situation which, if not avoided, may result in minor or
moderate injury.
WARNING: Indicates a potentially hazardous situation which, if not avoided, could result in death or
serious injury.
NOTICE: Indicates a practice not related to personal injury which, if not avoided, may result in property
damage.
Denotes risk of electric shock
Denotes risk of re
Improper operation or maintenance of this product could result in serious injury and property damage.
Read and understand all warnings and operating instructions before using this equipment. When using
power tools, basic safety precautions must always be followed to reduce the risk of personal injury.
1.1 GENERAL SAFETY
WARNING! Read all safety warnings and all instructions. Failure to follow the warnings and
instructions may result in electric shock, re and/or serious injury.
SAVE ALL WARNINGS AND INSTRUCTIONS FOR FUTURE REFERENCE
The term “power tool” in the warnings refers to your mains-operated (corded) power tool or battery-operated
(cordless) power tool.
• Do not use outside the design intent of Placing STANLEY Engineered Fastening Blind Fasteners.
• Use only parts, fasteners, and accessories recommended by the manufacturer.
• Use Power Tool only with specically designated battery packs.
1.2 POWER TOOL USE AND CARE
• The tool must be maintained in a safe working condition at all times and examined at regular intervals for
damage and function by trained personnel. Any dismantling procedure will be undertaken only by trained
personnel. Do not dismantle this tool without prior reference to the maintenance instructions.
• Do not modify the tool in any way. Any modication to the tool is undertaken by the customer and will be the
customer’s entire responsibility and void any applicable warranties.
• Disconnect the battery from the tool before performing any maintenance, attempting to adjust, t or remove a
nose assembly.
• Prior to use, check for misalignment or binding of moving parts, breakage of parts, and any other condition
that aects the tool’s operation. If damaged, have the tool serviced before using. Remove any adjusting key or
wrench before use.
• Prior to use, inspect battery for damage. Do not drop battery. A sharp impact may cause internal damage and
lead to premature battery failure.
Page 6
6
ENGLISH
• Keep work area clean and well lit.
• Dress properly. Do not wear loose clothing or jewelry. Keep your hair, clothing and gloves away from moving
parts. Loose clothes, jewelry or long hair can be caught in moving parts.
• Adopt a rm footing or a stable position before operating the tool.
• Operators and others in work area must wear ANSI Z87.1 CAN/CSA Z94.3 or other approved safety glasses with
side shields. Always wear safety glasses and ear protection during operation.
• Adequate clearance is required for the tool operator’s hands before proceeding.
• Do not operate a tool that is directed towards any person(s).
• DO NOT operate tool with the nose housing removed.
• Do not operate the tool or the charger in an explosive atmosphere or environment allowing exposure to
combustible uids or gasses.
• Do not operate the tool or the charger in an environment allowing exposure to moisture or rain to avoid risk of
electric shock.
• Do not abuse the tool by dropping or using it as a hammer.
• Keep dirt and foreign matter out of the air vents of the tool as this will cause the tool to malfunction.
• Keep tool handles dry, clean, and free from oil and grease.
• When carrying the tool from place to place keep hands away from the trigger to avoid inadvertent activation.
• Never leave installation tool unattended.
• Disconnect battery when tool is not in use.
1.3 IMPORTANT SAFETY INSTRUCTIONS FOR ALL BATTERY CHARGERS
SAVE THESE INSTRUCTIONS: This manual contains important safety and operating instructions for compatible
battery chargers (refer to Technical Data).
• Before using charger, read all instructions and cautionary markings on charger, battery pack, and product
using battery pack.
WARNING: Shock hazard. Do not allow any liquid to get inside charger. Electric shock may result.
WARNING: We recommend the use of a residual current device with a residual current rating of 30mA or
less.
CAUTION: Burn hazard. To reduce the risk of injury, charge only DEWALT®/POP®Avdel® rechargeable
batteries. Other types of batteries may burst causing personal injury and damage.
CAUTION: Children should be supervised to ensure that they do not play with the appliance.
NOTICE: Under certain conditions, with the charger plugged into the power supply, the exposed charging contacts
inside the charger can be shorted by foreign material. Foreign materials of a conductive nature such as, but not
limited to, steel wool, aluminium foil or any build-up of metallic particles should be kept away from charger cavities.
Always unplug the charger from the power supply when there is no battery pack in the cavity. Unplug charger
before attempting to clean
• DO NOT attempt to charge the battery pack with any chargers other than the ones in this manual. The charger
and battery pack are specically designed to work together.
• These chargers are not intended for any uses other than charging DEWALT®/POP®Avdel® rechargeable
batteries. Any other uses may result in risk of re, electric shock or electrocution.
• Do not expose charger to rain or snow.
Page 7
7
ENGLISH
• Pull by plug rather than cord when disconnecting charger. This will reduce risk of damage to electric plug and
cord.
• Make sure that cord is located so that it will not be stepped on, tripped over, or otherwise subjected to damage
or stress.
• Do not use an extension cord unless it is absolutely necessary. Use of improper extension cord could result in
risk of re, electric shock, or electrocution.
• Do not place any object on top of charger or place the charger on a soft surface that might block the
ventilation slots and result in excessive internal heat. Place the charger in a position away from any heat
source. The charger is ventilated through slots in the top and the bottom of the housing.
• Do not operate charger with damaged cord or plug—have them replaced immediately.
• Do not operate charger if it has received a sharp blow, been dropped, or otherwise damaged in any way. Take it
to an authorised service centre.
• Do not disassemble charger; take it to an authorised service centre when service or repair is required. Incorrect
reassembly may result in a risk of electric shock, electrocution or re.
• Disconnect the charger from the outlet before attempting any cleaning. This will reduce the risk of electric
shock. Removing the battery pack will not reduce this risk.
• NEVER attempt to connect two chargers together.
• The charger is designed to operate on standard household electrical power (refer to charger specications). Do
not attempt to use it on any other voltage. This does not apply to the vehicular charger.
1.4 IMPORTANT SAFETY INSTRUCTIONS FOR ALL BATTERY PACKS
When ordering replacement battery packs, be sure to include catalog number and voltage.
The battery pack is not fully charged out of the carton. Before using the battery pack and charger, read the safety
instructions below. Then follow charging procedures outlined.
READ ALL INSTRUCTIONS
• Do not charge or use battery in explosive atmospheres, such as in the presence of ammable liquids, gases or
dust. Inserting or removing the battery from the charger may ignite the dust or fumes.
• Never force battery pack into charger. Do not modify battery pack in any way to t into a non-compatible
charger as battery pack may rupture causing serious personal injury.
• Charge the battery packs only in DEWALT®/POP®Avdel®.
• DO NOT splash or immerse in water or other liquids.
• Do not store or use the tool and battery pack in locations where the temperature may reach or exceed 40 ˚C
(104 ˚F) (such as outside sheds or metal buildings in summer).
• When battery pack is not in use, keep it away from other metal objects like paper clips, coins, keys, nails, screws
or other small metal objects that can make a connection from one terminal to another.
• Do not discard batteries into water.
WARNING: Never attempt to open the battery pack for any reason. If battery pack case is cracked or
damaged, do not insert into charger. Do not crush, drop or damage battery pack. Do not use a battery
pack or charger that has received a sharp blow, been dropped, run over or damaged in any way (i.e., pierced
with a nail, hit with a hammer, stepped on). Electric shock or electrocution may result. Damaged battery
packs should be returned to service centre for recycling.
WARNING: Fire hazard. Do not store or carry the battery pack so that metal objects can contact exposed
battery terminals. When transporting individual battery packs, make sure that the battery terminals are
protected and well insulated from materials that could contact them and cause a short circuit.
CAUTION: When not in use, place tool on its side on a stable surface where it will not cause a tripping or
falling hazard. Some tools with large battery packs will stand upright on the battery pack but may be easily
knocked over.
Page 8

8
ENGLISH
1.5 SPECIFIC SAFETY INSTRUCTIONS FOR LITHIUM-ION (LI-ION)
1. Do not incinerate the battery pack even if it is severely damaged or is completely worn out. The battery
pack can explode in a re. Toxic fumes and materials are created when lithium-ion battery packs are burned.
2. If battery contents come into contact with the skin, immediately wash area with mild soap and water. If
battery liquid gets into the eye, rinse water over the open eye for 15 minutes or until irritation ceases. If medical
attention is needed, the battery electrolyte is composed of a mixture of liquid organic carbonates and lithium
salts.
3. Contents of opened battery cells may cause respiratory irritation. Provide fresh air. If symptoms persists,
seek medical attention.
WARNING: Burn hazard. Battery liquid may be ammable if exposed to spark or ame.
1.6 RESIDUAL RISKS
In spite of the application of the relevant safety regulations and the implementation of safety devices, certain
residual risks cannot be avoided. These are:
− Impairment of hearing
− Risk of personal injury due ying particles
− Risk of burns due to accessories becoming hot during operation.
− Risk of personal injury due to prolonged use.
1.7 LABELS AND ICONS
Markings on Tool
DATE CODE POSITION: The Date Code, which includes the year, month and location of manufacture, is
printed into the housing surface that forms the mounting joint between tool and battery.
Labels on charger and battery pack
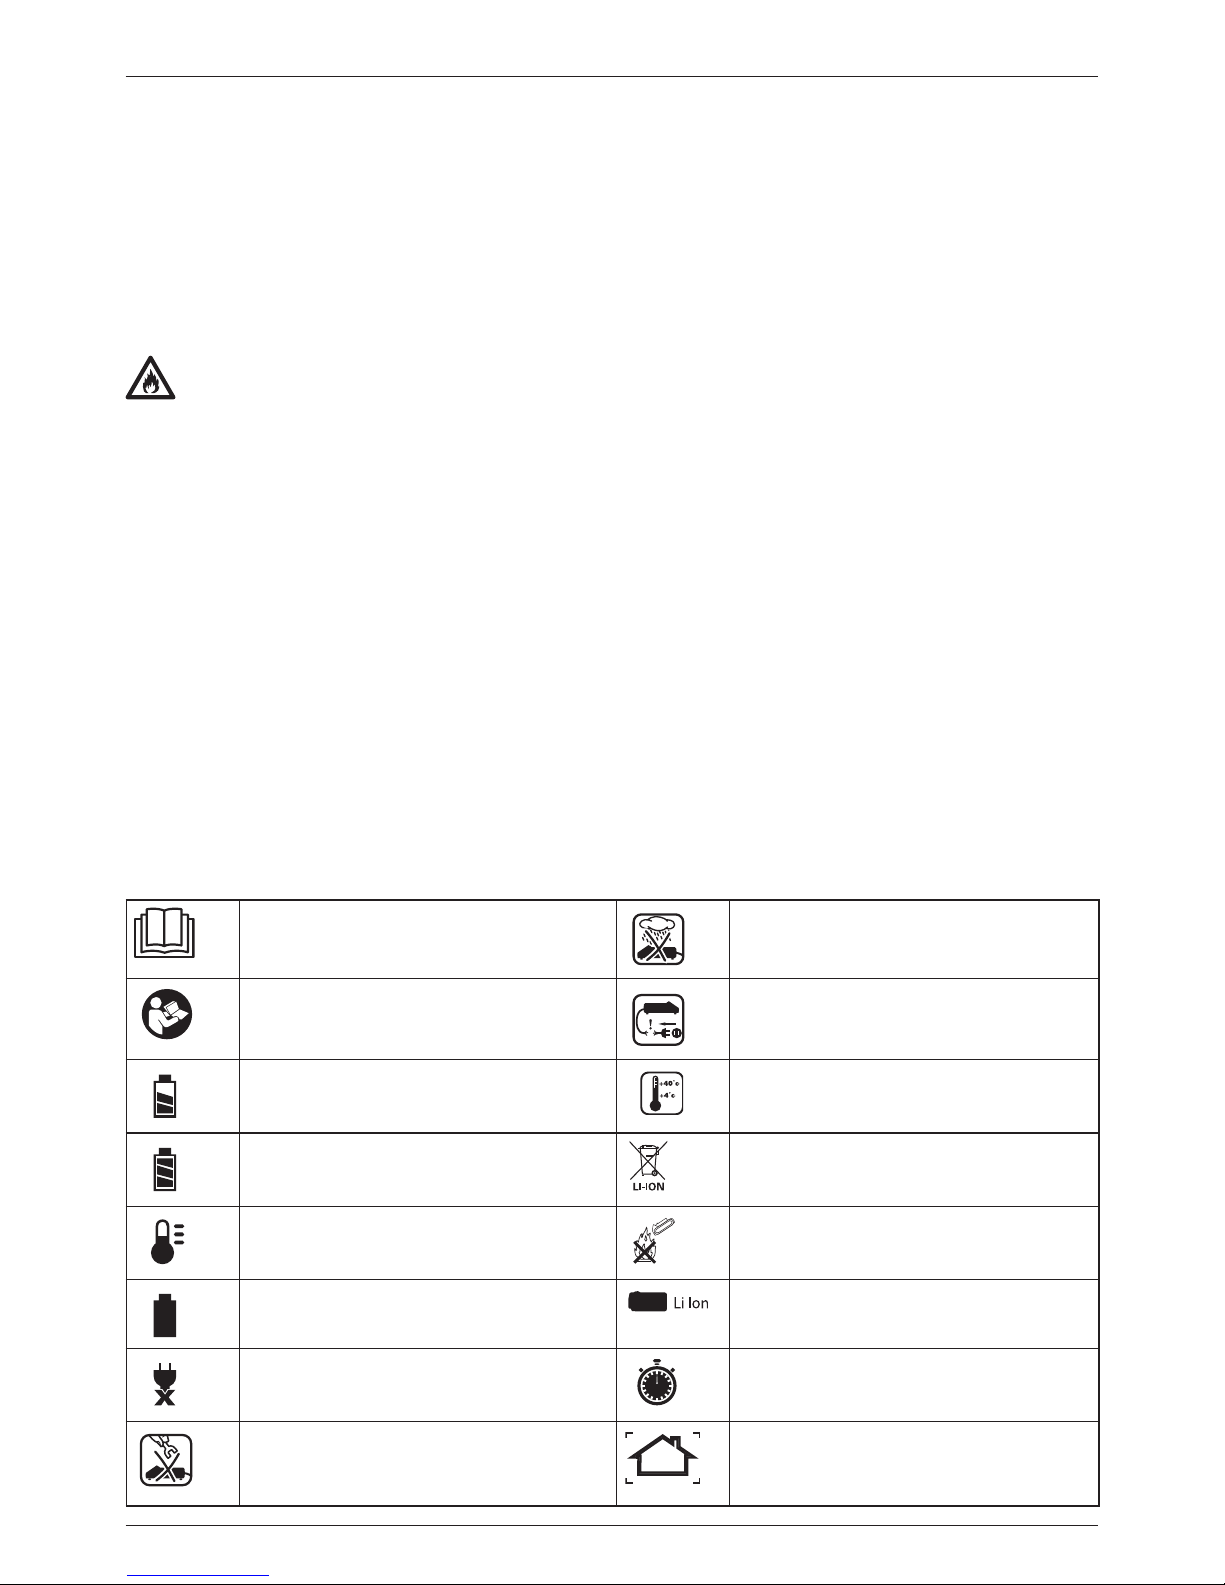
In addition to the pictographs used in this manual, the labels on the charger and the battery pack show the
following pictographs.
Read instruction manual before use. Do not expose to water.
Read instruction manual before use. Have defective cords replaced
immediately.
Battery charging. Charge only between 4 °C and 40 °C.
Battery charged. Discard the battery pack with due care
for the environment.
Hot/cold pack delay. Do not incinerate the battery pack.
x
Problem pack or charger. Charges Li-Ion battery packs.
Problem power line. See Technical Data for charging time.
Do not probe with conductive objects. Only for indoor use.
Page 9

9
ENGLISH
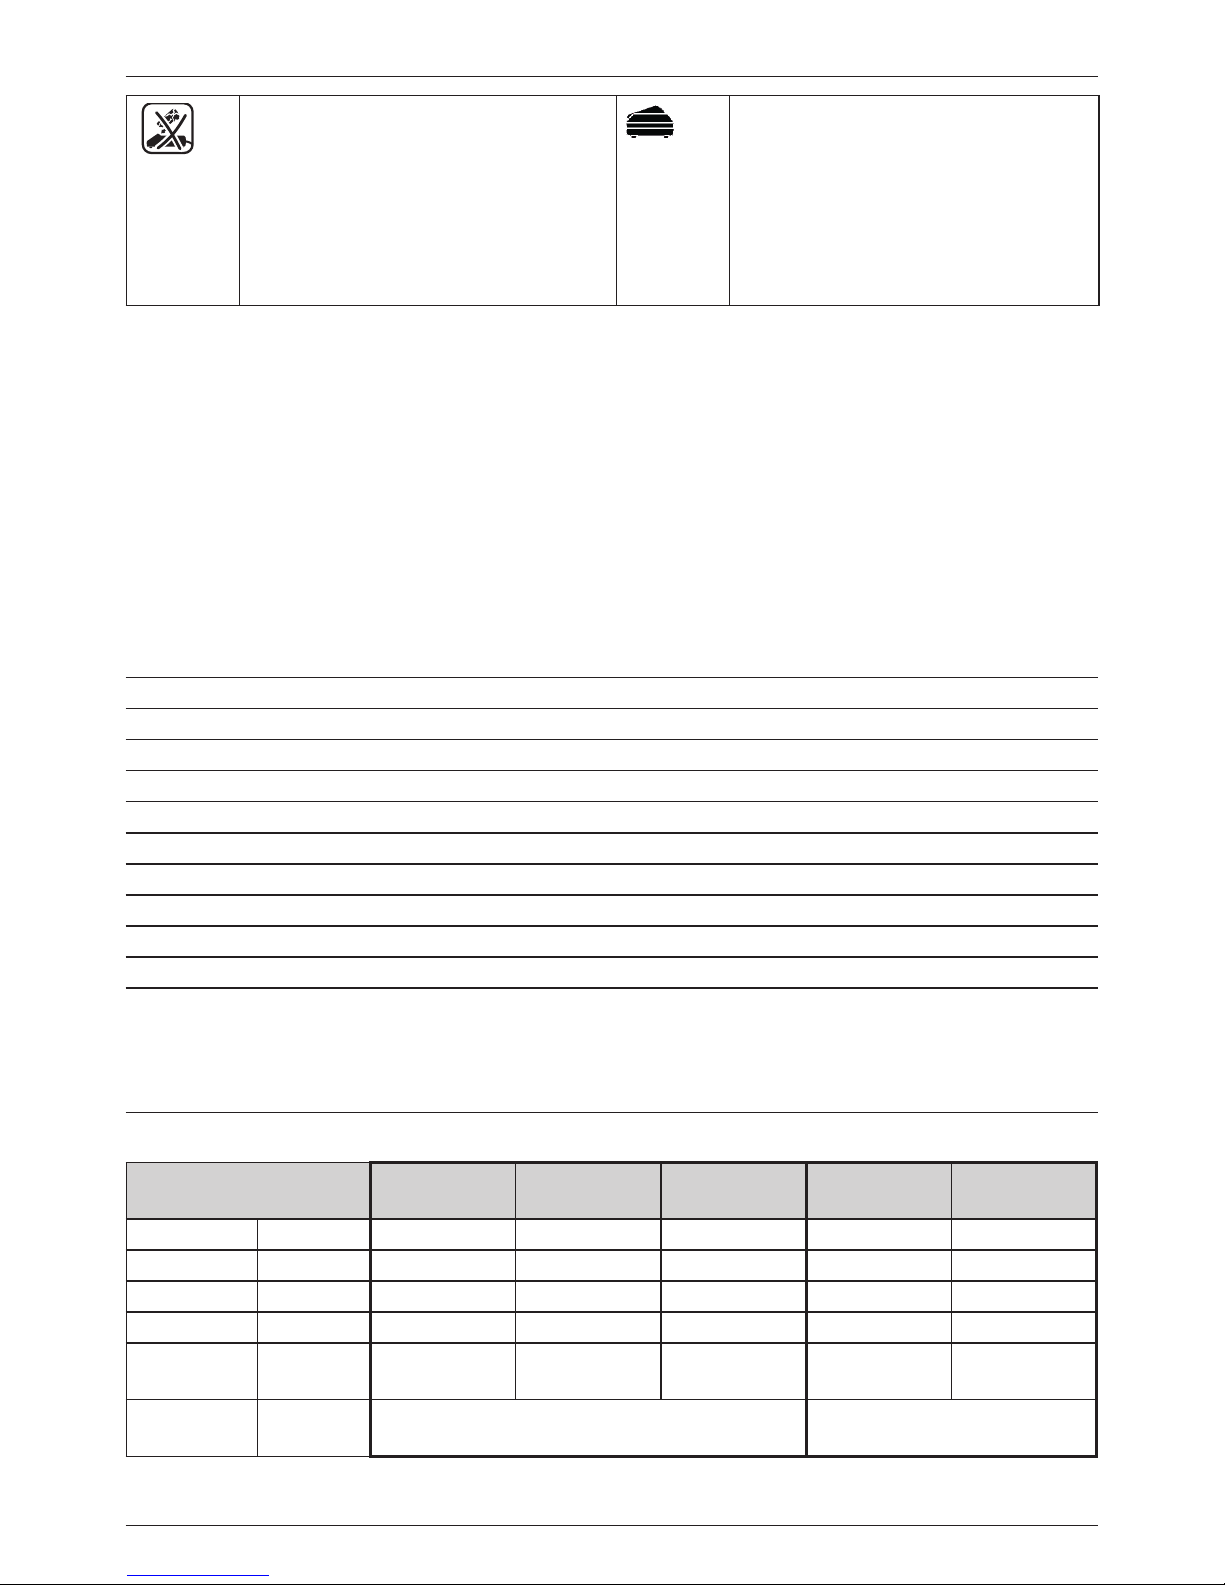
Do not charge damaged battery packs. Charge DEWALT®/POP®Avdel® battery
packs only with designated DEWALT®/
POP®Avdel® chargers. Charging battery
packs other than the designated
DEWALT®/POP®Avdel® batteries with
a DEWALT®/POP®Avdel® charger may
make them burst or lead to other
dangerous situations.
STANLEY Engineered Fastening policy
is one of continuous product development and improvement
and we reserve the right to change the speci cation
of any product without prior notice.
2. SPECIFICATIONS
UNDER NO CIRCUMSTANCES SHOULD ANY MAINTENANCE OR SERVICING BE CONDUCTED APART
FROM NOSE EQUIPMENT CHANGE.
2.1 TECHNICAL DATA
2.1.1.
ProSet® PB2500 ProSet® PB3400
Voltage V 18 nom /20 max 18 nom /20 max
Type 1/2 2
Battery Type Li-ion Li-ion
Weight (without battery pack) kg 1.35 1.77
Lpa (sound pressure) dB(A) 74 77
Kpa (sound pressure uncertainty) dB(A) 3 4
Lwa (sound power) dB(A) 85 88
Kwa (sound power uncertainty) dB(A) 3 4
Vibration total values (triax vector sum) determined according to EN 60745:
Vibration emission value ah
ah = m/s2 < 2.5 < 2.5
Uncertainty K = m/s2 1.5 1.5
2.1.2.
Model
PB2500
2.0 Ah
PB2500
3.0Ah
PB2500
4.0Ah
PB3400
2.0Ah
PB3400
4.0Ah
Weight kg [lbs] 1.7 [3.75] 2.0 [4.41] 2.0 [4.41] 2.1 [4.63] 2.4 [5.29]
Length mm [in] 320 [12.6] 320 [12.6] 320 [12.6] 336 [13.2] 336 [13.2]
Height mm [in] 240 [9,4] 260 [10,2] 260 [10,2] 255 [10.0] 255 [10.0]
Stroke mm [in] 25 [0.984] 25 [0.984] 25 [0.984] 30 [1.181] 30 [1.181]
Pulling Force N [lbf]
8,500
[1911]
8,500
[1911]
8,500
[1911]
18,000 [4047] 18,000 [4047]
Rivet Range
nom.dia.
mm [in]
ø 2,4 [3/32”]) thru
ø 4,8 [3/16”])
ø 4,8 [3/16“] thru
ø 6,4 [1/4“]
Page 10
10
ENGLISH
2.1.3.
Battery Pack*
Battery type Li-ion
Voltage V
DC
18 nom /20 max
Capacity Ah 2.0/3.0/4.0
Weight Kg 0.40/0.64/0.61
Charging duration** min 30/45/60
Charger* NA JP QW/GB/XE
Battery type Li-ion Li-ion Li-ion
Battery type Mains voltage V
AC
120 100 230
Input frequency Hz 60 50/60 50
Weight kg 0.50 0.50 0.50
Fuses
Europe 230 V tools 10 Amperes. mains
U.K. & Ireland 230 V tools 3 Amperes. in plugs
*PB Series tools are compatible with DEWALT®/POP®Avdel® 18V nom/20V max Li-Ion slide type batteries
** Charging duration is based on the DCB115 DEWALT® Charging units
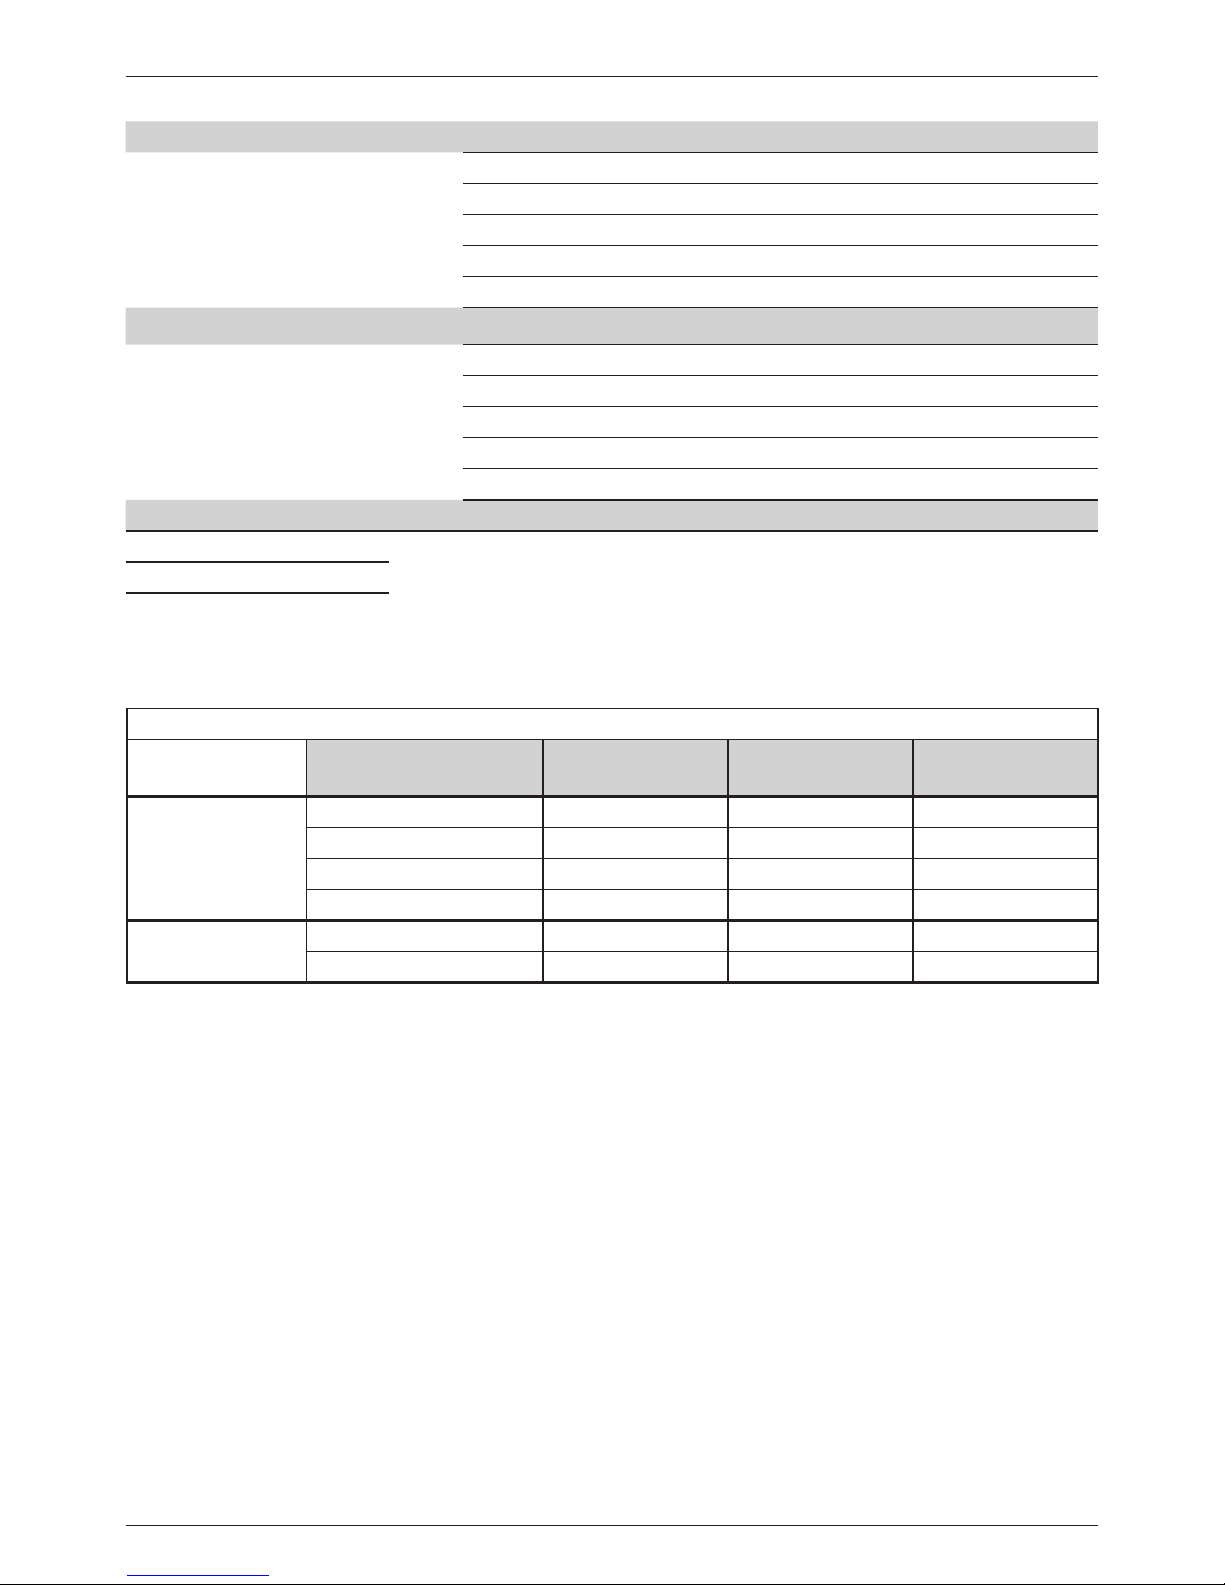
2.1.4.
Estimated Rivets per Charge
Nom. Rivet Dia.
mm [in]
Battery 2.0Ah Battery 3.0Ah Battery 4.0Ah
PB2500
ø 2,4 [3/32] 1,700 2,600 3,400
ø 3,2 [1/8] 1,600 2,400 3,200
ø 4,0 [5/32] 1,400 2,200 2,800
ø 4,8 [3/16] 1,200 1,800 2,400
PB3400
ø 4,8 [3/16] 1,000 - 2,000
ø 6.4 [1/4] 500 - 1,000
Note: These values are listed as a guide only and are estimates based on a fully charged battery. Results may vary
depending on rivet material, tool/battery condition and work environment.
Page 11

11
ENGLISH
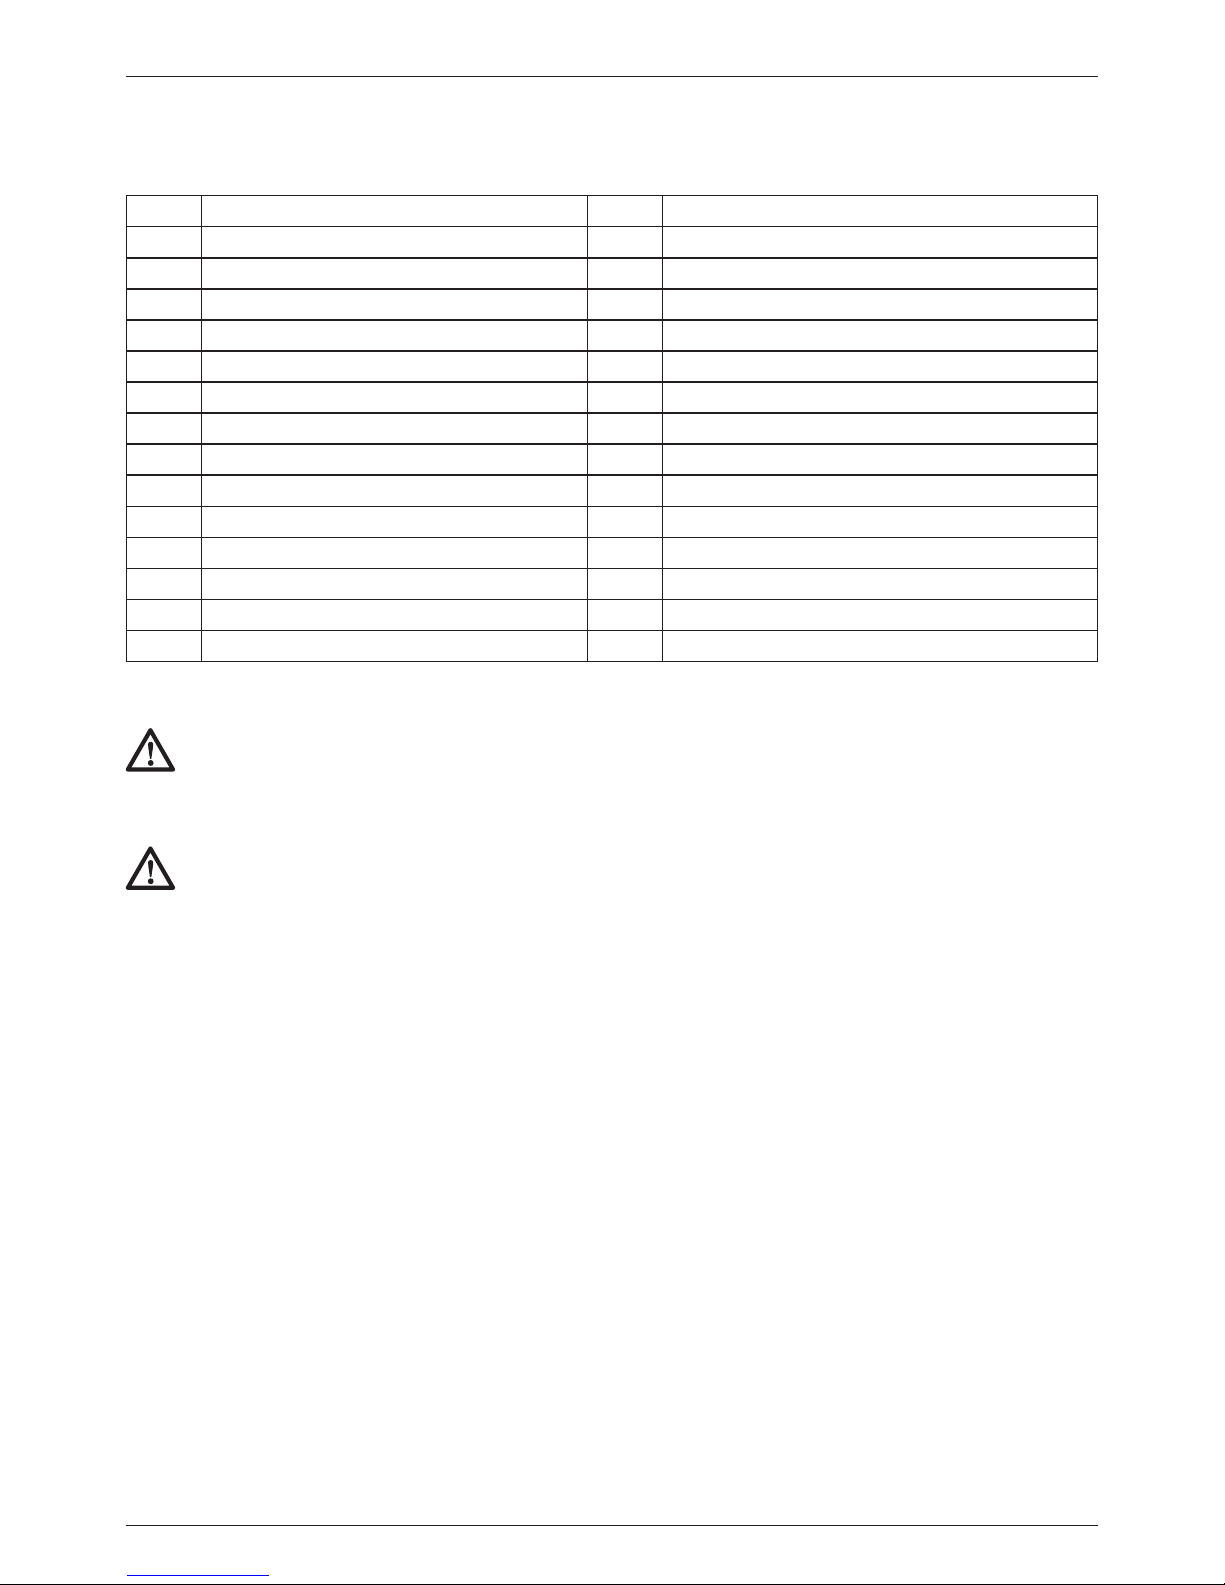
2.2 PLACING SPECIFICATIONS
Rivet Type
PLACING CAPACITY
PB2500 PB3400
2.0mm2.4mm
[3/32´´]
3.0mm3.2mm
[1/8´´]
4.0mm
[5/32´´]
4.8mm
[3/16´´]
5.0/
6.0/7.0
mm
4.8mm
[3/16´´]
6.0 mm
6.4mm
[1/4´´]
8.0/9.0
mm
OPEN END
CLOSED END
AVEX®/
STAVEX®
AVINOX®/
AVIBULB®
HR/HT
INTERLOCK®
HEMLOK®
KLAMP-TITE®/
KTR
BULBEX®/
LS/TL
MONOBOLT®
MULTI-GRIP
PULL-THRU
(PT)
Q RIVET
T-LOK®
T Rivet
AVSEAL® II
Note: For details on the nose equipment please refer to the accessories manual.
2.3 PACKAGE CONTENTS
This package contains:
1 Cordless Installation Tool**
1 Charger
1 or more Lithium Ion battery pack(s)*
1 set Nose Equipment Accessories
1 Kit Box
1 Instruction Manual
* The quantity and type of Li-Ion Battery Packs depends on Model Number and region sold. Contact your local
reseller for details and options
** If the Model Number purchased is a bare tool then only the Cordless Installation Tool will be supplied with a
standard set of 6.4mm [1/4“] Open End Nose Equipment installed.
Page 12
12
ENGLISH
2.4 MAIN COMPONENTS LIST (for complete tool explosion and Bill of Material please see service manual)
ProSet® PB2500 drawing can be found inside the front cover
ProSet® PB3400 drawing can be found inside the back cover
A Nose pieces O Battery charger connection
B Nose housing P Jaw guide
C Nose housing nut Q Jaws
D Collector lock R Jaw pusher
E Collector shutter S Spring
E2 Quick release collector T Pulling head
F Hook accessory attachment U Front clutch
G Motor housing V Tail guide
H Exhaust vent W Collector space
I Handle Y Rivet
J Switch Z Jaw Pusher assembly
K Battery pack AA Spindle clutch
L Manual AB Spindle clutch spring
M Charger lamp AC Pulling head assembly
N Charger AD Gear housing
2.5 OPTIONAL ACCESSORIES
WARNING: Since accessories, other than those oered by POP®Avdel® have not been tested with this
product, use of such accessories with this tool could be hazardous. To reduce the risk of injury, only
POP®Avdel® recommended accessories should be used with this product.
Consult your dealer for further information on the appropriate accessories.
WARNING: To reduce the risk of serious personal injury, disconnect battery pack before making any
adjustments or removing/installing attachments or accessories.
For a complete list of nose equipment and other accessories available for the PB Series, please visit our
website http://www.stanleyengineeredfastening.com/resource-center/document-library
Page 13
13
ENGLISH
3. Tool Use & Set up
The PB Series of tools are designed for installation of STANLEY Engineered Fastening Blind Fasteners.
DO NOT use under wet conditions or in presence of ammable liquids or gases.
READ ALL SAFETY WARNINGS AND INSTRUCTIONS BEFORE PUTTING TOOL INTO SERVICE.
Electrical Safety
The electric motor has been designed for one voltage only. Always check that the battery pack voltage
corresponds to the voltage on the rating plate. Also make sure that the voltage of your charger corresponds to
that of your mains.
Your DEWALT® charger is double insulated in accordance with EN60335; therefore no earth wire is
required.
Using an Extension Cable
An extension cord should not be used unless absolutely necessary. Use an approved extension cable
suitable for the power input of your charger (see Technical Data). The minimum conductor size is 1 mm2; the
maximum length is 30 m.
When using a cable reel, always unwind the cable completely.
Before Use
• Select relevant size nose equipment and install
• Ensure that the battery is fully charged
• Insert Battery Pack into the tool
• Quickly pull and release the trigger to set the tool to the home position.
4. Operating Instructions
Always wear approved hearing and eye protections at all times when using installation
equipment.
WARNING: Before adjusting tool, always remove the battery pack.
4.1. NOSE EQUIPMENT
ProSet® PB2500 drawing can be found inside the front cover
ProSet® PB3400 drawing can be found inside the back cover
Mounting the nosepiece ( g. 7).
• Select the correct nosepiece for the rivet to be installed. Reference the Accessories Manual for appropriate
nose equipment.
• Tighten the nosepiece (A) into the nose housing (B) by turning it clockwise using 11 mm spanner.
Mounting the jaw pusher and tail guide
PB2500 ( g. 4 & 5)
• Select the correct jaw pusher or jaw pusher assembly (R) that matches the Nose Piece selected. Reference
the Accessories Manual for appropriate nose equipment.
• Insert jaw pusher (R) into jaw pusher spring (S).
• Reassemble jaw set (Q) and jaw guide (P) onto front clutch (U)
NOTE: Do NOT use spanners to mount jaw guide (P) onto front clutch (U). Manual tightening of Jaw guide (P) is
enough to lock onto front clutch (U)
Page 14
14
ENGLISH
PB3400 (g. 4 & 5)
• Select the correct jaw pusher or jaw pusher assembly (R) and Tail Guide (V) that matches the Nose Piece
selected. Reference the Accessories Manual for appropriate nose equipment.
NOTE: The Tail Guide that comes installed on the tool as purchased matches the installed Nose Piece. Reference
the Accessories Manual for appropriate nose equipment for the actual Tail Guide part number.
• Put the Tail guide (V) into the Spindle of the in Gear housing (AD). Put spindle clutch spring (AB) and
spindle clutch (AA) over the tail guide (V) and tighten Puling head assembly (AC) counter clockwise using
a 24mm spanner.
• Insert jaw pusher (R) into jaw pusher spring (S)
• Reassemble jaw set (Q) and jaw guide (P) onto Pulling head (T)
NOTE: Do NOT use spanners to mount jaw guide (P) onto front clutch (U). Manual tightening of Jaw guide (P) is
enough to lock onto front clutch (U)
4.2. CHARGERS
Your tool uses a DEWALT®/POP® Avdel® charger. Be sure to read all safety instructions before using your
charger. The charger requires no adjustment and is designed to be as easy as possible to operate.
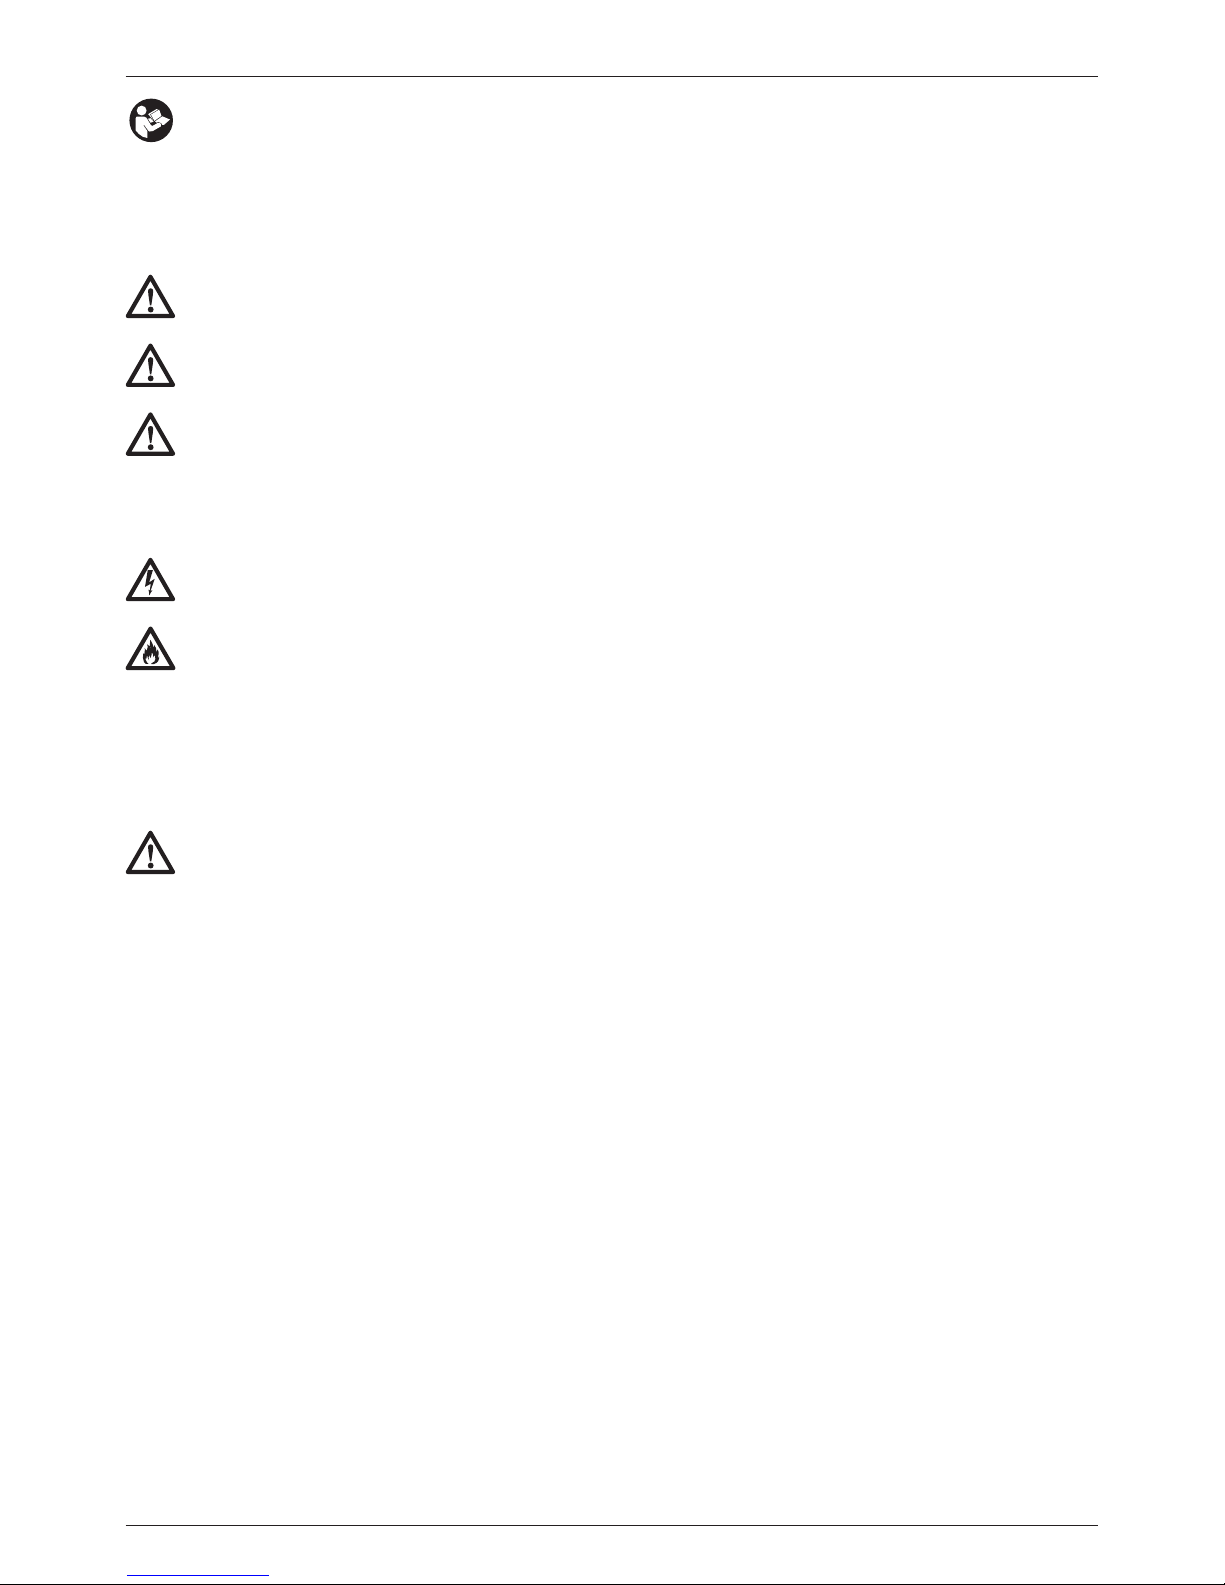
Charging Procedure (g. 2)
• Plug the charger into an appropriate outlet before inserting the battery pack. (Refer to the Charger
Specications in Section 2)
• Insert the battery pack (K) into the charger, making sure the pack is fully seated in the charger. The red
(charging) light will blink continuously indicating that the charging-process has started.
• The completion of charge will be indicated by the red light remaining ON continuously. The pack is fully
charged and may be used at this time or left in the charger.
NOTE: To ensure maximum performance and life of Li-Ion battery packs, charge the battery pack fully before
rst use.
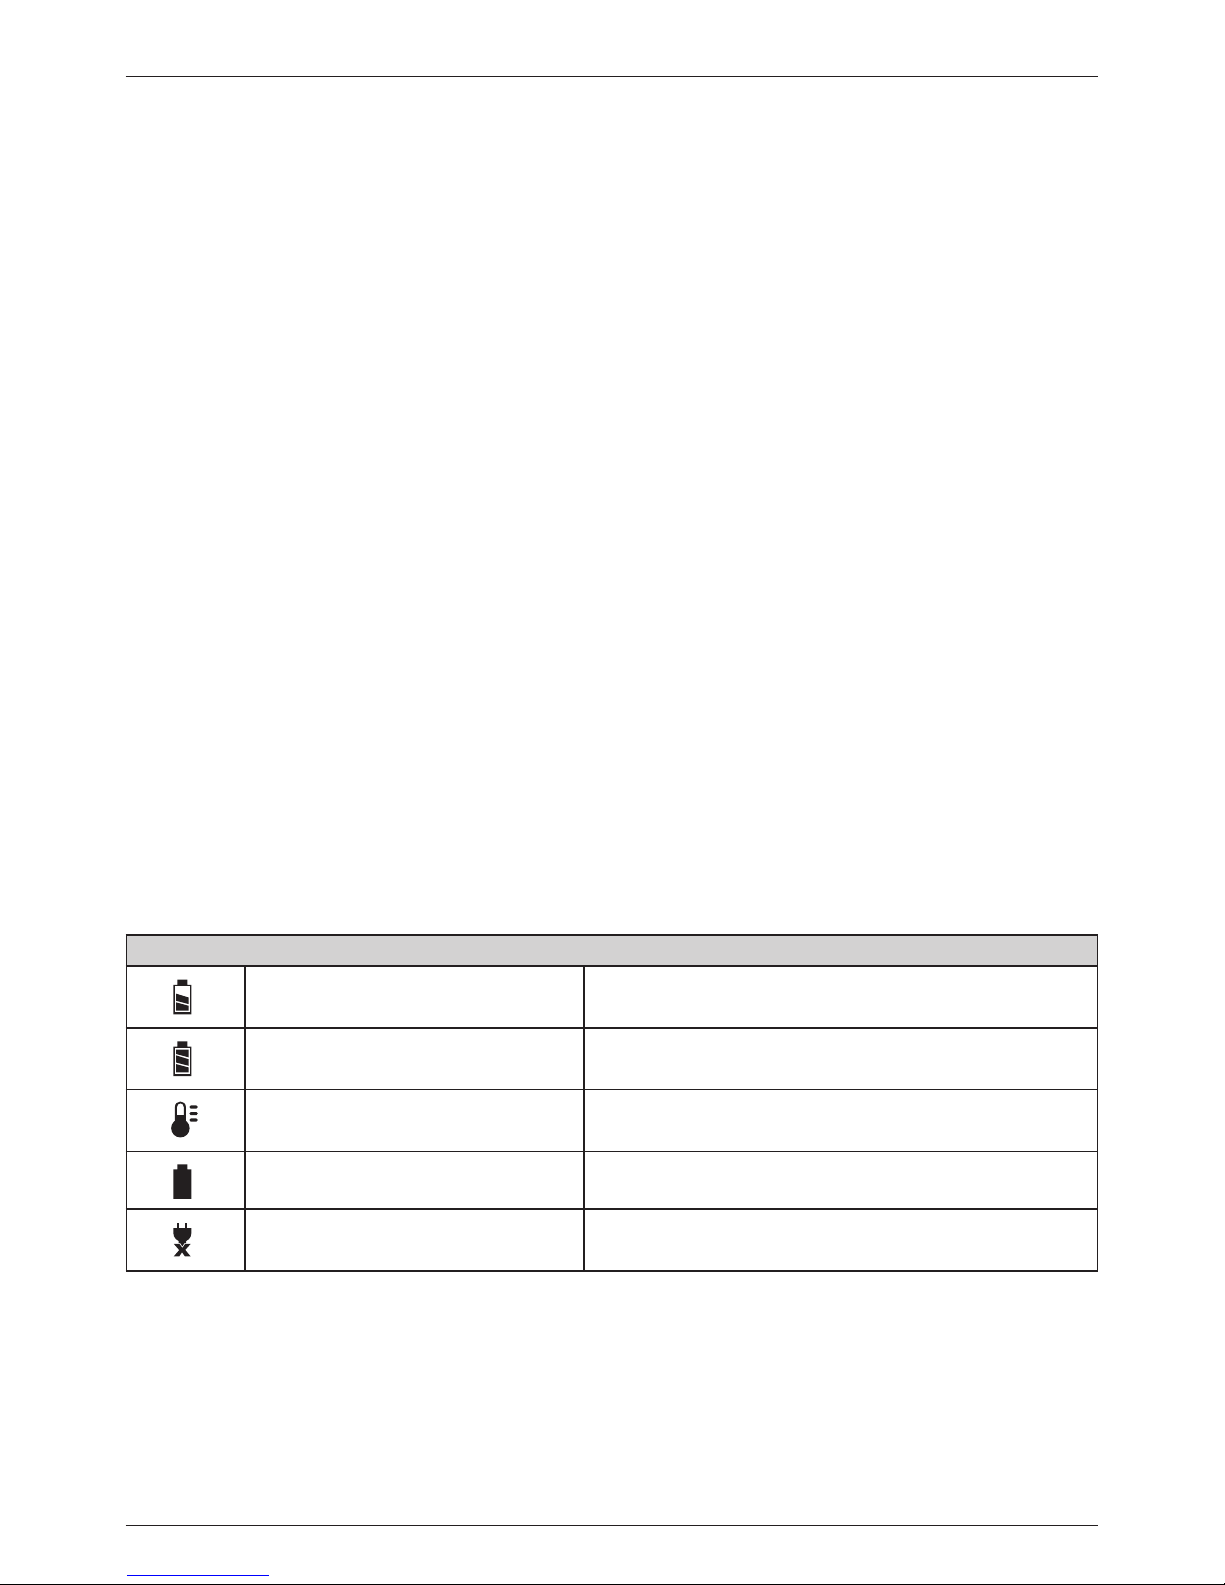
Charging Process
Refer to the table below for the state of charge of the battery pack.
Charge indication
charging –– –– –– ––
fully charged –––––––––––––––––
hot/cold pack delay –– • –– • –– • –– •
x
problem pack or charger • • • • • • • • • • • •
problem power line •• •• •• •• •• ••
This charger will not charge a faulty battery pack. The charger will indicate faulty battery by refusing to light or
by displaying problem pack or charger blink pattern.
NOTE: This could also mean a problem with a charger.
If the charger indicates a problem, take the charger and battery pack to be tested at an authorised service
centre.
Page 15
15
ENGLISH
Hot/Cold Pack Delay
When the charger detects a battery that is too hot or too cold, it automatically starts a hot/cold pack
delay, suspending charging until the battery has reached an appropriate temperature. The charger then
automatically switches to the pack charging mode. This feature ensures maximum battery life.
A cold battery pack will charge at about half the rate of a warm battery pack. The battery pack will charge at
that slower rate throughout the entire charging cycle and will not return to maximum charge rate even if the
battery warms.
Lithium-Ion Battery Packs
STANLEY Engineered Fastening PB Series Li-Ion tools are designed with an Electronic Protection System that
will protect the battery against overloading, overheating or deep discharge.
The tool will automatically turn o if the Electronic Protection System engages. If this occurs, place the Li-Ion
battery on the charger until it is fully charged.
4.3 BATTERY PACKS
Your tool is designed to work specically with DEWALT®/POP® Avdel® 18V/20V max Li-Ion battery packs.
Inserting and Removing the Battery Pack from the Tool (g. 3)
NOTE: For best results, make sure your battery pack is fully charged. The tool will shut o without warning when the
battery is fully discharged.
TO INSTALL THE BATTERY PACK INTO THE HANDLE
• Align the battery pack (K) with the rails inside the tool’s handle (g. 3).
• Slide it into the handle until the battery pack is rmly seated in the tool and ensure that it does not
disengage.
TO REMOVE THE BATTERY PACK FROM TO THE HANDLE
• Press battery release button and rmly pull the battery pack out of the tool handle.
• Insert battery pack into the charger as described in the charger section for this manual.
Storage Recommendations
• The best storage place is one that is cool and dry away from direct sunlight and excess heat or cold. For
optimum battery performance and life, store battery packs at room temperature when not in use.
• For long storage, it is recommended to store a fully charged battery pack in a cool, dry place out of the
charger for optimal results.
NOTE: Battery packs should not be stored completely depleted of charge. The battery pack will need to be
recharged before use.
5. OPERATING PROCEDURE
WARNING: Always observe the safety instructions and applicable regulations.
WARNING: To reduce the risk of serious personal injury, disconnect battery pack before making any
adjustments or removing/installing attachments or accessories.
WARNING: To reduce the risk of serious personal injury, ALWAYS use proper hand position.
WARNING: To reduce the risk of serious personal injury, ALWAYS hold securely in anticipation of a
sudden reaction.
Page 16

16
ENGLISH
5.1 PROPER HAND POSITION
Proper hand position requires one hand on the main handle (I) g. 1.
5.2. TOOL OPERATION
Installing a blind rivet (g. 8)
To install a blind rivet
• Place the blind rivet (Y) in the nose piece (A)
• Position the tool (g.9)
• Pull and hold the switch (J) until the rivet is fully set in the application (g. 10).
• When the blind rivet (Y) has been set completely, release the switch (J). The tool will return to its initial
position automatically. The mandrel is automatically dropped into the mandrel collector (W).
If you release the switch (J) before the end of the setting stroke, the tool will immediately return to its initial
position. If the blind rivet (Y) has not been set completely, repeat the previous steps.
Reset function (g.9)
If the tool does not move to its initial position after releasing the switch or stops during the setting stroke,
reset the tool to home by quickly pulling and releasing the switch (J). If this does not resolve the issue, remove
the battery, re-insert and then repeat the prior step.
If the issue persists, contact your local service representative.
Emptying the mandrel collector (W) (g. 6)
The mandrel collector is used to collect the waste mandrels. The mandrel collector must be emptied
depending on the size of the blind rivets used.
Nom. Rivet Dia. Approx. Capacity (PB2500) Approx. Capacity (PB3400)
2.4 mm [3/32“] 600 Not applicable
3.2 mm [1/8“] 360 Not applicable
4.0 mm [5/32“] 200 Not applicable
4.8 mm [3/16“] 150 190
6.4 mm [1/4“] Not applicable 100
• Tilt the tool back to allow all waste mandrels to fall into the mandrel collector.
• Open the mandrel collector (W) by sliding the Collector Lock (D) towards the nose housing nut (C) and
raise the cover (E).
• Empty the waste mandrels into an appropriate recycling container or waste bin
• To close the mandrel collector (W), lower the cover (E) until the Collector Lock (D) clicks into place.
Optional Quick-Release mandrel collector (E2) (g. 6a)
When using the optional Quick-Release mandrel collector accessory with the PB Series tools, the mandrel
collector can be removed as follows:
• Tilt the tool back to allow all waste mandrels to fall into the mandrel collector (E2).
• Grab mandrel collector (E2) with one hand and disengage Collector Lock (D) with index nger.
• Pull the mandrel collector (E2) up and away from the tool, tilting the collector slightly back to prevent
mandrels from falling out.
• To replace the collector, slide it back into the tool with the opening facing the front of the tool.
• Push the collector down until you hear the Collector Lock (D) click into place.
Page 17

17
ENGLISH
6. SERVICING THE TOOL
6.1. MAINTENANCE FREQUENCY
Item Frequency
General Tool Inspection Daily
Clean & lubricate Nose Equipment 5,000 rivets
Clean & grease Ball Screw and Thrust Bearing 50,000 rivets*
*Recommend contacting authorized service centre
6.2. CLEANING
ALWAYS wear approved eye protection at all times when cleaning equipment
Tool Exterior
Keep the brushless motor exhaust vent openings (H) free from dust and dirt. If necessary, use a soft, moist
cloth to remove dust and dirt from the exhaust vents.
Blow dirt and dust out of the main power tool housing with dry air as often as dirt is seen collecting in and
around the exhaust vents (H).
WARNING: Wear approved eye protection and approved dust mask when performing this procedure.
WARNING: Never use solvents or other harsh chemicals for cleaning the non-metallic parts of the tool.
These chemicals may weaken the materials used in these parts. Use a cloth dampened only with water
and mild soap. Never let any liquid get inside the tool; never immerse any part of the tool into a liquid.
Cleaning the Nose Equipment ( g. 4 & 5)
• Loosen the nose housing nut (C). Remove the nose housing (B).
• Press the front clutch (U) and loosen the jaw guide (P). Release the front clutch (U).
• Remove the jaws (Q) and the jaw pusher (R).
• Remove the spring (S)
• Clean the inside of the nose housing (B) using a dry cloth.
• Clean the jaws (Q) and the jaw pusher (R) using a dry cloth. If necessary, replace the jaws (Q) and the jaw
pusher (R).
• Clean the pulling head (T) using a dry cloth.
• Apply grease to the inside of the jaw guide (P) where the jaws (Q) make contact. A Molybdenum
Disulphide based grease is recommended.
• Mount the spring (S)
• Mount the jaw pusher(R) and the jaws (Q)
• Press front clutch (U) and tighten the jaw guide (P). Release front clutch (U).
• Mount the nose housing (B). Tighten the nose housing nut (C).
• Perform tool reset function to ensure the tool is at the initial home position as described in section 5.2
Charger Cleaning Instructions
WARNING: Shock hazard. Disconnect the charger from the AC outlet before cleaning.
Dirt and grease may be removed from the exterior of the charger using a cloth or soft non-metallic brush.
DO NOT use water or any cleaning solutions.
Page 18
18
ENGLISH
6.3 SPARE PARTS TOOLS
For spare parts we refer you to the specic service manuals which you can nd on our website
at http://www.stanleyengineeredfastening.com/resource-center/document-library
6.4. RECHARGEABLE BATTERY PACK
This long life battery pack must be recharged when it fails to produce sucient power on jobs which were
easily done before. At the end of its technical life, discard it with due care for our environment:
• Run the battery pack down completely, then remove it from the tool.
• Li-Ion cells are recyclable. Take them to your dealer or a local recycling station. The collected battery packs
will be recycled or disposed of properly.
6.5. PROTECTING THE ENVIRONMENT
Separate collection. This product must not be disposed of with normal household waste.
Should you nd one day that your POP®Avdel® product needs replacement, or if it is of no further use
to you, do not dispose of it with household waste. Make this product available for separate collection.
Separate collection of used products and packaging allows materials to be recycled and used again.
Re-use of recycled materials helps prevent environmental pollution and reduces the demand for raw
materials.
Local regulations may provide for separate collection of electrical products from the household, at
municipal waste sites or by the retailer when you purchase a new product.
You can check the location of your nearest authorised repair agent by contacting your local
POP®Avdel® oce at the address indicated in this manual. Alternatively, a list of authorised POP®Avdel®
repair agents and full details of our after-sales service and contacts are available on the Internet at:
www.StanleyEngineeredFastening.com
Page 19

19
ENGLISH
7. EC-Declaration of Conformity
Original
We, Avdel UK Limited; Stanley House, Works Road, Letchworth Garden City, Hertfordshire, SG6 1JY
UNITED KINGDOM, declare under our sole responsibility that the product:
Description POP®Avdel® battery tool for blind rivets
Brand/Model ProSet® PB2500 or ProSet® PB3400
Serial No.
to which this declaration relates is in conformity with the following standard:
2006/42/EC The Machinery Directive
Statutory Instruments 2008 No 1597 - The Supply of Machinery (Safety) Regulations refers.
2014/30/EU The Electromagnetic Compatibility (EMV) Regulations Directive
2011/65/EU RoHS Restriction of Hazardous Substances
and standards:
ISO 12100:2010
EN62841-1:2015
Technical documentation is compiled in accordance with Annex 1, section 1.7.4.1, in accordance with
2006/42/EC.
Manufacturer:
Naito Nobuharu
Senior Manager, R&D Engineering
STANLEY Engineered Fastening, Nippon POP Rivets and Fasteners Ltd., Noyori-cho Hosoda, Toyohashi, Aichi
441-8540 JAPAN
Signature
Place of issue Japan
Date of issue 30. 10. 2016
Authorised Representative:
A. K. Seewraj
Technology Manager – EU Blind Fastening
Avdel UK Limited; Stanley House, Works Road, Letchworth Garden City, Hertfordshire, SG6 1JY UNITED KINGDOM
This machinery is in conformity with Machinery Directive 2006/42/EC.
Original
Page 20

20
ENGLISH
8. PROTECT YOUR INVESTMENT!
8.1. POP®AVDEL® RIVET TOOL WARRANTY
STANLEY Engineered Fastening warrants that all power tools have been carefully manufactured and that they
will be free from defect in material and workmanship under normal use and service for a period of one (1) year.
We will extend the warranty on your tool (excluding batteries and charger) from one (1) year to two (2) years
when you register your tool online. (Ref. Section 8.2 at the bottom of this page.)
This rivet tool warranty applies to the rst time purchaser of the tool for original use only.
Exclusions:
Normal wear and tear.
Periodic maintenance, repair and replacement parts due to normal wear and tear are excluded from coverage.
Abuse & Misuse.
Defect or damage that results from improper operation, storage, misuse or abuse, accident or neglect, such as
physical damage are excluded from coverage.
Unauthorized Service or Modication.
Defects or damages resulting from service, testing adjustment, installation, maintenance, alteration or
modication in any way by anyone other than STANLEY Engineered Fastening, or its authorized service
centres, are excluded from coverage.
All other warranties, whether expressed or implied, including any warranties of merchantability or tness for
purpose are hereby excluded.
Should this tool fail to meet the warranty, promptly return the tool to our factory authorized service centre
location nearest you. For a list of POP®Avdel® Authorized Service Centres in the US or Canada, contact us at
our toll free number (877)364 2781.
Outside the US and Canada, visit our website www.StanleyEngineeredFastening.com to nd your nearest
STANLEY Engineered Fastening location.
STANLEY Engineered Fastening will then replace, free of charge, any part or parts found by us to be defective
due to faulty material or workmanship, and return the tool prepaid. This represents our sole obligation under
this warranty. In no event shall STANLEY Engineered Fastening be liable for any consequential or special
damages arising out of the purchase or use of this tool.
8.2. REGISTER YOUR BLIND RIVET TOOL ONLINE
To register your warranty online, visit us
http://www.stanleyengineeredfastening.com/popavdel-powertools/warranty-card. Thank you for choosing
a STANLEY Engineered Fastening’s POP®Avdel® Brand tool.
Page 21

4
DANSK
©2016 Stanley Black & Decker
Alle rettigheder forbeholdes.
Disse oplysninger må ikke gengives og/eller oentliggøres gennem nogen medier (trykte eller elektroniske), uden forudgående skriftlig tilladelse
fra STANLEY Engineered Fastening. De foreliggende oplysninger er baseret på de data, der er kendt på tidspunktet for introduktionen af dette
produkt. STANLEY Engineered Fastening fører en politik om løbende produktforbedringer, derfor kan og vil produkterne løbende blive ændret. De
foreliggende oplysninger gælder for produktet, leveret af STANLEY Engineered Fastening. STANLEY Engineered Fastening kan derfor ikke stilles til
ansvar for eventuelle skader, som følge af afvigelser fra de oprindelige produktspecikationer.
Alle informationer er blevet udarbejdet med største omhu. STANLEY Engineered Fastening kan ikke stilles til ansvar for eventuelle fejl i
oplysningerne, eller for konsekvenserne heraf. STANLEY Engineered Fastening kan ikke stilles til ansvar for skader som følge af aktiviteter, der
gennemføres af tredjemand. Arbejdsnavne, rmanavne, registrerede varemærker osv. der anvendes af STANLEY Engineered Fastening kan ikke
anvendes frit i henhold til bestemmelserne vedrørende beskyttelse af varemærker.
INDHOLD
Bemærk: Tegningerne mhp. ProSet® PB2500 er på den udfoldelige del af forsiden
Tegningerne mhp. ProSet® PB3400 er på den udfoldelige del af forsiden
1. DEFINITIONER MHP. SIKKERHEDSRÅD ...................................................................................................5
1.1 Generelt mhp. sikkerhedsråd .......................................................................................................................................................5
1.2 Anvendelse og vedligeholdelse af elektrisk værktøj ...........................................................................................................5
1.3 Vigtig sikkerhedsvejledning for alle batteriopladere ..........................................................................................................6
1.4 Vigtige sikkerhedsinstruktioner for alle batterier .................................................................................................................7
1.5 Specikke sikkerhedsanvisninger for Lithium-Ion (Li-Ion) ................................................................................................8
1.6 Andre risici ..........................................................................................................................................................................................8
1.7 Mærkater og symboler ...................................................................................................................................................................8
2. SPECIFIKATIONER ...................................................................................................................................... 9
2.1 Tekniske data .....................................................................................................................................................................................9
2.2 Specikationer om placering ...................................................................................................................................................11
2.3 Pakkeindhold .................................................................................................................................................................................. 11
2.4 Oversigt over komponenter ...................................................................................................................................................... 12
2.5 Valgfrit tilbehør .............................................................................................................................................................................. 12
3. ANVENDELSE AF VÆRKTØJ & INDSTILLINGER .....................................................................................13
4. BRUGSANVISNINGER ..............................................................................................................................13
4.1 Forstykke .......................................................................................................................................................................................... 13
4.2 Opladere ........................................................................................................................................................................................... 14
4.3 Batteripakker ...................................................................................................................................................................................15
5. ANVENDELSESPROCEDURE ...................................................................................................................15
5.1 Korrekt håndtering ....................................................................................................................................................................... 16
5.2 Anvendelse af værktøjet ............................................................................................................................................................. 16
6. VEDLIGEHOLDELSE AF VÆRKTØJET ......................................................................................................17
6.1 Vedligeholdelsesintervaller ....................................................................................................................................................... 17
6.2 Rengøring ........................................................................................................................................................................................ 17
6.3 Reservedele – Værktøj .................................................................................................................................................................18
6.4 Genopladelig batteripakke ........................................................................................................................................................18
6.5 Miljøbeskyttelse .............................................................................................................................................................................18
7. EUOVERENSSTEMMELSESERKLÆRING ...............................................................................................19
8. BESKYT DIN INVESTERING......................................................................................................................20
8.1 Garanti for POP®Avdel® nitteværktøj .....................................................................................................................................20
8.2 Registrér dit værktøj til blindnitter online ........................................................................................................................... 20
Oversættelse af original instruktion
Page 22
5
DANSK
Læg mærke til følgende sikkerhedssymboler. Læs manualen grundigt igennem, og vær opmærksom
på nedenstående symboler.
1. DEFINITIONER MHP. SIKKERHEDSRÅD
De efterfølgende denitioner beskriver de enkelte symbolers alvorlighedsgrad. Læs brugsvejledningen
grundigt igennem, og vær opmærksom på disse symboler.
FARE: Angiver en umiddelbart farlig situation, der medmindre den undgås, vil resultere i ulykker med
dødelig udgang eller alvorlige kvæstelser.
FORSIGTIG: Angiver en mulig farlig situation, der medmindre den ikke undgås, kan resultere i mindre
eller moderat alvorlig personskade.
ADVARSEL: Angiver en mulig farlig situation, der medmindre den ikke undgås, kan resultere i ulykker
med dødelig udgang eller alvorlige kvæstelser.
BEMÆRK: Angiver en handling, der ikke er forbundet med kvæstelser, men som kan resultere i materielle
skader.
Angiver fare for elektrisk stød
Angiver risiko for brand
Forkert anvendelse eller vedligeholdelse af værktøjet, kan medføre alvorlige kvæstelser eller materielle
skader. Læs og forstå derfor alle advarsler og symboler i brugsanvisningerne før værktøjet anvendes.
Ved brug af elektrisk værktøj skal alle grundlæggende sikkerhedsregler altid overholdes for at reducere
risikoen for kvæstelser.
1.1 GENERELT MHP. SIKKERHEDSRÅD
ADVARSEL! Læs alle sikkerhedsadvarsler og -anvisninger. Manglende overholdelse af advarsler og
anvisninger kan medføre elektrisk stød, brand og/eller alvorlige kvæstelser.
GEM ALLE ADVARSLER OG ANVISNINGER TIL SENERE BRUG
Termen “elektrisk værktøj” i advarslerne henviser til dit elektriske værktøj, hvad enten det er tilsluttet strømnettet
(ledning) eller er batteridrevet (uden ledning).
• STANLEY Engineered Fastening blindnitteværktøjer må ikke anvendes til andre formål end de tilsigtede formål.
• Brug kun reservedele, fastgørelseselementer og tilbehør anbefalet af STANLEY Engineered Fastening.
• Brug kun elektrisk værktøj med de batteripakker, der er beregnet til hver enkelt type.
1.2 ANVENDELSE OG VEDLIGEHOLDELSE AF ELEKTRISK VÆRKTØJ
• Værktøjet skal altid holdes i en god stand, og skal undersøges jævnligt for skader af en autoriseret reparatør.
Enhver form for demontering må kun foretages af uddannet personale. Dette værktøj må ikke demonteres
uden at konsultere brugermanualen.
• Modicér ikke værktøjet på nogen måde. Enhver ændring af værktøjet foretaget af kunden, vil være kundens
fulde ansvar og vil gøre alle gældende garantier ugyldige.
• Fjern batteriet fra værktøjet inden vedligeholdelse, justering, på- eller afmontering af et forstykke.
• Kontrollér, om der forekommer fejltilpasninger, eller om bevægelige dele er bevægelige, beskadigelse eller
andre forhold, der kan påvirke værktøjets funktion inden brug. Få værktøjet serviceret før brug, hvis det er
beskadiget. Fjern alle justerings- og skruenøgler inden brug.
• Kontrollér batteriet for beskadigelser inden brug. Batteriet må ikke tabes. Et hårdt slag kan forårsage indvendig
beskadigelse af værktøjet, og for tidlig batterisvigt.
Page 23
6
DANSK
• Sørg for, at arbejdsområdet er rent og godt oplyst.
• Bær hensigtsmæssig påklædning. Bær ikke løstsiddende tøj og smykker. Hold hår, tøj og handsker væk fra
bevægelige dele. Løstsiddende tøj, smykker eller langt hår kan blive fanget i bevægelige dele.
• Indtag en god arbejdsstilling og sørg for at stå stabilt, inden værktøjet tages i brug.
• Operatører og andre i arbejdsområdet skal bære sikkerhedsbriller iht. ANSI Z87.1 CAN/CSA Z94.3 eller andre
godkendte sikkerhedsbriller med sideskærme. Bær altid sikkerhedsbriller og høreværn under arbejdet.
• Inden anvendelsen skal der tages højde for, om der tilstrækkelig plads til at håndtere værktøjet med hænderne.
• Ret aldrig værktøjet mod andre personer, når det anvendes.
• Værktøjet må IKKE betjenes, hvis forstykket er afmonteret.
• Værktøjet eller opladeren må ikke anvendes i omgivelser med eksplosiv atmosfære eller brændbare væsker eller
gas.
• For at undgå fare for elektrisk stød må værktøjet eller opladeren ikke anvendes i fugtige omgivelser eller i regnvejr.
• Misbrug ikke værktøjet, ved at tabe eller smide med det. Anvend ALDRIG værktøjet som hammer.
• Undgå at der kommer snavs og fremmedlegemer i værktøjets udluftningsåbninger, da dette vil medføre
funktionsfejl på værktøjet.
• Hold altid værktøjshåndtaget rent for olie og snavs.
• Undgå at trykke på aftrækkeren, hvis værktøjet yttes mellem arbejdspladser.
• Efterlad aldrig værktøjet uden opsyn.
• Fjern altid batteriet, når værktøjet ikke er i brug.
1.3 VIGTIGE SIKKERHEDSANVISNINGER FOR ALLE BATTERIOPLADERE
GEM DISSE ANVISNINGER: Denne brugsvejledning indeholder vigtige sikkerheds- og brugsanvisninger for
kompatible batteriopladere (se Tekniske data).
• Læs alle anvisninger og advarselsmærkater på opladeren, batteripakken og produkter med batteripakker inden
anvendelsen.
ADVARSEL: Risiko for elektrisk stød. Lad ikke nogen ydende væsker komme ind i opladeren. Det kan
resultere i et elektrisk stød.
ADVARSEL: Vi anbefaler at anvende en fejlstrømsafbryder med en nominel strømstyrke på 30 mA eller
mindre.
PAS PÅ: Fare for forbrændinger. For at reducere risikoen for kvæstelser må der kun oplades genopladelige
DEWALT®/POP®Avdel®-batterier. Andre batterityper kan eksplodere og forårsage kvæstelser og materielle
skader.
PAS PÅ: Børn skal altid være under opsyn for at sikre, at de ikke leger med udstyret.
BEMÆRK: Under særlige forhold, når opladeren er tilsluttet til strømforsyningen, kan den blive kortsluttet pga.
fremmedlegemer. Fremmedlegemer med ledeevne så som ståluld, aluminumsfolie eller anden ophobning af
metalliske partikler m.m. skal holdes på afstand af opladeren. Tag altid stikket til opladeren ud fra kontakten, når
der ikke er indsat et batteri i opladeren. Tag stikket til opladeren ud inden rengøringen
• Forsøg ALDRIG at oplade batteripakken med andre opladere end dem, der er omtalt i denne vejledning.
Opladeren og batteripakken er specielt designet til at arbejde sammen.
• Disse opladere er ikke beregnet til anden brug end opladning af genopladelige DEWALT®/POP®Avdel®-batterier.
Al anden brug kan medføre risiko for brand eller livsfarlige elektriske stød.
• Udsæt ikke opladeren for regn eller sne.
• Træk i stikket i stedet for ledningen, når opladeren frakobles. Dette vil reducere risikoen for beskadigelse af
elstikket og ledningen.
Page 24
7
DANSK
• Sørg for at ledningen er placeret, så den ikke bliver trådt på, snublet over eller på anden måde bliver genstand
for skader eller belastning.
• Anvend kun en forlængerledning, når det er absolut nødvendigt. Anvendelse af en ukorrekt forlængerledning
kan resultere i risiko for brand eller elektrisk stød som kan være livsfarlige.
• Placér ikke genstande ovenpå opladeren eller anbring ikke opladeren på en blød overade, som kan
blokere udluftningsåbningerne og resultere i indvendig overophedning. Opladeren må ikke placeres tæt på
varmekilder. Opladeren udluftes via åbninger, som bender sig øverst og i bunden af huset.
• Brug ikke opladeren, hvis ledningen eller stikket er beskadiget — de skal udskiftes omgående.
• Brug ikke opladeren, hvis den har fået et hårdt slag er blevet tabt eller blevet beskadiget på anden vis. Tag den
med til et autoriseret værksted.
• Demontér ikke opladeren; den skal aeveres på et autoriseret værksted, når service eller reparation er påkrævet.
Ukorrekt genmontering kan medføre risiko for elektrisk stød med dødelig udgang eller brand.
• Tag stikket til opladeren ud af kontakten før forsøg på nogen form for rengøring. Dette vil reducere risikoen for
elektrisk stød. Fjernelse af batteripakken vil ikke reducere denne risiko.
• Forsøg ALDRIG at tilslutte to opladere til hinanden.
• Opladeren er beregnet til tilslutning til en standard strømforsyning (se specikationer for opladeren). Den må
på ingen måde tilsluttes en anden spændingskilde. Dette gælder ikke for opladere til køretøjer.
1.4 VIGTIGE SIKKERHEDSANVISNINGER FOR ALLE BATTERIPAKKER
Sørg for at oplyse katalognummer og spænding ved bestilling af nye batteripakker.
Batteripakken er ikke fuldt opladet, når du køber det. Læs sikkerhedsanvisningerne inden anvendelse af
batteripakken og -opladeren. Følg derefter de nævnte opladningsprocedurer.
LÆS ALLE ANVISNINGER
• Batteriet må ikke oplades eller anvendes i en eksplosionsfarlig atmosfære, som f.eks. ved tilstedeværelsen af
brændbare væsker, gasser eller støv. Isætning eller udtagning af batteriet fra opladeren kan antænde støv eller
dampe.
• Tving aldrig batteripakken ind i opladeren. Foretag ikke nogen ændringer på batteripakken, så den kan passe
ind i en ikke kompatibel oplader, da batteripakken kan briste, hvilket kan medføre alvorlige kvæstelser.
• Batteripakker må kun oplades i DEWALT®/POP®Avdel®.
• Sprøjt IKKE på det eller nedsænk det i vand eller andre væsker.
• Opbevar eller brug ikke værktøjet og batteripakken på steder, hvor temperaturen kan nå op på eller overstige
40 ˚C (104 ˚F) (som f.eks. uden for skure eller i metalbygninger om sommeren).
• Når en batteripakke ikke er i brug, skal den holdes borte fra andre metalgenstande, såsom papirclips,
mønter, nøgler, søm, skruer og andre små metalgenstande, der kan danne forbindelse mellem to elektriske
kontaktader.
• Batterier må ikke kastes i vand.
ADVARSEL: Forsøg aldrig at åbne batteripakken. Hvis batteripakken er revnet eller beskadiget, må den ikke
anbringes i opladeren. Undgå at mase, tabe eller beskadige batteripakken. Anvend ikke en batteripakke
eller oplader, der har fået et hårdt slag, er blevet tabt, kørt over eller blevet beskadiget på anden vis (f.eks.
stukket med et søm, slået med en hammer, trådt på). Det kan medføre elektrisk stød med dødelig udgang.
Beskadigede batteripakker skal returneres til servicecenteret for genanvendelse.
ADVARSEL: Fare for brand. Batteripakken må ikke opbevares eller transporteres således, at der opstår
kontakt mellem metalobjekter og batteripolerne. Kontrollér, at batteripolerne er beskyttede og
ikke kommer i kontakt med materialer, som ville kunne forårsage kortslutninger under transport af
batteripakker.
PAS PÅ: Placér værktøjet på siden på et fast underlag, hvor det ikke medfører fare for at vælte eller falde, når
det ikke er i brug. Visse værktøjer med store batteripakker kan stå oprejst på batteripakken, men kan være
lette at vælte.
Page 25
8
DANSK
1.5 SPECIFIKKE SIKKERHEDSANVISNINGER FOR LITHIUM-ION (LI-ION)
1. Batteripakken må ikke forbrændes, selv hvis den er alvorligt beskadiget eller slidt op. Batteripakken kan
eksplodere i åben ild. Der dannes giftige dampe og stoer ved forbrænding af lithium-ion-batteripakker.
2. Hvis batteriets indhold kommer i kontakt med huden, skal området omgående vaskes med mild sæbe
og vand. Hvis batterivæske kommer i øjnene, skal du lade vand løbe over det åbne øje i 15 minutter, eller indtil
irritationen ophører. Hvis det er nødvendigt at søge lægehjælp, består batterielektrolytten af en blanding af
ydende organiske karbonater og lithiumsalte.
3. Indholdet af åbnede battericeller kan forårsage luftvejsirritation. Sørg for frisk luft. Søg lægehjælp, hvis
symptomerne varer ved.
ADVARSEL: Fare for forbrændinger. Batterivæske kan være brændbar, hvis den udsættes for gnister eller
åben ild.
1.6 ANDRE RISICI
På trods af overholdelsen af de relevante sikkerhedsregler og brug af sikkerhedsudstyr kan visse andre risici
ikke undgås. Disse omfatter:
− Hørenedsættelse
− Risiko for kvæstelser som følge af yvende partikler
− Risiko for forbrændinger pga. tilbehør, der bliver varmt under brugen.
− Risiko for kvæstelser som følge af vedvarende brug.
1.7 MÆRKATER OG SYMBOLER
Mærkning på værktøjet
PLACERING AF DATAKODEN: Datokoden, som også inkluderer produktionsår, -måned og -sted, er trykt på
husets overade, som er kontaktaden mellem værktøjet og batteriet.
Mærkater på oplader og batteripakke
Ud over piktogrammerne, der anvendes i denne vejledning, ndes følgende piktogrammer på mærkaterne på
opladeren og batteripakken:
Læs brugsvejledningen inden brug. Må ikke udsættes for vand.
Læs brugsvejledningen inden brug. Defekte ledninger skal udskiftes
omgående.
Batteriopladning. Oplad kun mellem 4 °C og 40 °C.
Batteri opladet. Tag hensyn til miljøet ved bortskaelse
af batteripakken.
Varm/kold pakkeforsinkelse. Batteripakken må ikke forbrændes.
x
Problem med batteri eller oplader. Oplader Li-Ion batteripakker.
Problem strømledning. Se Tekniske data for opladningstid.
Undersøg ikke med strømførende
genstande.
Kun til indendørs brug.
Page 26
9
DANSK
Beskadigede batteripakker må ikke
oplades.
Oplad kun DEWALT®/POP®Avdel®
batteripakker med egnede DEWALT®/
POP®Avdel® opladere. Hvis der oplades
andre batteripakker end de egnede
DEWALT®/POP®Avdel® batterier med
en DEWALT®/POP®Avdel® oplader, er
det muligt at de brister eller der opstår
andre farlige situationer.
Stanley Engineered Fastening's politik
er fortsat produktudvikling og løbende forbedring.
Vi forbeholder os retten til at ændre speci kationer
for alle produkter uden forudgående varsel.
2. SPECIFIKATIONER
DER BØR UNDER INGEN OMSTÆNDIGHEDER FORETAGES VEDLIGEHOLDELSE ELLER SERVICERING
BORTSET FRA UDSKIFTNING AF FORSTYKKE.
2.1 TEKNISKE DATA
2.1.1.
ProSet® PB2500 ProSet® PB3400
Spænding V 18 nom./20 maks. 18 nom./20 maks.
Type 1/2 2
Batteritype Li-ion Li-ion
Vægt (uden batteripakke) kg 1,35 1,77
Lpa (lydtryk) dB(A) 74 77
Kpa (lydtryk afvigelse) dB(A) 3 4
Lwa (lyde ekt) dB(A) 85 88
Kwa (lyde ekt afvigelse) dB(A) 3 4
Samlet værdi for vibration (triaxvektorsum) bestemt i henhold til EN 60745:
Værdi for vibrationsemission ah
ah = m/s2 < 2,5 < 2,5
Afvigelse K = m/s2 1,5 1,5
2.1.2.
Model
PB2500
2,0 Ah
PB2500
3,0 Ah
PB2500
4,0 Ah
PB3400
2,0 Ah
PB3400
4,0 Ah
Vægt kg [lbs] 1,7 [3.75] 2,0 [4.41] 2,0 [4.41] 2,1 [4.63] 2,4 [5.29]
Længde mm [in] 320 [12.6] 320 [12.6] 320 [12.6] 336 [13.2] 336 [13.2]
Højde mm [in] 240 [9.4] 260 [10.2] 260 [10.2] 255 [10.0] 255 [10.0]
Slag mm [in] 25 [0.984] 25 [0.984] 25 [0.984] 30 [1.181] 30 [1.181]
Trækkraft N [lbf ]
8.500
[1911]
8.500
[1911]
8.500
[1911]
18.000 [4047] 18.000 [4047]
Nittesorti-
ment
nom. dia.
mm [in]
ø 2,4 [3/32”]) til
ø 4,8 [3/16”])
ø 4,8 [3/16”] til
ø 6,4 [1/4“]
Page 27

10
DANSK
2.1.3.
Batteripakke*
Batteritype Li-ion
Spænding V
DC
18 nom./20 maks.
Kapacitet Ah 2,0/3,0/4,0
Vægt Kg 0,40/0,64/0,61
Ladetid** min 30/45/60
Oplader* NA JP QW/GB/XE
Batteritype Li-ion Li-ion Li-ion
Batteritype netspænding V
AC
120 100 230
Indgangsfrekvens Hz 60 50/60 50
Vægt kg 0,50 0,50 0,50
Sikringer
Europa 230-volts værktøj 10 A. Strømnet
Storbritannien & Irland 230-volts værktøj 3 A. I stik
Værktøj fra serie *PB er kompatible med DEWALT®/POP®Avdel® 18 V nom./20 V maks. Li-Ion slide type-batterier
** Ladetid er baseret på DCB115 DEWALT® ladeenheder
2.1.4.
Skønnet antal nitter pr. opladning
Nom. nitte dia.
mm [in]
Batteri 2,0 Ah Batteri 3,0 Ah Batteri 4,0 Ah
PB2500
ø 2,4 [3/32] 1.700 2.600 3.400
ø 3,2 [1/8] 1.600 2.400 3.200
ø 4,0 [5/32] 1.400 2.200 2.800
ø 4,8 [3/16] 1.200 1.800 2.400
PB3400
ø 4,8 [3/16] 1.000 - 2.000
ø 6,4 [1/4] 500 - 1.000
Bemærk: * Disse angivne værdier er kun vejledende og anslåede værdier baseret på et fuldt opladet batteri.
Resultaterne kan variere afhængigt af nittemateriale, værktøjets/batteriets tilstand og arbejdsområde.
Page 28

11
DANSK
2.2 SPECIFIKATIONER OM PLACERING
Nittetype
Placeringskapacitet
PB2500 PB3400
2,0mm2,4 mm
[3/32´´]
3,0mm3,2 mm
[1/8´´]
4,0 mm
[5/32´´]
4,8 mm
[3/16´´]
5,0/
6,0/7,0
mm
4,8 mm
[3/16´´]
6,0 mm
6,4 mm
[1/4´´]
8,0/9,0
mm
ÅBEN ENDE
LUKKET ENDE
AVEX®/
STAVEX®
AVINOX®/
AVIBULB®
HR/HT
INTERLOCK®
HEMLOK®
KLAMP-TITE®/
KTR
BULBEX®/
LS/TL
MONOBOLT®
MULTI-GRIP
PULL-THRU
(PT)
Q NITTE
T-LOK®
T Rivet
AVSEAL® II
Bemærk: Mhp. yderligere oplysninger om forstykkeudstyr, se vejledningen om tilbehør.
2.3 PAKKEINDHOLD
Denne pakke indeholder:
1 installationsværktøj uden kabel**
1 oplader
1 eller ere Lithium Ion batteripakke(r)*
1 sæt udstyrstilbehør til forstykke
1 kit-boks
1 brugsvejledning
* Kvantiteten og typen af Li-Ion batteripakker er afhængig af modelnummer og landet, hvor værktøjet er
blevet solgt. Kontakt din lokale forhandler mhp. oplysninger og muligheder
** Hvis modelnummeret, som blev købt, blot er værktøjet, leveres installationsværktøjet uden ledning med et
standardsæt indsatsudstyr på 6,4 mm [1/4“] monteret med åben ende.
Page 29
12
DANSK
2.4 OVERSIGT OVER KOMPONENTER (mhp. komplet oversigt over værktøjet og materialeliste, se venligst
servicevejledningen)
ProSet® PB2500 illustration ndes i omslagets forside
ProSet® PB3400 illustration ndes i omslagets bagside
A Næsemøtrikker O Tilslutning til batterioplader
B Næsehus P Kæbehus
C Næsehusmøtrik Q Kæber
D Samlelås R Trykstykke
E Nitte glas S Fjeder
E2 Hurtig tilkoblingssamlestykke T Trækhoved
F Krog til ophæng U Forkobling (kæbehuslås)
G Motorhus V Endeføring
H Udluftningsåbninger W Stiftopsamler
I Håndtag Y Nitte
J Kontakt Z Næseenhed
K Batteripakke AA Spindelkobling
L Manual AB Spindelkoblingseder
M Opladerlampe AC Trækhovedenhed
N Oplader AD Transmissionshus
2.5 VALGFRIT TILBEHØR
ADVARSEL: Da andet tilbehør end det, som stilles til rådighed af POP®, ikke er afprøvet med dette
produkt, kan det være farligt at bruge sådant tilbehør med dette værktøj. For at mindske risikoen for
kvæstelser, må dette produkt kun anvendes med tilbehør, som anbefales af POP®.
Kontakt forhandleren for yderligere oplysninger om korrekt tilbehør.
ADVARSEL: For at mindske risikoen for alvorlige kvæstelser, skal du frakoble batteriet, før du foretager
justeringer eller erner/installerer udstyr eller tilbehør.
Mhp. en komplet liste over indsatsudstyr og andet tilbehør, som er til rådighed for serie PB, se venligst vores
webside http://www.stanleyengineeredfastening.com/resource-center/document-library
Page 30
13
DANSK
3. Anvendelse af værktøj & indstillinger
Værktøj fra serie PB er konstrueret til montering af STANLEY Engineered Fastening blindnitter.
Må ikke anvendes under våde forhold eller i nærheden af brændbare væsker eller gasser.
LÆS ALLE SIKKERHEDSADVARSLER OG -ANVISNINGER INDEN VÆRKTØJET ANVENDES.
Elektrisk sikkerhed
Den elektriske motor er kun konstrueret til én spænding. Kontrollér altid, at batteripakken svarer til
spændingen på mærkepladen. Kontrollér også, at spændingen på din oplader svarer til dit strømnet.
Din POP® oplader er dobbeltisoleret i overensstemmelse med EN60335. Derfor kræves der ingen
jordledning.
Brug af forlængerledninger
Forlængerledninger bør ikke anvendes, medmindre det er strengt nødvendigt. Brug en godkendt
forlængerledning, som er egnet til din opladers indgangse ekt (se Tekniske data). Den mindste lederstørrelse
er 1 mm2; den maksimale længde er 30 m.
Når der anvendes kabelvinde, skal kablet altid vikles helt af.
Før brug
• Vælg det relevante forstykke og montér det
• Kontrollér om batteriet er fuldt opladet
• Anbring batteripakken i værktøjet
• Tryk på udløseren og og slip den for at indstille værktøjet til udgangspositionen.
4. Brugsanvisninger
Bær altid godkendt høreværn og beskyttelsesbriller, når installationsudstyret anvendes.
ADVARSEL: Tag altid batteripakken ud før værktøjet justeres.
4.1. INDSATSUDSTYR
ProSet® PB2500 illustration ndes i omslagets forside
ProSet® PB3400 illustration ndes i omslagets bagside
Montering af forstykke ( g. 7)
• Vælg det korrekte forstykke til den nitte, der skal monteres. Se tilbehørsvejledningen for at nde det
passende forstykke.
• Spænd forstykket fast (A) i næsehuset (B) ved at dreje det med uret vha. en 11 mm ga elnøgle.
Montering af trykstykke og endeføring
PB2500 ( g. 4 & 5)
• Vælg det korrekte trykstykke eller trykstykkeenhed (R), der passer til den valgte næsemøtrik. Se
tilbehørsvejledningen for at nde det passende indsatsudstyr.
• Isæt trykstykket (R) i kæbe ederen (S).
• Saml kæbesættet (Q) og kæbehuset (P) på forkoblingen (U)
BEMÆRK: Anvend IKKE ga elnøgler til at montere kæbehuset (P) på forkoblingen (U). Spænd blot kæbehuset
(P) fast med hånden for at montere den på forkoblingen (U)
Page 31

14
DANSK
PB3400 (g. 4 & 5)
• Vælg det korrekte trykstykke eller trykstykkeenhed (R) og endeføring (V), der passer til den valgte
næsemøtrik. Se tilbehørsvejledningen for at nde det passende indsatsudstyr.
BEMÆRK: Endeføringen, som er monteret på værktøjet ved købet, passer til det monterede forstykke. Se
tilbehørsvejledningen for at nde det passende forstykke til det aktuelle reservedelsnummer for endeføringen.
• Sæt endeføringen (V) ind i spindelen på transmissionshuset (AD). Anbring spindelkoblingsederen (AB)
og spindelkoblingen (AA) over endeføringen (V) og spænd trækhovedenheden (AC) fast mod uret vha. en
24mm gaelnøgle.
• Isæt trykstykket (R) i kæbeederen (S)
• Saml kæbesættet (Q) og kæbehuset (P) på trækhovedet (T)
BEMÆRK: Anvend IKKE gaelnøgler til at montere kæbehuset (P) på forkoblingen (U). Spænd blot kæbehuset
(P) fast med hånden for at montere den på forkoblingen (U)
4.2. OPLADERE
Dit værktøj anvender en DEWALT®/POP® Avdel® oplader. Læs alle sikkerhedsanvisninger, inden du anvender
din oplader. Det er ikke nødvendigt at justere opladeren, og den er yderst enkel at betjene.
Opladningsprocedure (g. 2)
• Tilslut opladeren i en passende stikkontakt, før batteripakken indsættes. (Se specikationerne for
opladeren i afsnit 2)
• Indsæt batteripakken (K) i opladeren og kontrollér, at pakken sidder godt fast i opladeren. Det røde
(opladning) lys vil blinke hele tiden og angive, at opladningsprocessen er startet.
• Når batteriet er helt opladet, er den røde lampe konstant på ON. Batteriet er helt opladet og kan hermed
anvendes eller efterlades i opladeren.
BEMÆRK: For at sikre maksimal ydeevne og levetid for Li-Ion batteripakkerne, skal batteripakken oplades
komplet inden den første anvendelse.
Opladningsproces
Se batteripakkens opladningstilstand i nedenstående skema.
Opladningsindikation
oplader –– –– –– ––
helt opladet –––––––––––––––––
varm/kold pakkeforsinkelse –– • –– • –– • –– •
x
problem med batteri eller oplader • • • • • • • • • • • •
problem strømledning •• •• •• •• •• ••
Denne oplader oplader ikke en defekt batteripakke. Opladeren viser at batteriet er defekt ved ikke at lyse eller
ved at vise problem med batteri eller oplader blinkmønster.
BEMÆRK: Dette kan også være et tegn på et problem med opladeren.
Hvis opladeren angiver et problem, skal opladeren og batteripakken kontrolleres hos et autoriseret
servicecenter.
Page 32

15
DANSK
Forsinkelse ved varmt/koldt batteri
Når opladeren registrerer et batteri, der er for varmt eller for koldt, starter den automatisk med en forsinkelse
for den varme/kolde batteripakke, hvilket forhindrer opladningen, indtil batteriet har opnået en passende
temperatur. Derefter skifter opladeren automatisk til batteriopladningsfunktionen. Denne funktion sikrer
maksimal batterilevetid.
En kold batteripakke oplades halvt så hurtigt som en varm batteripakke. Batteripakken oplades langsommere
under hele opladningscyklussen og opnår ikke maks. opladningshastighed, selvom batteriet er varmere.
Lithium-Ion batteripakker
STANLEY Engineered Fastening Li-Ion værktøjet fra serie PB har et elektronisk beskyttelsessystem, der
beskytter batteriet imod overbelastning, overopvarmning eller fuldaadning.
Værktøjet slukker automatisk, hvis det elektroniske beskyttelsessystem aktiveres. Hvis det sker, skal du
anbringe Li-Ion-batteriet i opladeren, indtil det er fuldt opladet.
4.3 BATTERIPAKKER
Dit værktøj er beregnet til anvendelse til med DEWALT®/POP® Avdel® 18V/20V maks. Li-Ion batteripakker.
Isætning og udtagning af batteripakken fra værktøjet (g. 3)
BEMÆRK: For at sikre de bedste resultater skal det kontrolleres at batteripakken er fuldt opladet. Værktøjet afbrydes
uden advarsel, når batteriet er fuldt aadet.
SÅDAN INSTALLERES BATTERIPAKKEN I HÅNDTAGET
• Ret batteripakken (K) ind efter rillerne inde i værktøjets håndtag (g. 3).
• Skub den ind i håndtaget, indtil batteripakken sidder godt fast i værktøjet og kontrollér, at den ikke river
sig løs.
SÅDAN FJERNES BATTERIPAKKEN FRA HÅNDTAGET
• Skub den ind i håndtaget, indtil batteripakken sidder godt fast i værktøjet og kontrollér, at den ikke river
sig løs.
• Isæt batteripakken i opladeren som beskrevet i opladerafsnittet i denne vejledning.
Anbefalet opbevaring
• Det bedste opbevaringssted er et køligt og tørt sted, hvor den ikke udsættes for direkte sollys og ekstrem
varme eller kulde. For at optimere batteriydelsen og -levetiden skal du opbevare batteripakker ved
stuetemperatur, når de ikke er i brug.
• Ved langtidsopbevaring anbefales det at opbevare en fuldt opladet batteripakke et køligt, tørt sted adskilt
fra opladeren for at optimere ydelsen.
BEMÆRK: Batteripakker bør ikke opbevares fuldt aadet. Batteripakken skal genoplades før brug.
5. ANVENDELSESPROCEDURE
ADVARSEL: Overhold altid sikkerhedsvejledningen og de gældende regler.
ADVARSEL: For at mindske risikoen for alvorlige kvæstelser, skal du frakoble batteriet, før du foretager
justeringer eller erner/monterer udstyr eller tilbehør.
ADVARSEL: For at reducere risikoen for alvorlig kvæstelser skal du ALTID anvende den korrekte
håndposition.
ADVARSEL: For at reducere risikoen for alvorlige kvæstelser skal du altid holde godt fast i tilfælde af
en pludselig reaktion.
Page 33

16
DANSK
5.1 KORREKT HÅNDTERING
Korrekt håndtering kræver en hånd på hovedhåndtaget (I) g. 1.
5.2. ANVENDELSE AF VÆRKTØJET
Anbringelse af en blindnitte (g. 8).
Følgende skal udføres for at anbringe en blindnitte i værktøjet
• Anbring blindnitten (Y) i næsemøtrikken (A)
• Positionér værktøjet (g.9)
• Træk i og hold kontakten (J), indtil nitten er indsat helt i enheden(g. 10).
• Når blindnitten (Y) er helt indsat, skal kontakten (J) slippes. Værktøjet vender automatisk tilbage til
udgangspositionen. Stiften falder automatisk ind i stiftopsamleren (W).
Hvis du slipper kontakten (J), inden den indstillede slaglængde er opnået, vender værktøjet omgående
tilbage til udgangspositionen. Hvis blindnitten (Y) ikke er blevet helt indsat, skal de foregående trin gentages.
Reset-funktion (g.9)
Hvis værktøjet ikke vender tilbage til udgangspositionen efter kontakten er sluppet eller stopper bevægelsen
ved den indstillede slaglængde, skal værktøjet resettes ved hurtigt at trække og slippe kontakten (J). Hvis
dette ikke løser problemet, skal batteriet ernes, sættes i igen og de forudgående trin gentages.
Hvis problemet stadig foreligger, skal du rette henvendelse til din lokale service-repræsentant.
Tømning af stiftopsamler (W) (g. 6)
Stiftopsamleren bruges til at indsamle de resterende stifter. Stiftopsamleren skal tømmes afhængigt af
størrelsen på de anvendte blindnitter.
Nom. Nitte dia. Ca. kapacitet (PB2500) Ca. kapacitet (PB3400)
2,4 mm [3/32“] 600 Kan ikke anvendes
3,2 mm [1/8“] 360 Kan ikke anvendes
4,0 mm [5/32“] 200 Kan ikke anvendes
4,8 mm [3/16“] 150 190
6,4 mm [1/4“] Kan ikke anvendes 100
• Vip værktøjet bagud for at alle resterende stifter falder ned i stiftopsamleren.
• Åbn stiftopsamleren (W) ved at skubbe samlelåsen (D) mod næsehusmøtrikken (C), og løft låget (E).
• Hæld de resterende stifter ned i en passende recycling-beholder eller en aaldsspand.
• For at lukke stiftopsamleren (W) skal låget (E) sænkes, indtil samlelåsen (D) går i indgreb.
Valgfri Quick-Release-stiftopsamler (E2) (g. 6a)
Når der anvendes valgfrit Quick-Release stiftopsamler-tilbehør sammen med værktøj fra serie PB, er det
muligt at erne stiftopsamleren på følgende måde:
• Vip værktøjet bagud for at alle resterende stifter falder ned i stiftopsamleren (E2).
• Tag fat stiftopsamleren (E2) med en hånd og deaktivér samlelås (D) med pegengeren.
• Træk stiftopsamleren (E2) op og væk fra værktøjet, vip samleren en smule for at forhindre at stifterne
falder ud.
• For at udskifte opsamleren skal den skubbes tilbage i værktøjet med åbningen vendt mod forsiden af
værktøjet.
• Skub opsamleren nedad, indtil det kan høres, at samlelåsen (D) går i indgreb.
Page 34

17
DANSK
6. VEDLIGEHOLDELSE AF VÆRKTØJET
6.1. VEDLIGEHOLDELSESINTERVALLER
Element Intervaller
Generel kontrol af værktøjet Dagligt
Rengøring & smøring af indsatsudstyr 5.000 nitter
Rengøring & smøring af kugleskrue og aksialleje 50.000 nitter*
*Vi anbefaler at kontakte et autoriseret servicecenter
6.2. RENGØRING
Bær altid godkendte beskyttelsesbriller, når udstyret rengøres
Værktøjets ydersider
Hold den børsteløse motors udluftningsåbninger (H) fri for støv og snavs. Anvend om nødvendigt en blød,
fugtig klud til at erne støv og snavs fra udluftningsåbningerne. Blæs støv og snavs ud af det elektriske
værktøjs hovedhus med tør luft, så snart der samler sig snavs i og omkring udluftningsåbninger (H).
ADVARSEL: Bær godkendte beskyttelsesbriller og godkendt støvmaske ved udførelse af denne
procedure.
ADVARSEL: Brug aldrig opløsningsmidler eller andre kraftige kemikalier til at rengøre værktøjets ikkemetalliske dele. Disse kemikalier kan svække de materialer, der anvendes i værktøjet. Brug en klud,
der kun er fugtet med vand og mild sæbe. Lad aldrig væske trænge ind i værktøjet, og nedsænk aldrig
nogen del af værktøjet i væske.
Rengøring af indsatsudstyret ( g. 4 & 5)
• Løsn næsehusmøtrik (C). Fjern næsehuset (B).
• Tryk på forkoblingen (U) og løsn kæbehuset (P). Slip forkoblingen (U).
• Fjern kæberne (Q) og trykstykket (R).
• Fjern ederen (S).
• Rengør den indvendige side af næsehuset (B) med en tør klud.
• Rengør kæberne (Q) og trykstykket (R) med en tør klud. Udskift om nødvendigt kæberne (Q) og
trykstykket (R).
• Rengør trækhovedet (T) med en tør klud.
• Påfør smøremiddel på indersiden af kæbehus (P), hvor kæberne (Q) kommer i kontakt. Der anbefales et
molybdendisul d baseret smøremiddel.
• Montér ederen (S)
• Montér trykstykket (R) og kæberne (Q).
• Tryk på forkoblingen (U) og spænd kæbehuset (R) fast. Slip forkoblingen (U).
• Montér næsehuset (B). Spænd næsehusmøtrik (C) fast.
• Udfør værktøjets reset-funktion for at sikre at værktøjet be nder sig i udgangspositionen, som beskrevet
i afsnit 5.2
Rengøringsanvisninger for opladeren
ADVARSEL: Risiko for elektrisk stød. Afbryd strømforsyningen til opladeren før rengøring.
Snavs og fedt kan ernes fra opladerens yderside med en klud eller blød børste, der ikke er af metal.
Brug IKKE vand eller rengøringsmidler.
Page 35

18
DANSK
6.3 RESERVEDELE VÆRKTØJ
Mhp. reservedele, se de specikke servicevejledninger,som ndes på vores webside
under http://www.stanleyengineeredfastening.com/resource-center/document-library
6.4. GENOPLADELIG BATTERIPAKKE
Denne batteripakke har en lang levetid, men skal udskiftes, når den ikke afgiver tilstrækkelig eekt ved
opgaver, der før var lette at udføre. Ved afslutningen af dens tekniske levetid skal den bortskaes under
hensyntagen til miljøet.
• Brug batteripakken til den er helt tom, og ern den derefter fra værktøjet.
• Li-Ion celler er genanvendelige. Tag dem med til din forhandler eller til den lokale genbrugsplads. De
indsamlede batteripakker vil blive genanvendt eller korrekt bortskaet.
6.5. MILJØBESKYTTELSE
Særskilt bortskaelse. Dette produkt må ikke bortskaes sammen med almindeligt husholdningsaald.
Hvis du på noget tidspunkt nder det nødvendigt at udskifte dit POP®Avdel® produkt, eller hvis det
ikke længere tjener det tiltænkte formål, må det ikke bortskaes med almindeligt husholdningsaald.
Sørg for, at dette produkt bortskaes særskilt.
Særskilt bortskaelse af brugte produkter og emballage gør det muligt at genbruge materialer og
anvende dem på ny. Genanvendelse af genbrugsmaterialer bidrager til at forhindre forurening af
miljøet og reducerer behovet for råmaterialer.
Lokale forskrifter muliggør i nogen tilfælde særskilt bortskaelse af elektriske produkter fra
husholdningen, ved kommunale aaldsdepoter eller hos forhandleren i forbindelse med køb af et nyt
produkt.
Du kan nde ud af, hvor det nærmeste autoriserede serviceværksted bender sig ved at kontakte
dit lokale POP®Avdel® kontor på den adresse, der er angivet i denne vejledning. Alternativt ndes
der en liste over autoriserede POP®Avdel® serviceværksteder og detaljerede oplysninger om vores
eftersalgsservice og kontakter på følgende internetadresse: www.StanleyEngineeredFastening.com
Page 36

19
DANSK
7. EU-overensstemmelseserklæring
Original
Vi, Avdel UK Limited; Stanley House, Works Road, Letchworth Garden City, Hertfordshire, SG6 1JY
UNITED KINGDOM, erklærer på eget ansvar at produktet:
Beskrivelse POP®Avdel®-batteriværktøj til blindnitter
Mærke/model ProSet® PB2500 eller ProSet® PB3400
Serienr.
som denne erklæring vedrører, er i overensstemmelse med følgende standarder:
2006/42/EF Maskindirektivet
Bekendtgørelser 2008 nr. 1597 - Se bestemmelser om levering af maskiner (sikkerhed).
2014/30/EU Direktivet om elektromagnetisk kompatibilitet (EMC)
2011/65/EU RoHS begrænsning af farlige stoer
og standarderne:
ISO 12100:2010
EN62841-1:2015
Teknisk dokumentation er udarbejdet i overensstemmelse med bilag 1, afsnit 1.7.4.1, i overensstemmelse med
2006/42/EF.
Producent:
Naito Nobuharu
Overordnet leder, R&D Engineering
STANLEY Engineered Fastening, Nippon POP Rivets and Fasteners Ltd., Noyori-cho Hosoda, Toyohashi, Aichi
441-8540 JAPAN
Underskrift
Udstedelsessted Japan
Udstedelsesdato 30. 10. 2016
Autoriseret repræsentant:
A. K. Seewraj
Teknologimanager - EU Blind Fastening
Avdel UK Limited; Stanley House, Works Road, Letchworth Garden City, Hertfordshire, SG6 1JY UNITED KINGDOM
Denne maskine er i overensstemmelse med Maskindirektivet 2006/42/EF.
Oversættelse af original instruktion
Page 37

20
DANSK
8. BESKYT DIN INVESTERING!
8.1. GARANTI FOR POP®AVDEL® NITTEVÆRKTØJ
STANLEY Engineered Fastening garanterer, at alle el-værktøjer er blevet omhyggeligt fremstillet, og at de vil
være fri for materiale- og udførelsesfejl under normal brug og service i en periode på et (1) år.
Vi forlænger garantien på dit værktøj (ekskl. batterier og oplader) fra et (1) til to (2) år, hvis du registrerer dit
værktøj online. (ref. afsnit 8.2 nederst på denne side.)
Denne garanti for nitteværktøjet gælder kun for den første køber af værktøjet og når det anvendes iht. til dets
oprindelige formål.
Undtagelser:
Normal slitage.
Periodisk vedligeholdelse, reparation, reservedele som følge af normal slitage er undtaget fra dækning.
Forkert brug & misbrug.
Fejl eller skader, som skyldes forkert betjening, opbevaring, forkert brug eller misbrug, ulykke eller
forsømmelse som f.eks. fysisk skade er udelukket fra dækning.
Uautoriseret service eller ændring.
Mangler eller skader som følge af service, testjustering, installation, vedligeholdelse, ombygning eller ændring
på nogen måde af andre end Engineered Fastening eller dets autoriserede servicecentre, er udelukket fra
dækning.
Alle andre garantier, enten udtrykt eller underforstået, herunder eventuelle garantier for salgbarhed eller
egnethed til formålet udelukkes hermed.
Skulle dette værktøj ikke leve op til garantien, skal du straks returnere værktøjet til det af vores
fabriksautoriserede servicecentre, der ligger nærmest ved dig. For en liste over autoriserede POP®Avdel®
servicecentre i USA eller Canada, kan du kontakte os på vores gratis nummer (877)364 2781.
Besøg vores websted www.StanleyEnigineeredFastening.com for at nde den nærmeste STANLEY
Engineered Fastening lial udenfor USA og Canada.
STANLEY Engineered Fastening vil derefter gratis erstatte enhver del eller dele, som vi nder er defekte på
grund af materiale- eller fabrikationsfejl og returnere værktøjet forudbetalt. Dette repræsenterer vores eneste
forpligtelse under denne garanti. STANLEY Engineered Fastening vil under ingen omstændigheder være
ansvarlig for eventuelle følgeskader eller særlige skader, der følger af køb eller brug af dette værktøj.
8.2. REGISTRÉR DIT BLINDNITTEVÆRKTØJ ONLINE.
Besøg os for at registrere din garanti online
http://www.stanleyengineeredfastening.com/popavdel-powertools/warranty-card. Tak fordi du har valgt et
værktøj af mærket STANLEY Engineered Fastening’s POP®Avdel® Brand tool.
Page 38

4
DEUTSCH
©2016 Stanley Black & Decker
Alle Rechte vorbehalten.
Die bereitgestellten Informationen dürfen in keiner Weise durch irgendwelche Mittel (elektronisch oder mechanisch) vervielfältigt und/oder
veröentlicht werden, wenn keine vorherige ausdrückliche und schriftliche Genehmigung von STANLEY Engineered Fastening vorliegt. Die
bereitgestellten Informationen basieren auf den Daten, die zum Zeitpunkt der Einführung dieses Produkts bekannt sind. STANLEY Engineered
Fastening verfolgt eine Politik der ständigen Produktverbesserung und somit können die Produkte Änderungen unterliegen. Die bereitgestellten
Informationen gelten für das Produkt wie von STANLEY Engineered Fastening geliefert. Daher haftet STANLEY Engineered Fastening nicht für
Schäden, die aus Abweichungen von den ursprünglichen Spezikationen des Produkts entstehen.
Die verfügbaren Informationen wurden mit größter Sorgfalt zusammengestellt. Allerdings übernimmt STANLEY Engineered Fastening keine Haftung
für eventuelle Fehler in den Informationen noch für die Folgen davon. STANLEY Engineered Fastening haftet nicht für Schäden, die aus Tätigkeiten
entstehen, die von Dritten ausgeführt werden. Die Arbeitsnamen, Handelsnamen, eingetragenen Marken usw., die von STANLEY Engineered Fastening
verwendet werden, sollten gemäß den Rechtsvorschriften in Bezug auf den Schutz von Marken nicht als frei angesehen werden.
INHALT
Hinweis: Zeichnungen zum ProSet® PB2500 benden sich am Ausfalter des Deckblatts
Zeichnungen zum ProSet® PB3400 benden sich am Ausfalter der Rückseite
1. SICHERHEITSDEFINITIONEN ....................................................................................................................5
1.1 Allgemeine Sicherheit ....................................................................................................................................................................5
1.2 Verwendung und Pege des Elektrowerkzeugs ...................................................................................................................5
1.3 Wichtige Sicherheitshinweise für alle Akku-Ladegeräte....................................................................................................6
1.4 Wichtige Sicherheitshinweise für alle Akkupacks ................................................................................................................7
1.5 Besondere Sicherheitsanweisungen für Lithiumionen (Li-Ion)-Akkus .........................................................................8
1.6 Restrisiken ...........................................................................................................................................................................................8
1.7 Schilder und Symbole.....................................................................................................................................................................8
2. SPEZIFIKATIONEN .....................................................................................................................................9
2.1 Technische Daten .............................................................................................................................................................................9
2.2 Spezikationen der Setzkapazität ...........................................................................................................................................11
2.3 Verpackungsinhalt ........................................................................................................................................................................ 11
2.4 Liste der Hauptkomponenten .................................................................................................................................................. 12
2.5 Optionales Zubehör ..................................................................................................................................................................... 12
3. VERWENDUNG & EINRICHTUNG ............................................................................................................13
4. BEDIENANWEISUNGEN ...........................................................................................................................13
4.1 Nietausrüstung ..............................................................................................................................................................................13
4.2 Ladegeräte ....................................................................................................................................................................................... 14
4.3 Akkupacks ........................................................................................................................................................................................ 15
5. BEDIENUNGSSCHRITTE ..........................................................................................................................15
5.1 Richtige Haltung der Hände ......................................................................................................................................................16
5.2 Bedienung des Werkzeugs .........................................................................................................................................................16
6. WARTUNG DES WERKZEUGS .................................................................................................................. 17
6.1 Häugkeit der Wartung...............................................................................................................................................................17
6.2 Reinigung ......................................................................................................................................................................................... 17
6.3 Ersatzteile - Werkzeug ..................................................................................................................................................................18
6.4 Auadbarer Akkupack ................................................................................................................................................................. 18
6.5 Umweltschutz ................................................................................................................................................................................. 18
7. ECKONFORMITÄTSERKLÄRUNG ...........................................................................................................19
8. SCHÜTZEN SIE IHRE INVESTITION .........................................................................................................20
8.1 POP®Avdel®-Nietwerkzeug-Garantie .....................................................................................................................................20
8.2 Registrieren Sie Ihr Blindnietwerkzeug online ...................................................................................................................20
Übersetzung der Originalanleitung
Page 39

5
DEUTSCH
Diese Betriebsanleitung ist von jeder Person zu lesen, die mit der Installation oder Inbetriebnahme
dieses Werkzeugs befasst ist, wobei besonders die folgenden Sicherheitsregeln zu beachten sind.
1. SICHERHEITSDEFINITIONEN
Im Folgenden wird die Relevanz der einzelnen Warnhinweise erklärt. Bitte lesen Sie die Betriebsanleitung und
achten Sie auf diese Symbole.
GEFAHR: Weist auf eine unmittelbar drohende gefährliche Situation hin, die, sofern nicht vermieden,
zu tödlichen oder schweren Verletzungen führt.
VORSICHT: Weist auf eine möglicherweise gefährliche Situation hin, die, sofern nicht vermieden,
zu leichten oder mittelschweren Verletzungen führen kann.
WARNUNG: Weist auf eine möglicherweise gefährliche Situation hin, die, sofern nicht vermieden,
zu tödlichen oder schweren Verletzungen führen kann.
HINWEIS: Weist auf ein Verhalten hin, das nichts mit Verletzungen zu tun hat, aber, wenn es nicht vermieden
wird, zu Sachschäden führen kann.
Weist auf ein Stromschlagrisiko hin.
Weist auf eine Brandgefahr hin.
Unsachgemäßer Betrieb oder falsche Wartung dieses Produkts können zu schweren Verletzungen
und Sachschäden führen. Machen Sie sich mit den Warnungen und Bedienanweisungen vertraut,
bevor Sie dieses Gerät verwenden. Beim Gebrauch von Elektrowerkzeugen sind zum Schutz gegen
Verletzungsgefahren immer die grundlegenden Sicherheitsvorschriften zu beachten.
1.1 ALLGEMEINE SICHERHEIT
WARNUNG! Lesen Sie alle Sicherheitswarnhinweise und alle Anweisungen. Das Nichtbeachten von
Warnhinweisen und Anweisungen kann zu Stromschlag, Brand und/oder schweren Verletzungen führen.
BEWAHREN SIE ALLE WARNHINWEISE UND ANWEISUNGEN ZUM SPÄTEREN NACHSCHLAGEN AUF
Der Begri „Elektrowerkzeug“ in den Warnhinweisen bezieht sich auf Ihr netzbetriebenes Elektrowerkzeug (mit
Kabel) oder auf Ihr akkubetriebenes (kabelloses) Elektrowerkzeug.
• Nicht auf andere Weise verwenden als zum setzen von STANLEY Engineered Fastening Blindbefestigern.
• Verwenden Sie nur Teile, Verbindungselemente und Zubehörteile, die vom Hersteller empfohlen werden.
• Verwenden Sie das Elektrogerät nur mit den speziell vorgesehenen Akkus.
1.2 VERWENDUNG UND PFLEGE DES ELEKTROWERKZEUGS
• Das Werkzeug muss jederzeit in einem sicheren Betriebszustand gehalten und in regelmäßigen Abständen von
geschultem Personal auf Beschädigungen und Funktion überprüft werden. Nur geschultes Personal darf das
Gerät demontieren. Vor der Demontage dieses Werkzeugs ist die Wartungsanleitung zu lesen.
• Nehmen Sie keinerlei Veränderungen an dem Werkzeug vor. Jede Änderung am Werkzeug durch den Kunden
unterliegt einzig der vollen Verantwortung des Kunden und macht geltende Gewährleistungen ungültig.
• Ziehen Sie den Akku von dem Werkzeug ab, bevor Sie Wartungsarbeiten durchführen oder versuchen,
Ausrüstungsteile einzustellen, anzubringen oder abzunehmen.
• Prüfen Sie vor der Verwendung, ob bewegliche Teile verzogen oder ausgeschlagen, ob Teile gebrochen oder
in einem Zustand sind, der den Betrieb des Werkzeugs beeinträchtigt. Bei Beschädigungen lassen Sie das
Werkzeug warten, bevor Sie es verwenden. Entfernen Sie vor dem Gebrauch alle Einstellwerkzeuge oder
Schraubenschlüssel.
Page 40

6
DEUTSCH
• Akku vor Gebrauch auch Schäden überprüfen. Akku nicht fallen lassen. Heftige Stöße können zu internen
Beschädigungen und zu vorzeitigem Akkuversagen führen.
• Halten Sie den Arbeitsbereich sauber und gut ausgeleuchtet.
• Tragen Sie geeignete Kleidung. Tragen Sie keine weite Kleidung und keinen Schmuck. Halten Sie Ihre Haare,
Kleidung und Handschuhe von beweglichen Teilen fern. Lose sitzende Kleidung, Schmuck oder lange Haare
können sich in den beweglichen Teilen verfangen.
• Nehmen Sie einen festen Stand oder eine stabile Position ein, bevor Sie das Werkzeug bedienen.
• Bediener und andere Personen im Arbeitsbereich müssen zugelassene Schutzbrillen mit Seitenschutz gemäß ANSI
Z87.1 CAN/CSA Z94.3 oder andere Schutzbrillen tragen.
• Vor der Arbeit müssen die Hände des Bedieners ausreichenden Abstand zum Werkstück haben.
• Bedienen Sie das Werkzeug nicht, wenn es auf Personen gerichtet ist.
• Werkzeug NICHT bedienen, wenn die Mundstückhülse entfernt wurde.
• Betreiben Sie das Werkzeug oder das Ladegerät nicht in einer explosionsgefährdeten Atmosphäre oder in einer
Umgebung, die den Kontakt mit brennbaren Flüssigkeiten oder Gasen ermöglicht.
• Betreiben Sie das Werkzeug oder das Ladegerät nicht in einer Umgebung, in der es Feuchtigkeit oder Regen
ausgesetzt ist, da sonst die Gefahr eines elektrischen Schlags besteht.
• Missbrauchen Sie das Werkzeug nicht, indem Sie es herunterfallen lassen oder als Hammer verwenden.
• Halten Sie Schmutz und Fremdkörper von den Lüftungsschlitzen des Werkzeugs fern, da sonst Fehlfunktionen
auftreten können.
• Halten Sie die Werkzeuggrie trocken, sauber und frei von Öl und Fett.
• Wenn das Werkzeug an einen anderen Ort gebracht wird, halten Sie die Hände vom Auslöser fern, um eine
unbeabsichtigte Aktivierung zu vermeiden.
• Lassen Sie ein laufendes Werkzeug niemals unbeaufsichtigt.
• Trennen Sie den Akku ab, wenn das Werkzeug nicht in Gebrauch ist.
1.3 WICHTIGE SICHERHEITSHINWEISE FÜR ALLE AKKULADEGERÄTE
BEWAHREN SIE DIESE ANWEISUNGEN AUF: Dieses Handbuch enthält wichtige Sicherheits- und
Bedienanweisungen für kompatible Ladegeräte (siehe Technische Daten).
• Lesen Sie vor der Verwendung des Ladegeräts alle Anweisungen und Warnhinweise auf dem Ladegerät und
dem Akku.
WARNUNG: Stromschlaggefahr. Keine Flüssigkeiten in das Ladegerät gelangen lassen. Dies kann einen
elektrischen Schlag zur Folge haben.
WARNUNG: Wir empfehlen die Verwendung einer Fehlerstromschutzeinrichtung mit einem
Nennfehlerstrom von maximal 30mA.
VORSICHT: Verbrennungsgefahr. Zur Reduzierung der Verletzungsgefahr sollten nur Akkus von DEWALT®/POP®Avdel®
verwendet werden. Andere Akkutypen können bersten und Verletzungen und Sachschäden verursachen.
VORSICHT: Lassen Sie nicht zu, dass Kinder mit dem Werkzeug spielen.
HINWEIS: Unter bestimmten Umständen können bei an die Stromquelle angeschlossenem Ladegerät die Kontakte
im Ladegerät durch Fremdmaterial kurzgeschlossen werden. Leitende Fremdmaterialien wie z.B. Stahlwolle,
Aluminiumfolie oder die Ansammlung von Metallpartikeln sind von den Hohlräumen des Ladegerätes fernzuhalten.
Ziehen Sie den Netzstecker des Ladegerätes immer aus der Steckdose, wenn kein Akku in der Vertiefung steckt.
Ziehen Sie den Netzstecker des Ladegerätes vor dem Reinigen aus der Steckdose.
• Der Akkupack darf NIEMALS in einem anderen Ladegerät, außer dem in diesem Handbuch beschriebenen,
aufgeladen werden. Das Ladegerät und der Akku wurden speziell zur gemeinsamen Verwendung konzipiert.
• Diese Ladegeräte sind ausschließlich für das Laden von Akkus von DEWALT®/POP®Avdel® bestimmt. Eine
anderweitige Verwendung kann zu Brand führen oder gefährliche oder tödliche Verletzungen durch
Elektroschock verursachen.
• Halten Sie das Ladegerät von Regen und Schnee fern.
Page 41

7
DEUTSCH
• Ziehen Sie immer am Stecker und nicht am Kabel, um das Ladegerät abzutrennen. Dadurch wird das Risiko
einer Beschädigung von Stecker und Kabel reduziert.
• Verlegen Sie das Netzkabel so, dass niemand darauf treten oder darüber stolpern kann und dass es keinen
sonstigen schädlichen Einüssen oder Belastungen ausgesetzt wird.
• Ein Verlängerungskabel sollte nur dann verwendet werden, wenn es absolut notwendig ist. Ein ungeeignetes
Verlängerungskabel kann zu Brand, Stromschlag oder Tod durch elektrischen Strom führen.
• Stellen Sie keine Gegenstände auf das Ladegerät bzw. stellen Sie das Ladegerät nicht auf eine weiche Oberäche.
Dadurch könnten die Lüftungsschlitze blockiert und das Gerät überhitzt werden. Stellen Sie das Ladegerät von
Hitzequellen entfernt auf. Das Ladegerät ist oben und unten am Gehäuse mit Lüftungsschlitzen versehen.
• Betreiben Sie das Ladegerät nicht mit einem beschädigten Netzkabel oder Netzstecker – lassen Sie sie sofort austauschen.
• Benutzen Sie das Ladegerät nicht, wenn es einen harten Stoß erlitten hat, fallen gelassen oder anderweitig
beschädigt wurde. Bringen Sie es zu einer autorisierten Kundendienststelle.
• Das Ladegerät darf nicht zerlegt werden. Bringen Sie es zu einer autorisierten Kundendienststelle, wenn es
gewartet oder repariert werden muss. Ein unsachgemäßer Zusammenbau kann zu Stromschlag, Tod durch
Strom oder Brand führen.
• Ziehen Sie den Netzstecker des Ladegerätes vor dem Reinigen aus der Steckdose. Dadurch wird das Risiko eines
Stromschlags reduziert. Durch alleiniges Herausnehmen des Akkus wird dieses Risiko nicht reduziert.
• Versuchen Sie NIEMALS, zwei Ladegeräte miteinander zu verbinden.
• Das Ladegerät ist für die Verwendung an normalen Haushaltssteckdosen vorgesehen (siehe Technische Daten des
Ladegeräts). Es darf mit keiner anderen Spannung verwendet werden. Dies gilt nicht für das Fahrzeugladegerät.
1.4 WICHTIGE SICHERHEITSHINWEISE FÜR ALLE AKKUPACKS
Achten Sie beim Bestellen von Ersatzakkus darauf, dass Sie die Katalognummer und die Spannung angeben.
Der Akku ist bei der Lieferung nicht vollständig aufgeladen. Lesen Sie vor der Verwendung von Akku und Ladegerät
die folgenden Sicherheitshinweise. Befolgen Sie dann das beschriebene Ladeverfahren.
LESEN SIE SÄMTLICHE ANWEISUNGEN
• Laden oder benutzen Sie den Akku nicht in explosionsgefährdeten Umgebungen, in denen sich z.B. brennbare
Flüssigkeiten, Gase oder Staub benden. Beim Einsetzen und Herausnehmen des Akkus aus dem Ladegerät
können sich Staub oder Dämpfe entzünden.
• Setzen Sie den Akkupack niemals mit Gewalt in das Ladegerät ein. Führen Sie keine Änderungen am Akkupack durch,
damit er in ein anderes Ladegerät passt, da der Akkupack reißen kann, was zu schweren Verletzungen führen kann.
• Laden Sie die Akkupacks nur in Ladegeräten von DEWALT®/POP®Avdel®.
• Das Produkt KEINEN Spritzern aussetzen und nicht in Wasser oder andere Flüssigkeiten eintauchen.
• Das Werkzeug und den Akku niemals in Bereichen lagern oder verwenden, in denen die Temperatur 40 ºC
überschreiten könnte (z.B. Scheunen oder Metallgebäude im Sommer).
• Wenn Akkus nicht verwendet werden, halten Sie sie von anderen Metallteilen, z.B. Büroklammern, Münzen, Schlüsseln,
Nägeln, Schrauben oder anderen kleinen Metallteilen fern, die eine Verbindung zwischen den Polen verursachen können.
• Akkus nicht in Gewässer entsorgen.
WARNUNG: Versuchen Sie niemals den Akkupack aus irgendeinem Grund zu önen. Wenn das
Akkugehäuse Risse oder Beschädigungen aufweist, darf es nicht in das Ladegerät gelegt werden. Den
Akkupack nicht quetschen, fallen lassen oder beschädigen. Verwenden Sie niemals einen Akku oder
ein Ladegerät, wenn sie einen harten Schlag erlitten haben, fallen gelassen, überfahren oder sonst wie
beschädigt wurden (z. B. wenn sie mit einem Nagel durchlöchert wurden, mit einem Hammer darauf
geschlagen oder getreten wurde). Ein Stromunfall oder ein tödlicher Stromschlag könnte entstehen.
Beschädigte Akkus sollten zum Recycling zur Kundendienststelle zurückgebracht werden.
WARNUNG: Brandgefahr. Lagern oder tragen Sie den Akku nicht so, dass Metallobjekte in Kontakt mit
freiliegenden Batterieklemmen kommen können. Wenn Sie einzelne Akkus transportieren, stellen Sie sicher,
dass die Batterieklemmen geschützt und gut von Materialien isoliert sind, die bei Kontakt mit ihnen einen
Kurzschluss verursachen könnten.
VORSICHT: Wenn das Werkzeug nicht benutzt wird, muss es seitlich auf eine stabile Fläche gelegt werden,
wo es kein Stolperrisiko darstellt und nicht herunterfallen kann. Manche Werkzeuge mit großen Akkupacks
können aufrecht auf dem Akkupack stehen, aber leicht umgestoßen werden.
Page 42

8
DEUTSCH
1.5 BESONDERE SICHERHEITSANWEISUNGEN FÜR LITHIUMIONEN (LI-ION)-AKKUS
1. Den Akku nicht verbrennen, auch wenn er stark beschädigt oder vollkommen verschlissen ist. Der Akku
kann im Feuer explodieren. Beim Verbrennen eines Lithium-Ion-Akkus entstehen giftige Dämpfe und Stoe.
2. Wenn der Akkuinhalt mit der Haut in Kontakt kommt, waschen Sie die Stelle sofort mit einer milden
Seife und Wasser. Wenn Akkuüssigkeit in die Augen gelangt, spülen Sie das oene Auge für 15 Minuten,
oder bis die Reizung nachlässt, mit Wasser. Falls Sie sich in ärztliche Behandlung begeben müssen: Das
Akkuelektrolyt besteht aus einer Mischung von organischen Karbonaten und Lithiumsalzen.
3. Der Inhalt einer geöneten Akkuzelle kann Atemwegsreizungen verursachen. Sorgen Sie für Frischluft.
Wenn die Symptome anhalten, begeben Sie sich in ärztliche Behandlung.
WARNUNG: Verbrennungsgefahr. Die Akkuüssigkeit kann brennbar sein, wenn sie Funken oder einer
Flamme ausgesetzt ist.
1.6 RESTRISIKEN
Trotz Beachtung der geltenden Sicherheitsvorschriften und des Einsatzes von Schutzvorrichtungen können
bestimmte Risiken nicht vermieden werden. Diese sind:
− Gehörschädigung
− Verletzungsgefahr durch umheriegende Teilchen
− Verbrennungsgefahr durch während des Betriebes heiß werdende Zubehörteile
− Verletzungsgefahr durch andauernden Gebrauch
1.7 SCHILDER UND SYMBOLE
Bildzeichen am Werkzeug
LAGE DES DATUMSCODES: Der Datumscode, der auch das Jahr, den Monat und den Ort der Herstellung
enthält, ist in die Gehäuseäche geprägt, die die Montagefuge zwischen Gerät und Akku bildet.
Schilder am Ladegerät und Akku
Zusätzlich zu den in diesem Handbuch verwendeten Bildzeichen benden sich die folgenden Bildzeichen auf
dem Ladegerät und dem Akkupack:
Vor der Verwendung die
Betriebsanleitung lesen.
Keinem Wasser aussetzen.
Vor der Verwendung die
Betriebsanleitung lesen.
Schadhafte Kabel sofort ersetzen.
Akkus wird aufgeladen. Nur bei 4°C bis 40°C auaden.
Akku ist aufgeladen. Akkupack umweltfreundlich entsorgen.
Heiß/Kalt-Verzögerung. Werfen Sie den Akku nicht ins Feuer.
x
Problem mit Akku oder Ladegerät. Lädt Li-Ion-Akkupacks.
Problem mit Stromleitung. Die Ladezeit ist den Technischen Daten
zu entnehmen.
Keine leitenden Gegenstände
einstecken.
Nur in Innenräumen verwenden.
Page 43

9
DEUTSCH
Beschädigte Akkus nicht au aden. Akkus von DEWALT®/POP®Avdel® nur
mit den angegebenen Ladegeräten
von DEWALT®/POP®Avdel® au aden.
Wenn mit einem DEWALT®/POP®Avdel®Ladegerät andere Akkus als die
genannten DEWALT®/POP®Avdel®Akkus aufgeladen werden, kann dies
dazu führen, dass sie platzen oder
dass andere gefährliche Situationen
entstehen.
STANLEY Engineered Fastening verfolgt eine Politik
der ständigen Produktentwicklung und -verbesserung und wir behalten uns das Recht vor,
die technischen Daten eines Produkts ohne vorherige Ankündigung zu ändern.
2. SPEZIFIKATIONEN
UNTER KEINEN UMSTÄNDEN SOLLTEN ANDERE INSTANDHALTUNGS ODER WARTUNGSARBEITEN
ALS DAS REINIGEN UND SCHMIEREN DER NIETAUSRÜSTUNG DURCHGEFÜHRT WERDEN.
2.1 TECHNISCHE DATEN
2.1.1.
ProSet® PB2500 ProSet® PB3400
Spannung V 18 Nenn./max. 20 18 Nenn./max. 20
Typ 1/2 2
Akkutyp Li-Ion Li-Ion
Gewicht (ohne Akku) kg 1,35 1,77
Lpa (Schalldruckpegel) dB(A) 74 77
Kpa (Schalldruck-Unsicherheitsfaktor) dB(A) 3 4
Lwa (Schallleistung) dB(A) 85 88
Kwa (Schallleistungs-
Unsicherheitsfaktor)
dB(A) 3 4
Gesamtschwingungswerte (triaxiale Vektorsumme) gemäß EN60745:
Vibrationsemissionswert ah
ah = m/s² < 2,5 < 2,5
Unsicherheitsfaktor K = m/s² 1,5 1,5
2.1.2.
Modell
PB2500
2,0Ah
PB2500
3,0Ah
PB2500
4,0Ah
PB3400
2,0Ah
PB3400
4,0Ah
Gewicht kg 1,7 [3,75] 2,0 [4,41] 2,0 [4,41] 2,1 [4,63] 2,4 [5,29]
Länge mm 320 [12,6] 320 [12,6] 320 [12,6] 336 [13,2] 336 [13,2]
Höhe mm 240 [9,4] 260 [10,2] 260 [10,2] 255 [10,0] 255 [10,0]
Hub mm 25 [0,984] 25 [0,984] 25 [0,984] 30 [1,181] 30 [1,181]
Zugkraft N
8.500
[1911]
8.500
[1911]
8.500
[1911]
18.000 [4047] 18.000 [4047]
Nietbereich
nom.dia.
mm [in]
ø 2,4 [3/32”]) bis
ø 4,8 [3/16”])
ø 4,8 [3/16“] bis
ø 6,4 [1/4“]
Page 44

10
DEUTSCH
2.1.3.
Akku*
Akkutyp Li-Ion
Spannung V
DC
18 Nenn./max. 20
Kapazität Ah 2,0/3,0/4,0
Gewicht kg 0,40/0,64/0,61
Ladedauer** Min. 30/45/60
Ladegerät* NORD-AMERIKA JAPAN EUROPA
Akkutyp Li-Ion Li-Ion Li-Ion
Netzspannung V
AC
120 100 230
Eingangsfrequenz Hz 60 50/60 50
Gewicht kg 0,50 0,50 0,50
Sicherungen
Europa 230V-Werkzeuge, 10 Ampere, Netz
GB & Irland 230V-Werkzeuge, 3 Ampere im Stecker
*Werkzeuge der PB-Serie sind mit DEWALT®/POP®Avdel®-Li-Ion-Einschubakkus mit 18V Nennspannung/max. 20V
kompatibel
**Die Ladedauer basiert auf den DEWALT®-Ladegeräten DCB115
2.1.4.
Geschätzte Nieten pro Ladung
Nom. Rivet Dia.
mm [in]
Akku 2,0Ah Akku 3,0Ah Akku 4,0Ah
PB2500
ø 2,4 [3/32] 1.700 2.600 3.400
ø 3,2 [1/8] 1.600 2.400 3.200
ø 4,0 [5/32] 1.400 2.200 2.800
ø 4,8 [3/16] 1.200 1.800 2.400
PB3400
ø 4,8 [3/16] 1.000 - 2.000
ø 6,4 [1/4] 500 - 1.000
Hinweis: Diese Werte werden nur als Richtwerte aufgeführt und wurden auf der Grundlage eines voll geladenen
Akkus geschätzt. Die Ergebnisse können in Abhängigkeit vom Nietmaterial, vom Werkzeug-/Akkuzustand und von
der Arbeitsumgebung abweichen.
Page 45

11
DEUTSCH
2.2 SPEZIFIKATIONEN DER SETZKAPAZITÄT
Niettyp
SETZKAPAZITÄT
PB2500 PB3400
2,0mm2,4mm
[3/32"]
3,0mm3,2mm
[1/8"]
4,0mm
[5/32"]
4,8mm
[3/16"]
5,0/
6,0/7,0
mm
4,8mm
[3/16"]
6,0 mm
6,4mm
[1/4"]
8,0/9,0
mm
OFFEN
GESCHLOSSEN
AVEX®/
STAVEX®
AVINOX®/
AVIBULB®
HR/HT
INTERLOCK®
HEMLOK®
KLAMP-TITE®/
KTR
BULBEX®/
LS/TL
MONOBOLT®
MULTI-GRIP
PULL-THRU
(PT)
Q RIVET
T-LOK®
T Rivet
AVSEAL® II
Hinweis: Details zu Nietausrüstungen nden Sie im Zubehörhandbuch.
2.3 VERPACKUNGSINHALT
Dieses Paket enthält:
1 Kabelloses Installationswerkzeug**
1 Ladegerät
1 oder mehr Lithium-Ionen-Akku(s)*
1 Set Nietausrüstungs-Zubehör
1 Kit-Box
1 Betriebsanleitung
*Die Menge und der Typ der Li-Ionen-Akkus hängt von der Modellnummer und der Region ab, in der sie
verkauft werden. Ihr Händler informiert Sie über Details und Optionen.
**Wenn das gekaufte Modell ein bloßes Werkzeug ist, dann wird dazu nur das "Kabellose
Installationswerkzeug" mit einem 6,4mm [1/4"] Standard-Mundstück geliefert.
Page 46

12
DEUTSCH
2.4 LISTE DER HAUPTKOMPONENTEN (die vollständige Explosionszeichnung des Werkzeugs und die
Materialaufstellung nden Sie im Wartungshandbuch)
Die Zeichnung für das ProSet® PB2500 nden Sie im Ausfalter des Deckblatts.
Die Zeichnung für das ProSet® PB3400 nden Sie im Ausfalter der Rückseite.
A Mundstück O Akkuladegerätanschluss
B Mundstückhülse P Spannbackenpatrone
C Mundstückhülsenmutter Q Spannbacken
D Kollektorsperre R Spannbackenspreizer
E Kollektorverschluss S Feder
E2 Quick Release-Kollektor T Ziehkopf
F Befestigung für Hakenzubehör U Vordere Kupplung
G Motorgehäuse V Endstückführung
H Ausblasönung W Dornkollektor
I Gri Y Niet
J Schalter Z Spannbacken-Patronenbaugruppe
K Akku AA Spindelkupplung
L Handbuch AB Spindelkupplungsfeder
M Ladegerätlampe AC Kopfbaugruppe
N Ladegerät AD Getriebegehäuse
2.5 OPTIONALES ZUBEHÖR
WARNUNG: Da anderes Zubehör als das von POP®Avdel® angebotene nicht mit diesem Produkt
getestet wurde, könnte der Gebrauch dieses Zubehörs gefährlich sein. Um das Verletzungsrisiko
zu reduzieren, sollte mit diesem Produkt nur das von POP®Avdel® empfohlene Zubehör verwendet
werden.
Wenden Sie sich an Ihren Händler, wenn Sie weitere Informationen über das geeignete Zubehör
benötigen.
WARNUNG: Um die Gefahr schwerer Verletzungen zu mindern, trennen Sie den Akkupack ab, bevor
Sie Einstellungen vornehmen oder Anbaugeräte oder Zubehör anbringen oder entfernen.
Eine vollständige Liste von Nietausrüstungen sowie anderem Zubehör für die PB-Serie nden Sie über unsere
Website http://www.stanleyengineeredfastening.com/resource-center/document-library
Page 47

13
DEUTSCH
3. VERWENDUNG & EINRICHTUNG
Die Werkzeuge der PB-Serie sind für die Installation von STANLEY Engineered Fastening Blindbefestigern konzipiert.
NICHT VERWENDEN in nasser Umgebung oder in der Nähe von ent ammbaren Flüssigkeiten oder Gasen.
LESEN SIE VOR INBETRIEBNAHME DES WERKZEUGS ALLE SICHERHEITSWARNHINWEISE UND ALLE
ANWEISUNGEN.
Elektrische Sicherheit
Der Elektromotor wurde für eine einzige Spannung konstruiert. Überprüfen Sie immer, ob die Spannung
des Akkupacks der Spannung auf dem Typenschild entspricht. Überprüfen Sie auch, dass die Spannung des
Ladegeräts der Ihres Stromnetzes entspricht.
Ihr DEWALT®-Ladegerät ist gemäß EN60335 doppelt isoliert, deshalb ist keine Erdung erforderlich.
Verwendung eines Verlängerungskabels
Ein Verlängerungskabel sollte nur dann verwendet werden, wenn es absolut notwendig ist. Benutzen Sie ein
zugelassenes Verlängerungskabel, das für die Leistungsaufnahme Ihres Ladegeräts ausreichend ist (siehe
Technische Daten). Der Mindestquerschnitt der Leitungen beträgt 1 mm² und die Höchstlänge beträgt 30 m.
Wenn Sie eine Kabeltrommel verwenden, wickeln Sie das Kabel vollständig ab.
Vor dem Gebrauch
• Wählen Sie das passende Mundstück und bringen Sie es an.
• Gewährleisten Sie, dass der Akku vollständig aufgeladen ist.
• Setzen Sie den Akku in das Werkzeug ein
•
Ziehen Sie den Auslöser und lassen Sie ihn sofort wieder los, um das Werkzeug in die Ausgangsposition zurückzusetzen.
4. BEDIENANWEISUNGEN
Tragen Sie bei der Verwendung von Nietgeräten immer zugelassenen Gehör- und
Augenschutz.
WARNUNG: Bevor Sie das Werkzeug einstellen, entfernen Sie immer den Akkupack.
4.1. NIETAUSRÜSTUNG
Die Zeichnung für das ProSet® PB2500 nden Sie im Ausfalter des Deckblatts
Die Zeichnung für das ProSet® PB3400 nden Sie im Ausfalter der Rückseite
Anbringen des Mundstücks (Abb. 7)
• Wählen Sie das richtige Mundstück für die einzusetzenden Niete. Das Zubehörhandbuch informiert Sie
über die richtige Nietausrüstung.
• Ziehen Sie das Mundstück (A) in die Mundstückhülse (B), indem Sie es mit einem 11mmSchraubenschlüssel im Uhrzeigersinn schrauben.
Montage von Spannbackenspreizer und Endstückführung
PB2500 (Abb. 4 & 5)
• Wählen Sie den richtigen Spannbackenspreizer oder die richtige Spannbacken-Patronenbaugruppe (R), die
zum gewählten Mundstück passt. Das Zubehörhandbuch informiert Sie über die richtige Nietausrüstung.
• Setzen Sie den Spannbackenspreizer (R) in die Spannbackenspreizerfeder (S) ein.
• Bringen Sie den Spannbackensatz (Q) und die Spannbackenpatrone (P) wieder an der vorderen Kupplung (U) an.
HINWEIS: Verwenden Sie KEINE Schraubenschlüssel, um die Spannbackenpatrone (P) an der vorderen Kupplung (U)
anzubringen. Es reicht aus, die Spannbackenpatrone (P) von Hand an der vorderen Kupplung (U) zu befestigen.
Page 48

14
DEUTSCH
PB3400 (Abb. 4 & 5)
• Wählen Sie den richtigen Spannbackenspreizer oder die richtige Spannbacken-Patronenbaugruppe
(Z) und die richtige Endstückführung (V), die zum gewählten Mundstück passt. Das Zubehörhandbuch
informiert Sie über die richtige Nietausrüstung.
HINWEIS: Die Endstückführung, die beim Kauf am Werkzeug angebracht ist, passt zu dem montierten
Mundstück. Das Zubehörhandbuch informiert Sie über die richtige Nietausrüstung für die jeweilige
Teilenummer der Endstückführung.
• Stecken Sie die Endstückführung (V) in die Spindel des Getriebegehäuses (AD). Setzen Sie die
Spindelkupplungsfeder (AB) und die Spindelkupplung (AA) über der Endstückführung (V) ein und ziehen
Sie die Baugruppe (AC) mit einem 24mm-Schlüssel gegen den Uhrzeigersinn fest.
• Setzen Sie den Spannbackenspreizer (R) in die Spannbackenspreizerfeder (S) ein.
• Bringen Sie den Spannbackensatz (Q) und die Spannbackenpatrone (P) wieder am Ziehkopf (T) an.
HINWEIS: Verwenden Sie KEINE Schraubenschlüssel, um die Spannbackenpatrone (P) an der vorderen Kupplung (U)
anzubringen. Es reicht aus, die Spannbackenpatrone (P) von Hand an der vorderen Kupplung (U) zu befestigen.
4.2. LADEGERÄTE
Ihr Werkzeug ist für die Verwendung mit einem DEWALT®/POP® Avdel®-Ladegerät vorgesehen. Achten Sie
darauf, alle Sicherheitsanweisungen zu lesen, bevor Sie das Ladegerät verwenden. An dem Ladegerät brauchen
keine Einstellungen vorgenommen zu werden und es wurde für eine möglichst einfache Bedienung konzipiert.
Ladevorgang (Abb. 2)
• Schließen Sie das Ladegerät an einer geeigneten Steckdose an, bevor Sie den Akkupack einsetzen. (Siehe
Technische Daten des Ladegeräts in Abschnitt2)
• Setzen Sie den Akkupack (K) in das Ladegerät ein und achten darauf, dass er vollständig im Ladegerät sitzt.
Die rote Leuchte (Auaden) blinkt dauerhaft und zeigt dadurch an, dass der Ladevorgang begonnen wurde.
• Der Ladevorgang ist abgeschlossen, wenn die rote Kontrollleuchte ununterbrochen leuchtet. Der Akku ist
vollständig aufgeladen und kann jetzt benutzt oder im Ladegerät belassen werden.
HINWEIS: Um die maximale Leistung der Li-Ion-Akkupacks zu gewährleisten, laden Sie die Akkus vor der ersten
Anwendung vollständig auf.
Ladevorgang
Die Ladezustände des Akkupacks sind in der Tabelle unten aufgeführt.
Ladestandsanzeige
Auaden –– –– –– ––
Voll geladen –––––––––––––––––
Heiß/Kalt-Verzögerung –– • –– • –– • –– •
x
Problem Akku oder Ladegerät • • • • • • • • • • • •
Problem Stromleitung •• •• •• •• •• ••
Dieses Ladegerät lädt keine defekten Akkupacks auf. Das Ladegerät zeigt einen defekten Akku an, indem es nicht
leuchtet oder indem das Blinkmuster für Probleme mit dem Akku oder dem Ladegerät angezeigt werden.
HINWEIS: Dies kann auch auf ein Problem mit dem Ladegerät hinweisen.
Wenn das Ladegerät auf ein Problem hinweist, bringen Sie es zusammen mit dem Akku zur Überprüfung zu
einer autorisierten Servicestelle.
Page 49

15
DEUTSCH
Heiß/Kalt-Verzögerung
Wenn das Ladegerät feststellt, dass ein Akku zu heiß oder zu kalt ist, wird automatisch eine Heiß/KaltVerzögerung ausgelöst. Dabei wird der Ladevorgang so lange ausgesetzt, bis der Akku eine geeignete
Temperatur erreicht hat. Das Ladegerät schaltet dann automatisch auf Ladebetrieb. Dieses Funktionsmerkmal
gewährleistet die maximale Lebensdauer des Akkus.
Ein kalter Akkupack wird mit etwa der halben Geschwindigkeit eines warmen Akkupacks geladen. Der Akku
wird während des gesamten Ladevorgangs mit der geringeren Geschwindigkeit geladen, die sich auch nicht
erhöht, wenn der Akku wärmer wird.
Lithium-Ionen-Akkus
STANLEY Engineered Fastening Li-Ion-Werkzeuge der PB-Serie sind mit einem elektronischen Schutzsystem
ausgestattet, das den Akku vor Überladung, Überhitzung und vollständiger Entladung schützt.
Das Gerät schaltet sich automatisch aus, wenn das elektronische Schutzsystem anschlägt. Wenn dies
geschieht, setzen Sie den Li-Ion-Akku in das Ladegerät, bis er vollständig geladen ist.
4.3 AKKUPACKS
Ihr Werkzeug wurde speziell zur Verwendung mit DEWALT®/POP® Avdel®-Li-Ion-Akkus mit 18V/20V max.
entwickelt.
Einsetzen und Entnahme des Akkus in das/aus dem Werkzeug (Abb. 3)
HINWEIS: Um beste Ergebnisse zu erzielen, sollte der Akku vollständig aufgeladen sein. Das Werkzeug geht ohne
Warnung aus, wenn der Akku entladen ist.
EINSETZEN DES AKKUPACKS IN DEN GRIFF
• Richten Sie den Akkupack (K) an den Führungen im Werkzeuggri aus (Abb. 3).
• Schieben Sie ihn in den Gri, bis der Akku fest im Werkzeug sitzt, und stellen Sie sicher, dass er sich nicht
lösen kann.
ENTNAHME DES AKKUPACKS AUS DEM GRIFF
• Drücken Sie Akku-Löseknopf, und ziehen Sie den Akkupack kräftig aus dem Werkzeuggri.
• Legen Sie den Akku wie im Abschnitt "Ladegeräte" dieses Handbuchs beschrieben in das Ladegerät.
Empfehlungen für die Lagerung
• Ein idealer Lagerplatz ist kühl und trocken und nicht direktem Sonnenlicht sowie übermäßiger Hitze
oder Kälte ausgesetzt. Für eine optimale Akkuleistung und Lebensdauer lagern Sie die Akkupacks bei
Raumtemperatur, wenn sie nicht verwendet werden.
• Bei längerer Aufbewahrung sollte ein vollständig aufgeladener Akkupack an einem kühlen, trockenen Ort
und außerhalb des Ladegeräts aufbewahrt werden, um optimale Ergebnisse zu erhalten.
HINWEIS: Akkus sollten nicht vollständig entladen aufbewahrt werden. Der Akku muss vor der Verwendung
aufgeladen werden.
5. BEDIENUNGSSCHRITTE
WARNUNG: Beachten Sie immer die Sicherheitsanweisungen und die geltenden Vorschriften.
WARNUNG: Um die Gefahr schwerer Verletzungen zu mindern, trennen Sie den Akkupack ab, bevor
Sie Einstellungen vornehmen oder Anbaugeräte oder Zubehör anbringen oder entfernen.
WARNUNG: Um die Gefahr schwerer Verletzungen zu mindern, beachten Sie IMMER die richtige
Haltung der Hände.
WARNUNG: Um die Gefahr schwerer Verletzungen zu mindern, halten Sie das Werkzeug IMMER
sicher fest und seien Sie auf eine plötzliche Reaktion gefasst.
Page 50

16
DEUTSCH
5.1 RICHTIGE HALTUNG DER HÄNDE
Bei der korrekten Handposition liegt eine Hand auf dem Haupthandgri (I), Abb.1.
5.2. BEDIENUNG DES WERKZEUGS
Blindniet einsetzen (Abb. 8)
So installieren Sie einen Blindniet
• Schieben Sie den Blindniet (Y) in das Mundstück (A).
• Positionieren Sie das Werkzeug (Abb.9)
• Drücken und halten Sie den Schalter (J), bis der Niet voll in die Anwendung eingesetzt ist (Abb. 10).
• Wenn der Blindniet (Y) vollständig eingesetzt worden ist, lassen Sie den Schalter (J) los. Das Werkzeug
kehrt jetzt automatisch in seine Ausgangsposition zurück. Der Dorn wird automatisch in den
Dornkollektor (W) abgeführt.
Wenn Sie den Schalter (J) loslassen, bevor das Ende des Einstellhubs erreicht ist, geht das Werkzeug sofort in
seine Ausgangsposition zurück. Wenn der Blindniet (Y) nicht vollständig eingesetzt worden ist, wiederholen
Sie die vorigen Schritte.
Zurücksetzen (Abb.9)
Wenn der Dorn sich nach dem Loslassen des Schalters nicht in seine Ausgangsposition bewegt oder während
des Einsetzhubs anhält, setzen Sie das Werkzeug in seine Ausgangsstellung zurück, indem Sie den Schalter
(J) schnell ziehen und loslassen. Wenn das Problem hierdurch nicht behoben wird, entfernen Sie den Akku,
setzen ihn wieder ein und wiederholen dann den vorherigen Schritt.
Wenn das Problem danach weiterhin besteht, wenden Sie sich an den Kundendienst.
Leeren des Dornkollektors (W) (Abb.6a)
Der Dornkollektor wird benutzt, um Restdorne einzusammeln. Der Dornkollektor muss je nach Größe der
benutzten Blindniete entleert werden.
Nenn- durchm. der Niete Ungefähre Kapazität (PB2500) Ungefähre Kapazität (PB3400)
2,4 mm [3/32“] 600 Nicht zutreend
3,2 mm [1/8“] 360 Nicht zutreend
4,0 mm [5/32“] 200 Nicht zutreend
4,8 mm [3/16“] 150 190
6,4 mm [1/4“] Nicht zutreend 100
• Kippen Sie das Werkzeug nach hinten, damit alle Restdorne in den Dornkollektor fallen können.
• Önen Sie den Dornkollektor (W), indem Sie die Kollektorsperre (D) zur Nasengehäusemutter (C)
schieben und die Abdeckung (E) anheben.
• Entleeren Sie die Restdorne in einen geeigneten Recycling-Container oder Abfallbehälter.
• Um den Dornkollektor (W) zu schließen, lassen Sie die Abdeckung (E) herunter, bis die Kollektorsperre (D)
einrastetet.
Optionaler Quick-Release-Dornkollektor (E2) (Abb.6B)
Bei Verwendung des optionalen Quick-Release-Dornkollektorzubehörs an Werkzeugen der PB-Serie kann der
Dornkollektor wie folgt abgenommen werden:
• Kippen Sie das Werkzeug nach hinten, damit alle Restdorne in den Dornkollektor (E2) fallen können.
• Halten Sie den Dornkollektor (E2) mit einer Hand fest und lösen Sie die Kollektorsperre (D) mit dem Zeigenger.
• Ziehen Sie den Dornkollektor (E2) nach oben vom Werkzeug weg und kippen Sie den Kollektor dabei
etwas nach hinten, damit keine Dorne herausfallen können.
• Zum Auswechseln des Kollektors schieben Sie ihn so nach hinten in das Werkzeug, dass die Önung zur
Vorderseite des Werkzeugs zeigt.
• Drücken Sie den Kollektor nach unten, bis zu hören ist, wie die Kollektorsperre (D) einrastet.
Page 51

17
DEUTSCH
6. WARTUNG DES WERKZEUGS
6.1. HÄUFIGKEIT DER WARTUNG
Element Häu gkeit
Allgemeine Werkzeugüberprüfung Täglich
Nietausrüstung säubern & schmieren 5.000 Niete
Reinigen und schmieren der Kugelspindel und des Drucklagers 50.000 Niete*
*Es wird empfohlen, sich an ein autorisiertes Servicecenter zu wenden
6.2. REINIGUNG
Tragen Sie bei der Reinigung der Geräte IMMER zugelassenen Augenschutz
Außenseite des Werkzeugs
Halten Sie die Lüftungsö nungen des bürstenlosen Motors (H) frei von Staub und Schmutz. Wenn nötig,
benutzen Sie ein weiches, feuchtes Tuch, um Staub und Schmutz von den Lüftungsö nungen zu entfernen.
Blasen Sie mit Trockenluft immer dann Schmutz und Staub aus dem Hauptgehäuse des Werkzeugs, wenn sich
Schmutz sichtbar in und um die Lüftungsö nungen (H) ansammelt.
WARNUNG: Tragen Sie bei diesen Arbeiten zugelassenen Augenschutz und eine zugelassene
Staubmaske.
WARNUNG: Verwenden Sie niemals Lösungsmittel oder andere scharfe Chemikalien für die Reinigung
der nichtmetallischen Teile des Gerätes. Diese Chemikalien können das in diesen Teilen verwendete
Material aufweichen. Verwenden Sie ein nur mit Wasser und einer milden Seife befeuchtetes Tuch.
Achten Sie darauf, dass niemals Flüssigkeiten in das Werkzeug eindringen. Tauchen Sie niemals
irgendein Teil des Werkzeugs in eine Flüssigkeit.
Reinigung des Mundstücks (Abb. 4 & 5)
• Lösen Sie die Mundstückhülsenmutter (C). Entfernen Sie die Mundstückhülse (B).
• Drücken Sie auf die vordere Kupplung (U) und lösen Sie die Spannbackenpatrone (P). Lassen Sie die
vordere Kupplung (U) los.
• Entfernen Sie die Spannbacken (Q) und den Spannbackenspreizer (R).
• Entfernen Sie die Feder (S).
• Reinigen Sie die Innenseite der Mundstückhülse (B) mit einem trocknen Tuch.
• Reinigen Sie die Spannbacken (Q) und den Spannbackenspreizer (R) mit einem trocknen Tuch. Wenn
nötig, wechseln Sie die Spannbacken (Q) und den Spannbackenspreizer (R).
• Reinigen Sie den Ziehkopf (T) mit einem trocknen Tuch.
• Tragen Sie Fett auf die Innenseite der Spannbackenpatrone (P) auf, wo die Spannbacken (Q) in Kontakt
kommen. Es wird ein Fett auf Molybdändisul dbasis empfohlen.
• Bringen Sie die Feder (S) an.
• Bringen Sie den Spannbackenspreizer (R) und die Spannbacken (Q) an.
• Drücken Sie auf die vordere Kupplung (U) und ziehen Sie die Spannbackenpatrone (P) an. Lassen Sie die
vordere Kupplung (U) los.
• Bringen Sie die Mundstückhülse (B) an. Ziehen Sie die Mundstückhülsenmutter (C) fest.
• Führen Sie den Vorgang zum Zurücksetzen des Werkzeugs durch, damit sich das Werkzeug wie in
Abschnitt 5.2 beschrieben in seiner ursprünglichen Ausgangsposition be ndet.
Reinigungsanweisungen für Ladegeräte
WARNUNG: Stromschlaggefahr. Trennen Sie das Ladegerät von der Wechselstromsteckdose, bevor Sie
es reinigen.
Schmutz und Fett an der Außenseite des Ladegeräts können mit einem Tuch oder einer weichen,
nicht-metallischen Bürste entfernt werden. Verwenden Sie KEIN Wasser oder Reinigungslösungen.
Page 52

18
DEUTSCH
6.3 ERSATZTEILE WERKZEUG
Informationen zu Ersatzteilen enthalten die jeweiligen Wartungshandbücher, die Sie auf unserer Website
nden:
http://www.stanleyengineeredfastening.com/resource-center/document-library
6.4. AUFLADBARER AKKU
Dieser Akkupack mit langer Lebensdauer muss wieder aufgeladen werden, wenn er nicht mehr ausreichend
Energie bei Arbeiten liefert, die vorher problemlos durchgeführt werden konnten. Am Ende seiner
technischen Lebensdauer entsorgen Sie ihn bitte umweltgerecht.
• Lassen Sie den Akkupack sich vollständig entladen und entfernen Sie ihn dann vom Werkzeug.
• Li-Ionen-Zellen sind recycelbar. Geben Sie sie bei Ihrem Händler oder bei einer kommunalen Recycling-
Sammelstelle ab. Dort werden die gesammelten Akkupacks recycelt oder ordnungsgemäß entsorgt.
6.5. UMWELTSCHUTZ
Abfalltrennung. Dieses Produkt darf nicht mit normalem Haushaltsabfall entsorgt werden.
Wenn Sie eines Tages feststellen, dass Ihr POP®Avdel®-Produkt ersetzt werden muss oder Sie es nicht
mehr benötigen, entsorgen Sie es nicht mit dem normalen Haushaltsabfall. Führen Sie dieses Produkt
der Abfalltrennung zu.
Die separate Entsorgung von Gebrauchtprodukten und Verpackungen ermöglicht das Recycling
und die Wiederverwendung der Stoe. Die Wiederverwendung von Recyclingstoen hilft,
Umweltverschmutzung zu vermeiden und mindert die Nachfrage nach Rohstoen.
Lokale Vorschriften regeln möglicherweise die getrennte Entsorgung von Elektroprodukten und
Haushaltsabfall an kommunalen Entsorgungsstellen oder beim Einzelhändler, wenn Sie ein neues
Produkt kaufen.
Die nächstgelegene autorisierte Kundendienststelle erfahren Sie bei Ihrem örtlichen
POP®Avdel®-Repräsentanten. Alternativ erhalten Sie eine Liste der autorisierten POP®Avdel®Kundendienstwerkstätten und vollständige Informationen über unseren Kundendienst im Internet
unter: www.StanleyEngineeredFastening.com
Page 53

19
DEUTSCH
7. EC-Konformitätserklärung
Übersetzung der Originalanleitung
Wir, Avdel UK Limited; Stanley House, Works Road, Letchworth Garden City, Hertfordshire, SG6 1JY,
GROSSBRITANNIEN, erklären in unserer alleinigen Verantwortung, dass das Produkt:
Beschreibung POP®Avdel®-Akkuwerkzeug für Blindniete
Marke/Modell ProSet® PB2500 oder ProSet® PB3400
Seriennr.
auf das sich diese Erklärung bezieht, mit den folgenden Normen übereinstimmt:
2006/42/EC Die Maschinenrichtlinie
Statutory Instruments 2008 No 1597 - The Supply of Machinery (Safety) Regulations.
2014/30/EU Die Richtlinie über elektromagnetische Verträglichkeit (EMV)
2011/65/EU RoHS Restriction of Hazardous Substances (Reduzierung von Schadstoen)
und mit den Normen:
ISO 12100:2010
EN62841-1:2015
Die technische Dokumentation wird in Übereinstimmung mit Anhang 1, Abschnitt 1.7.4.1, in Übereinstimmung
mit 2006/42/EC zusammengestellt.
Hersteller
Naito Nobuharu
Senior Manager, R&D Engineering
STANLEY Engineered Fastening, Nippon POP Rivets and Fasteners Ltd., Noyori-cho Hosoda, Toyohashi, Aichi
441-8540 JAPAN
Unterschrift
Ort der Ausstellung Japan
Datum der Ausstellung 30. 10. 2016
Bevollmächtigte Person:
A. K. Seewraj
Technology Manager – EU Blind Fastening
Avdel UK Limited; Stanley House, Works Road, Letchworth Garden City, Hertfordshire, SG6 1JY, GROSSBRITANNIEN
Diese Maschine entspricht der Maschinenrichtlinie 2006/42/EC.
Übersetzung der Originalanleitung
Page 54

20
DEUTSCH
8. SCHÜTZEN SIE IHRE INVESTITION!
8.1. POP®AVDEL®NIETWERKZEUGGARANTIE
STANLEY Engineered Fastening garantiert, dass alle Blindnietmutternwerkzeuge sorgfältig hergestellt wurden
und dass sie bei normalem Gebrauch und Service für einen Zeitraum von einem (1) Jahr frei von Mängeln in
Material und Verarbeitung sind.
Wir verlängern die Garantie für Ihr Werkzeug (ausgenommen Akkus und Ladegerät) von einem (1) Jahr auf
zwei (2) Jahre, wenn Sie Ihr Werkzeug online registrieren (siehe nachfolgender Abschnitt 8.2.).
Diese Nietwerkzeuggarantie gilt nur für den ursprünglichen Käufer des Werkzeugs und für die ursprüngliche
Nutzung.
Ausschlüsse:
Normale Abnutzung und Verschleiß.
Regelmäßige Wartung, Reparatur und Ersatzteilbedarf aufgrund normaler Abnutzung sind von der Garantie
ausgeschlossen.
Missbrauch & Fehlbedienung.
Defekte oder Schäden, die durch unsachgemäßen Betrieb, Lagerung, Missbrauch oder Fehlbedienung, Unfall
oder Nachlässigkeit entstehen, sowie physische Schäden sind von der Garantie ausgeschlossen.
Unbefugte Wartung oder Änderung
Defekte oder Schäden, die auf irgendeine Weise durch Wartung, Prüfung, Einstellung, Installation, Wartung,
Änderung oder Modikation entstehen, die von anderen Stellen als von STANLEY Engineered Fastening oder
einer autorisierten Kundendienststelle vorgenommen wurden, sind von der Garantie ausgeschlossen.
Alle anderen Garantien, ob ausdrücklich oder impliziert, einschließlich Garantien der Marktgängigkeit oder
Eignung für einen bestimmten Zweck, sind ausgeschlossen.
Sollte dieses Werkzeug die Garantiebedingungen erfüllen, bringen Sie es unverzüglich zu einer autorisierten
Kundendienststelle an einem Standort in Ihrer Nähe. Für eine Liste der autorisierten POP®Avdel®Kundendienststellen in den USA oder Kanada rufen Sie uns gebührenfrei an unter: (877)364 2781.
Von außerhalb der USA und Kanada besuchen Sie unsere Website www.StanleyEngineeredFastening.com ,
wo Sie eine Filiale von STANLEY Engineered Fastening in Ihrer Nähe nden.
STANLEY Engineered Fastening wird dann kostenlos alle Teile austauschen, die von uns aufgrund von
fehlerhaftem Material oder Verarbeitung als defekt festgestellt wurden und das Werkzeug mit bezahlten
Versandkosten zurücksenden. Das ist unsere einzige Verpichtung unter dieser Garantie. In keinem Fall ist
STANLEY Engineered Fastening haftbar für irgendwelche Folge- oder speziellen Schäden, die aus dem Kauf
oder der Verwendung dieses Werkzeugs entstehen.
8.2. REGISTRIEREN SIE IHR BLINDNIETWERKZEUG ONLINE
Um Ihre Garantie online zu registrieren, besuchen Sie http://www.stanleyengineeredfastening.com/
popavdel-powertools/warranty-card. Vielen Dank, dass Sie sich für ein Werkzeug der Marke STANLEY
Engineered Fastening POP®Avdel® entschieden haben.
Page 55

4
ESPAÑOL
©2016 Stanley Black & Decker
Todos los derechos reservados.
La información suministrada no puede reproducirse ni hacerse pública en ningún modo ni a través de ningún medio (ni en modo electrónico
ni impreso) sin expresa autorización previa de STANLEY Engineered Fastening. La información suministrada se proporciona sobre la base de los
datos conocidos en el momento de la presentación de este producto. STANLEY Engineered Fastening aplica una política de mejora continua de
producto, por lo tanto, los productos están sujetos a modicaciones. La información facilitada es de aplicación al producto tal y como ha sido
entregado por STANLEY Engineered Fastening. Por tanto, STANLEY Engineered Fastening no se responsabilizará de ningún daño derivado de
cualquier desviación de las especicaciones originales del producto.
La información disponible ha sido elaborada con extrema diligencia. No obstante, STANLEY Engineered Fastening no asumirá responsabilidad
alguna en relación con cualesquiera fallos en la información o con las consecuencias que pudieran derivarse de la misma. STANLEY Engineered
Fastening no asumirá responsabilidad alguna por daños derivados de actividades efectuadas por terceros. Los nombres profesionales, los nombres
comerciales, las marcas comerciales registradas, etc. usadas por STANLEY Engineered Fastening no deberán considerarse libres, de conformidad
con la legislación relativa a la protección de marcas comerciales.
CONTENIDOS
Nota: Los dibujos referidos a la remachadora ProSet® PB2500 se encuentran en el desplegable de la cubierta
Los dibujos referidos a la remachadora ProSet® PB3400 se encuentran en el desplegable de la contracubierta
1. DEFINICIONES DE SEGURIDAD ................................................................................................................5
1.1 Seguridad general............................................................................................................................................................................5
1.2 Uso y cuidado de la herramienta ..................................................................................................................................................5
1.3 Instrucciones de seguridad importantes para todos los cargadores de batería .......................................................6
1.4 Instrucciones de seguridad importantes para todas las baterías ...................................................................................7
1.5 Instrucciones de seguridad especícas para baterías de iones de litio (Li-Ion) .........................................................8
1.6 Riesgos residuales ............................................................................................................................................................................8
1.7 Etiquetas e iconos ............................................................................................................................................................................8
2. ESPECIFICACIONES....................................................................................................................................9
2.1. Datos técnicos ...................................................................................................................................................................................9
2.2 Especicaciones sobre la colocación ..................................................................................................................................... 11
2.3 Contenido del embalaje .............................................................................................................................................................11
2.4 Lista de componentes principales .......................................................................................................................................... 12
2.5 Accesorios opcionales ................................................................................................................................................................. 12
3. USO Y CONFIGURACIÓN DE LA HERRAMIENTA ...................................................................................13
4. INSTRUCCIONES DE FUNCIONAMIENTO...............................................................................................13
4.1 Conjunto de la boquilla ..............................................................................................................................................................13
4.2 Cargadores .......................................................................................................................................................................................14
4.3 Baterías ..............................................................................................................................................................................................15
5. PROCEDIMIENTO DE TRABAJO ..............................................................................................................15
5.1 Posición correcta de las manos ................................................................................................................................................ 16
5.2 Funcionamiento de la herramienta ........................................................................................................................................16
6. MANTENIMIENTO DE LA HERRAMIENTA ..............................................................................................17
6.1 Frecuencia del mantenimiento ................................................................................................................................................17
6.2 Limpieza ...........................................................................................................................................................................................17
6.3 Piezas de repuesto – Herramientas ........................................................................................................................................18
6.4 Baterías recargables .....................................................................................................................................................................18
6.5 Protección del medioambiente ...............................................................................................................................................18
7. DECLARACIÓN DE CONFORMIDAD CE ..................................................................................................19
8. PROTEJA SU INVERSIÓN .........................................................................................................................20
8.1 Garantía de la remachadora POP®Avdel® .............................................................................................................................20
8.2 Registre su remachadora online ............................................................................................................................................. 20
Traducción de la Instrucción Original
Page 56

5
ESPAÑOL
Las personas que instalen o hagan funcionar la herramienta deberán leer el manual de instrucciones,
prestando especial atención a las siguientes normas de seguridad.
1. DEFINICIONES DE SEGURIDAD
Las deniciones que guran a continuación describen el nivel de gravedad de cada término de alarma. Lea el
manual y preste atención a estos símbolos.
PELIGRO: Indica una situación de peligro inminente que, de no evitarse, ocasionará la muerte o
lesiones graves.
PRECAUCIÓN: Indica una situación potencialmente peligrosa que, de no evitarse, puede ocasionar
una lesión menor o de gravedad moderada.
ADVERTENCIA: Indica una situación potencialmente peligrosa que, de no evitarse, podría ocasionar la
muerte o una lesión grave.
AVISO: Indica una práctica no relacionada con lesiones personales que, de no evitarse, puede ocasionar
daños materiales.
Indica riesgo de descarga eléctrica
Indica riesgo de incendio
El funcionamiento o el mantenimiento inadecuado de este producto podría causar lesiones graves o daños
materiales. Lea y comprenda todas las advertencias e instrucciones de funcionamiento antes de usar este
equipo. Cuando utilice herramientas eléctricas, deberá tomar siempre todas las precauciones básicas de
seguridad para reducir el riesgo de daños personales.
1.1 SEGURIDAD GENERAL
ADVERTENCIA. Lea todas las advertencias de seguridad y todas las instrucciones. En caso de
incumplimiento de las advertencias e instrucciones, puede ocurrir una descarga eléctrica, un incendio
y/o lesiones graves.
CONSERVE TODAS LAS ADVERTENCIAS E INSTRUCCIONES PARA FUTURAS CONSULTAS
El término “herramienta eléctrica” que aparece en las advertencias se reere a la herramienta eléctrica que
funciona a través de la red eléctrica (con cable) o a la herramienta eléctrica que funciona con batería (sin cable).
• No use la herramienta para otros nes distintos al previsto de colocación de remaches de STANLEY Engineered
Fastening.
• Use solamente piezas, remaches y accesorios recomendados por el fabricante.
• Use las herramientas solo con las baterías designadas especícamente.
1.2 USO Y CUIDADO DE LA HERRAMIENTA
• La herramienta debe mantenerse siempre en condiciones de trabajo seguras, debe comprobarse a intervalos
regulares que no presente daños y debe ser utilizada por personal capacitado. El procedimiento de desmontaje
deberá ser realizado por personal capacitado. No desmonte esta herramienta sin consultar antes las
instrucciones de mantenimiento.
• No modique la herramienta de ningún modo. Si el cliente aporta cualquier modicación a la herramienta, se
responsabilizará totalmente de ello y perderán validez todas las garantías aplicables.
• Desconecte la batería de la herramienta antes de realizar cualquier mantenimiento o intento de ajuste, o antes
de colocar o extraer un conjunto de boquilla.
• Antes del uso, compruebe que no haya ninguna desalineación o bloqueo de las piezas móviles, rotura de piezas
y cualquier otra condición que pudiera afectar al funcionamiento de la herramienta. Si la herramienta está
dañada, llévela a reparar antes de utilizarla. Extraiga eventuales llaves o pinzas de ajuste antes del uso.
Page 57

6
ESPAÑOL
• Antes de usar la herramienta, compruebe que la batería no esté dañada. Evite caídas de la batería. Los golpes
bruscos pueden causar daños internos y fallos prematuros a la batería.
• Mantenga el área de trabajo limpia y bien iluminada.
• Utilice la vestimenta adecuada. No lleve ropa suelta ni joyas. Mantenga el cabello, la ropa y los guantes alejados
de las piezas móviles. Las ropas sueltas, las joyas o el cabello largo pueden quedar atrapados por las piezas en movimiento.
• Adopte una posición rme y estable antes de hacer funcionar la herramienta.
• Los operadores y otras personas que se encuentren en la zona de trabajo deben usar gafas de seguridad
aprobadas ANSI Z87.1 CAN/CSA Z94.3 u otras gafas de seguridad homologadas con protectores laterales.
Use siempre gafas de seguridad y protectores del oído durante el funcionamiento.
• Se requiere espacio suciente para las manos del operador de la máquina antes de remachar.
• No haga funcionar la herramienta dirigiéndola hacia ninguna persona.
• NO HAGA FUNCIONAR la herramienta sin la carcasa de la boquilla montada.
• No utilice la herramienta o el cargador en atmósfera explosiva o en un entorno que permita la exposición a
uidos o gases combustibles.
• No utilice la herramienta o el cargador en un entorno que permita la exposición a humedad o lluvia, para
evitar el riesgo de descarga eléctrica.
• No haga un uso indebido de la máquina arrojándola o usándola como un martillo.
• No permita que entren polvo u objetos extraños en las ranuras de ventilación de la herramienta pues esto
puede causar el mal funcionamiento de la herramienta.
• Mantenga las manos secas, limpias y libres de aceite y grasa.
• Cuando transporte la herramienta de un lugar a otro, mantenga las manos alejadas del gatillo, para evitar la
activación involuntaria.
• Nunca deje la máquina funcionando sin supervisión.
• Desconecte la batería cuando no use la herramienta.
1.3 INSTRUCCIONES DE SEGURIDAD IMPORTANTES PARA TODOS LOS CARGADORES DE BATERÍA
GUARDE ESTAS INSTRUCCIONES: Este manual contiene instrucciones importantes de seguridad y
funcionamiento para cargadores de batería compatibles (Consulte Datos técnicos).
• Antes de utilizar el cargador, lea todas las instrucciones y advertencias del cargador, de la batería y del
producto que utiliza la batería.
ADVERTENCIA: Riesgo de descarga eléctrica. No permita que ningún líquido penetre en el cargador. Ello
puede causar descargas eléctricas.
ADVERTENCIA: Recomendamos el uso de un dispositivo diferencial residual con una capacidad nominal
de corriente residual de 30 mA o menos.
PRECAUCIÓN: Peligro de quemaduras. Para reducir el riesgo de daños, cargue solo las baterías recargables
de DEWALT®/POP®Avdel®. Otras baterías pueden explotar y causar lesiones personales y daños.
PRECAUCIÓN: Mantener fuera del alcance los niños.
AVISO: En determinadas circunstancias, cuando el cargador está conectado a la red eléctrica, los contactos de carga
internos pueden entrar en cortocircuito debido a materiales extraños. Los materiales extraños conductores, como
por ejemplo, a título enunciativo pero no limitativo, lana de acero, papel de aluminio o cualquier acumulación de
partículas metálicas, deben mantenerse alejados de las cavidades del cargador. Desconecte siempre el cargador de la
red cuando no haya ninguna batería en la cavidad. Desconecte el cargador antes de intentar limpiarlo.
• NO intente cargar la batería con otros cargadores distintos a los indicados en el presente manual. El cargador y
la batería han sido especícamente diseñados para funcionar juntos.
• Estos cargadores han sido diseñados con la nalidad especíca de recargar las baterías recargables
de DEWALT®/POP®Avdel®. Cualquier otro uso puede causar riesgos de incendio, descargas eléctricas o
electrocución.
• No exponga el cargador a la lluvia o a la nieve.
Page 58

7
ESPAÑOL
• Tire del enchufe y no del cable para desconectar el cargador. De este modo se reduce el riesgo de daños a la
toma de corriente y al cable.
• Compruebe que el cable se encuentre ubicado de modo que nadie pueda pisarlo o tropezar con él y que no esté
sujeto a daños o esfuerzos.
• No utilice cables prolongadores a menos que sea estrictamente necesario. El uso de un cable prolongador
inadecuado puede causar riesgos de incendios y descargas eléctricas o electrocución.
• No coloque ningún objeto encima del cargador ni coloque el cargador sobre una supercie blanda que bloquee
las ranuras de ventilación y produzca un excesivo calor interno. Coloque el cargador en un lugar alejado de
cualquier fuente de calor. El cargador se ventila a través de las ranuras en la parte superior e inferior de la carcasa.
• No utilice el cargador si el cable o el enchufe están dañados, y hágalos reparar de inmediato.
• No utilice el cargador si ha recibido un gran golpe, si se ha caído o si se ha dañado de cualquier otro modo.
Llévelo a un centro de servicios autorizado.
• No desmonte el cargador, llévelo a un centro de servicio autorizado cuando necesite repararlo o hacerle
el mantenimiento. Un rearmado inadecuado puede causar riesgos de incendio y descarga eléctrica o
electrocución.
• Desconecte el cargador del enchufe antes de intentar limpiarlo. Esto reducirá el riesgo de descarga eléctrica.
Extraer la batería no reduce el riesgo de descarga eléctrica.
• NO intente nunca conectar dos cargadores juntos.
• El cargador ha sido diseñado para funcionar con la corriente eléctrica doméstica estándar (consulte las
especicaciones del cargador). No intente usarlo con ningún otro voltaje. Esto no se aplica al cargador de vehículos.
1.4 INSTRUCCIONES DE SEGURIDAD IMPORTANTES PARA TODAS LAS BATERÍAS
Cuando solicite baterías de repuesto, asegúrese de incluir el número de catálogo y el voltaje.
La batería no está totalmente cargada al desembalarla. Antes de usar la batería y el cargador, lea las instrucciones
de seguridad que se hallan a continuación. Después siga los procedimientos expuestos.
LEA TODAS LAS INSTRUCCIONES
• No cargue ni utilice la batería en atmósferas explosivas, como ambientes donde haya polvo, gases o líquidos
inamables. Al introducir o extraer la batería del cargador pueden encenderse el polvo o los humos.
• No fuerce nunca la batería para introducirla en el cargador. No altere la batería de ningún modo para
introducirla en un cargador no compatible pues la batería puede romperse y causar lesiones personales graves.
• Cargue las baterías solo con los cargadores DEWALT®/POP®Avdel®.
• NO salpique la batería ni la sumerja en agua ni en otros líquidos.
• No guarde ni utilice la herramienta y la batería en lugares en los que la temperatura pueda alcanzar o superar
los 40 ºC (104 ºF) (como por ejemplo, cobertizos de exterior o instalaciones metálicas en verano).
• Cuando no se esté utilizando la batería, manténgala alejada de otros objetos metálicos tales como los clips,
monedas, llaves, clavos, tornillos u otros objetos pequeños de metal que pueden hacer una conexión de un
terminal a otro.
• No deseche las baterías en el agua.
ADVERTENCIA: Nunca trate de abrir la batería por ningún motivo. Si la carcasa de la batería está rota
o dañada, no la introduzca en el cargador. No golpee, deje caer ni dañe la batería. No utilice una batería
o cargador que haya sufrido golpes fuertes, caídas o daños de cualquier otro tipo (por ejemplo, perforación
con clavos, golpes de martillo o pisadas). Ello puede causar choque eléctrico o electrocución. Las baterías
dañadas deben llevarse al centro de servicios para su reciclaje.
ADVERTENCIA: Riesgo de incendio. No guarde ni transporte la batería de modo que algún objeto metálico
pueda hacer contacto con los terminales expuestos de la batería. Cuando transporte una sola batería,
compruebe que los terminales de la batería estén protegidos y bien aislados de materiales que pudieran
hace contactos con ellos y causar un cortocircuito.
PRECAUCIÓN: Cuando no utilice la herramienta, colóquela de costado sobre una supercie estable donde
no suponga riesgos de tropezones o caídas. Algunas herramientas con baterías grandes permanecen de
forma vertical sobre la batería, pero pueden cambiarse fácilmente de posición.
Page 59

8
ESPAÑOL
1.5 INSTRUCCIONES DE SEGURIDAD ESPECÍFICAS PARA BATERÍAS DE IONES DE LITIO (LI-ION)
1. No incinere la batería aunque tenga daños importantes o esté completamente desgastada. La
batería puede explotar si se expone al fuego. Cuando se queman baterías de iones de litio se generan gases y
materiales tóxicos.
2. Si el contenido de la batería entra en contacto con la piel, lávese inmediatamente con jabón suave
y agua. Si el líquido de la batería entra en contacto con los ojos, enjuáguese con agua los ojos abiertos
durante 15 minutos o hasta que cese la irritación. Si necesita atención médica, el electrolito de la batería está
compuesto de una mezcla de carbonatos orgánicos líquidos y sales de litio.
3. El contenido de las células de la batería puede causar irritación respiratoria. Proporcione aire fresco. Si
los síntomas persisten, hágase atender por un médico.
ADVERTENCIA: Peligro de quemaduras. El líquido de la batería puede ser inamable si se expone a chispas
o llamas.
1.6 RIESGOS RESIDUALES
A pesar del cumplimiento de las normas de seguridad pertinentes y del uso de dispositivos de seguridad,
existen determinados riesgos residuales que no pueden evitarse. Los riesgos son los siguientes:
− Deterioro auditivo.
− Riesgo de lesiones debidas a partículas volantes.
− Riesgo de quemaduras debidas a los accesorios que se calientan durante el funcionamiento.
− Riesgo de lesiones debidas al uso prolongado.
1.7 ETIQUETAS E ICONOS
Marcas sobre la herramienta
POSICIÓN DEL CÓDIGO DE FECHA: El código de fecha, que contiene el año, el mes y el lugar de fabricación,
está impreso en la supercie de la carcasa que forma la junta de montaje entre la herramienta y la batería.
Etiquetas del cargador y la batería
Además de las imágenes contenidas en este manual, las etiquetas del cargador y la batería muestran los
siguientes pictogramas.
Antes de usar la herramienta, lea el
manual de instrucciones.
No exponga al agua.
Antes de usar la herramienta, lea el
manual de instrucciones.
Haga cambiar inmediatamente los
cables defectuosos.
La batería se está cargando. Cargue solo entre 4 °C y 40 °C.
La batería está cargada. Deseche la batería respetando el
medioambiente.
Retraso por batería caliente/fría. No queme la batería.
x
Problema en la batería o el cargador. Carga baterías de iones de litio.
Problema en la línea de alimentación. Para información sobre el tiempo de
carga, consulte Datos técnicos.
No sondear con objetos conductores. Solo para uso en interior.
Page 60

9
ESPAÑOL
No cargue baterías deterioradas. Cargue las baterías DEWALT®/
POP®Avdel® solo con los cargadores
de baterías DEWALT®/POP®Avdel®
indicados. Cargar otras baterías que
no sean las baterías especi cadas
de DEWALT®/POP®Avdel® con un
cargador DEWALT®/POP®Avdel® puede
causar explosiones u otras situaciones
peligrosas.
STANLEY Engineered Fastening ha adoptado una política
de desarrollo y mejora continua de producto, por tanto nos reservamos el derecho de cambiar las
especi caciones de cualquier producto sin aviso previo.
2. ESPECIFICACIONES
EN NINGUNA CIRCUNSTANCIA DEBE REALIZARSE NINGUNA OPERACIÓN DE MANTENIMIENTO
O REPARACIÓN EXCEPTO EL CAMBIO DE BOQUILLA.
2.1.DATOS TÉCNICOS
2.1.1.
ProSet® PB2500 ProSet® PB3400
Voltaje V 18 nom /20 máx. 18 nom /20 máx.
Tipo 1/2 2
Tipo de batería Iones de litio Iones de litio
Peso (sin la batería) kg 1,35 1,77
Lpa (presión acústica) dB(A) 74 77
Lpa (incertidumbre de presión acústica) dB(A) 3 4
Lwa (potencia acústica) dB(A) 85 88
Lpa (incertidumbre de presión acústica) dB(A) 3 4
Valores totales de vibración (suma de vectores teniendo en cuenta los tres ejes) determinados de acuerdo
con la norma EN60745:
Valor de emisión de vibraciones ah
ah = m/s2 < 2,5 < 2,5
Incertidumbre K = m/s2 1,5 1,5
2.1.2.
Modelo
PB2500
2.0 Ah
PB2500
3.0 Ah
PB2500
4.0 Ah
PB3400
2.0 Ah
PB3400
4.0 Ah
Peso kg [lb] 1.7 [3.75] 2.0 [4.41] 2.0 [4.41] 2.1 [4.63] 2.4 [5.29]
Longitud mm [in] 320 [12.6] 320 [12.6] 320 [12.6] 336 [13.2] 336 [13.2]
Altura mm [in] 240 [9.4] 260 [10.2] 260 [10.2] 255 [10.0] 255 [10.0]
Carrera mm [in] 25 [0.984] 25 [0.984] 25 [0.984] 30 [1.181] 30 [1.181]
Fuerza de
tracción
N [lbf]
8.500
[1911]
8.500
[1911]
8.500
[1911]
18.000 [4047] 18.000 [4047]
Gama
remache
Diámetro
nominal
mm [in]
ø 2,4 [3/32”]) pasante
ø 4,8 [3/16”])
ø 4,8 [3/16”] pasante
ø 6,4 [1/4“]
Page 61

10
ESPAÑOL
2.1.3.
Batería*
Tipo de batería Iones de litio
Voltaje V
CC
18 nom /20 máx.
Capacidad Ah 2.0/3.0/4.0
Peso Kg 0.40/0.64/0.61
Duración de la carga** min 30/45/60
Cargador* NA JP QW/GB/XE
Tipo de batería Iones de litio Iones de litio Iones de litio
Tipo de red V
CA
120 100 230
Frecuencia de entrada Hz 60 50/60 50
Peso kg 0.50 0.50 0.50
Fusibles
Europa Herramientas de 230 V......10 amperes, red eléctrica
R.U. e Irlanda Herramientas de 230 V......3 amperes, en enchufes
*Las herramientas de la serie PB son compatibles con los tipos de baterías de iones de litio DEWALT®/POP®Avdel® de
18 V nom./20 V máx.
** La duración de la carga está basada en los cargadores DCB115 DEWALT®
2.1.4.
Remaches estimados por carga
Diámetro nominal
remache
Mm [in]
Batería 2.0 Ah Batería 3.0 Ah Batería 4.0 Ah
PB2500
ø 2.4 [3/32] 1.700 2.600 3.400
ø 3.2 [1/8] 1.600 2.400 3.200
ø 4.0 [5/32] 1.400 2.200 2.800
ø 4.8 [3/16] 1.200 1.800 2.400
PB3400
ø 4.8 [3/16] 1.000 - 2.000
ø 6.4 [1/4] 500 - 1.000
Nota: Estos valores se detallan solo como guía y han sido estimados sobre la base de una batería totalmente
cargada. Los resultados pueden variar según el material del remache, el estado de la batería y de la remachadora
y el entorno de trabajo.
Page 62

11
ESPAÑOL
2.2 ESPECIFICACIONES SOBRE LA COLOCACIÓN
Tipo de
remache
CAPACIDAD DE COLOCACIÓN
PB2500 PB3400
2,0mm2,4 mm
[3/32´´]
3,0mm3,2 mm
[1/8´´]
4,0 mm
[5/32´´]
4,8 mm
[3/16´´]
5,0/
6,0/7,0
mm
4,8 mm
[3/16´´]
6,0 mm
6,4 mm
[1/4´´]
8,0/9,0
mm
EXTREMO
ABIERTO
EXTREMO
CERRADO
AVEX®/
STAVEX®
AVINOX®/
AVIBULB®
HR/HT
INTERLOCK®
HEMLOK®
KLAMP-TITE®/
KTR
BULBEX®/
LS/TL
MONOBOLT®
MULTI-GRIP
PULL-THRU
(PT)
Q RIVET
T-LOK®
T Rivet
AVSEAL® II
Nota: Para más información sobre el conjunto de sufrideras, consulte el manual de accesorios.
2.3 CONTENIDO DEL EMBALAJE
El embalaje contiene:
1 remachadora de batería**
1 cargador
1 o más baterías de iones de litio*
1 boquilla con sufridera montada en la máquina
1 maletín de la remachadora
1 manual de instrucciones
* La cantidad y el tipo de baterías de iones de litio depende del número de modelo y de la región de venta.
Contacte con su vendedor local para más detalles y opciones
** Si el número de modelo comprado es una herramienta básica, se suministra solo la remachadora de batería
con una sufridera estándar de Ø 6,4 mm [1/4"] instalada.
Page 63

12
ESPAÑOL
2.4 LISTA DE COMPONENTES PRINCIPALES (consulte el dibujo de despiece y la lista de materiales de la
herramienta en el manual de servicio)
El dibujo de la ProSet® PB2500 se encuentra dentro de la cubierta
El dibujo de la ProSet® PB3400 se encuentra dentro de la contracubierta
A Sufridera O Conexión cargador de batería
B Carcasa de la boquilla P Portamordazas
C Tuerca de la carcasa Q Mordazas
D Cierre del colector R Aprietamordazas
E Tapa del colector S Muelle
E2 Colector de vaciado rápido T Cabezal de tracción
F Anclaje de la anilla de suspensión
(accesorio)
U Bloqueo del portamordazas
G Carcasa del motor V Tubo guía de vástagos
H Oricios de ventilación W Colector de vástagos
I Empuñadura Y Remache
J Gatillo Z Conjunto del portamordazas
K Baterías AA Embrague del husillo
L Manual AB Muelle de embrague del husillo
M Lámpara del cargador AC Conjunto cabezal de tracción
N Cargador AD Carcasa del cabezal de tracción
2.5 ACCESORIOS OPCIONALES
ADVERTENCIA: Puesto que los accesorios no suministrados por POP®Avdel® no han sido sometidos
a pruebas con este producto, el uso de los mismos con esta herramienta puede ser peligroso.
Para reducir el riesgo de lesiones, con este producto se deben usar exclusivamente los accesorios
recomendados de POP®Avdel®.
Consulte a su proveedor si desea información más detallada sobre los accesorios apropiados.
ADVERTENCIA: Para reducir el riesgo de lesiones personales graves, desconecte la batería antes de
efectuar cualquier ajuste o instalar/extraer acoplamientos o accesorios.
Para obtener una lista completa de equipos de colocación y otros accesorios disponibles para la serie PB,
consulte nuestro sitio web http://www.stanleyengineeredfastening.com/resource-center/document-library
Page 64

13
ESPAÑOL
3. Uso y con guración de la herramienta
La serie de herramientas PB ha sido diseñada para la colocación de los remaches de STANLEY Engineered
Fastening.
NO debe usarse en lugares húmedos ni en presencia de líquidos o gases in amables.
LEA TODAS LAS ADVERTENCIAS DE SEGURIDAD Y LAS INSTRUCCIONES ANTES DE PONER EN
FUNCIONAMIENTO LA HERRAMIENTA.
Seguridad eléctrica
El motor eléctrico está diseñado para un solo voltaje. Compruebe siempre que el voltaje de la batería coincida
con el voltaje que gura en la placa de especi caciones. Asegúrese también de que el voltaje del cargador
coincida con el de la red eléctrica.
Su cargador DEWALT® tiene doble aislamiento de conformidad con la norma EN60335 y por ello no
requiere conexión a tierra.
Uso de un cable prolongador
No debe utilizarse cable prolongador a menos que sea estrictamente necesario. Use un cable prolongador
aprobado y adecuado a la potencia de entrada del cargador (consulte Datos técnicos). La dimensión mínima
del conductor es de 1 mm
2
y la longitud máxima es de 30 m.
Si utiliza un prolongador enrollable, desenrolle siempre el cable completamente.
Antes de usar
• Seleccione el tipo de sufridera que corresponda y móntela en carcasa de la boquilla.
• Compruebe que la batería esté totalmente cargada.
• Inserte la batería en la herramienta.
• Tire velozmente y suelte el activador para colocar la herramienta en la posición de inicio.
4. Instrucciones de funcionamiento
Use siempre protectores auditivos y gafas cuando utilice herramientas de colocación.
ADVERTENCIA: Antes de ajustar la herramienta, extraiga siempre la batería.
4.1. CONJUNTO DE LA BOQUILLA
El dibujo de la ProSet® PB2500 se encuentra dentro de la cubierta
El dibujo de la ProSet® PB3400 se encuentra dentro de la contracubierta
Montaje de la boquilla (Fig. 7)
• Seleccione la sufridera correcta para el remache que va a colocar. Consulte el manual de accesorios para el
conjunto de sufridera correcto.
• Apriete la sufridera (A) en la carcasa de la boquilla (B) girando en sentido horario con una llave de 11 mm.
Montar el aprietamordazas y el tubo guía
PB2500 (Figs. 4 y 5)
• Seleccione el aprietamordazas o el conjunto de aprietamordazas (R) que coincida con la sufridera
seleccionada. Consulte el manual de accesorios para el conjunto de sufridera correcto.
• Introduzca el aprietamordazas (R) en el muelle del aprietamordazas (S).
• Vuelva a colocar el juego de mordazas (Q) y el portamordazas (P) en el bloqueo del portamordazas (U)
NOTA: NO use llaves para montar el portamordazas (P) en el bloqueo del portamordazas (U) Apretar
manualmente el portamordazas (P) es su ciente para bloquearla sobre el bloqueo del portamordazas (U)
Page 65

14
ESPAÑOL
PB3400 (Figs. 4 y 5)
• Seleccione el aprietamordazas o el conjunto de aprietamordazas (R) y el tubo guía de vástagos (V)
correctos que coincidan con la boquilla seleccionada. Consulte el manual de accesorios para el conjunto
de sufridera correcto.
NOTA: El tubo guía de vástagos que viene instalado en la herramienta tal como se suministra coincide con la
sufridera instalada. Consulte el manual de accesorios para el equipamiento de sufridera correcto para el actual
número de pieza del tubo guía.
• Coloque el tubo guía (V) al fondo de la carcasa del cabezal de tracción (AD). Coloque el muelle del
embrague (AB) y del embrague del husillo (AA) sobre el tubo guía (V) y apriete el conjunto del cabezal de
tracción (AC) en sentido antihorario usando una llave de 24 mm.
• Introduzca el aprietamordazas (R) en el muelle del aprietamordazas (S).
• Vuelva a colocar el juego de mordazas (Q) y el portamordazas (P) en el cabezal de tracción (T)
NOTA: NO use llaves para montar el portamordazas (P) en el bloqueo del portamordazas (U) Apretar
manualmente el portamordazas (P) es suciente para bloquearla sobre el bloqueo del portamordazas (U)
4.2. CARGADORES
Su herramienta utiliza un cargador DEWALT®/POP® Avdel®. Lea todas las instrucciones de seguridad antes
de usar el cargador. El cargador no requiere ningún ajuste y ha sido diseñado para ser lo más fácil posible de
manejar.
Procedimiento de carga (Fig. 2)
• Enchufe el cargador en una toma de corriente adecuada antes de introducir la batería. (Consulte las
Especicaciones del cargador en la sección 2)
• Introduzca la batería (K) en el cargador y compruebe que la batería quede correctamente colocada en el
cargador. La luz roja (carga) pestañeará continuamente indicando que ha iniciado el proceso de carga.
• Sabrá que ha terminado la carga cuando la luz roja quede ENCENDIDA en modo jo. La batería está
totalmente cargada y podrá utilizarse en ese momento o dejarse en el cargador.
NOTA: Para asegurar el máximo rendimiento y vida útil de las baterías de iones de litio, cargue totalmente la
batería antes de usarla por primera vez.
Proceso de carga
Para conocer el estado de carga de la batería, véase el cuadro de aquí abajo.
Indicación de carga
cargando –– –– –– ––
completamente cargada –––––––––––––––––
retraso por batería caliente/fría –– • –– • –– • –– •
x
problema de la batería o el cargador • • • • • • • • • • • •
problema en la línea de
alimentación
•• •• •• •• •• ••
Este cargador no carga baterías defectuosos. El cargador indica que la batería es defectuosa no
encendiéndola, mostrando el problema de la batería o del cargador mediante pestañeo.
NOTA: Esto puede signicar también un problema en el cargador.
Si el cargador indica un problema, haga controlar el cargador y la batería en un centro de asistencia autorizado.
Page 66

15
ESPAÑOL
Retraso por batería caliente/fría
Cuando el cargador detecta que una batería está demasiado caliente o demasiado fría, inicia
automáticamente un Retraso por batería caliente/fría y suspende la carga hasta que la batería alcance la
temperatura adecuada. En ese momento, el cargador inicia automáticamente el modo de carga de la batería.
Esta función garantiza la máxima duración de la batería.
Una batería frío se carga a la mitad de la velocidad de una batería caliente. La batería se carga a una velocidad
inferior durante el ciclo completo de recarga y no vuelve a la velocidad de recarga máxima aunque la batería
se caliente.
Baterías de iones de litio
Las herramientas de iones de litio de STANLEY Engineered Fastening de la serie PB han sido diseñadas con un
sistema de protección electrónico que protege la batería de las sobrecargas, recalentamientos o descargas
intensas. La herramienta se apaga automáticamente al activarse el sistema de protección electrónico. Si esto
ocurre, coloque la batería de iones de litio en el cargador hasta que esté totalmente cargada.
4.3 BATERÍAS
Su herramienta ha sido diseñada para trabajar especícamente con baterías de iones de litio DEWALT®/POP®
Avdel® de 18 V/20 V máx.
Insertar y extraer la batería de la herramienta (Fig. 3)
NOTA: Para obtener mejores resultados, compruebe que la batería esté completamente cargado. La herramienta se
apaga sin ningún aviso cuando la batería esté totalmente cargada.
INSTALAR LA BATERÍA EN LA EMPUÑADURA DE LA HERRAMIENTA
• Alinee la batería (K) con las guías que se encuentran en el interior de la empuñadura de la herramienta (Fig. 3)
• Haga deslizar la batería en la empuñadura hasta que quede bien colocada en la herramienta y compruebe
que no se salga.
RETIRAR LA BATERÍA DE LA EMPUÑADURA
• Pulse el botón de desbloqueo de la batería y tire enérgicamente de la batería para sacarla de la
empuñadura de la herramienta.
• Introduzca la batería en el cargador tal y como se indica en la sección del cargador del presente manual.
Recomendaciones para el almacenamiento
• El mejor lugar de almacenamiento es uno que sea fresco y seco, que no esté expuesto directamente a la
luz del sol ni a un exceso de frío o calor. Para un rendimiento y vida útil óptimos de la batería, guarde las
baterías a temperatura ambiente cuando no las use.
• En caso de almacenamiento prolongado, se aconseja guardar la batería completamente cargada en un
lugar fresco y seco fuera del cargador para obtener óptimos resultados.
NOTA: Las baterías no deben guardarse completamente descargadas. La batería deberá recargarse antes del uso.
5. PROCEDIMIENTO DE TRABAJO
ADVERTENCIA: Respete siempre las instrucciones de seguridad y las normas aplicables.
ADVERTENCIA: Para reducir el riesgo de lesiones personales graves, desconecte la batería antes de
efectuar cualquier ajuste o instalar/extraer acoplamientos o accesorios.
ADVERTENCIA: Para reducir el riesgo de lesiones personales graves, mantenga SIEMPRE las manos en
la posición correcta.
ADVERTENCIA: Para reducir el riesgo de lesiones personales graves, tenga SIEMPRE bien aferrada la
herramienta para estar preparado ante cualquier eventualidad.
Page 67

16
ESPAÑOL
5.1 POSICIÓN CORRECTA DE LAS MANOS
La posición adecuada de las manos exige que una mano repose en la empuñadura principal (l) Fig. 1.
5.2. FUNCIONAMIENTO DE LA HERRAMIENTA
Colocar un remache (Fig. 8).
Para colocar un remache.
• Coloque el remache (Y) en la sufridera (A)
• Posicionar la herramienta (Fig. 9)
• Pulse y mantenga pulsado el gatillo (J) hasta que el remache esté completamente colocado en la
aplicación y suelte el gatillo nada más romper el vástago (Fig. 10).
• Si el remache (Y) no se ha colocado totalmente, suelte el gatillo (J). La herramienta volverá
automáticamente a su posición inicial. El vástago cae automáticamente en el colector de vástagos (W).
Si suelta el gatillo (J) antes de nalizar la carrera de colocación, la herramienta vuelve inmediatamente a su
posición inicial. Si el remache (Y) no se ha colocado totalmente, repita los pasos anteriores.
Función de restablecimiento (Fig.9)
Si la herramienta no vuelve a su posición inicial después de soltar el gatillo o se para durante la carrera de
colocación, restablezca la herramienta pulsando y soltando rápidamente el gatillo (J). Si esto no soluciona el
problema, saque la batería, vuelva a colocarla y repita el paso anterior.
Si el problema persiste, contacte con su representante local de servicios.
Vaciar el colector de vástagos (W) (Fig. 6)
El colector de vástagos se utiliza para recoger los vástagos rotos. El colector de vástagos debe vaciarse
dependiendo del diámetro de los remaches utilizados.
Diámetro nom. remache
Capacidad aproximada (PB2500) Capacidad aproximada (PB3400)
2,4 mm [3/32"] 600 No aplicable
3,2 mm [1/8"] 360 No aplicable
4,0 mm [5/32"] 200 No aplicable
4,8 mm [3/16"] 150 190
6,4 mm [1/4"] No aplicable 100
• Incline la herramienta hacia atrás para que los vástagos rotos caigan en el colector de vástagos.
• Para abrir el colector de vástagos (W), deslice el cierre del colector (D) hacia la tuerca de la carcasa de la
boquilla (C) y levante la tapa (E).
• Vacía los vástagos rotos en un contenedor de reciclaje o un cubo de basura.
• Para cerrar el colector de vástagos (X), baje la tapa (E) hasta que el cierre del colector (D) haga clic al
posicionarse en su lugar.
Colector de vástagos de vaciado rápido opcional (E2) (Fig. 6a)
Cuando use el accesorio del colector de vástagos de vaciado rápido opcional con las herramientas de la serie
PB, el colector de vástagos puede extraerse como sigue:
• Incline la herramienta hacia atrás para que los vástagos rotos caigan en el colector de vástagos (E2).
• Coja el colector de vástagos (E2) con una mano y desenganche el cierre del colector (D) con el dedo índice.
• Tire el colector de vástagos (E2) hacia arriba y hacia fuera de la herramienta, inclinando el colector
ligeramente hacia atrás para evitar que los vástagos se salgan.
• Para cambiar el colector, hágalo deslizar hacia atrás en la herramienta con la apertura mirando hacia la
parte delantera de la herramienta.
• Empuje el colector hacia abajo hasta oír que el cierre del colector (D) hace clic al posicionarse en su lugar.
Page 68

17
ESPAÑOL
6. MANTENIMIENTO DE LA HERRAMIENTA
6.1. FRECUENCIA DEL MANTENIMIENTO
Artículo Frecuencia
Inspección general de la herramienta Diaria
Limpieza y lubricación del conjunto de la boquilla 5.000 remaches
Limpieza y engrasado de tornillo de bolas y cojinete de empuje 50.000 remaches*
*Se recomienda contactar con el centro de servicios autorizado
6.2. LIMPIEZA
SIEMPRE use protectores auditivos y gafas cuando utilice equipos de limpieza.
Exterior de la herramienta
Mantenga los ori cios de ventilación del motor sin escobillas (H) libres de polvo y suciedad. Si es necesario,
use un paño suave humedecido para eliminar el polvo y la suciedad de los ori cios de ventilación.
Elimine con aire seco la suciedad y el polvo de la carcasa principal de la herramienta cada vez que advierta
que se acumula en los ori cios de ventilación (H) o cerca de ellos.
ADVERTENCIA: Cuando realice este procedimiento, use una protección ocular y una mascarilla
antipolvo aprobadas.
ADVERTENCIA: Nunca use disolventes u otros productos químicos fuertes para limpiar las piezas no
metálicas de la herramienta. Dichos productos químicos pueden debilitar los materiales con los que
están fabricadas estas piezas. Use un paño humedecido únicamente con agua y jabón suave. Nunca
deje que entre ningún líquido en la herramienta ni sumerja ninguna parte de la misma en un líquido.
Limpieza del conjunto de la boquilla (Figs. 4 y 5)
• A oje la tuerca de la carcasa de la boquilla (C). Extraiga la carcasa de la boquilla (B).
• Deslice el bloqueo del portamordazas (U) y a oje el aprietamordazas (P). Suelte el bloqueo del
portamordazas (U).
• Extraiga las mordazas (Q) y el aprietamordazas (R).
• Coloque el muelle (S).
• Limpie el interior de la carcasa (B) usando un paño seco.
• Limpie las mordazas (Q) y el aprietamordazas (R) usando un paño seco. Si es necesario, sustituya las
mordazas (Q) y el aprietamordazas (R).
• Limpie el cabezal de tracción (T) usando un paño seco.
• Aplique grasa en el interior del portamordazas (P), en el punto de contacto con las mordazas (Q). Se
recomienda usar grasa a base de bisulfuro de molibdeno.
• Coloque el muelle (S) sobre el aprietamordazas.
• Introduzca las mordazas (R) al fondo del portamordazas (Q) y manténgalas en su posición presionándolas
ligeramente con el apritamordazas (R).
• Deslice el bloqueo del portamordazas (U) y monte y apriete con la mano todo el conjunto anterior del
portamordazas (P). Suelte el bloqueo del portamordazas (U).
• Coloque la carcasa de la boquilla (B). Apriete la tuerca de la carcasa (C).
• Ejecute la función de restablecimiento de la herramienta para comprobar que esta esté en la posición
inicial, según se describe en la sección 5.2
Instrucciones de limpieza del cargador
ADVERTENCIA: Riesgo de descarga eléctrica. Antes de limpiarlo, desconecte el cargador de la toma
de corriente alterna.
Para limpiar la suciedad y grasa del exterior del cargador puede usarse un paño o un cepillo no metálico suave.
No utilice agua ni ningún producto de limpieza.
Page 69

18
ESPAÑOL
6.3 PIEZAS DE REPUESTO HERRAMIENTAS
Para las piezas de repuesto, consulte los manuales de mantenimiento especícos que puede encontrar en
nuestro sitio web en http://www.stanleyengineeredfastening.com/resource-center/document-library
6.4. BATERÍAS RECARGABLES
Esta batería de larga duración debe recargarse cuando deje de tener la suciente potencia para realizar el
remachado como lo hacía anteriormente. Al nal de su vida útil, deséchela respetando el medioambiente:
• Descargue completamente la batería, después extráigala de la herramienta.
• Las celdas de iones de litio son reciclables. Llévelas a su distribuidor o a un centro de reciclaje local. Las
baterías recogidas serán recicladas o eliminadas correctamente.
6.5. PROTECCIÓN DEL MEDIOAMBIENTE
Recogida selectiva. Este producto no debe desecharse con los residuos domésticos normales.
Si algún día se da cuenta que tiene que sustituir su producto POP®Avdel® o si ya no lo necesita, no lo
deseche junto con los residuos domésticos. Destine el producto a la recogida selectiva.
La recogida selectiva de productos y embalajes usados permite que los materiales sean reciclados
y utilizados nuevamente. La reutilización de materiales reciclados ayuda a prevenir la contaminación
medioambiental y reduce la demanda de materias primas.
Los reglamentos locales pueden prever la recogida de productos eléctricos separada de los residuos
domésticos en vertederos municipales o por el minorista cuando usted compra un producto nuevo.
Puede controlar la ubicación de su agente de reparaciones autorizado más próximo poniéndose en
contacto con la ocina local de POP®Avdel® en la dirección indicada en este manual. Como alternativa,
se encuentra a disposición una lista de agentes de reparaciones autorizados de POP®Avdel®,
los detalles completos de nuestro servicio posventa y los contactos online en:
www.StanleyEngineeredFastening.com
Page 70

19
ESPAÑOL
7. Declaración de conformidad CE
Original
Nosotros, Avdel UK Limited; Stanley House, Works Road, Letchworth Garden City, Hertfordshire, SG6 1JY
UNITED KINGDOM, declaramos bajo nuestra única responsabilidad que el producto:
Descripción Remachadora a batería POP®Avdel®
Marca/Modelo ProSet® PB2500 o ProSet® PB3400
N.º de serie
al que se reere la declaración es conforme a las siguientes normas:
2006/42/CE Directiva de máquinas
Instrumentos jurídicos 2008, n.º 1597 - Normas de suministro de maquinaria (seguridad)
aplicables.
2014/30/UE Directiva de compatibilidad electromagnética (CEM)
2011/65/UE Restricciones a la utilización de determinadas sustancias peligrosas en aparatos
eléctricos y electrónicos (RuSP)
y las normas:
ISO 12100:2010
EN62841-1:2015
La documentación técnica ha sido completada de conformidad con lo previsto en el Anexo 1, sección 1.7.4.1,
y de acuerdo con la directiva 2006/42/CE.
Fabricante:
Naito Nobuharu
Director sénior, I+D de Ingeniería
STANLEY Engineered Fastening, Nippon POP Rivets and Fasteners Ltd., Noyori-cho Hosoda, Toyohashi, Aichi
441-8540 JAPAN
Firma
Lugar de edición Japón
Fecha de edición 30. 10. 2016
Representante autorizado:
A. K. Seewraj
Director de Tecnología – EU Blind Fastening
Avdel UK Limited; Stanley House, Works Road, Letchworth Garden City, Hertfordshire, SG6 1JY UNITED KINGDOM
Esta máquina es conforme a la Directiva relativa a máquinas 2006/42/CE.
Traducción de la Instrucción Original
Page 71

20
ESPAÑOL
8. PROTEJA SU INVERSIÓN.
8.1. GARANTÍA DE LAS REMACHADORAS POP®AVDEL®
STANLEY Engineered Fastening garantiza que todas las herramientas han sido fabricadas cuidadosamente
y que no presentarán ningún defecto en sus materiales o en su funcionamiento en el periodo de un (1) año,
en condiciones de uso normal.
Prolongaremos la garantía de la herramienta (excluidas las baterías y el cargador) de un (1) año a dos (2) años
si registra su herramienta online (Consulte la Sección 8.2 al nal de esta página).
La garantía de la remachadora se aplica al primer comprador de la herramienta y sólo para su uso original.
Excepciones:
Desgaste normal.
El mantenimiento periódico, la reparación o la sustitución de piezas debido al desgaste normal están
excluidos de la garantía.
Uso indebido.
Cualquier defecto o daño causado por un uso o un almacenamiento inadecuado, un accidente o negligencia,
así como un daño físico, quedarán excluidos de la garantía.
Reparación o modicaciones no autorizadas.
Cualquier defecto o daño producido por un servicio, ajuste de prueba, instalación, mantenimiento
o modicación llevado a cabo por personal que no sea de STANLEY Engineered Fastening, o alguno de sus
centros autorizados, quedarán excluidos de la garantía.
No se aplicará ninguna otra garantía, expresa o implícitamente indicada, incluyendo las garantías de
comercialización o adecuación para un propósito concreto.
Si esta herramienta no cumple con la garantía, reenvíenosla rápidamente al servicio de fábrica autorizado
más cercano. Para obtener una lista de los Centros de servicio autorizados de POP®Avdel® en EE. UU. y Canadá,
póngase en contacto con nosotros llamando al número gratuito (877)364 2781.
Fuera de EE. UU. y Canadá, visite nuestro sitio web www.StanleyEnigineeredFastening.com para encontrar
la ocina de STANLEY Engineered Fastening más próxima a su localidad.
STANLEY Engineered Fastening sustituirá gratis cualquier pieza que, según nuestro criterio, sea defectuosa
debido a fallos del material o de fabricación, y devolverá la herramienta con franqueo pagado. Esto constituye
nuestra única obligación de conformidad con la presente garantía. En ningún caso STANLEY Engineered
Fastening se hará responsable de daños consecuentes o especiales que pudieran derivarse del uso de esta
herramienta.
8.2. REGISTRAR LA REMACHADORA ONLINE
Para registrar su garantía on-line, visite nuestra página
http://www.stanleyengineeredfastening.com/popavdel-powertools/warranty-card. Gracias por elegir
una herramienta de la marca POP®Avdel® de STANLEY Engineered Fastening.
Page 72

4
SUOMI
©2016 Stanley Black & Decker
Kaikki oikeudet pidätetään.
Tässä olevia tietoja ei saa jäljentää ja/tai julkistaa millään tavalla tai millään keinoilla (sähköisesti tai mekaanisesti) ilman STANLEY Engineered
Fasteningin etukäteen hankittua kirjallista lupaa. Annetut tiedot perustuvat tuotteen julkaisuhetkellä tiedettyihin tietoihin. STANLEY Engineered
Fastening pyrkii jatkuvaan tuotekehittelyyn ja tämän vuoksi tuotteita saatetaan muuttaa. Annetut tiedot soveltuvat tuotteeseen siinä muodossa,
kuin STANLEY Engineered Fastening on sen toimittanut. Tämän vuoksi STANLEY Engineered Fasteningia ei voida pitää vastuussa mistään
vahingoista, jotka aiheutuvat poikkeamista tuotteen alkuperäisistä teknisistä tiedoista.
Tiedot on laadittu äärimmäisen huolellisesti. STANLEY Engineered Fastening ei kuitenkaan ota vastuuta tietojen virheistä tai virheiden seurauksista.
STANLEY Engineered Fastening ei hyväksy vastuuta kolmansien osapuolien suorittamien toimien aiheuttamista vaurioita. STANLEY Engineered
Fasteningin käyttämiä alustavia nimiä, kauppanimiä, rekisteröityjä tavaramerkkejä jne. ei tule pitää ilmaisina tavaramerkkien suojan lainsäädännön
mukaisesti.
SISÄLTÖ
Huomaa: Malliin ProSet® PB2500 viittaavat kaaviot ovat etukannen liitteessä
Malliin ProSet® PB3400 viittaavat kaaviot ovat takakannen liitteessä
1. TURVAMÄÄRITYKSET ............................................................................................................................... 5
1.1 Yleinen turvallisuus .........................................................................................................................................................................5
1.2 Sähkötyökalun käyttö ja hoito ....................................................................................................................................................5
1.3 Tärkeitä turvallisuusohjeita latauslaitetta käytettäessä .....................................................................................................6
1.4 Akkujen tärkeitä turvallisuusohjeita..........................................................................................................................................7
1.5 Litiumioniakkujen (Li-Ion) erityiset turvaohjeet ...................................................................................................................8
1.6 Jäännösriskit ......................................................................................................................................................................................8
1.7 Merkit ja kuvakkeet .........................................................................................................................................................................8
2. TEKNISET TIEDOT ......................................................................................................................................9
2.1 Tekniset tiedot ...................................................................................................................................................................................9
2.2 Asetuksen tekniset tiedot ..........................................................................................................................................................11
2.3 Pakkauksen sisältö ........................................................................................................................................................................ 11
2.4 Pääkomponenttien luettelo ...................................................................................................................................................... 12
2.5 Valinnaiset lisävarusteet .............................................................................................................................................................12
3. TYÖKALUN KÄYTTÖ JA ASETUS .............................................................................................................13
4. KÄYTTÖOHJEET .......................................................................................................................................13
4.1 Kärkilaite .......................................................................................................................................................................................... 13
4.2 Laturit ................................................................................................................................................................................................ 14
4.3 Akut .................................................................................................................................................................................................... 15
5. KÄYT TÖ .....................................................................................................................................................15
5.1 Oikeaoppinen käden asento ..................................................................................................................................................... 16
5.2 Työkalun käyttö .............................................................................................................................................................................16
6. TYÖKALUN HUOLTO ................................................................................................................................17
6.1 Huoltovälit ....................................................................................................................................................................................... 17
6.2 Puhdistus .......................................................................................................................................................................................... 17
6.3 Varaosat – Työkalut ....................................................................................................................................................................... 18
6.4 Ladattava akku ............................................................................................................................................................................... 18
6.5 Ympäristönsuojelu ........................................................................................................................................................................18
7. EYVAATIMUSTENMUKAISUUSVAKUUTUS ..........................................................................................19
8. SUOJAA SIJOITUKSESI ............................................................................................................................20
8.1 POP®Avdel®-niittauskoneen takuu .........................................................................................................................................20
8.2 Sokkoniittien niittauskoneen rekisteröinti netissä ...........................................................................................................20
Alkuperäisen käyttöohjeen käännös
Page 73

5
SUOMI
Kaikkien tätä työkalua asentavien tai käyttävien henkilöiden tulee lukea tämä käyttöohje ja kiinnittää
erityistä huomiota seuraaviin turvasääntöihin.
1. TURVAMÄÄRITYKSET
Alla näkyvät selitykset liittyvät turvallisuuteen. Lue käyttöohje ja kiinnitä huomiota näihin symboleihin.
VAARA: Ilmoittaa, että olemassa on välitön kuoleman tai vakavan henkilövahingon vaara.
HUOMIO: Ilmoittaa, että olemassa on mahdollinen lievän tai keskivakavan henkilövahingon vaara.
VAROITUS: Ilmoittaa, että olemassa on kuoleman tai vakavan henkilövahingon mahdollisuus.
HUOMAUTUS: Ilmoittaa, käytännöstä, joka ei koske henkilövahinkoja, mutta voi johtaa
omaisuusvahinkoihin.
Sähköiskun vaara
Tulipalon vaara
Tuotteen virheellinen käyttö tai ylläpito saattaa aiheuttaa vakavan loukkaantumisen ja
omaisuusvahingon. Sinun tulee lukea ja ymmärtää kaikki varoitukset ja käyttöohjeet ennen laitteiston
käyttöä. Sähkötyökaluja käyttäessä tulee noudattaa aina perusvarotoimia henkilövahinkovaaran
välttämiseksi.
1.1 YLEINEN TURVALLISUUS
VAROITUS! Lue kaikki turvallisuusvaroitukset ja ohjeet. Jos varoituksia ja ohjeita ei noudateta, on
olemassa sähköiskun, tulipalon ja/tai vakavan henkilövahingon vaara.
SÄILYTÄ KAIKKI VAROITUKSET JA OHJEET MYÖHEMPÄÄ KÄYTTÖÄ VARTEN
Näissä varoituksissa käytettävä sähkötyökalu-ilmaus viittaa verkkovirtaan yhdistettävään tai akkukäyttöiseen
työkaluun.
• Älä käytä muuhun käyttötarkoitukseen kuin STANLEY Engineered Fastening -sokkoniittien kiinnittämiseen.
• Käytä vain valmistajan suosittelemia osia, kiinnikkeitä ja lisävarusteita.
• Käytä sähkötyökalussa vain siihen tarkoitettuja akkuja.
1.2 SÄHKÖTYÖKALUN KÄYTTÖ JA HOITO
• Koulutetun henkilöstön täytyy aina ylläpitää työkalu turvallisessa työtilassa. ja se tulee tarkistaa säännöllisin
väliajoin vaurioiden ja toiminnan osalta. Vain koulutettu henkilöstö saa purkaa laitteen. Älä pura työkalua
ilman, että tutustut ylläpito-ohjeisiin.
• Älä koskaan tee työkaluun mitään muutoksia. Kaikki asiakkaan työkaluun tekemät muutokset ovat täysin
asiakkaan omalla vastuulla ja ne mitätöivät kaikki sovellettavat takuut.
• Irrota akku työkalusta ennen kuin teet ylläpitotöitä, yrität säätää, asettaa tai irrottaa kärkikokoonpanoa.
• Tarkista ennen käyttöä liikkuvat osat, niiden kiinnitys, osien eheys ja muut toimintaan vaikuttavat tekijät. Jos
havaitset vaurioita, korjauta työkalu ennen sen käyttämistä. Poista jakoavain tai kiintoavain ennen käyttöä.
• Tarkista akku vaurioiden varalta ennen käyttöä. Akkua ei saa pudottaa. Terävä isku voi aiheuttaa sisäisiä
vaurioita ja johtaa akun ennenaikaiseen vahingoittumiseen.
• Pidä työskentelyalue siistinä ja kirkkaasti valaistuna.
Page 74

6
SUOMI
• Pukeudu asianmukaisesti. Älä käytä löysiä vaatteita tai koruja. Pidä hiukset, vaatteet ja kädet loitolla
liikkuvista osista. Löysät vaatteet, korut tai pitkät hiukset voivat juuttua liikkuviin osiin.
• Ota vakaa jalansija tai tukeva asento, ennen kuin käytät työkalua.
• Käyttäjien ja muiden työalueella tulee käyttää ANSI Z87.1 CAN/CSA Z94.3 tai muita hyväksyttyjä turvalaseja,
joissa on sivusuojat. Käytä aina suojalaseja ja korvasuojia käytön aikana.
• Työkalun käyttäjän kädet tulee pitää riittävän etäällä ennen jatkamista.
• Älä käytä työkalua, kun se on suunnattu ihmisiin päin.
• ÄLÄ käytä työkalua, jos kärjen kotelo on irrotettu.
• Älä käytä työkalua tai laturia räjähdysalttiissa ympäristössä tai paikassa, jossa on palavia nesteitä tai kaasuja.
• Älä käytä työkalua tai laturia paikassa, jossa se altistuu kosteudelle tai sateelle sähköiskuvaaran välttämiseksi.
• Älä käytä työkalua väärin pudottamalla se tai käyttämällä sitä vasarana.
• Pidä lika ja vieraat esineet poissa työkalun ilmankiertoaukoista, koska ne voivat aiheuttaa työkalun
toimintahäiriön.
• Pidä työkalun kahvat kuivina, puhtaina sekä puhtaina öljystä ja rasvasta.
• Kun kannat työkalua paikasta toiseen, pidä kätesi poissa liipaisimelta, jotta vältät työkalun tahattoman
käynnistymisen.
• Älä koskaan jätä toimivaa työkalua valvomatta.
• Irrota akku, kun työkalu ei ole käytössä.
1.3 TÄRKEITÄ TURVALLISUUSOHJEITA LATAUSLAITETTA KÄYTETTÄESSÄ
SÄILYTÄ NÄMÄ OHJEET: Tämä ohjekirja sisältää tärkeitä turvallisuus- ja käyttöohjeita yhteensopiviin
akkulatureihin (ks. tekniset tiedot).
• Lue kaikki laturin, akkuyksikön ja akkuyksikköä käyttävän tuotteen ohjeet ja varoitusmerkinnät ennen laturin
käyttöä.
VAROITUS: Sähköiskun vaara. Älä päästä nestettä laturin sisään. Se voi aiheuttaa sähköiskun.
VAROITUS: Suosittelemme käyttämään vikavirtasuojakytkintä, jonka nimellisjäännösvirta on korkeintaan
30 mA.
HUOMIO: Palovamman vaara. Loukkaantumisriskin vähentämiseksi lataa vain ladattavia DEWALT®/
POP®Avdel®-akkuja. Muunlaiset akut voivat räjähtää sekä aiheuttaa henkilö- ja omaisuusvahinkoja.
HUOMIO: Lapsia tulee valvoa ja varmistaa, että he eivät leiki laitteella.
HUOMAUTUS: Tietyissä olosuhteissa kun laturi on liitetty tehosyöttöön, vieras materiaali voi aiheuttaa laturin
oikosulun. Johtavat materiaalit kuten, mutta ei näihin rajoittuen, hiomapöly, metallihiukkaset, teräsvilla,
alumiinifolio tai muu metallipartikkeleiden kasaantuma, tulee pitää poissa laturin aukoista. Irrota laturi aina
tehonsyötöstä, kun laturissa ei ole akkua. Irrota laturi tehonsyötöstä ennen kuin yrität puhdistaa sitä.
• ÄLÄ YRITÄ ladata akkua millään muulla laturilla kuin tässä käyttöohjeessa mainituilla. Laturi ja akku on
suunniteltu erityisesti toimimaan yhdessä.
• Näitä latureita ei ole tarkoitettu käytettäväksi mihinkään muuhun tarkoitukseen kuin ladattavien DEWALT®/
POP®Avdel® -akkujen lataamiseen. Muu voi aiheuttaa tulipalon tai jopa kuolettavan sähköiskun riskin.
• Älä jätä laturia sateeseen tai lumeen.
Page 75

7
SUOMI
• Vedä pistokkeesta äläkä johdosta, kun irrotat laturia verkkovirrasta. Tämä vähentää pistokkeen ja
sähköjohdon vahingoittumisen riskiä.
• Varmista, että johto sijaitsee niin, että sen päälle ei astuta, siihen ei kompastu tai että siihen ei muuten
kohdistu vaurioita tai rasitusta.
• Älä käytä jatkojohtoa ellei se ole ehdottoman välttämätöntä. Jatkojohdon virheellinen käyttö voi aiheuttaa
tulipalon tai jopa kuolettavan sähköiskun riskin.
• Älä aseta mitään esineitä laturin päälle tai aseta laturia pehmeälle alustalle, joka voi tukkia laitteen
ilmankiertoaukot ja aiheuttaa sen ylikuumenemisen. Sijoita laturi pois lämpölähteiden läheltä. Laturin
ilmankierto tapahtuu kotelon ylä- ja alaosissa olevien aukkojen kautta.
• Älä käytä laturia, jos johto tai pistoke on vahingoittunut — vaihdata ne välittömästi.
• Älä käytä laturia, jos siihen on kohdistunut terävä isku, se on pudotettu tai muuten vahingoittunut millään
tavalla. Vie se valtuutettuun huoltoon.
• Älä pura laturia. Vie se valtuutettuun huoltoon, jossa se huolletaan tai korjataan. Virheellinen kokoaminen voi
aiheuttaa tulipalon tai jopa kuolettavan sähköiskun riskin.
• Irrota laturi pistorasiasta ennen kuin yrität puhdistaa sitä. Tämä vähentää sähköiskun vaaraa. Akun
poistaminen ei vähennä riskiä.
• ÄLÄ KOSKAAN yritä yhdistää kahta laturia yhteen.
• Laturi on tarkoitettu toimimaan standardilla kotitalouksien verkkovirralla (ks. laturin tekniset tiedot). Älä yritä
käyttää mitään muuta kuin määritettyä jännitettä. Tämä ei koske autolaturia.
1.4 AKKUJEN TÄRKEITÄ TURVALLISUUSOHJEITA
Kun tilaat uutta akkua, ilmoita tuotenumero ja jännite.
Pakkauksen akkua ei ole ladattu täyteen. Lue alla olevat turvallisuusohjeet ennen akkulaturin ja laturin käyttöä.
Noudata sen jälkeen annettuja latausohjeita.
LUE KAIKKI OHJEET
• Älä lataa tai käytä akkua räjähdysalttiissa ympäristössä, esimerkiksi tilassa, jossa on syttyviä nesteitä, kaasuja
tai pölyä. Akun laittaminen laturiin tai poistaminen laturista voi sytyttää pölyn tai höyryt.
• Älä koskaan pakota akkua laturiin. Älä muokkaa akkua millään tavalla saadaksesi sen sopimaan
yhteensopimattomaan laturiin, sillä akku saattaa murtua ja aiheuttaa vakavan henkilökohtaisen vaurion.
• Lataa akut ainoastaan DEWALT®/POP®Avdel®.
• ÄLÄ roiskuta vettä tai upota veteen tai muihin nesteisiin.
• Älä säilytä tai käytä työkalua ja akkuyksikköä paikassa, jossa lämpötila voi saavuttaa tai ylittää 40 ˚C (104 ˚F)
(kuten kesällä ulkokatoksissa tai metallirakennuksissa).
• Kun akku ei ole käytössä, pidä se poissa muiden metalliesineiden läheltä, kuten paperiliittimien, kolikoiden,
avainten, naulojen, ruuvien tai muiden pienten esineiden läheltä. Ne voivat oikosulkea akun navat.
• Akkuja ei saa hävittää veteen.
VAROITUS: Älä koskaan yritä avata akkua mistään syystä. Jos akkukotelo on murtunut tai vahingoittunut,
älä laita sitä laturiin. Älä riko, pudota tai vahingoita akkua. Älä käytä akkua tai laturia, johon on osunut
terävä isku, joka on pudotettu tai vahingoittunut millään tavalla (esim. lävistetty naulalla, isketty vasaralla,
astuttu päälle). Se voi aiheuttaa jopa kuolettavan sähköiskun. Vahingoittuneet akut tulee palauttaa
huoltoon kierrätystä varten.
VAROITUS: Tulipalon vaara. Akkua ei saa säilyttää tai kuljettaa niin, että akun napoihin pääsee
kosketuksiin metalliesineitä. Yksittäisiä akkuja kuljettaessa tulee varmistaa, että akun navat on suojattu ja
eristetty hyvin materiaaleilta, jotka voivat koskettaa niihin ja aiheuttaa oikosulun.
HUOMIO: Kun työkalua ei käytetä, aseta se vakaalle alustalle kyljelleen, jotta se ei aiheuta putoamis- tai
kompastumisvaaraa. Kookkaalla akulla varustetut työkalut voidaan jättää pystyasentoon, mutta ne
kaatuvat helposti.
Page 76

8
SUOMI
1.5 LITIUMIONIAKKUJEN (LI-ION) ERITYISET TURVAOHJEET
1. Älä hävitä akkua polttamalla, vaikka se olisi vaurioitunut pahasti tai tullut elinkaarensa päähän. Akku
voi räjähtää poltettaessa. Litiumioniakkuja poltettaessa syntyy myrkyllisiä kaasuja ja aineita.
2. Jos akun sisältöä pääsee iholle, huuhtele heti miedolla saippualla ja vedellä. Jos akkunestettä pääsee
silmään, huuhtele avointa silmää vedellä 15 minuutin ajan, kunnes ärsytys lakkaa. Jos on hakeuduttava lääkärin
hoitoon, ilmoita, että akun elektrolyytti on nestemäisten orgaanisten karbonaattien ja litiumsuolojen seosta.
3. Avatun akkukennon sisältö voi ärsyttää hengitysteitä. Hakeudu raittiiseen ilmaan. Jos oireet jatkuvat, ota
yhteys lääkäriin.
VAROITUS: Palovamman vaara. Akkuneste voi syttyä altistuessaan kipinälle tai liekille.
1.6 JÄÄNNÖSRISKIT
Turvamääräysten noudattamisesta ja turvalaitteiden käyttämisestä huolimatta tiettyjä vaaroja ei voida välttää.
Näitä ovat seuraavat:
− Kuulon heikkeneminen
− Lentävien kappaleiden aiheuttamat henkilövahingot
− Käytön aikana kuumenevien varusteiden aiheuttamat palovammat
− Pitkäaikaisen käyttämisen aiheuttamat henkilövahingot
1.7 MERKIT JA KUVAKKEET
Työkalun merkinnät
PÄIVÄMÄÄRÄKOODIN SIJAINTI: Päivämääräkoodi sisältää vuoden, kuukauden ja valmistajan sijainnin ja se
on merkitty kotelon pintaan laitteen ja akun väliin.
Latauslaitteen ja akun tarrat
Tässä käyttöohjeessa käytettävien kuvakkeiden lisäksi latauslaitteessa ja akussa käytetään seuraavia
kuvakkeita.
Lue käyttöohjeet ennen käyttämistä. Älä altista vedelle.
Lue käyttöohjeet ennen käyttämistä. Vaihdata vialliset akut heti.
Akkua ladataan. Lataa vain lämpötilassa 4–40 °C.
Akku on ladattu. Toimita akku kierrätykseen
ympäristöystävällisellä tavalla.
Liian kuumaa tai kylmää akkua ei ladata. Älä hävitä akkuyksikköä polttamalla.
x
Ongelma akussa tai laturissa. Lataa litiumioniakkuja.
Ongelma virtajohdossa. Latausajan tiedot ovat Teknisissä
tiedoissa.
Älä työnnä sähköä johtavia esineitä
laitteen sisään.
Käytettäväksi vain ulkona.
Page 77

9
SUOMI
Älä lataa vaurioitunutta akkua. Lataa DEWALT®/POP®Avdel®-akkuja
ainoastaan niiden lataukseen
tarkoitetuilla DEWALT®/POP®Avdel®latureilla. Muiden kuin vastaavien
DEWALT®/POP®Avdel®-akkujen
lataaminen DEWALT®/POP®Avdel®laturilla voi aiheuttaa niiden
räjähtämisen tai muita vaaratilanteita.
STANLEY Engineered Fastening -ohjeistus
on jatkuvan tuotekehityksen ja parantelun alaisena,
ja varaamme oikeuden muuttaa minkä tahansa
tuotteen teknisiä tietoja ilman etukäteisilmoitusta.
2. TEKNISET TIEDOT
MISSÄ TAPAUKSESSA MITÄÄN YLLÄPITO TAI HUOLTOTÖITÄ EI SAA SUORITTAA LUKUUN
OTTAMATTA KÄRKILAITTEISTON VAIHTOA.
2.1 TEKNISET TIEDOT
2.1.1.
ProSet® PB2500 ProSet® PB3400
Jännite V 18 nim. / 20 maks. 18 nim. / 20 maks.
Tyyppi 1/2 2
Akkutyyppi Litiumioni Litiumioni
Paino (ilman akkua) kg 1,35 1,77
Lpa (äänenpaine) dB(A) 74 77
Kpa (äänenpaineen vaihtelu) dB(A) 3 4
Lwa (ääniteho) dB(A) 85 88
Kwa (äänitehon vaihtelu) dB(A) 3 4
Tärinän kokonaisarvot (kolmiakselivektorisumma) EN 60745 -standardin mukaisesti:
Tärinäpäästöarvo ah
ah = m/s2 < 2,5 < 2,5
Vaihtelu K = m/s2 1,5 1,5
2.1.2.
Malli
PB2500
2,0 Ah
PB2500
3,0 Ah
PB2500
4,0 Ah
PB3400
2,0 Ah
PB3400
4,0 Ah
Paino kg [lbs] 1,7 [3,75] 2,0 [4,41] 2,0 [4,41] 2,1 [4,63] 2,4 [5,29]
Pituus mm [in] 320 [12,6] 320 [12,6] 320 [12,6] 336 [13,2] 336 [13,2]
Korkeus mm [in] 240 [9,4] 260 [10,2] 260 [10,2] 255 [10,0] 255 [10,0]
Isku mm [in] 25 [0,984] 25 [0,984] 25 [0,984] 30 [1,181] 30 [1,181]
Vetovoima N [lbf]
8500
[1911]
8500
[1911]
8500
[1911]
18000 [4047] 18000 [4047]
Niittiväli
nimel-
lishalk.
mm [in]
ø 2,4 [3/32”]) läpi
ø 4,8 [3/16”])
ø 4,8 [3/16“] läpi
ø 6,4 [1/4“]
Page 78

10
SUOMI
2.1.3.
Akku*
Akun tyyppi Litiumioni
Jännite V
DC
18 nim. / 20 maks.
Kapasiteetti Ah 2,0/3,0/4,0
Paino kg 0,40/0,64/0,61
Latausaika** min 30/45/60
Latauslaite* NA JP QW/GB/XE
Akun tyyppi Litiumioni Litiumioni Litiumioni
Akkutyyppi Verkkojännite V
AC
120 100 230
Syöttötaajuus Hz 60 50/60 50
Paino kg 0,50 0,50 0,50
Sulakkeet
Eurooppa 230 Vtyökalut 10 ampeeria, verkkovirta
Iso-Britannia ja Irlanti 230 Vtyökalut 3 ampeeria, pistokkeet
*PB-sarjan työkaluja voidaan käyttää DEWALT®/POP®Avdel® 18 V nim./20 V maks. liu'utettavilla litiumioniakuilla
** Latausaika perustuu DCB115 DEWALT®-latausyksiköihin
2.1.4.
Arvioitu niittimäärä latausta kohti
Niitin nimellishalk.
mm [in]
Akku 2,0 Ah Akku 3,0 Ah Akku 4,0 Ah
PB2500
ø 2,4 [3/32] 1700 2600 3400
ø 3,2 [1/8] 1600 2400 3200
ø 4,0 [5/32] 1400 2200 2800
ø 4,8 [3/16] 1200 1800 2400
PB3400
ø 4,8 [3/16] 1000 - 2000
ø 6,4 [1/4] 500 - 1000
Huomaa: Nämä arvot ovat ainoastaan viitteellisiä ja täyteen ladattuun akkuun perustuvia arviointeja. Tulokset
voivat vaihdella niitattavan materiaalin, työkalun/akun kunnon ja työympäristön mukaan.
Page 79

11
SUOMI
2.2 ASETUKSEN TEKNISET TIEDOT
Niittityyppi
ASETUSKAPASITEETTI
PB2500 PB3400
2,0mm2,4 mm
[3/32´´]
3,0mm3,2 mm
[1/8´´]
4,0 mm
[5/32´´]
4,8 mm
[3/16´´]
5,0/
6,0/7,0
mm
4,8 mm
[3/16´´]
6,0 mm
6,4 mm
[1/4´´]
8,0/9,0
mm
AVOIN PÄÄ
SULJETTU PÄÄ
AVEX®/
STAVEX®
AVINOX®/
AVIBULB®
HR/HT
INTERLOCK®
HEMLOK®
KLAMP-TITE®/
KTR
BULBEX®/
LS/TL
MONOBOLT®
MULTI-GRIP
PULL-THRU
(PT)
Q-NIITTI
T-LOK®
T Rivet
AVSEAL® II
Huomaa: Katso lisätietoa kärkilaitteesta lisävarusteiden ohjekirjasta.
2.3 PAKKAUKSEN SISÄLTÖ
Pakkauksen sisältö:
1 Langaton asennustyökalu**
1 Laturi
1 tai useampi litiumioniakku*
1 sarja kärkilaitteen lisävarusteita
1 sarjakotelo
1 käyttöohje
* Litiumioniakkujen tyyppi ja määrä riippuu mallinumerosta ja markkina-alueesta. Pyydä lisätietoa valinnoista
paikalliselta jälleenmyyjältä
** Jos hankittu malli on pelkkä työkalu, langaton asennustyökalu sisältää ainoastaan asennetun avopäisen
kärkilaitteen 6,4 mm [1/4“] vakiosarjan.
Page 80

12
SUOMI
2.4 PÄÄKOMPONENTTIEN LUETTELO (katso työkalun täydellinen kaavio ja materiaaliluettelo huolto-ohjeesta)
ProSet® PB2500 -kaavio löytyy etukannesta
ProSet® PB3400 -kaavio löytyy takakannesta
A Kärkikappaleet O Akkulaturin liitäntä
B Kärkikappaleen kotelo P Istukan ohjain
C Kärkikappaleen kotelon mutteri Q Istukka
D Sulkimen lukitus R Istukan työntökappale
E Keräimen suljin S Jousi
E2 Keräysyksikkö pikaliitännällä T Vetopää
F Koukkuvaruste U Etukytkin
G Moottorin kotelo V Takaosan ohjain
H Ilmanpoistoaukko W Keräysyksikön tila
I Kahva Y Niitti
J Kytkin Z Istukan työntökappale
K Akku AA Karan kytkin
L Käyttöohje AB Karan kytkimen jousi
M Laturin lamppu AC Vetopään kokoonpano
N Laturi AD Vaihteiston kotelo
2.5 VALINNAISET LISÄVARUSTEET
VAROITUS: Koska tämän tuotteen kanssa ei ole testattu muita kuin POP®Avdel®-lisävarusteita,
muiden lisävarusteiden käyttö tämän työkalun kanssa voi olla vaarallista. Tämän tuotteen kanssa tulee
käyttää ainoastaan POP®Avdel®:n suosittelemia lisävarusteita. Näin toimimalla vähennetään myös
vahingoittumisriskiä.
Kysy jälleenmyyjältäsi lisätietoja työkaluusi soveltuvista lisävarusteista.
VAROITUS: Vähennä vakavan henkilövahingon vaaraa irrottamalla akku ennen säätöjä tai liitososien
tai lisävarusteiden poistamista/asentamista.
Katso kaikki PB-sarjaan saatavilla olevat kärkilaitteet ja muut lisävarusteet verkko-osoitteesta
http://www.stanleyengineeredfastening.com/resource-center/document-library
Page 81

13
SUOMI
3. Työkalun käyttö ja asetus
PB-työkalusarja on tarkoitettu STANLEY Engineered Fastening -sokkoniittien kiinnittämiseen.
ÄLÄkäytä kosteissa olosuhteissa tai jos laitteen lähellä on syttyviä nesteitä tai kaasuja.
LUE KAIKKI VAROITUKSET JA OHJEET ENNEN TYÖKALUN KÄYTTÖÖNOTTOA.
Sähköturvallisuus
Sähkömoottori toimii vain yhdellä jännitteellä. Tarkista aina, että akun jännite vastaa laitteen tyyppikilpeen
merkittyä jännitettä. Tarkista myös, että latauslaitteen jännite vastaa sähköverkon jännitettä.
DEWALT®-laturi on kaksoiseristetty EN60335-säädösten mukaisesti, joten maadoitusjohtoa ei tarvita.
Jatkojohdon käyttäminen
Jatkojohtoa saa käyttää vain, jos se on ehdottoman välttämätöntä. Käytä laturin vaatimukset täyttävää
hyväksyttyä jatkojohtoa (ks. tekniset tiedot). Johdinten pienin koko on 1 mm2 ja suurin pituus 30 m.
Jos käytät johtokelaa, kelaa johto aina kokonaan auki.
Ennen käyttöä
• Valitse sopiva kärkilaitteisto ja asenna
• Varmista, että akku on ladattu täyteen
• Aseta akku laitteeseen
• Paina liipaisinta ja vapauta se nopeasti työkalun asettamiseksi lähtöasentoon.
4. Käyttöohjeet
Käytä aina hyväksyttyjä kuulonsuojaimia ja suojalaseja asennuslaitteistoa käyttäessä.
VAROITUS: Poista akku ennen työkalun säätämistä.
4.1. KÄRKILAITE
ProSet® PB2500 -kaavio löytyy etukannesta
ProSet® PB3400 -kaavio löytyy takakannesta
Kärkikappaleen asentaminen (kuva 7).
• Valitse oikea kärkikappale asennettavalle niitille. Katso asianmukaiset kärkilaitteet lisävarusteiden
ohjekirjasta.
• Kiristä kärkikappale (A) kärkikappaleen koteloon (B) kiertämällä sitä myötäpäivään 11 mm:n kiintoavaimella.
Istukan työntökappaleen ja takaosan ohjaimen asentaminen
PB2500 (kuvat 4 & 5)
• Valitse oikea istukan työntökappale tai istukan työntökokoonpano (R), joka vastaa valittua
kärkikappaletta. Katso asianmukaiset kärkilaitteet lisävarusteiden ohjekirjasta.
• Aseta istukan työntökappale (R) vastaavaan istukan työntökappaleen jouseen (S).
• Asenna istukkasarja (Q) ja istukan ohjain (P) etukytkimeen (U)
HUOMAA: ÄLÄ käytä kiintoavaimia asentaessasi istukkasarjaa (Q) ja istukan ohjainta (P) etukytkimeen (U)
Istukan ohjain (P) voidaan kiristää käsin sen lukitsemiseksi etukytkimeen (U)
Page 82

14
SUOMI
PB3400 (kuvat 4 ja 5)
• Valitse oikea istukan työntökappale tai istukan työntökokoonpano (R) sekä takaosan ohjain (V), jotka
vastaavat valittua kärkikappaletta. Katso asianmukaiset kärkilaitteet lisävarusteiden ohjekirjasta.
HUOMAA: Työkaluun esiasennettu takaosan ohjain sopii asennettuun kärkikappaleeseen. Katso lisätietoa
takaosan ohjaimen osanumeroon sopivasta kärkilaitteesta lisävarusteiden ohjekirjasta.
• Aseta takaosan ohjain (V) vaihteiston kotelon (AD) karaan. Aseta karan kytkimen jousi (AB) ja karan kytkin
(AA) takaosan ohjaimen (V) päälle ja kiristä vetopään kokoonpano (AC) kiertämällä sitä vastapäivään
24 mm:n kiintoavaimella.
• Aseta istukan työntökappale (R) vastaavaan istukan työntökappaleen jouseen (S)
• Asenna istukkasarja (Q) ja istukan ohjain (P) vetopäähän (T)
HUOMAA: ÄLÄ käytä kiintoavaimia asentaessasi istukkasarjaa (Q) ja istukan ohjainta (P) etukytkimeen (U)
Istukan ohjain (P) voidaan kiristää käsin sen lukitsemiseksi etukytkimeen (U)
4.2. LATURIT
Työkalu ladataan DEWALT®/POP® Avdel® -laturilla. Lue aina kaikki turvallisuusohjeet ennen laturin käyttöä.
Laturi ei vaadi säätöä ja sen käyttö on suunniteltu mahdollisimman helpoksi.
Lataaminen (kuva 2)
• Yhdistä laturi sopivaa pistorasiaan ennen kuin laitat siihen akun. (Katso laturin määritykset osiosta 2)
• Aseta akku (K) laturiin ja varmista, että se on hyvin paikoillaan laturissa. Punainen (latauksen) merkkivalo
vilkkuu jatkuvasti ilmoittaen, että latausprosessi on alkanut.
• Kun akku on ladattu täyteen, punainen latausvalo palaa jatkuvasti. Akku on nyt ladattu, ja se voidaan
ottaa käyttöön tai jättää latauslaitteeseen.
HUOMAA: Litiumioniakkujen maksimaalisen suorituskyvyn ja käyttöiän saavuttamiseksi akku on ladattava
täyteen ennen ensimmäistä käyttökertaa.
Lataaminen
Alla näkyvässä taulukossa on lisätietoja akun latautumisesta.
Lataustason ilmaisin
lataus käynnissä –– –– –– ––
täyteen ladattu –––––––––––––––––
liian kuumaa tai kylmää akkua ei
ladata
–– • –– • –– • –– •
x
ongelma akussa tai laturissa • • • • • • • • • • • •
ongelma virtajohdossa •• •• •• •• •• ••
Tämä laturi ei lataa viallista akkua. Jos akku on viallinen, merkkivalo ei syty tai laturi ilmoittaa viallisesta akusta
tai sen merkkivalo vilkkuu.
HUOMAA: Tämä voi tarkoittaa myös laturivikaa.
Jos laturi ilmoittaa ongelmasta, vie laturi ja akku testattavaksi valtuutettuun huoltopalveluun.
Page 83

15
SUOMI
Liian kuumaa tai kylmää akkua ei ladata
Jos latauslaite tunnistaa, että akku on liian kuuma tai kylmä, latautuminen aloitetaan vasta akun saavutettua
oikean lämpötilan. Kun oikea lämpötila on saavutettu, latautuminen alkaa automaattisesti. Tämä ominaisuus
pidentää akun ikää.
Kylmä akku latautuu puolet hitaammin lämpimään akkuun verrattuna. Akku latautuu hitaammin koko
latausjakson ajan, sen latautumisnopeus ei palaudu nopeaksi, vaikka akku lämpenee.
Litiumioniakut
PB-sarjan STANLEY Engineered Fastening Li-Ion -työkaluissa on elektroninen suojausjärjestelmä, joka suojaa
akkua ylikuormitukselta, ylikuumenemiselta tai suurelta purkautumiselta.
Jos elektroninen suojausjärjestelmä tulee käyttöön, työkalu poistaa sen käytöstä automaattisesti. Jos näin käy,
lataa litiumioniakkua latauslaitteessa, kunnes se on ladattu täyteen.
4.3 AKUT
Työkalusi on tarkoitettu käytettäväksi DEWALT®/POP® Avdel® 18V/20V maks. -litiumioniakuilla.
Akun irrottaminen ja asettaminen paikoilleen (kuva 3)
HUOMAA: Parhaiden tuloksien saavuttamiseksi on varmistettava, että akku on ladattu täyteen. Työkalu sammuu
varoituksetta, kun akkuvirta on loppunut kokonaan.
AKUN ASENTAMINEN TYÖKALUN KAHVAAN
• Kohdista akku (K) kahvan sisällä oleviin kiskoihin (kuva 3).
• Liu’uta se kahvaan, kunnes akku on hyvin paikoillaan laitteessa ja varmista, ettei se irtoa.
AKUN POISTAMINEN KAHVASTA
• Paina akun vapautuspainiketta ja vedä akku ulos työkalun kahvasta.
• Laita akku laturiin, kuten käyttöohjeen laturiosassa kuvataan.
Säilytyssuositukset
• On suositeltavaa säilyttää akku viileässä ja kuivassa paikassa poissa suorasta auringonpaisteesta sekä
liiallisesta kylmyydestä tai kuumuudesta. Akku toimii mahdollisimman tehokkaasti ja pitkään, kun sitä
säilytetään huoneenlämpötilassa, kun se ei ole käytössä.
• Pitkän säilytyksen aikana täyteen ladattu akku on suositeltavaa säilyttää viileässä ja kuivassa paikassa irti
laturista.
HUOMAA: Akkuja ei saa asettaa säilöön täysin tyhjinä. Akku on ladattava ennen käyttöä.
5. KÄYTTÖ
VAROITUS: Noudata aina turvaohjeita ja määräyksiä.
VAROITUS: Vähennä vakavan henkilövahingon vaaraa irrottamalla akku ennen säätöjä tai liitososien
tai lisävarusteiden poistamista/asentamista.
VAROITUS: Voit vähentää vakavan henkilövahingon vaaraa pitämällä kädet AINA oikeassa asennossa.
VAROITUS: Voit vähentää vakavan henkilövahingon vaaraa pitelemällä työkalua AINA tiukassa
otteessa.
Page 84

16
SUOMI
5.1 OIKEAOPPINEN KÄDEN ASENTO
Käsien oikea asento tarkoittaa toisen käden pitämistä pääkahvassa (I), kuva 1.
5.2. TYÖKALUN KÄYTTÖ
Sokkoniitin asentaminen (kuva 8)
Sokkoniitin asentaminen
• Aseta niitti (Y) kärkikappaleeseen (A)
• Aseta työkalu paikoilleen (kuva 9)
• Vedä ja pidä kytkintä (J), kunnes niitti on kiinnittynyt täysin (kuva 10).
• Jos sokkoniitti (Y) ei ole kiinnittynyt kokonaan, vapauta kytkin (J). Työkalu palaa sen lähtöasentoon
automaattisesti. Kara putoaa automaattisesti karan keräimeen (W).
Jos vapautat kytkimen (J) ennen asetusiskun päättymistä, työkalu palaa välittömästi takaisin lähtöasentoon.
Jos niitti (Y) ei ole kiinnittynyt kokonaan, toista edelliset vaiheet.
Toiminnon nollaaminen (kuva 9)
Jos työkalu ei siirry lähtöasentoon kytkimen vapauttamisen jälkeen tai pysähtyy asetusiskun aikana, nollaa
työkalu lähtöasentoon vetämällä ja vapauttamalla kytkimen (J) nopeasti. Jos ongelma ei ratkea, irrota ja
asenna akku takaisin ja toista edellinen vaihe uudelleen.
Jos ongelma toistuu, ota yhteyttä paikalliseen huoltopalveluun.
Karan keräimen tyhjentäminen (W) (kuva 6)
Karan keräintä käytetään karan jäämien keräämiseen. Karan keräin tulee tyhjentää käytettyjen niittien koosta
riippuen.
Nim. niitin halk. Kapasiteetti likimäärin (PB2500) Kapasiteetti likimäärin (PB3400)
2,4 mm [3/32“] 600 Ei sovellu
3,2 mm [1/8“] 360 Ei sovellu
4,0 mm [5/32“] 200 Ei sovellu
4,8 mm [3/16“] 150 190
6,4 mm [1/4“] Ei sovellu 100
• Kallista työkalua taaksepäin, jotta kaikki karan jäämät putoavat karan keräimeen.
• Avaa karan keräin (W) liu'uttamalla keräimen lukitusta (D) kärkikappaleen kotelon mutteria (C) kohti ja
nostamalla suoja (E).
• Tyhjennä karan jäämät asianmukaiseen kierrätys- tai jäteastiaan.
• Sulje karan keräin (W) laskemalla suojaa (E), kunnes keräimen lukitus (D) napsahtaa paikoilleen.
Valinnainen karan keräin Quick-Release (E2) (kuva 6a)
Kun PB-sarjan työkaluissa käytetään valinnaista karan keräintä Quick-Release, karan keräin voidaan poistaa
seuraavasti:
• Kallista työkalua taaksepäin, jotta kaikki karan jäämät putoavat karan keräimeen (E2).
• Tartu karan keräimeen (E2) yhdellä kädellä ja avaa keräimen lukitus (D) etusormella.
• Vedä karan keräintä (E2) ylöspäin ja työkalusta irti, kallista keräintä hiukan taaksepäin niin, ettei karat
putoa ulos.
• Asenna keräin takaisin paikoilleen liu'uttamalla se takaisin työkaluun avauspuoli työkalun etuosaan päin.
• Paina keräintä alas, kunnes keräimen lukitus (D) napsahtaa paikoilleen.
Page 85

17
SUOMI
6. TYÖKALUN HUOLTO
6.1. HUOLTOVÄLIT
Osa Aikaväli
Työkalun yleisen kunnon tarkistus Päivittäin
Kärkilaitteen puhdistus ja voitelu 5 000 niittiä
Palloruuvin ja painelaakerin puhdistus ja voitelu 50 000 niittiä*
*Suositellaan yhteydenottamista valtuutettuun huoltopalveluun
6.2. PUHDISTUS
Käytä AINA hyväksyttyjä suojalaseja laitteiston puhdistamisen aikana.
Työkalun ulkopuoli
Pidä harjattoman moottorin tuuletusaukot (H) aina vapaina pölystä ja liasta. Käytä tarvittaessa pehmeää ja
kosteaa liinaa pölyn ja lian poistamiseksi ilmanpoistoaukoista.
Puhalla lika ja pöly ulos sähkötyökalun pääkotelosta kuivalla ilmalla aina, kun havaitset lian kertyvän
ilmanpoistoaukkojen (H) sisälle ja ympärille.
VAROITUS: Käytä asianmukaisia silmäsuojaimia ja hyväksyttyä pölysuojainta tämän toimenpiteen
aikana.
VAROITUS: Työkalun metallittomien osien puhdistamiseen ei saa käyttää liuottimia tai muita vahvoja
kemikaaleja. Nämä kemikaalit voivat heikentää näiden osien valmistuksessa käytettyjä materiaaleja.
Käytä ainoastaan mietoon saippuaveteen kostutettua kangasta. Älä koskaan päästä mitään nestettä
työkalun sisälle äläkä koskaan upota työkalun mitään osaa nesteeseen.
Kärkilaitteen puhdistus (kuvat 4 ja 5)
• Löysää kärkikappaleen kotelon mutteria (C). Poista kärkikappaleen kotelo (B).
• Paina etukytkintä (U) ja löysää istukan ohjainta (P). Vapauta etukytkin (U).
• Poista istukat (Q) ja istukan työntökappale (R).
• Poista jousi (S).
• Puhdista kärkikappaleen kotelon (B) sisäosa kuivalla liinalla.
• Puhdista istukka (Q) ja istukan työntökappale (R) kuivalla liinalla. Vaihda istukka (Q) ja istukan
työntökappale (R) tarvittaessa.
• Puhdista vetopää (T) kuivalla liinalla.
• Levitä rasvaa istukan ohjaimen (P) sisälle istukan (Q) liitäntäkohtaan. Molybdeenidisul dipohjaisen
voiteluaineen käyttö on suositeltavaa.
• Asenna jousi (S).
• Asenna istukan työntökappale (R) ja istukka (Q).
• Paina etukytkintä (U) ja kiristä istukan ohjainta (P). Vapauta etukytkin (U).
• Asenna kärkikappaleen kotelo (B). Kiristä kärkikappaleen kotelon mutteri (C).
• Suorita työkalun nollaustoiminto varmistaaksesi, että työkalu on lähtöasennossa osion 5.2 mukaisesti
Laturin puhdistusohjeet
VAROITUS: Sähköiskun vaara. Irrota laturin virtapistoke pistorasiasta ennen puhdistusta.
Voit puhdistaa laturin ulkopinnalla olevan lian ja rasvan liinalla tai pehmeällä harjalla (ei metallisella).
ÄLÄ käytä vettä tai puhdistusliuoksia.
Page 86

18
SUOMI
6.3 VARAOSAT TYÖKALUT
Katso lisätietoa varaosista erityisistä huolto-ohjeista, jotka ovat saatavilla osoitteessa http://www.
stanleyengineeredfastening.com/resource-center/document-library
6.4. UUDELLEENLADATTAVA AKKU
Tämä pitkään kestävä akku on ladattava uudelleen, jos se ei enää tuota riittävää tehoa töissä, joihin teho on
aikaisemmin riittänyt hyvin. Kun laitteen toiminta-aika on lopussa, se tulee hävittää ympäristöystävällisellä
tavalla:
• Anna akun tyhjentyä kokonaan ja irrota se sitten laitteesta.
• Litiumioniakut ovat kierrätettäviä. Vie ne jälleenmyyjälle tai paikalliseen kierrätyspisteeseen. Kerätyt akut
kierrätetään tai hävitetään oikein.
6.5. YMPÄRISTÖNSUOJELU
Lajittele osat. Tätä tuotetta ei saa hävittää normaalin kotitalousjätteen seassa.
Jos huomaat POP®Avdel®-tuotteesi vaativan vaihtoa tai jos et tarvitse sitä enää, älä hävitä sitä
kotitalousjätteen mukana. Vie tuote lajiteltavaksi.
Kun käytetyn tuotteen ja pakkauksen osat erotetaan toisistaan, materiaali voidaan kierrättää ja käyttää
uudelleen. Kierrätetyn materiaalin uudelleen käyttö auttaa estämään ympäristön saastumista ja
vähentää raaka-aineen tarvetta.
Paikallisten säädösten mukaan sähkötuotteiden osat saatetaan erottaa kotitalousjätteestä
kunnallisissa jätteenkäsittelypaikoissa, tai jälleenmyyjä tekee sen, kun ostat uuden tuotteen.
Saat lähimmän valtuutetun korjauspaikan osoitteen ottamalla yhteyden paikalliseen POP®Avdel®toimipisteeseen tässä käyttöohjeessa mainittuun osoitteeseen. Valtuutetut POP®Avdel®-korjauspaikat
ja täydelliset tiedot myynnin jälkeisestä huoltopalvelusta ja yhteyshenkilöistä ovat saatavilla myös
Internetissä osoitteessa: www.StanleyEngineeredFastening.com
Page 87

19
SUOMI
7. EY-vaatimustenmukaisuusvakuutus
Alkuperäinen
Me, Avdel UK Limited; Stanley House, Works Road, Letchworth Garden City, Hertfordshire, SG6 1JY
UNITED KINGDOM, vakuutamme vastuunalaisina, että seuraava tuote:
Kuvaus POP®Avdel® -akkutyökalu niiteille
Tuotemerkki/malli ProSet® PB2500 tai ProSet® PB3400
Sarjanumero
johon tämä ilmoitus viittaa, on seuraavan standardin mukainen:
2006/42/EY Konedirektiivi
Säädös 2008 nro 1597 – The Supply of Machinery (Safety) Regulations.
2014/30/EY Sähkömagneettisen yhteensopivuuden (EMC) direktiivi
2011/65/EY Vaarallisten aineiden RoHS-rajoitukset
ja standardit:
ISO 12100:2010
EN62841-1:2015
Tekninen dokumentaatio on laadittu liitteen 1, osan 1.7.4.1 mukaisesti direktiiviä 2006/42/EY noudattaen.
Valmistaja:
Naito Nobuharu
Ylin johto, R&D Engineering
STANLEY Engineered Fastening, Nippon POP Rivets and Fasteners Ltd., Noyori-cho Hosoda, Toyohashi, Aichi
441-8540 JAPAN
Allekirjoitus
Myöntämispaikka Japani
Myöntämisaika 30. 10. 2016
Valtuutettu edustaja:
A. K. Seewraj
Technology Manager – EU Blind Fastening
Avdel UK Limited; Stanley House, Works Road, Letchworth Garden City, Hertfordshire, SG6 1JY UNITED KINGDOM
Tämä kone on konedirektiivin 2006/42/EY mukainen.
Alkuperäisen käyttöohjeen käännös
Page 88

20
SUOMI
8. TURVAA SIJOITUKSESI!
8,1. POP®AVDEL®NIITTAUSKONEESI TAKUU
STANLEY Engineered Fastening takaa, että kaikki sähkötyökalut on valmistettu huolellisesti ja että niissä ei ole
materiaali- tai valmistusvirheitä normaalissa käytössä yhden (1) vuoden aikana.
Pidennämme työkalun takuun (ei koske litiumioniakkuja tai latureita) yhdestä (1) jahteen (2) vuoteen, kun
rekisteröit työkalun verkossa. (viitekap. 8.2 tämän sivun alaosassa).
Tämä niittauskoneen takuu koskee työkalun ensimmäistä ostajaa vain alkuperäisessä käytössä.
Rajaukset:
Normaali kuluminen
Säännöllinen huolto, korjaus ja vaihto-osat normaalin kulumisen vuoksi eivät kuulu takuun piiriin.
Väärinkäyttö
Virheet tai vauriot, jotka aiheutuvat virheellisestä käytöstä, varastoinnista, väärinkäytöstä, onnettomuudesta
tai laiminlyönnistä, kuten fyysisestä vahingosta eivät kuulu takuun piiriin.
Valtuuttamaton huolto tai muuttaminen
Virheet tai vauriot, jotka aiheutuvat huollosta, testaussäädöstä, asennuksesta, ylläpidosta, muutoksista tai
muokkauksesta millään tavalla jonkun muun kuin STANLEY Engineered Fasteningin tai sen valtuuttaman
huoltokeskuksen tekemänä, eivät kuulu takuun piiriin.
Kaikki muut takuut, nimenomaiset tai epäsuorat, mukaan lukien takuut kauppakelpoisuudesta tai
soveltuvuudesta käyttötarkoitukseen eivät kuulu takuuseen.
Jos tämä työkalu ei vastaa takuuta, palauta työkalu tehtaamme valtuuttamaan sinua lähellä olevaan
huoltokeskukseen. Saat luettelon valtuutetuista POP®Avdel®-huoltokeskuksista Yhdysvalloissa tai Kanadassa
ottamalla yhteyttä numeroon +1 (877) 364 2781.
Yhdysvaltojen ja Kanadan ulkopuolella löydät verkkosivustolta www.StanleyEngineeredFastening.com
lähimmän STANLEY Engineered Fasteningin toimipisteen.
STANLEY Engineered Fastening korvaa maksutta osan tai osat, joiden olemme todenneet olevan viallisia
virheellisen materiaalin tai valmistuksen vuoksi, ja palautamme työkalun postikulut maksettuina. Tämä on
ainoa takuun piiriin kuuluva velvoituksemme. Missään tapauksessa STANLEY Engineered Fastening ei ole
vastuussa mistään seurauksista tai erityisistä vahingoista, jotka aiheutuvat tuotteen ostamisesta tai käytöstä.
8.2. REKISTERÖI SOKKONIITTIEN NIITTAUSKONEESI VERKOSSA
Rekisteröi takuusi verkossa osoitteessa
http://www.stanleyengineeredfastening.com/popavdel-powertools/warranty-card. Kiitos, että valitsit
STANLEY Engineered Fasteningin POP®Avdel®-työkalun.
Page 89

4
FRANÇAIS
©2016 Stanley Black & Decker
Tous droits réservés.
Les informations fournies ne peuvent être ni reproduites et/ou rendues publiques de quelque façon que ce soit et par quelque moyen que ce
soit (électronique ou mécanique) sans autorisation préalable, expresse et écrite, de STANLEY Engineered Fastening. Les informations fournies
sont issues des données connues au moment de la sortie de ce produit. STANLEY Engineered Fastening adopte une politique d'amélioration
permanente de ses produits et ces derniers peuvent donc faire l'objet de modications. Les informations fournies s'appliquent au produit tel que
livré par STANLEY Engineered Fastening. Par conséquent, STANLEY Engineered Fastening ne saurait être tenu responsable des dommages résultant
de diérences avec les spécications d'origine du produit.
Les informations disponibles ont été rédigées avec le plus grand soin. Toutefois, STANLEY Engineered Fastening rejette toute responsabilité
concernant les éventuelles erreurs dans les informations et les conséquences qu'elles pourraient entraînées. STANLEY Engineered Fastening rejette
toute responsabilité quant aux dommages résultant d'activités eectuées par des tiers. Les appellations, noms commerciaux, marques déposées,
etc. utilisés par STANLEY Engineered Fastening ne sont pas libres de droit, conformément à la législation sur la protection des marques.
CONTENU
Remarque: Les plans faisant référence au ProSet® PB2500 sont sur le dépliant de la première de couverture
Les plans faisant référence au ProSet® PB3400 sont sur le dépliant de la dernière de couverture
1. CONSIGNES DE SÉCURITÉ .........................................................................................................................5
1.1 Sécurité générale .............................................................................................................................................................................5
1.2 Utilisation et entretien de l'outil électrique ............................................................................................................................5
1.3 Consignes de sécurité importantes propres à tous les chargeurs de batteries .........................................................6
1.4 Consignes de sécurité importantes propres à tous les blocs-batteries ........................................................................7
1.5 Consignes de sécurité propres aux batteries Lithium-Ion (Li-Ion) .................................................................................8
1.6 Risques résiduels ..............................................................................................................................................................................8
1.7 Étiquettes et icônes .........................................................................................................................................................................8
2. CARACTÉRISTIQUES .................................................................................................................................. 9
2.1 Données techniques .......................................................................................................................................................................9
2.2 Spécications de pose .................................................................................................................................................................11
2.3 Contenu de l'emballage ..............................................................................................................................................................11
2.4 Liste des principaux composants ............................................................................................................................................12
2.5 Accessoires en option .................................................................................................................................................................. 12
3. UTILISATION ET CONFIGURATION DE L'OUTIL ..................................................................................... 13
4. INSTRUCTIONS D'UTILISATION .............................................................................................................. 13
4.1 Nez ...................................................................................................................................................................................................... 13
4.2 Chargeurs ......................................................................................................................................................................................... 14
4.3 Blocs-batteries ................................................................................................................................................................................ 15
5. PROCÉDURE DE FONCTIONNEMENT .....................................................................................................15
5.1 Position correcte des mains.......................................................................................................................................................16
5.2 Fonctionnement de l'outil .........................................................................................................................................................16
6. ENTRETIEN DE L'OUTIL ............................................................................................................................17
6.1 Fréquence de maintenance ....................................................................................................................................................... 17
6.2 Nettoyage ........................................................................................................................................................................................17
6.3 Pièces détachées – Outils ........................................................................................................................................................... 18
6.4 Bloc-batterie rechargeable ........................................................................................................................................................ 18
6.5 Protection de l’environnement ................................................................................................................................................18
7. CERTIFICAT DE CONFORMITÉ CE ...........................................................................................................19
8. PROTÉGER VOTRE INVESTISSEMENT ....................................................................................................20
8.1 Garantie Outil à riveter POP®Avdel® ....................................................................................................................................... 20
8.2 Enregistrer votre Outil pour rivets aveugles en ligne .......................................................................................................20
Traduction du manuel d'utilisation
Page 90

5
FRANÇAIS
Ce manuel d'utilisation doit être lu par toute personne assemblant ou utilisant cet outil, en portant
une attention particulière aux consignes de sécurité qui suivent.
1. CONSIGNES DE SÉCURITÉ
Les dénitions ci-après décrivent le niveau de gravité de chaque avertissement. Veuillez lire le manuel et
porter une attention particulière à ces symboles.
DANGER : Indique une situation de danger imminent qui engendre, si elle n'est pas évitée, la mort
ou de graves blessures.
ATTENTION: Indique une situation de danger potentiel qui peut engendrer, si elle n'est pas évitée,
des blessures bénignes ou modérées.
AVERTISSEMENT : Indique une situation de danger potentiel qui pourrait engendrer, si elle n'est pas
évitée, la mort ou de graves blessures.
NOTIFICATION: Indique une pratique ne posant aucun risque de blessures mais qui, si elle n'est pas évitée,
peut entraîner des dommages matériels.
Indique un risque de choc électrique
Indique un risque d’incendie
L'utilisation ou la maintenance incorrectes de ce produit peut conduire à de graves blessures et dommages
matériels. Lisez et assimilez tous les avertissements et instructions d'utilisation avant d'utiliser cet
équipement. L'utilisation d'outils électriques impose le respect des consignes de sécurité de base an de
réduire le risque de blessure.
1.1 SÉCURITÉ GÉNÉRALE
AVERTISSEMENT ! Lisez tous les avertissements et consignes de sécurité. Tout manquement au
respect des avertissements et des instructions peut entraîner un choc électrique, un incendie et/ou de
graves blessures.
CONSERVEZ TOUS CES AVERTISSEMENTS ET CONSIGNES POUR POUVOIR VOUS Y RÉFÉRER DANS LE FUTUR
Le terme "outil électrique" mentionné dans les avertissements fait référence à vos outils électriques branchés sur
secteur (avec câble) ou fonctionnant sur pile ou batterie (sans l).
• N'utilisez pas l'outil pour autre chose que positionner des xations aveugles STANLEY Engineered Fastening.
• N'utilisez que des pièces, xations et accessoires, recommandés par le fabricant.
• N'utilisez l'outil électrique qu'avec les blocs-batteries spéciquement prévus.
1.2 UTILISATION ET ENTRETIEN DE L'OUTIL ÉLECTRIQUE
• L'outil doit en permanence être conservé en bon état de marche, l'absence de dommages et son bon
fonctionnement doivent être vériés à intervalles réguliers par des personnes qualiées. Toutes les opérations
de démontage ne doivent être réalisées que par du personnel qualié. Ne démontez pas l'outil sans avoir au
préalable consulté les instructions de maintenance.
• N'altérez l'outil d'aucune sorte. Toute modication de l'outil réalisée par le client l'est sous sa propre
responsabilité et annule toute garantie applicable.
• Débranchez la batterie de l'outil avant d'eectuer toute opération de maintenance, de réglage ou de xer et
retirer le nez.
• Avant utilisation, contrôlez l'alignement et le raccordement des pièces mobiles, l'absence de rupture des pièces
ainsi que toute autre condition qui pourrait aecter le fonctionnement de l'outil. En cas de dommage, faites
réparer l’outil avant de l'utiliser. Retirez toute clé ou pince de réglage avant utilisation.
Page 91

6
FRANÇAIS
• Avant utilisation, contrôlez l'absence de dommage sur la batterie. Ne faites pas tomber la batterie. Un impact
brusque peut engendrer des dommages internes et conduire à une défaillance prématurée de la batterie.
• Maintenez la zone de travail propre et bien éclairée.
• Portez des vêtements appropriés. Ne portez pas de bijoux ou de vêtements amples. Gardez vos cheveux, vos
vêtements et vos gants éloignés des pièces mobiles. Les bijoux, vêtements amples ou cheveux longs peuvent se
prendre dans les pièces mobiles.
• Adoptez une posture stable et équilibrée avant d'utiliser l'outil.
• Les opérateurs et les autres personnes dans la zone d’intervention doivent porter des lunettes de protection
conformes à la norme ANSI Z87.1 CAN/CSA Z94.3 ou homologuées de façon similaire, avec écrans latéraux.
• Le dégagement des mains de l'utilisateur de l'outil est nécessaire avant l'intervention.
• Ne faites jamais fonctionner l'outil en direction de quiconque.
• N'utilisez PAS l'outil si le porte-nez n'est pas en place.
• Ne faites pas fonctionner l'outil ou le chargeur dans ne atmosphère explosive ou des environnements
contenant des uides ou des gaz combustibles.
• Ne faites pas fonctionner l'outil ou le chargeur dans des environnements exposés à l'humidité ou à la pluie an
d'éviter le risque de chocs électriques.
• Ne maltraitez pas l'outil en le faisant tomber ou en vous en servant comme d'un marteau.
• Gardez les fentes d'aération de l'outil exemptes de toute saleté ou corps étranger car cela pourrait provoquer le
dysfonctionnement de l'outil.
• Gardez les poignées de l'outil sèches, propres et exemptes d'huile ou de graisse.
• Lorsque vous déplacez l'outil d'un endroit à un autre, gardez vos mains éloignées de la gâchette an d'éviter un
déclenchement accidentel.
• Ne laissez jamais l'outil en marche sans surveillance.
• Débranchez la batterie lorsque l'outil n'est pas utilisé.
1.3 CONSIGNES DE SÉCURITÉ IMPORTANTES PROPRES À TOUS LES CHARGEURS DE BATTERIES
CONSERVEZ CES INSTRUCTIONS : Ce manuel contient d'importantes consignes de sécurité et d'utilisation liées
aux chargeurs de batterie compatibles (consultez la section Données techniques).
• Avant d’utiliser le chargeur, veuillez lire toutes les instructions et les marquages d’avertissement gurant sur le
chargeur, le bloc-batterie et le produit utilisant le bloc-batterie.
AVERTISSEMENT : Risque de choc électrique. Ne laissez aucuns liquides pénétrer dans le chargeur.
Il y a sinon risque de choc électrique.
AVERTISSEMENT : Nous recommandons l'utilisation d'un dispositif diérentiel à courant résiduel calibré
à 30mA ou moins.
ATTENTION : Risque de brûlure. An de réduire le risque de blessures, ne rechargez que les batteries rechargeables
DEWALT®/POP®Avdel®. D'autres batteries pourraient exploser et provoquer des blessures et des dommages.
ATTENTION : Les enfants doivent être surveillés an de garantir qu'ils ne jouent pas avec l'appareil.
REMARQUE : Dans certaines conditions, lorsque le chargeur est branché à l'alimentation électrique, ses contacteurs
de charge exposés peuvent être court-circuités par un corps étranger. Les corps étrangers de nature conductrice,
incluant notamment, la laine d’acier, les feuilles d’aluminium ou l'accumulation de particules métalliques doivent
être tenus à distance des cavités du chargeur. Débranchez toujours le chargeur de l'alimentation électrique lorsqu’il
n’y a pas de bloc-batterie installé. Débranchez le chargeur avant de le nettoyer
• NE tentez PAS de charger le bloc-batterie avec un chargeur autre que ceux indiqués dans ce manuel. Le
chargeur et le bloc-batterie sont spéciquement conçus pour fonctionner ensemble.
• Ces chargeurs ne sont pas prévus pour d’autres utilisations que la charge des batteries rechargeables
DEWALT®/POP®Avdel®. Toute autre utilisation représente un risque d’incendie, de choc électrique ou
d’électrocution.
• N'exposez pas le chargeur à la pluie ou à la neige.
Page 92

7
FRANÇAIS
• Tirez sur la prise plutôt que sur le cordon pour débrancher le chargeur. Cela permet de réduire le risque
d'endommagement de la prise et du cordon.
• Assurez-vous que le cordon est placé de sorte qu’on ne puisse pas marcher ou trébucher dessus ou
l’endommager d’une autre manière.
• N'utilisez pas de rallonge sauf si cela est absolument nécessaire. L'utilisation d'une rallonge inadaptée peut
générer un risque d’incendie, de choc électrique ou d’électrocution.
• Ne placez aucun objet sur le dessus du chargeur et ne placez pas le chargeur sur une surface molle qui pourrait
obturer les fentes d'aération et engendrer une accumulation de chaleur à l'intérieur. Placez le chargeur loin de
toute source de chaleur. Le chargeur est aéré grâce aux fentes sur le dessus et au bas du boîtier.
• N'utilisez pas un chargeur dont le cordon ou la prise sont endommagés — faites-les immédiatement remplacer.
• N'utilisez pas le chargeur s’il a reçu un choc violent, s’il est tombé ou s’il a été autrement endommagé de
quelque manière que ce soit. Amenez le chargeur dans un centre de réparation agréé.
• Ne démontez pas le chargeur. Apportez-le dans un centre de réparation agréé si l'entretien ou une réparation sont
nécessaires. Un chargeur mal ré-assemblé peut entraîner un risque de choc électrique, d’électrocution ou d’incendie.
• Débranchez le chargeur de la prise de courant avant de procéder à son nettoyage. Cela permet de réduire le
risque de choc électrique. Le retrait seul du bloc-batterie ne réduit pas ces risques.
• NE tentez JAMAIS de raccorder deux chargeurs ensemble.
• Le chargeur est conçu pour fonctionner sur une alimentation électrique domestique standard (consultez les
caractéristiques du chargeur). Ne tentez pas de l'utiliser à une autre tension. Cette consigne ne concerne pas le
chargeur pour véhicule.
1.4 CONSIGNES DE SÉCURITÉ IMPORTANTES PROPRES À TOUS LES BLOCSBATTERIES
Si vous commandez des blocs-batteries de rechange, assurez-vous d’inclure leur numéro de catalogue et la tension.
Le bloc-batterie n’est pas complètement chargé à la livraison. Avant d'utiliser le bloc-batterie et le chargeur, veuillez
lire les consignes de sécurité ci-dessous. Suivez ensuite les procédures de charge décrites.
LISEZ TOUTES LES CONSIGNES
• Ne chargez et n'utilisez pas la batterie dans un environnement présentant des risques d'explosion ou en
présence de liquides, gaz ou poussières inammables. L'insertion ou le retrait de la batterie du chargeur peut
faire enammer les poussières ou les fumées.
• Ne forcez jamais pour insérer le bloc-batterie dans le chargeur. Ne modiez le bloc-batterie d’aucune manière
pour le faire entrer dans un chargeur incompatible car il pourrait éclater et provoquer de graves blessures.
• Ne chargez les blocs-batteries qu'avec les chargeurs DEWALT®/POP®Avdel®.
• NE les aspergez et NE les immergez PAS dans de l'eau ou tout autre liquide.
• Ne rangez et n'utilisez pas l’outil et le bloc-batterie dans des endroits où la température peut atteindre ou
dépasser 40°C (104°F) (comme des remises extérieures ou des bâtiments métalliques en été par exemple).
• Lorsque le bloc-batterie n'est pas utilisé, gardez-le à l'écart des objets métalliques tels que trombones, pièces de
monnaie, clés, clous, vis ou autres petits objets susceptibles de créer un contact entre les deux bornes.
• Ne jetez pas les batteries dans l'eau.
AVERTISSEMENT : Ne tentez jamais d’ouvrir le bloc-batterie pour quelque raison que ce soit. Si le boîtier du
bloc-batterie est ssuré ou endommagé, ne l'insérez pas dans le chargeur. N'écrasez pas le bloc-batterie, ne
le faites pas tomber et ne l'endommagez pas. N'utilisez pas le bloc-batterie ou le chargeur s'ils ont reçu un
coup violent, s'ils ont chuté, ont été écrasés ou endommagés de quelque façon que ce soit (percés par un clou,
cognés par un marteau ou piétinés par exemple). Il y sinon risque de choc électrique ou d’électrocution. Les
blocs-batteries endommagés doivent être retournés dans un centre de réparation pour y être recyclés.
AVERTISSEMENT : Risque d'incendie. Ne rangez et ne transportez pas le bloc-batterie de façon que des
objets métalliques pourraient entrer en contact avec les bornes de la batterie. Lors du transport de blocsbatteries individuels, assurez-vous que les bornes de la batterie sont protégés et bien isolés des matériaux
qui pourraient entrer en contact avec elles et provoquer un court-circuit.
ATTENTION : Lorsqu'il n'est pas utilisé, posez l’outil, à plat, sur une surface stable là où il ne pourra faire
tomber ou trébucher personne. Certains outils équipés d’un gros bloc-batterie peuvent tenir à la verticale
sur celui-ci, mais ils manquent alors de stabilité.
Page 93

8
FRANÇAIS
1.5 CONSIGNES DE SÉCURITÉ SPÉCIFIQUES PROPRES AUX BATTERIES LITHIUM-ION (LI-ION)
1. N'incinérez pas le bloc-batterie même s'il est sévèrement endommagé ou complètement hors d'usage.
Il pourrait exploser dans les ammes. Des fumées et substances toxiques se dégagent en cas d'incinération de
blocs-batteries lithium ion.
2. Si le contenu de la batterie entre en contact avec la peau, lavez immédiatement la zone avec du savon
doux et de l'eau. Si le liquide de la batterie entre en contact avec les yeux, rincez l'œil ouvert pendant 15
minutes ou jusqu'à ce que l'irritation cesse. Si des soins médicaux sont nécessaires, sachez que l’électrolyte de la
batterie est composé d’un mélange de carbonates organiques liquides et de sels de lithium.
3. Le contenu des cellules d’une batterie ouverte peut provoquer une irritation des voies respiratoires. De
l'air frais est alors nécessaire. Si les symptômes persistent, consultez un médecin.
AVERTISSEMENT : Risque de brûlure. Le liquide de la batterie peut s’enammer s’il est exposé à des
étincelles ou à une amme.
1.6 RISQUES RÉSIDUELS
Malgré l'application de la réglementation de sécurité applicable et la mise en œuvre de dispositifs de sécurité,
certains risques résiduels ne peuvent pas être évités. À savoir:
− Diminution de l’acuité auditive
− Risques de blessures dus à des projections de particules
− Risques de brûlures dus à des accessoires ayant chaué pendant leur fonctionnement.
− Risques de blessures dus à un usage prolongé.
1.7 ÉTIQUETTES ET ICÔNES
Marquages sur l’appareil
EMPLACEMENT DU CODE DATE : Le Code Date, qui inclut également l’année, le mois et le lieu de
fabrication, est imprimée sur la surface du boîtier formant charnière entre l’outil et la batterie.
Étiquettes sur le chargeur et le bloc-batterie
En plus des pictogrammes utilisés dans ce manuel, les étiquettes sur le chargeur et le bloc-batterie
comportent les pictogrammes suivants.
Veuillez lire le manuel d'utilisation avant
utilisation.
N'exposez pas à l’eau.
Veuillez lire le manuel d'utilisation avant
utilisation.
Remplacez immédiatement tous les
cordons défectueux.
Rechargement de la batterie. Ne rechargez qu'entre 4° C et 40° C.
Batterie rechargée. Jetez le bloc-batterie en respectant
l’environnement.
Délai Bloc chaud/froid. Ne jetez pas le bloc-batterie au feu.
x
Problème sur le bloc ou le chargeur. Pour recharger les blocs-batteries Li-Ion.
Problème sur la ligne d'alimentation. Consultez les Données techniques pour
connaître la durée de la charge.
Ne sondez pas à l'aide d'objets
conducteurs.
Ne l'utilisez qu'à l’intérieur.
Page 94

9
FRANÇAIS
Ne rechargez pas des blocs-batteries
endommagés.
Ne chargez les blocs-batteries
DEWALT®/POP®Avdel® qu'avec les
chargeurs DEWALT®/POP®Avdel® prévus
à cet e et. Le rechargement de blocsbatteries autres que les blocs-batteries
DEWALT®/POP®Avdel® avec un chargeur
DEWALT®/POP®Avdel® peut provoquer
leur éclatement ou conduire à des
situations dangereuses.
La politique STANLEY Engineered Fastening
prévoit l'amélioration et le développement permanents de ses produits et nous nous réservons le droit
de modi er les caractéristiques de n'importe quel produit, sans noti cation préalable.
2. CARACTÉRISTIQUES
AUCUNE MAINTENANCE OU RÉPARATION D'AUCUNE SORTE NE DOIT ÊTRE ENTREPRISE,
À L'EXCEPTION DU REMPLACEMENT DU NEZ.
2.1 DONNÉES TECHNIQUES
2.1.1.
ProSet® PB2500 ProSet® PB3400
Tension V 18 nom /20 max 18 nom /20 max
Type 1/2 2
Type de batterie Li-ion Li-ion
Poids (sans bloc-batterie) kg 1,35 1,77
Lpa (pression acoustique) dB(A) 74 77
Kpa (incertitude pression acoustique) dB(A) 3 4
Lwa (puissance acoustique) dB(A) 85 88
Kwa (incertitude puissance acoustique) dB(A) 3 4
Valeur totale des vibrations (somme vectorielle triaxiale) déterminée conformément à la norme EN 60745:
Valeur totale d'émission de vibrations ah
ah = m/s2 < 2,5 < 2,5
Incertitude K = m/s2 1,5 1,5
2.1.2.
Modèle
PB2500
2,0 Ah
PB2500
3.0Ah
PB2500
4.0Ah
PB3400
2.0Ah
PB3400
4.0Ah
Poids kg [lbs] 1,7 [3,75] 2,0 [4,41] 2,0 [4,41] 2,1 [4,63] 2,4 [5,29]
Longueur mm [po] 320 [12,6] 320 [12,6] 320 [12,6] 336 [13,2] 336 [13,2]
Hauteur mm [po] 240 [9,4] 260 [10,2] 260 [10,2] 255 [10,0] 255 [10,0]
Course mm [po] 25 [0,984] 25 [0,984] 25 [0,984] 30 [1,181] 30 [1,181]
Force de
traction
N [lbf]
8500
[1911]
8500
[1911]
8500
[1911]
18000 [4047] 18000 [4047]
Gamme rivet
Dia Nom.
Rivet
mm [in]
ø 2,4 [3/32”]) à
ø 4,8 [3/16”])
ø 4,8 [3/16”]) à
ø 6,4 [1/4”])
Page 95

10
FRANÇAIS
2.1.3.
Bloc-batterie*
Type de batterie Li-ion
Tension V
cc
18 nom /20 max
Capacité Ah 2,0/3,0/4,0
Poids kg 0,40/0,64/0,61
Durée de charge** min 30/45/60
Chargeur* NA JP QW/GB/XE
Type de batterie Li-ion Li-ion Li-ion
Tension secteur type de batterie V
ca
120 100 230
Fréquence d'entrée Hz 60 50/60 50
Poids kg 0,50 0,50 0,50
Fusibles
Europe Outils 230 V Secteur 10 ampères
R.U et Irlande Outils 230 V dans prise 3 ampères
*Les outils de la gamme PB sont compatibles avec les batteries coulissantes DEWALT®/POP®Avdel® 18V nom/20V max.
**La durée de la charge est basée sur les équipements de charge DCB115 DEWALT®
2.1.4.
Nombre approximatif de rivets par charge
Dia. Nom. Rivet
mm [in]
Batterie 2,0Ah Batterie 3,0Ah Batterie 4,0Ah
PB2500
ø 2,4 [3/32] 1700 2600 3400
ø 3,2 [1/8] 1600 2400 3200
ø 4,0 [5/32] 1400 2200 2800
ø 4,8 [3/16] 1200 1800 2400
PB3400
ø 4,8 [3/16] 1000 - 2000
ø 6,4 [1/4] 500 - 1000
Remarque: * Ces valeurs sont fournies à titre indicatif uniquement et sont estimées sur la base d'une batterie
totalement chargée. Les résultats peuvent varier en fonction de la matière du rivet, de l'état de l'outil et de la batterie
et de l'environnement de travail.
Page 96

11
FRANÇAIS
2.2 SPÉCIFICATIONS DE POSE
Type de rivet
CAPACITÉ DE POSE
PB2500 PB3400
2,0mm2,4mm
[3/32"]
3,0mm3,2mm
[1/8"]
4,0mm
[5/32"]
4,8mm
[3/16"]
5,0/
6,0/7,0
mm
4,8mm
[3/16"]
6,0 mm
6,4mm
[1/4"]
8,0/9,0
mm
EXTRÉMITÉ
OUVERTE
EXTRÉMITÉ
FERMÉE
AVEX®/
STAVEX®
AVINOX®/
AVIBULB®
HR/HT
INTERLOCK®
HEMLOK®
KLAMP-TITE®/
KTR
BULBEX®/
LS/TL
MONOBOLT®
MULTI-GRIP
PULL-THRU
(PT)
RIVET Q
T-LOK®
T Rivet
AVSEAL® II
Remarque : Pour plus de détails concernant le nez, consultez le manuel des accessoires.
2.3 CONTENU DE L'EMBALLAGE
L'emballage contient:
1 outil de rivetage sans l**
1 Chargeur
1 ou plusieurs bloc(s)-batterie(s) Lithium-Ion*
1 kit de nez en accessoire
1 Mallette pour le kit
1 Manuel d'utilisation
* La quantité et le nombre de blocs-batteries Li-Ion dépend du numéro de modèle et de la région de vente.
Contactez votre revendeur local pour avoir plus de détails et connaître vos options
** Si le numéro de modèle acheté correspond à un outil seul, alors seul l'outil de rivetage sans l est fourni,
équipé d'un nez standard à extrémité ouverte de 6,4 mm [1/4"].
Page 97

12
FRANÇAIS
2.4 LISTE DES PRINCIPAUX COMPOSANTS (pour voir la vue éclatée et la nomenclature complètes de l'outil,
consultez le manuel d'entretien)
ProSet® PB2500 le plan se trouve à l'intérieur de la première de couverture
ProSet® PB3400 le plan se trouve à l'intérieur de la dernière de la couverture
A A. Nez (Embouts) O Prise de raccordement du chargeur de batterie
B Porte-nez P Guide-mors
C Écrou porte-nez Q Mors
D Verrou du récupérateur R Poussoir
E Cache du récupérateur S Ressort
E2 Récupérateur à libération rapide T Tête de traction
F Crochet d'attache U Embrayage avant
G Carter moteur V Guide mandrin
H Orice d'échappement W Espace du récupérateur
I Poignée Y Rivet
J Interrupteur Z Ensemble poussoir
K Bloc-batterie AA Embrayage à broche
L Manuel AB Ressort embrayage à broche
M Voyant du chargeur AC Ensemble Tête de traction
N Chargeur AD Carter d'engrenage
2.5 ACCESSOIRES EN OPTION
AVERTISSEMENT : Du fait que les accessoires, autres que ceux proposés par POP®Avdel® n'ont pas été
testés avec ce produit, leur utilisation pourrait être dangereuse. An de réduire le risque de blessure,
n'utilisez que des accessoires POP®Avdel®, recommandés avec ce produit.
Contactez votre revendeur pour obtenir plus d’informations sur les accessoires appropriés.
AVERTISSEMENT : An de réduire le risque de blessures graves, débranchez le bloc-batterie avant
d'eectuer tout réglage ou de retirer/installer des accessoires.
Pour obtenir la liste complète des nez et autres accessoires disponible pour la gamme PB, visitez notre site
Web http://www.stanleyengineeredfastening.com/resource-center/document-library
Page 98

13
FRANÇAIS
3. Utilisation et con guration de l'outil
La gamme d'outils PB est conçue pour la xation de rivets aveugles STANLEY Engineered Fastening.
NE LES UTILISEZ PAS si les conditions sont humides ou en présence de liquides ou de gaz in ammables.
LISEZ TOUS LES AVERTISSEMENTS ET TOUTES LES INSTRUCTIONS AVANT DE METTRE L'OUTIL EN
SERVICE.
Sécurité électrique
Le moteur électrique a été conçu pour fonctionner à une tension unique. Véri ez systématiquement si
la tension indiquée sur la plaque signalétique de l'appareil correspond à la tension du secteur. Véri ez
également que la tension du chargeur correspond bien à la tension du secteur.
Votre chargeur DEWALT® dispose d'une double isolation conformément à la norme EN60335; aucun
raccordement à la terre n’est donc nécessaire.
Utilisation d’une rallonge
N’utilisez une rallonge qu’en cas de nécessité absolue. Utilisez une rallonge homologuée adaptée
à la puissance absorbée de votre chargeur (consultez les Données techniques). Le calibre minimum du
conducteur est de 1mm2 et la longueur maximum de 30m.
En cas d’utilisation d’un enrouleur de câble, déroulez toujours le câble complètement.
Avant utilisation
• Choisissez un nez de la bonne taille et installez-le
• Assurez-vous que la batterie est complètement rechargée
• Insérez le bloc-batterie dans l'outil
• Tirez et relâchez rapidement la gâchette pour faire revenir l’outil en position d’accueil.
4. Instructions d'utilisation
Portez toujours des protections auditives et oculaires homologuées lorsque vous utilisez
l'équipement de xation.
AVERTISSEMENT : Avant de régler l'outil, retirez toujours le bloc-batterie.
4.1. NEZ
ProSet® PB2500, le plan se trouve à l’intérieur de la première de couverture
ProSet® BB3400, le plan se trouve à l’intérieur de la dernière de la couverture
Montage du nez ( g. 7)
• Choisissez le nez correspondant au rivet à installer. Prenez référence dans le manuel Accessoires pour
savoir quel nez est approprié.
• Serrez le nez dans (A) le porte-nez (B) en le tournant dans le sens des aiguilles d'une montre à l'aide d'une
clé de 11 mm.
Montage du poussoir et du guide mandrin
PB2500 ( g. 4 et 5)
• Choisissez le poussoir ou l'ensemble poussoir adapté (R) qui correspond au nez choisi. Prenez référence
dans le manuel Accessoires pour savoir quel nez est approprié.
• Insérez le poussoir (R) dans le ressort du poussoir (S).
• Ré-assemblez le mors (Q) et le guide-mors (P) sur l'embrayage avant (U)
REMARQUE : N'utilisez pas de clé pour installer le guide-mors (P) sur l'embrayage avant (U). Le serrage à la
main du guide-mors (P) est su sant pour le xer sur l'embrayage avant (U)
Page 99

14
FRANÇAIS
PB3400 (g. 4 et 5)
• Choisissez le poussoir ou l'ensemble poussoir (R) et le guide mandrin (V) adaptés au nez choisi. Prenez
référence dans le manuel Accessoires pour savoir quel nez est approprié.
REMARQUE : Le guide mandrin présent sur l'outil à la livraison correspond au nez installé. Prenez référence
dans le manuel Accessoires pour savoir quel nez est adapté au numéro de pièce du guide mandrin installé.
• Placez le guide mandrin (V) sur la broche du boîtier d'engrenage (AD). Placez le ressort d'embrayage à
broche (AB) et l'embrayage à broche (AA) par dessus le guide mandrin (V) et serrez l'ensemble tête de
traction (AC) dans le sens inverse des aiguilles d'une montre à l'aide d'une clé de 24 mm.
• Insérez le poussoir (R) dans le ressort du poussoir (S)
• Ré-assemblez le mors (Q) et le guide-mors (P) sur la tête de traction (U)
REMARQUE: N'utilisez pas de clé pour installer le guide-mors (P) sur l'embrayage avant (U). Le serrage à la
main du guide-mors (P) est susant pour le xer sur l'embrayage avant (U)
4.2. CHARGEURS
Votre outil utilise un chargeur DEWALT®/POP® Avdel®. Assurez-vous de lire toutes les consignes de sécurité
avant d'utiliser le chargeur. Le chargeur ne nécessite aucun réglage et il est conçu pour une utilisation la plus
simple possible.
Procédure de charge (g. 2)
• Branchez le chargeur dans une prise de courant adaptée avant d’insérer le bloc-batterie. (Consultez les
caractéristiques du chargeur dans la Section 2)
• Insérez le bloc-batterie (K) dans le chargeur en prenant soin que le bloc soit complètement inséré dans
le chargeur. Le voyant rouge (charge) clignote en continu pour indiquer que le processus de charge a
commencé.
• La n de la charge est indiquée par le voyant rouge restant xe en continu. Le bloc est alors
complètement rechargé et il peut soit être utilisé, soit être laissé dans le chargeur.
REMARQUE : An de garantir des performances et une durée de vie optimales des blocs-batteries Li-ion,
rechargez complètement ces derniers avant la première utilisation.
Processus de charge
Consultez le tableau ci-dessous pour connaître l'état de charge du bloc-batterie.
Indications concernant la charge
Charge en cours –– –– –– ––
Complètement rechargé –––––––––––––––––
Délai Bloc chaud/froid –– • –– • –– • –– •
x
Problème sur le bloc ou le chargeur • • • • • • • • • • • •
Problème sur la ligne d'alimentation •• •• •• •• •• ••
Ce chargeur ne peut charger un bloc-batterie défectueux. Le chargeur indique que la batterie est défectueuse
en refusant de s’allumer ou en achant le motif clignotant de problème de pack ou de chargeur.
REMARQUE : Cela peut également signier un problème avec un chargeur.
Si le chargeur indique un problème, apportez-le avec le bloc-batterie dans un centre de réparation agréé pour
les faire tester.
Page 100

15
FRANÇAIS
Délai Bloc chaud/froid
Lorsque le chargeur détecte qu’une batterie est trop chaude ou trop froide, il démarre automatiquement
un délai Bloc chaud/froid, arrêtant ainsi la charge de la batterie jusqu’à ce qu'elle retrouve une température
correcte. Le chargeur se met alors automatiquement en mode Charge. Cette fonctionnalité garantit la durée
de vie maximale de la batterie.
Un bloc-batterie froid se recharge environ moitié moins qu'un bloc-batterie chaud. Le bloc-batterie se
recharge plus ainsi plus lentement durant tout le cycle de charge et n’atteint pas la charge maximale même si
la batterie se réchaue.
Blocs-batteries Lithium-Ion
Les outils Li-Ion de la gamme PB de STANLEY Engineered Fastening Li-Ion sont conçus avec un système
de protection électronique qui protège la batterie des surcharges, surchaues ou d'être complètement
déchargée.
L'outil s'éteint automatiquement si le système de protection électronique se déclenche. Si cela arrive, placez la
batterie Li-Ion dans le chargeur jusqu'à ce qu'elle soit complètement rechargée.
4.3 BLOCSBATTERIES
Votre outil est spéciquement conçu pour fonctionner avec des blocs-batteries Li-Ion 18V/20V max DEWALT®/
POP® Avdel®.
Insertion et retrait du bloc-batterie dans l’outil (g. 3)
REMARQUE : Pour un résultat optimal, assurez-vous que le bloc-batterie soit complètement chargé. L'outil s'éteint
sans avertissement lorsque la batterie est complètement déchargée.
POUR INSTALLER LE BLOC-BATTERIE DANS LA POIGNÉE
• Alignez le bloc-batterie (K) avec les rails à l’intérieur de la poignée de l’outil (g. 3).
• Faites-le coulisser dans la poignée jusqu’à ce qu’il soit correctement logé dans l’outil et vériez qu’il ne se
libère pas.
POUR RETIRER LE BLOC-BATTERIE DE LA POIGNÉE
• Appuyez sur le bouton de libération de la batterie et tirez fermement le bloc-batterie hors de la poignée
de l’outil.
• Insérez le bloc-batterie dans le chargeur comme décrit dans la section Chargeur de ce manuel.
Recommandations de stockage
• Le lieu idéal de rangement est un lieu frais et sec, à l’abri des rayons directs du soleil et de tout excès de
chaleur ou de froid. Pour des performances et une durée de vie optimales, entreposez les blocs-batteries
à température ambiante lorsqu'ils ne sont pas utilisés.
• Pour un stockage prolongé, il est recommandé de conserver le bloc-batterie complètement rechargé
dans un lieu frais et sec, hors du chargeur pour de meilleurs résultats.
REMARQUE : Les blocs-batteries ne doivent pas être stockés complètement déchargés. Le bloc-batterie doit être
rechargé avant réutilisation.
5. PROCÉDURE D'UTILISATION
AVERTISSEMENT : Respectez toujours les consignes de sécurité et la réglementation applicable.
AVERTISSEMENT : An de réduire le risque de blessures graves, débranchez le bloc-batterie avant
d'eectuer tout réglage ou de retirer/installer des accessoires.
AVERTISSEMENT : An de réduire tout risque de blessures graves, placez TOUJOURS vos mains
correctement.
AVERTISSEMENT : An de réduire tout risque de blessures graves, maintenez TOUJOURS l’outil
fermement pour anticiper toute réaction soudaine de sa part.
 Loading...