

Page 1
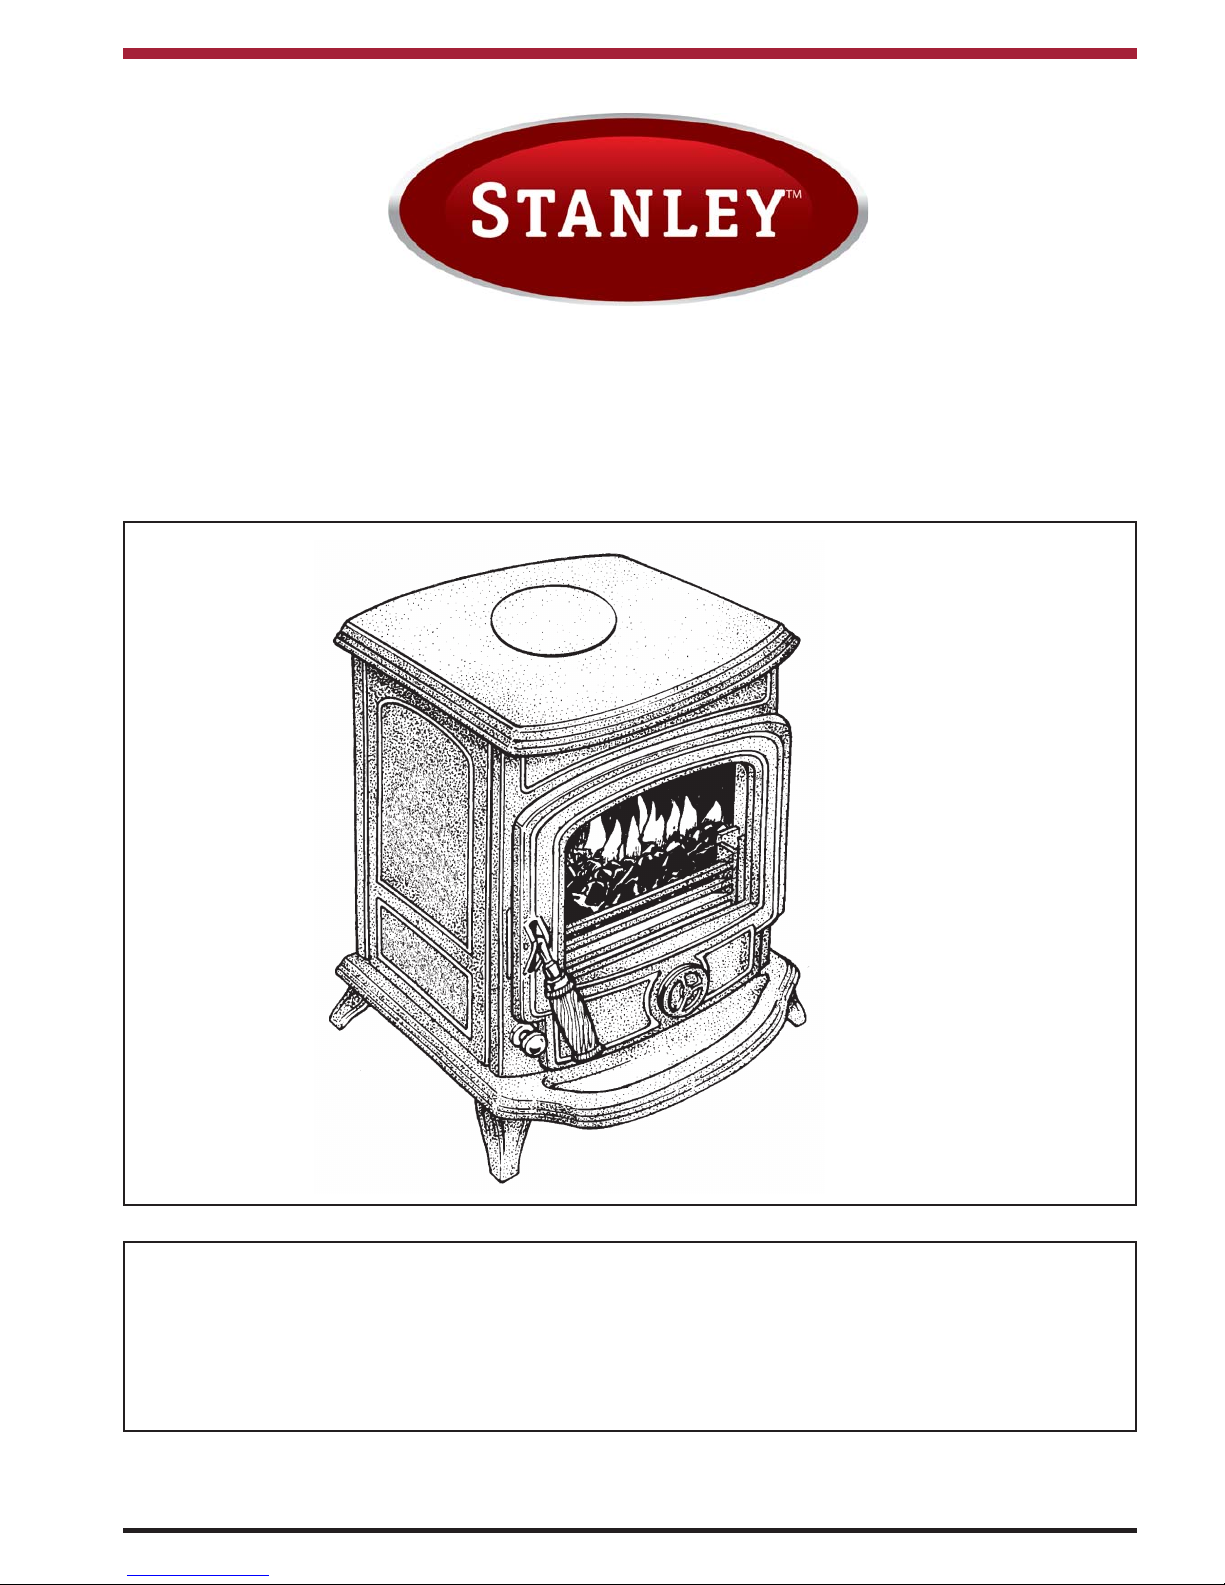
Oisin Solid Fuel Stove
INSTALLATION AND OPERATING INSTRUCTIONS
This appliance is hot while in operation and retains its heat for a long period of time after use.
Children, aged or infirm persons should be supervised at all times and should not be allowed to touch
the hot working surfaces while in use or until the appliance has thoroughly cooled.
When using the boiler stove in situations where children, aged and/or infirm persons are present a
fireguard must be used to prevent accidental contact with the stove. The fireguard should be
manufactured in accordance with BS 6539.
Page 2

TABLE OF CONTENTS
PAGE NO.
1. General . . . . . . . . . . . . . . . . . . . . . . . . . . . . . . . . . . . . . . . . . . . . . . . . . . . . . . . . . . . . . . . . . . . . . . . 3
2. Handling . . . . . . . . . . . . . . . . . . . . . . . . . . . . . . . . . . . . . . . . . . . . . . . . . . . . . . . . . . . . . . . . . . . . . . 3
3. Fire Cement . . . . . . . . . . . . . . . . . . . . . . . . . . . . . . . . . . . . . . . . . . . . . . . . . . . . . . . . . . . . . . . . . . . 3
4. Asbestos . . . . . . . . . . . . . . . . . . . . . . . . . . . . . . . . . . . . . . . . . . . . . . . . . . . . . . . . . . . . . . . . . . . . . . 3
5. Metal Parts . . . . . . . . . . . . . . . . . . . . . . . . . . . . . . . . . . . . . . . . . . . . . . . . . . . . . . . . . . . . . . . . . . . . 3
6. Pre Installation Assembly . . . . . . . . . . . . . . . . . . . . . . . . . . . . . . . . . . . . . . . . . . . . . . . . . . . . . . . . . 3
7. Flues . . . . . . . . . . . . . . . . . . . . . . . . . . . . . . . . . . . . . . . . . . . . . . . . . . . . . . . . . . . . . . . . . . . . . . . . . 3
8. Chimney . . . . . . . . . . . . . . . . . . . . . . . . . . . . . . . . . . . . . . . . . . . . . . . . . . . . . . . . . . . . . . . . . . . . . . 3
9. Top Flue Exit . . . . . . . . . . . . . . . . . . . . . . . . . . . . . . . . . . . . . . . . . . . . . . . . . . . . . . . . . . . . . . . . . . 4
10. Rear Flue Exit . . . . . . . . . . . . . . . . . . . . . . . . . . . . . . . . . . . . . . . . . . . . . . . . . . . . . . . . . . . . . . . . . . 4
11. Down Draughts . . . . . . . . . . . . . . . . . . . . . . . . . . . . . . . . . . . . . . . . . . . . . . . . . . . . . . . . . . . . . . . . . 5
12. Ventilation & Combustion Air Requirements . . . . . . . . . . . . . . . . . . . . . . . . . . . . . . . . . . . . . . . . . . . 5
13. Permanent Air Vent . . . . . . . . . . . . . . . . . . . . . . . . . . . . . . . . . . . . . . . . . . . . . . . . . . . . . . . . . . . . . . 5
14. Commissioning & Handover . . . . . . . . . . . . . . . . . . . . . . . . . . . . . . . . . . . . . . . . . . . . . . . . . . . . . . . 6
15. Location . . . . . . . . . . . . . . . . . . . . . . . . . . . . . . . . . . . . . . . . . . . . . . . . . . . . . . . . . . . . . . . . . . . . . . . 6
16. Clearance to Combustibles . . . . . . . . . . . . . . . . . . . . . . . . . . . . . . . . . . . . . . . . . . . . . . . . . . . . . . . . 6
17. Floor Protection . . . . . . . . . . . . . . . . . . . . . . . . . . . . . . . . . . . . . . . . . . . . . . . . . . . . . . . . . . . . . . . . . 7
18. Stove Dimensions . . . . . . . . . . . . . . . . . . . . . . . . . . . . . . . . . . . . . . . . . . . . . . . . . . . . . . . . . . . . . . . 7
19. Plumbing . . . . . . . . . . . . . . . . . . . . . . . . . . . . . . . . . . . . . . . . . . . . . . . . . . . . . . . . . . . . . . . . . . . . . . 7
20. Regulations . . . . . . . . . . . . . . . . . . . . . . . . . . . . . . . . . . . . . . . . . . . . . . . . . . . . . . . . . . . . . . . . . . . . 8
21. Gravity Circuit . . . . . . . . . . . . . . . . . . . . . . . . . . . . . . . . . . . . . . . . . . . . . . . . . . . . . . . . . . . . . . . . . . 8
22. Lighting . . . . . . . . . . . . . . . . . . . . . . . . . . . . . . . . . . . . . . . . . . . . . . . . . . . . . . . . . . . . . . . . . . . . . . . 8
23. Primary Air Settings . . . . . . . . . . . . . . . . . . . . . . . . . . . . . . . . . . . . . . . . . . . . . . . . . . . . . . . . . . . . . . 8
24. Recommended Fuels . . . . . . . . . . . . . . . . . . . . . . . . . . . . . . . . . . . . . . . . . . . . . . . . . . . . . . . . . . . . 8
25. Outputs . . . . . . . . . . . . . . . . . . . . . . . . . . . . . . . . . . . . . . . . . . . . . . . . . . . . . . . . . . . . . . . . . . . . . . . 9
26. Re-Fuelling . . . . . . . . . . . . . . . . . . . . . . . . . . . . . . . . . . . . . . . . . . . . . . . . . . . . . . . . . . . . . . . . . . . . 9
27. Important Notes . . . . . . . . . . . . . . . . . . . . . . . . . . . . . . . . . . . . . . . . . . . . . . . . . . . . . . . . . . . . . . . . . 10
28. Lighting . . . . . . . . . . . . . . . . . . . . . . . . . . . . . . . . . . . . . . . . . . . . . . . . . . . . . . . . . . . . . . . . . . . . . . . 11
29. De-Ashing . . . . . . . . . . . . . . . . . . . . . . . . . . . . . . . . . . . . . . . . . . . . . . . . . . . . . . . . . . . . . . . . . . . . . 12
30. Disposal of Ash . . . . . . . . . . . . . . . . . . . . . . . . . . . . . . . . . . . . . . . . . . . . . . . . . . . . . . . . . . . . . . . . . 12
31. Maintenance . . . . . . . . . . . . . . . . . . . . . . . . . . . . . . . . . . . . . . . . . . . . . . . . . . . . . . . . . . . . . . . . . . . 12
32. Chimney Cleaning . . . . . . . . . . . . . . . . . . . . . . . . . . . . . . . . . . . . . . . . . . . . . . . . . . . . . . . . . . . . . . . 12
33. Fire Safety . . . . . . . . . . . . . . . . . . . . . . . . . . . . . . . . . . . . . . . . . . . . . . . . . . . . . . . . . . . . . . . . . . . . . 12
34. Glass - Cleaning & Replacement . . . . . . . . . . . . . . . . . . . . . . . . . . . . . . . . . . . . . . . . . . . . . . . . . . . 13
35. CO Alarm . . . . . . . . . . . . . . . . . . . . . . . . . . . . . . . . . . . . . . . . . . . . . . . . . . . . . . . . . . . . . . . . . . . . . . 13
36. Enamel Cleaning . . . . . . . . . . . . . . . . . . . . . . . . . . . . . . . . . . . . . . . . . . . . . . . . . . . . . . . . . . . . . . . . 13
37. Exploded View . . . . . . . . . . . . . . . . . . . . . . . . . . . . . . . . . . . . . . . . . . . . . . . . . . . . . . . . . . . . . . . . . 14
38. Installation Check List . . . . . . . . . . . . . . . . . . . . . . . . . . . . . . . . . . . . . . . . . . . . . . . . . . . . . . . . . . . . 15
2
Page 3

OISIN SOLID FUEL STOVE
INSTALLATION & OPERATING INSTRUCTIONS
GENERAL
When installing, operating and maintaining your
Oisin Stove respect basic standards of fire safety.
Read these instructions carefully before commencing the installation. Failure to do so may result in
damage to persons or property. Consult your local
Municipal office and your insurance representative
to determine what regulations are in force. Save
these instructions for future reference.
Special care must be taken when installing the stove
such that the requirements of the Health & Safety at
Work Act are met.
Handling
Adequate facilities must be available for loading,
unloading and site handling.
Fire Cement
Some types of fire cement are caustic and should
not be allowed to come into contact with the skin. In
case of contact with the skin wash immediately with
plenty of water.
Asbestos
This stove contains no asbestos. If there is a possibility of disturbing any asbestos in the course of
installation then please seek guidance and use
appropriate protective equipment.
Metal Parts
When installing or servicing this stove care should
be taken to avoid the possibility of personal injury.
3
The complete installation must be done in
accordance with current Standards and Local
Codes. It should be noted that the requirements
and these publications may be superseded during the life of this manual.
NOTE: Please note that it is a legal requirement
under England & Wales Building Regulations that
the installation of the stove is either carried out
under Local Authority Building Control approval or
is installed by a Competent Person registered with
a Government approved Competent Persons
Scheme. HETAS Ltd operate such a Scheme and
a listing of their Registered Competent Persons
can be found on their website at www.hetas.co.uk.
IMPORTANT WARNING
This stove must not be installed into a chimney that
serves any other heating appliance. There must not
be an extractor fan fitted in the same room as the
stove as this can cause the stove to emit fumes into
the room.
PRE-INSTALLATION ASSEMBLY
1. After removing the stove from its pack, open the
firedoor and remove all contents from the ashpan.
2. Fit the firedoor handle using the screw provided.
3. Remove the stove from the pallet and position it
in the final installation position (See Location &
Clearance to Combustibles Section).
FLUES
Flues should be vertical wherever possible and
where a bend is necessary, it should not make an
angle of more than 37.5
o
with the vertical.
Horizontal flue runs should be avoided except in the
case of a back outlet connection where the length of
the horizontal section should not exceed 150mm.
CHIMNEY
The Oisin is a radiant room heater and must be connected to a chimney of the proper size and type.
The chimney must have a cross-sectional area of at
least 20 square inches 124 sq.cm or a diameter of at
least 5” (125mm). Never connect to a smaller size
chimney. Do not connect to a chimney serving
another appliance. Minimum chimney height 15’
(4.1 meters) from floor on which stove is installed. A
flue that has proved to be unsatisfactory, particularly with regard to down draught should not be used
for venting this appliance until it has been examined
and any faults corrected. An existing masonry chimney should be inspected and if necessary repaired
by a competent mason or relined using an approved
lining system. The stove must be connected to a
chimney with a minimum continuous draught of 0.06
w.g. Poor draught conditions will result in poor performance.
All register plates, restricter plates, damper etc.,
which could obstruct the flue at a future date should
be removed before connecting this appliance.
If connecting to an existing chimney with a flue
diameter of more that 6” it is recommend to line the
flue using a suitable stainless steel flue liner.
Page 4

When flue piping passes through closure plate with
sliding door, ensure that the pipe continues up and
is ultimately connected to the flue liner and well
sealed with fire cement.
Flue Liner
Stainless Steel
chimney
connector
Insulated
non-combustible
throat seal
Fig.1
Where a masonry chimney is not available a proprietary type of 5”/6” - 12.5/15cm twin wall, fully insulated pipe may be used. The pipe must terminate at
a point not lower than the main ridge of adjacent outside obstructions. With such installation, access to
the chimney must be provided for cleaning purposes. (See Fig.1)
TOP FLUE EXIT
For the top outlet configuration, remove the blanking plate (part no.10) from the hob, remove the flue
spigot (part no.11) from the back plate and fix it to
the hob. Fix the outlet blanking plate to back plate
(see Fig. 2). Push the flue outlet connector pipe (not
supplied) into the flue spigot and cement into place
using approved fire cement ensuring that no cement
blocks the flue passageway.
Fig.2
REAR FLUE EXIT
Push the flue connector pipe (not supplied) into the
flue spigot and cement into place using approved
fire cement ensuring that no cement blocks the flue
passageway (see Fig.3).
Fig.3
Fig.4
4
Page 5

DOWN DRAUGHTS
However well designed constructed and positioned,
the satisfactory performance of the flue can be
adversely affected by down draught caused by nearby hills, adjacent tall buildings or trees. These can
deflect wind to blow directly down the flue or create
a zone of low pressure over the terminal.
A suitable anti-down draught terminal or cowl will
usually effectively combat direct down blow but no
cowl is likely to prevent down draught due to a low
pressure zone. (See Fig.5)
Direction of wind
Direction of wind
Direction of wind
Pressure zone
Pressure zone
Suction zone
Suction zone
Pressure zone
Suction zone
Fig.5
5
VENTILATION AND COMBUSTION AIR
REQUIREMENTS
The minimum effective air requirement for this appliance is 132 cm2. When calculating combustion air
requirements for this appliance use the following
equation: 550mm2per each kW of rated output
above 5 kW should be provided, where a flue
draught stabiliser is used the total free area shall be
increased by 300mm2for each kW of rated output.
If there is another appliance using air fitted in the
same or adjacent room, it will be necessary to provide an additional air supply.
All materials used in the manufacture of air vents
should be such that the vent is dimensionally stable,
corrosion resistant, and no provision for closure.
The effective free area of any vent should be ascertained before installation. The effect of any grills
should be allowed for when determining the effective
free area of any vent.
Air vents direct to the outside of the building should
be located so that any air current produced will not
pass through normally occupied areas of the room.
An air vent outside the building should not be located less than the dimensions specified within the
Building Regulations and B.S. 8303: Part 1 from
any part of any flue terminal. These air vents must
also be satisfactorily fire proofed as per Building
Regulations and B.S. 8303: Part 1.
Air vents in internal walls should not communicate
with bedrooms, bedsits, toilets, bathrooms or rooms
containing a shower.
Air vents traversing cavity walls should include a
continuous duct across the cavity. The duct should
be installed in such a manner as not to impair the
weather resistance of the cavity.
Joints between air vents and outside walls should be
sealed to prevent the ingress of moisture. Existing
air vents should be of the correct size and unobstructed for the appliance in use. If there is an
extraction fan fitted in adjacent rooms where this
appliance is fitted, additional air vents may be
required to eleviate the possibility of spillage of products of combustion from the appliance/flue while the
fan is in operation. Refer to B.S. 8303 Part 1.
Where such an installation exists, a test for spillage
should be made with the fan or fans and other
appliances using air in operation at full rate, (i.e.
extraction fans, tumble dryers) with all external
doors and windows closed.
If spillage occurs following the above operation, an
additional air vent of sufficient size to prevent this
occurrence should be installed.
PERMANENT AIR VENT
The stove requires an adequate air supply in order
for it to operate safely and efficiently. The installer
may have fitted a permanent air supply vent into the
room in which the stove is installed to provide combustion and/or ventilation air. This air vent should
not under any circumstances be shut off or sealed.
Extractor Fan
There must not be an extractor fan fitted in the same
room as the stove as this can cause the stove to
emit smoke and fumes into the room.
Page 6

6
COMMISSIONING & HANDOVER
On completion of the installation allow a suitable
period of time for any fire cement and mortar to dry
out, when a small fire may be lit and checked to
ensure the smoke and fumes are taken from the
stove up the chimney and emitted safely to the
atmosphere. Do not run at full output for at least
24 hours.
On completion of the installation and commissioning
ensure that the operating instructions for the stove
are left with the customer. Ensure to advise the customer on the correct use of the appliance with the
fuels likely to be used on the stove and warn them to
use only the recommended fuels for the stove.
Advise the user what to do should smoke or fumes
be emitted from the stove. The customer should be
warned to use a fire guard to BS 6539 in the presence of children, aged and/or infirm persons.
LOCATION
There are several conditions to be considered in
selecting a location for your Oisin Stove.
a. Position in the area to be heated - central
locations are usually best.
b. Allowances for proper clearances to
combustibles.
CLEARANCE TO COMBUSTIBLES
Side wall to stove 20” 510mm
Back wall to stove non-boiler model 15” 380mm
Back wall to stove boiler model 12” 305mm
Ceiling to horizontal connector 18” 460mm
Corner 13” 330mm
Mantle clearance 25” 635mm
Side trim, which extends less than 2”
from the face of the fireplace 14” 355mm
It is recommended that this appliance is sited next to
and on a non-combustible surface. A minimum all
round clearance of 100 mm will allow air circulation
and not impede the performance of the stove.
Fig.6
The connector may pass through walls or partitions
constructed of combustible materials provided the
connector is either listed for wall pass-through or is
routed through a device listed for a wall passthrough and is installed in accordance with the conditions of the listing. Any unexposed metal that is
used as part of a wall pass-through system is
exposed to flue gases shall be constructed of stainless steel or other equivalent material that will resist
corrosion, softening, or cracking from flue gas at
temperatures up to 982
o
C.
Page 7

7
Fig.7
STOVE DIMENSIONS
PLUMBING
(Boiler Model only)
A stainless steel saddle boiler is available as an
optional extra. Fit boiler as follows:
1. Open fire door (Part No. 21).
2. Remove fire bars (Part No. 19)
3. If the stove has already been in service
thoroughly clean out the combustion chamber.
4. Remove side bricks (Part No. 13).
5. Remove back brick (Part No. 14).
Note: Dimensions stated are in millimetres and may be subject to a slight +/- variation.
6. Remove top baffle plate (Part No. 15).
7. Punch out the two boiler tapping blanks on
the back plate (Part No.7) from the outside
using a hammer and dolly.
8. Insert boiler through the fire door (Part No.28).
9. Screw the two 28mm (1”) flange nuts over
the boiler connections. (Do not over tighten
flange nuts).
10. Replace side bricks (Part No. 13).
11. Replace fire bars (Part No. 19). (See Fig.8)
FLOOR PROTECTION
When installing this heater on a combustible floor , a
floor protector, consisting of a layer of non-combustible material at least 3/8” thick or 1/4” thick covered with 1/8” sheet metal is required to cover the
area under the heater and extend to at least 18” at
the front and 8” to the sides and rear. This will provide protection from sparks and embers which may
fall out from the door when stoking or fuelling. (See
Fig.7)
Page 8

Fig.8
REGULATIONS
The plumbing must be in accordance with all relevant regulations and practices. It must include a
gravity circuit with vent pipe, open to the atmosphere.
GRAVITY CIRCUIT
The gravity circuit consists of the domestic hot water
tank of 135 litres direct cylinder, fixed in upright position, recommended for hot water storage and it
should be connected to the boiler by 28mm (1”)
diameter flow and return piping. The pipes should
not exceed 7.8m (25 1/2ft) in length and anything in
excess of 2.0m (6ft) must be fully lagged. The shorter the run of pipe work the more effective the water
heating. The cylinder should be fully lagged. (See
Fig.9)
There must be no gate valves on this circuit and it
must have an expansion pipe exhausting to atmosphere. Cylinder and pipe work should be lagged to
minimise heat loss.
NOTE: (Boiler Model Only) In line water conditioners fitted to the cold mains supply both of chemical and magnetic type are suitable for use with the
DHW stove.
Fig 9
LIGHTING
Before lighting the fire check pipe work and connections for leaks (Boiler Model). Check that all
dampers and catches are operating correctly and
ensure that all flue connections are thoroughly
sealed.
PRIMARY AIR SETTINGS
The spin valve (Part No. 22, located at the bottom
end of the door - Part No. 21) controls the primary
and window wash air supply to the stove. For maximum heat output and burn rate rotate the spin valve
(Part No. 22) fully in an anti-clockwise direction and
for a minimum heat output and burn rate rotate the
spin valve clockwise until fully closed. You will soon
learn spin valve settings to best suit your requirements. (See Fig.10)
Fig.10
RECOMMENDED FUELS
Bituminous coal, Anthracite, smokeless fuels, peat
briquettes and seasoned wood. Do not use fuels
with a Petro-coke ingredient.
The stove output levels are assessed on standard
House Coals of good quality (Grade A).
8
Page 9

Reduced outputs will result when fuels of lower
calorific values are used.
All fuels should be stored under cover and kept as
dry as possible prior to use.
This stove has obtained HETAS Ltd approval as an
‘intermittent’ operating appliance for burning natural
wood logs only as the recommended fuel. HETAS
Approval does not cover the use of other fuels either
alone or mixed with the recommended fuel, nor does
it cover instructions for the use of other fuels.
Outputs
BTU’s kW
Maximum 29,000 8.5
Non Boiler average to space 22,000 6.5
Boiler model to water 11,000 3.2
Boiler model to space 11,000 3.2
Stove Weight: Gross Net
74 kgs 66kgs
RE-FUELLING
Riddle the fire by connecting the grate operating tool
onto the rocker connection located at the bottom
front of the stove, then gently pull and push the rocker arm until all dead ash has fallen through into the
ashpan. Before opening the door, open the spin
valve by turning it anti-clockwise, as this will help to
eliminate any smoke or fly ash resident in the combustion chamber. Add fuel to fire, close fire door and
re-set spin valve to required setting. (See Fig.11)
Fig.11
9
Page 10

IMPORTANT NOTES
Now that your Stanley solid fuel Stove is installed and no doubt you are looking forward to many comforts it will
provide, we would like to give you some tips on how to get the best results from your stove.
1. We would like if you could take some time to read the operating instructions/hints, which we are
confident, will be of great benefit to you.
2. Do not burn fuel with a high moisture content, such as a damp peat or unseasoned timber. This
will only result in a build up of tar in the stove and in the chimney.
3. CLEAN THE FLUE-WAYS OF THE STOVE EVERY WEEK AND ENSURE THAT THERE ARE
NO BLOCKAGES. PLEASE REFER TO MANUAL FOR INSTRUCTIONS.
4. Before loading fresh fuel into the firebox, riddle fully to remove all ashes this will allow better and
cleaner burning. See Re-Fuelling Section Page 6.
5. Never allow a build up of ashes in the ash pan, as this will cause the grate to burn out prematurely.
6. Avoid slow burning of damp or unseasoned fuel as this will result in tarring flue ways and chimney i.e. peat or timber.
7. Allow adequate air ventilation to ensure plenty of air for combustion.
8. Do not burn rubbish/household plastic.
9. Clean the chimney at least twice a year.
10. Burning soft fuels such as timber and peat will stain the glass. Regular cleaning will prevent permanent staining.
11. Keep all combustible materials a safe distance away from unit, please see section for clearances to combustibles.
12. For safety reasons never leave children unaccompanied while stove is in use.
13. Avoid contact with unit when in use as stove reaches very high operating temperatures.
FUEL CALORIFIC VALUES - SOLID FUELS
Anthracite 25-50mm C.V.: 8.2kW/Kg 14,000 BTUs/lb
House Coal 25-75mm C.V.: 7.2kW/Kg 12,000 BTUs/lb
Timber - Firebox size C.V.: 5.0kW/Kg 8,600 BTUs/lb
Peat Briquettes C.V.: 4.8kW/Kg 8,300 BTUs/lb
Bog Peat C.V.: 3.4kW/Kg 6,000 BTUs/lb
10
Page 11

Before lighting the stove check with the installer that the installation work
and commissioning checks described in the installation instructions have
been carried out correctly and that the chimney has been swept clean, is
sound and free from any obstructions. As part of the stoves commissioning and handover the installer should demonstrate how to operate the stove
correctly.
LIGHTING
IMPORTANT: The first few fires should be relatively small to
permit the refractory to set properly and to season the stove.
1. Before lighting the stove, ensure that any build-up in the firebox
has been removed and that the ashpan has been emptied.
2. Open the spin valve (Part No. 22) by turning it anti-clockwise.
3. Lay a few crumpled sheets of paper on the hearth and then a few
small sticks, kindling or an approved firelighter.
4. Ignite and close the door.
5. Never use inflammable liquid i.e. gasoline, petrol paraffin
etc. to start or “freshen up” a fire in this heater.
6. When the fire is well established add fuel to the firebox and
adjust the spin valve to the required setting.
11
Page 12

DISPOSAL OF ASH
Ashes should be placed in a metal container with a
tight fitting lid. The closed container of ashes should
be on a non-combustible floor or on the ground well
away from all combustible materials pending final
disposal. If the ashes are disposed of by burial in
soil or other wise locally dispersed they should be
retained in the closed container until all cinders have
thoroughly cooled.
MAINTENANCE
CREOSOTE: Formation and Need for Removal
When some fuels are burned slowly, they produce
tar and other organic vapours, which combine with
expelled moisture to form creosote. The creosote
vapours condense in the relatively cool chimney flue
of a slow-burning fire. As a result, creosote residue
accumulates on the flue lining. When ignited creosote makes an extremely hot fire.
CHIMNEY CLEANING
Chimney and connector should be cleaned at least
twice a year. Once before heating season and once
after.
The chimney connector and chimney should be
inspected at least monthly during the heating season to determine if a creosote build-up has
occurred.
If the stove has no boiler, remove the cast iron baffle plate ( Part No.15) located at the top end of the
firebricks (Part No’s 13 & 14) before chimney cleaning.
12
DE-ASHING
Never allow ashpan to over fill as it will cause damage to firebars.
Open the fire door (Part No.21) and remove ashpan
(Part No.12) using the operating tool (Part No.34).
Close the fire door (Part No. 21). When the ash is
disposed of, replace the empty ashpan. (See Fig.12)
Fig.12
WARNING NOTE:
Properly installed, operated and maintained this
stove will not emit fumes into the dwelling.
Occasional fumes from the de-ashing and refuelling may occur. However, persistent fume emission is potentially dangerous and must not be
tolerated. If fume emission does persist, then the
following immediate action should be taken:
(a) Open doors and windows to ventilate room.
(b) Let the fire out or eject and safely dispose of
fuel from the stove.
(c) Check for flue or chimney blockage and
clean if required.
(d) Do not attempt to relight the fire until the cause
of the fume emission has been identified and
corrected. If necessary seek expert advice.
The most common cause of fume emission is flueway or chimney blockage. For you own safety
these must be kept clean at all times.
If the stove is fitted with a boiler the area above the
boiler should be thoroughly cleaned out using a suitable wire brush with a flexible handle.When inspecting a masonry chimney, start at the cleanout door,
normally found at the base of the chimney, or on the
outside. If your chimney does not have a clean-out
door one should be provided.
REMEMBER COAL GASES ARE TOXIC.
FIRE SAFETY
To provide reasonable fire safety the following
should be give serious consideration:
1. The installation of smoke detectors.
2. A conveniently located class ‘A’ fire extinguisher
to contend with small fires resulting from burning
embers.
3. A practical evacuation plan.
4. A plan to deal with a chimney fire as follows:
a. Notify the fire department.
b. Prepare occupants for immediate evacuation
c. Close all openings into the stove.
d. While awaiting the fire department watch for
ignition to adjacent combustibles from over
head stove pipe or from embers or sparks
from the chimney.
Page 13

GLASS
1. How to clean:
The glass will clean itself when there is sufficient
heat generated by burning fuel. If a build-up of creosote occurs on the glass it may be due to draft conditions, poor quality fuel or very low burning for a
long time. Only clean glass when stove is thoroughly cooled.
2. Glass Replacement: (See Fig.13)
a. Open the door (Part No.21) fully.
b. Remove the four corner screws and clips
and carefully remove the broken glass.
c. Clean the glass recess in the door.
d. Attach adhesive thermal tape to the perimeter of
the replacement glass.
e. Place the thermal tape side of the glass into
the door recess and replace the four corner
clips.
f. Tighten screws.
g. Replace glass only with ceramic glass 5mm
thick.
Fig.13
ENAMEL CLEANING
General cleaning must be carried out when the
stove is cool.
If this stove is finished in a high gloss vitreous enamel, to keep the enamel in the best condition observe
the following tips:
1. Wipe over daily with a soapy damp cloth,
followed by a polish with a clean dry duster.
2. For stubborn deposits a soap impregnated
pad can be carefully used on the vitreous
enamel.
3. Use only products recommended by the
Vitreous Enamel Association, these products
carry the vitramel label.
4. DO NOT USE ABRASIVE PADS OR OVEN
CLEANSERS CONTAINING CITRIC ACID
ON ENAMELLED SURFACES. ENSURE
THAT THE CLEANSER MANUFACTURERS INSTRUCTIONS ARE ADHERED TO.
13
CO ALARM
Waterford Stanley recommend the fitting of a CO
Alarm in the same room as the appliance, this is a
requirement under UK Building Regulations.
Further guidance on the installation of a carbon
monoxide alarm is available in BS EN 50292:2002
and from the alarm manufacturers instructions.
Provision of an alarm must not be considered a
substitute for either installing the appliance
correctly or ensuring regular servicing and
maintenance of the appliance and chimney
system.
WARNING:-
If the CO Alarm sounds unexpectedly:-
1. Open Doors and windows to ventilate the
room and then leave the premises.
2. Let the fire go out.
Page 14

OISIN SF NB EXPLODED VIEW
1. LEG (SHORT) - B00001AXX
2. BASE - B00002AXX
3. FRONT FRAME - B00003BXX
4. LH SIDE PLATE - B00004CXX
5. RH SIDE PLATE - B00005CXX
6. HOB BLANKING PLATE - B00006AXX
7. FLUE SPIGOT - B00007BXX
8. HOB - B00008BXX
9. OPERATING TOOL - B00009DXX
10. FRONT DOOR - B00010HXX
11. SPIN VALVE - B00012AXX
12. ASHPAN - F00001AXX
13. DOOR GLASS CLIP - F00003AXX
14. RATING PLATE BRACKET - F00879BXX
15. SIDE BRICK - H00001AXX
16. BACK BRICK - H00002AXX
17. SERIAL NUMBER PLATE - N00234BXX
18. DATA PLAQUE - N00440AXX
19. GRATE SUPPORT PLATE - Q00001BXX
20. TOP BAFFLE - Q00003AXX
21. BAFFLE PROTECTION PLATE - Q00004AXX
22. FIRE FENCE - Q00005AXX
23. FIRE FENCE RETAINER - Q00006AXX
24. HOB PROTECTION PLATE - Q00007AXX
25. BACK PANEL - Q00576CXX
26. BRACE PLATE - Q00759AXX
27. GLASS WINDOW - T00001AXX
28. PULL ROD KNOB - U00001AXX
29. DOOR HANDLE (LONG) - U00009AXX
30. HINGE - U00153AXX
31. GRATE CONNECTING ROD - V00001AXX
32. DOOR CATCH - V00002AXX
33. DOOR LATCH - V00003BXX
34. LONG TIE BOLT - V00052AXX
35. TIE ROD (M8 * 260MM) - V00053AXX
36. M8*39 SPINDLE - V00703BXX
37. BADGE - V00730BXX
38. GRATE - Z00025BXX
14
Page 15

INSTALLATION CHECK LIST
Flue System
1. Minimum Flue Height of 4.6 metres (15 feet).
2. Appliance should be connected to a minimum of 1.8 metres (6 feet) of 125mm (5”)
flue pipe with a horizontal run not exceeding 150mm (6”).
3. Appliance should be connected to a chimney of less than 200mm (8”) in diameter
(otherwise the chimney must be lined with a 5” flue liner).
4. The chimney venting position must be above the main ridge of the roof or adjacent
outside obstructions.
5. The chimney serving this appliance should not serve any other appliance.
6. Access should be provided to the chimney serving the appliance to allow for cleaning.
Location
7. Clearance to combustible materials must be adhered to as described in the Clearance
to Combustible section.
8. The stove must be installed on a floor protector that covers the area under the stove
and extends 18” to the front & 8” to the sides and back.
Plumbing
9. Appliance must be connected to a gravity circuit using 1” ID flow & return piping.
10. The length of pipes from the cylinder to the cooker should not exceed 7.8 metres
(25
1
/2 feet).
Ventilation & Combustion Air Requirements
11. The room in which the appliance is located should have an air vent of adequate
size to support correct combustion (see Ventilation & Combustion Air Requirement
Section for specific details).
Tick
15
Page 16

Rev:003 DP 150327
Item No: N00002AXX
16
Manufactured by
Waterford Stanley Ltd.,
Unit 401-403, IDA Industrial Estate, Cork Road,
Waterford, Ireland.
Tel: (051) 302300 Fax (051) 302315
 Loading...