

Page 1
Stud Sensor (77-110)
1
Stud Sensor (77-110)
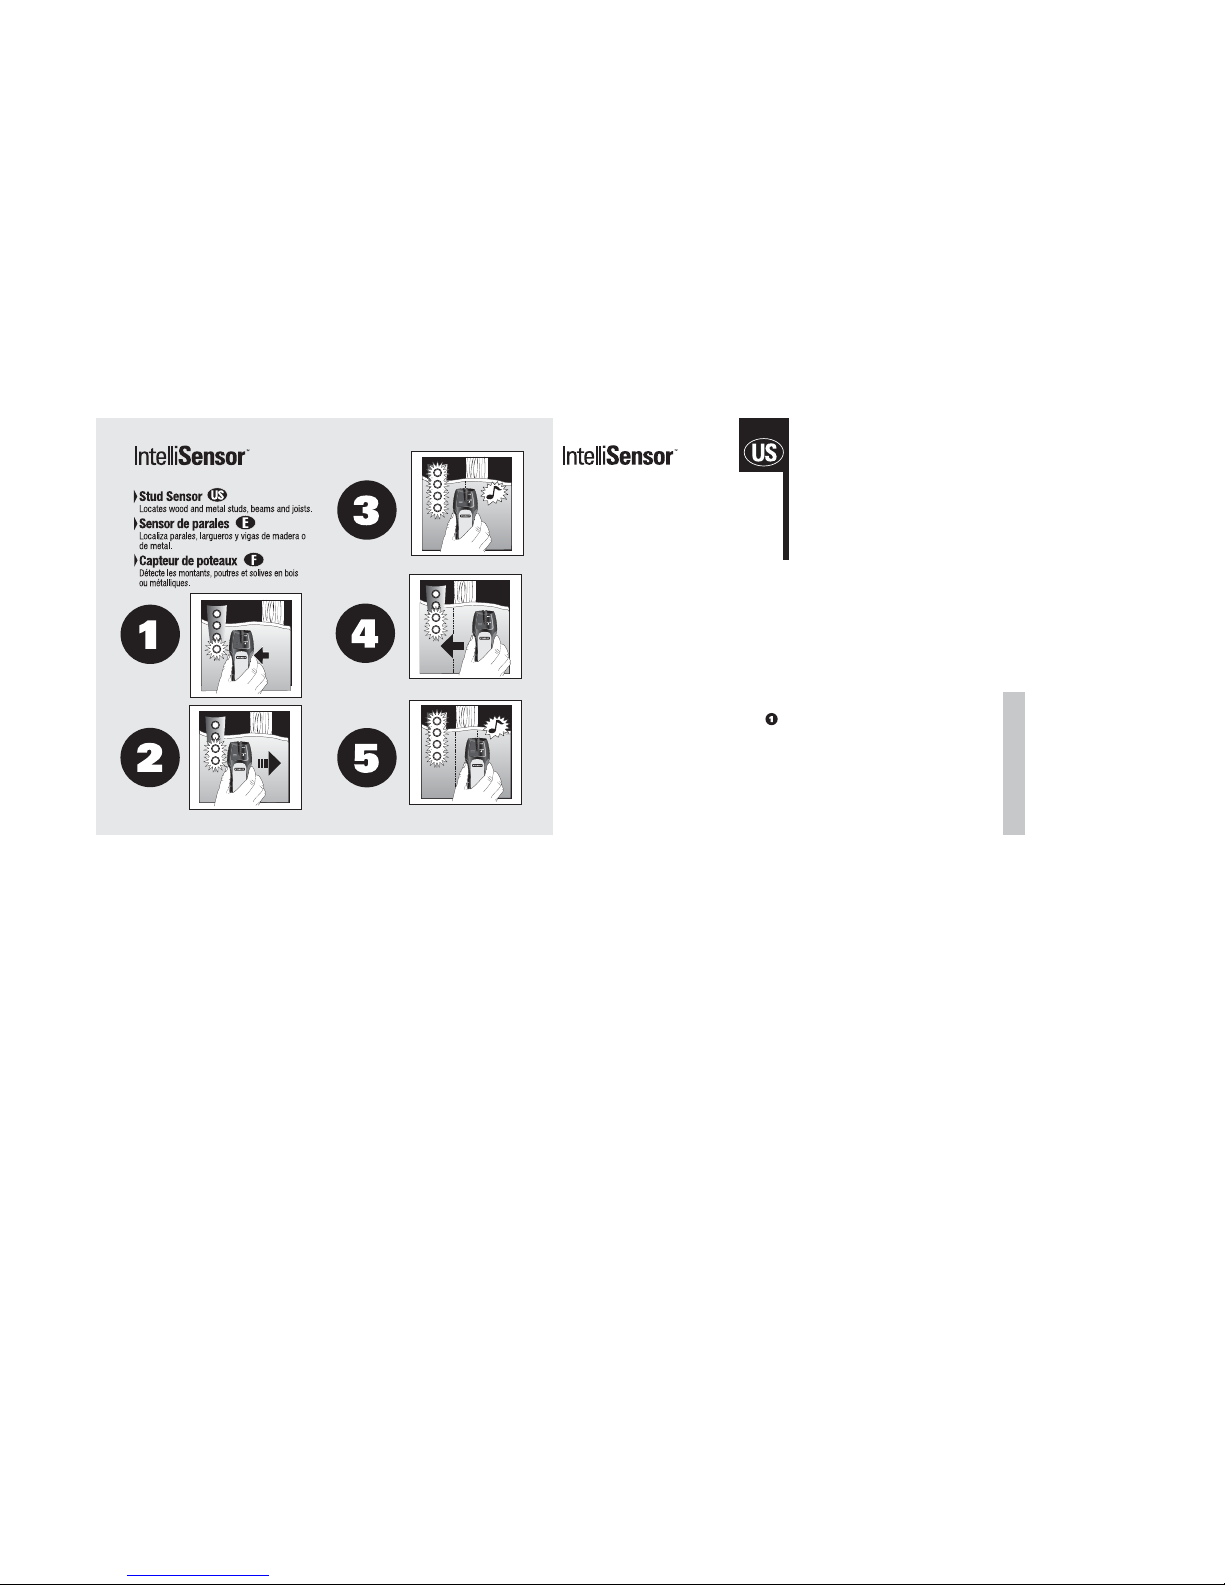
The Stanley IntelliSensor™ Stud Sensor uses
electronic signals to locate the edges of studs or
joists through drywall and plywood at a maximum
depth of 3/4". Once the edge of a stud has been
detected, the Stanley IntelliSensor
™ unit emits
audio and visual signals (Speaker/LED Display).
A pencil hole marker allows you to easily note
the edge of the stud behind the wall.
The Stanley
® IntelliSensor™Stud Sensor offers
automatic calibration and heavy-duty ABS
construction. The ergonomically-designed shape
increases user comfort during use.
OPERATING INSTRUCTIONS
Battery:
Open door on back of unit and connect a 9-volt battery
to clip. Put battery back into case and close back
battery door.
Calibration:
Calibrate the unit before use.
•Hold the IntelliSensor ™Stud Sensor flat against the
surface, making firm contact.
•Locate the activation switch on the right-hand side
of the unit – press and hold in. The red LEDs will briefly
flash and the green LED “Power” light will go on and
remain on. Keep holding the activation switch during all
Spécifications
Avec la procédure d’exploration et de marquage
de deux côtés, le détecteur IntelliSensor
™est
capable de trouver le centre des montants de
bois ou de métal avec une précision de 1/8 de
po (0,26 cm), à travers des surfaces de 3/4 de
po (1,9 cm).
Lors de la mesure d'un montant en bois sous
19mm (3/4 po) de mur de plâtre, il vous est
recommandé d'utiliser IntelliSensor
™ à un taux
d'humidité relatif de 35 à 55 %.
Résistance aux Chocs : résiste à une chute de 1,65 m
de haut sur une surface de béton.
Résistance à L'eau : résiste à l’eau mais n’est pas
étanche.
Température en Service : -7 à + 49 °C
Température de Rangement : -29 à + 66 °C
18
Page 2

Warranty
The Stanley Works warrants the IntelliSensor™
Stud Sensor against defects in material and
workmanship for one year from the date of
purchase. Deficient products will be repaired
or replaced at Stanley’s discretion if sent to:
The Stanley Works
Repair Department
480 Myrtle Street
New Britain, CT 06053
Stanley’s liability under this warranty is limited
the replacement of the unit. Any attempt to
repair the product by other than factory
authorized personnel will void this warranty.
Calibration, batteries and maintenance are
the responsibility of the user. Where permitted
by law, Stanley is not responsible for incidental
or consequential damages. Agents of Stanley
cannot change this warranty. Stanley is not
responsible for damage resulting from wear,
abuse or alteration of this product. The user
is expected to follow ALL operating instructions.
This warranty may provide you with additional
rights that vary by state, province or nation.
au clip. Remettez la pile dans son logement
et refermez le couvercle.
Étalonnage :
Etalonner Avant Utilisation.
•Maintenez fermement le détecteur de montants
IntelliSensor
™à plat sur une surface, pour assurer
un bon contact.
•Repérez l’interrupteur de mise en marche
sur la droite de l’unité – appuyez sur celui-ci et
maintenez-le enfoncé. La DEL rouge clignote
brièvement et la DEL verte “Power” s’allume
et reste allumée. Maintenez les interrupteurs de
mise en marche enfoncés pendant toute la durée
des procédures suivantes.
Remarque : pendant l’étalonnage, le détecteur de
montants IntelliSensor
™
NE DOIT NI être placé
directement au-dessus d’un montant, ni d’un matériau
dense tel que le métal ni sur une surface humide
fraîchement peinte, car il risque de ne pas s’étalonner
correctement. Mettez-vous, le cas échéant, à un autre
endroit et essayez à nouveau d'étalonner.
Utilisation
•Faites glisser l’IntelliSensor ™lentement en
ligne droite . Les voyants rouges s’allument
lorsque le détecteur se rapproche du montant.
Lorsque le détecteur repère le bord du montant,
OPERATING TIPS
Use a Fresh Battery
Always test the battery before use. Place the
IntelliSensor
™ unit in one hand, away from all
surfaces. Press and hold down the activation
switch. The green light should go on. Now, move
your free hand in an open-faced position toward
the back of the unit. When your hand is 2 to 3
inches from the back of the unit, the LEDs will
begin to light up. The lights should go off as you
move your hand away from the unit. If you do
not see the LEDs react as described above,
replace the battery.
Prevent Interference
To ensure best performance from the
IntelliSensor
™ product, keep your free
hand at least 6 inches away from the
unit while testing or scanning surfaces.
Conventional Construction
Doors and windows are commonly constructed
with additional studs and headers for added
stability. The IntelliSensor
™Stud Sensor detects
the edge of these double studs and solid headers
and emits and holds an audio signal as it
completely crosses them.
CONSEILS RELATIFS À L’UTILISATION
Utilisez une Pile Chargée
Testez toujours la pile avant de l’utiliser. Tenez
l’appareil IntelliSensor
™d’une main, éloigné de
toute surface. Appuyez sur l’interrupteur de mise
en marche et maintenez-le enfoncé. Le voyant vert
devrait s’allumer. Approchez à présent votre main
libre, la paume ouverte, vers l’arrière de l’unité.
Lorsque votre main est entre 5 et 7 cm de l’arrière
de l’unité, les DEL se mettent à s’allumer. Elles
s’éteignent dès que vous éloignez la main. Si vous
vous apercevez queles voyants ne s’allument et
ne s’éteignent pas selon la description ci-dessus,
remplacez la pile.
Évitez les Interférences
Tenez votre main libre à au moins 15 cm du
détecteur lorsque vous procédez à un test ou
à l’exploration d’une surface, pour assurer le
rendement optimal de l’appareil.
Construction Conventionnelle
Pour obtenir plus de stabilité, on utilise
généralement davantage de montants et de
5
3
16
14
When working near electrical wires,
always turn off the power.
Page 3

Calibración:
Calibre la unidad antes de utilizarla.
•Mantenga el sensor de travesaños
IntelliSensor
™de plano sobre la superficie,
estableciendo un contacto firme.
•Localice el interruptor de activación a la
derecha de la unidad – púlselo y manténgalo
oprimido. El LED rojo parpadeará brevemente y la
luz “verde” del LED se encenderá y permanecerá
encendida. Siga oprimiendo los interruptores de
activación durante todos los procedimientos que
siguen.
Nota: Mientras se calibra, el sensor de travesaños
IntelliSensor
™
NO SE DEBERá colocar directamente
sobre un travesaño o un material denso, como un
metal o una zona húmeda o recién pintada, porque no
se calibraría correctamente. Desplácelo a un lugar
distinto y vuelva a hacer la prueba.
Garantía
La Stanley Works garantiza el IntelliSensor™
Sensor contra defectos en material
y mano de obra durante un año a partir de
la fecha de la compra. Los productos
deficientes serán reparados o reemplazados
a la discreción de Stanley si son enviados a:
The Stanley Works
Repair Department
480 Myrtle Street
New Britain, CT 06053
La responsabilidad de Stanley bajo esta garantía
está limitada al reemplazo de la unidad.
Cualquier intento de reparar este producto por
persona diferente al personal autorizado por la
fábrica anulará esta garantía. La calibración,
las baterías y el mantenimiento son la
responsabilidad del usuario. Donde sea
permitido por la ley, Stanley no es responsable
por daños incidentales o consecuentes.
Los agentes de Stanley no pueden cambiar
esta garantía. Stanley no es responsable por
daños como resultado de desgaste, abuso
o alteración de este producto. El usuario está
7
12
9
10
INDICACIONES DE UTILIZACIÓN
Use una Batería Nueva
Pruebe siempre la batería antes de utilizarla.
Coloque la unidad del IntelliSensor
™en una de
sus manos, lejos de todas las superficies. Pulse
y mantenga oprimido el interruptor de activación.
La luz verde deberá encenderse. Luego, desplace
su mano libre en posición abierta hacia la parte
posterior de la unidad. Cuando su mano se
encuentre a de 5 a 7.5 cm (2 a 3 pulgadas) de la
parte posterior de la unidad, los LED comenzarán
a encenderse. Las luces deberán apagarse
cuando aleje la mano de la unidad. Si no ve que
los LED reaccionen como se indica, reemplace
la batería.
Evite las Interferencias
Para asegurar el mejor funcionamiento del
IntelliSensor
™, mantenga su mano libre cuando
menos a 15 cm (6 pulgadas) de distancia de las
unidades mientras esté probando o rastreando
superficies.
Construcción Convencional
Comúnmente, las puertas y ventanas se
construyen con puntales y largueros
adicionales para que tengan más estabilidad.
El sensor de travesaños IntelliSensor
™ detecta
el borde de esos puntales dobles y emite
una señal acústica continua al cruzarlos
por completo.
Diferencias de Superficies
Empapelado de Paredes –
No habrá diferencias
de funcionamiento del sensor de travesaños
IntelliSensor
™en las superficies cubiertas con
papel o tela, excepto cuando esos materiales
contengan láminas o fibras metálicas.
Yeso y Listones Y eseros–
Excepto cuando la
construcción de listones y yeso sea demasiado
gruesa, no habrá dificultades para que funcione
correctamente la unidad del IntelliSensor
™.
Techos–
Al trabajar en una superficie áspera,
como el tirol de un techo, utilice un pedazo de
cartón para rastrear la superficie. Aplique la
técnica de calibración que se indicó antes
con el trozo de cartón, para garantizar el mejor
funcionamiento posible de la unidad. Asimismo,
es especialmente importante en esta aplicación
el acordarse de mantener la mano libre alejada
de la unidad.
Page 4

Stud Sensor
WARNING:
Protect Your Eyes. Wear Safety Goggles.
AVERTISSEMENT:
Protégez vos yeux. Portez des lunettes de sécurité.
ADVERTENCIA:
Protéjase los ojos. Lleve gafas de seguridad.
Buzzer
Altavoz
Indicateur Sonore
Proximity LEDs
LED de Proximidad
Indicateurs de Proximité
Hole Marker
Marcador de Orificios
Marqueur
Comfortable Grip
Asidero Cómodo
Poignée Ergonomique
Automatic Calibration
Switch
Botón Para Calibración
Automática
Bouton de Calibration
Automatique
Garantie
The Stanley Works garantit l’IntelliSensor™
contre tout défaut de matériau et de main
d’oeuvre pendant un an à partir de la date
d’achat. Les produits défectueux seront
réparés ou remplacés au choix de Stanley
s’ils sont envoyés à:
The Stanley Works
Repair Department
480 Myrtle Street
New Britain, CT 06053
La responsabilité de Stanley sous les termes
de cette garantie se limite au remplacement
de l’unité. Tout tentative de réparation du
produit par du personnel autre que celui
autorisé par l’usine annulera cette garantie.
L’étalonnage, les piles et la maintenance font
partie des responsabilités de l’utilisateur.
Là où la loi le permet, Stanley ne pourra pas
être tenu responsable des dégâts accidentels
ou conséquents. Les agents de Stanley ne
peuvent pas changer cette garantie. Stanley
n’est pas responsable des dégâts dûs à
l’usure, l’abus ou aux modifications de ce
INSTRUCTION MANUAL
©2003 THE STANLEY WORKS:
Stanley Tools Product Group,
480 Myrtle Street, New Britain, CT 06053 U.S.A.
Tel 1-800-262-2161 Fax 860-643-3756
T5320
www.stanleyworks.com
19
77-110
77-110
One Year Warranty
Garantie de un an
Garantía durante un año
Page 5

Surface Differences
Wallpaper
– There will be no difference in the
function of the IntelliSensor™ Stud Sensor on
surfaces covered with wallpaper or fabric
unless the coverings used contain metallic foil
or fibers.
Plaster and Lath –
Unless lath and plaster
construction is excessively thick, there will
be no problem with proper functioning of the
IntelliSensor™ unit.
Ceilings –
When dealing with a rough surface
such as a sprayed ceiling, utilize a piece
of cardboard when scanning the surface.
Run through the calibration technique
described earlier with the piece of cardboard
too, to assure best performance of the unit.
Also, it is particularly important in this application to remember to keep your free hand
away from the unit.
Specifications
Utilizing the procedure of scanning and marking
from two sides, the IntelliSensor™ unit will find
the stud center within 1/8" accuracy for wood and
1/4" accuracy for metal.
When measuring a wood stud under 3/4" drywall,
it is recommended the IntelliSensor
TM
to be used
at 35-55% relative humidity.
Shock Resistance:Resistant to shock from 3 feet dropped
onto concrete.
Water Resistance: Water resistant, but not waterproof.
Operating Temperature: +20°F to +120°F (-7°C to +49°C)
Storage Temperature: -20°F to +150°F (-29°C to +66°C)
linteaux pour la construction des portes et
fenêtres. Le détecteur de montants IntelliSensor
™
repère l’extrémité de ces montants doubles et
des linteaux solides et émet un signal sonore
continu lorsqu'il en trouve sur son passage.
Différences de Surface
Papier Peint –
Le détecteur de montants
IntelliSensor
™fonctionne de la même façon
sur les surfaces recouvertes de papier peint
ou de tissu, sauf si le revêtement mural
contient des feuilles ou des fibres métalliques.
Latte et Plâtre –
L’IntelliSensor™fonctionne
normalement sur des constructions en latte et
en plâtre, à moins que le revêtement ne soit
particulièrement épais.
Plafonds –
Lorsque vous travaillez sur une
surface rugueuse telle qu’un plafond vaporisé,
servez-vous d’un morceau de carton lorsque
vous passez la surface au détecteur. Utilisez la
technique d’étalonnage décrite ci-dessous À
L’AIDE d’un morceau de carton, pour garantir
le meilleur rendement possible. Il est tout
particulièrement important dans ce cas que
vous vous souveniez de tenir votre main libre
à distance de l'appareil.
of the following procedures.
Note: While calibrating, the IntelliSensor™Stud
Sensor must not
be placed directly over a stud, dense
material such as metal, or over a wet or newly painted
area, or it will not properly calibrate. Move to a different
location and try again.
Usage:
•Slide the IntelliSensor™ unit slowly across
the surface in a straight line . As it moves
closer to the stud, red LEDs will go on. When it
detects the stud edge, the top LED will go on and
an audio tone will sound .
•Use the handy pencil hole marker on the
IntelliSensor
™unit to mark the stud edge.
•Double check stud location by coming from
the opposite direction. Make additional markings.
The midpoint of the two marks indicates the stud
center , .
Cautions on Operating
The proximity of electrical wiring or pipes to the
surface of the wall may cause the IntelliSensor
™
unit to detect them as studs. You should always
use caution when nailing, cutting or drilling in
walls, ceilings and floors that may contain these
items. Always remember that studs or joists are
normally spaced 16 inches or 24 inches apart
and are 1-1/2 inches in width. To avoid surprises
be aware that anything closer together or of a
different width may not be a stud, joist or fire break.
la DEL rouge supérieure s’allume et une tonalité
se fait entendre .
•Servez-vous du marqueur et du trou qui a été
aménagé sur l’IntelliSensor
™pour marquer le
bord du montant.
•Vérifiez à nouveau l’emplacement du montant
en vous en approchant depuis la direction
opposée. Faites d'autres marques. Le point situé
entre ces deux marques correspond au centre
du montant , .
Mises en garde relatives au fonctionnement
Le détecteur IntelliSensor™risque de détecter des
fils électriques ou des tuyaux se trouvant proches
de la surface du mur, comme s’il s’agissait de
montants. Prenez toujours des précautions lorsque
vous enfoncez des clous et découpez ou percez
des murs, des plafonds et des sols qui risquent de
renfermer fils électriques et tuyaux. Rappelez-vous
toujours que les montants ou solives sont
normalement espacés de 45 à 60 cm environ
et sont d’une largeur allant de 2,5 à 3,7 cm.
Pour éviter les mauvaises surprises, sachez que
des éléments plus rapprochés ou dont la largeur
est inférieure à ces valeurs risquent d’être autre
chose qu’un montant, une solive ou un coupe-feu.
Assurez-vous de toujours couper le courant avant
de travailler à proximité de fils électriques.
4
2
17
15
Assurez-vous de toujours couper
le courant avant de travailler à
proximité de fils électriques.
Page 6

IntelliSensor
™
Sensor de travesaños
(77-110)
El sensor de travesaños IntelliSensor™de
Stanley utiliza señales electrónicas para localizar
la posición exacta de travesaños o puntales a
través de pircas y madera comprimida. Una vez
detectado el borde de un travesaño, la unidad
IntelliSensor
™de Stanley emite señales visuales
y de audio (Bocina/Pantalla LED) que le permitirán
marcar automáticamente su posición central.
Un lápiz marcador de orificios le permitirá indicar
fácilmente la posición del centro en la pared.
El sensor de travesaños IntelliSensor
™
de Stanley ofrece calibración automática y
construcción ABS para servicio intenso.
Su forma de diseño ergonómico hace que
se aumente la comodidad al utilizarlo.
INSTRUCCIONES DE UTILIZACIÓN
Batería:
Abra la compuerta de la parte posterior
de la unidad y conecte una batería de 9 voltios a
la regleta. (Meta la batería en su alojamiento y
cerre la cubierta).
613
811
Especificaciones
Utilizando el procedimiento de rastreo y marcaje
desde dos direcciones, las unidades de
IntelliSensor
™permitirán detectar el centro de
travesaños de madera o metálicos a través de
superficies de 1.9 cm (3/4 de pulgada) con una
precisión de 3 mm (1/8 de pulgada).
Cuando esté localizando un paral de madera
debajo de pirca de 19mm (3/4 pul.), se recomienda
que el IntelliSensor
™ sea usado a una humedad
relativa del 35 al 55%
Resistencia a los Choques: Resistente a los
choques de hasta caídas sobre concreto desde
1m (3 pies) de altura.
Resistencia al Agua: Resistente al agua;
pero no impermeable.
Temperatura Funcional: -7 a +49°C (+20 a +120°F)
Temperatura de Almacenamiento: -29 a +66°C
(-20 a +150°F)
Utilización
•Deslice la unidad del IntelliSensor™ lentamente
a través de la superficie en una línea recta .
Cuando se acerque al travesaño, los LED rojos
parpadearán. Al detectar el borde del travesaño
o puntal, el LED superior se encenderá y se oirá
una señal acústica .
•Use el lápiz marcador de orificios del
IntelliSensor
™para marcar el borde del travesaño.
•Compruebe bien la ubicación del travesaño,
acercándose a él desde la dirección contraria.
El punto medio entre las dos marcas indicará el
centro del travesaño , .
Precauciones de Utilización
La proximidad de cables eléctricos o tuberías a la
superficie de la pared puede hacer que la unidad
del IntelliSensor
™los detecte como travesaños.
Deberá tener cuidado siempre al poner clavos,
cortar o perforar paredes, techos y pisos que
puedan contener esas cosas. Recuerde siempre
que los travesaños o puntales tienen normalmente
una separación de 40.64 ó 60.96 cm (16 a 24
pulgadas) entre ellos y su anchura es de 3.81 cm
(1-1/2 pulgadas). Para evitarse sorpresas, deberá
estar consciente de que cualquier cosa que esté
más cerca o que tenga una anchura distinta no
será un travesaño, puntal o listón.
Cuando esté trabajando cerca de cables
eléctricos, corte siempre la corriente.
supuesto a seguir TODAS las instrucciones
de operación.
Esta garantía podrá darle derechos adicionales
los cuales varían de acuerdo al estado, la
provincia o la nación.
IntelliSensor
™
Détecteur de montants
(77-110)
Le détecteur de montants Stanley IntelliSensor™
repère, à l’aide de signaux électroniques,
la position exacte des montants ou des
solives à travers le placoplâtre et les
cloisons en bois. Une fois le bord d’un
montant repéré, le détecteur Stanley
®
IntelliSensor™ émet des signaux sonores
et visuels (haut parleur/affichage DEL) qui
vous permettent de repérer automatiquement
la position du centre du montant. Il est alors
facile de noter la position de ce centre sur
le mur en le marquant à l’aide du marqueur
de trou.
Le détecteur de montants Stanley IntelliSensor
™
s’étalonne automatiquement et est fait en
ABS robuste. Sa forme ergonomique offre
davantage de confort pendant l’utilisation.
NOTICE D’UTILISATION
Pile :
ouvrez le volet situé à l’arrière de
l’unité et connectez une pile de 9 volts
 Loading...