

Stanley GS3-LF Installation Manual

GS3-LF Mullion / Standard Reader
Installation Guide
17998 v3.01 DRAFT 61 Jul 2013

2

GS3-LF Mullion / Standard Reader
Installation Guide
GS3-LF Mittelpfosten / Standard
Installationsanleitung
GS3-LF Lecteur Profilé / Standard
Guide d’installation
GS3-LF Lector Columelar / Estándar
Guía de instalación
GS3-LF Spröjs / Standard
Installationsanvisninar
GS3-LF Mullion / Standaard
Installatiehandleiding
GS3-LF Post / Standard
Installasjonsguide
GS3-LF Stipite / Standard
Guida all’installazione
GS3-LF De parede / Standard
Guia de Instalação
GS3-LF Pystykarmi / Vakio
Asennusopas
3

Standard Reader · Standardleser · Lecteur standard · Lector estándar ·
Standardläsare · Standaard lezer · Standard leser · Lettore standard ·
Leitor standard · Vakiolukija
P/N 909028111
Parts · Teile · Pièces · Piezas · Delar · Delen · Deler · Componenti · Componentes · Osat
×4
×1×1
MOV
×1×1
×1
Dimensions · Ausmaße · Dimensions · Dimensiones · Mått · Afmetingen · Dimensjoner ·
Dimensioni · Dimensões · Mitat
20.05
13.75
11.5
85.25
11.5
9.97
40.05
60
82.5
110.5
115
89
28
All dimensions mm · Alle Ausmaße in mm · Toutes dimensions en mm · Todas las dimensiones
en mm · Alla mått i mm · Alle afmetingen mm · Alle dimensjoner i mm · Tutte le dimensionisono
in mm · Todas as dimensões em mm · Kaikki mitat ovat mm:nä
4
Mullion Reader · Mittelpfostenleser · Lecteur profilé · Lector columelar ·
Spröjsläsare · Mullion lezer · Postleser · Lettore per stipite · Leitor de
parede · Pystykarmilukija
P/N 909028110
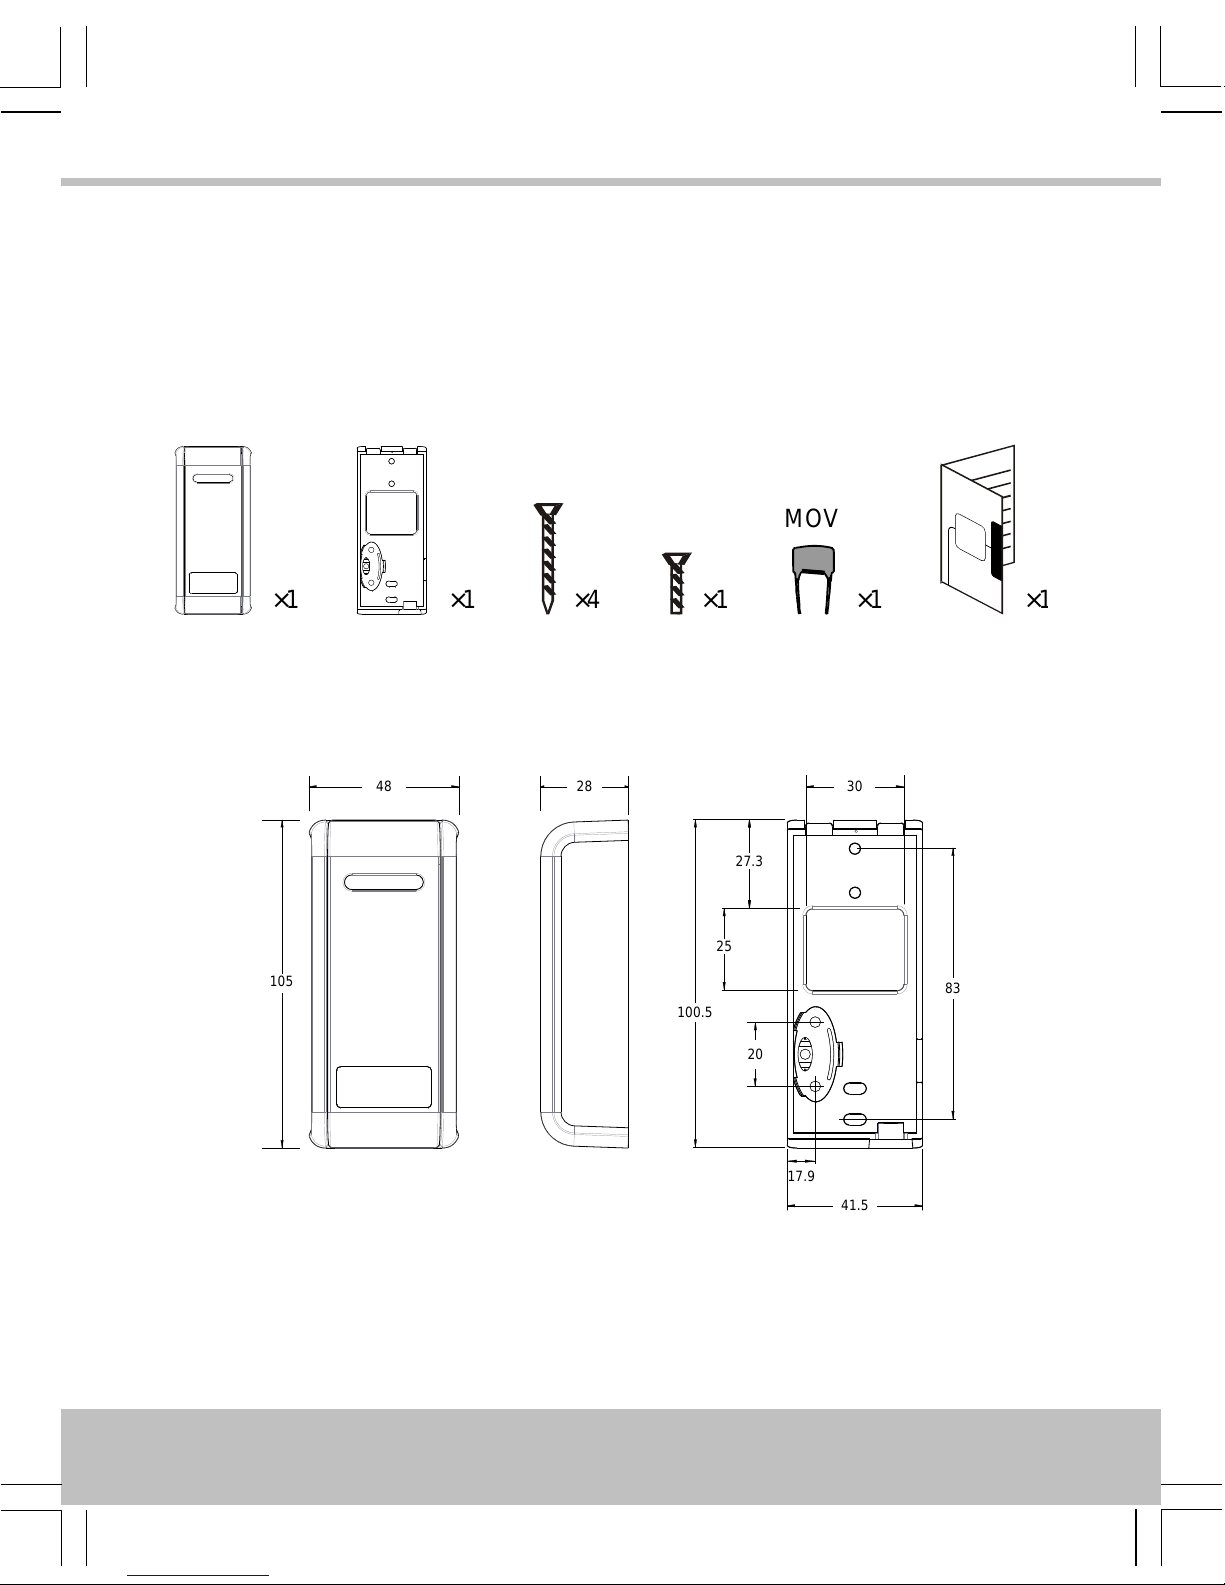
Parts · Teile · Pièces · Piezas · Delar · Delen · Deler · Componenti · Componentes · Osat
×1
×4
×1×1 ×1
MOV
×1
Dimensions · Ausmaße · Dimensions · Dimensiones · Mått · Afmetingen · Dimensjoner ·
Dimensioni · Dimensões · Mitat
48
105
28
20
83
100.5
41.5
25
27.3
30
17.9
All dimensions mm · Alle Ausmaße in mm · Toutes dimensions en mm · Todas las dimensiones
en mm · Alla mått i mm · Alle afmetingen mm · Alle dimensjoner i mm · Tutte le dimensionisono
in mm · Todas as dimensões em mm · Kaikki mitat ovat mm:nä
5
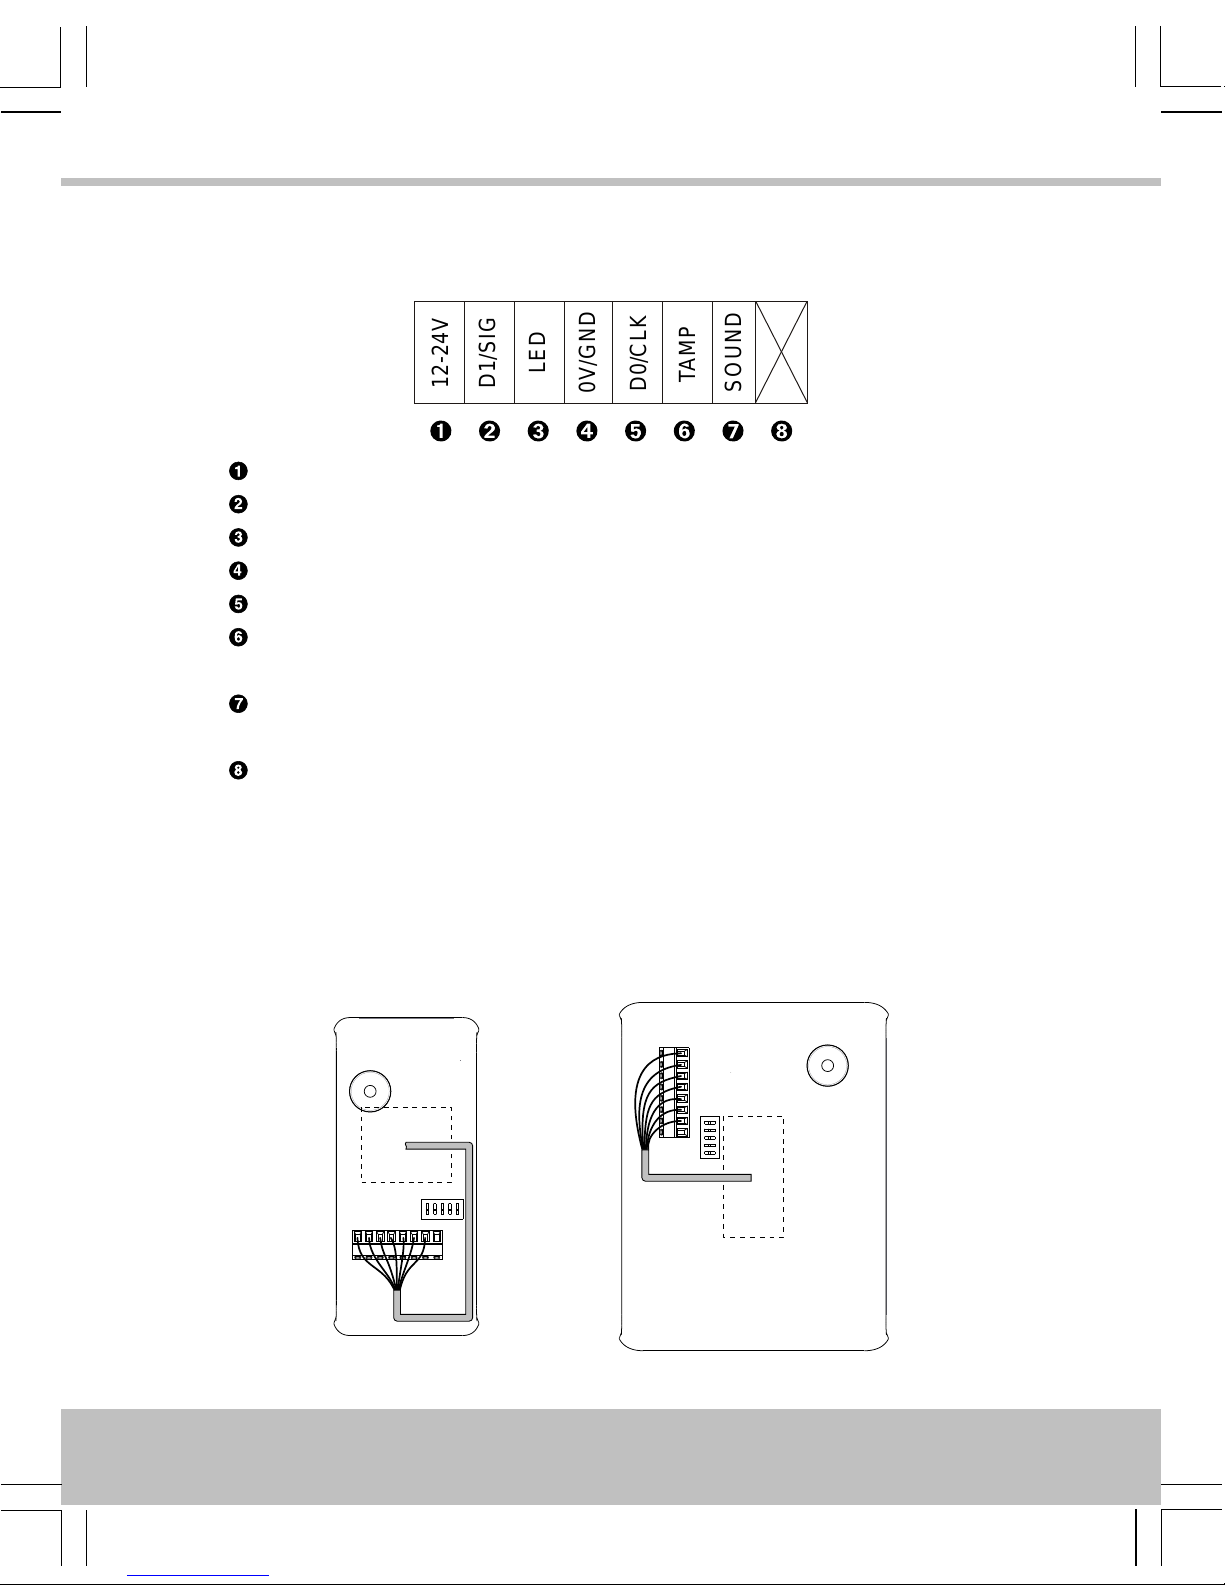
Connections · Anschlüsse · Connexions · Conexiones · Anslutningar ·
Aansluitingen · Tilkoplingar · Connessioni · Ligações · Liitännät
12-24V
D1/SIG
LED
0V/GND
D0/CLK
TAMP
SOUND
+V / 12V–24V
D1 / SIG
LED
0V / GND
D0 / CLK
Tamper · Sabotage · Effraction · Manip. fraud. · Manip. · Tamper · Sabotasje ·
Manomissione · Interferência · Ilkivalta
Sounder · Signaltongeber · Alarme sonore · Sonido · Ljudsignal · Alarm · Sirene ·
Ricevitore acustico · Dispositivo emissor de sons · Äänimerkinantaja
Do not use · Nicht verwenden · N’utiliser pas · No utilice · Använd inte · Niet
gebruiken · Ikke bruk · Non usare · Não utilizar · Älä käytä
Cable Routing · Kabelführung · Routage du câble · Recorrido del cable ·
Kabeldragning · Kabelroute · Kabelføring · Percorso dei cavi ·
Encaminhamento de cabos · Kaapelireititys
6
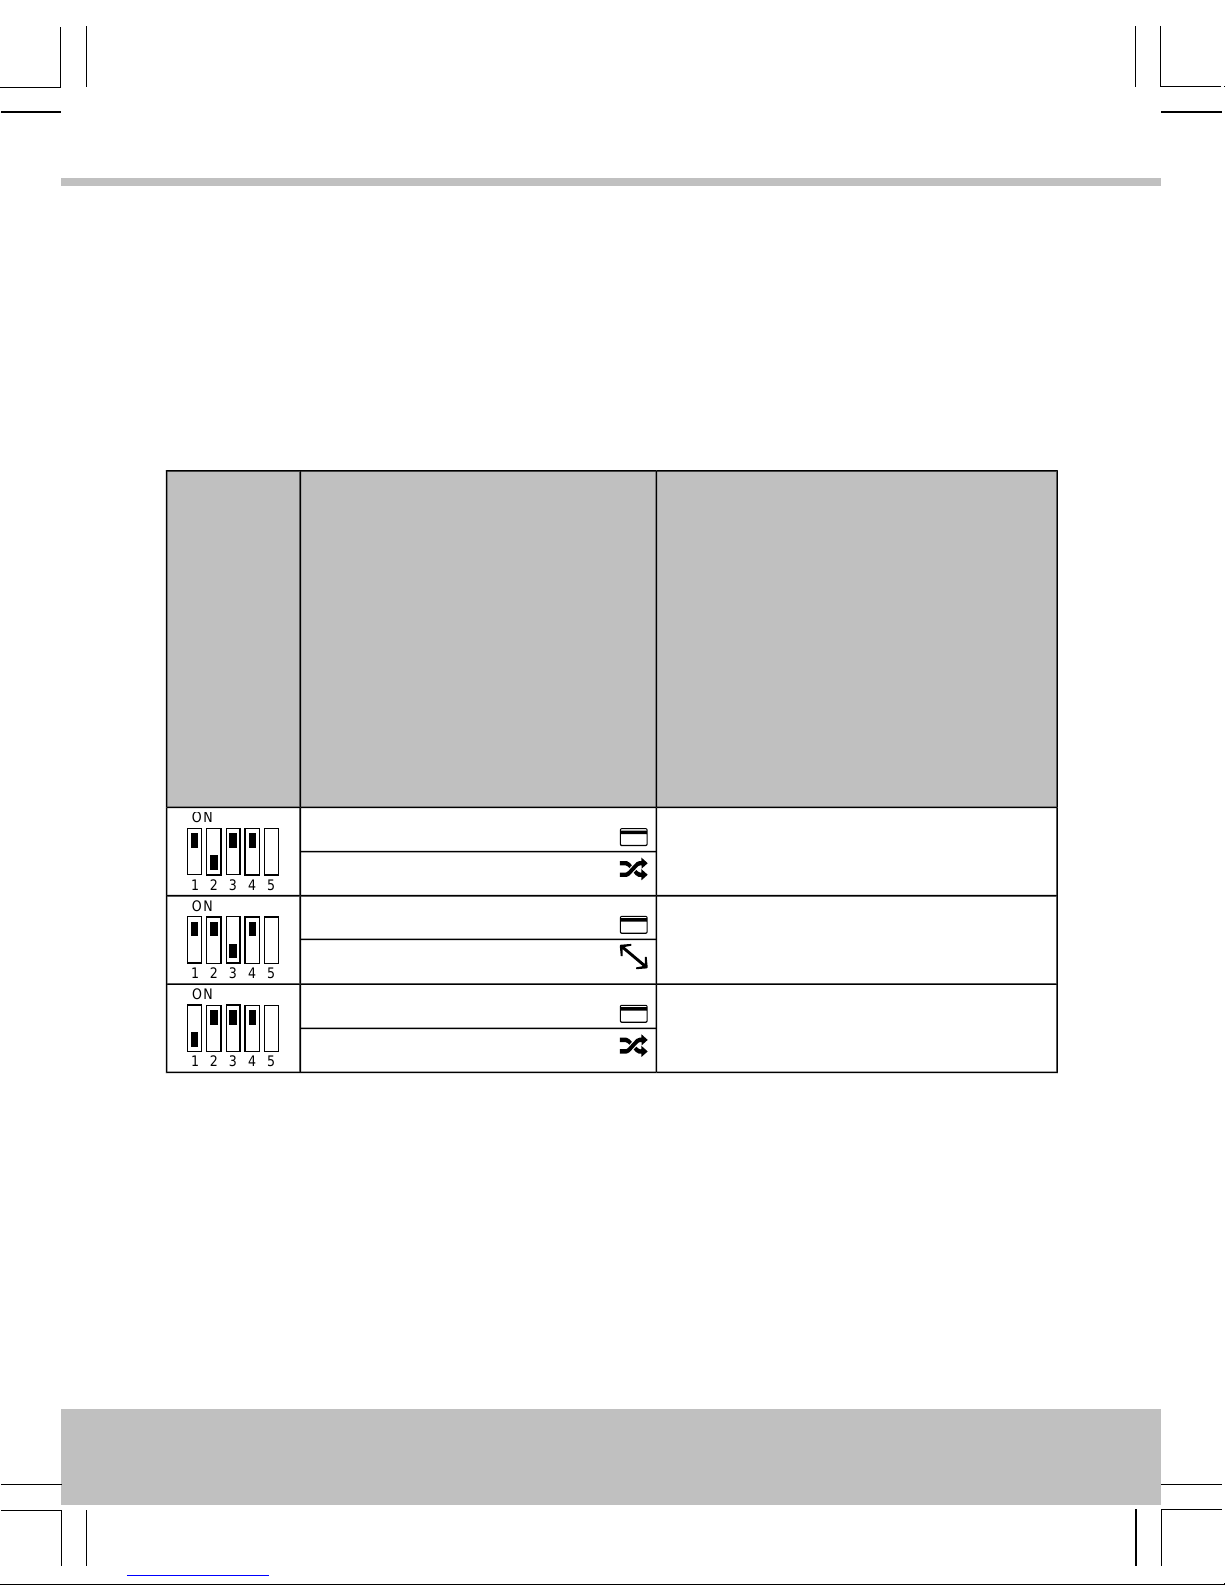
Output Format · Ausgabeformat · Format de Sortie · Formato de Salida ·
Utdataformat · Uitvoerformaat · Utdataformat · Formato uscita · Formato
de saída · Lähtömuoto
Default Settings · Standardeinstellungen · Paramètres standards · Ajustes estándares ·
Standardinställningar · Standaardinstellingen · Standardinnstillinger · Impostazioni
standard · Configurações padrões · Oletusasetukset
Output Format
Ausgabeformat
Format de sortie
Formato de Salida
Utdataformat
Uitvoerformaat
Utdataformat
Formato uscita
Formato de saída
Lähtömuoto
Card / Token
Karten / Token
Carte / Fiche
Tarjeta / Ficha
Kort / Nyckel
Kaart / Penning
Kort / Nøkkel
Scheda / Contrassegno
Cartão / Token
Kortti / Rahake
DIP
PAC
ON
1 2 3 4 5
PAC / KeyPAC
Wiegand Prox
PAC 64
ON
1 2 3 4 5
PAC / KeyPAC
Wiegand Prox
Magstripe
ON
1 2 3 4 5
PAC / KeyPAC
Wiegand Prox
7

Other Settings · Andere Einstellungen · Autres paramètres · Otros ajustes · Övriga
inställningar · Andere instellingen · Andre innstillinger · Altre impostazioni · Outras
configurações · Muut asetukset
Output Format
Ausgabeformat
Format de sortie
Formato de Salida
Utdataformat
Uitvoerformaat
Utdataformat
Formato uscita
Formato de saída
Lähtömuoto
Card / Token
Karten / Token
Carte / Fiche
Tarjeta / Ficha
Kort / Nyckel
Kaart / Penning
Kort / Nøkkel
Scheda / Contrassegno
Cartão / Token
Kortti / Rahake
DIP
Wiegand 26-bit
ON
1 2 3 4 5
PAC / KeyPAC
Wiegand Prox
Wiegand 34-bit
ON
1 2 3 4 5
PAC / KeyPAC
Wiegand Prox
Wiegand 74-bit
ON
1 2 3 4 5
PAC / KeyPAC
Wiegand Prox
Wiegand 74-bit
ON
1 2 3 4 5
PAC / KeyPAC
WiegandWiegand Prox
8
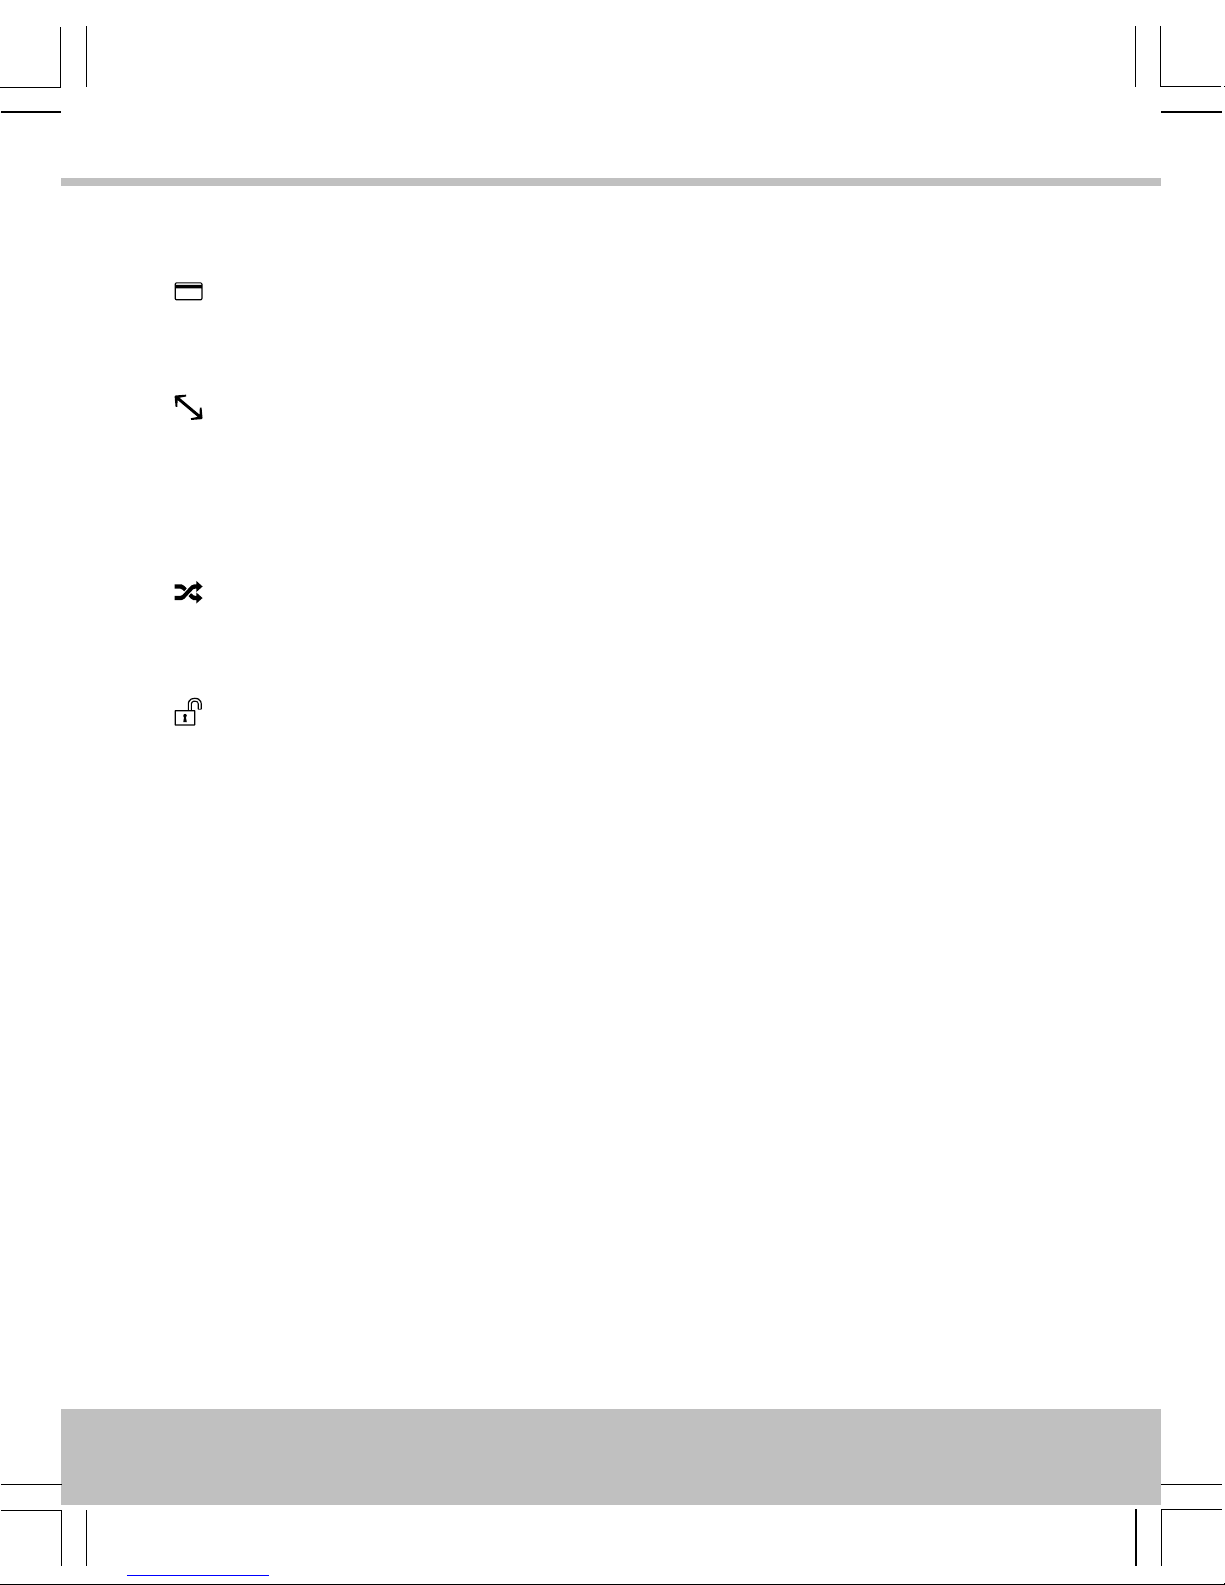
Symbols · Symbole · Symboles · Símbolos · Symboler · Symbolen · Symboler · Simboli ·
Símbolos · Symbolit
Data from card · Daten von Karte · Les données de la carte · Los datos de tarjeta ·
Data från kortet · Gegevens van de kaart · Data fra kortet · Dati dalla scheda · Os
dados do cartão · Tiedot kortti
Padded or truncated data · Daten aufgefüllt oder abgeschnitten · Les données sont
complétées ou tronquées · Los datos se rellenan o se truncan · Data utfylls eller
trunkeras · Gegevens worden opgevuld of afgekapt · Data polstres eller avkortes ·
Dati sono imbottiti o troncati · Os dados são preenchidos ou truncados · Tiedot on
pehmustettu tai katkaistu
Processed data · Daten verarbeitet · Les données sont traitées · Los datos se
procesan · Data bearbetas · Gegevens worden verwerkt · Data behandles · Dati
sono trattati · Os dados são processados · Tiedot käsitellään
OPS processeddata · Daten verarbeitet alsOPS · Les données sont traitées comme
OPS · Los datos se procesan como OPS · Data bearbetas som OPS · Gegevens
worden alsOPSverwerkt · Data behandlessom OPS · Datisonotrattati come OPS ·
Os dados são processados como OPS · Tiedot käsitellään ja salaus puretaan
9
Reader Configuration · Konfiguration des Lesers · Configuration du
lecteur · Configuración de lector · Läsarens konfigurering ·
Lezerconfiguratie · Leserkonfigurasjon · Configurazione del lettore ·
Configuração do leitor · Lukijan konfiguraatio
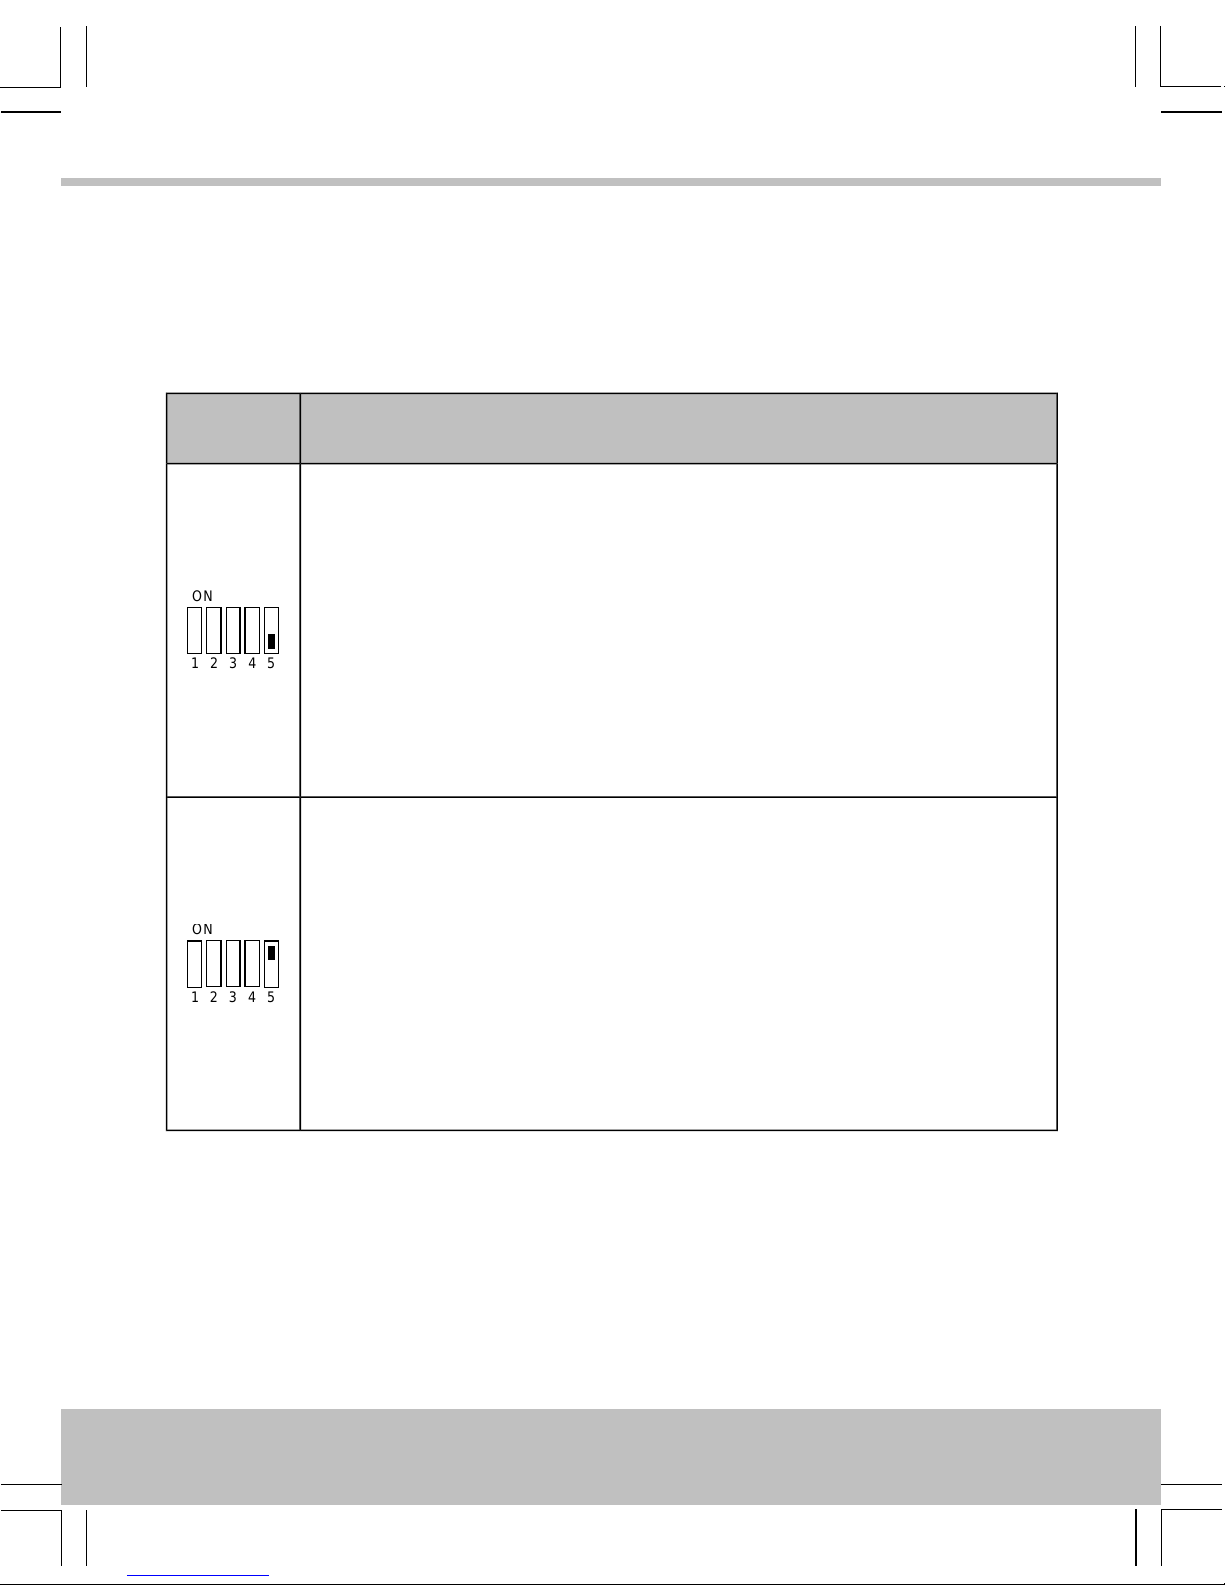
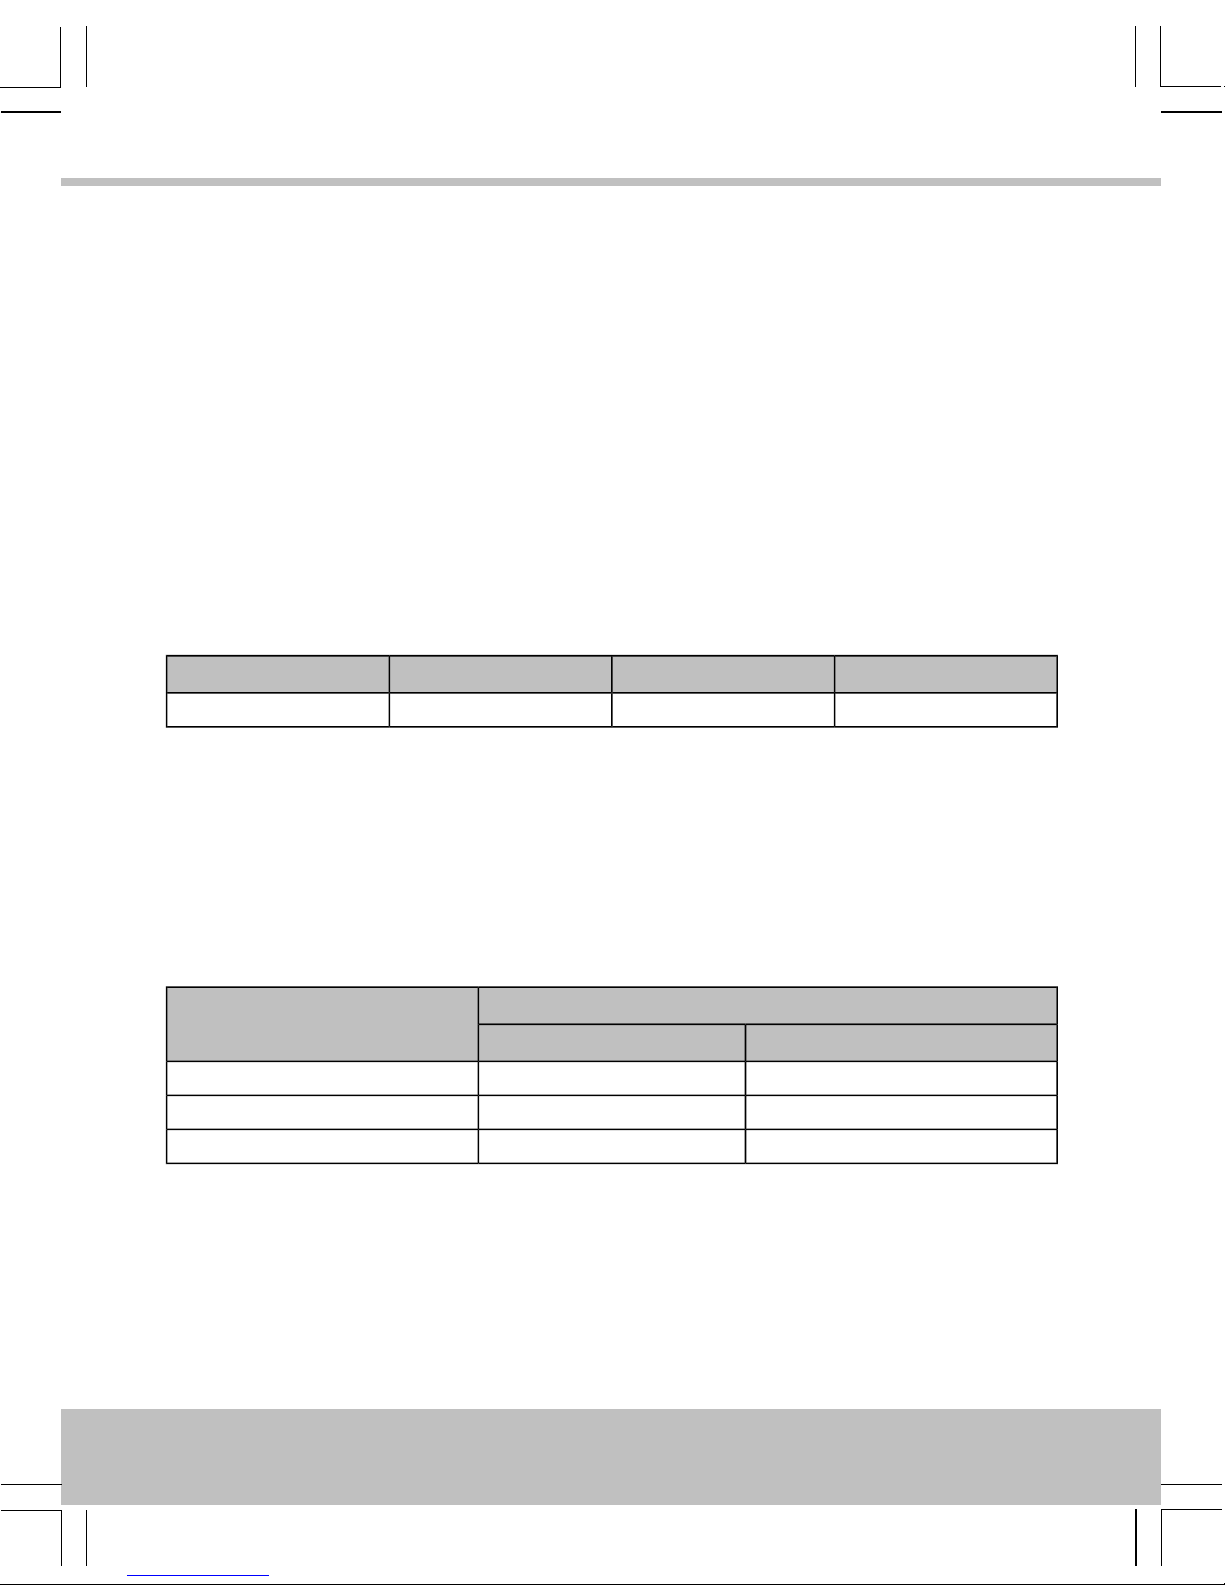
Result · Ergebnis · Résultat · Resultado · Resultat · Resultaat · Resultat ·
Risultato · Resultado · Tulos
DIP
Reader beeps when token presented
Der Leser piept, wenn ein Token vorgezeigt wird.
Le lecteur émet un bip lorsque la fiche est présenté
Lector pita cuando una tarjeta es presentada
Läsaren piper när nyckel visas
Lezer piept als een token wordt aangeboden
Leseren piper når symbolet vises
Il lettore emette un segnale acustico quando viene presentato il contrassegno
O leitor emite sinais sonoros quando o token é apresentado
Lukija piippaa laitettaessa rahake laitteeseen
ON
1 2 3 4 5
Reader silent when token presented
Der Leser bleibt stumm, wenn ein Token vorgezeigt wird.
Le lecteur reste silencieux lorsque la fiche est présenté
Lector silencia cuando una tarjeta es presentada
Läsaren är tyst när nyckel visas
Lezer stil als een token wordt aangeboden
Leseren er stille når symbolet vises
Il lettore è silenzioso quando viene presentato il contrassegno
O leitor fica silencioso quando o token é apresentado
Lukija on hiljaa laitettaessa rahake laitteeseen
ON
1 2 3 4 5
10

English
Installation
1. Ensure your product comes with the items indicated on pages 4–5; if not please
contact your branch.
2. Feed cables through backplate.
3. Use two screws to attach backplate to wall.
4. Use two screws to attach tamper plate to wall.
5. Connect cable to circuit board — see page 6.
6. Set output format — see page 7.
7. Configure reader — see page 10.
8. Snap reader to backplate and secure with final screw.
9. Apply power when all readers are installed.
Notes
•
If power is applied when the reader is not properly attached to the wall, a wall
tamper condition is generated.
•
Do not distort the back plate or tamper plate when mounting, e.g. to a back box,
or a spurious wall tamper / case tamper condition may be generated.
•
Mount readers >3′ / 1m apart, e.g. on either side of the door. Mounting on metal
surfaces will reduce the reading range.
•
If the reader is being used to enter credential information to arm a system, the
reader must be located within 3′ / 1m of the panel’s main keypad or display.
•
For outside readers, use corrosion-resistant fixings and apply silicone sealant to
the backplate before fixing to the wall.
•
The suppliedMOV(MetalOxideVaristor,AngliaComponentsP/NB72207S250K101)
should be fitted across the power terminals of the lock to suppress back EMF. Any
suppression diodes fitted in the lock / lock circuit must be removed.
•
Output format and reader configuration can be changed without disconnecting the
power supply. The reader automatically restarts with the new configuration.
11
English
Reader Tamper
If the backplate is pulled away from the wall, the tamper plate remains attached to the wall
and awall tamper condition is generated.Likewise,if the reader is removedfrom the backplate,
a case tamper condition is generated.
The voltage on the Tamper line is normally low. If case tamper or wall tamper is detected, the
voltage on the Tamper line becomes high and the reader sounds 3 long beeps every 5 seconds
for two minutes, then stops.
To clear a wall tamper condition, reattach the backplate to the tamper plate. To clear a case
tamper condition, reattach the reader to the backplate.
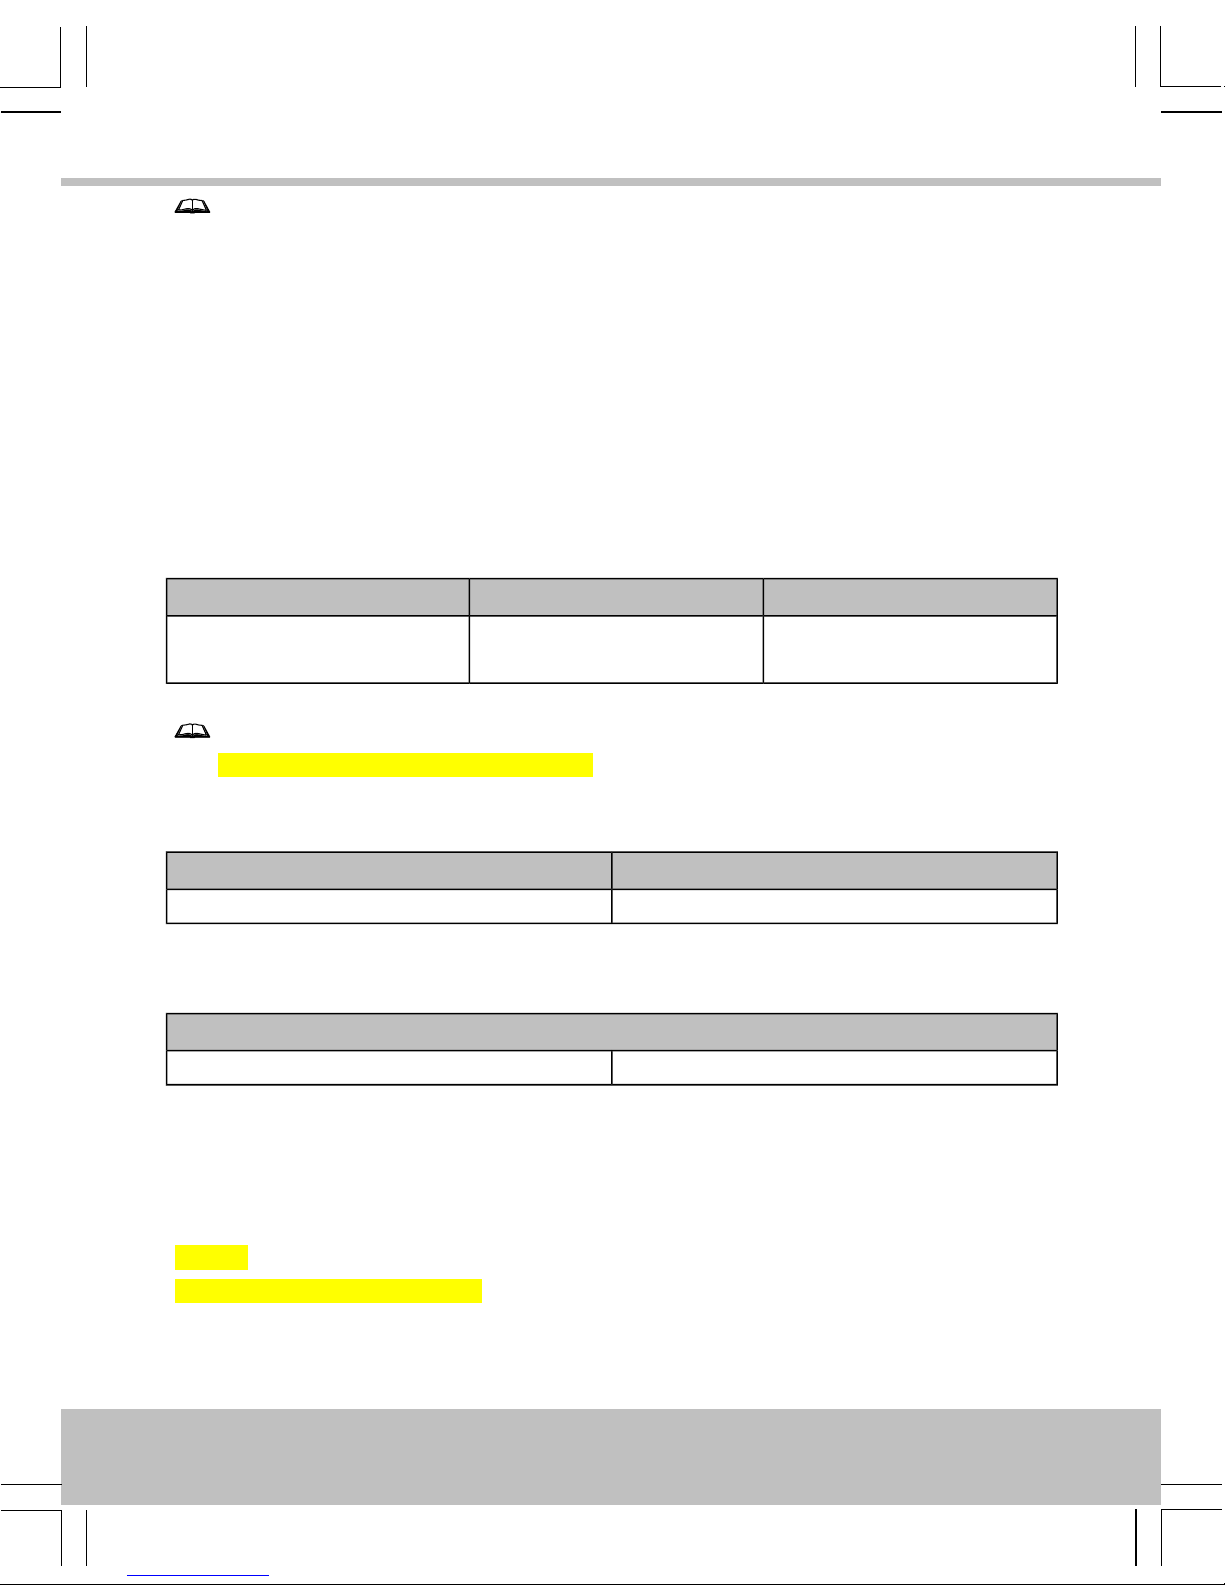
Usage
LEDs
YellowRed / GreenGreenRed
Not usedAccess deniedAccess permittedDefault
Sounder
•
The reader sounds 4 rapid beeps when it is powered up or restarted.
•
If specified, the reader beeps once when a token is presented.
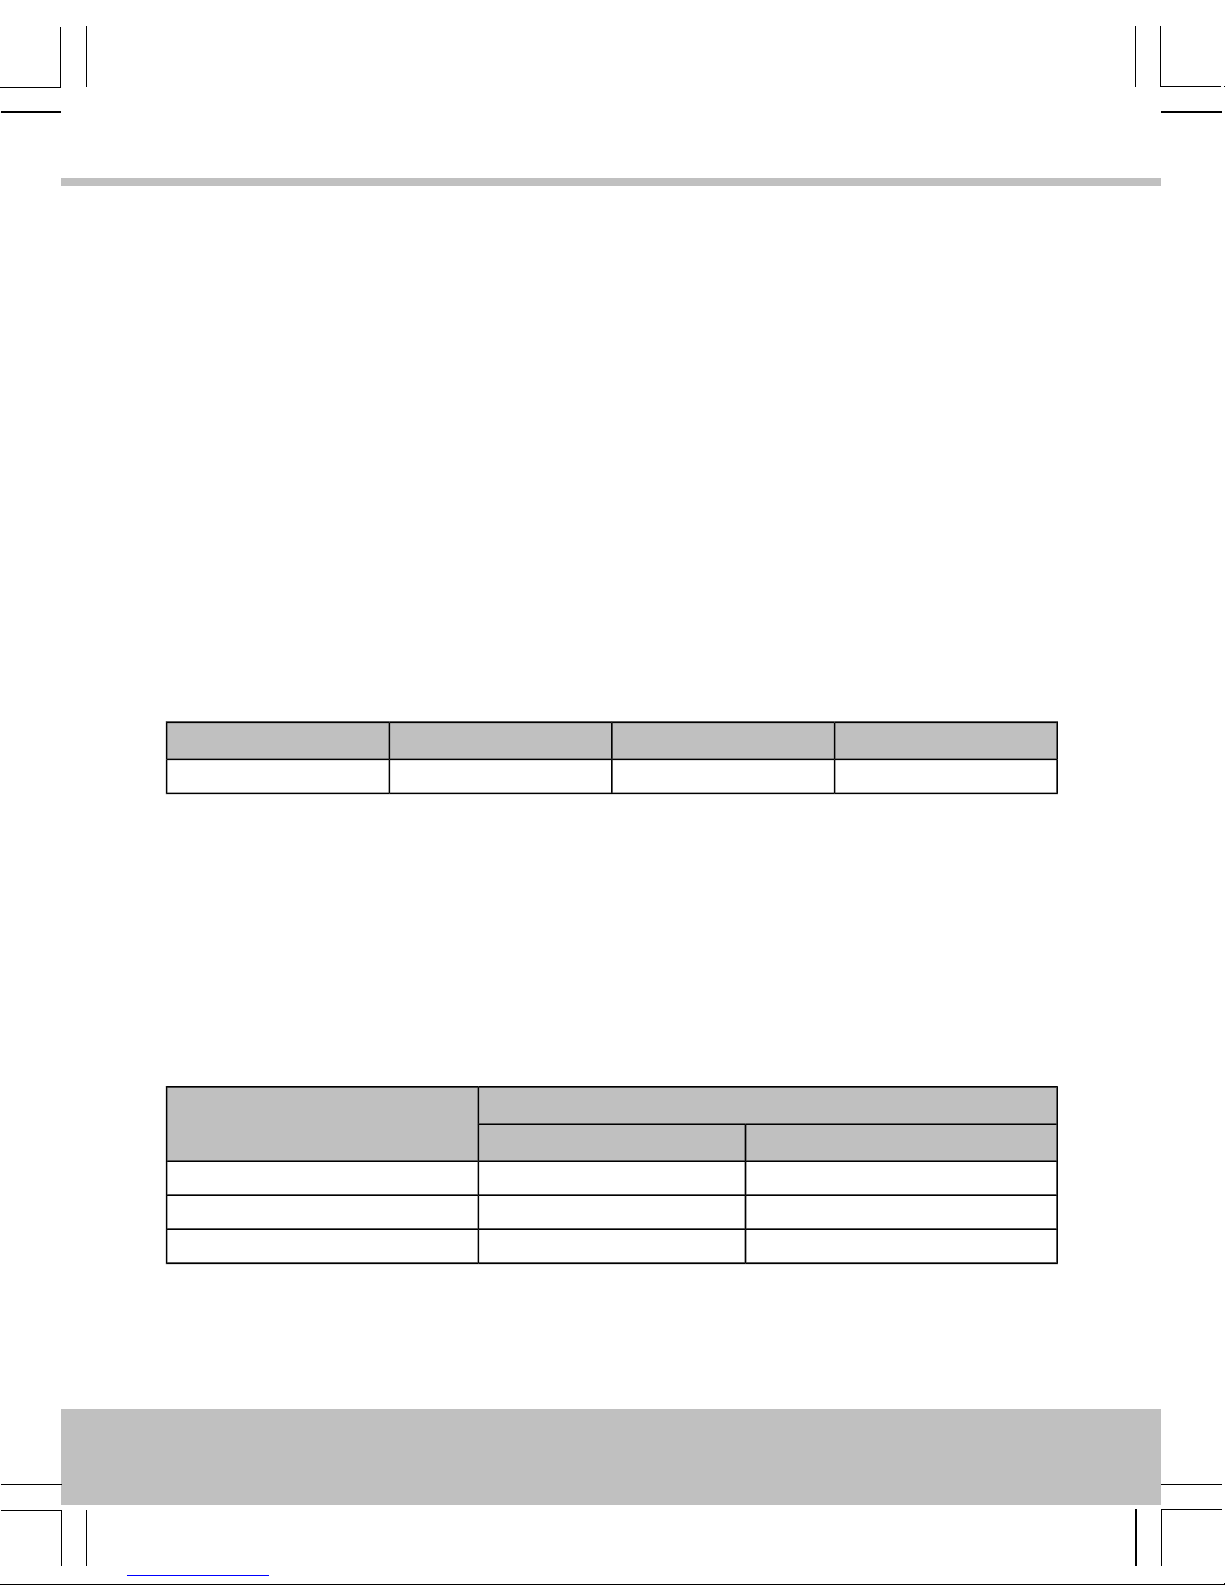
Cable Lengths
PAC door controllers only
Distance from Reader to ControllerCable Gauge
AC 202 / 512AC 2100 / 2200
230′ / 70m *750′ / 250m7/0.2 0.34mm² 22AWG
230′ / 70m *1500′ / 500m16/0.2 0.5mm² 20AWG
230′ / 70m *3000′ / 1000m32/0.2 1.0mm² 18AWG
12
English
Notes
•
These figures (*) are for readers powered from the controller. The cable distances
can be increased to 1650′ / 500m by locally powering the readers.
•
Locally powered readers must be connected to a UL 603 power limited Class 2
supply for US, or a ULC S318 power limited Class 2 supply for Canada.
•
If you use 22AWG / 0.34mm² cables, twist the wires and double them over before
inserting them in the crimps.
•
Maximum cable distances will be less for readers which have been set to give
Wiegand output.
Specification
CurrentPowerReader Range
100mA (Mullion) / 120mA
(Standard)
12V–24V DCUp to 4.0″ / 100mm
Note
Maximum current draw is lower at 24V.
Temperature
StorageOperating
-40°C — +66°C / -40°F — +151°F-40°C — +66°C / -40°F — +151°F
Humidity
Operating for 24 hours
Tested at 93% for ULC S319.10-85% RH @ 30±2°C / 85±4°F
Ingress Protection
IP65 afterinstallation — evaluated bylab separate fromUL. Installer must adequatelyseal any
connections made.
Weight
150g (Mullion) / 290g (Standard)
13
English

Deutsch
Installation
1. Überprüfen Sie, ob Ihr Produkt die Einzelteile angezeigt auf Seiten 4–5; wenn nicht,
wenden Sie sich bitte an Ihren Zweigstelle.
2. Kabel durch die Rückseite schieben.
3. Rückplatte mit zwei Schrauben an der Wand befestigen.
4. Sicherheitsplatte mit zwei Schrauben an der Wand befestigen.
5. Kabel mit der Platine verbinden — siehe Seite 6.
6. Ausgabeformat einstellen — siehe Seite 7.
7. Leser konfigurieren — siehe Seite 10.
8. Leser an der Rückplatte einschnappen lassen und mit einer letzten Schraube sichern.
9. Strom erst anlegen, wenn alle Leser installiert sind.
Hinweise
•
Falls der Strom angelegt wird, bevor der Leser korrekt an der Wand befestigt ist,
wird ein Wandmanipulationsalarm ausgeben.
•
Nicht zulassen, dass sich dieRückseiteoderSicherheitsplattebeider Montage z. B.
an einemRückkastenverzieht.Dies kann zu falschenWand-/ Gehäusemanipulationsalarmen führen.
•
Leser im Abstand von > 1 m anbringen.
•
Wird derLeserverwendet, um Zugangsinformationen zur AktivierungeinesSystems
einzugeben, musssichderLeser innerhalb eines Umkreises von 1mumdasTastenfeld
oder die Anzeige des Panels befinden.
•
Für Leser im Freien sind korrosionsbeständige Befestigungselemente und
Silikondichtungsmittel an den Anschlüssen verwenden.
•
Der MOV sollte über den Stromanschlüssen des Schlosses montiert werden.
•
Das Ausgabeformat und die Leserkonfiguration können geändert werden, ohne die
Stromversorgung zu unterbrechen. Der Leser startet automatisch erneut mit der
neuen Konfiguration.
14
Deutsch
Sabotage des Lesers
Wird die Rückplatte von der Wand getrennt, bleibt die Sicherheitsplatte an der Wand hängen
und ein Wandmanipulationsalarm wird ausgegeben. Falls der Leser von der Rückplatte
entfernt wird, wird ein Gehäusemanipulationsalarm ausgegeben.
Die Manipulationsschutzleitungführtnormalerweiseeine geringe Spannung. FallseineGehäuseoder Wandmanipulation erkannt wird, steigt die Spannung in der Manipulationsschutzleitung
an. Der Leser gibt zwei Minuten lang alle 5 Sekunden 3 lange Pieptöne aus und verstummt
dann.
Um den Wandmanipulationsalarm abzuschalten, befestigen Sie die Rückplatte wieder an der
Sicherheitsplatte. Um den Gehäusemanipulationsalarm abzuschalten, befestigen Sie den Leser
wieder an der Rückplatte.
Verwendung
LEDs
GelbRot / GrünGrünRot
Nicht verwendetZutritt verweigertZutritt gestattetStandard
Signaltongeber
•
Der Leser gibt 4 schnelle Pieptöne aus, wenn er eingeschaltet oder neu gestartet
wird.
•
Falls vorgegeben, piept der Leser einmal, wenn ein Token angezeigt wird.
Kabellängen
Nur PAC Türkontroller
Maximale Distanz zwischen Leser und KontrollerKabeltyp
AC 202 / 512AC 2100 / 2200
230′ / 70m *750′ / 250m7/0.2 0.34mm² 22AWG
230′ / 70m *1500′ / 500m16/0.2 0.5mm² 20AWG
230′ / 70m *3000′ / 1000m32/0.2 1.0mm² 18AWG
15
Deutsch
 Loading...