

Page 1

Catalog Number
FMC640
INSTRUCTIVO DE OPERACIÓN, CENTROS DE SERVICIO Y PÓLIZA DE GARANTÍA.
ADVERTENCIA: LÉASE ESTE INSTRUCTIVO ANTES DE USAR EL PRODUCTO.
SAVE THIS INSTRUCTION MANUAL FOR FUTURE REFERENCE.
VEA EL ESPAÑOL EN LA CONTRAPORTADA.
INSTRUCTION MANUAL
20 Volt Max*
Cordless Impact Driver
Destornillador de
impacto inalámbrico
de 20V máx*
Visseuse à percussion
sans fil, de 20V max*
Page 2

SAFETY GUIDELINES - DEFINITIONS
It is important for you to read and understand this manual. The information it contains
relates to protecting YOUR SAFETY and PREVENTING PROBLEMS. The symbols
below are used to help you recognize this information.
DANGER: Indicates an imminently hazardous situation which, if not avoided, will
result in death or serious injury.
WARNING: Indicates a potentially hazardous situation which, if not avoided, could
result in death or serious injury.
CAUTION: Indicates a potentially hazardous situation which, if not avoided, may
result in minor or moderate injury.
NOTICE: Used without the safety alert symbol indicates a potentially hazardous
situation which, if not avoided, may result in property damage
General Power Tool Safety Warnings
WARNING: Readall safety warnings and all instructions. Failure tofollow
the warningsand instructions may result inelectric shock,fire and/or serious injury.
Save all warnings and instructions for future reference.
The term “power tool” in the warnings refers to your mains-operated (corded)
power tool or battery-operated (cordless) power tool.
1) Work area safety
a) Keep work area clean and well lit. Cluttered or dark areas invite accidents.
b) Do not operate power tools in explosive atmospheres, such as in the
presence of flammable liquids, gases or dust. Power tools create sparks which
may ignite the dust or fumes.
c) Keep children and bystanders away while operating a power tool.
Distractions can cause you to lose control.
2) Electrical safety
a) Power tool plugs must match the outlet. Never modify the plug in any way.
Do not use any adapter plugs with earthed (grounded) power tools.
Unmodified plugs and matching outlets will reduce risk of electric shock.
b) Avoid body contact with earthed or grounded surfaces such as pipes,
radiators, ranges and refrigerators. There is an increased risk of electric shock
if your body is earthed or grounded.
c) Do not expose power tools to rain or wet conditions. Water entering a power
tool will increase the risk of electric shock.
d) Do not abuse the cord. Never use the cord for carrying, pulling or
unplugging the power tool. Keep cord away from heat, oil, sharp edges or
moving parts. Damaged or entangled cords increase the risk of electric shock.
e) When operating a power tool outdoors, use an extension cord suitable for
outdoor use. Use of a cord suitable for outdoor use reduces the risk of electric
shock.
f) If operating a power tool in a damp location is unavoidable, use a ground
fault circuit interrupter (GFCI) protected supply. Use of a GFCI reduces the
risk of electric shock.
3) Personal safety
a) Stay alert, watch what you are doing and use common sense when
operating a power tool. Do not use a power tool while you are tired or under
the influence of drugs, alcohol or medication. A moment of inattention while
operating power tools may result in serious personal injury.
b) Use personal protective equipment. Always wear eye protection. Protective
equipment such as dust mask, non-skid safety shoes, hard hat, or hearing
protection used for appropriate conditions will reduce personal injuries.
c) Prevent unintentional starting. Ensure the switch is in the off-position
before connecting to power source and/or battery pack, picking up or
2
Page 3

c
arrying the tool. Carrying power tools with your finger on the switch or
energising power tools that have the switch on invites accidents.
d) Remove any adjusting key or wrench before turning the power tool on. A
wrench or a key left attached to a rotating part of the power tool may result in
personal injury.
e) Do not overreach. Keep proper footing and balance at all times. This enables
better control of the power tool in unexpected situations.
f) Dress properly. Do not wear loose clothing or jewelry. Keep your hair,
clothing and gloves away from moving parts. Loose clothes, jewelry or long
hair can be caught in moving parts.
g) If devices are provided for the connection of dust extraction and collection
facilities, ensure these are connected and properly used. Use of dust
collection can reduce dust-related hazards.
4) Power tool use and care
a) Do not force the power tool. Use the correct power tool for your application.
The correct power tool will do the job better and safer at the rate for which it was
designed.
b) Do not use the power tool if the switch does not turn it on and off. Any power
tool that cannot be controlled with the switch is dangerous and must be repaired.
c) Disconnect the plug from the power source and/or the battery pack from the
power tool before making any adjustments, changing accessories, or
storing power tools. Such preventive safety measures reduce the risk of starting
the power tool accidentally.
d) Store idle power tools out of the reach of children and do not allow persons
unfamiliar with the power tool or these instructions to operate the power
tool. Power tools are dangerous in the hands of untrained users.
e) Maintain power tools. Check for misalignment or binding of moving parts,
breakage of parts and any other condition that may affect the power toolʼs
operation. If damaged, have the power tool repaired before use. Many
accidents are caused by poorly maintained power tools.
f) Keep cutting tools sharp and clean. Properly maintained cutting tools with
sharp cutting edges are less likely to bind and are easier to control.
g) Use the power tool, accessories and tool bits etc., in accordance with these
instructions, taking into account the working conditions and the work to be
performed. Use of the power tool for operations different from those intended
could result in a hazardous situation.
5) Battery tool use and care
a) Recharge only with the charger specified by the manufacturer. A charger that
is suitable for one type of battery pack may create a risk of fire when used with
another battery pack.
b) Use power tools only with specifically designated battery packs. Use of any
other battery packs may create a risk of injury and fire.
c) When battery pack is not in use, keep it away from other metal objects like
paper clips, coins, keys, nails, screws, or other small metal objects that can
make a connection from one terminal to another. Shorting the battery
terminals together may cause burns or a fire.
d) Under abusive conditions, liquid may be ejected from the battery, avoid
contact. If contact accidentally occurs, flush with water. If liquid contacts
eyes, additionally seek medical help. Liquid ejected from the battery may cause
irritation or burns.
6) Service
a) Have your power tool serviced by a qualified repair person using only
identical replacement parts. This will ensure that the safety of the power tool is
maintained.
3
Page 4

SPECIFIC SAFETY RULES
• Wear ear protectors with impact drills. Exposure to noise can cause hearing loss.
• Use auxiliary handles supplied with the tool. Loss of control can cause personal
injury.
• Hold power tools by insulated gripping surfaces when performing an operation
where the cutting tool may contact hidden wiring or its own cord. Contact with a
"live" wire will make exposed metal parts of the tool "live" and shock the operator.
• Use clamps or another practical way to secure and support the work piece to a
stable platform. Holding the work by hand or against your body leaves it unstable and
may lead to loss of control.
• When not in use, place tool on its side on a stable surface where it will not cause
a tripping or falling hazard. Some tools with large battery packs will stand upright but
may be easily knocked over.
• Keep your hair, clothing, and gloves away from air vents. Air vents often cover
moving parts in which these items can be caught.
• Hold tool firmly with two hands. Use auxiliary handle if provided. If auxiliary handle
not provided, grip tool at bottom of battery pack. Loss of control can cause personal
injury.
• Wear safety goggles or other eye protection. Hammering and drilling operations
cause chips to fly. Flying particles can cause permanent eye damage.
• Bits, sockets and tools get hot during operation. Wear gloves when touching them.
• Do not operate this tool for long periods of time. Vibration caused by tool action
may be harmful to your hands and arms. Use gloves to provide extra cushion and limit
exposure by taking frequent rest periods.
• Wear appropriate personal hearing protection during use. Under some conditions
and duration of use, noise from this product may contribute to hearing loss.
WARNING: Impact wrenches are not torque wrenches. Do not use this tool for
tightening fasteners to specified torques. An independent, calibrated torque
measurement device such as a torque wrench should be used when under tightened
or over tightened fasteners can lead to the failure of the joint.
WARNING: ALWAYS use safety glasses. Everyday eyeglasses are NOT safety
glasses. Also use face or dust mask if drilling operation is dusty. ALWAYS WEAR
CERTIFIED SAFETY EQUIPMENT:
• ANSI Z87.1 eye protection (CAN/CPA Z94.3),
• ANSI S12.6 (S3.19) hearing protection,
• NOSH/OSHA respiratory protection.
WARNING: Some dust created by power sanding, sawing, grinding, drilling, and
other construction activities contains chemicals known to the state of California to cause
cancer, birth defects or other reproductive harm. Some examples of these chemicals are:
• lead from lead-based paints,
• crystalline silica from bricks and cement and other masonry products, and
• arsenic and chromium from chemically-treated lumber.
Your risk from these exposures varies, depending on how often you do this type of work.
To reduce your exposure to these chemicals: work in a well ventilated area, and work
with approved safety equipment, such as those dust masks that are specially designed to
filter out microscopic particles.
• Avoid prolonged contact with dust from power sanding, sawing, grinding,
drilling, and other construction activities. Wear protective clothing and wash
exposed areas with soap and water. Allowing dust to get into your mouth, eyes, or
lay on the skin may promote absorption of harmful chemicals.
WARNING: Use of this tool can generate and/or disperse dust, which may
cause serious and permanent respiratory or other injury. Always use NOSH/OSHA
approved respiratory protection appropriate for the dust exposure. Direct particles away
from face and body.
4
Page 5
Symbols
• The label on your tool may include the following symbols. The symbols and their
definitions are as follows:
V..................volts A ..................amperes
Hz................hertz W..................watts
min ..............minutes ................alternating current
............direct current
n
o ................no load speed
................Class I Construction ..................earthing terminal
(grounded) ................safety alert symbol
................Class II Construction .../minorrpm ....revolutions or reciprocation
(double insulated) per minute
IPM.............impacts per minute BPM ............beats per minute
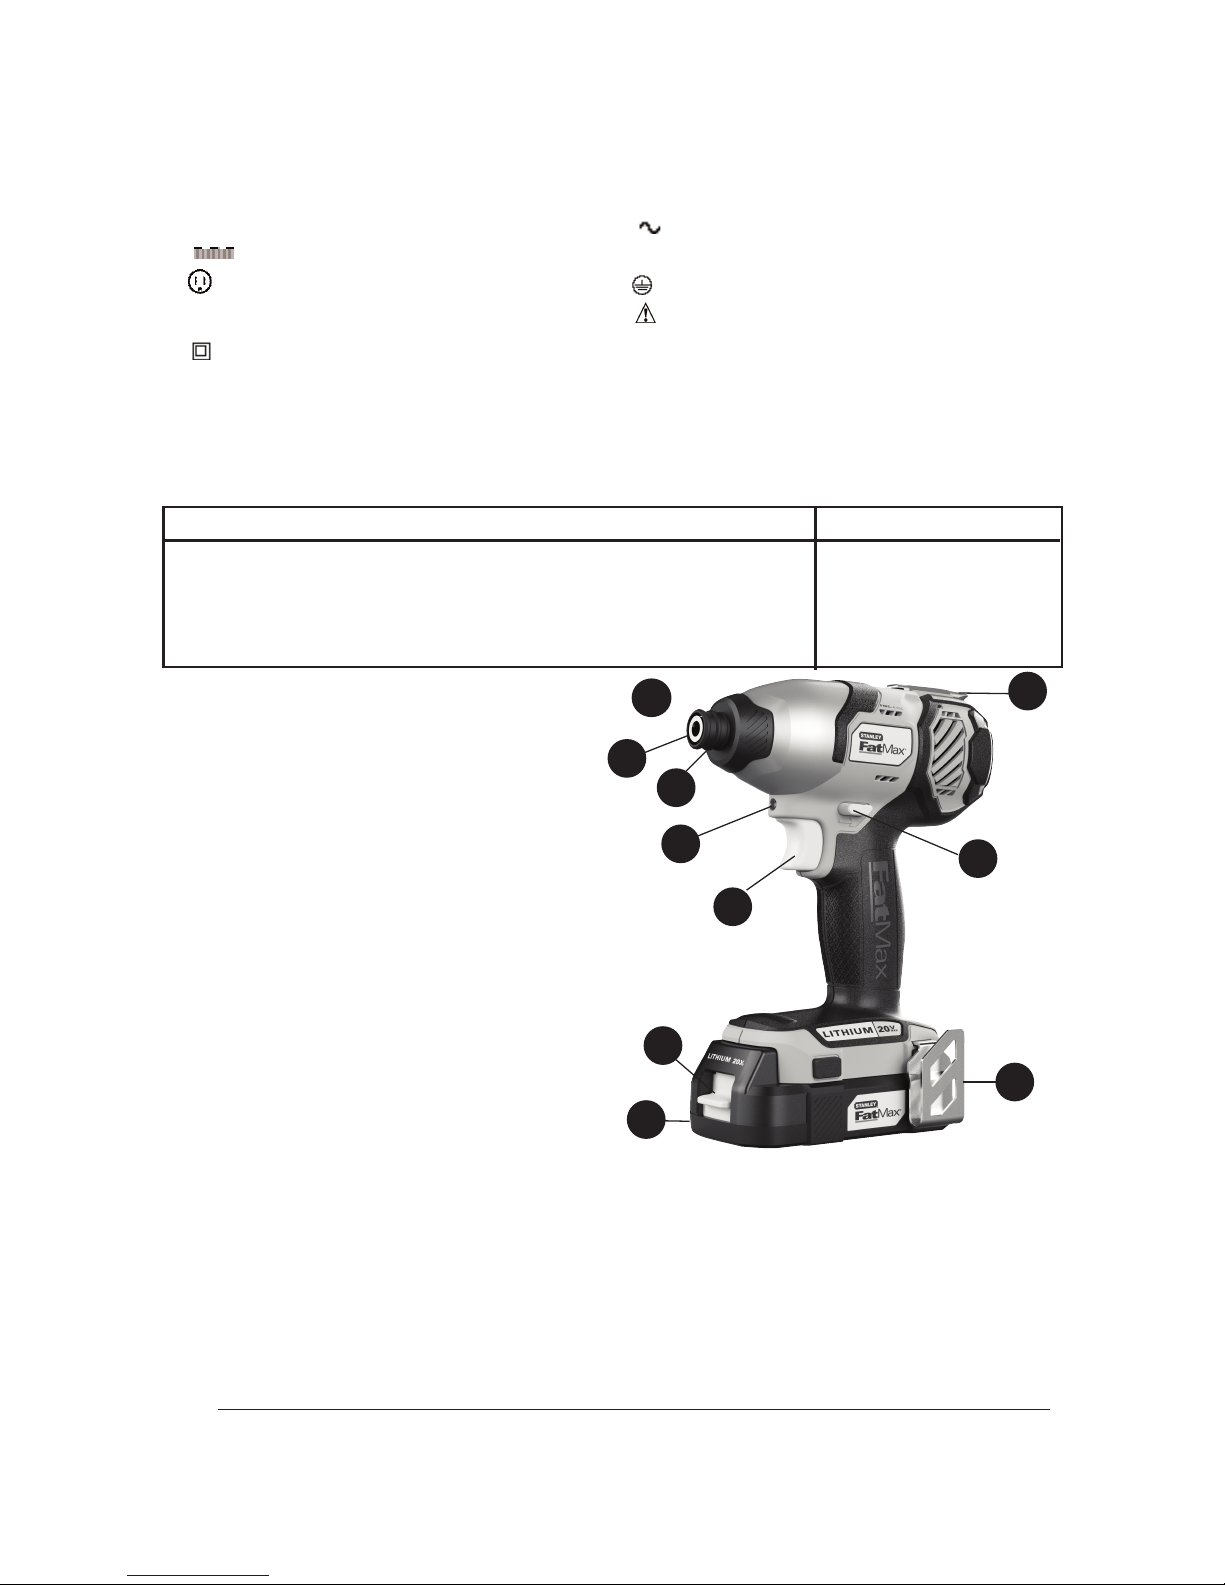
FUNCTIONAL DESCRIPTION
Figure A
1. Trigger switch
2. Forward/Reverse button
3. Chuck collar
4. 1/4inch hex quick-release chuck
5. LED Work light
6. Bit storage
7. Belt hook
8. Battery
9. Battery Release Button (on
battery)
• When using an extension cord, be sure to use one heavy enough to carry the current
your product will draw. An undersized cord will cause a drop in line voltage resulting
in loss of power and overheating. The following table shows the correct size to use
depending on cord length and nameplate ampere rating. If in doubt, use the next
heavier gauge. The smaller the gauge number, the heavier the cord.
Recommended Minimum Wire Size for Extension Cords
Total Length of Cord
25 ft. 50 ft. 75 ft. 100 ft. 125 ft. 150 ft. 175 ft.
7.6 m 15.2 m 22.9 m 30.5 m 38.1 m 45.7 m 53.3 m
Wire Size AWG
18 18 16 16 14 14 12
3
1
2
4
5
A
6
8
7
9
Lithium Ion Battery Pack and Charger
Description Catalog #
This product uses the battery and charger listed in the chart below.
20v max* Lithium Ion Battery: FMC680L
20v max* Series Lithium Ion Battery Charger: FMC690L
5
Page 6

IMPORTANT SAFETY INSTRUCTIONS FOR BATTERY CHARGERS
SAVE THESE INSTRUCTIONS: This manual contains important safety instructions for
battery chargers.
• Before using charger, read all instructions and cautionary markings on charger, battery
pack, and product using battery pack.
WARNING: Shock hazard. Do not allow any liquid to get inside charger.
CAUTION: Burn hazard. To reduce the risk of injury, charge only designated
Stanley FatMax FMC 20V MAX lithium batteries. Other types of batteries may burst
causing personal injury
and damage.
CAUTION: Under certain conditions, with the charger plugged in to the power
supply, the charger can be shorted by foreign material. Foreign materials of a conductive
nature such as, but not limited to, steel wool, aluminum foil, or any buildup of metallic
particles should be kept away from charger cavities. Always unplug the charger from the
power supply when there is no battery pack in the cavity. Unplug charger before
attempting to clean.
WARNING:
• DO NOT attempt to charge the battery pack with any chargers other than the ones in
this manual. The charger and battery pack are specifically designed to work together.
• These chargers are not intended for any uses other than charging designated
Stanley FatMax FMC 20V MAX lithium rechargeable batteries. Any other uses may
result in risk of fire, electric shock or electrocution.
• Do not expose charger to rain or snow.
• Pull by plug rather than cord when disconnecting charger. This will reduce risk of
damage to electric plug and cord.
• Make sure that cord is located so that it will not be stepped on, tripped over, or
otherwise subjected to damage or stress.
• Do not use an extension cord unless it is absolutely necessary. Use of improper
extension cord could result in risk of fire, electric shock, or electrocution.
• An extension cord must have adequate wire size (AWG or American Wire Gauge)
for safety. The smaller the gauge number of the wire, the greater the capacity of the
cable, that is 16 gauge has more capacity than 18 gauge. When using more than one
extension to make up the total length, be sure each individual extension contains at
least the minimum wire size.
• Do not place any object on top of charger or place the charger on a soft surface
that might block the ventilation slots and result in excessive internal heat. Place
the charger in a position away from any heat source. The charger is ventilated
through slots in the top and the bottom of the housing.
• Do not mount charger on wall or permanently affix charger to any surface. The
charger is intended to use on a flat, stable surface (i.e., table top, bench top).
• Do not operate charger with damaged cord or plug — have them replaced immediately.
• Do not operate charger if it has received a sharp blow, been dropped, or
otherwise damaged in any way. Take it to an authorized service center.
• Do not disassemble charger; take it to an authorized service center when service or
repair is required. Incorrect reassembly may result in a risk of electric shock,
electrocution or fire.
• Disconnect the charger from the outlet before attempting any cleaning. This will
reduce the risk of electric shock. Removing the battery pack will not reduce this risk.
• NEVER attempt to connect 2 chargers together.
• The charger is designed to operate on standard household electrical power
(120 Volts). Do not attempt to use it on any other voltage.
6
Page 7

SAVE THESE INSTRUCTIONS
IMPORTANT SAFETY INSTRUCTION FOR BATTERY PACKS
WARNING: For safe operation, read this manual and manuals originally supplied
with tool before using the charger.
The battery pack is not fully charged out of the carton. Before using the battery pack
and charger, read the safety instructions below. Then follow charging procedures outlined.
READ ALL INSTRUCTIONS
• Do not incinerate the battery pack even if it is severely damaged or is
completely worn out. The battery pack can explode in a fire. Toxic fumes and
materials are created when LI-ION battery packs are burned.
• Do not charge or use battery in explosive atmospheres, such as in the presence
of flammable liquids, gases or dust. Inserting or removing the battery from the
charger may ignite the dust or fumes.
• If battery contents come into contact with the skin, immediately wash area with
mild soap and water. If battery liquid gets into the eye, rinse water over the open eye
for 15 minutes or until irritation ceases. If medical attention is needed, the battery
electrolyte for LI-ION batteries is composed of a mixture of liquid organic carbonates and
lithium salts. For NI-CD batteries it is a 25-35% solution of potassium hydroxide.
• Contents of opened battery cells may cause respiratory irritation. Provide fresh air.
If symptoms persist, seek medical attention.
WARNING: Burn hazard. Battery liquid may be flammableifexposed tospark or flame.
• Charge the battery packs only in Stanley FatMax chargers.
• DONOT splash or immerse inwater orother liquids. This may cause premature cellfailure.
• Do not store or use the tool and battery pack in locations where the temperature
may reach or exceed 105°F (40˚C) (such as outside sheds or metal buildings in
summer).
WARNING: Never attempt to open the battery pack for any reason. If battery pack
case is cracked or damaged, do not insert into charger. Do not crush, drop or damage
battery pack. Do not use a battery pack or charger that has received a sharp blow, been
dropped, run over or damaged in any way (i.e., pierced with a nail, hit with a hammer,
stepped on). Damaged battery packs should be returned to service center for recycling.
WARNING: Fire hazard. Do not store or carry battery so that metal objects can
contact exposed battery terminals. For example, do not place battery in aprons,
pockets, tool boxes, product kit boxes, drawers, etc., with loose nails, screws, keys, etc.
Transporting batteries can possibly cause fires if the battery terminals inadvertently
come in contact with conductive materials such as keys, coins, hand tools and the
like. The US Department of Transportation Hazardous Material Regulations (HMR)
actually prohibit transporting batteries in commerce or on airplanes (i.e., packed in
suitcases and carry-on luggage) UNLESS they are properly protected from short circuits.
So when transporting individual batteries, make sure that the battery terminals are
protected and well insulated from materials that could contact them and cause a short
circuit. NOTE: LI-ION batteries should not be put in checked baggage.
STORAGE RECOMMENDATIONS
1. The best storage place is one that is cool and dry away from direct sunlight and
excess heat or cold.
2. Long storage will not harm the battery pack or charger.
7
Page 8
C
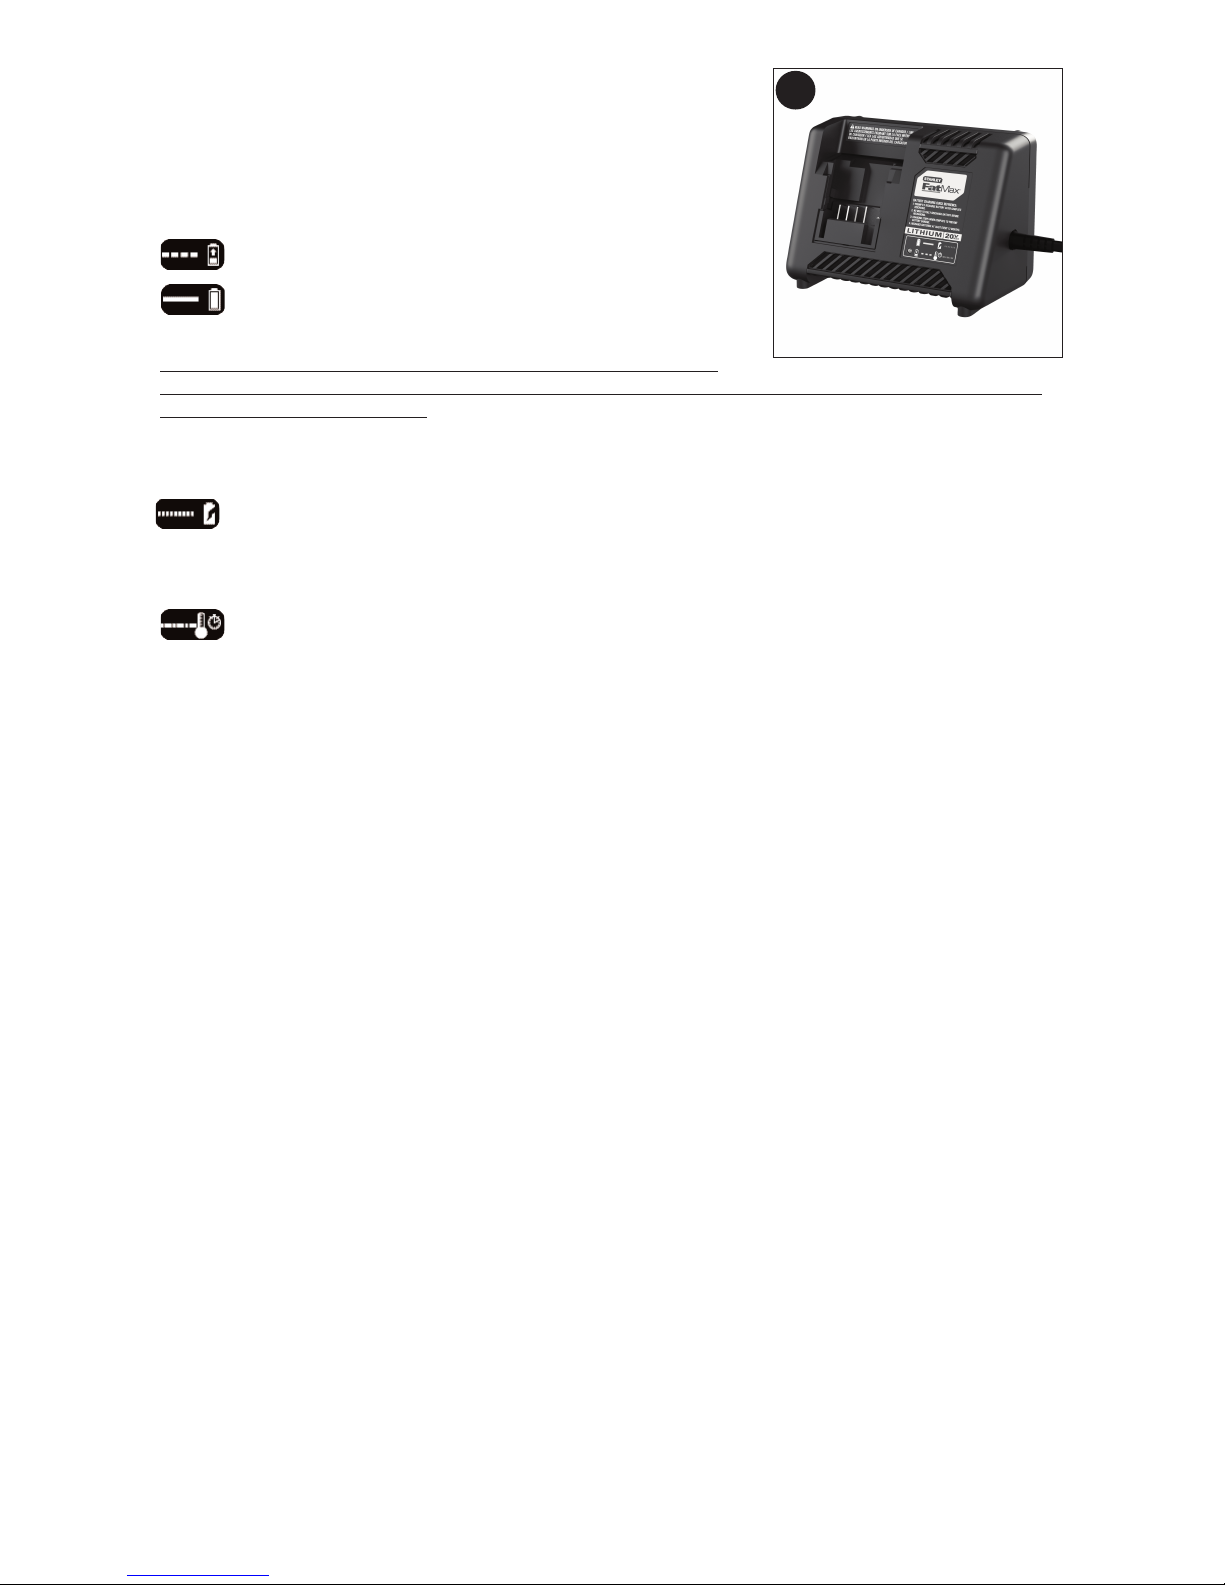
HARGING PROCEDURE
Stanley FatMax chargers are designed to charge Stanley
FatMax battery packs in 30-60 minutes depending on the
pack being charged.
1. Plug the charger (Fig. B) into an appropriate outlet
before inserting the battery pack.
2. Insert the battery pack into the charger.
3. The LED will flash indicating that the battery is
being charged.
4. The completion of charge is indicated by the LED
remaining on continuously. The pack is fully charged
and may be used at this time or left on the charger.
Recharge discharged batteries as soon as possible
after use or battery life may be greatly diminished. For longest battery life, do not
discharge batteries fully. It is recommended that the batteries be recharged after each
use.
CHARGER DIAGNOSTICS
This charger is designed to detect certain problems that can arise with the battery
packs or the power source. Problems are indicated by one LED flashing in
different patterns.
BAD BATTERY
The charger can detect a weak or damaged battery. The LED flashes in the
pattern indicated on the label. If you see this bad battery blink pattern, do not
continue to charge the battery. Return it to a service center or a collection site for
recycling.
HOT/COLD PACK DELAY
When the charger detects a battery that is excessively hot or excessively cold, it
automatically starts a Hot/Cold Pack Delay, suspending charging until the battery has
normalized. After this happens, the charger automatically switches to the Pack
Charging mode. This feature ensures maximum battery life. The light flashes in the
pattern indicated on the label.
LEAVING THE BATTERY IN THE CHARGER
The charger and battery pack can be left connected with the LED glowing indefinitely.
The charger will keep the battery pack fresh and fully charged. This charger features
an automatic tune-up mode which equals or balances the individual cells in the battery
pack to allow it to function at peak capacity. Battery packs should be tuned up weekly
or whenever the battery no longer delivers the same amount of work. To use the
automatic tune-up mode, place the battery pack in the charger and leave it for at least 8 hours.
IMPORTANT CHARGING NOTES
1. Longest life and best performance can be obtained if the battery pack is charged
when the air temperature is between 65°F and 75°F (18°- 24°C). DO NOT charge the
battery pack in an air temperature below +40°F (+4.5°C), or above +105°F (+40.5°C).
This is important and will prevent serious damage to the battery pack.
2. The charger and battery pack may become warm to touch while charging. This is a
normal condition, and does not indicate a problem. To facilitate the cooling of the
battery pack after use, avoid placing the charger or battery pack in a warm
environment such as in a metal shed, or an uninsulated trailer.
3. If the battery pack does not charge properly:
a. Check current at receptacle by plugging in a lamp or other appliance
b. Check to see if receptacle is connected to a light switch which turns power off
when you turn out the lights.
c. Move charger and battery pack to a location where the surrounding air
temperature is approximately 65°F - 75°F (18°- 24°C).
d. If charging problems persist, take the tool, battery pack and charger to your
local service center.
4. The battery pack should be recharged when it fails to produce sufficient power on
jobs which were easily done previously. DO NOT CONTINUE to use under these
conditions. Follow the charging procedure. You may also charge a partially used pack
whenever you desire with no adverse affect on the battery pack.
B
8
Page 9
5
. Foreign materials of a conductive nature such as, but not limited to, steel wool,
aluminum foil, or any buildup of metallic particles should be kept away from charger
cavities. Always unplug the charger from the power supply when there is no battery
pack in the cavity. Unplug charger before attempting to clean.
6. Do not freeze or immerse charger in water or any other liquid.
WARNING: Shock hazard. Do not allow any liquid to get inside charger. Never
attempt to open the battery pack for any reason. If the plastic housing of the battery pack
breaks or cracks, return to a service center for
recycling.
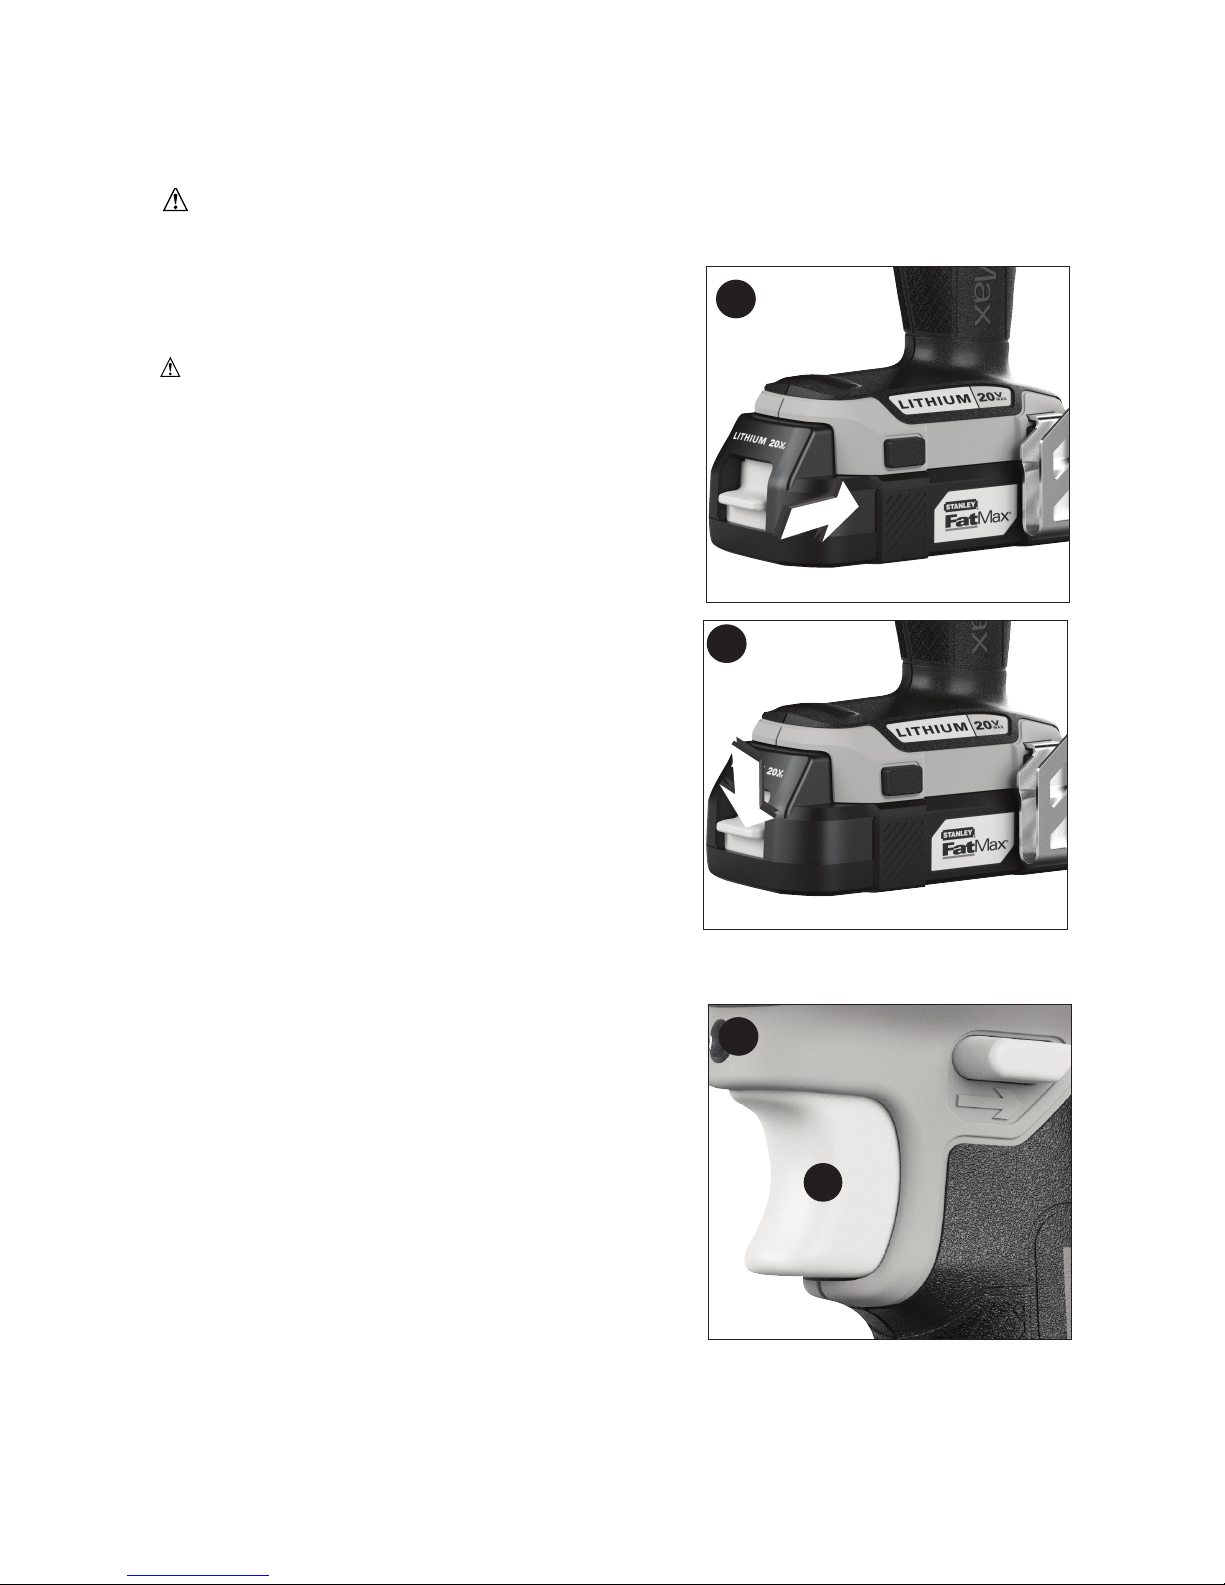
INSTALLING AND REMOVING THE BATTERY
PACK FROM THE TOOL
WARNING: Make certain the lock-off button is
engaged to prevent switch actuation before removing
or installing battery.
TO INSTALL BATTERY PACK: Insert battery pack
into tool until an audible click is heard as shown in
figure C. Make sure battery pack is fully seated and
fully latched into position.
TO REMOVE BATTERY PACK: Depress the battery
release button as shown in figure D and pull battery
pack out of tool.
OPERATING INSTRUCTIONS
VARIABLE SPEED TRIGGER SWITCH (FIG. E)
To turn the tool on, squeeze the trigger switch (1).
To turn the tool off, release the trigger switch. Your
tool is equipped with a brake. The chuck will stop as
soon as the trigger switch is fully released. The
variable speed switch enables you to select the best
speed for a particular application. The more you
squeeze the trigger, the faster the tool will operate.
Use lower speeds for starting holes without a center
punch, drilling in metals or plastics, or driving
screws. For maximum tool life, use variable speed
only for starting holes or fasteners.
NOTE: Continuous use in variable speed range is
not recommended. It may damage the switch and
should be avoided.
E
C
D
1
9
Page 10
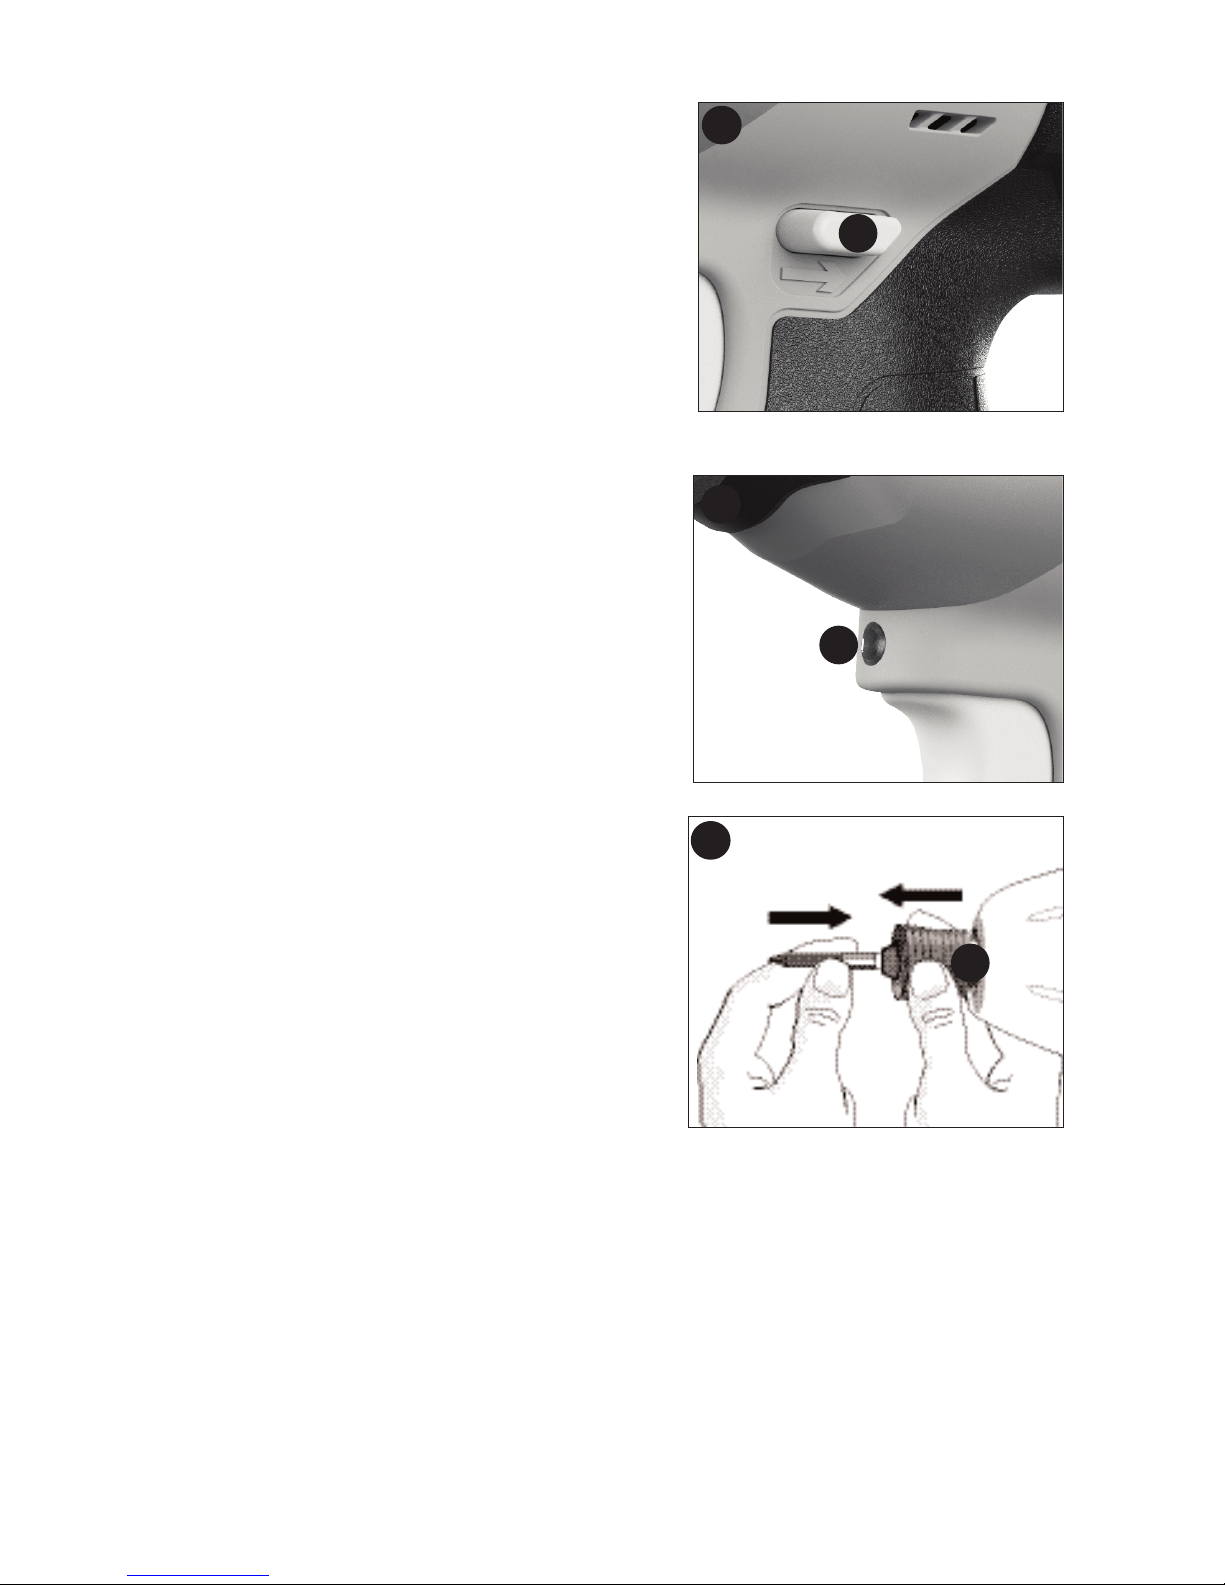
FORWARD/REVERSE CONTROL BUTTON (FIG. F)
A forward/reverse control button (2) determines the
direction of the tool and also serves as a lock off
button. To select forward rotation, release the
trigger switch and depress the forward/reverse
control button on the right side of the tool. To select
reverse, depress the forward/reverse control button
on the left side of the tool. The center position of
the control button locks the tool in the OFF position.
When changing the position of the control button,
be sure the trigger is released.
NOTE: The first time the tool is run after changing
the direction of rotation, you may hear a click on
start up. This and the impacting noise that the tool
makes is normal and does not indicate a problem.
LED WORKLIGHT (FIG. G)
There is a worklight (5) located just above the
trigger switch (A). The worklight will be activated
when the trigger switch is squeezed.
NOTE: The worklight is for lighting the immediate
work surface and is not intended to be used as a
flashlight.
QUICK RELEASE CHUCK (FIG. H)
NOTE: The chuck accepts 1/4 inch (6.35 mm) hex
accessories only.
Place the switch in the locked off (center) position
or remove battery pack before changing
accessories.
To install an accessory, pull the chuck collar (3)
away from the front of the tool, insert the
accessory, and release the collar. The accessory is
locked in place.
To remove an accessory, pull the chuck collar (3)
away from the front of the tool, remove the
accessory and release the collar.
ON BOARD BIT STORAGE
A bit storage slot is built-in to the area on the top of the drill.
This Class B digital apparatus complies with Canadian ICES-003.
This device complies with part 15 of the FCC rules. Operation is subject to the
following two conditions: (1) This device may not cause harmful interference, and (2)
this device must accept any interference received, including interference that may
cause undesired operation.
NOTE: This equipment has been tested and found to comply with the limits for a
Class B digital device, pursuant to Part 15 of the FCC Rules. These limits are designed
to provide reasonable protection against harmful interference in a residential
installation. This equipment generates, uses and can radiate radio frequency energy
and, if not installed and used in accordance with the instructions, may cause harmful
interference to radio communications. However, there is no guarantee that interference
will not occur in a particular installation.
If this equipment does cause harmful interference to radio or television reception, which
G
H
F
2
3
5
10
Page 11

c
an be determined by turning the equipment off and on, the user is encouraged to try to
correct the interference by one or more of the following measures:
• Reorient or relocate the receiving antenna.
• Increase the separation between the equipment and receiver.
• Connect the equipment into an outlet on a circuit different from that to which the
receiver is connected.
• Consult the dealer or an experienced radio/TV technician for help.
Changes or modifications to this unit not expressly approved by the party responsible
for compliance could void the user's authority to operate the equipment. This Class B
digital apparatus complies with Canadian ICES-003.
TROUBLESHOOTING
Problem Possible Cause Possible Solution
• Unit will not start. • Battery pack not installed • Check battery pack
properly. installation.
• Battery pack not charged. • Check battery pack
charging requirements.
• Battery pack will not • Battery packnot inserted into • Insert battery pack into
charge. charger. charger until LEDappears.
• Charger not plugged in. • Plug charger into a working outlet.
Refer to “Important Charging
Notes” formore details.
• Surrounding airtemperature • Move chargerand battery pack
toohot or too cold. to a surrounding air temperature of
above 40 degrees F (4,5°C)or
below 105 degrees F (+40,5°C).
SPECIALNOTES FOR USE WITH LITHIUM BATTERIES
• Unit shuts off • Battery pack has reached its • Allowbatterypack tocool
abruptly. maximum thermal limit. down.
• Out of charge. ( To • Place on charger and
maximize the life of the allow to charge.
battery pack it is designed
to shutoffabruptly when
thecharge is depleted.)
For assistance with your product, visit our website at www.stanleytools.com for a list of
service centers, or call the Stanley FatMax Customer Care Center at (800) 262 2161.
THE RBRC™ SEAL
The RBRC™ (Rechargeable Battery Recycling Corporation) Seal on the
lithium-ion battery (or battery pack) indicates that the costs to recycle the
battery (or battery pack) at the end of its useful life have already been paid by
Stanley FatMax.
RBRC™ in cooperation with Stanley FatMax and other battery users, has established
programs in the United States to facilitate the collection of spent lithium-ion batteries.
Help protect our environment and conserve natural resources by returning the spent
lithium-ion battery to an authorized Stanley FatMax service center or to your local retailer
for recycling. You may also contact your local recycling center for information on where to
drop off the spent battery.
RBRC™ is a registered trademark of the Rechargeable Battery Recycling Corporation.
MAINTENANCE
CLEANING
With the motor running, blow dirt and dust out of all air vents with dry air. Wear safety
glasses when performing this procedure. Exterior plastic parts may be cleaned with a
damp cloth and mild detergent. Although these parts are highly solvent resistant,
NEVER use solvents.
Use only mild soap and damp cloth to clean the tool. Never let any liquid get inside the
tool; never immerse any part of the tool into a liquid.
11
Page 12

12
REPLACEMENT PARTS
Use only identical replacement parts. For a parts list or to order parts, visitour service website at
www.stanleytools.com. Youcan also order parts from your nearest Stanley FatMax Factory
Service Center or Stanley FatMax Authorized Warranty Service Center. Or, you can call our
Customer Care Center at (800) 262 2161.
SERVICE AND REPAIRS
All quality tools will eventually require servicing and/or replacement of parts. For
information about Stanley FatMax, its factory service centers or authorized warranty
service centers, visit our website at www.stanleytools.com or call our Customer Care
Center at (800) 262 2161. All repairs made by our service centers are fully guaranteed
against defective material and workmanship. We cannot guarantee repairs made or
attempted by others.
You can also write to us for information at Stanley Tools, 701 E. Joppa Road, Towson,
Maryland 21286 - Attention: Product Service. Be sure to include all of the information
shown on the nameplate of your tool (model number, type, serial number, etc.).
ACCESSORIES
WARNING: Since accessories, other than those offered by Stanley FatMax have
not been tested with this product, use of such accessories with this tool could be
hazardous. To reduce the risk of injury, only Stanley FatMax recommended accessories
should be used with this product.
A complete line of accessories is available from your Stanley FatMax Factory Service
Center or a Stanley FatMax Authorized Warranty Service Center. Please visit our Web
Site www.stanleytools.com for a catalog or for the name of your nearest supplier.
THREE YEAR LIMITED WARRANTY
Stanley FatMax will repair or replace, without charge, any defects due to faulty materials
or workmanship for three years from the date of purchase for tools (two years for batteries).
This warranty does not cover part failure due to normal wear or tool abuse. For further
detail of warranty coverage and warranty repair information, visit
www.stanleytools.com or call (800) 262-2161. This warranty does not apply to
accessories or damage caused where repairs have been made or attempted by others.
This warranty gives you specific legal rights and you may have other rights which vary in
certain states or provinces.
In addition to the warranty, Stanley FatMax tools are covered by our:
1 YEAR FREE SERVICE: Stanley FatMax will maintain the tool and replace worn parts
caused by normal use, for free, any time during the first year after purchase.
90 DAY MONEY BACK GUARANTEE: If you are not completely satisfied with the
performance of your Stanley FatMax Power Tool for any reason, you can return it within
90 days from the date of purchase with a receipt for a full refund – no questions asked.
LATIN AMERICA: This warranty does not apply to products sold in Latin America. For
products sold in Latin America, see country specific warranty information contained in
the packaging, call the local company or see website for warranty information.
To register your tool for warranty service visit our website at www.stanleytools.com
WARNING LABEL REPLACEMENT
If your warning labels become illegible or are missing, call (800) 262-2161 for a free
replacement.
Imported by
Stanley Tools
701 E. Joppa Road
Towson, Maryland 21286
Page 13

13
Numéro de catalogue
FMC640
MODE DʼEMPLOI
CONSERVER CE MANUEL POUR UN USAGE ULTÉRIEUR.
Visseuse à percussion
sans fil, de 20V max*
Page 14

LIGNES DIRECTRICES EN MATIÈRE DE SÉCURITÉ DÉFINITIONS
Il est important que vous lisiez et compreniez ce mode dʼemploi. Les informations quʼil
contient concernent VOTRE SÉCURITÉ et visent à ÉVITER TOUT PROBLÈME. Les
symboles ci-dessous servent à vous aider à reconnaître cette information.
DANGER : Indique une situation dangereuse imminente qui, si elle nʼest pas évitée,
causera la mort ou des graves blessures.
AVERTISSEMENT : Indique une situation potentiellement
dangereuse qui, si elle nʼest pas évitée, pourrait causer la mort ou de graves blessures.
MISE EN GARDE : Indique une situation potentiellement dangereuse qui, si elle
nʼest pas évitée, pourrait causer des blessures mineures ou modérées.
AVIS: Utilisé sans le symbole dʼalerte à la sécurité, indique une situation potentiellement
dangereuse qui, si elle nʼest pas évitée, peut résulter en des dommages à la propriété.
Avertissements de sécurité généraux pour les outils
électriques
AVERTISSEMENT : Lire tous les avertissements de sécurité et toutes
les directives. Le non-respect des avertissements et des directives pourrait se
solder par un choc électrique, un incendie et/ou une blessure grave.
Conserver tous les avertissements et toutes les directives pour un usage
ultérieur.
Le terme «outil électrique» cité dans les avertissements se rapporte à votre
outil électrique à alimentation sur secteur (avec fil) ou par piles (sans fil).
1) Sécurité du lieu de travail
a) Tenir la zone de travail propre et bien éclairée. Les endroits sombres sont
souvent des causes d'accidents.
b) Ne pas faire fonctionner dʼoutils électriques dans un milieu déflagrant, soit
en présence de liquides inflammables, de gaz ou de poussière. Les outils
électriques produisent des étincelles qui peuvent enflammer la poussière ou les
vapeurs.
c) Éloigner les enfants et les curieux au moment dʼutiliser un outil électrique.
Une distraction pourrait vous en faire perdre la maîtrise.
2) Sécurité en matière dʼélectricité
a) Les fiches des outils électriques doivent correspondre à la prise. Ne jamais
modifier la fiche en aucune façon. Ne jamais utiliser de fiche dʼadaptation avec
un outil électrique mis à la terre. Le risque de choc électrique sera réduit par
lʼutilisation de fiches non modifiées correspondant à la prise.
b) Éviter tout contact physique avec des surfaces mises à la terre comme des
tuyaux, des radiateurs, des cuisinières et des réfrigérateurs. Le risque de
choc électrique est plus élevé si votre corps est mis à la terre.
c) Ne pas exposer les outils électriques à la pluie ou à d'autres conditions où il
pourrait être mouillé. La pénétration de lʼeau dans un outil électrique augmente
le risque de choc électrique.
d) Ne pas utiliser abusivement le cordon dʼalimentation. Ne jamais utiliser le
cordon pour transporter, tirer ou débrancher un outil électrique. Tenir le cordon
éloigné de la chaleur, de lʼhuile, des bords tranchants ou des pièces mobiles.
Les cordons endommagés ou emmêlés augmentent les risques de choc électrique.
e) Pour lʼutilisation dʼun outil électrique à lʼextérieur, se servir dʼune rallonge
convenant à une telle utilisation. Lʼutilisation dʼune rallonge conçue pour
lʼextérieur réduit les risques de choc électrique.
f) Sʼil est impossible dʼéviter lʼutilisation dʼun outil électrique dans un endroit
humide, brancher lʼoutil dans une prise ou sur un circuit dʼalimentation
dotés dʼun disjoncteur de fuite à la terre (GFCI). Lʼutilisation de ce type de
disjoncteur réduit les risques de choc électrique.
14
Page 15

3
) Sécurité personnelle
a) Être vigilant, surveiller le travail effectué et faire preuve de jugement
lorsquʼun outil électrique est utilisé. Ne pas utiliser dʼoutil électrique en cas
de fatigue ou sous lʼinfluence de drogues, dʼalcool ou de médicaments. Un
simple moment dʼinattention en utilisant un outil électrique peut entraîner des
blessures corporelles graves.
b) Utiliser des équipements de protection individuelle. Toujours porter une
protection oculaire. Lʼutilisation dʼéquipements de protection comme un masque
antipoussière, des chaussures antidérapantes, un casque de sécurité ou des
protecteurs auditifs lorsque la situation le requiert réduira les risques de blessures
corporelles.
c) Empêcher les démarrages intempestifs. Sʼassurer que lʼinterrupteur se trouve
à la position dʼarrêt avant de relier lʼoutil à une source dʼalimentation et/ou
dʼinsérer un bloc-piles, de ramasser ou de transporter lʼoutil. Transporter un
outil électrique alors que le doigt repose sur lʼinterrupteur ou brancher un outil
électrique dont lʼinterrupteur est à la position de marche risque de provoquer un
accident.
d) Retirer toute clé de réglage ou clé standard avant de démarrer lʼoutil. Une clé
standard ou une clé de réglage attachée à une partie pivotante peut causer des
blessures.
e) Ne pas trop tendre les bras. Conserver son équilibre en tout temps. Cela
permet de mieux maîtriser lʼoutil électrique dans les situations imprévues.
f) Sʼhabiller de manière appropriée. Ne pas porter de vêtements amples ni de
bijoux. Garder les cheveux, les vêtements et les gants à lʼécart des pièces
mobiles. Les vêtements amples, les bijoux ou les cheveux longs risquent de rester
coincés dans les pièces mobiles.
g) Si des composants sont fournis pour le raccordement de dispositifs de
dépoussiérage et de ramassage, sʼassurer que ceux-ci sont bien raccordés et
utilisés. Lʼutilisation dʼun dispositif de dépoussiérage peut réduire les dangers
engendrés par les poussières.
4) Utilisation et entretien dʼun outil électrique
a) Ne pas forcer un outil électrique. Utiliser lʼoutil électrique approprié à
lʼapplication. Lʼoutil électrique approprié effectuera un meilleur travail, de façon
plus sûre et à la vitesse pour laquelle il a été conçu.
b) Ne pas utiliser un outil électrique dont lʼinterrupteur est défectueux. Tout outil
électrique dont lʼinterrupteur est défectueux est dangereux et doit être réparé.
c) Débrancher la fiche du secteur ou le bloc-piles de lʼoutil électrique avant de
faire tout réglage ou changement dʼaccessoire, ou avant de ranger lʼoutil
électrique. Ces mesures préventives réduisent les risques de démarrage
accidentel de lʼoutil électrique.
d) Ranger les outils électriques hors de la portée des enfants, et ne permettre à
aucune personne nʼétant pas familière avec un outil électrique (ou son
manuel dʼinstruction) dʼutiliser ce dernier. Les outils électriques deviennent
dangereux entre les mains dʼutilisateurs inexpérimentés.
e) Entretenir les outils électriques. Vérifier les pièces mobiles pour sʼassurer
quʼelles sont bien alignées et tournent librement, quʼelles sont en bon état et
ne sont affectées par aucun trouble susceptible de nuire au bon
fonctionnement de lʼoutil électrique. En cas de dommage, faire réparer lʼoutil
électrique avant toute nouvelle utilisation. Beaucoup dʼaccidents sont causés
par des outils électriques mal entretenus.
f) Sʼassurer que les outils de coupe sont aiguisés et propres. Les outils de coupe
bien entretenus et affûtés sont moins susceptibles de se coincer et sont plus faciles
à contrôler.
g) Utiliser lʼoutil électrique, les accessoires, les forets, etc. conformément aux
présentes directives en tenant compte des conditions de travail et du travail à
effectuer. Lʼutilisation dʼun outil électrique pour toute opération autre que celle pour
laquelle il a été conçu est dangereuse.
5) Utilisation et entretien du bloc-piles
a) Ne recharger lʼoutil quʼau moyen du chargeur précisé par le fabricant.
Lʼutilisation dʼun chargeur qui convient à un type de bloc-piles risque de provoquer
un incendie sʼil est utilisé avec un autre type de bloc-piles.
15
Page 16

b
) Utiliser les outils électriques uniquement avec les blocs-piles conçus à cet
effet. Lʼutilisation de tout autre bloc-piles risque de causer des blessures ou un
incendie.
c) Lorsque le bloc-piles nʼest pas utilisé, le tenir éloigné des objets
métalliques, notamment des trombones, de la monnaie, des clés, des clous,
des vis, etc., qui peuvent établir une connexion entre les deux bornes. Le
court-circuit des bornes du bloc-piles risque de provoquer des étincelles, des
brûlures ou un incendie.
d) En cas dʼutilisation abusive, le liquide peut gicler hors du bloc-piles, éviter
tout contact. Si un contact accidentel se produit, laver à grande eau. Si le
liquide entre en contact avec les yeux, obtenir des soins médicaux. Le
liquide qui gicle hors du bloc-piles peut provoquer des irritations ou des brûlures.
6) Réparation
a) Faire réparer lʼoutil électrique par un réparateur professionnel en nʼutilisant
que des pièces de rechange identiques. Cela permettra de maintenir une
utilisation sécuritaire de lʼoutil électrique.
CONSIGNES DE SÉCURITÉ PARTICULIÈRES
• Porter des protecteurs auditifs si une perceuse à percussion est utilisée. Une
exposition au bruit peut entraîner une perte auditive.
• Utiliser les poignées auxiliaires fournies avec l’outil. Une perte de maîtrise de
lʼoutil peut entraîner des blessures corporelles.
• Saisir l’outil électrique par ses surfaces de prises isolées lorsque l’outil peut
entrer en contact avec des fils cachés ou son cordon. En cas de contact avec un
fil sous tension, les pièces métalliques de lʼoutil seront sous tension et lʼutilisateur subira
dessecousses électriques.
• Utiliser des brides de fixation ou un autre dispositif de fixation permettant de fixer
solidement et desoutenir la pièce sur une plateforme stable. Tenir lapièce avec lamain
ou contre son corps la rend instable et risque de provoquer une perte de maîtrise de lʼoutil.
• Lorsque lʼoutil nʼest pas utilisé, le placer sur le côté, sur une surface stable, de
manière à ne faire trébucher ou tomber personne. Certains outils ont un gros bloc
dʼalimentation. En le plaçant à la verticale, vous risquez de le renverser.
• Tenir les cheveux, les vêtements et les gants loin des évents. En effet, les évents
cachent souvent des pièces mobiles qui risquent de happer ces articles.
• Tenir fermement l’outil à deux mains. Utiliser la poignée auxiliaire si lʼoutil en est
muni. Sinon, saisir lʼoutil par le bas de poignée. Une perte de maîtrise de lʼoutil peut
entraîner des blessures.
• Toujours porter des lunettes de protection ou toute autre protection oculaire.
Lors du martelage ou du perçage, des débris sont rejetés dans lʼair. Ces derniers
peuvent causer des dommages oculaires permanent.
• Mèches, douilles ou outils peuvent chauffer pendant leur utilisation. Toujours
porter des gants avant de les manipuler.
• Ne pas utiliser cet outil pendant des périodes prolongées. Les vibrations causées
par lʼaction de fonctionnement de lʼoutil peuvent blesser en permanence les doigts, les
mains et les bras. Porter des gants pour amortir les vibrations, faire des pauses
fréquentes et limiter le temps dʼutilisation quotidien de lʼoutil.
• Porter des protecteurs dʼoreilles appropriés durant lʼutilisation. Selon les conditions
et la durée dʼutilisation, le bruit émis par cet outil peut causer une perte auditive.
AVERTISSEMENT : Les clés à chocs ne sont pas des clés dynamométriques.
Ne pas utiliser cet outil pour resserrer des attaches à des couples spécifiques. Un
instrument spécifique de mesure de couple calibré, telle une clé dynamométrique, doit
être utilisé lorsque le serrage excessif ou insuffisant dʼune attache peut entraîner la
défaillance du joint.
AVERTISSEMENT : TOUJOURS porter des lunettes de sécurité. Les lunettes
de vue ne constituent PAS des lunettes de sécurité. Utiliser également un masque
facial ou anti-poussière si lʼopération de découpe génère de la poussière. TOUJOURS
PORTER UN ÉQUIPEMENT DE PROTECTION HOMOLOGUÉ :
• protection oculaire conforme à la norme ANSI Z87.1 (CAN/CSA Z94.3);
• protection auditive ANSI S12.6 (S3.19);
• protection des voies respiratoires conformes aux normes NIOSH/OSHA/MSHA.
16
Page 17

AVERTISSEMENT : certains outils électriques, tels que les sableuses, les
scies, les meules, les perceuses ou certains autres outils de construction,
peuvent produire de la poussière contenant des produits chimiques reconnus par
lʼÉtat de la Californie comme étant susceptibles dʼentraîner le cancer, des
malformations congénitales ou pouvant être nocifs pour le système reproductif.
Parmi ces produits chimiques, on retrouve :
· le plomb dans les peintures à base de plomb,
· la silice cristalline dans les briques et le ciment et autres produits de maçonnerie,
· lʼarsenic et le chrome dans le bois de sciage ayant subi un traitement chimique.
Le risque associé à de telles expositions varie selon la fréquence avec laquelle on
effectue ces travaux. Pour réduire lʼexposition à de tels produits, il faut travailler dans un
endroit bien aéré et utiliser le matériel de sécurité approprié, tel un masque
anti-poussières spécialement conçu pour filtrer les particules microscopiques.
• Éviter tout contact prolongé avec la poussière soulevée par cet outil ou autres
outils électriques. Porter des vêtements de protection et nettoyer les parties
exposées du corps à lʼeau savonneuse. Sʼassurer de bien se protéger afin dʼéviter
dʼabsorber par la bouche, les yeux ou la peau des produits chimiques nocifs.
AVERTISSEMENT : Cet outil peut produire et répandre de la poussière
susceptible de causer des dommages sérieux et permanents au système
respiratoire. Toujours utiliser un appareil respiratoire anti-poussières approprié
approuvé par le NIOSH ou lʼOSHA. Diriger les particules dans le sens opposé du visage
et du corps.
SYMBOLES
• Lʼétiquette apposée sur votre outil pourrait comprendre les symboles suivants. Les
symboles et leurs définitions sont indiqués ci-après :
V ..............volts A................ampères
Hz ............hertz W ..............watts
min............minutes ............courant alternatif
..........courant continue non............régime à vide
............Construction de classe I
(mis à la terre)
............Construction classe II
............
borne de terre
............symbole dʼalerte à la .../minourpm..révolutions ou alternance par minute
sécurité
IPM.............Impacts par minute BPM ............Coups par minute
17
Page 18

• En cas dʼutilisation dʼune rallonge, sʼassurer que les valeurs nominales de la rallonge
utilisée correspondent bien à celles de lʼoutil alimenté. Lʼusage dʼune rallonge de calibre
insuffisant causera une chute de tension entraînant perte de puissance et surchauffe. Le
tableau ci-dessous illustre les calibres à utiliser selon la longueur de rallonge et
lʼintensité nominale indiquée sur la plaque signalétique. En cas de doutes, utiliser le
calibre suivant. Plus le calibre est petit, plus la rallonge peut supporter de courant.
Calibre de fil minimum recommandé pour les rallonges
Longueur totale de la rallonge
25 pi 50 pi 75 pi 100 pi 125 pi 150 pi 175 pi
7,6 m 15,2 m 22,9 m 30,5 m 38,1 m 45,7 m 53,3 m
Calibre AWG
18 18 16 16 14 14 12
DESCRIPTION FONCTIONNELLE FIGURE A
1. Détente
2. Bouton de marche
avant/marche arrière
3. Collet du mandrin
4. Mandrin à blocage rapide, à
entraînement hexagonal de 6,35
mm (1/4 po)
5. Lampe de travail à DEL
6. Rangement des mèches
7. Crochet de ceinture
8. Bloc-pile
9. Bouton de dégagement de
pile (sur la pile)
3
1
2
4
5
A
6
8
7
9
Bloc-piles au lithium-ion et chargeur
Description le numéro de catalogue
Ce produit peut être utilisé avec les modèles de blocs-piles et de chargeurs
énumérés dans le tableau ci-après.
Bloc-piles au lithium-ion de 20 V max.* : FMC680L
Chargeur de bloc-piles au lithium-ion,
série de 20 V max.* : FMC690L
18
Page 19

DIRECTIVES DE SÉCURITÉ IMPORTANTES POUR LES
CHARGEURS DE PILES
CONSERVER CES DIRECTIVES : ce mode dʼemploi comprend dʼimportantes directives
de sécurité pour les chargeurs de piles.
• Avant dʼutiliser le chargeur, lire toutes les directives et tous les avertissements figurant
sur le chargeur, le bloc-piles et le produit utilisé avec le bloc-piles.
AVERTISSEMENT : risque de choc électrique. Éviter la pénétration de tout
liquide dans le chargeur.
MISE EN GARDE : risque de brûlure. Pour réduire le risque de blessures,
charger uniquement les blocs-piles désignés au lithium-ion, de 20 V MAX., Stanley
FatMax FMC. Dʼautres types de blocs-piles peuvent exploser, provoquant ainsi des
blessures corporelles et des dommages.
MISE EN GARDE : dans certaines circonstances, lorsque le chargeur est
branché au bloc dʼalimentation, le chargeur peut être court-circuité par des corps
étrangers conducteurs tels que, mais sans sʼy limiter, la laine dʼacier, le papier
dʼaluminium ou toute accumulation de particules métalliques. Ils doivent être maintenus
à distance des ouvertures du chargeur. Débrancher systématiquement celui-ci si aucun
bloc-piles nʼy est inséré. Débrancher le chargeur avant tout nettoyage.
AVERTISSEMENT :
• NE PAS tenter de charger le bloc-piles avec autre chose qu’unchargeur de marque.
Les chargeurs et blocs-piles sont conçus spécialement pour fonctionner ensemble.
• Ces chargeurs doivent servir uniquement à la charge desblocs-piles rechargeables
désignés au lithium-ion, de 20 V MAX., Stanley FatMax FMC. Toute autre utilisation
risque de provoquer un incendie, une décharge électrique ou une électrocution.
• Protéger le chargeur de la pluie et de la neige.
• Tirer la fiche plutôt que le cordon pour débrancher le chargeur ou pour débrancher
les cordons à l’aide de la fonction de guirlande. Cela permet de réduire le risque
dʼendommager la fiche ou le cordon dʼalimentation.
• S’assurer que le cordon est situé en lieu sûr de manière à ce que personne ne
marche ni ne trébuche dessus ou à ce qu’il ne soit pas endommagé ni soumis à
une tension.
• Ne pas utiliser de rallonge à moins que cela ne soit absolument nécessaire.
Lʼutilisation dʼune rallonge inadéquate risque dʼentraîner un incendie, un choc électrique
ou une électrocution.
• Pour la sécurité de l’utilisateur, utiliser une rallonge de calibre adéquat (AWG,
American Wire Gauge [calibrage américain normalisé des fils]). Plus le numéro de
calibre de fil est petit et plus sa capacité est grande, par exemple un calibre 16 a plus de
capacité quʼun calibre 18. Si plus dʼune rallonge est utilisée pour obtenir la longueur
totale, sʼassurer que chaque rallonge présente au moins le calibre de fil minimum.
• Ne pas mettre d’objet sur le chargeur ni mettre ce dernier sur une surface
souple, ce qui pourrait causer l’obstruction des fentes de ventilation et, du fait,
provoquer une chaleur interne excessive. Éloigner le chargeur de toute source
de chaleur. La ventilation du chargeur se fait par les fentes pratiquées dans les
parties supérieures et inférieures du boîtier.
• Ne pas installer le chargeur sur un mur ni le fixer de manière permanente sur
toute surface. Le chargeur est destiné à une utilisation sur une surface plane et
stable (c.-à-d. un dessus de table ou dʼétabli).
• Ne pas faire fonctionner le chargeur si la fiche ou le cordon est endommagé; les
remplacer immédiatement.
• Ne jamais se servir d’un chargeur qui a subi un choc violent, qui est tombé par
terre ou qui est endommagé de quelque manière que ce soit. Le faire vérifier dans
un centre de réparation autorisé.
• Ne pas démonter le chargeur; confier lʼentretien ou la réparation de lʼappareil à un
centre de réparation autorisé. Le remontage non conforme du chargeur comporte des
risques de choc électrique, dʼélectrocution ou dʼincendie.
• Débrancher le chargeur avant de le nettoyer. Cela réduira le risque de choc
électrique. Le risque ne sera pas éliminé en enlevant simplement le bloc-piles.
19
Page 20

20
• NE JAMAIS relier deux chargeurs ensemble.
• Le chargeur est conçu pour être alimenté en courant domestique standard
(120 V). Ne pas utiliser une tension supérieure pour le chargeur.
CONSERVER CES DIRECTIVES
DIRECTIVES DE SÉCURITÉ IMPORTANTES POUR LES BLOCSPILES
AVERTISSEMENT : pour un fonctionnement sûr, lire le présent mode dʼemploi et
les manuels fournis avec lʼoutil avant dʼutiliser le chargeur.
Le bloc-piles nʼest pas complètement chargé à la sortie de lʼemballage. Avant dʼutiliser le
bloc-piles et le chargeur, lire les directives de sécurité ci-après. Respecter ensuite les
consignes de chargement décrites.
LIRE TOUTES LES DIRECTIVES.
• Ne pas incinérer le bloc-piles, même s’il est très endommagé ou complètement
usé, car il peut exploser au contact de flammes. Des vapeurs et des matières
toxiques sont dégagées lorsque les blocs-piles au LI-ION sont incinérés.
• Ne pas charger ou utiliser un bloc-piles dans un milieu déflagrant, en présence de
liquides, de gaz ou de poussière inflammables. Insérer ou retirer un bloc-piles du
chargeur peut enflammer de la poussière ou des émanations.
• Si le contenu de la pile entre en contact avec la peau, laver immédiatement la zone
touchée au savon doux et à l’eau. Si le liquide de la pile entre en contact avec les
yeux, rincer lʼoeil ouvert à lʼeau pendant 15 minutes ou jusquʼà ce que lʼirritation cesse. Si
des soins médicaux sont nécessaires, lʼélectrolyte des piles au LI-ION est composé dʼun
mélange de carbonates organiques liquides et de sels de lithium. Quant aux piles au NICD, il est question dʼune solution de 25 % à 35 % dʼhydroxyde de potassium.
• Le contenu des cellules de pile ouvertes peut provoquer une irritation respiratoire.
Exposer la personne à de lʼair frais. Si les symptômes persistent, obtenir des soins médicaux.
AVERTISSEMENT : risque de brûlure. Le liquide du bloc-piles peut sʼenflammer
sʼil est exposé à des étincelles ou à une flamme.
• Charger les blocs-piles uniquement dans des chargeurs Stanley FatMax.
• NE PAS éclabousser le bloc-piles ou l’immerger dans l’eau ou tout autre liquide.
Cela peut entraîner une défaillance prématurée de lʼélément.
• Ne pas ranger ni utiliser l’outil et le bloc-piles dans un endroit où la température
peut atteindre ou dépasser les 40 °C (105 °F) (comme dans les remises extérieures
ou les bâtiments métalliques en été).
AVERTISSEMENT : ne jamais ouvrir le bloc-piles pour quelque raison que ce
soit. Si le boîtier du bloc-piles est fissuré ou endommagé, ne pas lʼinsérer dans un
chargeur. Ne pas écraser, faire tomber ou endommager le bloc-piles. Ne pas utiliser un
bloc-piles ou un chargeur qui a reçu un choc violent, qui est tombé, a été écrasé ou est
endommagé de quelque manière que ce soit (p. ex. percé par un clou, frappé dʼun coup
de marteau, piétiné). Les blocs-piles endommagés doivent être envoyés au centre de
réparation pour être recyclés.
AVERTISSEMENT : risque dʼincendie. Ne pas ranger ou transporter les piles
de manière à ce que des objets métalliques puissent entrer en contact avec les
bornes exposées des piles. Par exemple, ne pas mettre un bloc-piles dans un tablier,
une poche, une boîte à outils, une boîte de nécessaire de produit ou un tiroir contenant
des objets tels que des clous, des vis ou des clés, car tout contact accidentel entre les
bornes à découvert et un objet métallique conducteur comme une clé, une pièce de
monnaie, un outil à main, etc. risque de provoquer un incendie. La Hazardous Material
Regulations (réglementation sur les produits dangereux) du département américain des
transports interdit en fait le transport des blocs-piles pour le commerce et dans les avions
(c.-à-d. dans des valises et les bagages à main) À MOINS quʼils ne soient bien protégés
contre les courts-circuits. Pour le transport de piles individuelles, on doit donc sʼassurer
que les bornes sont protégées et bien isolées contre toute matière pouvant entrer en
contact avec elles et provoquer un court-circuit. REMARQUE : il ne faut pas laisser de
piles au LI-ION dans les bagages enregistrés.
Page 21

21
R
ECOMMANDATIONS EN MATIÈRE DE RANGEMENT
1. Le meilleur endroit de rangement est celui qui est frais et sec, loin de toute lumière
directe du soleil et protégé dʼune température extrême (chaleur ou froid).
2. Un entreposage prolongé ne nuira pas au bloc-piles ou au chargeur.
PROCÉDURE DE CHARGE
Les chargeurs Stanley FatMax sont conçus pour charger les blocs-piles
Stanley FatMax en 30 ou 60 minutes selon le type de bloc-piles à charger.
1. Brancher le chargeur dans une prise appropriée avant
dʼinsérer le bloc-piles.
2. Insérer le bloc-piles dans le chargeur. (Fig. B)
3. Le voyant DEL clignotera indiquant que la pile est
en cours de recharge.
4. La fin de la recharge est indiquée par le voyant qui
demeurera allumé. Le bloc-piles est chargé à plein et
peut être utilisé ou laissé sur le chargeur.
Recharger les piles épuisées aussitôt que possible
après leur utilisation pour prolonger leur durée de vie.
Pour préserver le plus possible la durée de vie du
bloc-piles, ne pas le décharger tout à fait. Il est
recommandé de recharger le bloc-piles après chaque utilisation.
FONCTIONS DE DIAGNOSTIC DU CHARGEUR
Le chargeur est conçu pour détecter certains problèmes du bloc-piles ou de la source
dʼalimentation. Le type de clignotement du voyant de charge indique les problèmes.
PILE EN MAUVAIS ÉTAT
Le chargeur est en mesure de détecter une pile faible ou endommagée. Le
voyant DEL rouge clignote selon la séquence indiquée sur lʼétiquette. Si la
séquence code correspondant à une pile en mauvais état est en clignotement,
cesser de recharger la pile. Il faut la retourner à un centre de réparation ou à un
site de collecte pour le recyclage.
FONCTION DE SUSPENSION DU BLOC-PILES CHAUD/FROID
Lorsque le chargeur détecte un bloc-piles trop chaud ou trop froid, il suspend
automatiquement la recharge jusquʼau retour à la normale de la température de
celui-ci. Une fois la température du bloc-piles revenue à la normale, le chargeur
passe automatiquement au mode de recharge du bloc-piles. Cette fonction
assure une durée de vie maximale des blocs-piles. Le voyant DEL rouge
clignote selon la séquence indiquée sur lʼétiquette.
REMARQUES IMPORTANTES POUR LE CHARGEMENT
1. Pour augmenter la durée de vie du bloc-piles et optimiser son rendement, le charger à
une température entre 18 et 24 °C (65 et 75 °F). NE PAS charger le bloc-piles à des
températures inférieures à 4,5 °C (40 °F) ou supérieures à 40,5 °C (105 °F). Ces
consignes sont importantes et permettent dʼéviter dʼendommager gravement le blocpiles.
2. Le chargeur et le bloc-piles peuvent devenir chauds au toucher pendant la charge. Il
sʼagit dʼun état normal et cela nʼindique pas un problème. Pour faciliter le refroidissement
du bloc-piles après son utilisation, éviter de mettre le chargeur ou le bloc piles dans un
endroit chaud comme dans une remise métallique ou une remorque non isolée.
3. Si le bloc-piles ne se charge pas adéquatement, on doit :
a. vérifier le courant à la prise en branchant une lampe ou un autre appareil électrique;
b. vérifier si la prise est reliée à un interrupteur mural qui la met hors tension lorsque
la lumière sont éteinte;
c. déplacer le chargeur et le bloc-piles dans un endroit où la température ambiante
est entre 18 et 24 °C (65 et 75 °F);
d. si le problème persiste, apporter ou envoyer lʼoutil, le bloc-piles et le chargeur au
centre de réparation de votre région.
4. Le bloc-piles doit être rechargé lorsquʼil nʼarrive pas à produire suffisamment de
puissance pour des travaux qui étaient facilement réalisés auparavant. NE PAS
CONTINUER à utiliser le bloc-piles dans ces conditions. Suivre les procédures de charge.
B
Page 22

22
On peut également recharger à tout moment un bloc-piles partiellement déchargé sans
nuire à son fonctionnement.
5. Tout corps étranger conducteur, tel que notamment la laine dʼacier, le papier
dʼaluminium, ou toute accumulation de particules métalliques, doit être maintenu à
distance des ouvertures du chargeur. Débrancher systématiquement celui-ci si aucun
bloc-piles nʼy est inséré. Débrancher le chargeur avant tout nettoyage.
6. Ne pas congeler le chargeur, lʼimmerger ans lʼeau ou dans tout autre liquide.
AVERTISSEMENT : risque de choc électrique. ne jamais ouvrir le bloc-piles
pour quelque raison que ce soit. Si le boîtier en plastique du bloc-piles est brisé ou
fissuré, le retourner à un centre de réparation pour quʼil soit recyclé.
INSERTION ET RETRAIT DU BLOC-PILES DE LʼOUTIL
AVERTISSEMENT : Sʼassurer que le bouton de verrouillage est bien engagé pour
empêcher lʼutilisation de lʼinterrupteur lors de la pose et du retrait du
bloc-piles.
INSERTION DU BLOC-PILES : insérer le bloc-piles
dans lʼoutil, comme montré à la figure C. Sʼassurer
que le bloc-piles est bien logé et enclenché en
place.
RETRAIT DU BLOC-PILES : Enfoncer le bouton de
dégagement du bloc-piles, comme montré à la
figure D, puis retirer le bloc-piles de lʼoutil.
FONCTIONNEMENT
DÉTENTE À VITESSE VARIABLE (FIG. E)
Pour démarrer lʼoutil, presser la détente (1). Pour éteindre lʼoutil, simplement la
relâcher. Lʼoutil est doté dʼun frein, dès le relâchement complet de la détente, le
mandrin sʼarrêtera. Lʼinterrupteur de vitesse variable
vous permet de choisir la vitesse convenant le
mieux à une application particulière. Plus la détente
est enfoncée, plus la vitesse de lʼoutil sera élevée.
REMARQUE : utiliser les vitesses plus basses pour
débuter le perçage dʼun trou sans pointeau, percer
le métal, les plastiques ou la céramique et visser.
Pour une durée de vie accrue de lʼoutil, utiliser la
fonction de vitesse variable uniquement pour
commencer le vissage des fixations.
REMARQUE : lʼutilisation prolongée à des vitesses
variables nʼest pas recommandée. Cette pratique
pourrait endommager la détente et devrait être évitée.
E
C
D
1
Page 23

23
B
OUTON DE COMMANDE MARCHE AVANT/MARCHE ARRIÈRE (FIG. F)
Un bouton de commande marche avant/marche
arrière (2) détermine le sens de lʼoutil et sert aussi
de bouton de verrouillage. Pour sélectionner la
marche avant, relâcher la détente et enfoncer le
bouton de commande marche avant/marche arrière
vers le côté droit de lʼoutil. Pour la marche arrière,
enfoncer le bouton de commande marche
avant/marche arrière vers le côté gauche de lʼoutil.
La position centrale du bouton de commande
verrouille lʼoutil en position dʼarrêt. Toujours
relâcher la détente avant de changer la position du
bouton de commande.
REMARQUE : au premier démarrage de lʼoutil,
après un changement de direction, il est possible
quʼun déclic se fasse entendre. Ce son, tout comme
le bruit percutant de lʼoutil, est normal et nʼindique
pas de problème.
LAMPE DE TRAVAIL À DEL (FIG. G)
Il y a une lampe de travail (5) située juste
au-dessus de la détente (A). Elle sʼactive lorsquʼon
presse la détente.
REMARQUE : la lampe de travail permet dʼéclairer
la surface immédiate et nʼest pas destinée à servir
de lampe de poche.
MANDRIN À BLOCAGE RAPIDE (FIG. H)
REMARQUE : le mandrin est seulement
compatible avec des accessoires hexagonaux de
6,35 mm (1/4 po).
Avant de changer dʼaccessoire, mettez le
commutateur en position dʼarrêt (au centre) ou
retirer le bloc-piles.
Pour installer un accessoire, éloigner le collet du
mandrin (3) du devant de lʼoutil, insérer lʼaccessoire
et relâcher le collet. Lʼaccessoire est verrouillé en
place.
Pour enlever un accessoire, éloigner le collet du
mandrin (3) du devant de lʼoutil, retirer lʼaccessoire
et relâcher le collet.
RANGEMENT INTÉGRÉ DES EMBOUTS
Une fente pour le rangement des mèches est intégrée à la partie supérieure de lʼoutil.
G
H
F
2
3
5
Page 24

LE SCEAU SRPRC
MC
Le sceau SRPRCMC(Société de recyclage des piles rechargeables au Canada)
sur la pile lithium-ion (ou sur le bloc-piles) indique que son coût de recyclage (ou
celui du bloc-piles) à la fin de sa vie utile a déjà été payé par Stanley FatMax.
La SRPRCMCen collaboration avec Stanley FatMax et dʼautres utilisateurs de piles ont
établi aux États-Unis des programmes facilitant la cueillette des piles au lithium-ion
déchargées. Contribuez à protéger lʼenvironnement et à conserver les ressources
naturelles en retournant les piles au lithium-ion épuisées à un centre de réparation agréé
Stanley FatMax ou au détaillant de votre région pour quʼelles soient recyclées. On peut
également communiquer avec le centre de recyclage de la région pour savoir où déposer
les piles usées. La SRPRCMCest une marque déposée de la Société de recyclage des
piles rechargeables au Canada.
ENTRETIEN
Le moteur étant en marche, enlever les saletés et la poussière hors des évents au
moyen dʼair comprimé sec. Porter des lunettes de sécurité lors de cette opération. Les
pièces extérieures en plastique peuvent être nettoyées avec un chiffon humecté et un
détergent doux. Bien que ces pièces soient hautement résistantes aux solvants, ne
JAMAIS utiliser de solvants.
Nʼutiliser quʼun détergent doux et un chiffon humide pour nettoyer lʼappareil. Ne jamais
laisser de liquide pénétrer dans lʼappareil et nʼimmerger aucune partie de lʼappareil dans
un liquide.
24
DÉPANNAGE
Problème
Cause possible Solution possible
• Lʼappareil refuse de • Mauvaise installation du • Vérifier lʼinstallation du
démarrer. bloc-piles. bloc-piles.
• Bloc-piles non chargé. • Vérifier les exigences de
charge pour le bloc-piles.
• Le bloc-piles ne se charge • Bloc-piles non inséré dans • Insérer le bloc-piles dans
pas. le chargeur. le chargeur de sorte que
le voyant DEL vert
apparaisse.
• Chargeur non branché. • Brancher le chargeur
dans une prise qui
fonctionne. Se reporter à
« Remarques importantes
de chargement » pour plus
de renseignements.
• Si les chargeurs sont
reliés à un cordon
multiprise, vérifier toutes
les connexions.
• Température ambiante. • Déplacer le chargeur et
la pile dans un endroit où
la température de lʼair
ambiant est supérieure à
4,5 °C (40 °F) et inférieure
à 40,5 °C (105 °F).
REMARQUES SPÉCIALES SUR LʼEMPLOI AVEC DES PILESAULITHIUM
•Lʼappareil sʼéteint Lebloc-piles a atteintsa •Laisser lebloc-piles
soudainement. limitethermiquemaximale. refroidir.
•Bloc-piles épuisé.(Pour •Placerdanslechargeur le
maximiserladurée devie du temps dʼune charge.
bloc-piles, celui-ci estconçu
poursʼéteindre soudainement
lorsquʼil est épuisé.)
Pour obtenir de lʼaide relativement au produit, consulter notre site Web à lʼadresse
suivante : www.stanleytools.com pour obtenir une liste des centres de réparation ou
appeler le centre de service à la clientèle de Stanley FatMax au 800 262-2161.
Page 25

PIÈCES DE RECHANGE
Utiliser seulement des pièces de rechange identiques. Pour obtenir une liste des pièces
ou pour en commander, consulter notre site Web de réparation à lʼadresse suivante :
www.stanleytools.com. Il est également possible de commander des pièces auprès du
centre de réparation en usine Stanley FatMax ou du centre de réparation sous garantie
agréé Stanley FatMax le plus proche. Sinon, appeler notre service à la clientèle au
800 262-2161.
Cet appareil est conforme aux dispositions du paragraphe 15 des règlements de la
FCC. Son fonctionnement est régi par les deux conditions suivantes : (1) Cet appareil
ne peut pas causer dʼinterférence nuisible et (2) cet appareil doit accepter toutes les
interférences reçues, y compris celles qui risquent dʼen gêner le fonctionnement.
REMARQUE : ce matériel a été testé et a été déclaré conforme aux limites en vigueur
concernant les dispositifs numériques de classe B, en vertu de la partie 15 de la
réglementation FCC. Ces limites visent à assurer une protection raisonnable contre tout
brouillage nuisible dans une installation résidentielle. Ce matériel produit, consomme et
peut émettre une énergie de radiofréquence et, s'il n'est pas installé et utilisé
conformément aux directives qui l'accompagnent, il peut entraîner un brouillage nuisible
des communications radio. Cependant, nous ne garantissons pas l'absence de
brouillage dans tous les types d'environnement. Si, après avoir effectué une vérification
en mettant l'appareil hors tension puis sous tension, l'utilisateur s'aperçoit que ce
matériel provoque un brouillage nuisible à la réception des signaux de radio ou de
télévision, il lui faudra essayer de corriger ce brouillage en prenant une ou plusieurs des
mesures ci-dessous :
• Réorienter ou repositionner l'antenne de réception.
• Éloigner le plus possible le matériel du récepteur.
• Brancher le matériel dans une prise électrique située sur un circuit différent de celui du
récepteur.
• Consulter le distributeur ou un technicien radio/télévision expérimenté pour obtenir de
l'aide.
Tout changement ou toute modification à cet appareil qui n’est pas expressément
approuvé par l’institution responsable de la conformité peut faire annuler le droit de
l’utilisateur d’utiliser ce matériel. Cet appareil numérique de la classe B est conforme à
la norme NMB-003 du Canada.
ENTRETIEN ET RÉPARATION
Tous les outils de qualité finissent par demander un entretien ou un changement de pièce.
Pour de plus amples renseignements à propos de Stanley FatMax, ses centres de
réparation en usine ou ses centres de réparation sous garantie agréés, visiter son site
Web à lʼadresse suivante : www.stanleytools.com ou communiquer avec son centre de
service à la clientèle en composant le 800 262-2161. Toutes les réparations effectuées
dans nos centres de réparation sont entièrement garanties contre les défauts de
matériaux et de main-dʼœuvre. Nous ne pouvons garantir les réparations effectuées en
partie ou totalement par dʼautres.
Vous pouvez aussi nous écrire pour obtenir de lʼinformation à lʼadresse suivante : Stanley
Tools, 701 E. Joppa Road, Towson, Maryland 21286 - Attention: Product Service.
Sʼassurer dʼindiquer toutes les informations figurant sur la plaque signalétique de lʼoutil
(numéro du modèle, type, numéro de série, etc.).
ACCESSOIRES
AVERTISSEMENT : Puisque les accessoires autres que ceux offerts par Stanley
FatMax nʼont pas été testés avec ce produit, lʼutilisation de ceux-ci avec lʼoutil pourrait
sʼavérer dangereuse. Pour réduire le risque de blessures, utiliser exclusivement les
accessoires Stanley FatMax recommandés avec le produit. Les centres de réparation de
lʼusine Stanley FatMax ou les centres de réparation sous garantie autorisés
Stanley FatMax sont en mesure de vous fournir la gamme complète dʼaccessoires.
Consulter le site Web www.stanleytools.com pour obtenir un catalogue ou le nom du
fournisseur local.
25
Page 26

Imported by / Importé par
Stanley Tools
701 E. Joppa Road
Towson, Maryland 21286
26
GARANTIE RESTREINTE DE TROIS ANS
Stanley FatMax réparera ou remplacera gratuitement les outils défectueux présentant des
défauts de matériau ou de fabrication pendant trois ans à compter de la date dʼachat des
outils (garantie de deux ans pour les blocs-piles). Cette garantie ne couvre pas des
défaillances de pièce dues à une usure normale ou à une mauvaise utilisation de lʼoutil.
Pour plus de détails relatifs à la
couverture de la garantie et aux réparations sous garantie, visitez le site Web
www.stanleytools.com ou composez le 800 262-2161. Cette garantie ne sʼapplique pas
aux accessoires ni aux
dommages causés par des réparations réalisées ou tentées par des tiers. Cette garantie
vous accorde des droits légaux spécifiques et il est possible que vous ayez dʼautres droits
qui varient dʼun État ou dʼune province à lʼautre.
En plus de la garantie, les outils Stanley FatMax sont couverts par notre :
SERVICE DʼENTRETIEN GRATUIT DE 1 AN : Stanley FatMax entretiendra lʼoutil et
remplacera gratuitement les pièces usées par une utilisation normale en tout temps
pendant la première année à compter de la date dʼachat.
GARANTIE DE REMBOURSEMENT DE 90 JOURS : Si vous nʼêtes pas entièrement
satisfait des performances de votre outil électrique Stanley FatMax pour quelque
raison que ce soit, vous pouvez le retourner accompagné dʼun reçu dans les 90 jours
suivant la date dʼachat et nous vous rembourserons entièrement – sans poser de
questions.
AMÉRIQUE LATINE : Cette garantie ne sʼapplique pas aux produits vendus en
Amérique latine. Pour les produits vendus en Amérique latine, veuillez consulter les
informations relatives à la garantie propre au pays, présentes dans lʼemballage,
appelez lʼentreprise locale ou consultez le site Web pour connaître les informations
relatives à la garantie.
Pour enregistrer votre outil en vue dʼobtenir un service de garantie, consultez notre site
Web à lʼadresse suivante : www.stanleytools.com.
REMPLACEMENT DES ÉTIQUETTES DʼAVERTISSEMENT
Si les étiquettes dʼavertissement deviennent illisibles ou sont manquantes, composez le
800 262-2161 pour en obtenir le remplacement gratuit.
Page 27

27
CONSERVE ESTE MANUAL PARA FUTURAS CONSULTAS.
Catálogo N°
FMC640
MANUAL DE INSTRUCCIONES
Destornillador de
impacto inalámbrico
de 20V máx*
Page 28

PAUTAS DE SEGURIDAD/DEFINICIONES
Es importante que lea y comprenda este manual. La información que contiene se
relaciona con la protección de SU SEGURIDAD y la PREVENCIÓN DE PROBLEMAS.
Los símbolos que siguen se utilizan para ayudarlo a reconocer esta información.
PELIGRO: indica una situación de peligro inminente que, si no se evita, provocará la
muerte o lesiones graves.
ADVERTENCIA: indica una situación de peligro potencial que, si no se evita,
provocará la muerte o lesiones graves.
PRECAUCIÓN: indica una situación de peligro potencial que, si no se evita,
provocará lesiones leves o moderadas.
AVISO: utilizado sin el símbolo de alerta de seguridad indica una situación de peligro
potencial que, si no se evita, puede provocar daños en la propiedad.
Advertencias generales de seguridad para herramientas
eléctricas
ADVERTENCIA: Lea todas las advertencias de seguridad e instrucciones El
incumplimiento de las advertencias e instrucciones puede provocar descargas
eléctricas, incendios o lesiones graves.
Conserve todas las advertencias e instrucciones para futuras consultas.
El término “herramienta eléctrica” incluido en las advertencias hace referencia
a las herramientas eléctricas operadas con corriente (con cable eléctrico) o a
las herramientas eléctricas operadas con baterías (inalámbricas).
1) Seguridad en el área de trabajo
a) Mantenga el área de trabajo limpia y bien iluminada. Las áreas abarrotadas y
oscuras propician accidentes.
b) No opere herramientas eléctricas en atmósferas explosivas, como
ambientes donde se encuentran líquidos, gases o polvo inflamables. Las
herramientas eléctricas originan chispas que pueden encender el polvo o los
vapores.
c) Mantenga a los niños y espectadores alejados de la herramienta eléctrica en
funcionamiento. Las distracciones pueden provocar la pérdida de control.
2) Seguridad eléctrica
a) Los enchufes de la herramienta eléctrica deben adaptarse al tomacorriente.
Nunca modifique el enchufe de ninguna manera. No utilice ningún enchufe
adaptador con herramientas eléctricas con conexión a tierra. Los enchufes
no modificados y que se adaptan a los tomacorrientes reducirán el riesgo de
descarga eléctrica.
b) Evite el contacto corporal con superficies puestas a tierra, como por
ejemplo tuberías, radiadores, rangos y refrigeradores. Existe mayor riesgo de
descarga eléctrica si su cuerpo está puesto a tierra.
c) No exponga las herramientas eléctricas a la lluvia o a condiciones de
humedad. Si ingresa agua a una herramienta eléctrica, aumentará el riesgo de
descarga eléctrica.
d) No maltrate al cable. Nunca utilice el cable para transportar, tirar o
desenchufar la herramienta eléctrica. Mantenga el cable lejos del calor,
aceite, bordes afilados o piezas móviles. Los cables dañados o enredados
aumentan el riesgo de descarga eléctrica.
e) Al operar una herramienta eléctrica en el exterior, utilice un cable
prolongador adecuado para tal uso. Utilice un cable adecuado para uso en
exteriores a fin de reducir el riesgo de descarga eléctrica.
f) Si el uso de una herramienta eléctrica en un lugar húmedo es imposible de
evitar, utilice un suministro protegido con un interruptor de circuito por falla
a tierra (GFCI). El uso de un GFCI reduce el riesgo de descargas eléctricas.
28
Page 29

3
) Seguridad personal
a) Permanezca alerta, controle lo que está haciendo y utilice el sentido común
cuando emplee una herramienta eléctrica. No utilice una herramienta eléctrica si
está cansado o bajo el efecto de drogas, alcohol o medicamentos. Un momento de
descuido mientras se opera una herramienta eléctrica puede provocar lesiones
personales graves.
b) Utilice equipos de protección personal. Siempre utilice protección para los
ojos. En las condiciones adecuadas, el uso de equipos de protección, como
máscaras para polvo, calzado de seguridad antideslizante, cascos o protección
auditiva, reducirá las lesiones personales.
c) Evite el encendido por accidente. Asegúrese de que el interruptor esté en la
posición de apagado antes de conectarlo a la fuente de energía o paquete de
baterías, o antes de levantar o transportar la herramienta. Transportar
herramientas eléctricas con el dedo apoyado en el interruptor o enchufar
herramientas eléctricas con el interruptor en la posición de encendido puede
propiciar accidentes.
d) Retire las clavijas de ajuste o llaves de tuercas antes de encender la
herramienta eléctrica. Una llave de tuercas o una clavija de ajuste que se deje
conectada a una pieza giratoria de la herramienta eléctrica pueden provocar
lesiones personales.
e) No se estire. Conserve el equilibrio adecuado y manténgase parado
correctamente en todo momento. Esto permite un mejor control de la
herramienta eléctrica en situaciones inesperadas.
f) Use la vestimenta adecuada. No use ropas holgadas ni joyas. Mantenga el
cabello, la ropa y los guantes alejados de las piezas en movimiento. Las ropas
holgadas, las joyas o el cabello largo pueden quedar atrapados en las piezas en
movimiento.
g) Si se suministran dispositivos para la conexión de accesorios con fines de
recolección y extracción de polvo, asegúrese de que estén conectados y que
se utilicen correctamente. El uso de dispositivos de recolección de polvo puede
reducir los peligros relacionados con el polvo.
4) Uso y mantenimiento de la herramienta eléctrica
a) No fuerce la herramienta eléctrica. Utilice la herramienta eléctrica correcta
para el trabajo que realizará. La herramienta eléctrica correcta hará el trabajo
mejor y más seguro a la velocidad para la que fue diseñada.
b) No utilice la herramienta eléctrica si no puede encenderla o apagarla con el
interruptor. Toda herramienta eléctrica que no puede ser controlada mediante el
interruptor es peligrosa y debe ser reparada.
c) Desconecte el enchufe de la fuente de energía y/o el paquete de baterías de la
herramienta eléctrica antes de realizar ajustes, cambiar accesorios o
almacenar herramientas eléctricas. Estas medidas de seguridad preventivas
reducen el riesgo de encender la herramienta eléctrica en forma accidental.
d) Guarde las herramientas eléctricas que no están en uso fuera del alcance de
los niños y no permite que otras personas no familiarizadas con ella o con
estas instrucciones operen la herramienta. Las herramientas eléctricas son
peligrosas en las manos de usuarios no entrenados.
e) Mantenimiento de las herramientas eléctricas. Controle que no haya piezas
móviles mal alineadas o trabadas, piezas rotas y toda otra situación que
pueda afectar el funcionamiento de las herramientas eléctricas. Si encuentra
daños, haga reparar la herramienta eléctrica antes de utilizarla. Se producen
muchos accidentes a causa de las herramientas eléctricas que carecen de un
mantenimiento adecuado.
f) Mantenga las herramientas de corte afiladas y limpias. Las herramientas de
corte con mantenimiento adecuado, con los bordes de corte afilados son menos
propensas a trabarse y son más fáciles de controlar.
g) Utilice la herramienta eléctrica, los accesorios y las brocas de la herramienta,
etc. de acuerdo con estas instrucciones y teniendo en cuenta las condiciones
de trabajo y el trabajo que debe realizarse. El uso de la herramienta eléctrica
para operaciones diferentes de aquéllas para las que fue diseñada podría originar
una situación peligrosa.
29
Page 30

5) Uso y mantenimiento de la herramienta con baterías
a) Recargue solamente con el cargador especificado por el fabricante. Un
cargador adecuado para un tipo de paquete de baterías puede originar riesgo de
incendio si se utiliza con otro paquete de baterías.
b) Utilice herramientas eléctricas sólo con paquetes de baterías
específicamente diseñados. El uso de cualquier otro paquete de baterías puede
producir riesgo de incendio y lesiones.
c) Cuando no utilice el paquete de baterías, manténgalo lejos de otros objetos
metálicos como sujetapapeles, monedas, llaves, clavos, tornillos u otros
objetos metálicos pequeños que puedan realizar una conexión desde un
terminal al otro. Los cortocircuitos en los terminales de la batería pueden
provocar quemaduras o incendio.
d) En condiciones abusivas, el líquido puede ser expulsado de la batería. Evite
su contacto. Si entra en contacto accidentalmente, enjuague con agua. Si el
líquido entra en contacto con sus ojos, busque atención médica. El líquido
expulsado de la batería puede provocar irritación o quemaduras.
6) Mantenimiento
a) Haga que una persona de reparaciones calificada realice el mantenimiento
de su herramienta eléctrica y utilice piezas de repuesto idénticas solamente.
Esto garantizará la seguridad de la herramienta eléctrica.
NORMAS DE SEGURIDAD ESPECÍFICAS
• Utilice protectores auditivos con los taladros de impacto. La exposición al ruido
puede ocasionar la pérdida de la audición.
• Use los mangos auxiliares que se suministran con la herramienta. La pérdida del
control podría ocasionar lesiones personales.
• Sostenga la herramienta por sus superficies de empuñadura aisladas cuando
realice una operación en la cual la herramienta para cortar pudiera entrar en
contacto con instalaciones eléctricas ocultas o con su propio cable. El contacto
con un cable cargado, cargará a su vez las partes metálicas expuestas de la
herramienta y dará un golpe de corriente al operador.
• Utilice abrazaderas u otra forma práctica para asegurar y sostener la pieza de
trabajo sobre una plataforma estable. Sostener el trabajo con la mano o contra el
cuerpo no brinda la estabilidad requerida y puede llevar a la pérdida del control.
• Cuando no se utilice, coloque la herramienta de costado en una superficie
estable en la que no provocará tropezones o caídas. Algunas herramientas con
paquetes de baterías grandes tienen la capacidad de mantenerse en posición vertical,
pero pueden ser fácilmente derribadas.
• Mantenga el cabello, la ropa y los guantes alejados de los orificios de
ventilación. Los orificios de ventilación suelen cubrir piezas móviles donde estos
elementos se pueden enganchar.
• Sostenga la herramienta firmemente con ambas manos. Utilice el mango auxiliar,
en caso de tenerlo. Si no tiene mango auxiliar, agarre la herramienta con ambas
manos. La pérdida del control podría ocasionar lesiones personales.
• Use gafas de protección u otro tipo de protección ocular. El martillado y taladrado
pueden hacer que vuelen astillas. Estas partículas pueden causar daños permanentes.
• Las brocas, los casquillos y herramientas se calientan durante la operación. Use
guantes cuando las toque.
• No opere esta herramienta durante períodos largos de tiempo. La vibración
causada por la acción de operación de esta herramienta puede causar lesiones
permanentes a los dedos, las manos y los brazos. Utilice guantes para una mayor
amortiguación, tome descansos frecuentes y limite el tiempo de uso diario.
• Utilice una protección auditiva apropiada durante el uso. En
determinadas condiciones y con utilizaciones prolongadas, el ruido generado por este
producto puede favorecer la pérdida de audición.
ADVERTENCIA: Las llaves de impacto no son llaves de torsión. No utilice esta
herramienta para ajustar piezas de sujeción a pares de torsión específicos. Cuando un
par de torsión inadecuado en una pieza de sujeción determinada pudiera llevar a
defectos en la junta, utilice un dispositivo de medición de par de torsión independiente
y calibrado como una llave de torsión.
30
Page 31

ADVERTENCIA: USE SIEMPRE LENTES DE SEGURIDAD. Los anteojos de
uso diario NO son lentes de seguridad. Utilice también máscaras faciales o para polvo
si el corte produce polvillo. UTILICE SIEMPRE EQUIPOS DE SEGURIDAD
CERTIFICADOS:
• Protección para los ojos según la norma ANSI Z87.1 (CAN/CSA Z94.3)
• Protección auditiva según la norma ANSI S12.6 (S3.19)
• Protección respiratoria según las normas NIOSH/OSHA/MSHA
ADVERTENCIA: parte del polvo producido por las herramientas eléctricas al
lijar, aserrar, esmerilar, taladrar y realizar otras actividades de la construcción,
contiene productos químicos reconocidos por el Estado de California como
causantes de cáncer, defectos de nacimiento u otros problemas reproductivos.
Algunos de estos productos químicos son:
• el plomo de las pinturas de base plomo,
• la sílice cristalina de ladrillos, el cemento y otros productos de mampostería, y
• el arsénico y el cromo de la madera con tratamiento químico.
El riesgo derivado de estas exposiciones varía según la frecuencia con la que se
realice este tipo de trabajo. Para reducir la exposición a estos productos químicos:
trabaje en áreas bien ventiladas y trabaje con equipos de seguridad aprobados, como
las máscaras para polvo especialmente diseñadas para filtrar las partículas
microscópicas.
• Evite el contacto prolongado con el polvo procedente del lijado, serrado,
esmerilado y taladrado eléctricos, así como de otras actividades del sector de la
construcción. Lleve ropa protectora y lave con agua y jabón las zonas
expuestas. Si permite que el polvo se introduzca en la boca u ojos o quede sobre la
piel, puede favorecer la absorción de productos químicos peligrosos.
ADVERTENCIA: El uso de esta herramienta puede generar o dispersar polvo
lo cual puede causar lesiones respiratorias serias y permanentes y otros tipos de
lesión. Siempre use protección respiratoria aprobada por NIOSH/OSHA para la
exposición al polvo. Dirija las partículas en dirección opuesta a su cara y cuerpo.
SÍMBOLOS
• La etiqueta de su herramienta puede incluir los siguientes símbolos. Los símbolos y
sus definiciones son los siguientes:
V ..............voltios A ............amperios
Hz ............hertz W ............vatios
min............minutos ..........corriente alterna
..........corriente continua
n
o............no velocidad sin carga
............Construcción Clase I
(con conexión a tierra)
............
Construcción de clase II
........
terminal a tierra
............símbolo de alerta de ../mino rpm ..revoluciones o reciprocidad por minuto
seguridad
IPM.............impactos por minuto BPM ............beats per minute (golpes por minuto)
31
Paquete de baterías de iones de litio y cargador
Descripción Catálogo N°
Este producto usa la batería y el cargador indicados en el cuadro a continuación.
Batería de iones de litio de 20 V Máx.*: FMC680L
Cargador para baterías de iones de litio
serie 20 V Máx.*: FMC690L
Page 32

DESCRIPCIÓN DE LAS
FUNCIONES - FIGURA A
1. Interruptor disparador
2. Botón de avance/reversa
3. Anillo del portabrocas
4. Portabrocas hexagonal de
liberación rápida de 6,4 mm
(1/4 pulgada)
5. Luz de trabajo de LED
6. Almacenamiento de brocas
7. Gancho para cinturón
8. Batería
9. Botón de liberación de la
batería (en la batería)
• Cuando use un alargador, asegúrese de usar uno de un calibre suficiente como para
cargar con la corriente que requerirá su producto. Un alargador de menor calibre
causará una caída en el voltaje de la línea lo que resultará en pérdida de potencia y
sobrecalentamiento. El siguiente cuadro muestra el tamaño correcto a utilizar,
dependiendo del largo del cable y el amperaje nominal. En caso de duda, utilice el
de mayor calibre. Mientras menor el número del calibre, mayor la capacidad del
cable.
Tamaño mínimo recomendado del conductor
para los cables de extensión
Longitud total del cable
25 pies 50 pies 75 pies 100 pies 125 pies 150 pies 175 pies
7.6 m 15.2 m 22.9 m 30.5 m 38.1 m 45.7 m 53.3 m
Tamaño AWG del conductor
18 18 16 16 14 14 12
INSTRUCCIONES DE SEGURIDAD IMPORTANTES PARA LOS
CARGADORES DE BATERÍAS
CONSERVE ESTAS INSTRUCCIONES: Este manual contiene instrucciones de
seguridad importantes para los cargadores de baterías.
• Antes de utilizar el cargador, lea todas las instrucciones y las prevenciones en el
cargador, en el paquete de baterías y en el producto que utiliza el paquete de baterías.
ADVERTENCIA: Riesgo de descarga eléctrica. No permita que ningún líquido
entre en el cargador.
PRECAUCIÓN: Riesgo de quemaduras. Para reducir el riesgo de lesiones,
cargue únicamente las baterías de iones de litio Stanley FatMax FMC de 20 V MÁX.
especificadas. Es posible que otros tipos de baterías estallen y provoquen lesiones
personales y daños.
PRECAUCIÓN: En determinadas circunstancias, con el cargador enchufado en
el tomacorriente, algunos materiales extraños pueden provocar un cortocircuito en el
cargador. Se deben mantener lejos de las cavidades del cargador los materiales
extraños de naturaleza conductora, entre los que se incluyen la lana de acero, el papel
de aluminio o cualquier acumulación de partículas metálicas. Éstos son sólo algunos
ejemplos y no constituyen una lista taxativa. Siempre desenchufe el cargador del
tomacorriente cuando no haya un paquete de baterías en la cavidad. Desenchufe el
cargador antes de intentar limpiarlo.
32
3
1
2
4
5
A
6
8
7
9
Page 33

ADVERTENCIA:
• NO intente cargar el paquete de baterías con otros cargadores que no sean de la
marca. Los cargadores y los paquetes de baterías están diseñados específicamente
para trabajar juntos.
• Estos cargadores no están diseñados para ningún otro uso que no sea la carga
de las baterías recargables de iones de litio Stanley FatMax FMC de 20V MÁX.
especificadas. Otros usos pueden provocar riesgo de incendio, descarga eléctrica o
electrocución.
• No exponga el cargador a la lluvia ni a la nieve.
• Para desconectar el cargador o los cables para cadena de margarita, tire del
enchufe en lugar del cable. Esto reducirá el riesgo de dañar el enchufe o el cable.
• Asegúrese de que el cable esté ubicado de modo que no lo pise o se tropiece con
él y que no esté sujeto a daños o tensiones de alguna otra forma.
• No utilice un cable prolongador a menos que sea absolutamente necesario. El uso
de un cable prolongador incorrecto puede provocar riesgo de incendio, descarga eléctrica
o electrocución.
• Para garantizar la seguridad, un cable prolongador debe tener un tamaño de cable
adecuado (AWG o Calibre de conductor de Estados Unidos). Cuanto más pequeño
sea el número de calibre del conductor, mayor será la capacidad del cable; es decir, un
calibre 16 tiene más capacidad que un calibre 18. Cuando se utiliza más de una
prolongación para lograr la longitud total, asegúrese de que cada prolongación tenga la
medida mínima del conductor.
• No coloque objetos en la parte superior del cargador ni coloque el cargador en
una superficie blanda que pueda bloquear las ranuras de ventilación y provocar
un calor interno excesivo. Coloque el cargador en una posición alejada de
cualquier fuente de calor. El cargador se ventila a través de ranuras en la parte
superior e inferior de la cubierta.
• No monte el cargador en la pared ni lo instale en forma permanente sobre
ninguna superficie. El cargador está diseñado para ser utilizado sobre una superficie
plana y estable (p. ej., un banco o una mesa).
• No opere el cargador con cables o enchufes dañados: reemplácelos de inmediato.
• No opere el cargador si éste ha recibido un golpe fuerte, se ha caído, o se ha
dañado de cualquier otra manera. Llévelo a un centro de mantenimiento autorizado.
• No desarme el cargador; llévelo a un centro de mantenimiento autorizado
cuando se requiera mantenimiento o una reparación. El armado incorrecto puede
implicar un riesgo de descarga eléctrica, electrocución o incendio.
• Antes de limpiarlo, desconecte el cargador del tomacorriente. Esto reducirá el riesgo
de descarga eléctrica. Quitar el paquete de baterías no reducirá este riesgo.
• NUNCA intente conectar 2 cargadores juntos.
• El cargador está diseñado para operar con corriente eléctrica doméstica estándar
(120 voltios). No intente utilizarlo con otro voltaje.
CONSERVE ESTAS INSTRUCCIONES
INSTRUCCIONES DE SEGURIDAD IMPORTANTES PARA LOS
PAQUETES DE BATERÍAS
ADVERTENCIA
: Para un funcionamiento seguro, lea éste y todos los manuales
de instrucciones incluidos con la herramienta antes de usar el cargador.
El paquete de baterías incluido en la caja no está completamente cargado. Antes de
utilizar el paquete de baterías y el cargador, lea las instrucciones de seguridad a
continuación. Luego siga los procedimientos de carga descritos.
LEA TODAS LAS INSTRUCCIONES
• No incinere el paquete de baterías, aun si tiene daños importantes o está
completamente desgastado. El paquete de baterías puede explotar en el fuego. Cuando
se queman paquetes de baterías de LI-ION, se generan vapores y materiales tóxicos.
• No cargue ni use la batería en atmósferas explosivas, como ambientes en los que
hay líquidos, gases o polvo inflamables. Insertar o retirar la batería del cargador puede
encender el polvo o los vapores.
33
Page 34

• Si el contenido de las baterías entra en contacto con la piel, lave el área de
inmediato con agua y jabón suave. Si el líquido de la batería entra en contacto con los
ojos, enjuague con agua manteniendo los ojos abiertos durante 15 minutos o hasta que
la irritación cese. Si se necesita atención médica, el electrolito de las baterías de
LI-ION contiene una mezcla de carbonatos orgánicos líquidos y sales de litio. Las
baterías de NI-CD contienen una solución de hidróxido de potasio al 25%-35%.
• El contenido de las células de la batería abierta puede generar irritación
respiratoria. Respire aire fresco. Si los síntomas persisten, busque atención médica.
ADVERTENCIA: Peligro de quemaduras. El líquido de la batería puede
encenderse si se expone a chispas o llamas.
• Cargue los paquetes de baterías con cargadores Stanley FatMax únicamente.
• NO salpique o sumerja en agua u otros líquidos. Esto puede causar una falla
prematura de las células.
• No almacene ni utilice la herramienta y el paquete de baterías en lugares en los
que la temperatura pueda alcanzar o superar los 40 °C (105 °F) (como en toldos al
aire libre o construcciones de metal en verano).
ADVERTENCIA: Nunca intente abrir el paquete de baterías por ningún motivo. Si
la caja del paquete de baterías está agrietada o dañada, no la introduzca en el cargador.
No comprima, deje caer ni dañe el paquete de baterías. No utilice un paquete de baterías
o un cargador que haya recibido un golpe fuerte, se haya caído, esté agotado o dañado
de alguna forma (por ejemplo, perforado con un clavo, golpeado con un martillo, pisado).
Los paquetes de baterías dañados deben devolverse al centro de mantenimiento para su
reciclado.
ADVERTENCIA: Riesgo de incendio. No guarde o transporte la batería de
ninguna manera que permita que los terminales expuestos de la batería entren en
contacto con objetos metálicos. Por ejemplo, no coloque la batería en delantales,
bolsillos, cajas de herramientas, cajas de juegos de productos, cajones, etc. con clavos,
llaves, tornillos sueltos, etc. Transportar baterías puede provocar incendios si los
terminales de la batería entran en contacto accidentalmente con materiales
conductores como llaves, monedas, herramientas de mano u objetos similares. Las
Normas para Materiales Peligrosos del Departamento de Transporte de los EE.UU. (HMR)
concretamente prohíben transportar baterías comercialmente o en aviones (es decir,
empacadas en maletas y equipaje de mano) A MENOS que estén debidamente protegidas
de cortocircuitos. Por lo tanto, cuando transporte baterías individuales, asegúrese de que
los terminales de la batería estén protegidos y bien aislados de materiales que puedan
hacer contacto y causar un cortocircuito. NOTA: Las baterías de iones de LI-ION no
deben colocarse dentro del equipaje registrado.
RECOMENDACIONES CON RESPECTO AL ALMACENAMIENTO
1. El mejor lugar de almacenamiento es uno que sea fresco y seco fuera de la luz solar
directa y de un exceso de calor o frío.
2. El almacenamiento prolongado no dañará el paquete de baterías o el cargador.
PROCEDIMIENTO DE CARGA
Los cargadores Stanley FatMax están diseñados para cargar paquetes de baterías
Stanley FatMax en 30 a 60 minutes según el paquete que
se está cargando.
1. Enchufe el cargador en un tomacorriente adecuado
antes de insertar el paquete de baterías.
2. Introduzca el paquete de baterías en el cargador.
(Fig. B)
3. La luz LED titilará, lo que indica que la batería se
está cargando.
4. La luz LED fija indicará que la carga ha finalizado.
El paquete está completamente cargado y puede
utilizarse en este momento o dejarse en el cargador.
34
B
Page 35

D
espués del uso, recargue las baterías descargadas a la brevedad posible o de lo
contrario la vida útil de las baterías podría acortarse en gran medida. Para
obtener la máxima vida útil de las baterías, no permita que éstas se descarguen
completamente. Se recomienda recargar las baterías después de cada uso.
DIAGNÓSTICO DEL CARGADOR
Este cargador está diseñado para detectar ciertos problemas que pueden surgir con
los paquetes de baterías o la fuente de alimentación. Los problemas se indican
mediante una luz LED que titila en diferentes patrones.
BATERÍA EN MAL ESTADO
El cargador puede detectar una batería débil o dañada. La luz LED titila en el
patrón indicado en la etiqueta. Si observa este patrón intermitente de batería en
mal estado, interrumpa la carga de la batería. Devuélvala a un centro de
mantenimiento o a un lugar de recolección para reciclado.
RETRASO POR PAQUETE CALIENTE/FRÍO
Cuando el cargador detecta una batería excesivamente caliente o
excesivamente fría, enciende automáticamente un Retraso por paquete
caliente/frío que suspende la carga hasta que la batería se normaliza. Después
de esto, el cargador cambia automáticamente al modo de Paquete cargando.
Esta función garantiza la duración máxima de la batería. La luz titila en el patrón
indicado en la etiqueta.
DEJAR LA BATERÍA EN EL CARGADOR
El cargador y el paquete de baterías se pueden dejar conectados indefinidamente con
la luz LED encendida. El cargador mantendrá el paquete de baterías como nuevo y
completamente cargado. Este cargador posee un modo Tune-up automático que
iguala o equilibra las celdas individuales en el paquete de baterías para que éste
funcione a máxima capacidad. Los paquetes de baterías deben ajustarse
semanalmente o siempre que la batería ya no suministre la misma cantidad de
potencia. Para utilizar el modo Tune-up automático, coloque el paquete de baterías en
el cargador y déjelo allí durante 8 horas como mínimo.
NOTAS IMPORTANTES SOBRE LA CARGA
1. Obtendrá una duración más prolongada y un mejor rendimiento si el paquete de
baterías se carga cuando la temperatura ambiente está entre 18 °C y 24 °C (65 °F y
75 °F). NO cargue el paquete de batería con una temperatura ambiental por debajo de
+4,5 °C (+40 °F) o por encima de +40,5 °C (+105 °F). Esto es importante y evitará
daños graves en el paquete de baterías.
2. El cargador y el paquete de baterías pueden estar calientes al tacto durante la carga.
Esto es una condición normal y no indica un problema. Para facilitar el enfriado del
paquete de baterías después de su uso, evite colocar el cargador o el paquete de
baterías en un ambiente cálido, como debajo de un toldo de metal o en un remolque
sin aislamiento.
3. Si el paquete de baterías no se carga adecuadamente:
a. Revise el tomacorriente enchufando una lámpara u otro aparato
b. Verifique si el tomacorriente está conectado a un interruptor que corta la
energía cuando usted apaga las luces.
c. Mueva el cargador y el paquete de baterías a un lugar donde la temperatura
ambiental sea de aproximadamente 18 °C a 24 °C (65 °F a 75 °F).
d. Si los problemas de carga persisten, lleve la herramienta, el paquete de
baterías y el cargador al centro de mantenimiento local.
4. Se debe recargar el paquete de baterías cuando no produce energía suficiente para
tareas que previamente realizaba con facilidad. NO CONTINÚE utilizando la
herramienta en estas condiciones. Siga el procedimiento de carga. También se puede
cargar un paquete de baterías parcialmente usado cuando se desee, sin ningún efecto
negativo sobre éstas.
5. Se deben mantener lejos de las cavidades del cargador los materiales extraños de
naturaleza conductora, entre los que se incluyen la lana de acero, el papel de aluminio
o cualquier acumulación de partículas metálicas. Éstos son sólo algunos ejemplos y
no constituyen una lista taxativa. Siempre desenchufe el cargador del tomacorriente
cuando no haya un paquete de baterías en la cavidad. Desenchufe el cargador antes
de intentar limpiarlo.
6. No congele ni sumerja el cargador en agua ni en ningún otro líquido.
35
Page 36

ADVERTENCIA: Riesgo de descarga eléctrica. No permita que ningún líquido
entre en el cargador. Nunca intente abrir el paquete de baterías por ningún motivo. Si la
caja protectora de plástico del paquete de baterías se rompe o agrieta, devuélvala a un
centro de mantenimiento para su reciclado.
INSTALACIÓN Y EXTRACCIÓN DEL PAQUETE DE BATERÍAS DE LA HERRAMIENTA
PRECAUCIÓN: Asegúrese de que el botón de bloqueo esté trabado para evitar el
accionamiento del interruptor antes de extraer o instalar la batería.
PARA INSTALAR EL PAQUETE DE BATERÍAS:
Introduzca el paquete de baterías en la herramienta
como se muestra en la figura C. Asegúrese de que
el paquete de baterías esté bien colocado y
completamente asegurado en su lugar.
PARA EXTRAER EL PAQUETE DE BATERÍAS:
Presione el botón de liberación de la batería, como
se muestra en la figura D, y tire del paquete de
baterías hasta extraerlo de la herramienta.
INSTRUCCIONES DE OPERACIÓN
INTERRUPTOR DISPARADOR DE VELOCIDAD VARIABLE (FIGURA E)
Para encender la herramienta, oprima el interruptor disparador (1). Para apagar la
herramienta, suelte el interruptor disparador. La herramienta está equipada con un
freno. El portabrocas se detendrá cuando suelte
completamente el interruptor disparador. El
interruptor de velocidad variable le permite
seleccionar la mejor velocidad para una aplicación
en particular. Cuanto mayor sea la presión sobre el
disparador, más rápido será el funcionamiento de la
herramienta. Para comenzar orificios sin marcar el
centro con un punzón; taladrar en metal, plástico o
cerámicos; o para colocar tornillos, use velocidades
bajas. Para una
máxima duración de la herramienta, utilice la
velocidad variable solo para orificios y sujetadores
de arranque.
NOTA: No se recomienda el uso continuo de la
velocidad variable. Puede dañar el interruptor y
debe evitarse.
36
E
C
D
1
Page 37

BOTÓN DE CONTROL DE AVANCE/REVERSA
(FIGURA F)
El botón de control de avance/reversa (2) determina
la dirección de la herramienta y también sirve como
botón de bloqueo. Para seleccionar la rotación de
avance, libere el interruptor disparador y oprima el
botón de control de avance/reversa que se
encuentra en el costado derecho de la herramienta.
Para seleccionar la rotación de reversa, oprima el
botón de control de avance/reversa que se
encuentra en el costado izquierdo de la herramienta.
La posición del centro del botón de control bloquea
la herramienta en la posición de apagado. Al
cambiar la posición del botón de control, asegúrese
de que el disparador esté liberado.
NOTA: La primera vez que haga funcionar la herramienta luego de cambiar la
dirección de la rotación tal vez escuche un "clic" al encenderla. La herramienta hará
este sonido y otro de impacto. Esto es normal y no
indica un problema.
LUZ DE TRABAJO DE LED (FIGURA G)
La luz de trabajo (5) se encuentra justo por encima
del interruptor disparador (A). La luz de trabajo se
activa cuando se oprime el interruptor disparador.
NOTA: La luz de trabajo sirve para iluminar la
superficie de trabajo cercana y no fue diseñada
para utilizarse como linterna.
PORTABROCAS DE LIBERACIÓN RÁPIDA
(FIGURA H)
NOTA: El portabrocas acepta solo accesorios
hexagonales de 6,4 mm (1/4 pulgada).
Coloque el interruptor en la posición de bloqueo
(central) o retire el paquete de baterías antes de
cambiar los accesorios.
Para instalar un accesorio, quite el anillo del
portabrocas (3) de la parte frontal de la
herramienta, inserte el accesorio y libere el anillo.
El accesorio está fijo en su lugar.
Para quitar un accesorio, quite el anillo del
portabrocas (3) de la parte frontal de la
herramienta, quite el accesorio y libere el anillo.
ESPACIO EN LA HERRAMIENTA PARA GUARDAR PUNTAS
Una ranura para guardar puntas está integrada en el área superior de la herramienta.
37
G
H
F
2
3
5
Page 38

Este aparato digital Clase B cumple con la norma canadiense ICES-003.
Este mecanismo cumple con la parte 15 de las normas de la Comisión Federal de
Comunicaciones de Estados Unidos (FCC). La operación está sujeta a las dos
condiciones siguientes: (1) Este mecanismo posiblemente no cause interferencia
perjudicial; y (2) este mecanismo puede aceptar cualquier interferencia recibida,
incluso interferencia que podría provocar una operación no deseada.
NOTA: Este equipo ha sido probado y se encontró que cumple con los límites para
dispositivo digital Clase B, según la parte 15 de las normas de la FCC. Estos límites
están diseñados para brindar protección razonable contra interferencia perjudicial en
una instalación residencial. Este equipo genera, usa y puede irradiar energía en
frecuencia de radio y, si no se instala y se usa de acuerdo con las instrucciones, puede
provocar interferencia perjudicial en las comunicaciones de radio. Sin embargo, no hay
garantía de que la interferencia no ocurra en una instalación en particular. Si este
equipo provoca interferencia perjudicial en la recepción de radio o televisión, lo que se
puede determinar al apagar y encender el equipo, el usuario debe tratar de corregir la
interferencia mediante una o más de las siguientes medidas:
• Cambiar la orientación o la ubicación de la antena de recepción.
• Aumentar la separación entre el equipo y el receptor.
• Conectar el equipo a un tomacorriente sobre un circuito diferente de aquel al que está
conectado el receptor.
• Consultar al vendedor o pedir la ayuda de un técnico en radio y televisión con experiencia.
Los cambios o las modificaciones que se le realicen a esta unidad sin aprobación
expresa del tercero responsable del cumplimiento pueden anular la autorización del
usuario para operar el equipo. Este aparato digital de la clase B se conforma con
ICES-003 canadiense.
DETECCIÓN DE PROBLEMAS
Problema
Causa posible Solución posible
• La unidad no enciende. • El paquete de baterías no • Controle la instalación del
está bien instalado. paquete de baterías.
• El paquete de baterías no • Verifique los requisitos de
está cargado. carga del paquete de baterías.
• El paquete de baterías • El paquete de baterías no • Inserte el paquete de
no carga. está insertado en el baterías en el cargador hasta
cargador. que se encienda la luz verde
(LED).
• El cargador no está • Enchufe el cargador en un
enchufado. tomacorriente que funcione.
Consulte "Notas importantes
sobre la carga" para conocer
más detalles.
• Temperatura ambiental. • Traslade el cargador y la
batería a una temperatura
ambiental que esté por encima
de 40 °F (4,5 °C) o por debajo
de 105 °F (+40,5 °C).
NOTASESPECIALES PARA EL USOCONBATERÍASDELITIO
•Launidadseapaga •Elpaquete de bateríasalcanzó • Esperequeel paquete de baterías
repentinamente. el límite térmico máximo. seenfríe.
•Notiene máscarga. (Para •Colóquelo enelcargador
maximizar lavida útil del para quesecargue.
paquetede baterías,este
estádiseñadoparaapagarse
repentinamente cuando no
tiene más carga).
Para recibir ayuda con su producto, visite nuestro sitio Web en www.stanleytools.com para
conocer una lista de centros de mantenimiento o llame al Centro de atención al cliente de
Stanley FatMax al (800) 262 2161.
38
Page 39

EL SELLO RBRC™
El sello RBRC™ (Corporación de reciclado de baterías recargables) que se
encuentra sobre la batería (o el paquete de baterías) de iones de litio indica
que los costos para reciclar la batería (o el paquete de baterías) al final de su
vida útil ya fueron pagados por Stanley FatMax.
La RBRC™, en cooperación con Stanley FatMax y otros usuarios de baterías, ha
establecido programas en los Estados Unidos para facilitar la recolección de baterías de
iones de litio agotadas. Ayude a proteger nuestro medio ambiente y a conservar los
recursos naturales mediante la devolución de las baterías de iones de litio agotadas a un
centro de mantenimiento Stanley FatMax autorizado o a un comerciante minorista local
para que se reciclen. También puede comunicarse con el centro de reciclado local para
obtener información sobre dónde dejar las baterías agotadas. RBRC™ es una marca
comercial registrada de la Corporación de reciclado de baterías recargables.
MANTENIMIENTO
Con el motor en funcionamiento, sople la suciedad y el polvo de todos los conductos
de ventilación con aire seco. Use anteojos de seguridad cuando realice este
procedimiento. Las partes externas plásticas se pueden limpiar con un paño húmedo y
detergente suave. Aunque estas partes son muy resistentes a los solventes, NUNCA
use solventes.
Utilice únicamente jabón suave y un trapo húmedo para limpiar la herramienta. Nunca
permita que se introduzcan líquidos en la herramienta; nunca sumerja ninguna parte de
la herramienta en ningún líquido.
PIEZAS DE REPUESTO
Utilice únicamente piezas de repuesto idénticas a las originales. Para obtener una lista
de piezas o para hacer un pedido de éstas, visite nuestro sitio Web en
www.stanleytools.com.
También puede hacer un pedido de piezas al centro de mantenimiento de fábrica de
Stanley FatMax o al centro de mantenimiento en garantía autorizado de Stanley
FatMax más cercanos. O bien, puede llamar a nuestro centro de atención al cliente al
(800) 262-2161.
MANTENIMIENTO Y REPARACIONES
Con el paso del tiempo, todas las herramientas de calidad requieren mantenimiento o
reemplazo de las piezas. Para obtener información acerca de Stanley-Bostitch, sus
centros de mantenimiento de fábrica o centros de mantenimiento con garantía
autorizados, visite nuestro sitio Web en www.stanleytools.com o llame a nuestro Centro
de atención al cliente al (800) 262 2161. Todas las reparaciones realizadas por nuestros
centros de mantenimiento están completamente garantizadas contra defectos de
materiales y de mano de obra. No podemos otorgar garantías en relación con las
reparaciones ni los intentos de reparación de otras personas.
Además, puede escribirnos para obtener información a Stanley-Bostitch, S.A. de C.V ,
Av. de Los Angeles No. 303 Interior Local 1-C, Col. San Martin Xochinahuac,
Delegacion Azcapotzalco, Mexico, D.F, C.P. 02120, R.F.C SB0-861201-7z5; referencia:
Mantenimiento de productos. Asegúrese de incluir toda la información mencionada en la
placa de la herramienta (número de
modelo, tipo, número de serie, etc.).
ACCESORIOS
ADVERTENCIA: Debido a que no se han probado con este producto otros
accesorios que no sean los que ofrece Stanley FatMax, el uso de dichos accesorios con
esta herramienta podría ser peligroso. Para reducir el riesgo de lesiones, con este
producto deben usarse sólo los accesorios Stanley FatMax recomendados.
Puede encontrar la línea completa de accesorios en los centros de mantenimiento de
fábrica Stanley FatMax o centros de mantenimiento con garantía autorizados de
Stanley FatMax. Visite nuestro sitio web www.stanleytools.com para obtener un
catálogo o para conocer el nombre de su proveedor más cercano.
39
Page 40

40
Catalog Number FMC640 Form # 90577315
June 2011 Printed in China
Imported Mexico By:
En Mexico importado por:
Au Mexique, importeʼ par:
Stanley-Bostitch, S.A. de C.V
Av. de Los Angeles No. 303
Interior Local 1-C
Col. San Martin Xochinahuac
Delegacion Azcapotzalco
Mexico, D.F, C.P. 02120
R.F.C SB0-861201-7z5
GARANTÍA LIMITADA DE TRES AÑOS
Stanley FatMax reparará o reemplazará, sin cargo, cualquier defecto ocasionado por
materiales o mano de obra defectuosos durante tres años a partir de la fecha de compra
para las herramientas (dos años para las baterías). Esta garantía no cubre fallas en las
piezas que resulten del desgaste normal de la herramienta o de su utilización
inadecuada. Para obtener información detallada sobre la cobertura de la garantía y las
reparaciones en garantía, visite www.stanleytools.com o llame al (800) 262-2161. Esta
garantía no se extiende a los accesorios o a los daños causados por terceros al realizar
o intentar realizar reparaciones. Esta garantía le concede derechos legales específicos;
usted goza también de otros derechos que varían según el estado o provincia.
Además de la garantía, las herramientas Stanley FatMax están cubiertas por nuestro:
MANTENIMIENTO GRATUITO DURANTE 1 AÑO: Stanley FatMax realizará el
mantenimiento de la herramienta y reemplazará las piezas desgastadas tras el uso
normal, sin costo alguno, en cualquier momento durante el primer año después de la
compra.
GARANTÍA DE DEVOLUCIÓN DE DINERO DE 90 DÍAS: Si, por alguna razón, no
está completamente satisfecho con el desempeño de su herramienta eléctrica
Stanley FatMax, puede devolverla dentro de los 90 días posteriores a la fecha de
compra con el recibo correspondiente para un reembolso íntegro, sin objeciones.
AMÉRICA LATINA: Esta garantía no se aplica a los productos que se venden en
América Latina. Para los productos que se venden en América Latina, consulte la
información de garantía específica del país que viene en el empaque, llame a la
compañía local o visite el sitio Web para obtener información de la garantía.
Para registrar su herramienta y obtener el mantenimiento en garantía, visite nuestro
sitio Web en www.stanleytools.com.
REEMPLAZO DE LAS ETIQUETAS DE ADVERTENCIA
Si sus etiquetas de advertencia se vuelven ilegibles o faltan, llame al (800) 262-2161
para su reemplazo gratuito.
 Loading...