


Compulevel
Measurement System
R
S
T
S
T
A
N
L
E
Y
A
N
L
E
Y
C
A
L
R
E
C
M
A
R
K
H
O
L
D
R
E
S
S
C
A
L
E
Z
E
R
O
O
N
O
F
F
C
O
M
P
U
L
E
V
E
L
C
C
OO
MM
PP
UU
L
L
EE
VV
EE
LL
USER GUIDE
BEDIENUNGSANLEITUNG
MANUEL D'UTILISA
TION
MANUALE UTENTE
GUÍA DEL USUARIO
TM
47855 CompuLevel 6/11/07 11:14 Page 1
1 • CompulevelTMMeasurement system
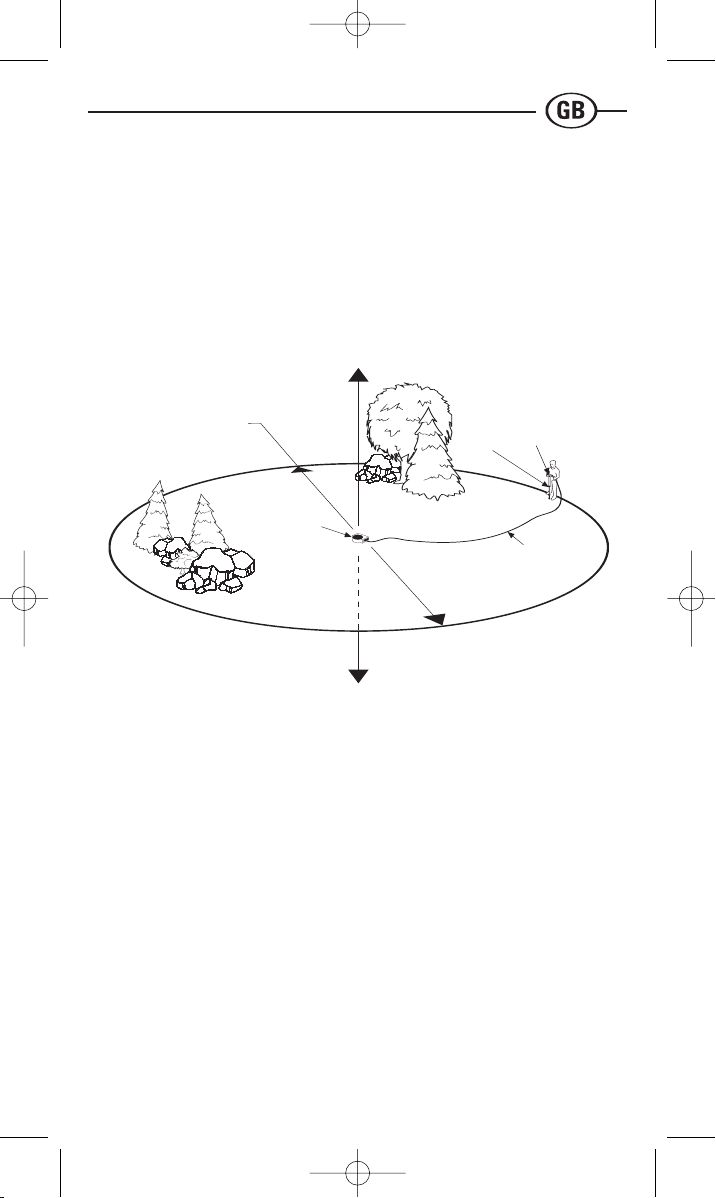
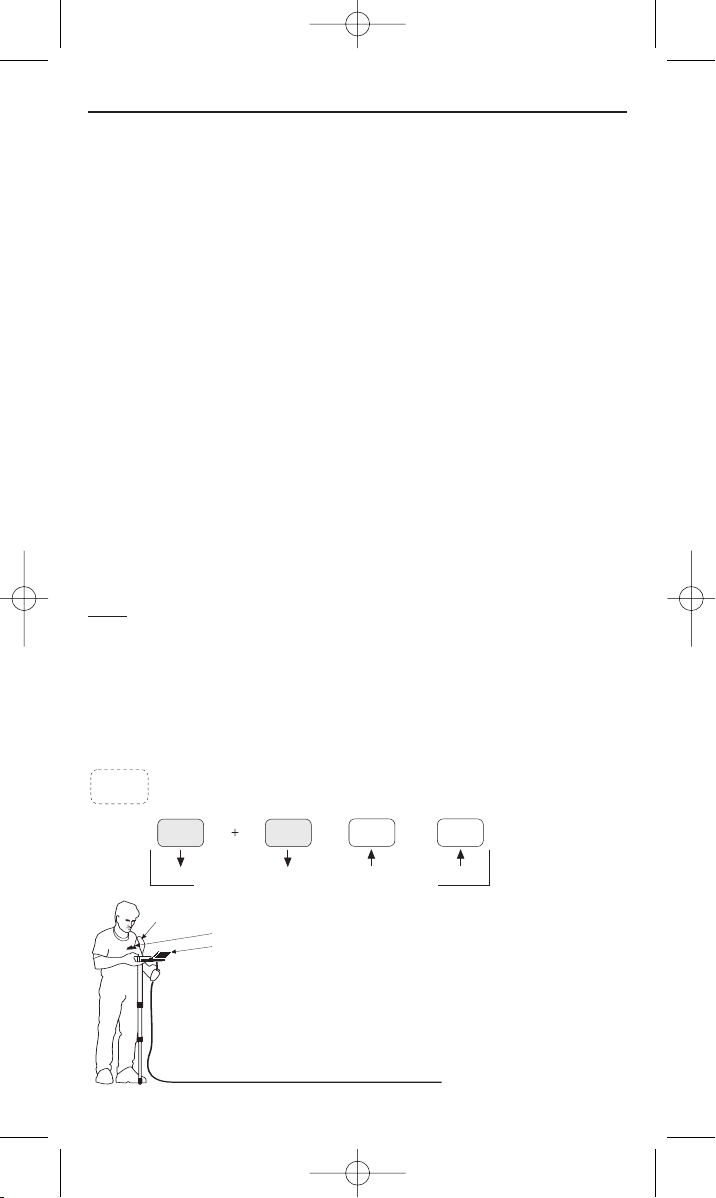
COMPULEVELTMSystem Concept
Thank you for purchasing the new STANLEY
®
CompulevelTMElevations Measurement System.
+20’
200’ CIRCLE
SINGLE SET-UP RANGES
-20’
*Zero at any reference
within range
Cord
Base
Unit
Uni-pod
Measurement
Module*
47855 CompuLevel 6/11/07 11:14 Page 1

CompulevelTMMeasurement system • 2
Introduction
Congratulations on your purchase of a Stanley Tools Contractor Grade
COMPULEVEL
T
M
. With it, you’ve entered into an exciting new world of
elevation measurement and levelling.
• COMPULEVEL
TM
is the first instrument of its kind to let you work alone
and even around corners with better than 1/-8” precision to cover up
to 40’ vertically over a 200’ circle on a single set up.
• COMPULEVELTMdirectly displays vertical measurements in large, easy
to read digits (unlike conventional builders and laser levels). You can
select any of six scales in which to work for extra convenience.
Owning a COMPULEVEL
TM
is like owning six 40’ rods and an imaginary
20’ tripod, all in one convenient package.
In addition you can:
• Use the CARRY function, to take elevation measurements across
unlimited ranges with multiple set ups, and without paper, pencil,
tedious calculations and endless errors.
• Attach a Serial Link to COMPULEVEL’s built in Serial Port and make
COMPULEVEL
TM
a powerful data gathering instrument capable of
downloading stored measurements to a Personal Computer for
analysis and tabulation or plots of profiles, sections and topographical
maps.
• Use any of COMPULEVEL’s 15 powerful built-in functions to master
tough elevation measuring and levelling jobs from site planning and
excavation throughout construction to final grading and landscaping.
• Never again worry about calibration because the rugged, water
resistant COMPULEVEL
TM
is easily checked and quickly field
calibrated.
Carefully review this User’s Guide and with a little practice you’ll soon cut
time, cost and frustration from your site measurement tasks.
47855 CompuLevel 6/11/07 11:14 Page 2

3 • CompulevelTMMeasurement system
Table of Contents
COMPULEVELTMBasics 3-6
Quick Start 7
On/Off, Hold & Zero 8-9
Scale & Resolution 10
Calibration 11
Record 12
Mark 13-14
Temperature & Adder 15
Carry 16
Record Data 17
Inspect/Dump & Initialise 19
Elevation 20
Monitor 21
Display Alarm Indicators 21
Use Tips 22
How to Measure Accurately 22-23
COMPULEVEL
TM
Care 23
Troubleshooting 24
Maintenance/Product Assistance 25
COMPULEVEL
TM
Specifications 26
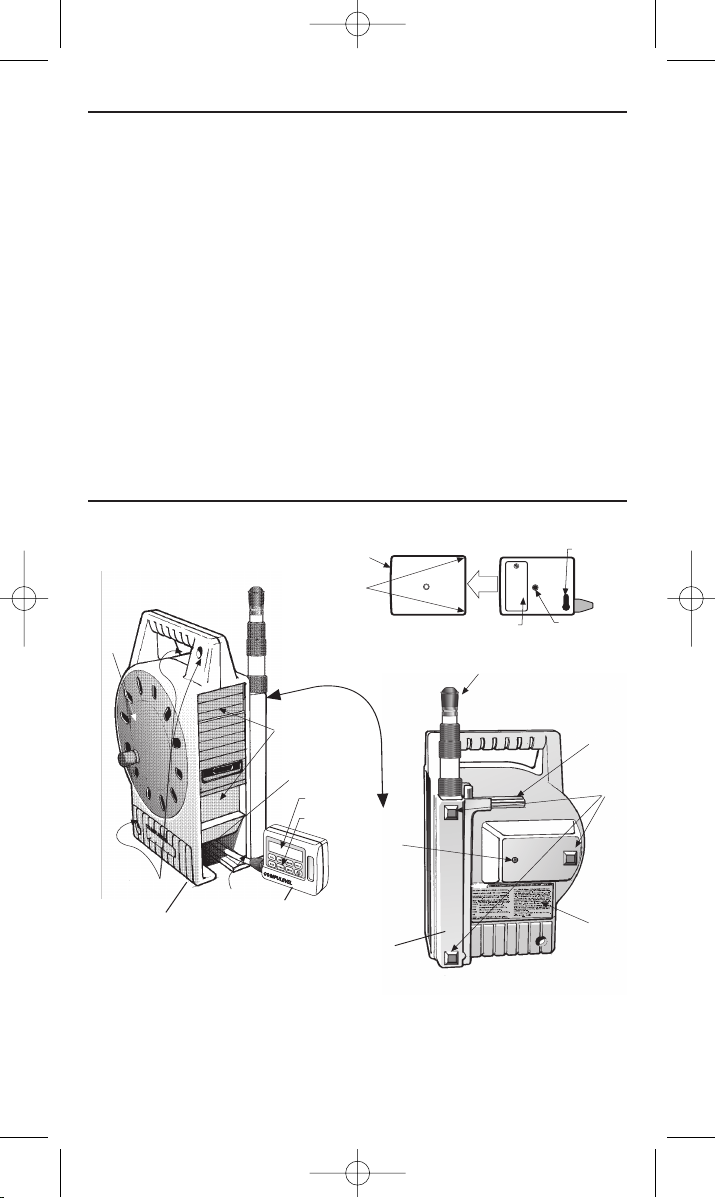
COMPULEVELTMBasics
COMPULEVELTMconsists of
• Base unit
• Hand-held measurement module
• Interconnecting cord between base unit and measurement module
• Unipod for the measurement module
• Stakes to secure the base unit
All components are stor
ed in the base unit when not in use.
LABELLED
FUNCTIONS
HIDDDEN
FUNCTIONS
47855 CompuLevel 6/11/07 11:14 Page 3
CompulevelTMMeasurement system • 4
COMPULEVELTMBasics continued
To use COMPULEVELTM:
1) Secure the base unit on its back at any convenient location and pull
from the reel ample cord to cover the area to be measured. The cord
will communicate elevation information from the base unit to the
measurement module.
2) If desired, attach the unipod to the measurement module to avoid
bending to measure. The unipod is not required for operation.
3) Turn on the unit and zero with the ZERO button at any site reference or
benchmark within COMPULEVEL’s 200’ horizontal, and + 20’ vertical
range. Although it is not necessary for the base unit to be level, it must
be secure.
Note: If the base unit moves, you must re-zero the measurement module
at the bench mark before continuing.
Parts of the COMPULEVEL
TM
Serial Port
Uni-Pod port
Battery
Boot
To remove the boot:
1. Place against chest
2. Pull back 1” with 4 fingernails each side.
3. Grip measurement module and boot and pull off.
Cord
Reel
Storage
Measur
ement module
docking ar
ea
Display
Keypad
Staking
locations*
Cord
Reel
retaining
scr
ew
Uni-pod
T
wo
stakes
Three
feet
Quick
r
efer
ence
guide
BASE UNIT
REAR VIEW
MEASUREMENT
MODULE
BASE UNIT
(THIS IS EASIER WHEN WARMED)
*Stake through handle area if unipod
remains in base unit
T
ypically on back
side during use
47855 CompuLevel 6/11/07 11:14 Page 4
5 • CompulevelTMMeasurement system
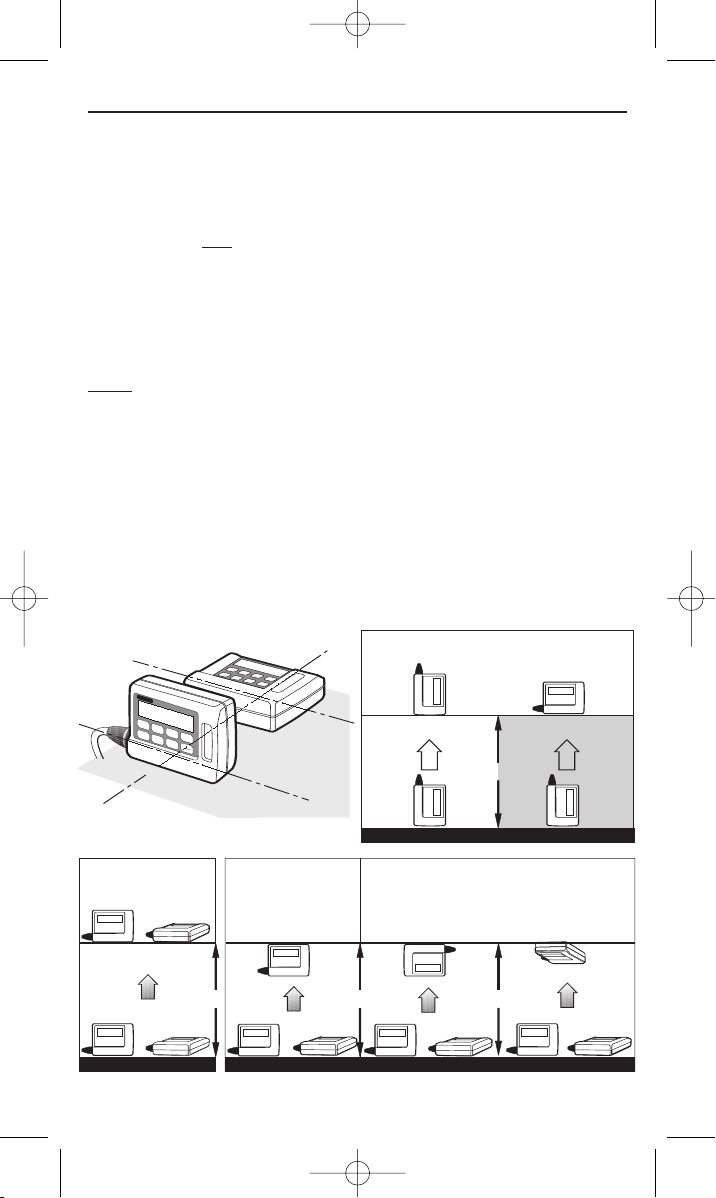
The Measurement Module
The hand-held measurement module, linked to the base unit by its polymer
cord, is the COMPULEVELTMcomponent you use to take the actual
elevation measurements.
When taking measurements, the bottom and back of the measurement
module are the
only sides that may be used interchangeably for
measurements. Hold the module level at the point where you want to
measure. Measure near the centre of either the back or the bottom.
Other sides may be used throughout any series of measurements, but
measure only with the surface you used to zero COMPULEVEL
TM
– Do not
change one surface to another for measuring without re-zeroing the unit.
Never invert the measurement module without compensation (see
illustration) unless it was inverted when zeroed. It will not show the
correct elevation.
Example: To measure the distance between the floor and ceiling in the
illustration on the opposite page: first, zero the measurement module on
its back or bottom on the floor. Then place its top, bottom, or back against
the ceiling to take a reading. To get the correct measurement, you then
manually add the height or thickness of the measurement module to the
display reading, or do so automatically using the ADDER function
described later.
M
M
o
n
B
O
T
T
O
M
R
C
O
M
P
U
L
E
V
E
L
C
O
M
P
U
L
E
V
E
L
C
A
L
R
E
C
M
A
R
K
H
O
L
D
R
E
S
S
C
A
L
E
Z
E
R
O
O
N
O
F
F
M
M
on
BA
C
K
C
L
Display reading is equivalent for measurements taken
fr
om back or bottom.
T
o avoid adding values, use the same side for star
t
and finish, without r
otating or inverting.
H = Display Measurement module
r
otated
H
HHH
RIGHT WRONG
H
= Display H = Display
+
3.5” or 3.75” with boot
For Measurement module inverted
H = Display
+
2.0” or 2.25” with boot
OR
OR OR OR OR
Typical Use
Must add value or use ADDER function (see page 15)
47855 CompuLevel 6/11/07 11:14 Page 5

CompulevelTMMeasurement system • 6
Keypad
Use the keypad to control the COMPULEVEL
T
M
. The most frequently used
functions – called labelled functions – are printed on the eight keys below
the display on the measurement module.
COMPULEVEL’s more advanced or less frequently used functions – called
hidden functions – may be accessed by logical combinations of two or
more of the same keys. All keys
except the HOLD and ON/OFF keys must
be pressed and held for two seconds to activate. This minimises
accidental operation of the functions.
All function keys also emit distinctive audible signals (clicks and beeps)
and show visual indicators on the display to further ease use. With use
these are quickly recognisable.
Examples: When a measurement is nearly stable enough to read,
COMPULEVEL
TM
emits two short ‘read ready’ beeps.
When storing a reading, COMPULEVELTMemits short, regular beeps and
the display flashes until the reading is stable enough to store. The unit
then emits a single long tone.
Note: All most recent settings and stored measurements are retained
indefinitely once power is shut off and even without a battery installed.
Keypad & Display
Flashes when
batter
y is low
Flashes when calibration is
r
equired due to temperature.
Main display digits.
Flashes when re-zero required
due to temperatur
e.
Scale
indicators.
Fraction bar flashes
in MARK mode.
Every key clicks and beeps
when pr
essed.
Hand grip area.
Press 2 seconds for
these 6 keys to enter
function
Record indicators.
REC flashes in RECORD DDT
A function.
On when display value is frozen.
47855 CompuLevel 6/11/07 11:14 Page 6

7 • CompulevelTMMeasurement system
Quick Start
Although most COMPULEVEL
T
M
users will use only those functions
routinely necessary in their work, we recommend that you try all
COMPULEVELTMfunctions at least once to become familiar with its
capabilities. The use of all COMPULEVEL
TM
functions is detailed in
this guide.
These quick start pages, however, show the operation of a few basic
functions that most users will employ and they will help you gain
confidence in working with all of COMPULEVEL’s functions.
To take basic elevation measurements with COMPULEVEL
TM
:
1) raise the lower door of the base unit, remove the measurement module
and lay the base unit on its back on the floor or ground.
2) Pull from the reel ample cord to cover the area to be measured.
Momentarily press the ON/OFF key to turn the unit on. The ON/OFF key
will click when pressed and the unit will emit a double a beep.
3) Place the measurement module on a nearby horizontal surface. When
the reading has settled, it will emit two quick beeps. Then, press and
hold the ZERO key for two seconds. Keep the measurement module
steady until the numeral zero appears on the display. The unit is now
zeroed on this reference point.
4) Move the measurement module to a different elevation (from a table to
the floor, for example). It will display the difference in elevation from
the first location to the second. Move it to a third location and it will
display the difference in elevation from the first location to the third
(current) location.
5) Momentarily press the ON/OFF key to shut off the unit. Reel in the
cord, dock the measurement module in its storage compartment and
lock the door.
WARNING: READ AND UNDERSTAND THIS ENTIRE USER’S GUIDE
BEFORE USE.
47855 CompuLevel 6/11/07 11:14 Page 7
CompulevelTMMeasurement system • 8
Mechanics of Use
Labelled Functions
The following section describes how to operate COMPULEVEL’s labelled
functions. Glance through all the functions and the example illustrations
then try each function on your COMPULEVEL
TM
.
ON/OFF
Momentarily press the ON/OFF key to turn COMPULEVELTMon or off. If no
key is pressed, or the measurement module is not moved in four minutes,
the unit powers down automatically. The unit emits two long warning
beeps after three minutes of no movement or keypad activity to warn of
shut-off activity.
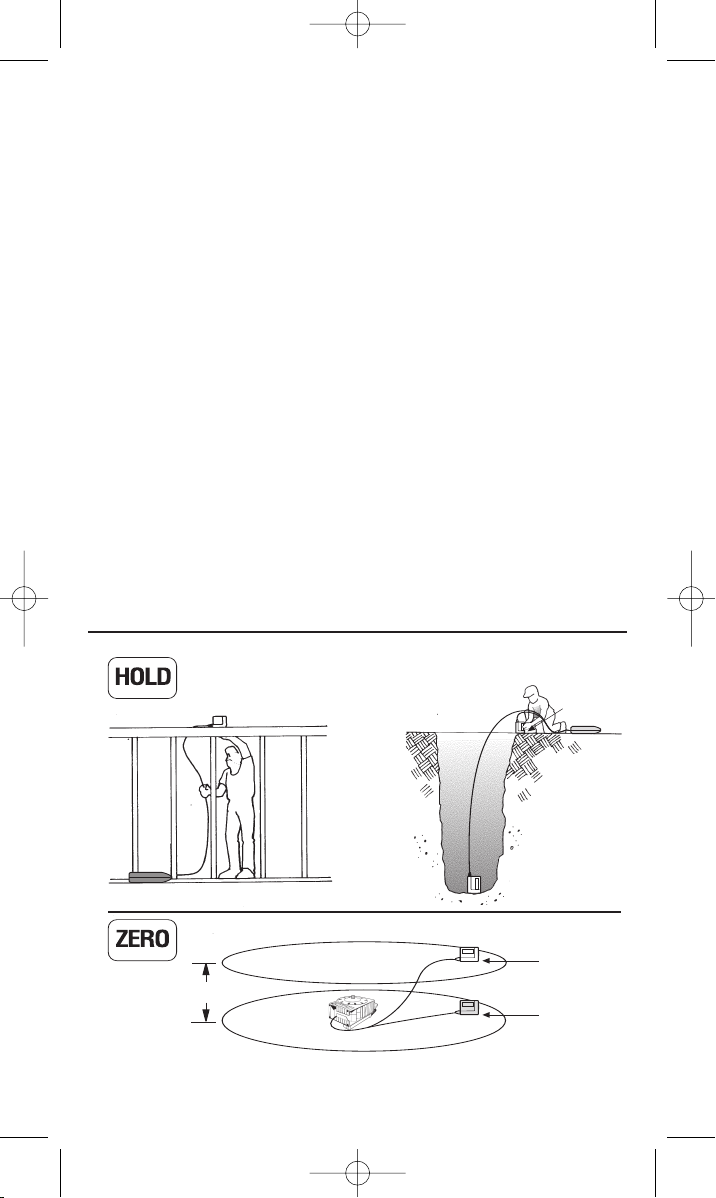
HOLD
The HOLD function is used to make and retain a measurement from any
location where the display is hard to see, such as overhead, in a deep
trench, or anytime you want to hold a measurement on the display while
moving the measurement module. The HOLD function is toggled on/off by
momentarily pressing the HOLD key.
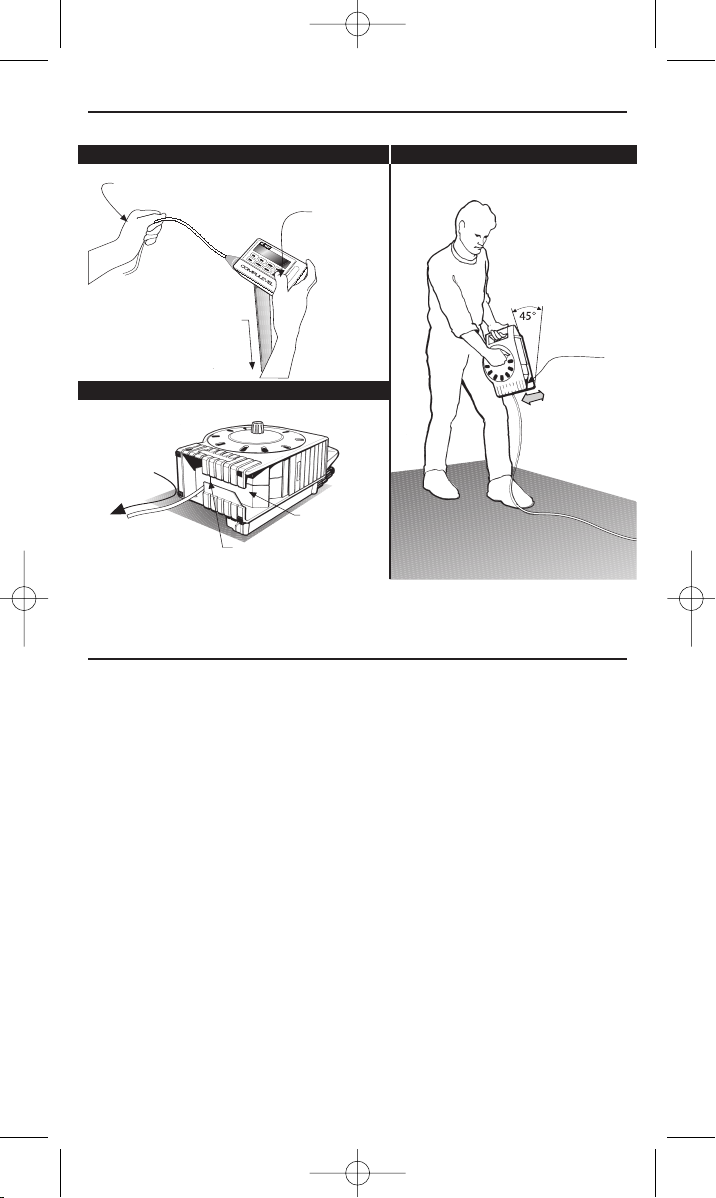
Typical Handling Suggested Reeling Technique
M
anage cord with left hand, gently
‘
whip’ over small objects.
T
humb can
r
each the 3
m
ost used
keys
For consistent readings,
balance with unipod
b
etween middle fingers like
a plumb-bob before
c
ontacting surface.
Easiest cord
removal
d
irection
Cord Removal
Quick jerks may cause reel
over-spin and cord jams
Avoid pulling or winding
cord in docking area
Docking ar
ea
R
est ‘round’
against thigh
Dock
m
easur
ement
module face-up
Slowly move from side
t
o side to make cord
uniform on reel
47855 CompuLevel 6/11/07 11:14 Page 8
9 • CompulevelTMMeasurement system
To use the HOLD function to freeze a measurement on the measurement
module display:
Press HOLD momentarily. The word ‘hold’ will appear on the left side of
the display window. To release the HOLD function, momentarily press the
HOLD key again. The word ‘hold’ will no longer appear on the display.
To use the HOLD function to obtain and hold a measurement reading from
a remote or hard to reach location:
1) Press the HOLD key momentarily while the measurement module is in
motion. The unit will begin to emit a series of beeps.
2) Move the measurement module to the location to be measured.
3) Allow the unit to settle there until it stops beeping.
4) Retrieve the measurement module. The reading from that location will
be retained on the display window. Press HOLD momentarily again to
exit the function.
ZERO
Press the ZERO key for two seconds to make the current elevation
(location of the measurement module) the zero reference or benchmark.
Hold & Zero
HOLD can be pressed before measurement module is in position. It will
freeze the display only when movement and beeping stops.
Display not visible
ZERO her
e
first
Deep, dark tr
ench
Framing
New
r
efer
ence plane
Original reference plane
(set during calibration)
When zeroed
above…
Will read -10.00’
below
-10.00’
47855 CompuLevel 6/11/07 11:14 Page 9
CompulevelTMMeasurement system • 10
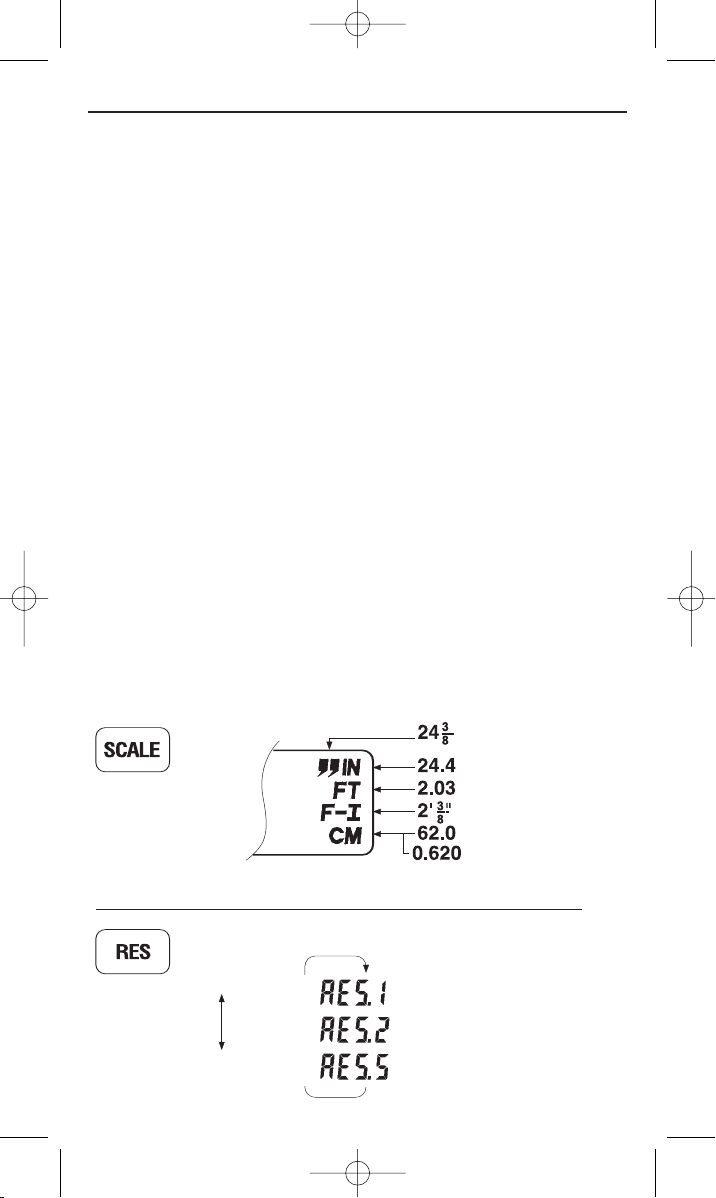
Scale & Resolution
SCALE
You can choose any of six scales measuring elevation with
COMPULEVEL
TM
: 1) fractional inches, 2) decimal inches, 3) feet,
4) feet and inches, 5) centimetres, 6) meters.
To choose a measurement scale:
Press and hold the SCALE key for two seconds. Continue pressing the
SCALE key to sequence through all the scales. Release on the desired
scale. The current scale is indicated on the right side of the display
window.
RES
You can choose one of three level’s of resolution or measurement
precision in which to work with COMPULEVELTM. Res 1, offers the highest
precision but requires longer for a reading to stabilise. Res 2, provides
intermediate precision and takes less time to obtain a stable reading.
Res 5, is best for rough measurements and provides the fastest readings.
To choose the preferred resolution:
Press and hold the RES key for two seconds to enter and continue
pressing to select the desired measurement resolution. The current
resolution level (ie. 1/8”, 1/4" or 1/2" when using inch scales) is shown
on the display window.
Release the RES key at the desired value.
Fractional inches
Decimal inches
Feet
Feet – Inches
Centimetr
es
Meters
EQUIVALENT
DISPLAY
READINGS
Right end of display
TYPICAL DISPLA
Y (Decimal inches display)
Longer
Shorter
Time for reading
to stabilise
Use for highest precision
Use for intermediate precision
Use for rough measurements
47855 CompuLevel 6/11/07 11:14 Page 10

11 • CompulevelTMMeasurement system
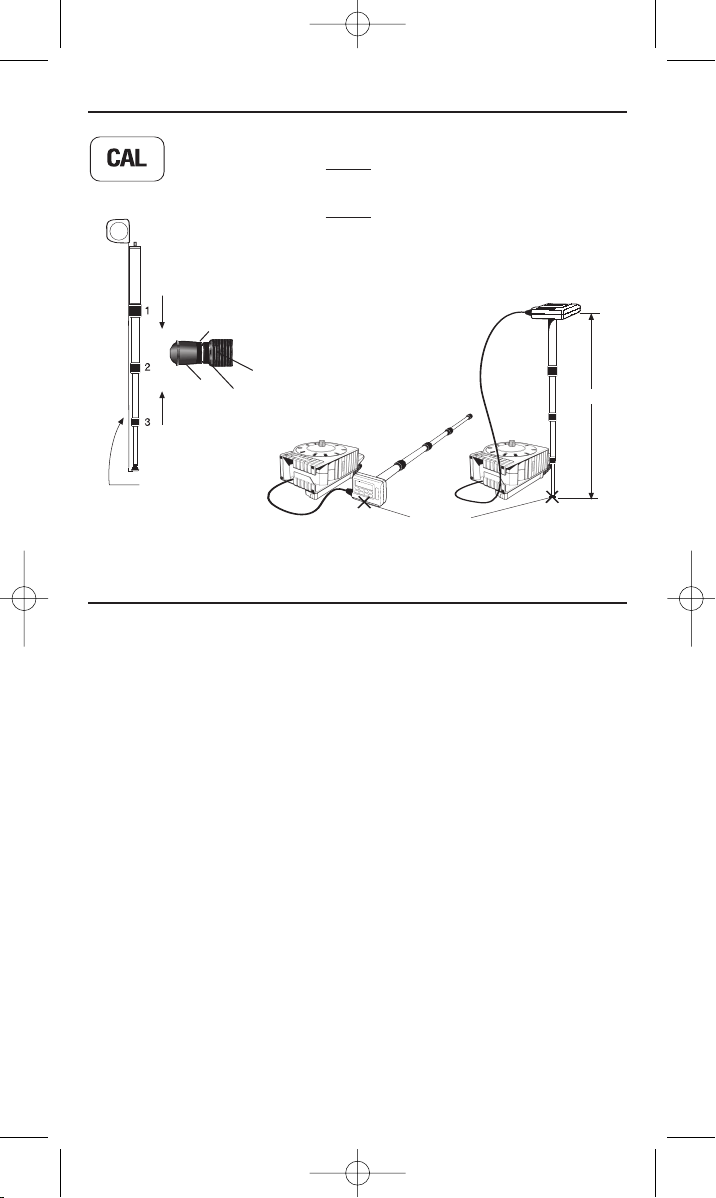
Calibration
CAL
COMPULEVELTMwill need to be calibrated when there has been a
temperature change of 36°F (20°C) or greater since the last calibration.
COMPULEVEL
TM
signals the user that it requires calibration by flashing the
word ‘CAL’ in the measurement module display window. Calibration is
done by the user, in the field, in minutes, as described below.
To calibrate COMPULEVEL
T
M
:
1) Place the base unit on its back on a level, flat surface and turn it on.
2) Place the measurement module on its bottom or back side next to the
base unit. Press and hold the CAL key for two seconds.
3) When the display flashes [0] press the CAL key momentarily.
4) When [48] flashes on the display, raise the measurement module to 48”
above the base unit and momentarily press the CAL key again while
holding the measurement module steady. Note: The fully extended,
calibrated unipod, a plywood sheet, or a tape rule mark on a wall can
be used as a calibration standard.
5) When the display stops flashing and shows “48”, the unit is calibrated.
Notes: You may exit without calibrating at any time during the procedure
by pr
essing and holding the CAL key for two seconds.
At any time, you may quickly check calibration by first zeroing beside the
base unit and then checking for a 48” reading at an appropriate location
above the zero benchmark. CAL may flash on the display indicating that
re-calibration is required.
CALIBRATION IS CRITICAL FOR ACCURATE VERTICAL MEASUREMENTS.
It is not required for levelling operations.
47855 CompuLevel 6/11/07 11:14 Page 11
CompulevelTMMeasurement system • 12
Calibration
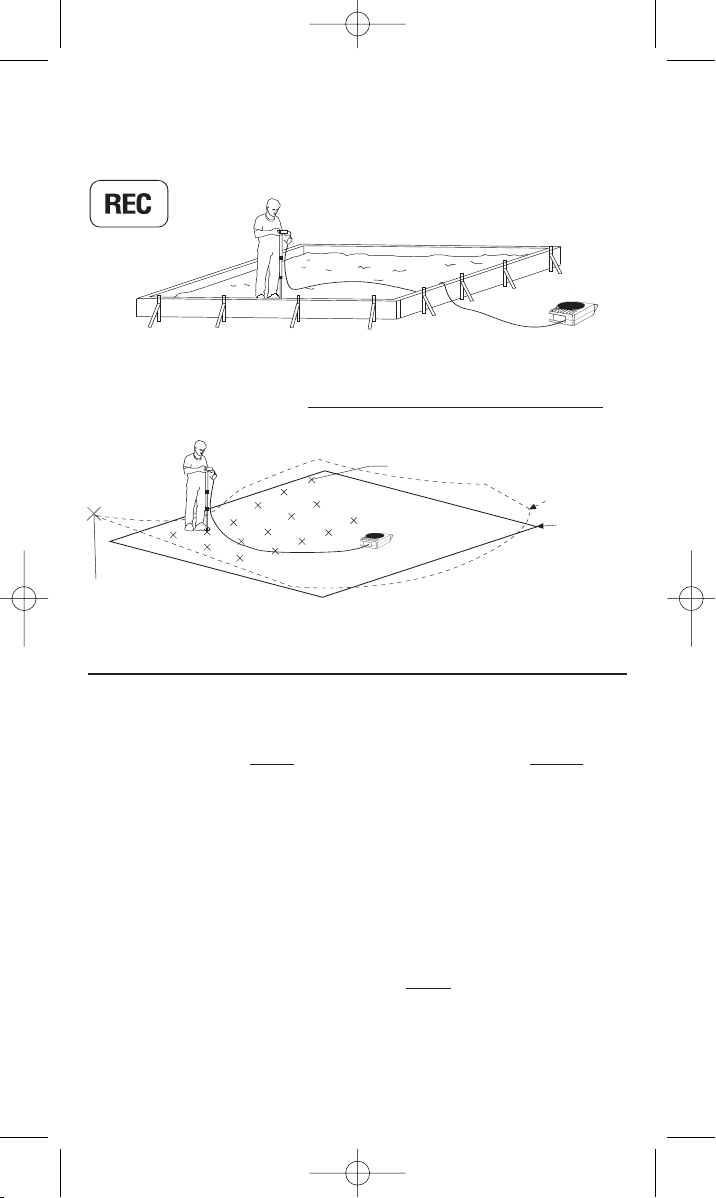
Record
REC
COMPULEVELTMcan be used to record virtually any number of
measurements for jobs such as calculating the fill required beneath
concrete or predicting final lot elevation.
To record measurement data:
1) Press and hold the REC key for two seconds to enter the record
function. The word ‘REC’ appears on the left side of the display
window.
2) Allow the measurement module to settle at the first measurement
location. Press the HOLD key momentarily to store the measurement.
When the HOLD key is pressed the unit will emit a series of beeps.
Wait until the beeping stops to move to the next location.
3) Press the REC key momentarily to display the average, minimum and
maximum for the measurement series. The wor
ds ‘AVG’, ‘MIN’ and
‘MAX’ will appear in the display window as the REC key is momentarily
pressed.
4) To exit the record function, press and hold the REC key for two
T
o extend,
loosen/tighten
b
ushings top
d
own (1, 2, 3)
To collapse, loosen/
t
ighten from bottom
up (3, 2, 1)
Occasionally check
unipod for 4’ with a
Stanley
®
tape rule.
Same spot
S
tep 3
4
8”
Step 1 - P
ress CAL 2 seconds to start 3 beep tone
Step 2 - L
ay bottom or back down close to base unit and press CAL again
[ ]
0 display*
T
hen [48] flashes and 2 beep tone
S
tep 3
- R
aise to 48”, press CAL again and hold steady
[ ]
48 display*
T
hen normal display resumes as 48”
*a single beep sounds until value is locked in.
▼
▼
▼
▼
Step 2
To adjust length, loosen jam nut,
turn foot in or out and retighten nut.
T
o reverse foot for pointed end,
remove foot and rubber boot, place
j
am nut in opposite end of foot,
reassemble foot, blunt end first,
back into unipod, adjust and tighten
j
am nut.
A
djustable and
reversible foot
Unipod
J
am nut
Rubber
b
oot
47855 CompuLevel 6/11/07 11:14 Page 12
13 • CompulevelTMMeasurement system
seconds. COMPULEVEL
T
M
retains computed values. They will be
replaced with new values only if the HOLD key is pressed after re-entry
into the record function.
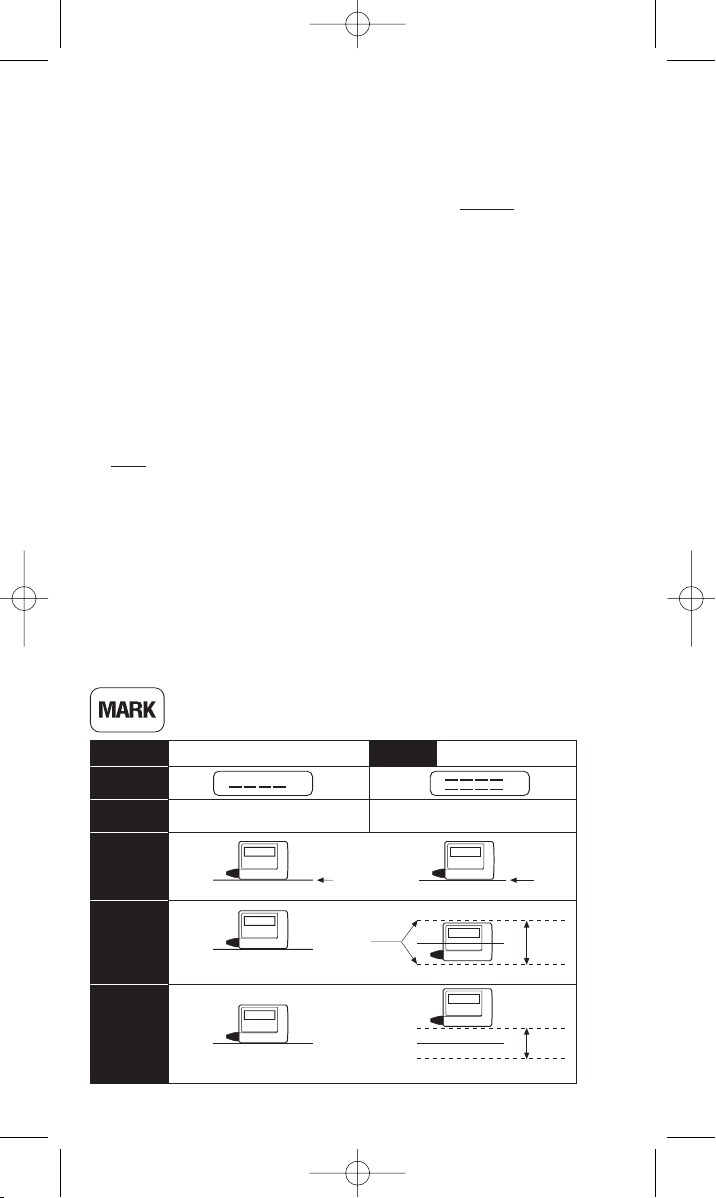
Mark
MARK
The MARK function lets you create audible tones to indicate 1) a selected
elevation, 2) elevation within a selected band, or 3) elevation outside a
selected band.
To use the MARK function: to create a tone at a selected elevation:
1) Place the measurement module at the desired elevation.
2) Press and hold the MARK key for two seconds. Hold the unit steady
until the double band lines flash in the display window.
3) Press the MARK key momentarily and hold the unit steady to set the
audible tone.
To use the MARK function: to create a tone inside the measurement band:
1) Place the measurement module at the desired elevation.
2) Press and hold the MARK key for two seconds. Hold the unit steady
until double band lines flash in the display window.
C
an compute average, minimum and maximum error from
level around forms.
Calculates fill needed below concrete.
Z
ERO at bottom level for concrete, take as many measurements as needed.
A
verage x Area = Volume
A
verage = final elevation relative to
benchmark after cut and fill.
Predicting lot elevations
5’, 10’ or any measurement intervals
Existing lot
Pr
edicted level
lot
Bench mark
47855 CompuLevel 6/11/07 11:14 Page 13
CompulevelTMMeasurement system • 14
3) Move the measurement module below to the desired elevation, half the
band.
4) Press the MARK key momentarily, while holding the unit steady, to set
the audible tone.
To use the MARK function: to create audible tones outside the
measurement band:
1) Place the measurement module at the desired elevation.
2) Press and hold the MARK key for two seconds. Hold the unit steady
until double band lines flash in the display window.
3) Move the measurement module above to the desired elevation, half the
band.
4) Press the MARK key momentarily, while holding the unit steady, to set
the audible tone.
Note: this procedure will create a solid audible tone above the
measurement band and a warbling tone below the measurement band.
There will be no tone within the band.
Notes: The fraction bar flashes in the display window to indicate that you
are in the MARK function.
To exit the MARK function and retain setting, momentarily press the
MARK and ON/OFF keys together.
Press the MARK key for two seconds to re-enter.
Tones can supplement display to level or alarm at height limits.
Enter at elevation Set band
Double beep Single beep
USE FOR PRECISE LEVELLING
USE FOR PRECISE LEVELLING
BEST FOR ROUGH LEVELLING OR
ELEVATION LIMIT INDICA
TION
T
one
No tone
T
one
No tone
Band
Steady
No tone
Beeping Tone
STEP 1 STEP 2
DISPLAY
TONES
TONE
AT
MARK
TONE
INSIDE
OF
BAND
TONE
OUTSDE
OF
BAND
Mark
47855 CompuLevel 6/11/07 11:14 Page 14
15 • CompulevelTMMeasurement system
Hidden Functions
COMPULEVEL’s ‘hidden’ functions may be accessed by logical
combinations of two or more of the labelled keys on the measurement
module keypad.
TEMP
COMPULEVELTMcan display the ambient temperature at its location.
To show temperature when turning on the unit, press and hold the ON/OFF
key for two seconds. Press any other key to exit the TEMP function.
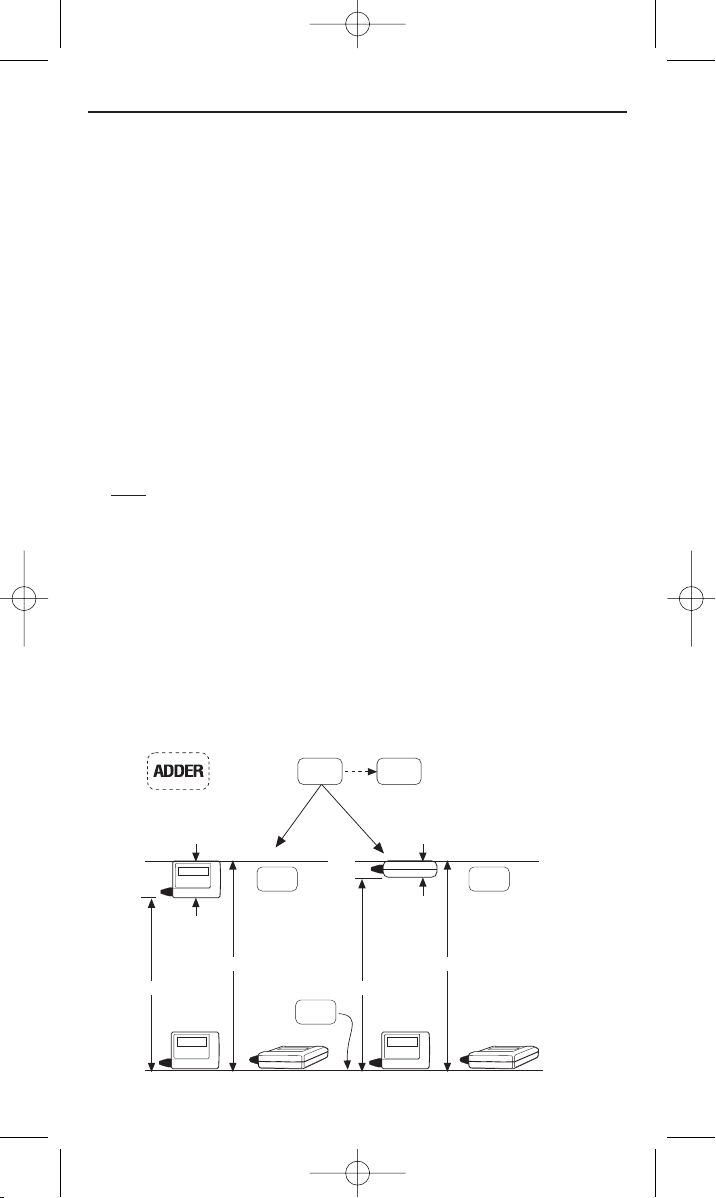
ADDER
The ADDER function automatically adds the height or thickness of the
measurement module for making accurate inside measurements.
To access the ADDER function:
1) Momentarily press the HOLD key to freeze the measurement.
Note: You must select ‘boot on’ or ‘boot off’ to indicate whether you are
using the protective boot on the measurement module and
automatically add its dimension to the measurement. To do so: press
the CAL key for two seconds and release at the desired ‘boot on’ or
‘boot off’.
2) Press the MARK key for two seconds to add the measurement module
height to the measur
ement, or press the REC key for two seconds to
add the measurement module thickness (eg. Floor to ceiling inverted)
to the measurement.
3) To exit, momentarily press the HOLD key.
HOLD
STEP 2
STEP 4 STEP 4
STEP 1
BOTTOM TO TOP:
CAL
MARK
REC
ZERO
Fr
ont
H=d
1
+h
H=d
2
+h
Bottom Bottom
Back
Back
HH
T
OR OR
d
2
d
1
h
INVERTED
STEP 3
Select boot on or off. Change
only if boot is changed
47855 CompuLevel 6/11/07 11:14 Page 15

CompulevelTMMeasurement system • 16
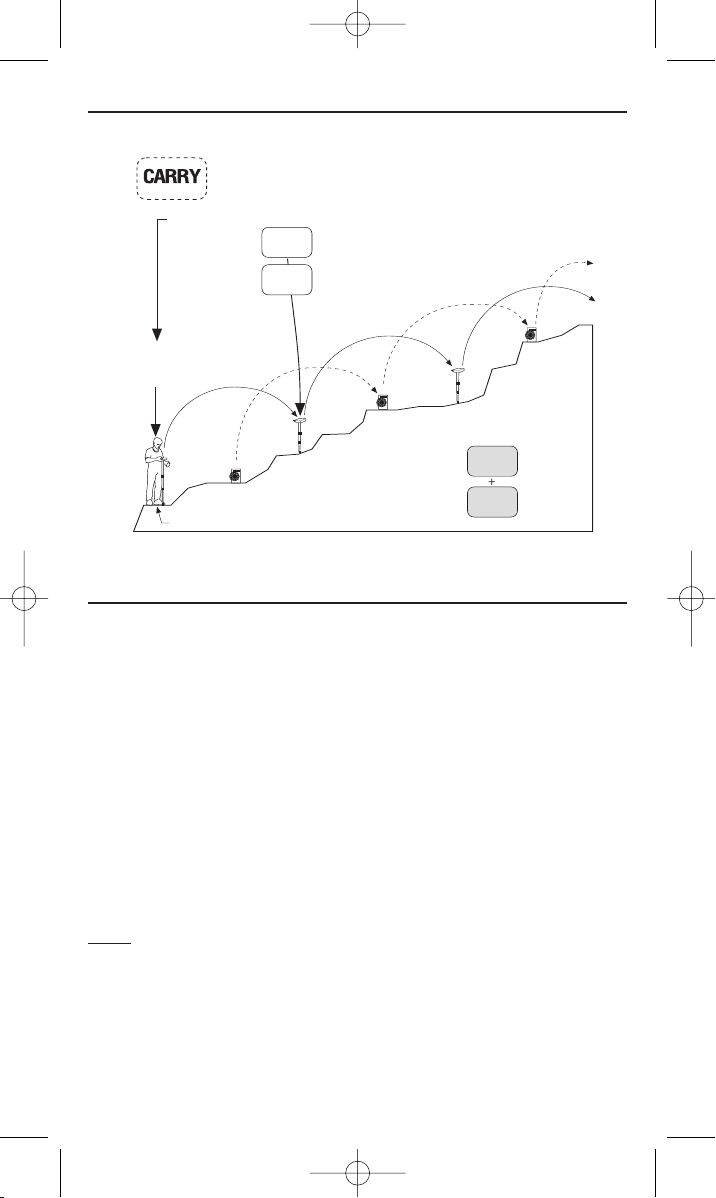
Carry
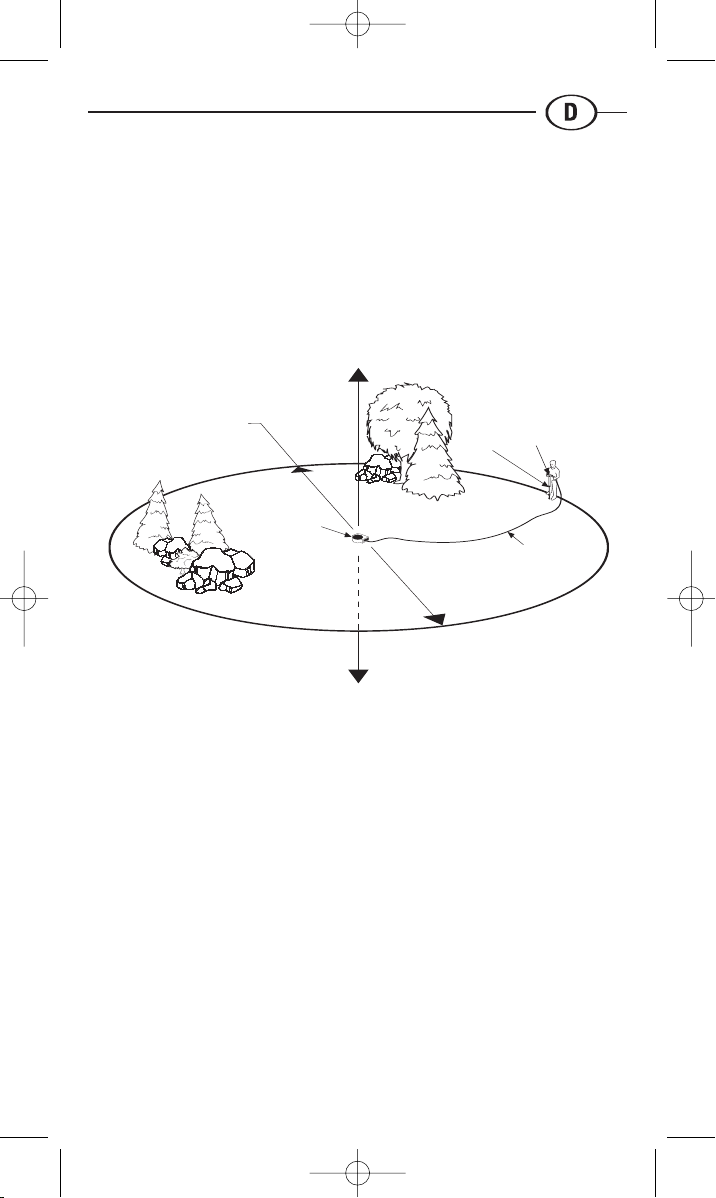
CARRY
COMPULEVEL’s CARRY function allows you to measure elevations at
virtually any location, no matter how distant from the starting reference.
To use the CARRY function:
1) At the starting benchmark (reference), press and hold the MARK key
and ZERO key together for two seconds. The word ‘CAry’ will alternate
with [0] on the display. Hold the measurement module steady to zero
the CARRY function. This will also zero the set up.
2) Move the measurement module to a convenient location within the
single set-up limit. Momentarily press the HOLD key to store elevation.
3) Leaving the measurement module in place at its ‘hold’ location, move
the base unit toward the final destination and establish the second
set-up location.
4) Press and hold the ZERO key for two seconds at the measurement
module ‘hold’ spot while keeping it steady. The word ‘CAry’ will again
appear on the display. When ‘CAry’ stops flashing, you will be in the
CARRY function where upper display ‘C----‘ and measurement display
alternate.
Repeat steps 2 through 4, over any number of set-ups. Once in the CARRY
function, momentarily press the zero key thereafter with each base unit
move.
To exit the CARRY function within any set-up, press and hold the ZERO key
for two seconds.
Notes: Outside the CARRY function, elevations will be referenced to the
HOLD/ZERO elevation for that set-up, but you may re-zero anywhere. To
re-enter the CARRY function at any elevation within the set-up, simply
momentarily press the HOLD key, then press the ZERO key for two
seconds.
The CARRY function can be used to quickly establish a remote elevation
with an assistant moving the base unit. The base unit may be placed and
held upright if kept upright after the ZERO key has been pressed for the
set-up.
47855 CompuLevel 6/11/07 11:14 Page 16
17 • CompulevelTMMeasurement system
Carry
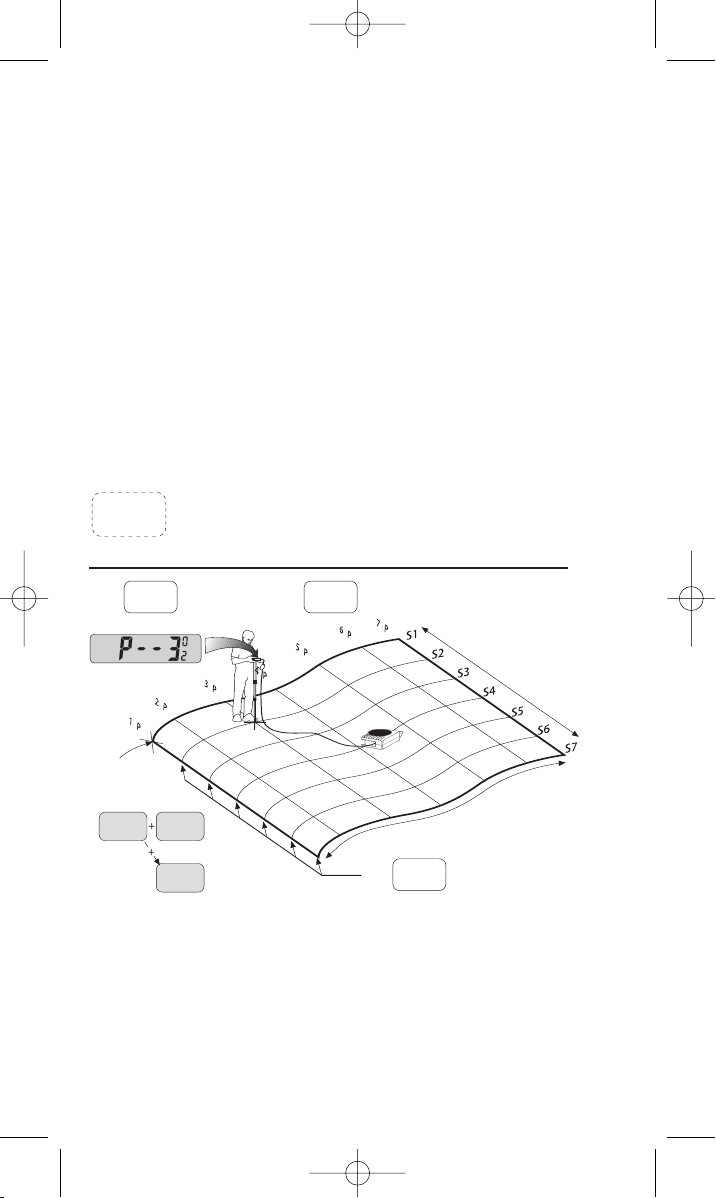
Record Data
COMPULEVELTMcan be used to record measurement data for creating
contour or 3D maps, working alone or with a PC.
RECORD DATA
To record data with COMPULEVELTM:
1) Press and hold the REC and MARK keys together for two seconds.
The word ‘REC’ will start flashing in the display window.
2) Momentarily press the HOLD key to store each measurement.
3) Press the MARK key for two seconds to start a new sequence.
4) To exit the RECORD function, press and hold the REC and MARK keys
together for two seconds.
Notes: With each measurement, the display shows that measurement’s
position within the sequence (PXXX) and the sequence number (fraction
digits).
The display will flash ‘full’ with each measurement when memory is within
20 measurements of being filled.
The number of remaining measurements will show in the fraction digits.
STEP 1
STEP 2
Click
STEP 3 Click
H
OLD
Z
ERO
*Clear CARRY or set
ELEV
ATION (see ELEV)
here.
Star
ting benchmark
Before base unit is moved to set-up 2, be sure to
‘
HOLD’ measurement module securely in position
(Press 2 seconds to enter CARRY) Once base unit
is secured at set-up 2
MARK
ZERO
*Press 2 seconds To Clear
BU
S
et up 3
MM
B
U
Set up 2
MM
BU
Set up 1
Can measure the height of a mountain or locate an elevation
a
cross town – no pencil, paper or calculator needed.
47855 CompuLevel 6/11/07 11:14 Page 17
CompulevelTMMeasurement system • 18
A pocket PC can be connected to the serial port to store, graph or
tabulate each measurement as it is taken for an unlimited number of
measurements. The position display will show (FXXX) after the
COMPULEVEL
TM
memory is full.
Press the ZERO key for two seconds to back step and clear a previous
measurement, then momentarily press and release to clear additional
measurements.
Press the REC and ZERO keys together for two seconds to clear all
measurements.
The REC DATA function can be used while in the CARRY function to record
data with each press of the HOLD key. CARRY data and normal data won’t
mix – storing one will delete all other data.
HOLD ZERO
MARK
Saves up to 137 measurements, or an
unlimited number with pocket PC.
T
ake measur
ements over a grid of r
egular surface
inter
vals for a contour or 3D map.
One sequence can define a profile or section.
REC
DATA
Click to record Press 2 seconds, back space (erase)
REC MARK
ZERO
Sample position display
T
o star
t
Press 2 seconds to start a new sequence
Press 2 seconds to enter
Pr
ess 2
seconds to
clear all data
if needed
POSITIONS
SEQUENCES
47855 CompuLevel 6/11/07 11:14 Page 18
19 • CompulevelTMMeasurement system
Inspect/Dump and Initialise
INSPECT or DUMP
This function allows inspection of previously gathered measurement data
and/or data transfer to a PC.
To use this function:
• Momentarily press the CAL and REC keys together to dump data to PC.
• Press and hold CAL and REC keys together for two seconds to inspect
data.
• Momentarily press the MARK key to sequence up through positions.
• Momentarily press the REC key to sequence down through positions.
• To sequence up or down in multiples of ten positions, momentarily
press the CAL key for up and the HOLD key for down.
INITIALISE
This function resets all user settings to default values (COMPULEVEL
TM
must be re-calibrated in this case, see calibration on page 11). This
function also returns the user from any function to the normal display
function.
Note: This is a sure way to recover from an unwanted function.
To INITIALISE:
Press and hold the CAL, REC, MARK and hold keys together for two
seconds using two fingers of each hand with the measurement module on
its back on a flat surface.
INSPECT/
DUMP
Click CAL and REC momentarily and
release to DUMP DATA to PC
Pr
ess
CAL and REC two seconds to
enter or exit INSPECT
INSPECT POSITION CONTROL KEYS
Serial – link
Pocket PC or…
Palmtop mounted to unipod or held in left hand with
display visible operator
RECORDING DATA ‘ON THE FLY’
When COMPULEVELTMregisters fill, ‘FULL’ will display
but record date to PC can continue indefinitely.
TENS TENS
ONES
ONES
Sequence
down
Sequence
up
HOLD
CAL
MARKREC
47855 CompuLevel 6/11/07 11:14 Page 19
CompulevelTMMeasurement system • 20
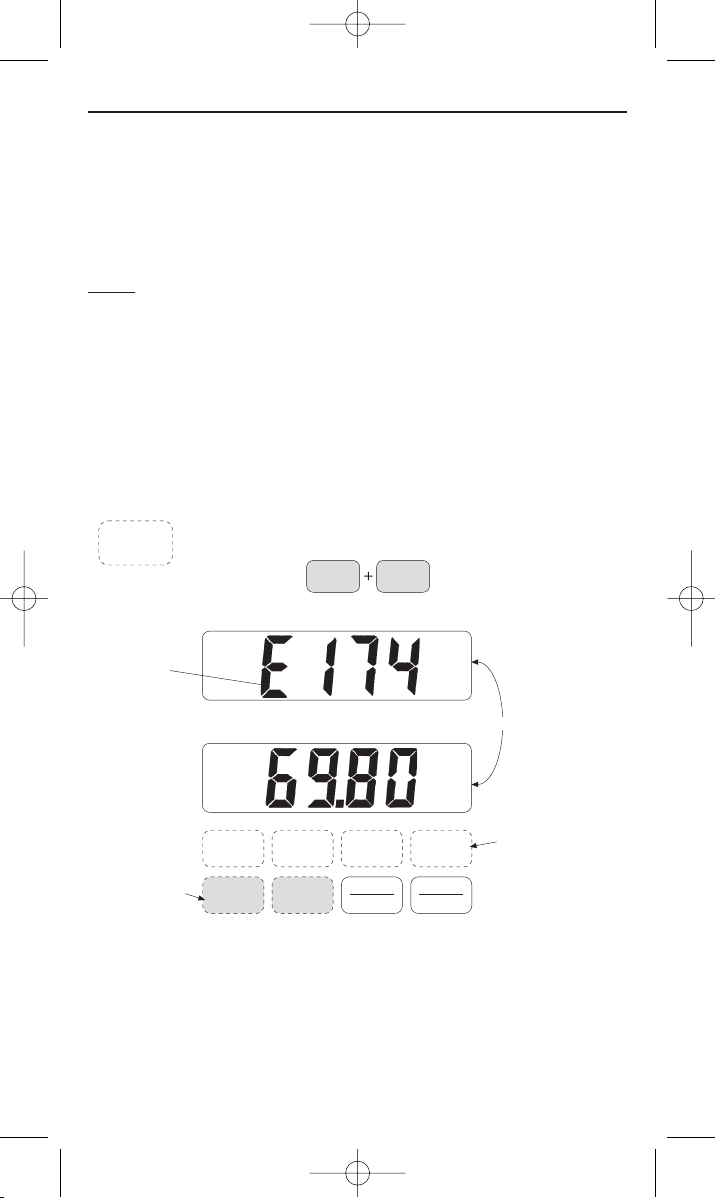
Elevation
ELEV
ELEVATION lets you preset the display to a benchmark elevation in
engineers (FT) or metric scales for use in the CARRY function.
To enter or exit the ELEV function, press and hold the SCALE and RES keys
together for two seconds.
Notes: It’s best to set digits starting with the least significant: momentarily
press the HOLD key to set the hundredths digit, press the MARK key to set
tenths, the REC key for ones, the CAL key for tens, the SCALE key for
hundreds and the RES key for thousands. Press the ZERO key to select up
or down.
To use your preset elevation, exit ELEVATION and enter CARRY
(see page 16).
ELEV
Allows preset of elevation in CARRY function.
First place measurement module at benchmark.
Press 2 seconds to Enter or Exit
Display looks like CARRY function:
Example reading: 17,469.80 (a very high elevation!)
End set her
e
Start set here
Upper display
Alternates
Lower display
E for elevation
SCALERES
UP
DOWN
ON
OFF
100’1000’
10’ 1’ 0.1’ 0.01’
47855 CompuLevel 6/11/07 11:14 Page 20

21 • CompulevelTMMeasurement system
Monitor
The MONITOR function can be used to keep the COMPULEVELTMfrom
shutting off during periods of inactivity. It also can be used with a serial
link to a PC for remote monitoring or data logging. For example, please
the base unit on a Styrofoam float to log water tank or river levels.
To enter the MONITOR function, press and hold the ON/OFF and CAL keys
together for two seconds when turning on COMPULEVEL
TM
.
To exit, turn the unit off.
Note: The MONITOR function disables the AUTO-OFF feature and enables
continuous data from the serial port.
CAUTION: MONITOR reduces battery life 15%.
Remember: Shut off when finished to avoid loss of battery.
Display Alarm Indicators*
CAL
- - 0 - -
8888
BAT
CORD
* See page 6 for illustration of alarm indicators.
Flashes if unit needs to be re-calibrated due to temperature
change. CAL is on constantly when unit is outside of the -25°F
to +158°F operating temperature range.
CAUTION: Measurements may be in error.
Periodic flash on the display indicates re-zero required due to
temperature change.
8888 Alternates with displayed elevation when the
measurement module is more than 20’ above or below the
base unit.
CAUTION: Over range measurements may be in
error.
If 8888 flashes well within range, check troubleshooting
chart; check for cord damage or leakage and if necessary,
return to service.
Flashes when only a few hours of battery life remain. A fresh
9V alkaline battery can allow up to 60 hours of active use.
Flashes to indicate cord or system failure requiring factory
service.
CAUTION: Measurements may be in error.
47855 CompuLevel 6/11/07 11:14 Page 21

CompulevelTMMeasurement system • 22
Use Tips
1) Secure the base unit before removing the measurement module
2) Extend the unipod from the top down and retract from the bottom up
(see page 12). Always tighten bushings (avoid over-tightening).
3) Hold the measurement module in the handgrip areas to the right and
beneath the keypad. For single handed operation, use the thumb to
press the most frequently used buttons: ON/OFF, HOLD and ZERO.
The left hand can manipulate the cord. Release or hold steady whilst
reading (see page 8).
4) In muddy conditions use a rag to wipe down the cord before reeling in.
This can also remove cord twists.
5) Always reel cord through cord entry area by holding the base unit
handle with base unit tilted backward at about 45° (for example,
resting against thigh). This will ease reeling, reduce wear and keep
docking area clean (see page 8).
6) Use a coin, screwdriver or thumbnail to loosen battery door screw to
replace 9V alkaline battery. Lift the terminal end of battery with
thumbnail or simply thump measurement module against your hand
and catch the battery.
Note: The protective boot is more easily
removed when warmed.
How to Measure Accurately
COMPULEVELTMis typically precise to within 0.2% of measurements 10ft or
less and 0.35% of measurements beyond 10ft. It can typically level to
within 1/8” over a single set-up.
1)
For critical levelling frequently r
e-check or re-zero at the benchmark
(CAL is necessary for levelling). When possible minimise height
differences between cord, base unit and measurement module.
2)
For critical elevation measurements, fr
equently re-check calibration
and benchmark zero. Whenever possible avoid temperature
difference between the cord and measurement module
(eg. sun vs. shade).
3) When moving the COMPULEVEL
TM
from one temperature to a much
different temperature, such as from indoors to outdoors on a cold day,
allow 10-15 minutes for COMPULEVEL
TM
to adapt to the change.
4) Avoid violent tugging, whipping or stomping on the cord without
re-check or re-zero at the benchmark.
5) Promptly zero or calibrate the COMPULEVEL
TM
when its display
flashes –0-- or CAL.
47855 CompuLevel 6/11/07 11:14 Page 22

23 • CompulevelTMMeasurement system
6) Always secure the case unit to prevent movement during
measurements – it does not need to be level.
7) Avoid using COMPULEVEL
TM
beyond the specified ranges of elevation
or temperature. The display will flash 8888 when beyond the +/-20’
vertical range and the CAL will be on steady for temperatures below
-22°F or above +158°F
8) Occasionally check the 4’ length of the fully extended unipod for wear
with a tape rule. Adjust its length if necessary.
9) As with conventional instruments, additional errors may be caused
during use outdoors on sunny or windy days. In such conditions pull
out only as much cord as is needed and avoid unnecessary loops over
objects. Measurements are most accurate in early morning, late
afternoon or when overcast, in full shade or indoors. If a measurement
varies when breezy, take the average reading.
COMPULEVELTMCare
COMPULEVEL
T
M
is rugged, durable and designed to provide years of
reliable performance when properly used. Here are some guidelines:
1) Avoid excessive strain on the measurement module by guiding the
cord with the left hand during use (see page 8)
2) Whenever possible use the protective boot on the measurement
module. Avoid dropping the measurement module and never use
as a hammer.
3) Do not immerse the measurement module in water or any other liquid
or gas and avoid contact with solvents.
4) Minimise COMPULEVEL
TM
wear by wiping with a damp cloth (avoid
scratching display window) or rinsing lightly to remove mud and dirt
from the base unit, cord and measurement module. In extreme cases
the single screw at the back of the reel can be removed to release the
reel from the housing for a thorough hosing.
5) Keep the cord, measurement module or base unit out f the path of
vehicle traffic and out of contact with hot objects such as smouldering
cigarette butts, fresh asphalt or welding.
6) Pack up the COMPULEVEL
TM
when not in use for extended periods of
time. Never leave out in foul weather or overnight. Avoid storage
inside a hot closed vehicle or trunk.
7) COMPULEVEL
TM
contains a non-toxic biodegradable clear liquid. In the
unlikely event that a damaged unit r
eleases liquid or if the cord is cut,
bend over cord and wrap with tape or wir
e to stop liquid r
elease.
Wipe up liquid with absorbent towels, r
emove r
esidue with soap and
water and return to factory for service.
47855 CompuLevel 6/11/07 11:14 Page 23

CompulevelTMMeasurement system • 24
Problem Action
Unit won’t turn on or shuts
off soon after turn on
Replace battery
Unit won’t turn on or off and
battery is good
Remove battery for 15 seconds
and try again
After installing new battery
display reads 8888 and tone
is steady
Remove battery and make reverse
polarity contact with battery clips
and try again
Unit is stuck in an undesired
function and you can’t
remember how to escape
Initialise as described under
‘hidden functions’ (page 15)
Cord flashes on display or
readings are not repeatable
Check cord and base unit and
return to factory for repair if
damaged
ErrX flashes on display when
unit is switch on
Return to factory – unit may
need service
Trouble Shooting
See page 21 for alarm indicators
47855 CompuLevel 6/11/07 11:14 Page 24

25 • CompulevelTMMeasurement system
Maintenance/Product Assistance
ONE YEAR WARRANTY
Stanley Tools warrants Contractor GradeTMCOMPULEVELTMElevation
Measurement Tool against deficiencies in materials and workmanship for
on year from the date of purchase. Deficient products will be replaced or
repaired if sent to:
Stanley UK Sales Limited,
Gowerton Road,
Brackmills,
Northampton
NN4 7BW
This Warranty does not cover deficiencies caused by accidental damage,
wear and tear, use other than in accordance with the manufacturer's
instructions or repair or alteration of this product not authorised by
Stanley Tools.
Repair or replacement under this Warranty does not affect the expiry date
of the Warranty.
To the extent permitted by law, Stanley Tools shall not be liable under this
Warranty for indirect or consequential loss resulting from deficiencies in
this product.
This Warranty may not be varied without the authorisation of Stanley
Tools.
This Warranty does not affect the statutory rights of consumer purchasers
of this product.
This Warranty shall be governed by and construed in accordance with the
laws of England and Stanley Tools and the purchaser each irrevocably
agrees to submit to the exclusive jurisdiction of the courts of England over
any claim or matter arising under or in connection with this Warranty.
47855 CompuLevel 6/11/07 11:14 Page 25

CompulevelTMMeasurement system • 26
COMPULEVELTMSpecifications
Set-up vertical range: 40’ (20’ above and below base unit)
Set-up horizontal range: 200’ diameter circle (100’ cord)
Carry function range: No limit
Range of zero or mark settings: Full vertical range
Reading repeatability: 1/8” typical
Levelling accuracy: 1/8” typical
Elevation accuracy: The greater of 1/8” or 0.2% of
measurements 10ft or less and 0.35%
of measurements beyond 10ft typical.
Record capacity (min, max, avg): 16,834 no practical limits
Record data memory capacity: 137 readings
Settings/data memory retention: Indefinitely, even without battery
Operating temperature range: -22°F to +158°F
Storage temperature range: -40°F to +158°F
Shock resistance: Measurement module – 5’ drop test
on concrete. Base unit – 3’ drop test
on concrete
Water resistance: Rain tight; not immersible
9V alkaline battery life: 60 hours active use
(auto shut-off after four minutes
inactive)
U.S. patent 4,878,297 and 5,517,869 and 5,726,365 plus additional patents
pending
47855 CompuLevel 6/11/07 11:14 Page 26
27 • CompulevelTMMeasurement system
Herzlichen Dank für den Erwerb des neuen
STANLEY®CompulevelTMElevations
Measurement System.
+20’
70 m RADIUS
(200 Fuß)
EINZELNE
EINSTELLREICHWEITEN
-20’
*Null auf jeder Referenz
innerhalb des Messbereichs
Kabel
durch Kabel
mit Basiseinheit
verbunden
Einbeinstativ
Messmodul*
COMPULEVELTMSystem Concept
47855 CompuLevel 6/11/07 11:14 Page 27

CompulevelTMMeasurement system • 28
Einführung
Wir gratulieren Ihnen zum Erwerb eines Stanley Tools Contractor Grade™
COMPULEVEL™. Damit können Sie eine ganz neue Welt der Höhenmessung
und Nivellierung erforschen.
• COMPULEVEL™ ist das erste Gerät seiner Art, das Sie allein und
sogar um die Ecke herum arbeiten lässt und das bei einer Genauigkeit
von mehr als 0,31 mm (1/8") auf bis zu 12,2 m (40') vertikal in einem
Umkreis von ca. 61 m (200') mit einer einzigen Einstellung.
• COMPULEVEL™ zeigt die vertikalen Messwerte direkt in großen,
einfach ablesbaren Ziffern an (anders als herkömmliche Bau- und
Lasernivelliergeräte). Sie können unter Maßeinheiten die auswählen,
mit der Sie arbeiten möchten. Damit wird Ihre Arbeit noch weiter
erleichter
t. Ein COMPULEVEL™ ersetzt sechs Stangen à 12 m (40') ,
sowie einen Dreifuß von 6 m (20') und das alles in einem einzigen Gerät.
Außerdem:
• Können Sie die CARRY-Funktion (MITNAHME) verwenden, um
Höhenmessungen unbegrenzt unter verschiedenen Einstellungen
vorzunehmen, ohne Papier und Bleistift und ohne komplizierte
Berechnungen mit einer Vielzahl an möglichen Fehlern durchführen
zu müssen.
• Können Sie über den eingebauten seriellen Anschluss des
COMPULEVEL™ andere Geräte anschließen und aus COMPULEVEL™
ein effizientes Instrument zur Sammlung von Daten machen, mit dem
gespeicherte Messwerte für die Analyse und Tabellarisierung oder
Plots zur Erstellung von Profilen, Querschnitten oder topographischen
Karten auf einen PC heruntergeladen werden können.
• Können Sie jede der eingebauten 15 Funktionen von COMPULEVEL™
einsetzen, um schwierige Höhenmessungen und Nivellierungsarbeiten
durchzuführen, von der Baustellenplanung und den
Aushebungsarbeiten über die Konstruktion bis hin zur abschließenden
Einebnung und Landschaftsgestaltung.
• Müssen Sie sich nie wieder mit der Kalibrierung her
umärgern, denn
das robuste, wasserresistente COMPULEVEL™ kann leicht überprüft
und schnell vor Ort kalibriert werden.
Lesen Sie diese Bedienungsanleitung sorgfältig durch, und Sie sparen mit ein
wenig Übung schon bald Zeit und Geld bei Ihren Messungen und können
obendrein stressfrei arbeiten!
47855 CompuLevel 6/11/07 11:14 Page 28

29 • CompulevelTMMeasurement system
Inhaltsverzeichnis
COMPULEVEL™ Grundlagen 29-32
Quick Start 33
Ein/Aus, Hold & Zero 34-35
Skalierung & Auflösung 36
Kalibrierung 37
Speichern 38
Markieren 39-40
Temperatur & Addieren 41
Carry (Mitnehmen) 42
Daten speichern 43
Prüfen/Übermitteln & Initialisieren 45
Höhe 46
Monitor 47
Alarmanzeigen auf dem Display 47
Tipps zum Gebrauch 48
So erhalten Sie genaue Messwerte 48-49
COMPULEVEL™ Pflege 49
Fehlerbehebung 50
Wartung/Produkthilfe 51
COMPULEVEL™ Technische Daten 52
COMPULEVEL™ Grundlagen
COMPULEVEL™ besteht aus
• Basiseinheit
• Hand-Messmodul
• Verbindungskabel zwischen Basiseinheit und Messmodul
• Einbeinstativ für das Messmodul
• Aufsteller für den festen Stand der Basiseinheit
Alle Komponenten wer
den in der Basiseinheit aufbewahr
t, wenn sie nicht
benutzt werden.
AUSGEWIESENE
FUNKTIONEN
VERSTECKTE
FUNKTIONEN
K
47855 CompuLevel 6/11/07 11:14 Page 29
 Loading...