

Page 1

BRANDON
DRY & DHW OIL MODELS
OPERATION INSTRUCTIONS
THIS MANUAL IS TO BE LEFT WITH THE END USER
Page 2

1
TABLE OF CONTENTS
PAGE NO.
1. Introduction . . . . . . . . . . . . . . . . . . . . . . . . . . . . . . . . . . . . . . . . . . . . . . . . . . . . .2
2. Technical Data . . . . . . . . . . . . . . . . . . . . . . . . . . . . . . . . . . . . . . . . . . . . . . . . . . .3
3. Operation . . . . . . . . . . . . . . . . . . . . . . . . . . . . . . . . . . . . . . . . . . . . . . . . . . . . . .3
Programmable Controller - Mechanical . . . . . . . . . . . . . . . . . . . . . . . . . . . .3
Pre-Operational Checks . . . . . . . . . . . . . . . . . . . . . . . . . . . . . . . . . . . . . . .3
Time Setting . . . . . . . . . . . . . . . . . . . . . . . . . . . . . . . . . . . . . . . . . . . . . . . .4
Coarse Adjustment . . . . . . . . . . . . . . . . . . . . . . . . . . . . . . . . . . . . . . . . . . .4
Fine Adjustment . . . . . . . . . . . . . . . . . . . . . . . . . . . . . . . . . . . . . . . . . . . . .4
Setting the Switching Times . . . . . . . . . . . . . . . . . . . . . . . . . . . . . . . . . . . .4
Power Failure . . . . . . . . . . . . . . . . . . . . . . . . . . . . . . . . . . . . . . . . . . . . . . .4
Programmable Controller Digital . . . . . . . . . . . . . . . . . . . . . . . . . . . . . . . . .4
To Set Time . . . . . . . . . . . . . . . . . . . . . . . . . . . . . . . . . . . . . . . . . . . . . . . . .4
Interval Time . . . . . . . . . . . . . . . . . . . . . . . . . . . . . . . . . . . . . . . . . . . . . . . .4
Operation Period . . . . . . . . . . . . . . . . . . . . . . . . . . . . . . . . . . . . . . . . . . . . .5
Stop . . . . . . . . . . . . . . . . . . . . . . . . . . . . . . . . . . . . . . . . . . . . . . . . . . . . . . .5
Manual Mode . . . . . . . . . . . . . . . . . . . . . . . . . . . . . . . . . . . . . . . . . . . . . . . .5
Correcting or Clearing Programs . . . . . . . . . . . . . . . . . . . . . . . . . . . . . . . .5
Operating the Appliance . . . . . . . . . . . . . . . . . . . . . . . . . . . . . . . . . . . . . . .5
4. Ovens . . . . . . . . . . . . . . . . . . . . . . . . . . . . . . . . . . . . . . . . . . . . . . . . . . . . . . . . .5
The Main Oven . . . . . . . . . . . . . . . . . . . . . . . . . . . . . . . . . . . . . . . . . . . . . .5
The Lower Oven . . . . . . . . . . . . . . . . . . . . . . . . . . . . . . . . . . . . . . . . . . . . .6
Hotplate . . . . . . . . . . . . . . . . . . . . . . . . . . . . . . . . . . . . . . . . . . . . . . . . . . . .6
Reset Button/High Limit Stat . . . . . . . . . . . . . . . . . . . . . . . . . . . . . . . . . . . .6
Burner Control Box Lock-out Reset Button . . . . . . . . . . . . . . . . . . . . . . . . .7
Hot Water Output Reduction (DHW Only) . . . . . . . . . . . . . . . . . . . . . . . . . .7
Burner Does Not Ignite . . . . . . . . . . . . . . . . . . . . . . . . . . . . . . . . . . . . . . . .7
Hotplate Insulating Covers . . . . . . . . . . . . . . . . . . . . . . . . . . . . . . . . . . . . .7
Cooking Utensils . . . . . . . . . . . . . . . . . . . . . . . . . . . . . . . . . . . . . . . . . . . . .8
5. Opening Cooker Door . . . . . . . . . . . . . . . . . . . . . . . . . . . . . . . . . . . . . . . . . . . . .8
6. Cleaning . . . . . . . . . . . . . . . . . . . . . . . . . . . . . . . . . . . . . . . . . . . . . . . . . . . . . . .8
Chimney Cleaning . . . . . . . . . . . . . . . . . . . . . . . . . . . . . . . . . . . . . . . . . . . .9
Servicing . . . . . . . . . . . . . . . . . . . . . . . . . . . . . . . . . . . . . . . . . . . . . . . . . . .9
Mild Steel . . . . . . . . . . . . . . . . . . . . . . . . . . . . . . . . . . . . . . . . . . . . . . . . . . .9
Ovens . . . . . . . . . . . . . . . . . . . . . . . . . . . . . . . . . . . . . . . . . . . . . . . . . . . . .9
Hot Plate . . . . . . . . . . . . . . . . . . . . . . . . . . . . . . . . . . . . . . . . . . . . . . . . . . .9
7. Cooking Guidance . . . . . . . . . . . . . . . . . . . . . . . . . . . . . . . . . . . . . . . . . . . . . . . .9
General Information . . . . . . . . . . . . . . . . . . . . . . . . . . . . . . . . . . . . . . . . . . .9
Grilling . . . . . . . . . . . . . . . . . . . . . . . . . . . . . . . . . . . . . . . . . . . . . . . . . . . . .9
The Care of your Cooker . . . . . . . . . . . . . . . . . . . . . . . . . . . . . . . . . . . . . . .9
Cookware . . . . . . . . . . . . . . . . . . . . . . . . . . . . . . . . . . . . . . . . . . . . . . . . . .10
8. User Cooking Tips . . . . . . . . . . . . . . . . . . . . . . . . . . . . . . . . . . . . . . . . . . . . . . .12
9. Wiring Diagram (Digital Timer) . . . . . . . . . . . . . . . . . . . . . . . . . . . . . . . . . . . . . .13
10. Wiring Diagram (Mechanical Timer) . . . . . . . . . . . . . . . . . . . . . . . . . . . . . . . . . .14
11. Fault Finding . . . . . . . . . . . . . . . . . . . . . . . . . . . . . . . . . . . . . . . . . . . . . . . . . . . .15
Page 3

2
INTRODUCTION
To help you make the best use of your cooker, PLEASE READ THIS BOOKLET CAREFULLY.
To ensure safety, satisfaction and reliable operation, this quality cooker should be installed and commissioned
by a trained and competent person.
Please note for DHW Models the domestic hot water facility involved must fully conform to good plumbing
practices, established standards, Regulations and OFTEC Recommendations.
As manufacturers and suppliers of cooking and heating appliances, we take every possible care to ensure as
reasonably practicable, that these appliances are so designed and constructed as to meet the general safety
requirements when properly used and installed.
Section 10 of the Consumer Protection Act 1987.
Safety, Health and Welfare at Work Act.
Your new cooker is guaranteed, the guarantee is only applicable if the cooker has been installed in accordance
with the Installation Instructions.
IMPORTANT NOTICE: Any alteration to this appliance that is not approved in writing by Waterford Stanley will
render the guarantee void.
The cooker is designed specifically for domestic use and responsibility will not be accepted for use in any other
installation. When the Cooker is first used, a slight odour may be noticed - this should cease after a short period
of use.
The Installation must comply with the following:
B.S. 5410: Oil Installations Part 1 under 45kW.
The Building Regulations : Part J England & Wales Part F Section 4 Scotland.
Part L Northern Ireland and Part J Ireland.
The Control of Pollution (Oil) Regulations.
Health and Safety at Work Act.
B.S. 7671: Requirements for Electrical Regulations.
Safety Document 635: The Electricity at Work Regulations.
For DHW Models additionally the installation must comply with the following:
B.S. 7593: Treatment of Water in Domestic Hot Water Systems.
B.S. 7074: Parts 1 & 2 Hot Water Supply.
Important: Control of Substances Harmful to Health -
It is the Users/Installers responsibility to ensure that the necessary personal clothing is worn when handling
materials that could be interpreted as being injurious to health and safety.
When handling Firebricks, Fire Cement or Fuels, use disposable gloves.
Exercise caution and use disposable masks and gloves when handling glues and sealants.
When working with fibre glass, mineral wool, insulation materials, ceramic blanket/board, avoid inhalation as it
may be harmful if inhaled. Avoid contact with skin, eyes, nose and throat, use disposable protection.
Installation should be carried out in a well ventilated area.
This appliance is hot while in operation and retains its heat for a long period of time after use. Children,
aged or infirm persons should be supervised at all times and should not be allowed to touch the hot
working surfaces while in use or until the appliance has thoroughly cooled.
The manufacturers reserve the right to make alterations to design, materials or construction for manufacturing or other reasons subsequent to publication
.
Page 4
TECHNICAL DATA
FUEL: 28 Sec Kerosene
MAINS SUPPLY: 230-240V, 50Hz A.C.
I.P. PROTECTION DEGREE: IP20
ELECTRICAL INPUT: 90 Watts
SUPPLY FUSE RATING: 3A
COOKER WEIGHT: 356 Kgs (783 lbs)
GROSS HEAT INPUT: 15.6 kW (53,355 Btu’s)
NOZZLE: DANFOSS 0.45 60
o
ES
PRESSURE SETTING: 115 p.s.i.
CO
2 RANGE: 10.4 - 11.2%
ADDITIONAL TECHNICAL DATA FOR DHW MODELS:
MAX. DHW BOILER WORKING PRESSURE: 28 p.s.i.
TEST PRESSURE IN DHW BOILER: 40 p.s.i.
OPERATING TEMPERATURE LIMIT IN
DHW BOILER: 96
o
C (194oF)
DHW BOILER OUTPUT: 3.8 kW (13,000 Btu’s) (Continuous Running)
DHW BOILER CAPACITY: 10 Litres (2.2 gallons)
DHW BOILER MATERIAL: 3mm Stainless Steel
COOKER WEIGHT: 360 kg (790 lbs)
3
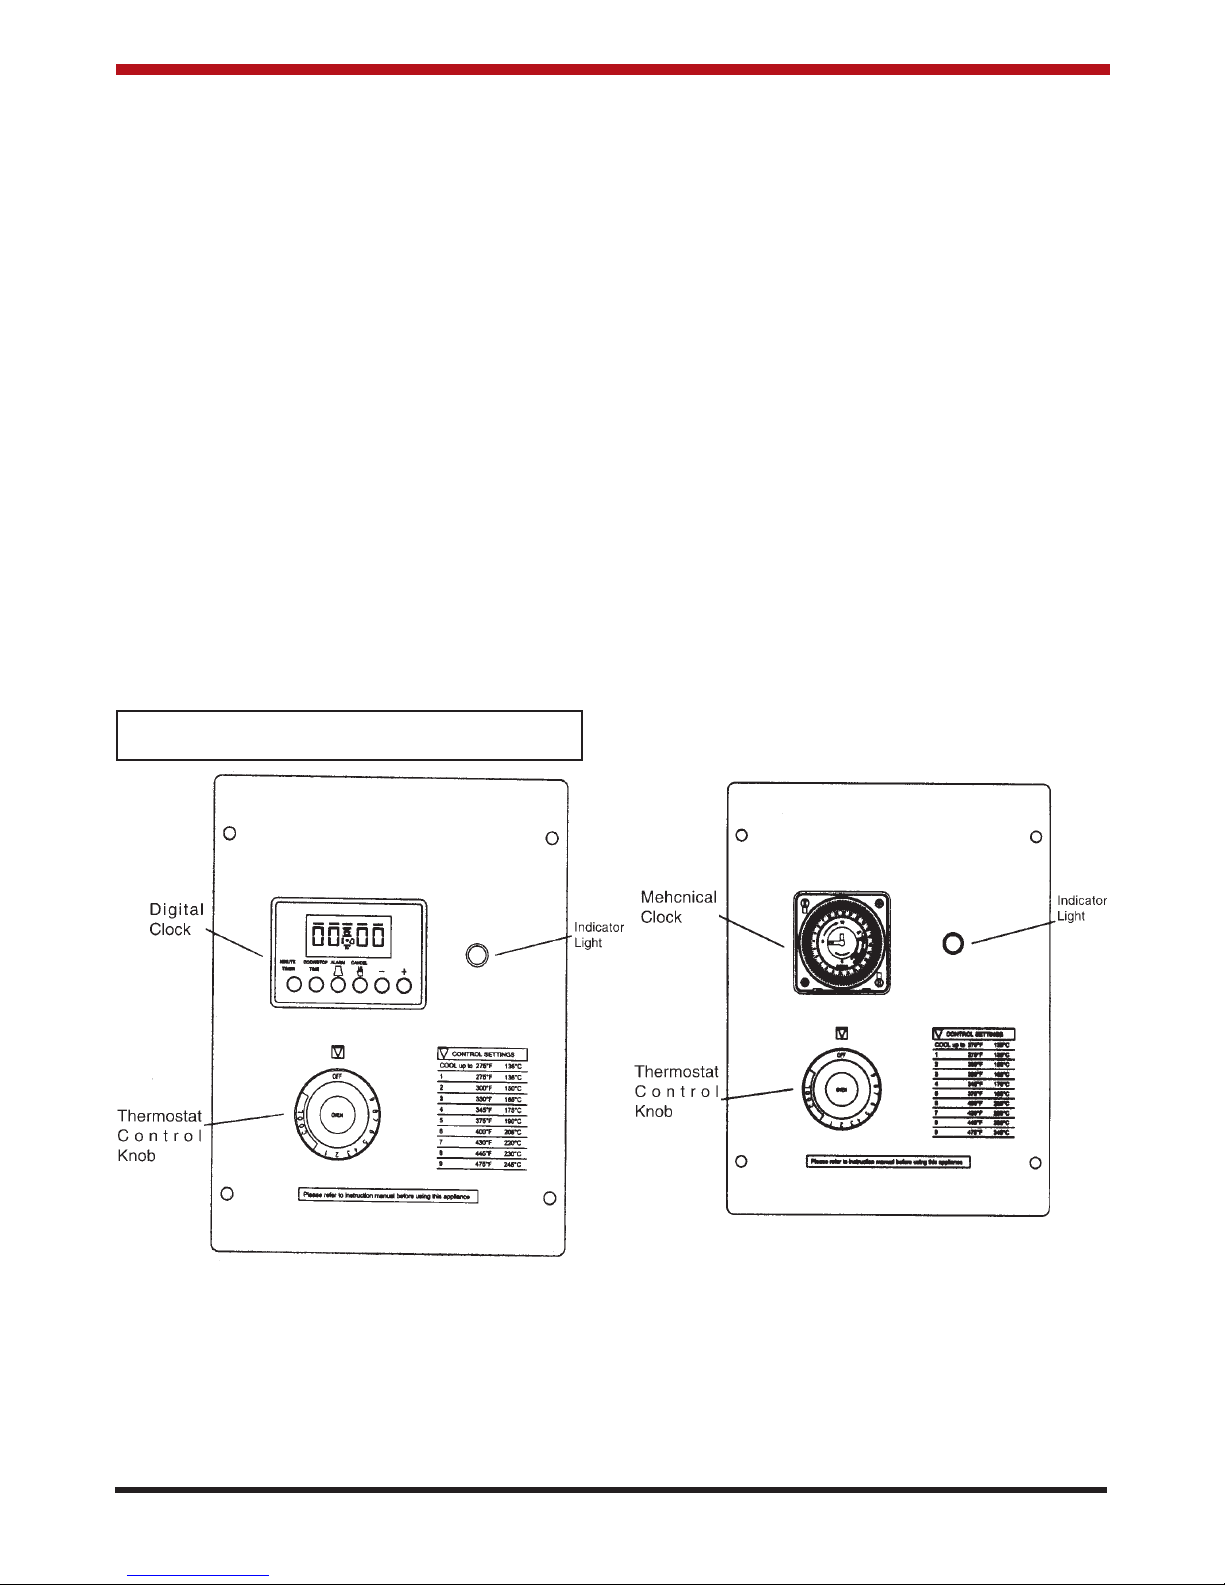
OPERATION
Note: The controls are located behind the top left
hand door.
PROGRAMMABLE CONTROLLER
(MECHANICAL)
The programmer controls your cooker which allows
you to set your cooking times. It will enable you to
pre-set the times when cooking is switched ON and
OFF.
PRE-OPERATIONAL CHECKS
(a) Check that the cooker is connected to the mains
electricity.
(b) Check that the oil supply line is purged of air
and that all valves are open.
(c) Check that appliance thermostats are in the off
position.
Page 5
4
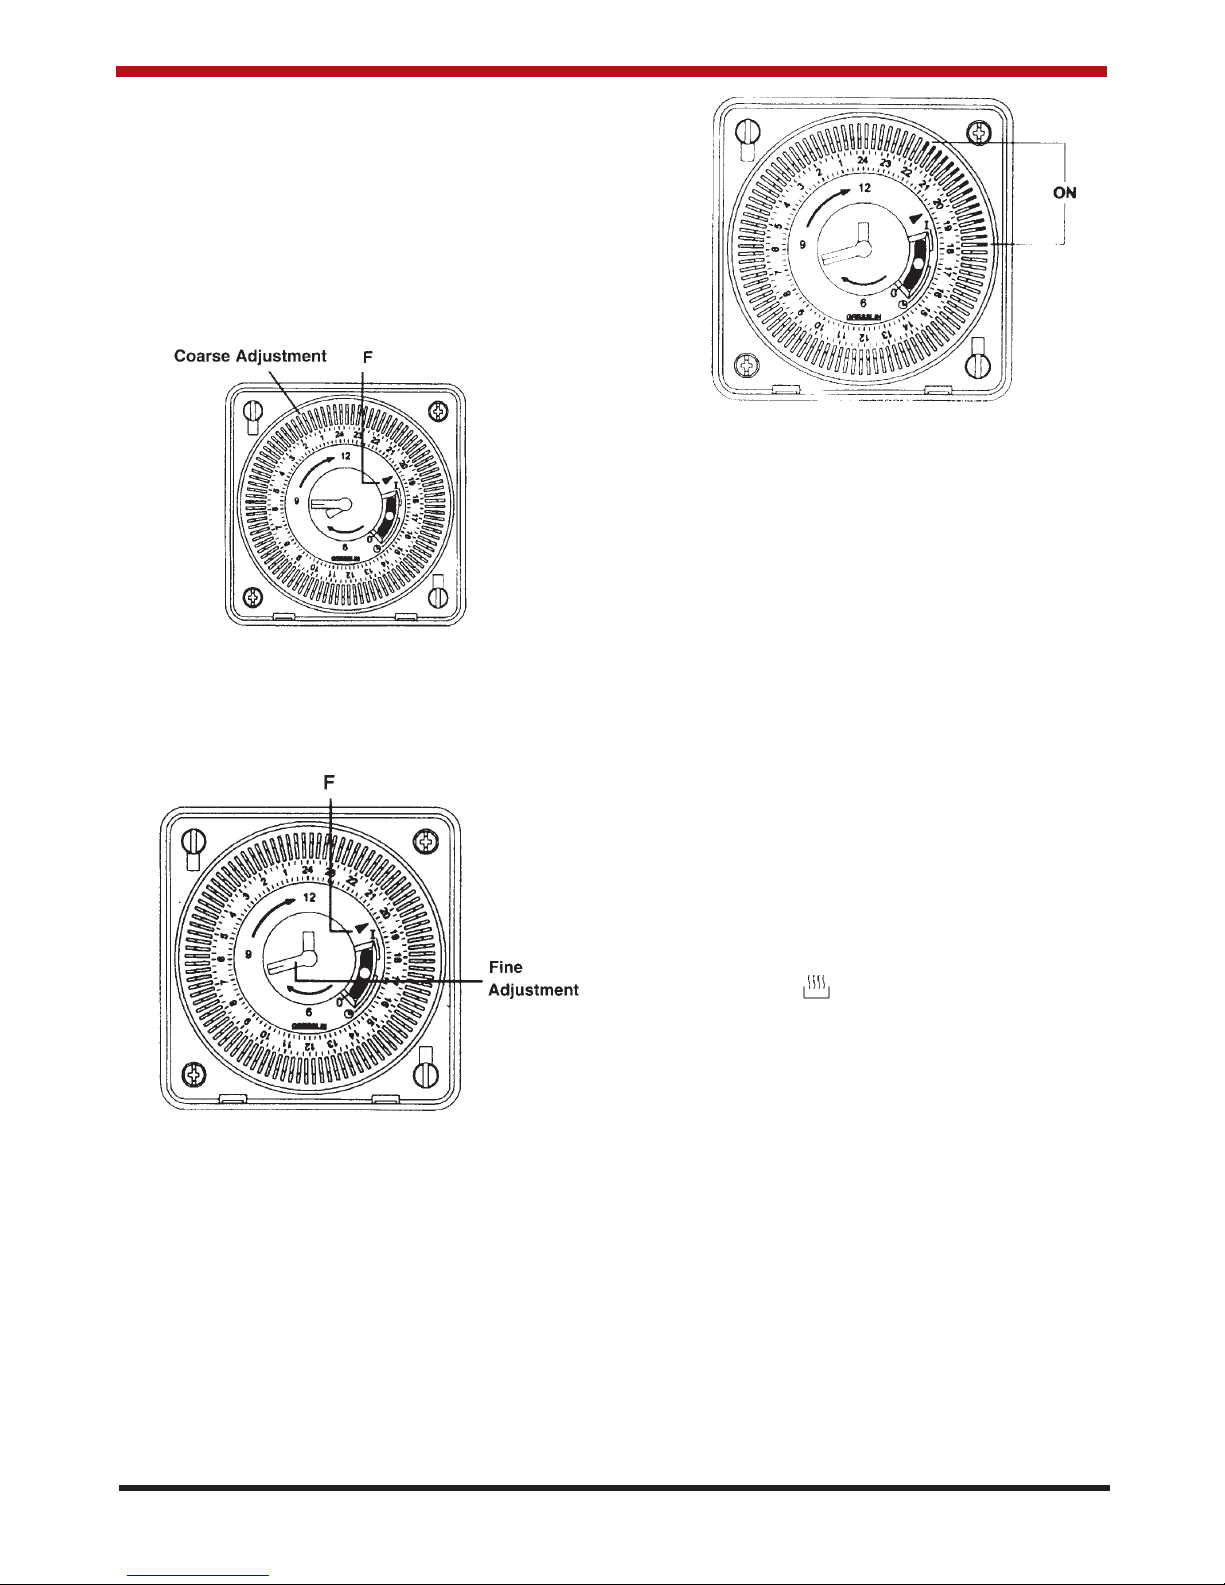
TIME SETTING - For DHW Models Only
Mechanical Clock Programmable
Controller
COARSE ADJUSTMENT
Rotate switching dial (section containing numbers 1
- 24) in direction of the arrow until the current time is
almost opposite the arrow marked F (here: 19.45)
Fig.1
Fig.1
FINE ADJUSTMENT
Push the minute hand in the direction of the arrow
until the current time is opposite the arrow marked F
(here: 20.00) Fig.2.
Fig.2
SETTING THE SWITCHING TIMES
To operate the appliance using the automatic
switching set the large slider to position marked
On the outer ring there are 96 small sliders, each
slider represents a time period of fifteen minutes.
The cooker switches “ON” or “OFF” depending on
the position of these sliders. When the slider is
nearest the centre of the clock it is in the “OFF”
mode, and when the slider is moved away from the
centre of the clock it is in the “ON” mode.
Switching example:
ON - Function from 18 - 22 h
OFF - Function from 22 - 18 h
Fig.3
POWER FAILURE
In the event of power failure, the programmer will
need to be reset, but switching times will not be
altered. If appliance does not operate normally
please refer to Fault Finding.
TIME SETTING FOR DRY MODELS ONLY
DIGITAL CLOCK PROGRAMMABLE
CONTROLLER
TO SET TIME (NOTE: Cooker cannot be operated
until the time is set).
1. When Power is applied, display flashes
“AUTO” and “000” alternatively.
2. Press buttons 1 & 2 from left, “0.00” is
displayed steadily . Letters “AUTO” flash.
3. Press plus or minus button until the actual Time
- Of - Day is displayed.
4. When releasing the buttons Time - of - Day
starts precisely to the second --.--. the cooking
INTERVAL TIME
Note: Interval Time does not control the cooker, it
sets off an alarm after the preset period of time.
1. Press interval time button (first button on
the left) display shows “0.00” and the bell
symbol is displayed.
2. Press plus button until the desired setting is
displayed.
3. On releasing the button, run down of interval
time starts after the 4 - seconds time window.
Time - of - Day re-appears in the display with
the cooking pot symbol illuminated steadily.
4. The interval time having elapsed. The acoustic
signal sounds with two beeps, pause, two
beeps etc....
“ is illuminated steadily.
pot symbol “
Page 6

OPERATION PERIOD
Note: When setting the operation period, the
programmer automatically sets a stop time which is
equal to the operation period added to the current
time. If you do not want the cooker to start
immediately, you will have to adjust the STOP time
accordingly.
1. Press operation period button (second button
from the left), display shows “0.00” and
the cooking pot symbol is displayed steadily.
2. Press plus button until the desired operation
period is displayed.
3. Releasing the button starts the run down of
time.
4. The operation period having elapsed, the
acoustic signal sounds with four beeps, pause,
four beeps etc.. The cooking pot symbol
disappears, letters “AUTO” flash until the
manual button is pressed. The cooking pot
symbol is illuminated steadily.
STOP
(Time at which you want cooker to switch off)
1. Press operation stop button (third button from
left), display shows “0.00” and the cooking pot
symbol is displayed.
2. Press plus button until the desired operation
STOP is displayed (Time at which you want
oven to switch off).
3. Releasing the buttons start run down of time,
time - of - day reappears. Letters “Auto” and
the cooking pot symbol is illuminated steadily.
Operation Period starts at once.
4. The operation period having elapsed, the
acoustic signal sounds with four beeps, pause,
four beeps etc.. The cooking pot symbol
disappears, letters “AUTO” flash until the
manual button is pressed. Thus switching over
to manual mode. The cooking pot symbol is
illuminated steadily.
MANUAL MODE
When programming operation period or operation
stop, the timer automatically transfers into automatic
mode, being displayed by the letters “AUTO”
illuminated. The set programs being completed,
letters “AUTO” illuminated. The set programs being
completed, letters “AUTO” flash and the time can be
switched over to manual mode by pressing the
manual button. The cooking pot symbol is
illuminated steadily.
CORRECTING OR CLEARING PROGRAMS
Set programs can be corrected at any time by
pressing the respective button and either the plus or
minus button depending on whether the program is
to be cut short or prolonged.
Clearing is done by setting the program to “0.00”.
Clearing operation period automatically causes
clearing of operation stop and vice-versa. When
operation period or operation stop are programmed
Time-Of-Day cannot be corrected. The setting of
nonsensical programs is impossible (e.g. operation
period is programmed and operation stop is set too
early).
NOTE: In the event of a short term power failure the
clock display will disappear and then turn when the
power is reinstated. If the power supply is
interrupted for a lengthy period of time the clock
display will be lost.
OPERATING THE APPLIANCE
For the appliance to operate both the oven control
knob and the timer must be set correctly.
The oven control knob setting corresponds to a
temperature. The control setting and their
corresponding temperatures are shown on the
control panel to the right of the control knob. These
temperatures are a guideline to the average
temperature in the top oven.
Either time clock can be used to switch
automatically as outlined above. The mechanical
timer also has “continuous on” and continuous off”
mode on the digital time so the appliance must be
switched off using the oven control knob.
The indicator light on the control panel is illuminated
when the solenoid valve is open. It will take
approximately 8 seconds after the cooker is turned
on before the solenoid valve is opened.
OVENS
THE MAIN OVEN
This oven is your simmering oven, your baking oven
and your roasting oven. It is a generous size of 390
x 310 x 406 mm (15
1
/4
x 12
1
/4
x 16 inches) - big
5
Page 7

One of the outstanding features of the Stanley is its
hotplate. It is generous in size and is machine
ground for maximum heat transfer to your
cookware.
The temperature of the hotplate is controlled by the
oven control thermostat. During the cold winter
months, when you are busy in the kitchen and you
want warmth from the cooker and heat in the
hotplate, a thermostat setting of 100oC will give you
the heat you require. If you need the hotplate to be
hotter, turn the thermostat up to a higher setting.
The hottest part of the hotplate is at the left side, the
centre is a little cooler and the right side cooler still.
The type of cookware you use will affect the
hotplate’s performance. Good contact between pan
and hotplate is essential.
On the right there is a small simmering plate. This
is ideal for keeping the coffee-pot warm, or you can
keep a kettle of water there ready to move on to the
hotplate. All sorts of culinary jobs can be done over
this gentle heat - dissolving gelatin, melting fats and
chocolate, steaming vegetables, and cooking soups
and stocks.
RESET BUTTON/HIGH LIMIT STAT
A high limit thermostat is located behind plinth on
bottom of cooker. Remove plinth by sliding approx
10mm to the left.
The thermostat button will pop out if the temperature
selected is exceeded. To reset simply unscrew the
protective cap and press the plastic button inward.
(See Figs 4, 5, & 6) If this situation persists contact
your Service Engineer.
enough to take a large turkey. It is of a cast-iron
construction which gives a perfect roast, sealing in
all the juices and flavours. The oven is fitted with a
thermometer which gives the average temperature
in the oven. There are two chromed steel shelves
and four shelf positions. The main oven is controlled
by the thermostat inside the top left hand door. The
top shelf will be a shade hotter than the centre of the
oven and the bottom shelf will be a shade cooler,
giving you different zones of heat in the main oven this allows you to cook foods that require different
temperatures in the same oven. Lifting the
insulating lids on the hotplate and cooking for any
length of time, will not affect the oven temperature.
The Stanley has hot flue gases flowing around four
faces of the main oven. The all-round heat allows
you to cook on the base of the main oven marvellous for browning and crisping the bases of
fruit pies and for finishing off pizzas and quiches.
You can also oven fry on the base of the oven using
metal or cast-iron cookware,and its ideal for
poaching smoked haddock - no more tell-tale
cooking smells in the kitchen, as these pass directly
into the flue.
THE LOWER OVEN
The lower oven measures 390 x 220 x 406 mm (15
1
/4
x 8
3
/4
x 16 inches). It has one chromed shelf
with two shelf positions. Like the main oven, it has
a cast-iron interior and gives a similarly superb
finish to dishes that need more gentle cooking.
The lower oven is heated from its top face as the
flue gases pass between the two ovens. The
temperature of this oven is approximately half that
of the main oven and the top shelf position is hotter
than the lower one.
The lower oven really comes into its own when you
are cooking a large family meal or having a baking
session - any time, in fact, when cooking foods that
need different temperatures.
HOTPLATE
The hotplate in this appliance is treated with a
protective coating, which when heated will
evaporate and will cause an odour for a short period
of time on first lighting.
IMPORTANT: DO NOT ALLOW THE COOKER
BURNER TO RUN WITH THE MAIN OVEN DOOR
OPEN, OTHER THAN WHEN ATTENDING TO
FOOD.
Fig.4
6
PLINTH
Page 8

Fig.6
Fig.5
BURNER CONTROL BOX LOCK-OUT RESET
BUTTON
The control box reset button, located on the base
underneath the left hand door will illuminate if the
burner experiences a problem.
Press the button to reset the control box. If this
situation persists, contact your Service Engineer.
(See fig. 7)
Fig.7
7
HOT WATER OUTPUT REDUCTION (DHW ONLY)
The requirement for hot water differs from
household to household. If excess hot water is
provided the temperature in the boiler will reach its
limit temperature and the appliance will shut down
until the limit stat is manually reset. The amount of
hot water provided can be reduced by hanging
optional boiler insulation panels to the boiler. (See
Fig. 8). These are available to order. The panels
can be hung individually or together for a further
reduction in boiler outputs.
When fitting both panels together, the panel must be
fitted to the left hand side first. Both panels are the
same size.
Fig.8
BURNER DOES NOT IGNITE
Check:
(a) that the electricity is switched on.
(b) that the oil supply valve is open and the line is
purged of air.
(c) that the thermostat reset button is pressed in.
(d) that the programmer is on and the thermostat is
calling for heat.
(e) that the “lock out” button on the control box at
the base of the cooker is not illuminated.
(f) If in doubt contact your local Stanley Engineer.
HOT PLATE INSULATING COVERS
The insulating covers retain most of the heat that
would otherwise be radiated into the kitchen. They
also retain the heat in the hot plates so that rapid
heating of cooking utensils will occur when one or
both of them are lifted for cooking purposes.
UNSCREW CAP IN
DIRECTION SHOWN
PLINTH
Page 9

COOKING UTENSILS
For best cooking results and economy of operation
use heavy based, flat bottomed utensils.
IMPORTANT: WHEN HOTPLATE IS NOT IN USE
ENSURE THAT HOTPLATE COVERS ARE IN A
DOWN POSITION.
IMPORTANT: DO NOT USE MIS-SHAPED PANS
WHICH MAY BE UNSUITABLE. DO NOT USE
ROUND BASED WOKS.
OPENING COOKER DOOR
Fig.10
To open the cooker door grip the door handle
between the fingers and thumb as per Fig.C, swing
the door handle in an outwards and upwards
direction as shown in Fig. D.
Fig.11
8
Fig.12
Fig.13
Fig.14
IMPORTANT: WE DO NOT RECOMMEND DEEP
FAT FRYING ON THIS APPLIANCE.
CLEANING
IMPORTANT: BE CAREFUL OF THE HOT
APPLIANCE.
General cleaning must be carried out when the
cooker is cool.
Stanley cookers are finished in a high gloss vitreous
enamel. To keep the enamel in the best condition
observe the following tips:
1. Wipe over daily with a soapy damp cloth,
followed by a polish with a clean dry duster.
2. If milk, fruit juice or anything containing acid is
spilt on the hob or down the cooker, be sure to
wipe it immediately or the vitreous enamel may
be permanently discoloured. Jam and
preservatives containing sugar can permanently
damage the vitreous enamel.
Hotplate
Covers
Simmer
Plate
Cover
Fig.9
Page 10

9
3. Keep a damp cloth to hand while cooking, to
wipe up any spills as they occur, so they do not
harden and become more difficult to remove
later.
4. If spills do become baked on, a cream cleanser
can be used. For stubborn deposits a soap
impregnated pad can be carefully used on the
vitreous enamel.
5. Use only products recommended by the
Vitreous Enamel Association, these products
carry the Vitramel label.
6. In the oven, spills and fat splashes are
carbonised at high temperatures: occasionally
brush out with a stiff brush. The shelves can be
soaked and cleaned with a cream cleanser.
7. Both insulating covers should be raised and
allowed to cool before cleaning the enamel with
a soapy damp cloth. Use a wire brush to keep
the cast iron hotplate clean.
DO NOT USE ABRASIVE PADS OR OVEN
CLEANERS CONTAINING CITRIC ACID ON
ENAMELLED SURFACES. ENSURE THAT
THE CLEANSER MANUFACTURERS
INSTRUCTIONS ARE ADHERED TO.
CHIMNEY CLEANING
Whichever type of flue is chosen, there must be
cleaning access to the whole of the flue system. The
flue of the chimney will need to be cleaned regularly.
The combustion products of any oil burning
appliance will have a descaling effect on hardened
soot deposits left from burning solid fuels.
Although, the chimney may have been cleaned of
loose soot prior to installation, it is imperative that
the chimney is inspected for scaled soot particles
after the first month of operation and any loose
material removed to avoid blockage.
SERVICING
We recommend that the cooker and burner be
serviced annually by an Authorised Stanley Service
Engineer.
MILD STEEL
The steel side panels and splash back must not be
cleaned with steel wool. Use only washing-up liquid
in hot water with a lint free cloth. Dry off and apply
a coat of good quality furniture polish.
Association
OVENS
Grease spillages will burn off from the oven interior
when the oven is hot and any other loose materials
can be emptied out with a cloth when cold. Stubborn
stains in the oven and on the shelves can be
cleaned off with a paste of bread soda and water.
HOT PLATE
The hotplate may be cleaned using a small amount
of paraffin oil or fine steel wool to remove rust or
cooking stains, dry off with a lint free cloth and apply
a light coat of cooking oil to preserve the finish.
COOKING GUIDANCE
GENERAL INFORMATION
GRILLING
Turn the oven thermostat to a reasonably high
setting and this will give a greater temperature at the
top of the main oven. The roasting tin supplied with
the cooker contains a grill rack. Place any foods that
require grilling onto the rack, and place the roasting
tin as near to the top of the oven as possible. Any
gratin type recipe that requires browning, place the
dish on a shelf as near to the top of the oven as it
will allow. For a delicious breakfast, lightly grease
the base of the roasting tin and place slices of bread
with a hole cut out of the centre, onto the base,
carefully breaking an egg into each hole. Foods
such as mushrooms and halved tomatoes can be
placed around the eggs. Place the grilling rack over
the eggs and lay the bacon, sausage, black pudding
etc., onto the grilling rack. The fat will drop onto the
eggs, helping to cook and flavour them. Fatty foods
such as lamb cutlets are best suited to this method
of oven grilling, most of the fats are drawn out into
the roasting tin. Certain foods with little fat, benefit
from pan frying/dry frying on the hotplate, using a
ribbed frying or griddle pan. The foods cooked this
way look attractive with the bar markings from the
pan.
THE CARE OF YOUR COOKER
The vitreous enamel finish on your cooker is tough
and hard wearing but should be treated with care.
Acidic spills on the hob should be wiped off with a
clean damp cloth. The vitreous enamel front, sides
and hob only need a wipe with a warm soapy cloth,
then a polish with a dry one. Do not use an abrasive
cleaning material on the vitreous enamel. If there
are stubborn marks on the hob, use a good quality
enamel cleaner. Look for cleansers carrying the
VEDC (Vitreous Enamel Development Council)
Page 11

Follow the manufacturers instructions carefully. The
hotplate will carbonise any food spilt on it, which
should be removed with a wire brush or metal
scraper. This will ensure a good contact between
cooking utensil and the hotplate. Take care when
cleaning the insulating lids, the hotplate may be hot.
The ovens are self cleaning, any food that spills on
the oven floors will carbonise and can be brushed or
scraped away. It is often easier to use the vacuum
cleaner to remove all the bits.
COOKWARE
You do not have to rush out and buy a new set of
pans when you take delivery of your new Stanley
cooker, but it is advisable to check your cookware.
Thin, lightweight saucepans are liable to buckle, so
it is recommended that you use saucepans which
have a flat, thermic base. This design of saucepan
will give you complete contact with the hotplate and
maximum heat retention for a good cooking
performance. This design is usually of 18/20
stainless steel, with the thermic base encapsulated
onto the bottom of the pan. The base will have a
core of aluminium sandwiched between two layers
of stainless steel. The aluminium does not come
into contact with the food while cooking, but will very
quickly pick up the heat and evenly distribute it over
the base of the pan. Some continental designs of
saucepans will have this inner sandwich of
aluminium, not only at the base but up the sides as
well. Many people prefer the look of cast iron
cookware. This cookware is just as versatile as
stainless steel, absorbing and distributing the heat
evenly, and serving from the oven to table. They are
available in a range of colours and designs, some
with knobs and handles of a heat resistant material.
Good quality saucepans can be expensive to buy,
but the versatility they offer means that fewer items
need to be purchased. Oven proof earthenware will
also produce satisfactory results. Your traditional
cake tins, baking trays, loaf tins and any other
favourite ovenware you use, will be suitable. There
is bakeware on the market of Continental design
which has a steel base, ideal for quickly absorbing
the heat. It is covered with a magnum (enamel like)
coating, which is safe to cook on, non stick effect
and easy to clean. A roasting tin, containing the
grilling rack is provided. You can use a pressure
cooker on the hotplate but however, do check that
the base of the pressure cooker makes good contact
with the hotplate.
All timings in the cooking chart are guidelines only,
as there are no set rules for roasting meat - each cut
lends itself to several different ways of preparation
and cooking and each family will have a preference.
When meat is roasted quickly the juices are sealed
in, preserving the full flavour, but there will
sometimes be shrinkage. Some people prefer to
slow roast at a lower temperature, a method that will
reduce shrinkage and give a more tender joint.
Whichever roasting method you choose, the joint
should first be weighed to calculate the cooking
time. Place the meat on the grilling rack in the
roasting tin, fat side uppermost. This will baste the
meat as it is cooking, but check the roast from time
to time and using a metal spoon, baste the meat
yourself.
If you are using a meat thermometer, do take care
when inserting it that it does not touch bone or
excess fat. This will give you a false internal
reading.
Stuffed joints of meat will need extra cooking time approximately 10 minutes more for every 500g
(1 lb).
10
Page 12

TYPE OF MEAT TEMPERATURE TIMING per 500g (1 lb)
BEEF ON THE BONE 180oC RARE 10 mins + 10 mins over
SIRLOIN MED 12mins + 12 mins over
FORE RIB WELL DONE 20 mins + 20 mins over
BEEF BONED AND ROLLED 180oC RARE 12 mins + 12 mins over
TOPSIDE
TOP RUMP MED 15 mins + 15 mins over
FILLET WELL DONE 20 mins + 20 mins over
ROLLED RIB
PORK ON THE BONE 180oC 25 mins + 25 mins over
SHOULDER
LOIN
LEG
PORK BONED AND ROLLED 180oC 30 mins + 30 mins over
SHOULDER
LOIN
LEG
LAMB ON THE BONE 180oC MED 20 mins + 20 mins over
CROWN WELL DONE 25 mins + 25 mins over
GUARD OF HONOUR
LEG
BEST END
LOIN
LAMB BONED AND ROLLED 180oC MED 25 mins + 25 mins over
WELL DONE 30 mins + 30 mins over
VEAL BONED AND ROLLED 180oC MED 20 mins + 20 mins over
TOPSIDE WELL DONE 25 mins + 25 mins over
SHOULDER
FILLET
VENISON ON THE BONE 180oC RARE 12 mins + 12 mins over
HAUNCH (LEG) MED 15 mins + 15 mins over
SADDLE WELL DONE 20 mins + 20 mins over
RABBIT/HARE 180oC Up to 1 kg (2 lb): 45 - 60 mins
Up to 2 kg (4 1/2 lb): 60 - 90 mins
CHICKEN 190oC 20 mins + 20 mins over
TURKEY 160oC
3.6 - 4.5 kg (8 - 10 lb) 3 1/2 - 3 3/4 hrs
4.9 - 5.4 kg (11 - 12 lb) 3 3/4 - 4 hrs
5.4 - 6.3 kg (12 - 14 lb) 4 - 4 1/2
6.3 - 7.2 kg (14 - 16 lb) 4 1/4 - 4 1/2 hrs
7.2 - 8.1 kg (16 - 18 lb) 4 1/2 - 4 3/4 hrs
8.1 - 9 kg (18 - 20 lb) 4 3/4 - 5 hrs
DUCK 200oC MED 25 mins + 25 mins over
WELL DONE 30 mins + 30 mins over
GOOSE 180oC 20 mins + 20 mins over
PHEASANT 200oC 50 - 60 mins total cooking
GROUSE 220oC 30 - 45 mins total cooking
PARTRIDGE 220oC 45 mins total cooking
11
Page 13

You will soon come to look upon the Stanley as a
reliable companion to help you during a busy baking
session or when you are preparing that extra-special
meal. The following tips are ways in which you will
find the Stanley invaluable: no doubt you will quickly
add discoveries of your own to the list.
1. Baking: If you are using butter or margarine
from the refrigerator, simply place the required
amount of fat in a heatproof bowl on the hob,
near to the hotplate. It will be quickly brought
to room temperature, making it easier to work
with.
2. Breadmaking: Stand the required liquid for
the recipe in a heatproof jug on the hob near
the hotplate to warm. Take care not to overheat
as yeast is killed at high temperatures.
3. Breadmaking: Depending on what mode the
cooker is set at, the hob, plate rack or lower
oven can be used for proving the dough.
4. Baking: To dissolve gelatin, place two
tablespoons of water or liquid from the recipe in
a small heatproof bowl. Sprinkle the required
amount of gelatin on the liquid and place on or
near the hotplate to dissolve. A small stainless
steel bowl is useful for this type of job.
5. Baking: When melted chocolate is needed in
a recipe or for decoration work, simply place
the chocolate in a heatproof bowl near the
hotplate. This method is easier than placing
over a pan of hot water, which can often splash
into the chocolate and spoil it.
6. Baking: Syrup tins and jam jars with only a
little left in them are easier to empty when they
have warmed on the hob.
7. Cooking: If a recipe requires a small amount
of fried or softened onion, place the finely
chopped onion and a little butter or oil in a
heatproof bowl on or near the hotplate to
soften. I use this method often, because it is so
much easier than having to wash up a fryingpan! Many different types of vegetables can be
prepared this way before adding to a recipe.
8. Cooking: To make breadcrumbs, simply place
the bread on a baking sheet in the lower oven
and allow to dry out. Crush and store for future
use.
9. Cooking: To make croutons, cut the bread into
small cubes, place in a shallow cast iron dish
with a little oil and fry, using the base of the
main oven. (If the oven is in use, fry on the
hotplate) Drain, spread out on a baking sheet
and put to crisp in the lower oven. Croutons
can be frozen for use when required.
10. Drying: An abundance of fresh herbs need not
be wasted. Place on a baking sheet, after
washing and patting dry with kitchen paper, and
leave to dry in the lower oven. Store for future
use.
11. Drying: Cooker rice can be spread out on a
baking sheet and left to dry in the lower oven.
12. Baking: When making fruit cakes, wash the
dried fruit, place on a baking sheet and allow to
dry off in the lower oven before use. Moist fruit
will sink to the bottom of a cake and spoil it.
13. Preserving: When you are bottling, the depth
of the main oven makes it easy to sit a tray of
bottled fruit all on the same shelf to cook in one
session.
14. Preserving: When you are making jam the
graduated hotplate enables you to control the
simmering of a large preserving pan much
more easily than on a conventional cooker,
where the pan is too large for the burner or ring.
The warming of sugar, drying of the prepared
fruit and the warming of jars and bottles can all
be done with plenty of space using the lower
oven and plate rack, if you have one.
USER COOKING TIPS
12
Page 14

13
WIRING DIAGRAM - DIGITAL TIMER
CYC - STAT:
Remove link between
Terminal 1 and Terminal
31. Connect cyc - stat
on to Terminals 1 & 31.
PL - 13 AMP PLUG TOP
F - FUSE BLOCK COMPLETE WITH 3 AMP FUSE
EVG - SOLENOID VALVE
TR - TRANSFORMER
MV - BURNER MOTOR
FR - PHOTOCELL
OT - OVEN THERMOSTAT
LT - HIGH LIMIT THERMOSTAT
RB - RUNNING LAMP
S - SUPPRESSER
Page 15

14
WIRING DIAGRAM (MECHANICAL TIMER)
CYC - STAT:
Remove link between
Terminal 1 and Terminal
31. Connect cyc - stat
on to Terminals 1 & 31.
PL - 13 AMP PLUG TOP
F - FUSE BLOCK COMPLETE WITH 3 AMP FUSE
EVG - SOLENOID VALVE
TR - TRANSFORMER
MV - BURNER MOTOR
FR - PHOTOCELL
OT - OVEN THERMOSTAT
LT - HIGH LIMIT THERMOSTAT
RB - RUNNING LAMP
S - SUPPRESSER
Page 16

15
FAULT FINDINGS
PROBLEM CAUSE REMEDY
1. Poor Flue Draught: (a) Obstruction. (a) Clear and clean.
(b) Chimney too low. (b) Raise height above ridge.
(c) Chimney not lined. (c) Fit flue liner 125mm (5”)
(d) Insufficient Air Supply (d) Increase provision of free air for ventilation and combustion
2. Excessive Flue Draught (a) High chimney. (a) Fit draught stabiliser venting to the outside atmosphere.
3. Down Draught: (a) High trees (a) Raise chimney height.
(b) High buildings (b) Raise chimney height.
(c) Low chimney. (c) Raise chimney height.
(d) Positive pressure zone. (d) Check flue termination
4. Cooker Smoking: (a) Insufficient primary air. (a) Provide additional room air inlet or adjust burner air intake.
(b) Chimney choked. (b) Clean chimney.
(c) Downdraught. (c) Raise chimney height.
(d) Poor combustion. (d) Check air supply.
5. Hot Plate Not Heating: (a) Burner cutting out. (a) Increase cooker thermostat setting.
(b) Utensils not flat. (b) Use machined based utensils.
6. Oven Not Heating: (a) Flueways blocked with soot. (a) Clean out.
7. Intermittent Performance: (a) Cooker starved of primary air. (a) Provide air inlet in room.
(b) Extraction fan in room. (b) Provide additional air inlet in room.
(c) Dirt in nozzle. (c) Clean or replace nozzle.
(d) Dirty burner. (d) Service burner.
(e) Faulty Thermostats. (e) Replace if defective.
(f) Dirty flueways. (f) Clean flueways.
(g) Dirty Oil Filter (g) Clean or replace
(h) Worn nozzle (h) Replace nozzle
DHW Model Only (J) Cylinder thermostat interruption (J) Release hot water from cylinder
It is of the utmost importance to keep the flue pipe and chimney clear of deposits. Blocked or
partially obstructed flueways and chimneys will cause dangerous fumes to be emitted into the room,
these may well be invisible.
Rev: 003 DP 070925
N00356AXX
Manufactured by
Waterford Stanley Ltd.,
Unit 210, IDA Industrial Estate, Cork Road,
Waterford, Ireland.
Tel: (051) 302300 Fax (051) 302315
 Loading...