

77-030
MOISTURE METER
Caution: The electrode pins are very sharp.
Handle instrument carefully. Keep pins covered
when not in use.
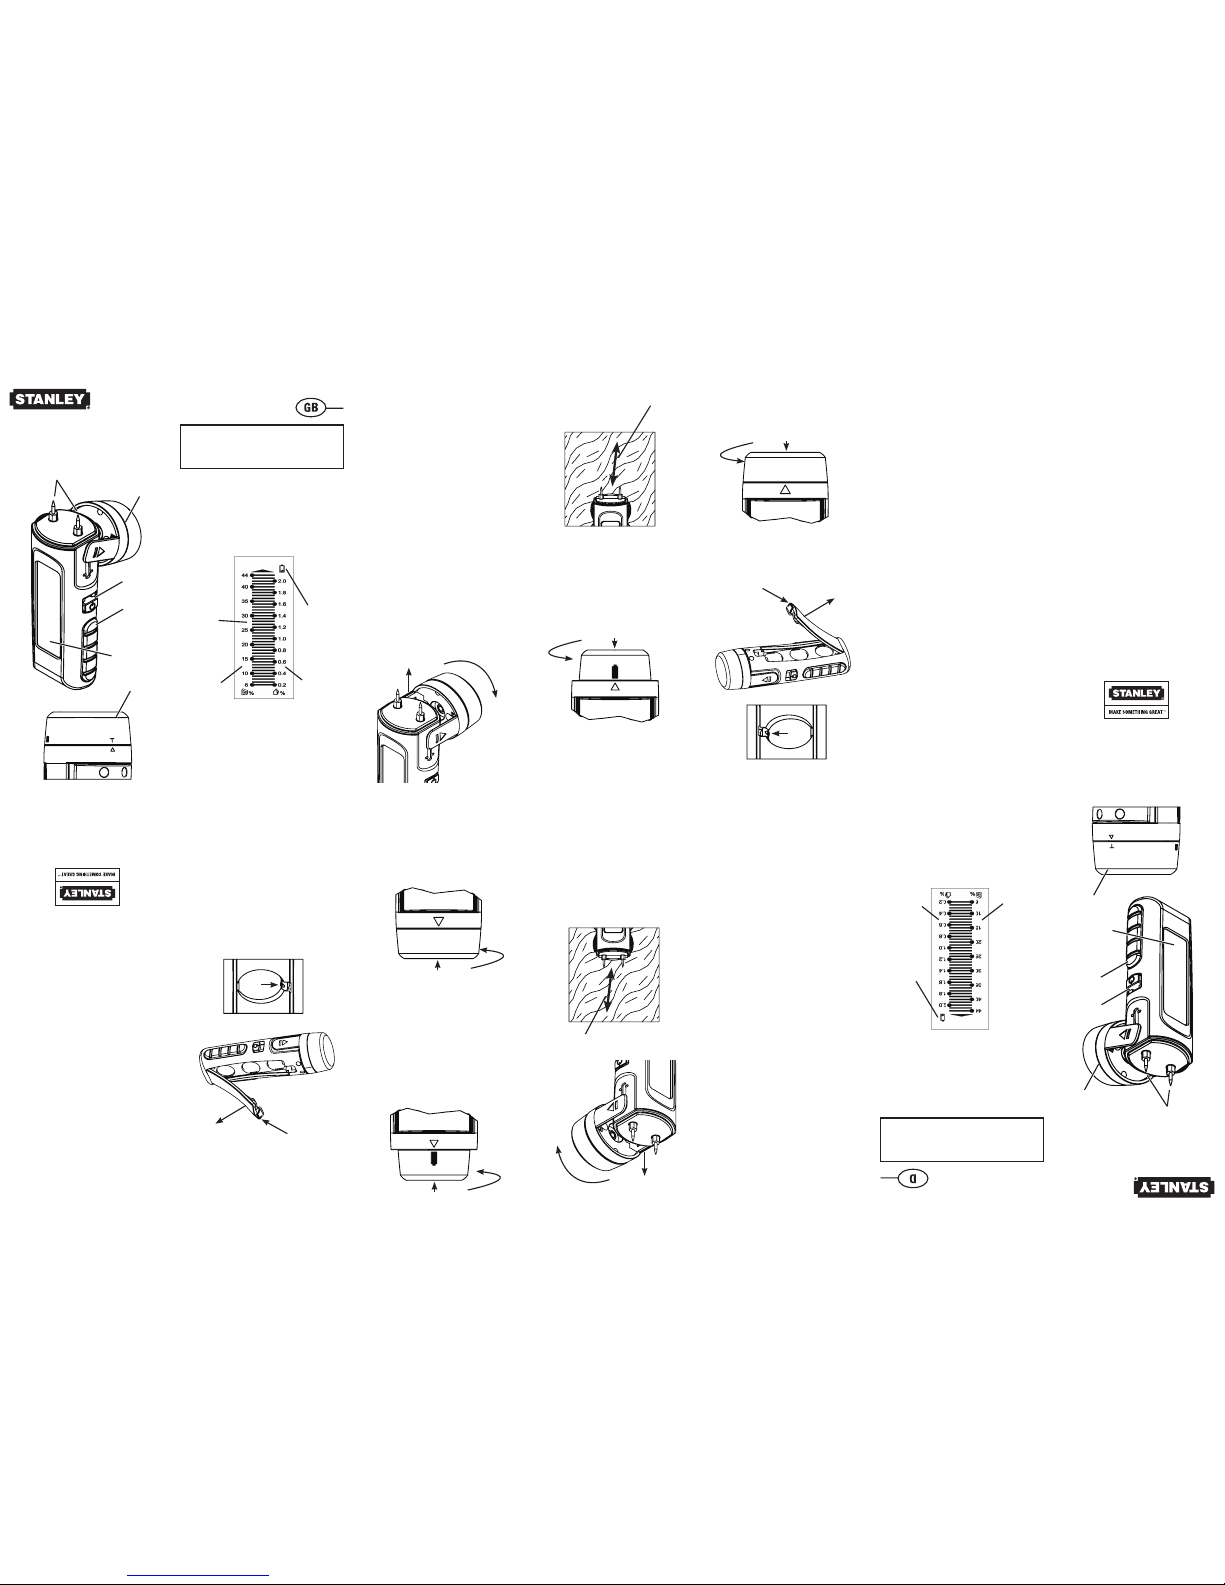
A Replaceable Electrodes
B Flip-Off Protective Cap with Battery and
Resistance Test sockets
C On/Off Switch
D Rubber Hand Grips
E Backlit LCD Screen
Stanley Moisture Meter
The Stanley Moisture Meter detects moisture in
wood and common building materials including,
but not limited to, drywall, plaster, concrete and
cement board.
A
B
B
C
D
E
Low Battery
Icon
Building
Materials
Scale
Wood Scale
Ready
SPECIFICATIONS
Display LCD with dual measuring
scales
With green Backlight
Range, Wood 6 to 44% ± 2%
Range, Building Materials 0.2 to 2.0% ± 0.1%
Auto Power Off 3 minutes
Operating Temperature 32° to 122°F (0 to 50°C)
Operating % Humidity 80% Max.
Relative Humidity
Power Supply (3) CR-2032 Button Cells
Electrode Pins (2) 0.3” (8mm),
Replaceable
Accessories Carry Pouch w/ Belt Clip
OPERATING INSTRUCTIONS
Use
1. Slide power switch to “ON” position.
2. Lift protective cap 1, then pivot to position 2.
3. Press electrodes into the material to be tested.
A. Press carefully, but as deeply as possible to get
good contact.
B. In wood, take measurements across the grain.
C. Take several readings to get a better idea of the
general moisture content of the material.
1
2
Wood Grain
Testing Batteries:
1. With the protective cap in place over electrodes
and unit power “ON”, rotate cap until battery icon
aligns with arrow.
2. Push down on cap. LCD should display 44%
reading on “Wood” scale.
If the display is not at 44% or the battery icon appears
on the LCD, replace the batteries.
Testing Moisture Scale Accuracy:
1. With the protective cap in place over electrodes
and unit power “ON”, rotate cap until the “T”
aligns with arrow.
T
2. Push down on cap. LCD should display 27.5% ±2%
reading on “Wood” scale.
If the reading is not within the limits, the unit may
require repair.
Replacing Batteries:
Push in 1, Then lift door 2, 3 push in on tab and battery
will pop up.
T
+
1
2
T
+
3
©2009 THE STANLEY WORKS:
www.stanleyworks.com
Stanley Tools Product Group, Stanley Europe
Egide Walschaertsstraat 14-16, 2800 Mechelen, Belgium
(01/09) Issue 1
50301 X
WARRANTY
One Year Warranty
Deficient products will be repaired or replaced, at
Stanley Tools’ option, if sent together with proof of
purchase to:
Stanley UK Sales Limited,
Gowerton Road,
Brackmills,
Northampton
NN4 7BW
This Warranty does not cover deficiencies caused
by accidental damage, wear and tear, use other than
in accordance with the manufacturer’s instructions
or repair or alteration of this product not authorized
by Stanley Tools. Repairs or replacement under
this Warranty does not affect the expiry date of the
Warranty.
To the extent permitted by law, Stanley Tools shall
not be liable under this Warranty for indirect or
consequential loss resulting from deficiencies in this
product.
This Warranty may not be varied without the
authorization of Stanley Tools.
This Warranty does not affect the statutory rights of
consumer purchasers of the product.
This Warranty shall be governed by and construed in
accordance with the laws of England and Stanley Tools
and the purchaser each irrevocably agrees to submit to
the exclusive jurisdiction of the courts of England over
any claim or matter arising under or in connection with
this Warranty.
IMPORTANT NOTE:
The customer is responsible for the correct use and
care of the instrument. Moreover he is completely
responsible for checking the job along its prosecution,
and therefore for the calibration of the instrument.
Calibration and care are not covered by Warranty.
Subject to change without notice
77-030
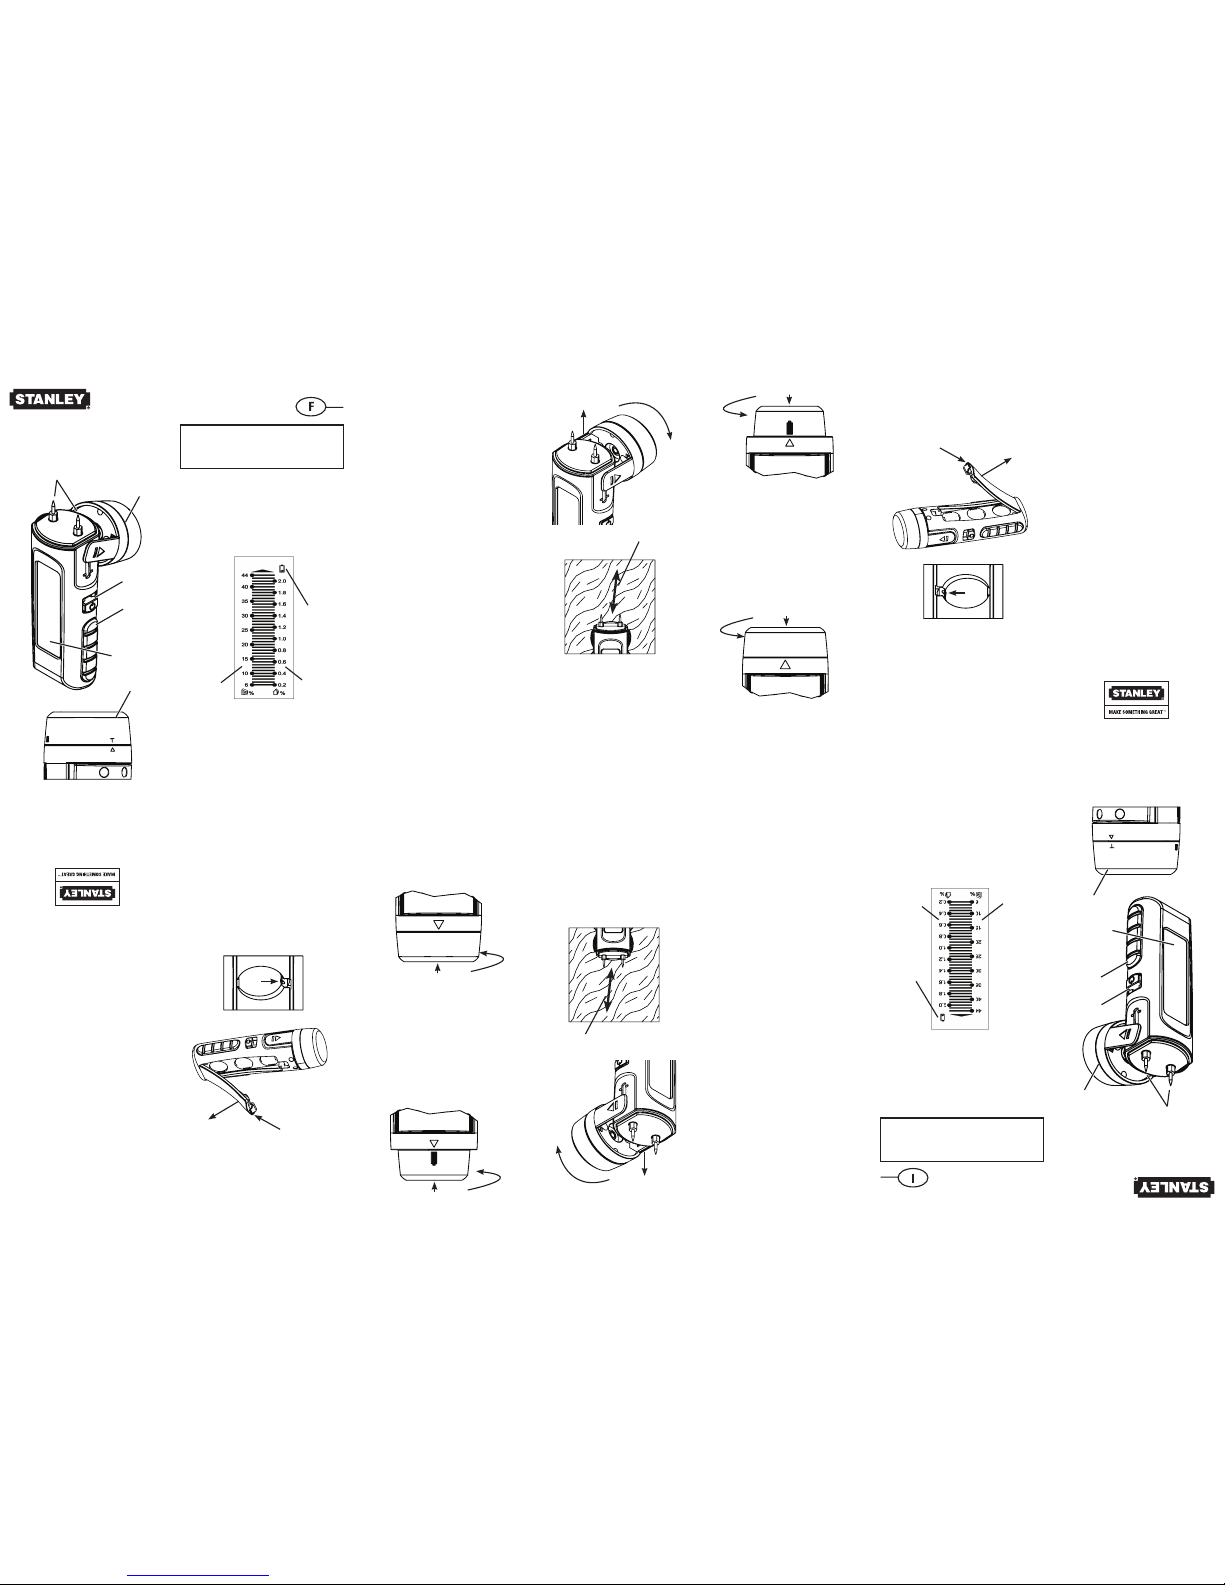
Feuchtigkeitsmesser
T
+
BUL
SL
SI
Achtung: Die Elektrodenkontakte sind sehr
scharf. Bitte gehen Sie mit dem Gerät vorsichtig
um. Wenn es nicht benutzt wird, sollten die
Kontakte abgedeckt werden.
A Auswechselbare Elektroden
B Flip-Off Schutzkappe mit Batterie und
Widerstandsteststeckdosen
C An-/Aus-Schalter
D Gummihandgriffe
E Hintergrundbeleuchtete LCD-Anzeige
Stanley Feuchtigkeitsmessgerät
Das Stanley Feuchtigkeitsmessgerät ermittelt
Feuchtigkeit in Holz und verbreiteten Baumaterialien
einschließlich, jedoch nicht begrenzt auf,
Trockenmauern, Putz, Beton- und Zementplatten.
A
B
B
C
D
E
T
+
Symbol für
niedrigen
Batteriestand
Anzeige für
Baumaterialien
Holzanzeige
TECHNISCHE DATEN
Display LCD mit dualen
Maßanzeigen
Mit grüner
Hintergrundbeleuchtung
Bandbreite, Holz 6 bis 44% ± 2%
Bandbreite, Baumaterialien 0,2 bis 2,0% ± 0,1%
Automatisches Abschalten 3 Minuten
Betriebstemperatur 0 bis 50°C
Betriebliche % Feuchtigkeit 80% max. relative
Feuchtigkeit
Stromversorgung (3) CR-2032 Knopfzellen
Elektrodenkontakte (2) (8mm), Austauschbar
Zubehör Tragebeutel mit
Gürtelklemme
BETRIEBSANLEITUNG
Inbetriebnahme
1. Schieben Sie den Netzschalter in die „An“-Position.
2. Nehmen Sie die Schutzabdeckung 1 ab und drehen Sie
das Gerät dann in Position 2.
3. Drücken Sie die Elektroden in das zu prüfende Material.
A. Drücken Sie die Elektroden sorgfältig, jedoch so tief
wie möglich hinein, um einen guten Kontakt zu
erzielen.
B. Nehmen Sie bei Holz die Messung quer zur
Maserung vor.
C. Nehmen Sie mehrere Messungen vor, um
einen genaueren Überblick über den allgemeinen
Flüssigkeitsgehalt des Materials zu erhalten.
1
2
T
+
Überprüfen der Genauigkeit der
Feuchtigkeitsmessung:
1.
Drehen Sie die Abdeckung, während sich diese über
den Elektroden befindet und der Netzschalter des
Gerätes auf „An“ steht, bis das Symbol „T“ mit einem
Pfeil aufleuchtet.
2. Abdeckkappe hinunter drücken. Die LCD-Anzeige
sollte 27,5% ±2% auf der „Holz“-Anzeige zeigen.
Wenn der abzulesende Wert sich nicht innerhalb dieses
Bereichs befindet, dann muss das Gerät möglicherweise
repariert werden.
1
2
+
3
©2009 THE STANLEY WORKS:
www.stanleyworks.com
Stanley Tools Product Group, Stanley Europe
Egide Walschaertsstraat 14-16, 2800 Mechelen, Belgium
(01/09) Issue 1
50301 X
GARANTIE
Ein-Jahresgarantie
Defekte Produkte werden nach dem Ermessen von Stanley
Tools repariert oder ersetzt unter der Bedingung, dass sie
zusammen mit dem Kaufbeleg an folgende Adresse gesandt
werden:
Stanley Bostitch GmbH
Bützgenweg 2
45239 Essen
Germany
Defekte, die durch zufällige Beschädigung, Verschleiß oder
Verwendung entgegen den Anweisungen des Herstellers
oder von Stanley Tools nicht genehmigten Reparaturen
oder Veränderungen des Geräts entstehen, bleiben von
der vorliegenden Garantie ausgeschlossen. Reparaturen
oder Ersatz unter der vorliegenden Garantie haben keinen
Einfluss auf das Ablaufdatum der Garantie.
Im Rahmen der gesetzlichen Bestimmungen haftet Stanley
Tools unter der vorliegenden Garantie nicht für indirekte oder
Folgeschäden auf Grund von Defekten des vorliegenden
Produkts.
Jede Änderung der vorliegenden Garantie bedarf der
vorherigen Genehmigung von Stanley Tools.
Die vorliegende Garantie schmälert die im Verbrauchergesetz
vorgesehenen Rechte des Käufers des Produkts nicht.
Die vorliegende Garantie untersteht und entspricht dem
englischen Recht und Stanley Tools und der Käufer erklären
unwiderruflich, sich bei Ansprüchen oder Streitigkeiten
in Zusammenhang mit der vorliegenden Garantie der
ausschließlichen Rechtsprechung der englischen Gerichte
zu unterstellen.
WICHTIGE BEMERKUNG:
Korrekte Nutzung und Pflege fallen in die alleinige
Zuständigkeit des Kunden. Weiter liegt es in der alleinigen
Verantwortung des Kunden, das Gerät während der Arbeit
zu prüfen und für die entsprechende Kalibrierung des
Instruments zu sorgen. Kalibrierung und Pflege bleiben von
der Garantie ausgeschlossen.
Kalibrierung und Pflege bleiben von der Garantie
ausgeschlossen.
Änderungen dürfen ohne vorherige Benachrichtigung
vorgenommen werden.
T
+
Holzmaserung
T
+
Prüfen der Batterien:
1.
Drehen Sie die Abdeckung, während sich diese über
den Elektroden befindet und der Netzschalter des
Gerätes auf „An“ steht, bis das Batteriesymbol mit
einem Pfeil aufleuchtet.
2. Abdeckkappe hinunter drücken. Die LCD-Anzeige
sollte 44% auf der „Holz“-Anzeige zeigen.
Wenn das Display nicht auf 44% steht oder das
Batteriesymbol auf der LCD-Anzeige erscheint, müssen
die Batterien ersetzt werden.
Auswechseln der Batterien:
1 hineindrücken, dann Tür 2 anheben, 3 Scheibe
hineindrücken und die Batterie tritt heraus.
77-030
Humidimètre
ATTENTION : Les broches des électrodes sont
très pointues. Manipuler l’instrument avec
précaution. Conserver les broches protégées
lorsqu’elles ne sont pas utilisées.
A Électrodes remplaçables
B Capuchon protecteur détachable avec piles
et prises de test de résistance
C Interrupteur ON/OFF (marche/arrêt)
D Poignées en caoutchouc
E Écran LCD rétroéclairé
Humidimètre Stanley
L’humidimètre de Stanley détecte l’humidité dans
le bois et les matériaux de construction communs
dont, entre autres, les cloisons sèches, les enduits,
les planches en béton et en ciment.
A
B
B
C
D
E
Icône de pile
faible
Échelle de
matériaux de
construction
Échelle de
bois
SPÉCIFICATIONS
Affichage LCD avec double échelle
de mesure
Avec rétroéclairage vert
Portée, bois 6 à 44% ± 2%
Portée, matériaux de
construction 0,2 à 2% ± 0,1%
Arrêt automatique de
l’alimentation 3 minutes
Température de
fonctionnement 0 à 50°C (32° à 122°F)
% d’humidité de
fonctionnement 80% d’humidité relative
max.
Alimentation électrique (3) Piles boutons CR-2032
Broches d’électrodes (2) 8 mm (0,3”),
remplaçables
Accessoires Étui de transport avec
pince pour ceinture
MODE D’EMPLOI
Utilisation
1. Mettre l’interrupteur d’alimentation électrique sur
la position « ON ».
2. Soulever le capuchon protecteur 1, puis pivoter sur
la position 2.
3. Faire pénétrer les électrodes dans le matériel à
tester.
A. Appuyer soigneusement mais aussi
profondément que possible pour obtenir un bon
contact.
B. Dans le bois, effectuer les mesures en travers
du grain.
C. Effectuer plusieurs lectures pour obtenir une
meilleure idée du contenu général d’humidité
du matériel.
1
2
Grain du bois
Tester la précision de l’échelle d’humidité :
1. Avec le capuchon protecteur en place sur les
électrodes et l’alimentation de l’unité sur
« ON », faire tourner le capuchon jusqu’à ce que
le « T » s’aligne sur la flèche.
2. Enfoncer le capuchon. L’écran LCD devrait afficher
27,5% ±2% en lecture d’échelle « bois ».
Si la lecture n’est pas dans cette fourchette, l’unité
devrait être réparée.
T
+
1
2
T
+
3
©2009 THE STANLEY WORKS:
www.stanleyworks.com
Stanley Tools Product Group, Stanley Europe
Egide Walschaertsstraat 14-16, 2800 Mechelen, Belgium
(01/09) Issue 1
50301 X
GARANTIE
Garantie d’un (1) an.
Les produits défectueux seront réparés ou remplacés au
choix de Stanley Tools s’ils sont envoyés avec une preuve
d’achat à :
Stanley Tools France
24, rue Auguste Jouchoux
BP 1579
25 009 Besançon – France
Tél : 03 81 66 37 02
Cette garantie ne couvre pas les défauts causés par
des dommages accidentels, l’usure, une utilisation autre
que celle indiquée dans les instructions du fabricant ou
toute réparation ou modification de ce produit n’étant
pas autorisée par Stanley Tools. Les réparations ou le
remplacement sous garantie n’affectent pas la date
d’expiration de la garantie.
77-030
Igrometro
T
+
BUL
SL
SI
Attenzione: I puntali degli elettrodi sono molto
acuminati. Maneggiare lo strumento con
attenzione. Coprire i puntali quando non viene
utilizzato.
A Elettrodi sostituibili
B Cappuccio protettivo a scatto con batteria
e prese per provare la resistenza
C Interruttore accensione/spegnimento
D Manici in gomma
E Schermo LCD con retroilluminazione
Igromentro Stanley
L’igrometro Stanley rileva l’umidità presente
nel legno e nei materiali comunemente utilizzati
nelle costruzioni compresi, ma senza limitarsi a
cartongesso, gesso, cemento e stucchi.
A
B
B
C
D
E
T
+
Icona batteria
scarica
Scala materiali
da costruzione
Scala per legno
SPECIFICHE
Display LCD con doppia scala
per le misurazioni
Con retroilluminazione di
colore verde
Intervallo, Legno da 6 a 44% ± 2%
Intervallo, Materiali
da costruzione da 0,2 a 2,0% ± 0,1%
Spegnimento automatico 3 minuti
Temperatura di
funzionamento da 0 a 50°C (da 32° a
122°F)
% umidità per
funzionamento umidità relative 80% max.
Alimentazione 3 batterie CR-2032
Puntali elettrodi 2 da 8mm ( 0.3”),
Sostituibili
Accessori Protezione per trasporto
con clip per cinta
ISTRUZIONI DI FUNZIONAMENTO
Uso
1. Portare l’interruttore di accensione nella posizione
“ON”.
2. Sollevare il cappuccio di protezione 1, quindi farlo
ruotare nella posizione 2.
3. Premere gli elettrodi nel materiale da controllare.
A. Premere con attenzione, ma per quanto
possibile a fondo in modo da garantire un buon
contatto.
B. Nel legno, effettuare le misurazioni in senso
longitudinale rispetto alle venature.
C. Effettuare diverse misurazioni per avere
un’idea migliore sul contenuto generale
di umidità del materiale.
1
2
T
+
Controllo della precisione della scala dell’igrometro:
1. Con il cappuccio di protezione inserito sugli
elettrodi e l’unità accesa, ruotare il cappuccio fino
a quando la “T”non è allineata con la freccia.
2. Premere il cappuccino verso il basso. Sullo
schermo LCD dovrebbe visualizzare la lettura
27,5% ±2% sulla scala “legno”.
Se la lettura non è compresa nei limiti, potrebbe
essere necessario far riparare l’unità-
1
2
+
3
©2009 THE STANLEY WORKS:
www.stanleyworks.com
Stanley Tools Product Group, Stanley Europe
Egide Walschaertsstraat 14-16, 2800 Mechelen, Belgium
(01/09) Issue 1
50301 X
GARANZIA
Garanzia di un anno
I prodotti difettosi saranno riparati o sostituiti a discrezione
di Stanley Tools, se inviati al seguente indirizzo,
accompagnati dalla prova di acquisto:
Stanley Tools srl
Via Don L.Meroni, 56
22060 FIGINO SERENZA (Co)
Italy
La garanzia non copre difetti causati da danni accidentali,
logorio, uso differente da quello indicato nelle istruzioni del
produttore, o riparazioni o modifiche eseguite da personale
non autorizzato. Le riparazioni o sostituzioni effettuate in
base alla presente non hanno alcuna influenza sulla data
di scadenza della garanzia.
Laddove consentito dalla legge, Stanley declina ogni
responsabilità per danni incidentali o indiretti causati
da difetti a questo prodotto.
È vietata la modifica a questa garanzia senza l’autorizzazione
di Stanley Tools.
La presente non pregiudica i diritti legali degli acquirenti
del prodotto.
Questa garanzia è soggetta alla legislazione inglese;
Stanley Tools e l’acquirente accettano in maniera
irrevocabile di rimettersi alla giurisdizione esclusiva
dei tribunali inglesi, in caso di rivendicazioni o questioni
relative alla presente.
IMPORTANTE:
Il cliente è responsabile dell’uso corretto e della cura
dello strumento. Egli è inoltre pienamente responsabile
della verifica dei lavori durante il loro svolgimento e, di
conseguenza, della taratura dello strumento.
La taratura e la cura non sono coperte da garanzia.
Soggetto a modifica senza preavviso.
T
+
Venature del legno
T
+
Prova delle batterie:
1. Con il cappuccio di protezione inserito sugli
elettrodi e l’unità accesa, ruotare il cappuccio fino
a quando l’icona della batteria non sia allineata
con la freccia.
2. Premere il cappuccino verso il basso. Sullo
schermo LCD dovrebbe visualizzare la lettura 44%
sulla scala “legno”.
Se il display non è al 44% o sullo schermo LCD è
visibile l’icona della batteria, sostituire le batterie.
Dans les limites de la légalité, Stanley Tools ne sera pas
responsable, sous cette garantie, des dégâts accidentels ou
conséquents résultant de défauts de ce produit.
Cette garantie ne pourra pas être changée sans
l’autorisation de Stanley Tools.
Cette garantie n’affecte pas les droits statutaires des
consommateurs achetant ce produit.
Cette garantie devra être gouvernée et interprétée selon les
lois anglaises et Stanley Tools et l’acheteur conviendront
chacun irrévocablement de se soumettre à la juridiction
exclusive des tribunaux anglais à propos de toute
réclamation ou problème se produisant sous ou en rapport
avec cette garantie.
REMARQUE IMPORTANTE :
Le client est responsable de l’utilisation et de l’entretien
corrects de l’instrument.
Il est, en outre, entièrement responsable de la vérification de
la tâche pendant toute sa durée et de ce fait, de l’étalonnage
de l’instrument.
L’étalonnage et l’entretien ne sont pas couverts par la
garantie.
Sujet à changement sans préavis.
T
Tester les piles :
1. Avec le capuchon protecteur en place sur les
électrodes et l’alimentation de l’unité sur « ON »,
faire tourner le capuchon jusqu’à ce que l’icône de
la pile s’aligne sur la flèche.
2. Enfoncer le capuchon. L’écran LCD devrait afficher
44% en lecture d’échelle « bois ».
Si l’affichage n’est pas de 44% ou si l’icône de pile
apparaît sur l’écran LCD, changer les piles.
Remplacer les piles :
Enfoncer 1, puis soulever le couvercle 2, 3 appuyer
sur les onglets et la pile se dégagera.
Sostituzione delle batterie:
Premere 1, sollevare lo sportellino 2, 3 premere la
linguetta e la batteria si solleverà.
 Loading...