

Page 1
0-77-030
www.STANLEYTOOLS.com
79003406
Moisture Meter
GB
NL
GR
I
FIN
HU
BG
LV
D
DK
CZ
E
NO
SK
RO
LT
F
SE
RU
PT
PL
SI
EE
TR
HR
B
T
STHT77030
ON/SET
B
T
ON/SET
STHT77030
% %
44
2.0
1.8
1.6
1.4
1.2
1.0
0.8
0.6
0.4
0.2
40
35
30
25
20
15
10
6
Page 2
2
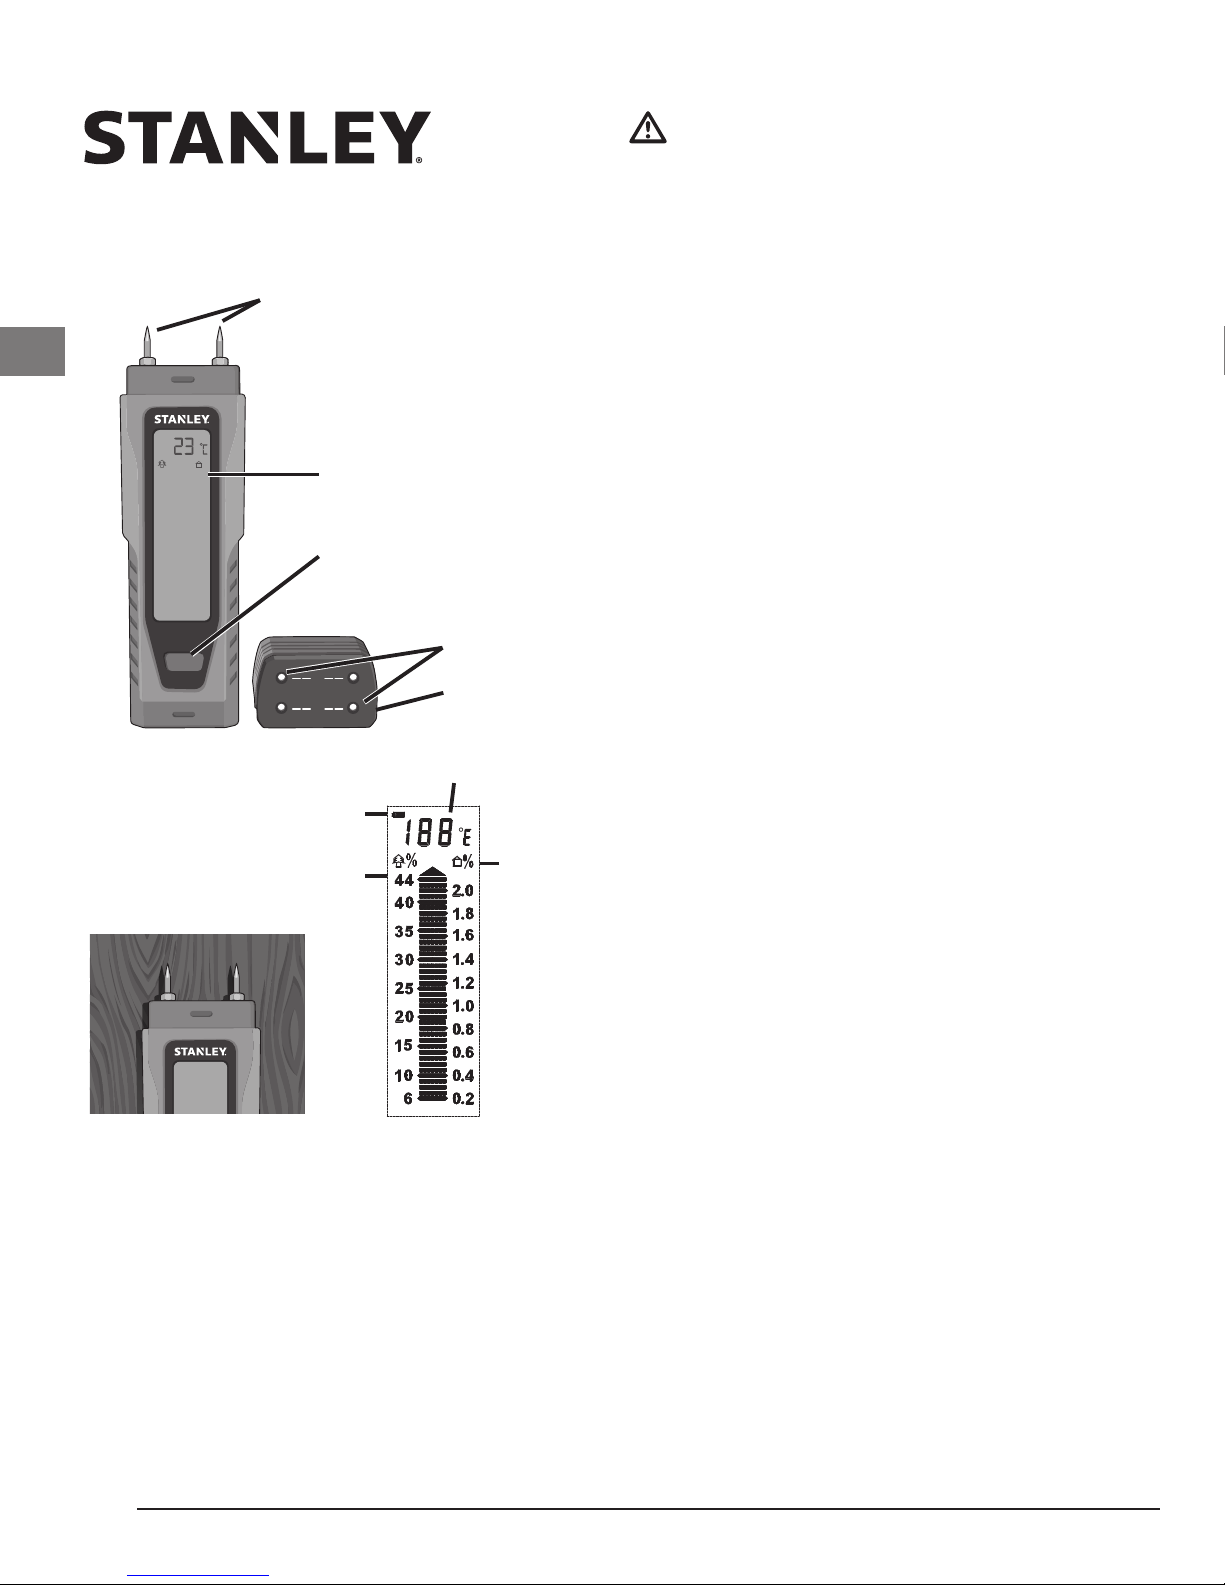
User Manual
GB
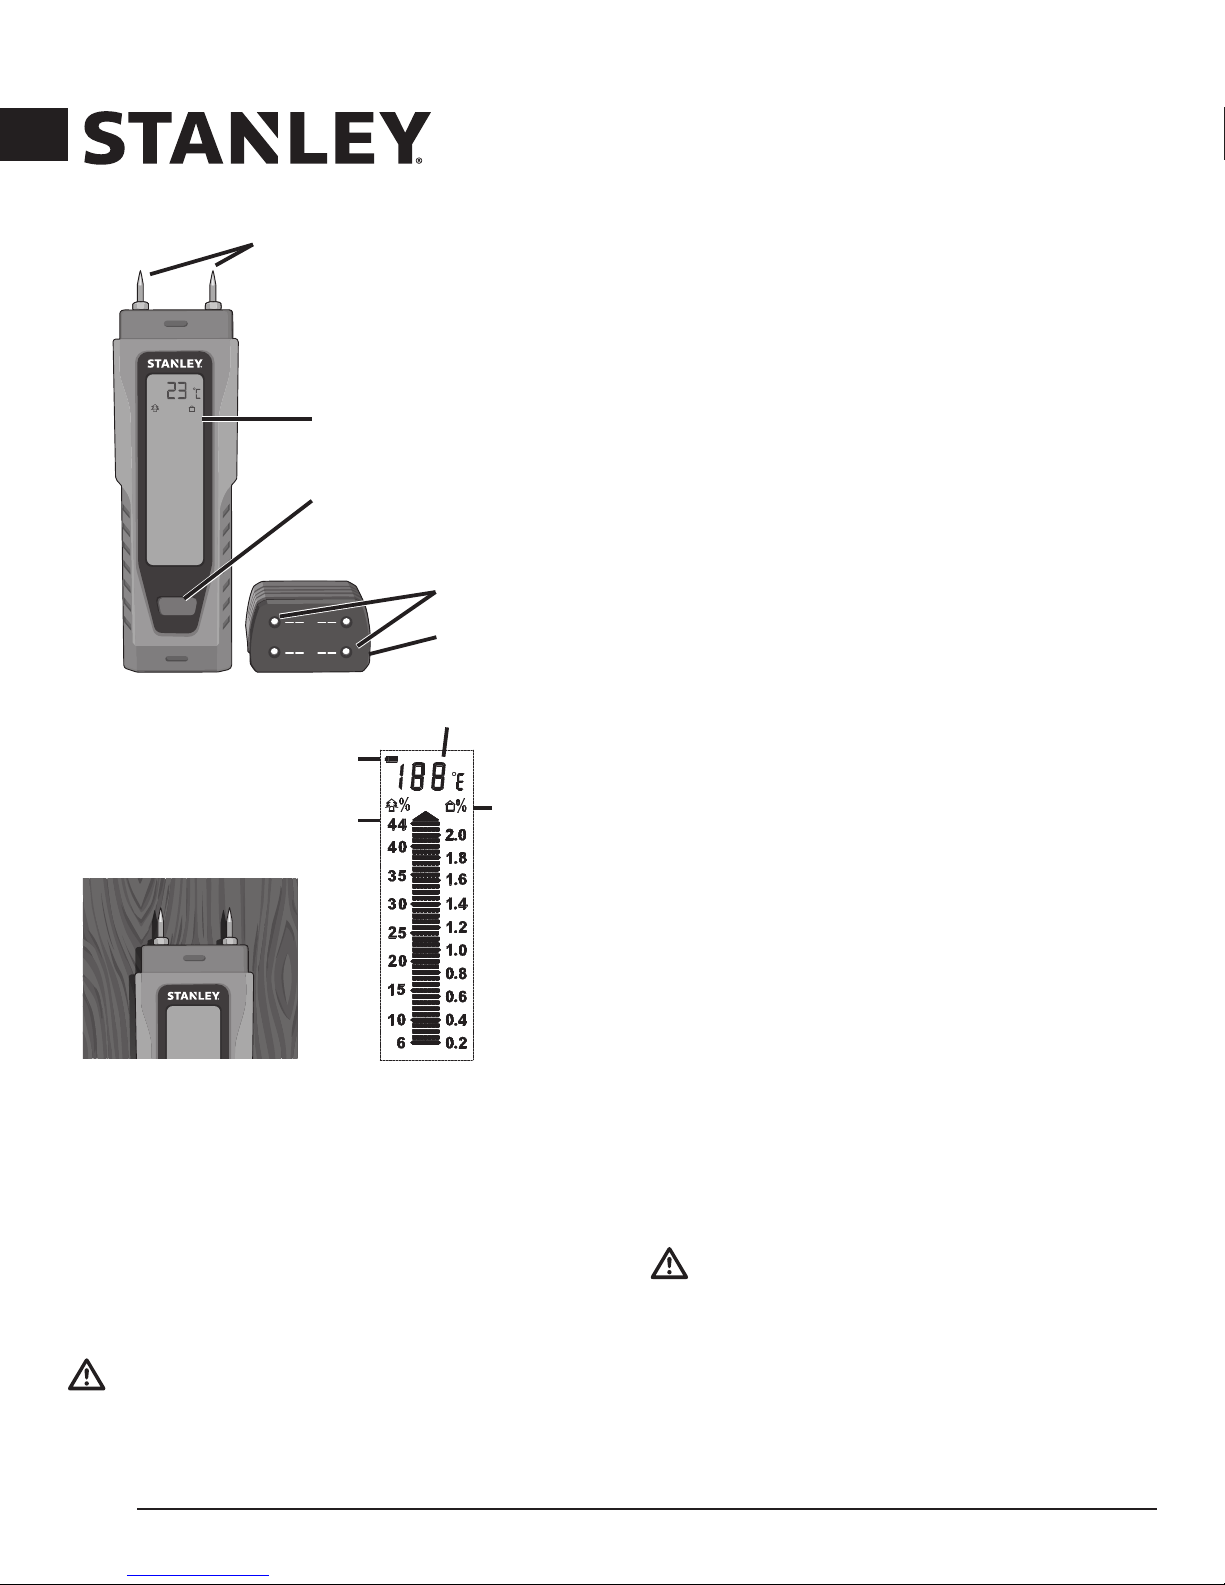
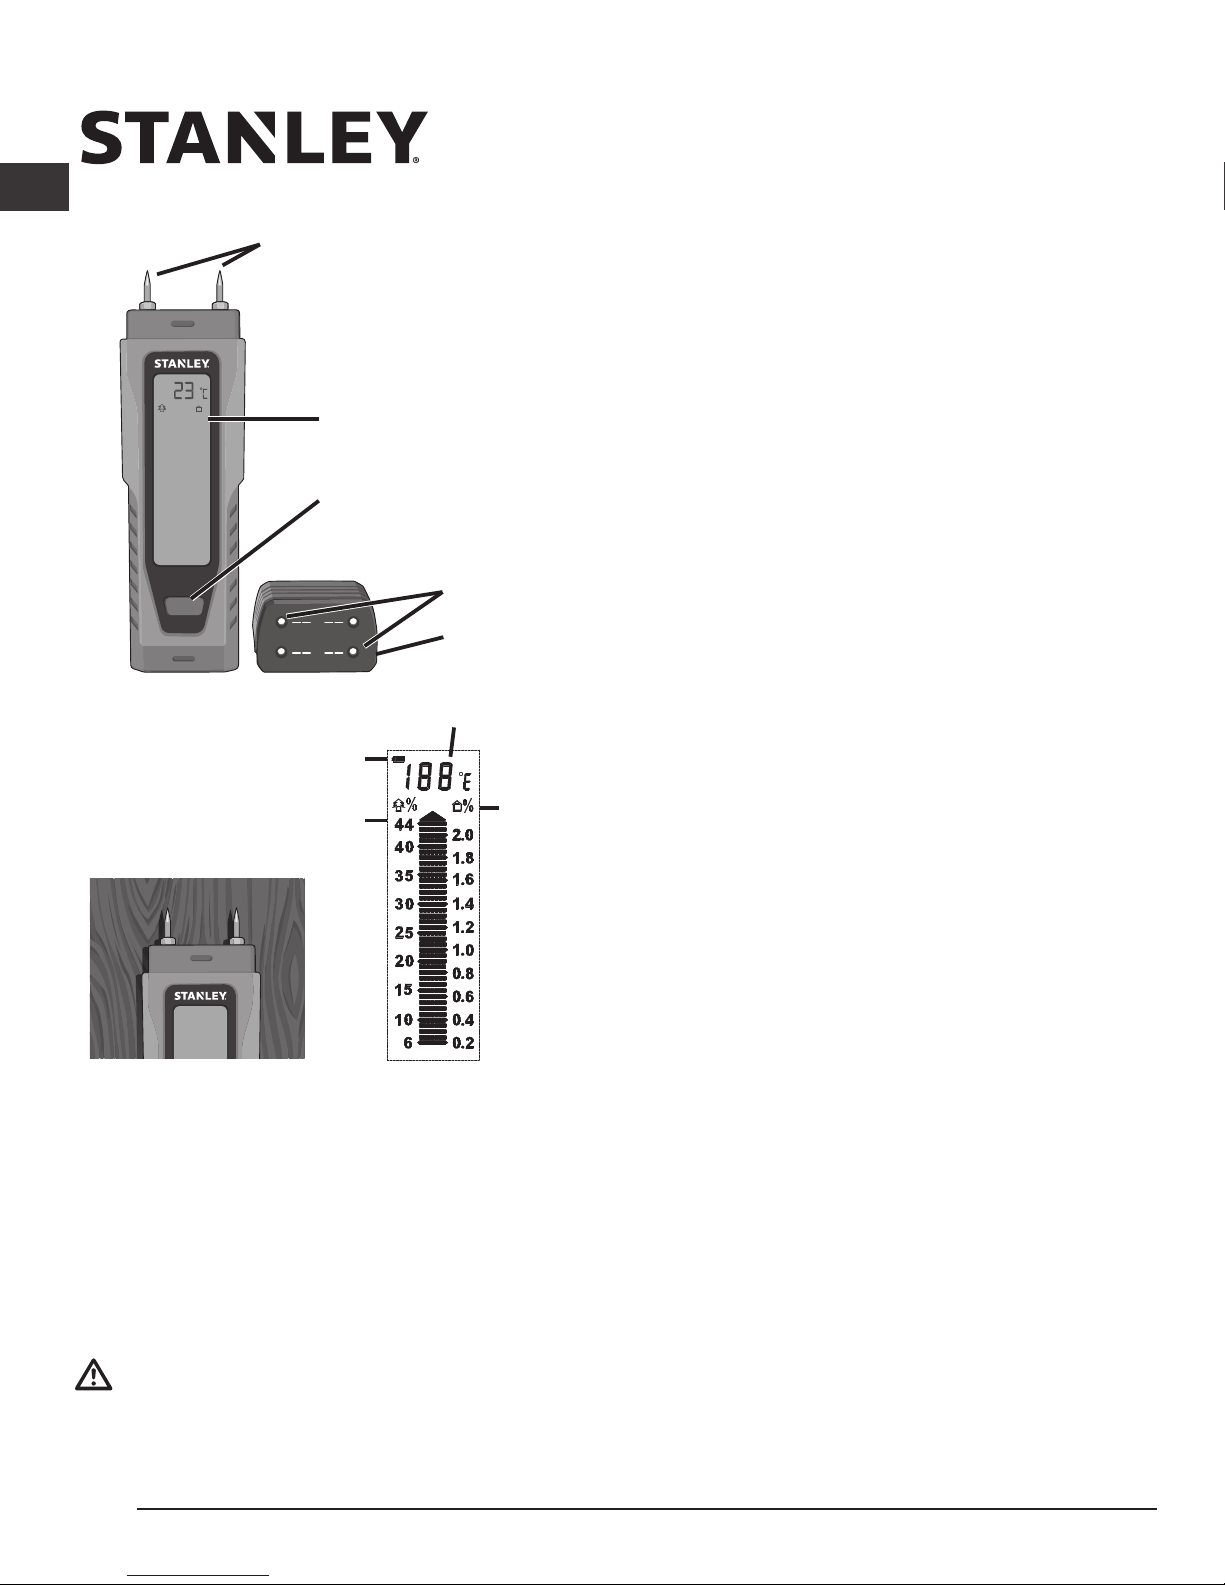
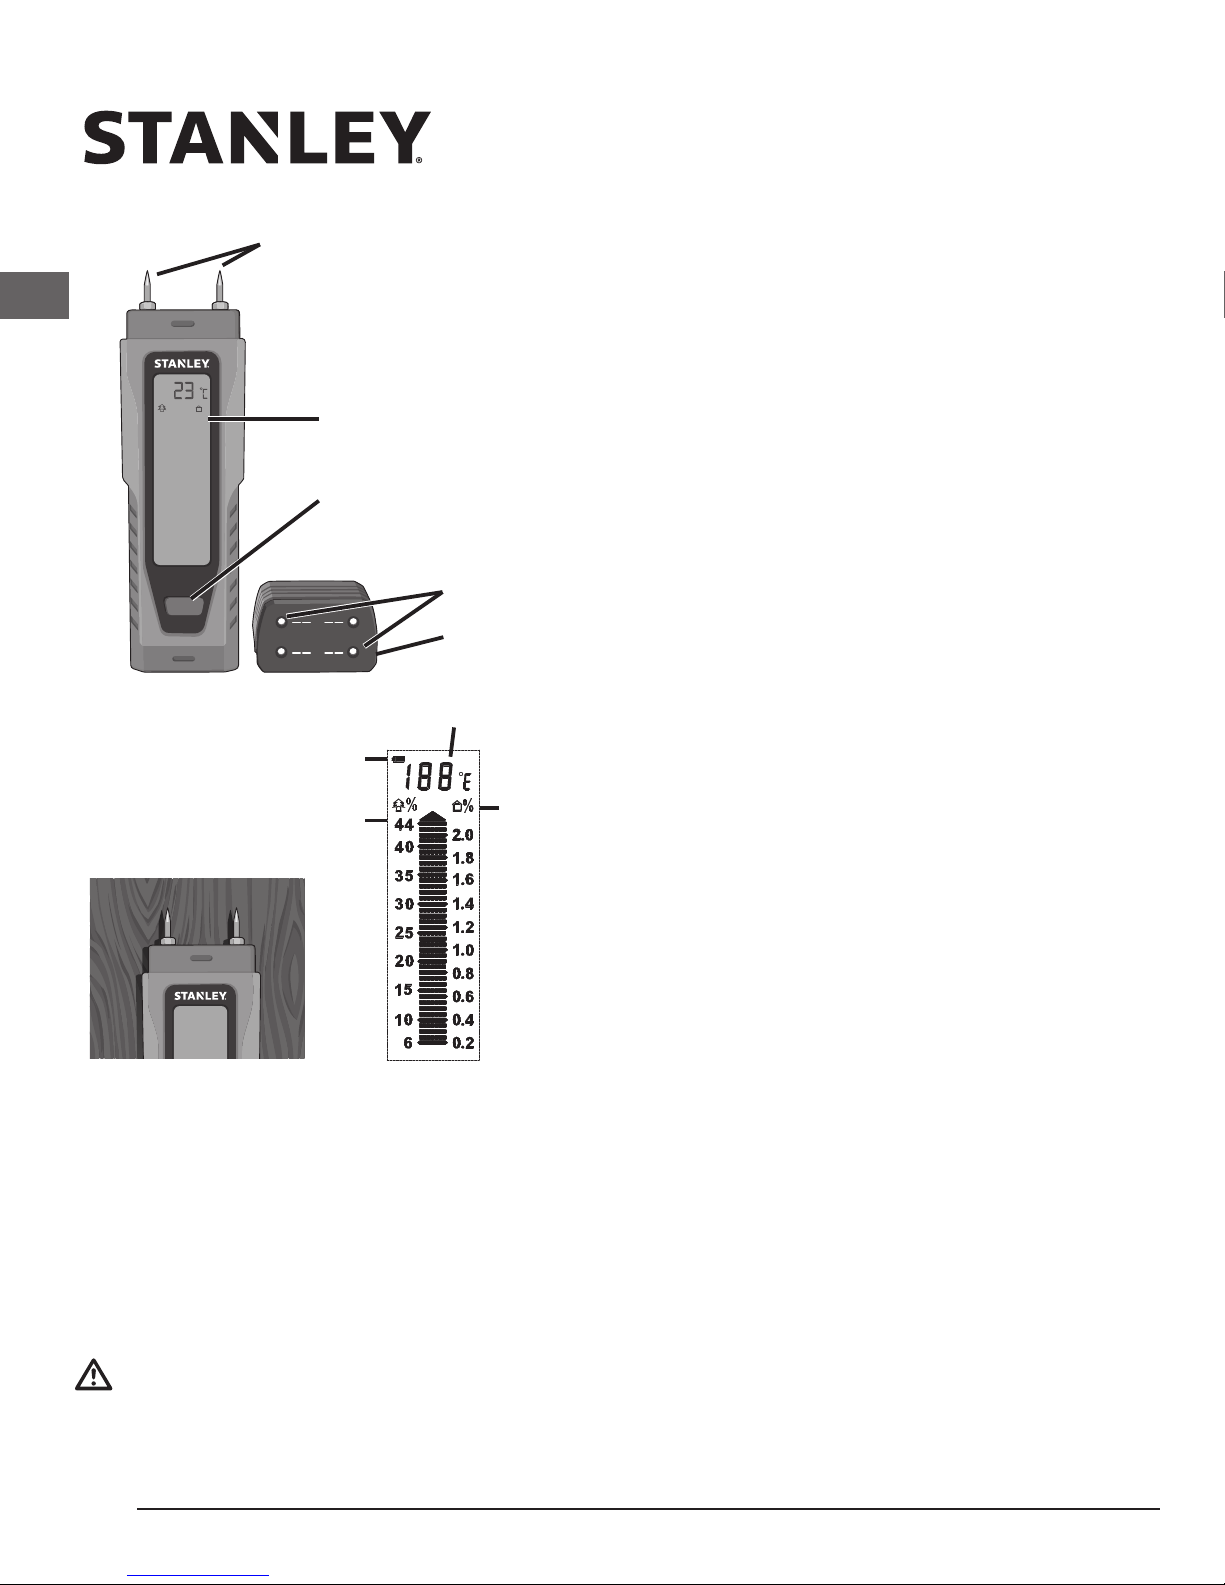
Low Battery
Icon
Power
Button
Wood Scale
Temperature
Test Sockets
Cap
Building
Materials
Scale
B
T
ON/SET
STHT77030
% %
44
2.0
1.8
1.6
1.4
1.2
1.0
0.8
0.6
0.4
0.2
40
35
30
25
20
15
10
6
Figure 1
Electrodes
LCD Display
STANLEY® Moisture Meter
The Stanley Moisture Meter detects
moisture in wood and common building
materials including, but not limited to,
drywall, plaster, concrete and cement
board.
WARNING:
• ALWAYS follow all instructions and
warnings included in this operator
manual.
• DO NOT splash or immerse the unit in
water.
• ALWAYS turn off the product when not
in use.
• ALWAYS ensure batteries are inserted
in the correct manner, with the correct
polarity.
• DO NOT mix old and new batteries.
Replace all of them at the same time
with new batteries of the same brand
and type.
• NEVER intentionally short any battery
terminals.
• DO NOT attempt to charge alkaline
batteries.
• DO NOT mix battery chemistries.
• DO NOT dispose of batteries in re.
• ALWAYS remove the batteries if storing
the unit for over a month.
• DO NOT dispose of this product with
household waste.
• ALWAYS check local codes and properly
dispose of used batteries.
• PLEASE RECYCLE in line with local
provisions for the collection and disposal
of electrical and electronic waste.
• CAUTION: The electrode pins are
very sharp. Handle instrument carefully.
Keep pins covered when not in use.
Page 3

3
Operating Instructions
BATTERY:
Open door on back of the unit using
a Philips head screwdriver. Insert 4 new
AAA batteries, ensuring polarity is correct
per the indication on the inside of case.
Replace battery door and Phillips head
screw. When the battery symbol appears
on the LCD screen, it is time to replace
your batteries.
OPERATION:
Remove cap (cap can be stored on
bottom of unit while in use).
Turn the unit on by pressing the power
button once.
Press electrodes into the material to be
tested.
• Press carefully, but as deeply as
possible to get good contact.
• In wood, take measurements across
the grain (Figure 1).
• Take several readings at various
locations to get a better idea of the
general moisture content of the
material.
The unit will auto-hold the moisture
measurement on display for 5 seconds
once the reading has stabilized and pins
are removed from the material being
measured.
The unit will automatically shut off after
approximately 1 minute of not being used/
no measurements.
The unit displays the environment
temperature at the top of the LCD display.
To change between F° & C° simply hold
the power button for about 3 seconds.
VERIFYING UNIT CALIBRATION:
There are 2 pairs of metal test sockets on
the top of the cap, these can be used to
test the moisture meter.
Touch the 2 probes to the 2 metal
contacts marked “T”, the reading on the
wood scale should be 19% ±1.
Now touch the 2 probes to the 2 metal
contacts marked “B”, all indication bars
should blink on the LCD display.
If the moisture meter operates as
mentioned above, the unit is working
properly.
SPECIFICATIONS:
Display LCD with dual
measuring scale
Range, Wood 6 – 44%
Range, Building
Materials
0.2 – 2.0%
Auto Power Off 1 minute
IP degree: IP20
Operating
Temperature
0°C – 40°C
(32°F – 104°F)
Storage
Temperature
-10°C - 50°C
Operating Humidity 80% Max Relative
Humidity
Battery 4x AAA (1.5 volt)
Accessories Carry pouch w/belt
loop
Page 4

4
User Manual
GB
Material Conversion Table:
The following table contains specic conversions for some common materials. All
values listed are in material % moisture.
Display Beech Sqruce Concrete Plaster Cement Aerated
Reading /Oak/Birch C20/C25 Screed Concrete
44 29 33.6 1.6 2.3 1.8 9.5
42 27.4 32 1.6 2.1 1.8 9
40 27.1 31.4 1.6 2.1 1.8 8.8
38 25.3 29.4 1.6 2 1.8 8
36 24.1 28 1.5 1.9 1.7 7.7
34 22.9 26.7 1.5 1.8 1.7 7.2
32 21.9 25.6 1.5 1.6 1.7 6.6
30 20.8 24.3 1.4 1.4 1.6 5.7
28 20.3 23.8 1.4 1.4 1.6 5.6
26 19.4 22.8 1.4 1.3 1.6 5.1
24 18.7 22 1.4 1.2 1.6 4.8
22 17.7 20.9 1.3 1 1.5 4.6
20 15.8 18.7 1.3 0.8 1.4 4.1
18 14.6 17.4 1.3 0.6 1.4 3.7
16 11.9 14.2 1.2 0.3 1.2 3
14 9.2 11.3 1.2 0.2 1.1 2.7
12 7.4 9.2 1.1 0.1 1.1 2.4
10 6.7 8.4 1.1 0.1 1.1 2.3
8 5.6 7.3 1.1 0.1 1 2.2
= Dry = Wet
Page 5

5
1-YEAR WARRANTY
Stanley warrants its electronic measuring
tools against deciencies in materials and
/ or workmanship for one year from date of
purchase.
Decient products will be repaired or replaced,
at Stanley’s option, if sent together with proof
of purchase to:
Stanley Black & Decker
210 Bath Road
Slough, Berkshire SL1 3YD
UK
This Warranty does not cover deciencies
caused by accidental damage, wear and
tear, use other than in accordance with
the manufacturer’s instructions or repair or
alteration of this product not authorised by
Stanley.
Repair or replacement under this Warranty
does not affect the expiry date of the Warranty.
To the extent permitted by law, Stanley shall
not be liable under this Warranty for indirect or
consequential loss resulting from deciencies
in this product.
This Warranty may not be varied without the
authorisation of Stanley.
This Warranty does not affect the statutory
rights of consumer purchasers of this product.
This Warranty shall be governed by and
construed in accordance with the laws of the
country sold where in and Stanley and the
purchaser each irrevocably agrees to submit
to the exclusive jurisdiction of the courts of that
country over any claim or matter arising under
or in connection with this Warranty.
Calibration and care are not covered by
warranty.
NOTE:
The customer is responsible for the correct
use and care of the instrument. Moreover,
the customer is completely responsible for
periodically checking the accuracy of the laser
unit, and therefore for the calibration of the
instrument.
Subject to change without notice
Page 6
6
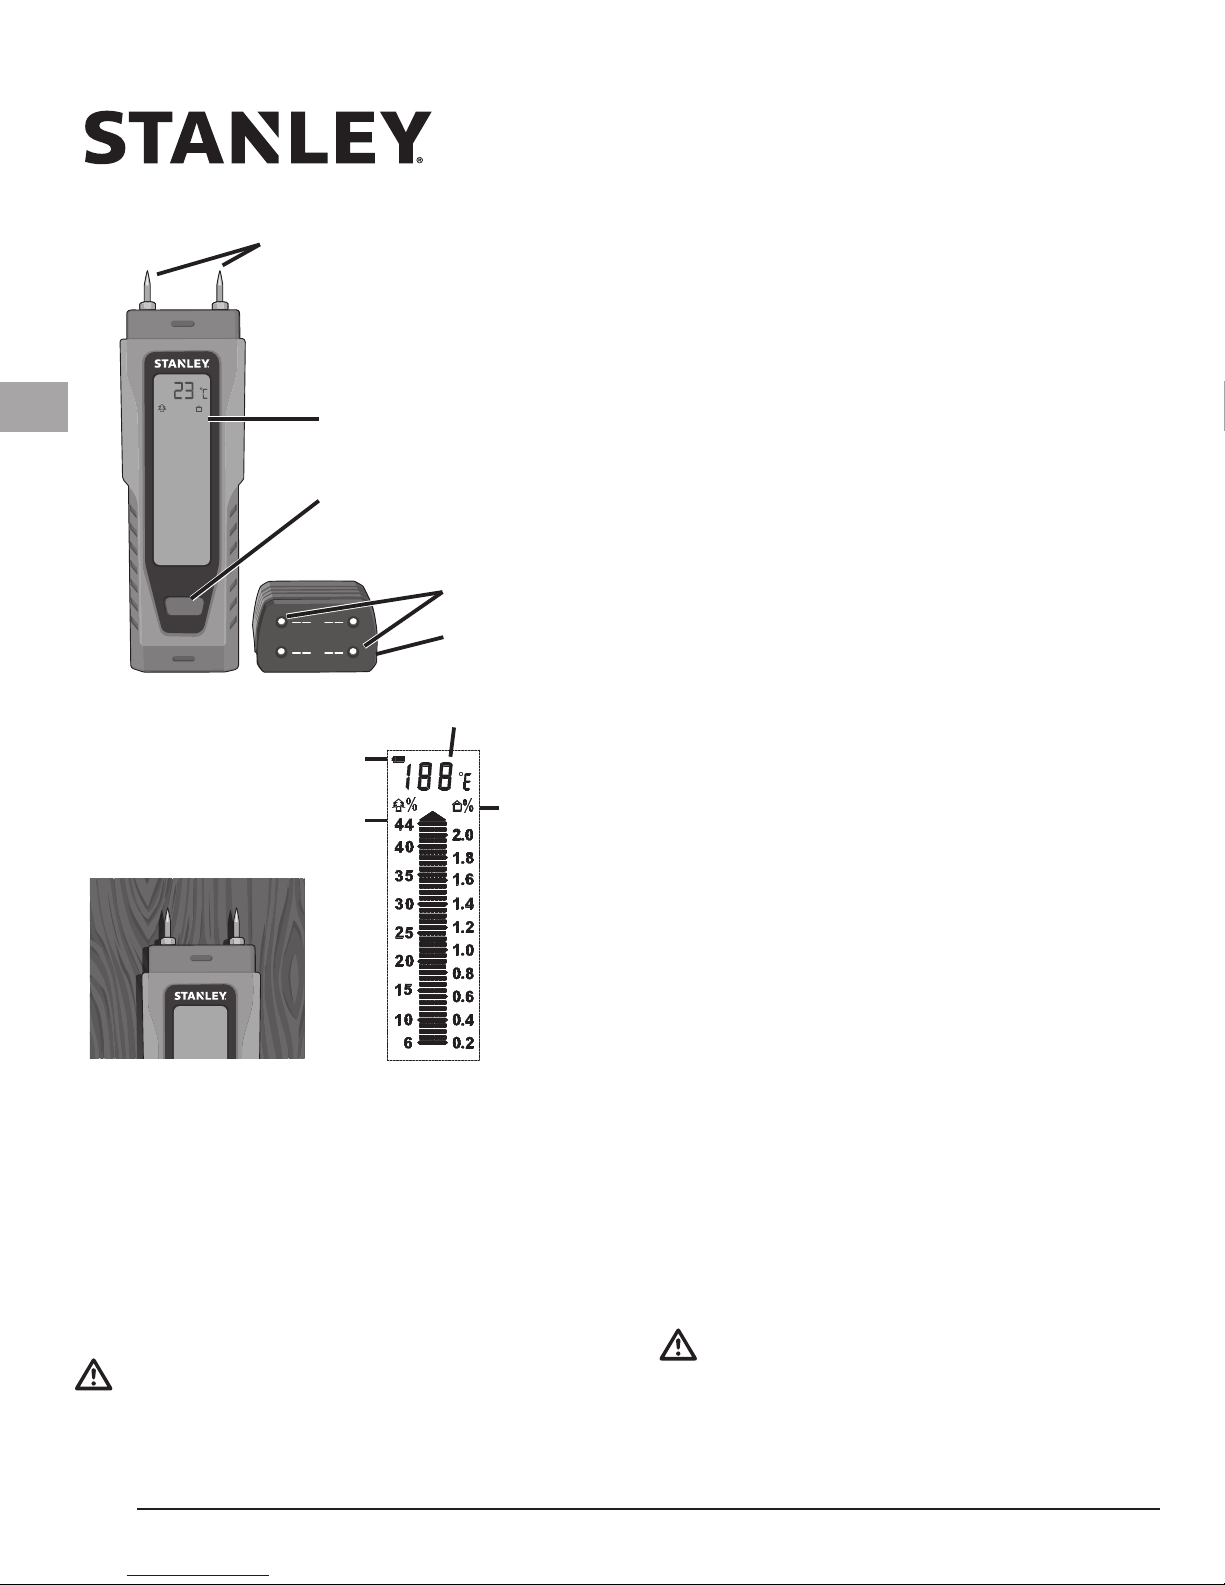
D
Benutzerhandbuch
Batterie schwach
Icon
Leistung
Taste
Holzskala
Temperatur
Prüfbuchsen
Kappe
BauMaterialien
Skala
B
T
ON/SET
STHT77030
% %
44
2.0
1.8
1.6
1.4
1.2
1.0
0.8
0.6
0.4
0.2
40
35
30
25
20
15
10
6
Abbildung 1
Elektroden
LCD-Display
STANLEY® Feuchtigkeitsmessgerät
Das Stanley Feuchtigkeitsmessgerät
erkennt Feuchtigkeit in Holz und üblichen
Baumaterialien, einschließlich, aber nicht
beschränkt auf Trockenbau, Putz, Beton
und Zementplatten.
WARNUNG:
• Befolgen Sie IMMER alle
Anweisungen und Warnhinweise in
diesem Bedienerhandbuch.
• KEINESFALLS das Gerät nass
spritzen oder in Wasser eintauchen.
• IMMER das Gerät ausschalten, wenn
es nicht benutzt wird.
• IMMER sicherstellen, dass die
Batterien richtig herum und mit der
richtigen Polarität eingesetzt sind.
• NICHT neue und alte Batterien
untereinander mischen. Immer alle
Batterien durch neue Batterien
derselben Marke und Art ersetzen.
• NIEMALS absichtlich
Batterieanschlüsse kurzschließen.
• NICHT versuchen, Alkali-Batterien
aufzuladen.
• NICHT Batterien mit unterschiedlicher
chemischer Zusammensetzung
gleichzeitig verwenden.
• Batterien NICHT verbrennen.
• IMMER die Batterien entfernen, wenn
das Gerät länger als einen Monat
aufbewahrt werden soll.
• Das Produkt NICHT im Hausmüll
entsorgen.
• IMMER Informationen über die
örtlichen Vorschriften einholen
und Altbatterien ordnungsgemäß
entsorgen.
• BITTE RECYCELN Sie das Gerät im
Einklang mit den lokalen Vorschriften
für die Sammlung und Entsorgung von
Elektro- und Elektronikabfällen.
Page 7

7
• VORSICHT: Die Elektrodenstifte
sind sehr scharf. Gerät vorsichtig
behandeln. Stifte abdecken, wenn sie
nicht in Gebrauch sind.
Bedienanweisungen
BATTERIE:
Abdeckung an der Rückseite des Geräts
mit einem Kreuzschlitzschraubendreher
öffnen. Legen Sie 4 neue AAABatterien ein und achten Sie auf die
richtige Polarität, die innen in dem
Fach angegeben ist. Bringen Sie die
Abdeckung und die Kreuzschlitzschraube
wieder an. Wenn das Batteriesymbol auf
dem LCD-Bildschirm angezeigt wird, ist
es Zeit, die Batterien zu ersetzen.
BETRIEB:
Entfernen Sie die Kappe (sie kann
während des Gebrauchs unten am Gerät
aufbewahrt werden).
Schalten Sie das Gerät durch einmaliges
Drücken der Power-Taste ein.
Drücken Sie die Elektroden in das zu
testende Material.
• Drücken Sie sie vorsichtig, aber so tief
wie möglich herein, um einen guten
Kontakt zu bekommen.
• Messen Sie in Holz quer zur Maserung
(Abbildung 1).
• Nehmen Sie mehrere Messungen
an verschiedenen Stellen vor, um
eine bessere Vorstellung von dem
allgemeinen Feuchtigkeitsgehalt des
Materials zu erhalten.
Nachdem sich die Messung stabilisiert
hat und die Stifte von dem gemessenen
Material entfernt wurden, zeigt das Gerät
die Feuchtigkeitsmesswerte automatisch
5 Sekunden lang auf dem Display an.
Das Gerät wird automatisch abgeschaltet,
nachdem es ca. 1 Minute nicht verwendet
wurde/keine Messungen erfolgt sind.
Das Gerät zeigt die
Umgebungstemperatur an der Oberseite
des LCD-Displays an. Um zwischen F°
und C° zu wechseln, halten Sie einfach
die Power-Taste für ca. 3 Sekunden
gedrückt.
VERIFIZIERUNG DER
EINHEITENKALIBRIERUNG:
Auf der Oberseite der Kappe gibt
es 2 Paar Metallprüfbuchsen, diese
können verwendet werden, um den
Feuchtigkeitsmesser zu testen.
Wenn Sie mit den 2 Sonden die
2 Metallkontakte berühren, die mit “T”
gekennzeichnet sind, sollte der Messwert
auf der Holzskala 19% ±1 sein.
Wenn Sie nun mit den 2 Sonden die
2 Metallkontakte berühren, die mit
“B” gekennzeichnet sind, sollten alle
Anzeigebalken auf dem LCD-Display blinken.
Wenn das Feuchtigkeitsmessgerät wie
oben beschrieben reagiert, funktioniert es
ordnungsgemäß.
Page 8

8
D
Benutzerhandbuch
TECHNISCHE DATEN:
Display LCD mit zwei
Messskalen
Bereich, Holz 6 – 44%
Bereich,
Baumaterialien
0,2 – 2,0%
Automatische
Abschaltung
1 Minute
IP-Schutzart: IP20
Betriebstemperatur
0°C – 40°C
(32°F – 104°F)
Lagertemperatur -10°C - 50°C
Luftfeuchtigkeit bei
Betrieb
80% Maximale
relative
Luftfeuchtigkeit
Batterie 4x AAA (1,5 Volt)
Zubehör Tragetasche mit
Gürtelschlaufe
Materialumrechnungstabelle:
Die folgende Tabelle enthält spezische Umrechnungen einiger gängiger Materialien.
Alle angegebenen Werte sind in % Materialfeuchte angegeben.
Display Buche Fichte Beton Gips Zement Gasbeton
Messwert /Eiche/
Birke
C20/C25 Estrich Beton
44 29 33,6 1,6 2,3 1,8 9,5
42 27,4 32 1,6 2,1 1,8 9
40 27,1 31,4 1,6 2,1 1,8 8,8
38 25,3 29,4 1,6 2 1,8 8
36 24,1 28 1,5 1,9 1,7 7,7
34 22,9 26,7 1,5 1,8 1,7 7,2
32 21,9 25,6 1,5 1,6 1,7 6,6
30 20,8 24,3 1,4 1,4 1,6 5,7
28 20,3 23,8 1,4 1,4 1,6 5,6
26 19,4 22,8 1,4 1,3 1,6 5,1
24 18,7 22 1,4 1,2 1,6 4,8
22 17,7 20,9 1,3 1 1,5 4,6
20 15,8 18,7 1,3 0,8 1,4 4,1
18 14,6 17,4 1,3 0,6 1,4 3,7
16 11,9 14,2 1,2 0,3 1,2 3
14 9,2 11,3 1,2 0,2 1,1 2,7
12 7,4 9,2 1,1 0,1 1,1 2,4
10 6,7 8,4 1,1 0,1 1,1 2,3
8 5,6 7,3 1,1 0,1 1 2,2
= Trocken = Nass
Page 9

9
1 JAHR GARANTIE
Stanley gewährt auf seine elektronischen
Messgeräte eine Garantie für ein Jahr ab
Kaufdatum bei Mängeln in Material und/oder
Verarbeitung.
Mangelhafte Produkte werden nach
Entscheidung von Stanley repariert oder
ersetzt, wenn sie zusammen mit dem
Kaufbeleg an folgende Adresse geschickt
werden:
Stanley Black & Decker Deutschland GmbH
Black & Decker Str. 40
65510 Idstein
Germany
Diese Garantie gilt nicht für Mängel, die durch
Unfallschäden, Verschleiß, Verwendung
entgegen den Anweisungen des Herstellers
oder eine Reparatur oder Änderung dieses
Produkts entstanden sind, die nicht von
Stanley erlaubt wurde.
Reparatur oder Austausch im Rahmen
dieser Garantie hat keinen Einuss auf das
Ablaufdatum der Garantie.
Soweit gesetzlich zulässig, ist Stanley im
Rahmen dieser Garantie nicht haftbar für
indirekte oder Folgeschäden, die aus Mängeln
dieses Produkts entstehen.
Diese Garantie kann ohne die Genehmigung
von Stanley nicht geändert werden.
Diese Garantie hat keinen Einuss auf die
gesetzlichen Rechte des Endverbrauchers an
diesem Produkt.
Diese Garantie unterliegt den Gesetzen des
Landes, in dem das Produkt verkauft wurde,
und Stanley und der Käufer erklären sich
jeweils unwiderruich damit einverstanden,
sich der ausschließlichen Gerichtsbarkeit
der Gerichte dieses Landes zu stellen, wenn
Ansprüche oder Probleme aus oder im
Zusammenhang mit dieser Garantie entstehen.
Kalibrierung und Wartung werden nicht durch
die Garantie abgedeckt.
HINWEIS:
Der Kunde ist für die korrekte Verwendung
und Pege des Instruments verantwortlich.
Darüber hinaus ist der Kunde vollständig für
die regelmäßige Überprüfung der Genauigkeit
der Lasereinheit und somit für die Kalibrierung
des Instruments verantwortlich.
Änderungen ohne vorherige Ankündigung
möglich
Page 10

10
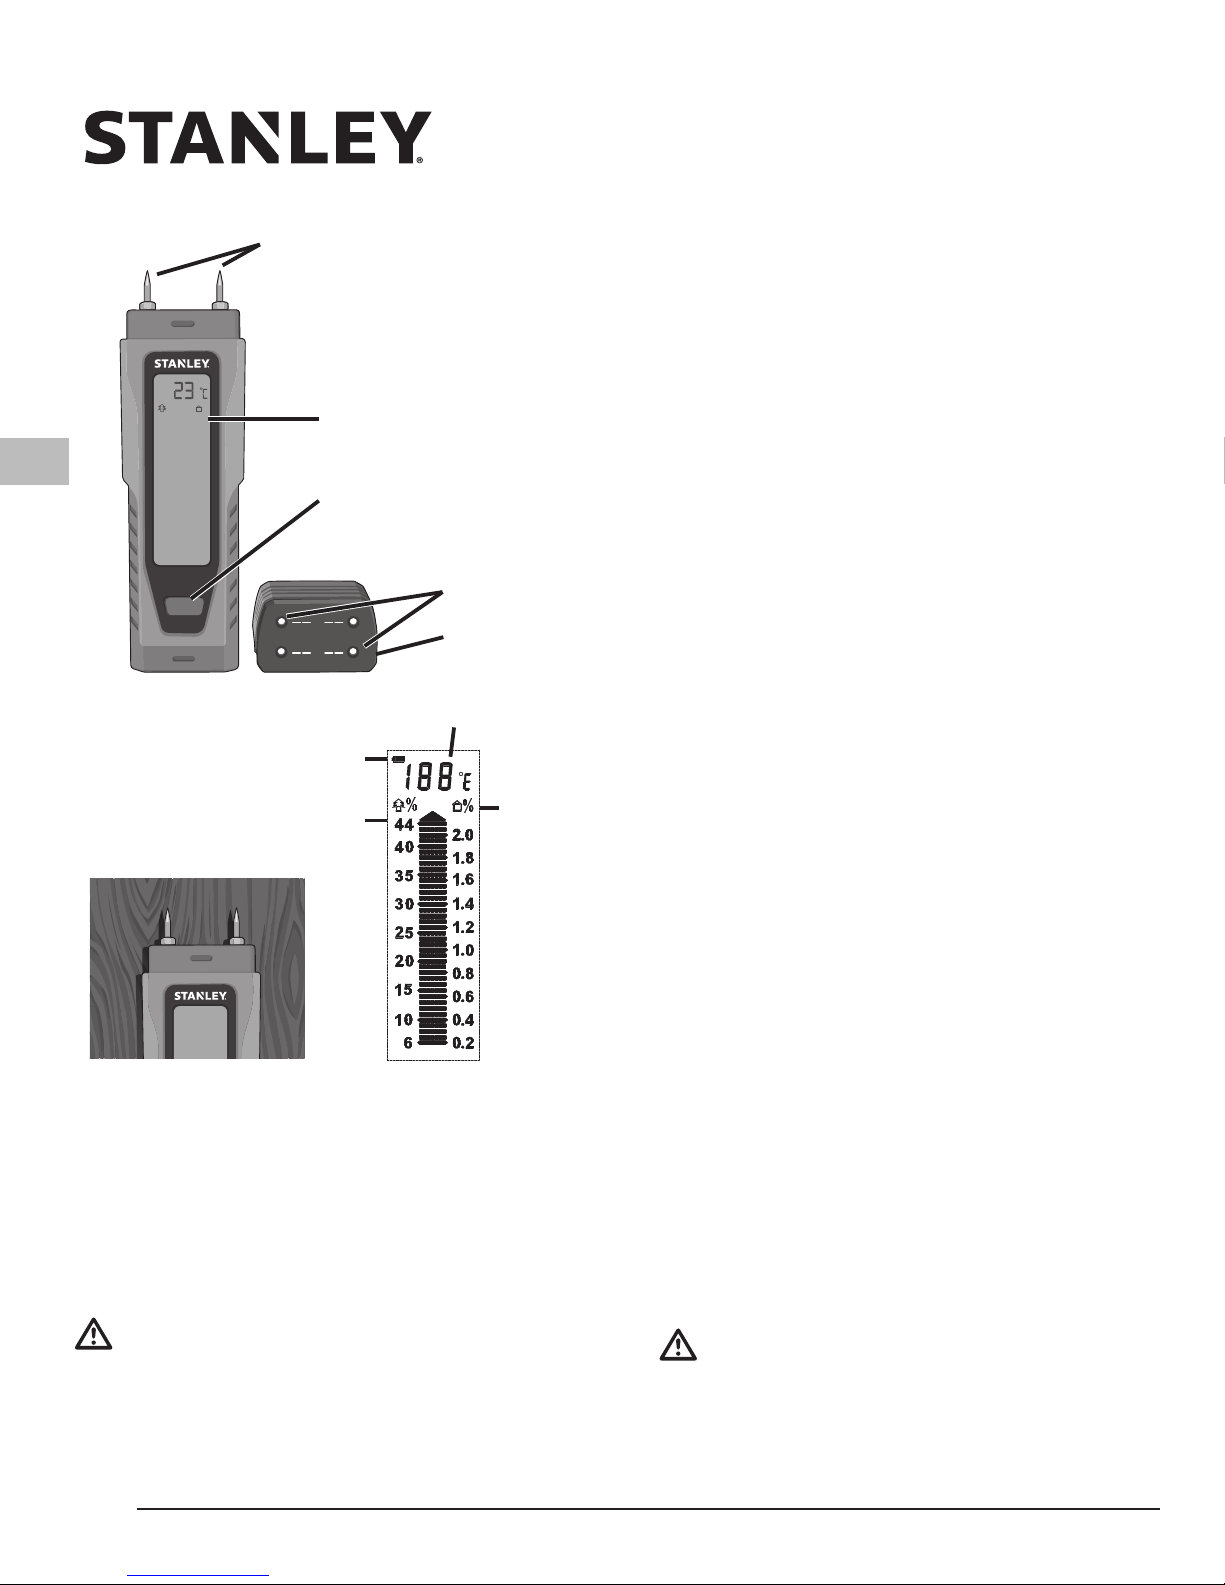
F
Manuel d’utilisation
Batterie faible
Icône
Bouton
d'alimentation
Échelle du bois
Température :
Douilles de test
Capuchon
Matériaux
de
construction
Échelle
B
T
ON/SET
STHT77030
% %
44
2.0
1.8
1.6
1.4
1.2
1.0
0.8
0.6
0.4
0.2
40
35
30
25
20
15
10
6
Figure 1
Électrodes
Écran LCD
Hygromètre STANLEY
®
L’hygromètre Stanley détecte l’humidité
dans le bois et les matériaux de
construction courants y compris, mais
sans limitation, les cloisons sèches, le
plâtre, le béton et les plaques de ciment.
AVERTISSEMENT :
• TOUJOURS suivre toutes les
instructions et tous les avertissements
inclus dans ce manuel d’utilisation.
• NE PAS asperger ou immerger
l’appareil dans l’eau.
• TOUJOURS éteindre l’appareil lorsqu’il
n’est pas utilisé.
• TOUJOURS s’assurer que les piles
sont insérées correctement, en
respectant la polarité.
• NE PAS mélanger les piles usagées
avec les piles neuves. Remplacer
toutes les piles en même temps avec
des piles neuves de marque et de type
identiques.
• NE JAMAIS court-circuiter les bornes
des piles de façon intentionnelle.
• NE PAS tenter de recharger des piles
alcalines.
• NE PAS mélanger les propriétés
chimiques des piles.
• NE PAS jeter les piles au feu.
• TOUJOURS retirer les piles si l’appareil
est stocké pendant plus d’un mois.
• NE PAS jeter ce produit avec les
ordures ménagères.
• TOUJOURS vérier la règlementation
locale et mettre au rebut les piles
usagées de façon appropriée.
• PROCÉDER AU RECYCLAGE
conformément aux dispositions locales
concernant la collecte et la mise
au rebut des déchets électriques et
électroniques.
Page 11

11
• ATTENTION : Les ergots de
l’électrode sont très tranchants.
Manipulez l’instrument avec soin.
Tenez les ergots couverts en cas
d’inutilisation.
Instructions d’utilisation
PILE :
Ouvrez le couvercle à l’arrière de
l’appareil à l’aide d’un tournevis à tête
cruciforme. Insérez 4 piles AAA neuves
en respectant la polarité indiquée
à l’intérieur du compartiment. Remettez le
couvercle des piles en place et revissez.
Lorsque le symbole de la pile s’afche
sur l’écran LCD, il est nécessaire de
remplacer les piles.
FONCTIONNEMENT :
Retirez le capuchon (il peut être rangé au
bas de l’appareil durant l’utilisation).
Mettez l’appareil en marche en appuyant
une fois sur le bouton d’alimentation.
Enfoncez les électrodes dans le matériau
à tester.
• Enfoncez soigneusement, mais le plus
en profondeur possible an d’obtenir un
bon contact.
• Dans le bois, effectuez la mesure en
travers du grain (Figure 1).
• Effectuez plusieurs mesures
à différents emplacements pour
obtenir une meilleure idée de la teneur
générale en humidité du matériau.
L’appareil conservera automatiquement
la mesure d’humidité sur l’écran pendant
5 secondes lorsque la mesure est
stabilisée et que les ergots sont retirés du
matériau mesuré.
L’appareil s’éteindra automatiquement
au bout d’une minute environ après la
dernière utilisation/mesure.
L’appareil afche la température ambiante
en haut de l’écran LCD. Pour passer des
unités °F à °C, maintenez simplement
enfoncé le bouton d’alimentation pendant
3 secondes environ.
VÉRIFICATION DE L’ÉTALONNAGE DE
L’APPAREIL :
Le sommet du capuchon comprend
2 paries de douilles métalliques de test
qui peuvent être utilisée pour tester
l’hygromètre.
Faites toucher les 2 sondes avec les
2 contacts métalliques marqués « T » ; la
mesure sur l’échelle du bois doit être de
19% ±1.
Faites toucher à présent les 2 sondes
avec les 2 contacts métalliques marqués
« B », toutes les barres de l’indicateur
doivent clignoter sur l’écran LCD.
Si l’hygromètre se comporte comme
indiqué ci-dessus, l’appareil fonctionne
correctement.
Page 12

12
F
Manuel d’utilisation
SPÉCIFICATIONS :
Écran LCD avec double
échelle de mesure
Plage, bois 6 – 44%
Plage, matériaux de
construction
0,2 – 2,0%
Extinction
automatique
1 minute
Degré IP : IP20
Température de
fonctionnement
0 °C – 40 °C
(32 °F – 104 °F)
Température de
stockage
-10 °C – 50 °C
Humidité de
fonctionnement
80 % d'humidité
relative maximum
Piles 4 AAA (1,5 volts)
Accessoires Housse de
transport avec
boucle pour
ceinture
Tableau de conversion des matériaux :
Le tableau suivant contient les taux de conversions spéciques pour les matériaux les
plus courants. Toutes les valeurs indiquées sont en % d’humidité du matériau.
Écran Hêtre Épicéa Béton Plâtre Ciment Cellulaire
Lecture /chêne/
bouleau
C20/C25 Chape Béton
44 29 33,6 1,6 2,3 1,8 9,5
42 27,4 32 1,6 2,1 1,8 9
40 27,1 31,4 1,6 2,1 1,8 8,8
38 25,3 29,4 1,6 2 1,8 8
36 24,1 28 1,5 1,9 1,7 7,7
34 22,9 26,7 1,5 1,8 1,7 7,2
32 21,9 25,6 1,5 1,6 1,7 6,6
30 20,8 24,3 1,4 1,4 1,6 5,7
28 20,3 23,8 1,4 1,4 1,6 5,6
26 19,4 22,8 1,4 1,3 1,6 5,1
24 18,7 22 1,4 1,2 1,6 4,8
22 17,7 20,9 1,3 1 1,5 4,6
20 15,8 18,7 1,3 0,8 1,4 4,1
18 14,6 17,4 1,3 0,6 1,4 3,7
16 11,9 14,2 1,2 0,3 1,2 3
14 9,2 11,3 1,2 0,2 1,1 2,7
12 7,4 9,2 1,1 0,1 1,1 2,4
10 6,7 8,4 1,1 0,1 1,1 2,3
8 5,6 7,3 1,1 0,1 1 2,2
= Sec = Mouillé
Page 13

13
GARANTIE DE 1 AN
Stanley garantit ses outils de mesure
électroniques contre les défauts de pièces et/
ou de fabrication pendant un an, à compter de
la date d’achat.
Les produits défectueux sont réparés ou
remplacés, à la discrétion de Stanley, s’ils sont
envoyés avec leur preuve d’achat à :
Stanley Black & Decker France
5 Allée des Hetres
CS 60105
69579
Limonest
Cette garantie ne couvre pas les pannes
dues à des dommages accidentels, une
usure normale, une utilisation autre que celle
conforme aux instructions du fabricant, une
réparation ou une altération du produit qui
n’a pas été autorisée par Stanley.
La réparation ou le remplacement sous
garantie n’affecte pas la date de n de la
garantie.
Dans les limites imposées par la loi, Stanley ne
saurait être tenu responsable, en vertu de cette
garantie, des pertes indirectes ou consécutives
à la panne de cet outil.
Cette garantie ne peut pas être modiée sans
l’autorisation de Stanley.
Cette garantie n’affecte d’aucune sorte les
droits légaux des personnes ayant acheté ce
produit.
Cette garantie est régie et interprétée
conformément à la législation applicable
dans le pays d’achat et Stanley et l’acheteur
s’engagent irrévocablement à soumettre à la
juridiction exclusive des tribunaux de ce pays,
toute réclamation ou problème découlant de
cette garantie ou qui serait en relation avec
elle.
Le calibrage et l’entretien ne sont pas couverts
par la garantie.
REMARQUE :
Le client est responsable d’utiliser et
d’entretenir correctement l’instrument de
mesure. De plus, le client est entièrement
responsable de la vérication périodique de
l’exactitude de l’appareil et donc du calibrage
de l’instrument de mesure.
Sujet à modication sans notication préalable
Page 14
14
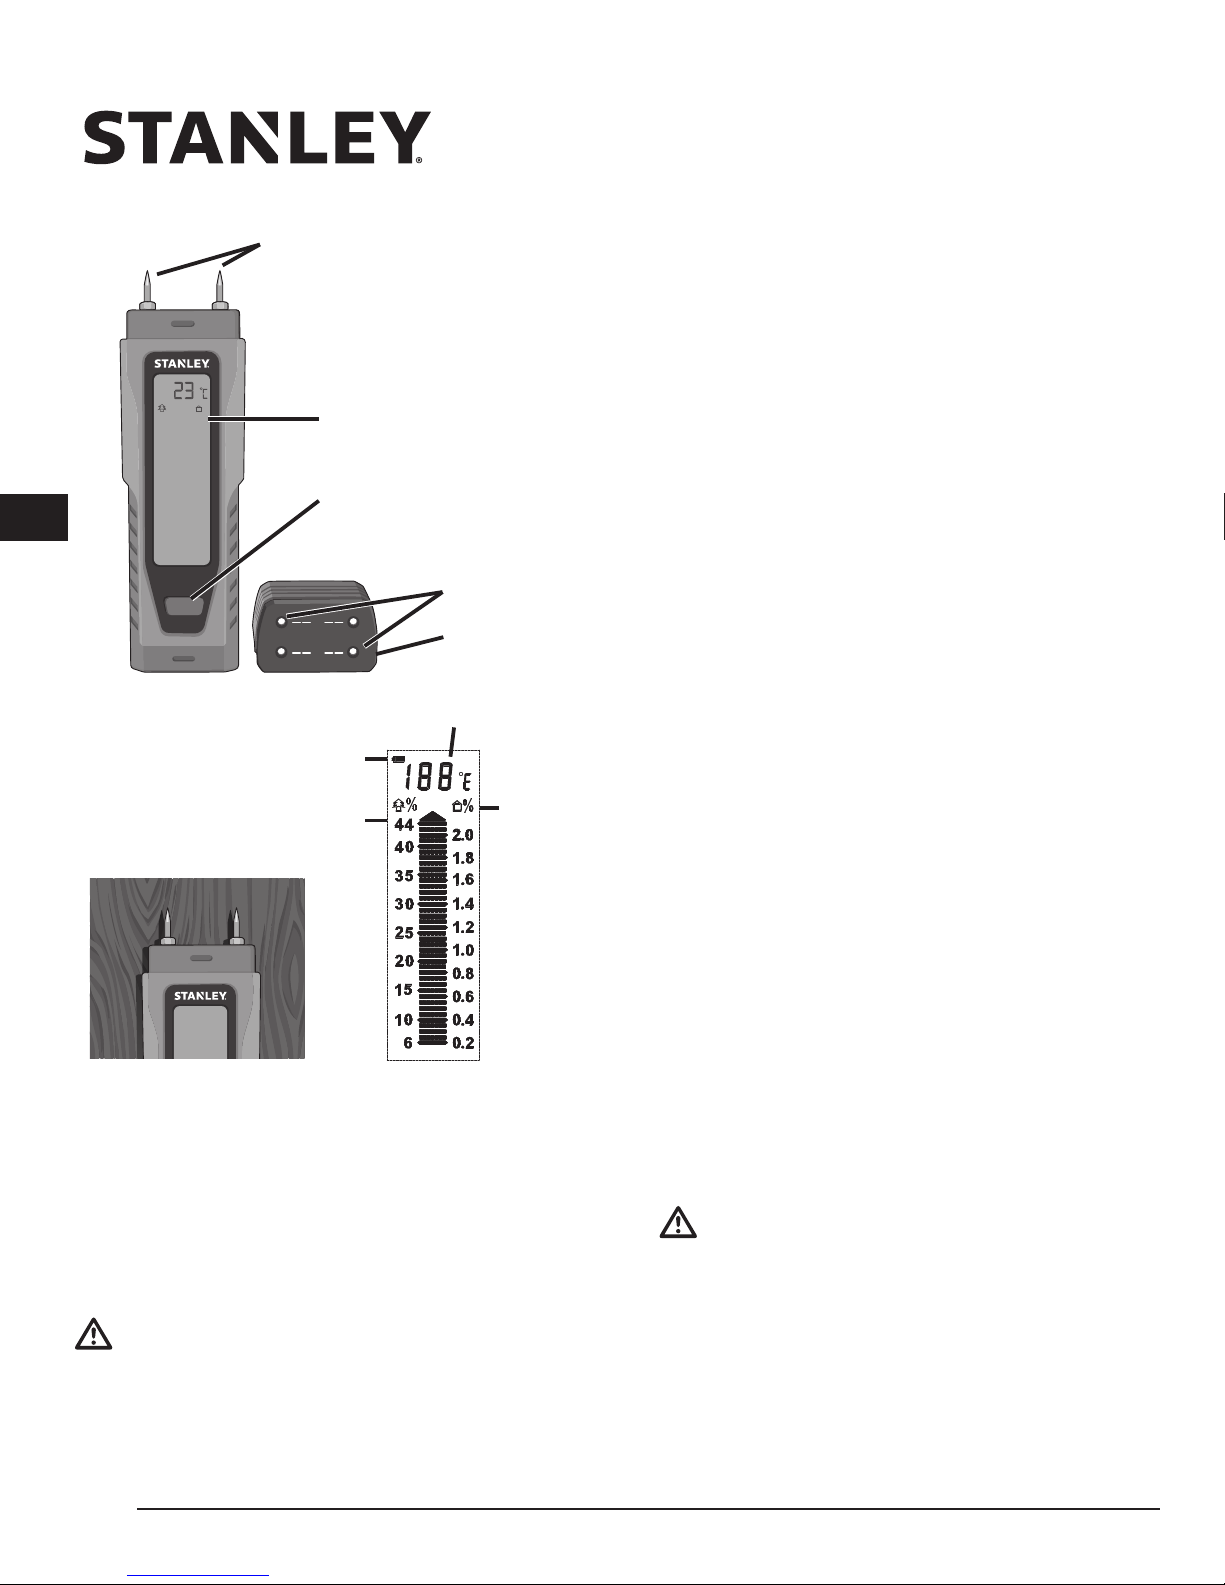
I
Manuale utente
Batteria quasi scarica
Icona
Potenza
Pulsante
Scala legno
Temperatura
Prese di prova
Coperchio
Costruzione
Materiali
Scala
B
T
ON/SET
STHT77030
% %
44
2.0
1.8
1.6
1.4
1.2
1.0
0.8
0.6
0.4
0.2
40
35
30
25
20
15
10
6
Figura 1
Elettrodi
Display LCD
Igrometro STANLEY
®
L’igrometro Stanley rileva l’umidità nel
legno e nei materiali da costruzione
comuni, compresi, ma non limitati
a, pannelli in cartongesso, gesso,
calcestruzzo e cemento.
ATTENZIONE:
• Seguire SEMPRE tutte le istruzioni
e gli avvertimenti riportati dal presente
manuale istruzioni.
• NON spruzzare acqua sull’unità o non
immergerla nell’acqua.
• Spegnere SEMPRE il prodotto quando
esso non viene utilizzato.
• Assicurarsi SEMPREche le batterie
siano inserite correttamente e con la
polarità corretta.
• NON mischiare le batterie vecchie
e nuove. Sostituirle tutte allo stesso
tempo con batterie nuove della stessa
marca e dello stesso tipo.
• Non cortocircuitare
MAIintenzionalmente un terminale di
batteria.
• NON cercare mai di ricaricare batterie
alcaline.
• NON mischiare le composizioni
chimiche delle batterie.
• NON smaltire le batterie nel fuoco.
• Rimuovere SEMPRE le batterie
quando l’unità viene stoccata per oltre
un mese.
• NON smaltire il prodotto con i riuti
domestici.
• Controllare SEMPRE le leggi
vigenti a livello locale in materia di
smaltimento di batterie esauste.
• RICICLAREil prodotto in linea con le
disposizioni locali in materia di raccolta
e smaltimento di riuti elettrici ed
elettronici.
Page 15

15
• ATTENZIONE: Le punte degli
elettrodi sono molto accuminate.
Maneggiare lo strumento con cautela.
Mantenere le punte coperte quando
non in uso.
Istruzioni di funzionamento
BATTERIA:
Rimuovere il coperchio sul retro dell’unità
servendosi di un cacciavite Phillips.
Inserire 4 batterie AAA, accertandosi
che la polarità in base all’indicazione
all’interno del corpo della batteria sia
corretta. Reinserire il coperchio e la vite
Phillips. Quando sul display LCD appare
il simbolo della batteria, è arrivato il
momento di sostituire le proprie batterie.
FUNZIONAMENTO:
Rimuovere il coperchio (esso può essere
conservato sul fondo dell’unità durante
l’utilizzo).
Mettere in funzione l’unità premendo una
volta il pulsante di accensione.
Premere gli elettrodi nel materiale da
sottoporre a test.
• Premere con cautela, ma il più
profondamente possibile per ottenere
un buon contatto.
• Ottenere nel legno le misurazioni
trasversali (gura 1).
• Eseguire diverse letture in diverse
posizioni per ottenere un quadro
migliore dell’umidità generale del
materiale.
L’unità visualizza sul display il valore di
misurazione dell’umidità per 5 secondi
non appena la lettura è stabile e le punte
sono state estratte dal materiale da
misurare.
L’unità si spegne automaticamente dopo
circa 1 minuto di non utilizzo/in assenza
di misurazioni.
L’unità visualizza la temperatura ambiente
nella parte superiore del display LCD.
Per passare da F° a C° e viceversa
basta tenere premuto il pulsante di
alimentazione per circa 3 secondi.
VERIFICA DELLA CALIBRAZIONE
DELL’UNITÁ:
Vi sono 2 paia di prese di prova in metallo
sulla parte superiore del coperchio ed
esse possono essere utilizzate per
eseguire un test dell’igrometro.
Le 2 sonde a contatto devono toccare
i 2 contatti metallici contrassegnati con la
lettera “T”, la scala per il legno dovrebbe
corrispondere a 19% ±1.
Ora le 2 sonde devono toccare i contatti
metallici contrassegnati con la lettera “B”,
tutte le barre di indicazione dovrebbero
lampeggiare sul display LCD.
Se il funzionamento dell’igrometro
corrisponde alla descrizione di cui sopra,
l’unità funziona correttamente.
Page 16

16
I
Manuale utente
SPECIFICHE:
Display LCD con
doppia scala di
misurazione
Intervallo, legno 6 – 44%
Intervallo, materiali da
costruzione
0,2 – 2,0%
Autospegnimento 1 minuto
Grado di protezione IP: IP20
Temperatura di
esercizio
da 0°C a 40°C
(da 32°F a 104°F)
Temperatura di
stoccaggio
da -10°C a 50°C
Umidità di esercizio 80% di umidità
relativa massima
Batteria 4x AAA (1.5 volt)
Accessori Astuccio da
trasporto con
gancio per tracolla
Tabella di conversione materiale:
La seguente tabella consente la conversione per la maggior parte dei materiali comuni.
Tutti i valori riportati sono espressi in % di umidità.
Display Faggio Abete Calcestruzzo Gesso Cemento Calcestruzzo
aerato
Lettura /quercia/
betulla
C20/C25 Massetto Calcestruzzo
44 29 33,6 1,6 2,3 1,8 9,5
42 27,4 32 1,6 2,1 1,8 9
40 27,1 31,4 1,6 2,1 1,8 8,8
38 25,3 29,4 1,6 2 1,8 8
36 24,1 28 1,5 1,9 1,7 7,7
34 22,9 26,7 1,5 1,8 1,7 7,2
32 21,9 25,6 1,5 1,6 1,7 6,6
30 20,8 24,3 1,4 1,4 1,6 5,7
28 20,3 23,8 1,4 1,4 1,6 5,6
26 19,4 22,8 1,4 1,3 1,6 5,1
24 18,7 22 1,4 1,2 1,6 4,8
22 17,7 20,9 1,3 1 1,5 4,6
20 15,8 18,7 1,3 0,8 1,4 4,1
18 14,6 17,4 1,3 0,6 1,4 3,7
16 11,9 14,2 1,2 0,3 1,2 3
14 9,2 11,3 1,2 0,2 1,1 2,7
12 7,4 9,2 1,1 0,1 1,1 2,4
10 6,7 8,4 1,1 0,1 1,1 2,3
8 5,6 7,3 1,1 0,1 1 2,2
= Secco = Umido
Page 17

17
GARANZIA DI 1 ANNO
Stanley garantisce i propri strumenti elettronici
di misura contro difetti nei materiali e/o di
fabbricazione per un anno dalla data di
acquisto.
I prodotti difettosi saranno riparati o sostituiti,
a discrezione di Stanley Tools, se inviati
insieme con la prova di acquisto a:
Stanley Black&Decker Italia
Via Energypark 6 c/o Building 3 Sud
20871 Vimercate (MB)
Italy
La presente garanzia non copre i difetti dovuti
a danni accidentali, usura, utilizzo non in
conformità con le istruzioni del fabbricante,
riparazione o alterazione di questo prodotto
non autorizzate da Stanley.
La riparazione o la sostituzione in garanzia non
pregiudica la data di scadenza della garanzia.
Nella misura consentita dalla legge, Stanley
Tools non è responsabile ai sensi della
presente garanzia a fronte di perdite indirette
o consequenziali derivanti da difetti di questo
prodotto.
La presente garanzia non può essere
modicata senza l’autorizzazione di Stanley.
La presente garanzia non pregiudica i diritti
legali dei consumatori acquirenti di questo
prodotto.
La presente garanzia è regolata e interpretata
in conformità alle leggi in vigore nel Paese
di vendita e Stanley e l’acquirente accettano
irrevocabilmente di sottoporsi alla giurisdizione
esclusiva dei tribunali inglesi per eventuali
reclami o questioni derivanti da o in relazione
alla presente garanzia.
La calibrazione e la manutenzione non sono
coperte da garanzia.
NOTA:
Il cliente è responsabile per un utilizzo e la
manutenzione dello strumento in modo
corretto. Inoltre il cliente di assume la completa
responsabilità per controlli periodici della
precisione dell’unità laser e quindi per la
calibrazione dello strumento.
Con riserva di modiche senza preavviso
Page 18
18
E
Manual de usuario
Medidor de humedad
Batería baja
Icono
Alimentación
Botón
Escala de madera
Temperatura
Clavijas de
prueba
Tapón
Edicio
Materiales
Escala
B
T
ON/SET
STHT77030
% %
44
2.0
1.8
1.6
1.4
1.2
1.0
0.8
0.6
0.4
0.2
40
35
30
25
20
15
10
6
Figura 1
Electrodos
Pantalla LCD
STANLEY
®
El medidor de humedad Stanley mide
la humedad en la madera y en los
materiales de construcción más comunes,
incluidos, entre otros, placas de pladur,
yeso, hormigón y planchas de cemento.
ADVERTENCIA:
• Siga SIEMPRE todas las instrucciones
y advertencias contenidas en este
manual de usuario.
• NO sumerja la unidad en agua ni la
salpique con agua.
• Apague SIEMPRE el producto cuando
no lo use.
• Compruebe SIEMPRE que la batería
esté colocada en el modo correcto, con
la polaridad correcta.
• NO mezcle pilas antiguas con pilas
nuevas. Cámbielas todas a la vez por
pilas nuevas del mismo tipo y de la
misma marca.
• NUNCA corte intencionalmente ningún
terminal de la batería.
• NO intente recargar las baterías
alcalinas.
• NO mezcle las sustancias químicas de
las baterías.
• NO arroje las baterías al fuego.
• Extraiga SIEMPRE la batería si va
a guardar la unidad durante más de
un mes.
• NO deseche este producto con los
residuos domésticos.
• Compruebe SIEMPRE las normas
locales y deseche correctamente las
baterías usadas.
• RECICLE de acuerdo con las normas
locales de recogida y eliminación de
residuos eléctricos y electrónicos.
Page 19

19
• PRECAUCIÓN: Los pines de los
electrodos son muy losos. Maneje el
instrumento con cuidado. Mantenga los
pines cubiertos cuando no los use.
Instrucciones de funcionamiento
BATERÍA:
Abra la tapa trasera de la unidad
usando un destornillador para tornillos
Philips. Inserte 4 baterías nuevas AAA.
compruebe que la polaridad sea correcta
de acuerdo con la indicación lateral
del bastidor. Vuelva a colocar la tapa
y el tornillo de cabeza Phillips. Cuando
aparezca el símbolo de la batería en la
pantalla LCD, debe sustituir las baterías.
FUNCIONAMIENTO:
Extraiga la tapa (la tapa puede colocarse
en el otro extremo de la unidad durante
el uso).
Encienda la unidad apretando una vez el
botón de alimentación.
Presione los electrodos contra el material
que va medir.
• Presione con cuidado, pero tan a fondo
como pueda para conseguir un buen
contacto.
• En la madera, tome las medidas a lo
largo de las vetas (Figura 1).
• Tome varias lecturas en diferentes
posiciones para tener una mejor idea
del contenido de humedad general del
material.
La unidad conservará las mediciones
de temperatura en la pantalla durante
5 segundos, después de que la lectura se
haya estabilizado y se hayan retirado los
pines del material que se está midiendo.
La unidad se apagará automáticamente
después de aproximadamente 1 minuto si
no se utiliza o no se toman mediciones.
La unidad mostrará la temperatura
ambiente en la parte superior de la
pantalla LCD. Para cambiar entre ºF
y ºC solo tiene que mantener pulsado
el botón de alimentación durante
aproximadamente 3 segundos.
COMPROBAR LA CALIBRACIÓN DE
LA UNIDAD:
En el extremo de la tapa hay 2 pares de
clavijas metálicas de prueba que pueden
utilizarse para medir la humedad.
Toque las 2 sondas con los 2 contactos
metálicos marcados con “T”, la lectura en
la escala de madera debe ser 19 % ±1.
Después toque las 2 sondas con los
2 contactos metálicos marcados con
“B”, todas las barras indicadoras deben
parpadear en la pantalla LCD.
Si el medidor de temperatura funciona
como se menciona arriba, signica que la
unidad trabaja correctamente.
Page 20

20
E
Manual de usuario
ESPECIFICACIONES:
Pantalla LCD con escala de
medición doble
Alcance, madera 6 – 44 %
Alcance, materiales de
construcción
0,2 – 2,0 %
Apagado automático 1 minuto
Grado IP: IP20
Temperatura de
funcionamiento
0 °C - 40°C
(32 °F - 104 °F)
Temperatura de
almacenamiento
-10 °C - 50 °C
Humedad de
funcionamiento
80 % humedad
máx. relativa
Batería 4 AAA (1.5 voltios)
Accesorios Bolsa de transporte
con cinturón
Tabla de conversión de materiales:
La siguiente tabla contiene las conversiones especícas de algunos materiales
comunes. Todos los valores listados son en humedad % de los materiales.
Pantalla Haya Abeto Hormigón Yeso Cemento Ventilado
Lectura /Roble/
Abedul
C20/C25 Revestimiento Hormigón
44 29 33,6 1,6 2,3 1,8 9,5
42 27,4 32 1,6 2,1 1,8 9
40 27,1 31,4 1,6 2,1 1,8 8,8
38 25,3 29,4 1,6 2 1,8 8
36 24,1 28 1,5 1,9 1,7 7,7
34 22,9 26,7 1,5 1,8 1,7 7,2
32 21,9 25,6 1,5 1,6 1,7 6,6
30 20,8 24,3 1,4 1,4 1,6 5,7
28 20,3 23,8 1,4 1,4 1,6 5,6
26 19,4 22,8 1,4 1,3 1,6 5,1
24 18,7 22 1,4 1,2 1,6 4,8
22 17,7 20,9 1,3 1 1,5 4,6
20 15,8 18,7 1,3 0,8 1,4 4,1
18 14,6 17,4 1,3 0,6 1,4 3,7
16 11,9 14,2 1,2 0,3 1,2 3
14 9,2 11,3 1,2 0,2 1,1 2,7
12 7,4 9,2 1,1 0,1 1,1 2,4
10 6,7 8,4 1,1 0,1 1,1 2,3
8 5,6 7,3 1,1 0,1 1 2,2
= Seco = Húmedo
Page 21

21
GARANTÍA DE 1 AÑO
Stanley garantiza sus herramientas de
medición electrónicas contra defectos de
materiales y/o fabricación por un año a partir
de la fecha de compra.
Los productos defectuosos serán reparados
o sustituidos, a discreción de Stanley, si se
envían acompañados con la prueba de compra
a:
STANLEY BLACK & DECKER IBÉRICA
S.L.U.
Parque de Negocios “Mas Blau”
Edicio Muntadas C/Berguedá 1, Of. A6
CP 08820 El Prat de Llobregat (Barcelona)
Esta garantía no cubre los defectos causados
por daños accidentales, desgaste, uso distinto
al indicado en las instrucciones del fabricante
o reparaciones o alteraciones del producto no
autorizadas por Stanley.
Las reparaciones o sustituciones bajo garantía
no afectan a la fecha de caducidad de la
garantía.
En la medida que la ley lo permita, Stanley
no será responsable de conformidad con
la presente garantía por pérdidas directas
o consecuentes que pudieran derivarse de las
deciencias de este producto.
Esta garantía no puede modicarse sin la
autorización de Stanley.
Esta garantía no afecta a los derechos legales
de los compradores consumidores de este
producto.
Esta garantía se regirá y será interpretada
de acuerdo con las leyes del país de
venta, y Stanley y el comprador acuerdan
irrevocablemente someterse a la jurisdicción
exclusiva de los tribunales y juzgados de tal
país en relación con cualquier reclamación
o cuestión que pudiera derivarse de esta
garantía o que esté relacionada con la misma.
La calibración y el cuidado no están cubiertos
por la garantía.
NOTA:
El cliente es responsable del uso correcto del
instrumento. El cliente es asimismo totalmente
responsable del control periódico de la
precisión de la unidad láser y de la calibración
del instrumento.
Sujeto a variaciones sin aviso previo.
Page 22
22
PT
Manual do utilizador
Pilha fraca
Ícone
Botão de
alimentação
Régua de madeira
Temperatura
Tomadas de teste
Tampa
Régua de
materiais
de construção
B
T
ON/SET
STHT77030
% %
44
2.0
1.8
1.6
1.4
1.2
1.0
0.8
0.6
0.4
0.2
40
35
30
25
20
15
10
6
Figura 1
Eléctrodos
Visor LCD
Medidor de humidade da STANLEY
®
O Medidor de humidade da Stanley
detecta humidade em madeira e materiais
de construção comuns, incluindo, mas
não se limitando a, contraplacado, gesso,
betão e placa de cimento.
AVISO:
• Siga SEMPRE todas as instruções
e avisos incluídos neste manual de
instruções.
• NÃO salpique ou mergulhe a unidade
dentro de água.
• Desligue SEMPRE o produto quando
não estiver a ser utilizado.
• Certique-se SEMPRE que a pilha
está inserida correctamente, com
a polaridade correcta.
• NÃO misture pilhas usadas e novas.
Substitua todas as pilhas ao mesmo
tempo por pilhas novas da mesma
marca e tipo.
• NUNCA faça um curto-circuito
intencionalmente nos terminais da
pilha.
• NÃO carregue as pilhas alcalinas.
• NÃO misture as químicas das pilhas.
• NÃO elimine as pilhas no fogo.
• Retire SEMPRE as pilhas se
armazenar a unidade durante um
período superior a um mês.
• NÃO elimine este produto em conjunto
com os resíduos domésticos.
• Verique SEMPRE os códigos locais
e gaste as pilhas usadas.
• RECICLE as pilha em conjunto com as
regulamentações locais sobre recolha
e eliminação dos resíduos eléctricos
e electrónicos.
• AVISO: Os pinos dos eléctrodos
são muito aados. Utilize o instrumento
com cuidado. Mantenha os pinos
Page 23

23
tapados quando não utilizar
o equipamento.
Instruções de funcionamento
PILHA:
Abra a porta na parte de trás da unidade
com uma chave de fenda. Coloque
4 novas pilhas AAA, certicando-se
de que a polaridade está correcta de
acordo com a indicação no interior do
compartimento. Volte a colocar a porta do
compartimento das pilhas e e o parafuso
Phillips. Quando o símbolo da bateria é
apresentado no visor LCD, isso signica
que é necessário substituir as pilhas.
FUNCIONAMENTO:
Retire a tampa (a tampa pode ser
armazenada na parte inferior da unidade
quando está a ser utilizada).
Ligue a unidade premindo o botão de
alimentação uma vez.
Insira os eléctrodos no material que
pretende testar.
• Insira-os com cuidado, mas com
a maior profundidade possível para
obter um bom contacto.
• Se utilizar madeira, faça as medições
no grão (Figura 1).
• Faça medições em vários locais para
ter uma melhor noção do teor de
humidade geral do material.
A unidade retém automaticamente
a medição de humidade no visor durante
5 segundos quando o valor estabilizar
e os pinos são retirados do material que
está a ser medido.
A unidade desliga-se após cerca de
1 minuto se não for utilizada ou não
forem efectuadas medições.
A unidade mostra a temperatura
ambiente na parte superior do visor LCD.
Para alternar entre F° e C°, basta manter
premido o botão de alimentação durante
cerca de 3 segundos.
VERIFICAR A CALIBRAÇÃO DA
UNIDADE:
Há 2 pares de tomadas de teste
metálicas na parte superior da tampa,
que podem ser utilizadas para testar
o medidor de humidade.
Toque nas 2 sondas nos 2 contactos
metálicos assinalados com “T”, o valor
indicado na régua de madeira deve ser
19 % ±1.
Em seguida, toque nas 2 sondas dos
2 contactos metálicos assinalados
com “B”, todas as barras de indicação
começam a piscar no visor LCD.
Se o medidor de humidade funcionar de
acordo com a indicação acima, a unidade
está funcionar correctamente.
Page 24

24
PT
Manual do utilizador
ESPECIFICAÇÕES:
Visor LCD com régua de
medição dupla
Gama, madeira 6 – 44 %
Gama, materiais de
construção
0,2 – 2,0 %
Desligar automático 1 minuto
Grau de IP: IP20
Temperatura de
funcionamento
0 °C - 40 °C
32 °F - 104 °F
Temperatura de
armazenamento
-10 °C - 50 °C
Humidade de
funcionamento
Humidade relativa
máx. de 0 %
4 pilhas AAA (1,5 volts)
Acessórios Bolsa de transporte
c/ clip para cinto
Tabela de conversão de material:
A seguinte tabela contém conversões especícas para alguns materiais comuns.
Todos os valores indicados indicam a % de humidade do material.
Visor Faia Abeto Betão Gesso Cimento Celular
Valor /Carvalho/
bétula
C20/C25 Ripa Betão
44 29 33,6 1,6 2,3 1,8 9,5
42 27,4 32 1,6 2,1 1,8 9
40 27,1 31,4 1,6 2,1 1,8 8,8
38 25,3 29,4 1,6 2 1,8 8
36 24,1 28 1,5 1,9 1,7 7,7
34 22,9 26,7 1,5 1,8 1,7 7,2
32 21,9 25,6 1,5 1,6 1,7 6,6
30 20,8 24,3 1,4 1,4 1,6 5,7
28 20,3 23,8 1,4 1,4 1,6 5,6
26 19,4 22,8 1,4 1,3 1,6 5,1
24 18,7 22 1,4 1,2 1,6 4,8
22 17,7 20,9 1,3 1 1,5 4,6
20 15,8 18,7 1,3 0,8 1,4 4,1
18 14,6 17,4 1,3 0,6 1,4 3,7
16 11,9 14,2 1,2 0,3 1,2 3
14 9,2 11,3 1,2 0,2 1,1 2,7
12 7,4 9,2 1,1 0,1 1,1 2,4
10 6,7 8,4 1,1 0,1 1,1 2,3
8 5,6 7,3 1,1 0,1 1 2,2
= Seco = Molhado
Page 25

25
GARANTIA DE 1 ANO
A Stanley oferece uma garantia com
as respectivas ferramentas de medição
electrónica no que respeita a defeitos de
materiais e/ou mão-de-obra durante um ano
após a data de aquisição.
Os produtos com defeitos serão reparados ou
substituídos, ao critério da Stanley, se forem
enviados com o comprovativo de compra para
a morada:
Black&Decker Limited SARL Suc
Quinta da Fonte - Edifício Q55 D.
Diniz, Rua dos Malhões,
2 e 2A - Piso 2 Esquerdo, 2770-071 Paço de
Arcos, Portugal
A presente garantia não cobre defeitos
causados por danos acidentais, desgaste,
utilização que não esteja de acordo com
as instruções do fabricante, reparação ou
modicação deste produto que não tenham
sido autorizadas pela Stanley.
A reparação ou substituição cobertas por esta
garantia não afectam a data de validade da
garantia.
Na medida em que a lei o permite, a Stanley
não será responsável de acordo com esta
garantia por quaisquer perdas indirectas ou
consequenciais resultantes de defeitos neste
produto.
Esta garantia não pode ser alterada sem
a autorização da Stanley.
Esta garantia não afecta os direitos
estatutários dos compradores consumidores
deste produto.
Esta garantia deverá ser regida e interpretada
de acordo com a legislação do país onde
o produto é vendido e a Stanley e o comprador
comprometem-se irrevogavelmente em cumprir
a jurisdição exclusiva dos tribunais desse país
no que respeita a qualquer reclamação ou
questão decorrente ou relacionada com esta
garantia.
A calibração e os cuidados não são abrangidos
pela garantia.
NOTA:
O cliente é responsável pela utilização
e cuidados correctos do instrumento. Além
disso, o cliente é totalmente responsável
pela vericação periódica do rigor da unidade
laser e por conseguinte pela calibração do
instrumento.
Sujeito a alterações sem aviso prévio
Page 26
26
NL
Gebruikershandleiding
Batterij laag
Icoon
Aan/uit
Knop
Hout schaalverdeling
Temperatuur
Testcontacten
Deksel
Bouw
Materialen
Schaalverdeling
B
T
ON/SET
STHT77030
% %
44
2.0
1.8
1.6
1.4
1.2
1.0
0.8
0.6
0.4
0.2
40
35
30
25
20
15
10
6
Afbeelding 1
Elektrodes
LCD scherm
STANLEY® Vochtmeter
De Stanley Vochtmeter detecteert vocht
in hout en veel gebruikte bouwmaterialen,
inclusief gipswanden, stukadoorwerk,
beton en cementplaat.
WAARSCHUWING:
• ALTIJD alle instructies
en waarschuwing in deze
gebruikershandleiding navolgen.
• NOOIT het product natspetteren of in
water onderdompelen.
• ALTIJD het product uitschakelen als
het niet wordt gebruikt.
• ALTIJD controleren of de batterijen op
de juiste manier zijn geplaatst, met de
juiste polariteit.
• NOOIT oude en nieuwe batterijen
mengen. Vervang ze allemaal tegelijk
met nieuwe batterijen van hetzelfde
merk en type.
• NOOIT opzettelijk de batterijcontacten
kortsluiten.
• NOOIT proberen om alkaline batterijen
op te laden.
• NOOIT verschillende soorten batterijen
mengen.
• NOOIT batterijen in vuur gooien.
• ALTIJD de batterijen verwijderen als
u het product langer dan een maand
opbergt.
• NOOIT het product in het huisvuil
gooien.
• ALTIJD de plaatselijke regelgeving
raadplegen en de batterijen op de juiste
manier afvoeren.
• A.U.B. RECYCLEN in navolging van
de plaatselijke regelgeving voor de
inzameling en afvoer van elektrisch en
elektronisch afval.
• LET OP: De elektrode pennen zijn
erg scherp. Het instrument voorzichtig
Page 27

27
behandelen. Dek de pennen af als ze
niet worden gebruikt.
Bedieningsinstructies
BATTERIJ:
Open het batterijdeksel aan de
achterkant van het product met een
kruiskopschroevendraaier. Plaats
4 nieuwe AAA batterijen, zorg ervoor
dat de polariteit correct is, zoals
aangegeven aan de binnenkant van
de behuizing. Plaats het batterijdeksel
en de kruiskopschroef weer terug.
Als het batterij symbool op het LCD
scherm verschijnt zijn de batterijen aan
vervanging toe.
GEBRUIK:
Verwijder het deksel (het deksel kan
tijdens gebruik van de meter aan de
onderkant worden vastgemaakt).
Schakel de meter in door eenmaal op de
aan/uit-knop te drukken.
Druk de elektrodes in het materiaal dat
moet worden getest.
• Druk voorzichtig, maar zo diep mogelijk
om goed contact te krijgen.
• Voer de meting in hout uit tegenover de
houtnerf (Afbeelding 1).
• Voer meerdere metingen uit op
verschillende plekken om een beter
idee te krijgen van de vochtigheid van
het materiaal.
Zodra de meting is gestabiliseerd en de
pennen uit het materiaal zijn verwijderd,
zal de meter de vochtmeting automatisch
5 seconden vasthouden.
De meter zal na ongeveer 1 minuut
uitschakelen als deze niet wordt gebruikt/
niks meet.
Aan de bovenkant van het LCD scherm
wordt de omgevingstemperatuur
weergegeven. U kunt tussen F° & C°
wisselen door ongeveer 3 seconden op
de aan/uit-knop te drukken.
METER KALIBRATIE VERIFIËREN:
Er bevinden zich 2 paar metalen
testcontacten op de bovenkant van het
deksel, deze kunnen worden gebruikt om
de vochtmeter te testen.
Tik de 2 pennen tegen de 2 metalen
contacten van de “T” markering,
de gemeten waarde op de hout
schaalverdeling moet 19% ±1 zijn.
Tik nu de 2 pennen tegen de 2 metalen
contacten van de “B” markering, alle
indicatie balken op het LCD scherm
moeten nu knipperen.
De vochtmeter werkt correct als deze
functioneert zoals hierboven vermeld.
Page 28

28
NL
Gebruikershandleiding
SPECIFICATIES:
Scherm LCD met dubbele
schaalverdeling
Bereik, Hout 6 – 44%
Bereik,
Bouwmaterialen
0,2 – 2,0%
Automatisch uit 1 minuut
IP classicatie: IP20
Bedrijfstemperatuur
0°C – 40°C
(32°F – 104°F)
Opslagtemperatuur -10°C - 50°C
Luchtvochtigheid 80% Max relatieve
luchtvochtigheid
Batterij 4x AAA (1,5 volt)
Accessoires Draagtas met
riemlus
Materiaal omrekentabel:
De volgende tabel bevat specieke omrekeningen voor veel gebruikte materialen. Alle
vermelde waarden zijn % vocht in het materiaal.
Scherm Beuk Spar Beton Stukadoorwerk Cement Cellen
Gemeten
waarde
/Eik/Berk C20/C25 Vloer Beton
44 29 33,6 1,6 2,3 1,8 9,5
42 27,4 32 1,6 2,1 1,8 9
40 27,1 31,4 1,6 2,1 1,8 8,8
38 25,3 29,4 1,6 2 1,8 8
36 24,1 28 1,5 1,9 1,7 7,7
34 22,9 26,7 1,5 1,8 1,7 7,2
32 21,9 25,6 1,5 1,6 1,7 6,6
30 20,8 24,3 1,4 1,4 1,6 5,7
28 20,3 23,8 1,4 1,4 1,6 5,6
26 19,4 22,8 1,4 1,3 1,6 5,1
24 18,7 22 1,4 1,2 1,6 4,8
22 17,7 20,9 1,3 1 1,5 4,6
20 15,8 18,7 1,3 0,8 1,4 4,1
18 14,6 17,4 1,3 0,6 1,4 3,7
16 11,9 14,2 1,2 0,3 1,2 3
14 9,2 11,3 1,2 0,2 1,1 2,7
12 7,4 9,2 1,1 0,1 1,1 2,4
10 6,7 8,4 1,1 0,1 1,1 2,3
8 5,6 7,3 1,1 0,1 1 2,2
= Droog = Nat
Page 29

29
1-JAAR GARANTIE
Stanley waarborgt zijn elektronische
meetinstrumenten tegen materiële defecten in
materialen en / of vakmanschap tot één jaar na
de aankoopdatum.
Defecte producten worden gerepareerd of
vervangen bij Stanley, indien deze samen met
het aankoopbewijs opgestuurd worden naar:
Stanley Tools Benelux, Egide
Walsschaertsstraat 14-16,
2800 Mechelen, Belgium
Deze garantie dekt geen defecten veroorzaakt
door incidentele schade, normale slijtage,
defecten als gevolg van gebruik anders
dan aangegeven in de handleiding, of door
reparaties en aanpassingen aan dit product die
niet door Stanley zijn geautoriseerd.
Reparatie of vervanging tijdens de tijdsduur
van deze garantievoorwaarden hebben geen
invloed op de resterende tijdsduur van de
garantie.
Voor zover de wet dit toestaat, kan Stanley niet
aansprakelijk worden gesteld voor indirecte of
gevolgschade veroorzaakt door defecten aan
dit product.
Deze garantie mag niet worden aangepast
zonder toestemming van Stanley.
Deze garantiebepalingen hebben geen invloed
op uw wettelijke rechten als consument.
Op deze garantie is het Nederlands recht van
toepassing, zowel Stanley als de aankoper
onderwerpen zich hierbij onherroepelijk aan
de exclusieve jurisdictie van de rechtbank van
Nederland bij een geschil of claim aangaande
deze garantie.
Kalibratie en onderhoud vallen niet onder de
garantie.
OPMERKING:
De klant is verantwoordelijk voor correct
gebruik en onderhoud van dit instrument.
Verder is het de volledige verantwoordelijkheid
van de klant om periodiek de nauwkeurigheid
van de laser en de kalibratie van het
meetinstrument te controleren.
Onderhevig aan veranderingen zonder
kennisgeving
Page 30
30
DK
Brugervejledning
Lavt batteri
Symbol
Strøm
Knap
Træskala
Temperatur
Kontrolstik
Hætte
Bygning
Materialer
Skala
B
T
ON/SET
STHT77030
% %
44
2.0
1.8
1.6
1.4
1.2
1.0
0.8
0.6
0.4
0.2
40
35
30
25
20
15
10
6
Figur 1
Elektroder
LCD display
STANLEY® fugtighedsmåler
Stanley fugtighedsmåler registrerer fugt
i træ og almindelige byggematerialer,
herunder, men ikke begrænset til, gips,
puds, beton og cement.
ADVARSEL:
• Følg ALTID alle instruktioner og
advarsler i denne betjeningsvejledning.
• Sprøjt IKKEeller nedsænk enheden
i vand.
• Slå ALTID produktet fra når det ikke
er i brug.
• Kontrollér ALTID at batterierne er
indsat på den korrekte måde, med den
korrekte polaritet.
• Bland IKKE gamle og nye batterier.
Udskift alle batterierne samtidig med
nye batterier af samme mærke og type.
• Kortslut ALDRIGfortsætligt batteriets
poler.
• Forsøg IKKEat oplade alkaline
batterier.
• Bland IKKE batterikemier.
• Bortskaf IKKE batterier ved at brænde
dem.
• Tag ALTIDbatterierne ud, hvis enheden
opbevares over en måned.
• Bortslaf IKKE dette produkt sammen
med almindeligt husholdningsaffald.
• Kontrollér ALTIDlokale direktiver og
bortskaf brugte batterier korrekt.
• GENBRUG VENLIGST i henhold til de
lokale bestemmelser for indsamling og
bortskaffelse af elektrisk og elektronisk
affald.
• FORSIGTIG: Elektrodestifterne
er meget skarpe. Håndter instrument
forsigtigt. Hold stifterne tildækket, når
de ikke er i brug.
Page 31

31
Værktøjets funktioner
BATTERI:
Åbn dækslet bag på enheden ved hjælp
af en Philips hovedskruetrækker. Indsæt
4 nye AAA batterier og kontrollér, at
polariteten er korrekt ifølge angivelsen
inde i huset. Udskift batteridækslet og
Phillips hovedskrue. Når batterisymbolet
vises på LCD skærmen, er det på tide at
udskifte batterierne.
BETJENING:
Tag hætten af (hætten kan opbevares
i bunden af enheden, når den er i brug).
Tænd for enheden ved at trykke en gang
på tænd/slukknappen.
Tryk elektroderne ind i det materiale, der
skal testes.
• Tryk forsigtigt men så dybt som muligt
for at få en god kontakt.
• I træ tag målinger på tværs af åren
(gur 1).
• Foretag ere aæsninger på forskellige
steder for at få et bedre indtryk af
materialets generelle fugtindhold.
Enheden vil automatisk vise
fugtighedsmålingen på displayet i 5
sekunder, når aæsningen er blevet
stabiliseret, og stifterne er taget ud af det
materiale, der måles.
Enheden slås automatisk fra, når det
ikke har været brugt i ca. 1 minut/ingen
målinger.
Enheden viser den omgivende temperatur
øverst på LCD displayet. Du skifter
mellem F° & C° ved at trykke på tænd/
slukknappen i ca. 3 sekunder.
KONTROL AF KALIBRERING AF
ENHED:
Der ndes 2 par metalteststik øverst
på hætten, disse kan bruges til at teste
fugtighedsmåleren.
Tryk på de 2 sonder til de
2 metalkontakter mærket “T”, aæsningen
på træskalaen bør være 19% ±1.
Tryk derefter på de 2 sonder til de
2 metalkontakter mærket “B”, alle
indikationssøjler bør blinke på LCDdisplayet.
Hvis fugtighedsmåleren virker som nævnt
ovenfor, virker enheden korrekt.
SPECIFIKATIONER:
Display LCD med dobbelt
måleskala
Område, træ 6 – 44%
Område,
byggematerialer
0,2 – 2,0%
Automatisk afbrydelse 1 minut
IP grad: IP20
Driftstemperatur
0°C - 40°C
32°F - 104°F
Opbevaringstempe-
ratur
-10°C - 50°C
Luftfugtighed ved
brug
80% maks. relativ
fugtighed
Batteri 4x AAA (1,5 volt)
Ekstraudstyr Bæretaske m/
bæltestrop
Page 32

32
DK
Brugervejledning
Materiale konverteringstabel:
Den følgende tabel indeholder specielle konverteringer for nogle almindelige
materialer. Alle oplistede værdier er i materiale % fugtighed.
Display Bøg Gran Beton Gips Cement Iltet
Aæsning /eg/birk C20/C25 Leder Beton
44 29 33,6 1,6 2,3 1,8 9,5
42 27,4 32 1,6 2,1 1,8 9
40 27,1 31,4 1,6 2,1 1,8 8,8
38 25,3 29,4 1,6 2 1,8 8
36 24,1 28 1,5 1,9 1,7 7,7
34 22,9 26,7 1,5 1,8 1,7 7,2
32 21,9 25,6 1,5 1,6 1,7 6,6
30 20,8 24,3 1,4 1,4 1,6 5,7
28 20,3 23,8 1,4 1,4 1,6 5,6
26 19,4 22,8 1,4 1,3 1,6 5,1
24 18,7 22 1,4 1,2 1,6 4,8
22 17,7 20,9 1,3 1 1,5 4,6
20 15,8 18,7 1,3 0,8 1,4 4,1
18 14,6 17,4 1,3 0,6 1,4 3,7
16 11,9 14,2 1,2 0,3 1,2 3
14 9,2 11,3 1,2 0,2 1,1 2,7
12 7,4 9,2 1,1 0,1 1,1 2,4
10 6,7 8,4 1,1 0,1 1,1 2,3
8 5,6 7,3 1,1 0,1 1 2,2
= Tør = Våd
Page 33

33
1 ÅRS GARANTI
Stanley yder garanti på sine elektroniske
måleværktøjer mod mangler i materialer og/
eller udførelse i ét år fra købsdatoen.
Mangelfulde produkter vil blive repareret eller
udskiftet efter Stanleys ‘ valg, hvis de sendes
sammen med købsbevis til:
Stanley Black & Decker Denmark A/S
Roskildevej 22
2620 Albertslund
Denmark
Denne garanti dækker ikke mangler, der
skyldes utilsigtet skade, slitage, brug der ikke
er i overensstemmelse med producentens
anvisninger eller reparation eller ændring af
dette produkt, der ikke er autoriseret af Stanley.
Reparation eller udskiftning i henhold til
denne garanti påvirker ikke udløbsdatoen for
garantien.
I det omfang loven tillader det, vil Stanley
ikke være ansvarlige under denne garanti for
indirekte skader eller følgeskader som følge af
fejl og mangler i dette produkt.
Denne garanti kan ikke ændres uden tilladelse
fra Stanley.
Denne garanti påvirker ikke forbrugernes
lovmæssige rettigheder ved køb af dette
produkt.
Denne garanti er underlagt og fortolkes
i overensstemmelse med lovgivningen i det
land, produktet er blevet solgt, hvor Stanley
og køberen accepterer uigenkaldeligt at
underkaste sig den eksklusive kompetence fra
domstolene i dette land mod ethvert krav eller
spørgsmål, der opstår under eller i forbindelse
med denne garanti.
Kalibrering og pleje er ikke dækket af
garantien.
BEMÆRK:
Kunden er ansvarlig for korrekt brug og
vedligeholdelse af instrumentet. Desuden
er kunden helt ansvarlig for periodisk at
kontrollere laserenhedens nøjagtighed og
derfor for kalibrering af instrumentet.
Med forbehold for ændringer uden varsel
Page 34

34
SE
Bruksanvisning
Lågt batteri
Ikon
Ström
Knapp
Träskala
Temperatur
Testkontakter
Skyddshatt
Byggnad
Material
Skala
B
T
ON/SET
STHT77030
% %
44
2.0
1.8
1.6
1.4
1.2
1.0
0.8
0.6
0.4
0.2
40
35
30
25
20
15
10
6
Figur 1
Elektroder
LCD-display
STANLEY® fuktmätare
Stanley fuktmätare upptäcker fukt i trä
och vanligt byggmaterial inklusive men
inte begränsat till, kallmurar, gips, betong
och cementskivor.
VARNING:
• ALLTID följ alla instruktioner och
varningar som medföljer denna
bruksanvisning.
• GÖR INTEskvätt eller sänk ned
enheten i vatten.
• ALLTID stäng av produkten när den
inte används.
• ALLTID se till att batterier är isatt på
korrekt sätt med korrekt polaritet.
• GÖR INTE blanda inte gamla och nya
batterier. Ersätt alla på samma gång
med nya batterier av samma märke
och typ.
• ALDRIG oavsiktligt kortslut några
batteriterminaler.
• GÖR INTE försök att ladda alkaliska
batterier.
• GÖR INTE blanda olika kemiska
batterier.
• GÖR INTE kasta batterier i elden.
• ALLTID ta bort batteriet om enheten
skall förvaras längre tid än en månad.
• GÖR INTE kasta produkten i de vanliga
hushållssoporna.
• ALLTID kontrollera de lokala
bestämmelserna för korrekt avyttring av
förbrukade batterier.
• ÅTERVINNi enlighet med de lokala
bestämmelserna för insamling och
avyttring av elektriskt och elektroniskt
avfall.
• FÖRSIKTIGHET: Elektronpinnarna
är mycket vassa. Hantera instrumentet
försiktigt. Håll pinnarna täckta när de
inte används.
Page 35

35
BRUKSANVISNING
BATTERI:
Öppna luckan på baksidan av enheten
med en skruvmejsel med philipshuvud.
Sätt i fyra nya AAA batterier, se till att
polariteten är korrekt enligt indikationen
på höljets insida. Sätt tillbaka
batteriluckan och philipsskruvarna. När
batterisymbolen visas på LCD-skärmen är
det dags att byta batterierna.
ANVÄNDNING:
Ta bort skyddshatten (skyddshatten kan
förvaras på undersidan av enheten när
den används).
Slå på enheten genom att trycka på
strömknappen en gång.
Tryck elektroderna in i materialet som
skall testas.
• Tryck försiktigt men så djupt som
möjligt för att få god kontakt.
• I trä, gör mätningen längs med
träbrerna (gur 1).
• Gör era avläsningar på olika platser
för att få en bättre uppfattning om det
allmänna fuktinnehållet i materialet.
Enheten kommer automatiskt att
hålla kvar fuktmätningen på displayen
i fem sekunder när avläsningen har
stabiliserats och pinnarna tagits bort från
materialet som mätts.
Enheten kommer automatiskt att stängas
av efter ungefär en minut om den inte
används/mätningar görs.
Enheten visar den omgivande
temperaturen överst på LCD-displayen.
För ändring mellan F° och C° håll bara
strömknappen nedtryckt i ungefär tre
sekunder.
VERIFIERA ENHETSKALIBRERING:
Det nns två par med metalltestuttag på
ovansidan av skyddshatten, dessa kan
användas för test av fuktmätaren.
Toucha de två sonderna mot de två
metallkontakterna märkta “T”, avläsningen
på träskalan skall vara 19 % ±1.
Toucha nu de två sonderna mot de
tå metallkontakterna märkta “B”, alla
indikeringsfält skall blinka på LCDdisplayen.
Om fuktmätaren fungerar såsom angetts
ovan fungerar enheten korrekt.
SPECIFIKATIONER:
Display LCD med dubbel
mätskala
Område, Trä 6 – 44 %
Område,
byggnadsmaterial
0,2 – 2,0 %
Automatisk
avstängning
1 minut
IP-grad: IP20
Drifttemperatur
0 °C - 40°C
(32 °F - 104 °F)
Lagringstemperatur: -10 °C - 50 °C
Driftfuktighet 80 % max relativ
fuktighet
Batteri 4x AAA (1,5 volt)
Tillbehör Bärväska w/
bältesögla
Page 36

36
SE
Bruksanvisning
Materialkonverteringstabell:
Följande tabell innehåller specik konvertering för vissa vanliga material. Alla värden
som listas är i material % fuktighet.
Display Bok Gran Betong Gips Cement Luftad
Avläsning /Ek/Björk C20/C25 Flytspackel Betong
44 29 33,6 1,6 2,3 1,8 9,5
42 27,4 32 1,6 2,1 1,8 9
40 27,1 31,4 1,6 2,1 1,8 8,8
38 25,3 29,4 1,6 2 1,8 8
36 24,1 28 1,5 1,9 1,7 7,7
34 22,9 26,7 1,5 1,8 1,7 7,2
32 21,9 25,6 1,5 1,6 1,7 6,6
30 20,8 24,3 1,4 1,4 1,6 5,7
28 20,3 23,8 1,4 1,4 1,6 5,6
26 19,4 22,8 1,4 1,3 1,6 5,1
24 18,7 22 1,4 1,2 1,6 4,8
22 17,7 20,9 1,3 1 1,5 4,6
20 15,8 18,7 1,3 0,8 1,4 4,1
18 14,6 17,4 1,3 0,6 1,4 3,7
16 11,9 14,2 1,2 0,3 1,2 3
14 9,2 11,3 1,2 0,2 1,1 2,7
12 7,4 9,2 1,1 0,1 1,1 2,4
10 6,7 8,4 1,1 0,1 1,1 2,3
8 5,6 7,3 1,1 0,1 1 2,2
= torr = våt
Page 37

37
1 ÅRS GARANTI
Stanley garanterar att de elektroniska
mätverktygen är fria från defekter i material
och/eller tillverkning under ett år från
inköpsdatumet.
Defekta produkter kommer att repareras eller
ersättas efter Stanleys bedömning om den
skickas tillsammans med inköpsbevis till:
Stanley Black & Decker Sweden AB
Box 94
431 22 Mölndal
Sweden
Denna garanti gäller inte defekter som orsakats
av oavsiktlig skada, slitage, användning
av annan användning än i enlighet med
tillverkarens instruktioner eller reparationer
eller ändring av denna produkt som inte
godkänts av Stanley.
Reparationer eller byte under denna garanti
påverkar inte garantins utgångsdatum.
Enligt vad som tillåts enligt lag skall inte
Stanley hållas ansvariga under denna garanti
för direkta eller därpå följande förluster som
uppstår på grund av defekter hos denna
produkt.
Denna garanti kan inte ändras utan
godkännande av Stanley.
Denna garanti påverkar inte de lagstadgade
rättigheterna för kunder som köpt denna
produkt.
Denna garanti styrs av och är skapad i enlighet
med de lagar i det land där produkten sålts och
Stanley och köparen var och en oåterkalleligen
samtycker till att till den exklusiva jurisdiktionen
av domstolen i det land skicka alla begäran
eller frågor som uppstår under eller i anslutning
till denna garanti.
Kalibrering och skötsel täcks inte av garantin.
NOTERA:
Kunden är ansvarig för korrekt användning
och skötsel av instrumentet. Dessutom är
kunden helt ansvarig för regelbundet kontroll
av noggrannheten hos laserenheten pch därför
för kalibreringen av instrumentet.
Kan ändras utan vidare meddelande
Page 38

38
FIN
Käyttöohje
Alhainen akku/paristo
Kuvake
Virtapainike
Puuasteikko
Lämpötila
Testipistokkeet
Suojus
Rakennusmateriaalien
asteikko
B
T
ON/SET
STHT77030
% %
44
2.0
1.8
1.6
1.4
1.2
1.0
0.8
0.6
0.4
0.2
40
35
30
25
20
15
10
6
Kuva 1
Elektrodit
LCD-näyttö
STANLEY®-kosteusmittari
Stanleyn kosteusmittari havaitsee
kosteuden puussa ja tavallisissa
rakennusmateriaaleissa, kuten kipsi-,
laasti-, betoni- ja sementtilevy mutta ei
näihin rajoittuen.
VAROITUS:
• Noudata AINA kaikkia tässä
käyttöohjeessa olevia ohjeita ja
varoituksia.
• ÄLÄ roiskuta vettä tai upota yksikköä
veteen.
• Sammuta laite AINA, kun se ei ole
käytössä.
• Varmista AINA, että akku/paristo
asetetaan oikealla tavalla ja oikein
päin.
• ÄLÄ sekoita vanhoja ja uusia paristoja.
Vaihda kaikki paristot samaan aikaan
uusiin samanmerkkisiin ja -tyyppisiin
paristoihin.
• ÄLÄ KOSKAAN tarkoituksellisesti
aiheuta oikosulkua akun napojen
välillä.
• ÄLÄ yritä ladata alkaliparistoja
uudelleen.
• ÄLÄ sekoita erilaisia akkuja/paristoja
keskenään.
• ÄLÄ hävitä akkuja/paristoja tulessa.
• Poista AINA akut/paristot, jos yksikköä
varastoidaan yli kuukausi.
• ÄLÄ hävitä tuotetta kotitalousjätteen
mukana.
• Varmista AINA paikalliset säädökset
ja hävitä käytetyt akut/paristot
asianmukaisesti.
• KIERRÄTÄ paikallisten sähkö- ja
elektroniikkaromun keräämisen ja
hävittämisen ohjeiden mukaan.
Page 39

39
• HUOMIO: Elektrodien pinnit
ovat hyvin teräviä. Käsittele laitetta
varovasti. Pidä pinnit peitettyinä, kun
ne eivät ole käytössä.
Käyttöohjeet
AKKU/PARISTO:
Avaa luukku yksikön takana
ristipääruuvimeisselillä. Laita neljä uutta
AAA-paristoa/akkua ja varmista, että akut/
paristot ovat oikein päin kotelon sisällä
olevan ohjeen mukaisesti. Laita luukku
ja ristipääruuvi takaisin paikalleen. Kun
akkukuvake tulee näkyviin LCD-näytölle,
on aika vaihtaa akut/paristot.
KÄYTTÖ:
Poista suojus (suojuksen voi laittaa
käytön ajaksi yksikön alaosaan).
Käynnistä yksikkö painamalla
virtapainiketta kerran.
Paina elektrodit testattavaan materiaaliin.
• Paina varovaisesti mutta niin syvään
kuin mahdollista, jotta saat hyvin
kosketuksen.
• Ota puusta mittaus poikkisyin (kuva 1).
• Ota useita mittauksia eri kohdista, jotta
saat paremman käsityksen materiaalin
kosteussisällöstä.
Yksikkö säilyttää kosteusmittauksen
näytöllä automaattisesti 5 sekuntia,
kun lukema on vakiintunut ja pinnit on
poistettu mitattavasta materiaalista.
Yksikkö sammuu automaattisesti noin
1 minuutin kuluttua, kun sitä ei käytetä tai
mittauksia ei tehdä.
Yksikkö näyttää ympäröivän lämpötilan
LCD-näytön yläosassa. Vaihda F°- ja
C°-arvojen välillä pitämällä virtapainiketta
painettuna noin 3 sekunnin ajan.
YKSIKÖN KALIBROINNIN
VAHVISTAMINEN:
Suojuksen päällä on kaksi paria metallisia
testipistokkeita, joita voidaan käyttää
kosteusmittarin testaamisen.
Kosketa kahdella anturilla kahta metallista
kontaktia, jotka on merkitty T:llä. Lukeman
puuasteikoilla tulisi olla 19 % ±1.
Kosketa nyt kahdella anturilla kahta
metallista kontaktia, jotka on merkitty
B:llä. Kaikki merkkivalopalkkien tulisi
vilkkua LCD-näytöllä.
Jos kosteusmittari toimii yllä kuvatulla
tavalla, yksikkö toimii oikein.
Page 40

40
FIN
Käyttöohje
TEKNISET TIEDOT:
Näyttö LCD-näyttö, jossa
on kaksi mitta-
asteikkoa
Mittausalue, puu 6–44 %
Mittausalue,
rakennusmateriaalit
0,2–2,0 %
Automaattinen
sammutus
1 minuutti
IP-luokitus: IP20
Käyttölämpötila
0–40 °C
Säilytyslämpötila -10–50 °C
Käyttökosteus Enintään 80 %:n
suhteellinen
kosteus
Akku/paristo 4 AAA-akkua/
paristoa (1,5 V)
Lisävarusteet Kantolaukku, jossa
vyölenkki
Materiaalien muuntotaulukko:
Seuraavassa taulukossa on muunto-ohjeet tavallisille materiaaleille. Kaikki arvot ovat
materiaalin kosteus %.
Näyttö Pyökki Kuusi Betoni Laasti Sementti Ilmastettu
Lukema /tammi/
koivu
C20/C25 Oikolauta Betoni
44 29 33,6 1,6 2,3 1,8 9,5
42 27,4 32 1,6 2,1 1,8 9
40 27,1 31,4 1,6 2,1 1,8 8,8
38 25,3 29,4 1,6 2 1,8 8
36 24,1 28 1,5 1,9 1,7 7,7
34 22,9 26,7 1,5 1,8 1,7 7,2
32 21,9 25,6 1,5 1,6 1,7 6,6
30 20,8 24,3 1,4 1,4 1,6 5,7
28 20,3 23,8 1,4 1,4 1,6 5,6
26 19,4 22,8 1,4 1,3 1,6 5,1
24 18,7 22 1,4 1,2 1,6 4,8
22 17,7 20,9 1,3 1 1,5 4,6
20 15,8 18,7 1,3 0,8 1,4 4,1
18 14,6 17,4 1,3 0,6 1,4 3,7
16 11,9 14,2 1,2 0,3 1,2 3
14 9,2 11,3 1,2 0,2 1,1 2,7
12 7,4 9,2 1,1 0,1 1,1 2,4
10 6,7 8,4 1,1 0,1 1,1 2,3
8 5,6 7,3 1,1 0,1 1 2,2
= Kuiva = Märkä
Page 41

41
1 VUODEN TAKUU
Stanley takaa elektroniset mittaustyökalunsa
materiaali- ja/tai valmistuspuutteiden varalta
yhdeksi vuodeksi ostopäivästä lähtien.
Puutteelliset tuotteet korjataan tai vaihdetaan
Stanleyn valinnan mukaan, jos ne lähetetään
ostotositteen kanssa osoitteeseen:
Stanley Black & Decker Finland OY
PL 47 / PO Box 47
FI-00521 Helsinki
Finland
Takuu ei kata puutteita, jotka aiheutuvat
onnettomuudesta, kulumisesta, muusta kuin
valmistajan ohjeidenmukaisesta käytöstä tai
tuotteen korjauksesta tai muutoksesta, jota
Stanley ei ole valtuuttanut.
Tämän takuun mukainen korjaus tai vaihto ei
vaikuta takuun päättymispäivään.
Lain sallimissa rajoissa Stanley ei ole
vastuussa epäsuorista tai välillisistä
menetyksistä, jotka aiheutuvat tämän tuotteen
puutteista.
Tätä takuuta ei saa muuttaa ilman Stanleyn
valtuutusta.
Tämä takuu ei vaikuta tuotteen
kuluttajaostajien lain mukaisiin oikeuksiin.
Tätä takuuta tulkitaan ja määritetään sen
maan lakien mukaan, jossa tuote on myyty.
Stanley ja ostaja molemmat hyväksyvät
peruuttamattomasti kyseisen maan toimivallan
kaikissa vaateissa tai asioissa, joita esitetään
tämän takuun mukaisesti tai yhteydessä.
Takuu ei kata kalibrointia ja huoltoa.
HUOMAA:
Asiakas on vastuussa tuotteen oikeasta
käytöstä ja huollosta. Asiakas on lisäksi
vastuussa laseryksikön tarkkuuden
säännöllisestä tarkistuksesta ja siksi laitteen
kalibroinnista.
Voidaan muuttaa ilman ilmoitusta
Page 42

42
NO
Bruksanvisning
Lavt batteri
Symbol
Strøm
Knapp
Tre-skala
Temperatur
Testkontakter
Hette
Bygningsmaterialer
Skala
B
T
ON/SET
STHT77030
% %
44
2.0
1.8
1.6
1.4
1.2
1.0
0.8
0.6
0.4
0.2
40
35
30
25
20
15
10
6
Figur 1
Elektroder
LCD-skjerm
STANLEY® Fuktighetsmåler
Stanleys fuktighetsmåler registrerer
fuktighet i treverk og vanlige
bygningsmaterialer inkludert, men ikke
begrenset til, gipsplater, gips, betong og
sementplater.
ADVARSEL:
• FØLG ALLTID alle anvisninger og
advarsler i denne bruksanvisningen.
• IKKE sprut vann på enheten eller senk
den i vann.
• SKRU ALLTID AV produktet når det
ikke er i bruk.
• SØRG ALLTID FOR at batteriet er satt
inn riktig, med riktig polaritet.
• IKKE blande gamle og nye batterier.
Skift ut alle samtidig med nye batterier
av samme merke og type.
• KORTSLUTT ALDRI
batteriterminalene.
• FORSØK IKKE å lade alkaliske
batterier.
• IKKE blande batterier med ulik kjemi.
• BRENN IKKE batterier.
• TA ALLTID UT batteriet dersom
enheten skal oppbevares i over en
måned.
• KAST IKKE dette produktet sammen
med husholdningsavfall.
• SJEKK ALLTID lokale bestemmelser
og kast batterier i henhold til disse.
• RESIRKULER i henhold til lokale
bestemmelse for innsamling og
avfallshåndtering av elektrisk og
elektronisk avfall.
• FORSIKTIG: Elektrodepinnene er
svært skarpe. Håndter instrumentet
forsiktig. Hold pinnene tildekket når de
ikke er i bruk.
Page 43

43
Instruksjonshåndbok
BATTERI:
Åpne luken på baksiden av enheten
ved hjelp av en Philips-skrutrekker.
Sett inn 4 nye AAA-batterier, pass på
at polariteten er korrekt i henhold til
merkingen på innsiden av enheten.
Sett på igjen batteridekselet og Phillipsskruen. Dersom batterisymbolet vises på
LCD-skjermen, er det på tide å skifte ut
batteriene.
BRUK:
Ta av hetten (hetten kan settes nederst
på enheten under bruk).
Slå på enheten ved å trykke en gang på
strømknappen.
Trykk elektrodene inn i materialet som
skal testes.
• Trykk forsiktig, men så dypt som mulig
for å oppnå god kontakt.
• I treverk, ta målingene på tvers av
veden (gur 1).
• Ta ere avlesninger på ulike punkter
for å få en bedre indikasjon om
det generelle fuktighetsinnholdet
i materialet.
Enheten vil automatisk holde
fuktighetsmålingen på displayet
i 5 sekunder når avlesningen har
stabilisert seg og pinnene er tatt ut av
materialet som måles.
Enheten vil automatisk slå seg av etter
omtrent 1 minutt uten bruk eller målinger.
Enheten viser omgivelsestemperaturen
øverst på LCD-displayet. For å skifte
mellom F° & C°, hold inne strømknappen
i omtrent 3 sekunder.
VERIFISERE ENHETENS
KALIBRERING:
Det er 2 par testkontakter av metall på
toppen av hetten, disse kan brukes for
test av fuktighetsmåleren.
Sett de 2 probene mot de
2 metallkontaktene merket med “T”,
avlesningen på tre-skalaen skal være
19% ±1.
Berør så de 2 probene mot de
2 metallkontaktene merket med “B”, alle
indikatorstolper skal blinke på LCDdisplayet.
Dersom fuktighetsmåleren fungerer som
angitt over, fungerer enheten som den
skal.
Page 44

44
NO
Bruksanvisning
SPESIFIKASJONER:
Skjerm LCD med dobbel
måleskala
Område, treverk 6 – 44%
Område,
bygningsmaterialer
0,2 – 2,0%
Automatisk
utkobling
1 minutt
IP klasse:
Driftstemperatur
IP20
0°C - 40°C
(32°F - 104°F)
Lagringstemperatur -10°C - 50°C
Luftfuktighet ved
bruk
80% maks relativ
luftfuktighet
Batteri 4x AAA (1,5 volt)
Tilbehør Bærepung m/
beltestropp
Materialomregningstabell:
Følgende tabell inneholder spesikke omregninger for noen vanlige materialer. Alle
verdier i listen er % fuktighet.
Skjerm Bøk Gran Betong Gipsplate Sement Porøs
Avlesning /Eik/Bjørk C20/C25 fylling Betong
44 29 33,6 1,6 2,3 1,8 9,5
42 27,4 32 1,6 2,1 1,8 9
40 27,1 31,4 1,6 2,1 1,8 8,8
38 25,3 29,4 1,6 2 1,8 8
36 24,1 28 1,5 1,9 1,7 7,7
34 22,9 26,7 1,5 1,8 1,7 7,2
32 21,9 25,6 1,5 1,6 1,7 6,6
30 20,8 24,3 1,4 1,4 1,6 5,7
28 20,3 23,8 1,4 1,4 1,6 5,6
26 19,4 22,8 1,4 1,3 1,6 5,1
24 18,7 22 1,4 1,2 1,6 4,8
22 17,7 20,9 1,3 1 1,5 4,6
20 15,8 18,7 1,3 0,8 1,4 4,1
18 14,6 17,4 1,3 0,6 1,4 3,7
16 11,9 14,2 1,2 0,3 1,2 3
14 9,2 11,3 1,2 0,2 1,1 2,7
12 7,4 9,2 1,1 0,1 1,1 2,4
10 6,7 8,4 1,1 0,1 1,1 2,3
8 5,6 7,3 1,1 0,1 1 2,2
= Tørr = Våt
Page 45

45
1-ÅRS GARANTI
Stanley garanterer sine elektriske måleverktøy
mot materialfeil og/eller fabrikasjonsfeil i ett år
fra kjøpsdatoen.
Produkter med feil blir reparert eller erstattet
etter Stanleys vurdering dersom de sendes
med kjøpsbevis til:
STANLEY NORWAY
Postboks 4613, Nydalen
0405 Oslo
Norway
Denne garantien dekker ikke feil som skyldes
uhell eller normal slitasje, bruk som avviker fra
produsentens anvisninger for produktet eller
ved endring av produktet som ikke er autorisert
av Stanley.
Reparasjon eller bytte under denne garantien
endrer ikke utløpsdatoen for garantien.
I den grad loven tillater det, skal Stanley ikke
holdes ansvarlig under denne garantien for
indirekte skader eller følgeskader som skyldes
feil ved dette produktet.
Denne garantien skal ikke endres uten
autorisasjon fra Stanley.
Denne garantien påvirker ikke dine rettslige
rettigheter som forbruker etter kjøp av dette
produktet.
Denne garantien skal bedømmes etter og
tolkes i henhold til lovene i salgslandet, og
Stanley og kjøperen samtykker i at kun dette
landet er gyldig verneting for alle krav eller
konikter som oppstår fra eller i sammenheng
med denne garantien.
Kalibrering og stell er ikke dekket av garantien.
MERK:
Kunden er ansvarlig for riktig bruk og stell av
instrumentet. Videre er kunden selv fullt ut
ansvarlig for nøyaktigheten av laserenheten,
og derfor for kalibreringen av instrumentet.
Med forbehold om endringer uten forvarsel
Page 46

46
PL
Instrukcja obsługi
Niski stan baterii
Ikona
Zasilanie
Przycisk
Skala dla drewna
Temperatura
Gniazda testowe
Zaślepka
Materiały
budowlane
Skala
B
T
ON/SET
STHT77030
% %
44
2.0
1.8
1.6
1.4
1.2
1.0
0.8
0.6
0.4
0.2
40
35
30
25
20
15
10
6
Rysunek 1
Elektrody
Wyświetlacz LCD
Miernik wilgotności STANLEY
®
Miernik wilgotności Stanley wykrywa
wilgoć w drewnie i typowych materiałach
budowlanych, w tym m.in. w płytach
regipsowych, gipsie, betonie i cemencie.
OSTRZEŻENIE:
• ZAWSZE zwracać uwagę na wszystkie
instrukcje i ostrzeżenia w niniejszej
instrukcji obsługi.
• NIE chlapać ani zanurzać urządzenia
w wodzie.
• ZAWSZE wyłączać produkt, gdy nie
jest używany.
• ZAWSZE upewnić się, że baterie
są włożone w prawidłowy sposób
i z zachowaniem właściwej
biegunowości.
• NIE łączyć starych baterii z nowymi.
Wszystkie baterie należy wymieniać
jednocześnie, wykorzystując nowe
baterie tej samej marki i typu.
• NIGDY nie zwierać zacisków baterii.
• NIE próbować ładować baterii
alkalicznych.
• NIE używać baterii o różnym składzie
chemicznym.
• NIE wrzucać baterii do ognia.
• ZAWSZE wyjmować baterie, gdy
urządzenie ma być przechowywane
przez czas dłuższy niż miesiąc.
• NIE utylizować produktu z normalnymi
odpadami z gospodarstwa domowego.
• ZAWSZE utylizować zużyte baterie
zgodnie z lokalnymi przepisami.
• UTYLIZOWAĆ zgodnie z lokalnymi
przepisami dotyczącymi zbiórki
i utylizacji odpadów elektrycznych
i elektronicznych.
• OSTRZEŻENIE: Końcówki
elektrod są bardzo ostre. Obsługiwać
urządzenie z zachowaniem
Page 47

47
ostrożności. Zakryć końcówki, kiedy nie
są używane.
Instrukcja obsługi
BATERIA:
Otworzyć tylną pokrywę w urządzeniu,
korzystając ze śrubokręta krzyżowego.
Włożyć 4 nowe baterie AAA, upewniając
się, że ułożenie jest zgodne ze
wskazaniem wewnątrz obudowy. Założyć
pokrywę komory baterii i przykręcić
śrubokrętem. Kiedy na ekranie LCD
pojawi się symbol baterii, czas je
wymienić.
OBSŁUGA:
Zdjąć zaślepkę (można ją schować
w dolnej części urządzenia).
Włączyć urządzenie, naciskając raz
przycisk zasilania.
Docisnąć elektrody do testowanego
materiału.
• Dociskać ostrożnie, ale możliwie jak
najmocniej.
• Pomiary drewna wykonywać
w kierunku przeciwnym do usłojenia
(rysunek 1).
• Wykonać kilka odczytów w różnych
miejscach, aby uzyskać informacje
o ogólnej wilgotności materiału.
Pomiar wilgotności będzie widoczny
na ekranie przez 5 sekund od
ustabilizowania odczytu i zdjęcia elektrod
z mierzonego materiału.
Urządzenie wyłączy się automatycznie
po około 1 minucie bezczynności/braku
pomiarów.
Urządzenie wyświetla temperaturę
otoczenia na górze wyświetlacza LCD.
Aby zmienić jednostki z F° na C°, po
prostu przytrzymaj przycisk zasilania
przez około 3 sekundy.
SPRAWDZANIE KALIBRACJI
URZĄDZENIA:
Na zaślepce znajdują się 2 pary
metalowych gniazd testowych. Można
z nich korzystać do testowania miernika
wilgotności.
Zetknij 2 sondy z 2 metalowymi stykami
oznaczonymi literą T. Odczyt na skali dla
drewna mieścić się w zakresie 19% ±1.
Następnie zetknij 2 sondy z 2 metalowymi
stykami oznaczonymi literą B. Wszystkie
paski wskaźnika powinny zamigać na
ekranie LCD.
Jeśli miernik wilgotności działa zgodnie
z powyższym opisem, urządzenie jest
sprawne.
Page 48

48
PL
Instrukcja obsługi
DANE TECHNICZNE:
Wyświetlacz LCD z podwójną
skalą pomiaru
Zakres, drewno 6 – 44%
Zakres, materiały
budowlane
0,2 – 2,0%
Automatyczne
wyłączenie zasilania
1 minuta
Stopień IP:
Temperatura
robocza
IP20
0°C – 40°C
(32°F – 104°F)
Temperatura
przechowywania
-10°C – 50°C
Wilgotność robocza 80% maksymalnej
wilgotności
względnej
Bateria 4x AAA (1,5 V)
Akcesoria Torba do
przenoszenia
z pętlą na pasek
Tabela konwersji materiałów:
Poniższa tabela zawiera określone konwersje dla typowych materiałów. Podane
wartości to % wilgotności materiału.
Wyświetlacz Buk Świerk Beton Gips Cement Odpowietrzenie
Odczyt Dąb/brzoza C20/C25 Deska
równająca
Beton
44 29 33,6 1,6 2,3 1,8 9,5
42 27,4 32 1,6 2,1 1,8 9
40 27,1 31,4 1,6 2,1 1,8 8,8
38 25,3 29,4 1,6 2 1,8 8
36 24,1 28 1,5 1,9 1,7 7,7
34 22,9 26,7 1,5 1,8 1,7 7,2
32 21,9 25,6 1,5 1,6 1,7 6,6
30 20,8 24,3 1,4 1,4 1,6 5,7
28 20,3 23,8 1,4 1,4 1,6 5,6
26 19,4 22,8 1,4 1,3 1,6 5,1
24 18,7 22 1,4 1,2 1,6 4,8
22 17,7 20,9 1,3 1 1,5 4,6
20 15,8 18,7 1,3 0,8 1,4 4,1
18 14,6 17,4 1,3 0,6 1,4 3,7
16 11,9 14,2 1,2 0,3 1,2 3
14 9,2 11,3 1,2 0,2 1,1 2,7
12 7,4 9,2 1,1 0,1 1,1 2,4
10 6,7 8,4 1,1 0,1 1,1 2,3
8 5,6 7,3 1,1 0,1 1 2,2
= Suche = Mokre
Page 49

49
1 ROK GWARANCJI
Firma Stanley udziela dla swoich
elektronicznych urządzeń pomiarowych
gwarancji obejmującej wady materiałowe
i wady wykonania na okres roku od daty
zakupu.
Wadliwe produkty zostaną naprawione lub
wymienione, zgodnie z uznaniem rmy Stanley,
jeśli zostaną przesłane wraz z dowodem
zakupu na adres:
Stanley Black & Decker Polska SP.z.o.o
ul. Postepu 21D,
02-676 Warsaw,
Poland
Gwarancja nie obejmuje wad spowodowanych
przez uszkodzenia na skutek wypadku,
zużycia, użytkowania niezgodnie z instrukcją
producenta bądź przeprowadzenia napraw
lub modykacji tego produktu bez zgody rmy
Stanley.
Naprawa lub wymiana zgodnie z tą gwarancją
nie wpływa na datę ważności gwarancji.
W zakresie dopuszczalnym przez prawo rma
Stanley, na podstawie tej gwarancji, nie ponosi
odpowiedzialności za pośrednie lub wynikowe
szkody wynikające z braków tego produktu.
Zmiana tej gwarancja bez zgody rmy Stanley
jest niedozwolona.
Gwarancja nie wpływa na ustawowe prawa
nabywców - konsumentów tego produktu
Gwarancja podlega, jest interpretowana
i podlega wykładni prawa kraju sprzedaży,
a rma Stanley oraz nabywca nieodwołalnie
zgadzają się na objęcie jurysdykcją sądów
tego kraju w sprawie wszelkich sporów
lub spraw wynikających z tej gwarancji lub
w związku z nią.
Gwarancja nie obejmuje gwarancji i dbałości
o produkt.
UWAGA:
Klient jest odpowiedzialny za prawidłowe
użytkowanie i dbałość o urządzenie. Ponadto
klient jest w pełni odpowiedzialny za regularne
sprawdzanie dokładności jednostki lasera i,
w związku z tym, kalibrację urządzenia.
Informacje zawarte w niniejszej publikacji
mogą ulec zmianie bez wcześniejszego
powiadomienia.
Page 50

50
GR
Εγχειρίδιο χρήσης
Εικονίδιο
Χαμηλής ισχύος μπαταρίας
Κουμπί
Τροφοδοσίας
Κλίμακα ξύλου
Θερμοκρασία
Υποδοχές δοκιμής
Κάλυμμα
Κλίμακα
Δομικών
Υλικών
B
T
ON/SET
STHT77030
% %
44
2.0
1.8
1.6
1.4
1.2
1.0
0.8
0.6
0.4
0.2
40
35
30
25
20
15
10
6
Εικόνα 1
Ηλεκτρόδια
Οθόνη LCD
Υγρασιόμετρο STANLEY
®
Το υγρασιόμετρο Stanley ανιχνεύει
υγρασία σε ξύλο και κοινά δομικά υλικά
που περιλαμβάνουν, αλλά χωρίς να
περιορίζονται σε, γυψοσανίδες, σοβά,
σκυρόδεμα και τσιμεντοσανίδες.
ΠΡΟΕΙΔΟΠΟΙΗΣΗ:
• ΠΑΝΤΑ να τηρείτε όλες τις οδηγίες και τις
προειδοποιήσεις που περιλαμβάνονται
στο παρόν εγχειρίδιο χρήσης.
• ΜΗΝ πιτσιλίζετε ή βυθίζετε τη μονάδα
σε νερό.
• ΠΑΝΤΑ να απενεργοποιείτε το προϊόν
όταν δεν το χρησιμοποιείτε.
• ΠΑΝΤΑ να διασφαλίζετε ότι οι
μπαταρίες εισάγονται με το σωστό
τρόπο, με τη σωστή πολικότητα.
• ΜΗ χρησιμοποιείτε μαζί παλιές
και νέες μπαταρίες. Αντικαθιστάτε
ταυτόχρονα όλες τις μπαταρίες με νέες
ίδιας μάρκας και τύπου.
• ΠΟΤΕ μη βραχυκυκλώσετε σκόπιμα
οποιουσδήποτε πόλους μπαταριών.
• ΜΗΝ επιχειρήσετε να φορτίσετε
αλκαλικές μπαταρίες.
• ΜΗ χρησιμοποιείτε μαζί μπαταρίες
διαφορετικής χημείας.
• ΜΗΝ πετάτε μπαταρίες στη φωτιά.
• ΠΑΝΤΑ να αφαιρείτε τις μπαταρίες αν
σκοπεύετε να αποθηκεύσετε τη μονάδα
για διάστημα μεγαλύτερο του μηνός.
• ΜΗΝ απορρίψετε αυτό το προϊόν μαζί
με τα οικιακά απορρίμματα.
• ΠΑΝΤΑ να ελέγχετε τους τοπικούς
κανονισμούς και να απορρίπτετε με
σωστό τρόπο τις χρησιμοποιημένες
μπαταρίες.
• ΠΑΡΑΚΑΛΟΥΜΕ ΑΝΑΚΥΚΛΩΣΤΕ
σύμφωνα με τις τοπικά ισχύουσες
διατάξεις για τη συλλογή και
απόρριψη αποβλήτων ηλεκτρικού και
ηλεκτρονικού εξοπλισμού.
Page 51

51
• ΠΡΟΣΟΧΗ: Οι ακίδες των
ηλεκτροδίων είναι πολύ αιχμηρές. Να
χειρίζεστε το όργανο με προσοχή.
Διατηρείτε τις ακίδες καλυμμένες όταν
δεν τις χρησιμοποιείτε.
Οδηγίες χρήσης
ΜΠΑΤΑΡΙΑ:
Ανοίξτε το πορτάκι στο πίσω μέρος της
μονάδας χρησιμοποιώντας ένα κατσαβίδι
με κεφαλή Philips. Εισάγετε 4 νέες
μπαταρίες AAA, διασφαλίζοντας ότι η
πολικότητα είναι σωστή σύμφωνα με την
ένδειξη στο εσωτερικό του περιβλήματος.
Επανατοποθετήστε το πορτάκι των
μπαταριών και τη βίδα κεφαλής Phillips.
Όταν εμφανίζεται το σύμβολο μπαταρίας
στην οθόνη LCD, σημαίνει ότι πρέπει να
αντικαταστήσετε τις μπαταρίες.
ΛΕΙΤΟΥΡΓΙΑ:
Αφαιρέστε το κάλυμμα (μπορείτε να
φυλάξετε το κάλυμμα στο κάτω μέρος της
μονάδας όσο τη χρησιμοποιείτε).
Ενεργοποιήστε τη μονάδα πιέζοντας μία
φορά το κουμπί τροφοδοσίας.
Πιέστε τα ηλεκτρόδια ώστε να εισέλθουν
στο προς έλεγχο υλικό.
• Πιέστε προσεκτικά, αλλά όσο το
δυνατόν πιο βαθιά για να αποκτήσετε
καλή επαφή.
• Σε ξύλο πρέπει να λαμβάνετε μετρήσεις
κάθετα στα νερά (Εικόνα 1).
•
Πάρτε αρκετές μετρήσεις σε διάφορες
θέσεις για να έχετε μια καλύτερη ιδέα
σχετικά τη γενικά περιεχόμενη υγρασία
στο υλικό.
Η μονάδα θα διατηρήσει αυτόματα για
5 δευτερόλεπτα τη μέτρηση της υγρασίας
στην οθόνη αφού έχει σταθεροποιηθεί η
ένδειξη της μέτρησης και έχετε αφαιρέσει
τις ακίδες από το υλικό που μετράτε.
Η μονάδα θα απενεργοποιηθεί αυτόματα
μετά από περίπου 1 λεπτό χωρίς να
χρησιμοποιηθεί/χωρίς να λάβει μετρήσεις.
Η μονάδα εμφανίζει τη θερμοκρασία
περιβάλλοντος στο πάνω μέρος της
οθόνης LCD. Για αλλαγή μεταξύ °F και °C
απλά κρατήστε το κουμπί τροφοδοσίας
πατημένο για περίπου 3 δευτερόλεπτα.
ΕΠΑΛΗΘΕΥΣΗ ΤΗΣ ΒΑΘΜΟΝΟΜΗΣΗΣ
ΤΗΣ ΜΟΝΑΔΑΣ:
Υπάρχουν 2 ζευγάρια μεταλλικών
υποδοχών δοκιμής στο πάνω μέρος
του καλύμματος, τις οποίες μπορείτε
να χρησιμοποιήσετε για να ελέγξετε το
υγρασιόμετρο.
Αγγίξτε τα 2 ηλεκτρόδια στις 2 μεταλλικές
επαφές που επισημαίνονται με «T»: η
ένδειξη μέτρησης στην κλίμακα ξύλου θα
πρέπει να είναι 19% ±1.
Κατόπιν αγγίξτε τα 2 ηλεκτρόδια στις
2 μεταλλικές επαφές με τη σήμανση «B»:
θα πρέπει να αναβοσβήνουν όλες οι
ράβδοι ένδειξης στην οθόνη LCD.
Αν το υγρασιόμετρο λειτουργεί όπως
Page 52

52
GR
Εγχειρίδιο χρήσης
αναφέρθηκε παραπάνω, η μονάδα
λειτουργεί σωστά.
ΠΡΟΔΙΑΓΡΑΦΕΣ:
Οθόνη LCD με διπλή
κλίμακα μέτρησης
Κλίμακα, Ξύλο 6 – 44%
Κλίμακα, Δομικά υλικά
0,2 – 2,0%
Αυτόματη
απενεργοποίηση
1 λεπτό
Βαθμός προστασίας (IP): IP20
Θερμοκρασία
λειτουργίας
0 °C – 40 °C
(32 °F – 104 °F)
Θερμοκρασία
αποθήκευσης
-10 °C - 50 °C
Υγρασία
λειτουργίας
80% μέγ. σχετική
υγρασία
Μπαταρία 4x AAA (1,5 V)
Αξεσουάρ
Τσαντάκι μεταφοράς
με θηλιά για τη ζώνη
Πίνακας μετατροπής υλικών:
Ο πίνακας που ακολουθεί περιλαμβάνει ειδικές μετατροπές για ορισμένα κοινά υλικά.
Όλες οι τιμές που αναφέρονται είναι σε % υγρασίας υλικού.
Ένδειξη
στην
Οξιά Ερυθρελάτη Σκυρόδεμα Σοβάς Επίχρισμα Αφρώδες
Οθόνη /Βελανιδιά/
Σημύδα
C20/C25 Από
τσιμέντο
Σκυρόδεμα
44 29 33,6 1,6 2,3 1,8 9,5
42 27,4 32 1,6 2,1 1,8 9
40 27,1 31,4 1,6 2,1 1,8 8,8
38 25,3 29,4 1,6 2 1,8 8
36 24,1 28 1,5 1,9 1,7 7,7
34 22,9 26,7 1,5 1,8 1,7 7,2
32 21,9 25,6 1,5 1,6 1,7 6,6
30 20,8 24,3 1,4 1,4 1,6 5,7
28 20,3 23,8 1,4 1,4 1,6 5,6
26 19,4 22,8 1,4 1,3 1,6 5,1
24 18,7 22 1,4 1,2 1,6 4,8
22 17,7 20,9 1,3 1 1,5 4,6
20 15,8 18,7 1,3 0,8 1,4 4,1
18 14,6 17,4 1,3 0,6 1,4 3,7
16 11,9 14,2 1,2 0,3 1,2 3
14 9,2 11,3 1,2 0,2 1,1 2,7
12 7,4 9,2 1,1 0,1 1,1 2,4
10 6,7 8,4 1,1 0,1 1,1 2,3
8 5,6 7,3 1,1 0,1 1 2,2
= ξηρές συνθήκες = υγρές συνθήκες
Page 53

53
1 ΕΤΟΣ ΕΓΓΥΗΣΗ
Η Stanley εγγυάται το ηλεκτρονικό της
εργαλείο μέτρησης για ένα έτος από την
ημερομηνία αγοράς έναντι ελαττωμάτων σε
υλικά και / ή εργασία.
Τα ελαττωματικά προϊόντα θα επισκευάζονται
ή θα αντικαθίστανται, κατ’ επιλογή της Stanley,
αν αποσταλούν συνοδευόμενα από απόδειξη
αγοράς στη διεύθυνση:
Stanley Black & Decker (HELLAS) L.T.D
7 Stravonos & Vouliagmenis
Glyfada - 16674 - Attika
GREECE
Η παρούσα Εγγύηση δεν καλύπτει
ελαττώματα που προκλήθηκαν από ζημιές
λόγω ατυχήματος, από φθορά, από χρήση
που δεν ήταν σύμφωνη με τις οδηγίες του
κατασκευαστή ή από επισκευή ή τροποποίηση
του προϊόντος που δεν είχε την έγκριση της
Stanley.
Η επισκευή ή αντικατάσταση υπό την
παρούσα Εγγύηση δεν επηρεάζει την
ημερομηνία λήξης της Εγγύησης.
Ως την έκταση που επιτρέπεται από το νόμο, η
Stanley δεν θα φέρει την ευθύνη υπό αυτή την
Εγγύηση για έμμεσες ή επακόλουθες απώλειες
που προκύπτουν από ελαττώματα σε αυτό το
προϊόν.
Η παρούσα Εγγύηση δεν μπορεί να
τροποποιηθεί χωρίς την έγκριση της Stanley.
Η παρούσα Εγγύηση δεν επηρεάζει τα
προβλεπόμενα από το νόμο δικαιώματα των
καταναλωτών που προμηθεύονται αυτό το
προϊόν.
Page 54

54
CZ
Uživatelská příručka
Vybitá baterie
– ikona
Vypínač napájení
– tlačítko
Stupnice pro dřevo
Teplota
Testovací zdířky
Ochranný kryt
Stupnice
pro
stavební
materiály
B
T
ON/SET
STHT77030
% %
44
2.0
1.8
1.6
1.4
1.2
1.0
0.8
0.6
0.4
0.2
40
35
30
25
20
15
10
6
Obrázek 1
Elektrody
LCD displej
STANLEY® Měřič vlhkosti
Měřič vlhkosti Stanley zjišťuje vlhkost
v dřevěných a běžných stavebních
materiálech včetně, mimo jiné, suchého
zdiva, sádry, betonu a cementotřískových
desek.
VAROVÁNÍ:
• VŽDY dodržujte všechny pokyny
a varování obsažené v tomto návodu
k obsluze.
• CHRAŇTE zařízení před stříkající
vodou a neponořujte je do vody.
• VŽDY přístroj vypínejte, jestliže se
nepoužívá.
• VŽDY se ujistěte, že baterie jsou
vloženy správným způsobem a se
správnou polaritou.
• NEPOUŽÍVEJTE společně staré
a nové baterie. Baterie nahrazujte
novými současně, a to stejnou značkou
a typem.
• NIKDY záměrně nezkratujte svorky
baterií.
• NEPOKOUŠEJTE se nabíjet alkalické
baterie.
• NEPOUŽÍVEJTE baterie s různým
chemickým složením.
• NELIKVIDUJTE baterie spalováním.
• VŽDY vyjímejte baterie, má-li být
přístroj uskladněn po dobu delší než
jeden měsíc.
• NELIKVIDUJTE tento výrobek
společně s domovním odpadem.
• VŽDY postupujte podle místních
předpisů a zajistěte řádnou likvidaci
vyřazených baterií.
• ZAJISTĚTE RECYKLACI v souladu
s ustanoveními místních předpisů
Page 55

55
týkajících se sběru a likvidace
elektrického a elektronického odpadu.
• POZOR: Kolíky elektrod jsou
velmi ostré. S přístrojem zacházejte
opatrně. Jestliže se přístroj nepoužívá,
nechávejte kolíky jeho elektrod zakryté.
Návod k obsluze
BATERIE:
Otevřete dvířka na zadní straně přístroje
za použití křížového šroubováku. Vložte
4 nové baterie typu AAA a přitom se
ujistěte, že je dodržena správná polarita
podle značek na vnitřní straně pouzdra.
Umístěte zpět dvířka prostoru pro baterie
a zajistěte je pomocí šroubu s křížovou
drážkou. Zobrazí-li se na obrazovce LCD
symbol baterie, nastal čas k provedení
výměny baterií.
OBSLUHA:
Sejměte ochranný kryt (po dobu
provádění měření je tento kryt možno
ukládat v dolní části přístroje).
Zapněte přístroj jedním stisknutím tlačítka
vypínače napájení.
Vtlačte elektrody do zkoušeného
materiálu.
• Elektrody vtlačte opatrně, avšak co
nejhlouběji, aby bylo možno získat
dostatečný kontakt.
• V případě dřeva provádějte měření
napříč ke směru vláken (obrázek 1).
• Provádějte několik odečtů v různých
místech, abyste získali lepší
představu o celkovém obsahu vlhkosti
v materiálu.
Po stabilizaci odečtené hodnoty a vyjmutí
kolíků z měřeného materiálu bude přístroj
na displeji automaticky zachovávat
zobrazenou hodnotu naměřené vlhkosti
po dobu 5 sekund.
Přístroj se automaticky vypíná po uplynutí
přibližně 1 minuty nečinnosti / bez měření.
V horní části displeje LCD zobrazuje
přístroj teplotu okolního prostředí.
Přepínání mezi jednotkami F° a C°
se provádí jednoduchým přidržením
stisknutého tlačítka vypínače napájení po
dobu 3 sekund.
OVĚŘENÍ KALIBRACE PŘÍSTROJE:
Na horní straně ochranného krytu se
nacházejí 2 dvojice testovacích zdířek,
které lze používat k testování měřiče
vlhkosti.
Dotknete-li se 2 sondami dvou kovových
kontaktů s označením „T“, odečtená
hodnota na stupnici pro dřevo by měla
činit 19% ±1.
Poté se 2 sondami dotkněte dvou
kovových kontaktů s označením „B“:
na LCD displeji by měly blikat všechny
indikační sloupce.
Pokud měřič vlhkosti funguje výše
uvedeným způsobem, je jeho funkce
správná.
Page 56

56
CZ
Uživatelská příručka
TECHNICKÉ ÚDAJE:
Displej LCD s dvojí měřicí
stupnicí
Rozsah pro dřevo 6 – 44%
Rozsah pro stavební
materiály
0,2 – 2,0%
Automatické vypnutí 1 minuta
Stupeň IP:
Provozní teplota
IP20
0°C – 40°C
(32°F – 104°F)
Teplota při
uskladnění
-10°C - 50°C
Provozní vlhkost
vzduchu
max. 80% relativní
vlhkosti
Baterie 4x AAA (1,5 V)
Příslušenství Přenášecí pouzdro
s poutkem pro
upevnění na
opasek
Převodní tabulka materiálů:
Následující tabulka obsahuje specické převody pro několik nejběžnějších materiálů.
Všechny hodnoty jsou uvedeny v % vlhkosti materiálu.
Displej Buk Smrk Beton Sádra Cementový Lehčený
Odečtená
hodnota
/dub/bříza C20/C25 potěr beton
44 29 33,6 1,6 2,3 1,8 9,5
42 27,4 32 1,6 2,1 1,8 9
40 27,1 31,4 1,6 2,1 1,8 8,8
38 25,3 29,4 1,6 2 1,8 8
36 24,1 28 1,5 1,9 1,7 7,7
34 22,9 26,7 1,5 1,8 1,7 7,2
32 21,9 25,6 1,5 1,6 1,7 6,6
30 20,8 24,3 1,4 1,4 1,6 5,7
28 20,3 23,8 1,4 1,4 1,6 5,6
26 19,4 22,8 1,4 1,3 1,6 5,1
24 18,7 22 1,4 1,2 1,6 4,8
22 17,7 20,9 1,3 1 1,5 4,6
20 15,8 18,7 1,3 0,8 1,4 4,1
18 14,6 17,4 1,3 0,6 1,4 3,7
16 11,9 14,2 1,2 0,3 1,2 3
14 9,2 11,3 1,2 0,2 1,1 2,7
12 7,4 9,2 1,1 0,1 1,1 2,4
10 6,7 8,4 1,1 0,1 1,1 2,3
8 5,6 7,3 1,1 0,1 1 2,2
= Suché = Mokré
Page 57

57
JEDNOLETÁ ZÁRUKA
Společnost Stanley ručí za to, že se u těchto
elektronických měřicích zařízení po dobu
jednoho roku od data jejich zakoupení
nevyskytnou závady způsobené vadou
materiálu a/nebo špatným dílenským
zpracováním.
Vadné výrobky budou opraveny nebo
vyměněny, dle posouzení společností Stanley,
pokud budou odeslány společně s dokladem
o zakoupení na adresu:
TONA, a.s.,
Chvalovická 326,
281 51 Pečky, Česká republika
Tato záruka se nevztahuje na závady
způsobené neúmyslným poškozením,
opotřebováním, jiným použitím než v souladu
s pokyny výrobce nebo opravou či úpravou
tohoto výrobku bez schválení společnosti
Stanley.
Oprava nebo výměna provedená v rámci
záruky nemá vliv na datum vypršení záruky.
V rozsahu povoleném zákonem nebude
společnost Stanley v rámci této záruky
odpovídat za nepřímé nebo následné škody
vyplývající z nedostatků tohoto výrobku.
Tuto záruku nelze upravit bez svolení
společnosti Stanley.
Tato záruka nemá žádný vliv na zákonná práva
spotřebitelů kupujících tento výrobek.
Tato záruka bude posuzována a interpretována
v souladu se zákony platnými v zemi prodeje,
přičemž společnost Stanley i kupující
neodvolatelně souhlasí s tím, že se podřídí
pravomoci soudů této země při jakékoli
reklamaci nebo v záležitosti vyplývající nebo
související s touto zárukou.
Na kalibraci a ošetřování přístroje se záruka
nevztahuje.
POZNÁMKA:
Zákazník je zodpovědný za správné používání
přístroje a za péči o něj. Mimoto nese zákazník
plnou zodpovědnost za provádění pravidelných
kontrol přesnosti laserové jednotky, a tudíž i za
kalibraci přístroje.
Podléhá změnám bez předchozího oznámení
Page 58

58
RU
Руководство пользователя
Индикатор низкого заряда
Кнопка питания
Шкала для дерева
Температура
Гнезда для
проверки работоспособности
Крышка
Шкала
строительных
материалов
B
T
ON/SET
STHT77030
% %
44
2.0
1.8
1.6
1.4
1.2
1.0
0.8
0.6
0.4
0.2
40
35
30
25
20
15
10
6
Рисунок 1
Электроды
ЖК дисплей
STANLEY® Влагомер
Измеритель влажности предназначен для
определения уровня влажности дерева,
а также строительных материалов, в том
числе гипсокартона, штукатурки, бетона,
цементных плит и так далее.
ВНИМАНИЕ!
• Соблюдайте все инструкции
и предупреждения данного
руководства.
• НЕ брызгайте и не погружайте
корпус дисплея в воду.
• Всегда отключайте устройство,
если оно не используется.
• Убедитесь в правильности установки
батарей с соблюдением их
полярности.
• Не устанавливайте новые батареи
вместе со старыми. Меняйте их как
один комплект на новые батареи
одинаковой марки и типа.
• Не закорачивайте контакты батареи.
• Не пытайтесь заряжать щелочные
батареи.
• Несмешивайте батареи различных
типов.
• Не бросайте старые батареи в огонь.
• Извлекайте батареи из устройства,
если оно не используется более месяца.
• Не выбрасывайте устройство вместе
с бытовыми отходами.
• Уточните местные нормы и правила
и утилизируйте использованные
батареи надлежащим образом.
• Пожалуйста, сдавайте инструмент
на переработку в соответствии
с местным законодательством
и положениями об электрическом
и электронном оборудовании.
• ВНИМАНИЕ! Щупы-электроды
очень острые. Соблюдайте
осторожность при использовании
Page 59

59
инструмента. Закрывайте щупы,
если они не используются.
Инструкции по эксплуатации
БАТАРЕЯ:
Снимите крышку на задней
части инструмента с помощью
крестообразной отвертки. Установите
4 новых батареи типа AAA, соблюдая
полярность, указанную внутри корпуса.
Установите крышку батарейного
отсека на свое место, закрутите винт
с крестообразным шлицем. Когда
на ЖК экране будет отображаться
индикатор батареи, значит пришло
время заменить батареи на новые.
ЭКСПЛУАТАЦИЯ:
Снимите крышку (во время
эксплуатации крышку можно установить
на нижнюю часть инструмента).
Нажмите кнопку питания один раз,
чтобы включить инструмент.
Прикоснитесь электродами к материалу,
который необходимо измерить.
• Соблюдая осторожность, надавите
как можно сильнее, чтобы
обеспечить полноценный контакт.
• При измерении показателей
дерева прикладывайте устройство
в соответствии с волокнами (рис. 1).
• Для получения наиболее точных
показателей влажности материала
выполняйте измерение несколько
раз в разных местах.
Устройство удерживает результаты
измерения на дисплее в течение
5 секунд после стабилизации
измерения и после того, как щупы
были сняты с материала.
Инструмент автоматически отключится
приблизительно через 1 минуту
неиспользования/отсутствия
измерений.
В верхней части ЖК инструмента
отображается температура
окружающей среды. Чтобы изменить
отображение показателей с F° на C°
просто нажмите и удерживайте кнопку
питания в течение 3 секунд.
ПРОВЕРКА КАЛИБРОВКИ
ИНСТРУМЕНТА:
На верхней части крышки имеются
две пары гнезд для проверки
работоспособности.
Прикоснитесь 2 щупами
к 2 металлическим контактам,
отмеченным буквой «Т». Данные шкалы
дерева должны быть равны 19%±1.
Затем прикоснитесь 2 щупами
к 2 металлическим контактам,
отмеченным буквой «В». На дисплее
должны замигать все индикаторные
полоски.
Если инструмент работает так, как
описано выше, инструмент работает
надлежащим образом.
Page 60

60
RU
Руководство пользователя
ТЕХНИЧЕСКИЕ ХАРАКТЕРИСТИКИ:
Дисплей ЖК дисплей
с двойной
измерительной
шкалой
Диапазон, дерево 6 – 44%
Диапазон,
строительные
материалы
0,2 – 2,0%
Автоматическое
отключение
1 мин
Степень защиты IP:
Рабочая
температура
IP20
0°C – 40°C
(32°F – 104°F)
Температура
хранения
От -10°C до 50°C
Влажность
во время
эксплуатации
Макс. 80% ОВВ
аккумуляторной
батареи
4x AAA (1,5 В)
Дополнительные
приспособления
Сумка для
переноски
инструмента
с петлей для
ремня
Таблица соотношений материала
Данная таблица содержит соотношения для наиболее часто измеряемых
материалов. Все значения представляют собой влажность в %.
Дисплей Бук Ель Бетон Штукатурка Цементный Газобетон
Данные на
дисплее
/Дуб/
береза
C20/C25 маяк
44 29 33,6 1,6 2,3 1,8 9,5
42 27,4 32 1,6 2,1 1,8 9
40 27,1 31,4 1,6 2,1 1,8 8,8
38 25,3 29,4 1,6 2 1,8 8
36 24,1 28 1,5 1,9 1,7 7,7
34 22,9 26,7 1,5 1,8 1,7 7,2
32 21,9 25,6 1,5 1,6 1,7 6,6
30 20,8 24,3 1,4 1,4 1,6 5,7
28 20,3 23,8 1,4 1,4 1,6 5,6
26 19,4 22,8 1,4 1,3 1,6 5,1
24 18,7 22 1,4 1,2 1,6 4,8
22 17,7 20,9 1,3 1 1,5 4,6
20 15,8 18,7 1,3 0,8 1,4 4,1
18 14,6 17,4 1,3 0,6 1,4 3,7
16 11,9 14,2 1,2 0,3 1,2 3
14 9,2 11,3 1,2 0,2 1,1 2,7
12 7,4 9,2 1,1 0,1 1,1 2,4
10 6,7 8,4 1,1 0,1 1,1 2,3
8 5,6 7,3 1,1 0,1 1 2,2
= сухой = влажный
Page 61

61
ГАРАНТИЯ 1 ГОД
Компания Stanley предоставляет гарантию
на отсутствие дефектов материалов и/
или производства на один год с момента
покупки измерительных приборов.
Дефектная продукция будет
отремонтирована или заменена на новую
по усмотрению компании Stanley, если
прибор и доказательство его покупки будут
отправлены на следующий адрес:
Stanley Europe,
Egide Walschaertsstraat 14-16,
2800 Mechelen,
Belgium
Гарантийные обязательства не
распространяются на дефекты, ставшие
причиной непреднамеренного повреждения
и износа, некорректного использования или
самостоятельных модификаций и ремонта
данного продукта без разрешения компании
Stanley.
Ремонт и замена в рамках данной гарантии
не влияет на дату истечения срока
гарантии.
В рамках разрешения законодательства
компания Stanley не будет нести
ответственность за косвенный или
последующий ущерб или любой ущерб,
каким-либо образом вытекающий из
пользования данного прибора.
Внесение изменений в данную гарантию
запрещено без разрешения компании
Stanley.
Данная гарантия не вносит изменений
в законные права покупателей данного
изделия.
Данное гарантийное обязательство
должно регулироваться и толковаться
в соответствии с законодательством
страны, где было приобретено данное
изделие, при условии что как компания
Stanley, так и покупатель безоговорочно
соглашаются подчиняться исключительной
юрисдикции судов этой страны
относительно любых претензий и вопросов,
связанных с данной гарантией.
Калибровка и обслуживание не входят
в гарантийные условия.
ПРИМЕЧАНИЕ:
За надлежащее использование
и обслуживание прибора ответственность
несет клиент. Более того, клиент несет
полную ответственность за периодическую
проверку прибора, и таким образом, за
калибровку инструмента.
Сведения могут быть модифицированы без
предварительного предупреждения
Page 62

62
HU
Felhasználói kézikönyv
Alacsony telepfeszültség
Ikon
Bekapcsoló
gomb
Fa skála
Hőmérséklet
Tesztelő aljzatok
Sapka
Építési
anyagok
skála
B
T
ON/SET
STHT77030
% %
44
2.0
1.8
1.6
1.4
1.2
1.0
0.8
0.6
0.4
0.2
40
35
30
25
20
15
10
6
1. ábra
Elektródák
LCD kijelző
STANLEY® nedvességmérő
A Stanley nedvességmérő fában
és a szokásos építési anyagokban,
pl. a teljesség igénye nélkül
szárazfalazatban, gipsz- és
betonlapokban érzékeli a nedvességet.
FIGYELMEZTETÉS:
• MINDIG tartsa be az ebben
a felhasználói kézikönyvben megadott
útmutatásokat.
• NE fröccsentsen a műszerre vizet, és
ne merítse vízbe.
• MINDIG kapcsolja ki a műszert, amikor
nem használja.
• MINDIG ügyeljen az elemek helyes
polaritás szerinti behelyezésére.
• NE használjon régi és új elemeket
együtt. Mindegyiket egyidejűleg
cserélje ugyanolyan gyártmányú és
típusú új elemre.
• SOHA NE zárja szándékosan rövidre
az elem érintkezőit.
• NE kísérletezzen alkáli elemek
töltésével.
• NE használjon különböző vegyi
összetételű elemeket.
• NE dobja tűzbe az elemeket.
• MINDIG vegye ki az elemeket, amikor
a műszert egy hónapnál hosszabb
időre tárolja el.
• NE a háztartási hulladékkal együtt
dobja ki ezt a műszert.
• MINDIG nézzen utána a helyi
előírásoknak, és megfelelő módon
ártalmatlanítsa az elhasznált elemeket.
• KÉRJÜK, JUTTASSA EL
ÚJRAHASZNOSÍTÁSRA az
elektromos és elektronikus hulladékok
begyűjtésére és ártalmatlanítására
Page 63

63
vonatkozó helyi rendelkezéseknek
megfelelően.
• VIGYÁZAT: Az elektródák hegye
nagyon éles. Óvatosan bánjon
a műszerrel. Amikor nem használja
a műszert, az elektródák hegyét
lefedve tartsa.
Kezelési útmutató
ELEM:
Philips csavarhúzóval nyissa ki a műszer
hátoldalán lévő elemtartó rekesz fedelét.
Helyezzen be 4 db AAA elemet a rekesz
belsejében megjelölt helyes polaritás
szerint. Tegye vissza a rekesz fedelét
a Phillips csavarhúzóval. Amint az
elemet jelző szimbólum az LCD kijelzőn
megjelenik, ideje kicserélni az elemeket.
KEZELÉS:
Vegye le a sapkát (a műszer használata
közben a műszer alján tarthatja).
A bekapcsoló gomb egyszeri
megnyomásával kapcsolja be a műszert.
Nyomja be az elektródákat a mérendő
anyagba.
• Óvatosan, de a jó érintkezés végett
a lehető legmélyebbre nyomja.
• Fában szálirányra merőlegesen mérjen
(1. ábra).
• Több mérést is végezzen különböző
helyeken, hogy jobb képet kapjon az
anyag általános nedvességtartalmáról.
A mért adatot a műszer automatikusan
5 másodpercig a kijelzőn tartja, miután
a leolvasandó érték stabilizálódott, és
az elektródák hegyét kivették a mért
anyagból.
A műszer automatikusan kikapcsol,
miután 1 percig nem használják/nem
mérnek vele.
A műszer LCD kijelzőjének felső részén
megjelenik a környezeti hőmérséklet. Ha
Fahrenheit és Celsius fok között kíván
átkapcsolni, csak tartsa 3 másodpercig
lenyomva a bekapcsoló gombot.
A MŰSZER KALIBRÁLÁSÁNAK
ELLENŐRZÉSE:
A sapka tetején ki van alakítva 2 pár
fém tesztelő aljzat, ezek használhatók
a nedvességmérő műszer tesztelésére.
Érintse a 2 mérőhegyet a „T” jelölésű
2 fém érintkezőhöz, a fa skálának ennyit
kell mutatnia: 19% ±1.
Most érintse a 2 mérőhegyet a 2 „B”
jelölésű fém érintkezőhöz, és az LCD
kijelzőn minden kijelző sávnak villognia
kell.
A műszer akkor megfelelő, ha a fentebb
említett módon működik.
Page 64

64
HU
Felhasználói kézikönyv
MŰSZAKI ADATOK:
Kijelző LCD, kettős
mérőskálával
Tartomány, fa 6 – 44%
Tartomány, építési
anyagok
0,2 – 2,0%
Automatikus
kikapcsolás
1 perc
Védelmi osztály:
Üzemi hőmérséklet
IP20
0°C – 40°C
(32°F – 104°F)
Tárolási
hőmérséklet
-10°C - 50°C
Üzemi páratartalom 80% max. relatív
páratartalom
Elem 4 db AAA elem
(1,5 volt)
Tartozékok Hordtáska
övakasztóval
Átváltási táblázat anyagokhoz:
A következő táblázat néhány szokásos anyaghoz tartozó átváltási értékeket tartalmaz.
Minden felsorolt érték az anyagok nedvességének %-át jelzi.
Kijelző Bükkfa Sqruce Beton Gipsz Cement Szellőztetett
Leolvasható
érték
/Tölgy/
nyírfa
C20/C25 Esztrich beton
44 29 33,6 1,6 2,3 1,8 9,5
42 27,4 32 1,6 2,1 1,8 9
40 27,1 31,4 1,6 2,1 1,8 8,8
38 25,3 29,4 1,6 2 1,8 8
36 24,1 28 1,5 1,9 1,7 7,7
34 22,9 26,7 1,5 1,8 1,7 7,2
32 21,9 25,6 1,5 1,6 1,7 6,6
30 20,8 24,3 1,4 1,4 1,6 5,7
28 20,3 23,8 1,4 1,4 1,6 5,6
26 19,4 22,8 1,4 1,3 1,6 5,1
24 18,7 22 1,4 1,2 1,6 4,8
22 17,7 20,9 1,3 1 1,5 4,6
20 15,8 18,7 1,3 0,8 1,4 4,1
18 14,6 17,4 1,3 0,6 1,4 3,7
16 11,9 14,2 1,2 0,3 1,2 3
14 9,2 11,3 1,2 0,2 1,1 2,7
12 7,4 9,2 1,1 0,1 1,1 2,4
10 6,7 8,4 1,1 0,1 1,1 2,3
8 5,6 7,3 1,1 0,1 1 2,2
= Száraz = Nedves
Page 65

65
1 ÉVI GARANCIA
A Stanley cég a vásárlás időpontjától
számított egy év garanciát vállal elektronikus
mérőműszereinek anyaghibáiért és/vagy
gyártási rendellenességeiért.
A hibás termékeket a Stanley cég saját
belátása szerint megjavítja vagy kicseréli,
feltéve, ha a vásárlást igazoló bizonylattal
együtt juttatják el az alábbi címre:
Stanley Black & Decker Hungary Kft.
Meszaros u. 58/B
1016 Budapest
Hungary
Ez a garancia nem terjed ki olyan
meghibásodásokra, amelyek véletlen
károsodásból, normál elhasználódásból és
kopásból származnak, vagy ha a terméket nem
a gyártó útmutatásai szerint használták, illetve
ha a Stanley által nem engedélyezett javítást
vagy átalakítást végeztek rajta.
Jelen garancia hatálya alatt végzett javítás
vagy csere nem befolyásolja a garancia
lejáratának időpontját.
A jogszabály által meghatározott mértékig,
a Stanley ezen garanciája nem terjed ki
a termék meghibásodásaiból eredő közvetett
vagy járulékos károkra.
Ez a garancia a Stanley engedélye nélkül nem
módosítható.
Jelen garancia nem befolyásolja a termék
vásárlóinak törvényben garantált jogait.
Jelen garanciára és annak értelmezésére az
angliai jog az irányadó, mind a Stanley mind
a vásárló visszavonhatatlanul megegyeznek
abban, hogy a jelen garancia hatálya alatt vagy
azzal kapcsolatban felmerülő bármilyen igényt
Anglia kizárólagos joghatóságaihoz fognak
benyújtani.
A műszer kalibrálására és gondozására nem
terjed ki a garancia.
TARTSA SZEM ELŐTT:
A műszer helyes használatáért és
gondozásáért a vásárló a felelős. Ezenkívül
a vásárló teljes mértékben felelős
a lézeregység pontosságának rendszeres
ellenőrzéséért és ezáltal a műszer
kalibrálásáért.
Előzetes értesítés nélkül is módosítható
Page 66

66
SK
Príručka používateľa
Ikona nízkej
hladiny batérie
Napájacie
tlačidlo
Stupnica pre drevo
Teplota
Testovacie konzoly
Kryt
Stavebné
materiály
Stupnica
B
T
ON/SET
STHT77030
% %
44
2.0
1.8
1.6
1.4
1.2
1.0
0.8
0.6
0.4
0.2
40
35
30
25
20
15
10
6
Obrázok 1
Elektródy
LCD displej
Merač vlhkosti STANLEY
®
Merač vlhkosti Stanley deteguje
vlhkosť v dreve a bežných stavebných
materiáloch vrátane (okrem iného)
sadrokartónu, omietky, betónu
a cementových panelov.
VAROVANIE:
• VŽDY dodržiavajte všetky pokyny
a varovania obsiahnuté v tomto návode
na obsluhu.
• Jednotku NEOŠPLECHUJTE vodou
ANI JU NEPONÁRAJTE do vody.
• Produkt v čase nepoužívaniaVŽDY
vypínajte.
• VŽDY sa uistite, že batérie sú vložené
správne pri zachovaní náležitej polarity.
• Naraz NEPOUŽÍVAJTE staré
a nové batérie. Všetky batérie naraz
vymieňajte za nové batérie rovnakej
značky a typu.
• NIKDY úmyselne neskratujte svorky
batérie.
• NEPOKÚŠAJTE sa nabíjať alkalické
batérie.
• NEKOMBINUJTE batérie s rôznym
chemickým zložením.
• Batérie NEVHADZUJTE do ohňa.
• Ak sa bude jednotka skladovať
dlhšie ako mesiac, VŽDY vyberte
batérie.
• Produkt NELIKVIDUJTE ako súčasť
komunálneho odpadu.
• VŽDY si overte miestne nariadenia
a použité batérie likvidujte náležitým
spôsobom.
• RECYKLUJTE v súlade s miestnymi
nariadeniami pre zber a likvidáciu
elektrických a elektronických odpadov.
Page 67

67
• VAROVANIE: Kolíky elektródy
sú mimoriadne ostré. S prístrojom
manipulujte opatrne. V čase
nepoužívania kolíky ponechávajte
zakryté.
Prevádzkové pokyny
BATÉRIA:
Otvorte dvierka na zadnej strane jednotky
pomocou krížového skrutkovača. Vložte
4 nové batérie typu AAA so zaistením
správnej polarity podľa znázornenia na
vnútornej strane puzdra. Dvierka batérie
a krížovú skrutku dajte späť na miesto.
Keď sa na LCD displeji zobrazí symbol
batérie, nastal čas na výmenu batérií.
OBSLUHA:
Odstráňte kryt (kryt sa počas používania
môže odložiť do spodnej časti
zariadenia).
Zapnite jednotku jedným stlačením
napájacieho tlačidla.
Elektródy zatlačte do testovaného
materiálu.
• Zatláčajte opatrne, ale čo najhlbšie,
aby ste dosiahli náležitý kontakt.
• Meranie na dreve uskutočňujte proti
smeru rastu vlákien (obrázok 1).
• Vykonajte niekoľko meraní na rôznych
miestach, aby ste získali komplexnejší
prehľad o obsahu vlhkosti v materiáli.
Jednotka po stabilizovaní nameranej
hodnoty a vzdialení sa kolíkov od
meraného materiálu automaticky ponechá
nameranú hodnotu vlhkosti na displeji po
dobu 5 sekúnd.
Jednotka sa po približne 1 minúte
nepoužívania/bez realizácie akýchkoľvek
meraní automaticky vypne.
Na jednotke sa zobrazí teplota prostredia
v hornej časti LCD displeja. Ak chcete
prepnúť medzi jednotkami °F a °C, stačí
podržať približne 3 sekundy stlačené
napájacie tlačidlo.
OVERENIE KALIBRÁCIE JEDNOTKY:
V hornej časti krytu sa nachádzajú
2 kovové testovacie konzoly, ktoré je
možné použiť na otestovanie merača
vlhkosti.
2 sondami sa dotknite 2 kovových
kontaktov označených písmenom T.
Hodnota načítaná na stupnici pre drevo
by mala dosahovať 19 % ±1.
Teraz sa 2 sondami dotknite 2 kovových
kontaktov označených písmenom B. Na
LCD displeji by mali začať blikať všetky
signalizačné lišty.
Ak merač vlhkosti pracuje podľa vyššie
uvedenej charakteristiky, prevádzka
prebieha náležitým spôsobom.
Page 68

68
SK
Príručka používateľa
ŠPECIFIKÁCIE:
Displej LCD s duálnou
stupnicou merania
Rozsah pre drevo 6 – 44 %
Rozsah pre stavebné
materiály
0,2 – 2,0%
Automatické
vypnutie
1 minúta
Stupeň IP:
Teplota počas
prevádzky
IP20
0 °C – 40 °C
(32 °F – 104 °F)
Teplota pri
uskladnení
-10°C – 50°C
Hustota počas
prevádzky
80 % max. relatívna
vlhkosť
Batéria: 4x AAA (1,5 V)
Príslušenstvo Prenosné puzdro
s úchytkou na
opasok
Tabuľka na konverziu materiálov:
Nasledujúca tabuľka uvádza špecické konverzie pre niekoľko bežne používaných
materiálov. Všetky uvádzané hodnoty udávajú % vlhkosti materiálu.
Hodnota Buk Smrek Betón Omietka Cementová Prevzdušnený
na displeji /dub/breza C20/C25 omietka Betón
44 29 33,6 1,6 2,3 1,8 9,5
42 27,4 32 1,6 2,1 1,8 9
40 27,1 31,4 1,6 2,1 1,8 8,8
38 25,3 29,4 1,6 2 1,8 8
36 24,1 28 1,5 1,9 1,7 7,7
34 22,9 26,7 1,5 1,8 1,7 7,2
32 21,9 25,6 1,5 1,6 1,7 6,6
30 20,8 24,3 1,4 1,4 1,6 5,7
28 20,3 23,8 1,4 1,4 1,6 5,6
26 19,4 22,8 1,4 1,3 1,6 5,1
24 18,7 22 1,4 1,2 1,6 4,8
22 17,7 20,9 1,3 1 1,5 4,6
20 15,8 18,7 1,3 0,8 1,4 4,1
18 14,6 17,4 1,3 0,6 1,4 3,7
16 11,9 14,2 1,2 0,3 1,2 3
14 9,2 11,3 1,2 0,2 1,1 2,7
12 7,4 9,2 1,1 0,1 1,1 2,4
10 6,7 8,4 1,1 0,1 1,1 2,3
8 5,6 7,3 1,1 0,1 1 2,2
= Suché = Mokré
Page 69

69
1-ROČNÁ ZÁRUKA
Spoločnosť Stanley poskytuje na svoje
elektronické meracie zariadenia záruku
na nedostatky v materiálovom spracovaní
a dielenskom vyhotovení, ktorá platí jeden rok
od dátumu zakúpenia.
Chybné produkty budú opravené alebo
vymenené (podľa uváženia spoločnosti
Stanley), pokiaľ sa produkt spolu s dokladom
o zakúpení zašle na adresu:
TONA, a.s.,
Chvalovická 326, 281 51 Pečky, Česká
republika
Táto záruka sa nevzťahuje na nedostatky
spôsobené náhodným poškodením, bežným
opotrebením, používaním v rozpore s pokynmi
výrobcu alebo opravami či zmenami produktu
bez povolenia od spoločnosti Stanley.
Oprava alebo výmena v rámci tejto záruky sa
nevzťahuje na dátum skončenia záruky.
Spoločnosť Stanley v zákonom povolenom
rozsahu nebude podľa znenia tejto záruky
niesť zodpovednosť za nepriame ani
dôsledkové škody vyplývajúce z nedostatkov
tohto produktu.
Bez súhlasu od spoločnosti Stanley nemôže
dôjsť k zmene tejto záruky.
Táto záruka nevplýva na zákonné práva
spotrebiteľských nákupov tohto produktu.
Táto záruka sa bude uplatňovať a interpretovať
podľa zákonov platných v krajine zakúpenia,
pričom spoločnosť Stanley a kupujúci v prípade
akýchkoľvek reklamácií alebo záležitostí
vyvstávajúcich podľa alebo v spojitosti s touto
zárukou neodvolateľne súhlasia s tým, že
pristupujú na exkluzívnu jurisdikciu súdov
v príslušnej krajine.
Záruka sa nevzťahuje na kalibráciu
a starostlivosť.
POZNÁMKA:
Zákazník je zodpovedný za správnosť
používania a starostlivosti o zariadenie.
Zákazník je tiež v plnej miere zodpovedný
za pravidelnú kontrolu presnosti laserovej
jednotky, a tým pádom aj za kalibráciu
zariadenia.
Podlieha zmenám bez predchádzajúceho
upozornenia
Page 70

70
SI
Uporabniški priročnik
Izpraznjena baterija
Ikona
Gumb
za vklop
Skala za les
Temperatura
Testni priključki
Kapica
Gradbeni
materiali
Skala
B
T
ON/SET
STHT77030
% %
44
2.0
1.8
1.6
1.4
1.2
1.0
0.8
0.6
0.4
0.2
40
35
30
25
20
15
10
6
Slika 1
Elektrodi
LCD zaslon
STANLEY® merilnik vsebnosti vlage
Merilnik vsebnosti vlage Stanley je
zasnovan za merjenje vlage v lesu in
gradbenih materialih, kot so cementni
betonski estrihi, mavčne plošče, beton,
suho montažne plošče, itd.
OPOZORILO:
• VEDNO upoštevajte navodila za
uporabo in varnostne napotke v tem
uporabniškem priročniku.
• NE polijte ali potopite merilnika v vodo.
• VEDNO izklopite napravo, če jo ne
uporabljate.
• PREPRIČAJTE SE, da so baterije
pravilno nameščene in da je polariteta
pravilna.
• NE pomešajte starih in novih baterij.
Istočasno zamenjajte vse baterije
z novimi, ki so istega tipa in iste
znamke.
• NIKOLI ne spojite terminalov na
bateriji.
• NE polnite alkalnih baterij.
• NE pomešajte kemijskih sestavin
baterij.
• NE mečite baterij v ogenj.
• VEDNO odstranite baterije, če želite
shraniti napravo za več kot eden
mesec.
• NE odložite naprave med navadne
gospodinjske odpadke.
• VEDNO preverite lokalno zakonodajo,
ki predpisuje odlaganje baterij.
• RECIKLIRAJTE skladno s predpisi
o odpadni električni in elektronski
opremi.
• SVARILO: Konice elektrod so zelo
ostre. Z napravo ravnajte previdno!
Page 71

71
Pokrijte konice elektrod, če naprave ne
uporabljate.
Navodila za uporabo
BATERIJA:
S križnim izvijačem odprite pokrovček
predala za baterije. Vstavite 4 nove
baterije tipa AAA; pri vstavljanju baterij
v ležišče pazite na polariteto, ki je
označena v predalčku za baterije.
S pomočjo križnega izvijača privijte
pokrovček predalčka za baterije. Če se
na LCD zaslonu prikaže indikator baterije,
pomeni, da je baterija izpraznjena in jo je
treba zamenjati.
UPORABA
Odstranite kapico (med uporabo naprave
lahko kapico shranite na spodnjem delu
naprave).
Z enkratnim pritiskom na gumb za vklop
vklopite merilnik.
Pritisnite elektrode v material, ki ga želite
izmeriti.
• Pritisnite pazljivo in globoko, da
zagotovite dober stik z materialom.
• Pri merjenju vsebnosti vlage v lesu,
merite preko letnic (slika 1).
• Za natančnejšo določanje vsebnosti
vlage, obdelovanec premerite nekajkrat
na različnih lokacijah.
Ko je meritev opravljena in ko odstranite
elektrode iz obdelovanca, bo izmerjena
vsebnost vlage na zaslonu prikazana
5 sekund.
Merilnik se bo izklopil samodejno po
1 minuti nedejavnosti.
Temperatura okolice je na merilniku
prikazana na zgornjem delu LCD zaslona.
Za preklop med F° in C° pritisnite
in zadržite tipko za vklop za pribl.
3 sekunde.
KONTROLA KALIBRACIJE
MERILNIKA:
Merilnik ima na zgornjem delu kapice
2 para kovinskih testnih priključkov -
uporabite jih lahko za kontrolo delovanja
merilnika vsebnosti vlage.
Z dvema sondama se dotaknite dveh
kovinskih kontaktov označenih “T”,
merilna skala za les mora prikazati
19 % ±1.
Sedaj se z obema sondama dotaknite
dveh kovinskih kontaktov označenih
“B”, na LCD zaslonu morajo utripati vse
indikatorske črtice.
Merilnik vlage deluje pravilno, če deluje,
kot je opisano zgoraj.
Page 72

72
SI
Uporabniški priročnik
SPECIFIKACIJE:
Zaslon LCD zaslon
z dvojno merilno
skalo
Merilno območje,
les
6 – 44 %
Merilno območje,
gradbeni materiali
0,2 – 2,0 %
Samodejni izklop 1 minuta
IP stopnja zaščite:
Delovna
temperatura
IP20
0 °C – 40 °C
(32 °F – 104 °F)
Temperatura
shranjevanja
-10 °C - 50 °C
Relativna vlaga
delovnega okolja
80 % največja
relativna vlaga
Baterija 4x AAA (1,5 V)
Dodatki Torbica s pasno
priponko
Tabela materialov za pretvorbo:
Spodnja tabela vsebuje pretvorjene vrednosti za najbolj pogosto uporabljene materiale.
Vse vrednosti so % vlažnosti materiala.
Prikaz Bukev Smreka Beton Mavec Cementni Porozni
na zaslonu /hrast/
breza
C20/C25 estrihi Beton
44 29 33,6 1,6 2,3 1,8 9,5
42 27,4 32 1,6 2,1 1,8 9
40 27,1 31,4 1,6 2,1 1,8 8,8
38 25,3 29,4 1,6 2 1,8 8
36 24,1 28 1,5 1,9 1,7 7,7
34 22,9 26,7 1,5 1,8 1,7 7,2
32 21,9 25,6 1,5 1,6 1,7 6,6
30 20,8 24,3 1,4 1,4 1,6 5,7
28 20,3 23,8 1,4 1,4 1,6 5,6
26 19,4 22,8 1,4 1,3 1,6 5,1
24 18,7 22 1,4 1,2 1,6 4,8
22 17,7 20,9 1,3 1 1,5 4,6
20 15,8 18,7 1,3 0,8 1,4 4,1
18 14,6 17,4 1,3 0,6 1,4 3,7
16 11,9 14,2 1,2 0,3 1,2 3
14 9,2 11,3 1,2 0,2 1,1 2,7
12 7,4 9,2 1,1 0,1 1,1 2,4
10 6,7 8,4 1,1 0,1 1,1 2,3
8 5,6 7,3 1,1 0,1 1 2,2
= Suho = Mokro
Page 73

73
1-LETNA GARANCIJA
Stanley nudi za svoje merilne naprave eno
leto garancije, ki velja od dneva nakupa dalje
in zajema tovarniške napake v materialu ali /
in izdelavi.
Stanley bo po svoji odločitvi izdelek popravil
ali zamenjal, če ga pošljete skupaj s potrdilom
o nakupu na naslednji naslov:
Stanley Black & Decker Polska SP.z.o.o
ul. Postepu 21D, 02-676 Warsaw, Poland
Ta garancija ne pokriva škode, ki nastane
zaradi namerne povzročitve, obrabe, uporabe,
ki ni skladna z navodili proizvajalca, niti škode,
ki nastane kot posledica popravil oziroma
predelav s strani oseb, katerih ni pooblastil
Stanley.
Popravilo izdelka ali zamenjava delov znotraj
te garancije ne vpliva na datum prenehanja
veljavnosti garancije.
V obsegu, ki ga dovoljuje zakonodaja, znotraj
te garancije Stanley ne odgovarja za posredno
ali posledično izgubo, ki lahko nastane zaradi
garancijsko priznane okvare tega izdelka.
Te garancije brez soglasja Stanley ni dovoljeno
spreminjati.
Ta garancija ne vpliva na zakonske pravice
kupcev tega izdelka.
Ta garancija je pravno urejena skladno
z zakonodajo, kjer je izdelek prodan. zato
Stanley in kupec nepreklicno soglašata, da je
za reševanje vseh sporov, ki bi lahko izhajali
z naslova te garancije, pristojno sodišče
v državi, kjer je bil izdelek prodan.
Umerjanje in nega naprave nista predmet te
garancije.
OPOMBA:
Kupec je odgovoren za pravilno uporabo in
nego naprave. Prav tako je kupec odgovoren
za občasno preverjanje natančnosti merjenja in
posledično za umerjanje naprave.
Pridržujemo si pravico do sprememb brez
predhodnega obvestila
Page 74

74
BG
Ръководство за употреба
Влагомер
Изтощена батерия
Икона
Мощност
Бутон
Скала на дървото
Температура
Тестови гнезда
Капаче
Сграда
Материали
Скала
B
T
ON/SET
STHT77030
% %
44
2.0
1.8
1.6
1.4
1.2
1.0
0.8
0.6
0.4
0.2
40
35
30
25
20
15
10
6
Фигура 1
Електроди
LCD дисплей
STANLEY®
Влагомерът на Stanley открива влага
в дървени и други общи строителни
материали, включително, но не само,
гипсокартон, гипс, бетон и циментени
плочи.
ПРЕДУПРЕЖДЕНИЕ:
• ВИНАГИ следвайте всички
инструкции и предупреждения,
включени в това ръководство.
• НЕ мокрете и не потапяйте уреда
във вода.
• ВИНАГИ изключвайте продукта,
когато не е в употреба.
• ВИНАГИ проверявайте дали
батериите са поставени по правилен
начин, с правилната полярност.
• НЕ смесвайте стари и нови батерии.
Сменяйте всичките по едно и също
време с нови батерии от една
и съща марка и тип.
• НИКОГА не подлагайте на късо
съединение клемите на батерията.
• НЕ се опитвайте да зареждате
алкалните батерии.
• НЕ смесвайте химиите на батериите.
• НЕ изхвърляйте батериите в огън.
• ВИНАГИ сваляйте батериите, ако
няма да използвате уреда повече от
месец.
• НЕ изхвърляйте този продукт
с битовите отпадъци.
• ВИНАГИ проверявайте местните
разпоредби и правилно изхвърляйте
използваните батерии.
• МОЛЯ, РЕЦИКЛИРАЙТЕ
в съответствие с местните
разпоредби за събиране
Page 75

75
и изхвърляне на електрически
и електронни отпадъци.
• ВНИМАНИЕ: Щифтовете на
електрода са много остри. Работете
внимателно с инструмента. Дръжте
щифтове покрити, когато не са
в употреба.
Инструкции за работа
БАТЕРИЯ:
Отворете вратата на гърба на
устройството с помощта на отвертка
Philips. Сложете 4 нови AAA батерии,
уверете се, че полярността е правилна,
според маркировката от вътрешната
страна на гнездото. Сложете обратно
вратичката на батериите, както и винта
с глава Phillips. Когато на LCD екрана
се появи символът батерия, време е за
смяна на батериите.
РАБОТА:
Свалете капачето (капачето може да
се съхранява отдолу на уреда, докато
той е в употреба).
Включете уреда чрез еднократно
натискане на захранващия бутон.
Натиснете електродите в тествания
материал.
• Натиснете внимателно, но колкото
се може по-дълбоко, за да получите
добър контакт.
• В дърво, намерете измервания през
влакната (Фигура 1).
• Направете няколко измервания
в различни места, за да получите подобра идея за общото съдържание
на влага в материала.
Уредът ще задържи автоматично
измерването на влагата на дисплея
за 5 секунди, след като измерването
е стабилизирано и щифтовете са
отстранени от измерваният материал.
Устройството ще се изключи
автоматично до 1 минута след спиране
на употребата/липса на измервания.
Устройството показва температурата
на околната среда в горната част
на LCD дисплея. За да превключите
между F° и C° просто задръжте бутона
за захранване за около 3 секунди.
ПРОВЕРКА НА КАЛИБРИРАНЕТО НА
УРЕДА:
Има 2 чифта метални тестови гнезда
отгоре на капачето, които могат да се
използват за тестване на влагомера.
Докоснете 2 пробки към 2 метални
контакта, маркирани с “T”, показанието
на скалата за дървесина трябва да
бъде 19% ± 1.
Сега докоснете 2 пробки към 2 метални
контакта, маркирани с “B”, всички
индикаторни ленти на LCD дисплея
трябва да мигат.
Ако влагомерът работи, както
е споменато по-горе, уредът работи
правилно.
Page 76

76
BG
Ръководство за употреба
СПЕЦИФИКАЦИИ:
Дисплей
LCD с двойна
измервателна скала
Обхват, дърво 6 – 44%
Обхват, строителни
материали
0,2 – 2,0%
Автоматично
изключване
1 минута
IP степен:
Работна
температура
IP20
0°C – 40°C
(32°F – 104°F)
Температура на
съхраняване
-10°C - 50°C
Работна влага 80% Максимална
относителна
влажност
Батерия 4x AAA (1,5 волт)
Аксесоари Калъф за носене
с халка за колан
Таблица за конвертиране на материали:
Таблицата по-долу съдържа конкретни конверсии за някои общи материали.
Всички стойности, изброени са в материал % влага.
Дисплей Бук Смърч Бетон Гипс Цимент Аериран
Отчитане /Дъб/
Бреза
C20/C25 Мазилка Бетон
44 29 33,6 1,6 2,3 1,8 9,5
42 27,4 32 1,6 2,1 1,8 9
40 27,1 31,4 1,6 2,1 1,8 8,8
38 25,3 29,4 1,6 2 1,8 8
36 24,1 28 1,5 1,9 1,7 7,7
34 22,9 26,7 1,5 1,8 1,7 7,2
32 21,9 25,6 1,5 1,6 1,7 6,6
30 20,8 24,3 1,4 1,4 1,6 5,7
28 20,3 23,8 1,4 1,4 1,6 5,6
26 19,4 22,8 1,4 1,3 1,6 5,1
24 18,7 22 1,4 1,2 1,6 4,8
22 17,7 20,9 1,3 1 1,5 4,6
20 15,8 18,7 1,3 0,8 1,4 4,1
18 14,6 17,4 1,3 0,6 1,4 3,7
16 11,9 14,2 1,2 0,3 1,2 3
14 9,2 11,3 1,2 0,2 1,1 2,7
12 7,4 9,2 1,1 0,1 1,1 2,4
10 6,7 8,4 1,1 0,1 1,1 2,3
8 5,6 7,3 1,1 0,1 1 2,2
= сух = мокър
Page 77

77
1-ГОДИШНА ГАРАНЦИЯ
Stanley дава гаранция за своите
електронни измервателни инструменти
срещу недостатъци в материалите и/или
неправилна изработка в рамките на една
година от датата на покупката.
Бракувани продукти ще бъдат ремонтирани
или заменени, по преценка на Stanley, ако
бъдат изпратени заедно с доказателство за
покупка до:
Stanley Europe,
Egide Walschaertsstraat 14-16,
2800 Mechelen,
Belgium
Тази гаранция не покрива неизправности,
причинени от случайни повреди, износване,
при използване по начини, които не
са в съответствие с инструкциите на
производителя, при ремонт или изменения
на този продукт, които не са одобрени от
Stanley.
Поправка или замяна под тази гаранция
не засяга датата на изтичане на срока за
гаранция.
До степента, позволена от закона, Stanley
не носи отговорност по силата на тази
гаранция за преки или косвени загуби,
произтичащи от недостатъци в този продукт.
Тази гаранция не може да бъде променяна
без разрешението на Stanley.
Тази гаранция не засяга законните права на
потребителите, закупили този продукт.
Тази гаранция се прилага и тълкува
в съответствие със законите на страната,
където се продават, и както Stanley, така
и купувача безвъзвратно се съгласяват
да се подчиняват на изключителната
юрисдикция на съдебната система на
тази държава, над всеки иск или въпроси,
произтичащи от или във връзка с тази
гаранция.
Настройката и грижата по уреда не се
покриват от тази гаранция.
ЗАБЕЛЕЖКА:
Потребителят е отговорен за правилната
употреба и грижа за този инструмент.
Освен това, клиентът е напълно отговорен
за периодичната проверка на точността
на лазерния уред, както и за неговата
настройка.
Предмет на промяна без предупреждение
Page 78

78
RO
Manual de utilizare
Baterie descărcată
Pictogramă
Putere
Buton
Scală pentru lemn
Temperatura
Oricii de testare
Capac
Scală
materiale
construcţii
B
T
ON/SET
STHT77030
% %
44
2.0
1.8
1.6
1.4
1.2
1.0
0.8
0.6
0.4
0.2
40
35
30
25
20
15
10
6
Figura 1
Electrozi
Ecran LCD
Aparat pentru măsurat umiditatea
STANLEY
®
Aparatul pentru măsurat umiditatea
Stanley detectează umezeala în materiale
lemnoase şi materiale de construcţie
comune, inclusiv, dar nelimitându-se
la, gips carton, ipsos, beton şi plăci de
ciment.
AVERTISMENT:
• ÎNTOTDEAUNA respectaţi toate
instrucţiunile şi avertismentele incluse
în acest manual.
• NU stropiţi sau scufundaţi aparatul în
apă.
• ÎNTOTDEAUNA opriţi produsul când
nu este folosit.
• ÎNTOTDEAUNA asiguraţi-vă că este
introdusă bateria în mod corect, cu
polaritatea corectă.
• NU combinaţi baterii vechi cu baterii
noi. Înlocuiţi-i pe toţi în acelaşi timp cu
acumulatori noi de aceeaşi marcă şi tip.
• NICIODATĂ nu puneţi în scurt-circuit
terminalele bateriei
• NU încercaţi să încărcaţi bateriile
alcaline.
• NU amestecaţi baterii chimice.
• NU aruncaţi bateriile în foc.
• ÎNTOTDEAUNA scoateţi bateriile dacă
aparatul urmează să e depozitat
pentru o perioadă de peste o lună.
• NU aruncaţi acest produs împreună cu
deşeurile menajere.
• ÎNTOTDEAUNA vericaţi normele
locale cu privire la eliminarea adecvată
a bateriilor folosite.
• VĂ RUGĂM SĂ RECICLAŢI în
conformitate cu prevederile locale
pentru colectarea şi eliminarea
deşeurilor electrice şi electronice.
Page 79

79
• ATENŢIONARE: Vârfurile
electrozilor sunt foarte ascuţite.
Manevraţi cu grijă instrumentul. Păstraţi
vârfurile acoperite atunci când nu este
utilizat.
Instrucţiuni de operare
BATERIA:
Deschideţi uşa din spatele aparatului cu
ajutorul unei şurubelniţe cu cap Philips.
Introduceţi 4 baterii noi AAA, asigurânduvă că polaritatea este corectă conform
indicaţiei din interiorul carcasei. Puneţi la
loc uşa bateriei şi şurubul cu cap Phillips.
Când simbolul baterie apare pe ecranul
LCD, este timpul să înlocuiţi bateriile.
OPERAREA:
Scoateţi capacul (capacul poate pus pe
partea de jos a unităţii în timpul utilizării).
Porniţi aparatul apăsând o dată butonul
de pornire.
Apăsaţi electrozii în materialul care
urmează să e testat.
• Apăsaţi cu atenţie, dar cât mai profund
posibil pentru a obţine un contact bun.
• În lemn, efectuaţi măsurători
transversale (Figura 1).
• Efectuaţi mai multe citiri în locaţii
diferite pentru a obţine o idee mai
bună a conţinutului de umiditate al
materialului.
Unitatea va auto-menţine măsurarea
umidităţii timp de 5 secunde odată ce
citirea a fost stabilizată şi vârfurile sunt
îndepărtate din materialul care este
măsurat.
Aparatul se va opri automat după
aproximativ 1 minut în care nu este utilizat
/ fără măsurători.
Aparatul aşează temperatura mediului
în partea de sus a ecranului LCD. Pentru
a schimba între F° şi C° apăsaţi butonul
de alimentare timp de aproximativ
3 secunde.
VERIFICAREA CALIBRĂRII
APARATULUI:
Există 2 perechi de oricii de testare
de metal de pe partea superioară
a capacului, acestea pot utilizate pentru
a testa umiditatea citită de aparat.
Atingeţi cele 2 sonde la 2 contactele
metalice marcate „T”, citirea pe scala de
lemn trebuie să e de 19% ± 1.
Acum atingeţi cele 2 sonde de
2 contactele metalice marcate „B”, barele
de indicare trebuie să clipească pe
ecranul LCD.
În cazul în care aparatul pentru
măsurat umiditatea funcţionează aşa
cum s-a menţionat mai sus, unitatea
funcţionează corect.
Page 80

80
RO
Manual de utilizare
SPECIFICAŢII:
Aşaj LCD cu scală dublă
de măsurare
Domeniu, lemn 6 – 44%
Domeniu, materiale de
construcţii
0,2 – 2,0%
Oprire automată 1 minut
Grad IP:
Temperatura de
funcţionare
IP20
0°C – 40°C
(32°F – 104°F)
Temperatura de
depozitare
-10°C - 50°C
Umiditate de
operare
80% umiditate
relativă max
Acumulator 4x AAA (1,5 volţi)
Accesorii Săculeţ de transport
cu curea
Tabel de conversie material:
Tabelul de mai jos conţine conversiile specice pentru anumite materiale obişnuite.
Toate valorile listate sunt % umiditate material.
Aşaj Fag Pin Beton Tencuială Ciment Aerat
Citire /Stejar/
mesteacăn
C20/C25 Şapă Beton
44 29 33,6 1,6 2,3 1,8 9,5
42 27,4 32 1,6 2,1 1,8 9
40 27,1 31,4 1,6 2,1 1,8 8,8
38 25,3 29,4 1,6 2 1,8 8
36 24,1 28 1,5 1,9 1,7 7,7
34 22,9 26,7 1,5 1,8 1,7 7,2
32 21,9 25,6 1,5 1,6 1,7 6,6
30 20,8 24,3 1,4 1,4 1,6 5,7
28 20,3 23,8 1,4 1,4 1,6 5,6
26 19,4 22,8 1,4 1,3 1,6 5,1
24 18,7 22 1,4 1,2 1,6 4,8
22 17,7 20,9 1,3 1 1,5 4,6
20 15,8 18,7 1,3 0,8 1,4 4,1
18 14,6 17,4 1,3 0,6 1,4 3,7
16 11,9 14,2 1,2 0,3 1,2 3
14 9,2 11,3 1,2 0,2 1,1 2,7
12 7,4 9,2 1,1 0,1 1,1 2,4
10 6,7 8,4 1,1 0,1 1,1 2,3
8 5,6 7,3 1,1 0,1 1 2,2
= Uscat = Umed
Page 81

81
1 AN GARANŢIE
Stanley garantează că uneltele electronice de
măsurare nu prezintă defecte de manoperă
sau de materiale pentru un termen de un an de
la data achiziţiei.
Produsele defecte vor reparate sau înlocuite,
la alegerea companiei Stanley, în cazul în care
sunt trimise alături de dovada achiziţiei către:
Stanley Black&Decker Polska Bucharest
Branch
Phoenicia Business Center
Turturelelor Street, No 11A, 6th
Floor,Module 15, 3rd District
Romania
Această Garanţie nu acoperă defectele
provocate de deteriorarea accidentală, de
uzură sau rupere, utilizarea în dezacord cu
instrucţiunile producătorului sau reparaţiile şi
modicările neautorizate de Stanley.
Reperarea sau înlocuirea în baza garanţiei nu
afectează data de expirare a Garanţiei.
În limitele prevederilor legale, Stanley nu
poate considerat responsabil în baza acestei
Garanţii pentru pierderile indirecte sau în
consecinţă care rezultă din decienţele acestui
produs.
Această Garanţie nu poate schimbată fără
autorizarea Stanley.
Această Garanţie nu afectează drepturile
statutorii ale consumatorului care
achiziţionează acest produs.
Această Garanţie trebuie să e guvernată şi
realizată în conformitate cu legislaţia engleză,
iar Stanley şi cumpărătorul sunt de acord să
respecte jurisdicţia exclusivă a curţii a ţării cu
jurisdicţie exclusivă în cazul oricărei solicitări
sau diferenţe care apar în baza sau în legătură
cu această garanţie.
Calibrarea şi întreţinerea nu sunt acoperite de
garanţie.
NOTĂ:
Clientul este responsabil pentru utilizarea
corectă şi întreţinerea instrumentului. În plus,
clientul este complet responsabil pentru
vericarea periodică a preciziei unităţii laser, şi,
prin urmare, pentru calibrarea instrumentului.
Poate modicat fără preaviz
Page 82

82
EE
Kasutusjuhend
Tühi patarei
Ikoon
Toitenupp
Puiduskaala
Temperatuur
Testimispistikud
Kork
Ehitusmaterjalid
Skaala
B
T
ON/SET
STHT77030
% %
44
2.0
1.8
1.6
1.4
1.2
1.0
0.8
0.6
0.4
0.2
40
35
30
25
20
15
10
6
Joonis 1
Elektroodid
LCD-ekraan
STANLEY® niiskusmõõtja
Stanley niiskusmõõtja tuvastab niiskuse
puidus ja muudes tavapärastes
ehitusmaterjalides, muuhulgas, kuid
mitte ainult küprokis, kipsis, betoonis ja
tsemendiplaadis.
HOIATUS:
• Järgige ALATI kõiki juhiseid ja
hoiatusi, mis on antud kasutusjuhendis
toodud.
• ÄRGEpritsige ega kastke seadet vette.
• Lülitage ALATI toode välja, kui seda
ei kasutata.
• Tagage ALATI , et patareid on
sisestatud õigesti ja õige polaarsusega.
• ÄRGE kasutage korraga uusi ja vanu
patareisid. Vahetage kõik patareid
korraga välja ja paigaldage seadmesse
ainult sama tootja sarnased patareid.
• Ärge KUNAGI lühistage ühtegi patarei
terminali tahtlikult.
• ÄRGE püüdke laadida leelispatareisid.
• ÄRGE segage patarei keemilisi
koostisaineid.
• ÄRGE visake patareisid tulle.
• Eemaldage ALATI patareid, kui
asetate seadme enam kui kuuks
kõrvale.
• ÄRGEvisake seda toodet ära koos
majapidamisjäätmetega.
• Kontrollige ALATI kohalikke
koode ja visake kasutatud patareid
nõuetekohaselt ära.
• PALUN TAASKASUTAGEkooskõlas
kohalike määrusega seoses elektriliste
ja elektroonikajäätmete kogumise ja
kõrvaldamisega.
• ETTEVAATUST: Elektroodi tihvtid
on väga teravad. Käsitsege seadet
Page 83

83
ettevaatlikult. Hoidke tihvte kaetuna, kui
neid ei kasutata.
Kasutusjuhend
PATAREI:
Avage seadme tagaküljel olev uks
ristpeakruvikeerajaga. Sisestage 4 uut
AAA patareid, tagades õige polaarsuse
vastavalt märgistusele patareisahtli sees.
Sulgege patareisahtli uks ja sulgege
ristpeakruvikeerajaga. Kui LCD-ekraanil
kuvatakse patareisümbol, on aeg patareid
välja vahetada.
KASUTAMINE:
Eemaldage kork (korki saab hoida
seadme alumisel küljel, kui seda ei
kasutata).
Lülitage seade sisse, vajutades korra
toitenuppu.
Vajutage elektroodid testitavasse materjali.
• Vajutage ettevaatlikult, kui võimalikult
sügavale, et tagada hea kontakt.
• Puidu puhul mõõtke mööda kiude
(joonis 1).
• Mõõtke erinevatest kohtadest, et
saaksite materjali niiskussisaldusest
parema ülevaate.
Seade hoiab niiskuse andmeid ekraanil 5
sekundit, kui näit on stabiliseerunud ja tihvtid
on mõõdetavalt materjalilt eemaldatud.
Seade lülitub automaatselt välja, kui seda
pole umbes 1 minut kasutatud/pole ühtegi
näitu.
Seade näitab keskkonnatemperatuuri
LCD-ekraani peal. Liikumiseks F° ja C°
vahet hoidke toitenuppu all 3 sekundit.
SEADME KALIBREERIMISE
KINNITAMINE:
Korgi peal on 2 metallist testimispistiku
paari, mida saab kasutada niiskusmõõtja
testimiseks.
Puudutage 2 sondiga 2 metallist kontakti
märgistusega “T”, puiduskaala näit peaks
olema 19% ±1.
Nüüd puutuge 2 sondiga 2 metallist
kontakti märgistusega “B”, seejärel
peavad kõik LCD-ekraani näidutulbad
vilkuma.
Kui niiskusmõõtja töötab, nagu ülal
kirjeldatud, on seade töökorras.
SPETSIFIKATSIOONID:
Ekraan LCD mõõtmise
topeltskaalaga
Vahemik, puit 6 – 44%
Vahemik,
ehitusmaterjalid
0,2 – 2,0%
Automaatne
väljalülitus
1 minut
IP-aste:
Töötemperatuur
IP20
0°C – 40°C
(32°F – 104°F)
Säilitustemperatuur -10°C - 50°C
Tööniiskus 80% max suhteline
niiskus
Patarei 4x AAA (1,5 volti)
Tarvikud Kandekott
rihmasilmusega
Page 84

84
EE
Kasutusjuhend
Materjali ümberarvutustabel:
Järgmine tabel näitab mõne tavapärase materjali kindlaid ümberarvutuse väärtusi. Kõik
loetletud väärtused näitavad materjali niiskust %des.
Ekraan Pöök Kuusk Betoon Kips Tsement Gaseeritud
Näit /tamm/kask C20/C25 Krohv Betoon
44 29 33,6 1,6 2,3 1,8 9,5
42 27,4 32 1,6 2,1 1,8 9
40 27,1 31,4 1,6 2,1 1,8 8,8
38 25,3 29,4 1,6 2 1,8 8
36 24,1 28 1,5 1,9 1,7 7,7
34 22,9 26,7 1,5 1,8 1,7 7,2
32 21,9 25,6 1,5 1,6 1,7 6,6
30 20,8 24,3 1,4 1,4 1,6 5,7
28 20,3 23,8 1,4 1,4 1,6 5,6
26 19,4 22,8 1,4 1,3 1,6 5,1
24 18,7 22 1,4 1,2 1,6 4,8
22 17,7 20,9 1,3 1 1,5 4,6
20 15,8 18,7 1,3 0,8 1,4 4,1
18 14,6 17,4 1,3 0,6 1,4 3,7
16 11,9 14,2 1,2 0,3 1,2 3
14 9,2 11,3 1,2 0,2 1,1 2,7
12 7,4 9,2 1,1 0,1 1,1 2,4
10 6,7 8,4 1,1 0,1 1,1 2,3
8 5,6 7,3 1,1 0,1 1 2,2
= kuiv = märg
Page 85

85
1-AASTANE GARANTII
Stanley garantii oma elektroonika mõõtmise
tööriistadele katab materjali ja/või töö vigasid
üks aasta alates ostukuupäevast.
Vigane toode remonditakse või asendatakse
Stanley valikul, kui see saadetakse
ostutõendiga aadressil:
Stanley Black & Decker Polska SP.z.o.o
ul. Postepu 21D, 02-676 Warsaw, Poland
Garantii ei kata vigasid, mis on põhjustatud
kogemata kahjustamise, kulumise, tootja
juhistele mittevastava kasutamise või Stanley
poolt volitamata toote remontimise või
muutmisega.
Antud garantii all tehtav remont või
asendamine ei mõjuta garantii kehtivuse
kuupäeva.
Seadusega ettenähtud ulatuses ei vastuta
Stanley antud garantii alusel kaudsete või
kaasnevate kadude eest, mis tulenevad toote
vigadest.
Antud garantiid ei tohi muuta Stanley
volitusteta.
See garantii ei mõjuta selle toote ostjale
kuuluvaid kohustuslikke tarbijakaitseõigusi.
Seda garantiid reguleeritakse ja tõlgendatakse
kooskõlas müügiriigis kehtivate seadustega
ning Stanley ja ostja nõustuvad pöördumatult
lähtuda selle riigi kohtu jurisdiktsioonist mis
tahes nõude või muul teemal, mis tuleneb
antud garantiist või sellega seoses.
Garantii ei kata kalibreerimist või hooldust.
MÄRKUS:
Tarbija vastutab selle instrumendi korrektse
kasutamise ja hooldamise eest. Lisaks on
tarbija ainuvastutab laserseadme täpsuse
perioodilise täpsuskontrolli eest ja seetõttu ka
instrumendi kalibreerimise eest.
Lubatud muuta eelnevalt hoiatamata
Page 86

86
LV
Lietotāja rokasgrāmata
Izlādējusies baterija
Ikona
Strāva
Poga
Koka skala
Temperatūra
Testa ligzdas
Vāks
Būvniecī-
bas
Materiāli
Skala
B
T
ON/SET
STHT77030
% %
44
2.0
1.8
1.6
1.4
1.2
1.0
0.8
0.6
0.4
0.2
40
35
30
25
20
15
10
6
1. attēls
Elekltrodi
LCD displejs
STANLEY® Mitruma mērītājs
Stanley mitruma mērītājs nosaka koksnes
un parasto būvmateriālu ieskaitot, bet ne
tikai, sausā apmetumā, ģipša, betona un
cementa-skaidu plākšņu, mitrumu.
BRĪDINĀJUMS!
• VIENMĒR ievērojiet visus šajā
operatora rokasgrāmatā iekļautos
norādījumus un brīdinājumus.
• NEAPŠĻAKSTIET vai neiegremdējiet
iekārtu ūdenī.
• VIENMĒR izslēdziet ierīci, kad to nelieto.
• VIENMĒR nodrošiniet, ka baterija ir
ievietota pareizi, ar pareizu polaritāti.
• NEIZMANTOJIET vecās un jaunās
baterijas vienlaicīgi. Nomainiet visas
baterijas vienlaicīgi ar jaunām tās
pašas preču zīmes un tipa baterijām.
• NEKAD apzināti neveidojiet
īssavienojumu starp baterijas spailēm.
• NEMĒĢINIET uzlādēt sārma baterijas.
• NELIETOJIET vienlaicīgi dažāda
ķīmiskā sastāva baterijas.
• NEIZMETIET baterijas ugunskurā.
• VIENMĒR izņemiet bateriju, ja iekārtu
uzglabājat ilgāk nekā mēnesi.
• NEIZMETIET šo izstrādājumu sadzīves
atkritumos.
• VIENMĒR iepazīstieties ar vietējiem
noteikumiem un pareizi rīkojieties ar
izlietotām baterijām.
• LŪDZU, NODODIET PĀRSTRĀDEI
saskaņā ar vietējiem noteikumiem
par elektrisko un elektronisko iekārtu
atkritumu savākšanu un iznīcināšanu.
• UZMANĪBU! Elektroda adatas ir
ļoti asas. Rīkojieties ar instrumentu
uzmanīgi. Glabājiet adatas pārsegtas,
kad tās nelietojat.
Ekspluatācijas instrukcijas
BATERIJA:
Atveriet vāciņu iekārtas aizmugurē,
Page 87

87
izmantojot skrūvgriezi ar Philips tipa
uzgali. Ievietojiet 4 jaunas AAA baterijas,
nodrošinot, ka polaritāte ir pareiza,
saskaņā ar norādēm korpusa iekšpusē.
Novietojiet baterijas vāciņu vietā un
ieskrūvējiet Phillips galvas skrūvi. Kad
LCD ekrānā parādās baterijas simbols, ir
pienācis laiks nomainīt baterijas.
EKSPLUATĀCIJA:
Noņemiet vāciņu (apkalpošanas laikā
vāciņu var uzglabāt).
Ieslēdziet ierīci, vienu reizi nospiežot
barošanas pogu.
Iespiediet elektrodus materiālā, kas
jāpārbauda.
• Iespiediet uzmanīgi, taču tik dziļi,
cik vien iespējams, lai iegūtu labu
kontaktu.
• Kokā veiciet mērījumus šķērsām
šķiedrai (1.attēls).
• Uzņemiet vairākas rādījumus dažādās
vietās, lai iegūtu labāku priekšstatu par
materiālu vispārējo mitruma saturu.
Iekārta automātiski paturēs mitruma
mērījumus displejā 5 sekundes pēc tam,
kad nolasījums ir stabilizējies un adatas tiek
izņemtas no mērāmā materiāla.
Ierīce automātiski izslēdzas pēc aptuveni
1 minūtes, ja netiek izmantota / netiek veikti
mērījumi.
Iekārta parāda vides temperatūru LCD
displeja augšpusē. Lai pārslēgtos starp
Fārenheita un Celsija grādiem, vienkārši
turiet ieslēgšanas pogu aptuveni 3 sekundes.
KALIBRĒŠANAS IEKĀRTAS
PĀRBAUDE.
Iekārtai ir 2 pāri metālisku testa ligzdu
vāciņa augšpusē, tās var izmantot, lai
pārbaudītu mitruma mērītāju.
Pieskarieties ar 2 zondēm 2 metāliskajiem
kontaktiem, kas marķēti ar “T” nolasījumam uz koksnes skalas jābūt
19 ±1%.
Pēc tam pieskarieties ar 2 zondēm pie
2 metāla kontaktiem, kas marķēti ar “B” visām indikatora joslām vajadzētu mirgot
LCD displejā.
Ja mitruma mērītājs darbojas kā minēts
iepriekš, ierīce darbojas pareizi.
TEHNISKIE DATI:
Displejs LCD displejs ar
divkāršu mērīšanas
skalu
Diapazons, koks 6 – 44%
Diapazons,
būvmateriāli
0,2 – 2,0%
Automātiska
izslēgšanās
1 minūte
IP klase:
Ekspluatācijas
temperatūra
IP20
0 °C – 40 °C
(32 °F – 104 °F)
Uzglabāšanas
temperatūra
-10 °C - 50 °C
Ekspluatācijas
mitrums ir
80% maks.
relatīvais mitrums
Baterijas 4x AAA (1,5 volti)
Piederumi Maisiņš nēsāšanai
ar jostas cilpu
Page 88

88
LV
Lietotāja rokasgrāmata
Materiālu konversijas tabula:
Tabulā ir iekļauti speciski dažu parasto materiālu konvertēšanas rezultāti. Visas
minētās vērtības ir materiāla mitrums procentos
Displejs Dižskābardis Egle Betons Ģipša
apmetuma
plāksnes
Cements aerēts
Nolasīšana /Ozols/
bērzs
C20/C25 Cementa
java
Betons
44 29 33,6 1,6 2,3 1,8 9,5
42 27,4 32 1,6 2,1 1,8 9
40 27,1 31,4 1,6 2,1 1,8 8,8
38 25,3 29,4 1,6 2 1,8 8
36 24,1 28 1,5 1,9 1,7 7,7
34 22,9 26,7 1,5 1,8 1,7 7,2
32 21,9 25,6 1,5 1,6 1,7 6,6
30 20,8 24,3 1,4 1,4 1,6 5,7
28 20,3 23,8 1,4 1,4 1,6 5,6
26 19,4 22,8 1,4 1,3 1,6 5,1
24 18,7 22 1,4 1,2 1,6 4,8
22 17,7 20,9 1,3 1 1,5 4,6
20 15,8 18,7 1,3 0,8 1,4 4,1
18 14,6 17,4 1,3 0,6 1,4 3,7
16 11,9 14,2 1,2 0,3 1,2 3
14 9,2 11,3 1,2 0,2 1,1 2,7
12 7,4 9,2 1,1 0,1 1,1 2,4
10 6,7 8,4 1,1 0,1 1,1 2,3
8 5,6 7,3 1,1 0,1 1 2,2
= sauss = mitrs
Page 89

89
1 GADA GARANTIJA
Stanley garantē elektroniskos mērīšanas
instrumentus pret materiālu un/vai montāžas
defektiem vienu gadu no iegādes brīža.
Izstrādājumi ar defektiem tiks salaboti vai
nomainīti pēc Stanley ieskatiem, ja tie tiks
iesniegti, kopā ar pirkuma apliecinājumu, uz:
Stanley Black & Decker Polska SP.z.o.o
ul. Postepu 21D
02-676 Warsaw, Poland
Šī garantija neattiecas uz defektiem, ko izraisa
nejauši bojājumi, nodilums un nolietojums,
cita veida izmantošana, kas neatbilst ražotāja
norādījumiem, šī mēraparāta labošana vai
pārveidošana ko nav pilnvarojis uzņēmums
Stanley.
Remonts vai nomaiņa saskaņā ar šo garantiju
neietekmē garantijas derīguma termiņu.
Ciktāl to atļauj likums, Stanley saskaņā ar
šo garantiju nav atbildīgs par tiešiem vai
netiešiem zaudējumiem, kas radušies produkta
nepilnību dēl.
Šī garantija nevar tikt mainīta bez Stanley
pilnvarojuma.
Šī garantija neietekmē šī produkta pircēju
patērētāju tiesības.
Šī garantija tiek regulēta un interpretēta
saskaņā ar valsts, kurā pārdod izstrādājumu,
tiesību aktiem, un uzņēmums Stanley un
pircējs neatsaucami piekrīt jebkuru pretenziju
vai problēmu, kas rodas saskaņā vai saistībā
ar šo garantiju, iesniegt vienīgi šīs valsts tiesu
jurisdikciju.
Garantija nesedz kalibrēšanu un apkopi.
PIEZĪME:
Klients ir atbildīgs par pareizu instrumenta
izmantošanu un kopšanu. Turklāt, klients ir
pilnībā atbildīgs par periodisku lāzera iekārtas
precizitātes pārbaudi, un līdz ar to arī par
instrumenta kalibrēšanu.
Var tikt mainīta bez iepriekšēja brīdinājuma
Page 90

90
LT
Vartotojo vadovas
Išsikraunančios baterijos
piktograma
Įjungimo
mygtukas
Medienos skalė
Temperatūra
Tikrinimo lizdai
Dangtelis
Statybinių
medžiagų
skalė
B
T
ON/SET
STHT77030
% %
44
2.0
1.8
1.6
1.4
1.2
1.0
0.8
0.6
0.4
0.2
40
35
30
25
20
15
10
6
1 pav.
Elektrodai
Skystųjų kristalų ekranas
STANLEY® drėgmėmatis
„Stanley“ drėgmėmatis aptinka
drėgmę, esančią medienoje ir įprastose
statybinėse medžiagose, įskaitant, bet
neapsiribojant, sienines plokštes, tinklą,
betoną ir cenetro plokštes.
ĮSPĖJIMAS!
• VISADA vadovaukitės visais šioje
naudojimo instrukcijoje pateiktais
nurodymais ir įspėjimais.
• NETAŠKYKITE korpuso vandeniu ir
nemerkite jo į vandenį.
• VISADA išjunkite gaminį, kai jo
nenaudojate.
• VISADA pasirūpinkite, kad baterijos
būtų tinkamai įdėtos, tinkamai atitaikant
polius.
• NENAUDOKITE vienu metu ir senų, ir
naujų maitinimo elementų. Pakeiskite
juos visus naujais elementais vienu
metu ir naudokite vienos rūšies ir tipo
elementus.
• NIEKADA tyčia nesujunkite baterijų
gnybtų trumpuoju jungimu.
• NEBANDYKITE krauti šarminių
baterijų.
• NENAUDOKITE skirtingų cheminių
savybių baterijų.
• NEMESKITE baterijų į ugnį.
• VISADA išimkite baterijas, jeigu
įrenginys bus nenaudojamas ilgiau nei
mėnesį.
• NEIŠMESKITE šio prietaiso kartu su
buitinėmis atliekomis.
• VISADA vadovaukitės vietos atliekų
surinkimo taisyklėmis ir tinkamai
išmeskite naudotas baterijas.
Page 91

91
• RŪŠIUOKITE atliekas, atsižvelgdami
į vietos elektros ir elektroninių atliekų
surinkimo taisykles.
• DĖMESIO! Elektrodų galai yra labai
aštrūs. Būkite atsargūs, naudodamiesi
įrenginiu. Jeigu įrenginio nenaudojate,
uždenkite galus.
Naudojimo instrukcija
BATERIJA:
Atidarykite korpuso galinėje pusėje
esantį dangtelį, naudodami veržliaraktį
šešiakampiu antgaliu. Įdėkite 4 naujas
AAA baterijas, nukreipdami jų polius taip,
kaip nurodyta baterijų skyriaus viduje.
Uždarykite baterijų skyriaus dangtelį ir
įsukite varžtą šešiakampe galvute. Kai
skystųjų kristalų ekrane pasirodo baterijos
ženklas, laikas keisti baterijas.
NAUDOJIMAS:
Nuimkite dangtelį (naudojant įrenginį,
dangtelį galima laikyti korpuso apačioje).
Įjunkite įrenginį, vieną kartą paspausdami
įjungimo mygtuką.
Įkiškite elektrodus į medžiagą, kurią reikia
patikrinti.
• Spauskite atsargiai, bet kaip įmanoma
giliau, kad užtikrintumėte tinkamą
kontaktą.
• Tikrindami medieną, matavimus atlikite
skersai pluošto (1 pav.).
• Atlikite kelis matavimus įvairiose
vietose, kad tiksliau sužinotumėte
bendrą visos medžiagos drėgmę.
Įrenginio ekrane rodmuo automatiškai
bus rodomas 5 sekundes, kai tik jis
stabilizuosis, o elektrodų galai bus
ištraukti iš tikrinamos medžiagos.
Įrenginys automatiškai išsijungs maždaug
po 1 minutės, jei per tą laiką jis nebus
naudojamas / nebus atliekami matavimai.
Įrenginys skystųjų kristalų ekrano viršuje
rodo aplinko oro temperatūrą. Norėdami
perjungti F° ir C°, tiesiog paspauskite
ir maždaug 3 sekundes palaikykite
nuspaudę įjungimo mygtuką.
ĮRENGINIO KALIBRAVIMO
PATIKRINIMAS:
Dangtelio viršuje yra 2 poros metalinių
tikrinimo lizdų; juos galima naudoti
drėgmėmačiui tikrinti.
Prilieskite 2 zondus prie 2 metalinių
kontaktų, pažymėtų „T“; medienos skalėje
turi būti rodomas 19 % ±1 rodmuo.
Dabar prilieskite 2 zondus prie 2 metalinių
kontaktų, pažymėtų „B“; skystųjų kristalų
ekrane turi sumirksėti visos kontrolinės
juostos.
Jeigu drėgmėmatis veikia taip, kaip
minėta pirmiau, įrenginys veikia tinkamai.
Page 92

92
LT
Vartotojo vadovas
SPECIFIKACIJOS:
Ekranas Skystųjų kristalų
ekranas su dviem
matavimo skalėmis
Intervalas, mediena 6–44%
Intervalas, statybinės
medžiagos
0,2–0,5 %
Automatinis
išjungimas
1 min.
IP lygis:
Darbo aplinkos
temperatūra
IP20
0–40 °C
(32–104 °F)
Sandėliavimo
temperatūra
-10–+50 °C
Darbo aplinkos
drėgnumas
maks. 80 %
santykinis oro
drėgnumas
Baterija 4 x AAA (1,5 voltų)
Priedai Nešiojimo maišelis
su kilpa diržui
Medžiagų konvertavimo lentelė
Šioje lentelėje pateikiamos tam tikrų dažnai naudojamų medžiagų tikslios konvertavimo
vertės. Visos nurodytos vertės yra medžiagoje esantis drėgmės %.
Ekranas Bukas Eglė Betonas Tinkas Cementas, Aeruotas
rodmuo / ąžuolas / beržas C20 / C25 išlygintas betonas
44 29 33,6 1,6 2,3 1,8 9,5
42 27,4 32 1,6 2,1 1,8 9
40 27,1 31,4 1,6 2,1 1,8 8,8
38 25,3 29,4 1,6 2 1,8 8
36 24,1 28 1,5 1,9 1,7 7,7
34 22,9 26,7 1,5 1,8 1,7 7,2
32 21,9 25,6 1,5 1,6 1,7 6,6
30 20,8 24,3 1,4 1,4 1,6 5,7
28 20,3 23,8 1,4 1,4 1,6 5,6
26 19,4 22,8 1,4 1,3 1,6 5,1
24 18,7 22 1,4 1,2 1,6 4,8
22 17,7 20,9 1,3 1 1,5 4,6
20 15,8 18,7 1,3 0,8 1,4 4,1
18 14,6 17,4 1,3 0,6 1,4 3,7
16 11,9 14,2 1,2 0,3 1,2 3
14 9,2 11,3 1,2 0,2 1,1 2,7
12 7,4 9,2 1,1 0,1 1,1 2,4
10 6,7 8,4 1,1 0,1 1,1 2,3
8 5,6 7,3 1,1 0,1 1 2,2
= Sausasis = Šlapiasis
Page 93

93
1 METŲ GARANTIJA
„Stanley“ garantuoja, kad jo elektroniniai
matavimo prietaisai bus be medžiagų ir (arba)
gamybos defektų vienerius metus nuo pirkimo
datos.
Gaminiai su defektais bus suremontuoti arba
pakeisti „Stanley“ nuožiūra, jeigu jie bus atsiųsti
kartu su pirkimą įrodančiu dokumentu toliau
nurodytu adresu:
Stanley Black & Decker Polska SP.z.o.o
ul. Postepu 21D
02-676 Warsaw, Poland
Ši garantija nesuteikiama gedimams,
atsiradusiems dėl atsitiktinio sugadinimo,
įprasto nusidėvėjimo ir naudojimo ne pagal
gamintojo nurodymus arba bandymų šį gaminį
remontuoti arba keisti, negavus „Stanley“
leidimo.
Remontas arba keitimas pagal šią garantiją
neturi įtakos šios garantijos galiojimo datai.
„Stanley“, kiek tai leidžiama pagal įstatymus,
nėra atsakinga už šios garantijos netiesioginę
arba pasekminę žalą, patirtą dėl šio gaminio
gedimų.
Ši garantija negali būti pakeista be „Stanley“
leidimo.
Ši garantija neturi įtakos įstatymais
nustatytoms šio gaminio pirkėjų vartojimo
teisėms.
Ši garantija apsprendžiama ir interpretuojama
atsižvelgiant į pardavimo šalies įstatymus, ir
„Stanley“ bei pirkėjas nekeičiamai sutinka bet
kokius pagal šią garantiją arba su ja susijusius
ieškinius arba ginčus teikti tos šalies teismų
jurisdikcijai.
Garantija netaikoma kalibravimo ir techninės
priežiūros darbams.
PASTABA:
Vartotojas yra atsakingas už tinkamą įrenginio
naudojimą ir techninę priežiūrą. Be to,
vartotojas yra visiškai atsakingas už reguliarias
lazerio tikslumo patikras, todėl ir už įrenginio
kalibravimą.
Galimi pakeitimai be perspėjimo
Page 94

94
TR
Kullanım Kılavuzu
Düşük Pil
Simgesi
Güç
Düğmesi
Ahşap Skalası
Sıcaklık
Test Soketleri
Kapak
İnşaat
Materyalleri
Skala
B
T
ON/SET
STHT77030
% %
44
2.0
1.8
1.6
1.4
1.2
1.0
0.8
0.6
0.4
0.2
40
35
30
25
20
15
10
6
Şekil 1
Elektrotlar
LCD Ekran
STANLEY® Nem Ölçer
Stanley Nem Ölçer, ahşaptaki ve alçı
panel, harç, beton ve çimento panel gibi
yaygın inşaat malzemelerindeki nemi
tespit eder.
UYARI:
• MUTLAKA bu kullanım kılavuzundaki
talimat ve uyarılara uyun.
• KESİNLİKLE üniteye su sıçratmayın
veya üniteyi suya daldırmayın.
• MUTLAKA ürünü kullanmadığınız
zamanlarda kapatın.
• MUTLAKA pilin doğru şekilde artı eksi
kutuplara uygun olarak takıldığından
emin olun.
• KESİNLİKLE eski ve yeni pilleri birlikte
kullanmayın. Tümünü aynı marka ve
tipteki yeni pillerle aynı anda değiştirin.
• KESİNLİKLE herhangi bir pil
terminaline kısa devre yaptırmayın.
• KESİNLİKLEalkali pilleri şarj etmeye
çalışmayın.
• KESİNLİKLE farklı kimyasal yapıdaki
pilleri bir arada kullanmayın.
• KESİNLİKLE pilleri ateşe atmayın.
• MUTLAKA üniteyi bir aydan daha
uzun süre kullanmayacaksınız pillerini
çıkarın.
• KESİNLİKLE bu ürünü evsel atıklarla
atmayın.
• MUTLAKA yerel düzenlemeleri takip
edin ve kullanılmış eski pilleri doğru bir
şekilde imha edin.
• LÜTFEN elektrikli ve elektronik atıkların
toplanması ve imha edilmesiyle ilgili
yerel düzenlemelere uygun bir şekilde
GERİ DÖNÜŞÜM SAĞLAYIN.
• DİKKAT: Elektrot pinleri çok sivridir.
Cihazı dikkatli kullanın. Kullanmadığınız
zamanlarda pinleri kılıfta saklayın.
Page 95

95
Kullanım Talimatları
PİL:
Ünitenin arkasındaki kapağı bir yıldız
tornavida ile açın. Gövdedeki kutup
işaretlerini gözeterek 4 yeni AAA pili doğru
konumda takın. Pil kapağını kapatın ve
yıldız tornavida ile vidasını sıkın. LCD
ekranda pil sembolü görüldüğünde, pilleri
değiştirmeniz gerekir.
KULLANMA:
Kapağı çıkarın (üniteyi kullanırken kapağı
alt kısmına takabilirsiniz).
Güç düğmesine bir defa basarak üniteyi
açın.
Elektrotları test edeceğiniz materyale
bastırın.
• Sıkı temas için, dikkatlice ve gittiği
kadar derine bastırın.
• Ahşapta ölçümü damar üzerinden
yapın (Şekil 1).
• Materyalin genel nem içeriği hakkında
daha iyi bir kir edinmek için, birkaç
farklı yerinden birkaç ölçüm yapın.
Ünite, nem ölçümünü kesinleştikten
ve pinler ölçüm yapılan materyalden
çekildikten sonra ekranda otomatik olarak
5 saniye boyunca gösterecektir.
Ünite, yaklaşık 1 dakika boyunca
kullanılmadığında/ölçüm yapılmadığında
otomatik olarak kapanacaktır.
Ünite, LCD ekranın en üstünde ortam
sıcaklığını gösterir. F° ve C° arasında
geçiş yapmak için, güç düğmesini
3 saniye kadar basılı tutmanız yeterlidir.
ÜNİTE KALİBRASYONUNU
DOĞRULAMA
Kapağın üstünde 2 çift metal soket
bulunur. Bunları, nem ölçeri test etmek
için kullanabilirsiniz.
2 ucu, “T” yazan 2 metal temas noktasına
değdirin, ahşap skalasındaki değer
%19 ±1 olmalıdır.
Daha sonra da 2 ucu “B” yazan 2 metal
temas noktasına değdirin, LCD ekrandaki
tüm gösterge çubukları yanıp sönmelidir.
Nem ölçer yukarıdaki adımları aynen
uyguluyorsa, ünite düzgün çalışıyordur.
ÖZELLİKLER:
Ekran Çift ölçüm skalalı
LCD
Aralık, Ahşap %6 - 44
Aralık, İnşaat
Malzemeleri
%0,2 - 2,0
Otomatik Kapanma 1 dakika
IP derecesi:
Çalışma Sıcaklığı
IP20
0°C – 40°C
(32°F – 104°F)
Saklama Sıcaklığı -10°C - 50°C
Çalışma Nemliliği Maks. %80 Bağıl
Nem
Pil 4x AAA (1,5 volt)
Aksesuarlar Kayış halkalı taşıma
kılıfı
Page 96

96
TR
Kullanım Kılavuzu
Materyal Dönüştürme Tablosu:
Aşağıdaki tabloda, bazı yaygın materyallere özel dönüştürme değerleri verilmiştir.
Listelenen değerlerin tamamı, malzeme nem yüzdesidir.
Ekran Kayın Çam Beton Harç Çimento Havalandırılmış
Ölçüm
Sonucu
/Meşe/Huş C20/C25 Şap Beton
44 29 33,6 1,6 2,3 1,8 9,5
42 27,4 32 1,6 2,1 1,8 9
40 27,1 31,4 1,6 2,1 1,8 8,8
38 25,3 29,4 1,6 2 1,8 8
36 24,1 28 1,5 1,9 1,7 7,7
34 22,9 26,7 1,5 1,8 1,7 7,2
32 21,9 25,6 1,5 1,6 1,7 6,6
30 20,8 24,3 1,4 1,4 1,6 5,7
28 20,3 23,8 1,4 1,4 1,6 5,6
26 19,4 22,8 1,4 1,3 1,6 5,1
24 18,7 22 1,4 1,2 1,6 4,8
22 17,7 20,9 1,3 1 1,5 4,6
20 15,8 18,7 1,3 0,8 1,4 4,1
18 14,6 17,4 1,3 0,6 1,4 3,7
16 11,9 14,2 1,2 0,3 1,2 3
14 9,2 11,3 1,2 0,2 1,1 2,7
12 7,4 9,2 1,1 0,1 1,1 2,4
10 6,7 8,4 1,1 0,1 1,1 2,3
8 5,6 7,3 1,1 0,1 1 2,2
= Kuru = Islak
Page 97

97
1-YILLIK GARANTİ
Stanley, elektronik ölçüm cihazları için
malzeme ve/veya işçilik hatalarına karşı
satın alma tarihinden itibaren bir yıl garanti
vermektedir.
Hatalı ürünler, faturasıyla birlikte gönderilmesi
şartıyla Stanley’nin takdirine dayalı olarak
onarılacak veya yenisiyle değiştirilecektir:
CENTER DIŞ TİCARET MAKİNA
SAN. ve PAZ. LTD. ŞTİ. Hamidiye Mah.
Atatürk Cad. No : 292 A
Sultanbeyli / Istanbul, 34295 TURKEY
Bu Garanti kazaen oluşan hasarlar, yıpranma
ve aşınma, cihazların üreticinin talimatlarında
uygun kullanılmaması, cihazlar üzerinde
Stanley tarafından izin verilmeyen onarım
veya değişikliklerinin neden olduğu hataları
kapsamaz.
Bu Garanti kapsamında gerçekleştirilecek
olan onarım veya değişiklikler Garantinin son
kullanma tarihini etkilemez.
Yasalarla izin verilen ölçüler çerçevesinde,
Stanley bu üründeki hatalardan kaynaklanan
dolaylı veya arızi kayıplar için bu Garanti
kapsamında sorumlu olmayacaktır.
Bu Garanti, Stanley’nin izni olmadan
değiştirilemez.
Bu Garanti, bu ürünün alıcılarının yasal
haklarını etkilemez.
Bu Garanti, cihazların satın alındığı
ülkenin kanunlarına göre yönetilecek ve
yorumlanacaktır ve Stanley ve alıcı bu Garanti
kapsamında veya Garantiyle bağlantılı olarak
oluşabilecek herhangi bir alacak talebi veya
mesele üzerinde ilgili ülkenin mahkemelerinin
münhasır yetkisine tabi olduklarını ve
olacaklarını gayri kabili rücu olarak kabul
ederler.
Kalibrasyon ve bakım işlemleri bu garanti
kapsamında değildir.
NOT:
Müşteri, cihazın doğru kullanımı ve bakımı
konusunda sorumluluk sahibidir. Ayrıca,
müşteri lazer ünitesinin doğruluğunu ve
dolayısıyla cihazın kalibrasyonu düzenli olarak
kontrol etmek konusunda tümüyle kendisi
sorumludur.
Bildirim yapılmadan değiştirilebilir
Page 98

98
HR
Priručnik za upotrebu
Baterija je prazna
Ikona
Napajanje
Tipka
Ljestvica za drvo
Temperatura
Ispitne utičnice
Poklopac
Zgrada
Materijali
Ljestvica
B
T
ON/SET
STHT77030
% %
44
2.0
1.8
1.6
1.4
1.2
1.0
0.8
0.6
0.4
0.2
40
35
30
25
20
15
10
6
Crtež 1
Elektrode
LCD zaslon
STANLEY® mjerač vlažnosti
Stanley mjerač vlažnosti otkriva vlagu
u drvu i uobičajenim građevinskim
materijalima, uključujući, ali se ne
ograničavajući na suhe građevinske
ploče, gips, beton i cementne ploče.
UPOZORENJE:
• UVIJEK se pridržavajte svih uputa
i upozorenja navedenih u ovim
uputama za upotrebu.
• NEMOJTE uređaj prskati vodom ili
uranjati u vodu.
• UVIJEK isključite uređaj kada nije
u upotrebi.
• UVIJEK provjerite jesu li baterije
pravilno umetnute obzirom na polaritet.
• NEMOJTE kombinirati stare i nove
baterije. Sve stare baterija istovremeno
zamijenite novim baterijama istog
proizvođača i vrste.
• NEMOJTE namjerno kratko spajati
kontakte baterije.
• NEMOJTE pokušavati s punjenjem
alkalnih baterija.
• NEMOJTE kombinirati baterije
različitog kemijskog sastava.
• NEMOJTE bacati baterije u vatru.
• UVIJEK izvadite baterije ako uređaj
pohranjujete na dulje od mjesec dana.
• NEMOJTE ovaj proizvod odbacivati
zajedno s kućanskim otpadom.
• UVIJEK provjerite lokalne propise
i pravilno odbacite rabljene baterije.
• RECIKLIRAJTE sukladno lokalnim
propisima o prikupljanju i odlaganju
električnog i elektroničkog otpada.
• PAŽNJA: Iglice elektroda jako su
oštre. Pažljivo rukujte instrumentom.
Page 99

99
Iglice držite pokrivenima kada nisu
u upotrebi.
Upute za upotrebu
BATERIJA:
Pomoću križnog odvijača otvorite
vratašca na stražnjoj strani uređaja.
Umetnite 4 nove AAA baterije, pazeći
da polaritet odgovara naznačenom
u unutrašnjosti kućišta. Vratite poklopac
baterije i vijak s križnom glavom. Baterije
treba zamijeniti kada se na LCD zaslonu
prikaže simbol baterije.
UPOTREBA:
Uklonite poklopac (poklopac se tijekom
upotrebe može spremiti na dnu uređaja).
Jedanput pritisnite tipku napajanja da
biste uključili uređaj.
Elektrode utisnite u materijal koji treba
ispitati.
• Pritisnite pažljivo, ali što je dublje
moguće da biste ostvarili dobar
kontakt.
• Mjerenje u drvu izvodite poprečno na
godove (Crtež 1).
• Izvedite nekoliko očitanja na različitim
mjestima kako biste dobili bolju
predodžbu o općem sadržaju vlažnosti
materijala.
Uređaj će automatski zadržati očitanje
mjerenja na zaslonu tijekom 5 sekundi
kada se očitanje stabilizira i iglice se
uklone iz mjerenog materijala.
Uređaj će se automatski isključiti nakon
približno 1 minute neaktivnosti / bez
mjerenja.
Uređaj prikazuje okolišnu temperaturu
pri vrhu LCD zaslona. Da biste prebacili
između °F i °C, jednostavno držite
pritisnutom tipku napajanja na približno
3 sekunde.
PROVJERA KALIBRACIJE UREĐAJA:
Na vrhu poklopca nalaze se 2 para
metalnih ispitnih utičnica koje se mogu
upotrijebiti za ispitivanje mjerača
vlažnosti.
Dodirnite s 2 sonde na 2 metalna
kontakta s oznakom “T”. Očitanje na
ljestvici za drvo trebalo bi biti 19% ±1.
Zatim dodirnite s 2 sonde na 2 metalna
kontakta s oznakom “B”. Sve trake
pokazivača na LCD zaslonu trebale bi
zatreptati.
Ako mjerač vlažnosti funkcionira na
opisani način, uređaj pravilno radi.
Page 100

100
HR
Priručnik za upotrebu
SPECIFIKACIJE:
Zaslon LCD s dvije ljestvice
mjerenja
Raspon, drvo 6 - 44%
Raspon, građevinski
materijali
0,2 - 2,0%
Automatsko
isključivanje
1 minuta
IP kategorija:
Radna temperatura
IP20
0 °C - 40 °C
(32 °F - 104 °F)
Temperatura
skladištenja
-10 °C - 50 °C
Radna relativna
vlažnost
80% relativna
vlažnost, najviše
Baterija 4x AAA (1,5 V)
Dodatni pribor Torbica za nošenje
s omčom za opasač
Tablica za pretvaranje materijala:
Sljedeća tablica sadrži specična pretvaranja za neke uobičajene materijale. Svi
navedene vrijednosti izražene su u % materijala.
Zaslon Bukva Smreka Beton Gips Cement Lagani
Očitanje /hrast/
breza
C20/C25 Deka Beton
44 29 33,6 1,6 2,3 1,8 9,5
42 27,4 32 1,6 2,1 1,8 9
40 27,1 31,4 1,6 2,1 1,8 8,8
38 25,3 29,4 1,6 2 1,8 8
36 24,1 28 1,5 1,9 1,7 7,7
34 22,9 26,7 1,5 1,8 1,7 7,2
32 21,9 25,6 1,5 1,6 1,7 6,6
30 20,8 24,3 1,4 1,4 1,6 5,7
28 20,3 23,8 1,4 1,4 1,6 5,6
26 19,4 22,8 1,4 1,3 1,6 5,1
24 18,7 22 1,4 1,2 1,6 4,8
22 17,7 20,9 1,3 1 1,5 4,6
20 15,8 18,7 1,3 0,8 1,4 4,1
18 14,6 17,4 1,3 0,6 1,4 3,7
16 11,9 14,2 1,2 0,3 1,2 3
14 9,2 11,3 1,2 0,2 1,1 2,7
12 7,4 9,2 1,1 0,1 1,1 2,4
10 6,7 8,4 1,1 0,1 1,1 2,3
8 5,6 7,3 1,1 0,1 1 2,2
= Suho = Mokro
 Loading...