

Standers 1100 Assembly Instructions Manual
Security Pole
Assembly Instructions:
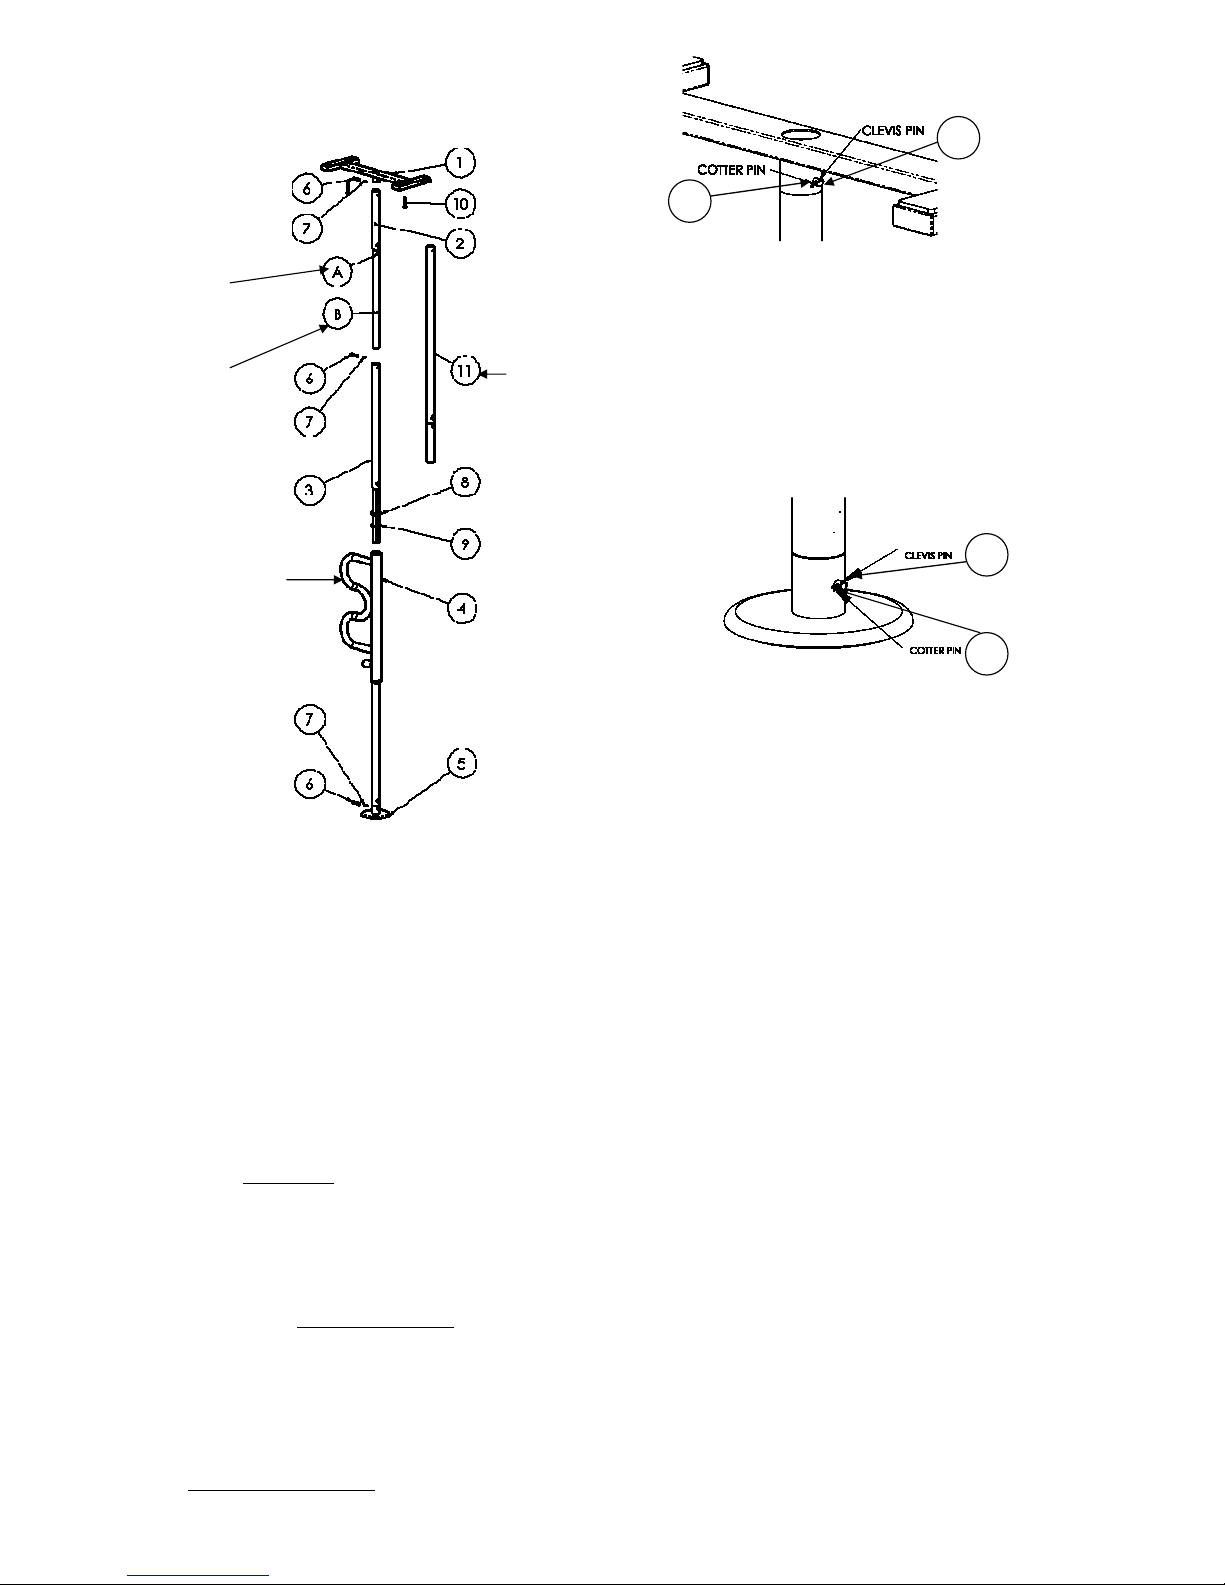
FIGURE 1
NOTE: The Security Pole is designed to be used with
ceiling heights of 7, 8, and 9 feet. If you have a 10 foot
ceiling, you can purchase a 10 foot extension (ITEM-11)
Call 1-800-506-9901 for your nearest dealer.
Determine where you plan to use this product and the
height of the ceiling before continuing the assembly
process.
1. Take all parts out of the box and lay them on a flat
surface as shown in Figure 1. As noted above, ITEM-11
is NOT included but represents an extension for a 10
foot ceiling.
2. If you have an 8 or 9 foot ceiling skip to step 3. If you
have a 7 foot ceiling
, attach the Upper Frame (ITEM-1)
directly to ITEM-3 by aligning the holes in ITEM-1 and
ITEM-3 and inserting the Clevis Pin (ITEM-6) through
the holes. After the Clevis Pin is inserted, place the
Cotter Pin (ITEM-7) through the hole of the Clevis Pin
and bend the end of the Cotter Pin to secure the Clevis
Pin as shown in Figure 2.
3. If you have an 8 foot or 9 foot ceiling
, attach the Upper
Frame (ITEM-1) to the Extension Tube (ITEM-2) by
aligning the holes in the large diameter tube of ITEM-2
with the set of holes in (ITEM-1) and inserting the Clevis
Pin and Cotter Pin as previously done in Step 2 and
shown in Figure 2.
4. The Extension Tube (ITEM-2) has 2 sets of holes
marked “A” and “B” in Figure 1. The set of holes marked
“A” are for an 8 foot ceiling
. The set of holes marked “B”
are for a 9 foot ceiling.
FIGURE 2
5. Attach the Extension Tube (ITEM-2) to (ITEM-3) by
aligning the appropriate ceiling height set of holes,
marked “A” or “B” of (ITEM-2) with the mating holes in
the Upper Tube (ITEM-3) and inserting the Clevis Pin
and Cotter Pin as previously done in Step 2.
6. Attach ITEM-5 (Base) to ITEM-4 (Main Pole & Curve Grab
Bar), as shown in Figure 1, by aligning the holes in ITEM-4
and ITEM-5 and inserting the Clevis Pin and Cotter Pin as
previously done in Step 2, and as shown in Figure 3.
FIGURE 3
NOTE: Before Step #7 make sure the Adjustment Nut
(ITEM-8) and the Washer (ITEM-9) are in place on
threaded part of bar as shown in Figure 1. The
Adjustment Nut (ITEM-8) should be above the Washer
(ITEM-9).
7. Insert the threaded portion of ITEM-3 into ITEM-4 and
place the Safety Pole in the desired location with ITEM-5
on the floor and ITEM-1 on the ceiling.
8. Secure the Safety Pole between the floor and the ceiling,
the Adjustment Nut (ITEM-8) must be tightened in a
clockwise direction with the included wrench (Item not
shown). Tighten the lower Adjustment Nut until the Safety
Pole is secured between the floor and the ceiling.
NOTES:
If the Safety Pole does not appear to be securely fastened
between the floor and ceiling, loosen the Adjustment Nut
(ITEM-8) and make sure the length of the Safety Pole is
perpendicular to the floor and ceiling before tightening the
Adjustment Nut (ITEM-8) again as previously done in Step
7. If assembled correctly, tightening between the floor and
ceiling with the included wrench will provide adequate
stability. It is not necessary, but, if preferred, two Wood
Screws (ITEM-10) can be installed into the ceiling joists as
shown in Figure 4.
Slight movement of the pivoting handle is normal and safe.
This movement allows the locking pin to easily lock into 8
user friendly positions. Pull the pin and rotate the curved
handle. Release the handle and continue to rotate the
curved handle until the spring loaded pin locks the handle
into the desired position.
Use hole “A”
with 8ft
ceiling
Use hole “B”
with 9ft
ceiling
“11” Optional
purchase for
10ft ceiling
6
7
6
7
Do not remove
Curve Grab Bar
from main pole
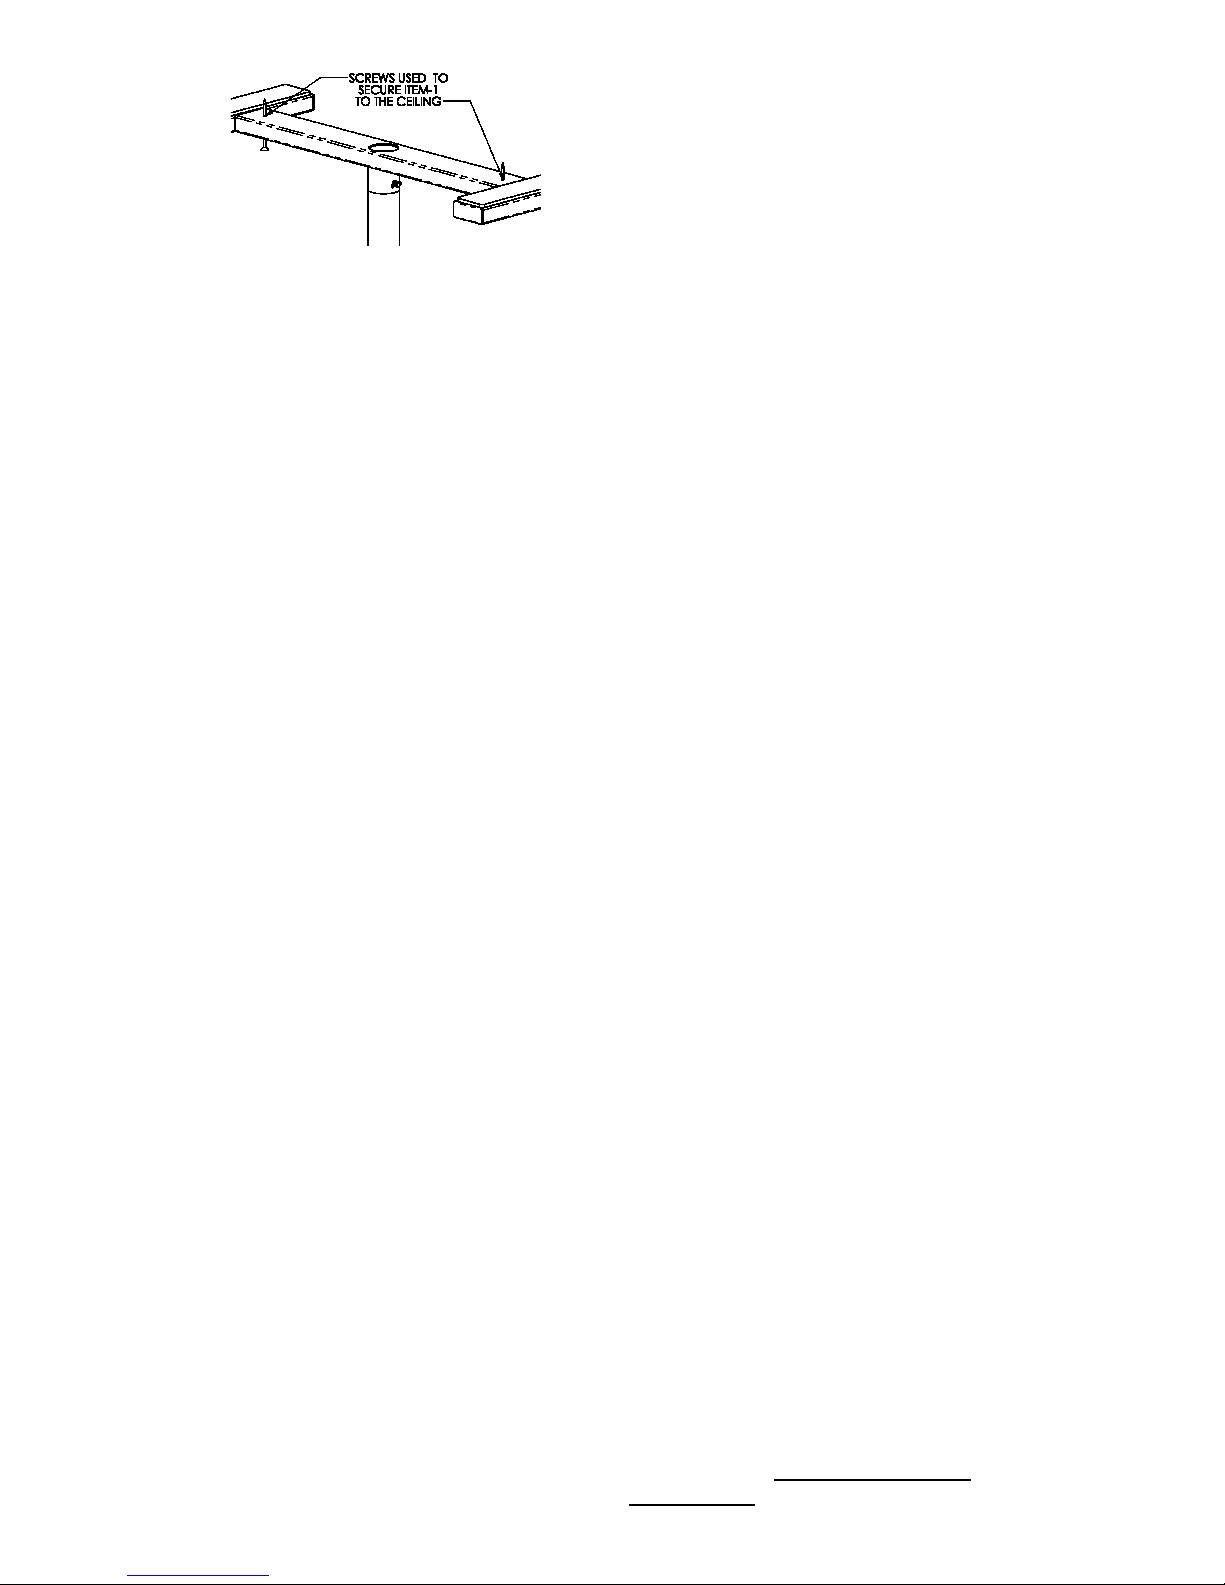
FIGURE 4
WARNING: Please read before
using this product.
1. Serious injury or death can result if the Safety Pole is
not properly installed. Standers Inc. is committed to
providing safe products and informing the user of
ways to prevent accidents.
SAFETY PRECAUTIONS:
Regularly check the Security Pole to make
sure the pole is tightly secured between the
floor and ceiling.
Make sure the Security Pole axis is installed
at 90 degrees relative to the floor. All
protective rubber pads must be in contact with
the floor and the ceiling.
Additional safety measures should be taken
for users that are a high risk. High risk users
include those who are not mentally conscious
(including those individuals under
medication), users who have size or weight
conditions, or any condition that impair their
ability to use the Security Pole without
assistance.
The Security Pole uses a spring loaded pin
that allows the handle to rotate and lock into
several user positions. Make sure that the
rotating handle is in a locked position before
using the product. If the rotating handle is not
locked before using, the user may fall and
serious injury or harm could result.
If you have any concerns or questions
regarding these precautions, please contact
Standers at 1-800-506-9901.
2. If you are suffering from an ailment or injury or are
taking medications that affect your balance or ability
to stand or sit down, you should first consult with a
physician before using this product. If the product is
not used properly, serious injury or harm could result.
3. The product was not intended to carry the full weight
of an individual. This product is only intended to
provide balance and support while sitting and
standing.
4. The product instructions must be carefully followed to
ensure that the product is properly assembled and
positioned. Failure to follow the instructions could
result in serious injury to the user(s) of the product.
5. Children should not be allowed to hang on or play
with the product.
6. DISCLAIMER: Neither Standers, Inc. nor the
manufacture is liable for any harm or injury that may
result or has resulted from the improper use or
assembly of the product.
Limited Warranty
Congratulations on your purchase of your Standers
brand product. We hope that it will ease your daily living.
Please read the following warranty statement for your
protection.
Standers, Inc. warrants to the original purchaser that
this product will be free from defects in material and/or
workmanship for 1 year from the date of purchase.
During the warranty period, Standers, Inc. will correct
any defects in material or workmanship, at no charge.
The original purchaser, however, must prepay shipping
cost. Any replacement parts will be new and are
warranted for the remainder of the original warranty or
thirty (30) days from the date of shipment, whichever is
longer. The original purchaser must notify Standers, Inc.
during the warranty period in writing of the defect in
workmanship or material. This warranty is not
transferable and covers only normal use. NO SHIPPING
CHARGES ARE REFUNDABLE.
The warranty does NOT cover the following:
• Damage during shipment other than original
shipment to retailer.
• Damage caused by unauthorized attachments,
alterations, or modifications.
• Damage caused by the use of the product for
purposes other than those for which the product
was designed or intended.
• Damage caused by any other abuse, misuse,
mishandling or misapplication.
Under no circumstances shall Standers, Inc. be liable
for any special, incidental, or consequential damages
based upon breach of this limited warranty, breach of
contract, or strict liability.
THERE ARE NO WARRANTIES WHICH EXTEND BEYOND
THE DESCRIPTION ON THEFACE HEREOF. ALL OTHER
WARRANTIES, EXPRESS OR IMPLIED (INCLUDING ALL
IMPLIED WARRANTIES OF MERCHANTABILITY OR
FITNESS FOR A PARTICULAR PURPOSE), ARE HEREBY
DISCLAIMED.
Some states do not allow limitations on how long
an implied warranty lasts, so the above limitation may
not apply to you. This warranty gives you specific legal
right, and you may also have other rights, which vary
from state to state.
To obtain service under this warranty, you can
reach Standers Inc. at 74 Canterbury Circle, Logan, Utah
84321.
Please read Safety Precautions and
Instructions before using this product.
 Loading...