

Standart Horizon SSM-71H, RAM4W Owner's Manual
RAM4W (SSM-71H
)
Wireless Remote Access Microphone
The RAM4W (SSM-71H) allows remote control of all functions* of the enabled Standard
Horizon fixed mount VHF radio. *(Except for “SPEAKER SELECT” in SETUP MENU CONFIGURATION.) The full dot matrix display and programmable keys make operation
simple and fast. Additional features include a Water activated Emergency Strobe Light,
an MOB (Man Over-Board) function, and all DSC functions including Distress Signaling.
Up to four RAM4W (SSM-71H) Wireless Remote Access Microphones may be connected
to a xed mount VHF radio utilizing the optional SCU-30 RAM4W Wireless Access Point.
Owner’s Manual
The details for the installation and operation of the RAM4W (SSM-71H) are in-
cluded in the Owner’s Manual of the compatible xed mount VHF radio, or the
Owner’s Manual can be downloaded at www.standardhorizon.com.
Safety Precautions (Be Sure to Read)
Be sure to read the safety precautions of Operating Manual of the compatible
xed mount VHF radio to use this product safely.
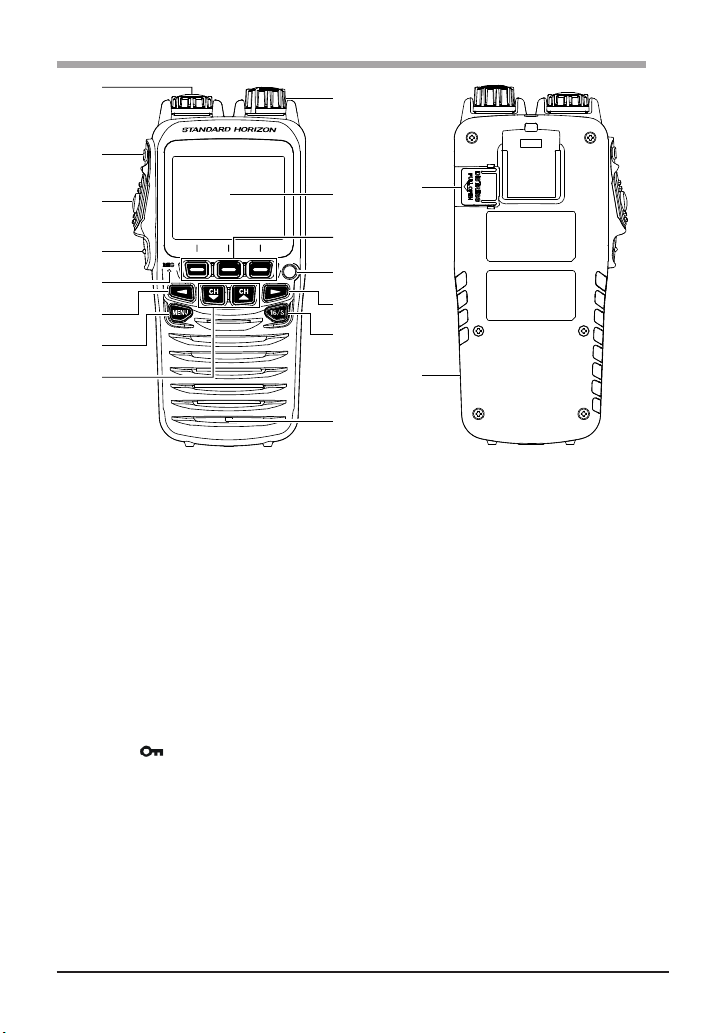
Front and Rear Panel
②
③
④
①
⑩
⑮
⑤
⑥
⑦
⑧
⑨
⑪
⑫
⑦
⑬
⑯
⑭
① Power/VOL knob
Press and hold this knob to turn the RAM4W remote microphone ON or OFF.
Turn the knob to adjust the speaker volume.
② DIAL/ENT knob
While the normal operating screen is displayed, rotate the DIAL/ENT knob to select
the desired channel. While the MENU screen is displayed, rotate the knob to select
the desired menu item.
Secondary use:
Press this knob to enter a selection in the MENU.
③ SQL key (Squelch control)
Press this key to activate the squelch adjustment mode. Press the [CH▲] or [CH▼]
key to adjust the squelch level.
④ PTT (Push-To-Talk) switch
Press this switch to enable transmit.
⑤ CLEAR/
Press this key to cancel a menu selection. Press and hold this key to activate the key
lock function.
Press and hold this key again to deactivate the key lock function.
⑥ Microphone
When speaking into the microphone your voice will be transmitted with reduction of
background noise, using Clear Voice Noise Reduction Technology.
Note: Position your mouth about 1/2” (1.5 cm) away from the microphone aperture
⑦ ◄ & ► keys
Press these keys to switch the function menu.
key
and speak in a normal voice.
2

Secondary use:
While the MENU screen is displayed, press the key to shift the on-screen menu to
the right/left side.
⑧ MENU key
Press this key to access the MENU.
⑨ CH▼ & CH▲ keys
These keys are used to change the operating channel.
Press the key momentarily, the to increase/decrease the channel one step. Holding
the key, increases/decreases the channel number continuously.
Secondary use:
While the MENU screen is displayed, press the key to shift the on-screen menu
upward/downward.
When in the PA or Fog mode, press the key to change the channel.
⑩ Display
222 by 162 pixels full dot matrix display.
⑪ Soft keys
These three programmable keys can be customized through the setup menu mode.
When pressing one of these keys briey, the key functions will appear at the bottom of
the display.
⑫ Strobe Light
When the [STROBE] soft key is pressed, the internationally-recognized Morse Code
“S.O.S” message will light and ash repeatedly.
When the RAM4W comes in contact with water, the light will blink red to assist in
locating the RAM4W in low light conditions.
⑬ 16/S key
Pressing this key immediately recalls channel 16 from any channel location. Holding
down this key recalls the SUB channel (The default setting is channel 9). Pressing
this key again reverts to the previous selected working channel.
⑭ Speaker
The internal speaker is located here.
⑮ DISTRESS key
This key is used to send a DSC distress call.
⑯ USB jack
Use the micro USB type B jack to connect the SSM-71H (RAM4W) battery charger.
• The RAM4W is only oating / submersible* when the USB jack is properly sealed with jack cover.
*(IPX8 Specication for submersibility: 4.92 ft. (1.5 m) for 30 minutes.)
• Make sure that there is no dust, dirt or crack on the jack or the rubber gasket.
• Remove any dust and dirt before closing the cover.
• If you nd any cracks on the jack cover or gasket, please contact Standard Horizon or your local
dealer to purchase a replacement.
• To keep the LCD, keypad and speaker grill clean and in top operating condition after exposure
to water: Clean the RAM4W with fresh water after exposure to salt water by rinsing the RAM4W
under a sink faucet or by dunking the RAM4W in a bucket of fresh water. After washing, use a
soft cloth and thoroughly dry all parts of the RAM4W.
NOTES
3
Included Accessories and replacement part numbers
• SAD-17 USB Wall Charger (100-240 VAC)
• Charging Cable (Type USB “A” plug to Type USB micro “B” plug)
• CLIP-22 Belt Clip
• SCH-11 Belt Clip Hanger & Screws (U40412220 x 2 pcs)
• Hand Strap
Optional Accessories
• SCU-30 RAM4W Wireless Access Point with 5 feet (1.5 m) Cable
• SDD-14 USB DC Charger with Cigarette Lighter Plug
Belt Clip Installation / Removal
1. To install, align the Belt Clip CLIP-22 to the groove of the
rear panel, then press the Belt Clip downward until it locks
in place with a “Click”.
2.
To remove, pull the CLIP-22 tab away from the rear panel
to unlock the CLIP-22, then slide the CLIP-22 upward to
remove it.
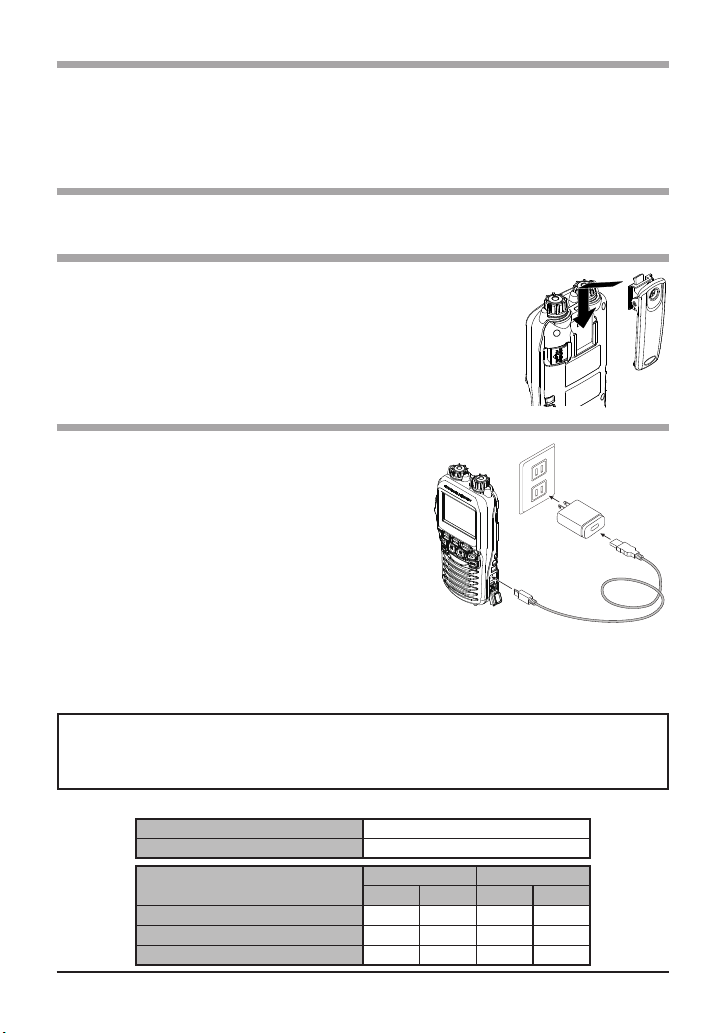
Battery Charging
If the battery has never been used, or its
charge is depleted, charge the RAM4W according to the following procedures:
1. Turn the RAM4W OFF.
2. Slide the USB jack cover button down to
open the cover.
3. Referring to the gure at the right, connect
the supplied Charge Cable to the USB
jack.
4. If the connection is correct, the RAM4W’s LCD display will show the battery-charging icon.
5. A fully discharged RAM4W will be charged completely in approximately 4 hours.
When charging is completed, the battery charging icon will disappear.
Waterproof and oating features of the RAM4W are assured only when the USB jack cover is
locked completely.
The SAD-17 or SDD-14 is NOT designed to be waterproof. Charge the radio in a dry location.
Built-in Lithium-ion Battery
Capacity 1800 mAh
Nominal Voltage 3.7 V
Temperature Range
Charge
Discharge
Storage
CAUTION
Minimum Maximum
°C °F °C °F
5 41 35 95
–20 –4 60 140
–10 14 35 95
4
 Loading...