

Page 1

Puck Installation Guide
Page 2

Welcome to the Flair
community!
Our users are energy nerds, home automation gurus,
and HVAC Pros.
If you have any questions, feel free to check out the
forums at forum.flair.co.
If you don’t see what you are looking for there, you can
reach us at one of the following:
[email protected]
+1 (800) 590 6943
Monday-Friday, 9am to 5pm PST
2
Page 3
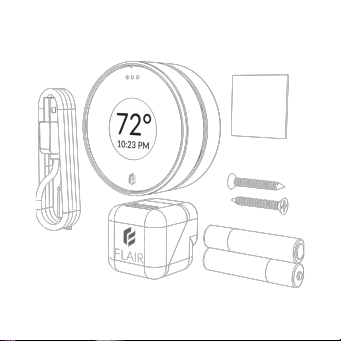
What’s in the Box?
A
B
F
A. Puck
B. USB Cable
C. Batteries
D. Screws
E
D
C
E. Mounting Adhesive
F. Power Adapter
3
Page 4

Quick Start
Install the Flair App
Install our App from the Google Play Store or Apple App Store. If
you don’t have an Android or iOS device, go to my.flair.co in
your web browser for setup. Create an Account and Log In.
WIFI
If you are setting up your first Puck, plug it in with the power
adapter and follow the instructions in the App for Connecting to
WIFI. If you need to make a change to your WIFI settings at
anytime, go to Home Settings → Change Puck WIFI Settings.
Remaining Devices
After connecting the first Puck to WIFI, install and power on your
remaining devices.
Rooms, Integrations, Settings
In the App you can create rooms, associate devices with rooms,
set up integrations, and set your preferred settings.
4
Page 5
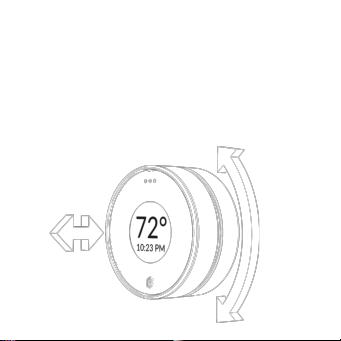
Controlling Your System
Your Flair system can be controlled through the App or directly with
your Puck(s).
For details on the App, see Flair App Overview.
Controlling the Puck is simple. You can push the front surface or
rotate the collar.
Rotate
Push
5
Page 6

Puck Overview
Puck works with most IR controlled heating and cooling devices
including Minisplits, Window ACs and Portables.
Puck also works with Central Heating and Cooling systems as a
remote temperature and occupancy sensor. For these systems, Puck
integrates with popular Smart Thermostats and our Smart Vents to
deliver precise control and comfort using as little energy as possible.
There are two principle modes for Puck: Gateway or Sensor Mode
Gateway Sensor
Powered by Adapter
Always on WIFI
Serves As Hub
(additional modes coming soon)
Wired or Battery Power
Only on WIFI for Updates
6
Page 7
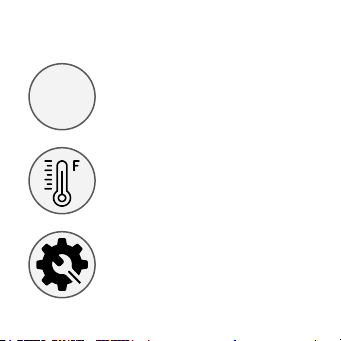
Setting a Puck as a Gateway or Sensor
1
2
3
72
Temperature App (Default Home Screen)
Puck opens in this App by default. This screen
lets you adjust the room’s current setpoint.
Push the Puck to go back to the app menu.
Temperature App Icon
This is the menu icon for the Temperature App
shown above. You can Push the Puck to open
the Temperature App. Rotate to see other
menu icons for different apps.
Settings App Icon
This is the menu icon for the Puck Settings
App. Push the Puck to open the Settings App.
7
Page 8
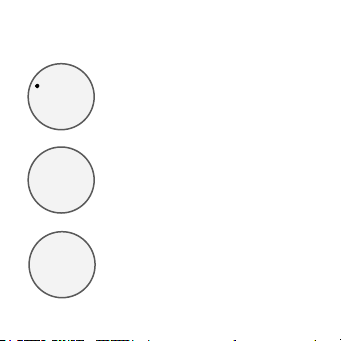
Setting a Puck as a Gateway or Sensor
4
5
6
Make Gateway
Factory Rest
Exit
Switching
To
Gateway
72
Settings App
This App lets you change your Puck from a
Sensor or Gateway and apply other settings.
Push the Puck to go back to the App menu.
Wait
After switching your Puck to a Sensor or
Gateway, the Puck will take a few moments to
apply the change. Wait until you see the home
screen or a message saying its finished.
Temperature App (Default Home Screen)
After making your Puck a Gateway or Sensor,
your Puck will return to the home screen.
8
Page 9
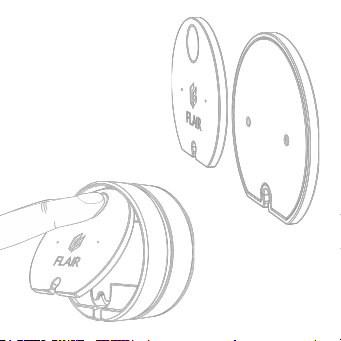
Puck Door
The Puck door has
two sides. For wall
mounting, side A
should face away
from the wall.
Side A
Side B
To open the Puck
door, press on the
round dimple.
9
Page 10
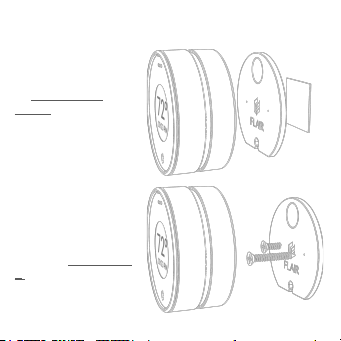
Wall Mounting
Adhesive
Attach adhesive square to
the hard plastic side
(side B) of the Puck door.
Press the Puck door onto
the wall and ensure it is
securely attached before
attaching the Puck.
Screws
Press and rotate the
screws through the small
holes in the soft side (side
A) of the Puck door.
10
Page 11
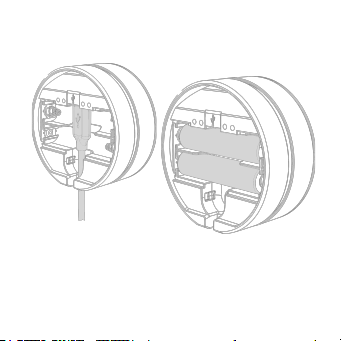
Power
Wired
Gateway Pucks should be
wired with the included
adapter and cable. Sensors
can optionally be wired.
Wireless
Sensor Pucks can run for
more than a year on AAAs
(included).
11
Page 12

Puck Placement
Interior Walls, Night Stands, Coffee Tables, Shelves
In order to get accurate temperature readings from your Puck it is best
to avoid placing it directly under windows, on exterior walls or directly
next to fans/vents etc. Ideally it is wall mounted just behind a couch,
on a nightstand, on your desk, etc. The closer it is to where you work,
sleep or hang out the better it will keep you comfortable.
Minisplit, Window ACs and other IR Controlled Devices
Flair Pucks have a number of IR LEDs for controlling Minisplits,
Window and Wall ACs, Portables as well as other devices like TVs,
Stereos etc. If you are using Pucks to control IR devices ensure that
there is line-of-sight between the Pucks’ front or side faces and the
device. Sometimes IR reflection is good enough such that a direct line
of sight is not needed but you will need to test this on a per
device/room basis.
Pro Tip: Nobody likes power cables. If installing multiple Pucks, it’s
worth taking into consideration which Puck should be the gateway as
some places are easier to hide cables than others. We recommend
wall mounting a Gateway just behind a couch or nightstand.
12
Page 13
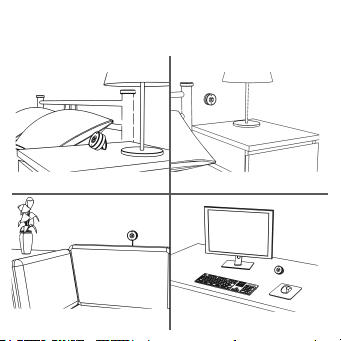
Puck Placement Examples
Wall Bedside TableStand Bedside Table
Wall Behind Couch Office Desk
13
Page 14

Flair App Overview
Flair has two primary modes, Automatic and Manual which can be
selected in Home Settings → System Mode.
Manual Mode
Allows you to adjust the open/closedness of your Smart Vents or
manually change Air Conditioner/Heater settings.
Automatic Mode
Flair maintains temperatures so that you don’t need to worry about
opening and closing vents or manually making changes to your Air
Conditioner/Heater.
If your system is in Automatic Mode, you have additional options that
relate to how Flair determines if you are Home or Away, temperature
set points and how to behave when you are away or heading home.
14
Page 15

Flair App - Settings when Home
The main setpoint options are Evenness, Evenness (Active
Rooms), and Defer to Rooms.
Evenness
Maintains a consistent setpoint across all rooms with Flair equipment.
Evenness (Active Rooms)
Maintains a consistent setpoint across all rooms that are deemed
‘active’.
Rooms are designated active if either a user with our app on their
phone is near a Puck, a third party sensor determines a user is in a
room, a setpoint is adjusted on the Puck or the room is designated
active via the slider on the room tile (app main screen) menu.
Defer to Rooms
Allows you to set settings on a room level. A user may either adjust a
Puck, adjust the dial on a room tile, or adjust the ‘My Temperature’
slide on the room tile menu to set a specific room-user preference.
15
Page 16
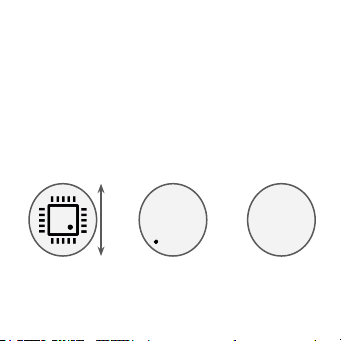
FCC Compliance Statement
FCC ID: 2AK78PUCKU
Contain FCC ID:2ADUIESP-12-F
This device complies with Part 15 of the FCC Rules .Operation is
subject to the following two conditions: (1) this device may not cause
harmful interference, and (2) this device must accept any interference
received, including interference that may cause undesired operation.
Accessing FCC & IC ID on the Puck
1 2 3
Open the Settings App Click ‘Certs’ FCC & IC ID Shown
⌀27mm
ID:
Ver:
Wi-Fi
Certs
FCC ID: 2AK78PUCKU
Contain FCC ID:2ADUIESP-12-F
IC: 22464-PUCKU
Model:Puck
16
Page 17

Flair Software - Settings when Away
While away, you can have Flair maintain temperatures across the
whole home, specific rooms or just make sure everything is off.
Off Only
Ensures that everything is off while you are away.
Smart Away
Allows you to specify upper and lower bounds for temperature and
humidity and will apply this to every room with Flair equipment.
Defer to Rooms
Allows you to specify temperature and humidity ranges for each room
individually.
More information is available at https://flair.co/support.
17
Page 18

FCC STATEMENT
Changes or modifications not expressly approved by the
party responsible for compliance could void the user’s
authority to operate the equipment.
This equipment has been tested and found to comply with
the limits for a Class B digital device, pursuant to Part 15 of
the FCC Rules. These limits are designed to provide
reasonable protection against harmful interference in a
residential installation. This equipment generates, uses and
can radiate radio frequency energy and, if not installed and
used in accordance with the instructions, may cause
harmful interference to radio communications. However,
there is no guarantee that interference will not occur in a
particular installation.
18
Page 19

If this equipment does cause harmful interference to radio
or television reception, which can be determined by turning
the equipment off and on, the user is encouraged to try to
correct the interference by one or more of the following
measures:
-- Reorient or relocate the receiving antenna.
-- Increase the separation between the equipment and
receiver.
-- Connect the equipment into an outlet on a circuit
different from that to which the receiver is connected.
-- Consult the dealer or an experienced radio/TV technician
for help.
19
Page 20

This equipment complies with FCC radiation exposure
limits set forth for an uncontrolled environment. This
equipment should be installed and operated with minimum
distance 20cm between the radiator and your body. This
transmitter must not be co-located or operating in
conjunction with any other antenna or transmitter.
Canada Statement
This device complies with Industry Canada license-exempt
RSS standard(s). Operation is subject to the following two
conditions: (1) this device may not cause interference, and
(2) this device must accept any interference, including
interference that may cause undesired operation of the
device.
20
Page 21

Le présent appareil est conforme aux CNR d'Industrie
Canada applicables aux appareils radio exempts de licence.
L'exploitation est autorisée aux deux conditions suivantes :
(1) l'appareil ne doit pas produire de brouillage, et (2)
l'utilisateur de l'appareil doit accepter tout brouillage
radioélectrique subi, même si le brouillage est susceptible
d'en compromettre le fonctionnement.
This equipment complies with FCC/IC RSS-102 radiation
exposure limits set forth for an uncontrolled environment.
This equipment should be installed and operated with
minimum distance 20cm between the radiator & your body.
Ce matériel est conforme aux limites de dose d'exposition
aux rayonnements, fac / ic rss-102 énoncée dans un autre
environnement.cette equipment devrait être installé et
exploité avec distance minimale de 20 entre le radiateur et
votre corps.
21
Page 22

 Loading...