

Standard PF-P330 Operator's Manual

OPERATORS MANUAL
Standard Horizon PF-P330
Suction-Feed Paper Folder
PF-P330/OM
Read this manual, and thoroughly
familiarize yourself with its
contents before operating or
servicing this equipment.


Features on This Machine
This section explains the useful functions on this machine.
6 standard folding is performed easily
by pressing a button.
Various type of sheet including thin paper, thick paper,
and color copied coated paper can be folded.
11" x 17"
2.898
5.827
Using Pre-set function, the machine will stop
automatically when the required number of folding
is completed.
Off-setting the folded sheets is available.
Memory function will allow you to call the
job settings easily.
Page 18
Page 20
STOP!
1

View of This Operation Manual
This section explains how to read this operation manual, and how to search the necessary topic.
Explanation
Indicates the summary for
operation described in
this page.
Topic Title
Chapter Title
Folding Standard Size Sheet
Let’s fold the standard size (11"x17", 9"x11", 8.5"x11", 5,5"x8.5") sheet.
Turn on the power switch.
1
PowerSwitch
Select the fold pattern and sheet size.
Fold Pattern Selecting Button.
Folding Pattern
Sheet Size Selecting Button
8
1/2"X
1/2"X
14"
8
5
1/2"X 81/2
"
Sheet Size
ABC
Start / Stop
11"
X
17"
11"
Test Feed
Sheet Guide Locking Knob
Sheet Guide
ABC
Short Fold
2
Loosen the sheet guide locking knobs
and place the sheets on the center.
Then fit the sheet guides to the sheet.
3
There are 6 folding patterns shown below.
Single Fold
Parallel Fold
Short Fold
Letter Fold
Accordion Fold
Gate Fold
Sheets set as the left illustration are folded
as the illustration to the below.
When performing the short folding, set the
sheet oppositely as the illustration to the
lower left part shows.
Single Fold
Parallel Fold
Short Fold
ABC
ABC
Letter Fold
Accordion Fold
Gate Fold
ABC
ABC
Sheet can be piled mazimum 50 mm.
When performing the opposite direction folding,
pile the sheet up sisde down.
Tighten the sheet guide locking knobs after fitting the guides.
4
5
6
ABC
ABC
7
Folding Standard Size Sheet
Set the end stopper.
End Stopper
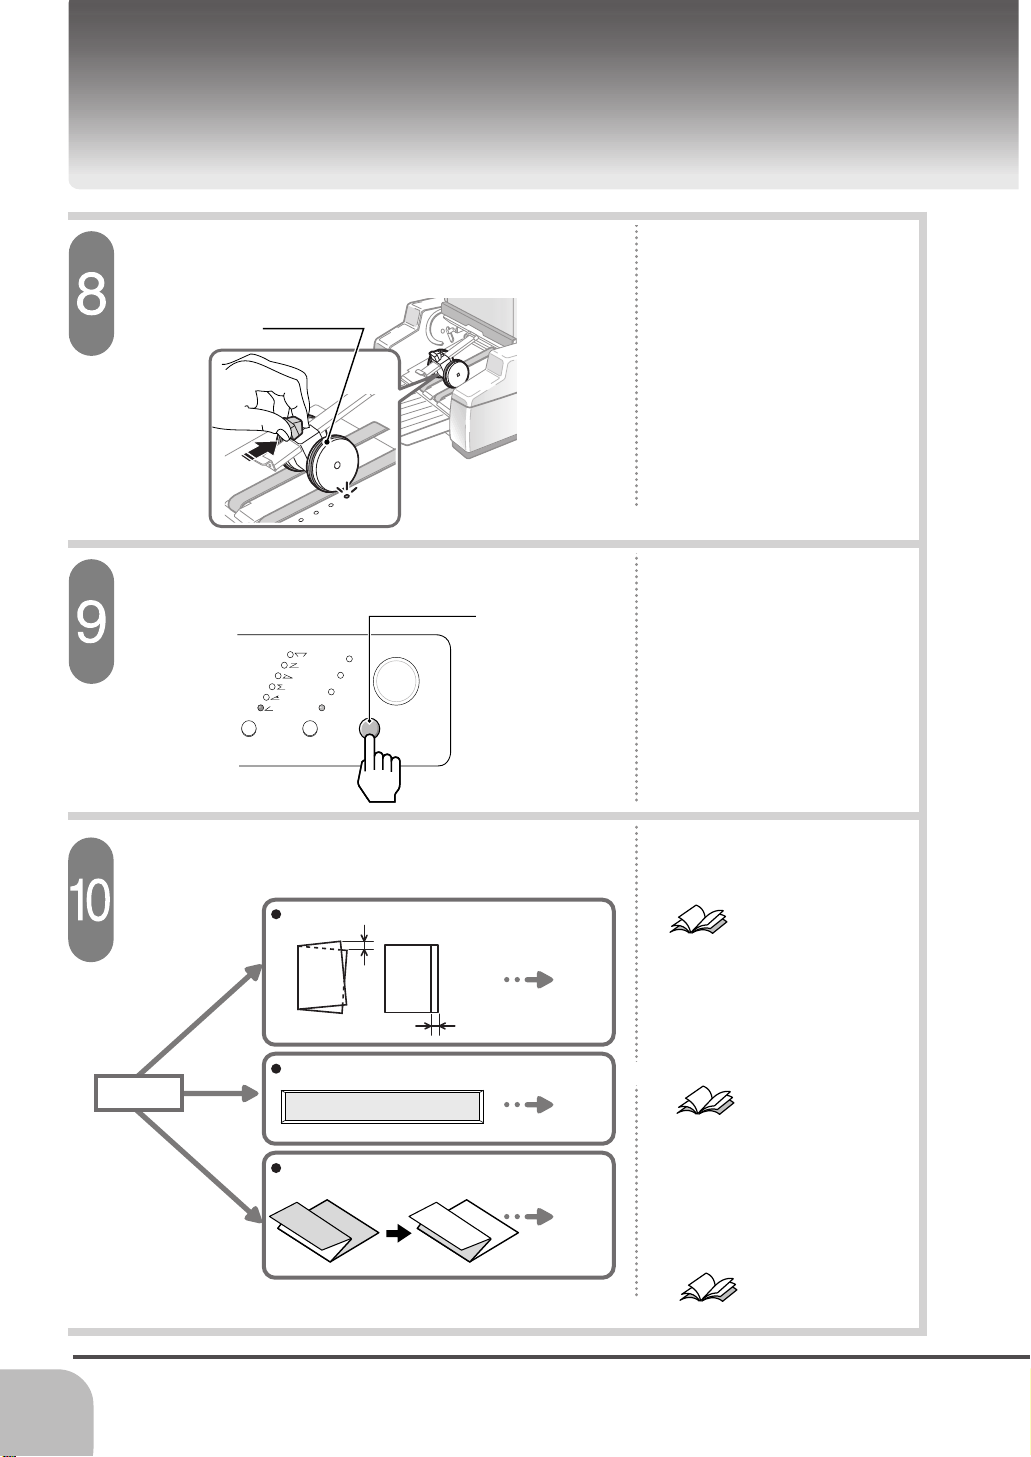
Set the delivery Roller.
Delivery Roller
Press the test button.
Folding Pattern
Press the start/stop button and start folding.
Folding Pattern
Test Button
Start / Stop
X
17"
11"
8
1/2"X
11"
8
1/2"X
14"
5
1/2"X 81/2
"
Test Feed
Sheet Size
Start/Stop Button
Start / Stop
X
17"
11"
8
1/2"X
11"
8
1/2"X
14"
1/2"X 81/2
"
5
Sheet Size
Test Feed
Check the folded sheet. If there is a
folding skew, refer to [Troubleshooting]
and perform the adjustment.
¥When folding the specific number of sheets,
refer to [Set the Number of Fold (Pre-set Function)].
¥To quit folding, press the start/stop button again.
Folding Procedures
Refer to page 22.
Refer to page 16.
1514
2
This number indicates the
operating order.
This mark indicates the title or
page to refer.
Indicates the trick of the operation.
Indicates the items that you have to be careful during operation.
Indicates the useful informations.

Contents
Folding Procedures
Before You Begin
Before You Begin
View of This Operation Manual ........................................................................ 2
Safety Precaution............................................................................................. 4
Accessories...................................................................................................... 7
Installation ........................................................................................................ 8
Machine Description ........................................................................................ 10
Folding Standard Size Sheet ........................................................................... 14
Setting the Number to Fold (Preset Function) ................................................. 18
Storing the Present Job Setting to Memory ..................................................... 20
Load the Memorized Job Setting from the Memory .........................................22
Folding Irregular Size Sheet ............................................................................ 24
View of This Operation Manual
Contents
Other Functions
Fold Line Shifts ................................................................................................ 28
Removing a Jammed Sheet............................................................................. 30
Error Message Appears on the Display ........................................................... 32
Sheet Can Not Be Folded Correctly ................................................................. 34
Sheet Jam Occurs Frequently ......................................................................... 36
Double Feeding Occurs Frequently ................................................................. 38
No Feeding Occurs Frequently ........................................................................39
Troubleshooting
Sheets Get Stain or Wrinkle............................................................................. 40
Other Problems ................................................................................................ 41
Cleaning/Replacing the Roller ......................................................................... 42
Replacing the Gate Plate .................................................................................44
Cleaning the Sensor ........................................................................................ 46
Maintenance
Sheet Folding Mechanism ............................................................................... 48
Screen Description........................................................................................... 50
Major Specification........................................................................................... 52
Consumption Parts .......................................................................................... 53
Appendix
Index ................................................................................................................ 54
3

Safety Precaution
Safety precautions are indicated in this manual as follows:
Safety Precautions
WARNING
The term WARNING indicates a potentially hazardous situation which, if not avoided,
could result in death or serious injury.
CAUTION
The term CAUTION indicates a potentially hazardous situation which, if not avoided,
could result in damage to the machines. It may also be used to alarm against unsafe
practices.
- Please read and understand all safety instructions which include the term WARNING and CAUTION. If these safety instructions are ignored, personal injury may
result.
- Horizon International Inc. cannot anticipate every possible situation that might
involve a potential hazard. The instructions in this manual and warning labels on the
machine are therefore not all-inclusive.
- All equipment shall be locked out or tagged out to protect against accidental or
inadvertent operation when such operation could cause injury to personnel. Do not
attempt to operate any switch, valve, or other energy isolating device when it is
locked or tagged out.
- Do not operate the machine when any covers are removed.
- Some of the drawings in this manual show the machine uncovered to help in explaining the details inside the machine.
4
Meaning of the Symbols
This symbol indicates there is a note which is important notandum when operating
this machine. Follow the note for safe operation.
Example
This symbol indicates there is a prohibited action when operating this machine.
Do not perform the prohibited action.
Example
This symbol indicates there is an essential procedure when operating this machine.
Follow the procedure for safe operation.
Be careful for the Electrical Shock.
Do not dismantle.
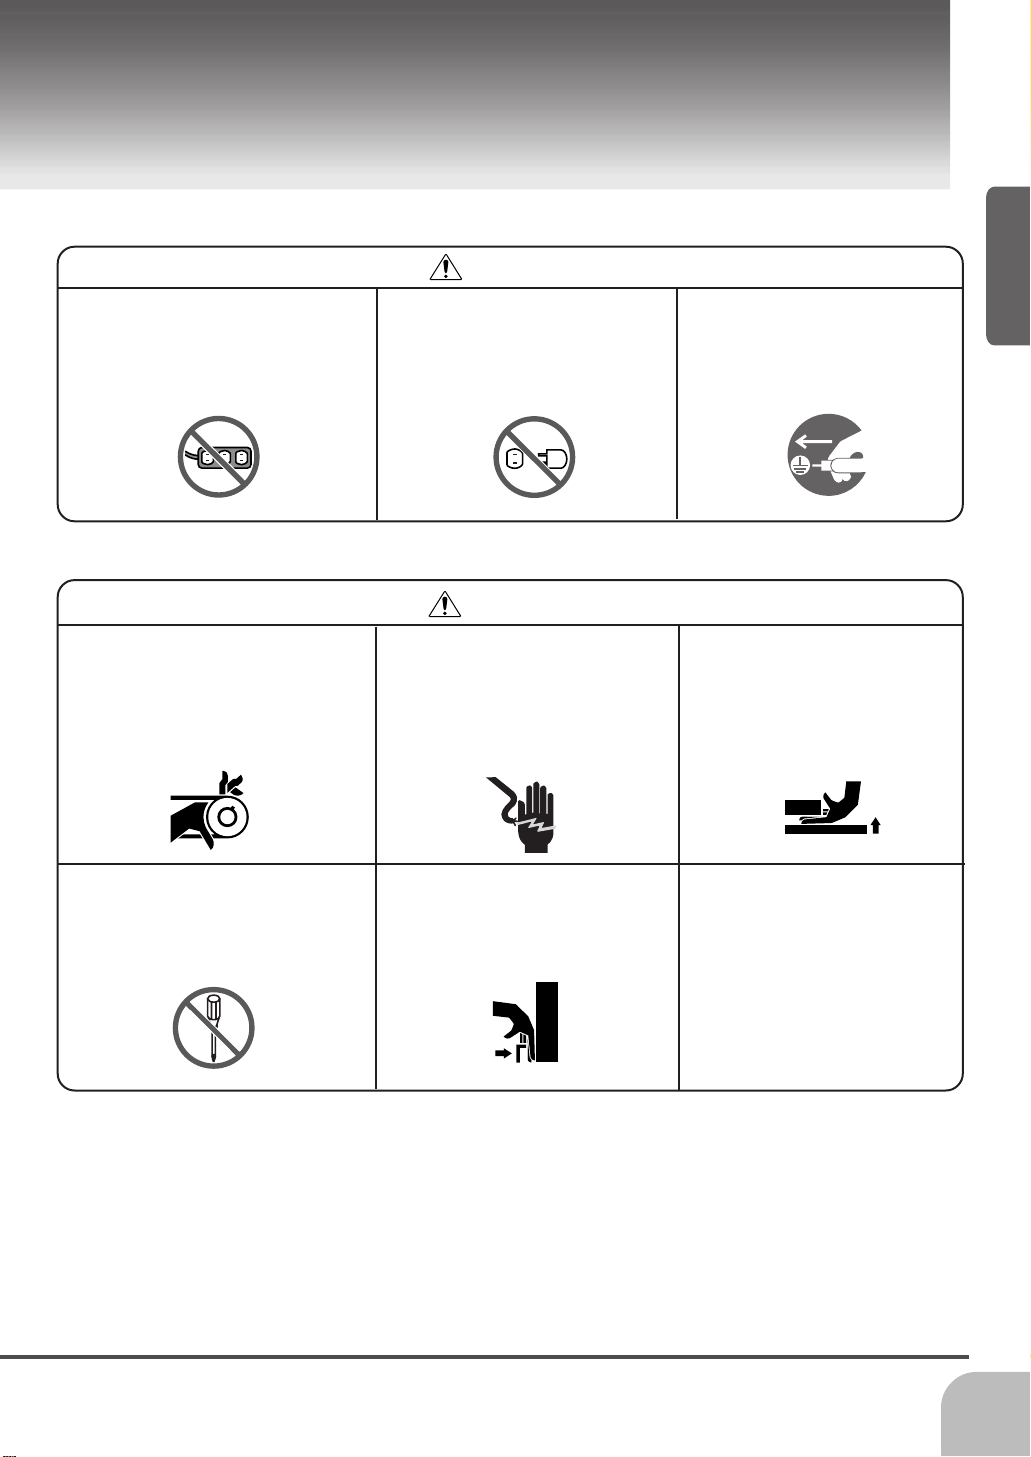
Warning for Installation
Before You Begin
Safety Precaution
WARNING
Do not do the starburst connection. Otherwise, the fire or
electrical shock may be caused.
Warning for Operation
Keep your hands and fingers off
inside of the machine. Otherwise, moving parts can cause
severe personal injury.
Keep the safety function active,
or do not dismantle the machine. It can cause severe
persinal injury.
Do not use the machine in
incorrect voltage.
115V
200V
WARNING
Do not remove the cover.
Otherwise, electrical shock
can cause severe personal
injury.
Be careful not to pinch your
hand when returning the
buckle fixing lever.
Make sure to connect the
earth.
Keep your hands and fingers
off the raising table. Otherwise, raising table can cause
severe personal injury.
5
Safety Precaution
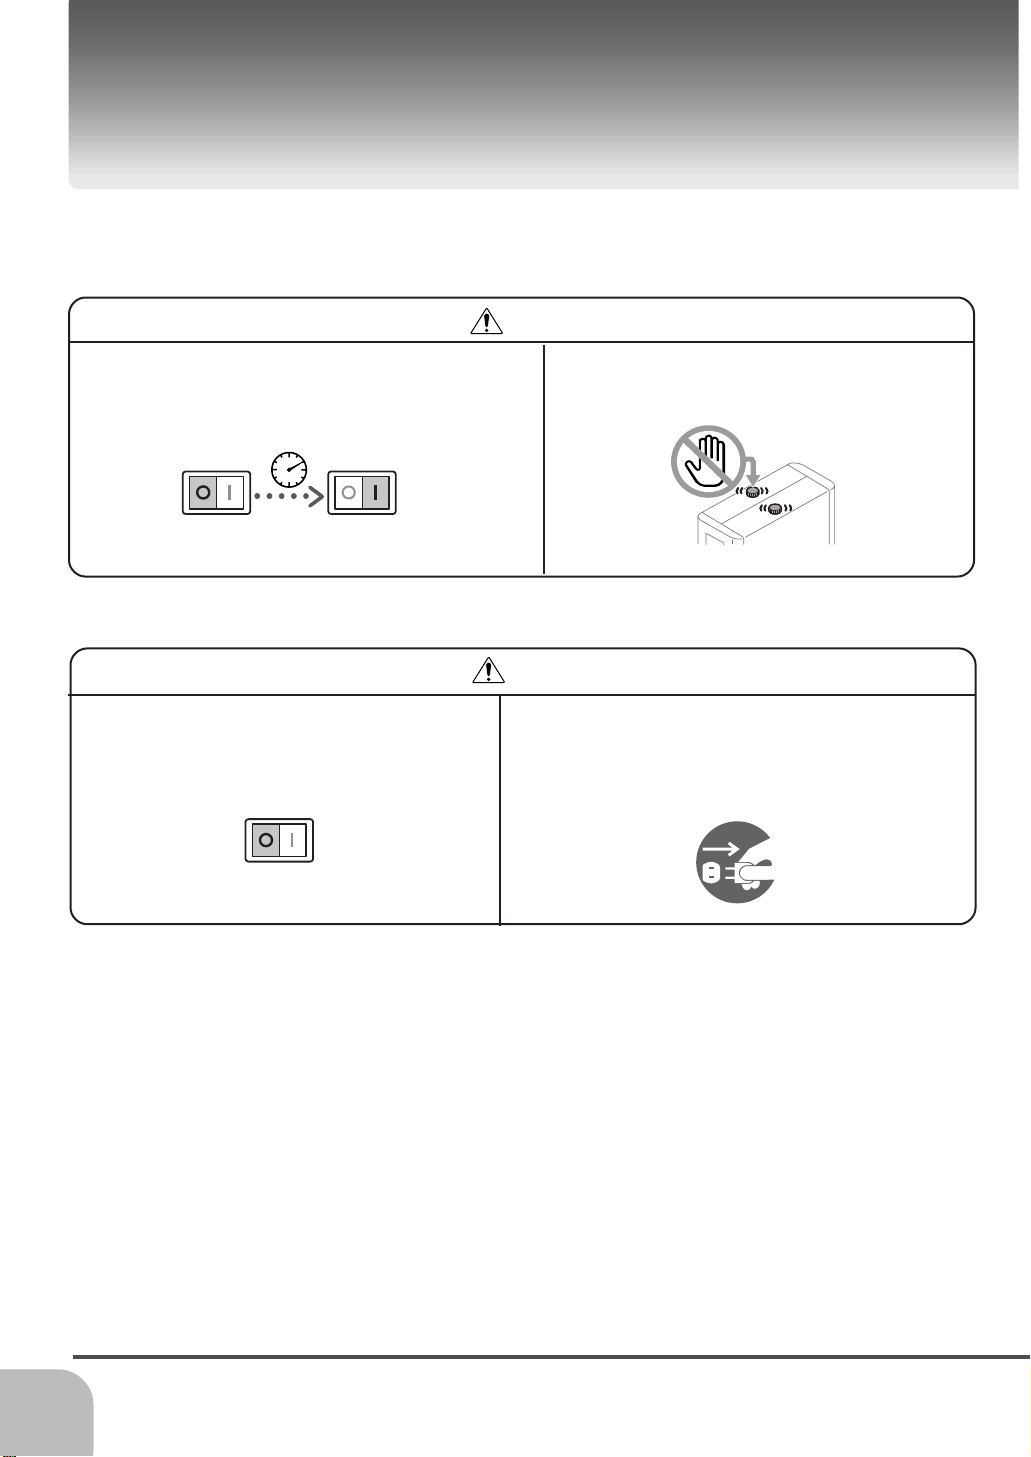
Caution for Operation
CAUTION
When turning off the power switch and on again,
wait a dozen of seconds. Otherwise, the
P.C.board may be damaged.
OFF ON
Caution for Maintenance
Turn off the power switch before cleaning or
replacing each part.
OFF
Keep your fingers and hands off the rotating
stopper adjusting knobs.
WARNING
Disconnect the power cable from receptacle
before moving the machine. Otherwise, the
power cable may be damaged and may
cause the fire or electrical shock.
6
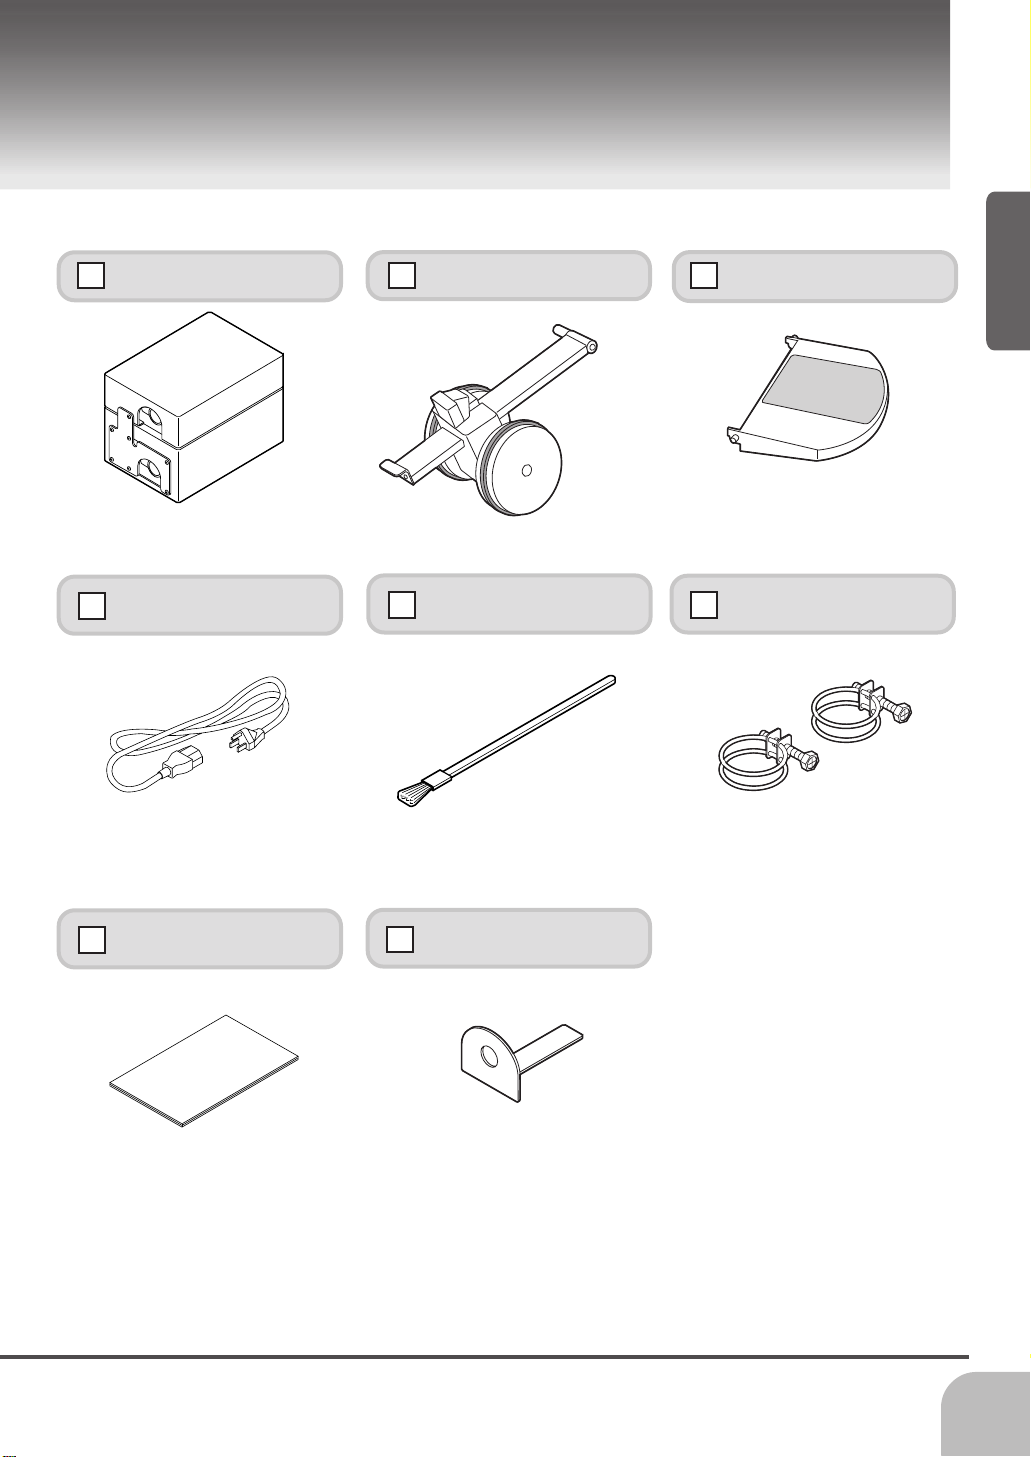
Accessories
Before You Begin
Accessories
Before installing PF-P330, check that there are following items inside the box.
Pump 1 pc Delivery Roller 1 pc Support Table 1 pc
Power Cable 1 pc Cleaning Brush 1 pc Hose Band 2 pcs
Operation Manual 1 pc End Stopper 1 pc
Operation Manual
7
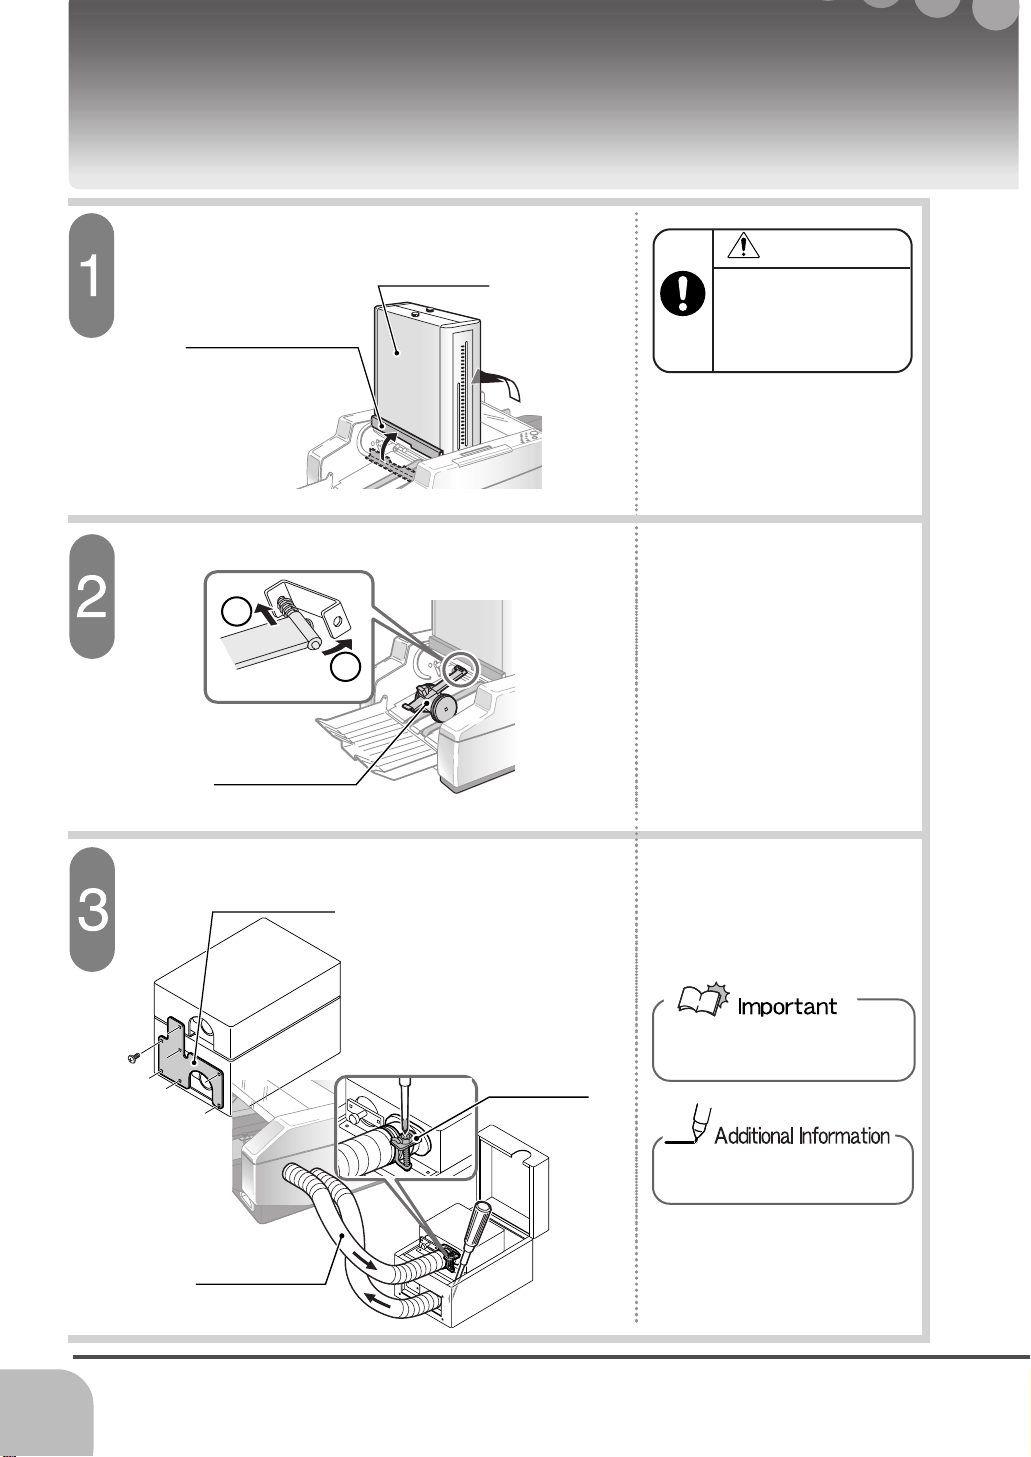
Installation
This section explains how to install PF-P330.
Raise the buckle section and return the buckle
fixing lever.
Buckle Fixing Lever
Buckle Section
Attach the delivery roller.
1
2
Delivery Roller
WARNING
Be careful not to pinch
your finger by buckle
fixing lever.
- Attach the delivery roller as
shown in the figure at left.
8
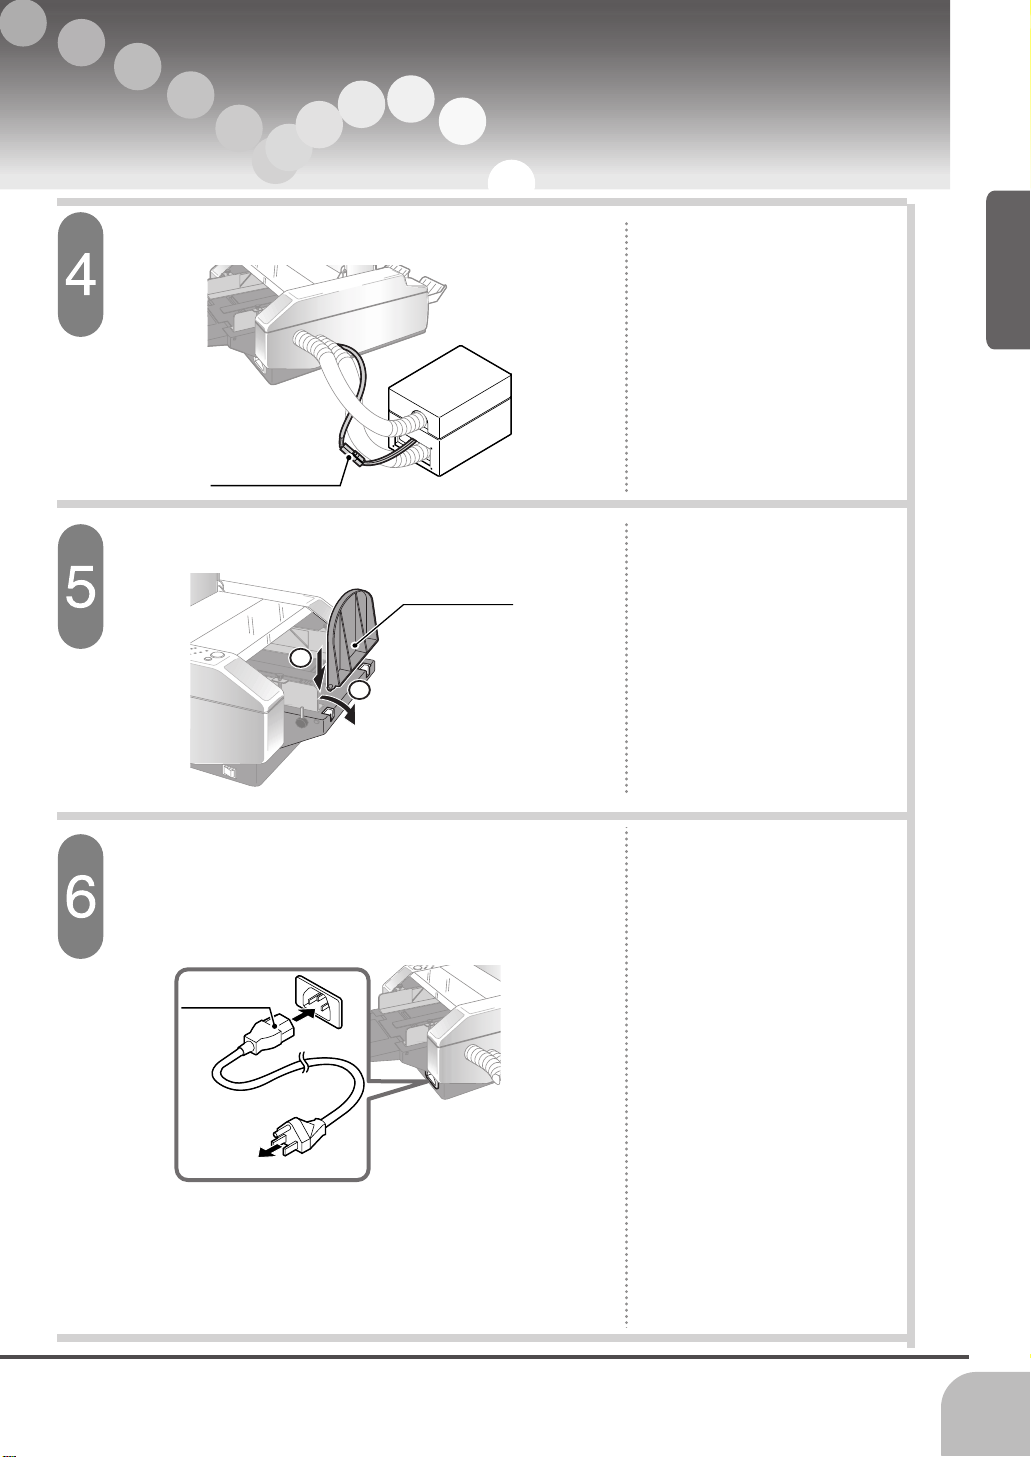
Connect the hose to the pump.
Pump Cover
Upper Hose
- Remove seven screws of the
pump cover using the driver, then
attach the hose to the pump
using the hose band.
Fit the upper hose to the upper
part of pump.
Hose Band
Upper hose is for vacuuming,
and lower hose is for blowing.
Installation
Before You Begin
Connect the pump connector.
Connector
Install the support table.
1
2
- Connect the connector which
comes out from rear side of the
machine to the pump connector.
- Place the connector inside the
pump and attach the pump cover.
Support Table
Connect the power cord to the right side of the
machine and connect the other side of the cord to
the socket.
Power Cord
- Make sure to connect the earth.
9
L
0
H
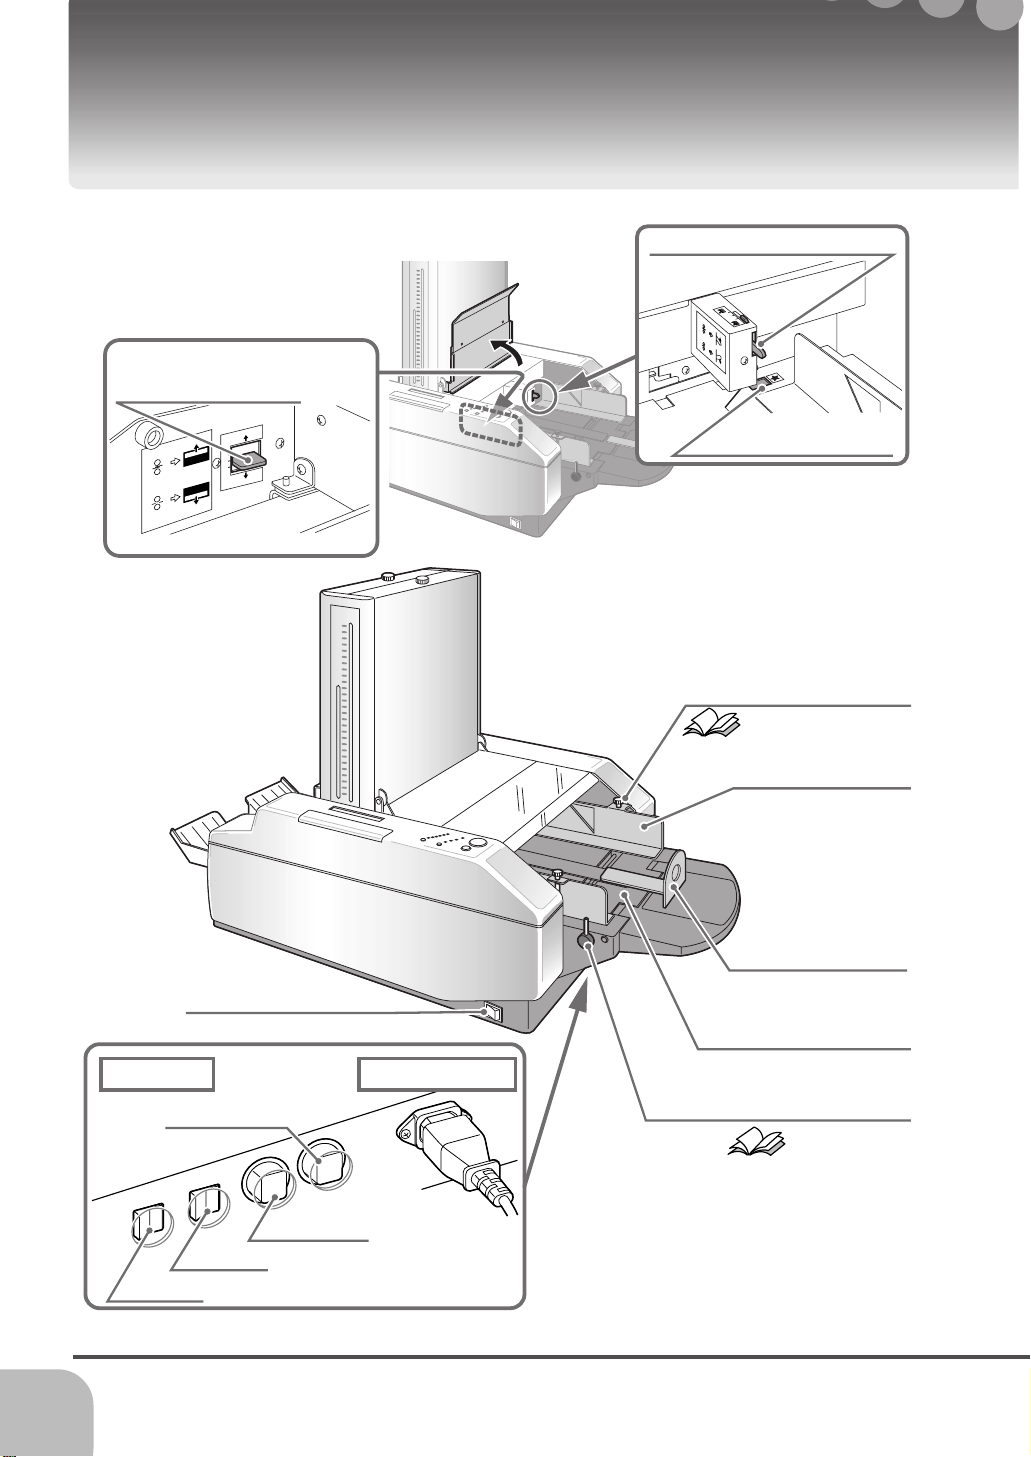
Machine Description
This section explains the machine description.
Gate Plate Height
Adjusting Lever
A
A
B
B
Table Height Adjusting Lever
Sheet Detect Sensor
Power Switch
Breaker
For Stopper 1
For Control
For Pump
Sheet Guide Locking Knob
Refer to page 14
Sheet Guide
End Stopper
Table
Power Cable
Feed Angle Adjusting Lever
Refer to page 28
0.3A
0.3A
For Stopper 2
10

Stopper Adjusting Knob
Before You Begin
Machine Description
Refer to page 29
Buckle Section
Refer to page 30
Buckle Fixing Lever
Refer to page 30
Delivery Roller
Delivery Tray
Stopper Position
Checking Window
Feed Section Cover
Support Table
Operation Panel
Refer to page 13
Extension Panel
Refer to page 12
Sheet Jam Sensor
11

1
2
3
4
5
6
7
89
0
C
Feed Gap
2
nd
Stopper
1
st
Stopper
Memory
Mode
Stopper
Position
Display
Machine Description
This section explains the panel description.
Stopper 1 Moving Button
Refer to page 21
Display
Memory Button
Refer to page 21
12
Feed Gap Button
Stopper 2 Moving Button
Refer to page 38
Stopper Position Displaying Button
Refer to page 29
Numeric Keypad
Refer to page 18
Mode Selecting Button
Refer to page 20
Clear Button

Fold Pattern Lamp
Before You Begin
Sheet Size Lamp
Machine Description
Start / Stop
11"
X
17"
8
1/2"X
11"
8
1/2"X
14"
5
1/2"X 81/2
"
Sheet SizeFolding Pattern
Test Feed
Sheet Size Selecting Button
Refer to page 15
Fold Pattern Selecting Button
Refer to page 15
Start/Stop Button
Refer to page 17
Test Button
Refer to page 16
Gate Fold
Accordion Fold
Letter Fold
Short Fold
Parallel Fold
Single Fold
13
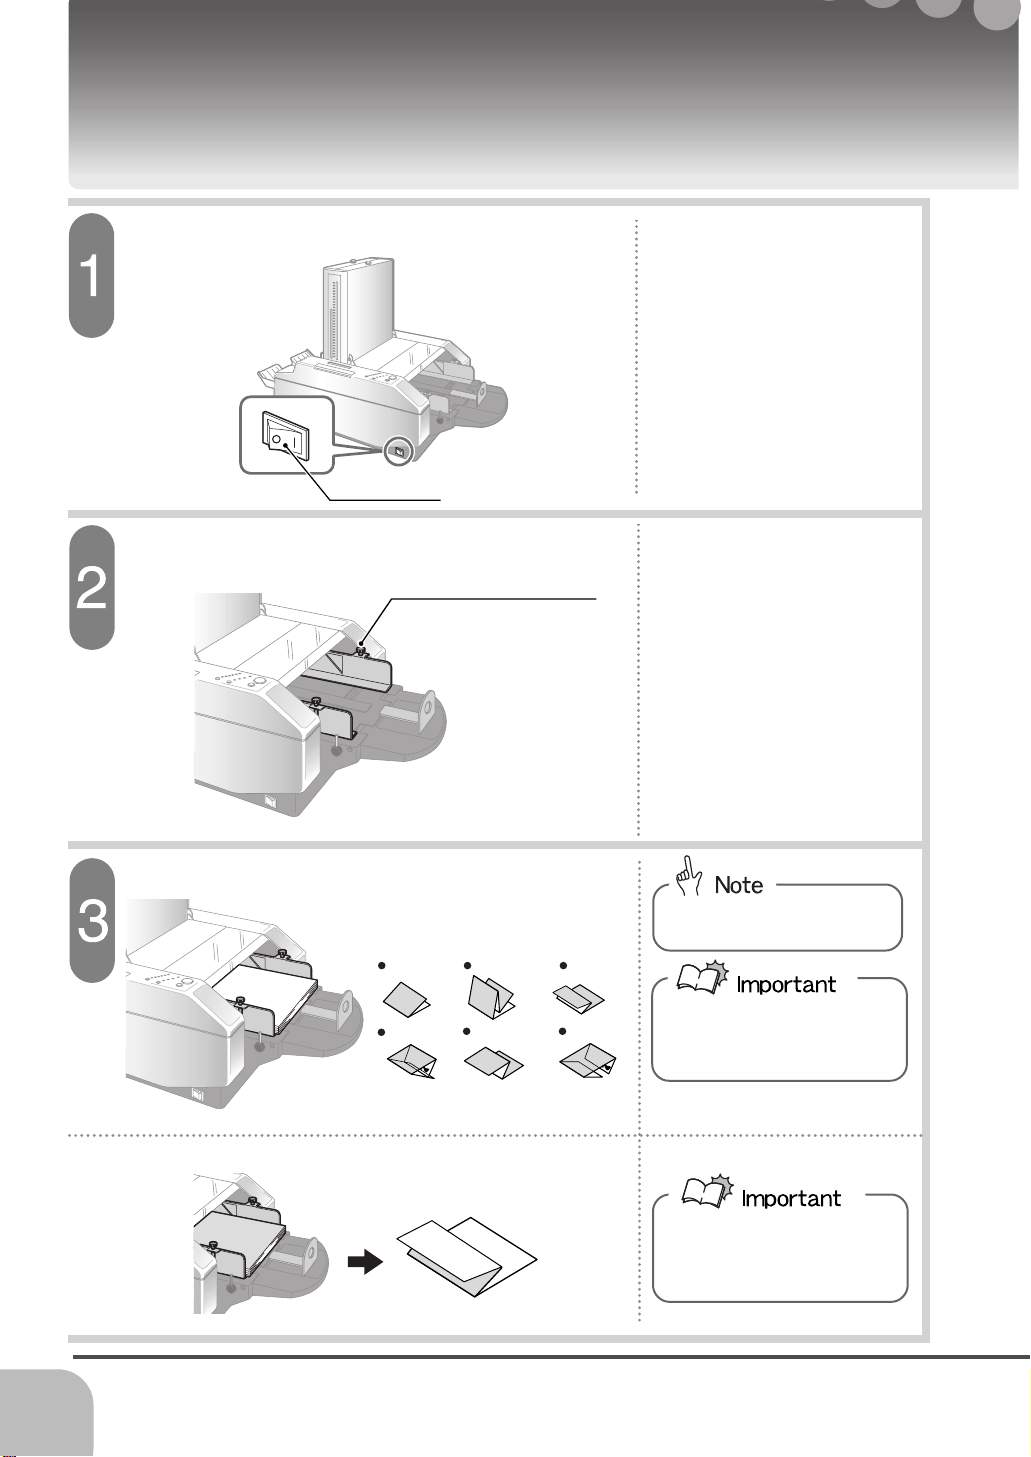
Folding Standard Size Sheet
Let's fold the standard size A3, A4, B4, B5 (11” x 17”, 8.5” x 11”, 8.5” x 14”, 5.5” x 8.5”) sheet.
Turn on the power switch.
Power Switch
Loosen the sheet guide locking knobs
Sheet Guide Locking Knob
14
Place the sheets on the center.
Single Fold
ABC
Letter Fold
ABC
Short Fold
ABC
ABC
Parallel Fold
ABC
Accordion Fold
ABC
ABC
Short Fold
ABC
Gate Fold
Sheet can be piled maximum
50 mm (2”).
Sheets set as the left illustration
are folded as the illustration to
the below.
ABC
When performing he short
folding, set the sheet up side
down as the illustration to the
lower left part shows.
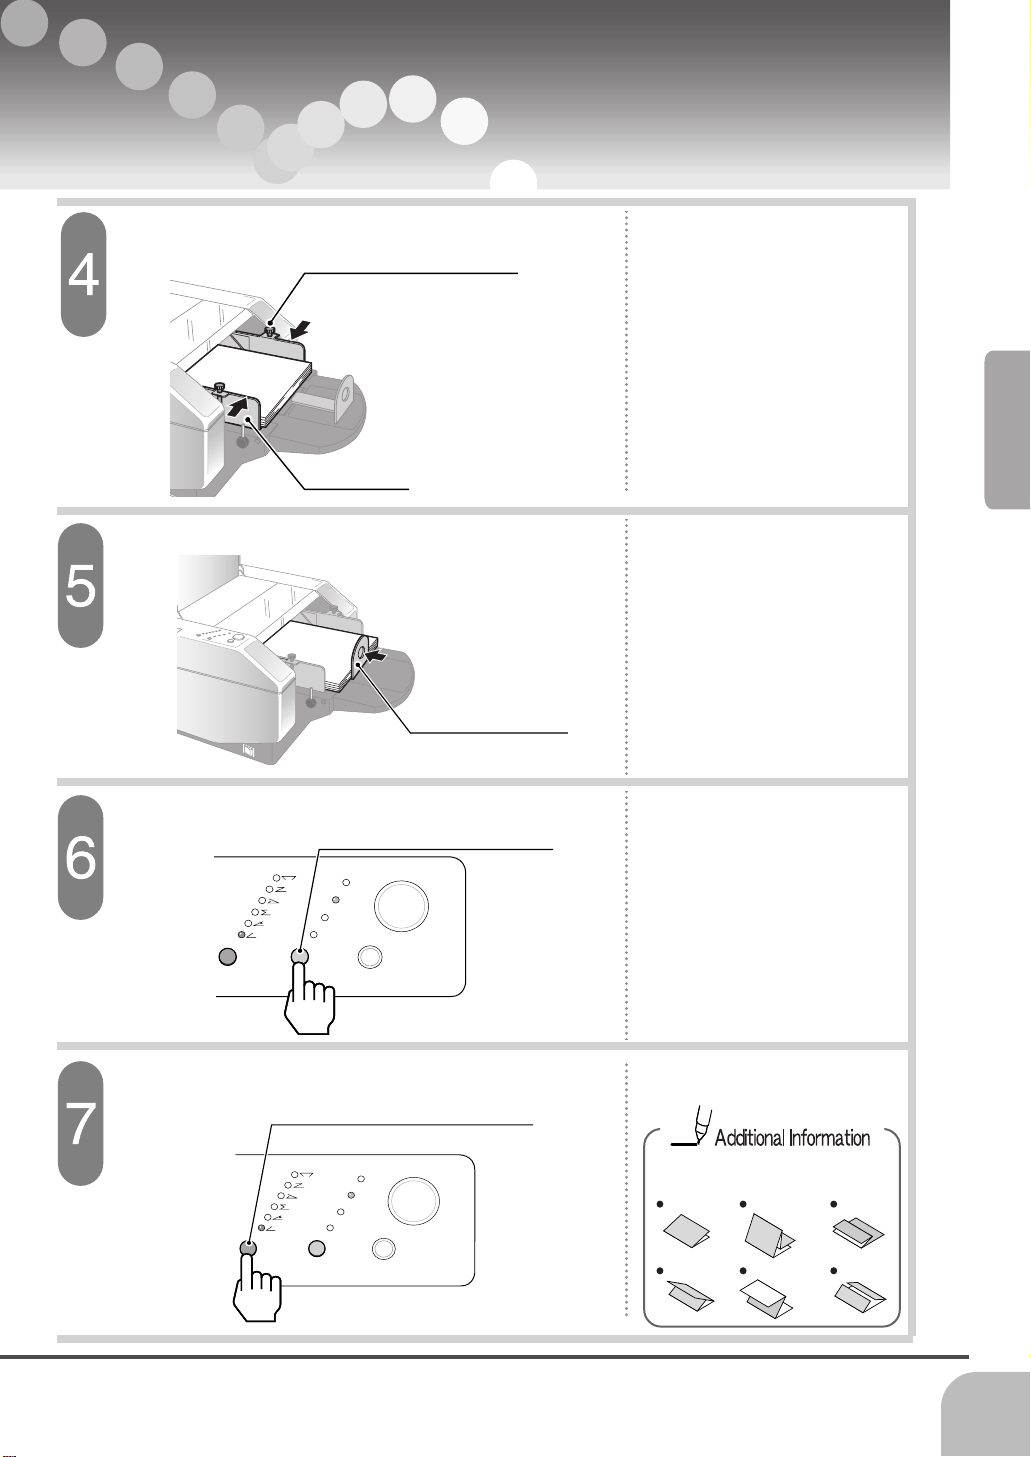
Folding Standard Size Sheet
Fit the sheet guides to the sheet.
Sheet Guide Locking Knob
ABC
Sheet Guide
Set the end stopper.
ABC
Select the sheet size.
Sheet Size Selecting Button
- Tighten the sheet guide locking
knobs after fitting the guides.
Folding Procedures
End Stopper
- The machine moves to the set
position.
Sheet SizeFolding Pattern
Select the fold pattern.
Fold Pattern Selecting Button
Sheet SizeFolding Pattern
5
1/2"X 81/2
1/2"X
8
5
11"
8
1/2"X
14"
"
Test Feed
8
1/2"X
1/2"X 81/2
X
17"
11"
11"
8
1/2"X
14"
"
Test Feed
Start / Stop
Start / Stop
X
17"
11"
- The machine moves to the set
position.
There are 6 folding patterns
shown below.
Single Fold
Letter Fold
Parallel Fold
Accordion Fold
Short Fold
Gate Fold
15
Folding Standard Size Sheet
Set the delivery roller.
Delivery Roller
Press the test button.
Sheet SizeFolding Pattern
5
8
1/2"X 81/2
8
1/2"X
11"
X
1/2"X
11"
14"
"
Test Feed
17"
Start / Stop
Test Button
- Set the delivery roller to the
position where light illuminates.
- Press the test button, and the
table rises, and one sheet is
folded.
Check the folded sheet.
Folding Skew, Folding Shift
Error Message
Check
Up Side Down
3 / 5 Feed error
ABC
ABC
P.28
P.32
P.14
- If there is a folding skew, refer to
[Troubleshooting] and perform
the adjustment.
Refer to page 28
- When the error message is
indicated on the display and the
machine stops, refer to [Error
Message Appears on the
Display] and remove the error.
Refer to page 32
- If the sheet is folded oppositely,
pile the sheet upside down.
- If the sheet can not be fed
correctly, refer to [Troubleshooting].
Refer to page 39
16
 Loading...