

Page 1
Owner's Ma nual
Assembly, Installation,
Care, Maintenance, and
Use Instructions.
W ARNING: Rea d these materials prior to a ssembling a nd using this trampoline.
Product May Vary Slightly From Pictured.
DO NOT attempt or allow somersaults.
Landing on the head or neck can cause
serious injury, paralysis, or death even
when landing in the middle of the bed.
Do not allow more than one person on the
trampoline.
Always use two or more strong people to
unfold and fold the trampoline. When
unfolding, the rails will try to spring back
into the folded position. FAILURE TO
USE TWO OR MORE STRONG PEOPLE
MAY ALLOW THE RAILS TO SPRING
BACK INTO THE FOLDED POSITION AND
STRIKE SOMEONE.
Use trampoline only with mature
knowledgeable supervision.
Exercise can pre sent a health risk. Con sult
a physician before beginning a ny exercise
program with this equipment.
If you feel faint or dizzy, immediately
discontinue use of this equipment.
Keep others and pets away from equi pment
when in use.
Always make sure all parts are tightened
prior to each use.
Weight on this trampoline should not
exceed 250 lbs.
This trampoline is not recommended
for children.
! WARNING !
1.
2.
3.
4.
5.
6.
7.
8.
9.
10.
35-1650F
Licensed Under U.S. Patent
6,237,169B1
Other Patents Applied and Are Pending
MADE IN CHINA
When calling for parts or service,
please specify the following number.
Serious bodily injury or death can occur
if the above warnings are not followed
or if this equipment is not assembled
and used according to all instructions.
This Product is Produced Exclusively by
2040 N. ALLIANCE, SPRINGFIELD, MO 65803
Customer Service Number
1 (800) 375-7520
www.staminaproducts.com
2007 Stamina Products, Inc.
2007, 11
Meijer.com
Page 2

2
THANK YOU FOR PURCHASING THE
STAMINA INMOTION TRAMPOLINE
Simply follow the assembly and safety instructions in this manual and you will soon be
starting your STAMINA
INMOTION exercise program and be on your way
to a happier, healthier lifestyle.
Should you have any questions, please call our Customer Service Department toll-free
number, 1 (800) 375-7520, Monday - Thursday, 7:30 A.M. - 5:00 P.M., Central Time.
Friday, 8:00 A.M. - 3:00 P .M., Central Time.
CALL US FIRST
TABLE OF CONTENTS
Page
Safety Instructions 3
Before Y ou Begin 4
Product Parts Drawing 4
Equipment Warning & Notice Labels 5
Assembly Instructions 6
Installation Instructions 9
Care and M aintenance Instructions 9
Storage Instructions 10
Use Instructions 11
Workout Progra m 12
Warm-Up and Cool-Down 13
Basic W orkout 14
Warranty 16
Notes 17
Fax/Mail Ordering Form 18
Meijer.com
Page 3

SAFETY INSTRUCTIONS
33
WARNING: Before starting any exercise or conditioning program you should consult with your personal
physician to see if you require a complete physical exam. This is especially important if you are over the age
of 35, have never exercised before, are pregna nt, or suffer from any ill ness. READ AND FOLLOW THE SAFETY
INSTRUCTIONS. FAILURE TO FOLLOW THESE INSTRUCTIONS CAN RESULT IN SERIOUS BODILY INJURY.
!
WARNING: To reduce the risk of serious injury, read the following Safety Instructions
before using the INMOTION
trampoline.
!
1.
2.
3.
4.
5.
6.
7.
8.
9.
10.
11.
12.
13.
14.
15.
16.
17.
18.
19.
20.
21.
22.
23.
24.
25.
26.
27.
28.
29.
30.
Misuse and abuse of this trampoline is dangerous and can cause serious injuries.
Tra mpolines, being rebounding devices, propel the perf ormer to un a ccustomed heights a nd into a variety of body
movements.
When unfolding or folding the trampoline, the rails will try to spring into the folded position.
Always use two or more strong people to unfold or fold the INMOTION trampoline. Failure to use two or
more strong people may allow the rails to spring back into the folded position a nd strike someone which
can cause serious bodily injury or death.
The INMOTION trampoline is for home use only. Do not use in institutional or commercial applications.
Failure to follow this warning could result in minor or moderate injury.
All purchasers and all persons using the INMOTION trampoline must become familiar with the manufacturer's
recommendations for proper assembly, use and care of the INMOTION trampoline, as well as being alert to the
performer's own limitations in the execution of trampoline skills. Assembly Instructions, Safety Instructions,
Trampoline Fundamentals, and Warning Labels are included to promote safe, enjoyable use of the INMOTION
trampoline.
The owner and supervisors of the trampoline are responsible to make all users aware of the Safety Instructions
and practices in the use instructions.
Place the INMOTION trampoline on a level surface before use.
Use the INMOTION tra mpoline in a well lighted area. Artificial illumination may be required f or indoor or sha dy area s.
Do not place the INMOTION trampoline on an elevated surface. The INMOTION trampoline should be at floor
level or ground level.
Inspect your INMOTION trampoline before each use. Make sure the safety pad is in place. Replace any worn,
defective, or missing parts.
Make sure the floor or ground around the INMOTION tra mpoline is clear of all objects that may cause injury if you
step on them when dismounting.
Adequate overhead clearance is essential. Provide adequate clearance for ceilings, ceiling lights, ceiling fans,
wires and tree limbs. Failure to provide a dequate he a d cle arance can result in head or neck injury. A minimum of
24 feet is recommended for outdoor trampolines.
Do not allow children to use the INMOTION trampoline. The INMOTION trampoline is not a toy, it is for use by
adults only. Use the trampoline only with mature knowledgeable supervision.
NOTE: The TRAMPOLINE USE INSTRUCTIONS sign is a standard sign that is supplied to comply with
ASTM F381. This sign indicates that tra mpolines are suita ble f or use by children over six years of age. However,
the INMOTION trampoline is not recommended for children of any age.
Lateral clearance is essential. Place the INMOTION trampoline away from walls, structures, fences, play areas,
furniture, and other exercise equipment. Maintain a clear space on all sides of the trampoline.
Keep small children and pets away from the INMOTION trampoline at all time s including use a nd a sse mbly of the
INMOTION trampoline.
The weight limit on the INMOTION trampoline is 250 pounds.
Do not use the INMOTION tra mpoline with sock s only. Good tra ction is very importa nt when mounting, using, a nd
dismounting the INMOTION tra mpoline. Bare feet are acceptable but we recommend good footwear with rubber
non-skid soles such as walking, running or cross-training shoes.
W ear appropri ate clothing when exercising; do not wear loose clothing that could become caught in the INMOTION
trampoline.
The INMOTION trampoline should be used by only one person at a time.
Remove any obstructions from beneath the INMOTION trampoline.
The surface of the bed should be dry.
Be careful to maintain your balance when mounting, using, dismounting, or a ssembling the INMOTION trampoline.
Loss of balance may result in a fall and serious bodily injury.
Do not step on the safety pad when mounting, using or dismounting the INMOTION trampoline.
Do not attempt any gymnastic or acrobatic maneuvers on the INMOTION trampoline.
Stop exercising before attempting to dismount the INMOTION trampoline. To avoid sprains and broken bones,
come to a complete stop before dismounting.
Use the INMOTION trampoline only as described in this manual.
Always store the INMOTION trampoline indoors in a dry place.
Secure the INMOTION trampoline against unauthorized and unsupervised use.
Remove the safety pad before folding the INMOTION trampoline for storage. Failure to remove the safety pad
before folding will result in damage to the safety pad.
Meijer.com
Page 4
BEFORE YOU BEGIN
4
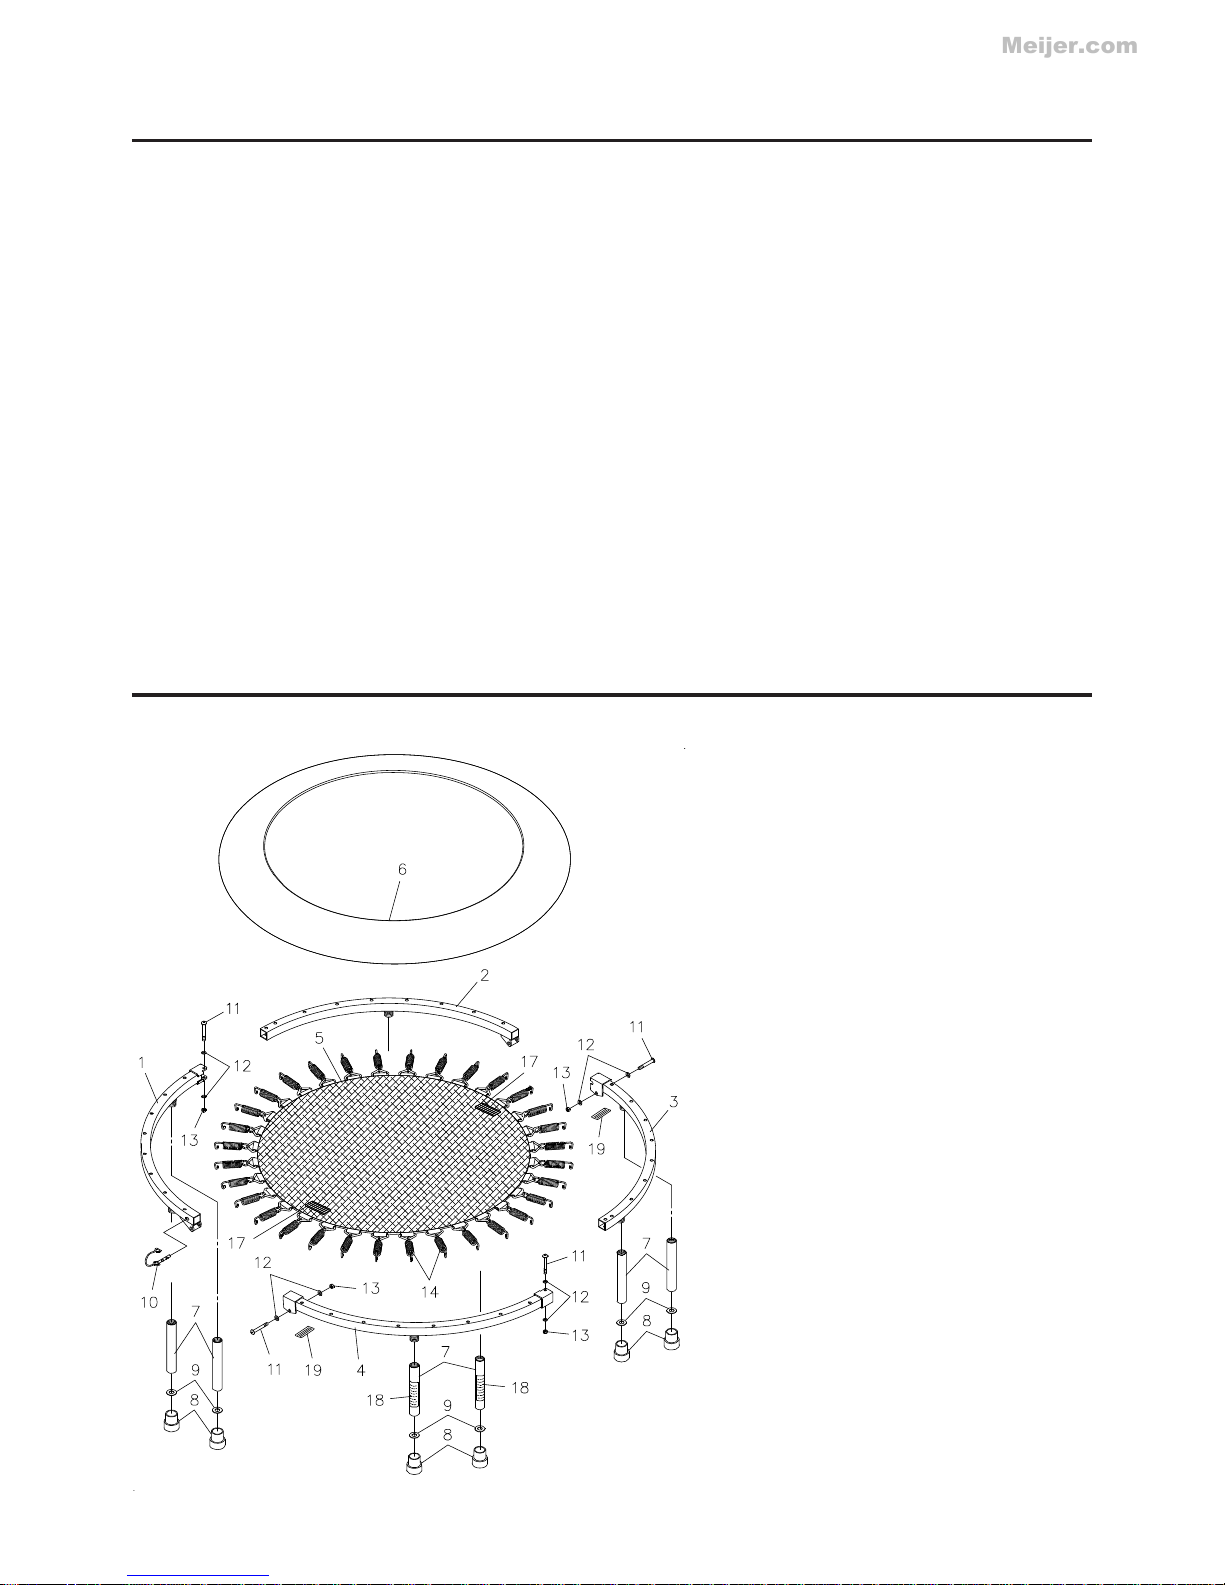
Part No. and Description Qty
1 Rail A 1
2 Rail B 1
3 Rail C 1
4 Rail D 1
5 Mat 1
6 Safety Pad 1
7 Leg 6
8 Leg Cap 6
9 Cap Washer 6
10 Secure Pin 1
11 Bolt, Round Head(M6 x 1 x 41mm) 4
12 Washer (M6) 8
13 Nylock Nut (M6 x 1) 4
14 Spring 32
15 Manual 1
16 Use Instructions Sign (Not Shown) 1
17 Hazard Label 2
18 Warning Label 2
19 Warning Decal 2
PRODUCT PARTS DRAWING
Thank you f or choosing the INMOTION tra mpoline.
W e ta ke great pride in producing this quality product
and hope it will provide many hours of quality
exercise to make you feel better , look better and enjoy
life to its fullest.
Y es, it's a proven fa ct that a regular exercise program
can improve your physical and mental health. Too
often, our busy lifestyles limit our ti me and opportunity
to exercise. The INMOTION trampoline provides a
convenient and simple method to begin your assault
on getting your body in shape a nd a chieving a happier
and healthier life style.
Before reading further, please review the drawing
below and familiarize yoursel f with the parts that are
labeled.
Read this manual carefully before using the
INMOTION trampoline.
Although Stamina manufactures its products with
the finest materials and uses the highest standards
of manufacturing, occasionally a part that does not
fit, is the incorrect size, or is otherwise inappropriate
is found. Even with the highest inspe ction and quality
controls in place, these things will happen
occasionally. Please do not return the product.
Contact us FIRST!
If a part is missing or defective, please call us toll
free at 1-800-375-7520 (in the U.S.). Our Customer
Service Staff is available to a ssist you from 7:30 A.M.
to 5:00 P .M. (Central T ime) Monday through Thursday
and 8:00 A.M. to 3:00 P.M. (Central Ti me) on Friday.
If you would like to contact us online, go to our
website at www.sta mina products.com a nd access the
Customer Service section or e-mail us at
parts@staminaproducts.com.
Be sure to have the name and model number of
the product available when you contact us.
Meijer.com
Page 5
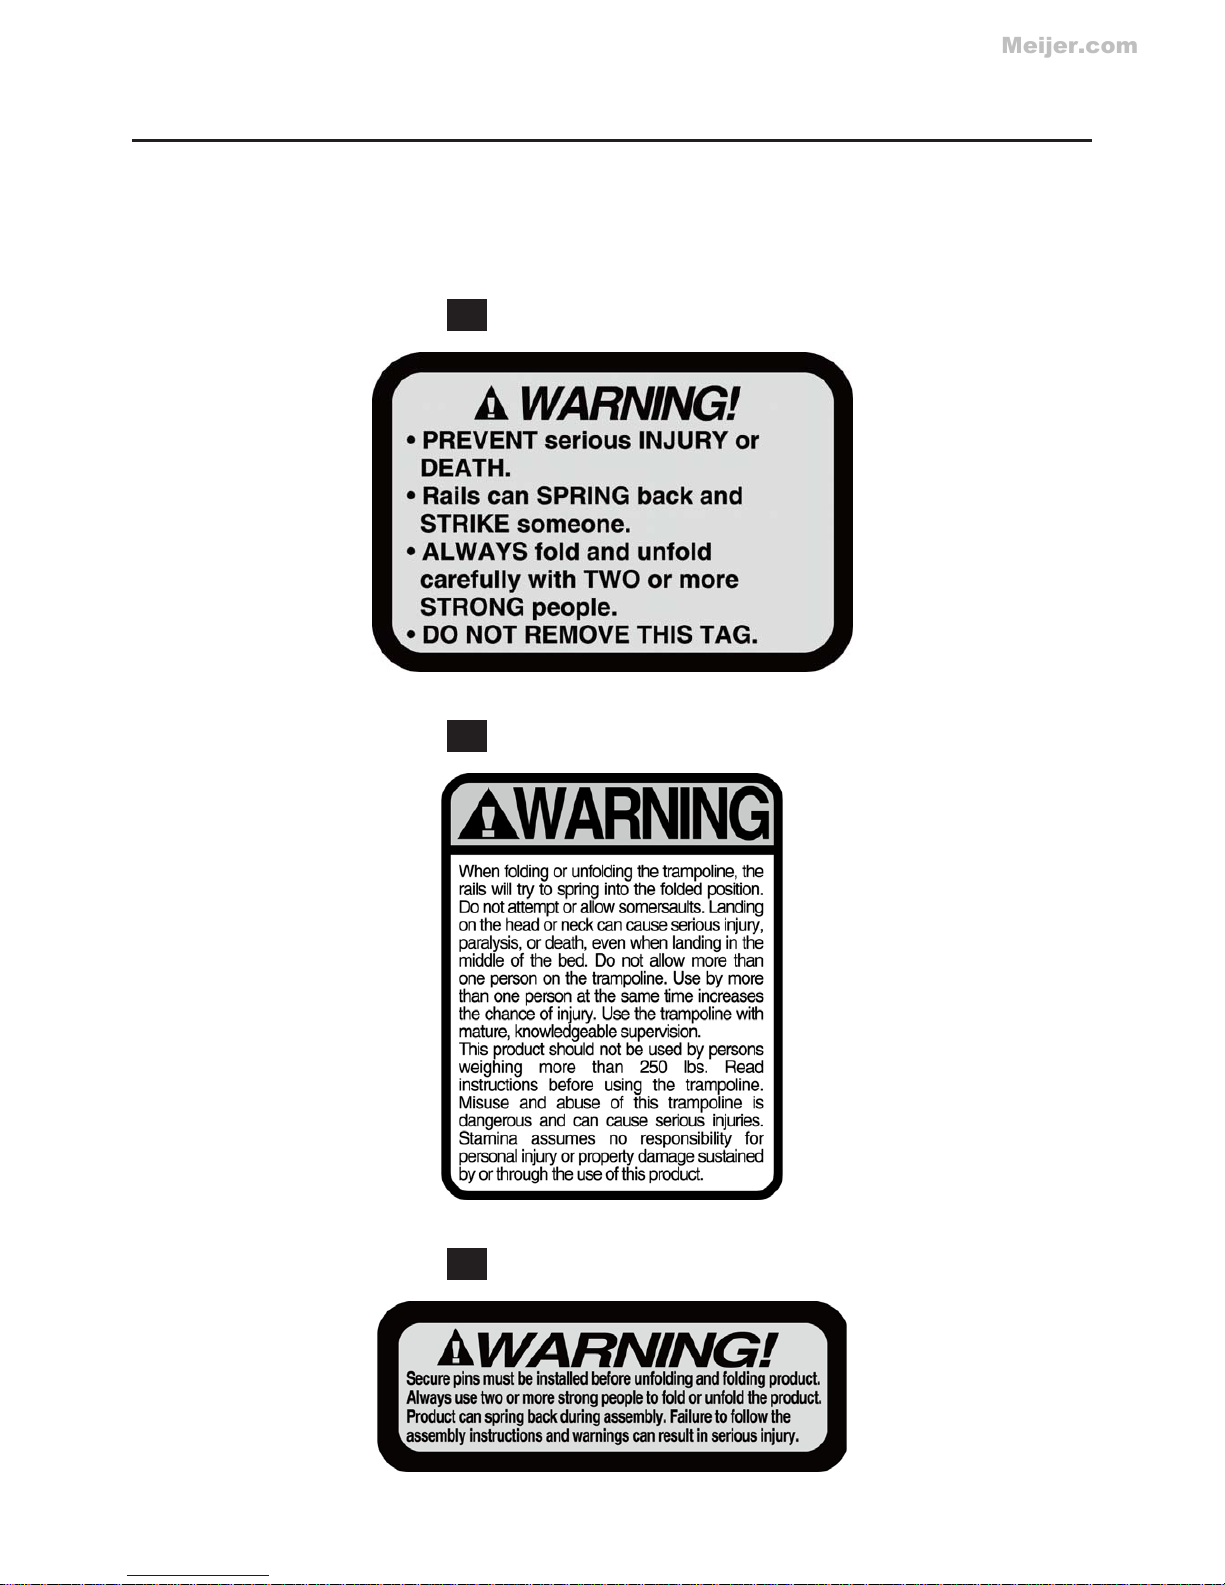
EQUIPMENT WARNING & NOTICE LABELS
This chart is provided to help identify the warning & notice labels on the INMOTION tra mpoline. Plea se ta ke
a moment to fa miliarize yourself with all of the warning & notice labels.
5
Labels are larger than actual size
WAR NING LABEL(18)
W2
HAZARD LABEL(17)
W1
WAR NING DECAL(19)
W3
Meijer.com
Page 6
6
STEP 1:
1.
Lay the trampoline on the floor and open the rails. The trampoline will look as shown in
illustration 1.
ASSEMBLY INSTRUCTIONS
Place all parts from the box in a cleared area and position them on the floor in front of you. Remove all
packing materi als from your area a nd pla ce the m ba ck into the box. Do not dispose of the pa cking materi als
until a ssembly is completed. Read ea ch step carefully before beginning. If you are missing a part ple a se call
our toll-free number for assistance 1 (800) 375-7520 or e-mail us at: parts@staminaproducts.com
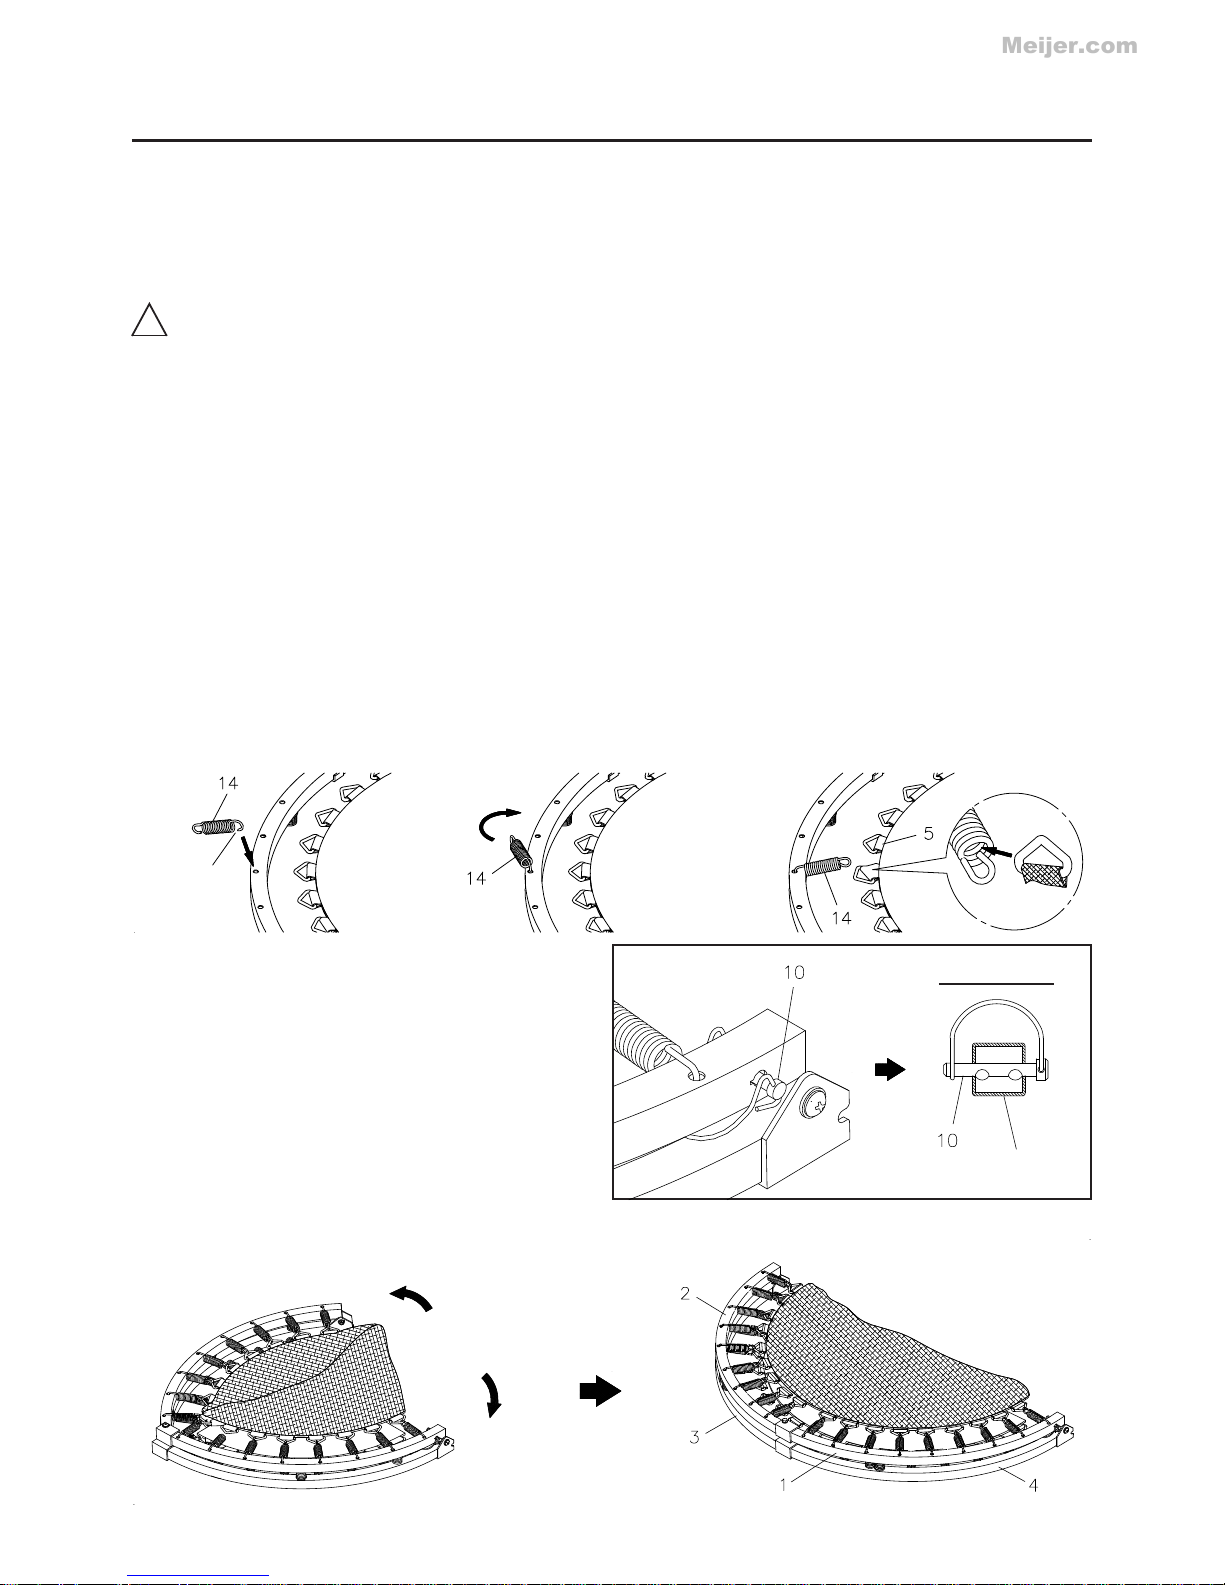
Check all SPRINGS(14) before a ssembly . If a ny SPRING(14) is not attached or da maged, plea se
follow this process to attach or replace the spring:
A.
B.
C.
NOTE 1 :
Find the open end of the SPRING(14) and hook this end into the hole on the RAIL(1,2,3,4). Refer to
illustration A.
Swing the SPRING(14) to face inside of the trampoline. Refer to illustration B.
Slide a sharp corner of the metal loop on the MA T(5) into the spring hook as shown in the illustration C.
Before a ssembly , verify that the SECURE PIN(10)
is properly inserted in the Frame Rail. The two
protrusions must be assembled inside the Frame
Rail as shown in the SECTION VIEW of the
illustration. Otherwise, it could damage the
SECURE PIN(10) during Assembly Step 3.
NOTE 2 :
Frame Rail
SECTION VIEW
1.
2.
3.
4.
ALWAYS USE TWO OR MORE STRONG PEOPLE TO UNFOLD OR FOLD THE INMOTION
TRAMPOLINE. FAILURE TO USE TWO OR MORE STRONG PEOPLE MAY ALLOW THE
RAILS TO SPRING BACK INTO THE FOLDED POSITION AND STRIKE SOMEONE WHICH
CAN CAUSE SERIOUS BODILY INJURY OR DEATH.
Keep children away from the INMOTION trampoline during assembly.
Keep fingers away from the ends of the rails in the hinge area when unfolding the
INMOTION trampoline. The INMOTION trampoline will snap into the unfolded position.
Serious injury can occur if fingers are caught between the ends of the RAILS.
The SAFETY PAD(6) must be installed bef ore using the INMOTION trampoline.
WARNING:!
Open End
A.
B. C.
Meijer.com
Page 7

ASSEMBLY INSTRUCTIONS
7
STEP 3: Slide the SAFETY P AD(6) over the rail fra me. Ma ke sure the holes in SAFETY P AD(6) fit over the
threaded connectors properly. Refer to illustration 3.
HINT:
Bracket
Guide
ALWAYS USE TWO OR MORE STRONG PEOPLE TO UNFOLD OR FOLD THE
INMOTION TRAMPOLINE. FAILURE TO USE TWO OR MORE STRONG PEOPLE
MAY ALLOW THE RAILS TO SPRING BACK INTO THE FOLDED POSITION AND
STRIKE SOMEONE WHICH CAN CAUSE SERIOUS BODILY INJUR Y OR DEATH.
Keep fingers away from the ends of the rails in the hinge area when unfolding the
INMOTION trampoline. Serious injury can occur if fingers are caught between the ends
of the RAILS.
STOP!
Hold RAILS(3, 4) and push down on RAILS(1, 2) to unfold the INMOTION trampoline to the flat position.
The RAILS(1, 4) and RAILS(2, 3) should snap together and be locked by the SECURE PIN(10) when you
reach the flat position. Refer to illustration 2.
2. 3.
STEP 2
NOTE:
Make sure the SECURE PIN(10) is inserted into the end of RAIL(1) and properly secured by the
Wire Ring. Both ends of the SECURE PIN(10) should have approximately 1/8 inch between the
RAIL(1) and the Wire Ring. Refer to illustration 2.
A. First step,
install the Safety Pad(6) on
to this Threaded Connector.
B. Second Step,
install the Safety Pad(6) on
to this Threaded Connector.
Install one hole over a threaded connector. The next hole installed should be on the connector on
the opposite side of the trampoline.
The SAFETY PAD(6) must be securely atta ched to the rail frame in the correct position. All six
(6) holes in the SAFETY PAD(6) must fit over a threaded conne ctor on the rail frame as shown
in illustration 4 on the following page. The SAFETY PAD(6) must also cover the springs on the
MAT(5) as shown in illustratration 5 on the following page.
CAUTION:
Hazard label on trampoline surface reads as follows:
PREVENT serious INJURY or DEATH.
Rails can SPRING back and STRIKE someone.
ALW A YS fold a nd unfold carefully with TWO or more
STRONG people.
Do NOT remove this tag.
WARNING!!
WAR NING:
!
Meijer.com
Page 8

8
STEP 5: Place the trampoline in the normal use position. Make
sure that the SAFETY PAD(6) covers the Springs on the
INMOTION trampoline. Stand on the trampoline to make all six
legs set flat on the floor. Refer to illustration 5.
STEP 6: Post the USE INSTRUCTIONS SIGN(16) in a highly
visible and safe location. The USE INSTRUCTIONS SIGN(16) shall
be placed such that it will be rea dily visible to the intended viewer .
5.
CORRECT PLACEMENT OF
SAFETY P AD
The SAFETY PAD(6) must be securely atta ched
to the frame before using the trampoline. It must
be properly positioned a s shown in illustration 5.
ASSEMBLY INSTRUCTIONS
STEP 4: The two LEGS(7) with a Warning La bel must
be on opposite sides of the INMOTION trampoline.
Screw one of the LEGS(7) with a Warning La bel onto
a threaded connector on the rail fra me. Attach the other
LEG(7) with a Warning La bel to the threaded connector
directly opposite the other LEG(7) with a Warning
Label. Screw the other four LEGS(7) onto the threaded
connectors on the rail frame. Refer to illustration 4.
4.
Warning
Label
Warning
Label
WAR NING:
!
Meijer.com
Page 9

9
Inspect the INMOTION trampoline before each use and replace any worn, defective, or missing parts. The
following conditions could represent potential hazards:
CARE AND MAINTENANCE
1.
2.
3.
4.
5.
6.
7.
Missing, improperly positioned, or inse curely attached frame padding.
Punctures, frays, tears, or holes worn in the bed or frame padding.
Deterioration in the stitching or fabric of the bed or frame padding.
Ruptured springs.
A bent or broken frame.
A sagging bed.
Sharp protrusions on the frame or suspension system.
1.
2.
3.
4.
5.
6.
7.
Adequate overhead clearance is essential. For example, a minimum of 24 feet from ground level is
recommended for large outdoor tra mpolines. When using your INMOTION tra mpoline, be sure to provide
clearance for ceiling height, ceiling lights, ceiling fans, wires, tree limbs, and other possible hazards.
Lateral clearance is essential. Place the trampoline away from walls, structures, fences, play areas,
furniture, and other exercise equipment. Maintain a clear space on all sides of the trampoline.
Place the trampoline on a level surface.
Use the tra mpoline in a well lighted area. Artificial illumination may be required for indoor or shady areas.
Prevent unauthorized and unsupervised use of the trampoline.
Remove any obstructions from beneath the trampoline.
The owner and supervisors of the tra mpoline are responsible to ma ke all users aware of practice s specified
in the use instructions.
INSTALLATION INSTRUCTIONS
Meijer.com
Page 10

ALWAYS USE TWO OR MORE STRONG PEOPLE TO UNFOLD OR FOLD THE INMOTION
TRAMPOLINE. FAILURE TO USE TWO OR MORE STRONG PEOPLE MAY ALLOW THE
RAILS TO SPRING BACK INTO THE FOLDED POSITION AND STRIKE SOMEONE WHICH
CAN CAUSE SERIOUS BODILY INJURY OR DEATH.
Remove the safety pad before folding the trampoline for storage. Failure to remove the
pad will result in damage to the pad.
The INMOTION trampoline can be f olded a s illustrated for ea sy storage. Please follow the following process:
STORAGE INSTRUCTIONS
STEP 3: T o prevent the tra mpoline from sn apping into the f olded position, push down the four RAILS(1,2,3,4).
Then unhook the Wire Ring from the SECURE PIN(10) and turn the pin to a flat position to re move the pin.
Firmly gra sp both side s of the trampoline and fold the tra mpoline upward, the trampoline will fold upward at
the BRACKET GUIDES as shown in illustration Step 3.
STEP 1: Unscrew the LEGS(7) from the trampoline. Refer to
illustration Step 1.
STEP 2: Remove the SAFETY PAD(6) from the fra me. After the
SAFETY PAD(6) is removed, place the trampoline on the floor
with the threaded connectors pointing up. Refer to illustration Step 2.
10
STOP! ALWAYS USE TWO OR MORE STRONG PEOPLE TO UNFOLD
OR FOLD THE INMOTION TRAMPOLINE. FAILURE TO USE TWO OR MORE
STRONG PEOPLE MAY ALLOW THE RAILS TO SPRING BACK INTO THE
FOLDED POSITION AND STRIKE SOMEONE WHICH CAN CAUSE SERIOUS
BODILY INJURY OR DEATH.
WAR NING:
!
Threaded
Connector
Bracket Guide
The safety pad must
be removed before
folding the trampoline.
Wire Ring
Step 2 Step 3
Step 1
STEP 5: Refer to illustration Step 5. Set the position of the SECURE PIN(10) as shown. Lift up the RAILS
(1, 2), insert the SECURE PIN(10) into the RAIL(1), a nd hook the Wire Ring onto the pin from the bottom of
the RAIL(1).
STEP 6: Fold the trampoline again as shown in illustration Step 6.
Wire Ring
Step 5 Step 6
Meijer.com
Page 11

USE INSTRUCTIONS
11
WARNING
! !
ALWAYS USE TWO OR MORE STRONG PEOPLE TO UNFOLD OR FOLD THE INMOTION
TRAMPOLINE. FAILURE TO USE TWO OR MORE STRONG PEOPLE MA Y ALLOW THE RAILS TO
SPRING BACK INTO THE FOLDED POSITION AND STRIKE SOMEONE WHICH CAN CAUSE
SERIOUS BODILY INJURY OR DEA TH.
DO NOT attempt or allow somersaults. Landing on the he ad or neck ca n cause serious injury , paralysis,
or death, even when landing in the middle of the bed.
Do not allow more than one person on the trampoline. Use by more than one person at the same time
can result in serious injuries.
Use trampoline only with mature, knowledgeable supervision.
This trampoline is not recommended for children.
Inspect the tra mpoline before ea ch use. Ma ke sure the fra me padding is correctly a nd securely positioned.
Replace any worn, defective, or missing parts.
Climb on and off the trampoline. It is a dangerous practice to jump from the trampoline to the floor or
ground when dismounting, or to jump onto the tra mpoline when mounting. Do not use the tra mpoline a s
a springboard to other objects.
Stop bounce by flexing knees as feet come in contact with the trampoline bed. Learn this skill before
attempting others.
Learn funda mental bounces a nd body positions thoroughly before trying more adva nced skills. A variety
of trampoline activities can be carried out by performing the basic fundamentals in various series and
combinations, performing one fundamental after another, with or without feet bounces between the m.
Avoid bouncing too high. Stay low until bounce control and re peated landing in the center of the tra mpoline
can be accomplished. Control is more important than height.
While keeping the head erect, f ocus eyes on the trampoline toward the perimeter. This will help control
bounce.
Avoid bouncing when tired. Keep turns short.
Properly secure the tra mpoline when not in use. Prote ct it against un authorized use. Protect it against
use by children.
Keep objects away which could interfere with the performer . Maintain a clear are a around the tra mpoline.
Do not use the trampoline while under the influence of alcohol or drugs.
For additional information concerning the trampoline equipment, contact the manufacturer.
For information concerning skill training, contact a certified trampoline instructor.
Bounce only when the surface of the bed is dry. Wind or air movement must be calm to gentle. The
trampoline must not be used in gusty or severe winds.
Read all instructions bef ore using the trampoline. W arnings a nd in structions f or the care, maintena nce,
and use of the trampoline are included to promote safe, enjoyable use of this equipment.
1.
2.
3.
4.
5.
6.
7.
8.
9.
10.
11.
12.
13.
14.
15.
16.
17.
18.
19.
Meijer.com
Page 12

12
Remember always to check with your physician before starting any exercise program.
Lower Body Stretch
Place feet shoulder-width
apart and lean forward.
Keep this position for 30
seconds using the body as a
natural weight to stretch the
backs of the legs.
DO NOT BOUNCE!
When the pull on the back of
the legs lessen, try a lower
position gradually.
Floor Stretch
While sitting on the floor,
open the legs as wide as
possible. Stretch the upper
body toward the knee on the
right leg by using your arms
to pull your chest to your
thighs. Hold this stretch 10
to 30 seconds.
DO NOT BOUNCE!
Do this stretch 10 times.
Repeat the stretch with the
left leg.
Bent Over Leg Stretch
Stand with feet shoulderwidth a part and lean forward
as illustrated. Using the
arms, gently pull the upper
body towards the right leg.
Let the head hang down.
DO NOT BOUNCE!
Hold the position a minimum
of 10 seconds. Repeat
pulling the upper body to the
left leg. Do this stretch
several times slowly.
Bent Torso Pulls
While sitting on the floor,
have legs apart one leg
straight and one knee bent.
Pull the chest down to touch
the thigh on the leg that is
bent and twist at the waist.
Hold this position at least 10
seconds. Repeat 10 times
on each side.
WORKOUT PROGRAM
Stretching Stretching while your muscles are warm after a proper warm-up and again after your strength
or aerobic training session is very important. Muscles stretch more easily at these times because of their
elevated temperature, which greatly reduces the risk of in jury . Stretches should be held for 15 to 30 seconds.
Do not bounce.
Suggested Stretching Exercises
(Perform stretches slowly)
Meijer.com
Page 13

13
W ARM-UP AND COOL-DOWN
Warm-Up The purpose of warming up is to prepare your body f or exercise and to mini mize injuries. W arm
up for two to five minutes before strength-training or aerobic exercising. Perform activities that raise your
heart rate and warm the working muscle s. Activitie s may include brisk walking, jogging, jumping ja cks, jump
rope, and running in place. Below are specific warm-up exercises for the trampoline workout.
Cool-Down The purpose of cooling down is to return the body to its normal, or near-normal, resting state
at the end of ea ch exercise se ssion. A proper cool-down slowly lowers your he art rate and allows blood to
return to the heart. Y our cool-down should include the previously mentioned stretches a nd the sa me warmup exercises listed below.
Contact Bounce
Place your feet shoulder width apart and bend at the
knees. Place your hands on your waist. Start bouncing
very gently without your feet leaving the mat.This
movement is to get you comfortable with being on the
mat.
Foot Ta p
While in the Contact Bounce position, shift your weight
towards the right and tap your left foot out to the side.
Bring your left foot back to shoulder width. Shift your
weight to the left ta p your right foot out to the side. Repe at
the movement back and forth.
Hamstring Curls
While bouncing, shift your weight to the right and bring
your left foot up to your left buttock. Bring your left foot
down and shift your weight to the left a nd bring your right
foot up to your right buttock. Repeat the move ment back
and forth.
Side To Side
In this movement, place both feet together and bounce
from one side of the mat to the other side of the mat.
Repeat the movement back and forth.
Jog in Place
While standing in the center of the mat, jog in place as
you would on the ground.
Jog Bounce
While jogging in place, bounce twice on one leg before
switching to the other leg.
Hamstring Curls
Foot Tap
Side T o Side
Contact Bounce
Warm-Up and Cool-Down Exercises
(Do each move ment 10 times)
Meijer.com
Page 14

BASIC WORKOUT
Basic Workout Exercises
( Do each movement 10 times)
Contact Bounce, Big Bounce
Place your feet shoulder-width a part a nd bend at the knee s. Pla ce your
hands on your waist. Start bouncing very gently without your feet leaving
the mat. On your second bounce, bounce high enough that your feet
leave the mat; only bounce as high as you feel comfortable bouncing.
Continue to alternate your bounces back and forth. A variation can be
done by raising your forearms as if you are doing biceps curls.
Knee Raises
While in the Contact Bounce position, alternately raise your right and
left knees to just above waist height. Repeat the movement back and
forth. Y ou ca n add your own vari ations to this movement such a s raising
your arms out to the sides or to the front.
Jumping Jack s
With your feet together in the center of the mat, simultaneously bounce
and land with your feet shoulder width apart. At the same, raise your
arms out to the sides and overhead. Then, bounce and land with your
feet back together and your arms resting at your sides. Repeat the
movement.
Upright Row
While in the Contact Bounce position, alternately raise your knees to
just above waist height. At the same time, perform an upright row with
your arms to chin height each time you raise a knee. Repeat the
movement.
Twist Bounce
With your feet together in the center of the mat bounce and twist your
lower body to the right, simultaneously twisting your upper body to the
left. Then bounce and twist your lower body to the left, simultaneously
twisting your upper body to the right. Repeat the movement.
14
Meijer.com
Page 15

Basic Workout
Do each exercise 10 times
1.
2.
3.
4.
5.
6.
7.
8.
9.
10.
11.
BASIC WORKOUT (continued)
Basic Workout Progra m
Trampoline Warm-Up
Do each exercise 10 times
1. Contact Bounce
2. Foot Tap
3. Hamstring Curls
4. Side to Side
5. Contact Bounce
6. Jog in Place
7. Jog Bounce
8. Jog in Place
9. Contact Bounce
Trampoline Cool-Down
Do each exercise 10 times
1. Contact Bounce
2. Jog in Place
3. Jog Bounce
4. Jog in Place
5. Contact Bounce
6. Side to Side
7. Hamstring Curls
8. Foot Tap
9. Contact Bounce
Contact Bounce, Big Bounce
(Hands on waist)
Contact Bounce, Big Bounce
(Hands, T riceps/bice ps movement)
Jog in Place
Knee Raises (Hands and Shoulder
movement)
Jumping Jacks
Upright Row
Jog in Place
Front / Back jumps (Lateral and Forward
shoulder raise)
Twist Bounce
Knee Raises (Hands on waist)
Jog in Place
15
Meijer.com
Page 16

LIMITED WARRANTY
MODEL 35-1650F
Licensed Under U.S. Patent 6,237,169B1
Other Patents Applied and Are Pending
16
W ARRANTY
Stamina Products, Inc. warrants that this product will be free from defects in materials and workmanship
under normal use, service and proper operation for a period of 90 days on the parts and one year on the
frame from the date of the original purchase from an authorized retailer. THIS WARRANTY SHALL NOT
APPLY TO ANY PRODUCT WHICH HAS BEEN SUBJECT TO COMMERCIAL USE, ABUSE, MISUSE,
ALTERATION OF ANY TYPE OR CAUSE OR TO ANY DEFECT OR DAMAGE CAUSED BY REPAIR,
REPLACEMENT , SUBSTITUTION OR USE WITH P ARTS OTHER THAN P ARTS PROVIDED BY ST AMINA
PRODUCTS, INC. Commercial use includes use of the product in athletic clubs, health clubs, spas,
gymnasiums, exercise facilitie s, and other public or semipublic facilities whether or not the product's use is
in furtherance of a profit making enterprise, and all other use which is not f or personal, family, or household
purposes.
T o i mplement this li mited warranty, send a written notice stating your name, date, and pla ce of purchase and
a brief description of the defect along with your rece ipt to Stamin a Products, Inc. P .O. Box 1071, Springf ield
Missouri, USA, 65801-1071 or call us at 1 (800) 375-7520. If the defect is covered under this limited
warranty , you will be requested to return the product or part to us f or free repair or repla cement at our option.
NO ACTION FOR BREACH OF THIS LIMITED WARRANTY MAY BE COMMENCED MORE THAN ONE
(1) YEAR AFTER THE DATE THE ALLEGED BREACH WAS OR SHOULD HAVE BEEN DISCOVERED.
NO ACTION FOR BREACH OF ANY IMPLIED WARRANTY MAY BE COMMENCED MORE THAN ONE
(1) YEAR AFTER DELIVERY OF THE PRODUCT TO THE PURCHASER. This limited warranty is not
transferable. IF ANY PART OF THE PRODUCT IS NOT IN COMPLIANCE WITH THIS LIMITED
WARRANTY OR ANY IMPLIED WARRANTY, THE REMEDY OF REPAIR OR REPLACEMENT IS THE
EXCLUSIVE REMEDY AVAILABLE TO YOU. In the event that the purchaser makes any claim under this
limited warranty or a ny implied warra nty , the Warra ntor reserves the right to require the product to be returned
for inspection, at the purchaser's expense, to the Warrantor's premises in Springfield, Missouri. Return of
the enclosed warranty registration card is not required for warranty coverage, but is merely a way of
establishing the date and place of purchase.
Stamin a Products, Inc. SHALL NOT BE LIABLE FOR THE LOSS OF USE OF ANY PRODUCT, LOSS OF
TIME, INCONVENIENCE, COMMERCIAL LOSS OR ANY OTHER INDIRECT, CONSEQUENTIAL,
SPECIAL OR INCIDENT AL DAMAGES DUE TO BREACH OF THE ABOVE WARRANTY OR ANY IMPLIED
WARRANTY.
This limited warra nty is the only written or express warranty given by Sta mina Products, Inc. This warranty
gives you specific legal rights, and you may also have other legal rights which vary from state to state.
ANY OTHER RIGHT WHICH YOU MAY HAVE, INCLUDING ANY IMPLIED WARRANTY OR
MERCHANT ABILITY OR FIT NESS FOR A P ARTICULAR PURPOSE, IS LIMITED IN DURA TION TO THE
DURA TION OF THIS WARRANTY.
The laws in some jurisdictions restrict the rights of manufacturers and distributors of consumer goods to
disclaim or limit implied warranties and consequential and incidental damages with respect thereto. If any
such law is found to be a pplicable, the foregoing disclai mers a nd limitations of a nd on implied warrantie s and
consequential a nd incidental da mages with respect thereto shall be disregarded a nd shall be deemed not to
have been made to the extent necessary to comply with such legal restriction.
Meijer.com
Page 17

NOTES
17
Meijer.com
Page 18

IMPORT ANT : Before filling out the form below make sure you have the right information.
Refer to the parts list to make sure you're ordering the right parts!
Detach and Mail or Fax the Form Below
Stamina Products, Inc.
P.O. Box 1071
Springfield, MO 65801-1071
IMPORT ANT : We must have your phone number in order to process the order!
FAX/MAIL ORDERING FORM
Plea se do not return the product. For your convenience, Sta mina has a Customer Service Department with
a toll-free number. Should a part be missing or a defective part found, please call 1 (800) 375-7520
(in the U.S.) from 7:30 A.M. to 5:00 P.M. Central Ti me, Monday through Thursday a nd 8:00 A.M. to 3:00 P .M.
on Friday or fill out the fax sheet ordering form below and fax it to (417) 889-8064. Our Customer Service
Department will be able to assist you with your problem and the part will be mailed directly to your house.
Mr./Ms:
Address: Apt. #:
City: State: Zip Code:
Phone #: ( ) Work Phone #: ( )
Date Purchased:
Model #:
Purchased From:
PART # DESCRIPTION QUANTITY
1 Rear Unit Assembly 1
EXAMPLE:
TELEPHONE
CUSTOMER SERVICE
Tel: 1 (800) 375-7520
FAX
CUSTOMER SERVICE
Fax: (417) 889-8064
MAIL
STAMINA PRODUCTS, INC.
ATTN: Customer Service
P.O. Box 1071
Springfield, MO. 65801-1071
ONLINE
CUSTOMER SERVICE
parts@staminaproducts.com
cust-srvc@staminaproducts.com
www.staminaproducts.com
Meijer.com
 Loading...