

Page 1

SX421 AUTOMATIC VOLTAGE
REGULATOR (AVR)
SPECIFICATION, INSTALLATION AND ADJUSTMENTS
GENERAL DESCRIPTION
The SX421 is a three phase sensed Automatic Voltage
Regulator (AVR) and forms part of the excitation system for a
brushless generator.
In addition to regulating the generator voltage, the AVR
circuitry includes a number of protective features. Excitation
power is derived directly from the generator terminals.
Positive voltage build-up from residual levels is ensured by
the use of efficient semiconductors in the power circuitry of
the AVR.
The AVR is linked with the main stator and exciter field
windings to provide closed loop control of the output voltage
with load regulation in the order of +/-0.5% RMS.
The AVR senses the output voltage from the main stator
windings and in response to this controls the power fed to the
exciter field and hence the main field to maintain output
voltage within the specified limits, compensating for load,
speed, temperature, and power factor of the generator.
Overvoltages caused by open circuit sensing terminals or
short circuit power device are avoided by overvoltage
detection circuitry which provides circuit breaker trip signals
for circuit isolation. (see note 1).
A frequency measuring circuit continually monitors the
generator output and provides underspeed protection of the
excitation system by reducing the generator output voltage
proportionally with speed below a presettable threshold. A
further enhancement of this feature is an adjustable V/Hz
slope, to improve frequency recovery time on turbo-charged
engines.
Provision is made for the connection of a remote voltage
trimmer, allowing the user fine control of the generator output.
Accessories are available for this AVR. Please refer to factory
for further details.
TECHNICAL SPECIFICATION
SENSING INPUT
Voltage 170-250 V ac max
Frequency 50-60 Hz nominal
Phase 3
Wire 3
OUTPUT
Voltage max 90 V dc at 207 V ac input
Current Continuous 4 A dc
Transient 6 A for 10 seconds
Field Resistance 15 Ω minimum
REGULATION
(See Note 2) +/- 0.5% RMS
THERMAL DRIFT
(after 10 min)
0.5% for 40°C change in AVR ambient
TYPICAL SYSTEM RESPONSE
Field current to 90% 80ms
Machine Volts to 97% 300ms
EXTERNAL VOLTAGE ADJUSTMENT
+/- 6% with 1 K Ω trimmer
UNDER FREQUENCY PROTECTION
Set Point (See Note 3) 95% Hz
Slope 100-300% down to 30 Hz
UNIT POWER DISSIPATION
20 watts maximum
BUILD UP VOLTAGE
3.5 V ac @ AVR terminals
ACCESSORY INPUT
+/- 1V = +/- 5% change in output
volts @ 415 V
QUADRATURE DROOP
Maximum sensitivity (10 Ω Burden)
0.22A for 5% droop @ 0p.f.
OVER VOLTAGE PROTECTION
Set Point 300 V dc
Time Delay (fixed) 1 second
Circuit Breaker Trip Coil Voltage 12-30 V dc
C/B Trip Coil Resistance 25-40 Ω
ENVIRONMENTAL
Vibration 20-100 Hz 50mm/sec
100 Hz-2 kHz 3.3g
Relative Humidity 0-60°C 95%
Operating Temperature -40°C to + 70°C
Storage Temperature -55°C + 80°C
NOTES
1. A miniature circuit breaker must be fitted to use the Overvoltage
Protection feature.
2. With 4% engine governing.
3. Factory set, semi-sealed, jumper selectable.
Page 2
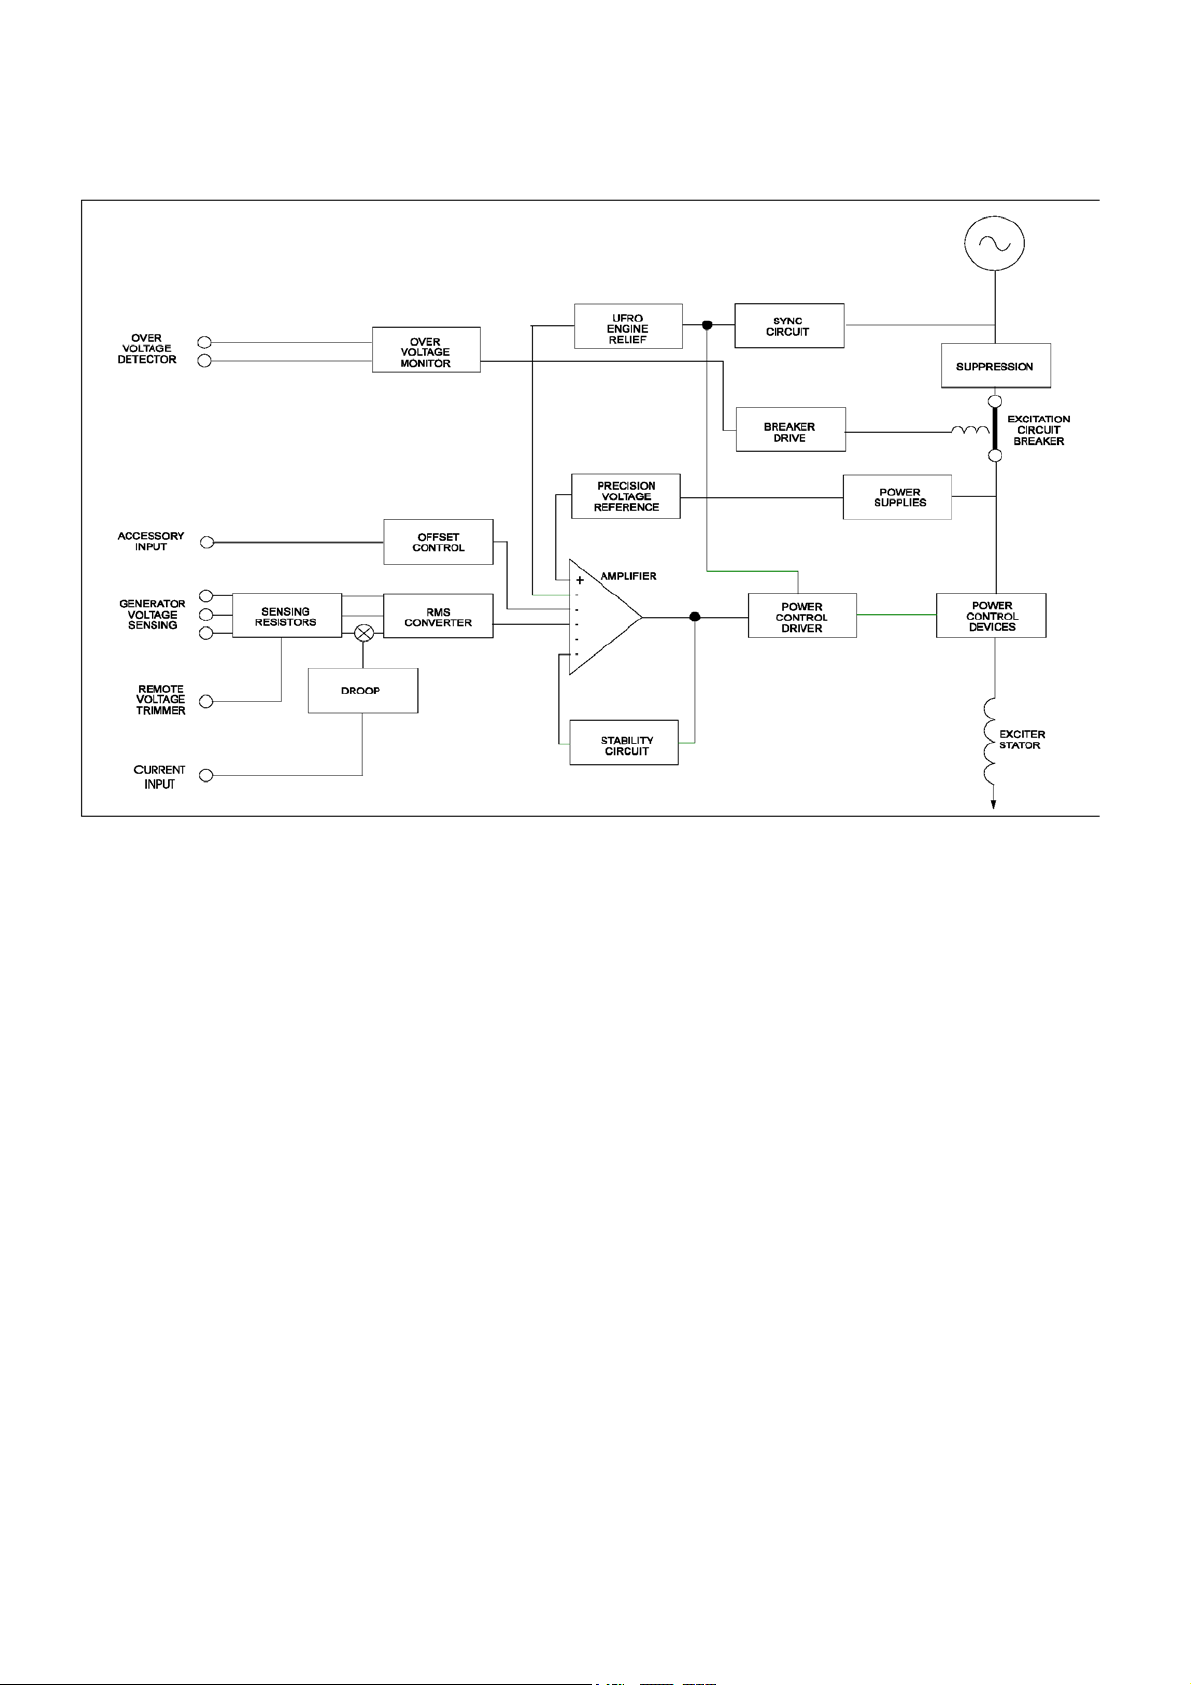
DESING DETAILS
The main functions of the AVR are:
Sensing Resistors take a proportion of the generator output
voltage and attenuate it. This input chain of resistors includes
the range potentiometer and hand trimmer which adjusts the
generator voltage.
Quadrature Droop Circuit converts the current input into a
voltage which is phase mixed with the sensing voltage. The
result is a net increase in the output from the sensing network
as the power factor lags, causing the reduction in excitation
needed for reactive load sharing of paralleled generators.
A trimmer allows control over the amount of droop signal.
RMS Converter is a square law precision rectifier circuit that
converts the ac signals from the sensing networks into a
composite dc signal representing the mean squared value of
the waveform.
Offset Control provides an interface between the AVR and
accessories.
Power Supply components consist of zener diodes, dropper
resistors and smoothing to provide the required voltages for
the integrated circuits.
Precision Voltage Reference is a highly stable temperature
compensated zener diode for comparison purposes.
Main Comparator/Amplifier compares the sensing voltage to
the reference voltage and amplifies the difference (error) to
provide a controlling signal for the power device.
Stability Circuit provides adjustable negative ac feedback to
ensure good steady state and transient performance of the
control system.
Power Control Driver controls the conduction period of the
output device. This is achieved by pedestal and ramp control
followed by a level detector and driver stage.
Power Control Devices and Rectifier vary the amount of
exciter field current in response to the error signals produced
by the main comparator.
Synchronising Circuit provides a short pulse at the zero
crossing of each cycle and is used to synchronise the Under
Frequency Roll Off (UFRO) and power control circuits to the
generator cycle period.
UFRO circuit measures the period of each electrical cycle and
reduces the reference voltage linearly with speed below a
presettable threshold. A light emitting diode (LED) gives
indication of underspeed.
Engine Relief (load acceptance) circuit causes greater
voltage roll off (makes the volts/Hz slope steeper) to aid
engine speed recovery after application of a "block" load.
Overvoltage Monitor continuously monitors the voltage at
the generator terminals and provides signals to trip a circuit
breaker to isolate power from the exciter and AVR if sustained
overvoltages occur. A one second timer is included in the
circuit to prevent operation during transient overvoltages
which are normal after load removal.
A miniature circuit breaker must be fitted to use the
Overvoltage Protection feature.
Page 3
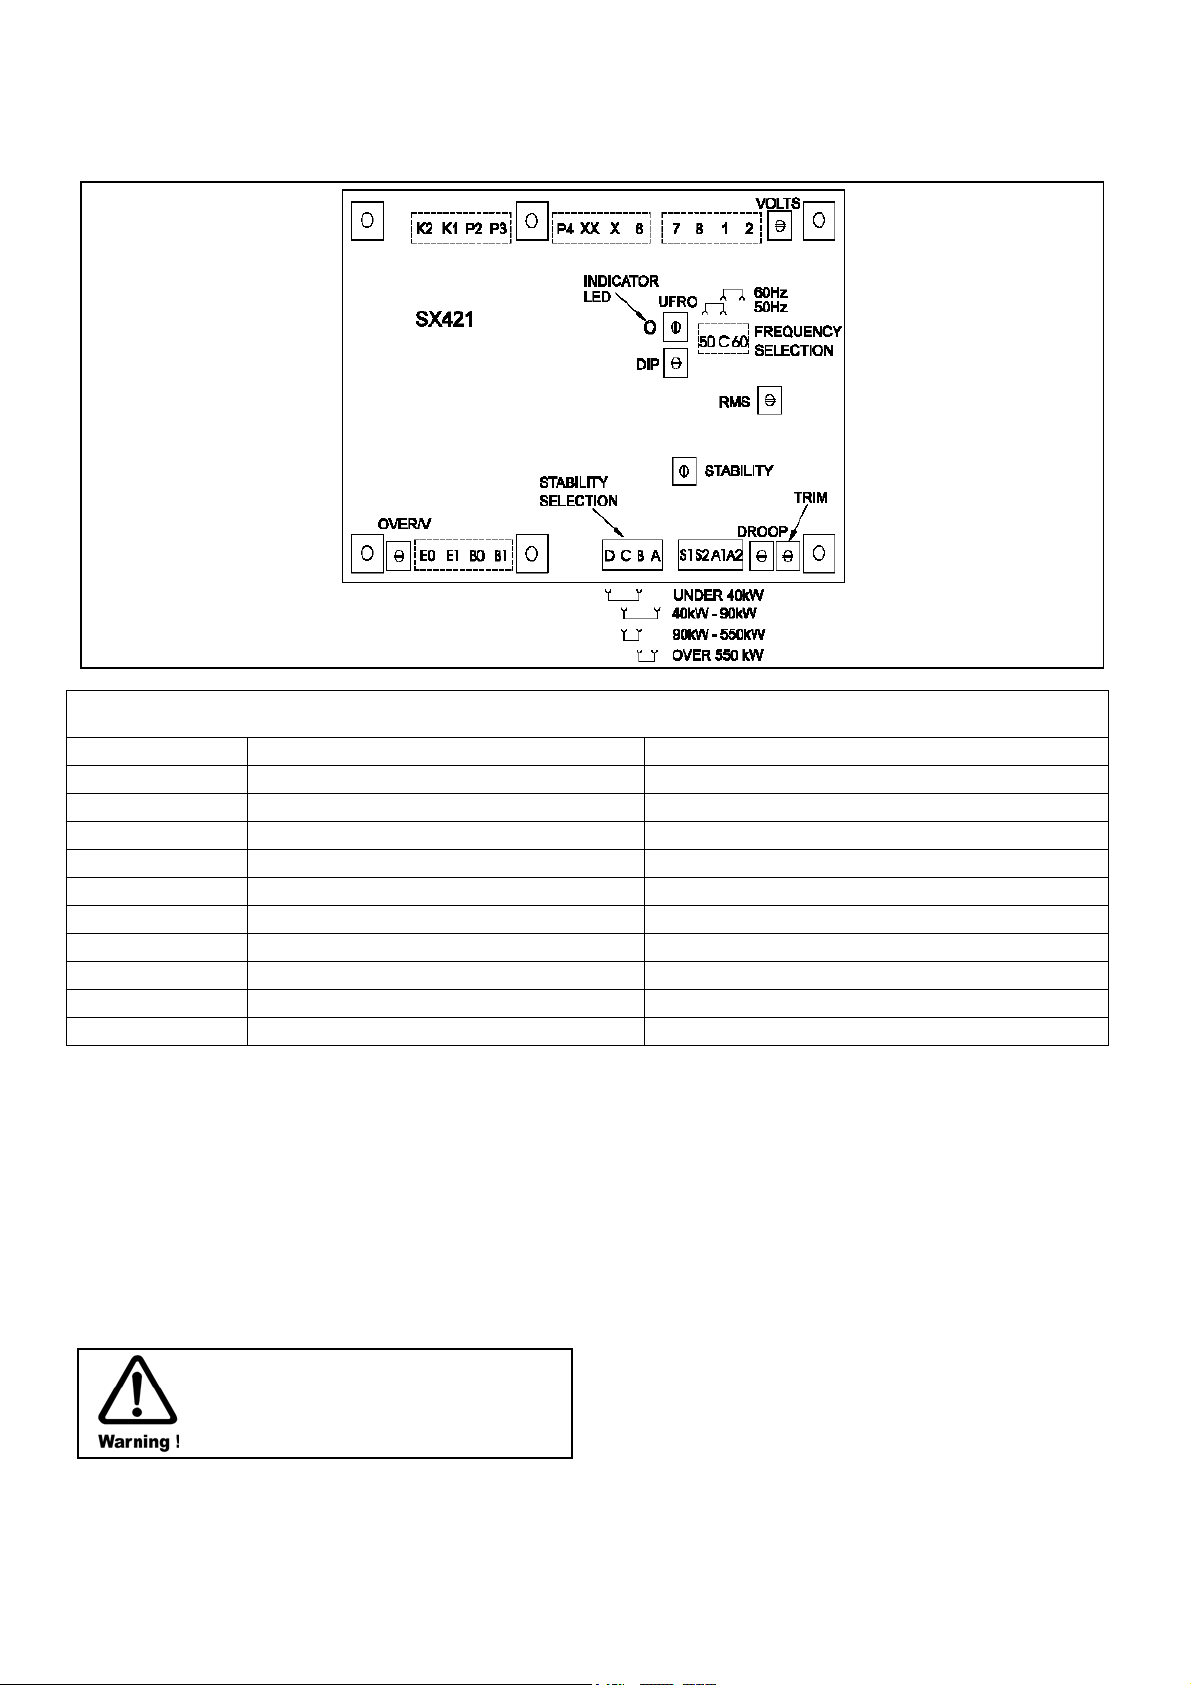
FITTING AND OPERATING
SUMMARY OF AVR CONTROLS
CONTROL FUNCTION DIRECTION
VOLTS TO ADJUST GENERATOR OUTPUT VOLTAGE CLOCKWISE INCREASES OUTPUT VOLTAGE
STABILITY TO PREVENT VOLTAGE HUNTING CLOCKWISE INCREASES STABILITY OR DAMPING EFFECT
STABILITY SELECTION TO OPTIMISE TRANSIENT PERFORMANCE LINK DEPENDING UPON KW OUTPUT
UFRO TO SET UNDER FREQUENCY ROLL OFF KNEE POINT CLOCKWISE REDUCES THE KNEE POINT FREQUENCY
FREQUENCY SELECTION TO SELECT ‘UFRO’ CONTROL RANGE LINK DEPENDING ON OPERATING FREQUENCY
DROOP TO SET GENERATOR DROOP TO 5% AT FULL LOAD 0 PF CLOCKWISE INCREASES THE DROOP
TRIM TO MATCH AVR INPUT CLOCKWISE ALLOWS THE ACCESSORY MORE CONTROL OVER AVR
DIP TO SET THE INTIAL FREQUENCY RELATED VOLTAGE DIP CLOCKWISE INCREASES THE VOLTAGE DIP
OVER/V TO SET THE OVERVOLTAGE PROTECTION CUT OFF LEVEL CLOCKWISE INCREASES THE OVERVOLTAGE CUT OFF LEVEL
RMS SET AND SEALED AT FACTORY
The AVR is fully encapsulated to ensure long trouble-free
operation. It is usually fitted on a panel of the terminal box. It
can also be separately fitted in a switchboard.
ADJUSTMENT OF AVR CONTROLS
VOLTAGE ADJUSTMENT
The generator output voltage is set at the factory, but can be
altered by careful adjustment of the volts control on the AVR
board, or by the external hand trimmer if fitted. Terminals 1 &
2 on the auxiliary terminal block inside the generator terminal
box will be fitted with a shorting link if no hand trimmer is
required.
Do not increase the voltage above the
rated generator voltage. If in doubt, refer
to the rating plate mounted on the
generator case.
If a replacement AVR has been fitted or re-setting of the
VOLTS adjustment is required, proceed as follows:-
1) Before running generator, turn VOLTS control fully anticlockwise.
2) Turn remote volts trimmer (if fitted) to midway position.
3) Turn STABILITY control to midway position.
4) Connect a suitable voltmeter (0-300V ac) across line to
neutral of the generator.
5) Start generator set, and run on no load at nominal
frequency e.g. 50-53Hz or 60-63Hz.
6) If the red Light Emitting Diode (LED) is illuminated, refer
to the Under Frequency Roll Off (UFRO) adjustment.
7) Carefully turn VOLTS control clockwise until rated voltage
is reached.
8) If instability is present at rated voltage, refer to stability
adjustment, then re-adjust voltage if necessary.
9) Voltage adjustment is now completed.
STABILITY SELECTION
The "jumper" selector lead should be correctly linked for the
frame size of the generator (See diagram above).
Page 4
STABILITY ADJUSTMENT
The AVR includes a stability or damping circuit to provide
good steady state and transient performance of the generator.
The correct setting can be found by running the generator at
no load and slowly turning the stability control anti-clockwise
until the generator voltage starts to become unstable.
The optimum or critically damped position is slightly clockwise
from this point (i.e. where the machine volts are stable but
close to the unstable region).
FREQUENCY SELECTION
The "jumper" selection lead should be correctly linked for the
nominal operating frequency of the generator (see diagram).
UNDER FREQUENCY ROLL OFF (UFRO) ADJUSTMENT
The AVR incorporates an underspeed protection circuit which
gives a volts/Hz characteristic when the generator speed falls
below a presettable threshold known as the "knee" point.
The red Light Emitting Diode (LED) gives indication that the
UFRO circuit is operating, and turning the UFRO control
clockwise lowers the frequency setting of the "knee" point and
extinguishes the LED.
For optimum setting, the LED should illuminate as the
frequency falls just below nominal, i.e. 47Hz on a 50Hz
system or 57Hz on a 60Hz system.
If the red LED is illuminated and no output voltage is present,
refer to Over Voltage protection adjustment.
DIP ADJUSTMENT
The 'DIP' adjustment allows some control over the generator
voltage dip upon the application of load.
This feature is mostly used when the generator is coupled to
turbo-charged engines with limited block load acceptance,
and operates only when the speed is below the UFRO knee
point.
The circuit works by increasing the volts/Hz slope to give
greater voltage roll off in proportion to speed.
With the 'DIP' control fully anti-clockwise the generator
voltage characteristics will follow the normal V/Hz line as the
frequency falls below nominal.
Turning the 'DIP' control more clockwise provides greater
voltage dip allowing easier engine recovery.
DROOP ADJUSTMENT
Generators intended for parallel operation are fitted with a
quadrature droop C.T. which provides a power factor
correction signal for the AVR. The C.T. is connected to S1, S2
on the AVR.
The DROOP adjustment is normally preset in the works to
give 5% voltage droop at full load zero power factor.
Clockwise increases the amount of C.T. signal injected into
the AVR and increases the droop with lagging power factor
(cos Ø).
With the control fully anti-clockwise there is no droop.
TRIM ADJUSTMENT
An auxiliary input is provided to connect to the Power Factor
controller. It is designed to accept dc signals up to +/- 5 volts.
The dc signal on this input (A1,A2) adds to or subtracts from
the AVR sensing circuit, depending on polarity.
The Trim control allows the user to adjust the sensitivity of the
AVR to the PF controller output.
With Trim fully anti-clockwise the PF controller has no effect.
Clockwise it has maximum effect. Normal setting is fully
clockwise.
OVER VOLTAGE (OVER V) ADJUSTMENT
A miniature circuit breaker is supplied for this feature. It may
be fitted in the generator or supplied loose for fitting in the
control panel.
The AVR includes over voltage protection circuitry to remove
generator excitation in the event of a short circuit power
device or loss of sensing input.
Separate terminals are provided for the over voltage circuit
E1, E0 which connect to the generator windings
independently of the AVR sensing terminals. (Typical E1, E0
voltage = 240 Vac).
Provision is made for the connection of the circuit breaker to
break terminals K1, K2, interrupting the power supply to the
exciter field. The addition of this circuit breaker (and leads B0
and B1) causes the AVR power supply to be interrupted
automatically in the event of an over voltage.
The OVER V adjustment is normally set and sealed at the
factory but can be reset on retrofit AVRs. Clockwise increases
the tripping voltage.
When the circuit breaker is supplied loose,
the AVR is fitted with a link on terminals
K1-K2 to enable operation of the AVR.
When connecting the circuit breaker this
link must be removed.
In the event of operation of the circuit breaker, indicated by
loss of generator output voltage, manual resetting is required.
When in the "tripped" state the circuit breaker switch lever
shows "OFF". To reset move the switch lever to the position
showing "ON".
When fitted in the generator, access to the breaker is gained
by removal of the AVR access cover.
Terminals which are live with the
generating set running are exposed when
the AVR access cover is removed.
Resetting of the circuit breaker must be
carried out with the generating set
stationary, and engine starting circuits
disabled.
The circuit breaker is mounted on the AVR mounting bracket
either to the left or to the right of the AVR depending upon
AVR position. After resetting the circuit breaker replace the
AVR access cover before restarting the generating set.
Should resetting of the circuit breaker not restore the
generator to normal operation, refer to the Service section in
the generator Instruction Manual.
Caution !
TD_SX421.GB_09.02_01
PO Box 17 • Barnack Road • Stamford • Lincolnshire • PE9 2NB
Tel: 00 44 (0)1780 484000 • Fax: 00 44 (0)1780 484100
Website: www.newage-avkseg.com
© 2002 Newage International Limited.
Reprinted with permission of N.I. only.
Printed in England.
 Loading...