

S
VUE
Body-Worn
®
Video Camera / Recorder
Operator’s Manual
PROPRIETARY – COPYING AND REPRODUCING RESTRICTED
applied concepts, inc.
2609 Technology Drive
Plano, TX 75074
Phone (972) 398-3780
Fax (972) 398-3781
Toll Free Sales 1-800-STALKER
Toll Free Service 1-877-STALKER
sales@stalkerradar.com
www.stalkerradar.com
011-0121-00 Rev D

Dear Valued Stalker Customer:
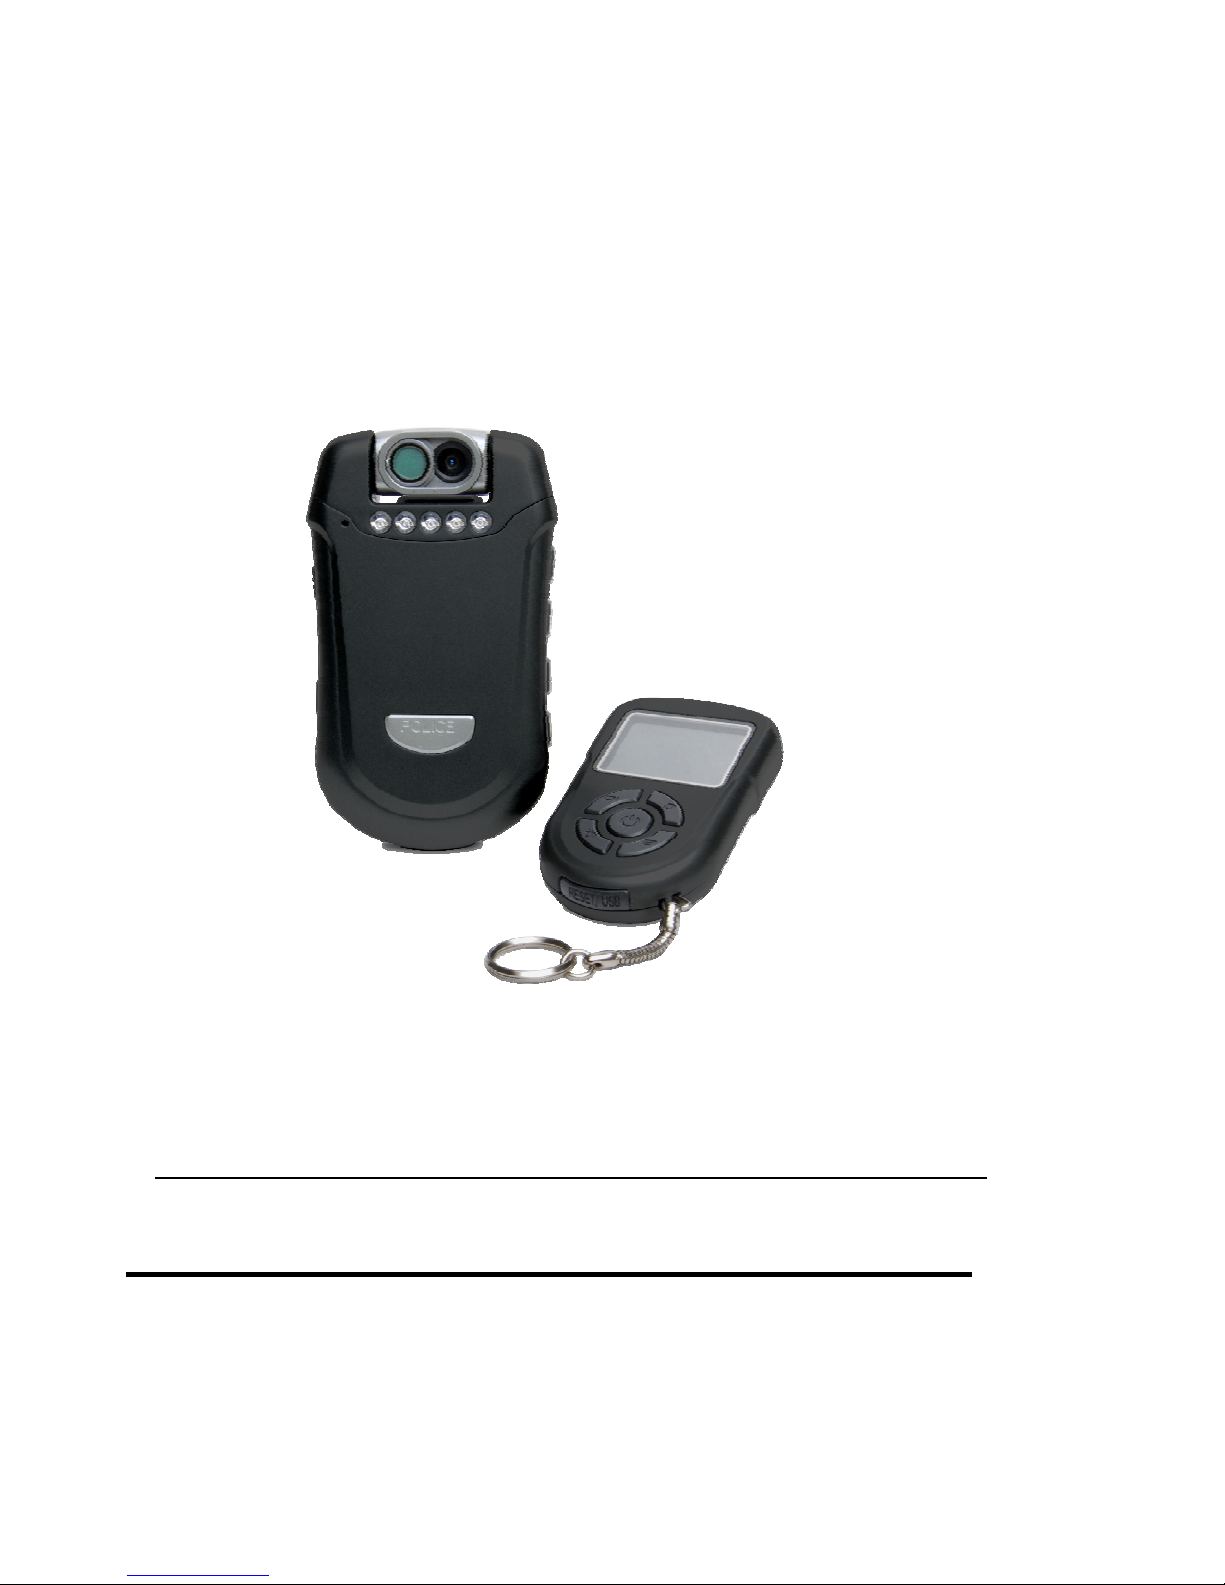
Thank you for choosing the StalkerVUE Standalone Wearable Digital Camera.
We sincerely appreciate you purchasing the StalkerVUE and giving us the
opportunity to serve. You will find the StalkerVUE to be an invaluable tool in
recording and presenting digital video evidence. Moreover, we care about you,
our customer, and want you to be completely satisfied. Our success as a
company depends upon your satisfaction and experience with the StalkerVUE.
Applied Concepts, Inc. believes that the StalkerVUE offers more than superior
performance and versatility. StalkerVUE is backed 100% with reliable,
professional, and experienced sales and service support, ready to assist you.
Please do not hesitate to let us know if there is anything we may do to add to
your product satisfaction. Thanks again!
Sincerely,
Applied Concepts, Inc.

TABLE OF CONTENTS
THE STALKER VUE WEARABLE CAMERA ....................................................................................................................................... 2
Introduction to Your StalkerVUE .................................................................................................................................................................................. 2
How will you use your StalkerVUE? ............................................................................................................................................................................ 2
WHAT’S IN THE BOX? ........................................................................................................................................................................ 3
Contents and Unpacking Your StalkerVUE ................................................................................................................................................................. 3
COLOR DISPLAY ................................................................................................................................................................................ 4
LCD Panel Information ................................................................................................................................................................................................ 4
CONTROL PANELS ............................................................................................................................................................................. 5
Control Panel Features and Buttons ........................................................................................................................................................................... 5
FRONT AND BACK PANEL COMPONENTS ...................................................................................................................................... 6
LCD Panel ................................................................................................................................................................................................................... 6
Camera Panel .............................................................................................................................................................................................................. 6
INSTALLING THE BATTERY ............................................................................................................................................................... 7
Remove Battery Cover ................................................................................................................................................................................................ 7
Insert battery ................................................................................................................................................................................................................ 7
Replace Battery Cover ................................................................................................................................................................................................ 7
CHARGING THE BATTERIES ............................................................................................................................................................. 8
Charging the Camera .................................................................................................................................................................................................. 8
Charging the Remote Control ...................................................................................................................................................................................... 8
TURNING THE CAMERA ON AND OFF .............................................................................................................................................. 9
Powering On the Camera ............................................................................................................................................................................................ 9
Powering Down the Camera ........................................................................................................................................................................................ 9
TIME AND DATE ................................................................................................................................................................................ 10
Setting the Time and Date ......................................................................................................................................................................................... 10
USING THE IR FILTER AND IR ILLUMINATORS ............................................................................................................................. 11
Daylight Recording .................................................................................................................................................................................................... 11
Night / Low-Light Recording ...................................................................................................................................................................................... 11
RECORDING VIDEO (VIDEO/AUDIO CAPTURE) ............................................................................................................................ 12
Selecting Video Record Resolution ........................................................................................................................................................................... 12
Start Recording .......................................................................................................................................................................................................... 13
Stop Recording .......................................................................................................................................................................................................... 13
TAKING A SNAPSHOT (IMAGE CAPTURE) ..................................................................................................................................... 14
Taking Pictures .......................................................................................................................................................................................................... 14
RECORDING AUDIO ONLY (AUDIO CAPTURE) .............................................................................................................................. 15
Recording Stand-Alone Audio ................................................................................................................................................................................... 15
PLAYING BACK VIDEOS, SNAPSHOTS, AND AUDIO FILES .......................................................................................................... 16
Playing Back Recorded Videos and Snapshots ........................................................................................................................................................ 16
Change the Volume Level During Video Playback .................................................................................................................................................... 18
Fast-forward or Fast-Reverse Playback Video .......................................................................................................................................................... 18
WIRELESS REMOTE CONTROL ...................................................................................................................................................... 19
STALKERVUE TO REMOTE SYNC .................................................................................................................................................. 20
Synching the Remote to the StalkerVue .................................................................................................................................................................... 20
USING THE STALKER VUE WITH YOUR COMPUTER ................................................................................................................... 21
General Information and Requirements .................................................................................................................................................................... 21
Minimum Hardware Requirements ............................................................................................................................................................................ 21
The StalkerVUE Computer Connection ..................................................................................................................................................................... 22
Windows Operating Systems .................................................................................................................................................................................... 23
Apple/MAC Operating Systems ................................................................................................................................................................................. 23
Operating System Examples ..................................................................................................................................................................................... 24
Troubleshooting Windows USB Connection Issues: ................................................................................................................................................. 26
Apple/MAC Operating Systems ................................................................................................................................................................................. 27
Troubleshooting Apple/MAC Connection Issues: ...................................................................................................................................................... 27
FILE STORAGE SPACE REQUIREMENTS ...................................................................................................................................... 28
Camera Flash Storage Table .................................................................................................................................................................................... 28
Network or PC Storage Requirements ...................................................................................................................................................................... 28
Sample Calculation @ 1024x768 Video .................................................................................................................................................................... 28
TROUBLESHOOTING ....................................................................................................................................................................... 29
WARRANTY COVERAGE .................................................................................................................................................................. 30
TECHNICAL INFORMATION ............................................................................................................................................................. 31

THE STALKER VUE WEARABLE CAMERA
Introduction to your StalkerVUE
Video evidence is important to security and law enforcement agencies. Security cameras are utilized in
buildings, parking lots, highways and in homes. Until recently having a body wearable camera was not
practicable for many reasons. Disk storage, size, weight, battery life, picture quality and reliability are some of
the technical aspects that had to be worked out.
Today is the beginning of a new era of video evidence recording and storage. With the StalkerVUE you have a
unique body wearable camera with features not available on other products.
Built-in 8GB or optional 32GB flash drive.
Record live video/audio.
Take snapshots.
Record audio only feature.
Record in daylight in full color.
Record at night using the built-in IR LEDs and the sliding IR filter.
Wide angle lens allows more information to be recorded.
Play back Video/Audio, Snapshots, and Audio Only recordings using the built-in Color LCD.
Files can only be moved or deleted via your computer, eliminating inadvertent file deletion.
Set Date and Time to your local time zone using the built-in clock.
Date and Time stamp is overlaid onto the Video and Snapshots.
Wear on your shirt or mount on an optional window mount.*
Connect to any computer from Vista/XP to all OSX and Linux variations. No special hardware drivers
are required with across the board compatibility for all modern operating systems.
* See your Sales Representative for the latest options and accessories.
With the excellent video and audio quality you will be able to use this device for applications in security and
law enforcement. In addition, training of officers and security agents is greatly enhanced by using the
StalkerVUE during training sessions.
How will you use your StalkerVUE?
Building Security Personnel Training Body Wearable Busses and Trains
Law Enforcement In-car Video Monitor Insurance Investigators Self-assessment
Evidence Gathering Park Surveillance Accident Investigation Equipment surveillance
Court Cases Night Work with IR Officer Training
2
WHAT’S IN THE BOX?
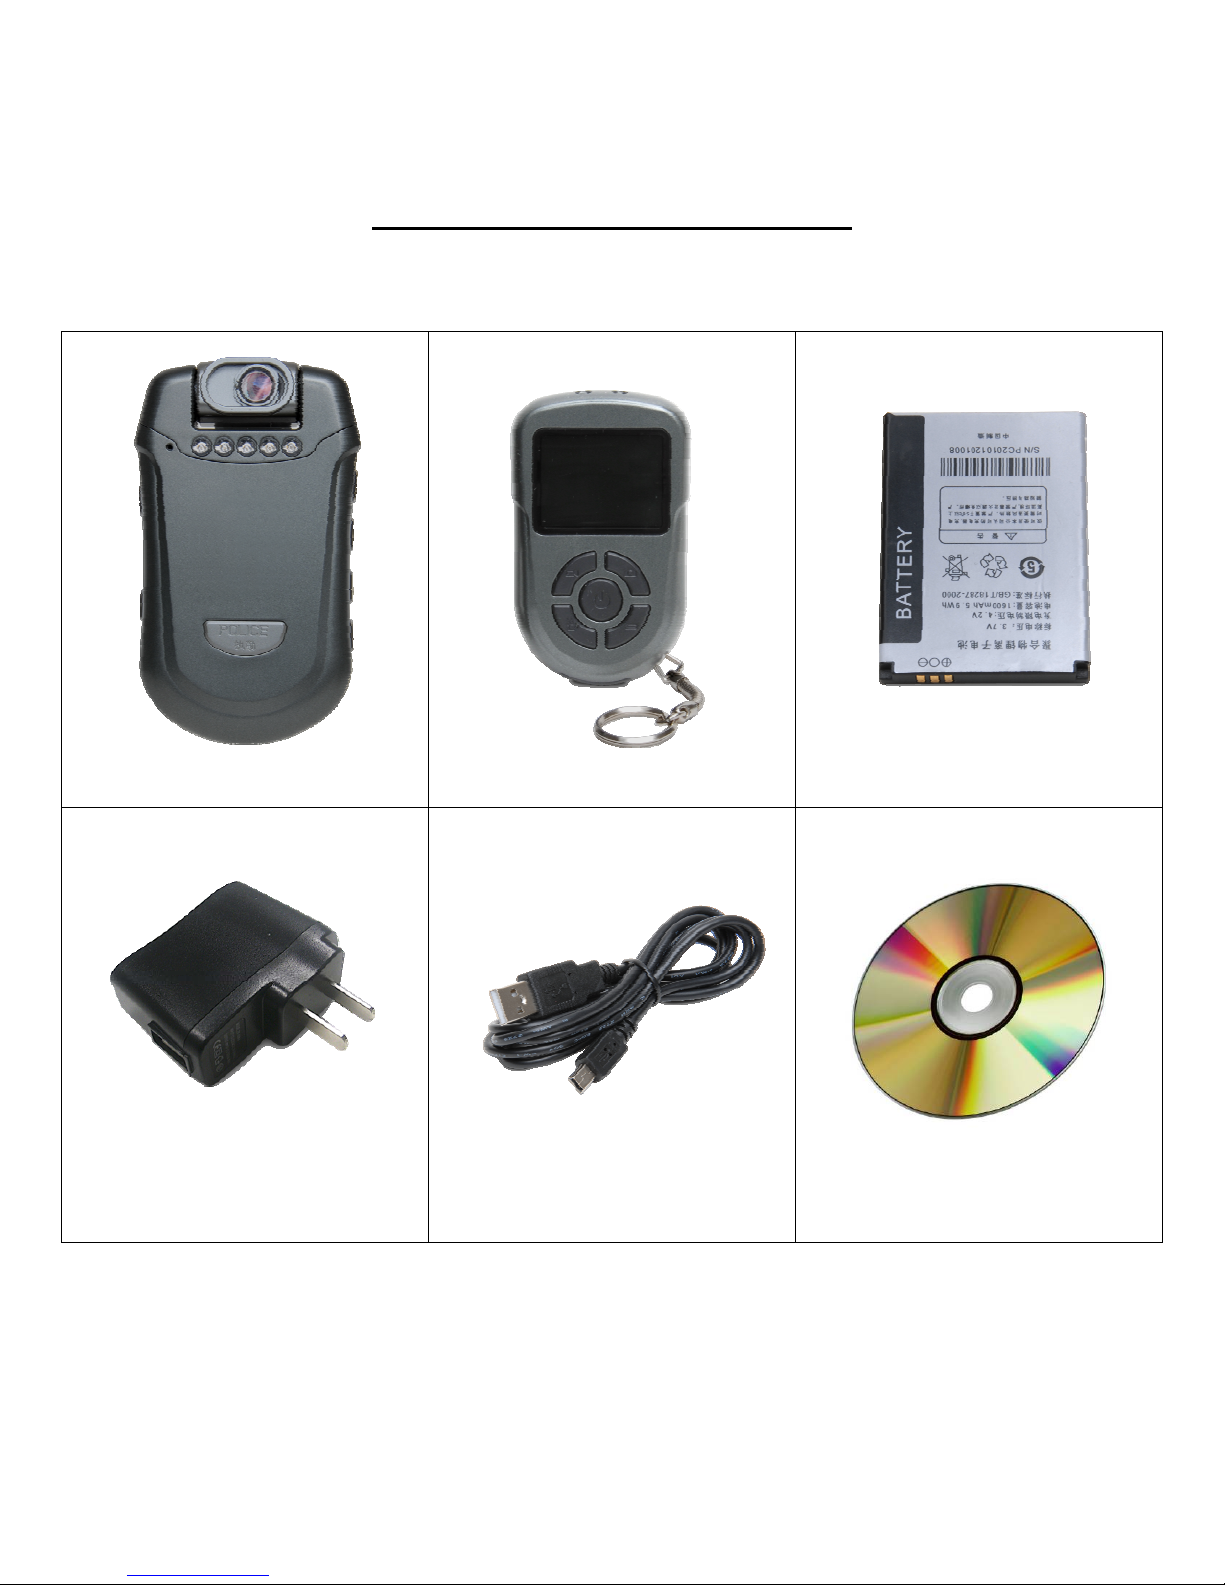
Contents and Unpacking Your StalkerVUE
When you open your StalkerVUE package make sure that it contains the six items shown below:
Wearable Camera Wireless Remote Control Camera Battery
AC Charger Adapter USB Docking Cable CDROM with user manual
3
COLOR DISPLAY
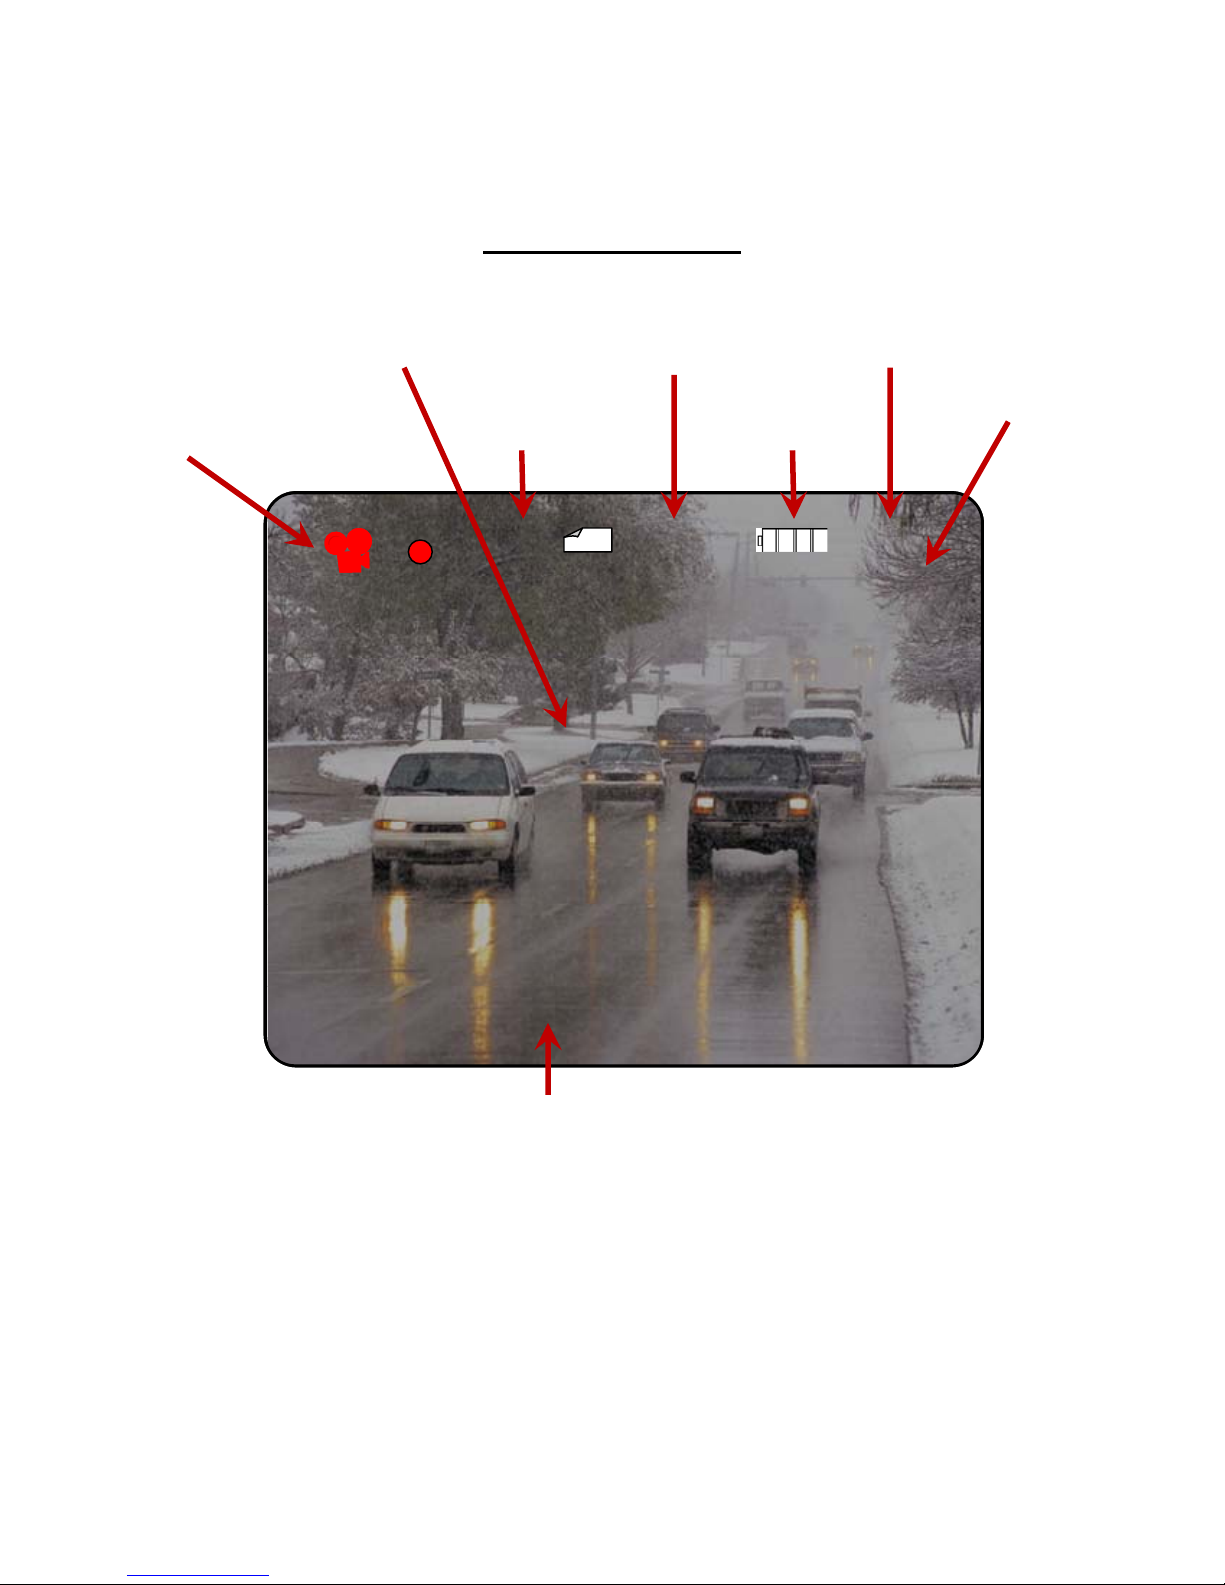
LCD Panel Information
Camera and
Blinking Dot When
Video Recording
Recording
Resolution
Remaining Memory
Storage Status
Battery Level
7545MB 06:33D1
7545MB 06:33D1
Status
Current Time Live Video Image
01:00
01:00
06:33
Record Time *
000000 2011 / 12 / 19 06 : 40 : 43
000000 2011 / 12 / 19 06 : 40 : 43
Date and Time Stamp
Year / Month / Date Hours : Minutes : Seconds
* Record Time: Shows the actual time in minutes for each contiguous file recorded. The recording time for each
file is determined by the resolution setting.
For example, if the recording resolution is set for 640x480, each file will be up to ~20 minutes in time.
If you record continuously for one hour, you would have a total of three files approx 20 minutes each.
Each file will have a Date/Time stamp identifying when that file was saved to the Flash Disk.
At 1024x768, the maximum record time per file would be approximately 10 minutes each. If you record
for one hour, there would be 6 files saved to the flash
In essence, this is a function of the MPEG-4 recording codec that is used in throughout the media
industry.
4

CONTROL PANELS
Control Panel Features and Buttons
Left Side Buttons
Microphone
Not used
IR Emitter LEDs
Button 5
On / Off
Button 1
Power OR
Video Capture
Button 2
Photo Capture OR
OK/Select
Button 3
Cursor Up OR
Event Playback Menu
Button 4
Cursor Down OR
Time Date Setting
Resolution Select Menu
Right Side Buttons
5
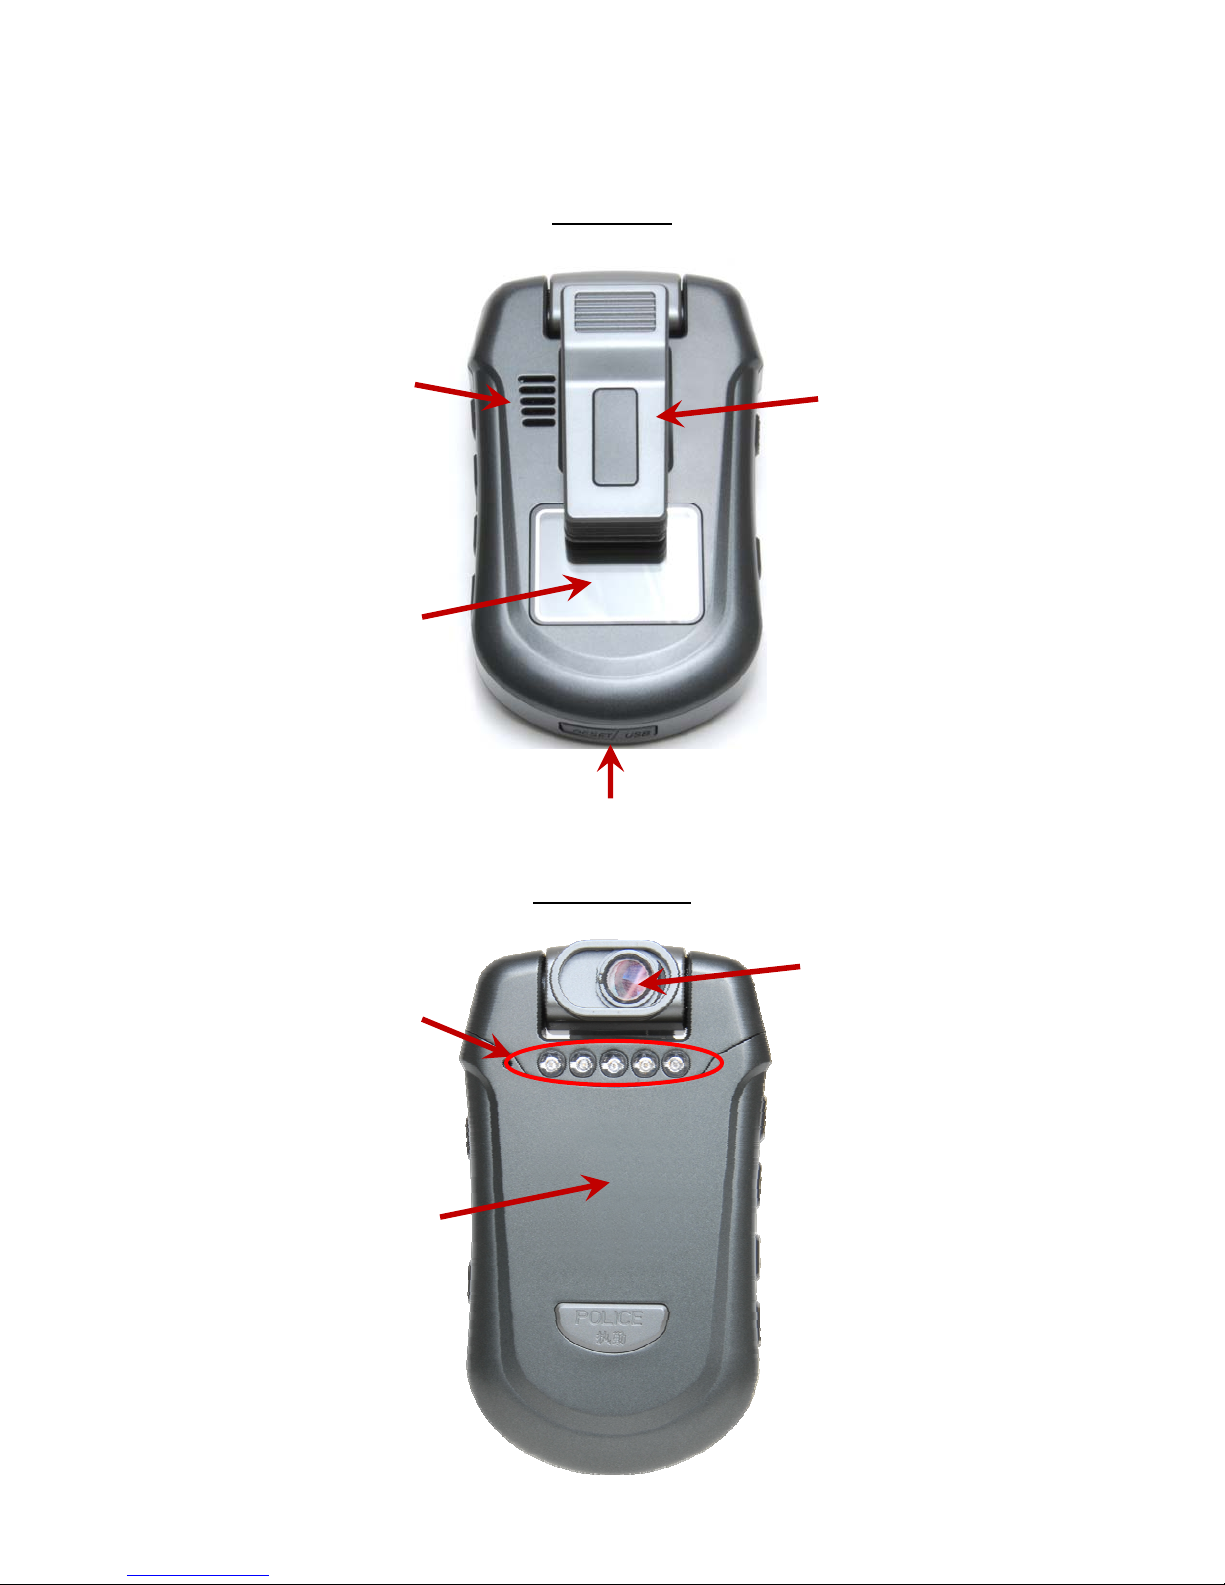
FRONT AND BACK PANEL COMPONENTS
LCD Panel
Speaker
360°RotatableClip
ColorLCDMonitor
andUserInterface
USBCover
Camera Panel
InfraredLEDsfor
nighttimeimaging
CameraandDay/Night
Filter
BatteryCover
6
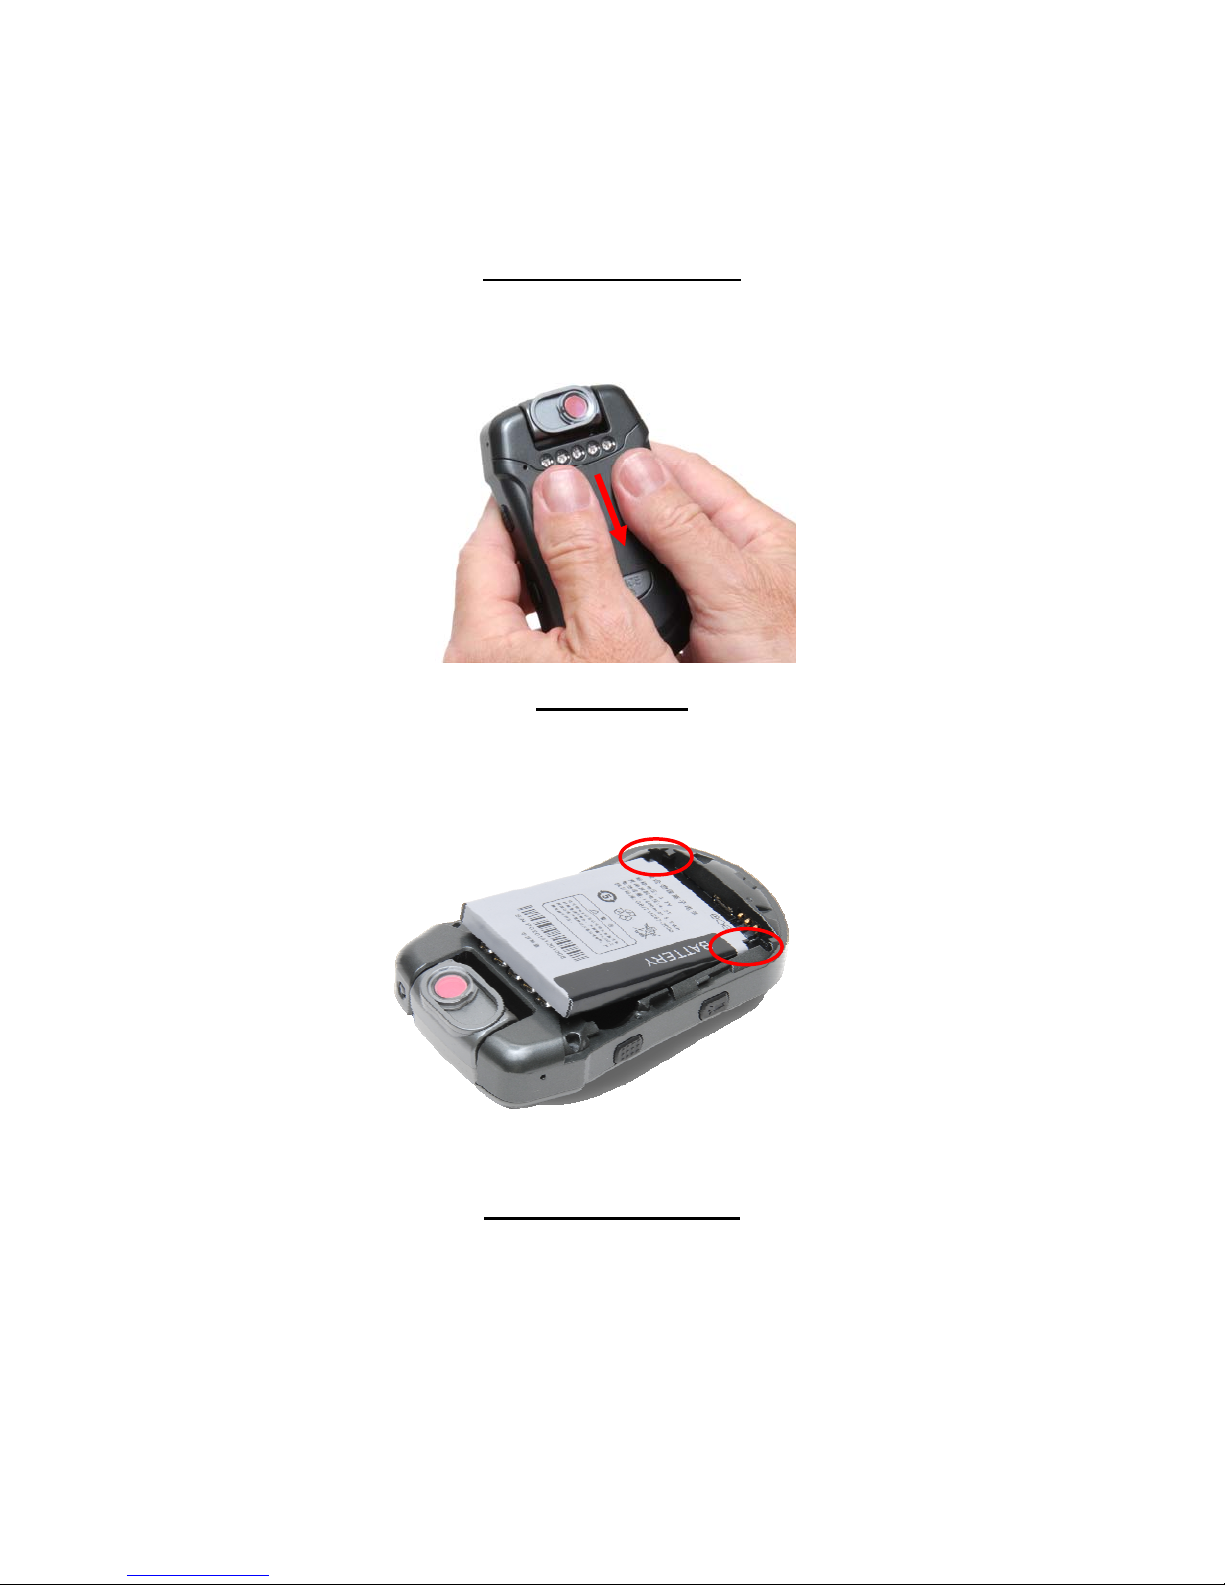
INSTALLING THE BATTERY
The first step to preparing your StalkerVUE for use is to install the battery. The battery is located underneath
the front cover of the StalkerVUE.
Remove Battery Cover
Place one or both thumbs underneath the IR emitters and apply gentle downward pressure while sliding the
cover downward to remove the cover.
Insert battery
Insert the battery as shown below and ensure that the connectors on the battery match the connectors in the
battery compartment.
TIP: The two notches on the battery slide under the catches in the battery compartment.
Replace Battery Cover
Replace the cover and gently slide it back into place keeping it aligned in the track on the case.
TIP: Charge the battery before using the camera for the first time. See “Charging the Battery” on the next page.
7
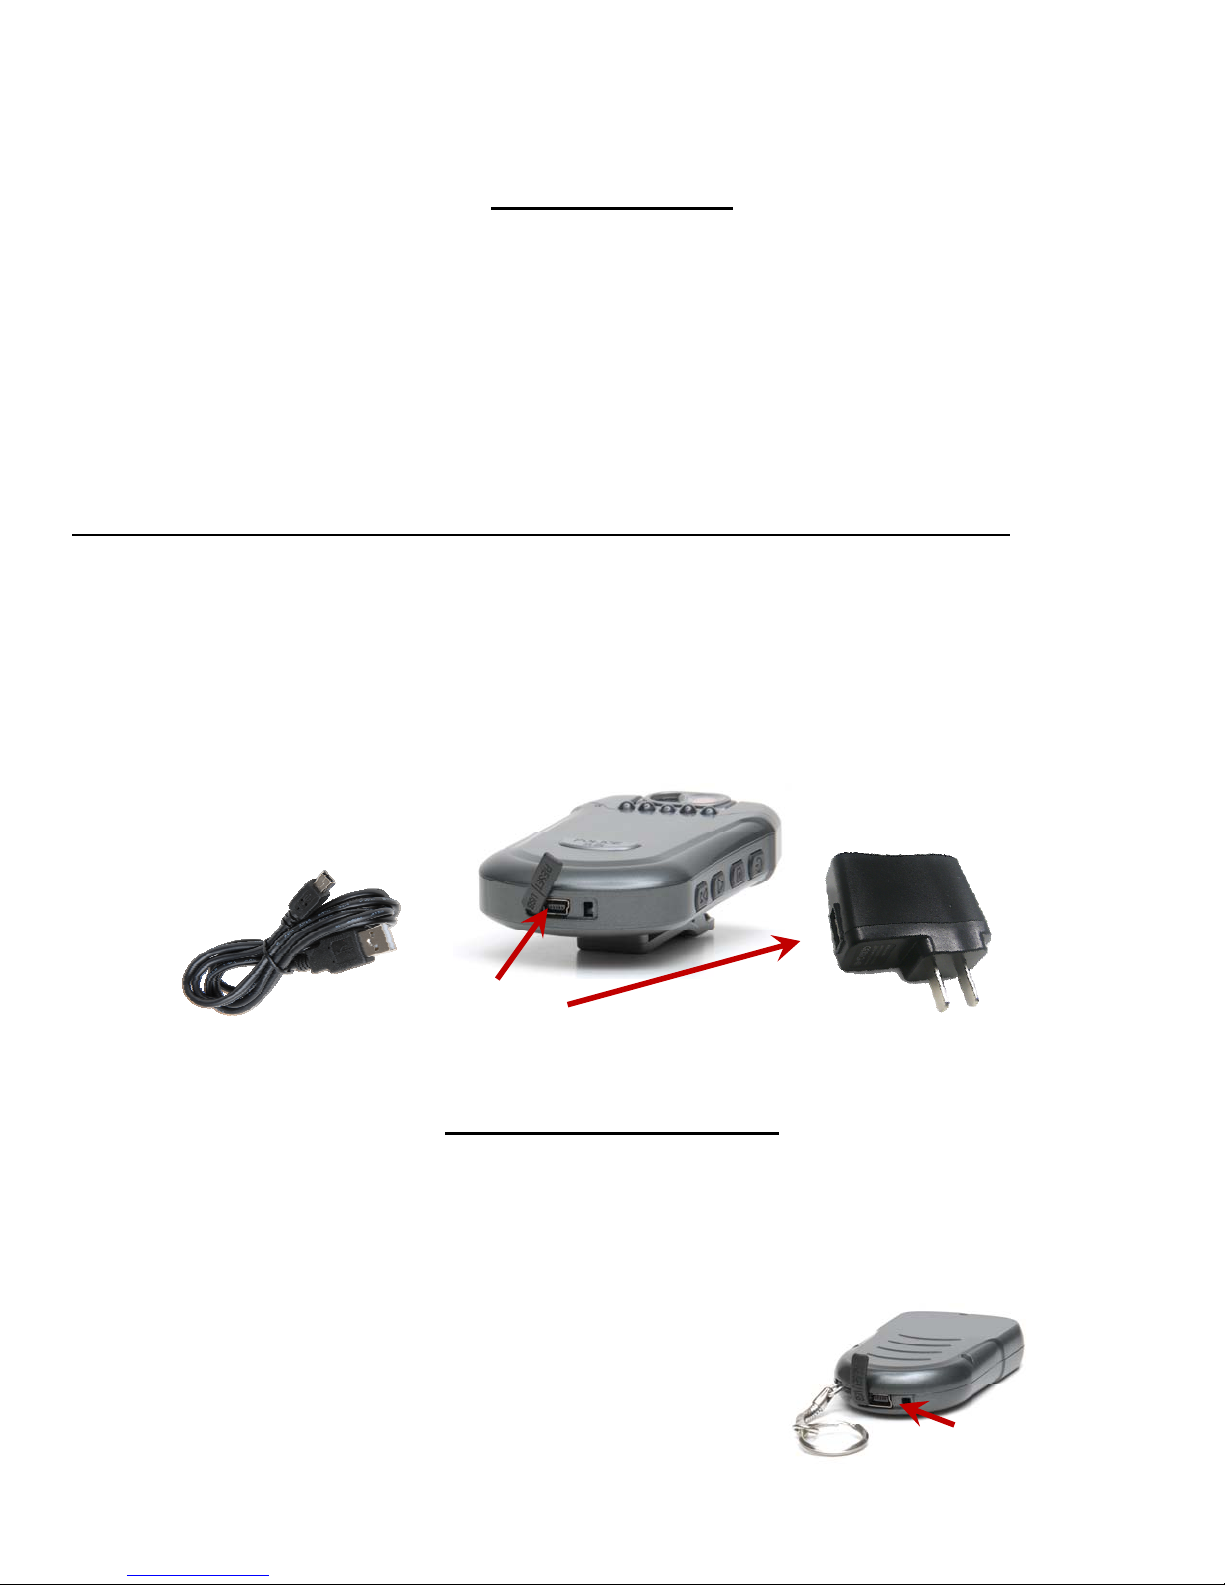
CHARGING THE BATTERIES
Before use, the batteries in the camera and remote control must be fully charged.
Charging the Camera
The StalkerVUE battery is charged while in the unit like a cell phone and takes 4 to 5 hours to complete a full
charge the first time. The camera battery can be charged two ways:
1. Use the USB cable to connect to the camera, connect the USB connector into the 110v USB wall adapter.
a. Use this method for initial charging.
2. Alternatively, use the USB cable to connect to the camera and to a computer's USB port. The computer
must be powered on in order to charge the unit.
TIP: Use the AC wall charger unless there is no AC Power available. This will ensure that the StalkerVUE will
get fully charged and independent on whether a computer is powered on or off.
The indicator light will change from slowly flashing red, to a steady red when fully charged.
Step 1- Locate the USB port on the bottom of the camera.
Step 2 - The USB port is protected by a waterproof cover. Pull it back and rotate to expose the USB receptacle.
The cover opens from the side imprinted with “RESET”. If needed, use a small pin knife or a paperclip and pop
it open from the far side, but not from the middle of the flap. Do not try to remove the cover completely.
Step 3 - Insert the USB mini-connector into the StalkerVUE's USB port and the standard USB connector into
the AC adapter.
USB Port
Charging the Remote Control
The wireless remote control is charged in the same way the camera battery is charged:
Using the USB cable to connect to the remote control, connect the USB connector into the 110v USB
wall adapter.
The indicator light will show blue while charging and go out when it is fully charged.
USB Port
8
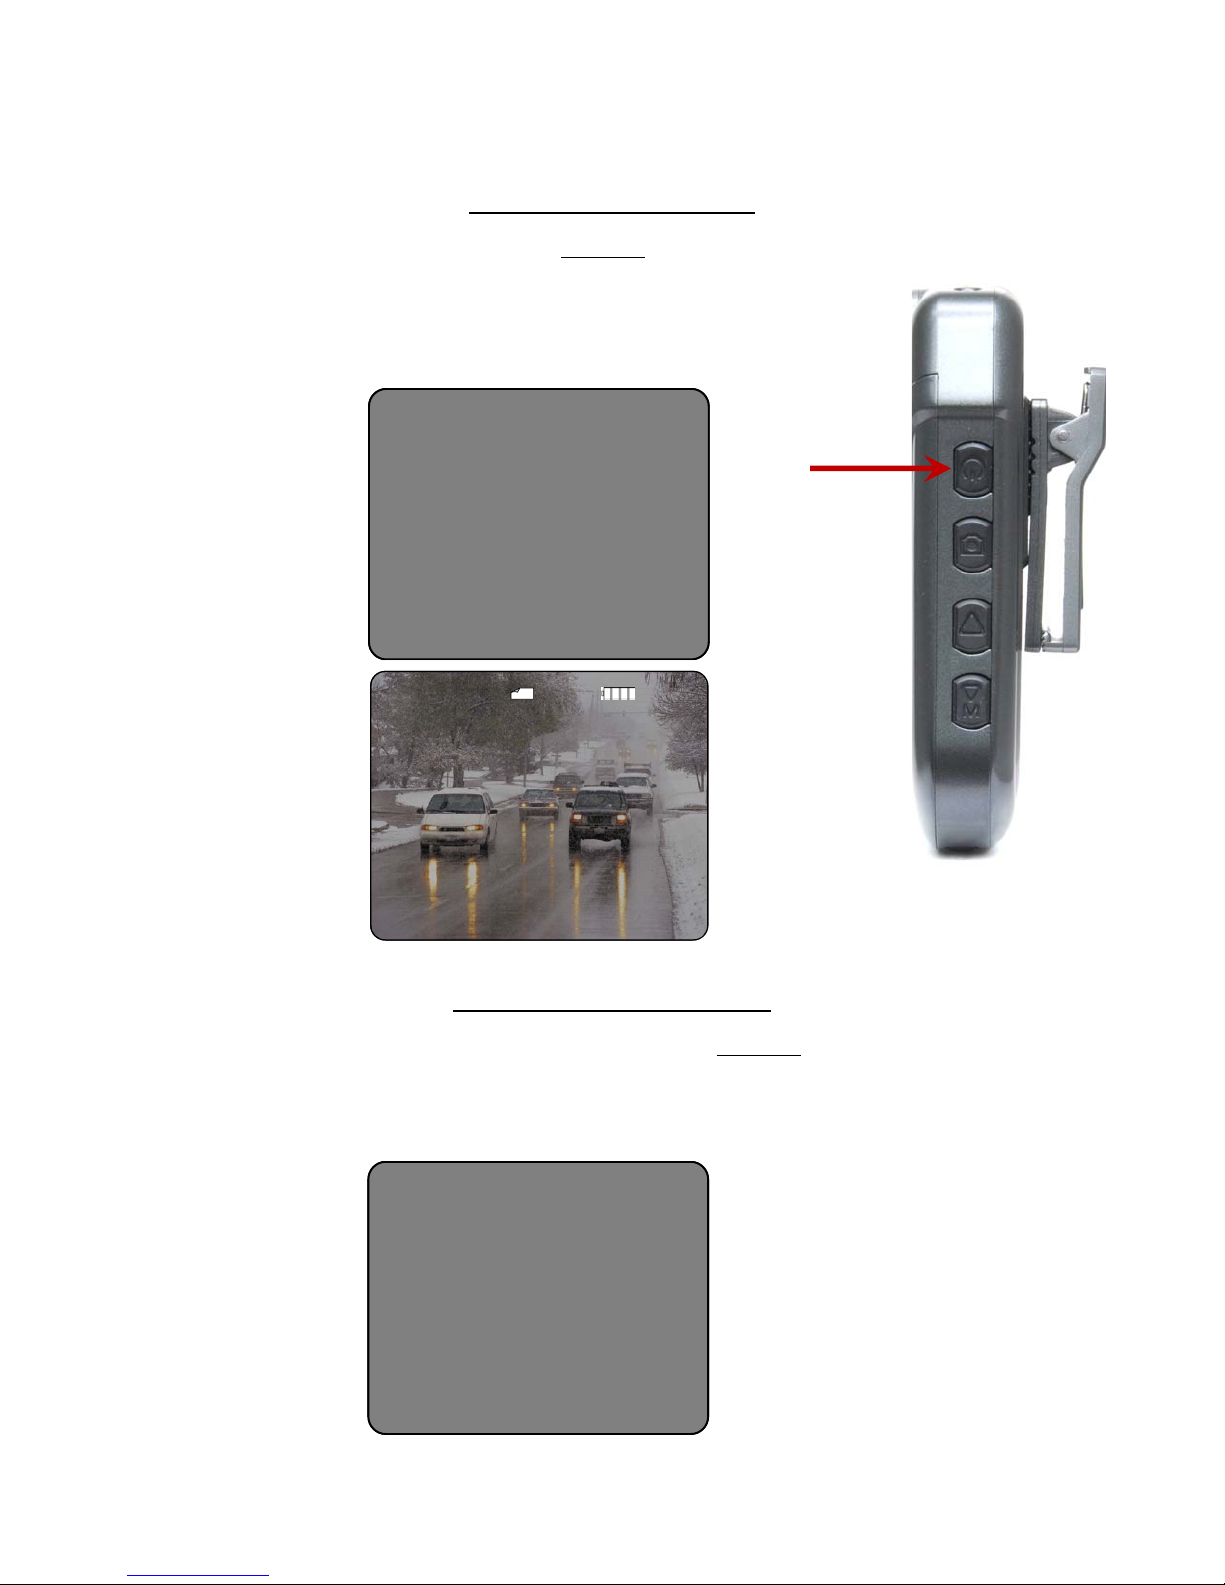
TURNING THE CAMERA ON AND OFF
Powering On the Camera
To power the camera ON, press the Power button (Button 1.)
The unit will acknowledge with 1 beep while powering on.
The LCD screen will display:
Powering On
Police Camera RecordPolice Camera Record
Button 1
7545MB 06:33D1
7545MB 06:33D1
Live Video Image
000000 2011 / 12 / 19 06 : 40 : 43
000000 2011 / 12 / 19 06 : 40 : 43
Powering Down the Camera
To power down the StalkerVUE, press and hold the Power button (Button 1) until you hear 3 beeps and
then release.
The LCD screen will display the following message just before the
screen goes blank:
Powering Down
Power OffPower Off
9

TIME AND DATE
Setting the Time and Date
1. Press the Power button (Button 1) to power on the StalkerVUE.
2. Press the Time/Date Menu button (Button 4) to open to the Date Time Setting menu screen.
3. Press Down Arrow button, if needed, to select Date/Time setting
System
System
Date Time Setting
Date Time Setting
Resolution
Resolution
4. Press Button 2 to activate the Date Time settings program.
Date Time
Date Time
Select
Setting:
Setting:
Select
2011 / 12 / 16 09:34
2011 / 12 / 16 09:34
OK
OK
Button 1
Button 2
Button 3
Button 4
5. Press Button 3 or 4 to change the Year.
6. Press Button 2 to select the month setting.
7. Press Button 3 or 4 to change the month.
8. Press Button 2 to select the date change.
9. Press Button 3 or 4 to change the date.
10. Press Button 2 to select the hour change.
11. Press Button 3 or 4 to change the hour (time is in 24-hour format (e.g. 3pm = 1500).
12. Press Button 2 to select the minutes change.
13. Press Button 3 or 4 to change the minutes.
14. Press Button 2 for two seconds or until the screen returns to the Date Time Setting – Resolution
selection screen.
TIP: If you remove the battery or the battery is discharged the StalkerVUE will retain its Date Time settings
two days or longer. If this has been the case, you should check and verify the date and time settings before
using the recorder.
10

USING THE IR FILTER AND IR ILLUMINATORS
Daylight Recording
When recording in daylight or brightly lit environments, position the infrared filter over the lens. The
StalkerVUE automatically adapts to the intensity of lighting.
When working in sunlight and artificially lit areas (such as buildings, street lights, etc.) be sure to keep
the IR filter in front of the camera lens.*
If you can clearly see the image on the LCD, there is no need to move the IR filter or use the IR
Illuminators.
* It is important to keep the IR filter in the daylight position in order to keep bright surfaces, sunlight,
etc from washing out the images.
Night / Low-Light Recording
When recording in nighttime or low light environments, position the infrared filter to the side of the lens, The
StalkerVUE automatically adapts to the intensity of lighting.
The Six Infrared LEDs can also be activated for additional IR illumination.
With the IR Filter moved to the side as shown below, press Button 5 to turn on the IR LEDs.
IR Filter Lens moved to the left
Button 5
IR Emitter LEDs
On / Off Button
IR LEDs can be turned on for additional nighttime lighting.
TIP: Be sure to turn off the IR LEDs when not needed to extend the battery life.
11

RECORDING VIDEO (VIDEO/AUDIO CAPTURE)
Selecting Video Record Resolution
The StalkerVUE includes four video file storage settings from VGA to 1M.
Each higher setting increases the file storage size and uses a greater amount of space.
Use the lowest two settings to achieve maximum storage.
After setting resolution to the desired setting, the camera retains the last selection.
TIP: You will only need to enter the resolution menu if you want to change to another setting.
Resolution Settings
The following files sizes are available:
640x480 @ 1.44 GB/Hour (VGA)
720x480 @ 1.56 GB/Hour (D1-Mode 1)
720x576 @ 1.62 GB/Hour (D1-Mode 2)
1024x768 @ 2.70 GB/Hour (1M)
TIP: Actual recorded file size will vary according to scene content, scene movement, scene detail and sounds
during recording.
IMPORTANT: Video storage requirements could be significant either on your local computer or on your
network drives. See RESOLUTION VS STORAGE Table in the back of this manual to help determine
minimum storage drive space needed for your company or department.
Select Video Resolution
Press Power (Button 1) to power on the StalkerVUE.
Press Button 4 to change to the Date Time Setting – Resolution
selection screen.
Button 1
Press Button 4, if needed, to select Resolution.
System
System
Date Time Setting
Date Time Setting
Resolution
Resolution
Button 4
12

Press Button 2 to activate the Resolution settings program.
Resolution
Resolution
1024X768
1024X768
720X756
720X756
720X480
720X480
640X480
640X480
Button 2
Button 3
Press Button 3 or Button 4 to the desired resolution setting.
Press Button 2 to select the desired resolution setting.
Button 4
The camera is now ready to record at the new resolution setting.
TIP: To verify the setting, follow the same steps as above. You can either change the
setting and press Button 2 or leave the setting as is and press Button 1 to exit the
Resolution menu.
Start Recording
To begin recording video, press and release Button 1.
The StalkerVUE will acknowledge with a single beep and begin recording.
The LCD screen will show the live view of what is being recorded.
When recording, a camera icon and a blinking dot will show on the upper left-hand side of the display.
7545MB 06:33D1
7545MB 06:33D1
01:00
01:00
000000 2011 / 12 / 19 06 : 40 : 43
000000 2011 / 12 / 19 06 : 40 : 43
Stop Recording
To stop recording video, press and release Button 1.
The StalkerVUE will acknowledge with two beeps and stop recording.
13

TAKING A SNAPSHOT (IMAGE CAPTURE)
Taking Pictures
The StalkerVUE takes snapshots with a click of the button.
Press Button 1 to power on the StalkerVUE.
Look at the LCD to determine the object or area you want to take a snapshot of.
Press Button 2 to take the snapshot.
You will hear a “camera click” sound letting you know the picture was
successfully taken.
o A small camera icon will also be seen momentarily.
Button 1
7545MB 06:33D1
7545MB 06:33D1
Button 2
000000 2011 / 12 / 19 06 : 40 : 43
000000 2011 / 12 / 19 06 : 40 : 43
File Size vs Resolution
The following file size will be stored on the flash drive:
3392x2544 Pixels @ ~800 MB file size per image.
TIP: Actual file size will vary according to scene content and scene detail at the time the snapshot is taken.
IMPORTANT: Photo storage requirements could be significant either on your local computer or on your
network drives. See the RESOLUTION VS STORAGE Table in the back of this manual to help determine
minimum storage drive space needed for your company or department.
14

RECORDING AUDIO ONLY (AUDIO CAPTURE)
Recording Stand-Alone Audio
The StalkerVUE takes snapshots with a click of the button.
Press Button 1 to power on the StalkerVUE.
Press and hold Button 2 to activate audio recording and release after the
“Audio Record” screen is showing.
Audio Record
Audio Record
Select OK
Select OK
Start Record
Start Record
Recorded Time
Recorded Time
Stop Record
Stop Record
00:00:00
00:00:00
Press Button 2 to end audio recording.
Button 1
Button 2
File Size vs Resolution
The following file size will be stored on the flash drive:
@ 21,666 bits/second or 1.3MB/minute of audio recorded.
TIP: Actual file size will vary according to audio content.
IMPORTANT: Audio storage requirements could be significant either on your local computer or on your
network drives. See the RESOLUTION VS STORAGE Table in the back of this manual to help determine
minimum storage drive space needed for your company or department.
15

PLAYING BACK VIDEOS, SNAPSHOTS, AND AUDIO FILES
Playing Back Recorded Videos and Snapshots
The StalkerVUE provides a method to review video and photos taken with the camera.
For security, you cannot delete or move files via the StalkerVUE. You must use a
computer to copy, move and/or delete files from the StalkerVUE.
Power the StalkerVUE on with Button 1.
Press Button 3 to access the Event Playback menu.
Event Playback
Event Playback
Record Files
Record Files
Photo Files
Photo Files
Audio Files
Audio Files
Button 1
Button 2
Button 3
Button 4
Press Button 3 or Button 4 to position the curser on one of the three playback
selections as shown above.
Press Button 2 to select the highlighted playback event you want to review.
In the Video window you will see the dates of all of the files that you have recorded on the StalkerVUE
(below.)
TIP: This is the year/month/date that the videos are recorded on. Each day a new dated folder will be created to
hold the videos that you record on that day. This makes for a quick way to locate particular files.
Video
Video
20111219
20111219
20111219
20111219
20111219
20111219
1/ 3 Select OK
1/ 3 Select OK
16
Video
Video
20111219
20111219
20111219
20111219
20111219
20111219
1/ 3 Select OK
1/ 3 Select OK

Playing back files (Continued)
Press Button 3 or Button 4 to move to different dates.
Press Button 2 to select.
You will now see the actual files recorded on the date selected.
Press Button 3 or Button 4 to locate the desired file.
TIP: The Video files are saved as: Year/Month/Day – Hours/Minutes/Seconds
The Photo/Snapshots are saved as: Hour/Minutes/Seconds
Button 1
Video
Video
1/ 6 Select OK
1/ 6 Select OK
20111219 - 071756
20111219 - 071756
20111219 - 093525
20111219 - 093525
20111219 - 112102
20111219 - 112102
20111219 - 124802
20111219 - 124802
20111219 - 131246
20111219 - 131246
20111219 - 152222
20111219 - 152222
Button 2
Button 3
Button 4
Press Button 2 to play back the file.
Each file will play in succession until the last file is played or press Button 1 to stop playing.
Starting Playback Playing Video
000000 2011 / 12 / 19 06 : 40 : 43
000000 2011 / 12 / 19 06 : 40 : 43
To exit the file playback mode, press Button 1 to return to the main screen.
TIP: Any video, photo, and audio file can be played back as described above.
In addition, you can change the audio volume or scan forward and back while playing a video file.
00:00:00
00:00:00
00:00:00
00:00:00
000000 2011 / 12 / 19 06 : 40 : 43000000 2011 / 12 / 19 06 : 40 : 43
17
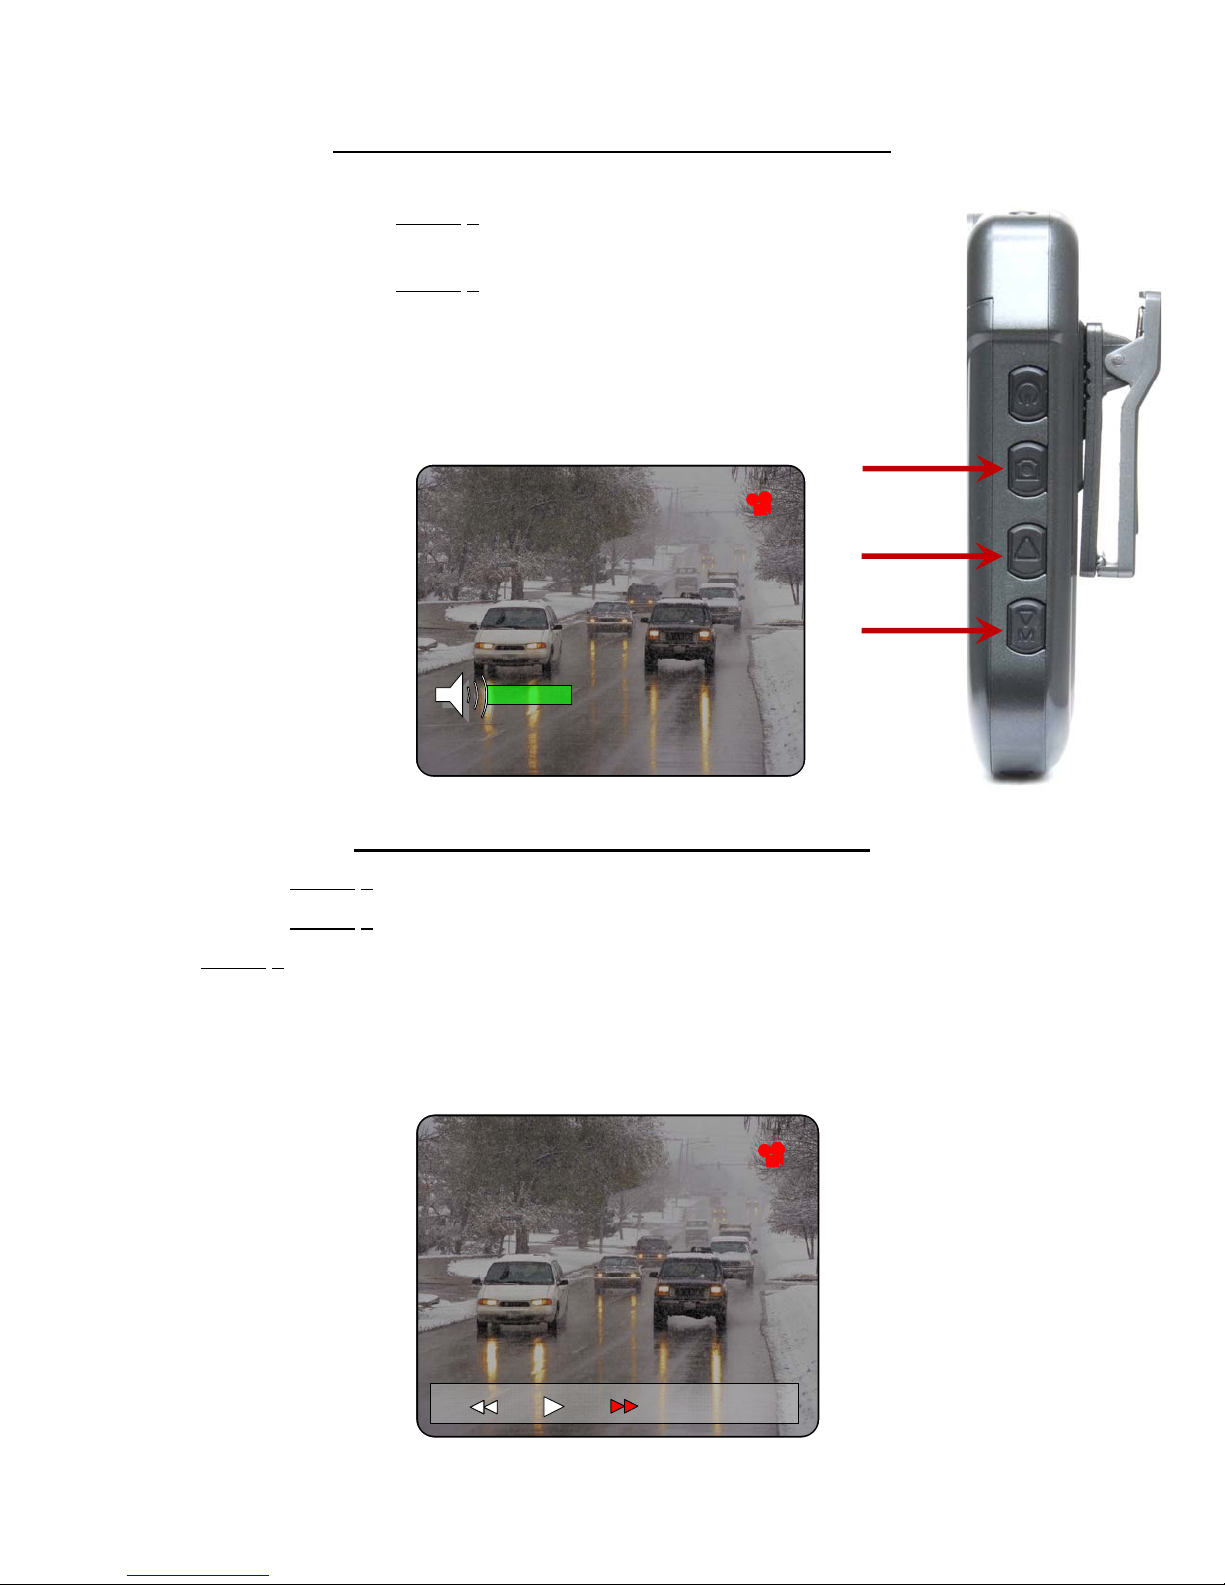
Change the Volume Level During Video Playback
Quickly press and release Button 3 to decrease volume (the green bar in the video
will shrink.)
Quickly press and release Button 4 to increase the volume (the green bar in the
video will grow.)
TIP: Do not hold the buttons down as this will switch to the fast-forward or fast-reverse
play modes. You will need to press and release for each step of volume level you want to
change up or down.
Button 2
Button 3
Button 4
000000 2011 / 12 / 19 06 : 40 : 43000000 2011 / 12 / 19 06 : 40 : 43
Fast-forward or Fast-Reverse Playback Video
Press and hold Button 4 to fast forward the video.
Press and hold Button 3 to fast-reverse the video.
Press Button 2 to resume normal play mode.
TIP: Each time you press and hold these buttons, the fast-forward or fast-reverse rate will change as
follows:
2X to 4X to 8X to 20X and back to 1X (normal play mode)
000000 2011 / 12 / 19 06 : 40 : 43
000000 2011 / 12 / 19 06 : 40 : 43
18
X4
X4
00:00:00
00:00:00
00:00:00
00:00:00

WIRELESS REMOTE CONTROL
The wireless remote control allows the operator to control the StalkerVUE's functions without disturbing the
camera's position or orientation. By pressing the buttons shown below, the operator can:
• Sync video capture to the remote.
• Turn the StalkerVUE on and off
• Start/Stop video capture
• Shoot a still photo capture
In addition, the operator can re-sync to the remote's video and place the camera into standby mode.
To power the remote control off, press the SYNC button. To power the StalkerVUE off, press the Power Off
button.
VideoButton
PowerOnbutton
(Powersuptherecorder)
StillphotoButton
PowerOFFButton
(Powersdowntherecorder)
SynchButton
19

STALKERVUE TO REMOTE SYNC
If the remote control unit no longer controls the StalkerVue (pressing power or record does not do anything)
you will need to re-sync the remote to the camera. This could happen if the remote battery is fully drained or its
internal reset button is pressed.
TIP: If you can control the StalkerVue, but cannot see the camera's video on the remote, re-syncing will not
resolve this. Power the camera off and back on. Make sure it is working normally (ie video and controls are
working). Retry the remote and then re-sync it using the procedure below to see if it helps.
Synching the Remote to the StalkerVue
1. Fully charge the StalkerVue and the remote.
2. Remove the StalkerVue battery and have it handy to reinsert it when instructed below.
3. On the remote, simultaneously press and hold the lower-left and center buttons until the red LED on the
top of the remote starts blinking (the remotes power off and power on buttons - see button descriptions
elsewhere in this manual or Quick Start Guide.)
4. Immediately insert the battery into the StalkerVue. DO NOT touch any buttons.
5. The remote will scan for the appropriate RF channel and the power up the StalkerVue.
6. At this point you should be able to control the StalkerVue using the remote.
TIP: if you did not get the battery inserted before the LEDs on the remote stops blinking, you will need to
restart the process and #2 above
20

USING THE STALKER VUE WITH YOUR COMPUTER
General Information and Requirements
Your StalkerVUE is a Plug n Play device that mounts on your computer like a standard external flash or hard
drive. There are no drivers to install and will work with all modern computers including Windows XP, Vista,
Windows 7, Windows 8, and ALL versions of Apple/Mac and Linux Operating Systems.
Once connected to your computer, you can do any of the following:
View snapshots or play videos on your computer directly from the StalkerVUE.
Copy or Move snapshots or videos to your computer for distribution or archiving.
Delete snapshots or videos from the StalkerVUE to make room for new recordings.
TIP: You can only delete files from the StalkerVUE using your computer’s file viewer such as the Window’s
Files and Folders or Explorer, Apple’s Finder, or the various file viewers available in Linux.
TIP: Media players such as Windows Media Player and Quicktime may not have built-in video Codecs to play
the files from the StalkerVUE. For reliable results download and install the VLC media player from:
http://www.videolan.org
Minimum Hardware Requirements
For all operating systems the following minimum hardware is required:
USB-2 ports (the StalkerVUE will not work with USB1.1 or USB.)
o Virtually all Apple products since 2004 have USB-2 hardware.
o Windows and Linux computers are dependent on the USB ports that were available when the PC
motherboard was manufactured.
o There may be a mix of port types on many motherboards and computer manufacturer’s products,
even recently manufactured PCs.
Internet connection for initial installation of the VUE on your computer.
Logged in as Administrator of the computer for initial installation.
External USB port devices and distribution hubs must also be USB-2 regardless of the hardware on the
PC itself. If unsure, try the PC USB ports first for initial setup.
It is recommended, but probably not necessary, to check and update the following:
The computer’s Bios (Windows and Linux based PCs) should be checked and updated.
The hardware drivers should also be checked by a computer IT professional and updated.
TIP: Most computers have numerous USB ports, but some may not be USB-2. For instance, Dell computers
may still have legacy USB-1.1 ports on the front and/or back of the computer. Generally, on the back of the
computer you will see a set of 4 USB ports and another set of two USB ports.
The set of 4 USB ports are likely to be USB-2.
21

The StalkerVUE Computer Connection
Connected to a PC Workstation
Connected to a Laptop
22

Windows Operating Systems
StalkerVUE Setup Instructions for Windows Operating Systems:
Insert a fully charged battery.
With the StalkerVUE’s power off, connect it to one of the USB-2 ports.
Power on the StalkerVUE and watch for the connection status on the Windows status bar (lower-right
corner of the Windows Desktop.
Look for any warning messages in case the driver didn’t load.
Once the StalkerVUE is recognized and the driver initiated, you should see it as a drive labeled
“STALKERVUE” under My Computer and whatever drive letter that was assigned by Windows.
o You may see a window pop up asking how you want to view the device. If you see this, just click
view as files and folders and that will bring up the StalkerVUE in a new window.
TIP: When connected, the StalkerVUE LCD screen will be blank except the battery symbol.
Apple/MAC Operating Systems
StalkerVUE Instructions for Apple/MAC Operating Systems:
Insert a fully charged battery.
With the StalkerVUE’s power off, connect it to one of the USB-2 ports.
o All Mac computers after 2004 have USB-2 ports.
Power on the StalkerVUE.
Once the StalkerVUE is powered up, you should a drive labeled “STALKERVUE” in the “Finder”
under the “Devices” section.
o Depending on how you have your desktop configured, you may also see the VUE as a drive labeled
“STALKERVUE” on the desktop.
23

Operating System Examples
r
The following pages show the file folders on a Windows XP operating system when in Icon view:
The first folder will contain a folder named “DCIM”.
This is a standard camera generated folder just as used with Canon, Kodak and others.
Apple’s Finder will look the same when in Icon view.
1
To open, double-click on this folde
2
To view the contents of one of these
folders, double-click on its Icon
Next Page
24

3
These folders contain the files recorded on
the dates as indicated by the folder’s name:
Year/Month/Day
Double-click to open the desired folder
4
These are the files recorded on the dates and
time of day as indicated by the file name:
Year/Month/Day_Hrs/Min/Sec
Double-click to open the desired file
25

Troubleshooting Windows USB Connection Issues:
Cannot get the camera to be recognized when plugged into the USB port.
o Log in as “administrator”.
o Have your IT professional log in and install the camera.
o Make sure that all of the Windows Update capabilities are turned on so that the Windows driver
installer can search the Internet for any missing drivers.
o You may need your IT’s assistance or possibly the computer sales/service company that sold the
computers to you.
For initial installation, you may need to have Internet connectivity.
o If the required drivers do not already exist on your computer, the Windows driver installer will
search the internet for driver updates.
o The computer must be logged in with administrator privileges as stated above.
USB ports are not USB-2.
o This is by far the most prevalent issue, especially on older computers.
o Try various ports on the computer until the installation sequence is successful.
o Most recent computers should have USB-2 ports on the back (usually group of 4 ports.)
o Use the installation sequence exactly as indicated above for each port that you try.
TIP: If the computer appears to not have USB-2, you can easily install a PCI card that is fully compliant. See
your computer dealer or IT professional to have one installed if needed.
Disconnect the StalkerVUE
To disconnect the StalkerVUE from your computer, you should always use the “Safely Remove Hardware” icon
in the task bar or use the “Eject this Disk” icon under My Computer.
Note: This feature requirement may actually be turned off in Windows settings whereby you can simply unplug
the StalkerVUE without first ejecting it. If you get a warning that the device was not properly ejected, then you
should use the “Safely Remove Hardware” method.
26

Apple/MAC Operating Systems
StalkerVUE Instructions for Apple/MAC Operating Systems:
Insert a fully charged battery.
With the StalkerVUE’s power off, connect it to one of the USB-2 ports.
o All Mac computers after 2004 have USB-2 ports.
Power on the StalkerVUE.
Once the StalkerVUE is powered up, you should a drive labeled “STALKERVUE” in the “Finder”
under the “Devices” section.
o Depending on how you have your desktop configured, you may also see the StalkerVUE as a drive
labeled “STALKERVUE” on the desktop.
TIP: You can configure your desktop to display drives from the Finder’s Preferences settings. Once this is
turned on, the drive icon will immediately show up on the desktop.
When connected, the StalkerVUE LCD screen will be blank except the battery symbol.
Apple’s Finder program, when in Icon mode, will look and operate the same as Windows Explorer.
See the Operating System Examples on previous pages.
Troubleshooting Apple/MAC Connection Issues:
Verify that other flash drives can be plugged in and work properly.
o If other flash drives work, then you can assume that the StalkerVUE will too.
o At this point you will need to verify the first two steps above since there are no special drivers
required on MAC computers.
Disconnect the StalkerVUE
To disconnect the StalkerVUE from your computer, you should always use the MAC Eject feature when the
drive is highlighted and all files closed.
27

(1)
(2)
(1)
(2)
FILE STORAGE SPACE REQUIREMENTS
Camera Flash Storage Table
The table below shows the approximate number of hours that can be recorded on the internal flash drive of the
StalkerVUE.
Recording Time in Hours by Screen Resolution
Resolution @ Storage in GB StalkerVUE 29.76 GB
StalkerVUE 7.39 GB
640 x 480 @ ~1.44 GB/Hr* ~20 hours ~5 hours
720 x 480 @ ~1.56 GB/Hr* ~22 hours ~4 hours
720 x 576 @ ~1.62 GB/Hr* ~21 hours ~4 hours
1024 x 768 @ ~2.70 GB/Hr* ~11 hours ~2.5 hours
* Disk space needed for each
31,877,697,024 bytes
7,939,424,256 bytes
hour of video recorded
IMPORTANT: Recording times are approximate and will be dependent on the type of scene information is
present. The time could be reduced by as much as 2 hours from the stated number.
Snapshots/Photos = ~ 800 KB each snapshot taken
Audio Only Files = ~1.3 MB per 1 minute audio recorded
Network or PC Storage Requirements
When offloading and storing files from your StalkerVUE to a PC or to a Network Volume, you will need to
know how much storage disk space will be required. First, if you consider an 8GB or 32 GB StalkerVUE and
the average size of PC Hard Disk of 250GB to 500GB, you can readily see that you can potentially run out of
space in short order, even on Terabyte storage.
To assist in determining hard space requirement, consider the following questions?
1. How many cameras will be downloading to the PC or Network?
2. How many hours per camera are expected on each download (i.e. required shift usage)?
3. How many photos will be taken?
4. How many audio-only recording will be taken?
5. How many days are the files to be kept on the PC or Network prior to deleting?
Sample Calculation @ 1024x768 Video
2.7 GB Storage/Hr 2 cameras 1 hr Video(ea) 50 Photos 10 Audio 365 days of storage
((2.7 X 2 = 5.4GB) + (50 X .8 = 26MB) + (10* 1.3 = 26MB) = 5.506GB) X 365 = 2.010 Terabytes
Note: 2.7 GB is from the table above // 800 KB is the Photo Files // 1.3 MB is the recorded audio
28

TROUBLESHOOTING
Troubleshooting the StalkerVUE
Symptom Action
StalkerVUE will not start or function.
StalkerVUE operates for a short period then stops or
powers down.
Computer cannot find the StalkerVUE via the USB
docking cable.
Computer cannot locate the USB driver for the
StalkerVUE.
No power.
Ensure that the internal battery has been charged for
5.5 hours and is fully charged before putting the
unit into service for the first time.
Image frozen on LCD monitor.
Remove the battery for 10 minutes and retry.
Unit does not stay powered up.
Make sure that the battery is installed properly and
fully charged.
Clean the battery terminals and the contacts on the
camera with isopropyl alcohol
Connection not being made between the
StalkerVUE and PC.
Make sure that both PC and StalkerVUE are
connected using the USB docking cable provided
within the system package.
Make sure that both the PC and StalkerVUE are
powered on.
Ensure that the StalkerVUE device driver is
installed.
This is a plug-n-play device, but you must initially
have administration rights in Windows in order to
pick up the driver. Once installed, it should then
operate normally.
Verify the USB Port Configuration.
USB-2 ports MUST be available and the correct
firmware drivers installed in the operating system.
Some ports on the PC may not have USB-2
capability. Try other ports until the camera is
recognized.
29

WARRANTY COVERAGE
Applied Concepts, Inc. (ACI) warrants this Stalker VUE wearable video device to the original purchaser to be
free of defects. At its discretion, ACI agrees to repair or replace all components that fail due to defective
materials or workmanship for a period of one (1) year from the date of purchase.
During the warranty period, there will be no charge for repair labor or parts. Purchaser shall return the failed
unit to the factory freight prepaid. ACI will pay return shipping.
This warranty applies only to internal electronic components and circuitry. Warranty excludes normal wearand-tear such as broken connectors, scratched or broken cases, or physical abuse. ACI reserves the right to
charge for defects and/or damages resulting from abuse or extraordinary environmental damage to the unit
during the warranty period at rates normally charged for repairing such units not covered under warranty.
Seller warrants the video devices are designed to perform the function of recording events surrounding the
wearer. The foregoing warranty is exclusive, in lieu of all other warranties, of quality, fitness, or
merchantability, whether written, oral, or implied.
As a further limit on warranty, and as an expressed warning, the user should be aware that harmful personal
contact may be made with seller's video devices in the event of violent vehicle maneuvers, collisions, or other
circumstances, even though said video devices are used according to instructions. Applied Concepts, Inc.
specifically disclaims any liability for injury caused by the video devices in all such circumstances.
Note: For service or repair, call the factory at 1-800-STALKER (1-800-782-5537).
30

TECHNICAL INFORMATION
General Specifications
Size
Weight
Color
Warranty
DVR Monitor
Battery
Battery Standby
Battery Run Time
Power Off w/battery
Charge Time
3.77 x 2.48 x 0.82 Inches
10 Oz
Black
1 Year
1.4 Color TFT
Removable Rechargeable
Auto-off after 1 minute
inactivity
6.5 hours recording
> 100 hours
~5 hours
Accessories
Replacement Battery
Replacement AC Charger
Replacement USB Cable
Video
Video Format
Playback Format
Photo Format
Sensor Type
Sensor Format
Focus
MPEG 4
AVI
JPEG
CMOS
640x480
4.3mm / F 2.7
015-0202-00
015-0203-00
015-0204-00
Memory/Storage
Connectivity
Operating System
Compatibility
8GB or 32 GB
Solid State Memory
USB-2 Only
Plug-n-Play capable
Windows: XP, Win7,
Win8, VISTA, 2000
Apple OSX, all versions
Linux OS, all versions
Lens Configuration
Focal Range
Field of View
Day/Night IR Filter
0.5m→ºº
~80 degrees
31

*011012100*
 Loading...