

Stairville DMX-Master 3-FX User Manual
DMX-Master 3-FX
DMX controller
user manual

Musikhaus Thomann
Thomann GmbH
Hans-Thomann-Straße 1
96138 Burgebrach
Germany
Telephone: +49 (0) 9546 9223-0
E-mail: info@thomann.de
Internet: www.thomann.de
03.05.2017, ID: 294610 (V3) | SW V1.5

Table of contents
1 General information.............................................................................................................. 4
1.1 Further information........................................................................................................ 4
1.2 Notational conventions................................................................................................. 4
1.3 Symbols and signal words........................................................................................... 5
2 Safety instructions................................................................................................................. 6
3 Features....................................................................................................................................... 7
4 Installation................................................................................................................................. 8
5 Setup............................................................................................................................................. 9
6 Connections and controls................................................................................................ 10
7 Basics.......................................................................................................................................... 15
8 Instructions for use.............................................................................................................. 17
8.1 Introduction.................................................................................................................... 17
8.2 Scenes and banks.......................................................................................................... 19
8.3 Chasers.............................................................................................................................. 22
8.4 Blackout............................................................................................................................ 25
8.5 Overlay scenes............................................................................................................... 27
8.6 Effects generator........................................................................................................... 28
8.7 Cross-fades...................................................................................................................... 32
8.8 Channel inversion......................................................................................................... 33
8.9 Assigning the jog wheels Pan and Tilt for rotation and inclination .......... 34
8.10 Playback......................................................................................................................... 35
8.11 MIDI control.................................................................................................................. 38
8.12 ‘Easy Mode’................................................................................................................... 41
8.13 Saving data and reloading...................................................................................... 42
8.14 Complementary functions...................................................................................... 43
9 Technical data........................................................................................................................ 46
10 Plug and connection assignment................................................................................. 47
11 Protecting the environment........................................................................................... 48
Table of contents
DMX-Master 3-FX
3

1 General information
This manual contains important instructions for the safe operation of the unit. Read
and follow the safety instructions and all other instructions. Keep the manual for
future reference. Make sure that it is available to all those using the device. If you sell
the unit please make sure that the buyer also receives this manual.
Our products are subject to a process of continuous development. Thus, they are
subject to change.
1.1 Further information
On our website (www.thomann.de) you will find lots of further information and
details on the following points:
Download This manual is also available as PDF file for you to download.
Keyword search
Use the search function in the electronic version to find the
topics of interest for you quickly.
Online guides
Our online guides provide detailed information on technical
basics and terms.
Personal
consultation
For personal consultation please contact our
technical hotline.
Service
If you have any problems with the device the
customer service will gladly assist you.
1.2 Notational conventions
This manual uses the following notational conventions:
The letterings for connectors and controls are marked by square brackets and italics.
Examples: [VOLUME] control, [Mono] button.
Texts and values displayed on the device are marked by quotation marks and italics.
Examples: ‘24ch’, ‘OFF’.
Letterings
Displays
General information
DMX controller
4
The individual steps of an instruction are numbered consecutively. The result of a
step is indented and highlighted by an arrow.
Example:
1. Switch on the device.
2. Press [Auto].
ð
Automatic operation is started.
3. Switch off the device.
References to other locations in this manual are identified by an arrow and the speci‐
fied page number. In the electronic version of the manual, you can click the crossreference to jump to the specified location.
Example: See Ä ‘Cross-references’ on page 5.
1.3 Symbols and signal words
In this section you will find an overview of the meaning of symbols and signal words
that are used in this manual.
Signal word Meaning
DANGER! This combination of symbol and signal word indicates
an immediate dangerous situation that will result in
death or serious injury if it is not avoided.
NOTICE! This combination of symbol and signal word indicates
a possible dangerous situation that can result in mate‐
rial and environmental damage if it is not avoided.
Warning signs Type of danger
Warning – danger zone.
Instructions
Cross-references
General information
DMX-Master 3-FX
5

2 Safety instructions
This device is intended to be used to control spot lights, dimmers, light effects,
moving heads or other DMX-controlled devices. Use the device only as described in
this user manual. Any other use or use under other operating conditions is consid‐
ered to be improper and may result in personal injury or property damage. No lia‐
bility will be assumed for damages resulting from improper use.
This device may be used only by persons with sufficient physical, sensorial, and intel‐
lectual abilities and having corresponding knowledge and experience. Other persons
may use this device only if they are supervised or instructed by a person who is
responsible for their safety.
DANGER!
Danger for children
Ensure that plastic bags, packaging, etc. are disposed of properly and
are not within reach of babies and young children. Choking hazard!
Ensure that children do not detach any small parts (e.g. knobs or the
like) from the unit. They could swallow the pieces and choke!
Never let children unattended use electrical devices.
NOTICE!
External power supply
The device is powered by an external power supply. Before connecting
the external power supply, ensure that the input voltage (AC outlet)
matches the voltage rating of the device and that the AC outlet is pro‐
tected by a residual current circuit breaker. Failure to do so could result
in damage to the device and possibly the user.
Unplug the external power supply before electrical storms occur and
when the device is unused for long periods of time to reduce the risk of
electric shock or fire.
NOTICE!
Risk of fire
Do not cover the device nor any ventilation slots. Do not place the
device near any direct heat source. Keep the device away from naked
flames.
NOTICE!
Operating conditions
This device has been designed for indoor use only. To prevent damage,
never expose the device to any liquid or moisture. Avoid direct sunlight,
heavy dirt, and strong vibrations.
Intended use
Safety
Safety instructions
DMX controller
6

3 Features
Special characteristics of the device:
n control of up to 16 DMX devices with 16 DMX channels each (256 channels)
n 240 scenes on 30 banks (8 per bank)
n six chases with up to 250 single steps
n six overlay scenes
n integrated effect generator
n fade in time, fade out time and speed for scenes and chases can be adjusted per
channel
n all channels invertible
n jog wheels for the control of pan and tilt movements
n operating modes: ‘Play Mode’ , ‘Program Mode’ , ‘Setup Mode’ and ‘Easy Mode’
n Functions: desk lock, auto-start, blackout, freeze, copy
n MIDI control (synthesizer and MIDI keyboard)
n data backup and restore via USB interface
n suitable for 19" racks (four rack units)
Features
DMX-Master 3-FX
7

4 Installation
Unpack and carefully check that there is no transportation damage before using the
unit. Keep the equipment packaging. To fully protect the device against vibration,
dust and moisture during transportation or storage use the original packaging or
your own packaging material suitable for transport or storage, respectively.
The device is designed for mounting in 19" racks, it occupies four rack units (RU).
Before you install the device, remove the cover (ten fastening screws). Then mount
the device into the racks using the optionally available mounting brackets.
Rack mounting
Installation
DMX controller
8

5 Setup
Create all connections while the device is off. Use the shortest possible high-quality
cables for all connections. Take care when running the cables to prevent tripping
hazards.
Connect the included power adapter to the 9V connector of the unit and then plug
the power adapter into a wall outlet.
Turn on the device using the main switch on the rear panel. Turn on the device using
the main switch at the back side. After turning the device on the displays shows the
software version and the operation mode for a short time. The related display LEDs
light up.
Connecting the power supply
Turning the unit on
Setup
DMX-Master 3-FX
9
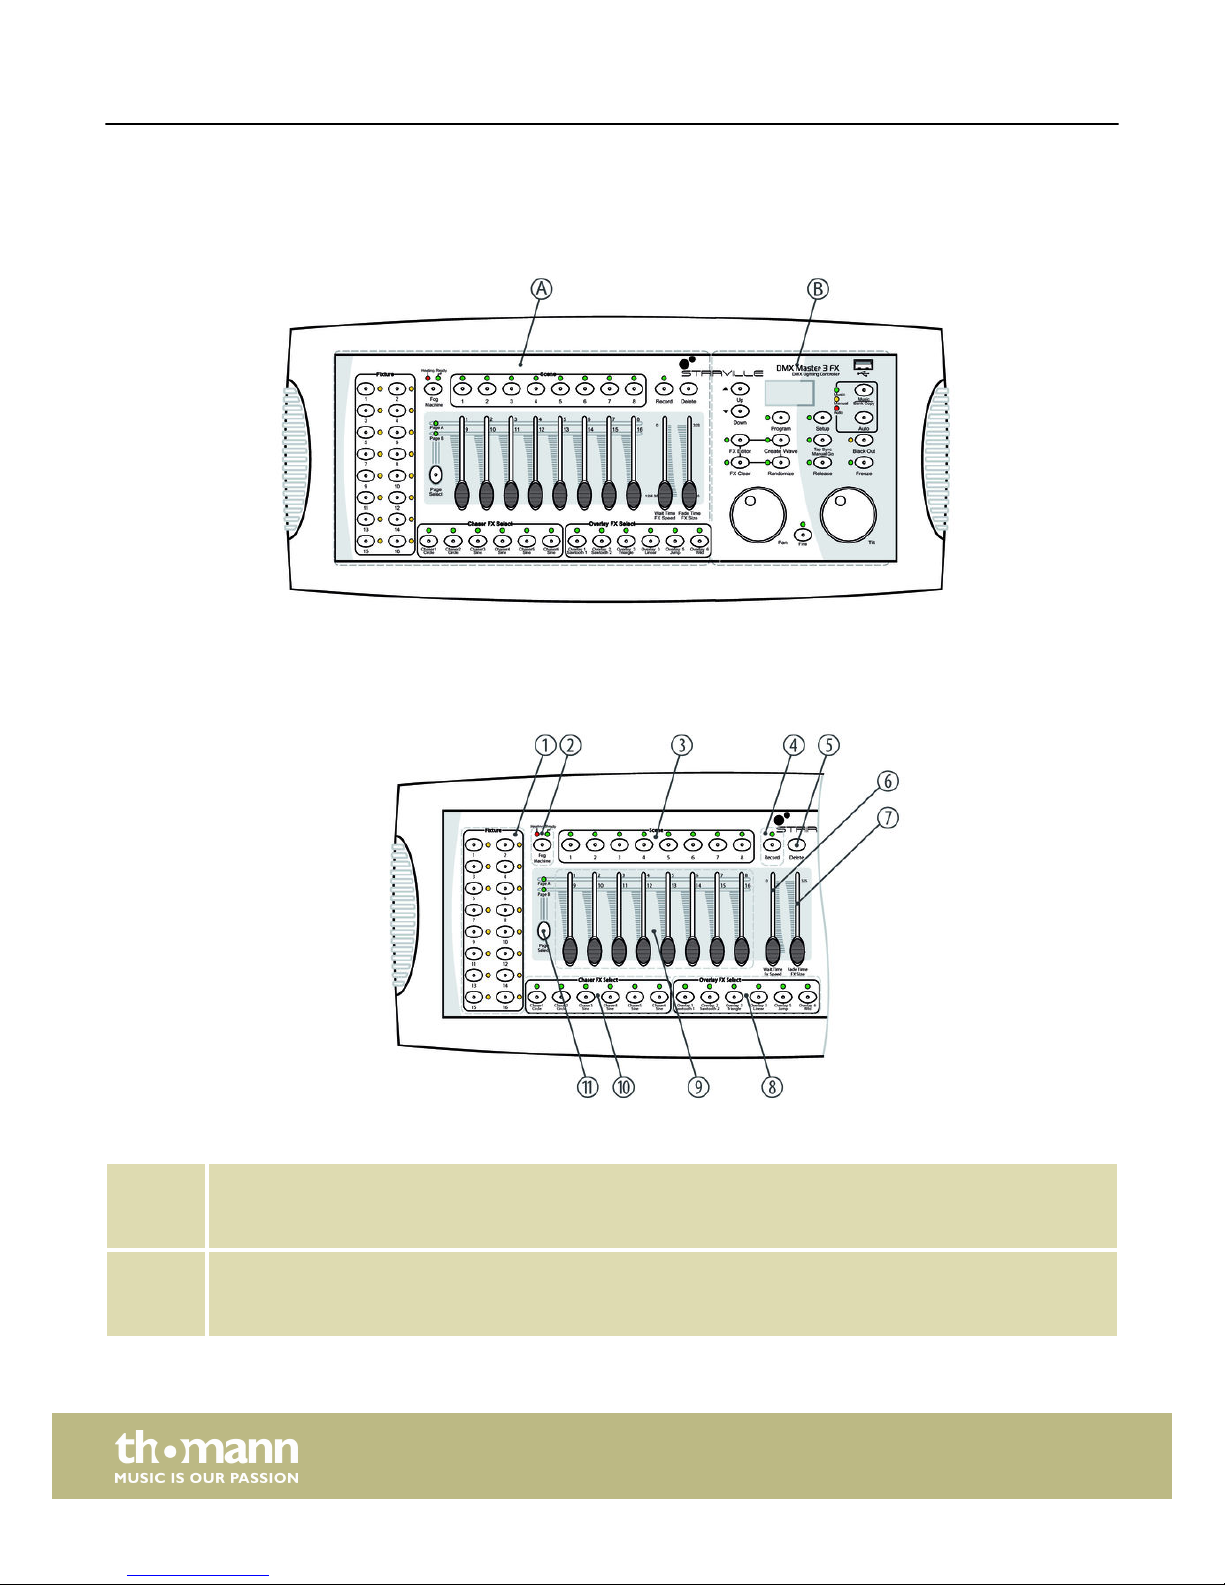
6 Connections and controls
1 Button group [Fixture]
Buttons 1 to 16 to select the control channels. The corresponding indicator LED shows whether the respective
channel is switched (LED on) or deactivated (LED off).
2 Button [Fog Machine]
Activates a connected fog machine. The LEDs [Heating] and [Ready] indicate the operating status of the fog
machine.
Front panel, total view
Front panel, detail view A
Connections and controls
DMX controller
10
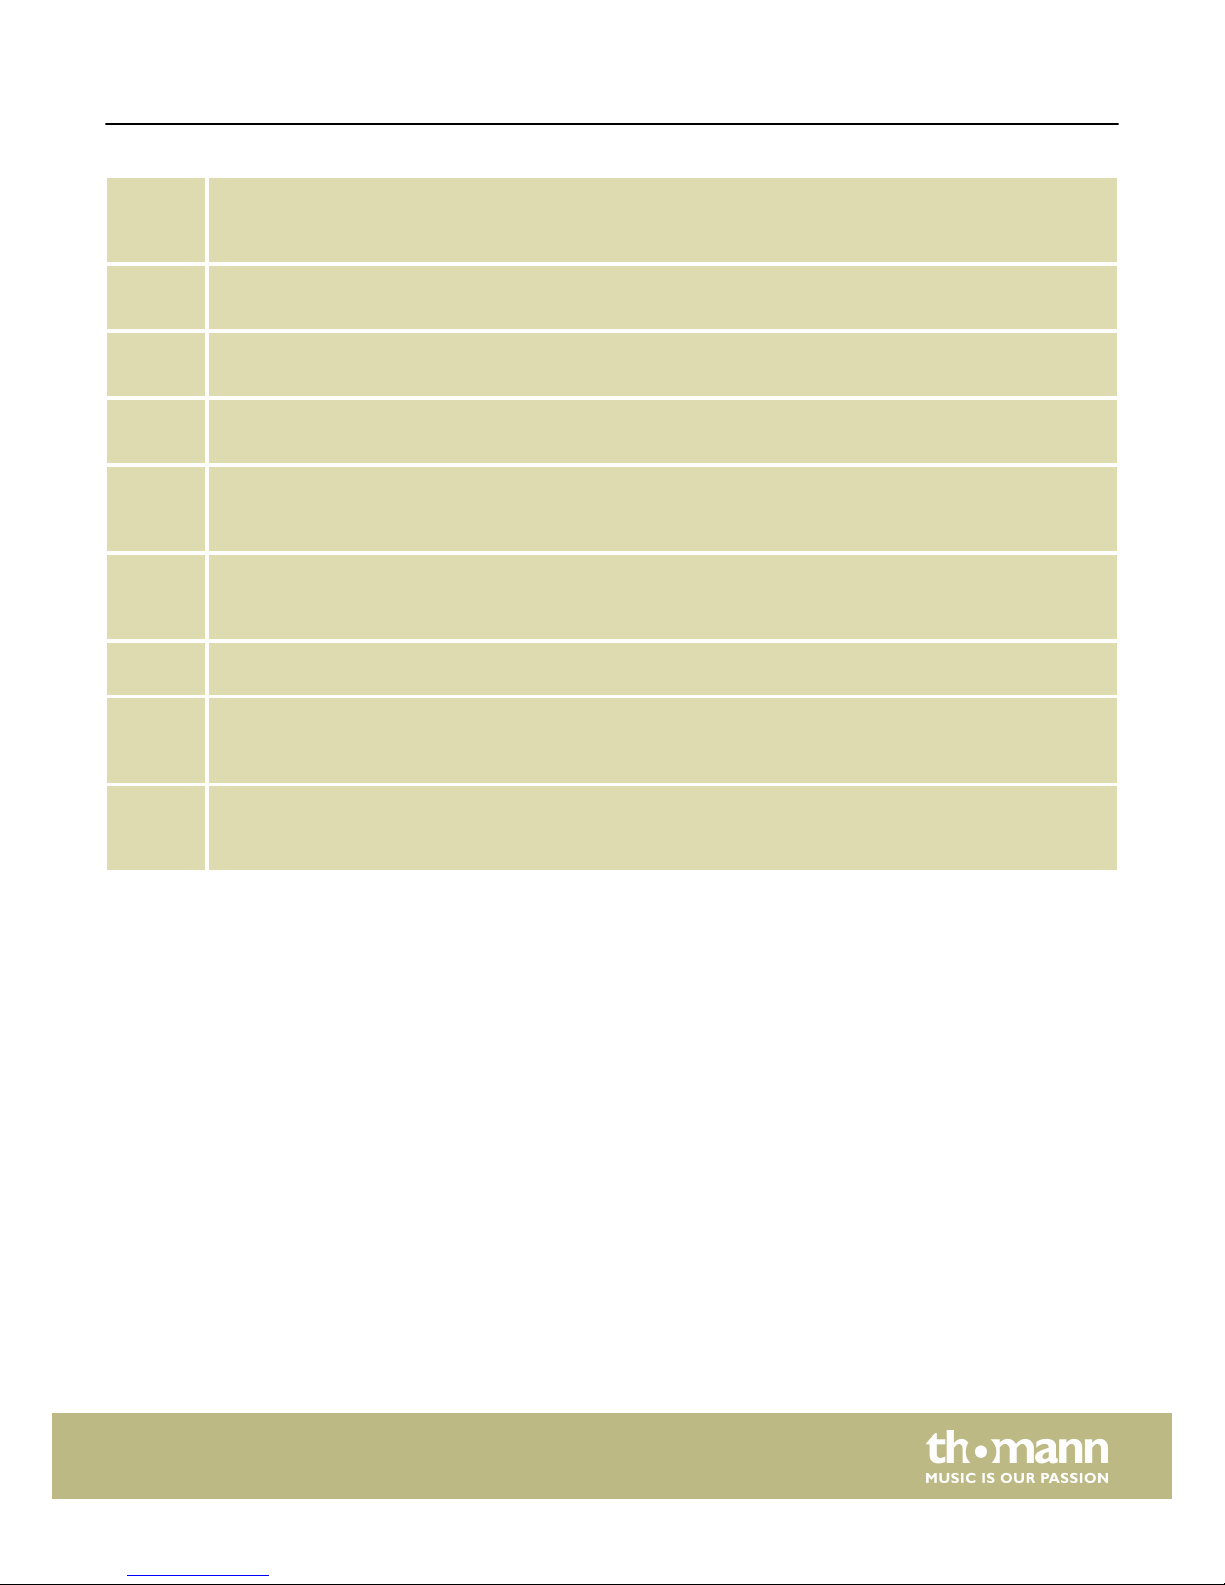
3 Button block [Scene]
Buttons 1 to 8 for enabling / disabling of the programmed scenes. The LEDs indicate which scenes are enabled
(LED is on).
4 Button [Record]
Button for recording own sequences.
5 Button [Delete]
Button for deleting sequences.
6 [Wait Time | FX Speed]
Slider for adjusting the programme and effect speed as well as the input sensitivity of the microphone.
7 [Fade Time | FX Size]
Slider for adjusting the fade in and out time in scene or programme changes as well as the display size of the
effect.
8 Button block [Overlay FX Select]
Buttons 1 to 6 for enabling / disabling of the Overlay scenes. The LEDs indicate which scenes are enabled (LED is
on).
9 Slider with dual function for adjusting DMX channels 1 to 16. Switching between memory banks 1…8 and 9…16 is
done using the Shift key (11).
10 Button block [Chaser FX Select]
Buttons 1 to 6 for enabling / disabling of the Chasers. The LEDs indicate which Chaser sequences are enabled (LED
is on).
11 Button [Page Select]
Button for switching between memory banks 1…8 and 9…16 (slider with dual function for adjusting the DMX
channels). The LEDs [Page A] and [Page B] indicate which of the two memory banks is currently active.
Connections and controls
DMX-Master 3-FX
11
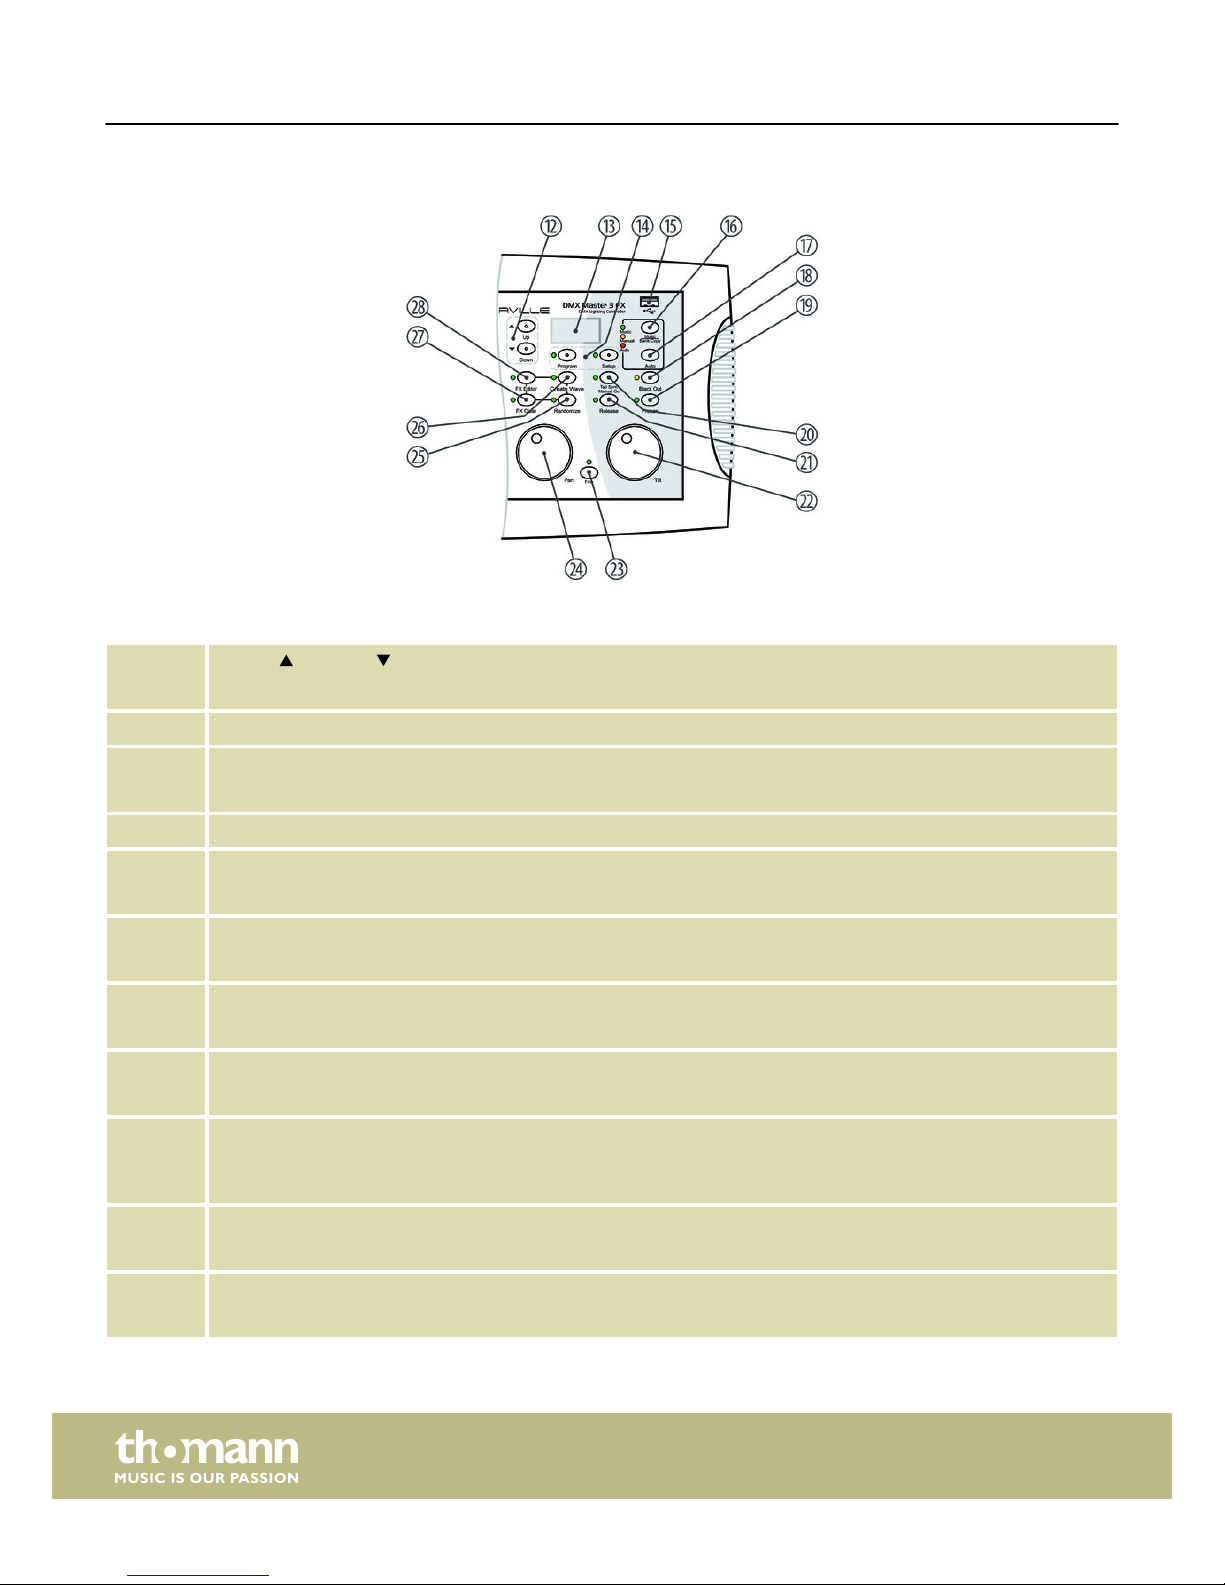
12
Buttons | [Up] and | [Down]
Buttons for switching between the 30 banks and for setting the starting angle in the effects editor.
13 Display
14 Buttons [Program], [Setup]
Buttons with LED indicators for switching between function modes.
15 USB socket for a USB drive or a USB lamp (included in delivery).
16 Button [Music Bank Copy]
Button for activating the music control as well as to copy an entire bank.
17 Button [Auto]
Activates the automatic control.
18 Button [Black Out]
Button to override the DMX outputs with user-specific data (such as all shutter channels to ‘0’).
19 Button [Freeze]
Enables the Freeze function.
20 Button [Tap Sync Manual Go]
Button to synchronize the timing as well as to activate a chaser sequence in automatic mode. The display alter‐
nates between the individual steps of the activated sequence and the current bank.
21 Button [Release]
Resets all DMX channels to ‘0’.
22 [Tilt]
Jog wheel for the direct control of the tilt motion of all active channels.
Front panel, detail view B
Connections and controls
DMX controller
12
23 Button [Fine]
Button for changing the resolution of the tilt motion or rotation (fine adjustment).
24 [Pan]
Jog wheel for the direct rotation control of all active channels.
25 Button [Randomize]
Activates the Random function.
26 Button [Create Wave]
Activates the Wave function.
27 Button [FX Clear]
Button for resetting the custom effects settings.
28 Button [FX Editor]
Activates the effects editor.
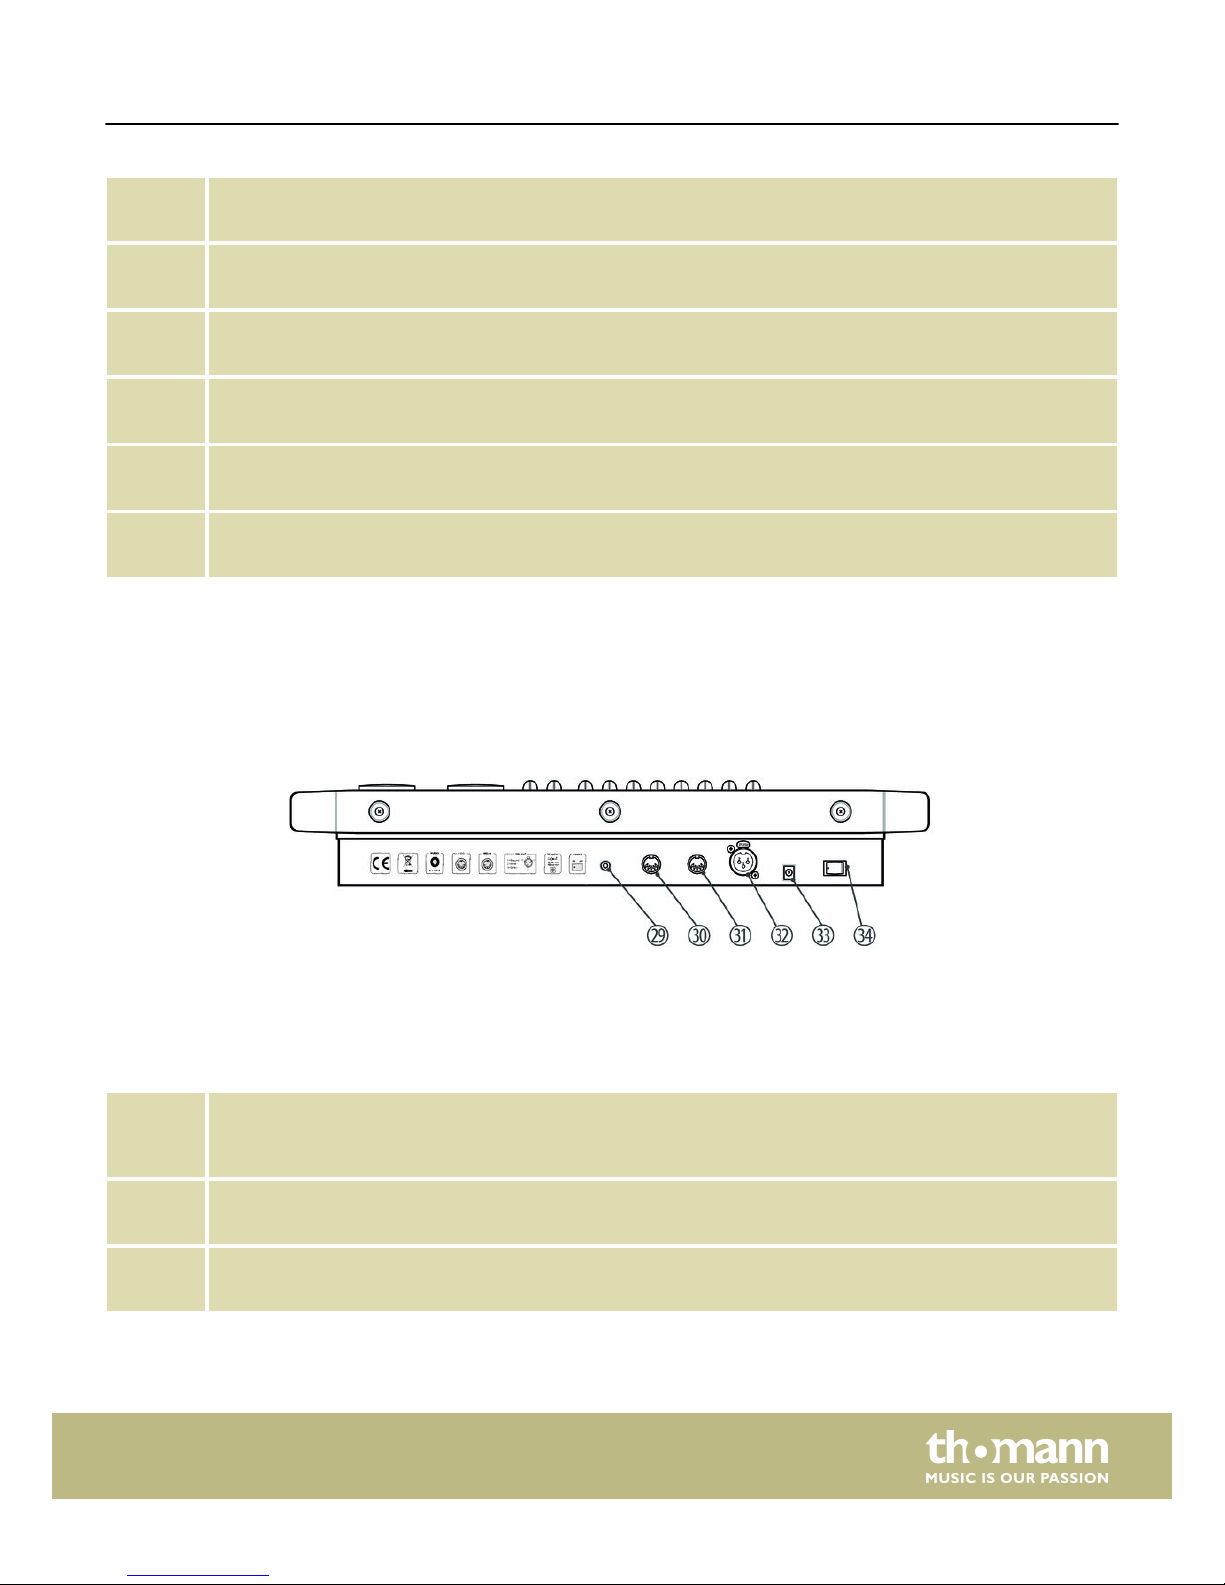
29 [AUDIO]
RCA input for connecting audio equipment for sound control. Once you connect an audio device here, the built-in
microphone is turned off and the signal of this input is then used for music control instead.
30 [Fog]
Connection for the fog machine.
31 [MIDI IN]
MIDI input socket.
Rear panel
Connections and controls
DMX-Master 3-FX
13
32 [DMX OUT]
Lockable DMX output socket.
33 [DC IN]
Connection socket for the 9 V power supply unit.
34 [OFF | ON]
Main switch to turn the device on and off.
Connections and controls
DMX controller
14
7 Basics
This chapter provides basic information about the data transmission using the DMX
protocol.
DMX signals are generated by a DMX controller. The signals are transferred over a
DMX cable to the connected devices. Each connection can transmit up to 512 chan‐
nels. For each channel, a value between 0 and 255 is being transmitted. The 512
channels form a so-called ‘DMX universe’.
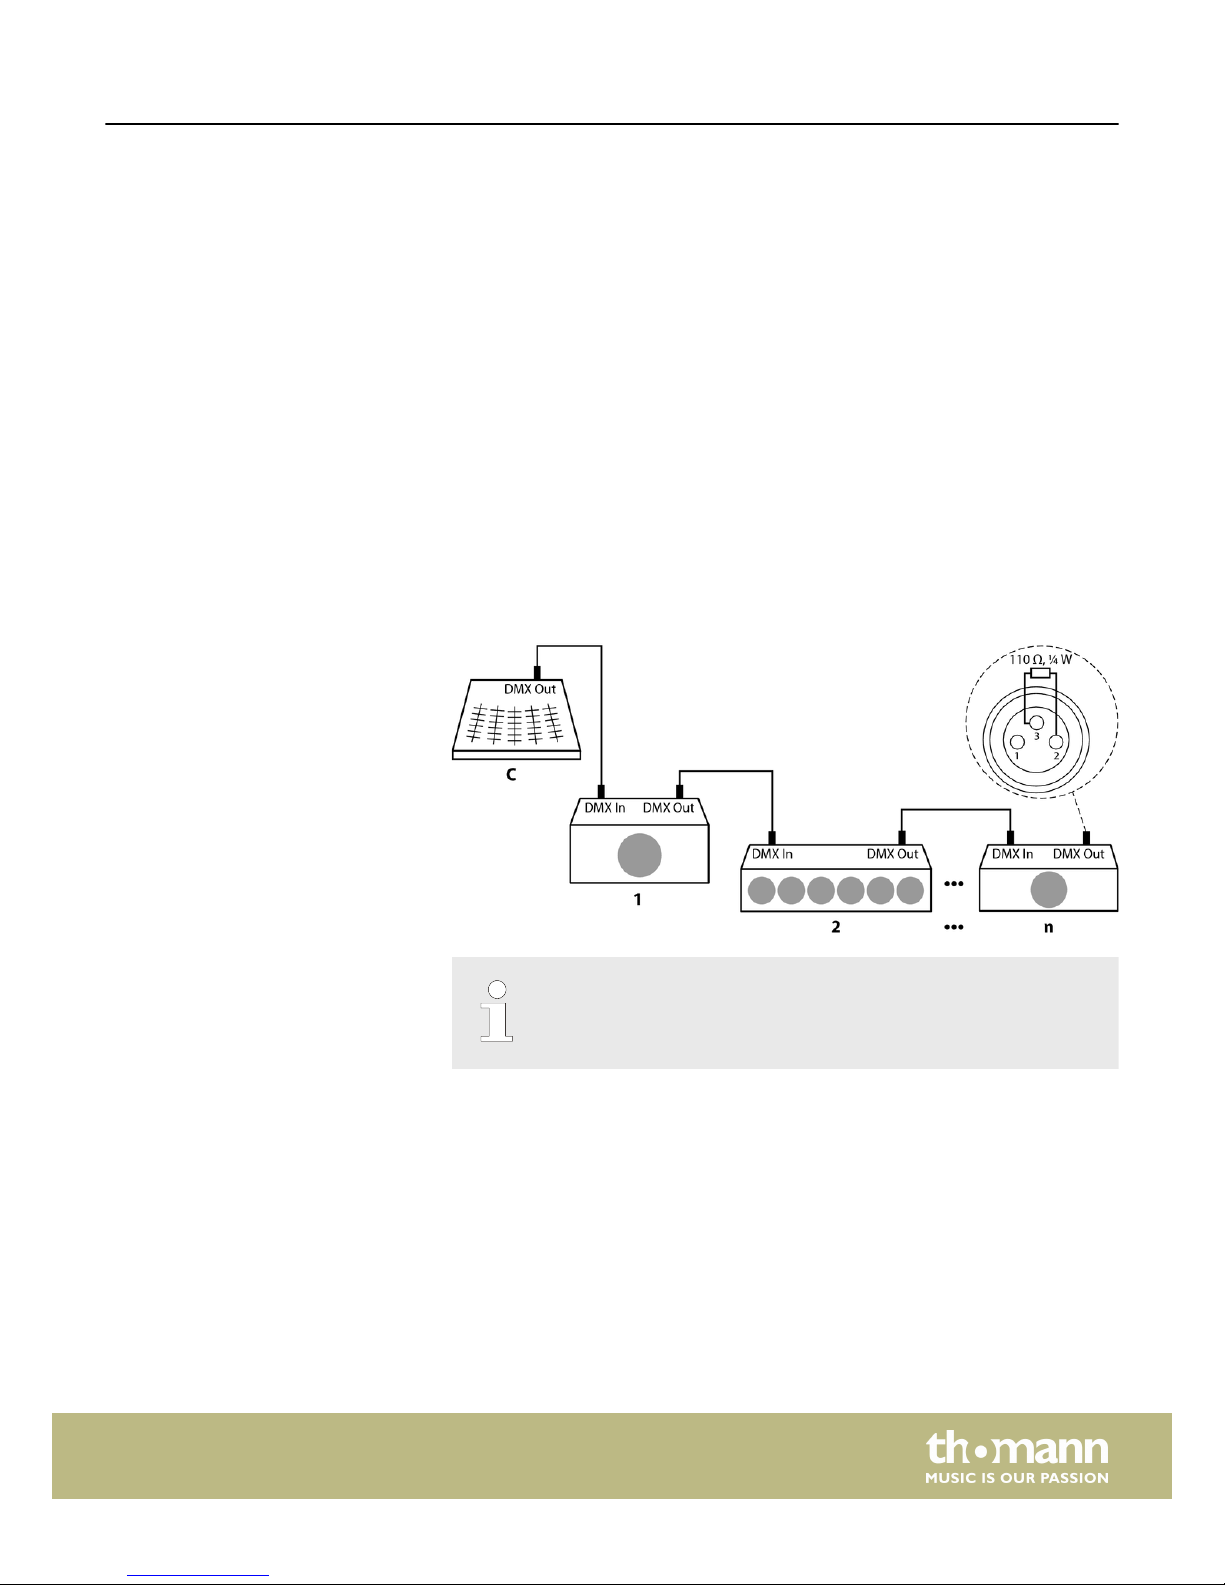
DMX devices are connected serially, that means the sending device transmits signals
to all connected receivers (daisy chain). The order of the receivers in the daisy chain
does not matter since all devices filter and process the relevant data independently
from each other.
To create the daisy chain, the DMX input of the first receiver is connected to the DMX
output of the controller or another DMX master. The output of the first receiver is
connected to the input of the second one, and so on. The output of the last receiver
in the DMX chain must be terminated using a resistor (110 Ω, ¼ W).
If the cable length exceeds 300 m (328 yds.) or the number of devices is
greater than 32, the signal must be amplified using a DMX booster.
Each DMX devices operates on a specific number of channels to transfer the
incoming control signals into movements, changing of light intensity or colour, and
so on. Since all receivers that are part of a DMX daisy chain receive all signals, a start
address must be assigned to each DMX device. Starting from this address (a value
between 0 and 512) the incoming signals are being evaluated and transferred into
the functions of the receiver (internal channel assignment).
It is no problem to use a start address more than once in a DMX chain. In that case,
the relevant receivers operate synchronously (identical movement, light intensity,
colour, and so on).
Signal transmission
Cabling
Signal processing
Basics
DMX-Master 3-FX
15

When setting the DMX address, the counting method of the device determines the
first channel. Depending on the device, the channel numbers may start from 0 or
from 1. The address range may therefore reach from 0 to 511 or from 1 to 512.
Addressing
Basics
DMX controller
16
 Loading...