

Page 1
The Results You Want
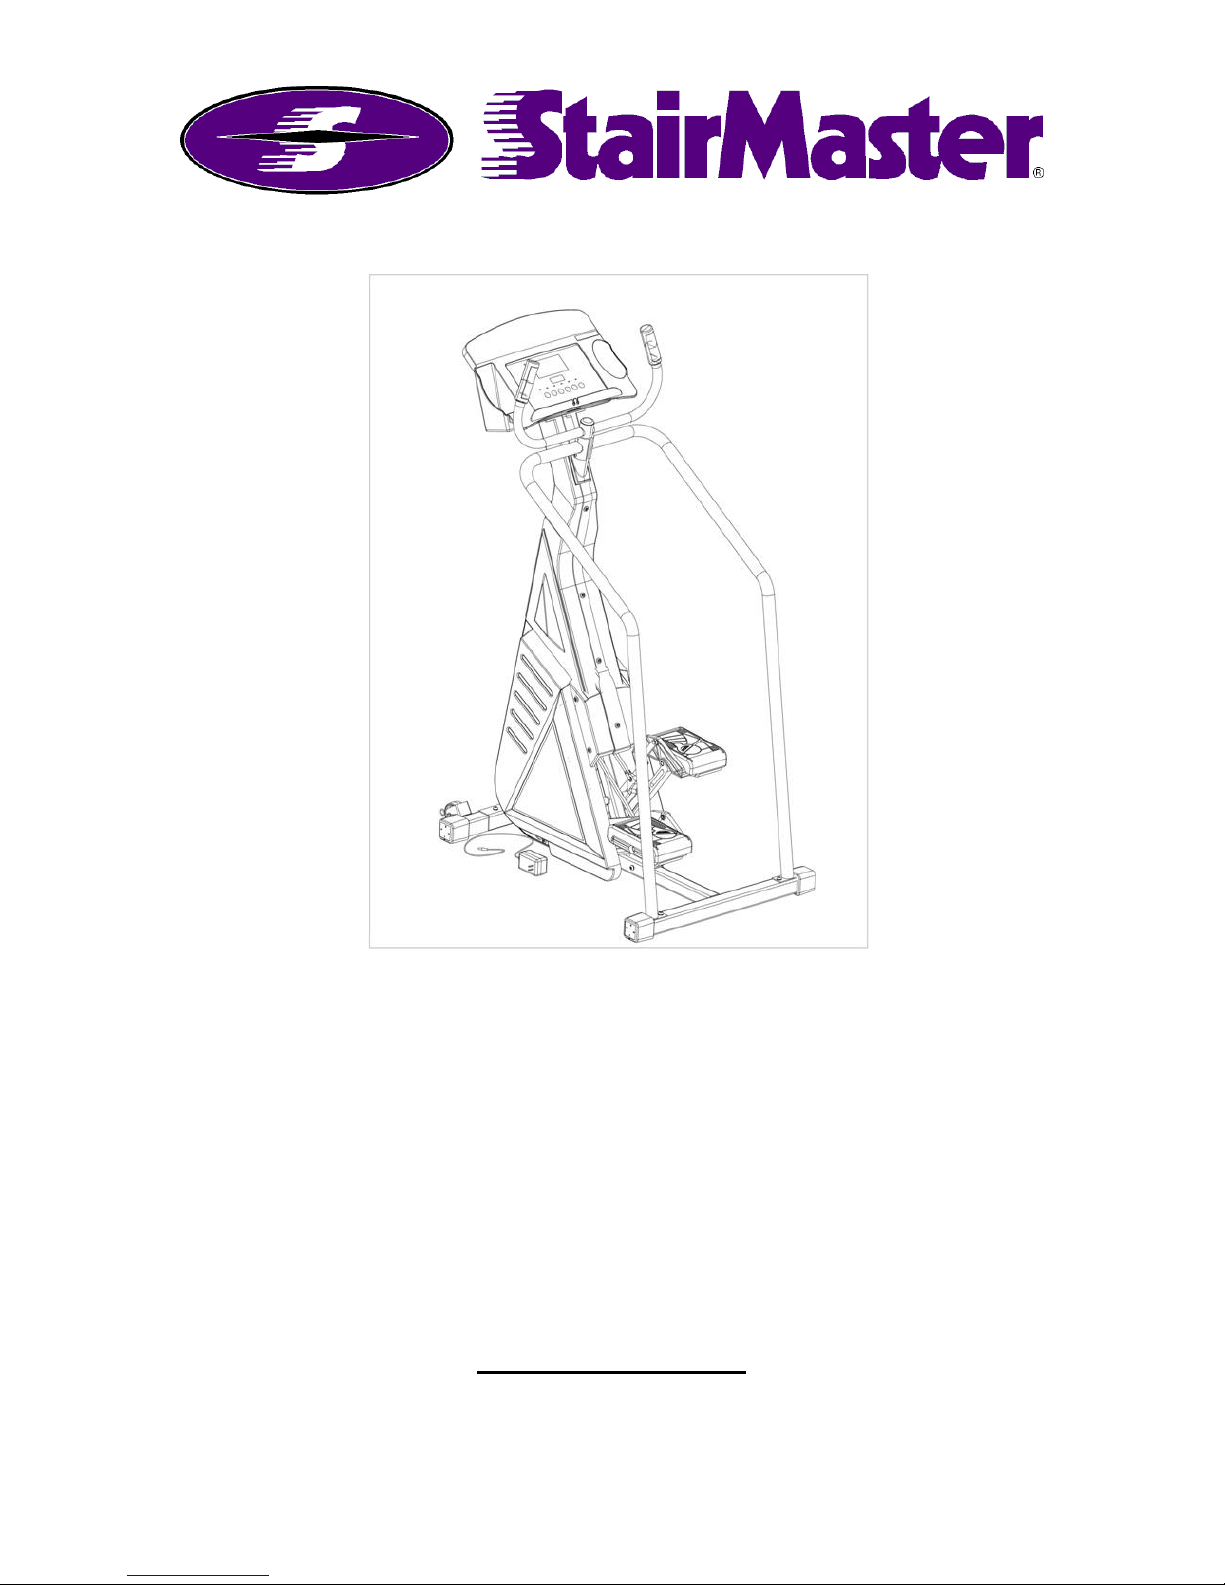
StairMaster 4100PT
Owner’s Manual
Division of Nautilus Health & Fitness
StairMaster
10757 E. Ute St.
Tulsa, OK 74116
800-331-3578
www.StairMaster.com
Manual Part # 25679A
Page 2

STAIRMASTER HOME STEPPER
OWNER’S MANUAL
♦ Table of Contents……………………………………………………………………… 2
♦ Introduction Letter…………………………………………………………………… 3
♦ Safety Requirements………………………………………………………………… 4,5
♦ Machine Placement
• Right Hand vs. Left Hand..……………………………………………….. 6
• Moving Machine…………………………………………………………………. 7
• Leveling………………………………………………………………………………
7
♦ Assembly Instructions
• Tool List……………………………………………………………………………..
8
• Hardware List………………………………………………………………….... 8
• Parts List…………………………………………………………………………....
8,9,10
• Assembly Instructions …………………………………….…………….... 11-18
♦ Exercise Guidelines
• Achieving Fitness Goals…………………………………….………….... 19
• Intensity
– Target Heart Rate……………………….……………………….…….... 20
– Perceived Exertion…………………………………….………………... 21
– Talk Test……………………………………………………….…………….... 21
♦ Console Layout…………………………………………………………….…………....
22,23
♦ Operating Instructions
• Program Profiles/Description……………………..….………….... 24-26
• Detail Program Description
– Quick Start…………………………..….………….……………………….. 27
– Manual…………………………..….………………….………………………..
27
– Fat Burner………..…………………..….………….………………………..
27
– Fat Burner Plus…………………………….…….……………………….. 27
– Speed Interval…………………………..….….….……………………….. 27,28
– Constant HR……………….………..….………….……………………….. 28
– Interval Constant HR………………………...……………………….. 28,29
♦ Preventive Maintenance
• Cleaning………………………………..…..….………….………………………..
30
• After each use…………………………..….………….……………………….. 30
• 3 month/70 hrs………………………...….………….……………………….. 30
• 1 year/300 hrs…..……………………..….………….………………………..30,31
- 2 -
Page 3

♦ Glossary…………………………..….…………………………….………………………..
32
♦ Warranty/Customer Service Contacts.………..….………..…………..33
- 3 -
Page 4

Dear Customer,
Congratulations! You have chosen one of the finest home exercise products in the world, from one of the
most recognized names in the fitness industry. The StairMaster 4100 PT exercise system provides a
clinically proven superior cardiovascular and complete lower body workout. The 4100 PT exercise
system is effective because the exclusive, patented independent step movement dynamically engages
every primary lower body muscle groups. You will feel the difference from the first workout.
Stepping has long been considered one of the best exercise options available. In as little as 20 minutes a
day, the low impact, biomechanically correct StairMaster Stepper will quickly help you meet your fitness
goals. Pounds will disappear, endurance will increase and your ability to manage stress will be
tremendously enhanced. The clinically proven health benefits from the StairMaster Stepper include:
1. Helps lose weight and keep it off
2. Conditions heart, lungs, and muscles
3. Strengthens and firms buttocks and thighs
4. Develops stronger, healthier bones
5. Increases energy and stamina levels
6. Helps to more effectively mange stress
7. Reduces risk of heart disease
8. Reduces risk of diabetes
The 4100 PT Stepper was designed specifically for home use by the same Engineers that design and build
the commercial StairMaster Steppers (i.e., 4000 PT, 4200 PT, 4400 PT/CL, and 4600 PT/CL). The 4100
PT is also built in the same factory in Tulsa, Oklahoma as the famous commercial StairMaster Steppers.
This is not a cheap imitation import, but a quality product that is American designed and built. You are
going to love it because:
1. It uses the same patented independent stepping action, so it feels like a commercial StairMaster
and provides a biomechanically correct workout.
2. It was built with commercial grade steel, giving the unit a solid feel.
3. It was designed to fit easily through home doorways, allowing easy movement.
4. It requires a smaller user space than most home fitness products allowing it to be used in any room
in the house, without compromising your decorating style.
5. It comes with soft pedal pads that will make your feet love this exercise.
6. The console is bright, easy to read and understand.
7. StairMaster backs the unit with the best warranty in the industry and a nationwide service force.
If we can be of any assistance during set-up or usage please call our toll free number at 1-800-331-3578
where trained Customer Service representatives are anxious to help you, or visit us at
www.StairMaster.com
Jay Kirkham
Vice President of Manufacturing and Customer Service
- 4 -
Page 5
The StairMaster team has developed and produced this 4100
consumer StairClimber for optimum safety and has been tested to
assure compliance to all applicable structural and electrical
standards. However, for the customer to obtain the safest use
of this machine, PLEASE READ THE FOLLOWING SAFETY
INSTRUCTIONS.
CAUTION: RISK OF INJURY TO PERSONS – TO
AVOID INJURY, READ THE ENTIRE OWNER’S
MANUAL PRIOR TO OPERATING.
This symbol appearing throughout this manual means:
Attention! Be Alert! Your safety is involved.
Warning
1. The external power supply should always be unplugged
from the AC wall outlet before removing or installing
parts. Never make adjustments or repairs while an exercise
program is in progress.
2. close supervision is necessary whenever the machine is used
by or near children.
3. Keep your hands away from all moving parts and keep your
feet on the pedals while exercising. Do not operate machine
with covers removed.
4. Use this machine only for its intended use as described in
this manual. Do not use parts, attachments or accessories
other than those provided by StairMaster or Nautilus
Health and Fitness.
- 5 -
Page 6
5. Do not use external power supply if it has a damaged cord
or plug, if it is not working properly, if it has been dropped
or damaged, or dropped into water. Contact your equipment
dealer or our Customer Service Department at 1-800-3313578 to arrange for the return and replacement of
damaged parts.
6. Connect the external power supply to a properly grounded
AC wall outlet. Keep all cords away from heated surfaces.
7. To disconnect the external power supply, remove the plug
from the AC wall outlet.
8. Never drop or insert objects into any openings on the
machine.
9. Do not use this machine outdoors.
The safety level given by the design of this equipment can only be
maintained when the equipment is regularly examined for damage
and wear. Failure to follow guidelines may compromise the
effectiveness of the exercise experience, expose yourself and
possibly others to injury and reduce the longevity of the
machine. Follow all training instructions listed in the manual
and/or on the machine. Physical injury may result from
incorrect or excessive training.
The exercise guidelines provided in this manual are not meant to
substitute for trained medical or fitness professionals. Do not
begin any exercise program without first consulting with a
medical physician.
- 6 -
Page 7
4100PT Placement
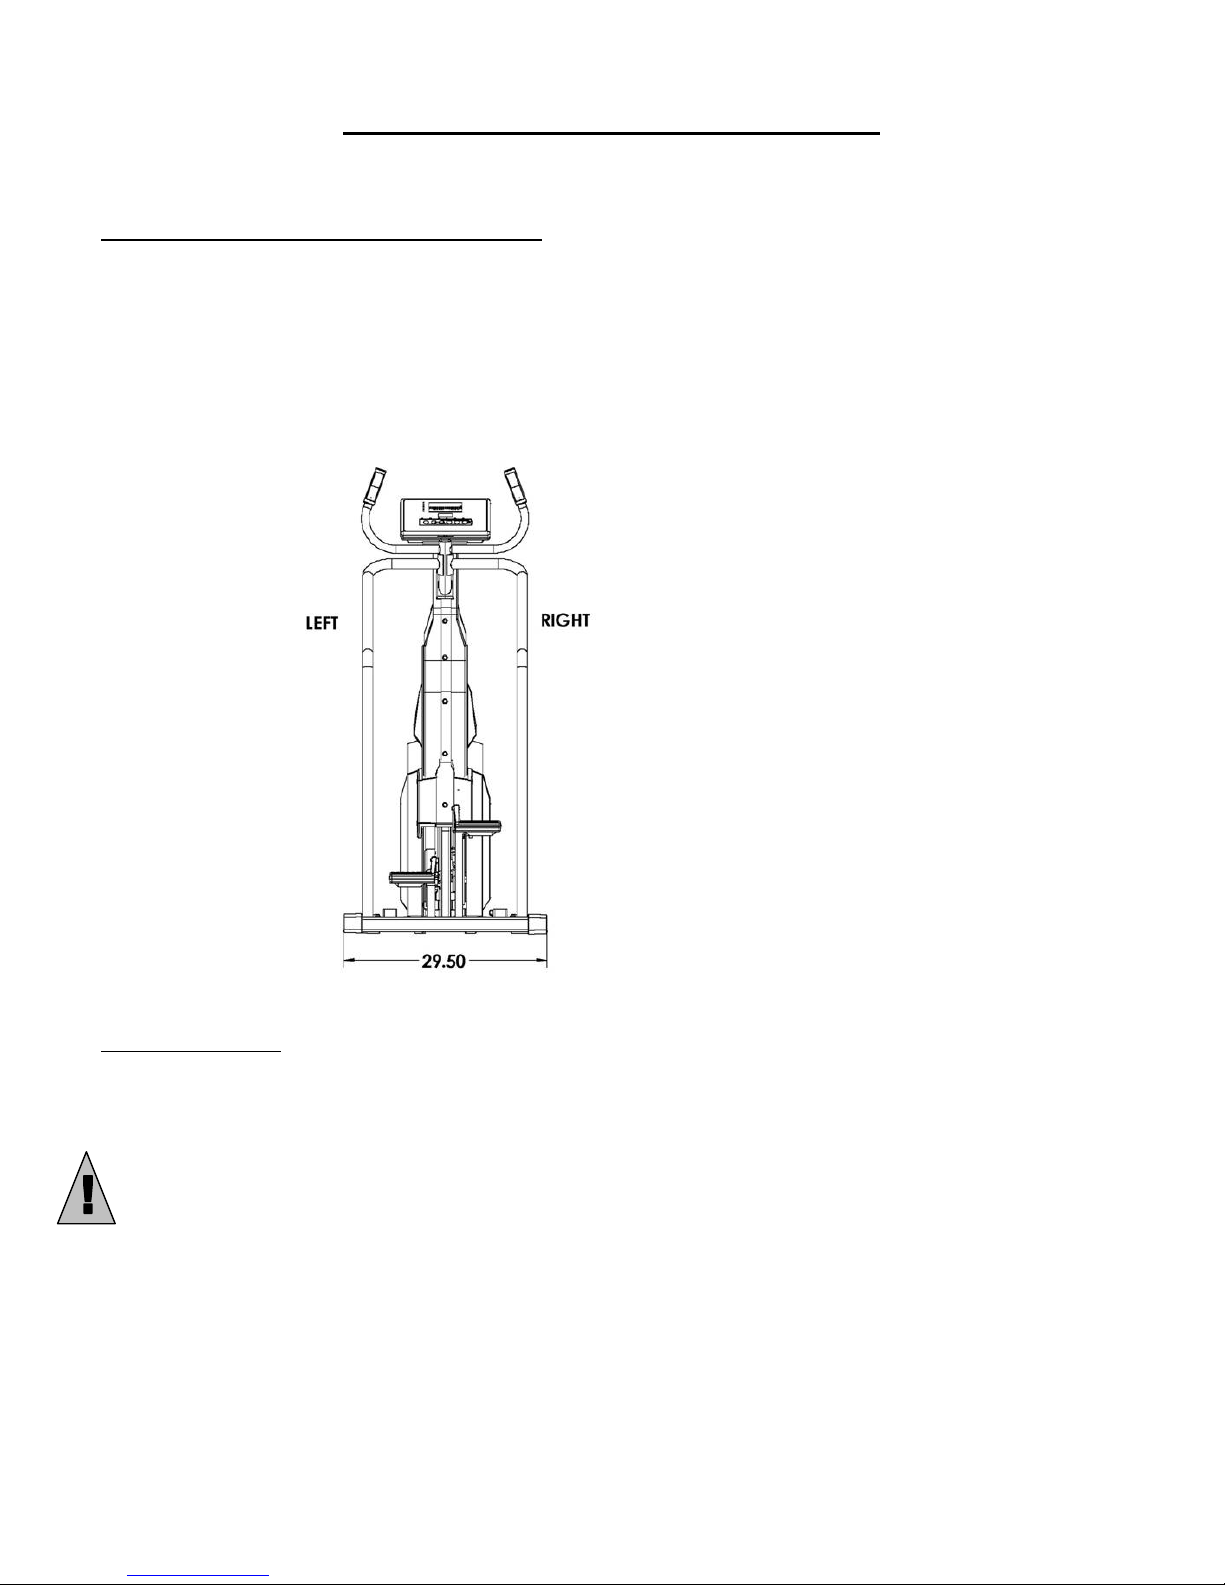
Right hand vs. Left hand
References to the right hand (RH) and left hand (LH) side of
the machine are based on the final user position facing the
console.
Placement
Your 4100PT StairClimber may be placed on either hard
flooring or low carpet.
We recommend placing a rubber mat or other protective
material under your stepper to prevent grease and oil from
damaging your flooring.
- 7 -
Page 8

Moving
Your 4100 StairClimber is easily movable. Verify the two
transport wheels are secure with cotter pins. Then grasp
the siderails just below the console, with a foot resting
against the front frame leg, tilt the machine towards you so
it is balancing on two transport wheels. Push or pull
machine to the desired location and gently set the rear of
the machine back down to the floor.
For added convenience, the width of your 4100 is only
29.5”, narrow enough to fit through most residential
internal doorways.
CAUTION: Your 4100 StairClimber weighs approximately130
pounds, Always use care when moving equipment and ask for
additional assistance if necessary.
4100PT Placement
Leveling
The four hexagonal leg caps at the end of the front and
rear legs are used for leveling. The caps are asymmetric,
numbered 1-4 with 1 being the thinnest wall and 4 being the
thickest. To adjust, slide the caps off the ends of the legs
and rotate to the desired thickness and slide back over the
leg. The caps fit snuggly to the frame and some force may
need to be applied.
- 8 -
Page 9

4100 PT Hardware/Parts List
For your safety, please read and follow all assembly
instructions. If you have any questions, please contact your
equipment dealer or StairMaster customer service @ 1-
3578.
Hardware Included:
•
(4) ¼-20 X 1.00” Button Head Screw [#25777]
•
(2) ¼-20 X 2.25” Button Head Screw [#25795]
•
(8) 3/8-16 X 1.00” Button Head Screw [#25796]
•
(2) 3/8-16 X 2.437” Button Head Screw [#25807]
•
(4) ¼” Internal Star Lock Washer [#22138]
•
(16) 3/8” Flat Washer [#21462]
•
(8) Plastic Rivets [#18072]
•
(6) 3/8-16 Nylon Insert Nuts [#22029]
Loose Parts Included:
800-331-
•
(1) Rubber neck grommet [#21578]
•
(1) Power Supply [#25726]
Tools Required
•
Razor knife
•
5/32” Allen wrench (included)
•
7/32” Allen wrench (included)
•
9/16 Open End wrench
•
Hammer
•
Tape
- 9 -
Page 10
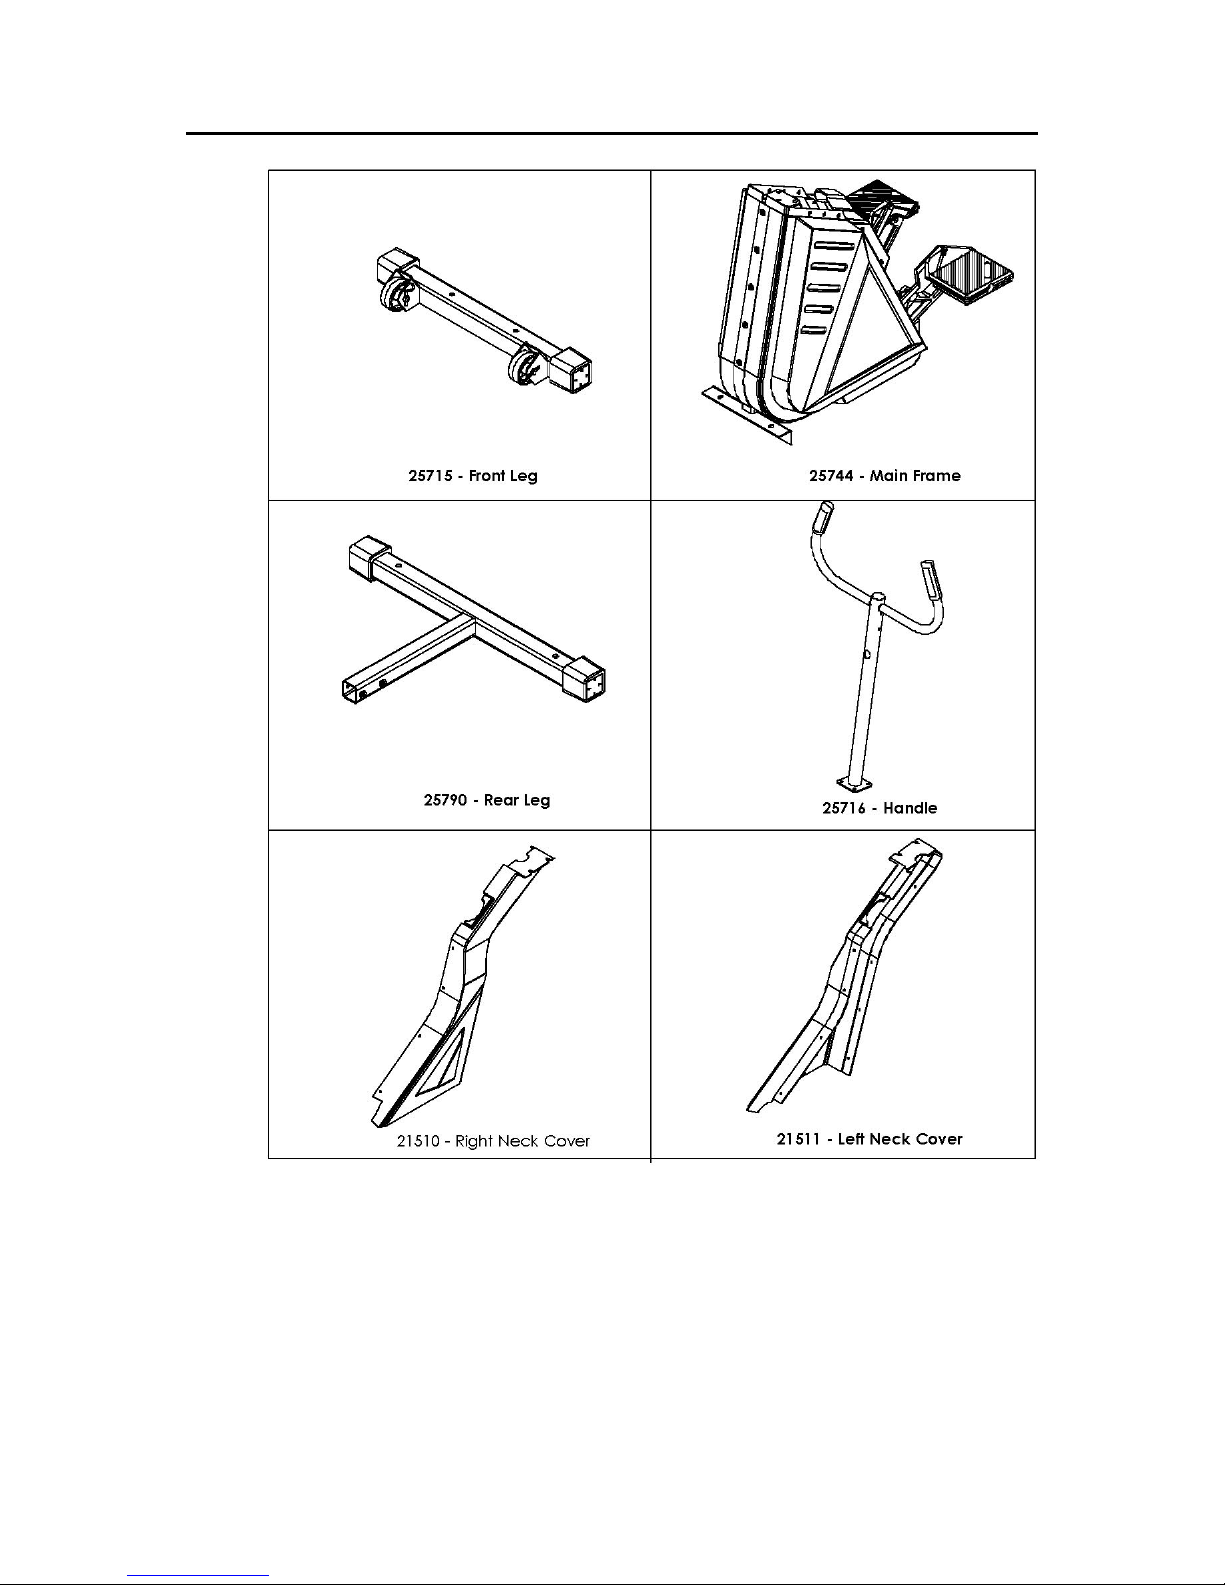
4100 PT Hardware/Parts List
- 10 -
Page 11
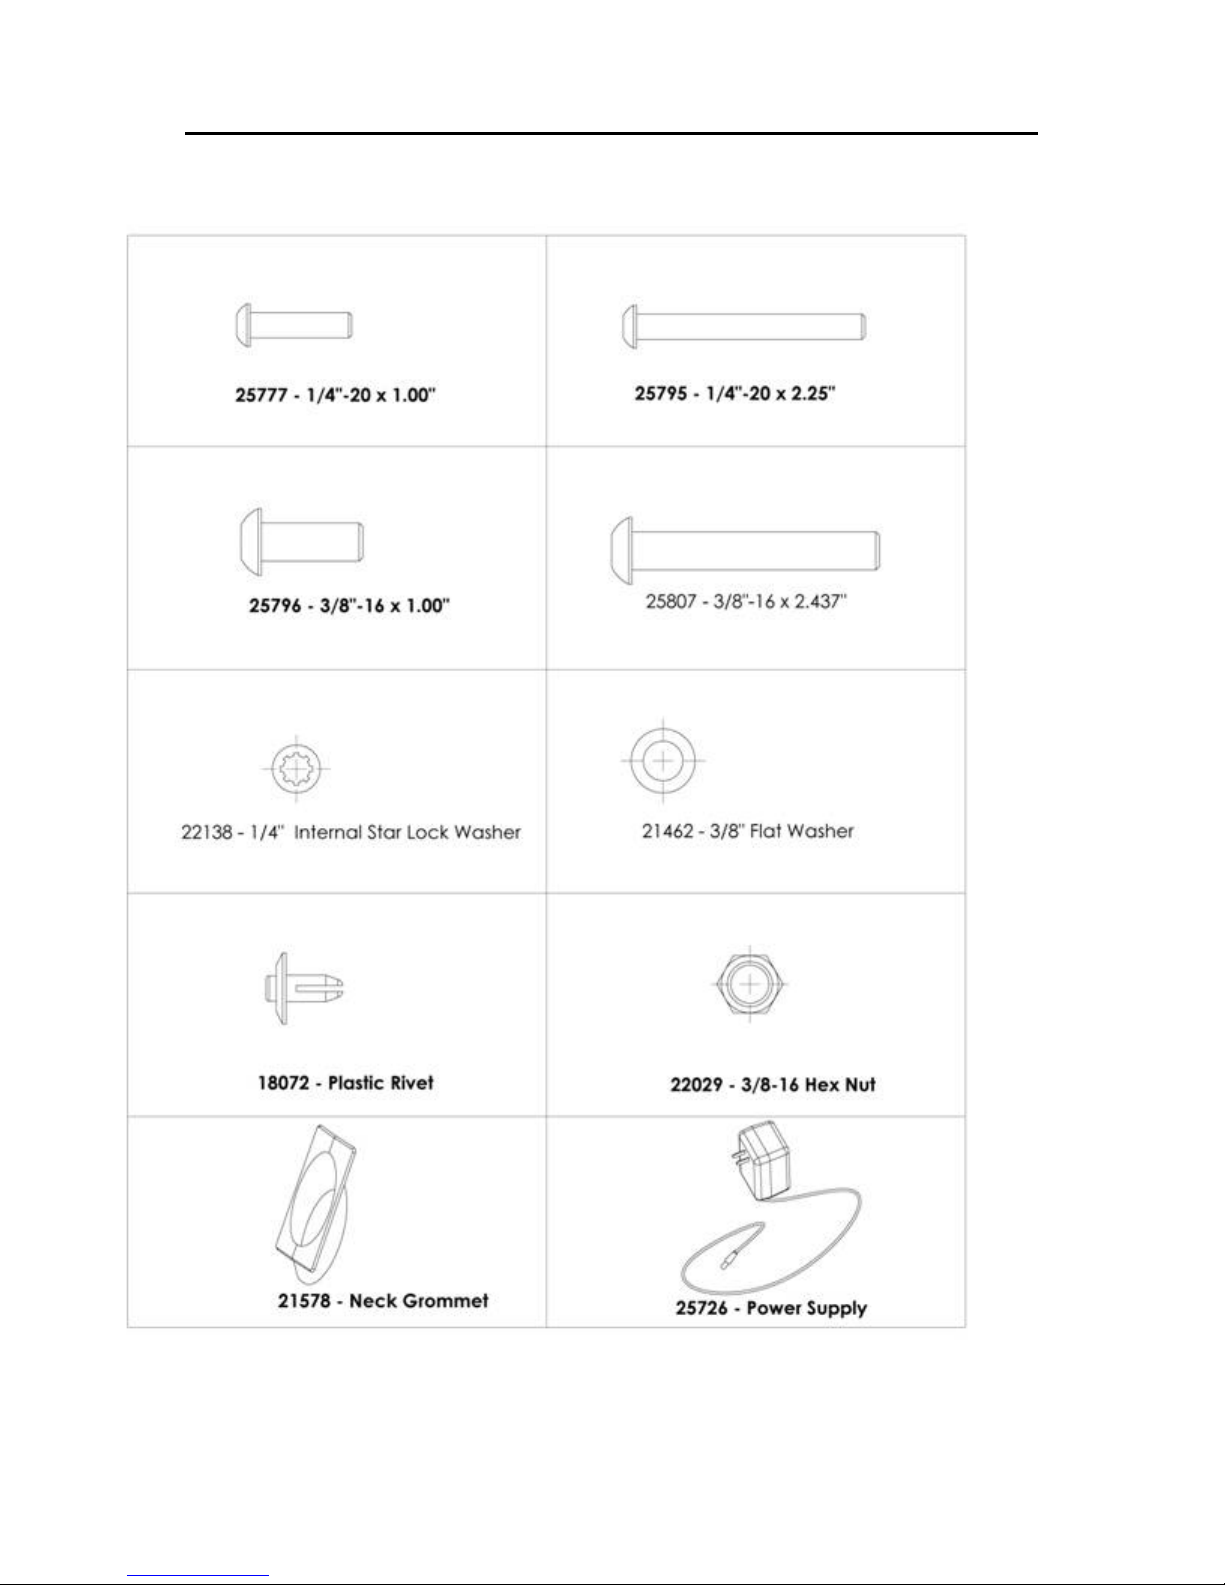
4100 PT Hardware/Parts List
- 11 -
Page 12
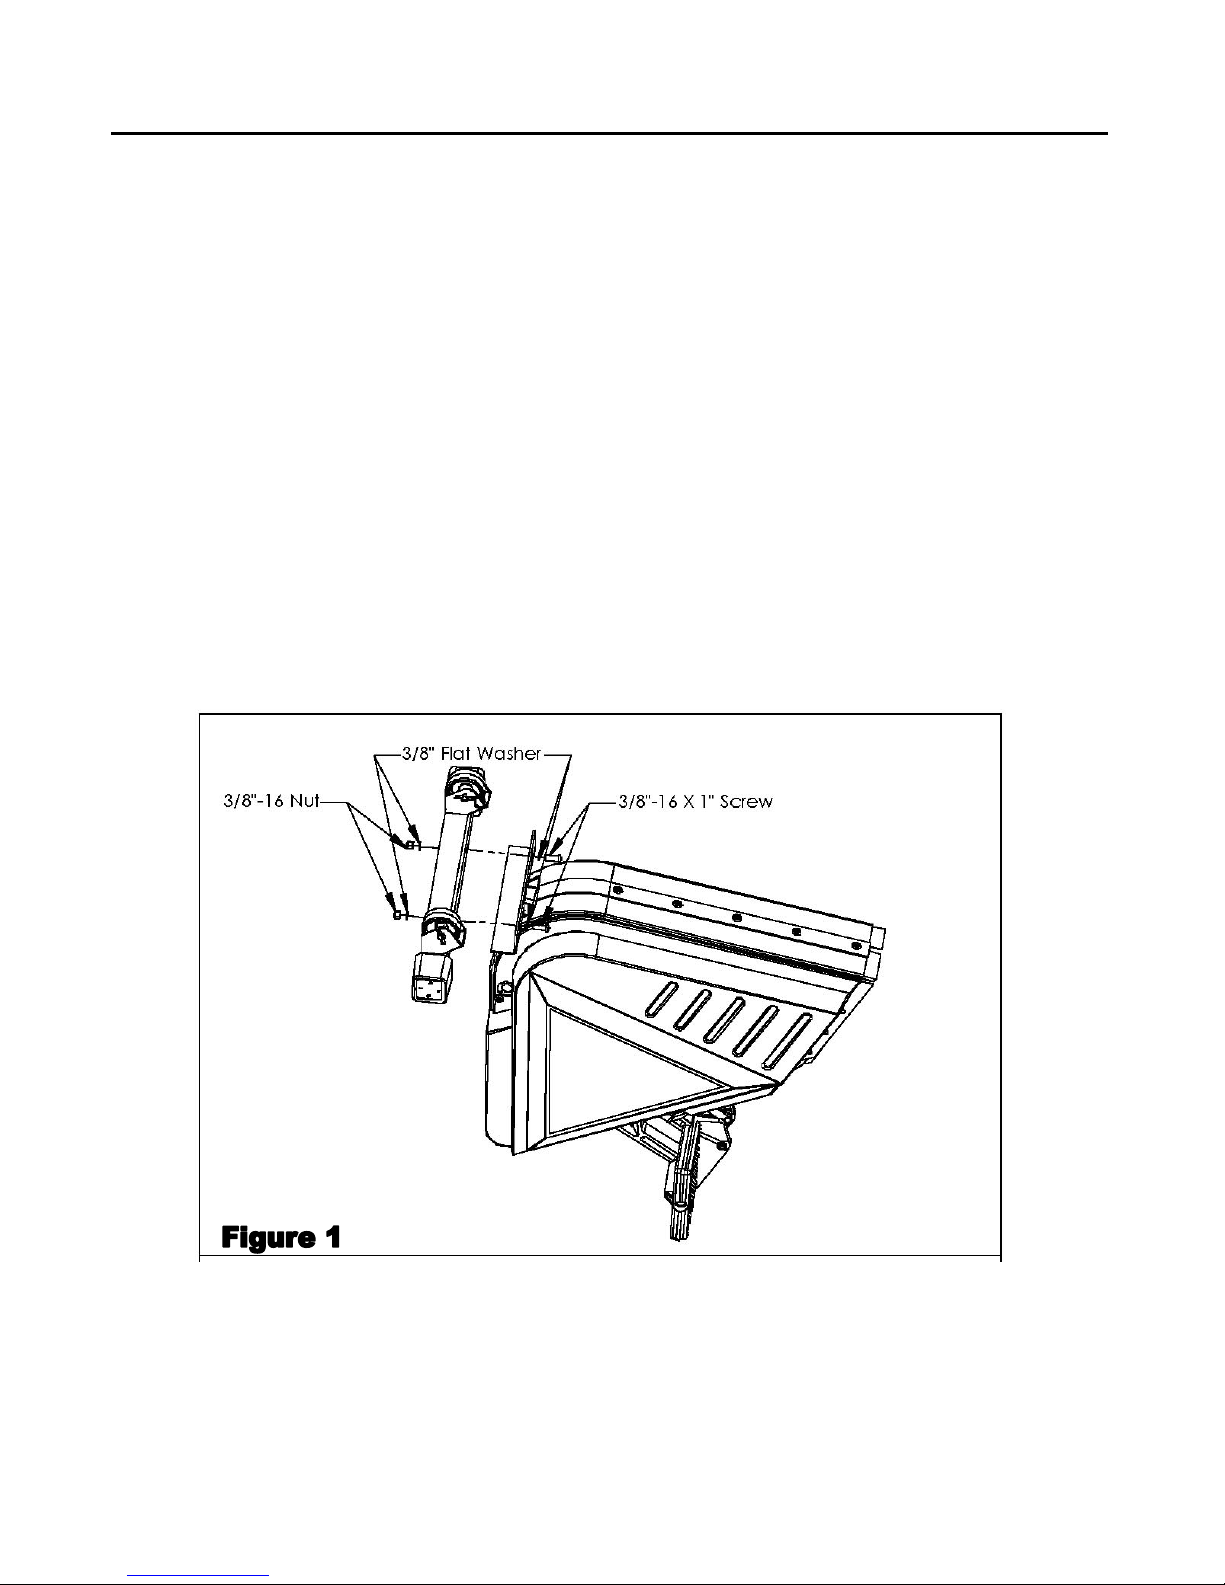
4100PT Unpacking and Assembling
1. Use a razor knife to cut Box 1 along the dotted line marked on the
box. Remove the cover.
2. Use a razor knife to cut the tape on Box 2. Remove the cover.
3. Remove the packing materials from around the Stepper.
4. Verify the all the components and hardware are in the boxes. (See
above Parts List.) .
5. Get Main Frame [#25744] and stand it on its back post and pedals.
(See Figure. 1) .
6. Install Front Leg [#25715] on Main Frame as shown in Figure 1.
7. Loosely install (qty 2) 3/8-16 x 1.00” screws [#25796], (qty 4) 3/8
flat washers [#21462], and (qty 2) 3/8-16 hex nuts [#22029] into
front leg and the front top flange of leg bracket on the main frame.
Once both screws are in place, tighten using a 9/16” open end wrench
and a 7/32” allen wrench. (See Figure 1)
- 12 -
Page 13
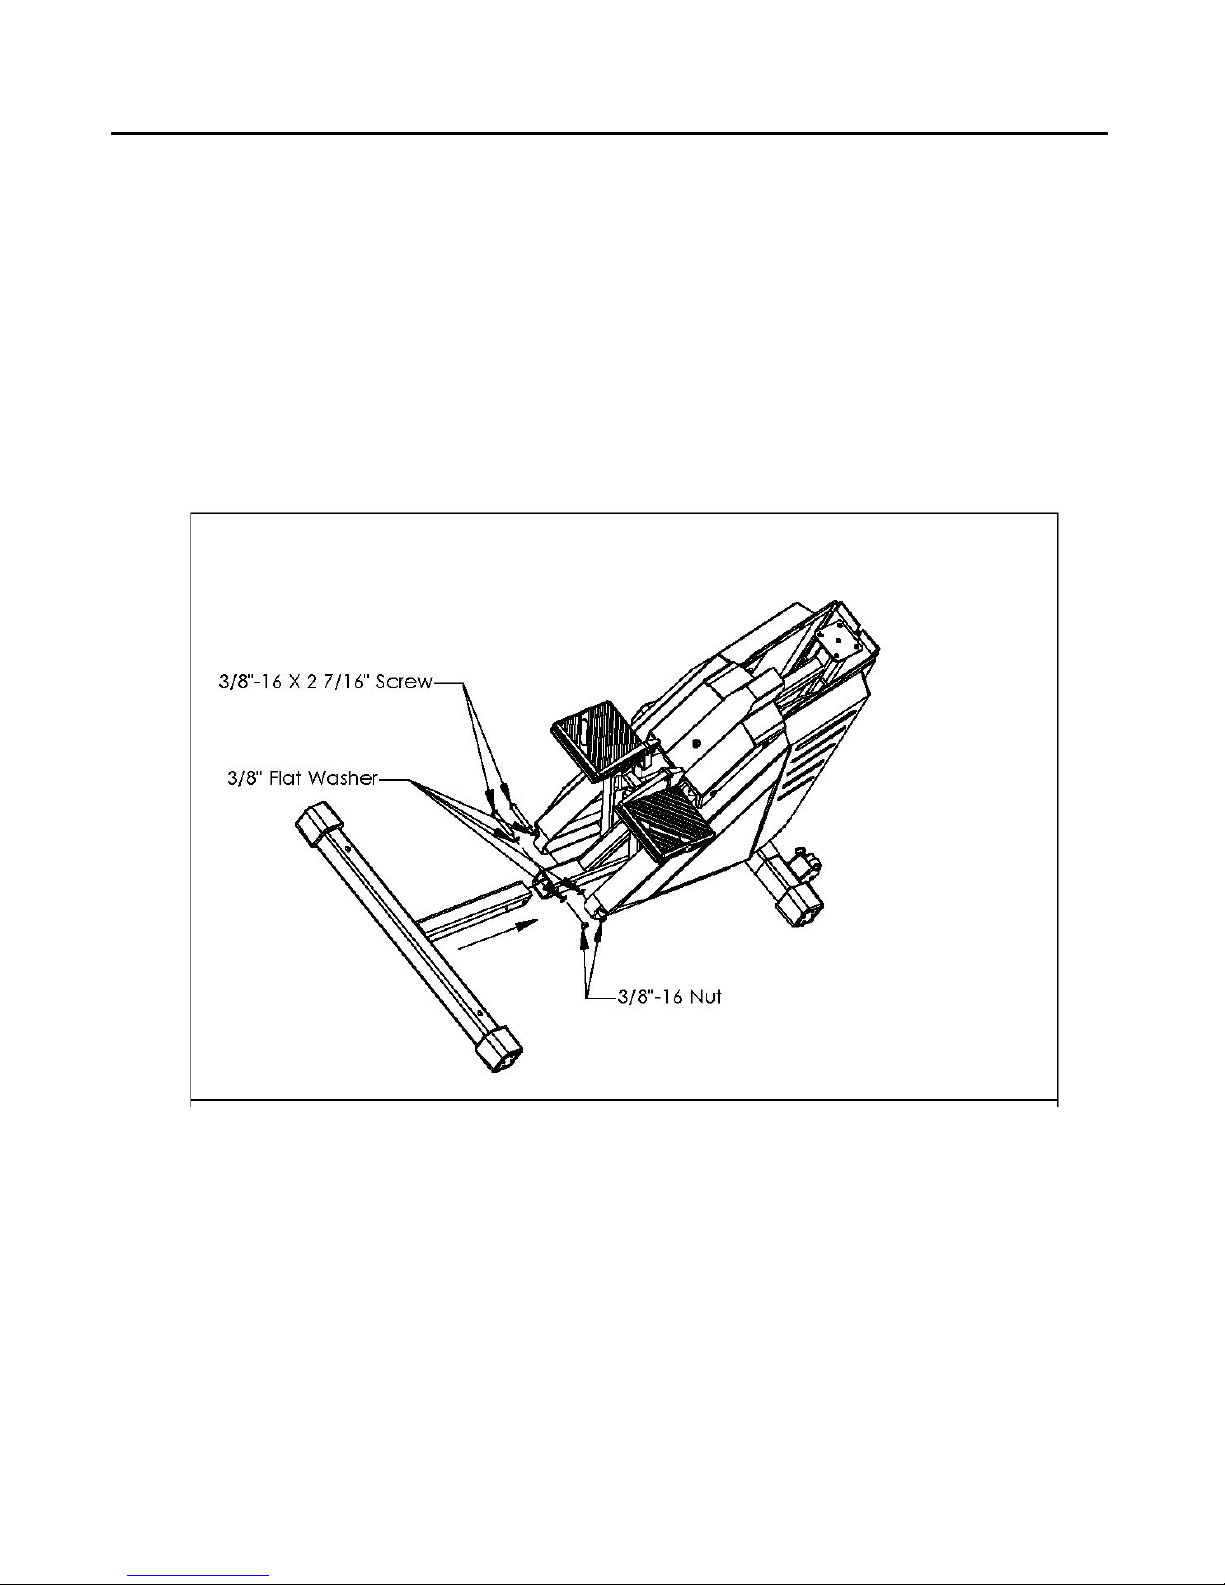
4100PT Unpacking and Assembling
8. Set the stepper back in its upright position. (See Figure 2).
9. Install Rear Leg [#25790] by slightly lifting the rear of the stepper
and slide the front tube of the rear leg into the rear tube of the
stepper.(See Figure 2).
Align the holes in the two tubes and loosely install (qty 2) 3/8-16 x
2.437” screws [#25807], (qty 4) 3/8 flat washers [#21462], and (qty
2) 3/8-16 hex nuts [#22029]. Once both screws are in place tighten
using a 9/16” open end wrench and a 7/32” allen wrench. (See Figure
2)
Figure 2
- 13 -
Page 14
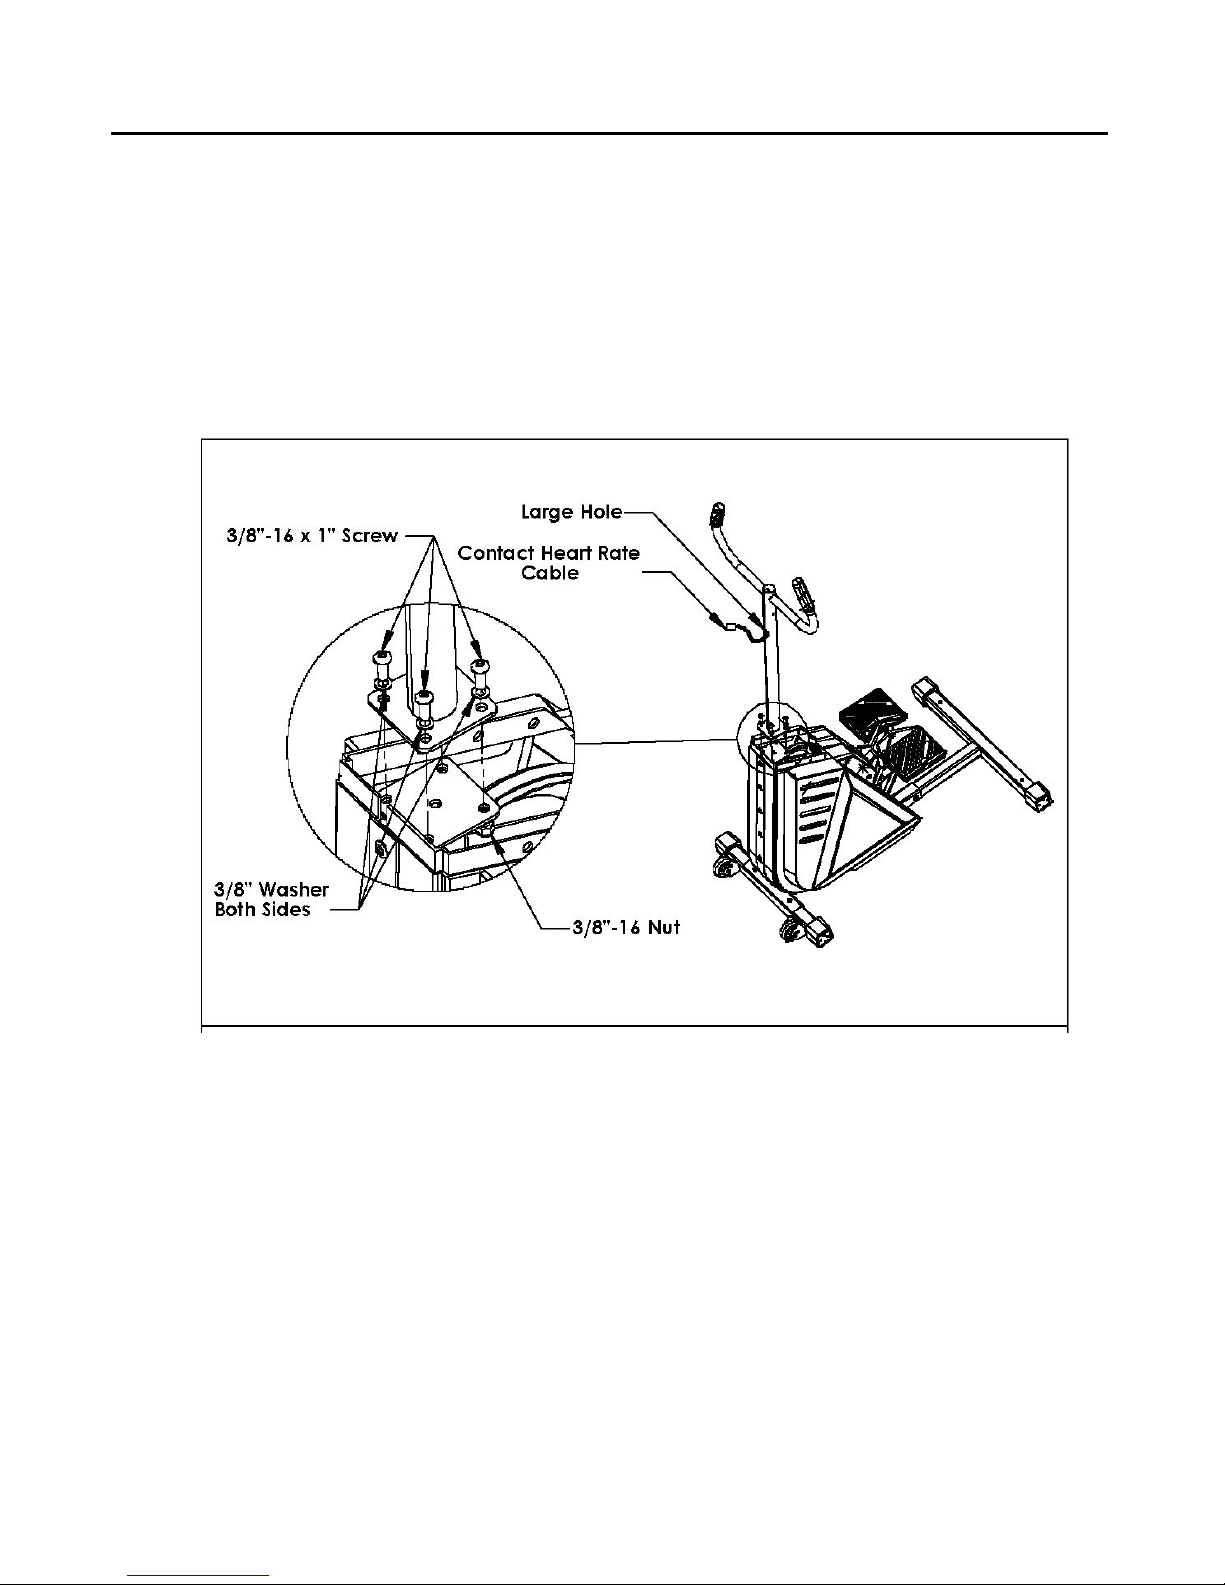
4100PT Unpacking and Assembling
Install Handle [#25716] by aligning the four holes on the
10.
bottom flange of the handle with the four holes on the top front
flange of the stepper. The large hole with the contact heart rate
cable should be facing forward, away from the user position. (See
Figure 3)
11. Loosely install (qty 4) 3/8-16 x 1” screws [#25796], (qty 8) 3/8
flat washers [#21462], and (qty 4) 3/8-16 hex nuts [#22029]. Once
all four screws are in place, tighten using a 9/16” open end wrench
and a 7/32” allen wrench. (See Figure 3)
Figure 3
- 14 -
Page 15
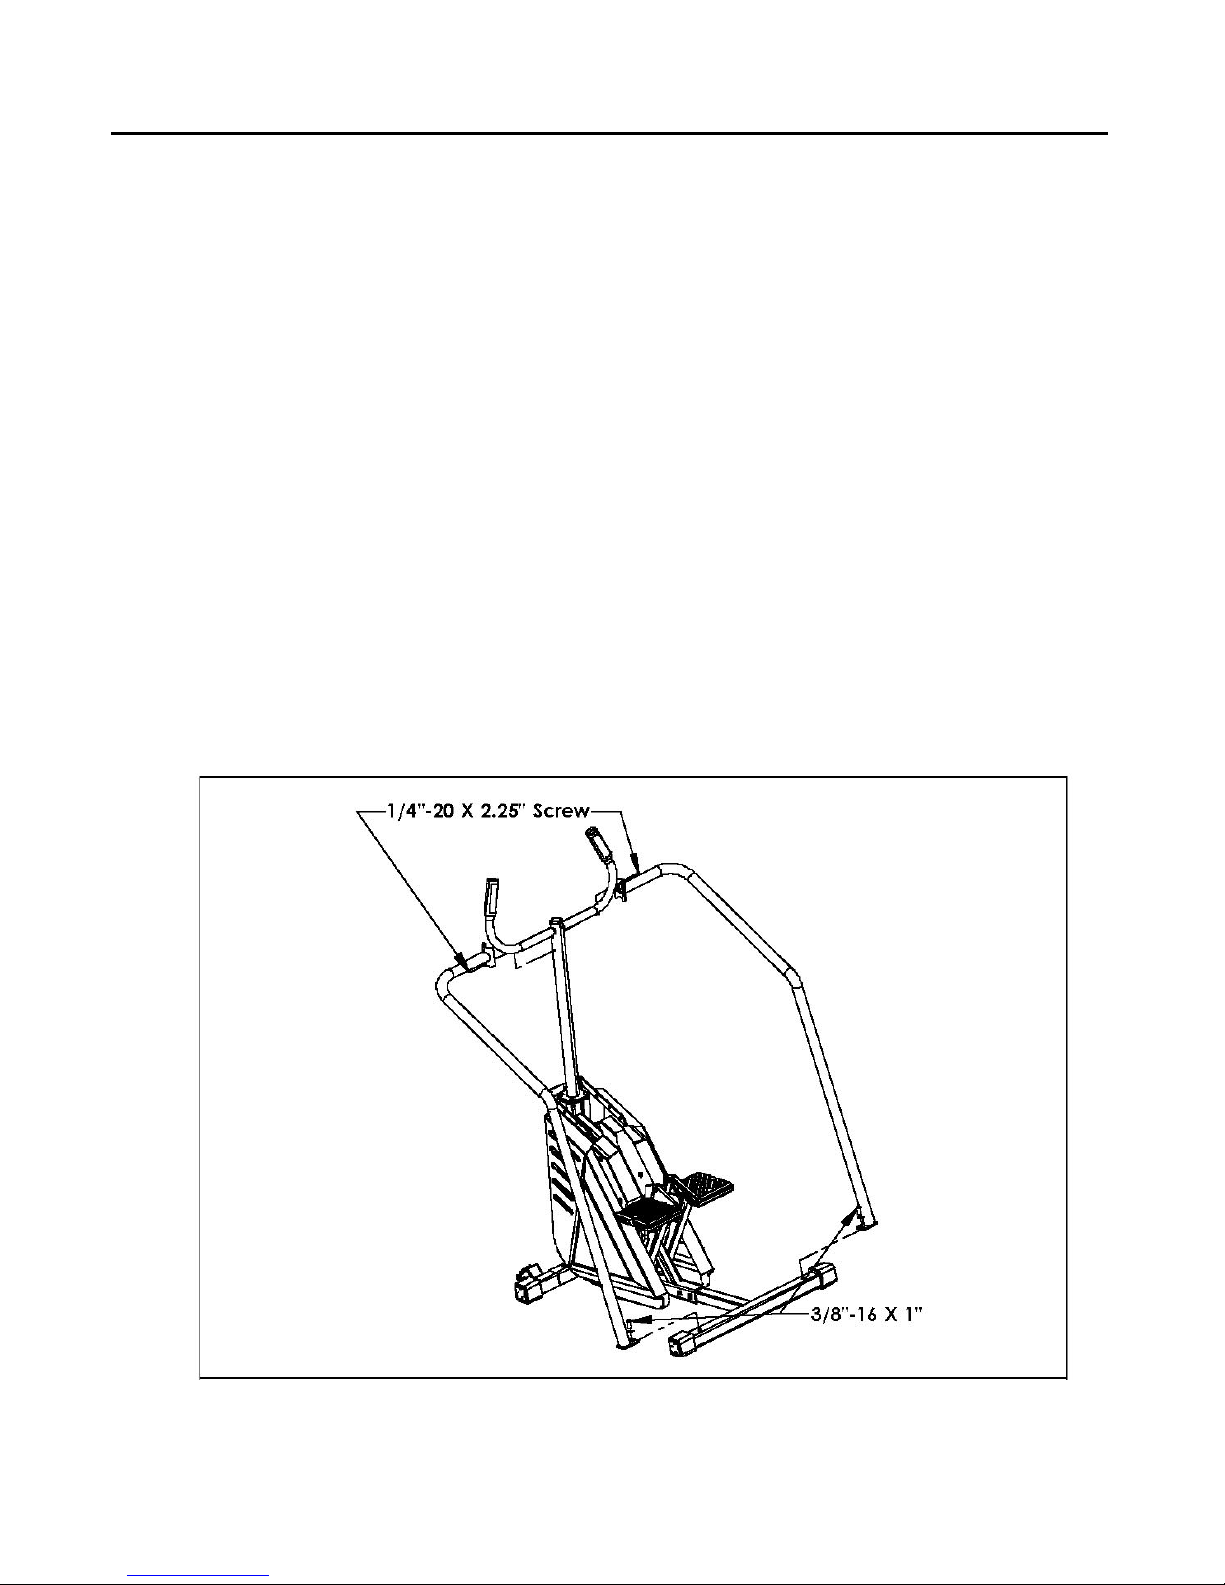
4100PT Unpacking and Assembling
12. Install Left Handrail [#25737] by aligning the hole on the
bottom rear flange of the handrail with the hole on the top of the
rear leg of the stepper. Make sure the top round bracket of the
handrail is cupping the front handle tube. (See Figure 4)
13. Loosely install (qty 1) 3/8-16 x 1” screw [#25796] and (qty1)
3/8 flat washer [#21462]. (See Figure 4)
14. Install Right Handrail [#25740] by aligning the hole on the
bottom rear flange of the handrail with the hole on the top of the
rear leg of the stepper. Make sure the top round bracket of the
handrail is cupping the front handle tube. (See Figure 4)
15. Loosely install (qty 1) 3/8-16 x 1” screw [#25796] and (qty1)
3/8 flat washer [#21462]. (See Figure 4)
16. Loosely install (qty 2) ¼”-20 x 2.25” screws [#25795] in the top
round flange of the handrail. (See Figure 4)
17. Once all four screws are in place, tighten the two 3/8-16 screws
using a 7/32” allen wrench and the two ¼”-20 screws using a 5/32”
allen wrench.
Figure 4
- 15 -
Page 16
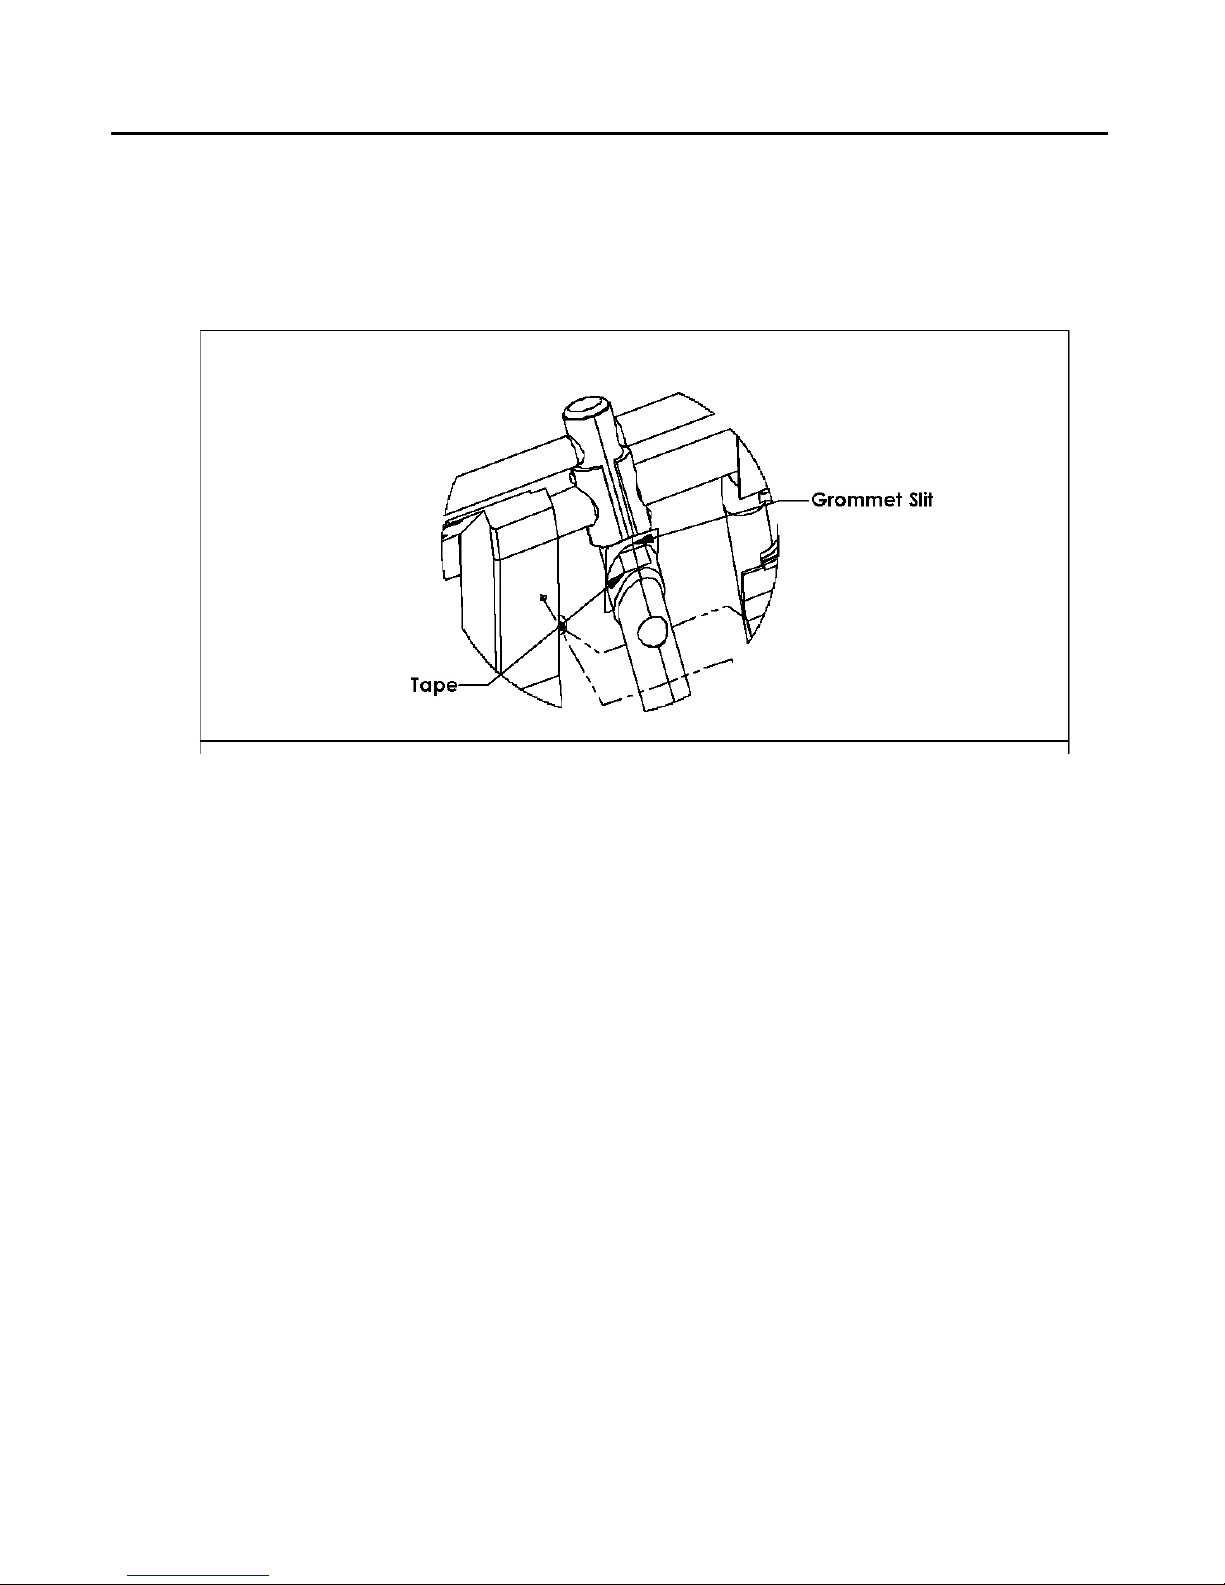
4100PT Unpacking and Assembling
18. Place the neck grommet [#21578] round the stepper neck with
the flange up and the slit in the grommet facing forward away from
the stepper. Use a small piece of tape to secure the grommet to the
around the neck. (See Figure 5)
Figure 5
- 16 -
Page 17
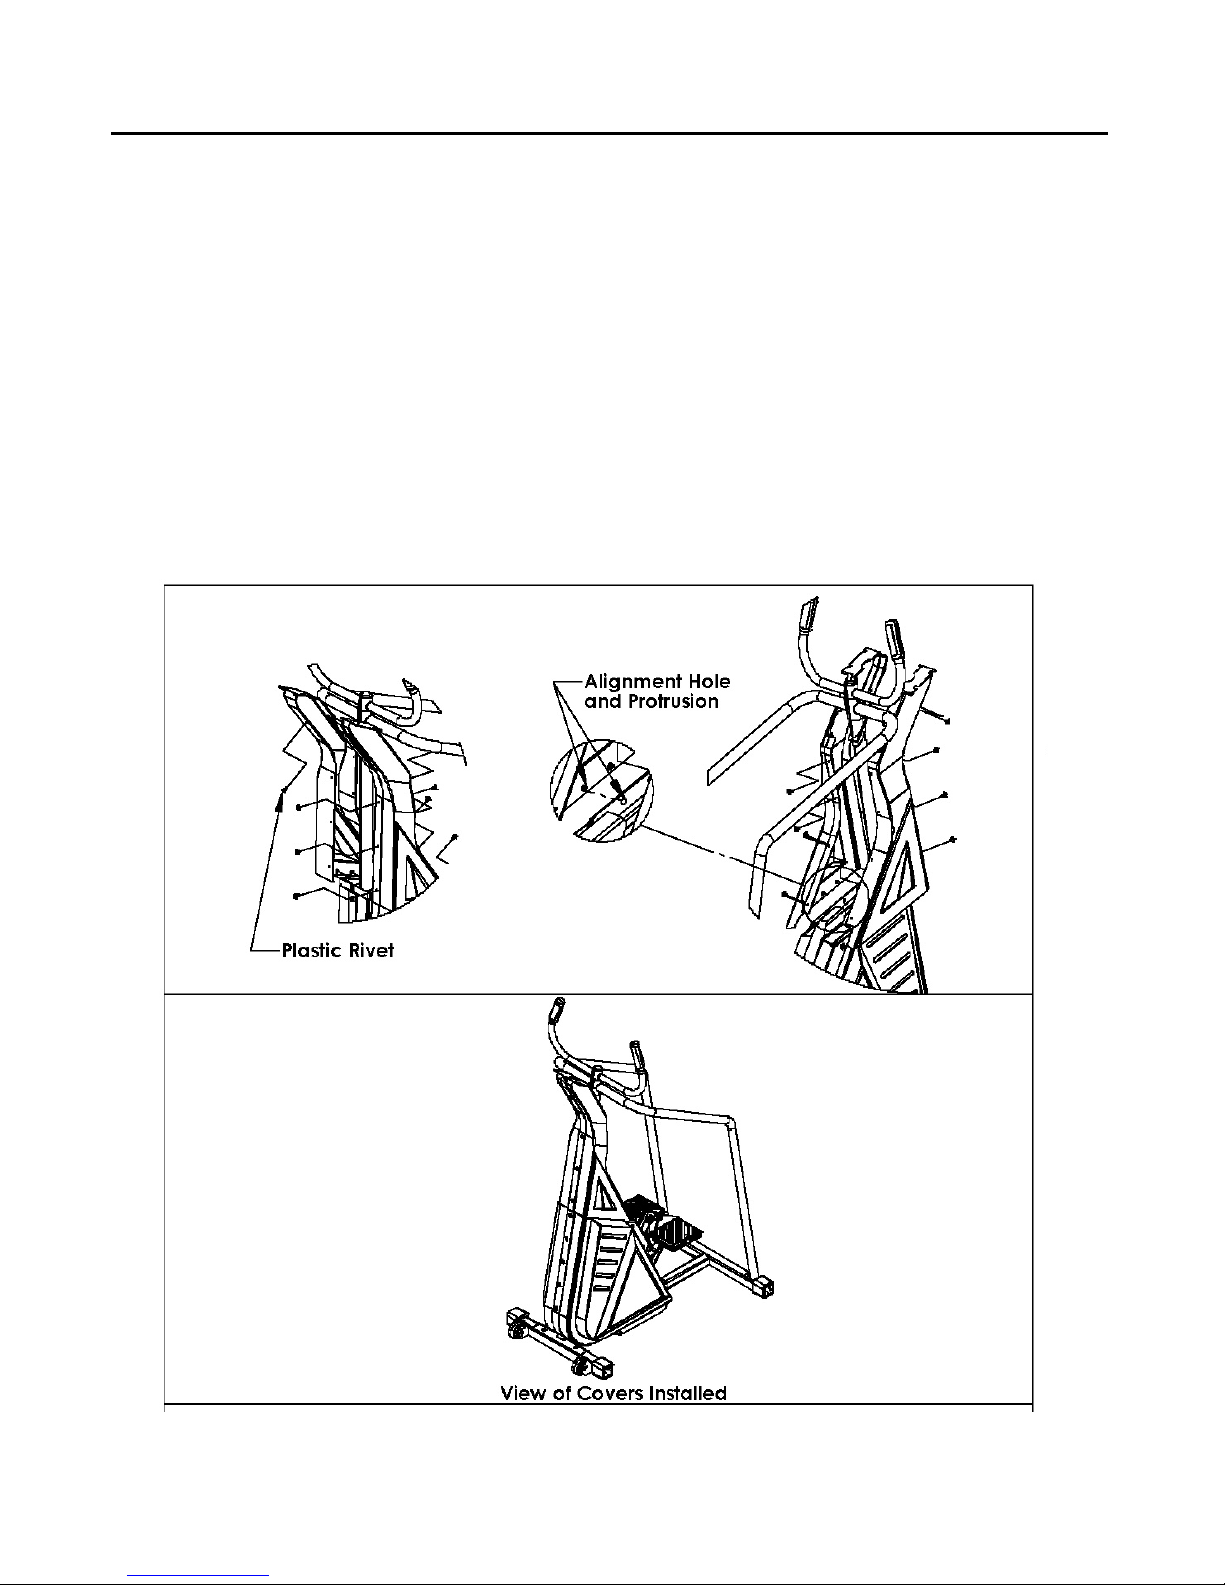
4100PT Unpacking and Assembling
19. Hold the right neck cover [#21510] in place. There are two
holes in the top of the Main Stepper Cover that align with two round
protrusions in the bottom of the neck cover. Run the main power
cable and contact heart rate cable inside the cover through the top
center hole in the neck cover. (See Figure 6)
20. Install the left neck cover [#21511] by sliding it in place over
the inside edge of the right neck cover and align the two holes in the
top of the main stepper cover with the two round protrusions in the
bottom of the neck cover. Position the neck grommet so that the top
flange of the grommet in resting on the top of the neck covers. (See
Figure 6)
Align rivet holes in the two neck covers and install (qty 8) plastic
rivets. Lightly hammer the head of the rivet until it is seated in the body
of the rivet. (See Figure 6)
Figure 6
- 17 -
Page 18
4100PT Unpacking and Assembling
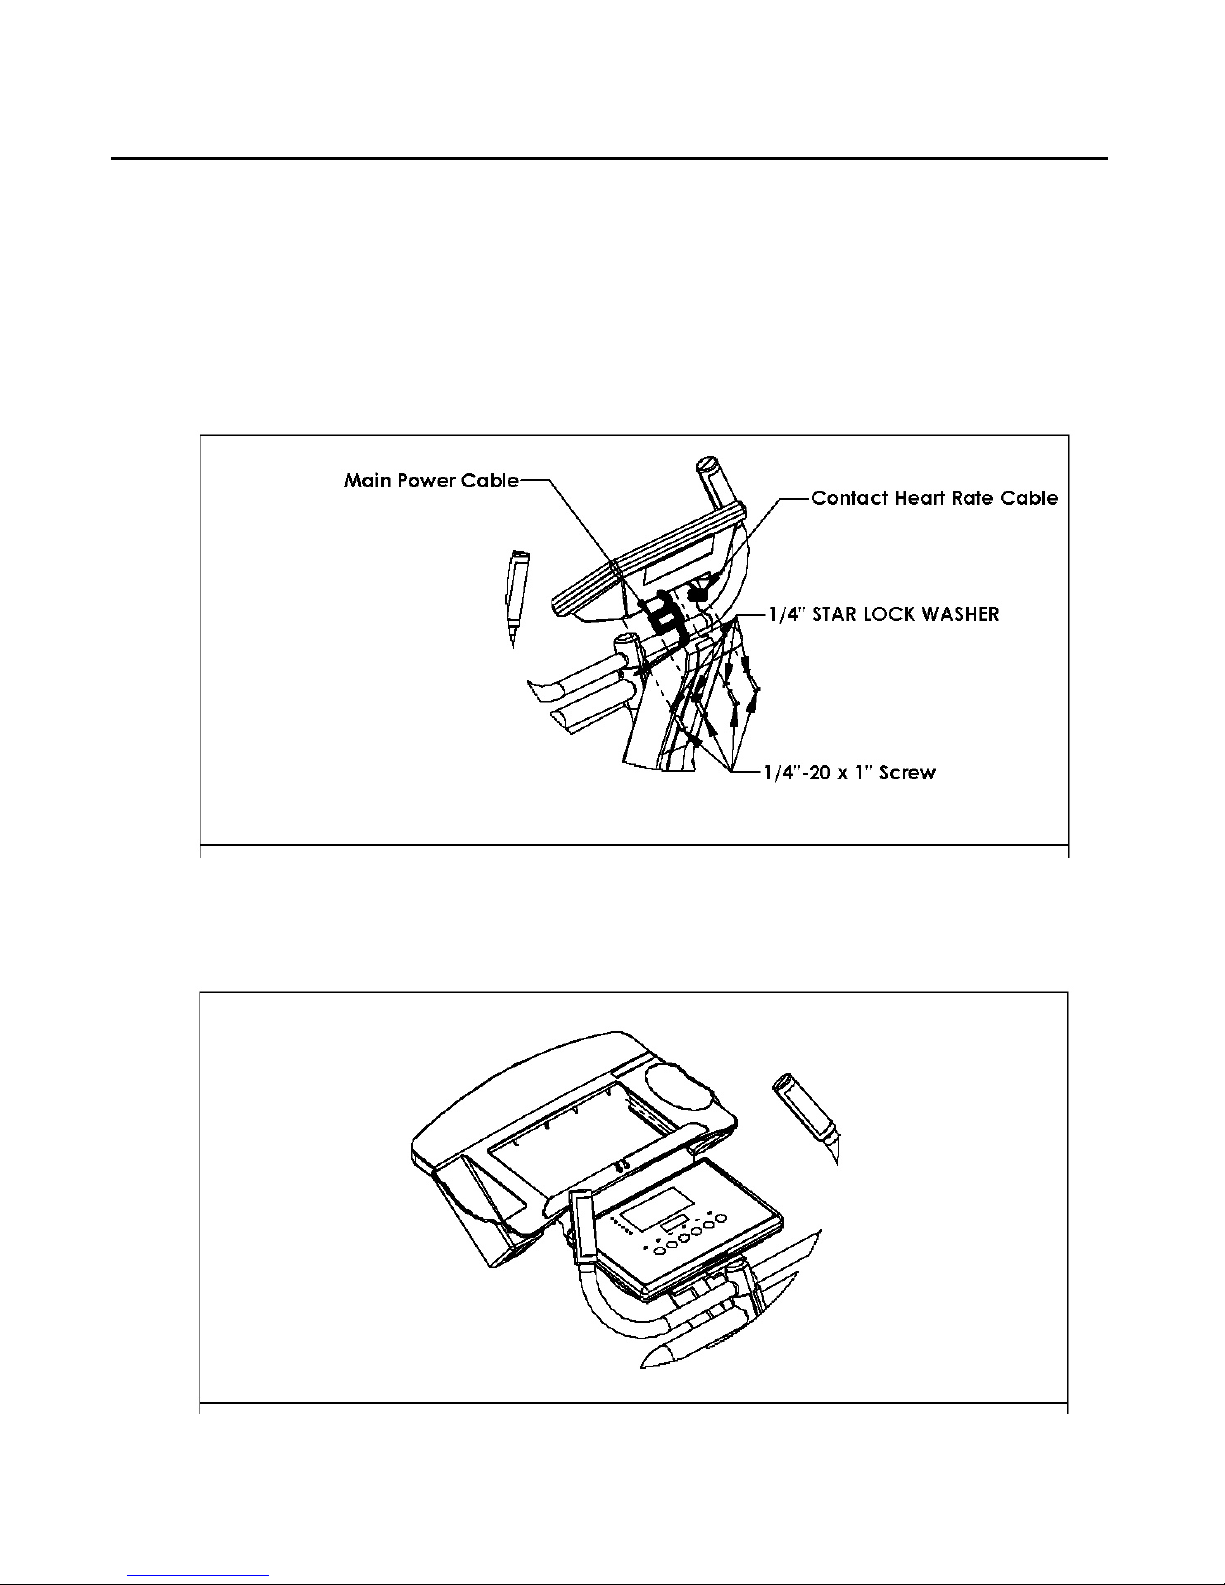
21. Hold Console [#25773] between the handle and the neck
covers. Plug in the main power cables and the contact heart rate
cables.
22. Install Console [#25773] by aligning the four threaded holes
with the four slots in the top of the Neck Covers. Loosely install
(qty 4) ¼”-20 x 1” screws [#25777] and (qty 4) ¼” internal star lock
washers [#22138]. Once all four screws are in place, tighten the
four ¼”-20 screws using a 5/32” allen wrench. (See Figure 7)
Figure 7
23. Install Reading Rack [#22775] by aligning the edges of the
reading rack with the console and sliding it down onto the console.
(See Figure 8)
Figure 8
- 18 -
Page 19
4100PT Unpacking and Assembling
24. Install Left and Right Pedal Pads [#18054] by positioning the
front edge of the pedal pad over the Front edge of the pedal and
snapping it out the front edge. Pull the pedal pad back and down
over the back edge of the pedal. The will require a slight amount of
force to stretch the pad over the pedal.
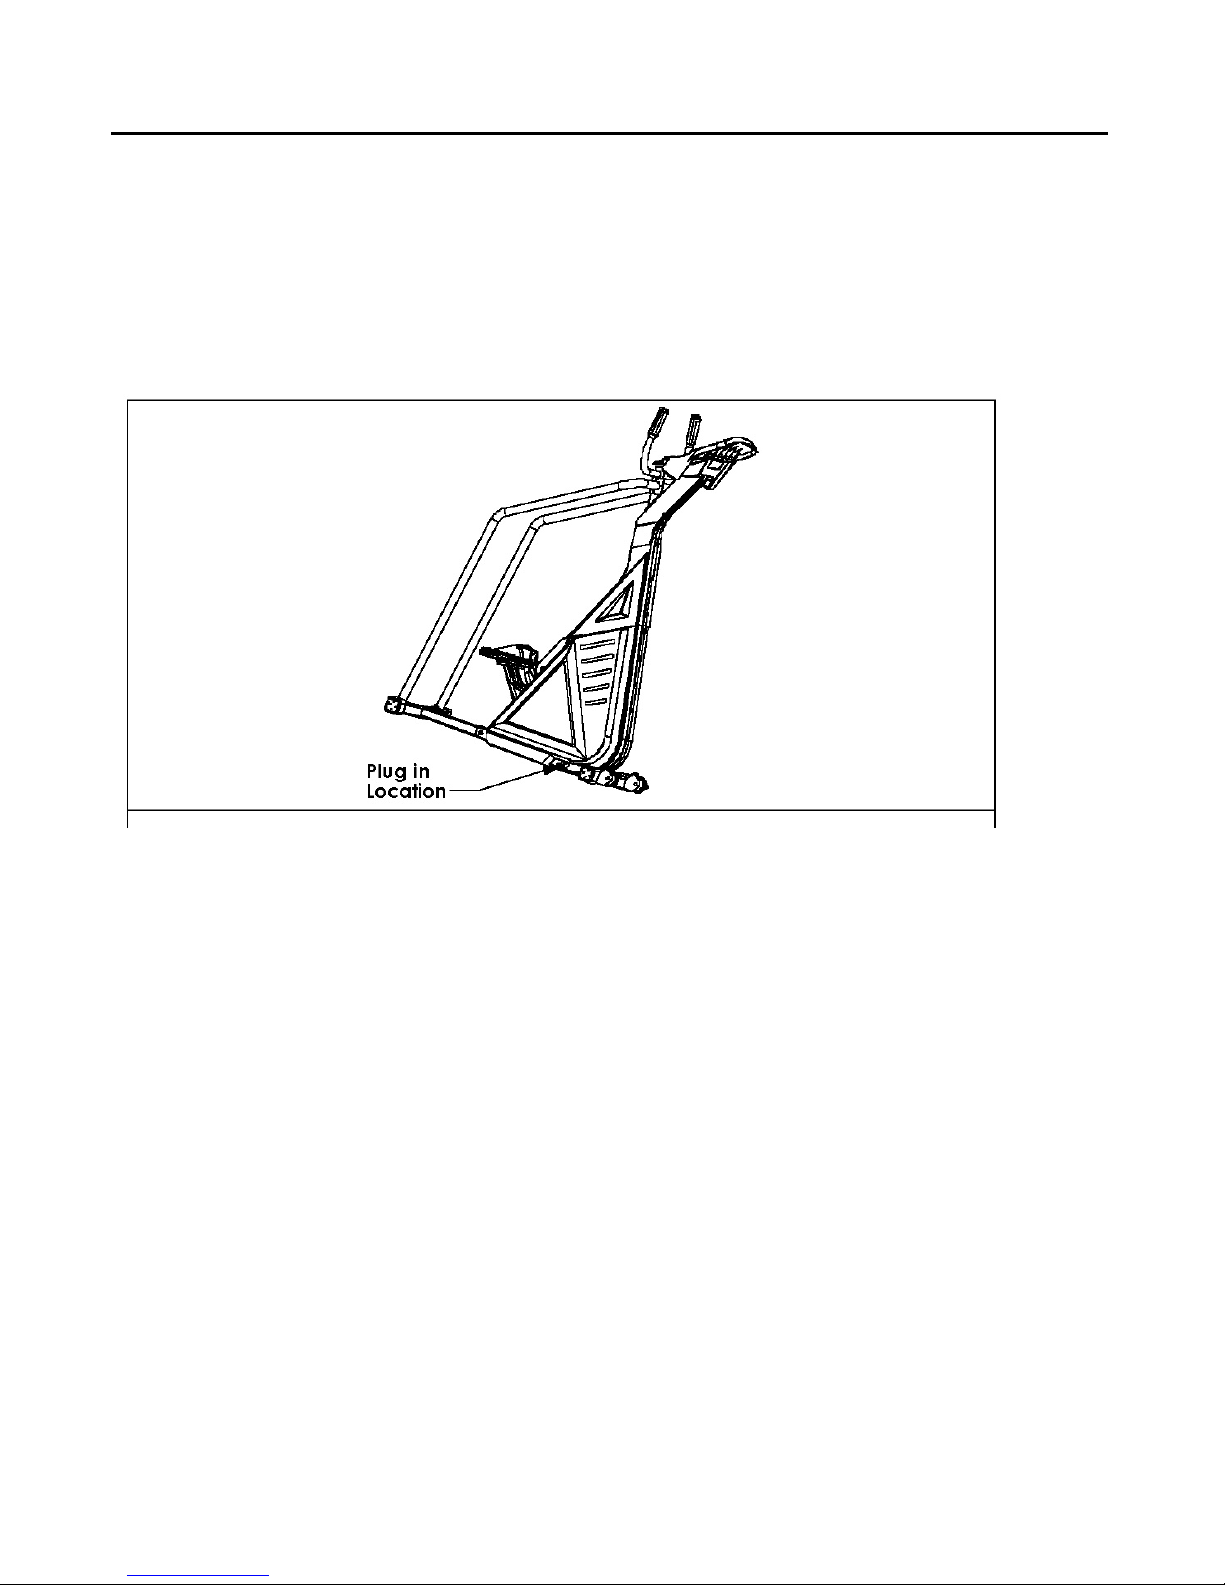
25. Plug Power Supply [#25726] into the bottom left side of the
stepper. See figure 9.
Figure 9
- 19 -
Page 20

Exercise guidelines
For Healthy Aerobic Activity
As published by the American College of Sports Medicine
Fitness Goals:
your individual fitness goals. Some common exercise goals include:
• Weight loss
• Improve body tone and muscular strength
• Increase energy
• Increase cardiovascular endurance
• Reduce stress
The more specific and measurable your goals, the easier it will be to track
your progress. If you have very long-term goals, break them down into
smaller short-term goals to make them easier to achieve. Success breads
success! One of our goals at StairMaster is to help you succeed in
achieving your fitness goals!
Frequency:
Warm up:
body needs more oxygen to fuel your muscles. This increase demand for
oxygen is what causes your heart rate, breathing rate and blood flow to
increase. Your warm-up activity should be progressive and involve all the
muscles you plan to use during your workout. A warm up should involve a
very gradual increase in intensity and range of motion. Your overall
fitness and type of workout will help determine the length of your warm-up,
5-10 minutes is normally recommended. Your warm-up should leave you with
a slightly increased heart and breathing rate but should not leave you
feeling fatigued.
5 to 10 minutes before aerobic activity. When exercising, your
An Important step in developing fitness program is setting
Exercise 3 to 5 days each week.
Duration:
loss is a major goal, recommendations are to maintain at least 30 minutes 5
days a week.
Cool Down:
opposite of the warm up is what is accomplished during the cool down. Your
muscles have been consuming large quantities of oxygen and a gradual
decrease in your intensity if best for your body. Again, the type of workout
and overall fitness will determine the length of your cool down but 5-10
minutes is recommended. The goal of the cool down is to gradually
decrease intensity and range of motion the same muscles used during your
workout. This will allow your heart and breathing rate to return to near
normal levels gradually. then stretch to cool down during the last 5 to
10 minutes.
Maintain your exercise intensity for 30-45 minutes. If weight
Gradually decrease the intensity of your workout, The
- 20 -
Page 21
Exercise Intensity
To obtain maximum cardiovascular benefit from your workouts,
you will need to work out within a defined window. You’ll need
to monitor your exercise intensity to assure you are exercising
within this desired window. There are 3 methods that can be used
to calculate your exercise intensity:
1.Target Heart Rate
2. Perceived Exertion
3. Talk Test
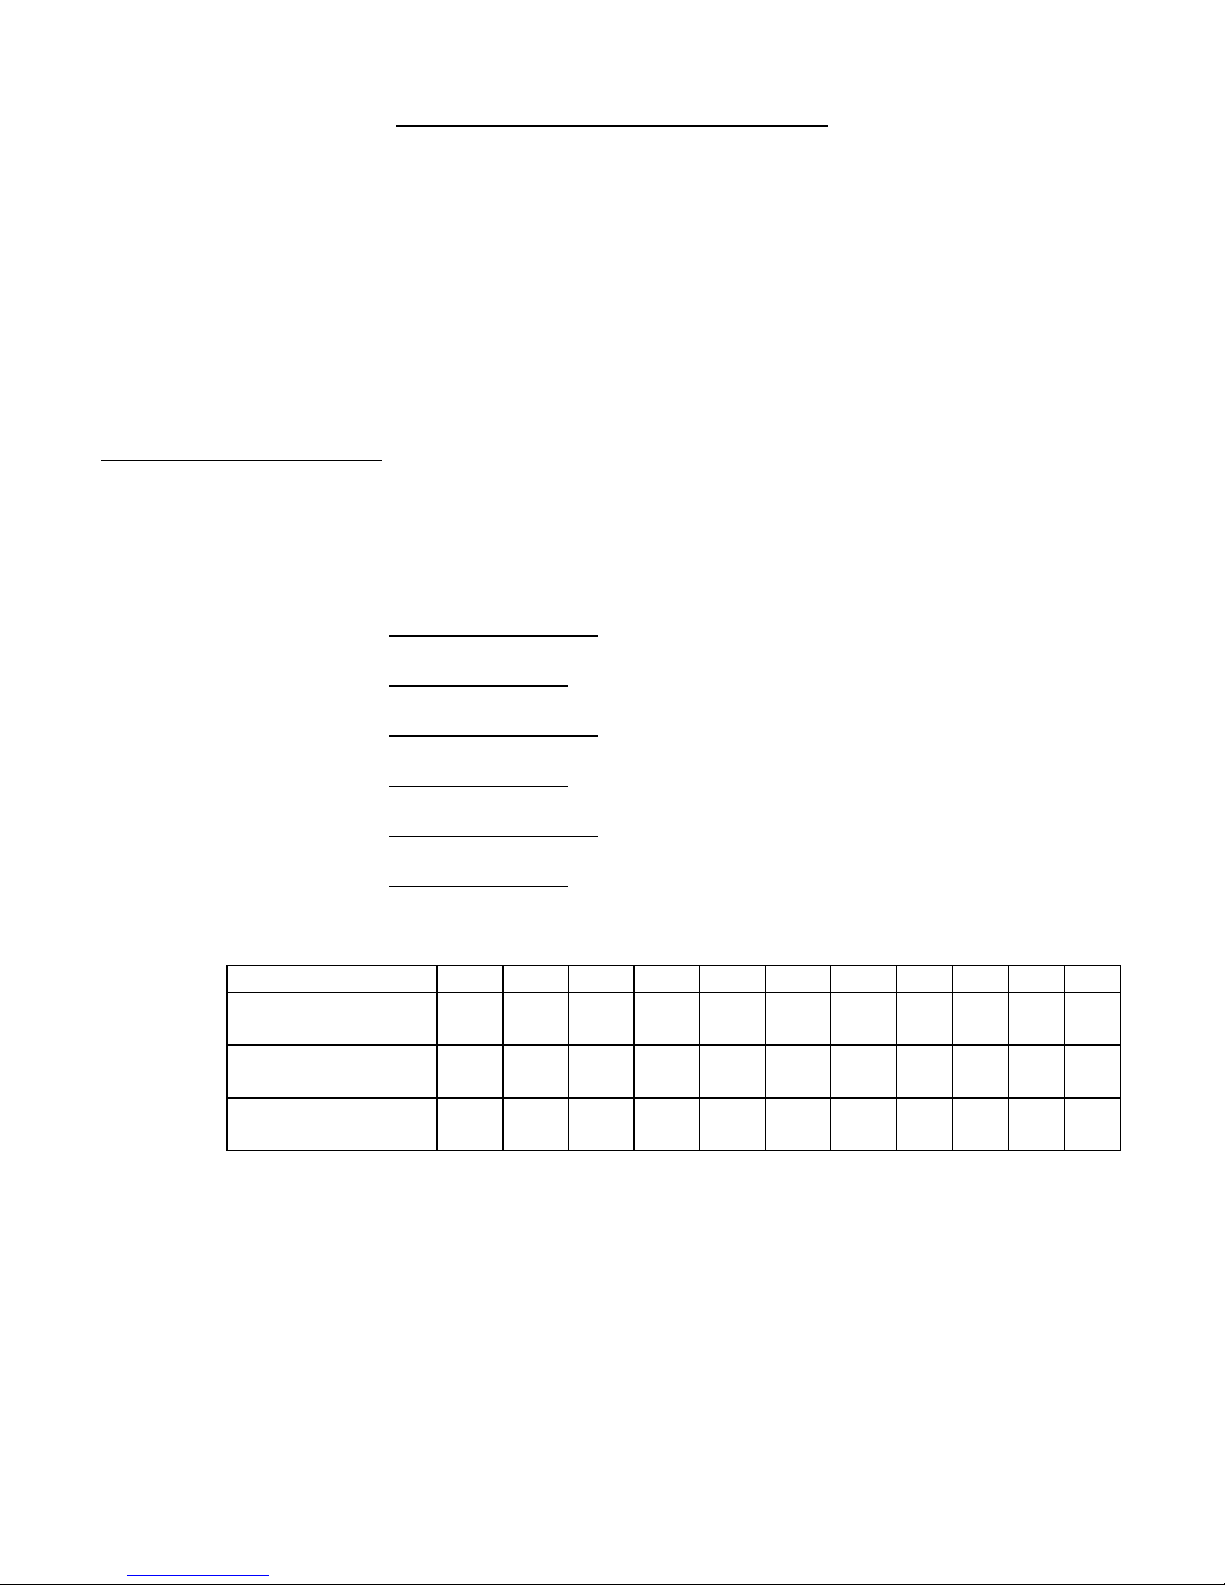
Target Heart Rate
Target heart rate (T.H.R.) is by far the most accurate, but also the
most “involved” method used to measure exercise intensity.
T.H.R. is a measure of exertion based on a percent of maximum heart
rate for a given age and level of desired conditioning.
50%-60% Target audience: Beginner exerciser, poor physical
60%-75% Target audience: Intermediate exerciser, average
75%-90% Target audience: Advanced athletes, excellent cardio
Advance 75%-90%
Intermediate 60%75%
Beginner 50%-60%
** Percentage of Maximum Heart Rate
:
condition, or other health concerns.
Exercise goal: Getting started.
physical condition, no health concerns.
Exercise goal: General overall fitness, weight loss.
condition.
Exercise goal: Increase cardiac capacity, an athlete in
serious training.
Age 20 25 30 35 40 45 50 55 60 65 70
180-
150
150-
120
120-
100
175-
146
146-
117
117-97114-95111-92108-90105-87102-8599-8296-5093-7790-
171-
142
142-
114
166-
138
138-
111
162-
135
135-
108
157-
131
131-
105
153-
127
127-
102
148-
144-
140-
135-
123
120
116
113
123-99120-96116-93113-
90
75
- 21 -
Page 22

Exercise Intensity
Rate of Perceived Exertion
Rate of perceived exertion is one of the easiest ways to monitor
exercise intensity and accounts for individual conditioning. To use the
perceived rate of exertion, continually monitor your intensity level by
exercising at a rate that maintains a
Perceived exertion is directly related to the elevation in heart rate.
Beginner exercisers should use the T.H.R. to begin understanding
their level of cardiac capacity. Once an individual had an
understanding of how strenuous moderate exercise should feel, then
perceived exertion is an easy way to monitor exercise intensity. Use of
T.H.R. occasionally to “check” yourself is always a good idea. A good
target intensity for general exercise is between 3-6. Increase or
decrease intensity of your workout to keep your perceived exertion
between those goals.
PE Scale:
Min 0 No exertion
1 Very low exertion
2 Low exertion
3 Low-moderate exertion
4 Moderate exertion
5 Moderate-strong exertion
6 Fairly Strong exertion
7 strong exertion
8 Very strong exertion
9 Very very strong exertion
Max 10 Maximum exertion
:
comfortable
level of exertion.
Talk Test
The easiest way to monitor intensity is with the “talk test”. At all
points during your work out, you should be able to speak a complete
sentence out load. If you cannot complete a full sentence, feel very
short of breath or uncomfortable speaking, you should decrease the
intensity of your workout.
:
- 22 -
Page 23

4100PT Console layout
Programs: LED’s will light up next to the program selected.
W0rk-Out Statistics: LED’s will light up above the workout statistic being
displayed.
Select Function: During normal operation, the programs will display
workout stats in the lower text window, cycling through Time, interval time,
steps/min, Calories burned, floors climbed and average heart rate. If you
would like to display a single workout statistic, press the select bottom
until the LED toggles to the appropriate statistic.
Quick Start: Selecting the
start the stepper in manual mode at an intensity level of 4. The display will
then prompt the user to enter their weight. On this home stepper, the
resistance generated is dependent on use weight and therefore must be
entered by each user. Selecting the
selection but before data entry, will enter all the default data entry
settings. Again, the user’s weight must be entered, even with the quick start
selection.
<quick start>
<quick start>
button as a program choice will
button after program
- 23 -
Page 24

4100PT Console layout
Up/Down Arrows: Use of the up/down arrows during program selection will
cycle the LED’s through the available programs for selection. Use of the
up/down arrows during data entry will adjust the data for selection.
Use of the up/down arrows during any program will adjust the intensity
level accordingly.
Enter: The
and data entry.
Pause/Stop/Resume: To temporarily pause a program, press the
button once. To reset or stop during a program, press the
second time. To resume – press
will resume at the point it was interrupted.
<enter>
key is used to make selections during program selection
<Stop>
<enter> or <Quick Start>
and the program
<Stop>
button a
- 24 -
Page 25

4100PT PROGRAMS
Note:
1) You may select
selections to accept the default settings (except user weight) for that
program,
2) All programs have 16 levels of intensity; the lowest being level 1 and
highest being level 16.
Quick Start:
setting of intensity level=4 and workout time = 20 minutes. the user must
enter their weight prior to the workout beginning.
Manual Mode:
level and total workout time. Defaults are level = 4 and time =20 minutes.
the user must enter their weight prior to the workout beginning.
<quick start>
<Quick start>
after selecting any of the workout program
will select manual mode and select default
For Manual program, the user defines weight, intensity
(Abbreviated Profile)
Manual/
Quick
Start
1 2 3 4 5 6 7 8 9 10 1 2 3 4 5
8
7
6
5
4
3
2
1
Fat Burner/Fat Burner Plus:
<Fat Burner>
workout is designed with
moderate changes in intensity levels to stimulate fat store assimilation.
<Fat Burner Plus>
program has larger changes in intensity designed to
elicit a more dramatic HR response and thereby burn more calories. For
both programs, the user defines weight, intensity level and total workout
time. Defaults are level = 4 and time =20 minutes.
Abbreviated Profile
1 2 3 4 5 6 7 8 9 10 1 2 3 4 5
8
7
6
5
4
3
2
1
- 25 -
Page 26
4100PT PROGRAMS
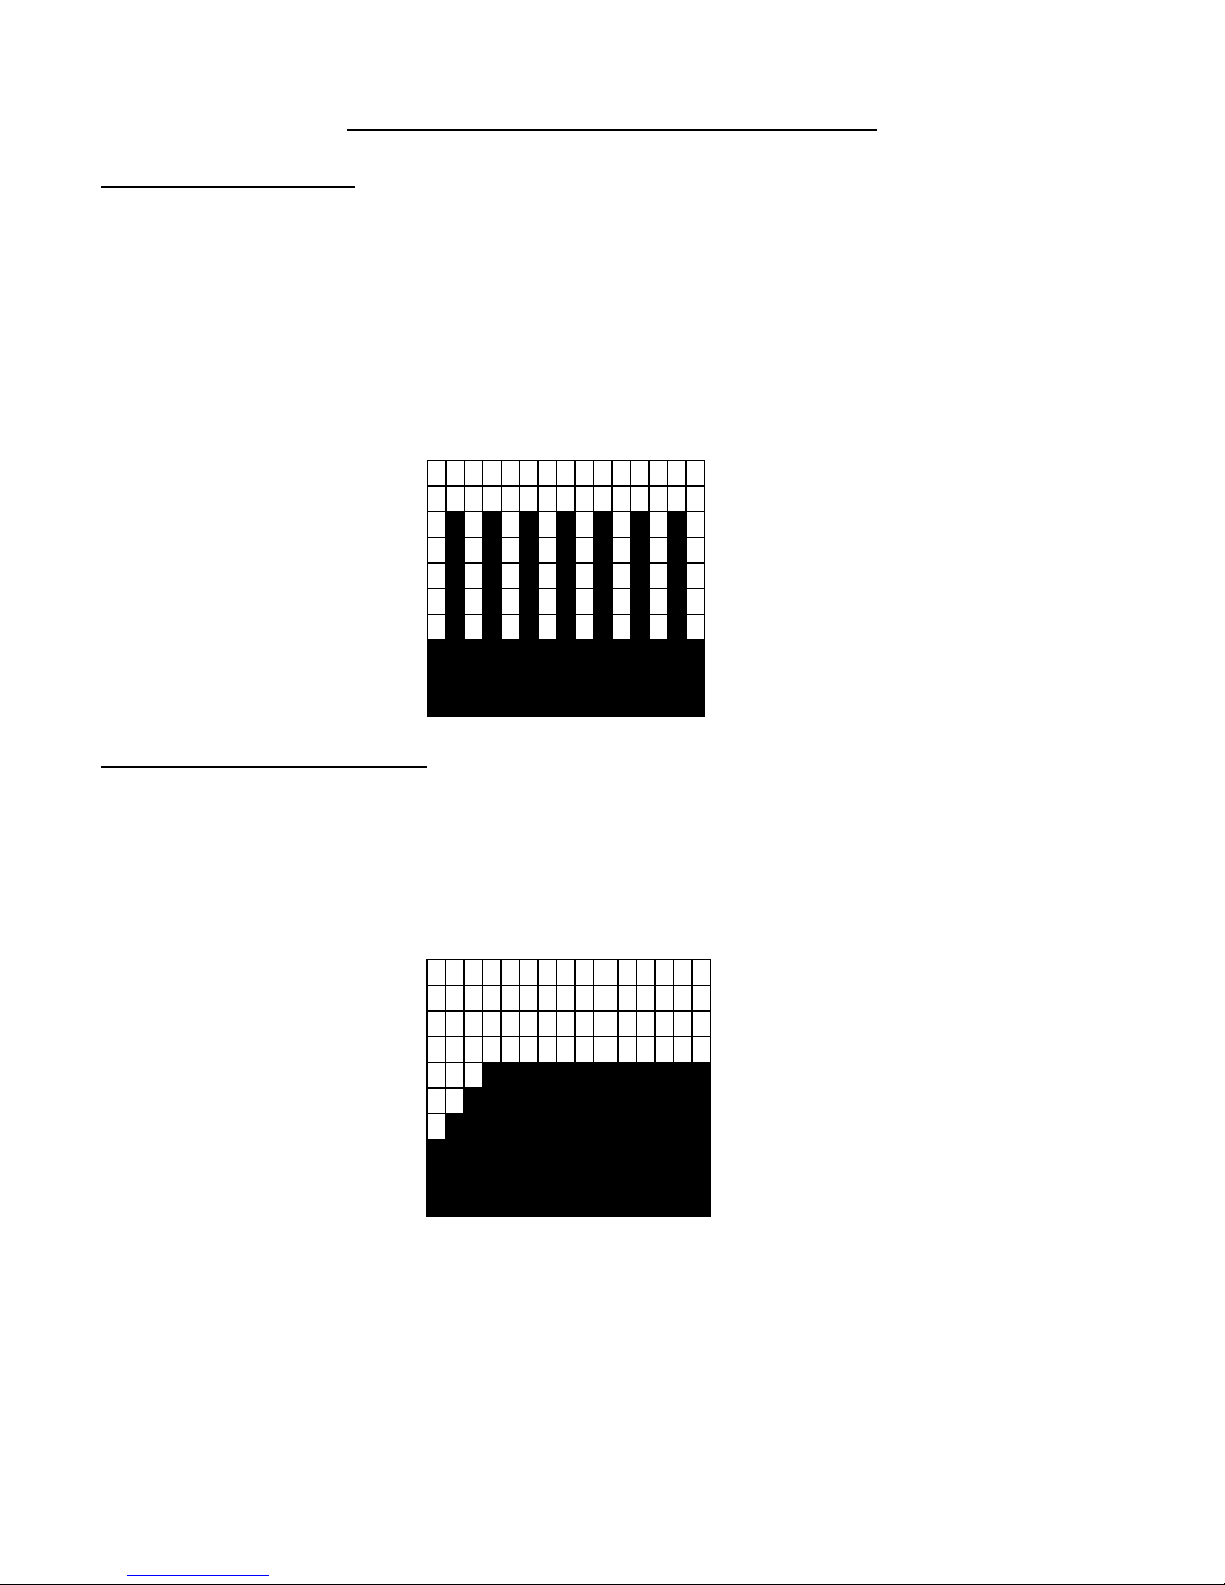
Speed intervals:
Workout contains 8 alternating rest intervals with 7
exercise intervals. The user defines weight, exercise interval intensity, rest
interval intensity and total workout time. Since there are 15 total
intervals, each will be 1/15 of the total time. Default settings are exercise
intensity = 10, rest intensity = 4 and time = 20 minutes. During the
workout, the user may adjust the rest and exercise intensity independently,
which is saved for the remainder of the workout.
(Abbreviated Profile)
Speed Intervals
1 2 3 4 5 6 7 8 9
10
9
8
7
6
5
4
3
2
1
1 2 3 4 5
1
0
Constant heart rate:
Workout maintains a chosen target heart rate by
automatically changing intensity level during the workout. The user defines
weight, target heart rate and total workout time. Default settings are
target heart rate = 125 BPM and time = 20 minutes.
(Abbreviated Profile)
Constant HR Profile
1 2 3 4 5 6 7 8 9 10 1 2 3 4 5
10
9
8
7
6
5
4
3
2
1
- 26 -
Page 27

4100PT PROGRAMS
Interval Constant heart rate:
Workout that allows a user to define
the rest interval heart rate and length, the exercise interval heart rate
and length and total workout time. After the first rest and exercise
interval, the program will remember the level that the user was exercising
at the end of the interval. Then, during the next interval, the program
automatically goes to that intensity level. The heart rate algorithm makes
adjustments to maintain the user within that rest or exercise heart rate
zone. The user defines weight, rest heart rate, rest interval time, exercise
heart rate, exercise interval time and total workout time. Default settings
are rest heart rate = 100 BPM, rest interval = 5 min, exercise heart rate =
125 BPM, exercise interval time = 5 min and total workout time=20 min.
(Abbreviated Profile)
Constant HR
Intervals
1 2 3 4 5 6 7 8 9
10
9
8
7
6
5
4
3
2
1
1 2 3 4 5
1
0
- 27 -
Page 28

4100PT PROGRAM DETAILS
Quick Start Mode:
To access the quick start manual mode, press the green <
button. The program will default an intensity of level 4 and workout
time = 20 min. The console will prompt each user to enter their weight
and the program will begin. The workout timer will count down from
20 minutes to zero.
quick start>
Manual/Fat Burner/Fat Burner Plus Program:
Selecting:
While the display is scrolling “Results you want”, it is ready to
begin program selection. Press the up/down arrow and the LED
will advance through the program selections. When the
appropriate program LED is lit, hit the
Accepting Defaults:
Press the green
entry to accept the default settings. The console will prompt
each user to enter their weight and the program will begin.
Entering custom settings:
Weight: Text line will prompt: “
Use the up/down arrows to change weight from the default
of 175#’s, in 5# increments. Press
Intensity: Text line will prompt:
Use up/down arrows to change the intensity level from the
default of 4, in1level increments. Press
select.
Time: Text line will prompt “
Use up/down arrows to change the total workout time from
the default of 20 minutes, in1minute increments. Press
<Enter>
After this data entry is complete, the program advances into
workout mode.
<quick start>
to select.
button at the beginning of data
Weight”.
“Intensity”.
time”.
<enter
> button to select.
<enter>
to select.
<Enter>
to
Speed Interval Program:
Selecting:
While the display is scrolling “Results you want”, it is ready to
begin program selection. Press the up/down arrow and the LED
will advance through the program selections. When the
appropriate program LED is lit, hit the
Accepting Defaults:
Press the green
entry to accept the default settings. The console will prompt
each user to enter their weight and the program will begin.
Entering custom settings:
Weight: Text line will prompt:
Use the up/down arrows to change weight from the default
of 175#’s, in 5# increments. Press
Exercise interval Intensity: Text line will prompt
Intensity”.
Use the up/down arrows to change speed from the default
of 10, in 1-unit increments. Press
4100PT PROGRAM DETAILS
<quick start>
- 28 -
<enter
button at the beginning of data
“Weight
”.
> button to select.
<enter>
to select.
“Exercise
<Enter>
to select.
Page 29

Speed Interval Program (cont):
Rest interval Intensity: Text line will prompt “
Use the up/down arrows to change speed from the default
of 4, in 1-unit increments. Press
Time: Text line will prompt “
Use up/down arrows to change the total workout time from
the default of 20 minutes, in1minute increments. Press
<Enter>
After this data entry is complete, the program advances into
workout mode.
to select.
time
”.
Rest Intensity
<Enter>
:
to select.
Constant Heart Rate Program:
Selecting:
While the display is scrolling “Results you want”, it is ready to
begin program selection. Press the up/down arrow and the LED
will advance through the program selections. When the
appropriate program LED is lit, hit the
Accepting Defaults:
Press the green
entry to accept the default settings. The console will prompt
each user to enter their weight and the program will begin.
Entering custom settings:
Weight: Text line will prompt:
Use the up/down arrows to change weight from the default
of 175#’s, in 5# increments. Press
Target Heart Rate: Text line will prompt:
Use the up/down arrows to change heart rate from the
default of 125, in 5 unit increments. Press
select.
Time: Text line will prompt
Use up/down arrows to change the total workout time from
the default of 20 minutes, in1minute increments. Press
<Enter>
After this data entry is complete, the program advances into
workout mode.
<quick start>
to select.
“time”.
<enter
button at the beginning of data
“Weight”.
> button to select.
<enter>
to select.
“Target HR”.
<Enter>
to
Interval Constant Heart Rate Program:
Selecting:
While the display is scrolling “Results you want”, it is ready to
begin program selection. Press the up/down arrow and the LED
will advance through the program selections. When the
appropriate program LED is lit, hit the
Accepting Defaults:
Press the green
entry to accept the default settings. The console will prompt
each user to enter their weight and the program will begin.
Entering custom settings:
Weight: Text line will prompt:
4100PT PROGRAM DETAILS
Interval Constant Heart Rate Program (cont):
<quick start>
- 29 -
<enter
button at the beginning of data
> button to select.
“Weight”.
Page 30

Use the up/down arrows to change weight from the default
of 175#’s, in 5# increments. Press
Rest Target Heart Rate: Text line will prompt:
Use the up/down arrows to change heart rate from the
default of 100, in 5 unit increments. Press
select.
Rest Interval Time: Text line will prompt
Use up/down arrows to change the rest interval time from
the default of 5 minutes, in1minute increments. Press
<Enter>
Exercise Target Heart Rate: Text line will prompt:
Use the up/down arrows to change heart rate from the
default of 125, in 5 unit increments. Press
select.
Exercise Interval Time: Text line will prompt
Use up/down arrows to change the Exercise interval time
from the default of 5 minutes, in1minute increments. Press
<Enter>
Total Workout Time: Text line will prompt “
Use up/down arrows to change the total workout time from
the default of 20 minutes, in1minute increments. Press
<Enter>
After this data entry is complete, the program advances into
workout mode.
to select.
to select.
to select.
<enter>
to select.
“Rest HR”.
<Enter>
“Rest time”.
“Exercise HR”.
<Enter>
“Exercise time”.
Total Work time”.
to
to
- 30 -
Page 31

PREVENTIVE MAINTENANCE
Your 4100 StairClimber will stay in peak operating condition for many
years, but you must perform some basic preventive maintenance on a
periodic basis. The preventive maintenance schedule is based on an
average of 5 hours of use per week.
Use only 30 weight motor oil or the equivalent when lubricating your
machine. Protect your floor by placing a mat or newspapers under
your machine. If you use WD-40 or similar cleaners anywhere on the
machine, the life of those parts will be greatly reduced.
Clean the paint and covers with only mild soap and rinse w/ clean
water.
No petroleum based cleaners or products should ever be
used on the paint or plastics of your stepper as serious
degradation will occur.
After Each Workout:
1) Clean the console with water dampened cloth. Do not use glass
cleaner or any other household cleaner on the console.
2) Clean the covers with mild soap and water.
After 70 hrs of use or every 3 months:
1) Lubricate the step chains and the step chain connection points.
Use a cloth dampened with 30 weight motor oil
Step on one pedal and hold it down to the floor. Wipe the entire
length of the exposed step chain with the oil dampened cloth.
Slowly return the pedal to the upper stop. Repeat for the other
chain.
Put a few drops of 30 weight motor oil on the step chain
connection of each pedal arm. Let the oil soak in for a few
minutes and wipe away excess.
After 300 hrs of use or annually:
1) Lubricate the step chain. First, remove the mid-cover. Use the
rivet removal tool to remove the pin from each of the four
fasteners on the mid-cover. Pull the remaining fastener base out
of the cover. Stand on both pedals and keep them on the floor.
Slide the mid-cover down and away from the machine. Remove the
cover from the frame tube. Carefully let both pedals return to
the upper stops.
The drive chain is the smaller chain to the right of the step
chain. Put a few drops of 30 weight motor oil on the exposed
part of the drive chain.
PREVENTIVE MAINTENANCE
- 31 -
Page 32

Depress one pedal a few inches to advance the drive chain.
Lubricate the newly exposed section of chain. Continue in this
manner until the entire chain is lubricated.
Let the oil soak in for a few minutes. Wipe off the excess
lubricant.
Reinstall the mid cover. Stand on the pedals and keep them on
the floor. Snap the mid cover onto the frame tube. Slide it
forward, making sure the front edge of the mid cover goes under
the top covers. Insert rivet into the base to secure the cover.
NOTE: Use of WD-40 or similar cleaners will greatly reduce
the life of your parts.
- 32 -
Page 33

Glossary of terms
4100PT: 4100= Model # identifier. PT= Personal Trainer.
LED’s: Light Emitting Diodes. The type display board used in the
console.
Programs: Quickstart, Fat Burner, Fat Burner Plus, Speed intervals,
Constant heart rate, Interval Constant heart rate.
CHR: Contact Heart Rate.
- 33 -
Page 34

Limited Home Use Warranty
The Nautilus Group warranties the 4100 StairClimber for home use only.
Any light commercial use will void this warranty. Your home stepper carries
the same warranty as our commercial products.
Parts (Mechanical & Electrical) – 3 years
Labor – 1 year. Labor provided by either your equipment dealer or by
StairMaster service technicians.
Wearables – 1 year
– Pedal Pad Covers
– Soft Hand Grips
Frame & Paint– 15 years
If you have a question or warranty concern, your primary contact should be
the dealer you purchased this machine from. If unable to do so, please feel
free to contact StairMaster Customer Support at the following numbers:
Customer Service Contacts
Customer Service
10757 E. Ute St.
Tulsa, OK 74116
Phone: 800-331-3578
Fax: 800-764-7380
WWW. [email protected]
Corporate Headquarters:
Nautilus Health & Fitness Group
1886 Prairie Way
Louisville, CO 80027
Phone: 303-939-0100
- 34 -
 Loading...