


Stahl~Tek
Vekian - CDT
Operations Manual


Safety Instructions
The lightning flash with the arrowhead symbol within an equilateral triangle is intended to alert the user
to the presence of “dangerous voltage” inside the product that may constitute a risk of electric shock.
The exclamation point within an equilateral triangle is intended to alert the user to the presence of important operating and maintenance instructions in the literature accompanying the product.
TO REDUCE THE RISK OF ELECTRIC SHOCK, AND/OR DAMAGE TO THE UNIT DO NOT REMOVE COVER.
NO USER-SERVICEABLE PARTS INSIDE. REFER SERVICING TO QUALIFIED SERVICE PERSONNEL
1. Read Instructions — Read all the safety and operating instructions before operating this
2. Retain Instructions — Retain safety and operating instructions for future reference.
3. Heed Warnings — Adhere to all warnings on the product and in the operating instructions.
4. Follow Instructions — Follow all operating and use instructions.
5. Cleaning — Unplug this product from the wall outlet before cleaning. Use a damp cloth for cleaning. Clean the
outside of the product only.
6. Attachments — Do not use attachments that are not recommended by the product manufacturer; they may be
hazardous.
7. Water and Moisture — Do not use this product near water.
8. Accessories — Do not place this product on an unstable cart or stand. The product may fall, causing bodily
injury and damage to the product. A product and cart combination should be moved with care. Quick stops,
excessive force, and uneven surfaces may cause the product and cart to overturn.
9. Ventilation — Slots and openings in the cabinet are provided for ventilation to ensure reliable operation of the
product and to protect it from overheating. These openings must not be blocked or covered. This product
should not be placed in a built-in installation such as a bookcase or rack unless proper v entilation is provided.
10. Power Sources — Operate this product only from the type of power source indicated on the label. If you are
not sure of the type of power supply to your home, consult your dealer or local power company. This product is
equipped with a three-prong grounding plug. This plug will only fit into a grounding power outlet. If you are unable to insert the plug into the outlet, contact your electrician to replace your obsolete outlet. Do not defeat the
safety purpose of the grounding plug.
11. Power Cord Protection — Power supply cords should be routed so that they are not likely to be walked on or
pinched by items placed upon or against them.
12. Lightning — Unplug the unit from the wall outlet for added protection during a lightning storm and when it is left
unattended and unused for long periods of time. This will prevent damage to the product due to li ghtning and
power line surges.
13. Overloading — Do not overload wall outlets or extension cords. This can result in a fire or electric shock.
14. Inserting Objects into Unit — Never push objects of any kind into this product through any openings; they
may touch dangerous voltage points or short out parts that could result in fire or electric shock.
15. Servicing — Do not attempt to repair or service this product yourself. Opening or removing covers may expose
you to dangerous voltage and other hazards. Refer all servicing to qualified service personnel.
16. Damage Requiring Service — Unplug this product from the wall outlet and refer servicing to qualified service
personnel under the following conditions: a) If the power-supply cord or plug is damaged. b) If liquid has been
spilled into the product. c) If the product has been exposed to rain or water. d) If the product does not operate
normally by following the operating instructions. e) If the product has been dropped or damaged in any way. f) If
the product exhibits a distinct change in performance.
17. Replacement Parts — When replacement parts are required, be sure the service technician has used repl acement parts specified by the manufacturer. Unauthorized substitutions may result in fire, electric shock, and
other hazards.
Continued on reverse...
3

Safety Instructions
18. Safety Check — Upon completion of any service or repairs to this product, ask the service technician to perform safety checks to determine that the product is in proper operating condition.
19. Wall or Ceiling Mounting — Mount the product to a wall or ceiling only as recommended.
20. Heat — The product should be situated away from heat sources such as radiators, heat registers, stoves, and
other products (including amplifiers) that produce heat.
CLASS 1 Laser Product
The Vekian-CDT is a CD player which has been designed and manufactured according to FDA regulations "title 21,
CFR, chapter 1, sub-chapter J, based on the Radiation Control for Health and Safety Act of 1968", and is classified as a
Class 1 laser product. There is no hazardous radiation during normal use because invisible radiation emitted inside this
product is completely confined within the protective housing. However you must observe the following important
warnings:
CAUTION!
THIS CD PLAYER USES INVISIBLE LASER LIGHT. WHEN THE PLAYER OPERATES, LASER LIGHT
IS RADIATED INTERNALLY. DO NOT REMOVE THE PROTECTIVE HOUSINGS. USE OF CONTROLS
OR ADJUSTMENTS OR PERFORMANCE OF PROCEDURES OTHER THAN THOSE SPECIFIE D
HEREIN MAY RESULT IN HAZARDOUS RADIATION EXPOSURE CAUSING EYE INJURY. IF THIS
PRODUCT DEVELOPS A FAULT, PLEASE CONTACT YOUR AUTHORISED MUSICAL FIDELITY SERVICE AGENT. DO NOT ATTEMPT TO SERVICE IT YOUR-SELF AND DO NOT CONTINUE TO USE
THIS PRODUCT IN A FAULTY STATE.
4
BACK OF UNIT

Safety Instructions
Warning Label:
BOTTOM OF UNIT:
“CLASS 1 LASER PRODUCT:
The Vekian-CDT is a CD player which has been designed and manufactured according to FDA regulations
"title 21, CFR, chapter 1, sub-chapter J, based on the Radiation Control for Health and Safety Act of
1968", and is classified as a Class 1 laser product.
This device complies with part 15 of the FCC rules. Operation is subject to the following two conditions;
1. This device may not cause harmful interference, and
2. This device must accept any interference received, including interference that may cause undesired
operation. “
operation.
including interference that may cause undesired
2. This device must accept any interference received,
1. This device may not cause harmful interference, and
Operation is subject to the following two conditions;
This device complies with part 15 of the FCC rules.
product.
Act of 1968", and is classified as a Class 1 laser
based on the Radiation Control for Health and Safety
regulations "title 21, CFR, chapter 1, sub‐chapter J,
designed and manufactured according to FDA
The Vekian‐CDT is a CD player which has been
CLASS 1 LASER PRODUCT:
5

Introduction
hank you for purchasing the Stahl~Tek Vekian - CDT! Your new Vekian - CDT is a
truly superior CD Transport! It is precision –machined and hand assembled of materials that
provide excellent structural integrity, superb mechanical dampening, and isolates the internal cir-
T
clean presentation. The Vekian - CDT is sonically breath-taking,!
function beautifully with the Vekian - D/A through the I2S interface (via HDMI).
We recommend taking the time to read through this manual prior to using the unit. The manual
will guide you through the setup, operation, proper care, and maintenance of the Vekian - CDT.
We are positive the Vekian - CDT will provide you many years of musical bliss. Please enjoy! If
you have any questions, comments, concerns please do not hesitate to contact us.
- The Stahl~Tek Staff
cuitry from outside electrical interferences; while giving a stunningly sophisticated, elegant, and
The Vekian - CDT is designed to
Stahl~Tek
P.O. Box 125
Clute, TX 77531
Phone: (979) 265-5114
Fax: (979) 265-1211
Website: www.stahltek.com
Email: info@stahltek.com
Please fill in the information below for your records (The serial number is located on the back
bottom right of the unit.):
Ownership Information:
Vekian - CDT S/N:
Stahl~Tek Dealer:
Date of Purchase:
6
/ / Dealer Phone: ( ) -

Table of Contents
Safety Instruction
Introduction
Table of Contents
Unpacking
Getting To Know Your Unit
Front Of Unit
Rear Of Unit
Top Of Unit
Remote
Placement
Connecting
Power
Digital Outputs
Disconnecting
Operations
03
06
07
09
10
10
11
12
13
14
15
15
15
15
16
Powering Up
Inserting CD
Playing CD
System Stand By
Scan
Programming Tracks
CD Time Display
A/B Feature
Shuffle
Track/Disc Repeat
Display Dimming
Mode: Advanced Settings
16
16
18
18
19
19
20
20
20
21
21
22
7

Table of Contents
Trouble Shooting
Maintenance
Cleaning
Fuse
Remote Batteries
Repairs
Warranty
Notes
23
24
24
24
24
24
25
26
8

Unpacking
UN-BOXING THE UNIT:
1. Please Note: (1) Remove all jewelry to keep from scratching the unit. (2) The unit is
double boxed.
2. Make sure the box is positioned with the “This Side Up” label.
3. Carefully open the outer box.
4. Remove the top foam piece.
5. Remove the cable box. The unit’s HDMI and power cord is inside this packing box.
6. Remove the Operations Manual.
7. Remove the two foam pieces protecting the inner box.
8. Gently remove the inner box, and set it on a flat solid surface.
9. Carefully open the inner box.
10. Remove the top foam piece.
11. Remove the pieces of foam on each side of the unit. (The back of the unit is indicated by
the slotted piece of foam to protect the connectors).
12. Gently lift the unit out of the box by reaching down and lifting up from the bottom of the
unit.
13. Save all boxes and pieces of foam for transport.
14. Handle the unit with care.
15. Remember to note the Serial Number (located on the back bottom right of the unit) in the
front of this manual.
CONTENTS:
• One Vekian - CDT unit
• One Vekian - CDT Puck
• One Vekian - CDT Remote
• One Purist Audio Design HDMI Cable
• One Purist Audio Design Aqueous Aureus Power Cord
• Operations Manual
9

Getting To Know Your Unit
10

Getting To Know Your Unit
11

Getting To Know Your Unit
L
I
D
12
TOP OF UNIT (OPEN)

Getting To Know Your Unit
STBY - PUTS THE UNIT IN STAND BY MODE
NUMBER PAD - ENTERS THE CD TRACK
NUMBER
SCAN - PREVIEWS EACH TRACK ON THE CD
PROG - ALLOWS THE USER TO PROGRAM
THE ORDER THE CD TRACKS PLAY IN
FAST – SETS THE FAST-FORWARD OR
REWIND SPEED
TIME – DISPLAYS THE TRACK TIME
- REWINDS THE CURRENT TRACK
- FAST-FORWARDS THE CURRENT TRACK
A/B - ALLOWS THE USER TO PROGRAM TWO
TRACKS TO SWITCH BETWEEN
SHUF - RANDOMLY PLAYS TRACKS ON THE
CD
- SKIPS TO THE PREVIOUS TRACK
- SKIPS TO THE NEXT TRACK
REP - REPEATS SINGLE TRACK (PRESS
ONCE) OR ENTIRE DISC (PRESS TWICE)
PAUSE - PAUSES THE CD PLAY BACK
STOP - STOPS THE CD PLAY BACK
PLAY - BEGINS CD PLAY BACK
REMOTE CONTROL
4-40 Socket Screws
13

Placement
When placing the unit in your system, position the unit where there
is nothing above the unit so as to
be able to slide open the CD
drawer on the top of the unit, and
there is 3 inches (7.62 cm) to 4
inches (10.16 cm) of clearance at
the rear of the unit.
Suggested equipment placement:
14
PRE-AMP

Connecting
POWER:
1. Verify the power switch (located on the rear lower right
of the unit) is in the OFF position.
2. Connect the IECC end of the power cord to the back of
the unit (located to the right of the power switch).
3. Plug the AC end of the power cord into a wall outlet or
power source.
DIGITAL OUTPUT:
1. The digital outputs are located on the upper left section of the rear panel,
labeled OUTPUT.
2. Select the appropriate type of digital output based on your equipment.
3. Connect the digital cable from the Vekian - CDT to a D/A.
4. Please note the I2S output uses HDMI connector, however, it will only work with D/As
that use I2S via HDMI.
DISCONNECTING:
1. Switch off the power to the Vekian - CDT.
2. Put the Vekian - CDT in Stand By mode by pressing the “Stand By” button on front of the
unit.
3. Disconnect the power cord from the outlet or power source, then unhook it from the
Vekian - CDT.
4. Carefully disconnect the digital cable.
15

Operations
POWERING UP:
1. Verify the unit is plugged in.
2. Set the power switch (located on the rear lower right of the unit) is in the ON position.
3. The front display will display “WELCOME”, followed by “LOAD”, then “NO DISC” because there is currently no CD in the player.
INSERTING A CD:
1. Slide the lid on the top of the
unit back.
2. Locate the magnetic puck.
3. Gently place the CD into the
drawer. NOTE: Do not press
down when inserting the CD, as
too much force could damage
the mechanism.
4. Gently place the magnetic puck
on the disc as shown. The puck
is magnetic, and no force is
required. Applying force could
damage the mechanism.
5. Slide the lid into the closed position.
6. The front display will indicate
it is reading the disc, and will
display the total play time of
the CD with the number of
tracks.
16

Operations
REMOVING A CD:
1. Stop the CD play back either by pressing “Stop” on the remote or “Stop” on the unit.
2. Slide the lid on the top of the unit back.
3. Remove the magnetic puck.
4. Remove the CD.
USING THE REMOTE CONTROL:
Operating distance for the remote control should be no more than 16.4’ (5.0 M) from the unit.
Remember to point the remote at the unit , otherwise remote operations may be hindered.
The remote has batteries installed from the factory. To replace the batteries, see page 24.
17
Operations
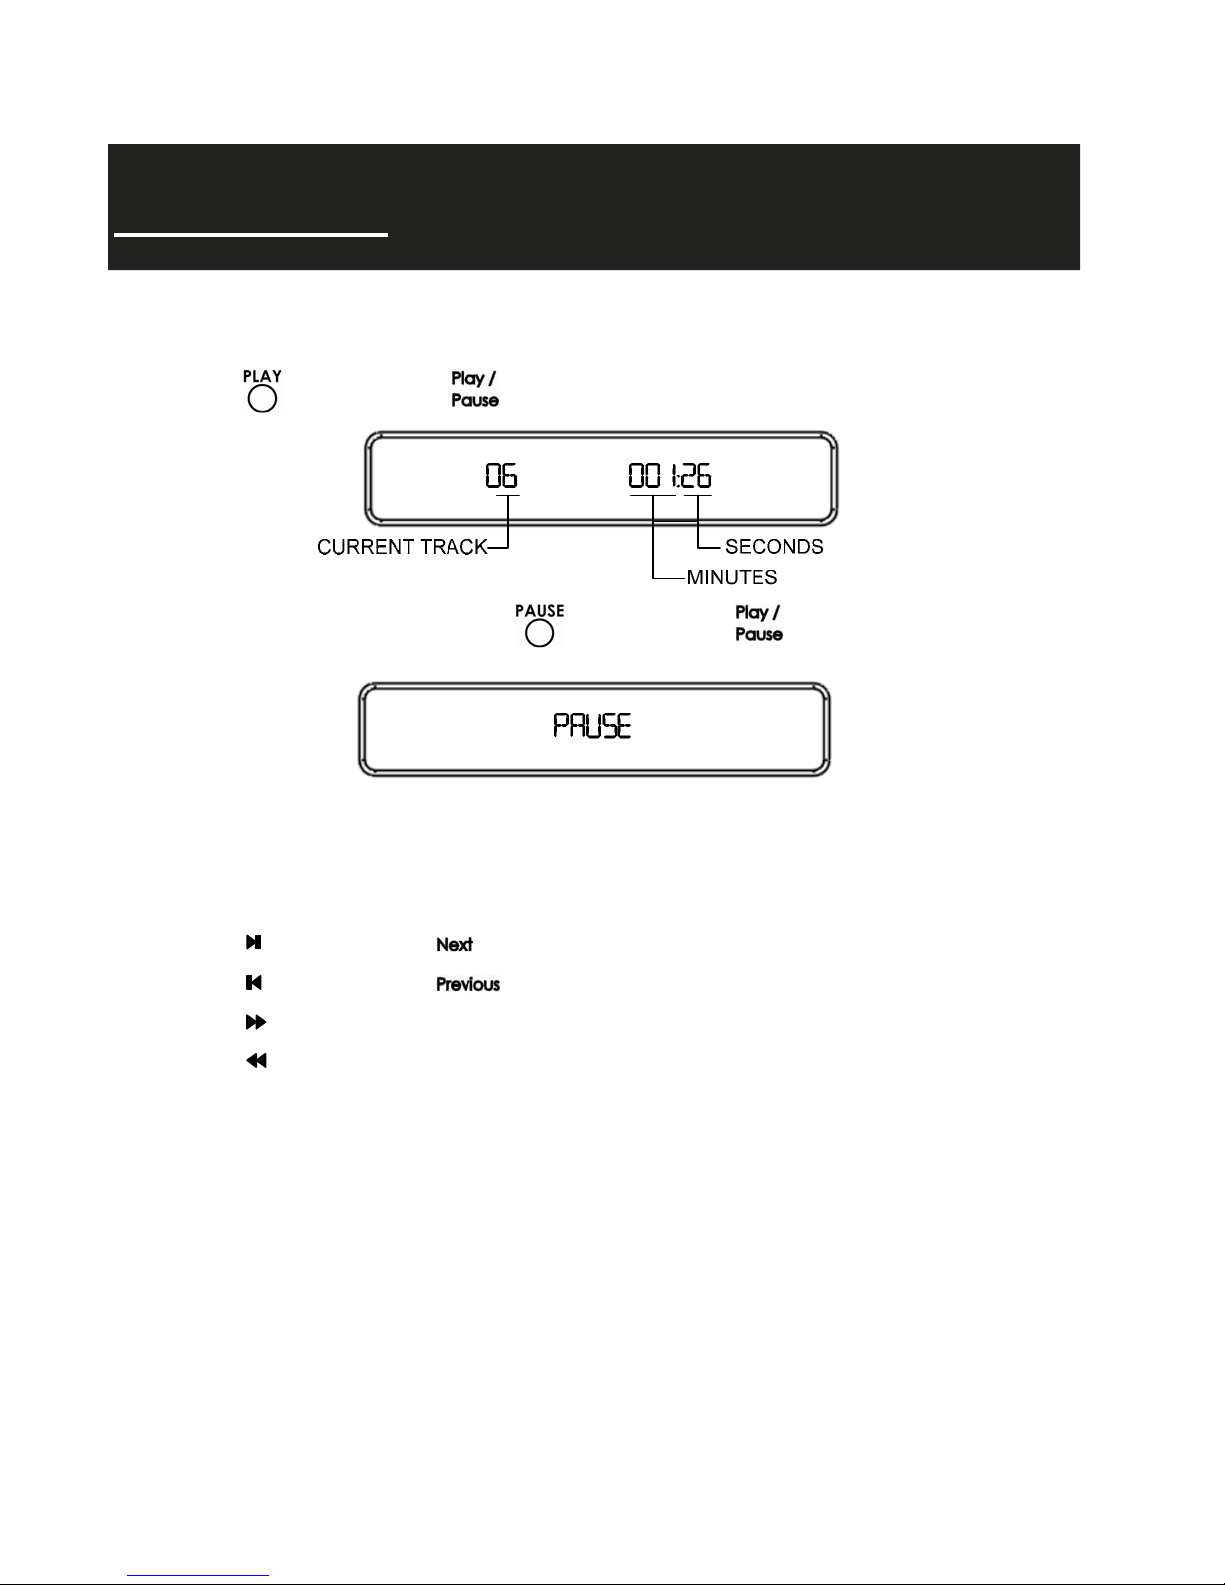
PLAYING A CD:
1. Load a CD into the unit.
2. Press on the remote or
2. To pause the CD play back, press on the remote or
3. To stop CD playback, press on the remote or on the unit.
Navigating Tracks
1. Press on the remote or
on the unit.
on the unit to skip to the next track.
on the unit.
2. Press on the remote or
3. Press
4. Press
5. Enter the two-digit track number on the remote to go to that track.
18
on the remote to fast-forward through the current track.
on the remote to rewind through the current track.
on the unit to go back one track.

Operations
STAND BY MODE:
1. Press on the remote or
2. The main display will show “STAND BY”, and turn off.
3. A yellow LED indicator will light up.
To take the unit out of Stand By mode, press on the remote or
SCAN (ON THE REMOTE):
Press
To play the full track, press
PROGRAM (ON THE REMOTE):
to scan through the first 10 seconds of each track on the disc.
again.
on the unit.
on the unit.
To program the order of tracks, the CD must be stopped.
1. Press the
2. Press the or
3. Press
4. Once all of the desired tracks are programmed, press
5. Press
6. Press
7. Press
button on the remote.
on the remote to navigate to the track.
again to set the track.
to play the program.
to stop the program play back.
twice to clear the program.
to store the program.
19

Operations
TIME (ON THE REMOTE):
The TIME feature is used with the
1. Press the or
2. Press
A/B (ON THE REMOTE):
The A/B feature is used to repeat a section of a track.
1. During track playback, Press
2. Press
3. The display will show REPEAT A-B.
4. To cancel the A/B function, press
in increase the rate the unit fast-forwards or rewinds.
again at the end point of the desired section.
to fast-forward or rewind.
functions on the remote.
at the start point of the desired section.
SHUF (ON THE REMOTE):
SHUF is the shuffle function for randomly playing tracks.
Press
Press
20
to play a CD in shuffle mode. The display will indicate SHUFFLE prior to playing.
to end shuffle play back. The display will indicate SHUFFLE OFF.

Operations
REP (ON THE REMOTE):
REP is the repeat function for repeating a single track play back or repeat play back of the entire
disc.
During play back, press
Press
To turn repeat off, press
twice to repeat the entire disc. The display were indicate REPEAT DISC.
once to repeat a single track. The display will indicate RPT TRACK.
again. The display will indicate REPEAT OFF.
DIM (ON THE UNIT):
The DIM button on the front of the unit controls the brightness of the display.
• Press
• Press
• Press
• Press
• Press
one time: Display is off.
two times: Display is on low brightness.
three times: Display is on medium brightness.
four times: Display is on high brightness.
five times: Display is on default brightness.
21

Advanced Settings
MODE (ON THE UNIT):
The MODE button on the front of the unit is used for accessing advanced system features of the
unit.
From MODE, the following features can be accessed:
• UP-SAMPLING
• DIMMING
• RST FACTORY
• VERSION
1. Press MODE on the front of the unit.
2. Press the NEXT button to cycle through the options.
3. Press PLAY/PAUSE to select the desired options.
Adjusting Up-Sampling (This unit is capable of 4x and 2x up-sampling rate):
1. Stop CD play back.
2. Press MODE on the front of the unit.
3. The first feature displayed is UP-SAMPLING.
4. Press PLAY/PAUSE to select UP-SAMPLING.
5. The display will indicate 4 FS (4x sampling rate).
6. If 4 FS is the desired sample rate, press PLAY/PAUSE to select.
7. To select a different sample rate, press NEXT. The two remaining options are 2 FS (2x
sampling rate), and FS (no up-sample).
DIMMING sets the default display brightness.
RST FACTORY is for resetting the system to factory defaults.
VERSION is the firmware version.
22

Troubleshooting
Symptom Cause Remedy
Unit is off
Display is not on
Display is off
Display shows “NO DISC” A CD is not loaded. Load a CD into the CD tray.
Loose or unconnected cable
The display indicates a CD is playing,
but there is no sound.
Incorrect Input Selection on
D/A
Make sure the unit has power
and is on.
Press the DIM button of the
front of the unit until the display is visible.
Check the cables on the back of
the transport to verify they are
connected in properly.
Check the cable connections to
the D/A to make sure they are
connected properly.
Check the cable connections to
the Pre-Amp and/or amplifier to
make sure they are connected
properly.
Choose the correct input on the
D/A
The “WELCOME” message does not
display when the unit is powered on.
Low master volume level
If the unit has been off and unplugged for a long period of
time; when powered on it may
skip the “WELCOME” message and proceed to “LOAD”
Increase the master volume for
the system.
After powering the unit on,
press STAND BY on the front
of the unit or STBY on the remote to put the unit in Stand By
Mode. Then, press STAND BY
on the front of the unit or STBY
on the remote to bring it out of
Stand By, and the
“WELCOME” message will
display.
23

Maintenance And Repairs
MAINTENANCE:
Cleaning:
1. Wipe the unit down with a micro-fiber cloth to remove dust.
2. Apply a non-solvent glass cleaner (i.e. Windex) to a soft cotton cloth to remove
smudges from the front, sides, and, top of the unit.
Fuse:
1. Switch the power off, and unplug the unit.
2. Check the rear of the unit, under the AC Power In, for the listing of the fuse, and make
sure the correct replacement type is obtained.
3. Squeeze the tab on the fuse and pull it from the socket.
4. Insert the new fuse (verify it is the correct type) into the socket until it snaps into place.
Remote Batteries:
1. Turn the remote over.
2. Use an 1/16 allen key to remove the two 4-40 screws fastening the battery plate, and re-
move the battery plate.
3. Remove and discard the old batteries.
4. Insert two fresh AAA batteries; taking care to place them in the proper orientation.
5. Put the battery plate back into place.
6. Insert and tighten the two 4-40 screws for the battery plate with an 1/16 allen key.
REPAIRS:
1. DO NOT attempt any repairs yourself.
2. Any un-authorized service or repairs will void the warranty.
3. In the event repairs are needed, contact Stahl~Tek.
4. Please Note
: Any attempt to open and/or alter the unit will void the warranty.
24

Warranty
Scope and Duration of Warranty
Subject to the terms and conditions stated below, Stahl~Tek. ("Company") warrants to the original owner that this
Product shall be free from defects in workmanship or materials as follows:
Vekian - CDT
The warranty period for the Vekian - CDT is for a term of one (1) year for both parts and labor from the date when the
Product was purchased from an Authorized Stahl~Tek Dealer, Custom Installer, System Integrator or Reseller.
Limitations on Persons and Products Covered
This warranty, and all rights provided hereunder, are limited to the original owner. In the event that the original owner
transfers ownership of the Product prior to expiration of the applicable term stated in "Scope of Duration" above, this
Warranty shall terminate in its entirety upon the date of such transfer. In addition, Stahl~Tek does not warrant in any
way Products which are purchased from anyone who is not an Authorized Stahl~Tek Dealer, Custom Installer, System
Integrator, or Reseller. Therefore, if this Product falls into any of the foregoing categories, this Warranty is void.
What Stahl~Tek Will Do Under the Warranty
In the event of any defect covered by this Warranty, Stahl~Tek shall without charge provide all parts and materials and,
during the period applicable to labor, will also provide all labor necessary to restore the Product to its original specifications, and shall return the Product to its owner at Stahl~Tek's expense within the U.S. only. In the alternative,
Stahl~Tek may at its sole option either replace the Product without charge, or if replacement is not commercially practicable or repair or replacement cannot be accomplished within a reasonable time, Stahl~Tek may refund the purchase
price of the Product, subject, where appropriate, to reasonable depreciation for actual use in accordance with applicable
laws in full satisfaction of its warranty obligations, Stahl~Tek will undertake to complete the repair and return of the
Product as soon as circumstances permit, unless prevented by causes beyond its reasonable control.
LIMITATIONS ON STAHL~TEK'S OBLIGATIONS UNDER THE WARRANTY STAHL~TEK'S SOLE OBLIGATION UNDER THIS WARRANTY SHALL BE TO REPAIR OR REPLACE THE PRODUCT, OR AT ITS OPTION,
REFUND THE PURCHASE PRICE, AS PROVIDED FOR HEREINABOVE. STAHL~TEK DOES NOT WARRANT AGAINST, NOR SHALL IT BE LIABLE FOR ANY OF THE FOLLOWING: REMOVAL OR INSTALLATION CHARGES; SHIPPING EXPENSES TO STAHL~TEK OR ITS AUTHORIZED SERVICE FACILITY; LOSS
OF USE; PROPERTY DAMAGE OF ANY KIND; OR OTHER INCIDENTAL OR CONSEQUENTIAL DAMAGES
OR LOSSES OF ANY KIND.
Note: Some states do not allow exclusions or limitation of consequential damages, so the foregoing exclusions may not
apply to you.
Exclusions: Parts and Occurrences That Are Not Covered by the Warranty
In addition to the exclusions stated in "Limitations on Persons and Products Covered" above, this Warranty does not
cover any of the following: (a) glass or plastic panels, cabinetry, trim, or other appearance items (except where they are
defective at the time of original sale and the Product is delivered for repair within the first thirty (30) days thereafter);
(b) batteries or failure of or damage to the Product caused by batteries; (c) failures arising from accident, catastrophe,
misuse, neglect, or failure to properly connect and operate the Product in accordance with the accompanying instructions or specifications; (d) failure of moving parts, remote controls, lasers, front panel displays and video screens occurring more than two (2) years after purchase, even though the Product may otherwise still be under warranty, as provided in "Scope and Duration" above; (e) failures of any kind in Products which evidence any tampering, alteration,
defacement of their serial numbers, or attempted servicing by anyone other than Stahl~Tek or an Authorized Stahl~Tek
Service Facility; and (f) failures arising from improper installation of the Product or incompatibility of other components in the system of which the Product is a part; and Stahl~Tek shall have no liability or obligation of any kind with
respect to any of the foregoing types of failures.
25

Notes
26

Notes
27

 Loading...