

Page 1
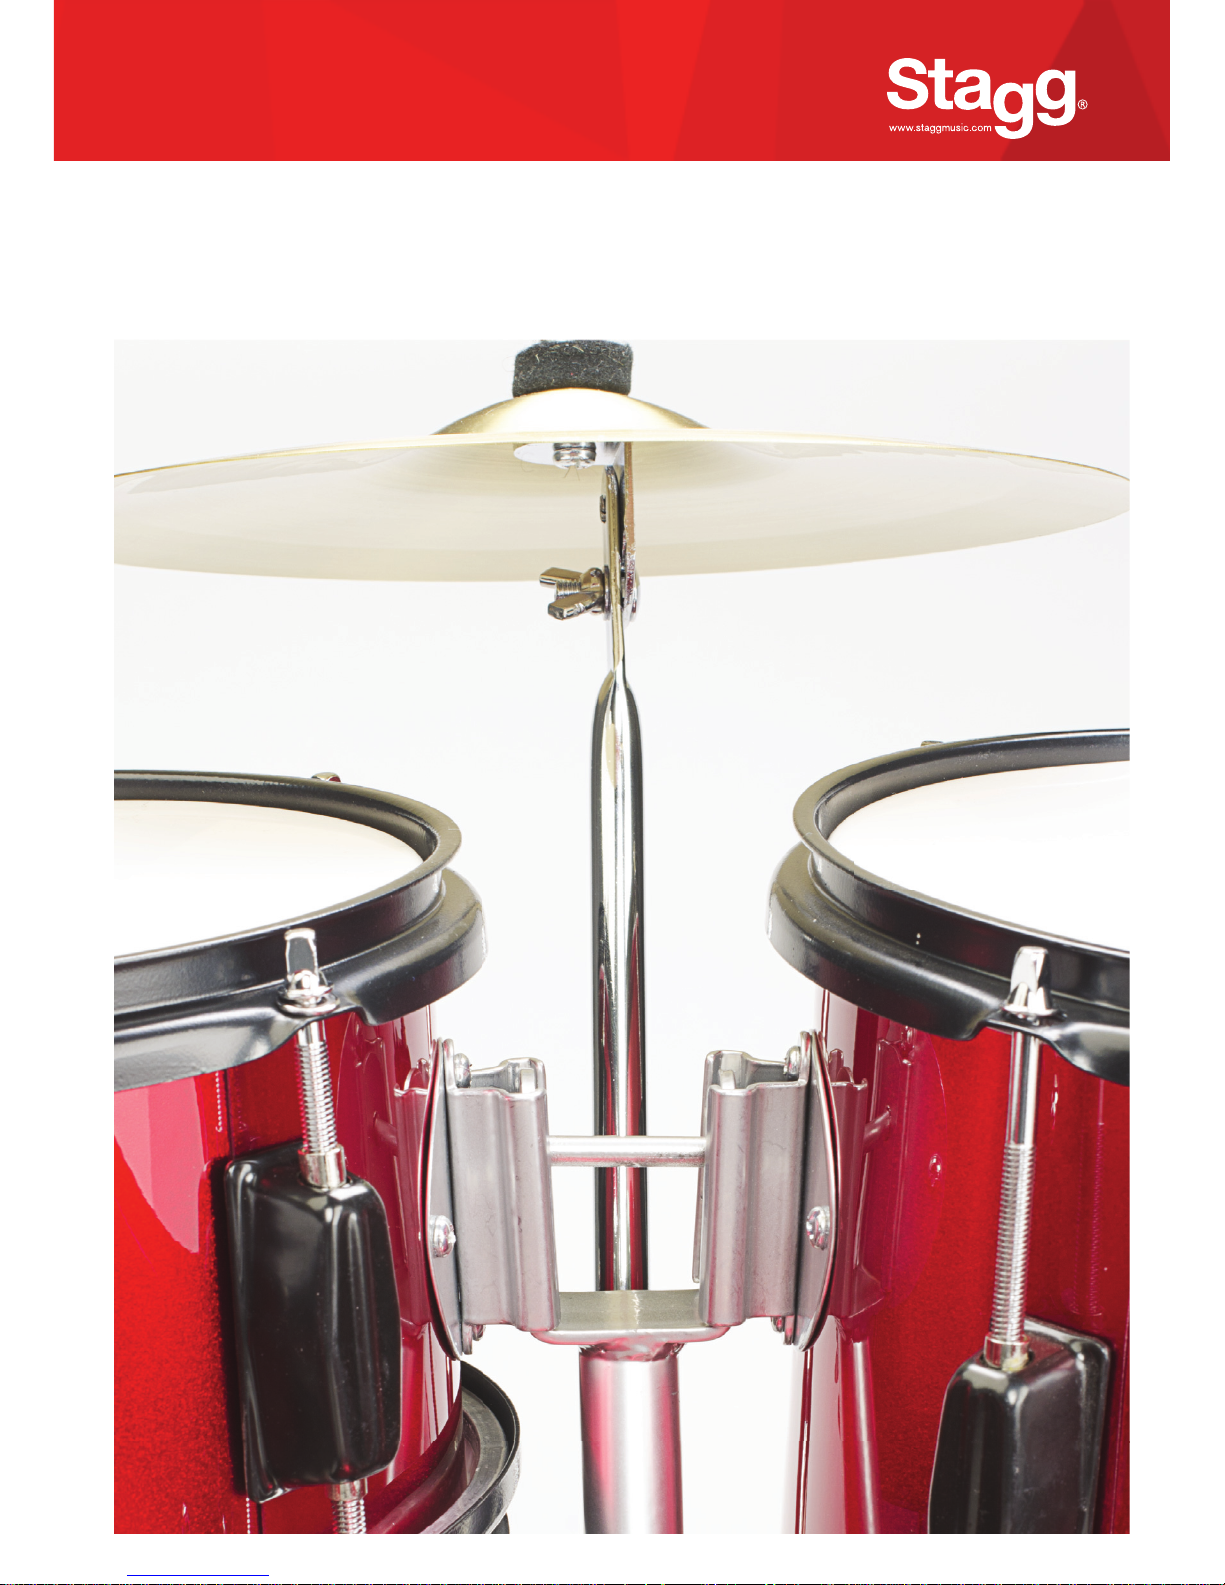
TIM JR 516
USER MANUAL
Video demonstration on www.staggmusic.com
User Manual --> Support --> Drums & Percussion
Page 2
10.b
10.a
9
4
13.a/b
6
2
8
3
1.c
11.a
11.b
11.c
11.d
12.a/b
10.h/i
10.d
10.c
10.g
10.f
1.a
1.b
11.e
5
7
Page 3

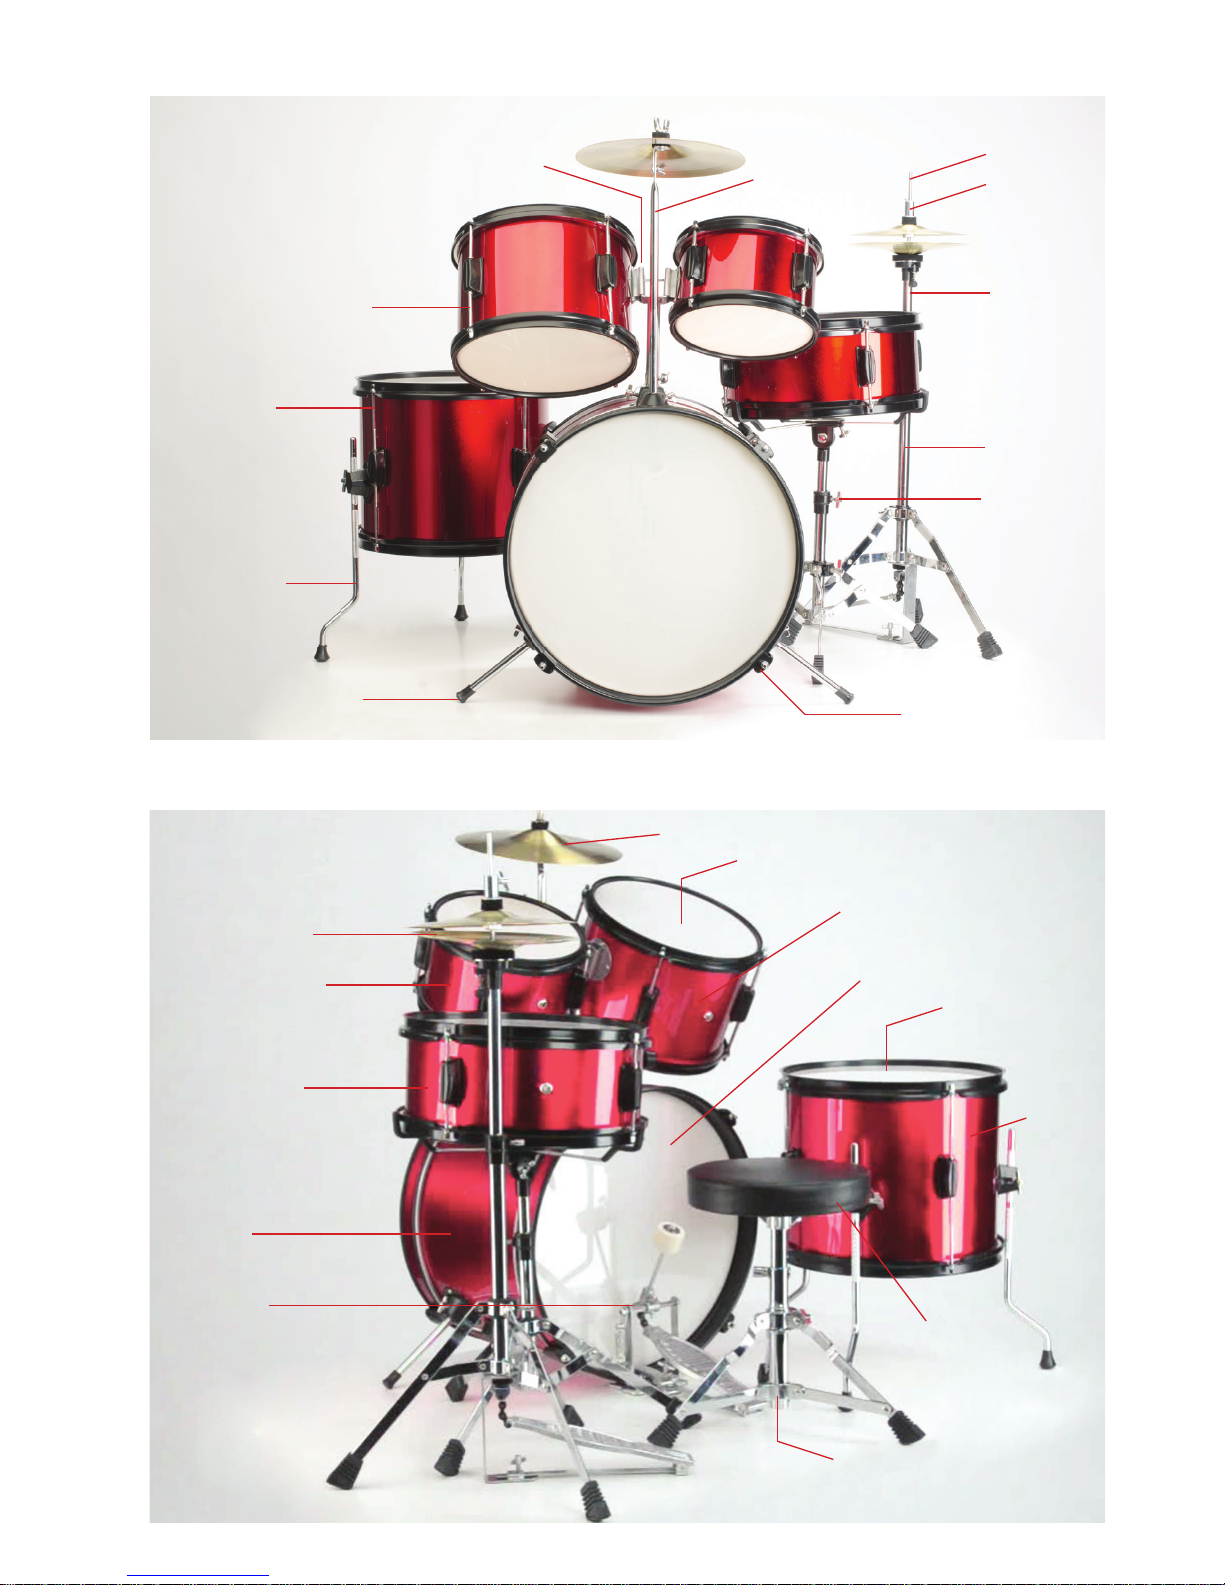
1. Drum Head:
a. 10” tom-tom head x 2 pcs
b. 12” floor tom head x 2 pcs
c. 16” bass drum head x 2 pcs
2. Assembled snare drum x 1 pcs
3. Assembled 8” tom-tom x 1 pcs
4. 10” tom-tom shell x 1 pc + hoop x 2 pcs + 2 locked lugs
5. 12” floor tom shell x 1 + pc + hoop x 2 pcs
6. 16” bass drum shell x 1 pc + hoop x 2 pcs
7. Seat of drum throne
8. 8” hi-hat x 1 pair
9. 10” cymbal x 1 pc
10. Spare Part carton:
a. Cymbal stand x 1 pc
b. Central tom holder x 1 pc
c. Floor tom feet x 3 pcs
d. Bass drum feet x 2 pcs
e. Drum sticks x 1 pair
f. 3” (7.5cm) lug for 10” tom-tom x 6 pcs
g. 4.3” (11cm) lug for 12” floor tom x 8 pcs
h. 6” (15cm) lug for 16” bass drum x 8 pcs
i. Bass drum lug hook x 8 pcs
j. Lug spacers x 22 pcs
k. Drum key x 1 pc
11. Hi-hat Stand carton:
a. Pull rod x 1 pc
b. Clutch x 1 pc
c. Top section tube x 1 pc
d. Feet section x 1 pc
e. Feet section of drum throne
12. Snare Stand carton:
a. Basket arm x 1 pc
b. Feet stand x 1 pc
13. Drum Pedal carton:
a. Drum pedal x 1 pc
b. Beater x 1 pc
FULL PART LIST:
Page 4
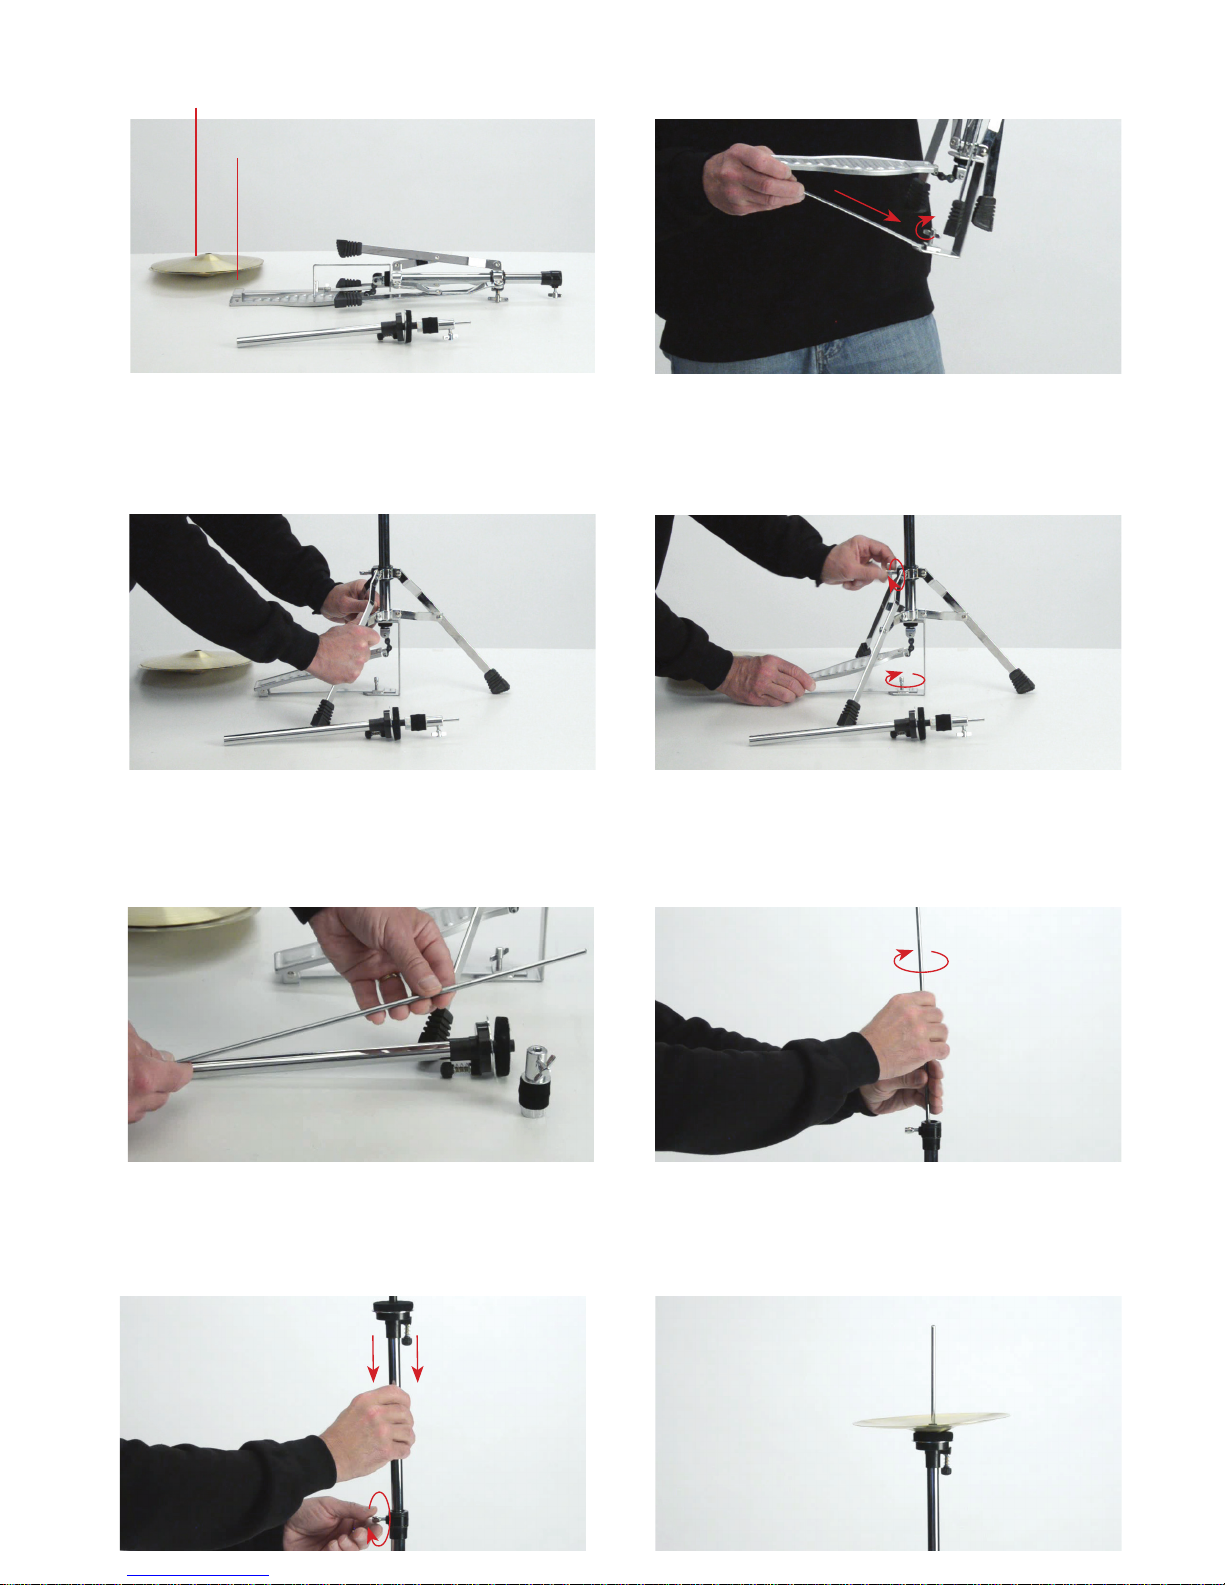
a. HI-HAT
Top hi-hat x 1
Feet section
Insert the foot pedal rod and tighten.
Open the feet and make sure
all feet are well secured to the ground.
Take out the pull rod from the top-section
tube and leave the clutch aside.
Insert the pull rod and tighten.
Tighten the feet & foot pedal rod.
Top section
Top-section tube
Pull rod
Clutch
Bottom hi-hat x 1
1
3
5
2
4
6
7 8
Insert the top-section tube
and tighten.
Place the bottom hi-hat.
Page 5

9
11
1
10
12
2
Disassemble the clutch. Place the top hi-hat on the clutch rod.
Assemble the felt and the screw back.
Fit the top hi-hat on the pull rod
and tighten the screw.
Pull open the legs and tighten.
You may leave some space for
playing open and close sound
Adjustable tilter for adjusting
the angle of bottom hi-hat
b. Throne
Seat
Feet
Adjustable tube
3 4
Set the throne to appropriate
height and tighten.
Fit seat to the stand and tighten.
Page 6
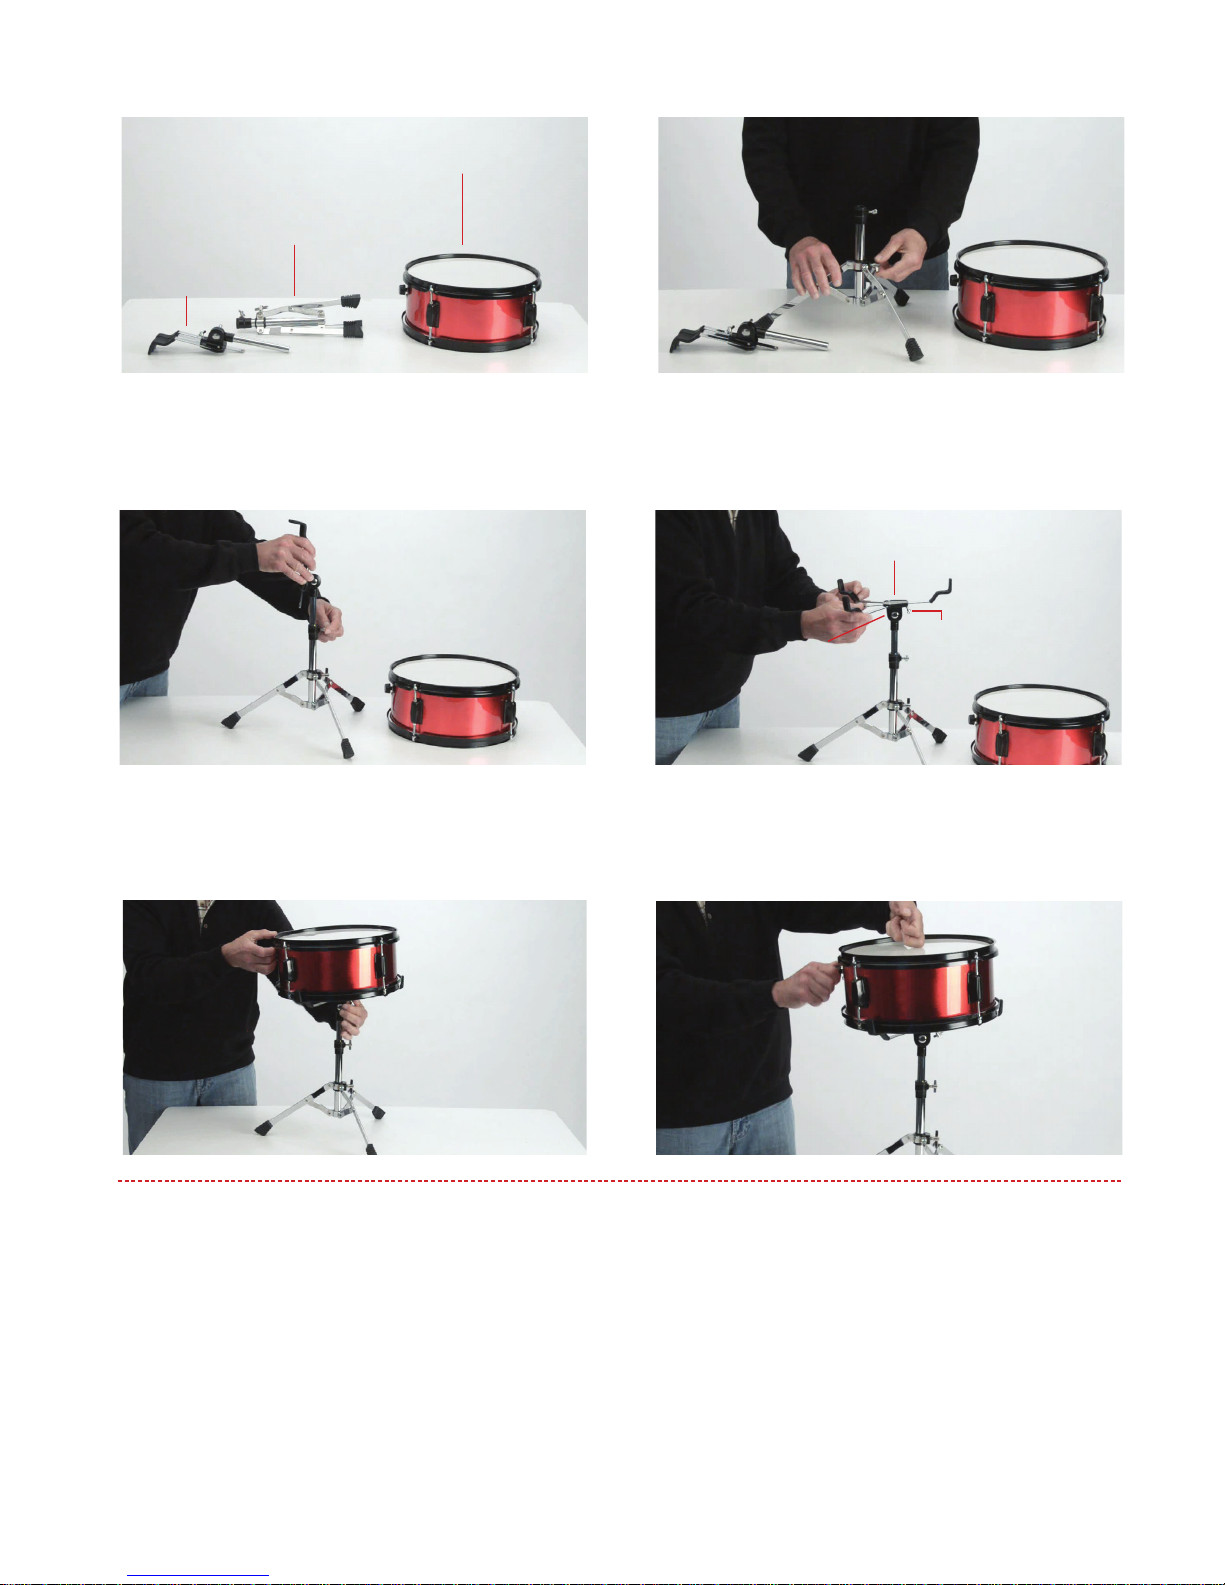
1
3
2
4
Pull open the legs and tighten.
Insert the basket arm to
appropriate height and tighten.
c. Snare drum
Stand-feet
Assembled snare drum
Basket arm
1. adjust the arm to
horizontal position
and tighten
3.loose the screw
and pull the arm
2. open the arms
5 6
Place the snare drum on basket. You may adjust the snare
by tuning the knob.
Page 7
1
2
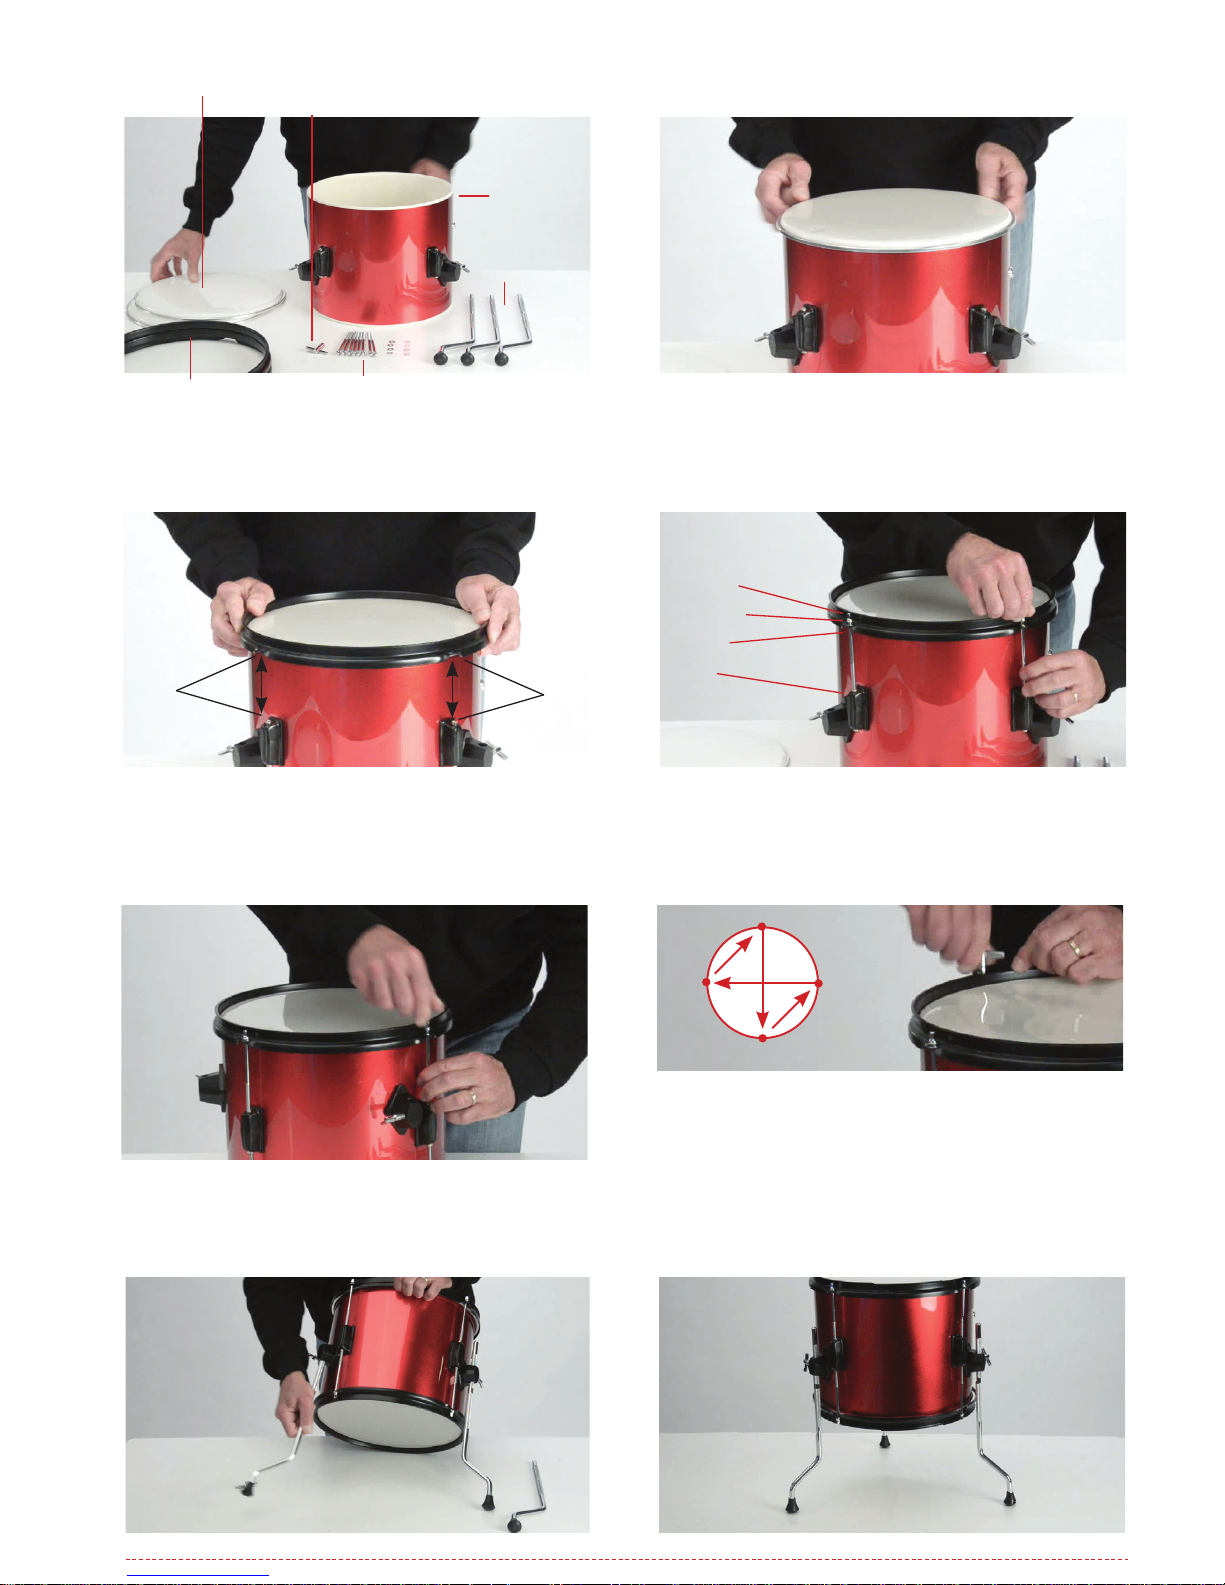
Place a head on the floor tom.
d. Floor tom & 10” tom-tom
Floor tom
Leg x 3 pcs
12” Head x2 pcs
Hoop x2 pcs
drum key x1 pc
Tension rod & spacer x 8 pcs
3
5
4
6
Place the hoop onto the head.
Screw the tension rod to the lug.
NOTE: DO NOT FULLY TIGHTEN
Use the drum key to tune the tension rod.
Note: Do not fully tighten one rod at a time.
Please tune rods in the diametrical order as above.
Repeat several times until the tension of each rod is
equal. The higher tension you tune , the higher pitch
it would sound
Repeat the same procedure on the
other side until all lugs are half screwed.
Rod
Spacer
Hoop
Lug
The holes on the hoop
should be straight to the lug
1st
2nd
3rd
4th
7 8
Insert the floor tom legs into the leg
bracket to appropriate height and tighten.
Page 8
3
5
4
6
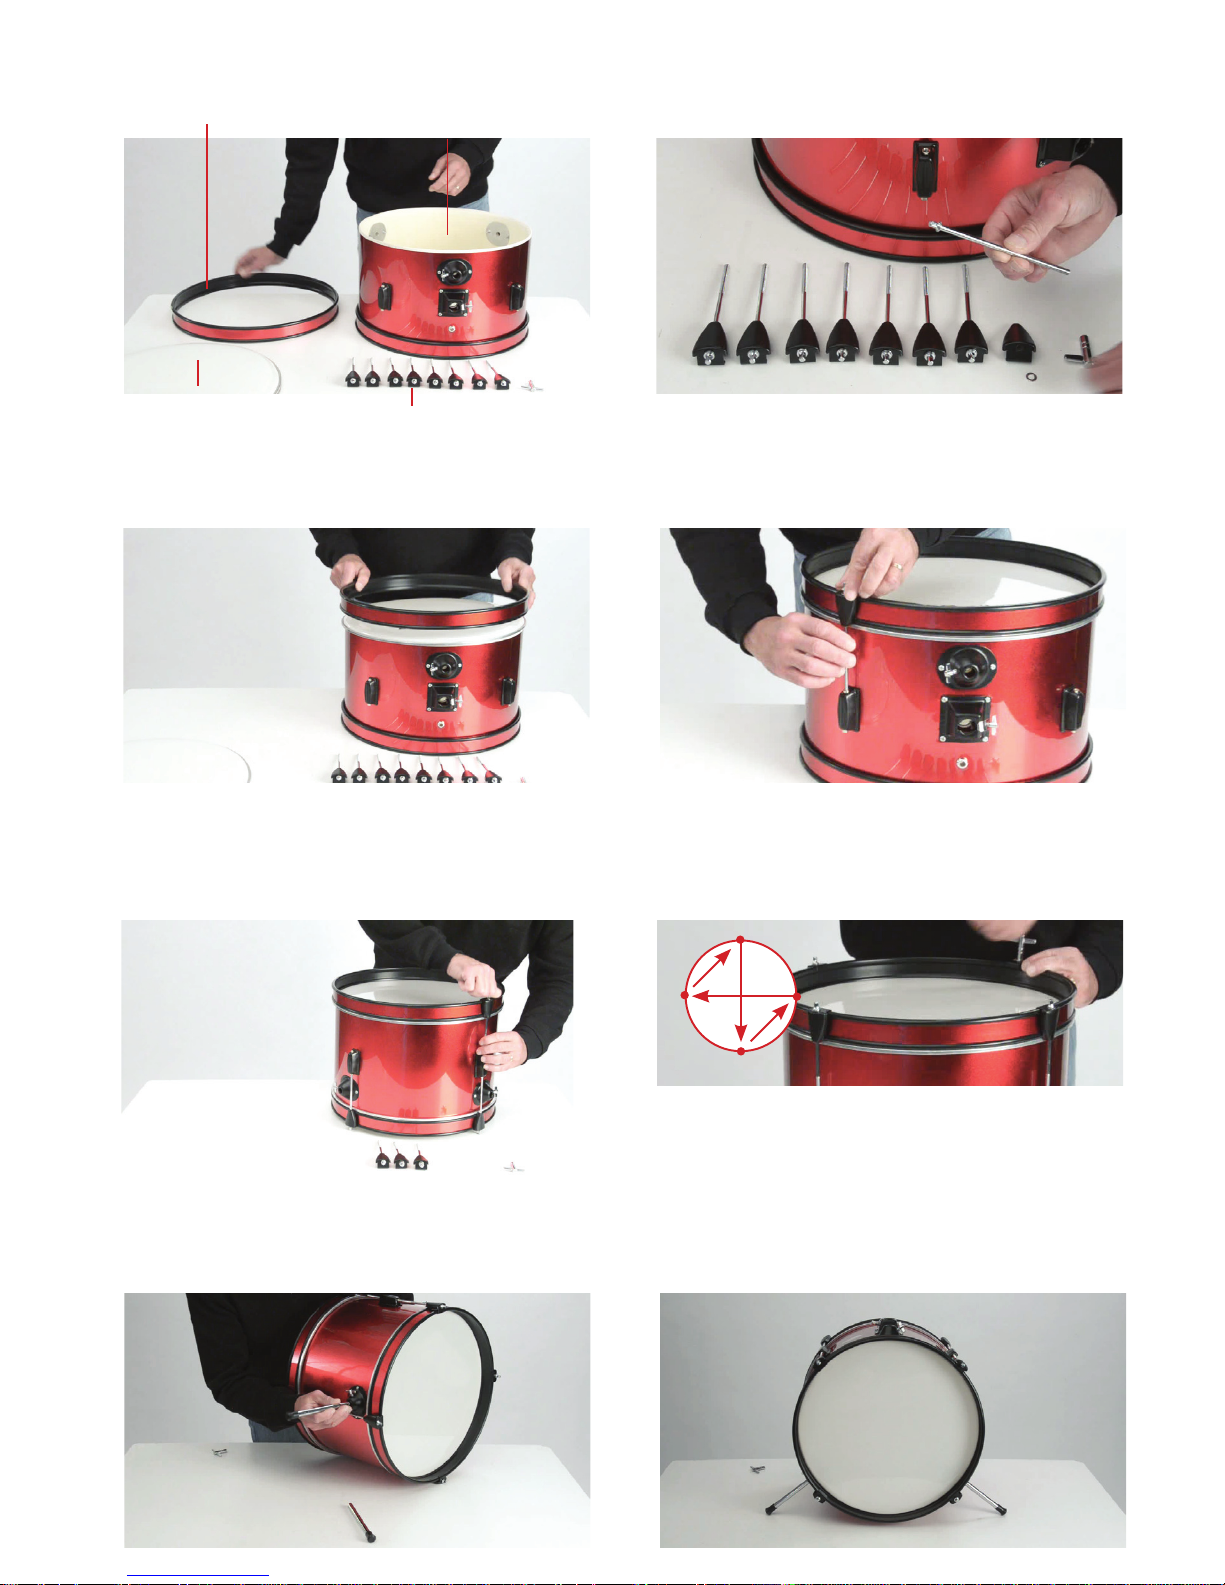
1. Place the head with logo
on the front side of the bass drum.
2. Place the hoop onto the drum head.
Screw the tension rod to the lug.
NOTE: DO NOT FULLY TIGHTEN
Note: Do not fully tighten one rod at a time.
Please tune rods in the diametrical order as above.
Repeat several times until the tension of each rod is
equal. The higher tension you tune , the higher pitch
it would sound
Use the drum key to tune the tension rod.Repeat the same procedure on the
other side until all rods are half screwed.
1st
2nd
3rd
4th
7 8
Insert the legs to the leg bracket
and tighten.
Bass drum leg x 2 pcs
1
2
Prepare 8 sets of
bass drum tension rod + spacer + bracket
e. Bass drum
Hoop x2 pcs
Bass drum x1
Drum key
tension rod set x8 sets
Bass drum head x2pcs
Page 9

3
5 6
4
Insert the cymbal arm to
the holder bracket and tighten.
Unscrew the cymbal lock and
leave single felt on the holder.
1. Place the cymbal between 2 felts.
2. Place the spacer on the top.
3. Lock the cymbal.
Don’t forget to connect your
bass drum pedal before playing.
1
2
Hang 8” and 10” tom tom on the holder
The logo should face the audience.
Insert the tom tom holder
to the holder bracket and tighten.
f. Tom-tom, cymbal arm & bass drum pedal
Page 10

Notes:
Page 11

Notes:
Page 12

 Loading...