

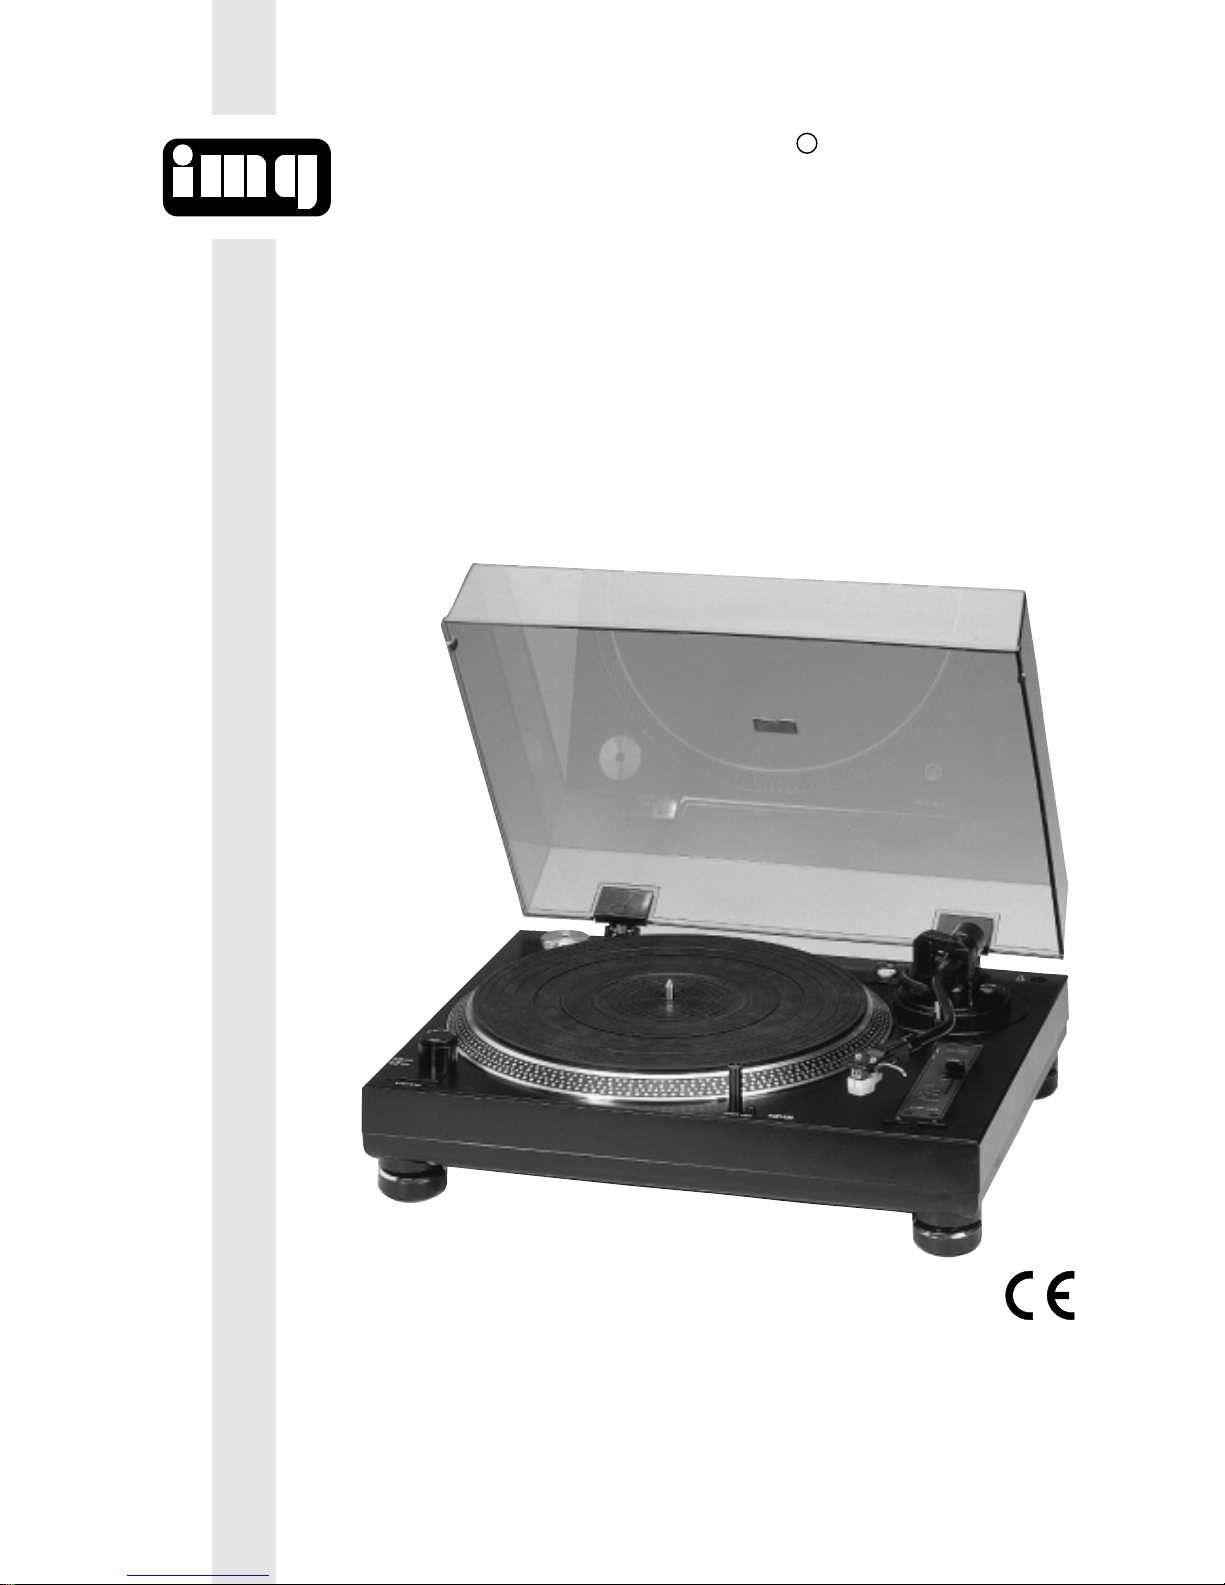
Page 1
Stage Line
R
BEDIENUNGSANLEITUNG • INSTRUCTION MANUAL • MODE D`EMPLOI • ISTRUZIONI PER L´USO
GEBRUIKSAANWIJZING • HANDLEIDING • MANUAL DE INSTRUCCIONES • MANUAL DE INSTRUÇÕES
BRUGSANVISNING • BRUKSANVISNING • KÄYTTÖOHJE
STEREO-HIFI-PLATTENSPIELER
STEREO HIFI TURNTABLE
PLATINE DISQUES HIFI STÉRÉO
GIRADISCHI STEREO HIFI
DJP-120 Best.-Nr. 21.0400
Page 2

2
Bevor Sie einschalten ...
Wir wünschen Ihnen viel Spaß mit Ihrem
neuen img Stage Line Gerät. Dabei soll
Ihnen diese Bedienungsanleitung helfen,
alle Funktionsmöglichkeiten kennenzulernen. Die Beachtung der Anleitung vermeidet außerdem Fehlbedienungen und
schützt Sie und Ihr Gerät vor eventuellen
Schäden durch unsachgemäßen Gebrauch.
Den deutschen Text finden Sie auf den
Seiten 4
-
6.
Before you switch on ...
We wish you much pleasure with your new
img Stage Line unit. With these operating
instructions you will be able to get to know
all functions of the unit. By following these
instructions false operations will be avoided, and possible damage to you and your
unit due to improper use will be prevented.
You will find the English text on the pages
4
-
6.
Prima di accendere ...
Vi auguriamo buon divertimento con il
Vostro nuovo apparecchio img Stage Line.
Le istruzioni per l’uso Vi possono aiutare a
conoscere tutte le possibili funzioni. E rispettando quanto spiegato nelle istruzioni,
evitate di commettere degli errori, e così
proteggete Voi stessi, ma anche l’apparecchio, da eventuali rischi per uso improprio.
Il testo italiano lo potete trovare alle
pagine 7
-
9.
Avant toute mise en service ...
Nous vous remercions d’avoir choisi un
appareil img Stage Line et vous souhaitons beaucoup de plaisir à l’utiliser. Cette
notice a pour objectif de vous aider à
mieux connaître les multiples facettes de
l’appareil et à vous éviter toute mauvaise
manipulation.
La version française se trouve pages 7
-
9.
Voordat u inschakelt ...
Wij wensen u veel plezier met uw nieuw
toestel van img Stage Line. Met behulp
van bijgaande gebruiksaanwijzing kunt u
alle functiemogelijkheden leren kennen.
Door deze instructies op te volgen zal een
slechte werking vermeden worden, en zal
een eventueel letsel aan uzelf en schade
aan uw toestel tengevolge van onzorgvuldig gebruik worden voorkomen.
U vindt de nederlandstalige tekst op de
pagina’s 10
-
12.
Antes de pôr em funcionamento ...
Agradecemos-lhe por ter escolhido um
aparelho img Stage Line. Com estas
instruções ficará habilitado a conhecer e
utilizar todas as funções desta unidade.
Seguindo-as, evita possíveis manipulações defeituosas.
A versão em idioma português pode ser
encontrada nas páginas 13
-
14.
Antes de cualquier instalación
Tenemos de agradecerle el haber adquirido un equipo img Stage Line y le deseamos un agradable uso. Este manual
quiere ayudarle a conocer las multiples
facetas de este equipo y evitar cualquier
uso inadecuado.
La versión española se encuentra en las
páginas 10
-
12.
D
A
CH
GB
NL
B
F
B
CH
E
I
P
Inden De tænder for apparatet ...
Vi ønsker Dem god fornøjelse med Deres
nye img Stage Line apparat. Denne brugsanvisning giver mulighed for at lære alle apparatets funktioner at kende. Følg vejledningen
for at undgå forkert betjening og for at beskytte Dem og Deres apparat mod skade på
grund af forkert brug.
Den danske tekst finder De på side 13-15.
Förskrift
Vi önskar dig mycket nöje med din nya
DJP-120. Om du först läser instruktionerna kommer du att få glädje av enheten
under lång tid. Kunskap om alla funktioner
kan bespara dig mycket besvär med
enheten i framtiden.
Du finner den svenska texten på sidan
16
-
17.
Ennen virran kytkemistä ...
Toivomme, että uusi img Stage Line-laitteesi tuo sinulle paljon iloa ja hyötyä.
Tämä käyttöohje esittää sinulle kaikki
uuden laitteesi toiminnot. Seuraamalla
sitä vältät virhetoiminnot ja niistä johtuvat
mahdolliset vahingot sinulle tai laitteellesi.
Löydät suomenkieliset käyttöohjeet sivuilta 16
-
18.
DK
S
FIN
Stage Line
R
Page 3
3
START/STOP
P
o
w
e
r
TARGET LIGHT
4533
Stage Line
DJP-120
PITCH ADJ.
BELT DRIVE
TURNTABLE
+
-
33
45
60Hz
33
45
50Hz
0
3
2
1
DJP-120Belt Drive Full Manual Turntable
DC12V 250mA
REMOTE
FORW/BACKW
REMOTE
START/STOP
12345
11 12 13 14 15 16 17
18 19 20 21 22
6
7
8
9
10
➀
➁
Start
Stop
Forw.
Backw.
Remote control Forward/Backward ➆Remote control Start/Stop ➅
Tonearm balance ➂
0
0.5
2.5
2
1.5
1
0
0.5
2.5
2
1.5
1
Scale ring ➃ Stylus pressure ➄
adjustment
Page 4

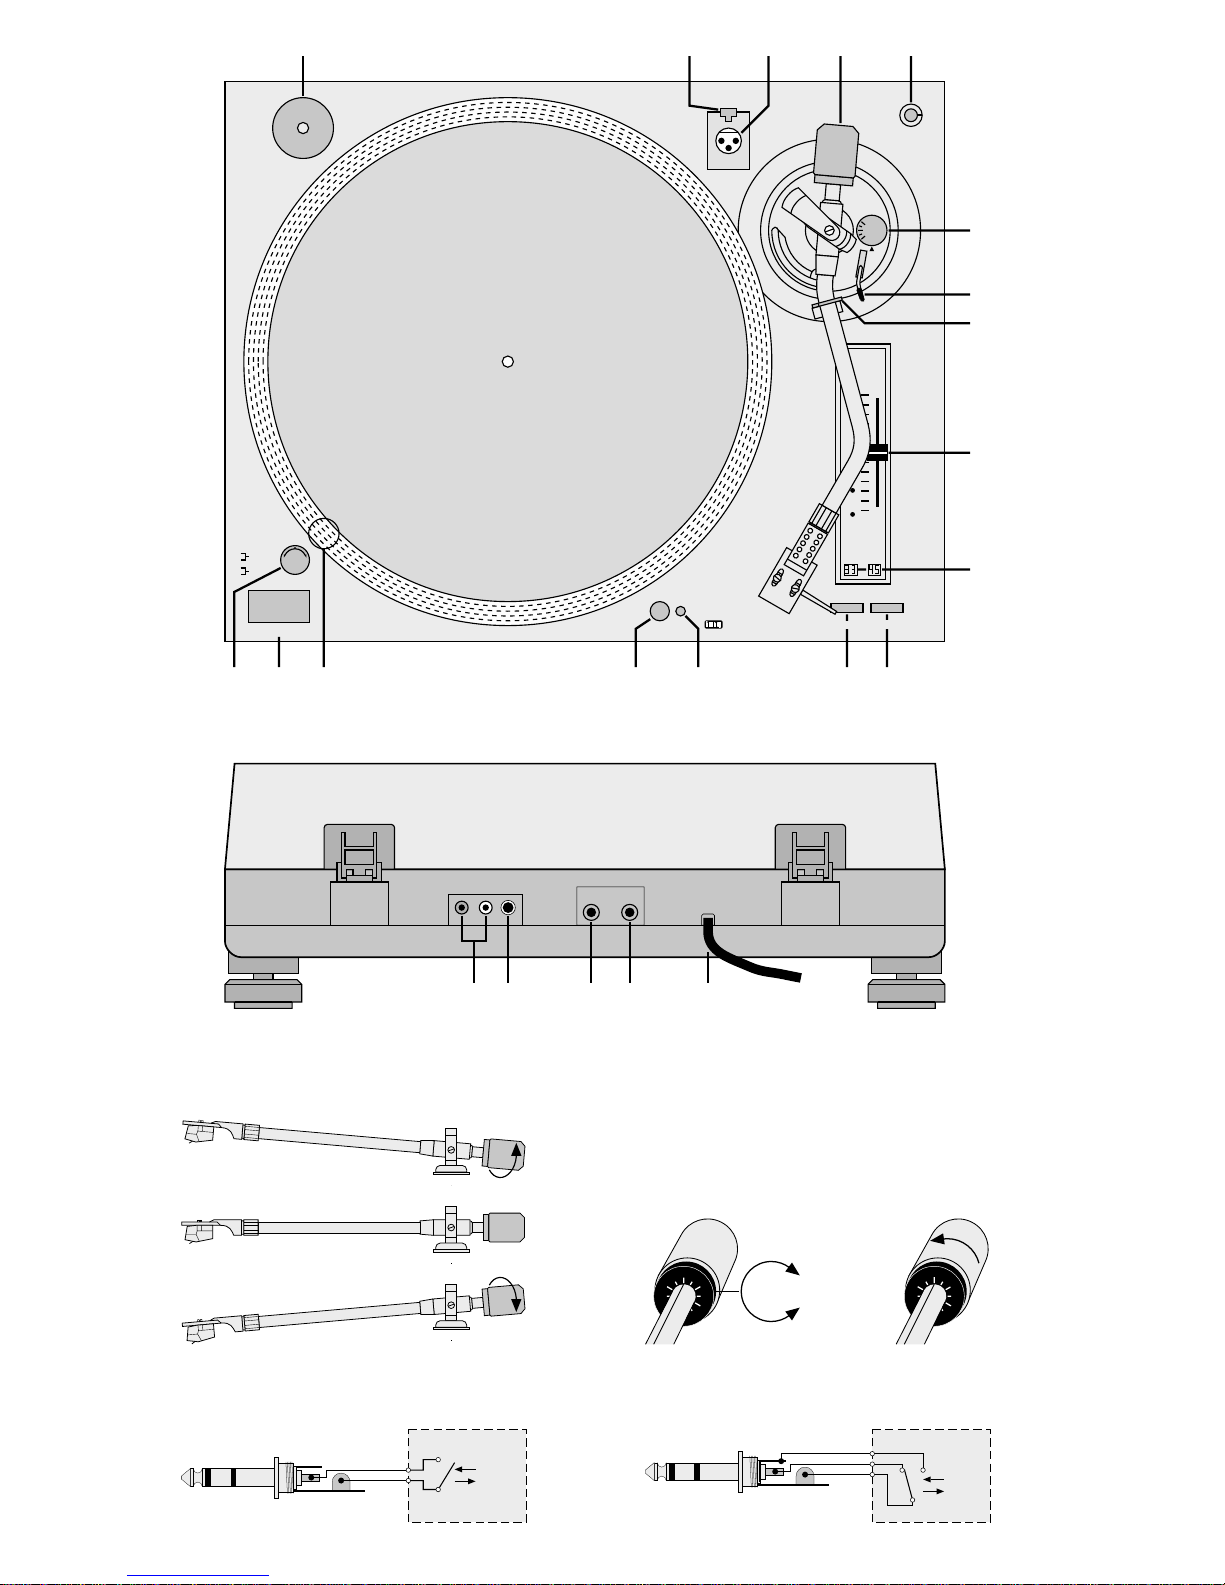
Bitte klappen Sie die Seite 3 heraus. Sie sehen
dann immer die beschriebenen Bedienelemente
und Anschlüsse.
1 Übersicht der Bedienelemente und
Anschlüsse
1.1 Bedienelemente
1 Adapter für Single-Platten
2 Entriegelung für Zusatzlampe
3 XLR-Buchse für Zusatzlampe 12 V, 3W
4 Gegengewicht für den Tonarm
5 Halterung für Ersatz-Systemträger
6 Antiskating-Einstellung
7 Tonarm-Lift
8 Verriegelungshebel für den Tonarm
9 Geschwindigkeitsregler
10 Geschwindigkeitsanzeige
11 Ein-/Ausschalter und Stroboskop-Lampe
12 Start/Stop-Taste
13 Stroboskop-Ring
14 Beleuchtung für den Plattenteller
15 Ein-/Ausschalter für die Plattentellerbeleuchtung
16 Taste für Geschwindigkeit 33UpM
17 Taste für Geschwindigkeit 45UpM
1.2 Anschlüsse
18 Tonausgang für Verstärker oder Mischpult
19 Masse-Anschluß
20 Anschluß für Fernsteuerung Vor-/Rücklauf
21 Anschluß für Fernsteuerung Start/Stop
22 Netzkabel zum Anschluß an 230V~/50Hz
2 Hinweise für den sicheren Gebrauch
Dieses Gerät entspricht den EU-Richtlinien Nr.
89/336/EWG für elektromagnetische Verträglichkeit
und Nr.73/23/EWG für Niederspannungsgeräte.
Das Gerät wird mit lebensgefährlicher Netzspannung (230V~) versorgt. Nehmen Sie deshalb niemals selbst Eingriffe im Gerät vor. Durch unsachgemäßes Vorgehen besteht die Gefahr eines
elektrischen Schlages. Außerdem erlischt beim
Öffnen des Gerätes jeglicher Garantieanspruch.
Beachten Sie für den Betrieb auch unbedingt die folgenden Punkte:
•
Das Gerät ist nur zur Verwendung in Räumen
geeignet.
•
Schützen Sie das Gerät vor Feuchtigkeit und Hitze.
•
Das Gerät nicht in Betrieb nehmen und sofort den
Netzstecker ziehen, wenn:
1. sichtbare Schäden am Gerät oder an der Netz-
anschlußleitung vorhanden sind,
2. nach einem Sturz oder ähnlichem der Verdacht
auf einen Defekt besteht,
3. Funktionsstörungen auftreten.
Das Gerät in jedem Fall zur Reparatur in eine
Fachwerkstatt geben.
•
Eine beschädigte Netzanschlußleitung darf nur
durch den Hersteller oder eine autorisierte Fach-
werkstatt ersetzt werden.
•
Den Netzstecker nie an der Zuleitung aus der
Steckdose ziehen.
•
Wird das Gerät zweckentfremdet, falsch bedient
oder nicht fachgerecht repariert, kann für eventu-
elle Schäden keine Haftung übernommen werden.
•
Für die Reinigung nur ein trockenes Staubtuch ver-
wenden, auf keinen Fall Chemikalien oder Wasser.
3 Montage und Grundeinstellungen
Der Plattenteller, das Gegengewicht für den Tonarm
und die Abdeckhaube sind einzeln verpackt, damit
beim Transport der Plattenspieler nicht beschädigt
wird. Nach dem Auspacken lassen sich alle Teile
ganz einfach montieren. Die Verpackung sollte für
eventuelle Transporte aufgehoben werden.
3.1 Plattenteller montieren
1) Den Plattenteller auf die Achse des Plattenspielers stecken.
2) Von Hand den Plattenteller so weit drehen, bis
sich eines der größeren Löcher in der Nähe des
Adapters für Single-Platten (1) befindet und die
Antriebsachse des Motors zu sehen ist.
3) Der Gummi-Antriebriemen ist durch die größeren
Plattentellerlöcher zu sehen. Den Antriebsriemen
fassen und über die Antriebsachse legen.
4) Die beiliegende Gummimatte auf den Plattenteller legen. Zum Erzeugen von “Scratch”-Effekten
ist alternativ die Filzmatte zu verwenden, damit
die Schallplatte beim Drehen von Hand rutschen
kann.
3.2 Gegengewicht für den Tonarm montieren
1) Das Gegengewicht (4) aus einem der beiden seitlichen Styropor-Verpackungsteilen herausnehmen.
2) Mit einer Hand den Tonarm in der Mitte festhalten.
Mit der anderen Hand das Gegengewicht auf das
Ende des Tonarmes stecken, bis es einrastet.
3) Mit dem Gegengewicht wird anschließend das
Gewicht genau eingestellt, mit dem die Abtastnadel auf der Schallplatte aufliegt.
3.3 Auflagegewicht einstellen
1) Zuerst den Antiskating-Drehknopf (6) im Uhrzeigersinn auf “0” drehen.
2) Die Schutzkappe für die Abtastnadel nach unten
abziehen.
3) Den Hebel für den Tonarm-Lift (7) in die vordere
Position stellen.
4) Den Verriegelungshebel für den Tonarm (8) nach
rechts öffnen. Den Tonarm am Griff anfassen und
ihn vorsichtig bis kurz vor den Plattenteller führen,
so daß er sich frei nach oben und unten bewegen
läßt.
Achtung! Die Abtastnadel nirgends anstoßen
lassen.
Please unfold page 3. Then you can always see
the operating elements and connections described.
1 Operating Elements and Connections
1.1 Operating Elements
1 Adapter for single records
2 Button for unlocking an additional lamp
3 XLR jack for an additonal lamp 12 V, 3W
4 Counterweight for the tonearm
5 Mounting support for a reserve headshell
6 Antiskating adjustment
7 Lever for tonearm lift
8 Tonearm locking lever
9 Pitch control
10 Speed indication
11 POWER knob and stroboscope lamp
12 Start/Stop button
13 Stroboscope ring
14 Target light
15 On/Off switch for target light
16 Button for 33 rpm speed
17 Button for 45 rpm speed
1.2 Connections
18 Signal output for the amplifier or mixing console
19 Ground connection
20 Connection for advance/reverse remote control
21 Connection for start/stop remote control
22 Mains cable 230 V~/50 Hz
2 Safety Notes
This appliance corresponds to the EC Directives No.
89/336/EWG for electromagnetic compatibility and
No. 73/23/EWG for low voltage appliances.
This unit uses lethally high voltage (230 V~). To
prevent a shock hazard do not open the cabinet.
Leave servicing to authorized skilled personnel
only. Besides any guarantee claim expires if the
unit has been opened.
For the operation also watch in any case the following items:
•
The unit is only suitable for indoor use.
•
Avoid excessively warm locations for the unit or
high humidity.
•
Do not set the unit into operation and immediately
take the mains plug out of the mains socket if:
1. damage at the unit or mains cable can be seen.
2. a defect might have occurred after a drop or
similar accident.
3. there are malfunctions.
The unit must in any case be repaired by author-
ized skilled personnel.
•
A damaged mains cable must only be repaired by
the manufacturer or authorized skilled personnel.
•
Never pull the mains plug out of the mains socket
by means of the mains cable.
•
If the unit is used for purposes other than originally
intended, if it is operated in the wrong way or not
repaired by authorized skilled personnel, there is
no liability for possible damage.
•
For the cleaning only use a dry cloth for dust re-
moving, by no means chemicals or water.
•
Important for U.K. Customers!
The wires in this mains lead are coloured in ac-
cordance with the following code:
blue = neutral
brown = live
As the colours of the wires in the mains lead of this
appliance may not correspond with the coloured
markings identifying the terminals in your plug,
proceed as follows:
1. The wire which is coloured blue must be con-
nected to the terminal in the plug which is marked
with the letter N or coloured black.
2. The wire which is coloured brown must be connected to the terminal which is marked with the letter L or coloured red.
3 Mounting and Basic Adjustments
The turntable platter, the counterweight for the tonearm, and the dust cover are separately packed so
that during transportation no damage may occur. All
parts are easy to mount. The packing material
should be kept for possible transportation.
3.1 Mounting of the Turntable Platter
1) Place the turntable platter on the spindle of the
turntable.
2) Turn the platter by hand so far until one of the
larger cutouts is near the adapter for single records
(1) and the drive axle of the motor can be seen.
3) Through the larger turntable platter cutouts the
rubber drive belt is visible. Take it to place it
around the drive axle.
4) Place the included rubber mat on the turntable
platter. To produce “scratch” effects, use the felt
pad as an alternative so that sliding of the record
is possible while turning it by hand.
3.2 Mounting of the Counterweight for the
Tonearm
1) Take the counterweight (4) for the tonearm out of
the packing.
2) Hold the tonearm in the middle with one hand.
With the other hand insert the counterweight at
the end of the tonearm until it is fixed.
3) With the counterweight the pressure of the stylus
on the record is adjusted afterwards.
3.3 Stylus Pressure Adjustment
1) At first turn the antiskating knob (6) clockwise to
the “0” position.
2) Remove the stylus protection cap downwards.
3) Place the lever for the tonearm (7) in the front
position.
4
GB
D
A
CH
Page 5

5) Das Gegengewicht (4) so verdrehen, daß der
Tonarm genau waagerecht stehen bleibt und
nicht nach oben oder unten schwingt (Abb.3).
Schwingt der Tonarm nach oben: Gegengewicht
entgegen dem Uhrzeigersinn drehen.
Schwingt der Tonarm nach unten: Gegengewicht
im dem Uhrzeigersinn drehen.
6) Den Tonarm zurück auf die Tonarm-Halterung
legen und mit dem Verriegelungshebel (8)
sichern.
7) Am Gegengewicht (4) befindet sich ein drehbarer,
schwarzer Ring mit einer Skala. Die weiße Linie
auf dem Tonarm zeigt auf irgendeinen Wert der
Skala. Ohne daß das Gegengewicht verdreht
wird, nur den Ring auf “0” drehen (Abb.4).
8) Auf der Skala wird das Auflagegewicht in Gramm
abgelesen. Für das mitgelieferte Abtastsystem ist
ein Auflagegewicht von 2,5 g erforderlich. Dazu
das Gegengewicht (nicht den Ring mit der Skala
allein!) entgegen dem Uhrzeigersinn bis zur “2,5”
drehen (Abb. 5). Für andere Abtastsysteme das
Auflagegewicht einstellen, welches in den dazugehörigen technischen Daten angeben ist.
3.4 Antiskating einstellen
Beim Abspielen einer Schallplatte treten Kräfte an
der Abtastnadel auf, welche durch die AntiskatingEinrichtung aufgehoben werden. Dazu den Antiskating-Drehknopf (6) von “0” auf den Wert einstellen,
der dem Auflagegewicht gleich ist, d.h. bei dem mitgelieferten Abtastsystem auf “2,5”. Der Wert ist am
Pfeil unter dem Drehknopf abzulesen.
3.5 Abdeckhaube montieren
Die zwei Scharniere für die Abdeckhaube aus den
beiden Styropor-Verpackungsteilen herausnehmen
und auf die Abdeckhaube stecken. Die Abdeckhaube
mit den Scharnieren auf den Plattenspieler aufsetzen. Die Abdeckhaube kann jederzeit wieder abgenommen werden, wenn sie beim Betrieb stört (z.B.
beim Disco-Betrieb).
4 Plattenspieler anschließen
Das beiliegende Anschlußkabel in die Cinch-Buchsen (18) des Plattenspielers stecken und am Verstärker oder Mischpult in die Anschlußbuchsen für
einen Plattenspieler mit Magnetsystem. Dabei auf
die farbige Kennzeichnung der Buchsen und Stecker
achten (rot = rechter Kanal, weiß = linker Kanal).
Den Masse-Anschluß des Kabels an der Klemme
(19) festschrauben und an der Masse-Klemme des
Verstärkers oder Mischpultes. Den Netzstecker in
eine Steckdose (230V~/50Hz) stecken.
5 Bedienung
5.1 Schallplatte abspielen
1) Die Schutzkappe für die Abtastnadel nach unten
abziehen.
2) Zum Einschalten den Drehknopf des Ein-/Ausschalters (11) in Richtung “on” drehen. Die
Geschwindigkeitsanzeige (10) und die Stroboskop-Lampe (11) leuchten. Bei Bedarf die Plattentellerbeleuchtung (14) mit dem Druckschalter (15)
einschalten.
3) Die Geschwindigkeit wählen:
33UpM für Langspielplatten mit der Taste (16),
45UpM für Single-Platten mit der Taste (17).
Die eingestellte Geschwindigkeit wird durch die
Anzeige (10) angegeben.
4) Schallplatte auflegen. Bei Single-Platten den
Adapter (1) mit auflegen.
5) Den Hebel für den Tonarm-Lift (7) in die hintere
Position stellen. Den Verriegelungshebel (8) für
den Tonarm nach rechts öffnen. Den Tonarm am
Griff anfassen, und die Abtastnadel über den
Anfang der Schallplatte stellen.
6) Den Hebel für den Tonarm-Lift (7) in die vordere
Position stellen. Der Tonarm senkt sich langsam
auf die Schallplatte.
7) Mit der Taste START/ STOP (12) die Platte starten. Während des Abspielens kann die Platte für
eine Unterbrechung mit der Taste START/STOP
an jeder Stelle gestoppt und wieder gestartet werden.
8) Am Ende der Schallplatte den Tonarm mit dem
Tonarm-Lift (7) anheben und ihn per Hand auf
den Tonarm-Halter zurückführen. Den Plattenteller mit der Taste START/STOP (12) stoppen.
9) Nach dem Gebrauch des Plattenspielers den Tonarm mit dem Verriegelungshebel (8) sichern, und
das Gerät mit dem Ein-/Ausschalter (11) ausschalten. Die Abdeckhaube zum Schutz gegen
Staub herunterklappen.
5.2 Feineinstellung der Geschwindigkeit
Bei Bedarf kann die Geschwindigkeit des Plattenspielers mit dem Schieberegler (9) um 8 % erhöht
oder verringert werden. In der Mittelstellung (Regler
rastet ein) stimmt die Geschwindigkeit genau und
kann auf dem Stroboskop-Ring (13) der Plattentellers kontrolliert werden.
Bei sich drehendem Plattenteller den Teil des
Stroboskop-Rings (13) betrachten, der von der Stroboskop-Lampe (11) beleuchtet wird. (Eventuell die
Raumbeleuchtung verringern.) Bei exakt eingestellter Geschwindigkeit bleiben die Markierungen auf
dem Stroboskop-Ring scheinbar stehen:
bei 33UpM auf dem oberen Ring,
bei 45UpM auf dem zweiten Ring.
5.3 Fernsteuern von Start/Stop
Für den Disco-Betrieb kann die Funktion Start/Stop
über einen separaten Schalter ferngesteuert werden, z.B. über ein Mischpult mit sogenannten FaderStart. Wenn am Mischpult der Regler für den Plattenspieler geöffnet wird, startet automatisch der
Plattenspieler bzw. stoppt wieder, wenn der Regler
geschlossen wird.
Den Schalter bzw. das Mischpult über einen
3poligen Klinkenstecker (6,3mm) an die Buchse
REMOTE START/STOP (21) anschließen (siehe
auch Abb. 6). Die Taste START/ STOP (12) am Plattenspieler ist dann ohne Funktion.
4) Open the tonearm lever (8) to the right. Carefully
hold the tonearm at the handle just before the
turntable platter so that it is possible to move it
upwards and downwards.
Attention! The stylus must not contact any surface.
5) Turn the counterweight (4) so that the tonearm
remains in the horizontal position and neither
swings upwards nor downwards (fig.3).
If the tonearm swings upwards: turn the counterweight counterclockwise.
It the tonearm swings downwards: turn the counterweight clockwise.
6) Put the tonearm back onto the tonearm support
and secure it with tonearm locking lever (8).
7) At the counterweight there is a black rotary ring
with a scale. The white marking on the tonearm
points to any value on the scale. Without turning
the counterweight, move only the ring to the “0”
position (fig.4).
8) On the scale the pressure weight is given in
grams. For the supplied stylus system a pressure
weight of 2.5 g is necessary. For this turn the
counterweight together with the scale ring counterclockwise up to the “2.5” position (fig. 5). For
other stylus systems adjust the pressure weight
according to the respective specifications.
3.4 Antiskating Adjustment
When playing a record, forces occur at the stylus
which are compensated by the antiskating facility.
For this set the antiskating knob (6) from the “0” position to the value which corresponds to the value of
the pressure weight, i.e. for the supplied stylus
system to the “2.5” position. The value can be read at
the arrow under the knob.
3.5 Mounting of the Dust Cover
Take the two joints for the dust cover out of the
packing. Mount the joints at the dust cover. Put the
dust cover with the joints onto the turntable. The dust
cover can be removed any time if it is uncomfortable
for the operation (e.g. during disco operation).
4 Connection of the Turntable
Connect the included cable to the turntable (cinch
jacks 18) and to the amplifier or mixing console
(jacks for a turntable with magnetic system). By this
watch the coloured markings of the jacks and plugs
(red = right channel, white = left channel). Firmly
screw the ground connection of the cable at the plug
(19) of the turntable and at the ground jack of the
amplifier or mixing console. Connect the mains plug
to the mains socket (230V~/50Hz).
5 Operation
5.1 Playing a Record
1) Remove the stylus protection cap downwards.
2) For switching on turn the POWER knob (11) in
“on” direction. The speed indication (10) and the
strobescope lamp (11) are lighting. If necessary,
switch on the target light (14) with the push button (15).
3) Select the speed:
33rpm for long-playing records with the push button (16),
45 rpm for single records with the push button
(17).
The selected speed is displayed by the indication (10).
4) Put on a record. In case of a single record also put
on the adapter (1).
5) Place the lever for the tonearm lift (7) in the rear
position. Open the locking lever (8) to the right.
Hold the tonearm at the handle and place the stylus above the beginning of the record.
6) Place the lever for the tonearm lift (7) in the front
position. Lower the tonearm slowly onto the record.
7) Start playing the record with the START/STOP
button (12). The playing can be interrupted, i. e.
the record can be stopped and started again at
any spot with the START/STOP button.
8) Lift the tonearm at the end of the record with the
lever for the tonearm (7) and put it back by hand
onto the tonearm support. Stop the record with
the START/STOP button (12).
9) After use of the turntable, secure the tonearm with
the locking lever (8) and switch the turntable off
with the POWER knob (11). Close the cover for
dust protection.
5.2 Fine Adjustment of the Speed
If necessary, the speed of the turntable can be
increased or reduced by 8 % with the pitch control
(9). In the midposition (control in center click position), the speed is exactly adjusted and can be controlled by the stroboscope ring (13) of the turntable
platter.
While the turntable platter is revolving, watch the
part of the stroboscope ring (13) which is illuminated
by the stroboscope lamp (11). (Maybe reduce the
room lighting.) In case of exact speed adjustment the
markings on the stroboscope ring seem to stand still:
at 33rpm on the upper ring
at 45rpm at the second ring
5.3 Remote Control of Start/Stop
For the disco operation the Start/ Stop function can
remotely be controlled by a separate switch, e.g. via
a mixing console with so-called fader start. If at the
mixing console the fader for the turntable is opened,
the turntable automatically starts resp. stops again if
the fader is closed.
Connect the switch resp. the mixing console via a
3-pole
1
/4” plug to the jack (21) REMOTE START/
STOP (also see fig. 6). Then the START/STOP button (12) is out of function.
5.4 Remote Control of Reverse/Advance
For special effects or to find a special spot on the
record, the revolving direction can be switched to
advance or reverse with a separate selector switch.
Connect the selector switch via a 3-pole
1
/4” plug to
the jack REMOTE FORW/BACKW (20), see fig.7.
5
GB
D
A
CH
Page 6

5.4 Fernsteuern von Vor-/Rücklauf
Für besondere Effekte oder zum Auffinden einer
bestimmten Stelle auf der Schallplatte läßt sich die
Drehrichtung über einen separaten Umschalter
zwischen Vor- und Rücklauf umschalten. Den Umschalter über einen 3poligen Klinkenstecker
(6,3 mm) an die Buchse REMOTE FORW / BACKW
(20) anschließen (siehe auch Abb.7).
6 Zubehör
6.1 Zusatzlampe
Zum Beleuchten des Plattenspielers kann in die
XLR-Buchse (3) eine Schwanenhalslampe (12V/
3W) gesteckt werden, z.B. MONACOR GNL-300.
Zum Abnehmen der Zusatzlampe die Entriegelungstaste (2) drücken, und gleichzeitig die Lampe
herausziehen.
6.2 Ersatz-Abtastsystem und -Nadel
Bei Bedarf kann das Abtastsystem oder die Abtastnadel leicht ausgewechselt werden. Im Fachhandel
sind entsprechende Ersatzteile erhältlich, z.B.:
Diamant-Abtastnadel MONACOR EN-22SP,
Abtast-Magnetsystem MONACOR EN-22.
Nach dem Austausch des Abtastsystems das Auflagegewicht und Antiskating neu einstellen (siehe
Kapitel 3.3 und 3.4).
6.3 Ersatz-Systemträger
Ein Ersatz-Systemträger komplett mit einem Abtastsystem (im Fachhandel erhältlich) kann in die Halterung (5) gesteckt werden. Damit ist bei Bedarf immer
sofort Ersatz verfügbar. Der Systemträger läßt sich
schnell durch Ab- und Anschrauben austauschen.
Anschließend das Auflagegewicht und Antiskating
neu einstellen (siehe Kapitel 3.3 und 3.4).
7 Wartung
7.1 Pflege
Das Plattenspielergehäuse und die Abdeckhaube
am besten nur mit einem Staubtuch oder angefeuchteten Lappen (nicht tropfnaß!) abwischen. Keinen
Alkohol, Chemikalien oder scharfe Reinigungsmittel
verwenden! Zum Entstauben der Abtastnadel und
Schallplatten ist im Fachhandel entsprechendes
Zubehör erhältlich, z.B.:
Carbonfaser-Plattenbürste MONACOR DC-100.
7.2 Transport
Wollen Sie den Plattenspieler versenden, so achten
Sie darauf, daß der Plattenteller und alle anderen
Baugruppen des Gerätes nur original verpackt und/
oder extra transportgesichert verschickt werden.
Gehäuse- und Geräteschäden, die durch einen unsachgemäß lose verpackten Plattenteller (z.B. Plattenteller nicht von der Achse genommen und nicht
gesichert o.ä.) verursacht werden, unterliegen nicht
der Garantie und sind deshalb kostenpflichtig!
Für den Versand unbedingt beachten:
1) Schutzkappe für die Abtastnadel aufstecken.
2) Tonarm mit dem Verriegelungshebel (8) sichern.
3) Das Gegengewicht für den Tonarm (4) durch Drehen im Uhrzeigersinn abschrauben.
4) Der Plattenteller von der Achse abnehmen, einzeln verpacken und gegen Verrutschen sichern.
5) Am besten den Original-Verpackungskarton verwenden.
8 Technische Daten
8.1 Tonarm
effektive Länge: . . . . . . . . . . 230mm
Überhang: . . . . . . . . . . . . . . 16mm
Tracking-Fehler
innere Rille: . . . . . . . . . . . +0°32’
äußere Rille: . . . . . . . . . . +2°32’
Offset-Winkel: . . . . . . . . . . . 22°
vertikale Friktion: . . . . . . . . . 7mg
8.2 Laufwerk
Plattenteller: . . . . . . . . . . . . . Alu-Guß, 330mm Ø,
740g
Geschwindigkeiten: . . . . . . . 33
1
/3 UpM, 45UpM
Geschwindigkeits-
Feinregelung: . . . . . . . . . . . . ±8%
Start-Drehmoment: . . . . . . . 1,5Nm
Hochlaufzeit: . . . . . . . . . . . . < 0,5 Sekunden
Bremsweg: . . . . . . . . . . . . . .
1
/8 Umdrehung
Wow und Flutter: . . . . . . . . . 0,045%
Rumpelgeräusch-Abstand: .
-
55dB (DIN 45544)
Stromversorgung: . . . . . . . . 230V~/50Hz/15 VA
Abmessungen (BxHxT): . . 445 x 158 x 356mm
Gewicht: . . . . . . . . . . . . . . . . 10kg
Laut Angaben des Herstellers.
Änderungen vorbehalten.
6 Accessories
6.1 Additional Lamp
T o illuminate the turntable, a goose-neck lamp (12V/
3 W) can be connected to the XLR jack (3), e. g.
MONACOR GNL-300.
To remove the lamp, push the unlocking button
(2) and pull out the lamp at the same time.
6.2 Reserve Phono Cartridge System and
Stylus
If necessary, the cartridge system or the stylus can
easily be replaced. At the retailer the corresponding
replacement parts are available, e.g.:
diamond stylus MONACOR EN-22SP,
stereo magnetic phono cartridge system MONACOR
EN-22.
After replacement of the cartridge system readjust
the stylus pressure and antiskating (see chapters 3.3
and 3.4).
6.3 Reserve Headshell
A complete reserve headshell with stylus (available
at the retailer) can be placed in the mounting support
(5) so that there is always a replacement at hand.
The headshell can quickly be replaced by screwing
the existing one off and the new one on. Then the
pressure weight and antiskating have to be adjusted
anew
-
see sections 3.3 and 3.4.
7 Maintenance
7.1 Care
Clean the housing of the turntable and the dust cover
with a dust cloth or wet cloth (not dripping wet!). Do
not use alcohol or strong cleaners! For removing
dust from stylus and records special cleaning accessories are available at the retailer, e.g.:
carbon fibre brush for records MONACOR DC-100.
7.2 Transportation
If you want to despatch the turntable, watch that only
the original packing is used for the turntable platter
and all other component parts of the unit and/or that
these parts are extra secured for transportation.
Damage to housing and units caused by a turntable
platter which is not properly packed, just packed in a
loose way (e.g. turntable platter not taken from the
spindle and not secured or similar) is not covered by
the guaranty and therefore the repair must be paid!
For the despatch watch in any case:
1) Mount the stylus protection cap.
2) Secure the tone arm with the locking lever (8).
3) Screw off the counterweight for the tone arm (4)
by clockwise turning.
4) Take off the turntable platter from the spindle, put
it in a single packing and secure it against displacement.
5) The best thing is to use the original packing.
8 Specifications
8.1 Tonearm
Effective length: . . . . . . . . . . 230 mm
Overhang: . . . . . . . . . . . . . . 16mm
Tracking error
inner groove: . . . . . . . . . . +0°32’
outer groove: . . . . . . . . . . +2°32’
Offset angle: . . . . . . . . . . . . 22°
Lateral vertical friction: . . . . . 7mg
8.2 Mechanism
Turntable: . . . . . . . . . . . . . . . aluminium die cast,
330mm Ø, 740g
Speeds: . . . . . . . . . . . . . . . . 33
1
/3 rpm, 45rpm
Pitch control: . . . . . . . . . . . . ±8%
Starting torque: . . . . . . . . . . 1.5Nm
Starting time: . . . . . . . . . . . . < 0.5 sec.
Braking: . . . . . . . . . . . . . . . .
1
/
8 revolution
Wow and flutter: . . . . . . . . . . 0,045%
Rumble: . . . . . . . . . . . . . . . .
-
55dB (DIN 45544)
Power supply: . . . . . . . . . . . 230V~/50Hz/15 VA
Dimensions (WxHxD): . . . . 445 x 158 x 356mm
Weight: . . . . . . . . . . . . . . . . . 10 kg
According to the manufacturer.
Subject to technical change.
6
GB
D
A
CH
Page 7

B
CH
Vi preghiamo di aprire completamente la pagina 3. Così potete sempre vedere gli elementi di
comando e i collegamenti descritti.
1 Comandi e collegamenti
1.1Comandi
1 Adattatore per dischi single
2 Sblocco per lampada supplementare
3 Presa XLR per lampada supplementare 12 V, 3W
4 Contrappeso del braccio
5 Supporto per portapuntina di scorta
6 Regolazione antiskating
7 Lift per il braccio
8 Leva di bloccaggio del braccio
9 Regolatore velocità
10 Visualizzazione velocità
11 Interruttore ON/OFF e lampada stroboscopica
12 Tasto Start/Stop
13 Anello stroboscopico
14 Illuminazione piatto
15 Interruttore illuminazione piatto
16 Tasto per velocità 33g/m
17 Tasto per velocità 45g/m
1.2 Collegamenti
18 Uscita audio per amplificatore o mixer
19 Collegamento massa
20 Telecomando avanzamento/ritorno
21 Telecomando Start/Stop
22 Collegamento rete 230 V~/50 Hz
2 Avviso di sicurezza
Questo apparecchio corrisponde alle norme CE
89/336/CCE sulla compatibilità elettromagnetica ed
alle norme 73/23/CEE per apparecchi a bassa tensione.
Questo apparecchio funziona con tensione di rete
di 230 V~. Non intervenire mai al suo interno; la
manipolazione scorretta può provocare delle scariche pericolose. Se l’apparecchio viene aperto
decade ogni diritto alla garanzia.
Durante l’uso si devono osservare assolutamente i
seguenti punti:
•
Lo strumento è previsto solo per l’uso all’interno di
locali.
•
Proteggere l’apparecchio dall’umidità e dal calore.
•
Non mettere in funzione l’apparecchio e staccare
immediatamente la presa dalla spina nel caso di:
1. danni visibili all’apparecchio o al cavo rete,
2. caduta o altro evento che può procurare danni,
3. funzionamento scorretto.
Per la riparazione, rivolgersi in ogni caso ad un
laboratorio autorizzato.
•
Il cavo rete, se danneggiato, deve essere sostituito
solo dal costruttore o da un laboratorio autorizzato.
•
Non staccare mai la spina rete tirando il cavo.
•
Nel caso di utilizzo improprio dell’apparecchio, di
errore durante l’uso o di riparazione non a regola
d’arte, il costruttore o rivenditore non risponde di
eventuali danni.
•
Per la pulizia usare solo un panno asciutto; non
impiegare in nessun caso prodotti chimici o acqua.
3 Montaggio e regolazioni base
Il piatto, il contrappeso per il braccio ed il coperchio
sono imballati singolarmente per evitare danni
durante il trasporto. Dopo aver disimballato i pezzi,
l’assemblaggio risulta molto facile. E opportuno conservare l’imballaggio per eventuali trasporti.
3.1 Montaggio del piatto
1) Infilare il piatto sull’asse del giradischi.
2) Girare il piatto a mano finché uno dei fori maggiori
si trova vicino all’adattatore per dischi single (1) e
si vede l’albero motore.
3) La cinghia di gomma é visibile attraverso i fori
maggiore del piatto. Afferrare la cinghia e farla
passare sopra l’albero motore.
4) Posare la stuoia di gomma sul piatto. Per produrre effetti “scratch” si può utilizzare in alternativa la stuoia di feltro: così il disco può scivolare
se viene fatto girare a mano.
3.2 Montaggio del contrappeso
1) Togliere il contrappeso (4) per il braccio dal suo
involucro di polistirolo.
2) Tener fermo il braccio con una mano ed infilare il
contrappeso sull’estremità posteriore del braccio
fino allo scatto.
3) Il contrappeso servirà poi a regolare con esattezza il peso della puntina sul disco.
3.3 Regolazione della pressione della puntina
1) Girare il pomello antiskating (6) in senso orario e
portarlo sullo “0”.
2) Sfilare la protezione della puntina verso il basso.
3) Portare la leva del lift del braccio (7) in posizione
anteriore.
4) Sbloccare il braccio spostando la levetta (8) verso
destra. Afferrare il braccio alla sua presa ed avvicinarlo al piatto in modo che si possa muovere
liberamente in alto ed in basso.
Attenzione! Evitare qualsiasi contatto con la puntina.
5) Girare il contrappeso (4) in modo tale che il braccio rimanga fermo in posizione orizzontale, senza
muoversi né verso l’alto né verso il basso (ved.
fig.3).
Se il braccio si muove verso l’alto, girare il contrappeso in senso antiorario.
7
I
FOuvrez le présent livret page 3 de manière à
visualiser les divers éléments.
1 Eléments et branchements
1.1 Eléments
1 Adaptateur 45 tours
2 Verrouillage de la lampe
3 Prise XLR pour brancher une lampe 12 V, 3W
4 Contre-poids du bras de lecture
5 Support de la cellule de remplacement
6 Réglage anti-skating
7 Lève-bras
8 Levier de verrouillage du bras de lecture
9 Réglage de la vitesse
10 Affichage de la vitesse
11 Interrupteur Marche/Arrêt et lampe strobosco-
pique
12 Touche Marche/Arrêt
13 Anneau stroboscopique
14 Eclairage du plateau
15 Interrupteur Marche/Arrêt de l’éclairage du
plateau
16 Sélecteur de la vitesse 33 t/mn
17 Sélecteur de la vitesse 45t/mn
1.2 Branchements
18 Sortie pour l’ampli ou la table de mixage
19 Branchement masse
20 Branchement pour la commande à distance
avance/retour
21 Branchement pour la commande marche/arrêt
22 Câble secteur 230 V~/50 Hz
2 Conseils d’utilisation
Cet appareil répond aux normes figurant dans la
directive européenne 89/336/EWG relative à la compatibilité électro-magnétique et dans la directive
73/23/EWG portant sur les appareils à basse tension.
Cet appareil est alimenté par une tension en
230V~. Ne touchez jamais l’intérieur de l’appareil
car, en cas de mauvaise manipulation, vous pourriez subir une décharge électrique mortelle. Faites
plutôt appel à un spécialiste. Tout droit à la garantie disparaît si vous ouvrez l’appareil.
Respectez les points suivants:
•
Cet appareil est conçu pour une utilisation en
intérieur uniquement
•
Protégez-le de la chaleur et de l’humidité
•
Ne faites pas fonctionner l’appareil et coupez
immédiatement l’alimentation lorsque:
1. Le câble secteur ou l’appareil présente des
dommages visibles.
2. Après une chute ou autre incident, vous avez un
doute sur l’état de la platine.
3. Il y a un disfonctionnement.
Dans tous les cas, seul un technicien est habilité à
effectuer les réparations.
•
Seul le fabricant ou un technicien spécialisé ont le
droit de remplacer un câble secteur endommagé.
•
Ne retirez jamais la fiche secteur de la prise en
tirant le câble.
•
Nous déclinons toute responsabilité en cas de
dommages causés par une mauvaise utilisation ou
une utilisation détournée de cet appareil.
•
Utilisez un chiffon sec pour le nettoyer, en aucun
cas, de produits chimiques ou d’eau.
3 Montage et réglages de base
Le plateau, le contre-poids du bras de lecture et le
capot sont emballés séparément de manière à ne
pas endommager la platine lors du transport. Le
montage des différentes pièces est simple. Ne jetez
pas les emballages une fois l’installation terminée,
vous pourrez les utiliser à nouveau.
3.1 Montage du plateau
1) Mettez le plateau sur l’axe de la platine
2) Tournez-le manuellement jusqu’à ce qu’un des
grands trous soit près de l’adaptateur 45tr (1) et
que l’on puisse voir l’axe d’entraînement du
moteur.
3) Saisissez la courroie d’entraînement en caoutchouc et fixez-la sur l’axe.
4) Posez maintenant le tapis en caoutchouc sur le
plateau; pour obtenir des effets “Scratch”, il faut
utiliser alternativement le tapis en feutre de sorte
que le disque, sous l’action de la main, puisse
glisser.
3.2 Installation du contre-poids du bras de
lecture
1) Retirez le contre-poids (4) de l’emballage
2) D’une main, tenez-le par le milieu, de l’autre
main, posez le contre-poids à l’extrémité du bras
de lecture jusqu’à enclenchement.
3) Le contre-poids permet de régler la force avec
laquelle l’aiguille appuie sur le disque.
3.3 Réglage de la pression de la cellule
1) Tournez le bouton anti-skating (6) dans le sens
des aiguilles d’une montre et mettez-le sur “0”.
2) Retirez la protection de la cellule en la tirant vers
le bas.
3) Mettez le lève-bras (7) sur la position avant.
4) Ouvrez le levier de verrouillage du bras de lecture
(8) en le poussant vers la droite. Saisissez le bras
et amenez-le avec précaution juste devant le plateau; il doit pouvoir bouger librement vers le haut
et le bas.
Attention: ne laissez jamais tomber la cellule!
5) Tournez le contre-poids (4) jusqu’à ce que le bras
de lecture tienne horizontalement et ne penche ni
vers l’avant ni vers l’arrière (voir schéma 3).
Si le bras oscille vers le haut, tournez le contrepoids dans le sens inverse des aiguilles d’une
montre.
Page 8

Si le bras oscille vers le bas, tournez le contrepoids dans le sens des aiguilles d’une montre.
6) Remettez le bras sur son support et fixez-le avec
le levier de verrouillage (8).
7) Sur le contre-poids (4) se trouve un anneau noir
mobile doté d’une échelle. Le repère blanc sur le
bras indique une valeur quelconque de l’échelle.
Sans tourner le contre-poids, mettez cet anneau
sur “0” (voir schéma 4).
8) L’échelle indique en gramme un poids de charge.
Pour la cellule livrée avec la platine, le poids est
de 2,5 g. Tournez le contre-poids dans le sens
inverse des aiguilles d’une montre jusqu’à atteindre 2,5g (schéma 5).
Attention: ne tournez pas uniquement l’anneau
mais bien l’ensemble anneau et contre-poids!
Pour d’autres cellules, reportez-vous à leurs
caractéristiques techniques.
3.4 Réglage de l’anti-skating
Lors de la lecture d’un disque, des forces s’exercent
sur le diamant; on peut les diminuer grâce à l’antiskating. Mettez le bouton (6) sur “0”; cela correspond
au poids, c’est-à-dire, pour la cellule livrée, à 2,5g.
Vous pouvez lire cette valeur sur la flèche sous le
bouton.
3.5 Mise en place du couvercle de la platine
Retirez les deux charnières du couvercle de leur
emballage. Fixez le couvercle et charnières sur la
platine. Vous pouvez le retirer s’il gêne l’utilisation,
par exemple en discothèque.
4 Branchements
Reliez le câble de liaison aux prises RCA (18) de la
platine et aux prises de l’ampli ou de la table de
mixage (jacks pour une platine-disques avec
système magnétique). Respectez les repères de
couleur:
rouge canal droit
blanc canal gauche
Reliez le conducteur de la masse à la borne (19) de
la platine et à la prise jack de masse de l’ampli ou de
la table de mixage. Reliez maintenant la platine-disques au secteur: 230V~/50Hz.
5 Utilisation
5.1 Lecture d’un disque
1) Retirez la protection de la cellule
2) Pour allumer, mettez l’interrupteur Marche /Arrêt
(11) sur Marche (ON). Les lampes (10) et (11)
(respectivement affichage de la vitesse de lecture
et lampe stroboscopique) s’allument. Si besoin,
allumez l’éclairage de la platine (14) avec l’interrupteur (15).
3) Sélectionnez la vitesse de lecture:
33tr/m fonction (16)
45tr/m fonction (17)
La vitesse sélectionnée est indiquée: fonction (10).
4) Posez votre disque sur le plateau: pour un 45 tr,
pensez à utiliser l’adaptateur (1).
5) Mettez le lève-bras (7) sur la position arrière et
ouvrez le levier de verrouillage (8) en le tirant vers
la droite. Saisissez le bras de lecture par la poignée et posez la cellule au début du disque.
6) Mettez le lève-bras (7) sur la position avant, le
bras se penche lentement vers le disque.
7) Faites démarrer la lecture avec la touche
Marche/ Arrêt (12). Au cours de la lecture, vous
pouvez arrêter et redémarrer le disque avec ce
même interrupteur.
8) Ala fin du disque, soulevez le bras de lecture avec
le lève-bras (7), remettez-le manuellement sur son
support. Arrêtez le plateau avec la touche (12).
9) Attachez le bras (levier 8) après utilisation et coupez l’alimentation de la platine-disques [interrupteur Marche/ Arrêt (11)]. Remettez le couvercle
pour éviter tout dépôt de poussière.
5.2 Réglage de la vitesse
Vous avez la possibilité de modifier la vitesse de la
platine-disques de ±8% avec le réglage (9). En position médiane (le réglage enclenche), la vitesse de
lecture est correcte et peut être contrôlée sur
l’anneau stroboscopique (13) du plateau.
Lorsque le plateau tourne, surveillez la partie de
l’anneau (13) éclairé par la lampe (11). Si la vitesse
correspond à celle réglée au départ, les repères sur
l’anneau doivent rester immobiles:
33tr/m sur l’anneau supérieur
45tr/m sur l’anneau inférieur
5.3 Commande à distance Marche/Arrêt
Pour une utilisation en discothèque, il est possible de
commander la fonction Marche/Arrêt par un interrupteur séparé, par exemple depuis une table de mixage
équipée d’un démarrage électrique. Lorsque le potentiomètre correspondant de la table est ouvert, la platine-disques démarre automatiquement; de même,
elle s’arrête lorsque le potentiomètre est fermé.
Reliez l’interrupteur (la table de mixage) à la prise
REMOTE START/ STOP (21) de la platine-disques
par une prise jack 6,35 3 pôles (voir schéma 6). La
fonction Marche/Arrêt (12) de la platine est alors
hors fonction.
5.4 Commande à distance avance et retour
Pour créer certains effets ou pour rechercher un
morceau précis, il est possible de commuter le sens
de rotation du plateau grâce à un interrupteur
séparé. Reliez le commutateur à la prise REMOTE
FORW/BACKW (20) par une prise jack 6,35 3 pôles
(voir schéma7)
6 Accessoires
6.1 Lampe supplémentaire
Vous pouvez brancher une lampe col de cygne supplémentaire sur la prise XLR (3) (12V/3W), par
exemple MONACOR GNL-300.
Pour retirer la lampe, il suffit d’enfoncer la touche
de déverrouillage (2) et de tirer la lampe.
Se il braccio si muove verso il basso, girare il contrappeso in senso orario.
6) Riportare il braccio sul suo supporto e bloccarlo
con la levetta (8).
7) Sul contrappeso (4) si trova un anello nero girevole graduato. La linea bianca sul braccio indica
inizialmente un qualsiasi valore. Posizionare
l’anello sullo “0” senza far girare il contrappeso
(ved. fig.4).
8) La scala indica il peso della puntina in grammi. La
puntina in dotazione richiede un peso di 2,5 gr.
Pertanto girare il contrappeso (non solo l’anello
graduato!) in senso antiorario sul “2,5” (ved.
fig. 5). Nello stesso modo si imposta il peso per
altre puntine a seconda delle relative indicazioni.
3.4 Regolazione antiskating
Durante la riproduzione di un disco, sulla puntina
agiscono delle forze che devono essere compensate
con il dispositivo antiskating. Girare il pomello antiskating (6) dallo “0” su un valore pari a quello del
peso della puntina, nel nostro caso sul “2,5”. Il valore
si legge sulla freccia che si trova sotto il pomello.
3.5 Montaggio del coperchio
T ogliere le due cerniere dall’imballaggio e infilarle sul
coperchio. Quindi inserire il coperchio con le cerniere sul giradischi. Il coperchio può essere staccato
in qualsiasi momento se disturba (p. es. in discoteca).
4 Collegamento del giradischi
Inserire il cavo di collegamento in dotazione nelle
prese cinch (18) del giradischi e collegare l’altra
estremità con l’ingresso giradischi magnetico di un
amplificatore o di un mixer, rispettando i colori delle
prese e degli spinotti (rosso = canale destro, bianco
= canale sinistro). Avvitare la massa ai rispettivi morsetti (19) del giradischi e dell’amplificatore o mixer.
Collegare il cavo rete con la presa di rete (230 V~ /
50Hz).
5 Le funzioni del giradischi
5.1 Riproduzione di un disco
1) Sfilare la protezione della puntina verso il basso.
2) Accendere il giradischi girando il pomello dell’interruttore ON/OFF (11) verso “ON”. Si accendono
l’indicazione velocità (10) e la lampada stroboscopica (11). Se necessario accendere l’illuminazione del piatto (14) con il pulsante (15).
3) Selezionare la velocità:
33 per long play con il tasto (16),
45 per single con il tasto (17).
La velocità impostata viene indicata nella finestra
(10).
4) Mettere il disco; nel caso di un disco single inserire l’adattatore (1).
5) Portare la leva per il lift del braccio (7) in posizione posteriore. Spostare la leva blocco braccio
(8) verso destra. Prendere il braccio dalla presa e
portare la puntina sopra l’inizio del disco.
6) Portare la leva per il lift del braccio (7) in posizione anteriore. Il braccio si abbassa lentamente
sul disco.
7) Avviare il giradischi con il tasto START/STOP
(12). Durante la riproduzione, il disco può essere
fermato e riavviato in un qualsiasi punto mediante
il tasto START/STOP.
8) Alla fine del disco sollevare il braccio con il lift (7)
e riportarlo con la mano nella sua sede. Fermare
il disco con il tasto START/STOP (12).
9) Dopo l’uso bloccare il braccio con la levetta (8) e
spegnere l’apparecchio con l’interruttore (11).
Chiudere il coperchio per proteggere il giradischi
dalla polvere.
5.2 Regolazione fine della velocità
Se necessario, la velocità del giradischi può essere
aumentata o ridotta dell’8 % agendo sul regolatore
(9). In posizione centrale (stop a scatto) la velocità è
esatta e può essere controllata sull’anello stroboscopico (13).
Quando il piatto gira, osservare la parte dell’
anello stroboscopico (13) che viene illuminata dalla
lampada stroboscopica (11) (eventualmente ridurre l’illuminazione ambiente). Se la velocità è impostata con
esattezza, le tacche sull’anello sembrano star ferme:
a 33g/m sull’anello superiore,
a 45g/m sul secondo anello.
5.3 Start/Stop telecomandato
Per il funzionamento in discoteca, la funzione Start/
Stop può essere telecomandata mediante un commutatore separato, p. es. da un mixer con avviamento fader. In questo caso, se sul mixer si apre il
regolatore per il giradischi, questo parte automaticamente e si ferma se viene chiuso il regolatore.
Il commutatore esterno (oppure il mixer) viene
collegato con un jack a 3 poli (6,3 mm) alla presa
REMOTE START/STOP (21) (vedere fig.6). In
questo caso il tasto START/STOP (12) del giradischi
è disattivato.
5.4 Avanzamento/ritorno telecomandato
Per ottenere determinati effetti o per trovare un
determinato punto sul disco, il senso di rotazione
può essere invertito da un commutatore separato. Il
commutatore viene collegato alla presa REMOTE
FORW/BACKW (20) mediante un jack a 3 poli
(6,3mm) (vedere figura7).
6 Accessori
6.1 Lampada supplementare
Per illuminare il giradischi si può collegare una lampada a collo di cigno (12 V /3 W, p. es. MONACOR
GNL-300) alla presa XLR (3).
Per staccare la lampada premere il tasto di
sblocco (2) e sfilare contemporaneamente la lampada.
6.2 Sistema puntina di scorta
Se necessario, il sistema puntina oppure la sola puntina possono essere sostituiti facilmente. I relativi
ricambi si trovano in commercio, p.es.
8
I
F
B
CH
Page 9

6.2 Cellule de remplacement
Il peut s’avérer nécessaire de remplacer facilement
le système de lecture. Les pièces de rechange portent les références:
diamant EN-22SP
système magnétique EN-22
Après tout remplacement de la cellule, il convient de
régler à nouveau l’anti-skating et le poids du contrepoids (voir chapitres 3.3 et 3.4).
6.3 Système de remplacement
Il est possible de conserver un système complet
(disponible dans le commerce) dans le support (5).
Pour le remplacer, il suffit de dévisser l’ancien et de
mettre le neuf à la place. Après tout remplacement, il
faut régler à nouveau l’anti-skating et le poids du
contre-poids (voir chapitres 3.3 et 3.4).
7 Entretien
7.1 Entretien
Nettoyez le boîtier de la platine-disques et le couvercle avec un chiffon sec ou à peine humide. En aucun
cas, n’utilisez de produits détergents ou d’eau. Pour
dépoussiérer l’aiguille et le disque, utilisez les produits de nettoyage disponibles dans le commerce,
par exemple la brosse MONACOR DC-100.
7.2 Transport
Si vous souhaitez déplacer votre platine-disques
(pour l’expédier par exemple), vérifiez que le plateau
et tous les éléments soient emballés dans leur
emballage d’origine et/ou soient assurés pour leur
transport. Tout dommage sur le boîtier ou l’appareil,
engendré par un plateau mal emballé (par exemple,
si le plateau n’a pas été auparavant retiré de l’axe et
correctement fixé), ne sont pas couverts par la
garantie, les réparations en résultant peuvent donc
faire l’objet d’une facturation.
Pour toute expédition, respectez les points
suivants:
1) Mettez le capuchon de protection sur la cellule.
2) Fixez le bras de lecture à l’aide du levier de verrouillage (8).
3) Dévissez le contre-poids (4) en tournant dans le
sens horaire.
4) Retirez le plateau de l’axe, emballez-le séparément
et évitez qu’il ne bouge lors des déplacements.
5) Il est vivement recommandé d’utiliser l’emballage
d’origine.
8 Caractéristiques techniques
8.1 Bras de lecture
Longueur effective: . . . . . . . 230mm
Surplomb: . . . . . . . . . . . . . . 16 mm
Erreurs
Sillon interne: . . . . . . . . . . +0°32’
Sillon externe: . . . . . . . . . +2°32’
Angle: . . . . . . . . . . . . . . . . . . 22°
Friction verticale: . . . . . . . . . 7mg
8.2 Système
Plateau: . . . . . . . . . . . . . . . . aluminium,
Ø 330mm, 740g
Vitesses: . . . . . . . . . . . . . . . 33
1
/3 t/m, 45 t/m
Réglage de la vitesse: . . . . . ±8 %
Couple de démarrage: . . . . . 1,5Nm
Temps de montée: . . . . . . . . < 0,5s
Frein: . . . . . . . . . . . . . . . . . .
1
/
8 révolution
Pleurage et scintillement: . . . 0,045 %
Bruit perturbateur: . . . . . . . .
-
55dB
(norme DIN 45544)
Alimentation: . . . . . . . . . . . . 230V~/50Hz/15VA
Dimensions (LxHxP): . . . . 445x 158 x 356 mm
Poids: . . . . . . . . . . . . . . . . . . 10 kg
D’après les données du constructeur.
Tout droit de modification réservé.
puntina di diamante MONACOR EN-22 SP,
sistema magnetico MONACOR EN-22.
Dopo la sostituzione del sistema, reimpostare il peso
della puntina e il dispositivo antiskating (vedere i
paragrafi 3.3 e 3.4)
6.3 Portapuntina di scorta
Il vano (5) è previsto per accogliere un portapuntina
completo con puntina (in commercio). In tal modo,
per ogni evenienza è disponibile una puntina di
scorta. Il portapuntina può essere sostituito facilmente agendo sulle viti di fissaggio. Successivamente reimpostare il peso della puntina e il dispositivo antiskating (vedere i paragrafi 3.3 e 3.4).
7 Manutenzione
7.1 Pulizia
Pulire il contenitore e il coperchio possibilmente con
uno straccio per la polvere, al massimo inumidito
(ma non bagnato!). Non usare alcol o prodotti
aggressivi. Per pulire la puntina e i dischi, sono disponibili sistemi adeguati che si trovano in commercio, p.es.
Spazzola in fibra di carbonio per i dischi MONACOR
DC-100.
7.2 Trasporto
In caso di spedizione del giradischi, usare per il
piatto e per gli altri gruppi l'imballaggio originale
oppure provvedere ad assicurarli per il trasporto. I
danni al contenitore o al giradischi, causati da un
piatto non correttamente fissato (p.es. senza averlo
tolto dall'asse e senza averlo bloccato ecc.) non
sono coperti dalla garanzia, ed i relativi costi saranno
messi in conto all'utente!
Per il trasporto tener presente quanto segue:
1) Mettere la protezione della puntina.
2) Bloccare il braccio con l'apposita leva (8).
3) Togliere il contrappeso dal braccio (4) girandolo in
senso orario.
4) Togliere il piatto dall'asse, imballarlo separatamente e far attenzione che non possa spostarsi.
5) La soluzione migliore è l'impiego dell'imballaggio
originale.
8 Dati tecnici
8.1 Braccio
Lunghezza effettiva: . . . . . . . 230 mm
Sporgenza: . . . . . . . . . . . . . 16 mm
Errori di tracking
solco interno: . . . . . . . . . . +0°32’
solco esterno: . . . . . . . . . +2°32’
Angolo offset: . . . . . . . . . . . . 22°
Frizione verticale: . . . . . . . . . 7 mg
8.2 Parte meccanica
Piatto: . . . . . . . . . . . . . . . . . . pressofuso in allu-
minio, Ø 330mm,
740gr.
Velocità: . . . . . . . . . . . . . . . . 33
1
/3 e 45g/m
Regolazione fine velocità: . . ±8%
Coppia di avviamento: . . . . . 1,5 Nm
Tempo regime: . . . . . . . . . . . < 0,5 sec
Frenata: . . . . . . . . . . . . . . . .
1
/8 giro
Wow and Flutter: . . . . . . . . . 0,045%
Rapporto segnale/rumore: .
-
55 dB (DIN 45544)
Alimentazione: . . . . . . . . . . . 230 V~/50 Hz/15VA
Dimensioni (lxhxp): . . . . . . 445 x 158 x 356mm
Peso: . . . . . . . . . . . . . . . . . . 10kg
Dati forniti dal costruttore.
Con riserva di modifiche tecniche.
9
I
F
B
CH
Page 10

Vouw bladzijde 3 helemaal open, zodat u een
overzicht hebt van de bedieningselementen en
de verbindingen.
1 Bedieningselementen en aansluitingen
1.1 Bedieningselementen
1 Adaptor voor singles
2 Vergrendeling voor een extra lamp
3 XLR-jack voor een lamp van 12 V, 3W
4 Contragewicht van de toonarm
5 Opening voor een reserve toonkop
6 Afregeling voor de antiskating
7 Hendel voor de toonarmlift
8 Toonarmvergrendeling
9 Pitch-controle
10 Snelheidsindicator
11 Netschakelaar en stoboscooplamp
12 Start/stop-toets
13 Stoboscoopring
14 Naaldverlichting
15 Aan/uit-schakelaar van de naaldverlichting
16 Toets voor de snelheid van 33tpm
17 Toets voor de snelheid van 45tpm
1.2 Verbindingen
18 Uitgang voor de versterker of het mengpaneel
19 Massa-verbinding
20 Verbinding om afstandbediend vooruit of achter-
uit te draaien
21 Verbinding voor de start/stop-afstandsbediening
22 Netsnoer 230 V~/50 Hz
2 Veiligheidsvoorschriften
Dit apparaat voldoet aan de EC richtlijnen No.
89/336/EWG voor electromagnetische compatibiliteit
en No. 73/23/EWG voor laagspannings apparaten.
De netspanning waarmee dit toestel gevoed wordt
is levensgevaarlijk! Open het toestel niet, want
door onzorgvuldige ingrepen loopt u het risico van
een elektrische schok. Onderhoud en/of reparatie
dient te gebeuren door een gekwalificeerd vakman. Bovendien vervalt elke garantie bij het eigenhandig openen van het toestel.
Let bij ingebruikname eveneens op de volgende elementen:
•
Het toestel is enkel geschikt voor gebruik binnenshuis.
•
Vermijd uitzonderlijk warme en vochtige plaatsen
en plaats het toestel niet naast bronnen die een
brom kunnen veroorzaken zoals transformatoren
en motoren.
•
Schakel het toestel niet in en trek onmiddellijk de
stekker uit het stopcontact wanneer:
1. het netsnoer zichtbaar beschadigd is.
2. er een defect zou kunnen optreden nadat het
toestel bijvoorbeeld gevallen is.
3. het toestel slecht functioneert.
•
Een defect netsnoer mag enkel door de fabrikant of
door een gekwalificeerd persoon hersteld worden.
•
Trek de stekker nooit met het snoer uit het stopcontact.
•
Als het toestel gebruikt is voor zaken waarvoor het
niet geschikt is, als de platenspeler slecht bediend
wordt of door een niet-gekwalificeerd persoon hersteld is, dan vervalt de garantie bij eventuele
schade.
•
Verwijder het stof met een droge doek. Gebruik
zeker geen chemicaliën of water.
3 Montage en elementaire afregelingen
Het plateau van de platenspeler, het contragewicht
voor de toonarm en de stofkap zijn afzonderlijk verpakt zodat er tijdens het transport geen beschadi-
ging kan optreden. De montage van al die onderdelen is eenvoudig. Het is nuttig de verpakking te
bewaren voor eventueel transport later.
3.1 Montage van het plateau
1) Plaats het plateau op de as van de platenspeler.
2) Verdraai het plateau met de hand totdat één van
de grotere openingen in het plateau ter hoogte
van de single-adapter (1) komt te staan en men
de as van de motor kan zien.
3) Door de openingen is ook de rubberen aandrijfriem zichtbaar. Bevestig de riem rond de as
van de moter.
4) Leg de bijgeleverde rubberen mat op het plateau.
Om een ‘scratch-effect’ te bereiken kan men
eventueel de vilten mat gebruiken, waardoor de
plaat kan verschuiven bij het handmatig doordraaien.
3.2 Montage van het contragewicht van de
toonarm
1) Neem het contragewicht (4) van de toonarm uit
de verpakking.
2) Neem met de ene hand de toonarm in het midden
vast. Schuif met de andere hand het contragewicht over het einde van de toonarm.
3) Nadien wordt met het gewicht de druk van de
naald op de plaat afgeregeld.
3.3 Afregeling van de naalddruk
1) Stel de antiskatingknop (6) exact in op “0” door
deze te verdraaien met de wijzers van de klok mee.
2) Verwijder het kapje van het element door er
onderaan aan te trekken.
3) Maak de lift van de toonarm vrij met het hendeltje
(7).
4) Schuif de toonarmvergrendeling (8) opzij. Neem
de toonarm aan de greep vast en leid hem voorzichtig tot vlak voor het plateau zodat hij vrij op en
neer kan worden bewogen.
Opgelet! Vermijd elk contact tussen de naald en
het oppervlak van het plateau.
Referente a la página 3. Donde puede ver los elementos operativos y las conexiones descritas.
1 Elementos operativos y conexiones
1.1 Elementos operativos
1 Adaptador para reproducción de singles.
2 Adaptador para la conexión de una lámpara adi-
cional.
3 Jack XLR para una lámpara adicional 12 V, 3W
4 Contrapeso para el brazo
5 Soporte para un soporte de aguja
6 Regulador antiskating
7 Palanca para el brazo
8 Seguro del brazo
9 Control de velocidad (Pitch control)
10 Indicación de velocidad
11 Lámpara estroboscopica y conexión (POWER)
12 Botón Marcha/Paro
13 Anillo estroboscopico
14 Luz de posición
15 Interruptor para luz de posición
16 Botón para 33 rpm
17 Botón para 45 rpm
1.2 Conexiones
18 Senal de salida para el amplificador o la mesa de
mezcla
19 Conexión de masa
20 Control remoto para conexión de avance /retro-
ceso
21 Control remoto para conexión de marcha/paro
22 Cable de alimentación 230 V~/50 Hz
2 Notas
Este dispositivo corresponde a las indicaciones de la
C.E.E. n° 89/336/EWG para compatibilidad electromagnética y n° 73/23/EWG para dispositivos de baja
tensión.
Esta unidad usa alto voltage (230V~). No abrir la
caja del equipo para evitar cualquier accidente.
Dejar el servicio sólo al personal autorizado. Cualquier garantía se anula en caso de abrir la unidad.
Para su funcionamiento tener en cuenta los
siguientes apartados:
•
Funcionamiento sólo exclusivamente en interiores.
•
No guardar en lugares excesivamente humedos o
polvorientos y calientes.
•
No poner el equipo immediatamente en funcionamiento, si al conectarlo:
1. Se observa el cable de alimentación o el equipo
en mal estado.
2. El funcionamiento es incorrecto.
3. Se observa un defecto de un accidente similar.
El equipo tiene que repararse en cualquier caso
por personal especializado.
•
Si el cable de alimentación esta estropeado sólo
puede cambiarse por el fabricante o por personal
autorizado.
•
Nunca poner el conector del cable de conexión en
otros zócalos que el destinado.
•
Si el equipo es utilizado en otros usos que los originalmente destinados, si la utilización es erronea
o no se repara el equipo con personal autorizado,
no se asegura su posible avería.
•
Para la limpieza sólo usar una tela seca, nunca
productos químicos o agua.
3 Montaje y Ajustes Basicos
El plato, el contrapeso para el brazo, y la tapa están
embalados por separado, para que durante el transporte no sufran ningún deterioro. Todas las partes
son fáciles de montar. El material de embalaje puede
guardarse para un posible transporte.
3.1 Montaje del Plato
1) Poner el plato en el eje del giradiscos.
2) Girar el plato con la mano hasta uno de los grandes agujeros, cerca del adaptador para singles
(1), y donde puede verse el eje del motor.
3) Coger la correa del interior del plato y colocarla
en el eje del motor.
4) Poner el cauchu que se incluye, en el plato. Para
producir efectos “scratch”, utilizar el forro o como
alternativa se puede realizar girandolo con la
mano.
3.2 Montaje del contrapeso para el brazo
1) Poner el contrapeso (4) con el brazo sin montar.
2) Poner brazo en el medio con una mano. Con la
otra mano poner el contrapeso al final del brazo
hasta que se agarre.
3) Con el contrapeso la presión de la aguja se
puede ajustar a la medida.
3.3 Ajuste de la Presión de la Aguja
1) Girar el control de autoskating (6) hacia la posición “0”.
2) Quitar la protección de la aguja.
3) Poner la leva del brazo (7) en posición frontal.
4) Abrir el seguro del brazo (8) hacia la derecha.
Con cuidado equilibrar el brazo del plato con la
mano sin que se mueva ni hacia arriba ni hacia
abajo.
Atención! La aguja no debe tocar en ninguna
superficie.
5) Girar el contrapeso (4) hasta que el brazo permanezca en posición horizontal y que nunca suba ni
baje (fig.3).
Si el brazo sube: girar el contrapeso en el sentido
contrario de las agujas del reloj.
Si el brazo baja: girar el contrapeso en el sentido
delas agujas del reloj.
6) Poner el brazo en el soporte para el, y asegurarlo
con el seguro.
10
E
NL
B
Page 11

5) Verdraai nu het contragewicht (4) totdat de toonarm in horizontale positie balanceert en niet naar
boven of naar beneden beweegt (fig3).
Indien de toonarm naar boven beweegt, verdraai
dan het contragewicht tegen de wijzers vd klok in.
Beweegt de toonarm naar beneden, verdraai dan het
contragewicht in tegengestelde richting.
6) Plaats de toonarm opnieuw in zijn rustpositie en
vergrendel hem met het toonarmslot (8).
7) Op het contragewicht is een zwarte plastic ring
met een schaalverdeling aangebracht. De witte
markering op de toonarm wijst een bepaalde
waarde op die schaal aan. De ring wordt nu op de
“0”-stand ingesteld zonder dat het contragewicht
meedraait (fig.4).
8) De schaal is in gram onderverdeeld. Voor de bijgeleverde naald is een naalddruk van 2,5g noodzakelijk. Verdraai hiervoor het contragewicht
samen met de schaal met de wijzers van de kok
mee tot de stand ‘2,5’ (fig. 5). Voor andere naalden moet de naalddruk aangepast worden in
overeenstemming met de respectievelijke specificaties.
3.4 Afregeling van de anti-skating
Bij het afspelen van een plaat ontstaan er krachten
op de naald die gecompenseerd worden door het
anti-skatingsysteem. Verdraai hiervoor de knop van
de anti-skating (6) van de ‘0’-positie tot de waarde
die overeenkomt met de waarde van de naalddruk,
d.w.z. dat voor de bijgeleverde naald de knop in de
stand ‘2,5’ moet geplaatst worden. De waarde kan
aan de pijl onder de knop worden afgelezen.
3.5 Montage van de stofkap
Neem de twee scharnieren van de stofkap uit de verpakking en monteer ze op de stofkap. Plaats de stofkap met de scharnieren op de platenspeler. Indien
de stofkap hindert tijdens het gebruik (bijv. tijdens de
werking in een discotheek) dan kan deze worden
verwijderd.
4 Aansluiting van de platenspeler
Verbind de platenspeler [cinch-connectoren (18)] via
een bijbehorende kabel met een vesterker of een
mengpaneel (ingangen geschikt voor een platenspeler met een magnetisch element). Let hierbij op de
kleuren van de pluggen en de stekkers (rood = rechter kanaal, wit = linker kanaal). Bevestig de massaverbinding van de kabel zowel met de plug (19) van
de platenspeler als met de massaschroef van de versterker of de mengtafel. Verbind de netsstekker met
een stopcontact (230V~/50Hz).
5 Werking
5.1 Ingebruikname
1) Verwijder de beschermingskap van de naald door
er onderaan aan te trekken.
2) Schakel het toestel in door de POWER-toets (11)
in de ‘on’-stand te plaatsen. De snelheidsindicator
(10) en de stroboscooplamp (11) lichten op. Indien nodig, kan de naaldverlichting (14) met de
druktoets (15) ingeschakeld worden.
3) Selecteer de snelheid:
33tpm voor langspeelplaten met druktoets (16).
45tpm voor singles met de druktoets (17).
De gekozen snelheid wordt door de snelheidsindicator (10) weergegeven.
4) Leg een plaat op de draaitafel. Vergeet niet, bij
het afspelen van singles de adaptor (1) te gebruiken.
5) Plaats de hendel van de lift (7) naar achter. Open
het toonarmslot (8). Neem de toonarm vast en
plaats de naald boven het begin van de plaat.
6) Verdraai de hendel van de lift (7) naar voor. Laat
de toonarm rustig zakken op de plaat.
7) Start het afspelen met de START/STOP-toets
(12). Het afspelen kan steeds worden onderbroken d.w.z. dat men de plaat door middel van
de START/STOP-toets op elk willekeurige plaats
kan stoppen en starten.
8) Duw de toonarm op het einde van de plaat
omhoog met de lift (7) en plaats de arm met de
hand terug op de toonarmhouder. Beëindig het
afspelen met de START/STOP-toets (12).
9) Beveilig de toonarm met het toonarmslot na het
gebruik van de platenspeler (8) en schakel het
toestel uit met de POWER-toets (11). Sluit de
stofkap.
5.2 Fijnregeling van de snelheid
Desgewenst kan u door middel van de pitch-controle
(9) de snelheid van de draaitafel met 8% verhogen
of verlagen. Wanneer de pitch-controle in de middelste stand staat
-
u voelt een lichte klik -dan is de
snelheid exact afgeregeld. De snelheid kan op de
stroboscoopring (13) van het plateau gecontroleerd
worden.
Concentreer u bij een draaiende platenspeler op
het deel van de stroboscoopring (13) dat door het
stroboscooplicht (11) verlicht wordt (verminder misschien de kamerverlichting). Bij een exact ingestelde
snelheid blijven de markeringen op de stroboscoopring schijnbaar stilstaan.
bij 33tpm de bovenste ring
bij 45tpm de tweede ring.
5.3 Afstandsbediening van de Start/Stop
Voor het gebruik in een discotheek is het mogelijk de
start/stop-functie via een afzonderlijke schakelaar op
afstand te bedienen, bijvoorbeeld via de faderstart
van een mengpaneel. Wanneer op het mengpaneel
de schuifregelaar van de platenspeler open- en
daarna weer dichtgeschoven wordt, dan zal de draaitafel automatisch starten respectievelijk stoppen.
Hiervoor dienen schakelaar en mengpaneel via
een 3-polige 6,3-mm-jack met de jack-ingang (21)
REMOTE START/STOP verbonden te worden (zie
eveneens fig. 6). De START/STOP-schakelaar (12)
van de draaitafel zelf werkt dan niet.
7) En el contrapeso (4) hay un anillo redondo negro
con una escala. Sin girar el contrapeso, mover
sólo el anillo hacia la posición “0” (fig.4).
8) En la escala del peso la presión se indica en
gramos. Para el sistema de aguja que se entrega
la presión optima es de 2,5g. Girar el contrapeso
(no solamento el anillo con la escala) hasta la
posición de 2.5 en el disco con el peso marcado.
(fig. 5). Para otro sistema de agujas, ajustar la
presión de peso de acuerdo a las respectivas
especificaciones.
3.4 Ajuste del Antiskating.
Cuando se reproduce un disco, las fuerzas ejercidas
en la aguja pueden ser compensadas facilmente con
el antiskating. Para el botón antiskating (6) de la
posición “0” al valor que corresponde el valor del
peso, por ejemplo para la aguja entregada corresponde a una posición “2.5”. El valor puede leerse
en la flecha del botón.
3.5 Montaje de la Tapa.
Coger las dos juntas de la tapa en el interior de la
caja. Montar las juntas en la tapa. Poner la tapa con
las juntas en el plato. La tapa puede quitarse siempre que se desee (por ejemplo, durante funcionamiento en discoteca).
4 Conexión del Giradiscos
Conectar con el cable que se incluye, el plato (conexiones RCA 18) con el amplificador o la mesa de
mezcla (conexiones del giradiscos con sistema
magnético). Con los correspondientes colores de los
jacks y conectores (rojo = canal derecho, blanco =
canal izquierdo). Conectar el cable de masa en la
conexión del plato (19) hacia la masa del amplificador o mesa de mezcla. Conectar la alimentación
(230V~/50Hz).
5 Funcionamiento
5.1 Reproducción de un disco
1) Quitar la protección de la aguja.
2) Para su conexión girar el interruptor de POWER
(11) en dirección “on”. El indicador de velocidad
(10) y la lámpara estroboscopica (11) se encienden. Si es necesario, conectar la luz (14) con el
pulsador (15).
3) Seleccionar la velocidad:
33 rpm para gravaciones long-play con el botón
(16),
45rpm para gravaciones single con el botón (17).
La velocidad seleccionada se visualiza en el indicador (10).
4) Poner un disco. En caso de ser un single, poner
el adaptador (1).
5) Poner la leva del brazo (7) en posición trasera.
Abrir la leva (8) hacia la derecha. Mover el brazo
y poner la aguja al principio del disco.
6) Poner la leva del brazo (7) en posición frontal. La
aguja tiene que bajar lentamente hacia el disco.
7) Comenzar la reproducción del disco con el botón
START/STOP (12). La reproducción puede interrumpirse, con otra presión en el botón de START/
STOP.
8) Al fin de la reproducción subir el brazo con la leva
(7) y colocarlo en el soporte. Parar el disco con
START/STOP.
9) Después de usar el plato, fijar bien el brazo con
su leva (8) y desconectarlo con el interruptor
POWER (11). Cerrar la tapa protegerlo del polvo.
5.2 Ajuste Fino de la velocidad.
Si es necesario, la velocidad del plato puede incrementarse o reducirse un 8% con el pitch control (9).
En la posición media (posición en click central), la
velocidad se ajusta exactamente y puede controlarse con un estroboscopico (13) del plato.
Mientras el plato está girando, mirar la parte del
estroboscopico (13) que se ilumina con la luz estroboscopica (11). (Debe reducirse la luz de la habita-
ción.) Cuando se encuentra la velocidad exacta, las
marcas del estroboscopico parece que no se
mueven:
a 33rpm en el anillo superior
a 45rpm en el segundo anillo.
5.3 Control Remoto de Start/Stop
Para un funcionamiento en Discoteca la función
Start/ Stop puede controlarse remotamente con un
interruptor separado, por ejemplo con una mesa de
mezcla con arranque desde el potenciómetro. Si en
la mesa de mezcla el potenciómetro esta abierto el
plato se conecta immediatamente, del mismo modo
se para al bajarse.
Conectar el interruptor en la mesa con un conec-
tor de 3 polos
1
/
4” (21) REMOTE START/STOP (ver
figura 6). Entonces el botón START/STOP (12) se
inutiliza.
5.4 Control Remoto de Avance/Retroceso
Para efectos especiales o en gravaciones especiales, la dirección de la lectura puede conmutarse
avanzando o retrocediendo con un selector separado. Conectar el selector con un conector de 3
polos,
1
/
4” al jack REMOTE FORW/BACKW (20),
ver figura 7.
6 Accesorios
6.1 Lámpara adicional
Para iluminar el plato, puede conectarse una lámpara flexo (12 V/ 3 W) en el conector XLR (3), por
ejemplo MONACOR GNL-300.
Para quitar la lámpara, pulsar el cierre (2) y quitar
la lámpara al mismo tiempo.
6.2 Sistema de Aguja y Capsula de Recambio
Si es necesario, el sistema de capsula o la aguja
pueden cambiarse facilmente. Las partes están disponibles en las siguientes referencias, por ejemplo:
Aguja diamante MONACOR EN-22SP,
Sistema de capsula magnética estéreo MONACOR
EN-22.
11
E
NL
B
Page 12

5.4 Afstandsbediening voor normaal of achteruit afspelen
Om speciale effecten te bereiken of om een bepaald
fragment op de plaat terug te vinden, kan men de
draairichting door middel van een afzonderlijke
schakelaar veranderen. Verbind daarom de keuzeschakelaar via een 3-polige 6,3-mm-jack (20) met de
jack-ingang REMOTE FORW/BACKW (20), zie
figuur7.
6 Toebehoren
6.1 Extra lamp
Om de platenspeler te verlichten kan men een zwanehalslamp (12V/3W), zoals bijvoorbeeld de
MONACOR GNL-300, koppelen aan de XLR-jack
(3).
Om de lamp te verwijderen, duwt u de ontgrendelingsknop (2) in en trekt u tegelijker-tijd de lamp uit
de XLR-jack.
6.2 Reserve-element en reservenaald
Indien nodig kan het element of de naald eenvoudig
vervangen worden. Bij de handelaar zijn de volgende onderdelen verkrijgbaar:
een diamant naald MONACOR EN-22 SP
een magneto dynamisch stereo element MONACOR
EN-22.
Nadat het element vervangen is, moet men de
naalddruk en de anti-skating opnieuw afregelen (zie
paragrafen 3.3. en 3.4.).
6.3 Reserve toonkop
Een complete reservetoonkop met naald (verkrijgbaar bij de handelaar) kan in de opening (5) worden
geplaatst, zodat u steeds onmiddellijk een vervangstuk hebt. De toonkop kan snel gemonteerd worden
door de huidige toonkop eraf te schroeven en een
nieuwe te monteren. Opnieuw moet men de naalddruk en de anti-skating afregelen (zie paragrafen
3.3. en 3.4.).
7 Onderhoud
7.1 Zorg
Reinig de behuizing van de platenspeler en de stofkap met een stofdoek of met een licht bevochtigde
doek. Gebruik geen alcohol, chemicaliën of bijtende
middelen! Om stof van de naald en van de platen te
verwijderen, zijn speciale toebehoren, zoals een platenreiniger van koolstofvezels, de MONACOR
DC-100, bij de handelaar verkrijgbaar.
7.2 Transport
Indien u de draaitafel wil verzenden, let dan op dat
de draaitafel en alle bijbehorende zaken origineel
verpakt zijn. Beschadiging aan de behuizing, veroorzaakt door een niet correct verpakt draaiplateau, valt
niet onder de garantie.
Let voor het verzenden op:
1) Plaats de beschermkap op het element.
2) Vergrendel de toonarm met de vergrendel-hendel
(8).
3) Neem het contragewicht von de toonarm (4) door
hem met wijzers von de klok mee te draaien.
4) Neem het draaiplateau van de as, verpak het
apart en zorg ervoor dat het niet kan verschuiven.
5) Gebruik bij voorkeur de orginele verpakking.
8 Technische gegevens
8.1 De toonarm
Effectieve lengte: . . . . . . . . . 230 mm
Overhang: . . . . . . . . . . . . . . 16mm
Tracking-fout:
binnenste groef: . . . . . . . . +0°32’
buitenste groef: . . . . . . . . +2°32’
Vertikale aftasthoek: . . . . . . 22°
Zijdelingse verticale wrijving: 7 mg
8.2 Mechanisme
Plateau: . . . . . . . . . . . . . . . . aluminium,
330mm diameter,
740g
Snelheden: . . . . . . . . . . . . . . 33
1
/3 tpm, 45tpm
Pitch-controle: . . . . . . . . . . . ±8%
Startmoment: . . . . . . . . . . . . 1,5 Nm
Starttijd: . . . . . . . . . . . . . . . . < 0,5s
Remweg: . . . . . . . . . . . . . . .
1
/8 omwenteling
Wow en flutter: . . . . . . . . . . . 0,045%
Rumble: . . . . . . . . . . . . . . . .
-
55dB (DIN 45544)
Voedingsspanning: . . . . . . . 230V~/50Hz/15 VA
Afmetingen (BxHxD): . . . . 445 x 158 x 356 mm
Gewicht: . . . . . . . . . . . . . . . . 10kg
Opgemaakt volgens de gegevens van de fabrikant.
Deze behoudt zich het recht voor de technische
gegevens te veranderen.
Después de cambiar el sistema de capsula reajustar
la presión de la aguja y antiskating (ver capítulos 3.3
y 3.4).
6.3 Cabezal de brazo de repuesto
Cabezal de reserva completo con punta, que puede
ubicarse en el soporte (5) para tenerlo siempre a
punto para su cambio. El cabezal se puede cambiar
quitando la rosca y poniendo el otro. El peso de presión y antiskating se tiene que reajustar
-
ver sec-
ciones 3.3 y 3.4.
7 Mantenimiento
7.1 Cuidado
Limpiar la caja del plato y la tapa con una tela seca.
No usar alcohol y líquidos corrosivos! Para la limpieza de los discos y las agujas existen unos artículos, por ejemplo:
escombrilla de fibra de vidrio MONACOR DC-100.
7.2 Transporte
Si desea cambiar de lugar el giradiscos, utilizar solamente los embalajes originales por el plato del giradiscos y todas las partes de componentes del
equipo, asegurándose de su seguro transporte. El
daño del equipo causado por el plato del giradiscos
al no ser debidamente embalado (por ej. el plato del
giradiscos no está debidamente asegurado) no está
cubierto por la garantiá y además la reparación
puede agravarse!
Para el envio en cualquier caso:
1) Montar la protección de la aguja en la cabeza del
brazo.
2) Asegurar el brazo con la leva de seguridad (8).
3) Desenroscar el contrapeso del brazo (4).
4) Quitar el plato del giradiscos, y embalarla aparte,
asegurándose que no se mueva.
5) La mejor forma es utilizando el embalaje original.
8 Especificaciones
8.1 Brazo
Longitud efectiva: . . . . . . . . . 230 mm
Over hang: . . . . . . . . . . . . . . 16mm
Error tracking
surco interior: . . . . . . . . . . +0°32’
surco exterior: . . . . . . . . . +2°32’
Angulo offset: . . . . . . . . . . . . 22°
Fricción vertical lateral: . . . . 7mg
8.2 Mecanismo
Plato: . . . . . . . . . . . . . . . . . . fund. Aluminio
330mm diam., 740g
Velocidades: . . . . . . . . . . . . 33
1
/3 rpm, 45rpm
Pitch control: . . . . . . . . . . . . 8%
Arranque: . . . . . . . . . . . . . . . 1,5Nm
Tiempo de arranque: . . . . . . < 0,5seg.
Frenado (braking): . . . . . . . .
1
/
8 revolucion
Lloro y centelleo: . . . . . . . . . 0,045%
Rumor: . . . . . . . . . . . . . . . . .
-
55dB (DIN 45544)
Alimentación: . . . . . . . . . . . . 230 V~/50 Hz/15VA
Dimensiones: . . . . . . . . . . . . 445 x 158 x 356mm
Peso: . . . . . . . . . . . . . . . . . . 10kg
Sujeto a cambios técnicos de acuerdo con
el fabricante.
12
E
NL
B
Page 13

Fold venligst side 3 ud, idet de beskrevne funktionsknapper og forbindelser ses her.
1 Funktionsknapper og forbindelser
1.1 Funktionsknapper
1 Adapter til 45 omdr. plader
2 Knap til frigørelse af ekstralampe
3 XLR-bøsning til ekstralampe, 12 V, 3W
4 Kontravægt til tonearm
5 Holder til reserve pickuphus
6 Antiskating justering
7 Greb til tonearmløft
8 Låsegreb til tonearm
9 Pitch kontrol
10 Hastighedsvisning
11 Netafbryder og stroboskoplampe
12 Start/stop knap
13 Stroboskopring
14 Pickuplys
15 Kontakt til pickuplys
16 Knap til 33 omdr. hastighed
17 Knap til 45 omdr. hastighed
1.2 Forbindelser
18 Signaludgang til forstærker eller mixerpult
19 Stelforbindelse
20 Forbindelse til fjernbetjening af omdrejningsret-
ning
21 Forbindelse til start/stop fjernbetjening
22 Netledning 230 V~/50 Hz
2 Gode råd om sikkerhed
Dette apparat lever op til EU-kravene i 89/336/EØF,
EMC-direktivet (om elektromagnetisk kompatibilitet)
og i 73/23/EØF, lavspændingsdirektivet.
Der er stærkstrøm i apparatet, derfor må servicering kun udføres af en autoriseret fagmand. Ved et
hvert indgreb fra andre end MONACOR
DANMARK A/S bortfalder garantien.
Under brug skal følgende altid iagttages:
•
Pladespilleren er kun egnet til indendørs brug.
•
Undgå placering under ekstremt varme eller fugtige forhold
•
Brug ikke pladespilleren og træk straks netstikket
ud hvis:
1. Skade på apparat eller netledning er synlig.
2. En defekt er opstået efter tab eller lignende
uheld.
3. Der er fejlfunktion.
Apparatet skal i så fald repareres af Monacor
Danmark A/S.
•
Et defekt netkabel må kun repareres af Monacor
Danmark A/S.
•
Træk aldrig i selve netledningen, når stikket skal
ud af stikkontakten.
•
Hvis apparatet anvendes til andet end det oprindelige formål, betjenes forkert eller repareres af uautoriseret personel, garanteres ikke for mulige fejl.
•
Brug kun en tør klud til rengøring for støv, aldrig
vand eller kemikalier.
3 Montering og grundindstillinger
Pladetallerken, tonearmskontravægt og støvlåg er
pakket separat for at undgå beskadigelse under
transport. Alle dele monteres let. Originalemballagen
bør gemmes til evt. senere brug.
3.1 Montering af pladetallerken
1) Placer tallerkenen på centertappen.
2) Drej tallerkenen så langt med hånden, at en af de
store udskæringer er tæt på adapteren til 45
omdr. plader (1) og motorens drivaksel er synlig.
3) Gummidrivremmen er synlig gennem de store
udskæringer i tallerkenen. Tag fat i remmen og
læg den omkring drivakslen.
4) Læg den medfølgende gummimåtte på tallerkenen. Hvis man ønsker at frembringe “Scratch”
effekter, skal filtmåtten anvendes i stedet for. Herved er det muligt at skubbe pladen med håndkraft.
3.2 Montering af tonearmens kontravægt
1) Tag kontravægten (4) ud af pakningen.
2) Hold midt på tonearmen med den ene hånd. Sæt
kontravægten fast for enden af tonearmen med
den anden hånd.
3) Nåletrykket på pladen justeres bagefter med kontravægten.
3.3 Justering af nåletryk
1) Drej først antiskatingknappen (6) med uret til “0”stilling.
2) Fjern nålebeskyttelsesdækslet ved at trække det
nedad.
3) Sæt tonearmens løftegreb (7) i forreste stilling.
4) Drej tonearmens låsegreb (8) mod højre. Hold
tonearmen forsigtigt i håndgrebet tæt ved pladetallerkenen således, at armen kan bevæges op
og ned.
Bemærk! Nålen må ikke røre nogen overflade.
(5) Drej kontravægten (4) således at tonearmen bli-
ver i vandret stilling og hverken svinger op eller
ned (fig.3).
Hvis tonearmen svinger opad: Drej kontravægten
mod uret.
Hvis tonearmen svinger nedad: Drej kontravægten med uret.
6) Læg tonearmen tilbage i holderen og lås den med
låsegrebet (8).
7) På kontravægten (4) er der en sort drejeskive
med en skala. Det hvide mærke på tonearmen
peger på et tilfældigt sted på skalaen. Uden at
dreje kontravægten flyttes ringen til “0” stilling
(fig.4).
13
DK
PÉ favor desdobrar a página 3. Pode assim ver
sempre os elementos de comando e as respectivas ligações.
1 Recomendações
Este aparelho corresponde ás Directivas EC nº
89/336/EWG para compatibilidade electromagnetica
e nº 73/23/EWG para equipamento de baixa voltagem.
Esta unidade usa alta-voltagem (230V~). Para
evitar um choque, não abra a caixa. Aassistência
deve ser efectuada por pessoal autorizado. A
garantia extingue-se no caso de a caixa ser
aberta.
Para funcionamento, tenha em atenção as seguintes
items:
•
A unidade só pode funcionar no interior.
•
Evite locais muito quentes e com humidade exces-
siva.
•
Não ponha a unidade a funcionar e retire imedia-
tamente a ficha da corrente da tomada se:
1. houver avaria na unidade ou no cabo da cor-
rente.
2. possa ter ocorrido avaria provocada por queda
ou acidente similar.
3. verificar mau funcionamento.
Em qualquer caso a unidade deve ser reparada
por pessoal autorizado.
•
Nunca retire a ficha da tomada, puxando pelo
cabo.
•
Se a unidade for usada para fins diferentes dos
previstos originalmente, se for utilizada errada-
mente ou reparada por pessoal não autorizado,
não há responsabilidade nossa por possíveis ava-
rias.
•
Para limpeza de pó, use apenas um pano seco e
nunca produtos químicos ou áqua.
2 Instalação e regulações
Contrapeso do braço. Fixe o contrapeso principal ao
braço. A regulação precisa, efectua-se da seguinte
forma:
1) Retire a protecção da pastilha.
2) Coloque-o em “0” o botão “Anti-Skating” (6).
3) Coloque a alavanca do elevador do braço (7) na
posição.
4) Liberte o braço e desloque-o paralelamente ao
prato.
5) Segure com leveza a cabeça do braço e procure
o equilibrio, rodando o contrapeso (4). O equilibreo obtem-se logo que o braço fica paralelo ao
prato (Fig.3).
6) Fixe novamente o braço no suporte.
7) Ponha o contra-peso principal na posição “0”
(Fig. 4) e ajuste a força do apoio (vêr especificações da célula) rodando o contra-peso até ao
valor correcto (Fig.5).
8) A célula fornecida de origem, necessita de uma
força de apoio de 2,5 gramas.
3 Regulação “Anti-Skating”
(anti-deslizante)
Ajuste o indicador “Anti-Skating” (6) para a posição
correspondente (vêr especificações da célula).
4 Regulação da velocidade do prato
1) Seleccionar a velocidade “33”, carregar no
START.
2) Verificar se as estrias do prato correspondem à
velocidade.
3) Se as estrias se deslocarem para a direita, isso
significa que a velocidade é demasiado lenta.
Nesse caso, rectificar com o potenciometro da
velocidade (9). Se as estrias se deslocarem para
a esquerda, a velocidade é demasiado rápida.
Corrigir, como atraz.
A regulação correcta obtem-se logo que as esteias ficam imóveis.
4) Uma vez corrigida a velocidade, recoloque o
braço no descanço.
5 Ligações
O cabo cintado e o cabo da massa, ligam-se na
parte trazeira do gira-discos. Ligar firmemente a
ficha branca à entrada esquerda PHONO do amplificador estereo e o vermelho à entrada direita
PHONO. Ligar o fio da massa ao borne de terra do
amplicador. Por fim ligar a alimentação ao sector.
5.1 Arranque remoto
Um jack de 6,3 m/m permite fazer arrancar o giradiscos, a partir de um interruptor exterior.
-
Interruptor fechado -arranca.
-
Interruptor aberto -pára.
Este interruptor pode ser o “electro-start” de uma
mesa de mistura.
6 Funcionamento
1) Regular o prato para a velocidade correcta.
2) Colocar um disco no prato. Utilizar eventualmente o adaptador fornecido (1).
3) Retirar a protecção do porta celula e libertar o
braço do suporte (8).
4) Acionar a alavanca do elevador do braço (7).
Fazer avançar o braço para o disco.
5) Colocar a agulha no principio do disco e baixar o
elevador do braço (7). O braço baixará suavemente sobre a superficie do disco.
6) Carregar no botão START/STOP (12) quando o
quiser parar ou pôr o prato em andamento.
6.1 Como utilizar o elevador do braço
Pode ser utilizado sempre que queira parar o braço
momentaneamente. Coloque-o lentamente na posição “UP” afim de interromper a escuta e rebaixá-lo
para o retomar. Mantenha o elevador na posição
baixa, quando não estiver a usálo.
Page 14

6.2 Conselhos para manutenção
Não lave nem esfregue com produtos insecticidas,
alcool, diuente de pintura ou outros dissolventes.
Para limpeza, use um pano humido, depois de retirar
da tomada a ficha da alimentação.
7 Transporte
Se pretende transportar ou despachar o gira-discos,
tenha em atenção que só deve usar a embalagem
original, tanto para o prato como para os restantes
acessórios. Verifique que fica tudo convenientemente seguro. A garantia não cobre os danos causados por má embalagem ou deficiente acomudação, (como por exemplo, não retirar o prato do
seu eixo) e portanto qualquer dano terá de ser pago.
Para despach, tenha em atenção:
1) Instale a protecção.
2) Fixe o braço com o travão do elevador (8).
3) Rode para a direita o contrapeso até o fixar (4).
4) Retire o prato do eixo ou veio e coloque-o na sua
embalagem propria, para evitar deslocações.
5) O melhor sistema, é usar a embalagem original.
8 Especificações
8.1 Platina
Modelo: . . . . . . . . . . . . . . . . Platina, Gira-discos
manual. Tracção por
correia.
Motor: . . . . . . . . . . . . . . . . . . Motor de corrente
continua
Velocidades: . . . . . . . . . . . . 33
1
/3 e 45R.P.M.
Flutuação: . . . . . . . . . . . . . . 0,045%
Prato: . . . . . . . . . . . . . . . . . . 330 m/m de diametro
Braço: . . . . . . . . . . . . . . . . . Braço em S. Equili-
brio estático.
8.2 Gerais
Alimentação: . . . . . . . . . . . . 230V~/50Hz/15VA
(ou 220V)
Dimensões: . . . . . . . . . . . . . 445 x 158 x 356 m/m
Pêso liquido: . . . . . . . . . . . . 10kg
De acordo com o construtor.
Sujeitos a alterações técnicas.
8) Nåletrykket er på skalaen angivet i gram. Den tilhørende pickup-enhed kræver et nåletryk på
2,5g. Drej derfor modvægten sammen med skalaringen mod uret til “2,5”-stillingen (fig.5). Andre
pickup-enheders nåletryk justeres i henhold til
medfølgende specifikationer.
3.4 Antiskating justering
De kræfter, der påvirker nålen under afspilning, kompenseres med antiskating faciliteten.
Antiskating knappen (6) indstilles fra nulstillingen
til det tal, der svarer til det indstillede nåletryk, i dette
tilfælde “2,5”. Værdien kan aflæses ved pilen under
knappen.
3.5 Montering af støvlåget
Tag de to hængsler til støvlåget ud af pakningen og
monter dem på støvlåget. Sæt støvlåget med
hængslerne fast på pladespilleren. Låget kan til
enhver tid fjernes for at lette betjeningen (f. eks. til
diskoteksbrug).
4 Tilslutning af pladespilleren
Pladespillerens udgang (phonostik (18) forbindes via
det medfølgende kabel til en forstærker eller mixerpults magnetpickup indgang. Bemærk farvemarkeringerne på phonobøsninger og stik (rød = højre
kanal, hvid = venstre kanal). Skru forsigtigt kablets
stelforbindelse fast til pladespillerens stel (19) og til
stelskrue på forstærker eller mixerpult. Tilslut netledningen (230V~/50Hz).
5 Betjening
5.1 Afspilning
1) Fjern nålebeskyttelsesdækslet.
2) Sæt POWER knappen (11) på “on”. Hastighedsindikatoren (10) og stroboskoplampen (11) lyser.
Hvis det er nødvendigt, tændes lampen (14) med
trykknappen (15).
3) Vælg hastighed:
33omdr. til longplaying plader med trykknap (16),
45omdr. til single plader med trykknap (17).
Den valgte hastighed vises på indikatoren (10).
4) Læg en plade på. Hvis det er en single plade bruges adapteren (1) om nødvendigt.
5) Sæt løftegrebet til tonearmen (7) i bagerste stilling. Åbn låsegrebet (8). Hold tonearmen i håndgrebet og sæt nålen ved pladens begyndelse.
6) Sæt løftegrebet (7) til tonearmen i forreste stilling.
Sænk tonearmen langsomt ned på pladen.
7) Start afspilningen med START/STOP knappen
(12). Afspilningen kan afbrydes, dvs. pladen kan
stoppes og startes igen på et hvilket som helst
sted med START/STOP knappen.
8) Løft tonearmen ved pladens slutning med løftegrebet (7) og læg den tilbage i holderen. Stands
pladen med START/STOP knappen (12).
9) Efter endt brug sikres tonearmen med låsegrebet
(8) og netspændingen afbrydes med POWER
knappen (11). Luk støvlåget.
5.2 Finjustering af hastighed
Med Pitch kontrollen (9) kan pladespillerens hastighed hæves eller sænkes med op til 8%. I midterstilling (knap i midterste klik) er hastigheden nøjagtigt
justeret og kan kontrolleres med pladetallerkenens
stroboskopring (13).
Læg mærke til den belyste del af stroboskoprin-
gen, medens pladetallerkenen roterer. (Dæmp evt.
belysningen i rummet). Hvis hastigheden er korrekt
synes mærkerne på kanten at stå stille:
Ved 33omdr. den øverste ring
ved 45omdr. ring nr. 2
5.3 Fjernbetjening af start/stop
Til diskoteksbrug kan start/ stop funktionen fjernbetjenes med en separat afbryder, f. eks. via en mixerpult med såkaldt “fader-start”. Hvis pladespillerfaderen på mixerpulten åbnes eller lukkes, starter
eller stopper pladespilleren automatisk.
Forbind kontakten resp. mixerpulten via et
6,3mm stereo jackstik til (21) REMOTE START/
STOP (se også fig. 6). I så fald er START/STOP
knappen (12) ude af funktion.
5.4 Fjernbetjening af rotationsretning
Omdrejningsretningen kan skiftes med en særskilt
vælgerkontakt for at opnå særlige effekter eller for at
finde et bestemt sted på pladen. Forbind vælgerkontakten med et 6,3 mm stereo jackstik til REMOTE
FORW/BACKW (20), se fig. 7.
6 Tilbehør
6.1 Ekstra lampe
Til belysning af pladespilleren kan XLR udtaget (3)
på apparatets overside levere 12 V /3 W til en svanehalslampe, f.eks. MONACOR GNL-300.
Lampen fjernes ved at nedtrykke udløserknappen
(2) idet med lampen trækkes ud.
6.2 Reserve pickup enhed og nål
Det er let at udskifte pickup-enheden eller nålen. I
detailhandelen kan passende typer fås, f.eks.
diamantnål MONACOR EN-22SP, eller
stereo magnetisk pickup system MONACOR EN-22.
Efter udskiftning af pickup enheden skal nåletrykket
og antiskating justeres (se afs. 3.3 og 3.4).
6.3 Reserve pickuphoved
En komplet reserveenhed med nål (leveres hos
detailhandler) kan opbevares i hullet (5) bag tonearmens ophæng, så den altid er ved hånden. Enheden kan hurtigt udskiftes ved at skrue den gamle af
og den nye på. Herefter skal nåletryk og antiskating
påny justeres
-
se afs. 3.3 og 3.4
14
DK
P
Page 15

7 Vedligeholdelse
7.1 Rengøring
Rengør pladespillerens kasse og støvlåget med en
støvklud eller en hårdt opvredet klud. Brug ikke sprit
eller stærkere rensemidler! Særligt rengøringstilbehør til nål og plader kan leveres hos forhandleren,
f. eks. kulfiberbørste til plader MONACOR DC-100.
7.2 Transport
Såfremt grammofonen skai forsendes, bør der kun
anvendes original emballage til pladetallerkenen og
alle andre dele fra enheden. Det bør sikres, at alle
dele ligger fast i emballagen. Beskadigelser af enheden som følge af uforsvarlig forpakning (f. eks. hvis
pladetallerkenen ikke er fjemet fra centertappen) er
ikke dækket af garantien og reparationer vil derfor
foregå pr. regning.
Før afsendelse bør følgende punkter iagttages:
1) Monter nåle-beskyttelsen.
2) Fastgør tonearmen med låsemekanismen (8).
3) Afmonter tonearmens kontravægt (4) ved at dreje
den i urets retning.
4) Afmonter pladetallerkenen fra centertappen, placer den i særskilt emballage, som fastgøres.
5) Anvend om muligt original emballage.
8 Specifikationer
8.1 Tonearm
Effektiv længde: . . . . . . . . . . 230mm
Overhæng: . . . . . . . . . . . . . . 16mm
Tracking fejl
inderste rille: . . . . . . . . . . +0°32’
yderste rille: . . . . . . . . . . . +2°32’
Offset vinkel: . . . . . . . . . . . . 22°
Vertikal friktion: . . . . . . . . . . 7 mg
8.2 Løbeværk
Pladetallerken: . . . . . . . . . . . Alustøbt, 330mm Ø,
740g
Hastighed: . . . . . . . . . . . . . . 33
1
/3/45 omdr.
Pitch-kontrol: . . . . . . . . . . . . ±8%
Start-drejn. moment: . . . . . . 1,5Nm
Hurtigstart: . . . . . . . . . . . . . . < 0,5 sek
Nedbremsning: . . . . . . . . . .
1
/
8 omdrejning
Wow og flutter: . . . . . . . . . . . 0,045%
Rummel: . . . . . . . . . . . . . . .
-
55dB (DIN 45544)
Strømforsyning: . . . . . . . . . . 230V~/50Hz/15VA
Mål (BxHxD): . . . . . . . . . . . 445 x 158 x 356mm
Vægt: . . . . . . . . . . . . . . . . . . 10 kg
Vi forbeholder os ret til, uden forudgående varsel, at
foretage ændringer i ovennævnte data.
15
DK
Page 16

Vik upp sidan 3. Då kan du alltid se de delar och
anslutningar som texten hänvisar till.
1 Manöverorgan och kopplingar
1.1 Manöverorgan
1 Adapter för singelskivor utan mitthål.
2 Låsspärr för lampa med XLR-kontakt.
3 XLR-kontakt för belysning 12 v/3watt.
4 Motvikt för tonarm.
5 Hållare för reservskal till tonarm.
6 Justering av antiskating.
7 Spak för tonarmslyft.
8 Lås för tonarm.
9 Finjustering av hastighet.
10 Hastighetsindikering.
11 Stroboskoplampa.
12 Start/Stoppknapp.
13 Stroboskopindikering.
14 Nålbelysning.
15 Strömbrytare för nålbelysning.
16 Omkopplare för 33 varv/minut.
17 Omkopplare för 45 varv/minut
1.2 Kopplingar
18 Utgångar för lågnivåsignal till mixer ed.
19 Jord skruv.
20 Koppling för fjärrstyrning fram/back.
21 Koppling för fjärrstyrning start/stopp.
22 Elkabel 230 v/50hz.
2 Säkerhetsföreskrifter
Denna enhet motsvarar EU:s direktiv Nr.
89/336/EWG för elektromagnetiskt kompabilitet och
Nr. 73/23/EWG för lågvolts artiklar.
Denna skivspelare använder 230v växelspänning.
För att undvika elskador, överlåt ALL kvalificerad
service till utbildad personal. Garantin upphör att
gälla vid oauktoriserade ingrepp.
Observera även föjande:
•
Enheten är endast avsedd för inomhusbruk.
•
Utsätt inte enheten för hög värme eller hög luftfuktighet.
•
Använd inte enheten om något av föjande fel
uppstår:
1. Synbara skador på elkabeln.
2. Skador orsakade av fall eller slag.
3. Om enheten inte startar som den skall.
Service måste ske på verkstad om garantin skall
gälla.
•
Skadad elkabel måste bytas på verstad mot typgodkänd kabel.
•
Dra aldrig ut kontakten genom att hålla i sladden
och dra ut den.
•
Dra alltid ut kontakten genom att hålla i själva kontakten.
•
Om enheten används i strid med vad som avses
enligt tillverkaren upphör garantin att gälla.
•
Vid rengöring skall en mjuk trasa användas.
•
Använd aldrig starka lösningsmedel för rengöring
då detta kan skada enhetens funktion
3 Montering och allmäna injusteringar
Skivtallriken, motvikten och locket är separat packade för att inga skador skall uppstå under transport.
Alla delarna är enkla att montera. Kartongen bör
sparas för ev. service.
3.1 Montering av tallriken
1) Placera tallriken över centrumaxeln
2) Vrid tallriken så att ett av de stora hålen i tallriken
kommer mot adaptern för singlar och man ser
motoraxeln.
3) Dra försiktigt ut drivremmen och placera den på
utsidan av motoraxeln.
4) Lägg på gummimattan på tallriken . För att skratcha kan gummimattan bytas ut mot en filtmatta
vilket minskar friktionen mot tallriken.
3.2 Montering av motvikten
1) Med tonarmen låst i sitt stöd, fatta om armen mitt
på och tryck försiktigt fast motvikten. När motvikten sitter fast skruva medsols för att flytta in den.
2) Genom att skruva ut/in regleras nåtrycket på
pickupen.
3) Rekommenderat nåltryck bör följas då felaktigt
nåtryck kan leda till förslitningar på nål och skador
på skivor.
3.3 Justering av nåltryck
1) Lossa tonarmslåset och vrid motvikten tills tonarmen svävar vågrätt.
Om armen pekar uppåt skall motvikten vridas in.
Om armen pekar nedåt skall motvikten vridas ut.
2) Sätt tillbaks tonarmen och lås fast den. På motvikten finns en ring med siffror som visar nåltryck.
Vrid denna så att 0 syns uppåt. Justera in nåltrycket genom att vrida motvikten in/ut till rek nåltryck. Rekommenderat nåltryck för medföljande
pickup är 2,5gram.
3.4 Antiskating
Ställ in antiskatingkraften så att den motsvara inställt
nåltryck. För liten antiskating innebär att nålen släpar
i skivspårets yttervägg. För stor antiskating innebär
att nålen släpar i skivspårets yttervägg.
OBS!
Felinställt nåltryck/antiskating kan mycket snabbt
förstöra den bästa skivsamling. Var därför noggrann
med just dessa inställningar så varar skivorna längst.
Käännä esiin sivu 3, mistä voit samalla nähdä
käyttöohjeen mukaiset osat ja liitännät.
1 Osat ja liitännät
1.1 Osat
1 Adapteri Single-levyille
2 Lisävalaisimen irrotuspainike
3 XLR-liitin lisävalaisimelle 12 V, 3 W
4 Äänivarren vastapaino
5 Varakelkan pidin
6 Antiskating-säätö
7 Äänivarren nostovipu
8 Äänivarren lukitsin
9 Nopeudensäätö
10 Asetetun nopeuden indikaattori
11 Virtakytkin ja stroboskooppilamppu
12 Käynnistys-sammutuskytkin
13 Stroboskooppikehä
14 Levylautasen valaisin
15 Virtakytkin levylautasen valaisimelle
16 Kytkin 33-kierrosnopeudelle
17 kytkin 45-kierrosnopeudelle
1.2 Liitännät
18 Äänilähdöt vahvistimelle tai mikserille
19 Maaliitin
20 Liitin eteen./taaksepäin kauko-ohjaukselle
21 Liitin käynnistys-sammutus-kauko-ohjaukselle
22 Verkkojohto 230V~/50Hz
2 Turvallisuusohjeet
Tämä laite vastaa EU-direktiivejä nro 89/336/EWG
elektromagneettisesta yhteensopivuudesta ja 73/23/
EWG matalajännitteisistä laitteista.
Tämä laite käyttää hengenvaarallisen korkeaa
(230 V~) käyttöjännitettä. Sähköiskuvaaran eliminoimiseksi älä avaa koteloa. Vain ammattimies
saa huoltaa laitetta. Laitteen takuu ei ole voimassa, jos laite on avattu.
Huomioi myös seuraavat asiat:
•
Laite on suunniteltu vain sisäkäyttöön.
•
Suojaa laite tärinältä, kosteudelta, pölyltä ja
suoralta auringonvalolta.
•
Älä kytke laitetta sähköverkkoon, jos:
1. laitteessa tai verkkojohdossa on näkyvä vika.
2. laite on saattanut vaurioitua pudotuksessa tai
vastaavassa tilanteessa.
3. Laite toimii väärin.
Laitetta saa huoltaa vain koulutettu ammattimies.
•
Älä koskaan irrota laitetta sähköverkosta johdosta
vetämällä.
•
Jos laitetta käytetään muuhun kuin alunperin tarkoitettuun käyttöön tai laitetta on huoltanut hyväksymätön huolto, valmistaja ei vastaa mahdollisesta vahingosta.
•
Puhdista laite käyttämällä kuivaa kangaspalaa, älä
käytä kemikaaleja tai vettä.
3 Asennus ja perussäädöt
Levylautanen, vastapaino, äänivarsi ja pölykansi
ovat pakattu erikseen kuljetusvaurioiden välttämiseksi. Nämä osat on helppo asentaa paikoilleen.
Säästä pakkaus mahdollista kuljetusta varten.
3.1 Levylautasen asennus
1) Aseta levylautanen soittimen keskitappiin.
2) Käännä lautasta käsin kunnes suuremmat aukoitukset ovat single-levyadapterin (1) kohdalla ja
moottorin vetoakseli on näkyvissä.
3) Vetohihna on nyt näkyvissä suurempien aukoituksien kautta. Aseta sen vetoakselin ympärille.
4) Aseta kumimatto levylautaselle. "Scratch"-efektejä tehdessä kannattaa kumimatto korvata liukumisen mahdollistamiseksi huopaisella.
3.2 Äänivarren vastapainon asennus
1) Ota äänivarren vastapaino (4) pakkauksestaan.
2) Pidellen äänivartta keskiosastaan, asenna vastapaino äänivarteen.
3) Vastapainolla säädetään neulanpaineen määrää.
3.3 Neulanpaineen säätö
1) Käännä aluksi antiskating-säätönuppi (6) täysin
myötäpäivään, asentoon "0".
2) Irrota neulansuojus alaspäin.
3) Käännä äänivarren nostovipu (7) etuasentoon.
4) Avaa äänivarren lukitsin (8) kääntämällä oikealle.
Pitele äänivartta pitimestään varovasti aivan levylautasen yläpuolella niin, että se pääsee liikkumaan ylös- tai alaspäin.
Huomio! Neula ei saa koskettaa mitään.
5) Käännä vastapaino (4) niin, että äänivarsi pysyy
tasapainossa vaakasuorassa (kuva 3).
Jos äänivarsi pyrkii ylöspäin: käännä vastapainoa
vastapäivään.
Jos äänivarsi pyrkii alaspäin: käännä vastapainoa
myötäpäivään.
6) Siirrä äänivarsi takaisin kannattimelleen ja lukitse
se lukitsimellaan (8).
7) Vastapainossa on musta, asteikolla varustettu
pyörivä rengas. Äänivarren valkoinen merkintä
osoittaa asteikon lukeman. Kääntämättä vastapainoa käännä rengas "0"-asentoon (kuva 4).
8) Asteikon lukemat ovat grammoissa. DJP-120:n
mukana tulleen äänirasian suositeltu neulapaine
on 2,5g. Käännä vastapainoa (asteikkorengas
seuraa mukana) kohtaan "2.5" (kuva 5). Neulapaine voidaan säätää samalla tavalla myös käyttäessäsi toiselle neulapaineelle suunniteltua
rasiaa.
16
FIN
S
Page 17

4 Inkoppling av skivspelaren
Anslut den medföljande (18) till förstärkare eller
mixer (moving magnet) mm. Observera färgkoden
på sladden (Röd = höger. Vit = vänster.) Skruva fast
jordsladden i mixer/förstärkare och dra fast. Anslut
elsladden till 230v/50 hz växelspänning.
5 Användning
5.1 Start
1) Ta bort nålskyddet genom att dra det nedåt.
2) Starta skivspelaren genom att vrida Power-knappen till on-läge.
3) Välj hastighet 33/45 varv/minut.
4) Lägg på en skiva ev. med singel adapter.
5) Lyft upp tonarmen med lyften och placera pickupen över skivan.
6) Sänk tonarmen med lyften så att den hamnar i
ytterspår på skivan.
7) Starta skivspelaren med start/stoppknappen. Skivan kan stannas/startas under spelning med
denna knapp.
8) Lyft upp tonarmen vid skivslut för den till tonarmsstödet. Och tryck på start/stoppknappen.
9) Efter avslutad spelning bör tonarmen låsa fast i
stödet för att undvika att den ramlar ur och skadar
nålen.
5.2 Finjustering av hastighet.
Hastigheten kan justeras ±8% med (9). I mittpsition
är hastigheten 33/45v.min. vilkent kan ses på stroboskopringen som är belyst av strobolampan. Om
exakt hastighet önskas ställs 33 v.min in med den
övre ringen och 45v.min. med den undre. Om punkterna går bakåt är hastgheten för låg. Om punkterna
går framåt är hastigheten för hög.
5.3 Regelstart (fjärrstyrning) start/stopp
För discobruk kan skivspelaren regelstartas med
relä från mixer med faderstartfunktion. Anslut via en
3-polig telejack till (21) remote start/stop. Denna
kopplar bort start/stoppknappen på skivspelaren.
5.4 Remotekontroll fram/back
För specialeffekter eller för leta efter ett speciellt spår
kan man ansluta en 3-polig telejack till (20) remote
forw/back. Se fig. 7.
6 Tillbehör
6.1 Svanhalslampa
För att belysa skivtallriken finns en svanhalslampa
MONACOR GNL-300.
Lampan är av bajonetttyp och är lätt utbytbar.
6.2 Reservpickup och nål
Om nödvändigt, är det lätt att byta både pickup och
nål. Reservnål och pickup finns hos återförsäljare
MONACOR EN-22 SP (nål)
MONACOR EN-22 (pickup).
Efter nål-pickupbyte ställs nåltryck enligt 3.3 och 3.4.
6.3 Reservskat till pickup
Ett komplett skal med pickup/ nål kan köpas hos
återförsäljare för placering i (5). På detta sätt kan
man alltid ha en reservpickup till hand om olyckan
skulle vara framme.
7 Skötsel och underhåll
7.1 Omvårdnad
Rengör lock och chassie med en mjuk tras fuktad
med vatten. Använd aldrig alkohol eller starka
rengöringsmedel då dessa kan skada ytfinishen.
För rengöring av skivor finns MONACOR DC-100
skivborste.
7.2 Transport
Om du vill returnera skivspelaren, se till att endast originalförpackningen används till skivtallriken och alla
andra komponenter till enheten och/eller att de här delarna är säkert förpackade för transport. Om skada på
höljet och enheter orsakade av att skivtallriken ej är riktigt packad eller liggande löst (ex. om skivtallriken ej är
borttagen från drivenheten och ej fastsatt o.dyl.), uppstår gäller inte garantin och reparationen måste betalas!
Observeras vid retur
1) Sätt fast pickupnålsskyddet.
2) Säkra tonarmen med låsningsspaken.
3) Skruva fast transportsäkringen till tonarmen
genom att vrida medsols.
4) Tag av skivtallriken från drivenheten och placera
den i en enskild förpackning och fäst den ordentligt.
5) Det bästa är att använda originalförpackningen.
8 Specifikationer
8.1 Tonarm
Effektiv längd: . . . . . . . . . . . 230mm
Överhäng: . . . . . . . . . . . . . . 16mm
Spårningsfel
innnerspår: . . . . . . . . . . . . +0,32 grader
ytterspår: . . . . . . . . . . . . . +2,32 grader
Spårningsvinkel: . . . . . . . . . 22 grader
Friktion latteralt: . . . . . . . . . . 7 mg (milligram)
8.2 Mekanism
Skivtallrik: . . . . . . . . . . . . . . . Gjuten alluminium,
330mm diam.,
740gram
Hastighet: . . . . . . . . . . . . . . . 33/45 varv/minut
Finjustering hastighet: . . . . . ±8%
Vridmoment: . . . . . . . . . . . . 1,5 nm
Starttid: . . . . . . . . . . . . . . . . < 0,5 sekunder
Stopptid: . . . . . . . . . . . . . . . .
1
/8 varv
Svaj: . . . . . . . . . . . . . . . . . . . 0,045%
Störavstånd: . . . . . . . . . . . . .
-
55db (din 45544)
Strömförsörjning: . . . . . . . . . 230v~/50hz/15va
Dimensioner (BxHxD): . . . 445 x 158 x 356 mm
Vikt: . . . . . . . . . . . . . . . . . . . 10 kilo
Enligt tillverkaren.
Reservation för tekniska förändringar.
3.4 Antiskating-säätö
Levyä soitettaessa neula pyrkii ulospäin levylautasella. Tämä voima tasataan Antiskating-säädöllä (6).
Neulanpaineen säädettyäsi säädä Antiskating-nuppi
neulapainetta vastaavaan arvoon. Arvoon "2,5"
käytettäessä mukana tullutta äänirasiaa. Antiskatingsäädon lukema näkyy valkoisen nuolen kohdalla.
3.5 Kannen asennus
Asenna kaksi kannen mukana tullutta liitäntäkappaletta kannen vastaaviin kohtiin. Aseta kansi paikoilleen soittimeen. Kansi on irrotettavissa milloin vain
soiton aikana jos se on tiellä.
4 Levysoittimen kytkentä
Liitä mukanatullut RCA-johto levysoittimen äänilähtöihin (18) ja toiset päät vahvistimen tai mikserin
levysoitintuloon (magneettinen äänirasia). Huomaa
liittäessäsi, että punainen liitin = oikea kanava (right)
ja valkoinen liitin = vasen kanava (left). Kiristä kaapelin maajohdin tiukasti levysoittimen maaliitäntään
(19) ja vastaavasti toinen pää vahvistimen tai mikserin maaliittimeen. Kytke verkkojohto sähköverkkoon
(230V~/50Hz).
5 Käyttö
5.1 Levyn soitto
1) Irrota neulansuojus alaspäin.
2) Kytke virta päälle kääntämällä POWER-nuppi
(11) "on"-asentoon. Nopeusilmaisin (10) ja stroboskoopin (11) valo syttyvät. Tarvittaessa voit kytkeä levylautasen valaisimen (14) päälle painokytkimellä (15).
3) Valitse soittonopeus:
33rpm LP-levyille painokytkimellä (16).
45rpm single-levyille painokytkimellä (17).
Valittu nopeus näkyy nopeusilmaisimesta (10).
4) Aseta soitettava levy paikoilleen. Single-levylle on
myös adapteri (1).
5) Käännä äänivarren nostovipu (7) taka-asentoon.
Avaa äänivarren lukitusvipu (8) kääntämällä sitä
oikealle. Pitele äänivarren kannattimesta ja aseta
neula levyn alun yläpuolelle.
6) Käännä varren nostovipu rauhallisesti (7) etuasentoon.
7) START/STOP-painike (12) aloittaa soiton. Soitto
voidaan myös keskeyttää ja jatkaa samasta painikkeesta.
8) Levyn loputtua, nosta äänivarsi ylös nostovivusta
(7) ja siirrä se kädellä paikoilleen kannattimeensa. Pysäytä levylautanen START/STOPkytkimestä (12).
9) Käytön loputtua kiinnitä äänivarsi paikoilleen lukitusvivulla (8).ja kytke virta pois POWER-kytkimestä (11). Sulje pölykansi.
5.2 Nopeuden hienosäätö
Soittonopeutta voidaan tarvittaessa säätää nopeudensäädöstä (9) ±8%. Säädön keskiasennossa
(napsaus) nopeus on täsmälleen stroboskooppisäädön (13) mukainen.
Katso levyn pyöriessä stroboskooppikehää (13),
mitä stroboskooppilamppu (11) valaisee (vähennä
huoneen valaistusta tarvittaessa). Kun stroboskooppikehän merkinnät näyttävän olevan paikoillaan,
nopeus on oikea:
33 rpm,
-
ylempi kehä
45 rpm,
-
alempi kehä
5.3 Kauko-ohjattu käynnistys/sammutus
Esim. Disko-käytössä soitin voidaan käynnistää tai
sammuttaa kauko-ohjatusti esim. mikseristä nk.
Fader Startista, jos tällainen on olemassa. Tällöin
soitin käynnistyy automaattisesti ja vastaavasti
pysähtyy voimakkuusliun alussa.
Kytke mikserin vastaava kytkin DJP-120:n
REMOTE START/STOP-liitäntään (21)
1
/4"-stereoplugilla (kts. kuva 6). Käynnistyskytkin (12) on nyt
pois käytöstä.
5.4 Eteen-taaksepäin kauko-ohjaus
Oikean levyn kohdan löytämiseksi tai erikoisefektiä
varten soitin voidaan kauko-ohjata soittamaan joko
oikeaan- tai väärään suuntaan. Kytke valintakytkin
1
/4" stereoplugilla REMOTE FORW/BACKW-litän-
tään (20) (katso kuva 7).
6 Lisävarusteet
6.1 Lisävalaisin
Soittimen XLR-liittimeen (3) voidaan liittää taipuisa
lisävalaisin (12V/3 W), esim. Monacor GNL-300.
Valaisin voidaan irrottaa painamalla irtoituspaini-
ketta (2) ja samalla vetää lamppu pois.
6.2 Vaihtoäänirasia ja -neula
Äänirasia tai neula voidaan helposti vaihtaa. Sopivia
ovat esim:
MONACOR-timanttineula EN-22 SP
MONACOR EN-22-magneettinen stereoäänirasia
Säädä neulanpaine ja antiskating äänirasian vaihdon jälkeen (katso kohdat 3.3 ja 3.4).
6.3 Varakelkka
Varakelkan säilytyspidikkeessä (5) voidaan säilyttää
varakelkkaa äänirasioineen (saatavana jälleenmyyjiltä). Kelkka voidaan vaihtaa nopeasti ja helposti
ruuvaamalla vanha pois ja uusi tilalle. Neulanpaine
ja antiskating on säädettävä kelkan vaihdon jälkeen
(kts. kohdat 3.3 ja 3.4).
7 Ylläpito
7.1 Puhtaanapito
Pölysuoja ja levylautanen voidaan puhdistaa kuivalla
tai kostealla kankaalla (ei tippuvan märkä!). Älä
käytä alkoholipohjaisia tai muita voimakkaita puhdistusaineita! Neulan- ja levynpuhdistukseen tarkoitettuja tuotteita on saatavana jälleenmyyjiltä, esim.
Monacor DC-100-hiilikuituharja äänilevyille.
17
FIN
S
Page 18

7.2 Kuljetus
Varminta on käyttää alkuperäistä kuljetuslaatikkoa
tarvikkeineen. Muulla tavoin kuljetettaessa kiinnitä
erityistä huomiota osien kiinnitykseen, erityisesti
levylautasen kiinnitykseen. Huonosti kiinnitettynä
levylautanen saattaa aiheuttaa vaurioita muille osille.
Takuu ei kata kuljetusvaurioita!
Kuljetusohjeet:
1) Aseta neulansuojus paikoilleen.
2) Kiinnitä äänivarren lukitsin (8).
3) Irrota erikseen äänivarren vastapaino (4) kääntämällä sitä vastapäivään.
4) Irrota levylautanen keskitapistaan ja pakkaa huolella erikseen.
5) Jos mahdollista, käytä alkuperäistä pakkausta.
8 Tekniset tiedot
8.1 Äänivarsi
Efektiivinen pituus: . . . . . . . . 230mm
Overhang: . . . . . . . . . . . . . . 16mm
Seurantavirhe
Sisäreuna: . . . . . . . . . . . . +0°32'
Ulkoreuna: . . . . . . . . . . . . +2°32'
Offset-kulma: . . . . . . . . . . . . 22°
Pystykitka: . . . . . . . . . . . . . . 7mg
8.2 Soitinmekanismi
Levylautanen: . . . . . . . . . . . valualumiinia,
330mm Ø, 740g
Nopeudet: . . . . . . . . . . . . . . 331/3 rpm, 45rpm
Nopeudensäätö: . . . . . . . . . ±8%
Vääntö käynnistettäessä: . . . 1,5 Nm
Aloitusaika: . . . . . . . . . . . . . < 0,5 s
Jarrutus: . . . . . . . . . . . . . . . .
1
/8 kierrosta
Huojunta ja värinä: . . . . . . . . 0,045%
Jyrinä: . . . . . . . . . . . . . . . . .
-
55dB (DIN 45544)
Virtalähde: . . . . . . . . . . . . . . 230V~/50Hz/15 VA
Mitat (L x K x S): . . . . . . . . . 445 x 158 x 356mm
Massa: . . . . . . . . . . . . . . . . . 10 kg
Tiedot valmistajan antamia.
Oikeus muutoksiin pidätetään.
18
FIN
Copyright ® by INTER-MERCADOR GMBH & CO. KG, Bremen, Germany. All rights reserved.
Stage Line
R
02.96.02
 Loading...