

Page 1

BEDIENUNGSANLEITUNG • INSTRUCTION MANUAL • MODE D’EMPLOI • ISTRUZIONI PER L’USO
VEILIGHEIDSVOORSCHRIFTEN • CONSEJOS DE SEGURIDAD • ŚRODKI BEZPIECZEŃSTWA
SIKKERHEDSOPLYSNINGER • SÄKERHETSFÖRESKRIFTER • TURVALLISUUDESTA
CD/MP3-PLAYER
LECTEUR CD/MP3
LETTORE CD/MP3
CD-50DJ Best.-Nr. 21.2260
Page 2
2
Bevor Sie einschalten …
Wir wünschen Ihnen viel Spaß mit Ihrem neuen Gerät
von „img Stage Line”. Bitte lesen Sie diese Bedienungsanleitung vor dem Betrieb gründlich durch. Nur so lernen
Sie alle Funk tionsmöglichkeiten kennen, ver meiden
Fehlbedienungen und schützen sich und Ihr Gerät vor
eventuellen Schäden durch unsachge mäßen Ge brauch.
Heben Sie die Anleitung für ein späteres Nachlesen auf.
Der deutsche Text beginnt auf der Seite 4.
Before you switch on …
We wish you much pleasure with your new “img Stage
Line” unit. Please read these operating instructions carefully prior to operating the unit. Thus, you will get to know
all functions of the unit, operating errors will be prevented, and yourself and the unit will be protected against
any damage caused by improper use. Please keep the
oper ating instructions for later use.
The English text starts on page 4.
D
A
CH
GB
Avant toute installation …
Nous vous souhaitons beaucoup de plaisir à utiliser cet
ap pareil “img Stage Line”. Lisez ce mode dʼemploi enti è re ment avant toute utilisation. Uniquement ainsi, vous pourrez apprendre lʼensemble des possibilités de fonc tion nement de lʼappareil, éviter toute manipulation erro née et
vous protéger, ainsi que lʼappareil, de dommages éven tuels engendrés par une utilisation inadaptée. Conservez
la notice pour pouvoir vous y reporter ultérieurement.
La version française se trouve page 10.
Prima di accendere …
Vi auguriamo buon divertimento con il vostro nuovo ap pa recchio di “img Stage Line”. Leggete attentamente le
istruzioni prima di mettere in funzione lʼapparecchio.
Solo così potete conoscere tutte le funzionalità, evitare
co m an di sbagliati e proteggere voi stessi e lʼapparecchio
da eventuali danni in seguito ad un uso improprio. Conservate le istruzioni per poterle consultare anche in
futuro.
Il testo italiano inizia a pagina 10.
F
B
CH
I
Voor u inschakelt …
Wij wensen u veel plezier met uw nieuwe apparaat van
“img Stage Line”. Lees de veiligheidsvoorschriften grondig door, alvorens het apparaat in gebruik te nemen. Zo
behoedt u zichzelf en het apparaat voor eventuele
schade door ondeskundig gebruik. Bewaar de hand leiding voor latere raadpleging.
De veiligheidsvoorschriften vindt u op pagina 16.
Antes de la utilización …
Le deseamos una buena utilización para su nuevo
aparato “img Stage Line”. Por favor, lea las instrucciones
de seguridad atentamente antes de hacer funcionar el
aparato. De esta manera, usted y el aparato estarán
protegidos en contra de todo daño causado por un uso
inadecuado. Por favor, guarde las instrucciones para
una futura utilización.
Las instrucciones de seguridad se encuentran en la pá gi na 16.
NL
B
E
Før du tænder …
God fornøjelse med dit nye “img Stage Line” produkt.
Læs venligst sikkerhedsanvisningen nøje, før du tager
produktet i brug. Dette hjælper dig med at beskytte produktet mod ukorrekt ibrugtagning. Gem venligst denne
betjeningsvejledning til senere brug.
Du finder sikkerhedsanvisningen på side 17.
Ennen kytkemistä …
Toivomme Sinulle paljon miellyttäviä hetkiä uuden “img
Stage Line” laitteen kanssa. Ennen laitteen käyttöä
Sinua huolellisesti tutustumaan turval li suu soh jeisiin.
Näin vältyt vahingoilta, joita virheellinen laitteen käyttö
saattaa aiheuttaa. Ole hyvä ja säilytä käyttöohjeet myöhempää tarvetta varten.
Turvallisuusohjeet löytyvät sivulta 17.
DK
FIN
Innan du slår på enheten …
Vi önskar dig mycket glädje med din nya “img Stage
Line” produkt. Läs igenom säkerhetsföreskrifterna noga
innan enheten tas i bruk. Detta kan förhindra att problem
eller fara för dig eller enheten uppstår vid användning.
Spara instruktionerna för framtida användning.
Säkerhetsföreskrifterna återfinns på sidan 17.
S
Przed uruchomieniem …
Życzymy zadowolenia z nowego produktu “img Stage
Line”. Prosimy zapoznać się z informa cjami dotyczą cymi
bezpieczeństwa przed użytkowaniem urzą dz e nia, w ten
sposób zdrowie użytkownika nie bę dzie zagrożone, a
urzą dzenie nie ulegnie uszkodzeniu. Instrukcję należy
zachować do wglądu.
Informacje dotyczące bezpieczeństwa znajdują się na
stronie 16.
PL
www.imgstageline.com
Page 3
TRACK F
TRACK
SEARCH
CUE
PLAY/ PAUSE
AUTO CUE
SGL /CTN
+10
TIME/
OUTRO
PITCH
PITCH
BEND
-16
+16
PITCH
CTRL
OPEN
STOP
AUTO CUE SINGLE
PITCH
I0426
0
REMAIN
TOTAL TRACK
35
9
SMMP3
MP3
TRACK F
AUTO CUE SINGLE
PITCH
42638
3 2
--
REMAIN
TOTAL TRACK
25
23
SMMP3
MP3
OUTRO
CONTINUE
3
15 16 17 18
2
3
5
7
8
9
6
4
230V~/50Hz
DIGITAL
OUT
LINE OUT
L
R
POWER
11
12
13
14
10
abc defg
hi j k l
1
Page 4
Bitte klappen Sie die Seite 3 heraus. Sie sehen
dann im mer die beschriebenen Bedien elemente
und Anschlüsse.
Inhalt
1 Übersicht der Bedienelemente
und Anschlüsse . . . . . . . . . . . . . . . . . . . . . 4
1.1 Oberseite . . . . . . . . . . . . . . . . . . . . . . . . . . . 4
1.2 Rückseite . . . . . . . . . . . . . . . . . . . . . . . . . . . 5
2 Hinweise für den sicheren Gebrauch . . . . 5
3 Einsatzmöglichkeiten . . . . . . . . . . . . . . . . . 5
4 Gerät aufstellen und anschließen . . . . . . . 5
5 Bedienung . . . . . . . . . . . . . . . . . . . . . . . . . . 6
5.1 CD abspielen . . . . . . . . . . . . . . . . . . . . . . . . 6
5.2 Laufzeitanzeige und Funktion OUTRO . . . . . 6
5.2.1 Bargraf . . . . . . . . . . . . . . . . . . . . . . . . . . . 6
5.3 Ruhemodus . . . . . . . . . . . . . . . . . . . . . . . . . 6
5.4 Betriebsart wählen . . . . . . . . . . . . . . . . . . . . 7
5.4.1 Einzeltitelwiedergabe . . . . . . . . . . . . . . . . 7
5.4.2 Gesamttitelwiedergabe . . . . . . . . . . . . . . . 7
5.5 Anspielen eines Titels . . . . . . . . . . . . . . . . . . 7
5.6 Schneller Vor-/Rücklauf . . . . . . . . . . . . . . . . 7
5.7 Genaues Anfahren einer bestimmten Stelle . 7
5.8 Rücksprung zu einer bestimmten Stelle . . . . 7
5.9 Geschwindigkeit und Tonhöhe verändern . . 7
5.10 Takt zwischen 2 Musikstücken angleichen
(Pitch-Bend-Funktion) . . . . . . . . . . . . . . . . . . 8
6 Pflege des Gerätes . . . . . . . . . . . . . . . . . . . 8
7 Technische Daten . . . . . . . . . . . . . . . . . . . . 8
1 Übersicht der Bedienelemente
und Anschlüsse
1.1 Oberseite
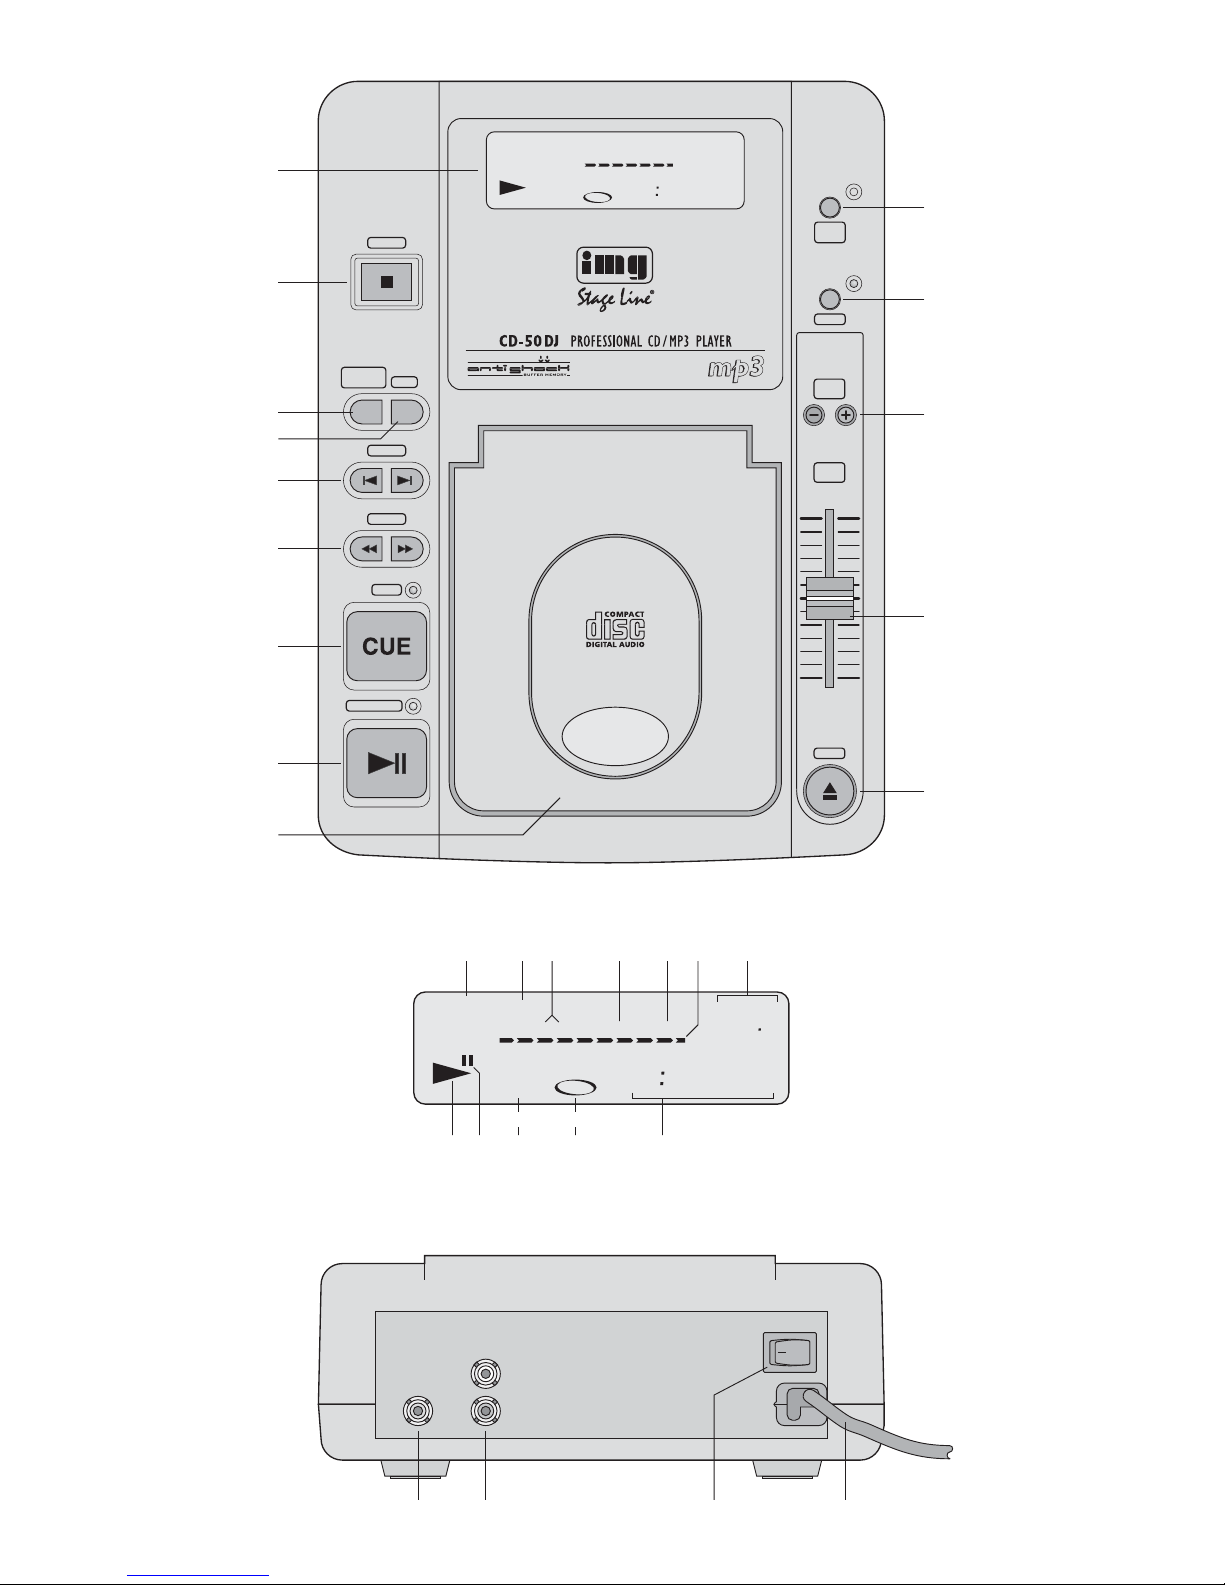
1 Multifunktionsdisplay (Details siehe Abb. 2)
a Anzahl der Titel auf der CD
b Anzeige „CONTINUE“:
signalisiert die Be triebs art Gesamttitelwiedergabe, siehe auch Position 3
c Anzeige „AUTO CUE SINGLE“:
signalisiert die Betriebsart Einzeltitelwiedergabe, siehe auch Position 3
d Anzeige „OUTRO“:
signalisiert die Funktion OUTRO,
siehe Position 10 Taste TIME/ OUTRO
e Anzeige „REMAIN“: signalisiert, dass die Rest-
zeit eines Titels oder einer CD angezeigt wird,
siehe Position 10 Taste TIME/ OUTRO
f Bargraf: stellt durch seine Länge die Zeitan-
zeige (l) grafisch dar
g Anzeige der Abweichung in % von der Stan-
dardgeschwindigkeit, eingestellt mit dem Schieberegler (13)
h Symbol für den Wiedergabemodus
i Symbol für den Pausenmodus
j Nummer des angewähltes Titels
k Anzeige „MP3“: signalisiert den MP3-Betrieb
l Laufzeitanzeige; siehe auch Position 10 Taste
TIME/ OUTRO
2 Taste STOP zum Beenden des Abspielens
3 Taste AUTO CUE SGL/CTN zum Umschalten
zwischen
Einzeltitelwiedergabe (Grundeinstellung):
nach jedem ge spielten Titel schaltet das Gerät
auf Pause, Anzeige „AUTO CUE SINGLE“ (c)
Gesamttitelwiedergabe:
fortlaufende Wiedergabe aller Titel, Anzeige
„CONTINUE” (b)
4 Taste +10 zur Titelanwahl:
Mit jedem Tastendruck erfolgt ein Sprung über
10 Titel vorwärts.
5 Tasten TRACK zur Titelanwahl
Taste zum Anwählen des nächsten Titels
Taste zum Sprung an den Anfang des gerade
laufenden Titels. Durch mehrfaches Drücken
der Taste wird immer ein Titel weiter zu rückgesprungen.
Zum Überspringen mehrerer Titel die entspre-
chende Taste gedrückt halten.
6 Tasten SEARCH für den schnellen Vor- und
Rücklauf, im Pausenmodus zum Anfahren einer
be stimmten Stelle auf 1 Frame genau
Für den Vorlauf die Taste gedrückt halten, für
den Rücklauf die Taste .
7 Taste CUE zum Anspielen eines Titels und für
den Rücksprung zu einer zuvor bestimmten
Stelle (siehe Kapitel 5.5 bzw. 5.8)
8 Taste PLAY/PAUSE zum Umschalten zwi-
schen Wiedergabe und Pause
9 CD-Fachklappe
Zum Öffnen die Taste (14) drücken,
zum Schließen die Klappe mit der Hand herunterdrücken.
10 Taste TIME/ OUTRO zum Umschalten der Lauf-
zeitanzeige (l) und zum Einschalten der Funktion
OUTRO
Grundeinstellung nach dem Einschalten:
Anzeige der Restzeit des laufenden Titels
erster Tastendruck:
Anzeige der be reits gespielten Zeit des laufenden Ti tels
nächster Tastendruck:
Anzeige der Restzeit des laufenden Titels und
Einschalten der Funktion OUTRO zum Ab spielen der je weils letzten 30 Sekunden der folgenden Titel (nicht bei MP3-Betrieb möglich);
die Funktion OUTRO ist erst ab dem nächs ten
Titel aktiv, ggf. die Taste (5) drücken
Please unfold page 3. Then you can always see
the operating elements and connections de scribed.
Contents
1 Operating Elements and Connections . . . 4
1.1 Top side . . . . . . . . . . . . . . . . . . . . . . . . . . . . 4
1.2 Rear side . . . . . . . . . . . . . . . . . . . . . . . . . . . 5
2 Safety Notes . . . . . . . . . . . . . . . . . . . . . . . . 5
3 Applications . . . . . . . . . . . . . . . . . . . . . . . . 5
4 Setting up and Connecting the Unit . . . . . 5
5 Operation . . . . . . . . . . . . . . . . . . . . . . . . . . . 6
5.1 Replaying a CD . . . . . . . . . . . . . . . . . . . . . . 6
5.2 Display of the playing time
and function OUTRO . . . . . . . . . . . . . . . . . . 6
5.2.1 Bar graph . . . . . . . . . . . . . . . . . . . . . . . . . 6
5.3 Sleep mode . . . . . . . . . . . . . . . . . . . . . . . . . 6
5.4 Selecting the operating mode . . . . . . . . . . . . 7
5.4.1 Single title replay . . . . . . . . . . . . . . . . . . . . 7
5.4.2 Replay of all titles . . . . . . . . . . . . . . . . . . . 7
5.5 Short replay of a title beginning . . . . . . . . . . 7
5.6 Fast forward and reverse . . . . . . . . . . . . . . . 7
5.7 Precise selection of a certain spot . . . . . . . . 7
5.8 Return to a desired spot . . . . . . . . . . . . . . . . 7
5.9 Changing the speed and the pitch . . . . . . . . 7
5.10 Matching the beat between 2 music pieces
(Pitch Bend function) . . . . . . . . . . . . . . . . . . 8
6 Maintenance of the Unit . . . . . . . . . . . . . . . 8
7 Specifications . . . . . . . . . . . . . . . . . . . . . . . 8
1 Operating Elements and Connections
1.1 Top side
1 Multifunctional display (for details see fig. 2)
a number of titles on the CD
b display “CONTINUE”:
indicates the operating mode of replay of all
titles, also see item 3
c display “AUTO CUE SINGLE”:
indicates the operating mode of single title
replay, also see item 3
d display “OUTRO”:
indicates the function OUTRO,
see item 10 button TIME/ OUTRO
e display “REMAIN”: indicates that the remain -
ing time of a title or a CD is displayed,
see item 10 button TIME/ OUTRO
f bar graph: its graphic display shows the play-
ing time indication (l) by its length
g display of the percentage deviation from the
standard speed adjusted with the sliding control (13)
h symbol for the replay mode
i symbol for the pause mode
j number of the title selected
k indication “MP3”: shows the MP3 operation
l playing time indication; also see item 10 but-
ton TIME/ OUTRO
2 Button STOP to stop the playing
3 Button AUTO CUE SGL/CTN for switching be -
tween
single title replay (basic setting):
each time a title is played, the unit switches to
pause, indication “AUTO CUE SINGLE” (c)
replay of all titles:
continuous replay of all titles, indication “CONTINUE” (b)
4 Button +10 for title selection:
Each time a button is pressed, the unit advances
10 titles in forward direction
5 Buttons TRACK for title selection
button to select the next title
button to return to the beginning of the title
currently playing. Each time the button is
pressed, the unit goes back another title.
To skip several titles, keep the corresponding
button pressed.
6 Buttons SEARCH for fast forward and reverse, in
the pause mode for precisely selecting a special
spot to 1 frame
For the fast forward, keep the button press ed,
for the fast reverse, the button .
7 Button CUE for short replay of a title beginning
and return to a spot previously defined (see
chapter 5.5 or 5.8)
8 Button PLAY/PAUSE for switching between
replay and pause
9 CD compartment cover
To open, press the button (14),
to close, press down the cover by hand.
10 Button TIME/OUTRO to switch the playing time
indication (l) and to switch on the function OUTRO
Basic setting after switching-on:
display of the remaining time of the current title
first pressing of button:
display of the time already played of the current title
next pressing of button:
display of the remaining time of the current
title and switching-on of the function OUTRO
to play the last 30 seconds each of the follow ing titles (not possible during MP3 operation);
the function OUTRO is only active as from the
next title, press the button (5), if required
next pressing of button:
display of the remaining playing time of the
entire CD (not possible during MP3 operation)
4
GB
D
A
CH
Page 5
nächster Tastendruck:
Anzeige der Restlaufzeit der ge samten CD
(nicht bei MP3-Betrieb möglich)
nächster Tastendruck:
Grundeinstellung (Anzeige der Titelrestzeit)
11 Taste PITCH zum Aktivieren und Deaktivieren
des Schiebereglers (13) für die Geschwindigkeit
12 Tasten PITCH BEND zur Anpassung des Taktes
des gerade laufenden Titels an den Takt eines auf
einem anderen Gerät laufenden Musikstückes:
Solange eine der Tasten betätigt wird, läuft der
Titel schneller bzw. langsamer als die gewählte
Geschwindigkeit und im Feld PITCH (g) des Displays blinkt der angezeigte Wert.
13 Schieberegler zum Ändern der Geschwindigkeit
und Tonhöhe; die Einstellung des Reglers ist nur
bei gedrückter Taste PITCH (11) wirksam
14
Taste OPEN zum Öffnen der CD-Fachklappe (9)
1.2 Rückseite
15 Cinch-Buchse DIGITAL OUT für den digitalen
Audioausgang
16 Cinch-Buchsen LINE OUT für den analogen
Audioausgang (Line-Pegel)
17 Ein-/Ausschalter POWER
18 Netzkabel zum Anschluss an eine Steckdose
(230 V~/ 50 Hz)
2 Hinweise für den sicheren Gebrauch
Das Gerät entspricht allen erforderlichen Richtlinien
der EU und ist deshalb mit gekennzeichnet.
Beachten Sie auch unbedingt die folgenden Punkte:
G
Das Gerät ist nur zur Verwendung im Innenbereich geeignet. Schützen Sie es vor Tropf- und
Spritz wasser, hoher Luftfeuchtigkeit und Hit ze
(zulässiger Einsatztemperaturbereich 0 – 40 °C).
G
Stellen Sie keine mit Flüssigkeit gefüllten Gefäße,
z. B. Trinkgläser, auf das Gerät.
G
Nehmen Sie das Gerät nicht in Betrieb und ziehen
Sie sofort den Netzstecker aus der Steckdose:
1. wenn sichtbare Schäden am Gerät oder an der
Netz anschlussleitung vorhanden sind,
2. wenn nach einem Sturz oder Ähnlichem der
Verdacht auf einen Defekt besteht,
3. wenn Funktionsstörungen auftreten.
Lassen Sie das Gerät in jedem Fall in einer Fachwerkstatt reparieren.
G
Eine beschädigte Netzanschlussleitung darf nur
durch eine Fachwerkstatt er setzt werden.
G
Ziehen Sie den Netzstecker nie an der Zuleitung aus
der Steckdose, fassen Sie immer am Stecker an.
G
Wird das Gerät zweckentfremdet, nicht richtig
angeschlossen, falsch bedient oder nicht fachge recht re pa riert, kann keine Garantie für das Gerät
und keine Haftung für daraus resultierende Sachoder Personenschäden übernommen werden.
3 Einsatzmöglichkeiten
Der CD/MP3-Player CD-50DJ ist speziell für den
professionellen DJ-Bereich konzipiert. Viele Funk tionsmöglichkeiten sind genau auf diesen Einsatzbereich abgestimmt, z. B. Einzeltitelwiedergabe,
variable Ge schwindigkeit und Rücksprung zu einer
zuvor be stimmten Stelle (CUE-Punkt).
Es können Audio-CDs, selbst gebrannte AudioCDs (Audio CD-R) sowie CDs mit Titeln im MP3Format abgespielt werden. Wiederbeschreibbare
CDs (CD-RW) lassen sich nicht abspielen.
Der CD-Player ist mit einem Anti-Schock-Speicher ausgestattet, der Störungen beim Abtas ten
einer CD durch Stöße und Vibrationen bis 10 Sekunden ausgleichen kann. Jedoch können da mit kei ne
lang an haltenden Störungen ausgeglichen werden.
4 Gerät aufstellen und anschließen
Der CD-50DJ ist als frei stehendes Gerät zu verwenden und muss auf einer ebenen, waagerechten
Fläche aufgestellt werden. Vor dem Anschluss bzw.
vor dem Verändern von Anschlüssen den CD/MP3Player und das anzu schließende Gerät ausschalten.
1) Ist an Ihrem Mischpult oder Verstärker ein Digi tal -
eingang vorhanden, diesen an die gelbe Cinch-
Buchse DIGITAL OUT (15) anschließen.*
Bei Geräten ohne Digitaleingang den StereoAusgang LINE OUT (16) – linker Ka nal weiße
Buchse und rechter Kanal rote Buchse – über ein
Cinch-Kabel mit dem CD-Player-Eingang am
Mischpult oder am Verstärker verbinden.
2) Zuletzt den Netzstecker des Anschlusskabels
(18) in eine Steckdose (230 V~/ 50 Hz) stecken.
* Beim Verändern der Abspielgeschwindigkeit kann das an
der Buchse DIGITAL OUT angeschlossene Gerät die Digitalsignale eventuell nicht richtig lesen, siehe Kapitel 5.9.
WARNUNG Das Gerät wird mit lebensgefähr -
licher Netzspannung (230 V~) versorgt. Nehmen Sie deshalb nie selbst
Eingriffe am Gerät vor. Durch un sachgemäßes Vorgehen besteht die
Gefahr eines elektrischen Schlages.
Soll das Gerät endgültig aus dem Betrieb
genommen werden, übergeben Sie es zur
umweltgerechten Entsorgung einem ört lichen Recyclingbetrieb.
next pressing of button:
basic setting (display of the remaining time of
the title)
11 Button PITCH to activate and deactivate the
sliding control (13) for the speed
12 Buttons PITCH BEND to adapt the beat of the
title currently playing to the beat of the music
piece playing on another unit:
As long as one of the buttons is pressed, the title
is played more quickly or more slowly than the
selected speed and the indicated value flashes
in the field PITCH (g) of the display.
13 Sliding control to modify the speed or pitch; the
adjustment of the control is only effective with the
button PITCH (11) pressed
14 Button OPEN to open the cover (9) for the CD
compartment
1.2 Rear side
15 Phono jack DIGITAL OUT for the digital audio
output
16 Phono jacks LINE OUT for the analog audio out-
put (line level)
17 POWER switch
18 Mains cable for the connection to a mains socket
(230 V~/ 50 Hz)
2 Safety Notes
The unit corresponds to all required directives of the
EU and is therefore marked with .
It is essential to observe the following items:
G
The unit is suitable for indoor use only. Protect it
against dripping water and splash water, high air
humidity, and heat (admissible ambient temper ature range 0 – 40 °C).
G
Do not place any vessels filled with liquid, e. g. a
drinking glass, on the unit.
G
Do not set the unit into operation, and immediately
disconnect the mains plug from the mains socket if
1. there is visible damage to the unit or to the
mains cable,
2. a defect might have occurred after a drop or
similar accident,
3. there are malfunctions.
The unit must in any case be repaired by skilled
personnel.
G
A damaged mains cable must only be replaced by
skilled personnel.
G
Never pull the mains cable to disconnect the
mains plug from the mains socket, always seize
the plug.
G
No guarantee claims for the unit and no liability for
any resulting personal damage or material
damage will be accepted if the unit is used for
other purposes than originally intended, if it is not
correctly connected, operated, or not repaired in
an expert way.
G
Important for U. K. Customers!
The wires in this mains lead are coloured in ac cord ance with the following code:
blue = neutral
brown = live
As the colours of the wires in the mains lead of this
appliance may not correspond with the coloured
markings identifying the terminals in your plug,
proceed as follows:
1. The wire which is coloured blue must be con nected to the terminal in the plug which is
marked with the letter N or coloured black.
2. The wire which is coloured brown must be con nected to the terminal which is marked with the
letter L or coloured red.
3 Applications
The CD/ MP3 player CD-50DJ has been especially
designed for professional DJ applications. Many
functional features have precisely been matched to
this range of application, e. g. single title replay,
variable speed, and return to a spot defined before
(CUE point).
The CD player allows replay of audio CDs and
CDs which you have written yourself (audio CD-R)
and CDs with titles in the MP3 format. It is not pos sible to replay rewritable CDs (CD-RW).
The CD player is equipped with an anti-shock
memory which is able to compensate interruptions
by shocks and vibrations up to 10 seconds when
sampling a CD. However, the anti-shock system
cannot compensate permanent interruptions.
4 Setting up and Connecting the Unit
The CD-50DJ is designed as table top unit and has
to be placed on an even, horizontal surface. Prior to
making the connection or changing any connec tions, switch off the CD/ MP3 player and the unit to
be connected.
1) If your mixer or amplifier is equipped with a digital
input, connect it to the yellow phono jack DIG -
ITAL OUT (15).*
In case of units without digital input connect
the stereo output LINE OUT (16) – left channel
white jack and right channel red jack – via a cable
with phono connectors to the CD player input at
the mixer or amplifier.
* When changing the playing speed, it is possible that the
unit connected to the jack DIGITAL OUT may not be able to
read the digital signals correctly, see chapter 5.9.
If the unit is to be put out of operation de finitively, take it to a local recycling plant for
disposal which is not harmful to the environment.
WARNING The unit is supplied with hazardous
mains voltage (230 V~). Leave servicing to skilled personnel only. Inexpert
handling may cause an electric shock
hazard.
5
GB
D
A
CH
Page 6
5 Bedienung
5.1 CD abspielen
1) Den CD/MP3-Player mit dem Ein-/Ausschalter
POWER (17) auf der Rückseite einschalten. Das
Display (1) signalisiert nacheinander:
„read“ (lesen)
„no disc“ (keine CD) – wenn keine CD eingelegt ist
2) Die Klappe (9) des CD-Fachs mit der Taste
(14) öffnen. Im Display erscheint „OPEN“ (offen).
3) Eine CD mit der Beschriftung nach oben in das
CD-Fach einlegen. Die Klappe von Hand schlie ßen. Bei korrekt eingelegter CD gibt das Display
nach kurzer Zeit die Gesamttitelanzahl (a) und
die Gesamtspieldauer (l) der CD an und an schließend die Spieldauer (l) des ersten Titels.
Bei CDs mit Titeln im MP3-Format signalisiert
das Display zusätzlich „MP3“ (k).
4) Zum Starten mit dem ersten Titel die Taste
(8) drücken. Solange die CD abgespielt wird,
zeigt das Display das Symbol (h).
Soll mit einem anderen Titel gestartet werden,
zuerst ggf. die Taste +10 (4) und dann die Taste
oder (5) so oft drücken, bis die ge wünschte Titelnummer im Display erscheint.
Danach den Titel mit der Taste starten.
Hinweis: Bei MP3-CDs mit mehreren Ordnern
nummeriert das Gerät alle Titel auf der CD in
alphabetischer Folge der Ordner durch. Anhand
dieser Nummerierung lassen sich die Titel gezielt
anwählen.
5) Das Abspielen kann jederzeit mit der Taste
unterbrochen werden. Im Display erscheint das
Pausensymbol (i). Die LEDs über den Tasten
und CUE (7) blinken. Zum Weiterspielen der
CD die Taste erneut drücken.
6) Nach dem Einschalten steht das Gerät immer
auf Einzeltitelwiedergabe: Das Display signalisiert „AUTO CUE SINGLE“ (c). Ist ein Titel zu
Ende gespielt, schaltet das Gerät am Anfang des
nächsten Titels auf Pause. Soll jedoch ein Titel
nach dem anderen kontinuierlich abgespielt werden, mit der Taste AUTO CUE SGL/CTN (3) auf
Gesamttitelwiedergabe schalten (siehe auch
Kap. 5.4.2).
7) Während des Abspielens oder auch bei eingeschalteter Pause kann mit der Taste +10 (4)
sowie mit den Tasten und (5) ein anderer
Titel angewählt werden:
Mit der Taste +10 werden 10 Titel vorgesprungen.
Mit der Taste wird immer ein Titel weiter -
geschaltet.
Mit der Taste wird an den Anfang des gerade
laufenden Titels ge sprungen. Durch mehrfaches
Drücken der Taste wird immer ein Titel weiter
zurückgesprungen. Zum Überspringen mehrerer
Titel kann die Taste oder auch gedrückt
gehalten werden.
8) Zum Beenden des Ab spielens mit der Taste
STOP (2) auf Stopp schalten. Die Zeitanzeige (l)
und der Bargraf (f) erlöschen. Im Feld TRACK (j)
erscheint die An zahl der Titel auf der CD.
9) Vor dem Ausschalten des Gerätes immer die
Klappe des CD-Fachs schließen, um das Fach vor
Verschmutzung zu schützen. Dann das Gerät mit
dem Ein-/Ausschalter POWER (17) ab schalten.
5.2 Laufzeitanzeige und Funktion OUTRO
In der Grundeinstellung nach dem Einschalten gibt
das Display während der Wiedergabe einer CD und
bei eingeschalteter Pause die Titelnummer (j) und
die Restzeit (l) des gerade laufenden Titels an. Zur
Kennzeichnung der Restzeit signalisiert das Display
„REMAIN“ (e). Die Zeit wird in Minuten (M) und
Sekunden (S) angezeigt, wobei die Sekunden noch
einmal in 75 sogenannte Frames (F) unterteilt sind
(1 Frame = 1/75 Sekunde).
Durch mehrfaches Drücken der Taste TIME /
OUTRO (10) können folgende Zeitinformationen
angezeigt und die Funktion OUTRO gewählt werden:
erster Tastendruck
die bereits gespielte Zeit des momentanen Titels;
die Anzeige „REMAIN“ erlischt
nächster Tastendruck
die Funktion OUTRO zum Abspielen der jeweils
letzten 30 Sekunden der weiteren Titel wird aktiviert (nicht bei MP3-Betrieb möglich); das Display
zeigt die Restzeit des laufenden Titels an und
signalisiert „OUTRO“ (d) und „REMAIN“ (e); die
Funktion ist erst ab dem nächsten Titel aktiv,
eventuell die Taste (5) betätigen
nächster Tastendruck
die Restzeit der gesamten CD (nicht bei MP3Betrieb möglich); die Funktion OUTRO ist wieder
deaktiviert
nächster Tastendruck
Grundeinstellung (Anzeige der Rest zeit des laufenden Titels)
5.2.1 Bargraf
Zusätzlich zur numerischen Laufzeitanzeige (l) stellt
der Bargraf (f) die Laufzeit grafisch durch seine
Länge dar. Die letzten 30 Sekunden eines Titels signalisiert der Bargraf durch Blinken in seiner vollen
Länge, wobei die letzten 15 Sekunden durch ein
schnelleres Blinken angezeigt werden.
5.3 Ruhemodus
Steht das CD-Laufwerk länger als 30 Minuten auf
Pause, schaltet das Gerät automatisch in den Ruhemodus. Das Laser-Abtast system ist dann abgeschaltet und wird somit geschont. Das Display zeigt
„SLEEP“ (Schlaf). Durch Betätigen einer beliebigen
Taste wird in den normalen Betriebsmodus zurückgeschaltet.
2) Finally connect the mains plug of the cable (18)
to a mains socket (230 V~/ 50 Hz).
5 Operation
5.1 Replaying a CD
1) Switch on the CD /MP3 player with the POWER
switch (17) on the rear side. The display (1) indicates successively:
“read”
“no disc” – if no CD is inserted
2) Open the cover (9) of the CD compartment with
the button (14). “OPEN” is displayed.
3) Insert a CD with the lettering facing upwards into
the CD compartment. Close the cover by hand. If
the CD is correctly inserted, after a short time the
display will show the number of all titles (a) and
the total playing time (l) of the CD and then the
playing time (l) of the first title. For CDs with titles
in the MP3 format, the display additionally indi cates “MP3” (k).
4) To start with the first title, press the button (8).
As long as the CD is replayed, the symbol (h)
is displayed.
To start the CD with another title, first press
the button +10 (4) if required and then the button
or (5) so many times until the desired title
number is displayed. Then start the title with the
button .
Note: For MP3-CDs with several folders the
unit numbers all titles on the CD in alphabetic
order of the folders. By this numbering the titles
can precisely be selected.
5) The replay can be interrupted at any time with the
button . The pause symbol (i) is displayed.
The LEDs above the buttons and CUE (7)
flash. To continue the CD, press the button
again.
6) After switching-on, the unit is always set to single
title replay: “AUTO CUE SINGLE” (c) is displayed. If the title is played to the end, the unit is
set to pause at the beginning of the next title.
However, for continuous replay of one title after
the other, set the unit to replay of all titles with the
button AUTO CUE SGL/CTN (3) [also see chapter 5.4.2].
7) While replaying or with activated pause, another
title can be selected with the button +10 (4) and
with the buttons and (5):
With the button +10, 10 titles are advanced in forward direction.
Each time the button pressed, one title is
advanced.
With the button , the unit goes to the beginning
of the title currently playing. Each time the button
is pressed, the unit reverses one title. To skip
several titles, the button or can also be
kept pressed.
8) To stop the replay, set the unit to stop with button
STOP (2). The time indication (l) and the bar
graph (f) disappear. The number of the titles on
the CD is shown in the field TRACK (j).
9) Prior to switching off the unit, always close the
cover of the CD compartment to protect the compartment against impurities. Then switch off the
unit with the POWER switch (17).
5.2 Display of playing time
and function OUTRO
In the basic setting after switching on, while replaying a CD and with activated pause, the display
shows the title number (j) and the remaining time (l)
of the title currently playing. To indicate the remain ing time, the display shows “REMAIN” (e). The time
is indicated in minutes (M) and seconds (S), the
seconds are subdivided again into 75 frames (F)
[1 frame = 1/75 second].
If the button TIME/ OUTRO (10) is pressed re peatedly, the following time information can be displayed and the function OUTRO can be selected:
first pressing of button
the time already played of the current title;
“REMAIN” is extinguished
next pressing of button
the function OUTRO to play the last 30 seconds
each of the following titles is activated (not pos -
sible during MP3 operation); the display shows
the remaining time of the title currently playing
and “OUTRO” (d) and “REMAIN” (e); the function
is only active as from the next title, press the but-
ton (5), if required.
next pressing of button
the remaining time of the entire CD (not possible
during MP3 operation); the function OUTRO is
deactivated again
next pressing of button
basic setting (display of the remaining time of the
title currently playing)
5.2.1 Bar graph
In addition to the numerical playing time indication
(l), the graphic display of the bar graph (f) indicates
the playing time by its length. The last 30 seconds of
a title are indicated by the bar graph flashing in its
full length, the last 15 seconds by even faster flash ing.
5.3 Sleep mode
If the CD player mechanism is in the pause mode
for more than 30 minutes, the unit automatically
switches to the sleep mode. Then the laser sampling
system is switched off and is thus saved. The display shows “SLEEP”. If any button is pressed, the
unit is set back to the standard operating mode.
6
GB
D
A
CH
Page 7

5.4 Betriebsart wählen
5.4.1 Einzeltitelwiedergabe
Nach dem Einschalten des Gerätes ist immer die
Einzeltitelwiedergabe aktiviert, die speziell für DJAnwendungen vorgesehen ist:
1. Das Display signalisiert „AUTO CUE SINGLE“ (c).
2. Nach dem Einlesen einer CD oder nach dem An wählen eines Titels mit den Tasten TRACK (5)
steht der CD-Player exakt an der Stelle, an der
die Musik beginnt (nicht bei Zeitindex 0:00:00).
Diese Stelle wird automatisch als Startpunkt
gespeichert. Nach dem Starten des Titels kann
mit der Taste CUE (7) auf diesen Startpunkt
zurückgesprungen werden.
3. Nach dem Spielen eines Titels schaltet das Gerät
exakt an der Stelle auf Pause, an der die Musik
des nächsten Titels beginnt. Diese Stelle ist dann
als neuer Startpunkt gespeichert.
5.4.2 Gesamttitelwiedergabe
Soll ein Titel nach dem anderen kontinuierlich abgespielt werden, mit der Taste AUTO CUE SGL/CTN
(3) auf Gesamttitelwiedergabe schalten. Das Display springt von „AUTO CUE SINGLE“ (c) auf
„CONTINUE“ (b) um. Zum Zurückschalten auf Einzeltitelwiedergabe die Taste AUTO CUE SGL/CTN
erneut betätigen.
5.5 Anspielen eines Titels
1) Mit der Taste (8) auf Pause schalten und
dann den ge wünschten Titel anwählen [mit der
Taste oder (5) und ggf. der Taste +10 (4)].
2) Erscheint im Display die Laufzeit (l) des Titels,
die Taste CUE (7) gedrückt halten. Der Titel wird
so lange angespielt, wie die Taste gedrückt wird.
3) Nach dem Lösen der Taste CUE springt das
Gerät auf den Titelanfang zurück und schaltet auf
Pause. Zum Starten des Titels die Taste drücken. Auf den Titelanfang kann weiterhin mit der
Taste CUE zurückgesprungen werden.
5.6 Schneller Vor- / Rücklauf
Während des Abspielens kann mit den Tasten
SEARCH und (6) schnell vor- oder zurückgefahren werden: Für den schnellen Vorlauf die
Taste ge drückt halten, für den schnellen Rücklauf die Taste .
5.7 Genaues Anfahren
einer bestimmten Stelle
Soll z. B. die Wiedergabe mitten in einem Titel ab
einer bestimmten Stelle starten, diese Stelle zuerst
un gefähr anfahren und dann mit der Taste (8)
auf Pause schalten. Im Pausenmodus lässt sich die
Stelle durch Antippen der Taste SEARCH oder
(6) auf 1 Frame (F) genau fahren (1 Frame =
1
/75 Sekunde). Die angefahrene Stelle wird so lange
wiederholt, bis die Taste gedrückt oder die Taste
CUE (7) kurz zweimal angetippt wird. (Mit der Taste
CUE wird ein neuer CUE-Punkt gesetzt, siehe Kapitel 5.8.)
5.8 Rücksprung zu einer bestimmten Stelle
1) Während des Abspielens eines Titels mit der
Taste (8) auf Pause schalten, wenn die Stelle
erreicht ist, zu der später zurückgesprungen werden soll. Die LEDs über den Tasten und CUE
(7) blinken.
2) Bei Bedarf kann mit den Tasten SEARCH
und (6) die Stelle exakter angefahren werden (siehe Kap. 5.7). Die angefahrene Stelle ist
danach fortlaufend zu hören.
3) Die Taste CUE (7) antippen. Dadurch wird ein
CUE-Punkt gesetzt, d. h. intern die Stelle markiert. (Falls die momentane Stelle zu hören ist,
die Taste CUE erneut kurz zum Stummschalten
drücken.) Die LED der Taste CUE leuchtet jetzt
kontinuierlich. Die LED der Taste blinkt weiter
als Aufforderung, die Wiedergabe zu starten.
4) Das Abspielen mit der Taste wieder starten.
Vorsicht: Jetzt nicht die Taste TRACK , (5)
oder +10 (4) drücken. Sie löschen den CUE-Punkt.
5) Mit der Taste CUE kann nun auf den CUE-Punkt
zurückgesprungen werden. Das Laufwerk steht
dann auf Pause.
6) Mit der Taste die Wiedergabe starten oder
die Taste CUE erneut drücken und gedrückt halten. Nach dem Lösen der Taste CUE steht das
Laufwerk wieder am CUE-Punkt auf Pause.
Durch erneutes Gedrückthalten der Taste CUE
kann so ab dem CUE-Punkt beliebig oft eine
Wiederholung erfolgen.
Hinweis: Im Modus Einzeltitelwiedergabe kann der
Rücksprung mit der Taste CUE nur innerhalb eines
Titels erfolgen. Beim Erreichen des nächsten Titels
wird der CUE-Punkt durch den Startpunkt des
nächs ten Titels ersetzt (siehe Kapitel 5.4.1).
5.9 Geschwindigkeit und
Tonhöhe verändern
Die Geschwindigkeit und damit gleichzeitig die Tonhöhe lassen sich mit dem Schieberegler (13) um
±16 % ändern:
1) Damit die Geschwindigkeit mit dem Schieberegler (13) geändert werden kann, muss die LED
neben der Taste PITCH (11) leuchten. Leuchtet
sie nicht, die Taste PITCH drücken.
2) Die Ge schwindigkeit mit dem Schieberegler verändern. Das Display zeigt die prozentuale Abweichung (g) von der Standardgeschwindigkeit an.
3) Mit der Taste PITCH kann jederzeit zwischen der
mit dem Schieberegler eingestellten Geschwindigkeit und der Standardgeschwindigkeit umgeschaltet werden.
Hinweis: Ein am Digitalausgang (15) angeschlossenes Gerät kann beim Verändern der Geschwindigkeit die Digitalsignale eventuell nicht richtig
lesen. (Mit dem Verändern der Geschwindigkeit
ändert sich die Abtastfrequenz.) In diesem Fall den
Schieberegler mit der Taste PITCH deaktivieren,
sodass keine Geschwindigkeitsänderung möglich ist.
5.4 Selecting the operating mode
5.4.1 Single title replay
After switching on the CD player, the single title
replay is always activated which is especially pro vided for DJ applications:
1. The display indicates “AUTO CUE SINGLE” (c).
2. After reading in a CD or after selecting a title with
the buttons TRACK (5), the CD player is precisely
on the spot where the music starts (not at the
time index 0:00:00).
The unit automatically memorizes this spot as
a starting point. After starting the title, it is pos sible to return to this starting point with the button
CUE (7).
3. After replaying a title the unit switches to pause
precisely on the spot where the music of the next
title starts. This spot is then memorized as a new
starting point.
5.4.2 Replay of all titles
For continuous replay of one title after the other, set
the unit to replay of all titles with the button AUTO
CUE SGL/ CTN (3). The display goes from “AUTO
CUE SINGLE” (c) to “CONTINUE” (b). To return to
single title replay, press the button AUTO CUE
SGL/ CTN again.
5.5 Short replay of a title beginning
1) Set the unit to pause with the button (8) and
then select the desired title [with the button or
(5) and, if required, with the button +10 (4)].
2) If the display shows the playing time (l) of the title,
keep the button CUE (7) pressed. The beginning
of the title is played as long as the button is
pressed.
3) After releasing the button CUE, the unit returns to
the title beginning and is set to pause. Press the
button to start the title. It is always possible to
return to the title beginning with the button CUE.
5.6 Fast forward and reverse
While replaying, the fast forward or reverse is possible with the buttons SEARCH or (6): For
the fast forward keep the button pressed, for the
fast reverse the button .
5.7 Precise selection of a certain spot
For starting the replay e. g. in the middle of a title
from a precise spot, first locate this spot approxi mately and then set the unit to pause with the button
(8). In the pause mode the spot can precisely be
selected to 1 frame (F) [=
1
/75 second] by shortly
pressing the button SEARCH or (6). The
spot aimed at is repeated until the button is
pressed or the button CUE (7) is shortly pressed
twice. (With the button CUE a new CUE point is set,
see chapter 5.8.)
5.8 Return to a desired spot
1) While replaying a title, set the unit to pause with
the button (8) when the spot is reached to
return to later. The LEDs above the buttons
and CUE (7) flash.
2) If required, the spot can be located more exactly
with the buttons SEARCH and (6) [see
chapter 5.7]. Then the spot aimed at can continuously be heard.
3) Shortly press the button CUE (7). Thus, a CUE
point is set, i. e. the spot is marked internally. (If
the current spot can be heard, shortly press the
button CUE again for muting.) The LED of the
button CUE now lights up continuously. The LED
of the button continues to flash as a request
to start the replay.
5) Restart the playing with the button . Caution:
do not press the button TRACK , (5), or
+10 (4) now. They delete the CUE point.
5) Now it is possible to return to the CUE point with
the button CUE. Then the player mechanism is
set to pause.
6) Start the replay with the button or press the
button CUE again and keep it pressed. After
releasing the button CUE, the player mechanism
is again set to pause at the CUE point. By keep ing the button CUE pressed again, it is possible
to make a repeat as from the CUE point as many
times as desired.
Note: During the mode of single title replay the
return with the button CUE is only possible within a
title. When reaching the next title, the CUE point is
replaced by the starting point of the next title (see
chapter 5.4.1).
5.9 Changing the speed and the pitch
The speed and thus at the same time the pitch can be
changed by max. ±16 % with the sliding control (13):
1) For changing the speed with the sliding control
(13), the LED next to the button PITCH (11) must
light up. If it does not light up, press the button
PITCH.
2) Change the speed with the sliding control. The
display shows the percentage deviation (g) from
the standard speed.
3) With the button PITCH it is possible to switch at
any time from the speed adjusted with the sliding
control to the standard speed and vice versa.
Note: When changing the speed, it is possible that a
unit connected to the digital output (15) may not correctly read the digital signals. (By changing the
speed, the sampling frequency is changed.) In this
case deactivate the sliding control with the button
PITCH so that the speed cannot be changed.
7
GB
D
A
CH
Page 8

5.10 Takt zwischen 2 Musikstücken angleichen
(Pitch-Bend-Funktion)
Mit den Tasten PITCH BEND (12) lässt sich der Takt
des gerade laufenden Titels an den Takt eines auf
einem anderen Gerät laufenden Musikstückes an passen (synchronisieren). Dadurch wird beim Überblenden von einem zum anderen Musikstück der
Rhythmus beim Tanzen nicht unterbrochen.
1) Zuerst mit dem Schieberegler (13) die Geschwin-
digkeit des laufenden Musikstückes an die Ge schwindigkeit des zweiten Musikstückes angleichen.
2) Mit den Tasten PITCH BEND die Taktschläge bei-
der Musikstücke genau übereinander legen: So lange die Taste + oder
-
gedrückt gehalten wird,
läuft der Titel schneller bzw. langsamer und im
Feld PITCH (g) des Displays blinkt der angezeigte Wert.
6 Pflege des Gerätes
Das Gerät vor Staub, Vibrationen, direktem Sonnenlicht, Feuchtigkeit und Hitze schützen (zuläs siger
Einsatztemperaturbereich 0 – 40 °C). Für die Reinigung nur ein weiches, trockenes Tuch verwenden,
auf keinen Fall Wasser oder Chemikalien.
Hinweis zu Tonaussetzern und Lesefehlern
Zigarettenrauch dringt leicht durch alle Geräte öffnungen und setzt sich auch auf der Optik des
Laser-Abtastsystems ab. Dieser Belag kann zu
Lesefehlern und Tonaus setzern führen. Da sich
Zigarettenrauch nicht immer vermeiden lässt (z. B.
in der Diskothek), muss das Gerät dann in einer
Fachwerkstatt gereinigt werden. Diese Reinigung ist
kostenpflichtig, auch während der Garantiezeit!
7 Technische Daten
Frequenzgang:. . . . . . . . . . . 20 – 20 000Hz
Klirrfaktor: . . . . . . . . . . . . . . < 0,05 %
Kanaltrennung: . . . . . . . . . . > 80 dB
Dynamikumfang: . . . . . . . . . > 90 dB
Störabstand: . . . . . . . . . . . . > 90 dB
Gleichlaufschwankungen: . . nicht messbar,
quarzgenau
Audioausgang
LINE OUT: . . . . . . . . . . . . 2 V
DIGITAL OUT: . . . . . . . . . 0,5 Vss, S/ PDIF
Stromversorgung: . . . . . . . . 230 V~/50 Hz
Leistungsaufnahme: . . . . . . 15 VA
Einsatztemperatur:. . . . . . . . 0 – 40 °C
Abmessungen (B
× H × T): . 215 × 90 × 300 mm
Gewicht:. . . . . . . . . . . . . . . . 2,2 kg
Änderungen vorbehalten.
5.10 Matching the beat between
2 music pieces (Pitch Bend function)
With the buttons PITCH BEND (12) it is possible to
match (synchronize) the beat of a title to that of a
title played on another unit. Thus, when fading from
one music piece to the other, the rhythm will not be
interrupted while dancing.
1) First match the speed of the playing music piece
to the speed of the second music piece with the
sliding control (13).
2) Synchronize the beats of both music pieces with
the buttons PITCH BEND: as long as the button +
or – is kept pressed, the title is played faster or
slower and the indicated value flashes in the field
PITCH (g) of the display.
6 Maintenance of the Unit
Protect the unit from dust, vibrations, direct sunlight,
humidity, and heat (admissible ambient temperature
range 0 – 40 °C). For cleaning only use a dry, soft
cloth, never use water or chemicals.
Notes concerning sound interruptions
and reading errors
Cigarette smoke easily penetrates through all open ings of the unit and settles on the optics of the laser
sampling system. This deposit may cause reading
errors and sound interruptions. As cigarette smoke
cannot always be prevented (e. g. in discothèques),
the unit must then be cleaned by skilled personnel.
There is a charge on this cleaning, even during the
warranty period!
7 Specifications
Frequency range:. . . . . . . . . 20 – 20 000Hz
THD: . . . . . . . . . . . . . . . . . . < 0.05 %
Channel separation:. . . . . . . > 80 dB
Dynamic range: . . . . . . . . . . > 90 dB
S/ N ratio: . . . . . . . . . . . . . . . > 90 dB
Wow and flutter:. . . . . . . . . . not measurable,
quartz precision
Audio output
LINE OUT: . . . . . . . . . . . . 2 V
DIGITAL OUT: . . . . . . . . . 0.5 Vpp, S/ PDIF
Power supply: . . . . . . . . . . . 230 V~/50 Hz
Power consumption: . . . . . . 15 VA
Ambient temperature: . . . . . 0 – 40°C
Dimensions (W
× H × D): . . . 215 × 90 × 300 mm
Weight:. . . . . . . . . . . . . . . . . 2.2 kg
Subject to technical modification.
8
GB
D
A
CH
All rights reserved by MONACOR®INTERNATIONAL GmbH & Co. KG. No part of this instruction manual
may be reproduced in any form or by any means for any commercial use.
Diese Bedienungsanleitung ist urheberrechtlich für MONACOR
®
INTERNATIONAL GmbH & Co. KG
geschützt. Eine Reproduktion für eigene kommerzielle Zwecke – auch auszugsweise – ist untersagt.
Page 9

9
Page 10

Ouvrez le présent livret page 3 de manière à
visualiser les éléments et branchements.
Table des matières
1 Eléments et branchements . . . . . . . . . . . 10
1.1 Face supérieure . . . . . . . . . . . . . . . . . . . . . 10
1.2 Face arrière . . . . . . . . . . . . . . . . . . . . . . . . . 11
2 Conseils dʼutilisation et de sécurité . . . . 11
3 Possibilités dʼutilisation . . . . . . . . . . . . . . 11
4 Positionnement de lʼappareil
et branchements . . . . . . . . . . . . . . . . . . . . 11
5 Utilisation . . . . . . . . . . . . . . . . . . . . . . . . . 12
5.1 Lecture des CDs . . . . . . . . . . . . . . . . . . . . . 12
5.2 Affichage de la durée et fonction OUTRO . 12
5.2.1 Bargraphe . . . . . . . . . . . . . . . . . . . . . . . . 12
5.3 Mode repos . . . . . . . . . . . . . . . . . . . . . . . . . 12
5.4 Sélection du mode de fonctionnement . . . . 13
5.4.1 Lecture titre par titre . . . . . . . . . . . . . . . . 13
5.4.2 Lecture de tous les titres . . . . . . . . . . . . . 13
5.5 Lecture des premières notes dʼun titre . . . . 13
5.6 Avance et retour rapides . . . . . . . . . . . . . . . 13
5.7 Positionnement précis à un endroit donné . 13
5.8 Retour à un endroit préalablement
déterminé . . . . . . . . . . . . . . . . . . . . . . . . . . 13
5.9 Modification de la vitesse et
de la hauteur tonale . . . . . . . . . . . . . . . . . . 13
5.10 Adaptation du rythme entre deux morceaux
de musique (Pitch Bend) . . . . . . . . . . . . . . 14
6 Entretien . . . . . . . . . . . . . . . . . . . . . . . . . . 14
7 Caractéristiques techniques . . . . . . . . . . 14
1 Eléments et branchements
1.1 Face supérieure
1 Affichage multifonctions (voir détails schéma 2)
a nombre de titres sur le CD
b affichage “CONTINUE” :
indique le mode de fonctionnement lecture de
tous les titres, voir également position 3
c affichage “AUTO CUE SINGLE” :
indique le mode de fonctionnement lecture
titre par titre, voir également position 3
d affichage “OUTRO” :
indique la fonction OUTRO,
voir position 10 touche TIME/ OUTRO
e affichage “REMAIN” : indique la durée res-
tante dʼun titre ou dʼun CD, voir position 10,
touche TIME/ OUTRO
f bargraphe : indique par sa longueur la durée
dʼun titre (f)
g affichage de la déviation en pourcentage,
réglée avec le potentiomètre (13), de la
vitesse standard.
h symbole du mode lecture
i symbole du mode Pause
j numéro du titre sélectionné
k affichage “MP3” : indique le mode MP3
l affichage de la durée : voir également position
10 touche TIME/ OUTRO
2 Touche STOP pour mettre le lecteur sur Stop
3 Touche AUTO CUE SGL/CTN pour commuter
entre :
la lecture titre par titre (réglage de base) :
après chaque titre lu, lʼappareil commute sur
Pause, affichage “AUTO CUE SINGLE” (c)
la lecture de tous les titres :
lecture continue de tous les titres, affichage
“CONTINUE” (b).
4 Touche +10 pour la sélection de titres :
à chaque pression de la touche, le lecteur
avance de 10 titres.
5 Touches TRACK pour la sélection de titres :
touche pour sélectionner le prochain titre
touche pour revenir au début du titre en
cours. Par plusieurs pressions sur la touche
, vous reculez toujours dʼun titre.
Pour sauter plusieurs titres, maintenez la touche
correspondante enfoncée.
6 Touches SEARCH pour lʼavance et retour rapi-
des, en mode Pause, pour aller à un endroit
donné avec une précision de 1 frame.
Pour lʼavance rapide, maintenez la touche
enfoncée, pour le retour rapide, maintenez la
touche enfoncée.
7 Touche CUE pour lire les premières notes dʼun
titre et pour le retour à un endroit préalablement
déterminé (voir chapitre 5.5/ 5.8).
8 Touche PLAY/PAUSE pour commuter entre
lecture et Pause
9 Couvercle du compartiment CD :
Pour lʼouvrir, appuyez sur la touche (14),
Pour le fermer, appuyez manuellement sur le
couvercle
10 Touche TIME/OUTRO pour commuter lʼaffi-
chage de la durée (l) et pour activer la fonction
OUTRO
réglage de base après la mise sous tension :
affichage de la durée restante du titre en cours
1. pression :
affichage de la durée déjà écoulée du titre en
cours
prochaine pression :
affichage de la durée restante du titre en cours
et activation de la fonction OUTRO pour lire
respectivement les 30 dernières secondes
des titres suivants (pas en mode MP3) ; la
fonction OUTRO nʼest active quʼaprès le titre
suivant, si besoin, enfoncez la touche (5).
prochaine pression :
affichage de la durée restante de tout le CD
(pas en mode MP3)
Vi preghiamo di aprire completamente la pagina 3.
Così vedrete sempre gli elementi di comando e i
collegamenti descritti.
Indice
1 Elementi di comando e collegamenti . . . 10
1.1 Lato superiore . . . . . . . . . . . . . . . . . . . . . . . 10
1.2 Lato posteriore . . . . . . . . . . . . . . . . . . . . . . 11
2 Avvertenze di sicurezza . . . . . . . . . . . . . . 11
3 Possibilità dʼimpiego . . . . . . . . . . . . . . . . 11
4 Collocamento e collegamenti . . . . . . . . . 11
5 Funzionamento . . . . . . . . . . . . . . . . . . . . . 12
5.1 Riprodurre un CD . . . . . . . . . . . . . . . . . . . . 12
5.2 Visualizzazione della durata e funzione
OUTRO . . . . . . . . . . . . . . . . . . . . . . . . . . . . 12
5.2.1 Diagramma a barre . . . . . . . . . . . . . . . . . 12
5.3 Modalità sleep . . . . . . . . . . . . . . . . . . . . . . 12
5.4 Selezionare il modo di funzionamento . . . . 12
5.4.1 Riproduzione di un singolo titolo . . . . . . . 12
5.4.2 Riproduzione di tutti i titoli . . . . . . . . . . . . 13
5.5 Riproduzione dellʼinizio di un titolo . . . . . . . 13
5.6 Avanzamento /ritorno veloce . . . . . . . . . . . 13
5.7 Posizionarsi con esattezza
su un determinato punto . . . . . . . . . . . . . . . 13
5.8 Ritorno ad un punto determinato . . . . . . . . 13
5.9 Variare la velocità e lʼaltezza del suono . . . 13
5.10 Adattamento del ritmo fra due brani
(funzione Pitch-bend) . . . . . . . . . . . . . . . . . 13
6 Manutenzione . . . . . . . . . . . . . . . . . . . . . . 14
7 Dati tecnici . . . . . . . . . . . . . . . . . . . . . . . . 14
1 Elementi di comando e collegamenti
1.1 Lato superiore
1 Display multifunzionale (per particolari vedi fig. 2)
a numero dei titoli sul CD
b indicazione “CONTINUE”:
indica la modalità di riproduzione di tutti i titoli,
vedi anche punto 3
c indicazione “AUTO CUE SINGLE”:
indica la modalità di riproduzione di un singolo
titolo, vedi anche punto 3
d indicazione “OUTRO”:
segnale la funzione OUTRO, vedi punto 10
tasto TIME/ OUTRO
e indicazione “REMAIN”: segnala che è indicato
il tempo residuo di un titolo o di un CD, vedi
punto 10 tasto TIME/ OUTRO
f diagramma a barre: con la sua lunghezza
offre una visualizzazione grafica del tempo (l)
g indicazione della deviazione percentuale dalla
velocità standard, impostata con il cursore (13)
h simbolo della modalità di riproduzione
i simbolo per la pausa
j numero del titolo scelto
k indicazione “MP3”; segnala il funzionamento
MP3
l indicazione del tempo; vedi anche punto 10
tasto TIME/ OUTRO
2 Tasto STOP per mettere il lettore su stop
3 Tasto AUTO CUE SGL /CTN per passare fra
riproduzione di singoli titoli (impostazione base):
dopo ogni titolo riprodotto, il lettore va in
pausa, indicazione “AUTO CUE SINGLE” (c)
e riproduzione di tutti i titoli:
riproduzione continua di tutti i titoli, indicazione “CONTINUE” (b)
4 Tasto +10 per selezionare un titolo:
con ogni pressione del tasto si saltano 10 titoli in
avanti
5 Tasti TRACK per selezionare un titolo:
tasto per selezionare il titolo successivo
tasto per tornare allʼinizio del titolo corrente.
Con ogni ulteriore pressione del tasto si
salta indietro di un altro titolo.
Per saltare più titoli, tenere premuto il relativo
tasto.
6 Tasti SEARCH per lʼavanzamento e ritorno
veloce; nella modalità di pausa per posizionarsi su
un determinato punto con lʼesattezza di 1 frame
Per lʼavanzamento tener premuto il tasto ,
per il ritorno il tasto
7 Tasto CUE per riprodurre lʼinizio di un titolo e per
ritornare su un punto marcato precedentemente
(vedi risp. capp. 5.5 e 5.8)
8 Tasto PLAY/PAUSE per passare fra riprodu-
zione e pausa
9 Coperchio del cassetto CD;
per aprire premere il tasto (14),
per chiudere, abbassare il coperchio con la
mano
10 Tasto TIME/OUTRO per commutare lʼindica-
zione del tempo (l) e per attivare la funzione
OUTRO
Impostazione base dopo lʼaccensione:
indicazione del tempo restante del titolo corrente
prima pressione del tasto:
indicazione del tempo già passato del titolo
corrente
altra pressione del tasto:
indicazione del tempo restante del titolo corrente e attivazione della funzione OUTRO per
riprodurre gli ultimi 30 secondi dei titoli successivi (non è possibile con funzionamento MP3);
la funzione OUTRO è attiva solo dopo il titolo
successivo; eventualmente premere il tasto
(5)
10
I
F
B
CH
Page 11
prochaine réglage de base :
affichage de la durée restante de titre
11 Touche PITCH pour activer et désactiver le
potentiomètre (13) pour la vitesse
12 Touches PITCH BEND pour adapter le rythme
du titre en cours de lecture au rythme dʼun morceau de musique lu sur un autre lecteur :
tant quʼune des touches est activée, le titre va
plus vite ou moins vite que la vitesse sélectionnée et dans le champ PITCH (g) de lʼaffichage, la
valeur affichée clignote.
13 Potentiomètre à glissières pour modifier la
vitesse et la hauteur tonale ; le réglage du potentiomètre nʼest efficace que si la touche PITCH
(11) est enfoncée.
14 Touche OPEN pour ouvrir le couvercle du
compartiment CD (9)
1.2 Face arrière
15 Prise RCA femelle DIGITAL OUT pour la sortie
audio digitale
16 Prises RCA femelles LINE OUT pour la sortie
audio analogique (niveau ligne)
17 Interrupteur POWER marche /arrêt
18 Cordon secteur à relier à une prise secteur
230 V~/ 50 Hz.
2 Conseils dʼutilisation et de sécurité
Cet appareil répond à toutes les directives nécessaires de lʼUnion Européenne et porte donc le symbole .
Respectez scrupuleusement les points suivants :
G
Lʼappareil nʼest conçu que pour une utilisation en
intérieur. Protégez-le de tout type de projections
dʼeau, des éclaboussures, dʼune humidité élevée
de lʼair et de la chaleur (plage de température de
fonctionnement autorisée : 0 – 40 °C).
G
En aucun cas, vous ne devez poser dʼobjet contenant du liquide ou un verre sur lʼappareil.
G
Ne le faites jamais fonctionner et débranchez-le
immédiatement lorsque :
1. des dommages visibles sur lʼappareil et sur le
cordon secteur apparaissent.
2. après une chute ou accident similaire..., vous
avez un doute au sujet de lʼétat de lʼappareil.
3. des dysfonctionnements apparaissent.
Dans tous les cas, les dommages doivent être
réparés par un technicien spécialisé.
G
Tout cordon secteur endommagé ne doit être remplacé que par un technicien habilité.
G
Ne débranchez jamais lʼappareil en tirant sur le
cordon secteur, tenez-le toujours par la fiche.
G
Nous déclinons toute responsabilité en cas de
dommages matériels ou corporels résultants si
lʼappareil est utilisé dans un but autre que celui
pour lequel il a été conçu, sʼil nʼest pas correctement branché, utilisé ou nʼest pas réparé par une
personne habilitée, en outre, la garantie deviendrait caduque.
3 Possibilités dʼutilisation
Le lecteur CD/ MP3, CD-50DJ, est spécialement
conçu pour une utilisation DJ professionnelle. De
nombreuses possibilités de fonctionnement sont
précisément définies dans ce but, par exemple la
lecture titre par titre, la vitesse variable et le retour à
un endroit donné sur le CD (point CUE).
On peut lire des CDs audio, des CD-R audio
(gravés) et des CDs avec titres au format MP3. Les
CD-RW réinscriptibles ne peuvent pas être lus.
Le lecteur CD est doté dʼune mémoire anti chocs
qui peut compenser les dysfonctionnements causés
par des chocs ou vibrations lors de la lecture du CD
jusquʼà 10 secondes. Cependant, la mémoire antichocs ne permet pas de compenser des interrup tions continues.
4 Positionnement de lʼappareil et
branchements
Le lecteur CD-50DJ est prévu pour être directement
installé sur une table et doit être placé sur une surface plane et horizontale. Avant dʼeffectuer ou de
modifier les branchements, assurez-vous que le
lecteur CD/ MP3 et lʼappareil à relier sont éteints.
1) Si une entrée digitale est prévue sur la table de
mixage ou lʼamplificateur, reliez-la à la prise RCA
jaune DIGITAL OUT (15).*
Pour les appareils sans entrée digitale, reliez
la sortie stéréo LINE OUT (16) – canal gauche
prise blanche et canal droit prise rouge – via un
cordon RCA à lʼentrée lecteur CD sur la table de
mixage ou sur lʼamplificateur.
2) Reliez enfin la prise du cordon secteur (18) à une
prise secteur 230 V~/ 50 Hz.
* Lorsquʼon modifie la vitesse de lecture, lʼappareil relié à la
prise DIGITAL OUT, peut éventuellement ne pas lire correctement les signaux digitaux, voir chapitre 5.9.
AVERTISSEMENT Cet appareil est alimenté
par une tension dangereuse
230 V~. Ne touchez jamais
lʼintérieur de lʼappareil car, en
cas de mauvaise manipulation, vous pourriez subir une
décharge électrique.
Lorsque lʼappareil est définitivement retiré
du service, vous devez le déposer dans
une usine de recyclage adaptée pour contribuer à son élimination non polluante.
altra pressione del tasto:
indicazione del tempo restante dellʼintero CD
(non è possibile con funzionamento MP3)
altra pressione del tasto:
impostazione base (indicazione del tempo
restante del titolo corrente)
11 Tasto PITCH per attivare e disattivare il cursore
(13) della velocità
12 Tasti PITCH BEND per adattare il ritmo del titolo
corrente a quello di un brano riprodotto con un
altro apparecchio: mentre si aziona uno dei tasti,
il titolo scorre più velocemente o più lentamente
rispetto alla velocità scelta, e nel campo PITCH
(g) del display lampeggia il valore indicato.
13 Cursore per modificare la velocità e quindi il
suono; tale regolazione ha effetto solo se il tasto
PITCH (11) è abbassato
14 Tasto OPEN per aprire il coperchio del cas-
setto CD (9)
1.2 Lato posteriore
15 Presa RCA DIGITAL OUT per lʼuscita audio digi-
tale
16 Prese RCA LINE OUT per lʼuscita audio analo-
gica (livello Line)
17 Interruttore on /off POWER
18 Cavo rete da collegare ad una presa di rete
(230 V~/ 50 Hz)
2 Avvertenze di sicurezza
Questʼapparecchio è conforme a tutte le direttive
richieste dellʼUE e pertanto porta la sigla .
Si devono osservare assolutamente anche i se guenti punti:
G
Lʼapparecchio è previsto solo per lʼuso allʼinterno di
locali. Proteggerlo dallʼacqua gocciolante e dagli
spruzzi dʼacqua, da alta umidità dellʼaria e dal calore
(temperatura dʼimpiego ammessa fra 0 e 40 °C).
G
Non posare contenitore pieni di liquidi, p. es.
bicchieri, sullʼapparecchio.
G
Non mettere in funzione lʼapparecchio e staccare
subito la spina rete se:
1. lʼapparecchio o il cavo rete presentano dei
danni visibili;
2. dopo una caduta o dopo eventi simili sussiste il
sospetto di un difetto;
3. lʼapparecchio non funziona correttamente.
Per la riparazione rivolgersi sempre ad una officina competente.
G
Il cavo rete, se danneggiato, può essere sostituito
solo da un laboratorio specializzato.
G
Staccare il cavo rete afferrando la spina, senza
tirare il cavo.
G
Nel caso di uso improprio, di collegamenti sbagliati, di impiego scorretto o di riparazione non a
regola dʼarte, non si assume nessuna responsabilità per eventuali danni consequenziali a persone
o a cose e non si assume nessuna garanzia per
lʼapparecchio.
3 Possibilità dʼimpiego
Il lettore CD/ MP3 CD-50DJ è stato realizzato spe cialmente per uso DJ professionale. Infatti, molte
funzioni sono previste appositamente per quellʼimpiego, p. es. la riproduzione di un singolo titolo, la
velocità variabile e il ritorno ad un punto determinato
precedentemente (punto CUE).
Con il lettore CD si possono riprodurre CD audio
e CD masterizzati in proprio (Audio CD-R) nonché
CD con titoli nel formato MP3. Non sono riproducibili
invece i CD riscrivibili (CD-RW).
Il lettore CD è equipaggiato con una memoria
anti-shock che è in grado di compensare i disturbi
durante la scansione del CD in seguito a colpi o
vibrazioni per una durata fino a 10 secondi. Tuttavia,
il sistema anti-shock non può compensare disturbi a
lunga durata.
4 Collocamento e collegamenti
Il lettore CD-50DJ è previsto come unità da collocare liberamente e deve essere posizionato su un
piano perfettamente orizzontale. Prima del collegamento o di eventuali modifiche occorre spegnere il
lettore CD/ MP3 e lʼapparecchio da collegare.
1) Se il mixer o amplificatore è equipaggiato con un
ingresso digitale, collegarlo con la presa RCA
gialla DIGITAL OUT (15)*.
Nel caso di apparecchi senza ingressi digitali,
collegare lʼuscita stereo LINE OUT (16) – canale
sinistro presa bianca e destro presa rossa – con
lʼingresso per lettori CD del mixer o amplificatore
servendosi di un cavo con connettori RCA.
2) Alla fine inserire la spina del cavo rete (18) in una
presa (230 V~/ 50 Hz).
* Modificando la velocità di riproduzione, lʼapparecchio colle-
gato con la presa DIGITAL OUT potrebbe eventualmente
non leggere bene i segnali digitali, vedi capitolo 5.9.
Se si desidera eliminare lʼapparecchio definitivamente, consegnarlo per lo smaltimento ad unʼistituzione locale per il riciclaggio.
AVVERTIMENTO Questo apparecchio funziona
con pericolosa tensione di rete
(230 V~). Non intervenire mai al
suo interno; la manipolazione
scorretta può provocare delle
scariche pericolose.
11
I
F
B
CH
Page 12
5 Utilisation
5.1 Lecture des CDs
1) Allumez le lecteur CD/MP3 avec lʼinterrupteur
Marche/Arrêt POWER (17) sur la face arrière.
Lʼaffichage (1) indique lʼun après lʼautre :
“read” : lecture
“no disc” : pas de CD inséré
2) Ouvrez le couvercle (9) du compartiment CD
avec la touche (14) ; sur lʼaffichage “OPEN”
(ouvert) apparaît.
3) Placez un CD, inscription vers le haut dans le
compartiment et refermez-le avec la main. Si le
CD est correctement inséré, lʼaffichage indique,
après quelques instants, le nombre total de titres
(a) et la durée totale (l) du CD puis la durée (l) du
premier titre. Pour des CDs au format MP3, lʼaffichage indique en plus “MP3” (k).
4) Pour démarrer avec le premier titre, enfoncez la
touche (8). Tant que le CD est lu, lʼaffichage
indique le symbole (h).
Si la lecture doit démarrer avec un autre titre,
enfoncez tout dʼabord et si besoin la touche +10
(4) puis la touche ou (5) autant de fois que
nécessaire jusquʼà ce que le numéro du titre
voulu apparaisse sur lʼaffichage. Démarrez en suite le titre avec la touche .
Remarque : sur des CDs MP3 avec plusieurs
dossiers, lʼappareil numérote tous les titres sur le
CD dans lʼordre alphabétique des dossiers. On
peut, grâce à cette numérotation, sélectionner
précisément les titres.
5) A tout moment, la lecture peut être interrompue
avec la touche ; sur lʼaffichage, le symbole
Pause (i) apparaît. Les LEDs au-dessus des
touches et CUE (7) clignotent. Pour poursuivre la lecture, enfoncez une nouvelle fois la
touche .
6) Une fois allumé, lʼappareil est toujours sur le
mode Lecture titre par titre ; lʼaffichage indique
“AUTO CUE SINGLE” (c). Si un titre est lu jusquʼà la fin, lʼappareil passe sur Pause au début
du titre suivant. Si cependant, un titre doit être lu
en continu après le précédent, passez sur le
mode Lecture de tous les titres avec la touche
AUTO CUE SGL/ CTN (3) [voir également chapitre 5.4.2].
7) Pendant la lecture ou en mode Pause, il est possible de sélectionner un autre titre avec la touche
+10 (4) et avec les touches et (5) :
avec la touche +10, le lecteur avance de 10 titres.
avec la touche , on avance toujours dʼun titre.
avec la touche , vous revenez au début du titre
en cours de lecture. Par plusieurs pressions sur
la touche , vous reculez toujours dʼun titre.
Pour sauter plusieurs titres, maintenez la touche
ou enfoncée.
8) Si la lecture du CD doit se terminer plus tôt, mettez le lecteur sur Stop avec la touche STOP (2).
Lʼaffichage de la durée (l) et le bargraphe (f) disparaissent. Dans le champ TRACK (j), le nombre
de titres sur le CD sʼaffiche.
9) Avant dʼéteindre lʼappareil, fermez toujours le
couvercle du compartiment CD pour protéger les
systèmes laser des salissures. Eteignez lʼappareil avec lʼinterrupteur POWER (17).
5.2 Affichage de la durée
et fonction OUTRO
Dans le réglage de base, une fois lʼappareil allumé,
lʼaffichage indique pendant la lecture dʼun CD et en
mode Pause, le numéro du titre (j) et la durée restante (l) du titre en cours. Sur lʼaffichage, “REMAIN”
(e) signale la durée restante. Elle est affichée en
minutes (M), secondes (S), les secondes étant divisées en 75 “Frames” (F) [1 frame = 1/75 seconde].
Par plusieurs pressions sur la touche TIME/
OUTRO (10), les informations de temps suivantes
sont affichées et la fonction OUTRO peut être
sélectionnée :
1. pression :
la durée déjà lue du titre en cours ; lʼaffichage
“REMAIN” sʼéteint
prochaine pression :
la fonction OUTRO pour lire respectivement les
30 dernières secondes des titres suivants est
activée (pas en mode MP3) ; lʼaffichage indique
la durée restante du titre en cours et indique
“OUTRO” (d) et “REMAIN” (e) ; la fonction nʼest
active quʼà partir du prochain titre ; si besoin,
enfoncez la touche (5).
prochaine pression :
la durée restante de tout le CD (pas en mode
MP3) ; la fonction OUTRO est à nouveau dés activée
prochaine pression :
réglage de base (affichage de la durée restante
du titre en cours)
5.2.1 Bargraphe
En plus de lʼaffichage numérique de la durée (l), le
bargraphe (f) indique par sa longueur, la durée. Il clignote dans toute sa longueur pour signaler les 30
dernières secondes dʼun titre, les 15 dernières
secondes sont signalées par un clignotement plus
rapide.
5.3 Mode repos
Si le lecteur CD est sur Pause plus de 30 minutes,
lʼappareil commute automatiquement en mode
Repos. Le système laser est éteint et ainsi protégé.
Lʼaffichage indique “SLEEP” (sommeil). En activant
une touche au choix, il revient en mode normal de
fonctionnement.
5 Funzionamento
5.1 Riprodurre un CD
1) Accendere il lettore CD/MP3 con lʼinterruttore
on/ off POWER (17) sul retro. Sul display (1) ap paiono una dopo lʼaltra le seguenti scritte:
“read” (leggere)
“no disc” (nessun CD) – se non è inserito nessun
CD.
2) Aprire il coperchio (9) del cassetto del CD con il
tasto (14). Il display indica “OPEN” (aperto).
3) Inserire il CD con la scritta rivolta in alto e richiudere il cassetto con la mano. Se il CD è inserito
correttamente, dopo breve tempo il display indica
il numero globale dei titoli (a) nonché la durata
complessiva del CD (l). Successivamente viene
indicata la durata del primo titolo (l). Nel caso di
CD con titoli nel formato MP3, il display indica in
più “MP3” (k).
4) La riproduzione del primo titolo viene avviata con
il tasto (8). Durante la riproduzione del CD,
sul display è visibile il simbolo (h).
Se si desidera iniziare con un altro titolo, premere dapprima, se necessario, il tasto +10 (4) e
quindi uno dei tasti o (5) finché il numero
del titolo desiderato appare sul display. Quindi
avviare la riproduzione con il tasto .
N.B.: Nel caso di CD nel formato MP3 con più
cartelle, lʼapparecchio numera tutti i titoli sul CD
in ordine alfabetico delle cartelle. Secondo tale
numerazione è possibile scegliere con esattezza
i titoli.
5) Con il tasto , si può in qualsiasi momento
interrompere la riproduzione. Sul display si vede
il simbolo di pausa (i), e i LED sopra i tasti
e CUE (7) lampeggiano. Per riprendere la riproduzione premere di nuovo il tasto .
6) Dopo lʼaccensione, lʼapparecchio è sempre in funzione di riproduzione di un singolo titolo, e il display
indica “AUTO CUE SINGLE” (c). Al termine del
titolo, lʼapparecchio si ferma in pausa allʼinizio del
titolo successivo. Per riprodurre automaticamente
il titolo successivo, attivare la riproduzione dellʼintero CD mediante il tasto AUTO CUE SGL/ CTN
(3) [vedi anche cap. 5.4.2].
7) Durante la riproduzione o durante la pausa, con i
tasti +10 (4) e o (5) si può selezionare un
altro titolo:
Con il tasto +10 si salta avanti di 10 titoli.
Con il tasto si salta avanti di un titolo.
Con il tasto si salta allʼinizio del brano attuale.
Con ogni ulteriore pressione del tasto si torna
indietro di un titolo. Per saltare diversi titoli, i tasti
o possono rimanere premuti.
8) Per terminare la riproduzione, mettere il lettore
su stop per mezzo del tasto STOP (2). Lʼindicazione del tempo (l) e il diagramma a barre (f) si
spengono. Nel campo TRACK (j) si legge il
numero dei titoli sul CD
9) Prima di spegnere il lettore, chiudere sempre il
coperchio del cassetto per proteggere il vano
dallo sporco. Quindi spegnere lʼapparecchio con
lʼinterruttore POWER (17).
5.2 Visualizzazione della durata
e funzione OUTRO
Nellʼimpostazione base, dopo lʼaccensione, durante
la riproduzione di un CD e con la pausa attivata, il
display indica il numero del titolo (j) e il tempo re stante (l) del titolo attuale. Il tempo restante viene
segnalato sul display con “REMAIN” (e). Lʼindicazione del tempo è in minuti (M) e secondi (S), questi
ultimi suddivisi ancora in 75 frames (F) [1 frame =
1
/75 sec.].
Con la pressione ripetuta del tasto TIME/ OUTRO
(10) è possibile indicare diverse informazioni sul
tempo e attivare la funzione OUTRO:
prima pressione del tasto:
il tempo già passato del titolo corrente (lʼindicazione “REMAIN” si spegne)
altra pressione del tasto
si attiva la funzione OUTRO per riprodurre gli
ultimi 30 secondi dei titoli successivi (non è possibile con funzionamento MP3); il display indica il
tempo restante del titolo attuale e segnala
“OUTRO” (d) e “REMAIN” (e); la funzione è attiva
solo dopo il titolo successivo; eventualmente premere il tasto (5).
altra pressione del tasto
il tempo restante dellʼintero CD (non per MP3); la
funzione OUTRO è di nuovo disattivata
altra pressione del tasto
impostazione base (indicazione del tempo re stante del titolo corrente)
5.2.1 Diagramma a barre
Oltre allʼindicazione numerica della durata (l), il diagramma a barre (f) offre, con la sua lunghezza, una
visualizzazione grafica del tempo. Gli ultimi 30
secondi di un titolo sono segnalati con il lampeggìo
del diagramma a barre in tutta la sua lunghezza, con
aumento della frequenza negli ultimi 15 secondi.
5.3 Modalità sleep
Se il lettore rimane in pausa per oltre 30 minuti, lʼapparecchio si mette automaticamente nella modalità
sleep. Il sistema di scansione laser è disattivato e
pertanto non si consuma. Il display indica “SLEEP”
(sonno). Azionando un qualsiasi tasto si ritorna nella
modalità normale di funzionamento.
5.4 Selezionare il modo di funzionamento
5.4.1 Riproduzione di un singolo titolo
Dopo lʼaccensione è attivata sempre la riproduzione
di singoli titoli, prevista specialmente per lʼuso in di scoteca.
12
I
F
B
CH
Page 13
5.4 Sélection du mode de fonctionnement
5.4.1 Lecture titre par titre
Une fois le lecteur allumé, le mode lecture titre par
titre est toujours activé ; ce mode est spécialement
conçu pour une utilisation par un DJ.
1. Lʼaffichage indique “AUTO CUE SINGLE” (c).
2. Après la lecture des premières notes du CD ou
après la sélection dʼun titre avec les touches
TRACK (5), le lecteur CD est exactement à lʼendroit où la musique commence (pas à lʼindex de
temps 0:00:00).
Cet endroit est automatiquement mémorisé
comme point de départ. Après le démarrage du
titre, il est possible de revenir avec la touche
CUE (7) à ce point de départ.
3. Après la lecture dʼun titre, lʼappareil se met à nouveau sur Pause, exactement à lʼendroit où la
musique du titre suivant commence. Cet endroit
est mémorisé alors comme nouveau point de
départ.
5.4.2 Lecture de tous les titres
Si un titre doit être lu à la suite du précédent, commutez le lecteur avec la touche AUTO CUE SGL/
CTN (3) sur le mode de lecture de tous les titres.
Lʼaffichage passe de “AUTO CUE SINGLE” (c) sur
“CONTINUE” (b). Pour revenir au mode de lecture
titre par titre, enfoncez une nouvelle fois la touche
AUTO CUE SGL/ CTN.
5.5 Lecture des premières notes dʼun titre
1) Avec la touche (8), commuter sur Pause et
sélectionnez le titre voulu [avec la touche ou
(5) et si besoin, la touche +10 (4)].
2) Si sur lʼaffichage, la durée (l) du titre sʼaffiche,
maintenez la touche CUE (7) enfoncée. Le titre
est lu tant que la touche est enfoncée.
3) Lorsque la touche CUE est relâchée, lʼappareil
revient au début du titre et passe sur Pause ;
pour démarrer le titre, enfoncez la touche ; il
est possible de revenir au début du titre avec la
touche CUE.
5.6 Avance et retour rapides
Pendant la lecture, vous pouvez faire une avance/
retour rapide sur le CD avec les touches SEARCH
et (6) : pour une avance rapide, maintenez
la touche enfoncée, pour un retour rapide, la
touche .
5.7 Positionnement précis
à un endroit donné
Si la lecture doit démarrer au milieu dʼun titre à partir dʼun endroit donné, sélectionnez cet emplacement tout dʼabord de manière approximative puis
commutez sur Pause avec la touche (8). En
mode Pause, on peut aller à lʼendroit avec une précision de 1 frame (F) [1 frame =
1
/75 seconde] en
appuyant brièvement sur la touche SEARCH ou
(6). Lʼendroit ciblé est répété jusquʼà ce que la
touche soit enfoncée ou que la touche CUE (7)
soit brièvement activée deux fois. (Avec la touche
CUE, on peut positionner un nouveau point CUE,
voir chapitre 5.8).
5.8 Retour à un endroit préalablement
déterminé
1) Pendant la lecture dʼun titre, passez sur Pause
avec la touche (8) lorsque lʼendroit où il faudra revenir plus tard est atteint. Les LEDs audessus des touches et CUE (7) clignotent.
2) Si besoin, allez à lʼendroit plus exactement avec
les touches SEARCH et (6) [voir chapitre 5.7]. Lʼendroit sélectionné peut être écouté en
continu.
3) Enfoncez la touche CUE (7) brièvement. Un point
CUE est déterminé, cʼest-à-dire marqué en
interne (si lʼendroit en cours est audible, enfoncez une nouvelle fois brièvement la touche CUE
pour couper le son). La LED de la touche CUE
brille maintenant en continu. La LED de la touche
clignote pour inciter à démarrer la lecture.
4) Démarrez la lecture avec la touche . Pré caution : nʼenfoncez pas maintenant la touche
TRACK , (5) ou +10 (4), vous effaceriez le
point CUE.
5) Avec la touche CUE, vous pouvez maintenant
revenir au point CUE : le lecteur est alors sur
Pause.
6) Avec la touche , démarrez la lecture ou
enfoncez une nouvelle fois la touche CUE et
maintenez-la enfoncée. Lorsque vous la relâchez, le lecteur est à nouveau au point CUE sur
Pause. Si vous maintenez à nouveau la touche
CUE enfoncée, il est possible dʼeffectuer une
répétition aussi souvent que souhaité à partir du
point CUE.
Conseil : lors de la lecture titre par titre, le retour
avec la touche CUE ne sʼeffectue quʼau sein dʼun
titre. Lorsque le titre suivant est atteint, le point CUE
est remplacé par le point de départ du titre suivant
(voir chapitre 5.4.1).
5.9 Modification de la vitesse
et de la hauteur tonale
La vitesse et donc simultanément la hauteur tonale
peuvent être modifiés avec le potentiomètre à glissière (13) de ±16 %.
1) Pour pouvoir modifier la vitesse avec le potentiomètre (13), la LED à côté de la touche PITCH
(11) doit briller. Si elle ne brille pas, enfoncez la
touche PITCH.
2) Modifiez la vitesse avec le potentiomètre ; lʼaffichage indique la déviation en pourcentage (g) de
la vitesse standard.
1. Il display segna “AUTO CUE SINGLE” (c).
2. Dopo lʼinserimento del CD o dopo la selezione di
un titolo con i tasti TRACK (5), il lettore si trova
esattamente sul punto dove inizia la musica (non
sullʼindice di tempo 0:00:00).
Questo punto viene memorizzato automaticamente come punto di partenza. Dopo lʼavvio del
titolo, con il tasto CUE (7) si può ritornare su tale
punto di partenza.
3. Dopo la riproduzione di un titolo, il lettore si mette
in pausa esattamente nel punto dove inizia la
musica del titolo successivo. Questo punto sarà
poi memorizzato come nuovo punto di partenza
5.4.2 Riproduzione di tutti i titoli
Se si desidera riprodurre un titolo dopo lʼaltro senza
interruzione, attivare la riproduzione di tutti i titoli con
il tasto AUTO CUE SGL/CTN (3). Il display passa
da “AUTO CUE SINGLE” (c) a “CONTINUE” (b).
Per ritornare alla riproduzione di un singolo titolo
premere di nuovo il tasto AUTO CUE SGL/CTN.
5.5 Riproduzione dellʼinizio di un titolo
1) Con il tasto (8) attivare la pausa e quindi
selezionare il titolo desiderato [con i tasti o
(5) e, se necessario, con il tasto +10 (4)].
2) Se sul display si vede la durata (l) del titolo, tenere
premuto il tasto CUE (7). Il titolo viene riprodotto
per tutto il tempo in cui si tiene premuto il tasto.
3) Se si libera il tasto CUE, lʼapparecchio torna
allʼinizio del titolo e va in pausa. Per avviare il
titolo, premere il tasto . Con il tasto CUE si
può tornare sempre allʼinizio del titolo.
5.6 Avanzamento/ritorno veloce
Durante la riproduzione, con i tasti SEARCH e
(6) ci si può muovere velocemente in avanti o
indietro: per lʼavanzamento veloce tener premuto il
tasto , per il ritorno veloce il tasto .
5.7 Posizionarsi con esattezza
su un determinato punto
Se la riproduzione deve iniziare, in mezzo ad un
titolo, da un punto determinato, spostarsi in modo
approssimativo su tale punto e quindi con il tasto
(8) attivare la pausa. Nella modalità di pausa,
toccando leggermente i tasti SEARCH o
(6), è possibile posizionarsi con lʼesattezza di 1
frame (1 frame = 1/75 secondo) su tale punto. Il punto
scelto viene ripetuto fino alla pressione del tasto
o fino a due brevi pressioni del tasto CUE (7). (Con
il tasto CUE si fissa un nuovo punto CUE – vedi
capitolo 5.8.)
5.8 Ritorno ad un punto determinato
1) Durante la riproduzione di un titolo, attivare la
pausa con il tasto (8) quando è raggiunto il
punto su cui tornare successivamente. I LED
sopra i tasti e CUE (7) lampeggiano.
2) Se necessario, con i tasti SEARCH e (6)
posizionarsi con maggiore esattezza su questo
punto (vedi cap. 5.7). Il punto scelto viene riprodotto continuamente.
3) Toccare brevemente il tasto CUE (7). Così, si
fissa un punto CUE, ovvero tale punto viene marcato internamente. (Se si sente il punto attuale,
premere ancora brevemente il tasto CUE per attivare la funzione muta.) Il LED del tasto CUE
rimane ora acceso, mentre il LED del tasto
continua a lampeggiare come invito ad avviare la
riproduzione.
4) Avviare la riproduzione con il tasto . Atten-
zione: a questo punto non azionare i tasti TRACK
, (5) o +10 (4) perché verrebbe cancellato
il punto CUE.
5) Con il tasto CUE si può tornare sul punto CUE. Il
lettore CD si mette in pausa.
6) Avviare la riproduzione con il tasto oppure
tenendo premuto il tasto CUE. Lasciando il tasto
CUE, il lettore torna sul punto CUE marcato e va
in pausa. Se si tiene di nuovo premuto il tasto
CUE, si possono attivare tante ripetizioni a partire dal punto CUE.
N. B.: Nella modalità di riproduzione di un titolo singolo, il ritorno con il tasto CUE è possibile solo allʼinterno di un titolo. Se si raggiunge il titolo successivo,
il punto CUE viene sostituito con il punto di partenza
del titolo successivo (vedi capitolo 5.4.1).
5.9 Variare la velocità e lʼaltezza del suono
La velocità e quindi anche lʼaltezza del suono possono essere modificate di ±16 % mediante il cursore
(13).
1) Per poter modificare la velocità con il cursore
(13), il LED vicino al tasto PITCH (11) deve rimanere acceso. Altrimenti premere il tasto PITCH.
2) Modificare la velocità con il cursore. Il display
indica la deviazione percentuale (g) dalla velocità
standard.
3) Con il tasto PITCH si può passare in ogni
momento fra la velocità impostata con il cursore
e quella standard.
N. B.: Modificando la velocità di riproduzione, un
apparecchio collegato con la presa digitale (15)
potrebbe eventualmente non leggere bene i segnali
digitali. (Modificando la velocità, cambia la frequenza di scansione.) In questo caso disattivare il
cursore con il tasto PITCH in modo da escludere
una variazione della velocità.
5.10 Adattamento del ritmo fra due brani
(funzione Pitch-bend)
Con i tasti PITCH BEND (12) è possibile adattare
(sincronizzare) il ritmo di un titolo corrente a quello
di un titolo riprodotto su un altro apparecchio. In
questo modo, il ritmo della musica non viene interrotto durante la dissolvenza fra i due brani
1) Per prima cosa, con il cursore (13) adattare la
velocità del titolo corrente a quella dellʼaltro titolo.
13
I
F
B
CH
Page 14

3) Avec la touche PITCH, il est possible à tout
instant, de commuter entre la vitesse standard et
la vitesse réglée avec le potentiomètre.
Remarque : un appareil relié à la sortie digitale (15)
peut éventuellement ne pas lire correctement les
signaux digitaux lorsquʼon modifie la vitesse. (Avec
la modification de la vitesse, la fréquence de sampling se modifie). Dans ce cas, désactivez le potentiomètre avec la touche PITCH de telle sorte quʼaucune modification de vitesse ne soit possible.
5.10 Adaptation du rythme entre deux
morceaux de musique (Pitch Bend)
Avec les touches PITCH BEND (12), on peut adapter le rythme du morceau en cours de lecture au
rythme dʼun morceau lu sur un autre lecteur (synchronisation). Ainsi, le rythme nʼest pas interrompu
lors du passage dʼun morceau à lʼautre pendant une
danse.
1) Avec le potentiomètre à glissière (13), adaptez la
vitesse du morceau en cours de lecture à la
vitesse du second morceau.
2) Avec les touches PITCH BEND, faites coïncider
les rythmes des deux morceaux; tant que la touche + ou
-
est maintenue enfoncée, le titre est lu
plus vite ou moins vite et dans le champ PITCH
(g) de lʼaffichage, la valeur affichée clignote.
6 Entretien
Protégez lʼappareil de la poussière, des vibrations,
de la lumière directe du soleil, de lʼhumidité et de la
chaleur (température de fonctionnement admissible
0 – 40 °C). Pour le nettoyer, utilisez uniquement un
chiffon sec et doux, en aucun cas, de produits chimiques ou dʼeau.
Remarques sur les coupures du son
et les erreurs de lecture
La fumée de cigarettes sʼintroduit facilement dans
les ouvertures du lecteur et se dépose sur lʼoptique
du système laser. Cela peut générer des erreurs de
lecture et des coupures de son. On ne peut pas toujours éviter la fumée de cigarettes (par exemple en
discothèque), confiez impérativement le nettoyage
du lecteur à un technicien spécialisé. Cette opération est à la charge de lʼutilisateur, même lorsque
lʼappareil est sous garantie!
7 Caractéristiques techniques
Bande passante :. . . . . . . . . 20 – 20 000Hz
Taux de distorsion : . . . . . . . < 0,05 %
Séparation des canaux : . . . > 80 dB
Dynamique :. . . . . . . . . . . . . > 90 dB
Rapport signal sur bruit : . . . > 90 dB
Pleurage et scintillement : . . non mesurable,
régulé par quartz
Sortie audio
LINE OUT : . . . . . . . . . . . 2 V
DIGITAL OUT :. . . . . . . . . 0,5 Vcc, S/ PDIF
Alimentation :. . . . . . . . . . . . 230 V~/50Hz
Consommation :. . . . . . . . . . 15 VA
Température de
fonctionnement : . . . . . . . . . 0 – 40°C
Dimensions (L
× H × P) : . . . 215 × 90 × 300 mm
Poids : . . . . . . . . . . . . . . . . . 2,2 kg
Tout droit de modification réservé.
2) Con i tasti PITCH BEND sovrapporre esattamente le battute dei due brani: tenendo premuto
il tasto + o -, il titolo scorre più velocemente o più
lentamente, e nel campo PITCH (g) del display
lampeggia il valore indicato.
6 Manutenzione
Proteggere lʼapparecchio dalla polvere, da vibrazioni,
dalla luce diretta del sole, dallʼumidità e dal calore
(temperatura dʼesercizio ammessa fra 0 e 40 °C). Per
la pulizia usare solo un panno morbido, asciutto;
non impiegare in nessun caso prodotti chimici o
acqua.
Note su possibili errori di lettura
Il fumo di sigarette penetra facilmente fra tutte le
aperture dellʼapparecchio e si deposita sul sistema
ottico della scansione ai raggi laser. Ciò può provocare errori di lettura e buchi nella riproduzione.
Poiché non si può escludere sempre il fumo di sigarette (p. es. in una discoteca), lʼapparecchio deve
eventualmente essere pulito in un laboratorio specializzato. Una tale pulizia è a pagamento, anche
durante il periodo di garanzia!
7 Dati tecnici
Risposta in frequenza:. . . . . 20 – 20 000Hz
Fattore di distorsione: . . . . . < 0,05 %
Separazione canali: . . . . . . . > 80 dB
Ragne dinamico: . . . . . . . . . > 90 dB
Rapporto S/ R: . . . . . . . . . . . > 90 dB
Wow and flutter:. . . . . . . . . . non misurabile,
precisione del quarzo
Uscita audio
LINE OUT: . . . . . . . . . . . . 2 V
DIGITAL OUT: . . . . . . . . . 0,5 Vpp, S/ PDIF
Alimentazione: . . . . . . . . . . . 230 V~/ 50 Hz
Potenza assorbita:. . . . . . . . 15 VA
Temperatura dʼesercizio: . . . 0 – 40°C
Dimensioni (l
× h × p): . . . . . 215 × 90 × 300 mm
Peso: . . . . . . . . . . . . . . . . . . 2,2 kg
Con riserva di modifiche tecniche.
14
I
F
B
CH
Notice dʼutilisation protégée par le copyright de MONACOR®INTERNATIONAL GmbH & Co. KG. Toute
reproduction même partielle à des fins commerciales est interdite.
La MONACOR®INTERNATIONAL GmbH & Co. KG si riserva ogni diritto di elaborazione in qualsiasi forma
delle presenti istruzioni per lʼuso. La riproduzione – anche parziale – per propri scopi commerciali è vietata.
Page 15

15
Page 16

Lees aandachtig de onderstaande veiligheids voor schriften, alvorens het toestel in gebruik te nemen.
Mocht u bijkomende informatie over de bediening
van het toestel nodig hebben, lees dan de Duitse,
En gelse, Franse, of Italiaanse tekst in deze hand leiding.
Veiligheidsvoorschriften
Het apparaat is in overeenstemming met alle vereiste
EU-Richtlijnen en is daarom gekenmerkt met .
Let eveneens op het volgende:
G
Het apparaat is enkel geschikt voor gebruik binnenshuis. Vermijd druip- en spatwater, uitzonderlijk warme plaatsen en plaatsen met een hoge
vochtigheid (toegestaan omgevingstemperatuurbereik: 0 – 40 °C).
G
Plaats geen bekers met vloeistof zoals drinkglazen etc. op het apparaat.
G
Schakel het apparaat niet in en trek onmiddellijk
de stekker uit het stopcontact, wanneer:
1. het apparaat of het netsnoer zichtbaar beschadigd is,
2. er een defect zou kunnen optreden nadat het
apparaat bijvoorbeeld gevallen is,
3. een apparaat slecht functioneert.
Het apparaat moet in elk geval hersteld worden
door een gekwalificeerd vakman.
G
Een beschadigd netsnoer mag alleen in een
erkende werkplaats worden vervangen.
G
Trek de stekker nooit met het snoer uit het stopcontact, maar steeds met de stekker zelf.
G
In geval van ongeoorloofd of verkeerd gebruik,
verkeerde aansluiting, foutieve bediening of van
herstelling door een niet-gekwalificeerd persoon
vervalt de garantie en de verantwoordelijkheid
voor hieruit resulterende materiële of lichamelijke
schade.
Onderhoud van het apparaat
Bescherm de cd/ mp3 speler tegen stof, trillingen,
rechtstreeks zonlicht, hoge vochtigheid en warmte
(toegelaten omgevingstemperatuur 0 – 40 °C). Verwijder het stof met een zachte, droge doek. Gebruik
zeker geen water of chemicaliën.
Opmerking in verband met klankstoringen en
leesfouten
Sigarettenrook dringt makkelijk in alle openingen
van de cd/ mp3 speler en zet zich ook af op de optische onderdelen van het laseraftastsysteem. Deze
aanslag kan leiden tot leesfouten en klankstoringen.
Omdat sigarettenrook niet steeds te vermijden valt
(b.v. in de discotheek), moet de cd/mp3 speler door
een gekwalificeerd vakman worden gereinigd. De
kosten voor deze reiniging draagt de koper, ook
tijdens de garantietermijn!
Wanneer het apparaat definitief uit bedrijf
wordt genomen, bezorg het dan voor
milieuvriendelijke verwerking aan een
plaatselijk recyclagebedrijf.
WAARSCHUWING De netspanning (230 V~) van
het apparaat is levensgevaarlijk. Open het apparaat niet,
want door onzorgvuldige in grepen loopt u het risico van
elektrische schokken.
Por favor, antes del uso del aparato observar en
todo caso las instrucciones de seguridad siguientes.
Si informaciones adicionales son necesarias para la
operación del aparato, estas se encuentran en el
texto alemán, inglés, francés o italiano de estas
instrucciones.
Notas de seguridad
La unidad corresponde a todas las Directivas requeridas por la UE y por ello está marcada con .
Por favor, preste atención a los puntos siguientes en
todo caso:
G
La unidad sólo está indicada para un uso en interior. Protéjala de goteos y salpicaduras de agua,
humedad elevada del aire, y calor (gama de temperatura ambiente admisible: 0 – 40 °C).
G
No coloque ningún recipiente lleno de líquido
sobre la unidad, p. ej. un vaso de bebida.
G
No utilice la unidad o desconecte inmediatamente
el enchufe de la toma de red:
1. en caso de daño visible en la unidad o en el
cable de red,
2. si ha ocurrido un defecto tras una caída de una
unidad o un accidente similar,
3. si ocurren disfunciones.
La unidad debe ser reparada por personal especializado en cualquier caso.
G
Un cable de red dañado sólo debe ser remplazado por personal especializado.
G
No tire nunca del cable de red para desconectar el
enchufe de la toma de red, tire siempre del enchufe.
G
No se asumirá ninguna garantía para la unidad ni
se aceptará ninguna responsabilidad en caso de
daños personales o patrimoniales causados si la
unidad se usa para otros fines diferentes a los originalmente concebidos, si no se conecta o se utiliza correctamente, o si no se repara de manera
experta.
Mantenimiento de la unidad
Proteja la unidad del polvo, vibraciones, luz del sol
directa, humedad, y calor (gama de temperatura
ambiente admisible 0 –40 °C). Para limpiar use sólo
un paño seco y suave, no use nunca agua o productos químicos.
Nota referente a las interrupciones de sonido y
errores de lectura
El humo de los cigarrillos penetra fácilmente a través de las aberturas de la unidad y también se
asien ta en las lentes del sistema de lectura láser.
Este depósito puede causar errores de lectura e
interrupciones de sonido. Como no será posible prevenir el humo de los cigarrillos (por ejemplo en discotecas), la unidad debe ser limpiada por personal
especializado. ¡Por favor, tenga en cuenta que, en
ese caso, se cobrará la limpieza, incluso durante el
pe riodo de garantía!
Si se debe retirar la unidad definitivamente
del funcionamiento, llévela a un centro de
reciclaje local para su disposición no contaminante para el medio ambiente.
ADVERTENCIA La unidad se alimenta con un
voltaje de red peligroso (230 V~).
Deje el mantenimiento sólo en
manos de personal especializado. Una manipulación inexperta puede causar un riesgo de
descarga eléctrica.
16
E
NL
B
PL
Przed obsługą urządzenia należy wcześniej za poznać się z następującymi uwagami odnośnie
środków bezpieczeństwa. Jeśli wymagane są bardziej szczegółowe informacje należy zapoznać się z
angielską, niemiecką, francuską lub włoską
instrukcją obsługi.
Bezpieczeństwo użytkowania
Urządzenie spełnia wymogi dyrektyw obowiązu jących
w Unii Europejskiej, posiada więc oznakowanie .
Należy przestrzegać następujących zaleceń:
G
Urządzenie przeznaczone jest do użytku jedynie
wewnątrz pomieszczeń. Należy chronić je przed
bezpośrednim kontaktem z wodą, działaniem wilgoci oraz wysokiej temperatury (zakres dopusz czalnej temperatury otoczenia pracy: 0 – 40 °C).
G
Na obudowie urządzenia nie wolno stawiać
pojemników z płynem (np. szklanek).
G
Należy przerwać obsługę urządzenia lub nie zwłocznie wyjąć z wtyczkę z gniazda jeśli:
1. istnieje widoczne uszkodzenie urządzenia lub
kabla zasilania,
2. mogło nastąpić uszkodzenie urządzenia w
wyniku jego upuszczenia itp.,
3. urządzenie działa nieprawidłowo.
Urządzenie należy przekazać do autoryzowanego
punktu serwisowego.
G
Uszkodzony kabel zasilania może wymienić jedynie producent lub pracownik autoryzowanego
punktu serwisowego.
G
Nie wolno odłączać urządzenia z gniazda sieciowego ciągnąc za kabel zasilania, należy zawsze
chwytać za wtyczkę.
G
Producent ani dostawca nie ponoszą odpowiedzialności za wynikłe szkody (uszkodzenie sprzętu
lub obrażenia użytkownika), jeśli urządzenie
używano niezgodnie z przeznaczeniem, niepra widłowo podłączono, obsługiwano bądź poddano
nieautoryzowanej naprawie.
Konserwacja urządzenia
Urządzenie należy chronić przed zabrudzeniem,
wstrząsami, bezpośrednim działaniem promieni
słonecznych, wilgocią oraz wysoką temperaturą
(dopuszczalna temperatura otoczenia pracy:
0 – 40 °C). Do czyszczenia urządzenia należy
używać suchej, miękkiej tkaniny. Nie wolno stosować wody, ani chemicznych środków czyszczących.
Uwagi dotyczące nieprawidłowego odtwarzania
oraz błędów odczytu
Dym papierosowy łatwo przedostaje się przez
otwory w obudowie odtwarzacza, osadzając się na
elementach optycznych oraz na systemie lasero wym. Może to powodować błędy odczytu płyt CD
oraz niepoprawne odtwarzanie dźwięku. Jeśli
pomieszczenie, w którym jest użytkowany odtwa rzacz jest zadymione (np. dyskoteka), należy zlecić
specjaliście okresowe czyszczenie układu opty cznego. W tym przypadku czyszczenie nie wchodzi
w zakres usług gwarancyjnych.
Po całkowitym zakończeniu eksploatacji
urządzenia należy przekazać je do punktu
utylizacji odpadów, aby uniknąć zanieczy szczenia środowiska.
UWAGA Urządzenie jest zasilane niebezpie -
cznym dla życia napięciem zmiennym
230 V~. Obsługę techniczna urządzenia należy zlecić osobom upowa żnionym aby uniknąć ryzyka porażenia
prądem.
Page 17

17
FIN
Læs nedenstående sikkerhedsoplys ninger opmærk somt igennem før ibrugtagning af enheden. Bortset
fra sikkerhedsoplys nin gerne henvises til den en gels ke, tyske, franske eller italienske tekst.
Vigtige sikkerhedsoplysninger
Denne enhed overholder alle nødvendige EU-direktiver og er som følge deraf mærket .
Vær altid opmærksom på følgende:
G
Enheden er kun beregnet til indendørs brug. Be skyt
den mod vanddråber og -stænk, høj luft fug tig hed
og varme (tilladt omgivelses tem pera tur 0 – 40°C).
G
Undgå at placere væskefyldte genstande, som
f. eks. glas, ovenpå enheden.
G
Tag ikke enheden i brug og tag straks stikket ud af
stikkontakten i følgende tilfælde:
1. hvis der er synlig skade på enheden eller net kablet,
2. hvis der kan være opstået skade, efter at en heden er tabt eller lignende,
3. hvis der forekommer fejlfunktion.
Enheden skal altid repareres af autoriseret per sonel.
G
Et beskadiget netkabel må kun repareres af autoriseret personel.
G
Tag aldrig stikket ud af stikkontakten ved at
trække i kablet, tag fat i selve stikket.
G
Hvis enheden benyttes til andre formål, end den
oprindeligt er beregnet til, hvis den ikke er tilsluttet
korrekt, eller hvis den ikke repareres af autoriseret
personel, omfattes eventuelle skader ikke af
garantien.
Vedligeholdelse af enheden
Beskyt enheden mod støv, vibrationer, direkte sollys, fugt og varme (tilladt temperatur i drift 0 –40°C).
Til rengøring må kun benyttes en blød, tør klud; der
må under ingen omstændigheder benyttes vand
eller kemikalier.
Bemærkninger vedrørende lydafbrydelser og
læsefejl
Tobaksrøg trænger let ind i alle åbninger på en heden og sætter sig så fast på lasersystemets
optiske dele. Denne hinde af nikotin på laserens
optik kan medføre fejl i forbindelse med læsning af
CDʼer og således forårsage forstyrrelser i afspilningen. Da det ikke altid er muligt at undgå brug af
enheden i lokaler med tobaksrøg (f. eks. et diskotek), skal enheden i tilfælde af funktionsfejl renses af
autoriseret personel. Sådan rensning vil kun blive
udført mod betaling – selv hvis reklamationsretten
stadig er gældende.
Hvis enheden skal tages ud af drift for
bestandigt, skal den bringes til en lokal
genbrugsstation for bortskaffelse.
ADVERSAL Enheden benytter livsfarlig net -
spæn d ing (230 V~). For at undgå
fare for elek trisk stød må kabinettet
ikke åbnes. Overlad servicering til
auto riseret personel.
Innan enheten tas i bruk, läs först igenom säkerhets föreskrifterna. Om ytterligare information önskas,
läs igenom den tyska, engelska, franska eller den
ita lienska texten som medföljer.
Säkerhetsföreskrifter
Enheten uppfyller samtliga Eu-direktiv och har därför försetts med symbolen .
Ge även akt på följande:
G
Enheten är endast avsedd för inomhusbruk. Skyd da enheten mot vätskor, hög luftfuktighet och hög
värme (tillåten omgivningstemperatur 0 – 40 °C).
G
Placera inte föremål innehållande vätskor, t.ex.
drick sglass, på enheten.
G
Använd inte enheten och tag omedelbart ut kontakten ur eluttaget om något av följande uppstår:
1. Enheten eller elsladden har synliga skador.
2. Enheten är skadad av fall ed.
3. Enheten har andra felfunktioner.
Enheten skall lämnas till auktoriserad verkstad för
service.
G
En skadad elsladd skall endast bytas på verkstad.
G
Dra aldrig ut kontakten genom att dra i sladden
utan ta tag i kontaktkroppen.
G
Om enheten används för andra ändamål än av sett, om den kopplas in felaktigt, om den an vänds
på fel sätt eller inte repareras av auktoriserad personal upphör alla garantier att gälla och inget
ansvar tas heller för uppkommen skada på person
eller materiel.
Skötsel av enheten
Skydda enheten mot damm, vibrationer, direkt solljus, fukt och värme (arbetstemperatur 0 – 40 °C).
Rengör endast med en ren och torr trasa. Använd
aldrig vätskor i någon form då dessa kan rinna in
och orsaka kortslutning.
Vid ljudavbrott och läsfel
Cigarettrök kan lätt komma in i CD-spelaren och ge
upphov till små partiklar som fastnar på lasernålen.
Denna orenhet kan orsaka läsfel. Då rök inte alltid
kan undvikas (på disco od.) skall enheten lämnas för
rengöring på verkstad. Denna rengöring är avgiftsbelagd även under gällande garantitid.
Om enheten skall kasseras bör de lämnas
in till återvinning.
VARNING Enheten använder högspänning in -
ternt (230 V~). For att undvika en
elektrisk stöt, öppna aldrig chas sit på
egen hand utan överlåt all ser vice till
auktoriserad verkstad.
Ole hyvä ja huomioi aina seuraavat turvallisuutta
kos kevat ohjeet ennen laitteen käyttöön ottoa. Katso
käyttöön liittyviä ohjeita Saksan, Englannin, Ranskan tai Italian kielisistä ohjeista, jos tarvitset lisää tietoa laitteen käytöstä.
Turvallisuudesta
Tämä laite täyttää kaikki siihen kohdistuvat EUdirek tiivit ja sille on myönnetty hyväksyntä.
Huomioi myös seuraavat seikat:
G
Tämä laite soveltuu vain sisätilakäyttöön. Suojele
lai tetta kosteudelta, vedeltä ja kuumuudelta (sallittu ympä röivä lämpötila 0 –40 °C).
G
Älä sijoita laitteen päälle mitään nestettä sisältävää, kuten vesilasia tms.
G
Irrota virtajohto pistorasiasta, äläkä käynnistä laitetta jos:
1. virtajohdossa on havaittava vaurio
2. putoaminen tai muu vastaava vahinko on saattanut aiheuttaa vaurion
3. laitteessa esiintyy toimintahäiriöitä
Kaikissa näissä tapauksissa laite tulee toimittaa
valtuutettuun huoltoliikkeeseen.
G
Vioittuneen virtakaapelin saa vaihtaa vain val tuutettu huoltoliike.
G
Älä koskaan irrota virtajohtoa pistorasias ta johdosta vetämällä.
G
Laitteen takuu raukeaa, eikä valmistaja, maahantuoja tai myyjä ota vastuuta mahdollisista välittömis tä tai välillisistä vahingoista, jos laitetta on
käytetty muuhun kuin alkuperäiseen käyttötarkoitukseen, laitet ta on taitamattomasti käytetty tai
kytketty tai jos laitetta on huollettu muussa kuin
valtuutetussa huollossa.
Laitteen huolto ja ylläpito
Suojele laitetta pölyltä, värähtelyiltä, suoralta auringonpaisteelta, kosteudelta ja kuumuudelta (sallittu
ympäröivä lämpötila 0 – 40 °C). Käytä puhdistamiseen vain kuivaa, pehmeää kangasta. Älä käytä
vettä tai kemikaaleja.
Huomioitavaa ääni- ja levynlukuhäiriöistä
Tupakansavu tunkeutuu helposti laiteen raoista ja
kiinnittyy optiseen lasersysteemiin. Tämä lika saattaa aiheuttaa lukuhäiriöitä ja äänen pätkimistä.
Koska tupakansavua ei aina voida välttää, laite tulee
puhdistuttaa valtuutetussa huoltoliikkeessä. Tällainen puhdistaminen maksaa myös takuuaikana!
Kun laite poistetaan lopullisesti käytösta,
vie se paikalliseen kierrätyskeskukseen jälkikäsittelyä varten.
VAROITUS Tämä laite toimii hengenvaarallisella
230 V~ jännitteellä. Välttääksesi sähköiskun, älä avaa laitteen koteloa.
Jätä huoltotoimet valtuutetulle, am mattitaitoiselle huoltoliikkeelle.
DK
S
Page 18

Copyright©by MONACOR INTERNATIONAL GmbH & Co. KG, Bremen, Germany. All rights reserved. A-0796.99.01.01.2008
®
 Loading...