

Page 1
little
Oskar
Operat ing in structio ns
Mode d‘emploi
Manual de instrucciones
READ AND SAVE THESE INSTRUCTIONS
LISEZ ET CONSERVEZ CES INSTRUCTIONS
LEA Y GUARDE ESTAS INSTRUCCIONES
Page 2

Oskar
little
10
9
12
13
11
4
Page 3
7
6
8
1
5
3
2
E
G
D
A
R
O
A
Ñ
A
1
•
E
I
T
N
A
R
A
G
E
D
N
A
1
1
•
N
T
Í
A
•
1
Y
E
A
R
W
A
R
R
A
N
T
Y
Page 4
Cleaning / Nettoyage / Limpieza
Page 5

Download instruction manual:
Téléchargez le mode d’emploi :
Descargue el manual de instrucciones:
www.stadlerformusa.com/manuals
Watch the video of Oskar little:
Regardez la vidéo du Oskar little :
Mire el vídeo de Oskar little:
www.stadlerformusa.com/Oskar-little
For frequently asked questions go to:
Trouvez la foire aux questions sur :
Para leer las preguntas frecuentes, visite:
www.stadlerform.com/Oskar-litte/support
Share your feedback about Oskar little on:
Partagez votre commentaire sur Oskar little :
Comparta sus opiniones sobre Oskar little en:
www.stadlerform.com/Oskar-little
Stadler Form of Switzerland
distributed in North America by Swizz Style
165 West Broadway Street, Dover, OH 44622, USA
Toll free 877-663-7895, www.stadlerformusa.com
®
, Inc.
Page 6

English
Congratulations! You have just acquired the exceptional Air Humidifier
OSKAR little. It will give you great pleasure and improve the indoor air for
you.
As with all domestic electrical appliances, particular care is needed with
this model also, in order to avoid injury, fire damage or damage to the appliance. Please study these operating instructions carefully before using the
appliance for the first time and follow the safety advice on the appliance
itself.
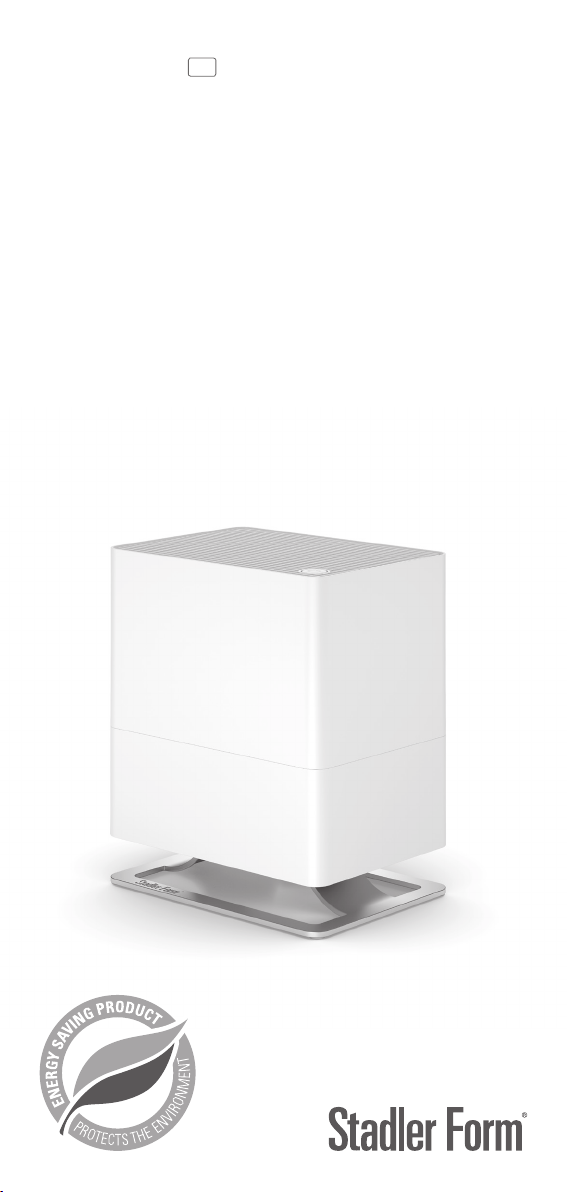
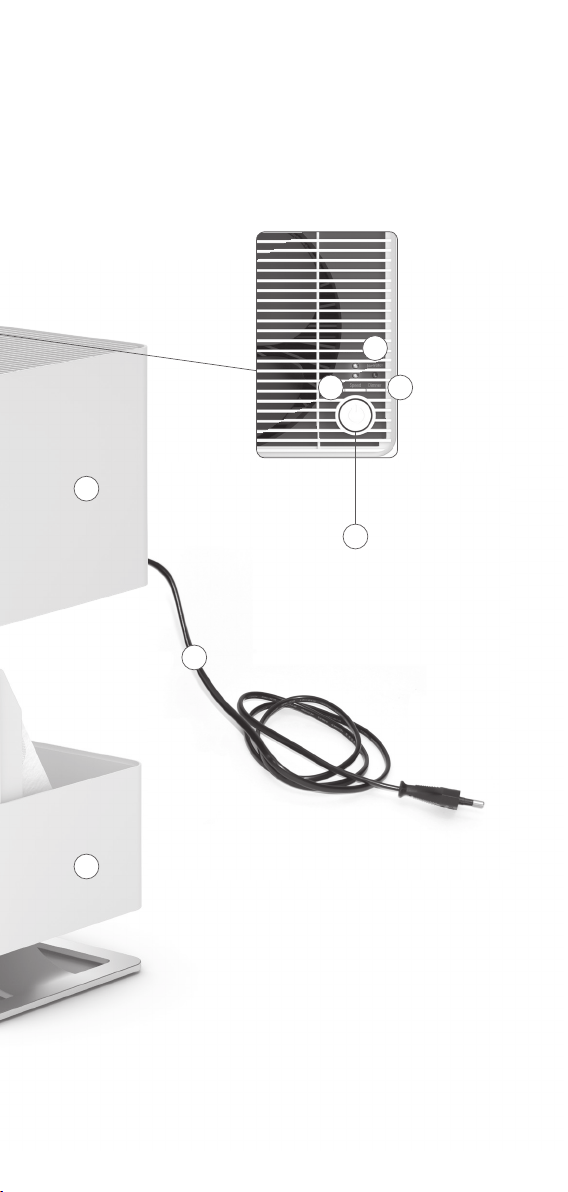
Description of the appliance
The appliance consists of the following main components:
1. Upper part of air humidifier with motor
2. Lower part of air humidifier (water container)
3. Mains cable for electricity supply
4. Zinc base
5. On/off switch
6. Speed level selector button
7. Night mode button
8. «No water» indicator
9. Opening for refilling while in operation
10. Fragrance container
11. Filter cassette
12. Maximum mark / water level indicator
13. Water Cube™
Important safety instructions - SAVE THESE INSTRUCTIONS
Please read through the operating instructions carefully before you use the
appliance for the first time and keep them safely for later reference; if necessary pass them on to the next owner.
• Stadler Form refuses all liability for loss or damage which arises as a
result of failure to follow these operating instructions.
• The appliance is only to be used in the home for the purposes described in
these instructions. Unauthorised use and technical modifications to the
appliance can lead to danger to life and health.
• This appliance is not intended for use by person (including children) with
reduced physical, sensory or mental capabilities, or lack of experience
and knowledge, unless they have been given supervision or instruction
concerning use of the appliance by a person responsible for their safety.
• Children should be supervised to ensure that they do not play with the
appliance.
• Only connect the cable to alternating current. Observe the voltage information given on the appliance.
• Do not use damaged extension cords.
• Do not run the power cord over sharp edges and make sure that it does
not get trapped.
• Do not pull the plug from the socket with wet hands or by holding on to
the power cord.
• Do not use the appliance in immediate vicinity of a bath tub, a shower or
a swimming pool (observe a minimum distance of 10 ft / 3 m). Place the
appliance such that a person in the bath tub cannot touch the appliance.
Page 7

• Do not place the appliance near a heat source. Do not subject the power
cord to direct heat (such as a heated hotplate, open flames, hot iron sole
plates or heaters for example). Protect power cords from oil.
• See to it that the appliance is properly positioned to ensure a high stability during its operation and make sure that no one can trip over the power
cord.
• The appliance is not splash-proof.
• For indoor use only.
• Do not store the appliance outdoors.
• Store the appliance in a dry place inaccessible to children (pack the appliance).
• If the power cord is damaged, it must be replaced by the manufacturer
or a repair shop authorized by the manufacturer or by similarly qualified
persons in order to avoid a hazard.
• Unplug the appliance before filling and cleaning.
Setting up / operation
1. Place Oskar little on a flat surface in the desired area. Plug the mains
cable (3) into an electric socket. Use the filling opening (9) to fill the lower
part (2) with water up to the maximum mark (12), either at a water tap or
with a watering can. When you have filled the lower part at the tap, carefully fit the upper part (1) to the lower part (2).
2. Start the appliance by pressing the on/off switch (5). The blue LED should
then light up. If a red pilot lamp (8 and 12) lights up however, this indicates
either lack of water in the appliance or failure to seat the upper part correctly on the lower part.
3. By pressing the speed level selector button (6) you can change the humidity output (a blue lamp for normal evaporation, two blue lamps for high
evaporation).
4. If you find the lamps too bright (in a bedroom for example), you may reduce the light inte nsity by pressing the night mode key (7). You can choo se
between three different modes:
• Normal mode (default mode)
• Dimmed mode (push once)
• Lights-out mode (push twice)
• By pushing the dimmer button once more, you can go back into normal
mode.
If there is no water in the appliance, the red LEDs (8 and 12) light up in all
modes (normal and night mode). The red light can not be dimmed.
5. You can use the Oskar little air humidifier to distribute fragrances in the
room. Please be as economical as possible in the use of fragrances, because excessive quantities may lead to malfunctions and damage to the
appliance. To use fragrances, remove the fragrance container (10) from
the filling opening (9). Place no more than 2–3 drops of fragrance in the
container and replace it in the space provided in the filling opening. If you
wish to change the fragrance, you can wash out the fragrance container
and fleece under running water.
6. If you wish to top up with water during operation, you can open the filling opening (9) by pressing on it (Push to open). You can then refill the
appliance using a water can or water bottle without having to switch it
off. PLEASE NOTE: If you are operating the appliance with fragrances,
remove the fragrance container before refilling to prevent water getting
Page 8

into it. Should this nevertheless occur, it will be necessary to remove the
water container (2) and rinse it. Fragrances should not be permitted to
enter the water tank, since they might destroy the plastic.
Important information
Humidification with an evaporator takes time. This means that it usually
takes more than 2–3 hours to reach the desired humidity. If you operate the
humidifier in a very dry environment we recommend to operate it on speed
level 2 to reach a maximum amount of humidity in a short time.
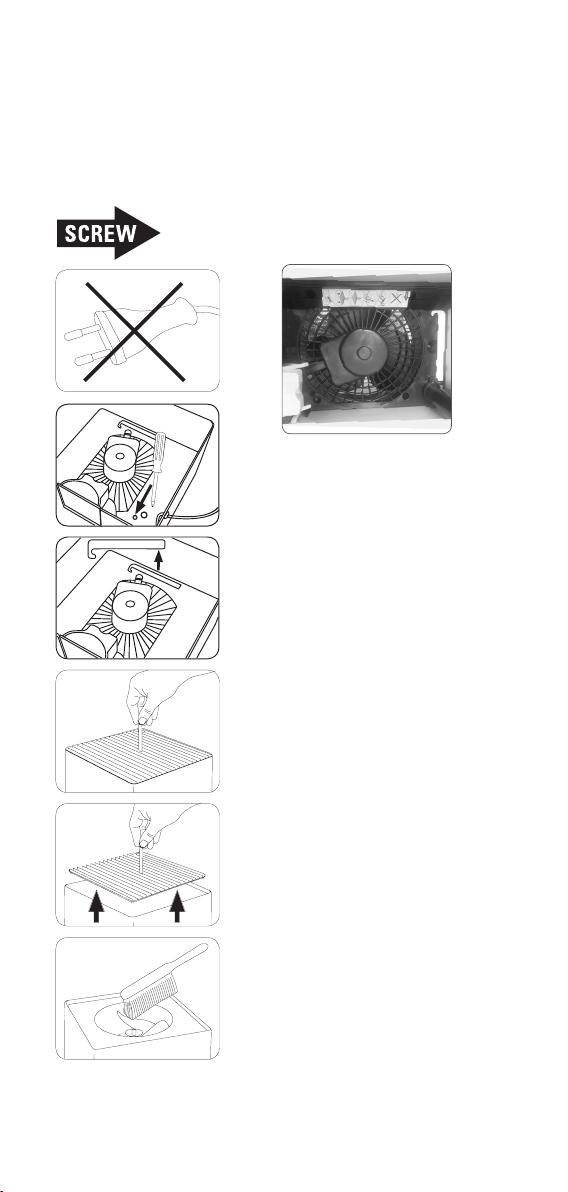
Cleaning and cassette replacement
Prior to any maintenance work and after each use, switch off the appliance
and withdraw the mains cable from the socket.
Never immerse in water (risk of short circuit).
• External surfaces should only be wiped off with a damp cloth and then
dried well.
• Every 2 weeks: To clean the inside, remove the filter cassette and
descale the lower part if necessar y. After descaling, thoroughly rinse the
lower part and then dry it before putting the air humidifier into operation
again.
• For hygienic and optimum operation of the air humidifier, the filter cas-
sett e must be replaced ever y 2 – 3 months. If the f ilter casset te remains in
use for longer than this, on the one hand the humidity output may decline
severely and on the other, the anti-bacterial action of the cassette can no
longer be guaranteed. The filter casset te can be obtained from the dealer
where you purchased your Oskar little.
Water Cube™
Attention: Remove water cube from plastic bag before use.
The water cube (13) keeps the humidifier fresh using activated carbon and
therefore ensures an optimal performance of the humidifier. Activated carbons’s range of application for example includes the use in water purification to remove pollutants, reduce heavy metals and odor-causing chemicals.
The water cube starts working as soon as it comes into contact with water,
and also works when the unit is switched off. The lifetime of the water cube
is around one year. We therefore recommend that you replace the water
cube at the beginning of every humidifying season.
Repairs
• Repairs to electrical appliances must only be carried out by a qualified
electrical technician. If improper repairs are carried out, the warranty
lapses and all liability is refused.
• Never operate the applian ce if the adaptor or plug is dam aged, after it has
malfunctioned, if it has been dropped or has been damaged in any other
way (cracks/breaks in the casing).
• Do not push any object into the appliance.
• If the appliance is beyond repair, make it unusable immediately by cut ting
through the cable and hand it in at the collection point provided for the
purpose.
Page 9

Disposal
• Do not dispose of electrical appliances in the domestic waste. Please use
the communal collection points.
• Ask your local authority if you do not know where the communal collection points are located.
• If electrical appliances are disposed of thoughtlessly, exposure to the ele ments may cause hazardous substances to find their way into the groundwater and from there into the food chain, or to poison the flora and fauna
for many years to come.
Specifications
Humidity output up to 200 g/h
Rated power 6 W (Level l)
15 W (Level ll)
Dimensions 9.6 x 11.4 x 6.8 inch / 246 x 290 x 175 mm
(width x height x depth)
Weight 5.5 lbs / 2.5 kg
Tank capacity 0.7 gallon / 2.5 Liter
Complies with
regulations ETL
All rights for any technical modifications are reserved
Page 10

1 year Limited Warranty
A. This 1 year limited warranty applies to repair or replacement of prod-
uct found to be defective in material or workmanship. This warranty does
not apply to damage resulting from commercial, abusive, unreasonable use
or supplemental damage. Defects that are the result of normal wear and
tear will not be considered manufacturing defects under this warranty.
SWIZZ STYLE IS NOT LIABLE FOR INCIDENTAL OR CONSEQUENTIAL DAMAGES OF ANY NATURE. ANY IMPLIED WARRANTY OF
MERCHANTABILITY OR FITNESS FOR A PARTICULAR PURPOSE
ON THIS PRODUCT IS LIMITED IN DURATION TO THE DURATION
OF THIS WARRANTY. Some jurisdictions do not allow the exclusion or
limitation of incidental or consequential damages or limitations on how long
an implied warranty lasts, so the above limitations or exclusions may not
apply to you. This warranty gives you specific legal rights, and you also may
have other rights which vary from jurisdiction to jurisdiction. This warranty
applies only to the original purchaser of this product from the original date
of purchase.
B. At its option, Swizz Style will repair or replace this product if it is found
to be defective in material or workmanship. Defective product should be
returned to the place of purchase in accordance with store policy. Thereafter, while within the warranty period purchaser should contact Swizz Style
at 1-877-663-7893 Monday – Friday 9 am – 4 pm EST for product return
information.
C. This warranty does not cover damage resulting from any unauthorized
attempts to repair or from any use not in accordance with the instruction
manual.
D. If the product has replaceable filters, these are not covered under this
warranty, except for material or workmanship defects.
E. The following must accompany all products returned for service: 1) Proof
of purchase 2) Brief description of the problem 3) Full contact information
(including return shipping address) 4) Check or money order for $10 ($15 if
in Canada) for return handling, packaging and shipping charges. All funds
are in US dollars.
F. Swizz Style is not responsible for items lost, stolen or damaged during
return shipping.
Page 11

Français
Félicitation! Vous venez d‘acheter le superbe humidificateur OSKAR little.
Nous espérons que cet appareil vous donnera entière satisfaction et améliorera l’air intérieur pour vous.
Comme pour tous les appareils ménagers électriques, il est important
d‘entretenir cet appareil correctement afin d’éviter les blessures, les incendies ou les dommages. Veuillez lire attentivement le présent mode d‘emploi
avant la mise en service et respecter les conseils de sécurité indiqués sur
l’appareil.
Description de l’appareil
L’appareil est composé des éléments principaux suivants :
1. Partie supérieure de l’humidificateur avec moteur
2. Partie inférieure de l’humidificateur (réservoir)
3. Cordon électrique pour l’alimentation
4. Pied en zinc
5. Interrupteur marche-arrêt
6. Bouton pour le choix du degré de vitesse
7. Bouton pour le mode nuit
8. Lampe «Manque d‘eau»
9. Ouverture pour le remplissage pendant le fonctionnement
10. Réservoir pour parfum
11. Cartouche à filtre
12. Marque maximale / Niveau du réservoir d’eau
13. Cube d’eau – Water Cube ™
Conseils de sécurité importants - CONSERVEZ CE MODE D’EMPLOI
Veuillez lire attentivement le mode d‘emploi avant la première mise en
service de l’appareil et conservez-le pour toute consultation ultérieure ou
remettez-le, le cas échéant, au nouveau propriétaire.
• La société Stadler Form décline toute responsabilité des dommages
résultant du non-respect des indications données dans ce mode d‘emploi.
• Cet appareil ne doit être utilisé qu’aux fins domestiques décrites dans ce
mode d‘emploi. Toute utilisation contraire à sa destination ainsi que toute
modification technique apportée à l‘appareil peut entraîner des risques
pour la santé et la vie.
• Cet appareil n’est pas prévu pour être utilisé par des personnes (y compris
les enfants) dont les capacités physiques, sensorielles ou mentales sont
réduites, ou des personnes dénuées d’expérience ou de connaissance,
sauf si elles ont pu bénéficier, par l’intermédiaire d’une personne responsable de leur sécurité, d’une surveillance ou d’instructions préalables
concernant l’utilisation de l’appareil.
• Il convient de surveiller les enfants pour s‘assurer qu‘ils ne jouent pas
avec l‘appareil.
• Ne branchez le câble qu’au courant alternatif. Tenez compte des indications de tension situées sur l‘appareil.
• Ne pas utiliser de rallonge électrique endommagée.
• Ne pas faire passer ou coincer le câble d’alimentation par-dessus des
arêtes vives.
• Ne jamais retirer la fiche de courant de la prise en tirant sur le câble
d’alimentation ou en ayant les mains mouillées.
Page 12

• Ne pas utiliser l’appareil à proximité immédiate d’une baignoire, d’une
douche ou d’une piscine (respecter une distance minimum de 3 m / 10 ft).
• Placer l’appareil de telle façon à ce que personne ne puisse le toucher à
partir de la baignoire.
• Ne pas placer l’appareil à proximité directe d‘ une source de chaleur. Ne
pas exposer le câble d’alimentation à la chaleur (comme p. ex. une plaque
chaude de cuisinière, flammes nues, semelle chaude de fer à repasser ou
poêles). Protéger le câble d’alimentation de tout contact avec de l‘huile.
• Veiller à ce que l’appareil ait une bonne stabilité lors de son fonctionnement et que l’on ne puisse pas trébucher sur le câble d’alimentation.
• Cet appareil n’est pas protégé contre les projections d’eau.
• Pour usage intérieur uniquement.
• L’appareil ne doit pas être conservé à l’extérieur.
• C onserve r l’appar eil à un endroit sec e t hors de por tée des enfan ts (l’emballer).
• Si le cordon d’alimentation est endommagé, le faire remplacer par le
fabricant ou par un atelier agréé par le fabricant ou des personnes qualifiées en conséquence, afin d’éviter tout danger.
• Débranchez l’appareil avant le remplissage et le nettoyage.
Mise en marche / Manipulation
1. Posez Oskar little à l’endroit voulu sur une surface plane. Branchez le cordon électrique (3) sur la prise appropriée. Remplissez maintenant la partie
inférieure (2) d’eau jusqu’à la marque maximum (12) soit au robinet soit
avec un arrosoir à l’aide de l’ouverture prévue à cet effet (9). Une fois le
réser voir rempli, ajustez la partie supérieure (1) sur la partie inférieure (2).
2. Met tez ensuite l’appareil en route en appuyan t sur l’interrupteur m arche-arrêt (5). Après cela les DE L bleues devraient briller. Cependant si une lumière
rouge (8 et 12) brille, cela indique soit qu’il n’y a pas d’eau dans l’appareil,
soit que la partie supérieure n’est pas bien ajustée à la partie inférieure.
3. En appuyant sur le bouton pour le choix du degré de vitesse (6) vous pouvez changer le degré d’humidification (une lumière bleue pour une évaporation normale, deux lumières bleues pour une évaporation forte).
4. Si la clarté des lumières vous dérange (dans la chambre à coucher par
exemple), vous pouvez réduire l’intensité de la luminosité en appuyant sur
le bouton pour le mode nuit (7). Vous avez trois modes différents au choix:
• Mode normal (allumage standard)
• Mode tamisé (appuyez une fois)
• Mode lumière éteinte (appuyez deux fois)
• Pour revenir au mode normal, il suffit d‘appuyer à nouveau sur le bouton.
S’il n’y a plus d’eau dans l’app areil, les lumières rouges (8 et 12) s’allument
quelque soit le mode (mode normal ou mode nuit). L’intensité de la lumière
rouge ne peut pas être réduite.
5. Avec l’humidificateur Oskar little vous avez la possibilité de diffuser du
parfum dans la pièce. Nous vous demandons d‘utiliser le parfum très modérément car un trop gros dosage peut entraîner un dysfonctionnement
et un endommagement de l‘appareil. Pour diffuser un parfum, sortez le
réservoir pour parfum (10) de l‘ouverture pour le remplissage (9). Déposez
maintenant 2–3 gouttes maximum dans le réservoir et remettez celuici à l’emplacement prévu, dans l’ouverture pour le remplissage. Si vous
souhaitez changer de parfum, rincez le réservoir pour parfum et le textile
non-tissé à l‘eau courante.
Page 13

6. Si vous souhaitez remplir le réservoir d‘eau pendant le fonctionnement de
l‘appareil, vous pouvez ouvrir l‘ouv erture pour r emplissage (9) en ap puyant
sur celle-ci (Push to open). Vous pouvez ensuite remplir le réservoir avec
un arrosoir ou une bouteille d’eau sans éteindre l’appareil. ATTENTION :
Si vous avez mis du parfum dans l’appareil, enlevez le réservoir à parfum
avant le remplissage avec de l’eau, afin d‘éviter que de l‘eau ne rentre
dans le réservoir à parfum. Si cela devait arriver, videz et rincez immédiatement le réservoir d‘eau (2). Aucun parfum ne doit être mis en contact
avec le réservoir d’eau, car cela peut endommager le plastique.
Informations importantes
L‘humidification avec un évaporateur prend du temps, c.-à-d. il faut attendre
2 à 3 heures pour obtenir des résultats d’humidification mesurables. Si vous
utilisez l’humidif icateur dans un en vironnement t rès sec, nous vous conseillons
de régler l’appareil pendant les premiers jours au niveau 2 (vitesse) pour permettre une augmentation efficace de l’humidité de l’air.
Nettoyage et remplacement des cartouches
L’appareil doit être débranché avant chaque entretien et après chaque utilisation et le câble d’alimentation doit être retiré de la prise. L’appareil ne doit
jamais être mouillé (risque de court-circuit).
• Pour le nettoyage extérieur il suffit de frotter avec un chiffon humide et
de bien sécher ensuite.
• Toutes les 2 semaines : Pour le nettoyage intérieur, ôtez la cartouche à
filtre et détartrez le réservoir (2) si nécessaire. Après le dét artrage, rincez
soigneusement le réservoir et séchez-le, avant de remettre l‘humidificateur en marche.
• Pour une utilisation hygiénique et optimale de l’humidificateur, le filtre
pour évaporateur doit être changé tous les 2–3 mois. En cas d’utilisation prolongée de filtre, la capacité d’utilisation peut baisser for tement et
d’autre part le traitement antibactérien de filtre n’est plus garanti. Vous
pouvez acheter le filtre auprès du distributeur chez qui vous avez acheté
votre Oskar little.
Cube d‘eau – Water Cube™
Attention : Retirer le cube d’eau du sac en plastique avant usage.
Le cube d’eau (13) maintient l’humidif icateur pur à l’aide de charbons activés
et garantit ainsi une performance optimale de l’humidificateur. L’éventail
des applications des charbons activés inclut par exemple l’usage de purificateur d’eau afin de supprimer les polluants, réduire les métaux lourds et
les produits chimiques provoquant des odeurs. Le cube d’eau commence
à fonctionner dès qu’il entre en contact avec de l’eau. Il fonctionne aussi
quand l’unité est éteinte. La durée de vie du cube d’eau est d’environ un an.
Nous vous recommandons donc de le remplacer au début de chaque saison
d’humidification.
Réparations
• Les réparations sur les appareils électriques ne doivent être effectuées
que par des électriciens qualifiés. La garantie s’éteint et toute responsabilité est exclue en cas de réparations non conformes aux règles de l‘art.
Page 14

• Ne mettez jamais l‘appareil en service en cas d’endommagement d’un
cordon ou d’une fiche, après un dysfonctionnement de l’appareil causé
par une chute ou par une autre détérioration de l’appareil (boî tier fissuré/
cassé).
• Ne pas pénétrer avec des objets quelconques dans l’appareil.
• Arrivé au bout de sa durée de vie, l’appareil doit immédiatement être rendu inutilisable (sectionner le cordon d’alimentation) et être déposé dans
une déchetterie prévue à cet effet.
Elimination
• Ne jetez pas vos appareils électriques avec les ordures ménagères, utilisez les points de collecte municipaux.
• Veuillez consulter vos services municipaux pour connaître les points de
collecte.
• La mise au rebut incontrôlée des appareils électriques peut entraîner,
lors de précipitations, la filtration de matières dangereuses dans les eaux
souterraines pouvant contaminer la chaîne alimentaire ou intoxiquer
durablement la flore et la faune.
Caractéristiques techniques
Puissance d’humidité jusqu’à 200 g/h
Consommation 6 W (Vitesse I)
15 W (Vitesse II)
Dimensions 246 x 290 x 175 mm / 9,6 x 11,4 x 6,8 inch
(largeur x hauteur x profondeur)
Poids 2,5 kg / 5,5 lbs
Contenance du réservoir 2,5 Litres / 0,7 gallon
Conforme à la
réglementation ETL
Sous réserve de modifications techniques
Page 15

Garantie limitée d‘1 an
A. La présente garantie limitée d‘1 an porte sur la réparation ou le rempla-
cement du produit en cas de défaut de pièces ou de main d‘oeuvre. Cette
garantie ne porte pas sur les défauts issus d‘une utilisation commerciale,
non conforme, non raisonnable ou supplémentaire. Les défauts résultant de
l‘usure normale ne seront pas considérés comme des défauts de fabrication
couverts par cette garantie. SWIZZ STYLE DECLINE TOUTE RESPON-
SABILI TE EN CAS DE DEFAU T ACCESS OIRE OU INDI RECT DE TOUTE
NATURE. L A GARANTIE SUPPOSEE SUR LES PROPRIETES DE VALEUR COMMERCIALE OU LES CARACTERISTIQUES APPLIQUEES A
UNE UTIL ISATION PAR TICULIERE DU PRODUIT, EST LIMITEE DA NS
LE TEMPS, A SAVOIR A LA DUREE DE CETTE GARANTIE. Certains
fors juridiques n‘autorisant pas l‘exclusion ou la limitation des dommages
accessoires ou indirects sur la durée d‘une garantie supposée, les limitations ou exclusions susmentionnées peuvent ne pas s‘appliquer à votre cas.
Cette garantie vous accorde des droits légaux spécifiques, sous réserve
d‘autres droits dont vous pouvez bénéficier en fonction du for juridique.
Cette garantie est valable uniquement pour l‘acheteur initial de ce produit à
partir de la date initiale d‘achat de ce dernier.
B. A sa discrétion, Swizz Style procédera soit à la réparation ou au remplacement de ce produit s‘il présente des défauts de pièces ou de main
d‘oeuvre. Tout produit défectueux devra être retourné au point de vente
conformément aux dispositions prévues par le magasin. Pendant la période
de garantie, l‘acheteur peut aussi contacter Swizz Style au 1-877-663-7893
du lundi au vendredi de 09h00 à 16h00 (EST, Heure Normale de l‘Est) pour
toute information relative au retour du produit.
C. La présente garantie ne couvre pas les dommages résultant d‘une tentative non autorisée de réparation ou de toute utilisation non conforme au
mode d‘emploi.
D. Si le produit est équipé de filtres remplaçables, ces derniers ne sont pas
couverts par la garantie, à moins qu‘ils ne présentent un défaut de pièces
ou de main d‘oeuvre.
E. Tout produit retourné en garantie doit être accompagné de la documentation suivante: 1) Justificatif d‘achat 2) Description brève du problème 3) Information complète sur le contact (y compris l‘adresse de retour) 4) Chèque
ou virement de $10 ($15 au Canada) pour la manipulation, l‘emballage et les
frais de transport retour. Tous les tarifs sont en dollars US.
F. Swizz Style décline toute responsabilité pour la perte, le vol ou la détérioration des articles pendant le transport retour.
Page 16

Español
¡Enhorabuena! Acaba de comprar un extraordinario humidificador de aire
OSKAR little. Estamos seguros de que mejora para usted el aire en los ambientes cerrados.
Como con todos los aparatos electrodomésticos también este aparato exige un especial cuidado para evitar heridas, daños causados por incendios
o daños en el aparato. Le rogamos por lo tanto que lea detenidamente el
presente manual de instrucciones antes de proceder a su puesta en marcha
y preste atención a las advertencias de seguridad indicadas en el aparato.
Descripción del aparato
El aparato tiene los siguientes componentes principales:
1. Parte superior del humidificador de aire con motor
2. Parte inferior del humidificador de aire (depósito de agua)
3. Cable para la alimentación de corriente eléctrica
4. Pie de cinc
5. Interruptor
6. Botón para la seleccionar el nivel de velocidad
7. Botón para el modo de noche
8. Luz «sin agua»
9. Orificio de alimentación para rellenarlo durante el functionamiento
10. Depósito de la sustancia aromática
11. Cartucho del filtro
12. Marca máxima / Nivel del tanque de agua
13. Cubo de agua – Water Cube™
Advertencias de seguridad importantes
- CONSERVE ESTAS INSTRUCCIONES
Por favor, lea detenidamente el manual de instrucciones antes de poner en
marcha por primera vez el aparato y guárdelas bien por si necesitara consultarlas de nuevo más adelante o, dado el caso, pasárselas a un futuro nuevo
propietario.
• Stadler Form declina cualquier responsabilidad por los daños resultantes
de una utilización del aparato no con forme a este manual de instruc ciones.
• El aparato sólo se ha de utilizar en el hogar y con los fines descritos en
este manual de instrucciones. Una utilización no conforme a las disposiciones así como modificaciones técnicas en el aparato pueden poner en
peligro la salud y la vida.
• Este aparato por lo tanto no está destinado a ser utilizado por personas
(incluido niños) con facultades físicas, sensoriales o psíquicas disminuidas o bien que no tengan suficiente experiencia y/o conocimientos, una
persona encargada de su seguridad tendrá que estar a su cuidado o bien
enseñarles como se utiliza el aparato.
• Los niños deberán estar vigilados para evitar que jueguen con el aparato.
• Conecte el cable sólo a la corriente alterna. En el aparato, fíjese en las
indicaciones sobre el voltaje.
• No utilice ningún cable alargador estropeado.
• No pase el cable de red sobre bordes afilados ni lo pise.
• Nunca tire del enchufe del cable de red ni lo extraiga de la toma de corriente con las manos mojadas.
Page 17

• No emplee el aparato cerca de bañeras, duchas o piscinas (mantenga una
distancia mínima de 3 m / 10 pi). Coloque el aparato de manera que no sea
posible tocarlo al salir de la bañera.
• No sitúe el aparato cerca de un foco calorífico. No exponga el cable de
red directamente al calor (como p.ej. fogones calientes, llamas, planchas
calientes o estufas). Proteja el cable de red del aceite.
• Asegúrese de que, durante su funcionamiento, el aparato mantiene una
buena estabilidad y que no tropieza con el cable de red.
• El aparato no está protegido contra salpicaduras de agua.
• Sólo para uso en el interior del hogar.
• No guarde el aparato en el exterior.
• Mantenga (empaquete) el aparato en un lugar seco e inaccesible para
los niños.
• En caso de que el cable de red esté dañado, debe ser sustituido por el
fabricante o un taller autorizado por el fabricante o personas calificadas
para evitar cualquier riesgo.
• Desenchufe el dispositivo antes del llenado y la limpieza.
Puesta en marcha / Manejo
1. Coloque Oskar little en el lugar deseado sobre un suelo plano. Conecte el
cable (3) en el enchufe que corresponda. A continuación llene con agua
hasta la marca máxima (12) la parte inferior (2) por el orificio de alimentación (9) ya sea directamente desde el grifo o bien con una regadera.
Si ha rellenado la parte inferior directamente desde el grifo, coloque a
continuación la parte superior (1) sobre la parte inferior (2) acoplándolas
perfectamente.
2. Ponga luego el aparato en m archa presionando el int erruptor (5) . Entonces
deberán encenderse los LED azules. Si por el contrario se enciende una
lámpara roja (8 y 12), esto significa que el aparato no tiene agua o que la
parte superior no se ha colocado correctamente sobre la parte inferior.
3. Presionando el botón para seleccionar el nivel de velocidad (6) Usted puede modificar la potencia de humidificación (una luz azul para una vaporización normal, dos luces azules para una vaporización alta).
4. Si le molesta la luminosidad de las lamparitas (en el dormitorio por ejemplo), Usted puede reducir la intensidad de la luz presionando la tecla para
el modo noche (7). Podrá elegir entre tres modos diferentes:
• Modo normal (se activa de manera estándar)
• Modo atenuado (pulse una vez)
• Modo luz apagada (pulse dos veces)
• Si vuelve a pulsar el interruptor del regulador de luz cambiará de nuevo
al modo normal.
En caso de que no haya agua en el aparato, los LED rojos (8 y 12) se
iluminan en todos los modos (modo normal y noche). La luz roja no puede
atenuarse.
5. Con el humidificador de aire Oskar little, Usted puede también dispersar
sustancias aromáticas en la habitación. Le pedimos sin embargo que utilice las sustancias aromáticas con mucha precaución ya que una dosis
excesiva puede provocar fallos en algunas funciones y dañar el aparato.
Para la utilización de sustancias aromáticas retire el depósito de las sustancias aromáticas (10) del orificio de alimentación (9). Introduzca como
máximo 2–3 gotas de la sustancia aromática en el depósito y coloque de
Page 18

nuevo el depósito en el lugar previsto en el orificio de alimentación. Si desea cambiar de sustancia aromática, sólo tiene que enjuagar el depósito
de la sustancia aromática y la tela con agua corriente.
6. Si desea añadir más agua durante el funcionamiento, puede abrir el orificio de alimentación (9) presionando en el mismo (Push to open). A continuación puede rellenar el aparato, sin necesidad de desenchufarlo, con
una regadera o con una botella de agua. ATENCIÓN: Siempre que el aparato funcione con sustancias aromáticas, antes de proceder a rellenarlo
retire el depósito de las sustancias aromáticas de manera que al rellenar
el aparato no caiga agua en el depósito. Si a pesar de todo sucediera
que cae agua, tendrá que vaciar completamente el depósito de agua (2) y
enjuagarlo. En el depósito de agua no tiene que haber nunca sustancias
aromáticas ya que estas sustancias pueden destruir el plástico.
Indicación importante
La humectación con un humidificador lleva algún tiempo. Esto implica que
deben transcurrir más de 2 o 3 horas hasta que se pueda sentir la humectación. En caso de que utilice el humidificador en un ambiente muy seco, le
recomendamos que utilice el dispositivo en el nivel 2 (velocidad) para que la
humedad del aire aumente de forma efectiva.
Limpieza y cambio de los cartuchos
Antes de proceder a cualquier tarea de mantenimiento o después de cada
utilización desconectar el aparato y desenchufar el cable de la red (peligro
de cortocircuito).
• Para la limpieza exterior frotar con un trapo húmedo y a continuación secar bien.
• Cada 2 semanas: Para la limpieza interior, retirar el cartucho del filtro
y separar la parte inferior y, si fuera necesario, desincrustar los residuos
calcáreos. Una vez desincrustados los residuos calcáreos, lavar a fondo
la parte inferior y secarla bien a continuación antes de volver a poner en
marcha el humidificador de aire.
• Para un funcionamiento óptimo e higiénico del humidificador de aire, es
necesario cambiar el cartucho del filtro cada 2– 3 meses. Si se dejan funcionando más tiempo sin cambiar el cartucho del filtro, es posible por
una parte que la potencia de humidificación disminuya y por otra par te el
tratamiento antibacteriano del filtro ya no estará garantizado. Encontrará
el cartucho del filtro en el mismo comercio en el que ha comprado su
Oskar little.
Cubo de agua – Water Cube™
Atención: Retire el cubo de agua de la bolsa de plástico antes de usarlo.
El cubo de agua (13) mantiene fresco el humidificador utilizando carbón activado, asegurando de esta forma el funcionamiento óptimo del humidificador. El carbón activado puede usarse en una variedad de aplicaciones como
por ejemplo, para eliminar las sustancias contaminantes en la purificación
del agua, reducir los metales pesados y los productos químicos que causan olor. El cubo de agua comienza a funcionar tan pronto como entra en
contacto con el agua y funciona también cuando la unidad está apagada.
La vida útil del cubo de agua es aproximadamente un año. Por lo tanto, es
aconsejable reemplazar el cubo de agua al comienzo de cada temporada en
que sea necesario humidificar el aire.
Page 19

Reparaciones
• Las reparaciones en los aparatos eléctricos (cambio del cable) sólo han de
ser llevadas a cabo por personal especializado y debidamente formado.
En caso de haberse procedido a reparaciones indebidas, la garantía déjà
de tener efecto y se declina cualquier responsabilidad.
• Nunca ponga en marcha el aparato si el cable o el enchufe están estropeados, si falla alguna de las funciones, si el aparato se ha caído o si ha
sufrido algún otro desperfecto (rajas/roturas en el chasis).
• No introducir ningún tipo de objetos en el aparato.
• Una vez llegado el aparato al final de su vida útil, inutilizarlo inmediatamente (separar el cable) y entregarlo en el centro de recogida previsto a
tal efecto.
Eliminación
• No elimine los aparatos electrodomésticos como basura doméstica. Llévelos al servicio de recogida de estos aparatos de su municipio.
• Infórmese en el ayuntamiento del lugar donde están ubicados estos centros de recogida.
• Si se eliminan los aparatos eléctricos de manera descontrolada, es posible que al descomponerse ciertas sustancias peligrosas se extiendan por
la capa freática y afecten a la cadena alimentaria o emponzoñen durante
muchos años la flora y la fauna.
Datos técnicos
Salida de humedad de hasta 200 g/h
Potencia nominal 6 W (nivel de velocidad I)
15 W (nivel de velocidad II)
Dimensiones 246 x 290 x 175 mm / 9.6 x 11.4 x 6.8 inch
(ancho x alto x largo)
Peso 2.5 kg / 5.5 lbs
Capacidad del tanque 2.5 Litros / 0.7 gallon
Cumple la norma ETL
Quedan reservadas modificaciones técnicas
Page 20

Garantía limitada por un año
A. La presente garantía limitada por un año comprende la reparación o sus-
titución de productos con defectos de material o fabricación. Esta garantía
no cubre los daños resultantes de un uso comercial, excesivo, indebido u
otro. Los defectos resultantes de su uso habitual no serán considerados
como defectos de fabricación según lo estipulado en la presente garantía.
SWIZZ S TYLE NO SE RESPONSABILIZA RÁ EN CASO DE DAÑOS INCIDENTALES DE CUALQUIER NATURALEZA. CUALQUIER GARANTÍA IMPLÍCITA DE COMERCIALIZACIÓN O APTITUD PARA UN USO
PARTICULAR DEL PRESENTE PRODUCTO ESTARÁ LIMITADA AL
PERIODO DE VIGENCIA DE ESTA GARANTÍA. Algunas jurisdicciones
no permiten la exclusión o la limitación de daños incidentales o limitaciones
en cuanto al periodo de validez de la garantía, por lo que las limitaciones
o exclusiones anteriormente establecidas puede que no sean aplicables
dependiendo de su caso. La presente garantía le concede determinados
derechos legales que no excluyen la existencia de otros, dependiendo de la
jurisdicción a la que se halle sometido. Esta garantía únicamente es aplicable al comprador original del producto y entrará en vigor a partir de la fecha
de adquisición de este.
B. Si así lo considerare oportuno, Swizz Style reparará o sustituirá el producto si este presenta defectos en sus componentes o en su fabricación. El
producto defectuoso deberá devolverse al punto de compra según la política del establecimiento. A partir de entonces, durante el periodo de validez
de la garantía, el comprador podrá ponerse en contacto con Swizz Style
llamando al teléfono 1-877-663-7893, de lunes a viernes, de 9.00 a 16.00
horas (GMT -05:00), para solicitar cualquier información sobre la devolución
del producto.
C. La presente garantía no cubre los daños resultantes de intentos no autorizados de reparación o debidos a cualquier uso que no se contemple en el
manual de instrucciones.
D. En caso de que el producto cuente con filtros intercambiables, estos no
se hallan cubiertos por la presente garantía, excepto en caso de defecto de
material o fabricación.
E. Cualquier producto que sea devuelto, deberá ir acompañado por los siguientes documentos: 1) Prueba de compra 2) Breve descripción del problema 3) Infor mación de contacto completa (incluida la dirección de devolución)
4) Cheque u orden de pago por un importe de 10 $ (15 $ para Canadá) en
concepto de costes de manipulación, empaquetado y envío. Cualquier pago
se realizará en dólares estadounidenses.
F. Swizz Style no se responsabilizará por aquellos artículos perdidos, robados o dañados durante la devolución.
Page 21

Cachet du poin t de vente / Sello del establecimiento de vent a
Retailer’s stamp /
Page 22

Design b y Matti
Thanks to all people involved in this project:
Del Xu for his engagement and for building cultural
bridges, Lin Shouming for the engineering and Qin Huiyi for his CAD work, Mario Rothenbühler for the photos,
Matti Walker for the small design, space saving ideas and
graphic work.
Martin Stadler, CEO Stadler Form Aktiengesellschaft
16-1
www.stadlerformusa.com
 Loading...