

Page 1
Fred
Gebrauchsanweisung
Operat ing in structio ns
Mode d‘emploi
Istruzioni per l‘uso
Manual de instrucciones
Gebruiks aanwijzing
Brugsa nvisning
Käy ttöohje
Bruksa nvisning
Bruksa nvisning
Page 2
Fred
7
13
14
10
12
11
1
A
G
R
E
A
R
N
H
É
N
N
2
•
A
2
T
I
E
•
2
Y
E
A
R
S
W
A
R
R
A
N
T
Y
3
A
J
2
•
E
I
T
N
A
R
A
G
E
D
S
E
Page 3
8
9
2
4
5
6
15
16
17
Download instruction manual:
www.stadlerform.com/Fred
Page 4

Page 5

Deutsch
Gratulation! Sie haben soeben den aussergewöhnlichen Luftbefeuchter
FRED erworben. Er wird Ihnen viel Freude machen und die Raumluft für
Sie verbessern.
Wie bei allen elektrischen Haushaltsgeräten wird auch bei diesem Gerät zur
Vermeidung von Verletzungen, Brand- oder Geräteschäden besondere Sorgfalt verlangt. Bitte studieren Sie die vorliegende Betriebsanleitung vor der
Inbetriebnahme und beachten Sie die Sicherheitshinweise auf dem Gerät.
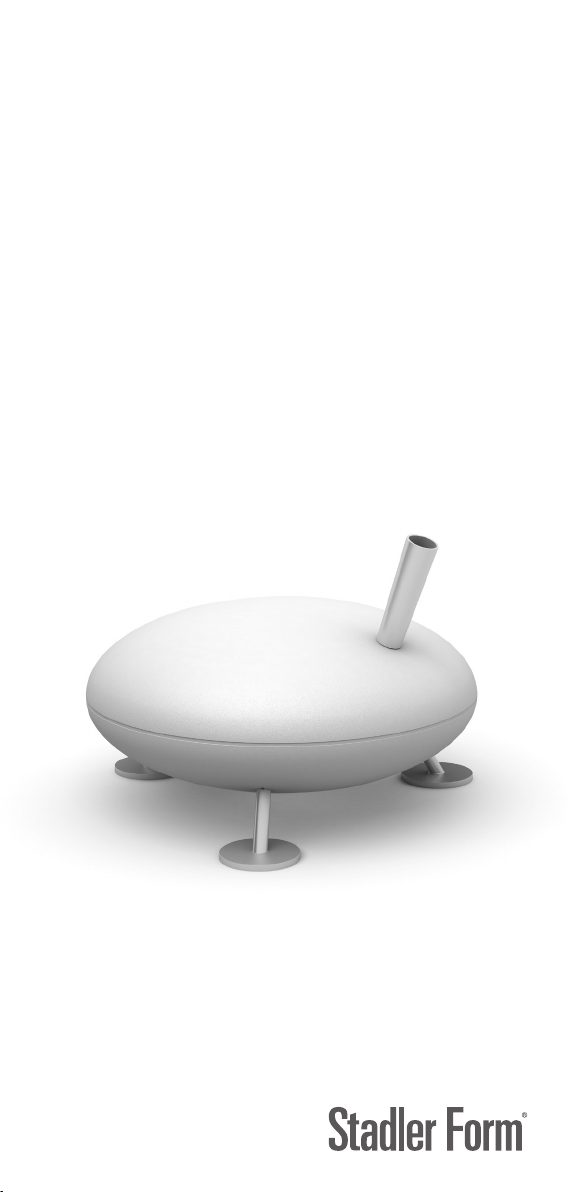
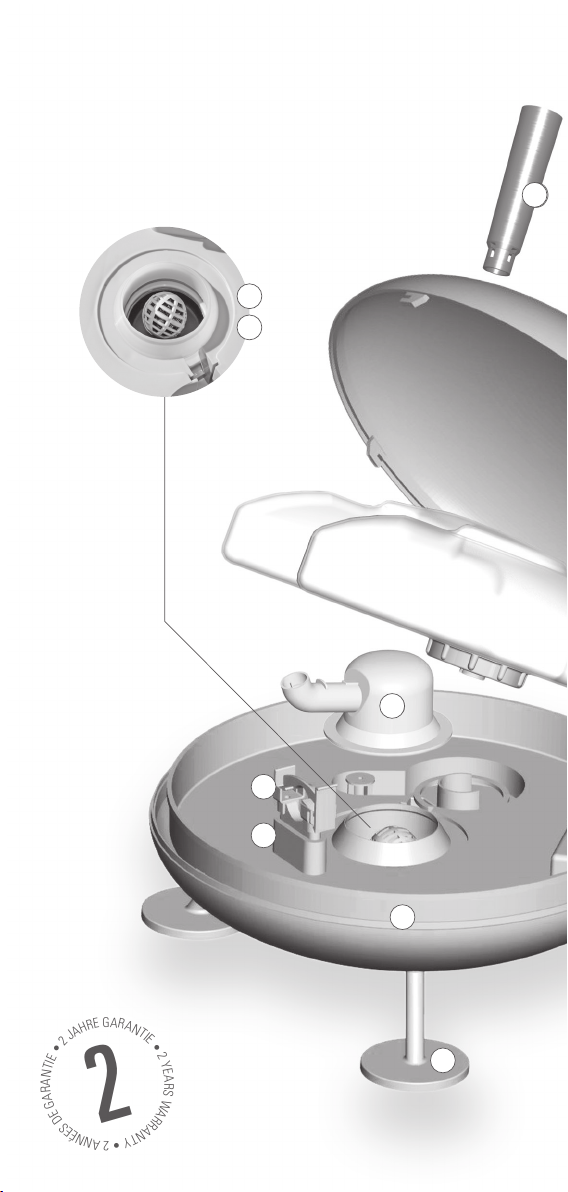
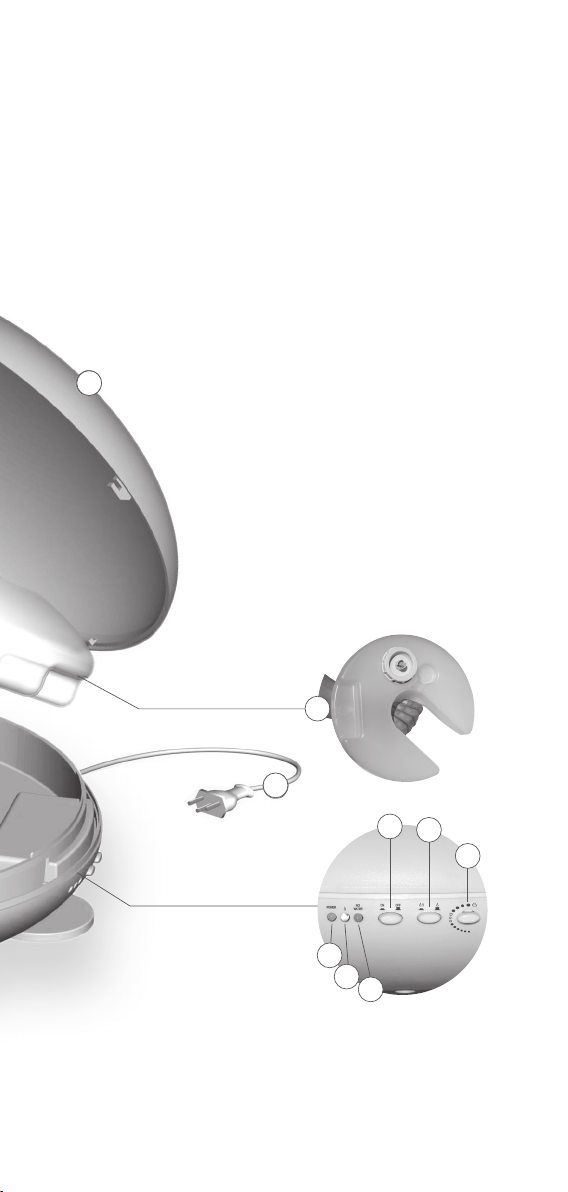
Gerätebeschreibung
Das Gerät besteht aus den folgenden Hauptkomponenten:
1. Luftbefeuchter
2. Netzkabel für die Stromversorgung
3. Füsse mit Einlege-Platte
4. Ein/Aus-Schalter
5. Knopf für die Wahl der Leistung
6. Hygrostat
7. Dampfrohr aussen
8. Deckel Gerät mit Öffnungshilfe
9. Wassertank mit Deckel und Tragemulde
10. Abdeckung für Heizplatte
11. Halter für Abdeckung Heizplatte
12. Clip zu Halter Abdeckung Heizplatte
13. Dichtung für Abdeckung
14. Entkalkungskugel
15. LED für Betrieb (Power)
16. LED für Leistung (blau=hoch, grün=economy)
17. Anzeige Tank leer (LED)
Wichtige Sicherheitshinweise
Bitte lesen Sie die Gebrauchsanleitung genau durch, bevor Sie das Gerät
das erste Mal in Betrieb nehmen und bewahren Sie sie zum späteren Nachschlagen gut auf, geben Sie sie ggf. an den Nachbesitzer weiter.
• Für Schäden, die durch Nichtbeachten dieser Gebrauchsanleitung entstehen, lehnt Stadler Form jegliche Haftung ab.
• Das Gerät ist nur im Haushalt für die in dieser Gebrauchsanweisung beschriebenen Zwecke zu benutzen. Ein nicht bestimmungsgemässer Gebrauch sowie technische Veränderungen am Gerät können zu Gefahren
für Gesundheit und Leben führen.
• Dieses Gerät kann von Kindern ab 8 Jahren und Personen mit eingeschränkten körperlichen, sensorischen oder geistigen Fähigkeiten, aber
auch von unerfahrenen und unwissenden Personen verwendet werden,
sofern diese das Gerät unter Aufsicht verwenden oder von einer anderen
Person über die sichere Verwendung des Gerätes unterwiesen wurden
und sich der damit verbundenen Gefahren bewusst sind. Kinder sollten
nicht mit dem Gerät spielen. Kinder sollten das Gerät nur unter Aufsicht
reinigen und pflegen.
• Schliessen Sie das Kabel nur an Wechselstrom an. Achten Sie auf die
Spannungsangaben auf dem Gerät.
• Keine beschädigten Verlängerungskabel verwenden.
Page 6

• Das Netzkabel nicht über scharfe Kanten ziehen oder einklemmen. Den
Stecker nie am Netzkabel oder mit nassen Händen aus der Steckdose
ziehen.
• Das Gerät nicht in unmittelbarer Nähe einer Badewanne, einer Dusche
oder eines Schwimmbeckens benutzen (Mindestabstand von 3 m einhalten). Gerät so aufstellen, dass Personen das Gerät von der Badewanne
aus nicht berühren können.
• Gerät nicht in der Nähe einer Wärmequelle aufstellen. Das Netzkabel
keiner direkten Hitzeeinwirkung (wie z.B. heisse Herdplatte, offene
Flammen, heisse Bügelsohle oder Heizöfen) aussetzen. Netzkabel vor Öl
schützen.
• Darauf achten, dass das Gerät beim Betrieb eine gute Standfestigkeit
besitzt und nicht über das Netzkabel gestolpert werden kann.
• Das Gerät ist nicht spritzwassergeschützt.
• Das Gerät ist nur zur Verwendung in Innenräumen geeignet.
• Das Gerät nicht im Freien aufbewahren.
• Das Gerät an einem trockenen und für Kinder unzugänglichen Ort aufbewahren (einpacken).
• Das Gerät funktioniert nur einwandfrei mit unbehandeltem Wasser. Nicht
einsetzen bei Enthärtungsanlagen/Ionenaustaucher.
• Das Gerät darf unter keinen Umständen mit Duftstoffen betrieben werden bzw. mit Duftstoffen in Berührung kommen, da diese den Kunststoff
zerstören und zu Fehlfunktionen des Gerätes führen können.
• Wenn das Netzkabel beschädigt ist, muss es vom Hersteller oder in einer
vom Hersteller zugelassenen Werkstatt oder von ähnlich qualifizierten
Personen ersetzt werden, um Gefahren zu vermeiden.
• Trennen Sie das Netzkabel von der Steckdose, wenn Sie das Gerät mit
Wasser befüllen oder reinigen.
• Vorsicht: heisst Dampf! Achten Sie bei der Verwendung des Geräts darauf, dass heisser Dampf ausströmt.
Hinweis:
Betreiben Sie den L uftbefeuchter Fred nicht mit entkalktem Wasser aus Entkalkungsanlagen, die nach dem Prinzip des Ionenaustausches funktionieren
(Salz wird dem Wasser beigefügt). Dies kann zu Fehlfunktionen und zum
anschliessenden Auslaufen des Gerätes führen.
Inbetriebnahme/Bedienung
1. Wenn der Luf tbefeuchter Fred am gewünschten Platz steht: Netzkabel (2)
an der Steckdose im Haushalt anschliessen. Dampfrohr (7) entfernen und
Deckel (8) abnehmen. Wassertank (9) mit Wasser füllen (Einfüll-Öffnung
leicht nach oben halten) – Deckel gut aufschrauben und prüfen, ob der
Deckel dichtet. Wassertank wieder in Luftbefeuchter einsetzen, Deckel
aufdrehen und Dampfrohr einsetzen.
2. Platzieren Sie das Gerät im Raum. Achten Sie darauf, dass das Gerät nicht
auf einem wasserempfindlichen Boden steht und dass keine feuchtigkeitsempfindlichen Geräte oder Möbel in der Nähe stehen.
3. Fred am Ein/Aus-Schalter (4) in Betrieb nehmen und gew ünschte Leistung
(5) wählen (blau=hoch, gr ün=economy). Wenn das Gerät aufhört zu dampfen, leuchtet die Anzeige Tank leer (15) auf, dann das Wasser gemäss
Punkt 1 nachfüllen.
Page 7

4. Mit dem Hygrostat (6) wird die Luftfeuchtigkeit eingestellt. Der Einstellbereich geht von 20 bis 90% relative Luftfeuchtigkeit. Für ein angenehmes Raumklima empfehlen wir Ihnen 45% Luftfeuchtigkeit einzustellen
(in der Mitte des Regelbereichs, horizontale Schalterposition).
Achtung: Sollte der Luftbefeuchter nach 5 Minuten nicht dampfen,
stellen Sie den Hygrostat ganz nach rechts (max.). Es kann sein, dass die
Luftfeuchtigkeit im Raum höher ist, als der von Ihnen eingestellte Wert.
Sie können danach den Hygrostat stufenweise zurückdrehen. Wenn die
Lämpchen erlöschen, haben sie die aktuelle Luftfeuchtigkeit des Raumes
erreicht. Sollte der Luftbefeuchter während des Betriebes automatisch
abschalten, wurde die gewünschte Luftfeuchtigkeit erreicht. Der Luftbe feuchter nimmt die Befeuchtung erneut auf, wenn die Raumluftfeuchtig keit unter den eingestellten Wert fällt.
5. Falls das Gerät genügend Wasser hat und dennoch abschaltet, Entkalkung (siehe Reinigung) durchführen.
Reinigung
Vor jeder War tung und nach jedem Gebrauch das Gerät ausschalten und das
Netzkabel aus der Dose ziehen.
• Achtung: Gerät nie ins Wasser tauchen (Kurzschlussgefahr).
• Zur Reinigung nur mit einem feuchten Lappen abreiben und danach gut
trocknen. Zuvor unbedingt Netzstecker ziehen.
• Luftbefeuchter je nach Kalkgehalt, aber mindestens wöchentlich entkalken: Dampfrohr (7) abnehmen, Deckel (8) mit der Öffnungshilfe öffnen
und abheben, Wassertank (9) entfernen. Dann die Abdeckung für die
Heizplatte (10) und die Dichtung (11) wegnehmen. Beide Teile mit einer
Bürste reinigen. Entkalkungs-Kugel (12) und die Heizplatte mit AntihaftBeschichtung mit einem handelsüblichen Entkalker entkalken und danach
gut ausspülen. Gerät vor dem Gebrauch wieder vollständig mit den Teilen
(8-12) zusammenbauen.
• Wassertank regelmässig gut ausspülen.
Reparaturen
• Reparaturen an Elektrogeräten (Wechseln des Netzkabels) dürfen nur
von instruierten Fachkräften durchgeführt werden. Bei unsachgemässen
Reparaturen erlischt die Garantie und jegliche Haftung wird abgelehnt.
• Nehmen Sie das Gerät nie in Betrieb, wenn ein Kabel oder Stecker beschädigt ist, nach Fehlfunktionen des Gerätes, wenn dieses heruntergefallen ist oder auf eine andere Art beschädigt wurde (Risse/Brüche am
Gehäuse).
• Nicht mit irgendwelchen Gegenständen in das Gerät eindringen.
• Ausgedientes Gerät sofort unbrauchbar machen (Netzkabel durchtrennen) und bei der dafür vorgesehenen Sammelstelle abgeben.
Entsorgung
Die europäische Richtlinie 2012 / 19 / CE über Elektro- und Elektronik-Altgeräte (WEEE) verlangt, dass elektrische Haushaltsgeräte nicht über den
Restmüll oder sonstigen Haushaltsabfall entsorgt werden dürfen, sondern
an Sammelpunkten für das Recycling von elektrischen und elektronischen
Geräten abgegeben werden müssen. So können die Verwertung der enthaltenen Materialien optimiert und ihre Auswirkungen auf die menschliche
Page 8

Gesundheit und die Umwelt reduziert werden. Das durchgestrichene Abfalltonnensymbol auf dem Produkt erinnert Sie an diese
Verpflichtung. Bitte fragen Sie bei Ihrer Gemeindeverwaltung
nach der zuständigen Entsorgungsstelle.
Technische Daten
Leistung Normal 300 W, Eco 150 W
Spannung 220 – 240 V / 50 Hz
Abmessungen 363 x 267 x 363 mm
(Breite x Höhe x Tiefe)
Gewich t 2.9 kg
Abschaltautomatik ja, dreifach gesichert
Tankinhalt 3.6 Liter
Schalldruckpegel 27 – 33 dB(A)
Erfüllt EU-Vorschrift GS / CE / WEEE / RoHS
Technische Änderungen vorbehalten
Page 9

English
Congratulations! You have just purchased the exceptional humidifier FRED.
It will give you great pleasure and improve the indoor air for you.
As with all domestic electrical appliances, particular care is needed with
this model also, in order to avoid injury, fire damage or damage to the appliance. Please study these operating instructions carefully before using the
appliance for the first time and follow the safety advice on the appliance
itself.
Description of the appliance
The appliance consists of the following main components:
1. Air humidifier
2. Power cord for power supply
3. Metal-plated feet
4. On/Off switch
5. Output selector switch
6. Hygrostat
7. External steam pipe
8. Cover appliance with opening aid
9. Water tank with cover and integrated carrier handle
10. Cover for heating plate
11. Holder for heating plate cover
12. Clip for heating plate cover holder
13. Sealing for cover
14. Anti-limescale magic ball
15. LED for operation (power)
16. LED for output (blue=high, green=economy)
17. Display Tank empty (LED)
Important safety instructions
Please read through the operating instructions carefully before you use the
appliance for the first time and keep them safely for later reference; if necessary pass them on to the next owner.
• Stadler Form refuses all liability for loss or damage which arises as a
result of failure to follow these operating instructions.
• The appliance is only to be used in the home for the purposes described in
these instructions. Unauthorised use and technical modifications to the
appliance can lead to danger to life and health.
• This appliance can be used by children aged from 8 years and above and
persons with reduced physical, sensory or mental capabilities or lack of
experience and knowledge if they have been given super vision or instruction concerning use of the appliance in a safe way and understand the
hazards involved. Children shall not play with the appliance. Cleaning and
user maintenance shall not be made by children without supervision.
• Only connect the cable to alternating current. Observe the voltage information given on the appliance.
• Do not use damaged extension cords.
• Do not run the power cord over sharp edges and make sure that it does
not get trapped. Do not pull the plug from the socket with wet hands or by
holding on to the power cord.
Page 10

• Do not use the appliance in immediate vicinit y of a bath tub, a shower or a
swimming pool (observe a minimum distance of 3 m). Place the appliance
such that a person in the bath tub cannot touch the appliance.
• Do not place the appliance near a heat source. Do not subject the power
cord to direct heat (such as a heated hotplate, open flames, hot iron sole
plates or heaters for example). Protect power cords from oil.
• See to it that the appliance is properly positioned to ensure a high stability during its operation and make sure that no one can trip over the power
cord.
• The appliance is not splash-proof.
• For indoor use only.
• Do not store the appliance outdoors.
• Store the appliance in a dry place inaccessible to children (pack the appliance).
• The appliance only functions perfectly with untreated water. Do not use
in conjunction with water softeners / ion exchangers.
• The appliance must not under any circumstances be operated with or
come into contact with fragrances because these damage the plastic and
may lead to appliance malfunctions.
• If the power cord is damaged, it must be replaced by the manufacturer
or a repair shop authorized by the manufacturer or by similarly qualified
persons in order to avoid a hazard.
• Unplug the appliance during filling and cleaning.
• Caution: hot vapour! Care should be taken when using the appliance due
to the emission of hot water vapour.
Note:
Do not operate the humidifier Fred with decalcified water out of a decalcification system that uses the principle of an ion exchanger (salt is added to
the water). This may lead to malfunctions and subsequent leakage of the
appliance.
Setting up/operation
1. If the air humidifier Fred has been placed in the desired place: Connect the
power cord (2) to the socket in your household. Remove the steam pipe (7)
and lift off the cover (8). Fill the water tank (9) with water (make sure to hold
inlet opening slightly up) – screw on the cover properly and check whether
the cover is tight. Reinsert the water tank in the air humidifier, screw on the
cover and insert the steam pipe.
2. Place the appliance in the room. Take care not to place it on a floor which
might be damaged by water, and that there are no appliances or furniture
sensitive to dampness close to it.
3. Operate Fred via the On/Off switch (4) and select the desired output (5)
(blue=high, green=economy). If the appliance stops steaming, the display
Tank empty (15) will be illuminated, then refill the water according to item 1.
4. Use the hygrostat (6) to set the humidity. The setting range
starts at 20 and ends at 90% relative humidity. We recommend
setting the unit to 45% humidity for a convenient room climate (in the middle
of the setting range, horizontal switch position).
Attention: If the air humidifier fails to steam after 5 minutes, turn
the hygrostat all the way to the right (max.). This may be due to the actual
Page 11

room humidity being higher than the value you have set. You may then
gradually reduce the hygrostat. When the pilot lamps go out, you have
reached the ambient room humidity. If the air humidifier switches off
automatically while in operation, the desired room humidity has been
reached. The air humidifier resumes operation when the room humidity
falls below the preset value.
5. If the appliance is filled with a sufficient amount of water and stops nevertheless, star t the descaling process (see cleaning).
Cleaning
Before servicing the humidifier and after each occasion of use, switch off
the appliance and unplug the mains cable from the socket.
• Attention: Never immerse the appliance in water (danger of short-
circuit).
• To clean the appliance, only wipe it down with a damp cloth and then dry
it carefully. Always take out the mains plug first.
• Descale the air humidifier depending on the lime content, but at least
once a week: Remove the steam pipe (7), open the cover (8) using the
opening aid and lift it off, remove the water tank (9). Then remove the
cover for the heating plate (10) and the sealing (11). Clean both parts with
a brush. Descale the anti-limescale magic ball (12) and the heating plate
with the anti stick coating using a commercial descaler and rinse well
afterwards. Reassemble appliance completely with all parts (8-12) before
reusing it.
• Rinse the water tank well at regular intervals.
Repairs
• Repairs to electrical appliances must only be carried out by a qualified
electrical technician. If improper repairs are carried out, the warranty
lapses and all liability is refused.
• Never operate the applianc e if the adaptor or plug is damaged, af ter it has
malfunctioned, if it has been dropped or has been damaged in any other
way (cracks/breaks in the casing).
• Do not push any object into the appliance.
• If the appliance is beyond repair, make it unusable immediately by cutting
through the cable and hand it in at the collection point provided for the
purpose.
Disposal
The European directive 2012 / 19 / CE on Waste Electrical and Electronic
Equipment (WEEE), requires that old household electrical appliances must
not be disposed in the normal unsorted municipal waste stream. Old appliances must be collected separately in order to optimize the recovery and
recycling of the materials they contain and reduce the impact on human
health and the environment. The crossed out “wheeled bin” symbol on the
product reminds you of your obligation, that when you dispose of
the appliance it must be separately collected. Consumers should
contact their local authority or retailer for information concerning
the correct disposal of their old appliance.
Page 12

Specifications
Output Normal 300 W, eco 150 W
Voltage 220 – 240 V / 50 Hz
Dimensions 363 x 267 x 363 mm
(width x height x depth)
Weight 2.9 kg
Automatic shut-off yes, triple security
Tank c apacit y 3.6 Lit er
Sound level 27 – 33 dB(A)
Complies with EU
regulations GS / CE / WEEE / RoHS
All rights for any technical modifications are reserved
Page 13

Français
Félicitation! Vous venez d‘acheter le superbe humidificateur FRED. Nous
espérons que cet appareil vous donnera entière satisfaction et améliorera
l’air intérieur pour vous.
Comme pour tous les appareils ménagers électriques, il est important
d‘entretenir cet appareil correctement afin d’éviter les blessures, les incendies ou les dommages. Veuillez lire attentivement le présent mode d‘emploi
avant la mise en service et respecter les conseils de sécurité indiqués sur
l’appareil.
Description de l’appareil
L’appareil est composé des éléments principaux suivants:
1. Humidificateur
2. Câble d’alimentation en courant
3. Pieds avec extension
4. Interrupteur marche/arrêt
5. Interrupteur pour choisir la puissance
6. Hygrostat
7. Tube à vapeur extérieur
8. Couvercle de l‘appareil, avec dispositif d’ouverture
9. Réservoir d’eau avec couvercle, doté d’une poignée en creux pour
une prise facile
10. Couvercle de protection pour plaque chauffante
11. Support de couvercle de plaque chauffante
12. Clip de support de couvercle de plaque chauffante
13. Joint pour couvercle de protection
14. Boule anticalcaire
15. DEL pour la marche (Power)
16. DEL pour la puissance (bleu = forte puissance, vert = économie)
17. Indicateur «réservoir vide» (DEL)
Conseils de sécurité importants
Veuillez lire attentivement le mode d‘emploi avant la première mise en
service de l’appareil et conservez-le pour toute consultation ultérieure ou
remettez-le, le cas échéant, au nouveau propriétaire.
• La société Stadler Form décline toute responsabilité des dommages
résultant du non-respect des indications données dans ce mode d‘emploi.
• Cet appareil ne doit être utilisé qu’aux fins domestiques décrites dans ce
mode d‘emploi. Toute utilisation contraire à sa destination ainsi que toute
modification technique apportée à l‘appareil peut entraîner des risques
pour la santé et la vie.
• Cet appareil peut être utilisé par les enfants âgés de 8 ans et plus et les
personnes aux capacités physiques, sensorielles ou mentales réduites
ou ne disposant pas de l’expérience ou de la connaissance nécessaire,
sous surveillance ou s’ils ont reçu les instructions concernant l’utilisation
de l’appareil et s’ils comprennent les dangers impliqués. Les enfants ne
doivent pas jouer avec l’appareil. Les opérations de nettoyage et d’entretien ne doivent pas être effectuées par des enfants sans surveillance.
• Ne branchez le câble qu’au courant alternatif. Tenez compte des indications de tension situées sur l‘appareil.
• Ne pas utiliser de rallonge électrique endommagée.
Page 14

• Ne pas faire passer ou coincer le câble d’alimentation par-dessus des
arêtes vives. Ne jamais retirer la fiche de courant de la prise en tirant sur
le câble d’alimentation ou en ayant les mains mouillées.
• Ne pas utiliser l’appareil à proximité immédiate d’une baignoire, d’une
douche ou d’une piscine (respecter une distance minimum de 3 m). Placer
l’appareil de telle façon à ce que personne ne puisse le toucher à partir
de la baignoire.
• Ne pas placer l’appareil à proximité directe d‘ une source de chaleur. Ne
pas exposer le câble d’alimentation à la chaleur (comme p. ex. une plaque
chaude de cuisinière, flammes nues, semelle chaude de fer à repasser ou
poêles). Protéger le câble d’alimentation de tout contact avec de l‘huile.
• Veiller à ce que l’appareil ait une bonne stabilité lors de son fonctionnement et que l’on ne puisse pas trébucher sur le câble d’alimentation.
• Cet appareil n’est pas protégé contre les projections d’eau.
• Pour usage intérieur uniquement.
• L’appareil ne doit pas être conservé à l’extérieur.
• Conserver l’appareil à un endroit sec et hors de portée des enfants (l’emballer).
• Pour assurer un fonctionnement irréprochable de l’appareil, n’utiliser que
de l’eau non traitée. Ne pas utiliser l’appareil avec des adoucisseurs/
échangeurs d’ions.
• Ne jamais utiliser l’appareil avec des produits parfumés et éviter le
contact de l’appareil avec ces derniers, car ils pourraient endommager le
plastique et entraîner des dysfonctionnements.
• Si le cordon d’alimentation est endommagé, le faire remplacer par le
fabricant ou par un atelier agréé par le fabricant ou des personnes qualifiées en conséquence, afin d’éviter tout danger.
• Débranchez l’appareil pendant le remplissage et le nettoyage.
• Attention: vapeur chaude ! Des précautions doivent être prises lors de
l’utilisation de l’appareil à cause de l’émission de vapeur d’eau chaude.
Note:
N’utilisez pas l’humidificateur Fred avec de l’eau provenant d’adoucisseurs
d’eau fonctionnant par échange d’ions (car du sel est ajouté à l’eau). Cela
pourrait provoquer des dysfonctionnements et des fuites de
l’appareil.
Mise en service/commande
1. Lorsque l’humidificateur Fred se trouve à l’endroit souhaité : brancher le
câble d’alimentation (2) à la prise de courant domestique. Retirer le tube
à vapeur (7) et ôter le couvercle (8). Remplir le réservoir d’eau (9) (tenir
l’orifice de remplissage légèrement vers le haut) ; bien visser le couvercle
et vérifier qu’il est bien étanche. Replacer le réservoir d’eau dans l’humidificateur, visser le couvercle et insérer le tube à vapeur.
2. Installez l’appareil dans la pièce. Assurez-vous que l’appareil ne repose
pas sur un revêtement de sol sensible à l’eau et qu’aucun appareil ou
meuble sensible à l’humidité ne se trouve à proximité.
3. Mettre en marche Fred au moyen de l’interrupteur marche / arrêt (4) et
choisir la puis sance souhai tée (5) (bleu = for te puissanc e, vert = écono mie).
Si l’appareil arrête d‘émettre de la vapeur, l’indicateur « réservoir vide »
(15) s’allume ; dans ce cas, remettre de l’eau comme décrit au point 1.
Page 15

4. L’hygrostat (6) permet de régler l’humidité dans l’air. La plage de réglage
est comprise entre 20 et 90% d’humidité relative. Pour obtenir un climat
ambiant agréable, nous vous recommandons de régler l’hygrostat à 45%
d’humidité d’air (au centre de la plage de réglage, interrupteur en position
horizontale).
Attention: Si l’humidificateur n’émet pas de vapeur au bout de
5 minutes, positionnez l’hygrostat complètement à droite (max.). Il est
possible que l’humidité de l’air de la pièce soit plus élevée que la valeur
que vous avez réglée. Dans ce cas, vous pouvez réduire le réglage de
l’hygrostat. Dès que les voyants s’éteignent, le réglage correspond à
l’humidité actuelle régnant dans la pièce. Si l’humidificateur s’éteint
automatiquement pendant le fonctionnement, cela indique que l’humidité
souhaitée a été atteinte. L’humidificateur se remettra en marche dès que
l’humidité ambiante retombera en dessous de la valeur réglée.
5. Si l’appareil s’arrête alors qu’il a suffisamment d’eau, effectuer un détartrage (voir nettoyage).
Nettoyage
Mettre l’appareil hors tension avant chaque utilisation et retirer la fiche de
la prise de courant.
• Attention: Ne jamais immerger l’appareil dans l’eau (risque de court-
circuit).
• Nettoyer avec un chiffon humide et ensuite bien essuyer. Retirer auparavant la fiche de la prise de courant.
• Dé tartre r l’humidifica teur en fonct ion de la teneur en c alcaire, toute fois au
moins une fois par semaine: ôter le tube à vapeur (7), ouvr ir le couvercle
(8) à l’aide du dispositif d’ouverture et l’enlever, retirer le réservoir d’eau
(9). Ensuite, retirer le couvercle de la plaque chauffante (10) et le joint (11).
Nettoyer ces deux pièces à l’aide d’une brosse. Détartrer la boule anticalcaire (12) et la plaque chauffante ecouverte de non adhésive à l’aide
d’un produit détartrant et, ensuite, bien rincer. Avant d’utiliser l‘appareil,
remonter toutes les pièces (8-12).
• Bien rincer le réservoir d’eau régulièrement.
Réparations
• Les réparations sur les appareils électriques ne doivent être effectuées
que par des électriciens qualifiés. La garantie s’éteint et toute responsabilité est exclue en cas de réparations non conformes aux règles de l‘art.
• Ne mettez jamais l‘appareil en service en cas d’endommagement d’un
cordon ou d’une fiche, après un dysfonctionnement de l’appareil causé
par une chute ou par une autre détérioration de l’appareil (boîtier fissuré/
cassé).
• Ne pas pénétrer avec des objets quelconques dans l’appareil.
• Arrivé au bout de sa durée de vie, l’appareil doit immédiatement être rendu inutilisable (sectionner le cordon d’alimentation) et être déposé dans
une déchetterie prévue à cet effet.
Page 16

Elimination
Conformément à la directive européenne 2012 / 19 / EC sur la mise au
rebut des déchets d’équipements électriques et électroniques (DEEE), les
appareils ménagers usés ne doivent pas être jetés avec les déchets non
triés. Ces appareils usés doivent être collectés séparément des déchets
ménagers pour optimiser la récupération et le recyclage de leurs composants dans le but de réduire les effets négatifs sur la santé humaine et sur
l’environnement. Le symbole de poubelle avec roulet tes et croix indique que
ces produits doivent être collectés et mis au rebut séparément
des ordures ménagères. Les consommateurs doivent contacter
les autorités locales ou leurs revendeurs concernant la mise au
rebut de leurs vieux appareils.
Caractéristiques techniques
Puissance Normal 300 W, éco 150 W
Tension 220 – 240 V / 50 Hz
Dimensions 363 x 267 x 363 mm
(largeur x hauteur x profondeur)
Poids 2,9 kg
Arrêt automatique oui, triple sécurité
Contenance du réservoir 3,6 Litres
Niveau de bruit 27 – 33 dB(A)
Conforme à la
réglementation UE GS / CE / DEEE / RoHS
Sous réserve de modifications techniques
Page 17

Italiano
Congratulazioni! Avete appena acquistato il fantastico umidificatore FRED.
Sarà estremamente piacevole e migliorerà l’aria nell’ambiente per voi.
Come con tutte le apparecchiature elettriche domestiche, è necessaria particolare attenzione anche con questo modello, al fine di evitare infortuni,
danni da incendio o danni al dispositivo. Studiare con attenzione queste
istruzioni per l’uso prima di utilizzare il dispositivo per la prima volta e seguire tutte le istruzioni di sicurezza fornite con esso.
Descrizione dell’apparecchio
L’apparecchio consiste delle seguenti componenti principali:
1. Umidificatore d’aria
2. Cavo di alimentazione
3. Piede in metallo
4. Interruttore On/Off
5. Interruttore selettore in uscita
6. Igrostato
7. Ugello di uscita vapore esterno
8. Copertura dell’apparecchiatura con aiuto di apertura
9. Serbatoio con coperchio e maniglia integrata
10. Copertura per la piastra riscaldata
11. Supporto per la piastra riscaldata
12. Clip per il supporto per la piastra riscaldata
13. Sigillo per coperchio
14. Sfera magica anti calcare
15. LED di utilizzo (alimentazione)
16. LED di uscita (blu= alto, verde= economico)
17. Mostra serbatoio vuoto (LED)
Importanti istruzioni di sicurezza
Prima di utilizzare l’apparecchio leggere attentamente le istruzioni p er l’uso.
Dopo aver letto le istruzioni per l’uso, conservarle con cura per la futura
consultazione.
• La Stadler Form respinge ogni responsabilità per la perdita o danni che
incorrano come risultato di un mancato rispetto di queste istruzioni d’uso.
• L’apparecchio dev’essere usato solo in casa e per gli scopi descritti in
queste istruzioni. L’uso non autorizzato e le modifiche tecniche all’apparecchio possono portare a pericoli per la vita e la salute.
• Questo apparecchio può essere utilizzato da bambini di età superiore agli
8 anni e persone con ridotte capacità mentali, fisiche o sensoriali o prive
di esperienza e conoscenze in merito, in presenza di altre persone che
ne sorveglino l’operato o ricevano istruzioni sull’uso dell’apparecchio in
modo sicuro e ne comprendano i pericoli. I bambini non devono giocare
con l’apparecchio. Pulizia e manutenzione non deve essere effettuata da
bambini senza supervisione.
• Collegate il cavo solo alla corrente alternata. Rispettate le informazioni
sul voltaggio riportate sull’apparecchio.
• Non utilizzate prolunghe.
• Non fate scorrere il cavo su bordi taglienti ed assicuratevi che non rimanga incastrato. Non tirate il cavo dalla presa con mani umide o afferrando
il cavo stesso.
Page 18

• Non utilizzate questo apparecchio nelle immediate vicinanze di una vasca, una doccia o una piscina (rispettate una distanza minima di 3 m).
Posizionate l’apparecchio in modo che una persona dentro la vasca non
possa toccare l’apparecchio.
• Non posizionate l’apparecchio vicino ad una sorgente di calore. Non sottoponete il cavo di alimentazione al calore diretto (come piastre, fiamme
libere, ferri da stiro caldi o caloriferi per esempio). Proteggete i cavi di
alimentazione dall’olio.
• Fate in modo che l’apparecchio sia posizionato appropriatamente per assicurare una buona stabilità durante il suo funzionamento ed assicuratevi
che nessuno possa inciampare sul cavo.
• L’apparecchio non è impermeabilizzato.
• Solo per uso interno.
• Non conservare questo apparecchio all’esterno.
• Riponete l’apparecchio in un luogo asciutto inaccessibile ai bambini (rimettete l’apparecchio nella confezione).
• L’apparecchio funziona perfettamente solo con acqua non trattata. Non
usare con addolcitori d’acqua / scambiatori di ioni.
• L’apparecchio non deve essere in nessun caso utilizzato con o venire a
contatto con fragranze in quanto queste potrebbero danneggiare la plastica e condurre a malfunzionamenti del apparecchio.
• Se il cavo di alimentazione è danneggiato, dev’essere sostituito dal produttore, dal responsabile della manutenzione o da una persona similarmente qualificata per evitare pericoli.
• Scollegare l’apparecchio durante il riempimento e la pulizia.
• Attenzione: vapore caldo! Prestare attenzione quando si usa l’apparecchio a causa di emissioni di vapore caldo.
Nota:
Non utilizzare l’umidificatore Fred con acqua decalcificata fuori da un sistema di decalcificazione che usa il principio di uno scambiatore di ioni (il sale
è aggiunto all’acqua). Ciò potrebbe comportare malfunzionamenti e conseguente perdita del apparecchio.
Montaggio/utilizzo
1. Se l’umidificatore Fred è stato posizionato nel luogo desiderato: Collegate
l’alimentazione (2) alla presa di casa. Rimuovete l’ugello del vapore (7) e
sollevate il coperchio (8). Riempite il serbatoio (9) con acqua (assicuratevi di tenere leggermente aperta l’apertura di ingresso) - riavvitate appropriatamente il coperchio e controllate che sia ben saldo. Reinserite il
serbatoio dell’acqua nell’umidificatore, riavvitate il coperchio ed inserite
l’ugello del vapore.
2. Posizionate l’apparecchio nella stanza. Fate in modo di non posizionarlo su
un pavimento che possa essere danneggiato dall’acqua, e che non ci siano
apparecchi o mobili sensibili all’umidità vicino ad esso.
3. Attivate Fred attraverso l’interruttore On/Off (4) e selezionate l’uscita desiderat a (5) (blu= alto, verde=economia). Se l’apparecchio smette di emettere vapore, il display serbatoio vuoto (15) si accenderà, dunque riempite
l’acqua secondo il primo passo.
4. Utilizzate l’igrostato (6) per impostare l’umidità. Il range di impostazione
inizia a 20 e finisce a 90% di umidità relativa. Vi raccomandiamo di im-
Page 19

postare l’unità al 45% di umidità per un clima adeguato della stanza (al
centro del range di impostazione, posizione orizzontale dell’interruttore).
Attenzione: Se l’umidificatore smette di emettere vapore dopo cinque
minuti, girate l’igrostato tutto a destra (massimo). Questo può essere
dovuto al fatto che l’umidità effettiva della stanza è maggiore del valore
impostato. Potete quindi ridurre gradualmente l’igrostato. Quando la luce
pilota si spegne, avete raggiunto l’umidità della stanza impostata. Se l’u
midificatore si spegne automaticamente durante l’uso, l’umidità deside rata per la stanza è stata raggiunta. L’umidificatore riprende a funzionare
quando l’umidità della stanza scende al di sotto del valore pre-impostato.
5. Se l’apparecchio è riempito con la quantità d’acqua sufficiente e si fer-
ma lo stesso, iniziate il processo di decalcificazione. (vedete la sezione
pulizia).
Pulizia
Prima di fare manutenzione all’umidificatore e dopo ogni uso, spegnete l’apparecchio e staccate la spina dalla presa.
• Attenzione: Non immergete mai l’apparecchio in acqua (pericolo di cor to
circuito).
• Per pulire l’apparecchio, pulitelo con un panno umido e quindi asciugatelo
attentamente. Scollegate sempre la spina.
• La disincrost azione dell’umidificatore dipende dal contenuto di calcare, ma
almeno una volta a settimana: Rimuovete l’ugello del vapore (7), aprite
il coperchio (8) utilizzando l’aiuto per l’apertura e sollevatelo, rimuovete il
serbatoio (9). Quindi rimuovete il coperchio per la piastra di riscaldamento
(10) e il sigillo (11). Pulite entrambe le parti con una spazzola. Pulite dal
calcare la sfera anticalcare (12) e la piastra riscaldata con la copertura
antiaderente usando un comune anticalcare e sciacquate attentamente
dopo. Riassemblate del tutto l’apparecchio con tutte le parti (8-12) prima
di riutilizzarlo.
• Sciacquate anche il serbatoio ad intervalli regolari.
Riparazione
• Le riparazioni agli apparecchi elettrici devono essere effettuate solo da
tecnici elettricisti qualificati. Se vengono effettuate riparazioni improprie, la garanzia viene annullata e tutte le responsabilità sono rifiutate.
• Non utilizzate mai l’apparecchio se l’alimentatore o la spina sono danneggiati, dopo un malfunzionamento, se è stato fatto cadere o è stato
danneggiato in qualunque altro modo (rotture/crepe nell’involucro).
• Non spingete oggetti nell’apparecchio.
• Se l’apparec chio è irreparabile, rendetelo inutilizzabile immediat amente e
consegnatelo al punto di raccolta appropriato.
Smaltimento
La Direttiva Europea 2012 / 19 / CE sullo Smaltimento dei rifiuti elettrici
ed elettronici (WEEE) prevede che i dispositivi elettrici domestici usati non
devono essere smaltiti nelle discariche municipali di rifiuti indifferenziati.
I dispositivi usati devono essere raccolti separatamente in modo da ottimizzare il recupero e il riciclaggio dei materiali in essi contenuti e ridurre
l’impatto sulla salute e sull’ambiente. Il simbolo del “cestino con ruote”
Page 20

barrato sul prodotto ricorda l’obbligo di smaltire il dispositivo mediante raccolta differenziata. I consumatori devono contattare le
autorità locali o il rivenditore per informazioni relative al corretto
smaltimento di dispositivi usati.
Specifiche
Uscita Normale 300 W, eco 150 W
Voltaggio 220 – 240 V / 50 Hz
Dimensioni 363 x 267 x 363 mm
(larghezza x altezza x profondità)
Peso 2.9 kg
Spegnimento automatico oui, triple sécurité
Capa cità serba toio 3. 6 Litri
Rumorosità 27 – 33 dB(A)
Conforme con i
regolamenti UE GS / CE / WEEE / RoHS
Tutti i diritti relativi a qualsiasi modifica tecnica sono riservati
Page 21

Español
¡Enhorabuena! Acaba de comprar un extraordinario humidificador FRED. Estamos seguros de que mejora para usted el aire en los ambientes cerrados.
Como con todos los aparatos electrodomésticos también este aparato exige un especial cuidado para evitar heridas, daños causados por incendios
o daños en el aparato. Le rogamos por lo tanto que lea detenidamente el
presente manual de instrucciones antes de proceder a su puesta en marcha
y preste atención a las advertencias de seguridad indicadas en el aparato.
Descripción del aparato
El aparato tiene los siguientes componentes principales:
1. Humidificador de aire
2. Cable de red para el suministro de corriente
3. Pies con placas engastadas
4. Interruptor ON/OFF
5. Interruptor para seleccionar el rendimiento
6. Higrostato
7. Tubo de vapor exterior
8. Dispositivo tapa con abridor
9. Tanque de agua con tapa y cavidad de agarre
10. Cubierta de la plancha de calefacción
11. Soporte de la cubierta de la plancha de calefacción
12. Pinza del soporte de la cubierta de la plancha de calefacción
13. Junta de la cubierta
14. Bola de descalcificación
15. Diodo LED de accionamiento (Power)
16. Diodo LED de rendimiento (azul = alto, verde = económico)
17. Indicador de tanque vacío (LED)
Advertencias de seguridad importantes
Por favor, lea detenidamente el manual de instrucciones antes de poner en
marcha por primera vez el aparato y guárdelas bien por si necesitara consultarlas de nuevo más adelante o, dado el caso, pasárselas a un futuro nuevo
propietario.
• Stadler Form declina cualquier responsabilidad por los daños resultantes
de una utilización del aparat o no conforme a este manual de instruccio nes.
• El aparato sólo se ha de utilizar en el hogar y con los fines descritos en
este manual de instrucciones. Una utilización no conforme a las disposiciones así como modificaciones técnicas en el aparato pueden poner en
peligro la salud y la vida.
• Este aparato pueden usarlo los niños mayores de 8 años y aquellas personas con capacidades físicas, sensoriales o mentales reducidas o con falta
de experiencia siempre y cuando se les haya dado una formación o supervisión respecto al uso del aparato de una forma segura y entiendan los
riesgos que implica. Los niños no deben jugar con el aparato. La limpieza
y el mantenimiento del usuario no deben hacerlo niños sin supervisión.
• Conecte el cable sólo a la corriente alterna. En el aparato, fíjese en las
indicaciones sobre el voltaje.
• No utilice ningún cable alargador estropeado.
• No pase el cable de red sobre bordes afilados ni lo pise. Nunca tire del
enchufe del cable de red ni lo extraiga de la toma de corriente con las
manos mojadas.
Page 22

• No emplee el aparato de aire cerca de bañeras, duchas o piscinas (mantenga una distancia mínima de 3 m). Coloque el aparato de manera que no
sea posible tocarlo al salir de la bañera.
• No sitúe el aparato cerca de un foco calorífico. No exponga el cable de
red directamente al calor (como p.ej. fogones calientes, llamas, planchas
calientes o estufas). Proteja el cable de red del aceite.
• Asegúrese de que, durante su funcionamiento, el aparato mantiene una
buena estabilidad y que no tropieza con el cable de red.
• El aparato no está protegido contra salpicaduras de agua.
• Sólo para uso en el interior del hogar.
• No guarde el aparato en el exterior.
• Mantenga (empaquete) el aparato en un lugar seco e inaccesible para
los niños.
• El aparato sólo funciona de manera impecable con agua no tratada. No
utilizar en instalaciones de descalcificación/intercambiador de iones.
• El ap arato no debe ponerse en ningún caso en marcha con sus tancias aromáticas ni tampoco debe entrar en contacto con sustancias aromáticas,
dado que éstas destruyen la materia plástica y pueden provocar fallos en
el funcionamiento del aparato.
• En caso de que el cable de red esté dañado, debe ser sustituido por el
fabricante o un taller autorizado por el fabricante o personas calificadas
para evitar cualquier riesgo.
• Desenchufe el aparato durante su limpieza y llenado.
• Precaución: ¡vapor muy caliente! Se debe tener cuidado cuando se use el
aparato debido a la emisión de vapor de agua caliente.
Nota:
No ponga en funcionamiento el humidificador Fred con agua descalcificada
fuera de un sistema de descalcificación que use el principio de un intercambiador de iones (se añade sal al agua). Esto puede provocar un funcionamiento incorrecto y las consiguientes fugas del aparato.
Puesta en marcha/Manejo
1. Cuando el humidificador de aire Fred se encuentre en el lugar deseado:
conecte el cable de red (2) a la toma de corriente de casa. Retire el tubo
de vapor ( 7) y la tapa (8). Llene el tanque (9) con agua (para ello, mantenga
la apertura de llenado ligeramente levantada). Desatornille bien la tapa
y compruebe si impermeabiliza. Coloque de nuevo el tanque de agua en
el humidificador de aire, atornille la tapa e introduzca el tubo de vapor.
2. Coloque el aparato en la sala. Tenga en cuenta que el aparato no esté
sobre un suelo sensible al agua y que no haya cerca aparatos ni muebles
sensibles a la humedad.
3. Ponga en funcionamiento a Fred con el interruptor ON/OFF (4) y elija el
rendimiento que desee (5) (azul = alto, verde = económico). Si el aparato
deja de emitir vapor, se encenderá el indicador de tanque vacío (15). Rellénelo entonces con agua siguiendo los pasos del punto 1.
4. Con el higrostato (6) se regula la humedad. El margen de ajuste va de 20
a 90% de humedad relativa. Para conseguir un clima agradable, le aconsejamos que regule la humedad al 45% (al medio del margen de ajuste,
posición horizontal del interruptor).
Page 23

Atención: Si el humidificador de aire no exhala vapor al cabo de
5 minutos, coloque el higrostato completamente a la derecha (máx). Es
posible que la humedad del aire en el local sea más elevada que el valor
que Usted ha ajustado. A continuación, Usted puede girar el higrostato
hacia at rás de manera gr adual. Cuando las lam paritas se ap agan, significa
que Usted ha llegado al valor de humedad del aire existente actualmente
en el local. Si el humidificador de aire se desconecta automáticamente
cuando está funcionando, esto significa que se ha alcanzado la humedad
del aire de seada. El humidif icador de aire em pezará a humidi ficar de nuevo
cuando la humedad del aire en el local sea inferior a la del valor ajustado.
5. Si a pesar de tener suficiente agua, el aparato se para igualmente, descalcifíquelo (véase limpieza).
Limpieza
Antes de proceder a cualquier trabajo de mantenimiento o después de cada
utilización desconectar el aparato y retirar el cable del enchufe.
• Atención: No meter nunca el aparato dentro del agua (peligro de cor-
tocircuito).
• Para limpiarlo, basta con frotar ligeramente con un trapo húmedo y a continuación secarlo bien. Previamente se le habrá desconectado imperativamente de la red.
• Descalcifique el humidificador de agua dependiendo de la cantidad de cal
que cont enga, pero al meno s una vez por semana. Par a ello: saque el tubo
de vapor (7), abra la tapa (8) con ayuda del abridor y levántela, retire el tanque de agua (9). A continuación, quite la cubierta de la plancha de calefacción (10) y la junta (11). Limpie ambas partes con un cepillo. Descalcifique la
bola de descalcificación (12) y la plancha de calefacción con recubrimiento
de non adhesivo con un descalcificador habitual y, después, enjuáguelos
bien. An tes de utilizarlo, m onte de nuevo to das las parte s del aparato (8 -12).
• Enjuague regularmente el tanque de agua a fondo.
Reparaciones
• Las reparaciones en los aparatos eléctricos (cambio del cable) sólo han de
ser llevadas a cabo por personal especializado y debidamente formado.
• En caso de haberse procedido a reparaciones indebidas, la garantía déjà
de tener efecto y se declina cualquier responsabilidad.
• Nunca ponga en marcha el aparato si el cable o el enchufe están estropeados, si falla alguna de las funciones, si el aparato se ha caído o si ha
sufrido algún otro desperfecto (rajas/roturas en el chasis).
• No introducir ningún tipo de objetos en el aparato.
• Una vez llegado el aparato al final de su vida útil, inutilizarlo inmediatamente (separar el cable) y entregarlo en el centro de recogida previsto a
tal efecto.
Eliminación
La directiva europea 2012 / 19 / CE sobre residuos de equipos eléctricos
y electrónicos (WEEE), exige que los aparatos eléctricos domésticos antiguos no deben eliminarse en la recogida de residuos municipal normal sin
clasificar. Los aparatos antiguos deben recogerse de forma separada para
optimizar la recuperación y el reciclaje de los materiales y reducir el impacto
Page 24

sobre la salud humana y el medioambiente. El símbolo del “cubo de basura”
tachado en el producto le recuerda su obligación de que, cuando se deshaga
del aparato, debe recogerse de forma separada. Los consumidores deben ponerse en contacto con las autoridades locales o con
el distribuidor para obtener información respecto a la correcta
eliminación del aparato antiguo.
Datos técnicos
Rendimiento Normal 300 W, eco 150 W
Tensión 220 – 240 V / 50 Hz
Dimensiones 363 x 267 x 363 mm
(ancho x alto x largo)
Peso 2.9 kg
Apagado automático sí, triple seguridad
Capacidad del tanque 3.6 Litros
Nivel de intensidad
acústica 27 – 33 dB(A)
Cumple la norma UE GS / CE / WEEE / RoHS
Quedan reservadas modificaciones técnicas
Page 25

Nederlands
Gefeliciteerd met uw aankoop van dit bijzondere FRED luchtbevochtiger!
Dit apparaat voorziet uw kamer van de omgevingslucht voor u verbeteren.
Zoals met alle elektronische apparaten, is zorgvuldig gebruik noodzakelijk
om verwonding, brandschade of schade aan het apparaat te vermijden. Bestudeer de instructies nauwkeurig en volg de adviezen op het apparaat zelf,
alvorens het apparaat voor het eerst te gebruiken.
Apparaatbeschrijving
Het apparaat bestaat uit de volgende onderdelen:
1. Luchtbevochtiger
2. Netkabel voor de stroomvoorziening
3. Voeten met inlegplaat
4. Aan/Uit-schakelaar
5. Schakelaar voor het kiezen van het vermogen
6. Hygrostaat
7. Stoombuis buiten
8. Dekselapparaat met openingshulp
9. Watertank met deksel en draaggreep
10. Afdekking voor verwarmingsplaat
11. Houder voor de bedekking verwarmplaat
12. Clip voor houder bedekking verwarmplaat
13. Dichting voor afdekking
14. Ontkalkingsbol
15. LED voor gebruik (Power)
16. LED voor vermogen (blauw=hoog, groen=economy)
17. Indicator: tank leeg (LED)
Belangrijke veiligheidsinstructies
Lees de instructies zorgvuldig door voordat u het apparaat voor het eerst
gebruikt en bewaar deze handleiding voor later gebruik; geef hem, indien
nodig, door aan de volgende eigenaar.
• Stadler Form is op geen enkele wijze aansprakelijk voor verlies of schade
ten gevolge van het nalaten van deze instructies.
• Het apparaat dient alleen in huis te worden gebruikt of voor de doeleinden
die in deze instructies worden beschreven. Interferentie op het toestel
door onbevoegden kan leiden tot gevaar voor de gezondheid.
• Dit apparaat kan worden gebruikt door kinderen van 8 jaar en ouder en
personen met gereduceerde fysieke, zintuiglijke of mentale capaciteiten
of met een tekort aan ervaring en kennis, vooropgesteld dat ze onder
toezicht staan of instructies hebben gekregen m.b.t. het gebruik van het
apparaat op een veilige wijze en begrijpen welke gevaren er kunnen optreden. Laat kinderen het apparaat niet als speelgoed gebruiken. Reiniging en gebruikersonderhoud mogen niet door kinderen zonder toezicht
worden uitgevoerd.
• Sluit de kabel alleen op wisselstroom aan. Let op de spanningsgegevens
op het apparaat.
• Gebruik geen beschadigde verlengkabels.
• De netkabel mag niet over scherpe kanten heen worden getrokken of
worden vastgeklemd. De stekker mag nooit aan de netkabel of met natte
handen uit de contactdoos worden getrokken.
Page 26

• Deze apparaat mag niet bij een ligbad, een douche of een zwembad worden gebruikt (minimumafstand van 3 m aanhouden). Plaats het apparaat
zo dat personen het apparaat vanaf de rand van het ligbad niet kunnen
aanraken.
• Plaats het apparaat niet in de buurt van een warmtebron. De netkabel
mag niet aan rechtstreekse hittewerking (bijv. heet fornuisplaat, open
vlammen, hete strijkzool of kachel) worden blootgesteld, netkabel tegen
olie beschermen.
• Let erop dat het apparaat bij het gebruik een goede stabiliteit heeft en
men niet over de netkabel kan struikelen.
• Het apparaat is niet tegen spattend water beschermd.
• Uitsluitend voor gebruik binnenshuis.
• Het apparaat niet buitenshuis opbergen.
• Het apparaat op een droge en voor kinderen niet toegankelijke plaats bewaren (inpakken).
• Het apparaat functioneert enkel correct met onbehandeld water. Niet
gebruiken bij onthardingsinstallaties/ionenwisselaars.
• Het apparaat mag in geen geval in aanraking komen of bediend worden
met reukstoffen, omdat die de kunststof vernielen en tot een verkeerde
werking van het toestel kunnen leiden.
• Als de netkabel beschadigd is, dient deze door de fabrikant of een door de
fabricant goedgekeurd servicebedrijf of soortgelijk gekwalificeerd personeel te worden vervangen om gevaarlijke situaties te voorkomen.
• Haal de stekker van het apparaat tijdens het vullen en reinigen uit het
stopcontact.
• Opgelet: hete damp! Voorzichtigheid is geboden bij het gebruik van het
apparaat wegens het uitstoten van hete waterdamp.
Opmerking:
Gebruik de luchtbevochtiger Fred niet met ontkalkt water uit een ontkalkingsysteem dat het principe van een ionenwisselaar gebruikt (zout wordt
aan het water toegevoegd). Dit kan tot storingen en daardoor lekkage van
het apparaat leiden.
Ingebruikname/bediening
1. Wanneer de luchtbevochtiger Fred op de gewenste plaats staat: netkabel (2) aansluiten op het stopcontact in de huishouding. Stoombuis (7)
verwijderen en deksel (8) er afnemen. Watertank (9) met water vullen
(vulopening enigszins omhoog houden) - deksel er goed opschroeven en
controleren of het deksel goed afdicht. Watertank weer in luchtbevochtiger plaatsen, deksel opendraaien en stoombuis aanbrengen.
2. Plaats het apparaat in de kamer. Let erop dat het apparaat niet op een
watergevoelige ondergrond staat en dat geen watergevoelige apparaten
of meubelen in de buurt geplaatst zijn.
3. Fred op de Aan/Uit-schakelaar (4) in gebruik nemen en het gewenste vermogen (5) uitkiezen (blauw=hoog, groen= economy. Wanneer het apparaat ophoudt te stomen, dan brandt de indicator tank leeg (15), vervolgens
het water conform punt 1 navullen.
Page 27

4. Met de hygrostaat (6) wordt de luchtvochtigheid ingesteld. Het instelbereik ligt tussen 20 tot 90% relatieve luchtvochtigheid. Voor een aangenaam klimaat in de kamer raden wij u aan om 45% luchtvochtigheid in te
stellen (in het midden van het in te stellen bereik, horizontale positie van
de schakelaar).
Let op: Indien de luchtbevochtiger na 5 minuten niet dampt, stelt u de
hygrostaat helemaal naar rechts (max.). Het kan zijn dat de luchtvoch tigheid in de ruimte hoger is dan de door u ingestelde waarde. U kunt de
hygrostaat daarna trapsgewijs terugdraaien. Als de lampjes doven, hebt
u de actuele luchtvochtigheid van de ruimte bereikt. Als de luchtbevoch tiger gedurende de werking automatisch uitschakelt, werd de gewenste
luchtvochtigheid bereikt. De luchtbevochtiger start de bevochtiging
opnieuw als de luchtvochtigheid in de ruimte onder de ingestelde waarde
valt.
5. Wanneer het apparaat voldoende water heeft en desondanks uitgaat,
dient dit te worden ontkalkt (zie reiniging).
Reiniging
Voor elk onderhoud en na elk gebruik het apparaat uitschakelen en de
stroomkabel uit het stopcontact trekken.
• Let op: Dompel het toestel nooit in water (gevaar voor kortsluiting).
• Het apparaat schoonmaken met een vochtige doek en daarna goed droogmaken. Let op: ontkoppel altijd eerst de kabel.
• Luchtbevochtiger afhankelijk van het kalkgehalte, maar tenminste wekelijks ontkalken: stoompijp (7) er afnemen, deksel (8) met de openingshulp
openen en eraf tillen, water tank (9) verwijderen. Vervolgens de afdekking
voor de verwarmingsplaat (10) en de dichting (11) wegnemen. Beide delen
met een borstel reinigen. Ontkalk ingsbol (12) en de verwarmingsplaat met
coating met een gangbaar ontkalkingsmiddel ontkalken en daarna goed
uitspoelen. Het apparaat voor het gebruik weer volledig met de onderdelen (8-12) in elkaar zetten.
• Watertank regelmatig goed uitspoelen.
Reparaties
• Reparaties aan het toestel dienen te worden verricht door een erkende reparateur. Als onbevoegden interferentie hebben gemaakt op het toestel,
dan vervalt de garantie evenals de aansprakelijkheid van Stadler Form.
• Zet het toestel nooit aan wanneer de adapter of de stop beschadigd is,
nadat het defect is geweest, het gevallen is of op een andere manier is
beschadigd. (barsten/onderbrekingen in het omhulsel).
• Duw geen voorwerp in het toestel. Haal het zuiveringssysteem niet uit
elkaar.
• Als het toestel niet meer te repareren is, maak het dan onmiddellijk onbruikbaar en geef het af op het inzamelingspunt.
Verwijdering
De Europese richtlijn 2012 / 19 / EG inzake Afval van Elektrische en Elektronische Apparatuur (AEEA), vereist dat oude elektrische huishoudapparaten
niet in de nor male gemeentelijke ongesor teerde af valstroom mogen worden
weggegooid. Oude apparaten moeten apart worden ingezameld om recy-
Page 28

cling en hergebruik van de materialen daarin te optimaliseren en de gevolgen op het milieu en de volksgezondheid te verminderen. Het symbool met
de doorgekruiste “vuilnisbak op wieltjes” op het product, herinnert u aan
uw verplichting, dat het toestel bij verwijdering gescheiden ingezameld moet worden. Consumenten moeten contact opnemen
met hun lokale autoriteit of verkoper voor informatie betreffende
de juiste verwijdering van hun oude toestel.
Specificaties
Vermogen Normaal 300 W, eco 150 W
Spanning 220 – 240 V / 50 Hz
Afmetingen 363 x 267 x 363 mm
(breedte x hoogte x diepte)
Gewich t 2.9 kg
Uitschakelautomatisme ja, drievoudig beveiligd
Tankinhoud 3.6 Liter
Geluidsdrempel 27 – 33 dB(A)
EU-verordening GS / CE / AEEA / RoHS
De inhoud van deze gebruiksaanwijzing kan zonder voorafgaand
bericht worden gewijzigd
Page 29

Dansk
Tillykke! De har lige anskaffet Dem den usædvanlige FRED luftfugter. Den
vil give dem stor fornøjelse, når luften omkring Dem trænger til at blive renset.
Som med alle elektriske husholdningsapparater er særlig pleje en nødvendighed også med dette produkt, for at undgå fysisk skade, brandskade eller
beskadigelse af produktet. Læs venligst denne brugsanvisning grundigt før
produk tet tages i brug, og følg sikkerhedsanvisningerne på selve produktet.
Beskrivelse af apparatet
Apparatet består af følgende hoveddele:
1. Luftfugter
2. Netkabel til strømforsyning
3. Fødder med indsats-plade
4. Tænd/sluk-knap
5. Kontakt til brug for niveauvalg
6. Hygrostat
7. Udvendigt damprør
8. Låg med åbningshjælp
9. Vandbeholder med låg og håndtag
10. Afskærmning til varmeplade
11. Holder til afdækning varmeplade
12. Clips til holder afdækning varmeplade
13. Pakning til afskærmning
14. Afkalkningskugel
15. LED til drift (Power)
16. LED til ydelse (blå=højt, grøn=lavt)
17. Angivelse tom tank (LED)
Vigtige sikkerhedsinstruktioner
Læs brugsvejledningen, før De bruger apparatet første gang og gem vejledningen; hvis nødvendigt skal den også gemmes til næste ejer.
• Stadler Forms distributør dækker ikke skader, der er opstået som følge af
misligholdelse eller forkert brug af apparatet.
• Apparatet må kun bruges i hjemmet med det formål, der er beskrevet i
vejledningen. Ukorrekt brug samt udførelse af tekniske ændringer på apparatet kann være farligt for liv og helbred.
• Dette apparat kan anvendes af børn fra 8 år og opefter og af personer med
nedsatte f ysiske, sanse- eller psy kiske evner eller me d manglende erfaring
og kendskab, hvis de har været under opsyn og har modtaget undervisning
i, hvordan apparatet kan bruges på sikker måde, og hvis de har forstået,
hvilke eventuelle farer der kan være. Børn må ikke lege med apparatet.
Rengøring og vedligeholdelse må ikke udføres af børn uden opsyn.
• Tilslut kun kablet til vekselstrøm. Læg mærke til apparatets spændingsangivelser.
• Benyt ikke en beskadiget forlængerledning.
• Træk ikke kablet over skarpe kanter og lad det ikke komme i klemme. Træk
aldrig stikket ud ved at holde i kablet og træk aldrig stikket ud af stikkontakten med våde hænder.
• Benyt ikke apparatet i umiddelbar nærhed af badekar, brusebad eller badebassin (overhold mindsteafstanden på 3 m). Stil apparatet således at
det ikke kan berøres fra et badekar.
Page 30

• Stil ikke apparatet i nærheden af en varmekilde. Netkablet bør ikke
udsættes for direkte varmepåvirkning (fra f.eks. komfurplade, åben ild,
varmt strygejern eller varmeovn). Beskyt netkablet mod olie.
• Ikke kan snuble over netkablet.
• Apparatet tåler ikke vandsprøjt.
• Kun til indendørs brug.
• Opbevar ikke apparatet udendørs.
• Apparatet bør opbevares på et tørt og for børn utilgængeligt sted (pakkes
sammen).
• Dette apparat kan kun fungere upåklageligt i forbindelse med ubehandlet
vand. Må ikke anvendes ved blødgøringsanlæg/ionbyttere.
• Apparatet må under ingen omstændigheder drives med duftstoffer hhv.
komme i berøring med duftstoffer, da disse vil ødelægge plasten og kan
resultere i fejlfunktioner på apparatet.
• Hvis strømforsyningskablet er beskadiget, skal det udskiftes af producenten eller hos en reparatør, der er autoriseret af producenten, eller af en
lignende kvalificeret tekniker for at undgå skade.
• Træk stikket til apparatet ud under opfyldning og rengøring.
• Advarsel: Varm damp! Pas på under brug af apparatet på grund af udstrømning af varm damp.
Bemærk:
Brug ikke luftfugteren Fred med afkalket vand fra et afkalkningssystem, der
opererer med en ionudveksler (salt tilsættes vandet). Dette kan medføre
funktionsfejl og efterfølgende lækage i apparatet.
Ibrugtagning/Betjening
1. Når Fred luftfugteren står på den ønskede plads, tilslut tes netkablet (2) til
husets stikko ntakt. Damprøret (7) fjernes og låget (8) t ages af. Vandbeholderen (9) fyldes med vand (påfyldnings-åbningen holdes let opad) - låget
skrues godt på og man afprøver om låget slutter tæt. Vandbeholderen
sættes igen i luftfugteren, låget skrues på og damprøret isættes.
2. Stil apparatet i rummet. Sørg for, at det står på et gulv, der kant tåle vand,
og at der ikke befinder sig fugtighedsfølsomme apparater eller møbler i
nærheden.
3. Fred tages i brug ved et tryk på (4) tænd/sluk-knappen, og det ønskede
niveau (5) vælges (blå=højt, grøn=lavt). Når apparatet stopper med at
dampe, lyser indikation af tom tank (15), derefter påfyldes vand som beskrevet i punkt 1.
4. Via hygrostat (6) indstilles luftfugtigheden. Indstillingsområdet dækker
fra 20 til 90 % relativ luftfugtighed. For et behageligt rumklima anbefaler
vi at indstille en luftfugtighed på 45 % (i midten af indstillingsområdet,
kontakt i horisontal stilling).
Obs: Hvis luftfugteren ikke begynder at dampe efter 5 minutter, skal
hygrostaten stilles helt til højre (maks.). Det kan være, at luftfugtigheden
i rummet er højere end den værdi, som De har indstillet. Derefter kan
hygrostaten drejes trinvist tilbage. Hvis de små lamper slukkes, har de
opnået den aktuelle luftfugtighed i rummet. Hvis luftfugteren slukkes
automatisk under drift, er den ønskede luftfugtighed blevet opnået.
Luftbefugteren vil starte befugtningen på ny, hvis luftfugtigheden i
rummet falder under den indstillede værdi.
Page 31

5. Hvis apparatet har nok vand og alligevel stopper, må det afkalkes (se rengøring).
Rengøring
Før hver vedligeholdelse og efter hvert brug skal der slukkes for apparatet
og netledningen trækkes ud af stikkontakten.
• Obs: Apparatet må aldrig dyppes ned i vand (fare for kortslutning).
• For at rengøre produktet skal man blot tørre overfladerne af med en fugtig
klud og lade den tørre. Afbryd altid først apparetet fra stikkontakten.
• Luftfugteren bør afkalkes i forhold til kalkindhold, dog mindst én gang
om ugen: Damprøret (7) aftages, låget (8) åbnes og tages af ved hjælp af
åbningshjælp, vandbeholderen (9) fjernes. Derefter tager man afskærmningen til varmepladen (10) af og pak ningen (11). Be gge dele rengøres med
en børste. Afkalkningskuglen (12) og varmepladen med belægning afkalkes med et almindeligt afkalkningsmiddel og skylles derefter grundigt.
Apparatet samles igen fuldstændigt med delene (8-12) før brug.
• Vandbeholderen bør regelmæssigt skylles grundigt.
Reparation
• Reparationer af elektriske apparater må kun udføres af en kvalificeret,
elektrisk tekniker. Udføres der upassende reparationer bortfalder garantien og ethvert ansvar fra producentens side.
• Brug aldrig apparatet, hvis et kabel eller stik er beskadiget, efter der har
været driftsfejl, hvis det har været udsat for tab, eller der er synlige tegn
på skade.
• Indfør ikke nogen former for genstande i apparatet.
• Hvis apparatet ikke kan repareres skal det gøres ubrugeligt (klip ledningen af) og aflever det på en genbrugsstation.
Bortskaffelse
EU-direktiv 2012 / 19 / CE om WEEE kræver, at brugte elektriske husholdningsapparater ikke bortskaffes sammen med almindeligt affald. Brugte
apparater skal indsamles separat for optimal genbrug og genanvendelse
af apparatets elementer og reduktion af miljøpåvirkning og helbredsrisici.
Symbolet med skraldespanden med et kryds over på produktet er
en påmindelse til dig om din forpligt else til at bort skaffe apparatet
separ at. Du bør kontakte de lokale myndigheder eller forhandleren
for at få oplysninger om korrekt bortskafning af brugte apparater.
Page 32

Specifikationer
Ydelse Normal 300 W, øko 150 W
Spænding 220 – 240 V / 50 Hz
Mål 363 x 267 x 363 mm
(bredde x højde x dybde)
Vægt 2.9 kg
Sikkerhedsafbrydning ja, tredobbelt sikring
Tankindhold 3.6 Li ter
Støjniveau 27 – 33 dB(A)
I overensstemmelse
med EU godkendelse GS / CE / WEEE / RoHS
Der tages forbehold for tekniske ændringer
Page 33

Suomi
Onneksi olkoon! Olet juuri hankkinut loistavan FRED ilmankostuttimen. Laite
tarjoaa nautinnollisempaa oloa parantaen huoneen ilmanlaatua.
Kuten kaikkien kotitalouden sähkölaitteiden kanssa, myös tämän mallin
kanssa tulee noudattaa erityistä huolellisuutta, jotta laite välttyy vahingoilta tai palovaurioilta. Lue nämä käyttöohjeet ensin huolellisesti ennen
laitteen ensimmäistä käyttöä ja noudata laitteen turvaohjeita.
Laitteen kuvaus
Laite koostuu seuraavista osista:
1. Ilmankostutin
2. Virtajohto
3. Metallijalat
4. Virtakytkin
5. Tehonsäädin
6. Kosteudensäädin
7. Ulkoinen höyryputki
8. Avattava kansi
9. Kannellinen vesisäiliö ja kantokahva
10. Lämpölevyn kansi
11. Lämp ölev yn ka nsipidike
12. Lämpölevyn kansipidikkeen kiinnitin
13. Kannen tiiviste
14. Kalkkeutumista ehkäisevä magneettikuula
15. Virran merkkivalo
16. Tehon merkkivalo (sininen = korkea, vihreä = taloudellinen)
17. Tyhjän säiliön merkkivalo
Tärkeitä turvallisuusohjeita
Lue käyttöohjeet huolellisesti ennen ensimmäistä käyttökertaa ja säilytä
ohjeet myöhempää tarvetta varten. Toimita ohjeet tarvittaessa myös seuraavalle omistajalle.
• Stadler Form ei ole missään tapauksessa vastuussa vaurioista tai menetyksistä, jotka johtuvat näiden ohjeiden noudattamatta jättämisestä.
• Laite on tarkoitettu ainoastaan kotitalouskäyttöön näiden ohjeiden mukaisella tavalla. Laitteen vääränlainen käyttö ja muokkaaminen voi johtaa
hengenvaarallisiin tilanteisiin.
• Vähintään 8 vuott a täyttäneet lapset ja sellaiset henkilöt, joiden fy ysiset,
sensoriset tai henkiset kyvyt eivät ole tähän riittäviä tai joilla ei ole laitteen tuntemusta tai kokemusta sen käytöstä, saavat käyttää tätä laitetta
ainoastaan silloin, kun heidän turvallisuudestaan vastaava henkilö valvoo
heitä. Lasten ei tule leikkiä laitteen kanssa. Lapset eivät saa puhdistaa
tai huoltaa laitetta ilman valvontaa.
• Liitä virtajohto vain vaihtovirtaverkkoon. Tarkista laitteen käyttöjännite.
• Älä käytä vaurioitunutta jatkojohtoa.
• Älä altista virtajohtoa teräville reunoille ja varmista, ettei se jää puristuksiin. Älä irrota pistoketta pistorasiasta märillä käsillä tai vetämällä
virtajohdosta.
• Älä käytä laitetta k ylpyammeen, suihkun tai uima-altaan välit tömässä läheisyydessä (säilytä 3 metrin vähimmäisetäisyys). Sijoita laite niin, ettei
kukaan voi koskettaa sitä kylpyammeesta käsin.
Page 34

• Älä sijoita laitetta lämmönlähteen läheisyyteen. Älä altista virtajohtoa
suoralle lämmölle (kuten liesi, avoliekit, kuumat metallinkappaleet tai
lämmittimet, jne.). Älä altista virtajohtoa öljylle.
• Varmista, että laite on sijoitettu tukevalle, tasaiselle pinnalle käytön aikana ja varmista, ettei virtajohto aiheuta kompastumisvaaraa.
• Laite ei ole roiskeenkestävä.
• Vain sisäkäyttöön.
• Älä säilytä laitetta ulkona.
• Säilytä laitetta kuivassa paikassa lasten ulottumattomissa (alkuperäispakkauksessa).
• Laite toimii moitteetta täydellisesti ainoastaan käsittelemättömällä vedellä. Älä käytä veden pehmennysaineiden/ioninvaihtimien kanssa.
• Laitetta ei saa missään olosuhteissa käyttää tuoksujen kanssa, eikä se
saa joutua kosketuksiin niiden kanssa, koska ne vahingoittavat muovia ja
saattavat johtaa toimintahäiriöihin.
• Jos virtajohto on vaurioitunut, valmistajan, valtuutetun huoltoliikkeen tai
vastaavan ammattitaitoisen henkilön on vaihdettava se vahinkojen välttämiseksi.
• Irrota laitteen pistoke pistorasiasta vedellä täyttämisen ja puhdistamisen
ajaksi.
• Varoitus: kuumaa höyryä! Laitteen käytössä on noudatettava varovaisuutta kuumien höyrypäästöjen takia.
Huomautus:
Älä käytä Fred-ilmankostutinta vedellä, josta on poistettu kalkki ioninvaihtoperiaatetta käyttävällä kalkinpoistojärjestelmällä (suolaa on lisätty veteen). Tämä voi aiheuttaa toimintahäiriöitä ja johtaa laitteen vuotamiseen.
Alkuvalmistelut ja käyttöönotto
1. Kun Fred-ilmankostutin on sijoitettu haluttuun paikkaan, kytke virtajohto
(2) pistorasiaan. Irrota höyryputki (7) ja nosta kansi (8). Täytä vesisäiliö (9)
vedellä (pidä aukkoa ylhäällä). Sulje kansi tiiviisti. Aseta vesisäiliö ilmankostuttimeen, kiinnitä kansi ja höyryputki.
2. Aseta laite paikalleen. Älä pidä laitetta lattialla, joka saattaa vahingoittua
vedestä, ja tarkista, ettei lähet tyvillä ole kosteudelle arkoja huonekaluja.
3. Käynnistä laite virtakytkimestä (4) ja valitse haluamasi teho (5) (sininen =
korkea, vihreä = t aloudellinen). Jos hö yryn tulo lak kaa, merkki valo (15) kertoo
säiliön olevan tyhjä. Täytä vesisäiliö kohdan 1 mukaisesti.
4. Säädä kosteutta kosteudensäätimellä (6). Säätöalue on laaja, ja sen asetukset vastaavat 20–90 prosentin suhteellista kosteutta. Suositeltu säätöalue
on 45 %, jolloin huoneen ilmankosteus on miellyttävä (keskellä vaakatasossa oleva säätö).
Huomaa: Jos ilmankostuttimesta ei tule höyryä 5 minuuttiin, kierrä
kosteudensäädintä oikealle, suurimmalle teholle. Huoneen ilmankosteus saattaa tällöin olla valittua säätöä suurempi. Alenna tämän jälkeen
kosteussäätöä asteittain. Kun merkkivalo sammuu, ilmankosteus vastaa
huoneen ilmankosteutta. Jos ilmankostuttimesta katkeaa virta automaattisesti käytön aikana, huoneen ilmankosteus vastaa valittua säätöä.
Ilmankostutin käynnistyy uudelleen, jos ilmankosteus pienenee valittua
säätöä alhaisemmaksi.
Page 35

5. Jos laite sammuu, vaikka laitteessa on riittävä määrä vettä, poista kalkkisaostumat puhdistusohjeiden mukaan.
Laitteen puhdistaminen
Ennen jokaista huoltoa ja jokaisen käyttökerran jälkeen, muista sammuttaa
laite ja irrottaa se verkkovirrasta.
• Huomio: Älä upota laitetta veteen (oikosulun vaara).
• Puhdista laite kostealla liinalla ja kuivaa huolellisesti. Irrot a pistoke pistorasiasta ennen puhdistamista.
• Poista kostuttimesta kalkkisaostumat vähintään kerran viikossa. Poista höyryputki (7), avaa kansi (8) ja poista vesisäiliö (9). Poista lämpölevyn
kansi (10) ja tiiviste (11). Puhdista molemmat osat harjalla. Puhdista kalkinpoistoaineella magneettikuula (12) ja lämpölevy, jossa on tarttumista
ehkäisevä pinta. Huuhtele hyvin. Kokoa laitteen kaikki osat (8 –12) huolellisesti ennen laitteen käyttöä.
• Huuhtele vesisäiliö säännöllisin väliajoin.
Korjaukset
• Sähkölaitteiden korjauksia (verkkokaapelin vaihto) saa suorittaa yksinomaan opetettu ammattihenkilökunta. Asiantuntemattomien suorittamissa korjauksissa takuu lakkaa olemasta voimassa ja kaikki vastuu hylätään.
• Älkää koskaan käyttäkö laitetta, jos kaapeli tai pistoke ovat vahingoittuneet, jos laite toimii väärin, jos se on pudonnut maahan tai muuten vioittunut (halkeamia/murtumia suojuksessa).
• Älkää työntäkö minkäänlaisia esineitä laitteeseen.
• Jos laitet ta ei voi enää korjata, tee se käy ttökelvot tomaksi välittömästi ja
vie se keräyspisteeseen (verkkokaapeli katkaistaan).
Jätehuolto
Euroopan parlamentin ja neuvoston direktiivi 2012 / 19 / CE Sähkö- ja
elektroniikkalaiteromusta (WEEE) edellyttää, ettei vanhoja kotitalouksien
sähkölaitteita saa hävittää lajittelemattoman yhdyskuntajätteen mukana.
Vanhat laitteet on kerättävä erikseen materiaalien palautuksen- ja kierrättämisen optimoimiseksi sekä terveys- ja ympäristövaikutuksien vähentämiseksi. Tuotteen yliviivattu roskakori -merkintä muistuttaa siitä, että sinun
velvollisuutesi on hävittää laite erikseen. Kuluttajia kehotetaan
ottamaan yhteyttä paikallisiin viranomaisiin tai tuotteen jälleenmyyjään saadakseen lisätietoja vanhan laitteen asianmukaisesta
hävittämisestä.
Page 36

Tekniset tiedot
Teho Korkea 300 W, taloudellinen 150 W
Jännite 220 – 240 V / 50 Hz
Mitat 363 x 267 x 363 mm
(leveys x korkeus x syvyys)
Paino 2.9 kg
Automaattinen
virrankatkaisu Kyllä, kolminkertainen varmistus
Säiliön tilavuu s 3.6 Lit raa
Äänenvoimakkuus 27 – 33 dB(A)
Täyttää EU-määräyksen GS / CE / WEEE / RoHS
Oikeus teknisiin muutoksiin pidätetään
Page 37

Norsk
Gratulerer! Du har akkurat anskaffet deg den eksepsjonelle luftfukteren
FRED. Den vil gi deg mye nytelse og forbedre innendørsluften for deg.
Som med alle elektriske husholdningsartikler er det nødvendig å utvise særlig hensyn til bruk av denne modellen, for å unngå personskader, brann eller
produk tskader. Vennligst les nøye gjennom disse drif tsinstruksjonene før du
tar i bruk apparatet for første gang, og følg sikkerhetsinstruksene på selve
apparatet.
Beskrivelse av apparatet
Apparatet består av følgende hoveddeler:
1. Luftfukter
2. Strømkabel for strømforsyning
3. Metallbelagte føtter
4. På/av-bryter
5. Effektvelgerbryter
6. Hygrostat
7. Eksternt damprør
8. Deksel med åpningsfunksjon
9. Vannbeholder med deksel og integrert bærehåndtak
10. Deksel for varmeplate
11. Holder for varmeplatedeksel
12. Klemme for varmeplatedekselholder
13. Dekselforsegling
14. Anti-kalkball
15. LED for drift (strøm)
16. LED for utgangseffekt (blå=høy, grønn=økonomisk)
17. Visning for tom vannbeholder (LED)
Viktige sikkerhetsinstrukser
Vennligst les nøye gjennom driftsinstruksjonene før du tar i bruk apparatet
for første gang, og ta vare på dem for senere referansebruk, f.eks. dersom
du gir viften videre til en ny eier.
• Stadler Form nekter alt ansvar innen tap eller skader som oppstår som en
følge av mangelfull oppfølging av disse driftsinstruksjonene.
• Apparatet er kun tiltenkt bruk i hjemme for de formål beskrevet i disse
instruksjonene. Uautorisert bruk og tekniske modifikasjoner på apparatet
kan føre til far for helse og liv.
• Dette apparatet kan brukes av barn over 8 år og personer med reduserte
fysiske, sensoriske eller mentale evner, eller mangel på erfaring og kunnskap, dersom de er under oppsyn av noen ansvarlig for dem eller har
mottatt instruksjoner vedrørende bruk av apparatet på en trygg måte og
forstår farene involvert. Barn må ikke leke med apparatet. Rengjøring og
vedlikehold må ikke utføres av barn uten oppsyn.
• Kun koble kabelen til vekselstrøm. Noter deg spenningsinformasjonen
oppgitt på apparatet.
• Ikke bruk skjøteledninger med skader.
• Ikke dra strømkabelen over skarpe kanter og sørg for at den ikke klemmes
mellom gjenstander. Ikke napp kabelen ut av stikkontakten, og ikke fjern
kabelen med våte hender.
Page 38

• Ikke bruk dette apparatet i umiddelbar nærhet av badekar, dusj eller
svømmebasseng (minimumsavstand på 3 m). Plasser apparatet slik at
man ikke kan nå det fra badekaret.
• Ikke plasser apparatet i nærheten av en varmekilde. Ikke utsett strømkabelen for direkte varme (som i nærheten av en kokeplate, åpen ild, varme
jernplater eller ovner, for eksempel). Beskytt strømkabelen mot oljete
væsker.
• Sørg for at apparatet er forsvarlig posisjonert for å sikre høy stabilitet
under driftsmodus, og sørg for at ingen kan snuble i strømkabelen.
• Apparatet er ikke sprutsikkert.
• Kun for innendørs bruk.
• Ikke oppbevar apparatet utendørs.
• Lagre apparatet på et tørt sted hvor barn ikke kan nå det (pakk apparatet
inn).
• Apparatet fungerer kun optimalt med ubehandlet vann. Må ikke brukes i
forbindelse med vannavherdere/ion-vekslere.
• Apparatet må ikke under noen omstendigheter drives med eller komme i
kontakt med dufter, da disse vil skade plastikken og kan føre til driftsfeil.
• Dersom strømkabelen er skadet må den erstattes av produsenten eller et
verksted som er autorisert av produsenten eller av en tilsvarende kvalifisert person for å forhindre skader.
• Koble fra apparatet ved påfyll og rengjøring.
• OBS: varm damp! Forsiktighet bør utvises ved bruk av apparatet på grunn
av utslipp av varm vanndamp.
Merknad:
Ikke bruk luftfukteren Fred med avkalket vann fra et avkalkingssystem som
bruker en ion-veksler (salt legges til i vannet). Dette kan føre til driftsfeil og
påfølgende lekkasje av apparatet.
Forberedelser for bruk/drift
1. Dersom luftfukteren Fred har blitt plassert i et ønsket område: Koble strømkabelen (2) til en stikkontakt. Fjern damprøret (7) og løft av dekselet (8). Fyll
vannbeholderen (9) med vann (sørg for å holde innløpsåpningen oppe) - skru
på dekselet ordentlig og sjekk hvor vidt dekselet er tet t. Sett vannbeholderen
tilbake i luftfukteren, skru på plass dekselet og sett inn damprøret.
2. Plasser apparatet i rommet. Sørg for å ikke plassere den på et gulv som kan
bli skadet av vann, og at det ikke er noen andre apparater eller møbler som er
sensitive mot fuktighet i nærheten.
3. Styr Fred via på/av-bryteren (4) og velg den ønskede utgangseffekten (5)
(blå=høy, grønn=økonomisk). Dersom apparatet stopper opp, vil lyset for
vannbeholderen (15) lyse. Fyll så på vann i henhold til instruksjonene 1.
4. Bruk hygrostaten (6) for å angi luftfuktigheten. Innstillingsspekteret begynner på 20 % og ender på 90 % relativ luftfuktighet. Vi anbefaler å stille enheten til 45 % luftfuktighet for et praktisk inneklima (i midten av innstillingsspekteret, horisontal bryterposisjon).
Obs: Dersom luftfukteren ikke fungerer etter 5 minutter, vri hygrostaten
hele veien til høyre (maks.). Dette kan være fordi den faktiske romluft
fuktigheten er høyere enn verdien du anga. Du kan så redusere hygrosta-
Page 39

ten gradvis. Når kontrollampene slukker har du nådd omgivelsenes rom luftfuktighet. Dersom luftfukteren slår seg automatisk av under drift, har
den ønskede romluftfuktigheten blitt nådd. Luftfukteren gjenopptar drift
når romluftfuktigheten faller under den forhåndsinnstilte verdien.
5. Dersom apparatet er fylt med en tilstrekkelig mengde vann og allikevel stanser driften, begynn avkalkingsprosessen (se rengjøring).
Rengjøring
Før vedlikeholdsarbeid og etter bruk, slå av apparatet og fjern strømkabelen
fra stikkontakten.
• Obs: Aldri senk apparatet i vann (fare for kortslutning).
• Ytre over flater må kun rengjøres med en lett fuktig klut og deretter tørkes
godt. Sørg alltid for å koble fra strømkabelen.
• Avkalk luftfukteren avhengig av kalkinnholdet, men minst én gang i
uken: Fjern damprøret (7), åpne dekselet (8) ved bruk av åpningsfunksjonen og løft det av, fjern vannbeholderen (9). Fjern så dekselet for varmeplaten (10) og forseglingen (11). Rengjør begge deler med en børste.
Avkalk anti-kalkballen (12) og varmeplaten ved bruk av et kommersielt
avkalkingsmiddel og skyll godt etter på. Sett app aratet sammen igjen med
alle deler (8-12) før du bruker det.
• Skyll vannbeholderen godt ved regelmessige intervaller.
Reparasjoner
• Reparasjoner på dette produktet må kun utføres av kvalifiserte teknikere.
Dersom det utføres urettmessige reparasjoner utløper garantien og alt
ansvarshold.
• Aldri bruk apparatet dersom adapteren eller kontakten er skadet, etter
det har feilfunksjonert, dersom det har blitt mistet eller skadet på noen
som helst måte (sprekker/spriker i kabinettet).
• Ikke press gjenstander inn i apparatet. Ikke demonter apparatet.
• Dersom apparatet er utenfor reparasjonsmuligheter, gjør det ubrukbart
umiddelbart og lever det til et returpunkt gitt til formålet.
Avhending
EU-direktiv 2012 / 19 / EF vedrørende elektriske og elektroniske apparater
(Waste Electrical and Electronic Equipment - WEEE) sier at gamle elektriske
husholdningsapparater ikke må kastes som vanlig restavfall. Gamle apparater må samles inn separat for å optimalisere gjenbruk og resirkulering av
materialene de inneholder og redusere påvirkningen på menneskers helse
og miljøet. Det overkryssede søppelkassesymbolet er for å minne om din
forpliktelse om at du når du kaster apparatet må det samles inn
separat. Forbrukerne må kontakte lokale myndigheter eller forhandler for informasjon angående riktig avhending av sitt gamle
apparat.
Page 40

Spesifikasjoner
Utgang Normal 300 W, øko 150 W
Utgangseffekt 220 – 240 V / 50 Hz
Dimensjoner 363 x 267 x 363 mm
(bredde x høyde x dybde)
Vekt 2.9 kg
Automatisk avslåing ja, trippel sikkerhet
Tankkapa sitet 3.6 Liter
Lydnivå 27 – 33 dB(A)
Samsvarer med
EU-forskrifter GS / CE / WEEE / RoHS
Alle rettigheter ovenfor tekniske modifikasjoner er forbeholdt
Page 41

Svenska
Grattis! Du har just införskaffat den enastående luftfuktaren FRED. Den
kommer att ge dig stor glädje och förbättra din inomhusluft.
Som med alla elektriska hushållsapparater krävs det att du är extra försiktig med den här modellen också, för att undvika personskador, brandskador
eller skador på apparaten. Läs denna bruksanvisning noggrant innan du
använder apparaten för första gången och följ säkerhetsanvisningarna på
själva apparaten.
Beskrivning av apparaten
Apparaten består av följande huvuddelar:
1. Luftfuktare
2. Strömkabel för strömförsörjning
3. Metallpläterade fötter
4. På/Av-knapp
5. Utgångsväljarknapp
6. Hygrostat
7. Externt ångrör
8. Hölje för apparaten med öppningsstöd
9. Vattentank med lock och integrerat bärhandtag
10. Hölje för värmeplatta
11. Hållare för värmeplattas hölje
12. Spännen för värmeplattas höljehållare
13. Tätning för hölje
14. Anti-kalk boll
15. LED för drift (ström)
16. LED för utgång (blå=hög, grön=ekonomi)
17. Display Tom tank (LED)
Viktiga säkerhetsanvisningar
Läs igenom bruksanvisningen noga innan du använder apparaten för första
gången och håll den i säkert förvar för framtida referens, vid behov ger du
den vidare till nästa ägare.
• Stadler Form avsäger sig allt ansvar för förlust eller skada som uppstår på
grund av att bruksanvisningen inte följts.
• Apparaten får endast användas i hemmet för de ändamål som beskrivs
i denna bruksanvisning. Otillåten användning och tekniska ändringar på
apparaten kan leda till fara för liv och hälsa.
• Denna apparat kan användas av barn från 8 år och uppåt och personer
med nedsatt fysisk eller mental förmåga eller brist på erfarenhet och
kunskap, om de övervakas eller får instruktioner angående användning
av apparaten på ett säkert sätt och förstår de inblandade riskerna. Barn
ska inte leka med apparaten. Rengöring och underhåll får inte göras av
barn utan tillsyn.
• Anslut endast kabeln till växelström. Observera spänningsinformationen
på apparaten.
• Använd inte skadade förlängningskablar.
• Dra inte nätsladden över vassa kanter och se till att den inte kommer i
kläm. Dra inte ut kontakten ur vägguttaget med våta händer eller genom
att hålla i sladden.
Page 42

• Använd inte denna apparat i omedelbar närhet av badkar, dusch eller simbassäng (minsta avstånd är 3 m). Placera apparaten så att en person som
befinner sig i badkaret inte kan röra apparaten.
• Placera inte apparaten nära en värmekälla. Utsätt inte sladden för direkt
värme (som t.ex. en uppvärmd värmeplatta, öppen eld, hett strykjärn, eller värmeelement). Skydda nätsladdar från olja.
• Se till att apparaten är korrekt placerad för att säkerställa en hög stabilitet under dess drift och se till att ingen kan snubbla över nätsladden.
• Apparaten är inte stänkskyddad.
• Endast för inomhusbruk.
• Förvara inte apparaten utomhus.
• Förvara apparaten på en torr plats, oåtkomlig för barn (packa in apparaten).
• Apparaten fungerar bara perfekt med obehandlat vatten. Använd inte i
kombination med avhärdare/jonbytare.
• Apparaten får inte under några omständigheter användas med eller komma i kontakt med dofter eftersom dessa skadar plasten och kan leda till
funktionsstörningar på apparten.
• Om nätsladden är skadad, måste den bytas ut av tillverkaren eller av en
verkstad som godkänts av tillverkaren eller av liknande kvalificerade personer för att undvika fara.
• Koppla ur apparaten under påfyllning och rengöring.
• Varning: het ånga! Du bör vara försiktig när du använder apparaten eftersom den släpper ut het vattenånga.
Notera:
Använd inte luftfuktare Fred med urkalkat vatten från ett avkalkningssystem som använder jonbytar-principen (salt tillsätts till vattnet). Detta kan
leda till funktionsstörningar och efterföljande läckage av apparaten.
Förberedelser för användning/drift
1. Om luftfuktare Fred har placerats på önskad plats: Anslut nätkabeln (2) till
ett vanligt uttag. Ta bort ångröret (7) och lyft bort höljet (8). Fyll vattentanken (9) med vatten (se till att hålla upp inloppsöppningen något) - skruva på
locket ordentligt och kontroller a att det sitter tät t. Sätt tillbaka vat tentanken
i luftfuktaren, skruva på locket och sätt i ångröret.
2. Placera apparaten i rummet. Se till att inte placera den på ett golv som kan
skadas av vatten och att det inte finns några apparater eller möbler som är
känsliga för fukt nära den.
3. Manövrera Fred via På/Av-knappen (4) och välj önskad utgång (5) (blå=hög,
grön=ekonomi). Om apparaten slutar att ånga, kommer displayen Tom tank
(15) att lysa, fyll sedan på med vatten enligt punkt 1.
4. Använd hygrostaten (6) för att ställa in fuktigheten. Inställningintervallet
börjar kl 20 och slutar vid 90% relativ fuk tighet. Vi rekommenderar att ställa
in systemet till 45% fuktighet för ett bekvämt rumsklimat (i mitten av inställningsintervalet, horisontellt knappläge).
Notera: Om luftfuktaren inte släpper ut ånga efter 5 minuter, vrider du
hygrostaten hela vägen till höger (max.). Detta kan bero på att den fak tiska luftfuktigheten i rummet är högre än det värde som du har ställt in.
Du kan sedan gradvis sänka hygrostaten. Om signallampan slocknar, har
du uppnått omgivande luftfuktighet i rummet. Om luftfuktaren stängs av
Page 43

automatiskt under drift, har den önskade luftfuktigheten i rummet upp nåtts. Luftfuktaren återupptar driften när rummets luftfuktighet sjunker
under inställt värde.
5. Om apparaten f ylls med tillräcklig mängd va tten och ändå stannar, startar du
avkalkningsprocessen (se rengöring).
Rengöring
Innan apparaten underhålls och efter varje användning, stänger du av apparaten och drar ut nätkabeln ur vägguttaget.
• Observera: Doppa aldrig i vatten (risk för kortslutning).
• Utvändiga ytor bör endast torkas av med en fuktig trasa och därefter torkas ordentligt torra. Ta alltid först ut nätkontakten.
• Avkalka luftfuktaren beroende på kalkhalten, men åtminstone en gång
i veckan: Ta bort ångröret (7), öppna höljet (8) genom att använda öppningsstödet och lyft bort det, ta bort vattentanken (9). Ta sedan bort höljet för värmeplattan (10) och tätningen (11). Rengör båda delarna med en
borste. Avkalka den magiska anti-kalkbollen (12) och värmeplattan med
den klibbfria beläggningen genom at t använda av et t kommersiellt av kalkningsmedel och skölj väl efteråt. Montera helt ihop apparaten igen med
alla delar (8-12) innan du använder den.
• Skölj vattentanken ordentligt med jämna mellanrum.
Reparationer
• Reparationer av elektriska apparater får endast utföras av en kvalificerad
eltekniker. Om felaktiga reparationer ut förs, upphör garantin att gälla och
allt ansvar frånsägs.
• Använd aldrig apparaten om en kabel eller kontakt är skadad, om den har
funktionsfel, om den har tappats eller blivit skadad på något annat sätt
(sprickor/brister i höljet).
• Tryck inte in några föremål i apparaten. Ta inte isär apparaten.
• Om apparaten inte går att reparera, gör den obrukbar omedelbart och
lämna in den på en lämplig återvinningsstation.
Kassering
Det europeiska direktivet 2012 / 19 / CE om avfall från elektrisk och elektronisk utrustning (WEEE), kräver att gammal hushållselektronik INTE kastas i
det normala osorterade avfallet. Förbrukad utrustning måste samlas in separat för att optimera återanvändning och återvinning av det material som
de innehåller och för minska påverkan på människors hälsa och på miljön.
Symbolen med den överkorsade ”soptunnan” på produkten påminner dig
om din skyldighet att apparaten måste samlas in separat när det
kasseras. Du kan kontakta din lokala myndighet eller återförsäljare för information om korrekt kassering av förbrukad elektronisk
utrustning.
Page 44

Specifikationer
Utflöde Normal 300 W, eko 150 W
Utgående effekt 220 – 240 V / 50 Hz
Mått 363 x 267 x 363 mm
(bredd x höjd x djup)
Vikt 2.9 kg
Automatisk avstängning ja, trippel säkerhet
Tankkapa citet 3.6 Lit er
Ljudnivå 27 – 33 dB(A)
Uppfyller EU:s regler GS / CE / WEEE / RoHS
Alla rättigheter för tekniska ändringar förbehålles
Page 45

Garantie/Warranty/Garantie/Garanzia/Garantía
Garantie/Garanti/Takuu/Garanti/Garanti
2 Jahre Garantie
Diese umfasst Konstruktions-, Produktions-, sowie Materialfehler. Ausgenommen sind sämtliche Verschleissteile und unsachgemässe Benutzung
oder Pflege.
2 Years warranty
This warranty covers defects of construction, production and material. All
abrasion parts are excluced and also inappropriate usage or maintenance.
Garantie 2 ans
Cette garantie couvre les défauts de construction, de fabrication et de
matériaux. En sont exclues toutes les pièces d’usure et d’utilisation pas
correcte ou mauvaise entretien.
2 anni di garanzia
Questa garanzia copre difetti di costruzione, di produzione e di materiale.
Tutte le parti di abrasione sono escluse e altresì l’uso o la manutenzione
inappropriata.
2 años de garantía
Esta garantía cubre los defectos de construcción, de fabricación y de materiales. Todas las piezas de desgaste están excluídas.
2 jaar garantie
Deze omvat de constructie-, productie en materiaal fouten. Hier buiten vallen de gebreken ten gevolgen van nalatig gebruik of Interferentie op het
toestel.
2 års garanti
Garantien omfatter konstruktions-, produktions- og matrialefejl. Sliddele og
fejlbrug er ikke indbefattet.
2 vuoden takuu
Takuu käsittää valmistus-, tuotanto- sekä materiaalivirheet. Takuun ulkopuolelle jäävät kaikki kuluvat osat sekä käyttöohjeiden vastainen tai huolimaton käyttö tai hoito.
2 års garanti
Denne garantien dekker feil ved konstruksjon, produksjon og materialet
anvendt. Alle reservedeler er utelatt fra garantien, samt uriktig bruk og
vedlikehold.
2 års garanti
Denna garanti täcker brister i tillverkning, produktion och material. Slitage
och olämpligt användande eller underhåll är uteslutna.
Page 46

Page 47

Stemp el Verkaufsstelle / R etailer’s stamp /
Cachet du poin t de vente / Timbro del rivenditore /
Sello del e stablecimie nto de venta / Stempel verkoopadres /
Butik kens stempe / Leima my yntikonttor i
Forhandlerstempel / Återförsäljarens stämpel
Page 48

Design b y Matti
Thanks to all people involved in this project: Del Xu
for his engagement, technical ideas and organisation,
Ye Zhiyong for the engineering and Lai Kaixuan for his
CAD work, Claudia Fagagnini for the beautiful photos,
Matti Walker for the surprising design and graphic work.
Martin Stadler, CEO Stadler Form Aktiengesellschaft
14-3
www.stadlerform.com
Stadler Form Aktiengesellschaft
Chamerstrasse 174
6300 Zug, Switzerland
Phone +41 41 720 48 48
 Loading...