

Page 1

Eva
Gebrauchsanweisung
Operating instructions
Mode d‘emploi
Istruzioni per l‘uso
Manual de instrucciones
Gebruiksaanwijzing
Brugsa nvisning
Käy ttöohje
Bruks anvisning
Bruks anvisning
Инструкция по эксплуатации
H
U
M
E
V
I
I
D
T
P
A
D
A
•
E
N
E
R
G
Y
-
E
F
F
I
C
I
T
Y
T
M
•
N
O
I
T
A
C
I
F
I
D
I
I
M
E
U
N
H
T
Page 2
Eva
1314
12
11
10
27
23
16
15
1
20
A
G
R
E
A
R
N
H
A
J
2
•
E
I
T
N
A
R
A
G
E
D
S
E
T
I
E
•
2
Y
E
A
R
S
W
A
R
R
A
É
N
T
N
Y
N
•
A
2
22
21
Page 3
25
24
9
26
6
17
18
19
11a
5
2
7
8
24
4
3
Page 4
Kartusche einweichen / Soak cartridge / Tremper la
cartouche
1 2 3
Remote Sensor
TM
24 h
Positionieren & aktivieren / Position & activate /
Positionner & activer
1
3
2
4
AAA
AAA
2 x
5
7
3 – 5 m optimal
distance
(max. 10 m)
6
Press
HYGROSTAT
Page 5
Entkalkung / Decalcification / Décalcification
mix
1
100 ml
WATER
2
+ 100 ml
DECALCIFIER
3
5
Press 5 sec
NIGHT MODE
7 8
9
200 ml
MAX.
200 ml
WATER
4
6
5 min
OK!
10
11
OK!
12
Mt
Einmal pro Monat reinigen
Clean once a month
Nettoyer une fois par mois
Page 6
H
U
M
E
V
I
T
P
A
D
A
•
E
N
E
R
G
Y
-
E
F
F
I
C
I
I
D
I
T
Y
T
M
•
N
O
I
T
A
C
I
F
I
D
I
M
E
U
N
H
T
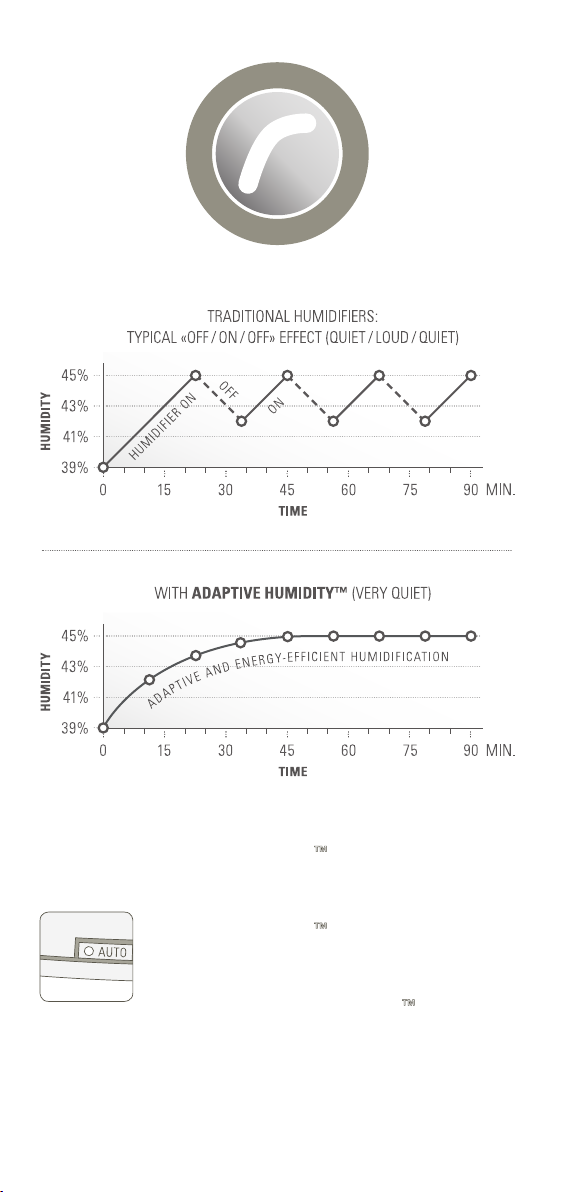
DE ADAPTIVE HUMIDITY™ Technologie adaptiert im
Auto Modus die Befeuchtungsstufe automatisch, um
Ziel‐Luftfeuchtigkeit leise und energieeffizient zu
erreichen und beizubehalten
EN ADAPTIVE HUMIDITY™ technology automatically
adapts the humidification output in Auto Mode in order
to reach and keep the desired humidity level quietly and
efficiently
FR La technologie ADAPTIVE HUMIDITY™ permet
d’adapter automatiquement la sortie d’humidification
en Mode Auto de façon à atteindre et à maintenir le
niveau d’humidité désiré sans bruit et avec efficacité
Page 7

Teilen Sie Ihr Feedback von Eva auf:
Share your feedback about Eva on:
Partagez votre commentaire sur Eva :
www.stadlerform.com/Eva
Für häufig gestellte Fragen besuchen Sie:
For frequently asked questions go to:
Trouvez la foire aux questions sur :
www.stadlerform.com/Eva/support
Bedienungsanleitung hier herunterladen:
Download instruction manual:
Téléchargez le mode d’emploi :
www.stadlerform.com/Eva/manual
Schauen Sie sich das Video zu Eva an:
Watch the video of Eva:
Regardez la vidéo du Eva :
www.stadlerform.com/Eva/video
Stadler Form Aktiengesellschaft, Chamerstrasse 174, 6300 Zug, Switzerland
Phone +41 41 720 48 48, Fax +41 41 720 48 44, www.stadlerform.com/contact
Page 8

Deutsch
Gratulation! Sie haben soeben den aussergewöhnlichen Luftbefeuchter
EVA erworben. Er wird Ihnen viel Freude machen und die Raumluft für Sie
verbessern.
Wie bei allen elek trischen Haushaltsgeräten wird auch bei diesem Gerät zur
Vermeidung von Verletzungen, Brand- oder Geräteschäden besondere Sorgfalt verlangt. Bitte studieren Sie die vorliegende Betriebsanleitung vor der
Inbetriebnahme und beachten Sie die Sicherheitshinweise auf dem Gerät.
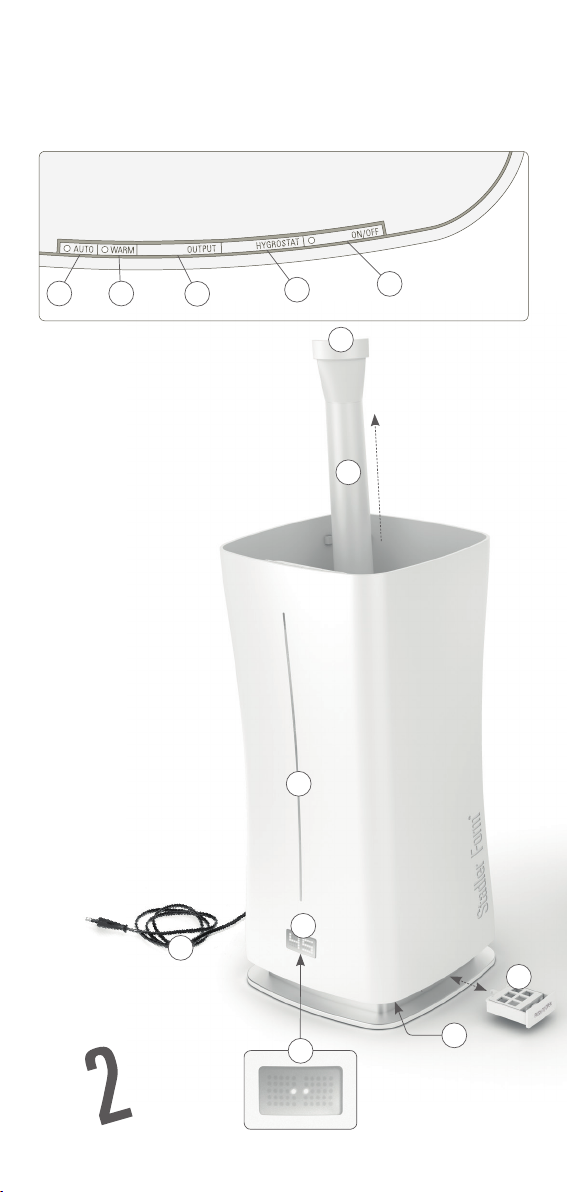
Gerätebeschreibung
Das Gerät besteht aus den folgenden Hauptkomponenten:
1. Netzkabel für die Stromversorgung
2. Remote SensorTM Feuchtigkeitssensor mit Fernbedienung
3. Standfuss für Remote Sensor
4. Batteriefach Remote SensorTM (Typ AAA)
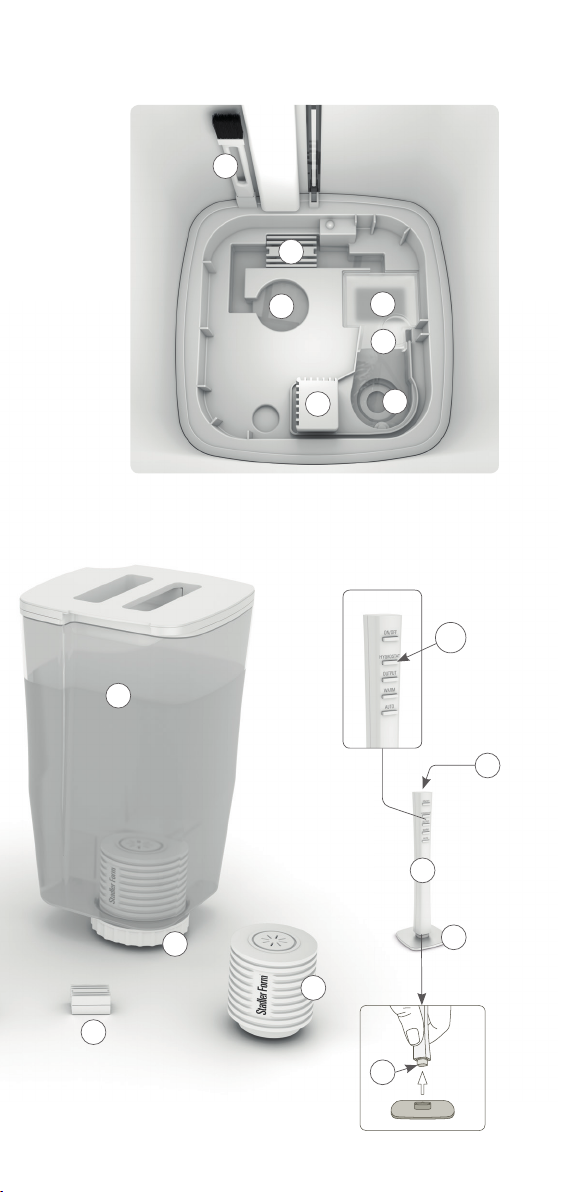
5. Position des Feuchtigkeitssensors
6. Wassertank mit Tragegriff
7. Wassertankdeckel mit Antikalkkartusche
8. Antikalkkartusche
9. Wasserwanne
10. Ein-/Aus-Knopf
11. Knopf für die Wahl der gewünschten Luftfeuchtigkeit (Hygrostat:
30 – 75 % und Dauer betrieb „C O“)
12. Knopf für die Wahl der Befeuchtungsstufe 1–5
13. Knopf für Warm-Modus (Wasser Vorheizung)
14. Knopf für Auto-Modus
15. Display mit Anzeige der aktuellen und der gewünschten (blinkend)
Luftfeuchtigkeit
16. Wasserstandanzeige
17. Heizplatte für Wasser Vorheizung
18. Silikon-Abdeckung für Heizplatte
19. Ultraschallmembrane
20. Duftstoffbehälter
21. Knopf für Nacht-Modus (LEDs normal, gedimmt oder ausgeschaltet) und
Reinigungsmodus (mind. 5 s gedrückt halten)
22. Symbol für fehlende Verbindung zwischen Remote SensorTM und Luftbe feuchter
23. Nebelkammer
24. Silver Cube
25. Reinigungsbürste
26. Lufteintritt (Achtung, es darf kein Wasser in die Öffnung treten!)
27. Nebelauslass
TM
TM
Wichtige Sicherheitshinweise
Bitte lesen Sie die Gebrauchsanleitung genau durch, bevor Sie das Gerät das
erste Mal in Betrieb nehmen und bewahren Sie sie zum späteren Nachschlagen gut auf, geben Sie sie ggf. an den Nachbesitzer weiter.
• Für Schäden, die durch Nichtbeachten dieser Gebrauchsanleitung entstehen, lehnt Stadler Form jegliche Haftung ab.
• Das Gerät ist nur im Haushalt für die in dieser Gebrauchsanweisung beschriebenen Zwecke zu benutzen. Ein nicht bestimmungsgemässer Ge-
Page 9

brauch sowie technische Veränderungen am Gerät können zu Gefahren
für Gesundheit und Leben führen.
• Dieses Gerät kann von Kindern ab 8 Jahren und Personen mit eingeschränkten körperlichen, sensorischen oder geistigen Fähigkeiten, aber
auch von unerfahrenen und unwissenden Personen verwendet werden,
sofern diese das Gerät unter Aufsicht verwenden oder von einer anderen
Person über die sichere Verwendung des Gerätes unterwiesen wurden
und sich der damit verbundenen Gefahren bewusst sind. Kinder sollten
nicht mit dem Gerät spielen. Kinder sollten das Gerät nur unter Aufsicht
reinigen und pflegen.
• Schliessen Sie das Kabel nur an Wechselstrom an. Achten Sie auf die
Spannungsangaben auf dem Gerät.
• Keine beschädigten Verlängerungskabel verwenden.
• Das Netzkabel nicht über scharfe Kanten ziehen oder einklemmen.
• Den Stecker nie am Netzkabel oder mit nassen Händen aus der Steckdose
ziehen.
• Das Gerät nicht in unmittelbarer Nähe einer Badewanne, einer Dusche
oder eines Schwimmbeckens benutzen (Mindestabstand von 3 m einhalten). Gerät so aufstellen, dass Personen das Gerät von der Badewanne
aus nicht berühren können.
• Gerät nicht in der Nähe einer Wärmequelle aufstellen. Das Netzkabel keiner direk ten Hitzeeinw irkung (wie z.B. h eisse Herdplat te, offene Fl ammen,
heisse Bügelsohle oder Heizöfen) aussetzen. Netzkabel vor Öl schützen.
• Darauf achten, dass das Gerät beim Betrieb eine gute Standfestigkeit besitzt und nicht über das Netzkabel gestolpert werden kann.
• Das Gerät ist nicht spritzwassergeschützt.
• Das Gerät ist nur zur Verwendung in Innenräumen geeignet.
• Das Gerät nicht im Freien aufbewahren.
• Das Gerät an einem trockenen und für Kinder unzugänglichen Ort aufbewahren (einpacken).
• Wenn das Netzkabel beschädigt ist, muss es vom Hersteller oder in einer
vom Hersteller zugelassenen Werkstatt oder von ähnlich qualifizierten
Personen ersetzt werden, um Gefahren zu vermeiden.
• Vor jeder Wartung, Reinigung und nach jedem Gebrauch das Gerät ausschalten und das Netzkabel von der Steckdose trennen.
• Das Gerät muss vor der internen Reinigung zuerst während 15 Minuten
ausgeschaltet sein!
• Bei eingeschalteter Vorheizung wird das Wasser im Inneren des Geräts
aufgeheizt: Das Wasser in der Wasserwanne (9) und die Heizplatte (17)
werden heiss. Vermeiden Sie Kontakt mit diesen!
• Stellen Sie das Gerät an einem für Kinder unzugänglichen Ort auf, da sich
bis zu 50 °C warmes Wasser im Inneren des Geräts befindet und die Heizplatte bis 75 °C heiss wird.
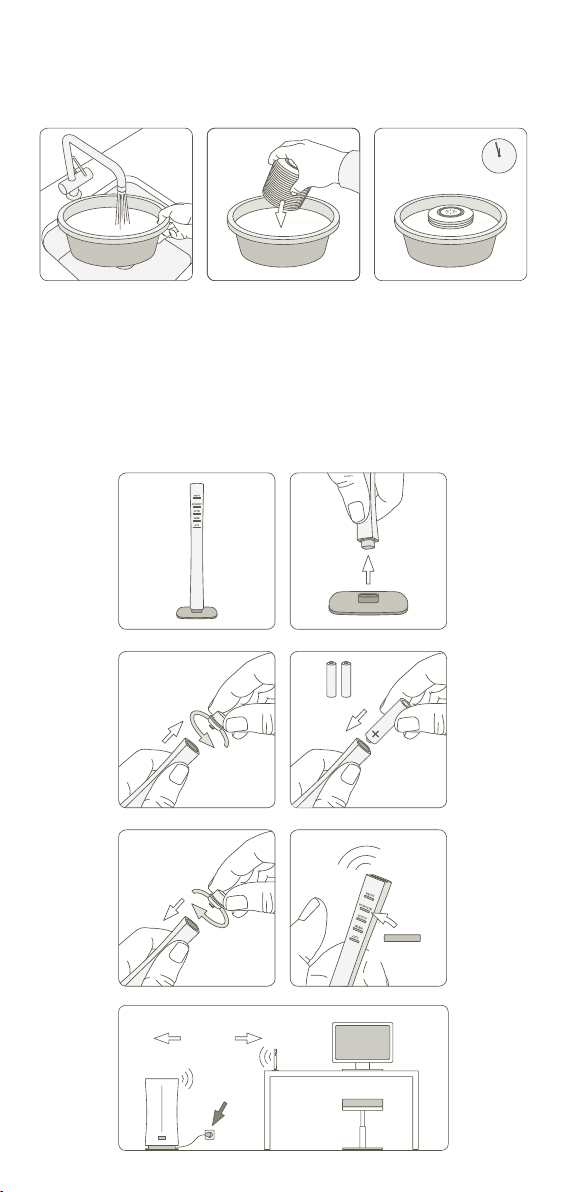
Vor der Inbetriebnahme: Antikalkkartusche und Wasserhärte
Die Antikalkkartusche vermindert den Kalkgehalt im Wasser und somit den
unerwünschten Ausstoss von Kalkpartikeln in die Umgebung. Wirkt je nach
Wasserhärte ein bis drei Monate (siehe Tabelle).
Wichtig: Legen Sie die Antikalkkartusche vor der ersten Verwendung 24
Stunden in Wasser ein (nicht im Wassertank!). Das Granulat muss zuerst
Wasser aufnehmen, um die volle Leistungsfähigkeit zu erreichen.
Page 10
Die Wirkungsdauer der Kartusche hängt von der Wasserhärte ab. Mit dem
mitgelieferten Teststreifen kann diese getestet werden (Teststreifen klebt
auf dem Quick Setup Guide).
1. Teststreifen eine Sekunde lang ins Wasser tauchen.
2. Nach ca. einer Minute ist das Ergebnis auf dem Teststreifen sichtbar.
Einige der grünen Felder wechseln ihre Farbe zu rosa. Die Wasserhärte
wird durch die Anzahl rosafarbener Felder angezeigt. Beispiel: Bei drei
rosafarbigen Feldern hat das Wasser den Härtegrad > 14 °dH.
Rosa Felder Wasserhärte Härtegrad
0/1 Weich
2 Mittelhart
3 Eher har t
4 Sehr hart
(°dH)
Ab 4
Ab 7
Ab 14
Ab 21
°dH
°dH
°dH
°dH
Kartusche reicht für
(bei 4 Liter/Tag)
Tage Liter
90 Tage ca. 360 L
45 Tage ca. 180 L
30 Tage ca. 120 L
15 Tag e ca. 60 L
Ab einer Wasserhärte von über 21 °dH können wir Ihnen den Betrieb eines
Ultras chall Luftbefeuchters nicht mehr empfehlen. Wir empfehlen Ihnen Ihre
Luft mit einem Luftbefeuchter nach dem Verdunsterprinzip zu befeuchten
(z.B. Oskar Verdunster von Stadler Form: www.stadlerform.com/Oskar).
Hinweis: Betreiben Sie Eva nicht mit entkalktem Wasser aus Entkalkungsanlagen, die nach dem Prinzip des Ionenaustausches funktionieren (Salz
wird dem Wasser beigefügt). Das im Wasser enthaltene Salz kann sich rund
um das Gerä t als weissen Staub nie derschlagen. Ev a darf jedoch mit Wasser
aus einem Tischwasserfiltersystem betrieben werden (z.B. Brita). Sind Sie
unsicher über die Qualität oder Zusammenstellung Ihres Wassers, nehmen
Sie mit dem Hauswart oder dem Trinkwasserversorger Kontakt auf.
Inbetriebnahme / Bedienung
1. Stellen Sie Eva an den gewünschten Platz auf einen flachen Untergrund.
Durch die leistungsstarke Befeuchtung erreicht der Nebel eine Höhe von
bis zu 1.4 m (Stufe 5, Warm-Modus eingeschaltet). Dies ermöglicht eine
direkte Platzierung von Eva auf dem Boden. Schliessen Sie das Netzkabel (1) an eine geeignete Steckdose an.
2. Nehmen Sie den Remote SensorTM (2), den Standfuss (3) und die zwei
Batterien aus der Verpackung. Öffnen Sie das Batteriefach (4) am unteren Ende des Remote SensorTM (2) durch Drehen des Deckels gegen den
Uhrzeigersinn. Fügen Sie die zwei Batterien in das Batteriefach (4), wie
auf Seite 4 gezeigt, und schliessen Sie den Deckel wieder. Stellen Sie
den Remote SensorTM (2) nun auf den Standfuss (3).
3. Der Remote SensorTM (2) ist einerseits ein Feuchtigkeitssensor und
stellt durch die externe Position eine präzise Befeuchtung sicher. Andererseits dient der Remote SensorTM (2) auch als Fernbedienung. Positionieren Sie den Feuchtigkeitssensor Remote SensorTM (2) mittig im
Raum auf einem Tisch oder einer Kommode mit einem optimalen Abstand zu Eva zwischen 3 – 5 m. Der Remote SensorTM sollte mittig im
Raum positioniert werden, damit die Raumluft den Sensor (5) möglichst
frei anströmen kann. Sollte dies nicht möglich sein, empfehlen wir, den
Page 11

Remote SensorTM mit mind. 30 cm Abstand zur Wand und mit mind. 2 m
Abstand zu Fenster und Lüftungsöffnungen zu positionieren.
4. Entnehmen Sie den Wassertank (6), indem Sie diesen am Griff oben halten und nach oben ziehen. Schrauben Sie den Wassertankdeckel (7) ab
und füllen Sie den Wassertank mit sauberem und kaltem Leitungswasser bis zur Maximalmarke. Stellen Sie sicher, dass die Antikalkkartusche
(8) vorab während 24 h in Wasser eingelegt wurde (siehe „Vor der Inbetriebnahme“). Schrauben Sie anschliessend den Deckel (7) wieder an
den Wassertank (6). Platzieren Sie den Wassertank (6) in das Gerät. Die
Wasserwanne (9) füllt sich nun langsam mit dem Wasser aus dem Wassertank. Wichtig: Bitte transportieren Sie das Gerät nicht, solange dieses mit Wasser gefüllt ist. Das Wasser könnte in die Elektronik laufen.
5. Schalten Sie Eva durch Drücken des Ein-/Aus-Knopfs (10) ein. Die aktuelle relative Luftfeuchtigkeit in % wird im Display (15) angezeigt. Leuchtet die Wasserstandanzeige (16) rot, ist zu wenig Wasser im Gerät. Die
Befeuchtungsstufe ist auf Stufe 2 und die gewünschte Luftfeuchtigkeit
auf 45 % voreingestellt.
6. Aktivieren Sie den Remote SensorTM (2) durch Drücken des „Hygrostat“Knopfs (11a). Der Feuchtigkeitssensor sendet die Information über die
gemessene relative Luftfeuchtigkeit automatisch mehrmals pro Minute
an das Gerät, welches diese im Display (15) anzeigt. Die Messung kann
auch durch Drücken eines beliebigen Knopfs auf dem Remote Sensor
(2) ausgelöst werden (ausser Ein/Aus Knopf (10)).
7. Die gewünschte Luftfeuchtigkeit kann durch mehrmaliges Drücken des
„Hygrostat“-Knopfs (11) verändert werden (35 – 75 % und Dauerbetrieb
«CO»). Die Anzeige im Display (15) blinkt während der Eingabe. Nach einigen Sekunden ohne Eingabe wird der gewählte Wert gespeichert. Die
Anzeige wechselt auf die aktuell gemessene Luftfeuchtigkeit.
8. Die Befeuchtungsleistung kann durch mehrmaliges Drücken des
„Output“-Knopfs (12) verändert werden (Stufen 1 – 5). Die Stufen werden durch horizontale Balken auf dem Display (15) angezeigt (z.B. 1 Balken = Stufe 1).
9. Durch Drücken des „Warm“-Knopfs (13) wird der Warm-Modus und
damit die Wasser Vorheizung eingeschaltet. Die LED auf dem „Warm“Knopf am Gerät leuchtet nun. Die Heizplatte (17) wärmt das Wasser auf,
bevor es durch die Ultraschallmembrane (19) vernebelt wird. Der WarmModus ermöglicht einen angenehm warmen Nebel plus eine höhere Befeuchtungsleistung.
10. Durch Drücken des „Auto“-Knopfs (14) wird der Auto-Modus und damit
die Adaptive HumidityTM Technologie aktiviert. Die LED auf dem „Auto“Knopf am Gerät leuchtet nun. Im Auto-Modus adaptiert das Gerät die
Befeuchtungsstufe automatisch, um die gewünschte Luftfeuchtigkeit
von 45 % leise und energieeffizient zu erreichen und beizubehalten.
Je tiefer die aktuelle Luftfeuchtigkeit ist, desto höher wird die Befeuchtungsstufe automatisch eingestellt (unter 33 % = Stufe 4, von
34 % – 37 % = Stufe 3, von 38 % – 41 % = St ufe 2, v on 42 % – 4 5 % = Stu fe 1). Sie können die gewünschte Luftfeuchtigkeit im Auto-Modus ändern, indem Sie den „Hygrostat“-Knopf (11) mehrmals drücken, während
der Auto-Modus aktiviert ist (die LED auf dem „Auto“-Knopf am Gerät
leuchtet). Die Befeuchtungsstufe (12) kann im Auto-Modus nicht manuell verändert werden. Sobald der „Output“-Knopf (12) zur Veränderung
der Befeuchtungsstufe gedrückt wird, ist der Auto-Modus deaktiviert.
TM
Page 12

11. Sie können mit Eva Duftstoffe im Raum verteilen. Seien Sie im Umgang
mit Duftstoffen äusserst sparsam, da eine zu grosse Dosierung zu Fehlfunktionen und zu Schäden am Gerät führen kann. Zur Verwendung von
Duftstoffen drücken Sie kurz auf den Duftstoffbehälter (20) und ziehen
ihn aus dem Gerät. Träufeln Sie die Duftstoffe direkt auf die Watte im
Behälter. Geben Sie max imal 1 – 2 Tropf en des Duftstoffes in den
Behälter! Schieben Sie den Behälter wieder zurück und drücken Sie
kurz darauf, um ihn zu arretieren. Tipp: Um den Duftstoff zu wechseln,
entfernen Sie die Watte und reinigen Sie den Behälter mit Seife. Sie
können nun ein neues Watte-Pad (handelsübliche Watte) einsetzen und
mit Duftstoff beträufeln.
12. Wenn die Wasserstandanzeige (16) rot leuchtet, muss Wasser nachgefüllt werden. Entfernen Sie dafür den Wassertank (6) und füllen Sie
diesen mit sauberem und kaltem Leitungswasser bis zur Maximalmarke.
Nach dem Einsetzen des Wassertanks nimmt das Gerät nach ein paar
Sekunden seinen Betrieb automatisch wieder auf. Der Wassertank kann
auch während dem Betrieb nachgefüllt werden.
13. Wenn Sie sich durch die Helligkeit der Lämpchen gestört fühlen (z.B. im
Schlafzimmer), können Sie die Leuchtintensität durch Drücken der Taste
für den Nacht-Modus (21) reduzieren:
• Normaler Modus (standardmässig eingeschaltet)
• Gedimmter Modus (einmal drücken)
• Licht-aus Modus (zweimal drücken)
• Durch nochmaliges Drücken des Dimmer-Schalters können Sie wie-
der in den Normalen Modus wechseln.
Wenn kein Wasser im Gerät ist, leuchtet die rote Wasserstandanzeige
(16) in allen Dimm-Modi. Das rote Licht kann nicht gedimmt werden.
14. Werden im Display (15) zwei Punkte angezeigt (22), kann Eva keine Funkverbindung zum Remote SensorTM (2) herstellen. Eva funktioniert weiterhin dank dem geräteinternen Feuchtigkeitssensor. Drücken Sie auf einen
beliebigen Knopf auf dem Remote SensorTM (2), um diesen zu aktivieren.
Stellen Sie sicher, dass sich der Remote SensorTM (2) im Umkreis von maximal 10 m zu Eva befindet. Wände, Türen und Stockwerke zwischen Eva
und dem Remote SensorTM (2) können die Funkverbindung stören. Der
Remote SensorTM (2) wird optimalerweise in einer Distanz von 3 – 5 m
von Eva auf einer erhöhten Fläche in der Mitte des Raumes positioniert
(siehe Punkt 3 von „Inbetriebnahme/Bedienung“). Die zwei Punkte auf
dem Display (22) können auch darauf hinweisen, dass die Batterien am
Remote SensorTM (2) ausgetauscht werden müssen (siehe Punkt 2 von
„Inbetriebnahme/Bedienung“).
Hinweis: Sollten Sie Tropfen (oder andere Spuren von Feuchtigkeit) auf
oder um das Gerät feststellen, handelt es sich um kondensiertes Wasser aus
dem Luftbefeuchter. Das heisst, dass die Luft die Feuchtigkeit vom Luftbefeuchter nicht mehr aufnehmen kann. Bitte aktivieren Sie den Auto-Modus
mit einer gewünschten Luftfeuchtigkeit von 45 %. Damit sollten sich keine
Wassertropfen mehr bilden.
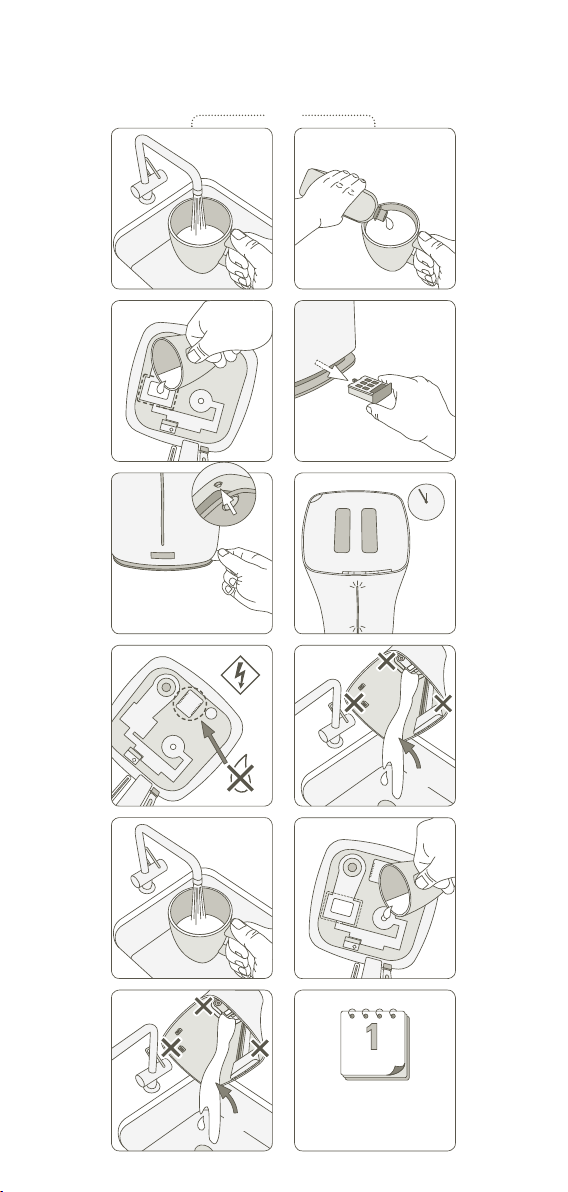
Reinigung
Vor jeder War tung, Reinigung und nach jedem Gebrauch das Gerät ausschalten und das Netzkabel (1) von der Steckdose trennen.
Page 13

Achtung: Das Gerät nie ins Wasser tauchen (Kurzschlussgefahr). Bei einge schalteter Vorheizung (Warm-Modus LED leuchtet (13)) wird das Wasser im
Inneren des Geräts aufgeheizt: Das Wasser in der Wasserwanne (9) und die
Heizplatte (17) werden heiss. Vermeiden Sie Kontakt mit diesen!
• Zur äusseren Reinigung mit einem feuchten Lappen abreiben und danach
gut trocknen.
• Reinigungmodus mind. 1 x pro Monat durchführen. Das Gerät muss
vor der internen Reinigung zuerst während 15 Minuten ausgeschaltet
sein! Entfernen Sie danach den Wassertank (6) die Nebelkammer (23), die
Silikon-Abdeckung (18), den Silver Cube (24) und den Duftstoffbehälter
(20). Füllen Sie eine Tasse mit 200 ml Leitungswasser vermischt mit Entkalkungsmittel (Mischverhältnis nach Herstellerangaben). Lassen Sie die
Flüssigkeit vorsichtig in die Wasserwanne (9) fliessen, in dem Sie die Tasse unmit telbar über der Wass erwanne halten (siehe Seite 5). Schütten Sie
die Flüssigkeit nicht von oben herab in die Wasserwanne! Achten Sie darauf, dass keine Flüssigkeit in den Lufteintrittsöffnung (26) gelangt. Dies
beschädigt das Gerät, wodurch jeglicher Anspruch auf Garantie erlischt.
• Um den Reinigungsmodus zu starten, muss das Netzkabel an einer
Steckdose angeschlossen sein. Drücken und halten Sie nun den Knopf
für den Nacht-Modus (21) an der Unterseite der rechten Ecke während 5
Sekunden, um den Reinigungsmodus zu aktivieren. Am Gerät blinkt nun
die Wasserstandanzeige (16) rot. Der Reinigungsmodus läuft während ca.
5 min. und schaltet sich danach automatisch aus (Wasserstandanzeige
blinkt nicht mehr).
• Überprüfen Sie nun in der Wasserwanne (9), ob sich der Kalk auf der Ultraschallmembrane (19) und der Heizplatte (17) gelöst hat. Achtung: das
Wasser und die Heizplatte sind heiss, Verbrühungsgefahr!
• Sollten nicht alle Kalk-Rückstände entfernt worden sein, kann mit Hilfe
der Reinigungsbürste (25) (Vorder- und Rückseite) die Ultraschallmembrane (19) und die Heizplatte (17) gereinigt werden. Versuchen Sie nicht,
diese mit einem harten Gegenstand freizukratzen.
• Bei hartnäckigen Verkalkungen empfehlen wir das Gerät mehrmals nacheinander mit dem Reinigungsmodus (21) zu entkalken. Lassen Sie das Entkalkungsmittel jedoch maximal während 2 0 min. in der Wasserwanne drin
und schütten Sie es nachher wie nachfolgend beschrieben aus.
• Wichtig: Schütten Sie das Entkalkungsmittel über die linke vordere Ecke
aus dem Gerät aus (siehe Pfeil im Gerät). Es darf kein Wasser in die Lufteintrittsöffnung (26) gelangen. Dies beschädigt das Gerät, wodurch jeglicher Anspruch auf Garantie erlischt.
• Zum Ausspülen füllen Sie nun die Tasse mit 200 ml Leitungswasser und
lassen die Flüssigkeit vorsichtig in die Wasserwanne (9) fliessen, in dem
Sie die Tasse unmittelbar über der Wasserwanne halten (siehe Seite 5).
Schütten Sie die Flüssigkeit nicht von oben herab in die Wasserwanne!
Schütten Sie das Wasser über die linke vordere Ecke aus dem Gerät.
Wiederholen Sie diesen Vorgang, bis sich kein Entkalkungsmittel mehr
in der Wasserwanne (9) befindet. Platzieren Sie Silver Cube (24), SilikonAbdeckung (18), Nebelkammer (23), Wassertank (6) und Duftstoffbehälter
(20) wieder im Gerät. Sollte sich der Wassertank nicht richtig aufsetzen
lassen, überprüfen Sie, ob der obere Teil der Nebelkammer (23) richtig
eingehängt ist.
• Reinigen Sie den Wassertank (6) alle 2 Wochen gründlich mit einer weichen Bürste oder Schwamm und warmem Wasser. Bei Kalkablagerungen
Page 14

im Wassertank verwenden Sie mit Wasser verdünntes Entkalkungsmittel
(Mischverhältnis nach Herstellerangaben). Spülen Sie den Wassertank
danach mit sauberen, kalten Leitungswasser gründlich aus.
Wechsel der Antikalkkartusche
• Die empfohlenen Wechselintervalle finden Sie in der Tabelle (siehe «Vor
der Inbetriebnahme»).
• Tipp: Die Funktion der Kartusche (8) kann mit einem einfachen Test über-
prüft werden: Halten Sie einen kleinen Spiegel für ein paar Sekunden in
den Nebel (27). Falls sich auf dem Spiegel anschliessend weisser (Kalk-)
Niederschlag befindet, muss die Kartusche ersetzt werden.
• Die Kartusche befindet sich auf der Innenseite des Tankdeckels (8).
Schrauben Sie zuerst den Tankdeckel (7) vom Wassertank (6) und dann die
Kartusche vom Tankdeckel. Entsorgen Sie die Kartusche im Hausmüll (8).
Bevor Sie die neue Antikalkkartusche auf die Innenseite des Tankdeckels
schrauben, legen Sie sie 24 h in Wasser ein (nicht im Wassertank!).
• Werfen Sie den Tankdeckel (7) beim Kartuschenwechsel nicht weg!
Silber Würfel – Silver Cube ™
Der Silber Würfel (24) verhindert durch stetige Abgabe von Silberionen das
Keim- und Bakterienwachstum im Luftbefeuchter. Der Einsatz des Silber
Würfels führt zu einem hygienischen Raumklima. Die Wirkzeit des Silber
Würfels ist ein Jahr. Wir empfehlen deshalb, jede neue Befeuchtungssaison
den Silber Würfel zu ersetzen. Der Silber Würfel wirkt, sobald er mit dem
Wasser im Gerät in Berührung kommt und auch wenn das Gerät ausgeschaltet ist.
Reparaturen
• Reparaturen an Elektrogeräten (Wechseln des Netzkabels) dürfen nur
von instruierten Fachkräften durchgeführt werden. Bei unsachgemässen
Reparaturen erlischt die Garantie und jegliche Haftung wird abgelehnt.
• Nehmen Sie das Gerät nie in Betrieb, wenn ein Kabel oder Stecker beschädigt ist, nach Fehlfunktionen des Gerätes, wenn dieses heruntergefallen ist oder auf eine andere Art beschädigt wurde (Risse/Brüche am
Gehäuse).
• Nicht mit irgendwelchen Gegenständen in das Gerät eindringen.
• Ausgedientes Gerät sofort unbrauchbar machen (Netzkabel durchtrennen) und bei der dafür vorgesehenen Sammelstelle abgeben.
Entsorgung
Die europäische Richtlinie 2012 / 19 / CE über Elektro- und Elektronik-Altgeräte (WEEE) verlangt, dass elektrische Haushaltsgeräte nicht über den
Restmüll oder sonstigen Haushaltsabfall entsorgt werden dürfen, sondern
an Sammelpunkten für das Recycling von elektrischen und elektronischen
Geräten abgegeben werden müssen. So können die Verwertung der enthaltenen Materialien optimiert und ihre Auswirkungen auf die menschliche Gesundheit und die Umwelt reduziert werden. Das durchgestrichene
Abfalltonnensymbol auf dem Produkt erinnert Sie an diese Verpflichtung. Bitte fragen Sie bei Ihrer Gemeindeverwaltung nach
der zuständigen Entsorgungsstelle.
Page 15

Technische Daten
Nennspannung 220–240 V / 50 Hz
Nennleistung 10 – 95 W
Befeuchtungsleistung bis 550 g/h
Abmessungen 196 x 418 x 196 mm
(Breite x Höhe x Tiefe)
Gewicht 3.0 kg
Wassertank Kapazität 6.3 Liter
Schalldruckpegel 26 – 34 dB(A)
Erfüllt EU-Vorschrift CE / WEEE / RoHS
Technische Änderungen vorbehalten
Page 16

English
Congratulations! You have just acquired the exceptional Eva air humidifier. It
will give you great pleasure and improve the indoor air for you.
As with all domestic electrical appliances, particular care is also needed
with this model in order to avoid injury, fire damage or damage to the appliance. Please study these operating instructions carefully before using this
appliance for the first time and follow the safety advice on the appliance
itself.
Description of the appliance
The appliance consists of the following main components:
1. Mains cable for power supply
2. Remote SensorTM humidity sensor with remote control
3. Stand for Remote Sensor
4. Battery compartment of Remote SensorTM (Type AAA)
5. Position of the humidity sensor
6. Water tank with carrying handle
7. Water tank lid with anticalc cartridge
8. Anticalc cartridge
9. Water tray
10. On/off button
11. Button for the selection of the desired humidity (hygrostat: 30 – 75 %
and continuous operation “CO“)
12. Button for the selection of the humidification output level 1 – 5
13. Button for warm mode (water pre-heating)
14. Button for auto mode
15. Display with the indication for the cur rent and desired (blinking) humidit y
16. Water level indicator
17. Heating plate for water pre-heating
18. Silicone cover for the heating plate
19. Ultrasonic membrane
20. Fragrance container
21. Button for night mode (LEDs normal, dimmed or off) and cleaning mode
(press for at least 5 seconds)
22. Sy mbol for a failed connection between Remote SensorTM and humidifier
23. Mist chamber
24. Silver Cube
25. Cleaning brush
26. Air inlet (Caution: no water may enter this opening!)
27. Mist o u t l e t
TM
TM
Important Safety Instructions
Please read through the operating instructions carefully before you use the
appliance for the first time and keep them safely for later reference; if necessary pass them on to the next owner.
• Stadler Form refuses all liability for loss or damage which arises as a
result of failure to follow these operating instructions.
• The appliance is only to be used in the home for the purposes described
in these instructions. Unauthorised use and technical modific ations to the
appliance can lead to danger to life and health.
• This appliance can be used by children aged from 8 years and above and
persons with reduced physical, sensory or mental capabilities or lack of
Page 17

experience and knowledge if they have been given supervision or instruction concerning use of the appliance in a safe way and understand the
hazards involved. Children shall not play with the appliance. Cleaning and
user maintenance shall not be made by children without supervision.
• Only connect the cable to alternating current. Observe the voltage information given on the appliance.
• Do not use damaged extension cords.
• Do not run the power cord over sharp edges and make sure that it does
not get trapped.
• Do not pull the plug from the socket with wet hands or by holding on to
the power cord.
• Do not use the appliance in immediate vicinity of a bath tub, a shower or a
swimming pool (observe a minimum distance of 3 m). Place the appliance
such that a person in the bath tub cannot touch the appliance.
• Do not place the appliance near a heat source. Do not subject the power
cord to direct heat (such as a heated hotplate, open flames, hot iron sole
plates or heaters for example). Protect power cords from oil.
• See to it that the appliance is properly positioned to ensure a high stability during its operation and make sure that no one can trip over the power
cord.
• The appliance is not splash-proof.
• For indoor use only.
• Do not store the appliance outdoors.
• Store the appliance in a dry place inaccessible to children (pack the appliance).
• If the power cord is damaged, it must be replaced by the manufacturer
or a repair shop authorized by the manufacturer or by similarly qualified
persons in order to avoid a hazard.
• Prior to any maintenance, cleaning and after each use, switch off the appliance and unplug the mains cable from the socket.
• Prior to cleaning t he interior of the appliance, make sure the appliance has
been off for at least 15 minutes!
• When the pre-heating is turned on, the water inside the appliance is
heated: the water in the water tray (9) and the heating plate (17) become
hot. Avoid touching the water and the heating plate!
• Place the appliance out of reach of children, as the water inside the appliance is heated up to 50 °C and the heating plate reaches hot temperatures up to 75 °C.
Before setup: Anticalc cartridge and water hardness
The anticalc cartridge reduces the limescale in the water and the undesirable emission of limescale particles into the surroundings. Effective for one
to three months, depending on water hardness (see table).
Important: Soak the anticalc cartridge in a water bath for 24 hours before
the first use (not in the water tank!). The resin has to absorb water to reach
high performance.
The period of time that the cartridge is effective for depends on the hardness of the water. This can be tested using the testing strips provided (testing strip stuck to the Quick Setup Guide).
Page 18

1. Dip the testing strips into the water for a second.
2. After around one minute the results can be seen on the test strip.
Some of the green fields change colour into pink. The water hardness is
shown by how many boxes turn pink. Example: If three are pink, then the
water hardness is >14 °dH.
Number of
pink boxes
0/1 Soft
2 Moderately
3 Hard
4 Very hard
Water
hardness
hard
Degree of
hardness
(°dH)
°dH
From 4
From 7
°dH
From 14
From 21
Cartridge will last for
(with 4 liter/day)
Days Liter
90 days app rox. 36 0 L
45 days app rox. 180 L
30 days app rox. 120 L
°dH
15 days approx. 60 L
°dH
With a water hardness above 21 °dH, we can no longer recommend the use
of an ultrasonic humidifier. We recommend that you use an evaporative
humidifier to increase the humidity in your house (e.g. an Oskar humidifier
made by Stadler Form: www.stadlerform.com/Oskar).
Note: Do not operate Eva with decalcified water out of a decalcification
system that uses the principle of an ion exchanger (salt is added to the water). The salt contained in the water may lead to white dust accumulation
around the appliance. However, Eva may be operated from a drinking water
filter system (e.g. Brita). Should you be unsure about the quality or composition of the water in your area, contact the caretaker or your drinking water
provider.
Setting up / operation
1. Put Eva in the desired location on a flat surface. The mist reaches a
height of up to 1.4 m thanks to the high-performance humidification (output level 5, warm mode on). This makes it possible to place Eva directly
on the floor. Connect the power cord (1) to a suitable socket.
2. Take the Remote SensorTM (2), the stand (3) and the two batteries out of
the packaging. Open the battery compartment (4) on the underside of
the Remote SensorTM (2) by turning the lid anticlockwise. Insert the two
batteries into the battery compartment (4), as shown on page 4, and
close the lid again. Now place the Remote SensorTM (2) on the stand (3).
3. On the one hand, the Remote SensorTM (2) is a humidity sensor and
guarantees precise humidification by its external position. On the other
hand, the Remote SensorTM (2) also serves as a remote control. Position
the humidity sensor Remote SensorTM (2) in the centre of the room on a
table or a sideboard with an optimal distance from Eva between 3 – 5 m.
The Remote SensorTM should be positioned centrally in the room so that
the room air can flow past the sensor (5) as freely as possible. If this is
not possible, we recommend positioning the Remote SensorTM with a
minimum distance of 30 cm from the wall and a minimum distance of 2 m
from windows and ventilation openings.
4. Remove the water tank (6) by holding it by the handle and pulling it
up. Screw off the water tank lid (7) and fill the water tank with clean,
Page 19

cold tap water up to the maximum mark. Make sure that the anticalc
cartridge (8) has been soaked in water for 24 hours prior (see “Before
setup“). Finally, screw the lid (7) back on the water tank (6). Then place
the water tank (6) in the unit. The water tray (9) will now slowly fill from
the water tank. Important: please do not move the appliance when it is
filled with water. The water could run into the electronics.
5. Press the on/off button (10) to switch Eva on. The current relative humidity in % is shown on the display (15). If the water level indicator light (16)
is red, there is too little water in the unit. The humidification output level
is pre-set to level 2 and the desired humidity at 45 %.
6. Activate the Remote SensorTM (2) by pressing the “Hygrostat” button
(11a). The humidity sensor automatically sends information about the
measured relative humidity several times per minute to the unit, which
shows it on the display (15). The measurement can also be activated by
pressing any button on the Remote SensorTM (2) (aside from the on/off
button (10)).
7. The desired humidity can be changed by pressing the “Hygrostat” button (11) several times (35 – 75 % and continuous operation “CO”). The
symbol on the display (15) blinks during input. After a few seconds without input, the selected value is saved. The symbol changes to the current
measured humidity.
8. The humidification performance can be changed by pressing the “Output” button (12) several times (levels 1 – 5). The level is indicated on the
display (15) by horizontal bars (e.g. 1 bar = level 1).
9. By pressing the “Warm” button (13), the warm mode, and with it the
water pre-heating, is turned on. Now the LED on the “Warm” button
on the unit is on. The heating plate (17) warms the water before it is
turned to mist by the ultrasonic membrane (19). The warm mode creates
a pleasantly warm mist plus increases the humidification performance.
10. By pressing the “Auto” button (14), the auto mode, and with it the Adaptive HumidityTM Technology, is activated. Now the LED on the “Auto”
button on the unit is on. In auto mode, the unit adapts the humidification
output level automatically in order to reach and maintain the desired
humidity of 45 % quietly and in an energy-efficient way. The lower the
current humidity is, the higher the humidification output level will automatically be set (under 33 % = level 4, from 34 % – 37 % = level 3, from
38 % – 41 % = level 2, from 42 % – 45 % = level 1). You can change the
desired humidity in auto mode by pressing the “Hygrostat” button (11)
several times while auto mode is active (the LED on the “Auto” button
on the unit is on). The humidification output level (12) cannot be altered
manually in auto mode. As soon as the “Output” button (12) is pressed
to change the humidification output level, the auto mode is deactivated.
11. You can use Eva to disperse fragrances in the room. Be extremely sparing with fragrances because an excessive dosage can result in the malfunctioning of, and damage to, the appliance. In order to use fragrances,
briefly press and release the fragrance container (20) and pull it out of
the appliance. Let the fragrance drip directly onto the cotton pad in the
fragrance container (20). Add a maximum of 1 – 2 drops of fragrance
into the fragrance container! Push the container back again and press
and release it to lock it. Tip: in order to change the fragrance, remove
the cotton pad and clean the container with soap. Now you may insert
Page 20

a new cotton pad (commercially available) and add drops of the desired
fragrance.
12. If the water level indicator (16) changes to red, the water must be refilled. Remove the water tank (6) and fill it with clean, cold tap water
up to the maximum mark. After replacing the water tank, the appliance
automatically resumes operation after a few seconds. The water tank
can also be refilled during operation.
13. If you find the lamps too bright (in a bedroom, for example), you may
reduce the light intensity by pressing the night mode key (21):
• Normal mode (default mode)
• Dimmed mode (push once)
• Lights-out mode (push twice)
• By pushing the dimmer button once more, you can go back into nor-
mal mode.
If there is no water in the appliance, the red water level symbol (16)
lights up in all modes. The red light cannot be dimmed.
14. If two dots are shown (22) on the display (15), Eva cannot establish a
radio connection to the Remote SensorTM (2). Eva still functions thanks
to a humidity sensor within the appliance. Press any button on the Remote SensorTM (2) to activate it. Make sure that the Remote SensorTM
(2) is within a 10 m radius of Eva. Walls, doors and floors between Eva
and the Remote SensorTM (2) can disrupt the radio connection. The Remote SensorTM (2) should be optimally positioned at a distance between
3 – 5 m from Eva and on an elevated surface in the middle of the room
(see «Setup/operation» No. 3). The two dots on the display (22) could
also indicate that the batteries in the Remote SensorTM (2) need replacing (see «Setup/operation» No. 2).
Note: Should you see droplets (or other signs of dampness) on or around
the unit, this condensed water is from the humidifier. This means that the
air can no longer absorb the moisture from the humidifier. Please activate
the auto mode with a desired humidity of 45 %. Water droplets should then
stop forming.
Cleaning
Prior to any maintenance, cleaning and after each use, switch off the appliance and unplug the mains cable (1) from the socket.
Attention: Never submerge the appliance in water (danger of short-circuit).
If pre-heating is turned on (the warm mode LED is on (13)), the water inside
the appliance is heated: the water in the water tray (9) and the heating plate
(17) become hot. Avoid touching the water and the heating plate!
• For external cleaning, rub with a damp cloth and then dry thoroughly.
• Run the cleaning mode at least once per month. The appliance must
be off for at least 15 minutes prior to internal cleaning! Then remove the
water tank (6), the mist chamber (23), the silicone cover (18), the Silver
Cube (24) and the fragrance container (20). Fill a cup with 200 ml of tap
water mixed with descaling agent (mix according to the manufacturer’s
instructions). Pour the liquid carefully into the water tray (9) by holding
the cup directly over the water tray (see page 5). Do not pour the liquid
into the water tray from high above the tray! Be sure that no liquid enters
the air inlet opening (26). This will damage the appliance and will void any
claim to the warranty.
Page 21

• To start the cleaning mode, the mains cable must be connected to a socket. Press and hold the night mode button (21) on the underside of the right
corner for 5 seconds to activate the cleaning mode. Now the water level
symbol (16) on the appliance will blink red. The cleaning mode runs for
around 5 minutes and automatically turns off afterwards (the water level
symbol stops blinking).
• Check in the water tray (9) if the limescale on the ultrasonic membrane
(19) and the heating plate (17) has dissolved. Attention: the water and
the heating plate are hot, risk of scalding!
• If limescale residue remains, the ultrasonic membrane (19) and the heating plate (17) can be cleaned with the help of the cleaning brush (25)
(front- and backside). Do not try to scrape them with a hard object.
• For stubborn limescale, we recommend descaling the appliance by running the cleaning mode (21) several times in a row. Leave the descaling
agent in the water tray for a maximum of 20 minutes and pour it out afterwards as described below.
• Important: Pour the descaling agent out over the left front corner of the
appliance (see the arrow on the appliance). No water may enter the air
inlet opening (26). This will damage the appliance and will void any claim
to the warranty.
• To rinse, now fill the cup with 200 ml of tap water and carefully pour the
liquid into the water tray (9) by holding the cup directly over the water tray
(see page 5). Do not pour the liquid into the water tray from high above
the tray! Pour the water out over the left front corner of the appliance.
Repeat the process until there is no more descaling agent in the water
tray (9). Place the Silver Cube (24), silicone cover (18), mist chamber (23),
water tank (6) and fragrance container (20) back into the appliance. If the
water tank is not sitting right, check if the upper part of the mist chamber
(23) is properly mounted.
• Clean the water tank (6) thoroughly every two weeks with a soft brush or
sponge and warm water. Use diluted descaling agent (mix according to
the manufacturer’s instructions) for lime deposits. Rinse the water tank
afterwards with clean, cold tap water thoroughly.
Replacement of the anticalc cartridge
• Please find the recommended replacement interval in the table (see “Before setup”).
• Tip: the efficiency of the cartridge (8) can be inspected with a simple
test. Hold a small mirror in the mist (27) for a few seconds. If white deposits (calcium carbonate) appear on the mirror, then the cartridge needs
changing.
• The anticalc cartridge is located on the inner side of the tank lid (7). First,
screw the tank lid (7) off the water tank (6) and then screw the cartridge
off the tank lid. Dispose of the cartridge in the domestic waste (8). Prior to
screwing the new anticalc cartridge into the inside of the tank lid, soak it
in water (not in the water tank!) for 24 hours.
• Keep the tank lid (7) when replacing the cartridge!
Silver Cube™
The Silver CubeTM (24) prevents the growth of germs and bacteria in the
humidifier due to the continuous release of silver ions. The use of silver
cubes leads to a hygienic room climate. The lifetime of the silver is around
Page 22
one year. We therefore recommend that you replace the silver cube at the
beginning of every humidifying season. The silver cube starts working as
soon as it comes into contact with water, and also works when the unit is
switched of f.
Repairs
• Repairs to electrical appliances must only be carried out by a qualified
electrical technician. If improper repairs are carried out, the warranty
lapses and all liability is refused.
• Never operate the appliance if the adap tor or plug is damaged, after it h as
malfunctioned, if it has been dropped or has been damaged in any other
way (cracks/breaks in the casing).
• Do not push any object into the appliance.
• If the appliance is beyond repair, make it unusable immediately by cutting
through the cable and hand it in at the collection point provided for the
purpose.
Disposal
The European directive 2012 / 19 / CE on Waste Electrical and Electronic
Equipment (WEEE), requires that old household electrical appliances must
not be disposed in the normal unsorted municipal waste stream. Old appliances must be collected separately in order to optimize the recovery and
recycling of the materials they contain and reduce the impact on human
health and the environment. The crossed out “wheeled bin” symbol on the
product reminds you of your obligation, that when you dispose of
the appliance it must be separately collected. Consumers should
contact their local authority or retailer for information concerning
the correct disposal of their old appliance.
Specifications
Rated vol tage 220 – 24 0 V / 5 0 Hz
Rated po wer 10 – 95 W
Humidity output up to 550 g/h
Dimensions 196 x 418 x 196 mm
(width x height x depth)
Weight 3.0 kg
Water tank capacity 6.3 litres
Sound level 26 – 34 dB(A)
Complies with EU
regulations CE / WEEE / RoHS
All rights for any technical modifications are reserved
Page 23

Français
Félicitation! Vous venez d‘acheter le superbe humidificateur EVA. Nous
espérons que cet appareil vous donnera entière satisfaction et améliorera
l’air intérieur pour vous.
Comme pour tous les appareils ménagers électriques, il est important
d‘entretenir cet appareil correctement afin d’éviter les blessures, les incendies ou les dommages. Veuillez lire attentivement le présent mode d‘emploi
avant la mise en service et respecter les conseils de sécurité indiqués sur
l’appareil.
Description de l’appareil
L’appareil est composé des éléments principaux suivants :
1. Câble d’alimentation
2. Remote SensorTM capteur d’humidité avec télécommande
3. Support à Remote Sensor
4. Compartiment à piles du Remote SensorTM (Type AAA)
5. Position du capteur d’humidité
6. Réservoir d’eau avec poignée
7. Couvercle du réservoir d’eau avec cartouche anticalcaire
8. Cartouche anticalcaire
9. Base d’eau
10. Bouton marche/arrêt
11. Bouton pour sélection du niveau d’humidité souhaité (hygrostat :
30 – 75 % et fonctionnement continu « CO »)
12. Bouton pour sélection du niveau d’humidification 1 à 5
13. Bouton pour mode tiède (préchauffage de l’eau)
14. Bouton pour mode auto
15. Affichage indiquant le niveau d’humidité en cours et souhaité (par
clignotements)
16. Indicateur du niveau d’eau
17. Plaque chauffante pour préchauffage d’eau
18. Couvercle de silicone pour la plaque chauffante
19. Membrane à ultrasons
20. Tiroir pour parfum
21. Bouton pour mode nuit (éclairage DEL normal, faible ou à l’arrêt)
et pour mode de nettoyage (maintenir appuyé pendant au moins 5 sec ondes)
22. Symbole d’un échec de connexion entre Remote SensorTM et
l’humidificateur
23. Chambre à condensation
24. Silver CubeTM (Cube d’argent)
25. Brosse de nettoyage
26. Entrée d’air (Attention à ne pas y laisser pénétrer de l’eau !)
27. Sortie de brume
TM
Conseils de sécurité importants
Veuillez lire attentivement le mode d‘emploi avant la première mise en
service de l’appareil et conservez-le pour toute consultation ultérieure ou
remettez-le, le cas échéant, au nouveau propriétaire.
• La société Stadler For m décline toute responsabilité des dommages résultant du non-respect des indications données dans ce mode d‘emploi.
Page 24

• Cet appareil ne doit être utilisé qu’aux fins domestiques décrites dans ce
mode d‘emploi. Toute utilisation contraire à sa destination ainsi que toute
modification technique apportée à l‘appareil peut entraîner des risques
pour la santé et la vie.
• Cet appareil peut être utilisé par les enfants âgés de 8 ans et plus et
les personnes aux capacités physiques, sensorielles ou mentales réduites
ou ne disposant pas de l’expérience ou de la connaissance nécessaire,
sous surveillance ou s’ils ont reçu les instructions concernant l’utilisation
de l’appareil et s’ils comprennent les dangers impliqués. Les enfants ne
doivent pas jouer avec l’appareil. Les opérations de nettoyage et d’entretien ne doivent pas être effectuées par des enfants sans surveillance.
• Ne branchez le câble qu’au courant alternatif. Tenez compte des indications de tension situées sur l‘appareil.
• Ne pas utiliser de rallonge électrique endommagée.
• Ne pas faire passer ou coincer le câble d’alimentation par-dessus des
arêtes vives.
• Ne jamais retirer la fiche de courant de la prise en tirant sur le câble d’alimentation ou en ayant les mains mouillées.
• Ne pas utiliser l’appareil à proximité immédiate d’une baignoire, d’une
douche ou d’une piscine (respecter une distance minimum de 3 m). Placer
l’appareil de telle façon à ce que personne ne puisse le toucher à partir
de la baignoire.
• Ne pas placer l’appareil à proximité directe d‘ une source de chaleur. Ne
pas exposer le câble d’alimentation à la chaleur (comme p. ex. une plaque
chaude de cuisinière, flammes nues, semelle chaude de fer à repasser ou
poêles). Protéger le câble d’alimentation de tout contact avec de l‘huile.
• Veiller à ce que l’appareil ait une bonne stabilité lors de son fonctionnement et que l’on ne puisse pas trébucher sur le câble d’alimentation.
• Cet appareil n’est pas protégé contre les projections d’eau.
• Pour usage intérieur uniquement.
• L’appareil ne doit pas être conservé à l’extérieur.
• Conserver l’appareil à un endroit sec et hors de portée des enfants (l’emballer).
• Si le câble d’alimentation est endommagé, le faire remplacer par le fabricant ou par un atelier agréé par le fabricant ou des personnes qualifiées
en conséquence, afin d’éviter tout danger.
• Avant toute opération d’entretien, de nettoyage et après chaque utilisation, éteignez l’appareil et débranchez le câble secteur de la prise.
• Avant de nettoyer l’intérieur de l’appareil, rassurez-vous que celui-ci était
à l’arrêt depuis au moins 15 minutes !
• Lorsque le préchauffage est en marche, l’eau qui se trouve à l’intérieur de
l’appareil se met à chauffer ; l’eau présente dans la base d’eau (9) et sur
la plaque chauffante (17) devient chaude. Évitez de toucher à l’eau et à la
plaque chauffante !
• Mettez l’appareil hors de portée des enfants, car l’eau présente dans
l’appareil peut atteindre la température de 50 °C et la plaque chauffante
jusqu’à 75 °C .
Avant la mise en marche : Cartouche anticalcaire et dureté de l‘eau
La cartouche anticalcaire adoucit l’eau dure et évite ainsi la libération indésirable de particules de calcaire dans l’espace environnant. Elle fonctionne
1 à 3 mois selon la dureté de l’eau (voyez le tableau).
Page 25
Important : Veuillez svp mettre la cartouche antic alcaire dans un bain d’eau
pour 24 heures avant la première utilisation (ne pas dans le réservoir d’eau
!). Ceci permet les granulés d’absorber de l’eau pour atteindre la capacité
maximale.
La durée d‘efficacité de la cartouche dépend de la dureté de l‘eau. Vous
pouvez la tester à l‘aide de la bandelet te test fournie (B andes de test collées
au Quick Setup Guide).
1. Plongez la bandelette test une seconde dans l‘eau.
2. Le résultat est visible sur la bandelette au bout d‘une minute environ.
Certains champs verts virent au rose. La dureté de l‘eau est indiquée par
le nombre de champs de couleur rose. Exemple : Trois champs de couleur
rose indiquent que l‘eau a un degré de dureté de > 14 °dH.
Champs
de couleur
rose
0/1 Douce
2 Moyennement
3 Plutôt dure
4 Très dure
Dureté de
l’eau
dure
Degré de
dureté (°dH)
à partir de 4
à partir de 7
à partir de 14
à partir de 21
Cartouche suffisante pour
(avec 4 litres/jour)
Jours Litres
90 jours env. 360 L
°dH
45 jours env. 180 L
°dH
30 jours env. 120 L
°dH
15 jours env. 60 L
°dH
À partir d‘une dureté supérieure à 21 °dH, nous ne pouvons plus vous recommander d‘utiliser un humidificateur à ultrasons. Nous vous recommandons
d‘humidifier votre air à l‘aide d‘un humidificateur d‘air conforme au principe
de l‘évaporateur (ex. l‘humidificateur évaporateur Oskar de Stadler Form:
www.stadlerform.com/Oskar).
Remarque : N’utilisez pas Eva avec de l’eau provenant d’adoucisseurs
d’eau fonctionnant par échange d’ions (car du sel est ajouté à l’eau). Le sel
contenu dans l’eau peut entraîner une accumulation de poussière blanche
tout autour de l’appareil. L‘appareil Eva peut toutefois fonctionner avec de
l‘eau filtrée par un système de filtration d‘eau (ex. Brita). Si vous doutez de
la qualité ou de la composition de votre eau, contactez votre régie ou votre
distributeur d‘eau courante.
Mise en marche / Manipulation
1. Placez Eva à l’endroit de votre choix, sur une surface plane. Grâce à la
haute performance d’humidification, la vapeur atteint 1,4 m (mode tiède
et niveau 5 en marche). Cela permet de poser Eva directement à même le
sol. Connectez le câble d’alimentation (1) à la prise appropriée.
2. Enlevez le Remote SensorTM (2), le support (3) ainsi que les deux piles de
l’emballage. Ouvrez le compartiment à piles (4) sur la face inférieure du
Remote SensorTM (2) en tournant le couvercle dans le sens contraire à
celui des aiguilles d’une montre. Insérez les deux piles dans le compartiment à piles (4), comme présenté en page 4, puis refermez le couvercle.
Fixez ensuite le Remote SensorTM (2) sur le support (3).
3. D’une part, le Remote SensorTM (2) est un capteur d’humidité qui, grâce
à sa position externe, garantit un niveau précis d’humidification. D’autre
Page 26

part, le Remote SensorTM (2) sert également de télécommande. Placez le
capteur d’humidité Remote SensorTM (2) au centre de la pièce, sur une
table ou un buffet, à une distance optimale d’environ 3 à 5 m d’Eva. Il est
préférable pour le Remote SensorTM d’être placé au centre de la pièce
afin que les courants d’air puissent y circuler librement et être facilement au contact du capteur (5). Et dans le cas où cela n’est pas possible,
nous recommandons de positionner Remote SensorTM à au moins 30 cm
du mur, ainsi qu’à une distance minimum de 2 m des fenêtres et autres
ouvertures d’aération.
4. Retirez le réservoir d’eau (6) en le saisissant par la poignée et en le tirant
vers le haut. Dévissez le couvercle du réservoir d’eau (7), puis remplissez
le réservoir d’eau du robinet propre et fraîche, jusqu’à la mesure maximale. Rassurez-vous que la cartouche anticalcaire (8) avait été trempée
dans l’eau 24 heures avant (voir « Avant la mise en marche »). Enfin,
revissez le couvercle (7) sur le réservoir d’eau (6). Placez ensuite le réservoir d’eau (6) dans l’unité. La base d’eau (9) se remplira tout doucement à
partir du réservoir d’eau. Attention : Ne déplacez pas l’appareil lorsqu’il
est rempli d’eau. L’eau pourrait endommager les circuits électroniques.
5. Appuyez sur le bouton marche/arrêt (10) pour mettre Eva en marche.
L’affichage (15) présente en % le niveau d’humidité relative en cours.
Si l’indicateur lumineux du niveau d’eau (16) affiche rouge, c’est qu’il y
a très peu d’eau dans l’unité. Le niveau d’humidification est préréglé à 2
et celui d’humidité souhaité à 45 %.
6. Activez le Remote SensorTM (2) en appuyant sur le bouton « Hygrostat »
(11a). Le capteur d’humidité envoie automatiquement à l’unité les informations sur l’humidité relative, plusieurs fois par minute, ce qui apparaît
sur l‘affichage (15). La mesure peut aussi être activée en appuyant sur
n’importe quel bouton du Remote SensorTM (2) (à l’exception du bouton
marche/arrêt (10)).
7. L’humidité souhaitée peut être changée en appuyant sur le bouton « Hygrostat » (11a) à plusieurs reprises (35 – 75 % et fonctionnement continu
« CO »). Le symbole sur l‘affichage (15) clignote pendant la sélection. Au
bout de quelques secondes d’inactivité, la valeur sélectionnée est enregistrée. Le symbole est alors remplacé par le niveau d’humidité en cour s.
8. La performance d’humidification peut être changée en appuyant sur le
bouton « Output » (12) à plusieurs reprises (niveaux 1 à 5). Le niveau est
indiqué sur l‘affichage (15) par des barres horizontales (ex. : 1 barre =
niveau 1).
9. En appuyant sur le bouton « Warm » (13), vous activez le mode tiède et,
avec lui, le préchauffage d’eau. À partir de cet instant s’allume le voyant
lumineux du bouton « Warm » qui est sur l’unité. La plaque chauffante
(17) fait d’abord chauffer l’eau avant de la transformer en vapeur par la
membrane ultrasonique (19). Le mode tiède génère une vapeur tiède et
agréable, tandis qu’il intensifie l’humidification.
10. En appuyant sur le bouton « Auto » (14), vous activez le mode auto, et
avec lui la technologie Adaptive HumidityTM . Dès cet instant s’allume
le voyant lumineux du bouton « Auto » qui est sur l’appareil. En mode
auto, l’appareil adapte le niveau d‘humidification automatiquement, afin
d’atteindre et de se maintenir au niveau d’humidité désiré de 45 %, de
manière lente et économique. Plus le niveau d’humidité ambiant est bas,
plus haut s’ajuste automatiquement le niveau d’humidification (moins de
33 % = niveau 4, de 34 % à 37 % = niveau 3, de 38 % à 41 % = niveau 2,
Page 27

de 42 % à 45 % = niveau 1). Pendant que le mode auto est activé, vous
pouvez changer l’humidité souhaitée en appuyant sur le bouton « Hygrostat » (11) à plusieurs reprises (le voyant lumineux du bouton « Auto » qui
est sur l’appareil est allumé). Le niveau d’humidification (12) ne peut être
alterné manuellement à partir du mode auto. Une fois que le bouton «
Output » (12) est appuyé afin de changer le niveau d’humidification, le
mode auto se désactive.
11. Avec Eva, vous pouvez diffuser des fragrances dans la pièce. Dosez les
fragrances avec parcimonie, car un dosage excessif pourrait provoquer
un dysfonctionnement ou une panne de l’appareil. Pour un usage modéré
des fragrances, appuyez brièvement sur le tiroir pour parfum (20), puis
relâchez-le et faites-le sortir de l’appareil. Laissez le parfum dégoutter
directement sur le coton du tiroir pour parfum (20). Ajoutez un maxi-
mum de 1 – 2 gouttes de parfum dans le tiroir pour parfum. Remettez
le tiroir en place, puis appuyez et relâchez pour le refermer. Astuce : si
vous souhaitez changer de parfum, retirez le coton et lavez le tiroir au
savon. À partir de là, vous pouvez remettre du coton neuf (disponible sur
le marché) et ajouter des gouttes de la fragrance souhaitée.
12. Si l’indicateur du niveau d’eau (16) passe au rouge, refaites le plein
d’eau. Retirez le réservoir d’eau (6), puis remplissez-le d’eau du robinet
propre et fraîche, jusqu’à la mesure maximale. Après remplacement du
réservoir d’eau, l’appareil se remet à fonctionner automatiquement au
bout d’une poignée de secondes. Le réservoir d’eau peut également être
rechargé en cours de fonctionnement.
13. Si la clarté des lumières vous dérange (dans la chambre à coucher par
exemple), vous pouvez réduire l’intensité de la luminosité en appuyant
sur le bouton pour le mode nuit (21).
• Mode normal (allumage standard)
• Mode tamisé (appuyez une fois)
• Mode lumière éteinte (appuyez deux fois)
• Pour revenir au mode normal, il suffit d‘appuyer à nouveau sur le
bouton.
Si l’appareil ne contient pas d’eau, l’indicateur du niveau d’eau (16)
passe au rouge à tous les modes. Le voyant lumineux rouge ne peut
être atténué.
14. Si l‘affichage (15) prése nte deux points (22), cela signifie que Eva ne p eut
établir une connexion radio avec le Remote SensorTM (2). Eva continue de
fonctionner grâce à un capteur d’humidité interne à l’appareil. Appuyez
sur n’importe quel bouton du Remote SensorTM (2) pour l’activer. Vérifiez
que le Remote SensorTM (2) est dans un rayon de 10 m de Eva. Les murs,
portes et planchers situés entre Eva et le Remote SensorTM (2) peuvent
pert urber la connexion radio. Le Remote Sens orTM (2) doit êt re positionné
de manière optimale à une distance de 3 à 5 m de Eva et sur une surface
en hauteur, au milieu de la pièce (voir « Mise en marche / Manipulation
» n°3). Les deux points sur l‘affichage (22) peuvent aussi vouloir indiquer
que les piles du Remote SensorTM (2) ont besoin d’être remplacées (voir
« Mise en marche / Manipulation » n°2).
Remarque : Si vous observez des gouttelettes (ou d’autres signes d’humidité) au-dessus ou autour de l’appareil, sachez qu’il s’agit d’eau condensée
provenant de l’humidificateur. Cela signifie que l’air ne peut plus absorber
la teneur en eau de l’humidificateur. Veuillez activer le mode auto avec son
Page 28

taux d’humidité désiré de 45 %. Les gouttelettes devraient alors cesser de
se former.
Nettoyage
Avant toute opération d’entretien, de nettoyage et après chaque utilisation,
éteignez l’appareil et débranchez le câble d’alimentation (1) de la prise.
Attention : Ne jamais plonger l’appareil dans l’eau (risque de court-circuit).
• Si le préchauf fage est en marche (le voyant du mode tiède est allumé (13)),
l’eau qui se trouve à l’intérieur de l’appareil se met à chauffer ; l’eau présente dans la base d’eau (9) et la plaque chauffante (17) devient chaude.
Évitez de toucher à l’eau et à la plaque chauffante !
• Pour le nettoyage extérieur, utilisez un chiffon humide et séchez bien
l‘appareil.
• Lancez le mode nettoyage au moins une fois par mois. L’appareil
devrait avoir été à l’arrêt pendant au moins 15 minutes avant tout nettoyage de l’intérieur. Retirez ensuite le réservoir d’eau (6), la chambre à
condensation (23), le couvercle de silicone (18), le cube d’argent (24) et
le tiroir pour parfum (20). Versez dans un verre 200 ml d’eau du robinet
mélangée à un détartrant (faites le mélange dans le respect des instructions du fabricant). Versez avec soin le liquide obtenu dans la base d’eau
(9), en tenant le verre directement au-dessus de la base d’eau (voir page
5). Ne versez pas le liquide dans la base d’eau de très loin au-dessus du
bac ! Veillez bien à ce qu’aucun liquide ne pénètre dans l’entrée d’air (26).
Cela risque d’endommager l’appareil et annuler la garantie.
• Avant de lancer le mode nettoyage, il faut que le câble d’alimentation soit
connecté à une prise. Pour activer le mode nettoyage, appuyez et maintenez appuyé pendant 5 secondes le bouton mode nuit (21) situé au coin
droit, sur la face inférieure. À ce moment, le symbole du niveau d’eau (16)
passe au clignotement rouge sur l’appareil. Le mode nettoyage reste actif
pendant 5 minutes env iron, puis s’arrête automatiquemen t (l’indicateur du
niveau d’eau s’arrête de clignoter).
• Vérifiez dans la base d’eau (9) que la tartre sur la membrane ultrasonique
(19) et la plaque chauffante (17) est dissoute. Attention : L’eau et la
plaque chauffante sont brûlantes ! Évitez donc de vous ébouillanter !
• Si des résidus de tartre résistent, la membrane ultrasonique (19) et la
plaque chauffante (17) peuvent être nettoyées à l’aide de la brosse de
nettoyage (25) (avant et arrière). N’essayez pas de les gratter avec un
objet dur.
• Contre le calcaire tenace, nous recommandons un détartrage de l’appareil en activant le mode nettoyage (21) plusieurs fois de suite. Laissez le
détar trant dans la bas e d’eau pendant 20 minut es maximum, puis jetez-en
le contenu selon les consignes ci-après.
• Important : Versez le détartrant par-dessus le coin gauche, vers l’avant
de l’appareil (voir la flèche indiquée sur l’appareil). L’eau ne doit en aucune
manière pénétrer dans l’entrée d’air (26). Cela risque d’endommager l’appareil et annuler la garantie.
• Pour rincer, versez 200 ml d’eau de fontaine dans un verre, puis versez
le liquide avec soin dans la base d’eau (9) en tenant le verre directement
au-dessus de la base d’eau (voir page 5). Ne versez pas le liquide dans
la base d’eau de très loin au-dessus du bac ! Versez l’eau en dehors du
bac, par-dessus le coin gauche, vers l’avant de l’appareil. Répétez ainsi le
Page 29

processus jusqu’à ce qu’il n’y ait plus de détartrant dans la base d’eau (9).
Remettez le cube d’argent (24), le couvercle de silicone (18), la chambre à
condensation (23), le réser voir d’eau (6) et le tiroir pour parfum (20) à leurs
places respectives sur l’appareil. Si le réservoir d’eau n’est pas bien fixe,
vérifiez que la partie supérieure de la chambre à condensation (23) est
montée correctement.
• Nettoyez le réservoir d’eau (6) soigneusement toutes les deux semaines,
à l’aide d’une brosse souple, d’une éponge et d’eau chaude. Utilisez des
détartrants dilués (mixés en respectant les consignes du fabricant) pour
les dépôts calcaires. Rincez ensuite méticuleusement le réservoir d’eau à
l’aide d’eau du robinet propre et fraîche.
Changement de cartouche anticalcaire
• Dans le tableau (voyez « Avant la mise en marche ») sont indiquées les
durées d’utilisation des cartouches.
• Conseil : Le fonctionnement de la cartouche (8) peut être vérifié par un
test simple : tenez un petit miroir dans la brume (27) quelques secondes.
Si le miroir présente un dépôt (de calcaire) blanc, il faut changer la cartouche.
• La cartouche anticalcaire se trouve à l’intérieur du couvercle (8) du réservoir d’eau (6). Dévissez le couvercle (7), puis dévissez la car touche du couvercle. L a cartouche p eut être jetée avec les ordures ménagères (8). Avant
la première utilisation, laissez tremper la cartouche anticalcaire dans un
récipient contenant de l’eau pendant 24 h (mais pas dans le réservoir).
La résine doit se gorger d’eau pour développer toutes ses performances.
• Ne p as jeter le bouchon ( 7) du réservoir lors du changement de car touche !
Cube d‘argent – Silver Cube ™
Le cube d‘argent (24) empêche la croissance des bactéries et des germes
dans l‘humidificateur en libérant constamment des ions d‘argent. L‘utilisation du cube d‘argent garantit un climat ambiant hygiénique. Le cube
d‘argent est efficace pendant un an. C‘est pourquoi nous recommandons de
changer le cube d‘argent à chaque nouvelle saison humide. Le cube d‘argent
est efficace dès qu‘il est en contact avec de l‘eau dans l‘appareil et même
lorsque l‘appareil est éteint.
Réparations
• Les réparations sur les appareils électriques ne doivent être effectuées
que par des électriciens qualifiés. La garantie s’éteint et toute responsabilité est exclue en cas de réparations non conformes aux règles de l‘art.
• Ne mettez jamais l‘appareil en service en cas d’endommagement d’un
cordon ou d’une fiche, après un dysfonctionnement de l’appareil causé
par une chute ou par une autre détérioration de l’appareil (boîtier fissuré/
cassé).
• Ne pas pénétrer avec des objets quelconques dans l’appareil.
• Arrivé au bout de sa durée de vie, l’appareil doit immédiatement être rendu inutilisable (sectionner le cordon d’alimentation) et être déposé dans
une déchetterie prévue à cet effet.
Elimination
Conformément à la directive européenne 2012 / 19 / EC sur la mise au
rebut des déchets d’équipements électriques et électroniques (DEEE), les
Page 30

appareils ménagers usés ne doivent pas être jetés avec les déchets non
triés. Ces appareils usés doivent être collectés séparément des déchets
ménagers pour optimiser la récupération et le recyclage de leurs composants dans le but de réduire les effets négatifs sur la santé humaine et sur
l’environnement. Le symbole de poubelle avec roulettes et croix indique que
ces produits doivent être collectés et mis au rebut séparément
des ordures ménagères. Les consommateurs doivent contacter les
autorités locales ou leurs revendeurs concernant la mise au rebut
de leurs vieux appareils.
Caractéristiques techniques
Tension nominale 220 – 240 V / 50 Hz
Puissance nominale 10 – 95 W
Émission d’humidité jusqu’à 550 g/h
Dimensions 196 x 418 x 196 mm
(largeur x hauteur x profondeur)
Poids 3,0 kg
Volume du réservoir d’eau 6,3 litres
Niveau de bruit 26 – 34 dB(A)
Conforme à la
réglementation UE CE / DEEE / RoHS
Sous réserve de modifications techniques
Page 31

Italiano
Congratulazioni! Avete appena acquistato il fantastico umidificatore EVA.
Sarà estremamente piacevole e migliorerà l’aria nell’ambiente per voi.
Come con tutte le apparecchiature elettriche domestiche, è necessaria particolare attenzione anche con questo modello, al fine di evitare infortuni,
danni da incendio o danni al dispositivo. Studiare con attenzione queste
istruzioni per l’uso prima di utilizzare il dispositivo per la prima volta e seguire tutte le istruzioni di sicurezza fornite con esso.
Descrizione dell’apparecchio
L’apparecchio consiste delle seguenti componenti principali:
1. Cavo di alimentazione elettrica
2. Sensore di umidità Remote SensorTM con telecomando
3. Supporto per il Remote Sensor
4. Vano batterie del Remote SensorTM (Tipo AAA)
5. Posizione del sensore di umidità
6. Serbatoio acqua con maniglia di trasporto
7. Coperchio serbatoio acqua con cartuccia anticalcare
8. Cartuccia anticalcare
9. Vaschetta acqua
10. Pulsante di accensione/spegnimento
11. Pulsante per la selezione del livello di umidità desiderata (igrostato:
35 – 75 % o funzionamento continuo «CO»)
12. Pulsante per la selezione del livello di umidificazione 1–5
13. Pulsante modalità calda (preriscaldamento dell’acqua)
14. Pulsante modalità automatica
15. Display con l’indicazione dell’umidità corrente e desiderata (lampeg giante)
16. Indicatore livello dell’acqua
17. Piastra riscaldante per il preriscaldamento dell’acqua
18. Coperchio di silicone per la piastra riscaldante
19. Membrana ad ultrasuoni
20. Contenitore fragranza
21. Pulsante modalità notturna (LED normali, attenuati o spenti) e modalità
pulizia (premere per almeno 5 secondi)
22. Simbolo di mancat a connessione fr a il Remote SensorTM e l’umidificatore
23. Camera di nebulizzazione
24. Silver Cube
25. Spazzola di pulizia
26. Presa d’aria (Attenzione: non lasciare penetrare l’acqua!)
27. Uscita nebulizzazione
TM
TM
Importanti istruzioni di sicurezza
Prima di utilizzare l’apparecchio leggere attentamente le istruzioni per l’uso.
Dopo aver letto le istruzioni per l’uso, conservarle con cura per la futura
consultazione.
• La Stadler Form respinge ogni responsabilità per la perdita o danni che
incorrano come risultato di un mancato rispetto di queste istruzioni d’uso.
• L’apparecchio dev’essere usato solo in casa e per gli scopi descritti in
queste istruzioni. L’uso non autorizzato e le modifiche tecniche all’apparecchio possono portare a pericoli per la vita e la salute.
Page 32

• Questo apparecchio può essere utilizzato da bambini di età superiore agli
8 anni e persone con ridotte capacità mentali, fisiche o sensoriali o prive
di esperienza e conoscenze in merito, in presenza di altre persone che
ne sorveglino l’operato o ricevano istruzioni sull’uso dell’apparecchio in
modo sicuro e ne comprendano i pericoli. I bambini non devono giocare
con l’apparecchio. Pulizia e manutenzione non deve essere effettuata da
bambini senza supervisione.
• Collegate il cavo solo alla corrente alternata. Rispettate le informazioni
sul voltaggio riportate sull’apparecchio.
• Non utilizzate prolunghe.
• Non fate scorrere il cavo su bordi taglienti ed assicuratevi che non rimanga incastrato.
• Non tirate il cavo dalla presa con mani umide o afferrando il cavo stesso.
• Non utilizzate questo apparecchio nelle immediate v icinanze di una vasca,
una doccia o una piscina (rispettate una distanza minima di 3 m). Posizionate l’apparecchio in modo che una persona dentro la vasca non possa
toccare l’apparecchio.
• Non posizionate l’apparecchio vicino ad una sorgente di calore. Non sottoponete il cavo di alimentazione al calore diretto (come piastre, fiamme
libere, ferri da stiro caldi o caloriferi per esempio). Proteggete i cavi di
alimentazione dall’olio.
• Fate in modo che l’apparecchio sia posizionato appropriatamente per assicurare una buona stabilità durante il suo funzionamento ed assicuratevi
che nessuno possa inciampare sul cavo.
• L’apparecchio non è impermeabilizzato.
• Solo per uso interno.
• Non conservare questo apparecchio all’esterno.
• Riponete l’apparecchio in un luogo asciutto inaccessibile ai bambini (rimettete l’apparecchio nella confezione).
• Se il cavo di alimentazione è danneggiato, dev’essere sostituito dal produttore, dal responsabile della manutenzione o da una persona similarmente qualificata per evitare pericoli.
• Prima di effettuar e interventi di m anutenzione, pulizia e dopo ogni utilizzo,
spegnere il dispositivo e scollegare il cavo di alimentazione dalla presa
di corrente.
• Prima di pulire l’interno dell’unità, accertarsi che sia stata spenta per almeno 15 minuti!
• Quando il preriscaldamento è acceso, l’acqua all’interno dell’unità viene
riscaldata: l’acqua nella vaschetta (9) e la piastra riscaldante (17) diventano roventi. Non toccare l’acqua e la piastra riscaldante!
• Tenere l’unità fuori dalla portata dei bambini, dato che l’acqua al suo interno è riscaldata fino a 50 °C e la piastra riscaldante raggiunge la temperatura di 75 °C.
Prima del montaggio: Cartuccia anticalcare e durezza dell’acqua.
La cartuccia anticalcare riduce il calcare dell’acqua e l’emissione indesiderata delle particelle di calcare nell’ambiente circostante. Efficace per un periodo da uno a tre mesi, in base alladurezza dell’acqua (consultare la tabella).
Importante: Tenere in ammollo la c artuccia anticalcare per 24 ore prima del
primo utilizzo (non nel serbatoio dell’acqua!). Per garantire ottime prestazioni, la resina deve assorbire l’acqua.
Page 33

La durata del tempo in cui la cartuccia è efficace dipende dalla durezza
dell’acqua. Il test può essere fatto usando le strisce da test fornite (Le strisce di test sono attaccate alla Quick Setup Guide).
1. Immergete le strisce di test nell’acqua per un secondo.
2. Dopo circa un minuto, il risultato può essere visto sulle strisce da test. Alcuni dei riquadri verdi diventano rosa. La durezza dell’acqua è mostrata da
quanti riquadri diventano rosa. Esempio: Se tre riquadri sono rosa, allora
la durezza dell’acqua è > 14 °dH.
Numero dei
riquadri rosa
0/1 Dolce
2 Moderata-
3 Dura
4 Molto dura
Durezza
dell‘acqua
mente dura
Grado di
durezza
(°dH)
°dH
Da 4
Da 7
°dH
Da 14
Da 21
La car tuccia durerà per
Giorni Litri
90 giorni circa 36 0 L
45 giorni circa 180 L
30 giorni circa 120 L
°dH
15 Tag e circa 60 L
°dH
(con 4 litri/giorno)
Con una durezza dell’acqua che arrivi a 21 °dH, non possiamo più raccomandare l’utilizzo dell’umidificatore per aria ad ultrasuoni. Vi raccomandiamo di
usare un umidificatore a ventola per aumentare l’umidità in casa vostra (per
esempio l’umidificatore Oskar prodotto dalla Stadler Form: www.stadlerform.com/Oskar).
Nota: Se non si utilizza Eva con l’acqua decalcificata prodotta da un sistema apposito e funzionante secondo il principio dello scambio ionico (con
aggiunta di sale all’acqua), i sali disciolti nell’acqua possono precipitare nel
dispositivo sotto forma di polvere bianca. Ad ogni modo, Eva può utilizzare
acqua filtrata da un sistema per l’acqua da bere (per esempio Brita). Se non
doveste essere sicuri della qualità della composizione dell’acqua nella vostra area, contattate il gestore della fornitura di servizi di acqua potabile.
Impostazione / Utilizzo
1. Posizionare Eva nella posizione desiderata su una superficie piana. La
nebulizzazione raggiunge un’altezza di 1,4 m grazie alle alte prestazioni
dell’umidificazione (livello di umidificazione 5, modalità calda). Ciò permette di posizionare Eva direttamente sul pavimento. Collegare il cavo
di alimentazione (1) a una presa adatta.
2. Tirare fuori dalla confezione il Remote SensorTM (2), il supporto (3) e le
due batterie. Aprire il vano batterie (4) posto sul lato inferiore del Remote SensorTM (2) ruotandone il coperchio in senso antiorario. Inserire le
due batterie nel vano batterie (4) come mostrato a pag. 4 e richiudere il
coperchio. Posizionare il Remote SensorTM (2) sul supporto (3).
3. Da un lato il Remote SensorTM (2) è un sensore di umidità che garantisce
una precisa umidificazione grazie alla sua posizione esterna, dall’altro il
Remote SensorTM (2) funge anche da telecomando. Posizionare il sensore
di umidità Remote SensorTM (2) al centro della stanza su un tavolo o una
credenza; la distanza ottimale da Eva è compresa fra 3 e 5 m. Il Remote
SensorTM deve essere posizionato al centro della stanza in modo che
l’aria possa fluire intorno al sensore (5) il più liberamente possibile. Se
Page 34

ciò non è possibile, consigliamo di posizionare il Remote SensorTM a una
distanza minima di 30 cm dalla parete e ad almeno 2 m da finestre e
aperture di ventilazione.
4. Rimuovere il serbatoio dell’acqua (6) tenendolo per la maniglia e sollevandolo. Svitare il coperchio del serbatoio dell’acqua (7) e riempirlo con
acqua di rubinetto fredda e pulita fino al segno che indica il massimo.
Accertarsi che la cartuccia anticalcare (8) sia stata preventivamente immersa in acqua per 24 ore (v. “Prima del montaggio”). Infine riavvitare il
coperchio (7) sul serbatoio dell’acqua (6). Porre il serbatoio dell’acqua (6)
nell’unità. La vaschet ta dell’acqua (9) ora si riempirà lentamente con l’acqua del serbatoio. Importante: non spostare il dispositivo finché non è
pieno d’acqua. L’acqua potrebbe fuoriuscire sulle componenti elettriche.
5. Premere il pulsante di accensione/spegnimento (10) per accendere Eva.
L’umidità relativa attuale in % viene indicata sul display (15). Se la spia
del livello dell’acqua (16) è rossa, l’acqua nell’unità è insufficiente. Il livello di umidificazione è preimpostato a 2 e l’umidità desiderata al 45 %.
6. Attivare il Remote SensorTM (2) premendo il pulsante “Hygrostat” (11a).
Il sensore di umidità invia automaticamente varie volte al minuto all’unità, che le mostra sul display (15), le informazioni sull’umidità relativa
misurata. La misurazione può inoltre essere attivata premendo qualsiasi pulsante sul Remote SensorTM (2) (eccetto il pulsante di accensione/
spegnimento (10)).
7. L’umidità desiderata può essere modificata premendo il pulsante “Hygrostat” (11) per diverse volte (dal 35 al 75 % e funzionamento continuo
“CO”). Durante l’immissione il simbolo sul display (15) lampeggia. Dopo
alcuni secondi senza immissione, il valore selezionato viene salvato. Il
simbolo cambia nell’umidità misurata attuale.
8. Le prestazioni di umidificazione possono essere cambiate premendo il
pulsante “Output” button (12) per diverse volte (livelli 1–5). Il livello è
indicato sul display (15) con delle barre orizzontali (es. 1 barra = livello 1).
9. Premendo il pulsante “Warm” (13), modalità calda, si accende il preriscaldamento dell’acqua. Il LED sul pulsante “Warm” dell’unità è acceso.
La piastra riscaldante (17) riscalda l’acqua prima che venga nebulizzata
dalla membrana a ultrasuoni (19). La modalità calda crea una piacevole
nebulizz azione calda, oltre ad aument are le prestazioni di umidifica zione.
10. Premendo il pulsante “Auto” (14), modalità automatica, si attiva la
tecnologia Adaptive HumidityTM. Il LED sul pulsante “Auto” dell’unità è
acceso. In modalità automatica l’unità adatta il livello di umidificazione
per raggiungere e mantenere l’umidità desiderata in modo efficiente e
più silenzioso del 45 %. Più bassa è l’umidità attuale, più alto viene impostato il livello di umidificazione (sotto il 33 % = livello 4, dal 34 % al
37 % = livello 3, dal 38 % al 41 % = livello 2, dal 42 % al 45 % = livello 1).
In modalità automatica si può modificare l’umidità desiderata premendo
il pulsante “Hygrostat” (11) per diverse volte (il LED sul pulsante “Auto”
dell’unità è acceso). In modalità automatica il livello di umidificazione
(12) non può essere alterato manualmente. Appena si preme il pulsante
“Output” (12) per cambiare il livello di umidificazione, la modalità automatica viene disattivata.
11. Eva può essere utilizzata per diffondere fragranze nella stanza. Usare
estrema parsimonia nell’utilizzo delle fragranze perché un eccesso può
portare a malfunzionamenti e a danni all‘unità. Per usare le fragranze,
premere brevemente e rilasciare il contenitore delle essenze (20) ed
Page 35

estrarlo dall’unità. Lasciar gocciolare la fragranza direttamente sul cuscinetto di cotone nel contenitore della fragranza (20). Aggiungere un
massimo di 1–2 gocce di fragranza nel contenitore della fragranza.
Spingere il contenitore in posizione, quindi premerlo e rilasciarlo per
bloccarlo. Suggerimento: per cambiare la fragranza rimuovere il cuscinetto di cotone e pulire il contenitore con sapone. Ora è possibile inserire un nuovo cuscinetto di cotone (disponibile sul mercato) e aggiungere
le gocce della fragranza desiderata.
12. Se l’indicatore del livello dell’acqua (16) diventa rosso, l’unità deve essere riempita. Rimuovere il serbatoio dell’acqua (6) e riempirlo con acqua
di rubinetto fredda e pulita fino al segno che indica il massimo. Dopo
aver riposizionato il serbatoio dell’acqua, il dispositivo riprende automaticamente il funzionamento dopo alcuni secondi. Il serbatoio può essere
riempito anche durante il funzionamento.
13. Se le luci sono troppo luminose (per esempio in camera) potete ridurre
l’intensità della luce premendo il tasto modalità notturna (21). Potete
scegliere tra tre diverse modalità:
• Modalità normale (modalità predefinita)
• Modalità attenuata (premete una volta)
• Modalità luci spente (premete due volte)
• Premendo ancora una volta il tasto per attenuare, potete tornare alla
modalità normale
Se nel dispositivo l’acqua è assente, il simbolo rosso del livello dell’acqua (16) si accende in tutte le modalità. La spia rossa non può essere
attenuata.
14. Se il display (15) mostra due punti (22), Eva non è in grado di stabilire un
collegamento radio con il Remote SensorTM (2). Eva continuerà a funzionare grazie al sensore di umidità interno. Premere qualsiasi pulsante sul
Remote SensorTM (2) per attivarlo. Accertarsi che il Remote SensorTM (2)
si trovi in un raggio di 10 m da Eva. Pareti, porte e pavimenti interposti
fra Eva e il Remote SensorTM (2) possono interferire con il collegamento
radio. Il Remote SensorTM (2) dovrebbe essere idealmente posizionato a
una distanza compresa fra 3 e 5 m da Eva e su una superficie rialzata nel
mezzo della stanza (v. «Impostazione/Utilizzo» punto 3). I due punti sul
display (22) potrebbero inoltre indicare che le batterie nel Remote SensorTM (2) devono essere sostituite (v. «Impostazione/Utilizzo» punto 2).
Nota: se si dovessero vedere gocce (o altri segni di umidità) sopra o at torno
all‘apparecchio, significa che tale acqua condensata proviene dall’umidificatore. Questo indica che l‘aria non può più assorbire l‘umidità da esso. Attivare la modalità automa tica con un’umidità desiderata del 4 5 %. La formazione
di gocce d’acqua dovrebbe interrompersi.
Pulizia
Prima di effettuare interventi di manutenzione, pulizia e dopo ogni utilizzo,
spegnere il dispositivo e scollegare il cavo di alimentazione (1) dalla presa
di corrente.
Attenzione: Non immergete mai l’unità in acqua (pericolo di corto circuito).
Se è acceso il preriscaldamento (il LED della modalità calda è acceso (13)),
l’acqua all’interno del dispositivo viene riscaldata: l’acqua nella vaschetta
(9) e la piastra riscaldante (17) diventano roventi. Non toccare l’acqua e la
piastra riscaldante!
Page 36

• Per pulire l’esterno, passatelo con un panno umido e quindi asciugatelo
bene.
• Attivare la modalità pulizia almeno una volta al mese. Prima della
pulizia interna il dispositivo deve restare spento per almeno 15 minuti!
Quindi, rimuovere il serbatoio dell’acqua (6), la camera di nebulizzazione
(23), il coperchio in silicone (18), il Silver Cube (24) e il contenitore della fragranza (20). Riempire una tazza con 200 ml di acqua del rubinetto
miscelata a un agente anticalcare (miscelare secondo le istruzioni del
fabbricante). Versare con attenzione il liquido nella vaschetta dell’acqua
(9) tenendo la tazza direttamente sopra di essa (v. pag. 5). Non versare il
liquido nella vaschetta da un’altezza eccessiva! Accertarsi che il liquido
non entri nella presa d’aria (26). Il dispositivo ne risulterebbe danneggiato, con annullamento della garanzia.
• Per avviare la modalità pulizia, il cavo di alimentazione dev’essere inserito
in una presa. Per attivare la modalità pulizia tenere premuto il pulsante
della modalità notturna (21) posto sul lato inferiore dell’angolo destro. Il
simbolo del livello dell’acqua (16) sul dispositivo lampeggia in rosso. La
modalità pulizia dura per cir ca 5 minuti, per poi spe gnersi automaticamente (il simbolo del livello dell’acqua smette di lampeggiare).
• Verificare nella vaschetta dell’acqua (9) se il calcare sulla membrana a
ultrasuoni (19) e sulla piastra riscaldante (17) si è dissolto. Attenzione:
l’acqua e la piastra riscaldante sono roventi, pericolo di ustioni!
• Se restano dei residui di calcare, la membrana a ultrasuoni (19) e la piastra riscaldante (17) possono essere puliti p er mezzo della spazzoletta (25)
(lati anteriore e posteriore). Non tentare di staccarli con un oggetto duro.
• Per il calcare ostinato consigliamo di disincrostare il dispositivo attivando
la modalità pulizia (21) per alcune volte di fila. Lasciare l’agente anticalcare nella vaschetta dell’acqua per un massimo di 20 minuti, quindi versarlo
fuori come descritto qui di seguito.
• Importante: far fuoriuscire l’agente anticalcare dall’angolo anteriore
sinistro del dispositivo (vedere la freccia su di esso). Non far entrare l’acqua nella presa d’aria (26). Il dispositivo ne risulterebbe danneggiato, con
annullamento della garanzia.
• Per risciacquare, riempire la tazza con 200 ml di acqua del rubinetto e
versare con attenzione il liquido nella vaschet ta (9) tenendo la tazza direttamente sopra di essa (v. pag. 5). Non versare il liquido nella vaschetta da
un’altezza eccessiva! Far fuoriuscire l’acqua dall’angolo anteriore sinistro
del dispositivo. Ripetere il processo finché la vaschetta dell’acqua non
contiene più agente anticalcare (9). Riposizionare il Silver Cube (24), il coperchio in silicone (18), la camera nebulizzatrice (23), il serbatoio dell’acqua (6) e il contenitore della fragranza (20) nel dispositivo. Se la vaschetta
dell’acqua non si posiziona correttamente, verificare se la parte superiore
della camera di nebulizzazione (23) è montata correttamente.
• Pulire il serbatoio dell’acqua (6) a fondo ogni due settimane con una spugna o una spazzola morbida e acqua calda. Per i depositi di calcare usare
un agente anticalcare diluito (miscelare secondo le istruzioni del fabbricante). Infine risciacquare a fondo il serbatoio dell’acqua con acqua del
rubinetto fredda e pulita.
Sostituzione della cartuccia anticalcare
• I tempi di sostituzione consigliati sono indicati nella tabella (consultare la
sezione «Prima del montaggio»).
Page 37

• Suggerimento: L’efficacia della cartuccia (8) può essere controllata con
un semplice test. Tenete un piccolo pecchio davanti al nebulizzatore (27)
per qualche secondo. Se ci sono depositi bianchi (carbonato di calcio) sullo specchio, allora la cartuccia dev’essere sostituita.
• La cartuccia anticalcare è situata nel lato interno del tappo del serbatoio
(7). Svitare prima il tappo del serbatoio (7), quindi svitare la cartuccia dal
tappo. Smaltire la cartuccia con i rifiuti domestici (8). Tenere in ammollo
la cartuccia anticalcare per 24 ore prima del primo utilizzo (non nel serbatoio dell’acqua!). Per garantire ottime prestazioni, la resina deve assorbire
l’acqua.
• Quando si sostituisce la cartuccia (8), consevare il tappo del serbatoio!
Silver Cube ™
Il silver cube (24) previene la formazione di germi e batteri nell’umidificatori
grazie al rilascio continuo di ioni d’argento. L’uso dei cubi d’argento porta
ad un clima igienico della stanza. La durata del cubo d’argento è circa di
un anno. Quindi vi raccomandiamo di sostituire il cubo d’argento all’inizio
di ogni stagione dell’umidificatore. Il cubo d’argento inizia a funzionare non
appena viene in contatto con l’acqua, e funziona anche quando l’unità è
spenta.
Riparazione
• Le riparazioni agli apparecchi elettrici devono essere effettuate solo da
tecnici elettricis ti qualificati. Se vengono ef fettuate riparazioni improprie,
la garanzia viene annullata e tutte le responsabilità sono rifiutate.
• Non utilizzate mai l’apparecchio se l’alimentatore o la spina sono danneggiati, dopo un malfunzionamento, se è stato fatto cadere o è stato
danneggiato in qualunque altro modo (rotture/crepe nell’involucro).
• Non spingete oggetti nell’apparecchio.
• Se l’apparecchio è irreparabile, rendetelo inutilizzabile immediatamente e
consegnatelo al punto di raccolta appropriato.
Smaltimento
La Direttiva Europea 2012 / 19 / CE sullo Smaltimento dei rifiuti elettrici
ed elettronici (WEEE) prevede che i dispositivi elettrici domestici usati non
devono essere smaltiti nelle discariche municipali di rifiuti indifferenziati. I
dispositivi usati devono essere raccolti separatamente in modo da ottimizzare il recupero e il riciclaggio dei materiali in essi contenuti e ridurre l’impatto sulla salute e sull’ambiente. Il simbolo del “cestino con ruote” barrato
sul prodotto ricorda l’obbligo di smaltire il dispositivo mediante
raccolta differenziat a. I consumatori devono contattare le autorità
locali o il rivenditore per informazioni relative al corretto smaltimento di dispositivi usati.
Page 38

Specifiche
Tensione nominale 220 – 240 V / 50 Hz
Potenza assorbita 10 – 95 W
Emissione umidità fino a 550 g/h
Dimensioni 196 x 418 x 196 mm
(larghezza x altezza x profondità)
Peso 3.0 kg
Capacità del
serbatoio acqua 6.3 Litri
Rumorosità 26 – 34 dB(A)
Conforme con i
regolamenti UE CE / WEEE / RoHS
Tutti i diritti relativi a qualsiasi modifica tecnica sono riservati
Page 39

Español
¡Enhorabuena! Acaba de comprar un extraordinario humidificador de aire
EVA . Estamos seguros de que mejora para usted el aire en los ambientes
cerrados.
Como con todos los aparatos electrodomésticos también este aparato exige un especial cuidado para evitar heridas, daños causados por incendios
o daños en el aparato. Le rogamos por lo tanto que lea detenidamente el
presente manual de instrucciones antes de proceder a su puesta en marcha
y preste atención a las advertencias de seguridad indicadas en el aparato.
Descripción del aparato
El aparato tiene los siguientes componentes principales:
1. Cable de corriente para la alimentación
2. Sensor de humedad con mando a distancia Remote SensorTM
3. Soporte para Remote Sensor
4. Compartimento de la batería de Remote SensorTM (Tipo AAA)
5. Posición del sensor de humedad
6. Tanque de agua con asa de transporte
7. Tapa del tanque de agua con cartucho antical
8. Cartucho antical
9. Bandeja de agua
10. Botón de encendido/apagado
11. Botón para la selección de la humedad deseada (higrostato: 30 % – 75 %
y funcionamiento continuo “CO”)
12. Botón para la selección del nivel de salida de humidificación 1–5
13. Botón para el modo de calentamiento (precalentamiento del agua)
14. Botón para el modo automático
15. Pantalla que indica la humedad actual y la humedad deseada (intermi tente)
16. Indicador del nivel de agua
17. Placa de calentamiento para precalentamiento del agua
18. Cubierta de silicona para la placa de calentamiento
19. Membrana ultrasónica
20. Depósito de fragancias
21. Botón para modo nocturno (LED normales, atenuados o apagados) y
modo de limpieza (pulse durante al menos 5 segundos)
22. Símbolo para error de conexión entre Remote SensorTM y el humidifica dor
23. Cámara de vapor
24. Silver CubeTM
25. Pincel de limpieza
26. Entrada de aire (Precaución: ¡no puede entrar agua en esta abertura!)
27. Salida de vapor
TM
Advertencias de seguridad importantes
Por favor, lea detenidamente el manual de instrucciones antes de poner en
marcha por primera vez el aparato y guárdelas bien por si necesitara consultarlas de nuevo más adelante o, dado el caso, pasárselas a un futuro nuevo
propietario.
• Stadler Form declina cualquier responsabilidad por los daños resultantes
de una utilización del aparato no conforme a este manual de instrucciones.
Page 40

• El aparato sólo se ha de utilizar en el hogar y con los fines descritos en
este manual de instrucciones. Una utilización no conforme a las disposiciones así como modificaciones técnicas en el aparato pueden poner en
peligro la salud y la vida.
• Este aparato pueden usarlo los niños mayores de 8 años y aquellas personas con capacidades físicas, sensoriales o mentales reducidas o con falta
de experiencia siempre y cuando se les haya dado una formación o supervisión respecto al uso del aparato de una forma segura y entiendan los
riesgos que implica. Los niños no deben jugar con el aparato. La limpieza
y el mantenimiento del usuario no deben hacerlo niños sin supervisión.
• Conecte el cable sólo a la corriente alterna. En el aparato, fíjese en las
indicaciones sobre el voltaje.
• No utilice ningún cable alargador estropeado.
• No pase el cable de red sobre bordes afilados ni lo pise.
• Nunca tire del enchufe del cable de red ni lo extraiga de la toma de corriente con las manos mojadas.
• No emplee el aparato cerca de bañeras, duchas o piscinas (mantenga una
distancia mínima de 3 m). Coloque el aparato de manera que no sea posible tocarlo al salir de la bañera.
• No sitúe el aparato cerca de un foco calorífico. No exponga el cable de
red directamente al calor (como p.ej. fogones calientes, llamas, planchas
calientes o estufas). Proteja el cable de red del aceite.
• Asegúrese de que, durante su funcionamiento, el aparato mantiene una
buena estabilidad y que no tropieza con el cable de red.
• El aparato no está protegido contra salpicaduras de agua.
• Sólo para uso en el interior del hogar.
• No guarde el aparato en el exterior.
• Mantenga (empaquete) el aparato en un lugar seco e inaccesible para
los niños.
• En caso de que el cable de red esté dañado, debe ser sustituido por el
fabricante o un taller autorizado por el fabricante o personas calificadas
para evitar cualquier riesgo.
• Antes de cualquier operación de mantenimiento, limpieza o después de
cada uso, apague al aparato y desenchufe el cable de la corriente de la
toma.
• ¡Antes de limpiar el interior del aparato, asegúrese de que lleve apagado
al menos 15 minutos!
• Cuando el precalentamiento está encendido, el agua dentro del aparato
se calienta: el agua en la bandeja de agua (9) y la placa de calentamiento
(17) se calientan. ¡Evite tocar el agua y la placa de calentamiento!
• Coloque el aparato fuera del alcance de los niños, ya que el agua en el
interior del aparato se calienta hasta 50 °C y la placa de calentamiento
alcanza temperaturas de hasta 75 °C.
Antes de la puesta en funcionamiento: Cartucho antical y dureza
del agua
El cartucho antical reduce la cantidad de cal del agua y la emisión no deseada de par tículas de cal en los alrededores. Efectiv o durante uno a tres meses
dependiendo de la dureza del agua (véase la tabla).
Page 41

Importante: Empape el cartucho antical en un baño de agua durante 24
horas antes de utilizarlo por primera vez (¡no en el depósito de agua!). La
resina tiene que absorber el agua para alcanzar su máximo rendimiento.
La duración del efecto del cartucho depende de la dureza del agua. Ésta
se puede comprobar con la tira de papel indicador que se adjunta (tira de
prueba pegada a la Quick Setup Guide).
1. Sumerja la tira durante un segundo en el agua
2. Después de aprox. un minuto podrá ver el resultado. Algunos de los campos verdes pasarán a ser de color rosa. El número de campos de color ros a
indica la dureza del agua. Ejemplo: Si tiene tres campos de color rosa, el
agua tiene el grado de dureza > 14 °dH.
Campos
rosa
0/1 Blanda
2 Moderadamente
3 Dura
4 Muy dura
Dureza del agua Grado de
dura
dureza
(°dH)
De 4
De 7
De 14
De 21
°dH
°dH
°dH
°dH
El cartucho sir ve para
(con 4 litros/día)
Días Litros
90 días apr ox. 360 L
45 días apr ox. 180 L
30 días apr ox. 120 L
15 día s aprox. 60 L
A partir de una dureza del agua de más de 21 °dH, le recomendamos que
no utilice un humidificador de aire ultrasónico, sino que humidifique el aire
por el principio de evaporación (p.ej. con el humidificador Oskar de la marca
Stadler Form: www.stadlerform.com/Oskar).
Nota: Si pone en funcionamiento Eva sin utilizar agua descalcificada de un
sistema de descalcificación que funcione según el principio de intercambio
iónico (se añade sal al agua), la sal contenida en el agua puede precipitarse
alrededor del aparato en forma de polvo blanco. No obstante, Eva se puede
utilizar con el agua de un sistema de filtrado de agua de mesa (p. ej. Brita).
Si no está seguro de la calidad o de la composición del agua, póngase en
contacto con el conserje o con el proveedor de agua potable
Puesta en funcionamiento / manejo
1. Coloque Eva en el lugar deseado sobre una superficie plana. El vapor
alcanza una altura de hasta 1,4 m gracias a la humidificación de alto
rendimiento (nivel de salida 5, en el modo de calentamiento). Esto hace
que sea posible colocar a Eva directamente en el suelo. Conecte el cable
de red (1) a un enchufe adecuado.
2. Saque Remote SensorTM (2), el soporte (3) y las dos pilas fuera del embalaje. Abra el compartimiento de la batería (4) en la parte inferior de
Remote SensorTM (2) girando la tapa en sentido contrario a las agujas
del reloj. Introduzca las dos pilas en el compartimiento de la batería (4),
como se muestra en la página 4, y cierre la tapa de nuevo. A continuación, coloque Remote SensorTM (2) en el soporte (3).
3. Por un lado, Remote SensorTM (2) es un sensor de humedad y garantiza
una humidificación precisa por su posición externa. Por otro lado, Remote SensorTM (2) también sirve como mando a distancia. Coloque el sensor
Page 42

de humedad Remote SensorTM (2) en el centro de la habitación sobre una
mesa o un aparador a una distancia óptima de Eva de entre 3 m y 5 m.
Remote SensorTM debe colocarse en el centro de la sala para que el aire
de la habitación pueda fluir más allá del sensor (5) con la mayor libertad
posible. Si no es posible, se recomienda colocar Remote SensorTM a una
distancia mínima de 30 cm de la pared y a una distancia mínima de 2 m
de ventanas y aberturas de ventilación.
4. Retire el tanque de agua (6) sujetándolo por el asa y tirando de él hacia
arriba. Desatornille la tapa del tanque de agua (7) y llene el tanque de
agua con agua del grifo limpia y fría hasta la marca de máximo. Asegúrese de que el cartucho antical (8) haya pasado las 24 horas anteriores
empapado en agua (consulte «Antes de la puesta en funcionamiento»).
Por último, vuelva a atornillar la tapa (7) en el tanque de agua (6). A
continuación, coloque el tanque de agua (6) en la unidad. La bandeja de
agua (9) se llenará ahora lentamente con el agua del tanque de agua.
Importante: por favor, no mueva el aparato cuando tenga agua dentro. El
agua podría llegar al sistema electrónico.
5. Para conectar Eva, pulse el botón de encendido/apagado (10). La humedad relativa actual en % se muestra en la pantalla (15). Si el indicador
del nivel de agua (16) tiene color rojo, hay muy poca agua en la unidad.
El nivel de salida de humidificación está preconfigurado en el nivel 2 y el
nivel deseado de humedad al 45 %.
6. Active Remote SensorTM (2) pulsando el botón «Hygrostat» (11a). El sensor de humedad envía automáticamente información a la unidad sobre
la humedad relativa medida varias veces por minuto. Estas mediciones
se muestran en la pantalla (15). La medición también se puede activar
pulsando cualquier botón de Remote SensorTM (2) (aparte del botón de
encendido/apagado (10)).
7. La humedad deseada se puede cambiar pulsando el botón «Hygrostat»
(11) varias veces (35 % – 75 % y funcionamiento continuo «CO»). El símbolo en la pantalla (15) parpadea durante la entrada. Tras unos segundos
sin entrada, se guarda el valor seleccionado. El símbolo cambia a la humedad medida actual.
8. El rendimiento de humidificación se puede cambiar pulsando el botón
«Output» (12) varias veces (niveles 1–5). El nivel se indica en la pantalla
(15) con barras horizontales (por ejemplo, 1 barra = nivel 1).
9. Pulsando el botón «Warm» (13), se activa el modo de calentamiento, y
con este el precalentamiento del agua. A continuación, el LED en el botón «Warm» de la unidad estará encendido. La placa de calentamiento
(17) calienta el agua antes de que se encienda para recibir el vapor de
la membrana ultrasónica (19). El modo de calentamiento crea un vapor
de temperatura agradable y además aumenta el rendimiento de humidificación.
10. Al pulsar el botón «Auto» (14), se activa el modo automático, y con este
la tecnología Adaptive HumidityTM. A continuación, el LED en el botón
«Auto» de la unidad estará encendido. En el modo automático, la unidad
se adapta de forma automática al nivel de salida de la humidificación
con el fin de alc anzar y mantener la humedad deseada del 45 % de forma
silenciosa y con bajo consumo. Cuanto menor sea la humedad actual,
mayor será el nivel de salida de humidificación ajustado automáticamente (por debajo del 33 % = nivel 4, de un 34 % – 37 % = Nivel 3, de
un 38 % – 41 % = Nivel 2, del 42 % – 45 % = nivel 1). Puede cambiar la
Page 43

humedad deseada en el modo automático pulsando el botón «Hygrostat» (11) varias veces mientras que el modo automático esté activado (el
LED en el botón «Auto» en la unidad está encendido). El nivel de salida
de humidificación (12) no se puede modificar manualmente en el modo
automático. En cuanto se pulsa el botón «Output» (12) para cambiar el
nivel de salida de humidificación, se desactiva el modo automático.
11. También puede utilizar Eva para dispersar sustancias aromáticas en la
habitación. Sea muy prudente con las sustancias, ya que una dosis excesiva puede provocar fallos en el funcionamiento o daños en el aparato. Para utilizar sustancias aromáticas, presione brevemente y libere el
depósito de sustancias de aromáticas (20) y tire de él para sacarlo del
aparato. Deje que las gotas de la fragancia caigan directamente sobre
el disco de algodón del depósito (20). Añada un máximo de 1 – 2 gotas
de la sustancia aromática en el depósito. Coloque el depósito de nuevo
y presione para cerrarlo. Consejo: para cambiar la sustancia aromática,
retire el disco de algodón y limpie el recipiente con jabón. A continuación, podrá insertar un nuevo disco de algodón (disponible comercialmente) y añadir gotas de la sustancia aromática deseada.
12. Si el indicador de nivel de agua (16) cambia a color rojo, el agua se debe
rellenar. Retire el tanque de agua (6) y llénelo con agua del grifo limpia
y fría hasta el máximo. Tras llenar el tanque de agua, el aparato reanuda automáticamente el funcionamiento después de unos segundos. El
tanque de agua también se puede rellenar durante el funcionamiento.
13. Si le molesta la luminosidad de las lamparitas (en el dormitorio por ejemplo), Usted puede reducir la intensidad de la luz presionando la tecla
para el modo noche (21). Podrá elegir entre tres modos diferentes:
• Modo normal (se activa de manera estándar)
• Modo atenuado (pulse una vez)
• Modo luz apagada (pulse dos veces)
• Si vuelve a pulsar el interruptor del regulador de luz cambiará de
nuevo al modo normal.
En caso de que no haya agua en el aparato, el símbolo de nivel de agua
de color rojo (16) se enciende en todos los modos. La luz roja no puede
atenuarse.
14. Si se muestran dos puntos (22) en la pantalla (15), Eva no puede establecer conexión de radio con Remote SensorTM (2). Eva sigue funcionando gracias a un sensor de humedad dentro del aparato. Pulse cualquier
botón de Remote SensorTM (2) para activarlo. Asegúrese de que Remote
SensorTM (2) se encuentra dentro de un radio de 10 m de Eva. Las paredes, puertas y pisos entre Eva y Remote SensorTM (2) pueden interrumpir
la conexión de radio. El mando de Remote SensorTM (2) debe posicionarse de manera óptima a una distancia de 3 m a 5 m de Eva y en una superficie elevada en el centro de la habitación (consulte la sección «Puesta
en funcionamiento / manejo» N.° 3). Los dos puntos en la pantalla (22)
también podrían indicar que necesita cambiar las pilas de Remote SensorTM (2) (consulte la sección «Puesta en funcionamiento/manejo» N.° 2).
Nota: Si ve pequeñas gotas (u otras señales de humedad) en la unidad o
alrededor de ella, el agua condensada procede del humidificador. Esto significa que el aire ya no puede absorber la humedad del humidificador. Por
favor, active el modo automático con una humedad deseada del 45 %. Las
gotas de agua deberían dejar de aparecer.
Page 44

Limpieza
Antes de cualquier operación de mantenimiento, limpieza y después de cada
uso, apague el aparato y desenchufe el cable de alimentación (1) de la toma.
Atención: no sumerja el aparato en agua (peligro de cortocircuito). Si el
precalentamiento está encendido (el LED del modo de calentamiento está
encendido (13)), el agua dentro del aparato se calienta: el agua en la bandeja
de agua (9) y la placa de calentamiento (17) se calientan. ¡Evite tocar el agua
y la placa de calentamiento!
• Para la limpieza exterior, frótelo con un paño húmedo y después séquelo
bien.
• Ejecute el modo de limpieza al menos una vez al mes. El aparato
debe llevar apagado al menos 15 minutos antes de la limpieza interna.
A continuación, retire el tanque de agua (6), la cámara de vapor (23), la
cubierta de silicona (18), el cubo de plata (Silver Cube) (24) y el depósito
de sustancias aromáticas (20). Llene una taza con 200 ml de agua del grifo mezclada con un producto descalcificador (mezcle de acuerdo con las
instrucciones del fabricante). Vierta el líquido con cuidado en la bandeja
de agua (9) manteniendo la taza directamente sobre la bandeja de agua
(consulte la página 5). ¡No vierta el líquido en la bandeja de agua por
encima de la bandeja! Asegúrese de que no entre líquido en la abertura
de entrada de aire (26). Esto puede dañar el aparato y anulará cualquier
reclamación de la garantía.
• Para iniciar el modo de limpieza, el cable de red debe estar conectado a
un enchufe. Mantenga pulsado el botón para modo nocturno (21) en la
parte inferior de la esquina derecha durante 5 segundos para activar el
modo de limpieza. Ahora, el símbolo de nivel de agua (16) en el aparato
parpadeará en rojo. El modo de limpieza tiene una duración de alrededor
de 5 minutos y se apaga automáticamente después (el símbolo de nivel de
agua deja de parpadear).
• Compruebe en la bandeja de agua (9) si la cal en la membrana ultrasónica
(19) y la placa de calentamiento (17) se ha disuelto. Atención: el agua y
la placa de calentamiento están calientes, ¡existe riesgo de quemaduras!
• Si los residuos de cal permanecen, la membrana ultrasónica (19) y la placa de calentamiento (17) se pueden limpiar con la ayuda del pincel de
limpieza (25) (parte trasera y delantera). No intente rascar la membrana
con un objeto duro.
• Si la cal persiste, le recomendamos que descalcifique el aparato con ayuda del modo de limpieza varias veces seguidas. Deje el producto en la
bandeja de agua durante un máximo de 20 minutos y viértalo después
como se describe a continuación.
• Importante: Vierta el producto descalcificador a lo largo de la esquina
delantera izquierda del aparato (véase la flecha en el aparato). No deje
que entre agua en la aber tura de entrada de aire (26). Esto puede dañar el
aparato y anulará cualquier reclamación de la garantía.
• Para enjuagar, llene una taza con 200 ml de agua del grifo y con cuidado
viert a el líquido en la bandeja de agua (9) mantenie ndo la taza direc tamente sobre la bandeja de agua (consulte la página 5). ¡No vierta el líquido en
la bandeja de agua por encima de la bandeja! Vierta el agua a lo largo de
la esquina delantera izquierda del aparato. Repita el proceso hasta que no
quede producto descalcific ador en la bandeja de agua (9). Coloque el cubo
de iones de plata (Silver Cube) (24), la cubierta de silicona (18), la cámara
Page 45

de vapor (23), el tanque de agua (6) y depósito de sustancias aromáticas
(20) en el aparato. Si el t anque de agua no est á bien situado, compruebe si
la parte superior de la cámara de vapor (23) está montada correctamente.
• Limpie el tanque de agua (6) a fondo cada dos semanas con un cepillo suave o una esponja y agua tibia. Utilice un producto descalcificador diluido
(mezcle de acuerdo con las instrucciones del fabricante) para la cal. Enjuague el tanque de agua después con agua del grifo fría y limpie a fondo.
Sustitución de un cartucho antical
• Por favor, busque los intervalos de sustitución recomendados en la tabla
(véase «Antes de la puesta en funcionamiento»).
• Consejo: Podrá comprobar la función del cartucho (8) de un modo muy
sencillo: exponga un espejo pequeño al vapor (27) durante un par de segundos. Si después de retirarlo observa un precipitado blanco (de cal)
sobre el espejo, es necesario cambiar el cartucho.
• El cartucho antical se encuentra situado en el lateral interno de la tapa
del depósito (8). En primer lugar, desatornille la tapa del depósito (7) y
posteriormente atornille el cartucho desde la tapa del depósito (6). Deshágase del cartucho como si fuera un residuo doméstico (8). Empape el
cartucho antical en un baño de agua durante 24 horas antes de utilizarlo
por primera vez (¡no en el depósito de agua!). La resina tiene que absorber
el agua para alcanzar su máximo rendimiento.
• ¡Guarde la tapa del depósito (7) cuando sustituya el cartucho!
Cubo de plata – Silver Cube ™
El cubo de plata (24) evita que se formen bacterias y gérmenes en el humidificador de aire emitiendo continuamente de plata. Su uso contribuye a
conseguir un ambiente higiénico y es efectivo durante un año. Por eso, le
recomendamos que lo cambie antes de empezar la temporada de humidificación del aire. El cubo de plata actúa al entrar en contacto con el agua del
aparato, incluso cuando el aparato esté apagado.
Reparaciones
• Las reparaciones en los aparatos eléctricos (cambio del cable) sólo han de
ser llevadas a cabo por personal especializado y debidamente formado.
• En caso de haberse procedido a reparaciones indebidas, la garantía déjà
de tener efecto y se declina cualquier responsabilidad.
• Nunca ponga en marcha el aparato si el cable o el enchufe están estropeados, si falla alguna de las funciones, si el aparato se ha caído o si ha
sufrido algún otro desperfecto (rajas/roturas en el chasis).
• No introducir ningún tipo de objetos en el aparato.
• Una vez llegado el aparato al final de su vida útil, inutilizarlo inmediatamente (separar el cable) y entregarlo en el centro de recogida previsto a
tal efecto.
Eliminación
La directiva europea 2012 / 19 / CE sobre residuos de equipos eléctricos
y electrónicos (WEEE), exige que los aparatos eléctricos domésticos antiguos no deben eliminarse en la recogida de residuos municipal normal sin
clasificar. Los aparatos antiguos deben recogerse de forma separada para
optimizar la recuperación y el reciclaje de los materiales y reducir el impacto
Page 46

sobre la salud humana y el medioambiente. El símbolo del “cubo de basura”
tachado en el producto le recuerda su obligación de que, cuando se deshaga
del aparato, debe recogerse de forma separada. Los consumidores deben ponerse en contacto con las autoridades locales o con
el distribuidor para obtener información respecto a la correcta
eliminación del aparato antiguo.
Datos técnicos
Tensión nominal 220 – 240 V / 50 Hz
Potencia 10 – 95 W
Salida de humedad de hasta 550 g/h
Dimensiones 196 x 418 x 196 mm
(ancho x alto x largo)
Peso 3.0 kg
Capacidad del tanque de agua 6.3 Litros
Nivel de intensidad acústica 26 – 34 dB(A)
Cumple la norma UE CE / WEEE / RoHS
Quedan reservadas modificaciones técnicas
Page 47

Nederlands
Gefeliciteerd met uw aankoop van dit bijzondere EVA Luchtbevochtiger! Dit
apparaat voorziet uw kamer van de omgevingslucht voor u verbeteren.
Zoals met alle elektronische apparaten, is zorgvuldig gebruik noodzakelijk
om verwonding, brandschade of schade aan het apparaat te vermijden. Bestudeer de instructies nauwkeurig en volg de adviezen op het apparaat zelf,
alvorens het apparaat voor het eerst te gebruiken.
Apparaatbeschrijving
Het apparaat bestaat uit de volgende onderdelen:
1. Netkabel voor voeding
2. Remote SensorTM-vochtigheidssensor met afstandsbediening
3. Houder voor Remote Sensor
4. Batterijvak voor Remote SensorTM (Type AAA)
5. Positie van de vochtigheidssensor
6. Watertank met draaghendel
7. Tankdeksel met antikalkpatroon
8. Antikalkcartouche
9. Waterlade
10. Aan-uitschakelaars
11. Knop voor selectie van de gewenste luchtvochtigheidsgraad (hy grostaat: 30 – 75 % en continue werking ‘CO’)
12. Knop voor selectie van de luchtvochtigheidsgraad, niveau 1–5
13. Toets voor modus opwarmen (water voorverwarmen)
14. Toets voor automatische modus
15. Display voor indicatie van de huidige en gewenste (knipperende) voch tigheid
16. Indicator voor waterpeil
17. Verwarmingsplaat voor het voorverwarmen van water
18. Siliconenafdekking voor de verwarmingsplaat
19. Membraan met ultrasone golven
20. Aromacontainer
21. Toets voor nachtmodus (leds normaal, gedimd of uit) en reinigingsmodus
(minimaal 5 seconden indrukken)
22. Symbool voor een verbroken verbinding tussen Remote SensorTM en be vochtiger
23. Nevelkamer
24. Silver Cube
25. Reinigingsborstel
26. Luchtinlaat (let op: er mag geen water in deze opening binnendringen!)
27. Nev elafvoer
TM
TM
Belangrijke veiligheidsinstructies
Lees de instructies zorgvuldig door voordat u het apparaat voor het eerst
gebruikt en bewaar deze handleiding voor later gebruik; geef hem, indien
nodig, door aan de volgende eigenaar.
• Stadler Form is op geen enkele wijze aansprakelijk voor verlies of schade
ten gevolge van het nalaten van deze instructies.
• Het apparaat dient alleen in huis te worden gebruikt of voor de doeleinden
die in deze instructies worden beschreven. Interferentie op het toestel
door onbevoegden kan leiden tot gevaar voor de gezondheid.
Page 48

• Dit apparaat kan worden gebruikt door kinderen van 8 jaar en ouder en
personen met gereduceerde fysieke, zintuiglijke of mentale capaciteiten
of met een tekort aan ervaring en kennis, vooropgesteld dat ze onder
toezicht staan of instructies hebben gekregen m.b.t. het gebruik van het
apparaat op een veilige wijze en begrijpen welke gevaren er kunnen optreden. Laat kinderen het apparaat niet als speelgoed gebruiken. Reiniging en gebruikersonderhoud mogen niet door kinderen zonder toezicht
worden uitgevoerd.
• Sluit de kabel alleen op wisselstroom aan. Let op de spanningsgegevens
op het apparaat.
• Gebruik geen beschadigde verlengkabels.
• De netkabel mag niet over scherpe kanten heen wor den getrokken of worden vastgeklemd.
• De stekker mag nooit aan de netkabel of met natte handen uit de contactdoos worden getrokken.
• Dit apparaat mag niet bij een ligbad, een douche of een zwembad worden
gebruik t (minimumafstand van 3 m aanhouden). Plaats het apparaat zo dat
personen het apparaat vanaf de rand van het ligbad niet kunnen aanraken
• Plaats het apparaat niet in de buurt van een warmtebron. De netkabel
mag niet aan rechtstreekse hittewerking (bijv. heet fornuisplaat, open
vlammen, hete strijkzool of kachel) worden blootgesteld, netkabel tegen
olie beschermen.
• Let erop dat het apparaat bij het gebruik een goede stabiliteit heeft en
men niet over de netkabel kan struikelen.
• Het apparaat is niet tegen spattend water beschermd.
• Uitsluitend voor gebruik binnenshuis.
• Het apparaat niet buitenshuis opbergen.
• Het apparaat op een droge en voor kinderen niet toegankelijke plaats bewaren (inpakken).
• Als de netkabel beschadigd is, dient deze door de fabrikant of een door de
fabricant goedgekeurd servicebedrijf of soortgelijk gekwalificeerd personeel te worden vervangen om gevaarlijke situaties te voorkomen.
• Vóór willekeurig onderhoud of reiniging en na elk gebruik, dient u het apparaat uit te schakelen en de voedingskabel uit het stopcontact te halen.
• Voorafgaand aan het reinigen van de binnenkant van het apparaat, dient
het apparaat ten minste gedurende 15 minuten te zijn uitgeschakeld!
• Als de voorverwarming is ingeschakeld, wordt het water in het apparaat
verwarmd: het water in de waterlade (9) en de verwarmingsplaat worden
heet. Let op dat u het water en de verwarmingsplaat niet aanraakt!
• Plaats het apparaat buiten het bereik van kinderen, aangezien het water
in het apparaat wordt verwarmd tot 50 °C en de verwarmingsplaat temperatuur tot 75 °C kan bereiken.
Voor de ingebruikname: Antikalkcartouche en waterhardheid
De antikalkcartouche vermindert de kalkdeeltjes in het water en de ongewenste uitstoot van kalkdeeltjes in de omgeving. Voor één tot drie maanden
effectief, afhankelijk van de hardheid van het water (zie tabel).
Belangrijk: Week de antikalkcartouche vóór het eerste gebruik voor 24 uur
in een bad met water (niet in de watertank!). Het hars moet het water absorberen om hoge prestaties te bereiken.
Page 49

De werkingsduur van de cartouche hangt af van de waterhardheid. Met de
meegeleverde teststrook kan deze getest worden (teststrip bevestigd op de
Quick Setup Guide).
1. Teststrook een seconde lang onder water houden
2. Na ca. een minuut is het resultaat zichtbaar op de teststrook. Enkele van
de groene velden worden roze. De waterhardheid wordt door het aantal
roze gekleurde velden getoond. Voorbeeld: Bij drie roze gekleurde velden
heeft het water de hardheidsgraad > 14 °dH.
Roze
velden
0/1 Zacht
2 Middelhard
3 Veeleer hard
4 Erg hard
Waterhardheid
Hardheidsgraad (°dH)
°dH
Vanaf 4
Vanaf 7
°dH
Vanaf 14
Vanaf 21
Cartouche is toereikend voor
Dagen Liter
90 dagen ca. 36 0 L
45 dagen ca. 180 L
30 dagen ca. 120 L
°dH
15 dagen ca. 60 L
°dH
(bij 4 liter/dag)
Vanaf een waterhardheid van meer dan 21 °dH kunnen wij het gebruik van
een luchtbevochtiger met ultrasone golven niet meer aanbevelen. Wij bevelen u aan om uw lucht met een luchtbevochtiger volgens het verdampingsprincipe te bevochtigen (bijv. Oskar verdamper van Stadler Form: www.
stadlerform.com/Oskar).
Let op: Als u Eva gebruikt zonder ontkalk t water uit een ontkalkingssysteem
wat functioneert overeenkomstig het principe van ionenwisseling (er wordt
zout aan het water toegevoegd), kan het zout dat in het water zit, neerslaan
rondom het apparaat als witte stof. Eva mag echter wel met water op een
tafelwaterfiltersysteem uitgevoerd worden (bijv. Brita). Bent u onzeker over
de kwaliteit of samenstelling van uw water, neem dan contact op met de
huismeester of de drinkwaterverzorger.
Ingebruikname / bediening
1. Plaats Eva op de gewenste plek op een vlak oppervlak. De nevel bereikt
een hoogte tot 1,4 m dankzij de hoogwaardige bevochtiging (uitvoerniveau 5, warme modus aan). Hierdoor kan Eva direct op de vloer worden
geplaatst. Sluit de voedingskabel (1) aan op een geschikt stopcontact.
2. Neem de Remote SensorTM (2), de houder (3) en twee batterijen uit de
verpakking. Open het batterijenvakje (4) aan de onderzijde van de Remote SensorTM (2) door het deksel tegen de wijzers van de klok te draaien
(linksom). Plaats de twee batterijen in het batterijenvakje (4) zoals weergegeven op pagina 4, en sluit het deksel. Plaats de Remote SensorTM (2)
in de houder (3).
3. Enerzijds is de Remote SensorTM (2) een luchtvochtigheidssensor en
waarborgt hij de exacte bevochtiging door zijn externe positie. Anderzijds wordt de Remote SensorTM (2) ook gebruikt als een afstandsbediening. Plaats de luchtvochtigheidssensor Remote SensorTM (2) in het
midden van de ruimte op een tafel of een dressoir met een optimale
afstand tot Eva van ca. 3 tot 5 meter. De Remote SensorTM moet centraal
in de kamer worden geplaatst zodat de lucht in de ruimte zo vrij mogelijk
Page 50

langs de sensor (5) kan stromen. Als dit niet mogelijk is, adviseren wij
de Remote SensorTM te plaatsen met een minimumafstand van 30 cm tot
de muur en een minimumafstand van 2 meter tot de ramen en ventilatieopeningen.
4. Verwijder de watertank (6) door deze bij de hendel vast te houden en
omhoog te trekken. Schroef het deksel van de watertank (7) los en vul
de watertank met schoon, koud leidingwater tot aan de maximummarkering. Let op dat de antikalkpatroon (8) voor gebruik 24 uur in water is
ondergedompeld geweest (zie ‘Vóór gebruik’). Ten slotte schroeft u het
deksel (7) terug op de watertank (6). Plaats de watertank (6) in het apparaat. De waterlade (9) vult zich nu langzaam met water uit de watertank.
Belangrijk: verplaats het apparaat niet als dit is gevuld met water. Het
water kan in de elektronica terecht komen.
5. Druk op de aan-uitschakelaar (10) om Eva in te schakelen. De huidige
relatieve luchtvochtigheid in % wordt weergegeven op het display (15).
Als het indicatorlampje van het waterpeil (16) rood brandt, zit er te weinig water in het apparaat. Het uitgangsniveau van de lucht vochtigheid is
vooraf ingesteld op niveau 2 en de gewenste luchtvochtigheid is 45 %.
6. Activeer de Remote SensorTM (2) door de knop ‘Hygrostaat’ (11a) in te
drukken. De vochtigheidssensor stuurt automatisch meerdere keren per
minuut informatie over de gemeten relatieve vochtigheid naar het apparaat, wat op het display (15) wordt weergegeven. De meting kan ook
worden geactiveerd door een knop op de Remote SensorTM (2) (naast de
aan-uitschakelaar (10) in te drukken).
7. De gewenste luchtvochtigheid kan worden gewijzigd door meerdere
keren op de knop ‘Hygrostaat’ (11) (35 – 75 % en continue werking ‘CO’)
te drukken. Het symbool op het display (15) knippert tijdens de invoer.
Wanneer enkele seconden lang geen invoer is ontvangen, wordt de geselecteerde waarde opgeslagen. Het symbool wijzigt naar de huidige
gemeten luchtvochtigheid.
8. De luchtvochtigheidsgraad kan worden gewijzigd door meerdere keren
op de knop ‘Output ’ (12) (niveau 1– 5) te drukken. Het aangege ven niveau
wordt op het display (15) met horizontale balken (bijv. 1 bar = niveau 1)
weergegeven.
9. Door op de knop ‘Warm’ (13), de opwarmingsmodus, en hierbij het voorverwarmen van het water, te drukken, wordt deze ingeschakeld. Nu zal
de led op de knop ‘Warm’ op het apparaat gaan branden. De verwarmingsplaat (17) verwarmt het water voordat deze als een nevel door het
ultrasone membraan (19) wordt verspreid. Het zorgt voor een aangename warme nevel en het verhoogt de luchtvochtigheidsgraad.
10. Door op de knop ‘Auto’ (14), de automatische modus, te drukken, activeert u ook de Adaptive HumidityTM- technologie. Nu gaat de led op
de knop ‘Auto’ op het apparaat branden. In automatische modus past
de luchtvochtigheidsgraad zich automatisch aan om de gewenste luchtvochtigheid van 45 % rustig en op een energie-efficiënte wijze te bereiken en te handhaven. Hoe lager de actuele luchtvochtigheid is, hoe
hoger de luchtvochtigheidsgraad automatisch wordt ingesteld (onder
33 % = niveau 4, van 34 % – 37 % = niveau 3, van 38 % – 41 % = niveau
2, van 42 % – 45 % = niveau 1). U kunt de gewenste luchtvochtigheid in
automatische modus wijzigen door meerdere keren op de ‘Hygrostaat’
(11) te drukken, terwijl automatische modus actief is (de led op de knop
Page 51

‘Auto’ op het apparaat brandt). De luchtvochtigheidsgraad (12) kan niet
handmatig worden gewijzigd in automatische modus. Zodra de knop
‘Output’ (12) wordt ingedrukt om de luchtvochtigheidsgraad te wijzigen,
wordt de automatische modus gedeactiveerd.
11. U kunt Eva gebruiken om een aromatische geur door de kamer te verspreiden. Wees uiterst spaarzaam met aromatische geuren, omdat een
overmatige dosering tot storingen en beschadigingen van het apparaat
kan leiden. Om een geur toe te voegen, drukt u kort op de aromacontainer (20) en trekt u deze uit het apparaat. Laat de geur rechtstreeks
op het wattenschijfje in de aromacontainer (20) druppelen. Voeg max
1 – 2 geurdruppels toe aan de aromacontainer! Duw de container weer
terug en druk deze in om te vergrendelen. Tip: om de geur te veranderen,
verwijdert u het wattenschijfje en reinigt u de aromacontainer met een
sopje. U kunt nu een nieuw wattenschijfje (verkrijgbaar in de handel)
plaatsen en de gewenste aromadruppeltjes toevoegen.
12. Als de indicator voor het waterpeil (16) rood gaat branden, moet er opnieuw water worden bijgevuld. Verwijder de watertank (6) en vul deze
met schoon, koud leidingwater tot de maximummarkering. Nadat u de
watertank heeft teruggeplaatst, gaat het apparaat automatisch na enkele seoncden weer verder. De water tank kan ook tijdens bedrijf worden
bijgevuld.
13. Indien de helderheid van de lampjes storen (bijv. in de slaapkamer), kunt
u de lichtintensiteit door het drukken van de toets voor de nachtmodus
(21) reduceren. U kunt tussen drie verschillende modi kiezen:
• Normale modus (standaard ingeschakeld)
• Gedimde modus (een keer indrukken)
• Licht-uit modus (twee keer indrukken)
• Door nog een keer de dimmer-schakelaar in te drukken, kunt u weer
terugkeren naar de Normale modus.
Als er geen water in het apparaat zit, gaat het symbool voor het waterpeil (16) in alle modi branden. Het rode lampje kan niet worden gedimd.
14. Als er twee stippen (22) op het display (15) worden weergegeven, kan
Eva geen draadloze verbinding met de Remote SensorTM (2) tot stand
brengen. Eva functioneert dankzij een vochtigheidssensor in het apparaat. Druk op een willekeurige knop op de Remote SensorTM (2) om deze
te activeren. Let op dat de Remote SensorTM (2) zich binnen 10 meter van
Eva bevindt. Muren, deuren en verdiepingen tussen Eva en de Remote
SensorTM (2) kunnen de draadloze verbinding verstoren. De Remote SensorTM (2) moet het liefst op een afstand tussen 3 en 5 m van Eva staan
en op een iets hoger gelegen oppervlak in het midden van de kamer (zie
‘Ingebruikname/bediening’ nr. 3). De twee stippen op het display (22)
kunnen ook aangeven dat de batterijen in de Remote SensorTM (2) vervangen moeten worden (zie ‘Ingebruikname/bediening’ nr. 2).
Let op: mocht u enkele druppels (of andere tekenen van condens) op of
rond het apparaat waarnemen, is dit gecondenseerd water afkomstig van
de luchtbevochtiger. Dit betekent dat de lucht niet langer in staat is om het
vocht van de luchtbevochtiger te absorberen. Activeer de automatische modus met een gewenste luchtvochtigheid van 45 %. De waterdruppels zouden
nu niet meer moeten vermeerderen.
Page 52

Reiniging
Vóór willekeurig onderhoud of reiniging en na elk gebruik, schakel het apparaat uit en haal de netkabel (1) uit het stopcontact.
Let op: het apparaat nooit in water onderdompelen (kortsluitingsgevaar).
Als voorverwarming wordt ingeschakeld (de led Warme modus is ingeschakeld (13)), wordt het water in het apparaat verwarmd: het water in de waterlade (9) en de verwarmingsplaat (17) worden heet. Raak het water en de
verwarmingsplaat niet aan!
• De buitenkant met een vochtige doek schoonwrijven en daarna goed
drogen.
• Voer minimaal één keer per maand de reinigingsmodus uit. Het
apparaat moet gedurende ten minste 15 minuten zijn uitgeschakeld voordat u het apparaat aan de binnenkant gaat reinigen! Verwijder vervolgens
de water tank (6), de nevelkamer (23), de siliconenafdekking (18), de Silver
Cube (24) en de aromacontainer (20). Vul een dop me t 200 ml leidingwater,
gemengd met een ontkalkingsmiddel (verhouding volgens de instructies
van de fabrikant). Giet de vloeistof zorgvuldig in de waterlade (9) door
deze direct boven de waterlade te houden (zie pagina 5). Giet de vloeistof
voorzichtig in de lade! Let op dat er geen vloeistof in de luchtinlaatopening (26) komt. Hierdoor kan het apparaat beschadigd raken en vervallen
alle aanspraken op garantie.
• Om de reinigingsmodus te starten, moet de voedingskabel zijn aangesloten op een stopcontact. Druk gedurende 5 seconden de knop Night
Mode (Nachtmodus) aan de onderzijde van de rechterhoek in om de reinigingsmodus te activeren. Nu gaat de indicator voor het waterpeil (16) op
het apparaat rood knipperen. De reinigingsmodus draait gedurende ca. 5
minuten en schakelt automatisch uit (de indicator voor het waterpeil stopt
met knipperen).
• Controleer in de waterlade (9) of de kalk op het ultrasone membraan (19)
en de verwarmingsplaat (17) is opgelost. Attentie: het water en de verwarmingsplaat zijn heet, risico op verbranding!
• Als er kalkresten achterblijven, kunnen het ultrasone membraan (19) en
de verwarmingsplaat (17) worden gereinigd met een reinigingsborstel (25)
(voor- en achterzijde). Schraap het kalk er niet af met een scherp voorwerp.
• Voor ernstige kalkafzetting adviseren wij om het apparaat meerdere keren achter elkaar te reinigen met behulp van de reinigingsmodus (21). Laat
het ontkalkingsmiddel in de waterlade gedurende max. 20 minuten en giet
deze na afloop weg zoals hieronder beschreven.
• Belangrijk: giet het ontkalkingsmiddel via de linkervoorzijde uit het
apparaat (zie de pijl op het apparaat). Er mag geen water in de luchtinlaatopening (26) terechtkomen. Hierdoor kan er schade aan het apparaat
optreden en vervallen alle aanspraken op garantie.
• Om te spoelen, vult u de dop met 200 ml leidingwater en giet u de vloeis tof
voorzichtig in de waterlade (9) door deze direct boven de lade te houden (zie pagina 5). Giet de vloeistof niet vanaf een hoge afstand in de
lade! Giet het water via de linkervoorzijde uit het apparaat. Herhaal dit
totdat er geen ontkalkingsmiddel meer in de waterlade (9) zit. Plaats de
Silver Cube (24), siliconenafdekking (18), nevelkamer (23), watertank (6)
en aromacontainer (20) terug in het apparaat. Als de watertank niet goed
is geplaatst, controleert u of het bovenste gedeelte van de nevelkamer
(23) goed is bevestigd.
Page 53

• Reinig de watertank (6) grondig elke twee weken met een zachte borstel
en warm water. Gebruik verdunde ontkalkingsmiddel (verhouding volgens
de instructies van de fabrikant) voor kalkafzettingen. Spoel de watertank
na afloop grondig met schoon, koud leidingwater.
Vervangen van de antikalkcartouche
• In de tabel vindt u de aanbevolen vervangingsintervallen (zie «Voor de
ingebruikname»).
• Tip: De functie van de cartouche (8) kan met een eenvoudige test gecon-
troleerd worden: houd een kleine spiegel een paar seconden in de nevel
(27). Indien er zich aansluitend op de spiegel witte (kalk-) aanslag bevindt,
moet de cartouche vervangen worden.
• De antikalkcartouche is aan de binnenzijde van de tankdop te vinden (8).
Schroef eerst de tankdop uit de watertank (6) en schroef dan de patroon
van de tankdop (7). Werp de patroon bij het huishoudelijk afval weg (8).
Week de antikalkcartouche vóór het eerste gebruik voor 24 uur in een bad
met water (niet in de watertank!). Het hars moet het water absorber en om
hoge prestaties te bereiken.
• Houd de tankdop (7) bij het vervangen van de patroon!
Zilveren kubus – Silver Cube ™
De zilveren kubus (24) verhindert door een onafgebroken uitstraling van zilverionen de groei van kiemen en bacteriën in de luchtbevochtiger. De inzet
van de zilveren kubus leidt tot een hygiënisch binnenklimaat. De werkingstijd van de zilveren kubus is een jaar. Wij bevelen u daarom aan om ieder
nieuw bevochtigingsseizoen de zilveren kubus te vervangen. De zilveren kubus werkt zodra hij met het water in het apparaat in aanraking komt en ook
als het apparaat uitgeschakeld is.
Reparaties
• Reparaties aan het toes tel dienen te worden verricht door een erkende reparateur. Als onbevoegden interferentie hebben gemaakt op het toestel,
dan vervalt de garantie evenals de aansprakelijkheid van Stadler Form.
• Zet het toestel nooit aan wanneer de adapter of de stop beschadigd is,
nadat het defect is geweest, het gevallen is of op een andere manier is
beschadigd. (barsten/onderbrekingen in het omhulsel).
• Duw geen voorwerp in het toestel. Haal het zuiveringssysteem niet uit
elkaar.
• Als het toestel niet meer te repareren is, maak het dan onmiddellijk onbruikbaar en geef het af op het inzamelingspunt.
Verwijdering
De Europese richtlijn 2012 / 19 / EG inzake Afval van Elektrische en Elektronische Apparatuur (AEEA), vereist dat oude elektrische huishoudapparaten
niet in de normale gemeentelijke ongesor teerde afvalstroom mogen worden
weggegooid. Oude apparaten moeten apart worden ingezameld om recycling en hergebruik van de materialen daarin te optimaliseren en de gevolgen op het milieu en de volksgezondheid te verminderen. Het symbool met
de doorgekruiste “vuilnisbak op wieltjes” op het product, herinnert u aan uw
verplichting, dat het toestel bij verwijdering gescheiden ingezameld moet
worden. Consumenten moeten contact opnemen met hun lokale autoriteit
Page 54

of verkoper voor informatie betreffende de juiste verwijdering van
hun oude toestel.
Specificaties
Nominale spanning 220 – 240 V / 50 Hz
Nominale vermogen 10 – 95 W
Vochtigheidsuitgang tot op 550 g/h
Afmetingen 196 x 418 x 196 mm
(breedte x hoogte x diepte)
Gewicht 3.0 kg
Capac iteit water tank 6.3 Lite r
Geluidsdrempel 26 – 34 dB(A)
EU- verordening CE / AEEA / RoHS
De inhoud van deze gebruiksaanwijzing kan zonder voorafgaand
bericht worden gewijzigd
Page 55

Dansk
Tillykke! De har lige anskaffet Dem den usædvanlige EVA luftfugter. Den vil
give Dem stor fornøjelse, når luften omkring Dem trænger til at blive renset.
Som med alle elektriske husholdningsapparater er særlig pleje en nødvendighed også med dette produkt, for at undgå fysisk skade, brandskade eller
beskadigelse af produktet. Læs venligst denne brugsanvisning grundigt før
produktet tages i brug, og følg sikkerhedsanvisningerne på selve produktet.
Beskrivelse af apparatet
Apparatet består af følgende hoveddele:
1. Ledning til strømforsyning
2. Remote SensorTM Fugtighedssensor med fjernbetjening
3. Sokkel til Remote Sensor
4. Batterirum til Remote SensorTM (AAA)
5. Placering af fugtighedssensor
6. Vandtank med bærehåndtag
7. Låg til vandtank med antikalkpatron
8. Antikalkpatron
9. Vandbasin
10. Tænd/sluk-knap
11. Knap til valg af ønsket fugtighed (hygrostat: 30 – 75 % og kontinuerlig
drift “CO“)
12. Knap til valg af befugtningsniveau 1 – 5
13. Knap til varm-tilstand (vandforvarmning)
14. Knap til automatisk tilstand
15. Display med symbol for aktuel og ønsket (blinker) fugtighed
16. Vandsstandsviser
17. Varmeplade til vandforvarmning
18. Silikonedække til varmeplade
19. Ultralydmembran
20. Duftbeholder
21. Knap til nattilstand (LED’er normale, nedtonede eller slukkede) og rens ning-tilstand (tryk i mindst 5 sekunder)
22. Symbol for forbindelsesfejl mellem Remote SensorTM og luftfugteren
23. Dampkammer
24. Silver CubeTM
25. Rengøringsbørste
26. Luftindløb (Advarsel: der må ikke komme vand ind i denne åbning!)
27. Dam p udlø b
TM
Vigtige sikkerhedsinstruktioner
Læs brugsvejledningen, før De bruger apparatet første gang og gem vejledningen; hvis nødvendigt skal den også gemmes til næste ejer.
• Stadler Forms distributør dækker ikke skader, der er opstået som følge af
misligholdelse eller forkert brug af apparatet.
• Apparatet må kun bruges i hjemmet med det formål, der er beskrevet i
vejledningen. Ukorrekt brug samt udførelse af tekniske ændringer på apparatet kann være farligt for liv og helbred.
• Dette apparat kan anvendes af børn fra 8 år og opefter og af personer
med nedsatte fysiske, sanse- eller psykiske evner eller med manglende
erfaring og kendskab, hvis de har været under opsyn og har modtaget
undervisning i, hvordan apparatet kan bruges på sikker måde, og hvis de
Page 56

har forstået, hvilke eventuelle farer der kan være. Børn må ikke lege med
apparatet. Rengøring og vedligeholdelse må ikke udføres af børn uden
opsyn.
• Tilslut kun kablet til vekselstrøm. Læg mærke til apparatets spændingsangivelser.
• Benyt ikke en beskadiget forlængerledning.
• Træk ikke kablet over skarpe kanter og lad det ikke komme i klemme.
• Træk aldrig stikket ud ved at holde i kablet og træk aldrig stikket ud af
stikkontakten med våde hænder.
• Benyt ikke denne apparatet i umiddelbar nærhed af badekar, brusebad
eller badebassin (overhold mindsteafstanden på 3 m). Stil apparatet således at det ikke kan berøres fra et badekar.
• Stil ikke apparatet i nærheden af en varmekilde. Netkablet bør ikke udsættes for direkte varmepåvirkning (fra f.eks. komfurplade, åben ild,
varmt strygejern eller varmeovn). Beskyt netkablet mod olie.
• Ikke kan snuble over netkablet.
• Apparatet tåler ikke vandsprøjt.
• Kun til indendørs brug.
• Opbevar ikke apparatet udendørs.
• Apparatet bør opbevares på et tørt og for børn utilgængeligt sted (pakkes
sammen).
• Hvis strømforsyningskablet er beskadiget, skal det udskiftes af producenten eller hos en reparatør, der er autoriseret af producenten, eller af en
lignende kvalificeret tekniker for at undgå skade.
• Før vedligeholdelse, rengøring og efter hver brug skal apparatet slukkes
og stikket trækkes ud af stikkontakten.
• Apparatet skal være slukket i mindst 15 minutter før indvendig rengøring.
• Når forvarmningen er aktiveret, opvarmes vandet inde i enheden: vandet i
vandbasinet (9) og varmepladen (17) bliver varmt. Undgå berøring af vand
og varmepladen!
• Opbevar apparatet utilgængeligt for børn, da vandet inde i apparatet opvarmes til 50 °C, og varmepladen når op på 75 °C.
Før ibrugtagning: Antikalkpatron og vandets hårdhed
Antikalkpatronen reducerer kalkaflejringer i vandet og den uønskede dannelse af kalkpartikler i omgivelserne. Effektiv i en til tre måneder, afhængig
af vandets hårdhedsgrad (se tabellen).
Vigtigt: Læg antikalkpatronen i vandbad i 24 timer før dens første brug (ikke
i vandtanken!). Kunstharpiksen er nødt til at absorbere vand for at kunne
yde sit bedste.
Levetiden for patronen afhænger af vandets hårdhed. Med den medfølgende teststribe kan hårdheden testes (strip fastgjort til Quick Setup Guide).
1. Dyp teststriben i vandet i 1 sekund
2. Efter ca. et minut er resultatet synligt på teststriben. Nogle af de grønne
felter vil skifte farve til rosa. Vandets hårdhed vises ud fra antallet af
rosafarvede felter. Eksempel: Ved tre rosafarvede felter har vandet en
hårhedsgrad > 14 °dH.
Page 57

Rosa
felter
0/1 Blødt
2 Middelhårdt
3 Mere hårdt
4 Meget hårdt
Vandets
hårhed
Hårdhedsgrad (°dH)
°dH
Fra 4
Fra 7
°dH
Fra 14
°dH
Fra 21
°dH
Patronen rækker antal
(ved 4 liter/dag)
Dage Liter
90 dage ca. 36 0 L
45 dage ca. 180 L
30 dage ca. 120 L
15 dage ca. 60 L
Hvis vandets hårdhed er over 21 °dH, kan vi ikke anbefale brug af en ultralydsluftfugter. Vi anbefaler dig at benytte en luftfugter, som er baseret
på et fordampningsprincip (f.eks. Oskar Fordamper fra Stadler Form: www.
stadlerform.com/Oskar).
Bemærk: Hvis du betjener Eva uden brug af afkalket vand fra en afkalkningsordning, der fungerer ifølge princippet om ionbytning (salt tilsættes
vandet), kan det salt, vandet indeholder, udfælde rundt om apparatet som
hvidt støv. Eva kan dog betjenes med vand fra et grundvandsspejlet filtersystem (f.eks. Brita). Hvis du er i tvivl om kvaliteten eller sammensætning af
vandet, kontakt da din vicevært eller din drikkevandsleverandør.
Ibrugtagning / betjening
1. Placer Eva på det ønskede sted på en flad overflade. Tågen når en højde
på op til 1,4 m på det højeste befugtningsniveau (Niveau 5, varm-tilstand
tændt). Dette gør det muligt at placere Eva direkte på gulvet. Tilslut
strømkablet (1) til en egnet stikkontakt.
2. Tag Remote SensorTM (2), soklen (3) og de to batterier ud af emballagen.
Åbn batterirummet (4) på undersiden af Remote SensorTM (2) ved at dreje
låget mod uret. Sæt to batterier i batterirummet (4) som vist på side 4,
og luk låget. Anbring Remote SensorTM (2) på soklen (3).
3. Remote SensorTM (2) er på den ene side en fugtighedssensor og garanterer ved sin eksterne placering præcis befugtning. På den anden side
fungerer Remote SensorTM (2) også som en fjernbetjening. Placer fugtighedssensoren Remote SensorTM (2) i midten af rummet på et bord eller
en kommode med en optimal afstand fra Eva på mellem 3 og 5 m. Remote
SensorTM skal placeres centralt i rummet, således at luften i rummet kan
strømme forbi sensoren (5) så frit som muligt. Hvis det ikke er muligt,
anbefaler vi at placere Remote SensorTM med en afstand på minimum
30 cm fra væggen og 2 m fra vinduer og ventilationsåbninger.
4. Fjern vandtanken (6) ved at holde den ved håndtaget og trække den op.
Skru vandtankens låg (7) af, og fyld vandtanken med rent, koldt postevand op til den maksimale grænse. Sørg for at lægge antikalkpatronen
(8) i vand i 24 timer inden anvendelse (se “Før ibrugtagning“). Skru til
sidst låget (7) på vandtanken (6). Placer tanken (6) i enheden. Vandbassinet (9) vil nu langsomt fyldes fra vandtanken. Vigtigt: fly t ikke apparatet,
når det fyldes med vand. Vandet kan sprøjte på elektronikken.
5. Tænd Eva ved at trykke på tænd/sluk-knappen (10). Den aktuelle fugtighed vises i % på displayet (15). Hvis vandsandsviseren (16) lyser rødt,
er der for lidt vand i enheden. Fugtighedsniveauet er forudindstillet til
niveau 2 og den ønskede luftfugtighed på 45 %.
Page 58

6. Aktiver Remote SensorTM (2) ved at trykke på knappen “Hygrostat” (11a).
Fugtighedssensoren sender automatisk information om den målte relative fugtighed mange gange i minuttet til enheden, der viser den på
displayet (15). Målinger kan også aktiveres ved at trykke på en tilfældig
knap på Remote SensorTM (2) (undtagen tænd/sluk-knappen (10)).
7. Den ønskede fugtighed kan ændres ved at trykke på knappen “Hygrostat” (11) flere gange (35 – 75 % og kontinuerlig drift “CO”). Symbolet på
displayet (15) blinker under input. Efter få sekunder uden input gemmes
den valgte værdi. Symbolet ændres til den aktuelt målte fugtighed.
8. Befugtningens ydeevne kan ændres ved at trykke på knappen “Output”
(12) flere gange (niveau 1 – 5). Niveauet vises med vandrette bjælker
(f.eks. 1 bjælke = niveau 1).
9. Ved tryk på knappen “Warm” (13) tændes varm-tilstanden og vandopvarmningen. Nu lyser LED‘en på “Warm”-knappen på enheden. Varmepladen (17) opvarmer vandet, før den er drejet til tåge af den ultrasoniske membran (19). Varm-tilstanden giver en behagelig tåge og bedre
befugtning.
10. Ved tryk på knappen “Auto” (14) aktiveres automatisk tilstand og med
denne Adaptive HumidityTM-teknologien. Nu lyser LED‘en på “Auto”knappen på enheden. I automatisk tilstand tilpasser enheden befugtningsniveauet automatisk for at nå og opretholde den ønskede fugtighed
på 45 % på en stille og energieffektiv måde. Jo lavere den aktuelle fugtighed er, desto højere befugtningsniveau indstilles automatisk (under
33 % = niveau 4, fra 34 % til 37 % = niveau 3, fra 38 % til 41 % = niveau
2, fra 42 % til 45 % = niveau 1). Du kan ændre den ønskede fugtighed i
automatisk tilstand ved at trykke flere gange på knappen “Hygrostat”
(11), mens automatisk tilstand er aktiv (LED‘en på knappen “Auto” på
enheden er tændt). Fugtighedsniveauet (12) kan ikke ændres manuelt i
automatisk tilstand. Så snart der trykkes på k nappen “Output” (12) for at
ændre fugtighedsniveauet, deaktiveres automatisk tilstand.
11. Du kan bruge Eva til at sprede dufte i rummet. Vær ekstremt sparsom
med dufte, da en for stor dosis kan resultere i funktionsfejl og skader
på apparatet. For at kunne bruge dufte skal du trykke kort på duftbeholderen (20) og trække den ud af apparatet. Lad duften dryppe direkte
på vatrondellen i duftbeholderen. Tilføj maksim alt 1 – 2 dr åber duft til
duftbeholderen! Luk beholderen igen, og tryk og slip den for at låse den.
Tip: For at ændre duften skal du fjerne vatrondellen og rengøre beholderen med sæbe. Nu kan du indsætte en ny vatrondel (fås i handelen) og
tilsætte dråber af den ønskede duft.
12. Hvis vandtsandsviseren (16) skifter til rødt, skal vandet genopfyldes.
Fjern vandtanken (6), og fyld den med rent, koldt postevand op til den
maksimale grænse. Efter udskiftning af vandtanken genoptager apparatet driften automatisk efter et par sekunder. Vandtanken kan også
genfyldes under drift.
13. Hvis De føler Dem generet af lyssty rken af den lille lampe (for eksempel i
soveværelset), kan lysintensiteten nedsættes ved at tr ykke på tasten til
nat-funktion (21). Du kan vælge mellem tre forskellige modi:
• Normal modus (tændes som standard)
• Dæmpet modus (tryk en gang)
• Lysslukket modus (tryk to gange)
• Ved endnu en gang at trykke på dæmpe-kontakten kan du skifte om
til normal modus.
Page 59

Hvis der ikke er vand i apparatet, lyser den røse vandstandsviser (16) i
alle tilstande. Det røde lys kan ikke dæmpes.
14. Hvis der vises to prikker (22) på displayet (15), kan Eva ikke oprette en
trådløs forbindelse med Remote SensorTM (2). Eva fungerer stadig takket
være en fugtighedssensor inde i enheden. Tryk på en vilkårlig knap på
Remote SensorTM (2) for at aktivere. Sørg for, at Remote SensorTM (2) er
inden for en radius på 10 m fra Eva. Vægge, døre og gulve mellem Eva
og Remote SensorTM (2) kan forstyrre den trådløse forbindelse. Remote
SensorTM (2) bør være optimalt placeret i en afstand på mellem 3 og 5 m
fra Eva og på en hævet flade i midten af rummet (se «Ibrugtagning / betjening» Nr. 3). De to prikker på displayet (22) kan angive, at batterierne i
Remote SensorTM (2) skal udskiftes (se «Ibrugtagning / betjening» Nr. 2).
Bemærk: Hvis du ser dråber (eller andre tegn på fugt) på eller omkring enheden, er dette kondensvand fra luftfugteren. Det betyder, at luften ikke
længere kan absorbere fugt fra befugteren. Aktiver automatisk tilstand med
en ønsket fugtighed på 45 %. Vanddråberne bør derefter forsvinde.
Rengøring
Før vedligeholdelse, rengøring og efter hver brug skal apparatet slukkes og
ledningen (1) trækkes ud af stikkontakten.
Advarsel: Nedsænk aldrig apparatet i vand (fare for kortslutning). Når forvarmning er tændt (varme-tilstandens LED er tændt (13)), opvarmes vandet
inde i apparatet: vandet i vandbassinet (9) og varmepladen (17) bliver varmt.
Undgå berøring af vand og varmepladen!
• For ydre rengøring tørres apparatet af med en fugtig klud og tørres herefter godt.
• K ør rengø ringstils tand minds t en gang om mån eden. Apparatet skal
være slukket i mindst 15 minutter før indvendig rengøring! Fjern derefter
vandtanken (6), dampkammeret (23), silikonedækslet (18), Silver Cube (24)
og duftbeholderen (20). Fyld en kop med 200 ml postevand blandet med
afkalkningsmiddel (blanding ifølge producentens anvisninger). Hæld væsken forsigtigt ind i vandbassinet (9) ved at holde koppen direkte over
vandbassinet (som vist på side 5). Hæld ikke væsken in d i vandbassinet fra
højt over bassinet! Sørg for, at der ikke kommer væske ind i luftindløbet
(26). Dette vil beskadige apparatet og ugyldiggøre alle garantikrav.
• For at starte rengøringen skal netkablet være tilsluttet en stikkontakt.
Tryk på og hold nattilstandsknappen (21) på undersiden af højre hjørne i
5 sekunder for at aktivere rengøringstilstanden. Nu blinker vandstandsviseren (16) på apparatet rødt. Rengøringstilstanden kører i omkring 5
minutter og slukker bagefter automatisk (vandstand-symbolet holder op
med at blinke).
• Kontroller vandbassinet (9) for at se, om kalken på ultralyd-membranen
(19) og varmepladen (17) er opløst. OBS: vandet og varmepladen er varme,
fare for skoldning!
• Hvis der er kalkrester tilbage, kan ultralydmembranen (19) og varmepladen (17) renses ved hjælp af rengøringsbørsten (25) (for- og bagside). Forsøg ikke at skrabe det af med en hård genstand.
• For genstridig kalk anbefaler vi afkalkning af apparatet ved at køre rengøringstilstand (21) flere gange i træk. Lad afkalkningsmidlet være i
vandbassinet i højst 20 minutter, og hæld det ud bagefter som beskrevet
nedenfor.
Page 60

• Vigtigt: Hæld afkalkningsmidlet ud over forreste venstre hjørne af ap-
paratet (se pilen på apparatet). Der må ikke komme vand ind i luftindløbet (26). Dette vil beskadige apparatet og ugyldiggøre ethvert krav til
garantien.
• For at skylle fyldes koppen med 200 ml postevand, som hældes omhyggeligt ind i vandbassinet (9) ved at holde koppen direkte over vandbassinet (som vist på side 5). Hæld ikke væsken ind i vandbassinet fra højt
over bassinet! Hæld vandet ud over forreste venstre hjørne af apparatet.
Gentag processen, indtil der ikke er mere afkalkningsmiddel i vandbassinet (9). Sæt Silver Cube (24), silikonedækslet (18), dampkammeret (23)
og vandtanken (6) tilbage i apparatet. Hvis vandtanken ikke sidder rigtigt,
skal du kontrollere, om den øvre del af dampkammeret (23) er monteret
korrekt.
• Rengør vandtanken (6) grundigt hver anden uge med en blød børste eller
svamp og varmt vand. Brug fortyndet afkalkningsmiddel (blanding ifølge
producentens anvisninger) for kalkaflejringer. Skyl vandtanken grundigt
efter med rent koldt postevand .
Udskiftning af antikalkpatron
• Se de anbefalede udskiftningsintervaller i tabellen (se «Før ibrugtagning»).
• Tip: Patronens (7) funk tion kan efter prøves med en enkel test: Hold et lille
spejl op mod dampen (27) i et par sekunder. Hvis der herefter forekommer
hvidt (kalk-)bundfald, skal patronen udskiftes.
• Antikalkpatronen er placeret på indersiden af vantankens låg (8). Skru
først låg til vandtank (6) af vandtanken og skru herefter patronen af fra
låget (7). Du kan bor tskaffe patronen i det almindelige husholdningsaffald
(8). Læg antikalkpatronen i vandbad i 24 timer før dens første brug (ikke
i vandtanken!). Kunstharpiksen er nødt til at absorbere vand for at kunne
yde sit bedste.
• Hold fast i låget (7), når du udskifter patronen!
Sølvterning – Silver Cube ™
Sølvterningen (24) forhindrer løbende frigivelse af sølvioner fra kim- og
bakterievækster i luftfugteren. Brugen af sølvterningen giver et hygiejnisk
indeklima. Levetiden for sølvterningen er et år. Vi anbefaler derfor, at du udskifter sølvterningen ved abegyndelsen på hver fugtsæson. Den sølvterning
virker, så snart den kommer i kontakt med vand i apparatet, og også hvis
apparatet er slukket.
Reparation
• Reparationer af elektriske apparater må kun udføres af en kvalificeret,
elektrisk tekniker. Udføres der upassende reparationer bortfalder garantien og ethvert ansvar fra producentens side.
• Brug aldrig apparatet, hvis et kabel eller stik er beskadiget, efter der har
været driftsfejl, hvis det har været udsat for tab, eller der er synlige tegn
på skade.
• Indfør ikke nogen former for genstande i apparatet.
• Hvis apparatet ikke kan reparere s skal det gøres ubr ugeligt (klip ledningen
af) og aflever det på en genbrugsstation.
Page 61

Bortskaffelse
EU-direktiv 2012 / 19 / CE om WEEE kræver, at brugte elektriske husholdningsapparater ikke bortskaffes sammen med almindeligt affald. Brugte
apparater skal indsamles separat for optimal genbrug og genanvendelse
af apparatets elementer og reduktion af miljøpåvirkning og helbredsrisici.
Symbolet med skraldespanden med et kryds over på produktet er
en påmindelse til dig om din forplig telse til at bortskaffe apparatet
separat. Du bør kontakte de lokale myndigheder eller forhandleren
for at få oplysninger om korrekt bortskafning af brugte apparater.
Specifikationer
Mærkespænding 220 – 240 V / 50 Hz
Mærkeeffekt 10 – 95 W
Befugtning på op til 550 g/h
Mål 196 x 418 x 196 mm
(bredde x højde x dybde)
Vægt 3.0 kg
Vandtankens
kapaci tet 6.3 Liter
Støjniveau 26 – 34 dB(A)
I overensstemmelse
med EU godkendelse CE / WEEE / RoHS
Der tages forbehold for tekniske ændringer
Page 62

Suomi
Onneksi olkoon! Olet juuri hankkinut loistavan EVA ilmankostuttimen. Laite
tarjoaa nautinnollisempaa oloa parantaen huoneen ilmanlaatua.
Kuten kaikkien kotitalouden sähkölaitteiden kanssa, myös tämän mallin
kanssa tulee noudattaa erityistä huolellisuutta, jotta laite välttyy vahingoilta tai palovaurioilta. Lue nämä käyttöohjeet ensin huolellisesti ennen
laitteen ensimmäistä käyttöä ja noudata laitteen turvaohjeita.
Laitteen kuvaus
Laite koostuu seuraavista osista:
1. Virtajohto
2. Remote SensorTM -kosteusanturi ja kaukosäädin
3. Remote SensorTM -anturin teline
4. Remote SensorTM -anturin paristolokero (tyyppi A AA)
5. Kosteusanturin sijainti
6. Vesitankki kantokahvalla
7. Vesitankin kansi kalkinpoistopatruunalla
8. Kalkinpoistopatruuna
9. Ilmanpesimen vesisäiliö
10. Päälle-/Pois-kytkin
11. Kosteustason valintapainike (hygrostaatti: 30 – 75 % ja jatkuvan toimin nan ”CO”)
12. Kytkin kostutuksen tehotason 1–5 valintaan
13. Lämmitystilan painike (veden esilämmitys)
14. Automaattisen toiminnon kytkin
15. Näyttö, jossa näkyy nykyinen ja haluttu (vilkkuu) kosteus
16. Veden tason ilmaisin
17. Veden esilämmityksen kuumennuslevy
18. Kuumennuslevyn silikonisuojus
19. Ultraäänikalvo
20. Hajustesäiliö
21. Yötilapainike (merkkivalo normaali, himmennetty tai sammutettu) ja
puhdistustila (paina vähintään 5 sekunnin ajan)
22. Remote SensorTM -anturin ja ilmankostuttimen välisen yhteyskatkon
symboli
23. Sumusäiliö
24. Silver CubeTM
25. Puhdistusharja
26. Ilmanottoaukko (huomio: tähän aukkoon ei saa päästä vettä!)
27. Su m u t in a ukko
Tärkeitä turvallisuusohjeita
Lue käyttöohjeet huolellisesti ennen ensimmäistä käyttökertaa ja säilytä
ohjeet myöhempää tarvetta varten. Toimita ohjeet tarvittaessa myös seuraavalle omistajalle.
• Stadler Form ei ole missään tapauksessa vastuussa vaurioista tai menetyksistä, jotka johtuvat näiden ohjeiden noudattamatta jättämisestä.
• Laite on tarkoitettu ainoastaan kotitalouskäyttöön näiden ohjeiden mukaisella tavalla. Laitteen vääränlainen käyttö ja muokkaaminen voi johtaa
hengenvaarallisiin tilanteisiin.
• Vähintään 8 vuotta täyttäneet lapset ja sellaiset henkilöt, joiden fyysiset,
sensoriset tai henkiset kyvyt eivät ole tähän riittäviä tai joilla ei ole lait-
Page 63

teen tuntemusta tai kokemusta sen käy töstä, saavat käyttää tätä laitet ta
ainoastaan silloin, kun heidän turvallisuudestaan vastaava henkilö valvoo
heitä. Lasten ei tule leikkiä laitteen kanssa. Lapset eivät saa puhdistaa tai
huoltaa laitetta ilman valvontaa.
• Liitä virtajohto vain vaihtovirtaverkkoon. Tarkista laitteen käyttöjännite.
• Älä käytä vaurioitunutta jatkojohtoa.
• Älä altista virtajohtoa teräville reunoille ja varmista, ettei se jää puristuksiin.
• Älä irrota pistoketta pistorasiasta märillä käsillä tai vetämällä virtajohdosta.
• Älä koskaan käytä tuoksutinta kylpyammeen, suihkun tai uima-altaan
välittömässä läheisyydessä (säilytä 3 metrin vähimmäisetäisyys). Sijoita
laite niin, ettei kukaan voi koskettaa sitä kylpyammeesta käsin.
• Älä sijoita laitetta lämmönlähteen läheisyyteen. Älä altista virtajohtoa
suoralle lämmölle (kuten liesi, avoliekit, kuumat metallinkappaleet tai
lämmittimet, jne.). Älä altista virtajohtoa öljylle.
• Varmista, et tä laite on sijoitettu tukevalle, tasaiselle pinnalle käytön aikana ja varmista, ettei virtajohto aiheuta kompastumisvaaraa.
• Laite ei ole roiskeenkestävä.
• Vain sisäkäyttöön.
• Älä säilytä laitetta ulkona.
• Säilytä laitetta kuivassa paikassa lasten ulottumattomissa (alkuperäispakkauksessa).
• Jos virtajohto on vaurioitunut, valmistajan, valtuutetun huoltoliikkeen tai
vastaavan ammattitaitoisen henkilön on vaihdettava se vahinkojen välttämiseksi.
• Huoltaaksesi tai puhdistaaksesi laitteen sekä jokaisen käyttökerran jälkeen, käännä laitteen virta pois päältä ja irrota virtajohto pistorasiasta.
• Varmista ennen laitteen sisäpuolen puhdistamist a, että laite on ollut sammutettuna vähintään 15 minuuttia!
• Kun esilämmitys on kytketty päälle, laitteen sisällä oleva vesi kuumenee:
ilmanpesimen vesisäiliöss ä (9) oleva vesi ja kuumennuslevy (17) kuumenevat. Vältä koskemasta veteen ja kuumennuslevyyn!
• Sijoita laite lasten ulottumattomiin, sillä laitteen sisällä oleva vesi kuumenee 50 °C:n lämpötilaan ja kuumennuslevy saavuttaa jopa 75 °C:n
lämpötilan.
Ennen käyttöönottoa: Kalkinpoistopatruuna ja veden kovuus
Kalkinpoistopatruuna vähentää kalkkisaostumia vedestä sekä epätoivot tuja
kalkkihiukkaspäästöjä ympäristöön. Teho säilyy yhdestä kolmeen kuukauteen riippuen veden kovuudesta (katso taulukko).
Tärkeää: Liota kalkinpoistopatruunaa vesihauteessa 24 tuntia ennen ensimmäistä käyttökertaa (ei vesisäiliössä!). Kumin täytyy imeä vettä saavuttaakseen hyvän suorituskyvyn.
Suodatinpatruunan käyttöikä riippuu veden kovuudesta. Veden kovuus
voidaan testata toimitettujen testiliuskojen avulla (koeliuska on kiinnitetty
Quick Setup Guide).
1. Kasta testiliuskat veteen sekunnin ajaksi.
2. Tulokset näkyvät liuskoilla noin minuutin kuluttua. Jotkin vihreistä ruuduista muuttuvat vaaleanpunaisiksi. Vaaleanpunaisten ruutujen määrä
Page 64

ilmaisee veden kovuuden. Esimerkki: Jos näet kolme vaaleanpunaista
ruutua, veden kovuus on > 14 °dHsta.
Ruusunvärisiä
kaistoja
0/1 Pehmeä
2 Puolikova
3 Vähän ovempi
4 Hyvin kova
Veden kovuus Kovuusaste
(°dH)
°dHsta
4
lähtien
°dHsta
7
lähtien
°dHsta
14
lähtien
°dHsta
21
lähtien
Kartussi riittää
(4 litraa / päivä)
Päivää Litraa
90 päivää ca. 360 L
45 päivää ca. 180 L
30 päivää ca. 120 L
15 päivää ca. 60 L
Jos veden kovuus lähestyy tasoa 21 °dH, ultraääni-ilmankostuttimen käyttöä ei suositella. Suosittelemme, että käytät tässä tapauksessa tuulettimella varustettua kostutinta (esim. Stadler Formin Oskar-kostutinta: www.
stadlerform.com/Oskar).
Huomio: Jos käytät Evaa vedellä, josta ei ole poistettu kalkkia ioninvaihtoon perustuv alla kalkinpoistojärjes telmällä (veteen lisätään suolaa), vedessä oleva suola voi saostua laitteen ympärille valkoiseksi pölyksi. Eva ilmakostutinta voidaan kuitenkin käyttää juomavesisuodattimen kautta (esim.
Brita). Jos et ole varma paikallisen veden laadusta tai koostumuksesta, ota
yhteyttä paikalliseen vesihuoltoon.
Käyttöönotto / käyttö
1. Aseta Eva haluamaasi paikkaan tasaiselle alustalle. Tehokkaan kostutuksen ansiosta (tehotaso 5, lämmitystila käytössä) sumu yltää jopa 1,4
metrin korkeudelle. Se mahdollistaa E van sijoittamisen suoraan lat tialle.
Liitä virtajohto (1) soveltuvaan pistorasiaan.
2. Ota Remote SensorTM (2), teline (3) ja kaksi paristoa ulos pakkauksesta.
Avaa paristolokero (4), joka on Remote SensorTM -anturin pohjassa (2),
kiertämällä kantta vastapäivään. Asenna kaksi paristoa paristolokeroon
(4) kuten sivulla 4 olevassa kuvassa, ja sulje kansi. Aseta sitten Remote
SensorTM (2) telineeseen (3).
3. Remote SensorTM (2) on kosteusanturi, jonka sijainti takaa täsmällisen
kostutuksen. Tämän lisäksi Remote SensorTM (2) toimii myös kaukosäätimenä. Sijoita Remote SensorTM -kosteusanturi (2) huoneen keskellä
olevalle pöydälle tai sivupöydälle optimaaliselle etäisyydelle 3 – 5 metrin päähän Evasta. Remote SensorTM -anturi tulee sijoittaa huoneen
keskialueelle niin, että huoneessa oleva ilma voi kulkea anturin ohi (5)
mahdollisimman vapaasti. Jos tämä ei ole mahdollista, suosittelemme
Remote SensorTM -anturin sijoittamista vähintään 30 cm:n etäisyydelle
seinästä ja vähintään 2 metrin etäisyydelle ikkunoista ja ilmastointiaukoista.
4. Irrota vesitankki (6) tarttumalla kahvaan ja vetämällä ylöspäin. Kierrä
irti vesitankin kansi (7) ja täytä vesitankki puhtaalla, kylmällä vesijoh-
Page 65

tovedellä maksimimerkintään saakka. Kalkinpoistopatruunaa (8) tulee
liottaa vedessä 24 tunnin ajan tätä ennen (ks. “Ennen käyttöönottoa“).
Kierrä lopuksi kansi (7) takaisin kiinni vesitankkiin (6). Asenna vesitankki
(6) sitten laitteeseen. Ilmanpesimen vesisäiliö (9) täyttyy hitaasti vesitankissa olevalla vedellä. Tärkeää: älä siirrä laitetta sen ollessa täynnä
vettä. Muutoin vettä voi joutua sähköosiin.
5. Käynnistä Eva painamalla Päälle-/Pois-kytkintä (10). Suhteellinen ilmankosteus näky y prosenttiarvona näytöllä (15). Jos veden tas on ilmaisimen
valo (16) on punainen, laitteessa on liian vähän vettä. Kostutuksen tehotaso on esimääritetty tasolle 2 ja haluttu ilmankosteuden taso on 45 %.
6. Aktivoi Remote SensorTM -anturi (2) painamalla “Hygrostat”-painiketta
(11a). Kosteusanturi lähettää automaattisesti tietoa mitatusta suhteellisesta ilmankosteudesta useita kertoja minuutissa laitteelle, joka
näyttää arvot näytöllä (15). Mittauksen voi aktivoida myös painamalla
mitä tahansa Remote SensorTM -anturin (2) painiketta (lukuun ottamatta
Päälle-/Pois-kytkintä (10)).
7. Halutun ilmankosteuden voi muuttaa painamalla “Hygrostat”-painiketta
(11) useita kertoja (35 – 75 % ja jatkuvan toiminnan “CO”). Näytöllä (15)
näkyvä symboli vilkkuu asetuksia säädettäessä. Valittu arvo tallentuu,
jollei muita säätöjä tehdä muutamaan sekuntiin. Symboli vaihtuu senhetkiseksi mitatuksi ilmankosteuden arvoksi.
8. Kostutustehoa voi muuttaa painamalla “Output”-kytkintä (12) toistuvasti (tasot 1 – 5). Taso ilmoitetaan näytöllä (15) vaakapalkkeina (esim.
1 palkki = taso 1).
9. Lämmitystila ja samalla veden esilämmitys käynnistetään painamalla
“Warm”-painiketta (13). Nyt laitteen “Warm”-painikkeen merkkivalo
palaa. Kuumennuslevy (17) lämmittää veden ennen kuin ultraäänikalvo
(19) muuntaa sen sumuksi. Lämmitystila luo miellyttävän lämmintä sumua ja lisää kostutustehoa.
10. Painamalla “Auto”-kytkintä (14) aktivoidaan automaattinen toiminto ja
Adaptive HumidityTM -teknologia. Laitteen “Auto”-kytkimen merkkivalo
palaa. Automaattitilassa laite mukauttaa automaattisesti kostutuksen
tehotasoa halutun 45 %:n kosteustason saavuttamiseksi ja ylläpitämiseksi hiljaa ja energiatehokkaasti. Mitä alhaisempi nykyinen ilmankosteus on, sitä korkeammaksi kostutuksen tehotaso automaattisesti säädetään (alle 33 % = taso 4, 34 % – 37 % = taso 3, 38 % – 41 % = taso 2,
42 % – 45 % = taso 1). Voit muut taa haluttua ilmankosteutta automaat titilassa painamalla “Hygrostat”-painiketta (11) toistuvasti automaattisen
toiminnon ollessa aktivoituna (“Auto”-kytkimen merkkivalo palaa). Kostutuksen tehotasoa (12) ei voi muuttaa manuaalisesti automaattitilassa.
Kun “Output”-kytkintä (12) painetaan kostutuksen tehotason muuttamiseksi, automaattinen toiminto kytkeytyy pois päältä.
11. Voit käyttää Evaa myös huoneen hajustamiseen. Hajusteita on käytettävä erittäin säästeliäästi, sillä liian runsas annostelu saattaa aiheuttaa
laitteen virheellisen toiminnan tai vahingoittumisen. Jos haluat käyttää
hajusteita, vapauta hajustesäiliö (20) painamalla sitä lyhyesti ja vetämällä se ulos laitteesta. Tiputa hajustetta suoraan hajustesäiliön (20)
vanutyynylle. Lisää en intään 1 – 2 ti ppaa hajustetta hajustesäiliöön!
Paina säiliö takaisin paikoilleen ja lukitse se painamalla ja vapauttamalla. Vinkki: Jos haluat vaihtaa hajusteen, poista vanutyyny ja puhdista
säiliö saippualla. Aseta tilalle uusi vanutyyny (ostettavissa) ja lisää haluttua hajustetta.
Page 66

12. Jos veden tason ilmaisin (16) muuttuu punaiseksi, vettä tulee lisätä. Irrota vesitankki (6) ja täy tä se puhtaalla, k ylmällä vesijohtove dellä maksimimerkintään asti. Kun vesitankki on kiinnitetty paikoilleen, laite jatkaa
toimintaansa automaattisesti muutaman sekunnin kuluttua. Vesitankkiin voi lisätä vettä myös käytön aikana.
13. Jos laitteen merkkivalojen kirkkaus häiritsee (esim. makuhuoneessa),
voit laskea voimakkuutta painamalla yötilapainiketta (21). Voit valita
kolmen eri tilan väliltä:
• Normaali (oletustila)
• Himmennetty (paina kerran)
• Merkkivalot pois päältä (paina kahdesti)
• Voit palata normaaliin tilaan painamalla painiketta vielä kerran.
Jos laitteessa ei ole vettä, veden tason punainen symboli (16) syttyy
kaikissa tiloissa. Punaista valoa ei voi himmentää.
14. Jos kaksi pistettä (22) ilmestyy näytölle (15), Eva ei voi muodostaa radioyhteyttä Remote SensorTM -anturiin (2). Eva toimii silti edelleen sisäisen kosteusanturinsa ansiosta. Voit aktivoida Remote SensorTM -anturin
(2) painamalla mitä tahansa anturin painiketta. Varmista, että Remote
SensorTM (2) on 10 metrin etäisyydellä Evasta. Evan ja Remote SensorTM
-anturin (2) välillä olevat seinät, ovet ja lattiat saattavat häiritä radioyhteyttä. Remote SensorTM (2) tulee sijoittaa optimaalisesti 3 – 5 metrin
etäisyydelle Evasta ja korotetulle alustalle huoneen keskelle (ks. «Käyttöönotto/käyttö», kohta 3). Näytöllä (22) näkyvät kaksi pistettä voivat
myös tarkoitt aa, että Remote SensorTM -anturin (2) paristot tulee vaihtaa
(ks. «Käyttöönotto/käyttö», kohta 2).
Huomio: Jos näet pisaroita (tai muita merkkejä kosteudesta) lait teen päällä
tai ympärillä, kostuttimesta kondensoituu vettä lait teen pinnalle. Tämä merkitsee sitä, että ilma ei pysty enää vastaanottamaan kostuttimesta tulevaa
kosteutta. Aktivoi automaattitila 45 %:n kosteudella. Vesipisaroita ei pitäisi
enää muodostua.
Puhdistaminen
Huoltaaksesi tai puhdistaaksesi laitteen sekä jokaisen käy ttökerran jälkeen,
käännä laitteen virta pois päältä ja irrota virtajohto (1) pistorasiasta.
Huomio: Älä koskaan upota laitetta veteen (oikosulun vaara). Jos esilämmitys on käytössä (esilämmityksen merkkivalo palaa (13)), laitteen sisällä
oleva vesi kuumennetaan: ilmanpesimen vesisäiliössä (9) oleva vesi ja kuumennuslevy (17) kuumenevat. Älä koske veteen tai kuumennuslevyyn!
• Puhdista ulko-osat kostealla liinalla ja kuivaa hyvin.
• Käytä puhdistustilaa vähintään kerran kuukaudessa. Laitteen tu-
lee olla sammutettuna vähintään 15 minuutin ajan ennen sisäosan puhdistamista! Irrota vesitankki (6), sumusäiliö (23), silikonisuojus (18), Silver
Cube -hopeaionikuutio (24) ja hajustesäiliö (20). Täytä kuppi 200 ml vesijohtovedellä, johon on sekoitettu kalkinpoistoainetta (sekoita valmistajan
ohjeiden mukaisesti). Kaada neste varovasti ilmanpesimen vesisäiliöön
(9) pitämällä kuppia suoraan ilmanpesimen vesisäiliön yläpuolella (ks.
sivu 5). Älä kaada nestettä ilmanpesimen vesisäiliöön korkealta! Varmista, ettei nestettä pääse ilmanottoaukkoon (26). Tämä vaurioittaa laitetta
ja mitätöi takuun.
• Ennen puhdistustilan käynnistämistä virtajohto tulee liittää pistorasiaan.
Aktivoi puhdistustila painamalla oikean kulman alapuolella olevaa yöti-
Page 67

lapainiketta (21) 5 sekunnin ajan. Veden tason symboli (16) vilkkuu nyt
punaisena. Puhdistustilan suorittamiseen kuluu noin 5 minuuttia, ja se
sammuu automaattisesti (veden tason symboli lakkaa vilkkumasta).
• Tarkista, onko ilmanpesimen säiliön (9) ultraäänikalvossa (19) ja kuumennuslevyssä (17) ollut kalkki liuennut. Huomio: vesi ja kuumennuslevy ovat
kuumia, palovammojen vaara!
• Jos kalkkijäämiä on jäljellä, ultraäänikalvo (19) ja kuumennuslevy (17) voidaan puhdistaa puhdistusharjalla (25) (etu- ja takapuoli). Älä rapsuta niitä
kovalla esineellä.
• Jos kalkki on hyvin pinttynyttä, laitteen kalkinpoisto kannattaa tehdä
suorit tamalla puhdistustila (21) useita ker toja peräkkäin. Anna kalkinpoistoaineen vaikuttaa ilmanpesimen vesisäiliössä enintään 20 minuutin ajan
ja kaada se sitten pois kuten kuvattu seuraavassa.
• Tärkeää: Kaada kalkinpoistoaine pois laitteen vasemmasta etukulmasta
(ks. laitteeseen merkitty nuoli). Ilmanottoaukkoon (26) ei saa päästää vettä. Tämä vaurioittaa laitetta ja mitätöi takuun.
• Täytä kuppi 200 ml vesijohtovedellä ja huuhtele kaatamalle neste varovasti ilmanpesimen vesisäiliöön (9) pitämällä kuppia suoraan ilmanpesimen vesisäiliön yläpuolella (ks. sivu 5). Älä kaada nestettä vesisäiliöön
korkealta sen yläpuolelta! Kaada vesi ulos laitteen vasemmasta etukulmasta. Toista, kunnes ilmanpesimen vesisäiliössä (9) ei enää ole kalkinpoistoainetta. Asenna Silver Cube -hopeaionikuutio (24), silikonisuojus
(18), sumusäiliö (23), vesitankki (6) ja hajustesäiliö (20) takaisin laitteeseen. Jos vesitankki ei ole oikein paikoillaan, tarkista, onko sumusäiliön
(23) yläosa kiinnitetty kunnolla.
• Puhdista vesitankki (6) huolellisesti kahden viikon välein pehmeällä harjalla tai sienellä ja lämpimällä vedellä. Käytä kalkkijäämien poistamiseen
laimennettua kalkinpoistoainetta (sekoita valmistajan ohjeiden mukaan).
Huuhtele vesitankki lopuksi huolellisesti puhtaalla, kylmällä vesijohtovedellä.
Kalkinpoistopatruunan vaihtaminen
• Löydät suositellut vaihtovälit taulukosta (katso «Ennen käyttöönottoa»).
• Vinkki: Patruunan (8) tehokkuus voidaan todeta yksinkertaisella testillä.
Pidä pientä peiliä sumussa (27) muutaman sekunnin ajan. Jos havaitset
valkoisia jään teitä (kalsiumkar bonaatti) p eilissä, patruuna on vaihdett ava.
• Kalkinpoistopatruuna sijaitsee säiliön kannen sisäpuolella (8). Ruuvaa
ensin säiliön kansi irti vesisäiliöstä (6), ruuvaa sitten patruuna irti säiliön
kannesta (7). Hävitä patruuna talousjätteen mukana (8). Liota kalkinpoistopatruunaa vesihauteessa 24 tuntia ennen ensimmäistä käyttökertaa
(ei vesisäiliössä!). Kumin täytyy imeä vettä saavuttaakseen hyvän suorituskyvyn.
• Pidä säiliön kantta (7), kun asetat patruunan!
Hopeakuutio
Hopeakuutio (24) estää mikrobien ja bakteerien kasvun kostuttimessa vapauttamalla hopeaioneja. Hopeakuution käyttö parantaa huoneen ilman
hygieniaa. Hopeakuution käyttöikä on noin vuoden verran. Tästä syystä suo sittelemme vaihtamaan Hopeakuution aina kostutuskauden alussa syksyllä.
Hopeakuutio alkaa toimia heti, kun se joutuu kosketuksiin veden kanssa toimien myös laitteen ollessa sammutettuna.
Page 68

Korjaukset
• Sähkölaitteiden korjauksia (verkkokaapelin vaihto) saa suorittaa yksinomaan opetettu ammattihenkilökunta. Asiantuntemattomien suorittamissa korjauksissa takuu lakkaa olemasta voimassa ja kaikki vastuu
hylätään.
• Älkää koskaan käyttäkö laitetta, jos kaapeli tai pistoke ovat vahingoittuneet, jos laite toimii väärin, jos se on pudonnut maahan tai muuten vioittunut (halkeamia/murtumia suojuksessa).
• Älkää työntäkö minkäänlaisia esineitä laitteeseen.
• Jos laitett a ei voi enää korjata, tee se käy ttökelvot tomaksi välittömästi ja
vie se keräyspisteeseen (verkkokaapeli katkaistaan).
Jätehuolto
Euroopan parlamentin ja neuvoston direktiivi 2012 / 19 / CE Sähkö- ja
elektroniikkalaiteromusta (WEEE) edellyttää, ettei vanhoja kotitalouksien
sähkölaitteita saa hävittää lajittelemattoman yhdyskuntajätteen mukana.
Vanhat laitteet on kerättävä erikseen materiaalien palautuksen- ja kierrättämisen optimoimiseksi sekä terveys- ja ympäristövaikutuksien vähentämiseksi. Tuotteen yliviivattu roskakori -merkintä muistuttaa siitä, että sinun
velvollisuutesi on hävittää laite erikseen. Kuluttajia kehotetaan
ottamaan yhteyttä paikallisiin viranomaisiin tai tuotteen jälleenmyyjään saadakseen lisätietoja vanhan laitteen asianmukaisesta
hävittämisestä.
Tekniset tiedot
Nimellisjännite 220 – 240 V / 50 Hz
Teho 10 – 95 W
Kostutusteho jopa 550 g/h
Mitat 196 x 418 x 196 mm
(leveys x korkeus x syvyys)
Paino 3. 0 kg
Vesitank in t ilavuus 6.3 Litr aa
Melutaso 26 – 34 dB(A)
Noudattaa EUmääräyksiä CE / WEEE / RoHS
Oikeudet muutoksiin pidätetäänn
Page 69

Norsk
Gratulerer! Du har akkurat anskaffet deg den eksepsjonelle luftfukteren
EVA. Den vil gi deg mye nytelse og forbedre innendørsluften for deg.
Som med alle elektriske husholdningsartikler er det nødvendig å utvise særlig hensyn til bruk av denne modellen, for å unngå personskader, brann eller
produktskader. Vennligst les nøye gjennom disse driftsinstruksjonene før du
tar i bruk apparatet for første gang, og følg sikkerhetsinstruksene på selve
apparatet.
Beskrivelse av apparatet
Apparatet består av følgende hoveddeler:
1. Strømkabel for strømforsyning
2. Remote SensorTM fuktighetssensor med fjernkontroll
3. Stativ for Remote Sensor
4. Batterirom på Remote SensorTM (Type AAA)
5. Plassering av fuktighetssenseor
6. Vannbeholder med bærehåndtak
7. Vannbeholderlokk med antikalkpatron
8. Antikalkpatron
9. Vannskuff
10. Av/på-knapp
11. Knapp for valg av ønsket luftfuktighet (hygrostat: 30 – 75 % og konti nuerlig drift «CO»)
12. Knapp for valg av luftfuktighetsutgangsnivå 1 – 5
13. Knapp for varmemodus (forvarming av vann)
14. Knapp for auto-modus
15. Display med indikator for nåværende og ønsket (blinkende) fuktighet
16. Indikator for vannivå
17. Varmeplate for forvarming av vann
18. Silikondeksel for varmeplaten
19. Ultralydmembran
20. Duftbeholder
21. Knapp for nattmodus (LED-lamper normal, dimmet eller av) og rensemo dus (trykk i minst 5 sekunder)
22. Symbol for manglende forbindelse mellom Remote SensorTM og luftfuk teren
23. Tåkekammer
24. Silver CubeTM
25. Rengjøringsbørste
26. Luftinntak (OBS: Det må ikke komme noe vann inn i denne åpningen!)
27. Tåkeut t ak
TM
Viktige sikkerhetsinstrukser
Vennligst les nøye gjennom driftsinstruksjonene før du tar i bruk apparatet
for første gang, og ta vare på dem for senere referansebruk, f.eks. dersom
du gir viften videre til en ny eier.
• Stadler Form nekter alt ansvar innen tap eller skader som oppstår som en
følge av mangelfull oppfølging av disse driftsinstruksjonene.
• Apparatet er kun tiltenkt bruk i hjemme for de formål beskrevet i disse
instruksjonene. Uautorisert bruk og tekniske modifikasjoner på apparatet
kan føre til far for helse og liv.
Page 70

• Dette apparatet kan brukes av barn over 8 år og personer med reduserte
fysiske, sensoriske eller mentale evner, eller mangel på erfaring og kunnskap, dersom de er under oppsyn av noen ansvarlig for dem eller har
mottatt instruksjoner vedrørende bruk av apparatet på en trygg måte og
forstår farene involvert. Barn må ikke leke med apparatet. Rengjøring og
vedlikehold må ikke utføres av barn uten oppsyn.
• Kun koble kabelen til vekselstrøm. Noter deg spenningsinformasjonen
oppgitt på apparatet.
• Ikke bruk skjøteledninger med skader.
• Ikke dra strømkabelen over skarpe kanter og sørg for at den ikke klemmes
mellom gjenstander.
• Ik ke napp kabelen u t av stikkonta kten, og ikke f jern kabelen med v åte hender.
• Ik ke bruk dette ap paratet i umiddelb ar nærhet av badekar, dusj eller svømmebasseng (minimumsavstand på 3 m). Plasser apparatet slik at man ikke
kan nå det fra badekaret.
• Ikke plasser apparatet i nærheten av en varmekilde. Ikke utsett strømkabelen for direkte varme (som i nærheten av en kokeplate, åpen ild, varme
jernplater eller ovner, for eksempel). Beskytt strømkabelen mot oljete
væsker.
• Sørg for at apparatet er forsvarlig posisjonert for å sikre høy stabilitet
under driftsmodus, og sørg for at ingen kan snuble i strømkabelen.
• Apparatet er ikke sprutsikkert.
• Kun for innendørs bruk.
• Ikke oppbevar apparatet utendørs.
• Lagre apparatet på et tørt sted hvor barn ikke kan nå det (pakk apparatet
inn).
• Dersom strømkabelen er skadet må den erstattes av produsenten eller et
verksted som er autorisert av produsenten eller av en tilsvarende kvalifisert person for å forhindre skader.
• Før vedlikehold og rengjøring av apparatet, slå av strømmen og plugg ut
strømkabelen.
• Før du rengjør innsiden av apparatet, sørg for at apparatet har vært slått
av i minst 15 minutter!
• Når forvarmingen er slått på, varmes vannet inni apparatet opp: Vannet i
vannskuffen (9) og på varmeplaten (17) blir varmt. Unngå å berøre vannet
på varmeplaten!
• Plasser apparatet utilgjengelig for b arn, da vannet på in nsiden av apparatet
varmes opp til 50 °C, og varmeplaten kan nå temperaturer på opptil 75 °C.
Før installasjon: Antikalkpatron og vannhardhet
Antikalkpatronen reduserer kalken i vannet og det uønskede utslippet av
kalkavleiringer i omgivelsene. Effektiv for en til tre måneder, avhengig av
vannhardheten (se tabell).
Viktig: Bløtlegg antikalkpatronen i et vannbad i 24 timer før førstegangsbruk (ikke i vannbeholderen!). Harpiksen er nødt til å absorbere vann for å
nå høy ytelse.
Tidsperioden patronen er effektiv avhenger av vannhardheten. Dette kan
testes ved å bruke teststrimlene som medfølger (teststrimmel er festet til
Quick Setup Guide).
1. Dypp teststrimlene i vannet i et sekund.
Page 71

2. Etter rundt ett minutt kan resultatet sees på teststrimmelen. Noen av de
grønne b oksene endrer f arge til rosa. Vann hardheten vis es ved hvor mang e
bokser som blir rosa. Eksempel: Dersom tre bokser er rosa, er vannhardheten > 14 °dH.
Antall rosa
bokser
0/1 Mykt
2 Moderat
3 Hardt
4 Veldig hardt
Vannhardhet Hardhets-
hardt
grad
(°dH)
Fra 4
Fra 7
Fra 14
Fra 21
°dH
°dH
°dH
°dH
Patronen vil vare i
(med 4 liter/dag)
Dager Liter
90 dager ru ndt 360 L
45 dager ru ndt 180 L
30 dager ru ndt 120 L
15 dager rundt 60 L
Med en vannhardhet over 21 °dH, kan vi ikke lenger anbefale bruk av en
ultrasonisk luftfukter. Vi anbefaler at du bruker en fordampingsluftfukter
for å øke fuktigheten i huset ditt (f.eks. luftfukteren Oskar fra Stadler Form:
www.stadlerform.com/Oskar).
Note: Hvis du anvender Eva uten å bruke avkalket vann fra et vannmykningssystem som benytter seg av ionebyt te (salt tilsettes vannet), kan saltet
i vannet utfelles rundt apparatet som hvitt støv. Eva kan imidlertid brukes
med et drikkevannfiltreringssystem (f.eks. Brita). Skulle du være usikker angående kvaliteten eller sammensetningen av vannet i området ditt, ta kontakt med vaktmesteren eller leverandøren av drikkevannet.
Installasjon / drift
1. Sett Eva på ønsket sted på et flatt underlag. Tåken når en høyde på
opptil 1,4 m takket være den høytytende luftfuktingen (utgangsnivå 5,
varmemodus på). Dette gjør det mulig å plassere Eva direkte på gulvet.
Koble til strømledningen (1) til en passende stikkontakt.
2. Ta Remote SensorTM (2), stativet (3) og de to batteriene ut av emballasjen. Åpne batterirommet (4) på undersiden av Remote SensorTM (2) ved
å dreie lokket mot klokken. Sett inn de to batteriene i batterirommet (4),
slik det er vist på side 4, og lukk lokket igjen. Plasser deretter Remote
SensorTM (2) på stativet (3).
3. På den ene siden er Remote SensorTM (2) en fuktighetssensor, og garanterer nøyaktig fukting ut fra sin eksterne posisjon. På den annen side er
Remote SensorTM (2) også en fjernkontroll. Plasser fuktighetssensoren
Remote SensorTM (2) i midten av rommet på et bord eller lignende, med
en optimal avstand f ra Eva på mellom 3 og 5 meter. Remote SensorTM bør
plasseres sentralt i rommet slik at luften kan strømme forbid sensoren
(5) så fritt som mulig. Hvis det ikke lar seg gjøre, anbefaler vi at du plasserer Remote SensorTM minst 30 cm fra veggen, og minst 2 m fra vinduer
og ventilasjonsåpninger.
4. Fjern vannbeholderen (6) ved å holde i håndtaket og dra det opp. Skru
av lokket til vannbeholderen (7) og fyll vannbeholderen med rent, kaldt
springvann opp til maksimumsmerket. Bløtlegg antikalkpatronen (8) i et
vannbad i 24 timer før bruk (se «Før installasjon»). Skru til slutt på lokket
(7) på vannbeholderen (6). Plasser deret ter vannbeholderen (6) i enheten.
Page 72

Vannskuffen (9) vil sakte fylles opp fra vannbeholderen. Viktig: Ikke flytt
apparatet når det er fylt med vann. Vannet kan skade elektronikken.
5. For å slå på Eva, trykk på av/på-knappen (10). Den faktiske relative luftfuktigheten i % vises på displayet (15). Hvis vannivåindikatoren (16) lyser
rødt, er det for lite vann i enheten. Utgangsnivået på luftfuktigheten er
forhåndsinnstilt til nivå 2, og den ønskede luftfuktigheten på 45 %.
6. Aktiver Remote SensorTM (2) ved å trykke på knappen «Hygrostat» (11a).
Fuktighetssensoren sender automatisk informasjon om den målte relative luftfuktigheten flere ganger per minutt til enheten, som viser det på
displayet (15). Målingen kan også aktiveres ved å trykke på en hvilken
som helst knapp på Remote SensorTM (2) (bortsett fra av/på-knappen
(10)).
7. Ønsket luftfuktighet kan velges ved å trykke på knappen «Hygrostat»
(11) flere ganger (35 % – 75 % og kontinuerlig drift «CO»). Symbolet på
displayet (15) blinker under inntastingen. Etter noen sekunder lagres den
valgte verdien. Symbolet endrer seg til nåværende malt luftfuktighet.
8. Luftfuktighetsytelsen kan endres ved å trykke på knappen «Output» (12)
flere ganger (nivå 1–5). Nivået vises på displayet (15) med horisontale
streker (dvs. 1 strek = nivå 1).
9. Ved å trykke på knappen «Warm» (13), skrus varmemodus på, og dermed
forvarmingen av vannet. LED-lampen på knappen «Warm» på enheten er
på. Varmeplaten (17) varmer opp vannet før det gjøres om til vanndamp
av den ultrasoniske membranen (19). Varmemodus skaper en behagelig
varm tåke og øker luftfuktighetsytelsen.
10. Når du trykker på knappen «Auto» (14), aktiveres auto-modus, og dermed Adaptive HumidityTM -teknologien. LED-lampen på knappen «Auto»
på enheten er på. I auto-modus opprettholder enheten automatisk luftfuktighetsnivået ved 45 % på en stille og energieffektiv måte. Jo lavere
den faktiske luftfuktigheten er, desto høyere vil viftehastigheten automatisk settes til (dvs. under 33 % = nivå 4, fra 34 % til 37 % = nivå 3, fra
38 % til 41 % = nivå 2, fra 42 % til 45 % = nivå 1). Du kan endre ønsket
luftfuktighetsnivå i auto-modus ved å trykke på knappen «Hygrostat»
(11) flere ganger når auto-modus er aktivt (LED-lampen på knappen
«Auto» på enheten er på). Luftfuktighetsnivået (12) kan ikke endres manuelt i auto-modus. Så fort du har trykket på knappen «Output» (12) for å
endre luftfuktighetsnivået, deaktiveres auto-modus.
11. Du kan bruke Eva til å spre dufter i rommet. Det må understrekes at
dufter må brukes ekstremt sparsomt grunnet at en overdreven dose kan
resultere i funksjonsfeil og skader på apparatet. For å bruke duf ter, trykk
kort på duftbeholderen (20) og ta den ut av apparatet. La duftvæsken
dryppe direkte på bomullsdotten i duftbeholderen (20). Putt maksimalt
1 – 2 drå per med duft i duftbeholderen! Dytt duftbeholderen inn igjen
og trykk og slipp for å låse den. Tips: For å endre duft, ta ut bomullsdotten og rengjør beholderen med såpe. Nå kan du sette inn en ny bomullsdott (kommersielt tilgjengelig) og legge til dråper av ønsket duft.
12. Hvis vannivåindikatoren (16) blir rød, må apparatet fylles med mer vann.
For å gjøre dette, fjern vannbeholderen (6) og fyll med rent, kaldt springvann opp til maksimumsmer ket. Etter å ha satt på plass vannbeholderen,
vil apparatet automatisk gjenoppta drift etter et par sekunder. Vannbeholderen kan også fylles mens apparatet er i drift.
13. Dersom du synes lampene er for sterke (for eksempel i et soverom), kan
du redusere lysintensiteten ved å trykke på knappen for nattmodus (21).
Page 73

Du kan velge mellom tre ulike moduser:
• Normalmodus (standardmodus)
• Dempet modus (trykk én gang)
• Mørk modus (trykk to ganger)
• Ved å trykke på knappen én gang til går du tilbake til normalmodus.
Hvis det ikke er noe vann i apparatet, vil det røde vannivåsymbolet (16)
lyse uansett modus. Det røde lyset kan ikke dempes.
14. Hvis displayet (15) viser to prikker (22), kan ikke Eva opprette radioforbindelse med Remote SensorTM (2). Eva vil fortsatt fungere takket være
luftfuktighetssensoren i apparatet. Trykk på hvilken som helst knapp på
Remote SensorTM (2) for å aktivere den. Pass på at Remote SensorTM (2)
er mindre enn 10 m fra Eva. Vegger, dører og gulv mellom Eva og Remote
SensorTM (2) kan forstyrre radioforbindelsen. Den optimale plasseringen
for Remote SensorTM (2) er 3 – 5 m fra Eva, helst på en forhøyet overflate
i midten av rommet (se «Installasjon/drift» nr. 3). De to prikkene på displayet (22) kan også bety at batteriene i Remote SensorTM (2) må skiftes
(se «Installasjon/drift» nr. 2).
Merknad: Skulle du se dråper (eller andre tegn på fuktighet) på eller rundt
enheten, så er dette kondensert vann fra luftfukteren. Dette vil si at luften
ikke lenger kan absorbere fuktigheten fra luftfukteren. Vennligst aktiver
auto-modus med ønsket luftfuktighet på 45 %. Da bør det ikke dannes flere
vanndråper.
Rengjøring
Før vedlikehold, rengjøring og etter bruk, slå av apparatet og plugg fra
strømkabelen (1).
Obs: Aldri senk enheten i vann (fare for kortslutning). Hvis forvarming er
slått på (varmemodus-LED er på (13)), varmes vannet i apparatet: Vannet
i vannskuffen (9) og varmeplaten (17) blir varmt. Ikke berør vannet og varmeplaten!
• For å rengjøre utsiden, tørk med en fuktig klut og tørk så godt.
• Kjør rensemodus minst én gang per måned. Apparatet må være slått
av i minst 15 minutter før innvendig rengjøring! Fjern vannbeholderen (6),
tåkekammeret (23), silikondekselet (18), silver cube (24) og duftbeholderen (20). Fyll en kopp med 2 dl springvann blandet med avkalkningsmiddel
(bland i henhold til produsentens anvisninger). Hell væsken forsiktig ned
i vannskuffen (9) ved å holde koppen rett over vannskuffen (se side 5).
Ikke hell væsken fra stor høyde over skuffen! Pass på at det ikke kommer
noe væske inn i luftinntaket (26). Det vil skade apparatet, og vil gjøre
garantien ugyldig.
• For å starte rensemodus, må strømledningen være koblet til en stikkontakt. Trykk og hold nede nattmodusknappen (21) på undersiden av høyre
hjørne i 5 sekunder for å aktivere rensemodus. Vannivåsymbolet (16) på
apparatet vil nå blinke rødt. Rensemodus kjører i ca. 5 minutter, og skrus
av automatisk (vannivåsymbolet slutter å blinke).
• Kontroller vannskuffen (9) for å se om kalkavleiringene på den ultrasoniske membranen (19) og på varmeplaten er oppløst. OBS: Vannet og
varmeplaten er varme, forbrenningsfare!
• Hvis det fortsatt er kalkrester, kan den ultrasoniske membranen (19) og
varmeplaten (17) renses ved hjelp av rengjøringsbørsten (25) (for- og bakside). Ikke prøv å skrape dem med en hard gjenstand.
Page 74

• Hvis det er vanskelig å få bort kalken, anbefaler vi å avkalke apparatet
ved å kjøre rensemodus (21) flere ganger på rad. Ha avkalkningsmiddel
i vannskuffen i maks. 20 minutter, og hell det ut igjen som beskrevet
nedenfor.
• Viktig: Hell avkalkningsmiddelet ut over det fremre venstre hjørnet av
apparatet (se pil på apparatet). Pass på at det ikke kommer noe væske inn
i luftinntaket (26). Det vil skade apparatet, og vil gjøre garantien ugyldig.
• For å skylle, fyller du koppen med 2 dl springvann og heller det forsiktig
ned i vannskuffen (9) ved å holde koppen rett over vannskuffen (se side
5). Ikke hell væsken fra stor høyde over skuffen! Hell vannet ut over det
fremre venstre hjørnet av apparatet. Gjenta prosessen til det ikke er noe
mer avkalkningsmiddel i vannskuffen (9). Sett silver cube (24), silikondekselet (18), tåkekammeret (23), vannbeholderen (6) og duftbeholderen (20)
på plass i apparatet. Hvis vannbeholderen ikke sitter riktig, sjekk om den
øvre delen av tåkekammeret er riktig montert.
• Rengjør vannbeholderen (6) grundig annenhver uke med en myk børste
eller svamp og varmt vann. Bruk fortynnet avkalkningsmiddel (blandes i
henhold til produsentens anvisninger) for kalkavleiringer. Skyll deretter
vannbeholderen grundig med rent, kaldt springvann.
Skifte ut antikalkpatronen
• Vennligst finn de anbefalte utskiftningsintervallene i tabellen (se «Før
installasjon»).
• Tips: Effektiviteten til patronen (8) kan inspiseres ved en enkel test. Hold
et lite speil i tåken (27) i et par sekunder. Dersom det dukker opp hvite
avleiringer (kalsiumkarbonat) på speilet, behøver patronen å skiftes ut.
• Antikalkpatronen er å finne på innsiden av beholderlokket. Skru først av
beholder lokket av vannbeholderen (6) o g deretter fjern patronen fra lok ket
(7). Avhend patronen blant husholdningsav fallet ditt (8). Blø tlegg antikalkpatronen i et vannbad i 24 timer før førstegangsbruk (ikke i vannbeholderen!). Harpiksen er nødt til å absorbere vann for å nå høy ytelse.
• Behold beholderlokket (7) når du skifter ut patronen!
Silver Cube™
Silver cube (24) forhindrer veksten av bakterier i luftfukteren grunnet sitt
kontinuerlige utslipp av sølvioner. Bruk av Silver cube fører til et hygienisk
romklima. Levetiden til Silver cube er omtrent ett år. Vi anbefaler derfor at
du skifter ut Silver cube i starten av hver luftfuktingssesong. Silver cube
begynner å fungere så snart den kommer i kontakt med vann, og fungerer
også når enheten er avslått.
Reparasjoner
• Reparasjoner på dette produktet må kun utføres av kvalifiserte teknikere.
Dersom det utføres urettmessige reparasjoner utløper garantien og alt
ansvarshold.
• Aldri bruk apparatet dersom adapteren eller kontakten er skadet, etter
det har feilfunksjonert, dersom det har blitt mistet eller skadet på noen
som helst måte (sprekker/spriker i kabinettet).
• Ikke press gjenstander inn i apparatet. Ikke demonter apparatet.
• Dersom apparatet er utenfor reparasjonsmuligheter, gjør det ubrukbart
umiddelbart og lever det til et returpunkt gitt til formålet.
Page 75

Avhending
EU-direktiv 2012 / 19 / EF vedrørende elektriske og elektroniske apparater (Waste Electrical and Electronic Equipment - WEEE) sier at
gamle elektriske husholdningsapparater ikke må kastes som vanlig restavfall. Gamle apparater må samles inn separat for å optimalisere gjenbruk og resirkulering av materialene de inneholder og redusere påvirkningen på menneskers helse og miljøet. Det
overkryssede søppelkassesymbolet er for å minne om din forpliktelse om at du når du kaster apparatet må det samles inn separat.
Forbrukerne må kontakte lokale myndigheter eller forhandler for
informasjon angående riktig avhending av sitt gamle apparat.
Spesifikasjoner
Rangert spenning 220 – 240 V / 50 Hz
Utgangseffekt 10 – 95 W
Fukteeffekt opp til 550 g/h
Dimensjoner 196 x 418 x 196 mm
(bredde x høyde x dybde)
Vekt 3.0 kg
Vannbeholderkapasitet 6.3 Liter
Lydnivå 26 – 34 dB(A)
I samsvar med EUforskrifter CE / WEEE / RoHS
Alle rettigheter ovenfor tekniske modifikasjoner er forbeholdt
Page 76

Svenska
Grattis! Du har just införskaffat den enastående luftfuktaren EVA. Den kommer att ge dig stor glädje och förbättra din inomhusluft.
Som med alla elektriska hushållsapparater krävs det att du är extra försiktig med den här modellen också, för att undvika personskador, brandskador
eller skador på apparaten. Läs denna bruksanvisning noggrant innan du
använder apparaten för första gången och följ säkerhetsanvisningarna på
själva apparaten.
Beskrivning av apparaten
Apparaten består av följande huvuddelar:
1. Nätkabel för strömförsörjning
2. Remote SensorTM fuktsensor med fjärrkontroll
3. Står för Remote Sensor
4. Batterifack för Remote SensorTM (typ AAA)
5. Fuktsensorns position
6. Vattentank med bärhandtag
7. Lock till vattentank med antikalkpatron
8. Antikalkpatron
9. Vattenbricka
10. På-/Av-knapp
11. Knapp för val av önskad fuktighet (hygrostat: 30 – 75 % och kontinuerlig
drift “CO“)
12. Knapp för val av utgångsnivå 1–5 för luftfuktning
13. Knapp för varmt läge (förvärmning av vatten)
14. Knapp för autoläge
15. Display med indikation för aktuell och önskad (blinkar) fuktighet
16. Vattennivåindikator
17. Värmeplatta för förvärmning av vatten
18. Silikonhölje för värmeplattan
19. Ultraljudsmembran
20. Doftbehållare
21. Knapp för nattläge (LED-ljus normalt, nedtonat eller av) och rengörings läge (tryck i minst 5 sekunder)
22. Symbol för misslyckad anslutning mellan Remote SensorTM och luftfuk tare
23. Dimkammaren
24. Silver Cube
25. Rengöringsborste
26. Luftintag (varning: inget vatten får komma in i denna öppning)
2 7. Ångu ts läpp
TM
TM
Viktiga säkerhetsanvisningar
Läs igenom bruksanvisningen noga innan du använder apparaten för första
gången och håll den i säkert förvar för framtida referens, vid behov ger du
den vidare till nästa ägare.
• Stadler Form avsäger sig allt ansvar för förlust eller skada som uppstår på
grund av att bruksanvisningen inte följts.
• Apparaten får endast användas i hemmet för de ändamål som beskrivs
i denna bruksanvisning. Otillåten användning och tekniska ändringar på
apparaten kan leda till fara för liv och hälsa.
Page 77

• Denna apparat kan användas av barn från 8 år och uppåt och personer
med nedsatt fysisk eller mental förmåga eller brist på erfarenhet och
kunskap, om de övervakas eller får instruktioner angående användning
av apparaten på ett säkert sätt och förstår de inblandade riskerna. Barn
ska inte leka med apparaten. Rengöring och underhåll får inte göras av
barn utan tillsyn.
• Anslut endast kabeln till växelström. Observera spänningsinformationen
på apparaten.
• Använd inte skadade förlängningskablar.
• Dra inte nätsladden över vassa kanter och se till att den inte kommer i
kläm.
• Dra inte ut kontakten ur vägguttaget med våta händer eller genom att
hålla i sladden.
• Använd inte denna apparat i omedelbar närhet av badkar, dusch eller simbassäng (minsta avstånd är 3 m). Placera apparaten så att en person som
befinner sig i badkaret inte kan röra apparaten.
• Placera inte apparaten nära en värmekälla. Utsätt inte sladden för direkt
värme (som t.ex. en uppvärmd värmeplat ta, öppen eld, hett str ykjärn, eller
värmeelement). Skydda nätsladdar från olja.
• Se till att apparaten är korrekt placerad för att säkerställa en hög stabilitet under dess drift och se till att ingen kan snubbla över nätsladden.
• Apparaten är inte stänkskyddad.
• Endast för inomhusbruk.
• Förvara inte apparaten utomhus.
• Förvara apparaten på en torr plats, oåtkomlig för barn (packa in apparaten).
• Om nätsladden är skadad, måste den bytas ut av tillverkaren eller av en
verkstad som godkänts av tillverkaren eller av liknande kvalificerade personer för att undvika fara.
• Innan apparaten underhålls och efter varje användning, stänger du av apparaten och drar ut nätkabeln ur vägguttaget.
• Se till att apparaten har varit avstängd i minst 15 minuter innan apparatens insida rengörs!
• När förvärmning är på värms vattnet i apparaten upp: vattnet i vattenbrickan (9) och värmeplattan (17) blir väldigt varmt. Undvik att röra vid
vattnet och värmeplattan!
• Placera apparaten utom räckhåll för barn, eftersom vattnet inuti apparaten värms upp till 50 °C och värmeplattan når höga temperaturer på upp
till 75 °C
Före installationen: Antikalkpatron och vattenhårdhet
Antikalkpatronen minskar kalkavlagringarna i vattnet och oönskat utsläpp
av kalkpartiklar i omgivningen. Den är effektiv i en till tre månader, beroende
på vattnets hårdhet (se tabell).
Viktigt: Lägg antikalkpatronen i blöt i ett vattenbad under 24 timmar innan
den används för första gången (inte i vattentanken!). Hartset måste absorbera vatten för att nå hög prestanda.
Tidsperioden som patronen fungerar effektivt beror på vattnets hårdhet.
Detta kan testas med hjälp av de testband som medföljer (testremsorna är
fästa på Quick Setup Guide).
Page 78

1. Doppa testbanden i vattnet under en sekund.
2. Efter cirka en minut kan resultaten ses på testbanden. Några av de gröna
rutorna ändrar färg till rosa. Vattnets hårdhet visas genom hur många rutor som blir rosa. Exempel: Om tre rutor är rosa, då ligger vattenhårdheten
> 14 °dH.
Antal
rosa utor
0/1 Mjuk
2 Måttligt hårt
3 Hårt
4 Mycket hårt
Vattenhårdhet
Hårdhetsgrad
(°dH)
°dH
Från 4
Från 7
°dH
Från 14
Från 21
Patronen räcker
(med 4 liter/dag)
Dagar Liter
90 dagar ru nt 360 L
45 dagar ru nt 180 L
30 dagar ru nt 120 L
°dH
15 dagar runt 60 L
°dH
Med en vattenhårdhet på över 21 °dH, kan vi inte längre rekommendera att
du använder en luft fuktare med ultraljud. Vi rekommenderar att du använder
en luftfuktare med ånga för att öka luftfuktigheten i ditt hus (t.ex. Oskar
luftfuktare tillverkad av Stadler Form: www.stadlerform.com/Oskar).
Obs: Om du använder Eva utan att använda avkalkat vatten från ett avkalkningssystem, som fungerar enligt principen om jonbyte (salt tillsät ts till vattnet), kan saltet som finns i vattnet fälla ut runt apparaten som vitt dam. Eva
kan emellertid användas med dricksvatten från ett filtersystem (t.ex. Brita).
Skulle du vara osäker på kvaliteten eller sammansättningen av vattnet i ditt
område, kontakta fastighetsskötaren eller leverantören av dricksvatten.
Inställning / drift
1. Placera Eva på önskad plats på en plan yta. Dimman når en höjd på upp
till 1,4 m tack vare den högpresterande luftfuktningen (utgångsnivå 5,
varmt läge på). Detta gör att Eva kan placeras direkt på golvet. Anslut
nätkabeln (1) till ett lämpligt uttag.
2. Ta ut Remote SensorTM (2), stället (3) och de två batterierna ur förpackningen. Öppna batterifacket (4) på undersidan av Remote SensorTM (2)
genom att vrida locket moturs. Sätt i de två batterierna i batterifacket
(4), såsom visas på sidan 4 och stäng locket igen. Placera nu Remote
SensorTM (2) på stället (3).
3. Å ena sidan är Remote SensorTM (2) en fuktsensor och garanterar exakt
luftfuktning med sin externa position. Å andra sidan fungerar Remote
SensorTM (2) också som en fjärrkontroll. Placera fuktsensorn Remote
SensorTM (2) i mitten av rummet på ett bord eller en skänk med ett optimalt avstånd från Eva på mellan 3 och 5 meter. Remote SensorTM bör
placeras centralt i rummet så att rumsluften kan strömma förbi sensorn
(5) så fritt som möjlig. Om detta inte är möjligt, rekommenderar vi att
Remote SensorTM placeras med ett avstånd på minst 30 cm från väggen
och minst 2 m från fönster och ventilationsöppningar.
4. Ta ut vattentanken (6) genom att hålla i handtaget och dra upp den.
Skruva bort locket på vattentanken (7) och fyll vattentanken med rent,
kallt kranvatten upp till markeringen för högsta nivå. Se till att antikalkpatronen (8) har dränkts i vatten under 24 timmar innan (se “Innan installation”). Skruva slutligen tillbaka locket (7) på vattentanken (6). Placera
Page 79

sedan vattent anken (6) i enheten. Vattenbrickan (9) kommer nu långsamt
att fyllas från vattentanken. Viktigt: Flytta inte apparaten när den är
fylld med vatten. Vattnet kan rinna in i elektroniken.
5. Tryck på på-/av-knappen (10) för att sätta igång Eva. Den nuvarande relativa fuktigheten i % visas på displayen (15). Om vattennivåindikatorns
ljus (16) är rött, finns det för lite vatten i enheten. Utgångsnivån för luftfuktighet är förinställd på nivå 2 och den önskade fuktigheten på 45 %.
6. Aktivera Remote SensorTM (2) genom att trycka på knappen “Hygrostat”
(11a). Fuktsensorn skickar automatiskt information om uppmätt relativ
fuktighet flera gånger per minut till enheten, som visar informationen på
displayen (15). Mätningen kan också aktiveras genom att trycka på någon knapp på Remote SensorTM (2) (bortsett från på-/ av-knappen (10)).
7. Den önskade luftfuktigheten kan ändras genom att trycka på knappen
“Hygrostat” (11) flera gånger (35 – 75 % och kontinuerlig drift “CO”).
Symbolen på displayen (15) blinkar under inmatning. Efter några sekunder utan inmatning, sparas det valda värdet . Symbolen ändras till aktuell
uppmätt luftfuktighet.
8. Luftfuktande prestanda kan ändras genom att trycka på knappen “Output” (12) flera gånger (nivå 1 – 5). Nivån visas på displayen (15) med horisontella ribbor (t.ex. en ribba = nivå 1).
9. Genom att trycka på knappen “Warm” (13), sätts det varma läget och
förvärmning av vattnet igång. Nu är LED-ljuset på knappen “Warm”
tänt. Värmeplattan (17) värmer vattnet innan det förvandlas till dimma
av ultraljudsmembranet (19). Det varma läget skapar en behaglig varm
dimma, samt ökar luftfuktningens prestanda.
10. Genom att trycka på knappen “Auto” (14), aktiveras autoläget och tekniken Adaptive HumidityTM . Nu är LED-ljuset på knappen “Auto” tänt. I
autoläget anpassar enheten automatiskt utgångsnivån för luftfuktning
till att nå och upprätthålla en önskad luftfuktighet på 4 5 % t yst och energieffektiv t. Ju lägre den akt uella luftfuk tigheten är, desto högre kommer
utgångsnivån för luftfuktning automatiskt att ställas in (under 33 % =
nivå 4, från 34 – 37 % = nivå 3, från 38 – 41 % = nivå 2, 42 – 45 % = nivå
1). Du kan ändra den önskade fuktigheten i autoläget genom att trycka
på knappen “Hygrostat” (11) flera gånger medan det automatiska läget
är aktivt (LED-ljuset på knappen “Auto” på enheten lyser). Utgångsnivån för luftfuktning (12) kan inte ändras manuellt i autoläget. Så snart
knappen “Output” tryckts in för att ändra utgångsnivån för luftfuktning,
inaktiveras autoläget.
11. Du kan använda Eva för att sprida dofter i rummet. Var mycket sparsam
med dofter, eftersom en överdriven dosering kan leda till funktionsstörningar i och skador på app araten. För at t kunna använd a dofter, tryck kort
och släpp doftbehållaren (20) och dra ut den ur apparaten. Droppa parfymen direkt på bomullskudden i doftehållaren (20). Tillsätt h ögst 1 – 2
droppar parfym i doftbehållaren! Tryck tillbaka behållaren och tryck på
den och släpp för att låsa den. Tips: För att byta doft, ta ut bomullskudden och rengör behållare med tvål. Nu kan du sätta i en ny bomullskudde
(kommersiellt tillgänglig) och tillsätta droppar med önskad doft.
12. Om vattennivåindikatoren (16) ändras till rött, måste vattnet fyllas på.
Ta ut vattentanken (6) och fyll på den med rent, kallt kranvatten upp till
markeringen för högsta nivå. Efter byte av vattentanken, börjar maskinen automatiskt fungera igen efter några sekunder. Vattentanken kan
också fyllas på under drift.
Page 80

13. Om du upplever lamporna som för ljusa (i ett sovrum till exempel), kan
du minska ljusstyrkan genom att trycka på knappen för nattläge (21). Du
kan välja mellan tre olika lägen:
• Normalläge (standardläge)
• Dämpat läge (tryck en gång)
• Släckningsläge (tryck två gånger)
• Genom att trycka på dimmer-knappen ytterligare en gång kan du gå
tillbaka till normalläge.
Om det inte finns något vatten i apparaten lyser den röda vattennivåsymbolen (16) i alla lägen. Den röda lampan kan inte dimmas.
14. Om två punkter visas (22) på displayen (15), kan Eva inte upprätta radioförbindelse till Remote SensorTM (2). Eva fungerar fortfarande tack vare
en fuktsensor i apparaten. Tryck på valfri knapp på Remote SensorTM (2)
för att aktivera den. Kontrollera att Remote SensorTM (2) finns inom 10 m
avstånd från Eva. Väggar, dörrar och golv mellan Eva och Remote SensorTM (2) kan störa radioförbindelsen. Remote SensorTM (2) bör optimalt
placeras på ett avstånd mellan 3 och 5 meter från Eva och på en upphöjd
yta i mitten av rummet (se “Inställning/Drift” nr 3). De två prickarna på
skärmen (22) kan också tyda på att batterierna i Remote SensorTM (2)
behöver bytas ut (se “Inställning/Drift” nr 2).
Obs! Om du ser droppar (eller andra tecken på fukt) på eller kring enheten, är
detta kondensvatten från luftfuktaren. Detta innebär att luften inte längre
kan absorbera fukten från luftfuktaren. Aktivera autoläget med en önskad
luftfuktighet på 45 %. Vattendropparna bör då sluta att bildas.
Rengöring
Innan apparaten underhålls och efter varje användning, stänger du av apparaten och drar ut nätkabeln (1) ur vägguttaget.
Observera: Doppa inte apparaten i vatten (risk för kortslutning). Om förvärmning är påslagen (det varma lägets LED-ljus är tänt (13)), värms vattnet
i apparaten upp: vattnet i vattenbrickan (9) och värmeplattan (17) blir väldigt
varm. Undvik att röra vid vattnet och värmeplattan!
• För att rengöra utsidan, torka av med en fuktig trasa och torka sedan ordentligt.
• Kör rengöringsläget minst en gång per månad. Apparaten måste
vara avstängd i minst 15 minuter före invändig rengöring! Ta sedan bort
vattentanken (6), dimkammaren (23), silikonhöljet (18), Silver Cube (24)
och doftbehållaren (20). Fyll en kopp med 200 ml kranvatten blandat med
avkalkningsmedel (blandning i enlighet med tillverkarens instruktioner).
Häll vätskan försiktigt på vattenbrickan (9) genom att hålla koppen direkt
över vattnenbrickan (se sidan 5). Häll inte på vätskan högt ovanför vattenbrickan! Se till att ingen vätska kommer in i öppningen för luftinloppet
(26). Detta kan skada apparaten och upphäver alla garantianspråk.
• För att starta rengöringsläget måste nätkabeln vara ansluten till ett eluttag. Tryck och håll inne nattlägesknappen (21) på undersidan av det högra
hörnet i 5 sekunder för att aktivera rengöringsläget. Nu kommer symbolen
för vattennivån (16) på apparaten att blinka rött. Rengöringsläget körs i
cirka 5 minuter och stängs sedan automatiskt av (symbolen för vattennivån slutar att blinka).
Page 81

• Kontrollera på vattenbrickan (9) om kalkavlagringarna på ultraljudsmembranet (19) och värmeplattan (17) har lösts upp. Observera: Vattnet och
värmeplattan är varma, risk för brännskador!
• Om kalkrester finns kvar, kan ultraljudsmembranet (19) och värmeplattan
(17) rengöras med hjälp av rengöringsborsten (25) (fram- och baksida).
Försök inte att skrapa dem med ett hårt föremål.
• För envis kalk rekommenderar vi avkalkning av apparaten genom att köra
rengöringsläget (21) flera gånger i rad. Låt avkalkningsmedlet i vattenbehållaren verka under högst 20 minuter och häll sedan ut det såsom
beskrivs nedan.
• Viktigt: Häll ut avkalkningsmedlet över det främre vänstra hörnet av ap-
paraten (se pilen på apparaten). Inget vatten får komma in i luftinloppet
(26). Detta kan skada apparaten och upphäver alla garantianspråk.
• Skölj genom att fylla koppen med 200 ml kranvatten och häll försiktigt
vätskan i vattenbrickan (9) genom att hålla koppen direkt över vattnetbrickan (se sidan 5). Häll inte på vätskan högt ovanför vattenbrickan! Häll
ut vattnet över det främre vänstra hörnet av apparaten. Upprepa processen tills det inte finns något avkalkningsmedel kvar i vattenbehållaren
(9). Sätt tillbaka Silver Cube (24), silikonhöljet (18), dimkammare (23), vattentanken (6) och doftbehållaren (20) i apparaten. Om vattenbehållaren
inte sitter rätt, kontrollera om den övre delen av dimkammaren (23) är
korrekt monterad.
• Rengör vattentanken (6) noggrant varannan vecka med en mjuk borste eller svamp och varmt vatten. Använd utspätt avkalkningsmedel (blandning
enligt tillverkarens anvisningar) för kalkavlagringar. Skölj vattentanken
ordentligt efteråt med rent, kallt kranvatten.
Byte av antikalkpatronen
• Se rekommenderade bytesintervaller i tabellen (se ”Före installationen”).
• Tips: Patronens (8) effektivitet kan kontrolleras med ett enkelt test. Håll
en liten spegel i ångan (27) under några sekunder. Om det sedan finns
vita avlagringar (kalciumkarbonat) på spegeln, behöver patronen bytas ut.
• Antikalkpatronen är placerad på tanklockets inre sida (8). Skruva först
bort tanklocket från vattentanken (6) och skruva sedan ut patronen ur
tanklocket (7). Kassera patronen i hushållssoporna (8). Lägg antikalkpatronen i blöt i ett vattenbad under 24 timmar innan den används för första
gången (inte i vattentanken!). Hartset måste absorbera vatten för att nå
hög prestanda.
• Behåll tanklocket (7) när du byter patronen!
Silver Cube™
Den silverkuben (24) förhindrar tillväxten av mikrober och bakterier i luftfuktaren tack vare den kontinuerliga frisättningen av silverjoner. Användningen
av en silverkub leder till ett hygieniskt rumsklimat. Livslängden på den joniska silverkuben är ungefär ett år. Vi rekommenderar därför att du byter ut
den silverkuben i början av varje befuktningssäsong. Den silverkuben börjar
arbeta så fort den kommer i kontakt med vatten och fungerar även när apparaten är avstängd.
Page 82

Reparationer
• Reparationer av elektriska apparater får endast utföras av en kvalificerad
eltekniker. Om felaktiga reparationer utförs, upphör garantin att gälla och
allt ansvar frånsägs.
• Använd aldrig apparaten om en kabel eller kontakt är skadad, om den har
funktionsfel, om den har tappats eller blivit skadad på något annat sätt
(sprickor/brister i höljet).
• Tryck inte in några föremål i apparaten. Ta inte isär apparaten.
• Om apparaten inte går att reparera, gör den obrukbar omedelbart och
lämna in den på en lämplig återvinningsstation.
Kassering
Det europeiska direktivet 2012 / 19 / CE om avfall från elektrisk och elektronisk utrustning (WEEE), kräver att gammal hushållselektronik INTE kastas i
det normala osorterade avfallet. Förbrukad utrustning måste samlas in separat för att optimera återanvändning och återvinning av det material som
de innehåller och för minska påverkan på människors hälsa och på miljön.
Symbolen med den överkorsade ”soptunnan” på produkten påminner dig
om din skyldighet att apparaten måste samlas in separat när det
kasseras. Du kan kontakta din lokala myndighet eller återförsäljare för information om korrekt kassering av förbrukad elektronisk
utrustning.
Specifikationer
Märkspänning 220 – 240 V / 50 Hz
Utgående effekt 10 – 95 W
Fuktutgång upp till 550 g/h
Mått 196 x 418 x 196 mm
(bredd x höjd x djup)
Vikt 3.0 kg
Vattentankskapacitet 6.3 Liter
Ljudnivå 26 – 34 d B(A)
Uppfyller EU:s regler CE / WEEE / RoHS
Alla rättigheter för tekniska ändringar förbehålles
Page 83

Русский
Поздравляем с приобретением устройства премиум-класса увлажнителя воздуха EVA. Использование этого устройства позволит улучшить воздух в помещении, а эксплуатация доставит несомненное
удовольствие.
При эксплуатации увлажнителя воздуха, а также иных электроприборов, следует обращать особое внимание на меры безопасности.
Преж де, чем использовать этот электроприбор, внимательно прочтите инструкцию. Во избежание травм или повреждений имущества,
строго следуйте приведенным в данной инструкции рекомендациям.
Описание устройства
1. Сетевой кабель для подачи электропитания
2. Датчик влажности Remote SensorTM с дистанционным управлением
3. Подставка для датчика Remote Sensor
4. Отсек для батареек датчика Remote SensorTM (тип AAA)
5. Местоположение датчика влажности
6. Резервуар для воды с ручкой для переноски
7. Крышка резервуара для воды с картриджем против накипи
8. Картридж для предотвращения минеральных отложений Anticalc
9. Лоток для воды
10. Кнопка питания
11. Кнопка выбора желаемой влажности (рег улятор влажности:
30 – 75 % или непрерывный режим «CO»)
12. Кнопка выбора уровня интенсивности увлажнения: от 1 до 5
13. Кнопка режима подогрева (предварительный подогрев воды)
14. Кнопка автоматического режима
15. Дисплей для отображения текущей и желаемой (значение мигает)
влажности
16. Индикатор уровня воды
17. Нагревательная пластина для предварительного подогрева воды
18. Силиконовая крышка нагревательной пластины
19. Мембрана ультразвукового генератора
20. Контейнер с ароматизатором
21. Кнопка ночного режима (индикаторы горят с стандартной ярко с тью, с приглушенной яркостью или вы ключены) и режима очистки
(нажмите и удерживайте в течение 5 секунд)
22. Индикация отсутствия связи между датчиком Remote SensorTM
и увлажнителем
23. Диффузионная камера
24. Silver CubeTM (антибактериальный картридж)
25. Щетка для чистки
26. Впускное отверстие для воздуха (Внимание! В это отверстие не
должна попадать вода.)
27. Распылите ль
TM
Важные указания по безопасности
Сохраните эту инструкцию для дальнейших справок, а в случае передачи увлажнителя воздуха другому владельцу, передайте инструкцию вместе с электроприбором.
Page 84

• Изготовитель не несет ответственности за любые травмы или
ущербы, возникшие вследствие неправильной эксплуатации электроприбора.
• Увлажнитель воздуха является бытовым электроприбором и предназначен для использования только в домашних условиях в строгом соответствии с инструкцией по эксплуатации. Неправильная
эксплуатация и техническая модификация устройства могут создать условия, опасные для жизни и здоровья пользователя.
• Этот электроприбор не предназначен для использования детьми до
8 лет или недееспособными взро слыми бе з надлежаще го контроля,
а также лицами, не имеющими достаточных навыков по использованию электроприборов и не знакомыми с инструкцией по эксплуатации. Детям категорически запрещено играть с прибором. Чистка
и установка прибора может производиться детьми исключительно
под присмотром взрослых.
• Перед подключением увлажнителя воздуха к электросети удостоверьтесь в том, что напряжение электросети соответствует напряжению, паспортизированному для данного электроприбора.
• Не используйте при подключении поврежденные или перегруженные удлинители.
• Следите за тем, чтобы сетевой шнур не касался поверхностей, способных повредить шнур, не запутывался и не перекручивался. Не
прикасайтесь к сетевому шнуру или его вилке мокрыми руками.
• Не эксплуатируйте электроприборы в местах с повышенной влажностью.Во избежание поражения электрическим током запрещается эксплуатировать электроприборы в непосредственной близости
ванны, душа или бассейна (минимальное расстояние 3 м). Устанавливайте прибор так, чтобы он не мешался.
• Не устанавливайте увлажнитель воздуха рядом с источниками тепла.
• Не допускайте, чтобы сетевой шнур касался горячих поверхностей
любых нагревательных приборов, не допускайте контакта сетевого
шнура с маслянистыми веществами.
• Следите за тем, чтобы нельзя было споткнуться о сетевой шнур при
хождении по комнате.
• Увлажнитель воздуха не является водонепроницаемым
• Не эксплуатируйте увлажнитель воздуха вне помещений.
• Не храните увлажнитель на улице.
• Д ля хранения упаку йте прибор в коробк у и храните в су хом помеще-
нии, в местах, недоступных для детей.
• В случаях повреждения сетевого шнура он должен быть заменен
авторизированным сервисным центром либо квалицифированным
специалистом.
• Установку и чистку прибора необходимо производить, отключив
прибор от сети.
• Устройство необходимо выключить как минимум за 15 минут до
проведения очистки его внутренних поверхностей!
• Если включен режим предварительного подогрева, вода внутри
уст ройст ва будет нагреваться. Обрат ите вним ание, что в ода в лотке
для воды (9) и нагревательная пластина (17) становятся горячими.
Не прикасайтесь к воде и к нагревательной пластине!
Page 85

• Установите устройство в недоступном д ля детей месте, поскольку
вода внутри устройства нагревается до 50 °C, а нагревательная
пластина – до 75 °C.
Пере д первым использованием: картридж Anticalc
и жесткость воды
Картридж Anticalc необходим для уменьшения концентрации кальция, накипи и извести в воде. Эффек тивен от 1 до 3 месяцев в зависимости от жёсткости воды. (см. таблицу)
Важно. Перед первым использованием увлажнителя опустите картридж Anticalc в воду комнатной температуры на 24 часа. По истечении этого срока вставьте картридж в отведенное для него место.
По истечении этого срока вставьте картридж в отведенное для него
место (не в резервуар д ля воды увлажнителя).
Срок использования картриджа зависит от уровня жесткости воды в
вашем регионе. Для анализа жесткости воды используйте тест-полоски, прикрепленные к предпоследней странице данной инструкции.
(tестовая полоска прикреплена к Quick Setup Guide)
1. Опустите тест-полоску на 1 секунду в воду.
2. Примерно через минуту оцените результат по количеству ячеек на
тест-полоске, изменивших окраску. Например, три розовые ячейки
соответствуют уровню жесткости более 14 °dH.
Картриджа хватит на
Количество
розовых
ячеек Жесткость воды
0/1 мягкая От 4°Ж 90 дней ~ 360 л
2 умеренно жесткая От 7°Ж 45 дней ~ 180 л
3 жесткая От 14°Ж 30 дней ~ 120 л
4 очень жесткая От 21°Ж 15 дней ~ 60 л
Степень
жесткости
(°Ж)
(при использовании
4 литров в день)
дни
литры
При жесткости воды свыше 21 °dH использование ультразвукового
увлажнителя воздуха не рекомендуется. В таком случае лучше воспользоваться увлажнителем традиционного типа, таким, как модель
Oskar от компании Stadler Form: www.stadlerform.com/Oskar.
Примечание: Если при работе устройства Eva не используется декальцинированная вода, полученная с помощью системы декальцинирования на основе технологии ионного обмена (в воду добавляется
соль), то содержащиеся в воде соли могут оседать на элементах
устройства в виде белого налет. Не используйте для предварительного смягчения или очистки воды какие-либо иные дополнительные
средства или устройства. Не используйте минеральную воду или
иные жидкости, кроме воды.
Настройка / эксплуатация
1. Установите устройство Eva в желаемом месте на ровную поверхность. Струя пара достигает высоты 1,4 м благодаря высокой эф-
Page 86

фективности увлажнения (интенсивность уровня 5, режим подогрева включен). Это позволяет размещать устройство Eva на полу.
Включите шнур питания (1) в подходящую розетку.
2. Выньте датчик Remote S ensorTM (2), по дставку (3) и дв е батар ейки из
упаковки. Откройте отсек для батареек (4) в нижней части датчика Remote SensorTM (2), повернув крышку против часовой стрелки.
Вставьте две батарейки в отсек для батареек (4), как показано на
стр. 4, и закройте крышку. Установите датчик Remote SensorTM (2)
на подставку (3).
3. С одной стороны, Remote SensorTM (2) является датчиком влажности и гарантирует точный уровень увлажнения, поскольку расположен снаружи. С другой стороны, датчик Remote SensorTM (2)
выступает также в качестве пульта дистанционного управления.
Разместите датчик влажности Remote SensorTM (2) в центре комнаты на столе или серванте. Оптимальное расстояние от устройства
Eva составляет от 3 до 5 м. Датчик Remote SensorTM следует размещать в центре комнаты, чтобы воздух как можно более проходил
через дат чик (5). Если это невозможно, рекомендуется размещать
дат чик Remote SensorTM на расстоянии не менее 30 см от с тены и не
менее 2 м от окон и вентиляционных отверстий.
4. Выньте резервуар для воды (6), взяв его за ручку и потянув вверх.
Откру тите кр ышку резерв уара для воды (7) и зап олните р езерву ар
чистой холодной водопроводной водой до отметки максимального
уровня. Не забудьте перед этим опустить картридж против накипи
(8) в воду на 24 часа (см. раздел «Перед установкой»). Снова прикрутите крышку (7) к резервуару для воды (6). Затем поместите
резервуар для воды (6) в прибор. Лоток для воды (9) будет медленно наполняться водой из резервуара. Важно! Не перемещайте
устройство, когда оно наполнено водой. Вода может попасть на
электронику.
5. Нажмите кнопку питания (10), чтобы включить устройство Eva. На
дисплее (15) отображается текущая относительная влажность в
процентах. Если индикатор уровня воды (16) горит красным цветом, это означает, что в приборе недостаточно воды. По умолчанию установлен уровень интенсивности увлажнения 2 и желаемая
вла жно сть 45 %.
6. Активируйте датчик Remote SensorTM (2), нажав кнопку «Hygrostat»
(Регулятор влажности) (11a). Датчик влажности несколько раз в
минуту автоматически посылает прибору информацию об измеренной относительной влажности, и это значение отображается
на дисплее (15). Измерение можно также активировать, нажав любую кнопк у на датчике Remote SensorTM (2) (за исключением кнопки
питания (10)).
7. Чтобы изменить желаемую влажность, необходимо несколько раз
нажать кнопку «Hygrostat» (Регулятор влажности) (11) (35 – 75 % и
непрерывный режим «CO»). Во время выбора значения символ на
дисплее (15) мигает. Если не нажимать кнопку в течение нескольких секунд, выбранное значение сохраняется. Символ на дисплее
меняется на измеренное текущее значение влажности.
8. Интенсивность увлажнения можно изменить, если несколько раз
нажать кнопку «Output» (Интенсивность) (12) (уровни 1–5). Уровни
Page 87

отображаются на дисплее (15) в виде горизонтальных полосок (например, 1 полоска = уровень 1).
9. При нажатии кнопки «Warm» (Подогрев) (13) включается режим
подогрева, а вместе с ним предварительный подогрев воды. На
приборе загорается светодиодный индикатор на кнопке «Warm»
(Под огрев). Нагре вател ьная пла стина (17) по догревает в оду, пере д
тем как она пр евраща ется в туман ультразвуковой мембр аной (19).
Режим подогрева позволяет создавать приятный теплый туман и
повышает эффективность увлажнения.
10. При нажатии кнопки «Auto» (Автоматический режим) (14) активируется автоматический режим, использующий технологию
Adaptive HumidityTM. На приборе загорается светодиодный индикатор на кнопке «Auto» (Автоматический режим). В автоматическом
режиме прибор автоматически регулирует интенсивность увлажнения, чтобы равномерно и без лишних затрат энергии установить
и поддерживать желаемую влажность воздуха 45 %. Чем ниже
текущая влажность воздуха, тем выше будет автоматически установленный уровень интенсивности увлажнения (до 33 % = уровень
4, 34 – 37 % = уров ень 3, 38 – 41 % = уровень 2, 42 – 4 5 % = у ровень 1).
Можно изменить желаемую влажность воздуха в автоматическом
режиме, несколько раз нажав кнопку «Hygrostat» (Регулятор влажности) (11) при включенном автоматическом режиме (горит светодиодный индикатор на кнопке «Auto» (Автоматический режим)
на приборе). В автоматическом режиме нельзя изменить вручную
уровень интенсивности увлажнения (12). При нажатии кнопки
«Output» (Интенсивность) (12) для изменения уровня интенсивности увлажнения автоматический режим отключается.
11. Можно использовать прибор Eva для распыления арома масла в
помещении. Используйте арома масла очень экономно, поскольку
их чрезмерное количество может привести к неисправности или
повреждению устройства. Для использования арома масла нажмите на контейнер для арома масла (20) и выньте его из устройства. Капните арома масла непосредственно на ват ный диск в контейнере для арома масла (20). Добавляйте в контейнер для арома
масла не более 1 – 2 капель арома мас ла! Вставьте контейнер на
место и нажмите до щелчка. Совет: чтобы сменить аромат, выньте
ватный диск и вымойте контейнер с мылом. Затем можно вс тавить
новый ватный диск (имеется в продаже), капнув на него нужный
аромат.
12. Если индикатор уровня воды (16) горит красным цветом, необходимо добавить воду. Выньте резервуар для воды (6) и наполните его
чистой холодной водопроводной водой до отметки максимального
уровня. По сле уст ановки резервуара для воды на мес то прибор автоматически возобновит работу через несколько секунд. Можно
также долить воду в резервуар во время работы.
13. Режим сна предназначен для использования увлажнителя в ночное время. В этом режиме интенсивность световой индикации
уменьшается до приятного мягкого свечения. Чтобы включить
режим сна, нажмите соответствующую кнопку (21). Вы можете выбрать 1 из режимов:
• нормальный (по умолчанию)
• туск лый (1 нажатие)
Page 88

• без подсветки (2 нажатия)
• для отмены режима сна нажмите эту кнопку еще раз.
Если в устройстве нет воды, то во всех режимах загорается красный индикатор уровня воды (16). Яркость красного индикатора
нельзя уменьшить.
14. Если на дисплее (15) отображаются две точки (22), это означает,
что устройство Eva не может установить радиосвязь с датчиком
Remote SensorTM (2). Устройство Eva продолжит работу благодаря
встроенному датчику влажности. Нажмите любую кнопку на датчике Remote SensorTM (2), чтобы ак тивироват ь его. Убедитесь в том,
что датчик Remote SensorTM (2) находится в радиусе 10 м от устройства Eva. Наличие стен, дверей и потолков между устройством Eva
и датчиком Remote SensorTM (2) может препятствовать прохождению радиосигнала. Оптимальным местоположением для датчика
Remote SensorTM (2) является находящаяся на возвышении поверхность в центре комнаты на расстоянии от 3 до 5 м от устройства
Eva (см. пункт 3 раздела «Настройка / эксплуатация»). Появление
на дисплее двух точек (22) может также означать необходимость
замены батареек датчика Remote SensorTM (2) (см. пункт 2 раздела
«Настройка / эксплуатация»).
Примечание. Наличие капель воды (или другие признаки влаги) на
приборе или вокруг него является конденсатом из увлажнителя. Это
означает, что воздух более не может поглощать испускаемую увлажнителем влагу. Активируйте автоматический режим с желаемой
влажностью воздуха 45 %. Капли воды должны исчезнуть.
Чистка
До проведения любого технического обслуживания, очистки, а также
после каждого использования выключите прибор и отсоедините сетевой кабель (1) от штепсельной розетки.
Внимание! Никогда не погружайте прибор в воду (во избежание корот кого замыкания). Если вк лючен режим предварит ельног о подогрева (горит индикатор режима подогрева (13)), вода внутри устройства
буде т нагрев аться. Обратите внимание, что вода в лот ке для во ды (9) и
нагревательная пластина (17) становятся горячими. Не прикасайтесь
к воде и к нагревательной пластине!
• Д ля наружной о чистк и протрите корпус влажной т ряпочкой, а затем
тщательно высушите.
• Вк лючайте режим очистки как минимум раз в месяц.
Устройство необходимо выключить как минимум за 15 минут до
проведения очистки его внутренних поверхностей! Затем снимите
резервуар для воды (6), камеру для пара (23), силиконовую крышку (18), ионизатор Silver Cube (24) и контейнер для ароматизатора
(20). Налейте в чашку 200 мл водопроводной воды и добавьте средство для удаления накипи (приготовьте раствор в соответствии с
инструкциями производителя). Аккуратно вылейте этот раствор в
лоток для воды (9), держа чашку непосредственно над лотком (см.
стр. 5). Не наливайте раствор в лоток для воды с большой высоты!
Убед итесь в том, чт о жидкость не попа ла во впускное отверстие д ля
воздуха (26). Это может повредить устройство и привести к аннулированию гарантии.
Page 89

• Чтобы включить режим очистки, кабель питания должен быть подключен к розетке. Для включения режима очистки нажмите и в течение 5 секунд удерживайте кнопку ночного режима (21), расположенную в нижней части устройства справа. Индикатор уровня воды
(16) на приборе будет мигать красным цветом. Режим очистки будет
активен в течение 5 минут и автоматически выключится по истечении этого времени (индикатор уровня воды перестанет мигать).
• Осмотрите лоток для в оды (9), чтобы понять, удален ли известковый
налет с ультразвуковой мембраны (19) и нагревательной пластины
(17). Внимание! Поскольку вода и нагревательная пластина нагре-
ты, есть риск ожога.
• Если известковый налет сохраняется, можно очистить ультразвуковую м ембран у (19) и наг реват ельну ю пласт ину (17) с помо щью щет ки
для чистки (25) (с передней и обратной с тороны). Запрещается скоблить их с помощью твердых предметов.
• Если известковый налет очень твердый, рекомендуется включить
режим очистки (21) и провести удаление накипи несколько раз подряд. Оставьте раствор для удаления накипи в лотке для воды не более чем на 20 минут, а затем вылейте его, как описано ниже.
• Важно! Выливайте раствор для удаления накипи через левый пе-
ред ний угол устройс тва (см. стре лку на ус тройстве). В ода не должна
попадать во впускное отверстие для воздуха (26). Это может повредить устройство и привести к аннулированию гарантии.
• Для споласкивания налейте в чашку 200 мл водопроводной воды
и аккуратно вылейте воду в лоток для воды (9), держа чашку непосредственно над лотком (см. стр. 5). Не наливайте раствор в лоток
для воды с большой высоты! Вылейте воду через левый передний
угол устройства. Повторяйте эту процедуру до тех пор, пока из лотка для воды (9) не будет удалено все средство для очистки накипи.
Установите ионизатор Silver Cube (24), силиконовую крышку (18), камеру для пара (23), резервуар для воды (6) и конт ейнер д ля арома тизатора (20) назад в устройство. Если резервуар для воды не встает
на место, проверьте правильность установки камеры для пара (23).
• Каждые две недели тщательно очищайте резервуар для воды (6)
мягкой щеткой или губкой и теплой водой. Для удаления известковог о налета испо льзуй те раст вор сре дства для очист ки наки пи (приготовьте раствор в соответствии с инструкциями производителя).
После очистки тщательно промойте резервуар для воды холодной
водопроводной водой.
Картридж против накипи
• Рекомендуемые интервалы для замены картриджа можно посмотреть в таблице выше. «Перед первым использованием»
• Совет: для проверки эффективности картриджа (8) проведите про-
стой тест – подержите над распылителем (27) в течение нескольких
сек унд маленькое зеркало. Если на зеркале останется белый налет,
то картридж Anticalc необходимо заменить.
• Перед первым использованием увлажнителя опустите картридж
Anticalc (8) в воду комнатной температуры на 24 часа. По истечении этого времени вставьте картридж в отведенное для него место.
Картридж прикручивается на внутреннюю сторону крышки (7) ре-
Page 90

зервуара для воды (6). Сначала снимите крышку с резервуара для
воды, затем прикрепите картридж к внутренней стороне крышки.
• Не выбрасывайте крышку резервуара для воды при замене картриджа!
Функциональные особенности: бактерицидный фильтр
с ионами серебра Silver Cube ™
Фильтр (24) предотвращает размножение болезнетворных бактерий
и микробв, оказывая бактерицидное воздействие и улучшая гигиенические показатели воздуха в помещении. Высокая эффективность
ионов серебра с охраняется в течение 1 года. По истеч ении этого сро ка
мы рекомен дуем зам енить фи льтр. Наиболее эффективным является
замена фильтра в начале сезона, в течение которого Вы используете
увлажнитель максимально часто. Фильтр с ионами серебра начинает
работу с разу после всту пления в конт акт с вод ой и продо лжает о казывать бактерицидное воздействие после выключения прибора.
Ремонт и устранение неисправностей
• В целях безопасности ремонт электроприбора должен осуществляться только квалифицированными специалистами авторизованного сервисного центра. Гарантия не распространяется на неисправности, обусловленные неквалифицированным ремонтом, а
также неправильной эксплуатацией электроприбора.
• Запрещается использование неисправного электроприбора, а также при механических или иных повреждениях самого электроприбора, сетевого шнура или его вилки.
• Никогда не вставляйте никакие посторонние предметы в отверстия
в корпусе электроприбора.
• Если устройство не пригодно к ремонту, обрежьте сетевой шнур и
сдайте в специальные пункты приема.
Утилизация
Позаботьтесь об окружающей среде! Не выбрасывайте неисправные
электроприборы вместе с бытовыми отходами. Обратитесь для этих
целей в специализированный пункт утилизации электроприборов.
Адреса пунктов приема бытовых электроприборов на переработку
Вы можете получить в муниципальных службах Вашего города. Неправильная утилизация электроприборов наносит непоправимый вред окружающей среде. При замене неисправного
электроприбора на новый юридическую ответственность за
утилизацию должен нести продавец.
Page 91

Спецификация
Номинальное 220–240 В / 50 Гц
напряжение / частота
Номи наль ная 10 – 95 Вт
потребляемая
мощность
Расход воды до 550 мл/ч
Обслуживаемая 80 м2 / 200 м
3
площадь
Габариты 196 x 418 x 196 мм (ширина х высота х глубина)
Вес 3,0 кг
Емкость резервуара 6,3 л
Уровень шума 26 – 34 дБ
Соответствует европейским правилам безопасности CE / WEE / RoHS.
Производитель сохраняет за собой право на внесение изменений в
технические характеристики, комплектацию и конструкцию данной
модели без предварительного уведомления.
Элек тронную версию инструкции можно скачать на нашем сайте:
www.stadlerform.ru
Информация о сертификации
Товар сертифицирован в соответствии с законом «О защите прав потребителей».
Установленный производителем в соответствии с п.2 ст.5 Федерального Закона РФ «О защите прав потребителей» срок службы для данного изделия равен 5 годам, при условии, что изделие используется
в строгом соответствии с настоящей инструкцией по эксплуатации и
применяемыми техническими стандартами.
Гарантийный срок
гарантийный срок составляет 12 месяцев с документально подтвержденной даты продажи Оборудования/Изделия Потребителю Продавцом. В случае отсутствия у Потребителя документов, подтверждающих дату покупки, гарантийный срок рассчитывается с даты
изготовления.
Дата изготовления
Дата изготовления зашифрована в виде группы цифр в серийном номере, расположенном на корпусе прибора.
Пример: 78901 1511 123456
78901 – код поставщика
15 – последние две цифры года
11 – номер месяца
123456 – номер продукта
Дату изготовления следует читать:
78901 1511 123456 – 2015 год, ноябрь.
Page 92

Garantie/Warranty/Garantie/Garanzia/Garantía
Garantie/Garanti/Takuu/Garanti/Garanti
2 Jahre Garantie
Diese umfasst Konstruktions-, Produktions-, sowie Materialfehler. Ausgenommen sind sämtliche Verschleissteile und unsachgemässe Benutzung
oder Pflege.
2 Years warranty
This warranty covers defects of construction, production and material. All
abrasion parts are excluded and also inappropriate usage or maintenance.
Garantie 2 ans
Cette garantie couvre les défauts de construction, de fabrication et de
matériaux. En sont exclues toutes les pièces d’usure et d’utilisation pas correcte ou mauvaise entretien.
2 anni di garanzia
Questa garanzia copre i difetti di costruzione, produzione e materiale. Tutte
le parti sono escluse all'abrasione e anche l'uso improprio o manutenzione.
2 años de garantía
Esta garantía cubre los defectos de construcción, de fabricación y de materiales. Todas las piezas de desgaste están excluídas.
2 jaar garantie
Deze omvat de constructie-, productie en materiaal fouten. Hier buiten vallen de gebreken ten gevolgen van nalatig gebruik of Interferentie op het
toestel.
2 års garanti
Garantien omfatter konstruktions-, produktions- og matrialefejl. Sliddele og
fejlbrug er ikke indbefattet.
2 vuoden takuu
Takuu käsittää konstruktio-, tuotanto- sekä materiaalivirheet. Takuun ulkopuolelle jäävät kaikki kuluvat osat sekä asiantuntematon käyttö tai hoito.
2 års garanti
Denne garantien dekker feil ved konstruksjon, produksjon og materialet anvendt. Alle reservedeler er utelatt fra garantien, samt uriktig bruk og vedlikehold.
2 års garanti
Denna garanti täcker brister i tillverkning, produktion och material. Slitage
och olämpligt användande eller underhåll är uteslutna.
Page 93

Page 94

Page 95

Page 96

Design by Matti
Thanks to all people involved in this project: Del Xu for
his engagement and for building cultural bridges, John Ye
for the engineering and Zeng Ling Shang for his CAD work,
Mario Rothenbühler for the photos, Matti Walker for the
elegant design and the graphic work.
Martin Stadler, CEO Stadler Form Aktiengesellschaft
16-1
Sello del establecimiento de v enta / Stempel verkoo padres /
Forhandlerstempel / Åt erförsäljarens stämpel / Печать м агазин а
www.stadlerform.com
Stemp el Verkaufss telle / Retailer’s stamp /
Cache t du point de vente / Timbro del rivenditore /
Butik kens stempe / Leima myy ntikonttori /
 Loading...