

Page 1
Emma
Operating instructions
Gebrauchsanweisung
Mode d‘emploi
Istruzioni per l‘uso
Manual de instrucciones
Gebruiksaanwijzing
Brugsanvisning
Käyttöohje
Bruksanvisning
Bruksanvisning
Инструкция по эксплуатации
Page 2

Emma
131214
3
4
16
10
11
15
5
9
6
6
1
Not suitable for fragrance oils
Nicht für Duftöle geeignet
Incompatible avec les huiles essentielles
17
Page 3
A B C
8
7
2
A
G
R
E
A
R
N
H
A
J
2
•
E
I
T
N
A
R
A
G
E
D
S
E
T
I
E
•
2
Y
E
A
R
S
W
A
R
R
A
É
N
T
N
Y
N
•
A
2
Page 4

Share your feedback about Emma on:
Teilen Sie Ihr Feedback von Emma auf:
Partagez votre commentaire sur Emma :
www.stadlerform.com/Reviews
For frequently asked questions go to:
Für häufig gestellte Fragen besuchen Sie:
Trouvez la foire aux questions sur :
www.stadlerform.com/Emma/support
Download instruction manual:
Bedienungsanleitung hier herunterladen:
Téléchargez le mode d’emploi :
www.stadlerform.com/Emma/manual
Watch the video of Emma:
Schauen Sie sich das Video zu Emma an:
Regardez la vidéo du Emma :
www.stadlerform.com/Emma/video
Stadler Form Aktiengesellschaft, Chamerstrasse 174, 6300 Zug, Switzerland
Phone +41 41 720 48 48, Fax +41 41 720 48 44, www.stadlerform.com/contact
Page 5

English
Congratulations! You have just acquired the exceptional EMMA air humidifier. It will give you great pleasure and improve the indoor air for you.
Please note that Emma is a personal air humidifier. That means that she
feels most comfortable when she is close to you and she will humidify the
air around you.
As with all domestic electrical appliances, particular care is also needed
with this model in order to avoid injury, fire damage or damage to the appliance. Please study these operating instructions carefully before using this
appliance for the first time and follow the safety advice on the appliance
itself.
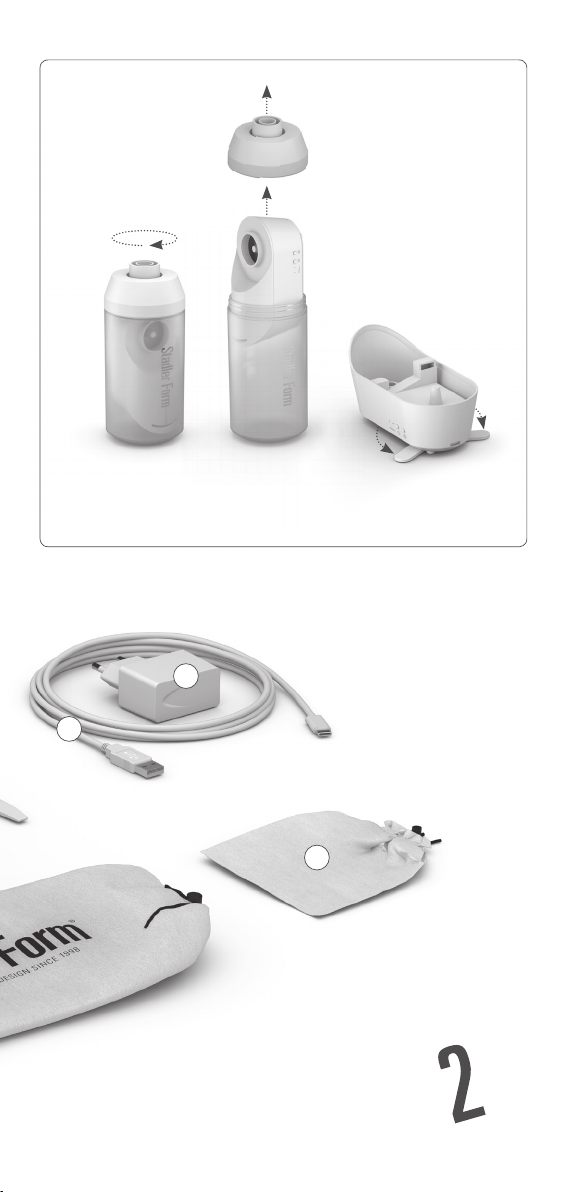
Description of the appliance
The appliance consists of the following main components:
1. Travel bag
2. Bag for adapter and cable
3. Bottle (water tank)
4. Bottle lid
5. Housing
6. Supporting feet
7. USB cable
8. Power adapter for power supply
9. Connection for USB cable
10. Housing cover
11. Water tra y
12. On/Off button and button for selection of humidification output level I + II
13. LED indicator for selected output level
14. Button for LED dimmer (normal, dimmed, lights-out)
15. Air outlet opening (Caution: no water may enter this opening!)
16. Mist outlet
17. Brush for cleaning of water tray
Important Safety Instructions
Please read through the operating instructions carefully before you use the
appliance for the first time and keep them safely for later reference; if necessary pass them on to the next owner.
• Stadler Form refuses all liability for loss or damage which arises as a
result of failure to follow these operating instructions.
• The appliance is only to be used in the home for the purposes described
in these instructions. Unauthorised use and technical modifications to the
appliance can lead to danger to life and health.
• This appliance can be used by children aged from 8 years and above and
persons with reduced physical, sensory or mental capabilities or lack of
experience and knowledge if they have been given supervision or instruction concerning use of the appliance in a safe way and understand the
hazards involved. Children shall not play with the appliance. Cleaning and
user maintenance shall not be made by children without supervision.
• Only connect the cable to alternating current. Observe the voltage information given on the appliance.
• Do not use damaged extension cords.
Page 6

• Do not run the power cord over sharp edges and make sure that it does
not get trapped.
• Do not pull the plug from the socket with wet hands or by holding on to
the power cord.
• Do not use the appliance in immediate vicinity of a bath tub, a shower or a
swimming pool (observe a minimum distance of 3 m). Place the appliance
such that a person in the bath tub cannot touch the appliance.
• Do not place the appliance near a heat source. Do not subject the power
cord to direct heat (such as a heated hotplate, open flames, hot iron sole
plates or heaters for example). Protect power cords from oil.
• See to it that the appliance is properly positioned to ensure a high stability during its operation and make sure that no one can trip over the power
cord.
• The appliance is not splash-proof.
• For indoor use only.
• Do not store the appliance outdoors.
• Store the appliance in a dry place inaccessible to children (pack the appliance).
• If the power cord is damaged, it must be replaced by the manufacturer
or a repair shop authorized by the manufacturer or by similarly qualified
persons in order to avoid a hazard.
• Prior to any maintenance, cleaning and after each use, switch off the appliance and unplug the cable from the socket.
• Repairs to electrical appliances must only be carried out by a qualified
electrical technician.
• Only use the adapter provided by the manufacturer.
Before setup
A. Take the travel bag (1) and the bag containing the adapter and cable (2)
out of the packaging. Open the travel bag (1) and take out the bottle (3).
B. Now turn the lid (4) to open the bottle and take the housing (5) out of the
bottle.
C. Fold out both of the supporting feet (6) to improve the stability of the
appliance when the bottle is full.
Setting up / operation
1. Place Emma in the desired location, on a flat surface. Connect the USB
cable (7) to the power adapter (8) and to the housing (9) and insert the
adapter into a suitable mains socket. Alternatively, you can also connect the USB cable to another power source such as an external battery
pack/powerbank with at least 2A.
2. Fill the bottle (3) with clean, cold tap water and seal it by putting the lid
(4) on the bottle and turning it as far as it will go.
3. On the housing cover (10), there is a recess in which the bottle (3) is
placed. Place the bottle (3) in this recess with the lid (4) facing downwards. Water will now flow into the water tray (11). Important: every
time you take off and put back the bottle (3), some water will run into
the tray (11). If you do this too often, the water tray (11) may overflow
and damage the appliance. We therefore recommend that you only take
off the bottle when it needs to be refilled with water.
4. Switch on the appliance by pressing the On/Off button (12). After it has
been switched on, the LEDs (13) on the left nex t to the On/Off button (12)
Page 7

will light up. If not, check to make sure that there is sufficient water in
the tray (11) and that the adapter is connected to the power supply. The
appliance has two humidification output levels which are selected using
the On/Off button (12). Press once for level II/press twice for level I/
press three times to switch off. The number of LEDs (13) indicates which
level you have selected.
5. If you find the LEDs too bright (in a bedroom, for example), you can reduce the light intensity by pressing the dimmer button (14). There are
three different modes to choose from:
• Normal mode (default mode)
• Dimmed mode (press once)
• Lights-out mode (press twice)
Press the dimmer button (14) again to return to normal mode.
6. Emma is the ideal travel companion and also provides pleasant air humidity in dry hotel rooms. Allow the individual parts of the appliance to
dry completely before placing the housing (5) in the bot tle (3) and sealing
the bottle. If you don’t have time to do this, simply do it at home or at
your next destination as residual moisture in the sealed bottle can lead
to an unpleasant smell.
7. Allow all the parts of the appliance to dry completely first before you
store Emma. Then open the bottle (3) and store the housing (5) in the
bottle. Important: The housing must be placed in the bottle with the
mist outlet at the front (16). Otherwise it will be difficult to remove the
housing from the bottle again (see point B on page 3).
Cleaning
Before maintenance and after every use, switch the device off and pull the
power adapter (8) out of the socket. Before you clean Emma, the power
adapter must be unplugged.
Careful: Never immerse the device in water (danger of short circuit).
• To clean the outside, rub with a damp cloth and then dry thoroughly.
• Cleaning the bottle (3): Clean the bottle once a month using warm water, a drop of washing-up liquid and a brush or sponge. Then rinse out the
bottle thoroughly. If there are lime deposits in the bottle or on the lid of
the bottle (4), we recommend that you use a household descaling agent
or vinegar.
• Cleaning the water tray (11): Clean the water tray once a month. Remove the cover (10) from the housing (5). Empty the water tray (11) via the
front of the tray – where the mist outlet (16) is located. This will prevent
water from entering the air outlet opening (15). Now clean the tray using
warm water and the cleaning brush (17) provided. If there are lime deposits in the water tray, we recommend that you use Stadler Form Cleaner &
Descaler (www.stadlerform.com/accessories). Alternatively, you can use
a household descaling agent or vinegar. Then rinse the tray thoroughly.
• No water may enter the air outlet opening (15). This will damage the appliance and will void any claim to the warranty.
Repairs
• Repairs to electrical appliances must only be carried out by a qualified
electrical technician. If improper repairs are carried out, the warranty
lapses and all liability is refused.
Page 8
• Never operate the appliance if the adaptor or plug is damaged, after it has
malfunctioned, if it has been dropped or has been damaged in any other
way (cracks/breaks in the casing).
• Do not push any object into the appliance.
• If the appliance is beyond repair, make it unusable immediately by cutting
through the cable and hand it in at the collection point provided for the
purpose.
• In the event of a repair, the following points must be observed before the
appliance is shipped or taken to the dealer: completely empty the water
in the appliance (water tray or water tank), and allow the appliance to dry
completely. Appliances containing residual water may be damaged during
transport, invalidating the warranty.
Disposal
The European directive 2012 / 19 / CE on Waste Electrical and Electronic
Equipment (WEEE), requires that old household electrical appliances must
not be disposed in the normal unsorted municipal waste stream. Old appliances must be collected separately in order to optimize the recovery and
recycling of the materials they contain and reduce the impact on human
health and the environment. The crossed out “wheeled bin” symbol on the
product reminds you of your obligation, that when you dispose of
the appliance it must be separately collected. Consumers should
contact their local authority or retailer for information concerning
the correct disposal of their old appliance.
Specifications
Rated voltage DC 5 V
Rated power 10 W
Dimensions 125 x 215 x 80 mm
(width x height x depth)
Running Time 8 h level II / 12 h level I
Weight 0.4 kg
Water tank capacity 0.5 Liter
Sound level < 27 dB(A)
Complies with EU
regulations CE / WEEE / RoHS / EAC
All rights for any technical modifications are reserved
Page 9

Deutsch
Gratulation! Sie haben soeben den aussergewöhnlichen Luftbefeuchter
EMMA erworben. Sie wird Ihnen viel Freude machen und die Raumluft für
Sie verbessern.
Bitte beachten Sie, dass Emma eine persönliche Luftbefeuchter-Dame ist.
Das bedeutet , dass sie sich am wohlsten in Ihrer Nähe fühlt und die Luft rund
um Sie herum befeuchtet.
Wie bei allen elek trischen Haushaltsgeräten wird auch bei diesem Gerät zur
Vermeidung von Verletzungen, Brand- oder Geräteschäden besondere Sorgfalt verlangt. Bitte studieren Sie die vorliegende Betriebsanleitung vor der
Inbetriebnahme und beachten Sie die Sicherheitshinweise auf dem Gerät.
Gerätebeschreibung
Das Gerät besteht aus den folgenden Hauptkomponenten:
1. Reiseetui
2. Beutel für Adapter und Kabel
3. Flasche (Wassertank)
4. Flaschendeckel
5. Gehäuse
6. Standfüsse
7. USB-Kabel
8. Netzadapter für die Stromversorgung
9. Anschluss für USB-Kabel
10. Gehäuse-Abdeckung
11. Wasserwanne
12. Ein/Aus Knopf und Knopf für Befeuchtungsstufen I + II
13. LEDs für Anzeige der gewählten Leistungsstufe
14. Knopf für LED Dimmer (normal – gedimmt – aus)
15. Luftaustrittsöffnung
(Achtung, es darf kein Wasser in die Öffnung treten!)
16. Nebelauslass
17. Bürste zur Reinigung der Wasserwanne
Wichtige Sicherheitshinweise
Bitte lesen Sie die Gebrauchsanleitung genau dur ch, bevor Sie das Gerät das
erste Mal in Betrieb nehmen und bewahren Sie sie zum späteren Nachschlagen gut auf, geben Sie sie ggf. an den Nachbesitzer weiter.
• Für Schäden, die durch Nichtbeachten dieser Gebrauchsanleitung entstehen, lehnt Stadler Form jegliche Haftung ab.
• Das Gerät ist nur im Haushalt für die in dieser Gebrauchsanweisung
beschriebenen Zwecke zu benutzen. Ein nicht bestimmungsgemässer
Gebrauch sowie technische Veränderungen am Gerät können zu Gefahren
für Gesundheit und Leben führen.
• Dieses Gerät kann von Kindern ab 8 Jahren und Personen mit eingeschränkten körperlichen, sensorischen oder geistigen Fähigkeiten, aber
auch von unerfahrenen und unwissenden Personen verwendet werden,
sofern diese das Gerät unter Aufsicht verwenden oder von einer anderen
Person über die sichere Verwendung des Gerätes unterwiesen wurden
und sich der damit verbundenen Gefahren bewusst sind. Kinder sollten
nicht mit dem Gerät spielen. Kinder sollten das Gerät nur unter Aufsicht
reinigen und pflegen.
Page 10

• Schliessen Sie das Kabel nur an Wechselstrom an. Achten Sie auf die
Spannungsangaben auf dem Gerät.
• Keine beschädigten Verlängerungskabel verwenden.
• Das Netzkabel nicht über scharfe Kanten ziehen oder einklemmen.
• Den Stecker nie am Netzkabel oder mit nassen Händen aus der Steckdose
ziehen.
• Das Gerät nicht in unmittelbarer Nähe einer Badewanne, einer Dusche
oder eines Schwimmbeckens benutzen (Mindestabstand von 3 m einhalten). Gerät so aufstellen, dass Personen das Gerät von der Badewanne
aus nicht berühren können.
• Gerät nicht in der Nähe einer Wärmequelle aufstellen. Das Netzkabel
keiner direkten Hitzeeinwirkung (wie z.B. heisse Herdplatten, offene
Flammen, heisse Bügeleisen oder Heizöfen) aussetzen. Netzkabel vor Öl
schützen.
• Darauf achten, dass das Gerät beim Betrieb eine gute Standfestigkeit
besitzt und nicht über das Netzkabel gestolpert werden kann.
• Das Gerät ist nicht spritzwassergeschützt.
• Das Gerät ist nur zur Verwendung in Innenräumen geeignet.
• Das Gerät nicht im Freien aufbewahren.
• Das Gerät an einem trockenen und für Kinder unzugänglichen Ort aufbewahren (einpacken).
• Wenn das Netzkabel beschädigt ist, muss es vom Hersteller oder in einer
vom Hersteller zugelassenen Werkstatt oder von ähnlich qualifizierten
Personen ersetzt werden, um Gefahren zu vermeiden.
• Vor jeder Wartung, Reinigung und nach jedem Gebrauch das Gerät ausschalten und das Kabel vom Gerät trennen.
• Reparaturen an Elektrogeräten dürfen nur von instruierten Fachkräften
durchgeführt werden.
• Verwenden Sie nur den vom Hersteller mitgelieferten Adapter.
Vor der Inbetriebnahme
A. Nehmen Sie das Reiseetui (1) und den Beutel mit dem Adapter und Kabel
(2) aus der Verpackung. Öffnen Sie das Reiseetui (1) und entnehmen Sie
die Flasche (3).
B. Drehen Sie nun den Flaschendeckel (4) auf, um die Flasche zu öffnen und
ziehen Sie das Gehäuse (5) aus der Flasche.
C. Klappen Sie beide Standfüsse (6) nach aussen, um die Stabilit ät des Ger-
äts mit voller Flasche zu verbessern.
Inbetriebnahme / Bedienung
1. Stellen Sie Emma an den gewünschten Platz auf einen flachen Untergrund. Schliessen Sie das USB-Kabel (7) an den Netzadapter (8) und
an das Gehäuse (9) an und stecken Sie den Adapter in eine geeignete
Steckdose. Alternativ können Sie das USB-Kabel auch an eine andere
Stromquelle wie einen externen Akku (Battery Pack/Powerbank mit
mind. 2A) anschliessen.
2. Befüllen Sie die Flasche (3) mit frischem, kaltem Leitungswasser und
verschliessen Sie diese, in dem Sie den Flaschendeckel (4) bis zum Anschlag auf die Flasche drehen.
3. Auf der Gehäuse-Abdeckung (10) befindet sich eine Aussparung, auf der
die Flasche (3) platziert wird. Setzen Sie die Flasche (3) mit dem Deckel
(4) gegen unten auf diese Aussparung. Wasser läuft nun in die Was-
Page 11

serwanne (11). Wichtig: bei jedem Abheben und Wiederaufsetzen der
Flasche (3) läuft etwas Wasser in die Wanne (11). Wird dies zu häufig
gemacht, kann die Wasserwanne (11) überlaufen und das Gerät beschädigen. Wir empfehlen deshalb, die Flasche nur abzuheben, wenn Wasser
nachgefüllt werden muss.
4. Schalten Sie das Gerät ein, indem Sie den Ein/Aus Knopf (12) drücken.
Nach dem Einschalten leuchten die LEDs (13) links neben dem Ein/Aus
Knopf (12). Ist dies nicht der Fall, überprüfen Sie, ob genügend Wasser in
der Wanne (11) ist und der Adapter mit dem Stro m verbunden wurde. Das
Gerät verfügt über zwei Befeuchtungsstufen, die mit dem Ein/Aus Knopf
(12) ausgewählt werden. 1x Drücken = Stufe II / 2x Drücken = Stufe I / 3x
Drücken = ausschalten. Die Anzahl LEDs (13) weisen darauf hin, welche
Stufe gewählt ist.
5. Wenn Sie sich durch die Helligkeit der LEDs gestört fühlen (im Schlafzimmer zum Beispiel), können Sie die Leuchtintensität durch Drücken
des Dimmer-Knopfes (14) reduzieren. Sie können zwischen drei verschiedenen Modi wählen:
• Normaler Modus (standardmässig eingeschaltet)
• Gedimmter Modus (einmal drücken)
• Licht-aus Modus (zweimal drücken)
Durch nochmaliges Drücken des Dimmer-Knopfs (14) können Sie wieder
in den normalen Modus wechseln.
6. Emma ist die ideale Reise-Begleiterin und sorgt auch in trockenen Hotelzimmern für angenehme Luftfeuchtigkeit. Lassen Sie die einzelnen Geräteteile komplett trocknen, bevor Sie das Gehäuse (5) in die Flasche (3)
geben und die Flasche verschliessen. Bleibt dazu keine Zeit, holen Sie es
einfach Zuhause oder am nächsten Reiseziel nach. Denn Restfeuchtigkeit in der verschlossenen Flasche kann zu einem unangenehmen Geruch
führen.
7. Um Emma zu verstauen, lassen Sie zuerst alle Geräteteile komplett
trocknen. Anschliessend öffnen Sie die Flasche (3) und verstauen das
Gehäuse (5) in der Flasche. Wichtig: Das Gehäuse muss mit dem Nebelauslass (16) voran in die Flasche gegeben werden. Ansonsten ist das
Gehäuse nur mühsam wieder aus der Flasche zu entfernen (siehe Punkt
B auf Seite 3).
Reinigung
Vor jeder War tung und nach jedem Gebrauch das Gerät ausschalten und den
Netzadapter von der Steckdose trennen (8). Bevor Sie Emma reinigen, muss
der Netzadapter ausgesteckt werden.
Achtung: Das Gerät nie ins Wasser tauchen (Kurzschlussgefahr).
• Zur äusseren Reinigung mit einem feuchten Lappen abreiben und danach
gut trocknen.
• Flasche (3) reinigen: Reinigen Sie die Flasche einmal pro Monat mit
warmem Wasser, einem Tropfen Spülmittel und einer Bürste oder einem
Schwamm. Spülen Sie die Flasche danach gründlich aus. Bei Kalkablagerungen in der Flasche oder am Flaschendeckel (4) empfehlen wir einen
Haushaltentkalker oder Essig zu verwenden.
• Wasserwanne (11) reinigen: Reinigen Sie die Wasserwanne einmal
pro Monat. Heben Sie dazu die Abdeckung (10) vom Gehäuse (5) ab. Entleeren Sie die Wasserwanne (11) über den vorderen Teil der Wanne – dort
wo sich der Nebelauslass (16) befindet. Damit verhindern Sie, dass Was-
Page 12

ser in die Luftaustrittsöffnung (15) gelangt. Reinigen Sie die Wanne nun
mit warmem Wasser und der mitgelieferten Reinigungsbürste (17). Für
Kalkablagerungen in der Wasserwanne empfehlen wir den Stadler Form
Reiniger & Entkalker zu verwenden (www.stadlerform.com/zubehoer).
Alternativ können Sie einen Haushaltentkalker oder Essig verwenden.
Spülen Sie die Wanne danach gründlich aus.
• Es darf kein Wasser in die Luftaustrittsöffnung (15) gelangen. Dies beschädigt das Gerät, wodurch jeglicher Anspruch auf Garantie erlischt.
Reparaturen
• Reparaturen an Elektrogeräten (Wechseln des Netzkabels) dürfen nur
von instruierten Fachkräften durchgeführt werden. Bei unsachgemässen
Reparaturen erlischt die Garantie und jegliche Haftung wird abgelehnt.
• Nehmen Sie das Gerät nie in Betrieb, wenn ein Kabel oder Stecker beschädigt ist, nach Fehlfunktionen des Gerätes, wenn dieses heruntergefallen ist oder auf eine andere Art beschädigt wurde (Risse/Brüche am
Gehäuse).
• Nicht mit irgendwelchen Gegenständen in das Gerät eindringen.
• Ausgedientes Gerät sofort unbrauchbar machen (Netzkabel durchtrennen) und bei der dafür vorgesehenen Sammelstelle abgeben.
• Im Falle einer Reparatur müssen folgende Punkte beachtet werden, bevor
das Gerät verschickt oder zum Händler gebracht wird: das Wasser im Gerät komplett ausleeren (Wasserwanne bzw. Wassertank) und das Gerät
vollständig trocknen lassen. Geräte mit Restwasser werden während des
Transports beschädigt. Die Garantie erlischt in diesem Falle.
Entsorgung
Die europäische Richtlinie 2012 / 19 / CE über Elektro- und Elektronik-Altgeräte (WEEE) verlangt, dass elektrische Haushaltsgeräte nicht über den
Restmüll oder sonstigen Haushaltsabfall entsorgt werden dürfen, sondern
an Sammelpunkten für das Recycling von elektrischen und elektronischen
Geräten abgegeben werden müssen. So können die Verwertung der enthaltenen Materialien optimiert und ihre Auswirkungen auf die menschliche Gesundheit und die Umwelt reduziert werden. Das durchgestrichene
Abfalltonnensymbol auf dem Produkt erinnert Sie an diese Verpflichtung. Bitte fragen Sie bei Ihrer Gemeindeverwaltung nach
der zuständigen Entsorgungsstelle.
Technische Daten
Nennsp annung DC 5 V
Nennleist ung 10 W
Abmessungen 125 x 215 x 80 mm
(Breite x Höhe x Tiefe)
Laufzeit 8 h Stufe II / 12 h Stufe I
Gewicht 0.4 kg
Wassertank Kapazität 0.5 Liter
Schalldruckpegel < 27 dB(A)
Erfüllt EU-Vorschrift CE / WEEE / RoHS / EAC
Technische Änderungen vorbehalten
Page 13

Français
Félicitation! Vous venez d‘acheter le superbe humidificateur EMMA. Nous
espérons que cet appareil vous donnera entière satisfaction et améliorera
l’air intérieur pour vous.
Veuillez prendre en compte que notre dame Emma est un brumisateur individuel. Emma se sent le plus à l’aise près de vous pour humidifier l’air ambiant
à votre proximité
Comme pour tous les appareils ménagers électriques, il est important d‘entretenir cet app areil correctement afin d’éviter les ble ssures, les incendies ou
les dommages. Veuillez lire attentivement le présent mode d‘emploi avant la
mise en service et respecter les conseils de sécurité indiqués sur l’appareil.
Description de l’appareil
L’appareil est composé des éléments principaux suivants :
1. Étui de voyage
2. Pochette de rangement de l’adaptateur et du câble
3. Bouteille (réservoir d‘eau)
4. Couvercle de la bouteille
5. Boîtier
6. Pieds-supports
7. Cordon USB
8. Adaptateur secteur pour l’alimentation électrique
9. Port de raccordement pour cordon USB
10. Couvercle du boîtier
11. Base d‘eau
12. Bouton marche/arrêt et bouton de sélection
des niveaux d‘humidification I + II
13. DEL d’affichage du niveau de puissance sélectionné
14. Bouton variateur DEL (normal – tamisé – éteint)
15. Sortie d’air (Attention à ne pas y laisser pénétrer de l’eau !)
16. Sortie de brume
17. Brosse de nettoyage pour la base d‘eau
Conseils de sécurité importants
Veuillez lire attentivement le mode d‘emploi avant la première mise en service de l’appareil et conservez-le pour toute consultation ultérieure ou remettez-le, le cas échéant, au nouveau propriétaire.
• La société Stadler Form décline toute responsabilité des dommages résultant du non-respect des indications données dans ce mode d‘emploi.
• Cet appareil ne doit être utilisé qu’aux fins domestiques décrites dans ce
mode d’emploi. Toute utilisation contraire à sa destination ainsi que toute
modification technique apportée à l’appareil peut entraîner des risques
pour la santé et la vie.
• Cet appareil peut être utilisé par les enfants âgés de 8 ans et plus et les
personnes aux capacités physiques, sensorielles ou mentales réduites
ou ne disposant pas de l’expérience ou de la connaissance nécessaire,
sous surveillance ou s’ils ont reçu les instructions concernant l’utilisation
de l’appareil et s’ils comprennent les dangers impliqués. Les enfants ne
doivent pas jouer avec l’appareil. Les opérations de nettoyage et d’entretien ne doivent pas être effectuées par des enfants sans surveillance.
Page 14

• Ne branchez le câble qu’au courant alternatif. Tenez compte des indications de tension situées sur l‘appareil.
• Ne pas utiliser de rallonge électrique endommagée.
• Ne pas faire passer ou coincer le câble d’alimentation par-dessus des
arêtes vives.
• Ne jamais retirer la fiche de courant de la prise en tirant sur le câble d’alimentation ou en ayant les mains mouillées.
• Ne pas utiliser l’appareil à proximité immédiate d’une baignoire, d’une
douche ou d’une piscine (respecter une distance minimum de 3 m). Placer
l’appareil de telle façon à ce que personne ne puisse le toucher à partir de
la baignoire.
• Ne pas placer l’appareil à proximité directe d‘ une source de chaleur. Ne
pas exposer le câble d’alimentation à la chaleur (comme p. ex. une plaque
chaude de cuisinière, flammes nues, semelle chaude de fer à repasser ou
poêles). Protéger le câble d’alimentation de tout contact avec de l‘huile.
• Veiller à ce que l’appareil ait une bonne stabilité lors de son fonctionnement et que l’on ne puisse pas trébucher sur le câble d’alimentation.
• Cet appareil n’est pas protégé contre les projections d’eau.
• Pour usage intérieur uniquement.
• L’appareil ne doit pas être conservé à l’extérieur.
• Conserver l’appareil à un endroit sec et hors de portée des enfants (l’emballer).
• Si le cordon d’alimentation est endommagé, le faire remplacer par le fabricant ou par un atelier agréé par le fabricant ou des personnes qualifiées
en conséquence, afin d’éviter tout danger.
• Avant toute opération d’entretien, de nettoyage et après chaque utilisation, éteignez l’appareil et débranchez le câble secteur de la prise.
• Les réparations sur les appareils électriques ne doivent être effectuées
que par des électriciens qualifiés.
• Veuillez utiliser uniquement l’adaptateur fourni par le fabricant.
Avant la mise en marche
A. Sortez de l’emballage l’étui de voyage (1) ainsi que la pochette de range-
ment de l’adaptateur et du câble (2). Ouvrez l’étui de voyage (1) et sortez
la bouteille (3).
B. Maintenant, dévissez le couvercle de la bouteille (4) pour ou vrir celle-ci et
sortez le boîtier (5) de la bouteille.
C. Rabattez les deux pieds-supports (6) vers l’extérieur pour assurer une
bonne stabilité de l’appareil avec la bouteille pleine.
Mise en marche / Manipulation
1. Placez Emma à l’endroit de votre choix, sur une surface plane. Raccordez
le cordon USB (7) à l’adaptateur secteur pour l’alimentation électrique (8)
et au boîtier (9) et branchez l’adaptateur dans une prise adaptée. Vous
pouvez également brancher le cordon USB à une autre source de courant, par ex. une batterie externe de type powerbank d’une puissance
minimale de 2A.
2. Remplissez la bouteille (3) d‘eau du robinet propre et fraîche et refermez
la bouteille en vissant jusqu’en butée le couvercle de la bouteille (4) sur
la bouteille.
3. L’évidemment sur le couvercle du boîtier (10) sert à positionner la bouteille (3). Placez la bouteille (3) avec son couvercle (4) vers le bas sur cet
Page 15

évidemment. L’eau s’écoule alors dans la base d’eau (11). Important : à
chaque fois que vous placez ou enlevez la bouteille (3), un peu d’eau coule
dans la base d‘eau (11). Si vous répétez cette opération trop souvent,
la base d’eau (11) risque de déborder de d’endommager l’appareil. Nous
recommandons donc d’enlever la bouteille uniquement pour la remplir.
4. Appuyez sur le bouton marche/arrêt (12) pour mettre Emma en marche.
Après avoir branché l’appareil, les DEL (13) situées sur la gauche à côté
du bouton marche/arrêt (12) s’allument. Si ce n’est pas le cas, vérifiez si
le niveau d’eau dans la base d’eau (11) est suffisant et si l’adaptateur
est mis sous tension. L’appareil propose deux niveaux d’humidification
dont la sélection s’effectue à l’aide du bouton marche/arrêt (12). Appuyez
une fois = niveau II / appuyez deux fois = niveau I / appuyez trois fois =
éteindre. Le nombre de DEL (13) indique le niveau sélectionné.
5. Si l’intensité des DEL vous dérange (dans la chambre à coucher par exemple), vous pouvez réduire leur luminosité en appuyant sur le bouton
variateur (14). Vous disposez de trois modes différents :
• Mode normal (allumage standard)
• Mode tamisé (appuyez une fois)
• Mode lumière éteinte (appuyez deux fois)
Pour revenir au mode normal, il vous suffit d’appuyer à nouveau sur le
bouton variateur (14).
6. Emma est la compagne de voyage idéale pour veiller à une humidité de
l’air agréable dans les chambres d‘hôtels où règne un air sec. Laissez
sécher entièrement tous les éléments de l’appareil avant de placer le boîtier (5) dans la bouteille (3) et de refermer la bouteille. S’il ne vous reste
pas suffisamment de temps, effectuez cette opération chez vous ou lors
de votre prochaine étape du voyage. En effet, l’humidité restante dans la
bouteille fermée peut générer une odeur désagréable.
7. Avant de ranger Emma, laissez sécher entièrement tous les éléments de
l’appareil. Ensuite, ouvrez la bouteille (3) dans laquelle vous déposerez le
boîtier (5). Important : placez le boîtier dans la bouteille, avec la sortie
de brume (16) en premier. Autrement, il est difficile d’extraire le boîtier
hors de la bouteille (voir point B, à la page 3).
Nettoyage
Avant chaque entretien et après chaque emploi, éteindre l’appareil et retirer
l’adaptateur de réseau (8) de la prise de courant. Avant de nettoyer Emma, il
faut que l’adaptateur de réseau soit débranché.
Attention: Ne jamais plonger l’appareil dans l’eau (danger de court-circuit).
• Pour le nettoyage extérieur, essuyer avec un chiffon humide, puis bien
sécher.
• Nettoyer la bouteille (3) : une fois par mois, nettoyez la bouteille à
l’eau chaude additionnée d’une goutte de produit vaisselle en utilisant
une brosse ou une éponge. Ensuite, rincez minutieusement la bouteille.
En présence de dépôts de calcaire dans la bouteille ou sur le couvercle de
la bouteille (4), nous conseillons d’utiliser un détartrant domestique ou du
vinaigre.
• Nettoyer la base d‘eau (11) : nettoyez la base d’eau une fois par mois.
Pour cela, démontez le couvercle (10) du boîtier (5). Videz la base d’eau (11)
en faisant s’écouler l’eau par la partie avant – là, où se situe la sortie de
brume (16). Vous évitez ainsi toute pénétration d’eau dans la sortie d‘air
(15). Nettoyez alors la base d’eau à l’eau chaude en utilisant la brosse de
Page 16
nettoyage livrée avec l’appareil (17). Pour les dépôts de calcaire dans la
base d’eau, nous conseillons d‘utiliser le Nettoyant & Détartrant Stadler
Form (www.stadlerform.com/accessoires). Vous pouvez aussi employer
un détartrant domestique ou du vinaigre. Ensuite, rincez minutieusement
la base d‘eau.
• L’eau ne doit en aucune manière pénétrer dans la sortie d’air (15). Cela
risque d’endommager l’appareil et annuler la garantie.
Réparations
• Les réparations sur les appareils électriques ne doivent être effectuées
que par des électriciens qualifiés. La garantie s’éteint et toute responsabilité est exclue en cas de réparations non conformes aux règles de l‘art.
• Ne mettez jamais l‘appareil en service en cas d’endommagement d’un
cordon ou d’une fiche, après un dysfonctionnement de l’appareil causé
par une chute ou par une autre détérioration de l’appareil (boîtier fissuré/
cassé).
• Ne pas pénétrer avec des objets quelconques dans l’appareil.
• A rrivé au bout de s a durée de vie, l’appareil doit immédiat ement être rendu
inutilisable (sectionner le cordon d’alimentation) et être déposé dans une
déchetterie prévue à cet effet.
• Dans le cas d’une réparation, veuillez tenir compte des points suivants
avant d’envoyer l’appareil ou de le ramener en magasin: videz entièrement
l’eau de l’appareil (bac à eau ou réservoir à eau) et laissez complètement
sécher l’appareil. Les appareils contenant des restes d’eau s’abîment pendant le transport. La garantie devient alors caduque.
Elimination
Conformément à la directive européenne 2012 / 19 / EC sur la mise au rebut
des déchets d’équipements électriques et électroniques (DEEE), les appareils ménagers usés ne doivent pas être jetés avec les déchets non triés.
Ces appareils usés doivent être collectés séparément des déchets ménagers
pour optimiser la récupération et le recyclage de leurs composants dans le
but de réduire les effets négatifs sur la santé humaine et sur l’environnement. Le symbole de poubelle avec roulettes et croix indique que ces produits doivent être collectés et mis au r ebut séparément des ordures
ménagères. Les consommateurs doivent contacter les autorités
locales ou leurs revendeurs concernant la mise au rebut de leurs
vieux appareils.
Caractéristiques techniques
Tension nominale DC 5 V
Puissa nce nominale 10 W
Dimensions 125 x 215 x 80 mm
(largeur x hauteur x profondeur)
Durée 8 h (niveau II) / 12 h (niveau I)
Poids 0,4 kg
Volume du réservoir d’eau 0,5 litres
Niveau de bruit < 27 dB(A)
Conforme à la
réglementation UE CE / DEEE / RoHS / EAC
Sous réserve de modifications techniques
Page 17

Italiano
Congratulazioni! Avete appena acquistato il fantastico umidificatore
EMMA. Sarà estremamente piacevole e migliorerà l’aria nell’ambiente per
voi.
Le ricordiamo che Emma è un umidificatore personale. Ciò significa che si
sente meglio nelle sue vicinanze e che umidifica l’aria attorno a lei.
Come con tutte le apparecchiature elettriche domestiche, è necessaria particolare attenzione anche con questo modello, al fine di evitare infortuni,
danni da incendio o danni al dispositivo. Studiare con attenzione queste
istruzioni per l’uso prima di utilizzare il dispositivo per la prima volta e seguire tutte le istruzioni di sicurezza fornite con esso.
Descrizione dell’apparecchio
L’apparecchio consiste delle seguenti componenti principali:
1. Astuccio da viaggio
2. Sacchetto per adattatore e cavo
3. Bottiglia (serbatoio dell’acqua)
4. Tappo della bottiglia
5. Corpo
6. Piedini
7. Cavo USB
8. Trasformatore per l’alimentazione elettrica
9. Connettore per il cavo USB
10. Copertura corpo
11. Vaschet ta dell’acqua
12. Interruttore on/off e pulsante per i livelli di umidificazione I + II
13. LED per l’indicazione del livello di prestazione selezionato
14. Interruttore per la regolazione della luminosità del LED
(normale - attenuato - spento)
15. Uscita d’aria (Attenzione: non lasciare penetrare l’acqua!)
16. Uscita della nebbia
17. Spazzola per la pulizia della vaschetta dell’acqua
Importanti istruzioni di sicurezza
Prima di utilizzare l’apparecchio leggere attentamente le istruzioni per l’uso.
Dopo aver letto le istruzioni per l’uso, conservarle con cura per la futura
consultazione.
• La Stadler Form respinge ogni responsabilità per la perdita o danni che
incorrano come risultato di un mancato rispetto di queste istruzioni d’uso.
• L’apparecchio dev’essere usato solo in casa e per gli scopi descritti in
queste istruzioni. L’uso non autorizzato e le modifiche tecniche all’apparecchio possono portare a pericoli per la vita e la salute.
• Questo apparecchio può essere utilizzato da bambini di età superiore agli
8 anni e persone con ridotte capacità mentali, fisiche o sensoriali o prive
di esperienza e conoscenze in merito, in presenza di altre persone che
ne sorveglino l’operato o ricevano istruzioni sull’uso dell’apparecchio in
modo sicuro e ne comprendano i pericoli. I bambini non devono giocare
con l’apparecchio. Pulizia e manutenzione non deve essere effettuata da
bambini senza supervisione.
• Collegate il cavo solo alla corrente alternata. Rispettate le informazioni
sul voltaggio riportate sull’apparecchio.
Page 18

• Non utilizzate prolunghe danneggiate.
• Non fate scorrere il cavo su bordi taglienti ed assicuratevi che non rimanga incastrato.
• Non tirate il cavo dalla presa con mani umide o afferrando il cavo stesso.
• Non utilizzate ques to apparecchio nelle immediate vicinanze di una vasca,
una doccia o una piscina (rispettate una distanza minima di 3 m). Posizionate l’apparecchio in modo che una persona dentro la vasca non possa
toccare l’apparecchio.
• Non posizionate l’apparecchio vicino ad una sorgente di calore. Non sottoponete il cavo di alimentazione al calore diretto (come piastre, fiamme
libere, ferri da stiro caldi o caloriferi per esempio). Proteggete i cavi di
alimentazione dall’olio.
• Fate in modo che l’apparecchio sia posizionato appropriatamente per assicurare una buona stabilità durante il suo funzionamento ed assicuratevi
che nessuno possa inciampare sul cavo.
• L’apparecchio non è impermeabilizzato.
• Solo per uso interno.
• Non conservare questo apparecchio all’esterno.
• Riponete l’apparecchio in un luogo asciutto inaccessibile ai bambini (rimettete l’apparecchio nella confezione).
• Se il cavo di alimentazione è danneggiato, dev’essere sostituito dal produttore, dal responsabile della manutenzione o da una persona similarmente qualificata per evitare pericoli.
• Spegnere l’apparecchio ed estrarre il cavo dall’apparecchio prima di ogni
manutenzione, pulizia e dopo ogni utilizzo.
• Le riparazioni agli apparecchi elettrici devono essere effettuate solo da
tecnici elettricisti qualificati.
• Utilizzare esclusivamente l’adattatore fornito dal produttore.
Prima del montaggio
A. Togliere l’astuccio da viaggio (1) e il sacchetto con l’adattatore e il cavo
(2) dalla confezione. Aprire l’astuccio da viaggio (1) ed estrarre la bottiglia (3).
B. Ora svitare il tappo della bottiglia (4) per aprire la bottiglia ed estrarre il
corpo (5) dalla bottiglia.
C. Ribaltare verso l’esterno entrambi i piedini (6) per migliorare la stabilità
dell’apparecchio con la bottiglia piena.
Impostazione / Utilizzo
1. Posizionare Emma nel luogo desiderato su una superficie piana. Collegare il cavo USB (7) al trasformatore (8) e al corpo (9) e quindi inserire il
trasformatore in una presa elettrica adatta. In alternativa è anche possibile collegare il cavo USB a un’altra sorgente di elettricità come una
batteria esterna (Battery Pack/Powerbank con min. 2A).
2. Riempire la bot tiglia (3) con acqua di rubinett o fredda e pulita e chiuderla
avvitando il tappo della bottiglia (4) fino a battuta.
3. Sulla copertura corpo (10) è presente un incavo nel quale viene posizionata la bottiglia (3). Posizionare la bottiglia (3) con il tappo (4) verso
il basso nell’incavo. L’acqua ora scorre nella vaschetta dell’acqua (11).
Importante: ogni volta che la bottiglia (3) viene tolta e riposizionata un
poco d’acqua defluirà nella vaschetta (11). Se questa operazione viene
Page 19

eseguite troppo frequentemente la vaschetta dell’acqua (11) potrebbe
traboccare e danneggiare l’apparecchio. Per questo motivo si consiglia
di togliere la bottiglia solo se è necessario aggiungere acqua.
4. Accendere l’apparecchio premendo l’interruttore on/off (12). Dopo
l’accensione i LED (13) a sinistra, accanto all’interruttore on/off (12), si
accendono. Se non è questo il caso controllare se vi è sufficiente acqua
nella vaschetta (11) e se l’adattatore è collegato all’alimentazione elettrica. L’apparecchio dispone di due livelli di umidificazione selezionabili
tramite l’interruttore on/off (12). 1 pressione = livello II / 2 pressioni =
livello I / 3 pressioni = spegnimento. Il numero di LED (13) indica il livello
selezionato.
5. Se la luce dei LED disturba (ad esempio in camera da letto) è possibile
ridurne la luminosità premendo l’interruttore per la regolazione della luminosità (14). È possibile scegliere tra tre modalità differenti:
• modalità normale (atttivata come standard)
• modalità ridotta (una pressione)
• luce spenta (due pressioni)
Premendo nuovamente l’interr uttore per la regolazione della luminosità
(14) è possibile tornare alla modalità normale.
6. Emma è la compagna di viaggio ideale e assicura una gradevole umidità
dell’aria anche nelle camere d’albergo più asciutte. Lasciare asciugare
completamente i singoli componenti dell’apparecchio prima di inserire il
corpo (5) nella bottiglia (3) e chiudere la bottiglia. Se non vi fosse tempo
sufficiente a questo scopo eseguire questa operazione a casa oppure
durante la successiva tappa di viaggio. L’umidità residua nella bottiglia
chiusa può provocare un odore sgradevole.
7. Prima di riporre Emma lasciare asciugare completamente tutti i componenti dell’apparecchio. Sucessivamente apire la bottiglia (3) e riporre il
corpo (5) nella bottiglia. Importante: Il corpo deve essere inserito nella
bottiglia con l’uscita della nebbia (16) posizionata in alto. Altrimenti sarà
difficoltoso estrarre il corpo dalla bottiglia (vedi punto B a pagina 3).
Pulizia
Prima di effet tuare la manutenzione e dopo ogni uso, spegnete il dispositivo
e scollegate l’alimentazione (8) dalla presa. Prima di pulire Emma, l’alimentatore dev’essere scollegato.
Attenzione: Non immergete mai il dispositivo in acqua (pericolo di corto
circuito).
• Per pulire l’esterno, passatelo con un panno umido e quindi asciugatelo
bene.
• Pulizia della bottiglia (3): pulire la bottiglia una volta al mese con
acqua calda, una goccia di detergente per piatti e una spazzola o una
spugna. Quindi sciacquare accuratamente la bottiglia. In caso di depositi
di calcare nella bottiglia o sul tappo della bottiglia (4) è consigliabile utilizzare un prodotto anticalcare oppure dell’aceto.
• Pulizia della vaschetta dell’acqua (11): pulire la vaschetta dell’acqua
una volta al mese. A questo scopo sollevare la copertura corpo (10) dal
corpo (5). Vuotare la vaschetta dell’acqua (11) dalla parte anteriore della
vaschetta – dove si trova l’uscit a della nebbia (16). In questo modo si evita
l’ingresso dell’acqua nell’uscita d’aria (15). Ora lavare la vaschetta con
acqua calda e con la spazzola in dotazione (17). Per i depositi di calcare si
Page 20

consiglia l’uso del Pulitore e anticalcare Stadler Form (www.stadlerform.
com/accessories). In alternativa è possibile utilizzare un prodot to anticalcare o dell’aceto. Quindi sciacquare accuratamente la vaschetta.
• Non far entrare l’acqua nella uscita d’aria (15). Il dispositivo ne risulterebbe danneggiato, con annullamento della garanzia.
Riparazione
• Le riparazioni agli apparecchi elettrici devono essere effettuate solo da
tecnici elettricisti qualificati. Se vengono effettuate riparazioni improprie, la garanzia viene annullata e tutte le responsabilità sono rifiutate.
• Non utilizzate mai l’apparecchio se l’alimentatore o la spina sono danneggiati, dopo un malfunzionamento, se è stato fatto cadere o è stato
danneggiato in qualunque altro modo (rotture/crepe nell’involucro).
• Non spingete oggetti nell’apparecchio.
• Se l’apparecchio è irreparabile, rendetelo inutilizzabile immediatamente
e consegnatelo al punto di raccolta appropriato.
• In caso di riparazione, prima di spedire o di portare l’apparecchio dal negoziante, devono essere rispettati i seguenti punti: vuotare tutta l’acqua
dall’apparecchio (vaschetta dell’acqua o serbatoio dell’acqua) e far asciugare l’apparecchio completamente. Gli apparecchi con residui d’acqua
vengono danneggiati durante il trasporto. In questo caso non può essere
applicata la garanzia.
Smaltimento
La Direttiva Europea 2012 / 19 / CE sullo Smaltimento dei rifiuti elettrici
ed elettronici (WEEE) prevede che i dispositivi elettrici domestici usati non
devono essere smaltiti nelle discariche municipali di rifiuti indifferenziati. I
dispositivi usati devono essere raccolti separatamente in modo da ottimizzare il recupero e il riciclaggio dei materiali in essi contenuti e ridurre l’impatto sulla salute e sull’ambiente. Il simbolo del “cestino con ruote” barrato
sul prodotto ricorda l’obbligo di smaltire il dispositivo mediante
raccolta dif ferenziata. I c onsumatori devono con tattare le au torità
locali o il rivenditore per informazioni relative al corretto smaltimento di dispositivi usati.
Specifiche
Tensione nominale DC 5 V
Potenza assorbita 10 W
Dimensioni 125 x 215 x 80 mm
(larghezza x altezza x profondità)
Tempo di funzionamento 8 h livello II / 12 h livello I
Peso 0.4 kg
Capacità del serbatoio acqua 0.5 Litri
Rumorosità < 27 dB(A)
Conforme con i
regolamenti UE CE / WEEE / RoHS / EAC
Tutti i diritti relativi a qualsiasi modifica tecnica
sono riservati
Page 21

Español
¡Enhorabuena! Acaba de comprar un extraordinario humidificador de aire
EMMA. Estamos seguros de que mejora para usted el aire en los ambientes
cerrados.
Tenga en cuenta que Emma es toda una dama entre los humidificadores
personales. Esto significa que donde mejor se encuentra es cerca de usted
para, de esta forma, humidificar el aire a su alrededor.
Como con todos los aparatos electrodomésticos también este aparato exige un especial cuidado para evitar heridas, daños causados por incendios
o daños en el aparato. Le rogamos por lo tanto que lea detenidamente el
presente manual de instrucciones antes de proceder a su puesta en marcha
y preste atención a las advertencias de seguridad indicadas en el aparato.
Descripción del aparato
El aparato tiene los siguientes componentes principales:
1. Estuche de viaje
2. Bolsa para adaptador y cable
3. Botella (depósito de agua)
4. Tapa de la botella
5. Carcasa
6. Pies de apoyo
7. Cable USB
8. Adaptador de red para el suministro eléctrico
9. Conexión para el cable USB
10. Cubierta de la carcasa
11. Bandeja de agua
12. Botón de encendido/apagado y botón para la selección del nivel
de humedad deseada I + II
13. LED para mostrar el nivel de potencia seleccionado
14. Botón para el regulador de intensidad del LED
(normal, atenuado, apagado)
15. Salida de aire (Precaución: ¡no puede entrar agua en esta abertura!)
16. Salida de vapor
17. Cepillo para la limpieza de la bandeja de agua
Advertencias de seguridad importantes
Por favor, lea detenidamente el manual de instrucciones antes de poner en
marcha por primera vez el aparato y guárdelas bien por si necesitara consultarlas de nuevo más adelante o, dado el caso, pasárselas a un futuro nuevo
propietario.
• Stadler Form declina cualquier responsabilidad por los daños resultantes
de una utilización del aparato no conforme a este manual de instrucciones.
• El aparato sólo se ha de utilizar en el hogar y con los fines descritos en
este manual de instrucciones. Una utilización no conforme a las disposiciones así como modificaciones técnicas en el aparato pueden poner en
peligro la salud y la vida.
• Este aparato pueden usarlo los niños mayores de 8 años y aquellas personas con capacidades físicas, sensoriales o mentales reducidas o con falta
de experiencia siempre y cuando se les haya dado una formación o supervisión respecto al uso del aparato de una forma segura y entiendan los
Page 22

riesgos que implica. Los niños no deben jugar con el aparato. La limpieza
y el mantenimiento del usuario no deben hacerlo niños sin supervisión.
• Conecte el cable sólo a la corriente alterna. En el aparato, fíjese en las
indicaciones sobre el voltaje.
• No utilice ningún cable alargador estropeado.
• No pase el cable de red sobre bordes afilados ni lo pise.
• Nunca tire del enchufe del cable de red ni lo extraiga de la toma de corriente con las manos mojadas.
• No emplee el aparato de aire cerca de bañeras, duchas o piscinas (mantenga una distancia mínima de 3 m). Coloque el aparato de manera que no
sea posible tocarlo al salir de la bañera.
• No sitúe el aparato cerca de un foco calorífico. No exponga el cable de
red directamente al calor (como p.ej. fogones calientes, llamas, planchas
calientes o estufas). Proteja el cable de red del aceite.
• Asegúrese de que, durante su funcionamiento, el aparato mantiene una
buena estabilidad y que no tropieza con el cable de red.
• El aparato no está protegido contra salpicaduras de agua.
• Sólo para uso en el interior del hogar.
• No guarde el aparato en el exterior.
• Mantenga (empaquete) el aparato en un lugar seco e inaccesible para
los niños.
• En caso de que el cable de red esté dañado, debe ser sustituido por el
fabricante o un taller autorizado por el fabricante o personas calificadas
para evitar cualquier riesgo.
• Antes de proceder con cada trabajo de mantenimiento o limpieza, y tras
cada uso, apagar el aparato y desconectar el cable de la red.
• Las reparaciones en los aparatos eléctricos sólo han de ser llevadas a
cabo por personal especializado y debidamente formado.
• Utilice únicamente el adaptador proporcionado por el fabricante.
Antes de la puesta en funcionamiento
A. Saque el estuche de viaje (1) y la bolsa con el adaptador y el cable (2) del
embalaje.Abra el estuche de viaje (1) y saque la botella (3).
B. Gire la tapa de la botella (4) para abrirla y saque la carcasa (5) de la
botella.
C. Abra los dos pies de apoyo (6) hacia fuera para mejorar la estabilidad del
aparato con la botella completamente llena.
Puesta en funcionamiento / manejo
1. Coloque a Emma en el lugar deseado y sobre una superficie plana. Conecte el cable USB (7) al adaptador de red (8) y a la carcasa (9) e inserte
el adaptador en un enchufe adecuado. De forma alternativa, también podrá conectar el cable USB a otra fuente de corriente, como una batería
externa (pack de baterías/powerbank con al menos 2 A).
2. Llene la botella (3) con agua corriente fría y ciérrela. Para ello, gire la
tapa de la botella (4) hasta alcanzar el tope.
3. En la cubierta de la carcasa (10) verá una hendidura sobre la que colocar
la botella (3). Coloque la botella (3) con la tapa (4) hacia abajo sobre esta
hendidura. El agua pasará a la bandeja de agua (11). Importante: cada
vez que se levanta y se vuelve a colocar la botella (3) cae un poco de
agua en la bandeja (11). Si se hace con demasiada frecuencia, el agua
Page 23

de la bandeja (11) se derramará y dañará el aparato. Por ello le recomendamos que retire la botella solamente cuando deba rellenarla con agua.
4. Encienda el aparato pulsando el botón de encendido/apagado (12). Tras
el encendido se iluminarán los LED (13) de la izquierda, junto al botón
de encendido/apagado (12). Si este no es el caso, compruebe que haya
suficiente agua en la bandeja (11) y que el adaptador esté conectado a la
corriente. El aparato dispone de dos niveles de humedad que se pueden
seleccionar con el botón de encendido/apagado (12).1 pulsación = nivel
II / 2 pulsaciones = nivel I / 3 pulsaciones = apagar. El número de LED (13)
le indicará qué nivel se ha seleccionado.
5. Si le molesta la luminosidad de los LED (por ejemplo, en el dormitorio),
puede reducir la intensidad de la luz pulsando el botón del regulador de
intensidad (14). Puede escoger entre tres modos distintos:
• Modo normal (activado de manera estándar)
• Modo atenuado (presionar una vez)
• Modo de luces apagadas (presionar dos veces)
Para regresar al modo normal, vuelva a presionar el botón del regulador
de intensidad (14).
6. Emma es su compañera ideal de viaje, y se encargará de proporcionarle una agradable humedad del aire incluso en el ambiente seco de las
habitaciones de hotel. Deje que las partes del aparato se sequen por
completo antes de introducir la carcasa (5) en la botella (3) y de cerrar
esta última. Si no tiene tiempo para ello, hágalo tranquilamente en casa
o en su siguiente destino. Recuerde que la humedad residual en la botella cerrada puede producir olores muy poco agradables.
7. Antes de guardar a Emma, espere primero a que todas las piezas del
aparato se hayan secado por completo. A continuación, abra la botella
(3) y guarde la carcasa (5) en su interior. Importante: La carcasa se
debe guardar en la botella con la salida de vapor (16) hacia delante. De
lo contrario, será muy difícil sacar la carcasa de la botella (consulte el
punto B en la página 3).
Limpieza
Antes de cualquier operación de mantenimiento y después de cada uso,
apague el aparato y extraiga el adaptador de red (1) del enchufe. Antes de
limpiar a Julia, extraiga el adaptador de red de la conexión.
Atención: Nunca sumerja el aparato en agua (riesgo de cortocircuito).
• Para la limpieza exterior, frótelo con un paño húmedo y después séquelo
bien.
• Limpiar la botella (3): Limpie la botella una vez al mes con agua calien-
te, unas gotas de detergente y un cepillo o un estropajo. Enjuague bien
la botella tras su lavado. Si observa depósitos de cal en la botella o en la
tapa (4) le recomendamos que utilice un descalcificador de uso doméstico
o vinagre.
• Limpiar la bandeja de agua (11): Limpie la bandeja de agua una vez al
mes. Para ello, levante la cubierta de la carcasa (10) de dicha carcasa (5).
Vacíe la bandeja de agua (11) por la parte delantera, donde se encuentra
la salida de vapor (16). De esta forma evitará que el agua llegue a la salida
de aire (15). Limpie la bandeja solamente con agua caliente y el pincel
de limpieza suministrado (17). En el caso de haber depósitos de cal en la
bandeja de agua le recomendamos el uso del limpiador y descalcificador
Page 24

de Stadler Form (www.stadlerform.com/accessories). De forma alternativa también puede usar un descalcificador de uso doméstico o vinagre.
Enjuague bien la bandeja tras su lavado.
• No deje que entre agua en la abertura de salida de aire (15). Esto puede
dañar el aparato y anulará cualquier reclamación de la garantía.
Reparaciones
• Las repar aciones en los apar atos eléctric os (cambio del cable) sólo han de
ser llevadas a cabo por personal especializado y debidamente formado.
• En caso de haberse procedido a reparaciones indebidas, la garantía déjà
de tener efecto y se declina cualquier responsabilidad.
• Nunca ponga en marcha el aparato si el cable o el enchufe están estropeados, si falla alguna de las funciones, si el aparato se ha caído o si ha
sufrido algún otro desperfecto (rajas/roturas en el chasis).
• No introducir ningún tipo de objetos en el aparato.
• Una vez llegado el aparato al final de su vida útil, inutilizarlo inmediatamente (separar el cable) y entregarlo en el centro de recogida previsto a
tal efecto.
• En caso de llevarse a cabo labores de reparación se deberán tener en
cuenta los siguientes puntos antes de enviar o llevar el aparato al comerciante: vaciar por completo el agua del aparato (bandeja de agua y/o tanque de agua) y dejar que el aparato se seque del todo. Aquellos aparatos
que no se vacíen correctamente sufrirán daños durante el transporte. En
estos casos, la garantía se extinguirá.
Eliminación
La directiva europea 2012 / 19 / CE sobre residuos de equipos eléctricos
y electrónicos (WEEE), exige que los aparatos eléctricos domésticos antiguos no deben eliminarse en la recogida de residuos municipal normal sin
clasificar. Los aparatos antiguos deben recogerse de forma separada para
optimizar la recuperación y el reciclaje de los materiales y reducir el impacto
sobre la salud humana y el medioambiente. El símbolo del “cubo de basura”
tachado en el producto le recuerda su obligación de que, cuando se deshaga
del aparato, debe recogerse de forma separada. Los consumidores deben ponerse en contacto con las autoridades locales o con
el distribuidor para obtener información respecto a la correcta
eliminación del aparato antiguo.
Datos técnicos
Tensión nominal DC 5 V
Poten cia 10 W
Dimensiones 125 x 215 x 80 mm
(ancho x alto x largo)
Tiempo de funcionamiento 8 h en nivel II / 12 h en nivel I
Peso 0.4 kg
Capacidad del tanque de agua 0.5 Litros
Nivel de intensidad acústica < 257 dB(A)
Cumple la norma UE CE / WEEE / RoHS / EAC
Quedan reservadas modificaciones técnicas
Page 25

Nederlands
Gefeliciteerd met uw aankoop van dit bijzondere EMMA Luchtbevochtiger!
Dit apparaat voorziet uw kamer van de omgevingslucht voor u verbeteren.
Houd er rekening mee dat Emma een persoonlijke luchtbevochtiger is. Dat
betekent dat ze zich het prettigst voelt wanneer ze dicht bij u in de buurt is
en ze de lucht om u heen zal bevochtigen.
Zoals met alle elektronische apparaten, is zorgvuldig gebruik noodzakelijk
om verwonding, brandschade of schade aan het apparaat te vermijden. Bestudeer de instructies nauwkeurig en volg de adviezen op het apparaat zelf,
alvorens het apparaat voor het eerst te gebruiken.
Apparaatbeschrijving
Het apparaat bestaat uit de volgende onderdelen:
1. Reistas
2. Tas voor adapter en kabel
3. Fles (waterreservoir)
4. Flesdeksel
5. Behuizing
6. Steunvoeten
7. USB-kabel
8. Voedingsadapter voor voeding
9. Aansluiting voor USB-kabel
10. Afscherming behuizing
11. Wa t e r b a k
12. Aan/Uit-knop en knop voor selectie van bevochtigingsniveau I + II
13. LED-indicator voor geselecteerd niveau
14. Knop voor LED-dimmer (normaal, gedimd, licht uit)
15. Luchtuitlaat (let op: er mag geen water in deze opening binnendringen!)
16. Stoomuitlaat
17. Borstel voor het schoonmaken van waterbak
Belangrijke veiligheidsinstructies
Lees de instructies zorgvuldig door voordat u het apparaat voor het eerst
gebruikt en bewaar deze handleiding voor later gebruik; geef hem, indien
nodig, door aan de volgende eigenaar.
• Stadler Form is op geen enkele wijze aansprakelijk voor verlies of schade
ten gevolge van het nalaten van deze instructies.
• Het apparaat dient alleen in huis te worden gebruikt of voor de doeleinden
die in deze instructies worden beschreven. Interferentie op het toestel
door onbevoegden kan leiden tot gevaar voor de gezondheid.
• Dit apparaat kan worden gebruikt door kinderen van 8 jaar en ouder en
personen met gereduceerde fysieke, zintuiglijke of mentale capaciteiten
of met een tekort aan ervaring en kennis, vooropgesteld dat ze onder
toezicht staan of instructies hebben gekregen m.b.t. het gebruik van het
apparaat op een veilige wijze en begrijpen welke gevaren er kunnen optreden. Laat kinderen het apparaat niet als speelgoed gebruiken. Reiniging en gebruikersonderhoud mogen niet door kinderen zonder toezicht
worden uitgevoerd.
• Sluit de kabel alleen op wisselstroom aan. Let op de spanningsgegevens
op het apparaat.
• Gebruik geen beschadigde verlengkabels.
Page 26

• De netkabel mag niet over scher pe kanten heen worden getrokken of worden vastgeklemd.
• De stekker mag nooit aan de netkabel of met natte handen uit de contactdoos worden getrokken.
• Deze apparaat mag niet bij een ligbad, een douche of een zwembad worden gebruikt (minimumafstand van 3 m aanhouden). Plaats het apparaat
zo dat personen het apparaat vanaf de rand van het ligbad niet kunnen
aanraken.
• Plaats het apparaat niet in de buurt van een warmtebron. De netkabel
mag niet aan rechtstreekse hittewerking (bijv. heet fornuisplaat, open
vlammen, hete strijkzool of kachel) worden blootgesteld, netkabel tegen
olie beschermen.
• Let erop dat het apparaat bij het gebruik een goede stabiliteit heeft en
men niet over de netkabel kan struikelen.
• Het apparaat is niet tegen spattend water beschermd.
• Het apparaat niet buitenshuis opbergen.
• Uitsluitend voor gebruik binnenshuis.
• Het apparaat op een droge en voor kinderen niet toegankelijke plaats bewaren (inpakken).
• Als de netkabel beschadigd is, dient deze door de fabrikant of een door de
fabricant goedgekeurd servicebedrijf of soortgelijk gekwalificeerd personeel te worden vervangen om gevaarlijke situaties te voorkomen.
• Schakel voor elk onderhoud, schoonmaken en na elk gebruik het apparaat
uit en haal de kabel uit het stopcontact.
• Reparaties aan het toestel dienen te worden verricht door een erkende
reparateur.
• Alleen met de meegeleverde adaptor gebruiken.
Voor gebruik
A. Neem de reistas (1) en de tas met de adapter en kabel (2) uit de verpa-
kking. Open de reistas (1) en haal de fles eruit (3).
B. Draai nu aan het deksel (4) om de fles te openen en haal de behuizing (5)
uit de fles.
C. Klap beide steunvoeten (6) uit om de stabiliteit van het apparaat te ver-
beteren wanneer de fles vol is.
Gebruik / bediening
1. Plaats Emma in de gewenste positie op een vlak oppervlak. Sluit de
USB-kabel (7) aan op de voedingsadapter (8) en op de behuizing (9) en
steek de adapter in een geschikt stopcontact. U kunt ook de USB-kabel
aansluiten op een andere voedingsbron, zoals een externe batterij/powerbank met min. 2A.
2. Vul de fles (3) met schoon, koud kraanwater en verzegel deze door het
deksel (4) op de fles te plaatsen en zo ver mogelijk dicht te draaien.
3. Op de deksel van de behuizing (10) bevindt zich een uitsparing waarin
de fles (3) wordt geplaatst. Plaats de fles (3) in deze uitsparing met het
deksel (4) naar beneden gericht. Er stroomt nu water in de waterbak (11).
Belangrijk: telkens wanneer u de fles optilt en terugplaatst (3), zal er
wat water in de lade lopen (11). Als u dit te vaak doet, kan de waterlade
(11) overlopen en het apparaat beschadigen. We raden u daarom aan
om de fles alleen te verwijderen wanneer deze moet worden bijgevuld
met water.
Page 27

4. Schakel het apparaat uit door op de Aan/Uit-knop te drukken (12). Nadat deze is ingeschakeld, gaan de LED’s (13) aan de linkerkant naast de
Aan/Uit-knop (12) branden. Als dit niet het geval is, controleert u of er
voldoende water in de lade zit (11) en of de adapter op de voeding is
aangesloten. Het apparaat heeft twee bevochtigingsniveaus die met de
Aan/Uit-knop (12) worden geselecteerd. Druk één keer voor niveau II /
druk tweemaal voor niveau I / druk drie keer om uit te schakelen. Het
aantal LED’s (13) geeft aan welk niveau u hebt geselecteerd.
5. Als u de LED’s te helder vindt (bijvoorbeeld in een slaapkamer), kunt u
de lichtintensiteit verminderen door op de dimmerknop (14) te drukken.
U kunt kiezen uit drie modi:
• Normale modus (standaardmodus)
• Gedimde modus (één keer drukken)
• Lichten uit modus (druk twee keer)
Druk opnieuw op de dimmerknop (14) om terug te keren naar de normale
modus.
6. Emma is de ideale reisgenoot en zorgt ook voor een aangename luchtvochtigheid in droge hotelkamers. Laat de afzonderlijke delen van het
apparaat volledig drogen voordat u de behuizing (5) in de fles (3) plaatst
en de fles afdicht. Als u hier geen tijd voor heeft, doe het dan gewoon
thuis of op uw volgende bestemming omdat restvocht in de afgesloten
fles kan leiden tot een onaangename geur.
7. Laat alle onderdelen van het apparaat volledig drogen voordat u Emma
opbergt. Open vervolgens de fles (3) en bewaar de behuizing (5) in de
fles. Belangrijk: De behuizing moet in de fles worden geplaatst met de
stoomuitlaat vooraan (16). Anders zal het moeilijk zijn om de behuizing
weer uit de fles te verwijderen (zie punt B op pagina 3 ).
Reiniging
Voor elk onderhoud en na elk gebruik het toestel uitschakelen en de stekker
uit het stopcontact (8) trekken. Voordat u Emma schoonmaakt moet de wisselstroomadapter worden losgekoppeld.
Let op: Het toestel nooit onder water houden (gevaar voor kortsluiting).
• Het toestel schoonmaken met een vochtige doek en daarna goed droogmaken.
• De fles reinigen (3): Maak de fles eenmaal per maand schoon met war m
water, een druppel afwasmiddel en een borstel of spons. Spoel vervolgens de fles grondig uit. Als er kalkafzetting in de fles of op het deksel
van de fles zit (4), raden we aan om een huishoudelijk ontkalkingsmiddel
of azijn te gebruiken.
• Reinigen van de waterbak (11): Maak de waterbak een keer per maand
schoon. Verwijder de afscherming (10) van de behuizing (5). Leeg het waterreservoir (11) via de voorkant van de lade - waar zich de stoomuitlaat
(16) bevindt. Hiermee wordt voorkomen dat water in de luchtuitlaatopening (15) komt. Reinig nu de lade met warm water en het meegeleverde
schoonmaakborsteltje (17). Als er kalkaanslag in het waterreservoir zit,
raden we aan Stadler Form Reiniger & Ontkalker (www.stadlerform.com/
accessories) te gebruiken. U kunt ook een huishoudelijke ontkalker of azijn
gebruiken. Spoel daarna de bak grondig.
• Er mag geen water in de luchtuitlaat (15) terechtkomen. Hierdoor kan er
schade aan het apparaat optreden en vervallen alle aanspraken op garantie.
Page 28
Reparaties
• Reparaties aan het toestel dienen te worden verricht door een erkende
reparateur. Als onbevoegden interferentie hebben gemaakt op het toestel, dan vervalt de garantie evenals de aansprakelijkheid van Stadler
Form.
• Zet het toestel nooit aan wanneer de adapter of de stop beschadigd is,
nadat het defect is geweest, het gevallen is of op een andere manier is
beschadigd. (barsten/onderbrekingen in het omhulsel).
• Duw geen voorwerp in het toestel. Haal het zuiveringssysteem niet uit
elkaar.
• Als het toestel niet meer te repareren is, maak het dan onmiddellijk onbruikbaar en geef het af op het inzamelingspunt.
• Neem in geval van reparatie de volgende punten in acht voordat het apparaat wordt verzonden of naar de dealer wordt gebracht: waterbakje
resp. watertank volledig legen en het apparaat volledig laten drogen.
Restwater beschadigt het apparaat tijdens het transport. De garantie
vervalt in dat geval.
Verwijdering
De Europese richtlijn 2012 / 19 / EG inzake Afval van Elektrische en Elektronische Apparatuur (AEEA), vereist dat oude elektrische huishoudapparaten niet in de normale gemeentelijke ongesorteerde afvalstroom mogen
worden weggegooid. Oude apparaten moeten apart worden ingezameld
om recycling en hergebruik van de materialen daarin te optimaliseren en de
gevolgen op het milieu en de volksgezondheid te verminderen. Het symbool
met de doorgekruiste “vuilnisbak op wieltjes” op het product, herinnert u
aan uw verplichting, dat het toestel bij verwijdering gescheiden
ingezameld moet worden. C onsumenten moeten contact opnemen
met hun lokale autoriteit of verkoper voor informatie betreffende
de juiste verwijdering van hun oude toestel.
Specificaties
Nominale spanning DC 5 V
Nominale vermogen 10 W
Afmetingen 125 x 215 x 80 mm
(breedte x hoogte x diepte)
Bedrijfstijd 8 h niveau II / 12 h niveau I
Gewich t 0.4 kg
Capac iteit water tank 0.5 Lite r
Geluidsdrempel < 27 dB(A)
EU- verordening CE / AEEA / RoHS / EAC
De inhoud van deze gebruiksaanwijzing kan zonder
voorafgaand bericht worden gewijzigd
Page 29

Dansk
Tillykke! De har lige anskaffet Dem den usædvanlige EMMA luftfugter. Den
vil give Dem stor fornøjelse, når luften omkring Dem trænger til at blive
renset.
Bemærk venligst, at Emma er en personlig luftfugter-dame. Det vil sige, at
hun føler sig bedst tilpas i nærheden af dig, hvor hun kan befugte luften
omkring dig.
Som med alle elektriske husholdningsapparater er særlig pleje en nødvendighed også med dette produkt, for at undgå fysisk skade, brandskade eller
beskadigelse af produktet. Læs venligst denne brugsanvisning grundigt før
produktet tages i brug, og følg sikkerhedsanvisningerne på selve produktet.
Beskrivelse af apparatet
Apparatet består af følgende hoveddele:
1. Rejseetui
2. Pose til adapter og ledning
3. Flaske (vandtank)
4. Flaskelåg
5. Hus
6. Fødder
7. USB kabel
8. Strømadapter til strømforsyning
9. Tilslutning for USB kabel
10. Afdækning til hus
11. Vandbas sin
12. Tænd/sluk knap og knap til befugtningsniveau I + II
13. LED’er til visning af det valgte effekttrin
14. Knap til LED dæmper (normalt – dæmpet – slukket)
15. Åbning til luftudløb
(Advarsel: der må ikke komme vand ind i denne åbning!)
16. Dampudløb
17. Rengøringsbørste til vandbassinet
Vigtige sikkerhedsinstruktioner
Læs brugsvejledningen, før De bruger apparatet første gang og gem vejledningen; hvis nødvendigt skal den også gemmes til næste ejer
• Stadler Forms distributør dækker ikke skader, der er opstået som følge af
misligholdelse eller forkert brug af apparatet.
• Apparatet må kun bruges i hjemmet med det formål, der er beskrevet i
vejledningen. Ukorrekt brug samt udførelse af tekniske ændringer på apparatet kann være farligt for liv og helbred.
• Dette apparat kan anvendes af børn fra 8 år og opefter og af personer
med nedsatte fysiske, sanse- eller psykiske evner eller med manglende
erfaring og kendskab, hvis de har været under opsyn og har modtaget
undervisning i, hvordan apparatet kan bruges på sikker måde, og hvis de
har forstået, hvilke eventuelle farer der kan være. Børn må ikke lege med
apparatet. Rengøring og vedligeholdelse må ikke udføres af børn uden
opsyn.
• Tilslut kun kablet til vekselstrøm. Læg mærke til apparatets spændingsangivelser.
• Benyt ikke en beskadiget forlængerledning.
Page 30

• Træk ikke kablet over skarpe kanter og lad det ikke komme i klemme.
• Træk aldrig stikket ud ved at holde i kablet og træk aldrig stikket ud af
stikkontakten med våde hænder.
• Benyt ikke apparatet i umiddelbar nærhed af badekar, brusebad eller badebassin (overhold mindsteafstanden på 3 m). Stil apparatet således at
det ikke kan berøres fra et badekar.
• Stil ikke apparatet i nærheden af en varmekilde. Netkablet bør ikke udsættes for direkte varmepåvirkning (fra f.eks. komfurplade, åben ild,
varmt strygejern eller varmeovn). Beskyt netkablet mod olie.
• Ikke kan snuble over netkablet.
• Apparatet tåler ikke vandsprøjt.
• Kun til indendørs brug.
• Opbevar ikke apparatet udendørs.
• Apparatet bør opbevares på et tørt og for børn utilgængeligt sted (pakkes
sammen).
• Hvis strømforsyningskablet er beskadiget, skal det udskiftes af producenten eller hos en reparatør, der er autoriseret af producenten, eller af en
lignende kvalificeret tekniker for at undgå skade.
• Før vedligeholdelse, rengøring og efter hver brug skal apparatet slukkes
og stikket trækkes ud af stikkontakten.
• Reparationer af elektriske apparater må kun udføres af en kvalificeret,
elektrisk tekniker.
• Käytä ainoastaan valmistajan toimittamaa adapteria.
Før ibrugtagning
A. Tag rejseetuiet (1) og posen med adapter og ledning (2) ud af embal-
lagen. Åbn rejseetuiet (1) og tag flasken (3) ud.
B. Drej nu låget på flasken (4) af, for at åbne flasken, og træk huset (5) ud af
flasken.
C. Klap de to fødder (6) ud for at forbedre apparatets stabilitet, når flasken
er fuld.
Ibrugtagning / betjening
1. Stil Emma på det ønskede sted på en plan overflade. Tilslut USB kablet
(7) til strømadapteren (8) og huset (9) og sæt adapteren i en egnet stikkontakt. Alternativt kan USB kablet også sluttes til en anden strømkilde
som f.eks. et eksternt bat teri (Battery Pack/Powerbank) med mindst 2A.
2. Fyld flasken (3) med rent, koldt postevand og luk den derefter ved at
dreje flaskelåget (4) på flasken til anslag.
3. På afdækningen til huset (10) er der en udsparing , hvorpå flasken (3)
placeres. Sæt flasken (3) med låget (4) nedad på denne udsparing. Nu
løber der vand ind i vandbassinet (11) Vigtigt: Hver gang flasken (3) lø ftes
af og sættes på igen løber der lidt vand ud i bassinet (11). Hvis det bliver
gjort for tit, kan vandbassinet (11) løbe over og beskadige apparatet.
Derfor anbefaler vi kun at løfte flasken op, når der skal fyldes vand efter.
4. Tænd for apparatet ved at trykke på tænd/sluk knappen (12). Når der er
tændt for apparatet, lyser LED’erne (13) til venstre for tænd/sluk-knappen (12). Er det ikke tilfældet, så skal du kontrollere,om der er vand nok
i bassinet (11) og om adapteren er tilsluttet strømmen. Apparatet har to
befugtningsniveauer, der vælges med tænd/sluk-knappen (12). 1x tryk =
niveau II / 2x tryk = niveau I / 3x tryk = sluk. Antallet af LED’er (13) viser,
hvilket niveau der er valgt.
Page 31

5. Hvis lysskæret fra LED’erne generer dig (for eksempel i soveværelset),
kan lyset dæmpes ved at trykke på lysdæmper-knappen (14). Der kan
vælges mellem tre forskellige modes:
• Normal mode (standard indstilling)
• Dæmpet mode (tryk én gang)
• Lys slukket-mode (tryk to gange)
Med et yderligere tryk på lysdæmper-knappen (14) skiftes der tilbage
til normal mode.
6. Emma er den ideelle rejseledsager og sørger for en behagelig luftfugtighed på et ellers tørt hotelværelse. Lad apparatets enkelte dele tørrre
helt, før du sætter huset (5) ned i flasken (3), og luk flasken. Er tiden for
knap til det, kan du indhente det forsømte, når du er kommet hjem eller
nået frem til din næste rejsedestination. For restfugtighed i den lukkede
flaske kan give en ubehagelig lugt.
7. Når du vil pakke Emma ned, skal alle dele først have lov til at blive helt
tørre. Derefter åbner du flasken (3) og sætter huset (5) ned i flasken.
Vigtigt: Huset sættes ned i flasken med dampudløbet forrest (16) . Ellers er et svært at få huset ud af flasken igen (se punkt B på side 3).
Rensning
Før hver vedligeholdelse og efter hver brug skal der slukkes for apparatet
og netadapteren (8) skal kobles fra stikkontakten. Inden Emma renses, skal
netadapteren trækkes ud.
OBS! Apparatet må aldrig dyppes i vand (fare for kortslutning).
• Til udvendig r ensning skal apparatet af gnides med en fugtig klud og tørres
godt derefter.
• Rengøring af flasken (3): Rengør flasken en gang om måneden med
varmt vand, en dråbe opvaskemiddel og en børste eller en svamp. Skyl
derefter flasken grundigt af. Er der kalkaflejringer i flasken eller på flaskelåget (4) anbefaler vi at bruge et normalt afkalkningsmiddel eller eddike.
• Rengøring af vandbassinet (11): Rengør vandbassinet en gang om måneden. Løft først afdækning (10) af huset (5). Tøm vandbassinet (11) ud
over bassinets forreste del – hvor dampudløbet (16) befinder sig. Dermed
forhindrer du, at der kommer vand ind i luftudløbsåbningen (15). Bassinet
må kun rengøres med varmt vand og den medfølgende rengøringsbørste
(17). Til at fjerne kalkaflejringer i vandbassinet anbefaler vi at bruge Stadler Form Rens & kalkfjerner (www.stadlerform.com/accessories). Alternativt kan du også bruge et normalt afkalkningsmiddel eller eddike. Skyl
derefter bassinet grundigt af.
• Der må ikke komme vand ind i åbning til luftudløb (15). Dette vil beskadige
apparatet og ugyldiggøre ethvert krav til garantien.
Reparation
• Reparationer af elektriske apparater må kun udføres af en kvalificeret,
elektrisk tekniker. Udføres der upassende reparationer bortfalder garantien og ethvert ansvar fra producentens side.
• Brug aldrig apparatet, hvis et kabel eller stik er beskadiget, efter der har
været driftsfejl, hvis det har været udsat for tab, eller der er synlige tegn
på skade.
• Indfør ikke nogen former for genstande i apparatet.
• Hvis appar atet ikke kan repareres skal det gøres ubrugeligt (klip ledningen
af) og aflever det på en genbrugsstation.
Page 32
• I tilfælde af en reparation skal der tages højde for følgende, før apparatet
sendes afsted eller afleveres hos forhandleren: Tøm alt vandet ud af apparatet (vandbakken resp. vandbeholderen) og lad apparatet tørre fuldstændig ud. Hvis der er vandrester i apparatet under transporten, bliver
apparatet beskadiget. I det tilfælde bortfalder garantien.
Bortskaffelse
EU-direktiv 2012 / 19 / CE om WEEE kræver, at brugte elektriske husholdningsapparater ikke bortskaffes sammen med almindeligt affald. Brugte
apparater skal indsamles separat for optimal genbrug og genanvendelse
af apparatets elementer og reduktion af miljøpåvirkning og helbredsrisici.
Symbolet med skraldespanden med et kryds over på produktet er
en påmindelse til dig om din forpligtelse til at bor tskaffe app aratet
separat. Du bør kontakte de lokale myndigheder eller forhandleren
for at få oplysninger om korrekt bortskafning af brugte apparater.
Specifikationer
Mærkespænding DC 5 V
Mærkee ffek t 10 W
Mål 125 x 215 x 80 mm
(bredde x højde x dybde)
Brugstid 8 timer niveau II / 12 timer niveau I
Vægt 0.4 kg
Vandta nkens kapacit et 0.5 Lite r
Støjniveau < 27 dB(A)
I overensstemmelse
med EU godkendelse CE / WEEE / RoHS / EAC
Der tages forbehold for tekniske ændringer
Page 33

Suomi
Onneksi olkoon! Olet juuri hankkinut loistavan EMMA ilmankostuttimen.
Laite tarjoaa nautinnollisempaa oloa parantaen huoneen ilmanlaatua.
Muistathan, että Emma on henkilökohtainen ilmankostutindaamisi. Tämä
merkitsee sitä, että Emma oleskelee mieluiten lähelläsi ja kostuttaa ilmaa
ympärilläsi.
Kuten kaikkien kotitalouden sähkölaitteiden kanssa, myös tämän mallin
kanssa tulee noudattaa erityistä huolellisuutta, jotta laite välttyy vahingoilta tai palovaurioilta. Lue nämä käyttöohjeet ensin huolellisesti ennen
laitteen ensimmäistä käyttöä ja noudata laitteen turvaohjeita.
Laitteen kuvaus
Laite koostuu seuraavista osista:
1. Matkakotelo
2. Adapterin ja johdon pussi
3. Pullo (vesisäiliö)
4. Pullon korkki
5. Kotelo
6. Jalat
7. USB-johto
8. Verkkoadapteri virransyöttöä varten
9. USB-johdon liitäntä
10. Kotelon kansi
11. Vesiallas
12. Päälle-/pois-nuppi ja kostutustasojen I + II nuppi
13. Valitun tehotason LED-näyttö
14. LED-himmennyskytkin (normaali – himmennetty – pois)
15. Kuumennuslevyn suojus (huomio: tähän aukkoon ei saa päästä vettä!)
16. Sumutusaukko
17. Vesialtaan puhdistusharja
Tärkeitä turvallisuusohjeita
Lue käyttöohjeet huolellisesti läpi ennen laitteen ensimmäistä käyttöönottoa, säilytä ne vastaisuuden varalta ja luovuta edelleen laitteen seuraavalle
käyttäjälle.
• Vaurioista, jotka ovat aiheutuneet tämän käyttöohjeen noudattamatta
jättämisestä, Stadler Form kieltäytyy ottamasta mitään vastuuta.
• Tämä laite on tarkoitettu käytettäväksi ainoastaan kotitalouksissa ja vain
tässä käyttöohjeessa kuvattuun tarkoitukseen. Määräystenvastainen
käyttö sekä tekniset muutokset laitteeseen voivat vaarantaa terveyden
ja olla hengenvaarallisia.
• Vähintään 8 vuotta täyttäneet lapset ja sellaiset henkilöt, joiden fyysiset,
sensoriset tai henkiset kyvyt eivät ole tähän riittäviä tai joilla ei ole laitteen tuntemusta tai kokemusta sen käy töstä, saavat käyttää tätä laitetta
ainoastaan silloin, kun heidän turvallisuudestaan vastaava henkilö valvoo
heitä. Lasten ei tule leikkiä laitteen kanssa. Lapset eivät saa puhdistaa tai
huoltaa laitetta ilman valvontaa.
• Liitä johto vain vaihtovirtaan. Huomioi jännitetiedot laitteella.
• Älä käytä vaurioituneita jatkojohtoja.
• Älä vedä verkkojohtoa terävien reunojen yli ja varo, ettei se joudu puristukseen.
Page 34

• Älä koskaan vedä pistoketta verkkojohdosta tai pistorasiasta märin käsin.
• Älä käytä laitetta kylpyammeen, suihkun tai uima-altaan välittömässä läheisyydessä (säilytä 3 metrin vähimmäisetäisyys). Sijoita laite niin, ettei
kukaan voi koskettaa sitä kylpyammeesta käsin.
• Älä sijoita laitetta lämpölähteen läheisyyteen. Älä altista verkkojohtoa
välittömälle lämpölähteelle (kuten esim. liesilevyt, avoimet liekit, kuumat
silitysraudat tai lämmitysuunit). Suojaa verkkojohto öljyltä.
• Varmistaudu, ett ä laite seisoo käy tön aikana tukevasti ja et tei kukaan pääse kompastumaan verkkojohtoon.
• Laite ei ole roiskeenkestävä.
• Vain sisäkäyttöön.
• Älä säilytä laitetta ulkona.
• Laite on säilytettävä kuivissa tiloissa ja pois lasten ulottuvilta (pakattuna).
• Jos virtajohto on vaurioitunut, valmistajan, valtuutetun huoltoliikkeen tai
vastaavan ammattitaitoisen henkilön on vaihdettava se vahinkojen välttämiseksi.
• Ennen kaikkia huolto- ja puhdistustoimia sekä joka käytön jälkeen sammuta laite ja irrota johto laitteesta.
• Huoltaaksesi tai puhdistaaksesi laitteen sekä jokaisen käyttökerran jälkeen, käännä laitteen virta pois päältä ja irrota virtajohto pistorasiasta.
• Sähkölaitteiden korjauksia saa suorittaa yksinomaan opetettu ammattihenkilökunta.
Ennen käyttöönottoa
A. Ota matkakotelo (1) ja adapterin ja johdon sisältävä pussi (2) pakkauk-
sesta. Avaa matkakotelo (1) ja ota pullo (3) pois.
B. Kierrä sitten pullon korkki (4) auki avataksesi pullon ja vedä kotelo (5) ulos
pullosta.
C. Käännä molemmat jalat (6) ulospäin, jotta laitteen stabiilius on parempi
pullon ollessa täynnä.
Käyttöönotto / käyttö
1. Aseta Emma halutulle paikalle tasaiselle alustalle. Liitä USB-johto (7)
verkkoadapteriin (8) ja koteloon (9) ja työnnä adapteri sopivaan pistorasiaan. Vaihtoehtoisesti voit liittää USB-johdon myös muuhun virranlähteeseen kuten ulkoiseen akkuun (akkusarja/powerbank-varavirtalähde,
väh. 2A).
2. Täytä pullo (3) raikkaalla, kylmällä vesijohtovedellä ja sulje se kiertämällä
pullon korkki (4) vasteeseen saakka pullon päälle.
3. Kotelon kannessa (10) on kolo, johon pullo (3) asetetaan. Pane pullo (3)
korkin (4) kera alassuin tähän koloon. Vettä valuu nut vesialtaaseen (11).
Tärkeää: aina kun pullo (3) nostetaan pois ja pannaan takaisin paikalleen,
niin altaaseen (11) valuu hieman vettä. Jos näin tehdään liian usein, niin
vesiallas (11) voi vuotaa yli ja vahingoittaa laitetta. Siksi suosittelemme
nostamaan pulloa vain silloin, kun siihen täytyy lisätä vettä.
4. Kytke laite päälle painamalla päälle-/pois-nuppia (12). Käynnistämisen
jälkeen syttyvät LEDit (13) päälle-/pois-nupin (12) vasemmalla puolella. Jos näin ei tapahdu, tarkasta, onko altaassa (11) riittävästi vettä ja
adapteri liitetty virtaverkkoon. Laitteessa on kaksi kostutustasoa, jotka
valitaan päälle-/pois-nupilla (12). Paina 1 kerran = taso II / paina 2 kertaa
= taso I / pain a 3 kertaa = sammuta laite. LEDien (13) lukumäärä ilmoittaa,
mikä taso on valittu.
Page 35

5. Jos LEDien kirkkaus häiritsee sinua (esimerkiksi makuuhuoneessa), voit
alentaa valotehoa painamalla himmenninnuppia (14). Valittavissasi on
kolme erilaista käyttötapaa:
• Normaali käyttö (vakiona kytketty päälle)
• Himmennetty käyttö (paina kerran)
• Sammutettu käyttö (paina kahdesti)
Voit palata normaaliin käyttötapaan painamalla himmenninnuppia (14)
uudelleen.
6. Emma on ihanteellinen matkatoveri, joka huolehtii miellyttävästä ilmankosteudesta myös kuivissa hotellihuoneissa. Anna laitteen yksittäisten
osien kuivua täysin, ennen kuin panet kotelon (5) pulloon (3) ja suljet
pullon. Jos tähän ei enää ole aikaa, kuivata laite yksinkertaisesti jälleen
kotona tai seuraavalla matkalla. Suljetussa pullossa oleva jäämäkosteus
voi aiheuttaa epämiellyttävää hajua.
7. Kun haluat pakata Emman, anna ensin kaikkien laitteen osien kuivua
täysin. Avaa sitten pullo (3) ja pane kotelo (5) pullon sisään. Tärkeää:
Kotelo tulee panna pulloon sumutusaukko (16) edellä. Muuten kotelon
saa vain vaivoin pullosta pois (katso kohta B sivulla 3).
Puhdistus
Sammuta laite ennen jokaista huoltoa ja jokaisen käytön jälkeen ja vedä
verkkoadapteri (8) pistorasiasta. Irrota verkkoadapteri ennen kuin puhdistat
Emma tuoksuttimen.
Huomio: Älä milloinkaan upota laitetta veteen (oikosulkuvaara).
• Puhdista laite ulkopuolelta kostealla liinalla ja kuivaa se hyvin tämän jälkeen.
• Pullon (3) puhdistaminen: Puhdista pullo kerran kuussa lämpimällä
vedellä, tipalla astianpesuainetta ja harjalla tai sienellä. Huuhtele pullo
sitten perusteellisesti puhtaaksi. Jos pulloon tai pullon korkkiin (4) on
kertynyt kalkkia, suosittelemme kotitalouskalkinpoistoaineen tai etikan
käyttöä.
• Vesialtaan (11) puhdistaminen: Puhdista vesiallas kerran kuussa. Ota
kansi (10) pois kotelosta (5). Tyhjennä vesiallas (11) altaan etuosan kautta – sieltä, missä on sumutusaukko (16). Täten estät veden valumisen
ilmanpoistoaukkoon (15). Puhdista allas sitten lämpimällä vedellä ja mukana toimitetulla puhdistusharjalla (17). Vesialtaaseen kertyneen kalkin
poistamiseen suosittelemme Stadler Form -puhdistus- ja kalkinpoistoainetta (www.stadlerform.com/accessories). Vaihtoehtoisesti voit käyttää
kotitalouden kalkinpoistoainetta tai etikkaa. Huuhtele allas sen jälkeen
perusteellisesti.
• Kuumennuslevyn suojus (15) ei saa päästää vettä. Tämä vaurioittaa laitetta ja mitätöi takuun.
Korjaukset
• Sähkölaitteiden korjauksia (verkkokaapelin vaihto) saa suorittaa yksin-omaan alan ammattilainen. Asiantuntemattomien suorit-tamissa korjauksissa takuu ja koko vastuu raukeavat.
• Älä koskaan käytä laitetta, jos kaapeli tai pistoke on vahingoittu-nut, jos
laite toimii virheellisesti, jos se on pudonnut maahan tai muuten vioit-tunut (halkeamia/murtumia suojuksessa).
• Älä työnnä minkäänlaisia esineitä laitteeseen.
Page 36
• Jos laitet ta ei voi enää korjata, tee se käyt tökelvottomaksi välittömästi ja
vie se keräyspisteeseen (verkkokaapeli katkaistaan).
• Siinä tapauksessa, että laite täytyy korjata, on huomioitava seuraavat
asiat ennen laitteen lähettämistä tai liikkeeseen viemistä: laitteessa oleva vesi (vesisäiliö ja mahdollisesti vesiallas) on laskettava kokonaan pois
ja laitteen on annettava kuivaa kokonaan. Laitteessa oleva jäämävesi
vahingoittaa sitä kuljetuksen aikana. Tässä tapauksessa takuu raukeaa.
Jätehuolto
Euroopan parlamentin ja neuvoston direktiivi 2012 / 19 / CE Sähkö- ja
elektroniikkalaiteromusta (WEEE) edellyttää, ettei vanhoja kotitalouksien
sähkölaitteita saa hävittää lajittelemattoman yhdyskuntajätteen mukana.
Vanhat laitteet on kerättävä erikseen materiaalien palautuksen- ja kierrättämisen optimoimiseksi sekä terveys- ja ympäristövaikutuksien vähentämiseksi. Tuotteen yliviivattu roskakori -merkintä muistuttaa siitä, että sinun
velvollisuutesi on hävittää laite erikseen. Kuluttajia kehotetaan
ottamaan yhteyttä paikallisiin viranomaisiin tai tuotteen jälleenmyyjään saadakseen lisätietoja vanhan laitteen asianmukaisesta
hävittämisestä.
Tekniset tiedot
Nimellisjännite DC 5 V
Teho 10 W
Mitat 125 x 215 x 80 mm
(leveys x korkeus x syvyys)
Käyttöaika 8 h tasolla II / 12 h tasolla I
Paino 0 .4 kg
Vesitank in t ilavuus 0.5 L itraa
Melutaso < 27 dB(A)
Noudattaa EUmääräyksiä CE / WEEE / RoHS / EAC
Oikeudet muutoksiin pidätetäänn
Page 37

Norsk
Gratulerer! Du har akkurat anskaffet deg den eksepsjonelle luftfukteren
EMMA. Den vil gi deg mye nytelse og forbedre innendørsluften for deg.
Husk at Emma er en personlig luftfukter. Det betyr at hun føler seg mest vel
når hun er i nærheten og kan fulte luften i omkring deg.
Som med alle elektriske husholdningsartikler er det nødvendig å utvise særlig hensyn til bruk av denne modellen, for å unngå personskader, brann eller
produktskader. Vennligst les nøye gjennom disse driftsinstruksjonene før du
tar i bruk apparatet for første gang, og følg sikkerhetsinstruksene på selve
apparatet.
Beskrivelse av apparatet
Apparatet består av følgende hoveddeler:
1. Reiseetui
2. Pose for adapter og kabel
3. Flaske (vanntank)
4. Lokk
5. Kropp
6. Fot
7. USB-kabel
8. Nettadapter for strømforsyning
9. Tilkobling for USB-kabel
10. Deksel på kropp
11. Vann beholder
12. Av/på-knapp og knapp for fuktetrinn I + II
13. LED-er so viser valgt effekttrinn
14. Knapp for LED dimmer (normal - dimmet - av)
15. Åpning for luftutløp
(OBS: Det må ikke komme noe vann inn i denne åpningen!)
16. Tåkedyse
17. Børste for rengjøring av vannbeholderen
Viktige sikkerhetsinstrukser
Vennligst les nøye gjennom driftsinstruksjonene før du tar i bruk apparatet
for første gang, og ta vare på dem for senere referansebruk, f.eks. dersom
du gir viften videre til en ny eier.
• Stadler Form nekter alt ansvar innen tap eller skader som oppstår som en
følge av mangelfull oppfølging av disse driftsinstruksjonene.
• Apparatet er kun tiltenkt bruk i hjemme for de formål beskrevet i disse
instruksjonene. Uautorisert bruk og tekniske modifikasjoner på apparatet
kan føre til far for helse og liv.
• Dette apparatet kan brukes av barn over 8 år og personer med reduserte
fysiske, sensoriske eller mentale evner, eller mangel på erfaring og kunnskap, dersom de er under oppsyn av noen ansvarlig for dem eller har
mottatt instruksjoner vedrørende bruk av apparatet på en trygg måte og
forstår farene involvert. Barn må ikke leke med apparatet. Rengjøring og
vedlikehold må ikke utføres av barn uten oppsyn.
• Kun koble kabelen til vekselstrøm. Noter deg spenningsinformasjonen
oppgitt på apparatet.
• Ikke bruk skjøteledninger med skader.
Page 38

• Ikke dra strømkabelen over skarpe kanter og sørg for at den ikke klemmes
mellom gjenstander.
• Ikke napp kabelen ut av stikkontakten, og ikke fjern kabelen med våte
hender.
• Ik ke bruk dette ap paratet i umiddelb ar nærhet av badekar, dusj eller svømmebasseng (minimumsavstand på 3 m). Plasser apparatet slik at man ikke
kan nå det fra badekaret.
• Ikke plasser apparatet i nærheten av en varmekilde. Ikke utsett strømkabelen for direkte varme (som i nærheten av en kokeplate, åpen ild, varme
jernplater eller ovner, for eksempel). Beskytt strømkabelen mot oljete
væsker.
• Sørg for at apparatet er forsvarlig posisjonert for å sikre høy stabilitet
under driftsmodus, og sørg for at ingen kan snuble i strømkabelen.
• Apparatet er ikke sprutsikkert.
• Kun for innendørs bruk.
• Ikke oppbevar apparatet utendørs.
• Lagre apparatet på et tørt sted hvor barn ikke kan nå det (pakk apparatet
inn).
• Dersom strømkabelen er skadet må den erstattes av produsenten eller et
verksted som er autorisert av produsenten eller av en tilsvarende kvalifisert person for å forhindre skader.
• Før vedlikehold, rengjøring og når det ikke er i bruk, skal apparatet skrus
av og skilles fra strømnettet.
• Reparasjoner på det te produktet må kun utføres av kvalifiserte teknikere.
• Bruk bare adapteren som følger med fra produsenten.
Før installasjon
A. Ta reiseetuiet (1) og posen med adapteren og kabelen (2) ut av forpaknin-
gen. Åpne reiseetuiet (1) og ta ut flasken (3).
B. Drei på lokket (4) for å åpne flasken og trekk kroppen (5) ut av flasken.
C. Vipp ut de to føttene (6) så apparatet står støtt når flasken er full.
Installasjon / drift
1. Plasser Emma på en rett flate, der du vil ha henne. Koble USB-kabelen
(7) til nettadaptern (8) og til kroppen (9) og sett adapteren i en passende
kontak t. Alternativt kan du set te USB-kabelen inn i en annen strømkilde,
som et eksternt batteri (powerbank) med minst 2A.
2. Fyll rent vann fra springen i flasken (3) og lukk den ved å skru lokket (4)
godt på.
3. I dekselet på kroppen (10) er det en utsparing som flasken (3) kan settes
inn i. Sett flasken (3), med lokket (4) nedover, på denne utsparingen.
Nå renner vannet inn i vannbeholderen (11). Viktig: Hver gang flasken
(3) tas av og settes på igjen (11) renner det litt vann inn i beholderen
(11). Hvis dette gjøres for ofte, kan vannbeholderen (11) renne over og
vannet skade apparatet. Derfor anbefaler vi at flasken bare tas av for
å etterfylle vann.
4. Skru på apparatet med av/på-knappen (12). Når apparatet er på, lyser
LED-ene (13) til venstre for av/på-knappen. Hvis de ikke lyser, skal du se
etter at det er nok vann i beholderen (11) og at adapteren får strøm. Ap-
paratet hat to fuktetrinn, som velges med av/på-knappen (12). 1x trykk =
trinn II / 2x trykk = trinn I / 3x trykk = skru av. Antallet LED-er (13) angir
hvilket trinn som er valgt.
Page 39

5. Hvis lyset fra LED-ene plager deg (f.eks. i soverommet), kan du redusere
intensiteten med dimmerknappen (14). Du kan velge mellom tre forskjellige modi:
• Normal (standard innkobing)
• Dimmet (trykk én gang)
• Lyset av (trykk to ganger)
Trykk en gang til på dimmerknappen (14) for å komme tilbake til
normalmodus.
6. Emma er et perfekt reisefølge og gir seg behagelig luftfuktighet når luften i hotellrommet er tørr. La alle delene tørke helt før du sette kroppen
(5) inn i flasken (3) og lukker den. Hvis du ikke har nok tid, sørger du
bare for å tørke når du kommer hjem eller på neste hotellrom. Rester av
fuktighet i flasken kan gi en ubehagelig lukt.
7. Når Emma skal oppbevares over tid, må alle delene først tørke helt.
Deretter åpner du flasken (3) og plasserer kroppen (5) i flasken. Viktig:
Kroppen må legges inn i flasken med tåkedysen (16) forover. Ellers blir
det vanskelig å få kroppen ut av flasken igjen (se punkt B på side 3).
Rengjøring
Før vedlikehold og etter bruk, slå av enheten og dra ut nettverksadapteren
(8) fra støpselet. Før du rengjør Emma må nettverksadapteren plugges ut.
OBS: Aldri senk enheten i vann (fare for kortslutning).
• For å rengjøre utsiden, bruk en fuktig klut og tørk grundig.
• Rengjøre flasken (3): Flasken bør gjøres ren en gang i måneden med
varmt vann, litt oppvaskmiddel og en børste eller svamp. Skyll flasken
godt. Hvis det har lagt seg kalk i flasken eller i lokket (4), anbefaler vi å
bruke et avkalkingsmiddel eller eddik.
• Rengjøre vannbeholderen (11): Rengjør vannbeholderen en gang i
måneden. Ta dekselet (10) av kroppen (5). Tøm vannet ut i fremre kant
av beholderen (11) - der hvor tåkedysen (16) sitter. Da unngår du at det
kommer vann inn i luftåpningen (15). Rengjør beholderen med varmt vann
og rengjøringsbørsten (17) som følger med. Ved kalkavleiringer i vannbeholderen anbefaler vi å bruke Stadler Form rengjørings- og avkalkingsmiddel (www.stadlerform.com/accessories). Alternativt kan du bruke et
avkalkingsmiddel eller eddik. Skyll beholderen godt.
• Pass på at det ikke kommer noe væske inn i åpning for luftutløp (15). Det
vil skade apparatet, og vil gjøre garantien ugyldig.
Reparasjoner
• Reparasjoner på det te produktet må kun utføres av kvalifiserte teknikere.
Dersom det utføres urettmessige reparasjoner utløper garantien og alt
ansvarshold.
• Aldri bruk apparatet dersom adapteren eller kontakten er skadet, etter
det har feilfunksjonert, dersom det har blitt mistet eller skadet på noen
som helst måte (sprekker/spriker i kabinettet).
• Ikke press gjenstander inn i apparatet. Ikke demonter apparatet.
• Dersom apparatet er utenfor reparasjonsmuligheter, gjør det ubrukbart
umiddelbart og lever det til et returpunkt gitt til formålet.
• I tilfelle reparasjon må disse punktene følges før apparatet sendes eller
bringes til forhandleren: Apparatet må tømmes for vann (vannbeholder
eller tank) og få tørke helt. Rester av vann ødelegger apparatet når det
transporteres. Det vil også medføre at garantien opphører.
Page 40

Avhending
EU-direktiv 2012 / 19 / EF vedrørende elektriske og elektroniske apparater
(Waste Electrical and Electronic Equipment - WEEE) sier at gamle elektriske
husholdningsapparater ikke må kastes som vanlig restavfall. Gamle apparater må samles inn separat for å optimalisere gjenbruk og resirkulering av
materialene de inneholder og redusere påvirkningen på menneskers helse og
miljøet. Det overkryssede søppelkassesymbolet er for å minne om
din forpliktelse om at du når du kaster apparatet må det samles inn
separat. Forbrukerne må kontakte lokale myndigheter eller forhandler for informasjon angående riktig avhending av sitt gamle apparat.
Spesifikasjoner
Rangert spenning DC 5 V
Utgan gseffek t 10 W
Dimensjoner 125 x 215 x 80 mm
(bredde x høyde x dybde)
Brukstid 8 t på trinn II / 12 t på trinn I
Vekt 0. 4 kg
Vannbeholderkapasitet 0.5 Liter
Lydnivå < 27 dB(A)
I samsvar med EUforskrifter CE / WEEE / RoHS / EAC
Alle rettigheter ovenfor tekniske modifikasjoner er forbeholdt
Page 41

Svenska
Grattis! Du har just införskaffat den enastående luftfuktaren EMMA. Den
kommer att ge dig stor glädje och förbättra din inomhusluft.
Observera att Emma är en personlig luftfuktar-dam. Det innebär att hon mår
bäst i din närhet och fuktar luften omkring dig.
Som med alla elektriska hushållsapparater krävs det att du är extra försiktig
med den här modellen också, för att undvika personskador, brandskador eller
skador på apparaten. Läs denna bruksanvisning noggrant innan du använder
apparaten för första gången och följ säkerhetsanvisningarna på själva apparaten.
Beskrivning av apparaten
Apparaten består av följande huvuddelar:
1. Resefodral
2. Påse för adapter och kabel
3. Flaska (vattentank)
4. Flasklock
5. Hus
6. Fötter
7. USB-kabel
8. Nätadapter för strömförsörjningen
9. Anslutning för USB-kabel
10. Huskåpa
11. Vatt entråg
12. På/Av-knapp och knapp för befuktningssteg I + II
13. LED-lampor för visning av valt effektsteg
14. Knapp för LED-dimmer (normal – dimmad – av)
15. Öppning för luftutlopp
(varning: inget vatten får komma in i denna öppning)
16. Dimutlopp
17. Borste för rengöring av vattentråget
Viktiga säkerhetsanvisningar
Läs igenom bruksanvisningen noga innan du använder apparaten för första
gången och håll den i säkert förvar för framtida referens, vid behov ger du
den vidare till nästa ägare.
• Stadler Form avsäger sig allt ansvar för förlust eller skada som uppstår på
grund av att bruksanvisningen inte följts.
• Apparaten får endast användas i hemmet för de ändamål som beskrivs i
denna bruksanvisning. Otillåten användning och tekniska ändringar på apparaten kan leda till fara för liv och hälsa.
• Denna apparat kan användas av barn från 8 år och uppåt och personer med
nedsatt fysisk eller mental förmåga eller brist på erfarenhet och kunskap,
om de över vakas eller får instruktioner angående användning av apparaten
på ett säkert sätt och förstår de inblandade riskerna. Barn ska inte leka
med apparaten. Rengöring och underhåll får inte göras av barn utan tillsyn.
• Anslut endast kabeln till växelström. Observera spänningsinformationen
på apparaten.
• Använd inte skadade förlängningskablar.
• Dra inte nätsladden över vassa kanter och se till att den inte kommer i
kläm.
Page 42

• Dra inte ut kontak ten ur vägguttaget med våta händer eller genom att hålla
i sladden.
• Använd inte denna apparat i omedelbar närhet av badkar, dusch eller simbassäng (minsta avstånd är 3 m). Placera apparaten så att en person som
befinner sig i badkaret inte kan röra apparaten.
• Placera inte apparaten nära en värmekälla. Utsätt inte sladden för direkt
värme (som t.ex. en uppvärmd värmeplatta, öppen eld, hett strykjärn, eller
värmeelement). Skydda nätsladdar från olja.
• Se till att apparaten är korrekt placerad för att säkerställa en hög stabilitet
under dess drift och se till att ingen kan snubbla över nätsladden.
• Apparaten är inte stänkskyddad.
• Endast för inomhusbruk.
• Förvara inte apparaten utomhus.
• F örvara apparaten p å en torr plats, oåtkomlig fö r barn (packa in apparaten).
• Om nätsladden är skadad, måste den bytas ut av tillverkaren eller av en
verkstad som godkänts av tillverkaren eller av liknande kvalificerade personer för att undvika fara.
• Stäng av apparaten och dra ut kabeln ur apparaten före varje underhåll,
rengöring och efter varje användning.
• Reparationer av elektriska apparater får endast utföras av en kvalificerad
eltekniker.
• Använd endast den adapter som levereras från tillverkaren
Före installationen:
A. Ta ut resefodralet (1) och påsen med adaptern och kabeln (2) ur förpack-
ningen. Öppna resefodralet (1) och ta ut flaskan (3).
B. Skruva nu upp flasklocket (4) för att öppna flaskan och dra ut huset (5) ur
flaskan.
C. Fäll ut de båda fötterna (6) för att göra apparaten s tabilare när flaskan är
full.
Inställning / drift
1. Ställ Emma på önskad plats och ett slätt underlag. Anslut USB-kabeln
(7) till nätadaptern (8) och till huset (9) och sätt i adaptern i ett passande
uttag. Alternativt kan du också ansluta USB-kabeln till en annan strömkälla, som ett externt batteri (Battery Pack/Powerbank) med minst 2A.
2. Fyll på flaskan (3) med färskt, kallt kranvatten och stäng den genom att
skruva på flasklocket (4) på flaskan tills det tar emot.
3. På huskåpan (10) finns ett urtag på vilket flaskan (3) placeras. Sätt emot
flaskan (3) med locket (4) nedtill mot detta urtag. Vatten rinner nu ner
i vattentråget (11). Viktigt: Varje gång flaskan (3) lyfts av och sätts på
rinner lite vatten ner i tråget (11). Om det görs för ofta kan vattnet i vattentråget (11) rinna över och apparaten skadas. Vi rekommen derar därför
att flaskan endast lyfts av när vatten måste fyllas på.
4. Tillkoppla apparaten genom att trycka på På/Av-knappen (12). Efter tillkopplingen lyser LED-lamporna (13) till vänster om På/Av-knappen (12).
Om så inte är fallet, kontrollera om det finns tillräckligt med vatten i
tråget (11) och adaptern har anslutits till strömmen. Apparaten har två
befuktningssteg som väljs med På/Av-knappen (12). Tryck 1x = steg II /
tryck 2x = steg I / tryck 3x = frånkoppling. Antalet LED-lampor (13) informerar om vilket steg som har valts.
Page 43

5. Om du störs av lysdiodernas ljusstyrka (t.ex. i sovrummet) kan du minska
styrkan genom att trycka på dimmerknappen (14). Du kan välja mellan
tre olika lägen:
• Normalt läge (påslaget som standard)
• Dimmat läge (tryck en gång)
• Släckt läge (tryck två gånger)
Genom att trycka på dimmerknappen (14) igen kan du åter växla till det
normala läget.
6. Emma är en idealisk reskamrat och ger angenäm luftfuktighet även i
torra hotellrum. Låt de enskilda apparatdelarna torka helt innan du sätter in huset (5) i flaskan (3) och stänger flaskan. Om du inte hinner vänta
tills de är helt torra, ta ut dem igen för torkning vid nästa resmål. För
restfukt i den stängda flaskan kan leda till en otrevlig lukt.
7. Före lagring av Emma måste alla apparatdelar torka helt. Öppna däref ter
flaskan (3) och förvara huset (5) i flaskan. Viktigt: Huset måste sättas i
flaskan med dimutloppet främst (16). Annars är det svårt att ta ut huset
ur flaskan igen (se punkt B på sidan 3).
Rengöring
Före underhåll och efter varje användning, stänger du av apparaten och drar
ut nätverksadaptern (8) ur uttaget. Innan du rengör Emma måste nätverksadaptern kopplas ur.
Försiktig: Doppa aldrig apparaten i vatten (risk för kortslutning).
• För att rengöra utsidan, gnugga med en fuktig trasa och torka sedan av
den försiktigt.
• Rengöra flaskan (3): Rengör flaskan en gång i månaden med varmt
vatten, en droppe diskmedel och en borste eller en svamp. Spola sedan
ur flaskan ordentligt. Vid kalkavlagringar i flaskan eller på flasklocket (4)
rekommenderar vi att ett hushållsavkalkningsmedel eller ättika används.
• Rengöra vattentråget (11): Rengör vattentråget en gång i månaden.
Lyft då av kåpan (10) från huset (5). Töm vattentråget (11) via den främre
delen av tråget – där dimutloppet (16) sitter. Därigenom förhindrar du att
vatten kommer in i luftutloppsöppningen (15). Rengör nu tråget med varmt
vatten och den medlevererade rengöringsborsten (17). För kalkavlagringar
i vattentråget rekommenderar vi att Stadler Form rengörings- & avkalkningsmedel används (www.stadlerform.com/accessories). Alternativt
kan du använda ett hushållsavkalkningsmedel eller ättika. Spola sedan
ur tråget ordentligt.
• Inget vatten får komma in i öppning för luftutlopp (15). Detta kan skada
apparaten och upphäver alla garantianspråk.
Reparationer
• Reparationer av elek triska apparater får endast ut föras av en kvalificerad
eltekniker. Om felaktiga reparationer utförs, upphör garantin att gälla och
allt ansvar frånsägs.
• Använd aldrig apparaten om en kabel eller kontakt är skadad, om den har
funktionsfel, om den har tappats eller blivit skadad på något annat sätt
(sprickor/brister i höljet).
• Tryck inte in några föremål i apparaten. Ta inte isär apparaten.
• Om apparaten inte går att reparera, gör den obrukbar omedelbart och
lämna in den på en lämplig återvinningsstation.
Page 44

• Vid reparation måste följande punkter beaktas innan apparaten skickas
eller tas till återförsäljaren: Töm ut allt vatten ur apparaten (vattentråg
och eventuell vat tentank) och låt apparaten torka helt. Apparaten skadas
om den transporteras med restvatten i. Garantin upphör då att gälla.
Kassering
Det europeiska direktivet 2012 / 19 / CE om avfall från elektrisk och elektronisk utrustning (WEEE), kräver att gammal hushållselektronik INTE kastas i
det normala osorterade avfallet. Förbrukad utrustning måste samlas in separat för att optimera återanvändning och återvinning av det material som
de innehåller och för minska påverkan på människors hälsa och på miljön.
Symbolen med den överkorsade ”soptunnan” på produkten påminner dig
om din skyldighet att apparaten måste samlas in separat när det
kasseras. Du kan kontakta din lokala myndighet eller återförsäljare för information om korrekt kassering av förbrukad elektronisk
utrustning.
Specifikationer
Märkspänning DC 5 V
Utgående effekt 10 W
Mått 125 x 215 x 80 mm
(bredd x höjd x djup)
Gångtid 8 h steg II / 12 h steg I
Vikt 0 .4 kg
Vattentankskapacitet 0.5 Liter
Ljudnivå < 27 dB(A)
Uppfyller EU:s regler CE / WEEE / RoHS / EAC
Alla rättigheter för tekniska ändringar förbehålles
Page 45

Русский
Поздравляем с приобретением устройства премиум-класса увлажнителя воздуха EMMA. Использование этого устройства позволит
улучшить воздух в помещении, а эксплуатация доставит несомненное
удовольствие.
Пожалуйста, учитывайте, что Emma является портативным увлажнителем воздуха. Это означает, что она предназначена для увлажнения
воздуха вблизи от Вас.
При эксплуатации увлажнителя воздуха, а также иных электроприборов, следует обращать особое внимание на меры безопасности.
Преж де, чем использовать этот электроприбор, внимательно прочтите инструкцию. Во избежание травм или повреждений имущества,
строго следуйте приведенным в данной инструкции рекомендациям.
Описание устройства
1. Дорожный чехол
2. Мешок для адаптера и кабеля
3. Бутылка (резервуар для воды)
4. Крышка для бутылки
5. Корпус
6. Подставка
7. USB-кабель
8. Сетевой адаптер
9. Разъем д ля USB-кабеля
10. Крышка для корпуса
11. Лоток для воды
12. Кнопка питания и кнопка выбора ступени интенсивности
увлажнения I и II
13. Светодиодные индикаторы выбранной ступени интенсивности
увлажнения
14. Кнопка регулировки яркости светодиодов
(обычная – пониженная – без света)
15. Впускное отверстие для воздуха
(Внимание! В это отверстие не должна попадать вода.)
16. Распылитель
17. Щетка для очистки лотка для воды
Важные указания по безопасности
Преж де чем использовать данный электроприбор, внимательно прочитайте инструкцию по эксплуатации. Ее необходимо сохранить для
использования в дальнейшем и при необходимости передать новому
владельцу.
• Компания Stadler Form не несет ответственности за любые травмы
или убытки, возникшие вследствие неисполнения правил техники
безопасности, указанных в данной инструкции по эксплуатации.
• Данный электроприбор предназначен для использования только в
домашних условиях в строгом соответствии с инструкцией по эксплуатации. Неправильная эксплуатация и техническая модификация электроприбора могут создать условия, опасные для жизни и
здоровья пользователя.
• Данный электроприбор может использоваться детьми в возрасте
Page 46

старше 8 лет и лицами с ограниченными физическими, сенсорными
или ментальными возможностями либо с недостаточными навыками и знаниями в сфере использования электроприборов, если им
обеспечен надлежащий контроль или даны указания относительно
безопасного использования данного прибора, и они осознают связанн ые с этим риски. Дет ям запрещается играть с прибором. Запрещается очистка и обслуживание прибора детьми без надлежащего
контроля со стороны взрослых.
• Подключайте кабель прибора только к сети переменного тока. Напряжение электросети должно соответствовать напряжению, указанному на данном электроприборе.
• Не используйте поврежденные удлинители.
• Следите за тем, чтобы сетевой шнур не касался острых кромок и не
был заблокирован.
• Не вынимайте вилку сетевого шнура из сети мокрыми руками и не
тяните за сам шнур.
• Не используйте прибор в непосредственной близости от ванны,
душа или бассейна (минимальное р асстояние 3 метра). Размещайте
прибор таким образом, чтобы находящийся в ванне человек не мог
коснуться прибора.
• Не устанавливайте прибор рядом с источниками тепла. Не допускайте нагрева сетевого шнура (например, посредством горячего
обогревателя, источника открытого огня, горячего утюга или других нагревательных приборов). Не допускайте контакта сетевого
шнура с маслянистыми веществами.
• Следите за тем, чтобы во время работы прибор располагался на
устойчивой поверхности, и никто не мог споткнуться о сетевой
шнур.
• Прибор не защищен от брызг.
• Прибор предназначен только для использования в помещении.
• Не храните прибор вне помещений.
• Храните прибор в сухом месте, недоступном для детей (прибор должен находится в упаковке).
• Если сетевой шнур поврежден, то во избежание травм он должен
быть заменен производителем, уполномоченной производителем
ремонтной мастерской или высококвалифицированным специалистом.
• Техниче ское обс луживание и очистку прибор а необходимо производить только после его отключения от сети. После каждой эксплуатации выключайте прибор и отсоединяйте кабель от прибора.
• Ремонт прибора может быть выполнен только авторизированным
сервисным центром.
• Пользуйтесь только адаптером производителя, входящим в комплектацию прибора.
Перед первым использованием
A. Выньте дорожный чехол (1) и мешок с адаптером и кабелем (2) из
упаковки. Откройте дорожный чехол (1) и выньте бутылку (3).
B. Отвинтите крышку бутылки (4), чтобы открыть бутылку, и выньте
корпус (5) из бутылки.
C. Раздвитьте ножки подставки (6) для улучшения устойчивости
прибора с полной бутылкой.
Page 47

Настройка / эксплуатация
1. Установите устройство Emma в желаемом месте на ровную поверхность. Подключите USB-кабель (7) к сетевому адаптеру (8) и
корпусу (9) и вставьте адаптер в подходящую розетку. Альтернативно можно подключить USB-кабель к другому источнику питания, например, к внешнему аккумулятору (батарейному блоку /
портативному зарядному устройству) с силой тока не менее 2 А.
2. Наполните бутылку (3) свежей холодной водопроводной водой и
закройте ее, повернув крышку бутылки (4) до упора.
3. На крыш ке корпуса (10) имеется выемка, в которую устанав ливается бутылка (3). Установите бутылку (3) в выемку крышкой (4) вниз.
Вода выливается в лоток для воды (11). Важно: при каждом поднимании и повторной установке бутылки (3) в лоток (11) выливается
небольшое количество воды. Если это делать часто, то лоток для
воды (11) может переполниться, что может привести к повреждению прибора. Поэтому мы рекомендуем поднимать бутылку только тогда, когда необходимо долить в нее воду.
4. Включите прибор, нажав на кнопку питания (12). После включения
загораютс я светодиоды (13) сл ева от кнопки пит ания (12). Если све тодиоды не горят, то проверьте, достаточно ли в лотке (11) воды и
подключен ли адаптер к электросети. Прибор имеет две ступени
интенсивности увлажнения, которые выбираются нажатием на
кнопку питания (12). Одно нажатие = ст упень II / два на жатия = ступень I / т ри нажатия = выключение. Количест во горящих светодиодов (13) указывает на то, какая ст упень выбрана.
5. Если Вам мешает свет индикаторов (например, в спальне), то
можно уменьшить яркость всех светодиодных индикаторов,
нажав кнопку регулировки яркости (14). Можно выбрать один из
трех режимов:
• Обычный режим
(устанавливается по умолчанию при включении устройства)
• Режим пониженной яркости (нажать один раз)
• Режим без света (нажать два раза)
Чтобы вернуться в обычный режим, нажмите кнопку регулировки
яркости (14) еще раз.
6. Увлажнитель Emma является идеальным дорожным прибором, который приятно увлажнит сухой гостиничный воздух. Прежде чем
вст авить корпус (5) в бут ылку (3), хорошо просушите все сост авные
части прибора, и закройте бу тылку. Если у Вас на это нет времени,
то сделайте это, приехав домой или прибыв в с ледующий п ункт назначения. Оставшаяся в закрытой бутылке влага может привести
к возникновению неприятного запаха
7. Перед тем как убрать увлажнитель воздуха Emma, хорошо просушите все составные части прибора. Затем откройте бутылку (3) и
уберите корпус (5) в бутылку. Важно: корпус должен быть установлен в бутылку распылителем вперед (16). В противном случае
корп ус будет очень трудно снова вынуть бу тылки (см. рис. B на стр.
3).
Page 48

Очистка
Перед облуживанием, а также после каждого использования выключайте устройство и вынимайте сетевой адаптер (8) из сети. Перед
очисткой устройства Emma необходимо отсоединить от него сетевой
адаптер.
Внимание! Запрещается погружать устройство в воду (опасность
короткого замыкания).
• Чтобы очистить внешнюю поверхность прибора, протрите ее влажной тканью, а затем вытрите насухо.
• Очистка (3) бутылки: очищайте бутылку один раз в месяц теплой
водой, добавив в не е немного моющего сре дства и испо льзуя щетк у
или губку. Затем тщательно промойте бутылку водой. Для удаления появившейся в бутылке или на крышке бутылки (4) накипи мы
рекомендуем использовать хозяйственное средство для удаления
накипи или уксус.
• Очистка лотка для воды (11): очищайте лоток для воды один раз
в месяц. Для этого снимите крышку (10) с корпуса (5). Опорожните
лоток для воды (11), слив воду через переднюю часть лотка – ту, на
которой находится распылитель (16). Этим самым предотвращается
попадание воды во впускное отверстие для воздуха (15). Очищайте
лоток только теплой водой и используйте только входящую в комплект поставки щетку для очистки (17). Д ля удаления накипи мы рекомендуем использовать средство д ля очистки и удаления накипи
фирмы Stadler Form (www.stadlerform.com/accessories). Альтернативно можно использовать хозяйственное средство для удаления
накипи или уксус. После очистки тщательно промойте лоток водой.
• Вода не должна попадать во впускное отверстие для воздуха (15).
Это может повредить устройство и привести к аннулированию гарантии.
Ремонт и устранение неисправностей
• В целях безопасности ремонт электроприбора должен осуществляться только квалифицированными специалистами авторизованного сервисного центра. Гарантия не распространяется на неисправности, обусловленные неквалифицированным ремонтом, а
также неправильной эксплуатацией электроприбора.
• Запрещается использование неисправного электроприбора, а также при механических или иных повреждениях самого электроприбора, сетевого шнура или его вилки.
• Никогда не вставляйте никакие посторонние предметы в отверстия
в корпусе электроприбора.
• Если устройство не пригодно к ремонту, обрежьте сетевой шнур и
сдайте в специальные пункты приема.
• В случае ремонта, прежде чем отправить прибор или отвезти его
дилеру, необходимо соблюдать следующие требования: полностью
слейте воду из прибора (из лотка или резервуара для воды) и хорошо просушите прибор. Если в приборе осталась вода, то во время
транспортировки он может быть поврежден. В таком случае гарантия аннулируется.
Page 49

Утилизация
Позаботьтесь об окружающей среде! Не выбрасывайте неисправные
электроприборы вместе с бытовыми отходами. Обратитесь для этих
целей в специализированный пункт утилизации электроприборов.
Адреса пунктов приема бытовых электроприборов на переработку
Вы можете получить в муниципальных службах Вашего города. Неправильная утилизация электроприборов наносит непоправимый вред окружающей среде. При замене неисправного
электроприбора на новый юридическую ответственность за
утилизацию должен нести продавец.
Спецификация
Номи наль ное DC 5 V
напряжение / частота
Номинальная 10 Вт
потребляемая
мощность
Габариты 125 x 215 x 80 мм (ширина х высота х глубина)
Время работы 8 ч ступень II / 12 ч ступень I
Вес 0,4 кг
Емкость резервуара 0,5 л
Уровень шума < 27 дБ
Соответствует европейским
правилам безопасности CE / WEE / RoHS./EAC
Производитель сохраняет за собой право на внесение изменений в
технические характеристики, комплектацию и конструкцию данной
модели без предварительного уведомления.
Элек тронную версию инструкции можно скачать на нашем сайте:
www.stadlerform.ru
Информация о сертификации
Товар сертифицирован в соответствии с законом «О защите прав потребителей».
Установленный производителем в соответствии с п.2 ст.5 Федерального Закона РФ «О защите прав потребителей» срок службы для данного изделия равен 5 годам, при условии, что изделие используется
в строгом соответствии с настоящей инструкцией по эксплуатации и
применяемыми техническими стандартами.
Page 50

Гарантийный срок
Гарантийный срок составляет 12 месяцев с документально подтвержденной даты продажи Оборудования/Изделия Потребителю Продавцом. В случае отсутствия у Потребителя документов, подтверждающих дату покупки, гарантийный срок рассчитывается с даты
изготовления.
Дата изготовления
Дата изготовления зашифрована в виде группы цифр в серийном номере, расположенном на корпусе прибора.
Пример: 78901 1511 123456
78901 – код поставщика
15 – последние две цифры года
11 – номер месяца
123456 – номер продукта
Дату изготовления следует читать:
78901 1511 123456 – 2015 год, ноябрь.
Page 51

Warranty/Garantie/Garantie/Garanzia/Garantía
Garantie/Garanti/Takuu/Garanti/Garanti
2 Years warranty
This warranty covers defects of construction, manufacturing and material.
Excluded are all wearing parts and improper usage, or consequential damages due to lack of cleaning and/or descaling of the appliance.
2 Jahre Garantie
Diese umfasst Konstruktions-, Produktions-, sowie Materialfehler. Ausgenommen sind sämtliche Verschleissteile und unsachgemässe Benutzung,
sowie Folgeschäden durch mangelnde Reinigung und/oder Entkalkung des
Gerätes.
Garantie 2 ans
La présente garantie couvre les défauts matériels, de construction et de
fabrication. En revanche, elle exclut toutes les pièces d’usure normale, ainsi
que tout dommage résultant de la négligence ou consécutif à un défaut
d’entretien/de détartrage de l’appareil.
2 anni di garanzia
Ques ta garan zia copre di fetti di c ostr uzione, di pr oduzione e di m ateriale. Tut te
le parti di abrasione sono escluse e altresì l’uso o la manutenzione inappropriata dovuti alla mancanza di pulizia e/o disincrostazione dell’apparecchio.
2 años de garantía
Esta g ar ant ía cub re lo s def ec t os de c on st ru cció n, f abr ica ción y m ate riale s. E st án
excluidas todas las piezas de desgaste y el uso indebido, o los daños indirectos provocados por la falta de limpieza y/o el descascarillado del dispositivo.
2 jaar garantie
Deze omvat constructie-, productie- en materiaalfouten. Uitgesloten zijn
alle slijtageonderdelen en onoordeelkundig gebruik, plus gevolgschade door
onvoldoende schoonmaken en/of ontkalken van het apparaat.
2 års garanti
Garantien omfatter konstruktions-, fremstillings- og matrialefejl. Alle sliddele og fejlbrug samt følgeskader pga. utilstrækkelig rengøring og/eller afkalkning af enheden er ikke indbefattet.
2 vuoden takuu
Takuu käsittää valmistus-, tuotanto- sekä materiaalivirheet. Takuun ulkopuolelle jäävät kaikki kuluvat osat ja käyttöohjeiden vastainen käyttö, tai ne
vauriot, jotka johtuvat siitä, että laitetta ei ole puhdistettu ja/tai laitteessa
on pinttynyttä likaa.
2 års garanti
Denne garantien dekker feil i konstruksjon, produksjon og materiale. Garantien omfatter ikke slitedeler og feilaktig bruk eller skader som skyldes
mangelfull rengjøring og/eller avkalking av apparatet.
2 års garanti
Denna garanti täcker brister i tillverkning, produktion och material. Slitdelar
och felaktig användning, eller följdskador på grund av bristande rengöring
och/eller avkalkning av apparaten är uteslutna.
Page 52

Design by B ernhard I Bu rkard
Thanks to all people involved in this project: Del
Xu for the organisation in Asia, John Ye for the development, engineering and CAD work, Mario Rothenbühler for
the photos, Fabian Bernhard and Thomas Burkard for the
unique design and spacesaving construction and Matti
Walker for the graphic work.
Martin Stadler, CEO Stadler Form Aktiengesellschaft
19-1
Sello del establecimien to de venta / Stempel verkoopadres /
Butik kens stempe / Leima my yntikonttori / F orhandlerstempel /
www.stadlerform.com
Retailer’s stamp / Stempel Verkaufsstelle /
Cache t du point de vente / Timbro del rivenditore /
Återförsäljarens stämpel / Печат ь магази на
 Loading...