

Page 1
Charly stand
Gebrauchsanweisung
Operating instructions
Mode d‘emploi
Istruzioni per l‘uso
Manual de instrucciones
Gebruiksaanwijzing
Brugsa nvisning
Käy ttöohje
Bruks anvisning
Bruks anvisning
Инструкция
по эксплуатации
Page 2
Charly stand
16
7
12
17
4
13
14
15
10
11
8
9
6
17
5
1
A
G
R
E
A
R
N
H
É
N
2
N
A
2
T
I
E
•
2
Y
E
A
R
S
W
A
R
R
A
N
T
Y
•
Watch assembly video
Article Number:
Charly stand C-060
A
J
2
•
E
I
T
N
A
R
A
G
E
D
S
E
2
3
Page 3
Deutsch
Teilen Sie Ihr Feedback von Charly auf:
Share your feedback about Charly on:
Partagez votre commentaire sur Charly :
www.stadlerform.com/Charly-stand
Für häufig gestellte Fragen besuchen Sie:
For frequently asked questions go to:
Trouvez la foire aux questions sur :
www.stadlerform.com/Charly-stand/support
Bedienungsanleitung hier herunterladen:
Download instruction manual:
Téléchargez le mode d’emploi :
www.stadlerform.com/Charly-stand/manual
Schauen Sie sich das Video zu Charly an:
Watch the video of Charly:
Regardez la video du Charly :
www.stadlerform.com/Charly-stand/video
Stadler Form Aktiengesellschaft, Chamerstrasse 174, 6300 Zug, Switzerland
Phone +41 41 720 48 48, Fax +41 41 720 48 44, www.stadlerform.com/contact
Gratulation! Sie haben soeben den aussergewöhnlichen Ventilator CHARLY
erworben. Er wird Ihnen viel Freude machen und die Raumluft für Sie verbessern.
Wie bei allen elek trischen Haushaltsgeräten wird auch bei diesem Gerät zur
Vermeidung von Verletzungen, Brand- oder Geräteschäden besondere Sorgfalt verlangt. Bitte studieren Sie die vorliegende Betriebsanleitung vor der
Inbetriebnahme und beachten Sie die Sicherheitshinweise auf dem Gerät.
Gerätebeschreibung
Das Gerät besteht aus den folgenden Hauptkomponenten:
1. Teleskoprohr
2. Fuss
3. Befestigungsschraube für Fuss und Verbindungsstück
4. Oberteil Teleskoprohr (höhenverstellbar)
5. Schraube für Höhenverstellung
6. Motorgehäuse
7. Befestigungsschraube für Motorgehäuse und Fuss
8. Sicherungsmutter für Gitter
9. Schutzgitter Rückseite
10. Ventilatorflügel
11. Befestigungsschraube für Ventilatorflügel und Motorgehäuse
12. Schutzgitter Vorderseite
13. Positionierungsklammer
14. Befestigungklammern (8 Stück Charly floor, 7 Stück Charly little)
15. Sicherheitsschraube
16. Regler für Ein/Aus und drei Geschwindigkeitsstufen (aus, hoch, mittel,
niedrig)
17. Schalter für Oszillation Ein/Aus
18. Netzkabel
Wichtige Sicherheitshinweise
Bitte lesen Sie die Gebrauchsanleitung genau durch, bevor Sie das Gerät das
erste Mal in Betrieb nehmen und bewahren Sie sie zum späteren Nachschlagen gut auf, geben Sie sie ggf. an den Nachbesitzer weiter.
• Für Schäden, die durch Nichtbeachten dieser Gebrauchsanleitung entstehen, lehnt Stadler Form jegliche Haftung ab.
• Das Gerät ist nur im Haushalt für die in dieser Gebrauchsanweisung
beschriebenen Zwecke zu benutzen. Ein nicht bestimmungsgemässer
Gebrauch sowie technische Veränderungen am Gerät können zu Gefahren
für Gesundheit und Leben führen.
• Dieses Gerät kann von Kindern ab 8 Jahren und Personen mit eingeschränkten körperlichen, sensorischen oder geistigen Fähigkeiten, aber
auch von unerfahrenen und unwissenden Personen verwendet werden,
sofern diese das Gerät unter Aufsicht verwenden oder von einer anderen
Person über die sichere Verwendung des Gerätes unterwiesen wurden
und sich der damit verbundenen Gefahren bewusst sind. Kinder sollten
nicht mit dem Gerät spielen. Kinder sollten das Gerät nur unter Aufsicht
reinigen und pflegen.
• Bewahren Sie keine Verpackungsbestandteile in der Reichweite von Kindern auf.
Page 4

• Überprüfen Sie den Zustand des Geräts, nachdem Sie es aus der Verpackung genommen haben. Stellen Sie sicher, dass alle Bestandteile komplett und in einwandfreiem Zustand sind (siehe Gerätebeschreibung).
• Montieren Sie das Gerät gemäss Montageanleitung. Folgen Sie exakt der
Montageanleitung und stellen Sie sicher, dass alle Schrauben fest angezogen sind, um Schäden und Gefahren zu vermeiden.
• Stecken Sie keine Gegenstände in das Gitter des Geräts. Das Gerät während des Betriebs nicht abdecken.
• Stellen Sie sicher, dass das Netzkabel von der Steckdose getrennt ist,
bevor Sie das Schutzgitter entfernen.
• Schliessen Sie das Kabel nur an Wechselstrom an. Achten Sie auf die
Spannungsangaben auf dem Gerät.
• Keine beschädigten Verlängerungskabel verwenden.
• Das Netzkabel nicht über scharfe Kanten ziehen oder einklemmen.
• Den Stecker nie am Netzkabel oder mit nassen Händen aus der Steckdose
ziehen.
• Das Gerät nicht in unmittelbarer Nähe einer Badewanne, einer Dusche
oder eines Schwimmbeckens benutzen (Mindestabstand von 3 m einhalten). Gerät so aufstellen, dass Personen das Gerät von der Badewanne
aus nicht berühren können.
• Gerät nicht in der Nähe einer Wärmequelle aufstellen. Das Netzkabel
keiner direkten Hitzeeinwirkung (wie z.B. heisse Herdplatte, offene
Flammen, heisse Bügelsohle oder Heizöfen) aussetzen. Netzkabel vor Öl
schützen.
• Darauf achten, dass das Gerät beim Betrieb eine gute Standfestigkeit besitzt und nicht über das Netzkabel gestolpert werden kann.
• Das Gerät ist nicht spritzwassergeschützt.
• Das Gerät ist nur zur Verwendung in Innenräumen geeignet.
• Das Gerät nicht im Freien aufbewahren.
• Das Gerät an einem trockenen und für Kinder unzugänglichen Ort aufbewahren (einpacken).
• Wenn das Netzkabel beschädigt ist, muss es vom Hersteller oder in einer
vom Hersteller zugelassenen Werkstatt oder von ähnlich qualifizierten
Personen ersetzt werden, um Gefahren zu vermeiden.
• Vor jeder Wartung, Reinigung und nach jedem Gebrauch das Gerät ausschalten und das Netzkabel von der Steckdose trennen.
• Reparaturen an Elektrogeräten dürfen nur von instruierten Fachkräften
durchgeführt werden.
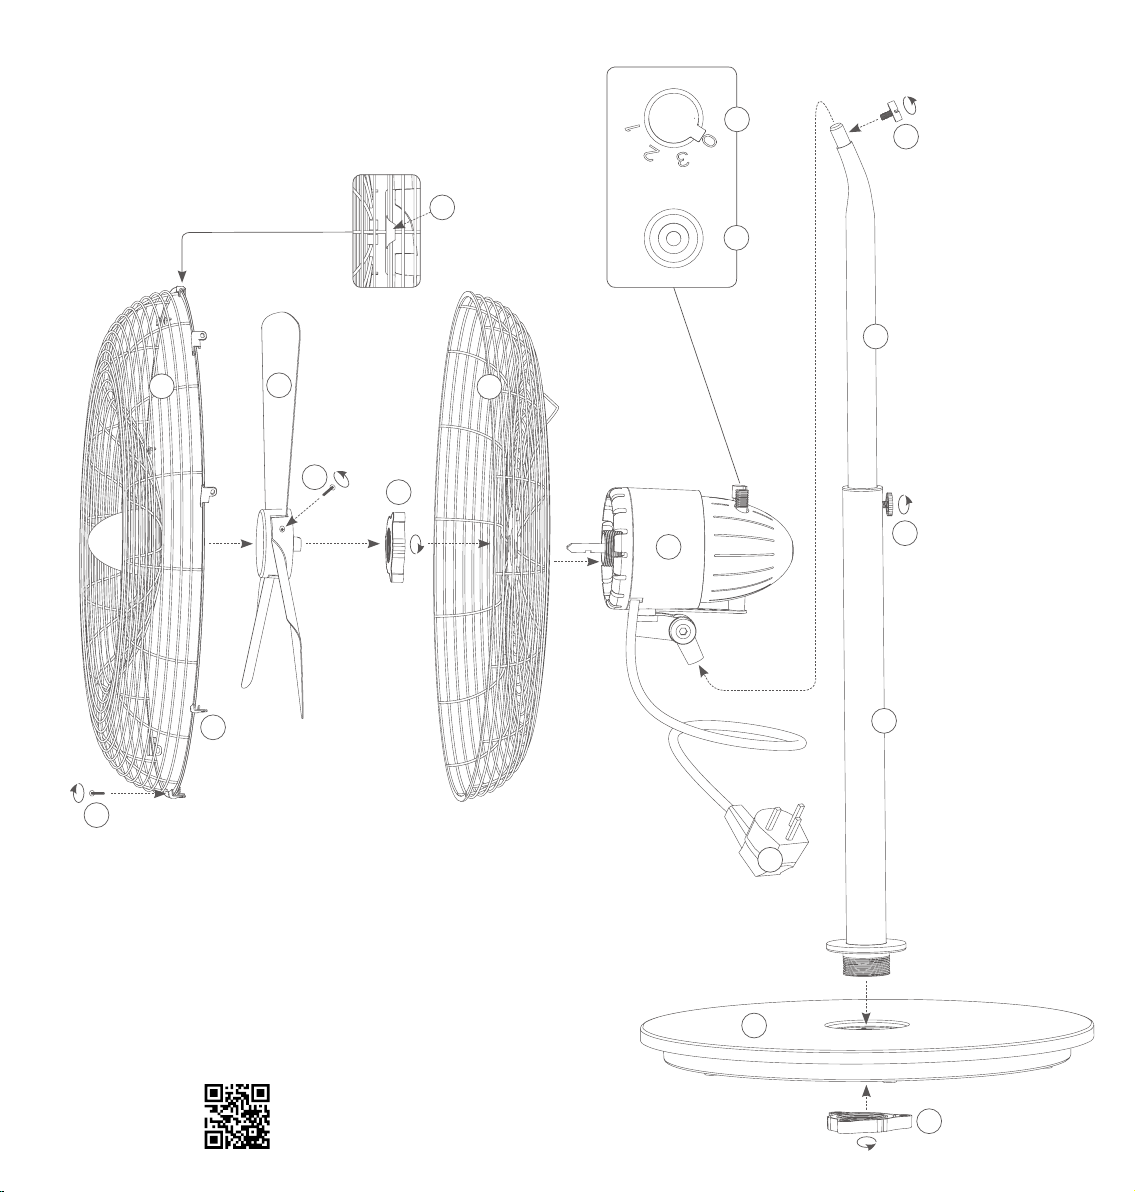
Montage (siehe Seite 2 und 3)
Achtung: Das Schutzgitter muss vor Inbetriebnahme des Gerätes einwand-
frei verschlossen sein, um Schäden und Gefahren zu vermeiden. Stellen Sie
sicher, dass alle Schrauben und Sicherungsmuttern fest angezogen sind.
Schliessen Sie das Netzkabel erst nach Beendigung der Montage an die
Steckdose an.
A. Entfernen Sie die Befestigungsmutter (3) unten am Teleskoprohr (1).
Stecken Sie das Teleskoprohr (1) in den Fuss (2) und fixieren es mit der
Befestigungsmutter (3).
B. Am Oberteil des Teleskoprohrs (4) befindet sich die Schraube für die Hö-
henverstellung (5) des Teleskoprohrs. Durch Lösen dieser Schraube lässt
sich das Rohr in der Höhe verstellen. Ziehen Sie die Schraube wieder
fest an, wenn das Rohr die gewünschte Höhe hat.
C. Lösen Sie die Befestigungsschraube (7) am Oberteil des Teleskoprohrs
(4). Stecken Sie das Motorgehäuse (6) auf das Oberteil des Teleskoprohrs (4) und fixieren es mit der Befestigungsschraube (7).
D. Entfernen Sie die Sicherungsmutter (8) vom Motorgehäuse (6) und
stecken Sie das Schutzgitter Rückseite (9) auf das Motorgehäuse (6).
Achten Sie bei der Positionierung darauf, dass der Tragegriff am Schutzgitter (9) oben ist. Schrauben Sie nun die Sicherungsmutter (8) wieder an
das Motorgehäuse (6) um das Schutzgitter (9) zu fixieren.
E. Fügen Sie die Ventilatorflügel (10) auf das Motorgehäuse (6) und fixie-
ren es mit der Befestigungsschraube (11) (lose am Ventilatorflügel befestigt). Ziehen Sie die Schraube fest, um die Ventilatorflügel (10) zu
sichern.
F. Stecken Sie das Schutzgitter Vorderseite (12) auf das Schutzgitter Rück-
seite (9). Achten Sie dabei darauf, dass die Positionierungsklammer (13)
am vorderen Schutzgitter gemäss Abbildung Seite 2-3 am Schutzgitter
Rückseite einhängt. Fixieren Sie die zwei Schutzgitter durch schliessen
der 8 Befestigungklammern (14). Stellen Sie sicher, dass alle Klammern
(14) geschlossen sind.
G. Befestigen Sie die zwei Schutzgitter (9 und 12) mit der Sicherheits-
schraube (15).
Inbetriebnahme/Bedienung
1. Stellen Sie Charly an den gewünschten Platz auf einen flachen Untergrund. Schliessen Sie das Netzkabel (18) an eine geeignete Steckdose
an.
2. Charly am Regler (16) einschalten und gewünschte Drehzahl (Stufe 1-3
von Brise bis viel Wind) einstellen.
3. Drücken Sie den Schalter für die Oszillation (17) nach unten, um die Oszillation einzuschalten. Ziehen Sie den Schalter nach oben, um die Oszillation auszuschalten.
4. Die Richtung des Luftstroms kann in 4 Positionen eingestellt werden.
Durch vorsichtiges Bewegen des Motorgehäuses (6) nach oben und unten, kann die Richtung angepasst werden (Klick-Geräusch).
Reinigung
Vor jeder War tung, Reinigung und nach jedem Gebrauch das Gerät ausschalten und das Netzkabel (18) von der Steckdose trennen.
Achtung: Das Gerät nie ins Wasser tauchen (Kurzschlussgefahr).
• Zur äusseren Reinigung mit einem feuchten Lappen abreiben und danach
gut trocknen.
• Zur Reinigung der Ventilatorflügel entfernen Sie die Sicherheitsschraube
(15), öffnen alle Befestigungsklammern (14) und heben das Schutzgitter
Vorderseite (12) vorsichtig ab. Nun können Sie die Ventilatorflügel (10)
mit einem feuchten Lappen abreiben und danach gut trocknen. Nach der
Reinigung stecken Sie das Schutzgitter (12) wieder auf das Gerät (Positionierungsklammer oben einhängen: 13), schliessen alle Befestigungsklammern (14) und schrauben die Sicherheitsschraube (15) fest.
Reparaturen
• Reparaturen an Elektrogeräten (Wechseln des Netzkabels) dürfen nur
von instruierten Fachkräften durchgeführt werden. Bei unsachgemässen
Reparaturen erlischt die Garantie und jegliche Haftung wird abgelehnt.
Page 5

English
• Nehmen Sie das Gerät nie in Betrieb, wenn ein Kabel oder Stecker beschädigt ist, nach Fehlfunktionen des Gerätes, wenn dieses heruntergefallen ist oder auf eine andere Art beschädigt wurde (Risse/Brüche am
Gehäuse).
• Nicht mit irgendwelchen Gegenständen in das Gerät eindringen.
• Ausgedientes Gerät sofort unbrauchbar machen (Netzkabel durchtrennen) und bei der dafür vorgesehenen Sammelstelle abgeben.
Entsorgung
Die europäische Richtlinie 2012 / 19 / CE über Elektro- und Elektronik-Altgeräte (WEEE) verlangt, dass elektrische Haushaltsgeräte nicht über den
Restmüll oder sonstigen Haushaltsabfall entsorgt werden dürfen, sondern
an Sammelpunkten für das Recycling von elektrischen und elektronischen
Geräten abgegeben werden müssen. So können die Verwertung der enthaltenen Materialien optimiert und ihre Auswirkungen auf die menschliche Gesundheit und die Umwelt reduziert werden. Das durchgestrichene
Abfalltonnensymbol auf dem Produkt erinnert Sie an diese Verpflichtung. Bitte fragen Sie bei Ihrer Gemeindeverwaltung nach
der zuständigen Entsorgungsstelle.
Technische Daten
Nennspannung 230 V / 50 Hz
Nennleistung 37 – 58 W
Abmessungen 450 x 1‘300 x 400 mm
(Breite x Höhe x Tiefe)
Gewich t 9.4 kg
Schalldruckpegel < 56 dB(A)
Erfüllt EU-Vorschrift CE / WEEE / RoHS
Technische Änderungen vorbehalten
Congratulations! You have just purchased the exceptional CHARLY fan. He
will give you great pleasure and improve the indoor air for you.
As with all domestic electrical appliances, particular care is needed with
this model also, in order to avoid injury, fire damage or damage to the appliance. Please study these operating instructions carefully before using the
appliance for the first time and follow the safety advice on the appliance
itself.
Description of the appliance
The appliance consists of the following main components:
1. Main pillar
2. Foot
3. Fixing nut for foot and pillar
4. Upper pillar (height-adjustable)
5. Screw for height adjusting
6. Motor housing
7. Fixing screw for motor housing and pillar
8. Securing nut for grille
9. Protection grille rear
10. Fan blades
11. Fixing screw for fan blades and motor housing
12. Protection grille front
13. Positioning clip
14. Fixing clips (8 pieces)
15. Securing screw
16. Controller for switching on/off and setting the three fan speeds (off,
high, medium, low)
17. Oscillating knob on/off
18. Power cord
Important safety instructions
Please read through the operating instructions carefully before you use the
appliance for the first time and keep them safely for later reference; if necessary pass them on to the next owner.
• Stadler Form refuses all liability for loss or damage which arises as a
result of failure to follow these operating instructions.
• The appliance is only to be used in the home for the purposes described
in these instructions. Unauthorised use and technical modifications to the
appliance can lead to danger to life and health.
• This appliance can be used by children aged from 8 years and above and
persons with reduced physical, sensory or mental capabilities or lack of
experience and knowledge if they have been given super vision or instruction concerning use of the appliance in a safe way and understand the
hazards involved. Children shall not play with the appliance. Cleaning and
user maintenance shall not be made by children without supervision.
• Never leave any parts of the packing within the reach of children.
• Check the condition of the appliance af ter removing it from the packaging.
Ensure that all component parts of the appliance are within the packaging
and have not been damaged (see description of the appliance).
Page 6

• Assemble the appliance in accordanc e with the instr uctions for Assembly.
Follow the instructions for assembly exactly and ensure that all screws
are firmly tightened so as to avoid damage and hazards.
• Never insert objects into the grille of the fan. Do not cover the appliance
during operation.
• Always disconnect the power cord from the socket before removing the
protection grille.
• Only connect the cable to alternating current. Observe the voltage information given on the appliance.
• Do not use damaged extension cords.
• Do not run the power cord over sharp edges and make sure that it does
not get trapped.
• Do not pull the plug from the socket with wet hands or by holding on to
the power cord.
• Do not use the appliance in immediate vicinity of a bath tub, a shower or a
swimming pool (observe a minimum distance of 3 m). Place the appliance
such that a person in the bath tub cannot touch the appliance.
• Do not place the appliance near a heat source. Do not subject the power
cord to direct heat (such as a heated hotplate, open flames, hot iron sole
plates or heaters for example). Protect power cords from oil.
• See to it that the appliance is properly positioned to ensure a high stability
during its operation and make sure that no one c an trip over the power cord.
• The appliance is not splash-proof.
• For indoor use only.
• Do not store the appliance outdoors.
• Store the appliance in a dry place inaccessible to children (pack the appliance).
• If the supply cord is damaged, it must be replaced by the manufacturer, or
its service agent, or a qualified person in order to avoid a hazard.
• Prior to any maintenance, cleaning and after each use, switch off the appliance and unplug the mains cable from the socket.
• Repairs to electrical appliances must only be carried out by a qualified
electrical technician.
Assembly (see page 2 and 3)
Attention: The protection grille must be properly closed prior to switch-
ing on the appliance so as to avoid any damage or hazards. Ensure that all
screws and securing nut s are firmly tightened. Only connect the power cable
to the socket once assembly has been completed.
A. Remove fixing nut (3) on the underside of main pillar (1). Insert main pillar
(1) into foot (2) and fix in position with fixing nut for foot and pillar (3).
B. The screw for height adjusting (5) for the main pillar is located on the
upper pillar (4). By undoing this screw the height of the pillar can be
adjusted. Retighten the screw firmly once the pillar is the desired height.
C. Undo fixing screw for motor housing and pillar (7) on upper pillar (4).
Locate motor housing (6) on upper pillar (4) and secure with fixing screw
for motor housing and pillar (7).
D. Remove securing nut for grille (8) from motor housing (6) and locate pro-
tection grille rear (9) on motor housing (6). When locating, ensure that
the handle on protection grille rear (9) is on the top. Now screw securing
nut for grille (8) back on to motor housing (6) so as to fix protection grille
rear (9) in position.
E. Attach fan blades (10) to motor housing (6) and secure in position with
fixing screw for fan blades and motor housing (11) (loosely attached to
fan blade). Tighten screw to secure fan blades (10).
F. Locate protection grille front (12) on protection grille rear (9). In doing so,
take care to ensure that positioning clip (13) on protection grille front is
fitted on protection grille rear as show n in illustration on page 2- 3. Close
the two grilles by fastening the 8 fixing clips (14). Ensure that all fixing
clips (14) are fastened.
G. Secure the two grilles (9 and 12) with securing screw (15).
Setting up / operation
1. Place Charly at the desired position on a flat surface. Connect the mains
cable (18) to a suitable plug socket.
2. Switch on the Charly fan at the controller (16) and set the desired speed
(Positions 1-3, from gentle breeze to powerful circulation).
3. Push the oscillating knob (17) down to switch on the oscillation and pull
the oscillating knob up to switch off the oscillation.
4. The direction of airflow can be set in 4 positions. By carefully moving
the motor housing (6) up and down, the direction can be adjusted (clicking noise).
Cleaning
Prior to any maintenance, cleaning and after each use, switch off the appliance and unplug the mains cable (18) from the socket.
Attention: Never submerge the appliance in water (danger of short-circuit).
• For external cleaning, rub with a damp cloth and then dry thoroughly.
• To clean the fan blades, remove securing screw (15), undo all fixing clips
(14) and carefully lift off protection grille front (12). Now you can wipe the
fan blades (10) with a damp cloth and dr y well afterwards. After cleaning,
replace protection grille front (12) on appliance (fit top positioning clip:
13), fasten all fixing clips (14) and fasten securing screw (15) tightly.
Repairs
• Repairs to electrical appliances must only be carried out by a qualified
electrical technician. If improper repairs are carried out, the warranty
lapses and all liability is refused.
• Never operate the appliance if the adaptor or plug is damaged, after it has
malfunctioned, if it has been dropped or has been damaged in any other
way (cracks/breaks in the casing).
• Do not push any object into the appliance.
• If the appliance is beyond repair, make it unusable immediately by cutting
through the cable and hand it in at the collection point provided for the
purpose.
Disposal
The European directive 2012 / 19 / CE on Waste Electrical and Electronic
Equipment (WEEE), requires that old household electrical appliances must
not be disposed in the normal unsorted municipal waste stream. Old appliances must be collected separately in order to optimize the recovery and
recycling of the materials they contain and reduce the impact on human
health and the environment. The crossed out wheeled bin symbol on the
product reminds you of your obligation, that when you dispose of the appli-
Page 7
Français
ance it must be separately collected. Consumers should contact
their local authority or retailer for information concerning the correct disposal of their old appliance.
Specifications
Rated voltage 230 V / 50 Hz
Rated power 37 – 58 W
Dimensions 450 x 1’300 x 400 mm
(width x height x depth)
Weight 9.4 kg
Sound level < 56 dB(A)
Complies with EU
regulations CE / WEEE / RoHS
All rights for any technical modifications are reserved
Félicitation ! Vous venez d‘acheter le superbe ventilateur CHARLY. Nous
espérons que cet appareil vous donnera entière satisfaction et améliorera
l’air intérieur pour vous.
Comme pour tous les appareils ménagers électriques, il est important
d‘entretenir cet appareil correctement afin d’éviter les blessures, les incendies ou les dommages. Veuillez lire attentivement le présent mode d’emploi
avant la mise en service et respecter les conseils de sécurité indiqués sur
l’appareil.
Description de l’appareil
L’appareil est composé des éléments principaux suivants :
1. Pied principal
2. Socle
3. Ecrou de fixation du socle au pied
4. Pied supérieur (réglable en hauteur)
5. Ecrou de réglage de la hauteur
6. Bloc moteur
7. Ecrou de fixation du bloc moteur au pied
8. Ecrou de fixation de la grille
9. Grille arrière de protection
10. Pales du ventilateur
11. Ecrou de fixation des pales du ventilateur au bloc moteur
12. Grille avant de protection
13. Attache de positionnement
14. Attaches de fixation (8 pièces)
15. Ecrou de fixation
16. Régulateur pour l’interrupteur marche/arrêt et choix de vitesse de ven tilation (arrêt, grande, moyenne, faible)
17. Bouton d’oscillation marche/arrêt
18. Cordon d’alimentation
Conseils de sécurité importants
Veuillez lire attentivement le mode d‘emploi avant la première mise en
service de l’appareil et conservez-le pour toute consultation ultérieure ou
remettez-le, le cas échéant, au nouveau propriétaire.
• La société Stadler Form décline tou te responsabilité des dommages résultant du non-respect des indications données dans ce mode d‘emploi.
• Cet appareil ne doit être utilisé qu’aux fins domestiques décrites dans ce
mode d‘emploi. Toute utilisation contraire à sa destination ainsi que toute
modification technique apportée à l‘appareil peut entraîner des risques
pour la santé et la vie.
• Cet appareil peut être utilisé par les enfants âgés de 8 ans et plus et
les personnes aux capacités physiques, sensorielles ou mentales réduites
ou ne disposant pas de l’expérience ou de la connaissance nécessaire,
sous surveillance ou s’ils ont reçu les instructions concernant l’utilisation
de l’appareil et s’ils comprennent les dangers impliqués. Les enfants ne
doivent pas jouer avec l’appareil. Les opérations de nettoyage et d’entretien ne doivent pas être effectuées par des enfants sans surveillance.
• Ne laissez jamais les matériaux de l’emballage à la portée des enfants.
Page 8

• Vérifiez l’état de l’appareil après l’avoir retiré de son emballage. Vérifiez
que tous les composants de l’appareil sont dans l’emballage et n’ont pas
été endommagés (voir description de l’appareil).
• Assemblez l’appareil conformément aux instructions de montage. Pour
éviter tout dommage et danger, suivez strictement les instructions de
montage et veillez à ce que tous les écrous soient bien serrés.
• N’insérez jamais d’objets dans la grille du ventilateur. Ne couvrez pas
l’appareil pendant le fonctionnement.
• Débranchez toujours le cordon d’alimentation de la prise secteur avant de
retirer la grille de protection.
• Ne branchez le câble qu’au courant alternatif. Tenez compte des indications de tension situées sur l‘appareil.
• Ne pas utiliser de rallonge électrique endommagée.
• Ne pas faire passer ou coincer le câble d’alimentation par-dessus des
arêtes vives.
• Ne jamais retirer la fiche de courant de la prise en tirant sur le câble d’alimentation ou en ayant les mains mouillées.
• Ne pas utiliser l’appareil à proximité immédiate d’une baignoire, d’une
douche ou d’une piscine (respecter une distance minimum de 3 m). Placer
l’appareil de telle façon à ce que personne ne puisse le toucher à partir
de la baignoire.
• Ne pas placer l’appareil à proximité directe d‘ une source de chaleur. Ne
pas exposer le câble d’alimentation à la chaleur (comme p. ex. une plaque
chaude de cuisinière, flammes nues, semelle chaude de fer à repasser ou
poêles). Protéger le câble d’alimentation de tout contact avec de l‘huile.
• Veiller à ce que l’appareil ait une bonne stabilité lors de son fonctionnement et que l’on ne puisse pas trébucher sur le câble d’alimentation.
• Cet appareil n’est pas protégé contre les projections d’eau.
• Pour usage intérieur uniquement.
• L’appareil ne doit pas être conservé à l’extérieur.
• Conserver l’appareil à un endroit sec et hors de portée des enfants (l’emballer).
• Pour éviter tout danger, faites remplacer le cordon d‘alimentation endommagé par le fabricant, un agent agréé ou une personne qualifiée.
• Les réparations sur les appareils électriques ne doivent être effectuées
que par des électriciens qualifiés.
Montage (voir page 2 et 3)
Attention : Pour éviter tout dommage et danger, fermez correctement la
grille de protection avant d’allumer l’appareil. Veillez à ce que toutes les
vis et tous les écrous de fixation soient bien serrés. Ne branchez le cordon
d’alimentation au secteur qu’après avoir effectué le montage.
A. Retirez l’écrou de fixation (3) de la face inférieure du pied principal (1).
Insérez le pied principal (1) dans le socle (2) et le fixer en place à l’aide de
l’écrou de fixation du socle au pied (3).
B. L’écrou de réglage de la hauteur (5) du pied principal se trouve dans
le pied supérieur (4). La hauteur du pied peut être réglée en dévissant
cet écrou. Resserrez l’écrou fermement une fois le pied est à la hauteur
souhaitée.
C. Desserrez l’écrou de f ixation du bloc mot eur au pied (7) du pied sup érieur
(4). Positionnez le bloc moteur (6) sur le pied supérieur (4) et le fixer avec
l’écrou de fixation du bloc moteur au pied (7).
D. Enlevez l’écrou de fixation de la grille (8) du bloc moteur (6) et placez
la grille arrière de protection (9) sur le bloc moteur (6). Lors de cette
opération, veillez à ce que la poignée (9) en haut de la grille arrière de
protection (8) soit soulevée. Serrez l’écrou de fixation de la grille (8) au
bloc moteur (6) de façon à la grille arrière de protection (9) soit bien en
place.
E. Fixez les pales du ventilateur (10) au bloc moteur (6) à l’aide de l’écrou de
fixation des pales de ventilateur au bloc moteur (11) (légèrement desserrée côté pale du ventilateur). Serrez l’écrou pour bien attacher les pales
du ventilateur (10).
F. Placez la grille avant de protection (12) sur la grille arrière de protection
(9). Lors de cette opération, veillez à ce que l’attache de fixation (13) de
la grille avant de protection soit accrochée à la grille arrière de protection comme illustré à la page 2-3. Fermez les deux grilles en serrant les 8
attaches de fixation (14). Vérifiez que toutes les attaches de fixation (14)
soient bien fermées.
G. Attachez les deux grilles (9 et 12) avec l’écrou de fixation (15).
Mise en marche/utilisation
1. Posez Charly à l’endroit voulu sur une surface plane. Branchez le cordon
d’alimentation (18) sur la prise appropriée.
2. Mettre Charly en marche en actionnant le régulateur (16) et régler la
vitesse de rotation souhaitée (niveau 1 à 3 de brise à vent fort).
3. Appuyez sur le bouton d’oscillation (17) pour mettre en marche l’oscillation et le soulever pour l’arrêter.
4. Il y a 4 positions de direction du flux d’air. Vous pouvez régler la direction
du flux d’air en changeant avec précaution de haut en bas la position du
bloc moteur (6) (des cliquetis seront entendus).
Nettoyage
Avant toute opération d’entretien, de nettoyage et après chaque utilisation,
éteignez l’appareil et débranchez le cordon d’alimentation (18) de la prise.
Attention : Ne jamais plonger l’appareil dans l’eau (risque de court-circuit).
• Pour le nettoyage extérieur, utilisez un chiffon humide et séchez bien
l‘appareil.
• Pour nettoyer les pales du ventilateur, enlevez l’écrou de fixation (15),
détachez toutes les attaches de fixation (14) et soulevez doucement la
grille arrière de protection (12). Vous pouvez alors nettoyer les pales du
ventilateur (10) avec un chiffon humide puis les sécher par la suite. Après
le nettoyage, remettez en place la grille avant de protection (12) (placez
l’attache supérieure 13), attachez toutes les attaches de fixation (14) et
bien serrez l’écrou de fixation (15).
Réparations
• Les réparations sur les appareils électriques ne doivent être effectuées
que par des électriciens qualifiés. La garantie s’éteint et toute responsabilité est exclue en cas de réparations non conformes aux règles de l‘art.
• Ne mettez jamais l‘appareil en service en cas d’endommagement d’un
cordon ou d’une fiche, après un dysfonctionnement de l’appareil causé
par une chute ou par une autre détérioration de l’appareil (boîtier fissuré/
cassé).
• Ne pas pénétrer avec des objets quelconques dans l’appareil.
Page 9
Italiano
• Arrivé au bout de sa durée de vie, l’appareil doit immédiatement être rendu inutilisable (sectionner le cordon d’alimentation) et être déposé dans
une déchetterie prévue à cet effet.
Elimination
Conformément à la directive européenne 2012 / 19 / EC sur la mise au
rebut des déchets d’équipements électriques et électroniques (DEEE), les
appareils ménagers usés ne doivent pas être jetés avec les déchets non
triés. Ces appareils usés doivent être collectés séparément des déchets
ménagers pour optimiser la récupération et le recyclage de leurs composants dans le but de réduire les effets négatifs sur la santé humaine et sur
l’environnement. Le symbole de poubelle avec roulettes et croix indique que
ces produits doivent être collectés et mis au rebut séparément
des ordures ménagères. L es consommateurs doivent contacter les
autorités locales ou leurs revendeurs concernant la mise au rebut
de leurs vieux appareils.
Caractéristiques techniques
Tension nominale 230 V / 50 Hz
Puissance nominale 37 – 58 W
Dimensions 450 x 1’300 x 400 mm
(largeur x hauteur x profondeur)
Poids 9,4 kg
Niveau de bruit < 56 dB(A)
Conforme à la
réglementation UE CE / DEEE / RoHS
Sous réserve de modifications techniques
Congratulazioni! Avete appena acquistato il fantastico ventilatore CHARLY.
Sarà estremamente piacevole e migliorerà l’aria nell’ambiente per voi.
Come con tutte le apparecchiature elettriche domestiche, è necessaria particolare attenzione anche con questo modello, al fine di evitare infortuni,
danni da incendio o danni al dispositivo. Studiare con attenzione queste
istruzioni per l’uso prima di utilizzare il dispositivo per la prima volta e seguire tutte le istruzioni di sicurezza fornite con esso.
Descrizione dell’apparecchio
L’apparecchio consiste delle seguenti componenti principali:
1. Sostegno principale
2. Base
3. Dado di fissaggio per base e sostegno
4. Sostegno superiore (altezza regolabile)
5. Vite per regolazione altezza
6. Alloggiamento motore
7. Vite di fissaggio per alloggiamento motore e sostegno
8. Dado di sicurezza per griglia
9. Griglia di protezione posteriore
10. Pale ventilatore
11. Vite di fissaggio per pale ventilatore e alloggiamento motore
12. Griglia di protezione anteriore
13. Clip di posizionamento
14. Clip di fissaggio (8 pezzi)
15. Vite di sicurezza
16. Interrutore per accensione/spegnimento e impostazione delle tre velo cità della ventilatore (spento, alta, media, bassa)
17. Manopola per accensione/spegnimento oscillazione
18. Cavo di alimentazione
Importanti istruzioni di sicurezza
Prima di utilizzare l’apparecchio leggere attentamente le istruzioni per l’uso.
Dopo aver letto le istruzioni per l’uso, conservarle con cura per la futura
consultazione.
• La Stadler Form respinge ogni responsabilità per la perdita o danni che
incorrano come risultato di un mancato rispetto di queste istruzioni d’uso.
• L’apparecchio dev’essere usato solo in casa e per gli scopi descritti in
queste istruzioni. L’uso non autorizzato e le modifiche tecniche all’apparecchio possono portare a pericoli per la vita e la salute.
• Questo apparecchio può essere utilizzato da bambini di età superiore agli
8 anni e persone con ridotte capacità mentali, fisiche o sensoriali o prive
di esperienza e conoscenze in merito, in presenza di altre persone che
ne sorveglino l’operato o ricevano istruzioni sull’uso dell’apparecchio in
modo sicuro e ne comprendano i pericoli. I bambini non devono giocare
con l’apparecchio. Pulizia e manutenzione non deve essere effettuata da
bambini senza supervisione.
• Non lasciare mai alcuna parte dell’imballaggio alla portata dei bambini.
• Controllare le condizioni del dispositivo dopo averlo rimosso dall’imballaggio. Assicurarsi che tutte i componenti del dispositivo siano presente e
non siano danneggiati (si veda la descrizione dell’apparecchio).
Page 10

• Montare il dispositivo secondo le istruzioni per il montaggio. Seguire
esattamente le istruzioni per il montaggio e assicurare che tutte le viti
siano strette fermamente per evitare danni e pericoli.
• Non inserire oggetti nella griglia della ventilatore. Non coprire il dispositivo durante il funzionamento.
• Scollegare sempre il cavo di alimentazione dalla presa prima di rimuovere
la griglia di protezione.
• Collegate il cavo solo alla corrente alternata. Rispettate le informazioni
sul voltaggio riportate sull’apparecchio.
• Non utilizzate prolunghe.
• Non fate scorrere il cavo su bordi taglienti ed assicuratevi che non rimanga incastrato.
• Non tirate il cavo dalla presa con mani umide o afferrando il cavo stesso.
• Non utilizzate questo apparecchio nelle immediate vicinanze di una vasca,
una doccia o una piscina (rispettate una distanza minima di 3 m). Posizionate l’apparecchio in modo che una persona dentro la vasca non possa
toccare l’apparecchio.
• Non posizionate l’apparecchio vicino ad una sorgente di calore. Non sottoponete il cavo di alimentazione al calore diretto (come piastre, fiamme
libere, ferri da stiro caldi o caloriferi per esempio). Proteggete i cavi di
alimentazione dall’olio.
• Fate in modo che l’apparecchio sia posizionato appropriatamente per assicurare una buona stabilità durante il suo funzionamento ed assicuratevi
che nessuno possa inciampare sul cavo.
• L’apparecchio non è impermeabilizzato.
• Solo per uso interno.
• Non conservare questo apparecchio all’esterno.
• Riponete l’apparecchio in un luogo asciutto inaccessibile ai bambini (rimettete l’apparecchio nella confezione).
• Se il cavo è danneggiato, farlo sostituire da un produttore, dall’assistenza
o da personale qualificato per evitare pericoli.
• Prima di effet tuare interv enti di manutenzione, pulizia e dopo ogni utilizzo,
spegnere il dispositivo e scollegare il cavo di alimentazione dalla presa
di corrente.
• Le riparazioni agli apparecchi elettrici devono essere effettuate solo da
tecnici elettricisti qualificati.
Montaggio (si veda pag. 2 e 3)
Attenzione: La griglia di protezione deve essere chiusa correttamente pri-
ma di accendere il dispositivo in modo da evitare danni o pericoli. Assicurarsi che tutte le viti e i dadi di sicurezza siano stretti fermamente. Collegare
il cavo di alimentazione alla presa una volta che il montaggio è completato.
A. Rimuovere il dado di fis saggio (3) dal lato inferiore del sostegno principa-
le (1). Inserire il sostegno principale (1) nel base (2) e fissare in posizione
con il dado di fissaggio per base e sostegno (3).
B. La vite per la regolazione dell’altezza (5) del sostegno principale è posta
sul sostegno superiore (4). Svitando questa vita è possibile regolare l’altezza del sostegno. Stringere la vite fermamente quando il sostegno si
trova all’altezza desiderata.
C. Svitare la vite di fissaggio per alloggiamento motore e sostegno (7) sul
sostegno superiore (4). Posizionare l’alloggiamento del motore (6) sul
sostegno superiore (4) e assicurarlo con la vite di fissaggio per alloggiamento motore e sostegno (7).
D. Rimuovere il dado di sicurezza della griglia (8) dall’alloggiamento del mo-
tore (6) e posizionare la griglia di protezione posteriore (9) sull’alloggiamento motore (6). Quando posizionato, assicurarsi che la maniglia sulla
griglia di protezione posteriore (9) sia in alto. Ora avvitare nuovamente
il dado di sicurezza della griglia (8) sull’alloggiamento del motore (6) in
modo da fissare la griglia di protezione posteriore (9) in posizione.
E. Fissare le pale della ventilatore (10) all’alloggiamento del motore (6) e
assicurare in posizione con la vite di fissaggio per pale ventilatore e alloggiamento motore (11) (fissata allentata alla pala della ventilatore).
Stringere la vite per assicurare le pale della ventilatore (10).
F. Posizionare la griglia di protezione anteriore (12) sulla griglia di prote-
zione anteriore (9). Nel fare ciò, fare attenzione ad assicurare che la clip
di posizionamento (13) sulla griglia di protezione anteriore si adatti alla
griglia di protezione posteriore come mostrato nell’immagine a pag. 2-3.
Chiudere le due griglie stringendo le 8 clip di fissaggio (14). Assicurare
che tutte le clip di fissaggio (14) siano serrate.
G. Assicurare le due griglie (9 e 12) con la vite di sicurezza (15).
Impostazione / Utilizzo
1. Posizionate Charly nella posizione desiderata su una superficie piana.
Collegate il cavo di alimentazione (18) all’unità ed inserite la spina in
una presa adatta.
2. Accendete il ventilatore Charly con il interruttore (16) e impostate la
velocità desiderata (posizioni da 1 a 3: da brezza leggera a circolazione
potente).
3. Premere la manopola di oscillazione (17) verso il basso per attivare l’oscillazione e tirare la manopola di oscillazione verso l’alto per disattivare
l’oscillazione.
4. La direzione del flusso dell’aria può essere impostata in 4 posizioni. Spostando con attenzione l’alloggiamento del motore (6) in alto e in basso, è
possibile regolare la direzione (si sente un clic).
Pulizia
Prima di effettuare interventi di manutenzione, pulizia e dopo ogni utilizzo,
spegnere il dispositivo e scollegare il cavo di alimentazione (18) dalla presa
di corrente.
Attenzione: Non immergete mai l’unità in acqua (pericolo di corto circuito).
• Per pulire l’esterno, passatelo con un panno umido e quindi asciugatelo
bene.
• Per pulire le pale della ventilatore, rimuovere la vite di sicurezza (15), svitare tutte le clip di fissaggio (14) ed estrarre con attenzione la griglia di
protezione anteriore (12). Ora è possibile pulire le pale della ventilatore
(10) con un panno umido e asciugare bene. Dopo aver pulito, riposizionare
la griglia di protezione anteriore (12) sul dispositivo (posizionare la clip di
posizionamento superiore: 13), stringere tutte le clip di fissaggio (14) e
serrare saldamente la vite di sicurezza (15).
Page 11

Español
Riparazione
• Le riparazioni agli apparecchi elettrici devono essere effettuate solo da
tecnici elettricisti qualificati. Se vengono effett uate riparazioni improprie,
la garanzia viene annullata e tutte le responsabilità sono rifiutate.
• Non utilizzate mai l’apparecchio se l’alimentatore o la spina sono danneggiati, dopo un malfunzionamento, se è stato fatto cadere o è stato
danneggiato in qualunque altro modo (rotture/crepe nell’involucro).
• Non spingete oggetti nell’apparecchio.
• Se l’apparecchio è irreparabile, rendetelo inutilizzabile immediatamente e
consegnatelo al punto di raccolta appropriato.
Smaltimento
La Direttiva Europea 2012 / 19 / CE sullo Smaltimento dei rifiuti elettrici ed
elettronici (WEEE) prevede che i dispositivi elettrici domestici usati non devono essere smaltiti nelle discariche municipali di rifiuti indifferenziati. I dispositivi usati devono essere raccolti separatamente in modo da ottimizzare
il recupero e il riciclaggio dei materiali in essi contenuti e ridurre l’impatto
sulla salute e sull’ambiente. Il simbolo del cestino con ruote barrato sul prodotto ricorda l’obbligo di smaltire il dispositivo mediante raccolta
differenziata. I consumatori devono contattare le autorità locali o
il rivenditore per informazioni relative al corretto smaltimento di
dispositivi usati.
Specifiche
Tensione nominale 230 V / 50 Hz
Potenza assorbita 37 – 58 W
Dimensioni 450 x 1’300 x 400 mm
(larghezza x altezza x profondità)
Peso 9.4 kg
Rumorosità < 56 dB(A)
Conforme con i
regolamenti UE CE / WEEE / RoHS
Tutti i diritti relativi a qualsiasi modifica tecnica sono riservati
¡Enhorabuena! Acaba de adquirir el extraordinario ventilador CHARLY. Quedará encantado con sus beneficios y mejorará la calidad del aire ambiente.
Como con todos los aparatos electrodomésticos también este aparato exige un especial cuidado para evitar heridas, daños causados por incendios
o daños en el aparato. Le rogamos por lo tanto que lea detenidamente el
presente manual de instrucciones antes de proceder a su puesta en marcha
y preste atención a las advertencias de seguridad indicadas en el aparato.
Descripción del aparato
El aparato tiene los siguientes componentes principales:
1. Pilar principal
2. Pié
3. Tuerca de fijación para pié y pilar
4. Pilar superior (ajustable en altura)
5. Tornillo para el ajuste en altura
6. Carcasa del motor
7. Tornillo de fijación para la carcasa del motor y el pilar
8. Tuerca de seguridad para la rejilla
9. Rejilla de protección trasera
10. Alabes del ventilador
11. Tornillo de fijación para los alabes del ventilador y la carcasa del motor
12. Rejilla de protección frontal
13. Sujeción de colocación
14. Sujeciones de fijación (8 elementos)
15. Tornillo de seguridad
16. Controlador para encender / apagar y configurar las tres velocidades
del ventilador (apagado, alta, media, baja)
17. Botón de encendido / apagado de oscilación
18. Cable de alimentación
Advertencias de seguridad importantes
Por favor, lea detenidamente el manual de instrucciones antes de poner en
marcha por primera vez el aparato y guárdelas bien por si necesitara consultarlas de nuevo más adelante o, dado el caso, pasárselas a un futuro nuevo
propietario.
• Stadler Form declina cualquier responsabilidad por los daños resultantes
de una utilización del aparato no conforme a este manual de instrucciones.
• El aparato sólo se ha de utilizar en el hogar y con los fines descritos en
este manual de instrucciones. Una utilización no conforme a las disposiciones así como modificaciones técnicas en el aparato pueden poner en
peligro la salud y la vida.
• Este aparato pueden usarlo los niños mayores de 8 años y aquellas personas con capacidades físicas, sensoriales o mentales reducidas o con falta
de experiencia siempre y cuando se les haya dado una formación o supervisión respecto al uso del aparato de una forma segura y entiendan los
riesgos que implica. Los niños no deben jugar con el aparato. La limpieza
y el mantenimiento del usuario no deben hacerlo niños sin supervisión.
• Nunca deje ninguna pieza del paquete al alcance de los niños.
Page 12

• Compruebe la condición del aparato tras retirarlo del envase. Asegúrese
que todos los componentes del aparato se encuentran en el paquete y no
presentan daños (véase la descripción del aparato).
• Monte el aparato conforme a las instrucciones de montaje. Siga las instrucciones de montaje exactamente y asegúrese que todos los tornillos
están bien apretados para evitar riesgo y daños.
• Nunca inserte objetos en la rejilla del ventilador. No cubra el aparato durante su funcionamiento.
• Desconecte siempre el cable de alimentación de la toma antes de retirar
la rejilla de protección.
• Conecte el cable sólo a la corriente alterna. En el aparato, fíjese en las
indicaciones sobre el voltaje.
• No utilice ningún cable alargador estropeado.
• No pase el cable de alimentación sobre bordes afilados ni lo pise.
• Nunca tire del enchufe del cable de red ni lo extraiga de la toma de corriente con las manos mojadas.
• No emplee el aparato de aire cerca de bañeras, duchas o piscinas (mantenga una distancia mínima de 3 m). Coloque el aparato de manera que no
sea posible tocarlo al salir de la bañera.
• No sitúe el aparato cerca de un foco calorífico. No exponga el cable de
red directamente al calor (como p.ej. fogones calientes, llamas, planchas
calientes o estufas). Proteja el cable de red del aceite.
• Asegúrese de que, durante su funcionamiento, el aparato mantiene una
buena estabilidad y que no tropieza con el cable de red.
• El aparato no está protegido contra salpicaduras de agua.
• Sólo para uso en el interior del hogar.
• No guarde el aparato en el exterior.
• Mantenga (empaquete) el aparato en un lugar seco e inaccesible para
los niños.
• Si el cable de alimentación presenta daños, debe sustituirlo el fabricante,
su agente de mantenimiento o personal con una cualificación similar para
evitar cualquier riesgo.
• Antes de cualquier operación de mantenimiento, limpieza o después de
cada uso, apague al aparato y desenchufe el cable de la corriente de la
toma.
• Las reparaciones en los aparatos eléctricos sólo han de ser llevadas a
cabo por personal especializado y debidamente formado.
Montaje (véase páginas 2 y 3)
Atención: Se debe cerrar debidamente la rejilla de protección antes de en-
cender el aparato para evitar cualquier daño o riesgo. Asegúrese que todos
los tornillos y tuercas de fijación están firmemente apretados. Únicamente
conecte el cable de alimentación a la toma una vez que el montaje se haya
completado.
A. Retire la tuerca de fijación (3) del lateral inferior del pilar principal (1). In-
serte el pilar principal (1) en el pié (2) y fíjelo en la posición con la tuerca
de fijación para el pié y el pilar (3).
B. El tornillo de ajuste en altura (5) para el pilar principal está situado en el
pilar superior (4). Al aflojar este tornillo, se puede ajustar la altura del
pilar. Vuelva a apretar este tornillo bien una vez que el pilar se encuentre
a la altura deseada.
C. Afloje el tornillo de f ijación para la carcasa del motor y el pilar (7) situado
en el pilar superior (4). Localice la carcasa del motor (6) en el pilar superior (4) y asegúrela con el tornillo de fijación para la carcasa del motor y
el pilar (7).
D. Retire la tuerca de seguridad de la rejilla (8) de la carcasa del motor
(6) y localice la rejilla de protección trasera (9) en la carcasa del motor
(6). Cuando la localice, asegúrese que el asa de la rejilla de protección
trasera (9) se encuentra en la parte superior. Ahora, atornille la tuerca
de seguridad a la rejilla (8) situada en la parte posterior de la carcasa del
motor (6) para fijar la rejilla de protección posterior (8) en posición.
E. Fije los alabes del ventilador (10) a la carcasa del motor (6) y asegúrelos
en posición con un tornillo de fijación para los alabes del ventilador y la
carcasa del motor (11) (fíjelos levemente para los alabes del ventilador).
Apriete el tornillo para asegurar los alabes del ventilador (10).
F. Localice la rejilla de protección frontal (12) en la rejilla de protección
posterior (9). Al hacerlo, tenga cuidado de asegurarse que la sujeción de
colocación (13) de la rejilla de protección frontal esté ajustada en la rejilla de protección posterior tal y como se muestra en la ilustración en la
página 2-3. Cierre las dos rejillas apretando las 8 sujeciones de fijación
(14). Asegúrese que todas las fijaciones (14) están apretadas.
G. Asegure las dos rejillas (9 y 12) con el tornillo de seguridad (15).
Puesta en funcionamiento/manejo
1. Coloque a Charly en el lugar deseado sobre un suelo plano. Conecte el
cable de alimentación (18) al aparato y enchúfelo en un enchufe adecuado.
2. Encienda el ventilador Charly desde el controlador (16) y seleccione la
velocidad deseada (posiciones de la 1-3, desde una agradable brisa a
una circulación con fuerza).
3. Empuje el botón de oscilación (17) hacia abajo para conectar la oscilación y tire del botón de oscilación hacia arriba para apagar la oscilación.
4. La dirección del flujo de aire puede fijarse en 4 posiciones. Al retirar con
cuidado la carcasa del motor (6) hacia arriba y hacia abajo, se puede
ajustar la dirección (ruido de un clic).
Limpieza
Antes de cualquier operación de mantenimiento, limpieza y después de
cada uso, apague el aparato y desenchufe el cable de alimentación (18) de
la toma.
Atención: no sumerja el aparato en agua (peligro de cortocircuito).
• Para la limpieza exterior, frótelo con un paño húmedo y después séquelo
bien.
• Para limpiar los alabes del ventilador, retire el tornillo de seguridad (15),
afloje todas las sujeciones de fijación (14) y levante con cuidado la rejilla
de protección frontal (12). Ahora puede limpiar los alabes del ventilador
(10) con un paño húmedo y secarlo bien después. Tras la limpieza, sustituya la rejilla de protección frontal (12) del aparato (ajuste la sujeción
de colocación superior: 13), apriete todas las sujeciones (14) y apriete el
tornillo de seguridad (15) bien.
Page 13

Nederlands
Reparaciones
• Las reparaciones en los aparatos eléctricos (cambio del cable) sólo han de
ser llevadas a cabo por personal especializado y debidamente formado.
• En caso de haberse procedido a reparaciones indebidas, la garantía déjà
de tener efecto y se declina cualquier responsabilidad.
• Nunca ponga en marcha el aparato si el cable o el enchufe están estropeados, si falla alguna de las funciones, si el aparato se ha caído o si ha
sufrido algún otro desperfecto (rajas/roturas en el chasis).
• No introducir ningún tipo de objetos en el aparato.
• Una vez llegado el aparato al final de su vida útil, inutilizarlo inmediatamente (separar el cable) y entregarlo en el centro de recogida previsto a
tal efecto.
Eliminación
La directiva europea 2012 / 19 / CE sobre residuos de equipos eléctricos
y electrónicos (WEEE), exige que los aparatos eléctricos domésticos antiguos no deben eliminarse en la recogida de residuos municipal normal sin
clasificar. Los aparatos antiguos deben recogerse de forma separada para
optimizar la recuperación y el reciclaje de los materiales y reducir el impacto
sobre la salud humana y el medioambiente. El símbolo del cubo de basura
tachado en el producto le recuerda su obligación de que, cuando se deshaga
del aparato, debe recogerse de forma separada. Los consumidores deben ponerse en contacto con las autoridades locales o con
el distribuidor para obtener información respecto a la correcta
eliminación del aparato antiguo.
Datos técnicos
Tensión nominal 230 V / 50 Hz
Potencia 37 – 58 W
Dimensiones 450 x 1’300 x 400 mm
(ancho x alto x largo)
Peso 9.4 kg
Nivel de intensidad
acústica < 56 dB(A)
Cumple la norma UE CE / WEEE / RoHS
Quedan reservadas modificaciones técnicas
Gefeliciteerd! U hebt zojuist de bijzondere CHARLY ventilator aangeschaft.
Hij zal u veel plezier doen en de ruimtelucht voor u verbeteren.
Zoals met alle elektronische apparaten, is zorgvuldig gebruik noodzakelijk
om verwonding, brandschade of schade aan het apparaat te vermijden. Bestudeer de instructies nauwkeurig en volg de adviezen op het apparaat zelf,
alvorens het apparaat voor het eerst te gebruiken.
Apparaatbeschrijving
Het apparaat bestaat uit de volgende onderdelen:
1. Hoofdkolom
2. Voet
3. Bevestigingsmoer voor voet en kolom
4. Bovenkolom (hoogte instelbaar)
5. Schroef voor het aanpassen van de hoogte
6. Motorhuis
7. Bevestigingschroef voor motorhuis en kolom
8. Bevestigingsmoer voor rooster
9. Beschermrooster achterzijde
10. Ventilatorbladen
11. Bevestigingschroef voor ventilatorbladen en het motorhuis
12. Beschermrooster voorzijde
13. Plaatsingklem
14. Bevestigingsklemmen (8 stuks)
15. Borgschroef
16. Bedieningsknop voor aan-/uitschakelen en instellen van de drie ventila torsnelheden (uit, hoog, gemiddeld, laag)
17. Oscillatieknop aan /uit
18. Netkabel
Belangrijke veiligheidsinstructies
Lees de instructies zorgvuldig door voordat u het apparaat voor het eerst
gebruikt en bewaar deze handleiding voor later gebruik; geef hem, indien
nodig, door aan de volgende eigenaar.
• Stadler Form is op geen enkele wijze aansprakelijk voor verlies of schade
ten gevolge van het nalaten van deze instructies.
• Het apparaat dient alleen in huis te worden gebruikt of voor de doeleinden
die in deze instructies worden beschreven. Interferentie op het toestel
door onbevoegden kan leiden tot gevaar voor de gezondheid.
• Dit apparaat kan worden gebruikt door kinderen van 8 jaar en ouder en
personen met gereduceerde fysieke, zintuiglijke of mentale capaciteiten
of met een tekort aan ervaring en kennis, vooropgesteld dat ze onder
toezicht staan of instructies hebben gekregen m.b.t. het gebruik van het
apparaat op een veilige wijze en begrijpen welke gevaren er kunnen optreden. Laat kinderen het apparaat niet als speelgoed gebruiken. Reiniging en gebruikersonderhoud mogen niet door kinderen zonder toezicht
worden uitgevoerd.
• Laat nooit delen van de verpakking binnen het bereik van kinderen achter.
• Controleer de toestand van het toestel na het verwijderen van de verpakking. Controleer of alle onderdelen van het toestel in de verpakking zitten
en niet beschadigd zijn (zie beschrijving van het apparaat).
Page 14

• Monteer het toestel in overeenstemming met de voorschriften voor de
montage. Volg nauwgezet de instructies voor de montage en zorg ervoor
dat alle schroeven stevig vastgedraaid zijn om schade en gevaren te voorkomen.
• Steek nooit voor werpen in het rooster van de ventilator. Bedek het toestel
niet tijdens het gebruik.
• Haal altijd de stekker van het netsnoer uit het stopcontact voordat u het
beschermrooster verwijdert.
• Sluit de kabel alleen op wisselstroom aan. Let op de spanningsgegevens
op het apparaat.
• Gebruik geen beschadigde verlengkabels.
• De netkabel mag niet over scherpe kanten heen worden getrokken of worden vastgeklemd.
• De stekker mag nooit aan de netkabel of met natte handen uit de contactdoos worden getrokken.
• Deze apparaat mag niet bij een ligbad, een douche of een zwembad worden gebruikt (minimumafstand van 3 m aanhouden). Plaats het apparaat
zo dat personen het apparaat vanaf de rand van het ligbad niet kunnen
aanraken.
• Plaats het apparaat niet in de buurt van een warmtebron. De netkabel
mag niet aan rechtstreekse hittewerking (bijv. heet fornuisplaat, open
vlammen, hete strijkzool of kachel) worden blootgesteld, netkabel tegen
olie beschermen.
• Let erop dat het apparaat bij het gebruik een goede stabiliteit heeft en
men niet over de netkabel kan struikelen.
• Het apparaat is niet tegen spattend water beschermd.
• Uitsluitend voor gebruik binnenshuis.
• Het apparaat niet buitenshuis opbergen.
• Het apparaat op een droge en voor kinderen niet toegankelijke plaats bewaren (inpakken).
• Als de voedingskabel is beschadigd, moet het worden vervangen door de
fabrikant, servicevertegenwoordiging van de fabrikant of dergelijke gekwalificeerde personen om gevaarlijke situaties te voorkomen.
• Vóór willekeurig onderhoud of reiniging en na elk gebruik, dient u het apparaat uit te schakelen en de voedingskabel uit het stopcontact te halen.
• Reparaties aan het toestel dienen te worden verricht door een erkende
reparateur.
Montage (zie pagina 2 en 3)
Opgelet: Het beschermrooster moet vóór het inschakelen van het toestel
behoorlijk worden gesloten om s chade of gevaren te voorkomen. Z org ervoor
dat alle schroeven en borgmoeren stevig zijn vastgedraaid. Steek alleen de
stekker van het netsnoer in het stopcontact nadat de montage is voltooid.
A. Verwijder de bevestigingsmoer (3) aan de onderkant van de hoofdkolom
(1). Steek de hoofdkolom (1) in de voet (2) en zet het vast met de bevestigingsmoer voor de voet en kolom (3).
B. De schroef voor de hoogte-instelling (5) voor de hoofdkolom is op de
bovenkolom (4) te vinden. Door deze schroef los te draaien kan de hoogte
van de kolom worden aangepast. Zet de schroef opnieuw stevig vast
wanneer de kolom op de gewenste hoogte is ingesteld.
C. Draai de bevestigingschroef voor het motorhuis en de kolom (7) op de
bovenkolom (4) los. Plaats het motorhuis (6) op de bovenkolom (4) en zet
het vast met de bevestigingschroef voor het motorhuis en voet (7).
D. Verwijder de bevestigingsmoer voor het rooster (8) van het motorhuis (6)
en plaats het beschermrooster voor de achterzijde (9) op het motorhuis
(6). Zorg bij het plaatsen ervoor dat het handvat op het beschermrooster
voor de achterzijde (9) aan de bovenzijde is geplaatst. Schroef nu de
bevestigingsmoer voor het rooster (8) terug op het motorhuis (6) om het
beschermrooster voor de achterzijde (9) in positie vast te zetten.
E. Bevestig de ventilatorbladen (10) op het motorhuis (6) en zet ze vast met
de bevestigingschroef voor de ventilatorbladen en het motorhuis (11)
(losjes bevestigd tegen het ventilatorblad). Draai de schroef vast om de
ventilatorbladen (10) vast te zetten.
F. Plaats het beschermrooster voor de voorzijde (12) op het bescherm-
rooster voor de achterzijde (9). Daarbij moet ervoor gezorgd worden dat
de plaatsingklem (13) op het beschermrooster voor de voorzijde op het
beschermrooster voor de achterzijde is gemonteerd zoals weergegeven
in de afbeelding op pagina 2-3. Sluit de twee roosters door de 8 bevestigingsklemmen (14). Zorg ervoor dat alle bevestigingsklemmen (14) zijn
bevestigd.
G. Bevestig de twee roosters (9 en 12) met de borgschroef (15).
Ingebruikname/bediening
1. Plaats Charly op de gewenste plek op een platte bodem. Sluit de netkabel (18) op het apparaat aan en steek de adapter in een geschikt stopcontact.
2. De Charly ventilator met de bedieningsknop (16) aanzetten en de gewenste snelheid instellen (standen 1-3, van een aangenaam briesje tot
krachtige circulatie).
3. Duw de oscillatieknop (17) omlaag om het oscilleren in te schakelen en
trek de oscillatieknop omhoog om het oscilleren uit te schakelen.
4. De richting van de luchtstroom kan in 4 standen worden ingesteld. Door
zorgvuldig het motorhuis (6) op en neer te bewegen, kan de richting worden aangepast (klikgeluid).
Reiniging
Vóór willekeurig onderhoud of reiniging en na elk gebruik, schakel het apparaat uit en haal de netkabel (18) uit het stopcontact.
Let op: het apparaat nooit in water onderdompelen (kortsluitingsgevaar).
• De buitenkant met een vochtige doek schoonwrijven en daarna goed
drogen.
• Voor het reinigen van de ventilatorbladen, verwijder de borgschroef (15),
maak alle bevestigingsklemmen (14) los en verwijder voorzichtig het beschermrooster voor de voorzijde (12). U kunt nu de ventilatorbladen (10)
met een vochtige doek schoonvegen en daarna goed afdrogen. Na het
reinigen, plaats het beschermrooster voor de voorzijde (12) op het toestel
terug (plaats de plaatsingklem aan de bovenzijde: 13), zet alle bevestigingsklemmen (14) vast en zet bevestigingschroef (15) strak vast.
Page 15

Dansk
Reparaties
• Reparaties aan het toestel dienen te worden verricht door een erkende reparateur. Als onbevoegden interferentie hebben gemaakt op het toestel,
dan vervalt de garantie evenals de aansprakelijkheid van Stadler Form.
• Zet het toestel nooit aan wanneer de adapter of de stop beschadigd is,
nadat het defect is geweest, het gevallen is of op een andere manier is
beschadigd. (barsten/onderbrekingen in het omhulsel).
• Duw geen voorwerp in het toestel. Haal het zuiveringssysteem niet uit
elkaar.
• Als het toestel niet meer te repareren is, maak het dan onmiddellijk onbruikbaar en geef het af op het inzamelingspunt.
Verwijdering
De Europese richtlijn 2012 / 19 / EG inzake Afval van Elektrische en Elektronische Apparatuur (AEEA), vereist dat oude elektrische huishoudapparaten
niet in de normale gemeentelijke ongesorteerde afvalstroom mogen worden
weggegooid. Oude apparaten moeten apart worden ingezameld om recycling en hergebruik van de materialen daarin te optimaliseren en de gevolgen op het milieu en de volksgezondheid te verminderen. Het symbool met
de doorgekruiste vuilnisbak op wieltjes op het product, herinnert u aan uw
verplichting, dat het toestel bij verwijdering gescheiden ingezameld moet worden. Consumenten moeten contact opnemen met
hun lokale autoriteit of verkoper voor informatie betreffende de
juiste verwijdering van hun oude toestel.
Specificaties
Nominale spanning 230 V / 50 Hz
Nominale vermogen 37 – 58 W
Afmetingen 450 x 1’300 x 400 mm
(breedte x hoogte x diepte)
Gewich t 9.4 kg
Geluidsdrempel < 56 dB(A)
EU- verordening CE / AEEA / RoHS
De inhoud van deze gebruiksaanwijzing kan zonder voorafgaand
bericht worden gewijzigd
Tillykke! Du har netop købt den exceptionelle CHARLY ventilator. Den vil
give dig stor fornøjelse, når luften omkring dig trænger til at blive renset.
Som med alle elektriske husholdningsapparater er særlig pleje en nødvendighed også med dette produkt, for at undgå fysisk skade, brandskade eller
beskadigelse af produktet. Læs venligst denne brugsanvisning grundigt før
produktet tages i brug, og følg sikkerhedsanvisningerne på selve produktet.
Beskrivelse af apparatet
Apparatet består af følgende hoveddele:
1. Midterstang
2. Fod
3. Låsemøtrik til fod og midterstang
4. Midterstangens top (justerbar højde)
5. Skrue til højdejustering
6. Motorhus
7. Låseskrue til motorhus og midterstang
8. Låsemøtrik til ventilatorgitter
9. Bagsidens beskyttelsesgitter
10. Ventilatorblade
11. Låseskruer til ventilatorblade og motorhus
12. Forsidens beskyttelsesgitter
13. Positionsklemme
14. Låseklemmer (8 stk.)
15. Låseskruer
16. Betjening til at tænde/slukke og indstille de tre ventilatorhastigheder
(fra, høj, mellem, lav)
17. S ving ningsk ont ak t (til/ fr a)
18. Strømkablet
Vigtige sikkerhedsinstruktioner
Læs brugsvejledningen, før De bruger apparatet første gang og gem vejledningen; hvis nødvendigt skal den også gemmes til næste ejer.
• Stadler Forms distributør dækker ikke skader, der er opstået som følge af
misligholdelse eller forkert brug af apparatet.
• Apparatet må kun bruges i hjemmet med det formål, der er beskrevet i
vejledningen. Ukorrekt brug samt udførelse af tekniske ændringer på apparatet kann være farligt for liv og helbred.
• Dette apparat kan anvendes af børn fra 8 år og opefter og af personer
med nedsatte fysiske, sanse- eller psykiske evner eller med manglende
erfaring og kendskab, hvis de har været under opsyn og har modtaget
undervisning i, hvordan apparatet kan bruges på sikker måde, og hvis de
har forstået, hvilke eventuelle farer der kan være. Børn må ikke lege med
apparatet. Rengøring og vedligeholdelse må ikke udføres af børn uden
opsyn.
• Børn må ikke kunne få fat i pakkens komponenter.
• Kontroller apparatets tilstand, efter det er taget ud af emballagen. Kontroller, at alle apparatets dele er til stede, og at de ikke er beskadiget (se
beskrivelsen af apparatet).
• Saml apparatet i henhold til samlingsvejledningen. Følg samlingsvejledningen nøjagtigt trin for trin og kontroller, at alle skruer er skruet stramt
fast for at forebygge skader og risici.
Page 16

• Stik aldrig genstande ind i ventilatorens gitter. Apparatet må ikke overdækkes, når det er i drift.
• Tag altid strømkablet ud af stikkontak ten, før beskyttelsesgitteret afmonteres.
• Tilslut kun kablet til vekselstrøm. Læg mærke til apparatets spændingsangivelser.
• Benyt ikke en beskadiget forlængerledning.
• Træk ikke kablet over skarpe kanter og lad det ikke komme i klemme.
• Træk aldrig stikket ud ved at holde i kablet og træk aldrig stikket ud af
stikkontakten med våde hænder.
• Benyt ikke apparatet i umiddelbar nærhed af badekar, brusebad eller badebassin (overhold mindsteafstanden på 3 m). Stil apparatet således at
det ikke kan berøres fra et badekar.
• Stil ikke apparatet i nærheden af en varmekilde. Netkablet bør ikke udsættes for direkte varmepåvirkning (fra f.eks. komfurplade, åben ild,
varmt strygejern eller varmeovn). Beskyt netkablet mod olie.
• Ikke kan snuble over netkablet.
• Apparatet tåler ikke vandsprøjt.
• Kun til indendørs brug.
• Opbevar ikke apparatet udendørs.
• Apparatet bør opbevares på et tørt og for børn utilgængeligt sted (pakkes
sammen).
• Hvis tilslutningsledningen bliver beskadiget, skal man overlade det til
fabrikanten, autoriseret servicepersonel eller personer med tilsvarende
kvalifikationer at montere den nye ledning, så man undgår ulykker.
• Før vedligeholdelse, rengøring og efter hver brug skal apparatet slukkes
og stikket trækkes ud af stikkontakten.
• Reparationer af elektriske apparater må kun udføres af en kvalificeret,
elektrisk tekniker.
F. Anbring forsidens beskyttelsesgitter (12) på bagsidens beskyttelsesgit-
ter (9). Kontroller, at positionsklemmen (13) på forsidens beskyttelsesgitter sidder fast på bagsidens beskyttelsesgitter som vist på tegningen
på side 2-3. Luk de to gitre ved at fastgøre de 8 låseklemmer (14). Kontroller, at alle låseklemmer (14) sidder godt fast.
G. Fastgør de to gitre (9 og 12) med låseskruen (15).
Ibrugtagning/betjening
1. Stil Charly på den ønskede plads på en plan overflade. Tilslut strømkablet (18) til apparatet og sæt adapteren i en egnet stikdåse.
2. Tænd Charly ventilatoren med betjeningen (16) og indstil den ønskede
hastighed (Position 1-3, fra stille brise til kraftig cirkulation).
3. Tryk svingningskontakten (17) ned for at tænde for svingning, eller skub
den op for at slå svingning fra.
4. Luftretningen kan sættes til fire positioner. Retningen kan justeres ved
forsigtigt at flytte motorhuset (6) op og ned.
Rengøring
Før vedligeholdelse, rengøring og efter hver brug skal apparatet slukkes og
ledningen (18) trækkes ud af stikkontakten.
Advarsel: Nedsænk aldrig apparatet i vand (fare for kortslutning).
• For ydre rengøring tørres apparatet af med en fugtig klud og tørres herefter godt.
• Rengør ventilatorbladene ved at afmontere låseskruen (15), frigøre alle
låseklemmer (14) og forsigtigt løfte forsidens beskyttelsesgitter af (12).
Du kan nu aftørre ventilatorbladene (10) med en fugtig klud. Lad efterfølgende bladene tørre helt. Efter rengøring sættes forsidens beskyttelsesgitter (12) tilbage på apparatet (brug positionsklemmen i toppen: 13),
fastgør alle låseklemmer (14), og skru låseskruen (15) stramt fast.
Samling (se side 2 og 3)
OBS: Beskyttelsesgitteret skal være lukket korrekt, før apparatet tændes
for at undgå skader og forebygge risici. Kontroller, at alle skruer og låsemøtrikker er strammet godt fast. Sæt først strømkablet i stikkontakten, når
apparatet er helt samlet.
A. Fjern låsemøtrikken (3) under midterstangen (1). Sæt midterstangen (1) i
foden (2), og fastgør med låsemøtrikken til fod og midterstang (3).
B. Skruen til højdejustering (5) af midterstangen sidder i toppen af midter-
stangen (4). Midterst angens højde kan justeres ved at skrue denne skrue
ud. Stram skruen godt til igen, når midters tangen har den ønskede højde.
C. Skru låseskruen til motorhus og midterstang (7) ud i toppen af midter-
stangen (4). Find motor huset (6) i toppen af midterstangen (4), og fastgør
med låseskruen til motorhus og midterstang (7).
D. Fjern låsemøtrikken til gitteret (8) fra motorhuset (6), og anbring bagsi-
dens beskyttelsesgitter (9) på motorhuset (6). Kontroller, at håndtaget
på bagsidens beskyttelsesgitter (9) sidder i toppen. Skru herefter låsemøtrikken til gitteret (8) tilbage på motorhuset (6), så bagsidens beskyttelsesgitter (9) fastgøres i sin position.
E. Sæt ventilatorbladene (10) på motorhuset (6), og fastgør deres position
med låseskruen til ventilatorblade og motorhus (11) (sidder løst på ventilatorbladene). Stram skruen, og fastgør ventilatorbladene (10).
Reparation
• Reparationer af elektriske apparater må kun udføres af en kvalificeret,
elektrisk tekniker. Udføres der upassende reparationer bortfalder garantien og ethvert ansvar fra producentens side.
• Brug aldrig apparatet, hvis et kabel eller stik er beskadiget, efter der har
været driftsfejl, hvis det har været udsat for tab, eller der er synlige tegn
på skade.
• Indfør ikke nogen former for genstande i apparatet.
• Hvis apparatet ikke kan repareres skal det gøres ubrugeligt (klip ledningen
af) og aflever det på en genbrugsstation.
Bortskaffelse
EU-direktiv 2012 / 19 / CE om WEEE kræver, at brugte elektriske husholdningsapparater ikke bortskaffes sammen med almindeligt affald. Brugte
apparater skal indsamles separat for optimal genbrug og genanvendelse
af apparatets elementer og reduktion af miljøpåvirkning og helbredsrisici.
Symbolet med skraldespanden med et kryds over på produktet er
en påmindelse til dig om din forpligtelse til at bortskaffe apparatet
separat. Du bør kontakte de lokale myndigheder eller forhandleren
for at få oplysninger om korrekt bortskafning af brugte apparater.
Page 17

Suomi
Specifikationer
Mærkespænding 230 V / 50 Hz
Mærkeeffekt 37 – 58 W
Mål 450 x 1’300 x 400 mm
(bredde x højde x dybde)
Vægt 9.4 kg
Støjniveau < 56 dB(A)
I overensstemmelse
med EU godkendelse CE / WEEE / RoHS
Der tages forbehold for tekniske ændringer
Onneksi olkoon! Olet juuri hankkinut loistavan CHARLY-tuulettimen. Laite
tarjoaa nautinnollisempaa oloa parantaen huoneen ilmanlaatua.
Kuten kaikkien kotitalouden sähkölaitteiden kanssa, myös tämän mallin
kanssa tulee noudattaa erityistä huolellisuutta, jotta laite välttyy vahingoilta tai palovaurioilta. Lue nämä käyttöohjeet ensin huolellisesti ennen
laitteen ensimmäistä käyttöä ja noudata laitteen turvaohjeita.
Laitteen kuvaus
Laite koostuu seuraavista osista:
1. Päävarsi
2. Jalka
3. Jalan ja varren kiinnitysmutteri
4. Ylävarsi (korkeudensäätö)
5. Korkeudensäädön ruuvi
6. Moottorikotelo
7. Moottorikotelon ja varren kiinnitysruuvi
8. Säleikön kiinnitysmutteri
9. Takasuojasäleikkö
10. Tuulettimen siivet
11. Tuulettimen siipien ja moottorin kotelon kiinnitysruuvi
12. Etusuojasäleikkö
13. Asetusliitin
14. Kiinnitysliittimet (8 kpl)
15. Kiinnitysruuvi
16. Tuulettimen virtakatkaisija ja nopeuden säädin (pois päältä, suuri, ke skisuuri, pieni)
17. Kääntönuppi päällä/pois päältä
18. Verkkovirtajohto
Tärkeitä turvallisuusohjeita
Lue käyttöohjeet huolellisesti ennen ensimmäistä käyttökertaa ja säilytä
ohjeet myöhempää tarvetta varten. Toimita ohjeet tarvittaessa myös seuraavalle omistajalle.
• Stadler Form ei ole missään tapauksessa vastuussa vaurioista tai menetyksistä, jotka johtuvat näiden ohjeiden noudattamatta jättämisestä.
• Laite on tarkoitettu ainoastaan kotitalouskäyttöön näiden ohjeiden mukaisella tavalla. Laitteen vääränlainen käyttö ja muokkaaminen voi johtaa
hengenvaarallisiin tilanteisiin.
• Vähintään 8 vuotta täyttäneet lapset ja sellaiset henkilöt, joiden fyysiset,
sensoriset tai henkiset kyvyt eivät ole tähän riittäviä tai joilla ei ole laitteen tuntemusta tai kokemusta sen käytöstä, saavat käyttää tätä laitetta
ainoastaan silloin, kun heidän turvallisuudestaan vastaava henkilö valvoo
heitä. Lasten ei tule leikkiä laitteen kanssa. Lapset eivät saa puhdist aa tai
huoltaa laitetta ilman valvontaa.
• Älä koskaan jätä mitään pakkauksen osia lasten ulottuville.
• Tarkista, että laite on asianmukaisessa kunnossa poistettuasi sen pakkauksesta. Tarkista, että pakkauksessa on kaikki laitteen osat ja että ne
ovat vahingoittumattomia (katso laitteen kuvaus).
• Kokoa laite annettujen ohjeiden mukaisesti. Noudata kokoamisohjeita
tarkasti ja varmista, että kaikki ruuvit on kiristetty kunnolla vahinkojen
välttämiseksi.
Page 18

• Älä koskaan työnnä esineitä tuulettimen säleikköön. Älä peitä laitetta
käytön aikana.
• Irrota pistoke pistorasiasta aina ennen suojasäleikön irrottamista.
• Liitä virtajohto vain vaihtovirtaverkkoon. Tarkista laitteen käyttöjännite.
• Älä käytä vaurioitunutta jatkojohtoa.
• Älä altista virtajohtoa teräville reunoille ja varmista, ettei se jää puristuksiin.
• Älä irrota pistoketta pistorasiasta märillä käsillä tai vetämällä virtajohdosta.
• Älä käytä laitetta kylpyammeen, suihkun tai uima-altaan välittömässä
läheisyydessä (vähintään 3 m etäisyys). Sijoita laite siten, ettei kylpyammeessa oleva henkilö ylety laitteeseen.
• Älä sijoita laitetta lämmönlähteen läheisyyteen. Älä altista virtajohtoa
suoralle lämmölle (kuten liesi, avoliekit, kuumat metallinkappaleet tai
lämmittimet, jne.). Älä altista virtajohtoa öljylle.
• Varmista, että laite on sijoitettu tukevalle, tasaiselle pinnalle käytön aikana ja varmista, ettei virtajohto aiheuta kompastumisvaaraa.
• Laite ei ole roiskeenkestävä.
• Vain sisäkäyttöön.
• Älä säilytä laitetta ulkona.
• Säilytä laitetta kuivassa paikassa lasten ulottumattomissa (alkuperäispakkauksessa).
• Mikäli virtajohto on vahingoittunut, se tulee vaihtaa laitteen valmistajan
tai tämän edustajan tai vastaavan henkilön toimesta sähköiskun välttämiseksi.
• Huoltaaksesi tai puhdistaaksesi laitteen sekä jokaisen käyttökerran jälkeen, käännä laitteen virta pois päältä ja irrota virtajohto pistorasiasta.
• Sähkölaitteiden korjauksia saa suorittaa yksinomaan opetettu ammattihenkilökunta.
Asennus (katso sivuja 2 ja 3)
Huomio: Suojasäleikön tulee olla suljettu kunnolla ennen laitteen päälle
kääntämistä vahinkojen välttämiseksi. Varmista, että kaikki ruuvit ja kiinnitysmutterit on kiristetty kunnolla. Laita pistoke pistorasiaan vasta, kun
laitteen asennus on suoritettu kokonaan.
A. Poista kiinnit ysmutteri (3) päävarren (1) alapuolelta. Aseta p äävarsi (1) jal-
kaan (2) ja kiinnitä oikeaan asentoon jalan ja varren (3) kiinnitysmutterilla.
B. Päävarren korkeudensäätöruuvi (5) sijaitsee ylävarressa (4). Varren kor-
keutta voidaan säätää löysäämällä tätä ruuvia. Kiristä ruuvi uudelleen,
kun varsi on halutulla korkeudella.
C. Irrota moottorin kotelon ja varren (7) kiinnitysruuvi ylävarressa (4). Ase-
ta moottorin kotelo (6) ylävarteen (4) ja kiristä moottorin kotelon ja varren ruuvi (7).
D. Irrota suojasäleikön (8) kiinnitysmutteri moottorikotelosta (6) ja aseta
takasuojasäleikkö (9) moottorikoteloon (6). Varmista tällöin, että takasuojasäleikön (9) kädensija on ylhäällä. Ruuvaa nyt säleikön (8) kiinnitysmutteri takaisin moottorikoteloon (6), jolloin takasuojasäleikkö (9)
kiinnittyy paikalleen.
E. Kiinnitä tuulettimen siivet (10) moottorikoteloon (6) ja kiinnitä paikalleen
tuulettimen siipien ja moottorikotelon kiinnitysruuvilla (11) (kiinnitetty
löysästi tuulettimen siipeen). Kiristä ruuvi kiinnittääksesi tuulettimen
siivet (10).
F. Kiinnitä etusuojasäleikkö (12) takasuojasäleikköön (9). Varmista tällöin,
että etusuojasäleikön kiinnitin (13) on kiinnitetty takasuojasäleikköön
kuvassa sivuilla 2-3 esitetyllä tavalla. Kiinnitä suojat yhteen käyttämällä
8 kiinnitintä (14). Varmista, että kaikki kiinnittimet (14) on kiinnitetty.
G. Varmista säleikköjen (9 ja 12) kiinnitys kiinnitysruuvilla (15).
Käyttöönotto / käyttö
1. Sijoita Charly haluttuun kohtaan tasaiselle pinnalle. Liitä verkkovirtajohto (18) laitteeseen ja liitä laite sopivaan pistorasiaan.
2. Kytke tuuletin päälle säätimen (16) avulla ja aseta haluamasi nopeus
(1–3, kevyt tuuletus – voimakas kierto).
3. Paina kääntönuppi (17) alas asettaaksesi laitteen kääntymisen päälle ja
vedä nuppi ylös estääksesi laitetta kääntymästä.
4. Ilmavirta voidaan suunnata 4 eri tavalla. Puhallussuuntaa voidaan säätää liikuttamalla moottorikoteloa (6) varovasti ylös ja alas (kuuluu naksahdus).
Puhdistaminen
Huoltaaksesi tai puhdistaaksesi laitteen sekä jokaisen käyttökerran jälkeen,
käännä laitteen virta pois päältä ja irrota verkkovirtajohto (18) pistorasiasta.
Huomio: Älä koskaan upota laitetta veteen (oikosulun vaara).
• Puhdista ulko-osat kostealla liinalla ja kuivaa hyvin.
• Puhdistaaksesi tuulettimen siivet, irrota kiinnitysruuvi (15) ja kaikki kiinnittimet (14) ja irrota etusuojasäleikkö (12) varovasti. Voit nyt puhdistaa
tuulettimen siivet (10) kostealla pyyhkeellä ja kuivata ne sitten huolellisesti. Puhdistettuasi tuulettimen siivet, aseta etusuojasäleikkö (12) takaisin paikalleen (kiinnitä kiinnitin: 13) ja kaikki kiinnittimet (14) ja kiristä
kiinnitysruuvi (15).
Korjaukset
• Sähkölaitteiden korjauksia (verkkokaapelin vaihto) saa suorittaa yksinomaan opetettu ammattihenkilökunta. Asiantuntemattomien suorittamissa korjauksissa takuu lakkaa olemasta voimassa ja kaikki vastuu
hylätään.
• Älkää koskaan käyttäkö laitetta, jos kaapeli tai pistoke ovat vahingoittuneet, jos laite toimii väärin, jos se on pudonnut maahan tai muuten vioittunut (halkeamia/murtumia suojuksessa).
• Älkää työntäkö minkäänlaisia esineitä laitteeseen.
• Jos laitetta ei voi enää korjata, tee se käyttökelvottomaksi välittömästi ja
vie se keräyspisteeseen (verkkokaapeli katkaistaan).
Jätehuolto
Euroopan parlamentin ja neuvoston direktiivi 2012 / 19 / CE Sähkö- ja
elektroniikkalaiteromusta (WEEE) edellyttää, ettei vanhoja kotitalouksien
sähkölaitteita saa hävittää lajittelemattoman yhdyskuntajätteen mukana.
Vanhat laitteet on kerättävä erikseen materiaalien palautuksen- ja kierrättämisen optimoimiseksi sekä terveys- ja ympäristövaikutuksien vähentämiseksi. Tuotteen yliviivattu roskakori -merkintä muistuttaa siitä, että sinun
velvollisuutesi on hävittää laite erikseen. Kuluttajia kehotetaan
ottamaan yhteyttä paikallisiin viranomaisiin tai tuotteen jälleenmyyjään saadakseen lisätietoja vanhan laitteen asianmukaisesta
hävittämisestä.
Page 19

Norsk
Tekniset tiedot
Nimellisjännite 230 V / 50 Hz
Teho 37 – 58 W
Mitat 450 x 1’300 x 400 mm
(leveys x korkeus x syvyys)
Paino 9. 4 kg
Melutaso < 56 dB(A)
Noudattaa EUmääräyksiä CE / WEEE / RoHS
Oikeudet muutoksiin pidätetäänn
Gratulerer! Du har akkurat kjøpt den eksepsjonelle CHARLY-vif ten. Den vil gi
deg mye nytelse og forbedre innendørsluften for deg.
Som med alle elektriske husholdningsartikler er det nødvendig å utvise særlig hensyn til bruk av denne modellen, for å unngå personskader, brann eller
produktskader. Vennligst les nøye gjennom disse driftsinstruksjonene før du
tar i bruk apparatet for første gang, og følg sikkerhetsinstruksene på selve
apparatet.
Beskrivelse av apparatet
Apparatet består av følgende hoveddeler:
1. Hovedstang
2. Fot
3. Festemutter for fot og stang
4. Øvre stang (justerbar i høyden)
5. Skrue for høydejustering
6. Motorhus
7. Festeskrue for motorhus og stang
8. Festemutter for gitter
9. Bakre beskyttelsesgitter
10. Vifteblader
11. Festeskrue for vifteblader og motorhus
12. Fremre beskyttelsesgitter
13. Posisjoneringsklips
14. Festeklips (8 deler)
15. Sikringsskrue
16. Kontroller for å skru av/på og stille inn de tre viftehastighetene (av, høy,
medium, lav)
17. Svingende knott på/av
18. Strømkabel
Viktige sikkerhetsinstrukser
Vennligst les nøye gjennom driftsinstruksjonene før du tar i bruk apparatet
for første gang, og ta vare på dem for senere referansebruk, f.eks. dersom
du gir viften videre til en ny eier.
• Stadler Form nekter alt ansvar innen tap eller skader som oppstår som en
følge av mangelfull oppfølging av disse driftsinstruksjonene.
• Apparatet er kun tiltenkt bruk i hjemme for de formål beskrevet i disse
instruksjonene. Uautorisert bruk og tekniske modifikasjoner på apparatet
kan føre til far for helse og liv.
• Dette apparatet kan brukes av barn over 8 år og personer med reduserte
fysiske, sensoriske eller mentale evner, eller mangel på erfaring og kunnskap, dersom de er under oppsyn av noen ansvarlig for dem eller har
mottatt instruksjoner vedrørende bruk av apparatet på en trygg måte og
forstår farene involvert. Barn må ikke leke med apparatet. Rengjøring og
vedlikehold må ikke utføres av barn uten oppsyn.
• Forlat aldri noen deler av emballasjen innen barns rekkevidde.
• Sjekk tilstanden til apparatet etter å ha tatt av emballasjen. Pass på at
alle komponentdeler til apparatet er i emballasjen og ikke har blitt skadet
(se beskrivelsen til apparatet).
Page 20

• Monter apparatet i henhold til monteringsinstruksene. Følg monteringsinstruksene for montering nøye, og pass på at alle skruene strammes til
stramt slik at skade og fare oppstår.
• Sett aldri inn gjenstander i gitteret til viften. Ikke dekk til apparatet under
bruk.
• Koble alltid fra strømkabelen fra stikkontakten før du fjerner beskyttelsesgitteret.
• Kun koble kabelen til vekselstrøm. Noter deg spenningsinformasjonen
oppgitt på apparatet.
• Ikke bruk skjøteledninger med skader.
• Ikke dra strømkabelen over skarpe kanter og sørg for at den ikke klemmes
mellom gjenstander.
• Ikke napp kabelen ut av stikkontakten, og ikke fjern kabelen med våte
hender.
• Ik ke bruk dette ap paratet i umiddelb ar nærhet av badekar, dusj eller svømmebasseng (oppretthold en minimumsdistanse på 3 m). Plasser apparatet
slik at man ikke kan nå det fra badekaret.
• Ikke plasser apparatet i nærheten av en varmekilde. Ikke utsett strømkabelen for direkte varme (som i nærheten av en kokeplate, åpen ild, varme
jernplater eller ovner, for eksempel). Beskytt strømkabelen mot oljete
væsker.
• Sørg for at apparatet er forsvarlig posisjonert for å sikre høy stabilitet
under driftsmodus, og sørg for at ingen kan snuble i strømkabelen.
• Apparatet er ikke sprutsikkert.
• Kun for innendørs bruk.
• Ikke oppbevar apparatet utendørs.
• Lagre apparatet på et tørt sted hvor barn ikke kan nå det (pakk apparatet
inn).
• Hvis strømledningen er skadet, må den skiftes ut av produsenten, serviceagenten eller liknende kvalifisert personell, for å unngå faresituasjoner.
• Før vedlikehold og rengjøring av apparatet, slå av strømmen og plugg ut
strømkabelen.
• Reparasjoner på dette produktet må kun utføres av kvalifiserte teknikere.
Montering (se side 2 og 3)
Obs: Beskyttelses gitteret må være riktig festet før du skrur på apparatet for
å unngå skader eller farer. Påse at alle skruer og festemutre er riktig strammet. Ikke koble strømkabelen til veggkontakten før monteringen er fullført.
A. Ta ut festemutteren (3) på undersiden av hovedstangen (1). Sett inn ho-
vedstangen (1) i foten (2) og fest med festemutteren for fot og stang (3).
B. Skruen for hø ydejustering (5) for hovedstangen befinner seg på den øvre
stangen (4). Ved å ta ut denne skruen kan høyden til stangen justeres.
Stram til skruen godt når stangen har ønsket høyde.
C. Ta av festeskruen for motorhuset og stangen (7) på øvre stang (4). Finn
motorhuset (6) på øvre stang (4) og fest med festeskruen for motorhuset
og stangen (7).
D. Ta ut fe stemutteren til gitteret (8) fra motorhuset (6) og plasser det bakre
beskyttelsesgitteret (9) på motorhuset (6). Kontroller at håndtaket (8) på
det bakre beskyttelsesgitteret (9) er øverst. Skru nå festemutteren til
gitteret (8) på motorhuset (6) igjen, slik at det bakre besk yttelsesgitteret
(9) festes i posisjon.
E. Fest viftebladene (10) til motorhuset (6) og fest i posisjon med feste-
skruen for viftebladene og motorhuset (11) (løst festet til viftebladet).
Stram til skruen for å feste viftebladene (10).
F. Plasser det fremre beskyttelsesgitteret (12) på det bakre beskyttelses-
gitteret (9). Når du gjør det må du passe på at plasseringsklipset (13) på
det bakre beskyttelsesgitteret som vist på tegningen på side 2-3. Lukk
de to gitrene ved å feste de 8 festeklipsene (14). Påse at alle festeklipsene (14) er festet.
G. Fest de to gitrene (9 og 12) med festeskruen (15).
Installasjon / drift
1. Plasser Charly i en ønsket posisjon på en flat overflate. Koble strømkabelen (18) til enheten og plugg adapteren til en egnet stikkontakt.
2. Slå på Charly-viften med kontrollen (16) og angi den ønskede hastigheten (Posisjonene 1-3, fra frisk bris til kraftig sirkulasjon).
3. Trykk ned svingebryteren (17) for å sku på svinging og trekk opp svingebryteren for å skru av svinging.
4. Luftretningen kan stilles inn på 4 posisjoner. Ved å forsik tig flytte motorhuset (6) opp og ned, kan retningen justeres (klikkelyd).
Rengjøring
Før vedlikehold, rengjøring og etter bruk, slå av apparatet og plugg fra
strømkabelen (18).
Obs: Aldri senk enheten i vann (fare for kortslutning).
• For å rengjøre utsiden, tørk med en fuktig klut og tørk så godt.
• For å rengjøre viftebladene, fjernes festeskruen (15), ta av alle festeklipsene (14) og løft forsiktig av det fremre beskyttelsesgitteret (12). Nå kan
du tørke av viftebladene (10) med en fuktig klut, tørk det grundig etterpå.
Etter rengjøring, setter du på det fremre beskyttelsesgitteret (12) på apparatet (fest det øvre festeklipset: 13), fest alle festeklipsene (14) og fest
festeskruen (15) stramt.
Reparasjoner
• Reparasjoner på dette produktet må kun utføres av kvalifiserte teknikere.
Dersom det utføres urettmessige reparasjoner utløper garantien og alt
ansvarshold.
• Aldri bruk apparatet dersom adapteren eller kontakten er skadet, etter
det har feilfunksjonert, dersom det har blitt mistet eller skadet på noen
som helst måte (sprekker/spriker i kabinettet).
• Ikke press gjenstander inn i apparatet. Ikke demonter apparatet.
• Dersom apparatet er utenfor reparasjonsmuligheter, gjør det ubrukbart
umiddelbart og lever det til et returpunkt gitt til formålet.
Avhending
EU-direktiv 2012 / 19 / EF vedrørende elektriske og elektroniske apparater
(Waste Electrical and Electronic Equipment - WEEE) sier at gamle elektriske
husholdningsapparater ikke må kastes som vanlig restavfall. Gamle apparater må samles inn separat for å optimalisere gjenbruk og resirkulering av
materialene de inneholder og redusere påvirkningen på menneskers helse
og miljøet. Det overkryssede søppelkassesymbolet er for å minne om din
forpliktelse om at du når du kaster apparatet må det samles inn separat.
Page 21

Svenska
Forbrukerne må kontakte lokale myndigheter eller forhandler for
informasjon angående riktig avhending av sitt gamle apparat.
Spesifikasjoner
Rangert spenning 230 V / 50 Hz
Utgangseffekt 37 – 58 W
Dimensjoner 450 x 1’300 x 400 mm
(bredde x høyde x dybde)
Vekt 9. 4 kg
Lydnivå < 56 dB(A)
I samsvar med EUforskrifter CE / WEEE / RoHS
Alle rettigheter ovenfor tekniske modifikasjoner er forbeholdt
Grattis! Du har just införskaffat den enastående CHARLY-fläkten. Den kommer att ge dig stor glädje och förbättra din inomhusluft.
Som med alla elektriska hushållsapparater krävs det att du är extra försiktig med den här modellen också, för att undvika personskador, brandskador
eller skador på apparaten. Läs denna bruksanvisning noggrant innan du
använder apparaten för första gången och följ säkerhetsanvisningarna på
själva apparaten.
Beskrivning av apparaten
Apparaten består av följande huvuddelar:
1. Huvudpelare
2. Fot
3. Låsring för fot och pelare
4. Övre pelare (höjdjusterbar)
5. Skruv för höjdjustering
6. Motorhölje
7. Fästskruv för motorhölje och pelare
8. Säkerhetsring för galler
9. Bakre skyddsgaller
10. Fläktblad
11. Fästskruv för fläktblad och motorhölje
12. Främre skyddsgaller
13. Positioneringsklämma
14. Fästklämmor (8 st)
15. Fastsättningsskruv
16. Regulator för att slå på/av och ställa in de tre fläkthastigheterna (av,
hög, medel, låg)
17. O scillerin gsre glage p å/a v
18. Nätkabel
Viktiga säkerhetsanvisningar
Läs igenom bruksanvisningen noga innan du använder apparaten för första
gången och håll den i säkert förvar för framtida referens, vid behov ger du
den vidare till nästa ägare.
• Stadler Form avsäger sig allt ansvar för förlust eller skada som uppstår på
grund av att bruksanvisningen inte följts.
• Apparaten får endast användas i hemmet för de ändamål som beskrivs
i denna bruksanvisning. Otillåten användning och tekniska ändringar på
apparaten kan leda till fara för liv och hälsa.
• Denna apparat kan användas av barn från 8 år och uppåt och personer
med nedsatt fysisk eller mental förmåga eller brist på erfarenhet och
kunskap, om de övervakas eller får instruktioner angående användning
av apparaten på ett säkert sätt och förstår de inblandade riskerna. Barn
ska inte leka med apparaten. Rengöring och underhåll får inte göras av
barn utan tillsyn.
• Lämna aldrig någon del av förpackningsmaterialet inom räckhåll för barn.
• Kontrollera apparatens skick efter att du tagit bort den ur förpackningen.
Se till att alla apparatens delar finns med i förpackningen och att de inte
är skadade (se apparatens beskrivning).
Page 22

• Montera apparaten enligt monteringsinstruktionerna. Följ monteringsinstruktionerna exakt och se till att alla skruvar är ordentligt åtdragna för
att undvika skador och faror.
• För aldrig in några föremål i fläktens galler. Täck inte över apparaten under drift.
• Koppla alltid ut strömkabeln ur eluttaget innan du tar bort skyddsgallret.
• Anslut endast kabeln till växelström. Observera spänningsinformationen
på apparaten.
• Använd inte skadade förlängningskablar.
• Dra inte nätsladden över vassa kanter och se till att den inte kommer i
kläm.
• Dra inte ut kontakten ur vägguttaget med våta händer eller genom att
hålla i sladden.
• Använd inte denna apparat i omedelbar närhet av badkar, dusch eller simbassäng (minsta avstånd är 3 m). Placera apparaten så att en person som
befinner sig i badkaret inte kan röra apparaten.
• Placera inte apparaten nära en värmekälla. Utsätt inte sladden för direkt
värme (som t.ex. en uppvärmd värmeplatta, öppen eld, hett str ykjärn, eller
värmeelement). Skydda nätsladdar från olja.
• Se till att apparaten är korrekt placerad för att säkerställa en hög stabilitet under dess drift och se till att ingen kan snubbla över nätsladden.
• Apparaten är inte stänkskyddad.
• Endast för inomhusbruk.
• Förvara inte apparaten utomhus.
• Förvara apparaten på en torr plats, oåtkomlig för barn (packa in apparaten).
• Om elkabeln skadas måste den bytas ut av tillverkaren, dess servicepersonal eller liknande kvalificerade personer för att undvika fara.
• Innan apparaten underhålls och efter varje användning, stänger du av apparaten och drar ut nätkabeln ur vägguttaget.
• Reparationer av elektriska apparater får endast utföras av en kvalificerad
eltekniker.
E. Fäst fläktbladen (10) på motorhöljet (6) och sätt fast i läge med fästskruv
för fläktblad och motorhölje (11) (löst fäst på fläktbladet). Dra åt skruven
som håller fast fläktbladen (10).
F. Placera det främre skyddsgallret (12) på det bakre skyddsgallret (9). När
du gör detta ska du se till att positioneringsklämman (13) på det främre
skyddsgallret monteras på det bakre skyddsgallret så som visas i bilden
på sidan 2-3. Stäng de två gallrena genom att fästa de 8 fästklämmorna
(14). Se till att alla fästklämmor (14) sitter fast.
G. Fäst de två gallrena (9 och 12) med fästskruven (15).
Inställning / drift
1. Placera Charly i ett önskat område på en plan yta. Anslut nätkabeln (18)
till apparaten och koppla in adaptern i ett lämpligt uttag.
2. Slå på Charly-fläkten på regulatorn (16) och ställ in önskad hastighet
(lägen 1-3, från mild fläkt till kraftig cirkulation).
3. Skjut oscilleringsreglaget (17) nedåt för att slå på oscilleringen och dra
oscilleringsreglage uppåt för att stänga av oscilleringen.
4. Luftflödets riktning kan ställas in i 4 lägen. Genom att försiktigt flytta
motorhöljet (6) upp och ner, kan riktningen justeras (klickande ljud).
Rengöring
Innan apparaten underhålls och efter varje användning, stänger du av apparaten och drar ut nätkabeln (18) ur vägguttaget.
Observera: Doppa inte apparaten i vatten (risk för kortslutning).
• För att rengöra utsidan, torka av med en fuktig trasa och torka sedan ordentligt.
• För att rengöra fläktbladen tar du bort fästskruven (15), lossar alla fästklämmor (14) och lyfter försiktigt bort det främre skyddsgallret (12). Du
kan nu torka av fläktbladen (10) med en fuktig trasa och torka dem ordentligt efteråt. Efter rengöring sätter du tillbaka det främre skyddsgallret (12)
på apparaten (passa in den övre positioneringsklämman: 13), sätter fast
alla fästklämmor (14) och skruvar fast fästskruven (15) ordentligt.
Montering (se sid 2 och 3)
Observera: Skyddsgallret måste vara ordentligt stängt innan du slår på ap-
paraten för att undvika skador eller faror. Se till att alla skruvar och säkerhetsringar är ordentligt åtdragna. Anslut endast strömkabeln till uttaget när
monteringen är klar.
A. Ta bort fästringen (3) från huvudpelarens undersida (1). Sätt in huvudpe-
laren (1) i foten (2) och fäst den på plats med fästringen för fot och pelare
(3).
B. Skruven för höjdjustering (5) av huvudpelaren sitter på den övre pelaren
(4). Genom att lossa på denna skruv kan pelarens höjd justeras. Dra åt
skruven ordentligt när pelaren har uppnått önskad höjd.
C. Lossa på fästskruven för motorhölje och pelare (7) på den övre pelaren
(4). Placera motorhöljet (6) på den övre pelaren (4) och fäst med fästskruven för motorhölje och pelare (7).
D. Ta bort fästringen för galler (8) från motorhöljet (6) och placera det ba-
kre skyddsgallret (9) på motorhöljet (6). Vid placeringen ser du till att
handtaget på det bakre skyddsgallret (9) är överst. Skruva nu tillbaka
fästringen för galler (8) på motorhöljet (6) för att fästa det bakre skyddsgallret (9) i sitt läge.
Reparationer
• Reparationer av elektriska apparater får endast utföras av en kvalificerad
eltekniker. Om felaktiga reparationer utförs, upphör garantin att gälla och
allt ansvar frånsägs.
• Använd aldrig apparaten om en kabel eller kontakt är skadad, om den har
funktionsfel, om den har tappats eller blivit skadad på något annat sätt
(sprickor/brister i höljet).
• Tryck inte in några föremål i apparaten. Ta inte isär apparaten.
• Om apparaten inte går att reparera, gör den obrukbar omedelbart och
lämna in den på en lämplig återvinningsstation.
Kassering
Det europeiska direktivet 2012 / 19 / CE om avfall från elektrisk och elektronisk utrustning (WEEE), kräver att gammal hushållselektronik INTE kastas i
det normala osorterade avfallet. Förbrukad utrustning måste samlas in separat för att optimera återanvändning och återvinning av det material som
de innehåller och för minska påverkan på människors hälsa och på miljön.
Symbolen med den överkorsade soptunnan på produkten påminner dig om
din skyldighet att apparaten måste samlas in separat när det kasseras. Du
Page 23

Русский
kan kontakta din lokala myndighet eller återförsäljare för information om korrekt kassering av förbrukad elektronisk utrustning.
Specifikationer
Märkspänning 230 V / 50 Hz
Utgående effekt 37 – 58 W
Mått 450 x 1’300 x 400 mm
(bredd x höjd x djup)
Vikt 9.4 kg
Ljudnivå < 56 dB(A)
Uppfyller EU:s regler CE / WEEE / RoHS
Alla rättigheter för tekniska ändringar förbehålles
Поздравляем с приобретением устройства премиум-класса. Вентилятор
Charly обеспечивает направленную циркуляцию воздуха от легкого бриза до мощного обдува и позволяет контролировать качество воздуха
в помещении, его эксплуатация доставим Вам несомненное удовольствие.
При эксплуатации вентилятора, а также иных электроприборов, следует обращать особое внимание на меры безопасности. Прежде, чем
использовать этот электроприбор, внимательно прочтите инструкцию.
Во избежание травм или повреждений имущества, строго следуйте приведенным в данной инструкции рекомендациями..
Описание устройства
Прибор состоит из следующих основных компонентов:
1. Основная опора
2. Подставка
3. Крепежная гайка для опоры и подставки
4. Верхняя опора (изменение высоты)
5. Винт для регулировки высоты вентилятора
6. Корпус двигателя
7. Винт, крепящий корпус мотора к опоре
8. Гайка для крепления решетки
9. Задняя защитная решетка
10. Лопасти вентилятора
11. Винт, крепящий лопасти вентилятора к корпусу мотора
12. Основной зажим
13. Передняя защитная решетка
14. Крепежные зажимы (8 шт)
15. Крепежный винт
16. Переключатель для включения/выключения и установки скорости
вентилятора (отключено, высокая, средняя, низкая)
17. Кнопка включения/выключения режима «swing»
18. Сетевой шнур с заземляющим проводом.
Важные указания по безопасности
Прежде чем использовать этот электроприбор, пожалуйста, внимательно ознакомьтесь с инструкцией по эксплуатации.
Ниже перечислены правила электробезопасности, которые необходимо
соблюдать при использовании электроприборов.
• Изготовитель не несет ответственности за любые травмы или ущер-
бы, возникшие вследствие неправильной эксплуатации электроприбора.
• Вентилятор воздуха является бытовым электроприбором и предна-
значен для использования только в домашних условиях в строгом
соответствии с инструкцией по эксплуатации. Неправильная эксплуатация и техническая модификация электроприбора могут создать
условия, опасные для жизни и здоровья пользователя.
• Этот электроприбор не предназначен для использования детьми или
недееспособными взрослыми без надлежащего контроля, а также лицами, не имеющими достаточных навыков по использованию электроприборов и не знакомыми с инструкцией по эксплуатации.
Page 24

• Перед под ключением вент илятора возду ха к электрос ети удостоверь-
тесь в том, что напряжение электросети соответствует напряжению,
паспортизированному для данного электроприбора.
• Не используйте при подключении поврежденные или перегруженные
удлинители.
• Следи те за тем, чтобы сетевой шнур не касался поверхностей, способ-
ных повредить шнур, не запу тывался и не перекручивался.
• Не прикасайтесь к сетевому шнуру или его вилке мокрыми руками.
• Не эксплуатируйте электроприборы в местах с повышенной влажно-
стью. Во избежание поражения электрическим током запрещается
эксплуатировать вентилятор в непосредственной близости ванны,
душа или бассейна (минимальное расстояние 3 метра).
• Не устанавливайте вентилятор рядом с источниками тепла. Не до-
пускайте, чтобы сетевой шнур касался горячих поверхностей любых
нагревательных приборов.
• Следите за тем, чтобы нельзя было споткну ться о сетевой шнур при
• хождении по комнате.
• Не допускайте попадания на электроприбор брызг воды и не эксплуа-
тируйте его вне помещений.
• Для хранения упакуйте вентилятор в коробку и храните в сухом поме-
щении, в местах, недоступных для детей.
• Сохраните эту инструкцию для дальнейших справок, а в случае пере-
дачи вентилятор другому владельцу, передайте инструкцию вместе с
электроприбором.
Сборка (стр. 2 и 3)
Внимание: перед включение прибора убедитесь, что все болты и гайки
вентилятора надёжно затянуты. Только после этого можно подключить
вентилятор к сети.
1. Извлеките крепежную гайку (3) из основной опоры (1). Вставьте основную опору (1) в подставку (2) и зафиксируйте конструкцию в нужном положении гайкой (3).
2. При помощи винта (5) отрегулируйте высоту верхней опоры (4) вентилятора.
3. Ослабьте винт (7) на верхней опоре (4). Прикрепите к опоре (4) корпус
двигателя (6) винтом (7).
4. Открутите гайку (8) от корпуса мотора (6) и прикрепите заднюю защитную решетку (9) к корпусу мотора (6) гайкой (8). Убедитесь, что
ручка для носки на задней части решетки находится вверху.
5. Закрепите лопасти вентилятора (10) на корпусе двигателя (6) крепежными винтами (11) и затяните соединения.
6. Найдите основной зажим (12) на передней защитной решетке (13)
вентилятора. Соедините заднюю (9) и переднюю (13) части решетки,
расположив переднюю часть таким образом, чтобы основной зажим
(12) находился вверх у. Закройте все зажимы (12, 14) скрепив решетки.
7. Дополнительно закрепите решетки (9, 13) крепежным винтом (15).
Эксплуатация
1. Установите вентилятор на сухую, ровную и устойчивую поверхность.
Подключите вилку сетевого шнура к розетке электросети.
2. Включите вентилятор с помощью переключателя (16) и установите
необходимую скорость (положения 1-3 – от легкого бриза до мощного воздушного потока).
3. Для включения режима «swing» нажмите кнопку (17).
4. Направление потока воздуха можно установить в 4 позициях , аккуратно перемещая корпус мотора (6) вверх и вниз. (повороты сопровождаются характерными щелчками).
Обслуживание и чистка
Перед обслуживанием и чисткой, а также после использования, отключите сетевой шнур (18) вентилятора от источника электропитания.
Внимание: во избежание поражения электротоком никогда не погружайте вентилятор и сетевой шнур (18) в воду.
• При необходимости вентилятор можно протереть влажной салфет-
кой, а затем вытереть насухо. Не допускайте попадания влаги в двигатель или блок регулировки скорости
• Для чистки лопастей вентилятора открутите крепежный винт (15),
откройте все крепежные зажимы (14) и аккуратно снимите переднюю
защитную решетку (13). Теперь Вы можете протереть лопасти вентилятора (10) влажной салфеткой и вытереть насухо. Далее соберите
вентилятор в обратном порядке, не забывая зафиксировать основной
зажим (12) до защелкивания всех остальных зажимов.
Ремонт и устранение неисправностей
• В целях безопасности ремонт электроприбора должен осуществлять-
ся только квалифицированными специалистами авторизованного
сервисного центра.
• Гарантия не распространяется на неисправности, обусловленные
неквалифицированным ремонтом, а также неправильной эксплуатацией электроприбора.
• Запрещается использование неисправного электроприбора, а также
при механических или иных повреждениях самого электроприбора,
сетевого шнура или его вилки.
• Никогда не разбирайте электроприбор самостоятельно, не вставляй-
те никакие посторонние предметы в отверстия в корпусе электроприбора.
Утилизация
Позаботьтесь об окружающей среде! Не выбрасывайте неисправные
электроприборы вместе с бытовыми отходами. Обратитесь для этих целей в специализированный пункт утилизации электроприборов. Адреса
пунктов приема бытовых электроприборов на переработк у Вы можете
получить в муниципальных службах Вашего города. Неправильная утилизация электроприборов наносит непоправимый
вред окружающей среде. При замене неисправного электроприбора на новый юридическую ответственность за утилизацию должен нести продавец.
Page 25

Спецификация
Электропитание 230 В / 50 Гц
Мощность 37–58 Вт
Габариты 450 x 1300 x 400 мм (ширина х высота х глубина)
Вес 9.4 кг
Площадь помещения до 50 м
2
Уровень шума < 56 dB (A)
Соответствует европейским правилам безопасности CE/ WEEE / RoHS
Производитель сохраняет за собой право на внесение изменений в технические характеристики, комплектацию и конструкцию данной модели
без предварительного уведомления.
Электронную версию инструкции можно скачать на нашем сайте:
www.stadlerform.ru
Информация о сертификации
Товар сертифицирован в соответствии с законом «О защите прав потребителей».
Установленный производителем в соответствии с п.2 ст.5 Федерального
Закона РФ «О защите прав потребителей» срок службы для данного изделия равен 5 годам, при условии, что изделие используется в строгом
соответствии с настоящей инструкцией по эксплуатации и применяемыми техническими стандартами.
Гарантийный срок
гарантийный срок составляет 12 месяцев с документально подтвержденной даты продажи Оборудования/Изделия Потребителю Продавцом.
В случае отсутствия у Потребителя документов, подтверждающих дату
покупки, гарантийный срок рассчитывается с даты изготовления.
Дата изготовления
Дата изготовления зашифрована в виде группы цифр в серийном номере, расположенном на корпусе прибора.
Пример: 78901 1511 123456
78901 – код поставщика
15 – последние две цифры года
11 – номер месяца
123456 – номер продукта
Дату изготовления следует читать:
78901 1511 123456 – 2015 год, ноябрь
Page 26

Garantie/Warranty/Garantie/Garanzia/Garantía
Garantie/Garanti/Takuu/Garanti/Garanti
2 Jahre Garantie
Diese umfasst Konstruktions-, Produktions-, sowie Materialfehler. Ausgenommen sind sämtliche Verschleissteile und unsachgemässe Benutzung
oder Pflege.
2 Years warranty
This warranty covers defects of construction, production and material. All
abrasion parts are excluced and also inappropriate usage or maintenance.
Garantie 2 ans
Cette garantie couvre les défauts de construction, de fabrication et de
matériaux. En sont exclues toutes les pièces d’usure et d’utilisation pas
correcte ou mauvaise entretien.
2 anni di garanzia
Questa garanzia copre difetti di costruzione, di produzione e di materiale.
Tutte le parti di abrasione sono escluse e altresì l’uso o la manutenzione
inappropriata.
2 años de garantía
Esta garantía cubre los defectos de construcción, de fabricación y de materiales. Todas las piezas de desgaste están excluídas.
2 jaar garantie
Deze omvat de constructie-, productie en materiaal fouten. Hier buiten vallen de gebreken ten gevolgen van nalatig gebruik of Interferentie op het
toestel.
2 års garanti
Garantien omfatter konstruktions-, produktions- og matrialefejl. Sliddele og
fejlbrug er ikke indbefattet.
2 vuoden takuu
Takuu käsittää valmistus-, tuotanto- sekä materiaalivirheet. Takuun ulkopuolelle jäävät kaikki kuluvat osat sekä käyttöohjeiden vastainen tai huolimaton käyttö tai hoito.
2 års garanti
Denne garantien dekker feil ved konstruksjon, produksjon og materialet anvendt. Alle reservedeler er utelatt fra garantien, samt uriktig bruk og vedlikehold.
2 års garanti
Denna garanti täcker brister i tillverkning, produktion och material. Slitage
och olämpligt användande eller underhåll är uteslutna.
Stemp el Verkaufss telle / Retailer’s stamp /
Cache t du point de vente / Timbro del rivenditore /
Sello del establecimiento de venta / Stempel verkoopadres /
Butikkens stempe / Leima myyntikonttori
Forhandlerstempel / Återförsäljarens stämpel
Печать магазина
Page 27

Design by Matti
Thanks to all people involved in this project: Lucia
Liu for her great organisation and technical interpretation,
QuanFeng Liu for his know how in engineering and CAD
work, Mario Rothenbühler for the realistic renderings,
Matti Walker for the reloaded design and beautiful graphic work.
Martin Stadler, CEO Stadler Form Aktiengesellschaft
15-1
www.stadlerform.com
 Loading...