

Page 1

big
Anna
Operating instructions
Gebrauchsanweisung
Mode d‘emploi
Istruzioni per l‘uso
Manual de instrucciones
Gebruiksaanwijzing
Brugsa nvisning
Käy ttöohje
Bruks anvisning
Bruks anvisning
Инструкция по эксплуатации
Page 2

Anna
big
12
11
14
3
7
4
2
13
1
Page 3

5
9 8
610
W
A
S
R
R
R
A
A
E
Y
2
•
E
I
T
N
A
R
A
G
E
R
H
A
J
2
•
2
N
T
E
I
N
T
Y
•
2
A
N
N
É
E
S
D
E
G
A
R
A
Page 4

Page 5

TRADITIONAL FAN HEATERS:
TYPICAL «COLD / WARM / COLD» EFFECT (QUIET / LOUD / QUIET)
22°
20°
HEAT ON
18°
TEMP ERATURE
OFF
ON
16°
0 15 30 45 60 75 90 MIN.
TIME
WITH ADAPTIVE HEAT™ (VERY QUIET)
22°
INUOUS HEAT ING
T
N
O
C
D
N
A
E
V
I
T
P
A
D
20°
18°
TEMP ER ATURE
A
16°
0 15 30 45 60 75 90 MIN.
TIME
E ADAPTIVE HEAT™ technology automatically adapts
heat output in auto mode to reach and keep the desired
temperature in an efficient way
D Heizleistung wird im Auto Modus dank ADAPTIVE
HEAT™ Technologie automatisch adaptiert, um die
Ziel-Temperatur effizient zu erreichen und beizubehalten
F En mode auto, la technologie ADAPTIVE HEAT™ ajuste
automatiquement le niveau de sortie de la chaleur pour
atteindre et maintenir la température désirée de manière
efficace
Page 6

Page 7
Share your feedback about Anna big on:
Teilen Sie Ihr Feedback von Anna big auf:
Partagez votre commentaire sur Anna big :
www.stadlerform.com/Anna-big
For frequently asked questions go to:
Für häufig gestellte Fragen besuchen Sie:
Trouvez la foire aux questions sur :
www.stadlerform.com/Anna-big/support
Download instruction manual:
Bedienungsanleitung hier herunterladen:
Téléchargez le mode d’emploi :
www.stadlerform.com/Anna-big/manual
Watch the video of Anna big:
Schauen Sie sich das Video zu Anna big an:
Regardez la vidéo du Anna big :
www.stadlerform.com/Anna-big/video
Stadler Form Aktiengesellschaft, Chamerstrasse 174, 6300 Zug, Switzerland
Phone +41 41 720 48 48, Fax +41 41 720 48 44, www.stadlerform.com/contact
Page 8

English
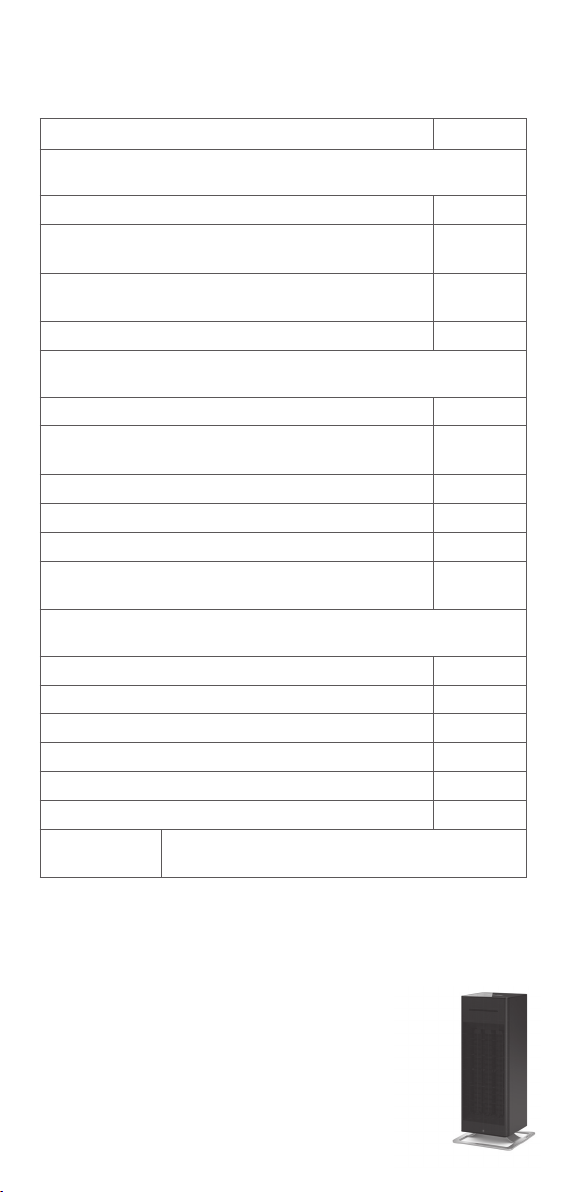
Congratulations! You have just purchased the exceptional ANNA big fan
heater. It will bring you great pleasure and improve the ambient air for you.
As with all domestic electrical appliances, particular care is needed with
this model also, in order to avoid injury, fire damage or damage to the
appliance. Please study these operating instructions carefully before using the appliance for the first time and follow the safety advice on the
appliance itself.
Description of the appliance
The appliance consists of the following main components:
1. Mains cable for power supply
2. Zinc base
3. Housing
4. Main switch for power supply
5. Touch Panel (touch-sensitive control element)
6. On/Off button
7. LED light (red=heating, blue=cooling)
8. Control panel for selection of temperature: 0° – 35 °C or maximum «Hi»
9. Control panel for selection of heat output level: low to high (8 levels)
10. Button for Auto Mode, symbol «Auto Mode»
11. Flap with washable air filter
12. Carrying handle
13. Back cover
14. Front cover
Important safety instructions
Please read through the operating instructions carefully before you use
the appliance for the first time and keep them safely for later reference; if
necessary pass them on to the next owner.
• This product is only suitable for well insulated spaces or occasional use.
• CAUTION – Some parts of this product can become very hot and
cause burns. Particular attention has to be given where children and
vulnerable people are present.
• This appliance can be used by children aged from 8 years and above
and persons with reduced physical, sensory or mental capabilities or
lack of experience and knowledge if they have been given supervision or
instruction concerning use of the appliance in a safe way and understand
the hazards involved. C hildren shall not play with the appliance. Cleaning
and user maintenance shall not be made by children without supervision.
• Children of less than 3 years should be kept away unless continuously
supervised.
• Children aged from 3 years and less than 8 years shall only switch on /off
the appliance provided that it has been placed or installed in its intended
normal operating position and they have been given super-vision or instruction concerning use of the appliance in a safe way and understand
the hazards involved.
Page 9

• If the supply cord is damaged, it must be replaced by the manufacturer,
or its service agent, or a qualified person in order to avoid a hazard.
• Stadler Form refuses all liabilit y for loss or damage which arises as a result
of failure to follow these operating instructions.
• The appliance is only to be used in the home for the purposes described
in these instructions. Unauthorised use and technical modifications to the
appliance can lead to danger to life and health.
• Never submerge the unit in water (danger of short circuiting).
• Never run a defective unit (e.g. supply cord).
• Never touch energized parts.
• Only connect the cable to alternating current. Observe the voltage information given on the appliance. Do not use extension cords.
• The heater must not be located directly below a socket-outlet.
• Do not open the appliance (repairs only by service agents).
• Do not run the power cord over sharp edges and make sure that it does
not get trapped. Do not pull the plug from the socket with wet hands or by
holding on to the power cord.
• Do not place the appliance near a heat source. Do not subject the power
cord to direct heat (such as a heated hotplate, open flames, hot iron sole
plates or heaters for example). Protect power cords from oil.
• Please make sure that the used socket remains accessible.
• Do not run the heater on an uneven or soft surface.
• CAUTION: In order to avoid a hazard due to inadvertent resetting of the
thermal cut-out, this appliance must not be supplied through an external
switching device, such as a timer.
• WARNING: In order to avoid overheating, do not cover the air inlet or air
outlet – fire hazard!
• Do not use the heater in small rooms (below 4 m2 in size), in explosive environment, or for drying laundry.
• Do not touch the front part of the appliance, it might reach hot temperature.
• Use the heater only under supervision.
• Do not insert any object and/or finger into the openings of the heater.
• To extinguish burning appliances only use fire blankets.
Setting up / operation
Note: Make sure that there is always sufficient space between the appli-
ance and the wall or other large objects (> 50 cm). The air flow must not
be blocked by objects of any kind. If Anna big is set up in a bathroom, keep
a safety distance of at least 100 cm to showers, bathtubs, water faucets,
washbasins, etc.
1. Having set up Anna big in the desired position connect the cable (1) to the
household supply socket.
2. First, push the main switch for power supply (4) on the back of the appliance.
3. Switch on the appliance by pressing the On/Off button (6). The target
temperature appears on the display.
4. The target temperature can be changed from 0 °C (cooling mode) to
35 °C or maximum «Hi» over the right control panel (8) «Temperature».
The heating mode is active from 1 ° – 35 °C & «Hi». The digit flashes in
configuration mode. Pushing the «+» button increases the target tem-
Page 10

perature. Pushing the «–» button reduces the target temperature. The
setting is saved if no change occurs on the control panel for selection of
temperature for three seconds. The current room temperature is subsequently shown on the display.
Info: The appliance switches off the heating element when the target
temperature is reached and the temperature indicator flashes on the
display. The ventilator remains switched on for 30 seconds at the lowest level to cool down the heating element. The current temperature is
then measured approx. every 30 minutes (the fan runs for 1 minute at the
lowest level). The appliance switches on again if the room temperature
recorded drops below the set target temperature.
5. Cooling mode: the heating element switches off if the temperature is set
to 0 °C and the ventilator blows cool air out of the appliance. The LED
light (7) changes from red to blue. There is no temperature shown on the
display in cooling mode.
6. The heat output level can be changed over the left control panel (9)
«Power Level». The display flashes during the input process. Typing «+»
increases the output level. Typing «–» reduces the output level. The setting is saved if no change occurs on the contr ol panel for selection of heat
output level for three seconds. The current room temperature is subsequently shown on the display.
7. Auto mode is activated by pressing the «Auto Mode» button (10). «Auto
Mode» is shown in the display. The preset target temperature of 22 °C
can be changed using the right-hand control panel for selection of temperature (8). The heat output level is selected automatically in auto mode
- depending on the room temperature. The smaller the difference between the room temperature and the target temperature, the smaller the
heat output level selec ted. We refer to this as «Ad aptive HeatTM» technology and we have filed for an international patent. This allows Anna big to
make sure that the target temperature is reached, quickly and efficiently,
and maintained. Anna big thus prevents a sharp temperature drop and
prevents the appliance from being constantly switched on and off. Auto
mode is deactivated if the heat output level is changed manually (9).
Info: The appliance switches off the heating element when the target
temperature is reached and the temperature indicator flashes on the
display.
8. Switch of f the appliance by pressing the On/Off button (6). The ventilator
remains switched on for 30 seconds at the lowest level to cool down the
heating element. The appliance sav es the temperature inpu t and the heat
output level even if the appliance is switched off.
9. Protection against overheating: the appliance is equipped with overheating protection which switches off the appliance in the event of a technical fault or improper use (the ventilator continues to run for some time at
the lowe st level to cool do wn the appliance). Should this oc cur, rectify the
fault or ce ase the improper use (e.g. 50 cm space around the appliance, do
not cover the appliance, set the appliance up in an upright position). Once
the appliance has cooled down it can be put back into service.
10. The temperature indicator c an be changed from Celsius to F ahrenheit and
vice versa by pressing the «Auto Mode» button (10) for five seconds.
11. In the fir st few hour s after p utting A nna big into o peration t here might be a n
unpleas ant smell. This smell will dissip ate and it is not hing to worr y about.
Page 11

Tip: At the back of Anna big you can find the air inlet. The air inlet is
covered with an air filter and a grid. The grid is detachable. Please take
off the grid and remove the air filter. You may wash out the air filter with
a little bit of soap and warm water. Rinse it well and let it dry completely
before you put it back on the air inlet and reattach the grid.
Cleaning
Prior to any maintenance, cleaning and after each use, switch off the appliance and unplug the mains cable (1) from the socket.
Attention: Never immerse the device in water (danger of short circuit).
• For external cleaning, rub with a damp cloth and then dr y thoroughly.
• If the filter (11) behind the back cover (13) is full of dust, please remove the
filter, wash it or clean it with the vacuum cleaner.
Repairs
• Repairs to electrical appliances must only be carried out by a qualified
electrical technician. If improper repairs are carried out, the warranty
lapses and all liability is refused.
• Never operate the appliance if the adaptor or plug is damaged, after it has
malfunctioned, if it has been dropped or has been damaged in any other
way (cracks/breaks in the casing).
• Do not push any object into the appliance.
• If the appliance is beyond repair, make it unusable immediately by cutting
through the cable and hand it in at the collection point provided for the
purpose.
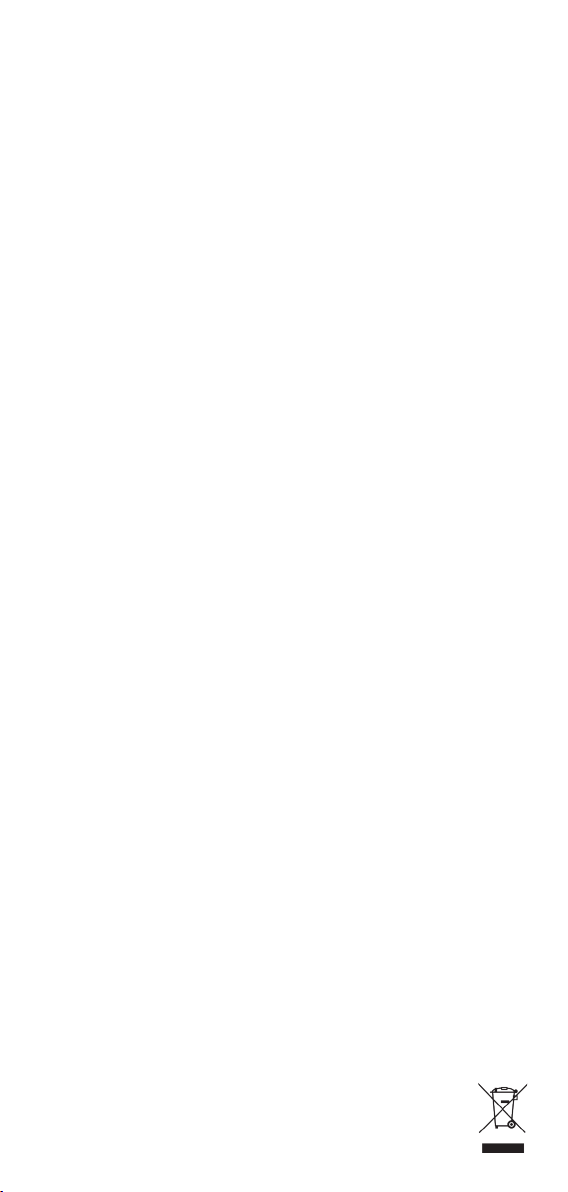
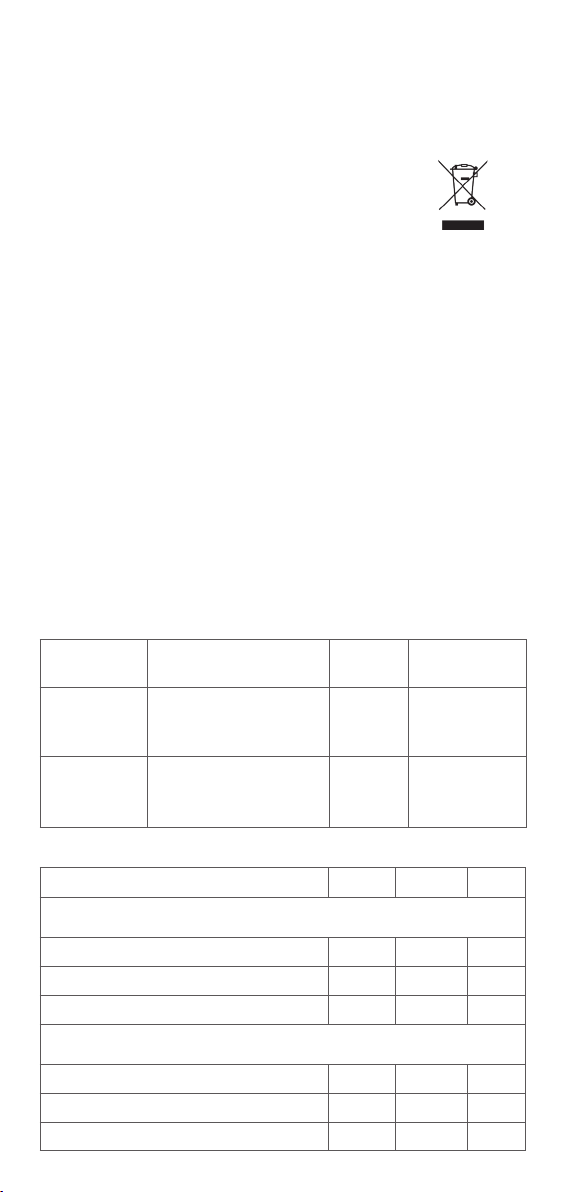
Disposal
The European directive 2012 / 19 / CE on Waste Electrical and Electronic
Equipment (WEEE), requires that old household electrical appliances must
not be disposed in the normal unsorted municipal waste stream. Old appliances must be collected separately in order to optimize the recovery and recycling of the materials they contain and reduce the impact on human health
and the environment. The crossed out “wheeled bin” symbol on the product
reminds you of your obligation, that when you dispose of the appliance it must be separately collected. Consumers should contact
their local authority or retailer for information concerning the correct disposal of their old appliance.
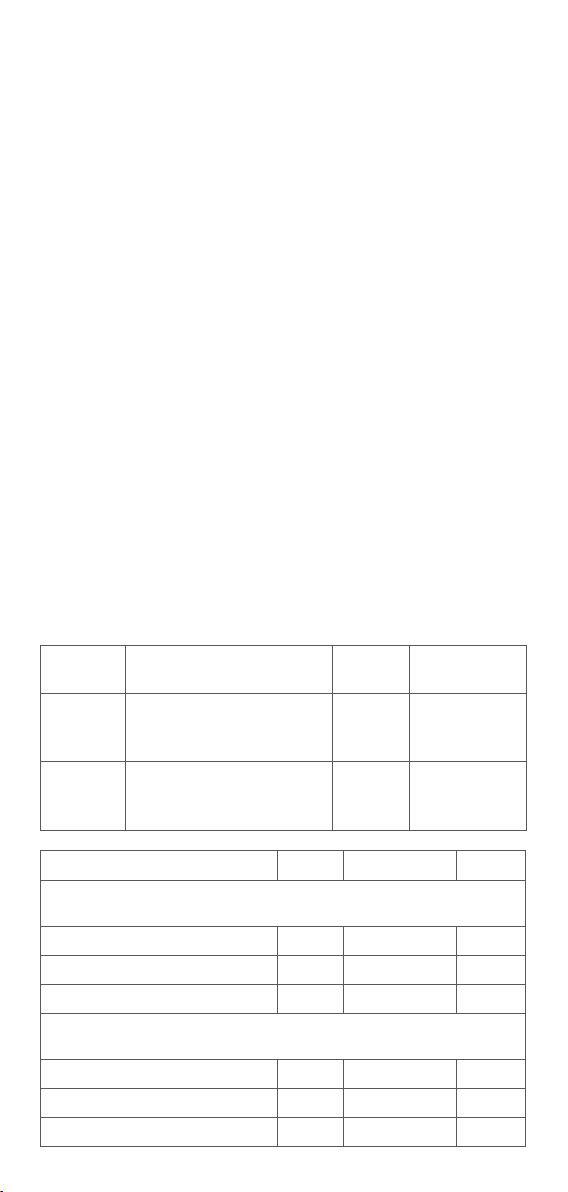
Specifications
Rated voltage 220 – 240 V / 50 Hz
Temperature range 0 ° – 35 °C / > 35 °C = Hi
Power consumption 300 W (min.)
Rated power 2‘000 W (max.)
Dimensions 183 x 420 x 183 mm
(width x height x depth)
Weight 3.2 kg
Sound level 28 – 5 0 dB(A )
Complies with EU
Regulations CE / WEEE / RoHS / EAC
All rights for any technical modifications are reserved
Page 12
Name
heater
element
fan motor
Manufacturer /
Trade Mark
Foshan Shunde Esite
Electrical Appliances Co. Ltd
Foshan Shunde Esite
Electrical Appliances Co. Ltd
Type /
Model
2000 W
EST1225S
Technical Da ta
AC 220 - 24 0 V
50 Hz
650Wx3
DC 12 V
250 0 rpm
8.4 W Class A
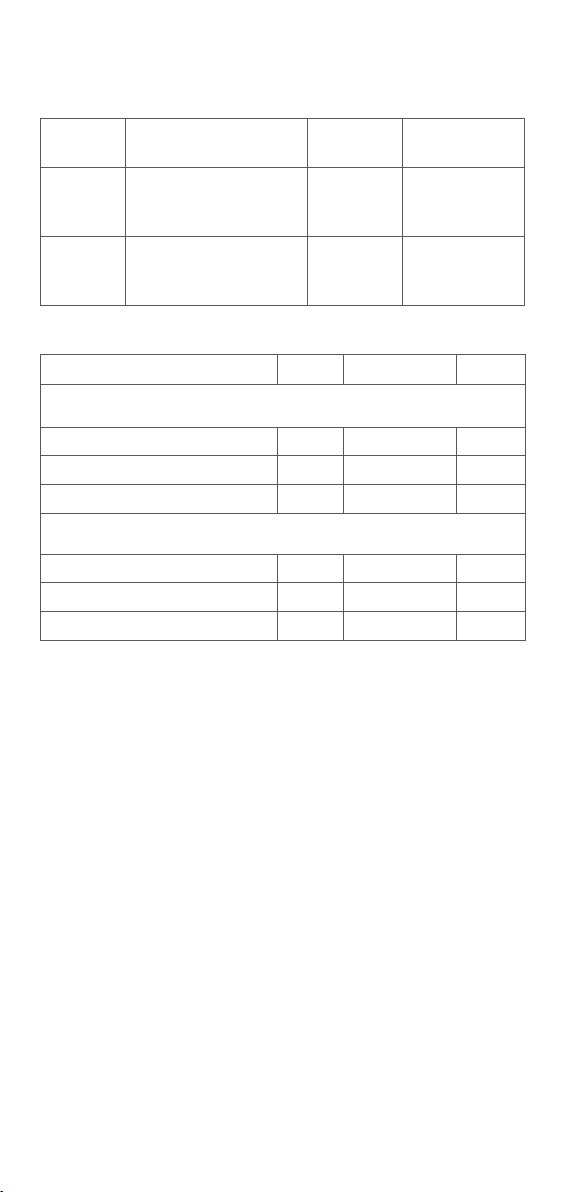
Item Symbol Value Unit
Heat output
Nominal heat output P
Minimum heat ouput (indicative) P
Maximum continous heat output P
Auxillary electricity consumption
at nominal heat output el
at minimum heat output el
in standby mode el
1.41 kW
nom
0.4 kW
min
2.0 kW
max,c
0.0064 kW
max
0.0044 kW
min
0 kW
SB
Page 13

Item Unit
Type of heat input, for electric storage local spater heaters only
(select one)
manual heat charge control,with integrated thermostat [no]
manual heat charge control with room and / or
outdoor temperature feedback
electronics heat charge control with room and / or
outdoor temperature feedback
fan assisted heat output [no]
Type of heat output / room temperature control (select one)
single stage heat output and no room temperature control [no]
Two or more manual stages, no room temperature control [no]
with mechanic thermostat room tenperature control [no]
with electronic room temperature control [yes]
electronic room temperature control plus day timer [no]
electronic room temperature control plus week timer [no]
Other control options (multiple selections possible)
room temperature control, with presence detection [no]
room temperature control, with open window detection [no]
with distance control option [no]
with adaptive start control [no]
with working time limitation [no]
with black bulb sensor [no]
Contact details
Stadler Form Aktiengesellschaft
Chamerstrasse 174, 6300 Zug, Switzerland
[no]
[no]
Page 14
Deutsch
Gratulation! Sie haben soeben den aussergewöhnlichen Heizlüfter ANNA
big erworben. Sie wird Ihnen viel Freude machen und die Raumluft für Sie
verbessern.
Wie bei allen elek trischen Haushaltsgeräten wird auch bei diesem Gerät zur
Vermeidung von Verletzungen, Brand- oder Geräteschäden besondere Sorgfalt verlangt. Bitte studieren Sie die vorliegende Betriebsanleitung vor der
Inbetriebnahme und beachten Sie die Sicherheitshinweise auf dem Gerät.
Gerätebeschreibung
Das Gerät besteht aus den folgenden Komponenten:
1. Netzkabel für die Stromversorgung
2. Fuss aus Zink
3. Gehäuse
4. Hauptschalter für Stromversorgung
5. Touch Panel (berührungsempfindliches Bedienelement)
6. Ein/Aus-Taste
7. LED Statuslicht (rot=Heizung, blau=Kühlung)
8. Bedienfeld für die Wahl der Temperatur: 0 ° – 35 ° C oder maximal «Hi»
9. Bedienfeld für die Wahl der Heizleistungsstufe: niedrig bis hoch (8 Stufen)
10. Taste für Auto Modus, Anzeige «Auto Mode»
11. Klappe mit abwaschbarem Luftfilter
12. Tragegriff
13. Lufteinlassgitter
14. Frontauslassgitter
Wichtige Sicherheitshinweise
Bitte lesen Sie die Gebrauchsanleitung genau durch, bevor Sie das Gerät das
erste Mal in Betrieb nehmen und bewahren Sie sie zum späteren Nachschlagen gut auf, geben Sie sie ggf. an den Nachbesitzer weiter.
• Dieses Produkt ist nur für gut isolierte Räume oder gelegentlichen Ge-
brauch geeignet.
• V ORSICHT – Einige Teile des Produktes k önnen sehr heiss werden und Ver-
brennungen verursachen. Besondere Vorsicht ist geboten, wenn Kinder
und schutzbedürftige Personen anwesend sind.
• Dieses Gerät kann von Kindern ab 8 Jahren und Personen mit einge-
schränkten körperlichen, sensorischen oder geistigen Fähigkeiten, aber
auch von unerfahrenen und unwissenden Personen verwendet werden,
sofern diese das Gerät unter Aufsicht verwenden oder von einer anderen
Person über die sichere Verwendung des Gerätes unterwiesen wurden
und sich der damit verbundenen Gefahren bewusst sind. Kinder dürfen
nicht mit dem Gerät spielen. Kinder dürfen das Gerät nur unter Aufsicht
reinigen und warten.
• Kinder unter 3 Jahren sind vom Gerät fernzuhalten; es sei denn sie wer-
den ständig überwacht.
• Kinder ab 3 Jahren und jünger als 8 Jahre dürfen das Gerät nur ein- und
ausschalten, wenn sie beaufsichtigt werden oder bezüglich des sicheren
Gebrauchs des Gerätes unterwiesen wurden und die daraus resultieren-
Page 15

den Gefahren verstanden haben , vorausgesetzt, dass das Gerät in seiner
normalen Gebrauchslage platziert oder installiert ist.
• Kinder ab 3 Jahren und jünger als 8 Jahre dürfen das Gerät nicht an
das Stromnetz anschliessen, es nicht regulieren oder reinigen und keine
Wartung durchführen.
• Wenn das Netzkabel beschädigt ist, muss es vom Hersteller oder in einer
vom Hersteller zugelassenen Werkstatt oder von ähnlich qualifizierten
Personen ersetzt werden, um Gefahren zu vermeiden.
• Für Schäden, die durch Nichtbeachten dieser Gebrauchsanleitung entstehen, lehnt Stadler Form jegliche Haftung ab.
• Das Gerät ist nur im Haushalt für die in dieser Gebrauchsanweisung beschriebenen Zwecke zu benutzen. Ein nicht bestimmungsgemässer Gebrauch sowie technische Veränderungen am Gerät können zu Gefahren
für Gesundheit und Leben führen.
• Gerät nie in Wasser / andere Flüssigkeiten tauchen. Kurzschlussgefahr!
• Beschädigte Geräte (inkl. Netzkabel) nie in Betrieb nehmen.
• Nie unter Spannung stehende Teile berühren.
• Schliessen Sie das Kabel nur an Wechselstrom an. Gerät nur an fachgerecht installierter Steckdose mit korrekter Spannung betreiben. Keine
Verlängerungskabel verwenden.
• Der Heizer darf nicht unmittelbar unter einer Steckdose platziert werden.
• Das Gerät nie selber öffnen (Reparaturen nur durch Fachleute).
• Das Netzkabel nicht über scharfe Kanten ziehen oder einklemmen. Den
Stecker nie am Netzkabel oder mit nassen Händen aus der Steckdose
ziehen.
• Gerät nicht in der Nähe einer Wärmequelle aufstellen. Das Netzkabel
keiner direkten Hitzeeinwirkung (wie z.B. heisse Herdplatten, offene
Flammen, heisse Bügeleisen oder Heizöfen) aussetzen. Netzkabel vor Öl
schützen.
• Die benutzte Steckdose muss jederzeit zugänglich bleiben.
• Gerät nie auf unebenen Flächen oder weichen Unterlagen betreiben.
• VORSICHT: Um eine Gefährdung durch ein unbeabsichtigtes Rücksetzen
des Schutztemperaturbegrenzers zu vermeiden, darf das Gerät nicht
über ein externe Schaltvorrichtung wie beispielsweise eine Zeitschaltuhr
versorgt werden.
• WARNUNG: Während des Betriebs den Lufteinlass und Luftauslass nicht
abdecken – Brandgefahr!
• Gerät nicht in kleinen Räumen (unter 4 m2 Fläche), nicht in explosiver Umgebung, nicht zum Wäsche trocknen einsetzen.
• Der Bereich des Luftauslasses nicht berühren, da er hohe Temperatur erreichen kann.
• Gerät nie unbeaufsichtigt stehen lassen.
• Keine Gegenstände und/oder Finger in Geräteöffnungen stecken.
• Brennende Geräte nur mit Löschdecke löschen.
Inbetriebnahme / Bedienung
Hinweis: Stellen Sie sicher, dass zwischen dem Heizer und der Wand oder
anderen grossen Objekten immer genügend Platz is t (> 50 cm). Der Luft strom
darf nicht durch etwaige Objekte blockiert werden. Wenn Anna big in einem Badezimmer verwendet wird, muss ein Mindestabstand von 100 cm zu
Page 16

Dusche, Badewanne, Wasserhahn, Waschbecken, etc. eingehalten werden.
1. Nachdem Sie Anna big am gewünschten Ort platziert haben, schliessen
Sie das Kabel (1) an der Steckdose an.
2. Drücken Sie zuerst auf den Hauptschalter (4) auf der Geräterückseite.
3. Schalten Sie das Gerät ein, indem Sie auf die Ein/Aus-Taste (6) drücken.
Auf dem Display erscheint die Ziel-Temperatur.
4. Die Ziel-Temperatur kann über das rechte Bedienfeld (8) «Temperature»
verändert werden, von 0 °C (Kühlungsmodus) bis 35 °C oder maximal
«Hi». Von 1 ° – 35 °C & «Hi» ist der Wärmemodus aktiv. Die Zahl blinkt
im Einstellmodus. Auf «+» tippen, erhöht die Ziel-Temperatur. Auf «–»
tippen verringert die Ziel-Temperatur. Die Einstellung wird gespeichert,
wenn 3 Sekunden lang keine Veränderung auf dem Bedienfeld erfolgt.
Danach zeigt das Display die aktuelle Raumtemperatur an.
Info: Wird die Ziel-Temperatur erreicht, schaltet das Gerät das Heiz-
element aus und auf dem Display blinkt die Temperaturanzeige. Der
Ventilator bleibt noch während 30 Sekunden auf der untersten Stufe
eingeschaltet, um das Heizelement abzukühlen. Die aktuelle Temperatur
wird dann ca. alle 30 Minuten gemessen (der Ventilator läuft für 1 Minute auf unterster Stufe). Sinkt die gemessene Raumtemperatur unter die
eingestellte Ziel-Temperatur, schaltet das Gerät wieder ein.
5. Kühlungsmodus: wird die Temperatur auf 0 °C eingestellt, schaltet das
Heizelement aus und der Ventilator bläst kühle Luft aus dem Gerät. Das
LED Statuslicht (7) wechselt von rot auf blau. Auf dem Display erscheint
im Kühlungsmodus keine Temperaturanzeige.
6. Die Heizleistungsstufe kann über das linke Bedienfeld (9) «Power Level» verändert werden, von niedrig bis hoch. Die Anzeige blinkt während
der Eingabe. Auf «+» tippen, erhöht die Leistungsstufe. Auf «–» tippen,
verringert die Leistungsstufe. Die Einstellung wird gespeichert, wenn 3
Sekunden lang keine Veränderung auf dem Bedienfeld erfolgt. Danach
zeigt das Display die aktuelle Raumtemperatur an.
7. Der Auto Modus wird durch Drücken der «Auto Mode» Taste (10) aktiviert, im Display wird «Auto Mode» angezeigt. Die voreingestellte
Ziel-Temperatur von 22 °C kann über das rechte Bedienfeld (8) verändert werden. Die Heizleistungsstufe wird im Auto Modus automatisch
gewählt, in Abhängigkeit zur Raumtemperatur. Je kleiner die Differenz
zwischen Raumtemperatur und Ziel-Temperatur, desto kleiner die gewählte Heizleistungsstufe. Diese Technologie nennen wir «Adaptive
HeatTM» und haben wir international zum Patent angemeldet. Damit
stellt Anna big sicher, dass die Ziel-Temperatur schnell und effizient erreicht und beibehalten wird. Anna big verhindert dadurch einen starken
Temperaturabfall sowie ein ständiges Ein- und Ausschalten des Geräts.
Wird die Heizleistungsstufe manuell verändert (9), wird der Auto Modus
deaktiviert.
Info: Wird die Ziel-Temperatur erreicht, schaltet das Gerät das Heizelement aus und auf dem Display blinkt die Temperaturanzeige.
8. Schalten Sie das Gerät aus, indem Sie auf die Ein/Aus-Taste (6) drücken.
Der Ventilator bleibt noch während 30 Sekunden auf der untersten Stufe eingeschaltet, um das Heizelement abzukühlen. Das Gerät speichert
die Eingabe der Temperatur und der Heizleistungsstufe, auch wenn das
Gerät ausgeschaltet wird.
9. Überhitzungssicherung: das Gerät ist mit einer Überhitzungssicherung
ausgestattet, die bei einer technischen Störung oder bei unsachgemäs-
Page 17
sem Einsatz das Gerät ausschaltet (der Ventilator läuft einige Zeit auf
der untersten Stufe weiter, um das Gerät abzukühlen). Sollte dieser Fall
eintreten, beseitigen Sie die Störung bzw. korrigieren Sie den Einsatz
(z.B. > 50 cm Platz ums Gerät, Gerät nicht abdecken, Gerät aufrecht aufstellen). Das Gerät kann wieder in Betrieb genommen werden, wenn das
Gerät abgekühlt ist.
10. Die Temperaturanzeige kann durch Drücken der «Auto Mode» Taste (10)
während 5 Sekunden von Celsius zu Fahrenheit und umgekehrt gewechselt werden.
11. In den ersten Stunden nach der Inbetriebnahme von Anna big kann es
zu einem unangenehmen Geruch kommen. Dieser Geruch wird sich von
selbst auflösen und ist kein Grund zur Sorge. Tipp: Auf der Rückseite
von Anna big befindet sich der Lufteinlass. Der Lufteinlass ist mit einem
Luftfilter und einem Gitter abgedeckt. Das Gitter ist abnehmbar. Bitte
nehmen Sie das Gitter und anschließend den Luftfilter ab. Sie können
den Luftfilter mit etwas Seife und warmem Wasser auswaschen. Spülen Sie den Luftfilter gut aus und lassen Sie ihn vollständig trocknen,
bevor Sie ihn wieder auf den Lufteinlass setzen und das Gitter erneut
anbringen.
Reinigung
Vor jeder War tung, Reinigung und nach jedem Gebrauch das Gerät ausschalten und das Netzkabel (1) von der Steckdose trennen.
Achtung: Das Gerät nie ins Wasser tauchen (Kurzschlussgefahr).
• Zur äusseren Reinigung nur mit einem feuchten Lappen abreiben und danach gut trocknen.
• Sollte der Filter (11) beim Einlassgitter (13) verstaubt sein, entfernen Sie
diesen und waschen ihn oder reinigen ihn mit dem Staubsauger.
Reparaturen
• Reparaturen an Elektrogeräten (Wechseln des Netzkabels) dürfen nur
von instruierten Fachkräften durchgeführt werden. Bei unsachgemässen
Reparaturen erlischt die Garantie und jegliche Haftung wird abgelehnt.
• Nehmen Sie das Gerät nie in Betrieb, wenn ein Kabel oder Stecker beschädigt ist, nach Fehlfunktionen des Gerätes, wenn dieses heruntergefallen ist oder auf eine andere Art beschädigt wurde (Risse/Brüche am
Gehäuse).
• Nicht mit irgendwelchen Gegenständen in das Gerät eindringen.
• Ausgedientes Gerät sofort unbrauchbar machen (Netzkabel durchtrennen) und bei der dafür vorgesehenen Sammelstelle abgeben.
Entsorgung
Die europäische Richtlinie 2012 / 19 / CE über Elektro- und Elektronik-Altgeräte (WEEE) verlangt, dass elektrische Haushaltsgeräte nicht über den
Restmüll oder sonstigen Haushaltsabfall entsorgt werden dürfen, sondern
an Sammelpunkten für das Recycling von elektrischen und elektronischen
Geräten abgegeben werden müssen. So können die Verwertung der enthaltenen Materialien optimiert und ihre Auswirkungen auf die menschliche Gesundheit und die Umwelt reduziert werden. Das durchgestrichene
Abfalltonnensymbol auf dem Produkt erinnert Sie an diese Verpflichtung. Bitte fragen Sie bei Ihrer Gemeindeverwaltung nach
der zuständigen Entsorgungsstelle.
Page 18
Technische Daten
Nennspannung 220 – 240 V / 50 Hz
Temperaturbereich 0 ° – 35 °C / > 35 °C = Hi
Leistu ngsaufn ahme 30 0 W (min.)
Nennleist ung 2‘00 0 W (m ax.)
Abmessungen 183 x 420 x 183 mm
(Breite x Höhe x Tiefe)
Gewich t 3.2 kg
Schalldr uckpegel 28 – 50 d B(A)
Erfüllt EU-Vorschrift CE / WEEE / RoHS / EAC
Technische Änderungen vorbehalten
Angabe
Heizelement
Lüftermotor
Hersteller /
Marke
Foshan Shunde Esite
Electrical Appliances Co. Ltd
Foshan Shunde Esite
Electrical Appliances Co. Ltd
Typ /
Model
2000 W
EST1225S
Technische
Daten
AC 220 - 24 0 V
50 Hz
650Wx3
DC 12 V
250 0 rpm
8.4 W Class A
Angabe Symbol Wert Einheit
Wärmeleistung
Nennwärmeleistung P
Mindestwärmeleistung (Richtwert) P
Max. kontinuierliche Wärmeleistung P
1.41 kW
nom
0.4 kW
min
2.0 kW
max,c
Hilfsstromverbrauch
Bei Nennwärmeleistung el
Bei Mindestwärmeleistung el
Im Bereitschaftszustand el
0.0064 kW
max
0.0044 kW
min
0 kW
SB
Page 19
Angabe Einheit
Art der Regelung der Wärmezufuhr
manuelle Regelung der Wärmezufuhr mit integriertem Thermostat
manuelle Regelung der Wärmezufuhr mit Rückmeldung der
Raum- und/oder Außentemperatur
elektronische Regelung der Wärmezufuhr mit Rückmeldung der
Raum- und/oder Außentemperatur
[nein]
[nein]
[nein]
Wärmeabgabe mit Gebläseunterstützung [nein]
Art der Wärmeleistung / Raumtemperaturkontrolle
einstufige Wärmeleistung, keine Raumtemperaturkontrolle [nein]
zwei oder mehr manuell einstellbare Stufen,
keine Raumtemperaturkontrolle
[nein]
Raumtemperaturkontrolle mit mechanischem Thermostat [nein]
mit elektronischer Raumtemperaturkontrolle [ja]
elektronische Raumtemperaturkontrolle und Tageszeitregelung [nein]
elektronische Raumtemperaturkontrolle
und Wochentagsregelung
[nein]
Sonstige Regelungsoptionen
Raumtemperaturkontrolle mit Präsenzerkennung [nein]
Raumtemperaturkontrolle mit Erkennung oener Fenster [nein]
mit Fernbedienungsoption [nein]
mit adaptiver Regelung des Heizbeginns [nein]
mit Betriebszeitbegrenzung [nein]
mit Schwarzkugelsensor [nein]
Kontaktangaben
Stadler Form Aktiengesellschaft
Chamerstrasse 174, 6300 Zug, Switzerland
Page 20

Français
Félicitations ! Vous venez d‘acheter le superbe chauffage d’appoint ANNA
big. Nous espérons que cet appareil vous donnera entière satisfaction et
améliorera l’air intérieur pour vous.
Comme pour tous les appareils ménagers électriques, il est important d’entretenir cet app areil correctement af in d’éviter les ble ssures, les incendies ou
les dommages. Veuillez lire attentivement le présent mode d’emploi avant la
mise en service et respecter les conseils de sécurité indiqués sur l’appareil.
Description de l’appareil
L’appareil est composé des éléments principaux suivants :
1. Cordon électrique pour l’alimentation
2. Base en zinc
3. Boîtier
4. Interrupteur principal pour l’alimentation
5. Panneau tactile (dispositif de contrôle tactile)
6. Touche Marche/Arrêt
7. Lumière LED (rouge = chauffe, bleu = refroidissement)
8. Panneau de configuration pour la sélection de la température : 0° à
35 °C ou maximum « Hi »
9. Panneau de configuration pour la sélection du niveau de sortie de la
chaleur : faible à élevé (8 niveaux)
10. Touche pour le Mode Auto, symbole « Auto Mode »
11. Grille avec filtre à air lavable
12. Poignée de transport
13. Grille d’entrée d’air
14. Grille sortie d‘air
Conseils de sécurité importants
Veuillez lire attentivement le mode d‘emploi avant la première mise en service de l’appareil et conservez-le pour toute consultation ultérieure ou remettez-le, le cas échéant, au nouveau propriétaire.
• Ce produit convient aux espaces bien isolés ou à un usage occasionnel
uniquement.
• ATTENTION – Certaines parties de ce produit peuvent devenir très
chaudes et causer des brûlures. Une attention particulière doit être
accordée aux enfants et personnes vulnérables présentes.
• Cet appareil peut être utilisé par des enfants de 8 ans et plus et des
personnes dont les capacités physiques, sensorielles ou mentales sont
diminuées, ou manquent d‘expérience et de connaissances si elles ont
été formées ou encadrées pour l‘utilisation de l‘appareil d‘une manière
sécuritaire, et elles sont conscientes des risques encourus. Les enfants
ne doivent pas jouer avec cet appareil. Le nettoyage et l‘entretien de
l‘utilisateur ne doivent pas être effectués par des enfants sans surveillance.
• Les enfants de moins de 3 ans doivent être tenus à l‘écart sauf s‘ils sont
surveillés de façon continue.
Les enfants entre 3 et 8 ans ne sont autorisés qu‘à allumer/éteindre
Page 21
l‘appareil à condition que celui-ci soit placé ou installé dans son emplacement d‘utilisation ordinaire prévu et que les enfants aient été formés
ou encadrés pour l‘utilisation de l‘appareil d‘une manière sécuritaire, et
ils sont conscients des risques encourus. Les enfants entre 3 et 8 ans ne
sont pas autorisés à brancher l‘appareil, faire des réglages ou effectuer le
nettoyage et l‘entretien de l‘utilisateur.
• Pour éviter tout danger, faites remplacer le cordon d‘alimentation
endommagé par le fabricant, un agent agréé ou une personne qualifiée.
• La société Stadler Form décline toute responsabilité des dommages résultant du non-respect des indications données dans ce mode d‘emploi.
• Cet appareil ne doit être utilisé qu’aux fins domestiques décrites dans ce
mode d’emploi. Toute utilisation contraire à sa destination ainsi que toute
modific ation technique ap portée à l’appar eil peut entraîner d es risques pour
la santé et la vie.
• Ne mouillez jamais l‘appareil (risque de court-circuit).
• Ne jamais utiliser d’appareils endommagés (y compris cordons électriques).
• Ne jamais toucher des pièces se trouvant sous tension.
• Ne branchez le câble qu’au courant alternatif. Utiliser l’appareil en respectant le voltage correct et uniquement sur une prise installée par un professionnel. Ne pas utiliser de rallonge électrique.
• L‘appareil de chauffage ne doit pas être placé juste en dessous d‘une prise
de courant.
• Ne jamais ouv rir l’appareil (réparations uniquement par des professionnels).
• Ne pas faire p asser ou coincer le c âble d’alimentation par-dessu s des arêtes
vives. Ne jamais retirer la fiche de courant de la prise en tirant sur le câble
d’alimentation ou en ayant les mains mouillées.
• Ne pas placer l’appareil à proximité directe d’une source de chaleur. Ne
pas exposer le câble d’alimentation à la chaleur (comme p. ex. une plaque
chaude de cuisinière, flammes nues, semelle chaude de fer à repasser ou
poêles). Protéger le câble d’alimentation de tout contact avec de l’huile.
• La prise de courant utilisée doit rester accessible en tout temps.
• Ne jamais utiliser l‘appareil sur des surfaces inégales ou molles.
• PRÉCAUTION : Afin d‘éviter tout danger dû au réarmement intempestif du
coupe-circuit thermique, cet appareil ne doit pas être alimenté par l‘intermédiaire d‘un interrupteur externe, comme une minuterie.
• ATTENTION : Pour éviter la surchauffe, ne couvrez pas l’entrée et la sortie
d’air – risque d’incendie !
• Ne pas utiliser l‘appareil dans les petites pièces (de moins de 4 m2), dans un
environnement explosif ou pour faire sécher du linge.
• Ne jamais toucher la partie avant de l’appareil, elle peut at teindre des températures très élevées.
• Ne jamais laisser l’appareil sans surveillance.
• Ne pas introduire d’objets et/ou mettre les doigts dans les ouvertures de
l’appareil.
• Jeter une couverture isolante sur les appareils en flammes pour éteindre
le feu.
Mise en marche / Manipulation
Remarque : Veillez à placer le radiateur à une certaine distance du mur ou
d’autres gros objets (> 50 cm). Cela permet au flux d’air de s’écouler sans en-
Page 22

trave. Le flux d’air ne doit être bloqué par aucun objet. Si Anna big est installé
dans la salle de bains, veillez à conserver une distance de sécurité d’au moins
100 cm entre l’appareil et les douches, baignoires, robinets, lavabos, etc.
1. Une fois que vous avez placé Anna big à l’endroit prévu, branchez le cordon d’alimentation (1) à une prise secteur
2. Appuyez sur l’interrupteur principal à l’arrière de l’appareil pour sa mise
sous tension (4).
3. Appuyez sur la touche Marche/Arrêt (6) pour allumer l’appareil. La tempé rature souhaitée apparaît sur l’affichage.
4. La température souhaitée peut être modifiée de 0 °C (mode refroidissement) à 35 °C ou sur le maximum «Hi» à l’aide du panneau de configuration (8) «Temperature» situé à droite. Le mode de chauffe est actif de 1 °
à 35 °C et pour le maximum «Hi». En mode configuration, le nombre clignote. A ppuyez sur «+» pour augmenter la température à la v aleur souhaitée. Appuyez sur «–» pour réduire la température à la valeur souhaitée.
Le réglage est sauvegardé si aucune modification de température n’est
réalisée pendant trois secondes. La température actuelle de la pièce
s’affiche en conséquence.
Information : L’appareil éteint le chauffage quand la température souhaitée est atteinte, et l’indica teur de température cligno te sur l’affichage.
Le ventilateur fonctionne encore pendant 30 secondes à son niveau le
plus bas pour évacuer la chaleur. La température actuelle est alors mesurée env. toutes les 30 minutes (le ventilateur fonctionne encore pendant
1 minute à son niveau le plus bas). Si la température de la pièce est plus
basse que la température souhaitée, l’appareil se remet en marche.
5. Mode refroidissement : le chauffage s’éteint si la température est réglée
à 0 °C et que le ventilateur rejette de l’air froid de l’appareil. L’éclairage
LED (7) passe du rouge au bleu. En mode refroidissement, aucune température n’apparaît sur l’affichage.
6. Le niveau de sortie de la chaleur, allant de faible à élevé, peut être modifié à l’aide du panneau de configuration (9) «Power Level» situé à gauche.
L’affichage clignote pendant la saisie. Appuyez sur «+» pour augmenter
le niveau de sortie de chaleur. Appuyez sur «–» pour réduire le niveau
de sortie de chaleur. Le réglage est sauvegardé si aucune modification
de sortie d’air n’est réalisée pendant trois secondes. La température
actuelle de la pièce s’affiche en conséquence
7. Pour activer le mode Auto, appuyez sur la touche « Auto Mode » (10).
« Auto Mode » apparaît sur l’affichage. La température d’origine, 22 °C
peut être modifiée à l’aide de la sélection de température (8) sur le
côté droit du panneau de configuration. Le niveau de sortie de la chaleur se règle automatiquement en mode auto, selon la température de
la pièce. Le niveau de sortie de chaleur sélectionné sera plus petit si
la différence entre la température de la pièce et celle souhaitée n’est
pas grande. Nous faisons référence à cette technologie sous le nom
« Adaptive Heat™ » et avons introduit une demande de brevet international. Anna big assure et maintient donc l’objectif de température souhaitée efficacement et rapidement. Il prévient de grandes chutes de température et évite que l’appareil ne s’éteigne et ne se rallume constamment.
Le mode auto se désactive si le niveau de sortie de la chaleur est modifié
manuellement (9).
Page 23

Information : l’appareil éteint le chauffage si la température souhaitée
est atteinte, l’indicateur de température clignote sur l’affichage.
8. Éteignez l’appareil en appuyant sur la touche Marche/Arrêt (6). Le ventilateur fonctionne encore pendant 30 secondes à son niveau le plus bas
pour évacuer la chaleur. L’appareil conserve la température d’entrée d’air
et le niveau de sortie de chaleur même si celui-ci s’éteint.
9. Protection anti-surchauffe : Anna big est équipé d’une protection antisurchauffe qui arrête l’appareil en cas d’anomalie technique ou d’utilisation non-conforme (le ventilateur fonctionne encore un certain temps à un
niveau faible pour refroidir l’appareil). Le cas échéant, réparez l’anomalie
ou interrompez l’utilisation non-conforme (distance de 50 cm autour de
l’appareil, ne pas couvrir l’appareil, placer l’appareil dans sa position verticale). Une fois que l’appareil a refroidi, il peut être remis en marche.
10. L’indicateur de température peut passer des degrés Celsius aux degrés
Fahrenheit et inversement : appuyez sur la touche « Auto Mode » (10)
pendant cinq secondes.
11. Dans les premières heures après la mise en service d’Anna big, peut
se dégager une odeur désagréable. Elle se dissipera, il n’y a pas lieu de
s’inquiéter. Conseil: Une entrée d’air est disponible à l’arrière d’Anna big.
L‘entrée d‘air est recouverte d’un filtre à air et d‘une grille. La grille est
détachable. Merci de retirer la grille et le filtre à air. Vous pouvez net toyer
le filtre à air à l’aide d’un peu de savon et d’eau chaude. Rincez-le bien et
laissez-le sécher complètement avant de le replacer sur l’entrée d’air et
de remettre la grille.
Nettoyage
Avant toute opération d’entretien, de nettoyage et après chaque utilisation,
éteignez l’appareil et débranchez le câble secteur (1) de la prise.
Attention : Ne jamais plonger l’appareil dans l’eau (risque de court-circuit).
• Pour le nettoyage extérieur, utilisez un chiffon humide et séchez bien
l‘appareil.
• Si le filtre (11) de la grille d’admission (13) est encrassé, le déposer et le
laver ou le nettoyer à l’aspirateur.
Réparations
• Les réparations sur les appareils électriques ne doivent être effectuées
que par des électriciens qualifiés. La garantie s’éteint et toute responsabilité est exclue en cas de réparations non conformes aux règles de l‘art.
• Ne mettez jamais l‘appareil en service en cas d’endommagement d’un cordon ou d’une fic he, après un dysf onctionnemen t de l’appareil causé par une
chute ou par une autre détérioration de l’appareil (boîtier fissuré/cassé).
• Ne pas pénétrer avec des objets quelconques dans l’appareil.
• Arrivé au bout de sa durée de vie, l’appareil doit immédiatement être rendu
inutilisable (sectionner le cordon d’alimentation) et être déposé dans une
déchetterie prévue à cet effet.
Elimination
Conformément à la directive européenne 2012 / 19 / EC sur la mise au
rebut des déchets d’équipements électriques et électroniques (DEEE), les
appareils ménagers usés ne doivent pas être jetés avec les déchets non
triés. Ces appareils usés doivent être collectés séparément des déchets
ménagers pour optimiser la récupération et le recyclage de leurs compo-
Page 24
sants dans le but de réduire les effets négatifs sur la santé humaine et sur
l’environnement. Le symbole de poubelle avec roulettes et croix indique que
ces produits doivent être collectés et mis au rebut séparément
des ordures ménagères. L es consommateurs doivent contacter les
autorités locales ou leurs revendeurs concernant la mise au rebut
de leurs vieux appareils.
Caractéristiques techniques
Tension nominale 220 – 240 V / 50 Hz
Écart de température 0 ° – 35 °C / > 35 °C = Hi
Consommation énergétique 300 W (min.)
Puissance nominale 2‘000 W (max.)
Dimensions 183 x 420 x 183 mm
(largeur x hauteur x profondeur)
Poids 3.2 kg
Niveau de brui t 28 – 50 dB (A)
Conforme à la
réglementation UES CE / DEEE / RoHS / EAC
Sous réserve de modifications techniques
Caractéristique
élément
chauant
moteur de
ventilateur
Caractéristique
Fabricant /
Marque de commerce
Foshan Shunde Esite
Electrical Appliances Co. Ltd
Foshan Shunde Esite
Electrical Appliances Co. Ltd
Puissance thermique
Puissance thermique nominale P
Puissance thermique minimale (indicative) P
Puissance thermique maximale continue P
Consommation d‘électricité auxiliaire
À la puissance thermique nominale el
À la puissance thermique minimale el
En mode veille el
Type /
Modèle
2000 W
EST1225S
Symbole
nom
min
max,c
max
min
SB
Caractéristiques
techniques
AC 220 - 24 0 V
50 Hz
650Wx3
DC 12 V
250 0 rpm
8.4 W Class A
Valeur Unité
1.41 kW
0.4 kW
2.0 kW
0.0064 kW
0.0044 kW
0 kW
Page 25
Caractéristique Unité
Type d‘apport de chaleur
contrôle thermique manuel de la charge avec thermostat intégré [non]
contrôle thermique manuel de la charge avec réception
d‘informations sur la température de la pièce et/ou extérieure
contrôle thermique électronique de la charge avec réception
d‘informations sur la température de la pièce et/ou extérieure
[non]
[non]
puissance thermique régulable par ventilateur [non]
Type de contrôle de la puissance thermique /
de la température de la pièce
contrôle de la puissance thermique à un palier,
pas de contrôle de la température de la pièce
contrôle à deux ou plusieurs paliers manuels,
pas de contrôle de la température de la pièce
[non]
[non]
contrôle de la température de la pièce avec thermostat mécanique [non]
contrôle électronique de la température de la pièce [oui]
contrôle électronique de la température de la pièce
et programmateur journalier
contrôle électronique de la température de la pièce
et programmateur hebdomadaire
[non]
[non]
Autres options de contrôle
contrôle de la température de la pièce, avec détecteur de présence [non]
contrôle de la température de la pièce,
avec détecteur de fenêtre ouverte
[non]
option contrôle à distance [non]
contrôle adaptatif de l‘activation [non]
limitation de la durée d‘activation [non]
capteur à globe noir [non]
Coordonnées
de contact
Stadler Form Aktiengesellschaft
Chamerstrasse 174, 6300 Zug, Switzerland
Page 26

Italiano
Congratulazioni! Avete appena acquistato lo splendido termoventilatore
ANNA big. Sarà estremamente piacevole e migliorerà l’aria nell’ambiente
per voi.
Come con tutte le apparecchiature elettriche domestiche, è necessaria particolare attenzione anche con questo modello, al fine di evitare infortuni,
danni da incendio o danni al dispositivo. Studiare con attenzione queste
istruzioni per l‘uso prima di utilizzare il dispositivo per la prima volta e seguire tutte le istruzioni di sicurezza fornite con esso.
Descrizione dell’apparecchio
L’apparecchio consiste delle seguenti componenti principali:
1. Cavo di alimentazione elettrica
2. Base in zincato
3. Alloggiamento
4. Interruttore principale dell’alimentazione
5. Pannello a sfioramento (comandi di controllo tattili)
6. Pulsante On/Off
7. Luce LED (rosso=riscaldamento, blu=raffreddamento)
8. Pannello di controllo per la selezione della temperatura: 0° – 35 °C o
massimo «Hi»
9. Pannello di controllo per la selezione del livello di emissione del calore:
da basso a elevato (8 livelli)
10. Pulsante per la modalità automatica, simbolo «Auto Mode»
11. Aletta con filtro dell’aria lavabile
12. Manico per il trasporto
13. Copertura posteriore
14. Copertura anteriore
Importanti istruzioni di sicurezza
Vi preghiamo di leggere attentamente t utte le istruzioni d‘uso prima di usare
l‘apparecchio per la prima volta e di conservarle per future consultazioni, e
se necessario, passatele ad un successivo proprietario.
• Questo prodotto è adatto solo per ambienti ben coibentati o per impiego
occasionale.
• ATTENZIONE – Alcune parti di questo prodotto possono diventare molto
calde e provocare ustioni. Prestare particolare attenzione quando sono
presenti bambini e persone vulnerabili.
• Questo apparecchio può essere utilizzato da bambini di età superiore
agli 8 anni e persone con ridotte capacità mentali, fisiche o sensoriali o
prive di esperienza e conoscenze in merito, in presenza di altre persone
che ne sorveglino l‘operato o ricevano istruzioni sull‘uso dell‘apparecchio in modo sicuro e ne comprendano i pericoli. I bambini non devono
giocare con l‘apparecchio. Pulizia e manutenzione non deve essere ef fettuata da bambini senza supervisione.
• Bambini di età inferiore a 3 anni devono essere tenuti lontani, a meno
che non continuamente controllati.
• Bambini di età tra i 3 e gli 8 anni possono accedere/spegnere
Page 27

l‘apparecchio ammesso che esso sia stato posto o installato nella posi-
zione di funzionamento prevista e che siano sorvegliati o abbiano ricevuto istruzioni per l‘uso dell‘apparecchio in modo sicuro e ne comprendano
i pericoli. I bambini di età tra i 3 e gli 8 anni non possono collegare,
regolare e pulire l‘apparecchio o effettuare la manutenzione.
• Se il cavo è danneggiato, farlo sostituire da un produttore, dall’assisten-
za o da personale qualificato per evitare pericoli.
• Stadler Form respinge ogni responsabilità per la perdita o danni che incorrano come risultato di un mancato rispetto di queste istruzioni d‘uso.
• L’apparecchio dev’essere usato solo in casa e per gli scopi descritti in
queste istruzioni. L’uso non autorizzato e le modifiche tecniche all’
apparecchio possono portare a pericoli per la vita e la salute.
• Non immergete mai l‘unità in acqua (pericolo di corto circuito).
• Non utilizzate mai un‘unità difettosa (per esempio, col cavo di alimentazi
one danneggiato).
• Non toccate le parti sottoposte a tensione elettrica.
• Collegate il cavo solo alla corrente alternata. Rispettate le informazioni
sul voltaggio riportate sull‘apparecchio. Non usate prolunghe.
• Il termoventilatore non dev‘essere posizionato direttamente sotto una
presa.
• Non aprire il apparecchio (far riparare solo da addetti all’assistenza).
• Non fate scorrere il cavo su bordi taglienti ed assicuratevi che non riman
ga incastrato. Non tirate il cavo dalla presa con mani umide o afferrando
il cavo stesso.
• Non posizionate l‘apparecchio vicino ad una sorgente di calore. Non sot
toponete il cavo di alimentazione al calore diretto (come piastre, fiamme
libere, ferri da stiro caldi o termoventilatore per esempio). Proteggete i
cavi di alimentazione dall‘olio.
• Assicuratevi che la presa utilizzata rimanga accessibile.
• Non utilizzate il termoventilatore su una superficie non piana o morbida.
• ATTENZIONE: Per evitare pericoli dovuti al ripristino involontario dell’
interruttore termico, questo apparecchio non deve essere alimentato
attraverso un dispositivo a commutazione esterna, come un timer.
• ATTENZIONE: Per evitare il surriscaldamento, non coprire la presa d’aria
o l’uscita dell’aria - pericolo d’incendio!
• Non utilizzate il termoventilatore in stanze piccole (inferiori ai 4 m2), in
ambienti con esplosivi, o per asciugare la lavanderia.
• Non toccare la par te anteriore dell’apparecchio in quanto può raggiungere
temperature elevate.
• Utilizzate il termoventilatore solo sotto supervisione.
• Non inserite alcun oggetto e/o dito nelle aperture del termoventilatore.
• Per spegnere apparecchi in fiamme, utilizzate solo teli antifuoco.
Impostazione / Utilizzo
Nota: Assicuratevi che ci sia sempre spazio sufficiente tra l‘apparecchio e il
muro o altri grandi oggetti (> 50 cm). Il flusso d’aria non deve essere ostruito
da ogget ti di qualsiasi tipo. Se Anna big viene installato in un bagno, mantenere una distanza di sicurezza di almeno 100 cm da docce, vasche da bagno,
rubinetti, lavandini, ecc.
Page 28

1. Avendo posizionato Anna big nella posizione desiderata, collegate il
cavo (1) alla presa di corrente.
2. Per prima cosa, premete l’interruttore principale dell’alimentazione (4)
sul retro dell’apparecchio.
3. Accendete il dispositivo premendo il pulsante On/Off (6). La temperatura programmata appare sul display.
4. La temperatura programmata può essere modificata da 0°C (modalità
raffreddamento) fino a 35°C, o massimo «Hi», tramite il pannello di controllo (8) «Temperature» sulla destra. Da 1°C fino a 35°C e «Hi» è attiva
la modalità di riscaldamento. La cifra lampeggia in modalità di configurazione. Per aumentare la temperatura programmata toccare «+». Per
ridurre la temperatura programmata toccare «-». L’impostazione viene
salvata se non si effettuano modifiche nella selezione della temperatura
sul pannello di controllo per tre secondi. Successivamente verrà mostrata la temperatura corrente della stanza.
Informazioni: Il dispositivo spegne l’elemento riscaldante quando raggiunge la temperatura programmata e l’indicatore della temperatura
lampeggia sul display. Il ventilatore rimane acceso per 30 secondi al livello minimo e raffredda l’elemento riscaldante. La temperatura attuale
viene misurata ogni 30 minuti circa (il ventilatore funziona per 1 minuto
al livello più basso). Il dispositivo si accende di nuovo se la temperatura
della stanza registrata scende al di sotto della temperatura programmata.
5. Modalità di raffreddamento: l’elemento di riscaldamento si spegne se
si imposta la temperatura a 0 °C e il ventilatore emette aria fredda dal
dispositivo. La luce LED (7) cambia da rossa a blu. In modalità di raffreddamento il display non indica la temperatura.
6. Il livello di calore emesso può essere modificato da basso ad elevato tramite il pannello di controllo sinistro (9) «Power Level». Il display
lampeggia durante l’inserimento. Per aumentare il livello di emissione
toccare «+». Per ridurre il livello di emissione toccare «-». L’impostazione
viene salvata se non si effettuano modifiche nella selezione del livello di
emissione di calore sul pannello di controllo per tre secondi. Successivamente verrà mostrata la temperatura corrente dell’ambiente.
7. La modalità automatica si attiva premendo il pulsante «Auto Mode»
(10). Viene mostrato «Auto Mode» sul display. La temperatura programmata preimpostata di 22 °C può essere modificata tramite il pannello
di controllo per la selezione della temperatura sulla destra. Il livello di
emissione del calore viene selezionato automaticamente in modalità
automatica - a seconda della temperatura della stanza. Minore è la differenza tra la temperatura della stanza e la temperatura programmata,
minore sarà il livello di emissione del calore selezionato. Abbiamo chiamato questa tecnologia «Adaptive HeatTM» e ne abbiamo depositato un
brevetto internazionale. In questo modo Anna big è in grado di garantire
il raggiungimento della temperatura programmata, in modo rapido ed efficace, e di mantenerla. Anna big pertanto evita un repentino calo della
temperatura e l’accensione e lo spegnimento continuo del dispositivo.
La modalità automatica si disattiva se il livello di emissione del calore si
modifica manualmente (9).
Informazioni: Il dispositivo spegne l’elemento riscaldante quando raggiunge la temperatura programmata e l’indicatore della temperatura
lampeggia sul display.
Page 29

8. Spegnete il dispositivo premendo il pulsante On/Off (6). Il ventilatore
rimane acceso per 30 secondi al livello minimo e raffredda l’elemento riscaldante. Il dispositivo salva la temperatura inserita e il livello di calore
emesso anche quando il dispositivo è spento.
9. Protezione da surriscaldamento: il dispositivo è dotato di protezione da
surriscaldamento che spegne il dispositivo in caso di guasto o uso improprio (il ventilatore continua a funzionare per un certo periodo al livello
minimo per raffreddare il dispositivo). Qualora si verificasse il problema,
eliminare l’anomalia o interrompere l’uso improprio (es. 50 cm di spazio
attorno al dispositivo, non coprite il dispositivo, installate il dispositivo
in verticale). Una volta che l’apparecchio si è raffreddato, può essere
rimesso in funzione.
10. L’indicatore della temperatura è modificabile da Celsius a Fahrenheit e
viceversa premendo il pulsante «Auto Mode» (10) per cinque secondi.
11. Nelle prime ore dopo la messa in funzione di Anna big, si potrebbe avvertire un odore sgradevole. L’odore scompare in breve tempo e non vi
è nulla di cui preoccuparsi.Suggerimento: nella parte posteriore di Anna
big è posizionata la presa d‘aria. La presa d‘aria è coperta da un filtro e
da una griglia. La griglia è rimovibile. Sfilare la griglia e rimuovere il filtro
dell‘aria. È opportuno lavare il filtro dell‘aria con un po‘ di sapone e acqua
calda. Dopo aver eseguito questa operazione, risciacquare il filtro dell’aria accuratamente e attendere che si asciughi completamente prima di
riposizionarlo sulla presa d‘aria e di rimontare la griglia.
Pulizia
Prima di effettuare interventi di manutenzione, pulizia e dopo ogni utilizzo,
spegnere il dispositivo e scollegare il cavo di alimentazione (1) dalla presa
di corrente.
Attenzione: Non immergete mai l‘apparecchio in acqua (pericolo di corto
circuito).
• Per pulire l’esterno, passatelo con un panno umido e quindi asciugatelo
bene.
• Se il filtro (11) dietro alla copertura posteriore (13) è pieno di polvere, rimuovetelo, lavatelo o pulitelo con l‘aspirapolvere.
Riparazione
• Le riparazioni agli apparecchi elettrici devono essere effettuate solo da
tecnici elettricisti qualificati. Se vengono effettuate riparazioni improprie,
la garanzia viene annullata e tutte le responsabilità sono rifiutate.
• Non utilizzate mai l’apparecchio se l’alimentatore o la spina sono danneggiati, dopo un malfunzionamento, se è stato fatto cadere o è stato
danneggiato in qualunque altro modo (rotture/crepe nell’involucro).
• Non spingete oggetti nell’apparecchio.
• Se l’apparecchio è irreparabile, rendetelo inutilizzabile immediatamente e
consegnatelo al punto di raccolta appropriato.
Smaltimento
La Direttiva Europea 2012 / 19 / CE sullo Smaltimento dei rifiuti elettrici
ed elettronici (WEEE) prevede che i dispositivi elettrici domestici usati non
devono essere smaltiti nelle discariche municipali di rifiuti indifferenziati. I
dispositivi usati devono essere raccolti separatamente in modo da ottimiz-
Page 30

zare il recupero e il riciclaggio dei materiali in essi contenuti e ridurre l’impatto sulla salute e sull’ambiente. Il simbolo del “cestino con ruote” barrato
sul prodotto ricorda l’obbligo di smaltire il dispositivo mediante
raccolta dif ferenziata. I c onsumatori devono contat tare le autorità
locali o il rivenditore per informazioni relative al corretto smaltimento di dispositivi usati.
Specifiche
Voltaggio 220 – 240 V / 50 Hz
Intervallo di temperatura 0 ° – 35 °C / > 35 °C = Hi
Consumo energetico 300 W (min.)
Potenza in uscita 2‘000 W (max.)
Dimensioni 183 x 420 x 183 mm
(larghezza x altezza x profondità)
Peso 3.2 kg
Rumoro sità 28 – 5 0 dB(A )
Conforme con i
regolamenti UE CE / WEEE / RoHS / EAC
Tutti i diritti relativi a qualsiasi modifica tecnica sono riservati
Dato
elemento
riscaldante
motore del
ventilatore
Fabbricante /
Marchio
Foshan Shunde Esite
Electrical Appliances Co. Ltd
Foshan Shunde Esite
Electrical Appliances Co. Ltd
Tipo /
Modello
2000 W
EST1225S
Specifiche
AC 220 - 24 0 V
50 Hz
650Wx3
DC 12 V
250 0 rpm
8.4 W Class A
Dato Simbolo Valore Unità
Potenza termica
Potenza termica nominale P
Potenza termica minima (indicativa) P
Massima potenza termica continua P
nom
min
max,c
1.41 kW
0.4 kW
2.0 kW
Consumo ausiliario di energia elettrica
Alla potenza termica nominale el
Alla potenza termica minima el
In modo stand-by el
max
min
SB
0.0064 kW
0.0044 kW
0 kW
Page 31

Dato Unità
Tipo di potenza termica
controllo manuale del carico termico, con termostato integrato [no]
controllo manuale del carico termico con riscontro della
temperatura ambiente e/o esterna
controllo elettronico del carico termico con riscontro della
temperatura ambiente e/o esterna
potenza termica assistita da ventilatore [no]
Tipo di potenza termica / controllo della temperatura ambiente
[no]
[no]
potenza termica a fase unica senza controllo della
temperatura ambiente
due o più fasi manuali senza contr ollo della temperatura ambiente [no]
con controllo della temperatura ambiente tramite
termostato meccanico
con controllo elettronico della temperatura ambiente [sì]
con controllo elettronico della temperatura ambiente e tempo-
rizzatore giornaliero
con controllo elettronico della temperatura ambiente e tempo-
rizzatore settimanale
Altre opzioni di controllo
contr ollo della temp eratura ambiente con rilevament o di presenza [no]
controllo della temperatura ambiente con rilevamento
di finestre aperte
con opzione di controllo a distanza [no]
con controllo di avviamento adattabile [no]
con limitazione del tempo di funzionamento [no]
con termometro a globo nero [no]
Contatti
Stadler Form Aktiengesellschaft
Chamerstrasse 174, 6300 Zug, Switzerland
[no]
[no]
[no]
[no]
[no]
Page 32

Español
¡Enhorab uena! Acaba de adquir ir el extraor dinario calefact or ANNA big. Que dará encantado con sus beneficios y mejorará la calidad del aire ambiente.
Como con todos los aparatos electrodomésticos también este aparato exige
un especial cuidado para evitar heridas, daños causados por incendios o daños en el aparato. L e rogamos por lo tanto que lea detenidamente el presente
manual de instrucciones antes de proceder a su puesta en marcha y preste
atención a las advertencias de seguridad indicadas en el aparato.
Descripción del aparato
El aparato tiene los siguientes componentes principales:
1. Cable de corriente para la alimentación
2. Base de cinc
3. Carcasa
4. Interruptor principal para la fuente de alimentación
5. Panel táctil (elemento de control sensible al tacto)
6. Botón de encendido y apagado
7. Piloto LED de estado (rojo=calor, azul=frío)
8. Panel de control para selección de temperatura 0 ° – 35 °C o máximo «Hi»
9. Panel de control para selección del nivel de salida de calor:
bajo a alto (8 niveles)
10. Botón para modo automático, símbolo «Auto Mode»
11. Aleta con filtro de aire lavable
12. Manija de transporte
13. Rejilla de entrada de aire
14. Rejilla frontal de salida
Advertencias de seguridad importantes
Por favor, lea detenidamente el manual de instrucciones antes de poner en
marcha por primera vez el aparato y guárdelas bien por si necesitara consultarlas de nuevo más adelante o, dado el caso, pasárselas a un futuro nuevo
propietario.
• Este producto solo es apto para espacios con un aislamiento adecuado o
uso ocasional.
• PRECAUCIÓN – Algunos componentes de este aparato pueden calen-
tarse mucho y causar quemaduras. Se debe prestar especial atención a
aquellos lugares donde estén presentes niños o personas vulnerables.
• Este electrodoméstico puede usarse por niños mayores de 8 años y
personas con capacidades físicas, sensoriales o mentales reducidas o
que carecen de experiencia o conocimientos, siempre y cuando se les
ofrezcan supervisión o instrucción respecto al uso del aparato de forma
segura y comprendan los riesgos que implica. Los niños no deben jugar
con el aparato. Los niños no deben realizar tareas de limpieza y mantenimiento sin supervisión.
• Los niños menores de 3 años deben mantenerse alejados salvo que se
les supervise continuamente.
• Los niños mayores de 3 años y menores de 8 años solo encenderán y
apagarán el aparato siempre que se haya colocado o instalado en la
Page 33

posición operativa normal prevista y se les haya supervisado
o se les haya ofrecido formación respecto al uso del aparato de forma
segura y entiendan los riesgos que implica. Los niños mayores de 3 años
y menores de 8 años no deben enchufar, regular y limpiar el aparato o
realizar el mantenimiento del usuario.
• Si el cable de alimentación presenta daños, debe sustituirlo el fabrican-
te, su agente de mantenimiento o personal con una cualificación similar
para evitar cualquier riesgo.
• Stadler Form declina cualquier responsabilidad por los daños resultantes
de una utilización del aparato no conforme a este manual de instrucciones.
• El aparato sólo se ha de utilizar en el hogar y con los fines descritos en este
manual de instrucciones. Una utilización no conforme a las disposiciones
así como modificaciones técnicas en el aparato pueden poner en peligro
la salud y la vida.
• No sumerja nunca el aparato en agua u otros líquidos. ¡Riesgo de cortocircuito!
• No ponga nunca en funcionamiento el aparato o el cable si están defectuosos.
• No toque jamás las partes componentes que están bajo corriente.
• Conecte el cable sólo a la corriente alterna. Conecte el aparato solo a un
enchufe debidamente instalado con la tensión correcta. No emplee alargaderas.
• Evite colocar el calefactor directamente bajo un enchufe.
• No abra nunca el aparato por sí mismo. Las reparaciones deben correr exclusivamente a cargo de personal especializado.
• No deje nunca el cable colgando, no lo extraiga del enchufe con las manos
mojadas, no lo coloque o cuelgue encima de superficies calientes ni permita que entre en contacto con aceites.
• No sitúe el aparato cerca de un foco calorífico. No exponga el cable de
red directamente al calor (como p.ej. fogones calientes, llamas, planchas
calientes o estufas). Proteja el cable de red del aceite.
• La caja de enchufe utilizada debe estar accesible en todo momento.
• Nunca colo que el aparato sobre super ficies irregular es y soportes blandos.
• PRECAUCIÓN: Para evitar cualquier riesgo debido a un reinicio inadvertido
del sensor térmico, no se debe suministrar este aparato mediante un interruptor eléctrico externo, como un temporizador.
• ADVERTENCIA: Para evitar el sobrecalentamiento, no cubra la entrada o
salida de aire ya que puede provocar un incendio.
• No emplee el aparato en espacios reducidos (inferiores a 4 m2 de superficie), ni en entornos con riesgo de explosión. No lo use para secar ropa.
• No toque el frente del aparato ya que puede estar muy caliente.
• No deje nunca el aparato sin la debida vigilancia.
• No introduzca ningún objeto ni los dedos en las aberturas del aparato.
• Si el aparato llegase a incendiarse, apáguelo solo con una manta ignífuga.
Puesta en funcionamiento / manejo
Indicación: Asegúrese de que haya suficiente espacio entre el calefactor
y la pared o cualquier otro objeto de grandes dimensiones (>50 cm). La circulación de la corriente de aire no debe verse perturbada por ningún tipo de
Page 34

objeto. El flujo de aire no debe estar obstruido por ningún tipo de objeto. Si se
instala a Anna big en el baño, se debe mantener una distancia de seguridad
de por lo menos 100 cm con la ducha, las bañeras, los grifos de agua, los
lavabos, etc.
1. Una vez que haya colocado a Anna big en la posición deseada, conecte el
cable (1) en el tomacorriente de suministro eléctrico doméstico.
2. Primero, pulse el interruptor principal de la fuente de alimentación (4)
situado en la parte de atrás del aparato.
3. Pulse el botón de encendido /apagado para encender el aparato (6). En la
pantalla aparecerá la temperatura deseada.
4. Se puede ajustar la temperatura deseada desde el panel de control derecho (8) «Temperature» entre 0 °C (modo de enfriamiento) y 35 °C o hasta
el máximo, «Hi». Entre 1 ° – 35 °C y «Hi» estará activo el modo calefacción. Durante el modo de ajuste, la cifra parpadea. Al pulsar el botón «+»
se aumenta la temperatura deseada. Al pulsar el botón «–» se reduce
la temperatura deseada. Si no se hacen cambios en el panel de control
para la selección de la temper atura durante t res segundos, s e guardará el
valor. A continuación, e mostrará la temperatura actual de la habitación.
Información: Cuando se alcanza la temperatura deseada, el aparato
apaga la resistencia y en la pantalla parpadea el indicador de temperatura. El ventilador permanecerá encendido durante 30 segundos en el nivel
más bajo para enfriar la resistencia. La temperatura actual se medirá
aproximadamente cada 30 minutos (el ventilador se pondrá en marcha
durante un minuto al nivel más bajo). El aparato se vuelve a encender si la
temperatura ambiente es inferior a la temperatura deseada establecida.
5. Modo de enfriamiento: la resistencia se apagará si la temperatura se
estableció en 0 °C y el ventilador expulsa aire frío del aparato. La luz LED
(7) cambia de rojo a azul. En el modo de enfriamiento no se muestra la
temperatura en la pantalla.
6. El nivel de potencia calorífica se puede modificar a través del panel de
contr ol izquierdo (9) «Power Lev el» de menos a más. La p antalla parpade a
durante la introducción del valor. Al pulsar el botón «+» se aumenta el
nivel de potencia. Al pulsar el botón «–» se reduce el nivel de potencia.
Si no se hacen cambios en el panel de control para la selección del nivel
de salida durante tres segundos, se guardará el valor. A continuación, se
mostrará la temperatura actual de la habitación.
7. Para activar el modo automático, pulse el botón «Auto Mode» (10). Aparecerá «Auto Mode» en la pantalla. La temperatura deseada preestablecida de 22 °C puede modificarse utilizando el panel de control derecho
para la selección de temperatura (8). El nivel de salida del calor se selecciona automáticamente en el modo automático y depende de la temperatura ambiente. Cuanto menor sea la diferencia entre la temperatura
ambiente y la t emperatura deseada, menor será el nivel de salida de calor
seleccionado. Esta tecnología r ecibe el nombre de « Adaptive Hea tTM» (calor adaptable) y hemos solicitado una patente internacional sobre ella.
Esto permite que Anna big se asegure de que la temperatura deseada
se alcance rápido y eficientemente y además, se mantenga. Anna big
previene las caídas bruscas de la temperatura y además, que el aparato
se encienda y apague constantemente. Si el nivel de salida de calor se
cambia manualmente, se desactiva el modo automático (9).
Información: Cuando se alcanza la temper atura desea da, el aparato apaga la resistencia y en la pantalla parpadea el indicador de temperatura.
Page 35

8. Para apagar el aparato, pulse el botón de encendido y apagado (6). El
ventilador permanecerá encendido durante 30 segundos en el nivel más
bajo para enfriar la resistencia. El aparato guarda el nivel de entrada de
temperatura y de salida de calor aun cuando el aparato esté apagado.
9. Protección contra sobrecalentamiento: el aparato cuenta con protección
contra sobrecalentamiento que lo apaga cuando se produce una falla técnica o si se utiliza en forma incorrecta (el ventilador continúa funcionando
durante un tiempo al nivel más bajo para enfriar el aparato). En ese caso,
corrija la falla o deje de usarlo incorrectamente (por ejemplo, deje 50 cm
de espacio libre alrededor del aparato, no obstruya entrada o salida de
aire, coloque el aparato en posición vertical). Una vez que el aparato se
haya enfriado puede volver a encenderlo.
10. Si pulsa el botón «Auto Mode» (10) durante cinco segundos podrá alternar
la temperatura entre grados Celsius y Fahrenheit.
11. En las primeras horas después de la puesta en funcionamiento de Anna
big, es posible que haya un olor desagradable. Este olor se disipará, así
que no hay nada de que preocuparse. Consejo: En la parte posterior de
Anna big, encontrará la entrada de aire. La entrada de aire está cubierta
con un filtro de aire y una rejilla. La rejilla es desmontable. Retire la rejilla
para quitar el filtro de aire. Puede lavar el filtro de aire con un poco de
jabón y agua tibia. Enjuáguelo bien y déjelo secar completamente antes
de volver a instalarlo en la entrada de aire y colocar la rejilla.
Limpieza
Antes de cualquier operación de mantenimiento, limpieza y después de cada
uso, apague el aparato y desenchufe el cable de alimentación (1) de la toma.
Atención: No sumerja jamás el aparato en agua (riesgo de cortocircuito).
• Para la limpieza exterior, frótelo con un paño húmedo y después séquelo
bien.
• En el caso de que el filtro (11) de la rejilla de entrada de aire (13) esté
cubierto de polvo, proceda a eliminarlo y lave el filtro o límpielo con una
aspiradora.
Reparaciones
• Las reparaciones en los aparatos eléctricos (cambio del cable) sólo han de
ser llevadas a cabo por personal especializado y debidamente formado.
• En caso de haberse proce dido a reparaciones indebidas, la garan tía déjà de
tener efecto y se declina cualquier responsabilidad.
• Nunca ponga en marcha el aparato si el cable o el enchufe están estropeados, si falla alguna de las funciones, si el aparato se ha caído o si ha sufrido
algún otro desperfecto (rajas/roturas en el chasis).
• No introducir ningún tipo de objetos en el aparato.
• Una vez llegado el aparato al final de su vida útil, inutilizarlo inmediatamente (separar el cable) y entregarlo en el centro de recogida previsto a
tal efecto.
Eliminación
La directiva europea 2012 / 19 / CE sobre residuos de equipos eléctricos
y electrónicos (WEEE), exige que los aparatos eléctricos domésticos antiguos no deben eliminarse en la recogida de residuos municipal normal sin
clasificar. Los aparatos antiguos deben recogerse de forma separada para
optimizar la recuperación y el reciclaje de los materiales y reducir el impacto
Page 36
sobre la salud humana y el medioambiente. El símbolo del “cubo de basura”
tachado en el producto le recuerda su obligación de que, cuando se deshaga
del aparato, debe recogerse de forma separada. Los consumidores
deben ponerse en contacto con las autoridades locales o con el
distribuidor para obtener información respecto a la correcta eliminación del aparato antiguo.
Datos técnicos
Tensión nominal 220 – 240 V / 50 Hz
Intervalo de temperatura 0 ° – 35 °C / > 35 °C = Hi
Consumo de energía 300 W (mín.)
Poten cia 2 ‘000 W (máx .)
Dimensiones 183 x 420 x 183 mm
(ancho x alto x largo)
Peso 3.2 kg
Nivel de intensid ad acústica 2 8 – 50 dB( A)
Cumple la norma UE CE / WEEE / RoHS / EAC
Quedan reservadas modificaciones técnicas
Partida
elemento de
calefacción
motor del
ventilador
Fabricante /
Marca comercial
Foshan Shunde Esite
Electrical Appliances Co. Ltd
Foshan Shunde Esite
Electrical Appliances Co. Ltd
Tipo /
Modelo
2000 W
EST1225S
Datos técnicos
AC 220 - 24 0 V
50 Hz
650Wx3
DC 12 V
250 0 rpm
8.4 W Class A
Partida Símbolo Valor Unidad
Potencia calorífica
Potencia calorífica P
Potencia calorífica mínima (indicativa) P
Potencia calorí fica máxima con tinuada P
nom
min
max,c
1.41 kW
0.4 kW
2.0 kW
Consumo auxiliar de electricidad
A potencia calorífica nominal el
A potencia calorífica mínima el
En modo de espera el
max
min
SB
0.0064 kW
0.0044 kW
0 kW
Page 37
Partida Unidad
Tipo de aportación de calor
control manual de la carga de calor, con termostato integrado [no]
control manual de la carga de calor con respuesta a la
temperatura interior o exterior
control electrónico de la carga de calor con respuesta a la
temperatura interior o exterior
potencia calorífica asistida por ventiladores [no]
Tipo de control de potencia calorífica / de temperatura interior
[no]
[no]
potencia calorífica de un solo nivel, sin control de temperatura
interior
Dos o más niveles manuales, sin control de temperatura interior [no]
con control de temperatura interior mediante
termostato mecánico
con control electrónico de temperatura interior [sí ]
contr ol electrónico de t emperatura interior y temporizador diario [no]
control electrónico de temperatura interior y
temporizador semanal
Otras opciones de control
control de temperatura interior con detección de presencia [no]
control de temperatura interior con detección de
ventanas abiertas
con opción de control a distancia [no]
con control de puesta en marcha adaptable [no]
con limitación de tiempo de funcionamiento [no]
con sensor de lámpara negra [no]
Información de
contacto
Stadler Form Aktiengesellschaft
Chamerstrasse 174, 6300 Zug, Switzerland
[no]
[no]
[no]
[no]
Page 38
Nederlands
Gefeliciteerd! U heeft zojuist de bijzondere ventilatorkachel ANNA big gekocht. Hij zal u veel plezier doen en de ruimtelucht voor u verbeteren.
Zoals met alle elektronische apparaten, is zorgvuldig gebruik noodzakelijk
om verwonding, brandschade of schade aan het apparaat te vermijden.
Bestudeer de instructies nauwkeurig en volg de adviezen op het apparaat
zelf, alvorens het apparaat voor het eerst te gebruiken.
Apparaatbeschrijving
Het apparaat bestaat uit de volgende onderdelen:
1. Netkabel voor voeding
2. Verzinkte voet
3. Behuizing
4. Hoofdschakelaar voor voeding
5. Aanraakpaneel (voor aanraking gevoelig bedieningselement)
6. Aan-uitknop
7. LED Statusindicator (rood = verwarming, blauw = koeling)
8. Bedieningspaneel voor temperatuurselectie: 0 °C – 35 °C of
maximaal «Hi»
9. Bedie ningspaneel v oor selectie v an verwar mingsverm ogen: laag to t hoog
(8 standen)
10. Knop voor automodus, symbool «Auto Mode»
11. Klep met wasbaar luchtfilter
12. Draaggreep
13. Rooster luchtinlaat
14. Ventilatierooster voorzijde
Belangrijke veiligheidsinstructies
Lees de instructies zorgvuldig door voordat u het apparaat voor het eerst
gebruikt en bewaar deze handleiding voor later gebruik; geef hem, indien
nodig, door aan de volgende eigenaar.
• De product is enkel geschikt voor gebruik in goed geïsoleerde ruimtes of
voor incidenteel gebruik.
• OPGELET – Sommige onderdelen van dit product kunnen erg heet wor-
den en brandwonden veroorzaken. Ben voornamelijk voorzichtig wanneer kinderen of kwetsbare personen aanwezig zijn.
• Dit apparaat kan worden gebruikt door kinderen vanaf 8 jaar en ouder en
door personen met gereduceerde fysieke, zintuiglijke of mentale capaciteiten of met een tekort aan kennis en ervaring, vooropgesteld dat zij
onder toezicht staan of instructies hebben gekregen m.b.t. het gebruik
van het apparaat en de gerelateerde risico’s begrijpen. Kinderen mogen
het apparaat niet als speelgoed gebruiken. Reiniging en onderhoud dienen niet door kinderen te worden uitgevoerd zonder toezicht.
• Houd kinderen jonger dan 3 jaar uit de buurt, tenzij onder continu toe-
zicht.
• Kinderen vanaf 3 jaar en jonger dan 8 jaar mogen het apparaat alleen in/
uitschakelen wanneer het is geplaatst of geïnstalleerd in de beoogde,
normale gebruikspositie en vooropgesteld dat ze onder toezicht staan
Page 39

of instructies hebben gekregen m.b.t. veilig gebruik van het apparaat
en de gerelateerde risico’s begrijpen. Kinderen vanaf 3 jaar en jonger
dan 8 jaar mogen het apparaat niet aansluiten, bedienen en reinigen of
gebruikersonderhoud uitvoeren.
• Als de voedingskabel is beschadigd, moet het worden vervangen door
de fabrikant, servicevertegenwoordiging van de fabrikant of dergelijke
gekwalificeerde personen om gevaarlijke situaties te voorkomen.
• Stadler Form is op geen enkele wijze aansprakelijk voor verlies of schade
ten gevolge van het nalaten van deze instructies.
• Het apparaat dient alleen in huis te worden gebruikt of voor de doeleinden
die in deze instructies worden beschreven. Interferentie op het toestel
door onbevoegden kan leiden tot gevaar voor de gezondheid.
• Toestel nooit in water/andere vloeistoffen onderdompelen. Gevaar voor
kortsluiting!
• Beschadigde apparatuur (incl. stroomkabel) nooit in gebruik nemen.
• Spanningvoerende onderdelen nooit aanraken.
• Sluit de kabel alleen op wisselstroom aan. Toestel alleen aansluiten
op een deskundig gemonteerd stopcontact met de correcte spanning.
Gebruik geen verlengkabels.
• De verwarming mag niet direct onder een stopcontact geplaatst worden.
• Het toestel nooit zelf openen (reparaties alleen door deskundigen).
• De netkabel mag niet over scherpe kanten heen worden getrokken of
worden vastgeklemd. De stekker mag nooit aan de netkabel of met natte
handen uit de contactdoos worden getrokken.
• Plaats het apparaat niet in de buurt van een warmtebron. De netkabel
mag niet aan rechtstreekse hittewerking (bijv. heet fornuisplaat, open
vlammen, hete strijkzool of kachel) worden blootgesteld, netkabel tegen
olie beschermen.
• Het gebruikte stopcontact moet te allen tijde toegankelijk blijven.
• Toestel nooit op een ongelijk of zacht oppervlak gebruiken.
• OPGELET: Om een gevaar als gevolg van het onbedoeld resetten van
de thermische beveiliging te voorkomen, mag dit apparaat niet via een
extern schakelapparaat, zoals een timer, worden gevoed.
• WAARSCHUWING: Dek de luchtinlaat of uitlaat niet af, om over verhitting
te voorkomen: brandgevaar!
• Toestel niet gebruiken in kleine ruimten (minder dan 4 m2), niet in een
explosieve omgeving en niet gebruiken voor het drogen van de was.
• Raak de voorkant van het apparaat niet aan; deze kan heet worden.
• Toestel nooit zonder toezicht laten staan.
• Geen voorwerpen en/of vingers in de openingen van het toestel steken.
• Bij brand het toestel alleen blussen met een blusdeken.
Ingebruikname / bediening
Instructie: Let erop dat tussen de verwarming en de muur of andere objec-
ten altijd voldoende ruimte zit (> 50 cm). De luchtverplaatsing mag niet door
eventuele objecten worden gehinderd. Als Anna big in een badkamer wordt
geplaatst, moet een veiligheidsafstand van ten minste 100 cm tot douches,
badkuipen, waterkranen, wasbakken enz. worden aangehouden.
Page 40

1. Nadat Anna big op de gewenste plek is gezet, sluit u de kabel (1) aan op
het stopcontact.
2. Druk eerst op de hoofdschakelaar voor de voeding (4) op de achterkant
van het apparaat.
3. Schakel het apparaat in door op de aan-uitknop (6) te drukken. De doeltemperatuur wordt op de display weergegeven.
4. De gewenste temperatuur kan worden gewijzigd via het rechter bedieningspaneel (8) «Temperature» van 0 °C (koelmodus) tot 35 °C of maximaal «Hi». Van 1 ° – 35 °C en op stand «Hi» is de verwarmingsmodus
actief. Bij het instellen knippert het getal. Tip op «+» om de temperatuur
te verhogen. Tip op «–» om de temperatuur te verlagen. De instelling
wordt opgeslagen als er gedurende drie seconden geen wijziging op het
bedieningspaneel voor temperatuurselectie plaatsvindt. Op de display
wordt vervolgens de huidige kamertemperatuur weergegeven.
Info: Zodra de doeltemperatuur is bereikt, wordt het verwarmingselement van het apparaat uitgeschakeld en knippert de temperatuurindicator op de display. De ventilator blijft nog 30 seconden ingeschakeld
op het laagste niveau om het verwarmingselement af te koelen. De
temperatuur wordt ca. om de 30 minuten gemeten (de ventilator loopt
gedurende 1 minuut op de laagste stand). Het apparaat wordt weer
ingeschakeld wanneer de geregistreerde kamertemperatuur onder de
ingestelde doeltemperatuur komt.
5. Koelmodus: als de temperatuur op 0 °C wordt ingesteld, wordt het verwarmingselement uitgeschakeld en blaast de ventilator koude lucht uit
het apparaat. De LED Statusindicator (7) verandert van rood in blauw.
Op het scherm verschijnt in de koelmodus geen weergave van de temperatuur.
6. Het verwarmingsvermogen kan van laag naar hoog worden gewijzigd via
het linker bedieningspaneel (9) «Power Level». Bij het wijzigen knippert
het display. Tip op «+» om het vermogensniveau te verhogen. Tip op «–»
om het vermogensniveau te verlagen. De instelling wordt opgeslagen als
er gedurende drie se conden geen wijziging op het bedieningspaneel voor
selectie van het verwarmingsvermogen plaatsvindt. Op de display wordt
vervolgens de huidige kamertemperatuur weergegeven.
7. De automodus activeer t u door op de knop «Auto Mode» (10) te drukken.
Op de display wordt «Auto Mode» weergegeven. De vooraf ingestelde
doeltemperatuur van 22 °C kan worden gewijzigd met behulp van het
rechtse bedieningspaneel voor temperatuurselectie (8). Het verwarmingsvermogen wordt in de automodus automatisch geselecteerd,
afhankelijk van de kamertemperatuur. Hoe kleiner het verschil tussen
de kamertemperatuur en de doeltemperatuur, hoe lager het geselecteerde verwarmingsvermogen. We hebben deze technologie «Adaptive
HeatTM» genoemd en hierop internationaal octrooi aangevraagd. Hiermee kan Anna big ervoor zorgen dat de doeltemperatuur snel en efficient wordt bereikt en wordt gehandhaafd. Anna big voorkomt zo sterke
temperatuurdalingen en voortdurend in- en uitschakelen van het apparaat. De automodus wordt gedeactiveerd als het ver warmingsvermogen
handmatig wordt gewijzigd (9).
Info: Zodra de doeltemperatuur is bereikt, wordt het verwarmingselement van het apparaat uitgeschakeld en knippert de temperatuurindicator op de display.
Page 41

8. Schakel het apparaat uit door op de aan-uitknop (6) te drukken. De ventilator blijft nog 30 seconden ingeschakeld op het laagste niveau om het
verwarmingselement af te koelen. Het apparaat bewaart de ingevoerde
temperatuur en het verwarmingsvermogen, ook wanneer het apparaat
wordt uitgeschakeld.
9. Beveiliging tegen oververhitting: het apparaat is voorzien van een beveiliging tegen oververhitting, die het apparaat uitschakelt in geval van een
technische storing of onjuis t gebruik (de ventilat or blijft enige tijd in de laag ste stand draaien om het apparaat af te koelen). Als dit gebeurt, verhelpt u
de storing of cor rigeert u het onjuis te gebruik (bijv. 50 cm ruimte rondom het
apparaat, het apparaat niet afdekken, het apparaat rechtop zetten). Zodra
het apparaat is afgekoeld, kan het weer in gebruik worden genomen.
10. De temperatuurindicator kunt u van Celsius in Fahrenheit wijzigen en
omgekeerd door de knop «Auto Mode» (10) vijf seconden ingedrukt te
houden.
11. De eerste uren na het in werking stellen van Anna big kan er een onaangename geur aanwezig zijn. Deze geur verdwijnt en is niets om u zorgen over te maken. Tip: Aan de achterzijde van Anna big bevindt zich de
luchtinlaat. De luchtinlaat is afgedekt met een luchtfilter en een rooster.
Het rooster kan verwijderd worden. Neem het rooster weg en verwijder
het luchtfilter. U kunt het luchtfilter reinigen met wat zeep en warm water. Spoel het grondig en laat het volledig drogen voordat u het terug in
de luchtinlaat plaatst en het rooster terugplaatst.
Reiniging
Vóór willekeurig onderhoud of reiniging en na elk gebruik, schakel het apparaat uit en haal de netkabel (1) uit het stopcontact.
Let op: Het apparaat nooit onder water houden (gevaar voor kortsluiting).
• De buitenkant met een vochtige doek schoonwrijven en daarna goed drogen.
• Als het filter (11) in het inlaatrooster (13) verstopt is, dit verwijderen en
uitwassen of reinigen met de stofzuiger.
Reparaties
• Reparaties aan het toestel dienen te worden verricht door een erkende reparateur. Als onbevoegden interferentie hebben gemaakt op het toestel,
dan vervalt de garantie evenals de aansprakelijkheid van Stadler Form.
• Zet het toestel nooit aan wanneer de adapter of de stop beschadigd is,
nadat het defect is geweest, het gevallen is of op een andere manier is
beschadigd. (barsten/onderbrekingen in het omhulsel).
• Duw geen voorwerp in het toestel. Haal het zuiveringssysteem niet uit
elkaar.
• Als het toestel niet meer te repareren is, maak het dan onmiddellijk onbruikbaar en geef het af op het inzamelingspunt.
Verwijdering
De Europese richtlijn 2012 / 19 / EG inzake Afval van Elektrische en Elektronische Apparatuur (AEEA), vereist dat oude elektrische huishoudapparaten niet in de normale gemeentelijke ongesorteerde afvalstroom mogen
worden weggegooid. Oude apparaten moeten apart worden ingezameld
om recycling en hergebruik van de materialen daarin te optimaliseren en de
Page 42

gevolgen op het milieu en de volksgezondheid te verminderen. Het symbool
met de doorgekruiste “vuilnisbak op wieltjes” op het product, herinnert u
aan uw verplichting, dat het toestel bij verwijdering gescheiden
ingezameld moet worden. C onsumenten moe ten contact opnemen
met hun lokale autoriteit of verkoper voor informatie betreffende
de juiste verwijdering van hun oude toestel.
Specificaties
Nominale spanning 220 – 240 V / 50 Hz
Temperatuurbereik 0 ° – 35 °C / > 35 °C = Hi
Opgenomen vermogen 300 W (min.)
Nominale vermogen 2‘000 W (max.)
Afmetingen 183 x 420 x 183 mm
(breedte x hoogte x diepte)
Gewich t 3.2 kg
Geluidsdre mpel 28 – 50 dB (A)
EU-verordening CE / AEEA / RoHS / EAC
De inhoud van deze gebruiksaanwijzing kan zonder voorafgaand
bericht worden gewijzigd
Item
verwarmingselement
ventilatormotor
Item
Fabrikant /
Handelsmerk
Foshan Shunde Esite
Electrical Appliances Co. Ltd
Foshan Shunde Esite
Electrical Appliances Co. Ltd
Warmteafgifte
Nominale warmteafgifte P
Minimale warmteafgifte (indicatief) P
Maximale continue warmteafgifte P
Aanvullend elektriciteitsverbruik
Bij nominale warmteafgifte el
Bij minimale warmteafgifte el
In stand-bymodus el
Symbool
nom
min
max,c
max
min
SB
Type /
Model
Specificaties
AC 220 - 24 0 V
2000 W
50 Hz
650Wx3
DC 12 V
EST1225S
250 0 rpm
8.4 W Class A
Waarde
1.41 kW
0.4 kW
2.0 kW
0.0064 kW
0.0044 kW
0 kW
Eenheid
Page 43

Item
Type warmte-input
Eenheid
Handmatige sturing van de warmteopslag,
met geïntegreerde thermostaat
Handmatige sturing van de warmteopslag,
met kamer- en/of buitentemperatuurfeedback
Elektronische sturing van de warmteopslag,
met kamer- en/of buitentemperatuurfeedback
[neen]
[neen]
[neen]
Door een ventilator bijgestane warmteafgiftet [neen]
Type warmteafgifte / sturing kamertemperatuur
Eentrapswarmteafgifte, geen sturing van de kamertemperatuur [neen]
Twee of meer handmatig in te stellen trappen,
geen sturing van de kamertemperatuur
Met mechanische sturing van de kamertemperatuur
door thermostaat
[neen]
[neen]
Met elektronische sturing van de kamertemperatuur [ja]
Elektronische sturing van de kamertemperatuur
plus dag-tijdschakelaa
Elektronische sturing van de kamertemperatuur
plus week-tijdschakelaar
[neen]
[neen]
Andere sturingsopties
Sturing van de kamertemperatuur, met aanwezigheidsdetectie [neen]
Sturing van de kamertemperatuur, met openraamdetectie [neen]
Met de optie van afstandsbediening [neen]
Met adaptieve sturing van de startl [neen]
Met beperking van de werkingstijd [neen]
Met black-bulbsensor [neen]
Contactgegevens
Stadler Form Aktiengesellschaft
Chamerstrasse 174, 6300 Zug, Switzerland
Page 44

Dansk
Tillykke! Du har netop købt den exceptionelle varmeblæser ANNA big. Den
vil give Dig stor fornøjelse, når luften omkring Dig trænger til at blive renset.
Som med alle elektriske husholdningsapparater er særlig pleje en nødvendighed også med dette produkt, for at undgå fysisk skade, brandskade eller
beskadigelse af produktet. Læs venligst denne brugsanvisning grundigt før
produktet tages i brug, og følg sikkerhedsanvisningerne på selve produktet.
Beskrivelse af apparatet
Apparatet består af følgende hoveddele:
1. Ledning til strømforsyning
2. Zinkfod
3. Kabinet
4. Hovedkontakt for strømforsyning
5. Berøringspanel (berøringsfølsomt kontrolelement)
6. Tænd/sluk-knap
7. LED-statuslys (rødt = varmer, blå = køler)
8. Kontrolpanel til valg af temperatur: 0 – 35 °C eller maksimalt «Hi»
9. Kontrolpanel til valg af varmeniveau: lavt til højt (8 trin)
10. Knap for Auto Mode, symbol «Auto Mode»
11. Klap med vaskbart luftfilter
12. Bærehåndtag
13. Luftindgangsgitter
14. Udgangsgitter på forsiden
Vigtige sikkerhedsinstruktioner
Læs brugsvejledningen, før Du bruger apparatet første gang og gem vejledningen; hvis nødvendigt skal den også gemmes til næste ejer.
• Dette produkt er kun egnet til velisolerede rum eller lejlighedsvis brug.
• ADVARSEL – Visse dele af apparatet kan blive meget varme og give
forbrændinger. Man skal være særligt opmærksom, hvis der er børn eller
svagelige personer til stede.
• Dette apparat kan anvendes af børn på fra 8 år og opefter. Personer med
ringe fysiske, sensoriske og mentale forudsætninger eller uden tilstrækkelig erfaring og kendskab skal kun anvende apparatet under opsyn,
eller hvis de har fået instruktioner i at anvende det sikkert og forstår
den risiko, der kan være. Børn må ikke lege med apparatet. Rensning og
vedligeholdelse skal ikke udføres af børn uden opsyn.
• Børn under 3 år skal holdes væk fra apparatet, med mindre de er under
konstant opsyn.
• Børn på mellem 3 og 8 år må kun tænde eller slukke apparatet, hvis det
er placeret og installeret i normal og korrekt brugsposition, og hvis de
er under opsyn eller har fået instruktioner i at bruge apparatet sikkert
og forstår den risiko, der kan være. Børn mellem 3 og 8 år skal ikke
tilslutte, rengøre eller vedligeholde apparatet.
• Hvis tilslutningsledningen bliver beskadiget, skal man overlade det til
Page 45

fabrikanten, autoriseret servicepersonel eller personer med tilsvarende
kvalifikationer at montere den nye ledning, så man undgår ulykker.
• Stadler Forms distributør dækker ikke skader, der er opstået som følge af
misligholdelse eller forkert brug af apparatet.
• Apparatet må kun bruges i hjemmet med det formål, der er beskrevet i
vejledningen.
• Apparatet må aldrig dyppes i vand/andre væsker. Fare for kortslutning!
• Beskadigede apparater (inkl. netkabel) må aldrig tages i drift.
• Man må aldrig berøre dele, der er under spænding.
• Tilslut kun kablet til vekselstrøm. Apparatet må kun drives på fagligt korrekt installeret stikkontakt med korrekt spænding. Der må ikke
anvendes forlængelseskabel.
• Varmeapparatet må ikke placeres umiddelbart under en stikkontakt.
• Apparatet må aldrig åbnes (reparationer kun af fagfolk).
• Træk ikke kablet over skarpe kanter og lad det ikke komme i klemme. Træk
aldrig stikket ud ved at holde i kablet og træk aldrig stikket ud af stikkontakten med våde hænder.
• Stil ikke apparatet i nærheden af en varmekilde. Netkablet bør ikke udsættes for direkte varmepåvirkning (fra f.eks. komfurplade, åben ild,
varmt strygejern eller varmeovn). Beskyt netkablet mod olie.
• Den brugte stikkontakt skal være tilgængelig til enhver tid.
• Apparatet må aldrig drives på ujævne overflader og bløde underlag.
• ADVARSEL: For at undgå fare på grund af en utilsigtet tilkobling af varmeafbryderen, må apparatet ikke strømforsynes via en ekstern anordning,
som f.eks. en timer.
• ADVARSEL: For at undgå overophedning må luftindtaget eller luftudtaget
ikke tildækkes – brandfare!
• Apparatet må ikke anvendes i små lokaler (under 4 m2 areal), ikke i eksplosive omgivelser, ikke til tørring af vasketøj.
• Rør ikke ved apparatets forside, da den kan blive meget varm.
• Apparatet må aldrig være uden opsyn.
• Der må ikke stikkes genstande og/eller fingre i apparaternes åbninger.
• Brændende apparater må kun slukkes med slukketæppe.
Ibrugtagning / betjening
Henvisning: Sørg for, at der altid er tilstrækkelig med plads mellem varme-
appartet og væggen eller andre store objekter (> 50 cm). Luftstrømmen må
ikke standses af eventuelle objekter. Luftgennemstrømningen må ikke blokeres af nogen andre genstande. Hvis Anna big installeres i et badeværelse,
skal der holdes en sikkerhedsafstand på mindst 100 cm til brusere, badekar,
vandhaner, håndvaske osv.
1. Efter at Anna big er blevet placeret på det ønskede sted, tilsluttes kablet
(1) til stikkontakten.
2. Først skal du skubbe til hovedkontakten for strømforsyningen (4) på apparatets bagside.
3. Tænd apparatet ved at trykke på tænd/sluk-knappen (6). Måltemperaturen vises på displayet.
4. Måltemperaturen kan ændres fra 0 °C (køletilstand) til 35 °C eller maksimum «Hi» via det højre kontrolpanel (8) «Temperature». Fra 1 ° – 35 °C
og «Hi» er varmetilstanden aktiv. Tallet blinker i konfigurationstilstand.
Page 46

Hvis du trykker på «+», øges måltemperaturen. Hvis du trykker på «–»,
reduceres måltemperaturen. Indstillingen gemmes, hvis der ikke sker
ændringer på kontrolpanelet til valg af temperatur i tre sekunder. Den
aktuelle rumtemperatur vises derefter på displayet.
Info: Apparatet slukker varmeelementet, når måltemperaturen nås, og
temperaturindikatoren blinker på displayet. Ventilatoren forbliver tændt
i 30 sekunder ved laveste niveau for at køle varmeelementet ned. Den
aktuelle temperatur måles så ca. hver halve time (ventilatoren kører på
nederste trin i 1 minut). Apparatet tændes igen, hvis den registrerede
rumtemperatur falder under den angivne måltemperatur.
5. Køletilstand: Varmeelementet slukkes, hvis temperaturen er indstillet
til 0 °C, og ventilatoren blæser kølig luft ud af apparatet. LED-lyset (7)
skifter fra rødt til blåt. Skærmen vil ikke vise nogle temperaturvisninger
under køletilstanden.
6. Varmeniveauet kan ændres fra lavt til højt via det venstre kontrolpanel
(9) «Power Level». Displayet blinker under indtastningen. Hvis du trykker på «+», øges niveauet. Hvis du trykker på «–», reduceres niveauet.
Indstillingen gemmes, hvis der ikke sker ændringer på kontrolpanelet til
valg af varmeniveau i tre sekunder. Den aktuelle rumtemperatur vises
derefter på displayet.
7. Den automatiske tilstand aktiveres ved at trykke på knappen «Auto
Mode» (10). «Auto Mode» vises i displayet. Den forudindstillede temperatur på 22 °C kan ændres ved hjælp af det højre kontrolpanel til valg
af temperatur (8). Varmeniveauet vælges automatisk i den automatiske
tilstand – afhængigt af rumtemperaturen. Jo mindre forskel, der er mellem rumtemperaturen og måltemperaturen, jo lavere varmeniveau bliver
der valgt. Denne teknologi kalder vi for «Adaptive HeatTM», og vi har indsendt en international patentansøgning. Den gør Anna big i stand til at
sikre, at måltemperaturen nås, hurtigt og effektivt, og holdes. Anna big
forhindrer således et større temperaturfald og forhindrer, at apparatet
hele tiden bliver tænd t og slukket. Den automatiske tilstand deak tiveres,
hvis varmeniveauet ændres manuelt (9).
Info: Apparatet slukker varmeelementet, når måltemperaturen nås, og
temperaturindikatoren blinker på displayet.
8. Sluk apparatet ved at trykke på tænd/sluk-knappen (6). Ventilatoren forbliver tændt i 30 sekunder ved laveste niveau for at køle varmeelementet ned. Apparatet gemmer temperaturindtastningen og varmeniveauet,
selvom apparatet bliver slukket.
9. Beskyttelse mod overophedning: Apparatet er udstyret med overophedningsbeskyttelse, som slukker apparatet i tilfælde af en teknisk fejl eller forkert brug (ventilatoren fortsætter med at køre i et stykke tid ved
laveste niveau for at køle apparatet ned). Hvis dette sker, skal du rette
fejlen eller stoppe den forkerte brug (f.eks. 50 cm plads omkring apparatet, undlade at tildække apparatet, sætte apparatet op i lodret stilling).
Når apparatet er kølet ned, kan det tændes og anvendes igen.
10. Temperaturindikatoren kan ændres fra celsius til fahrenheit og omvendt
ved at trykke på knappen «Auto Mode» (10) i fem sekunder.
11. I de første par timer efter at Anna big er taget i brug, kan der være en
ubehagelig lugt. Dette vil forsvinde, og det er intet at bekymre sig om.
Tip: På bagsiden af Anna big kan du finde luftindtaget. Luftindtaget er
Page 47

dækket af et luftfilter og et gitter. Gitteret er aftageligt. Tag gitteret af,
og fjern luftfilteret. Du kan vaske luftfilteret med lidt sæbe og varmt
vand. Skyl filteret godt og lad det tørre helt, før du sætter det tilbage på
luftindtaget og sætter gitteret i igen.
Rensning
Før vedligeholdelse, rengøring og efter hver brug skal apparatet slukkes og
ledningen (1) trækkes ud af stikkontakten.
OBS! Apparatet må aldrig dyppes i vand (fare for kortslutning).
• For ydre rengøring tørres apparatet af med en fugtig klud og tørres herefter godt.
• Hvis filteret (11) på indgangsgitteret (13) er støvet, skal det fjernes og
vaskes eller renses med en støvsuger.
Reparation
• Reparationer af elektriske apparater må kun udføres af en kvalificeret,
elektrisk tekniker. Udføres der upassende reparationer bortfalder garantien og ethvert ansvar fra producentens side.
• Brug aldrig apparatet, hvis et kabel eller stik er beskadiget, efter der har
været driftsfejl, hvis det har været udsat for tab, eller der er synlige tegn
på skade.
• Indfør ikke nogen former for genstande i apparatet.
• Hvis apparatet ikke kan repareres skal det gøres ubrugeligt (klip ledningen
af) og aflever det på en genbrugsstation.
Bortskaffelse
EU-direktiv 2012 / 19 / CE om WEEE kræver, at brugte elektriske husholdningsapparater ikke bortskaffes sammen med almindeligt affald. Brugte
apparater skal indsamles separat for optimal genbrug og genanvendelse
af apparatets elementer og reduktion af miljøpåvirkning og helbredsrisici.
Symbolet med skraldespanden med et kryds over på produktet er
en påmindelse til dig om din for pligtelse til at bortskaffe apparatet
separat. Du bør kontakte de lokale myndigheder eller forhandleren
for at få oplysninger om korrekt bortskafning af brugte apparater.
Specifikationer
Mærkespænding 220 – 240 V / 50 Hz
Temperaturinterval 0 ° – 35 °C / > 35 °C = Hi
Strømforbrug 300 W (min.)
Mærkee ffek t 2‘0 00 W (maks.)
Mål 183 x 420 x 183 mm
(bredde x højde x dybde)
Vægt 3.2 kg
Støjni veau 28 – 50 dB (A)
med EU godkendelse CE / WEEE / RoHS / EAC
Der tages forbehold for tekniske ændringer
Page 48

Element
varmeelement
ventilator
motor
Producent /
Varemærke
Foshan Shunde Esite
Electrical Appliances Co. Ltd
Foshan Shunde Esite
Electrical Appliances Co. Ltd
Type /
Model
2000 W
EST1225S
Specifikationer
AC 220 - 24 0 V
50 Hz
650Wx3
DC 12 V
250 0 rpm
8.4 W Class A
Element Symbol Værdi Enhed
Varmeydelse
Nominel varmeydelse P
Mindste varmeydelse (vejledende) P
Maximum continous heat output P
1.41 kW
nom
0.4 kW
min
2.0 kW
max,c
Supplerende strømforbrug
Ved nominel varmeydelse el
Ved mindste varmeydelse el
I standbytilstand el
0.0064 kW
max
0.0044 kW
min
0 kW
SB
Page 49

Element Enhed
Type varmetilførsel
Manuel varmelagringsstyring med integreret termostat [nej]
Manuel varmelagringsstyring med indendørs og /
eller udendørs temperaturmåling
Elektronisk varmelagringsstyring med indendørs og /
eller udendørs temperaturmåling
[nej]
[nej]
Varmeblæser [nej]
Type varmeydelse / rumtemperaturstyring
Ét-trinsvarmeydelse uden rumtemperaturstyring [nej]
To eller flere manuelle trin uden rumtemperaturstyring [nej]
Med mekanisk rumtemperaturstyring [nej]
Med elektronisk rumtemperaturstyring [ja]
Elektronisk rumtemperaturstyring og døgntimer [nej]
Elektronisk rumtemperaturstyring og ugetimer [nej]
Andre styringsmulighede
Rumtemperaturstyring med bevægelsessensor [nej]
Rumtemperaturstyring med temperaturfaldssensor [nej]
Med telestyringsoption [nej]
Med adaptiv startstyring [nej]
Med drifttidsbegrænsning [nej]
Med sort globe-sensorr [nej]
Kontaktoplysninger
Stadler Form Aktiengesellschaft
Chamerstrasse 174, 6300 Zug, Switzerland
Page 50

Suomi
Onnittelut! Olette juuri hankkinut erinomaisen ANNA big ilmankuumennustuulettimen. Laite tarjoaa nautinnollisempaa oloa parantaen huoneen ilmanlaatua.
Kuten kaikkien sähkötalousesineiden käsittelyssä myös tämän laitteen suhteen vaaditaan erityistä huolellisuutta, jotta haavoittumisia, laite- ja palovaurioit a voidaan välttää. Olkaa hyvä ja lukekaa tarkoin esillä oleva käy ttöohje
ennen käyttöönottoa ja huomioikaa laitteen turvallisuusviitteet.
Laitekuvaus
Laite koostuu seuraavista komponenteista:
1. Virtajohto
2. Jalusta sinkitty
3. Suojus
4. Virtalähteen pääkytkin
5. Kosketuspaneeli (kosketusherkkä ohjausyksikkö)
6. Virtapainike
7. LED merkkivalo (punainen = lämmittää, sininen = jäähdyttää)
8. Ohjauspaneeli lämpötilan valintaan: 0 °C – 35 °C tai enimmäisasetus «Hi»
9. Ohjauspaneeli lämmön tehotason valintaan: alhaisesta korkeaksi (8 tasoa)
10. Automaattitilan painike, symboli «Auto Mode»
11. Siiveke, jossa pestävä ilmansuodatin
12. Kantokahva
13. Ilman sisä ä ntuloritilä
14. Etupäästöaukon ritilä
Tärkeitä turvallisuusohjeita
Lukekaa käyttöohje tarkasti ennen laitteen käyttöönottoa ensimmäistä
kertaa ja säilyttäkää se hyvin myöhempään tarpeeseen, antakaa se mahdolliselle myöhemmälle omistajalle.
• Tämä tuote soveltuu vain hyvin eristettyihin tiloihin tai satunnaiseen
käyttöön.
• VAROITUS – Osa tämän laitteen osista voi kuumentua hyvin kuumiksi
ja aiheuttaa palovammoja. Laitteen käytössä on noudatettava erityistä
varovaisuutta lasten ja muiden heikommassa asemassa olevien henkilöiden läsnä ollessa.
• Vähintään 8 vuotta täyttäneet lapset ja sellaiset henkilöt, joiden fyysi-
set, sensoriset tai henkiset kyvyt eivät ole tähän riittäviä tai joilla ei ole
laitteen tuntemusta tai kokemusta sen käy töstä, saavat käyttää tätä laitetta ainoastaan silloin, kun heidän turvallisuudestaan vastaavahenkilö
valvoo ja ohjaa heitä käyttämään laitetta turvallisesti ja ymmärtämään
sen käyttöön liittyvät vaarat. Älä anna lasten leikkiä laitteella. Lapset
eivät saa suorittaa puhdistusta tai huoltoa ilmanvalvontaa.
• Alle 3-vuotiaat lapset tulee pitää poissa laitteen läheisyydestä, jollei
heitä valvota jatkuvasti.
• 3-8-vuotiaat lapset saavat kääntää laitteen päälle tai pois päältä vain,
mikäli se on asetettu tai asennettu sen normaaliin käyttöasentoon ja
heille on opetettu, miten laitetta käytetään tuvallisesti, ja he ymmärtä-
Page 51

vät sen käyttöön liittyvät vaarat. 3-8-vuotiaiden lasten ei tule kytkeä
laitetta eikä säätää, puhdistaa tai huoltaa laitetta.
• Mikäli virtajohto on vahingoittunut, se tulee vaihtaa laitteen valmistajan
tai tämän edustajan tai vastaavan henkilön toimesta sähköiskun välttämiseksi.
• Vioista, jotka aiheutuvat tämän käyttöohjeen huomiotta jättämisestä,
Stadler Form ei ota minkäänlaista vastuuta.
• Laite on tarkoitettu ainoastaan kotitalouskäyttöön näiden ohjeiden
mukaisella tavalla. Laitteen vääränlainen käyttö ja muokkaaminen voi johtaa hengenvaarallisiin tilanteisiin.
• Laitetta ei saa koskaan upottaa veteen/muihin nesteisiin. Oikosulkuvaara!
• Vioittuneita laitteita (verkkokaapeli mukaanluettuna) ei koskaan saa
ottaa käyttöön.
• Jännitteen alla oleviin osiin ei ikinä saa koskea.
• Liitä virtajohto vain vaihtovirtaverkkoon. Laitetta käytetään vain asiantuntemuksella asennetun pistorasian välityksellä, jossa on oikea jännite. Älkää
käyttäkö pidennyskaapeleita.
• Lämmitintä ei saa asettaa välittömästi pistorasian alle.
• Laitetta ei saa itse avata (korjaukset vain ammattihenkilöiden avulla).
• Älä altista virtajohtoa teräville reunoille ja varmista, ettei se jää puristuksiin. Älä irrota pistoketta pistorasiasta märillä käsillä tai vetämällä virtajohdosta.
• Älä sijoita laitetta lämmönlähteen läheisyyteen. Älä altista virtajohtoa suoralle lämmölle (kuten liesi, avoliekit, kuumat metallinkappaleet tai lämmittimet, jne.). Älä altista virtajohtoa öljylle.
• Käytössä olevan pistorasian on aina oltava tavoitettavissa.
• Laitetta ei saa koskaan käyttää epätasaisilla pinnoilla ja pehmeillä
alustoilla.
• VAARA: Laitetta ei saa kytkeä ulkoisella kytkentälaitteella kuten ajastimella, jotta vältetään lämpökatkaisun tahattoman kuittaantumisen
aiheuttama vaara.
• VAROITUS: Ylikuumenemisen välttämiseksi ilmanotto- ja -poistoaukkoa ei
saa peittää – tulipalovaara!
• Laitetta ei saa käyttää pienissä tiloissa (alle 4 m2 pinta-ala), helposti
räjähtävässä ympäristössä, eikä pyykin kuivaamiseen.
• Älä kosketa laitteen etuosaa; se saattaa olla erittäin kuuma.
• Laitetta ei saa koskaan jättää ilman valvontaa.
• Ei saa työntää esineitä ja / tai sormia laitteen aukkoihin.
• Palavat laitteet sammutetaan vain sammutuspeitteellä.
Käyttöönotto / käyttö
Viite: Varmistakaa, että lämmittimen ja seinän tai muiden suurten esinei-
den välillä on aina tarpeeksi tilaa (> 50 cm). Ilmavirta ei saa katketa joidenkin
esineiden johdosta. Ilmanvirtausta ei saa estää. Jos Anna big asetetaan kylpyhuoneeseen, säilytä vähintään 100 cm:n suojaetäisyys suihkuun, kylpyammeeseen, vesihanaan, pesualtaaseen yms.
1. Kun olet asettanut Anna big in halutulle paikalle, liitä kaapeli (1) pistorasiaan.
2. Paina ensin virtalähteen pääkytkintä (4) laitteen takaa.
Page 52

3. Kytke laitteen virta päälle painamalla virtapainiketta (6). Tavoitelämpötila
tulee näkyviin näyttöön.
4. Tavoitelämpötilaa voi muuttaa oikeanpuoleisesta käyttöpaneelista (8)
«Temperature» 0 °C:stä (jäähdytystila) 35 °C:hen tai enimmäisasetukseen «Hi». Lämmitystila on aktiivinen lämpötiloissa 1 °C – 35 °C & asetuksessa «Hi». Asetettava numero vilkkuu asetustilassa. Tavoitelämpötilaa nostetaan näppäilemällä «+» -kenttää. Tavoitelämpötila laskee, kun
näppäillään «–» -kenttää. Asetus tallennetaan, jos lämpötilan valintaan
ei tehdä ohjauspaneelissa muutoksia kolmeen sekuntiin. Nykyinen huoneen lämpötila näkyy tämän jälkeen näytössä.
Tiedoksi: Laite kytkee lämmityslaitteen pois päältä, kun tavoitelämpötila on saavutettu ja lämpötilan ilmaisin vilkkuu näytössä. Tuuletin käy
vielä 30 sekuntiin ajan alhaisimmalla teholla lämmityslaitteen jäähdyttämiseksi. Kulloinkin vallitseva lämpötila mitataan sitten n. 30 minuutin
välein (tuuletin pyörii 1 minuutin ajan alimmalla tasolla). Laite kytkeytyy
jälleen päälle, jos havaittu huoneen lämpötila laskee alle asetetun tavoitelämpötilan.
5. Jäähdytystila: lämmityslaite kytkeytyy pois päältä, jos lämpötilaksi on
asetettu 0 °C, ja tuuletin puhaltaa viileää ilmaa ulos laitteesta. LED-valo
(7) muuttuu punaisesta siniseksi. Jäähdytystilassa näytöllä ei näy lämpötilaa.
6. Lämmön tehotasoa voi muuttaa vasemmanpuoleisesta käyttöpaneelista
(9) «Power Level» alhaisesta korkeaksi. Näyttö vilkkuu tietojen syötön
ajan. Tehotasoa nostetaan näppäilemällä «+». Sitä alennetaan näppäilemällä «–». Asetus tallennetaan, jos lämmön tehotason valintaan ei tehdä
ohjauspaneeliin muutoksia kolmeen sekuntiin. Nykyinen huoneen lämpötila näkyy tämän jälkeen näytössä.
7. Automaattitila otetaan käyttöön painamalla «Auto Mode» -painiketta
(10). «Auto Mode» näkyy näytössä. Esiasetettua 22 °C:n tavoitelämpötilaa voi muuttaa lämpötilan valintaan tarkoitetulla oikeanpuoleisella
ohjauspaneelilla (8). Automaattitilassa lämmön tehotaso valitaan automaattisesti huoneen lämpötilasta riippuen. Mitä pienempi on ero huoneen lämpötilan ja tavoitelämpötilan välillä, sitä pienempi on valittu lämmön tehotaso. Tässä käytämme «Adaptive HeatTM» -tekniikkaa, jolle on
haettu kansainvälistä patenttia. Tämän ansiosta Anna big voi varmistaa,
että tavoitelämpötila saavutetaan nopeasti ja tehokkaasti ja se voidaan
myös säilyttää. Näin Anna big ehkäisee nopeita ja suuria lämpötilan
laskuja ja estää laitteen jatkuvan kytkeytymisen päälle ja pois päältä.
Automaattitila otetaan pois käytöstä, jos lämmön tehotasoa vaihdetaan
manuaalisesti (9).
Tiedoksi: Laite kytkee lämmit yslaitteen pois päältä, kun tavoitelämpötila on saavutettu ja lämpötilan ilmaisin vilkkuu näytössä.
8. Kytke laite pois päältä painamalla virtapainiket ta (6). Tuuletin käy vielä 30
sekuntiin ajan alhaisimmalla teholla lämmityslaitteen jäähdyttämiseksi.
Laite tallentaa lämpötila-asetuksen ja lämmön tehotason, vaikka laite
kytkettäisiin pois päältä.
9. Ylikuumenemissuoja: laitteessa on ylikuumenemissuoja, joka kytkee laitteen pois päältä teknisen vian tai laitteen väärinkäytön sattuessa (tuuletin käy jonkin aikaa alhaisimmalla teholla laitteen jäähdyttämiseksi).
Jos näin käy, korjaa vika tai lopeta virheellinen käyttö (muista esimerkiksi
seuraavat: 50 cm tila laitteen ympärillä, laitetta ei saa peittää, laite on
pystyasennossa). Kun laite on jäähtynyt, sitä voi jälleen käyttää.
Page 53

10. Lämpötilan ilmaisimen voi vaihtaa Celsius-asteista Fahrenheit-asteiksi ja
päinvastoin painamalla «Auto Mode» -painiketta (10) viisi sekuntia.
11. Kun Anna big on otettu käyttöön, muutaman ensimmäisen tunnin ajan
voi esiintyä epämiellyttävää hajua. Se häviää eikä aiheuta syytä huoleen. Vinkki: Annan takaosassa on ilmanottoaukko. Ilmanottoaukossa
on ilmansuodatin ja ritilä. Ritilä voidaan irrottaa. Irrota ritilä ja poista
ilmansuodatin. Voit pestä ilmansuodattimen lämpimällä vedellä ja pienellä määrällä saippuaa. Huuhtele ilmansuodatin huolellisesti ja anna
kuivua kokonaan ennen sen asettamista takaisin ilmanottoaukkoon ja
ritilän kiinnittämistä.
Puhdistaminen
Huoltaaksesi tai puhdistaaksesi laitteen sekä jokaisen käyttökerran jälkeen,
käännä laitteen virta pois päältä ja irrota virtajohto (1) pistorasiasta.
Huomio: Laitetta ei koskaan saa asettaa veteen (oikosulkuvaara).
• Puhdista ulko-osat kostealla liinalla ja kuivaa hyvin.
• Jos suodatin (11) sisääntuloritilässä on tullut pölyiseksi, poistakaa ja
peskää se tai puhdistakaa se pölynimurilla.
Korjaukset
• Sähkölaitteiden korjauksia (verkkokaapelin vaihto) saa suorittaa yksinomaan opetettu ammattihenkilökunta. Asiantuntemattomien suorittamissa korjauksissa takuu lakkaa olemasta voimassa ja kaikki vastuu hylätään.
• Älkää koskaan käyttäkö laitetta, jos kaapeli tai pistoke ovat vahingoittuneet, jos laite toimii väärin, jos se on pudonnut maahan tai muuten vioittunut (halkeamia/murtumia suojuksessa).
• Älkää työntäkö minkäänlaisia esineitä laitteeseen.
• Jos laitetta ei voi enää korjata, tee se käyttökelvottomaksi välittömästi ja
vie se keräyspisteeseen (verkkokaapeli katkaistaan).
Jätehuolto
Euroopan parlamentin ja neuvoston direktiivi 2012 / 19 / CE Sähkö- ja elektroniikkalaiteromusta (WEEE) edellyttää, ettei vanhoja kotitalouksien sähkölaitteita saa hävittää lajittelemattoman yhdyskuntajätteen mukana. Vanhat
laitteet on kerättävä erikseen materiaalien palautuksen- ja kierrättämisen
optimoimiseksi sekä terveys- ja ympäristövaikutuksien vähentämiseksi.
Tuotteen yliviivattu roskakori -merkintä muistuttaa siitä, että sinun velvollisuutesi on hävittää laite erikseen. Kuluttajia kehotetaan ottamaan
yhteyttä paikallisiin viranomaisiin tai tuotteen jälleenmyyjään
saadakseen lisätietoja vanhan laitteen asianmukaisesta hävittämisestä.
Page 54
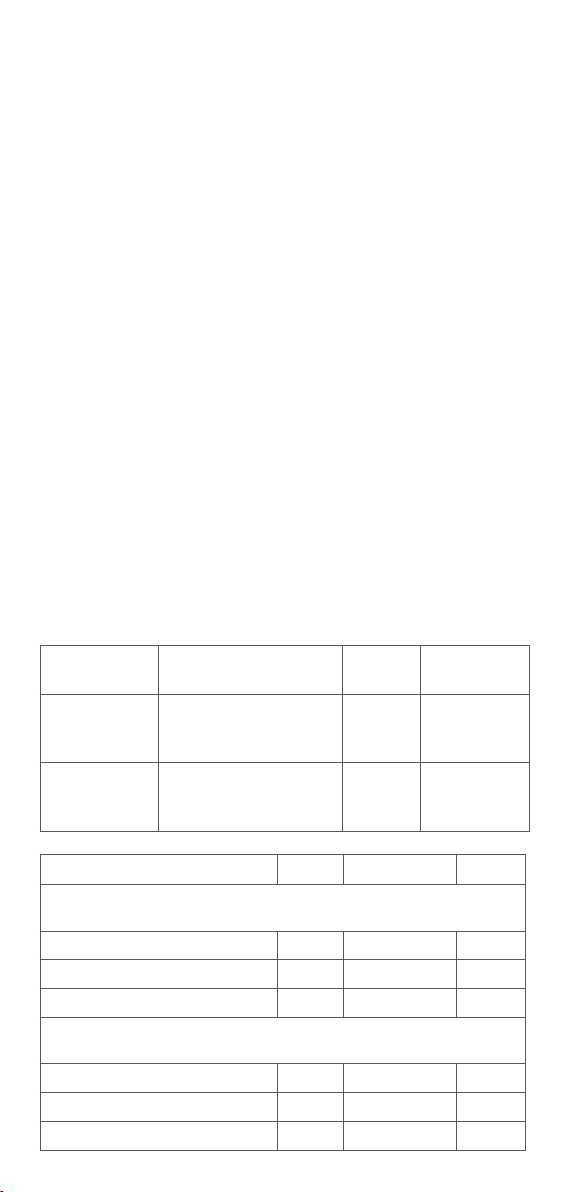
Teknillisiä tietoja
Nimellisjännite 220 – 240 V / 50 Hz
Lämpötila-alue 0 ° – 35 °C / > 35 °C = Hi
Tehonkulutu s 300 W (min.)
Nimellisteho 2‘00 0 W (maks.)
Mitat 183 x 420 x 183 mm
(leveys x korkeus x syvyys)
Paino n. 3 .2 kg
Äänit aso pienempi kuin 28 – 5 0 dB(A )
Täyttää EU-määräyksen CE / WEEE / RoHS / EAC
Teknilliset muutokset pidätetään
Kohta
lämmityselementti
tuuletin
moottori
Valmistaja/
Tavaramerkki
Foshan Shunde Esite
Electrical Appliances Co. Ltd
Foshan Shunde Esite
Electrical Appliances Co. Ltd
Kohta
Lämpöteho
Nimellislämpöteho P
Vähimmäislämpöteho (ohjeellinen) P
Suurin jatkuva lämpöteho P
Lisäsähkönkulutus
Nimellislämpöteholla el
Vähimmäislämpöteholla el
Valmiustilassa el
Tyyppi /
Malli
Teknillisiä
tietoja
AC 220 - 24 0 V
2000 W
50 Hz
650Wx3
DC 12 V
EST1225S
250 0 rpm
8.4 W Class A
Symboli Arvo Yksikkö
1.41 kW
nom
0.4 kW
min
2.0 kW
max,c
0.0064 kW
max
0.0044 kW
min
0 kW
SB
Page 55

Kohta Yksikkö
Lämmönsyötön tyyppi
manuaalinen lämmönvarauksen säätö,
johon liittyy integroitu termostaatti
manuaalinen lämmönvarauksen säätö,
johon liittyy huone- ja/tai ulkolämpötilan kompensointi
sähköinen lämmönvarauksen säätö,
johon liittyy huone- ja/tai ulkolämpötilan kompensointi
puhallinlämmitys [ei]
Lämmityksen / huonelämpötilan säädön tyyppi
yksiportainen lämmitys ilman huonelämpötilan säätöä [ei]
kaksi tai useampi manuaalista porrasta ilman huonelämpötilan
säätöä
mekaanisella termostaatilla toteutetulla huonelämpötilan
säädöllä
sähköisellä huonelämpötilan säädöllä [kyllä]
sähköinen huonelämpötilan säätö ja vuorokausiajastin [ei]
sähköinen huonelämpötilan säätö ja viikkoajastin [ei]
Muut säätömahdollisuudet
huonelämpötilan säätö läsnäolotunnistimen kanssa [ei]
huonelämpötilan säätö avoimen ikkunan tunnistimen kanssa [ei]
etäohjausmahdollisuuden kanssa [ei]
mukautuvan käynnistyksen ohjauksen kanssa [ei]
käyntiajan rajoituksen kanssa [ei]
lämpösäteilyanturin kanssa [ei]
Yhteystiedot
Stadler Form Aktiengesellschaft
Chamerstrasse 174, 6300 Zug, Switzerland
[ei]
[ei]
[ei]
[ei]
[ei]
Page 56

Norsk
Gratulerer! Du har akkurat kjøpt den eksepsjonelle varmeviften ANNA big
Den vil gi deg mye nytelse og forbedre luften du omgir deg med.
Som med alle elektriske husholdningsartikler er det nødvendig å utvise særlig hensyn til bruk av denne modellen, for å unngå personskader, brann eller
produktskader. Vennligst les nøye gjennom disse driftsinstruksjonene før du
tar i bruk apparatet for første gang, og følg sikkerhetsinstruksene på selve
apparatet.
Beskrivelse av apparatet
Apparatet består av følgende hoveddeler:
1. Strømkabel for strømforsyning
2. Sinkbase
3. Kabinett
4. Hovedbryter for strømforsyning
5. Berøringspanel (berøringsfølsomt kontrollelement)
6. Av/på-knapp
7. LED-lys (rød = oppvarming, blå = kjøling)
8. Kontrollpanel for valg av temperatur: 0 °C – 35 °C eller maksimum «Hi»
9. Kontrollpanel for valg av varmeeffekt: lav til høy (8 trinn)
10. Knapp for automodus, symbol «Auto Mode»
11. Klaff med vaskbart luftfilter
12. Bærehåndtak
13. Bakdeksel
14. Frontdeksel
Viktige sikkerhetsinstrukser
Vennligst les nøye gjennom driftsinstruksjonene før du tar i bruk apparatet
for første gang, og ta vare på dem for senere referansebruk, f.eks. dersom
du gir viften videre til en ny eier.
• Dette produktet er bare egnet på godt isolerte områder eller til spora-
disk bruk.
• FORSIKTIG – enkelte deler av dette produktet kan bli svært varmt og
forårsake brannskader. Det må utvises ekstra forsiktighet når det finnes
barn og andre sårbare personer i nærheten.
• Dette apparatet kan brukes av barn over åtte år og personer med
redusert syn, hørsel eller mental kapasitet, eller manglende erfaring
og kunnskap, forutsatt at de er under tilsyn eller har fått opplæring i
hvordan man bruker apparatet på en sikker måte og at de forstår hvilke
farer som foreligger. Barn skal ikke leke med apparatet. Rengjøring og
brukervedlikehold skal ikke utføres av barn uten tilsyn.
• Barn under tre år holdes på avstand med mindre de er under konstant
overvåking.
• Barn som er mellom tre og åtte år skal kun tillates å slå apparatet av/
på dersom det er plassert eller montert i dets tiltenkte bruksposisjon, og
forutsatt at er under tilsyn eller har fått opplæring i hvordan man bruker
apparatet på en sikker måte og at de forstår hvilke farer som foreligger
Barn mellom tre og åtte år skal ikke koble til, regulere eller rengjøre.
Page 57

apparatet, heller ikke utføre brukervedlikehold.
• Hvis s trømledningen er skadet, må den skiftes ut av pr odusenten, service-
agenten eller liknende kvalifisert personell, for å unngå faresituasjoner.
• Stadler Form nekter alt ansvar innen tap eller skader som oppstår som en
følge av mangelfull oppfølging av disse driftsinstruksjonene.
• Apparatet er kun tiltenkt bruk i hjemmet for de formål beskrevet i disse
instruksjonene. Uautorisert bruk og tekniske modifikasjoner på apparatet
kan føre til fare for helse og liv.
• Aldri senk enheten i vann (fare for kortslutning).
• Aldri bruk en defekt komponent (f.eks. strømledning).
• Aldri rør ved strømførende deler.
• Kun koble kabelen til vekselstrøm. Noter deg spenningsinformasjonen
oppgitt på apparatet. Ikke bruk skjøteledninger.
• Varmeviften må ikke plasseres rett under en stikkontakt.
• Ikke åpne apparatet (reparasjoner skal kun utføres av serviceagenter).
• Ikke dra strømkabelen over skarpe kanter og sørg for at den ikke klemmes
mellom gjenstander. Ikke napp kabelen ut av stikkontakten, og ikke fjern
kabelen med våte hender.
• Ikke plasser apparatet i nærheten av en varmekilde. Ikke utsett strømkabelen for direkte varme (som i nærheten av en kokeplate, åpen ild, varme
jernplater eller ovner, for eksempel). Beskytt strømkabelen mot oljete
væsker.
• Vennligst sørg for at den anvendte stikkontakten forblir tilgjengelig.
• Ikke bruk varmeviften på en ujevn eller myk overflate.
• OBS: For å unngå farlige situasjoner som følge av utilsiktet tilbakestilling
av den termiske utkoblingen, må ikke dette apparatet tilføres gjennom en
ekstern vekslingsenhet, slik som en timer.
• ADVARSEL: For å unngå overoppheting må du ikke dekke til luftinntaket
eller luftutløpet – brannfare!
• Ikke bruk varmeviften i små rom (under 4 m2 i størrelse), i eksplosive omgivelser eller for å tørke klesvask.
• Ikke ta på den fremre delen av apparatet; det kan bli svært varmt.
• Kun bruk varmeviften under tilsyn.
• Ikke stikk noen gjenstand og/eller finger inn i åpningene til varmeviftene.
• For å slukke brennende apparater, ta i bruk branntepper.
Installasjon / drift
Merknad: Sørg for at det alltid er tilstrekkelig plass mellom apparatet og
veggen eller andre større objekter (> 50 cm). Luftstrømmen må ikke blokkeres av objekter av noen type. Luftstrømmen må ikke blokkeres av andre
gjenstander. Hvis Anna big anbringes i et baderom, skal det være en minimumsavstand på 100 cm fra dusj, badekar, kraner, vasker osv.
1. Etter å ha plassert Anna big i en ønsket posisjon, koble kabelen (1) til
en stikkontakt.
2. Trykk først på hovedbryteren for strømforsyning (4) på baksiden av apparatet.
3. Slå på apparatet ved å trykke på av/på-knappen (6). Måltemperaturen
vises på displayet.
4. Måltemperaturen kan endres over høyre kontrollpanel (8) «Temperature», fra 0 °C (kjølemodus) til 35° C eller maksimalt «Hi». Fra 1 ° – 35 °C &
Page 58

«Hi» er varmemodus aktivt. Tallet blinker under innstillingsmodus. Trykk
«+» for høyere måltemperatur. Trykk «–» for lavere måltemperatur. Innstillingen lagres dersom ingen endringer gjøres i kontrollpanelet for valg
av temperatur i løpet av tre sekunder. Den aktuelle romtemperaturen
vises deretter på displayet.
Info: Apparatet slår av varmeelementet når ønsket temperatur er nådd,
og temperaturindikatoren blinker på displayet. Ventilatoren forblir påslått i 30 sekunder på laveste nivå for å kjøle ned var meelementet. A ktuell temperatur måles da ca. hvert 3 0. minutt (ventilatoren går 1 minut t på
laveste trinn). Apparatet slår seg på igjen hvis romtemperaturen synker
under den innstilte måltemperaturen.
5. Kjølemodus: Hvis temperaturen er satt til 0 °C, slår varmeelementet seg
av, og ventilatoren vil da blåse kald luft ut av apparatet. LED-lampen
(7) skifter fra rødt til blått. På displayet vises det i kjølingsmodus ingen
temperaturangivelse.
6. Oppvarmingsnivået kan forandres over venstre kontrollpanel (9) «Power
Level», fra lavt til høyt. Display blinker under innlesing. Trykk «+» for
øket effektnivå. Trykk «–» for redusert effektnivå. Innstillingen lagres
dersom ingen endringer gjøres i kontrollpanelet for valg av varmeeffekt
i løpet av tre sekunder. Den aktuelle romtemperaturen vises deretter
på displayet.
7. Automodus aktiverer du ved å tr ykke på «Auto Mode» (10). «Au to Mode»
vises i displayet. Den forhåndsinnstilte måltemperaturen på 22 °C kan
endres ved bruk av høyr e kontrollpanel for valg av temperatur (8). Varmeeffekten velges automatisk i automodus, avhengig av romtemperaturen.
Jo mindre forskjellen mellom romtemperaturen og ønsket temperatur er,
desto mindre varmeeffekt velges. Vi kaller dette for «Adaptive HeatTM»teknologi. En søknad om patent på denne teknologien er nå til behandling. Anna big sørger derfor for at ønsket temperatur nås og opprettholdes raskt og effektivt. Anna big hindrer dermed kraftige temperaturfall
og hindrer også at apparatet slår seg av og på til stadighet. Automodus
deaktiveres hvis varmeeffekten blir endret manuelt (9).
Info: Apparatet slår av varmeelementet når ønsket temperatur er nådd,
og temperaturindikatoren blinker på displayet.
8. Slå av apparatet ved å trykke på av/på-knappen (6). Ventilatoren forblir
påslått i 30 sekunder på laveste nivå for å kjøle ned varmeelementet.
Apparatet lagrer innstillingen for temperatur og varmeeffekt selv om
apparatet er slått av.
9. Beskyttelse mot overoppheting: Apparatet er utstyrt med overopphetingsbeskyttelse som slår av apparatet ved en eventuell teknisk feil eller
ved feil bruk (ventilatoren fortsetter å gå på det laveste nivået en viss tid
for å kjøle ned apparatet). Skulle dette skje, må du utbedre feilen eller
avbryte feilaktig bruk (f.eks. 50 cm klaring rundt apparatet, ikke dekk til
apparatet, sett apparatet opp i loddrett stilling). Når apparatet er avkjølt, kan det tas i bruk igjen.
10. Temperaturindikatoren kan endres fra Celsius til Fahrenheit og omvendt
ved at du trykker på «Auto Mode» -knappen (10) i fem sekunder.
11. Etter at Anna big er brukt de første timene, kan det komme en ubehagelig
lukt. L ukten forsvinner et ter hvert, og det er derfor ingen grunn til bekymring. Tips: Luftinnløpet er plassert på Anna bigs bakside. Luftinnløpet er
dekket av et luftfilter og et gitter. Gitteret kan tas av. Ta av gitteret og
Page 59

fjern luf tfilteret. Du kan rengjøre luftfilteret med litt såpe og varmt vann.
Skyll luftfilteret godt. La det så tørke helt før du setter det på plass i
luftinnløpet og fester gitteret.
Rengjøring
Før vedlikehold, rengjøring og etter bruk, slå av apparatet og plugg fra
strømkabelen (1).
Obs: Aldri senk apparatet i vann (fare for kortslutning).
• For å rengjøre utsiden, tørk med en fuktig klut og tørk så godt.
• Dersom filteret (11) bak bakdekselet (13) er fullt av støy, vennligst fjern
filteret og vask det eller rengjør med en støvsuger.
Reparasjoner
• Reparasjoner på dette produktet må kun utføres av kvalifiserte teknikere.
Dersom det utføres urettmessige reparasjoner utløper garantien og alt
ansvarshold.
• Aldri bruk apparatet dersom adapteren eller kontakten er skadet, etter
det har feilfunksjonert, dersom det har blitt mistet eller skadet på noen
som helst måte (sprekker/spriker i kabinettet).
• Ikke press gjenstander inn i apparatet. Ikke demonter apparatet.
• Dersom apparatet er utenfor reparasjonsmuligheter, gjør det ubrukbart
umiddelbart og lever det til et returpunkt gitt til formålet.
Avhending
EU-direktiv 2012 / 19 / EF vedrørende elektriske og elektroniske apparater
(Waste Electrical and Electronic Equipment - WEEE) sier at gamle elektriske
husholdningsapparater ikke må kastes som vanlig restavfall. Gamle apparater må samles inn separat for å optimalisere gjenbruk og resirkulering av
materialene de inneholder og redusere påvirkningen på menneskers helse og
miljøet. Det overkryssede søppelkassesymbolet er for å minne om
din forpliktelse om at du når du kaster apparatet må det samles inn
separat. Forbrukerne må kontak te lokale myndighe ter eller forhandler for informasjon angående riktig avhending av sit t gamle apparat.
Spesifikasjoner
Rangert spenning 220 – 240 V / 50 Hz
Temperaturområde 0 ° – 35 °C / > 35 °C = Hi
Strømforbruk 300 W (min.)
Utgan gseffek t 2‘00 0 W (maks.)
Dimensjoner 183 x 420 x 183 mm
(bredde x høyde x dybde)
Vekt 3.2 kg
Lydnivå 28 – 50 dB (A)
I samsvar med
EU-forskrifter CE / WEEE / RoHS / EAC
Alle rettigheter ovenfor tekniske modifikasjoner er forbeholdt
Page 60

Spesifikasjon
varmeelement
vifte motor
Produsenten /
Varemerke
Foshan Shunde Esite
Electrical Appliances Co. Ltd
Foshan Shunde Esite
Electrical Appliances Co. Ltd
Type /
Modell
2000 W
EST1225S
Spesifikasjoner
AC 220 - 24 0 V
50 Hz
650Wx3
DC 12 V
250 0 rpm
8.4 W Class A
Spesifikasjon Symbol Verdi Enhet
Varmeytelse
Nominell varmeytelse P
Minimal varmeytelse (veiledende) P
Maksimal kontinuerlig varmeytelse P
Supplerende strømforbruk
Ved nominell varmeytelse el
Ved minimal varmeytelse el
I standby-tilstand el
1.41 kW
nom
0.4 kW
min
2.0 kW
max,c
0.0064 kW
max
0.0044 kW
min
0 kW
SB
Page 61

Spesifikasjon Enhet
Type varmetilførsel
manuell varmestyring med integrert termostat [nei]
manuell varmestyring med innendørs- og /
eller utendørs temperaturmåling
elektronisk varmestyring med innendørs- og /
eller utendørs temperaturmåling
Varmeavgiving med hjelp av vifte [nei]
Type varmeytelse / romtemperaturkontroll
én-trinns varmeytelse, ingen romtemperaturkontroll [nei]
to eller flere manuelle trinn , ingen romtemperaturkontroll [nei]
romtemperaturkontroll med mekanisk termostat [nei]
med elektronisk romtemperaturkontroll [ja]
elektronisk romtemperaturkontroll og døgntimer [nei]
elektronisk romtemperaturkontroll og uketimer [nei]
Andre styringsmuligheter
romtemperaturkontroll med tilstedeværelsessensor [nei]
romtemperaturkontroll med åpent vindu-registrering [nei]
med mulighet for fjernbetjening [nei]
med adaptiv startregulering [nei]
med driftstidsbegrensning [nei]
med svart kulesensor [nei]
Kontaktopplys-
ninger
Stadler Form Aktiengesellschaft
Chamerstrasse 174, 6300 Zug, Switzerland
[nei]
[nei]
Page 62

Svenska
Grattis! Du har just köpt den fantastiska värmefläkten ANNA big. Med värmefläkten skapar du trivsel och förbättrar dessutom luften omkring dig.
Som med alla elektriska hushållsapparater krävs det att du är extra försiktig med den här modellen också, för att undvika personskador, brandskador
eller skador på apparaten. Läs denna bruksanvisning noggrant innan du
använder apparaten för första gången och följ säkerhetsanvisningarna på
själva apparaten.
Beskrivning av apparaten
Apparaten består av följande huvuddelar:
1. Nätkabel för strömförsörjning
2. Zinkbas
3. Hölje
4. Huvudbrytare för strömförsörjning
5. Pekskärm (beröringskänsliga kontrollelement)
6. På/av-knapp
7. Lysdiodlampa (röd=värme, blå=kyla)
8. Kontrollpanel för val av temperatur: 0° – 35 °C eller maximalt «Hi»
9. Kontrollpanel för val av värmeeffekt: låg till hög (8 nivåer)
10. Knapp för automatiskt läge, symbolen «Auto Mode»
11. Klaff med tvättbart luftfilter
12. Bärhandtag
13. Bakre hölje
14. Främre hölje
Viktiga säkerhetsanvisningar
Läs igenom bruksanvisningen noga innan du använder apparaten för första
gången och håll den i säkert förvar för framtida referens, vid behov ger du
den vidare till nästa ägare.
• Denna produkt är endast lämplig för välisolerade utrymmen eller vid
tillfällig användning.
• VARNING – Vissa delar av den här produkten kan bli mycket varma
och orsaka brännskador. Var särskilt uppmärksam när barn och utsatta
människor är närvarande.
• Denna apparat kan användas av barn från 8 år och uppåt och personer
med nedsatt fysisk eller mental förmåga eller brist på erfarenhet och
kunskap, om de övervakas eller får instruktioner angående användning
av apparaten på ett säkert sätt och förstår de inblandade riskerna. Barn
ska inte leka med apparaten. Rengöring och underhåll får inte göras av
barn utan tillsyn.
• Barn under 3 år bör hållas borta om de inte kontinuerligt övervakas.
• Barn från 3 år och uppåt får bara sätta på/stänga av apparaten om den
är placerad i sin normala driftsposition och om de är övervakade eller
har fått instruktioner angående användning av apparaten på ett säkert
sätt och förstår de inblandade riskerna. Barn från 3 år och yngre än 8 år
får inte koppla in, reglera och rengöra apparaten eller utföra underhåll.
• Om elkabeln skadas måste den bytas ut av tillverkaren, dess serviceper
Page 63

sonal eller liknande kvalificerade personer för att undvika fara.
• Stadler Form avsäger sig allt ansvar för förlust eller skada som uppstår på
grund av att bruksanvisningen inte följts.
• Apparaten får endast användas i hemmet för de ändamål som beskrivs
i denna bruksanvisning. Otillåten användning och tekniska ändringar på
apparaten kan leda till fara för liv och hälsa.
• Doppa inte apparaten i vatten (risk för kortslutning).
• Använd aldrig en skadad värmefläkt (t.ex. om sladden är skadad).
• Ta aldrig på strömförande delar.
• Anslut endast kabeln till växelström. Observera spänningsinformationen
på apparaten. Använd inte förlängningssladdar.
• Värmefläkten får inte placeras direkt under ett eluttag.
• Öppna inte apparaten (reparationer får endast ut föras av serviceagenter).
• Dra inte nätsladden över vassa kanter och se till att den inte kommer i
kläm. Dra inte ut kontakten ur vägguttaget med våta händer eller genom
att hålla i sladden.
• Placera inte apparaten nära en värmekälla. Utsätt inte sladden för direkt
värme (som t.ex. en uppvärmd vär meplatta, öppen eld, hett stry kjärn, eller
värmeelement). Skydda nätsladdar från olja.
• Försäkra dig om att det eluttag som används för värmefläkten är lätt
åtkomligt.
• Använd inte värmefläkten på ojämna eller mjuka ytor.
• VARNING: För att undvika fara som kan uppstå genom att värmebrytaren
återställs av misstag, får apparaten inte anslutas till en extern kopplingsanordning som t.ex. en timer.
• VARNING: För att undvika överhettning får luftintaget eller luftutsläppet
inte övertäckas – brandfara!
• Använd inte värmefläkten i små rum (mindre än 4 m2), i explosiva miljöer
eller för att torka tvätt.
• Vidrör inte den främre delen av apparaten eftersom den kan bli mycket
het.
• Använd endast värmefläkten under uppsikt.
• Stoppa aldrig in föremål och/eller fingrar i värmefläktens öppningar.
• Använd endast brandfiltar för att släcka brinnande apparater.
Inställning / drift
Observera: Se till att det alltid finns tillräckligt med utrymme mellan ap-
paraten och väggen eller andra större föremål (> 50 cm). Luftflödet får aldrig
blockeras av någon typ av föremål. Om Anna big installeras i ett badrum
ska ett säkerhetsavstånd på minst 100 cm hållas till duschar, badkar, vattenkranar, tvättställ osv.
1. När Anna big har installerats i önskad position ansluts kabeln (1) till hushållsuttaget.
2. Tryck först på huvudbrytaren för strömförsörjning (4) på baksidan av apparaten.
3. Slå på apparaten genom att trycka på på/av-knappen (6). Måltemperaturen visas på displayen.
4. Måltemperaturen kan förändras från 0 °C (kylningsläge) till 35°C eller maximalt »Hi« med höger kontrollpanel (8) »Temperature«. Från 1°
– 35°C & »Hi« är värmeläget aktivt. Siffran blinkar i inställningsläget.
Page 64

Peka på »+« för att öka måltemperaturen. Peka på »–« för att minska
måltemperaturen. Inställningen sparas om ingen förändring sker på
kontrollpanelen för val av temperatur under tre sekunder. Den aktuella
rumstemperaturen visas därefter på displayen.
Info: Apparaten stänger av värmeelementet när måltemperaturen har
uppnåtts och temperaturindikatorn blinkar på displayen. Ventilatorn förblir inkopplad under 30 sekunder på den lägsta nivån för att kyla ner
värmeelementet. Den aktuella temperaturen mäts då ca var 30:e minut
(fläkten går på lägsta nivå i 1minut). Apparaten slås på igen om den
registrerade rumstemperaturen sjunker under inställd måltemperatur.
5. Kylläge: värmeelementet stängs av om temperaturen är inställd på 0 °C
och fläkten blåser kall luft ur apparaten. LED-lampan (7) ändras från röd
till blå. Ingen temperatur visas på displayen i kylläget.
6. Värmeeffektsnivån kan förändras från låg till hög med höger kontrollpanel (9) »Power Level«. Indikeringen blinkar under inmatningen. Peka
på »+« för att öka effektnivån. Peka på »–« för att minska effektnivån.
Inställningen sparas om ingen förändring sker på kontrollpanelen för val
av värmeutgångsnivå under tre sekunder. Den aktuella rumstemperaturen visas därefter på displayen.
7. Det automatiska läget aktiveras genom att trycka på knappen «Auto
Mode» (10). «Auto Mode» visas på displayen. Den förinställda måltemperaturen på 22 °C kan ändras med hjälp av höger kontrollpanel för
val av temperatur (8). Värmeutgångsnivå väljs automatiskt i autoläge
- beroende på rumstemperaturen. Ju mindre skillnaden mellan rumstemperaturen och måltemperaturen är, desto mindre värmeeffektnivå
väljs. Vi kallar detta «Adaptive HeatTM»-teknik och vi har ansökt om ett
internationellt patent. Med hjälp av den här funktionen kan Anna big
säkerställa att måltemperaturen uppnås snabbt och effektivt, samt att
den upprätthålls. Anna big förhindrar därmed kraftiga temperatursänkningar och förhindrar att apparaten slås på och av ständigt. Autoläget
avaktiveras om värmeutgångsnivån ändras manuellt (9).
Info: Apparaten stänger av värmeelementet när måltemperaturen har
uppnåtts och temperaturindikatorn blinkar på displayen.
8. Stäng av apparaten genom att trycka på på/av-knappen (6). Ventilatorn
förblir inkopplad under 30 sekunder på den lägsta nivån för att kyla ner
värmeelementet. Apparaten sparar temperaturinmatningen och värmeeffekten även om den stängs av.
9. Sk ydd mot överhettning: Apparaten är utrustad med över hettningssk ydd
som stänger av apparat en i händelse av tekniskt fel eller felaktig användning (ventilatorn fortsätter att vara i drift en stund, på den lägsta nivån
för att kyla ned apparaten). Om detta inträffar ska felet avhjälpas eller
felaktig användning upphöra (t.ex. 50 cm utrymme runt om apparaten,
inte täcka över apparaten, ställa apparaten i upprätt läge). När apparaten har svalnat kan den tas i drift.
10. Temperaturindikatorn kan ändras från Celsius till Fahrenheit och vice
versa genom att trycka på «Auto Mode» -knappen (10) i fem sekunder.
11. Under de första timmarna efter att Anna big har börjat användas kan det
komma en obehaglig luk t. Detta kommer at t försvinna och det är inget att
oroa sig för. Tips: På baksidan av Anna big hittar du luftintaget. Luftintaget är täckt med ett luftfilter och ett galler. Gallret är avtagbart. Ta av
Page 65
gallret och t a bort luft filtret. Det går att t vätta luf tfiltret med lite tvål och
varmt vatten. Skölj av det ordentligt och låt det torka helt innan du sät ter
tillbaka det över luftintaget och sätter på gallret igen.
Rengöring
Innan apparaten underhålls och efter varje användning, stänger du av apparaten och drar ut nätkabeln (1) ur vägguttaget.
Observera: Sänk aldrig ned apparaten i vatten (risk för kortslutning).
• För att rengöra utsidan, torka av med en fuktig trasa och torka sedan ordentligt.
• Om filtret (11) bakom det bakre höljet (13) är fullt med damm bör det bytas
ut, sköljas rent eller rengöras med dammsugaren.
Reparationer
• Reparationer av elektriska apparater får endast utföras av en kvalificerad
eltekniker. Om felaktiga reparationer utförs, upphör garantin att gälla och
allt ansvar frånsägs.
• Använd aldrig apparaten om en kabel eller kontakt är skadad, om den har
funktionsfel, om den har tappats eller blivit skadad på något annat sätt
(sprickor/brister i höljet).
• Tryck inte in några föremål i apparaten. Ta inte isär apparaten.
• Om apparaten inte går att reparera, gör den obrukbar omedelbart och
lämna in den på en lämplig återvinningsstation.
Kassering
Det europeiska direktivet 2012 / 19 / CE om avfall från elektrisk och elektronisk utrustning (WEEE), kräver att gammal hushållselektronik INTE kastas i
det normala osorterade avfallet. Förbrukad utrustning måste samlas in separat för att optimera återanvändning och återvinning av det material som
de innehåller och för minska påverkan på människors hälsa och på miljön.
Symbolen med den överkorsade ”soptunnan” på produkten påminner dig
om din skyldighet att apparaten måste samlas in separat när det
kasseras. Du kan kontakta din lokala myndighet eller återförsäljare för information om korrekt kassering av förbrukad elektronisk
utrustning.
Specifikationer
Märkspänning 220 – 240 V / 50 Hz
Temperaturområde 0 ° – 35 °C / > 35 °C = Hi
Strö mförbruk ning 300 W (min.)
Utef fekt 2‘ 000 W (max. )
Dimensioner 183 x 420 x 183 mm
(bredd x höjd x djup)
Vikt 3.2 kg
Ljudniv å 28 – 50 d B(A)
Uppfyller EU:s regler CE / WEEE / RoHS / EAC
Alla rättigheter för tekniska ändringar förbehålles
Page 66

Post
värmeelement
fläktmotor
Tillverkare /
Varumärke
Foshan Shunde Esite
Electrical Appliances Co. Ltd
Foshan Shunde Esite
Electrical Appliances Co. Ltd
Typ /
Modell
2000 W
EST1225S
Specifikationer
AC 220 - 24 0 V
50 Hz
650Wx3
DC 12 V
250 0 rpm
8.4 W Class A
Post
Värmeeekt (Anna / Anna little)
Nominell avgiven värmeeekt P
Lägsta värmeeekt (indikativt) P
Maximal kontinuerlig värmeeekt P
Tillsatselförbrukning
Vid nominell avgiven värmeeekt el
Vid lägsta värmeeekt el
I standbyläge el
Beteckning
nom
min
max,c
max
min
SB
Värde Enhet
1.41 kW
0.4 kW
2.0 kW
0.0064 kW
0.0044 kW
0 kW
Page 67

Post Enhet
Typ av tillförd värme
manuell reglering av värmetillförseln med inbyggd termostat [nej]
manuell reglering av värmetillförseln med återkoppling av inom-
hus- och/eller utomhustemperaturen
elektronisk reglering av värmetillförseln med återkoppling av
inomhus- och/eller utomhustemperaturen
värmeavgivning med hjälp av fläkt [nej]
Typ av reglering av värmeeekt / rumstemperatur
enstegs värmeeekt utan rumstemperaturreglering [nej]
två eller flera manuella steg utan rumstemperaturreglering [nej]
med mekanisk termostat för rumstemperaturreglering [nej]
med elektronisk rumstemperaturreglering [ja]
med elektronisk rumstemperaturreglering plus dygnstimer [nej]
med elektronisk rumstemperaturreglering plus veckotimer [nej]
Andra regleringsmetoder
rumstemperaturreglering med närvarodetektering [nej]
rumstemperaturreglering med detektering av öppna fönster [nej]
med möjlighet till fjärrstyrning [nej]
med anpassningsbar startreglering [nej]
med driftstidsbegränsning [nej]
med svartkroppsgivare [nej]
Kontaktuppgifter
Stadler Form Aktiengesellschaft
Chamerstrasse 174, 6300 Zug, Switzerland
[nej]
[nej]
Page 68
Русский
Поздравляем с приобретением фантастического обогревателя ANNA
big! Керамический обогреватель ANNA big предназначен для эффективного и комфортного обогрева небольших помещений, его эксплуатация доставит Вам несомненное удовольствие.
При эксплуатации обогревателя, а также иных электроприборов, следует обращать особое внимание на меры безопасности. Прежде, чем
использовать этот электроприбор, внимательно прочтите инструкцию. Во избежание травм или повреж дений имущества, строго следуйте приведенным в данной инструкции рекомендациями.
Описание устройства
Устройство состоит из следующих компонентов:
1. Сетевой шнур
2. цинка подставка
3. Корпус
4. Кнопка включения питания
5. Панель управления (сенсорные элементы)
6. Кнопка «Включения /Выключения»
7. LED индикатор (красный – обогрев, синий – охлаждение)
8. Шкала выбора температ уры 0–35 °C или максимум
9. Шкала выбора мощности обдува +/- (8 уровней)
10. Кнопка включения Автома тического режима, символ «Auto Mode»
11. Съемная решетка с моющимся фильтром
12. Ручка для переноски
13. Задняя крышка
14. Передняя защитная решетка
Важные указания по безопасности
Преж де чем использовать этот электроприбор, пожалуйста, внимательно ознакомьтесь с инструкцией по эксплуатации.
•Этот прибор подходит только для применения в поме-
щениях с хорошей изоляцией или для нечастого применения.
•ВНИ МАНИ Е – Некоторые части данного прибора могут
сильно нагреваться и вызывать ожоги. Особое внимание безопасности должно быть уделено в местах, где
присутствуют дети и лица, не имеющие достаточных
навыков по использованию электроприборов.
•Данный прибор может эксплуатироваться детьми от
8 лет и старше, а также лицами с ограниченными физическими или умственными способностями только
под контролем либо после подробного инструктажа
относительно использования прибора безопасным
способом. Дети не должны играть с прибором. Чистка
и обслуживание прибора детьми должна производиться только под присмотром взрослых.
•Детей до 3-х лет следует оградить от контакта с при-
Page 69
бором, если они не находятся под постоянным наблюдением.
•Дети в возрасте от 3-х до 8-м могут только включать/
выключать устройство при условии, что оно было
установлено в предназначенном для этого месте, при
этом дети должны находиться под контролем и быть
проинструктированы о возможных опасностях использования прибора. Детям от 3-х до 8-ми лет запрещается включать прибор в розетку и изменять какие-либо
настройки, а также чистить прибор или выполнять его
обслуживание.
•Если сетевой шнур поврежден, он должен быть неза-
медлительно заменен в сервисном центре или квалифицированным специалистом.
• Изготовитель не несет ответственности за любые травмы или
ущербы, возникшие вследствие неправильной эксплуатации электроприбора.
• Тепловентилятор является бытовым электроприбором и предназначен для использования только в домашних условиях в строгом
соответствии с инструкцией по эксплуатации. Неправильная эксплуатация и техническая модификация электроприбора могут создать условия, опасные для жизни и здоровья пользователя.
• Никогда не погружайте тепловентилятор в воду(опасность короткого замыкания).
• Не включайте прибор, если он поврежден.
• Не касайтесь в частям под напряжением.
• Перед подключением тепловентилятора к электросети удостоверьтесь в том, что напряжение электросети соответствует напряжению, паспортизированному для данного электроприбора.
• Не устанавливайте тепловентилятор вплотную к розетке.
• Не разбирайте устройство самостоятельно (обратитесь в сервисный центр).
• Не используйте при подключении поврежденные или перегруженные удлинители.
• Не устанавливайте обогреватель рядом с источниками тепла. Не
допускайте, чтобы сетевой шнур касался горячих поверхностей любых нагревате льных приборов(плита, от крытый источник огня, утюг
и т.п.), не допускайте контакта сетевого шнура с маслянистыми веществами.
• Не храните обогреватель на улице.
• Не используйте обогреватель на неровной или мягкой поверхности.
• ОПАСНО: Никогда не подключайте обогреватель к сети с помощью
сторонних устройств.
• ВНИМАНИЕ: Никогда не накрывайте обогреватель, это может привести к перегреву прибора и возгоранию.
• Не эксплуатируйте обогреватель в помещениях с метражом менее
4 метров.
Page 70

• Не прикасайтесь к передней защитной решетке во избежание ожогов.
• Не оставляйте прибор без присмотра.
• Не вставляйте посторонние предметы в отверстия на корпусе обогревателя. Это может привести к ожогам, а так же образованию
искр, что влечет за собой короткое замыкание.
• При возгорании для тушения огня используйте только пожарные
одеяла.
Эксплуатация / настройки
Внимание. Убедитесь, что между прибором и стеной (или другими
большими объектами) достаточно места (более 50 см), потокам воздуха не должны препятствовать никакие предметы. Если вы поставили тепло вентилятор в ванной комнате, убедитесь, что расстояние от
душа, ванной, кранов, умывальников и т.п. более 100 см.
1. Установите тепловентилятор на ровной поверхности, подключите
сетевой шнур (1) к розетке электросети.
2. Нажмите на кнопку включения питания (4) для подключения прибора к сети.
3. Нажмите кнопку (6), чтобы включить тепловентилятор. Желаемая
температура отобразится на дисплее.
4. Целевая температура может быть изменена с помощью правой
пане ли управления (8) «Temperature» от 0°C (режим ох лаждения) до
35°C или на максиму м «Hi». В диапазоне от 1°С до 35°C и «Hi» включен режим нагрева. Число мигает в режиме настройки. Нажатием
на «+» целевая температура увеличивается, а нажатием на «–»
уменьшается. Настройка температуры отображается в течение
трех секунд. Затем на дисплее отобразится текущая температура
в комнате.
Важно. Нагревательный элемент отключается, когда желаемая
температура достигнута и соответствующие цифры мигают на
дисплее. После этого вентилятор будет работать ещё 30 секунд на
самой низкой скорости, чтобы нагревательный элемент остыл. Затем текущая температура измеряется примерно каждые 30 минут
(вентилятор работает в течение 1 минуты на нижнем уровне). Нагревательный элемент вк лючается снова, как только температура
в комнате станет ниже, установленной вами ранее.
5. Режим охлаждения: если вы установили температуру, равную 0°С,
то нагревательный элемент выключается и вентилятор будет дуть
холодным воздухом. LED индикатор (7) изменит свой цвет с красного на синий. В режиме ох лаждения на дисплее не будет отображаться текущая температура в комнате.
6. Уровень мощности нагрева может быть изменен с помощью левой
панели управления (9) «Power Level» от низкого до высокого. Индикатор мигает во время ввода. Нажмите на «+», чтобы увеличить
уровень мощности, нажмите на «–», чтобы уменьшить его. Во время изменения мощности обдува на дисплее будет отображаться
соответствующий уровень мощности. Настройки сохранятся, если
в течение трех секунд вы не будете их менять. Затем на дисплее
отобразится текущая температура в комнате.
Page 71

7. Чтобы включить автоматический режим, нажмите на кнопку (10)
и на дисплее появится соответствующая индикация. Заводскими
настройками установлена температура 22°С. Чтобы изменить настройки, проведите пальцем по шкале (8) вверх или вни з до нужной
вам температуры. Мощность нагрева выбирается автоматически
в зависимости от температуры в комнате. Чем меньше разница
между текущей комнатной температурой и желаемой вами температурой, тем ниже будет мощность. Мы называем это «АДАПТИВНОЕ ТЕПЛО»™ – эта технология достигает желаемой температуры,
автоматически регулируя тепловую мощность. Полученный результат поддерживается с точностью ±1° при постоянном, мягком
и, следовательно, тихом обдуве – по аналогии с системой кондиционирования в автомобиле. Автоматический режим отк лючится,
если мощность будет изменена вручную (9).
Важно. Нагревательный элемент отключится, когда требуемая
температура будет достигнута. Индикатор на дисплее начнет мигать.
8. Выключение прибора. Чтобы выключить тепловентилятор, нажмите на кнопку (6). После этого вентилятор будет работать ещё
30 секунд на самой низкой скорости, чтобы нагревательный элемент остыл. Прибор сохраняет установленные ранее температуру
и мощность обдува до следующего включения.
9. Защита от перегрева. Устанавливайте тепловентилятор на расстоянии 50 см от окружающих предметов. Прибор оборудован системой защиты от перегрева, которая отключает прибор в случае
технической неисправности или неправильного использования (в
свою очередь, вентилятор не выключится сразу, а продолжит работать, чтобы охладить прибор). Если такое случилось, устраните
причину возникновения перегрева. Как только прибор остынет, его
снова можно использовать.
10. Шкала температуры может быть изменена с градусов Цельсия на
градусы по Фаренгейту. Для этого необходимо нажать и удерживать кнопку (10) в течение 5 секунд.
11. После включения Anna big может издавать неприятный запах
в течение первых нескольких часов работы. Об этом не стоит
волноваться, запах исчезнет. Совет:На задней стороне прибора
Anna big находится впускное отверстие для воздуха. Оно закрыто
воздушным фильтром и решеткой. Решетка съемная. Снимите
решетку и извлеките воздушный фильтр. Воздушный фильтр
можно промыть теплой водой с небольшим количеством мыла.
После этого фильтр необходимо тщательно прополоскать и
полностью высушить. Затем установите фильтр обратно во
впускное отверстие для воздуха и закройте решеткой.
Чистка
Перед обслуживанием и чисткой, а также после использования,
отключите обогреватель от электросети.
Внимание. Во избежание поражения электрическим током никогда
не погружайте обогреватель, сетевой шнур или его вилку в воду или
иную жидкость.
Page 72
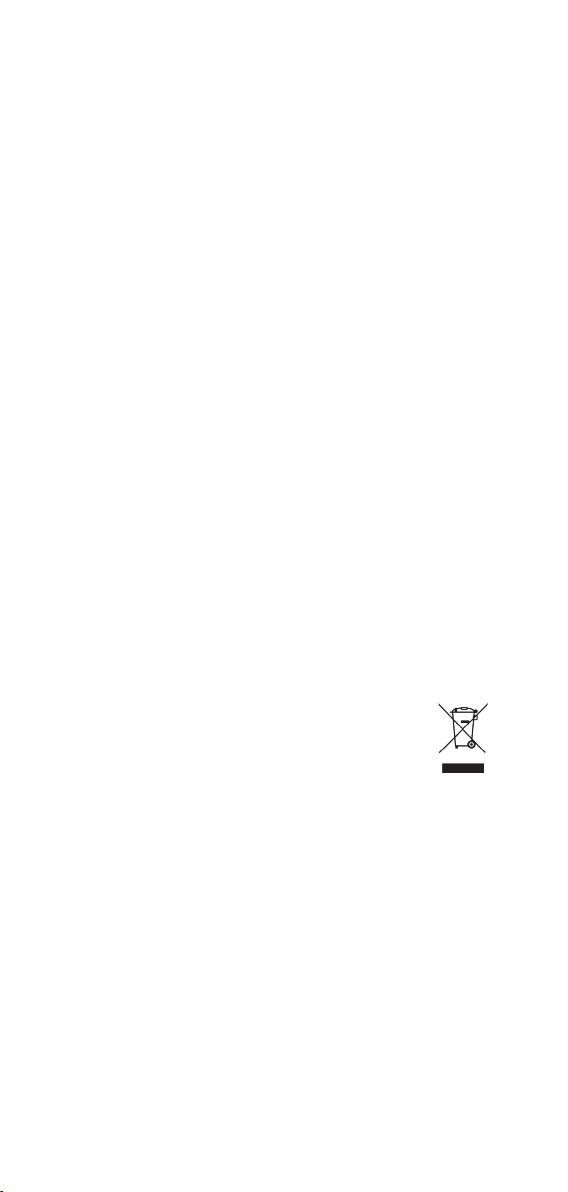
• При необходимости корпус обогревателя можно протереть влажной салфеткой, а затем вытереть насухо. Не допускайте попадания
влаги внутрь электроприбора.
• Следите за тем, чтобы на фильтре (11) не накапливалась пыль. Для
чистки извлеките фильтр, промойте его или почистите при помощи
пылесоса.
Ремонт и устранение неисправностей
• В целях безопасности ремонт электроприбора должен осуществляться только квалифицированными специалистами авторизованного сервисного центра. Гарантия не распространяется на неисправности, обусловленные неквалифицированным ремонтом, а
также неправильной эксплуатацией электроприбора.
• Запрещается использование неисправного электроприбора, а также при механических или иных повреждениях самого электроприбора, сетевого шнура или его вилки.
• Никогда не разбирайте электроприбор самостоятельно, не вставляйте никакие посторонние предметы в отверстия в корпусе электроприбора.
• Если прибор не подлежит ремонту, сделайте его непригодным для
использования обрезав шнур питания, после этого аппарат можно
утилизировать.
Утилизация
Позаботьтесь об окружающей среде! Не выбрасывайте неисправные
электроприборы вместе с бытовыми отходами. Обратитесь для этих
целей в специализированный пункт утилизации электроприборов.
Адреса пунктов приема бытовых электроприборов на переработку
Вы можете получить в муниципальных службах Вашего города. Неправильная утилизация электроприборов наносит непоправимый вред окружающей среде. При замене неисправного
электроприбора на новый юридическую ответственность за
утилизацию должен нести продавец.
Спецификация
Элек тр опит ание 220–24 0 В / 5 0 Гц
Температура 0–35°С / >35°C = Hi
Мощность 300 / 2000 Вт
Габариты 183 х 420 х 183 мм
(длина х высота х глубина)
Масса примерно 3.2 кг
Уров ень шум а 28 – 50 дБ (А)
Соответствует европейским
правилам безопасности CE / WEEE / RoHS / EAC
Производитель сохраняет за собой право на внесение изменений в
технические характеристики, комплектацию и конструкцию данной
модели без предварительного уведомления.
Элек тронную версию инструкции можно скачать на нашем сайте:
www.stadlerform.ru
Page 73
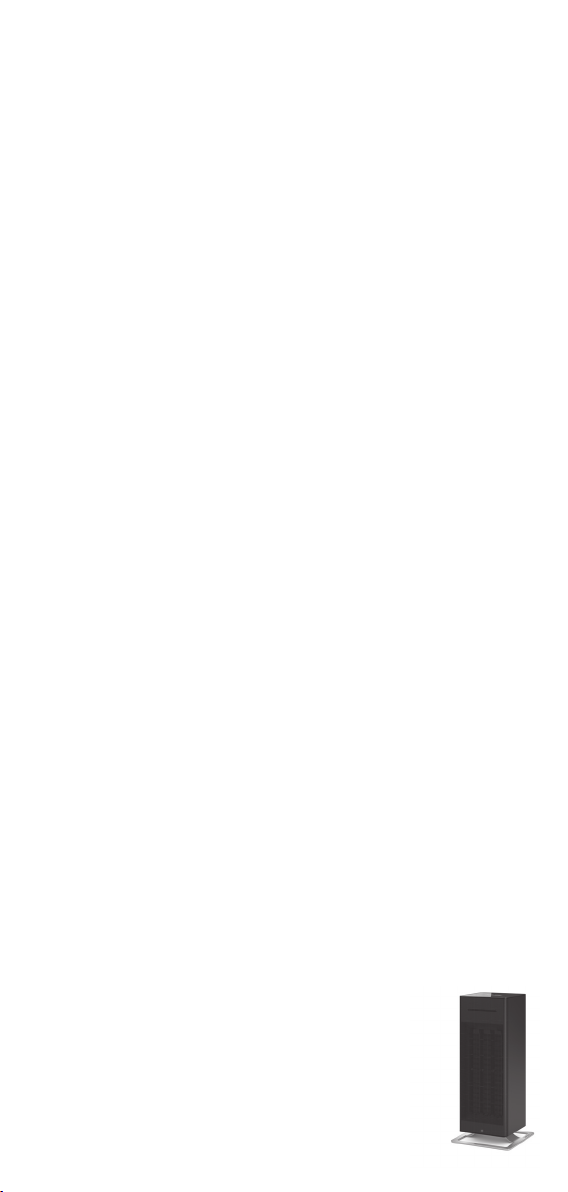
Информация о сертификации
Товар сертифицирован в соответствии с законом «О защите прав потребителей».
Установленный производителем в соответствии с п.2 ст.5 Федерального Закона РФ «О защите прав потребителей» срок службы для данного изделия равен 5 годам, при условии, что изделие используется
в строгом соответствии с настоящей инструкцией по эксплуатации и
применяемыми техническими стандартами.
Гарантийный срок
гарантийный срок составляет 12 месяцев с документально подтвержденной даты продажи Оборудования/Изделия Потребителю Продавцом. В случае отсутствия у Потребителя документов, подтверждающих дату покупки, гарантийный срок рассчитывается с даты
изготовления.
Дата изготовления
Дата изготовления зашифрована в виде группы цифр в серийном номере, расположенном на корпусе прибора.
Пример: 78901 1511 123456
78901 – код поставщика
15 – последние две цифры года
11 – номер месяца
123456 – номер продукта
Дату изготовления следует читать:
78901 1511 123456 – 2015 год, ноябрь
Page 74

Warranty/Garantie/Garantie/Garanzia/Garantía
Garantie/Garanti/Takuu/Garanti/Garanti
2 Years warranty
This warranty covers defects of construction, manufacturing and material.
Excluded are all wearing parts and improper usage, or consequential damages due to lack of cleaning and/or descaling of the appliance.
2 Jahre Garantie
Diese umfasst Konstruktions-, Produktions-, sowie Materialfehler. Ausgenommen sind sämtliche Verschleissteile und unsachgemässe Benutzung,
sowie Folgeschäden durch mangelnde Reinigung und/oder Entkalkung des
Gerätes.
Garantie 2 ans
La présente garantie couvre les défauts matériels, de construction et de
fabrication. En revanche, elle exclut toutes les pièces d’usure normale, ainsi
que tout dommage résultant de la négligence ou consécutif à un défaut
d’entretien/de détartrage de l’appareil.
2 anni di garanzia
Ques ta garan zia copre di fetti di c ostr uzione, di pr oduzione e di m ateriale. Tut te
le parti di abrasione sono escluse e altresì l’uso o la manutenzione inappropriata dovuti alla mancanza di pulizia e/o disincrostazione dell’apparecchio.
2 años de garantía
Esta g ar ant ía cub re lo s def ec t os de c on st ru cció n, f abr ica ción y m ate riale s. E st án
excluidas todas las piezas de desgaste y el uso indebido, o los daños indirectos provocados por la falta de limpieza y/o el descascarillado del dispositivo.
2 jaar garantie
Deze omvat constructie-, productie- en materiaalfouten. Uitgesloten zijn
alle slijtageonderdelen en onoordeelkundig gebruik, plus gevolgschade door
onvoldoende schoonmaken en/of ontkalken van het apparaat.
2 års garanti
Garantien omfatter konstruktions-, fremstillings- og matrialefejl. Alle sliddele og fejlbrug samt følgeskader pga. utilstrækkelig rengøring og/eller afkalkning af enheden er ikke indbefattet.
2 vuoden takuu
Takuu käsittää valmistus-, tuotanto- sekä materiaalivirheet. Takuun ulkopuolelle jäävät kaikki kuluvat osat ja käyttöohjeiden vastainen käyt tö, tai ne
vauriot, jotka johtuvat siitä, että laitetta ei ole puhdistettu ja/tai laitteessa
on pinttynyttä likaa.
2 års garanti
Denne garantien dekker feil i konstruksjon, produksjon og materiale. Garantien omfatter ikke slitedeler og feilaktig bruk eller skader som skyldes
mangelfull rengjøring og/eller avkalking av apparatet.
2 års garanti
Denna garanti täcker brister i tillverkning, produktion och material. Slitdelar
och felaktig användning, eller följdskador på grund av bristande rengöring
och/eller avkalkning av apparaten är uteslutna.
Page 75

Retailer’s stamp / Stempel Ver kaufsstelle /
Cache t du point de vente / Timbro del rivenditore /
Sello del establecimiento de venta / Stempel verko opadres /
Butik kens stempe / Leima my yntikont tori / Forhan dlerstempel /
Återförsäljarens stämpel / Пе чать маг азина
Page 76

Design by Matti
Thanks to all people in volved in this pr oject: Del Xu for
his engagement, ideas and organisation, John Ye for
the development, engineering and CAD work, Mario Rothenbühler for the photos, Matti Walker for the timeless,
unique, elegant design and graphic work.
Martin Stadler, CEO Stadler Form Aktiengesellschaft
18-1
www.stadlerform.com
 Loading...