

Stadler Form George User manual
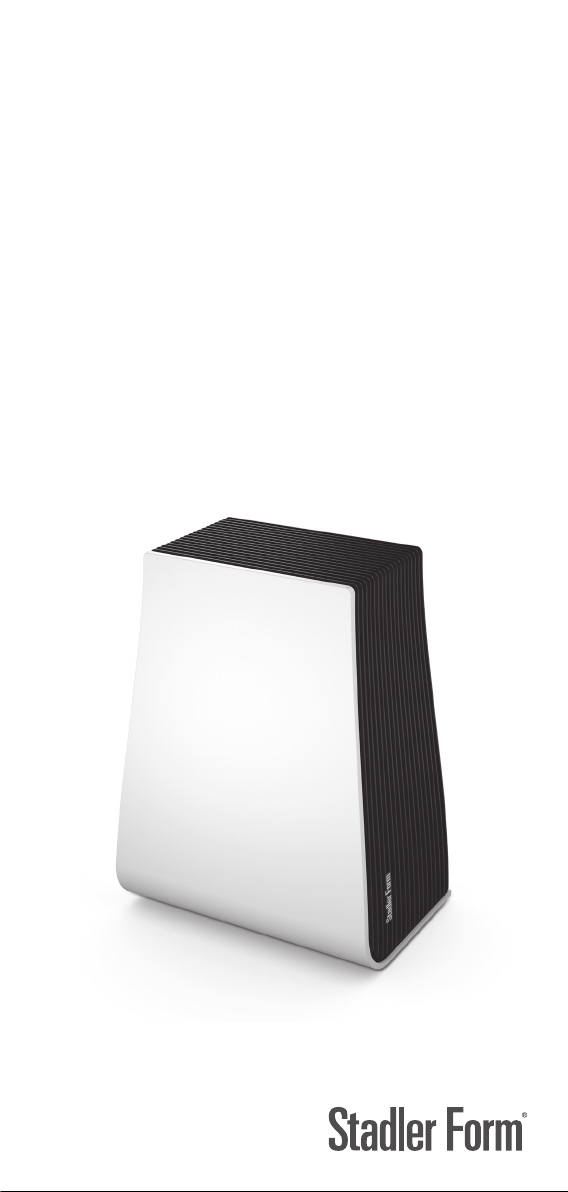
George
Operating instructions
Gebrauchsanweisung
Mode d‘emploi
Istruzioni per l‘uso
Manual de instrucciones
Gebruiksaanwijzing
Brugsanvisning
Käyttöohje
Bruksanvisning
Bruksanvisning
Инструкция по эксплуатации
George
1
17
19
16
18
14
8
3
A
G
R
E
A
R
N
H
A
J
2
•
E
I
T
N
A
R
A
G
E
D
S
E
T
I
E
•
2
Y
E
A
R
S
W
A
R
R
A
É
N
T
N
Y
N
•
A
2
9101213 11
5
2
6
7
Optional
4
15
Testing strip / Wasserteststreifen / Bandelette testeur / Test stricia / Papel indicator / Teststrook
Teststriben / Koeliuskat / Teststrimmel / Testremsa

Share your feedback about George on:
Teilen Sie Ihr Feedback von George auf:
Partagez votre commentaire sur George :
www.stadlerform.com/Reviews
For frequently asked questions go to:
Für häufig gestellte Fragen besuchen Sie:
Trouvez la foire aux questions sur :
www.stadlerform.com/George/support
Download instruction manual:
Bedienungsanleitung hier herunterladen:
Téléchargez le mode d’emploi :
www.stadlerform.com/George/manual
Watch the video of George:
Schauen Sie sich das Video zu George an:
Regardez la vidéo du George :
www.stadlerform.com/George/video
Stadler Form Aktiengesellschaft, Chamerstrasse 174, 6300 Zug, Switzerland
Phone +41 41 720 48 48, Fax +41 41 720 48 44, www.stadlerform.com/contact

English
Congratulations! You have just purchased the exceptional air washer (air purifier and humidifier) GEORGE. He will give you great pleasure and improve
the indoor air for you.
As with all domestic electrical appliances, particular care is needed with
this model also, in order to avoid injury, fire damage or damage to the appliance. Please study these operating instructions carefully before using the
appliance for the first time and follow the safety advice on the appliance
itself.
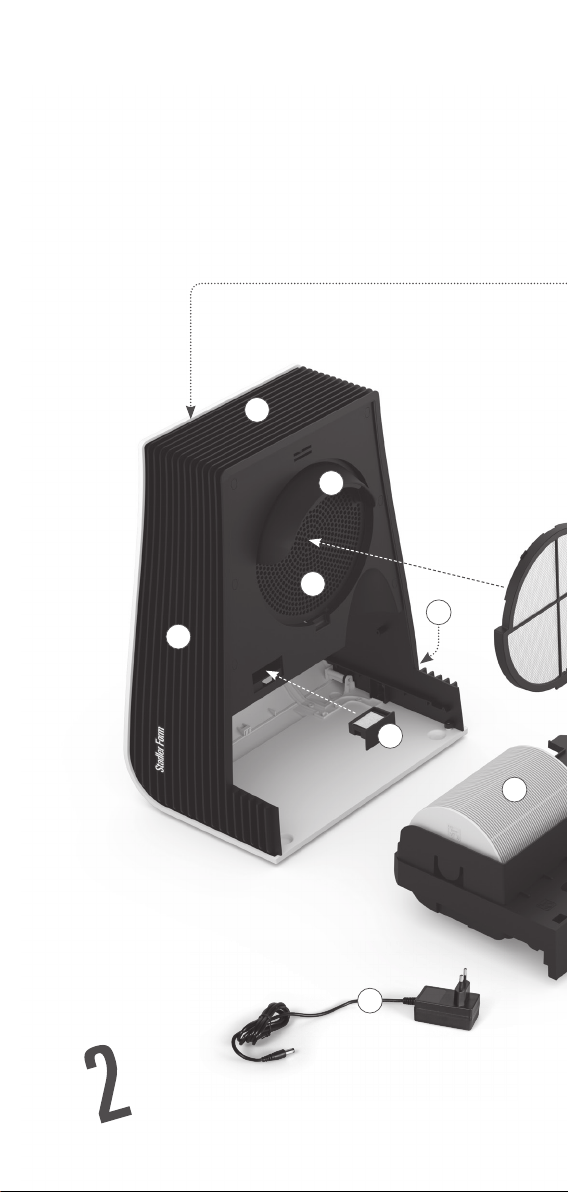
Description of the appliance
The appliance consists of the following main components:
1. Air washer housing with motor
2. Air washer water tray
3. Mains cable with adapter for power supply
4. On/Off switch
5. Water tank with carrying handle
6. Water tank lid
7. Anticalc cartridge (optional)
8. Evaporator discs
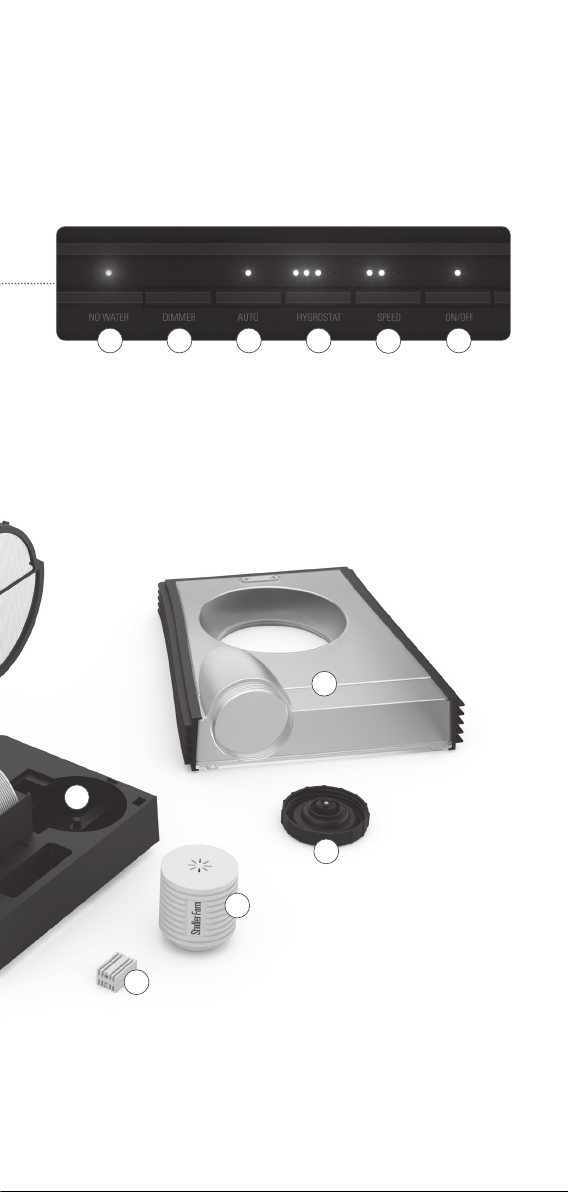
9. Button for the selection of the fan speed (1, 2, 3, 4)
10. Button for the selection of the desired humidity
(hygrostat: 40 / 45 / 50 / 55 % / continuous operation)
11. Button for Auto Mode
11. Button for Dimmer (dims or switches off LEDs)
13. Indicator for low water level, «No Water» (LED is illuminated red)
14. Fragrance container
15. Silver Cube™
16. Air inlet with washable air filter
17. Air outlet
18. Connection for power adapter
19. Hidden handle for easy carrying of the appliance
Important safety instructions
Please read through the operating instructions carefully before you use the
appliance for the first time and keep them safely for later reference; if necessary pass them on to the next owner.
• Stadler Form refuses all liability for loss or damage which arises as a
result of failure to follow these operating instructions.
• The appliance is only to be used in the home for the purposes described
in these instructions. Unauthorised use and technical modifications to the
appliance can lead to danger to life and health.
• This appliance can be used by children aged from 8 years and above and
persons with reduced physical, sensory or mental capabilities or lack of
experience and knowledge if they have been given supervision or instruction concerning use of the appliance in a safe way and understand the
hazards involved. Children shall not play with the appliance. Cleaning and
user maintenance shall not be made by children without supervision.
• Only connect the cable to alternating current. Observe the voltage information given on the appliance.
• Do not use damaged extension cords.

• Do not run the power cord over sharp edges and make sure that it does
not get trapped.
• Do not pull the plug from the socket with wet hands or by holding on to
the power cord.
• Do not use the appliance in immediate vicinity of a bath tub, a shower or a
swimming pool (observe a minimum distance of 3 m). Place the appliance
such that a person in the bath tub cannot touch the appliance.
• Do not place the appliance near a heat source. Do not subject the power
cord to direct heat (such as a heated hotplate, open flames, hot iron sole
plates or heaters for example). Protect power cords from oil.
• See to it that the appliance is properly positioned to ensure a high stability during its operation and make sure that no one can trip over the power
cord.
• The appliance is not splash-proof.
• For indoor use only.
• Do not store the appliance outdoors.
• Store the appliance in a dry place inaccessible to children (pack the appliance).
• If the power cord is damaged, it must be replaced by the manufacturer
or a repair shop authorized by the manufacturer or by similarly qualified
persons in order to avoid a hazard.
• Prior to any maintenance, cleaning and after each use, switch off the appliance and unplug the mains cable from the socket.
Setting up / Operation
1. George has an inte grated carr ying handle (16). Place your hand at t he top
of the circular hole of the water tank (5) to lift the appliance.
2. Place George at the desired position on a flat surface. Connect the
power adapter (3) to the unit (18) and plug the adapter into a suitable
plug socket.
3. First, remove the protective foil from the evaporator discs (8) and the
fixing adhesive from the Silver Cube (15).
4. Remove the water tank (5) by tilting it back in the upper area. Screw off
the water tank lid (6) and fill the water tank with clean, cold tap water.
Then screw the lid back onto the water tank. Place the water tank on the
water tray (2). The water tray now fills slowly with the water from the
water tank. Important: please do not transport George as long as he is
filled with water. The water could spill over.
5. Turn George on by pressing the On/Off switch (4). The «No Water» indicator (13) lights up when there is not enough water in the appliance. If
all LEDs flash slowly, the water tray (2) is not placed correctly in the appliance. Slide the water tray all the way into the appliance until you hear
a signal sound. The speed level is set to level 2 and the desired humidity
to continuous operation.
6. The desired humidity level can be set by pressing the hygrostat button
(10) (1 LED = 40 %, 2 LEDs = 45 %, 3 LEDs = 50 %, 4 LEDs = 55 %, 5 LEDs
= continuous operation). Info: Once the desired air humidity is reached,
the appliance stops and the hygrostat LEDs blink. If the measured current humidity falls below the set value, the appliance starts to humidify
again. If the current humidity is higher than the set value, the fan runs
every 30 minutes for 90 s.

7. The humidification performance depends on the speed of the fan. If
the auto mode is disabled, the speed level may be changed. Select the
speed level 1, 2, 3 or 4 by repeatedly pressing the «Speed» button (9).
8. Press the «Auto» button (11) to activate the auto mode. The LED above
the «Auto» button lights up. In auto mode, the appliance automatically
maintains the desired humidity level. First, set the hygrostat (10) to the
desired humidity (40 / 45 / 50 or 55 %). The auto mode can not be activated when the hygrostat (10) is set to continuous operation (5 LEDs
lit). The lower the current humidity, the higher the speed of the fan is set
automatically. The closer the current humidity is to the desired value,
the lower the speed level is selected (e.g. if desired humidit y is 45 % and
current humidity is below 34 %, level 3 is selected, from 35-40 % = level
2, from 41-45 % = Level 1). If the speed level is changed manually (button
9 is pressed), the auto mode is disabled.
9. If you feel disturbed by the brightness of the LEDs (for example in the
bedroom), you can reduce the light intensity by pressing the dimmer button (12):
• Normal mode (default mode)
• Dimmed mode (push once)
• Lights-out mode (push twice)
• By pushing the dimmer button once more, you can go back into nor-
mal mode.
If there is no water in the appliance, the red water level symbol (13)
lights up in all modes. The red light cannot be dimmed.
10. As soon as the «No Water» symbol (13) lights up, the appliance must
be refilled with water. To do this, remove the water tank (5) and fill it
with clean, cold tap water. After replacing the water tank, the appliance
automatically resumes operation after a few seconds.
11. You can use George to disperse fragrances in the room. It must be
emphasised to please use fragrances extremely sparingly because
an excessive dosage can result in malfunctioning of and damages to
the appliance. In order to use fragrances, remove the water tank (5)
and pull the fragrance container (14) out of the appliance. Let the fragrance drip directly onto the cotton pad in the fragrance container.
Add a maximum of 1–2 drops of fragrance into the fragrance container.
Tip: In order to change the fragrance, pull the fragrance container out of
the appliance, remove the cotton pad and clean the container with soap.
Now you may insert a new cotton pad (commercially available) and add
drops of the desired fragrance.
12. If you would like to refill the water during operation, you may remove t he
water tank and refill it. The appliance will continue to operate using the
water still in the appliance for at least 5 minutes. As long as the water
tank is replaced within this period of time, the appliance can continue its
service without interruption.
13. If the appliance is not used for several days, the water from the water
tank (2) and from the water tank (5) must be emptied beforehand. Fill
the water tank with fresh water before putting it back into operation.
Important information
Humidification with an air washer takes some time. An air washer works
according to the evaporation principle. In this process the air only absorbs
as much water as it needs at the current temperature (self-regulating

humidification). This means that it could take several hours to achieve a
measurable humidification result. If you put the air washer into operation
in a very dry environment, we recommend that you set the appliance to
continuous operation («Hygrostat» = 5 LEDs) and the speed level to 3 or 4
(«Speed») in order to effectively incre ase the air humidity level. Here t he size
of the room and the ventilation intervals also play a role. (Also see www.
stadlerform.com/faq).
Cleaning
Prior to any maintenance, cleaning and after each use, switch off the appliance and unplug the mains cable (3) from the socket.
Attention: Never submerge the appliance in water (danger of short-circuit).
• For external cleaning, rub with a damp cloth and then dry thoroughly.
• For internal cleaning, remove the water tank (5) and then pull out the water tray (2) with the evaporator discs (8) (grab underneath the tray).
• Rins e the water tray (2) and the e vaporator discs (8) wit h clean water once
per week, in order to wash out the particles of dirt removed from the air.
• Clean the water tray (2), evaporator discs (8) and the water tank (5) thoroughly every 2 weeks with a soft brush or sponge and warm water. If
there are lime scale deposits in the water tray or water tank, use a descaling solution diluted with water (for mixture ratio, see manufacturer’s
instructions). Subsequently rinse the tray and tank with tap water thoroughly. The water tray can also be cleaned in the dishwasher (at a maximum of 60 ° C).
• Descale the evaporator discs (8) approx. every 4 weeks, depending on the
water hardness level. To do so, first empty out any water remaining in the
water tray (2). Then fill the water tray with a descaling solution (mixture
ratio of solution/water according to the manufacturer’s instructions) up
to 2 cm below the edge of the tray (leave the evaporator discs in the tray).
Now push the water tray back into the appliance (the tank does not have
to be inserted). Activate the cleaning mode by simultaneously pressing
the buttons «Speed» (9) and «Dimmer» (12). All white LEDs will now flash
as a sign that the cleaning mode is active. Here the evaporator discs rotate but the fan does not run. Thus no air is blown into the room. After
20 minutes in cleaning mode, the appliance stops and the LEDs go out.
The cleaning process may be run several times depending on the thickness of the limescale deposits. Once the cleaning process is finished,
switch the appliance off using the On/Off switch (4). Empty the water
tray and clean it thoroughly with tap water. The evaporator discs can also
be cleaned in the dishwasher (at a maximum of 60 ° C).
• Make sure that the air inlet and outlet are cleaned regularly to prevent
the build-up of dust. Clean the air outlet (17) with a dry brush or vacuum
cleaner. The air inlet grid (16) is fitted with an air filter which can be removed and cleaned with a damp cloth. Remove the filter by pulling out the
flap at the bottom using the recessed grip.
Silver Cube™
The Silver Cube (15) prevents the growth of germs and bacteria in the humidifier due to the continuous release of silver ions. The use of the Silver
Cube leads to a hygienic room climate. The lifetime of the Silver Cube is
around one year. We therefore recommend that you replace the Silver Cube

at the beginning of every humidifying season. The Silver Cube starts working as soon as it comes into contact with water, and also works when the
unit is switched off.
Anticalc cartridge (optional accessory)
The anticalc cartridge (7) decreases the limescale in the water and thus
reduces the decalcification intervals. The cartridge has to be replaced ever y
one to three months, depending on the water hardness (see table).
With a water hardness above 21 °dH, we recommend the use of the anticalc
cartridge.
Important: Soak the anticalc cartridge in a water bath for 24 hours before
the first use (not in the water tank!). The resin has to absorb water to reach
high performance.
The period of time that the cartridge is effective for depends on the hardness of the water. This can be tested using the testing strips provided (see
page 4).
1. Dip the testing strips into the water for a second.
2. After around one minute, the results can be seen on the testing strips.
Some of the green boxes change colour into pink. The water hardness is
shown by how many boxes turn pink. Example: If three boxes are pink, then
the water hardness is > 14 °dH.
Number of
pink boxes
0/1 Soft
2 Moderately
3 Hard
4 Very hard
Water
hardness
hard
Degree of
hardness
(°dH)
°dH
From 4
From 7
°dH
From 14
From 21
Cartridge will last for
(with 6 liter/day)
Days Liter
60 days appro x. 360 L
30 days appro x. 180 L
20 days appro x. 120 L
°dH
10 days approx. 60 L
°dH
The car tridge is screwed onto the inside of the water tank lid (6). First, scre w
the tank lid (6) off of the water tank (5) and then affix the cartridge to the
inside of the tank lid. Dispose of used cartridges in the household waste. Do
not throw away the water tank lid when changing the cartridge!
Repairs
• Repairs to electrical appliances must only be carried out by a qualified
electrical technician. If improper repairs are carried out, the warranty
lapses and all liability is refused.
• Never operate the appliance if the adaptor or plug is damaged, after it has
malfunctioned, if it has been dropped or has been damaged in any other
way (cracks/breaks in the casing).
• Do not push any object into the appliance.
• If the appliance is beyond repair, make it unusable immediately by cutting
through the cable and hand it in at the collection point provided for the
purpose.

Disposal
The European directive 2012 / 19 / CE on Waste Electrical and Electronic
Equipment (WEEE), requires that old household electrical appliances must
not be disposed in the normal unsorted municipal waste stream. Old appliances must be collected separately in order to optimize the recovery and
recycling of the materials they contain and reduce the impact on human
health and the environment. The crossed out «wheeled bin» symbol on the
product reminds you of your obligation, that when you dispose of
the appliance it must be separately collected. Consumers should
contact their local authority or retailer for information concerning
the correct disposal of their old appliance.
Specifications
Rated voltage DC 12 V
Rated power 3 – 23 W
Humidity output up to 400 g/h
Dimensions 315 x 418 x 215 mm
(width x height x depth)
Weight 5.1 kg
Tank capacity 3.2 Liter
Sound level 27 – 48 dB(A)
Complies with EU
regulations CE / WEEE / RoHS / EAC
All rights for any technical modifications are reserved

Deutsch
Gratulation! Sie haben soeben den aussergewöhnlichen Luftwäscher
(Luftreiniger und Befeuchter) GEORGE erworben. Er wird Ihnen viel Freude
machen und die Raumluft für Sie verbessern.
Wie bei allen elek trischen Haushaltsgeräten wird auch bei diesem Gerät zur
Vermeidung von Verletzungen, Brand- oder Geräteschäden besondere Sorgfalt verlangt. Bitte studieren Sie die vorliegende Betriebsanleitung vor der
Inbetriebnahme und beachten Sie die Sicherheitshinweise auf dem Gerät.
Gerätebeschreibung
Das Gerät besteht aus den folgenden Hauptkomponenten:
1. Luftwäscher Gehäuse mit Motor
2. Luftwäscher Wasserwanne
3. Netzkabel mit Adapter für die Stromversorgung
4. Ein-/Aus-Schalter
5. Wassertank mit Tragegriff
6. Wassertankdeckel
7. Antikalkkartusche (optional)
8. Verdunsterscheiben
9. Taste für die Wahl der Ventilator Geschwindigkeitsstufe (1, 2, 3, 4)
10. Taste für die Wahl der gewünschten Luftfeuchtigkeit
(Hygrostat: 40 / 45 / 50 / 55 % / Dauerbetrieb)
11. Taste für Auto-Modus (regelt Geschwindigkeitsstufe automatisch)
12. Taste für Dimmer (dimmt oder schaltet LEDs aus)
13. Symbol für niedrigen Wasserstand, «No Water» (LED leuchtet rot)
14. Duftstoffbehälter
15. Silver Cube™
16. Lufteintritt mit abwaschbarem Luftfilter
17. L u f ta u s t r i t t
18. Anschluss für Netzadapter
19. Versteckter Handgriff für einfache Umplatzierung
Wichtige Sicherheitshinweise
Bitte lesen Sie die Gebrauchsanleitung genau dur ch, bevor Sie das Gerät das
erste Mal in Betrieb nehmen und bewahren Sie sie zum späteren Nachschlagen gut auf, geben Sie sie ggf. an den Nachbesitzer weiter.
• Für Schäden, die durch Nichtbeachten dieser Gebrauchsanleitung entstehen, lehnt Stadler Form jegliche Haftung ab.
• Das Gerät ist nur im Haushalt für die in dieser Gebrauchsanweisung
beschriebenen Zwecke zu benutzen. Ein nicht bestimmungsgemässer
Gebrauch sowie technische Veränderungen am Gerät können zu Gefahren
für Gesundheit und Leben führen.
• Dieses Gerät kann von Kindern ab 8 Jahren und Personen mit eingeschränkten körperlichen, sensorischen oder geistigen Fähigkeiten, aber
auch von unerfahrenen und unwissenden Personen verwendet werden,
sofern diese das Gerät unter Aufsicht verwenden oder von einer anderen
Person über die sichere Verwendung des Gerätes unterwiesen wurden
und sich der damit verbundenen Gefahren bewusst sind. Kinder sollten
nicht mit dem Gerät spielen. Kinder sollten das Gerät nur unter Aufsicht
reinigen und pflegen.
• Schliessen Sie das Kabel nur an Wechselstrom an. Achten Sie auf die
Spannungsangaben auf dem Gerät.

• Keine beschädigten Verlängerungskabel verwenden.
• Das Netzkabel nicht über scharfe Kanten ziehen oder einklemmen.
• Den Stecker nie am Netzkabel oder mit nassen Händen aus der Steckdose
ziehen.
• Das Gerät nicht in unmittelbarer Nähe einer Badewanne, einer Dusche
oder eines Schwimmbeckens benutzen (Mindestabstand von 3 m einhalten). Gerät so aufstellen, dass Personen das Gerät von der Badewanne
aus nicht berühren können.
• Gerät nicht in der Nähe einer Wärmequelle aufstellen. Das Netzkabel
keiner direkten Hitzeeinwirkung (wie z.B. heisse Herdplatte, offene
Flammen, heisse Bügelsohle oder Heizöfen) aussetzen. Netzkabel vor Öl
schützen.
• Darauf achten, dass das Gerät beim Betrieb eine gute Standfestigkeit besitzt und nicht über das Netzkabel gestolpert werden kann.
• Das Gerät ist nicht spritzwassergeschützt.
• Das Gerät ist nur zur Verwendung in Innenräumen geeignet.
• Das Gerät nicht im Freien aufbewahren.
• Das Gerät an einem trockenen und für Kinder unzugänglichen Ort aufbewahren (einpacken).
• Wenn das Netzkabel beschädigt ist, muss es vom Hersteller oder in einer
vom Hersteller zugelassenen Werkstatt oder von ähnlich qualifizierten
Personen ersetzt werden, um Gefahren zu vermeiden.
• Vor jeder Wartung, Reinigung und nach jedem Gebrauch das Gerät ausschalten und das Netzkabel von der Steckdose trennen.
Inbetriebnahme / Bedienung
1. George verf ügt über einen integrierten Tragegriff (16). Platzieren Sie Ihre
Hand oben an der kreisrunden Öffnung beim Wassertank (5), um das
Gerät anzuheben.
2. Stellen Sie George an den gewünschten Platz auf einen flachen Untergrund. Schliessen Sie den Netzadapter (3) ans Gerät an (18) und stecken
Sie den Adapter in eine geeignete Steckdose.
3. Entfernen Sie zuerst die Schutzfolie von den Verdunsterscheiben (8) und
den Fixierungskleber vom Silver Cube (15).
4. Entnehmen Sie den Wassertank (5), indem Sie diesen im oberen Bereich
nach hinten kippen. Schrauben Sie den Wassertankdeckel (6) ab und
füllen Sie den Wassertank mit sauberem und kaltem Leitungswasser.
Schrauben Sie anschliessend den Deckel wieder an den Wassertank.
Platzieren Sie den Wassertank auf der Wasserwanne (2). Die Wasserwanne füllt sich nun langsam mit dem Wasser aus dem Wassertank.
Wichtig: Bitte transportieren Sie George nicht, solange dieser mit Wasser gefüllt ist. Das Wasser könnte überschwappen.
5. Schalten Sie George durch Drücken des Ein-/Aus-Schalter ein (4). Leuchtet die «No Water» Anzeige (13), ist zu wenig Wasser im Gerät. Wenn
alle LEDs langsam blinken, ist die Wasserwanne (2) nicht korrekt im Gerät platziert. Schieben Sie die Wasserwanne ganz ins Gerät hinein, bis
Sie einen Signalton hören. Die Geschwindigkeitsst ufe ist auf Stufe 2 und
die gewünschte Luftfeuchtigkeit auf Dauerbetrieb voreingestellt.
6. Durch Drücken der Hygrostat Taste (10) kann die gewünschte Luftfeuchtigkeit eingestellt werden (1 LED = 40 %, 2 LEDs = 45 %, 3 LEDs = 50 %,
4 LEDs = 55 %, 5 LEDs = Dauerbetrieb). Info: Wenn die gewünschte
Luftfeuchtigkeit erreicht ist, stoppt das Gerät und die Hygrostat LEDs

blinken. Sinkt die gemessene aktuelle Luftfeuchtigkeit unter den eingestellten Wert, beginnt das Gerät wieder zu befeuchten. Ist die aktuelle
Luftfeuchtigkeit höher als der eingestellte Wert, läuft der Ventilator alle
30 Minut en f ür 9 0 s.
7. Die Befeuchtungsleistung hängt von der Geschwindigkeit des Ventilators ab. Ist der Auto-Modus deaktiviert, kann die Geschwindigkeitsstufe
verändert werden: Durch mehrmaliges Drücken der Taste «Speed» (9)
wählen Sie die Geschwindigkeitsstufe 1, 2, 3 oder 4.
8. Drücken Sie die Taste «Auto» (11) um den Auto-Modus zu aktivieren.
Die LED oberhalb der «Auto» Taste leuchtet nun. Im Auto-Modus hält
das Gerät die gewünschte Luftfeuchtigkeit automatisch. Stellen Sie
dazu zuerst den Hygrostat (10) auf die gewünschte Luftfeuchtigkeit (40
/ 45 / 50 oder 55 %) ein. Der Auto-Modus kann nicht aktiviert werden,
wenn der Hygrostat (10) auf Dauerbetrieb (5 LEDs leuchten) eingestellt
ist. Je tiefer die aktuelle Luftfeuchtigkeit ist, desto höher wird die Geschwindigkeitsstufe des Ventilators automatisch eingestellt. Je näher
die aktuelle Luftfeuchtigkeit am gewünschten Wert ist, desto tiefer wird
die Geschwindigkeitsstufe gewählt (z.B. wenn gewünschte Feuchtigkeit
45 % ist und aktuelle Feuchtigkeit unter 34 %, wird Stufe 3 gewählt, von
35 – 40 % = Stufe 2, von 41 – 45 % = Stufe 1). Wird die Geschwindigkeitsstufe manuell verändert (drücken der Taste 9), wird der Auto-Modus deaktiviert.
9. Wenn Sie sich durch die Helligkeit der Lämpchen gestört fühlen (z.B. im
Schlafzimmer), können Sie die Leuchtintensität durch Drücken der Taste
für den Dimmer (12) reduzieren:
• Normaler Modus (standardmässig eingeschaltet)
• Gedimmter Modus (einmal drücken)
• Licht-aus Modus (zweimal drücken)
• Durch nochmaliges Drücken des Dimmer-Schalters können Sie wie-
der in den Normalen Modus wechseln.
Wenn kein Wasser im Gerät ist, leuchtet die rote Wasserstandanzeige
(13) in allen Dimm-Modi. Das rote Licht kann nicht gedimmt werden.
10. Sobald das Symbol «No Water» aufleuchtet (13), muss Wasser nachgefüllt werden. Entfernen Sie dafür den Wassertank (5) und füllen Sie diesen mit sauberem und kaltem Leitungswasser. Nach dem Einsetzen des
Wassertanks nimmt das Gerät nach ein paar Sekunden seinen Betrieb
automatisch wieder auf.
11. Sie können mit George Duftstoffe im Raum verteilen. Wir bitten
Sie im Umgang mit Duftstoffen äusserst sparsam zu sein, da eine
zu grosse Dosierung zu Fehlfunktionen und zu Schäden am Gerät
führen kann. Zur Verwendung von Duftstoffen entnehmen Sie den
Wassertank (5) und ziehen den Duftstoffbehälter (14) aus dem Gerät. Träufeln Sie die Duftstoffe direkt auf die Watte im Behälter.
Geben Sie maximal 1–2 Tropfen des Duftstoffes in den Behälter.
Tipp: Um den Duftstoff zu wechseln, ziehen Sie den Duftstoffbehälter
aus dem Gerät, entfernen Sie die Watte und reinigen Sie den Behälter
mit Seife. Sie können nun ein neues Watte-Pad (handelsübliche Watte)
einsetzen und mit Duftstoff beträufeln.
12. Möchten Sie das Wasser während dem Betrieb nachfüllen, können Sie
den Wassertank entfernen und auffüllen. Das Gerät wird mit dem verbleibenden Wasser mind. 5 min. weiter funktionieren. Setzen Sie den

Wassertank in dieser Zeitdauer wieder ein und das Gerät kann seinen
Dienst ohne Unterbruch fortführen.
13. Wird das Gerät mehrere Tage nicht benutzt, leeren Sie vorab das Wasser aus der Wasserwanne (2) und aus dem Wassertank (5). Füllen Sie
frisches Wasser in den Wassertank bevor Sie das Gerät wieder in Betrieb nehmen.
Wichtiger Hinweis
Die Befeuchtung mit einem Luftwäscher nimmt etwas Zeit in Anspruch. Ein
Luftwäscher funktioniert nach dem Verdunstungsprinzip. Dabei nimmt die
Luft nur so viel Wasser auf, wie sie bei der aktuellen Temperatur benötigt
(selbstregulierende Befeuchtung). Das heisst, es kann mehrere Stunden
dauern, um ein messbares Befeuchtungsergebnis zu erreichen. Sollten Sie
den Luftwäscher in einer sehr trockenen Umgebung in Betrieb nehmen,
empfehlen wir Ihnen das Gerät in den ersten Tagen auf Dauerbetrieb («Hygrostat» = 5 LEDs) und Stufe 3 oder 4 («Speed») zu betreiben, um die Luftfeuchtigkeit wirksam ansteigen zu lassen. Dabei spielt die Raumgrösse und
die Lüftungsintervalle ebenfalls eine Rolle.
(Siehe auch www.stadlerform.com/faq)
Reinigung
Vor jeder War tung, Reinigung und nach jedem Gebrauch das Gerä t ausschalten und das Netzkabel (3) von der Steckdose trennen.
Achtung: Das Gerät nie ins Wasser tauchen (Kurzschlussgefahr).
• Zur äusseren Reinigung mit einem feuchten Lappen abreiben und danach
gut trocknen.
• Zur internen Reinigung den Wassertank (5) abnehmen und dann die Wasserwanne (2) mit den Verdunsterscheiben (8) herausziehen (Griff auf der
Unterseite der Wanne).
• Spülen Sie die Wasserwanne (2) und die Verdunsterscheiben (8) einmal
pro Woche mit sauberem Wasser aus, um die aus der Luft gereinigten
Schmutzpartikel auszuwaschen.
• Reinigen Sie die Wasserwanne (2), Verdunsterscheiben (8) und den
Wassertank (5) alle 2 Wochen gründlich mit einer weichen Bürste oder
Schwamm und warmem Wasser. Bei Kalkablagerungen in der Wasserwanne oder Wassertank verwenden Sie mit Wasser verdünntes Entkalkungsmittel (Mischverhältnis nach Herstellerangaben). Wanne und Tank
danach gut mit Leitungswasser ausspülen. Die Wasserwanne kann auch
im Geschirrspüler gereinigt werden (bei max. 60 °C).
• Die Verdunsterscheiben (8) je nach Wasserhärtegrad ca. alle 4 Wochen
entkalken. Entleeren Sie zuerst das Restwasser aus der Wasserwanne
(2). Danach Entkalkungsmittel (Mischverhältnis mit Wasser nach Herstellerangaben) bis 2 cm unter der Wannenkante einfüllen (die Verdunsterscheiben dabei in der Wanne lassen). Schieben Sie nun die Wasserwanne
zurück in das Gerät (Tank muss nicht eingesetzt werden). Aktivieren Sie
den Reinigungsmodus durch gleichzeitiges Drücken der Tasten «Speed»
(9) und «Dimmer» (12). Alle weissen LEDs blinken nun als Zeichen, dass
der Reinigungsmodus aktiviert ist. Dabei drehen die Verdunsterscheiben, aber der Ventilator läuft nicht. Somit wird keine Luft in den Raum
geblasen. Nach 20 Minuten im Reinigungs-Modus stoppt das Gerät und
die LEDs erlöschen. Je nach Stärke der Verkalkung können Sie den Reini-

gungs-Modus mehrmals laufen lassen. Wenn die Reinigung abgeschlossen ist, schalten Sie das Gerät mit dem Ein-/Aus-Schalter aus (4). Entleeren Sie die Wasserwanne und spülen sie gründlich mit Leistungswasser
aus. Die Verdunsterscheiben (8) können auch im Geschirrspüler gereinigt
werden (bei max. 60 °C).
• Darauf achten, dass Luftein- und austritt regelmässig gereinigt werden,
um eine Staubansammlung zu vermeiden. Den Luftaustritt (17) mit einem
trockenen Pinsel oder Staubsauger reinigen. Das Lufteintrittsgitter (16)
ist mit einem Luftfilter ausgestattet, der herausnehmbar und mit einem
feuchten Lappen gereinigt werden kann. Entnehmen Sie den Filter, indem
Sie die Klappe mit Hilfe der Griffmulde unten rausziehen.
Silber Würfel – Silver Cube™
Der Silber Würfel (15) verhindert durch stetige Abgabe von Silberionen das
Keim- und Bakterienwachstum im Luftbefeuchter. Der Einsatz des Silber
Würfels führt zu einem hygienischen Raumklima. Die Wirkzeit des Silber
Würfels ist ein Jahr. Wir empfehlen deshalb, den Silber Würfel vor jeder
neuen Befeuchtungssaison zu ersetzen. Der Silber Würfel wirkt, sobald er
mit dem Wasser im Gerät in Berührung kommt und auch wenn das Gerät
ausgeschaltet ist.
Antikalkkartusche (optionales Zubehör)
Die Antikalkkartusche (7) vermindert den Kalkgehalt im Wasser und reduziert damit die Entkalkungsintervalle. Je nach Wasserhärtegrad muss die
Kartusche alle ein bis drei Monate ersetzt werden (siehe Tabelle).
Ab einer Wasserhärte von über 21 °dH empfehlen wir Ihnen den Einsatz der
Antikalkkartusche.
Wichtig: Legen Sie die Antikalkkartusche vor der ersten Verwendung 24
Stunden in Wasser ein (nicht im Wassertank!). Das Granulat muss zuerst
Wasser aufnehmen, um die volle Leistungsfähigkeit zu erreichen.
Die Wirkungsdauer der Kartusche hängt von der Wasserhärte ab. Mit dem
mitgelieferten Teststreifen kann diese getestet werden (siehe Seite 4).
1. Teststreifen eine Sekunde lang ins Wasser tauchen.
2. Nach ca. einer Minute ist das Ergebnis auf dem Teststreifen sichtbar.
Einige der grünen Felder wechseln ihre Farbe zu rosa. Die Wasserhärte wird
durch die Anzahl rosafarbener Felder angezeigt. Beispiel: Bei drei rosafarbigen Feldern hat das Wasser den Härtegrad >14 °dH.
Rosa Felder Wasserhärte Härtegrad
0/1 Weich
2 Mittelhart
3 Eher har t
4 Sehr hart
(°dH)
Ab 4
Ab 7
Ab 14
Ab 21
°dH
°dH
°dH
°dH
Kartusche reicht für
(bei 6 Liter/Tag)
Tage Liter
60 Tage ca. 3 60 L
30 Tage ca. 18 0 L
20 Tage ca. 12 0 L
10 Tage ca. 6 0 L

Die Kartusche wird auf die Innenseite des Wassertankdeckels (6) geschraubt. Schrauben Sie zuerst den Tankdeckel (6) vom Wassertank (5) und
befestigen Sie dann die Kartusche an die Innenseite des Tankdeckels. Entsorgen Sie verbrauchte Kartuschen im Hausmüll. Werfen Sie den Tankdeckel
beim Kartuschenwechsel nicht weg!
Reparaturen
• Reparaturen an Elektrogeräten (Wechseln des Netzkabels) dürfen nur
von instruierten Fachkräften durchgeführt werden. Bei unsachgemässen
Reparaturen erlischt die Garantie und jegliche Haftung wird abgelehnt.
• Nehmen Sie das Gerät nie in Betrieb, wenn ein Kabel oder Stecker beschädigt ist, nach Fehlfunktionen des Gerätes, wenn dieses heruntergefallen ist oder auf eine andere Art beschädigt wurde (Risse/Brüche am
Gehäuse).
• Nicht mit irgendwelchen Gegenständen in das Gerät eindringen.
• Ausgedientes Gerät sofort unbrauchbar machen (Netzkabel durchtrennen) und bei der dafür vorgesehenen Sammelstelle abgeben.
Entsorgung
Die europäische Richtlinie 2012 / 19 / CE über Elektro- und Elektronik-Altgeräte (WEEE) verlangt, dass elektrische Haushaltsgeräte nicht über den
Restmüll oder sonstigen Haushaltsabfall entsorgt werden dürfen, sondern
an Sammelpunkten für das Recycling von elektrischen und elektronischen
Geräten abgegeben werden müssen. So können die Verwertung der enthaltenen Materialien optimiert und ihre Auswirkungen auf die menschliche Gesundheit und die Umwelt reduziert werden. Das durchgestrichene
Abfalltonnensymbol auf dem Produkt erinnert Sie an diese Verpflichtung. Bitte fragen Sie bei Ihrer Gemeindeverwaltung nach
der zuständigen Entsorgungsstelle.
Technische Daten
Nennspannung DC 12 V
Nennleistung 3 – 23 W
Befeuchtungsleistung bis 400 g/h
Abmessungen 315 x 418 x 215 mm
(Breite x Höhe x Tiefe)
Gewich t 5.1 kg
Wasser kapazit ät 3.2 Lit er
Schalldruckpegel 27 – 48 dB(A)
Erfüllt EU-Vorschrift CE / WEEE / RoHS / EAC
Technische Änderungen vorbehalten

Français
Félicitation ! Vous venez d‘acheter le superbe laveur d’air (purificateur et
humidificateur d’air) GEORGE. Nous espérons que cet appareil vous donnera
entière satisfaction et améliorera l’air intérieur pour vous.
Comme pour tous les appareils ménagers électriques, il est important
d‘entretenir cet appareil correctement afin d’éviter les blessures, les incendies ou les dommages. Veuillez lire attentivement le présent mode d’emploi
avant la mise en service et respecter les conseils de sécurité indiqués sur
l’appareil.
Description de l’appareil
L’appareil est composé des éléments principaux suivants:
1. Boîtier du laveur d’air avec moteur
2. Base d’eau du laveur d’air
3. Cordon secteur avec adaptateur pour l’alimentation électrique
4. Interrupteur marche-arrêt
5. Réservoir d‘eau avec une poignée
6. Couvercle du réservoir d‘eau
7. Cartouche anticalcaire (optionnelle)
8. Disques d’évaporation
9. Touche pour la sélection de la vitesse du ventilateur (1, 2, 3, 4)
10. Touche pour la sélection de l’humidité désirée
(hygrostat : 40 / 45 / 50 / 55 % / fonctionnement continu)
11. Touche « Auto Mode » (règle la vitesse automatiquement)
12. Touche « Gradateur » (varie l’intensité ou débranche les témoins LED)
13. Indicateur du niveau d’eau bas, « No Water »
(le témoin LED brille en rouge)
14. Tiroir pour parfum
15. Silver Cube™
16. Entrée d’air avec filtre à air lavable
17. Sor tie d’air
18. Raccordement pour adaptateur secteur
19. Poignée encastrée pour déplacer l’appareil facilement
Conseils de sécurité importants
Veuillez lire attentivement le mode d‘emploi avant la première mise en
service de l’appareil et conservez-le pour toute consultation ultérieure ou
remettez-le, le cas échéant, au nouveau propriétaire.
• La société Stadler Form dé cline toute responsabilité des dommages résultant du non-respect des indications données dans ce mode d‘emploi.
• Cet appareil ne doit être utilisé qu’aux fins domestiques décrites dans ce
mode d‘emploi. Toute utilisation contraire à sa destination ainsi que toute
modification technique apportée à l‘appareil peut entraîner des risques
pour la santé et la vie.
• Cet appareil peut être utilisé par les enfants âgés de 8 ans et plus et
les personnes aux capacités physiques, sensorielles ou mentales réduites
ou ne disposant pas de l’expérience ou de la connaissance nécessaire,
sous surveillance ou s’ils ont reçu les instructions concernant l’utilisation
de l’appareil et s’ils comprennent les dangers impliqués. Les enfants ne
doivent pas jouer avec l’appareil. Les opérations de nettoyage et d’entretien ne doivent pas être effectuées par des enfants sans surveillance.

• Ne branchez le câble qu’au courant alternatif. Tenez compte des indications de tension situées sur l‘appareil.
• Ne pas utiliser de rallonge électrique endommagée.
• Ne pas faire passer ou coincer le câble d’alimentation par-dessus des
arêtes vives.
• Ne jamais retirer la fiche de courant de la prise en tirant sur le câble d’alimentation ou en ayant les mains mouillées.
• Ne pas utiliser l’appareil à proximité immédiate d’une baignoire, d’une
douche ou d’une piscine (respecter une distance minimum de 3 m). Placer
l’appareil de telle façon à ce que personne ne puisse le toucher à partir
de la baignoire.
• Ne pas placer l’appareil à proximité directe d‘ une source de chaleur. Ne
pas exposer le câble d’alimentation à la chaleur (comme p. ex. une plaque
chaude de cuisinière, flammes nues, semelle chaude de fer à repasser ou
poêles). Protéger le câble d’alimentation de tout contact avec de l‘huile.
• Veiller à ce que l’appareil ait une bonne stabilité lors de son fonctionnement et que l’on ne puisse pas trébucher sur le câble d’alimentation.
• Cet appareil n’est pas protégé contre les projections d’eau.
• Pour usage intérieur uniquement.
• L’appareil ne doit pas être conservé à l’extérieur.
• Conserver l’appareil à un endroit sec et hors de portée des enfants (l’emballer).
• Si le cordon d’alimentation e st endommagé, le faire remplacer par le fabricant ou par un atelier agréé par le fabricant ou des personnes qualifiées
en conséquence, afin d’éviter tout danger.
• Avant toute opération d’entretien, de nettoyage et après chaque utilisation, éteignez l’appareil et débranchez le câble secteur de la prise.
Mise en marche / utilisation
1. George dispose d’une poignée intégrée (16). Pour soulever l’appareil,
glissez votre main dans l’ouverture circulaire du réservoir d‘eau (5)
située en haut.
2. Posez George à l’endroit voulu sur une sur face plane. Branchez l‘adaptateur électrique (3) à l‘appareil (18) puis sur la prise appropriée.
3. Enlevez d’abord le film protecteur des disques d’évaporation (8) et le
point de fixation du Silver Cube (15).
4. Enlevez le réservoir d’eau (5) en faisant basculer sa partie supérieure
vers l’arrière. Dévissez le couvercle du réservoir d’eau (6) et remplissezle avec de l’eau du robinet propre et froide. Puis, revissez le couvercle
sur le réservoir d’eau. Placez le réservoir d’eau sur le bac d’eau (2). Le
bac d’eau se remplit à présent doucement avec l’eau du réservoir. Important : Veuillez ne pas déplacer George tant qu’il est rempli d‘eau. L’eau
pourrait se renverser.
5. Pour brancher George, appuyez sur l’interrupteur On/Off (4). Le témoin
« No Water » (13) s’allume lorsqu’il n’y a pas suffisamment d’eau dans
l’appareil. Si tous les témoins LED clignotent lentement, le bac à eau
(2) n’est pas positionné correctement dans l’appareil. Enfoncez-le complètement dans l’appareil jusqu‘à la perception d’un signal sonore. La
vitesse est réglée sur le niveau 2 et l’humidité de l’air souhaitée est
préréglée sur le mode continu.
6. Appuyez sur la touche Hygrostat (10) pour régler l’humidité de l’air souhaitée (1 LED = 40 %, 2 LED = 45 %, 3 LED = 50 %, 4 LED = 55 %, 5 LED

= mode continu). Info : lorsque l’humidité de l’air souhaitée est atteinte,
l’appareil s’arrête et les témoins LED Hygrostat clignotent. Si l’humidité
de l’air réelle mesurée est inférieure à la valeur de consigne, l’appareil
redémarre un cycle d’humidification. En revanche, si l’humidité de l’air
réelle act uelle est supérieure à la valeur de consigne, le ventilateur fonctionne durant 90 secondes toutes les 30 minutes.
7. La performance d’humidification dépend de la vitesse du ventilateur. Si
le mode automatique est désactivé, le niveau de vitesse peut être modifié : appuyez plusieurs fois sur la touche « Speed » (9) et choisissez alors
le niveau de vitesse 1, 2, 3 ou 4.
8. Appuyez sur la touche « Auto » (11) pour activer le mode automatique.
Le témoin LED situé au-dessus de la touche « Auto » s’allume. En mode
« Auto », l’appareil maintient automatiquement l’humidité de l’air souhaitée. Pour cela, réglez d’abord l‘Hygrostat (10) sur l’humidité de l’air
souhaitée (40 / 45 / 50 ou 55 %). Il n’est pas possible d’activer le mode
automatique si l‘Hygrostat (10) fonctionne en continu (5 témoins LED
brillent). Plus le niveau d’humidité réele sera faible, plus le niveau de
vitesse du ventilateur augmentera automatiquement. Plus l’humidité de
l’air réelle sera rapprochera de la valeur de consigne, plus le niveau de
vitesse sélectionné sera bas (par ex. si l’humidité souhaitée est de 45 %
et l’humidité réelle inférieure à 34 %, le niveau 3 sera sélectionné, de 35
à 40 % = niveau 2, de 41 à 45 % = niveau 1). Si le niveau de vitesse est
modifié manuellement (en appuyant sur la touche 9), le mode automatique sera désactivé.
9. Si la luminosité de l’écran vous incommode (par ex. dans une chambre),
vous pouvez réduire l’intensité de la lumière en appuyant sur la touche
du gradateur (12) :
• Mode normal (allumage standard)
• Mode tamisé (appuyez une fois)
• Mode lumière éteinte (appuyez deux fois)
• Pour revenir au mode normal, il suffit d‘appuyer à nouveau sur le
bouton.
Si l’appareil ne contient pas d’eau, l’indicateur du niveau d’eau (13)
passe au rouge à tous les modes. Le voyant lumineux rouge ne peut
être atténué.
10. Dès lors que le symbole « No Water » (13) apparait, l’appareil doit être
rechargé en eau. Pour ce faire, enlevez le réservoir d’eau (5) et remplissez avec de l’eau du robinet propre et froide. Après avoir replacé
le réservoir d’eau, l’appareil reprend son fonctionnement automatiquement après quelques secondes.
11. Vous pouvez utiliser George pour disperser des parfums dans la pièce. Il
convient d’insister sur le fait que les parfums doivent être utilisés avec
beaucoup de précaution, car un dosage excessif pourrait aboutir à des
dysfonctionnements et des dégâts sur l’appareil. Afin d’utiliser les parfums, enlevez le réservoir d’eau (5) et sortez le tiroir de parfum (14) hors
de l’appareil. Versez le parfum directement sur le coton dans le tiroir de
parfum. Ajoutez au maximum 1 à 2 gouttes de parfum dans le tiroir de
parfum.
Renseignement : Pour changer le parfum, sortez le tiroir de parfum hors
de l’appareil, enlevez le coton et nettoyez le tiroir avec du savon. À présent, vous pouvez insérer un nouveau coton (disponible dans le commerce), et ajouter des gouttes du parfum désiré.

12. Si vous souhaitez recharger en eau pendant le fonctionnement, vous
pouvez enlever le réservoir d’eau et le remplir. L’appareil continuera de
fonctionner avec l’eau qu’il contient déjà pendant au moins 5 minutes.
Du moment que le réservoir d ’eau est replacé pendant ce délai, l’appareil
peut continuer à fonctionner sans interruption.
13. Si l’appareil n’est pas utilisé pendant plusieurs jours, videz l’eau du bac
à eau (2) puis celle du réservoir d’eau (5). Remplissez le réservoir d’eau
fraîche avant de rebrancher l’appareil.
Remarque importante
L‘humidification avec un laveur d’air prend du temps. Un laveur d’air fonctionne sur le principe de l’évaporation. Dans ce processus l’air n’absorbe que
la quantité d’eau dont il a besoin à la température actuelle (humidification
auto régulée). Cela signifie que plusieurs heures seront peut-être nécessaires pour obtenir un résultat d’humidification mesurable. Si vous mettez le
laveur d’air en fonctionnement dans un environnement très sec, nous vous
conseillons de régler l’appareil sur fonctionnement continu (« Hygrostat »
= 5 LED) et le niveau de vitesse à 3 ou 4 (« Speed ») afin d’augmenter efficacement le niveau d’humidité. Ici, la taille de la pièce et les intervalles de
ventilation jouent également un rôle.
(Voir également www.stadlerform.com/faq)
Nettoyage
Avant toute opération d’entretien, de nettoyage et après chaque utilisation,
éteignez l’appareil et débranchez le câble secteur (3) de la prise.
Attention : Ne jamais plonger l’appareil dans l’eau (risque de court-circuit).
• Pour le nettoyage extérieur, utilisez un chiffon humide et séchez bien
l‘appareil.
• Pour le nettoyage interne, enlevez le réservoir d’eau (5) et sortez le bac
d’eau (2) avec les disques d’évaporation (8) (attrapez sous le bac).
• Rincez le bac d’eau (2) et les disques d’évaporation (8) à l’eau claire une
fois par semaine, afin de laver les particules de saletés prises dans l’air.
• Nettoyez le bac d’eau (2), les disques d’évaporation (8) et le réservoir
d’eau (5) à fond toutes les 2 semaines avec une brosse souple ou une
éponge et de l’eau chaude. Si des dépôts de calcaire apparaissent dans
le bac d’eau ou le réservoir d’eau, utilisez une solution anti calcaire diluée
dans l’eau (pour le ratio de mélange, suivez les instructions du fabricant).
Par la suite, rincez abondamment le bac et le réservoir avec de l’eau courante. Le bac à eau peut aussi être nettoyé dans un lave-vaisselle (température maximale : 60 °C).
• Détartrez les disques d’évaporation (8) environ toutes les 4 semaines,
en fonction du niveau de dureté de l’eau. Pour ce faire, commencez par
vider l’eau restante dans le bac d’eau (2). Puis, remplissez le bac avec une
solution anti calcaire (le ratio solution/eau du mélange doit être conforme
aux instructions du fabricant) jusqu’à 2 cm en dessous du rebord du bac
(laissez les disques d’évaporation dans le bac). À présent, enfoncez le bac
d’eau dans l’appareil (le réservoir ne doit pas nécessairement être inséré).
Activez le mode nettoyage en appuyant simultanément sur les touches
« Speed » (9) et « Dimmer » (12). Tous les témoins LED blancs clignotent
alors pour signaler que le nettoyage est en cours. Ici, les disques d’évaporation tournent, mais le ventilateur ne fonctionne pas. Par conséquent,
aucun air n’est soufflé dans la pièce. Au bout de 20 minutes en mode net-

toyage, l’appareil s’arrête et les témoins LED s‘éteignent. Le processus
de nettoyage peut être activé plusieurs fois en fonction de l’épaisseur
des dépôts de calcaire. Une fois le processus de nettoyage terminé,
éteignez l’appareil avec l’interrupteur On/Off (4). Videz le bac d’eau et
nettoyez abondamment avec de l’eau courante. Les disques d‘évaporation (8) peuvent aussi être nettoyés dans un lave-vaisselle (température
maximale : 60 °C).
• Assurez-vous que les entrée et sortie d’air sont nettoyées régulièrement
afin d’empêcher l’accumulation de poussière. Nettoyez la sortie d’air (17)
à l’aide d’une brosse sèche ou d’un aspirateur. La grille d’entrée d’air (16)
est équipée d’un filtre à air qui peut être retiré et nettoyé avec un chiffon
sec. Pour retirer le filtre, sortez le cache vers le bas en utilisant la poignée
intégrée.
Cube d‘argent – Silver Cube™
Le cube d‘argent (15) empêche la croissance des bactéries et des germes
dans l‘humidificateur en libérant constamment des ions d‘argent. L‘utilisation du cube d‘argent garantit un climat ambiant hygiénique. Le cube
d‘argent est efficace pendant un an. C‘est pourquoi nous recommandons de
changer le cube d‘argent à chaque nouvelle saison humide. Le cube d‘argent
ionique est efficace dès qu‘il est en contact avec de l‘eau dans l‘appareil et
même lorsque l‘appareil est éteint.
Cartouche anticalcaire (accessoire optionnel)
La cartouche anticalcaire (7) diminue le calcaire dans l’eau et réduit par
conséquent les intervalles de décalcification. La cartouche doit être remplacée par intervalle de un mois à trois mois, en fonction de la dureté de l’eau
(voyez le tableau).
Avec une dureté d’eau supérieure à 21 °dH, nous conseillons l’utilisation de
la cartouche anticalcaire.
Important: Veuillez svp met tre la cartouche anticalcaire dans un bain d’eau
pour 24 heures avant la première utilisation (ne pas dans le réser voir d’eau!).
Ceci permet les granulés d’absorber de l’eau pour atteindre la capacité
maximale.
La durée d‘efficacité de la cartouche dépend de la dureté de l‘eau. Vous
pouvez la tester à l‘aide de la bandelette test fournie (voyez page 4).
1. Plongez la bandelette test une seconde dans l’eau.
2. Le résultat est visible sur la bandelette au bout d‘une minute environ.
Certains champs verts virent au rose. La dureté de l‘eau est indiquée par le
nombre de champs de couleur rose. Exemple : Trois champs de couleur rose
indiquent que l‘eau a un degré de dureté de > 14 °dH.
Champs
de couleur
rose
0/1 Douce
Dureté de
l’eau
Degré de
dureté (°dH)
à partir de 4
Cartouche suffisante pour
(avec 6 litres/jour)
Jours Litres
60 jours env. 36 0 L
°dH
2 Moyennement
dure
3 Plutôt dure
4 Très dure
à partir de 7
à partir de 14
à partir de 21
30 jours env. 180 L
°dH
20 jours env. 120 L
°dH
10 jour s env. 60 L
°dH
La cartouche est vissée à l’intérieur du couvercle du réservoir (6). D’abord,
dévissez le couvercle du réservoir (6) du réservoir (5), puis fixez la cartouche
à l’intérieur du couvercle du réservoir. Jetez les cartouches usagées avec
les ordures ménagères. Ne jetez pas le couvercle du réservoir d’eau lorsque
vous changer la cartouche.
Réparations
• Les réparations sur les appareils électriques ne doivent être effectuées
que par des électriciens qualifiés. La garantie s’éteint et toute responsabilité est exclue en cas de réparations non conformes aux règles de l‘art.
• Ne mettez jamais l‘appareil en service en cas d’endommagement d’un
cordon ou d’une fiche, après un dysfonctionnement de l’appareil causé
par une chute ou par une autre détérioration de l’appareil (boî tier fissuré/
cassé).
• Ne pas pénétrer avec des objets quelconques dans l’appareil.
• Arrivé au bout de sa durée de vie, l’appareil doit immédiatement être rendu inutilisable (sectionner le cordon d’alimentation) et être déposé dans
une déchetterie prévue à cet effet.
Elimination
Conformément à la directive européenne 2012 / 19 / EC sur la mise au
rebut des déchets d’équipements électriques et électroniques (DEEE), les
appareils ménagers usés ne doivent pas être jetés avec les déchets non
triés. Ces appareils usés doivent être collectés séparément des déchets
ménagers pour optimiser la récupération et le recyclage de leurs composants dans le but de réduire les effets négatifs sur la santé humaine et sur
l’environnement. Le symbole de poubelle avec roulettes et croix indique que
ces produits doivent être collectés et mis au rebut séparément
des ordures ménagères. Les consommateurs doivent contacter les
autorités locales ou leurs revendeurs concernant la mise au rebut
de leurs vieux appareils.
Caractéristiques techniques
Tension nominale DC 12 V
Puissance nominale 3 – 23 W
Émission d’humidité jusqu’à 400 g/h
Dimensions 315 x 418 x 215 mm
(largeur x hauteur x profondeur)
Poids 5,1 kg
Contenance du reservoir 3,2 Litres
Niveau de bruit 27 – 48 dB(A)
Conforme à la
réglementation UE CE / DEEE / RoHS / EAC
Sous réserve de modifications techniques
 Loading...