

Page 1

Montage- und Betriebsanleitung
Assembly and operating instructions
Instructions de montage et d’utilisation
Instrucciones de montaje y de servicio
Istruzioni per il montaggio e l’uso
Montage- en gebruiksaanwijzing
Instruções de montagem e modo de utilização
Monterings- och bruksanvisning
Asennus- ja käyttöohje
Instrukcja montażu i obsługi
Szerelési és használati utasítás
Navodila za montažo in uporabo
Návod k montáži a obsluze
Návod na montáž a obsluhu
Uputa za montažu i uporabu
Montajse- og bruksanvisning
Monterings- og driftsvejledning
Montaj ve işletme kılavuzu
# 370501032 Super Mario™ – Flying Cape Mario™
# 370501033 Super Mario™ – Flying Yoshi™
Made in China, Shantou
Page 2
1
ON
OFF
90°
180mAh
3,7V
0,66 Wh LiPo
3,7V 180mAh
0,66 Wh LiPo
2x 1.5 V Micro
AAA batteries
* Nur ein Mode ll enthalten · Contain s only one mo del · conti ent un seul mo dèle · Cont iene sólo un m odelo · Con tiene un so lo modelli no · Bevat slec hts één model · Contém só u ma miniatu ra · Endast en m odell ·
Sisältää v ain yhden radio-o hjattavan · Zawiera t ylko jeden model · Cs ak egy modellt tart almaz · Vključen sa mo en model · Obsahuj e pouze jeden model. · In neholder kun samm e modell · Indehold er kun én model ň
· Sadece tek m odeli dahil dir
TM & © 2017 Nintendo. A ll Rights Rese rved.
LED OFF =
Charging
Green
2
=
Ready
4
ON
2x 1.5 V Micro AAA batteries
3
7
OFF
ON
2 07/2017_A8_V01
90°
Page 3
5
ON
6
1
1
+
4
L
R
5
‒
2 3
6
7 8
+
+
‒
9
‒
10
4
ON
3
L
2
R
L
R
AUTO
+
‒
2,4m
3m 3m
3
Page 4

Sehr geehrter Kunde
Wir beglückwünschen Sie zum Kauf Ihres Carrera RC-Modell-Helikopters, der nach dem heutigen Stand der Technik
gefertigt wurde. Da wir stets um Weiterentwicklung und
Verbesserung unserer Produkte bemüht sind, behalten wir
uns eine Änderung in technischer Hinsicht und in Bezug auf
Ausstattung, Materialien und Design jederzeit und ohne Ankündigung vor. Aus geringfügigen Abweichungen des Ihnen
vorliegenden Produkts gegenüber Daten und Abbildungen
dieser Anleitung können daher keinerlei Ansprüche abgeleitet werden. Diese Bedienungs- und Montageanleitung
ist Bestandteil des Produkts. Bei Nichtbeachtung der Be-
DEUTSCH
dienungsanleitung und der enthaltenen Sicherheitsanweisungen erlischt der Garantieanspruch. Bewahren Sie diese
Anleitung zum Nachlesen und für die eventuelle Weitergabe
des Modells an Dritte auf.
Die aktuellste Version dieser Bedienungsanleitung und Informationen zu
erhaltlichen Ersatzteilen fi nden Sie auf
carrera-rc.com im Servicebereich.
Garantiebedingungen
Bei den Carrera-Produkten handelt es sich um technisch hochwertige Produkte, die sorgfältig behandelt
werden sollten. Beachten Sie bitte unbedingt die Hinweise in der Bedienungsanleitung. Alle Teile werden
einer sorgfältigen Prüfung unterzogen (technische Änderungen und Modelländerungen, die der Verbesserung
des Produktes dienen, sind vorbehalten). Sollten dennoch Fehler auftreten, wird eine Garantie im Rahmen
der nachstehenden Garantie-Bedingung gewährt:
Die Stadlbauer Marketing + Vertrieb GmbH (nachfolgend
„Hersteller“) garantiert dem Endkunden (nachfolgend „Kunde“) nach Maßgabe der nachfolgenden Bestimmungen,
dass der an den Kunden gelieferte Carrera RC-Modell-Helikopter (nachfolgend „Produkt“) innerhalb eines Zeitraums
von zwei Jahren ab Kaufdatum (Garantiefrist) frei von Material- oder Verarbeitungsfehlern sein wird. Derartige Fehler wird der Hersteller nach eigenem Ermessen auf seine
Kosten durch Reparatur oder Lieferung neuer oder generalüberholter Teile beheben. Die Garantie erstreckt sich nicht
auf Verschleißteile (wie z.B. Akku, Rotorblätter, Kabinenabdeckung, Zahnräder u.ä.), Schäden durch unsachgemäße
Behandlung/Nutzung oder bei Fremdeingriff en. Sonstige
Ansprüche des Kunden, insbesondere auf Schadensersatz,
gegen den Hersteller sind ausgeschlossen. Die vertraglichen oder gesetzlichen Rechte des Kunden (Nacherfüllung,
Rücktritt vom Vertrag, Minderung, Schadensersatz) gegenüber dem jeweiligen Verkäufer, welche bestehen, wenn das
Produkt bei Gefahrübergang nicht mangelfrei war, werden
durch diese Garantie nicht berührt.
Ansprüche aus dieser gesonderten Hersteller-Garantie
bestehen nur, wenn
• der geltend gemachte Fehler nicht in Schäden liegt, die
durch einen nach den Vorgaben in der Bedienungsanlei tung nicht bestimmungsgemäßen oder unsachgemäßen
Gebrauch verursacht wurden.
• es sich nicht um betriebsbedingte Verschleißerscheinun gen handelt.
• das Produkt keine Merkmale aufweist, die auf Reparaturen
oder sonstige Eingriff e von durch den Hersteller nicht auto risier ten Werkstätten schließen lassen.
• das Produkt nur mit vom Hersteller autorisiertem Zubehör
verwendet wurde.
Bei Fragen wenden Sie sich bitte
an die Carrera RC Service Hotline:
+49 911 7099-330 (D) bzw.
+43 662 88921-330 (AT)
oder besuchen Sie unsere Webseite
carrera-rc.com im Servicebereich.
Garantiekarten können nicht ersetzt werden.
Hinweis für EU-Staaten: Es wird auf die gesetzliche Gewähr-
leistungspfl icht des Verkäufers hingewiesen, dass nämlich
diese Gewährleistungspfl icht durch gegenständliche Garantie nicht eingeschränkt wird. Die Kosten der Einsendung und
Rücksendung des Produkts übernimmt der Hersteller. Diese
Garantie gilt in dem vorstehend genannten Umfang und unter
den oben genannten Voraussetzungen (einschließlich der Vorlage des Original-Kaufbelegs auch im Falle der Weiterveräußerung) für jeden späteren, künftigen Eigentümer des Produkts.
Konformitätserklärung
Hiermit erklärt Stadlbauer Marketing + Vertrieb GmbH, dass
sich dieses Modell einschließlich Controller in Übereinstimmung mit den grundlegenden Anforderungen folgender EGRichtlinien: EG Richtlinien 2009/48 und 2014/30/EU über die
elektromagnetische Verträglichkeit und den anderen relevanten Vorschriften der Richtlinie 2014/53/EU (RED) befi ndet.
Die Original-Konformitätserklärung kann unter
carrera-rc.com angefordert werden.
Maximale Funkfrequenzleistung <10dBm
Frequenzbereich: 2400 – 2483,5 MHz
Warnhinweise!
ACHTUNG! Dieses Spielzeug ist nicht geeig-
net für Kinder unter 3 Jahren, wegen ver-
schluckbarer Kleinteile.
ACHTUNG! Funktionsbedingte Klemmgefahr! Entfernen
Sie alle Verpackungsmaterialien und Befestigungsdrähte, bevor Sie dieses Spielzeug dem Kind übergeben. Für
Informationen und etwaige Fragen, bewahren Sie bitte
Verpackung und Adresse sowie die Gebrauchsanleitung
für späteres Nachschlagen auf. Hinweis für Erwachsene
Aufsichtspersonen: Überprüfen Sie, ob das Spielzeug
nach Anleitung montiert ist. Die Montage soll unter der
Aufsicht eines Erwachsenen durchgeführt werden.
ACHTUNG! Nicht geeignet für Kinder unter 8 Jahren!
Dieses Produkt ist nicht für den Gebrauch durch Kinder
ohne die Aufsicht eines Erziehungsberechtigten vorgesehen. Für das Steuern des Hubschraubers ist eine gewisse
Übung erforderlich. Kinder müssen dies unter direkter Beaufsichtigung durch einen Erwachsenen erlernen. Lesen
Sie vor dem ersten Gebrauch die Benutzerinformationen
zusammen mit Ihrem Kind.
Bei unsachgemäßer Verwendung kann es zu schweren
Verletzungen und/oder Sachbeschädigungen kommen.
Es muss mit Vorsicht und Umsicht gesteuert werden und erfordert einige mechanische und auch mentale Fähigkeiten. Die
Anleitung enthält Sicherheitshinweise und Vorschriften sowie
Hinweise fur die Wartung und den Betrieb des Produktes. Es
ist unabdingbar, diese Anleitung vor der ersten Inbetriebnahme
komplett zu lesen und zu verstehen. Nur so können Unfälle mit
Verletzungen und Beschädigungen vermieden werden.
Aus Sicherheitsgründen darf das Spielzeug nur in einem ausreichend großen Raum verwendet werden.
Fliegen Sie nur in geschlossenen Räumen, die genügend Platz bieten und befolgen Sie alle Anweisungen,
so wie sie in dieser Anleitung empfohlen werden.
Hände, Haare und lose Kleidung, einschließlich anderer
Gegenstände wie Stifte und Schraubendreher müssen vom
Propeller (Rotor) ferngehalten werden. Den rotierenden Rotor nicht berühren. Achten Sie besonders darauf, dass Ihre
Hände NICHT in die Nähe der Rotorblätter kommen!
ACHTUNG: Gefahr von Augenverletzungen. Lassen Sie
den Helikopter nicht in der Nähe Ihres Gesichtes fl iegen,
um Verletzungen zu vermeiden.
Sie als Nutzer dieses Produkts sind alleinverantwortlich
für den sicheren Umgang, so dass weder Sie noch andere Personen oder deren Eigentum Schaden nehmen
oder gefährdet werden.
• Verwenden Sie Ihr Modell nie mit schwachen Controller Batterien.
• Dieses Spielzeug ist nur für die Verwendung im häuslichen
Bereich bestimmt.
• ACHTUNG: Starten Sie den Hubschrauber nicht, wenn
sich Personen, Tiere oder andere Hindernisse im Flugbereich des Hubschraubers befi nden.
• Befolgen Sie genau die Anweisungen und Warnhinweise
für dieses Produkt und für die mögliche Zusatzausrüstung
(Ladegerät, Akkus usw.), die Sie nutzen.
4
• Sollte der Helikopter mit Lebewesen oder harten Gegen ständen in Berührung kommen, bitte sofort den Gas hebel in die Nullstellung bringen, d.h. der linke Joy stick muss am unteren Anschlag sein!
• Vermeiden Sie jegliche Feuchtigkeit, denn Sie kann die
Elektronik beschädigen.
• Führen Sie am Hubschrauber keinerlei Änderungen durch.
Wenn Sie diesen Bedingungen nicht zustimmen, geben Sie
das vollständige Helikopter Modell sofort in neuem und unbenutztem Zustand an den Händler zurück.
Wichtige Informationen über Lithium Polymer Akkus
Lithium-Polymer (LiPo) Akkus sind wesentlich empfi ndlicher
als herkömmliche Alkali-, oder NiMH-Akkus, die sonst bei
Funkfernsteuerungen verwendet werden. Die Vorschriften
und Warnhinweise müssen deshalb genauestens befolgt
werden. Bei falscher Handhabung von LiPo Akkus besteht
Brandgefahr. Beachten Sie immer die Herstellerangaben,
wenn Sie LiPo Akkus entsorgen.
Entsorgungsbestimmungen für Elektro- und ElektronikAltgeräte laut WEEE
sche Altgeräte etc. nicht in den Hausmüll gehören, da sie der
Umwelt und Gesundheit schaden. Helfen Sie bitte mit, Umwelt
und Gesundheit zu erhalten und sprechen Sie auch mit Ihren
Kindern über die ordentliche Entsorgung gebrauchter Batterien
und elektrischer Altgeräte. Batterien und elektrische Altgeräte
sollen bei den bekannten Sammelstellen abgegeben werden.
So werden sie ordnungsgemäßem Recycling zugeführt.
Ungleiche Batterietypen oder neue und gebrauchte Batterien dürfen nicht zusammen verwendet werden. Leere
Batterien aus dem Spielzeug herausnehmen. Nicht aufl adbare Batterien dürfen aufgrund des Explosionsrisikos nicht
aufgeladen werden.
ACHTUNG!
Das Ladegerät bzw. USB-Ladekabel kann von Kindern ab
einem Alter von acht (8) Jahren und von Personen mit eingeschränkten physischen, sensorischen oder geistigen Fähigkeiten oder einem Mangel an Erfahrung und/oder Wissen verwendet werden, wenn sie beaufsichtigt werden oder bezüglich
des sicheren Gebrauchs des Geräts unterwiesen wurden und
die daraus resultierenden Gefahren verstanden haben. Kinder
dürfen nicht mit dem Ladegerät bzw. USB-Ladekabel spielen.
Reinigung und Benutzerwartung dürfen nicht durch Kinder
durchgeführt werden, es sei denn sie sind älter als 8 Jahre
und beaufsichtigt.
Kinder jünger als 8 Jahre sind vom Ladegerät und der Anschlussleitung fernzuhalten. Lassen Sie den Akku beim La-
den nie unbewacht. Aufl adbare Batterien vor dem Laden aus
dem Spielzeug nehmen. Anschlussklemmen dürfen nicht kurzgeschlossen werden. Es dürfen nur die empfohlenen Batterien
oder die eines gleichwertigen Typs verwendet werden.
Bei regelmäßigem Gebrauch des Ladegeräts, muss dieses
am Kabel, Anschluss, Abdeckungen und anderen Teilen kontrolliert werden. Im Schadensfall darf das Ladegerät erst nach
einer Reparatur wieder in Betrieb genommen werden. Das fl exible Außenkabel dieses Ladegeräts kann nicht ausgetauscht
werden: Wenn das Kabel beschädigt ist, muss das Ladegerät
verschrottet werden.
Das Spielzeug darf nur an Geräte der Schutzklasse II angeschlossen werden.
Richtlinien und Warnhinweise für die Benutzung des LiPo
Akkus
•
Sie müssen den beigefügten 3,7 V 180 mAh LiPo-Akku an
einem sichern Ort abseits entzündlicher Materialien aufl aden.
• Lassen Sie den Akku beim Laden nie unbewacht auf.
• Zum Laden nach einem Flug muss sich der Akku zunächst
auf die Umgebungstemperatur abgekühlt haben.
• Sie dürfen nur das dazugehörige Lipo-Ladegerät (USB Kabel/ Controller) verwenden. Bei Nichteinhaltung dieser Hinweise besteht Brandgefahr und damit Gesundheitsgefährdung und/oder Sachbeschädigung. Benutzen Sie NIEMALS
ein anderes Ladegerät.
• Falls sich der Akku während des Entlade- oder Ladevorgangs aufbläht oder verformt, beenden Sie sofort das Laden
oder Entladen. Entnehmen Sie den Akku so schnell und
vorsichtig wie möglich und legen Sie ihn an einen sicheren,
off enen Bereich abseits brennbarer Materialien und beobachten Sie ihn mindestens 15 Minuten lang. Wenn Sie einen
Das hier abgebildete Symbol der durchgestrichenen Mülltonnen soll
Sie darauf hinweisen, dass leere Batterien, Akkumulatoren, Knopfzellen,
Akku packs, Geräte batterien, elektri-
Page 5
Akku, der sich bereits aufgebläht oder verformt hat, weiter
laden oder entladen, besteht Brandgefahr! Selbst bei geringer Verformung oder Ballonbildung muss ein Akku aus dem
Betrieb genommen werden.
• Lagern Sie den Akku bei Raumtemperatur an einem trockenen Ort.
• Laden Sie den Akku unbedingt nach Gebrauch wieder
auf um eine sog. Tiefenentladung des Akkus zu vermeiden. Beachten Sie dabei, dass Sie eine Pause von ca.
20 Min. zwischen dem Flug und dem Ladevorgang einhalten. Laden Sie den Akku von Zeit zu Zeit (ca. alle 2-3
Monate) auf. Eine Nichtbeachtung der o.g. Handhabung
des Akkus kann zu einem Defekt führen.
• Für den Transport oder für eine übergangsweise Lagerung
des Akkus sollte die Temperatur zwischen 5-50°C liegen.
Lagern Sie den Akku oder das Modell, wenn möglich nicht
im Auto oder unter direktem Sonneneinfl uss. Wenn der Akku
der Hitze im Auto ausgesetzt wird, kann er beschädigt werden oder Feuer fangen.
Hinweis: Bei geringer Batteriespannung/-leistung werden
Sie feststellen, dass erhebliche Trimmung und/oder Steuerbewegungen erforderlich sind, damit der Helikopter nicht ins
Trudeln gerät. Dies tritt in der Regel vor dem Erreichen von
3 V Akkuspannung auf und ist ein guter Zeitpunkt, um den
Flug zu beenden.
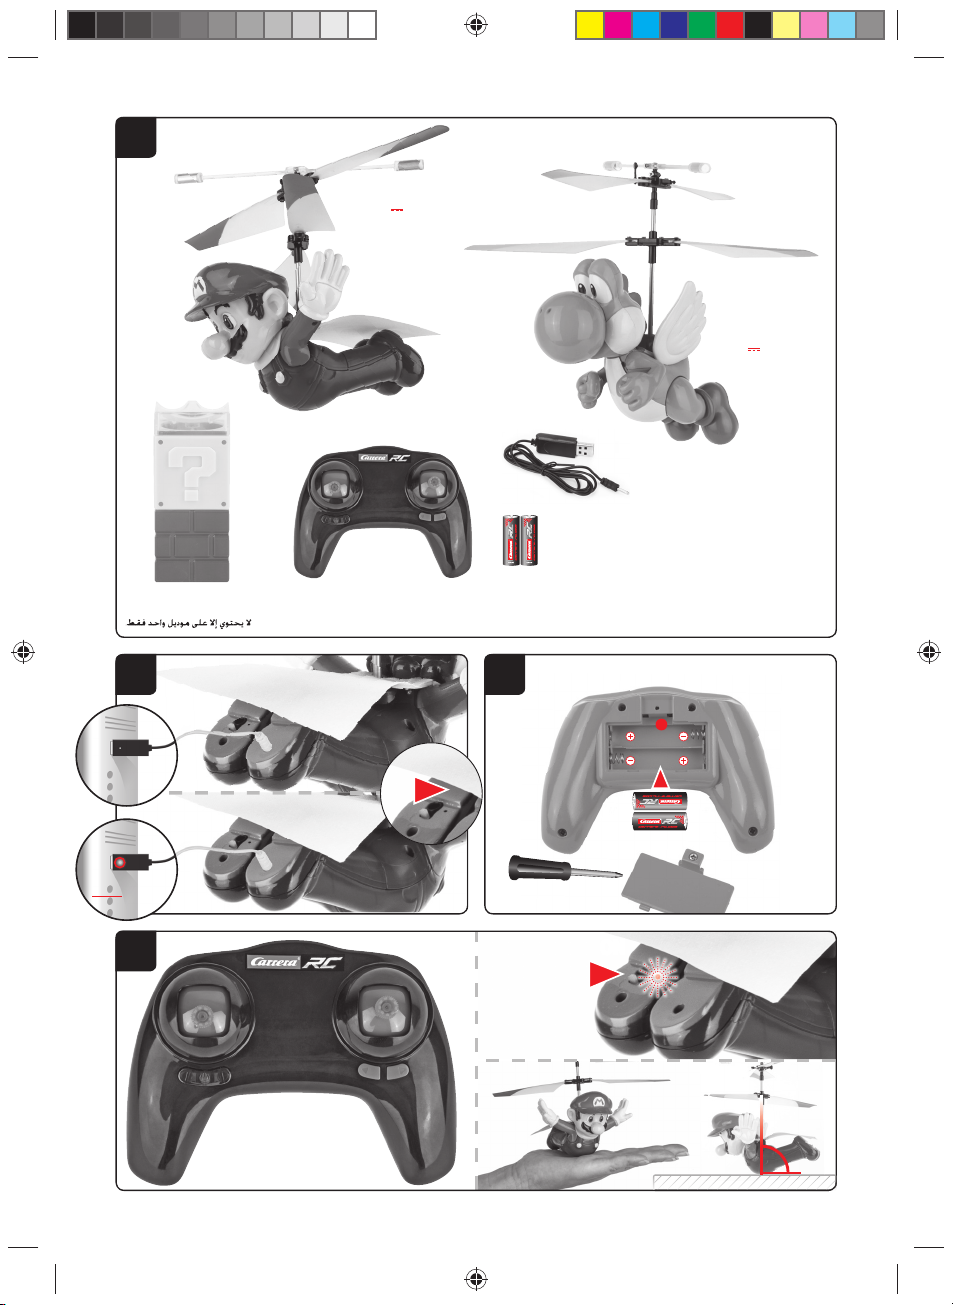
Lieferumfang
1x Helikopter
1
1x Controller
1x Präsentations- & Ladesockel
1x USB-Ladekabel
2x 1,5 V Micro AAA Batterien
(nicht wiederaufl adbar)
Aufl aden des LiPo-Akkus
Achten Sie darauf, dass Sie den mitgelieferten LiPo-Akku nur
mit dem mitgelieferten LiPo-Ladegerät (USB-Kabel bzw. Controller) laden. Wenn Sie versuchen den Akku mit einem anderen
LiPo-Akku Ladegerät oder einem anderen Ladegerät zu laden,
kann dies zu schweren Schäden führen. Bitte lesen Sie den vorangehenden Abschnitt mit den Warnhinweisen und Richtlinien
zur Akku-Verwendung sorgfältig durch, bevor Sie fortfahren.
Laden am Computer:
•
Verbinden Sie das USB-Ladekabel mit dem
2
USB-Port eines Computers. Die LED am USBLadekabel leuchtet grün auf und zeigt an, dass
die Ladeeinheit ordnungsgemäß mit dem Computer verbunden ist. Wenn Sie einen Helikopter mit
leerem Akku anstecken leuchtet die LED am USBLadekabel nicht mehr auf und zeigt an, dass der
Helikopter Akku geladen wird. Das USB-Ladekabel
bzw. die Ladebuchse am Helikopter sind so hergestellt, dass verkehrte Polarität ausgeschlossen ist.
• Es dauert ungefähr 30 Minuten, um einen entladenen Akku (nicht tiefentladenen) wieder aufzuladen. Wenn der Akku voll ist, leuchtet die LEDAnzeige am USB-Ladekabel wieder grün auf.
Hinweis: Bei der Auslieferung ist der enthaltene LiPoAkku teilgeladen. Daher könnte der erste Ladevorgang
etwas kürzer dauern.
Halten Sie die o.g. Anschlussreihenfolge unbedingt ein!
Sollten Sie das Ladekabel nicht an eine Stromquelle
angeschlossen und nur mit dem Helikopter verbunden
haben, so zeigt eine grün leuchtende LED-Anzeige an,
dass noch Spannung im Akku ist. Die grün leuchtende
LED-Anzeige zeigt nicht an ob der Akku ausreichend
geladen ist.
Während des Ladevorgangs muss der Powerschalter auf
„OFF“ stehen.
Einsetzen der Batterien in den
Controller
Öff nen Sie das Batteriefach mit einem Schrauben-
dreher und setzen Sie die Batterien in den Control-
3
ler ein. Achten Sie auf die richtige Polarität. Nach
dem verschließen des Faches können Sie die
Funktionalität des Controllers mit Hilfe des Powerschalters auf der Vorderseite prüfen.
Bei ON-Stellung des Powerschalters und ord-
nungsgemäßer Funktion sollte die LED oben in
der Mitte des Controllers rot aufl euchten. Wenn die
Kontroll LED schnell blinkt, müssen die Batterien
im Controller gewechselt werden.
Bindung des Modells mit dem
Controller
Der Carrera RC Helikopter und der Controller sind
werkseitig gebunden. Sollte es am Anfang Proble-
4
me bei der Kommunikation zwischen dem Carrera
RC Helikopter und dem Controller geben, führen
Sie bitte eine neue Bindung durch.
• Nehmen sie das Modell vom Präsentationssockel
• Schalten Sie das Modell am ON/OFF Schalter ein
• Die LED im Helikopter blinkt nun in rhythmisch
beschleunigender Folge.
• Schieben sie den linken Joystick ganz nach unten.
Schalten Sie den Controller am ON/OFF Schalter
ein. Die Bindung erfolgt automatisch. Während
des Bindungsvorgangs ertönt am Controller ein
Signalton.
• Halten Sie das Modell so, dass der Rotor senkrecht nach oben steht.
• Geben Sie dem Helikopter einen Augenblick Zeit,
bis das System korrekt initialisiert und betriebsbereit ist.
• Die Kontroll LED leuchtet wieder permanent und
zeigt an, dass die Bindung beendet ist.
Checkliste für die Flugvorbereitung
Diese Checkliste ist kein Ersatz für den Inhalt dieser Bedienungsanleitung. Obwohl Sie als Quick-Start-Guide
verwendet werden kann, empfehlen wir Ihnen eindringlich
zunächst diese Betriebsanleitung komplett zu lesen, bevor
Sie fortfahren.
• Überprüfen Sie den Verpackungsinhalt.
• Verbinden Sie das Ladegerät mit der Stromquelle.
• Laden Sie den LiPo-Akku wie im Abschnitt „Aufl aden des
LiPo-Akkus“ beschrieben
• Setzen Sie zwei AAA Batterien in den Controller ein und
achten Sie auf die richtige Polarität.
• Suchen Sie eine geeignete Umgebung zum Fliegen.
• Gehen Sie wie in 4 vor.
• Wiederholen Sie nun ggf. o.g. Punkte sollten Sie weitere
Helikopter gleichzeitig fl iegen wollen.
• Überprüfen Sie die Steuerung.
• Starten Sie den Helicopter aus einer Hand. Parallel dazu
halten sie bitte den Controller in der andren Hand, damit
sie sofort die Kontrolle über den Helicopter übernehmen
können.
ACHTUNG! DAS MODELL FLIEGT VON SELBST VOR-
WÄRTS UND KANN NUR IN HÖHE UND RICHTUNG
GESTEUERT WERDEN
• Machen Sie sich mit der Steuerung vertraut.
• Trimmen Sie den Helikopter ggf. wie unter „Steuerung des
Helikopters“ beschrieben.
• Der Helikopter ist jetzt einsatzbereit.
• Sofern der Helikopter keine Funktion zeigt versuchen Sie
den o.g. Bindevorgang erneut.
• Fliegen Sie das Modell.
• Landen Sie das Modell.
• Schalten Sie das Modell am ON/OFF Schalter aus.
(3 Sek.)
• Schalten Sie immer die Fernbedienung als letztes aus.
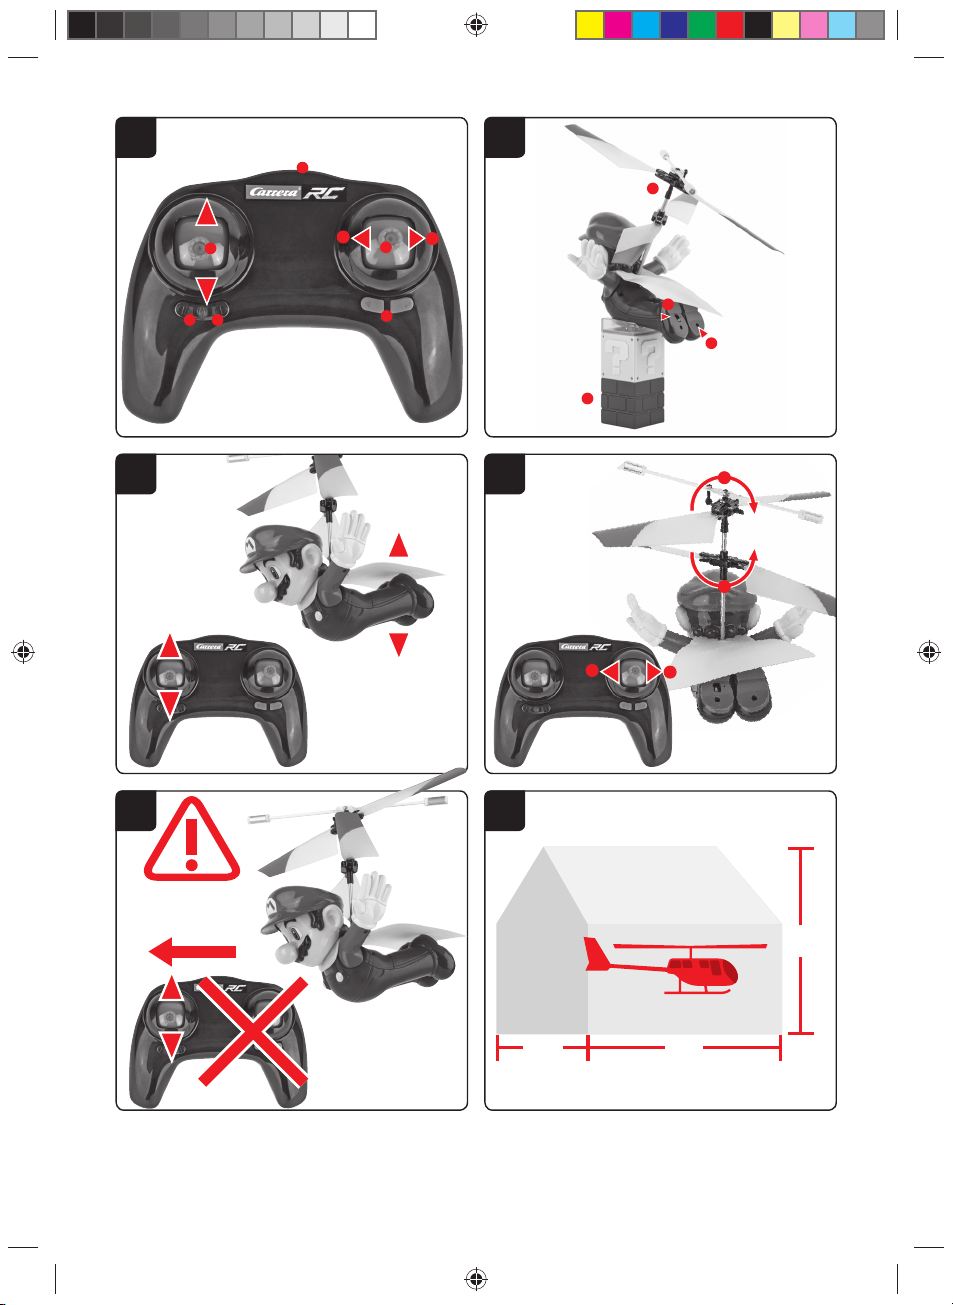
Funktionsübersicht des Controllers
1. Antenne
2. Powerschalter (ON / OFF)
5
3. Kontroll LED
4. Gas
5. Heck (Kreisdrehung)
6. Trimmer für Heck
7. Batteriefach
3
5
Beschreibung des Helikopters
1. Koaxiales Rotorsystem
2. Ladebuchse zum Laden des LiPo-Akku
6
3. Display/Präsentationssockel
4. ON-/OFF-Schalter
Steuerung des Helikopters
Wenn Sie die Steuerfunktionen Ihres Carrera
RC Helikopters noch nicht kennen, nehmen Sie
7
sich bitte vor dem ersten Flug ein paar Minuten
Zeit, um sich mit ihnen vertraut zu machen. Die
Beschreibung Links- oder Rechts entspricht dem
Blick aus dem Cockpit (Pilotensicht). Drücken Sie
den Gashebel nach oben, um die Rotationsgeschwindigkeit der Hauptrotorblätter zu erhöhen.
Erhöhen Sie die Rotationsgeschwindigkeit der
Hauptrotorblätter und das Modell beginnt zu steigen. Reduzieren Sie den Ausschlag des Gashebels und damit die Rotationsgeschwindigkeit der
Hauptrotorblätter, so sinkt der Helikopter. Wenn
das Modell vom Boden abgehoben ist, können
Sie es durch vorsichtiges Bewegen des Gashebels, nach oben oder nach unten, in einen stationären Schwebefl ug bringen, ohne dass es zu
abrupt steigt oder sinkt.
Bewegen Sie den rechten Hebel (Heck) nach
links und die Nase des Helikopters dreht sich
8
(giert) um die Achse des Hauptrotors kreisförmig nach links. Bewegen Sie den rechten Hebel
(Heck) nach rechts und die Nase des Helikopters
dreht sich (giert) um die Achse des Hauptrotors
kreisförmig nach rechts. Verwenden Sie den Trimmer für Heck, bis Sie eine stabile Neutralstellung
des Helikopters im Schwebefl ug, ohne Bewegung
des rechten Hebel (Heck), erreicht haben.
ACHTUNG! DAS MODELL FLIEGT VON
SELBST VORWÄRTS UND KANN NUR IN
9
HÖHE UND RICHTUNG GESTEUERT WERDEN
Nachdem Sie sich mit den Hauptsteuerfunktionen vertraut
gemacht haben, sind Sie nach Auswahl des Fluggebietes
bereit für den ersten Flug.
Auswahl des Fluggebietes
Wenn Sie für Ihren ersten Flug bereit sind,
sollten Sie einen geschlossenen Raum wäh-
10
len, der ohne Personen und ohne Hindernisse sowie möglichst groß ist. Aufgrund der
Größe und Steuerbarkeit des Helikopters
ist es für erfahrene Piloten möglich, auch
in relativ kleinen geschlossenen Räumen
zu fl iegen. Für Ihre ersten Flüge empfeh len
wir unbedingt eine Mindestraumgröße von
3 mal 3 Metern Grundfl äche und 2,40 Meter
Höhe. Nachdem Sie Ihren Helikopter ausgetrimmt haben und mit seiner Steuerung und
seinen Fähigkeiten vertraut geworden sind,
können Sie sich auch daran wagen, in kleineren und weniger freien Umgebungen zu
fl iegen.
Dieses Spielzeug darf nur im häuslichen Be-
reich (Haus und Garten) verwendet werden.
Informationen zu den Problemlösungen fi nden Sie auf Seite 42.
Irrtum und Änderungen vorbehalten
Farben / endgültiges Design – Änderungen vorbehalten
Technische und designbedingte Änderungen vorbehalten
Piktogra mme = Symbolf otos
DEUTSCH
Page 6

Dear customer
Congratulation! You bought a Carrera RC-helicopter which
has been manufactured according to today´s state-of-the-art
technology. As it is our constant endeavour to develop and
improve our products, we reserve the right to make modifi cations, either of a technical nature or with respect to features,
materials, and design, at any time, and without prior notice.
For this reason, no claims will be accepted for any slight
deviations in your product from the data and illustrations
contained in these instructions. These operating and assembly instructions are an integral part of the product. Non-
ENGLISH
observance of these operating instructions and the safety
instructions they contain will render the guarantee null and
void. These instructions are to be kept for future reference
and in the event that the product is passed on to a third party.
For the latest version of these operating instructions and information on
replacement and spare parts available, please visit
carrera-rc.com in the
service area.
Guarantee conditions
Carrera products are technically advanced products
which should be handled with care. It is important to
follow the directions given in the operating instructions. All components have been subjected to careful
inspection (technical modifi cations and alterations to
the model for the purpose of product improvement are
reserved).
Should any faults nevertheless occur, guarantee is assumed within the scope of the following conditions:
In accordance with the following provisions, Stadlbauer Marketing + Vertrieb GmbH (hereinafter referred to as “manufacturer”) warrants to the endconsumer (hereinafter referred to
as “customer”) that the Carrera RC-model-helicopter (hereinafter referred to as “product”) delivered to the customer
shall be free from defects in material or workmanship for two
years from the date of purchase (guarantee period). Such
defects will, at the manufacturer´s option, either be repaired
by the manufacturer or fi xed by delivering new or refurbished
parts free of charge. The warranty does not cover failure
due to normal wear and tear, (e.g. to batteries, rotor blades,
cabin covering, gear wheels etc.), or damage as a result of
improper handling/misuse or unauthorised interference. Any
other customer´s claims asserted against the manufacturer,
especially action for damages, shall be excluded.
The contractual and statutory rights of the customer against
the seller (supplementary performance, rescission of the
contract, abatement, compensation) which exist with the
product not having been free from defects at the time of the
passing of risk, shall remain unaff ected by this warranty.
Claims from this special warranty shall only be valid if:
• the defect reported has not arisen by damage caused by
unintended use or misuse as specifi ed in the instruction
manual,
• the failure of the product is not due to normal wear and tear
• the product does not show any signs resulting from repairs
or other interferences carried out by workshops not having
been authorised by the manufacturer,
• the product has only been operated with accessories authorised by the manufacturer and
• the product is sent in together with the original proof of
purchase (invoice / receipt) and the completely fi lled in warranty card which has not been altered in any way.
Guarantee cards cannot be replaced.
Note for EU countries: Reference is hereby made to the
seller’s statutory guarantee obligation, to the extent that this
guarantee obligation is not restricted by the product guarantee.
The manufacturer shall bear the costs for sending in and
returning the product.
This warranty shall be valid to the extent aforementioned and
under the above-named circumstances (including the submittal of the original proof of purchase also in case of resale)
for any future owner of the product.
Declaration of conformity
Stadlbauer Marketing + Vertrieb GmbH hereby declares that
this model including the controller conforms with the fundamental requirements of the following EC directives: EC Directives 2009/48 and 2014/30/EU regarding electromagnetic
compatibility and the other relevant regulations of Directive
2014/53/EU (RED).
The original declaration of conformity can be requested from
carrera-rc.com.
Maximum radio-frequency power transmitted <10 dBm
Frequency range: 2400 – 2483.5 MHz
Warning!
WARNING! This toy contains small parts
which can be swallowed and is therefore not
suitable for children under 3 years of age.
WARNING! danger of pinching during operation! Remove all packaging materials and wire fastenings before
handing the toy over to the child. For information and to
answer any questions, please retain packaging, address
and instructions in a safe place for future reference.
Adult supervisors note: please check that the toy has
been assembled in accordance with the instructions.
Assembly should be carried out under the supervision
of an adult.
WARNING! Not suitable for children under 8 years old!
This product is not intended for use by children without
supervision of a parent. Flying the helicopter requires skill
and children must be trained under the direct supervision of
an adult. Read the user’s information together with your child
Before the fi rst use. Inappropriate use may result in severe
injuries and/or damage to property.
It has to be operated with care and caution and requires both
mechanical and mental skills. The operating instructions
contain notes on safety and technical regulations as well as
information on maintaining and operating the product. It is
indispensable to read these instructions thoroughly before
the fi rst usage. Only this helps to avoid accidents with injuries and damage.
For safe use, the room where the toy is used must be
suffi ciently large.
Hands, hair and loose clothing, including other objects such
as pens and screwdrivers must be kept away from the propeller (rotor). Do not touch the rotating rotor. Especially take
care that your hands DO NOT get close to the rotor blades!
CAUTION: Risk of eye injuries. Do not fl y near your face
to avoid injuries.
As user of this product you are solely responsible for
handling it safely in order to ensure that neither you nor
other persons or their property suff er damages or are
endangered.
• Never use your model with weak remote control batteries.
• This toy is only designed to be used in a home environ-
ment.
• CAUTION: Do not start up and fl y when persons,
a nimals or any obstructions are within the fl ying range
of the helicopter.
• Exactly observe the instructions and warnings for this
product and for any possible additional equipment (battery
charger, rechargeable batteries etc.) being used by you.
• Should the helicopter come into contact with any
living thing or solid object, immediately return the gas
control to zero, in other words the left-hand joystick
must be at the stop at the bottom of the slide!
• Avoid any moisture as this might do damage to the elec tronics.
• Do not change or modify anything on the helicopter.
If you do not agree to these terms please immediately return
the complete helicopter model in new and unused condition
to the retailer.
6
Important information concerning Lithium Polymer rechargeable batteries
Lithium-Polymer (LiPo) rechargeable batteries are signifi cantly more sensitive than traditional alkali- or NiMH-rechargeable
batteries which are normally used with radio control units.
Therefore the instructions and warnings have to be observed
in detail. In case of improper use of LiPo rechargeable batteries there is a danger of fi re. Always follow the manufacturers´
instructions if you dispose of LiPo rechargeable batteries.
Regulations on disposal for waste electrical and electronic equipment (WEEE)
electrical equipment, etc. should not be disposed of in domestic refuse, as they are harmful to the environment and
health. Please help to preserve environment and health and
talk to your children about the correct disposal of used batteries and disused electrical equipment. Batteries and disused electrical equipment should be handed in to the usual
collection points where they can be properly recycled.
Do not mix dissimilar battery types or employ new and used
batteries together. Empty batteries should be removed from
the product. Do not recharge non-rechargeable batteries
due to risk of explosion.
WARNING!
This charger respectively USB-adapter can be used by children aged from 8 years and above and persons with reduced
physical, sensory or mental capabilities or lack of experience
and knowledge if they have been given supervision or instruction concerning use of the charger respectively USBadapter in a safe way and understand the hazards involved.
Children shall not play with the USB-adapter. Cleaning and
user maintenance shall not be made by children unless they
are older than 8 and supervised.
Keep the charger respectively USB-adapter and its cord
out of reach of children less than 8 years. Never leave the
battery unattended while it is charging. Exhausted batter-
ies are to be removed from the toy. Rechargeable batteries
should be removed from the product before charging. Supply
terminal are not to be short-circuited. Only use the batteries
recommended or equivalent types.
If in regular use the charger must be examined for damage
to the cord, plug, covers and all other parts. If any signs of
damage are found the charger may only be used again after
repair work has been completed. The external fl exible cable
or cord of this charger cannot be replaced: If the cord is damaged the charger shall be scrapped.
The toy is only to be connected to Class II equipment bearing the following symbol.
This symbol, showing refuse bins with
a cross through them, denotes that
empty batteries, rechargeable batteries, button cells, recharge able battery
packs, equipment batteries, disused
FCC statement
This device complies with Part 15 of the FCC Rules.
Operation is subject to the following two conditions:
(1) this device may not cause harmful interference, and
(2) this device must accept any interference received, in-
cluding interference that may cause undesired operation.
Changes or modifi cations not expressly approved by the
party responsible for compliance could void the user’s
authority to operate the equipment.
Guidelines and warnings for the use of LiPo rechargeable batteries
• You have to charge the attached 3.7 V
rechargeable battery in a safe place and at a safe distance
to fl ammable material.
• Never leave the battery unattended while it is charging
• After a fl ight, the rechargeable battery has to cool down to
the ambient air temperature before charging it.
• You must always use the corresponding LiPo charging unit
(USB cable / remote control). In case of non-compliance
with these directions there is a danger of fi re resulting in
a health risk and/or damage to property. NEVER use any
other battery charger.
• Should the rechargeable battery swell or deform while dis-
charging or recharging, you have to immediately stop charging or discharging the battery. Take the battery out as quickly
and carefully as possible and place it in a safe and open area
off side any infl ammable material and watch it for at least 15
minutes. In case you continue charging or discharging a battery which has already started to swell or deform there is a
danger of fi re! Even in case of slight deforming or ballooning
the rechargeable battery has to be taken out of operation.
180 mAh LiPo
Page 7
• Store the rechargeable battery at ambient temperature in a
dry place.
• Always recharge the battery immediately after use to
prevent its becoming deep discharged. Please make
sure to allow a pause of about 20 minutes between fi nishing the fl ight and recharging the battery. Recharge
the battery occasionally (suggested every 2-3 months).
Failure to treat the battery as described above can lead
to its becoming defective.
• When transporting or temporarily storing the rechargeable
battery the temperature should be between 5-50°C. If possible, do not store the battery or the model in a car and do
not expose it to direct sunlight. In case the battery is broiled
it can be damaged or catch fi re.
Note: If the battery voltage/output is low you will recognise
that a considerable trim and/or controlling is necessary to
avoid that the helicopter starts trundling. This usually occurs
before reaching a battery voltage of 3 V and it is a good moment to end the fl ight.
Contents of package
1x Helicopter
1
1x Controller
1x Display- & charging socket
1x USB charging cable
2x 1.5 V Micro AAA batteries (non-rechargeable)
Recharging the LiPo rechargeable
battery
Make sure you only charge the LiPo rechargeable battery
supplied with the LiPo charging unit also supplied (USB
cable and remote control). In case you try to charge the rechargeable battery with a diff erent LiPo battery charger or
any other battery charger, this might cause serious damages. Please carefully read the previous chapter about warnings and guidelines on the usage of rechargeable batteries
before proceeding.
Charging via computer:
• Connect the USB charging cable with the USB
2
port of a computer. The LED on the USB charger
cable lights green indicating that the charger unit
is correctly connected to the computer.
If you plug in a helicopter with a discharged battery, the LED on the USB charging cable does not
light up; this shows that the helicopter battery is
being charged. The USB charging cable and the
charging socket on the helicopter are designed to
make incorrect connection impossible.
• It takes about 30 minutes to recharge a discharged
battery (but NOT a deep-discharged one). When
the battery is fully charged, the LED display on the
USB charger cable lights up green again.
Note: When supplied, the lipo-battery is already partially
charged so the fi rst charging cycle may well take less time.
It is essential to follow the connection sequence given
above! If you have the charger cable only connected to
the helicopter, and not to a source of electricity, a green
LED display indicates that there is still power in the battery. The green LED display does not necessarily indicate the battery is still adequately charged.
While charging, the power switch must be in the “OFF”
position.
Inserting the batteries in the
remote control
Open the battery compartment with a screwdriver
and insert the batteries in the remote control.
3
Please keep in mind the correct polarity. After
having closed the compartment you can check all
functions of the remote control with the help of the
power-switch on the front. With the power-switch
turned ON and proper functioning, the top center
LED on the remote control will light up red.
When the control LED fl ashes rapidly, the batter-
ies in the controller must be changed.
Frequency bind between model
and remote control
The Carrera RC helicopter and the remote control
are frequency bound at purchase. Should there
4
occur any problems with the communication between the Carrera RC helicopter and the remote
control at the beginning, please carry out a new
frequency bind.
• Remove the model from its presentation plinth.
• Switch on the model at the ON/OFF switch.
• The LED in the helicopter now fl ashes in rhythmically-accelerating sequence.
• Slide the left joystick completely down. Switch on
the controller at the ON/OFF switch. The bond
will take place automatically. While connecting,
the controller emits a signal tone.
• Hold the model so that the rotor blades are horizontal.
• Allow the helicopter a few moments until the
system is correctly initialised and is ready for
operation.
• The control LED now lights continuously once
again, indicating that the connection is ended.
Checklist for fl ight preparation
This checklist does not replace the contents of the operating
instructions. Although it can be used as a quick-start-guide
we strongly advise to fi rst read the operating instructions in
detail before you proceed.
• Check the contents of the package
• Connect the charging unit to the source of power.
• Charge the lipo-battery as described in the section “Charging the lipo-battery”.
• Fit two AAA batteries in the controller, making sure their
polarity is correct.
• Look for a suitable environment for fl ying
• Proceed as described in 4.
• Repeat the above points as required, if you wish to fl y more
helicopters at the same time.
• Check the control system
• Start the helicopter from one hand. At the same time, hold
the controller in the other hand so that you can take over
control of the helicopter immediately.
WARNING! THE MODEL FLIES FORWARDS BY ITSELF
AND CAN ONLY BE CONTROLLED IN HEIGHT AND
DIRECTION
• Make yourself familiar with the control system
• Trim the helicopter as necessary as described under “Controlling the helicopter”.
• The helicopter is now ready to be fl own.
• If the helicopter displays no functions, retry the above binding procedure.
• Fly the model
• Land the model
• Switch the model off at the ON/OFF switch (3 sec.).
• Always switch off the remote control last
Range of functions of the remote
control
1. Antenna
2. Power switch (ON / OFF)
5
3. Control LED
4. Gas · tail (spinning in circles)
5. Tail (spinning in circles)
6. Trimmer for tail
7. Battery compartment
3
7
Description of helicopter
1. Coaxial rotor system
2. Socket for charging the lipo-battery
6
3. Display- & charging socket
4. ON-/OFF switch
Controlling the helicopter
In case you don´t know the control functions of
your Carrera RC helicopter yet, please take some
7
minutes before the fi rst fl ight in or to make yourself familiar with them. The descriptions left or
right refer to the view out of the cockpit (pilote´s
view). Push the throttle up to increase the rotational speed of the main rotor blades. Increase the
rotational speed of the main rotor blades and the
model will start to ascend.
If you push down the throttle and thus reduce the
rotational speed of the main rotor blades the helicopter will descend. When the model has lifted off
the ground you can get it into stationary hovering
without abrupt ascending or descending by carefully moving the throttle upwards and downwards.
Move the right lever (tail) to the left and the heli-
copter’s nose turns (yaws) round the main rotor’s
8
axis in a circle to the left.
Move the right lever (tail) to the right and the heli-
copter’s nose turns (yaws) round the main rotor’s
axis in a circle to the right.
Use the trimmer for tail until you have reached a
stable neutral position of the helicopter when hovering, without moving the right lever (tail).
WARNING! THE MODEL FLIES FORWARDS
BY ITSELF AND CAN ONLY BE CONTROLLED
9
IN HEIGHT AND DIRECTION
After having made yourself familiar with the main control
functions and having chosen an appropriate area for fl ying
the helicopter, you can start the fi rst fl ight.
Choosing the fl ight area
When being prepared for the fi rst fl ight you
10
should choose a closed room without any
persons or obstacles which is as big as possible. Due to the size and controllability of the
helicopter experienced pilotes may be able to
fl y the helicopter in relatively small rooms. For
your fi rst fl ights we strongly recommend to
choose a room with a minimum fl oor space of
3 x 3 metres and 2.40 metres of height. After
having trimmed your helicopter for fl ight and
having made yourself familiar with the controlling and its functions you may start fl ying in
smaller and less open environments.
This toy is intended to be used in domestic
area (house and garden) only.
Informatio n on trouble-shoot ing will be found on page 42.
Errors and changes excepted
Colours / fi nal design – cha nges excepted
Technical changes and design-related changes excepted
Pictograms = symbolic photos
ENGLISH
Page 8
Chère cliente ! Cher client !
Nous vous félicitons pour l‘achat de votre maquette d‘hélicoptère Carrera RC qui a été fabriqué selon le niveau actuel
de la technique. Nous avons toujours pour ambition d’améliorer et de perfectionner nos produits et nous réservons la
possibilité de réaliser des modifi cations techniques relatives
à la présentation et design de nos produits. Les divergences
de faible importance du produit, que vous avez acheté, par
rapport aux données et illustrations de ces instructions de
montage et d’utilisation ne sauraient donner lieu à des réclamations de ce fait. Ces instructions de montage et d’utilisation forment partie intégrale du produit. Le fabricant décline
FRANÇAIS
toute responsabilité en cas d’inobservation des instructions
de montage et d’utilisation et des consignes de sécurité y
fi gurant. Veuillez conserver ces instructions de montage et
d’utilisation, afi n que vous puissiez les consulter ultérieurement et et les remettre à tout utilisateur de ce véhicule si
besoin est.
Vous trouverez la version la plus actuelle de ce mode d‘emploi et les informations sur les pièces de rechange
disponibles sur
dans la zone de service.
Conditions de garantie
Les produits Carrera sont des produits de qualité technique élevée qui devraient être manipulés avec précaution. Veuillez impérativement respecter les indications
du mode d‘emploi. Tous les éléments sont soumis à des
contrôles approfondis (sous réserve de modifi cations
techniques et des véhicules destinées au perfectionnement du produit).
La responsabilité du fabricant est cependant engagée aux
termes des conditions de garantie ci-après à supposer que
le produit présente des défauts :
La société Stadlbauer Marketing + Vertrieb GmbH (ci-après
désignée „Fabricant“) garantit au client fi nal (ci-après désigné „Client“) selon les clauses suivantes que la maquette
d‘hélicoptère Carrera RC livré au client (ci-après désigné
„Produit“) sera exempt de vices de matériel ou de fabrication
durant une période de deux ans à partir de la date d‘achat
(délai de garantie). Le fabricant éliminera de tels vices selon
sa propre appréciation à ses frais en les réparant ou en
livrant des pièces neuves ou ayant subi une révision générale. La garantie ne s’étend pas aux pièces d’usure (par
exemple la batterie, les pales de rotor, le recouvrement de
cabine, la roue dentée), aux dommages dus à un traitement/
utilisation non conforme ou à des interventions externes.
D‘autres revendications du client, en particulier de dommages et intérêts, contre le fabricant sont exclus.
Les droits contractuels ou légaux du client (exécution ultérieure, résiliation du contrat, réduction du prix, dommages et
intérêts) vis-à-vis du vendeur correspondant, droits existant
si le produit n‘était pas exempt de vices lors du transfert du
risque, ne sont pas concernés par cette garantie.
Les droits issus de cette garantie du fabricant spéciale
n‘existent que si
• le vice réclamé ne repose pas dans des dommages qui
résultent d‘un emploi non conforme ou non dapté aux
directives prescrites dans le mode d‘emploi,
• il ne s‘agit pas de signes d‘usure dus à l‘emploi,
• le produit ne présente aucun signe qui permette de constater que des réparations ou d‘autres interventions ont été
eff ectuées par des ateliers non autorisés par le fabricant,
• le produit n‘a été utilisé qu‘avec des accessoires autorisés
par le fabricant et
• si le produit est envoyé avec le bon d‘achat original (facture /
bon de caisse) et la carte de garantie entièrement remplie,
produit sur lequel aucune modifi cation autonome n‘a été
réalisée.
Les cartes de garantie ne sont pas remplaçables.
Avis destinés aux États de l’Union européenne : nous
attirons l’attention sur l’obligation de garantie légale du vendeur, pour autant que cette obligation de garantie ne soit pas
restreinte par les conditions de la présente garantie.
Le fabricant prend en charge les coûts de l’expédition et du
renvoi du produit.
carrera-rc.com
Cette garantie est valable dans l’ampleur susmentionnée et
dans les conditions susmentionnées (y compris la présentation du bon d’achat original aussi en cas de revente) pour
chaque propriétaire ultérieur, futur du produit.
Déclaration de conformité
Par la présente, la société Stadlbauer Marketing + Vertrieb
GmbH déclare que cette maquette, y compris le contrôleur,
est conforme aux exigences essentielles des directives
européennes suivantes : est conforme aux Directives européennes 2009/48 et 2014/30/EU relatives à la comptabilité
électromagnétique et les autres prescriptions importantes de
la Directive 2014/53/EU (RED).
L’original de la déclaration de conformité est à votre disposition sur le site internet carrera-rc.com.
Puissance de fréquence radio maximale <10 dBm
Gamme de fréquences: 2400 – 2483,5 MHz
Avertissements !
ATTENTION ! Ne convient pas aux enfants de
moins de 3 ans. Danger d’étouff ement – Pré-
sence de petits éléments pouvant être avalés.
ATTENTION ! Danger d’écrasement en cours de fonctionnement ! Supprimez tous les matériaux d’emballage et fi ls
de fi xation avant de remettre ce jouet à l’enfant. Veuillez
conserver l’emballage, l’adresse ainsi que le mode d’emploi pour référence ultérieure en cas d’éventuelles questions ou de besoin d’informations. Remarque destinée
aux superviseurs adultes : veuillez vérifi er que le jouet est
monté conformément au mode d’emploi. Le montage doit
être réalisé sous la surveillance d’un adulte.
ATTENTION ! Ne convient pas aux enfants de moins de 8 ans.
Ce produit n‘est pas conçu pour être utilisé par des enfants
sans la surveillance d‘une personne chargée de l‘éducation.
Piloter l’hélicoptère nécessite une certaine habileté que les
enfants doivent acquérir sous la surveillance directe d’un
adulte. Veuillez lire le mode d’emploi avec votre enfant avant
la première utilisation. Un emploi non conforme peut entraîner
de graves blessures et/ou des dommages matériels.
Il doit être piloté avec prudence et circonspection et exige
certaines facultés mécaniques et mentales. Le mode d‘emploi contient des consignes de sécurité et des prescriptions
ainsi que des indications sur l‘entretien et l‘emploi du produit.
Il faut impérativement avoir lu complètement et compris ce
mode d‘emploi avant la première mise en service. C‘est la
seule manière d‘éviter les accidents accompagnés de blessures et de dommages.
Ne faire voler que dans des pièces closes qui off rent suffi samment de place et suivre toutes les consignes telles
qu‘elles sont recommandées dans ce mode d‘emploi. Il
convient de tenir l’hélice (rotor) à distance des mains, des
cheveux et des vêtements amples ainsi que d’autres objets
tels que des clous ou des tournevis. Ne pas toucher le rotor en
mouvement. Veiller surtout à NE PAS tenir les mains à proximité des pales du rotor !
ATTENTION : Risque de blessure oculaire. Afi n d’éviter
tout accident, ne pas faire voler à proximité du visage.
En tant qu‘utilisateur de ce produit, vous êtes seul responsable de la sécurité de manipulation de sorte que
vous ni d‘autres personnes ou leur propriété ne subissent
des dommages ou soient mis en danger.
• Ne jamais utiliser cette maquette avec des accus faibles
dans le contrôleur.
• Ce jouet est uniquement destiné à une utilisation dans le cadre
domestique.
• ATTENTION : Ne pas démarrer ni faire voler l’hélicop-
tère tant que des personnes, animaux ou obstacles se
trouvent dans le périmètre de vol de l’appareil.
• Respecter exactement les instructions et les avertisse ments pour ce produit et l‘équipement supplémentaire
éventuel (chargeur, accus etc.) que vous utilisez.
• Si l’hélicoptère entre en contact avec des êtres vivants
ou des objets durs, mettre immédiatement le levier
d’accélération en position zéro, à savoir le joystick
8
gauche doit être en butée inférieure !
• Éviter n‘importe quelle humidité, car elle peut endomma ger le système électronique.
• Ne rien remplacer ou modifi er sur l’hélicoptère.
Si vous n‘êtes pas d‘accord avec ces conditions, renvoyez
immédiatement au commerçant la maquette de l‘hélicoptère
intégrale dans sont état neuf et non utilisé.
Informations importantes sur les accus Lithium-Polymère
Les accus Lithium-Polymère (LiPo) sont nettement plus sensibles que les accus alcalins ou NiMh usuels qui sont utilisés
normalement pour les télécommandes radio. C‘est pourquoi
il faut respecter très strictement les prescriptions et avertissements du fabricant. En cas de mauvaise manipulation de l‘accu
LiPo, il y a risque d‘incendie. Toujours respecter les indications
du fabricant quand vous éliminez des accus LiPo.
Prescriptions d‘élimination de vieux appareils électriques
et électroniques selon la réglementation WEEE (Déchets
d‘équipements électriques et électroniques provenant des
Équipements Électriques et Électroniques)
batteries d’appareils, appareils électriques usagés etc. dans
les ordures ménagères, étant donné que ces produits
nuisent à l’environnement et à la santé. Veuillez nous aider
à sauvegarder l’environnement et la santé et attirez aussi
l’attention de vos enfants sur une élimination correcte des
batteries, piles et appareils électriques usagés. Remettez
les batteries, piles et appareils électriques usagés aux
postes de collecte respectifs. Ces postes veilleront à leur
recyclage aux termes des réglementations en vigueur.
Il est strictement interdit d’utiliser des types diff érents de batteries ou des piles neuves avec des piles usagées. Retirez
toujours les batteries et piles vides du jouet. En raison du
risque d’explosion, il est interdit de recharger des piles non
rechargeables.
ATTENTION !
Le chargeur ou le câble de charge USB peuvent être utilisés
par des enfants de plus de huit (8) ans et par des personnes
présentant des capacités physiques, sensorielles ou mentales
limitées ou un manque d’expérience et/ou de connaissances
lorsqu’elles se trouvent sous la surveillance d’une personne
responsable ou lorsqu’elles ont reçu des instructions détaillées de cette personne concernant l’utilisation sûre de l’appareil et ont compris les risques qui en résultent. Ne pas laisser
les enfants jouer avec le chargeur ou le câble de charge USB.
Le nettoyage et la maintenance ne doivent pas être eff ectués
par des enfants sauf s’ils sont âgés de plus de 8 ans et sous
la surveillance d’un adulte. Tenir le chargeur et le cordon hors
de portée des enfants de moins de 8 ans.
Ne laissez jamais la batterie se charger sans surveillance. Retirez les accumulateurs du jouet avant de les
recharger. Il est interdit de court-circuiter les bornes de raccordement. Servez-vous exclusivement du type de pile ou
d’accumulateur recommandé ou d’un type de pile ou d’accumulateur équivalent.
En cas d’emploi régulier du chargeur, il faut contrôler le
câble, le raccord, les couvercles et les autres pièces de ce
chargeur. En cas de dommage, le chargeur ne doit être remis en service qu’après avoir subi une réparation. Le câble
extérieur fl exible de ce chargeur ne peut pas être remplacé :
si celui-ci est endommagé, il doit être détruit.
Le jouet doit être raccordé uniquement à des appareils de la
classe de protection II.
Directives et avertissements pour l‘emploi de l‘accu LiPo
• Vous devez charger l‘accu LiPo 3,7 V
endroit sûr, à l‘écart de matériaux infl ammables.
• Ne laissez jamais la batterie se charger sans surveillance.
• Pour charger l‘accu après un vol, il faut tout d‘abord qu‘il refroidisse à la température ambiante.
•
Utilisez uniquement le chargeur LiPo correspondant (câble
USB / contrôleur). En cas de non-respect de ces indications,
il y a risque d‘incendie et donc un danger pour la santé et/ou
un risque de dommage matériel. NE JAMAIS utiliser un autre
chargeur.
• Si l‘accu gonfl e ou se déforme pendant la décharge ou la
charge, mettre immédiatement fi n à la décharge ou décharge.
Retirer l‘accu aussi rapidement et prudemment que possible et
le déposer dans un endroit sûr, à l‘air libre, à l‘écart de matériaux infl ammables et l‘observer au moins durant 15 minutes.
Le pictogramme ci-contre des poubelles sur roues barrées est destiné à
attirer votre attention sur le fait qu’il
est interdit de jeter les piles, accumulateurs, piles rondes, packs d’accus,
180 mAh dans un
Page 9

Si vous continuez à charger ou décharger un accu qui a déjà
gonfl é ou s‘est déformé, il y a risque d‘incendie. Même en présence d‘une faible déformation ou gonfl ement, un accu doit
être mis hors service.
• Entreposer l‘accu à température ambiante dans un lieu sec.
• Rechargez votre accu après utilisation afi n d’éviter une
décharge profonde de celui-ci. Veillez à faire une pause
de 20 minutes env. entre le vol et la charge. Chargez votre
accu de temps en temps (environ tous les 2 à 3 mois). La
non-observation de l’utilisation mentionnée précédemment peut provoquer une détérioration de l’accu.
• Pour le transport ou pour un entreposage temporaire de
l‘accu, la température devrait se situer entre 5-50 °C. Ne pas
entreposer l‘accu et la maquette si possible dans la voiture ou
sous l‘eff et direct du soleil. Si l‘accu est exposé à la chaleur
dans la voiture, il peut être endommagé ou prendre feu.
Remarque: Si la tension/puissance de l‘accu est faible, vous
constaterez qu‘il faut eff ectuer des opérations d‘équilibrage et/
ou des mouvements de pilotage considérables pour que l‘hélicoptère ne se mette pas en vrille. Ceci est le cas en général
avant que la tension de l‘accu n‘atteigne les 3 V et c‘est le bon
moment pour interrompre le vol.
Fournitures
1x Hélicoptère
1
1x Contrôleur
1x Socle de présentation et de chargement
1x Câble USB de chargement
2x Accus 1,5V micro AAA (non rechargeable)
Charger l‘accu LiPo
Veillez à ce que la batterie LiPo fournie soit chargée uniquement
avec l’appareil de charge LiPo fourni (câble USB ou contrôleur).
Si vous essayez de charger l‘accu avec un autre chargeur
d‘accu LiPo ou un autre chargeur, ceci peut entraîner de graves
détériorations. Veuillez lire attentivement le chapitre précédent
avec les avertissements et les directives d‘emploi de l‘accu
avant de continuer.
Charger à l’ordinateur :
• Relier le câble de charge USB au port USB d’un
2
ordinateur. La DEL sur le câble de charge USB
s’allume en vert et indique que l’unité de charge
est correctement reliée à l’ordinateur.
Lorsque vous branchez un hélicoptère dont l’accu est vide, la DEL sur le câble de charge USB
ne brille plus et indique que l’accu de l’hélicoptère est en phase de charge. Le câble de charge
USB voire la douille de charge sur l’hélicoptère
sont fabriqués de sorte qu’il n’est pas possible
d’inverser la polarité.
• Cela dure environ 30 minutes pour la recharge
d’un accu déchargé (pas déchargé en profondeur). Lorsque l’accu est plein, la DEL du câble
de charge USB se rallume en vert.
Remarque : Lors de la livraison, l’accu LiPo contenu est chargé
partiellement. C’est pourquoi le premier processus de charge
pourrait durer un peu moins longtemps.
Veuillez respecter impérativement l’ordre de raccordement
ci-dessus ! Si le câble de charge n’est pas raccordé à une
source de courant et s‘il est uniquement relié à l‘hélicoptère, une DEL s’allumant en vert indique qu‘il reste du courant dans l’accu. La DEL s‘allumant en vert n‘indique pas si
l‘accu est suffi samment chargé.
Lors du rechargement, l’interrupteur doit se trouver en
position «OFF».
Insérer l‘accu LiPo dans
l‘hélicoptère
Ouvrir le compartiment à accu avec un tournevis et
insérer les accus dans le contrôleur. Respecter la
3
bonne polarité. Après la fermeture du compartiment,
vous pouvez vérifi er la fonctionnalité du contrôleur
à l‘aide du commutateur puissance sur le devant.
En position ON du commutateur puissance et si le
fonctionnement est correct, la DEL devrait s‘allumer
en rouge en haut au milieu du contrôleur.
Quand la DEL de contrôle clignote rapidement, les
batteries doivent être remplacées dans le contrôleur.
Liaison entre la maquette et le
contrôleur
L‘hélicoptère Carrera RC et le contrôleur ont été
reliés en usine. Si des problèmes de communication
4
entre l‘hélicoptère Carrera RC et le contrôleur se produisent au début, exécuter une nouvelle liaison.
• Retirez le modèle du socle de présentation.
• Mettre le modèle en marche avec le commutateur
ON/OFF.
• La DEL dans l’hélicoptère clignote à présent à un
rythme accéléré.
• Pousser la manette de gauche complètement vers
le bas. Mettre le contrôleur sous tension avec le
commutateur ON/OFF. La connexion s’établit automatiquement. Pendant le processus de liaison, un
signal retentit sur le contrôleur.
• Positionnez le modèle de manière à ce que le rotor
soit situé vers le haut, à la verticale.
• Laisser à l’hélicoptère un peu de temps jusqu’à ce
que le système soit correctement initialisé et prêt
à l’emploi.
• La DEL de contrôle reste à nouveau allumée en
permanence et indique que la liaison est achevée.
Check-list pour la préparation
du vol
Cette check-list ne remplace pas le contenu de ce mode d‘emploi. Même si vous pouvez l‘utiliser comme guide Quick-Start,
nous vous conseillons impérativement de lire tout d‘abord attentivement et intégralement ce mode d‘emploi avant de continuer.
• Vérifi er le contenu de l’emballage
• Reliez l’appareil de charge à la source de courant.
• Charger l’accu LiPo comme cela est décrit au chapitre «Charger l’accu LiPo». R
• Placez les 2 piles AAA dans le contrôleur en veillant à respecter la polarité.
• Chercher un environnement approprié pour le vol
• Suivre la procédure indiquée au point 4.
• Répétez la procédure ci-dessus si vous désirez faire voler plusieurs hélicoptères simultanément.
• Vérifi er la commande
• Démarrez l’hélicoptère d’une main. En parallèle, veuillez
prendre la télécommande dans l’autre main afi n que vous
puissiez immédiatement prendre le contrôle de l’hélicoptère.
ATTENTION ! LE MODÈLE AVANCE TOUT SEUL ET
PEUT UNIQUEMENT ÊTRE DIRIGÉ EN HAUTEUR ET
DANS LES DIFFÉRENTES DIRECTIONS
• Se familiariser avec la commande
• Trimez l’hélicoptère comme décrit dans «Commande de l’hélicoptère».
• L’hélicoptère est à présent prêt à fonctionner.
• Si l’hélicoptère ne montre pas de signe de fonctionnement,
réessayez d’exécuter le processus de raccordement mentionné ci-dessus.
• Faire voler la maquette
• Faire atterrir la maquette
• Éteignez le modèle avec le commutateur ON/OFF (3 sec.)
• Toujours débrancher la télécommande en dernier
Vue d‘ensemble des fonctions
du contrôleur
1. Antenne
2. Commutateur puissance (ON / OFF)
5
3. DEL de contrôle
4. Gaz
5. Arrière (mouvement de rotation)
6. Trimmer pour l’arrière
7. Compartiment à accu
3
9
Description de l‘hélicoptère
1. Système de rotor coaxial
2. Douille pour charger l’accu LiPo
6
3. Affi chage / Socle de présentation
4. Commutateur ON/OFF
Pilotage de l‘hélicoptère
Si vous ne connaissez pas encore les fonctions de
pilotage de votre hélicoptère Carrera RC, prenez
7
quelques minutes de temps avant le premier vol
pour vous familiariser avec elles. La description
Gauche ou Droite correspond à une vue à partir du
cockpit (vue du pilote). Pousser le levier du gaz vers
le haut afi n d’augmenter la vitesse de rotation des
pales du rotor principal. Si vous augmentez la vitesse
de rotation des pales du rotor principal, la maquette
commence à monter. Si vous réduisez l’amplitude du
levier du gaz et donc la vitesse de rotation des pales
du rotor principal, l’hélicoptère descend. Quand la
maquette a quitté le sol, vous pouvez la mettre en
vol stationnaire en bougeant prudemment le levier
du gaz, vers le haut ou vers le bas sans qu’elle ne
monte ou ne descende abruptement.
Si vous bougez le levier de droite (arrière) vers la
gauche, le nez de l’hélicoptère se met en rotation
8
(louvoie) autour de l’axe du rotor principal en faisant
une rotation circulaire vers la gauche.
Si vous bougez le levier de droite (arrière) vers la
droite, le nez de l’hélicoptère se met en rotation (louvoie) autour de l’axe du rotor principal en faisant une
rotation circulaire vers la droite.
Utiliser le trimmer pour l’arrière jusqu’à ce que l’héli-
coptère ait atteint une position neutre stable en vol
stationnaire sans bouger le levier de droite (arrière).
ATTENTION ! LE MODÈLE AVANCE TOUT
SEUL ET PEUT UNIQUEMENT ÊTRE DIRIGÉ
9
EN HAUTEUR ET DANS LES DIFFÉRENTES
DIRECTIONS
Après vous être familiarisé avec les fonctions principales de pilotage, vous êtes prêts pour eff ectuer votre premier vol après avoir
choisi la zone de vol.
Choix de la zone de vol
Quand vous êtes prêt pour votre premier vol,
10
vous devriez choisir une pièce close qui doit être
aussi grande que possible sans la présence de
personnes et d‘obstacles. En raison de la taille et
la facilité de pilotage de l‘hélicoptère, les pilotes
expérimentés sont capables de faire voler l‘hélicoptère aussi dans des pièces fermées relativement petites. Mais pour vos premiers vols, nous
recommandons une taille minimale de la pièce
de 3 fois 3 mètres de surface et de 2,40 mètres
de haut. Après avoir trimmé votre hélicoptère
et vous être familiarisé avec son pilotage et ses
facultés, vous pouvez aussi risquer de le faire
voler dans des environnements plus petites et
moins libres.
Ce jouet doit uniquement être utilisé dans un
environnement domestique (maison et jardin).
Vous trouverez des informations pour résoudre les problèmes
à la page 42.
Sous réser ve d´erreurs et de mod ifi cati ons · Couleurs / de sign
fi nal – s ous réserve de m odifi ca tions · Sous rése rve de
modifi cations · techniq ues et relative s au design ·
Pictogrammes = photos symboliques
FRANÇAIS
Page 10

Estimado cliente
Le felicitamos por la compra de su modelo de helicóptero
Carrera RC, que ha sido fabricado conforme a la tecnología más avanzada. Constantemente nos esforzamos por
perfeccionar y mejorar nuestros productos, por lo que nos
reservamos el derecho de realizar modifi caciones en el
aspecto técnico y en relación al equipamiento, material y
diseño en cualquier momento y sin previo aviso. Por ello, no
podrá derivarse ningún derecho por pequeñas diferencias
entre este producto y los datos y las fi guras de estas instrucciones. Estas instrucciones de uso y de montaje son parte
integrante del producto. En caso de que no se cumplan las
ESPAŃOL
instrucciones de uso y las indicaciones de seguridad contenidas en ellas, se extinguirá el derecho de garantía. Guarde
bien estas instrucciones para poder consultarlas más tarde,
y entréguelas a terceros cuando les traspase el modelo.
La versión más actual de este manual de servicio e información acerca de los recambios disponibles
la encontrará en
carrera-rc.com
en el área de Servicio.
Condiciones de garantía
Los productos Carrera son productos de alto valor técnico, que deben ser tratados con cuidado. Es necesario
que observe las indicaciones de este manual de servicio. Todas las piezas han sido sometidas a un control
riguroso (queda reservado el derecho a realizar modifi caciones técnicas y cambios en el modelo, destinados
a mejorar el producto).
Si, a pesar de ello, se presentaran defectos, se aplicará una
garantía en el marco de las siguientes condiciones:
Stadlbauer Marketing + Vertrieb GmbH (en adelante, “el
fabricante”) garantiza al cliente fi nal (en adelante, “el cliente”) según las disposiciones referidas a continuación, que el
modelo de helicóptero Carrera RC entregado al cliente (en
adelante, “el producto”) estará exento de fallos de material
o de procesamiento por un período de dos años a partir de
la fecha de compra (plazo de garantía). Los fallos de este
tipo serán subsanados por el fabricante por cuenta propia
y según su propio criterio, mediante reparación o envío de
piezas nuevas o reparadas. La garantía no cubre las piezas
de desgaste (como p. ej. acumulador, aspas, cubierta de la
cabina, ruedas dentadas o similares), ni los daños causados
por un tratamiento o uso incorrectos o por intervenciones
ajenas. Queda excluido cualquier otro derecho de reclamación del cliente frente al fabricante, en particular, por daños
y perjuicios.
Los derechos contractuales o legales del cliente (cumplimiento a posteriori, rescisión del contrato, reducción del
precio, indemnización por daños y perjuicios) frente al
respectivo vendedor, existentes en aquellos casos en que
el producto no esté exento de defectos en el momento de
la transferencia del riesgo, no se verán afectados por esta
garantía.
Derechos resultantes de esta garantía especial del fabricante, sólo existirán en aquellos casos en que:
• el fallo reclamado no se deba a daños resultantes de un
uso incorrecto o inapropiado según las especifi caciones
incluidas en las instrucciones de servicio,
• no se trata de desgastes causados por el funcionamiento,
• el producto no presente señales, que permitan deducir que
hubo reparaciones u otras intervenciones realizadas por
talleres no autorizados por el fabricante,
• el producto sólo haya sido utilizado con accesorios autorizados por el fabricante y
• el producto sea devuelto, acompañado del justifi cante de
compra original (factura o tique de caja) y de la tarjeta de
garantía totalmente rellenada y sin estar modifi cada.
Las tarjetas de garantía no se pueden sustituir.
Instrucciones para los Estados de la Unión Europea: se
hace referencia al deber de prestación de garantía legal del
vendedor, en tanto que este deber no se vea limitado por
alguna garantía contraria.
Los gastos del envío y la devolución del producto corren a
cargo del fabricante.
Esta garantía es válida en el alcance antes expuesto y bajo
las condiciones arriba mencionadas, para cualquier propietario ulterior o futuro del producto (también el tener que
presentar el resguardo original de compra, incluso en caso
de pasarse a terceros).
Declaración de conformidad
Por la presente, Stadlbauer Marketing + Vertrieb GmbH
declara la conformidad de este modelo, inclusive el controlador, con los requisitos básicos de las siguientes directivas:
Directrices CE 2009/48 y 2014/30/EU acerca de la compatibilidad electromagnética y las demás normas relevantes de
la directriz 2014/53/EU (RED).
Puede solicitar la declaración de conformidad original bajo:
carrera-rc.com.
Potencia de radiofrecuencia máxima <10 dBm
#
Rango de frecuencia: 2400 – 2483,5 MHz
¡Advertencias!
¡ADVERTENCIA! Este juguete no es adecua-
do para niños menores de 3 años, ya que contiene piezas pequeñas que se podrían ingerir.
¡ADVERTENCIA! Existe peligro de quedar
atrapado por motivos funcionales. Retire todo el material de embalaje y los alambres de fi jación antes de
entregar este juguete al niño. Para obtener información
y en caso de posibles preguntas, conserve el embalaje y la dirección, así como el manual de instrucciones
para consultar posteriormente. Indicación para adultos
encargados de la supervisión: compruebe si el juguete
se ha montado conforme a las instrucciones. El montaje
debe llevarse a cabo bajo la supervisión de un adulto.
¡ADVERTENCIA! No apropiado para niños menores de 8 años.
Este producto no está pensado para que sea utilizado por
niños sin la vigilancia de un adulto. Pilotar el helicóptero
requiere habilidad y los niños deben entrenarse bajo la supervisión directa de un adulto. Lea la información para el
usuario con su hijo antes de utilizarlo por primera vez. Un
uso inadecuado puede conllevar lesiones graves o daños
materiales.
Debe ser dirigido con precaución y requiere ciertas habilidades mecánicas y mentales. El manual incluye instrucciones
de seguridad y normas, así como indicaciones relativas al
mantenimiento y el manejo del producto. Es imprescindible
haber leído y comprendido el presente manual, antes de la
primera puesta en marcha del aparato. Sólo así pueden evitarse accidentes con lesiones y daños.
Haga volar el aparato únicamente en recintos cerrados,
que cuenten con sufi ciente espacio, y siga todas las
instrucciones, tal y como recomienda este manual.
Las manos, los cabellos y la ropa suelta, incluidos otros
objetos como lápices y destornilladores deben mantenerse
alejados de la hélice (rotor). No tocar el rotor rotativo. Procure especialmente que las manos NO queden cerca de las
aspas.
¡ADVERTENCIA!: riesgo de lesiones oculares. No pilote
el helicóptero cerca de su ojos para evitar lesiones.
En su condición de usuario de este producto, usted es el
responsable único del manejo seguro del mismo, para que
ni usted, ni otras personas, ni las propiedades de éstas,
puedan resultar lesionadas, dañadas o puestas en peligro.
• No utilice nunca el modelo con las pilas del controlador
muy gastadas.
• Este juego solamente está concebido para el empleo en el
ámbito doméstico.
• ¡ADVERTENCIA!: no ponga en marcha ni pilote el he-
licóptero cuando haya personas, animales o cualquier
obstáculo dentro del margen de vuelo del mismo.
• Siga atentamente las instrucciones y las advertencias de
este producto y de los eventuales accesorios (cargador,
baterías, etc.) que pueda utilizar.
• Si el helicóptero entrase en contacto con seres vivos
o con objetos duros, colocar inmediatamente la pa
lanca del gas en posición cero (es decir que el joystick
izquierdo debe estar en el tope inferior).
• Evite cualquier posible humedad, ya que ésta puede dañar
10
la electrónica.
• No cambie ni modifi que nada en el helicóptero.
Si no está de acuerdo con estas condiciones, devuelva inmediatamente el helicóptero completo, nuevo y sin utilizar,
al vendedor.
Información relevante sobre las baterías recargables de
polímero de litio
Las baterías recargables de polímero de litio (LiPo) son mucho más sensibles que las habituales baterías alcalinas o de
NiMH utilizadas normalmente en los radiocontroles. Por ello
es imprescindible seguir exactamente las normas y las advertencias del fabricante. Existe riesgo de incendio en caso
de manipulación errónea de las baterías recargables LiPo.
A la hora de eliminar las baterías recargables LiPo, deben
tenerse siempre en cuenta las indicaciones del fabricante.
Disposiciones sobre la eliminacíon de aparatos eléctricos y electrónicos usados según RAEE.
tos, los aparatos eléctricos usados, etc., no deben tirarse a
la basura doméstica, ya que pueden dañar al medio ambiente y a la salud. Ayude a conservar el medio ambiente y a
cuidar de la salud pública, y enseñe también a sus hijos
cómo eliminar correctamente las pilas gastadas y los aparatos eléctricos usados. Las pilas gastadas y los aparatos
eléctricos viejos deben entregarse en los puntos de recogida conocidos. Así se reciclarán de una forma correcta.
No deben utilizarse juntas pilas de diferente tipo, ni pilas
nuevas con usadas. No deben recargarse las pilas no recargables debido al riesgo de explosión.
¡ADVERTENCIA!
El cargador o el cable de carga USB pueden ser utilizados
por niños a partir de los ocho (8) años de edad y por personas con capacidades físicas, sensoriales o cognitivas
limitadas o con falta de experiencia/conocimiento, si se les
supervisa o instruye en el uso seguro del aparato y estos
han comprendido los peligros derivados de ello. Los niños
no deben jugar con el cargador ni el cable de carga USB.
Los niños no deben realizar la limpieza ni el mantenimiento
propios del usuario a menos que sean mayores de 8 años
y se les supervise.
Debe mantenerse a los niños menores de 8 años fuera del
alcance del cargador y del cable de alimentación. No deje
de vigilar las baterías cuando se estén cargando. Saque
las pilas recargables del juguete antes de cargarlas. Los
bornes conectores no deben cortocircuitarse. Sólo deben
utilizarse las pilas recomendadas o pilas de un tipo equivalente.
Si se usa periódicamente el cargador, deben controlarse su
cable, conexión, cubiertas y demás piezas. En caso de avería, primero debe repararse el cargador, antes de volverlo a
poner en marcha. El cable exterior fl exible de este cargador
no puede sustituirse: si el cable está dañado, el cargador
debe desguazarse.
El juguete solo debe conectarse a un equipo de la Clase II
que tenga el siguiente símbolo.
Directrices y advertencias relativas al uso de la batería
recargable LiPo
• Debe cargar la batería LiPo de 3,7 V 180 mAh adjunta
en un lugar seguro, y alejado de materiales infl amables.
• No deje de vigilar la batería cuando esta se esté cargando.
• Para cargar la batería después de un vuelo, debe haberse
enfriado primero a temperatura ambiente.
• Debe utilizar únicamente el cargador de polímero de litio
correspondiente (cable de USB / controlador). El incumplimiento de estas indicaciones puede provocar incendios y
el riesgo correspondiente para la salud, o daños materiales. NO UTILICE NUNCA otro cargador.
• En caso que la batería se hinche o se deforme durante
el proceso de carga o descarga, interrumpa de forma inmediata tal carga o descarga. Retire entonces la batería
lo más rápida y cuidadosamente posible, y colóquela en
un lugar seguro y despejado, alejado de cualquier material infl amable, y observe la batería durante al menos 15
minutos. Si continua cargando o descargando la batería
hinchada o deformada, existe riesgo de incendio. Ante la
más mínima deformación o hinchazón de la batería, proceda a ponerla fuera de servicio.
• Guarde la batería recargable a temperatura ambiente en
un lugar seco.
El símbolo aquí representado, con los
cubos de basura tachados, indica que
las pilas gastadas, las baterías recargables, las pilas de botón, los paquetes de baterías, las pilas de los apara-
Page 11

• Tras usarla, cargue la batería de nuevo para evitar que
esta se descargue por completo. Al hacerlo, procure
mantener una pausa de aprox. 20 min. entre el vuelo y
el proceso de carga. Cargue la batería de vez en cuando (aprox. cada 2-3 meses). Si no se tienen en cuenta
las instrucciones de manejo de la batería indicadas
antes, puede producirse una avería.
• Para el transporte o el almacenaje transitorio de la batería,
la temperatura debería oscilar entre 5 - 50° C. Siempre que
sea posible, no guarde la batería ni el modelo en el coche,
ni en ningún lugar que esté expuesto a la radiación solar
directa. Si la batería se ve expuesta al calor del vehículo,
puede estropearse o incendiarse.
Indicación: cuando la batería tiene poca tensión / poca potencia verá que precisa mucho más equilibrio aerodinámico
y/o movimientos de control para que el helicóptero no entre
en barrena. Por regla general, esto sucede antes de alcanzar los 3 V de tensión en la batería, y es un buen momento
para fi nalizar el vuelo.
Contenido del embalaje
1x Helicóptero
1
1x Controlador
1x Base de presentación y carga
1x Cable de carga USB
2x Pilas de 1,5 V Micro AAA (no recargables)
Carga de la batería LiPo
Preste atención a cargar el acumulador de polímero de litio
suministrado con el cargador de polímero de litio suministrado (cable de USB o controlador). El intento de cargar la
batería con otro cargador de baterías LiPo o de otro tipo,
puede provocar graves daños. Antes de proseguir, lea atentamente el apartado anterior con las advertencias y las directivas relativas al uso de la batería.
Carga en el ordenador:
• Conecte el cable de carga USB al puerto USB
2
del ordenador. El led del cable de carga se ilumina de verde, indicando que el cargador está
correctamente conectado al ordenador.
Si conecta un helicóptero con la batería descargada, el led del cable de carga USB se apaga,
indicando que la batería del helicóptero se está
cargando. El cable de carga USB y el casquillo
de carga del helicóptero están hechos de tal
manera, que no se puede invertir por error la
polaridad.
• La recarga de una batería descargada (no com-
pletamente descargada) dura unos 30 minutos.
Cuando la batería está totalmente cargada, se
vuelve a encender de color verde el indicador
LED del cable de carga USB.
Aviso: La batería LiPo se entrega cargada parcialmente.
Por ello, la primera carga podría durar algo menos.
¡Es indispensable respetar el orden de conexión indicado arriba! Si no ha conectado el cable de carga a una
fuente de corriente y solamente lo ha conectado con el
helicóptero, un indicador led verde encendido indica que
todavía hay tensión en la batería. El indicador led verde
encendido no indica si la batería tiene carga sufi ciente.
Durante la carga, el interruptor de red debe estar en “OFF”.
Colocación de las baterías en el
controlador
Con ayuda de un destornillador abra el com-
partimiento de las baterías e inserte éstas en el
3
controlador. Asegúrese de que la polaridad sea
la correcta. Tras cerrar el compartimiento puede
verifi carse el funcionamiento del controlador con
ayuda del interruptor de encendido ubicado en la
cara anterior. Con el interruptor de encendido en
la posición ON y un correcto funcionamiento, debería encenderse el LED de color rojo situado en
la parte superior central del controlador.
Cuando el LED de control parpadea rápidamente,
deben cambiarse las pilas del controlador.
Vinculación del modelo al
controlador
El helicóptero Carrera RC y el controlador están
vinculados entre sí de fábrica. Si al principio hu-
4
biese algún problema en la comunicación entre el
helicóptero Carrera RC y el controlador, efectúe
una nueva vinculación.
• Extraiga el modelo de la base de presentación.
• Conecte el modelo por el interruptor.
• El LED del helicóptero parpadea ahora en una
secuencia rítmica y acelerada.
• Empuje el joystick izquierdo completamente
hacia abajo. Conecte el controlador por el interruptor. La conexión se establecerá automáticamente. Durante el proceso de enlace suena un
tono de aviso en el controlador.
• Sujete el modelo de tal manera que el rotor quede hacia arriba en vertical.
• Espere un momento hasta que el sistema del
helicóptero esté correctamente inicia lizado y
listo para funcionar.
• El LED de control vuelve a permanecer encendido, indicando que ha fi nalizado la vinculación.
Listado de chequeo para la
preparación del vuelo
El listado de chequeo que viene a continuación no puede
reemplazar en ningún caso al presente manual. A pesar de
que puede utilizarse como guía de inicio rápido, antes de
proseguir, recomendamos encarecidamente leer primero
íntegramente el presente manual.
• Verifi que el contenido del paquete
• Conecte el cargador con la fuente de corriente.
• Cargue la batería LiPo, tal como se describe en la sección
“Carga de la batería LiPo”.
• Introduzca 2 pilas AAA en el controlador y preste atención
a la polaridad correcta.
• Busque un entorno adecuado para el vuelo
• Proceda conforme a lo indicado en 4.
• En caso necesario, repita los puntos indicados arriba si
desea hacer volar más helicópteros simultáneamente.
• Verifi que el control
• Despegue el helicóptero desde una mano. Al mismo tiempo, sujete el controlador con la otra mano para poder tomar el control del helicóptero de inmediato.
¡ATENCIÓN! EL MODELO VUELA POR SÍ SOLO HACIA
ADELANTE Y ÚNICAMENTE SE PUEDE CONTROLAR
SU ALTURA Y DIRECCIÓN
• Familiarícese con el funcionamiento del control
• Ajuste el helicóptero tal y como se describe en “Control del
helicóptero”.
• El helicóptero está ahora listo para funcionar
• Si el helicóptero no mostrase señales de funcionamiento,
vuelva a realiza el proceso de conexión indicado arriba.
• Haga volar el modelo
• Aterrice el modelo
• Desconecte el modelo por el interruptor (3 seg.)
• Desactive siempre en último lugar el mando a distancia
Sinopsis de las funciones del
controlador
1. Antena
2. Interruptor de encendido (ON / OFF)
5
3. LED de control
4 Aceleración
5. Cola (giro circular)
6. Estabilizador para la cola
7. Compartimiento batería
3
11
Descripción del helicóptero
1. Sistema de rotor coaxial
2. Casquillo para cargar la batería LiPo
6
3. Pantalla / Base de presentación
4. ON/OFF Interruptor
Control del helicóptero
Si aún no conoce las funciones de control de su
helicóptero Carrera RC, tómese un par de mi-
7
nutos antes del primer vuelo, para familiarizarse
con ellas. La descripción izquierda o derecha corresponde a la visión desde la cabina (visión del
piloto). Presione la palanca del acelerador hacia
arriba para aumentar la velocidad de rotación de
las palas del rotor principal. Si incrementa la velocidad de rotación de las palas del rotor principal,
el modelo empezará a ascender.
Si reduce la inclinación de la palanca del acele-
rador y con ello la velocidad de rotación de las
palas del rotor principal, el helicóptero desciende.
Cuando el modelo se ha elevado sobre el suelo,
puede mantenerlo, moviendo cuidadosamente la
palanca del acelerador hacia arriba o hacia abajo
en un vuelo estacionario, sin que ascienda o descienda de forma excesivamente abrupta.
Mueva la palanca derecha (cola) hacia la iz-
quierda, y el frontal del helicóptero girará hacia
8
la izquierda en círculos alrededor del eje del rotor
principal. Mueva la palanca derecha (cola) hacia
la derecha, y el frontal del helicóptero girará hacia
la derecha en círculos alrededor del eje del rotor
principal.
Utilice el estabilizador de la cola, hasta que el
helicóptero alcance una posición neutra estable
en vuelo estacionario, sin que haya movido la palanca derecha (cola).
¡ATENCIÓN! EL MODELO VUELA POR SÍ
SOLO HACIA ADELANTE Y ÚNICAMENTE SE
9
PUEDE CONTROLAR SU ALTURA Y DIRECCIÓN
Una vez se haya familiarizado con las funciones de control
principal y haya elegido la zona de vuelo ya estará listo para
efectuar el primer vuelo.
Elección de la zona de vuelo
Si ya está preparado para el primer vuelo, de-
10
bería elegir un espacio cerrado, sin personas
y sin obstáculos y que sea lo más grande posible. Debido al tamaño y a la controlabilidad
del helicóptero, los pilotos experimentados
pueden volar incluso en espacios cerrados
relativamente pequeños. Para sus primeros
vuelos, recomendamos absolutamente un espacio con unas dimensiones mínimas de 3 x 3
metros de superfi cie y 2,40 metros de altura.
Una vez que haya desestabilizado el helicóptero y se haya familiarizado con el control y
con las capacidades de éste, podrá atreverse
a volar en entornos más pequeños y con más
obstáculos.
Este juguete debe usarse únicamente en el
ámbito doméstico (vivienda y jardín).
Encontrará información sobre las soluciones a problemas
en la página 42.
Reserva do el derecho a er rores y modifi caciones ·
Reserva do el derecho a mo difi caci ón de los colore s y del
diseño defi nitivo · Reservado el derecho a modifi caciones
técnica s o debidas al dis eño · Pictogram as = fotos de
símbolos
ESPAŃOL
Page 12

Gentile cliente
Ci congratuliamo con Lei per l‘acquisto del Suo modellino
di elicottero RC Carrera, realizzato secondo lo stato odierno
della tecnica. Poiché miriamo costantemente all’evoluzione
e al miglioramento dei nostri prodotti, ci riserviamo il diritto
di eseguire in qualsiasi momento e senza preavviso modifi che tecniche e della dotazione, dei materiali e del design.
Non è quindi possibile fare valere diritti a causa di piccole
diff erenze del prodotto in Suo possesso rispetto ai dati e alle
illustrazioni di queste istruzioni. Queste istruzioni per l’uso e
il montaggio sono parte integrante del prodotto. L’inosser-
ITALIANO
vanza delle istruzioni per l’uso e delle avvertenze sulla sicurezza ivi contenute fa decadere qualsiasi diritto di garanzia.
Conservi queste istruzioni per consultazioni successive e
per l’eventuale cessione del modellino a terzi.
La versione più attuale di queste
istruzioni per l‘uso e le informazioni sui pezzi di ricambio sono disponibili su
carrera-rc.com nell‘a-
rea assistenza.
Condizioni di garanzia
Gli articoli Carrera sono prodotti tecnicamente di alta
qualità, che dovrebbero essere trattati con cura. Rispettare assolutamente le indicazioni riportate nelle istruzioni per l‘uso. Tutte le parti vengono sottoposte a un
controllo minuzioso (con riserva di modifi che tecniche e
del modellino atte al miglioramento del prodotto).
Se ciononostante dovessero manifestarsi difetti, viene concessa una garanzia nell’ambito delle seguenti condizioni:
La Stadlbauer Marketing + Vertrieb GmbH (qui di seguito
„produttore“), garantisce al cliente fi nale (qui di seguito
„cliente“), conformemente alle successive disposizioni, che il
modellino di elicottero RC Carrera (qui di seguito „prodotto“)
fornito al cliente, per un periodo di due anni a partire dalla
data d‘acquisto (periodo di garanzia) sarà esente da difetti di
materiale o lavorazione. Difetti simili verranno eliminati dal
produttore, a sua discrezione a sue spese tramite riparazione o fornitura di pezzi nuovi o completamente revisionati. La
garanzia non copre particolari soggetti a usura (come p.es.
accumulatori, pale del rotore, rivestimento della cabina,
ruote dentate e simili), danni derivanti da un handling/uso
inappropriato o interventi di terzi. Altri diritti del cliente nei
confronti del produttore, soprattutto al risarcimento danni,
sono esclusi.
I diritti contrattuali o legali del cliente (adempimento successivo, recesso dal contratto, riduzione, risarcimento danni)
verso il relativo rivenditore che sussistono se al trapasso del
rischio il prodotto non era privo di vizi, non vengono toccati
da questa garanzia.
Diritti derivanti da questa garanzia del produttore separata esistono solo se
• il difetto contestato non rientra tra i danni causati da un uso
non appropriato e non conforme alle disposizioni secondo
le indicazioni riportate nelle istruzioni per l‘uso,
• non si tratta di fenomeni di usura dovuti al funzionamento,
• il prodotto non presenta caratteristiche che fanno dedurre
riparazioni o altri inter venti da parte di offi cine non autorizzate dal produttore,
• il prodotto è stato usato solo con accessori autorizzati dal
produttore e
• il prodotto viene inviato con la ricevuta originale (fattura /
scontrino di cassa) e il certifi cato di garanzia debitamente
compilato, al quale non sono state apportate modifi che arbitrarie.
I tagliandi di garanzia non possono essere sostituiti.
Indicazioni per gli Stati dell’UE: si rimanda all’obbligo di
garanzia legale del venditore nonché al fatto che questo obbligo di garanzia non viene limitato dalla garanzia in oggetto.
Il produttore si accolla le spese di invio e rispedizione del
prodotto.
Questa garanzia vale nella suddetta estensione e alle summenzionate condizioni (compresa la presentazione della ricevuta originale dell’acquisto anche in caso di rivendita) per
ogni successivo, futuro proprietario del prodotto.
Dichiarazione di conformità
Con la presente, la Stadlbauer Marketing + Vertrieb
G.m.b.H. dichiara che questo modellino, controller incluso,
soddisfa i requisiti fondamentali richiesti dalle seguenti direttive CE: è conforme alle direttive CE 2009/48 e 2014/30/EU
sulla compatibilità elettromagnetica e alle altre disposizioni
rilevanti della direttiva 2014/53/EU (RED).
La dichiarazione di conformità originale può essere richiesta
online nel sito: carrera-rc.com.
Potenza di radiofrequenza massima <10dBm
Gamma di frequenze : 2400 – 2483,5 MHz
Avvertenze!
AVVERTENZA! A causa delle piccole parti
ingeribili, questo giocattolo non è adatto per
bambini di età inferiore ai 3 anni.
AVVERTENZA! Pericolo di schiacciamento dovuto al
funzionamento! Prima di consegnare questo giocattolo
al bambino, togliere tutti i materiali di imballaggio e il
fi lo metallico di fi ssaggio. Per informazioni ed eventuali
domande conservare la confezione, l’indirizzo e le istruzioni per l’uso per consultazioni successive. Avvertenza
per adulti responsabili: verifi care se il gioco è montato
secondo le istruzioni. Il montaggio deve essere eseguito
sotto la stretta sorveglianza di un adulto.
AVVERTENZA! Non adatto per bambini sotto gli 8 anni!
Questo prodotto non è previsto per l‘uso da parte di bambini
non sorvegliati da un genitore o tutore. Far volare l’elicottero
richiede abilità e i bambini devono essere addestrati sotto
la stretta sorveglianza di un adulto. Prima dell’uso iniziale
leggere le informazioni per l’utente insieme con il bambino.
L‘uso non appropriato può causare gravi lesioni e/o danni
materiali.
Deve essere comandato con precauzione e accortezza e
richiede alcune capacità meccaniche e anche mentali. Le
istruzioni contengono avvertenze sulla sicurezza e disposizioni nonché indicazioni per la manutenzione e il funzionamento del prodotto. Prima della messa in funzione iniziale
è indispensabile che queste istruzioni vengano lette attentamente e comprese. Solo così si possono evitare incidenti
con lesioni e danni.
Far volare solo in ambienti chiusi che off rono suffi ciente spazio e seguire tutte le indicazioni, così come viene
consigliato in queste istruzioni. Tenere lontano dall’elica
(rotore) mani, capelli, indumenti larghi o altri oggetti come
matite e cacciaviti. Non toccare il rotore in movimento. Tenere soprattutto le mani LONTANO dalle pale del rotore!
AVVERTENZA: pericolo di lesioni agli occhi. Non far
volare l’elicottero vicino alla propria faccia per evitare
lesioni.
Lei come utilizzatore di questo prodotto, è il solo responsabile per il handling sicuro atto a impedire che né
Lei né altre persone o le loro proprietà subiscono danni
o vengano messi in pericolo.
L’utilizzo del drone è consentito solo in luoghi privati ed è
vietato in spazi pubblici o di accesso al pubblico e si ricorda che il suo impiego è puramente ricreativo e sportivo.
• Non usare mai il modellino se le batterie del controller sono
deboli.
• Questo giocattolo è destinato solo all’uso nell’ambito do-
mestico.
• AVVERTENZA: non fare decollare e volare l’elicottero
se persone, animali o altri ostacoli si trovano nel suo
raggio d’azione.
• Rispettare scrupolosamente le istruzioni e le avvertenze
relative a questo prodotto e agli eventuali accessori addi zionali (caricabatteria, accumulatori, ecc.) utilizzati.
• Se l’elicottero venisse in contatto con esseri viventi
od oggetti duri, posizionare immediatamente la leva
dell’acceleratore su zero, cioè il joystick sinistro deve
trovarsi sulla battuta inferiore.
• Evitare l‘umidità poiché può danneggiare l‘elettronica.
• Non eseguire cambiamenti o modifi che sull’elicottero.
12
Se non approva queste condizioni, riconsegni immediatamente al rivenditore l‘intero modellino di elicottero in perfetto
stato e non ancora utilizzato.
Informazioni importanti sugli accumulatori litio-polimeri
Gli accumulatori litio polimeri (LiPo) sono molto più sensibili
di quelli alcalini o NiMH tradizionali, normalmente usati per
radiocomandi. Le disposizioni e avvertenze del produttore
devono quindi essere rispettate tassativamente. In caso di
un handling errato degli accumulatori LiPo, esiste pericolo
d‘incendio. Per lo smaltimento degli accumulatori LiPo seguire sempre le indicazioni per produttore.
Direttive per lo smaltimento di apparecchiature elettriche ed elettroniche conf. WEEE
INFORMAZIONI AGLI UTENTI
ai sensi del Decreto Legislativo N° 49 del 14 Marzo 2014
“Attuazione della Direttiva 2012/19/UE sui rifi uti di apparecchiature elettriche ed elettroniche (RAEE)
raccolto separatamente dagli altri rifi uti. L’utente dovrà, pertanto, conferire l’apparecchiatura integra dei componenti
essenziali giunta a fi ne vita agli idonei centri di raccolta diff erenziata dei rifi uti elettrici ed elettronici, oppure riconsegnarla al rivenditore al momento dell’acquisto di nuova apparecchiatura di tipo equivalente, in ragione di uno a uno, oppure
1 a zero per le apparecchiature aventi dimensioni inferiori a
25 cm. L’adeguata raccolta diff erenziata per l’avvio successivo dell’apparecchiatura dismessa al recupero ambientalmente compatibile contribuisce ad evitare possibili eff etti
negativi sull’ambiente e sulla salute e favorisce il riciclo dei
materiali di cui è composta l’apparecchiatura. Lo smaltimento abusivo del prodotto da parte dell’utente comporta l’applicazione delle sanzioni amministrative di cui al D.Lgs n. Decreto Legislativo N° 49 del 14 Marzo 2014.
Non usare contemporaneamente tipi di batterie diversi o batterie nuove e usate. Togliere le batterie esauste dal giocattolo. Le batterie non ricaricabili non devono essere ricaricate a
causa del rischio di esplosione.
AVVERTENZA!
Il caricabatterie e il cavo di carica USB possono essere
usati da bambini a partire da un’età di otto (8) anni e da
persone con capacità fi siche, sensoriali o mentali ridotte o
mancanza di esperienza e/o conoscenza, se vengono sorvegliati e sono stati istruiti sull’uso sicuro dell’apparecchio
e hanno compreso i pericoli da ciò derivanti. I bambini non
devono giocare con il caricabatterie e il cavo di carica USB.
La pulizia e la manutenzione da parte dell’utente non devono
essere eseguite da bambini, a meno che abbiamo compiuto
8 anni e vengano sorvegliati.
I bambini sotto gli 8 anni devono essere tenuti lontano dal
caricabatterie e dal cavo di collegamento. Non lasciare mai
incustodito l’accumulatore durante la carica. Prima di
ricaricarle, togliere le batterie ricaricabili dal giocattolo. Non
cortocircuitare i morsetti. Usare solo le batterie consigliate o
quelle di un tipo equivalente.
Se il caricabatteria viene usato regolarmente, controllare il
cavo, il collegamento, i rivestimenti e altre parti. In caso di
danni, il caricabatteria può essere rimesso in funzione solo
dopo la riparazione. Il cavo esterno fl essibile di questo caricabatterie non può essere sostituito: se il cavo è danneggiato, rottamare il caricabatterie.
Il giocattolo può essere collegato solo ad apparecchi della
classe di protezione II.
Direttive e avvertenze per l‘uso dell‘accumulatore LiPo
• L‘accumulatore LiPo da 3,7 V 180 mAh accluso deve
essere caricato in un luogo sicuro lontano da materiali infi ammabili.
• Non lasciare mai incustodito l’accumulatore durante la
carica.
• Per la carica dopo un volo, l‘accumulatore deve dapprima essersi raff reddato e aver raggiunto la temperatura ambiente.
• Usare solo l’apposito caricabatterie LiPo (cavo USB/ controller). In caso di inosservanza di questa avvertenza esiste pericolo d‘incendio e quindi di messa in pericolo della
salute e/o di danni materiali. NON USARE MAI un caricabatteria diverso.
•
Se durante il processo di scarica o carica l‘accumulatore si
gonfi a o deforma, interrompere immediatamente il relativo
processo. Togliere l‘accumulatore il più velocemente e cautamente possibile e sistemarlo in una zona sicura all‘aperto,
Il simbolo del cassonetto barrato riportato sull’apparecchiatura indica
che il prodotto è stato immesso sul
mercato dopo il 31/12/2010 e che alla
fi ne della propria vita utile deve essere
Page 13

lontano da materiali infi ammabili, e tenerlo sotto osservazione
per almeno 15 minuti. Se si continua a caricare o scaricare un
accumulatore già gonfi ato o deformato, esiste pericolo d‘incendio! Un accumulatore non deve più essere utilizzato già in
presenza di una minima deformazione o rigonfi amento.
• Conservare l‘accumulatore a temperatura ambiente in un
luogo asciutto.
• Per evitare una cosiddetta scarica completa dell’accumulatore, ricaricarlo assolutamente dopo l’uso.
Osservare una pausa di ca. 20 minuti tra il volo e il processo di carica. Ricaricare l’accumulatore di tanto in
tanto (ca. ogni 2 - 3 mesi). L’inosservanza del suddetto
handling dell’accumulatore può causare difetti.
• Per il trasporto o uno stoccaggio temporaneo dell‘accumulatore, la temperatura non dovrebbe essere inferiore a
5° C e superiore a 50° C. Se possibile, non conservare
l‘accumulatore in auto e non esporlo alle radiazioni solari
dirette. Se l‘accumulatore viene esposto a calore nell‘auto,
può subire danni o incendiarsi.
Nota: in caso di una bassa tensione/potenza della batteria
si constaterà che occorrono un controllo dell‘assetto e/o movimenti di comando notevoli per impedire che l‘elicottero si
avviti. Normalmente questo si verifi ca prima che la tensione
dell‘accumulatore raggiunga i 3 V ed è il momento propizio
per concludere il volo.
Contenuto della fornitura
1x Elicottero
1
1x Controller
1x Base di presentazione & ricarica
1x Cavo di carica USB
2x Batterie micro AAA da 1,5V (non ricaricabili)
Carica dell‘accumulatore LiPo
Caricare l’accumulatore LiPo in dotazione solo con l’apposito
caricabatterie LiPo (cavo USB e controller). Se si cerca di
caricare l‘accumulatore con un altro caricabatteria LiPo o un
altro caricabatteria, possono verifi carsi gravi danni. Prima di
procedere, leggere attentamente il paragrafo precedente con
le avvertenze e le disposizioni per l‘uso dell‘accumulatore.
Carica tramite computer
• Collegare il cavo di carica USB a una porta USB
2
di un computer. Il LED sul cavo di carica si illumina in verde e indica che l’unità di carica è
collegata correttamente con il computer.
Se un elicottero viene collegato con un accumulatore scarico, il LED sul cavo di carica USB
non si illumina più, indicando che l’accumulatore
dell’elicottero viene caricato. Il cavo di carica
USB e la presa di carica sull’elicottero sono progettati in modo da escludere un’inversione della
polarità.
• La ricarica di un accumulatore scarico (non
completamente) dura circa 30 minuti. Quando
l’accumulatore è carico, il LED sul cavo di carica
USB si riaccende in verde.
Nota: all’atto della consegna, l’accumulatore LiPo è parzialmente carico. Il primo processo di carica potrebbe quindi
richiedere meno tempo.
Rispettare assolutamente la suddetta sequenza di collegamento! Se il cavo di carica non fosse stato collegato
a una fonte elettrica ma solo all’elicottero, un indicatore
LED illuminato in verde segnala che nell’accumulatore c’è
ancora tensione. L’indicatore LED illuminato in verde non
segnala se l’accumulatore è caricato suffi cientemente.
Durante il processo di carica, l’interruttore di potenza
deve essere posizionato su “OFF”.
Inserimento delle batterie nel
controller
Con un cacciavite aprire il vano batterie e inse-
rire le batterie nel controller, facendo attenzione
3
alla polarità. Dopo la chiusura del vano, con l‘aiuto dell‘interruttore di potenza sul lato anteriore
si può verifi care la funzionalità del controller. Se
l‘interruttore di potenza è posizionato su ON e il
controller funziona correttamente, il LED in alto al
centro del controller dovrebbe illuminarsi di rosso.
Se il LED di controllo lampeggia velocemente,
sostituire le batterie nel controller.
Collegamento del modellino con il
controller
L‘elicottero RC Carrera e il controller sono stati
collegati dalla fabbrica. Se inizialmente ci fosse-
4
ro problemi di comunicazione tra l‘elicottero RC
Carrera e il controller, eseguire un nuovo collegamento.
• Togliere il modellino dalla base di presentazione.
•
Accendere il modellino con l’interruttore ON/OFF.
•
Ora il LED nell’elicottero lampeggia velocemente.
• Spingere il joystick sinistro completamente
verso il basso. Accendere il controller con l‘interruttore ON/OFF. Il collegamento avviene automaticamente. Durante il processo di collegamento sul controller risuona un segnale acustico.
• Tenere il modellino in modo che il rotore sia
rivolto vert icalmente verso l’alto.
• Attendere fi nché il sistema è inizializzato correttamente ed è pronto per l‘uso.
• Il LED di controllo si illumina di nuovo permanentemente indicando che il processo di collegamento è terminato.
Check-list per la preparazione del
volo
Questa check-list non sostituisce il contenuto di queste
istruzioni per l‘uso. Anche se può essere usata come QuickStart-Guide, prima di proseguire raccomandiamo vivamente
di leggere queste istruzioni per l‘uso.
• Controllare il contenuto della confezione
• Collegare il caricabatterie alla fonte elettrica.
• Caricare l’accumulatore LiPo come descritto nel capitolo
“Carica dell’accumulatore LiPo”.
• Inserire nel Controller 2 batterie AAA facendo attenzione
che la polarità sia corretta.
• Cercare un ambiente aadatto per il volo
• Procedere come descritto al punto 4.
• Ora ripetere evtlm. i suddetti punti, se si desidera fare volare contemporaneamente altri elicotteri.
• Controllare il dispositivo di comando
• Fare decollare l’elicottero con una mano. Tenere contemporaneamente il Controller nell’altra mano per assumere
immediatamente il controllo dell’elicottero.
ATTENZIONE! IL MODELLINO VOLA AUTOMATICA-
MENTE IN AVANTI E NE PUÒ ESSERE COMANDATA
SOLO L’ALTEZZA E LA DIREZIONE
• Familiarizzare con il dispositivo di comando
• Stabilizzare eventualmente l’elicottero come descritto sotto
“Comando dell’elicottero”.
• Ora l‘elicottero è pronto per l‘uso
• Se l’elicottero non mostra funzioni, ripetere il suddetto
proces-so di collegamento.
• Far volare il modellino
• Fare atterrare il modellino
•
Spegnere il modellino con l’interruttore ON/OFF (3 sec.)
• Spegnere sempre il telecomando per ultimo.
Panoramica delle funzioni del
controller
1. Antenna
2. Interruttore di potenza (ON / OFF)
5
3. LED di controllo
4. Gas
5. Coda (rotazione circolare)
6. Trimmer per la coda
7. Vano batterie
3
13
Descrizione dell‘elicottero
1. Sistema a rotori coassiali
2.
Presa di carica per caricare l’accumulatore LiPo
6
3. Display / base di presentazione
4. Interruttore ON/OFF
Comando dell‘elicottero
Se non conosce ancora le funzioni di comando
dell’elicottero RC Carrera, prima del volo iniziale
7
si conceda alcuni minuti per familiarizzare con tali
funzioni. La descrizione sinistra o destra corrisponde alla vista dal cockpit (vista del pilota).
Spostare la leva del gas verso l’alto per aumen-
tare la velocità di rotazione delle pale del rotore
principale. Aumentare la velocità di rotazione delle pale del rotore principale e il modellino inizia a
sollevarsi.
Se si riduce l’inclinazione della leva del gas e
quindi la velocità di rotazione delle pale del rotore principale, l’elicottero si abbassa. Quando il
modellino è decollato, con un movimento cauto
della leva del gas verso l’alto o il basso è possibile
portarlo in un volo stazionario senza che salga o
scenda repentinamente.
Spostare la leva destra (coda) verso sinistra e il
muso dell’elicottero gira (imbarda) in circolo at-
8
torno all’asse del rotore principale verso sinistra.
Spostare la leva destra (coda) verso destra e il
muso dell’elicottero gira (imbarda) in circolo attorno all’asse del rotore principale verso destra.
Usare il trimmer per la coda fi no a raggiungere
una posizione neutra stabile dell’elicottero nel
volo stazionario, senza spostare la leva destra
(coda).
ATTENZIONE! IL MODELLINO VOLA AUTO-
MATICAMENTE IN AVANTI E NE PUÒ ESSERE
9
COMANDATA SOLO L’ALTEZZA E LA DIREZIONE
Dopo aver familiarizzato con le funzioni principali di comando e scelto la zona adatta, è pronto per il primo volo.
Scelta della zona di volo
Quando è pronto per il primo volo, dovrebbe
10
scegliere un ambiente chiuso, possibilmente
spazioso, dove non ci sono persone od ostacoli. Grazie alle dimensioni e alla manovrabilità dell‘elicottero, i piloti esperti sono in grado
di farlo volare anche in ambienti chiusi relativamente piccoli. Per i primi voli consigliamo
assolutamente ambienti delle dimensioni
minime di 3 x 3 metri di superfi cie di base e
2,40 metri di altezza. Dopo aver fatto il trim
dell‘elicottero e preso confi denza con il suo
comando e le sue prestazioni, può provare a
volare anche in ambienti più piccoli e meno
sgombri.
Questo giocattolo può essere usato solo
nell’ambiente domestico (casa e giardino).
Informazioni sulle soluzioni di problemi vengono fornite a
pagina 43.
Con riser va di errori e mod ifi che
Con riser va di modifi che dei colori/de sign defi ni tivo
Con riser va di modifi che tecn iche e dovute al de sign
Pittogr ammi = foto simbol iche
ITALIANO
Page 14

Geachte klant,
Wij feliciteren u met de aanschaf van uw Carrera RC modelhelicopter, die volgens de huidige stand van de techniek
werd vervaardigd. Omdat wij er steeds voor ijveren, onze
producten verder te ontwikkelen en te verbeteren, maken wij
voor een wijziging in technisch opzicht en met betrekking tot
uitrusting, materialen en design te allen tijde en zonder aankondiging voorbehoud. Op basis van minieme afwijkingen
van het u ter beschikking gestelde product tegenover gegevens en afbeeldingen in deze handleiding kan men daarom
geen aanspraken doen gelden. Deze gebruiks- en montageaanwijzing vormt een bestanddeel van het product. Bij veronachtzaming van de gebruiksaanwijzing en van de daarin
NEDERLANDS
vermelde veiligheidsinstructies komt de garantieclaim te vervallen. Bewaar deze handleiding om ze later te raadplegen
en om het model eventueel aan derden door te geven.
De meest actuele versie van deze
bedieningshandleiding en informatie over verkrijgbare reserveonderdelen vindt u op carrera-rc.com in
het servicebereik.
Garantievoorwaarden
Bij de Carrera producten gaat het om technisch hoogwaardige producten, die met zorg moeten worden behandeld. Gelieve absoluut de instructies in de bedieningshandleiding in acht te nemen. Alle onderdelen
worden aan een zorgvuldige test onderworpen (technische wijzigingen en modelwijzigingen in functie van een
verbetering van het product zijn voorbehouden).
Indien er desondanks fouten opduiken, wordt een garantie
in het kader van de hierna volgende garantievoorwaarde
verleend:
De Stadlbauer Marketing + Vertrieb GmbH (onderstaand
„producent“) garandeert de eindklant (onderstaand „klant“)
volgens de onderstaande bepalingen, dat de aan de klant
geleverde Carrera RC modelhelicopter (onderstaand „product“) binnen een periode van twee jaar vanaf koopdatum
(garantieperiode) vrij van materiaal- of verwerkingsfouten
zal zijn. Zulke fouten zal de producent naar eigen goeddunken voor zijn rekening verhelpen door reparatie of levering
van nieuwe of gereviseerde onderdelen. De garantie geldt
niet voor slijtageonderdelen (zoals bijv. accu, rotorbladen,
cabineafdekking, tandwielen enz.), voor schade door een
onjuiste behandeling of onjuist gebruik of bij ingrepen door
derden. Andere claims van de klant, met name voor schadevergoeding, tegen de producent zijn uitgesloten.
De contractuele of wettelijke rechten van de klant (vervulling
achteraf, terugtreding van het contract, verminderde betaling, schadevergoeding) ten opzichte van de betreff ende
verkoper, die bestaan, indien het product bij de gevarenovergang niet zonder gebreken was, blijven van deze garantie
onaangeroerd.
Claims uit deze speciale garantie van de producent bestaan alleen, wanneer
• de geclaimde fout niet in schade ligt, die door een overeenkomstig de bepalingen in de bedieningshandleiding een
ondoelmatig of ondeskundig gebruik werden ver oorzaaktr
• het niet gaat om door het gebruik veroorzaakte slijtageverschijnselen,
• het product geen kenmerken bezit, die wijzen op reparaties
of andere ingrepen van door de producent niet geautoriseerde werkplaatsen,
• het product alleen met het door de producent aanbevolen
toebehoren werd gebruikt, en
• het product samen met het originele koopbewijs (rekening/
kassastrook) en de volledig ingevulde garantiekaart, aan
dewelke geen eigen wijzigingen werden uitge voerd, wordt
opgestuurd.
Garantiekaarten kunnen niet vervangen worden.
Aanwijzing voor EU-lidstaten: er wordt gewezen op de
wettelijke garantieplicht van de verkoper, meer bepaald op
het feit dat deze garantieplicht door een concrete garantie
niet aan beperkingen onderworpen wordt.
De kosten voor het toesturen en terugsturen van het product
zijn voor rekening van de fabrikant.
Deze garantie geldt in de bovenstaand omschreven omvang
en onder de bovenstaande voorwaarden (inclusief het voorleggen van de originele aankoopstrook, ook in het geval van doorgeven) voor elke latere, toekomstige eigenaar van het product.
Conformiteitsverklaring
Hiermee verklaart Stadlbauer Marketing + Vertrieb GmbH
dat dit model inclusief controller in overeenstemming is met
de fundamentele vereisten van de volgende EG-richtlijnen:
EG richtlijnen 2009/48 en 2014/30/EU over elektromagnetische compatibiliteit en de andere relevante voorschriften van
de richtlijn 2014/53/EU (RED) befi ndet.
De originele conformiteitsverklaring kan op carrera-rc.com
opgevraagd worden.
Maximaal zendvermogen <10dBm
Frequentiebereik: 2400 – 2483,5 MHz
Waarschuwingsinstructies!
WAARSCHUWING! Wegens inslikbare, klei-
ne onderdelen is dit speelgoed niet geschikt
voor kinderen jonger dan 3 jaar.
WAARSCHUWING! Klemgevaar, door de werking veroorzaakt! Verwijder alle verpakkingsmaterialen en bevestigingsdraden voordat u dit speelgoed aan het kind
overhandigt. Bewaar de verpakking, het adres en de
handleiding voor latere raadpleging bij eventuele vragen of benodigde informatie. Opmerking voor toezichthoudende volwassenen: Controleer of het speelgoed in
overeenstemming met de handleiding gemonteerd is.
De montage dient onder toezicht van een volwassene
te worden uitgevoerd.
WAARSCHUWING! Niet geschikt voor kinderen onder de 8 jaar.
Dit product is niet voorzien voor gebruik door kinderen zonder toezicht door een bevoegd persoon om de ouderlijke
macht uit te voeren. Het besturen van de helikopter vereist
bepaalde vaardigheden. Kinderen moeten deze onder toezicht van een volwassene aanleren. Lees vóór het eerste
gebruik samen met uw kind de gebruikersinformatie door. Bij
ondeskundig gebruik kan het tot zware lichamelijke letsels
en/of materiële schade komen. Er dient vooryichtig en met
bedacht te worden bestuurd en dit vergt enkele mechanische en ook mentale vaardigheden. De handleiding bevat
veiligheidsinstructies en voorschriften alsook instructies
voor het onderhoud en de werking van het product. Het is
absoluut noodzakelijk, om de handleiding voor de eerste
ingebruikname volledig te lezen en te begrijpen. Alleen zo
kunnen ongevallen met letsels en beschadigingen worden
vermeden. Vlieg alleen in gesloten ruimtes, die voldoen-
de plaats bieden en volg alle aanwijzingen op, zoals zij
in deze handleiding worden aanbevolen. Handen, haar
en losse kleding alsmede andere voorwerpen zoals stiften
en schroevendraaiers moeten uit de buurt van de propeller
(rotor) worden gehouden. De roterende rotor niet aanraken.
Let er bijzonder op, dat uw handen NIET in de omgeving van
de rotorbladen komen!
WAARSCHUWING! Gevaar voor oogletsel. Laat de helikopter niet in de buurt van uw gezicht vliegen, om letsels te voorkomen.
U als gebruiker van dit product, bent alleen verantwoordelijk voor de veilige omgang, zodat noch u, noch andere personen in gevaar worden gebracht of aan hun
eigendom schade wordt berokkend.
• Gebruik uw model nooit met zwakke controller-batterijen.
• Dit speelgoed is alleen voor huiselijk gebruik bedoeld.
• WAARSCHUWING: Start de helikopter niet, wanneer
zich personen, dieren of andere hindernissen in het
vliegbereik van de helikopter bevinden.
• Volg nauwgezet de aanwijzingen en waarschuwingsin
structies voor dit product en voor de mogelijke aanvullende
uitrusting (laadtoestel, accu‘s enz.), die u gebruikt
• Als de helikopter met leefwezens of harde voorwerpen
in aanraking komt, dan brengt u de gashendel onmid dellijk in de nulpositie, dat betekent, de linker joystick
moet aan de onderste aanslag staan!
• Vermijd alle vochtigheid, want zij kan de elektronica be
schadigen.
14
• Breng aan de helikopter geen enkele aanpassing of verandering aan.
Als u deze voorwaarden niet toestemt, geeft u onmiddellijk
het volledige helicoptermodel in nieuwe en ongebruikte toestand terug aan uw handelaar.
Belangrijke informatie over lithium polymeer accu‘s
Lithium-polymeer (LiPo) accu‘s zijn aanzienlijk gevoeliger
dan gebruikelijke alkali-, of NiMH-accu‘s, die anders bij
afstandsbesturingen worden gebruikt. De voorschriften en
waarschuwingsinstructies van de producent moeten daarom
nauwgezet worden opgevolgd. Bij verkeerde omgang met
LiPo accu‘s bestaat er brandgevaar. Neem altijd de voorschriften van de producent in acht, als u LiPo accu‘s verwijdert.
Verwijderingsbepalingen voor oude elektrische en elektronische toestellen volgens WEEE
trische apparaten etc. niet bij het huisvuil thuishoren, omdat
ze schadelijk voor het milieu en voor de gezondheid zijn.
Gelieve mee te helpen, milieu en gezondheid in stand te
houden en praat ook met uw kinderen over de keurige afvalverwerking van gebruikte batterijen en oude elektrische apparaten. Batterijen en oude elektrische apparaten dienen op
de bekende verzamelpunten afgegeven te worden. Zodoende worden ze aan een reglementair voorgeschreven recycling onderworpen.
Ongelijke batterijtypes of nieuwe en gebruikte batterijen
mogen niet samen gebruikt worden. Lege batterijen uit het
speelgoed verwijderen. Niet-oplaadbare batterijen mogen
vanwege het ontploffi ngsgevaar niet worden opgeladen.
WAARSCHUWING!
De lader resp. USB-laadkabel mag door kinderen vanaf
een leeftijd van acht (8) jaar en door personen met fysieke,
zintuiglijke of geestelijke beperkingen of een gebrek aan ervaring en/of kennis alleen worden gebruikt, indien zij onder
toezicht staan of met betrekking tot het veilige gebruik van
het apparaat onderricht zijn en de hiermee samenhangende
risico’s begrepen hebben. Kinderen mogen niet met de lader
resp. USB-laadkabel spelen. Reiniging en onderhoud mogen niet door kinderen worden uitgevoerd, tenzij zij ouder
dan 8 jaar zijn en er op hen wordt toegezien.
Kinderen jonger dan 8 jaar moeten uit de buurt van de lader en het aansluitsnoer worden gehouden. Laat de accu
tijdens het laden nooit onbeheerd achter. Kortsluiting
aan aansluitklemmen niet toegestaan. Enkel de aanbevolen
batterijen of die van een gelijkwaardig type mogen gebruikt
worden.
Bij regelmatig gebruik van de lader moet deze aan de kabel,
aansluiting, afdekkingen en andere onderdelen gecontroleerd worden. In geval van schade mag de lader pas na een
reparatie terug in gebruik genomen worden. De fl exibele buitenkabel van deze lader kan niet worden vervangen. Indien
de kabel beschadigd is, moet de lader worden weggegooid.
Het speelgoed mag uitsluitend worden aangesloten op apparaten van beschermklasse II.
Richtlijnen en waarschuwingsinstructies voor gebruik
van LiPo accu‘s
• U moet de bijgevoegde 3,7 V 180 mAh LiPo-accu op
een veilige plaats buiten de omgeving van brandbare materialen laden.
• Laat de accu tijdens het laden nooit onbeheerd achter.
• Voor het laden na een vlucht moet de accu eerst op omgevingstemperatuur afgekoeld zijn.
• U mag uitsluitend de bijbehorende LiPo-lader (USB-kabel/
controller) gebruiken. Bij niet-naleving van deze instructies bestaat er brandgevaar en daarmee gevaar voor de
gezondheid en/of materiële schade. Gebruik NOOIT een
ander laadtoestel.
• Als de accu gedurende het ontladings- of laadproces opzwelt of vervormt, dan beëindigt u onmiddellijk het laden
of ontladen. Neem de accu zo snel en zo voorzichtig mogelijk uit het toestel en leg hem op een veilige, open plek
verwijderd van brandbare materialen en observeer hem
gedurende minimum 15 minuten. Als u een accu, die reeds
opgezwollen of vervormd is, verder laadt of ontlaadt bestaat er brandgevaar! Zelfs bij geringe vervorming of ballonvorming moet een accu buiten werking worden gesteld.
• Bewaar de accu bij kamertemperatuur op een droge plaats.
Het hier afgebeelde symbool van de
doorgestreepte vuilnisbakken dient
uw aandacht erop te vestigen dat lege
batterijen, accu’s, knoopcellen, accupacks, apparaatbatterijen, oude elek-
Page 15

• Laad de accu na g ebruik absoluut weer op, om een zogenaamde diepteontlading van de accu te vermijden.
Neem daarbij in acht, dat u een pauze van ongeveer 20
minuten tussen de vlucht en het laadproces aanhoudt.
Laad de accu van tijd tot tijd (ca. alle 2-3 maanden) op.
Een niet-inachtneming van de bovenstaande omgang
met de accu kan tot een defect leiden.
• Voor het transport of voor een tijdelijke bewaring van de
accu moet de temperatuur tussen 5-50°C liggen. Bewaar
de accu of het model indien mogelijk niet in de auto of onder directe zonnestraling. Als de accu aan de hitte in de
auto wordt blootgesteld, kan hij beschadigd worden of vuur
vatten.
Opmerking: Bij geringe batterijspanning/-vermogen zult u
vaststellen, dat aanzienlijke trimming en/of stuurbewegingen
noodzakelijk zijn, opdat de helicopter niet in een vrille raakt.
Dit geldt gewoonlijk voor het bereiken van 3 V accuspanning
en is een goed tijdstip, om de vlucht te beëindigen.
Inhound van de levering
1x Helikopter
1
1x Controller
1x Presentatie- & laadsokkel
1x USB-laadkabel
2x 1,5 V micro AAA batterijen (niet oplaadbaar)
Laden van de LiPo accu
Let erop dat u de bijgeleverde LiPo-accu uitsluitend met de
bijgeleverde LiPo-lader (USB-kabel resp. controller) oplaadt.
Als u probeert, om de accu met een ander LiPo-accu laadtoestel of een ander laadtoestel te laden, dan kan dit leiden
tot zware schade. Gelieve het voorgaande hoofdstuk met
waarschuwingsinstructies en richtlijnen voor het gebruik van
de accu zorgvuldig te lezen, voor u verder gaat.
Laden aan de computer:
• Verbind de USB-laadkabel met de USB-poort
2
van een computer. De led aan de USB-laadkabel licht groen op en geeft aan dat de laadunit
correct met de computer is verbonden.
Als u een helikopter met lege accu aansluit, licht
de led aan de USB-laadkabel niet meer op, om
aan te geven dat de accu van de helikopter geladen wordt. De USB-laadkabel resp. de laadbus
aan de helikopter zijn zodanig uitgevoerd, dat
verkeerde polariteit uitgesloten is.
• Het duurt ongeveer 30 minuten, om een ontla-
den accu (niet diepontladen) weer te laden. Als
de accu vol is, licht de LED-indicatie aan de
USB-laadkabel weer groen op.
Opmerking: Bij de levering is de meegeleverde LiPo-accu
gedeeltelijk geladen. Daardoor zou het eerste laadproces
iets minder lang kunnen duren.
Houd u in elk geval aan bovenstaande aansluitvolgorde!
Als u de laadkabel niet op een stroombron aangesloten
en alleen met de helikopter verbonden hebt, geeft een
groen brandende ledindicator aan dat er nog spanning
in de accu is. De groen brandende ledindicator geeft
niet aan of de accu voldoende geladen is.
Tijdens het laadproces moet de aan-uitschakelaar op
‘OFF’ staan.
Plaatsen van de batterijen in de
controller
Open het batterijvak met een schroevendraaier en
plaats de batterijen in de controller. Let op de cor-
3
recte polariteit. Na het sluiten van het vak kunt u
de functionaliteit van de controller met behulp van
de Powerschakelaar op de voorzijde controleren.
Bij de ON-positie van de Powerschakelaar en reglementaire functie dient de LED bovenaan in het
midden van de controller rood op te lichten.
Als de controle-LED snel knippert, moeten de bat-
terijen in de controller worden gewisseld.
Binding van het model met de
controller
De Carrera RC helicopter en de controller zijn
door de fabriek gebonden. Indien er in het begin
4
problemen bij de communicatie tussen de Carrera
RC helicopter en de controller zijn, dan gelieve
een nieuwe binding uit te voeren.
• Neem het model van de presentatiesokkel.
•
Schakel het model met de ON/OFF schakelaar in.
• De LED in de helikopter knippert nu in ritmisch
versnellende volgorde.
• Schuif de linker joystick helemaal naar beneden.
Schakel de controller met de ON/OFF schakelaar in. De binding vindt automatisch plaats.
Gedurende het verbindingsproces weerklinkt er
een akoestisch signaal.
• Houd het model zo, dat de rotor verticaal naar
boven gericht is.
•
Geef de helikopter een ogenblik de tijd, tot het
systeem correct geïnitialiseerd en bedrijfsklaar is.
• De controle-LED licht weer continu op en toont
aan, dat het verbindingsproces beëindigd is.
Checklist voor de vluchtvoorbereiding
Deze checklist is geen vervanging voor de inhoud van deze
bedieningshandleiding. Hoewel zij als quick-start-gids kan
worden gebruikt, raden wij u dringend eerst aan, om deze
gebruiksaanwijzing volledig te lezen, alvorens u verder gaat.
• Controleer de verpakkingsinhoud
• Verbind de lader met de stroombron.
• Laad de LiPo-accu zoals in paragraaf „Laden van de LiPo
accu“ beschreven.
• Plaats 2 AAA-batterijen in de controller en let hierbij op de
juiste polariteit.
• Zoek een geschikte omgeving om te vliegen
• Ga te werk zoals onder 4.
• Herhaal nu evt. bovenstaande punten, als u met meerdere
helikopters tegelijk wilt vliegen.
• Controleer de besturing
• Start de helikopter uit één hand. Houd tegelijkertijd de controller in uw andere hand, zodat u direct de controle over
de helikopter kunt overnemen.
WAARSCHUWING! HET MODEL VLIEGT VANZELF
VOORWAARTS EN KAN ALLEEN IN HOOGTE EN
RICHTING WORDEN GESTUURD
• Maak u vertrouwd met de besturing
• Trim de helikopter indien nodig, zoals beschreven onder
‘Besturing van de helikopter.
• De helikopter is nu klaar voor gebruik.
• Als de helikopter geen enkele functie vertoont, dient u bovenstaand koppelproces nogmaals te proberen.
• Vlieg het model
• Land het model
• Schakel het model met de ON/OFF schakelaar uit (3 s)
• Schakel altijd de afstandsbediening als laatste uit
Functieoverzicht van de controller
1. Antenne
2. Powerschakelaar (ON / OFF)
5
3. Controle LED
4. Gas
5. Staart (cirkelvormige draaibeweging)
6. Trimmer voor staartrotor
7. Batterijvak
3
Besturing van de helicopter
1. Coaxiaal rotorsysteem
2. Laadbus om de LiPo accu te laden
6
3. Display/presentatiesokkel
4. ON-/OFF-schakelaar
Besturing van de helicopter
Als u de besturingsfuncties van uw Carrera RC
helicopter nog niet kent, dan gelieve u voor de
7
eerste vlucht een paar minuten de tijd te nemen,
om u met de besturing vertrouwd te maken. De
beschrijving links of rechts stemt overeen met de
kijk vanuit de cockpit (pilotenzicht).
Druk de gashendel naar boven, om de rotatiesnel-
heid van de rotoren te verhogen. Verhoog de rotatiesnelheid van de hoofdrotorbladen en het model
begint te stijgen.
Reduceer de uitslag van de gashendel en daar-
mee de rotatiesnelheid van de hoofdrotorbladen,
om de helicopter te doen dalen. Als het model de
grond heeft verlaten, kunt u het door voorzichtige
beweging van de gashendel naar boven en beneden, in een stationaire zweefvlucht brengen,
zonder dat het te plots stijgt of daalt.
Beweeg de rechter hendel (staart) naar links en
de neus van de helikopter draait (giert) om de as
8
van de hoofdrotor cirkelvormig naar links.
Beweeg de rechter hendel (staart) naar rechts en
de neus van de helikopter draait (giert) om de as
van de hoofdrotor cirkelvormig naar rechts.
Gebruik de trimmer voor de staart, tot u een sta-
biele neutrale positie van de helikopter in zweefvlucht, zonder beweging van de linker hendel
(staart) heeft bereikt
WAARSCHUWING! HET MODEL VLIEGT VAN-
ZELF VOORWAARTS EN KAN ALLEEN IN
9
HOOGTE EN RICHTING WORDEN GESTUURD
Nadat u zich met de hoofdbesturingsfuncties vertrouwd
heeft gemaakt, bent u na de keuze van uw vlieggebied klaar
voor de eerste vlucht.
Keuze van het vlieggebied
Als u klaar bent voor uw eerste vlucht, dient
10
u een gesloten ruimte te kiezen, zonder personen en zonder hindernissen en die zo groot
mogelijk is. Op grond van de grootte en de
bestuurbaarheid van de helicopter is het
voor ervaren piloten mogelijk, om ook in relatief kleine gesloten ruimten te vliegen. Voor
uw eerste vluchten bevelen wij absoluut een
minimum kamergrootte van 3 maal 3 meter
grondoppervlak en 2,40 m hoogte aan. Nadat
u de helicopter uitgetrimd heeft en met zijn besturing en zijn mogelijkheden vertrouwd bent
geworden, kunt u er zich ook aan wagen, om
in kleinere en minder vrije omgeving te vliegen.
Dit speelgoed mag alleen worden gebruikt in
huiselijke omgeving (huis en tuin).
Informatie over het oplossen van problemen vindt u op pagina 43.
Vergissingen en fouten uitgesloten
Kleur/fi nale ontwerpaa npassingen ui tgesloten
Technische aanpassingen en ontwerp gerelateerde
aanpassingen uitgesloten
Pictogrammen = symb olisch foto’s
NEDERLANDS
15
Page 16

Estimado Cliente:
Os nossos parabéns pela aquisição do seu novo helicóptero
miniatura Carrera RC fabricado ao nível tecnológico actual.
Devido ao nosso empenho constante no aperfeiçoamento
dos nossos produtos, reservamo-nos o direito de realizar alterações tanto técnicas como no equipamento, em materiais
e no design sem aviso prévio. Diferenças mínimas entre o
presente produto e os dados e ilustrações contidos neste
manual, não implicam direitos de qualquer natureza. Este
manual de instruções, de uso e de montagem faz parte integrante do produto. A inobservância deste manual de instruções e das indicações de segurança nele contidas, implica
a extinção da garantia. Guarde este manual para consultas
PORTUGUĘS
posteriores e para sua eventual entrega a terceiros no caso
da transferência do carro-miniatura para os mesmos.
A última versão deste manual de
instruções de uso e informações
sobre as peças de reposição disponíveis podem ser consultadas
em
carrera-rc.com na secção de
serviço.
Condições de garantia
Os produtos Carrera são produtos de técnica de alta
qualidade que deviam ser tratados com cuidado. Siga
necessariamente as indicações contidas no manual de
instruções. Todas as peças são submetidas a um controlo rigoroso (reservados os direitos a alterações técnicas e do modelo em prol do melhoramento do produto).
Se surgirem contudo alguns defeitos, concede-se uma garantia no âmbito das condições seguintes:
A Stadlbauer Marketing + Vertrieb GmbH (doravante denominada „fabricante“) garante ao cliente fi nal (doravante
denominado „cliente“) que, nos termos das disposições
abaixo, o helicóptero miniatura Carrera RC (doravante denominado „produto“) estará livre de defeitos de material e de
fabrico durante um prazo de dois anos a contar da data de
aquisição do mesmo (prazo de garantia). Tais defeitos serão eliminados pelo fabricante, ao arbítrio e por conta deste
mesmo, mediante
reparação ou fornecimento de peças novas ou reacondicionadas. A garantia não abrange as peças de desgaste (tais
como por ex. pilha, pás do rotor, cobertura da cabina, rodas
dentadas e similares.) nem danos derivados do manuseamento/utilização incorretos ou da intervenção de terceiros.
Reivindicações desta natureza por parte do cliente, sobretudo indemnização, face ao fabricante, estão excluídas.
Os direitos contratuais ou legais do cliente (cumprimento
posterior, rescisão do contrato, redução do preço, indemnização) face ao respectivo vendedor, existentes quando
o produto não se encontra em perfeito estado no acto da
transferência do risco, não são afectados por esta garantia.
Os direitos desta garantia especial do fabricante só
existem quando
• o defeito reclamado não tiver origem em danos causados
pelo uso indevido ou incorrecto nos termos das prescrições contidas neste manual de instruções,
• não se tratar de sinais de desgaste decorrente do funcionamento,
• o produto não apresentar características das quais se possa deduzir reparações ou outras intervenções quaisquer
por ofi cinas não autorizadas pelo fabricante,
• o produto tiver sido utilizado só com acessórios autorizados pelo fabricante
• o produto for remetido juntamente com o documento comprobatório da aquisição em original (factura / talão) e com
o cartão de garantia completamente preenchido no qual
não foram efectuadas alterações arbitrárias.
Não é possível substituir cartões de garantia.
Nota para os Estados da UE: quanto à obrigação do ven-
dedor conceder uma garantia legal informa-se que esta obrigação não é limitada por uma garantia material.
Os custos de envio e de retorno do produto são a cargo do
fabricante.
Esta garantia é válida nos termos anteriormente mencionados e sob as pré-condições acima citadas (inclusive a
apresentação da factura/talão original mesmo no caso de
revenda a terceiros) para cada futuro proprietário que o produto possa ter mais tarde.
Declaração de conformidade
Por este meio, a Stadlbauer Marketing + Vertrieb GmbH
declara que esta miniatura inclusive o comando se encontram em conformidade com os requisitos fundamentais das
seguintes diretivas CE: com as Directivas CE 2009/48 e
2014/30/EU sobre a Compatibilidade Electromagnética bem
como com as demais disposições aplicáveis da Directiva
2014/53/EU (RED).
O original da declaração de conformidade pode ser solicitado em carrera-rc.com.
Potência máxima da radiofrequência <10 dBm
Gama de frequências: 2400 – 2483,5 MHz
Advertências!
AVISO! Este brinquedo não é apropriado
para crianças com menos de 3 anos de idade
devido a pequenas peças ingeríveis.
AVISO! Perigo de entalamento decorrente do funcionamento! Retire todos os materiais de embalagem e arames de fi xação antes de entregar o brinquedo à criança.
Para informações e eventuais esclarecimentos, guarde
a embalagem e o endereço bem como o manual de instruções para consultas posteriores. Nota para pessoas
adultas de vigilância: verifi que se o brinquedo está
montado como se descreve no manual de instruções.
A montagem deve ser efetuada na presença de uma
pessoa adulta.
AVISO! Impróprio para crianças de idade inferior a 8 anos.!
Este produto não se destina para utilização por crianças
sem a vigilância do respectivo encarregado de educação.
Para pilotar o helicóptero é necessário ter uma certa experiência. As crianças devem aprender a pilotar sob a vigilância direta de um adulto. Leia as informações ao utilizador
juntamente com o seu fi lho antes da primeira utilização. A
utilização incorrecta pode causar lesões graves e/ou danos
materiais.
É necessário comandá-lo com cuidado e prudência e o comando requer algumas capacidades mecânicas e mentais.
O manual de instruções contém indicações de segurança
e prescrições bem como dicas para a manutenção e o funcionamento do produto. É absolutamente necessário ler
este manual completamente antes da primeira colocação
em funcionamento e compreender o seu teor. Só assim se
poderá evitar acidentes com lesões e danos.
Ponha o helicóptero a voar só em salas fechadas que proporcionam espaço sufi ciente e siga todas as instruções
tal como são recomendadas neste manual. Manter as
mãos, cabelo e vestuário solto bem como outros obstáculos
tais como canetas e chaves de parafusos afastados do rotor.
Não tocar no rotor em movimento. Preste atenção às suas
mãos, NÃO as coloque na proximidade das pás do rotor!
AVISO: Perigo de lesão dos olhos. Não deixe o helicóptero voar na proximidade do seu rosto para evitar
lesões.
Como utilizador, você é o único responsável pelo manuseio seguro por forma a não pôr em perigo a si mesmo
nem a outras pessoas ou a danifi car os bens destas.
• Nunca utilize a sua miniatura com as pilhas do comando
fracas.
• Este brinquedo destina-se unicamente para uso em casa.
• AVISO: Não ponha o helicóptero a voar quando esti-
verem pessoas, animais ou outros obstáculos na área
de voo do mesmo.
• Siga exactamente as instruções e advertências relativas
a este produto e aos acessórios possíveis (carregador,
pilhas, etc) que você utiliza
• Se o helicóptero colidir com seres vivos ou objectos
sólidos, coloque a alavanca de aceleração na posição
zero imediatamente, ou seja, o joystick esquerdo tem
de estar encostado ao esbarro inferior!
• Evite qualquer tipo de humidade dado que esta pode da-
nifi car a electrónica.
• Não efetue nenhumas alterações nem modifi cações no
helicóptero.
16
Se não aceitar estas condições, devolva imediatamente o
helicóptero miniatura completo, em estado novo ou por usar,
ao distribuidor.
Informações importantes sobre pilhas de lítio polímero
As pilhas de lítio polímero (LiPo) são mais sensíveis que
as pilhas alcalinas convencionais ou as pilhas NiMH normalmente aplicadas em telecomandos por rádio. Por isso,
as prescrições e advertências do fabricante devem ser seguidas exactamente. No caso de manuseio incorrecto das
pilhas LiPo, corre-se risco de incêndio. Respeite sempre as
indicações do fabricante quando eliminar pilhas LiPo.
Prescrições para eliminação de aparelhos eléctricos e
electrónicos velhos segundo WEEE
lhos etc., não devem ser colocados no lixo doméstico, dado
que são nocivos ao meio ambiente e à saúde. Contribua
para a preservação do meio ambiente e da saúde e esclareça também os seus fi lhos quanto à eliminação correcta de
pilhas gastas e aparelhos eléctricos velhos. As pilhas e os
aparelhos eléctricos devem ser entregues nos pontos de
recolha conhecidos. Aqui, serão devidamente conduzidos à
reciclagem.
Não se deve utilizar pilhas de tipo diferente nem pilhas novas juntamente com pilhas usadas. Retirar as pilhas descarregadas do brinquedo. As pilhas não recarregáveis não
devem ser recarregadas devido a perigo de explosão.
AVISO!
O carregador ou o cabo USB de carregamento podem ser
utilizados por crianças a partir dos oito (8) anos de idade
e por pessoas com capacidades físicas, sensóricas ou
mentais reduzidas ou com pouca experiência e/ou pouco
conhecimento se forem vigiadas durante a utilização ou
tiverem sido instruídas no uso destes aparelhos em segurança e compreendido os perigos resultantes. Crianças não
devem brincar com o carregador ou o cabo USB de carregamento. A limpeza e conservação não devem ser realizadas
por crianças a não ser que tenham mais do que 8 anos de
idade e sejam vigiadas durante isso. Crianças com menos
de 8 anos de idade não devem aproximar-se do carregador
nem do cabo de alimentação elétrica. Nunca deixe a pi-
lha por vigiar durante o carregamento. Retirar as pilhas
recarregáveis do brinquedo antes de as recarregar. Não é
permitido ligar os terminais de conexão em curt-circuito. Só
é permitido utilizar as pilhas recomendadas ou pilhas de tipo
equivalente.
Aquando da utilização regular do carregador, dever-se-á
verifi car o cabo, a tomada e a fi cha bem como as tampas
e outras partes do mesmo. No caso de qualquer defeito ou
avaria, o carregador só deverá ser colocado em funcionamento depois de ter sido reparado. O fi o fl exível exterior
deste carregador não pode ser substituído: quando o fi o
estiver danifi cado, há que descartar o carregador na sucata
eletrónica.
O brinquedo deve ser ligado unicamente a aparelhos da
classe de proteção II.
Directivas e advertências relativas à utilização de pilhas
LiPo
• Você tem que carregar a pilha LiPo de 3,7 V 180 mAh
incluída no volume de fornecimento, num local seguro fora
de materiais infl amáveis.
• Nunca deixe a pilha por vigiar durante o carregamento.
• Para carregar a pilha depois de um voo, é necessário que
ela arrefeça primeiro até à temperatura ambiente.
• Utilize unicamente o carregador Lipo pertinente (cabo /
comando USB). No caso de inobser vância destas indicações, corre-se risco de incêndio e consequentemente
perigo para a saúde e/ou danos materiais. NUNCA utilize
outro carregador.
• Se a pilha inchar ou deformar-se durante os processos de
carga ou de descarga, termine imediatamente o respectivo
processo. Retire a pilha o mais rápido possível e com o
máximo cuidado e coloque-a num lugar seguro e aberto,
fora de materiais combustíveis e mantenha-a sob observação pelo menos 15 minutos. Se você continuar a carregar ou a descarregar uma pilha já inchada ou deformada,
corre-se risco de incêndio! Mesmo que a deformação ou o
inchaço sejam mínimos, a pilha tem que ser colocada fora
de serviço.
• Guarde a pilha à temperatura ambiente num lugar seco.
Este pictograma com o símbolo de
baldes de lixo riscados, avisa que as
pilhas descarregadas, baterias, células, blocos de baterias, pilhas em
aparelhos, aparelhos eléctricos ve-
Page 17

• Carregue a pilha necessariamente depois de cada uso
para evitar a denominada descarga total da mesma.
Considere que deve manter uma pausa de aprox. 20
minutos entre o voo e o carregamento da pilha. Carregue a pilha de quando em quando (aprox. cada 2-3
meses). A inobservância do manejo anteriormente
descrito, pode provocar defeitos.
• Para transporte ou para armazenagem passageira da pilha, a temperatura devia situar-se entre 5-50°C. Se possível, não guarde a pilha ou a miniatura num veículo nem sob
infl uência directa dos raios solares. Se a pilha for exposta
ao calor num veículo, pode danifi car-se ou incendiar-se.
Nota: aquando de tensão ou potência baixas da pilha, você
constatará que é necessário muito mais compensação e/ou
movimentos de comando para o helicóptero não perder a estabilidade. Normalmente, isto acontece antes da tensão de
3 V ser atingida e é um bom momento para terminar o voo.
Volume de fornecimento
1x Helicóptero
1
1x Comando
1x Base de apresentação & tomada para carga
1x Cabo de carregamento USB
2x Pilha 1,5V Micro AAA (não-recarregável)
Modo de carregar a pilha LiPo
Tenha em atenção que deve carregar a pilha LiPo incluída
no volume de fornecimento unicamente com o carregador
LiPo que a acompanha (cabo ou comando USB). Se tentar
carregar a pilha com outro carregador de pilhas LiPo ou outro carregador qualquer, isso pode provocar danos graves.
Por favor leia atentamente o capítulo anterior de advertências e directivas para utilização da pilha, antes de continuar.
Carregamento através do computador:
• Ligue o cabo de carga USB à porta USB de
2
um computador. O LED do cabo de carga
USB acende-se em verde o que assinala que
a unidade de carga está devidamente ligada ao
computador. Quando ligar um helicóptero com a
pilha vazia, o LED do cabo de carga USB não se
acende o que assinala que a pilha do helicóptero está a ser carregada. O cabo de carga USB
e a tomada do helicóptero estão concebidos de
forma aos pólos não poderem ser trocados.
• Demora aproximadamente 30 minutos a carregar uma bateria descarregada (não totalmente
descarregada). Quando a pilha estiver cheia, o
LED do cabo de carga USB acende-se novamente em verde.
Nota: no acto da entrega, a bateria LiPo está carregada parcialmente. Por isso, o primeiro carregamento pode demorar
menos tempo.
Siga necessariamente a ordem cronológica acima
descrita para a ligação! Se não tiver ligado o cabo de
carregamento a uma fonte de energia e o ligar só ao helicóptero, um LED aceso em verde assinala que a pilha
ainda tem tensão. O LED aceso em verde não indica se
a pilha tem carga sufi ciente.
Durante a fase de carregamento, o interruptor de ligar/
desligar „OFF“ tem de estar na posição „OFF“ (desligado).
Modo de colocar as pilhas no
comando
Abra a tampa da cavidade das pilhas com uma
chave de fendas e coloque as pilhas no coman-
3
do. Preste atenção à posição correcta dos pólos.
Depois de fechar a tampa da cavidade, poderá
controlar a funcionalidade do comando com a ajuda do interruptor que se encontra na parte frontal.
Aquando do interruptor na posição ON e de funcionamento correcto, o LED de cima, no centro do
comando, devia acender-se em vermelho.
Quando o LED de controlo intermitir rapidamente,
é necessário substituir as.
Interligação entre helicóptero
miniatura e o comando
O helicóptero Carrera RC e o comando estão
interligados de fábrica. Se, no início, surgirem
4
problemas de comunicação entre o helicóptero
Carrera RC e o comando, volte a estabelecer a
interligação.
• Retire a miniatura da base de apresentação.
• Ligue a miniatura com o interruptor ON/OFF.
• Agora o LED do helicóptero pisca em ritmo mais
acelerado.
• Empurre o joystick esquerdo o máximo para baixo. Ligue o comando com o interruptor ON/OFF.
A interligação é feita automaticamente. Durante
a fase de interligação, soa um sinal acústico no
comando.
• Pegue na miniatura com o rotor a apontar na
vertical para cima.
• Aguarde alguns segundos até o sistema se
inicializar e o helicóptero estar pronto para funcionamento.
• O LED de controlo volta a fi car permanentemente aceso o que assinala que a interligação está
concluída.
Lista de verifi cação „checklist“
para preparação do voo
Esta lista de verifi cação „checklist“ não substitui o conteúdo
das instruções contidas neste manual. Apesar desta lista
poder ser aplicada como Quick-Start-Guide, recomendamos-lhe insistentemente ler primeiro este manual de instruções, na sua íntegra, antes de prosseguir.
• Verifi que o conteúdo da embalagem
• Ligue o carregador à fonte de energia.
• Carregue a bateria LiPo como se descreve no capítulo
„Modo de carregar a bateria LiPo“.
• Coloque 2 pilhas AAA no comando e preste atenção à polaridade correta.
• Procure um ambiente apropriado para pôr o helicóptero a
voar
• Proceda como é indicado em 4.
• Eventualmente repita os pontos anteriormente descritos
caso deseje colocar outros helicópteros a voar simultaneamente.
• Verifi que o comando
• Deixe o helicóptero descolar de uma das mãos. Paralelamente, mantenha o comando na outra mão para poder
dominar o helicóptero imediatamente.
ATENÇÃO! A MINIATURA VOA PARA A FRENTE POR
ELA PRÓPRIA E SÓ PODE SER COMANDADA EM
TERMOS DE ALTITUDE E DE RUMO
• Familiarize-se com o comando
• Se for necessário, efetue a equilibração do helicóptero
como se descreve em „Comando do helicóptero“.
• O helicóptero está pronto para funcionar.
• Se o helicóptero não reagir com qualquer função, tente
efetuar novamente a ligação acima descrita.
• Proceda à descolagem do helicóptero miniatura
• Proceda à aterragem do helicóptero miniatura
• Desligue a miniatura com o interruptor ON/OFF (3s)
• Desligue sempre o telecomando em último lugar
Funções do comando
1. Antena
2. Interrutor de ligação (ON / OFF)
5
3. LED de controlo
4. Acelerar
5. Cauda (rotação)
6. Trimmer para a cauda
7. Cavidade das pilhas
3
17
Descrição do helicóptero
1. Sistema de rotor coaxial
2. Tomada para carregar a bateria LiPo
6
3. Display / Base de apresentação
4. Interruptor de ligar e desligar “ON/OFF”
Comando do helicóptero
Se ainda não conhecer as funções de comando
do seu helicóptero Carrera RC, empregue alguns
7
minutos antes do primeiro voo para familiarizar-
-se com elas. A designação esquerda ou direita
corresponde à vista a partir do cockpit (vista do
piloto). Puxe a alavanca de acelerar para cima,
para aumentar a velocidade de rotação das pás
do rotor principal. Aumente a velocidade de rotação das pás do rotor principal e o helicóptero
miniatura começa a subir.
Se você reduzir a amplitude da alavanca de ace-
lerar, reduz consequentemente a velocidade de
rotação das pás do rotor principal e o helicóptero
baixa. Quando o helicóptero miniatura descolar
do solo, você pode pô-lo a pairar estacionariamente movendo cuidadosamente a alavanca de
acelerar para cima e para baixo sem que o helicóptero suba ou desça abruptamente.
Mova a alavanca direita (cauda) para a esquerda
e o nariz do helicóptero gira (guina) circularmente
8
para a esquerda em torno do eixo do rotor principal. Mova a alavanca direita (cauda) para a direita
e o nariz do helicóptero gira (guina) circularmente
para a direita em torno do eixo do rotor principal.
Utilize o trimmer da cauda até conseguir uma posição neutra estável do helicóptero a pairar, sem
mover a alavanca direita (cauda).
ATENÇÃO! A MINIATURA VOA PARA A FREN-
TE POR ELA PRÓPRIA E SÓ PODE SER CO-
9
MANDADA EM TERMOS DE ALTITUDE E DE
RUMO
Depois de ter-se familiarizado com as funções de comando
principais, você está apto para o primeiro voo.
Escolha da área de voo
Quando você estiver apto para o primeiro
10
voo, deveria escolher uma sala fechada, sem
a presença de pessoas nem de obstáculos, e
o maior possível. Devido ao tamanho do helicóptero e à boa usabilidade do comando, pilotos experientes conseguem voar o helicóptero
em salas fechadas relativamente pequenas.
Para os seus primeiros voos, aconselhamos-
-lhe necessariamente as dimensões mínimas
de 3 por 3 metros de superfície e 2,40 metros
de altura. Depois de ter equilibrado o seu helicóptero e de ter-se familiarizado com o comando e as capacidades desse mesmo, pode
começar a tentar pô-lo a voar em áreas mais
pequenas e menos livres.
Este brinquedo deve ser utilizado unicamente
em ambientes domésticos (casa e jardim).
Para informações sobre a solução de problemas, consulte
a página 43.
Salvo erros, omissões e modifi caç ões
Cores /des ign fi nal – suj eitos a alteraç ões
Reservados os direitos a alterações da técnica e do design
Pictogra mas = Fotos de símbol os
PORTUGUĘS
Page 18

Bästa kund
Gratulerar till köpet av denna Carrera RC-modellhelikopter,
som är tillverkad enligt senaste tekniska rön. Eftersom vi alltid strävar efter att vidareutveckla och förbättra våra produkter, förbehåller vi oss alltid och utan föregående varsel rätten
till tekniska ändringar samt ändringar när det gäller utrustning, material och design. Därför kan inga anspråk beaktas
vad avser smärre avvikelser mellan den produkt Du har köpt
och uppgifter samt illustrationer i denna bruksanvisning.
Denna bruks- och monteringsanvisning är en del av produkten. Om bruksanvisningen och de säkerhetsanvisningar den
innehåller inte följs, upphör garantin att gälla. Spara bruks-
SVENSKA
anvisningen för senare bruk och låt den följa med produkten
om den övertas av någon annan.
Den senaste versionen av denna
bruksanvisning samt information om reservdelar återfi nns på
carrera-rc.com under rubriken Ser-
vice.
Garantivillkor
Produkterna från Carrera är tekniskt förstklassiga och
de skall behandlas varsamt. Se informationen i bruksanvisningen. Alla komponenter underkastas en noggrann
kontroll (tekniska ändringar och modelländringar som
syftar till att förbättra produkten förbehålles).
Om det mot förmodan skulle uppstå ett fel, gäller garantin
inom ramen av följande villkor:
Stadlbauer Marketing + Vertrieb GmbH (nedan kallat „tillverkaren“) garanterar slutkunden (nedan „kunden“) på basis av
nedanstående bestämmelser att den till kunden levererade
Carrera RC-modellhelikoptern (nedan kallad „produkten“) är
fri från material- eller bearbetningsfel inom en period på två
år efter inköpsdatum (garantitid). Fel av detta slag åtgärdas
av tillverkaren på dennes bekostnad genom reparation eller
leverans av nya eller renoverade delar, enligt tillverkarens
bedömning. Garantin omfattar inte slitdelar (t.ex. batteri,
rotorblad, kaross, kugghjul eller liknande), skador p.g.a. felaktig behandling/användning eller vid främmande ingrepp.
Övriga krav från kund, i synnerhet avs. skadeståndsersättning, gentemot tillverkaren är uteslutna.
Kundens kontraktsenliga eller lagstadgade rättigheter (efterleverans, hävande av avtalet, minskning, skadeståndsersättning) gentemot resp. säljaren, vilka är giltiga om produkten
inte var felfri vid övergången av risken, berörs inte av denna
garanti.
Anspråk på basis av denna särskilda tillverkargaranti
föreligger endast om
• det fel som görs gällande inte ligger i skador vilka har orsakats av icke ändamålsen lig eller felaktig användning enligt
föreskrifterna i bruksanvisningen,
• det inte rör sig om driftsbetingade slitagetecken,
• produkten inte uppvisar några kännetecken som tyder på
reparation eller andra ingrepp genom verkstäder som inte
har auktoriserats av tillverkaren,
• produkten har använts endast med av tillverkaren godkända tillbehör och
• produkten skickas in tillsammans med originalköpdokumentet (faktura/kassakvitto) och fullständigt ifylld garantisedel, på vilken inga egna ändringar har gjorts.
Garantisedlar kan inte ersättas.
Hänvisning för EU-medlemsländer: vi hänvisar till sälja-
rens lagstadgade garantiskyldighet i den mån som denna
garantiskyldighet inte begränsas av objektgarantin.
Tillverkaren står för kostnaderna för insändning och återsändning av produkten.
Garantin gäller i den nämnda omfattningen och under de
nämnda förutsättningarna (inkl. uppvisande av originalköpdokumentet även i händelse av vidareförsäljning) för varje
efterföljande, framtida ägare av produkten.
Försäkran om överensstämmelse
Härmed förklarar Stadlbauer Marketing + Vertrieb GmbH. att
denna modell inkl. kontroll överensstämmer med de grundläggande kraven i följande EU-direktiv: Enligt EG-direktiven
2009/48 och 2014/30/EU om elektromagnetisk kompatibilitet
och övriga relevanta bestämmelser i direktivet 2014/53/EU
(RED).
Originalet till försäkran om överensstämmelse kan beställas
på carrera-rc.com.
Max. radiofrekvenseff ekt <10 dBm
Frekvensområde: 2400 – 2483,5 MHz
Varningar!
VARNING! Denna leksak är inte lämplig för
barn under 3 år ålder – smådelarna kan sväl-
jas.
VARNING! Funktionsbetingad risk för klämskador! Avlägsna allt emballagematerial och alla klämmor innan
Du låter barnet leka med leksaken. Spara förpackningen, adressen och bruksanvisningen för senare bruk.
Anm. för vuxna överinseende personer: kontrollera att
leksaken har monterats enligt anvisningen. Monteringen skall utföras under överinseende av en vuxen.
VARNING! Ej lämpligt för barn under 8 års ålder.
Denna produkt är inte avsedd att användas av barn utan
överinseende av en ansvarig person. Flygning med helikoptern kräver viss övning. Barn måste läras upp under direkt
överinseende av en vuxen person. Läs igenom användarinformationen tillsammans med barnet före den första användningen. Vid felaktig användning kan svåra person- och/eller
sakskador uppstå.
Användningen av produkten kräver försiktighet och hänsyn,
ett visst mekaniskt kunnande samt omdöme. Bruksanvisningen innehåller säkerhetshänvisningar och föreskrifter
samt information om skötsel och användning av produkten.
Det är ett absolut krav att bruksanvisningen har lästs igenom
komplett och förståtts före första användning. Det är endast
då som olycksfall med person- och sakskador kan undvikas.
Använd helikoptern endast i stängda rum med tillräckligt utrymme. Följ alla instruktioner i denna bruksanvisning. Händer, hår och löst sittande klädesplagg, inkl. andra
föremål såsom pennor och skruvmejslar, måste hållas borta
från propellern (rotorn). Vidrör inte den roterande rotorn. Var
särskilt noggrann med händerna så att de INTE kommer i
närheten av rotorbladen!
VARNING: risk för ögonskador. Flyg inte med helikoptern i närheten av ansiktet, detta för att förhindra personskador.
Du, som användare av produkten, har ansvar för en säker användning, så att varken Du själv eller andra personer eller deras egendom tar skada eller utsätts för risker.
• Använd aldrig modellen med svaga batterier i kontrollen.
• Denna leksak får användas endast i hemmiljö.
• VARNING: starta och fl yg inte när det fi nns personer,
djur eller andra hinder i helikopterns fl ygområde.
• Följ exakt instruktionerna och varningarna för produkten
och för ev. tilläggsutrustning (laddare, batterier o.s.v.).
• Skulle helikoptern komma i beröring med levande
väsen eller hårda föremål, måste gasspaken genast
föras i nollställning, d.v.s. vänster joystick skall ligga i
undre anslaget!
• Undvik fukt - den kan skada elektroniken.
• Ändra eller modifi era ingenting på helikoptern.
Om Du inte godkänner dessa villkor, skall Du omedelbart returnera den kompletta helikoptermodellen i nytt och oanvänt
skick till återförsäljaren.
Viktig information om litium-polymer-batterier
Litium-polymer (LiPo)-batterier är väsentligt känsligare än
vanliga alkaliska eller NiMH-batterier som annars används
i radiofjärrstyrningar. Föreskrifterna och varningarna från
tillverkaren skall därför följas exakt. Vid felaktig användning
av LiPo-batterier råder brandfara. Följ alltid tillverkarens uppgifter om avfallshantering av LiPo-batterier.
18
Avfallshanteringsbestämmer för elektriska och elektroniska uttjänta produkter enl. WEEE
skall slängas i de vanliga hushållssoporna, då de är skadliga
för miljö och hälsa. Hjälp till att skona miljön och skydda hälsan, och tala också med barnen om att det är viktigt att
lämna uttjänta batterier och elektriska apparater till återvinning. Batterier och elektriska uttjänta apparater lämnas till
återvinningscentral, där de ingående materialen sorteras
och återvinns.
Batterityper av olika slag, eller nya och uttjänta batterier får
inte användas tillsammans. Ta ur tomma batterier ur leksaken. Icke återuppladdningsbara batterier får inte laddas upp.
Ej återuppladdningsbara batterier får inte återuppladdas
p.g.a. risk för explosion.
VARNING!
Laddaren resp. USB-laddningskabeln kan användas av barn
fr.o.m. åtta (8) års ålder och av personer med begränsad
fysisk, sensorisk eller mental förmåga eller med brist på erfarenhet och/eller kunskap, om de står under uppsikt eller
har informerats om en säker användning av produkten och
har förstått de därmed förknippade riskerna. Barn får inte
leka med laddaren resp. USB-laddningskabeln. Rengöring
och underhåll genom användaren får inte utföras av barn,
såvida de inte är äldre än 8 år och står under uppsikt.
Håll laddaren och anslutningskabeln borta från barn under
8 års ålder. Lämna aldrig batteriet utan uppsikt medan
det laddas. Anslutningsklämmor får inte kortslutas. Endast
rekommenderade batterier eller batterier av likvärdig typ får
användas.
Vid regelbunden användning av laddaren måste den kontrolleras: undersök kabel, anslutning, kåpor och andra delar. Om laddaren skadas får den inte användas förrän den
har reparerats. Den fl exibla ytterkabeln till denna laddare
kan inte bytas ut. Om kabeln har skadats måste laddaren
skrotas.
Leksaken får anslutas endast till produkter i kapslingsklass
II.
Direktiv och varningar för användning av LiPo-batterier
• Du måste ladda det bifogade 3,7 V 180 mAh LiPobatteriet på en säker plats borta från antändliga material.
• Lämna aldrig batteriet utan uppsikt medan det laddas.
• Om batteriet skall laddas efter en fl ygtur måste det först ha
fått svalna till omgivningstemperatur.
• Endast tillhörande LiPo-laddare (USB-kabel/kontroll) får
användas. Om detta villkor inte uppfylls fi nns risk för brand
och därmed äventyrande av hälsan och/eller egendom.
Använd ALDRIG andra laddare.
• Om batteriet utvidgas eller missformas under urladdning
eller laddning, måste Du omedelbart avsluta laddningen
eller urladdningen. Ta ur batteriet så snabbt och försiktigt
som möjligt och lägg det på en säker, öppen plats borta
från brännbara material. Håll uppsikt över batteriet i minst
15 minuter. Om Du fortsätter ladda eller urladda ett batteri som redan har utvidgats eller missformats fi nns risk
för brand! Även vid mindre missformning eller utvidgning
måste batteriet tas ur drift.
• Förvara batteriet torrt och i rumstemperatur.
• Ladda ovillkorligen alltid upp batteriet igen efter användningen för att undvika en s.k. djupurladdning av
det. Tänk på att lägga in en paus på ca 20 minuter mellan fl ygning och laddning. Ladda upp batteriet då och
då (ca varannan till var tredje månad). En ignorering
av ovannämnda handhavande kan leda till att batteriet
förstörs.
• För transport eller tillfällig lagring av batteriet skall temperaturen ligga mellan 5-50°C. Förvara batteriet eller modellen
helst inte i bilen eller i direkt solljus. Om batteriet utsätts för
värmen i bilen kan det skadas eller fatta eld.
OBS: Vid låg batterispänning/-eff ekt kommer Du att se att
det krävs kraftigare trimning och/eller styrrörelser för att inte
helikoptern skall råka i spinn. Detta uppträder i regel innan
3 V batterispänning har nåtts och är ett bra tillfälle att avsluta
fl ygningen.
Symbolen med de överkorsade soptunnorna hänvisar till att tomma batterier, ackumulatorer, knappbatterier,
ackumulatorpaket, apparatbatterier,
elektriska skrotade produkter etc. inte
Page 19

Leveransomfattning
1x Helikopter
1
1x Kontroll
1x Display- och laddningsuttag
1x USB-laddningskabel
2x 1,5 V Micro AAA batterier
(ej återuppladdningsbara)
Laddning av LiPo-batteriet
Observera att det medlevererade LiPo-batteriet endast får
laddas med den medlevererade LiPo-laddaren (USB-kabel
resp. kontroll). Om Du försöker ladda batteriet med en annan
LiPo-batteriladdare eller någon annan laddare, kan svåra
skador uppstå. Läs igenom föregående avsnitt med varningar och direktiv för batterianvändning innan Du fortsätter.
Ladddning i datorn:
• Koppla ihop USB-laddningskabeln med datorns
2
USB-port. LED på USB-laddningskabeln lyser
med grönt sken och anger att laddningsenheten
är korrekt hopkopplad med datorn.
Om man sätter i en helikopter med tomt batteri,
slocknar LED på USB-laddningskabeln, vilket
anger att helikopterbatteriet laddas. USB-laddningskabeln resp. laddningsuttaget på helikoptern är utformade så att det inte går att förväxla
polariteten.
• Det tar ca 30 minuter att ladda upp ett tomt batteri (ej djupurladdat) igen. När batteriet är fullt,
tänds LED-indikeringen på USB-laddningskabeln igen med grönt ljus.
OBS: Vid utleverans är det ingående LiPo-batteriet delvis
laddat. Därför går den första uppladdningen något snabbare.
Ovannämnda anslutningssekvens måste ovillkorligen
följas! Om laddningskabeln inte har anslutits till en
strömkälla och kopplats ihop endast med helikoptern,
visar en LED-lampa med grönt sken att det fi nns spänning kvar i batteriet. LED-lampan som lyser med grönt
sken anger inte huruvida batteriet är tillräckligt laddat
eller inte.
Under laddningen måste strömbrytaren stå på ”OFF”.
Isättning av batterierna i
kontrollen
Öppna batterifacket med en skruvmejsel och sätt
i batterierna i kontrollen. Se till att polariteten blir
3
rätt. Stäng facket och kontrollera funktionen hos
kontrollen med hjälp av strömbrytaren på framsidan. När strömbrytaren står i ON-läge och allt
fungerar korrekt skall LED-lampan uppe i mitten
av kontrollen lysa röd.
Om kontrollampan blinkar snabbt måste batte-
rierna i kontrollen bytas.
Hopkoppling av modellen och
kontrollen
Carrera RC helikoptern och kontrollen har sam-
mankopplats i fabriken. Om det uppstår problem
4
med kommunikationen i början mellan Carrera
RC helikoptern och kontrollen måste Du göra en
ny sammankoppling.
• Ta av modellen från display-uttaget.
• Knäpp på modellen med ON/OFF-knappen.
• LED i helikoptern blinkar nu i rytmiskt accelererande följd.
• Skjut den vänstra joysticken hela vägen nedåt.
Knäpp på kontrollen med ON/OFF-knappen.
Bindningen sker automatiskt. Under bindningen
ljuder en signal från kontrollen.
• Håll modellen så att rotorn står lodrätt uppåt.
• Vänta en liten stund tills att systemet blir korrekt
initialiserat och driftsklart.
• Kontroll-LED lyser nu igen hela tiden och anger
att bindningen är avslutad.
Checklista inför fl ygningen
Denna checklista ersätter inte innehållet i denna bruksanvisning. Även om den kan användas som snabbintroduktion
rekommenderar vi att Du läser igenom hela denna bruksanvisning innan Du fortsätter.
• Kontrollera innehållet i förpackningen
• Koppla ihop laddaren med strömkällan.
• Ladda LiPo-batteriet så som beskrivs i avsnittet „Laddning
av LiPo-batteriet“.
•
Sätt i 2 AAA-batterier i kontrollen och kontrollera polariteten.
• Leta rätt på en lämplig plats för fl ygturen
• Gör så som beskrivs i 4.
• Upprepa ovannämnda steg om du vill fl yga med fl era helikoptrar samtidigt.
• Kontrollera styrningen
• Starta helikoptern med ena handen. Parallellt med det
håller du kontrollen i den andra handen så att du kan ta
kontroll över helikoptern direkt.
OBS! MODELLEN FLYGER AUTOMATISKT FRAMÅT
OCH KAN STYRAS ENDAST I HÖJD OCH RIKTNING
• Gör Dig förtrogen med styrningen
• Trimma helikoptern ev. så som beskrivs under ”Styrning av
helikoptern”.
• Helikoptern är klar att använda.
• Om helikoptern inte visar någon funktion, försöker du utföra ovannämnda bindning på nytt.
• Flyg modellen
• Landa modellen
• Stäng av modellen med ON/OFF-knappen (3 sek.)
• Stäng alltid av fjärrkontrollen sist
Funktionsöversikt över kontrollen
1. Antenn
2. Strömbrytare (ON / OFF)
5
3. Kontrollampa
4. Gas
5. Akter (cirkelvridning)
6. Trimmer för akter
7. Batterifack
3
Beskrivning av helikoptern
1. Koaxialt rotorsystem
2. Laddningsuttag för laddning
6
av LiPo-batteriet
3. Display/displayuttag
4. ON-/OFF-knapp
Styrning av helikoptern
Om Du ännu inte är förtrogen med styrfunktio-
nerna hos Din Carrera RC helikopter bör Du ta
7
Dig litet tid att göra Dig bekant med dem före den
första fl ygningen. Beskrivningen av vänster eller
höger motsvarar utsikten från cockpit (pilotens
sikt).
Tryck gasspaken uppåt för att öka huvudrotorbla-
dens rotationshastighet. Öka bladens rotationshastighet - nu börjar modellen stiga.
Om Du minskar utslaget för gasspaken och där-
med huvudrotorbladens rotationshastighet, sjunker helikoptern. När modellen har lyft från golvet
kan Du få den att fl yta i stationär svävfl ygning
genom att försiktigt vidröra gasspaken nedåt eller uppåt, utan att den stiger eller sjunker alltför
abrupt.
Flytta den höger spak (akter) åt vänster och heli-
kopterns nos vrider sig (girar) åt vänster runt hu-
8
vudrotorns axel i en cirkelrörelse. Flytta den höger
spak (akter) åt höger och helikopterns nos vrider
sig (girar) åt höger runt huvudrotorns axel i en cirkelrörelse. Använd trimmern för aktern tills att en
stabil neutralposition för helikoptern i svävfl ygning
har uppnåtts utan att höger spak (akter) vidrörs.
OBS! MODELLEN FLYGER AUTOMATISKT
FRAMÅT OCH KAN STYRAS ENDAST I HÖJD
9
OCH RIKTNING
När Du har gjort Dig förtrogen med huvudstyrfunktionerna
och har valt fl ygområde, är Du klar för den första turen.
Val av plats för fl ygningen
När Du är klar för den första fl ygturen skall
10
Du välja ett stängt rum där inga personer eller
hinder befi nner sig och som är så stort som
möjligt. Genom helikopterns storlek och styrbarhet kan en erfaren pilot fl yga även i relativt
små stängda rum. För de första turerna är det
ett absolut krav att ha minimum 3 gånger 4
meters golvyta och 2,40 meters höjd. När Du
har trimmat in helikoptern och gjort Dig förtrogen med styrningen och funktionerna kan
Du börja fl yta i mindre ochh mindre fria omgivningar.
Denna leksak får användas endast i privathus-
håll (hem och trädgård).
Information om problemlösning återfi nns på sidan 44.
Fel och ändr ingar förbehål lna
Färger / slu tlig design - änd ringar förbe hållna
Tekniska och d esignrelater ade ändringar f örbehållna
Piktogr am = symbolfoton
SVENSKA
19
Page 20

Hyvä asiakas
Esitämme onnittelumme Carrera RC-helikopterin oston
johdosta. Se on valmistettu tekniikan nykytason mukaisesti.
Koska kehitämme ja parannamme tuotteitamme jatkuvasti,
pidätämme oikeuden teknisiin ja varustelu-, materiaali- sekä
muotoilumuutoksiin milloin tahansa ja ilman ennakkoilmoitusta. Sen vuoksi ostamasi tuotteen sekä tämän ohjeen
tietojen ja kuvien pienet poikkeamat eivät oikeuta korvausvaatimuksiin. Tämä käyttö- ja asennusohje on osa tuotetta.
Takuuvaatimukset eivät ole voimassa, jos käyttöohjetta ja
sen sisältämiä turvallisuusohjeita ei noudateta. Säilytä tämä
SUOMI
ohje myöhempää lukemista ja mallin edelleenluovutusta
varten.
Tämän käyttöohjeen uusin versio ja tiedot saatavissa olevista varaosista löytyy sivustosta
carrera-rc.com palvelujen kohdasta.
Takuuehdot
Carrera-tuotteet ovat teknisesti korkealaatuisia tuotteita, joita tulee käsitellä huolella. Käyttöohjeen neuvot on
ehdottomasti otettava huomioon. Kaikki osat tarkastetaan huolellisesti (oikeudet teknisiin muutoksiin ja tuotetta parantaviin mallimuutoksiin pidätetään).
Jos tuotteessa kaikesta huolimatta esiintyy vikoja, sille
myönnetään takuu seuraavien takuuehtojen mukaisesti:
Stadlbauer Marketing + Vertrieb GmbH (seuraavassa ”valmistaja”) takaa lopulliselle asiakkaalle (seuraavassa ”asiakas”) seuraavien määräysten mukaisesti, että asiakkaalle
toimitettu Carrera RC-helikopterissa (seuraavassa ”tuote”)
ei esiinny kahden vuoden aikana ostopäivästä (takuuaika)
materiaali- eikä valmistusvirheitä.
Sellaiset virheet valmistaja korjaa omin kustannuksin tai
lähettämällä uudet tai peruskorjatut osat oman päätöksen
mukaisesti. Takuu ei koske kuluvia osia (kuten esim. akkua,
roottorin lapoja, ohjaamon suojakantta, hammaspyöriä,
tms.) eikä vikoja, jotka on aiheuttanut epäasiallinen käsittely/
käyttö tai manipulointi. Asiakas ei voi esittää valmistajalle
mitään muita vaatimuksia, vahingonkorvaukset mukaan luettuina.
Tämä takuu ei koske asiakkaan myyjälle esittämiä sopimuksen tai lain mukaisia oikeuksia (sopimuksen täyttämistä
jälkikäteen, sopimuksen purkamista, alennusta, vahingonkorvausta), jotka ovat voimassa, kun tuote ei ollut moitteettomassa kunnossa riskin siirryttyä.
Tästä valmistajan myöntämän erityisen takuun piiriin
kuuluvat vaatimukset ovat voimassa vain, kun
• valituksen aiheuttanut virhe ei ole vioissa, jotka on aiheuttanut käyttöohjeen ohjeiden vastainen tai epäasiallinen
käyttö
• kyseessä ei ole käyttöön liittyvä kulumisilmiö
• tuotteessa ei ole mitään, mikä viittaisi korjauksiin tai muihin käsittelyihin, joita ei ole tehnyt valmistajan valtuuttama
korjaamo
• tuotetta on käytetty vain valmistajan valtuuttamin varustein
• tuotteen kanssa lähetetään alkuperäinen ostotosite (lasku/
kassakuitti) ja kokonaan täytetty takuukortti, johon ei ole
tehty minkäänlaisia muutoksia.
Takuukortteja ei voi korvata.
Huomautus EU-jäsenmaille: Viitataan jälleenmyyjän lain-
mukaiseen takuuvelvollisuuteen siinä määrin, että laitetakuuta ei rajoiteta.
Valmistaja maksaa tuotteen lähetys- ja palautuskustannukset. Tämä takuu pätee edellä mainitussa laajuudessa ja
yllä mainituin edellytyksin (sisältäen alkuperäisen ostokuitin
esittämisen myös, kun tuote on myyty edelleen) tuotteen jokaisen myöhemmän, tulevan omistajan osalta.
Vaatimustenmukaisuusvakuutus
Stadlbauer Marketing + Vertrieb GmbH vakuuttaa, että
tämä malli ja sen ohjain ovat seuraavien EU-direktiivien
perusvaatimusten mukaisia: Sähkömagneettisesta yhteensopivuudesta annetut EY-direktiivit 2009/48 ja 2014/30/EU
sekä muut asiaankuuluvat direktiivin 2014/53/EU (RED)
määräykset.
Alkuperäinen vaatimustenmukaisuusvakuutus löytyy osoitteesta
carrera-rc.com.
Radiotaajuusteho enintään <10dBm
Taajuusalue: 2400 – 2483,5 MHz
Varoitukset!
VAROITUS! Tämä tuote ei sovellu alle 3-vuo-
tiaiden käyttöön, koska lapset saattavat niel-
lä sen pieniä osia.
VAROITUS! Huomaa, että toiminta voi aiheuttaa puristumisvaaran! Poista kaikki pakkausmateriaalit ja kiinnityslangat, ennen kuin tämä leikkikalu annetaan lapselle.
Säilytä pakkaus ja osoitetiedot sekä käyttöohje siltä
varalta, että myöhemmin haet tietoa tai sinulla on kysyttävää. Huomautus aikuisille valvonnasta vastaaville:
Tarkasta, että leikkikalu on asennettu ohjeen mukaisesti. Asennus tulee tehdä aikuisen henkilön valvonnassa.
VAROITUS! Ei sovellu alle 8-vuotiaille!
Tämä tuote ei ole tarkoitettu lasten käyttöön ilman huoltajan
valvontaa. Helikopterin ohjaukseen tarvitaan jonkin verran
harjoittelua. Lapsien on opeteltava se aikuisen valvonnassa.
Ennen ensimmäistä käyttökertaa lue käyttöohjeet yhdessä
lapsen kanssa. Epäasiallisessa käytössä se voi aiheuttaa
vakavia tapaturmia ja/tai aineellisia vahinkoja.
Sitä on ohjattava varovasti ja huolella, ja se vaatii tiettyjä
mekaanisia ja myös henkisiä valmiuksia. Ohjeessa on turvaohjeita ja määräyksiä sekä tuotteen huolto- ja käyttöohjeita.
Tämä ohje on ehdottomasti luettava ennen ensimmäistä
käyttöönottoa ja ymmärrettävä sen sisältö. Vain näin voidaan
välttää tapaturmia ja vahinkoja.
Lennätä helikopteria vain suljetuissa tiloissa, joissa on
riittävästi tilaa, ja noudata tässä käyttöohjeessa annettuja ohjeita. Kädet, hiukset ja löysät vaatekappaleet sekä
muut esineet, kuten kynät ja ruuvitaltat on pidettävä kaukana propellista (roottorista). Älä koske pyörivään roottoriin.
Varmista ennen kaikkea, että kätesi EIVÄT pääse roottorin
siipien lähelle!
VAROITUS: Silmävammojen vaara. Välttääksesi loukkaantumiset älä lennätä helikopteria kasvojen lähellä.
Sinä olet tämän tuotteen käyttäjänä itse vastuussa turvallisesta käytöstä, niin että et aiheuta vaaraa muille
henkilöille tai näiden omaisuudelle.
•
Älä käytä helikopteria koskaan ohjaimen heikoilla paristoilla.
• Tämä leikkikalu on tarkoitettu käytettäväksi vain kodin alu-
eella.
• VAROITUS: Älä käynnistä helikopteria, kun ihmisiä,
eläimiä tai muita esteitä on helikopterin lentoalueella.
• Noudata tarkasti tämän tuotteen ja mahdollisten lisävarus-
teiden (laturien, akkujen jne.) ohjeita ja varoituksia.
• Jos helikopteri joutuu kosketuksiin elävien olentojen
tai kovien esineiden kanssa, vie kaasuvipu heti nollaasentoon, eli vasemman ohjaussauvan on oltava täysin alhaalla!
• Vältä kaikenlaista kosteutta, sillä se voi vioittaa elektroniik-
kaa.
• Älä tee helikopteriin minkäänlaisia muutoksia tai lisäyksiä.
Jos et hyväksy näitä määräyksiä, anna helikopterin koko
pienoismalli heti takaisin jälleenmyyjällä uudessa ja käyttämättömässä tilassa.
20
Tärkeitä tietoja litium-polymeeri-akuista
Litium-polymeeri-akut (LiPo) ovat huomattavasti herkempiä
kuin tavalliset alkali- tai NiMH-akut, joita käytetään yleensä
kauko-ohjauksissa. Sen vuoksi valmistajan antamia ohjeita
ja varoituksia on noudatettava tarkkaan. LiPo-akkujen väärä
käsittely aiheuttaa tulipalon riskin. Noudata aina valmistajan
antamia ohjeita LiPo-akkujen hävityksessä.
WEEE:n mukaiset sähkö- ja elektroniikkalaitteiden hävitysohjeet
koska ne vahingoittavat ympäristöä ja terveyttä. Auta turvaamaan ympäristö ja terveys ja puhu lastesi kanssa käytettyjen
paristojen ja sähkölaitteiden asianmukaisesta hävittämisestä. Paristot ja käytetyt sähkölaitteet pitää toimittaa niille varattuihin keräyspaikkoihin. Niin ne pääsevät kunnolliseen
kierrätykseen.
Eri paristotyyppejä ja uusia ja vanhoja paristoja ei saa käyttää yhdessä. Tyhjät paristot otetaan pois lelusta. Tavallisia
paristoja ei saa räjähdysvaaran vuoksi ladata.
VAROITUS!
Yli kahdeksan (8) vuotiaat lapset ja henkilöt, joiden fyysiset,
aistinvaraiset tai henkiset kyvyt ovat rajoittuneet tai joilla ei
ole kokemusta ja/tai tietoa laitteen käytöstä, saavat käyttää
laturia ja USB-latausjohtoa, jos heitä valvotaan tai he ovat
saaneet opastuksen laitteen turvalliseen käyttöön ja he ovat
ymmärtäneet siihen liittyvät vaarat. Lapset eivät saa leikkiä
laturin tai USB-latausjohdon kanssa. Lapset eivät saa tehdä
laitteen puhdistusta eivätkä käyttäjälle kuuluvaa huoltoa, elleivät he ole yli 8-vuotiaita ja aikuisen valvonnassa.
Laturi ja liitosjohto on pidettävä alle 8-vuotiaiden lapsien
ulottumattomissa. Akkua ei latauksen aikana saa jättää
ilman valvontaa. Ladattavat akut otetaan pois lelusta en-
nen latausta. Liittimiä ei saa oikosulkea. Saa käyttää vain
suositeltuja tai samantyyppisiä paristoja.
Kun laturia käytetään säännöllisesti, sen kaapeli, liitin, kotelo
ja muut osat on tarkastettava. Vikojen esiintyessä laturin saa
ottaa käyttöön vasta korjauksen jälkeen. Tämän laturin joustavaa ulkojohtoa ei voi vaihtaa: Jos johto on vahingoittunut,
on laturi hävitettävä.
Leikkikalun saa liittää vain suojaluokan II laitteisiin.
LiPo-akkuja koskevat direktiivit ja varoitukset
• Sinun täytyy ladata mukana toimitettu 3,7 V 180 mAh
LiPo-akun turvallisessa paikassa pois syttyvistä materiaaleista.
• Akkua ei latauksen aikana saa jättää ilman valvontaa.
• Kun akku ladataan lennon jälkeen, sen on jäähdyttävä ensin ympäristön lämpötilaan.
• Lataukseen saa käyttää vain siihen tarkoitettua LiPo-laturia
(USB-johto/ohjain). Jos näitä ohjeita ei noudateta, syntyy
tulipalon riski ja sen myötä terveysriskejä ja/tai aineellisia
vahinkoja. Älä KOSKAAN käytä mitään muuta laturia.
• Jos akku pullistuu tai muuttaa muotoaan purkauksen tai
latauksen aikana, lopeta lataus tai purkaus välittömästi.
Ota akku pois niin nopeasti ja varovasti kuin mahdollista
ja laita se turvalliseen, avoimeen paikkaan pois syttyvistä
materiaaleista ja pidä sitä silmällä vähintään 15 minuuttia.
Jos lataat edelleen pullistunutta tai muotoaan muuttanutta
akkua, on olemassa tulipalon riski! Akku on otettava pois
käytöstä heti, kun se on vähäänkään muuttanut muotoaan
tai pullistunut.
• Säilytä akku huoneenlämmössä kuivassa paikassa.
• Lataa akku ehdottomasti aina käytön jälkeen täyteen
välttääksesi akun purkautumisen täysin tyhjäksi. Muista, että sinun on pidettävä noin 20 minuutin tauko lennättämisen ja latauksen välillä. Lataa akku aika ajoin
(noin 2-3 kuukauden välein). Akku voi vahingoittua,
mikäli yllä mainittuja ohjeita akun käsittelystä ei noudateta.
• Akkujen kuljetuksessa ja väliaikaisessa säilytyksessä
lämpötilan tulisi olla 5 - 50 °C. Älä säilytä akkua tai pienoismallia mahdollisuuksien mukaan autossa tai suorassa
auringonpaisteessa. Jos akku joutuu olemaan kuumassa
autossa, se voi vioittua tai syttyä palamaan.
Huomautus: pariston jännitteen/tehon ollessa vähäinen, toteat, että tarvitaan huomattavaa trimmausta ja/tai ohjausliikkeitä, jotta helikopteri ei joudu syöksykierteeseen. Se tapahtuu tavallisesti ennen kuin on saavutettu 3 V:n akkujännite ja
on sopiva ajankohta päättää lento.
Tässä kuvattu yliviivatun jäteastian
merkki kertoo siitä, että tyhjiä paristoja, akkuja, nappiparistoja, latureita,
laiteparistoja, käytettyjä sähkölaitteita
jne. ei saa laittaa kotitalousjätteisiin,
Page 21

Toimituslaajuus
1x Helikopteri
1
1x Ohjain
1x Case de apresentação & tomada para carga
1x USB-latausjohto
2x 1,5V Micro AAA -paristoa
(ei voi ladata uudelleen)
LiPo-akun lataus
Pidä huoli siitä, että lataat mukana tulleen LiPo-akun vain
mukana tulleella LiPo-laturilla (USB-johto tai ohjain). Jos
yrität ladata akkua jollain muulla LiPo-akun laturilla tai muulla laturilla, se voi aiheuttaa vahinkoja. Lue huolellisesti yllä
mainittu kappale, joka sisältää akun käyttöä koskevat varoitukset ja ohjeet, ennen kuin jatkat.
Lataus tietokoneesta:
• Liitä USB-latausjohto tietokoneen USB-porttiin.
2
USB-latausjohdon LED syttyy vihreänä ja osoittaa, että latausyksikkö on liitetty oikein tietokoneeseen. Kun yhdistät helikopterin, jonka akku
on tyhjä, USB-latausjohdon LED ei enää syty
ja se osoittaa, että helikopterin akkua ladataan.
USB-latausjohto tai helikopterissa oleva latausliitin on valmistettu niin, että navat eivät voi tulla
väärinpäin.
• Tyhjentyneen (ei täysin purkautuneen) akun lataaminen jälleen täyteen kestää noin 30 minuuttia. Kun akku on täynnä, USB-latausjohdossa
oleva LED-valo syttyy jälleen vihreänä.
Ohje: Pakkaukseen sisältyvä LiPo-akku on osittain ladattu.
Siksi ensimmäinen latauskerta voi olla lyhyempi.
Noudata ehdottomasti edellä mainittua liitäntäjärjestystä! Jos et ole liittänyt latausjohtoa virtalähteeseen, vaan
vain helikopteriin, vihreänä palava LED-näyttö osoittaa,
että akussa on vielä jännitettä. Vihreänä palava LEDnäyttö ei näytä sitä, onko akku ladattu riittävästi.
Latauksen aikana on virtakytkimen oltava asennossa
”OFF”.
Akkujen asettaminen ohjaimeen
Avaa akkulokero ruuvimeisselillä ja laita akut
ohjaimeen. Varmista, että navat ovat oikein päin.
3
Kun olet sulkenut lokeron, voit tarkastaa ohjaimen
toiminnan etupuolella olevasta virtakytkimestä.
Kun virtakytkin on asennossa ON, ylhäällä ohjaimen keskiosassa olevan LEDin tulisi palaa punaisena.
Kun LED vilkkuu nopeasti, ohjaimen paristot on
vaihdettava.
Pienoismallin liittäminen ohjaimeen
Carrera RC -helikopteri ja ohjain on yhdistetty
tehtaalla. Jos aluksi esiintyy kommunikaatio-
4
ongelmia Carrera RC -helikopterin ja ohjaimen
välillä, luo yhteys uudelleen.
•
Ota radio-ohjattava esittelyjalustasta.
•
Kytke radio-ohjattava päälle ON/OFF-kytkimestä.
•
Helikopterin LED vilkkuu nyt kiihtyvässä tahdissa.
• Vedä vasen ohjaussauva täysin alas. Kytke ohjauslaite (controller) päälle ON/OFF-kytkimestä.
Yhteys syntyy automaattisesti. Liittämisen aikana ohjauslaitteesta kuulluu piippaava ääni.
• Pidä radio-ohjattavaa niin, että roottori on pystysuoraan ylöspäin.
• Odota hetki, kunnes helikopterin järjestelmä on
alustettu oikein ja se on valmis käyttöön.
• LED-merkkivalo palaa jälleen jatkuvasti ja osoittaa, että yhteys on päättynyt.
Lennon valmistelun
tarkastusluettelo
Tämä tarkastuslista ei korvaa tämän käyttöohjeen sisältöä.
Vaikka sitä voi käyttää pikaoppaana, suosittelemme, että
luet tämän käyttöohjeen ensin kokonaan, ennen kuin jatkat.
• Tarkasta pakkauksen sisältö.
• Yhdistä laturi virtalähteeseen.
• Lataa LiPo-akku kuten kappaleessa ”LiPo-akun lataus” on
kuvattu.
• Aseta ohjaimeen 2 AAA-paristoa ja varmista, että navat
tulevat oikeinpäin.
• Etsi sopiva paikka lentämistä varten.
• Toimi kuten kohdasta
• Toista nyt yllä mainityt kohdat, jos haluat lennättää muita
helikoptereita samanaikaisesti.
• Tarkasta ohjaus.
• Käynnistä helikopteri toisesta kädestä. Pidä samalla
ohjainta toisessa kädessä, jotta pystyt heti hallitsemaan
helikopteria.
VAROITUS! RADIO-OHJATTAVA LENTÄÄ ITSESTÄÄN
ETEENPÄIN JA VAIN SEN KORKEUTTA JA SUUNTAA
VOIDAAN OHJATA
• Tutustu ohjaukseen.
• Säädä helikopteria tarvittaessa kuten kohdassa ”Helikopterin ohjaus”.
• Helikopteri on nyt valmis käyttöön.
• Jos helikopteri ei toimi millään tavoin, toista yllä mainittu
yhdistäminen vielä kerran.
• Anna pienoismallin lentää.
• Anna pienoismallin laskeutua.
• Kytke radio-ohjattavasta virta pois ON/OFF -kytkimestä (3 s)
• Sammuta kauko-ohjaus aina viimeisenä.
Ohjaimen toiminnot
1. Antenni
2. Virt akytkin (ON / OFF)
5
3. LED
4. Kaasu · perä (ympärikierto)
5. Perä (pyöriminen ympyrässä)
6. Perän trimmeri
7. Paristokotelo
3
eteenpäin.
4
Helikopterin kuvaus
1. Koaksiaalinen roottorijärjestelmä
2. Latausliitin LiPo-akun lataukseen
6
3. Näyttö / esittelyjalusta
4. ON-/OFF-kytkin
Helikopterin ohjaaminen
Jos et vielä tunne Carrera RC-helikopterisi oh-
jaustoimintoja, ota ennen ensimmäistä lentoa
7
muutama minuutti aikaa tutustuaksesi niihin.
Kuvaukset vasemmalle ja oikealle vastaavat näkymää ohjaamosta (pilootin näkymää).
Paina kaasuvipu ylös nostaaksesi pääroottorisii-
pien pyörimisnopeutta. Nosta pääroottorisiipien
pyörimisnopeutta, ja pienoismalli alkaa nousta.
Pienennä kaasuvivun liikkumaa ja siten pääroot-
torisiipien pyörimisnopeutta, ja helikopteri laskeutuu. Kun pienoismalli on noussut maasta, voit
viedä sen leijumaan yhteen kohtaan liikuttamalla
kaasuvipua varovasti ylös tai alas, ilman että se
nousee tai laskee yhtäkkisesti.
Liikuta oikeaa vipua (perä) vasempaan ja helikop-
terin nokka pyörii (kääntyy) ympyrässä vasem-
8
paan pääroottorin akselin ympäri.
Liikuta oikeaa vipua (perä) oikeaan ja helikopterin
nokka pyörii (kääntyy) ympyrässä oikealle pääroottorin akselin ympäri.
Käytä perän säädintä, kunnes olet saanut leijuvan
helikopterin vakaaseen paikallaan olevaan asentoon ilman oikean vivun (perä) liikettä.
VAROITUS! RADIO-OHJATTAVA LENTÄÄ
ITSESTÄÄN ETEENPÄIN JA VAIN SEN KOR-
9
KEUTTA JA SUUNTAA VOIDAAN OHJATA
Kun olet tutustunut ohjauksen päätoimintoihin, olet valmis
ensimmäiseen lentoon valittuasi lentopaikan.
Lentopaikan valinta
Kun olet valmis ensimmäiselle lennollesi, si-
10
nun tulisi valita suljettu tila, joka on riittävän
tilava ja jossa ei ole henkilöitä eikä esteitä.
Helikopterin koon ja ohjattavuuden vuoksi kokeneet pilootit voivat lentää myös melko pienissä suljetuissa tiloissa. Ensimmäisiä lentoja
varten suosittelemme, että tila on vähintään
3 x 4 metriä ja 2,40 metriä korkea. Kun olet
trimmannut helikopterin ja tutustunut sen ohjaukseen ja ominaisuuksiin, voit yrittää lentää
pienemmissä ja vähemmän vapaissa tiloissa.
Tätä leikkikalua saa käyttää vain kodin alueel-
la (koti ja puutarha).
Ohjeita ongelmien ratkaisemisesta löytyy sivulta 44.
Oikeudet erehdyksiin ja muutoksiin pidätetään
Oikeudet v ärien / lopulli sen muotoilun muu toksiin
pidätetään
Oikeudet t eknisiin ja muot oilun muutoksii n pidätetään
Piktogrammit = symbolivalokuvat
SUOMI
21
Page 22

Szanowny kliencie!
Gratulujemy Państwu z okazji zakupu Państwa modelu helikoptera Carrera RC wyprodukowanego zgodnie z aktualnym
stanem techniki. Ponieważ ciągle staramy się rozwijać i
ulepszać nasze produkty, w każdym momencie zastrzegamy
sobie prawo do wprowadzania zmian technicznych, zmian
odnoszących się do wyposażenia, materiałów i wzornictwa
bez wcześniejszej zapowiedzi wprowadzenia takiej zmiany.
Z tytułu nieznacznych odchyleń produktu zakupionego przez
Państwa w stosunku do danych i rysunków przedstawionych
w niniejszej instrukcji nie można wnosić żadnych roszczeń.
POLSKI
Niniejsza instrukcja obsługi i montażu jest elementem składowym produktu. Nieprzestrzeganie wskazówek podanych
w instrukcji obsługi i zawartych w niej zasad bezpieczeństwa
powoduje wygaśnięcie praw z tytułu roszczeń grawancyjnych. Należy przechowywać niniejszą instrukcję dla późniejszych zastosowań lub celem przekazania jej osobie trzeciej
wraz z modelem samochodu.
Najnowszą wersję niniejszej instrukcji obsługi i informacje dotyczące
dostępnych części zamiennych znajdą Państwo w dziale serwisu pod
carrera-rc.com.
Warunki gwarancji
Produkty Carrera są produktami wysokiej jakości spełniającymi najwyższe wymagania techniczne, wymagające starannego obchodzenia się z nimi. Prosimy o
bezwarunkowe przestrzeganie wskazówek zawartych w
niniejszej instrukcji obsługi. Wszystkie elementy zostały poddane starannej kontroli (zastrzega się prawo do
zmian technicznych i zmian modelu, które mają na celu
ulepszenie produktu).
Mimo prowadzonych kontroli mogą pojawić się wady. Na
nasze produkty udzielana jest gwarancja uwzględniająca
poniższe warunki: Firma Stadlbauer Marketing + Vertrieb
GmbH (zwana dalej „producentem”) gwarantuje Kupującemu (zwanemu dalej „Kupującym”) stosownie do następujących postanowień, że dostarczony Kupującemu model
helikoptera Carrera RC (zwany dalej „produktem”) w ciągu
dwóch lat licząc od daty zakupu (termin gwarancji) będzie
wolny od usterek spowodowanych wadami materiału lub defektami produkcyjnymi.
Tego rodzaju usterki producent usunie według własnego
uznania i na własny koszt poprzez naprawę towaru lub dostawę nowych lub naprawionych części. Nie są objęte gwarancją części podlegające zużyciu (jak np. akumulator, łopaty wirnika nośnego, dach kokpitu, koła zębate itp.), szkody
wynikłe z niewłaściwego lub niezgodnego z przeznaczeniem
użytkowania produktu lub w wyniku działania osób trzecich.
Inne roszczenia Kupującego, szczególnie roszczenia odszkodowawcze wobec producenta są wykluczone.
Gwarancja nie narusza praw Kupującego wobec sprzedawcy wynikających z zawartych umów lub obowiązujących
przepisów prawa (naprawa, wymiana, odstąpienie od umowy, obniżenie ceny, odszkodowanie) powstałych od momentu przejścia ryzyka na Kupującego, jeżeli towar nie był wolny
od wad.
Roszczenia z niniejszej osobnej, udzielonej przez producenta gwarancji, powstają wyłącznie gdy
• zgłoszona wada nie powstała w wyniku użytkowania niezgodnego z instrukcją obsługi lub przeznaczeniem produktu,
• reklamacja nie dotyczy części podlegających zużyciu uwarunkowanemu eksploatacją,
• produkt nie wykazuje śladów świadczących o naprawie
lub innych działaniach podjętych przez nie autoryzowane
przez producenta warsztaty naprawcze,
• produkt użytkowano wyłącznie z autoryzowanym przez
producenta wyposażeniem i
• produkt zostanie nadesłany wraz z oryginalnym dowodem
zakupu (rachunkiem/paragonem) i kompletnie wypełnioną
kartą gwarancyjną, na której nie naniesiono własnych zmian.
Nie ma możliwości wydania zastępczej karty gwarancyjnej.
Wskazówka dla państw UE: zwraca się uwagę na usta-
wowy obowiązek gwarancji Sprzedawcy oraz na fakt, że ten
obowiązek gwarancji nie zostanie ograniczony przez przedmiotową gwarancję.
Koszty przesyłki i ponownego odesłania produktu przejmuje
producent.Niniejsza gwarancja obowiązuje w powyżej podanym zakresie i zgodnie z powyżej podanymi warunkami
(wraz z przedłożeniem oryginalnego dowodu zakupu także
w przypadku sprzedaży innej osobie) dla każdego przyszłego właściciela produktu.
Deklaracja zgodności
Firma Stadlbauer Marketing + Vertrieb G.m.b.H. oświadcza
niniejszym, że ten model włącznie z kontrolerem odpowiada podstawowym wymaganiom zawartym w następujących
dyrektywach Unii Europejskiej: Dyrektywy unijne 2009/48 i
2014/30/EU odnośnie zgodności elektromagnetycznej i innych ważnych przepisów Dyrektywy 2014/53/EU (RED).
Oryginalną deklarację zgodności można znaleźć na stronie
internetowej carrera-rc.com.
Najwyższa częstotliwość fal radiowych <10dBm
Zakres częstotliwości: 2400 – 2483,5 MHz
Ostrzeżenia!
OSTRZEŻENIE! Ta zabawka nie jest przezna-
czona dla dzieci poniżej 3 roku życia, gdyż zawiera drobne elementy, które mogą zostać po-
łknięte przez małe dzieci.
OSTRZEŻENIE! Niebezpieczeństwo zaklinowania uwarunkowane funkcjonowaniem. Przed przekazaniem zabawki
dziecku usunąć wszystkie elementy opakowania i elementy mocujące.W celu zasięgnięcia informacji i na wypadek
wystąpienia jakichkolwiek pytań, prosimy o zachowanie
na przyszłość opakowania i adresu, jak również instrukcji
obsługi. Wskazówka dla dorosłych nadzorujących zabawę:
Sprawdźcie Państwo, czy zabawka została zmontowana
zgodnie z instrukcją. Montaż zabawki powinien odbywać
się pod nadzorem osoby dorosłej.
OSTRZEŻENIE! Nie przeznaczony dla dzieci w wieku poniżej
8 roku życia!
Produkt nie jest przeznaczony do użytkowania przez dzieci bez
nadzoru osoby dorosłej. Sterowanie helikoptera wymaga pewnej wprawy. Dzieci muszą uczyć się sterowania pod nadzorem
osoby dorosłej. Przed pierwszym użyciem zapoznajcie się Państwo razem z dzieckiem z treścią instrukcji obsługi. Niewłaściwe użytkowanie może spowodować ciężkie obrażenia ciała i/lub
uszkodzenie rzeczy.
Sterowanie musi przebiegać przy zachowaniu ostrożności
i rozwagi, i wymaga pewnych mechanicznych i mentalnych
zdolności. Instrukcja obsługi zawiera wskazówki dotyczące
bezpieczeństwa i przepisy, jak również informacje dotyczące
konserwacji i funkcjonowania produktu. Przed pierwszym uruchomieniem modelu niezbędnie konieczne jest zapoznanie
się z kompletną instrukcją obsługi i jej zrozumienie. Tylko w
ten sposób można uniknąć obrażeń ciała w wyniku wypadku,
jak również uszkodzeń rzeczy.Latajcie Państwo wyłącznie
w zamkniętych pomieszczeniach zapewniających wystarczająco dużo miejsca i dokładnie przestrzegajcie Państwo
wszelkich poleceń zawartych w instrukcji obsługi.
włosy, luźne elementy garderoby i inne przedmioty jak długopisy i śrubokręty muszą znajdować się w bezpiecznej odległości
od śmigła. Nie dotykać wirującego śmigła. Zwróćcie Państwo
szczególną uwagę, aby Państwa ręce NIE znajdowały się w
pobliżu śmigła!
OSTRZEŻENIE: Niebezpieczeństwo uszkodzenia oczu. W
celu uniknięcia zranień nie wykonujcie Państwo lotów helikopterem w pobliżu twarzy.
Jako użytkownicy produktu ponoszą Państwo wyłączną
odpowiedzialność za bezpieczne użytkowanie w taki sposób, aby nie stwarzać zagrożenia dla Państwa, innych osób
lub ich mienia.
• Nigdy nie użytkujcie Państwo modelu ze słabymi bateriami do
kontrolera.
• Zabawka jest przeznaczona wyłącznie do użytku domowego.
• OSTRZEŻENIE: Nie startujcie Państwo helikoptera, jeżeli
w pobliżu obszaru lotu helikoptera znajdują się osoby,
zwierzęta lub inne przeszkody.
• Dokładnie przestrzegajcie Państwo instrukcji obsługi i wska-
zówek ostrzegawczych dotyczących użytkowanego przez
Państwa produktu i ewentualnego dodatkowego wyposażenia
(ładowarka, akumulatory, itd.).
22
Ręce,
• W przypadku zetknięcia się helikoptera z żywymi istotami
lub twardymi przedmiotami, prosimy o natychmiastowe
przesunięcie dźwigni gazu do pozycji zerowej, tzn. lewy
dżojstik musi znajdować się na dolnej pozycji oporu!
• Unikajcie Państwo wilgoci mogącej uszkodzić elektronikę.
• Nie przeprowadzajcie Państwo w helikopterze żadnych zmian
ani modyfi kacji.
Jeżeli nie wyrażają Państwo zgody na te warunki, natychmiast
zwróćcie Państwo kompletny model helikoptera w nowym i nieużywanym stanie sprzedawcy.
Ważne informacje dotyczące akumulatorów litowo - polimerowych
Akumulatory litowo- polimerowe są znacznie wrażliwsze niż
konwencjonalne akumulatory alkaliczne lub akumulatory niklowo - metalowo - wodorowe NiMH stosowane do zdalnego
kierowania. Z tego względu należy bezwzględnie przestrzegać zaleceń i wskazówek ostrzegawczych producenta. Przy
nieprawidłowym użytkowaniu akumulatorów typu LiPo istnieje
niebezpieczeństwo wybuchu pożaru. Prosimy Państwa o stałe
przestrzeganie informacji producenta przy wyrzucaniu zużytych
akumulatorów typu LiPo.
Przepisy dotyczące utylizacji zużytego sprzętu elektrycznego i elektronicznego zgodnie z dyrektywą Unii Europejskiej
WEEE
urządzenia zużyte itp. nie mogą być traktowane jak odpady domowe, ponieważ stanowią zagrożenie dla środowiska i zdrowia.
Prosimy o włączenie się do akcji mającej na celu ochronę środowiska i zdrowia oraz o przeprowadzenie rozmowy z dziećmi na
temat właściwej utylizacji zużytych baterii i zużytych urządzeń
elektrycznych. Baterie i zużyte urządzenia elektryczne należy
przekazywać do wyznaczonych punktów zbiorczych. W ten sposób zapewniony jest ich właściwy recykling.
Nie wolno stosować jednocześnie różnych typów baterii, ani łączyć baterii nowych z bateriami już używanymi. Zużyte baterie
należy usunąć z zabawki. Baterie nie przeznaczone do ponownego ładowania nie mogą być doładowywane ze względu na
niebezpieczeństwo wybuchu.
OSTRZEŻENIE!
Ładowarka lub kabel do ładowania USB mogą być używane
przez dzieci w wieku od ośmiu (8) lat i przez osoby z obniżoną sprawnością psychiczną, sensoryczną lub intelektualną lub
przez osoby niedoświadczone i/lub nie posiadające odpowiedniej wiedzy, jeżeli są nadzorowane lub jeżeli zostały poinstruowane w zakresie bezpiecznej obsługi urządzeń i zrozumiały
związane z tym zagrożenia. Dzieciom nie wolno bawić się
ładowarką lub kablem do ładowania USB. Dzieciom nie wolno
czyścić urządzeń ani dokonywać ich konserwacji, chyba że
osiągnęły wiek powyżej 8 lat i są nadzorowane. Dzieci poniżej 8
roku życia nie powinny mieć kontaktu z ładowarką i jej przewodem łączącym. Podczas ładowania akumulatora nigdy nie
pozostawiajcie go Państwo bez nadzoru. Nie wolno zwierać
zacisków podłączeniowych. Wolno stosować tylko zalecane baterie lub baterie równoważnego typu.
Przy regularnym użytkowaniu Chargersa należy kontrolować
kabel, łącza, okładziny i inne części. W przypadku uszkodzenia Chargersa wolno go ponownie użytkowac po uprzednim
dokonaniu naprawy. Elastyczny przewód zewnętrzny niniejszej
ładowarki nie może być wymieniony: w przypadku uszkodzenia
przewodu ładowarka musi zostać zezłomowana.
Zabawka może być przyłączana wyłącznie do urządzeń drugiej klasy ochronności.
Dyrektywy i wskazówki ostrzegawcze dotyczące użytkowania akumulatorów typu LiPo
• Dostarczony akumulator typu LiPo 3,7 V
Państwo ładować w bezpiecznym miejscu, z dala od łatwopalnych materiałów.
• Podczas ładowania akumulatora nigdy nie pozostawiajcie go
Państwo bez nadzoru.
• Przed ładowaniem po locie akumulator musi najpierw osty-
gnąć do temperatury otoczenia.
• Do tego celu mogą Państwo używać wyłącznie dostarczonej
w zestawie ładowarki przeznaczonej do akumulatorów litowo
- polimerowych (kabel USB/kontroler). Przy niezastosowaniu
się do tej wskazówki istnieje niebezpieczeństwo wybuchu pożaru, i w związku z tym zagrożenia zdrowia i / lub uszkodzenia
rzeczy. NIGDY nie używajcie Państwo innej ładowarki.
• W przypadku gdy akumulator w trakcie rozładowywania lub
Pokazany tutaj symbol przedstawiający
przekreślone pojemniki na odpady ma
zwrócić uwagę, że rozładowane baterie,
akumulatory, baterie guzikowe, zestawy
baterii, baterie urządzeń, elektryczne
180 mAh muszą
Page 23

ładowania wzdyma się lub się deformuje, muszą Państwo
natychmiast zakończyć ładowanie lub rozładowywanie.
Wyjmijcie Państwo akumulator tak szybko i tak ostrożnie jak
tylko możliwe, połóżcie go Państwo na bezpiecznej i otwartej
powierzchni, z dala od palnych materiałów, i obserwujcie go
Państwo przez przynajmniej 15 minut. W przypadku dalszego
ładowania lub rozładowywania już wzdętego lub zdeformowanego akumulatora istnieje niebezpieczeństwo wybuchu pożaru! Nawet przy nieznacznym zdeformowaniu lub tworzeniu się
balona, akumulator musi zostać usunięty.
• Akumulator przechowujcie Państwo w temperaturze pokojowej i w suchym miejscu.
• Po użytkowaniu prosimy bezwarunkowo ponownie naładować akumulator w celu uniknięcia tzw. głębokiego
rozładowania akumulatora. Prosimy Państwa o zwrócenie
uwagi na zachowanie 20 minutowej przerwy między lotem
i ładowaniem. Prosimy o ładowanie akumulatora co pewien czas (raz na około 2-3 miesiące). Nieprzestrzeganie
powyżej podanych zasad obsługi może doprowadzić do
uszkodzenia akumulatora.
• Podczas transportu lub przejściowego przechowywania akumulatora temperatura powinna wynosić 5 - 50 ° C. W miarę
możliwości nie przechowujcie Państwo akumulatora lub
modelu w samochodzie, lub nie narażajcie ich Państwo na
bezpośrednie działanie promieni słonecznych. Pozostawiony
w nagrzanym samochodzie akumulator może zostać uszkodzony lub może się zapalić.
Wskazówka: Przy niskim napięciu i mocy stwierdzą Państwo,
że aby helikopter nie wpadł w korkociąg konieczne jest silniejsze
trymowanie i sterowanie. Zjawisko to występuje z reguły przed
osiągnięciem poziomu 3 V napięcia akumulatora i jest odpowiednim momentem dla zakończenia lotu.
Zakres dostawy
1x Helikopter
1
1x Kontroler
1x Display- & charging socket
1x kabel do ładowania USB
2x Baterie 1,5 V Micro AAA
(nie przeznaczone do ponownego ładowania)
Ładowanie akumulatora typu LiPo
Zwracajcie Państwo uwagę, aby dostarczony akumulator litowo-
-polimerowy był ładowany wyłącznie w dostarczonej ładowarce
przeznaczonej do akumulatorów litowo-polimerowych (kabel USB
lub kontroler). Jeżeli będą Państwo próbowali ładować akumulator przy pomocy innej ładowarki przeznaczonej do ładowania
akumulatorów typu LiPo lub innej ładowarki, mogą Państwo doprowadzić do poważnych uszkodzeń. Zanim przystąpią Państwo
do następnych działań, prosimy Państwa o dokładne zapoznanie się z treścią powyższego akapitu zawierającego wskazówki
ostrzegawcze i dyrektywy dotyczące stosowania akumulatorów.
Ładowanie przez połączenie z komputerem
• Połączcie Państwo kabel do ładowania z gniazdem
2
USB z portem USB w komputerze. Lampa LED
znajdująca się przy kablu do ładowania z gniazdem
USB świeci na zielono i wskazuje prawidłowe połączenie zestawu do ładowania z komputerem. Jeżeli
Państwo włączą helikopter z pustym akumulatorem, lampa LED znajdująca się przy kablu do ładowania z gniazdem USB nie zapala się i wskazuje
ładowanie akumulatora helikoptera. Kabel do ładowania z gniazdem USB lub gniazdo do ładowania
znajdujące się przy helikopterze zostały wykonane
w sposób wykluczający niewłaściwą biegunowość.
•
Ponowne naładowanie wyładowanego (nie zupełnie rozładowanego) akumulatora trwa około 30
minut. Jeżeli akumulator jest w pełni naładowany,
zaświeca się ponownie na zielono wskaźnik LED
przy przewodzie do ładowania z gniazdem USB.
Wskazówka: załączony przy dostawie akumulator typu LiPo
jest częściowo naładowany. Z tego względu pierwsze naładowanie akumulatora może trwać krócej.
Prosimy o bezwarunkowe zachowanie w/w kolejności przyłączania! Jeżeli kabel ładujący nie został podłączony do
źródła prądu lecz jest połączony wyłącznie z helikopterem,
świecąca na zielono lampa LED wskazuje napięcie akumulatora. Świecąca na zielono lampa LED nie wskazuje, czy
akumulator został wystarczająco naładowany.
Podczas ładowania przycisk Power musi znajdować się w
pozycji „OFF”.
Umieszczenie baterii w kontrolerze
Otwórzcie Państwo komorę baterii przy pomocy śru-
bokrętu i umieśćcie Państwo baterie w kontrolerze.
3
Zwróćcie Państwo uwagę na prawidłową biegunowość. Po zamknięciu komory baterii mogą Państwo
sprawdzić działanie kontrolera przy pomocy przycisku Power znajdującego się na przedniej stronie.
Jeżeli przycisk Power znajduje się w połozeniu ON
i kontroler działa prawidłowo, wtedy powinien zabłysnąć na czerwono wskaźnik LED znajdujący się u
góry na środku kontrolera.
Gdy dioda kontrolna LED szybko miga, należy wy-
mienić baterie w kontrolerze.
Połączenie modelu z kontrolerem
Helikopter Carrera RC i kontroler są fabrycznie po-
łączone. W przypadku wystąpienia w początkowej
4
fazie problemów z komunikacją między helikopterem
Carrera RC i kontrolerem, prosimy Państwa o ponowne ich połączenie.
• Zdejmij model z podestu prezentacyjnego.
• Włączcie Państwo model naciskając przycisk ON/
OFF.
• Lampa LED znajdująca się w helikopterze świeci
teraz w rytmicznie przyspieszającym ciągu.
• Przesuńcie Państwo lewy joystick zupełnie do dołu.
Włączcie Państwo kontroler naciskając przycisk
ON/OFF. Połączenie następuje automatycznie.
Podczas łączenia przy kontrolerze rozbrzmiewa
sygnał dźwiękowy.
• Trzymaj model tak, aby wirnik był pionowo do góry.
• Dajcie Państwo helikopterowi trochę czasu na prawidłową inicjalizację i uruchomienie systemu.
• Kontrolna lampa LED ponownie świeci nieprzerwanie i wskazuje zakończenie połączenia.
Lista kontrolna dotycząca przygotowania lotu
Poniższa lista kontrolna nie zastępuje instrukcji obsługi. Mimo,
że może ona zostać zastosowana jako szybkie przygotowanie
do startu, zdecydowanie zalecamy Państwu zapoznanie się z
kompletną treścią instrukcji obsługi przed podjęciem dalszych
działań.
• Sprawdźcie Państwo zawartość opakowania
• Podłączcie Państwo ładowarkę do gniazdka sieciowego.
• Ładujcie Państwo akumulator typu LiPo zgodnie z opisem
zawartym w części „Ładowanie akumulatora typu LiPo“.
• Włóżcie Państwo 2 baterii typu AAA do kontrolera, zwracając
uwagę na ich prawidłową polaryzację.
• Poszukajcie Państwo odpowiedniego terenu do latania
• Postępuj jak w punkcie 4.
• Powtórzcie Państwo w/w wymienione czynności, jeżeli zamierzają Państwo latać jednocześnie dalszymi helikopterami.
• Sprawdźcie Państwo sterowanie
• Wystartuj helikopter jedną ręką. Jednocześnie trzymaj
przycisk sterowania w drugiej ręce, aby móc natychmiast
przejąć kontrolę nad helikopterem.
UWAGA! MODEL LECI SAMODZIELNIE DO PRZOEDU
I MOŻE BYĆ STEROWANY TYLKO POD WZGLĘDEM
WYSOKOŚCI I KIERUNKU
• Zapoznajcie się Państwo z zasadami sterowania
• W razie potrzeby trymujcie Państwo helikopter zgodnie z opisem zawartym w „Sterowaniu helikoptera”.
• Teraz helikopter jest gotowy do lotu.
• Jeżeli helikopter nie wykazuje żadnej funkcji, spróbujcie Państwo powtórzyć w/w procedurę łączenia.
• Latajcie Państwo Państwa modelem
• Lądujcie Państwo Państwa modelem
• Wyłączcie Państwo model naciskając przycisk ON/OFF
(3 sek.)
• Zawsze wyłączajcie Państwo pilota na końcu
23
Przegląd funkcji kontrolera
1. Antena
2. Przycisk Power (ON / OFF)
5
3. Lampa kontrolna LED
4. Gaz
5. Ogon (obrót wokół osi)
6. Trymer ogona
7. Komora baterii
3
Opis helikoptera
1. Współosiowy system obrotowy
2. Gniazdko do ładowania akumulatora typu LiPo
6
3. Display / podest prezentacyjny
4. Przycisk ON-OFF
Sterowanie helikoptera
Jeżeli Państwo jeszcze nie zapoznali się z funkcjami
sterowania Państwa helikoptera Carrera RC, prosimy
7
Państwa o kilkuminutowe zapoznanie się z nimi przed
pierwszym lotem. Opis dotyczący lewej lub prawej
strony odpowiada punktowi widzenia z kabiny pilota.
Przesuńcie Państwo dźwignię gazu do góry w celu
zwiększenia prędkości obrotów głównych łopatek śmigła. Zwiększcie Państwo prędkość obrotów głównych
łopatek śmigła i model zaczyna nabierać wysokości.
Przy ograniczeniu odchylenia dźwigni gazu i tym
samym prędkości obrotów głównych łopatek śmigła
helikopter opada. Jeżeli model uniósł się nad ziemią,
przez ostrożne przesunięcie dźwigni gazu do góry
lub na dół mogą Państwo doprowadzić do nieruchomego zawiśnięcia modelu w powietrzu bez nagłego
wznoszenia się lub opadania.
Przesuńcie Państwo prawą dźwignię (ogon) w lewo i
przód helikoptera obraca się w lewo wokół osi głów-
8
nego śmigła.
Przesuńcie Państwo prawą dźwignię (ogon) w prawo i przód helikoptera obraca się w prawo wokół osi
głównego śmigła.
Używajcie Państwo trymera ogona aż do osiągnięcia
stabilnego, neutralnego zawiśnięcia helikoptera w
powietrzu bez przesunięcia prawej dźwigni (ogon).
UWAGA! MODEL LECI SAMODZIELNIE DO
PRZOEDU I MOŻE BYĆ STEROWANY TYLKO
9
POD WZGLĘDEM WYSOKOŚCI I KIERUNKU
Po zapoznaniu się z głównymi funkcjami sterowania i po wyborze terenu do latania, są Państwo gotowi do pierwszego lotu.
Wybór terenu do latania
J
eżeli są Państwo gotowi do Państwa pierwszego
10
lotu, powinni Państwo w miarę możliwości wybrać duże, zamknięte pomieszczenie, w którym
nie przebywają osoby i nie znajdują się żadne
przeszkody. Ze względu na wielkość i sterowalność helikoptera, doświadczeni piloci mogą również latać w stosunkowo niewielkich zamkniętych pomieszczeniach. Dla Państwa pierwszych
lotów bezwarunkowo zalecamy pomieszczenie
o minimalnych rozmiarach 3 x 3 m powierzchni
i 2,40 m wysokości. Po zakończeniu trymowania
helikoptera i zapoznaniu się z jego sterowaniem i
zdolnościami, mogą Państwo się odważyć latać
na mniejszych i bardziej ograniczonych terenach.
Zabawka przeznaczona tylko dla użycia w domo-
wym środowisku (dom albo ogród).
Informacje dotyczące rozwiązywania problemów znajdą Państwo na stronie 44.
Błąd i zmiany zastrzeżone
Kolory / os tateczny wzorze c – zmiany zastrze żone
Techniczne i uwarunkowane wzorcem zmiany zastrzeżone
Piktogramy = symbole
POLSKI
Page 24

Igen tisztelt Vevőnk!
Gratulálunk Önnek a Carrera RC modell-helikopter megvásárlásához, melynek gyártása a technika mai állásának
megfelelően történt. Mivel folyamatosan fáradozunk termékeink fejlesztésén és tökéletesítésén, a műszaki, valamint
a felszereltséget, az anyagokat és a formatervezést érintő
módosítások jogát mindenkor és előzetes értesítés nélkül
fenntartjuk. Az Ön rendelkezésére álló termék jelen útmutató adataitól és ábráitól való csekély eltéréseiből ezért semmiféle igény nem származtatható. Jelen összeszerelési és
használati útmutató a termék részét képezi.
MAGYAR
A használati útmutató és az abban feltűntetett biztonsági
tudnivalók fi gyelmen kívül hagyása esetén a garanciaigény
megszűnik. Kérjük, az útmutatót a jövőbeni tanulmányozás
és a modell harmadik személyeknek történő átengedése
esetére őrizze meg.
Jelen használati utasítás legaktuálisabb verzióját, valamint a
rendelkezésre álló pótalkatrészekkel kapcsolatos információkat a
carrera-rc.com címen a szerviz-te-
rületen találhat.
Garanciális feltételek
A Carrera termékek műszaki szempontból igényes termékek, melyek gondos kezelést igényelnek. Kérjük, feltétlenül vegye fi gyelembe a használati útmutatóban szereplő
tudnivalókat. Minden alkatrészt gondos ellenőrzésnek
vetettek alá (a termék fejlesztését szolgáló műszaki módosítások és modellváltozások joga fenntartott).
Ha ennek ellenére hibák mutatkoznának, garanciát a lenti
garanciális feltételek keretében nyújtunk:
A Stadlbauer Marketing + Vertrieb GmbH (továbbiakban:
„gyártó“) a lenti rendelkezéseknek megfelelően garantálja a
végfelhasználónak (továbbiakban: „Vevő“), hogy a Vevőnek
szállított Carrera RC modell-helikopter (továbbiakban: „termék“) a vásárlástól számított két éven belül (garanciális idő)
mentes lesz az anyag- és feldolgozási hibáktól.
Az eff éle hibákat a gyártó saját mérlegelése szerint saját
költségére javítással, illetve új vagy generálozott alkatrészek
szállításával hárítja el. A garancia nem vonatkozik kopó alkatrészekre (mint pl. az akkura, a rotorlapátokra, a kabinfedélre, a fogaskerekekre, stb.), a szakszerűtlen kezelésből/
használatból eredő károkra vagy az idegen beavatkozásokra. A Vevő gyártóval szemben támasztott mindennemű
további - főként kártérítési - igénye kizárt.
Ez a garancia nem érinti a Vevő mindenkori eladóval szemben
fennálló azon szerződéses vagy törvényes jogait (utólagos
teljesítés, szerződéstől való visszalépés, engedmény, kártérítés), melyek abban az esetben állnak fenn, ha a termék a
kárveszély átszállása időpontjában nem volt hibamentes.
Jelen külön gyártói garanciából eredő igények csak akkor állnak fenn, ha
• az érvényesített hiba nem olyan károkra vezethető vissza,
amelyek a használati utasítás előírásaiban foglalt rendeltetésellenes vagy szakszerűtlen használat következtében
keletkeztek,
• nem működésből eredő kopási jelenségekről van szó,
• a termék nem rendelkezik olyan jellemzőkkel, melyek a
gyártó által nem felhatalmazott műhelyekben történő javításra vagy egyéb beavatkozásra utalnak,
• a terméket csak a gyártó által engedélyezett tartozékokkal
használták és
• a terméket a vásárlást igazoló eredeti bizonylattal (számla/
pénztárblokk) és a hiánytalanul kitöltött, saját módosításokat nem tartalmazó garanciajeggyel küldték be.
A garancialevelek nem pótolhatók.
Tájékoztató EU államok esetében: Felhívjuk a fi gyelmet
az eladó törvényes jótállási kötelezettségére, valamint arra,
hogy a tárgyban forgó garancia ezt a jótállási kötelezettséget
nem korlátozza.
A termék beküldésének és visszaküldésének költségeit a
gyártó vállalja.
Ez a garancia a fent leírt terjedelemben és a fent megnevezett feltételek mellett érvényes (beleértve a vásárlást igazoló
eredeti bizonylat bemutatását is további értékesítés esetén)
a termék minden későbbi, jövőbeni tulajdonosára.
Megfelelőségi nyilatkozat
A Stadlbauer Marketing + Vertrieb GmbH ezennel kijelenti,
hogy ez a modell a vezérlővel együtt összhangban van a
következő Tanácsi (EK) irányelvek alapvető követelményeivel:
2009/48 és 2014/30/EU számú Tanácsi irányelvek az elektromágneses összeférhetőségről, és az 2014/53/EU (RED)
(R&TTE) irányelv egyéb vonatkozó rendelkezéseivel.
Az eredeti megfelelőségi nyilatkozat a carrera-rc.com címen kérhető.
Maximális rádiófrekvenciás teljesítmény <10dBm
Frekvenciatartomány: 2400 – 2483,5 MHz
Figyelmeztető utasítások!
FIGYELMEZTETÉS! A játék a lenyelhető apró
alkatrészek miatt nem adható 3 év fi atalabb
gyermekeknek.
FIGYELMEZTETÉS! Működésből eredő becsípődésveszély! A játék gyermeknek történő átadása előtt távolítson el minden csomagolóanyagot és rögzítő drótot.
Információk és esetleges kérdések esetére kérjük, őrizze meg a csomagolást, a címet, valamint a használati
utasítást az információk későbbi felfrissítése érdekében. Tudnivaló felnőtt felügyeleti személyek számára:
Ellenőrizze, hogy a játék az utasításnak megfelelően
lett-e összeszerelve. Az összeszerelést felnőtt felügyelete mellett kell végezni.
FIGYELMEZTETÉS! 8 év alatti gyermekek általi használatra nem alkalmas.
Ezt a terméket gyermekek nem használhatják nevelésre
jogosult személy felügyelete nélkül. A helikopter vezérléséhez némi gyakorlatra van szükség. A gyermekeknek ezt egy
felnőtt közvetlen felügyelete mellett kell megtanulniuk. Az
első használat előtt gyermekével együtt olvassa el a felhasználói információkat. Szakszerűtlen használat esetén súlyos
sérülések és/vagy anyagi károk keletkezhetnek. A vezérlés
óvatosságot és körültekintést, valamint néhány mechanikus
és mentális képességet követel meg. Az útmutató biztonsági
tudnivalókat és előírásokat, valamint a termék karbantartására és működtetésére vonatkozó tudnivalókat tartalmaz. A
használati utasítást az első üzembe helyezés előtt feltétlenül
végig kell olvasni és meg kell érteni. Csak így kerülhetők el a
sérülésekkel és károkkal járó balesetek.
Csak olyan zárt terekben repüljön, melyek elegendő helyet biztosítanak és tartsa be a használati utasítás minden rendelkezését. A propellertől (rotor) távol kell tartani a
kezeket, a hajat és a lógó ruházatot, valamint az egyéb olyan
tárgyakat, mint ceruzák, tollak és csavarhúzók. A forgó rotort
megérinteni tilos. Különösen ügyeljen arra, hogy kezei NE
kerüljenek a rotorlapátok közelébe!
FIGYELMEZTETÉS: Fennáll a szemsérülések veszélye.
A sérülések elkerülése érdekében ne engedje a helikoptert arca közelében repülni.
A termék használójaként egyedül Ön felelős a biztonságos használatért, melynek oly módon kell történnie,
hogy se Ön, se más személyek vagy azok tulajdona ne
szenvedjen kárt vagy legyen kitéve veszélyeztetésnek.
• Ne használja a modellt, ha gyengék a vezérlőben lévő
elemek.
• A játék csak a háztartás területén történő használatra ren-
deltetett.
• FIGYELMEZTETÉS: Ne indítsa be a helikoptert, ha a
helikopter repülési tartományában személyek, állatok
vagy egyéb akadályok találhatók.
• Pontosan tartsa be a termékre és az esetleg használt ki-
egészítő tartozékokra (töltő, akku, stb.) vonatkozó utasításokat és fi gyelmeztetéseket.
• Ha a helikopter élőlényekkel vagy kemény tárgyakkal
érintkezne, kérjük, azonnal állítsa alaphelyzetbe (nulla-állás) a gázkart, azaz a bal joysticknek az alsó ütközőnél kell lennie!
• Kerüljön minden nedvességet, hiszen kárt okozhat az
elektronikában.
• A helikopteren ne végezzen semminemű változtatást vagy
módosítást.
24
Ha ezekkel a feltételekkel nem ért egyet, a helikopter-modellt hiánytalanul, új és használatlan állapotban azonnal adja
vissza a kereskedőnek.
Lítium polimer akkukra vonatkozó fontos információk
A lítium-polimer (LiPo) akkuk sokkal érzékenyebbek a rádiós távirányítókban egyébként használt hagyományos alkáli
vagy NiMH-akkuknál. Ezért a lehető legpontosabban be
kell tartani a gyártó előírásait és fi gyelmeztető utasításait.
A LiPo akkuk hibás kezelése tűzveszélyt rejt magában. A
LiPo akkuk ártalmatlanítása során mindig vegye fi gyelembe
a gyártó adatait.
Használt villamos és elektronikus készülékek ártalmatlanítására vonatkozó rendelkezések a WEEE szerint
készülékelemek, használt elektromos készülékek, stb. nem
tartoznak a háztartási hulladékok közé, mivel kárt okoznak a
környezetben és ártalmasak az egészségre. Kérjük,
segítsen Ön is környezetünk és az egészség fenntartásában
és gyermekeivel is beszélje meg a használt elemek és
használt elektromos készülékek szabályos ártalmatlanítását/
hulladékként történő kezelését. Az elemeket és a használt
elektromos készülékeket az ismert gyűjtőhelyeken kell
leadni. Ennek keretében biztosított szabályos
újrahasznosításuk.
Különböző típusú elemek, vagy új és használt elemek nem
használhatók együtt. A lemerült elemeket ki kell venni a játékból. A nem tölthető szárazelemeket a robbanásveszély
miatt nem szabad feltölteni.
FIGYELMEZTETÉS!
A töltőt ill. az USB-töltőkábelt akkor használhatják nyolcadik (8.) életévüket betöltött gyermekek és csökkent fi zikai,
szenzorikus vagy szellemi képességekkel rendelkező, vagy
nem kellő tapasztalattal és/vagy ismeretekkel rendelkező
személyek, ha felügyelet alatt állnak vagy kioktatásban részesültek a készülék biztonságos használata terén és megértették az ebből eredő veszélyeket. Gyermekeknek nem
szabad megengedni, hogy a töltővel ill. az USB-töltőkábellel
játszanak. A tisztítást és a felhasználói karbantartást nem
végezhetik gyermekek, kivéve ha betöltötték 8 . életévüket és
felügyelet alatt állnak.
A 8. életévüket be nem töltött gyermekeket a töltőtől és a
csatlakozó vezetéktől távol kell tartani. Töltés közben soha
ne hagyja az akkut felügyelet nélkül. A tölthető akkukat a
töltés előtt ki kell venni a játékból. A pólusokat nem szabad
rövidre zárni. Csak a javasolt elemek vagy egyenértékű típus
használható.
A töltő rendszeres használata esetén ellenőrizni kell annak
kábelét, csatlakozóját, fedeleit és egyéb részeit. Sérülés
esetén a töltő csak javítás után helyezhető újra üzembe. A
töltő rugalmas külső kábele nem cserélhető ki. A kábel sérülése esetén a töltőt ki kell selejtezni.
A játék csak II. védelmi osztálynak megfelelő készülékekre
csatlakoztatható.
A LiPo akkuk használatára vonatkozó irányelvek és fi gyelmeztető utasítások
• A mellékelt 3,7 V 180 mAh LiPo-akkut egy biztonságos
helyen, gyúlékony anyagoktól távol kell feltölteni.
• Töltés közben soha ne hagyja az akkut felügyelet nélkül.
• A repülés utáni töltés előtt először meg kell várni az akku
környezeti hőmérsékletre történő lehűlését.
• Csak a hozzátartozó Lipo-akkutöltőt (USB kábel/vezérlő)
használhatja. Jelen tudnivalók fi gyelmen kívül hagyása
esetén tűzveszély áll fenn, ennek folytán pedig az egészség veszélyeztetése és/vagy anyagi károk. SOHA ne használjon másik töltőt.
• Azonnal fejezze be a töltési vagy kisülési folyamatot, ha
az akku a kisülés vagy a töltés közben felfúvódik vagy
deformálódik. A lehető leggyorsabban és legóvatosabban
vegye ki az akkut és tegye egy biztonságos, nyitott, éghető anyagoktól távol eső helyre, ahol legalább 15 percig
tartsa szem előtt. Már felfúvódott vagy deformálódott akku
további töltése vagy kisütése esetén tűzveszély áll fenn! Az
akkut már csekély deformáció és ballonképződés esetén is
ki kell vonni a használatból.
• Az akkut szobahőmérsékleten, száraz helyen kell tárolni.
• Az akku ún. mélykisülésének megakadályozása érdekében a használat után az akkut feltétlenül újra fel kell
tölteni. Ennek során ügyeljen arra, hogy a repülés és
a töltés között kb. 20 perc szünetet tartson. Időnként
Az itt látható, áthúzott szeméttartályokat ábrázoló szimbólum arra hivatott
felhívni az Ön fi gyelmét, hogy a
lemerült elemek, akkumulátorok,
gombelemek, akkucsomagok,
 Loading...