

Made in China, Shantou
Montage- und Betriebsanleitung
Assembly and operating instructions
Instructions de montage et d’utilisation
Instrucciones de montaje y de servicio
Istruzioni per il montaggio e l’uso
Montage- en gebruiksaanwijzing
Instruções de montagem e modo de utilização
Monterings- och bruksanvisning
Asennus- ja käyttöohje
Instrukcja montażu i obsługi
Szerelési és használati utasítás
Navodila za montažo in uporabo
Návod k montáži a obsluze
Montajse- og bruksanvisning
Monterings- og driftsvejledning
Οδηγίες συναρμολόγησης και λειτουργίας
Carrera RC
Quadrocopter
CA XL
# 370503002
0°
3
1
4
3
1
2
5
6
7
8
+
‒
‒
+
RL RL
10
9
6 87
54
2a
2b
Green
=
Ready
LED OFF =
Charging
3 3
1
1
1
2
2
2
2
1
11
ON
4
5
2
3,7V 650 mAh
2,405 Wh LiPo
6x 1.5 V Mignon
AA batteries
undersidetop side
02/2016 · 1
6x 1.5 V Mignon
AA batteries
9
18
11
14
15 16
12
10
17
13a
13b
A
A
B
B
A
A
B
B
+
+
‒
‒
RL
‒
+
RL
RL
RL
‒
+
L R
3
Rotorblade Sideview
angle of tilt
REAR-ViewFRONT-View
4
DEUTSCH
Sehr geehrter Kunde
Wir beglückwünschen Sie zum Kauf Ihres Carrera RC-Modell-Quadrocopters, der nach dem heutigen Stand der Technik gefertigt wurde. Da wir stets um Weiterentwicklung und
Verbesserung unserer Produkte bemüht sind, behalten wir
uns eine Änderung in technischer Hinsicht und in Bezug auf
Ausstattung, Materialien und Design jederzeit und ohne Ankündigung vor. Aus geringfügigen Abweichungen des Ihnen
vorliegenden Produkts gegenüber Daten und Abbildungen
dieser Anleitung können daher keinerlei Ansprüche abgeleitet werden. Diese Bedienungs- und Montageanleitung
ist Bestandteil des Produkts. Bei Nichtbeachtung der Bedienungsanleitung und der enthaltenen Sicherheitsanweisungen erlischt der Garantieanspruch. Bewahren Sie diese
Anleitung zum Nachlesen und für die eventuelle Weitergabe
des Modells an Dritte auf.
Die aktuellste Version dieser Bedienungsanleitung und Informationen zu erhaltlichen Ersatzteilen
fi nden Sie auf
carrera-rc.com im
Servicebereich.
ACHTUNG! Vergewissern Sie sich
vor dem Erst-Flug, ob in ihrem
Land für Flug-Modelle eine gesetzliche Versicherungspfl icht für das
von ihnen erworbene Flug-Modell
besteht.
Garantiebedingungen
Bei den Carrera-Produkten handelt es sich um technisch
hochwertige Produkte (KEIN SPIELZEUG), die sorgfältig
behandelt werden sollten. Beachten Sie bitte unbedingt
die Hinweise in der Bedienungsanleitung. Alle Teile werden einer sorgfältigen Prüfung unterzogen (technische
Änderungen und Modelländerungen, die der Verbesserung des Produktes dienen, sind vorbehalten). Sollten
dennoch Fehler auftreten, wird eine Garantie im Rahmen
der nachstehenden Garantie-Bedingung gewährt:
Die Stadlbauer Marketing + Vertrieb GmbH (nachfolgend
„Hersteller“) garantiert dem Endkunden (nachfolgend „Kunde“) nach Maßgabe der nachfolgenden Bestimmungen,
dass der an den Kunden gelieferte Carrera RC-ModellQuadrocopter (nachfolgend „Produkt“) innerhalb eines
Zeitraums von zwei Jahren ab Kaufdatum (Garantiefrist) frei
von Material- oder Verarbeitungsfehlern sein wird. Derartige
Fehler wird der Hersteller nach eigenem Ermessen auf seine
Kosten durch Reparatur oder Lieferung neuer oder generalüberholter Teile beheben. Die Garantie erstreckt sich nicht
auf Verschleißteile (wie z.B. Akku, Rotorblätter, Kabinenabdekung, Zahnräder u.ä.), Schäden durch unsachgemäße
Behandlung/Nutzung oder bei Fremdeingriff en. Sonstige
Ansprüche des Kunden, insbesondere auf Schadensersatz,
gegen den Hersteller sind ausgeschlossen. Die vertraglichen oder gesetzlichen Rechte des Kunden (Nacherfüllung,
Rücktritt vom Vertrag, Minderung, Schadensersatz) gegenüber dem jeweiligen Verkäufer, welche bestehen, wenn das
Produkt bei Gefahrübergang nicht mangelfrei war, werden
durch diese Garantie nicht berührt.
Ansprüche aus dieser gesonderten Hersteller-Garantie
bestehen nur, wenn
• der geltend gemachte Fehler nicht in Schäden liegt, die
durch einen nach den Vorgaben in der Bedienungsanlei tung nicht bestimmungsgemäßen oder unsachgemäßen
Gebrauch verursacht wurden.
• es sich nicht um betriebsbedingte Verschleißerscheinun gen handelt.
• das Produkt keine Merkmale aufweist, die auf Reparaturen
oder sonstige Eingriff e von durch den Hersteller nicht auto risier ten Werkstätten schließen lassen.
• das Produkt nur mit vom Hersteller autorisiertem Zubehör
verwendet wurde.
Bei Fragen wenden Sie sich bitte an die Carrera RC Service
Hotline +49 911 7099-330 (D) bzw. +43 662 88921-330 (AT)
oder besuchen Sie unsere Webseite carrera-rc.com im
Servicebereich.
Garantiekarten können nicht ersetzt werden.
Hinweis für EU-Staaten: Es wird auf die gesetzliche Gewähr-
leistungspfl icht des Verkäufers hingewiesen, dass nämlich
diese Gewährleistungspfl icht durch gegenständliche Garantie nicht eingeschränkt wird. Die Kosten der Einsendung und
Rücksendung des Produkts übernimmt der Hersteller. Diese
Garantie gilt in dem vorstehend genannten Umfang und unter
den oben genannten Voraussetzungen (einschließlich der Vorlage des Original-Kaufbelegs auch im Falle der Weiterveräußerung) für jeden späteren, künftigen Eigentümer des Produkts.
Konformitätserklärung
Hiermit erklärt Stadlbauer Marketing + Vertrieb GmbH, dass
sich dieses Modell einschließlich Controller in Übereinstimmung mit den grundlegenden Anforderungen folgender EGRichtlinien: EG Richtlinien 2009/48 und 2004/108/EG über
die elektromagnetische Verträglichkeit und den anderen
relevanten Vorschriften der Richtlinie 1999/5/EG (R&TTE)
befi ndet.
Die Original-Konformitätserklärung kann unter
carrera-rc.com angefordert werden.
Warnhinweise!
ACHTUNG! Dieses Spielzeug ist nicht geeig-
net für Kinder unter 3 Jahren, wegen ver-
schluckbarer Kleinteile.
ACHTUNG! Funktionsbedingte Klemmgefahr! Entfernen
Sie alle Verpackungsmaterialien und Befestigungsdrähte, bevor Sie dieses Spielzeug dem Kind übergeben.
Für Informationen und etwaige Fragen, bewahren Sie
bitte Verpackung und Adresse sowie die Gebrauchsanleitung für späteres Nachschlagen auf. Hinweis für Erwachsene Aufsichtspersonen: Überprüfen Sie, ob das Spielzeug nach Anleitung montiert ist. Die Montage soll unter
der Aufsicht eines Erwachsenen durchgeführt werden.
ACHTUNG! Nicht geeignet für Kinder unter 12 Jahren!
Dieses Produkt ist nicht für den Gebrauch durch Kinder
ohne die Aufsicht eines Erziehungsberechtigten vorgesehen. Für das Steuern des Quadrocopters ist eine gewisse
Übung erforderlich. Kinder müssen dies unter direkter Beaufsichtigung durch einen Erwachsenen erlernen. Lesen
Sie vor dem ersten Gebrauch die Benutzerinformationen
zusammen mit Ihrem Kind. Bei unsachgemäßer Verwendung kann es zu schweren Verletzungen und/oder Sachbeschädigungen kommen. Es muss mit Vorsicht und Umsicht
gesteuert werden und erfordert einige mechanische und
auch mentale Fähigkeiten. Die Anleitung enthält Sicherheitshinweise und Vorschriften sowie Hinweise fur die Wartung
und den Betrieb des Produktes. Es ist unabdingbar, diese
Anleitung vor der ersten Inbetriebnahme komplett zu lesen
und zu verstehen. Nur so können Unfälle mit Verletzungen
und Beschädigungen vermieden werden.
Hände, Haare und lose Kleidung, einschließlich anderer
Gegenstände wie Stifte und Schraubendreher müssen vom
Propeller (Rotor) ferngehalten werden. Den rotierenden Rotor nicht berühren. Achten Sie besonders darauf, dass Ihre
Hände NICHT in die Nähe der Rotorblätter kommen!
ACHTUNG: Gefahr von Augenverletzungen. Lassen Sie
den Quadrocopter nicht in der Nähe Ihres Gesichtes
fl iegen, um Verletzungen zu vermeiden. Verwendung
nur im Außenbereich – nicht im Innen bereich. Risiko
von Augenverletzungen. Starten und fl iegen nur in geeignetem Gelände (freie Fläche, keine Hindernisse) und
nur innerhalb direktem Sichtkontakt. Nur bei guter Sicht
und ruhigen Wetterverhältnissen benutzen.
Sie als Nutzer dieses Produkts sind alleinverantwortlich
für den sicheren Umgang, so dass weder Sie noch andere Personen oder deren Eigentum Schaden nehmen
oder gefährdet werden.
• Verwenden Sie Ihr Modell nie mit schwachen Controller-
Batterien.
• Vermeiden Sie verkehrsreiche und belebte Bereiche. Achten
Sie immer darauf, dass genügend Platz zur Verfügung steht.
• Lassen Sie Ihr Modell moglichst nicht auf off ener Straße
oder in öff entlichen Bereichen fl iegen, um niemanden zu
gefährden oder zu verletzen.
• ACHTUNG: Star ten Sie den Quadrocopter nicht, wenn
sich Personen, Tiere oder andere Hindernisse im Flugbereich des Quadrocopters befi nden.
• Starten und fl iegen ist in der Nähe von Hochspannungsmasten, Eisenbahnschienen, Straßen, Schwimmbecken
oder off enem Wasser strikt Verboten.
• Befolgen Sie genau die Anweisungen und Warnhinweise
für dieses Produkt und für die mögliche Zusatzausrüstung
(Ladegerät, Akkus usw.), die Sie nutzen.
•
Sollte der Quadrocopter mit Lebewesen
oder harten
Gegenständen in Berührung kommen, bitte sofort den
Gashebel in die Nullstellung bringen, d.h. der linke
Joystick muss am unteren Anschlag sein!
• Vermeiden Sie jegliche Feuchtigkeit, denn Sie kann die
Elektronik beschädigen.
• Es besteht die Gefahr von schweren Verletzungen bis hin
zum Tod, wenn Sie Teile Ihres Modells in den Mund stecken oder an ihnen lecken.
• ACHTUNG: Bei Verwendung des Umhängebandes um
den Hals besteht Strangulationsgefahr!
• Führen Sie am Quadrocopter keinerlei Änderungen durch.
Wenn Sie diesen Bedingungen nicht zustimmen, geben Sie
das vollständige Quadrocopter Modell sofort in neuem und
unbenutztem Zustand an den Händler zurück.
Wichtige Informationen über Lithium Polymer Akkus
Lithium-Polymer (LiPo) Akkus sind wesentlich empfi ndlicher
als herkömmliche Alkali-, oder NiMH-Akkus, die sonst bei
Funkfernsteuerungen verwendet werden. Die Vorschriften
und Warnhinweise müssen deshalb genauestens befolgt
werden. Bei falscher Handhabung von LiPo Akkus besteht
Brandgefahr. Beachten Sie immer die Herstellerangaben,
wenn Sie LiPo Akkus entsorgen.
Entsorgungsbestimmungen für Elektro- und ElektronikAltgeräte laut WEEE
Das hier abgebildete Symbol der
durchgestrichenen Mülltonnen soll
Sie darauf hinweisen, dass leere Batterien, Akkumulatoren, Knopfzellen,
Akku packs, Geräte batterien, elektrische Altgeräte etc. nicht in den Hausmüll gehören, da sie
der Umwelt und Gesundheit schaden. Helfen Sie bitte mit,
Umwelt und Gesundheit zu erhalten und sprechen Sie auch
mit Ihren Kindern über die ordentliche Entsorgung gebrauchter Batterien und elektrischer Altgeräte. Batterien und
elektrische Altgeräte sollen bei den bekannten Sammelstellen abgegeben werden. So werden sie ordnungsgemäßem
Recycling zugeführt.
Ungleiche Batterietypen oder neue und gebrauchte Batterien dürfen nicht zusammen verwendet werden. Leere Batterien aus dem Spielzeug herausnehmen.Nicht aufl adbare
Batterien dür fen aufgrund des Explosionsrisikos nicht aufgeladen werden.
ACHTUNG!
Das Ladegerät bzw. USB-Ladekabel kann von Kindern ab einem
Alter von acht (8) Jahren und von Personen mit eingeschränkten
physischen, sensorischen oder geistigen Fähigkeiten oder einem
Mangel an Erfahrung und/oder Wissen verwendet werden, wenn
sie beaufsichtigt werden oder bezüglich des sicheren Gebrauchs
des Geräts unterwiesen wurden und die daraus resultierenden
Gefahren verstanden haben. Kinder dürfen nicht mit dem Ladegerät bzw. USB-Ladekabel spielen. Reinigung und Benutzerwartung dürfen nicht durch Kinder durchgeführt werden, es sei denn
sie sind älter als 8 Jahre und beaufsichtigt.
Kinder jünger als 8 Jahre sind vom Ladegerät und der Anschlussleitung fernzuhalten.
Lassen Sie den Akku beim Laden nie
unbewacht.
Aufl adbare Batterien vor dem Laden aus dem Spielzeug nehmen. Anschlussklemmen dürfen nicht kurzgeschlossen
werden. Es dürfen nur die empfohlenen Batterien oder die eines
gleichwertigen Typs verwendet werden.
Bei regelmäßigem Gebrauch des Ladegeräts, muss dieses am
Kabel, Anschluss, Abdeckungen und anderen Teilen kontrolliert
werden. Im Schadensfall darf das Ladegerät erst nach einer
Reparatur wieder in Betrieb genommen werden. Das fl exible
Außenkabel dieses Ladegeräts kann nicht ausgetauscht werden:
Wenn das Kabel beschädigt ist, muss das Ladegerät verschrottet
werden.

5
DEUTSCH
Richtlinien und Warnhinweise für die Benutzung des
LiPo Akkus
• Sie müssen den beigefügten 3,7 V
650 mAh / 2,405 Wh
LiPo-Akku an einem sicheren Ort abseits entzündlicher
Materialien aufl aden.
• Lassen Sie den Akku beim Laden nie unbewacht.
• Zum Laden nach einem Flug muss sich der Akku zunächst
auf die Umgebungstemperatur abgekühlt haben.
• Sie dürfen nur das dazugehörige Lipo-Ladegerät (USB
Kabel/ Controller) verwenden. Bei Nichteinhaltung dieser
Hinweise besteht Brandgefahr und damit Gesundheitsgefährdung und/oder Sachbeschädigung. Benutzen Sie
NIEMALS ein anderes Ladegerät.
• Falls sich der Akku während des Entlade- oder Ladevorgangs aufbläht oder verformt, beenden Sie sofort das Laden oder Entladen. Entnehmen Sie den Akku so schnell
und vorsichtig wie möglich und legen Sie ihn an einen
sicheren, off enen Bereich abseits brennbarer Materialien und beobachten Sie ihn mindestens 15 Minuten lang.
Wenn Sie einen Akku, der sich bereits aufgebläht oder
verformt hat, weiter laden oder entladen, besteht Brandgefahr! Selbst bei geringer Verformung oder Ballonbildung
muss ein Akku aus dem Betrieb genommen werden.
• Lagern Sie den Akku bei Raumtemperatur an einem trockenen Ort.
• Laden Sie den Akku unbedingt nach Gebrauch wieder
auf um eine sog. Tiefenentladung des Akkus zu vermeiden. Beachten Sie dabei, dass Sie eine Pause von
ca. 20 Min. zwischen dem Flug und dem Ladevorgang
einhalten. Laden Sie den Akku von Zeit zu Zeit (ca. alle
2-3 Monate) auf. Eine Nichtbeachtung der o.g. Handhabung des Akkus kann zu einem Defekt führen.
• Für den Transport oder für eine übergangsweise Lagerung
des Akkus sollte die Temperatur zwischen 5-50°C liegen.
Lagern Sie den Akku oder das Modell, wenn möglich nicht
im Auto oder unter direktem Sonneneinfl uss. Wenn der
Akku der Hitze im Auto ausgesetzt wird, kann er beschädigt werden oder Feuer fangen.
Hinweis: Bei geringer Batteriespannung/-leistung werden
Sie feststellen, dass erhebliche Trimmung und/oder Steuerbewegungen erforderlich sind, damit der Quadrocopter nicht
ins Trudeln gerät. Dies tritt in der Regel vor dem Erreichen
von 3 V Akkuspannung auf und ist ein guter Zeitpunkt, um
den Flug zu beenden.
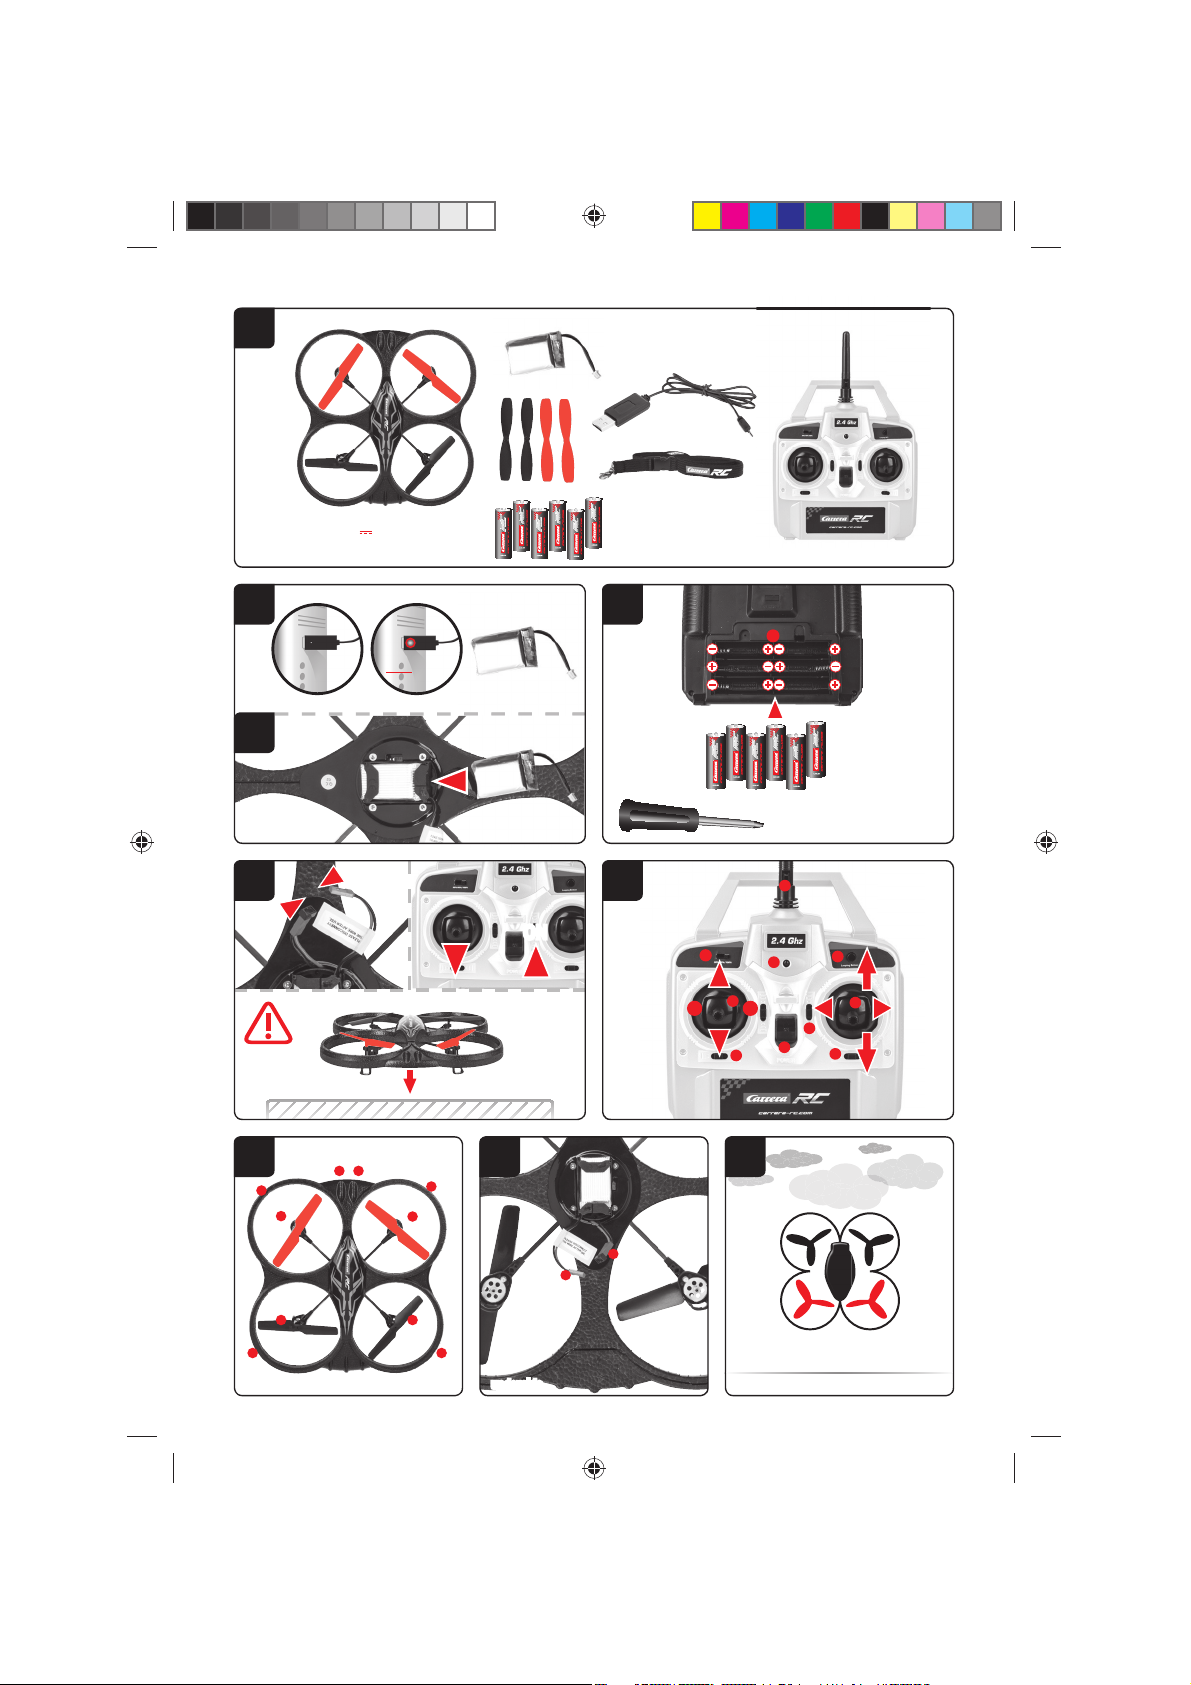
Lieferumfang
1
1 x Quadrocopter
1 x Controller
1 x USB-Ladekabel
1x Akku
1x Lanyard
1 x Ersatzrotoren-Set
6 x 1,5 V Mignon AA Batterien
(nicht wiederaufl adbar)
Aufl aden des LiPo-Akkus
Achten Sie darauf, dass Sie den mitgelieferten LiPo-Akku
nur mit dem mitgelieferten LiPo-Ladegerät (USB-Kabel)
laden. Wenn Sie versuchen den Akku mit einem anderen
LiPo-Akku Ladegerät oder einem anderen Ladegerät zu laden, kann dies zu schweren Schäden führen. Bitte lesen Sie
den vorangehenden Abschnitt mit den Warnhinweisen und
Richtlinien zur Akku-Verwendung sorgfältig durch, bevor Sie
fortfahren. Ladegeräte und Netzteile nicht kurzschließen.
Sie können den im Quadrocopter verbauten Akku mit dem
dazugehörigen USB-Ladekabel an einem USB Port laden:
2a
Laden am Computer:
• Entfernen Sie den Akku aus dem Modell bevor Sie diesen aufl aden.
•
Verbinden Sie das USB-Ladekabel mit dem USBPort eines Computers. Die LED am USB-Ladekabel
leuchtet grün auf und zeigt an, dass die Ladeeinheit
ordnungsgemäß mit dem Computer verbunden ist.
Wenn Sie einen Quadrocopter mit leerem Akku anstecken leuchtet die LED am USB-Ladekabel nicht
mehr auf auf und zeigt an, dass der Quadrocopter
Akku geladen wird. Das USB-Ladekabel bzw. die
Ladebuchse am Quadrocopter sind so hergestellt,
dass verkehrte Polarität ausgeschlossen ist.
• Es dauert ungefähr 60 Minuten, um einen entladenen Akku (nicht tiefentladenen) wieder aufzuladen. Wenn der Akku voll ist, leuchtet die LEDAnzeige am USB-Ladekabel wieder grün auf.
Hinweis: Bei der Auslieferung ist der enthaltene LiPoAkku teilgeladen. Daher könnte der erste Ladevorgang
etwas kürzer dauern.
Halten Sie die o.g. Anschlussreihenfolge unbedingt ein!
Lösen Sie die am
Quadrocopter
befi ndliche Steckver-
bindung, wenn Sie den
Quadrocopter
nicht verwenden.
Eine Nichtbeachtung kann zu Akkuschäden fuhren!
Einsetzen der Batterien in den
Controller
3
Öff nen Sie das Batteriefach mit einem Schrau-
bendreher und setzen Sie die Batterien in den
Controller ein. Achten Sie auf die richtige Polarität. Nach dem verschließen des Faches können
Sie die Funktionalität des Controllers mit Hilfe des
Powerschalters auf der Vorderseite prüfen.
Bei ON-Stellung des Powerschalters und ord-
nungsgemäßer Funktion sollte die LED oben in
der Mitte des Controllers rot aufl euchten.
Wenn die Kontroll LED schnell blinkt, müssen die
Batterien im Controller gewechselt werden.
Bindung des Modells mit dem
Controller
4
Der Carrera RC Quadrocopter und der Controller
sind werkseitig gebunden. Sollte es am Anfang
Probleme bei der Kommunikation zwischen dem
Carrera RC Quadrocopter und dem Controller geben, führen Sie bitte eine neue Bindung durch.
•
Verbinden Sie den Akku im Modell.
• Die LED‘s am Quadrocopter blinken nun rhythmisch.
• Schalten Sie den Controller am Powerschalter
ein.
• Schieben Sie den linken Joystick, also den Gashebel, ganz nach oben und wieder unten in die
Nullstellung.
•
Die Bindung ist erfolgreich abgeschlossen. Die
LED am Controller leuchtet nun permanent.
• ACHTUNG! Stellen Sie den Quadrocopter un-
bedingt direkt nach dem Einschalten auf eine
gerade waagrechte Fläche. Das Gyrosystem
richtet sich automatisch aus.
Funktionsübersicht des Controllers
5
1. Antenne
2. Powerschalter (ON / OFF)
3. Kontroll LED
4. Gas
Kreisdrehung
5. Vor-/Zurück
Rechts-/Links Neigung
6. Trimmer für Rechts-/Links Neigung
7. Trimmer für Vor-/Zurück
8. Trimmer für Kreisdrehung
9. Looping Button
10. Beginner/Advanced Schalter (30%/60%/100%)
3
11. Batteriefach
Beschreibung des Quadrocopters
6
1. Rotorsystem
2. Rotor-Schutzkäfi g
3. LEDs
7
4. Akku-Kabel
5. Quadrocopter-Verbindungsstecker
Auswahl des Fluggebietes
8
Der Quadrocopter kann draußen gefl ogen
werden. Nachdem Sie Ihren Quadrocopter
ausgetrimmt haben und mit seiner Steuerung
und seinen Fähigkeiten vertraut geworden
sind, können Sie sich auch daran wagen, in
kleineren und weniger freien Umgebungen
zu fl iegen. Bitte beachten Sie, dass es trotz
Windstille in Bodennähe, mit einigem Abstand
zum Boden sehr windig sein kann. Eine Nichtbeachtung dieses Hinweises kann zum Totalverlust des Quadrokopters führen.
Checkliste für die Flugvorbereitung
Diese Checkliste ist kein Ersatz für den Inhalt dieser Bedienungsanleitung. Obwohl Sie als Quick-Start-Guide verwendet
werden kann, empfehlen wir Ihnen eindringlich zunächst diese Betriebsanleitung komplett zu lesen, bevor Sie fortfahren.
• Überprüfen Sie den Verpackungsinhalt.
• Verbinden Sie das Ladegerät mit der Stromquelle.
• Laden Sie den LiPo-Akku wie im Abschnitt „Aufl aden des
LiPo-Akkus“ beschrieben.
• Setzen Sie 6 AA Batterien in den Controller ein und achten
Sie auf die richtige Polarität.
• Suchen Sie eine geeignete Umgebung zum Fliegen.
• Schieben Sie den Akku in den Akkuschacht auf der Unterseite des Quadrocopters.
2b
• Verbinden Sie den Akku im Modell.
•
ACHTUNG! Stellen Sie den Quadrocopter unbedingt direkt nach dem Einschalten auf eine gerade waagerechte
Fläche. Das Gyrosystem richtet sich automatisch aus.
• Die LEDs am Quadrocopter blinken rot.
• Schalten Sie den Controller am ON/OFF Schalter ein.
Überprüfen Sie unbedingt den Beginner-Advanced
Schalter (
13b
). Schieben Sie den linken Joystick, also den
Gashebel, ganz nach oben und wieder unten in die Nullstellung.
• Geben Sie dem Quadrocopter einen Augenblick Zeit, bis
das System korrekt initialisiert und betriebsbereit ist. Die
LED‘s am Quadrocopter blinken nun rhythmisch. Die LED
am Controller leuchtet nun permanent.
• Wiederholen Sie nun ggf. o.g. Punkte sollten Sie weitere
Quadrocopter gleichzeitig fl iegen wollen.
• Überprüfen Sie die Steuerung.
•vMachen Sie sich mit der Steuerung vertraut.
•
Trimmen Sie den Quadrocopter ggf. wie unter
14
15 16
beschrieben, so dass sich der Quadrocopter im Schwebefl ug
nicht mehr ohne Steuerbewegungen von der Stelle bewegt.
• Der Quadrocopter ist jetzt einsatzbereit.
• Sofern der Quadrocopter keine Funktion zeigt versuchen
Sie den o.g. Bindevorgang erneut.
• Fliegen Sie das Modell.
• Landen Sie das Modell.
• Trennen Sie die Akku-Steckverbindung.
• Schalten Sie immer die Fernbedienung als letztes aus.
Fliegen des 4-Kanal Quadrocopters
HINWEIS!
Achten Sie besonders bei den ersten Flugversuchen darauf das Sie die Hebel am Controller sehr vorsichtig und
nicht zu hastig zu betätigen. Es reichen meist sehr sehr
geringe Bewegungen am jeweiligen Hebel aus um den
jeweiligen Steuerbefehl auszuführen!
Sollten Sie merken, dass sich der Quadrocopter nach vorne
oder zur Seite bewegt ohne dass Sie den jeweiligen Hebel
betätigen, so trimmen Sie bitte den Quadrocopter wie in
14
15 16
beschrieben.
6
DEUTSCH
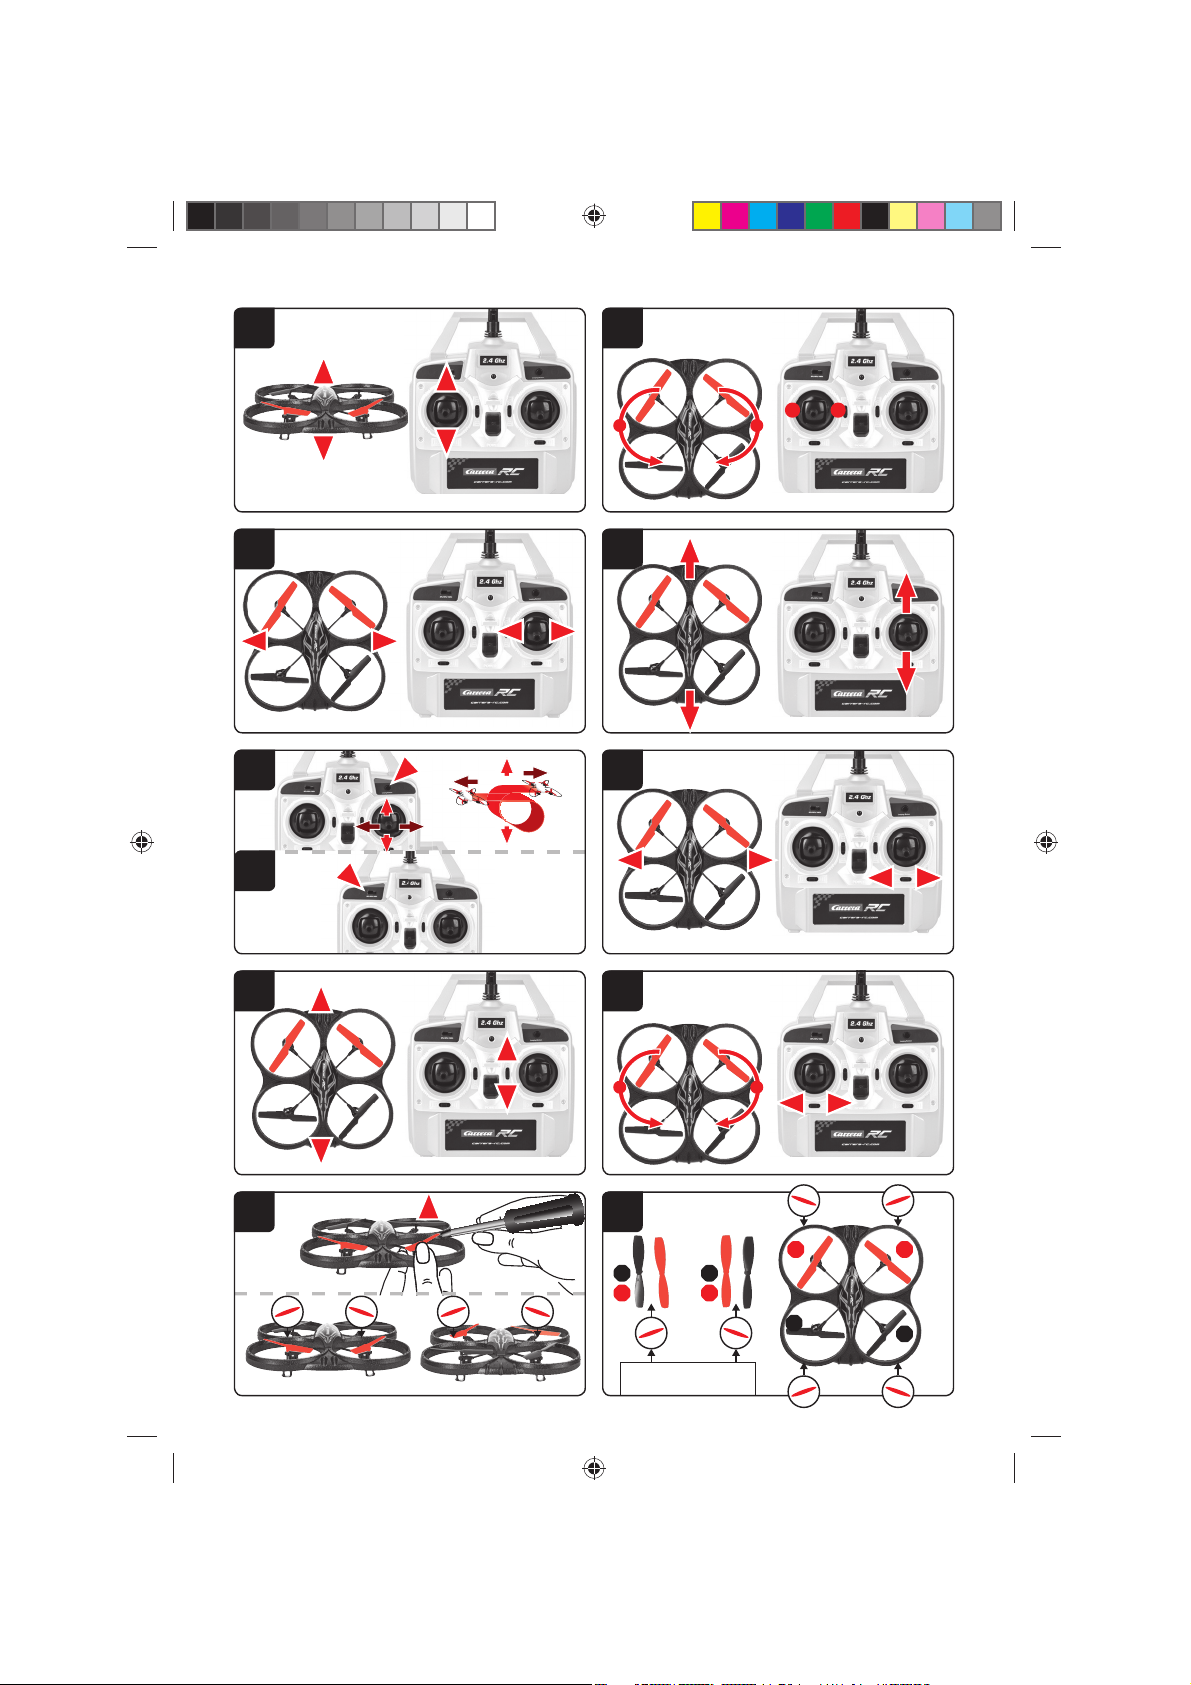
9
+/- Gas (Hoch/Runter)
Um zu starten oder höher zu Fliegen schieben die
den Gashebel links vorsichtig nach vorn. Um zu
landen oder niedriger zu Fliegen schieben die den
Gashebel links vorsichtig nach hinten.
10
Um den Quadrocopter auf der Stelle links oder
rechts herum zu drehen bewegen Sie den linken
Hebel vorsichtig nach links bzw. rechts.
11
Um den Quadrocopter nach links oder rechts zu
fl iegen bewegen Sie den rechten Hebel vorsichtig
nach links bzw. rechts.
12
Um den Quadrocopter nach vorne oder hinten zu
fl iegen bewegen Sie den rechten Hebel vorsichtig
nach vorn bzw. hinten.
Looping Funktion
ACHTUNG! NUR FÜR GEÜBTE PILOTEN!
13a
Drücken Sie den „Looping Button“ so ertönt ein
Signalton solange bis Sie den rechten Joystick
nach oben, unten, rechts oder links bewegen.
Der Quadrocopter führt dann den Looping bzw.
Rolle in die jeweilige Richtung aus. Achten Sie
darauf das Sie genügend Platz im Raum nach
allen Seiten haben (ca. 2,5m).
Beginner-Advanced Schalter
ACHTUNG! 100% NUR FÜR GEÜBTE PILOTEN!
13b
30% = Einsteiger Modus
Signalton beim Umschalten ertönt einmal. Es sind
Looping & Rollen wie in
13a
erklärt möglich.
60% = Medium Modus
Der Quadrocopter reagiert empfi ndlicher als im
30% Modus. Signalton beim Umschalten ertönt
2x. Es sind Looping & Rollen wie in
13a
erklär t
möglich.
100% = Advanced Modus -> 3D Modus
Der Quadrocopter reagiert sehr empfi ndlich auf
Steuerbewegungen. Signalton beim Umschalten
ertönt 3x.
Trimmen des Quadrocopters
14
Wenn der Quadrocopter im Schwebefl ug, ohne
Bewegung des Hebels für Rechts-/Links-Neigung
nach links bzw. rechts fl iegt gehen Sie bitte wie
folgt vor:
Bewegt sich der Quadrocopter von selbst schnell
oder langsam seitwärts nach links, drücken Sie
den unteren rechten Trimmer für Rechts-/LinksNeigung schrittweise nach rechts. Wenn sich der
Quadrocopter nach rechts bewegt, drücken Sie
den Trimmer Rechts-/Links-Neigung schrittweise
nach links.
15
Wenn sich der Quadrocopter im Schwebefl ug,
ohne Bewegung des Hebels für Vor-/Zurück nach
vorne bzw. hinten fl iegt gehen Sie bitte wie folgt
vor:
Bewegt sich der Quadrocopter von selbst schnell
oder langsam nach vorn, drücken Sie den oberen
rechten Trimmer für Vor-/Zurück schrittweise nach
unten. Wenn sich der Quadrocopter nach hinten
bewegt, drücken Sie den Trimmer für Vor-/Zurück
schrittweise nach oben.
16
Wenn sich der Quadrocopter im Schwebefl ug,
ohne Bewegung des Hebels für Kreisdrehung auf
der Stelle nach links bzw. rechts dreht, gehen Sie
bitte wie folgt vor: Dreht sich der Quadrocopter
von selbst schnell oder langsam um seine eigene
Achse nach links, drücken Sie den unteren linken
Trimmer für Kreisdrehung schrittweise nach rechts.
Wenn sich der Quadrocopter nach rechts dreht,
drücken Sie den Trimmer für Kreisdrehung schrittweise nach links.
Wechsel der Rotorblätter
17
Verwenden Sie zum abziehen eines Rotorblatts
ggf. einen Schraubenzieher. Achten Sie darauf
dass Sie das Rotorblatt vorsichtig senkrecht nach
oben abziehen und dabei den Motor von unten
stabilisierend festhalten. Befestigen Sie das Rotorblatt wieder fest mit der Schraube am Quadrocopter.
18
ACHTUNG!
Achten Sie unbendingt auf die Markierung und
Farbe, sowie den Neigungswinkel der Rotorblätter!
Vorne Links: rot – Markierung „A“
Vorne Rechts: rot – Markierung „B“
Hinten Rechts: schwarz – Markierung „A“
Hinten Links: schwarz – Markierung „B“
Problemlösungen
Problem: Controller funktioniert nicht.
Ursache: Der ON/OFF-Powerschalter steht auf „OFF“.
Lösung: Den ON/OFF-Powerschalter auf „ON“ stellen.
Ursache: Die Batterien wurden falsch eingelegt.
Lösung: Überprüfen Sie, ob die Batterien korrekt einge-
legt sind.
Ursache: Die Batterien haben nicht mehr genug Energie.
Lösung: Neue Batterien einlegen
Problem: Der Quadrocopter lässt sich mit dem Controller
nicht steuern.
Ursache: Der Powerschalter des Controller steht auf
„OFF“.
Lösung: Zuerst den Powerschalter am Controller auf
„ON“ stellen.
Ursache: Der Controller ist ggf. nicht richtig mit dem Emp-
fänger im Quadrocopter gebunden.
Lösung: Bitte führen Sie den Bindevorgang wie unter
„Checkliste für die Flugvorbereitung“ beschrieben durch.
Problem: Der Quadroc opter steigt nicht auf.
Ursache: Die Rotor blätter bewegen sich z u langsam.
Lösung: Den Gashebel na ch oben ziehen.
Ursache: Die Akku -Leistung reicht ni cht aus.
Lösung: Den Akku aufl aden (siehe Kapitel „ Aufl aden
des Akkus“ ).
Problem: Der Quadrocopter verliert ohne ersichtlichen
Grund während des Flugs an Geschwindigkeit
und sinkt ab.
Ursache: Der Akku ist zu schwach.
Lösung: Den Akku aufl aden (siehe Kap. „Aufl aden des
Akkus“).
Problem: Der Quadro copter dreht sich nur noch im Kreis
oder übers chlägt sich beim Star t.
Ursache: Falsch ange ordnete oder beschädig te R otor-
blätter
Lösung: Rotorblätter wi e in
17
18
beschrieb en an-
bringen/au stauschen.
Irrtum und Ä nderungen vor behalten
Farben / endgültiges Des ign – Änderung en vorbehalte n
Technische u nd designbedi ngte Änderun gen vorbehalt en
Piktogra mme = Symbolfot os
Dear customer
Congratulation! You bought a Carrera RC Quadrocopter
which has been manufactured according to today´s stateof-the-art technology. As it is our constant endeavour to
develop and improve our products, we reserve the right
to make modifi cations, either of a technical nature or with
respect to features, materials and design, at any time, and
without prior notice. For this reason, no claims will be accepted for any slight deviations in your product from the
data and illustrations contained in these instructions. These
operating and assembly instructions are an integral part of
the product. Non-observance of these operating instructions
and the safety instructions they contain will render the guarantee null and void. These instructions are to be kept for
future reference and in the event that the product is passed
on to a third party.
For the latest version of these operating instructions and information
on replacement and spare parts
available, please visit
carrera-rc.com
in the service area.
WARNING! Before you fi rst fl y the
model, fi nd out whether there is a
legal requirement to insure model
aeroplanes such as this in your
country.
Guarantee conditions
Carrera products are technically advanced products
(NO TOYS) which should be handled with care. It is important to follow the directions given in the operating
instructions. All components have been subjected to
careful inspection (technical modifi cations and alterations to the model for the purpose of product improvement are reserved).
Should any faults nevertheless occur, guarantee is assumed within the scope of the following conditions:
In accordance with the following provisions, Stadlbauer Marketing + Vertrieb GmbH (hereinafter referred to as “manufacturer”) warrants to the endconsumer (hereinafter referred
to as “customer”) that the Carrera RC-model-Quadrocopter
(hereinafter referred to as “product”) delivered to the customer shall be free from defects in material or workmanship
for two years from the date of purchase (guarantee period).
Such defects will, at the manufacturer´s option, either be
repaired by the manufacturer or fi xed by delivering new or
refurbished parts free of charge. The warranty does not
cover failure due to normal wear and tear, (e.g. to batteries,
rotor blades, cabin covering, gear wheels etc.), or damage
as a result of improper handling/misuse or unauthorised
interference. Any other customer´s claims asserted against
the manufacturer, especially action for damages, shall be
excluded.
The contractual and statutory rights of the customer against
the seller (supplementary performance, rescission of the
contract, abatement, compensation) which exist with the
product not having been free from defects at the time of the
passing of risk, shall remain unaff ected by this warranty.
Claims from this special warranty shall only be valid if:
• the defect reported has not arisen by damage caused by
unintended use or misuse as specifi ed in the instruction
manual,
• the failure of the product is not due to normal wear and tear
• the product does not show any signs resulting from repairs
or other interferences carried out by workshops not having
been authorised by the manufacturer,
• the product has only been operated with accessories authorised by the manufacturer.
Guarantee cards cannot be replaced.
Note for EU countries: Reference is hereby made to the
seller’s statutory guarantee obligation, to the extent that this
guarantee obligation is not restricted by the product guarantee.
The manufacturer shall bear the costs for sending in and
returning the product.
ENGLISH
7
ENGLISH
This warranty shall be valid to the extent aforementioned and
under the above-named circumstances (including the submittal of the original proof of purchase also in case of resale)
for any future owner of the product.
Declaration of conformity
Stadlbauer Marketing + Vertrieb GmbH hereby declares
that this model including the controller conforms with the
fundamental requirements of the following EC directives:
EC Directives 2009/48 and 2004/108/EC regarding electromagnetic compatibility and the other relevant regulations of
Directive 1999/5/EC (R&TTE).
The original declaration of conformity can be requested from
carrera-rc.com.
Warning!
WARNING! This toy contains small parts
which can be swallowed and is therefore not
suitable for children under 3 years of age.
WARNING! Danger of pinching during operation! Remove all packaging materials and wire fastenings before
handing the toy over to the child. For information and to
answer any questions, please retain packaging, address
and instructions in a safe place for future reference.
Adult supervisors note: please check that the toy has
been assembled in accordance with the instructions.
Assembly should be carried out under the supervision
of an adult.
WARNING! Not suitable for children under 12 years old!
This product is not intended for use by children without
supervision of a parent. Flying the helicopter requires skill
and children must be trained under the direct supervision of
an adult. Read the user’s information together with your child
Before the fi rst use. Inappropriate use may result in severe
injuries and/or damage to property.
It has to be operated with care and caution and requires both
mechanical and mental skills. The operating instructions
contain notes on safety and technical regulations as well as
information on maintaining and operating the product. It is
indispensable to read these instructions thoroughly before
the fi rst usage. Only this helps to avoid accidents with injuries and damage.
Hands, hair and loose clothing, including other objects such
as pens and screwdrivers must be kept away from the propeller (rotor). Do not touch the rotating rotor. Especially take
care that your hands DO NOT get close to the rotor blades!
WARNING: Risk of eye injuries. Do not fl y near your face
to avoid injuries. For use only outdoors – not to be used
indoors. Risk of eye injuries.
Start and fl y only when the area is appropriate for the
intended use (free area, no obstacles) and only within
direct visual contact. Only operate under good visibility
and calm weather conditions.
As user of this product you are solely responsible for
handling it safely in order to ensure that neither you nor
other persons or their property suff er damages or are
endangered.
• Never use your model with weak remote control batteries.
• Avoid busy areas. Always make sure that there is enough
space.
• Preferably do not use your model on an open street or in
public areas in order not to endanger or hurt anyone.
• WARNING: Do not star t up and fl y when persons,
a nimals or any obstructions are within the fl ying range
of the Quadrocopter.
• Taking off and fl ying in the vicinity of overhead wires and
pylons, railway lines, roads, swimming pools and other
stretches of open water is strictly prohibited.
• Exactly observe the instructions and warnings for this
product and for any possible additional equipment (battery
charger, rechargeable batteries etc.) being used by you.
• Should the Quadrocopter come into contact with any
living thing or solid object, immediately return the gas
control to zero, in other words the left-hand joystick
must be at the stop at the bottom of the slide!
• Avoid any moisture as this might do damage to the elec tronics.
• There is a risk to suff er severe injury or even death if you
put par ts of your model into your mouth or lick them.
• WARNING: there is danger of strangulation if you hang
the lanyard around your neck!
• Do not change or modify anything on the Quadrocopter.
If you do not agree to these terms please immediately return
the complete Quadrocopter model in new and unused condition to the retailer.
Important information concerning Lithium Polymer rechargeable batteries
Lithium-Polymer (LiPo) rechargeable batteries are signifi cantly more sensitive than traditional alkali- or NiMH-rechargeable batteries normally used with radio control units.
Therefore the instructions and warnings have to be obser ved
in detail. In case of improper use of LiPo rechargeable batteries there is a danger of fi re. Always follow the manufacturers´
instructions if you dispose of LiPo rechargeable batteries.
Regulations on disposal for waste electrical and electronic equipment (WEEE)
This symbol, showing refuse bins with
a cross through them, denotes that
empty batteries, rechargeable batteries, button cells, recharge able battery
packs, equipment batteries, disused
electrical equipment, etc. should not be disposed of in domestic refuse, as they are harmful to the environment and
health. Please help to preserve environment and health and
talk to your children about the correct disposal of used batteries and disused electrical equipment. Batteries and disused electrical equipment should be handed in to the usual
collection points where they can be properly recycled.
Do not mix dissimilar battery types or employ new and used
batteries together. Empty batteries should be removed from
the product. Do not recharge non-rechargeable batteries
due to risk of explosion.
WARNING!
This charger respectively USB-adapter can be used by children aged from 8 years and above and persons with reduced
physical, sensory or mental capabilities or lack of experience
and knowledge if they have been given supervision or instruction concerning use of the charger respectively USBadapter in a safe way and understand the hazards involved.
Children shall not play with the USB-adapter. Cleaning and
user maintenance shall not be made by children unless they
are older than 8 and supervised.
Keep the charger respectively USB-adapter and its cord
out of reach of children less than 8 years.
Never leave the
battery unattended while it is charging
Exhausted batteries are to be removed from the toy. Rechargeable batteries
should be removed from the product before charging. Supply
terminal are not to be short-circuited. Only use the batteries
recommended or equivalent types.
If in regular use the charger must be examined for damage
to the cord, plug, covers and all other parts. If any signs of
damage are found the charger may only be used again after
repair work has been completed. The external fl exible cable
or cord of this charger cannot be replaced: If the cord is damaged the charger shall be scrapped.
FCC statement
This device complies with Part 15 of the FCC Rules.
Operation is subject to the following two conditions:
(1) this device may not cause harmful interference, and
(2) this device must accept any interference received, in-
cluding interference that may cause undesired operation.
Changes or modifi cations not expressly approved by the
party responsible for compliance could void the user’s
authority to operate the equipment.
Guidelines and warnings for the use of LiPo rechargeable batteries
• You have to charge the attached 3.7 V
650 mAh/2,405 Wh
LiPo rechargeable battery in a safe place and at a safe
distance to fl ammable material.
• Never leave the battery unattended while it is charging
• After a fl ight, the rechargeable battery has to cool down to
the ambient air temperature before charging it.
• You must always use the corresponding LiPo charging unit
(USB cable / remote control). In case of non-compliance
with these directions there is a danger of fi re resulting in
a health risk and/or damage to property. NEVER use any
other battery charger.
• Should the rechargeable battery swell or deform while discharging or recharging, you have to immediately stop charging or discharging the battery. Take the battery out as quickly
and carefully as possible and place it in a safe and open area
off side any infl ammable material and watch it for at least 15
minutes. In case you continue charging or discharging a battery which has already started to swell or deform there is a
danger of fi re! Even in case of slight deforming or ballooning
the rechargeable battery has to be taken out of operation.
• Store the rechargeable battery at ambient temperature in a
dry place.
•
Always recharge the battery immediately after use to prevent
its becoming deep discharged. Please make sure to allow a
pause of about 20 minutes between fi nishing the fl ight and
recharging the battery. Recharge the battery occasionally
(suggested every 2-3 months). Failure to treat the battery as
described above can lead to its becoming defective.
• When transporting or temporarily storing the rechargeable
battery the temperature should be between 5-50°C. If possible, do not store the battery or the model in a car and do
not expose it to direct sunlight. In case the battery is broiled
it can be damaged or catch fi re.
Note: If the battery voltage/output is low you will recognise
that a considerable trim and/or controlling is necessar y to
avoid that the Quadrocopter starts trundling. This usually
occurs before reaching a battery voltage of 3 V and it is a
good moment to end the fl ight.
Contents of package
1
1 x Quadrocopter
1 x Controller
1 x USB charging cable
1x Rechargeable Battery
1x Lanyard
1 x Set of replacement parts
6 x 1.5 V Mignon AA batteries
(non-rechargeable)
Recharging the LiPo rechargeable
battery
Make sure you only charge the LiPo rechargeable battery
supplied with the LiPo charging unit also supplied (USB cable and remote control). If you try to charge the rechargeable
battery with a diff erent LiPo battery charger or any other battery charger, this might cause serious damage. Please carefully read the previous chapter with warnings and guidelines
on the usage of rechargeable batteries before proceeding.
Supply terminals are not to be short-circuited.
You can charge the rechargeable battery fi tted in the Quadrocopter with its USB charging cable from a USB port on a computer:
2a
Charging via computer:
• Rechargeable batteries are to be removed
from the model before being charged.
•
Connect the USB charging cable with the USB
port of a computer.
The LED on the USB charger
cable lights green indicating that the charger unit
is correctly connected to the computer. If you
plug in a Quadrocopter with a discharged battery,
the LED on the USB charging cable no longer
lights up, showing that the Quadrocopter battery
is being charged. The USB charging cable and
the charging socket on the Quadrocopter are designed to make incorrect connection impossible.
• It takes about 60 minutes to recharge a discharged battery (but NOT a deep-discharged
one). When the battery is fully charged, the
LED display on the USB charger cable lights up
green again.
Note: when supplied, the lipo-battery is already partially
charged. So the fi rst charging cycle may well take less time.
It is essential to follow the connection sequence given
above!
Undo the plugged connection on the Quadrocopter
when you are not using the Quadrocopter. Failure to observe this precaution may cause battery damage!
8
ENGLISH
Inserting the batteries in the
remote control
3
Open the battery compartment with a screwdriver
and insert the batteries in the remote control.
Please keep in mind the correct polarity. After
having closed the compartment you can check all
functions of the remote control with the help of the
power-switch on the front.
With the power switch turned ON and functioning
correctly, the top centre LED on the remote control will light up red.
When the control LED fl ashes rapidly, the batter-
ies in the controller must be changed.
Frequency bind between model
and remote control
4
The Carrera RC Quadrocopter and the remote
control are frequency bound at purchase. If initially
there are any problems with communication between the Carrera RC Quadrocopter and the remote
control, please carry out a new frequency bind.
• Connect the battery in the model.
• The LEDs on the quadrocopter now fl ash rhythmically.
• Switch on the controller at the power switch.
• Push the left-hand joystick, i.e. the throttle lever,
right to the top, then fully downwards into the
zero position.
• The binding has now been successfully established. The LED on the controller now lights continuously.
• WARNING! Immediately after switching it on,
place the Quadrocopter on a fl at and level
surface. The gyro-system will then set itself
automatically.
Range of functions of the
remote control
5
1. Aerial
2. Power switch (ON / OFF)
3. Control LED
4. Gas
Circling
5. Forwards / backwards
right / left banking
6. Trimmer for right / left banking
7. Trimmer for forwards / backwards
8. Trimmer for rotation
9. Looping Button
10.
Beginner/Advanced switch (30% / 60% / 100%)
3
11. Battery compartment
Description of the Quadrocopter
6
1. Rotor system
2. Rotor protection cage
3. LEDs
7
4. Battery cable
5. Quadrocopter connecting plug
Choosing the fl ight area
8
The Quadrocopter may be fl own outdoors.
When you have trimmed your Quadrocopter
properly and are thoroughly familiar with its
controls and how it can perform, you can then
start to fl y it in smaller and more confi ned
spaces. Please be aware that, although it may
be calm on the ground, it may still be very
windy even a little way off the ground. If this
warning is disregarded, it may lead to total
loss of the Quadrocopter.
Checklist for fl ight preparation
This checklist is not a substitute for the contents of the operating instructions. Although it can be used as a quick-startguide, we strongly recommend you fi rst to read the operating
instructions in detail before you proceed.
• Check the contents of the package.
• Connect the charging unit to the source of power.
• Charge the lipo-battery as described in the section
“Recharging the LiPo rechargeable battery”.
• Fit 6 AA batteries in the controller, making sure their polarity is correct.
• Look for a suitable environment for fl ying.
• Slide the battery into the battery bay on the bottom of the
Quadrocopter.
2b
• Connect the battery in the model.
• WARNING! Immediately after switching it on, place the
Quadrocopter on a fl at and level surface. The gyrosystem will then set itself automatically.
• The LEDs on the quadrocopter fl ash red.
•
Switch on the controller at the ON/OFF switch. Be sure to
check the Beginner-Advanced switch (
13b
).
Push the
left-hand joystick, i.e. the throttle lever, right to the top, then
fully downwards into the zero position.
• Allow the Quadrocopter a few moments until the system is
correctly initialised and is ready for operation. The LED in
the Quadrocopter now lights continuously. The LED on the
controller now lights continuously.
• Repeat the above points as required, if you wish to fl y more
Quadrocopters at the same time.
• Check the control system.
• Make yourself familiar with the control system.
• Trim the Quadrocopter as necessar y as described under
1614
15
, so that when hovering it no longer moves
from the spot without a command from the controller.
• The Quadrocopter is now ready to be fl own.
• If the Quadrocopter displays no functions, retry the above
binding procedure.
• Fly the model.
• Land the model.
• Disconnect the battery plug connection.
• Always switch off the remote control last.
Flying the 4-channel Quadrocopter
NOTE!
Take care particularly in the fi rst few fl ights to move
the lever on the controller very gently and not overhurriedly. As a rule, only very small movements of the
respective levers are necessary to carry out the desired
control commands!
If you notice that the Quadrocopter moves forwards or to the
side without your touching the respective lever, please adjust
the trim of the Quadrocopter as described in (
1614
15
).
9
+/- Gas (up / down)
To start or to fl y higher, push the gas lever on the
left cautiously forwards. To land or fl y lower, push
the gas lever on the left cautiously backwards.
10
To make the Quadrocopter circle to the left or the
right on the spot, move the lever on the left cautiously to the left or the right.
11
To fl y the Quadrocopter to the left or the right,
push the lever on the right cautiously to the left or
the right.
12
To fl y the Quadrocopter forwards or backwards,
push the lever on the right cautiously forwards or
backwards.
Looping function
WARNING! ONLY FOR EXPERIENCED PILOTS!
13a
When you press the looping button, an audi-
ble signal sounds until you move the right-hand
joystick either up or down, or right or left. The
Quadrocopter then carries out the loop or roll in
the respective direction. Before you do this, make
sure you have ample room on all sides (about
2.5 m – 8‘).
Beginner/Advanced switch
WARNING! 100 % IS ONLY FOR EXPERIENCED PILOTS!
13b
30 % = beginner mode
Signal sounds once on switching over. Looping
the loop and rollovers are possible as explained
in
13a
.
60 % = medium mode
The quadrocopter reacts more sensitively than
in 30 % mode. Signal sounds twice on switching
over. Looping the loop and rollovers are possible
as explained in
13a
.
100 % = advanced mode -> 3D mode.
The Quadrocopter reacts very sensitively to joy-
stick movements. Signal sounds three times on
switching over.
Trimming the Quadrocopter
14
When hovering, if the Quadrocopter fl ies to the left
or right without you moving the lever for left / right
movement, please proceed as follows:
If the Quadrocopter moves on its own fast or slow
sideways to the left, press the lower right trimmer
for right / left tilt in steps to the right. If the Quadrocopter moves right, press the trimmer for right /
left tilt in steps to the left.
15
When hovering, if the Quadrocopter fl ies forwards
or backwards without you moving the lever for forwards or backwards movement, please proceed
as follows:
If the Quadrocopter moves on its own fast or
slow forwards, press the upper right trimmer for
forwards / backwards in steps downwards. If the
Quadrocopter moves backwards, press the trimmer for forwards / backwards in steps upwards.
16
When hovering and without you moving the lever
for circling on the spot, if the quadrocopter rotates
to left or right, proceed as follows: If the quadrocopter rotates quickly or slowly to the left around
its own axis, press the trimmer for rotation below
left in steps to the right. If the quadrocopter rotates
to the right, press the trimmer for rotation in steps
to the left.
Changing the rotor blades
17
Use a screwdriver if it is necessary to remove a ro-
tor blade. Make sure that you draw the rotor blade
with great care vertically upwards, and hold the
motor from below to stabilise it. Screw the rotor
blade fi rmly back on to the quadrocopter.
18
WARNING!
Be sure to note the marking and colour, also the tilt
angle of the rotor blades!
Front left: red – marking “A”
Front right: red – marking “B”
Rear right: black – marking “A”
Rear left: black – marking “B”
9
ENGLISH
Troubleshooting
Problem: Remote control does not work.
Cause: The ON/OFF-power switch is turned “OFF”.
Solution: Turn the ON/OFF-power switch “ON”.
Cause: The batteries have been wrongly inserted.
Solution: Check if the batteries have been correctly inserted.
Cause: The batteries do not have enough power.
Solution: Insert new batteries.
Problem: The Quadrocopter cannot be controlled with the
remote control
Cause: The power switch on the reomote control is turned
“OFF”.
Solution: First turn the power switch on the remote control
“ON”.
Cause:
The remote control is possibly not correctly frequency bound with the receiver on the Quadrocopter.
Solution: Please carry out the binding procedure as de-
scribed in “Checklist for fl ight preparation“.
Problem: The Quadrocopter does not lift.
Cause: The rotor blades rotate too slowly.
Solution: Push the throttle up.
Cause: The battery´s power is not suffi cient.
Solution: Charge the battery (see chapter “Charging the
battery”).
Problem: During fl ight, the Quadrocopter loses speed and
height without any obvious reason.
Cause: The battery is too weak.
Solution: Charge the battery (see chapter “Charging the bat-
tery”).
Problem: The qua drocopter only fl ies in a circle or turns
over on starti ng.
Cause: Rotor blades incorrectly fi tted or damaged.
Solution: Fit rotor blades / replace rotor blades as de -
scribed in
17
18
.
Errors and changes exce pted
Colours / fi nal desi gn – c hanges excepted
Technical changes and des ign-related changes excepte d
Pictograms = symbo lic photos
Chère cliente ! Cher client !
Nous vous remercions pour l’achat de votre modèle réduit
Quadrocopter Carrera RC fabriqué selon le niveau actuel de
la technique. Nous avons toujours pour ambition d’améliorer
et de perfectionner nos produits et nous réservons la possibilité de réaliser des modifi cations techniques relatives à
la présentation et design de nos produits. Les divergences
de faible importance du produit, que vous avez acheté, par
rapport aux données et illustrations de ces instructions de
montage et d’utilisation ne sauraient donner lieu à des réclamations de ce fait. Ces instructions de montage et d’utilisation forment partie intégrale du produit. Le fabricant décline
toute responsabilité en cas d’inobservation des instructions
de montage et d’utilisation et des consignes de sécurité y
fi gurant. Veuillez conser ver ces instructions de montage et
d’utilisation, afi n que vous puissiez les consulter ultérieurement et et les remettre à tout utilisateur de ce véhicule si
besoin est.
Vous trouverez la version la plus
actuelle de ce mode d’emploi et les
informations sur les pièces de
re-
change disponibles sur
carrera-rc.
com
dans la zone de service.
ATTENTION! Assurez-vous avant le
premier vol qu‘une obligation d‘assurance légale existe dans votre
pays concernant le modèle d‘avion
dont vous avez fait l‘acquisition.
Conditions de garantie
Les produits Carrera sont des produits de qualité technique élevée (PAS DE JOUET) qui devraient être manipulés avec précaution. Veuillez impérativement respecter les indications du mode d’emploi. Tous les éléments
sont soumis à des contrôles approfondis (sous réserve
de modifi cations techniques et des véhicules destinées
au perfectionnement du produit).
La responsabilité du fabricant est cependant engagée
aux termes des conditions de garantie ci-après à supposer que le produit présente des défauts :
La société Stadlbauer Marketing + Vertrieb GmbH (ci-après
désignée «Fabricant») garantit au client fi nal (ci-après désigné «Client») selon les clauses suivantes que le modèle
réduit Quadrocopter Carrera RC livré au client (ci-après
désigné «Produit») sera exempt de vices de matériel ou de
fabrication durant une période de deux ans à par tir de la
date d’achat (délai de garantie). Le fabricant éliminera de
tels vices selon sa propre appréciation à ses frais en les
réparant ou en livrant des pièces neuves ou ayant subi une
révision générale. La garantie ne s’étend pas aux pièces
d’usure (par exemple la batterie, les pales de rotor, le recouvrement de cabine, la roue dentée), aux dommages dus à
un traitement/utilisation non conforme ou à des interventions
externes. D’autres revendications du client, en particulier de
dommages et intérêts, contre le fabricant sont exclus.
Les droits contractuels ou légaux du client (exécution ultérieure, résiliation du contrat, réduction du prix, dommages et
intérêts) vis-à-vis du vendeur correspondant, droits existant
si le produit n’était pas exempt de vices lors du transfert du
risque, ne sont pas concernés par cette garantie.
Les droits issus de cette garantie du fabricant spéciale
n’existent que si
• le vice réclamé ne repose pas dans des dommages qui
résultent d’un emploi non conforme ou non dapté aux
directives prescrites dans le mode d’emploi,
• il ne s’agit pas de signes d’usure dus à l’emploi,
• le produit ne présente aucun signe qui permette de constater que des réparations ou d’autres interventions ont été
eff ectuées par des ateliers non autorisés par le fabricant,
• le produit n’a été utilisé qu’avec des accessoires autorisés
par le fabricant.
Les cartes de garantie ne sont pas remplaçables.
Avis destinés aux États de l’Union européenne : nous
attirons l’attention sur l’obligation de garantie légale du vendeur, pour autant que cette obligation de garantie ne soit pas
restreinte par les conditions de la présente garantie.
Le fabricant prend en charge les coûts de l’expédition et du
renvoi du produit.
Cette garantie est valable dans l’ampleur susmentionnée et
dans les conditions susmentionnées (y compris la présentation du bon d’achat original aussi en cas de revente) pour
chaque propriétaire ultérieur, futur du produit.
Déclaration de conformité
Par la présente, la société Stadlbauer Marketing + Vertrieb
GmbH déclare que cette maquette, y compris le contrôleur,
est conforme aux exigences essentielles des directives
européennes suivantes : est conforme aux Directives européennes 2009/48 et 2004/108/CE relatives à la comptabilité
électromagnétique et les autres prescriptions importantes de
la Directive 1999/5/CE (R&TTE).
L’original de la déclaration de conformité est à votre disposition sur le site internet carrera-rc.com.
Avertissements !
ATTENTION ! Ne convient pas aux enfants de
moins de 3 ans. Danger d’étouff ement – Pré-
sence de petits éléments pouvant être avalés.
ATTENTION ! Danger d’écrasement en cours de fonctionnement ! Supprimez tous les matériaux d’emballage
et fi ls de fi xation avant de remettre ce jouet à l’enfant.
Veuillez conserver l’emballage, l’adresse ainsi que le
mode d’emploi pour référence ultérieure en cas d’éventuelles questions ou de besoin d’informations. Remarque
destinée aux superviseurs adultes : veuillez vérifi er que
le jouet est monté conformément au mode d’emploi. Le
montage doit être réalisé sous la surveillance d’un adulte.
ATTENTION ! Ne convient pas aux enfants de moins de
12 ans.
Ce produit n‘est pas conçu pour être utilisé par des enfants sans
la surveillance d‘une personne chargée de l‘éducation. Piloter
l’hélicoptère nécessite une certaine habileté que les enfants
doivent acquérir sous la surveillance directe d’un adulte. Veuillez
lire le mode d’emploi avec votre enfant avant la première utilisation. Un emploi non conforme peut entraîner de graves blessures
et/ou des dommages matériels.
Il doit être piloté avec prudence et circonspection et exige certaines facultés mécaniques et mentales. Le mode d‘emploi
contient des consignes de sécurité et des prescriptions ainsi que
des indications sur l‘entretien et l‘emploi du produit. Il faut impérativement avoir lu complètement et compris ce mode d‘emploi
avant la première mise en service. C‘est la seule manière d‘éviter
les accidents accompagnés de blessures et de dommages.
Il convient de tenir l'hélice (rotor) à distance des mains, des cheveux et des vêtements amples ainsi que d'autres objets tels que
des clous ou des tournevis. Ne pas toucher le rotor en mouvement.
Veiller surtout à NE PAS tenir les mains à proximité des pales du
rotor !
ATTENTION : Risque de blessure oculaire. Afi n d’éviter
tout accident, ne pas faire voler à proximité du visage.
Utilisation à l'extérieur uniquement – ne pas utiliser à
l'intérieur. Risque de blessures aux yeux. Démarrer et
faire voler sur un terrain adapté uniquement (surface
à l'air libre, sans obstacle) et avec un contact visuel
direct. N'utiliser qu'avec une bonne visibilité et dans de
bonnes conditions climatiques.
En tant qu‘utilisateur de ce produit, vous êtes seul
responsable de la sécurité de manipulation de sorte
que vous ni d‘autres personnes ou leur propriété ne
subissent des dommages ou soient mis en danger.
• Ne jamais utiliser cette maquette avec des accus faibles
dans le contrôleur.
• Éviter les zones à forte circulation et animées. Veiller à
disposer de suffi samment de place.
• Ne pas laisser si possible voler la maquette en pleine route
ou dans des lieux publics afi n de ne blesser ni de mettre
personne en danger.
• ATTENTION : Ne pas démarrer ni faire voler Quadro-
copter tant que des personnes, animaux ou obstacles
se trouvent dans le périmètre de vol de l’appareil.
FRANÇAIS
 Loading...