

Page 1

1
Rev 2.1, Feb 1, 2018
User Manual
Page 2

2
Welcome!
Congratulations on purchasing your STAC Zero! We here at STAC
Performance have put together some usage and safety information in
this manual to help you get started and to get the most out of your
STAC Zero. Please take the time to read through and understand the
recommended setup and safety best practices.
Through this document we will be referencing “Support Videos”. These
videos, along with many helpful support articles, are available through
our website support portal at https://www.staczero.com/support, or
from our YouTube page.
Scannable link to our support channel
available when we reference a video:
Table of Contents
TRAINER COMPONENT DIAGRAM: .................................................................. 3
TRAINER SAFETY .............................................................................................. 4
SET UP GUIDE: ................................................................................................. 5
WHEEL WEIGHT USE AND INSTALLATION ........................................................ 8
DETAILED USE OF MAGNET SPACER............................................................... 13
POWERMETER SETUP AND CONFIGURATION ................................................ 15
TROUBLESHOOTING – ALL MODELS ............................................................... 17
TROUBLESHOOTING – POWER METER ........................................................... 20
Page 3
3
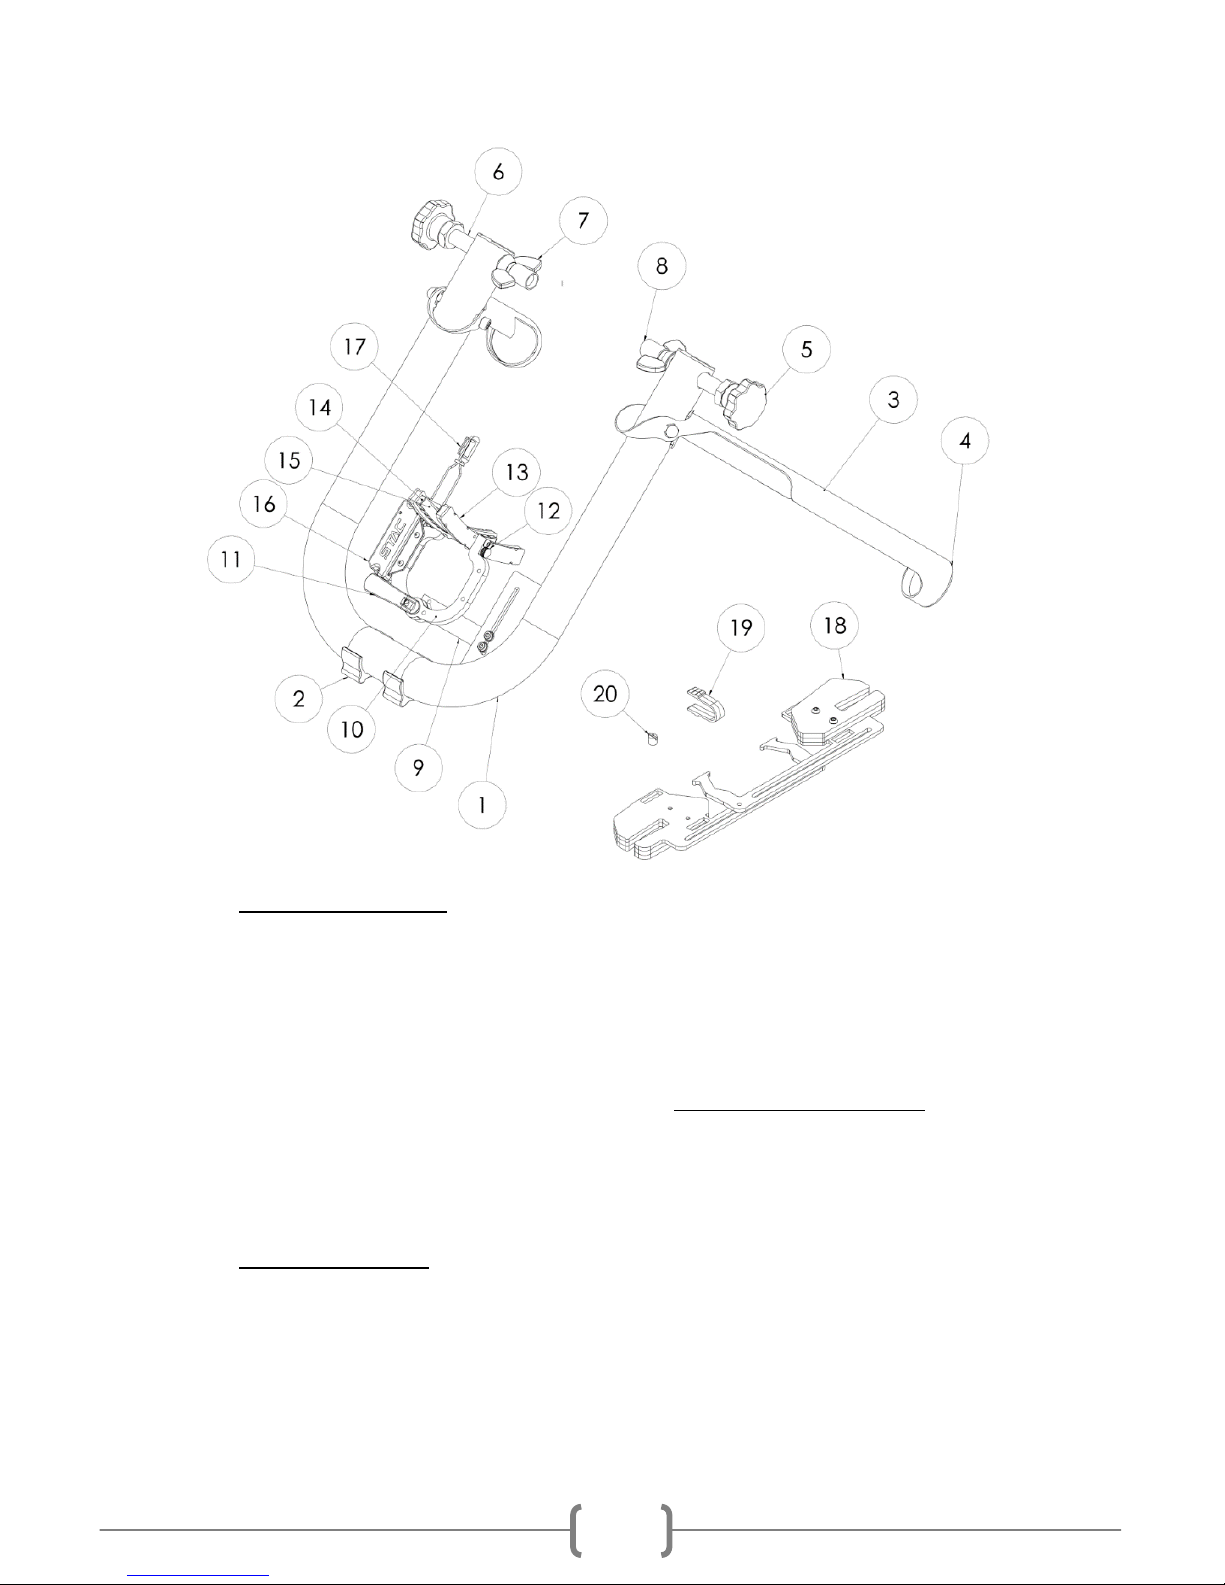
Trainer Component Diagram:
STAC Zero Frame:
1. U-Frame
2. Body Feet
3. Legs
4. Leg Cap
5. Knobs
6. Threaded Rods
7. Wing Nut
8. Skewer Cup
Resistance Unit:
9. Strain Gauge/ Mounting
Beam
10. Caliper Arm
11. Quick Release
12. Spring Pin
13. Magnet Holder
14. Magnets
15. Anti-Wear Stickers
16. Power Meter Pod
17. Magnet Sensor
Accessories included:
18. Bar Weight
19. Magnet Spacer
20. Spoke Magnet(PM)
21. Quick Release Skewer (not
shown)
22. 4mm Allen Key (not
shown)
23. USB 2.0 Cable(PM)
Page 4

4
Trainer Safety
For smooth and safe operation of your STAC Zero read and follow the
below safety information.
o Before using your STAC Zero consult a doctor if you or any
member of your family have any medical devices that can be
affected by strong magnetic fields such as pacemakers or ICD’s.
o When moving the trainer, carry it by the threaded rods or the
Knobs.
o Do not close your hands between the leg and the frame.
o Before each use inspect the face of magnets for any metallic
debris. Wipe anything off with a rag.
o Never place a computer or any other sensitive electronics near
the Magnets.
o Do not put your fingers, hands or any other appendages
between the Magnet Holders.
o Be very careful using metal tools near the Magnets.
Page 5
5
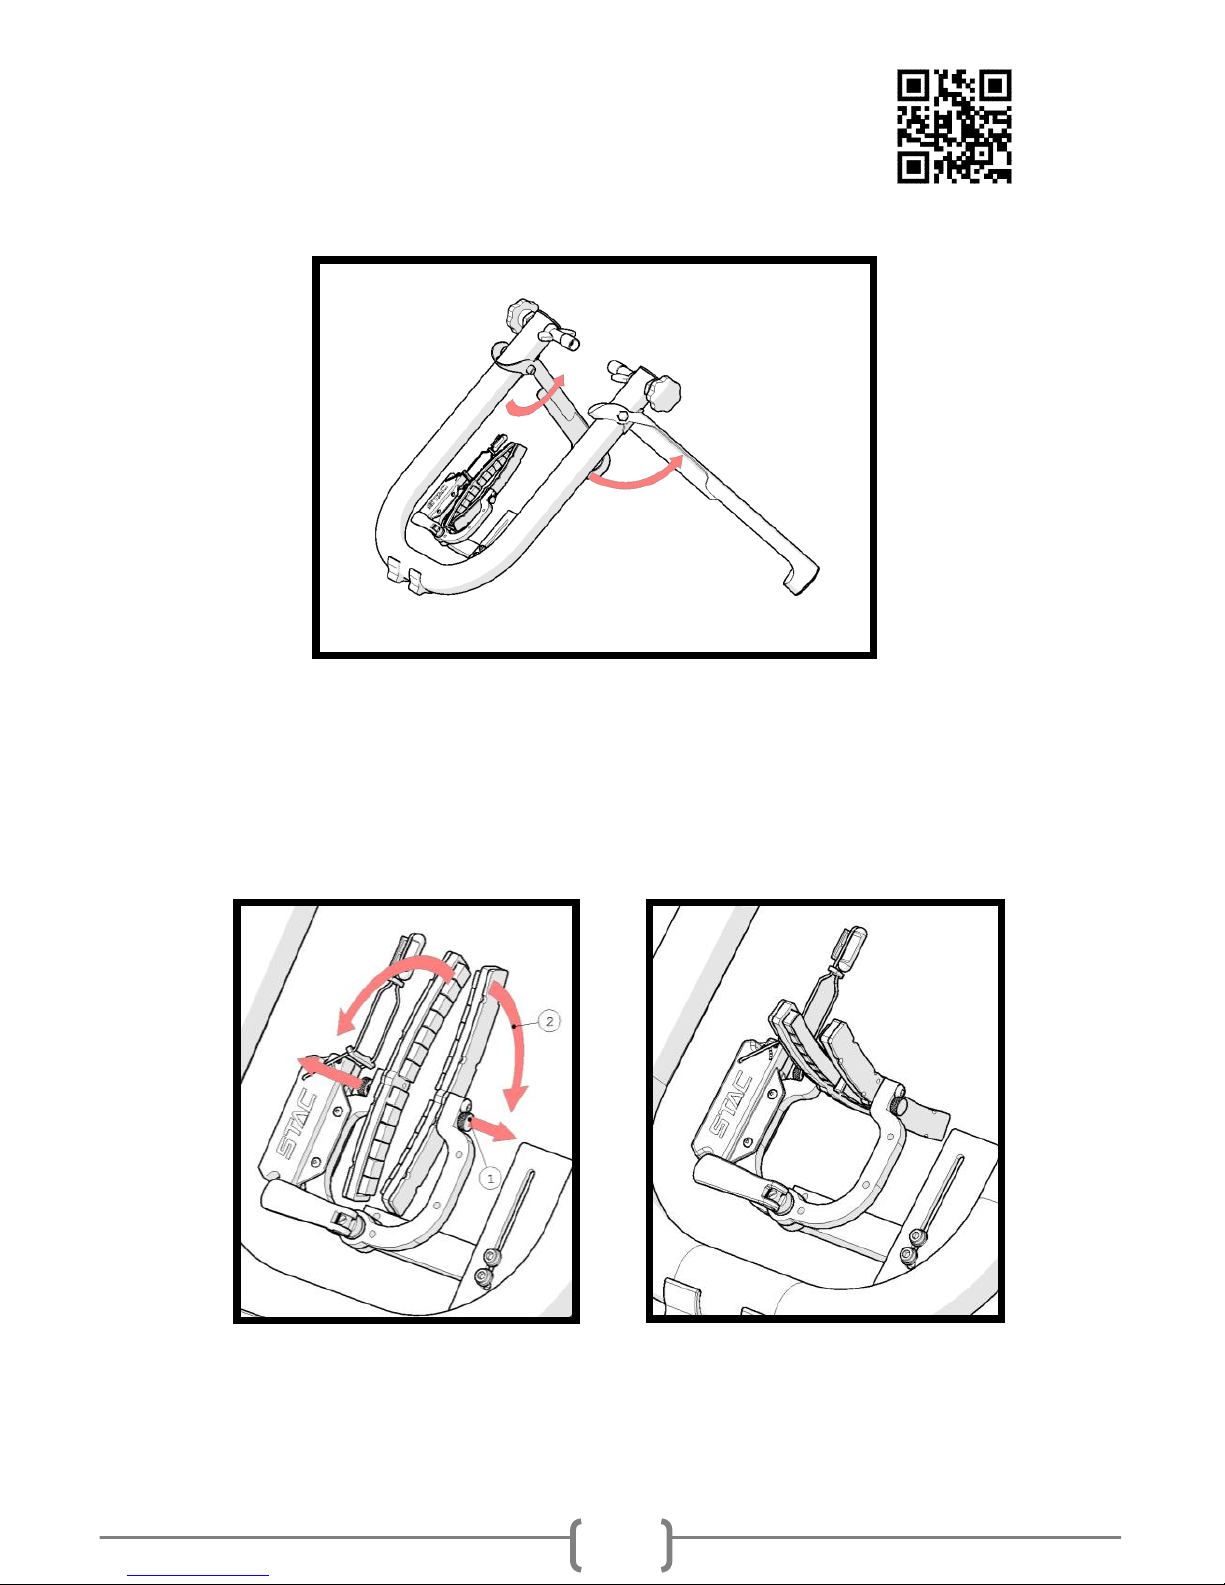
Set up Guide:
Support Video: “How to put your bike on the trainer”
1) Open Legs to full extension and place trainer flat on the floor.
2) Pull the Spring Pin back and rotate the Magnet Holder from the
stowed position to the open position. Do one Magnet Holder at a
time.
Page 6
6
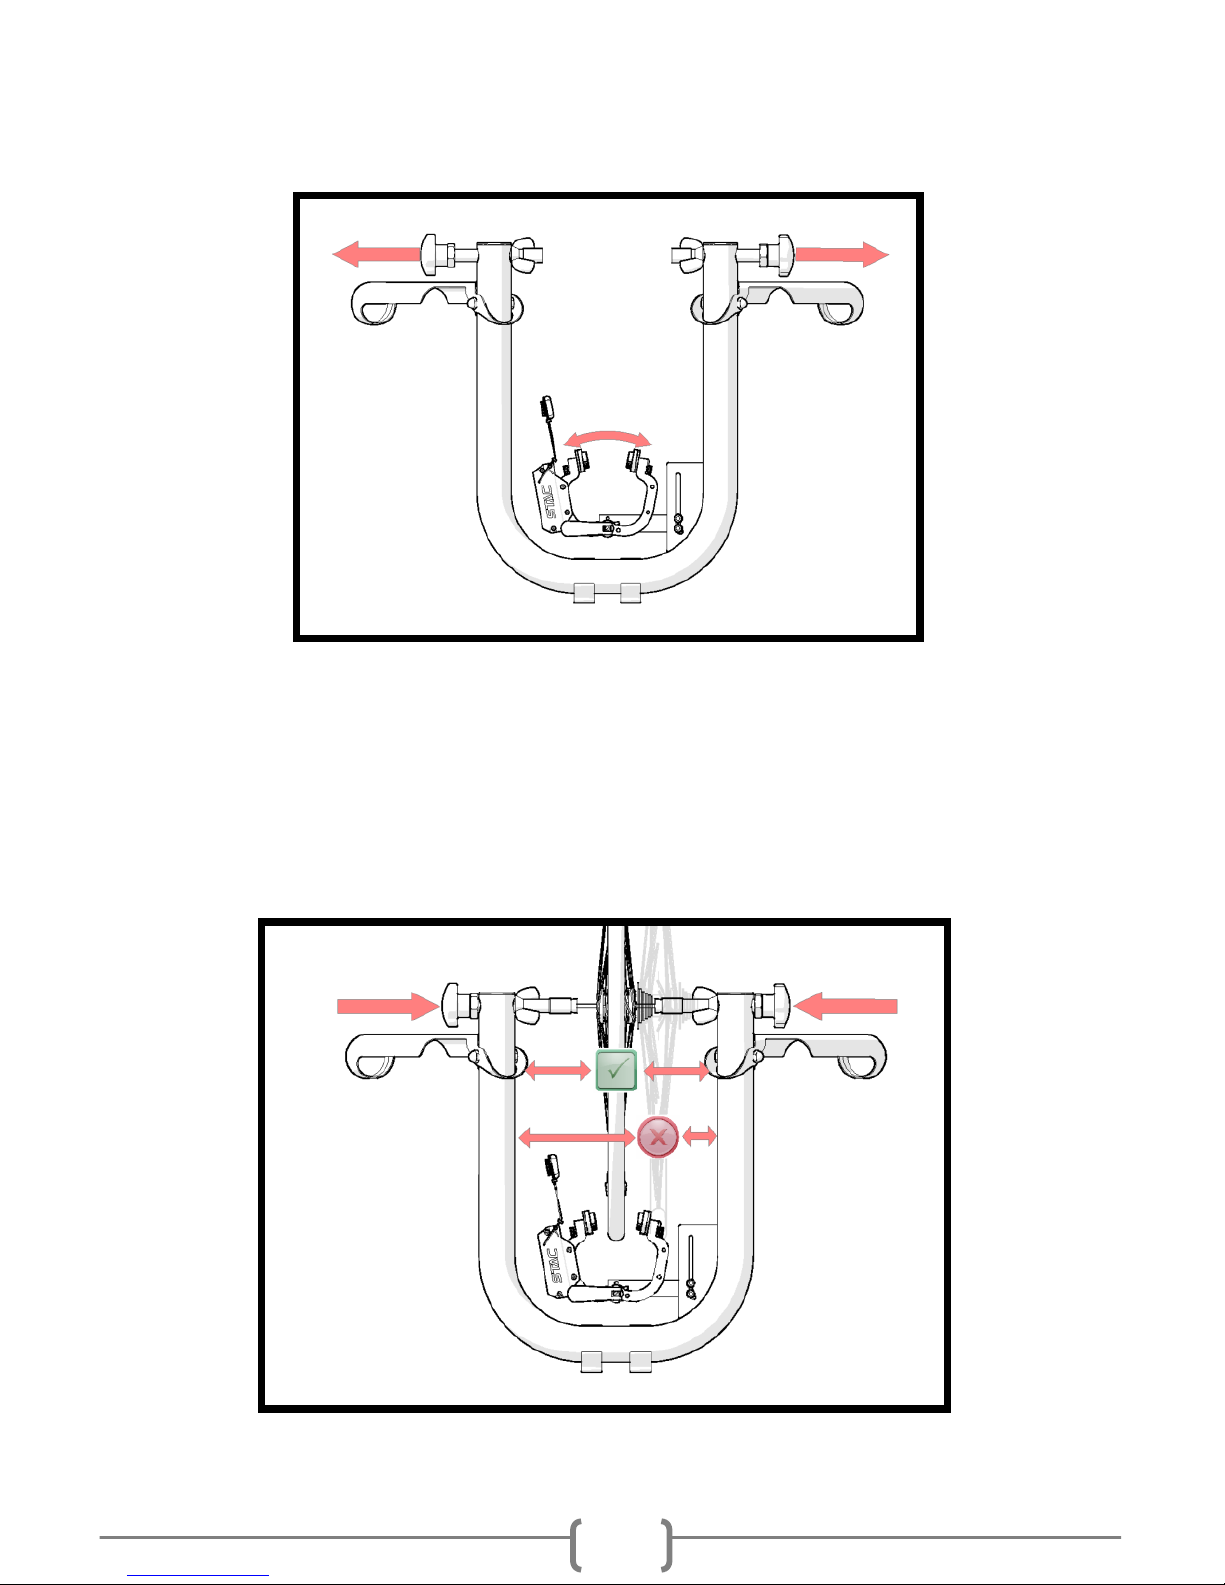
3) A) Unscrew the Knobs, opening them as far as they will go.
B) Loosen the quick release and open the calipers to the open
position.
4) A) Back your bike into the trainer lining up the skewer with the
Skewer Cups and tighten the knobs, clamping the bike in place.
B) Tighten the wing nuts against the frame, locking the bike in
place.
Important: make sure your bike is centered in the trainer.
Page 7

7
5) Insert the provided Magnet Spacer over the rim and pinch the
Magnet Holders against it.
Note: See Page 10 “Detailed use of Magnet Spacer” for more
information on fine tuning your set up.
6) Make sure the quick release is tight and then remove the Magnet
Spacer. You should have an even gap between your wheel and
the Magnet Holders.
Page 8
8
Wheel Weight Use and Installation
The STAC Zero can usually be adjusted to achieve a good feel AND the
targeted resistance without use of the weights simply by spinning the
wheel faster. The wheel weight is included to improve the road feel of
the STAC Zero. They are optional to use.
Support Video: “2018 Wheel Weight Installation”
Installation Procedure
Notes: This is to be performed with the bike mounted in the trainer
1) Once your bike is secured in your STAC Zero trainer approach the
rear wheel from the non-chain side of your bike.
2) Undo the Velcro straps on the weights and loosen the D-Ring
fastener on Weight A.
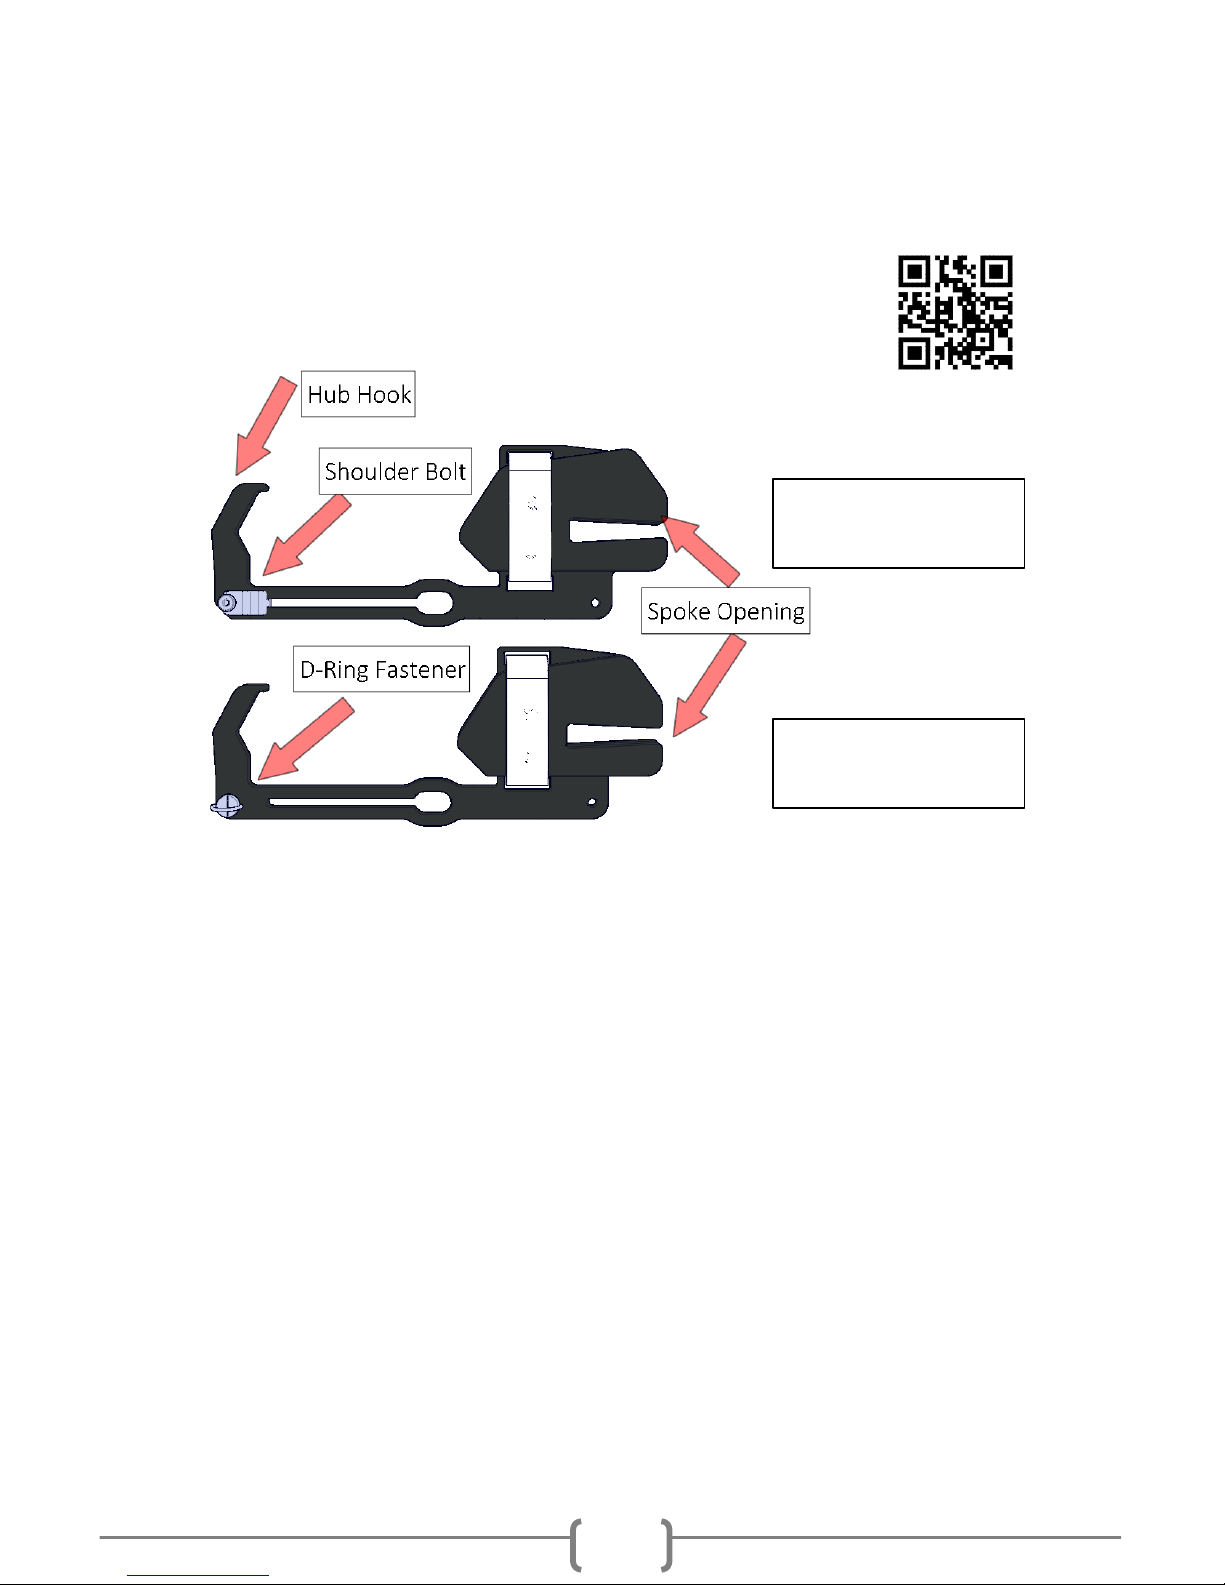
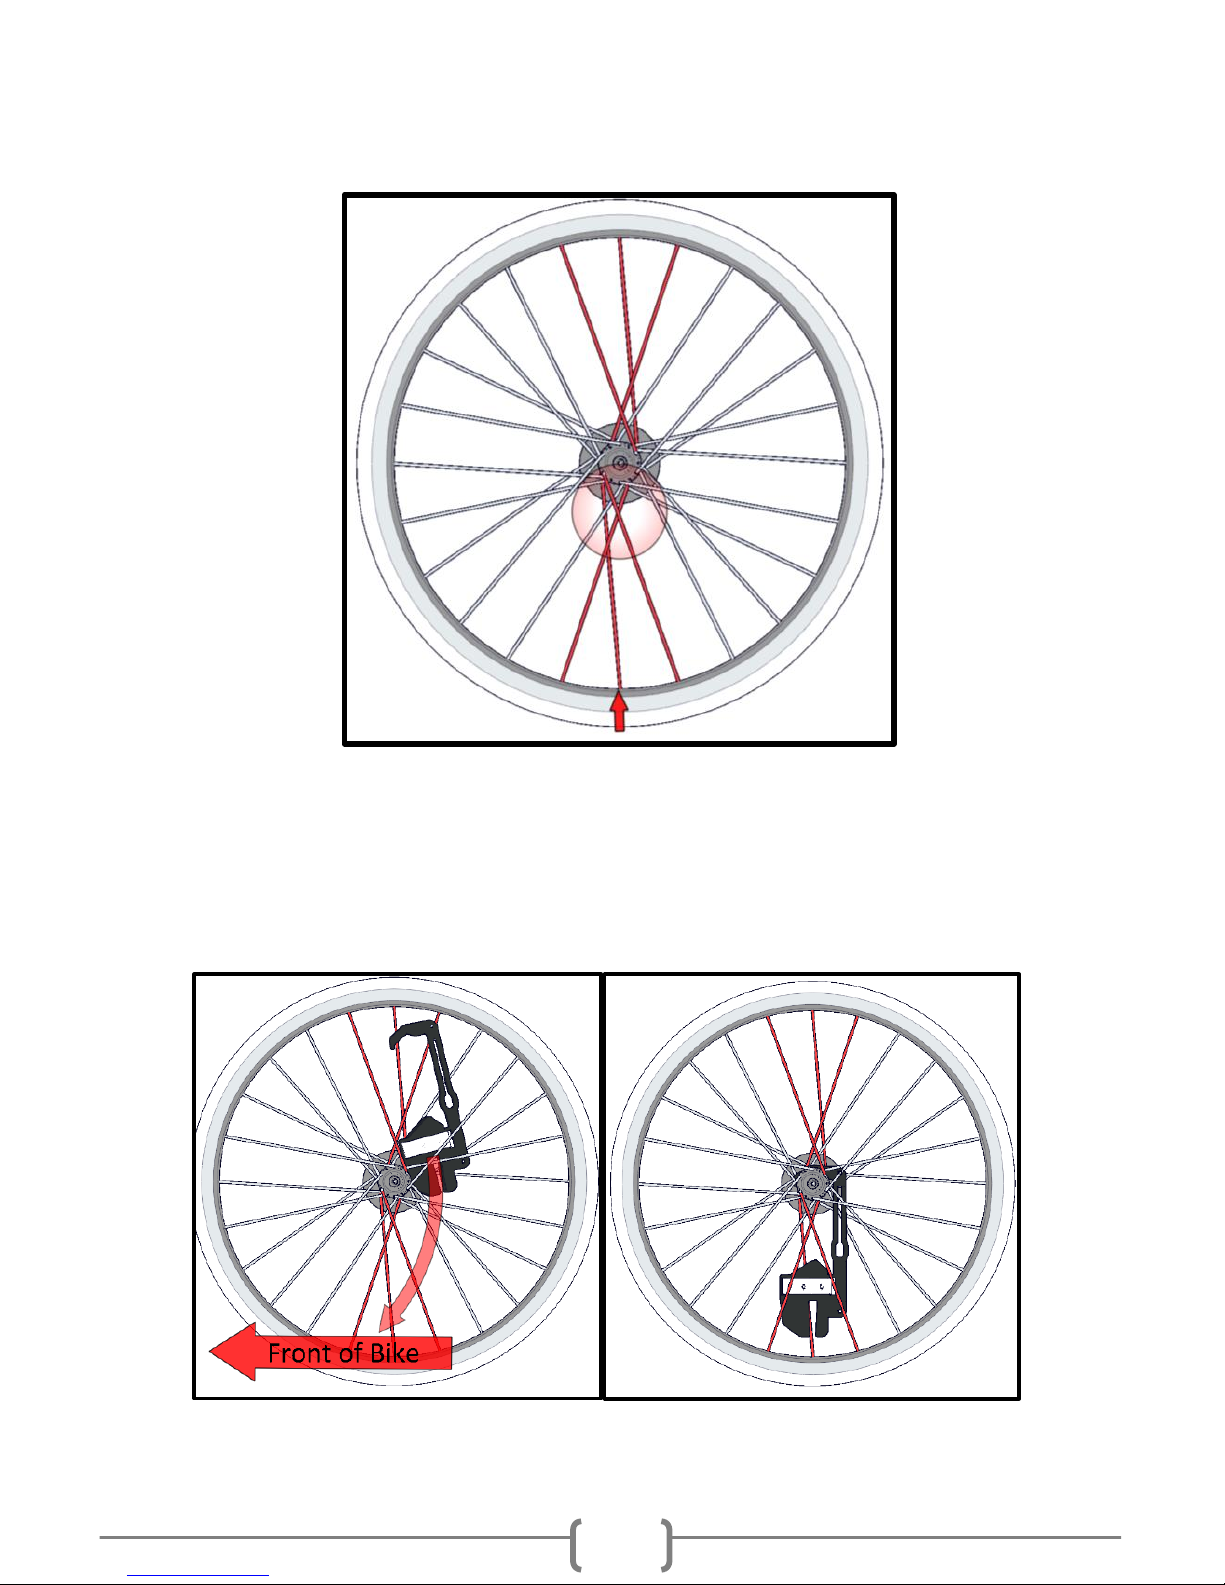
3) Identify your target spoke and rotate it towards the ground.
a. Find where the spokes on the near side of the wheel cross
near the hub (circled below).
Weight A
Weight B
Page 9
9
b. The target spoke will be the spoke coming from the chain side
of the bike that lands between the two crossed spokes.
Indicated with Arrow.
4) Insert the Weight A (has Shoulder Bolt) into the wheel.
a. The shoulder bolt should point towards the bike chain.
b. The hub hook should point towards the front of the bike.
c. Seat the Spoke Opening on your target spoke, and the Hub
Hook around the wheel hub.
Page 10

10
5) Insert Weight B through into the wheel.
a. Weighted end up, Hub Hook towards the front of the bike.
b. The D-Ring should be facing away from the chain.
6) Line up the Bars of Weights A & B. Insert the Fasteners in their
slots on the opposite Part.
Note: The ring on the D-Ring Fastener must be erect and aligned with
the slot to easily slot together.
Page 11

11
7) Secure the Weight assembly:
a. Pull Weight B upwards and seat the Spoke Opening on a target
spoke (1) opposite Weight A.
b. Tighten the D-ring Fastener (2) securing the two weight halves
together.
c. Wrap the Velcro straps on both weights (3) around the spokes
to secure the weight in place. Ideally across at least 3 spokes.
Final Checks
Warning: No not skip this step.
8) Check that the weight is properly secured and cannot move or
rotate.
Page 12

12
9) Rotate the wheel slowly by hand ensuring it does not contact
your bike frame.
10) Your wheel should be balanced and spin freely without coming to
rest in the same position.
11) Adjust if necessary.
Wheel weight shown below installed in a 24 spoke wheel.
IMPORTANT: IF AT ANY TIME YOU HEAR OR FEEL TICKING,
RUBBING OR A CLUNKING SOUND, STOP RIDING IMMEDIATELY
AND VERIFY THE WEIGHTS ARE PROPERLY ATTACHED.
For additional assistance contact support@staczero.com
Page 13

13
Detailed use of Magnet Spacer
Provided with your STAC Zero Trainer is a “Magnet Spacer”. This was
included to assist with an easy and repeatable set up. The use of this
accessory will allow for much more consistent road feel. There are 2
methods to use the Magnet Spacer to set up your trainer for increasing
levels of resistance.
Method 1 - Levels (Lowest)1-3
1. Place the Magnet spacer over your rim as shown in figure 4.
2. Loosen the quick release so the Magnet Holders can be rotated
easily but do not move around under their own weight.
3. Close the Magnet Holder against the Magnet spacer.
a. By using the progressively narrower steps as shown in
Figure 3, the resistance will increase.
4. Tighten the quick release.
5. Remove the Magnet Spacer.
Figure 2: Spacer over rim
Figure 1: Supplied Spacer.
Page 14

14
Method 2 - Levels 4-6 (Highest)
1. Loosen the quick release so the Magnet Holders can be rotated
easily but do not move around under their own weight.
2. Place the Magnet Spacer over the drive side magnet holder as
shown in Figure 5.
3. Press the opposite side Magnet Holder against the rim.
4. Squeeze the Magnet holder between the holder between the
rim and the drive side magnet holder.
a. By using the progressively narrower steps as shown in
Figure 3, the resistance will increase.
5. Remove the Magnet Spacer.
6. Rotate the two calipers as a unit until the distance between
both magnet holders and the wheel rim is the same.
7. Tighten down the quick release clamp.
Figure 3: Magnet Spacer over Magnet Holder
Page 15

15
POWERMETER SETUP AND CONFIGURATION
Support Videos:
"How to read the Power Meter lights"
"How to debug the Power Meter"
IMPORTANT: Make sure to charge the STAC zero every 6 months to prevent
damage to the battery
Note: The STAC Zero has been tested with Zwift, TrainerRoad, Sufferfest, Strava
and Kinomap. It is set up to work with their internal BT pairing system.
Installation of Spoke Magnet and startup of Power Meter
1. Install the included spoke magnet on a drive side spoke.
2. Align the spoke magnet with the end of the Magnet Sensor
nearest the center of your wheel.
3. Adjust the Magnet Sensor within 5mm-10mm (¼”-½”) of the
spoke magnet. The Red light on the power meter should toggle
on/off as the magnet goes by.
4. Rotate the wheel a couple of revolutions slowly by hand to make
sure the spoke magnet will not hit your bike or the Magnet
Sensor.
5. Allow the unit to sit for 15 seconds after the Power Meter lights
have activated to allow for self-calibration.
Pairing your STAC Zero with Bluetooth Smart®
1. Make sure the unit is on and lights are blinking.
2. Make sure that no other devices in the area are already
connected to the PM unit.
3. Start up your fitness/cycling app. Your STAC Zero should show
up as “STAC Zero” in the device list.
Page 16

16
Power Meter Usage Tips
o You can use the “STAC Zero Control Panel” Android app to
change your Zero’s BLE device name, EG. “MY STAC ZERO”,
“Silent Trainer”.
o The STAC Zero Power Meter auto-power-offs after 5 minutes of
idle time.
o BLE is different from “normal” Bluetooth protocols you may have
used to pair Bluetooth speakers, headsets, or with your car. You
shouldn’t need to pair it in your phone’s typical global Bluetooth
settings dialog.
Page 17

17
TROUBLESHOOTING – All Models
Problem: There’s not enough resistance.
Cause: The Magnet Arrays are not generating enough resistance.
Solutions:
Support Video: “How to get more resistance from your
STAC Zero”
• Shift to a higher gear. The faster your wheel is spinning, the
more resistance the trainer will generate.
• Move the magnets closer, if possible. With the magnets very
close to the rim, the STAC Zero should be able to provide
~1000W of resistance at about 60km/h wheel speed without
the magnets contacting the rim.
• You can tighten the wingnuts included on the threaded rods
against your frame in order to “lock down” the threaded rods
and prevent them from shifting slightly in the frame. This
reduces side-to-side wheel motion and should allow you to get
the magnets closer to your wheel.
Problem: The “road feel” of the trainer is poor; it feels like riding
through sand.
Cause: The magnets are removing kinetic energy from the wheel so
quickly, that it nearly comes to a halt during your pedal dead zone.
Solutions:
• Move the magnets further away from the wheel rim and shift to
a higher gear.
• Install the wheel weights on your wheel. This helps maintain
inertia and improve the road feel
• Use a heavier wheel
Page 18

18
Problem: Vibration in rear wheel while riding.
Cause: Rear wheel is out of balance.
Solutions:
• If you are using the wheel weights, try removing them to see if
the problem persists. If this fixes the problem, reinstall the
weights per the instructions in the manual.
• If you are not using the wheel weights, check to see if your
wheel is true and circular.
Problem: A rubbing or scraping noise while I ride.
Cause: Two objects are coming into contact that shouldn’t be coming
into contact.
Solutions:
• Check to make sure nothing on your bike is rubbing on your
wheel. Since the Zero is so quiet, equipment sounds that you
didn’t notice will make themselves heard. Some things to check
for:
o Rear brakes rubbing.
o Worn out hub bearings.
o Derailleur contacting your chain.
• Make sure your rear wheel’s skewer is firmly clamped in the
trainer with the wing nuts locked down. This will minimize
rocking and your chance of the wheel rubbing on the magnets.
• If at any point the magnets contact the rim or tire:
o Center the rear wheel in the middle of the Magnet
Holders
o Readjust the magnets so they are evenly spaced from
each brake track
o Tighten the quick-release clamp to ensure the magnets
don’t move once you begin riding.
o Verify your wheel is true
Page 19

19
Problem: The magnets try to clamp onto the wheel.
Cause: Your wheel probably has a steel component in it. This could be a
wire bead in the tire or a steel insert in the wheel.
Solutions:
Support Videos:
“How to identify steel components in your wheel”
“STAC Zero Modification to support magnetic wheels”
• First, run a strong magnet (like a spoke magnet from a bike
computer or the STAC Zero power meter) around your wheel
rim, looking for spots where it can stick.
• If the magnet sticks once per wheel revolution it is likely your
wheel has a steel insert in it from manufacturing. We
recommend getting a replacement wheel for optimal
performance. You can find suggested wheels under Support on
our website in the article “What Wheels are compatible with
the STAC Zero”. For 700x23C road-bike wheels, we recommend
a Mavic Open Pro or a Shimano R500.
• If the magnet sticks weakly the whole way around the brake
track, this usually indicates a tire with a steel bead. Suggested
options:
1: Tighten the quick release that holds the calipers
2: Follow the steps in the “modification to support magnetic
wheels” to prevent caliper motion.
3: Replace with a “folding tire” that includes a Kevlar bead
no steel. The STAC Zero crew ride Continental GP4000SII
tires.
4: Remove your tire and ride on the trainer without it.
Page 20

20
TROUBLESHOOTING – POWER METER
Problem: The STAC Zero power meter only ever reads 0W.
Causes: The magnet sensor may not be picking up your spoke magnet.
Solutions:
Support Video: “Typical STAC Zero power meter Debugging”
“STAC Zero power meter: What do the lights mean?”
• Make sure the unit is turned on.
• Make sure that the Magnet Sensor is being triggered as the
spoke magnet passes by. Position the Spoke Magnet near the
tip of the sensor (not the middle of it). Rotate the wheel by
hand, you should see the red light on the power meter toggle
on and off.
• The STAC Zero needs to complete self-calibration. Allow the
unit 15 seconds no load (no wheel motion or anything pressing
on the resistance unit).
Problem: The STAC Zero power meter reading doesn’t match my
existing power meter reading.
Causes: Various.
Note: that since power meters use many different algorithms and sense
force at differing points in a bicycle’s drivetrain, it is unlikely that two
power meters will come to identical instantaneous readings. However, if
your STAC Zero averages more than 4% above or below your other PM,
then try the tips below.
Solutions:
• The STAC Zero is self-calibrating. Let it sit for 30 seconds after
moving it for self calibration.
• Make sure that wires or any other objects are not pressing
against the resistance unit as this can result in either an
incorrect calibration or wrong readings.
Page 21

21
• Every STAC Zero is calibrated using a 700x23C wheel. If you are
riding a different wheel size, you will need to use the STAC Zero
Control Panel Android app to adjust the wheel to the wheel you
are using.
Download the STAC Zero Control Panel Android app and connect to
the trainer with the debugging menu. Using the app capture a log
file and contact support@staczero.com for additional support.
Page 22

22
This Page intentionally left blank
Page 23
23
Regulatory Compliance
Product: STAC Zero Powermeter
Model: Rigado BMD-300
FCC ID: 2AA9B04
IC: 12208A-04
European Compliance Statement
STAC Performance hereby declares that this device is in compliance with the
essential requirements and other relevant provisions of the R&TTE Directive.
FCC Compliance
This device complies with Part 15 of the FCC Rules. Operation is subject to the
following two conditions:
1) this device may not cause harmful interference, and
2) this device must accept any interference received, including interference
that may cause undesired operation.
Changes or modifications not expressly approved by STAC Performance, could
void the user’s right to operate the product.
This equipment has been tested and found to be compliant to FCC radiation
exposure limits. These limits are designed to provide reasonable protection
against harmful interference in a residential installation. This equipment
generates, uses, and can radiate radio frequency energy. If not installed and
used in accordance with the instructions, may cause harmful interference to
radio communications. However, there is no guarantee that interference will
not occur in a particular installation. If this equipment does cause harmful
interference, the user is encouraged to try to correct the interference with one
or more of the following measures
1) Reorient or relocate the receiving antenna
2) Increase the separation between the equipment and receiver
3) Connect the equipment into an outlet on a circuit different from that to
which the receiver is connected
4) Consult the dealer or an experienced radio/TV technician
Page 24

24
For any questions, clarifications or issues, contact us at:
support@staczero.com
Looking for more speed on the bike?
Check out the STAC Virtual Wind Tunnel:
• Improve your speed at your next race!
• All the benefits of wind tunnel testing without the
cost and inconvenience of going to one.
• Book your session today!
www.staczero.com/vwt
Follow us on social media:
@STACPerformance
 Loading...