


Staaker 1
User manual
Draft20170721

Using this manual
Read the Staaker 1 user manual before flying the drone for the first time. Before flight, learn
how to operate the drone and be aware of any local laws regarding flight of drones in your area.
Document revision: 1.0 (12.07.2017)
This document is subject to change. Download the latest digital version of the document at
www.staaker.com
.
Legend
••Warning
Explains something that, if not obeyed, could cause serious injury to people or damage
to equipment.
⚠ Important
Describes extra important information that you should take note of when using the
product.
Hints and Tips
Information that can improve user experience and improved video footage.
2

Introduction
We have tailored this autonomous follow drone to capture all your activities, moments and
beautiful places in the best possible way.
It consist of a tracker that is placed on your wrist and a quadcopter with a camera (camera not
included). With the touch of a button, it follows and films you automatically.
The Staaker drone follows whomever or whatever is wearing the tracker by itself. Using the
tracker, Staaker follows you and takes care of the filming automatically, even if you are alone.
Choose from 4 different tracking modes as well as Scenery mode. By using the tracker you can
always adjust the angle, height and distance of your Staaker relative to you.
3

Terminology
Emergency Landing: When the drone automatically lands due to low battery, sensor failure or
an abnormal system error.
Barometer:
A sensor device that measures air pressure. Can be used for determining altitude
above average sea level. Both the Staaker drone and Tracker are equipped with this sensor.
GPS:
Abbreviation for Global Positioning System. Both the Tracker and Staaker drone use GPS
for navigation and positioning. The system uses in reality multiple GNSS systems , but in this
1
document this is referred to as just GPS for simplicity.
Gimbal
: Camera stabilization module for improved video footage and framing.
LED:
Abbreviation for light-emitting-diode, a lamp located on the bottom of the Staaker drone.
Locate Staaker:
A menu option on the Tracker for locating the Staaker drone. Requires GPS
on the Tracker.
Return to Home:
A procedure where the drone flies back to a designated location and lands.
RTH:
Abbreviation for Return to Home. (See Return to Home)
Smart Battery:
The Staaker is equipped with an intelligent battery that measures voltage,
current and temperature on all 4 cells.
Staaker Drone:
Auto-follow drone equipped with 3-axis gimbal and camera.
Takeoff Mode:
One of three ways to make the drone takeoff and begin flight: Quick Staak
(normal use), Water Staak (use in watersports) and Pro Staak (for expert users).
Tracking Mode:
Autonomous follow modes, Follow, Compass, Hover, Circle and Scenery
Tracker:
Handheld wrist device which is used to remotely control the Staaker drone.
1
Staaker utilizes American GPS, Russian GLONASS, Chinese BeiDou-2 and SBAS such as
EGNOS and WAAS
4

Table of Contents
Using this manual 3
Legend 3
Introduction 4
Terminology 5
Table of Contents 6
Safety and disclaimer 10
Staaker Drone 11
Status LED 12
Unfolding the drone 13
Gimbal 14
Camera protection 14
Camera installation guide 14
Battery insertion and removal 17
Warning 18
Tracker 19
Emergency kill switch 20
Tracker Radio Signals 20
User Interface 21
Navigating the Main Menu 22
Quick Staak 22
Water Staak 22
Pro Staak 23
Calibrate Altitude 23
Locate Staaker 23
Pairing 24
About 24
Pro Staak Settings 25
Return to Home (RTH) 25
Track Altitude 26
Responsivity 26
Fuse GPS Alt 26
Faster Altitude 27
Takeoff 27
Tracking 29
Landing 31
Land now 31
Return To Home (RTH) 32
Pause/ Unpause 33
Mounting the Tracker 33
Attaching the strap 34
Charging the Tracker 34
How to use the Staaker 35
Before use 35
5

Check list 35
Things to be aware of while flying 35
Flying above water 36
What is a safe Takeoff location? 36
Takeoff 37
Flight 37
Tracking modes 38
Compass 38
Follow 38
Circle 39
Scenery 39
Hover 40
Drone Smart Battery 41
To turn the power on 41
To turn the power off 41
To check the capacity 41
Charging 42
Battery failure 43
Storage 43
Battery Warnings 43
Maintenance and repairs 44
After flight 44
Warranty warning 44
Replacing arms 44
Replacing Gimbal 44
Replacing landing gear 45
Motors 45
Propellers 46
Staaker tips 47
Camera tips 47
Drone Tips 47
Troubleshooting 48
Error Messages 48
Before or during takeoff 48
Under Flight 50
Land reasons 51
Return to home (RTH) reasons 52
Tracker cannot connect to the drone 53
Staaker Assist problems 53
System cannot get GPS reception 53
Tracker looses connection to the drone often 55
The drone landed or crashed and I cannot find it 55
The drone changes altitude too much 55
The drone does not always respond to my button presses 55
The drone crashed for unexpected reasons 55
Staaker Assist 56
Flight logs 56
Firmware update 57
6

Terms & Warranties 58
Assumption of risks 58
Product warranty and return 59
Limited One-Year Warranty 59
Warranty Exclusions 59
Return of products 60
Indemnity 60
Limitations of Liability 60
Software License 61
Dispute Resolution 61
General Terms 64
Technical Specifications 65
PRODUCT FEATURES 65
Staaker Drone 66
Tracker 67
Smart Battery 67
Smart Battery Charger 67
CE, FCC and IC compliance 68
CE 68
FCC Compliance Statement 68
FCC Modification Statement 68
FCC Interference Statement 68
Industry Canada Notes 69
About Staaker 70
Customer Support 70
7

Safety and disclaimer
1. Read the complete manual before using the product.
2. The user holding the tracker controlling the drone is legally the pilot of the drone. The
pilot is responsible for safe usage and consequences of unsafe usage of the drone. The
Staaker Company is not responsible for any injury, damage of property or harm caused
by usage of the drone.
3. Always check and follow all local regulations and laws for flying unmanned aerial vehicle
when using the Staaker.
4. Do not use the drone within designated No-Fly zones like areas close to airports and
heliports.
5. Do not use the drone close to obstacles.
6. Do not use close to man-made structures (e.g vehicles, buildings, power lines) and
areas with high level of interference (e.g radio transmission towers).
7. Do not use the drone over people, animals, urban areas or trafficked roads.
8. Do not breach the bounds of privacy. Ask for permission before flying on private
property.
9. Keep the drone in line of sight at all times.
10. Do not use the drone in weather or lighting conditions that result in reduced visibility.
11. Do not use the drone in wind conditions exceeding 10 m/s, or in other severe weather
conditions.
12. Do not use the drone while under the influence of drugs or alcohol.
13. Make sure that the drone is in good condition when using it.
14. Only use genuine certified Staaker replacement parts.
15. The appliance is not intended for use by persons (including children) with reduced
physical, sensory or mental capabilities, or lack of experience and knowledge, unless
they have been given supervision or instruction concerning the use of the appliance by a
person responsible for their safety.
8

Staaker Drone
The Staaker drone is a quadcopter powered by a Smart Battery and carries a 3-axis
stabilization gimbal equipped with a camera (camera not included). The drone is foldable and
compact, designed to be durable and lightweight. The drone is equipped with an intelligent
autopilot to aid you in flying the drone and keeping you always in the video frame.
The Staaker drone is pre-calibrated and tuned. This means no extra technical setup is required
and the drone is ready to fly out of the box!
⚠ Caution! The ESC cooling plate may be hot after flight.
9

Status LED
The multi-coloured status LED is located on the bottom of the Staaker drone. The LED indicates
if the drone is ready to fly or not. The led is only on when the drone is powered.
Status light
Description
Blinking yellow light
Drone is powered on and searching for GPS
Blinking green light
Drone has sufficient GPS and ready for
takeoff
Blinking red light
Drone has an error, check tracker for
message
Status light during flight
Description
Steady yellow light
Drone has lost GPS and is landing
Steady green light
Everything ok
Blinking red light
Drone has a problem or is running low on
battery, check message on tracker
10

Unfolding the drone
Unfold all arms first and then secure them by
pulling out the landing gear. It is important that all
arms are unfolded completely (reaching endpoint)
before the landing gear is pulled out. This will
ensure the arms are completely locked and
prevent vibrations which degrade flight
performance and video quality. Check that all
arms are tightly locked in extended position before
fight.
11

Camera protection
We always recommend to use the protective Staaker
camera cover on Gopro 3 and 4 to make the camera
water and dust resistant.
Gimbal
The gimbal eliminates vibrations and makes a steady
video footage. The Staaker 3-axis gimbal supports the
following cameras:
- GoPro Hero 3 (all versions).
- GoPro Hero 4 (all versions).
- GoPro Hero 5 black.
- Garmin VIRB ultra 30
Camera installation guide
1. Make sure the drone is powered off
2. Place the gimbal in the right orientation, logo on the
gimbal should be on the drone’s right side.
3. Loosen the two screws on the camera holder so the
camera fits in the holder.
4. Insert the camera in the middle of the holder.
12

⚠ NB! Be sure it’s inserted all the way in and is aligned with the edge where it stops.
5. Tighten the two screws on the camera holder and check if the camera is not loose.
6. Insert the power cable to the Gimbal and the camera(only for GoPro 3 and 4).
13

Tip: Lead the charging cable between the
camera and the screw before inserting the
camera to better secure the cable.
14

Battery insertion and
removal
The battery is inserted in the back of
the drone. Push the battery all the way
in so it is secured by the battery lock.
To take it out, pull the battery while
pressing the battery lock button.
••If the battery is not properly secured, there’s a risk that it may fall out during flight.
This can happen if the battery is not fully inserted or damaged. Always be sure it is
locked as this affects your and others' safety.
15

Warning
•• If drone is unfolded incorrectly, battery not inserted properly or the camera is not
secured it may cause unsafe flights, damages, bad video quality and uncontrolled crash
landings.
⚠ Do not power on the drone without a camera mounted in the gimbal. The gimbal
will spin erratically without the counter-weight from the camera and can damage your
equipment.
•• Do not modify or tamper with the drone or attempt to use non-authorized Staaker
replacement parts. Attempting such modifications can interfere with on board sensors
and severely degrade flight stability. Do not attach other modules on the drone, such as
additional cameras, magnetic materials or radio-emitting telemetry.
16

Tracker
The Tracker is the technology that replaces an ordinary remote-control. It has multiple buttons
for navigating the menus and controlling the Staaker in flight. The screen displays the current
state of the drone and tracker.
ڹ
ڹ ۃ Up/Down: Used to navigate menus or increase/decrease altitude of the drone.
Λ V Further away/Closer:
Two buttons located on the left side of the tracker. Used for placing
the drone closer or further away from the tracker.
< >
Left/Right: Two buttons located on the face pointing against you. Used for orbiting the
drone left or right around the tracker.
Mode:
Used for navigating menus (same as up/down) and changing tracking modes. It Is also
used for going back to the previous menu.
On/Off:
A single button located on the right side of the tracker. Pressing this button will
instantly the power on or off.
•
• • Select/Pause/Continue: This button confirms a selection. A single press during flight will
pause the drone instantly and resume movement when pressed again. Holding this button down
under flight will display the land menu.
17

Emergency kill switch
There is a “Kill switch” functionality that instantly cuts the power from the drone motors, for use
in dangerous situations as a last resort.To execute the “Emergency kill switch” press and hold
ڹ
ڹ (up) and ۃ (down) at the same time for 3 seconds. This will make the drone cut all power
from the engines.
⚠ By activating the Kill Switch, the motors will instantly power off and the drone will
fall to the ground if it is in the air.
If the drone detects that it has crashed, it will
automatically turn off the motors to reduce damage.
Tracker Radio Signals
The tracker has multiple sensors inside to read your
movements, the GPS is the most important one. Illustration
shows where on the tracker that the wireless signals to the
Staaker is being sent from and the GPS location. These
locations should be unobstructed while flying the drone.
⚠ Loss of radio link will make the drone hold its
current position until radio link is recovered. If the
battery level on the drone is too low, the drone will land on its current position. If the
drone is in
Water Staak mode or Pro Staak mode with Return to Home enabled it will
Return to Home
instead. If you fly the drone out of range in Scenery mode, the drone will
engage
Return to Home.
⚠ If the tracker loses GPS signal the drone will stop following you and the drone will
enter
Scenery mode under your control.
For optimal radio link range between drone and tracker, the wireless link on the
tracker should have clear line of sight to the drone.
18

User Interface
This section describes how to use the user interface on the tracker and explains how to
navigate through the different screens that are available. When you power on the tracker, the
following screen should appear:
If the Tracker has no connection with the drone (as shown by the radio signal
strength indicator
on the bottom left on the screen), the tracker does not know the
current battery status of the drone. Note the status bar on the bottom of the screen:
19

Navigating the Main Menu
The main menu is the initial screen state on the tracker. You can navigate through the menu by
either pressing the ڹ
ڹ or ۃ buttons or the button. Pressing • • will open the current selection.
Quick Staak
Quick Staak is a default and easy preset that fits most use scenarios on
land. It is the fastest way to get your camera tool up in the air ready to film
your adventure. If this is you first time using Staaker we recommend to
use Quick staak on land the first times to get use to the drone and using
the tracker. Do not use this mode when the tracker is used for water
sports.
Water Staak
Water Staak is made for flying over water or other places where you do
not need the drone to follow your vertical movements. In this mode the
drone will not change altitude when the tracker changes altitude. The
drone will automatically Return to Home (RTH) when battery is low. The
drone will also Return to Home if it loses connection with the tracker. This
mode should be used when doing watersports.
⚠ NB! In Water Staak the drone automatically engages Return to
Home
at 40% battery level. This means that if you discharge 60% of the battery by
moving directly away from the takeoff location, the drone might
not have enough battery
to fly completely back to home and will land on its current location when battery reaches
0%. You can abort any
Return to Home at any time as long as the tracker has radio
connection with the drone.
Pro Staak
Pro Staak is an expert mode where you can tailor advanced settings to fit
your specific needs. The default settings in Quick Staak and Water Staak
are our recommended settings for stable flight performance and good
video output. See the Pro Staak Settings for more information about Pro
Staak and the various expert user settings.
Calibrate Altitude
The drone uses barometers to track vertical movements. The sensor
operates differently based on temperature and local weather variations.
20

Therefore, to ensure optimal altitude tracking accuracy, the Staaker drone and the tracker can
be calibrated to improve altitude accuracy. This process takes about 10 seconds and can
improve camera framing significantly.
Altitude calibration needs to be performed outside and on the location, at the time, you are
going to fly. We recommend to always calibrate altitude before flight.
To start calibration, make sure the drone is powered on and has connection with the tracker.
Select the Calibrate Altitude option in the main menu, place the tracker on the drone and press
•
• •.
⚠ Do not touch the devices when calibrating. This might interfere with the calibration
process and cause degraded tracking performance.
Locate Staaker
The Locate Staaker feature allows the tracker to determine the current
location of the drone. It will point you towards the last known location of
the drone. The tracker needs a GPS fix for this functionality to work.
You can use Locate Staaker before takeoff to determine the GPS
and altitude accuracy.
Press • • while in Locate Staaker and the drone will respond with an audio beep if it
has connection.
Pairing
After uploading new software or replacing tracker/drone, you might need
to pair the tracker and drone.
1. Make sure the drone is not powered.
2. Select the Pairing option in the main menu, the tracker will now
begin beeping, signaling that it is looking for drones to pair with
nearby.
3. Place the tracker on top of the drone you want to pair with.
4. Turn on the drone battery, and wait for the drone to start beeping repeatedly.
5. The tracker screen will now show that it has found a drone to connect to.
6. Push the • •
button as instructed by the tracker, and the drone and tracker will start
pairing.
7. Pairing is finished when the loading bar has completed.
21

⚠ Do not touch the devices while pairing. This might interfere with the calibration
process and cause degraded tracking performance.
You can only pair two devices that are running the same software version (the
tracker will tell you if this fails). You can determine which version the tracker and drone
are running in the
About screen.
About
This screen displays the firmware version running on the tracker and if
connected, the drone firmware version as well.
22

Pro Staak Settings
The Pro Staak settings screen will appear when selecting the Pro Staak takeoff mode in the
main menu:
In this screen you can configure various settings that will change how the drone behaves and
follows you after takeoff. The Pro Staak option is only recommended for expert users. Use
Quick Staak or Water Staak for an easier and safe default setup. Navigate the Pro Staak
settings by using either ڹ
ڹ/ۃ or the buttons and press • • to modify the selected setting.
The tracker will remember your Pro Staak settings from previous session, even if the
tracker is powered off. This allows you to find a good configuration that fits your usage
and quickly takeoff using these settings.
SETTING
Quick Staak
Default settings
Water Staak
Default settings
Return to Home
OffOnOn/Off
Track Altitude
On
Off
On/Off
Responsivity
Balanced
Balanced
Smooth/Balanced/Aggressive
Fuse GPS Alt
Off
Off
On/Off
Faster Altitude
Off
Off
On/Off
⚠ Note that it is not possible to change these settings after takeoff.
Return to Home (RTH)
With this setting enabled, the drone will automatically engage RTH if it reaches low battery or
loses connection with the tracker. It will also engage RTH if it detects a temperature problem
with the battery instead of doing an emergency landing in its current position. Note that it is
possible to abort an automatic RTH using the tracker. However if you choose to do so, the
23
Pro Staak
Optional settings

automatic RTH option will be disabled for the rest of the flight. This setting is useful when flying
in areas where the drone should not land on its current position and should instead fly back
towards takeoff location (flying above water for example).
NB! The drone automatically does Return to Home at 40% battery level. This means
that if you discharge 60% of the battery by moving directly away from the takeoff
location, the drone will
not have enough battery to return completely back to home and
will land on its current location when battery reaches 0%.
Track Altitude
If Track Altitude is enabled, the drone will follow your vertical movement. This is good for
activity’s that’s going downhill or uphill. When you are flying over flat grounds, e.g. water, the
Track Altitude is not necessary and can be deactivated for smoother shots. The drone will
assume that the tracker keeps same elevation as the takeoff location at all times, so if the
tracker changes elevation while Track Altitude is OFF, the camera framing will be wrong. Do not
enable this setting when tracker has significant altitude changes.
•• When using Pro Staak in watersports, this option should be always disabled. Else
the drone will rapidly fall in altitude and crash if the tracker barometer connects with
water.
Responsivity
There are three kinds of responsivity options: Smooth, Balanced and Aggressive. This option
changes how responsive the drone should be when tracking the position and movements of the
Tracker. As the name indicates, Smooth responsivity will generate calmer and slower
movements while Aggressive will make the drone accelerate and decelerate more quickly for
tighter tracking performance. Balanced is the default setting for a best-of-both-worlds
responsivity which is good for most use cases.
Fuse GPS Alt
With this option enabled, the altitude tracking is improved by combining both GPS and
barometer. This is an experimental option and is disabled by default. This setting only has any
effect when Track Altitude is enabled.
This option is upon release (firmware version 1.0.0) disabled by default and marked
as
experimental due to insufficient testing and usage statistics. Initial testing indicates
however, that using GPS adds major improvements to the altitude tracking performance.
With this option enabled, the system should provide a more accurate, responsive and
stable altitude tracking.
24

Faster Altitude
When Faster Altitude is activated the drone will ascend and descend faster. This can
significantly improve the altitude position of the drone when Track Altitude is enabled. This is an
experimental option and is disabled by default.
This option is upon release (firmware version 1.0.0) disabled by default and marked
as
experimental due to insufficient testing and usage statistics. Initial testing indicates
that this option improves altitude tracking performance when tracker rapidly descends in
elevation.
Takeoff
After selecting a takeoff mode (Quick Staak, Water Staak or Pro Staak), the system prepares for
liftoff. Initially both the tracker and the drone require a good GPS fix before they can takeoff.
This can take minutes depending on the location and weather conditions.
In the screen shown above, the Staaker drone needs to improve its GPS signal and has an
estimated error of radius 1.25 meters. Both tracker and drone needs an estimated error less
than 5 meters before takeoff can be engaged.
⚠ Note that the GPS position error estimate is a best-effort estimate and might not be
correct.
25

A message will appear if the drone is unable to takeoff for some reason. The most common and
easily fixable is when the drone detects a nearby magnetic disturbance interfering with the
compass sensor:
Refer to the Troubleshooting section on how to interpret and solve warnings displayed on the
tracker.
If both the tracker and drone is ready for takeoff, the following screen will appear:
• •
Press and hold •
countdown will appear on the screen:
The system will countdown from 10 and at 5 seconds the motors will engage and begin spinup.
Liftoff will begin once the countdown reaches 0. If any button is pressed while countdown is in
progress, the takeoff will be aborted.
to start the takeoff procedure. Once the takeoff procedure has started, a
26

Tracking
After takeoff is complete, the drone will begin tracking your movements and following you.
⚠ The battery usage indicator on the tracker has a safety margin built into it. This
means there is still a tiny reserve of power left at 0% which will be used for emergency
landing. This means it is not unsafe or damaging to drain your battery to 0%.
After takeoff is complete, the drone will by default enter the Compass Tracking Mode
and is instantly ready to track your movements.
You can now use the navigation buttons to reposition the drone:
ڹ
ڹ ۃ Increase/Decrease altitude
Λ V Further away/Closer
< >
Left/Right (controls orbit velocity in Circle mode and heading in Scenery)
While tracking or paused, you can perform do the following actions to change tracking mode or
engage landing:
Press • •
once to pause or unpause the drone.
Press and hold • •
to open land menu.
Press
to open the tracking mode selection menu.
27

The mode selection menu (opened by pressing ) looks like this:
The current selection is highlighted in black. Navigate the menu by pressing ڹ
ڹ, ۃ or .
Pressing • •
will confirm your current selection and activate the selected mode. There are two
options in this menu that are not tracking modes, Land and Back:
Back Returns to the previous state without changing anything.
See section Tracking Modes on how each of the tracking modes work.
If you do not select an action within 10 seconds after opening the mode menu, the
tracker will automatically resume previous state.
⚠ Note that while in the mode menu, the ڹڹ/ۃ buttons do not control altitude, but
instead navigates the menu up and down. You can still change altitude by pressing and
holding down ڹ or ۃ.
⚠ When the battery reaches 15% or less, the tracker will begin to beep to warn the
user that the battery charge is getting low and that the drone will land soon.
28
Land Opens the Land Menu

Landing
Open the land menu by either pressing and holding the •• • button or select Land in the mode
menu. You can choose between Land Now or Return to Home. When a landing option is
selected, the drone engages the selected landing mode.
⚠ For safety reasons, the drone will automatically engage Pause while in the land
menu.
If the drone lands by itself, the reason for landing is shown on the bottom of the
land screen:
Land now
The drone will execute landing in its current position and start the descent when Land Now is
activated. You can abort landing anytime by holding the •
• • or ڹ button.
⚠ Emergency landings due to critical low battery (0%), GPS loss on the drone or a
system error cannot be aborted.
The gimbal will tilt upwards while landing so that the camera lens is pointing
upwards for protection.
29
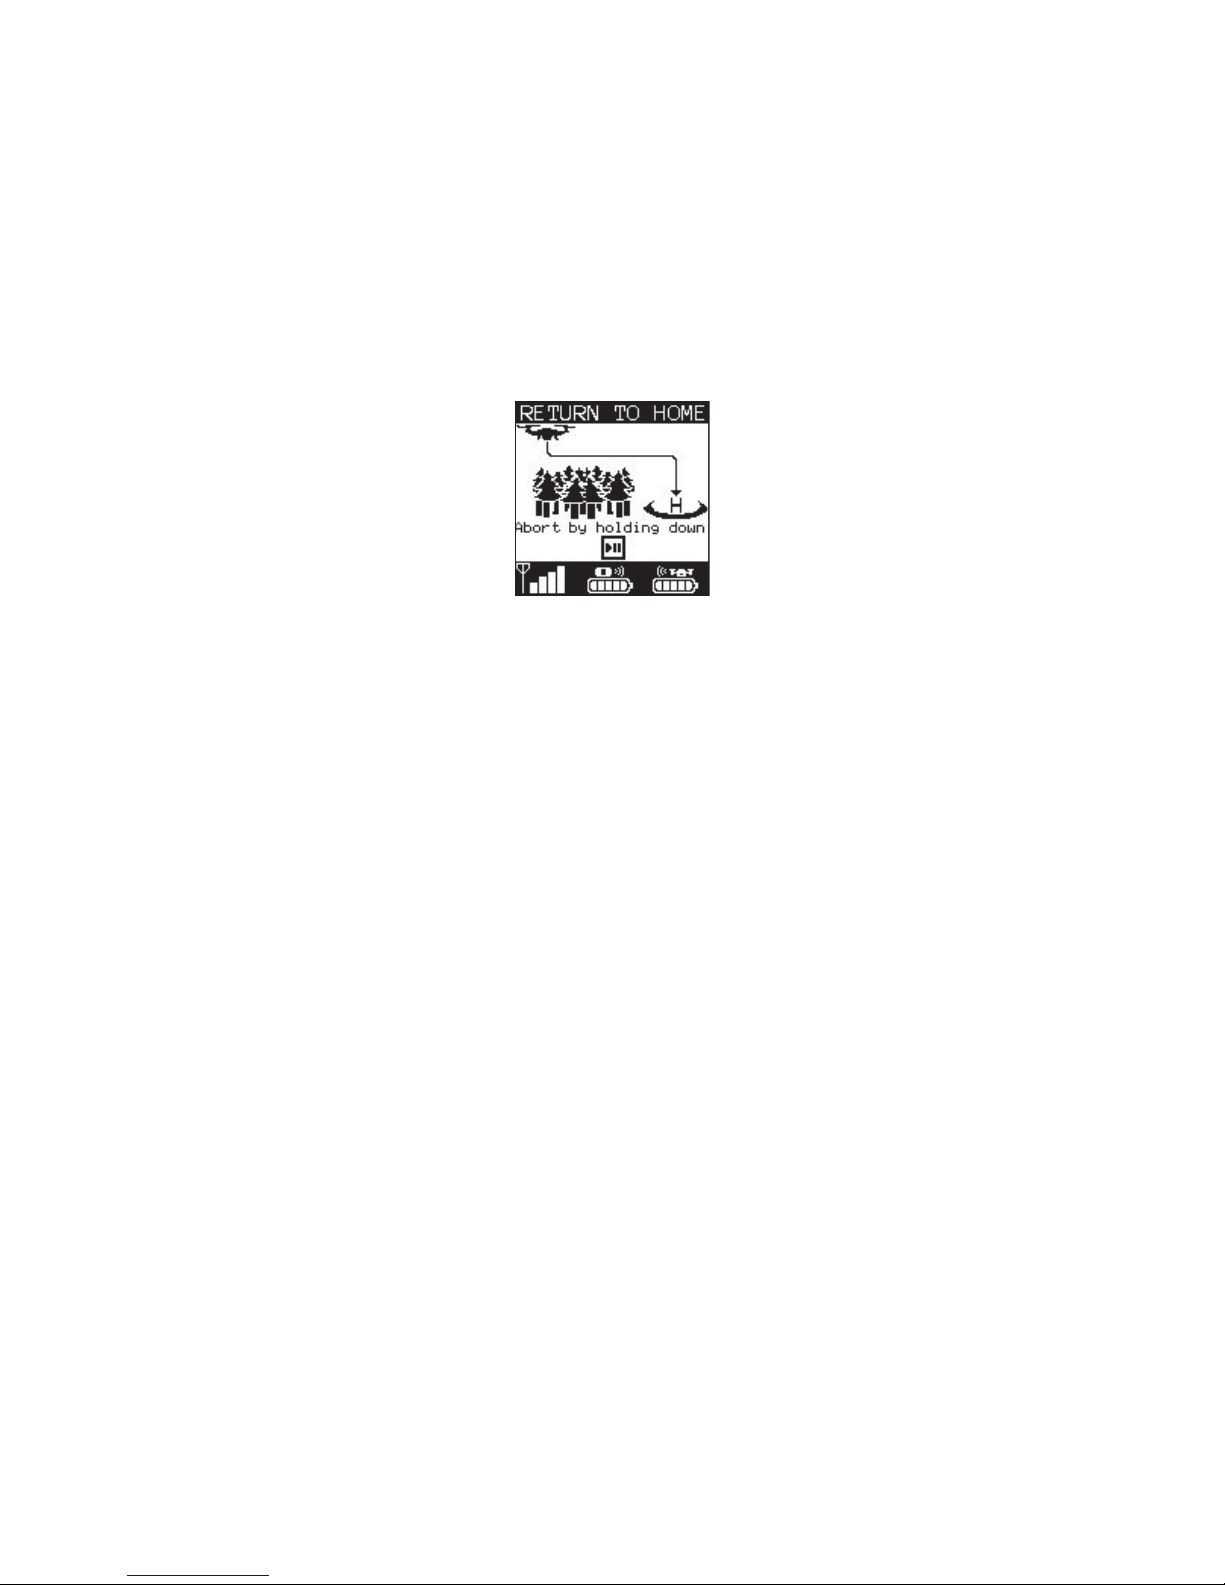
Return To Home (RTH)
When Return to Home is activated the drone ascends 10 m above the highest point of the flight.
When it achieves its altitude, it will fly back to its last takeoff position and land there. The landing
accuracy is about 5m which needs to be taken in consideration when choosing takeoff/landing
location. While flying towards home, the drone will keep pointing its camera towards the tracker
until it starts the descent. If the drone runs out of battery while flying towards home, it will land at
its current position.
You can abort Return to Home at any time as long as you have connection by pressing and
holding •
• •.
⚠ The landing accuracy during automatic Return to Home landing is in the worst case
about 5m. This needs to be taken into consideration when choosing takeoff/landing
location.
If the drone reaches 0% battery while Return to Home is engaged, it will land at its
current position.
•• For your own safety, wait for the propellers to stop before approaching the drone
after it has landed.
30

Pause/ Unpause
While the drone is tracking you, you can pause the drone by pressing •• • once. Pressing • •
again unpauses the drone.
While in pause mode the drone will hold its current position but still point the camera towards
the tracker. You can change mode or land the drone while it is paused. The drone can also be
controlled using the movement buttons:
ڹ
ڹ ۃ Increase/Decrease altitude
Λ V Further away/Closer
< > Left/Right
In a stressed situation, the pause function is a good solution for stopping the drone
in the air.
Mounting the Tracker
The tracker comes with two straps in different lengths, short and long.
1. Short strap, designed for sizes between 6 and 10 inches (15 to 26cm) in circumference.
2. Long long strap, designed for sizes between 10 and 15 inches (24 and 38cm) in
circumference.
We recommend to mount the Tracker on either wrist, lower arm or your overarm, but it may be
mounted anywhere it's possible. In general, the drone will perform better the less vibrations the
tracker senses.
⚠ NB: Remember that the signal strength will be reduced if you cover the areas of the
wireless link or the GPS, and in worst case make the drone do an emergency landing or
crash.
31

Attaching the strap
1. Place the tracker upside down
2. Lead the strap through the slots with the
logo on the strap pointing up.
3. Pull the strap all the way in
Charging the Tracker
Charge the battery before using it for the first time or when it has been unused for extended
periods. Connect the USB cable to a power supply and then plug the end of the USB into the
tracker USB port. Once connected, the tracker will display that it is charging:
Only use the accompanying orange Micro-B USB cable to charge the tracker. Using
unapproved charging equipment might damage the tracker and can cause the battery to
explode.
⚠ Connecting the charger improperly may cause serious damage to the device. Any
damage caused by misuse is not covered by the warranty.
32

How to use the Staaker
Before use
The Staaker drone is ready to fly out of the box. Still we recommend to do some preparations
and make this a routine before every flight. Before takeoff, the drone and the tracker require
connection with each other and a good GPS signal reception. When the system is ready, select
takeoff mode to begin!
Check list
1. Check if you got the latest firmware update on your drone and tracker.
2. Make sure the drone and tracker is not damaged, the propellers are fastened tightly,
arms are locked and the camera is properly secured.
3. Make sure the Tracker and the drone battery is fully charged for a longer and safer flight.
4. Check that the camera gets charged from the drone and the gimbal is working.
5. Make sure that you are not flying in a designated “no fly zone”, nearby airports, urban
areas or in crowded areas such as public parks. Respect the safety and privacy of
others.
Things to be aware of while flying
When takeoff is complete, the drone will instantly enter a follow mode and is ready to track your
movements. If you move around, the drone will match your movements and try to keep you in
the video frame at all times. The drone is not equipped with any anti-collision sensors and it is
important that you takeoff and position it in a location free from obstacles.
While the autopilot will autonomously follow use according to your follow mode instructions, the
person holding the tracker is still the pilot of the system and is responsible that the drone
operates safely. Do not fly the drone close to people, animals or buildings. Remember that the
drone uses GPS technology to track your position and movements, which under nominal usage
has an error of 2.5 meters radius on average. In degraded conditions (for example obstructed
sky due to rainfall or a mountain) the GPS error can be as large as 10 meters.
Due to variable GPS accuracy, it is good practice to place the drone at least 10
meters away from any people (including yourself) at all times.
When using Quick Staak or Pro Staak with Altitude Tracking enabled, you need to be aware that
the drone is flying high enough above the ground. The drone will try to keep a fixed altitude
above you in the Follow, Compass and Circle follow modes. This means that if the tracker
descends 5 meters, the drone will also descend 5 meters. Be aware of this when positioning the
drone, the drone keeps fixed altitude above the tracker and not the ground. It is generally good
33

practice to position the drone high above the ground to avoid any collisions with the ground and
any obstacles such as trees or large rocks.
⚠ When using Water Staak the drone does not change its altitude based on tracker
vertical movements.
Flying above water
When flying over water it is important that you use Water Staak or Pro Staak with Track Altitude
disabled and Return to Home enabled. These options are automatically enabled in Water Staak.
•• By not using the proper settings, you can cause your drone to land or crash into
the water!
Disabling Track Altitude prevents the barometer from being used for altitude tracking. The
barometer cannot measure altitude when in contact with water and will cause the drone to fall
rapidly if enabled.
Enabling Return to Home will prevent the drone from emergency landing in the water (e.g due to
low battery or link loss with tracker). Be sure to choose a takeoff spot that is safe to land in
when flying is complete.
What is a safe Takeoff location?
First ensure that the you area you intend to operate the drone in is not a designated “no fly
zone”. This includes nearby airports, helipads, military installations and any local laws
preventing you to fly in that area.
Do not fly in urban areas and in crowded areas such as public parks. Avoid trafficked roads and
paths where people, animals or vehicles can suddenly appear.
Only fly outside in open spacious areas. Choose a location that is flat and has no grass or
foliage that might interfere with the spinning propellers. The drone will refuse to takeoff if it
detects nearby magnetic interference (e.g large bodies of metal such as a car or underground
metal pipe) which might interfere with its flight stability. Move the drone to an area free from
magnetic interferences.
Note that if Water Staak or Pro Staak with the Return to Home option is used, the drone will
return to the takeoff location if it loses connection with the tracker or when it is running low on
battery and needs to land soon. The landing accuracy is in worst case 5m which needs to be
taken in consideration when choosing takeoff/landing location.
Respect the safety and privacy of others.
34

Takeoff
1. Make sure you are outside and the takeoff location is safe .
2
2. Fold out the arms to flight position then fold out the landing legs to lock the arms in this
position.
3
3. Place the drone on a flat ground and make sure the gimbal and Gopro isn’t touching
anything.
4. Turn on the tracker by pressing and the power button on the right side of the tracker.
5. Insert battery into the Staaker and turn it ON.
6. The tracker and the drone will connect and you will see the drone status on your tracker.
7. Keep at least 10 meters distance from the drone, make sure you have full line of sight of
it at all times.
8. Select takeoff mode from the main menu on your tracker. You can choose between
Quick Staak, Water Staak and Pro Staak .
4
9. Wait for the drone and tracker to establish GPS signal. Drone LED will blink green when
it is ready. Without a good GPS signal the drone will not fly for safety reasons.
10. This is a good time to turn on your camera and start recording. When the drone is ready
for takeoff, use the tracker to confirm by pressing and holding the •
• • button.
11. Press and hold the • •
button and the takeoff countdown starts, this takes 10 seconds
and displayed on the tracker. The drone will liftoff when the countdown reaches 0.
If there is any reason that prevents the drone from takeoff, it will tell you on the tracker screen.
You can abort a takeoff by pressing any button.
Flight
1. Takeoff is completed when the drone reaches 10 meters altitude and the GoPro is
pointing at your tracker.
2. Staaker is now in compass mode and is ready to Staak, so when you are ready to go the
drone will follow you in this position.
3. If you need to change tracking mode or reposition for a better camera angle you can
change mode by pressing the
button, find the desired tracking mode by pressing ڹ
and ۃ
and select by pressing • •. You can also press mode to scroll down in the menu.
Use the arrows on the tracker to move the drone for the desired position. You can also
do this while on the move.
4. The drone has a safety distance and will not move closer than 3m from the tracker.
⚠
The safety distance is disabled in Scenery mode.
For safety reasons, it is good practice to power off the drone before picking it up.
2
See section What is a safe Takeoff location?
3
See section Unfolding the drone
4
See section Takeoff Modes
35

Tracking modes
This section describes the five different interactive flight modes that can
be engaged by the tracker. Under flight, pressing the Mode button at any
time opens the tracking mode selection menu. Use the ڹ
ڹ, ۃ or button
to navigate the menu and select the desired tracking mode. Press the • •
button to confirm selection.
Compass
The drone will always keep a fixed angle relative to north while keeping distance from the
current tracker position. It will also keep a fixed altitude above the current altitude of the tracker.
This keeps the background for the shot the same no matter where you move. A perfect way to
capture riding into the sunset.
ڹ
ڹ Up: Increase altitude
ۃ Down: Decrease altitude
Λ Increase Distance: The drone will move further away from you.
V Decrease Distance: The drone will move closer towards you.
< Left: The drone will move to the left around you.
> Right: The drone will move to the right around you.
Compass is the default mode the drone will start in after a takeoff.
Follow
The drone will keep a fixed distance away and altitude above the tracker position at all times. If
the system detects movements, the drone will smoothly slide behind you and follow you from
the rear instead of keeping a fixed angle. The controls are same as Compass mode:
ڹ
ڹ Up: Increase altitude
ۃ Down: Decrease altitude
Λ Increase Distance: The drone will move further away from you.
V Decrease Distance: The drone will move closer towards you.
< Left: The drone will move to the left around you.
> Right: The drone will move to the right around you.
36

Circle
As soon as you enter this mode, the drone will begin to circle clockwise around the tracker
position. It will keep a fixed distance and altitude above the tracker while orbiting. You can
control the circling speed by pressing and holding the <
and > buttons. Pressing and holding the
opposite direction will decrease speed and eventually change orbiting direction.
ڹ Up: Increase altitude
ۃ Down: Decrease altitude
Λ Increase Distance: The drone will move further away from you.
V Decrease Distance: The drone will move closer towards you.
< Left: Increase counter-clockwise orbit speed
> Right: Increase clockwise orbit speed.
Scenery
In Scenery mode, the drone does not follow the tracker position. You gain full freedom of control
and can fly the drone in a simple and user-friendly manner. If you do not press any buttons
while in this mode, the drone will simply hover and hold its position. The camera will be angled
at 30 degrees at all time while in Scenery mode.
ڹ
ڹ Up: Increase altitude
ۃ Down: Decrease altitude
Λ Forwards: The drone will move forward.
V Backwards: The drone will move backwards.
< Left: The drone will look towards the left.
> Right: The drone will look towards the right.
⚠ The safety distance is disabled in Scenery mode.
37

Hover
In this mode the drone will keep its position and not follow your movements. It will look towards
the tracker and pitch the camera to keep you in the video frame.
ڹ
ڹ Up: Increase altitude
ۃ Down: Decrease altitude
Λ Increase Distance: The drone will move further away from you.
V Decrease Distance: The drone will move closer towards you.
< Left: The drone will move to the left around you.
> Right: The drone will move to the right around you.
38

Drone Smart Battery
The battery is inserted at the back of the drone and secured by a locking mechanism. The drone
has no power until the battery is turned on.
⚠ Ensure that the battery is inserted properly. Failure to do so can lead to in flight
power loss.
To turn the power on
1. Press the power button once.
2. Press and hold the circular button for 2 seconds until all four lights are on.
⚠ Do not power the drone without a camera mounted in the gimbal. The gimbal will
spin erratically without the counter-weight from the camera and can damage your
equipment.
To turn the power off
1. Press the circular button once.
2. Press and hold the circular button for 2 seconds until all four lights are off.
For safety reasons, the battery will power off automatically if it is not used within 30
minutes.
To check the capacity
Press the circular button once. The number of leds will indicate the current charge level (four
leds indicating full charge and one led indicating almost empty). When the charge goes below
10% the last led will start flashing once a second.
39

Charging
•• Only charge the Staaker battery with the accompanying Staaker charger. Damage
to the battery and fire can occur when using the wrong charging equipment.
To charge the battery, insert the Staaker battery charger jack
into the charging plug on the battery.
There are 2 indicators of a charging battery:
1. The 4 battery status LEDs will start flashing to indicate
the charge progress.
2. The charger status light is red.
When the battery is finished charging, the 4 battery status LEDs
will be off, and the battery charger status led will show green.
When the battery is fully charged and plugged into the charger, it is not possible to
check the battery charge status or turn the battery on by pressing the circular button.
⚠ Batteries are based on a chemical reaction and can not deliver power if they are
frozen. When flying in freezing conditions, remember to keep the battery warm before
you fly. After takeoff, the battery will heat itself because draining power generates
internal heat. Our test pilots usually keep the batteries in their inner pockets while they
are preparing to fly.
⚠ Keep in mind that that the drone will do a forced emergency landing if you reach
0% battery during flight which
cannot be aborted.
40

Battery failure
If the battery detects a failure in its safety checks, it will signal a failure by flashing one of the 4
status LEDs 4 times per second. Use the table below to interpret the error:
Battery LED flash pattern
Description
LED1 flash 4Hz
Dangerously low voltage detected
LED2 flash 4Hz
Dangerously high voltage detected
LED3 flash 4Hz
Dangerously low temperature detected
LED4 flash 4Hz
Dangerously high temperature detected
Storage
All batteries deteriorate over time. The most important factors to battery degradation are the
following:
● Too high storage temperature
● Freezing conditions
● Storing fully charged batteries
● Storing empty batteries
To make the most of your Staaker batteries, the batteries should be stored in a dry place at 5°C
to 20°C degrees (41°F to 68°F), and be charged to 50%. This puts the minimal strain on the
internal chemistry of the battery, preserving it longer.
To make your batteries 50% charged for storage, fly them in your drone until the
tracker shows 50%, then land the drone, turn off the battery and store it. If the battery is
below 50%, charge it until there are 2 solid LEDs, then store it.
Battery Warnings
1. Read the whole manual for Staaker 1 before using or charging the battery.
2. Never puncture, deform, disassemble, shock or short circuit the battery.
3. Stop using or charging the battery if it swells up, the temperature exceeds 60 C, it leaks
or anything abnormal happens.
4. Keep battery out of reach of children.
5. Never use a wet battery.
6. Keep away from heat and fire.
7. Only use the original Staaker 1 charger.
8. The user takes the full responsibility of using this battery.
41

Maintenance and repairs
As all sports equipment, maintenance and repairs is important for optimal performance over
long time and usage. Various replacements parts can be purchased from our homepage at
www.staaker.com
.
After flight
For a longer life we recommend to always:
- Rinse the tracker in fresh water if it has been exposed to water. Especially important
after use in salt water to prevent corrosion on the USB port. Be careful to dry off the
tracker after rinsing, especially the USB port.
- Use the casing when transporting.
- Charge the batteries after usage and do not store an empty or full battery for longer
periods.
- Change propellers if damaged.
- Check for damages after hard landings.
- Always use the rubber USB protector on the tracker.
Warranty warning
⚠ We recommend that all repairs is done by personnel authorized by Staaker, if this
is done by unauthorized personnel it will affect the warranty of the product.
See “Terms
& Warranties”.
Replacing arms
1. Place the drone upside down, unfolded, on a table.
2. Loosen all set screw on all four legs.
3. Unscrew all four socket head cap screws for the legs and remove them.
4. Unscrew all torx on the bottom part of the main body.
5. Lift up the bottom part a few cm and unplug the LED.
6. Unplug the gimbal power and the gimbal signal cable.
7. Unplug the connectors for the motor and change the arm. Remember to match the
colors of the connectors when replacing the new one.
8. Assembly by doing point 1-6 in reverse.
⚠ Ensure that no cables get squeezed when reassembling.
42

Replacing Gimbal
1. Place the drone upside down, unfolded, on a table.
2. Loosen all set screw on all four legs.
3. Unscrew all four socket head cap screws for the legs and remove them.
4. Unscrew all torx on the bottom part of the main body.
5. Carefully lift up the bottom part and unplug the LED.
6. Unplug the gimbal power and the gimbal signal cable.
7. Unscrew the two unbrako screws on top of the gimbal, this will release the gimbal from
the drone body.
8. Replace the gimbal.
9. Assembly by doing point 1-6 in reverse.
⚠ Ensure that no cables get squeezed when reassembling.
Replacing landing gear
1. Place the drone upside down, unfolded, on a table.
2. Loosen all set screw on all four legs.
3. Unscrew all four socket head cap screws for the legs and remove them.
4. Replace the broken parts
5. Assembly by doing point 1-3 in reverse.
Motors
1. Place the drone upside down, unfolded, on a table.
2. Loosen all set screw on all four legs.
3. Unscrew all four socket head cap screws for the legs and remove them.
4. Unscrew all torx on the bottom part of the main body.
5. Lift up the bottom part a few cm and unplug the LED.
6. Unplug the gimbal power and the gimbal signal cable.
7. Unplug the connectors for the motor take out the arms. Remember to match the colors of
the connectors when replacing the new one.
8. Unscrew the middle hex screw and the four unbrako screws on the arm.
9. Replace the motor.
10. Assembly by doing point 1-8 in reverse.
⚠ Ensure that no cables get squeezed when reassembling.
43

Propellers
1. Unfold the arms.
2. Hold the motor and spin the propellor in the directed direction shown
on the top of the propellor.
3. Use propellers with white lines around the nut if the motor has a white
dot on top of the shaft. If the motor doesn't have a hvite dot, use the
propellers with no white markings.
4. Spin the propellor in the directed direction shown on the top of the
propellor to tight it.
•• Make sure the propeller sits tight. A loose propeller might detach under flight and
make the drone crash.
If you use wrong propellers on the motors the treads on the shaft and nut will not
match.
44

Staaker tips
Camera tips
ISO: as low as possible considering the conditions.
FOV: Medium or narrow if possible.
Drone Tips
Improving tracking accuracy
By using Locate Staaker before takeoff, you can determine how accurate the current GPS fix is
by looking at the estimated distance between drone and tracker. For example if you are
standing next to the drone and Locate Staaker reports 5 meters distance, the GPS has currently
an error of 5 meters which can adversely affect tracking performance and camera framing. For
optimal conditions the error should be 2 meters or less. To reduce GPS position error, try
waiting for more satellites to become visible or moving both the tracker and drone which has a
clear unobstructed view of the sky in all directions.
Picking up the tracker and drone and walking around with them can also reduce GPS error
significantly. While GPS fix will improve under normal flight movements, reducing GPS error
before takeoff will make the drone perform optimally right after liftoff.
Improve altitude tracking
You can use Locate Staaker before takeoff to display the estimated altitude difference between
the tracker and the drone. If you place the tracker on top of the drone, the altitude difference
should display 0 meters. If this value is non-zero, there is an error in altitude estimation which
can be removed by using the Calibrate Altitude option. A large error in altitude can cause
incorrect framing and degraded tracking performance.
45

Troubleshooting
Error Messages
This section explains the various error messages that can be displayed on the tracker. An error
message on the tracker looks like this:
Error Message:
Description:
What to do:
GPS interference detected
Unusual interference
detected on Staaker’s
GPS
Change the drone location or
try again later.
Magnetic interference
detected
Magnetic disturbance
interferes with the drone’s
compass.
Try to move the drone to
another location. Magnetic
objects can occur in the
ground or nearby objects
such as cars or power lines,
reinforced concrete,
underground piping, buildings
etc.
Drone GPS Loss
The drone GPS signal is
too poor for takeoff.
Wait for better signal or move
around with the drone to
establish a better view of the
sky.
In this case, the drone cannot takeoff because it detects nearby magnetic interference. To solve
the issue and enable takeoff, the drone needs to be moved away from the magnetic
disturbance.
Before or during takeoff
46

Tracker GPS Loss
The tracker GPS signal is
too poor for takeoff.
Wait for better signal or move
around with the tracker to
establish a better view of the
sky.
Staaker has too low battery
for automatic Return to
Home
The drone battery level is
below the required level
for an automatic Return to
Home and will refuse to
takeoff.
Either use ProStaak option to
disable automatic Return to
Home or use a fully charged
battery.
Failsafe mode engaged
A serious system error
was detected. More
detailed error message
appears in the main
menu.
This usually indicates a fatal
system error for one of the
drone’s sensors. Contact
support for more help.
Bad battery
There is something wrong
with the battery.
The SmartBattery might be
damaged and is not working
correctly. Replace the battery.
Drone must be level
The ground that the drone
is standing on is not level
enough for it to take off.
Move the drone to level
ground.
Drone movement detected
The drone moved while
doing the preflight check.
Do not touch the drone when
takeoff is engaged.
Make sure the drone is stable
and not taking off from a
moving object.
47

Under Flight
Error Message:
Description:
What to do:
High battery temperature
detected
Battery is too hot. The drone
will go to preselected
landing mode.
Land the drone as soon as
possible.
Low battery temperature
detected
Battery is too cold. The
drone will go to preselected
landing mode.
Land the drone as soon as
possible.
Drone GPS interference
detected
The drone has bad GPS
because of radio
interference. The drone may
lose GPS.
The reason can be a
nearby transmitter
disturbing the drone GPS
signal. The problem could
disappear by itself. If not,
land the drone as soon as
possible.
48

Land reasons
Error Message:
Description:
What to do:
Land requested by user
User selected “Land now” in
the tracker menu
It is possible to abort the
landing by holding •
• • or ڹ
Critical low battery
The battery level was too
low and the drone has to
emergency land
immediately.
You cannot abort this
landing; the battery level is
too low.
Critical high battery temp
Battery is too hot. The drone
will land at its current
location.
You cannot abort this
landing.
Critical low battery temp
Battery is too cold. The
drone will land at its current
location.
You cannot abort this
landing.
Staaker lost GPS
The Drone has no GPS and
doesn’t know where it is and
if it’s moving or not.
You cannot abort this
landing, keep distance until
landing is completed.
Lost tracker link
The drone will hover for 3
minutes and then land at its
position if link between the
drone and tracker is not
reestablished. If automatic
RTH is enabled, it will RTH
instead.
Try to move closer to the
drone. Keep a clear path
between the drone and the
tracker. Other transmitters
can also interfere with the
Staaker link signal.
Aborted takeoff
Takeoff is aborted if any
buttons are pressed in
takeoff state.
Do not press any buttons
until the drone has reached
its height and is pointing at
you.
49

Return to home (RTH) reasons
Error Message:
Description:
What to do:
RTH requested by user
User selected “Return to
home” in the tracker menu
The RTH can be aborted by
user. If auto RTH is
aborted, the drone will not
go to automatic RTH again
at 40% battery level.
RTH due to low battery
If you are in Water staak or
Pro staak with the RTH
selected the drone will do a
auto RTH when it reaches
40% battery remaining.
The RTH can be aborted by
user. If auto RTH is
aborted, the drone will not
go to automatic RTH again.
RTH due to high battery
temperature
Battery is too hot. The drone
will go to preselected
landing mode.
You cannot abort this
landing.
RTH due to low battery
temperature
Battery is too cold. The
drone will go to preselected
landing mode.
You cannot abort this
landing.
RTH due to lost tracker link
The drone will hover for 1
minute then do a RTH if link
is not reestablished.
Try to move closer to the
drone. keep a clear path
between the drone and the
tracker. Other antennas
can also interfere with the
Staaker link signal.
Automatic Return to Home will only happen if you are in Water Staak or Pro Staak
with the
Return to Home setting enabled. If you lose connection with the tracker while
flying
Scenery mode, the drone will engage automatic Return to Home flight.
50

Tracker cannot connect to the drone
● Make sure the drone is powered. When the battery is inserted and turned on, the
drone should immediately make a beeping sound to notify that it is now powered.
The LED under the drone should also start to blink and the gimbal should startup
in about 17 seconds after the beep.
● Try to pair the tracker with the drone. If you replaced drone or tracker or updated
firmware, you need to pair the tracker with the drone.
● Make sure there is clear path between drone and tracker.
If the tracker doesn’t find the drone while pairing
● Try turning the drone power off and on again.
● Make sure the tracker and drone are running the same firmware version.
Staaker Assist problems
Trouble shooting guide for connection is also provided in Staaker Assist.
Tracker will not connect to Staaker Assist
1. Make sure the tracker is off
2. Check for damages on the USB connectors and cable
3. Try to re-plug the USB
4. Unplug the USB and press and hold
while turning on the tracker.
Drone will not connect to Staaker Assist
1. Sometimes it takes some seconds before the drone is ready after connections.
2. Check for damages on the USB connectors and cable
3. Try to re-plug the USB
System cannot get GPS reception
About GPS Technology
To get the exact coordinates needed for flying, the drone and tracker need contact with at least
6 satellites for precise location at all time. The best GPS reception is gained from a clear and
unobstructed view of the sky in all directions (eg. flat terrain or at the ocean). Weather
conditions such as clouds, fog or rain can reduce GPS visibility. The worst GPS reception is
found in terrain where view of the sky is obstructed (eg. a narrow valley or in a street between
high rises) and/or in bad weather (eg. cloudy/thunderstorm/rain/fog).
51

The red lines indicates satellites which causes degraded position accuracy (e.g signals passing
through buildings/trees or signals reflected on buildings/mountains). A degraded GPS signal can
cause the drone to drift in position and not follow the tracker properly. Therefore, do not fly the
drone in urban areas or GPS denied environments.
5
If Tracker cannot get GPS
● Improve GPS conditions for tracker by moving around with it. Try to keep the
tracker’s screen pointing towards the sky.
● Keep clear of obstacles between the tracker and the sky and do not cover the
tracker with any materials so that the view of the sky is obstructed. The tracker
GPS reception becomes better the more of the sky it can see.
If drone cannot get GPS
● Improve GPS conditions for drone by moving around with it.
● Make sure that the drone is not altered in any way, do not mount stuff on it or
cover parts of it.
5
In addition to most local laws forbid flight of drones in urban areas.
52

● Keep clear of obstacles between the drone and the sky and do not cover with any
materials so that the view of the sky is obstructed. The GPS reception becomes
better the more of the sky it can see.
Tracker looses connection to the drone often
● Keep tracker on the arm and keep a free line of sight between tracker and the
drone. The recommended placement of the tracker is on your arm, preferably on
your upper arm, to improve the quality of the link between the tracker and the
drone.
● Keep the tracker away from any metal objects. Metal object can greatly reduce
the performance of the tracker’s link to the drone. It is therefore recommended to
keep the tracker away from any and all metal objects during use. The minimum
allowed distance from metal, for safe usage of the system, is 10cm (4 inches).
The drone landed or crashed and I cannot find it
From the main menu, select Locate Staaker. A screen will display the direction and distance to
the last known position of the Staaker relative to your current position. The tracker needs GPS
reception for this functionality to work. Press the •
• • button while in this mode and the drone will
beep to notify you where it is.
The drone changes altitude too much
Mount outside clothes. Do not put inside something else (pockets, bags etc.). The
recommended placement of the tracker is on your arm, and preferably on your upper arm. It
should also be placed outside of any clothes, as it is completely waterproof. Altitude fluctuations
while flying might occur if the tracker is used while contained inside something.
The drone does not always respond to my button presses
● Check if there is connection between the drone and the tracker. If so, see
“Tracker loses connection to the drone often”
● Make sure the tracker is not damaged.
The drone crashed for unexpected reasons
● Contact Staaker tech-support and upload the flight log using staaker-assit. Write
down the date and time of the flight.
● Let us know how the crash happened.
● If the drone breaks and you cannot fix it, please collect all the pieces you can find
and contact Staaker support.
53

Staaker Assist
Staaker Assist is the assist and update software for both the drone and tracker. We always want
to improve the product and give our users a better experience to make this the optimal tool for
filming. By reviewing every flight, we always find things to improve.
By downloading the application from our webpage: www.staaker.com
you can easily connect
your Staaker for uploading flight logs and update your Staaker’s firmware.
⚠ Staaker Assist supports Mac, Windows and Ubuntu. It requires Java 8 or later
installed to work.
Flight logs
By using the Staaker Assist application on your desktop you will help us improve reliability and
user experience when using the Staaker and Tracker. By connecting your drone to the Staaker
Assist, the latest flight logs from your drone will be uploaded and used for further development
and user experience improvements. Logs are also required in warranty cases.
How to upload flight log:
1. Make sure your computer is connected to the internet.
2. Start the Staaker Assist app.
3. Plug your drone by using the USB.
4. The flight log uploading starts automatically.
5. Wait until the uploading is complete.
54

Firmware update
All firmware updates will be announced on our webpage. By downloading our Staaker Assist
app you can easily update your drone and tracker. Staaker Assist requires internet connection
and will download and update the latest firmware version for you. Staaker Assist will also notify
you if there is a new firmware since last time you updated your Staaker when you are plugged
inn.
You can easily see what firmware Version you have on your Staaker by going to “About” in the
tracker main menu. You can see the changes in the new version by clicking <Help><Changelog> in Staaker Assist
It’s best practice that you always update both tracker and drone with the latest firmware,
different versions are not
compatible.
Step by Step Guide:
● Go to www.staaker.com
and download the latest version of Staaker Assist for your
computer.
● Check if you got the latest firmware at www.staaker.com
or Staaker Assist, your current
firmware is listed in the About Screen in the tracker main menu.
● Plug in your drone with the USB (using the orange micro usb cable) to your computer
and press “Update Staaker Firmware”.
● Wait for completion in Staaker Assist. When the drone firmware is complete and the
flight log is uploaded, unplug the drone.
● Connect the Tracker with the USB (using the orange micro usb cable) to your computer
● Press <Update Tracker Firmware> in Staaker Assist
● Wait for completion in Staaker Assist, unplug you Tracker
● Confirm version by checking About screen in your tracker main menu
● Re-pair the tracker and drone if necessary.
55

Terms & Warranties
These terms and conditions of sale (“Terms”) govern the purchase of any products (“Products”) from The
Staaker Company AS, The Staaker company USA Inc. or any of their subsidiaries (“Staaker” or “we”)
unless where there is a separate written agreement with customer (“Customer” or “you”) that specifically
supersedes the Terms.
Assumption of risks
You agree to comply with all applicable local, state and national laws in connection with your use of the
Product, including Federal Aviation Administration (or similar authorities in other countries) regulations
and advisories. You understand and agree that the Product is not made or intended for use in any
application or hazardous environment that requires fail-safe performance, where the failure or inaccuracy
of the Product or its use might result in or cause death, personal injury, collision, or significant
environmental damages (“High-Risk Activities”). High-Risk Activities include without limitation operation
near any animal, power line, cellular or other radiofrequency tower, mining area, any other
electromagnetic interference environment, obstacle, airport, airfield or industrial facility or area. The
Products are not toys and improper operation may cause serious injury and property damage. You agree
to use precautions when using your Product.
Staaker accepts no risk, obligation or liability whatsoever to you or any third party for any of the following
(“Disclaimed Activities”) performed or caused, by act or omission, by you or a third party with access to
your Product:
· use of the Product contrary to Staaker’s published information, specifications and instructions, including,
but not limited to, storage requirements and environmental conditions or ranges for temperature or
humidity, leaving the Product in direct sunlight for long periods, use of the Product for High-Risk Activities,
use of the Product in combination with any third party device not provided or recommended by Staaker,
and affixing anything to the Product;
· repairs, modifications, adjustments or repairs to the Product made by a party not authorized by Staaker;
· damage from any external cause, including, but not limited to, sand, dirt, improper usage of any
electrical source, battery leakage, or local power surges;
· any damage to property or persons caused by your Product that is not caused by material defect for
which Staaker is held responsible, including your failure to properly operate or understand the
functionalities of the Product;
· improper use such as allowing the Product to land on unstable surfaces or dangerous terrain, using the
Product in inclement weather or low light, failure to maintain line-of-sight with the Product when using it,
attempting to charge the Product with chargers not provided by Staaker;
· failure to purchase any insurance required by law to operate the Product in your area;
· failure to determine the suitability of the Product for your intended use;
· failing to make sure that any other person who uses the Product also complies with these terms and any
other guidance we provide you, whether this guidance is included in writing with the Product or made
available on our website;
· any continued use of the Product after you detect any material defect, including erratic responses to
user input;
56

· failure to adhere to Federal Aviation Administration (or similar authorities in other countries) regulations
and advisories, as well as any other relevant laws and applicable rules; and
· any other use of the Product that must reasonably be considered improper.
Product warranty and return
You agree to read, and abide by any written instructions shipped with your Product and all safety
precautions contained therein. If you do not understand any part of any of these instructions or the
functionality of Product, you may view the FAQ on our webpages or contact us at support@staaker.com.
Limited One-Year Warranty
Our Products are warrantied against manufacturing defects for a period of one year from the original date
of delivery of the Product to you. Our sole obligation in the event of such defects during this period is to
repair or replace the defective part or Product with a comparable part or Product; how we replace or
repair the Product is at our sole discretion. Replaced or repaired Products will be warrantied for the
remainder of the original warranty period or thirty (30) days from the date of delivery of the replaced or
repaired Product to you, whichever is longer.
Please note that this warranty ONLY applies to the original purchaser.
Warranty Exclusions
You agree to fully read the instructions and guidance we provide and review the Product’s capabilities
and
constraints before using the Product. Notwithstanding the limited warranty above, you assume all liability
and we have no obligation whatsoever to you or anyone else for any of the Disclaimed Activities
mentioned herein.
All Products that are returned to us become our property. Staaker is not responsible for any memory card,
content
or information stored in any Product you return to us, whether under warranty or not.
ALL IMPLIED WARRANTIES OF MERCHANTABILITY OR FITNESS FOR A PARTICULAR PURPOSE
ARE LIMITED TO THE DURATION OF THE EXPRESS WARRANTY ABOVE. ALL OTHER EXPRESS
OR IMPLIED WARRANTIES OR CONDITIONS, INCLUDING ANY IMPLIED WARRANTY OF
NON-INFRINGEMENT AND ANY WARRANTIES ARISING OUT OF COURSE OF DEALING OR USAGE
OF TRADE, ARE DISCLAIMED. NO ADVICE OR INFORMATION, WHETHER ORAL OR WRITTEN,
OBTAINED FROM STAAKER OR ELSEWHERE, WILL CREATE ANY WARRANTY NOT EXPRESSLY
STATED IN THESE TERMS AND CONDITIONS. Some jurisdictions do not allow limitations on how long
an implied warranty lasts, so the above limitation may not apply to you. This warranty gives you specific
legal rights, and you may also have other rights which vary by jurisdiction.
57

Return of products
You must obtain a Return Materials Authorization (“RMA”) number from us prior to returning any Products
to us under the Limited One-Year Warranty, carefully and return it to us,
freight prepaid, together with the RMA. The returned Product must be in the original package and free of
any defect or damage caused by shipping. If we determine to repair or replace your Product under the
Limited One-Year Warranty, we will pay the return costs for ground shipping. If we reasonably determine
that the Product you returned is not defective or does not fall within the 30-Day Worry Free Guarantee,
we will contact you and will arrange for reshipment to you at your cost, plus a handling fee equal to 15%
of the Product purchase price. If you decline to pre-pay such shipping and handling costs, we are under
no obligation to return such non-defective Product to you.
You can only make returns as follows:
· Before requesting an RMA, please contact our customer support by clicking on Contact Us on our
website.
· If we are unable to solve your problem via email, please request an RMA number. If our customer
support determines that you are within your 30-Day Worry Free Guarantee or that your problem qualifies
under warranty coverage you will be issued an RMA number.
· Package Products along with a copy of the RMA form.
· Write the RMA number on the outside of the box and send it to the appropriate address based on your
specific location. Please do not hand-deliver your product to the addresses provided, even if you are
local. These locations are not set up to receive visitors.
Indemnity
You agree to defend, indemnify, and hold Staaker, its subsidiaries and affiliates, and their officers,
directors, employees and agents, harmless from and against any claims, liabilities, damages, losses, and
expenses, including, without limitation, reasonable legal and accounting fees, arising out of or in any way
connected to your violation of these Terms and your participation in Disclaimed Activities, or for liabilities,
interest, penalties or fees assessed against us arising from any failure by you to pay any required taxes.
Limitations of Liability
SUBJECT TO OUR WARRANTY PROGRAM, THE PRODUCT IS PROVIDED ON AN “AS IS” BASIS
AND YOUR USE OF THE PRODUCT IS AT YOUR OWN RISK, AND IN NO EVENT WILL STAAKER BE
LIABLE FOR ANY PUNITIVE, EXEMPLARY, SPECIAL, CONSEQUENTIAL OR INCIDENTAL
DAMAGES (INCLUDING, WITHOUT LIMITATION, LOSS OF REVENUE, USE, PROFITS, DATA, OR
GOODWILL) OR COSTS OF PROCURING SUBSTITUTE PRODUCTS, ARISING OUT OF, RELATING
TO, OR IN CONNECTION WITH THESE TERMS OR THE PURCHASE, SALE, USE, OPERATION OR
PERFORMANCE OF THE PRODUCTS, WHETHER SUCH LIABILITY ARISES FROM ANY CLAIM
BASED UPON CONTRACT, WARRANTY, TORT (INCLUDING NEGLIGENCE), PRODUCT LIABILITY
OR OTHERWISE, WHETHER OR NOT STAAKER HAS BEEN ADVISED OF THE POSSIBILITY OF
SUCH LOSS OR DAMAGE. YOU AND STAAKER HAVE AGREED THAT THESE LIMITATIONS WILL
SURVIVE AND APPLY EVEN IF ANY LIMITED REMEDY SPECIFIED IN THESE TERMS IS FOUND TO
HAVE FAILED OF ITS ESSENTIAL PURPOSE. IN NO EVENT WILL STAAKER’S LIABILITY TO YOU
58

ARISING OUT OF, RELATING TO, OR IN CONNECTION WITH THESE TERMS, FROM ALL CAUSES
OF ACTION AND UNDER ALL THEORIES OF LIABILITY, EXCEED THE ACTUAL AMOUNT PAID TO
STAAKER BY YOU FOR THE PRODUCT THAT GIVES RISE TO THE CLAIM. Some jurisdictions do not
allow the limitation or exclusion of liability for incidental or consequential damages, so the above limitation
or exclusion may not apply to you.
Software License
Any software installed in the Products (the “Software”) is licensed and not sold to Staaker’s customers.
You may only use this software for its normal, intended use with the Products and in line with these
Terms. When we say “sell” and “purchase” in these Terms, we mean “sell” and “purchase” only with
respect to the non-software elements of the Product. These Terms apply whether or not they are included
with the Products sold hereunder.
Subject to your compliance with these Terms, Staaker grants you a limited, non-exclusive,
non-transferable, non-sublicenseable license to use the Software as part of your use of the Product for
your own personal, non-commercial purposes and for no other purposes. You may not (i) copy, modify or
create derivative works based on the Software; (ii) distribute, transfer, sublicense, lease, lend or rent the
Software to any third party; (iii) reverse engineer, decompile or disassemble the Software; or (iv) make
the functionality of the Software available to multiple users through any means. Staaker reserves all rights
in and to the Software not expressly granted to you under these Terms. All Software is protected by U.S.
and international copyright law and treaties.
All the Software and any related documentation are “commercial items” as that term is defined in FAR
2.101, consisting of “commercial computer software” and “commercial computer software documentation,”
respectively, as such terms are used in FAR 12.212 and DFARS 227.7202. To the extent that the
Products are being acquired by or on behalf of the U.S. Government then, as provided in FAR 12.212 and
DFARS 227.7202-1 through 227.7202-4, as applicable, the U.S. Government’s rights in the software and
any related documentation will be only those specified in these Terms.
Dispute Resolution
These Terms and any action related thereto will be governed by the laws of the State of California without
regard to its conflict of laws provisions.
For any dispute, claim or controversy with Staaker arising out of or relating to these Terms or the use of
the Product (collectively, “Dispute”), you agree to first contact us and attempt to resolve the Dispute with
us informally. In the unlikely event that Staaker has not been able to resolve a Dispute with you after 30
days, you and Staaker agree that it shall be settled by binding arbitration, except that each party retains
the right: (i) to bring an individual action in small claims court and (ii) to seek injunctive or other equitable
relief in a court of competent jurisdiction to prevent the actual or threatened infringement,
misappropriation or violation of a party’s copyrights, trademarks, trade secrets, patents or other
intellectual property rights (the action described in the foregoing clause (ii), an “IP Protection Action”); and
(iii) you retain the right to litigate any Dispute other than an IP Protection Action by providing Staaker with
written notice of your desire to do so by email or regular mail within thirty days following the date you first
accept these Terms (such notice, an “Arbitration Opt-out Notice”). If you don’t provide Staaker with an
Arbitration Opt-out Notice within the 30-day period, you will be deemed to have knowingly and
intentionally waived your right to litigate any Dispute except as expressly set forth in (i) and (ii) above. The
exclusive jurisdiction and venue of any IP Protection Action or, if you timely provide Staaker with an
Arbitration Opt-out Notice, will be the state and federal courts located in California and each of the parties
hereto waives any objection to jurisdiction and venue in such courts. Unless you timely provide Staaker
59

with an Arbitration Opt-out Notice, you acknowledge and agree that you and Staaker are each waiving the
right to a trial by jury or to participate as a plaintiff or class member in any purported class action or
representative proceeding. Further, unless both you and Staaker otherwise agree in writing, the arbitrator
may not consolidate more than one person's claims, and may not otherwise preside over any form of any
class or representative proceeding. If this specific paragraph is held unenforceable, then the entirety of
this “Dispute Resolution” section will be deemed void. Except as provided in the preceding sentence, this
“Dispute Resolution” section will survive any termination of these Terms.
The arbitration will be administered by the American Arbitration Association (“AAA”) in accordance with
the Commercial Arbitration Rules and the Supplementary Procedures for Consumer Related Disputes
(the “AAA Rules”) then in effect, except as modified by this “Dispute Resolution” section. (The AAA Rules
are available at https://www.adr.org/aaa/faces/rules/searchrules or by calling the AAA at
1-800-778-7879). The U.S. Federal Arbitration Act will govern the interpretation and enforcement of this
Section.
A party who desires to initiate arbitration must provide the other party with a written demand for Arbitration
as specified in the AAA Rules. (The AAA provides a form Demand for Arbitration at
https://www.adr.org/aaa/faces/services/fileacase/forms). The arbitrator will be either a retired judge or an
attorney licensed to practice law and will be selected by the parties from the AAA’s roster of arbitrators. If
the parties are unable to agree upon an arbitrator within 7 days of delivery of the Demand for Arbitration,
then the AAA will appoint the arbitrator in accordance with the AAA Rules.
Unless you and Staaker agree otherwise, the arbitration will be conducted in the county where you reside.
If your claim does not exceed 10,000 U.S. dollars, then the arbitration will be conducted solely on the
basis of the documents that you and Staaker submit to the arbitrator, unless you request a hearing or the
arbitrator determines that a hearing is necessary. If your claim exceeds 10,000 U.S. dollars, your right to
a hearing will be determined by the AAA Rules. Subject to the AAA Rules, the arbitrator will have the
discretion to direct a reasonable exchange of information by the parties, consistent with the expedited
nature of the arbitration.
The arbitrator will render an award within the time frame specified in the AAA Rules. The arbitrator’s
decision will include the essential findings and conclusions upon which the arbitrator based the award.
Judgment on the arbitration award may be entered in any court having jurisdiction thereof. The arbitrator’s
award of damages must be consistent with the terms of the “Limitation of Liability” section above as to the
types and amounts of damages for which a party may be held liable. The arbitrator may award
declaratory or injunctive relief only in favor of the claimant and only to the extent necessary to provide
relief warranted by the claimant’s individual claim. If you prevail in arbitration you will be entitled to an
award of attorneys’ fees and expenses, to the extent provided under applicable law. Staaker will not seek,
and hereby waives all rights it may have under applicable law to recover, attorneys’ fees and expenses if
it prevails in arbitration.
Your responsibility to pay any AAA filing, administrative and arbitrator fees will be solely as set forth in the
AAA Rules. However, if your claim for damages does not exceed 75,000 U.S. dollars, Staaker will pay all
such fees unless the arbitrator finds that either the substance of your claim or the relief sought in your
Demand for Arbitration was frivolous or was brought for an improper purpose (as measured by the
standards set forth in Federal Rule of Civil Procedure 11(b)).
If Staaker changes this “Dispute Resolution” section after the date on which you placed your order for a
Product, you may reject any such change by sending us written notice within 30 days of the date such
change became effective. By rejecting any change, you are agreeing that you will arbitrate any Dispute
between you and Staaker in accordance with the provisions of this Dispute resolution section as of the
date you first accepted these Terms (or accepted any subsequent changes to these Terms).
60

61

General Terms
These Terms constitute the entire and exclusive understanding and agreement between you and Staaker
regarding the purchase of a Product, and these Terms supersede and replace any and all prior oral or
written understandings or agreements between us regarding such a purchase.
If for any reason a court of competent jurisdiction finds any provision of these Terms invalid or
unenforceable, that provision will be enforced to the maximum extent permissible and the other provisions
of these Terms will remain in full force and effect.
You may not assign or transfer these Terms, by operation of law or otherwise, without our prior written
consent. Any attempt by you to assign or transfer these Terms, without such consent, will be null. We
may freely assign or transfer these Terms without restriction. Subject to the foregoing, these Terms will
bind and inure to the benefit of the parties, their successors and permitted assigns.
Any notices or other communications provided by us under these Terms, including those regarding
modifications to these Terms, will be given: (i) via email; or (ii) by posting to our website. For notices
made by e-mail, the date of receipt will be deemed the date on which such notice is transmitted.
Staaker’s failure to enforce any right or provision of these Terms will not be considered a waiver of such
right or provision. The waiver of any such right or provision will be effective only if in writing and signed by
a duly authorized representative of Staaker. Except as expressly set forth in these Terms, the exercise by
either party of any of its remedies under these Terms will be without prejudice to its other remedies under
these Terms or otherwise.
These Terms were last updated
August 1, 2016
62

Technical Specifications
PRODUCT FEATURES
EASY TO USE
Ready to film in 30 sec, and super
easy to operate
HIGH QUALITY POWERTRAIN
Dust and snow resistant motors with
high quality bearings
RETURN TO HOME
You can choose from two landing
options, land where you are or
return to take-off spot. Clever if
you are doing water sports!
WEATHERPROOF
Designed for, and tested, in all
kinds of weather. Staaker flies in
snow, wind and rain!
PERFECTLY STABLE FOOTAGE
3 axis gimbal, with high accuracy,
stabilizes the camera at all times
WIND RESISTANCE
Staaker can withstand winds up
to 30 kph / 20 mph
ULTRA ACCURATE
POSITIONING
Ultra accurate positioning, with
concurrent satellite tracking using
GPS, GLONASS and SBAS
SMART BATTERY TECHNOLOGY
Accurate battery estimation,
over-heat protection, safety charge
protection, easy re-charging
PRE CALIBRATED
No calibration required!
Proprietary smart auto calibration
technology
63

Staaker Drone
Flight Range: 30 km / 19 miles
Max Speed: 80 kmh / 50 mph
Flight Modes: 5
Tracking Accuracy Vertical: Less than 10 cm / 4 in
Tracking Accuracy Horizontal : Less than 0.5 m / 1.5 ft
6
Max Distance: 50 m / 165 ft
Min Distance: 3 m / 10 ft
Max Alt: 50 m / 165 ft above tracker
Min Alt: 2 m / 6.5 ft above tracker
Water resistance: Splash proof
Operating Temperatures: -20 C / -4 F To 40 C / 104 F
Camera Stabilizer: 3 axis brushless motor
Motors: 900 kv motors with 4.8 kg total thrust
Dimensions (Folded)
Width: 200 mm
Length: 340 mm
Height: 110 mm
Dimensions (Expanded)
Width: 440 mm
Length: 340 mm
Height: 150 mm
6
Short term, -130 dBm, > 12 SVs
64

Tracker
Transmission Range: 500 m
Frequency Band: 2.4 GHz
Water resistance: Waterproof
Operating Temperatures: -20 C / -4 F to 40 C /
104 F
Dimensions:
- Width: 55 mm
- Length: 85 mm
- Height: 30 mm
Weight: 85 gram
Battery: 2000mAh 3.7 V LiPo
Battery Life: 24 hours (Charge via
USB)
Smart Battery
Name: STAAKER 1 Intelligent LiPo Battery
Art. nr: 120000
Rated Capacity: 6400mAh, 94.72Wh
Max Charge Voltage: 16.8V
Nominal Voltage: 14.8V
Charging temperature: 0 ~ 45ʹC
Optimal storage temperature: -20ʹ ~ 25ʹC
Optimal environmental temperature: -20ʹ ~ 55ʹC
Smart Battery Charger
AC/DC CHARGER
Model: XVE-1680500
Input: 100V-240VAC
50/60Hz 2.0A (max)
Output: DC 16.8V 5.0A
Art. nr: 130003
CAUTION: Indoor use only!
Do not remove the cover.
No serviceable parts inside.
Read the Staaker user manual before using the battery
charger.
65

CE, FCC and IC compliance
CE
This product is CE compliant.
Exposure Statement:
This portable device with its antenna complies with FCC RF exposure limits for general
population / uncontrolled exposure. The antenna used for this device must not be co-located or
operating in conjunction with any other antenna or transmitter.
FCC Compliance Statement
This device complies with Part 15 of the FCC Rules. Operation is subject to the following two
conditions:
1. this device may not cause harmful interference, and
2. this device must accept any interference received, including interference that may cause
undesired operation.
FCC Modification Statement
Changes or modifications to the equipment not expressly approved by the party responsible for
compliance could void the user's authority to operate the equipment.
FCC Interference Statement
This equipment has been tested and found to comply with the limits for a Class B digital device,
pursuant to part 15 of the FCC Rules. These limits are designed to provide reasonable
protection against harmful interference in a residential installation. This equipment generates,
uses and can radiate radio frequency energy and, if not installed and used in accordance with
the instructions, may cause harmful interference to radio communications. However, there is no
guarantee that interference will not occur in a particular installation. If this equipment does
cause harmful interference to radio or television reception, which can be determined by turning
the equipment off and on, the user is encouraged to try to correct the interference by one or
more of the following measures:
● Reorient or relocate the receiving antenna.
● Increase the separation between the equipment and receiver.
● Connect the equipment into an outlet on a circuit different from that to which the receiver
is connected.
● Consult the dealer or an experienced radio/TV technician for help.
66

This device complies with Part 15 of the FCC rules. Operation is subject to the following two
conditions: (1) this device may not cause harmful interference and (2) this device must accept
any interference received, including interference that may cause undesired operation.
Industry Canada Notes
This device complies with Industry Canada license-exempt RSS standard(s). Operation is
subject to the following two conditions: (1) this device may not cause interference, and (2) this
device must accept any interference, including interference that may cause undesired operation
of the device.
There are no restrictions for the use of the device.
Le présent appareil est conforme aux CNR d'Industrie Canada applicables aux
appareils radio exempts de licence. L'exploitation est autorisée aux deux conditions
suivantes: (1) l'appareil ne doit pas produire de brouillage, et (2) l'utilisateur de
l'appareil doit accepter tout brouillage radioélectrique subi, même si le brouillage est
susceptible d'en compromettre le fonctionnement.
67

About Staaker
STAAKER1 DRONE
Designed by The Staaker Company© in Norway. Assembled in Norway.
Customer Support
Website: www.staaker.com
E-Mail: support@staaker.com
Address: The Staaker Company AS, Martin Linges vei 25, 1364 Fornebu, Norway
www.youtube.com/staaker
www.instagram.com/staaker
www.facebook.com/staaker
68

69
 Loading...