

Page 1

January 2017
DocID030224 Rev 1
1/30
www.st.com
UM2163
User manual
Getting started with the STEVAL-IME011V2 evaluation board
based on the STHV748S
ultrasound pulser
Introduction
The STEVAL-IME011V2 evaluation board is designed around the STHV748S 4-channel 5-level high
voltage pulser, a state-of-the-art device designed for ultrasound imaging applications.
This board facilitates evaluation of the ultrasound pulser IC thanks also a new graphical user interface.
Once configured, the output waveforms can be displayed directly on an oscilloscope by connecting the
probe to the relative BNCs.
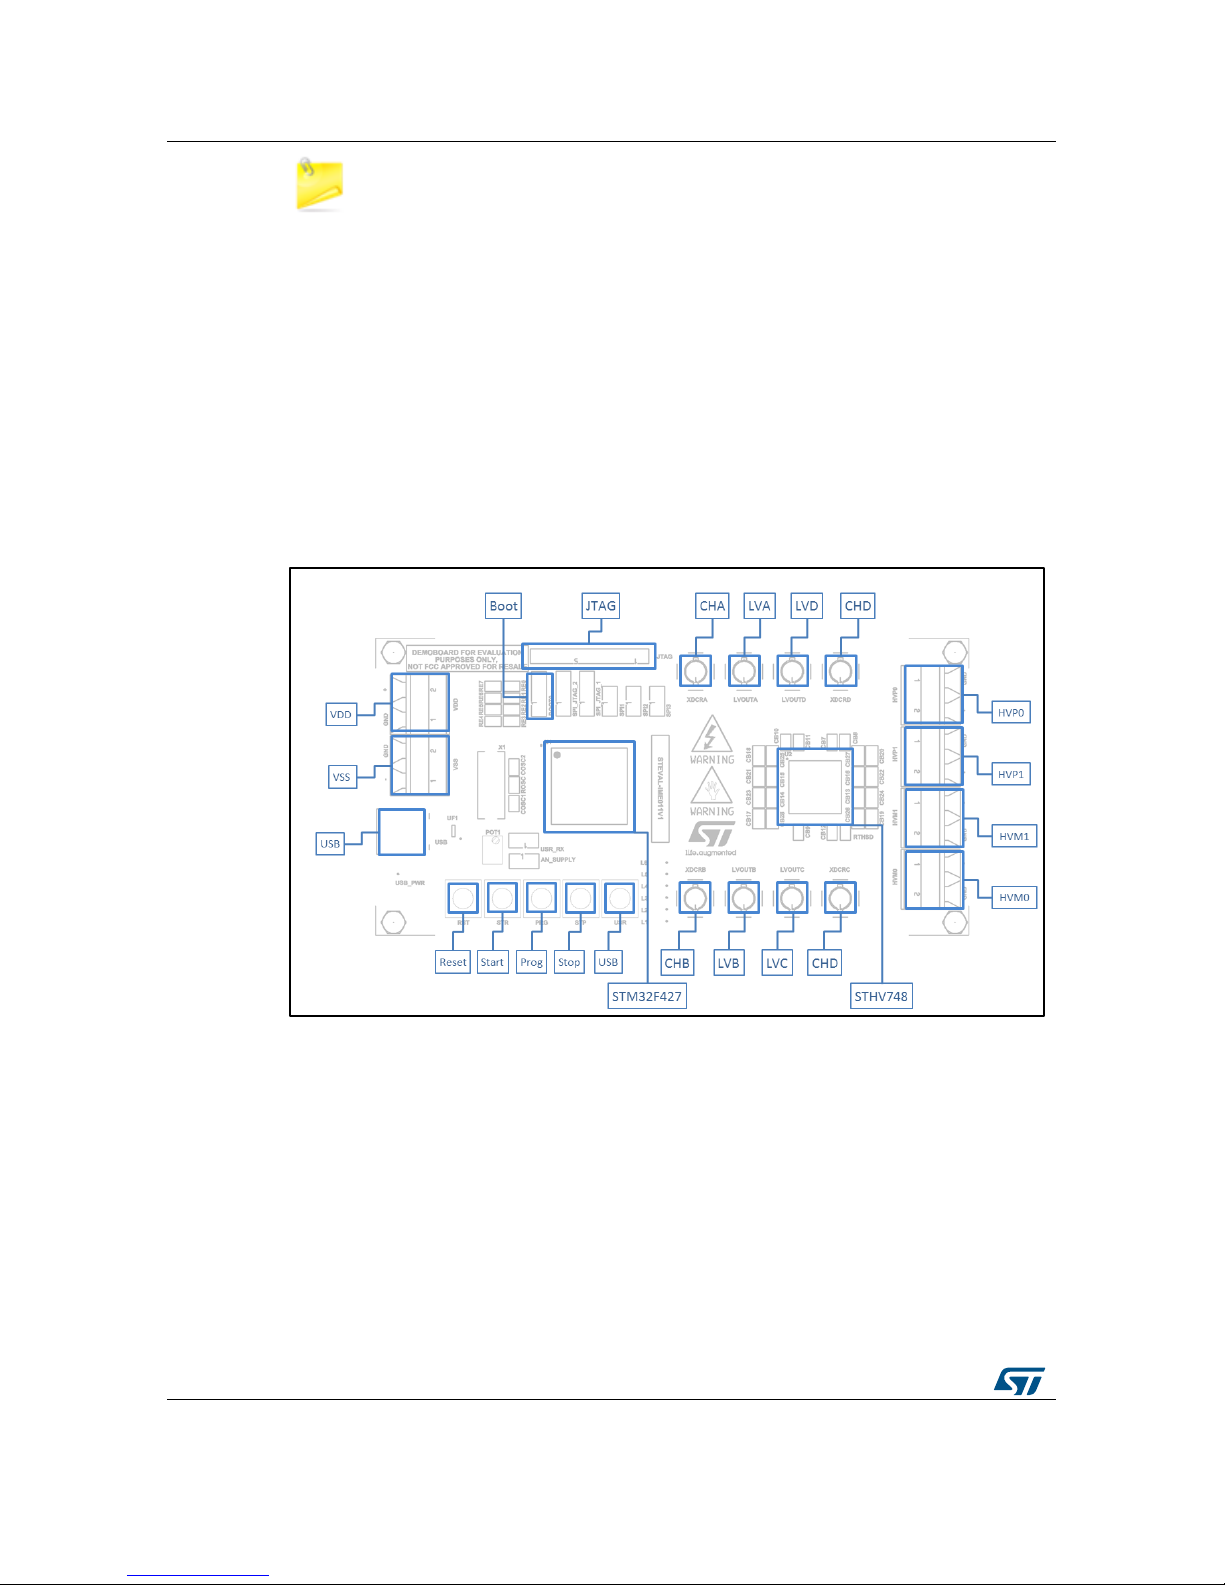
Figure 1: STEVAL-IME011V2 evaluation board
Page 2

Contents
UM2163
2/30
DocID030224 Rev 1
Contents
1 Board features ................................................................................. 5
2 Getting started ................................................................................. 6
3 Hardware layout and configuration ................................................ 7
3.1 Power supply ..................................................................................... 7
3.2 MCU .................................................................................................. 8
3.3 Stored patterns ................................................................................ 10
3.4 STHV748S stage ............................................................................ 18
3.5 Operating supply conditions ............................................................ 20
4 Connectors .................................................................................... 21
4.1 Power supply ................................................................................... 21
4.2 MCU ................................................................................................ 22
5 Schematic diagrams ...................................................................... 25
6 PCB layout ..................................................................................... 26
7 Revision history ............................................................................ 29
Page 3

UM2163
List of tables
DocID030224 Rev 1
3/30
List of tables
Table 1: Program 1 ................................................................................................................................... 12
Table 2: Program 2 ................................................................................................................................... 13
Table 3: Program 3 ................................................................................................................................... 15
Table 4: Program 4 ................................................................................................................................... 18
Table 5: DC working supply conditions ..................................................................................................... 20
Table 6: USB mini B connector pinout ...................................................................................................... 23
Table 7: JTAG connector pinout ............................................................................................................... 23
Table 8: Boot connector pinout ................................................................................................................. 24
Table 9: Document revision history .......................................................................................................... 29
Page 4

List of figures
UM2163
4/30
DocID030224 Rev 1
List of figures
Figure 1: STEVAL-IME011V2 evaluation board ......................................................................................... 1
Figure 2: Connection between STM32F4 and STHV748S ......................................................................... 7
Figure 3: STEVAL-IME011V2 board layout ................................................................................................ 7
Figure 4: STEVAL-IME011V2 connections ................................................................................................ 8
Figure 5: Solution 1 with STM32 direct memory access (DMA) peripheral ................................................ 9
Figure 6: Solution 2 with direct MCU core intervention ............................................................................ 10
Figure 7: Program 1 scheme .................................................................................................................... 11
Figure 8: Acquisition by Program 1 ........................................................................................................... 12
Figure 9: Program 2 scheme .................................................................................................................... 13
Figure 10: Acquisition by Program 2 ......................................................................................................... 14
Figure 11: Program 3 scheme .................................................................................................................. 15
Figure 12: Acquisition by Program 3 ......................................................................................................... 16
Figure 13: Program 4 ................................................................................................................................ 17
Figure 14: Acquisition by Program 4 ......................................................................................................... 18
Figure 15: STHV748S single channel block diagram ............................................................................... 19
Figure 16: Power supply connector VDD (+5V - GND) ............................................................................ 21
Figure 17: Power supply connector VSS (GND - -5V) .............................................................................. 21
Figure 18: Power supply connector HVP0 – HVP1 and HVM0 – HVM1 .................................................. 22
Figure 19: USB mini-B connector (CN1)................................................................................................... 22
Figure 20: JTAG connector ....................................................................................................................... 23
Figure 21: Boot connector ........................................................................................................................ 23
Figure 22: STEVAL-IME011V2 circuit schematic ..................................................................................... 25
Figure 23: Top layer .................................................................................................................................. 26
Figure 24: Inner layer 1 ............................................................................................................................. 26
Figure 25: Inner layer 2 ............................................................................................................................. 27
Figure 26: Inner layer 3 ............................................................................................................................. 27
Figure 27: Inner layer 4 ............................................................................................................................. 28
Figure 28: Bottom layer............................................................................................................................. 28
Page 5

UM2163
Board features
DocID030224 Rev 1
5/30
1 Board features
• 4-channel outputs: high voltage and low voltage BNC connectors
• Up to 4 memory locations to store own waveforms designs
• USB connector to load own waveforms onto the board
• Dedicated connectors to supply high voltage and low voltage to the STHV748S output
stage
• 4-key button rapid preferred program selection
• RoHS compliant
Page 6

Getting started
UM2163
6/30
DocID030224 Rev 1
2 Getting started
The STEVAL-IME011V2 is shipped by STMicroelectronics ready to use. The user only
needs to:
1 2 3
4
5
6
7
Plug the power supply to the board
Connect the BNCs to the oscilloscope (see Section 3.1: "Power supply" for details)
Check LED PROGRAM 1 (LD1) turns on
Select the waveform with the PROGRAM button
The corresponding PROGRAM LED (LD1-LD4) turns on
Press the START button to run the selected program
The START LED (L5) turns on.
When the program ends, L5 LED turns off
If a continuous wave program is selected, the STOP button must be pressed to
stop program execution and the STOP LED (L5) turns off
To run the same program again, restart from step 5. To run another program,
restart from step 4
An overvoltage protection mechanism suspends pattern generation if the HV
supply exceeds 90 V and the red LED (L6) switches on. Pattern generation restarts
as soon as the HV supply voltage falls back into the allowed range.
Page 7

UM2163
Hardware layout and configuration
DocID030224 Rev 1
7/30
3 Hardware layout and configuration
The STEVAL-IME011V2 evaluation board is designed around the STHV748S.
Figure 2: Connection between STM32F4 and STHV748S
Figure 3: STEVAL-IME011V2 board layout
3.1 Power supply
The STEVAL-IME011V2 low voltage block is designed to be powered:
• during programming and when the board is connected to a PC:
− 5 V DC through a USB Mini B connector to supply the STM32F4
• during pattern generation and when high voltage is powered on:
− 5 V DC connected to VDD to supply STM32F4 and STHV748S through an LDO
− -5 V DC connected to VSS to supply STHV748S through an LDO
Page 8
Hardware layout and configuration
UM2163
8/30
DocID030224 Rev 1
The USB connector must be removed when high voltage is powered on.
The STEVAL-IME011V2 high voltage block is designed to be powered:
• VDD: positive supply voltage, 5 V (2 - VDD conn.)
• GND: ground (1 – VDD conn. And 2 – VSS conn.)
• VSS: negative supply voltage 5 V (1 - VSS conn.)
• GND: ground (1 – HVP0 conn.)
• HVP0: TX0 high voltage positive supply (2 - HVP0 conn.)
• GND: ground (1 – HVP1 conn.)
• HVP1: TX1 high voltage positive supply (2 - HVP1 conn.)
• HVM1: TX1 high voltage negative supply (1 - HVM1 conn.)
• GND: ground (2 - HVM1 conn.)
• HVM0: TX0 high voltage negative supply (1 - HVM0 conn.)
• GND: ground (2 – HVM0 conn.)
Figure 4: STEVAL-IME011V2 connections
3.2 MCU
The STM32F427 is fully dedicated to generate the bitstream on its GPIO pins to drive the
pulser output channels. It is already pre-programmed as a DFU (device firmware upgrade)
with the ability of upgrading internal Flash memory.
The STM32F427 manages all the DFU operations, such as the authentication of product
identifier, vendor identifier and firmware version. The MCU drives the pulser channels
through the use of different GPIO pins. You can simultaneously drive from 1 to 16 different
pins by simply writing a 16-bit word into the GPIO output data register (ODR).
The board can be connected to a PC via USB. The required pattern is sent as a sequence
of states for each pulser channel and for each state duration (expressed in units of MCU
system clock cycle).
Page 9
UM2163
Hardware layout and configuration
DocID030224 Rev 1
9/30
Once the information is received, the channel states are converted into 16-bit words for the
GPIO peripheral and they are stored in the embedded Flash, with the timing information.
After programming, the PC is no longer required, so the board becomes a stand-alone
device.
Different patterns can be stored and you can select the one to use at run-time.
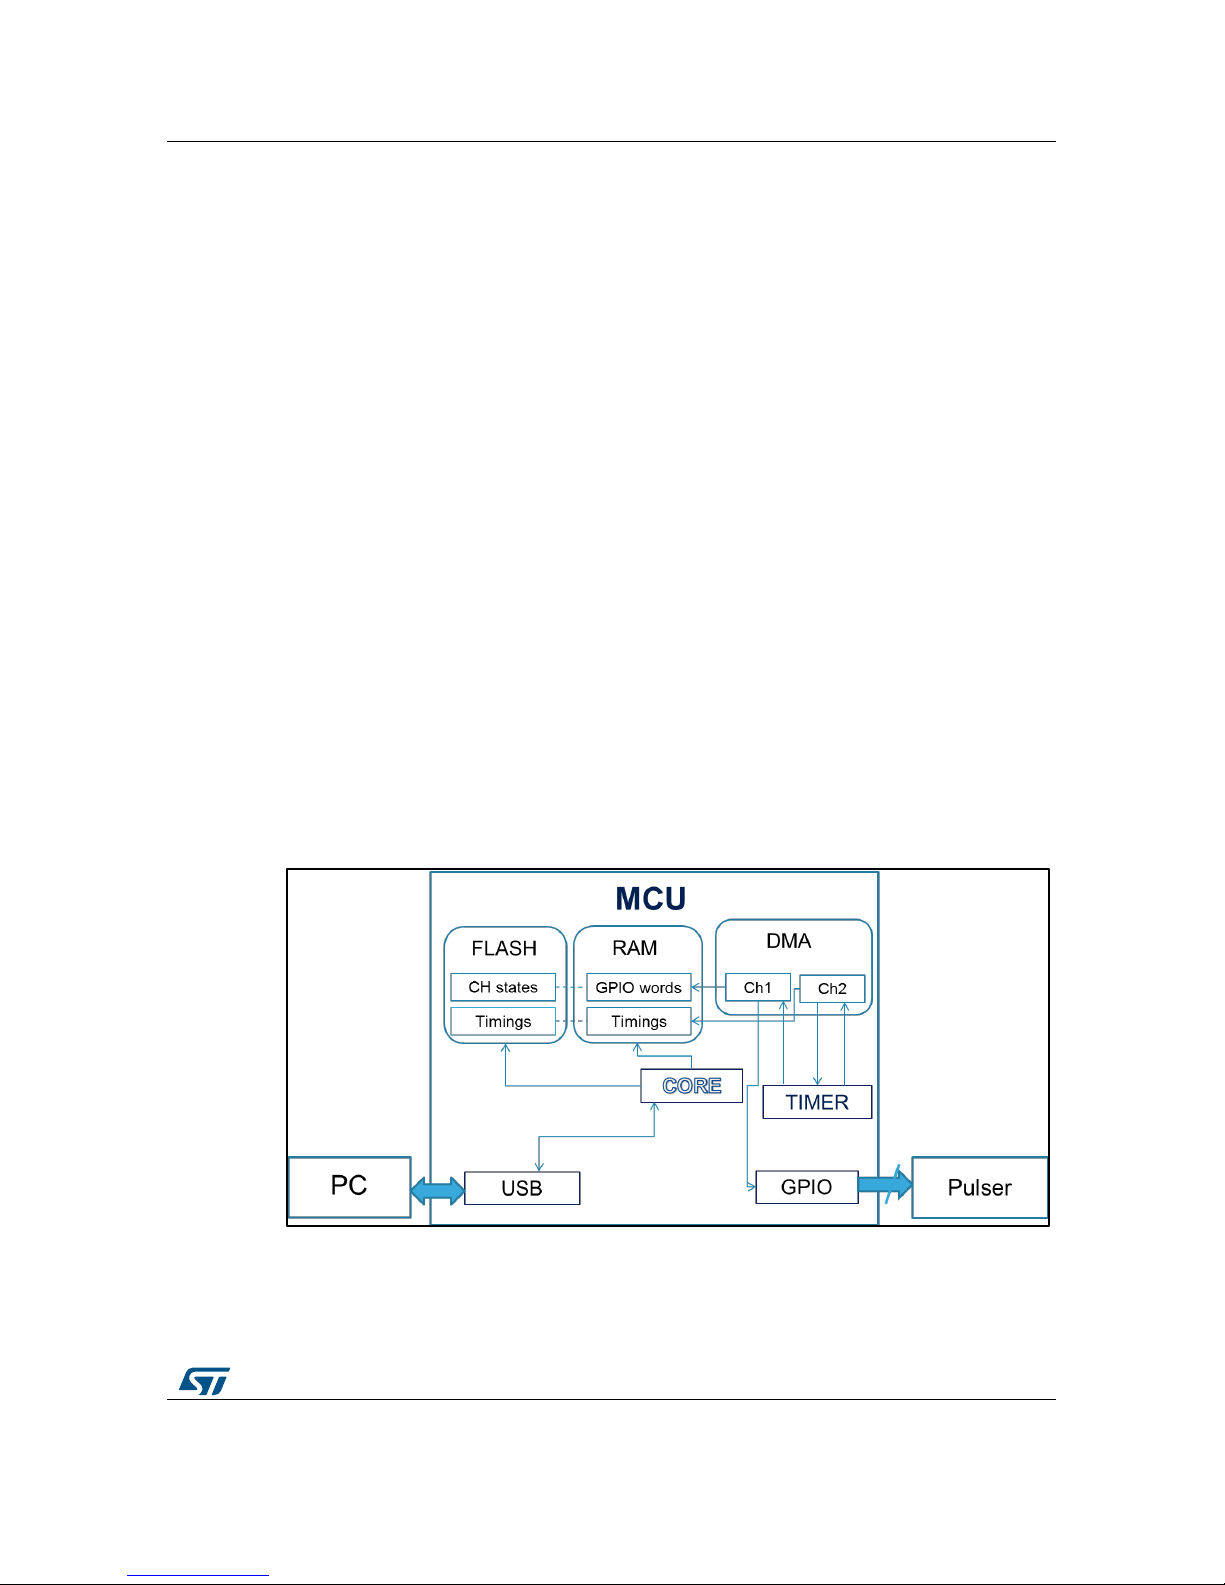
The same MCU can implement two different solutions for real-time execution.
The first solution involves the use of the STM32 direct memory access (DMA) peripheral,
which can transfer data from memory to any peripheral register, GPIO included, without the
intervention of the MCU core.
To trigger DMA transfer, a general purpose timer is used, that works at the system clock
frequency and basically acts as a counter: the reload value (the value at which the counter
returns to zero) is stored in the auto reload register (ARR).
The timer triggers two different DMA channels in two different moments:
• the first channel is triggered at each reload event and transfers the new GPIO word to
the ODR;
• the second is triggered at a constant time after reload and transfers the new duration
information to the ARR
The timer preload feature is enabled, so that the new ARR value is effective only at the
next reload. Since the time needed by the first DMA channel to update the ODR is a
constant, considering the reload trigger as a starting point, the time between two different
GPIO updates is simply given by the ARR value.
The DMA circular buffer feature can be enabled to allow automatic regeneration of the
same pattern at each end. This solution has the advantage of being fully managed by
hardware, thus, the MCU core is completely free for any user requirement.
The main drawback is that each timing value between two subsequent states cannot be
lower than a minimum value to guarantee enough time for both DMA channels to perform
their transfers.
Figure 5: Solution 1 with STM32 direct memory access (DMA) peripheral
The second solution is designed to overcome the DMA minimum duration requirement
and directly involves the MCU core:
• during run-time, the core generates the binary assembly code it needs to load and
store each word in the ODR. Any unnecessary instructions like control loops are
avoided; the code is only a succession of simple load/store instructions;
Page 10

Hardware layout and configuration
UM2163
10/30
DocID030224 Rev 1
• to adapt the timing to the pattern needs, dummy instructions are inserted in the
assembly code. To avoid wasting time to load each word from memory, the word is
inserted as a literal in the assembly instruction itself, which means that a 32-bit
instruction is needed instead of an equivalent 16-bit;
• to avoid any latency due to the instruction fetch from Flash, the code is executed from
the embedded RAM. Moreover, the RAM is configured to be accessed by the core
through a different bus to the one used to access the ODR.
Thanks to this solution, it is possible to achieve a minimum time of two system clock cycles
before two updates and maintain one system clock cycle resolution. For instance, if you
consider a STM32F4 clocked at 168 MHz, the minimum timing you can achieve is 12 ns
and you can set the duration of each state with a resolution of 6 ns. For a repetitive pattern,
a branch instruction is added at the end of the routine to restart the pattern generation. In
this case, the clock cycles needed for the branch instruction has to be considered for the
last state.
The main drawback of this solution is that the MCU core is 100% involved in the pattern
generation even though it can still be called by peripheral interrupts and stop pattern
generation to perform other tasks.
Figure 6: Solution 2 with direct MCU core intervention
3.3 Stored patterns
The STEVAL-IME011V2 can store four different patterns in the MCU Flash memory to
demonstrate the achievable performance at the pulser outputs.
Four selectable programs already stored in STM32 Flash memory form the default set
which is available and ready to use (flagged by L1 to L4 LEDs).
Program 1:
• XDCR_A: pulse wave mode, TX0 switching, 5 pulses, time-period TP = 400 ns and
PRF = 150 µs
• XDCR_B: pulse wave mode, TX0 switching, 5 pulses in counter phase respect to
XDCR_A, time-period TP = 400 ns and PRF = 150 µs
• XDCR_C: pulse wave mode, TX1 switching, 5 pulses, time-period TP = 200 ns and
PRF = 150 µs
• XDCR_D: pulse wave mode, TX1 switching, 5 pulses in counter phase with respect to
XDCR_C, time-period TP = 200 ns and PRF = 150 µs
Page 11

UM2163
Hardware layout and configuration
DocID030224 Rev 1
11/30
TX0 indicates that the H-bridge is supplied by HVP/M0, while TX1 indicates that
the H-bridge is supplied by HVP/M1.
Figure 7: Program 1 scheme
Page 12

Hardware layout and configuration
UM2163
12/30
DocID030224 Rev 1
Table 1: Program 1
PW 5 pulses - HV0/1 = ± 60 V; LOAD: 270 pF//100 Ω
Mode Frequency (MHz) Number of pulses Initial pulse H-bridge PRF
Ch A PW 2.5 5 positive TX0 150 µs
Ch B PW 2.5 5 negative TX0 150 µs
Ch C PW 5 5 positive TX1 150 µs
Ch D PW 5 5 negative TX1 150 µs
Figure 8: Acquisition by Program 1
Program 2:
• XDCR_A: pulse wave mode, TX0 switching, 5 pulses, time-period TP = 200 ns and
PRF = 150 µs
• XDCR_B: pulse wave mode, TX0 switching, 5 pulses in counter phase with respect to
XDCR_A, time-period TP = 200 ns and PRF =150 µs
• XDCR_C: pulse wave mode, TX1 switching, 5 pulses, time-period TP = 100 ns and
PRF = 150 µs
• XDCR_D: pulse wave mode, TX1 switching, 5 pulses in counter phase with respect to
XDCR_C, time-period TP = 100 ns and PRF = 150 µs
Page 13

UM2163
Hardware layout and configuration
DocID030224 Rev 1
13/30
Figure 9: Program 2 scheme
Table 2: Program 2
PW TX0 & TX1 5 pulses - HV0/1 = ± 60 V; LOAD: 270 pF//100 Ω
Mode Frequency (MHz) Number of pulses Initial pulse H-bridge PRF
Ch A PW 5 5 positive TX0 & TX1 150 µs
Ch B PW 5 5 negative TX0 & TX1 150 µs
Ch C PW 10 5 positive TX0 & TX1 150 µs
Ch D PW 10 5 negative TX0 & TX1 150 µs
Page 14

Hardware layout and configuration
UM2163
14/30
DocID030224 Rev 1
Figure 10: Acquisition by Program 2
Program 3:
• XDCR_A: continuous wave mode, TX-CW switching, time-period TP = 400 ns
• XDCR_B: continuous wave mode, TX-CW switching in counter-phase respect to
XDCR_A, time-period TP = 400 ns
• XDCR_C: continuous wave mode, TX-CW switching, time-period TP =200 ns
• XDCR_D: continuous wave mode, TX-CW switching in counter-phase with respect to
XDCR_C, time-period TP = 200 ns
Page 15

UM2163
Hardware layout and configuration
DocID030224 Rev 1
15/30
Figure 11: Program 3 scheme
Table 3: Program 3
Continuous wave - HV1=±10V; LOAD: 270 pF//100 Ω
Mode Frequency (MHz) Number of pulses Initial pulse H-bridge
Ch A CW 2.5 continuous wave positive TX-CW
Ch B CW 2.5 continuous wave negative TX-CW
Ch C CW 5 continuous wave positive TX-CW
Ch D CW 5 continuous wave negative TX-CW
Page 16

Hardware layout and configuration
UM2163
16/30
DocID030224 Rev 1
Figure 12: Acquisition by Program 3
Program 4:
• XDCR_A: pulse wave mode, TX0 switching, 1.5 pulses, time-period TP =400 ns and
consequently TX1 switching, 5 pulses, time period TP = 200 ns and PRF = 150 µs
• XDCR_B: pulse wave mode, TX0 switching, 1.5 pulses, time-period TP = 400 ns and
consequently TX1 switching, 5 pulses, time-period TP = 200 ns and PRF = 150 µs
• XDCR_C: pulse wave mode, TX0 switching, 1.5 pulses, time-period TP = 200 ns and
consequently TX1 switching, 5 pulses, time-period TP =200 ns and PRF=150 µs
• XDCR_D: pulse wave mode, TX0 switching, 1.5 pulses, time-period TP = 200 ns and
consequently TX1 switching, 5 pulses, time-period TP = 200 ns and PRF = 150 µs
Page 17

UM2163
Hardware layout and configuration
DocID030224 Rev 1
17/30
Figure 13: Program 4
Page 18

Hardware layout and configuration
UM2163
18/30
DocID030224 Rev 1
Table 4: Program 4
Pulse cancellation - HV0/1 = ±60 V; LOAD: 270 pF//100 Ω
Mode
Frequency
(MHz)
Number of pulses
Initial
pulse
H-bridge PRF
Ch A PW 2.5 - 5
3 half pulse then 4
pulse
positive
TX0 then
TX1
150
µs
Ch B PW 2.5 - 5
3 half pulse then 4
pulse
negative
TX0 then
TX1
150
µs
Ch
C
PW 5
3 half pulse then 4
pulse
positive
TX0 then
TX1
150
µs
Ch
D
PW 5
3 half pulse then 4
pulse
negative
TX0 then
TX1
150
µs
Figure 14: Acquisition by Program 4
The board can be connected to a PC via a USB cable and patterns can be edited through a
user interface.
The USB cable must be removed when a high voltage is connected to the board.
3.4 STHV748S stage
The STHV748S high-voltage, high-speed ultrasound pulser features four independent
channels. It is designed for medical ultrasound applications, but can also be used for other
piezoelectric, capacitive or MEMS transducers.
The device contains:
• a controller logic interface circuit
• level translators
• MOSFET gate drivers
Page 19

UM2163
Hardware layout and configuration
DocID030224 Rev 1
19/30
• noise blocking diodes
• high-power P-channel and N-channel MOSFETs as output stages for each channel
• clamping-to-ground circuitry
• anti-leakage
• anti-memory effect block
• a thermal sensor
• an HV receiver switch (HVR_SW), which guarantees strong decoupling during the
transmission phase
• self-biasing and thermal shutdown blocks (see Figure 15: "STHV748S single channel
block diagram")
Each channel can support up to five active output levels with two half bridges. Each
channel output stage is able to provide a ±2 A peak output current; to reduce power
dissipation during continuous wave mode, the peak current is limited to 0.6 A (a dedicated
half bridge is used).
For further information, please refer to the STHV748S datasheet.
Figure 15: STHV748S single channel block diagram
STHV748S output waveforms can be directly displayed for each channel Ch A/B/C/D using
an oscilloscope by connecting the scope probe to the XDCRA, XDCRB, XDCRC and
XDCRD SMB connectors. Moreover, pulser outputs are connected to the onboard
equivalent load, a 270 pF 200 V capacitor paralleled with a 100 Ω, 2 W resistor. A coaxial
cable can also be used to easily connect the user transducer; in this case, the equivalent
load should be removed from the board. Furthermore, four low voltage outputs are
available to receive the echo signal coming from the piezo-element through HVR_SW
(LVOUTA, LVOUTB, LVOUTC, LVOUTD).
Page 20

Hardware layout and configuration
UM2163
20/30
DocID030224 Rev 1
The main issues in this PCB design are the capacitance values necessary to ensure good
filtering and the effective decoupling between the low voltage inputs (IN1, IN2, IN3, IN4 and
EN for each channel) and the HV switching signals (XDCR, HVOUT, etc.), which is
ensured by the implemented layer separation.
3.5 Operating supply conditions
Table 5: DC working supply conditions
Operating supply voltages
Symbol Parameter Min. Typ. Max. Value
VDD Positive supply voltage 5 6 10 V
VSS Negative supply voltage -5 6 -10 V
HVP0 TX0 high voltage positive supply
95 V
HVP1 TX1 high voltage positive supply
95 V
HVM0 TX0 high voltage negative supply -95
V
HVM1 TX1 high voltage negative supply -95
V
The high voltage pins must be HVP0 ≥ HVP1 and HVM1 ≥ HVM0
Page 21

UM2163
Connectors
DocID030224 Rev 1
21/30
4 Connectors
4.1 Power supply
The STEVAL-IME011V2 evaluation board is powered through the screw connectors shown
in the following figures.
Figure 16: Power supply connector VDD (+5V - GND)
Figure 17: Power supply connector VSS (GND - -5V)
Page 22

Connectors
UM2163
22/30
DocID030224 Rev 1
Figure 18: Power supply connector HVP0 – HVP1 and HVM0 – HVM1
4.2 MCU
Figure 19: USB mini-B connector (CN1)
Page 23

UM2163
Connectors
DocID030224 Rev 1
23/30
Table 6: USB mini B connector pinout
Pin number Description
1 Vbus (power)
2 DM (STM32 PA11)
3 DP (STM32 PA12)
4 N.C.
5 Ground
Figure 20: JTAG connector
Table 7: JTAG connector pinout
Pin number Description
1 DVDD
2 JTDI
3 JTMS
4 JTCK
5 JTDO
6 JRST
7 GND
8 NRST
Figure 21: Boot connector
Page 24

Connectors
UM2163
24/30
DocID030224 Rev 1
Table 8: Boot connector pinout
Pin number Description
1 GND
2 BOOT0 (boot from flash memory)
3 DVDD (DFU mode)
Page 25

UM2163
Schematic diagrams
DocID030224 Rev 1
25/30
5 Schematic diagrams
Figure 22: STEVAL-IME011V2 circuit schematic
U1
P
E2
1
P
E
3
2
PE
4
3
P
E
5
4
PE
6
5
V
B
A
T
6
P
C
1
3
7
P
C
1
4
8
P
C
1
5
9
V
SS
5
1
0
V
DD
5
1
1
O
S
C_
I
N
1
2
O
S
C
_
O
U
T
1
3
N
RS
T
1
4
P
C
0
1
5
P
C
1
1
6
P
C
2
1
7
P
C
3
1
8
V
S
S
A
1
9
VR
EF
-
2
0
V
RE
F
+
2
1
V
DD
A
22
P
A0
2
3
PA1
2
4
PA2
2
5
PA3
26
V
S
S4
27
V
DD
4
28
PA
4
2
9
PA5
3
0
PA6
31
PA
7
3
2
P
C
4
33
PC
5
34
P
B
0
35
PB1
3
6
PB2
37
P
E7
3
8
PE
8
39
P
E9
4
0
P
E1
0
4
1
P
E1
1
4
2
PE
12
43
PE13
44
PE14
45
PE15
46
PB10
47
PB11
48
VSS1
49
VDD1
5
0
PB12
51
PB13
52
PB14
53
PB15
54
PD8
55
PD9
56
PD10
57
PD11
58
PD12
59
PD13
60
PD14
61
PD15
62
P
C6
6
3
PC
7
64
PC8
65
PC
9
66
PA8
67
PA9
68
PA10
69
PA11
70
PA12
71
PA13
72
NC
7
3
VSS2
74
VDD
2
75
PA14
76
PA15
77
P
C10
78
PC11
79
P
C12
8
0
PD0
81
PD1
82
PD2
83
PD3
84
PD4
85
PD5
86
PD6
87
PD7
88
PB3
89
PB4
90
PB5
91
PB6
92
PB7
93
BOOT
94
PB8
95
PB9
96
PE0
97
PE1
98
VSS3
99
VDD3
1
0
0
U2
STHV748
AGND1
1
REF1_HVM1
2
HVM1_A
3
HVM0_A
4,65
HVOUT_A
5
HVP0_A
6
REF1_HVP1
7
HVP1_A
8
HVP1_B
9
REF1_HVP0
10
HVP0_B
11
HVOUT_B
12
HVM0_B
13
HVM1_B
14
REF1_HVM0
15
D_CTR16IN4
17
IN1_B
18
IN2_B19IN3_B
20
VDDP1
21
GND_PWR_B
22
XDCR_B
23
LVOUT_B
24
LVOUT_C
25
XDCR_C
26
GND_PWR_C
27
VDDM1
28
IN3_C
29
IN2_C
30
IN1_C
31
THSD
32
AGND2
33
REF2_HVM1
34
HVM1_C
35
HVM0_C
36
HVOUT_C
37
HVP0_C
38
REF2_HVP1
39
HVP1_C
40
HVP1_D
41
REF2_HVP0
42
HVP0_D
43
HVOUT_D
44
HVM0_D
45
HVM1_D
46
REF2_HVM0
47
DGND
48
DVDD
49
IN1_D
50
IN2_D
51
IN3_D
52
VDDP2
53
GND_PWR_D
54
XDCR_D
55
LVOUT_D
56
LVOUT_A
57
XDCR_A
58
GND_PWR_A
59
VDDM2
60
IN3_A
61
IN2_A62IN1_A
63
INT_BIAS
64
RF1
107k
RF2
62k
RF4
107k
RF3
62k
REG2
LT3032
OUTP
1
ADJP
2
BYPP
3
GND
4,5
INN
6,9
OUTN
7
ADJN
8
BYPN
11
SHD
10,12
INP
14
X1
8MHz
Cosc2
22pF
Rosc
1M
OSC_INOSC_OU T
OSC_IN
OSC_OU T
REG1
LD1117
GND
OUT
IN
CF2
10F
CB1
100nF
+5V
DVDD
DVDD
SHD
AVDD
AVSS
CC1
10nF
CC2
10nF
Cosc1
22pF
CR5
3.9nF
CR1
22nF
CR6
3.9nF
CR7
3.9nF
CR8
3.9nF
CR2
22nF
CR3
22nF
CR4
22nF
CB25
220nF
CB27
220nF
C
B26
220nF
CB21
220nF
CB23
220nF
CB24
220nF
CB22
220n
F
HVM1
CB28
220nF
CF10
10F
CF9
10F
SHD
XDCRA
XDCRB
XDCRC
XDCRD
HV
P
1
HV+
HV-
HVM1
HV+
HV-
SPI_CLK
SPI_CLK
SPI1_MIS O
SPI2_MIS O
SPI_CLK
SPI3_MIS O
SPI_CLK
USBDP
USBDM
JTMS
JTCK
JTDI
SPI_JTAG_1
SPI_J TAG_2
JTDO
JRST
S
TR
PRG
STP
USR
CP1
100nF
CP2
100nF
CP3
100n
F
CP4
100nF
P1
P2
P3
P4
RP1
10k
RP
2
10k
RP3
10k
RP4
10k
P1
P2
P3
P4
DVDD
L1
L2
L3 L4
RL156
RL2
56
R
L3
56
RL4
56
L1
L2
L3 L4
L1
L2
L3
L4
ADC_IN0
ADC_IN1
ADC_IN2
VDD
LV+
LV-
VSS
LV+
LV-
-5V
CF3
10F
CF4
10F
-5V
CF6
10F
CF5
10F
CF1
10F
+5V
GND
_PW
R
GND_PWR
HVP1
RLA
100
RLB
100
RLC
100
RLD
100
CLA
270pF
CLB
270pF
CLC
270pF
CLD
270pF
GND_PW R
USB
1734035 -1
VBUS
1
D+
3
D-
2
GND
5
Shell
ID
4
PC0
PC
1
PC2
PC3
P
C4
PC5
PC
6
PC1
5
P
C1
4
PC1
3
PC
1
0
PC
1
1
P
C
1
2
PC0
PC1
P
C2
PC5
PC4
P
C3
PC1
0
PC
1
1
PC1
2
PC6
UF1U
S
B
UF01W6
D1
1
GND
2
D2
3
D3
4
VDD
5
D4
6
DVDD
USBDP
USBDM
D2
BAT20J
+5V
D1
BAT20J
CB2
100nF
CB3
100nF
CB4
100nF
CB5
100nF
CB6
100nF
DVDD
SPI2_MISO
SPI3_MISO
SPI1_MISO
SPI1
SPI2
SPI3
PC
1
1
PC
1
0
PC
1
2
C
B7
1
0
0nF
CB8
100nF
CB9
100nF
CB10
100nF
AVDD
AVSS
CB11
100nF
CB12
100nF
RST
CRST
100nF
NRST
NRST
JT
MS
JTCK
J
TDI
JTDO
JRST
USB_PW R
R18
330
RSH
D
330
RAD3
100k
RAD4
2.7k
ADC_IN2
RAD1
2.7k
R
AD2
100k
ADC_IN0
HVP1
HVM
1
AVDD
JTA
G
DVDD
POT1
50 %
ADC_IN1
L5
R
L5
56
L6
RL6
56
L5
L6
L
5
L6
R
E
0
56
RE1
56
RE2
56
RE3
5
6
RE
4
56
RE5
56
RE6
56
RE7
5
6
TH
SD
THSD
RTHSD
10k
HVP1
HVP0
HVP1
HVP0
HVM1
HVM0
HVM1
HVM0
CB17
220nF
CB19
220nF
CB18
220nF
CB13
220nF
CB15
220nF
CB16
220nF
CB14
220n
F
HVM0
CB20
220nF
CF8
10F
CF7
10F
HVP0
HV+
HV-
HVM0
HV+
HV-
GND_PW R
HVP0
ZAD2
DZ2S033
CAD2
100nF
CAD1
100nF
RHVP
0
HVP0HVP1
RHVM
0
HVM0HVM1
RGND
0
GND_P
WR
BOOT0
ZAD1
DZ2S033
NRST
DVDD
C2_F2_ F4
2.2F
C1
_F
2_F4
2.2F
R3_F1
0
R2_
F1
0
R1_F1_ F4
0
R2_F2_ F4
0
R
1_F2
0
DVDD
A
U
X
1
A
UX
2
A
UX3
AU
X0
AU
X4
A
U
X
5
A
U
X6
A
UX
7
AU
X
1
A
U
X
2
A
U
X
3
A
U
X
0
A
U
X4
A
U
X5
A
U
X
6
A
U
X7
P
C
1
3
PC
P
C
1
4
PC
1
5
LVOUTA
LVOUTB
LVOUTC
LVOUTD
RRA
100
RRB
100
RRC
100
RRD
100
CRA
270pF
CRB
270pF
CRC
270pF
CRD
270pF
USR_RX
AN_SUPPLY
AVDD
AVSS
S
TM3
2
F42
7
GSPG300916
1145SG
Page 26

PCB layout
UM2163
26/30
DocID030224 Rev 1
6 PCB layout
Figure 23: Top layer
Figure 24: Inner layer 1
Page 27

UM2163
PCB layout
DocID030224 Rev 1
27/30
Figure 25: Inner layer 2
Figure 26: Inner layer 3
Page 28

PCB layout
UM2163
28/30
DocID030224 Rev 1
Figure 27: Inner layer 4
Figure 28: Bottom layer
Page 29

UM2163
Revision history
DocID030224 Rev 1
29/30
7 Revision history
Table 9: Document revision history
Date Version Changes
17-Jan-2017 1 Initial release.
Page 30

UM2163
30/30
DocID030224 Rev 1
IMPORTANT NOTICE – PLEASE READ CAREFULLY
STMicroelectronics NV and its subsidiaries (“ST”) reserve the right to make changes, corrections, enhancements, modifications, and
improvements to ST products and/or to this document at any time without notice. Purchasers should obtain the latest relevant information on ST
products before placing orders. ST products are sold pursuant to ST’s terms and conditions of sale in place at the time of order
acknowledgement.
Purchasers are solely responsible for the choice, selection, and use of ST products and ST assumes no liability for application assistance or the
design of Purchasers’ products.
No license, express or implied, to any intellectual property right is granted by ST herein.
Resale of ST products with provisions different from the information set forth herein shall void any warranty granted by ST for such product.
ST and the ST logo are trademarks of ST. All other product or service names are the property of their respective owners.
Information in this document supersedes and replaces information previously supplied in any prior versions of this document.
© 2017 STMicroelectronics – All rights reserved
 Loading...