


UM0121
USER MANUAL
ControlBD-7FMC2
Reference Design Graphical User Interface (GUI)
INTRODUCTION
The Reference Design Kit Graphical User Interface (R DK-GUI) provides an easy way to configu re motor
control system parameters. These parameters are related to the user’s motor type and model. The parameters which can be configured include the following:
■ type of the motor driven;
– 3PH PMDC/AC or BLDC/AC ( trapezoidal driv en) , or
– 3PH AC induction motor, or
– 3PH PMAC or BLAC (sinusoidal driven)
■ number of the poles pairs of the motor; and
■ control method.
Other, more specific parameters include types of control (i.e., Ramp Up Acceleration Speed for the “3PH
BLDC/AC trapezoidal” or Variable Frequency Control for the “3PH AC Induction” motor).
These settings reside in the .h header file used with the design kit software library (see Compiling the Stan-
dalone RDK Libraries, page 16). The .h file is automatically generated by the GUI and/or can be modified
manually by the user. To generate the firmware for the ST7MC microcontroller, the .h file and the software
library must be compiled using the
ec STDV7 v3.10 environments. Th e firmware is then downloaded into th e microcontroller memory (see
GENERATING THE BINARY CODE FILE (.S19) USING STVD7, page 14).
Some features of the GUI are disabled and c annot be used with t he RDK at this tim e, but they are left to
illustrate the complete features of the microcontroller. If you want to use these features, please refer to the
ST7MC Starter Kit at http://www.mcu.st.com.
Cosmic
or
Metrowerks
compiler in the ST Visual Develop v3.2.0 or Soft-
Rev 1.0
1/21November 2005

UM0121 - USER MANUAL
TABLE OF CONTENTS
INTRODUCTION . . . . . . . . . . . . . . . . . . . . . . . . . . . . . . . . . . . . . . . . . . . . . . . . . . . . . . . . . . . . . . . . . . . 1
RDK-GUI INSTALLATION . . . . . . . . . . . . . . . . . . . . . . . . . . . . . . . . . . . . . . . . . . . . . . . . . . . . . . . . . . . 3
CONFIGURING THE STANDALONE RDK LIBRARIES USING THE RDK-GUI. . . . . . . . . . . . . . . . . .3
Motor Type Selection and Setup . . . . . . . . . . . . . . . . . . . . . . . . . . . . . . . . . . . . . . . . . . . . . . . . . . 3
Figure 1. Motor Type Selection Window. . . . . . . . . . . . . . . . . . . . . . . . . . . . . . . . . . . . . . . . . . . . . . 3
3PH PMDC/AC or BLDC/AC (Trapezoidal Driven) Motor Initial Settings . . . . . . . . . . . . . . . . . . 4
Figure 2. 3PH PMDC/AC or BLDC/AC (Trapezoidal Driven) Motor Basic Parameter Window . . . . 5
3PH PMDC/AC or BLDC/AC (Trapezoidal Driven) Motor Advanced Settings . . . . . . . . . . . . . . 6
Figure 3. 3PH PMDC/AC or BLDC/AC (Trapezoidal Driven) Motor Advanced Settings Window. . . 7
3PH AC Induction Motor Initial Settings . . . . . . . . . . . . . . . . . . . . . . . . . . . . . . . . . . . . . . . . . . . . 8
Figure 4. 3PH AC Induction Motor Basic Parameter Window. . . . . . . . . . . . . . . . . . . . . . . . . . . . . . 9
3PH AC Induction Motor Advanced Settings . . . . . . . . . . . . . . . . . . . . . . . . . . . . . . . . . . . . . . . 10
Figure 5. 3PH AC Motor Advanced Settings Window. . . . . . . . . . . . . . . . . . . . . . . . . . . . . . . . . . . 10
3PH PMAC or BLAC (Sinusoidal Driven) Motor Initial Settings . . . . . . . . . . . . . . . . . . . . . . . . 11
Figure 6. 3PH PMAC or BLAC (Sinusoidal Driven) Motor Basic Parameter Window. . . . . . . . . . . 12
3PH PMAC or BLAC (Sinusoidal Driven) Motor Advanced Settings . . . . . . . . . . . . . . . . . . . . 13
Figure 7. 3PH PMAC or BLAC (Sinusoidal Driven) Motor Advanced Settings Window . . . . . . . . . 13
GENERATING THE BINARY CODE FILE (.S19) USING STVD7. . . . . . . . . . . . . . . . . . . . . . . . . . . . 14
Installing the Software . . . . . . . . . . . . . . . . . . . . . . . . . . . . . . . . . . . . . . . . . . . . . . . . . . . . . . . . . 14
Installing the Hardware . . . . . . . . . . . . . . . . . . . . . . . . . . . . . . . . . . . . . . . . . . . . . . . . . . . . . . . . . 1 4
Figure 8. ControlBD-7FMC2 Hardware Hookup. . . . . . . . . . . . . . . . . . . . . . . . . . . . . . . . . . . . . . . 15
Compiling the Standalone RDK Libraries . . . . . . . . . . . . . . . . . . . . . . . . . . . . . . . . . . . . . . . . . . 16
Table 1. Reference Kit GUI Subfolders. . . . . . . . . . . . . . . . . . . . . . . . . . . . . . . . . . . . . . . . . . . . . 16
PROGRAMMING THE ST7MC FIRMWARE USING Softec ST7 TOOLSET FOR Indart-STX. . . . . . 17
Figure 9. Option Configuration Window . . . . . . . . . . . . . . . . . . . . . . . . . . . . . . . . . . . . . . . . . . . . . 17
Figure 10.Programming the Microprocessor. . . . . . . . . . . . . . . . . . . . . . . . . . . . . . . . . . . . . . . . . . 17
PROGRAMMING THE FIRMWARE INTO THE ST7FMC USING THE DATABLAZE UTILITY. . . . . . 18
Table 2. Binary Files (.S19). . . . . . . . . . . . . . . . . . . . . . . . . . . . . . . . . . . . . . . . . . . . . . . . . . . . . . 19
REVISION HISTORY. . . . . . . . . . . . . . . . . . . . . . . . . . . . . . . . . . . . . . . . . . . . . . . . . . . . . . . . . . . . . . . 20
Table 3. Document Revision History. . . . . . . . . . . . . . . . . . . . . . . . . . . . . . . . . . . . . . . . . . . . . . . 20
2/21
UM0121 - USER MANUAL
RDK-GU I INSTALL AT ION
To install th e PC software tool:
1. Put the companion CDROM into the PC.
2. Click on “Start”, then “Run”.
3. Browse the CDROM directory to locate the Setup executable (..\Setup\Setup.exe).
4. Double-click on the “Setup.exe” file.
5. Follow the instructions as they appear on the screen.
Note: To i nstall and use the RDK-GUI PC software t ool it i s necessary to be logged onto the PC with
Administrator rights.
CONFIG URING THE STAND ALONE RDK LIBRA RIES USING THE RD K-GUI
Motor Typ e Se lect i on and Setup
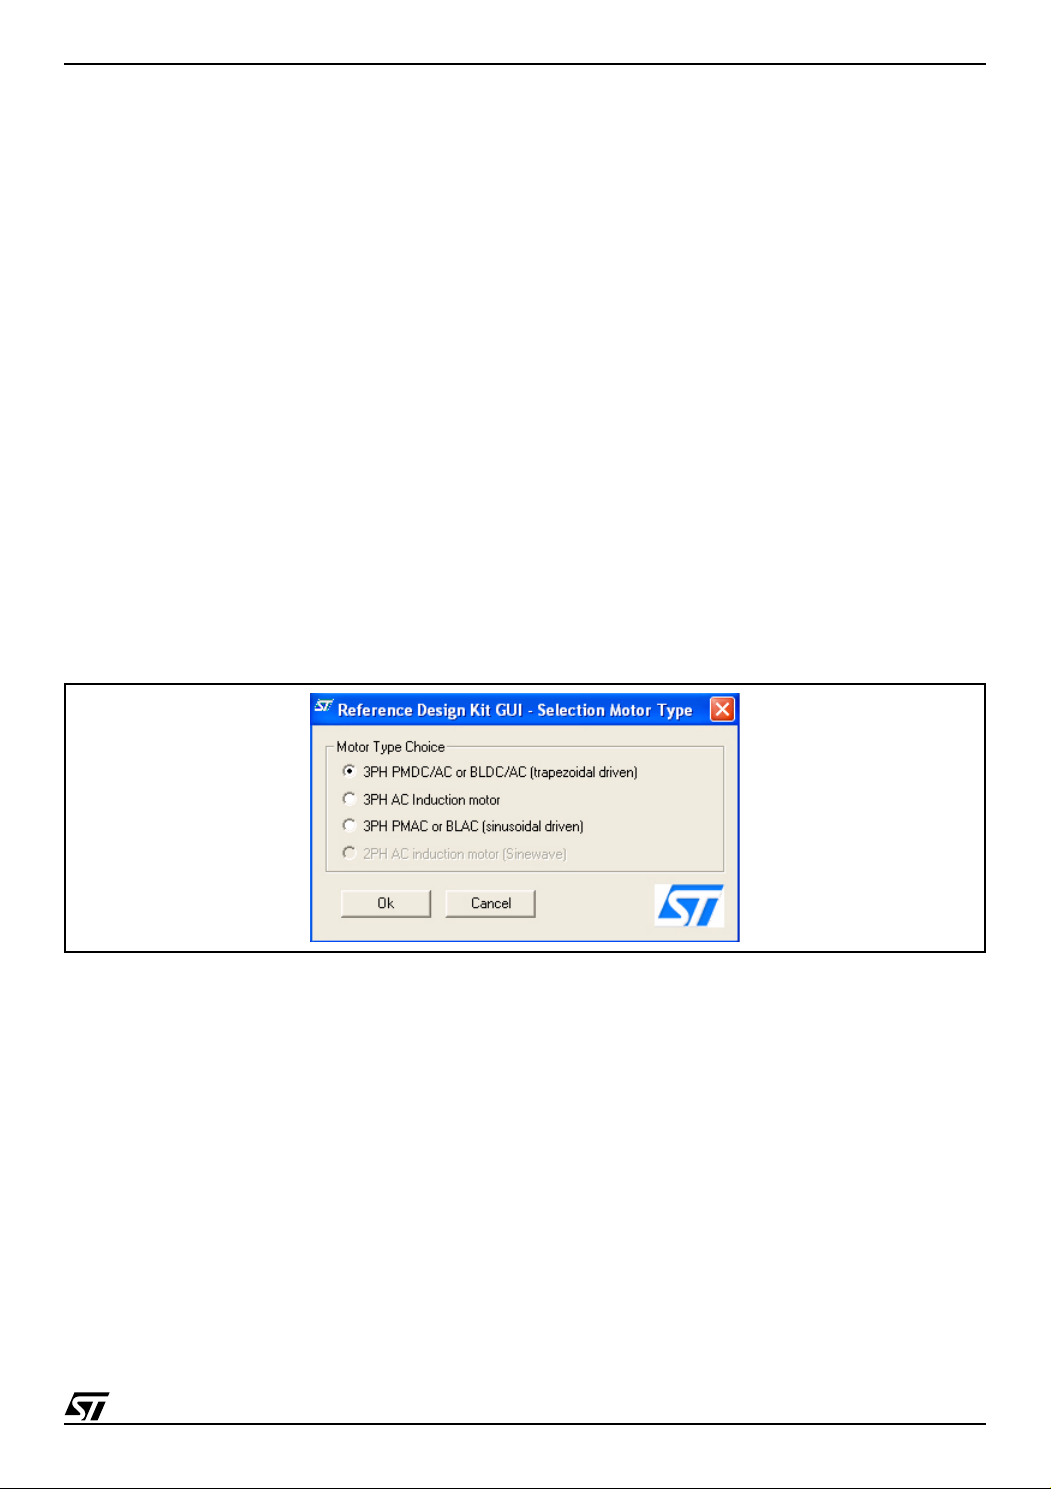
After the Reference Design Kit Graphical User Interface (RKD-GUI) application is installed and it is started
the first time, the Motor Type Selection dialog box appears (see Figure 1.). This sel ection defines the .h
header files that will be generated to compile the firmware able to drive that kind of motor.
The three options are:
■ 3PH PMDC/AC or BLDC/AC (trapezoidal driven),
■ 3PH AC Induction Motor, and
■ 3PH PMAC or BLAC (sinusoidal driven).
Figure 1. Mot or Type Selection Window
3/21

UM0121 - USER MANUAL
3PH PMDC/AC or BLDC/AC (Trapezoidal Driven) Motor Initial Settings
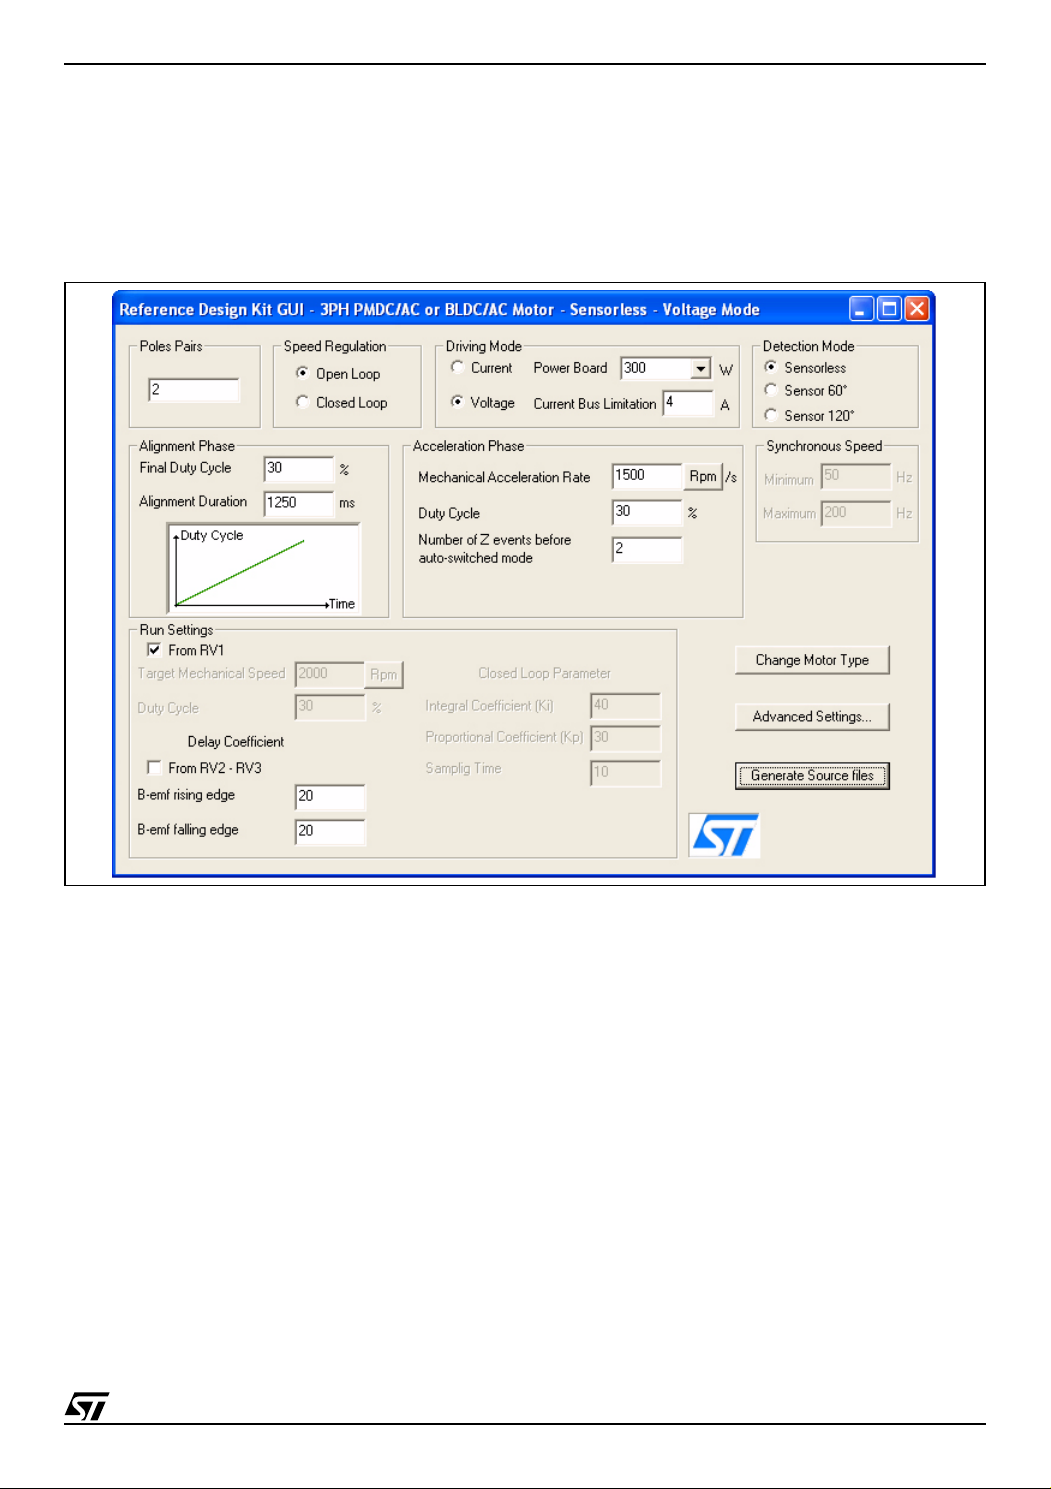
Clicking “Ok” after selecting the 3PH PMDC/AC or BLDC/AC (Trapezoidal) option opens the “3PH PMDC/
AC or BLDC/AC (Trapezoidal) - Sensorless - Voltage Mode” dial og box (see Figure 2., page 5). T his is
where the basic PMDC/AC motor type parameters are set.
There are 8 groups of initial settings that are specified by the user:
a. Pole Pairs - the number of Pole (North/South) Pairs in the motor
b. Speed Regulation - the manner in which to run the motor, either Open Loop (without speed regulation)
or Closed Loop (with speed regulation)
c. Driving Mode
– the motor driving mode, Current Mode or Voltage Mode
Note: The only option available in the Reference Design Kit is the “Voltage Mode.”
– Power Board - the Power Board that is being used (e.g., PowerBD-300, PowerBD-1000,
PowerBD-3000)
– Current Limitation - the maximum value of the current that can flow inside one (of three) phases
d. Detection Mode - the Back EMF (BEMF) Detection Mode (rotor position), either Sensorless, Hall
(Effect) Sensor 60°, or Hall (Effect) Sensor 120°
Note: The only option available in the Reference Design Kit is the “Sensorless” mode.
e. Alignment Phase
– the percentage of Final Duty Cycle applied at the end of alignment phase
– the phase Alignment Duration in milliseconds (ms)
f. Acceleration Phase
– the Mechanical Acceleration Rate of the rotor during the Ramp UP in RPMs (or Hz) per second
(alternate between RPM and Hz settings by clicking on the “RPM” button)
– the Duty Cycle percentage during the Ramp Up
– the Number of Consecutive Z events that occur before the microcontroller runs the motor in auto-
switched mode
g. g. Synchronous Speed
– the Minimum target rotor frequency in closed loop, express in Hz of mechanical speed
– the Maximum target rotor frequency in closed loop, express in HZ of mechanical speed
h. Run Settings
When the “From RV1” checkbox is selected, the, Duty Cycle value (or the target rotor speed in the
case of closed loop regulation) is defined by the RV1 potentiometer.
If this box is unchecked, the following options are set by the user:
– the Target Mechanical (rotor) Speed in RPMs (or Hz) if speed regulation is set to “Closed Loop”
(alternate between RPM and Hz settings by clicking on the “RPM” button)
– the Duty Cycle percentage when the motor is run in “Open Loop” mode
Run Settings and Delay Coefficient
When the “From RV2 - RV3” checkbox is selected the value of Rising Delay is defined by the RV2
potentiometer and the value of Falling Delay is defined by the RV3 potentiometer.
If this box is unchecked, the following options are set by the user:
– the B-EMF Rising Edge delay coefficient value (from 0 to 255)
– the B-EMF Falling Edge delay coefficient value (from 0 to 255)
Run Settings and Closed Loop Parameter
– the value of the Integral Coefficient (Ki) of the Proportional Integrative (PI) regulator
– the value of the Proportional Coefficient (Kp) of the PI regulator
– the regulation Sampling Time (in milliseconds)
i. The “Change Motor Type” button enables the user to change the motor type(see Figure 1., page 3).
4/21
UM0121 - USER MANUAL
j. The “Advanced Settings...” button enables the user to set the Advanced Parameters (see 3PH PMDC/
AC or BLDC/AC (Trapezoidal Driven) Motor Advanced Settings, page 6).
k. T he “Generate Source Files” button enables the user to generate the GUI configuration .h files. A
“Save” dialog window will appear, where the user can select in which folder to create the file as well
“Source”
as the
Libraries, page 16).
Figure 2. 3PH PMDC/AC or BLDC/AC (Trapezoidal Driven) Motor Basic Parameter Window
directory in the
software library
path (see C ompiling the Standalone RDK
5/21

UM0121 - USER MANUAL
3PH PMDC/AC or BLDC/AC (Trapezoidal Driven) Motor Advanced Settings
Clicking the “Advanced Settings...” button opens the “Advanced Settings” dialog box (see Figure
3., page 7). This is where the advanced PMDC/AC motor type parameters are set.
There are 6 groups of settings that are specified by the user:
a. PWM (Pulse Width Modulation) Settings
– Pulse Width Modulation (PWM) Frequency in kHz
Note: The only value available in the Reference Design Kit is the “12.5kHz.”
– PWM Minimum Off Time in microseconds (µs) to detect the BEMF
Note: The only values available in the Reference Design Kit are “2.5µs” and “5µs.”
– Complementary PWM Signal (Synchronous Rectification)
Note: This setting is disabled in the Reference Design Kit at this time.
b. Current Loop
– Current Blanking Window - prevents erroneous sampling of the current after the PWM is turned
ON in milliseconds (ms)
– Current Event Counter Filter - defines the number of counter events required to validate a current
limitation event
c. D and Z Sampling Parameters
– Sampling Clock (ISCF) - sets the frequency of the sampling clock for D and Z events in kHz
– Unused MCIx (Motor Control) Input - defines in which state the unused MCI input can be fixed,
either “Grounded” or “Hi-Z”
d. Zero Crossing
– After D Blanking Window - set the blanking window after a D event in microseconds (µs)
– Z Event Counter Filter - defines the number of counter events required to validate a Z event
– Threshold Voltage - voltage set (in Volts) for Z detection
e. Demagnetization
– After C Blanking Window - set the blanking window after a C event in microseconds (µs)
– D Event Counter Filter - defines the number of counter events required to validate a D event
– Demagnetize “All Hardware,” “Alternate Hardware/Software,” or “All Software”
Note: The only option available in the Reference Design GUI is the “Alternate Hardware/Software”
event.
Note: The Demagnetization Time option is not available in the Reference Design Kit at this time.
Note: The Force Duty Cycle During Demagnetization option is not available in the Reference
Design Kit at this time.
Note: The Duty Cycle option is not available in the Reference Design Kit at this time.
f. Stop Condition
– Free Wheeling - after Stop, the motor will continue to spin freely
Note: Only the Free Wheeling Stop Condition is available in the Reference Design Kit at this time.
– DC Current Braking
Note: This option is not available in the Reference Design Kit at this time.
Note: The Brake Level setting is not available in the Reference Design Kit at this time.
Note: The Brake Time setting is not available in the Reference Design Kit at this time.
6/21

UM0121 - USER MANUAL
Figure 3. 3PH PMDC/AC or BLDC/AC (Trapezoidal Driven) Motor Advanced Settings Window
7/21

UM0121 - USER MANUAL
3PH AC Induction Motor Initial Settings
Clicking “Ok” after selecting the 3PH AC Induction Motor option opens the “3PH AC Induction Motor” dialog box (see Figure 4., page 9). This is where the basic parameters for the AC Induction Motor with Sinusoidal waveforms are set.
There are 7 groups of initial settings that are specified by the user:
a. Pole Pairs - the number of Pole (North/South) Pairs in the motor
b. Speed Regulation - the manner in which to run the motor, either Open Loop (without speed regulation)
or Closed Loop (with speed regulation)
c. Speed Sens or
– Tachometer Pulses per Revolution - the number of pulses per revolution (of the speed sensor)
d. Stator Frequency/Mechanical Speed
– Minimum Stator Frequency/Minimum Mechanical speed - sets the minimum stator frequency in
Hz for open loop mode or minimum mechanical speed for closed loop mode
– Maximum Stator Frequency/Maximum Mechanical speed - sets the maximum stator frequency in
Hz for open loop mode or maximum mechanical speed for closed loop mode
e. V/F (Voltage vs. Frequency) Curve
– Min Voltage - sets the voltage level (expressed as a part of the 255th of the bus voltage) in the
first corner of the V/F curve
– Low Frequency - sets the frequency of the first corner of the V/F curve in Hz
– High Frequency - sets the frequency of the second corner of the V/F curve in Hz
f. Start-up Settings
– Voltage Slew Rate - affects the slew rate of the voltage during the motor start-up phase before
reaching the potentiometer set value
– Start-up Stator Frequency - sets the stator frequency during the start-up sequence
– Max Duration - sets the duration of the start-up sequence in milliseconds (ms)
– Min Rotor Frequency to Validate Closed Loop - sets the rotor speed or frequency to validate the
Closed Loop mode
g. Regulator Settings
– Integral Coefficient (Ki) - sets the value of the Integral Coefficient (Ki) of the Proportional
Integrative (PI) regulator
– Proporational Coefficient (Kp) - sets the value of the Proportional Coefficient (Kp) of the PI
regulator
– Sampling Time - sets the regulator samp li ng freque nc y in milliseconds (ms)
h. The “Change Motor Type” button enables the user to change the motor type(see Figure 1., page 3).
i. The “Advanced Settings...” button enables the user to set the Advanced Parameters (see 3PH AC In-
duction Motor Advanced Settings, page 10).
j. The “Generate Source Files” button enables the user to generate the GUI configuration .h file. A
“Save” dialog window will appear, where the user can select in which folder to create the file as well
“Source”
as the
Libraries, page 16).
directory in the
software library
path (see C ompiling the Standalone RDK
8/21

Figure 4. 3PH AC Induction Motor Basic Parameter Window
UM0121 - USER MANUAL
9/21

UM0121 - USER MANUAL
3PH AC Induction Motor Advanced Settings
Clicking the “Advanced Settings...” button opens the “Advanced Settings” dialog box (see Figure 5.). This
is where the advanced parameters for the AC Induction Motor with Sinusoidal waveforms are set.
There are 3 parameters that are specified by the user:
a. Pulse Width Modulation (PWM) Frequency in kHz
Note: The only value available in the Reference Design Kit is the “12.5kHz.”
b. Dead Time Value - select from available preset Dead Time duration values in microseconds (µs)
c. St op Condition
– Free Wheeling - after Stop, the motor will continue to spin freely
Note: Only the Free Wheeling Stop Condition is available in the Reference Design Kit at this time.
– DC Current Braking
Note: This option is not available in the Reference Design Kit at this time.
Note: The Brake Level setting is not available in the Reference Design Kit at this time.
Note: The Brake Time setting is not available in the Reference Design Kit at this time.
Figure 5. 3PH AC Motor Advanced Settings Window
10/21

UM0121 - USER MANUAL
3PH PMAC or BLAC (Sinusoidal Driven) Motor Initial Settings
Clicking “Ok” after selecting the 3PH PMAC or BLAC (sinusoidal driven) Motor option opens the PMAC
Motor window (see Figure 6., page 12). This is where the basic parameters for the 3PH PMAC Motor with
Sinusoidal waveforms are set.
There are 8 groups of initial settings that are specified by the user:
a. Pole Pairs - the number of Pole (North/South) Pairs in the motor
b. Speed Regulation - the manner in which to run the motor, either Open Loop (without speed regulation)
or Closed Loop (with speed regulation)
c. Sensor Configuration - the number of Hall sensors on the motor
– One Sensor
– Two Sensors
– Three Sensors
d. Synchronous Speed
– Min - sets the target minimum stator frequency in Hz for closed loop mode
– Max - sets the target maximum stator frequency in Hz for closed loop mode
e. V/F (Voltage vs. Frequency) Curve Limitation
– Knee-point Voltage Index - sets the voltage level (expressed as a part of the 255th of the bus
voltage) in the first corner of the V/F curve
– Knee-point Frequency - sets the frequency of the first corner of the V/F curve in Hz
– Rated Frequency - sets the frequency of the second corner of the V/F curve in Hz
f. Start-up Settings
– Voltage Slew Rate - affects the slew rate of the voltage during the motor start-up phase before
reaching the potentiometer set value
– Start-up Stator Frequency - sets the stator frequency during the start-up sequence
– Max Duration - sets the duration of the start-up sequence in milliseconds (ms)
– Min Rotor Frequency to Validate Closed Loop - sets the rotor speed or frequency to validate the
Closed Loop mode
g. Regulator Settings
– Integral Coefficient (Ki) - sets the value of the Integral Coefficient (Ki) of the Proportional
Integrative (PI) regulator
– Proporational Coefficient (Kp) - sets the value of the Proportional Coefficient (Kp) of the PI
regulator
– Sampling Time - sets the regulator samp li ng freque nc y in milliseconds (ms)
– Set Ki by P2 Kp by P3 - user’s manual setting for the value of Ki (Integral Coefficient) and Kp
(Proportional Coefficient) using P2 and P3, respectively.
h. Phase Shift Settings
– Set Phase Shift according to Ph/F Curve - software sets (in run time) the actual Phase Shift from
the Ph/F curve defined in the advanced settings (based on the rotor speed).
– Set Phase Shift according by P3 - user’s manual setting of the Phase Shift using potentiometer
P3; the maximum CCW position is 0° of Phase Shift and the maximum CW position is 360° of the
Phase Shift.
i. The “Change Motor Type” button enables the user to change the motor type(see Figure 1., page 3).
j. The “Advanced Settings...” button enables the user to set the Advanced Parameters (see 3PH PMAC
or BLAC (Sinusoidal Driven) Motor Advanced Settings, page 13).
k. T he “Generate Source Files” button enables the user to generate the GUI configuration .h file. A
“Save” dialog window will appear, where the user can select in which folder to create the file as well
“Source”
as the
Libraries, page 16).
directory in the
software library
path (see C ompiling the Standalone RDK
11/21

UM0121 - USER MANUAL
Figure 6. 3PH PMAC or BLAC (Sinusoidal Driven) Motor Basic Parameter Window
12/21

UM0121 - USER MANUAL
3PH PMAC or BLAC (Sinusoidal Driven) Motor Advanced Settings
Clicking the “Advanced Settings...” button opens the “Advanced Settings” dialog box (see Figure 7.). This
is where the advanced parameters for the 3 Phase PMAC Motor with Sinusoidal waveforms are set.
There are 4 parameters that are specified by the user:
a. Pulse Width Modulation (PWM) Frequency in kHz
b. Dead Time Value - select from available preset Dead Time duration values in microseconds (µs)
c. St op Condition
– Free Wheeling - after Stop, the motor will continue to spin freely
Note: Only the Free Wheeling Stop Condition is available in the Reference Design Kit at this time.
– Active Braking
Note: This option is not available in the Reference Design Kit at this time.
Note: The Brake Voltage setting is not available in the Reference Design Kit at this time.
Note: The Brake Minimum Speed setting is not available in the Reference Design Kit at this time.
d. Ph/F curve - Software uses this curve to set the value of the Phase Shift based on the actual value of
the rotor frequency when the “Set Phase Shift according to Ph/F Curve” option is set in the main
window. The curve is a linear interpolation between two knee-points.
– First Knee-Point Phase Shift - sets the value of Phase Shift of the first knee-point of the curve
– First Knee-Point Frequency - sets the value of Frequency of the first knee-point of the curve
– Second Knee-Point Phase Shift - sets the value of Phase Shift of the second knee-point of the
curve
– Second Knee-Point Frequency - sets the value of Frequency of the second knee-point of the curve
Figure 7. 3PH PMAC or BLAC (Sinusoidal Driven) Motor Advanced Settings Window
13/21

UM0121 - USER MANUAL
GENERATING TH E BINARY CO DE FILE (.S 1 9 ) USING ST VD7
Installing the Software
There are two applications required for compiling and/or loading the firmware into the ST7FMC Microcontroller memory, one IDE (Integrated Developm ent Environment) a nd one Compiler. There are two available IDEs to work with:
■ ST Visual Develop v3.2.0 or
■ Softec STDV7 v3.10 toolset.
Download and install them as follows:
1. Download the ST Visual Develop v3.2.0 (available at www.st.com), or download the ST7 Toolset for
InDART-STX (available at www.softecmicro.com).
With the Softec IDE it is possible to use the inDART-STX board-to-in-circuit debugger or program the
RDK.
2. Download the
mic-software.com) under the
– The user must first register before access is granted to the tools. Clicking on the “Download” link
will initiate the registration process. After submitting the information, access is granted for the
download.
– When the user downloads and installs this application, the installation procedure will require the
user to send an email to Cosmic Software to perform this registration.
Note: The application will not work without this license.
– When the user receives the license for the product, it must be saved in the
..\Program files\Cosmic\CXST7 _16K \license location (e .g., Local disk = C:\). Please refer to the
Cosmic Software manual for more information.
3. Launch the Softec STVD7 SofTec Microsystems Toolset v3.10.
Cosmic Compiler
STMicroelectronics ST7 Free Tools
(STMicroelectronics ST7 evaluation version, available at www.cos-
section.
Installing the Hardware
An inDART-STX board is required for the user to follow all of the steps listed below. This board can be
ordered in a bundle with the ControlBD-ST7FMC2 control board. It is recommended the connection steps
are completed in the following order:
1. Plug the ControlBD-ST7FMC2 control board into the PowerBD-xxx power board.
2. Use the flat cable to connect the I
J7 connector of the control board to the ICC connector of the
CC
inDART-STX Board.
Note: Make sure there are no unintended earth/ground loops caused by additional external equipment
(e.g., PC or oscilloscope).
3. Verify that the ControlBD-7FMC2 control board jumpers J8 and J14 are removed.
4. Verify that the CON2 terminal of the Motor Control Board is being supplied with 15V.
5. Use the USB cable to connect the inDART-STX Board to the PC. The green “Power” LED on the
inDART-STX Board will turn on. The Windows
®
operating system will automati c a lly de te ct the n ew
hardware and load the appropriate USB and inDART-STX drivers.
®
Note: Windows 2000
and Windows XP® may issue a warning the first time the inDART-STX Power
Board is connected to the PC. The USB driver used by inDART-STX is not digitally signed by
Microsoft, however, the user may safely ignore the warning since every kind of compatibility and
security test has been carried out by SofTec Microsystems.
14/21

Figure 8. ControlBD-7FMC2 Hardware Hookup
UM0121 - USER MANUAL
inDART Board
®
ControlBD-7FMC2
®
0
0
3
-
D
B
r
e
w
o
P
®
®
AI11101
15/21

UM0121 - USER MANUAL
Compiling the Standalone RDK Libraries
Before compiling the library, configure it as explained in CONFIGURING THE STANDALONE RDK LI-
BRARIES US ING THE RDK-G U I, page 3.
1. Run the ST Visual Develop v3.2.0 or Softec STDV7 v3.10 and choose “File > Open Workspace”.
2. Select the “RDK Libraries\AC\acmotor.stw,” “RDK Libraries\PMDC\pmdcmotor.stw,” or
“RDK Libraries\PMAC\pmacmotor.stw” as workspace files, depending on the motor type.
3. The default project in use is for Cosmic compiler. It will be "ac_cosmic.stp", "pmdc_cosmic.stp", or
"pmac_cosmic.stp", depending on th e motor type. If
Metrowerks Compiler
Metrowerks-specific projects, "ac_metrowerks.stp", "pmdc_metrowerks.stp", or
"pmac_metrowerks.stp ", depending on the motor type.
4. Use the “Build” pull-down menu to display and select the “Build” command. The project will be
compiled and built, and an executable file will be generated.
Table 1. Reference Kit GUI Subfolders
Folder Name Description
template\ where the template files for the GUI are stored
RDK Libraries\AC\ root path of the software library for the AC Induction motor
RDK Libraries\AC\Source\ where the source code of the library for the 3PH AC Induction motor is stored
RDK Libraries\AC\Release\ where the executable and object files will be created
RDK Libraries\PMDC\ root path of the software library for Brushless DC motor
RDK Libraries\PMDC\Source\
RDK Libraries\PMDC\Release\ where the executable and object files will be created
where the source code of the library for the 3PH PMDC/AC or BLDC/AC motor is
stored
is being used, select the
RDK Libraries\PMAC\ root path of the software library for the PMAC motor
RDK Libraries\PMAC\Source\ where the source code of the library for the 3PH PMAC or BLAC motor is stored
RDK Libraries\PMAC\Release\ where the executable and object files will be created
16/21

UM0121 - USER MANUAL
PROGRAMMI NG THE ST7M C FIRMWA RE USING Softec ST7 TOOLS ET FOR Indart-STX
When the compiled software is ready to be loa ded into t he F lash m em ory of the ST7 MC m icrocont roller,
it is time to program it.
1. Use the “Debug” pull-down menu to display and click on the “Start Debugging” button.
2. Configure the GUI Option Byte:
Use the “Debug instruments” pull-down menu to display and click on the “MCU Configuration” button.
3. Click on the “Set Option Bytes” button to invoke the “Edit Option Bytes” dialog box (see Figure 9.).
4. Select the appropriate options (see Figure 9.) provided by the list (accessed by clicking on the
scrollheads) in each parameter and click “Ok.”
5. Click on the “Program” button to invoke the “Program” dialog box (see Figure 10.).
6. Select the following Steps as shown in Figure 10.:
– Erase Device
– Program FLASH Memory
– Verify FLASH Memor y
– Program Option Bytes
–Run
7. Once the program has been loaded into the microcontroller, disconnect the cable between th e
ControlBD-7MC2 board and I
Note: Read User Manual UM0122 before starting the motor.
isolator board.
CC
Figure 9. Option Configuration Window
Figure 10. Programming the Microprocessor
17/21

UM0121 - USER MANUAL
PROGRAM MING THE FIRM WARE INTO THE ST7FMC USING THE DATABLAZE UTILITY
When the binary code (.S19) is ready to be used, follow the steps below to download this firmware into
the S T7MC microcont rollers me m ory.
1. If it is not already installed in previous step, download and install the Softec STDV7 v3.10
environment. This tool can be downloaded directly from the Softec site (www.softecmicro. com).
The Datablaze Programmer Utility that can be used to program the firmware with the inDART-STX
board is included in the package.
2. Connecting the hardware.
Note: One inDART-STX board is needed to program the firmware into the ST7FMC memory.
– Insert the ControlBD-ST7MC2 control board into the slot of the power board in use.
– Connect the inDART-STX board with the PC using the included USB cable.
– Connect the inDART-STX board with the ControlBD-ST7MC2 control board using the included I
flat cable.
– Remove the J8 and J14 jumpers and supply the Power Board with 15V
connector, and follow the serigraphy to detect the polarity.
3. Run the Softec Datablaze Programmer Utility.
4. Click “Select Device” button on the toolbar.
5. In the “Select Device” window, select “inDART-STX” in the “Programmer hardware” box, and
“ST7FMC2S4” as the Device code, and press OK.
Note: I f an error occurs, make sure that the inDART-STX board is connected to the PC. A green LED
will light up if the board is conn ected.
6. Click on the File pull-down menu, select “Open”, then “Code Buffer”.
7. In the Load File To Code Buffer dialog box Format menu, select “Motorola S-Rec” settings.
8. Click the button near “Name” box and select the Binary code (.S19) to download into the
microcontroller, and press “OK” (see Table 2., page 19).
9. Press the “Option Byte” button in the toolbar and select the value as shown in the “Option
Configuration” window (see Figure 9., page 17), and press “OK”.
10. Press the “Auto” button in the toolbar and select the desired programming options in the “Auto”
window:
– Erase Code,
– Program Code,
– Verify Code,
– Erase/Prog Options,
– Verify Options, and
–Run.
11. Press OK.
If an error window appears, make sure that the inDART-STX board is connected to the ControlBD-
ST7MC2 control board and that the power Board is well supplied.
12. Turn OFF the Power Board and plug in the J8 and J14 jumpers to enable the mains to supply power
to the microcontroller.
using the CON2
DC
CC
18/21

Table 2. Binary Files (.S19)
Folder Name Binary Filename Description
UM0121 - USER MANUAL
RDK Libraries\AC\Release
RDK Libraries\PMDC\Release
RDK Libraries\PMAC\Release
ac_cosmic.S19
ac_metroworks.S19
pmdc_cosmic.S19
pmdc_metroworks.S19
pmac_cosmic.S19
pmac_metroworks.S19
Binary executable that drives the 3PH AC Induction motor
compiled with Cosmic
Binary executable that drives the 3PH AC induction motor
compiled with Metrowerks
Binary executable that drives the 3PH BLDC/AC or PMDC/
AC (trapezoidal driven) motor compiled with Cosmic
Binary executable that drives the 3PH BLDC/AC or PMDC/
AC (trapezoidal driven) motor compiled with Metrowerks
Binary executable that drives the 3PH BLAC or PMAC
(sinusoidal driven) motor compiled with Cosmic
Binary executable that drives the 3PH BLAC or PMAC
(sinusoidal driven) motor compiled with Metrowerks
19/21

UM0121 - USER MANUAL
REVISION HISTORY
Table 3. Document Revision History
Date Version Description
09-November-2005 1.0 First edition
20/21

UM0121 - USER MANUAL
Information furnished is believed to be accurate and reliable. However, STMicroelectronics a ssumes no responsibility fo r the c onsequences
of use of such information nor for any infringement of patents or other rights of third parties which may result from its use. No license is granted
by implication or otherwise under any patent or patent rights of STMicroelectronics. Specifications mentioned in this publication are subject
to change without notice. This publication supersedes and replaces all information previously supplied. STMicroelectronics products are not
authori zed for use as crit ical components in life support devices or systems wi thout express written approval of STMicroelectronics.
The ST logo is a registered tra dem ark of STMic roelectron ics.
All other nam es are the property of their respective owners
© 2005 STMi croelectro ni cs - All rights reserved
Australi a - Belgium - Brazil - Canad a - China - Czech Republic - Finl and - France - Germany - Hong Kong - India - Is rael - Italy - Ja pan -
Malaysia - M al ta - Morocco - Singapore - Sp ai n - Sweden - Swi tzerland - United Kingd om - United States of America
STMicroelectronics group of companies
www.st.com
21/21
 Loading...