

Integrated stepper motor driver for bipolar stepper motors
with microstepping and programmable current profile
Features
■ Two full bridges for max. 1.3 A load
(R
■ Programmable current waveform with look-up
table: 9 entries with 5 bit resolution
■ Current regulation by integrated PWM
controller and internal current sensing
■ Programmable stepping mode: full, half, mini
and microstepping
■ Programmable slew rate for EMC and power
dissipation optimization
■ Programmable Fast-, Slow-, Mixed- and Auto-
Decay Mode
■ Full-scale current programmable with 3 bit
resolution
■ Programmable stall detection
■ Step clock input for reduced µController
requirements
■ Very low current consumption in standby mode
I
S
■ All outputs short circuit protected with
openload, overload current, temperature
warning and thermal shutdown
■ The PWM signal of the internal PWM controller
is available as digital output.
■
All parameters are guaranteed for 3 V < Vcc <
5.3 V
Applications
Stepper motor driver for bipolar stepper motors in
automotive applications like light levelling,
Bending light and Throttle control.
Table 1. Device summary
= 500 mΩ)
DSON
< 3 µA, typ. Tj ≤ 85 °C
and for 7 V < Vs < 20 V
L9942
PowerSSO24
Description
The L9942 is an integrated stepper motor driver
for bipolar stepper motors with microstepping and
programmable current profile look-up-table to
allow a flexible adaptation of the stepper motor
characteristics and intended operating conditions.
It is possible to use different current profiles
depending on target criteria: audible noise,
vibrations, rotation speed or torque. The decay
mode used in PWM-current control circuit can be
programmed to slow-, fast-, mixed-and autodecay. In autodecay mode device will use slow
decay mode if the current for the next step will
increase and the fast decay or mixed decay mode
if the current will decrease. The programmable
stall detection is useful in case of head lamp
leveling and bending light application, by
preventing to run the motor too long time in stall
for position alignment. If a stall is detected, the
alignment process is closed and the noise is
minimized.
Order code Junction temp. range, °CPackage Packing
L9942XP1 -40 to 150 PowerSSO24 Tube
L9942XP1TR -40 to 150 PowerSSO24 Tape and reel
May 2009 Doc ID 11778 Rev 6 1/40
www.st.com
1

Contents L9942
Contents
1 Block diagram and pin information . . . . . . . . . . . . . . . . . . . . . . . . . . . . . 6
2 Device description . . . . . . . . . . . . . . . . . . . . . . . . . . . . . . . . . . . . . . . . . . 9
2.1 Dual power supply: VS and V
CC . . . . . . . . . . . . . . . . . . . . . . . . . . . . . . . . . . . . . . . . . . 9
2.2 Standby mode . . . . . . . . . . . . . . . . . . . . . . . . . . . . . . . . . . . . . . . . . . . . . . 9
2.3 Diagnostic functions . . . . . . . . . . . . . . . . . . . . . . . . . . . . . . . . . . . . . . . . . . 9
2.4 Overvoltage and undervoltage detection . . . . . . . . . . . . . . . . . . . . . . . . . . 9
2.5 Temperature warning and thermal shutdown . . . . . . . . . . . . . . . . . . . . . . 10
2.6 Inductive loads . . . . . . . . . . . . . . . . . . . . . . . . . . . . . . . . . . . . . . . . . . . . . 10
2.7 Cross-current protection . . . . . . . . . . . . . . . . . . . . . . . . . . . . . . . . . . . . . . 10
2.8 PWM current regulation . . . . . . . . . . . . . . . . . . . . . . . . . . . . . . . . . . . . . . 10
2.9 Decay modes . . . . . . . . . . . . . . . . . . . . . . . . . . . . . . . . . . . . . . . . . . . . . . 10
2.10 Overcurrent detection . . . . . . . . . . . . . . . . . . . . . . . . . . . . . . . . . . . . . . . . 11
2.11 Open load detection . . . . . . . . . . . . . . . . . . . . . . . . . . . . . . . . . . . . . . . . . 11
2.12 Stepping modes . . . . . . . . . . . . . . . . . . . . . . . . . . . . . . . . . . . . . . . . . . . . 11
2.13 Decay modes . . . . . . . . . . . . . . . . . . . . . . . . . . . . . . . . . . . . . . . . . . . . . . 13
3 Electrical specifications . . . . . . . . . . . . . . . . . . . . . . . . . . . . . . . . . . . . . 14
3.1 Absolute maximum ratings . . . . . . . . . . . . . . . . . . . . . . . . . . . . . . . . . . . . 14
3.2 ESD protection . . . . . . . . . . . . . . . . . . . . . . . . . . . . . . . . . . . . . . . . . . . . . 14
3.3 Thermal data . . . . . . . . . . . . . . . . . . . . . . . . . . . . . . . . . . . . . . . . . . . . . . 15
3.4 Electrical characteristics . . . . . . . . . . . . . . . . . . . . . . . . . . . . . . . . . . . . . . 16
3.4.1 Supply . . . . . . . . . . . . . . . . . . . . . . . . . . . . . . . . . . . . . . . . . . . . . . . . . . 16
3.4.2 Over- and undervoltage detection . . . . . . . . . . . . . . . . . . . . . . . . . . . . . 17
3.4.3 Reference current output . . . . . . . . . . . . . . . . . . . . . . . . . . . . . . . . . . . . 17
3.4.4 Charge pump output . . . . . . . . . . . . . . . . . . . . . . . . . . . . . . . . . . . . . . . 18
3.4.5 Outputs: Qxn (x = A; B n = 1; 2) . . . . . . . . . . . . . . . . . . . . . . . . . . . . . . 18
3.4.6 PWM control . . . . . . . . . . . . . . . . . . . . . . . . . . . . . . . . . . . . . . . . . . . . . 20
4 Functional description of the logic with SPI . . . . . . . . . . . . . . . . . . . . . 21
4.1 Motor stepping clock input (STEP) . . . . . . . . . . . . . . . . . . . . . . . . . . . . . . 21
4.2 PWM output (PWM) . . . . . . . . . . . . . . . . . . . . . . . . . . . . . . . . . . . . . . . . . 21
4.3 Serial peripheral interface (SPI) . . . . . . . . . . . . . . . . . . . . . . . . . . . . . . . . 21
2/40 Doc ID 11778 Rev 6

L9942 Contents
4.4 Chip select not (CSN) . . . . . . . . . . . . . . . . . . . . . . . . . . . . . . . . . . . . . . . . 21
4.5 Serial data in (DI) . . . . . . . . . . . . . . . . . . . . . . . . . . . . . . . . . . . . . . . . . . . 21
4.6 Serial data out (DO) . . . . . . . . . . . . . . . . . . . . . . . . . . . . . . . . . . . . . . . . . 22
4.7 Serial clock (CLK) . . . . . . . . . . . . . . . . . . . . . . . . . . . . . . . . . . . . . . . . . . . 22
4.8 Data register . . . . . . . . . . . . . . . . . . . . . . . . . . . . . . . . . . . . . . . . . . . . . . . 22
5 SPI - control and status registers . . . . . . . . . . . . . . . . . . . . . . . . . . . . . 23
5.1 Register 0 . . . . . . . . . . . . . . . . . . . . . . . . . . . . . . . . . . . . . . . . . . . . . . . . . 23
5.2 Register 1 . . . . . . . . . . . . . . . . . . . . . . . . . . . . . . . . . . . . . . . . . . . . . . . . . 24
5.3 Register 2 . . . . . . . . . . . . . . . . . . . . . . . . . . . . . . . . . . . . . . . . . . . . . . . . . 24
5.4 Register 3 . . . . . . . . . . . . . . . . . . . . . . . . . . . . . . . . . . . . . . . . . . . . . . . . . 25
5.5 Register 4 and 5 . . . . . . . . . . . . . . . . . . . . . . . . . . . . . . . . . . . . . . . . . . . . 25
5.6 Register 6 . . . . . . . . . . . . . . . . . . . . . . . . . . . . . . . . . . . . . . . . . . . . . . . . . 26
5.7 Register 7 . . . . . . . . . . . . . . . . . . . . . . . . . . . . . . . . . . . . . . . . . . . . . . . . . 26
5.8 Auxiliary logic blocks . . . . . . . . . . . . . . . . . . . . . . . . . . . . . . . . . . . . . . . . 27
5.8.1 Fault condition . . . . . . . . . . . . . . . . . . . . . . . . . . . . . . . . . . . . . . . . . . . . 27
5.8.2 SPI communication monitoring . . . . . . . . . . . . . . . . . . . . . . . . . . . . . . . 27
5.8.3 PWM monitoring for stall detection . . . . . . . . . . . . . . . . . . . . . . . . . . . . 27
6 Logic with SPI - electrical characteristics . . . . . . . . . . . . . . . . . . . . . . . 28
6.1 Inputs: CSN, CLK, STEP, EN and DI . . . . . . . . . . . . . . . . . . . . . . . . . . . . 28
6.2 DI timing . . . . . . . . . . . . . . . . . . . . . . . . . . . . . . . . . . . . . . . . . . . . . . . . . . 28
6.3 Outputs: DO, PWM . . . . . . . . . . . . . . . . . . . . . . . . . . . . . . . . . . . . . . . . . . 29
6.4 Output: DO timing . . . . . . . . . . . . . . . . . . . . . . . . . . . . . . . . . . . . . . . . . . . 29
6.5 CSN timing . . . . . . . . . . . . . . . . . . . . . . . . . . . . . . . . . . . . . . . . . . . . . . . . 29
6.6 STEP timing . . . . . . . . . . . . . . . . . . . . . . . . . . . . . . . . . . . . . . . . . . . . . . . 30
7 Appendix . . . . . . . . . . . . . . . . . . . . . . . . . . . . . . . . . . . . . . . . . . . . . . . . . 33
7.1 Stall detection . . . . . . . . . . . . . . . . . . . . . . . . . . . . . . . . . . . . . . . . . . . . . . 33
7.2 Step clock input . . . . . . . . . . . . . . . . . . . . . . . . . . . . . . . . . . . . . . . . . . . . 33
7.3 Load current control and detection of overcurrent (shortages at outputs) 33
8 Package information . . . . . . . . . . . . . . . . . . . . . . . . . . . . . . . . . . . . . . . . 38
9 Revision history . . . . . . . . . . . . . . . . . . . . . . . . . . . . . . . . . . . . . . . . . . . 39
Doc ID 11778 Rev 6 3/40

List of tables L9942
List of tables
Table 1. Device summary . . . . . . . . . . . . . . . . . . . . . . . . . . . . . . . . . . . . . . . . . . . . . . . . . . . . . . . . . . 1
Table 2. Pin description . . . . . . . . . . . . . . . . . . . . . . . . . . . . . . . . . . . . . . . . . . . . . . . . . . . . . . . . . . . 7
Table 3. Truth table. . . . . . . . . . . . . . . . . . . . . . . . . . . . . . . . . . . . . . . . . . . . . . . . . . . . . . . . . . . . . . 11
Table 4. Absolute maximum ratings . . . . . . . . . . . . . . . . . . . . . . . . . . . . . . . . . . . . . . . . . . . . . . . . . 14
Table 5. ESD protection . . . . . . . . . . . . . . . . . . . . . . . . . . . . . . . . . . . . . . . . . . . . . . . . . . . . . . . . . . 14
Table 6. Operating junction temperature . . . . . . . . . . . . . . . . . . . . . . . . . . . . . . . . . . . . . . . . . . . . . 15
Table 7. Temperature warning and thermal shutdown . . . . . . . . . . . . . . . . . . . . . . . . . . . . . . . . . . . 15
Table 8. Supply. . . . . . . . . . . . . . . . . . . . . . . . . . . . . . . . . . . . . . . . . . . . . . . . . . . . . . . . . . . . . . . . . 16
Table 9. Over- and undervoltage detection . . . . . . . . . . . . . . . . . . . . . . . . . . . . . . . . . . . . . . . . . . . 17
Table 10. Reference current output . . . . . . . . . . . . . . . . . . . . . . . . . . . . . . . . . . . . . . . . . . . . . . . . . . 17
Table 11. Charge pump output . . . . . . . . . . . . . . . . . . . . . . . . . . . . . . . . . . . . . . . . . . . . . . . . . . . . . . 18
Table 12. Outputs: Qxn (x = A; B n =1; 2) . . . . . . . . . . . . . . . . . . . . . . . . . . . . . . . . . . . . . . . . . . . . . 18
Table 13. PWM control (see Figure 4 and Figure 7). . . . . . . . . . . . . . . . . . . . . . . . . . . . . . . . . . . . . . 20
Table 14. Register 0 . . . . . . . . . . . . . . . . . . . . . . . . . . . . . . . . . . . . . . . . . . . . . . . . . . . . . . . . . . . . . . 23
Table 15. Register 1 . . . . . . . . . . . . . . . . . . . . . . . . . . . . . . . . . . . . . . . . . . . . . . . . . . . . . . . . . . . . . . 24
Table 16. Register 2 . . . . . . . . . . . . . . . . . . . . . . . . . . . . . . . . . . . . . . . . . . . . . . . . . . . . . . . . . . . . . . 24
Table 17. Register 3 . . . . . . . . . . . . . . . . . . . . . . . . . . . . . . . . . . . . . . . . . . . . . . . . . . . . . . . . . . . . . . 25
Table 18. Register 4 and 5 . . . . . . . . . . . . . . . . . . . . . . . . . . . . . . . . . . . . . . . . . . . . . . . . . . . . . . . . . 25
Table 19. Register 6 . . . . . . . . . . . . . . . . . . . . . . . . . . . . . . . . . . . . . . . . . . . . . . . . . . . . . . . . . . . . . . 26
Table 20. Register 7 . . . . . . . . . . . . . . . . . . . . . . . . . . . . . . . . . . . . . . . . . . . . . . . . . . . . . . . . . . . . . . 26
Table 21. Inputs: CSN, CLK, STEP, EN and DI . . . . . . . . . . . . . . . . . . . . . . . . . . . . . . . . . . . . . . . . . 28
Table 22. DI timing (see Figure 11 and Figure 13)
Table 23. Outputs: DO, PWM . . . . . . . . . . . . . . . . . . . . . . . . . . . . . . . . . . . . . . . . . . . . . . . . . . . . . . . 29
Table 24. Output: DO timing (see Figure 12 and Figure 13) . . . . . . . . . . . . . . . . . . . . . . . . . . . . . . . 29
Table 25. CSN timing . . . . . . . . . . . . . . . . . . . . . . . . . . . . . . . . . . . . . . . . . . . . . . . . . . . . . . . . . . . . . 29
Table 26. STEP timing . . . . . . . . . . . . . . . . . . . . . . . . . . . . . . . . . . . . . . . . . . . . . . . . . . . . . . . . . . . . 30
Table 27. Document revision history . . . . . . . . . . . . . . . . . . . . . . . . . . . . . . . . . . . . . . . . . . . . . . . . . 39
. . . . . . . . . . . . . . . . . . . . . . . . . . . . . . . . . . . . . . . . . . . . . . . . . 28
4/40 Doc ID 11778 Rev 6

L9942 List of figures
List of figures
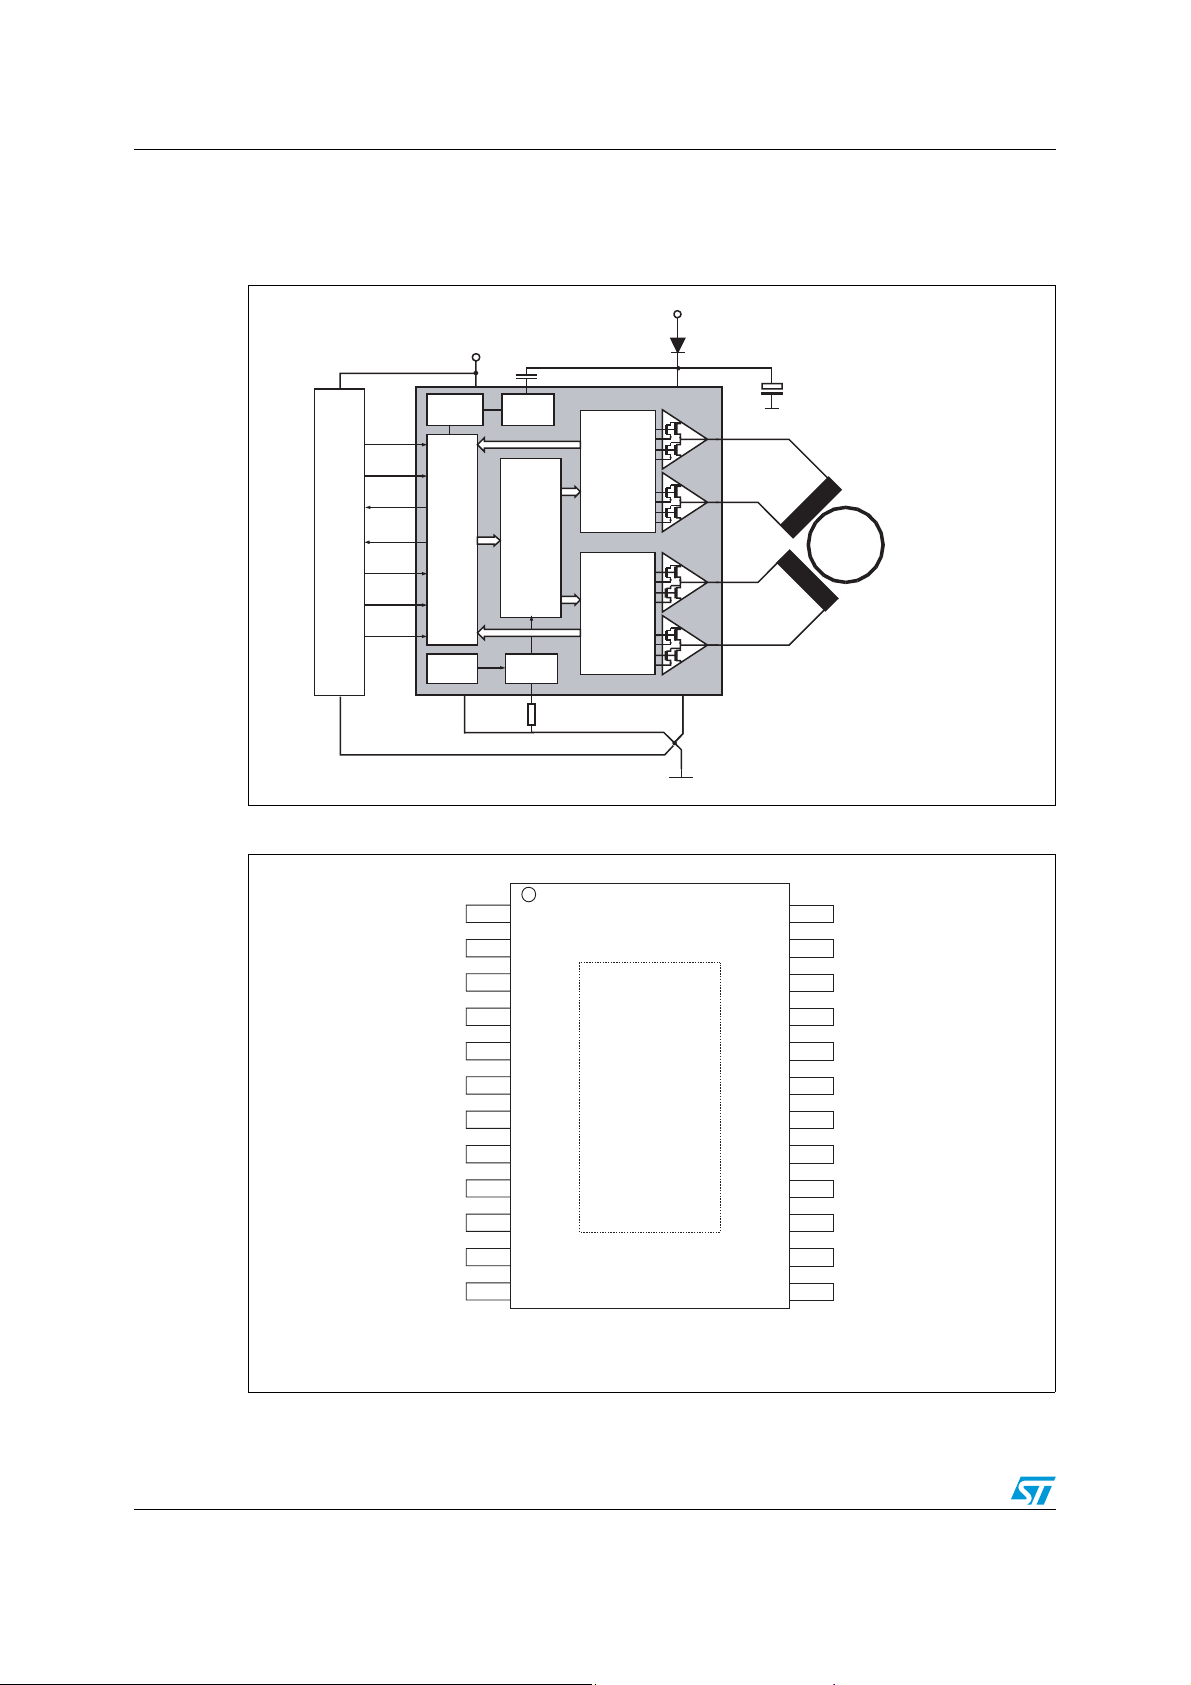
Figure 1. Block diagram . . . . . . . . . . . . . . . . . . . . . . . . . . . . . . . . . . . . . . . . . . . . . . . . . . . . . . . . . . . . 6
Figure 2. Pin connection (top view) . . . . . . . . . . . . . . . . . . . . . . . . . . . . . . . . . . . . . . . . . . . . . . . . . . . 6
Figure 3. Stepping modes . . . . . . . . . . . . . . . . . . . . . . . . . . . . . . . . . . . . . . . . . . . . . . . . . . . . . . . . . 12
Figure 4. Decay modes . . . . . . . . . . . . . . . . . . . . . . . . . . . . . . . . . . . . . . . . . . . . . . . . . . . . . . . . . . . 13
Figure 5. Thermal data of the package . . . . . . . . . . . . . . . . . . . . . . . . . . . . . . . . . . . . . . . . . . . . . . . 15
Figure 6. VS monitoring . . . . . . . . . . . . . . . . . . . . . . . . . . . . . . . . . . . . . . . . . . . . . . . . . . . . . . . . . . . 17
Figure 7. Logic to set load current limit . . . . . . . . . . . . . . . . . . . . . . . . . . . . . . . . . . . . . . . . . . . . . . . 19
Figure 8. Switching on minimum time . . . . . . . . . . . . . . . . . . . . . . . . . . . . . . . . . . . . . . . . . . . . . . . . 20
Figure 9. SPI and registers . . . . . . . . . . . . . . . . . . . . . . . . . . . . . . . . . . . . . . . . . . . . . . . . . . . . . . . . 22
Figure 10. Transfer timing diagram . . . . . . . . . . . . . . . . . . . . . . . . . . . . . . . . . . . . . . . . . . . . . . . . . . . 30
Figure 11. Input timing . . . . . . . . . . . . . . . . . . . . . . . . . . . . . . . . . . . . . . . . . . . . . . . . . . . . . . . . . . . . . 30
Figure 12. SPI - DO valid data delay time and valid time . . . . . . . . . . . . . . . . . . . . . . . . . . . . . . . . . . 31
Figure 13. DO enable and disable time . . . . . . . . . . . . . . . . . . . . . . . . . . . . . . . . . . . . . . . . . . . . . . . . 31
Figure 14. Timing of status bit 0 (fault condition) . . . . . . . . . . . . . . . . . . . . . . . . . . . . . . . . . . . . . . . . . 32
Figure 15. Stall detection . . . . . . . . . . . . . . . . . . . . . . . . . . . . . . . . . . . . . . . . . . . . . . . . . . . . . . . . . . . 35
Figure 16. Reference generation for PWM control (switch on) . . . . . . . . . . . . . . . . . . . . . . . . . . . . . . 36
Figure 17. Reference generation for PWM control (decay) . . . . . . . . . . . . . . . . . . . . . . . . . . . . . . . . . 37
Figure 18. PowerSSO24 mechanical data and package dimensions . . . . . . . . . . . . . . . . . . . . . . . . . 38
Doc ID 11778 Rev 6 5/40
Block diagram and pin information L9942
1 Block diagram and pin information
Figure 1. Block diagram
VBAT
VCC
CP
SPI + Register + Logic
GND
Charge
Pump
Diagnostic
⇓
Phase Counter+Current Profile
Diagnostic
U/I-
Converter
RREF
PWM Current DAC
Gate-Driver
&
PWM-Controller
Gate-Driver
&
PWM-Controller
Oscillator
STEP
EN
PWM
DO
μC
DI
CLK
CSN
Biasing
ReversePolarityProtection
VS
QA1
QA2
QB1
QB2QB2
QB2
GNDP
Note: value of capacitor has
to be choosen carefully to
limit the VS voltage below
absolute maximum ratings i n
case of an unexpected
freewheeling condition (e.g.
TSD, POR)
Stepper
Motor
Figure 2. Pin connection (top view)
PGND 1
QA1
2
VS
3
CLK
4
DI
5
CSN
6
DO
7
PWM
8
STEP 9
VS 10
QB1 11
PGND 12
All pins with the same name must be externally connected!
All pins PGND are internally connected to the heat slug.
Power SSO24
Exposed
Pad
GND
PGND24
QA223
22
VS
EN21
RREF20
VCC19
TEST18
GND
17
CP16
VS15
QB214
PGND13
6/40 Doc ID 11778 Rev 6
L9942 Block diagram and pin information
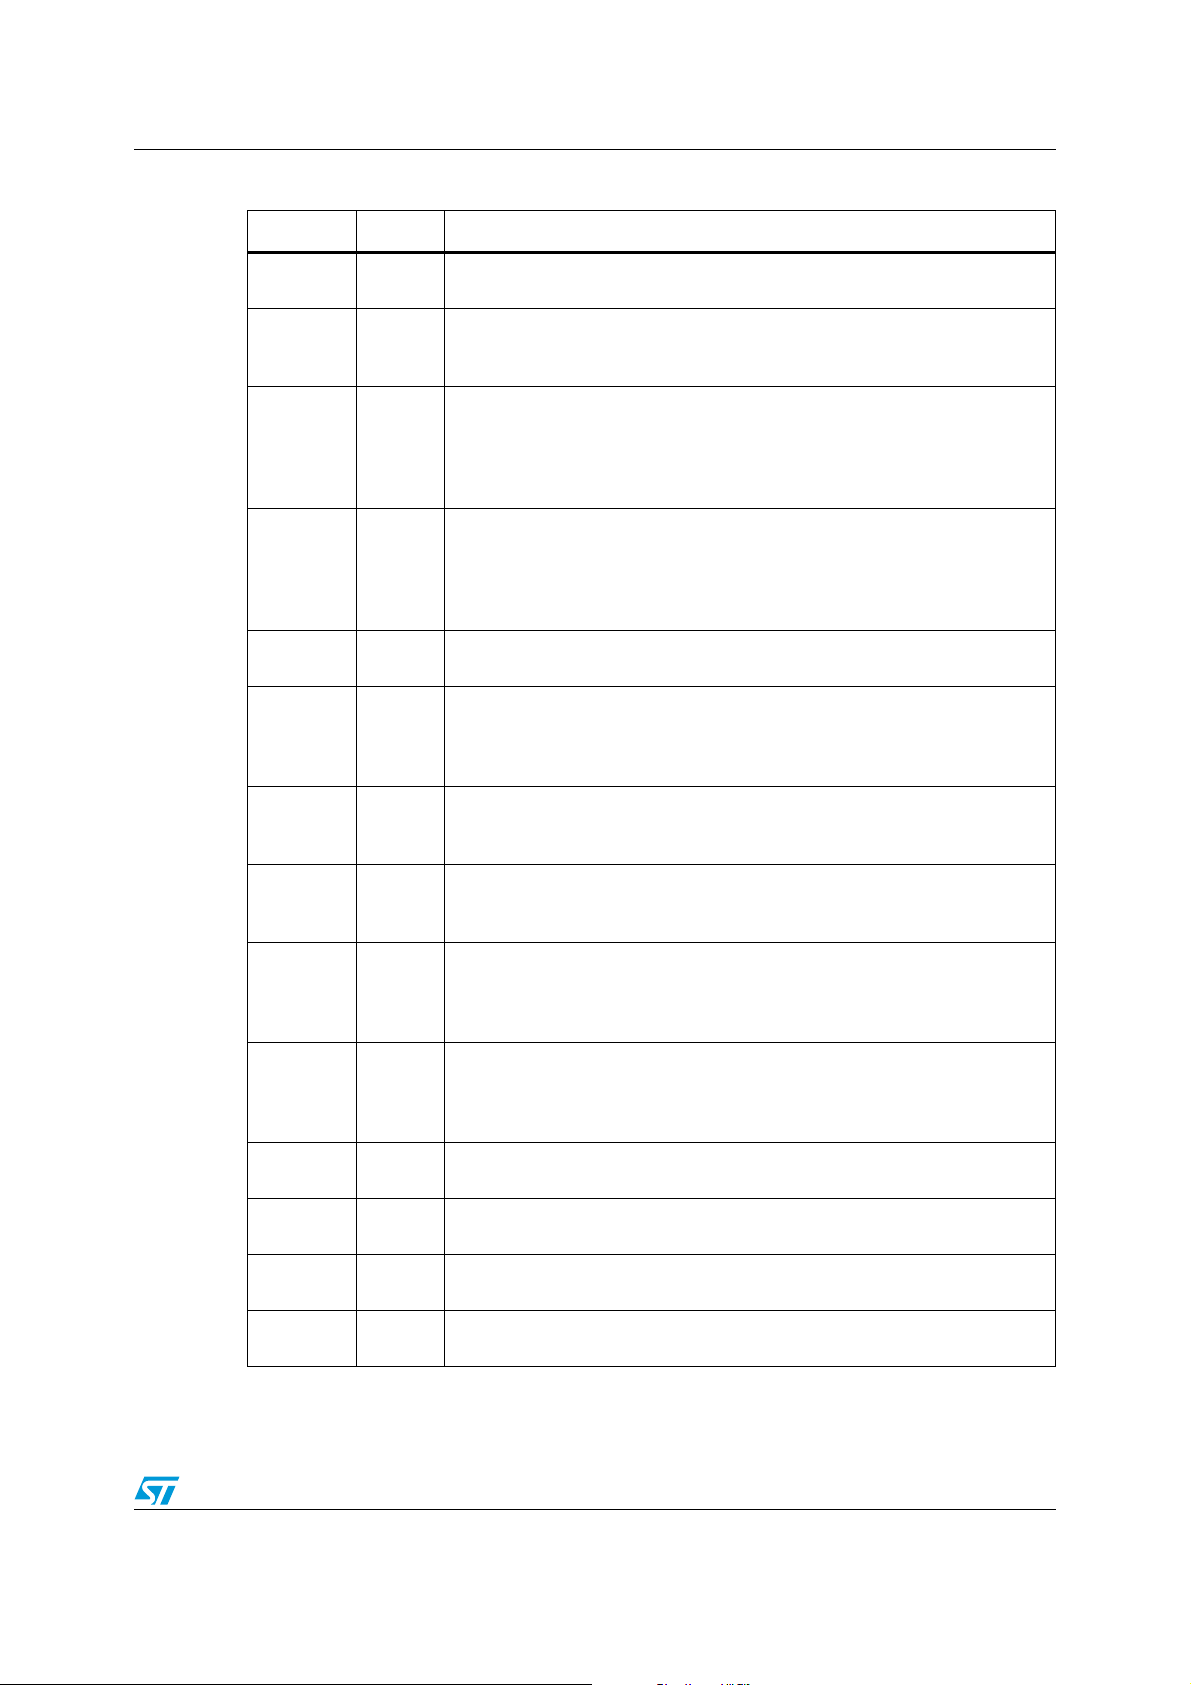
Table 2. Pin description
Pin Symbol Function
1, 12, 13,
24
3, 10, 15,
22
2, 23
11, 14
PGND
VS
QA1,QA
2
QB1,QB
2
4 CLK
5 DI
6 CSN
7 DO
8 PWM
9 STEP
Power ground: All pins PGND are internally connected to the heat slug.
Important: All pins of PGND must be externally connected!
Power supply voltage (external reverse protection required): For EMI
reason a ceramic capacitor as close as possible to PGND is recommended.
Important: All pins of VS must be externally connected!
Fullbridge-outputs An: The output is built by a high-side and a low-side
switch, which are internally connected. The output stage of both switches is
a power DMOS transistor. Each driver has an internal reverse diode (bulkdrain-diode: highside driver from output to VS, low-side driver from PGND to
output). This output is overcurrent protected.
Fullbridge-outputs Bn: The output is built by a highside and a low-side
switch, which are internally connected. The output stage of both switches is
a power DMOS transistor. Each driver has an internal reverse diode (bulkdrain-diode: highside driver from output to VS, low-side driver from PGND to
output). This output is overcurrent protected.
SPI clock input: The input requires CMOS logic levels. The CLK input has
a pull-down current. It controls the internal shift register of the SPI.
Serial data input: The input requires CMOS logic levels. The DI input has a
pull-down current. It receives serial data from the microcontroller. The data
is a 16bit control word and the most significant bit (MSB, bit 0) is transferred
first.
Chip Select Not input The input requires CMOS logic levels. The CSN
input has a pull-up current. The serial data transfer between device and
micro controller is enabled by pulling the input CSN to low level.
SPI data output: The diagnosis data is available via the SPI and it is a
tristate-output. The output is CMOS compatible will remain highly resistive,
if the chip is not selected by the input CSN (CSN = high)
PWM output This CMOS compatible output reflects the current duty cycle
of the internal PWM controller of bridge A. It is an high resistance output
until VCC has reached minimum voltage ore can switched off via the SPI
command.
Step clock input: The input requires CMOS logic levels. The STEP input
has a pull-down current. It is clock of up and down counter of control
register 0. Rising edge starts new PWM cycle to drive motor in next
position.
16 CP
17 GND
18 TEST
19 VCC
Charge Pump Output: A ceramic capacitor (e.g.100 nF) to VS can be
connected to this pin to buffer the charge-pump voltage.
Ground: Reference potential besides power ground e.g. for reference
resistor RREF. From this pin exist a resistive path via substrate to PGND.
Test in put The TEST input has a pull-down current. Pin used for production
test only. In the application it must be connected to GND.
Logic supply voltage: For this input a ceramic capacitor as close as
possible to GND is recommended.
Doc ID 11778 Rev 6 7/40

Block diagram and pin information L9942
Table 2. Pin description (continued)
Pin Symbol Function
Reference Resistor The reference resistor is used to generate a
temperature stable reference current used for current control and internal
20 RREF
21 EN
oscillator. At this output a voltage of about 1.28V is present. The resistor
should be chosen that a current of about 200uA will flow through the
resistor.
Enable input: The input requires CMOS logic levels. The EN input has a
pull-down resistor. In standby-mode outputs will be switched off and all
registers will be cleared. If EN is set to a logic high level then the device will
enter the active mode.
8/40 Doc ID 11778 Rev 6

L9942 Device description
2 Device description
2.1 Dual power supply: VS and VCC
The power supply voltage VS supplies the half bridges. An internal charge-pump is used to
drive the highside switches. The logic supply voltage V
part and the SPI of the device. Due to the independent logic supply voltage the control and
status information will not be lost, if there are temporary spikes or glitches on the power
supply voltage. In case of power-on (V
typical) the circuit is initialized by an internally generated power-on-reset (POR). If the
voltage V
are switched to tristate (high impedance) and the internal registers are cleared.
decreases under the minimum threshold (V
CC
2.2 Standby mode
The EN input has a pull-down resistor. The device is in standby mode if EN input isn't set to
a logic high level. All latched data will be cleared and the inputs and outputs are switched to
high impedance. In the standby mode the current at VS (VCC) is less than 3 µA (1 µA) for
CSN = high (DO in tristate). If EN is set to a logic high level then the device will enter the
active mode. In the active mode the charge pump and the supervisor functions are
activated.
increases from undervoltage to V
CC
(stabilized) is used for the logic
CC
= 2.60 V,
POR ON
POR OFF
= 2.3 V, typical), the outputs
2.3 Diagnostic functions
All diagnostic functions (overload/-current, open load, power supply over-/undervoltage,
temperature warning and thermal shutdown) are internally filtered (t
the condition has to be valid for a minimum time before the corresponding status bit in the
status registers will be set. The filters are used to improve the noise immunity of the device.
Open load and temperature warning function are intended for information purpose and will
not change the state of the bridge drivers. On contrary, the overload/-current and thermal
shutdown condition will disable the corresponding driver (overload/-current) or all drivers
(thermal shutdown), respectively. The microcontroller has to clear the status bit to reactivate
the bridge driver.
2.4 Overvoltage and undervoltage detection
If the power supply voltage Vs rises above the overvoltage threshold V
21 V), an overvoltage condition is detected. Programmable by SPI (OVW) the outputs are
switched to high impedance state (default after reset) or the overvoltage bit is set without
switching the outputs to high impedance. When the voltage Vs drops below the undervoltage threshold V
operation of the power devices without sufficient gate driving voltage (increased power
dissipation). Error condition is latched and the microcontroller needs to clear the status bits
to reactivate the drivers.
SUV OFF
, the outputs are switched to high impedance state to avoid the
= 32 µs, typical) and
GL
SOV OFF
(typical
Doc ID 11778 Rev 6 9/40

Device description L9942
2.5 Temperature warning and thermal shutdown
If junction temperature rises above T
detectable via the SPI. If junction temperature increases above the second threshold T
the thermal shutdown bit will be set and power DMOS transistors of all output stages are
switched off to protect the device. In order to reactivate the output stages the junction
temperature must decrease below Tj SD -Tj SD HYS and the thermal shutdown bit has to be
cleared by the microcontroller.
a temperature warning flag is set which is
j TW
2.6 Inductive loads
Each half bridge is built by an internally connected highside and a low-side power DMOS
transistor. Due to the built-in reverse diodes of the output transistors, inductive loads can be
driven without external free-wheeling diodes. In order to reduce the power dissipation during
free-wheeling condition the PWM controller will switch-on the output transistor parallel to the
freewheeling diode (synchronous rectification).
2.7 Cross-current protection
The four half-brides of the device are cross-current protected by an internal delay time
depending on the programmed slew rate. If one driver (LS or HS) is turned-off then
activation of the other driver of the same half bridge will be automatically delayed by the
cross-current protection time.
j SD
,
2.8 PWM current regulation
An internal current monitor output of each high-side and low-side transistor sources a
current image which has a fixed ratio of the instantaneous load current. This current images
are compared with the current limit in PWM control. Range of limit can reach from
programmed full scale value (register1 DAC Scale) down belonging LSB value of 5 bit DAC
(register1 DAC Phase x). The data of the two 5 bit DACs comes form set up in 9 current
profiles (register2 to 6). If signal changes to logic high at pin STEP then 2 current profiles
are moved in register1 for DAC Phase A and B. Number of profile depends on phase
counter reading and direction bit in register0 (Figure 7). The bridges are switched on until
the load current sensed at HS switch exceeds the limit. Load current comparator signal is
used to detect open load or overcurrent condition also.
2.9 Decay modes
During off-time the device will use one of several decay modes programmable by SPI
(Figure 4 top). In slow decay mode HS switches are activated after cross current protection
time for synchronous rectification to reduce the power dissipation (Figure 4 detail A). In fast
decay opposite half bridge will switched on after cross current protection time, that is same
like change in the direction. For mixed decay the duration of fast decay period before slow
decay can be set to a fixed time (Figure 4 detail B continuous line) or is triggered by underrun of the load current limit (Figure 4 detail B dashed line), that can be detected at LS
switch. The special mode where the actual phase counter value is taken into account to
select the decay mode is called auto decay (e.g. in Figure 3 Micro Stepping DIR=1). If the
absolute value of the current limit is higher as during step before then PWM control uses
10/40 Doc ID 11778 Rev 6
L9942 Device description
slow decay mode always. Otherwise one of the fast decay modes is automatic selected for a
quick decrease of the load current and so it obtains new lower target value.
2.10 Overcurrent detection
The overcurrent detection circuit monitors the load current in each activated output stage. In
HS stage it is in function after detection of current limit during PWM cycle and in LS stage it
works permanently. If the load current exceeds the overcurrent detection threshold for at
least t
= 4 µs, the overcurrent flag is set and the corresponding driver is switched off to
ISC
reduce the power dissipation and to protect the integrated circuit. Error condition is latched
and the microcontroller needs to clear the status bits to reactivate the drivers.
2.11 Open load detection
The open load detection monitors the activity time of the PWM controller and is available for
each phase. If the limit of load current is below around 100mA then open load condition is
detectable. Open load bit for a bridge is set in the register6 if this low current limit can't
reached after at least 15 consecutive PWM cycles.
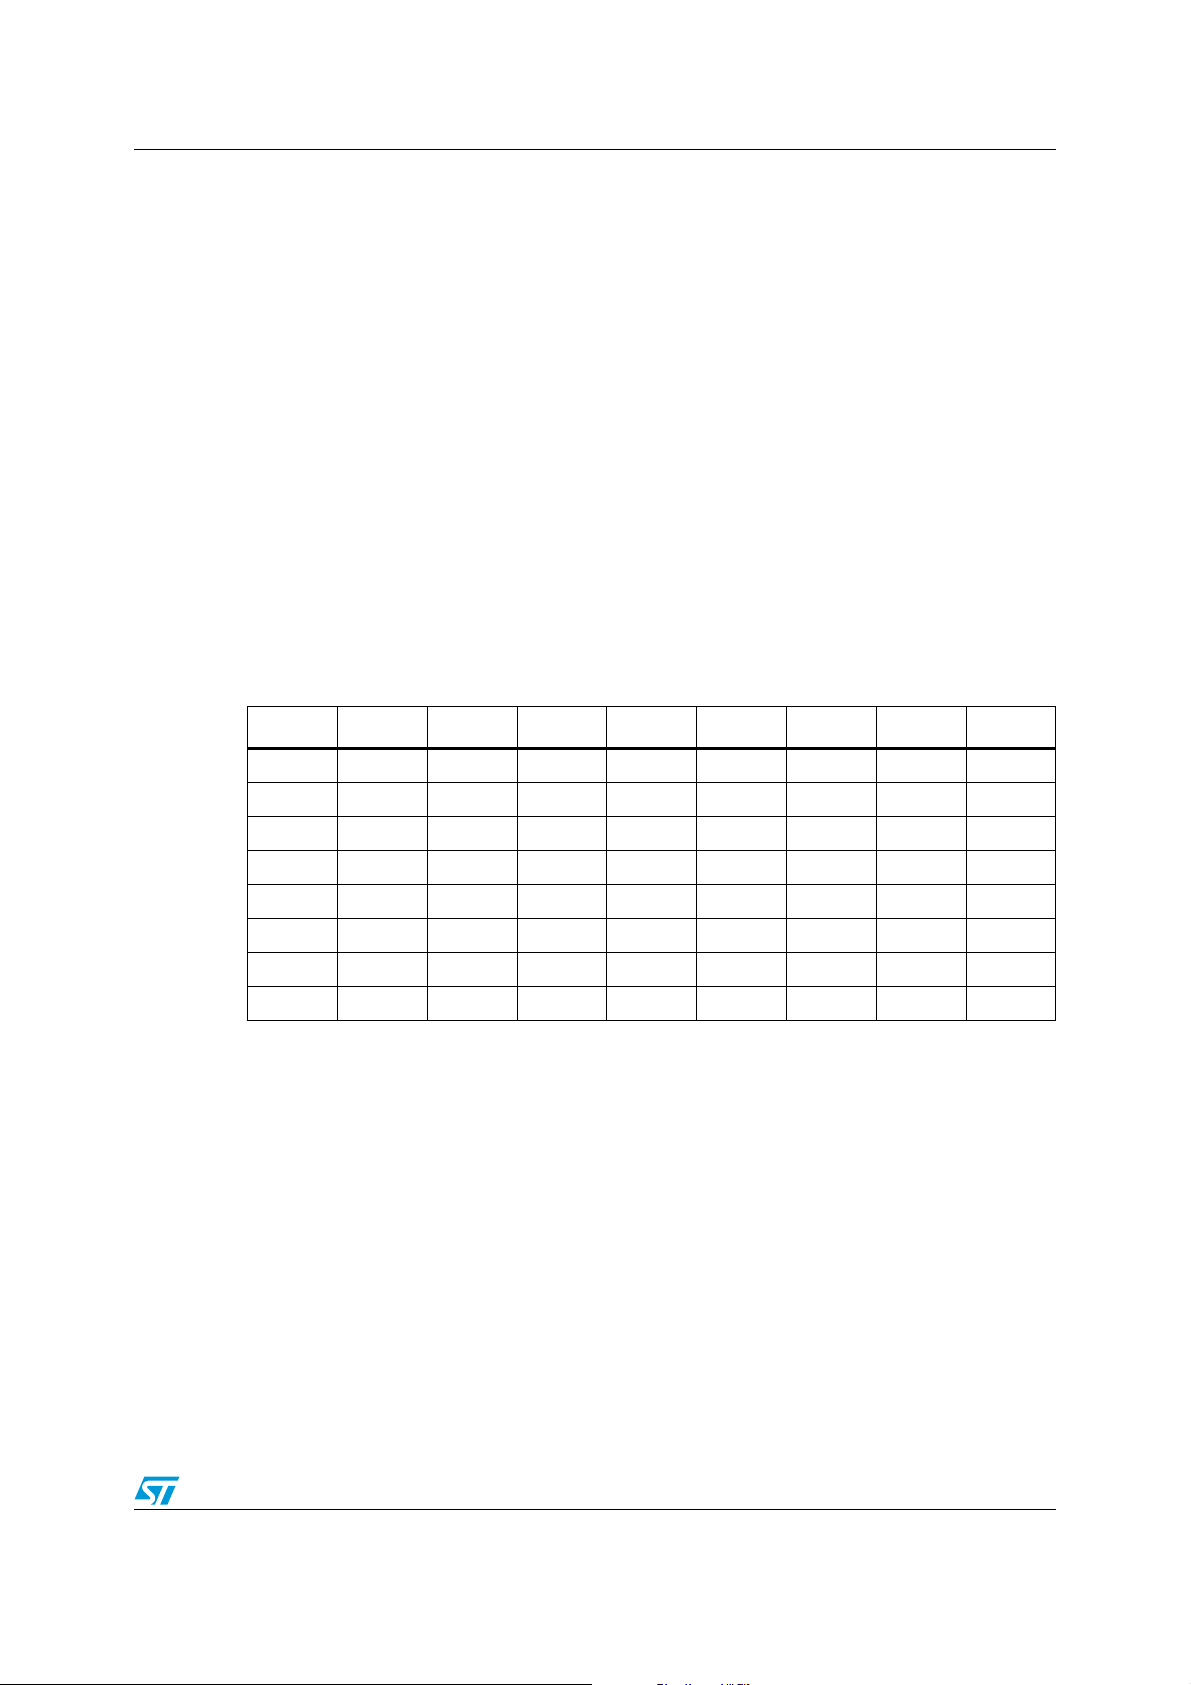
Table 3. Truth table
DC2 DC1 DC0 I4 I3 I2 I1 I0 max. IOL
0000xxxx46mA
0010xxxx68mA
01000xxx52mA
01100xxx81mA
100000xx53mA
101000xx78mA
1100000137mA
1110000144mA
Truth table shows possible profiles for active open load detection. Maximum threshold IOL is
shown in left column if x bits are 1 (see also Figure 7). Lowest possible limit is e.g. 3.1 mA
for DC2=DC1=DC0=0 and it is set only I0=1.
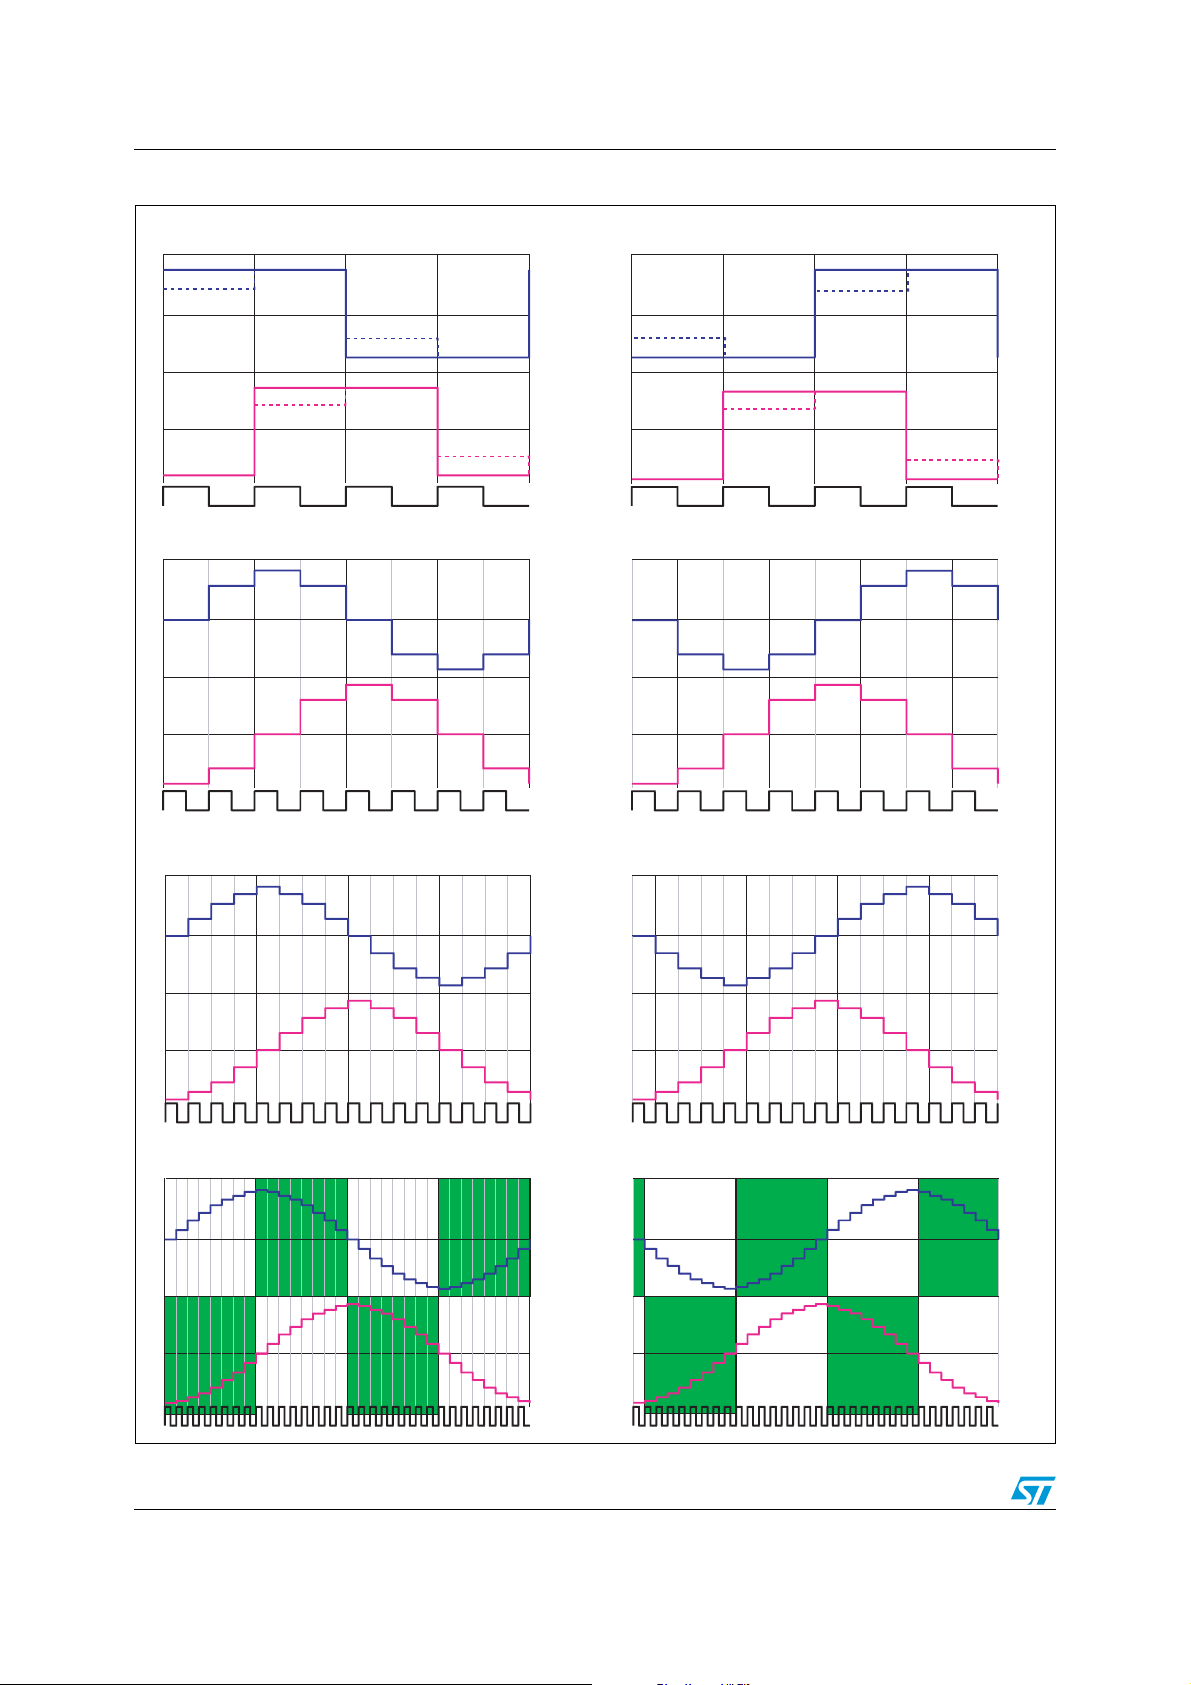
2.12 Stepping modes
One full revolution can consist of four full steps, eight half steps, sixteen mini steps or 32
microsteps.
Mode is set up in register 0 and it defines increment size of phase counter. Phase counter
value defines address of corresponding current profile. Stepping modes with typical profile
values can see in Figure 3 (e.g. also so called 'Two Phase On' shown in dashed line).
Doc ID 11778 Rev 6 11/40
Device description L9942
Figure 3. Stepping modes
Full-Stepping Mode: DIR=0
081624
Current Driver A
080 8
Current Driver B
0808
STEP Signal
Half-Stepping Mode: DIR=0
0 4 812162024 28
Current Driver A
04840 484
Current Driver B
04840484
STEP Signal
Phase Counter
Address of Current
Profile Entry
Address of Current
Profile Entry
Phase Counter
Address of Current
Profile Entry
Address of Current
Profile Entry
Full-Stepping Mode: DIR=1
24 16 8 0
Current Driver A
0808
Current Driver B
0808
STEP Signal
Half-Stepping Mode: DIR=1
0 2824 2016128 4
Driver Current A
048 404 84
Driver Current B
04840484
STEP Signal
Mini-Stepping Mode: DIR=0
0 2 4 6 81012141618202224262830
Current Driver A
0246864202468642
Current Driver B
0246864202468642
STEP Signal
Micro Stepping Mode: DIR=0 (e.g auto decay)
0 1 2 3 4 5 6 7 8 9 10 11 12 13 14 15 16 17 18 19 20 21 2223 24 25 26 27 28 29 30 31
Current Driver A
012345 678 765 432101 234 5678 76543 21
Slow Decay
Mode
Mixed Decay
Mode
Mixed Decay
Mode
0123 456 787654 321 012 34567876543 21
Slow Decay
Mode
Current Driver B
Slow Decay
Mode
Mixed Decay
Mode
Mixed Decay
Mode
Slow Decay
Mode
Phase Counter
Adress of Current
Profile Entry
Adress of Current
Profile Entry
Phase Counte r
Adress of Current
Profile Entry
Adress of Current
Profile Entry
Mini-Stepping Mode: DIR=1
0 30 28 262422 201816141210 8 6 4 2
Current Driver A
0246864202468642
Current Driver B
0246864202468642
STEP Signal
Micro Stepping Mode: DIR=1 (e.g. auto decay)
31 30 29 28 27 26 25 24 23 22 21 20 19 18 17 16 15 14 13 12 11 1 0 9 8 7 6 5 4 3 2 1
0
Current Driver A
Slow Decay
Mode
012 345 678 765432 101 2345 67876 543 21
Mixed Decay
Mode
Mixed Decay
Mode
0123 456 787 654321 012 345678 76 543 21
Slow Decay
Mode
Slow Decay
Mode
Current Driver B
Mixed Decay
Mode
Mixed Decay
Mode
Slow Decay
Mode
12/40 Doc ID 11778 Rev 6

L9942 Device description
T
T
T
T
T
T
T
T
>
T
T
2.13 Decay modes
Figure 4. Decay modes
Load
Current
ON
SLOW
DECAY
FAST
DECAY
MIXED
DECAY
Internal PWM_CLK
Load
Detail A: SWITCH ON AND SLOW DECAY
Current
Step
Limit
HS
Filter time for the purpose of switch off delay in on mode is set by FT register6
FT
Cross current protection time is set by SR1 SR0 register0
T
CC
Blank time of load current comparator
B
VS
A
VS
on
VS
on
on
on
VS
on
on
on
VS
on
on
B
Time
register0
DM2 DM1 DM0 MODE
0 0 0
slow
Fast decay is caused by
current through internal
diodes during cross current
protection time.
VS
OFF
OFF
OFF
OFF
fast decay
ON
T
CC
T
CC
fast decay
SLOW DECAY
=T
BCC
Time
T
FT
T
B
Detail B:
MIXED DECAY
Load
Current
CC
FT
Step
Limit
LS
FAST
DECAY
T
mc
Filter time for purpose of delay when decay mode has to change after limit under-run
FT
When limit is reached so fast decay duration time is set by DM1 DM2 register0
T
MD
register0
DM2 DM1 DM0 MODE CURVE
X 0 1
X 1 0
X 1 1
SLOW DECAY
T
CC
after current
undershoot
mc
+ 2T= T
CC
FT
Time
MD1
MD2
mc
Load
Current
=
T
T
MDx
MD1
or T
MD2
Doc ID 11778 Rev 6 13/40
T
CC
FAST
DECAY
T
MDx
SLOW DECAY
with delay
T
CC
Time

Electrical specifications L9942
3 Electrical specifications
3.1 Absolute maximum ratings
Table 4. Absolute maximum ratings
Symbol Parameter Value Unit
V
S
V
CC
V
DI,VDO
V
CLK VCSN
V
STEP VEN
V
RREF
V
CP
V
Qxn
I
Qxn
DC supply voltage
single pulse t
Stabilized supply voltage, logic supply
,
Digital input / output voltage
,
Current reference resistor
Charge pump output
(x=A;B n=1;2) output voltage
(x=A;B n=1;2) output current
Warning: Leaving the limitation of any of these values may cause an
irreversible damage of the integrated circuit!
3.2 ESD protection
Table 5. ESD protection
-0.3 to 28 V
< 400 ms 40 V
max
-0.3 to 5.5 V
-0.3 to VCC + 0.3 V
-0.3 to VCC + 0.3 V
-0.3 to VS + 11 V
-0.3 to VS + 0.3 V
±2.5 A
Parameter Value Unit
All pins
output pins: Qxn (x=A;B n=1;2)
1. HBM according to MIL 883C, Method 3015.7 or EIA/JESD22-A114-A
2. HBM with all unzapped pins grounded
14/40 Doc ID 11778 Rev 6
±2
±4
(2)
(1)
kV
kV

L9942 Electrical specifications
3.3 Thermal data
Table 6. Operating junction temperature
Symbol Parameter Value Unit
T
Table 7. Temperature warning and thermal shutdown
Operating junction temperature -40 to 150 °C
j
Symbol Parameter Min. Typ. Max . Uni t
Temperature warning
T
jTW ON
threshold junction
increasing - - 150 °C
T
j
temperature
Temperature warning
T
jTW OFF
threshold junction
-130--°C
temperature
T
jSD ON
T
jSD OFF
T
jSD HYS
Thermal shutdown threshold
junction temperature
Thermal shutdown threshold
junction temperature
---170°C
-150--°C
Thermal shutdown hysteresis - - 5 - K
Figure 5. Thermal data of the package
Note:
1s 1 signal layer
2s2p 2 signal layers 2 internal planes
Doc ID 11778 Rev 6 15/40

Electrical specifications L9942
3.4 Electrical characteristics
VS = 7 to 20 V, VCC = 3.0 to 5.3 V, Tj = -40 to 150 °C, I
= -200 µA, unless otherwise
REF
specified. The voltages are referred to GND and currents are assumed positive, when the
current flows into the pin.
3.4.1 Supply
Table 8. Supply
Symbol Parameter Test condition Min. Typ. Max. Unit
I
S
I
CC
I
CC
I
+ ICC Sum quiescent supply current
S
t
setPOR
1. This parameter is guaranteed by design.
VS DC supply current in active
mode
quiescent supply current
V
S
VCC DC supply current in
active mode
VCC quiescent supply current
(1)
VCC on set up time
VS = 13.5 V, EN=VCC outputs
floating
= -40 °C
T
VS = 13.5 V, TEST,
EN = 0V outputs
floating
j
to 25 °C
Tj = 125 °C -6 20
VCC = 5.0 V EN=VCC,
DI=CLK=STEP=0V
= 5.0 V TEST;
V
CC
EN = 0 V; CSN =
no clocks
V
CC
T
= -40 °C
j
to 25 °C
outputs floating
CSN=VCC no
clocks outputs
= 125 °C -2 6 µA
T
j
floating
= 13.5 V, V
V
S
5.0 V
CC
=
Tj = -40 °C
to 25 °C
TEST; EN=0 V
CC
no
= 125 °C -8 26
T
j
CSN=V
clocks outputs
floating
EN = 5 V, CSN=CLK=0V DO
changes from high ohmic to logic
level LOW
-7 20 mA
-3 10
-1 3 mA
-1 3 µA
-4 13
2 - - µs
µA
µA
16/40 Doc ID 11778 Rev 6

L9942 Electrical specifications
3.4.2 Over- and undervoltage detection
Table 9. Over- and undervoltage detection
Symbol Parameter Test condition Min. Typ. Max. Unit
V
V
V
V
V
V
V
V
V
VS UV-threshold voltage VS increasing - - 6.90 V
SUV ON
SUV OFF VS
SUV hyst VS
SOV OFF
SOV ON VS
SOV hys
POR OFF
POR ON
POR hyst
UV-threshold voltage VS decreasing 4.8 - - V
UV-hysteresis V
SUV ON
-V
SUV OFF
-0.3 - V
VS OV-threshold voltage VS increasing - 21 25 V
OV-threshold voltage VS decreasing 18.5 20 - V
t VS OV-hysteresis V
SOV OFF
-V
-0.5 - V
SOV ON
Power-off-reset threshold VCC increasing - 2.6 2.9 V
Power-on-reset threshold VCC decreasing 2.00 2.3 - V
Power-on-reset hysteresis V
POR OFF
-V
POR ON
-0.11 - V
Figure 6. VS monitoring
Register 7
UV
1
Register 7
OV
1
0
VSUV ONVSUV OFF
VS
0
VSOV OFFVSOV ON
VS
3.4.3 Reference current output
Table 10. Reference current output
Symbol Parameter Test condition Min. Typ. Max. Unit
V
REF
I
REFshorted
I
REFopen
Reference voltage range I
Reference current
threshold shorted pin REF
Reference current
threshold open pin REF
= -200 μA 1.05 1.25 1.45 V
REF
register6 bit7 RERR = 1 - - -250 μA
register6 bit7 RERR = 1 -150 - - μA
The device works properly without the external resistor at pin REF. In this case it doesn't
have to fulfill all specified parameters.
Doc ID 11778 Rev 6 17/40

Electrical specifications L9942
3.4.4 Charge pump output
Table 11. Charge pump output
Symbol Parameter Test condition Min. Typ. Max. Unit
VCP Charge pump output voltage
V
=7 V
S
VS=13.5 V 20 - 35 V
=20 V 30 - 40 V
V
S
= -100 μA, all
I
CP
switches off at
Qxn
11 - 20 V
The ripple of voltage at CP can suppressed using a capacity of e.g.100 nF.
3.4.5 Outputs: Qxn (x = A; B n = 1; 2)
The comparator, which is monitoring current image of HS, is working during ON cycle of
PWM control. If load current is higher as set value then the signal ILIMIT is generated and
after filter time the bridge is switched off. Test mode gets access to signal ILIMIT and
threshold of current can be measured.
Table 12. Outputs: Qxn (x = A; B n =1; 2)
Symbol Parameter Test condition Min. Typ. Max. Unit
R
DSON HS
R
DSON LS
|I
QxnOC
I
QxnFS_HS
I
QxnLIM_HS
1. MIN= 0.92 · I
On-resistance Qxn to VS
On-resistance Qxn to
PGND
Output overcurrent
|
limitation to VS or PGND
Value of output current to
supply V
scale value)1 sourcing
(so called full
S
from HS switch
Accuracy of micro steps
current limit
– 0.02 · |I
QxnLIM
QxnFS_HS
= 13.5 V, Tj = 25 °C,
V
S
= -1.0 A
I
Qxn
= 13.5 V, Tj = 125 °C,
V
S
= -1.0 A
I
Qxn
V
= 7.0 V, Tj = 25 °C,
S
I
= -1.0 A
Qxn
V
= 13.5 V, Tj = 25 °C,
S
= + 1.0 A
I
Qxn
= 13.5 V, Tj = 125 °C,
V
S
= + 1.0 A
I
Qxn
V
= 7.0 V, Tj = 25 °C,
S
I
= + 1.0 A
Qxn
test mode exclusive of filter
time 4µs (Chapter 2.10)
- 500 700 mΩ
- 750 1000 mΩ
- 550 750 mΩ
- 500 700 mΩ
- 750 1000 mΩ
- 550 750 mΩ
1.6 2 - A
Bits: DC2 DC1 DC0=000 60 95 130
Bits: DC2 DC1 DC0=001 100 140 180
Bits: DC2 DC1 DC0=010 180 230 280
Bits: DC2 DC1 DC0=011 300 360 420
Bits: DC2 DC1 DC0=100 485 550 615
Bits: DC2 DC1 DC0=101 720 810 900
Bits: DC2 DC1 DC0=110 1000 1150 1300
Bits: DC2 DC1 DC0=111 1200 1350 1500
-MIN
|; MAX= 1.08 · I
QxnLIM
+ 0.02 · |I
QxnFS_HS
(1)
-MAX
|
(1)
mA
mA
18/40 Doc ID 11778 Rev 6

L9942 Electrical specifications
Note: Current profile has to pre set with I4 I3 I2 I1 I0 = 11111 and load to register 1.
Output current limit I
is product of full scale current |I
QxnLIM
value of DAC Phase A/B (bits I4 I3 I2 I1 I0) in register1.
Values of DAC Phase A and B can read out and depends on set up done before:
1. direction DIR, stepping mode ST1 ST0 and phase counter P4 P3 P2 P1 P0 in register 0 and
2. value of corresponding current profile (for address of current profile entry see also
Figure 3).
Figure 7. Logic to set load current limit
STEP
Current-Profile Table
stored in register2, ...6
I4 I3 I2 I1 I0
I4 I3 I2 I1 I0
I4 I3 I2 I1 I0
I4 I3
I2 I 1 I0
I4 I3 I2 I1 I0
I4 I3 I2 I1 I0
I4 I3 I2 I1 I0
I4 I3 I2
I4 I3 I2 I1 I0
I1 I0
UP/Down
Count by
1,2,4,8
Profile 8
Profile 7
Profile 6
Profile 5
Profile 4
Profile 3
Profile 2
Profile 1
Profile 0
PhaseCounter
Adr
9
5
5
5
5
5
5
5
5
5
0 0 0
012301230123
MUX
MUX M UX
Phase A
A3=0
Adr
A[3..0]
DI
REF
Register 0
Decay Mode
DM2 DM1 DM0
P0P1P2P3P4
A0A1A2
A0A1A2A3
A3=1
neg(A[3..0])
I
REF
StepMode
Slew Rate
SR0SR1 ST1 ST0
Address Calculation
Phase B
A3=0
Adr neg(A[3..0])
5
Registe r 1
DAC Scale
DAC
Full Scale
DAC Phase B
DC0DC1DC2
5 bit DAC
Phase B
I
MAX
QxnFS_ |
DIR
A3=1
Adr
A[3..0]
DAC Phase A
LIMIT B
5 bit DAC
Phase A
I0I1I2I3I4I0I1I2I3I4
I
LIMIT A
(bits DC2 DC1 DC0) and
I
QA1LIM
1000
QA1
I
Qx1LIM
QA2
I
QB1LIM
1000
I
QA2LIM
1000
I
QB2LIM
1000
QB1
QB2
I
Qx2LIM
Doc ID 11778 Rev 6 19/40

Electrical specifications L9942
T
T
T
3.4.6 PWM control
Table 13. PWM control (see Figure 4 and Figure 7)
Symbol Parameter Test condition Min. Typ. Max. Unit
(1)
f
PWM
T
T
Frequency of PWM cycles
(1)
Mixed decay switch off delay time
MD
(1)
Glitch filter delay time
FT
Bit: FRE= 1 - 20.8 - kHz
Bit: FRE= 0 - 31.3 - kHz
Bits: DM1 DM0= 0 1 - 4 - µs
Bits: DM1 DM0= 1 0 - 8 - µs
Bit: FILTER= 0 - 1.5 - µs
Bit: FILTER= 1 - 2.5 - µs
Bits: SR1 SR0= 0 0 - 0.5 - µs
Tcc
TB
(1)
Cross current protection time Blank
(1)
time of comparator
Bits: SR1 SR0= 0 1 - 1 - µs
Bits: SR1 SR0= 1 0 - 2 - µs
Bits: SR1 SR0= 1 1 - 4 - µs
Bits: SR1 SR0= 0 0 - 13 - V/µs
VSR
Slew rate (dV/dt 30 % - 70 %) @HS
switches on resistive load of 10 Ω,
VS = 13.5 V
Bits: SR1 SR0= 0 1 - 13 - V/µs
Bits: SR1 SR0= 1 0 - 6 - V/µs
Bits: SR1 SR0= 1 1 - 6 - V/µs
1. This parameter is guaranteed by design.
Time base is an internal trimmed oscillator of typical 2MHz and it has an accuracy of ±6 %.
Figure 8. Switching on minimum time
Load current
at Qxn
Step limit
Internal PWM
clock
20 or 30 kHz
INT _2MHz
Pin PWM
(for bridge A)
T
CC
T
T
B
T
FT
on
CC
PWM
decay
Filter time of current comparator
FT
T
Cross current protection time
CC
TBBlank time of current comparator
e.g. TB= T
CC
TFT= 1.5 us= 1 us
Time
20/40 Doc ID 11778 Rev 6

L9942 Functional description of the logic with SPI
4 Functional description of the logic with SPI
4.1 Motor stepping clock input (STEP)
Rising edge of signal STEP is latched. It is synchronized by internal clock. At next start of a
new PWM cycle the new values of output current limit are used to drive motor in next
position. Before start new motor step this signal has to be low for at least two internal clock
periods to reset latch.
4.2 PWM output (PWM)
This output reflects the current duty cycle of the internal PWM controller of bridge A. High
level indicates on state to increase current through load and low level is in off state so load
current decreases depending on chosen decay mode.
4.3 Serial peripheral interface (SPI)
This device uses a standard 16 bit SPI to communicate with a microcontroller. The SPI can
be driven by a microcontroller with its SPI peripheral running in following mode: CPOL = 0
and CPHA = 0.
For this mode, input data is sampled by the low to high transition of the clock CLK, and
output data is changed from the high to low transition of CLK.
A fault condition can be detected by setting CSN to low. If CSN = 0, the DO-pin will reflect an
internal error flag of the device which is a logical-or of all status bits in the Status Register
(reg 7) and in the current profile register 4 (reg 6). The microcontroller can poll the status of
the device without the need of a full SPI-communication cycle.
4.4 Chip select not (CSN)
The input pin is used to select the serial interface of this device. When CSN is high, the
output pin (DO) will be in high impedance state. A low signal will activate the output driver
and a serial communication can be started. The state when CSN is going low until the rising
edge of CSN will be called a communication frame.
4.5 Serial data in (DI)
The input pin is used to transfer data serial into the device. The data applied to the DI will be
sampled at the rising edge of the CLK signal and latched into an internal 16 bit shift register.
The first 3 bit are interpreted as address of the data register. At the rising edge of the CSN
signal the contents of the shift register will be transferred to the selected data register. The
writing to the register is only enabled if exactly 16 bits are transmitted within one
communication frame (i.e. CSN low). If more or less clock pulses are counted within one
frame the complete frame will be ignored. This safety function is implemented to avoid an
activation of the output stages by a wrong communication frame.
Doc ID 11778 Rev 6 21/40

Functional description of the logic with SPI L9942
Note: Due to this safety functionality a daisy chaining of SPI is not possible. Instead, a parallel
operation of the SPI bus by controlling the CSN signal of the connected ICs is
recommended.
4.6 Serial data out (DO)
The data output driver is activated by a logical low level at the CSN input and will go from
high impedance to a low or high level depending on the status bit 0 (fault condition). The first
rising edge of the CLK input after a high to low transition of the CSN pin will transfer the
content of the selected status register into the data out shift register. Each subsequent
falling edge of the CLK will shift the next bit out.
4.7 Serial clock (CLK)
The CLK input is used to synchronize the input and output serial bit streams. The data input
(DI) is sampled at the rising edge of the CLK and the data output (DO) will change with the
falling edge of the CLK signal.
4.8 Data register
The device has eight data registers. The first three bits (bit 0 ... bit 2) at the DI-input are used
to select one of the input registers. All bits are first shifted into an input shift register. After
the rising edge of CSN the contents of the input shift register will be written to the selected
Input Data Register only if a frame of exact 16 data bits are detected. The selected register
will be transferred to DO during the current communication frame.
Figure 9. SPI and registers
DI
CLK
CSN
INT_2MHz
POR
SPI-
Controll
CLK_ADR
SEL_ERROR
SPI2REG
Register 7
D
D
Register 0
Register 1
Register 2
Register 3
Register 4
Register 5
Register 6
D1 A1D0
D3 D4 D5 D6 D7 D8 D9 D10 D11
D2 D12
A1A0 A2
Phase Counter
DAC_Scale
DC0
DC1DC2
Current Profile 5
CLR6
SST
Temperature VS Monitor
CLR7
TSD TW
Decay Mode
P0P1P2P3P4
DAC Phase B DAC Phase A
OV
OVW
PWM Counter
PWM Counter
I0I1I2I3I4
PWM Counter
I0I1I2I3I4
PWM
FT
Freq
Read-Only
RREF
ST
Phase
Error
Read-Only
UVOV(W)
Read Only
Test only
PWM
D0D1
NPWM
Openload
Phase
B
Slew Rate Step Mode
DM0DM1DM2
T0T1
D2D3D4
D5D6D7
A
Overcurrent
SR0SR1 ST1 ST0
Current Profile 0Current Profile 1
Current Profile 2Current Profile 3
Current Profile 4
Current Profile 6Current Profile 7
Current Profile 8
HSA1 LSA2HSA2LSB1LSB2HSB1HSB2
DIR
LSA1
DO
A2
A0
AI0AI1AI2AI3AI4BI0BI1BI2BI3BI4
I0I1I2I3I4I0I1I2I3I4
I0I1I2I3I4I0I1I2I3I4
I0I1I2I3I4
I0I1I2I3I4
I0I1I2I3I4
22/40 Doc ID 11778 Rev 6

L9942 SPI - control and status registers
5 SPI - control and status registers
5.1 Register 0
Table 14. Register 0
Phase counter Decay mode Slew rate Step mode DIR
Bit
12 11 10 9 8 7 6 5 4 3 2 1 0
Access r w r w r w r w r w r w r w r w r w r w r w r w r w
Reset 0 0 0 0 0 0 0 0 0 0 0 0 0
Name P4 P3 P2 P1 P0 DM2 DM1 DM0 SR1 SR0 ST1 ST0 DIR
The meaning of the different bits is as follows:
:
DIR This bit controls direction of motor movement. DIR=1 clockwise DIR=0 counter clockwise.
ST1 ST0 This bits controls step mode of motor movement (Figure 3).
00 Micro-stepping
01 Mini-stepping
10 Half-stepping
11 Full-stepping
SR1 SR0 This bit controls slew rate of bridge switches. See also parameter Ta bl e 1 3
DM2 DM1 DM0 This bits controls decay mode of output current (Figure 3).
000 Slow decay
001 Mixed decay, fast decay until T
> 4 µs
MD
010 Mixed decay, fast decay until TMD > 8 µs
011 Mixed decay, fast decay until current undershoot Tmc =TFT +TCC
100 Auto decay, fast decay without delay time
101 Auto decay, fast decay until T
110 Auto decay, fast decay until TMD > 8 µs
> 4 µs
MD
Auto decay uses mixed decay automatically
to reduce current for next step if required
(see Figure 3 down right).
111
Auto decay, fast decay until current
undershoot T
mc
P4 P3 P2 P1 P0 This bits control position of motor, e.g. 00000 step angle is 0°, 01111 step angle is 180 °.
Doc ID 11778 Rev 6 23/40

SPI - control and status registers L9942
5.2 Register 1
Table 15. Register 1
DAC scale DAC phase B DAC phase A
Bit
12 11 10 9 8 7 6 5 4 3 2 1 0
Access r w r w r w r r r r r r r r r r
Reset 0 0 0 0 0 0 0 0 0 0 0 0 0
Name DC2 DC1 DC0 BI4 BI3 BI2 BI1 BI0 AI4 AI3 AI2 AI1 AI0
The meaning of the different bits is as follows:
AI4 AI3 AI2 AI1 AI0
BI4 BI3 BI2 BI1 BI0
These bits control DAC of
bridge A.
These bits control DAC of
bridge B.
Value depends on address and the value of corresponding
current profile.
These bits set full scale range
DC2 DC1 DC0
of limit, e.g. 000 for 100 mA or
See also parameter Ta bl e 1 2 .
111 for e.g. 1500 mA
5.3 Register 2
Table 16. Register 2
Current profile 1 OV Test only Current profile 0
Bit
12 11 10 9 8 7 6 5 4 3 2 1 0
Access r w r w r w r w r w r w r w r w r w r w r w r w r w
Reset 0 0 0 0 0 0 0 0 0 0 0 0 0
Name I4 I3 I2 I1 I0 OVW T1 T0 I4 I3 I2 I1 I0
The meaning of the different bits is as follows:
:
I4 I3 I2 I1 I0 These bits are loaded in register1 DAC Phase A or B if needed. See also parameter Ta b le 1 2
T1 T0 Should be programmed to 0. -
In case of an overvoltage event (V-SOV OFF) the outputs are
OVW = 0
OVW = 1
switched to high impedance state and the Vs Monitor bit OV is
set.
In case of an overvoltage event (V-SOV OFF) the Vs Monitor bit
OV is set. The status of the outputs are unchanged.
-
-
24/40 Doc ID 11778 Rev 6

L9942 SPI - control and status registers
5.4 Register 3
Table 17. Register 3
Current profile 3 PWM counter PWM Current profile 2
Bit
12 11 10 9 8 7 6 5 4 3 2 1 0
Access r w r w r w r w r w r w r w r w r w r w r w r w r w
Reset 0 0 0 0 0 0 0 0 0 0 0 0 0
Name I4 I3 I2 I1 I0 D1 D0 NPW M I4 I3 I2 I1 I0
The meaning of the different bits is as follows:
I4 I3 I2 I1 I0 These bits are loaded in register1 DAC Phase A or B if needed. See also parameter Tab l e 12
D1 D0
NPWM
These bits are for threshold value in counter of active time during
signal PWM.
This bit switches internal PWM signal of bridge A to pin PWM if it
is set to 0, otherwise pin is in high resistance status.
-
-
5.5 Register 4 and 5
Table 18. Register 4 and 5
Current profile 5 (7) PWM counter Current profile 4 (6)
Bit
121110987 6 54321 0
Access r w r w r w r w r w r w r w r w r w r w r w r w r w
Reset00 0 000 0 00000 0
Name I4 I3 I2 I1 I0 D4(7) D3(6) D2(5) I4 I3 I2 I1 I0
The meaning of the different bits is as follows:
I4 I3 I2 I1 I0
These bits are loaded needed. in register1 DAC Phase A
or B if needed.
See also parameter Ta bl e 1 2
D4 D3 D2 (register4) These bits are for threshold value in counter of active time
D7 D6 D5 (register5)
during signal PWM. LSB and next value are set in
register3 by D0 and D1.
-
Doc ID 11778 Rev 6 25/40

SPI - control and status registers L9942
5.6 Register 6
Table 19. Register 6
CLR
ST
(PWM)
Filter Freq. ST
REF
ERR
Open load Current profile 8
Bit 12 11 10 9 8 7 6 5 4 3 2 1 0
Access r w r w r w r w r r r r r w r w r w r w r w
Reset 0 0 0 0 0 0 0 0 0 0 0 0 0
Name CLR6 SST FT
PWM
Freq.
ST
RREF
Error
PhaseB Phase
A
I4 I3 I2 I1 I0
The meaning of the different bits is as follows:
I4 I3 I2 I1 I0
Phase B Phase A These bits indicate open load at bridges
RREF Error This bit indicates if reference current is OK (150 µA <I
ST This bit indicates stall detection.
PWM Freq. This bit sets frequency of PWM cycle. FRE=1 frequency 20 kHz, FRE=0 frequency 30 kHz
FT This bit sets filter time in glitch filter. FT=0 T
SST This bit specifies output PWM to reflect same logical level like bit ST.
CLR6 This bit resets all read only bits to 0 in register 6.
These bits are loaded in register1 DAC Phase A or B if needed
< 250 µA), then is RERR=0.
REF
=1.5 µs, FT=1 TF = 2.5 µs
F
See also parameter Ta bl e 1 2
5.7 Register 7
Table 20. Register 7
Bit 12 11 10 9 8 7 6 5 4 3 2 1 0
Access r w r r r r r r r r r r r r
Reset 0 0 0 0 0 0 0 0 0 0 0 0 0
Name CLR7 TSD TW OV(W) UV HSB2 HSB1 LSB2 LSB1 HSA2 HSA1 LSA2 LSA1
bit7 ... bit0 These bits indicate overcurrent in each low side or highside power transistor.
OV(W) UV These bits indicates failure at VS (See also parameter Ta bl e 9 )
TSD TW These bits indicates temperature failure (See also parameter Ta b le 7 )
CLR Temperature VS monitor Overcurrent
The meaning of the different bits is as follows:
1 overcurrent failure I > 2 A
01 Voltage at pin VS is too low.
10 Voltage at pin VS is too high.
01 Only for information set at temperature warning threshold.
10 In case of thermal shutdown all bridges are switched off. It has to reset by bit CLR7.
CLR7 This bit resets all bits to 0 in register 7.
26/40 Doc ID 11778 Rev 6

L9942 SPI - control and status registers
5.8 Auxiliary logic blocks
5.8.1 Fault condition
Logical level at pin D0 represents fault condition. It is valid from first high to low edge of
signal CLK up to transfer of data bit D12. Fault bit is an logical OR of:
Control and status register 6 bit 5 and 6 for open load, bit 7 reference current failure
(RERR) and
Control and status register 7 bit 0 to bit 7 for overcurrent, bit 8 and 9 failure at VS
(UV,OV) and
bit 10 and bit 11 during high temperature (TW,TSD)
5.8.2 SPI communication monitoring
At the rising edge of the CSN signal the contents of the shift register will be transferred to
the selected data register. A counter monitors proper SPI communication. It counts rising
edges at pin CLK. The writing to the register is only enabled if exactly 16 bits are transmitted
within one communication frame (i.e. CSN low). If more or less clock pulses are counted
within one frame the complete frame will be ignored. This safety function is implemented to
avoid an activation of the output stages by a wrong communication frame. SPI
communication can be checked by loading a command twice and then answer at pin DO
must be same.
Note: Due to this safety functionality a daisy chaining of SPI is not possible. Instead, a parallel
operation of the SPI bus by controlling the CSN signal of the connected ICs is
recommended.
5.8.3 PWM monitoring for stall detection
Control registers 4, 5, and 3 contain bits D0-D7, use for setting a stall detection threshold.
The value in this set of bits determine the minimum time for current rise over one quadrant of
motor driving. D7-D0 is compared with the sum of the rise times over one quadrant. When
the sum is less than the value stored in D7-D0 the ST bit (register 6 bit 8) is set to a logic “1”.
The PWM pin reflects the PWM control signal of the load current in bridge A. This is so after
power on when the SST bit (register 6, bit11) is reset to a logic “0”. If this bit is set to a
logical “1” then status of the ST bit 8 is mirrored to pin PWM. This provides stall detection
without the need of reading register 6 through the SPI bus.
Doc ID 11778 Rev 6 27/40

Logic with SPI - electrical characteristics L9942
6 Logic with SPI - electrical characteristics
VS = 7 to 20 V, VCC = 3.0 to 5.3 V, EN=VCC, Tj = -40 to 150 °C, I
= -200 μA, unless
REF
otherwise specified. The voltages are referred to GND and currents are assumed positive,
when the current flows into the pin.
6.1 Inputs: CSN, CLK, STEP, EN and DI
Table 21. Inputs: CSN, CLK, STEP, EN and DI
Symbol Parameter Test condition Min. Typ. Max. Unit
V
in L
V
in H
V
in Hyst
I
CSN in
I
CLK in
I
DI in
I
STEP in
R
EN in
C
in
1. Parameter guaranteed by design.
input low level - 0.3*VCC 0.4*VCC - V
input high level - - 0.6*VCC 0.7*VCC V
input hysteresis - - 0.1*VCC - V
pull up current at input CSN V
pull down current at input CLK V
= VCC -1.5 V, -50 -25 -10 µA
CSN
= 1.5 V 10 25 50 µA
CLK
pull down current at input DI VDI = 1.5 V 10 25 50 µA
pull down current at input STEP V
resistance at input EN to GND V
input capacitance at input CSN,
(1)
CLK, DI and PWM
= 1.5 V 10 25 50 µA
STEP
= VCC 110 510 kΩ
EN in
0 V < VCC < 5.3 V - 10 15 pF
6.2 DI timing
Table 22. DI timing (see Figure 11 and Figure 13)
Symbol Parameter Test condition Min. Typ. Max. Unit
t
CLK
t
CLKH
t
CLKL
t
set CSN
t
set CLK
t
set DI
t
hold DI
t
r in
t
f in
1. DI timing parameters tested in production by a passed/failed test:
=-40°C/+25°C: SPI communication @5MHz; Tj=+125°C: SPI communication @4.25MHz
T
j
Clock period VCC = 5 V 250 - - ns
Clock high time VCC = 5 V 100 - - ns
Clock low time VCC = 5 V 100 - - ns
CSN set up time, CSN low before
rising edge of CLK
CLK set up time, CLK high before
rising edge of CSN
VCC = 5 V 100 - - ns
VCC = 5 V 100 - - ns
DI set up time VCC = 5 V 50 - - ns
DI hold time VCC = 5 V 50 - - ns
Rise time of input signal DI, CLK,
CSN
Fall time of input signal DI, CLK,
CSN
VCC = 5 V - - 25 ns
VCC = 5 V - - 25 ns
(1)
28/40 Doc ID 11778 Rev 6

L9942 Logic with SPI - electrical characteristics
6.3 Outputs: DO, PWM
Table 23. Outputs: DO, PWM
Symbol Parameter Test condition Min. Typ. Max. Unit
V
V
V
V
I
I
PWMoutLK
DOoutL
PWMoutL
DOoutH
PWMoutH
DOoutLK
Output low level VCC = 5 V, I
output high level VCC = 5 V, ID = -2 mA
Tristate leakage current
Tristate leakage current
(1)
C
Tristate input capacitance
out
= 2 mA - 0.2 0.4 V
D
= VCC,
V
CSN
0 V <
V
< VCC
DO
Register3bit5=1 (NPWM)
PWM
= VCC,
< VCC
0 V < V
V
CSN
0 V < VCC < 5.3 V
VCC -
0.4
VCC -
0.2
-V
-10 - 10 µA
-10 - 10 µA
- 10 15 pF
6.4 Output: DO timing
Table 24. Output: DO timing (see Figure 12 and Figure 13)
Symbol Parameter Test condition Min. Typ. Max. Unit
t
r DO
t
f DO
t
en DO tri L
t
dis DO L tri
DO rise time CL = 100 pF, I
DO fall time CL = 100 pF, I
DO enable time from tristate to low
level
DO disable time from low level to
tristate
= 100 pF, I
C
L
up load to VCC
CL = 100 pF, I
up load to VCC
= -1 mA - 50 100 ns
load
= 1 mA - 50 100 ns
load
= 1 mA pull-
load
= 4 mA pull-
load
- 50 250 ns
- 50 250 ns
t
en DO tri H
t
dis DO H tri
t
d DO
DO enable time from tristate to
high level
DO disable time from high level to
tristate
DO delay time
CL = 100 pF, I
= -1 mA pull-
load
down load to GND
C
= 100 pF, I
L
load
= -4 mA
pull-down load to GND
< 0.3 VCC, VDO > 0.7
V
DO
VCC, C
= 100 pF
L
- 50 250 ns
- 50 250 ns
- 50 250 ns
6.5 CSN timing
Table 25. CSN timing
Symbol Parameter Test condition Min. Typ. Max. Unit
t
CSN_HI,min
1. Parameter guaranteed by design.
(1)
CSN high time, active mode
Transfer of SPI-command to
Input Register
2 - - µs
Doc ID 11778 Rev 6 29/40

Logic with SPI - electrical characteristics L9942
6.6 STEP timing
Table 26. STEP timing
Symbol Parameter Test condition Min. Typ. Max. Unit
STEPmin
(1)
STEP low or high time - 2 - - µs
t
1. Parameter guaranteed by design.
Figure 10. Transfer timing diagram
t
CSN_HI,min
CSN high to low: DO enabled
CSN
time
CLK
DI
DO
Control and Status Register
1234 56 789101101213141510
DI: data will be accepted on the rising edge of CLK signal
actual data
A1 A0 D12D11 D10 D9
DO: data will change on the falling edge of CLK signal
D12D11 D10 D9 D8 D7 D6 D5 D4 D3 D2 D1 D0
fault bit
D8
D7 D6 D5 D4A2 D3 D2 D1 D0
status information
CSN low to high: actual data is
transfered to registers
old data
D0
fault bit
actual data
time
new data
A2 A1
time
time
time
Figure 11. Input timing
CSN
CLK
DI
t
set CSN
t
set DI
Va lid
t
CLKH
t
hold DI
t
CLK
t
CL KL
Val id
t
set CLK
0.8 VCC
0.2 VCC
0.8 VCC
0.2 VCC
0.8 VCC
0.2 VCC
30/40 Doc ID 11778 Rev 6

L9942 Logic with SPI - electrical characteristics
g
t
Figure 12. SPI - DO valid data delay time and valid time
t
f in
rin
CLK
t
rDO
DO
(low to high)
t
dDO
DO
hto low)
(hi
Figure 13. DO enable and disable time
CSN
t
f DO
t
f in r in
0.8 VCC
0.5 VCC
0.2 VCC
0.8 VCC
0.2 VCC
0.8 VCC
0.2 VCC
t
0.8 VC C
50%
0.2 VC C
pull-up load to V C C
DO
C = 100 pF
L
pull-dow n load to G N D
DO
C = 100 pF
L
50%
t t
e n D O tri L
dis DO L tri
50%
t t
e n D O tri H
dis DO H tri
Doc ID 11778 Rev 6 31/40

Logic with SPI - electrical characteristics L9942
Figure 14. Timing of status bit 0 (fault condition)
CSN high to low and CLK stays low: status information of data bit 0 (fault condition) is transferred to D0
CSN
time
CLK
time
DI
D0
D0
DI: data is not accepted
time
0
time
D0: status information of data bit 0 (fault condition) will stay as long as CSN is low
32/40 Doc ID 11778 Rev 6

L9942 Appendix
7 Appendix
7.1 Stall detection
The L9942 contains logic blocks designed to detect a motor stall caused by excessive
mechanical load.During a motor stall condition the load current rises much faster than
during normal operation. The L9942 measures this time and compares it to a programmed
value.
This is done by summing the PWM on times for one full quadrant. For a full wave stepping
this is just one value (step 0). For microstepping this includes 8 separate values added
together, one for each step. This measurement is only done on phase A during the
quadrants where the current is increasing naturally (quadrants 1 and 3 of Figure 15); e.g.
stall detection is active during phase counter values 1 to 8 and 17 to 24 for DIR=0. During
the quadrants where the current is decreasing fast decay recirculation interferes with
accurate measurement of this time. If the sum of the PWM on time is less than a
programmed threshold stored in D0-D7, stall is detected and indicated as a logic “1” in the
stall (ST) bit found in register 6 bit 8 (Figure 15 bottom). If bit 11 of register 6 is set to logical
“1” then the ST bit is mirrored to the PWM pin providing detection externally.The register
values DT7-DT0 store the threshold value in 16us intervals. These bits can be found
interstitially in register 3 (D0, D1), register4 (D2, D3, D4) and register5 (D5, D6, D7).
Care should be taken when deciding the threshold timing. Motor current slew rates are
dependant on the driving voltage, the actual speed of the motor, the back EMF of the motor
as well as the motor and the inductance. Be sure to set your threshold well away from what
can be seen in normal operation at any temperature.
7.2 Step clock input
The Step clock input allows to run one device in micro-step mode, or several devices
simultaneously with cost effective 8 bit µController. In case of the L9942, the SPI
communication link provides only the settings for motor operation mode. Motor commutation
as high duty process is outsourced to a parallel driven pin. Without this step clock input, the
SPI command would also have to clock the motor, leading to a high SPI speed. For full
micro-step operation or simultaneous motor drive, an 8 bit µController could be rapidly
overloaded.
7.3 Load current control and detection of overcurrent (shortages at outputs)
The L9942 controls load current in the two full bridges by using a pulls with modulation
(PWM) regulator. The mirrored output current of active HS switch is compared with a
programmed reference current (e.g. in figure A2 HSA1 and HSB2). Bridge is switched off if
current has exceeded the programmed limit value. A second comparator of the related LS
switch uses the mirrored load current to detect an overcurrent to ground during ON state of
bridges (e.g. in Figure 16 LSA2 and LSB1). The event of shortage from output to supply
voltage VS is detectable, but short current between outputs is limited through PWM
controller and so an overcurrent failure will not occur.
Load currents decrease more or less fast during OFF state of bridges depending on
selected decay mode. Slow decay mode is released by activating the HS switches of the
Doc ID 11778 Rev 6 33/40

Appendix L9942
bridge and current comparator has as new reference the overcurrent limit. A shortage to
ground can be detected, but not between the outputs.
Is it recommended to use the different fast decay modes too, especially in period if the load
current has to reduce from step to step. The duration of fast decay can set by fixed time ore
that it depends on the comparator signal utilizing the second current mirror at LS switch.
There can be monitored the undershoot of bridge current during OFF state.
Fast decay can be seen as switching the bridge in opposite direction, if it is compared to ON
state before. The load current control at HS switch is not used, but the comparator is still
active. The reference value is changed to overcurrent limit and a shortage to ground or now
between the outputs too will result in a signal. The internal filter time of at least 4 us will
inhibit the signal in many applications. Then you can use the mode “auto decay without any
delay time“ (On Section 5.1 mode 100). On page 12 you can find in the lower part of
Figure 3 the phase counter values, when fast decay as only part of mixed decay is used and
the shortages can be detected during a longer time. After this it is signalized in register 7 as
overcurrent in HS switch (e.g. in Figure 17 HSA1).
34/40 Doc ID 11778 Rev 6

L9942 Appendix
Figure 15. Stall detection
Load Current Rising During High Speed
PWM activ detection
Time
Counter value is above threshold value.
Stall
Time
Thres hold
16us *
PWM activ detection PWM activ detection
Register 4
bit5bit6bit7
bit5bit6bit7
D7 D6 D 5 D4 D3 D2 D1 D0
Reg3Register 5
bit6bit7
PWM activ detection
0 1 2 3 4 5 6 7 8 9 10 1 1 12 13 14 15 16 17 18 19 20 21 22 23 24 25 26 27 28 29 30 31
0123456787654321012345678765432
Activ
sampling and
threshold
01234567876543210123456787654321
Activ
sampling and
threshold
Current Driver B
Current Driver A
Phase Counter
Adress of Current
1
Profile Entry
Adress of Current
Profile Entry
STEP Signal
Micro Stepping Mode: DIR=0
Load Current Rising During Low Speed or Stall
Time
Stall
Thres hold
PWM activ
counter
3130 29 28 2726 25 24 23 22 21 20 19 18 17 16 15 14 13 12 11 10 9 8 7 6 5 4 3 2 1
0
Current Driver A
0123456787654321012345678765432
01234567876543210123456787654321
Stall
Thres hold
Current Driver B
PWM activ
counter
No
Stall Signal
Micro Stepping Mode: DIR=1
Counter value is below threshold value.
PWM activ dete ction PWM activ d etection
PWM activ
counter
Stall
Threshold
Stall Signal
Stall
Thresh old
Stall Signal
1
PWM activ
counter
0 1 2 3 4 5 6 7 8 9 10 1112 13 14 15 16 17 18 1920 21 22 23 24 25 26 2 728 29 30 31
0123456787654321012345678765432
Activ
sampling and
threshold
01234567876543210123456787654321
Activ
sampling and
threshold
Current Driver B
Current Driver A
STEP Signal
Micro Stepping Mode: DIR=0
Doc ID 11778 Rev 6 35/40
Phase Counter
Adress of Current
1
Profile Entry
Adress of Current
Profile Entry
3130 29 28 27 26 25 24 2322 21 20 19 18 17 16 15 1413 12 11 10 9 8 7 6 5 4 3 2 1
0
Current Driver A
0123456787654321012345678765432
Current Driver B
01234567876543210123456787654321
Micro Stepping Mode: DIR=1
1

Appendix L9942
+
+
Figure 16. Reference generation for PWM control (switch on)
1
Counter value changes after an signal at STEP to next one
depending on selected stepping mode described in figure 3
(e.g. during micro stepping to value 2) .
DIR
0
STEP
UP/Down
Count by
1,2,4,8
PhaseCo unter
000
0123 01 2301 23
MUX
1
10
0 0 0
MUX MUX
Register 0
Decay Mode
DM2 DM1 DM0
A0A1A2
Slew Rate
StepMode
SR0SR1 0 0
Address Calculation
Phase A
A3=0
A[3..0]
Adr
Current-Profile Table
stored in register2, ...6
11111
11110
11101
11010
10110
10001
01100
00110
00000
Register 1
DAC Scale
DI
95 mA
I
REF
REF
200 uA
DAC
Full Sc ale
LS Current
Monitoring
(Overcurrentl)
HS Current
Monitoring
(Load control)
A3=1
neg(A[3..0])
Adr
DAC Ph ase B
000
100mA * 30/31 = 91.9mA
I
MAX
Profile 8
Profile 7
Profile 6
Profile 5
Profile 4
Profile 3
Profile 2
Profile 1
Profile 0
5 bi t DAC
Phase B
Phase B
A3=0
Adr neg(A[3..0])
9
5
5
5
5
5
5
5
5
5
5
DAC Phas e A
01111 01100
100mA * 6/31 = 18.4mA
I
LIMIT B
2mA
OC
LSB1
LIMIT
2mA
A0A1A2A3
5 bit DAC
Phase A
2mA
HSB2
2mA
Adr
-
-
-
-
A3=1
A[3..0]
Phase Co un ter
Adress of Current
Profile Entry
Phase A
Adress of Current
Profile Entry
Phase B
I
LIMIT A
+
-
+
-
I
+
QA2LIM
1000
+
-
+
PWM Control With HS Current Monitoring
Overcurrent Detection At LS Switch
012345678910111213141516171819202122232425262728293031
Current Driver A
0123456787654321012345678765432
Current Driver B
654321
7
0123456787654321012345678
STEP Signal
HS Current
Monitoring
(Load control)
HS1 on
QA1
QA2
LS2 on
LS Current
Monitoring
(Overcurrent)
LS1 on
HS2on
QB1
QB2
LIMIT
HSA1
-
I
QA1LIM
+
2mA
2mA
2mA
I
B
OC
LSA2
2mA
1000
-
-
+
-
+
-
+
-
+
-
1
I
A
36/40 Doc ID 11778 Rev 6

L9942 Appendix
+
+
Figure 17. Reference generation for PWM control (decay)
1
Counter value chan ges after an signal at STEP to next o ne
depending on selec ted stepping mode de scribed in figure 1.2
(e.g. during micro stepping to value 2) .
DIR
0
STEP
UP/Down
Count by
1,2,4,8
PhaseCounter
000
1
Register 0
Decay Mode
DM2 DM1 DM0
10
Slew Rate
StepMode
SR0SR1 0 0
Address Calculation
Phase A
A3=0
Adr
A[3..0]
Current-Profile Table
stored in register2, ...6
11111
11110
11101
11010
10110
10001
01100
00110
00000
Register 1
DAC Scale
DI
95 mA
I
REF
REF
200 uA
DAC
Full Scale
HS Current
Monitoring
(Overcurrent)
LS Current
Monitoring
(Load Control)
A3=1
Adr
neg(A[3..0])
000
95mA * 3 0/31 = 91.9mA
I
MAX
Profile 8
Profile 7
Profile 6
Profile 5
Profile 4
Profile 3
Profile 2
Profile 1
Profile 0
DAC Phase B
5 bit DAC
Phase B
0 0 0
0123 01 2301 23
MUX
A0A1A2
MUX MUX
A0A1A2A3
Phase B
A3=0
Adr neg(A[3..0])
9
5
5
5
5
5
5
5
5
5
5
DAC Phase A
01111 01100
100mA * 6/31 = 18.4mA
I
LIMIT B
OC
5 bit DAC
Phase A
HSB1
2mA
2mA
2mA
2mA
LIMIT
LSB2
A3=1
Adr
A[3..0]
Phase Counter
Adress of Current
Profile Entry
Phase A
Adress of Current
Profile Entry
Phase B
I
LIMIT A
-
I
+
QB1
1000
-
-
-
+
-
-
+
-
+
-
-
+
-
Auto Decay
Mixed Decay
Slow Decay
012 3 4 5 6 7 8 9 10 11 12 13 14 15 16 17 18 19 20 21 22 23 24 25 26 27 2 8 29 30 31
Current Driver A
0123456787654321012345678765432
Current Driver B
654321
7
0123456787654321012345678
STEP Signal
Fast and Slow
Decay
HS Current
Monitoring
(Overcurrent)
OC
HSA1
HS1 on
Fast
Decay
LS2on
QB1
QB2
-
2mA
HSB1
2mA
+
-
-
-
+
-
-
+
-
+
-
-
+
-
2mA
OC
2mA
I
B
HS1 on
QA1
Slow
Decay
HS2 on
QA2
HS Current
Monitoring
(Overcurrent)
1
I
A
Doc ID 11778 Rev 6 37/40

Package information L9942
8 Package information
In order to meet environmental requirements, ST offers these devices in different grades of
ECOPACK
®
packages, depending on their level of environmental compliance. ECOPACK
®
specifications, grade definitions and product status are available at: www.st.com.
ECOPACK
®
is an ST trademark.
Figure 18. PowerSSO24 mechanical data and package dimensions
Dim.
A 2.45 0.0965
A2 2.15 2.35 0.084 0.0925
a1 0 0.10 0 0.003
b 0.33 0.51 0.013 0.020
c 0.23 0.32 0.009 0.012
(1)
D
(1)
E
e0.80 0.031
e3 8.80 0.346
F2.30 0.090
G 0.10 0.004
G1 0.06 0.002
H 10.10 10.50 0.398 0.413
h 0.40 0.016
k 0˚ (min.), 8˚ (max.)
L 0.55 0.85 0.0217 0.0335
O 1.20 0.047
Q 0.80 0.031
S 2.90 0.114
T 3.65 0.143
U 1.0 0.039
N 10˚ (max)
X 4.10 4.70 0.161 0.185
Y
(1) “D and E1” do not include mold flash or protusions.
Mold flash or protusions shall not exceed 0.15mm (0.006”)
(2) No intrusion allowed inwards the leads.
(3)
Flash or bleeds on exposed die pad shall not exceed 0.4 mm per side
(4) Variation for small window leadframe option.
mm inch
Min. Typ. Max. Min. Typ. Max.
10.10 10.50 0.398 0.413
7.40 7.60 0.291 0.299
7.10
6.50
4.90
(4)
5.50
0.256
(4)
(4)
0.192
0.279
0.216
OUTLINE AND
MECHANICAL DATA
(4)
PowerSSO24
(Exposed pad down)
38/40 Doc ID 11778 Rev 6
7412818 I

L9942 Revision history
9 Revision history
Table 27. Document revision history
Date Revision Changes
10-Nov-2005 1 Initial release.
04-May-2006 2
21-Sep-2006 3
09-Jul-2007 4
02-Feb-2009 5
15-May-2009 6
Feature list updated.
Part numbers updated.
Feature list updated.
Table 21 on page 28 updated.
Updated the order codes (see Table 1: Device summary on page 1).
Changed the status from Preliminary data to Datasheet.
Updated the following tables: 2, 9, 14, 15, 16, 17, 18, 19 and 20.
Updated the following chapters: 2.4, 5.1, 5.2, 5.3, 5.4, 5.5, 5.6 and
5.7.
Updated Figure 18: PowerSSO24 mechanical data and package
dimensions on page 38.
Doc ID 11778 Rev 6 39/40

L9942
Please Read Carefully:
Information in this document is provided solely in connection with ST products. STMicroelectronics NV and its subsidiaries (“ST”) reserve the
right to make changes, corrections, modifications or improvements, to this document, and the products and services described herein at any
time, without notice.
All ST products are sold pursuant to ST’s terms and conditions of sale.
Purchasers are solely responsible for the choice, selection and use of the ST products and services described herein, and ST assumes no
liability whatsoever relating to the choice, selection or use of the ST products and services described herein.
No license, express or implied, by estoppel or otherwise, to any intellectual property rights is granted under this document. If any part of this
document refers to any third party products or services it shall not be deemed a license grant by ST for the use of such third party products
or services, or any intellectual property contained therein or considered as a warranty covering the use in any manner whatsoever of such
third party products or services or any intellectual property contained therein.
UNLESS OTHERWISE SET FORTH IN ST’S TERMS AND CONDITIONS OF SALE ST DISCLAIMS ANY EXPRESS OR IMPLIED
WARRANTY WITH RESPECT TO THE USE AND/OR SALE OF ST PRODUCTS INCLUDING WITHOUT LIMITATION IMPLIED
WARRANTIES OF MERCHANTABILITY, FITNESS FOR A PARTICULAR PURPOSE (AND THEIR EQUIVALENTS UNDER THE LAWS
OF ANY JURISDICTION), OR INFRINGEMENT OF ANY PATENT, COPYRIGHT OR OTHER INTELLECTUAL PROPERTY RIGHT.
UNLESS EXPRESSLY APPROVED IN WRITING BY AN AUTHORIZED ST REPRESENTATIVE, ST PRODUCTS ARE NOT
RECOMMENDED, AUTHORIZED OR WARRANTED FOR USE IN MILITARY, AIR CRAFT, SPACE, LIFE SAVING, OR LIFE SUSTAINING
APPLICATIONS, NOR IN PRODUCTS OR SYSTEMS WHERE FAILURE OR MALFUNCTION MAY RESULT IN PERSONAL INJURY,
DEATH, OR SEVERE PROPERTY OR ENVIRONMENTAL DAMAGE. ST PRODUCTS WHICH ARE NOT SPECIFIED AS "AUTOMOTIVE
GRADE" MAY ONLY BE USED IN AUTOMOTIVE APPLICATIONS AT USER’S OWN RISK.
Resale of ST products with provisions different from the statements and/or technical features set forth in this document shall immediately void
any warranty granted by ST for the ST product or service described herein and shall not create or extend in any manner whatsoever, any
liability of ST.
ST and the ST logo are trademarks or registered trademarks of ST in various countries.
Information in this document supersedes and replaces all information previously supplied.
The ST logo is a registered trademark of STMicroelectronics. All other names are the property of their respective owners.
© 2009 STMicroelectronics - All rights reserved
STMicroelectronics group of companies
Australia - Belgium - Brazil - Canada - China - Czech Republic - Finland - France - Germany - Hong Kong - India - Israel - Italy - Japan -
Malaysia - Malta - Morocco - Philippines - Singapore - Spain - Sweden - Switzerland - United Kingdom - United States of America
www.st.com
40/40 Doc ID 11778 Rev 6
 Loading...